Loading ...
Loading ...
Loading ...
EN
7
Connect the water hose to the water
supply tap (fig. 3) only using the hose
supplied with the appliance (do not
reuse old hose-sets).
Some models may include one or more of
the following features:
HOT&COLD (fig. 4):
water mains connection settings with hot
and cold water for higher energy savings.
Connect the grey tube to the cold water
tap
and the red one to the hot water
tap. The machine can be connected to
the cold water tap only: in this case, some
programs may start a few minutes later.
AQUASTOP (fig. 5):
a device located on the supply tube that
stops water flow if the tube deteriorates;
in this case, a red mark will appear in the
window “A” and the tube must be
replaced. To unscrew the nut, press the
one-way lock device "B".
AQUAPROTECT – SUPPLY TUBE WITH
GUARD (fig. 6):
Should water leak from the primary
internal tube "A", the transparent
containment sheath "B" will contain water
to permit the washing cycle to complete.
At the end of the cycle, contact the
Customer Service Centre to replace the
supply tube.
The washing machine should be installed
in its final position such that the water fill
hose is not kinked or trapped. The
corrugated drain hose should be inserted
into suitable drain pipe of between 50 cm
and 85 cm height above the floor using
the curved drain hose support. If an under
sink connection is used the drain hose
must be routed above the sink overfill
opening to prevent back siphoning. Care
must be taken to avoid kinking or trapping
the drain hose (fig. 7).
3
1
4
B
A
5
B
A
6
min 50 cm
max 85 cm
+2,6 mt
max
max 100 cm
min 4 cm
7
Hydraulic connections
Setting
EN
7
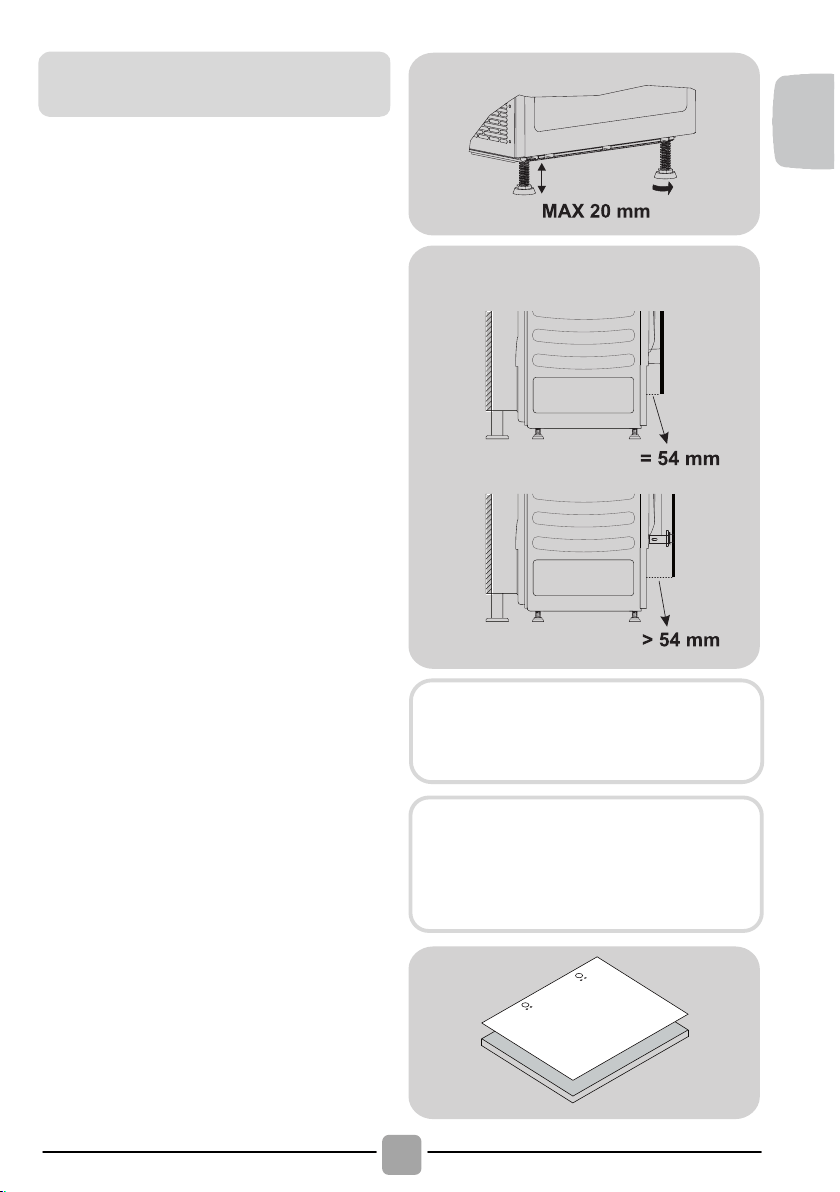
Regulate the height of the dryer
The 4 adjustable feet allow the
height of the dryer to be adjusted
from 827 mm to a maximum of
847 mm . To adjust the height, you
should rotate the adjustable feet,
ensuring that the machine is level
(figure 1).
Note : we suggest to Put the
dryer at the maximum height
possible in order to avoid tilting,
lefting at least 5mm from the
top of the furniture.
Before to fix the hinges it’s
necessary to determinate the
depth of the dryer from the front
part of the kitchen accordingly
with the dept of the kick plate
(check picture) and chose the
right installation option (figure 2).
Option 1
T
he position of the plinth of
the dryer is set back less than
54 mm from the front of the
furniture.
Position the template onto the
reverse of the furniture door. It is
possible to mount the hinges and
closure magnet on the right or
left-hand side depending on your
requirements. Mark the screw
hole positions, then drill out
these positions (figure 3).
Figure 1:
Figure 2:
Option 1:
Option 2:
Figure 3:
We suggest mounting the
furniture door so that it opens
towards the left, same direction
as the porthole door.
Instructions for mounting the
furniture door
consider the thickness of the
kickplate of the kitchen
.
EN
7
Regulate the height of the dryer
The 4 adjustable feet allow the
height of the dryer to be adjusted
from 827 mm to a maximum of
847 mm . To adjust the height, you
should rotate the adjustable feet,
ensuring that the machine is level
(figure 1).
dryer at the maximum height
possible in order to avoid tilting,
leaving at least 5mm from the
top of the furniture.
Before fixing the hinges it’s
necessary to determine the
depth of the dryer from the front
part of the kitchen according
to the depth of the kick plate
(check picture) and chose the
right installation option (figure 2).
Option 1
The position of the plinth of
the dryer is set back less than
54 mm from the front of the
furniture.
Position the template onto the
reverse of the furniture door. It is
possible to mount the hinges and
closure magnet on the right or
left-hand side depending on your
requirements. Mark the screw
hole positions, then drill out
these positions (figure 3).
Figure 1:
Figure 2:
Option 1:
Option 2:
Figure 3:
Instructions for mounting the
furniture door
Note: That distance don’t
consider the thickness of the
kickplate of the kitchen.
'RQRWLQVWDOOWKHSURGXFWLQD
ORZ WHPSHUDWXUH URRP RU LQ D
URRPZKHUHWKHUHLVDULVNRIIURVW
RFFXUULQJ$WWHPSHUDWXUHDURXQG
IUHH]LQJ SRLQW WKH SURGXFW PD\
QRW EH DEOH WR RSHUDWH SURSHUO\
WKHUH LV D ULVN RI GDPDJH LI WKH
ZDWHULVDOORZHGWRIUHH]HLQ WKH
K\GUDXOLF FLUFXLW YDOYHV KRVHV
SXPSV )RU D EHWWHU SURGXFW
SHUIRUPDQFH WKH DPELHQW URRP
WHPSHUDWXUH PXVW EH EHWZHHQ
& 3OHDVH QRWH WKDW
RSHUDWLQJ LQ FROG FRQGLWLRQ
EHWZHHQ DQG & PLJKW
VLPSO\VRPHZDWHUFRQGHQVDWLRQ
DQGZDWHUGURSVRQIORRU
3UHYHQW LWHPV IURP IDOOLQJ RU
FROOHFWLQJ EHKLQG WKH GU\HU DV
WKHVHPD\REVWUXFWWKHDLULQOHW
DQG RXWOHW 1(9(5 LQVWDOO WKH
GU\HUXSDJDLQVWFXUWDLQV
Ɣ
$LU2XWOHWVLQWKH%DVH
:$51,1* 7KH DSSOLDQFH
PXVWQRWEHVXSSOLHGWKURXJK
VXFKDVDWLPHURUFRQQHFWHG
WR D FLUFXLW WKDW LV UHJXODU\
VZLWFKHGRQDQGRIIE\DXWLOLW\
,IWKHVXSSO\FRUGLVGDPDJHG
LW PXVW EH UHSODFHG E\ WKH
PDQXIDFWXUHULWVVHUYLFHDJHQWRU
VLPLODUO\ TXDOLILHG SHUVRQV LQ
RUGHUWRDYRLGDKD]DUG
7KHSOXJVKRXOGEHDFFHVVLEOHIRU
GLVFRQQHFWLRQ DIWHU WKH DSSOLDQFH
KDVEHHQLQVWDOOHG
Ɣ
7
Note : we suggest to put the
distance Note: That does not
Loading ...
Loading ...
Loading ...