Documents: Go to download!
User Manual
- User Manual - (English)
- Specification Sheet - (English)
- Introduction
- First Use
- Cooktop Use
- Oven Use
- Griddle Use
- Care and Cleaning
- Trouble shooting
Table of contents
Owner's Guide Range
Introduction
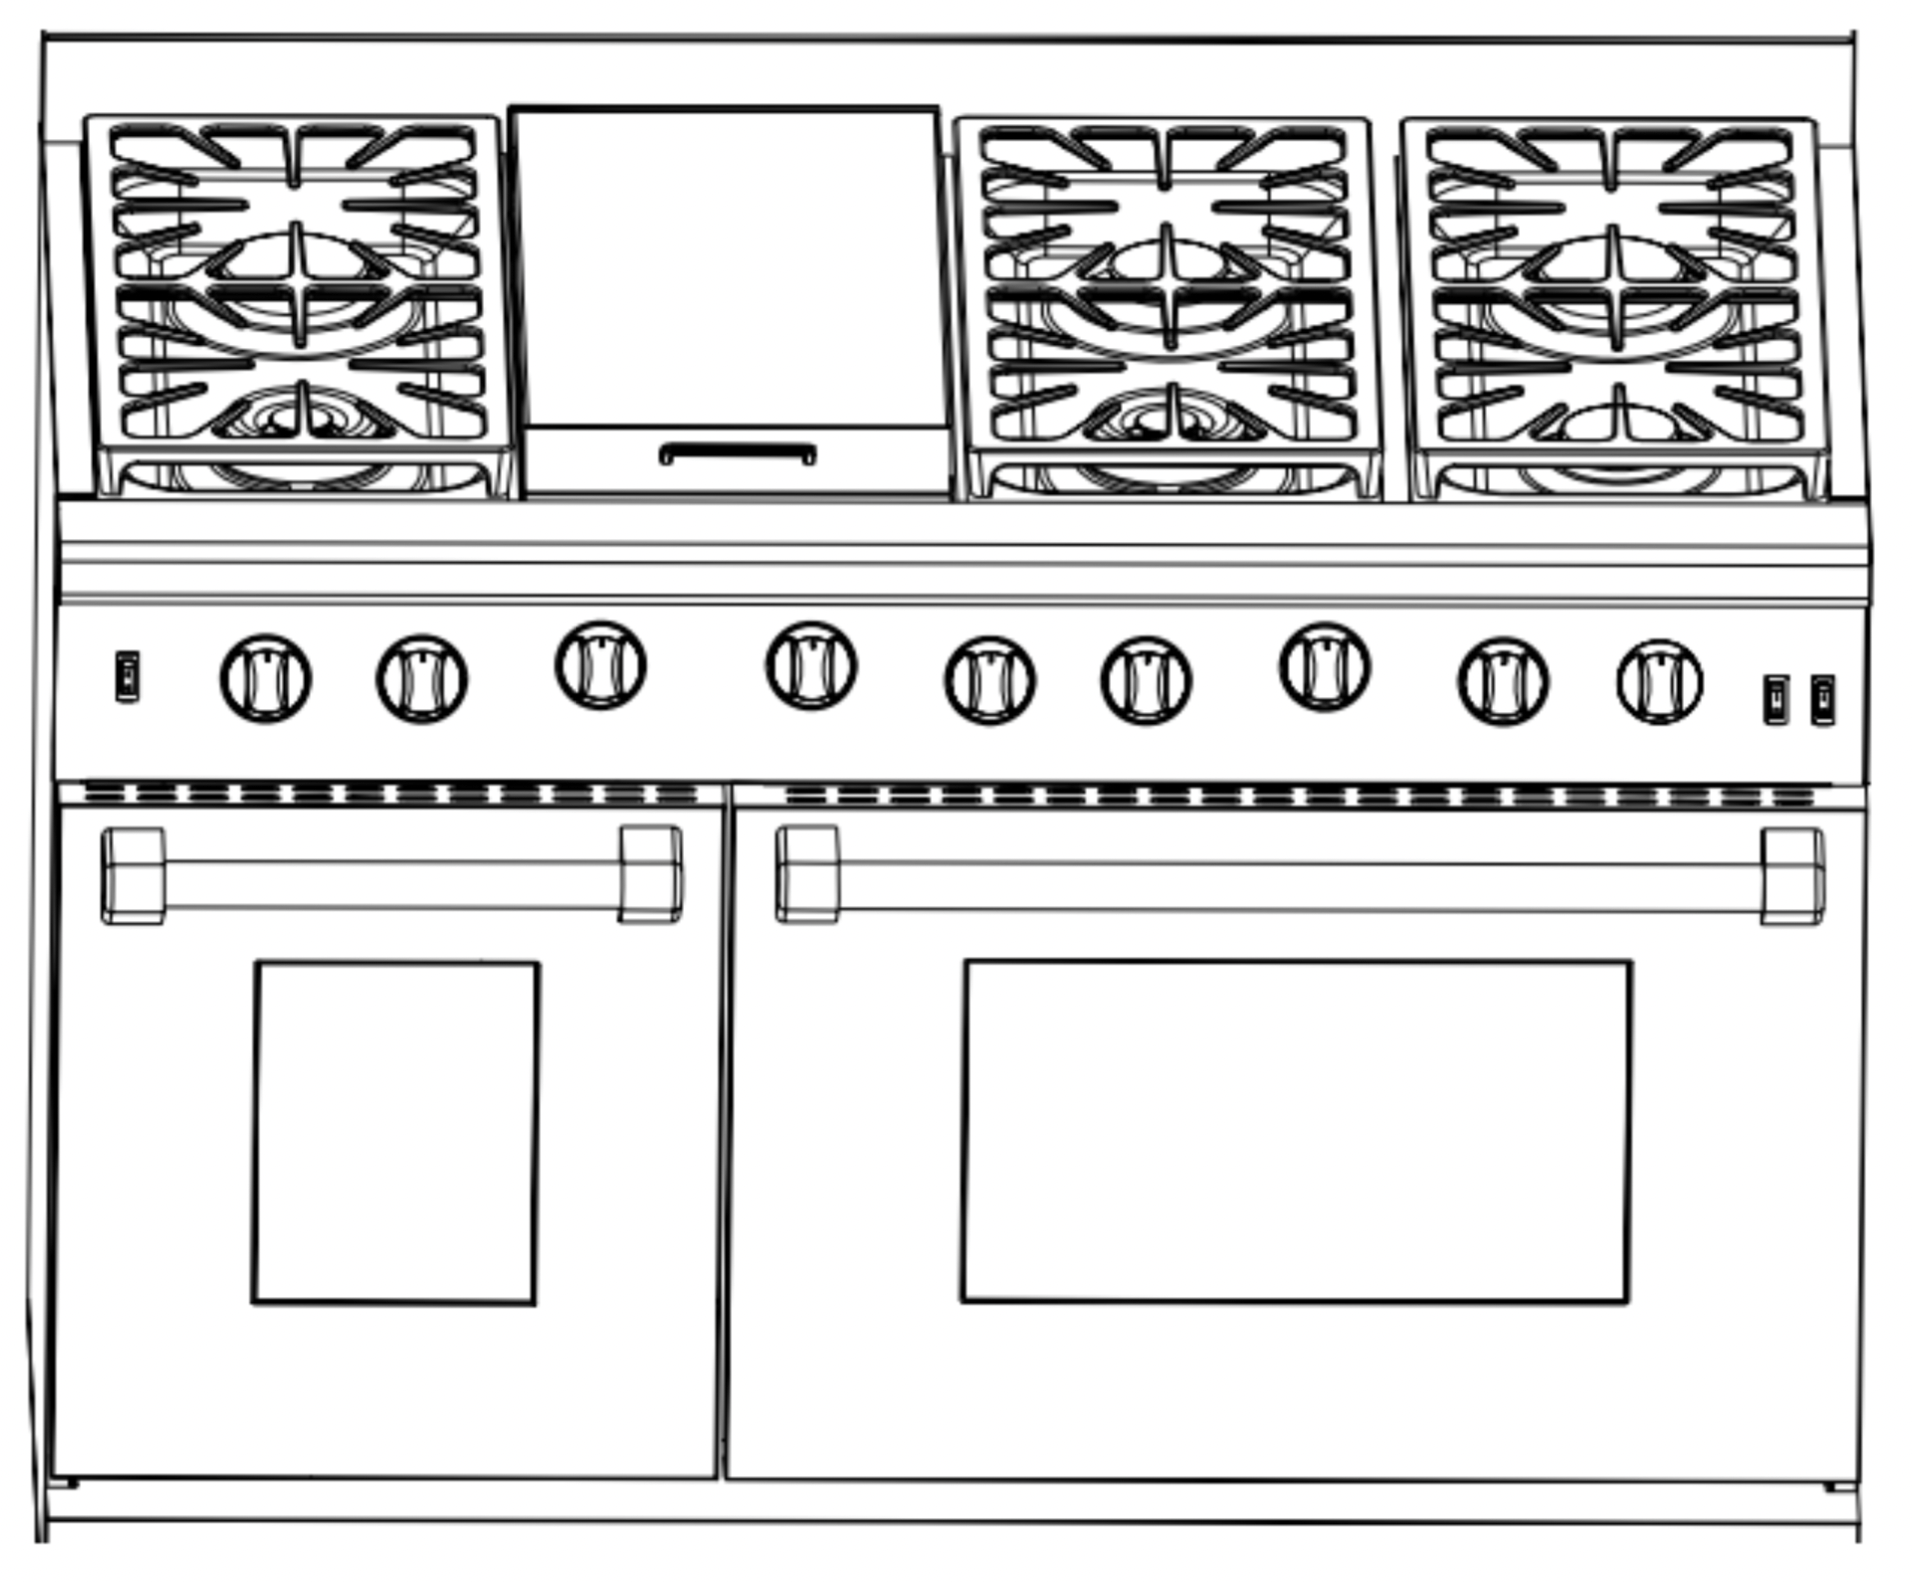
HRG48” series

HRG36” 6 burners series

HRG36” with griddle series
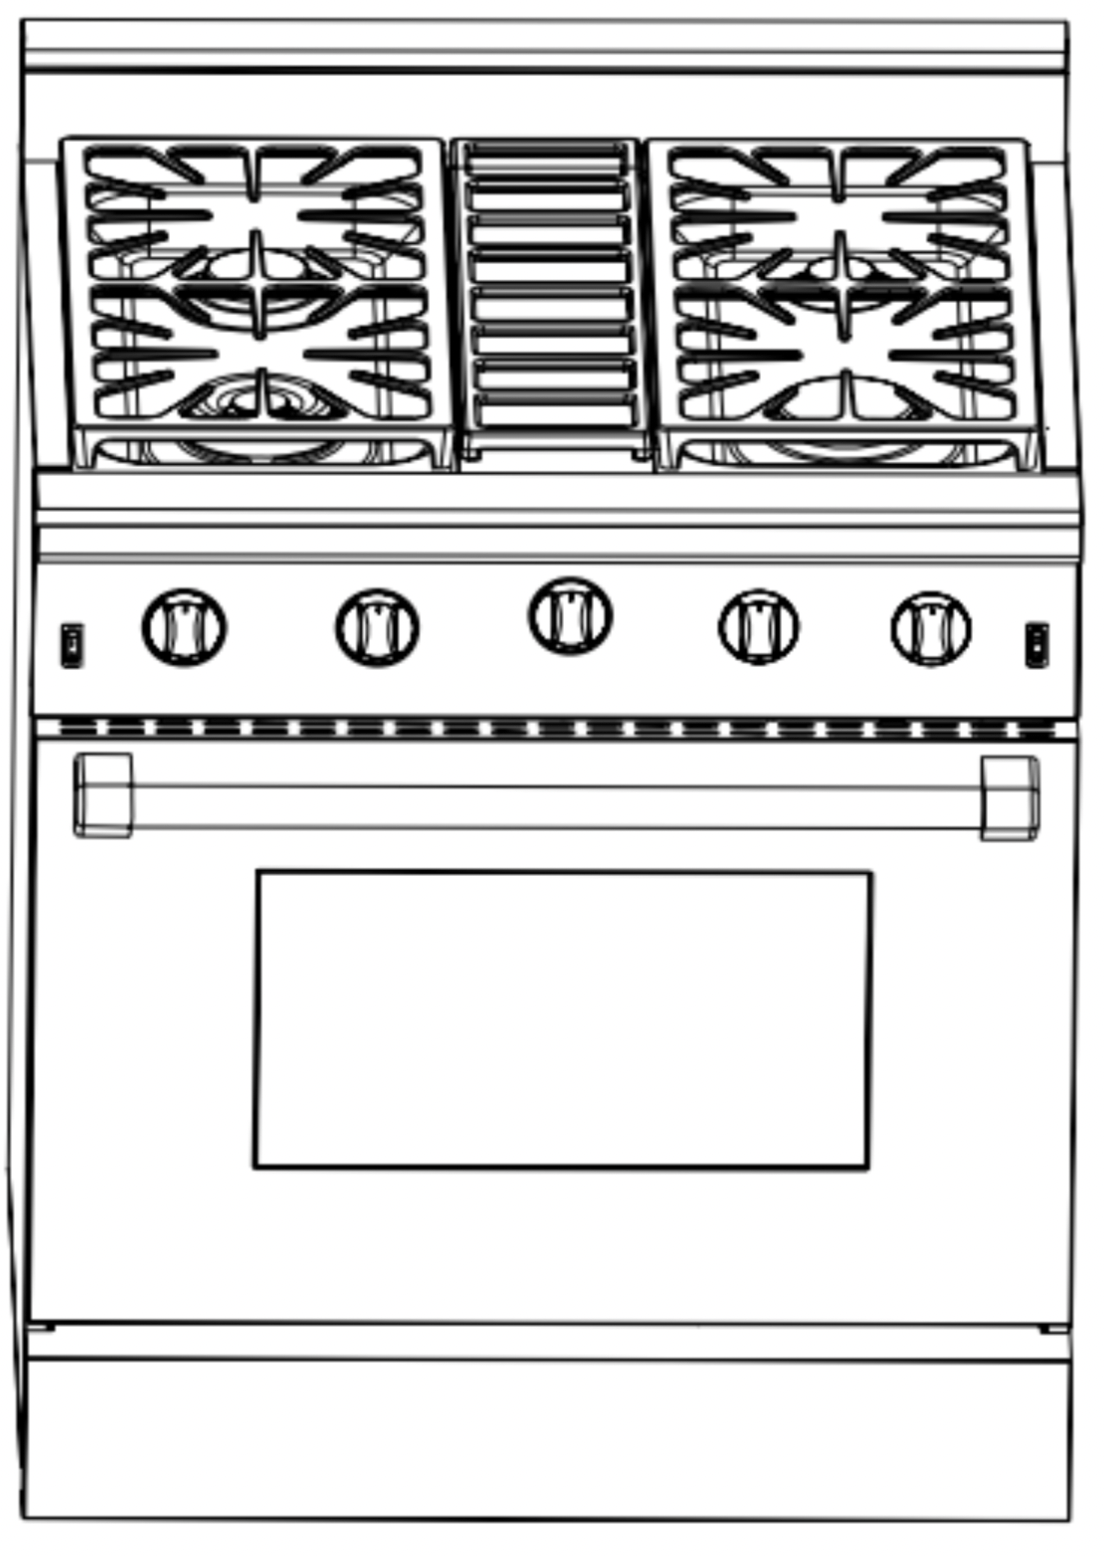
HRG30” series
Before you start
- Make sure that the anti-tip of the range has been properly installed.
- Find the model and serial numbers on the CSA label in the bottom right-hand corner of the backboard.Note these numbers down for future reference in the space provided in section ‘Warranty and service’.
- Read this guide, taking special note of the ‘Safety and warnings’ section.
- Remove all the packaging from the oven(s) and cooktop. Recycle items that you can. If any adhesive residue is left on surfaces, remove this using dish washing liquid on a soft cloth. Do not use any harsh or abrasive cleaners.
- Make sure you follow the instructions under ‘First use’ before using your range for cooking.

First Use
Conditioning the oven
Conditioning will burn off any manufacturing residues and ensure that you get the best results right from the start.
- Insert all the shelves. See ‘Positioning the shelves’ for instructions.
- Turn on the ventilation hood above your range on high.
- Heat the empty oven at the highest temperature for:
30 minutes using BAKE 30 minutes using BROIL (some ovens only).
There will be a distinctive smell while you are conditioning the oven. This is normal, but make sure the kitchen is well ventilated during the conditioning. - Once cooled, wipe out the oven with a damp cloth and mild detergent, and dry thoroughly.
Positioning the shelves

Both the sides panel and shelves with safety stop to keep them sliding out of the oven when pulled forward.
And the front stop prevent the shelves from against hitting the back of the oven
Insert the shelves

- Hold the front of both sides of the shelf firmly to keep it in horizontal.
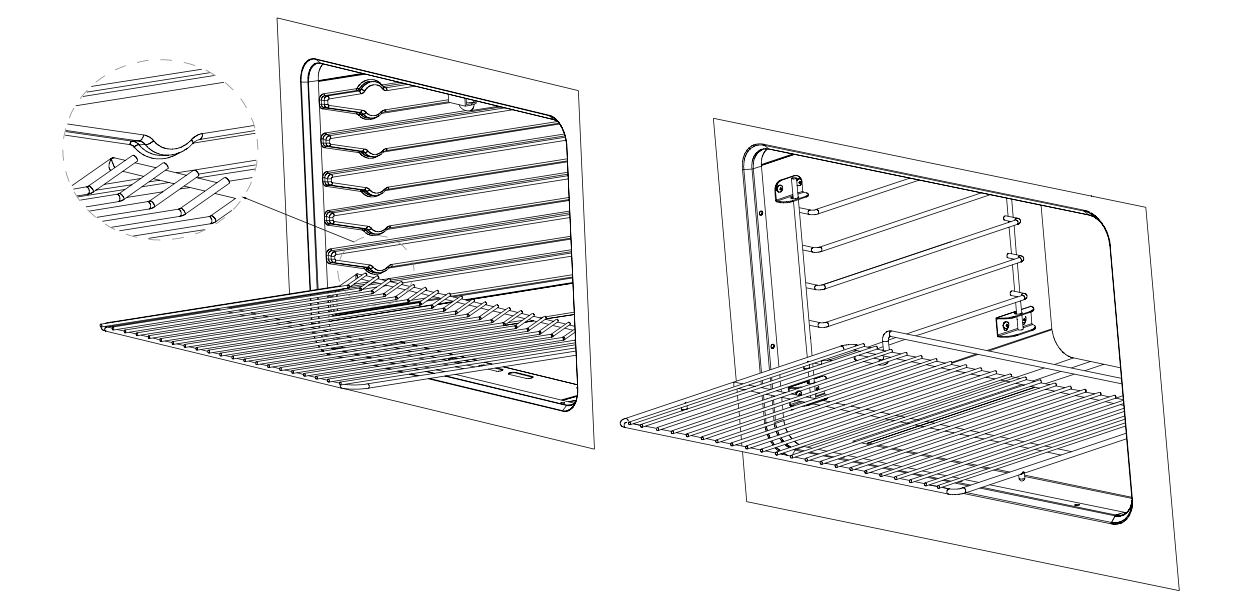
- Put the shelf on the slot horizontally.

- Lift the front about 15°upward till the tag of the shelf clear the safety stop of the side rack.Then lower the shelf horizontally and slide all the way into the oven.Other shelves can be installed by this way.
Cooktop Use
Cooktops
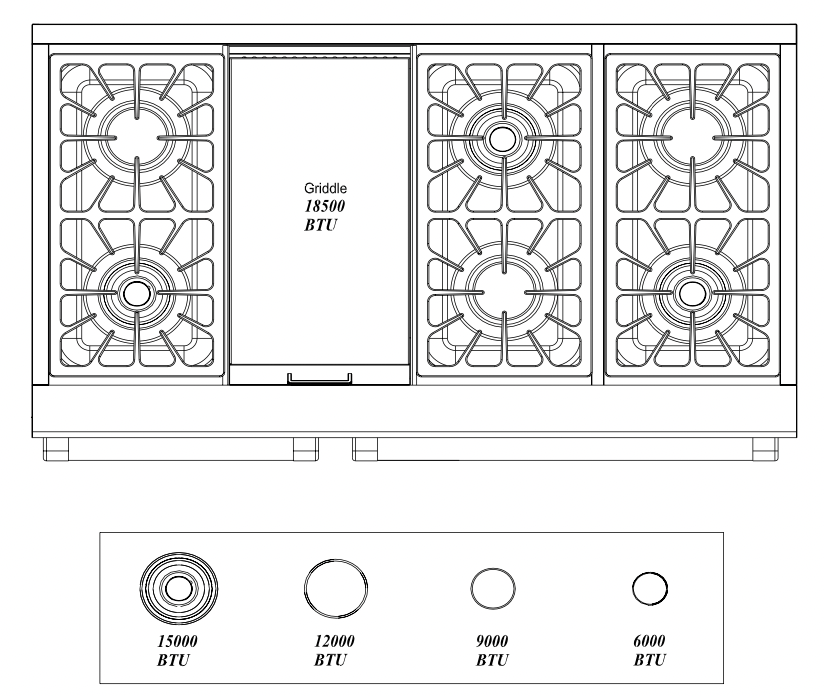
HRG48”

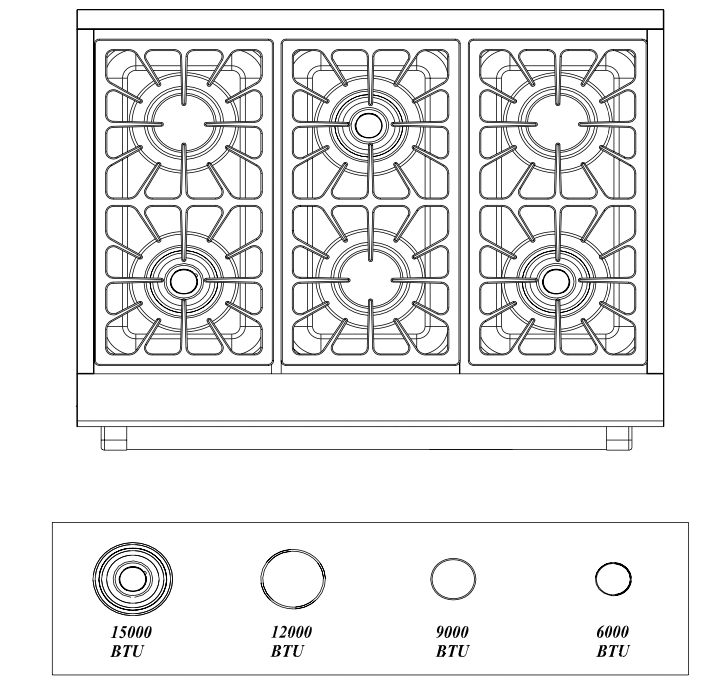
HRG36”
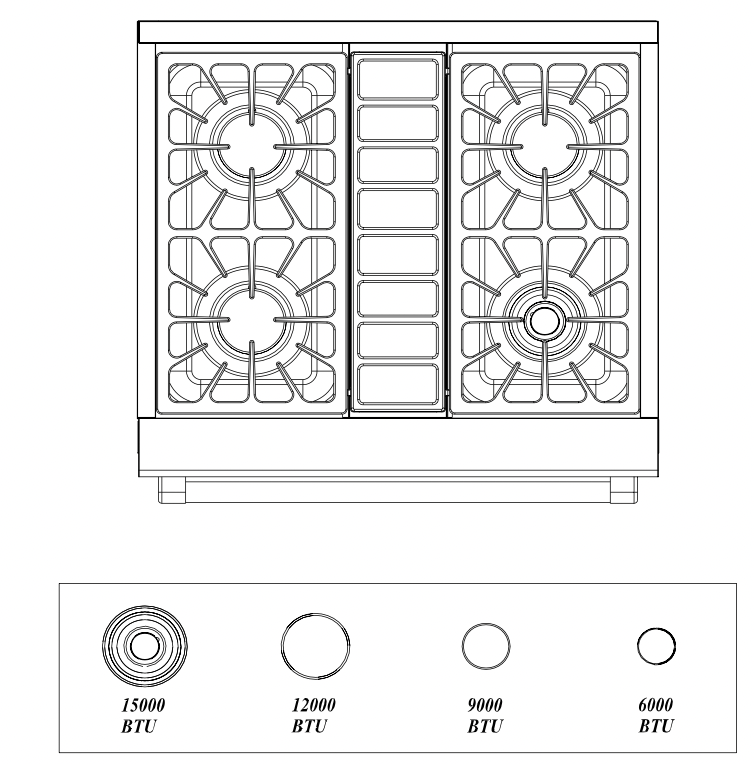
HRG30”
Guidelines for using the cooktop burners
There are dual burners have the same low turn-down setting (SIM) for gentle simmering (620 BTU/hr). Use the SIM setting for melting chocolate and butter, cooking rice and delicate sauces, simmering soups and stews, and keeping cooked food hot.
Never leave the cooktop unattended when in use. Boilover causes smoking and greasy spills that may ignite.
Never allow flames to extend beyond cookware or curl up its sides. This could discolor and damage the utensil and you may get burned touching a hot handle.
Keep handles out of the way. Turn handles so that they don’t extend over the edge of the range or another burner that is on.
Take care when deep-frying. Oil or fat can overheat very quickly, particularly on a high setting.
Make sure that all burner parts are properly in place. Incorrectly or incompletely assembled burners may produce dangerous flames. See‘Replacing the burner parts’ in ‘Care and cleaning’.
Keep the burners clean. Especially after a spill or boilover, make sure you clean the affected burners before using them again. Food residue may clog the igniter and the notches of the flame spreader, stopping the burner from functioning correctly. See ‘Care and cleaning’ for instructions.
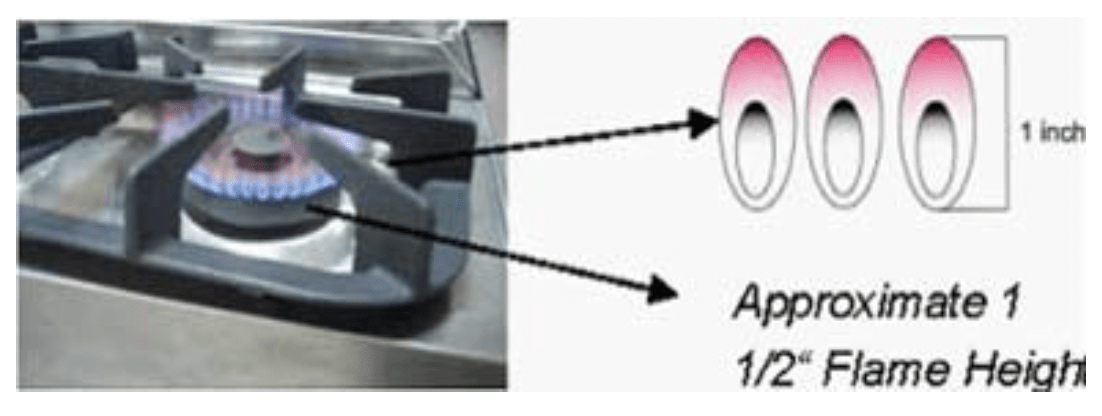
Check that the burner flames are regular. They should be blue with no yellow tipping, and burn without fluttering all around the burner cap. If not, see ‘Troubleshooting’ for advice.
Surface Burner Ignition

To light the top burners, push and turn the appropriate control knob counter clockwise to the “HI” position. You will hear a clicking noise – the sound of the electric spark igniting the burner. Once burner ignition has been achieved, then turn the burner control knob to adjust the the desired heat setting.
NOTE: When one burner is turned to the “HI” position, the burner igniters will park. Do not attempt to disassemble or clean around any burner while another burner is on. Do not touch any burner cap, burner base, or igniter while the igniters are sparking.
Simmer and Boil
- A smaller flame will give the best simmer results. Small flames offer precise cooking performance for delicate foods, keeping food warm, melting chocolate or butter, and for cooking that need to cook over low heat for a long time.
- The highest (larger) flame settings provide the maximum heat that is available on your range. This setting should be used for heavy cooking loads such as water boiling or pasta cooking.
Flame Size
When you select the flame size, watch the flame when you turn the knob.
Any flame larger than the bottom of the cookware is wasted.
The flame should be steady and blue in color. Foreign material in the gas line may cause an orange flame during initial operation.
Power Failure
If the gas does not ignite within four seconds, turn off the valve and allow at least five minutes for any gas to dissipate. Repeat the lighting procedure.
If the power fails, it is not capable of being safely placed in operation and user that no attempt should be made to operate during power failure.
Cooktop
To prevent the cooktop from discoloring or staining, clean cooktop after each use, and wipe up acidic or sugary spills as soon as the cooktop has cooled.
The sealed burners of your range are not sealed to your cooktop and are designed to be removed. Boil overs or spills will not seep underneath the cooktop. The burners should be cleaned after each use.
Burner Grates
The grates must be properly positioned before cooking. Improper installation of the grates may result in scratching of the cooktop and / or poor combustion.

Oven Use
Oven burner use

To light the oven burner, push and turn the appropriate control knob counter clockwise to the (150℉~500℉)position. You will hear a clicking noise – the sound of the electric spark igniting the burner. Once burner ignition has been achieved, then turn the burner control knob to adjust the the desired heat setting.
Broil burner use
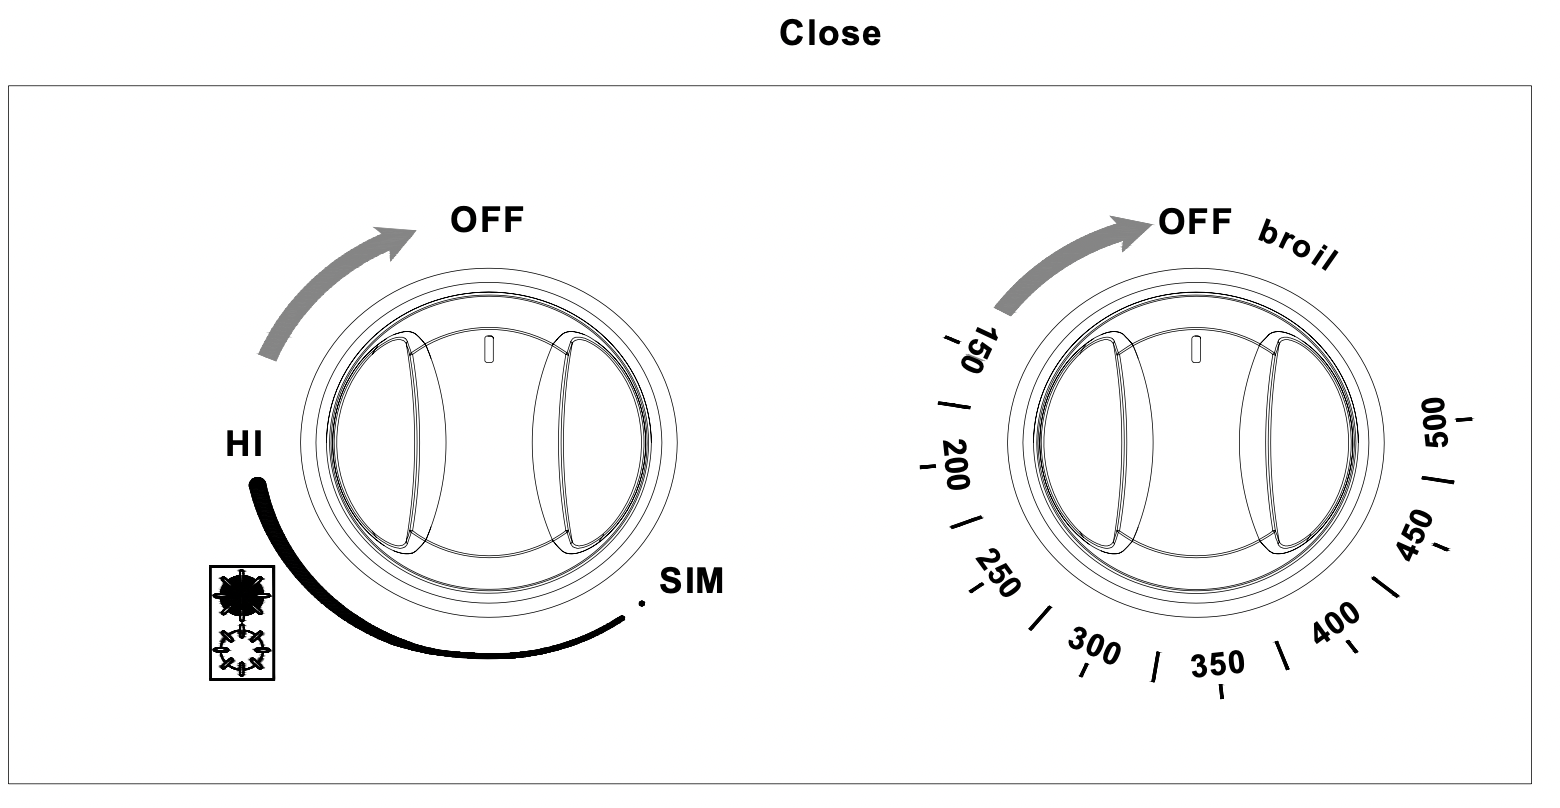
To light the broiler burner, push and turn the appropriate control knob clockwise to the broil position. You will hear a clicking noise – the sound of the electric spark igniting the burner. Keep pressing about 4 seconds until the burner ignition has been achieved.
Oven cooking guidelines
Important!
See other models: 36" LRG3001U
Do not block the ducts on the rear of the range when cooking in the oven. It is important that the flow of hot air from the oven and fresh air into the oven burner never be interrupted. Avoid touching the vent opening or nearby surfaces during oven or broiler operation--they may become hot.
Use all the oven modes with the oven door closed.
Never use aluminum foil to cover the oven shelves or to line the floor of the oven. The trapped heat can irreversibly damage the enamel and may even cause fire.
Do not place water, ice, or any dish or tray directly on the oven floor, as this will irreversibly damage the enamel.
Do not cover the slotted grid of the broil/roast pan with aluminum foil. This will catch the grease and could cause fire.
Do not use plastic wrap or wax paper in the oven.
For food safety reasons, do not leave food in the oven for longer than two hours before and after cooking or defrosting. This is to avoid contamination by organisms which may cause food poisoning. Take particular care during warmer weather.
WARNING: According to the United Sates Department of Agriculture: DO NOT hold foods at temperatures between 40ºF to 140ºF more than 2 hours. Cooking raw foods below 275ºF is not recommended.
WARNING: Never cover any slots, holes or passages in the oven bottom or cover an entire rack with materials such as aluminum foil. Doing so blocks air flow through the oven and may cause carbon monoxide poisoning.
Aluminum foil lining may also trap heat, causing a fire hazard.
Oven Function
Natural Airflow Bake
Occurs when heat is transferred into the oven from the bake burners in the bottom of the oven cavity. Heat is then circulated by natural airflow. This is a traditional bake setting.
Infrared Broil
The broil burner is located at the top of the oven. This burner heats the metal screen until it glows. The glowing screen produces the infrared heat, searing the outside of broiled foods and sealing in juices.
Convection Bake
Heat is transferred from the bake burners in the bottom of the oven cavity to the oven cavity itself. The convection fan in the rear of the oven then circulates it. This convection process provides more even heat distribution throughout the oven cavity. Multiple rack use is possible for the largest baking job. Convection cooking is faster, can be accomplished at lower temperatures and provides more even temperatures than with regular cooking.
Position the oven bottom cover and the oven shelf/shelves before using oven. And remove any unused shelves and baking utensils from the oven.
Preheat the oven to the temperature stated in the recipe before most baking. Depending on the temperature and the size of the oven, preheating will take around 15-20 minutes.
Arrange pans and food items evenly on the shelves. Make sure pans do not touch each other or the sides of the oven. When baking a single item, always center the item on the oven shelf. If baking on multiple shelves, make sure you stagger items on the shelves so that one is never directly above another.
CONVECTION, either reduce the temperature stated in the recipe and leave the baking time unchanged, or reduce the baking time by several minutes and leave the temperature unchanged. For foods with a baking time of over an hour, reducing both the temperature and time slightly may give the best results.
Dark metal baking pans or those with a dull finish absorb heat faster than shiny pans, and are excellent for pies and breads, or anything that needs browning or a crisper crust.
A shiny finish may work best for foods that require lighter, delicate browning (e.g. cakes and cookies), as it reflects some heat and gives a less intense baking surface. Avoid opening the oven door frequently during baking.
Convection Roast
The convection fan circulates the heated air evenly over and around the food. Using the cover and broiler pan provided, heated air will be circulated over the around the food being roasted. The heated air seals in juices quickly for a moist and tender product while, at the same time, creating a rich golden brown exterior. When convection roasting, it is important that you use the broiler pan for best convection roasting results. The pan is used to catch grease spills and has a cover to prevent grease splatter.
Use the broil/roast pan and slotted grid supplied with the range when roasting, elevating the meat on a metal roasting rack. This allows hot air to circulate around the meat, giving a more even browning and a result similar to a rotisserie. A suitable roasting rack can be purchased through your HRG by the distributer or Customer Care.
When roasting larger items like a whole turkey, use only the pan and grid for greater stability.
Convection Defrost
With temperature control off, a motorized fan in the rear of the oven circulates air. The fan accelerates natural defrosting of the food without heat. To avoid illness and food waste, do not allow defrost food to remain in the oven for more than two hours without being cooked.
Defrosting
To thaw uncooked frozen food, set the oven temperature to 100-150°F . Once thawed, cook the food immediately and do not refreeze.
To prevent liquid from thawing food dripping on the oven floor, be sure any uncooked food is tightly wrapped in foil and/or placed in a container.
Convection Dehydrate
With the temperature control on 175°F, warm air is radiated from the bake burners in the bottom of the oven cavity and is circulated by a motorized fan in the rear of the oven.
Over a period of time, the water is removed from the food by evaporation. Removal of water inhibits growth of microorganisms and retards the activity if enzymes.
Broiler Operation
Note: Door must be closed during broiler operation.
Broiling is a method of cooking tender cuts of meat directly under the infrared broiler in the oven. Broiling in the oven is accomplished with the oven door closed. It is normal and necessary for some smoke to be present to give the food a broiled flavor.
If you open the oven door to check the food, have it open for as short a time as possible. This is to prevent the control panel from overheating.
Use both the broil/roast pan and slotted grid supplied. The grid helps to reduce smoking and splatter by letting grease drip into the bottom of the pan, away from intense heat. To prevent food sticking, spray the grid with a light coating of non-stick cooking spray.
Preheating
Preheating is suggested when searing rare steaks (Remove the broiler pan before preheating with the infrared broiler. Foods will stick on hard metal). To preheat, turn the “Oven” selector knob to the “Broil” position. Wait for the burner to become hot, approximately 2 minutes. Preheating is not necessary when broiling meat well-done.
To Broil
Broil one side until the food is browned; turn and cook on the second side. Season and serve. Always pull the rack out to the “stop” position before turning or removing food.
Setting Broil
The “Oven” selector knob controls the Broil feature. When broiling, heat radiates downward from the oven broiler for even coverage. The Broil feature temperature is 500°F (260℃).
The broil pan and insert used together allow dripping grease to drain and be kept away from the high heat of the oven broiler. DO NOT use the broil pan without the insert.
DO NOT cover the broil pan insert with foil. The exposed grease could catch fire.
To set the oven to Broil:
- Place the broiler pan insert on the broiler pan. Then place the food on the broiler pan insert.
- Arrange the interior oven rack and place the broiler pan on the rack. Be sure to center the broiler pan and position directly under the broil burner. If preheating the broil burner first, position the broiler pan after the broil burner is preheated.
- Turn selector knob to Broil.
The oven indicator light will remain on until the selector knob is turned to the off position or the temperature control cycles off.
Broiling guidelines
Choose a suitable shelf position. To ensure that meat is cooked through rather than just browned on the outside, broil thick pieces of meat and poultry on shelf positions 2 or 3. Use shelf position 4 for thinner items that need less cooking time like steaks, chops, or hamburger patties.
When finishing off meals by browning the top under the broiler, use metal or glass-ceramic bakeware. Do not use heatproof glass or earthenware, as these cannot withstand the intense heat of the broiler.
Center the item in the oven, so that it is directly under the broiler.
Griddle Use
For the models with Griddle
Before Using the Griddle
- Clean the griddle throughly with warm, soapy water to remove dust or any protective coating.
- Rinse with clean water and wipe off to dry with soft, clean, lint-free cloth.
- A stainless steel cover that is sized to fit on top of the surface when the griddle is not being used is provided. Please note that the cover must be removed before turning the griddle on.
- Make sure the grease tray is under the front edge of the griddle. Position the tray under the griddle overhang to catch grease or food residue.
Use of the griddle
- Push and turn the control knob counter-clockwise to the preferred cooking temperature.
- Preheat the griddle for 10-12 minutes.
- When the griddle is preheated to the desired temperature, the indicator light will turn on.
- Butter or cooking oil can be added for more flavor, then plate the food to cook.
CAUTION: The surface of the griddle is hot after use. Please allow sufficient time for the griddle to cool prior to cleaning.
WARNING: When using the appliance or the first time. The oven and broiler burners should be turned on to burn off the manufacturing oils. Turn the oven on to 450°F (230°C) for 20 to 30 minutes.
Then turn the oven control knob to “Broil” for the same length of time. It is recommended to turn on the ventilator above the range at this time.
CAUTION: Must disconnect the electrical supply before servicing or cleaning the appliance. Failure to follow this advice may result in injury or death.
Care and Cleaning
| DO | DON’T |
|---|---|
|
Read these cleaning instructions and the ‘Safety and warnings’ section before you start cleaning your range. Before cleaning or removing any part, make sure that everything on the range has been turned off. Unless suggested otherwise in the chart following, allow any part to cool to a safe temperature before cleaning. If you do need to handle a warm or hot part (e.g. grill or griddle), take extreme care. Wear long protective mitts to avoid burns from steam or hot surfaces. Try using any cleaner on a small area first, to ensure it doesn’t stain. See the pages following this chart for instructions on removing and replacing different parts of the range for cleaning or maintenance. To help you identify any parts, see illustrations in section ‘Introduction’ and after this cleaning chart. |
Do not use aerosol cleaners until the range has completely cooled. The propellant substance in these cleaners could catch fire in the presence of heat. Do not let soiling or grease accumulate anywhere in or on the range. This will make future cleaning more difficult and may present a fire hazard. Do not use any abrasive or harsh cleaners, cloths, scouring pads or steel wool. These will scratch your range and damage its appearance. Do not use a steam cleaner to clean any part of the range. Do not perform any cleaning or maintenance on parts not specifically named in the chart below. If in doubt, contact Customer Care. Do not lift the black grill and griddle frames off the cooktop. |
Parts Care and Cleaning
Burner caps and brass flame spreaders
Check that the burner is turned OFF and allow it to cool.Lift off the burner cap and brass flame spreader.Wash them in hot soapy water, rinse, and dry.
Use a stiff nylon brush or straight-ended paper clip to clear the notches of a flame spreader.Replace the flame spreader and burner cap correctly.
To avoid electrical shock or burns, turn off controls and ensure the cooktop is cool before cleaning.
Before cleaning the cooktop, ensure that all burners are turned off and that all components are cool enough to safely touch.
Do not use harsh or abrasive cleaning agents, waxes, polishes, or commercial cooktop cleaners to clean the cooktop.
Use only a sponge, soft cloth, fibrous or plastic brush, and nylon pad for cleaning. Always dry components completely before using the cooktop.
Control Panel, Door Handle, Control Housing
Clean the control panel, door handle and control housing with a solution of mild detergent and warm water.
Do not use abrasive cleaners or scrubbers; they may permanently damage the finish. Dry the components with a soft, lint-free cloth.
Side racks
Pre-soak any stubborn, burnt-on soiling, then clean with a solution of mild detergent and hot water and wipe dry with a microfiber cloth.
Alternatively, clean these in the dishwasher.
Oven shelves
To remove stubborn or ‘baked-on’ soiling, scrub with a dampened, soap-filled, nonmetal, non-abrasive pad, then wipe dry.
Apply a chrome cleaner with a damp sponge or cloth following manufacturer instructions.
Wipe and dry.
Broil/roast pan and slotted grid
Pre-soak any stubborn soiling in a solution of mild detergent and hot water. Wash by hand or in a dishwasher.
Bake and broil burners Do not clean these parts. They self-clean during normal use.
Porcelain Surfaces
Clean oven interior and inner door liners with a solution of mild detergents and hot water. Rinse and dry with a soft, lint-free cloth. Do not use abrasives or commercial oven cleaners.
Oven Window
Clean all glass surfaces with a solution of mild detergent and hot water. Use a mild glass cleaner to remove fingerprint or smears.
Dry completely with a soft, lint-free cloth.
Oven door gasket
Avoid cleaning this part. If you need to remove large food particles off it, proceed as follows:
- Dampen a sponge with clean hot water.
- Gently wipe off the soiling, but do not rub.
- Press a dry towel gently on the gasket to dry.
Do not use any cleaning agent on the gasket.
The gasket is essential for a good seal. Take care not to rub, displace, or damage it.
Stainless steel surfaces cleaning
Do not use any cleaning product with chlorine bleach.
Do not use a steel wool pad; it will scratch the surface.
Use a hot, damp cloth with a mild detergent.
Use a clean, hot, damp cloth to remove soap. Dry with a dry, clean cloth.
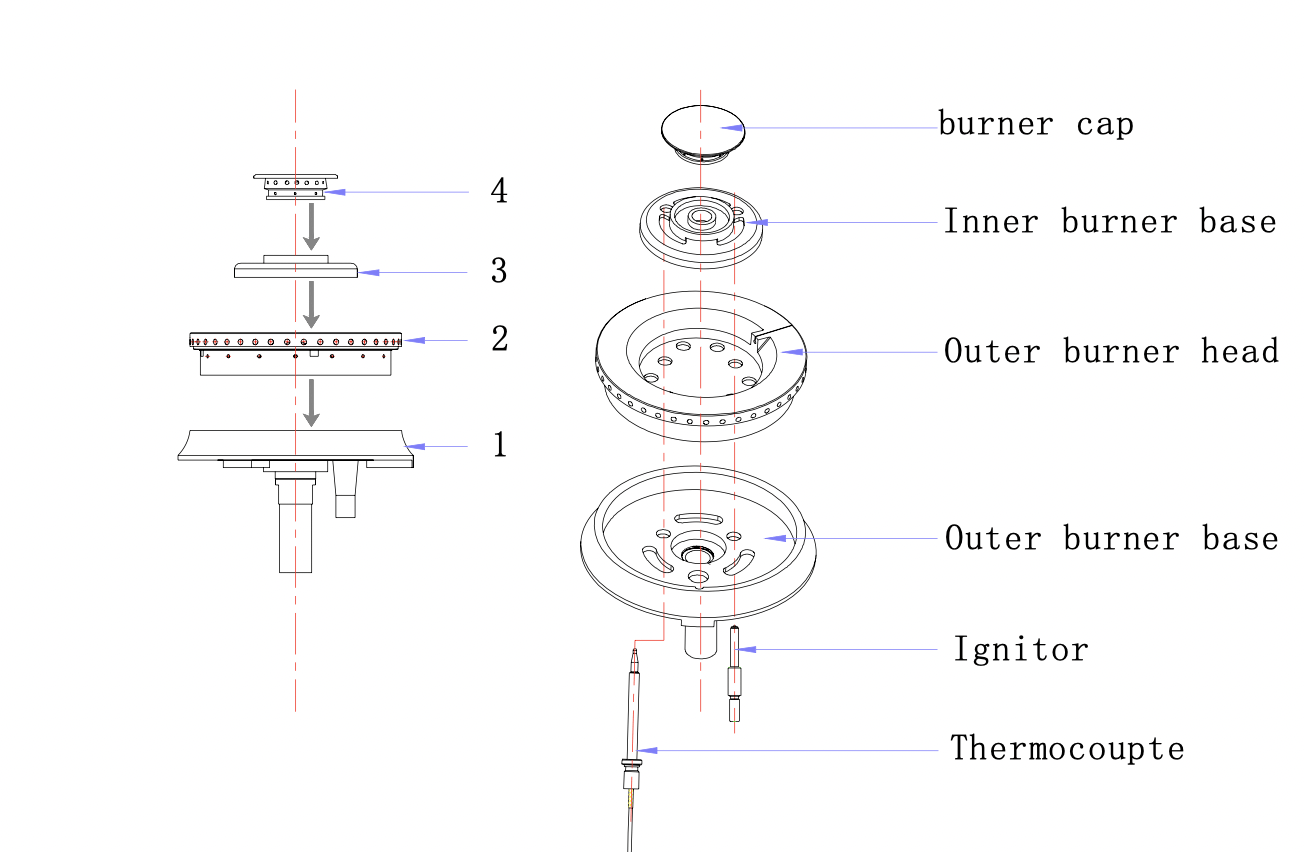
Replacing the burner parts

Removing and replacing the oven door
Important!
Do not lift the oven door by its handle. Doing so may damage the door.
Make sure the oven and the door are cool before you begin to remove the door. Before removing the door, make sure there is a large enough clear, protected surface in the kitchen to rest the door on.
Take care, the oven door is heavy!
When replacing the burners, make sure that the two locating pins on the bottom of the brass flame spreader are properly aligned with the locating pin holes on the top of the simmer ring.
Incorrect alignment will produce a potentially dangerous flame and poor burner performance.
Removing the oven door
- Open the door fully.
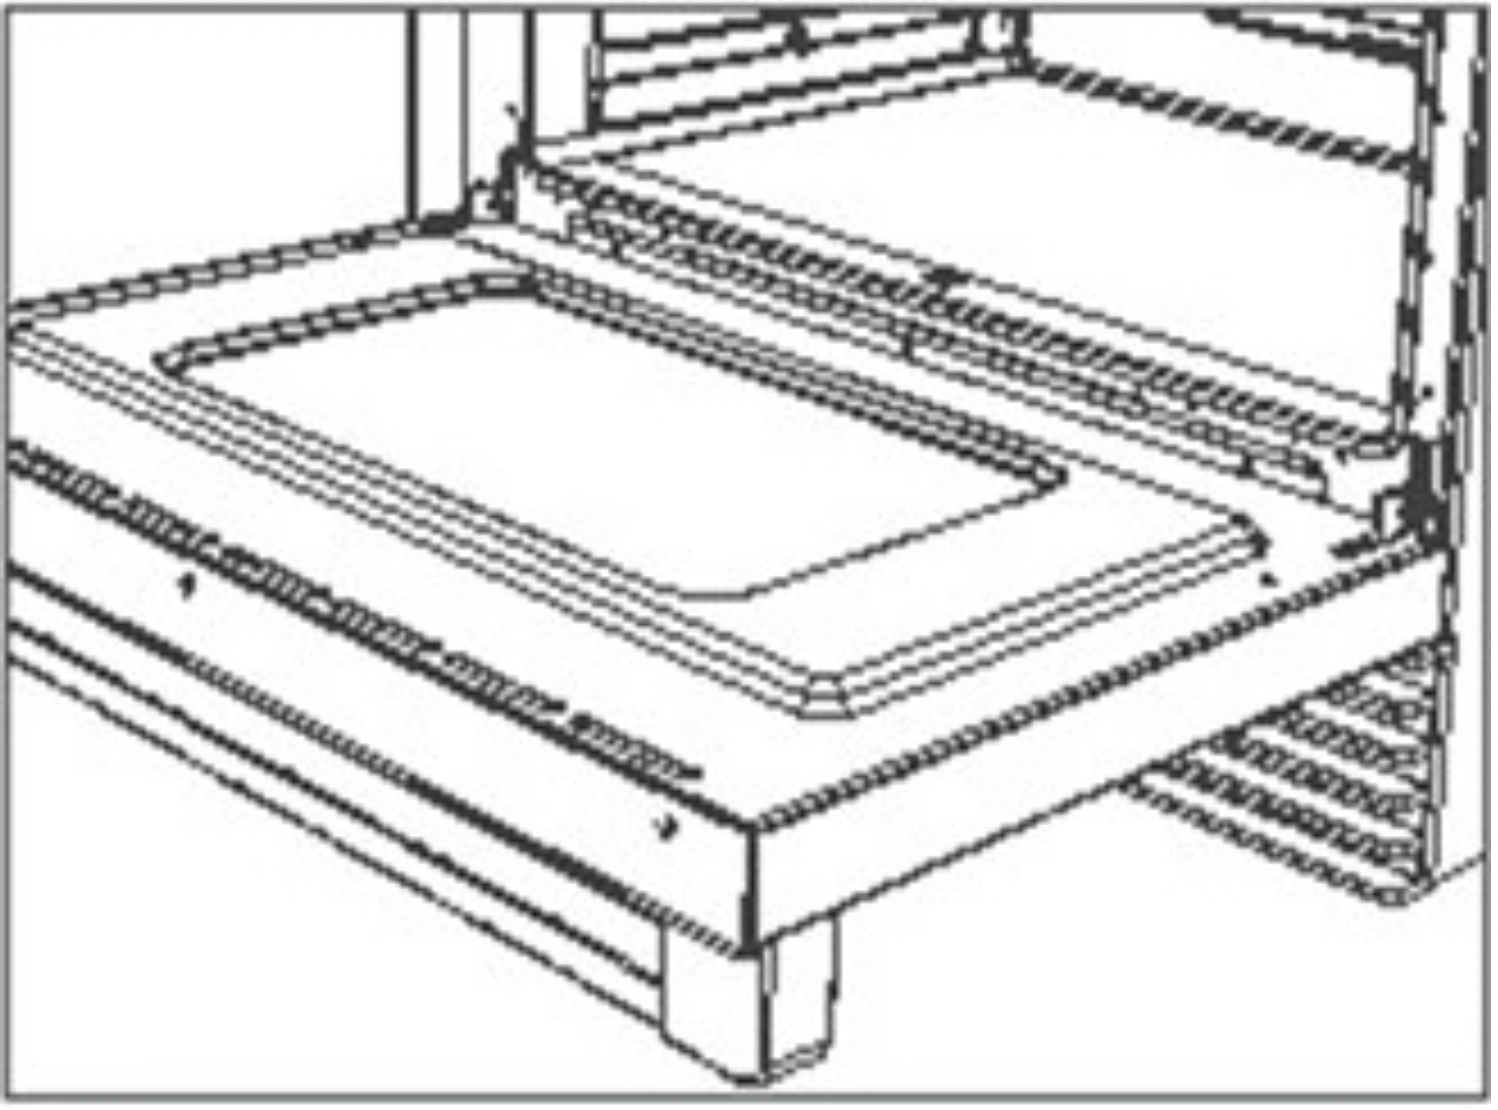
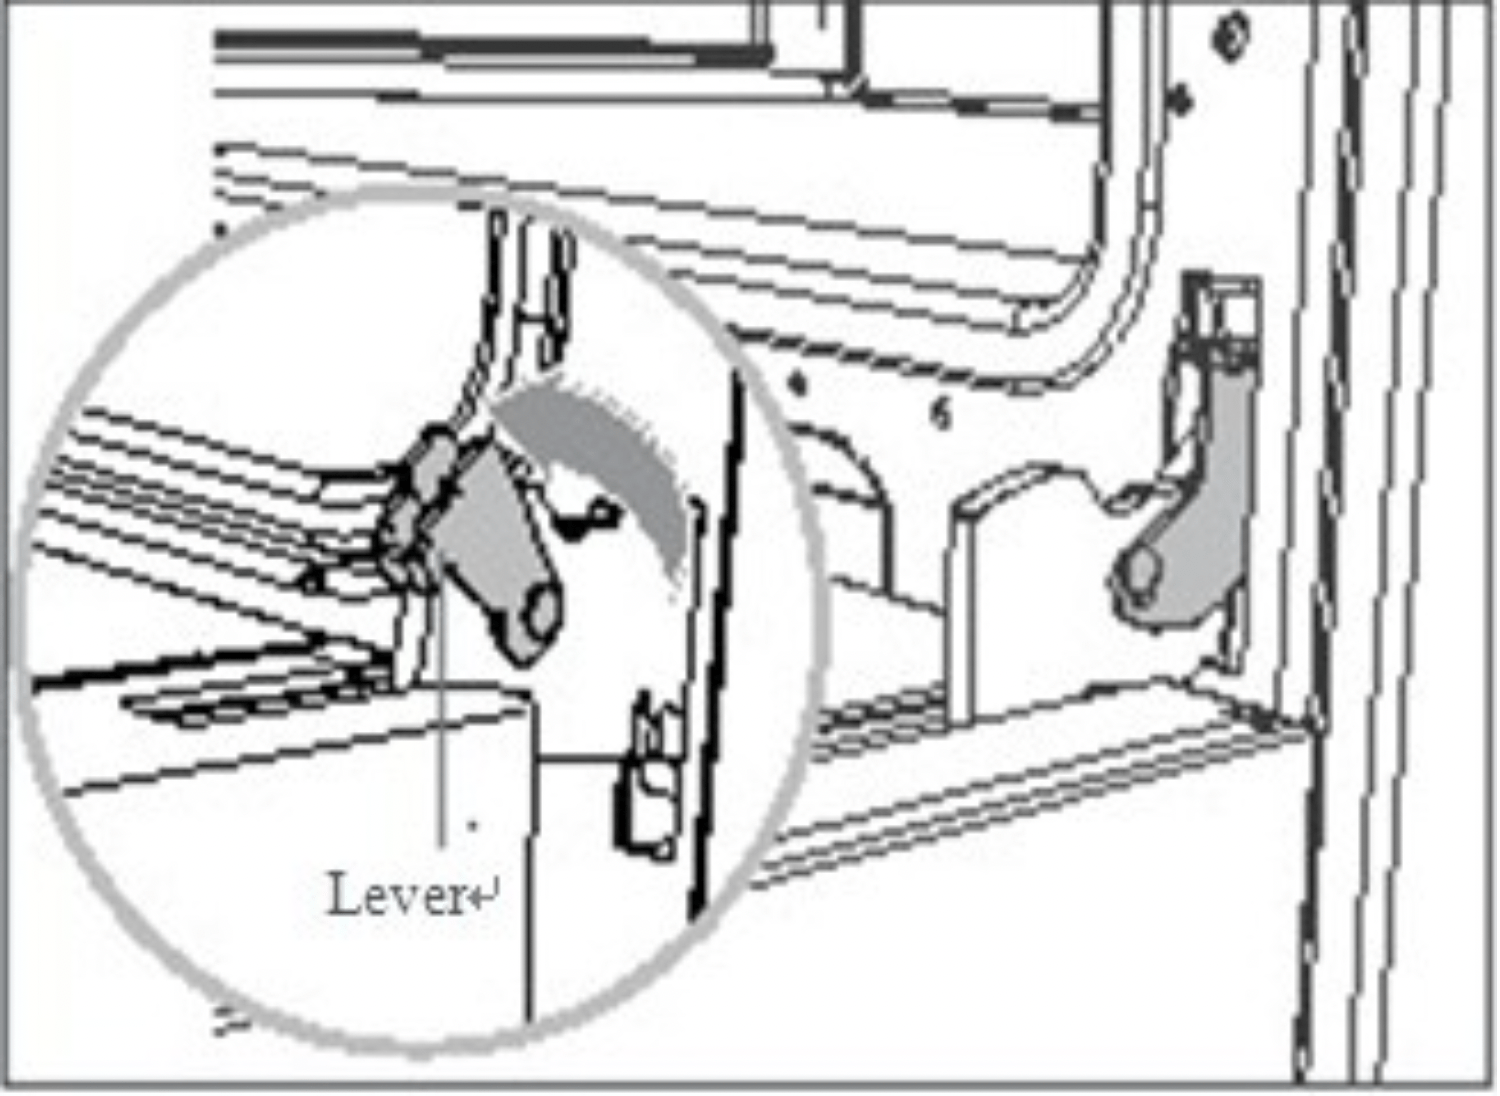
- Open the levers fully on both sides.
- Holding the door firmly on both sides, gently close it about halfway.
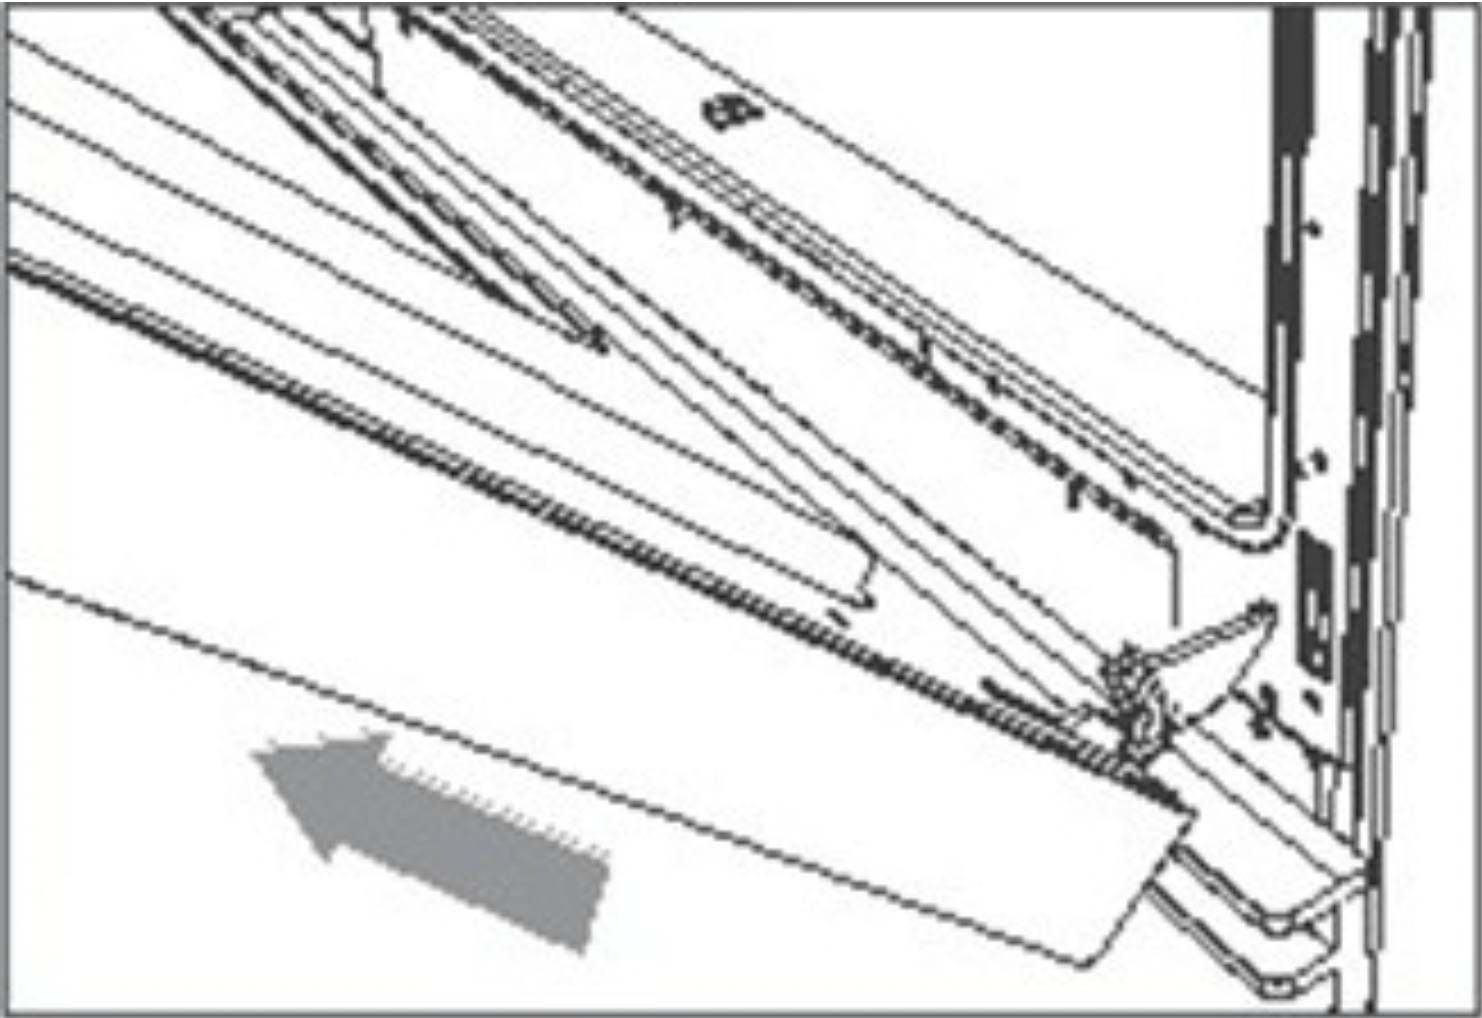
- Disengage the hinges and remove the door, place on a protected surface.
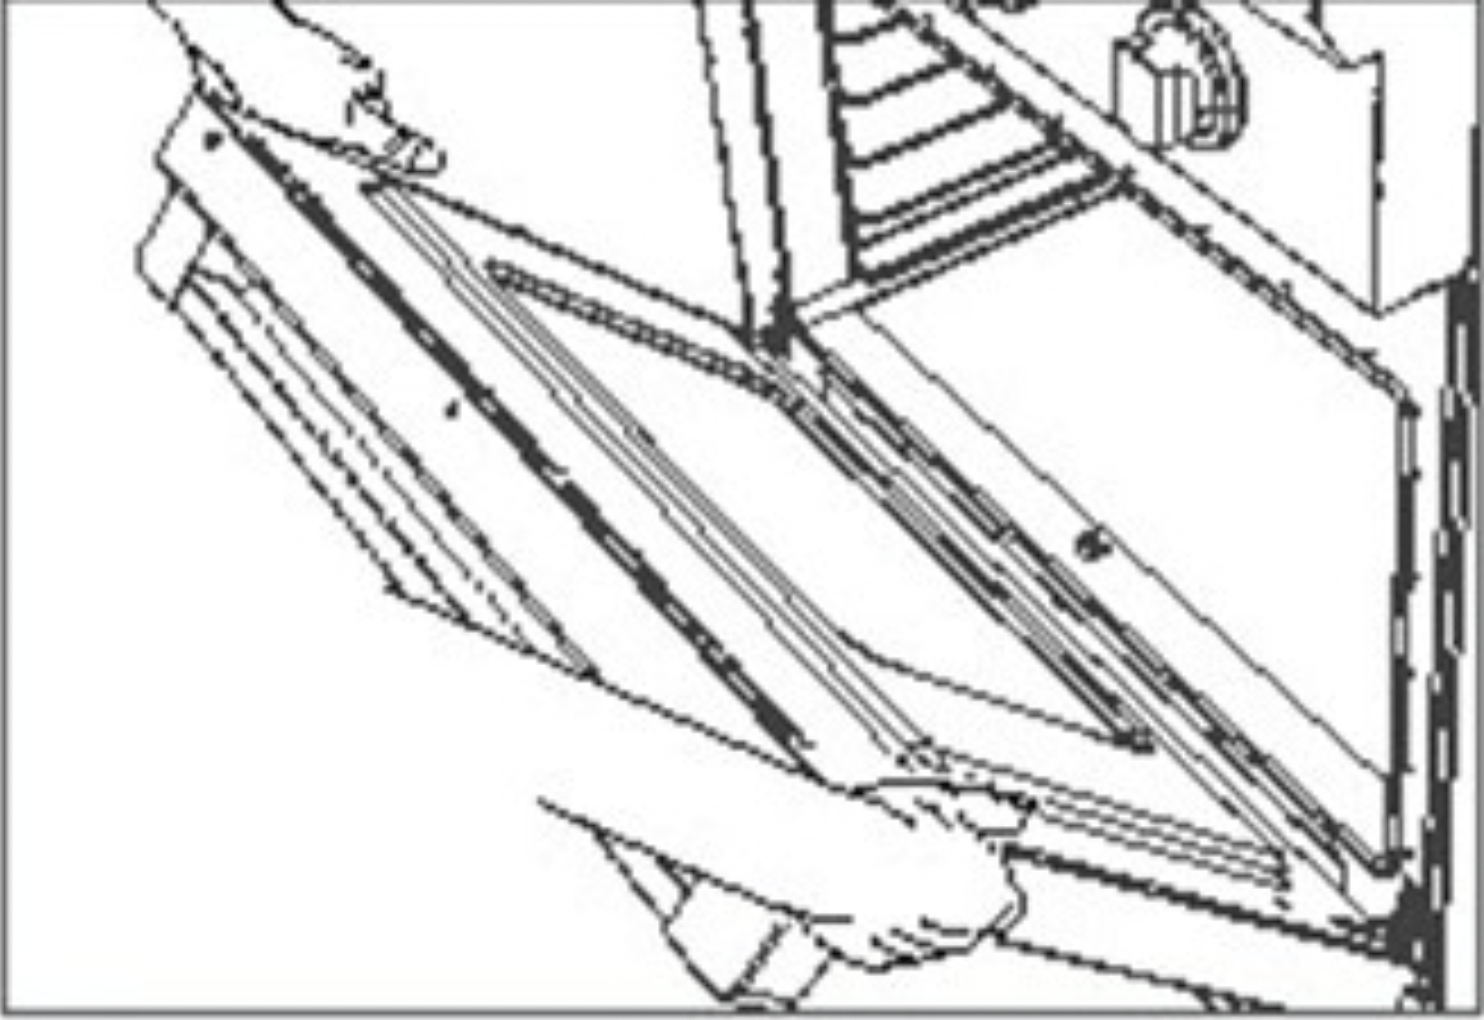
Replacing the oven door
- Hold the door firmly in an approximately halfway open position.
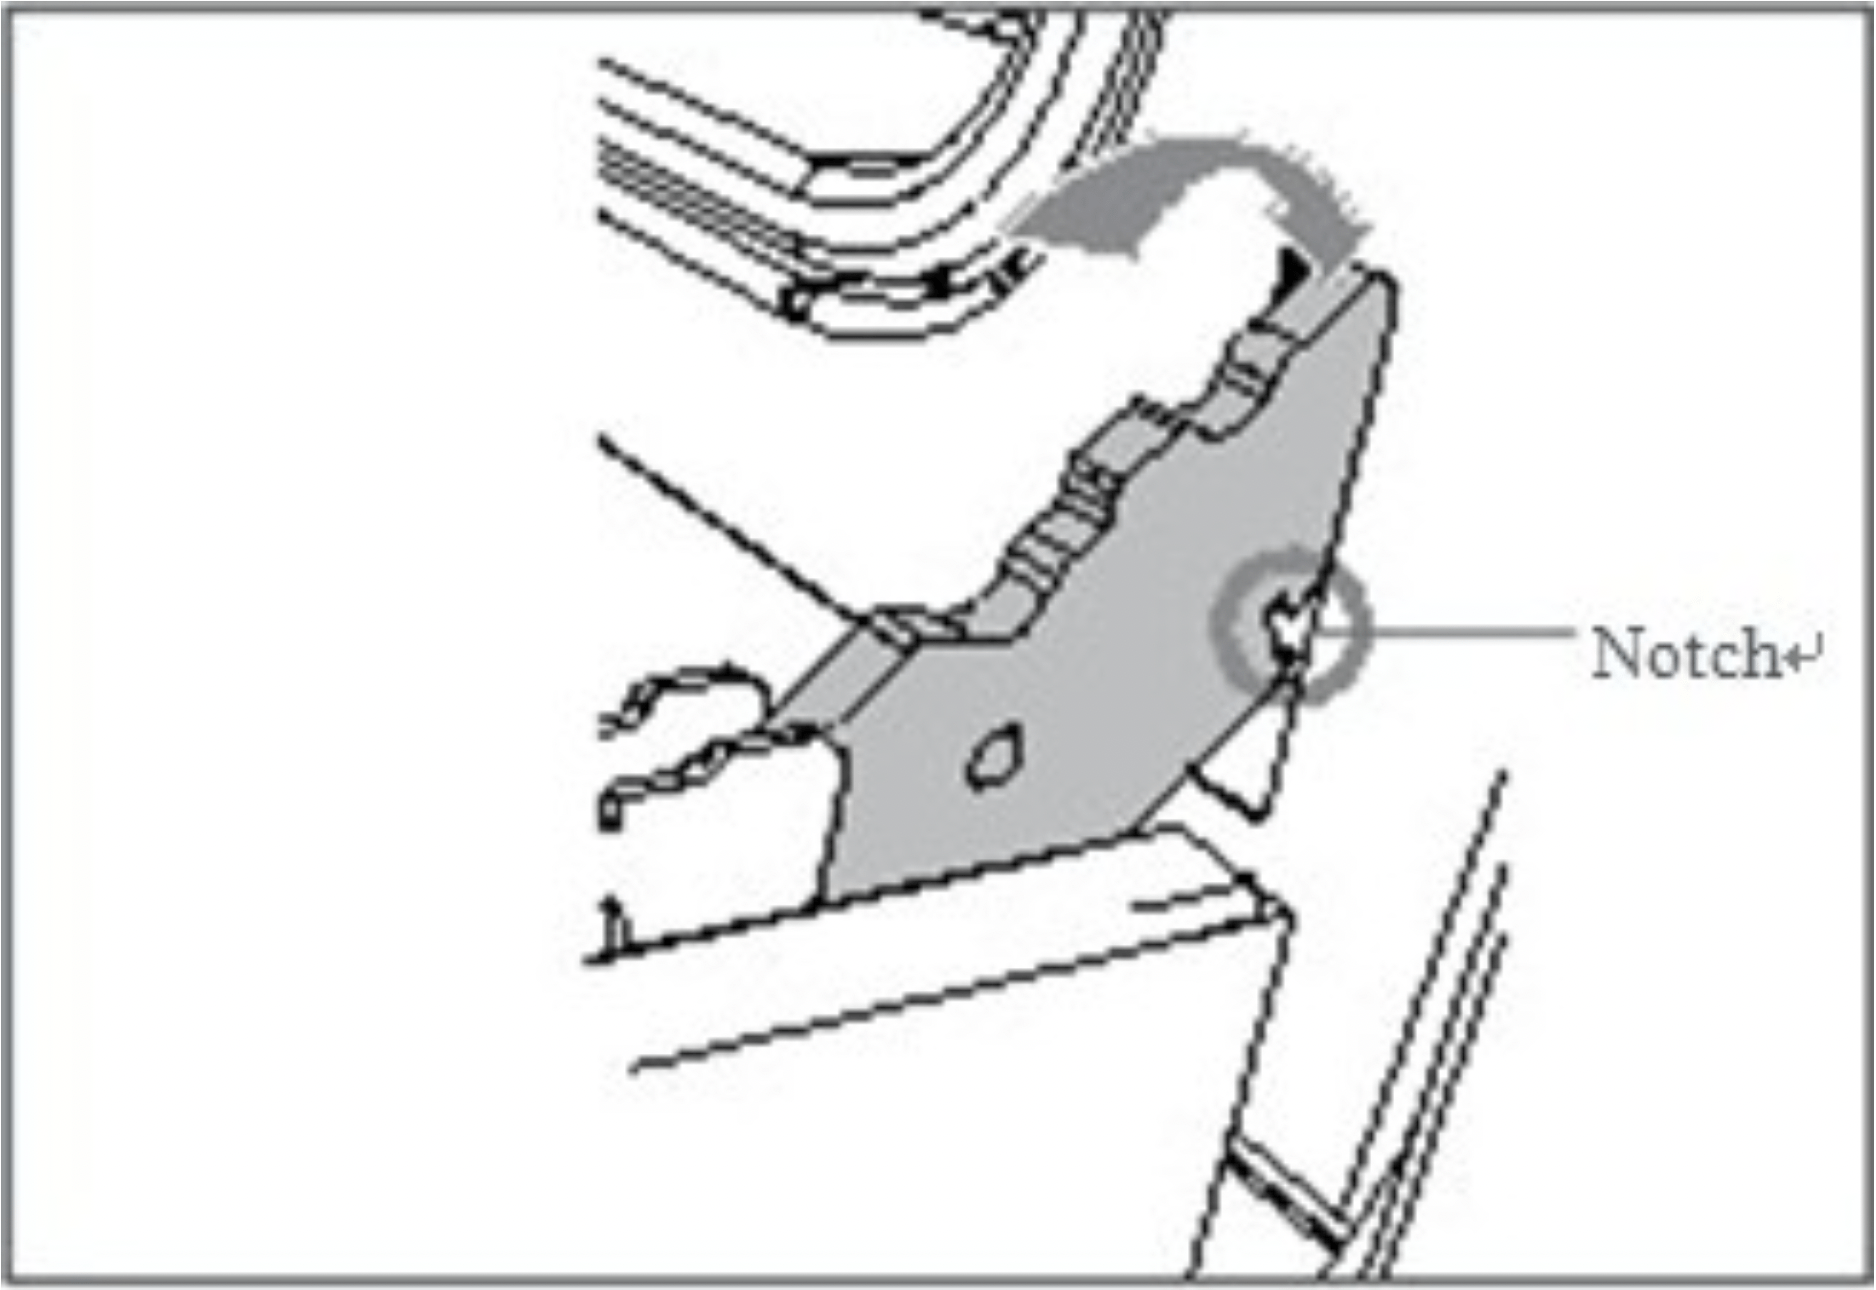
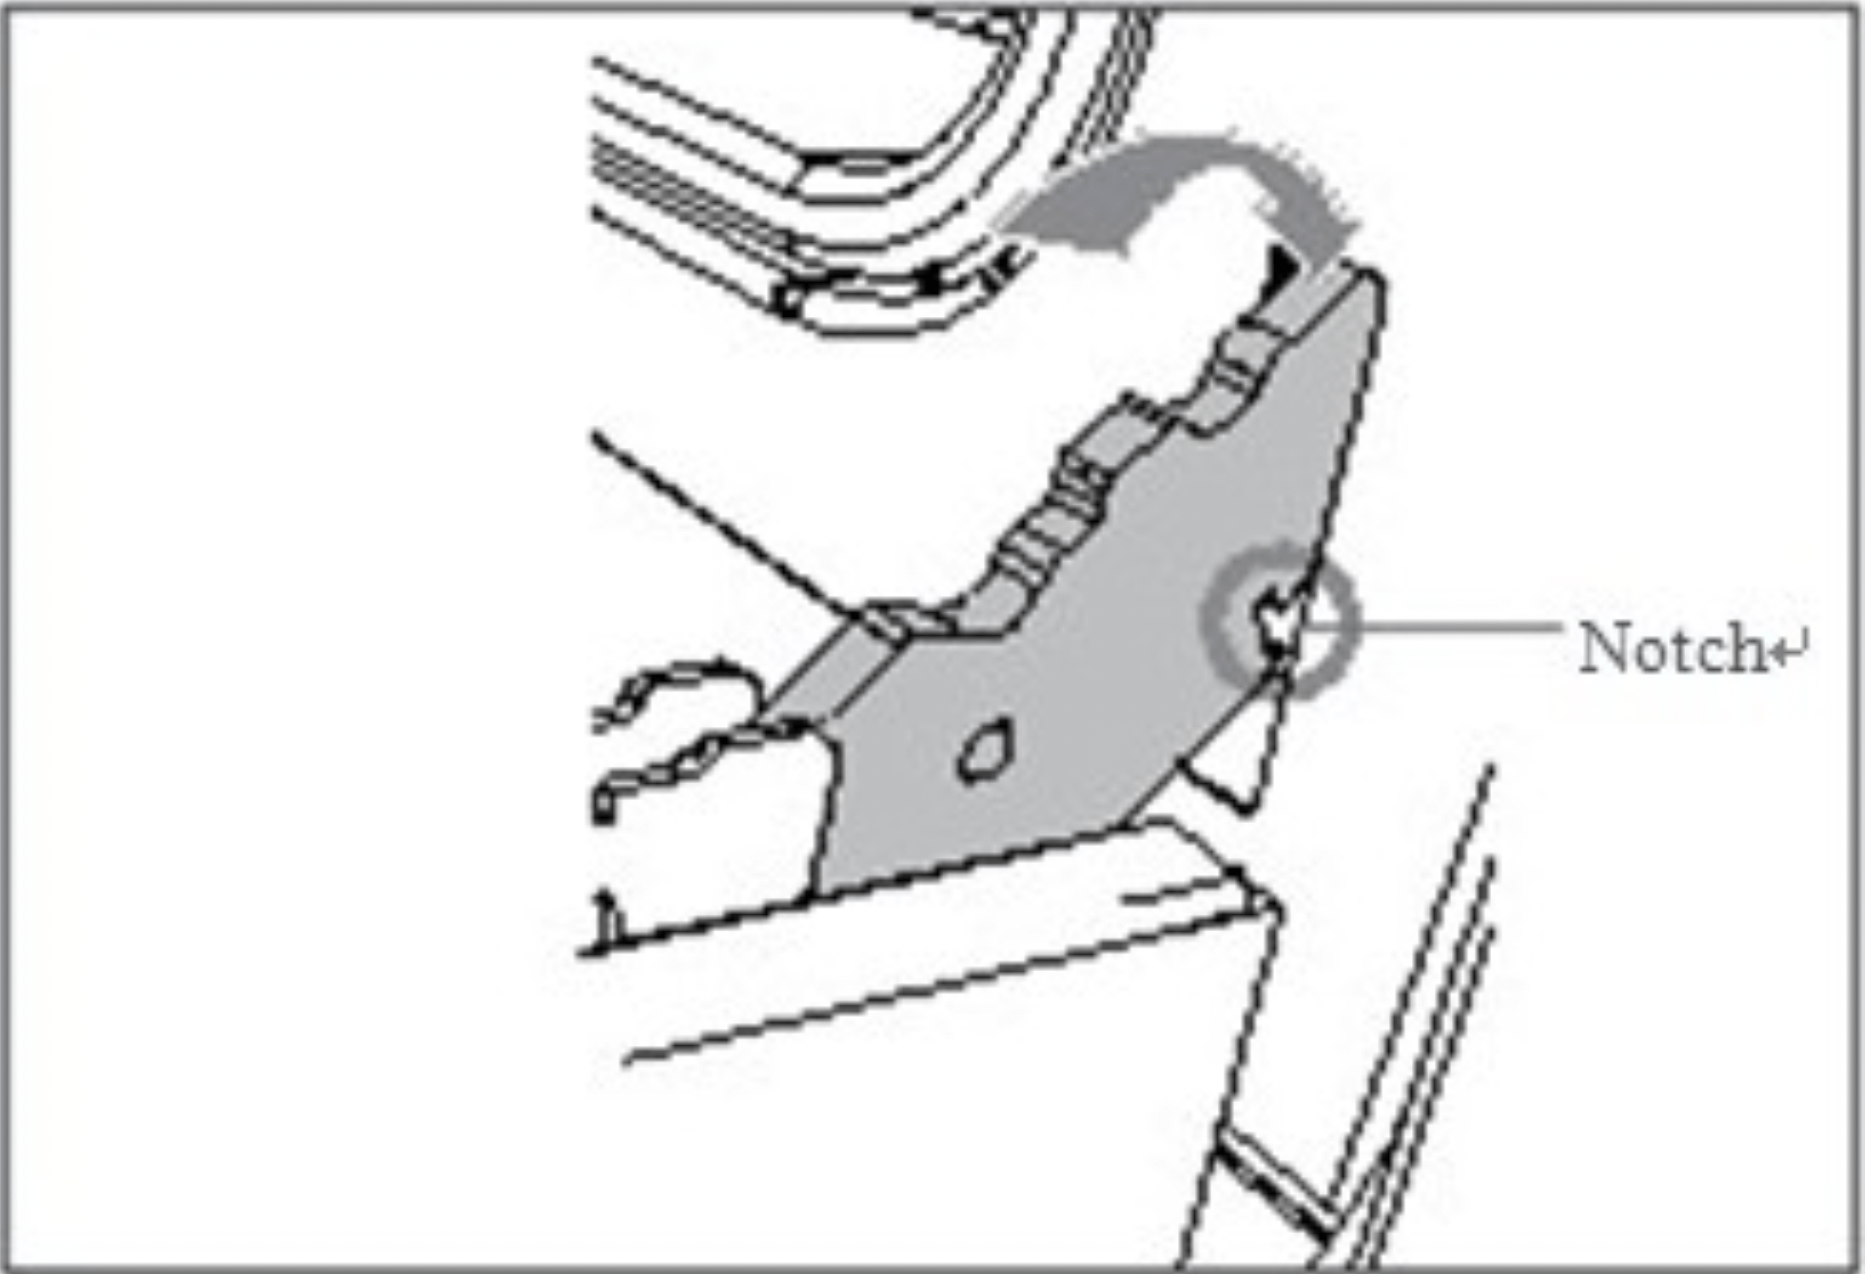
- Insert the hinge tongues into the slots, making sure that the notches on both sides drop into place as shown.
- Open the door fully.
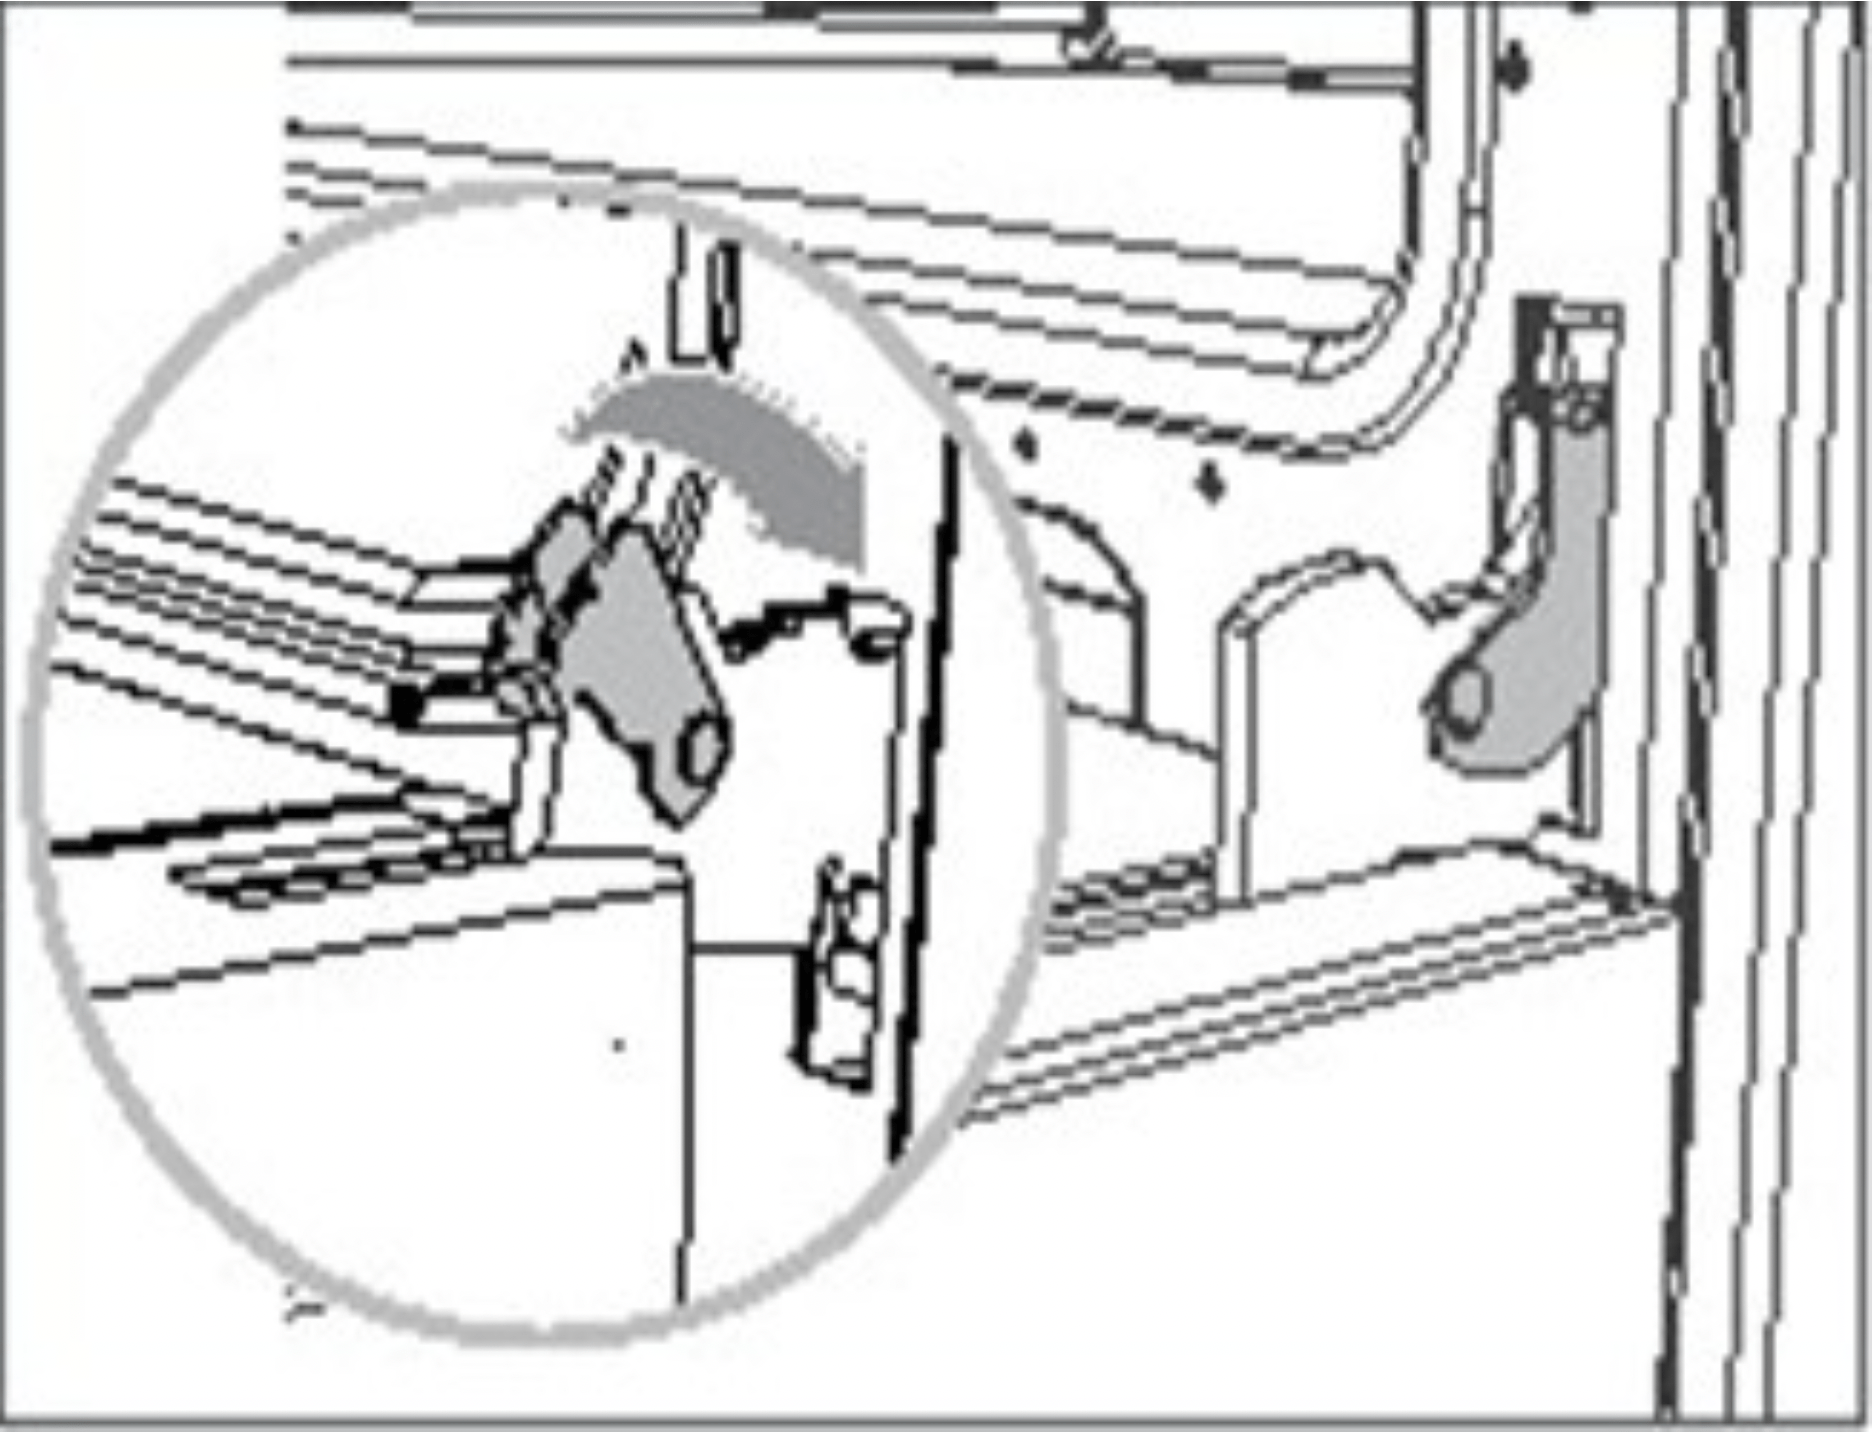
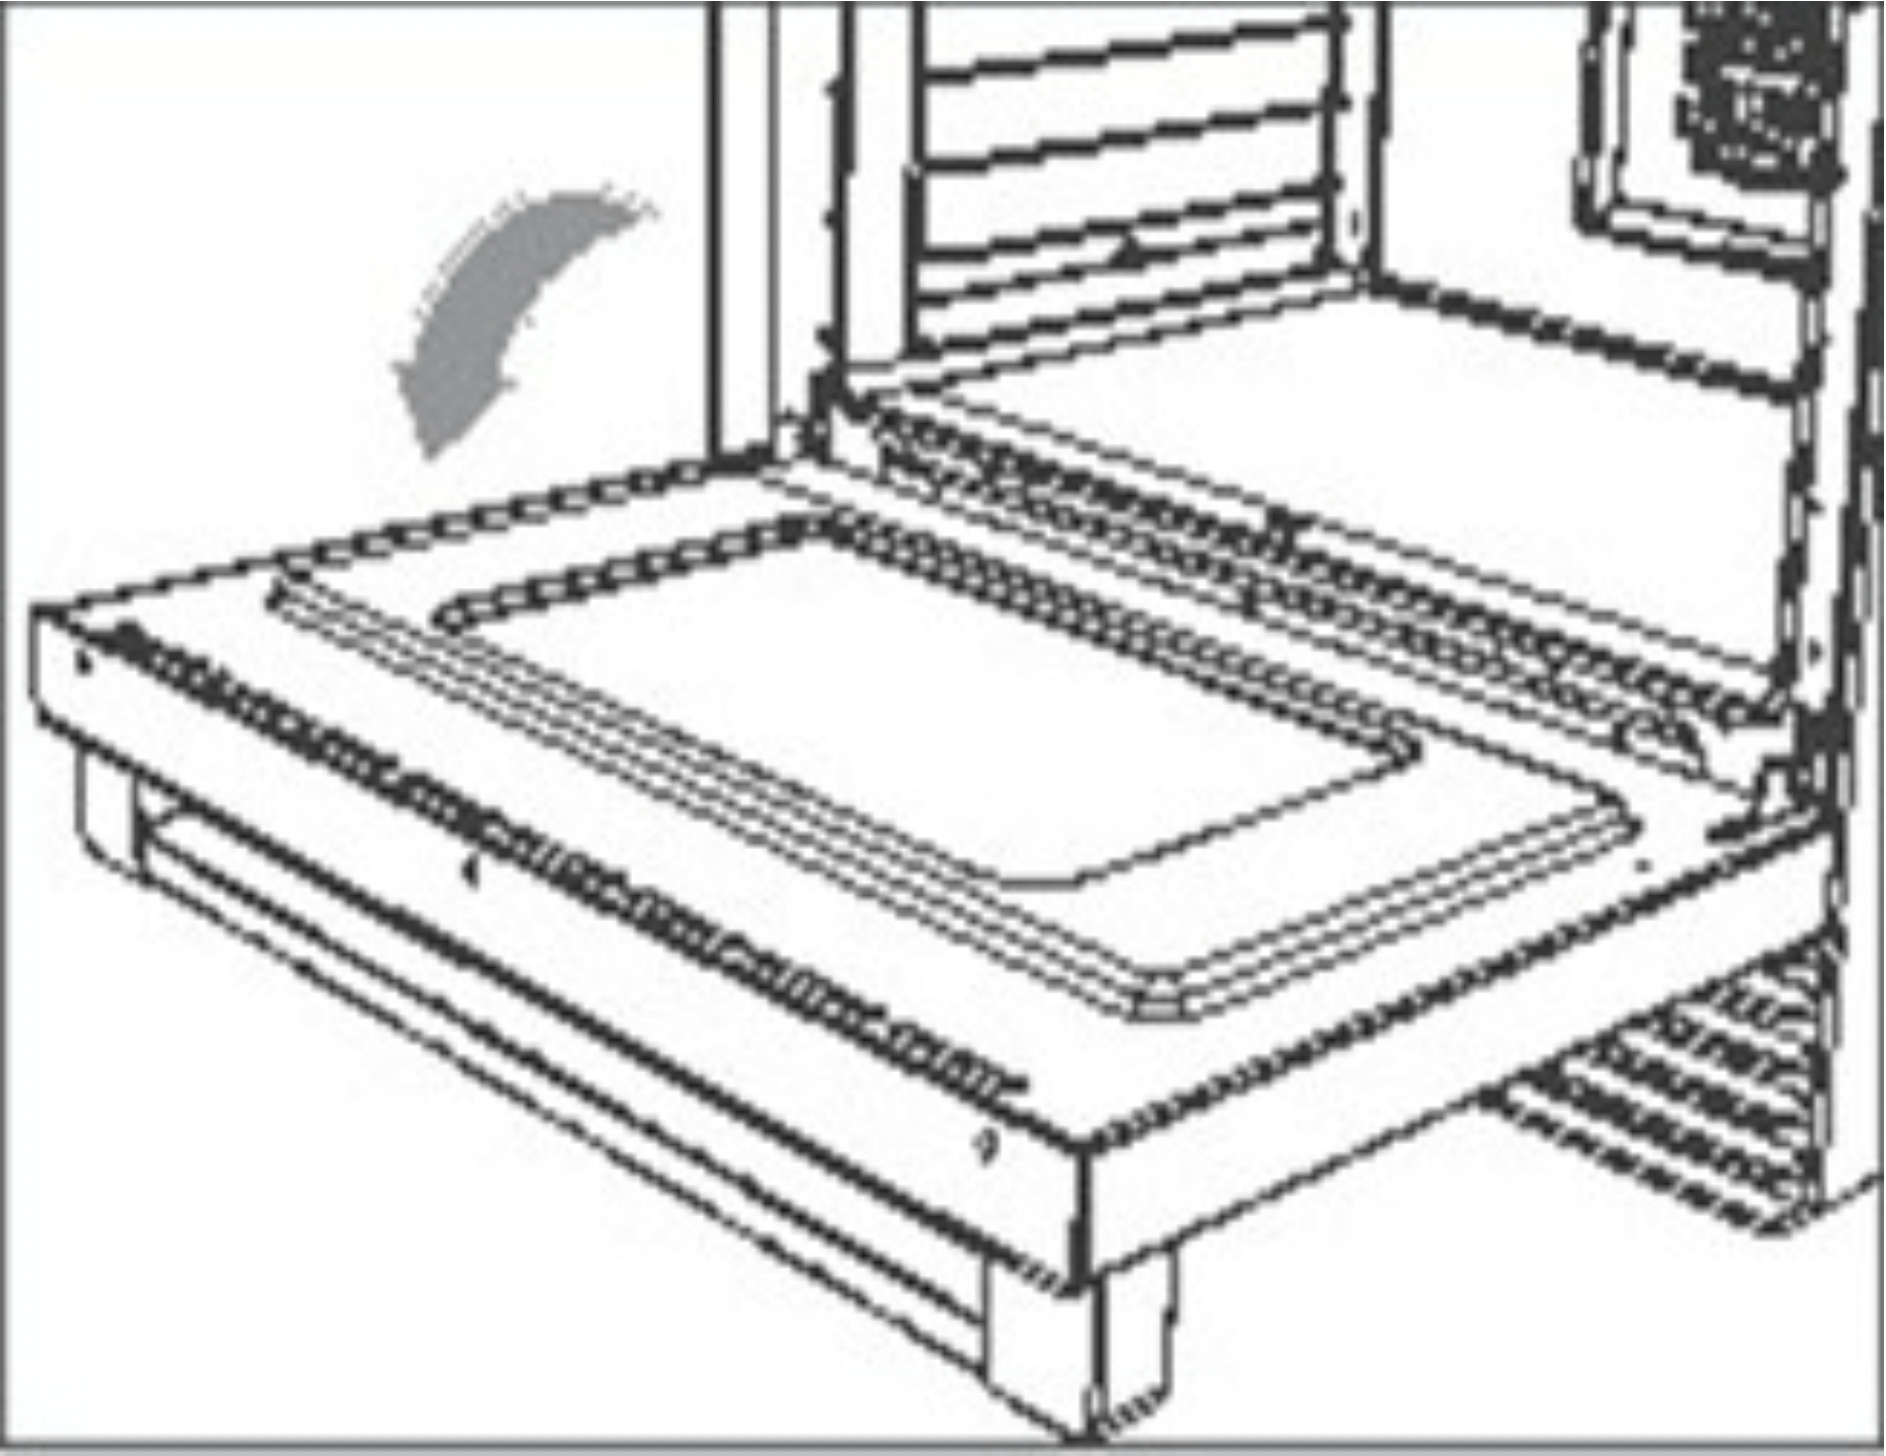
- Fully close the levers on the left and right hinges, as shown, then close the door.
Replacing the oven light bulb
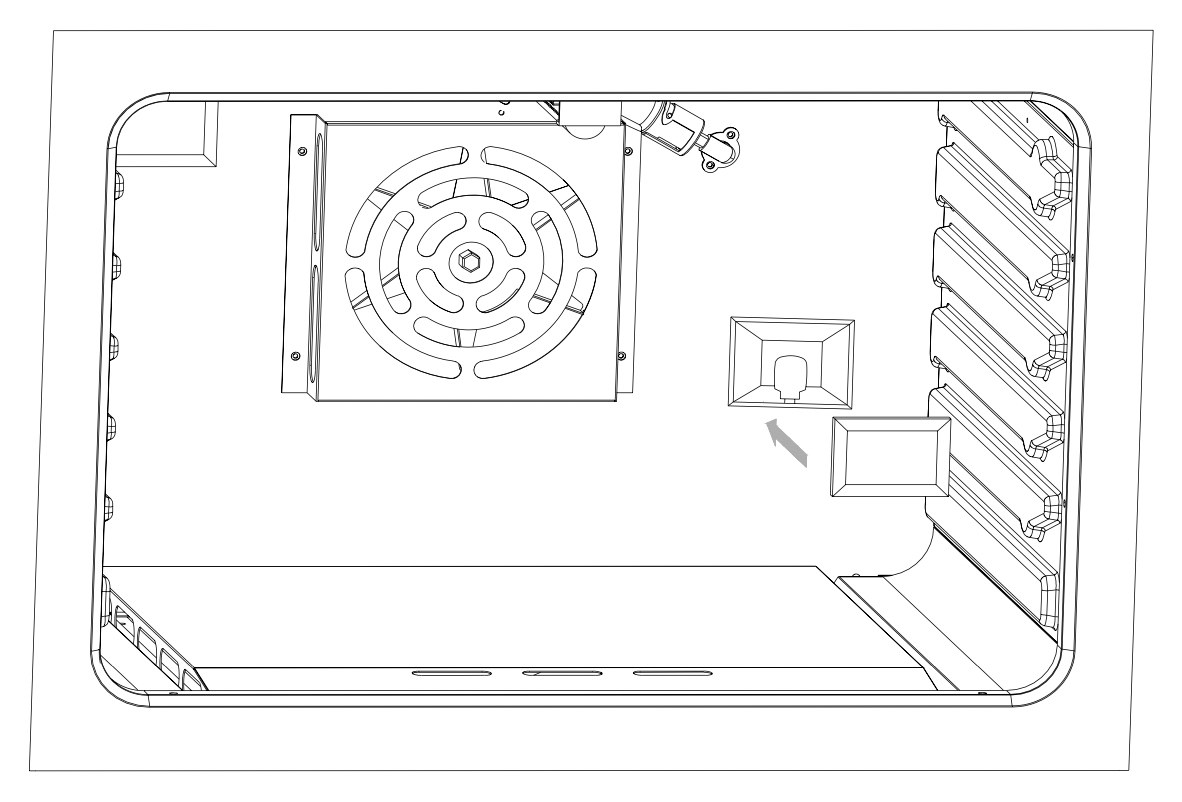

When replace bulbs, release the glass cover on the lamp holder first, and then remove the bulb to replace new light bulb.
Trouble shooting
If you can’t find an answer to your problem in the chart below, or if the problem cannot be fixed, you will need technical help. Contact your Authorized Service Center or Customer Care.
| Problem | Possible causes | What to do |
|---|---|---|
|
Cooktop |
||
|
Some burners will not light. Flames do not burn all around the burner cap. |
Burner parts or igniters may be wet, dirty, or misaligned. |
Check that the burner parts are clean, dry, and correctly assembled. Check that the igniters are clean and dry. See ‘Care and cleaning’ for instructions. |
|
Burner flames very large and yellow. |
Burner bezel ports are clogged. Burner ports or burner caps are not positioned properly. Cooktop is being operated with the wrong type of gas. Regulator is not installed, is faulty, or is set for the wrong type of gas. |
Clean burner bezel ring ports with straightened paper clip, needle, or wire. Remove and carefully re-install burner bezel and caps. Ensure that the type of cooktop matches the natural gas supply. Check installation, replace regulator, or set regulator for proper gas. |
|
Sparking but no flame ignition. |
Gas shut-off valve is in the ‘OFF’ position. |
Turn shut-off valve to the ‘ON’ position. |
|
Igniters spark continuously after flame ignition. |
Power supply polarity is reversed. |
Have polarity corrected. Dry or clean igniters. |
|
Burner flame goes out at low setting. |
Low gas supply pressure. Air intake holes around knobs are obstructed. |
Contact gas company. Remove obstruction. |
|
The flames have suddenly gone out. |
A draft or a spill has extinguished the flame. |
No action required. The burner will detect this and automatically relight. However, if there has been a large spill, we recommend turning the burners off and cleaning the burners and sump area. See ‘Care and cleaning’ for instrucions. |
|
There is apower failure – can I still use the cooktop burners? |
Power outage in your area. |
The cooktop burners can still be used. To light them:
Important! If the flame is blown out during a power failure, turn the knob immediately to OFF, as the burner will not automatically relight and gas may escape. |
|
Oven |
||
|
The oven doesn’t work (no heating). |
No power supply (oven light and halos do not come on either). No gas supply (gas ovens). |
Check that the circuit breaker hasn’t tripped and there is no power outage in your area. If there is a power outage, you cannot use the oven until power has been restored. The supply to the house may not be working or there may be an outage. Contact your local gas supplier. |
|
One of the oven lights does not come on, but the oven works. |
The light bulb is loose. The light bulb has blown. |
See instructions for ‘Replacing the oven light bulb’ in section ‘Care and cleaning’. Instead of replacing the bulb, simply ensure that it is secure in its socket. Replace the bulb. See instructions for ‘Replacing the oven light bulb’ in section ‘Care and cleaning.’ |
|
Condensation around oven (e.g. on control panel or top of oven door.) |
Food has high moisture content or local climate (temperature, humidity) is contributing to condensation. |
Condenstaion is normal. You can wipe the drops off the control panel. If there is frequent or excessive condensation, make sure that cabinetry around the range is moisture-proofed. |
|
Steam coming from oven vents at the back of the range. |
Moisture from food evaporating during cooking. |
This is normal, especially if you are cooking large quantities of food in the oven using a CONVECTION mode. |
|
The convection fan does not come on in a CONVECTION mode. |
Technical fault. |
Contact your Authorized Service Center or Customer Care. |
|
Oven will not heat |
Oven settings are not corrected |
Follow mode selection and clock settings as specified in Oven Operation section of the manual. |
|
Foods over-cooked orunder-cooked |
Incorrect cooking time or temperature. |
Adjust time, temperature, or rack position. |
|
‘Cracking’ or ‘Popping’ sound. |
This is the sound of metal heating and cooling. |
This is normal. |
|
There is a power failure –can I still use the oven? |
Power outage in your home or neighborhood. |
The oven cannot be used until power is restored. |
