Loading ...
Loading ...
Loading ...
40
Using the hand-held cordless vacuum
cleaner
Fig.
7
Unlock the hand-held cordless vacuum cleaner by
pressing the release button and remove it from the
hand stick.
Vacuuming with accessories
Fig.
8
Crevice nozzle
For vacuuming in difficult-to-reach places and over-
head.
Open the accessory holder using the recessed grip
and remove the crevice nozzle. Place it on the air
intake opening of the cordless handheld vacuum
cleaner and click into place.
The crevice nozzle can be extended as required. To
do this, press the unlock button, pull out the crevice
nozzle and engage it in the end position.
After use, push the crevice nozzle together again,
place it in the accessory holder and close the holder.
Fig.
9
Combination nozzle
Combination nozzle with furniture brush and uphols-
tery nozzle for vacuuming window frames, cup-
boards, furniture, etc.
Open the accessory compartment and remove the
combination nozzle. Place it on the air intake ope-
ning of the upright vacuum cleaner and click into
place.
The furniture brush attachment can be pushed to the
side. The upholstery nozzle is located underneath.
The combination nozzle can also be placed on the tip
of the crevice nozzle.
After use, place the combination nozzle back in the
accessory compartment for storage, close the ac-
cessory compartment, clicking it into place.
Charging the hand-held cordless vacuum cleaner
Fig.
10
To charge the hand-held cordless vacuum cleaner,
insert it into the hand stick and lock into place. Make
sure that it is seated correctly.
After using the appliance
Fig.
11
Switch off the appliance after vacuuming.
Emptying the dust container
In order to achieve the best possible vacuuming re-
sults, the dust container should be emptied after every
use or, at the latest, when dust at one point in the dust
container has reached the marking.
We recommend that you not fill the dust container bey-
ond the marking, as this leads to considerable soiling
of the filter.
Using the hand stick vacuum cleaner
Vacuuming
Fig.
4
Actuate the sliding switch in the direction of the ar-
row.
Controlling the suction level
Fig.
5
Slide the sliding switch into the required position in
order to set the suction power:
Position 1
1
Vacuuming with the electric brush switched on.
For routine cleaning tasks on all surfaces.
The appliance achieves the maximum run time at
this level.
Position 2
2
Vacuuming with the electric brush switched on.
For stubborn cleaning tasks on all surfaces (carpets,
in particular).
The appliance achieves a shorter runtime at this le-
vel.
Runtime
Like every other Li-Ion battery the battery is subject
to natural wear as well. That means the battery ca-
pacity and thus runtime decrease over time. This is a
natural aging process and not the result of a material/
production failure or a product defect.
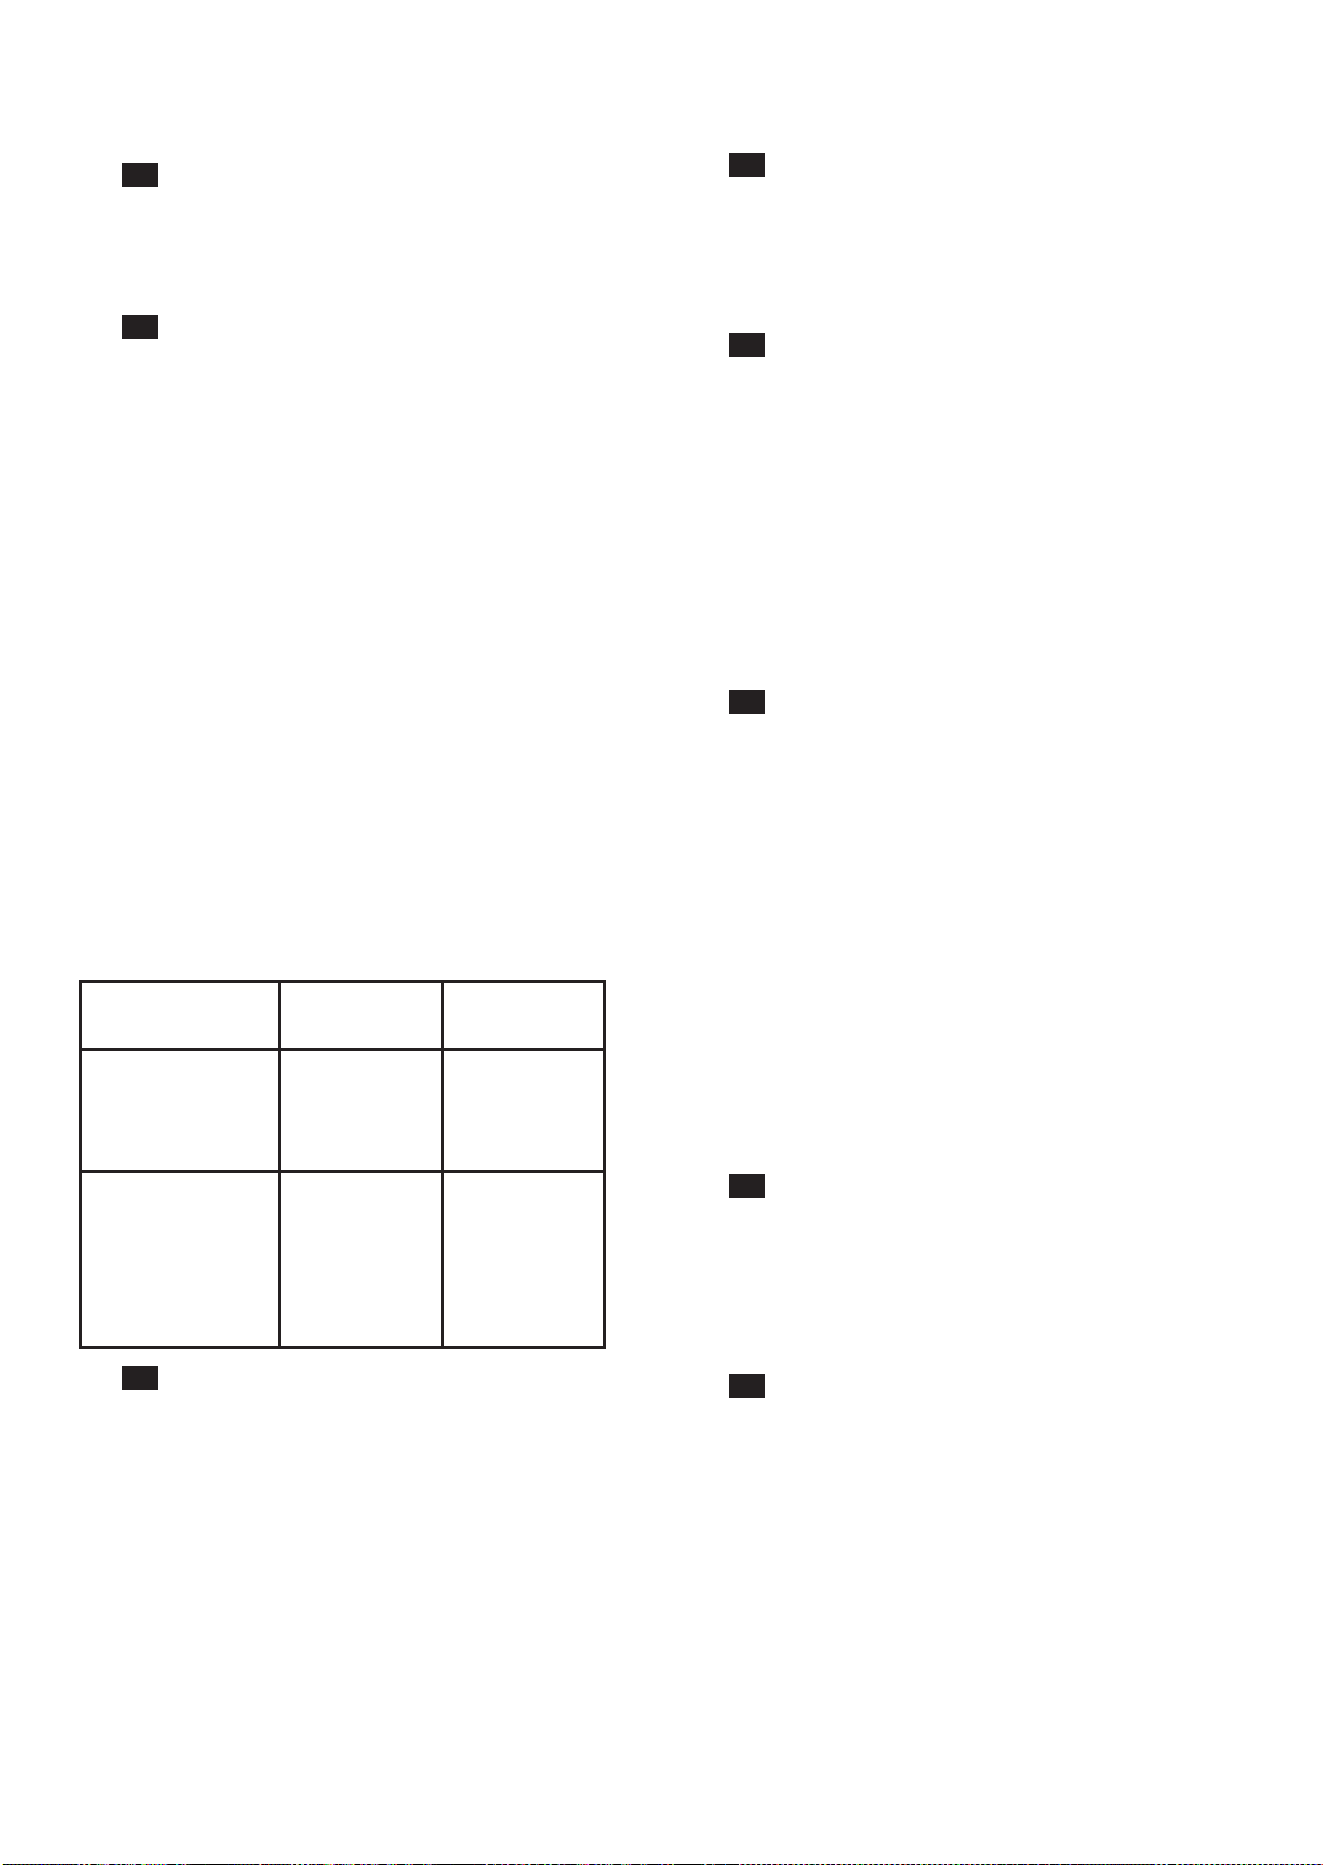
BBH3/BCH3
25,2V
BBH3/BCH3
21,6V
On normal mode
with electrical
nozzle for normal
cleaning tasks
Up to 55 min. Up to 50 min.
Turbo mode
with electrical
floor nozzle or
hand-held for de-
manding cleaning
tasks
Up to 20 min. Up to 18 min.
Fig.
6
During short pauses in vacuuming, the appliance can
be left standing anywhere in the room. To do this, tilt
the vacuum cleaner forwards slightly in the direction
of the nozzle.
!
Caution: When the appliance is left standing, it
must be switched off because, if the brush is
turning while the appliance is standing still, it could
cause damage to the floor covering.
* Depending on model
Loading ...
Loading ...
Loading ...