
HH70VH
User Manual

Table of contents
Safety and use .................................................................................................................. 1
1. Overview ..................................................................................................................... 5
1.1 System requirements ......................................................................................5
1.2 Device description ........................................................................................... 5
2.. Geng.started.with.your.device ........................................................................... 7
2.1 Insert nano-SIM ...............................................................................................7
2.2 Connect the power adapter ..........................................................................8
2.3 Optional: Installing the external antennae ................................................. 9
2.4 How to connect in Wi-Fi mode ................................................................. 10
3.. Conguring.your.Cat7.Router ...............................................................................12
3.1 Configure your Cat7 Router via application............................................ 12
3.2 Configure your Cat7 Router via Web page ............................................. 12
4. Services ......................................................................................................................15
4.1 SMS .................................................................................................................. 15
4.2 Call logs ........................................................................................................... 16
4.3 Share ................................................................................................................ 16
5.. Sengs.......................................................................................................................19
5.1 Dial-up ............................................................................................................. 19
5.2 WAN ................................................................................................................ 20
5.3 Wi-Fi ................................................................................................................ 21
5.4 Security ........................................................................................................... 23
5.5 NAT .................................................................................................................. 24
5.6 QoS .................................................................................................................. 25
5.7 LAN .................................................................................................................. 25
6. System ........................................................................................................................25
6.1 Device info ..................................................................................................... 25
6.2 Reboot and reset .......................................................................................... 25
6.3 Update ............................................................................................................ 26
6.4 Device management .................................................................................... 26
7. Warranty ...................................................................................................................27
8. Q&A ............................................................................................................................28

1
Safety and use
We recommend that you read this chapter carefully before using your device.
The manufacturer disclaims any liability for damage, which may result as a
consequence of improper use or use contrary to the instructions contained
herein.
CONDITIONS OF USE:
Switch the device off before boarding an aircraft.
Switch the device off when you are in health care facilities, except in designated
areas. As with many other types of equipment now in regular use, devices can
interfere with other electrical or electronic devices, or equipment using radio
frequency.
Switch the device off when you are near gas or flammable liquids. Strictly obey
all signs and instructions posted in a fuel depot, petrol station, or chemical plant,
or in any potentially explosive atmosphere.
When this device is switched on, it should be kept at least 20 cm from the body.
When the device is switched on, it should be kept at least 15 cm from any
medical device such as a pacemaker, a hearing aid, or an insulin pump, etc.
Do not let children use the device and/or play with the device and accessories
without supervision.
If your device has a removable cover, note that your device may contain
substances that could create an allergic reaction.
If your device is a unibody device, the back cover is not removable. If you
disassemble your device the warranty will not apply.
Always handle your device with care and keep it in a clean and dust-free place.
Do not allow your device to be exposed to adverse weather or environmental
conditions (moisture, humidity, rain, infiltration of liquids, dust, sea air, etc.). The
manufacturer’s recommended operating temperature range is -20°C (-4°F) to
+50°C (122°F).
Do not open, dismantle, or attempt to repair your device yourself.
Do not drop, throw, or bend your device.
Do not paint it.
Use only adapters and accessories which are recommended by TCL
Communication Ltd. and its affiliates and are compatible with your device model.
TCL Communication Ltd. and its affiliates disclaim any liability for damage caused
by the use of other adapters.

2
This symbol on your device and the accessories means that these products
must be taken to collection points at the end of their life:
- Municipal waste disposal centres with specific bins for these items of
equipment;
- Collection bins at points of sale.
They will then be recycled, preventing substances being disposed of in the
environment, so that their components can be reused.
In European Union countries:
These collection points are accessible free of charge.
All products with this sign must be brought to these collection points.
In non-European Union jurisdictions:
Items of equipment with this symbol are not to be thrown into ordinary bins if
your jurisdiction or your region has suitable recycling and collection facilities;
instead they are to be taken to collection points for them to be recycled.
Adapters:
Mains powered adapters will operate within the temperature range of: 0°C
(32°F) to 40°C (104°F ).
The adapters designed for your device meet the standard for safety of information
technology equipment and office equipment use. They are also compliant with
the ecodesign directive 2009/125/EC.
Due to different applicable electrical specifications, an adapter you purchased
in one jurisdiction may not work in another jurisdiction. They should be used for
this purpose only.
Radio.waves
Proof of compliance with international standards (ICNIRP) or with European
Directive 2014/53/EU (RED) is required of all device models before they can
be put on the market. The protection of the health and safety for the user and
any other person is an essential requirement of these standards or this directive.
THIS DEVICE MEETS INTERNATIONAL GUIDELINES FOR EXPOSURE TO
RADIO WAVES.
Your device is a radio transmitter and receiver. It is designed not to exceed
the limits for exposure to radio waves (radio frequency electromagnetic fields)
recommended by international guidelines. The guidelines were developed by
an independent scientific organisation (ICNIRP) and include a substantial safety
margin designed to assure the safety of all persons, regardless of age and health.

3
The World Health Organization has stated that present scientific information
does not indicate the need for any special precautions for the use of mobile
devices. They recommend that if you are interested in further reducing your
exposure then you can easily do so by limiting your usage or keep the device
away from the head and body.
Additional information about electromagnetic fields and public health are
available on the following site: http://www.who.int/peh-emf.
Your device is equipped with a built-in antenna. For optimal operation, you
should avoid touching it or degrading it.
Licences
The Wi-Fi Logo is a certification mark of the Wi-Fi Alliance
This equipment may be operated in all European countries. The 5150-5350
MHz band is restricted to indoor use only.
BE BG CZ DK DE EE IE EL ES FR HR IT CY LV NO IS
LT LU HU MT NL AT PL PT RO SI SK FI SE UK LI CH
We hereby point out that the end user warranty for infringement IPR is solely
limited to the EU/EEA/Switzerland.
If and to the extent that the Product is exported, taken with, or used by end
customer or end user outside the EU/EEA/Switzerland any responsibility,
warranty or indemnification of manufacturer and its suppliers in regard to the
Product expires (including any indemnification in regard to infringement IPR).
General information
Internet address: www.alcatel-mobile.com
Hot Line Number: see "SERVICES" leaflet or go to our website.
Manufacturer: TCL Communication Ltd.
Address:
5/F, Building 22E, 22 Science Park East Avenue, Hong Kong Science
Park, Shatin, NT, Hong Kong.
This radio equipment operates with the following frequency bands and maximum
radio-frequency power:
GSM900: 32.5dBm
GSM850: 32.5dBm
GSM1800: 29.5dBm

4
GSM 1900: 29.5dBm
UMTS 2100/1800/900 : 23dBm
LTE 2100/1800/2600/900/800 : 23dBm
LTE TDD 38/40 : 23dBm
802.11a/b/g/n/ac: 2.4GHz<20dBm , 5GHz<20dBm
Regulatory.information
Hereby, TCL Communication Ltd. declares that the radio equipment type Alcatel
HH70VH is in compliance with Directive 2014/53/EU.
Additional information
The full text of the EU declaration of conformity is available at the following
internet address: http://www.alcatel-mobile.com/EU_doc
The description of accessories and components, including software, which allow
the radio equipment to operate as intended, can be obtained in the full text of
the EU declaration of conformity at the following internet address: http://www.
alcatel-mobile.com/EU_doc
Disclaimer
There may be certain differences between the user manual description and the
device’s operation, depending on the software release of your device or specific
operator services.
TCL Communication Ltd. shall not be held legally responsible for such differences,
if any, nor for their potential consequences. This device may contain materials,
including applications and software in executable or source code form, which is
submitted by third parties for inclusion in this device ("Third Party Materials").
All Third Party Materials in this device are provided "as is", without warranty
of any kind, whether express or implied. The purchaser undertakes that TCL
Communication Ltd. has complied with all quality obligations incumbent upon it
as a manufacturer of mobile devices and devices in complying with Intellectual
Property rights. TCL Communication Ltd. will at no stage be responsible for the
inability or failure of the Third Party Materials to operate on this device or in
interaction with any other device. To the maximum extent permitted by law,
TCL Communication Ltd. disclaims all liability for any claims, demands, suits or
actions, and more specifically – but not limited to – tort law actions, under any
theory of liability, arising out of the use, by whatever means, or attempts to
use, such Third Party Materials. Moreover, the present Third Party Materials,
which are provided free of charge by TCL Communication Ltd., may be subject
to paid updates and upgrades in the future; TCL Communication Ltd. waives any
responsibility regarding such additional costs, which shall be borne exclusively
5
by the purchaser. TCL Communication Ltd. shall not be held responsible for the
lack of availability of any application, as its availability depends on the country
and the operator of the purchaser. TCL Communication Ltd. reserves the right at
any time to add or remove Third Party Materials from its devices without prior
notice; in no event shall TCL Communication Ltd. be held responsible by the
purchaser for any consequences of such removal.
1. Overview
This device allows you to share a secure mobile broadband internet connection
using Wi-Fi or an ethernet cable. Wi-Fi enabled devices (PCs, smartphones,
tablets, gaming devices, etc.) can access the internet by connecting to the Cat7
Router. To get the best signal, the ideal place for your device will be near a
window. Try a few different locations until you find the one with the best signal.
1.1 System requirements
This Cat7 Router is compatible with Wi-Fi devices which support 2.4GHz
(802.11 b/g/n) or 5GHz (802.11 a/n/c) and have a web browser.
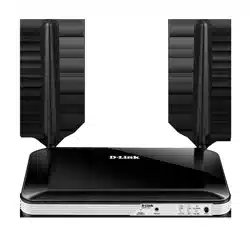
1.2 Device description
WPS button
Power button
TEL port
Signal
indicator
Network
indicator
TEL
indicator
Wi-Fi
indicator
Power
indicator
Antenna port
LAN/WAN
ports
Reset button
Power
connector
USB
port
nano-SIM
Power button
• Once connected to a power outlet, your Cat7 Router will automatically
power on.
• To power off your device, press and hold the power button for 3 seconds.
• To power on your device, press and hold the power button for 1 second.
6
WPS button
To enable WPS, press and hold the WPS button for 3 seconds. The Wi-Fi LED
will start to flash blue. Then press the WPS button on the device you wish to
connect to within two minutes. Your Cat7 Router will automatically assign your
network settings to the device you wish to connect to.
Reset.button
Use a paperclip or blunt pin to gently press and hold the reset button for 3
seconds. All LEDs will turn on, then off, and finally turn on again once the reset
is completed. You can also reset the device via the Web-UI.
USB port
Connect a USB storage device, or USB printer.
• This port cannot be connected to a USB host, only to devices such as
computers.
• Supports USB 1.0 / 2.0 storage.
• If the power supply requirements exceed USB standards, it may not function
properly.
LED description
Icon Description
• Solid blue: The device is powered on.
• Off: The device is powered off.
• Solid blue: Wi-Fi is enabled.
• Flashing blue: WPS connection is available.
• Off: Wi-Fi is disabled.
• Flashing blue: Phone is ringing.
• Solid blue: Phone is in call.
• Off: Phone is not in use.
7
Icon Description
• Solid yellow: Connected to 2G.
• Solid green: Connected to 3G.
• Solid blue: Connected to 4G/Ethernet.
• Solid red: No nano-SIM available or the device is not
registered to the network.
• Flashing yellow: Registered to 2G.
• Flashing green: Registered to 3G.
• Flashing blue: Registered to 4G.
• Solid blue: Signal strength ranges from 1-3 bars, with 3 being
the strongest.
• Off: No service / No signal / No nano-SIM / Invalid nano-
SIM.
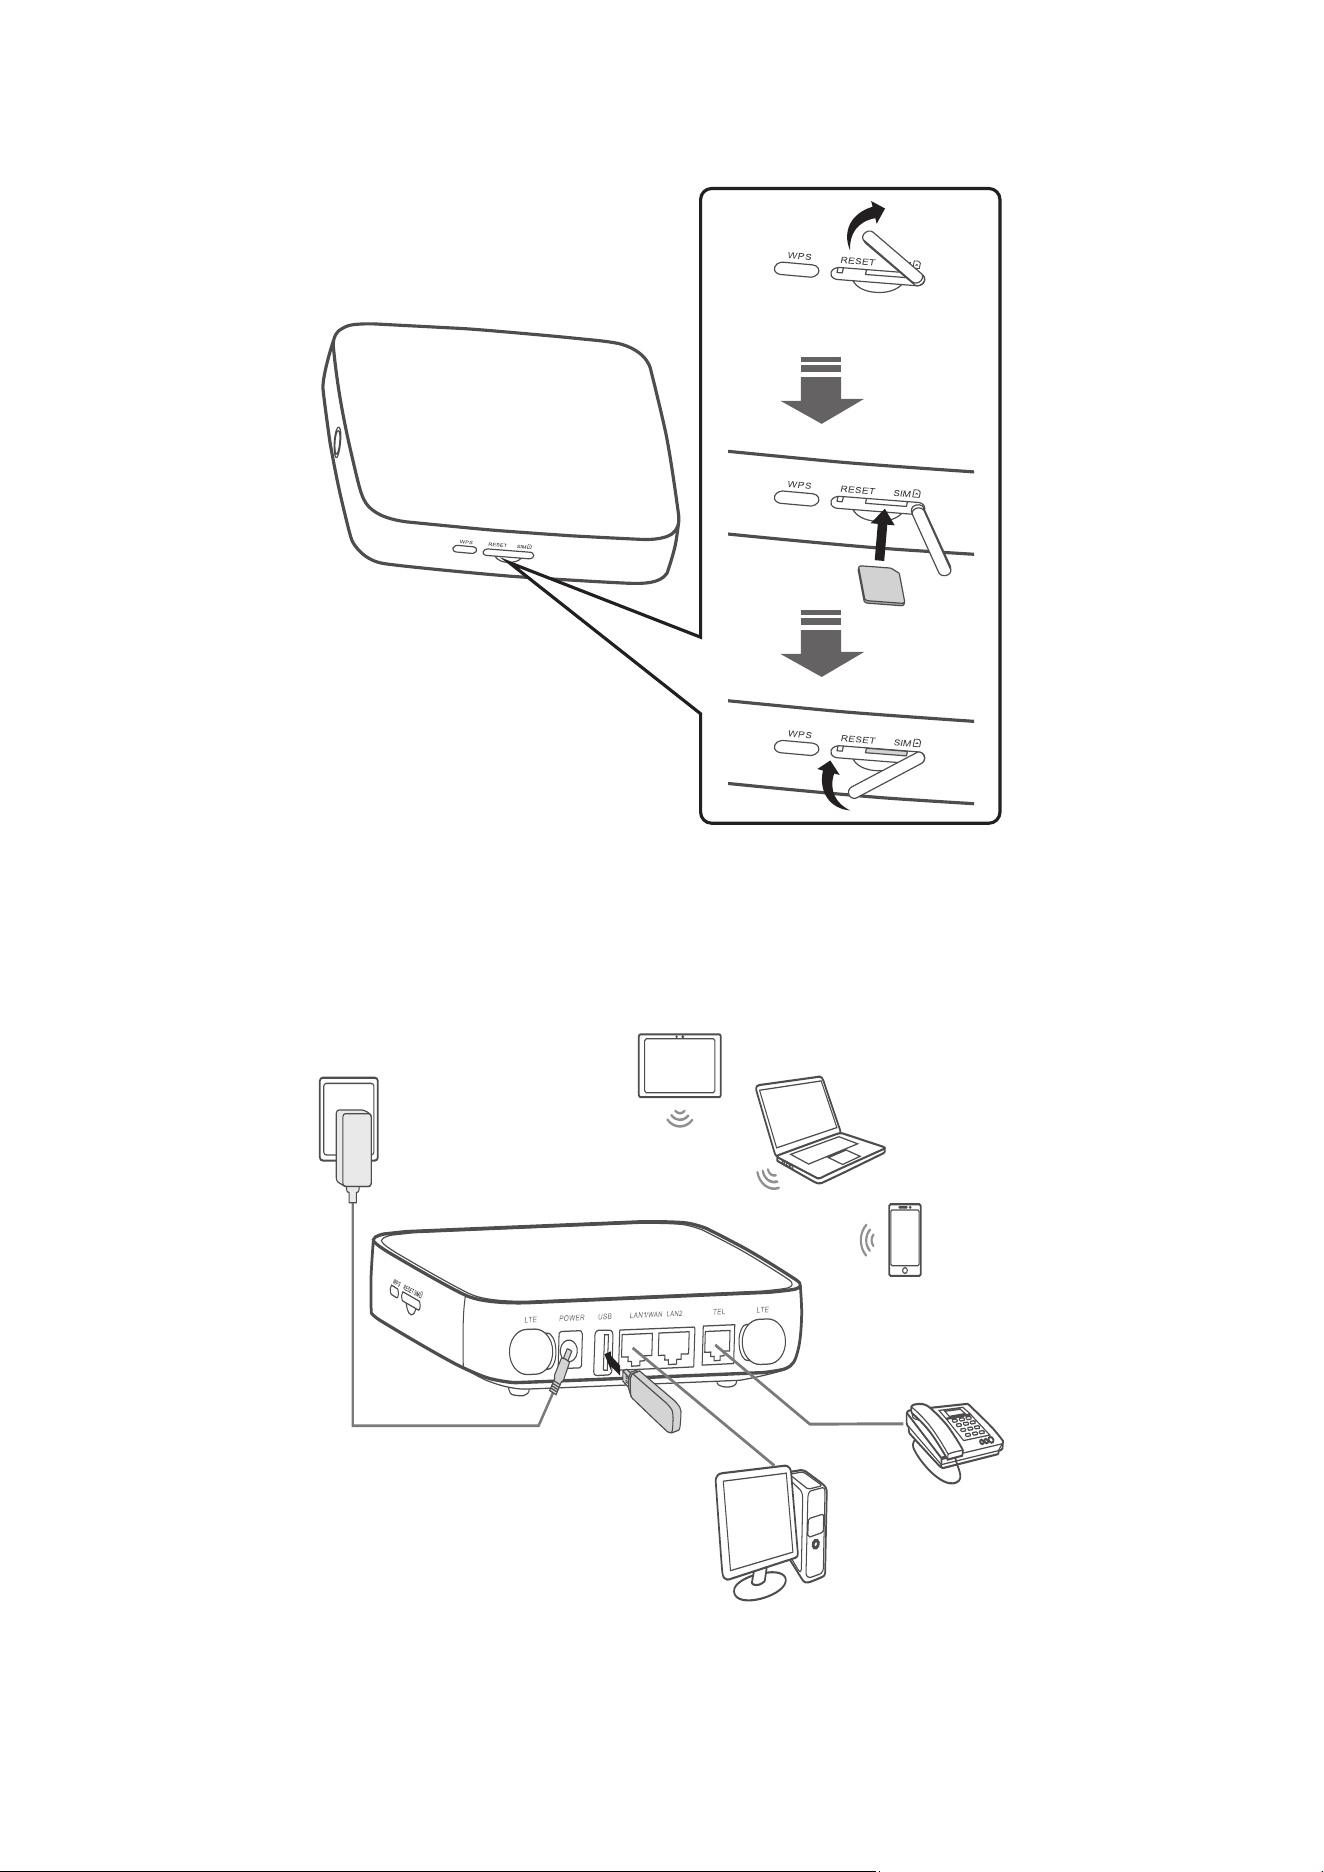
2. Geng.started.with.your.device
2.1 Insert nano-SIM
Follow the 3 steps in the illustration below.
1) Open the nano-SIM slot cover.
2) Insert the nano-SIM into the SIM slot.
3) Close the nano-SIM slot cover.
Do not remove the nano-SIM when your Cat7 Router is in use. Doing so will
affect the performance of your device, and data stored on the nano-SIM may
be lost.
8
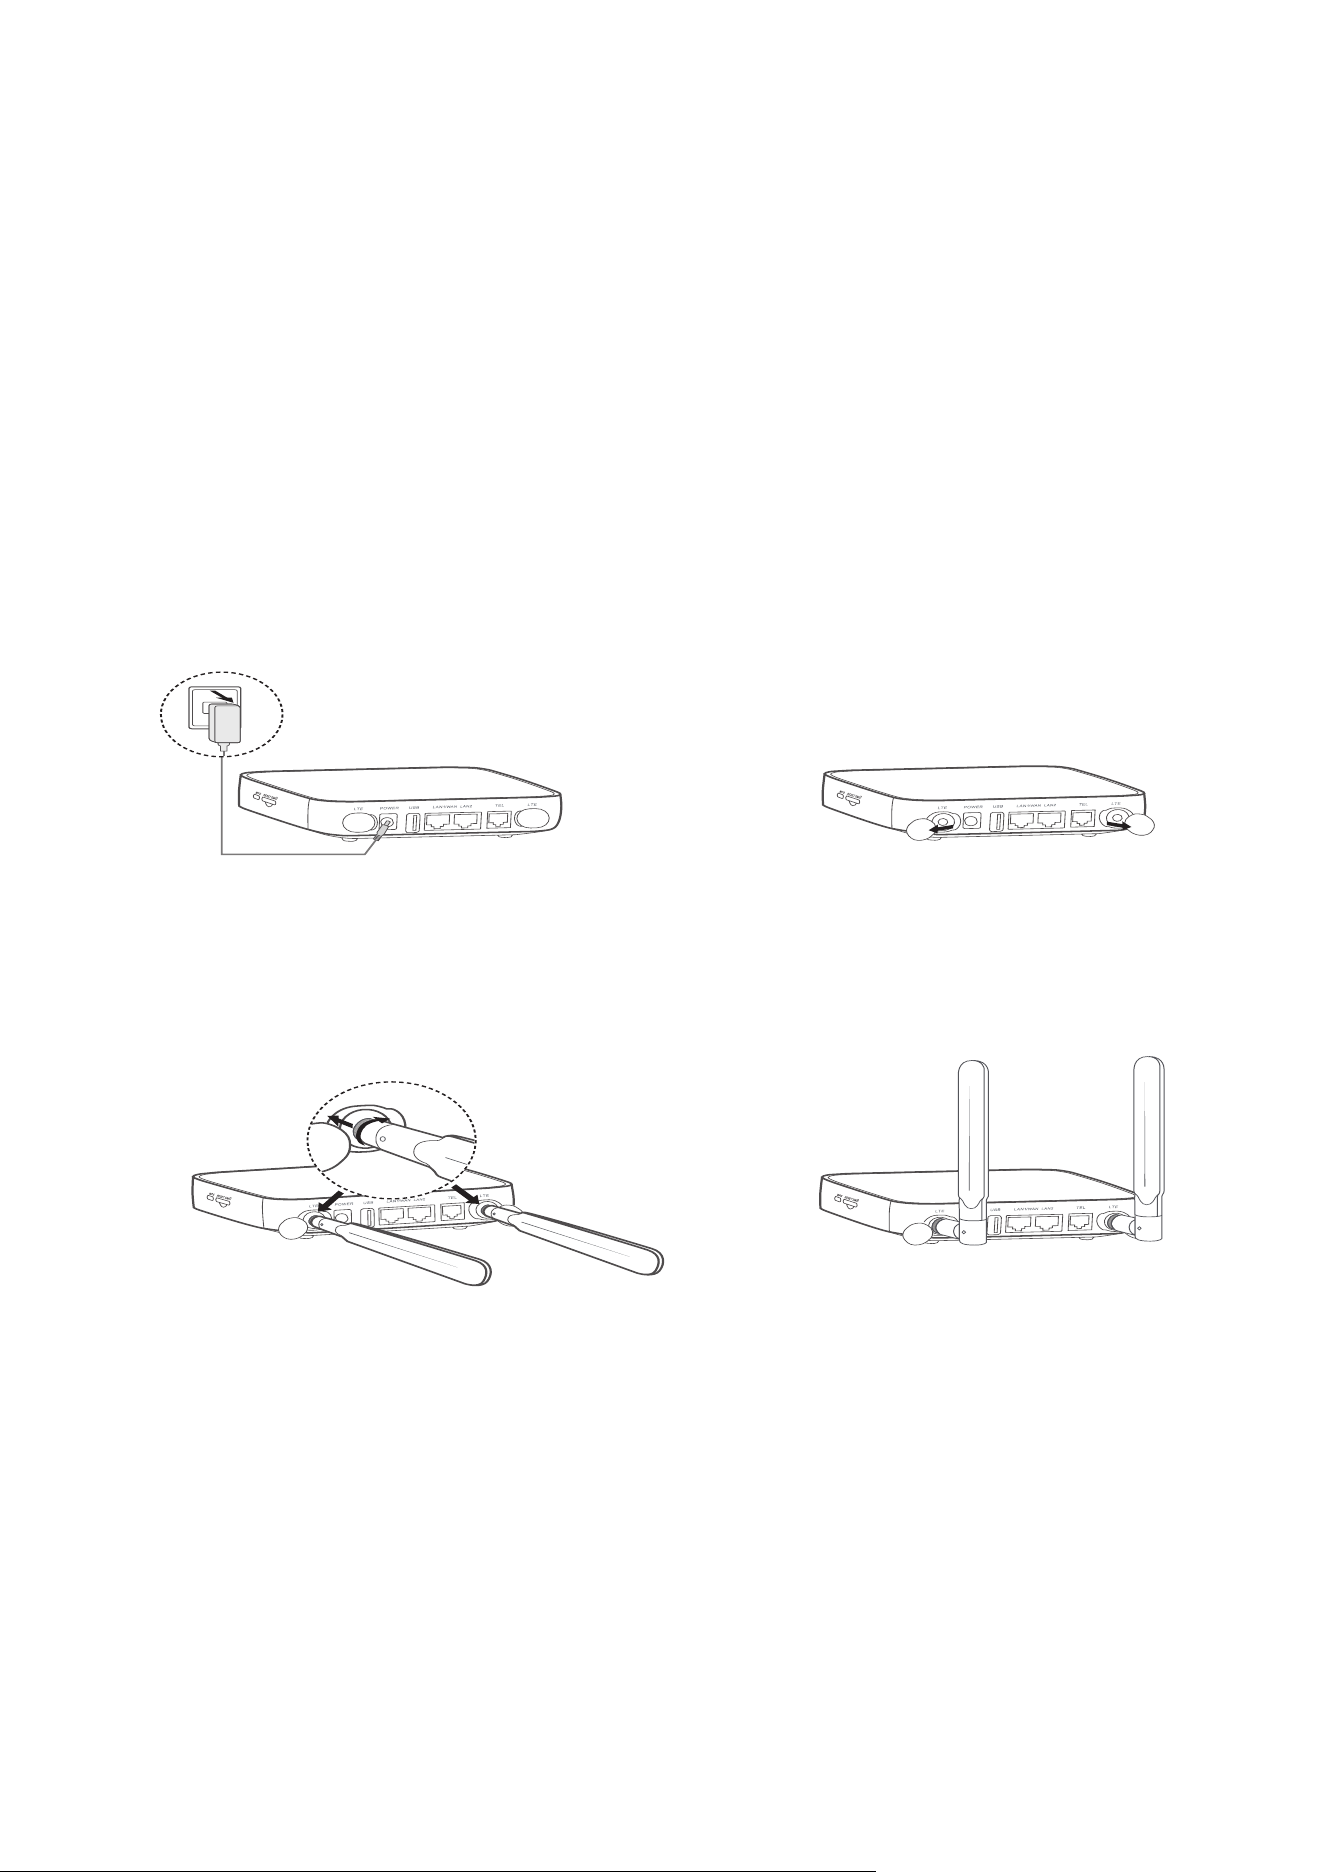
2.2 Connect.the.power.adapter
Follow the illustration below to plug in the power adapter. Once connected to a
power outlet, your Cat7 Router will automatically power on.
To prevent interference caused by radio signals, place the Cat7 Router at least
one metre away from phones and other electrical devices.
9
2.3 Optional:.Installing.the.external.antennae
In areas with poor signal reception, connect external antennae to the two ports
labelled 'LTE' to improve signal reception.
Warning:
Before installing the external antennae, ensure that your Cat7 Router is powered
off and disconnected from the power outlet.
The external antennae must be installed by a qualified technician.
Use antennae supplied by device manufacturer only.
① Power off your Cat7
Router and disconnect it
from the power outlet.
② Open the 'LTE'
covers on both sides.
③ Screw external
antenna fully into the
antenna port.
④ Keep external antennae
pointed upwards to get a
better signal.

10
2.4 How to connect in Wi-Fi mode
Step 1: Enabling Wi-Fi on your Cat7 Router.
When the Wi-Fi indicator is solid blue, Wi-Fi is enabled.
Step 2: Recording the SSID and Wi-Fi Key.
The default SSID and Wi-Fi key are printed on the device label, situated on the
underside of your Cat7 Router.
To prevent unauthorised parties from accessing your Wi-Fi network, it is
recommended that you change the SSID and Wi-Fi key from time to time. For
more information, please refer to the User Guide which can be accessed via the
Web User Interface.
XXXXXXXXX
Step 3: Setting up a Wi-Fi connection
•. Setting.up.a.Wi-Fi.connection.manually:
1) From your Wi-Fi enabled client, perform a scan for wireless networks.
2) Connect to the network name that matches the SSID found on the device
label.
3) When prompted for a password, enter the Wi-Fi key found on the device
label (this is case sensitive). Your client will notify you when it is connected.
•. Setting.up.a.Wi-Fi.connection.through.WPS:
Your client must support WPS. There are 3 ways to set up a WPS connection.
Option 1: WPS button
1) Ensure that Wi-Fi is enabled on the client and enable WPS.
2) Press and hold the WPS button for 3 seconds. The Wi-Fi LED will begin to
flash blue.
3) Your device should then automatically connect.
Option 2: WPS key
1) Enable the WPS function on your smart device (only Android devices are
supported) and note the WPS key.
11
2) Open the WPS page on your Web User Interface (Navigate to Settings >
Wi-Fi > WPS).
3) Enter the WPS key on the WEB User Interface and click Apply.
4) Your device should then connect automatically.
Option 3: PBC
1) Open the WPS page on your Web User Interface (Go to Settings > Wi-Fi >
WPS).
2) Click on PBC.
3) Click Apply. WPS is now enabled for 2 minutes.
4) Enable WPS on your client and it should automatically connect.

12
3. Conguring.your.Cat7.Router
There are two ways to configure your Cat7 Router.
• Link Hub app
• Web page
3.1 Configure.your.Cat7.Router.via.application
Download the free Alcatel Wi-Fi Link app to control your Cat7 Router.
1) Make sure your device is connected to the internet.
2) Scan the QR code. Alternatively, you can also search for “Alcatel WiFi Link”
in the App Store or Google Play Store.
3) Download the Alcatel Wi-Fi Link app from App Store or Google Play store.
4) Click on Alcatel Wi-Fi Link app icon to log in to the management page.
You.can.find.the.default.password.on.the.label.on.the.back.of.the.device.
IOS | Android
3.2 Configure.your.Cat7.Router.via.Web.page
The Web User Interface is compatible with the following browsers:
• Mozilla Firefox
• Safari
• Internet Explorer 9.0 or later.
• Microsoft Edge
• Opera
• Google Chrome
13
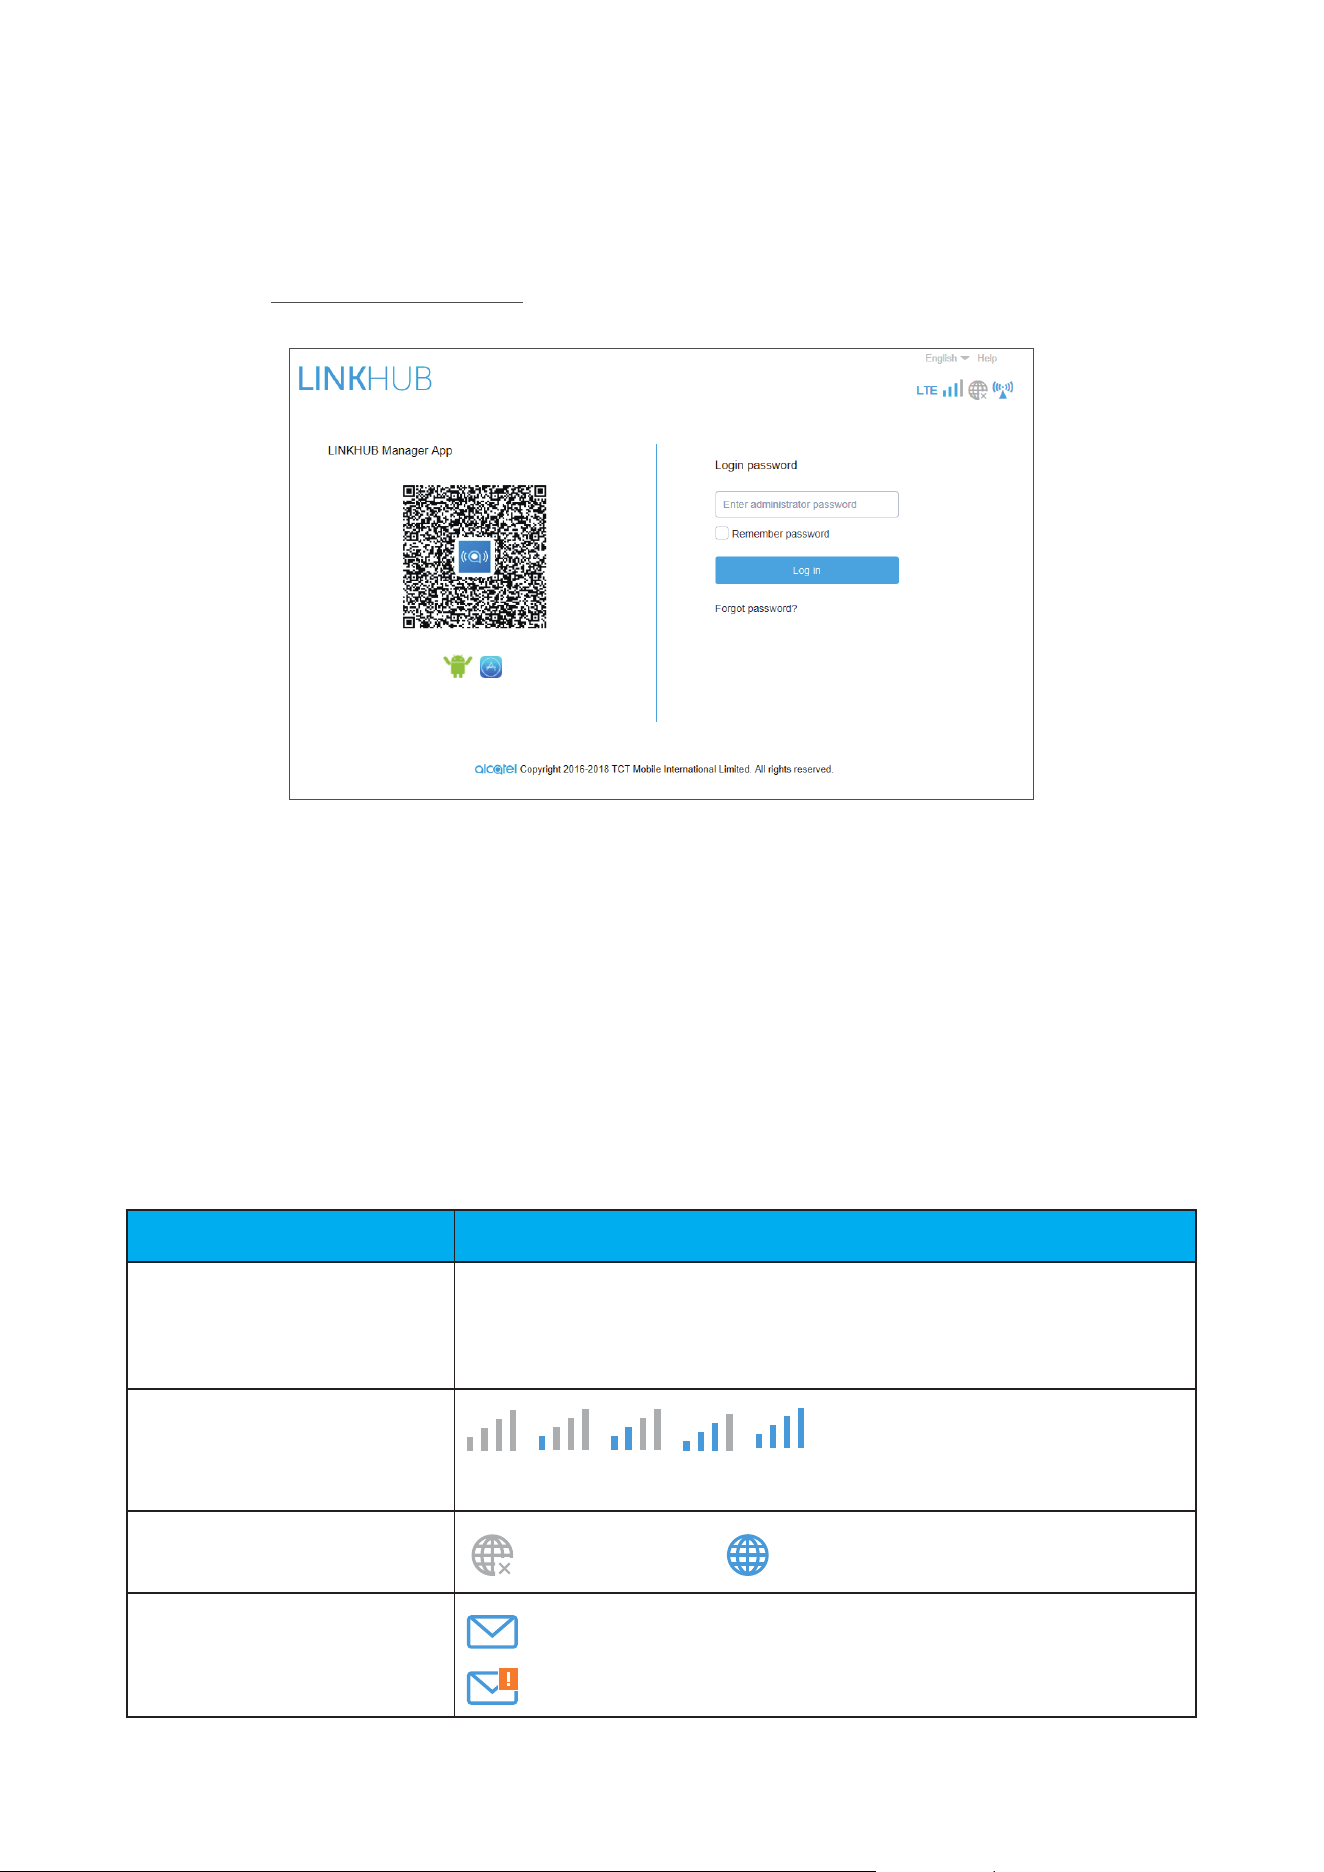
3.2.1 How.to.log.in.to.the.Home.page
1) Open your web browser.
2) Input http://192.168.1.1 into the address bar and press enter. The Home
page will then load, as shown in the image below.
3) Log in to change your Cat7 Wi-Fi device SSID and password, or change
other basic settings.
You can find the default password on the label on the back of the device.
Note: You will be forced to change the default password for additional
security.
3.2.2 Web.UI.status.bar.page
Status bar icons
Description Icon displayed
Network technology
2G, 3G or 4G will be displayed, depending on the
network available. No service will be displayed when
there is no network available.
Signal indicator
From no signal to excellent.
Connection status
disconnected, connected
SMS
New message / Unread message(s) in inbox
SMS box is full.

14
Description Icon displayed
Wi-Fi status
Wi-Fi is enabled.
Wi-Fi is disabled.
USB
USB device or printer is connected.
3.2.3 Status
Status allows you to view your device information including internet, LAN, WAN
and Wi-Fi. You can connect, disconnect or change the SSID of the device here.
3.2.4 Statistics
The internet statistics can be seen here, both for your current session and your
total traffic for the month.
Note: These figures are only meant to be used as a guide.
LAN and Wi-Fi statistics can also be viewed.
3.2.5 Setup wizard
You can make changes to basic connection settings here and enable/disable
data roaming.
On the next page, you can change the SSID or enable/disable 2.4GHz or 5GHz.
On the final page, you can set up your Wi-Fi security and change the Wi-Fi key.

15
4. Services
You can navigate to Services and click the items you want. In this section, the
following items are included:
4.1 SMS
Inbox:.List the messages received.
Outbox:.List the messages sent successfully.
Drafts: Unsent messages are saved here.
New.message:.Write a new message.
SMS.Settings:.Configure settings for messaging.
How to read an SMS:
Left-click the content of the message you wish to read.
How to send an SMS:
1) Click on SMS.
2) Left-click on New.message.
3) Input the recipient's number and message content.
4) Click Send.
Note: Messages can be saved to Drafts by clicking on Save. An SMS message
cannot be sent to multiple recipients simultaneously.
How to forward an SMS:
1) Click on the content of the message that you wish to forward.
2) Click Forward.
3) Input the new recipient's number.
4) Click Send.
How to reply to an SMS:
1) Left-click the message in your Inbox that you wish to reply to.
2) Click Reply.
3) Input the content that you wish to send.
4) Click Send.

16
How to delete an SMS:
1) Find the message you wish to delete in either the Inbox, Sent or Draft folder.
2) Tick the box in the far right column for the message(s) that you wish to
delete.
3) Click Delete.
How to delete all SMS:
1) Left-click at the top of the column to select all.
2) Click Delete.
How to enable SMS delivery reports:
1) Click SMS.Settings.
2) Click
.
How to disable SMS delivery reports:
1) Click SMS.Settings.
2) Click
.
SMS.Settings:
SMS delivery reports: You can enable or disable delivery reports here.
SMS centre: This is preset and is non-editable.
4.2 Call.logs
You can view your call history here. Once the device is connected, you can view
all call logs, including incoming calls, outgoing calls, and missed calls.
4.3 Share
4.3.1 Storage.share
Samba and FTP
The Samba and FTP Service allows computers running different operating
systems to access files in the USB storage device connected to your Cat7 Router.
•. How.to.access.files.in.the.USB.storage.via.Samba:

17
1) Log in to your Cat7 Router Web-UI and go to Services > Share.> Device
access > Connected devices. Ensure that the Access. Storage of the
connected devices is enabled.
2) Go to Services > Share > USB and enter the administrator password.
3) Enable Samba.
4) On Windows OS: Go to 'My Computer'. Click in the navigation bar where it
says 'Computer' and input \\192.168.1.1 (If default IP address is changed,
Samba IP address will be changed accordingly). Double-click on the
admin shared folder and input your username and password (same as the
credentials used to log in to the Web UI) to access the USB storage.
On Mac OS: There are 2 ways to access files in the USB storage via Samba:
- Go to 'File > New Finder Window'. Check for Cat7 Router under Shared
and left-click on it. Click on 'Connect As...' and select 'Registered User'. Enter
your username and password (same as the credentials used to log in to the
Web UI). Then double-click on admin.
- Select ‘Go' > Connect to Server. Input smb://192.168.1.1 (If default IP
address is changed, Samba IP address will be changed accordingly.) The
shared folder will then appear in the folder list. Input your username and
password (same as the credentials used to log in to the Web UI), and click
connect.
•. How.to.access.files.in.the.USB.storage.via.FTP:
1) Download and install your chosen FTP program.
2) Log in to your Cat7 Router Web-UI and go to Services > Share > Device
access > Connected devices. Make sure that connected devices have
enabled the Access.Storage permission.
3) Go to Services > Share > USB.mass.storage and enter the administrator
password.
4) Enable FTP.
5) Input the following details into your FTP program:
Host: 192.168.1.1
Username: admin
Password: (same as password to log in to the Web UI)
6) You may now connect.
4.3.2 USB
•. USB.mass.storage

18
1) Click on Services > USB.mass.storage and enable Samba.
2) Click Start, enter \\192.168.1.1, and press Enter. You can then access the
storage in the same way as outlined above.
•. USB Printer
3) Connect a USB printer via the USB port on your Cat7 Router.
4) Connect your computer to your Cat7 Router.
5) Install the printer driver on your computer and select the USB printer from
the printer list on your computer.
Note: Set the printer port as a standard TCP / IP port with address
192.168.1.1 (this should be the same as your Cat7 Router Web-UI address).
6) Click File and select Print to start printing.
4.3.3 DLNA
Sharing Files Using the DLNA Function.
After enabling Digital Living Network Alliance (DLNA), you can use a connected
device that support DLNA to perform functions such as accessing multimedia
files stored on a USB device.
1) Download and install your chosen DLNA program.
2) Go to Services > Share > DLNA. Input your administrator password and
click Log.in. You may now enable or disable DLNA.
3) Open your DLNA program on the connected device to view the DLNA
content.
4.3.4 Device access
You can configure access to the internet and storage for any connected devices.
Connected devices will be shown in the table on this page, it is possible to
enable or disable access for each device. You may also rename each connected
device.

19
5. Sengs
You can go to Settings and make changes to the following:
Dial-up
WAN
Wi-Fi
Security
NAT
QoS
LAN
5.1 Dial-up
5.1.1 Network connection
Network connection allows you to configure connection mode, data roaming
and IP mode.
5.1.2 Profile.management
Profile management allows you to set up a new APN profile or edit/delete
existing profiles.
•. Add a new profile
1) Click New.
2) Input the correct parameters for your network operator. Profile name, dial
number and APN are required as a minimum.
3) Click Save.
•. Edit a profile:
1) Select the profile from the profile management list.
2) Click Edit to change the parameters.
3) Click Save.
•. Delete a profile:
1) Select the profile from the profile management list.
2) Click Delete.

20
Note: The default profile cannot be deleted.
•. Setting.as.default:
1) Select the profile from the profile management list.
2) Click Set default.
Note: Once the new profile has been set as default, (Default) will be added next
to the profile name.
5.1.3 Network.settings
You can set the network search mode to either Auto or Manual, and change the
network mode to Auto, 2G only, 3G only or 4G only. Make sure that you click
Apply after making any changes.
5.1.4 Monthly.plan
Here you can set your monthly data plan, set a data limit, configure auto-
disconnect settings, etc.
5.2 WAN
5.2.1 WAN status
Here you can view detailed information on the wide area network (WAN),
including IP address, subnet mask, gateway, DNS server, etc.
5.2.2 Configure.WAN.
Set up the WAN connection mode and parameters here. You can set the
connection mode to PPPoE, DHCP or static IP.
PPPoE: PPPoE stands for Point-to-Point Protocol over Ethernet. This is a network
protocol that is mainly used for DSL services whereby individual users connect
to a modem using an Ethernet connection. Enter the username and password
provided by your network service provider and click Apply.
DHCP: Dynamic Host Configuration Protocol (DHCP) is a client /server protocol
that automatically provides you with an Internet Protocol (IP) host. The IP address
and related configuration settings such as subnet mask and default gateway are
all automatically assigned. Select DHCP and click Apply.
21
Static IP: Access the internet using a fixed IP address, subnet mask, gateway IP
address and Primary DNS server. These should all be provided by your network
service provider.
5.2.3 MAC Clone
Using the MAC Clone function, multiple clients can connect to the Cat7 Router
and access the internet.
Your current MAC address is displayed here. Click Reset to set a new MAC
address. Click Clone to copy your host MAC address.
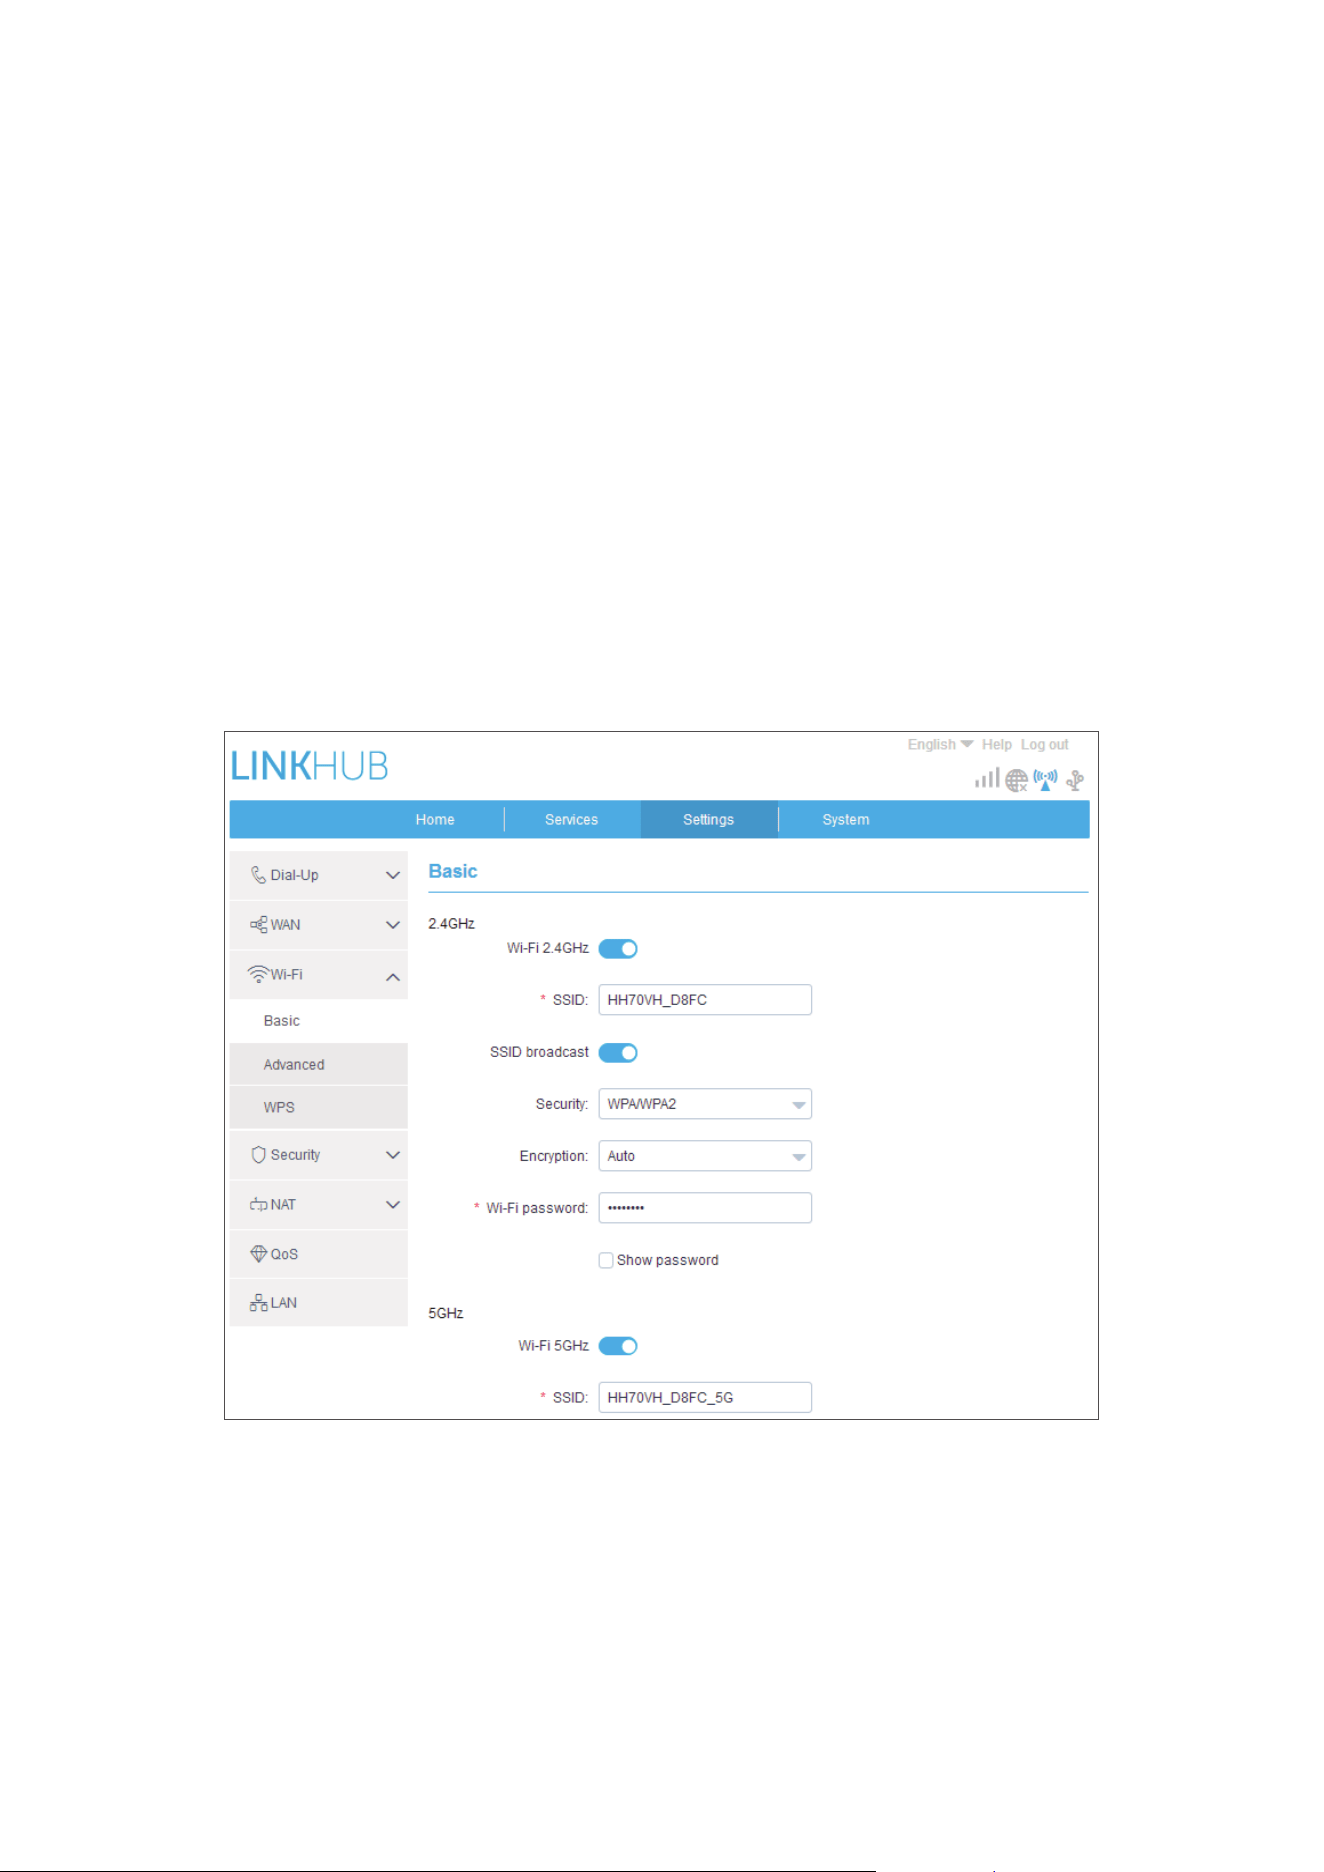
5.3 Wi-Fi
5.3.1 Basic
•. SSID: This is the name of the Wi-Fi network and is used to identify your
Wi-Fi network. The SSID can be between 1 and 32 characters long.
•. SSID Broadcast: This is enabled by default.
Note: If you do choose to disable this, the SSID will no longer be displayed
and will need to be entered manually.
22
•. Security: You can choose the security mode, available options are Disable,
WEP, WPA, WPA2, or WPA/WPA2.
•. Encryption: This is set to Auto by default, available options are TKIP, AES,
or Auto.
•. Password: You can check your Wi-Fi key here.
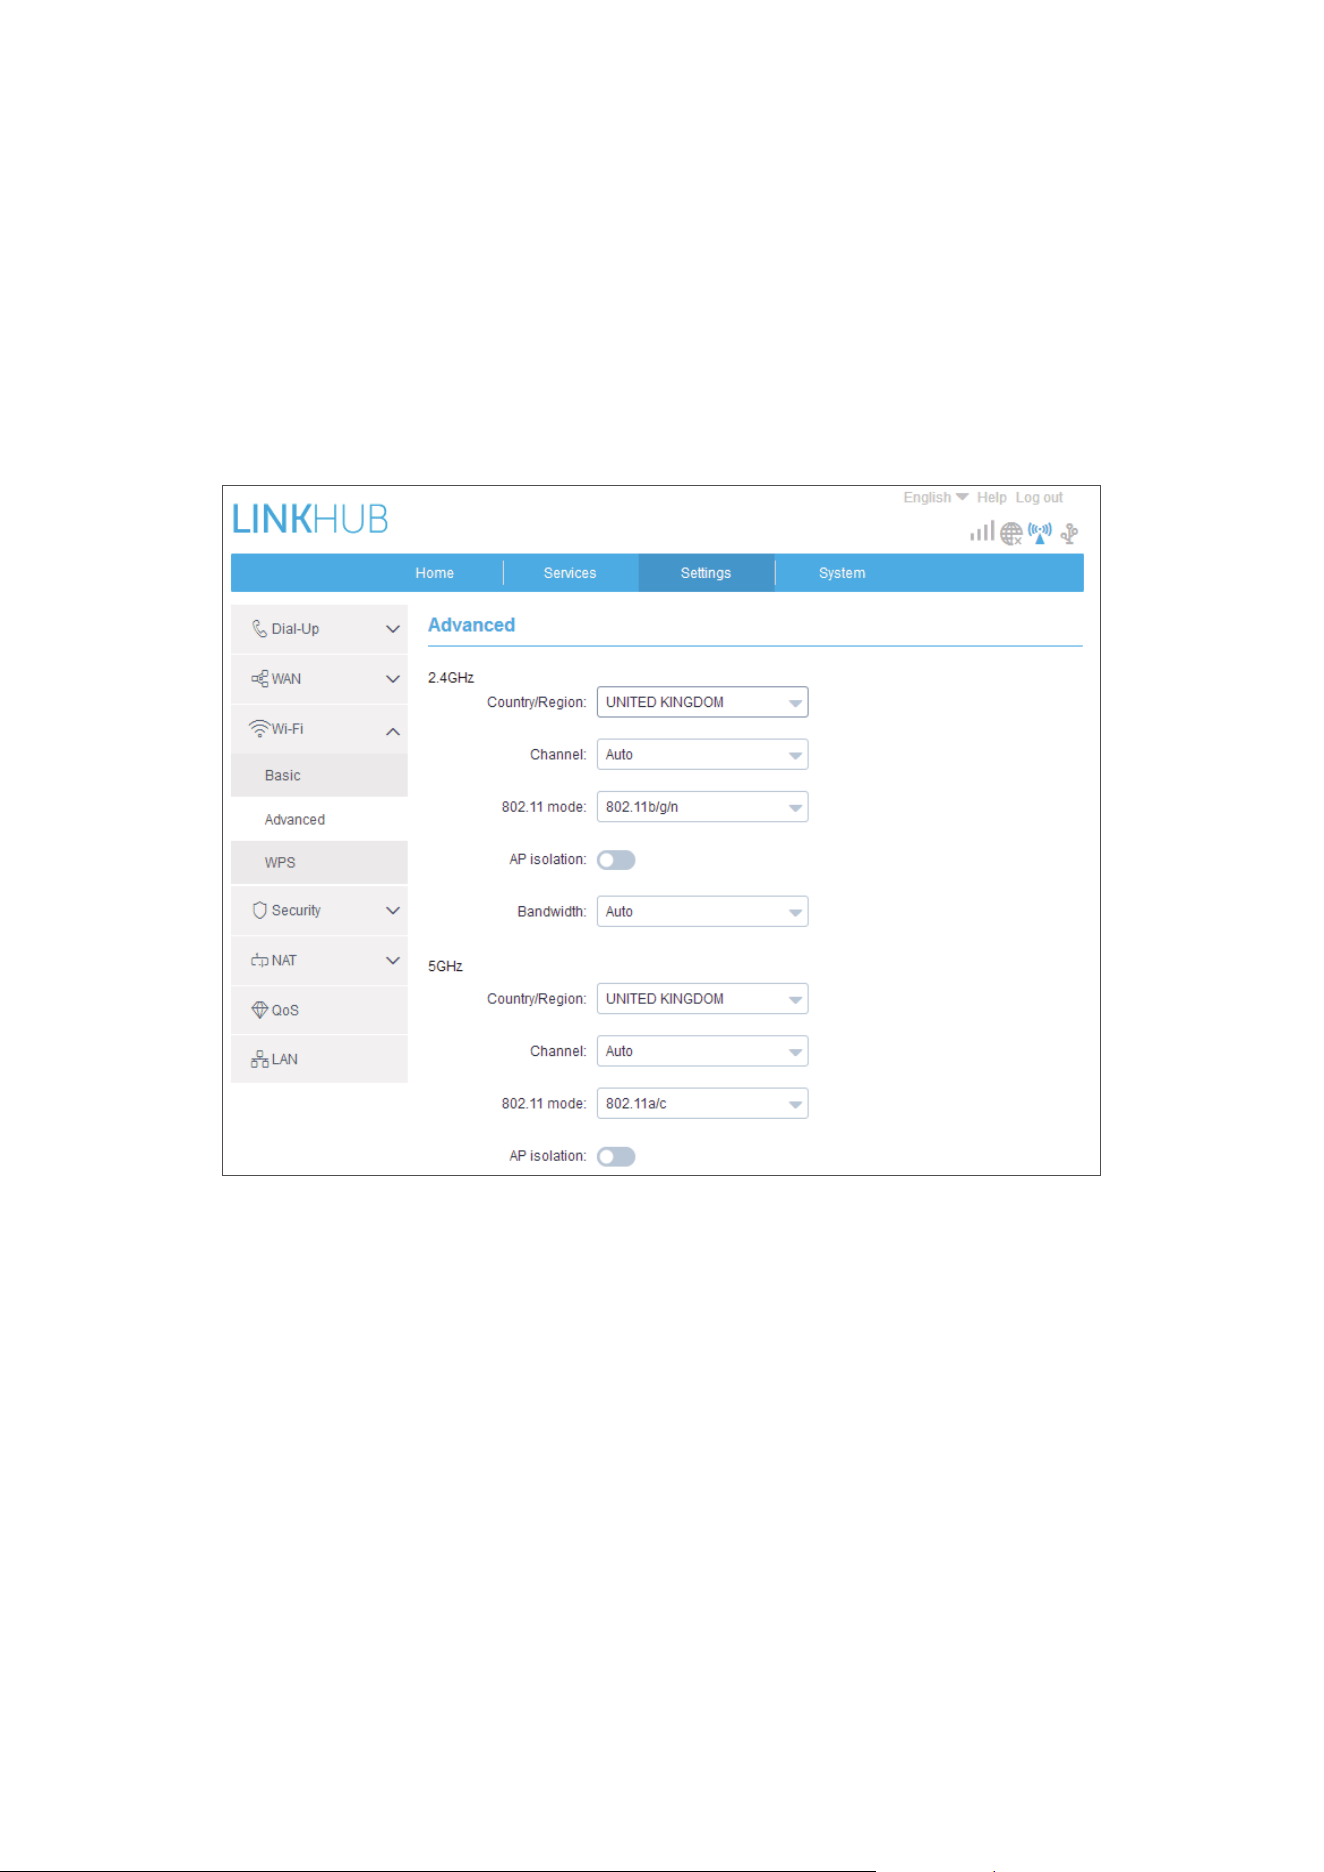
5.3.2 Advanced
Country/Region:
•. Channel: Different regions use different channels (Channel 1-11 in FCC
(US) / IC (Canada); Channel 1-13 in ETSI (Europe); Channel 1-13 in MKK
(Japan)).
•. 802.11 Mode: You can select from the available options via the drop-down
menu. For 2.4GHz, this is set to 802.11b/g/n by default. For 5GHz, this is
set to 802.11a/c by default.
•. AP isolation: You can enable or disable this function.
•. Bandwidth:.You can select from the available options via the drop-down
menu. This is set to Auto by default.

23
5.3.3 WPS
Use the WPS key to verify the WPS access credentials. Your router will receive
an access request from the client within 2 minutes. Enter the WPS key from the
wireless access client, then click Apply. (For more information on how to set up
WPS, please see page 10 )
5.4 Security
5.4.1 PIN.management
•. Enabling.nano-SIM.PIN:.
1) When nano-SIM PIN is disabled, click
.
2) Enter a nano-SIM PIN that is 4-8 digits long.
3) Click Apply.
•. Disabling.nano-SIM.PIN:.
4) When nano-SIM PIN is enabled, click
.
5) Enter the current SIM PIN.
6) Click Apply.
•. Changing.nano-SIM.PIN:.
7) When nano-SIM PIN is enabled, click Change.SIM.PIN.
8) Enter the old nano-SIM PIN and confirm the new nano-SIM PIN.
9) Click Apply.
Note: When a nano-SIM PIN is entered incorrectly 3 times, a PUK code is
required. You can obtain this by calling customer services on 150 using your
nano-SIM.
5.4.2 WAN.ping
For improved security, your device will not respond to ping commands when
this function is disabled.

24
5.4.3 IP filter
By default, any device connected to your Cat7 Router is allowed to access the
internet. You can use the IP filter to block specific devices from accessing the
internet.
Disable: All connected devices can access the internet.
Whitelist: Only devices with an IP address added to this list can access the
internet.
Blacklist: Devices with an IP address added to this list cannot access the internet.
5.4.4 MAC filter
By default, any device connected to your Cat7 Router is allowed to access the
internet. You can use the MAC filter to block specific devices from accessing the
internet.
Disable: All connected devices can access the internet.
Whitelist: Only devices with a MAC address added to this list can access the
internet.
Blacklist: Devices with a MAC address added to this list cannot access the
internet.
5.4.5 URL.filter.
This function enables the administrator to block specific devices from accessing
specified URL(s) during set time periods.
Note: Blocking a URL may not block the associated app. For example, adding
www.facebook.com may not block the specified device from using the Facebook
app.
5.5 NAT
5.5.1 DMZ
If external users cannot access certain network services provided by the LAN,
you can enable DMZ and set a new Host IP address. Click to enable it. Enter an
appropriate Host IP address and then click Apply.
5.5.2 UPnP
Universal Plug and Play (UPnP) is a set of networking protocols that allows devices
connected to your Cat7 Router to discover each other and establish functional

25
network services for data sharing, communications, and entertainment. You may
enable or disable UPnP. This function is disabled by default.
5.5.3 Virtual Server
This device supports virtual server connections, enabling external users to
access the services provided in the local area network (LAN) using the Hypertext
Transfer Protocol (HTTP), File Transfer Protocol (FTP), and other protocols. Click
to enter the parameters, including name, LAN IP address, LAN port, WAN
port, etc. Click Apply when finished.
5.6 QoS
Quality of Server (QoS) is an advanced feature that prioritises internet traffic for
applications, online gaming, Ethernet LAN ports, or specified MAC addresses
to minimise the impact of busy bandwidth. Enable QoS, set your uplink and
download limits, and click Apply.
5.7 LAN
Local area network (LAN) parameters are displayed here. The default Gateway
address is 192.168.1.1.
The default Subnet Mask is 255.255.255.0.
DHCP Server will automatically assign IP addresses to devices in the network.
DHCP Server is disabled by default.
6. System
6.1 Device info
You can view device information here, including IMEI, software version, and
MAC address.
6.2 Reboot.and.reset.
Click Reboot to reboot the device. Click Reset to restore factory default settings.
You also can use the reset button on your Cat7 router.

26
6.3 Update
Online updates:
Click Check. for. updates. Your Cat7 Router will check if there is an update
available. If one is found, you may click Download. Once the file has been
downloaded successfully, you can click Update.
Note: Do not power off your router during the update process as this may
damage the device.
6.4 Device.management
6.4.1 Login.password
Enter your current password and confirm a new password. Your chosen password
must be between 4-16 characters long.
6.4.2 System.settings
You can set the language and the correct time zone here. Note that the time is
automatically adjusted for Daylight Saving Time.
6.4.3 NTP server
Network Time Protocol (NTP) is a networking protocol for clock synchronisation
between computer systems over packet-switched data networks. You can
specify which NTP servers to use
6.4.4 Backup & restore
How.to.save.the.configuration:
Click Backup to backup current device configuration. On both Windows and
MAC OS, this is saved to your 'Downloads' folder.
How.to.restore.the.configuration:
1) Click Browse to select a file.
2) Click Restore.
6.4.5 TR069
TR-069 (Technical Report 069) is a technical specification that defines an
application layer protocol for remote management of end-user devices. Click

27
to enable Inform, enter Inform interval, ACS URL, ACS username, and ACS
password. Click Apply when finished.
7. Warranty
Your device is warranted against any defect or malfunctioning which may occur
in conditions of normal use during the warranty period of twenty-four (24)
months
1
from the date of purchase as shown on your original invoice.
Accessories sold with your device are also warranted against any defect which
may occur during the first twelve (12) months
(1)
from the date of purchase as
shown on your original invoice.
In case of any defect of your device which prevents you from normal use thereof,
you must immediately inform your vendor and present your device with your
proof of purchase.
If the defect is confirmed, your device or part thereof will be either replaced or
repaired, as appropriate. Repaired device and accessories are entitled to a one
(1) month warranty for the same defect. Repair or replacement may be carried
out using reconditioned components offering equivalent functionality.
This warranty covers the cost of parts and labor but excludes any other costs.
This warranty shall not apply to defects to your device and/or accessory due to
(without any limitation):
- Non-compliance with the instructions for use or installation, or with technical
and safety standards applicable in the geographical area where your device is
used;
- Connection to any equipment not supplied or not recommended by TCL
Communication Ltd.;
- Modification or repair performed by individuals not authorised by TCL
Communication Ltd. or its affiliates or your vendor;
- Modification, adjustment or alteration of software or hardware performed by
individuals not authorised by TCL Communication Ltd.;
- Inclement weather, lightning, fire, humidity, infiltration of liquids or foods,
chemical products, download of files, crash, high voltage, corrosion, oxidation.
Your device will not be repaired in case labels or serial numbers (IMEI) have
been removed or altered.
There are no express warranties, whether written, oral or implied, other than this
printed limited warranty or the mandatory warranty provided by your country or
jurisdiction.
1
The warranty period may vary depending on your country.

28
In no event shall TCL Communication Ltd. or any of its affiliates be liable for
indirect, incidental or consequential damages of any nature whatsoever, including
but not limited to commercial or financial loss or damage, loss of data or loss of
image to the full extent those damages can be disclaimed by law.
Some countries/states do not allow the exclusion or limitation of indirect,
incidental or consequential damages, or limitation of the duration of implied
warranties, so the preceding limitations or exclusions may not apply to you.
8. Q&A
How.can.I.access.the.Home.page?
1) Open the web browser.
2) Enter http://192.168.1.1 in the address bar.
3) Once the Cat7 Router home page is displayed, enter the login password:
admin.
4) Click Log.in.
What.should.I.do.if.I.can’t.log.in.to.the.web.management.page?
1) Make sure the power indicator of the device is on (solid blue). If not, power
on the device.
2) Check whether the connection between end user's device and Cat7 Router
is functioning properly.
-If the end user is connected to the Cat7 Router through Wi-Fi, go to the
Wi-Fi connection page to check the connection status.
-If end user's device is connected to Cat7 Router using a network cable,
check whether the LAN / WAN indicator is on (solid blue).
3) Make sure 192.168.1.1 is entered correctly in the web browser.
What.should.I.do.if.I.can’t.access.the.internet?
1) Make sure your SIM is a 4G, 3G or 2G nano-SIM.
-If no nano-SIM is detected, power off your Cat7 Router, reinsert the nano-
SIM, and try again.
-If a PIN is required, enter the PIN and try again.
-If no network is available, move the device to a an area with a better signal
(try placing it near a window) and try again.
2) Make sure 192.168.1.1 is entered correctly in the web browser and click
Enter.

29
3) Reboot your Cat7 Router and try again.
4) If MAC address filtering is enabled, make sure your device MAC address is
on the approved list.
5) If Parental Control is enabled, make sure your device name and MAC address
is not under parental control.
What.should.I.do.if.I.experience.any.issue.with.the.device?
1) Restart the device.
2) Reset the device to its factory settings.
3) Contact your service provider.
What.should.I.do.if.I.forget.the.Wi-Fi.key?
1) Log in the web configuration page (192.168.1.1 as default). Go to Settings
> Wi-Fi > Basic. Click Show.password to obtain the current Wi-Fi Key.
2) Reset the device to factory default settings. Use a paper clip or a blunt pin
to gently press the reset button for 3 seconds. The Wi-Fi key will be reset
to the default password, which can be found on the bottom label of the
device. During the reset, all LEDs will turn on, then off, and finally turn on
again once the reset is completed.
Which.operating.system.does.the.device.support?.
The device supports the following operating systems:
1) Windows 7/8/10.
2) Mac OS X (10.6.X-10.12.X)
3) Linux.
How.can.I.connect.Cat7.Router.via.Wi-Fi?
Open your Wireless Network Connection list.
Follow these steps to select the device SSID:
For a Windows device:
1) Right-click Wireless Network Connection on the task bar.
2) Select the network name (SSID) of your Cat7 Router, click Connect, and
enter the Wi-Fi key.
For Mac:
1) Click the AirPort icon.

30
2) Select the network name (SSID) of your Cat7 Router from the drop-down
menu and enter the Wi-Fi key.
What.should.I.do.if.I.see.the.SSID.but.the.device.fails.to.connect?
Make sure you have entered the correct Wi-Fi key.
What.should.I.do.if.the.network.indicator.is.solid.red?
When there is no nano-SIM, no service, or the device is not registered to the
network, the network indicator on Cat7 Router is solid red.
1) If using a nano-SIM:
- Make sure the nano-SIM is valid and inserted correctly.
- Move the Cat7 Router to an area with a better signal (try placing it near a
window).
2) If using an ethernet connection, check if the network is working properly.
What.should.I.do.if.a.multi-network.IP.address.conflict.occurs?
IP address conflict could happen when a computer is using multiple types of
internet connections. For example, the computer may be connected to the Cat7
Router via an ethernet cable and another network via Wi-Fi. If IP addresses
are the same, you may be unable to log in Cat7 Router home page due to an IP
address conflict.
Why.does.the.SSID.not.appear.in.the.wireless.network.list?
Follow the steps below to make sure the device is set up correctly:
1) Check the device to see if the Wi-Fi indicator is on or off.
2) Refresh the network list on your computer.
For Windows:
1) Click the Refresh Network icon on the right top corner of the Wireless
Network Connection screen.
2) Right-click Wireless Network Connection.
3) Click Open.network.and.sharing.centre.
4) Select Wireless.Management.
5) Click the wireless network which is not being used, and delete it from
network list.
6) Click OK and restart your computer.
For Mac: Try rebooting your computer.

31
What. should. I. do. if. it. says. "No. SIM". or. "Invalid. SIM". on. the. Cat7. Router.
configuration.page?.
Possible reasons for this may be that there is no nano-SIM inserted in the device,
it is inserted incorrectly, or the nano-SIM is disabled. Try removing your nano-
SIM and reinserting it. Make sure not to touch the contact points when doing
so.
What.should.I.do.if."PIN.lock".or."PUK.lock".is.displayed.on.the.screen.of.the.
device.connected.to.Cat7.Router?.
This means the nano-SIM is locked.
Log in to the Home page (refer to "How can I access the Home page?") and enter
your PIN code or PUK code. To obtain the PUK code, contact your network
operator.
Note: If the incorrect PIN is entered 3 times you will be required to enter the
PUK code. If the incorrect PUK code is entered 10 times the nano-SIM will be
permanently blocked.
How.can.I.connect.to.the.4G.network?
1) Log in to the Home page (refer to "How can I access the Home page?").
2) Go to Settings > Network.settings > Network mode.
3) Select 4G only.
How.can.I.disconnect.from.the.2G,.3G.or.4G.network?
1) Log in to the Home page (refer to "How can I access the Home page?").
2) Go to Status > Internet.
3) Click Disconnect.
How.can.I.set.a.new.PIN.for.my.nano-SIM?.
1) Log in to the Home page (refer to "How can I access the Home page?").
2) Go to Settings > Security > PIN.management.
3) Enable PIN operation.
4) Enter new PIN code.
5) Click Apply.
How.can.I.find.more.information.about.Wi-Fi.setup?.
1) Log in to the Home page (refer to "How can I access the Home page?").
2) Go to Settings > Wi-Fi.

32
How.can.I.check.usage.data?.
1) Log in to the Home page (refer to "How can I access the Home page?").
2) Go to Statistics > Internet.
How.can.I.manually.search.for.the.network?.
1) Log in to the Home page (refer to "How can I access the Home page?").
2) Go to.Settings > Dial-up > Network connection.
3) Select Manual from the network connection mode.
4) Click Apply.
How.can.I.check.my.device's.model.number.and.firmware.version?
1) Log in to the Home page (refer to "How can I access the Home page?").
2) Go to System > Device info.
How.can.I.set.the.data.connection.to.connect.to.the.internet.automatically?
1) Log in to the Home page (refer to "How can I access the Home page?").
2) Go to.Settings > Dial-up > Network connection.
3) Select Auto.
4) Click Apply.
How.do.I.change.the.SSID.and.Wi-Fi.key?
1) Log in to the Home page (refer to "How can I access the Home page?").
2) Go to Settings > Wi-Fi > Basic.
How.can.I.change.the.login.password?
1) Log in to the Home page (refer to "How can I access the Home page?").
2) Go to System > Device.management > Login.password.