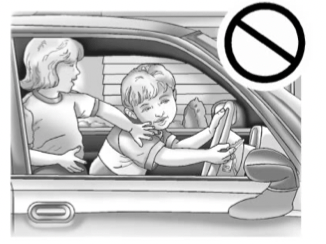
Cadillac XT6 AWD Sport 2020
Product's Documents
Below are documents related to this product, you can read online or download:
- Owner's manual - (English) Read Online | Download pdf
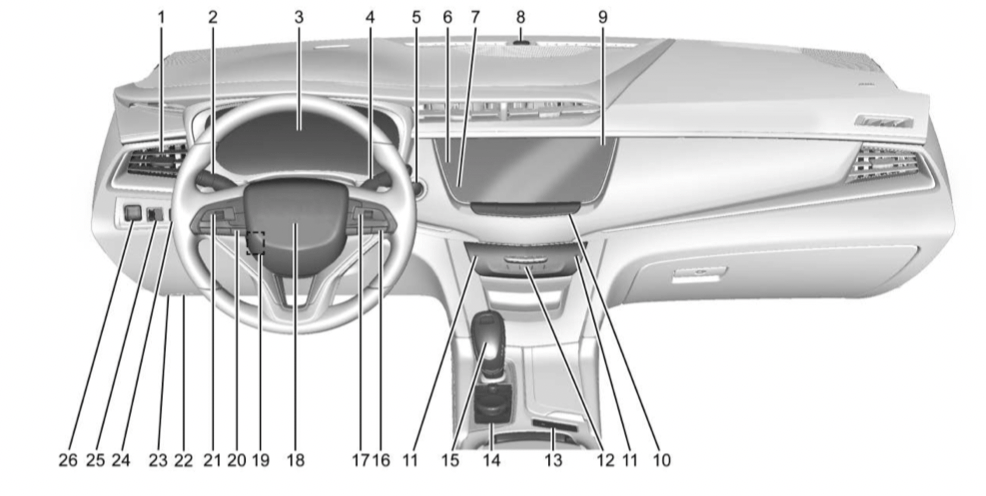
1. Air Vents  161.
161.
2. Exterior Lamp Controls 145.
Turn Signal Lever. See Turn and Lane-Change Signals 148.
IntelliBeam System Button (If Equipped). See Exterior Lamp Controls 145.
3. Instrument Cluster 113.
Driver Information Center (DIC) Display. See Driver Information Center (DIC) 129.
4. Windshield Wiper/Washer 106.
Rear Window Wiper/Washer 107.
5. ENGINE START/STOP Button.
See Ignition Positions 179.
6. Park Assist Button. See Assistance Systems for Parking or Backing 214.
Automatic Parking Assist (APA) Button. See Assistance Systems for Parking or Backing 214.
7. Stop/Start Disable Switch. See Stop/Start System 181.
8. Light Sensor. See Automatic Headlamp System 147.
9. Hazard Warning Flashers 148.
Lane Keep Assist (LKA) 0 234 (If Equipped).
10. Infotainment 152.
11. Heated and Ventilated Front Seats 48 (If Equipped).
12. Dual Automatic Climate Control System 153.
13. MODE Switch. See Driver Mode Control 201.
Traction Control/Electronic Stability Control 199.
14. Infotainment Controls. See Infotainment 152.
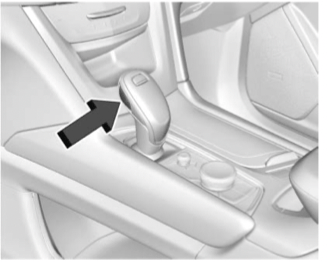
15. Shift Lever. See Automatic Transmission 189.
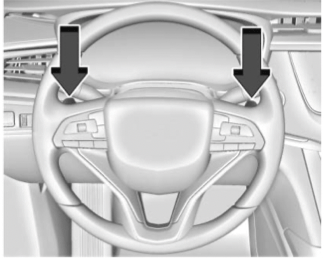
16. Steering Wheel Controls 105.
17. Steering Wheel Controls 105.
Driver Information Center (DIC) Controls. See Driver Information Center (DIC) 129.
18. Horn 105.
19. Steering Wheel Adjustment 105 (Out of View).
20. Forward Collision Alert (FCA) System 223 (If Equipped).
Heated Steering Wheel 105 (If Equipped).
21. Cruise Control 202.
Adaptive Cruise Control 204 (If Equipped).
Phone Button. See Steering Wheel Controls 105.
22. Data Link Connector (DLC) (Out of View).
See Malfunction Indicator Lamp (Check Engine Light) 120.
23. Hood Release. See Hood 257.
24. Head-Up Display (HUD) 131 (If Equipped).
25. Instrument Panel Illumination Control 149.
26. Electric Parking Brake 197.
The key, inside the Remote Keyless Entry (RKE) transmitter, can be used for all locks.
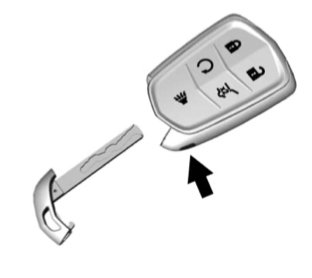
To remove the key, press the button on the side of the transmitter, near the bottom, and pull the key out. Never pull the key out without pressing the button.
If it becomes difficult to turn the key, inspect the key blade for debris. Periodically, clean with a brush or a pick.
See your dealer if a new key is needed.
Contact Roadside Service if locked out of the vehicle. See Roadside Service 349.
With an active OnStar or connected service plan, an OnStar Advisor may remotely unlock the vehicle. See OnStar Overview 360.
See Radio Frequency Statement 0 355.
If there is a decrease in the key operating range:
The Keyless Access system allows for vehicle entry when the Remote Keyless Entry (RKE) transmitter is within 1 m (3 ft). See “Keyless Access Operation” following.
The RKE transmitter functions may work up to 60 m (197 ft) away from the vehicle.
Other conditions can impact the performance of the transmitter. See Remote Keyless Entry (RKE) System 8.
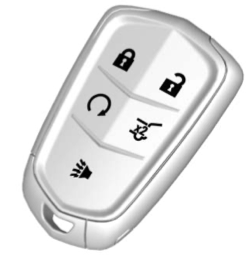
 : Press to lock all doors and if equipped, the fuel door. The turn signal indicators may flash and/or the horn may sound on the second press to indicate locking. See Vehicle Personalization 136.
If the driver door is open when is pressed and Open Door Anti-Lockout is enabled, all doors will lock and then the driver door will immediately unlock. See Vehicle Personalization 0 136. If the passenger door is open when is pressed, all doors lock.
Pressing may also arm the theft-deterrent system. See Vehicle Alarm System 0 29.
If equipped with remote folding mirrors, press and hold for one second to fold the mirrors, if enabled. See Vehicle Personalization 136.
 : Press to unlock the driver door and if equipped, the fuel door. Press unlock again within five seconds to unlock all doors. The RKE transmitter can be programmed to unlock all doors on the first button press. See Vehicle Personalization 136. The turn signal indicators may flash to indicate unlocking. See Vehicle Personalization 136. When remotely unlocking the vehicle at night, the lights come on briefly to light your approach to the vehicle.
Pressing will disarm the theft-deterrent system. See Vehicle Alarm System 29.
If equipped with remote folding mirrors, press and hold for one second to unfold the mirrors, if enabled. See Vehicle Personalization 136.
If equipped with remote windows, press and hold until the windows fully open, if enabled. See Vehicle Personalization 136.
 : Press and release and then immediately press and hold for at least four seconds to start the engine from outside the vehicle using the RKE transmitter. See Remote Vehicle Start 15.
 : Press and release one time to initiate vehicle locator. The exterior lamps flash and the horn chirps three times. Press and hold for three seconds to sound the panic alarm. The horn sounds and the turn signal lamps flash for 30 seconds, or until is pressed again or the vehicle is started.
 : Press twice quickly to open or close the liftgate.
Press once to stop the liftgate from moving.
With the Keyless Access system, you can lock and unlock the doors and access the liftgate without removing the RKE transmitter from your pocket, purse, briefcase, etc. The RKE transmitter should be within 1 m (3 ft) of the liftgate or door being opened.
Keyless Access can be programmed to unlock all doors on the first lock/ unlock press from the driver door. Keyless unlocking can also be turned off. See Vehicle Personalization 0 136.
If equipped with memory seats, RKE transmitters 1 and 2 are linked to seating positions of memory 1 or 2. See Memory Seats 45.
Keyless Unlocking/Locking from the Driver Door
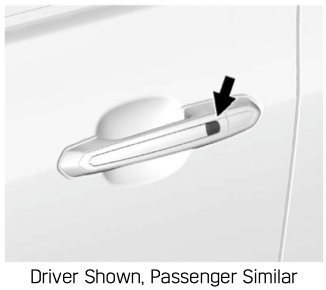
When the doors are locked and the RKE transmitter is within 1 m (3 ft) of the driver door handle, pressing the lock/unlock button on the driver door handle will unlock the driver door. If the lock/unlock button is pressed again within five seconds, all passenger doors will unlock.
Pressing the lock/unlock button will cause all doors to lock if any of the following occur:
Keyless Unlocking/Locking from Passenger Doors
When the doors are locked and the RKE transmitter is within 1 m (3 ft) of the door handle, pressing the lock/ unlock button on that door handle will unlock all doors. Pressing the lock/unlock button will cause all doors to lock if any of the following occur:
Disable/Enable Keyless Unlocking of Exterior Door Handles and Liftgate
If equipped, keyless unlocking of the exterior door handles and liftgate can be disabled and enabled.
Disabling Keyless Unlocking:
With the vehicle off, press and hold and on the RKE transmitter at the same time for approximately three seconds. The turn signal lamps will flash four times quickly to indicate access is disabled. Using any exterior handle to unlock the doors or open the liftgate will cause the turn signal lamps to flash four times quickly, indicating access is disabled. If disabled, disarm the alarm system before starting the vehicle.
Disabling Keyless Unlocking may also be configured under Vehicle Personalization. See Vehicle Personalization 136.
Enabling Keyless Unlocking:
With the vehicle off, press and hold and on the RKE transmitter at the same time for approximately three seconds. The turn signal lamps will flash twice quickly to indicate access is enabled.
Enabling Keyless Unlocking may also be configured under Vehicle Personalization. See Vehicle Personalization 136.
Passive Locking
This vehicle will lock several seconds after all doors are closed if the vehicle is off and at least one RKE transmitter has been removed or none remain in the interior.
If equipped, the fuel door will lock.
If other electronic devices interfere with the RKE transmitter signal, the vehicle may not detect the RKE transmitter inside the vehicle.
If passive locking is enabled, the doors may lock with the RKE transmitter inside the vehicle. Do not leave the RKE transmitter in an unattended vehicle.
To customize the doors to automatically lock when exiting the vehicle, see Vehicle Personalization 136.
Temporary Disable of Passive Locking
Temporarily disable passive locking by pressing and holding on the interior door switch with a door open for at least four seconds, or until three chimes are heard. Passive locking will then remain disabled until on the interior door is pressed, or until the vehicle is turned on.
Remote Left in Vehicle Alert
When the vehicle is turned off and an RKE transmitter is left in the vehicle, the horn will chirp three times after all doors are closed. To turn on or off, see Vehicle Personalization 0 136.
Remote No Longer in Vehicle
If the vehicle is on with a door open, and then all doors are closed, the vehicle will check for RKE transmitters inside. If an RKE transmitter is not detected, the Driver Information Center (DIC) will display NO REMOTE DETECTED and the horn will chirp three times.
This occurs only once each time the vehicle is driven.
To turn on or off, see Vehicle Personalization 136.
Keyless Liftgate Opening
Press the touch pad on the liftgate handle to open the liftgate if the RKE transmitter is within 1 m (3 ft).
Key Access
To access a vehicle with a weak transmitter battery, see Door Locks 17.
Programming Transmitters to the Vehicle
Only RKE transmitters programmed to the vehicle will work. If a transmitter is lost or stolen, a replacement can be purchased and programmed through your dealer.
The vehicle can be reprogrammed so that lost or stolen transmitters no longer work. Each vehicle can have up to eight transmitters matched to it.
Programming with Recognized Transmitters
A new transmitter can be programmed to the vehicle when there are two recognized transmitters.
To program, the vehicle must be off and all of the transmitters, both currently recognized and new, must be with you.
1. Place the two recognized transmitters in the cupholder.
2. Remove the key lock cylinder cap on the driver door handle. See Door Locks 17. Insert the vehicle key of the transmitter into the key lock cylinder on the driver door and turn the key counterclockwise, to the unlock position, five times within 10 seconds.
The DIC displays READY FOR REMOTE #3, 4, 5, ETC.
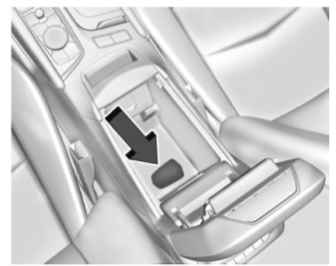
3. Place the new transmitter into the transmitter pocket. The transmitter pocket is inside the center console storage area between the driver and front passenger seats. The storage area will need to be opened and the storage tray lifted up to access the transmitter pocket.
4. Press ENGINE START/STOP. When the transmitter is learned the DIC display will show that it is ready to program the next transmitter.
5. Remove the transmitter from the transmitter pocket and press the transmitter or button.
To program additional transmitters, repeat Steps 3–5.
When all additional transmitters are programmed, press and hold ENGINE START/STOP for 12 seconds to exit programming mode.
6. Return the key back into the transmitter.
7. Replace the key lock cylinder cap. See Door Locks 17.
Programming without Recognized Transmitters
If two currently recognized transmitters are not available, follow this procedure to program up to eight transmitters. This feature is not available in Canada. This procedure will take approximately 30 minutes to complete. The vehicle must be off and all of the transmitters you wish to program must be with you.
1. Remove the key lock cylinder cap on the driver door handle. See Door Locks 0 17. Insert the vehicle key of the transmitter into the key lock cylinder on the driver door handle and turn the key counterclockwise, to the unlock position, five times within 10 seconds.
The DIC displays REMOTE LEARN PENDING, PLEASE WAIT.
2. Wait for 10 minutes until the DIC displays PRESS ENGINE START BUTTON TO LEARN and then press ENGINE START/STOP. The DIC display will again show REMOTE LEARN PENDING, PLEASE WAIT.
3. Repeat Step 2 two additional times. After the third time all previously known transmitters will no longer work with the vehicle. Remaining transmitters can be relearned during the next steps.
The DIC display should now show READY FOR REMOTE # 1.
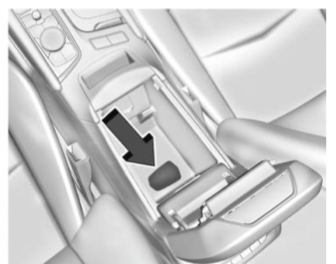
4. Place the new transmitter into the transmitter pocket. The transmitter pocket is inside the center console storage area between the driver and front passenger seats. The storage area will need to be opened and the storage tray lifted up to access the transmitter pocket.
5. Press ENGINE START/STOP. When the transmitter is learned the DIC display will show that it is ready to program the next transmitter.
6. Remove the transmitter from the transmitter pocket and press the transmitter or button.
To program additional transmitters, repeat Steps 4–6.
When all additional transmitters are programmed, press and hold ENGINE START/STOP for 12 seconds to exit programming mode.
7. Return the key back into the transmitter.
8. Replace the key lock cylinder cap. See Door Locks 17.
Starting the Vehicle with a Low Transmitter Battery
When the vehicle is started, if the transmitter battery is weak, the DIC may display NO REMOTE DETECTED or NO REMOTE KEY WAS DETECTED PLACE KEY IN TRANSMITTER POCKET THEN START YOUR VEHICLE. The DIC may also display REPLACE BATTERY IN REMOTE KEY.
To start the vehicle:
1. Open the center console storage area and the storage tray.
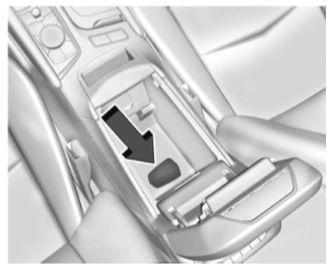
2. Place the transmitter in the transmitter pocket.
3. With the vehicle in P (Park) or N (Neutral), press the brake pedal and ENGINE START/STOP.
Replace the transmitter battery as soon as possible.
Battery Replacement
Warning
Never allow children to play with the RKE transmitter. The transmitter contains a small battery, which can be a choking hazard. If swallowed, internal burns can occur, resulting in severe injury or death. Seek medical attention immediately if a battery is swallowed.
Warning
To avoid personal injury, do not touch metal surfaces on the RKE transmitter when it has been exposed to extreme heat. These surfaces can be hot to the touch at temperatures above 59 °C (138 °F).
Caution
When replacing the battery, do not touch any of the circuitry on the transmitter. Static from your body could damage the transmitter.
Caution
Always replace the battery with the correct type. Replacing the battery with an incorrect type could potentially create a risk of battery explosion. Dispose of used batteries according to instructions and local laws. Do not attempt to burn, crush, or cut the used battery, and avoid exposing the battery to environments with extremely low air pressures or high temperatures.
Replace the battery if the DIC displays REPLACE BATTERY IN REMOTE KEY

1. Press the button on the side of the RKE transmitter near the bottom and pull the key out. Never pull the key out without pressing the button.
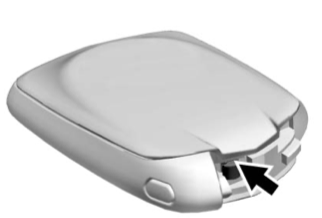
2. Separate the two halves of the transmitter using a flat tool inserted into the bottom center of the transmitter. Do not use the key slot.
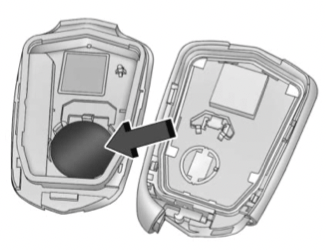
3. Remove the old battery. Do not use a metal object.
4. Insert the new battery on the back housing, positive side facing down. Replace with a CR2032 or equivalent battery.
5. Align the front and back housing then snap the transmitter together.
6. Reinsert the key.
This feature allows the engine to be started from outside of the vehicle.
: This button is on the RKE transmitter for remote start.
The climate control system will use the previous settings during a remote start. The rear window defogger may come on during remote start based on cold ambient conditions. The rear window defogger indicator light does not come on during remote start.
If the vehicle has auto heated or ventilated seats they may come on during a remote start. See Heated and Ventilated Front Seats 48.
Laws in some local communities may restrict the use of remote starters. For example, some laws may require a person using remote start to have the vehicle in view. Check local regulations for any requirements.
Do not use the remote start feature if the vehicle is low on fuel. The vehicle could run out of fuel.
Other conditions can affect the performance of the transmitter. See Remote Keyless Entry (RKE) System 8.
Starting the Engine Using Remote Start
1. Press and release on the RKE transmitter.
2. Immediately press and hold for at least four seconds or until the turn signal lamps flash. The turn signal lamps flashing confirms the request to remote start the vehicle has been received.
During the remote start the doors will be locked and the parking lamps will remain on as long as the engine is running.
The engine will shut off after 15 minutes unless a time extension is done or the ignition is turned on.
3. With the RKE transmitter in the vehicle, press the brake pedal and start the vehicle to drive.
Extending Engine Run Time
The engine run time can also be extended by another 15 minutes, if during the first 15 minutes Steps 1 and 2 are repeated while the engine is still running. An extension can be requested 30 seconds after starting. This provides a total of 30 minutes.
The remote start can only be extended once.
When the remote start is extended, the second 15-minute period is added on to the first 15 minutes for a total of 30 minutes.
A maximum of two remote starts, or a remote start with an extension, are allowed between ignition cycles.
The ignition must be turned on and then off before the remote start procedure can be used again.
Canceling a Remote Start
To cancel a remote start, do any of the following:
until the parking lamps turn off.Conditions in Which Remote Start Will Not Work
The remote start will not operate if any of the following occur:
Warning
Unlocked doors can be dangerous.
To lock/unlock the doors from outside the vehicle:
or on the Remote Keyless Entry (RKE) transmitter. See Remote Keyless Entry (RKE) System Operation 8.To lock/unlock the doors from inside the vehicle:
or on the power door lock switch. See Power Door Locks 19.Keyless Access
If equipped, the RKE transmitter must be within 1 m (3 ft) of the liftgate or door being opened.
To lock or unlock the vehicle from the driver door:
To lock or unlock the vehicle from any passenger door:
See Remote Keyless Entry (RKE) System Operation 0 8.
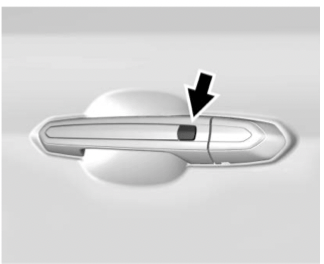
Driver Door Key Lock Cylinder Access (In Case of Dead Battery)
To access the driver door key lock cylinder:
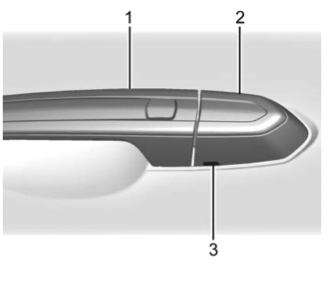
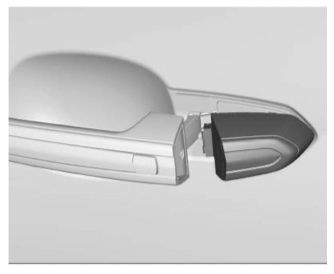
1. Pull the door handle (1) to the open position and hold it open until the cap removal is complete.
2. Insert the key into the slot (3) on the bottom of the cap (2) and lift the key upward.
3. Move the cap (2) rearward and remove.
4. Use the key in the cylinder.
To replace the cap:
1. Pull the door handle (1) to the open position and hold it open until the cap installation is complete.
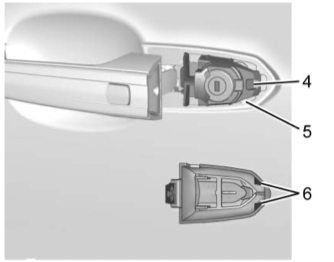
2. Insert the two tabs (6) at the back of the cap between the seal (5) and the metal base (4).
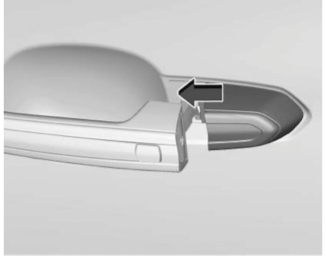
3. Slide the cap forward and press the forward edge to install the cap in place.
4. Release the door handle.
5. Check that the cap is secure.
Free-Turning Locks
The door key lock cylinder turns freely when either the wrong key is used, or the correct key is not fully inserted. The free-turning door lock feature prevents the lock from being forced open. To reset the lock, turn it to the vertical position with the correct key fully inserted. Remove the key and insert it again. If this does not reset the lock, turn the key halfway around in the cylinder and repeat the reset procedure.
: Press to lock the doors.
: Press to unlock the doors.
This feature delays the locking of the doors until five seconds after all doors are closed.
Delayed locking can only be turned on when Open Door Anti-Lockout has been turned off.
When is pressed on the power door lock switch while the door is open, a chime will sound three times indicating delayed locking is active.
The doors will lock automatically five seconds after all doors are closed. If a door is reopened before that time, the five-second timer will reset when all doors are closed again.
Press on the door lock switch again or press on the RKE transmitter to lock the doors immediately.
This feature can also be programmed. See Vehicle Personalization 136.
The doors will lock automatically when all doors are closed, the ignition is on, and the vehicle is shifted out of P (Park).
If a vehicle door is unlocked and then opened and closed, the doors will lock either when your foot is removed from the brake or the vehicle speed becomes faster than 13 km/h (8 mph).
To unlock the doors:
on the power door lock switch.Automatic door locking cannot be disabled. Automatic door unlocking can be programmed. See Vehicle Personalization 136.
If the ignition is on or in ACC/ ACCESSORY and the power door lock switch is pressed with the driver door open, all the doors will lock and only the driver door will unlock.
If the vehicle is off and locking is requested while a door is open, when all doors are closed the vehicle will check for RKE transmitters inside.
If an RKE transmitter is detected and the number of RKE transmitters inside has not reduced, the driver door will unlock and the horn will chirp three times.
Lockout Protection can be manually overridden with the driver door open by pressing and holding on the power door lock switch.
Open Door Anti-Lockout
If Open Door Anti-Lockout is turned on and the vehicle is off, the driver door is open, and locking is requested, all the doors will lock and the driver door will unlock. The Open Door Anti-Lockout feature can be turned on or off. See Vehicle Personalization 136.
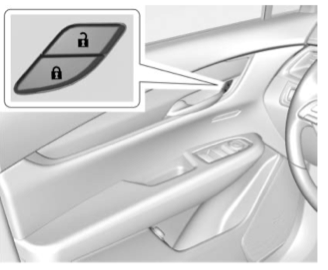
The rear door safety locks prevent passengers from opening the rear doors from inside the vehicle.
Manual Safety Locks
If equipped, the safety lock is on the inside edge of the rear doors. To use the safety lock:
1. Move the lever down to the lock position.
2. Close the door.
3. Do the same for the other rear door.
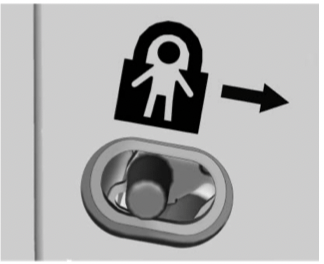
To open a rear door when the safety lock is on:
1. Unlock the door by activating the inside handle, by pressing the power door lock switch, or by using the Remote Keyless Entry (RKE) transmitter.
2. Open the door from the outside.
When the safety lock is enabled, adults and older children will not be able to open the rear door from the inside. Cancel the safety locks to enable the doors to open from the inside.
To cancel the safety lock:
1. Unlock the door and open it from the outside.
2. Move the lever up to unlock. Do the same for the other door.
Driving for Better Fuel Economy
Driving habits can affect fuel mileage. Here are some driving tips to get the best fuel economy possible.
Distracted Driving
Distraction comes in many forms and can take your focus from the task of driving. Exercise good judgment and do not let other activities divert your attention away from the road. Many local governments have enacted laws regarding driver distraction. Become familiar with the local laws in your area.
To avoid distracted driving, keep your eyes on the road, keep your hands on the steering wheel, and focus your attention on driving.
Warning
Taking your eyes off the road too long or too often could cause a crash resulting in injury or death. Focus your attention on driving.
Refer to the infotainment manual for more information on using that system and the navigation system, if equipped, including pairing and using a cell phone.
Defensive Driving
Defensive driving means “always expect the unexpected.” The first step in driving defensively is to wear the seat belt. See Seat Belts 55.
Drunk Driving
Death and injury associated with drinking and driving is a global tragedy.
Warning
Drinking and then driving is very dangerous. Your reflexes, perceptions, attentiveness, and judgment can be affected by even a small amount of alcohol. You can have a serious — or even fatal collision if you drive after drinking.
Do not drink and drive or ride with a driver who has been drinking. Ride home in a cab; or if you are with a group, designate a driver who will not drink.
Control of a Vehicle
Braking, steering, and accelerating are important factors in helping to control a vehicle while driving.
Braking
Braking action involves perception time and reaction time. Deciding to push the brake pedal is perception time. Actually doing it is reaction time.
Average driver reaction time is about three-quarters of a second. In that time, a vehicle moving at 100 km/h (60 mph) travels 20 m (66 ft), which could be a lot of distance in an emergency.
Helpful braking tips to keep in mind include:
If the engine ever stops while the vehicle is being driven, brake normally but do not pump the brakes. Doing so could make the pedal harder to push down. If the engine stops, there will be some power brake assist but it will be used when the brake is applied.
Once the power assist is used up, it can take longer to stop and the brake pedal will be harder to push.
Steering
Electric Power Steering
Caution
To avoid damage to the steering system, do not drive over curbs, parking barriers, or similar objects at speeds greater than 3 km/h (1 mph). Use care when driving over other objects such as lane dividers and speed bumps. Damage caused by misuse of the vehicle is not covered by the vehicle warranty.
The vehicle has electric power steering. It does not have power steering fluid. Regular maintenance is not required.
If power steering assist is lost due to a system malfunction, the vehicle can be steered, but may require increased effort.
If the steering assist is used for an extended period of time while the vehicle is not moving, power assist may be reduced.
If the steering wheel is turned until it reaches the end of its travel and is held against that position for an extended period of time, power steering assist may be reduced.
Normal use of the power steering assist should return when the system cools down.
See your dealer if there is a problem.
Curve Tips
Steering in Emergencies
Off-Road Recovery
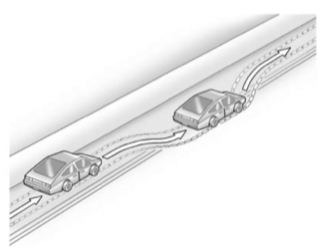
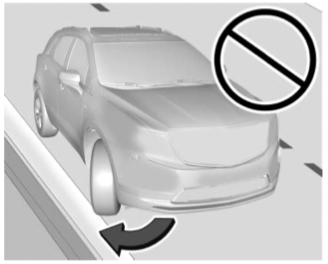
The vehicle's right wheels can drop off the edge of a road onto the shoulder while driving. Follow these tips:
1. Ease off the accelerator and then, if there is nothing in the way, steer the vehicle so that it straddles the edge of the pavement.
2. Turn the steering wheel about one-eighth of a turn, until the right front tire contacts the pavement edge.
3. Turn the steering wheel to go straight down the roadway.
Loss of Control
Skidding
There are three types of skids that correspond to the vehicle's three control systems:
Defensive drivers avoid most skids by taking reasonable care suited to existing conditions, and by not overdriving those conditions. But skids are always possible.
If the vehicle starts to slide, follow these suggestions:
Remember: Antilock brakes help avoid only the braking skid.
Off-Road Driving
All-Wheel Drive vehicles can be used for off-road driving. Vehicles without All-Wheel Drive and vehicles not equipped with All Terrain (AT) or On-Off Road (OOR) tires must not be driven off-road except on a level, solid surface. To contact the tire manufacturer for more information about the original equipment tires, see the Limited Warranty and Owner Assistance Information manual.
Controlling the vehicle is the key to successful off-road driving. One of the best ways to control the vehicle is to control the speed.
Warning
When driving off-road, bouncing and quick changes in direction can easily throw you out of position. This could cause you to lose control and crash. You and your passengers should always wear seat belts.
Before Driving Off-Road
To gain more ground clearance if needed, it may be necessary to remove the front fascia lower air dam. However, driving without the air dam reduces fuel economy.
Caution
Operating the vehicle for extended periods without the front fascia lower air dam installed can cause improper airflow to the engine. Reattach the front fascia air dam after off-road driving.
Loading the Vehicle for Off-Road Driving
Warning
For more information about loading the vehicle, see Vehicle Load Limits 175.
Environmental Concerns
187.Driving on Hills
Driving safely on hills requires good judgment and an understanding of what the vehicle can and cannot do.
Warning
Many hills are simply too steep for any vehicle. Driving up hills can cause the vehicle to stall. Driving down hills can cause loss of control. Driving across hills can cause a rollover. You could be injured or killed. Do not drive on steep hills.
Before driving on a hill, assess the steepness, traction, and obstructions. If the terrain ahead cannot be seen, get out of the vehicle and walk the hill before driving further.
When driving on hills:
Warning
Driving to the top of a hill at high speed can cause a crash. There could be a drop-off, embankment, cliff, or even another vehicle. You could be seriously injured or killed. As you near the top of a hill, slow down and stay alert.
Warning
Heavy braking when going down a hill can cause your brakes to overheat and fade. This could cause loss of control and you or others could be injured or killed. Apply the brakes lightly when descending a hill and use a low gear to keep vehicle speed under control.
Heavy braking when going down a hill can cause your brakes to overheat and fade. This could cause loss of control and you or others could be injured or killed. Apply the brakes lightly when descending a hill and use a low gear to keep vehicle speed under control.
If the vehicle stalls on a hill:
1. Apply the brakes to stop the vehicle, and then apply the parking brake.
2. Shift into P (Park) and then restart the engine.
3. If the vehicle cannot be restarted after stalling, set the parking brake, shift into P (Park), and turn the vehicle off.
3.1. Leave the vehicle and seek help.
3.2. Stay clear of the path the vehicle would take if it rolled downhill.
Warning
Getting out of the vehicle on the downhill side when stopped across an incline is dangerous. If the vehicle rolls over, you could be crushed or killed. Always get out on the uphill side of the vehicle and stay well clear of the rollover path.
Driving in Mud, Sand, Snow, or Ice
Use a low gear when driving in mud the deeper the mud, the lower the gear. Keep the vehicle moving to avoid getting stuck.
Traction changes when driving on sand. On loose sand, such as on beaches or sand dunes, the tires tend to sink into the sand. This affects steering, accelerating, and braking. Drive at a reduced speed and avoid sharp turns or abrupt maneuvers.
Traction is reduced on hard packed snow and ice and it is easy to lose control. Reduce vehicle speed when driving on hard packed snow and ice.
Warning
Driving on frozen lakes, ponds, or rivers can be dangerous. Ice conditions vary greatly and the vehicle could fall through the ice; you and your passengers could drown. Drive your vehicle on safe surfaces only.
Driving in Water
Warning
Driving through rushing water can be dangerous. Deep water can sweep your vehicle downstream and you and your passengers could drown. If it is only shallow water, it can still wash away the ground from under your tires. Traction could be lost, and the vehicle could roll over. Do not drive through rushing water.
Caution
Do not drive through standing water if it is deep enough to cover the wheel hubs, axles, or exhaust pipe. Deep water can damage the axle and other vehicle parts.
If the standing water is not too deep, drive slowly through it. At faster speeds, water splashes on the ignition system and the vehicle can stall. Stalling can also occur if you get the exhaust pipe under water. While the exhaust pipe is under water, you will not be able to start the engine. When going through water, the brakes get wet, and it might take longer to stop. See Driving on Wet Roads 172.
After Off-Road Driving
Remove any brush or debris that has collected on the underbody or chassis, or under the hood. These accumulations can be a fire hazard.
After operation in mud or sand, have the brake linings cleaned and checked. These substances can cause glazing and uneven braking. Check the body structure, steering, suspension, wheels, tires, and exhaust system for damage and check the fuel lines and cooling system for any leakage.
Driving on Wet Roads
Rain and wet roads can reduce vehicle traction and affect your ability to stop and accelerate. Always drive slower in these types of driving conditions and avoid driving through large puddles and deep-standing or flowing water.
Warning
Wet brakes can cause crashes. They might not work as well in a quick stop and could cause pulling to one side. You could lose control of the vehicle.
After driving through a large puddle of water or a car/vehicle wash, lightly apply the brake pedal until the brakes work normally.
Flowing or rushing water creates strong forces. Driving through flowing water could cause the vehicle to be carried away. If this happens, you and other vehicle occupants could drown. Do not ignore police warnings and be very cautious about trying to drive through flowing water.
Hydroplaning
Hydroplaning is dangerous. Water can build up under the vehicle's tires so they actually ride on the water. This can happen if the road is wet enough and you are going fast enough. When the vehicle is hydroplaning, it has little or no contact with the road.
There is no hard and fast rule about hydroplaning. The best advice is to slow down when the road is wet.
Other Rainy Weather Tips
Besides slowing down, other wet weather driving tips include:
285.Hill and Mountain Roads
Driving on steep hills or through mountains is different than driving on flat or rolling terrain. Tips include:
Warning
Using the brakes to slow the vehicle on a long downhill slope can cause brake overheating, can reduce brake performance, and could result in a loss of braking. Shift the transmission to a lower gear to let the engine assist the brakes on a steep downhill slope.
Warning
Coasting downhill in N (Neutral) or with the ignition off is dangerous. This can cause overheating of the brakes and loss of steering assist. Always have the engine running and the vehicle in gear.
Winter Driving
Driving on Snow or Ice
Snow or ice between the tires and the road creates less traction or grip, so drive carefully. Wet ice can occur at about 0 °C (32 °F) when freezing rain begins to fall. Avoid driving on wet ice or in freezing rain until roads can be treated.
For Slippery Road Driving:
199. 196. 201 and All-Wheel Drive 195.Blizzard Conditions
Stop the vehicle in a safe place and signal for help. Stay with the vehicle unless there is help nearby. If possible, use Roadside Assistance. See Roadside Service 349. To get help and keep everyone in the vehicle safe:
Warning
Snow can trap engine exhaust under the vehicle. This may cause exhaust gases to get inside. Engine exhaust contains carbon monoxide (CO), which cannot be seen or smelled. It can cause unconsciousness and even death.
If the vehicle is stuck in snow:
For more information about CO, see Engine Exhaust 188.
To save fuel, run the engine for short periods to warm the vehicle and then shut the engine off and partially close the window. Moving about to keep warm also helps.
If it takes time for help to arrive, when running the engine, push the accelerator pedal slightly so the engine runs faster than the idle speed. This keeps the battery charged to restart the vehicle and to signal for help with the headlamps. Do this as little as possible, to save fuel.
If the Vehicle Is Stuck
Slowly and cautiously spin the wheels to free the vehicle when stuck in sand, mud, ice, or snow.
If stuck too severely for the traction system to free the vehicle, turn the traction system off and use the rocking method. See Traction Control/ Electronic Stability Control 0 199.
Warning
If the vehicle's tires spin at high speed, they can explode, and you or others could be injured. The vehicle can overheat, causing an engine compartment fire or other damage. Spin the wheels as little as possible and avoid going above 56 km/h (35 mph).
Rocking the Vehicle to Get it Out
Turn the steering wheel left and right to clear the area around the front wheels. Turn off any traction system. Shift back and forth between R (Reverse) and a low forward gear, spinning the wheels as little as possible. To prevent transmission wear, wait until the wheels stop spinning before shifting gears. Release the accelerator pedal while shifting, and press lightly on the accelerator pedal when the transmission is in gear. Slowly spinning the wheels in the forward and reverse directions causes a rocking motion that could free the vehicle. If that does not get the vehicle out after a few tries, it might need to be towed out. If the vehicle does need to be towed out, see Towing the Vehicle 316.
Vehicle Load Limits
It is very important to know how much weight the vehicle can carry. This weight is called the vehicle capacity weight and includes the weight of all occupants, cargo, and all nonfactory-installed options. Two labels on the vehicle may show how much weight it may properly carry, the Tire and Loading Information label and the Certification/Tire label.
Warning
Do not load the vehicle any heavier than the Gross Vehicle Weight Rating (GVWR), or either the maximum front or rear Gross Axle Weight Rating (GAWR). This can cause systems to break and change the way the vehicle handles. This could cause loss of control and a crash. Overloading can also reduce stopping distance, damage the tires, and shorten the life of the vehicle.
Tire and Loading Information Label
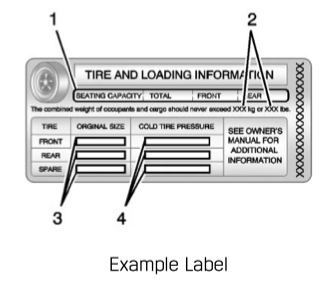
A vehicle-specific Tire and Loading Information label is attached to the center pillar (B-pillar). The tire and loading information label shows the number of occupant seating positions (1), and the maximum vehicle capacity weight (2) in kilograms and pounds.
The Tire and Loading Information label also shows the size of the original equipment tires (3) and the recommended cold tire inflation pressures (4). For more information on tires and inflation see Tires 285 and Tire Pressure 292.
There is also important loading information on the vehicle Certification/Tire label. It may show the Gross Vehicle Weight Rating (GVWR) and the Gross Axle Weight Rating (GAWR) for the front and rear axle. See “Certification/Tire Label” later in this section.
“Steps for Determining Correct Load Limit-
1. Locate the statement "The combined weight of occupants and cargo should never exceed XXX kg or XXX lbs.” on your vehicle’s placard.
2. Determine the combined weight of the driver and passengers that will be riding in your vehicle.
3. Subtract the combined weight of the driver and passengers from XXX kg or XXX lbs.
4. The resulting figure equals the available amount of cargo and luggage load capacity. For example, if the "XXX" amount equals 1400 lbs. and there will be five 150 lb passengers in your vehicle, the amount of available cargo and luggage load capacity is 650 lbs. (1400-750 (5 x 150) = 650 lbs.)
5. Determine the combined weight of luggage and cargo being loaded on the vehicle. That weight may not safely exceed the available cargo and luggage load capacity calculated in Step 4.
6. If your vehicle will be towing a trailer, load from your trailer will be transferred to your vehicle. Consult this manual to determine how this reduces the available cargo and luggage load capacity of your vehicle.”
See Trailer Towing 245 for important information on towing a trailer, towing safety rules and trailering tips.
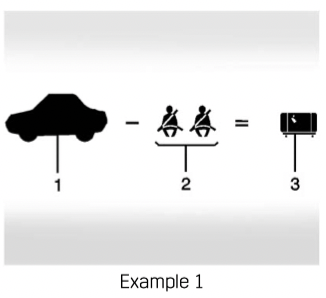
1. Vehicle Capacity Weight for Example 1 = 453 kg (1,000 lbs).
2. Subtract Occupant Weight @ 68 kg (150 lbs) × 2 = 136 kg (300 lbs).
3. Available Occupant and Cargo Weight = 317 kg (700 lbs).
1. Vehicle Capacity Weight for Example 2 = 453 kg (1,000 lbs).
2. Subtract Occupant Weight @ 68 kg (150 lbs) × 5 = 340 kg (750 lbs).
3. Available Cargo Weight = 113 kg (250 lbs).
1. Vehicle Capacity Weight for Example 3 = 453 kg (1,000 lbs).
2. Subtract Occupant Weight @ 91 kg (200 lbs) × 5 = 453 kg (1,000 lbs).
3. Available Cargo Weight = 0 kg (0 lbs).
Refer to the vehicle's tire and loading information label for specific information about the vehicle's capacity weight and seating positions. The combined weight of the driver, passengers, and cargo should never exceed the vehicle's capacity weight.
Certification/Tire Label
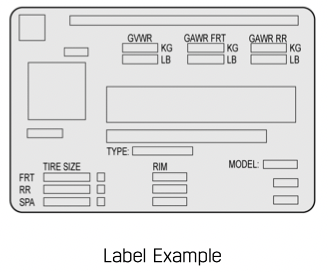
A vehicle-specific Certification/ Tire label is attached to the center pillar (B-pillar).
The label may show the size of the vehicle's original tires and the inflation pressures needed to obtain the gross weight capacity of the vehicle. The label shows the gross weight capacity of the vehicle. This is called the Gross Vehicle Weight Rating (GVWR). The GVWR includes the weight of the vehicle, all occupants, fuel, and cargo.
The Certification/Tire label may also show the maximum weights for the front and rear axles, called the Gross Axle Weight Rating (GAWR). To find out the actual loads on the front and rear axles, weigh the vehicle at a weigh station. Your dealer can help with this. Be sure to spread the load equally on both sides of the centerline.
Caution
Overloading the vehicle may cause damage. Repairs would not be covered by the vehicle warranty. Do not overload the vehicle.
Warning
Things inside the vehicle can strike and injure people in a sudden stop or turn, or in a crash.
• Put things in the cargo area of the vehicle. In the cargo area, put them as far forward as possible. Try to spread the weight evenly.
• Never stack heavier things, like suitcases, inside the vehicle so that some of them are above the tops of the seats.
• Do not leave an unsecured child restraint in the vehicle.
• Secure loose items in the vehicle.
• Do not leave a seat folded down unless needed.
New Vehicle Break-In
Caution
Following break-in, engine speed and load can be gradually increased.
Ignition Positions
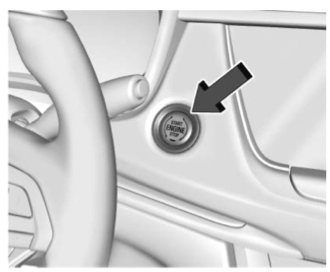
The vehicle has an electronic keyless ignition with pushbutton start.
If the pushbutton start is not working, the vehicle may be near a strong radio antenna signal causing interference to the Remote Keyless Entry (RKE) system. See Remote Keyless Entry (RKE) System Operation 8.
To shift out of P (Park), the vehicle must be turned on and the brake pedal must be applied.
Stopping the Engine/OFF (No Indicator Light) : When the vehicle is stopped, press ENGINE START/STOP once to turn the engine off.
If the vehicle is in P (Park), the ignition will turn off, and Retained Accessory Power (RAP) will remain active. See Retained Accessory Power (RAP) 185.
If the vehicle is in R (Reverse), D (Drive), or M (Manual Mode), the vehicle will shift into P (Park), the ignition will turn off, and RAP will remain active.
If the vehicle is in N (Neutral), the ignition will return to ACC/ ACCESSORY and display the message SHIFT TO PARK in the Driver Information Center (DIC). When the vehicle is shifted into P (Park), the ignition will turn off.
Warning
Turning off the vehicle while moving may cause loss of power assist in the brake and steering systems and disable the airbags. While driving, only shut the vehicle off in an emergency.
If the vehicle must be shut off in an emergency:
1. Brake using a firm and steady pressure. Do not pump the brakes repeatedly. This may deplete power assist, requiring increased brake pedal force.
2. Shift the vehicle to N (Neutral). This can be done while the vehicle is moving. After shifting to N (Neutral), firmly apply the brakes and steer the vehicle to a safe location.
3. Come to a complete stop and shift to P (Park).
4. Set the parking brake. See Electric Parking Brake 197. Press ENGINE START/STOP to turn the vehicle off.
If the vehicle cannot be pulled over and must be shut off while driving, press and hold ENGINE START/STOP for longer than two seconds, or press twice in five seconds.
ACC/ACCESSORY (Amber Indicator Light) : This mode allows you to use some electrical accessories when the engine is off.
With the ignition off, pressing ENGINE START/STOP once without the brake pedal applied will place the ignition system in ACC/ACCESSORY.
The ignition will switch from ACC/ ACCESSORY to OFF after 10 minutes to prevent battery rundown.
ON/RUN/START (Green Indicator Light) : This mode is for driving and starting. With the ignition off and the brake pedal applied, pressing ENGINE START/STOP once will place the ignition system in ON/RUN/START. Once engine cranking begins, release the button. Engine cranking will continue until the engine starts, and the ignition will then remain ON. See Starting the Engine 180.
Service Mode
This mode is available to verify the proper operation of the malfunction indicator lamp as may be required for emissions inspection purposes and for service and diagnostics.
With the vehicle off, and the brake pedal not applied, pressing and holding ENGINE START/STOP for more than five seconds will place the vehicle in Service Mode. The instruments and audio systems will operate as they do in ON/RUN, but the vehicle will not be able to be driven. The engine will not start in Service Mode. Press ENGINE START/ STOP again to turn the vehicle off.
Starting the Engine
Place the transmission in the proper gear, P (Park) or N (Neutral). To restart the engine when the vehicle is already moving, use N (Neutral).
Caution
Do not try to shift to P (Park) if the vehicle is moving. If you do, you could damage the transmission. Shift to P (Park) only when the vehicle is stopped.
Caution
If you add electrical parts or accessories, you could change the way the engine operates. Any resulting damage would not be covered by the vehicle warranty. See Add-On Electrical Equipment 252.
To start the vehicle:
1. With the Keyless Access system, the RKE transmitter must be in the vehicle. Press ENGINE START/STOP with the brake pedal applied. When the engine begins cranking, let go of the button. The idle speed will go down as the engine warms up. Do not race the engine immediately after starting it.
If the RKE transmitter is not in the vehicle, if there is interference, or if the RKE battery is low, a Driver Information Center (DIC) message will display. See Remote Keyless Entry (RKE) System Operation 8.
Caution
Cranking the engine for long periods of time, by pressing ENGINE START/STOP immediately after cranking has ended, can overheat and damage the cranking motor, and drain the battery. Wait at least 15 seconds between each try, to let the cranking motor cool down.
2. If the engine does not start after five to 10 seconds, especially in very cold weather (below −18 °C or 0 °F), it could be flooded with too much gasoline. Try pushing the accelerator pedal all the way to the floor and hold it there, then press ENGINE START/STOP for up to a maximum of 15 seconds. Wait at least 15 seconds between each try, to allow the cranking motor to cool down. When the engine starts, let go of the button and the accelerator. If the vehicle starts briefly but then stops again, do the same thing. This clears the extra gasoline from the engine. Do not race the engine immediately after starting it. Operate the engine and transmission gently until the oil warms up and lubricates all moving parts.
Stop/Start System
This vehicle has a Stop/Start system to shut off the engine to help conserve fuel. It has components designed for the increased number of starts.
Warning
The automatic engine Stop/Start feature causes the engine to shut off while the vehicle is still on. Do not exit the vehicle before shifting to P (Park). The vehicle may restart and move unexpectedly. Always shift to P (Park), and then turn the ignition off before exiting the vehicle.
Auto Engine Stop/Start
When the brakes are applied and the vehicle is at a complete stop, the engine may turn off. When stopped, the tachometer displays AUTO STOP. See Tachometer 0 116. When the brake pedal is released or the accelerator pedal is pressed, the engine will restart.
To maintain vehicle performance, other conditions may cause the engine to automatically restart before the brake pedal is released.
Auto Stops may not occur and/or auto restarts may occur because:
The Auto Stop has reached the maximum allowed time.
Auto Stop Disable Switch
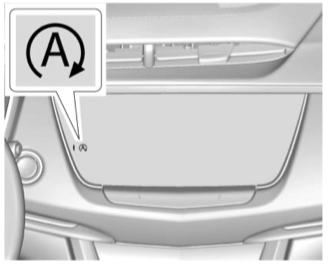
The automatic engine Stop/Start feature can be disabled and enabled by touching the  symbol. Auto Stop is enabled each time you start the vehicle.
When the light next to the is illuminated, the system is enabled.
Engine Heater
The engine heater, if available, can help in cold weather conditions at or below −18 °C (0 °F) for easier starting and better fuel economy during engine warm-up. Plug in the engine heater at least four hours before starting the vehicle. An internal thermostat in the plug end of the cord will prevent engine heater operation at temperatures above −18 °C (0 °F).
Warning
Do not plug in the engine block heater while the vehicle is parked in a garage or under a carport. Property damage or personal injury may result. Always park the vehicle in a clear open area away from buildings or structures.
To Use the Engine Heater
1. Turn off the engine.
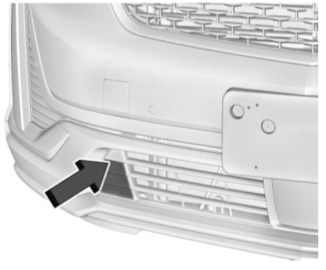
2. Remove the engine heater connector cover by gently prying with a flat-bladed tool at the location of the notch along the top edge of the cover.
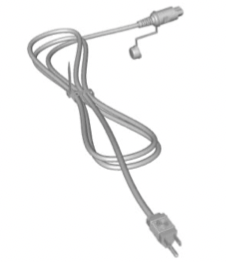
3. Check the heater cord for damage. If it is damaged, do not use it. See your dealer for a replacement. Inspect the cord for damage yearly.
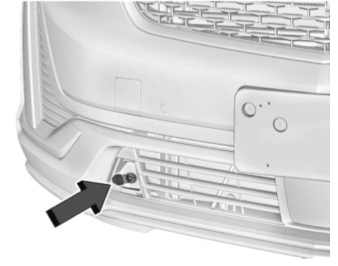
4. Plug the heater cord into the connector in the front fascia.
5. Plug it into a normal, grounded 110-volt AC outlet.
Warning
Improper use of the heater cord or an extension cord can damage the cord and may result in overheating and fire.
6. Before starting the engine, be sure to unplug and store the cord.
7. Install the engine heater connector cover.
The length of time the heater should remain plugged in depends on several factors. Ask a dealer in the area where you will be parking the vehicle for the best advice on this.
Retained Accessory Power (RAP)
When the ignition is turned from on to off, the following features (if equipped) will continue to function for up to 10 minutes, or until the driver door is opened. These features will also work when the ignition is in RUN or ACC/ACCESSORY:
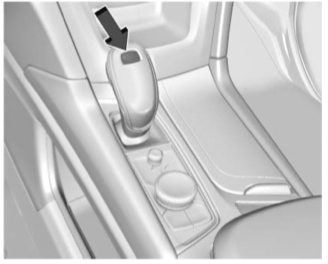
Shifting Into Park
To shift into P (Park):
1. Hold the brake pedal down and set the parking brake. See Electric Parking Brake 197.
2. Press the button on top of the shift lever to shift into P (Park). See Automatic Transmission 189.
3. The P indicator on the shift lever will turn red when the vehicle is in P (Park).
Leaving the Vehicle with the Engine Running
Warning
It can be dangerous to leave the vehicle with the engine running. It could overheat and catch fire.
It is dangerous to get out of the vehicle if the vehicle is not in P (Park) with the parking brake set. The vehicle can roll.
Do not leave the vehicle when the engine is running. If you have left the engine running, the vehicle can move suddenly. You or others could be injured. To be sure the vehicle will not move, even when you are on fairly level ground, always set the parking brake and shift to P (Park). See Shifting Into Park 185. If you are towing a trailer, see Driving Characteristics and Towing Tips 241.
If you have to leave the vehicle with the engine running, be sure the vehicle is in P (Park) and the parking brake is set before you leave it.
If you are towing a trailer and parking on a hill, see Driving Characteristics and Towing Tips 241.
Shifting out of Park
This vehicle is equipped with an electronic transmission. The shift lock release button is designed to prevent inadvertent shifting out of P (Park) unless the ignition is on, the brake pedal is applied, and the shift lock release button is pressed.
The shift lock control is always functional except in the case of an uncharged or low voltage (less than 9-volt) battery.
If the vehicle has an uncharged battery or a battery with low voltage, try charging or jump starting the battery. See Jump Starting - North America 313.
To shift out of P (Park):
1. Ensure the engine is running.
2. Apply the brake pedal.
3. Press and hold the shift lock release button.
4. Move the shift lever to the desired position.
5. The P indicator will turn white and the gear indicator on the shift lever will turn red when the vehicle is no longer in P (Park).
6. After releasing the shift lever, it will return to the center position.
If the vehicle cannot be shifted from P (Park), a Driver Information Center (DIC) message, such as CONDITIONS NOT CORRECT FOR SHIFT, will be displayed. Ensure the ignition is on, the engine is running, and the brake pedal is applied. If the vehicle still will not shift out of P (Park), see your dealer for service.
Manual Park Release
Warning
The transmission will be placed in N (Neutral) when the manual park release is pulled. The vehicle can roll and you or others could be injured. Ensure the vehicle is on level ground.
Caution
The manual park release is not intended to be used for towing. Damage may result from using the manual park release in this way. The repairs would not be covered by the vehicle warranty.
This vehicle includes a manual park release that can be used to shift the vehicle into N (Neutral) when the engine is not running.
Pulling the manual park release while the vehicle is on or turning the ignition on while the manual park release is pulled, will cause a DIC message to display.
To place the vehicle in N (Neutral) using the manual park release:
1. Ensure the vehicle is on level ground and set the parking brake. Release the brake pedal.
2. Turn the vehicle off.
3. Use a flat-bladed tool to remove the interior trim panel.
4. Ensure more than one minute has passed since Step 2. Apply the brake pedal.
5. Pull the manual park release lever 90°to its latching position.
6. With the brake pedal released, place the ignition in ACC/ ACCESSORY. Then apply the brake pedal and release the parking brake.
7. Ensure there are no loose objects in the area that could bump the manual park release lever.
To return the vehicle to P (Park) using the manual park release:
1. Bring the vehicle to a complete stop.
2. Rotate the manual park release lever 90°back to its original position.
3. Apply the parking brake.
4. Confirm that the vehicle is in P (Park) by turning the ignition on or by placing the vehicle in ACC/ACCESSORY, then ensure that the indicator displays P.
5. Reinstall the interior trim panel.
Parking over Things That Burn
Warning
Things that can burn could touch hot exhaust parts under the vehicle and ignite. Do not park over papers, leaves, dry grass, or other things that can burn.
Active Fuel Management
The vehicle’s engine may be equipped with Active Fuel Management, which allows the engine to operate on either all of its cylinders, or in reduced cylinder operation, depending on the driving conditions.
When less power is required, such as cruising at a constant vehicle speed, the system will operate in reduced operation mode, allowing the vehicle to achieve better fuel economy. When greater power demands are required, such as accelerating from a stop, passing, or merging onto a highway, the system will maintain full-cylinder operation.
If the vehicle has an Active Fuel Management indicator, see Driver Information Center (DIC) for more information on using this display.
Extended Parking
It is best not to park with the vehicle running. If the vehicle is left running, be sure it will not move and there is adequate ventilation.
See Shifting Into Park 185 and Engine Exhaust 188.
If the vehicle is left parked and running with the RKE transmitter outside the vehicle, it will continue to run for up to half an hour.
If the vehicle is left parked and running with the RKE transmitter inside the vehicle, it will continue to run for up to an hour.
The vehicle could turn off sooner if it is parked on a hill, due to lack of available fuel.
The timer will reset if the vehicle is taken out of P (Park) while it is running.
Warning
Engine exhaust contains carbon monoxide (CO), which cannot be seen or smelled. Exposure to CO can cause unconsciousness and even death.
Exhaust may enter the vehicle if:
If unusual fumes are detected or if it is suspected that exhaust is coming into the vehicle:
Never park the vehicle with the engine running in an enclosed area such as a garage or a building that has no fresh air ventilation.
Running the Vehicle While Parked
It is better not to park with the engine running.
If the vehicle is left with the engine running, follow the proper steps to be sure the vehicle will not move. See Shifting Into Park 185 and Engine Exhaust 188.
If parking on a hill and pulling a trailer, see Driving Characteristics and Towing Tips 241.

The shift pattern is displayed in the top of the shift lever. The selected gear position will illuminate red on the shift lever, while all others will be displayed in white. If the shift is not immediate, as in very cold conditions, the indicator on the shift lever may flash until it is fully engaged.
The shift lever always starts from a center position, represented by an up/ down arrow on the shift pattern. After releasing the shift lever, it will return to the center position.
The transmission does not operate when the vehicle is off.
If the vehicle is in ACC/ACCESSORY, the transmission can be shifted into P (Park).
If the vehicle is turned off while at a relatively high vehicle speed, the transmission will automatically shift to N (Neutral). Once the vehicle is stopped, P (Park) is automatically selected.
P : This position locks the drive wheels. Use P (Park) when starting the engine because the vehicle cannot move easily.
Warning
It is dangerous to get out of the vehicle if the transmission is not in P (Park) with the parking brake set. The vehicle can roll.
Do not leave the vehicle when the engine is running. If the engine has been left running, the vehicle can move suddenly. You or others could be injured. To be sure the vehicle will not move, even when on fairly level ground, always set the parking brake and place the transmission into P (Park). See Shifting Into Park 185 and Electric Parking Brake 197.
This vehicle is equipped with an electronically controlled transmission. The shift lock release button is designed to prevent inadvertent shifting out of P (Park) unless the ignition is on, the brake pedal is applied, and the shift lock release button is pressed.
When the vehicle is stopped, press ENGINE START/STOP to turn off the vehicle. The transmission will shift to P (Park) automatically unless the vehicle is in N (Neutral), See “Car Wash Mode” later in this section.
The vehicle will not shift into P (Park) if it is moving too fast. Stop the vehicle and shift into P (Park).
To shift into and out of P (Park), see Shifting Into Park 185 and Shifting out of Park 185.
Service Shift Lever Message
If the message SERVICE SHIFTER SEE OWNER’S MANUAL appears in the Driver Information Center (DIC), the shift lever needs service. Have the vehicle serviced as soon as possible.
If the vehicle is automatically shifting into P (Park), check to see if the P (Park) button on top of the shift lever is stuck. To operate the vehicle, hold the shift lever in the desired gear, R (Reverse) or D (Drive), until vehicle speed exceeds 15 km/h (10 mph), then release the shift lever.
R : Use this gear to back up.
If the vehicle is shifted from either R (Reverse) to D (Drive) or M (Manual Mode), or M (Manual Mode) or D (Drive) to R (Reverse) while the speed is too high, the vehicle will shift to N (Neutral). Reduce the vehicle speed and try the shift again.
To shift into R (Reverse):
1. Bring the vehicle to a complete stop.
2. Press and hold the shift lock release button on the side of the shift lever.
3. From the center position, move the shift lever forward through the first detent to the end of travel. R is illuminated in red.
4. After releasing the shift lever, it will return to the center position.
To shift out of R (Reverse):
1. Bring the vehicle to a complete stop.
2. Shift to the desired gear.
3. After releasing the shift lever, it will return to the center position.
At low vehicle speeds, R (Reverse) can be used to rock the vehicle back and forth to get out of snow, ice, or sand without damaging the transmission. See If the Vehicle Is Stuck 175.
N : In this position, the engine does not connect with the wheels. To restart the engine when the vehicle is already moving, use N (Neutral) only.
Warning
Shifting into a drive gear while the engine is running at high speed is dangerous. Unless your foot is firmly on the brake pedal, the vehicle could move very rapidly. You could lose control and hit people or objects. Do not shift into a drive gear while the engine is running at high speed.
Caution
Shifting out of P (Park) or N (Neutral) with the engine running at high speed may damage the transmission. The repairs would not be covered by the vehicle warranty. Be sure the engine is not running at high speed when shifting the vehicle.
The vehicle is not designed to stay in N (Neutral) for more than five minutes. It may automatically shift into P (Park). N (Neutral) is not intended for towing. If the vehicle needs to be towed, see Towing the Vehicle 316.
To shift into N (Neutral):
1. Move the shift lever forward to the first detent from the center position.
2. After releasing the shift lever, it will return to the center position.
To shift out of N (Neutral):
1. Bring the vehicle to a complete stop.
2. Shift to the desired gear.
If shifting from N (Neutral) to R (Reverse), press the shift lock release button.
3. After releasing the shift lever, it will return to the center position.
Car Wash Mode
This vehicle includes a Car Wash Mode that allows the vehicle to remain in N (Neutral) for use in automatic car washes.
Car Wash Mode (Engine Off – Driver in Vehicle)
To place the vehicle in N (Neutral) with the engine off and the vehicle occupied:
1. Drive to the entrance of the car wash.
2. Apply the brake pedal.
3. Shift to N (Neutral).
4. Turn off the engine and release the brake pedal.
5. The indicator should continue to show N. If it does not, repeat Steps 2–4.
6. The vehicle is now ready for the car wash.
Car Wash Mode (Engine Off – Driver out of Vehicle)
To place the vehicle in N (Neutral) with the engine off and the vehicle unoccupied:
1. Drive to the entrance of the car wash.
If the vehicle is in P (Park), apply the brake pedal and press the shift lock release button while moving the shift lever forward.
N will illuminate in red.
2. After releasing the shift lever, it will return to the center position.
To shift out of N (Neutral):
1. Bring the vehicle to a complete stop.
2. Shift to the desired gear.
3. Open the door.
4. Shift to N (Neutral).
5. Turn off the engine and release the brake pedal.
6. The indicator should continue to show N. If it does not, repeat Steps 2–5.
7. Exit the vehicle and close the door. The vehicle is now ready for the car wash.
8. The vehicle may automatically shift to P (Park) when the door is opened.
Car Wash Mode (Engine On – Driver in Vehicle)
To place the vehicle in N (Neutral) with the engine on and the vehicle occupied:
1. Drive to the entrance of the car wash.
2. Apply the brake pedal.
3. Shift to N (Neutral).
4. Release the brake pedal. The vehicle is now ready for the car wash.
Car Wash Mode (Engine On – Driver out of Vehicle)
To place the vehicle in N (Neutral) with the engine on and the vehicle unoccupied:
1. Drive to the entrance of the car wash.
2. Apply the brake pedal.
3. Open the door.
4. Shift to N (Neutral), then release the brake pedal.
5. The indicator should continue to show N. If it does not, repeat Steps 2–4.
6. Exit the vehicle and close the door. The vehicle is now ready for the car wash.
7. The vehicle may automatically shift to P (Park) when the door is opened.
Caution
A transmission hot message may display if the automatic transmission fluid is too hot. Driving under this condition can damage the vehicle. Stop and idle the engine to cool the automatic transmission fluid. This message clears when the transmission fluid has cooled sufficiently.
D : This position is for normal driving. If more power is needed for passing, press the accelerator pedal down.
To shift into D (Drive):
1. Bring the vehicle to a complete stop.
2. From the center position, move the shift lever back.
To shift out of D (Drive):
1. Bring the vehicle to a complete stop.
2. Shift to the desired gear.
3. After releasing the shift lever, it will return to the center position.
Downshifting the transmission in slippery road conditions could result in skidding. See “Skidding” under Loss of Control 167.
Caution
Spinning the tires or holding the vehicle in one place on a hill using only the accelerator pedal may damage the transmission. The repair will not be covered by the vehicle warranty. If the vehicle is stuck, do not spin the tires. When stopping on a hill, use the brakes to hold the vehicle in place.
Manual Mode
Tap Shift
Caution
Driving with the engine at a high rpm without upshifting while using Tap Shift, could damage the vehicle. Always upshift when necessary while using Tap Shift.
If equipped, vehicles with Tap Shift have controls on the back of the steering wheel to manually shift the automatic transmission.
Permanent Tap Shift Mode
To enter Permanent Tap Shift Mode:
1. With the vehicle in D (Drive), pull back on the shift lever to activate M (Manual Mode). The M in the shift pattern will illuminate in red, and the D will switch to white.
2. After releasing the shift lever, it will return to the center position.
3. Pull the control toward you to shift. Pull the left control to downshift, and the right control to upshift. To shift to the lowest available gear, pull and hold the left control.
To exit Permanent Tap Shift Mode:
1. To exit M (Manual Mode) and return to D (Drive), pull back on the shift lever. The D in the shift pattern will illuminate in red, and the M will switch to white.
2. After releasing the shift lever, it will return to the center position.
M (Manual Mode) can be exited to return to D (Drive) at any speed by pulling the lever rearward from the center position. It is not necessary to stop the vehicle or shift to N (Neutral) or P (Park) prior to shifting back to D (Drive).
Temporary Tap Shift Mode
To enter Temporary Tap Shift Mode:
1. With the transmission in D (Drive) and not in Permanent Tap Shift Mode, the Tap Shift controls will activate a Temporary Tap Shift Mode, allowing the transmission to be manually shifted.
2. To shift to the lowest available gear, press and hold the left control.
3. To deactivate, hold the right control briefly. Automatic shifts return after no manual shifts have been done for seven to 10 seconds.
While using Tap Shift, the vehicle will have firmer, quicker shifting. This can be used for sport driving or when climbing or descending hills, to stay in gear longer, or to downshift for more power or engine braking.
The transmission will only allow shifting into gears appropriate for the vehicle speed and engine revolutions per minute (rpm). If shifting is prevented for any reason, the M or D will flash in the instrument cluster. The transmission will not automatically shift to the next higher gear if the engine rpm is too high.
It will only automatically shift to the next lower gear if the engine rpm is much too low.
All-Wheel Drive
Vehicles with this feature can operate in All-Wheel Drive (AWD) Mode. See Driver Mode Control 201.
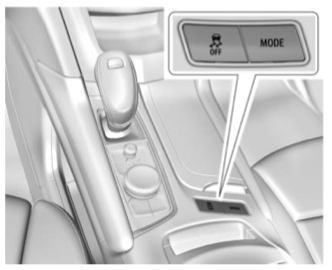
Press MODE to activate AWD. AWD is active in both AWD and Sport Modes.
The AWD system delivers power to all four wheels and the system adjusts as needed to improve traction.
The AWD Mode will stay selected until the mode is changed. If the vehicle is placed in Sport Mode, see Driver Mode Control 201.
Sport Mode is canceled with each ignition cycle. See Driver Mode Control 201.
When operated in Tour Mode, the vehicle will deliver power to the front wheels only and may provide better fuel economy.
If Tour Mode is selected see Driver Mode Control 201.
Electric Brake Boost
Vehicles equipped with electric brake boost have hydraulic brake circuits that are electronically controlled when the brake pedal is applied during normal operation. The system performs routine tests and turns off within a few minutes after the vehicle is shutdown. Noise may be heard during this time. If the brake pedal is pressed during the tests or when the electric brake boost system is off, a noticeable change in pedal force and travel may be felt. This is normal.
Antilock Brake System (ABS)
The Antilock Brake System (ABS) helps prevent a braking skid and maintain steering while braking hard.
ABS performs a system check when the vehicle is first driven.
A momentary motor or clicking noise may be heard while this test is going on, and the brake pedal may move slightly. This is normal.
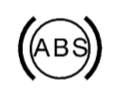
If there is a problem with ABS, this warning light stays on. See Antilock Brake System (ABS) Warning Light 123.
ABS does not change the time needed to get a foot on the brake pedal and does not always decrease stopping distance. If you get too close to the vehicle ahead, there will not be enough time to apply the brakes if that vehicle suddenly slows or stops. Always leave enough room ahead to stop, even with ABS.
Using ABS
Do not pump the brakes. Just hold the brake pedal down firmly. Hearing or feeling ABS operate is normal.
Braking in Emergencies
ABS allows steering and braking at the same time. In many emergencies, steering can help even more than braking.
Electric Parking Brake

The vehicle has an Electric Parking Brake (EPB). The EPB can always be activated, even if the ignition is off. To prevent draining the battery, avoid repeated cycles of the EPB system when the engine is not running.
The system has a  or PARK Electric Parking Brake light, and a
  Service Parking Brake light. See Electric Parking Brake Light 122 and Service Electric Parking Brake Light 123.
Before leaving the vehicle, check for the or PARK light to ensure that the parking brake is applied.
EPB Apply
To apply the EPB:
1. Be sure the vehicle is at a complete stop.
2. Press the EPB switch momentarily.
The or PARK light will flash and then stay on once the EPB is fully applied. If the or PARK light flashes continuously, then the EPB is only partially applied or there is a problem with the EPB. A DIC message will display. Release the EPB and try to apply it again. If the light does not come on, or keeps flashing, have the vehicle serviced. Do not drive the vehicle if the or PARK light is flashing. See your dealer. See Electric Parking Brake Light 122.
If the light is on, press the EPB switch and hold it. Continue to hold the switch until theor PARK light remains on. If the light remains on, see your dealer.
If the EPB is applied while the vehicle is moving, the vehicle will decelerate as long as the switch is pressed. If the switch is pressed until the vehicle comes to a stop, the EPB will remain applied.
The vehicle may automatically apply the EPB in some situations when the vehicle is not moving. This is normal, and is done to periodically check the correct operation of the EPB system.
If the EPB fails to apply, block the rear wheels to prevent vehicle movement.
EPB Release
To release the EPB:
1. Turn the ignition on or to ACC/ ACCESSORY.
2. Apply and hold the brake pedal.
3. Press the EPB switch momentarily.
The EPB is released when the or PARK light is off.
If the light is on, release the EPB by pressing and holding the EPB switch. Continue to hold the switch until the or PARK light is off.
If either light stays on after release is attempted, see your dealer.
Caution
Driving with the parking brake on can overheat the brake system and cause premature wear or damage to brake system parts. Make sure that the parking brake is fully released and the brake warning light is off before driving.
Automatic EPB Release
The EPB will automatically release if the vehicle is running, placed into gear, and an attempt is made to drive away. Avoid rapid acceleration when the EPB is applied to preserve parking brake lining life.
If parking on a hill, or if the vehicle is pulling a trailer, see Driving Characteristics and Towing Tips 241.
Brake Assist
Brake Assist detects rapid brake pedal applications due to emergency braking situations and provides additional braking to activate the Antilock Brake System (ABS) if the brake pedal is not pushed hard enough to activate ABS normally. Minor noise, brake pedal pulsation, and/or pedal movement during this time may occur. Continue to apply the brake pedal as the driving situation dictates. Brake Assist disengages when the brake pedal is released.
Hill Start Assist (HSA)
Warning
Do not rely on the HSA feature. HSA does not replace the need to pay attention and drive safely. You may not hear or feel alerts or warnings provided by this system. Failure to use proper care when driving may result in injury, death, or vehicle damage. See Defensive Driving 165.
When the vehicle is stopped on a grade, Hill Start Assist (HSA) prevents the vehicle from rolling in an unintended direction during the transition from brake pedal release to accelerator pedal apply. The brakes release when the accelerator pedal is applied. If the accelerator pedal is not applied within a few minutes, the Electric Parking Brake will apply. The brakes may also release under other conditions. Do not rely on HSA to hold the vehicle.
HSA is available when the vehicle is facing uphill in a forward gear, or when facing downhill in R (Reverse). The vehicle must come to a complete stop on a grade for HSA to activate.
Traction Control/Electronic Stability Control
System Operation
The vehicle has a Traction Control System (TCS) and StabiliTrak/ Electronic Stability Control (ESC). These systems help limit wheel spin and assist the driver in maintaining control, especially on slippery road conditions.
TCS activates if it senses that any of the drive wheels are spinning or beginning to lose traction. On an All-Wheel Drive (AWD) vehicle in AWD or Sport Mode, the system will operate if it senses that any of the wheels are spinning or beginning to lose traction. When this happens, TCS applies the brakes to the spinning wheels and reduces engine power to limit wheel spin.
StabiliTrak/ESC activates when the system senses a discrepancy between the intended path and the direction the vehicle is actually traveling.
StabiliTrak/ESC selectively applies braking pressure at any one of the vehicle's brakes to help steer the vehicle in the direction which you are steering.
If cruise control is being used and TCS or StabiliTrak/ESC begins to limit wheel spin, cruise control will disengage. Cruise control may be turned back on when road conditions allow. TCS and StabiliTrak/ESC will automatically turn on when cruise control is set.
Both systems come on automatically when the vehicle is started and begins to move. The systems may be heard or felt while they are operating or while performing diagnostic checks. This is normal and does not mean there is a problem with the vehicle.
It is recommended to leave both systems on for normal driving conditions, but it may be necessary to turn TCS off if the vehicle gets stuck in sand, mud, ice, or snow. See If the Vehicle Is Stuck 175 and “Turning the Systems Off and On” later in this section.

The indicator light for both systems is in the instrument cluster. This light will:
If either system fails to turn on or to activate, a message may display in the Driver Information Center (DIC), and  comes on and stays on to indicate that the system is inactive and is not assisting the driver in maintaining control. The vehicle is safe to drive, but driving should be adjusted accordingly.
If comes on and stays on:
1. Stop the vehicle.
2. Turn the engine off and wait 15 seconds.
3. Start the engine.
Drive the vehicle. If comes on and stays on, the vehicle may need more time to diagnose the problem. If the condition persists, see your dealer.
Turning the Systems Off and On
Caution
Do not repeatedly brake or accelerate heavily when TCS is off. The vehicle driveline could be damaged.
To turn off only TCS, press and release  . The Traction Off light
  displays in the instrument cluster and a DIC message may display. To turn TCS on again, press and release . The Traction Off lightdisplayed in the instrument cluster will turn off and a DIC message may display.
If TCS is limiting wheel spin when is pressed, the system will not turn off until the wheels stop spinning.
To turn off both TCS and StabiliTrak/ ESC, press and hold until the Traction Off light and StabiliTrak/ ESC Off light come on and stay on in the instrument cluster. A DIC message may display. To turn TCS and StabiliTrak/ESC on again, press and release . The Traction Off light and StabiliTrak/ESC Off light in the instrument cluster turn off and a DIC message may display.
StabiliTrak will automatically turn on if the vehicle exceeds 56 km/h (35 mph). Traction control will remain off.
Adding accessories can affect vehicle performance. See Accessories and Modifications 256.
Driver Mode Control
Depending on the option package and available features, Driver Mode Control can have the following modes: Tour, Sport, All-Wheel Drive (AWD), Snow/Ice (FWD vehicles only), and Off-Road (AWD vehicles only).
Press the Drive Mode button on the center console to make a mode selection. When pressed, the mode menu will display in the instrument cluster and activate the next available mode.
If the vehicle is in Tour or AWD it will stay in that mode through future ignition cycles. If the vehicle is in any other mode, it will revert back to Tour Mode when the vehicle is restarted. When AWD, Sport Mode, Snow/Ice Mode, or Off-Road is selected, a unique and persistent indicator will be displayed in the instrument cluster. For more information on AWD Mode, see All-Wheel Drive 195.
Mode Descriptions
Tour : Tour Mode operates in FWD to improve fuel economy. This setting provides balance between comfort and handling. This is the standard/default mode and should be used during normal driving operations. There is no persistent indicator in the instrument cluster for this mode.
Sport : Sport Mode improves vehicle handling and acceleration on dry pavement. When active, Sport Mode modifies steering efforts, transmission shifting, AWD torque, and suspension tuning (if equipped). Choosing Sport Mode also engages AWD (if equipped).
The Performance Algorithm Liftfoot (PAL) feature is enabled in Sport Mode. PAL allows the transmission to hold the current gear after a quick release of a heavily applied accelerator pedal. This provides greater engine braking and enhanced vehicle control.
When PAL is activated, there may be an additional green gear symbol which appears in the instrument cluster display. See Gear Shifting Light 123.
AWD : AWD Mode provides drive torque to all four wheels. Select AWD to improve traction and control on slippery road surfaces, such as gravel, sand, wet pavement, snow, and ice For more information on AWD Mode, see All-Wheel Drive 195.
Snow/Ice (FWD Vehicles Only) : Snow/Ice Mode improves vehicle acceleration on snow and ice covered roads. This mode will adjust acceleration to optimize traction on a slippery surface. The accelerator pedal will reduce engine torque at small pedal inputs.
Off-Road : Use this mode for off-road recreational driving. When active, Off-Road Mode modifies accelerator pedal response, AWD torque, TCS, ABS and ESC settings. Choosing Off-Road Mode also engages AWD.
Warning
Cruise control can be dangerous where you cannot drive safely at a steady speed. Do not use cruise control on winding roads or in heavy traffic.
Cruise control can be dangerous on slippery roads. On such roads, fast changes in tire traction can cause excessive wheel slip, and you could lose control. Do not use cruise control on slippery roads.
With cruise control, a speed of about 40 km/h (25 mph) or more can be maintained without keeping your foot on the accelerator. Cruise control does not work at speeds below about 40 km/h (25 mph).
If the Traction Control System (TCS) or StabiliTrak/Electronic Stability Control (ESC) system begins to limit wheel spin while using cruise control, cruise control automatically disengages. See Traction Control/ Electronic Stability Control 199. If a collision alert occurs when cruise control is activated, cruise control is disengaged. See Forward Collision Alert (FCA) System 223. When road conditions allow cruise control to be safely used, it can be turned back on.
Cruise control will disengage if either TCS or StabiliTrak/ESC is turned off.
If the brakes are applied, cruise control disengages.
 : Press to turn the system on and off. A white indicator appears in the instrument cluster when cruise is turned on.
RES+ : If there is a set speed in memory, move the thumbwheel up briefly to resume that speed or move the thumbwheel up and hold to accelerate. If cruise control is already active, use to increase vehicle speed. To increase speed by 1 km/h (1 mph), press RES+ to the first detent. To increase speed to the next 5 km/h (5 mph) mark on the speedometer, press RES+ to the second detent.
SET− : Move the thumbwheel down briefly to set the speed and activate cruise control. If cruise control is already active, use to decrease vehicle speed. To decrease speed by 1 km/h (1 mph), press SET− to the first detent. To decrease speed to the next 5 km/h (5 mph) mark on the speedometer, press SET− to the second detent.
 : Press to disengage cruise control without erasing the set speed from memory.
Setting Cruise Control
If is on when not in use, SET− or RES+ could get pressed and go into cruise when not desired. Keep off when cruise is not being used.
1. Press .
2. Get up to the desired speed.
3. Move the thumbwheel down toward SET− and release. The desired set speed briefly appears in the instrument cluster.
4. Remove your foot from the accelerator.
When cruise control has been set to the desired speed, a green cruise control indicator appears on the instrument cluster and a cruise set speed message appears on the Head-Up Display (HUD), if equipped.
Resuming a Set Speed
If cruise control is set at a desired speed and then the brakes are applied or is pressed, cruise control is disengaged without erasing the set speed from memory.
Once the vehicle speed reaches about 40 km/h (25 mph) or more, move the thumbwheel up toward RES+ briefly. The vehicle returns to the previous set speed.
Increasing Speed While Using Cruise Control
If the cruise control system is already activated:
The speedometer reading can be displayed in either English or metric units. See Instrument Cluster 113. The increment value used depends on the units displayed.
Reducing Speed While Using Cruise Control
If the cruise control system is already activated:
The cruise control system may automatically brake to slow the vehicle.
The speedometer reading can be displayed in either English or metric units. See Instrument Cluster 113. The increment value used depends on the units displayed.
Passing Another Vehicle While Using Cruise Control
Use the accelerator pedal to increase the vehicle speed. When you take your foot off the pedal, the vehicle will slow down to the previous set cruise speed.
While pressing the accelerator pedal or shortly following the release to override cruise, briefly moving the thumbwheel down toward SET− will result in cruise set to the current vehicle speed.
Using Cruise Control on Hills
How well cruise control will work on hills depends upon the vehicle speed, load, and the steepness of the hills. When going up steep hills, you might have to step on the accelerator pedal to maintain speed. When going downhill, the cruise control system may automatically brake to slow the vehicle. Also, you may have to brake or shift to a lower gear to keep your speed down. If the brake pedal is applied, cruise control disengages.
Ending Cruise Control
There are four ways to end cruise control:
..Erasing Speed Memory
The cruise control set speed is erased from memory if is pressed or if the ignition is turned off.
Adaptive Cruise Control
If equipped, Adaptive Cruise Control (ACC) allows the cruise control set speed and following gap to be selected. Read this entire section before using this system. The following gap is the following time between your vehicle and a vehicle detected directly ahead in your path, moving in the same direction. If no vehicle is detected in your path, ACC works like regular cruise control. ACC uses camera and radar sensors. See Radio Frequency Statement 355.
If a vehicle is detected in your path, ACC can speed up the vehicle or apply limited, moderate braking to maintain the selected following gap. To disengage ACC, apply the brake.
If ACC is controlling your vehicle speed when the traction control system (TCS) or StabiliTrak electronic stability control system activates, ACC may automatically disengage. See Traction Control/Electronic Stability Control 199. When road conditions allow ACC to be safely used, ACC can be turned back on. ACC will not engage if the TCS or StabiliTrak/ESC is disabled.
Warning
ACC has limited braking ability and may not have time to slow the vehicle down enough to avoid a collision with another vehicle you are following. This can occur when vehicles suddenly slow or stop ahead, or enter your lane. Also see “Alerting the Driver” in this section. Complete attention is always required while driving and you should be ready to take action and apply the brakes. See Defensive Driving 165.
Warning
ACC will not detect or brake for children, pedestrians, animals, or other objects.
Do not use ACC when:
 : Press to turn the system on or off. The indicator turns white on the instrument cluster when ACC is turned on.
RES+ : Press briefly to resume the previous set speed or to increase vehicle speed if ACC is already activated. To increase speed by about 1 km/h (1 mph), press RES+ to the first detent. To increase speed to the next 5 km/h (5 mph) mark on the speedometer, press RES+ to the second detent.
SET– : Press briefly to set the speed and activate ACC or to decrease vehicle speed if ACC is already activated. To decrease speed by about 1 km/h (1 mph), press SET− to the first detent. To decrease speed to the next 5 km/h (5 mph) mark on the speedometer, press SET− to the second detent.
: Press to disengage ACC without erasing the selected set speed from memory.
 : Press to select a following gap time (or distance) setting for ACC of Far, Medium, or Near.
The speedometer reading can be displayed in either English or metric units. See Instrument Cluster 113. The increment value used depends on the units displayed.
Switching Between ACC and Regular Cruise Control
To switch between ACC and regular cruise control, press and hold .
A Driver Information Center (DIC) message displays. See Vehicle Messages 135.
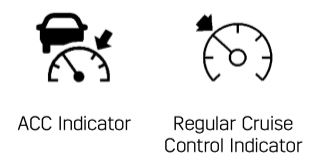
When ACC is engaged, a green  indicator will be lit on the instrument cluster and the following gap will be displayed. When the regular cruise control is engaged, a green indicator will be lit on the instrument cluster; the following gap will not display.
When the vehicle is turned on, the cruise control mode will be set to the last mode used before the vehicle was turned off.
Warning
Always check the cruise control indicator on the instrument cluster to determine which mode cruise control is in before using the feature. If ACC is not active, the vehicle will not automatically brake for other vehicles, which could cause a crash if the brakes are not applied manually. You and others could be seriously injured or killed.
Setting Adaptive Cruise Control
If is on when not in use, SET-/RES + could be pressed by mistake and engage ACC when not desired. Keep off when cruise is not being used.
Select the set speed desired for ACC. This is the vehicle speed when no vehicle is detected in its path.
While the vehicle is moving, ACC will not set at a speed less than 25 km/h (15 mph), although it can be resumed when driving at lower speeds.
To set ACC while moving:
1. Press .
2. Get up to the desired speed.
3. Press and release SET–.
4. Remove your foot from the accelerator pedal.
After ACC is set, it may immediately apply the brakes if a vehicle ahead is detected closer than the selected following gap.
ACC can also be set while the vehicle is stopped if ACC is on and the brake pedal is applied.
The ACC indicator displays on the instrument cluster and Head-UpDisplay (HUD), if equipped. When ACC is turned on, the indicator will be lit white. When ACC is engaged, the indicator will turn green.
Be mindful of speed limits, surrounding traffic speeds, and weather conditions when selecting the set speed.
Resuming a Set Speed
If ACC is set at a desired speed and then the brakes are applied, ACC is disengaged without erasing the set speed from memory.
To begin using ACC again, press RES+ up briefly while moving more than 5 km/h (5 mph). The vehicle returns to the previous set speed.
If the vehicle is stopped with the brake pedal applied, press RES+ and release the brake pedal. ACC will hold the vehicle until RES+ or the accelerator pedal is pressed.
A green ACC indicator and the set speed display on the instrument cluster. The vehicle ahead indicator may be flashing if a vehicle ahead was present and moved. See “Approaching and Following a Vehicle” later in this section.
Once ACC has resumed, if there is no vehicle ahead, if the vehicle ahead is beyond the selected following gap, or if the vehicle has exited a sharp curve, then the vehicle speed will increase to the set speed.
Increasing Speed While ACC is at a Set Speed
If ACC is already activated, do one of the following:
When the accelerator pedal is pressed, ACC will not brake because it is overridden. The ACC indicator turns blue on the instrument cluster and head-up display, if equipped.
The set speed can also be increased while the vehicle is stopped.
When it is determined there is no vehicle ahead or the vehicle ahead is beyond the selected following gap,,then the vehicle speed will increase to the set speed.
The speedometer reading can be displayed in either English or metric units. See Instrument Cluster 113. The increment value used depends on the units displayed.
Reducing Speed While ACC is at a Set Speed
If ACC is already activated, do one of the following:
The set speed can also be decreased while the vehicle is stopped.
Selecting the Follow Distance Gap
When a slower moving vehicle is detected ahead within the selected following gap, ACC will adjust the vehicle's speed and attempt to maintain the follow distance gap selected.
Press on the steering wheel to adjust the following gap.
When pressed, the current gap setting displays briefly on the instrument cluster. Subsequent presses cycle the gap button through three settings: Far, Medium, or Near. The gap setting will be maintained until it is changed.
Since each gap setting corresponds to a following time (Far, Medium, or Near), the following distance will vary based on vehicle speed. The faster the vehicle speed, the further back your vehicle will follow a vehicle detected ahead. Consider traffic and weather conditions when selecting the following gap. The range of selectable gaps may not be appropriate for all drivers and driving conditions.
Changing the gap setting automatically changes the alert timing sensitivity (Far, Medium, or Near) for the Forward Collision Alert (FCA) feature. See Forward Collision Alert (FCA) System 223.
Alerting the Driver
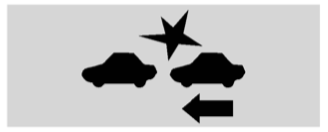
If ACC is engaged, driver action may be required when ACC cannot apply sufficient braking because of approaching a vehicle too rapidly.
When this condition occurs, the collision alert symbol on the HUD will flash on the windshield. Either eight beeps will sound from the front, or both sides of the Safety Alert Seat will pulse five times. See “Collision/ Detection Systems” under Vehicle Personalization 136.
See Defensive Driving 165.
Approaching and Following a Vehicle
The vehicle ahead indicator is in the instrument cluster and HUD display, if equipped.
The vehicle ahead indicator only displays when a vehicle is detected in your vehicle’s path moving in the same direction.
If this symbol is not displaying, ACC will not respond to or brake to vehicles ahead.
ACC automatically slows the vehicle down and adjusts vehicle speed to follow a detected vehicle ahead at the selected follow gap. The vehicle speed increases or decreases to follow a detected vehicle in front of your vehicle when that vehicle is traveling slower than your vehicle set speed.
It may apply limited braking, if necessary. When braking is active, the brake lamps will come on. The automatic braking may feel or sound different than if the brakes were applied manually. This is normal.
Stationary or Very Slow-Moving Objects
Warning
ACC may not detect and react to stopped or slow-moving vehicles ahead of you. For example, the system may not brake for a vehicle it has never detected moving. This can occur in stop-and-go traffic or when a vehicle suddenly appears due to a vehicle ahead changing lanes. Your vehicle may not stop and could cause a crash. Use caution when using ACC. Your complete attention is always required while driving and you should be ready to take action and apply the brakes.
ACC Automatically Disengages
ACC may automatically disengage and the driver will need to manually apply the brakes to slow the vehicle when:
The ACC active symbol will turn white when ACC is no longer active.
In some cases, when ACC will not activate, regular cruise control may be used. See “Switching Between ACC and Regular Cruise Control” previously in this section. Always consider driving conditions before using either cruise control system.
Notification to Resume ACC
ACC will maintain a following gap behind a detected vehicle and slow your vehicle to a stop behind that vehicle.
If the stopped vehicle ahead has driven away and ACC has not resumed, the vehicle ahead indicator will flash as a reminder to check traffic ahead before proceeding. In addition, the left and right sides of the Safety Alert Seat will pulse three times, or three beeps will sound. See “Alert Type” and “Adaptive Cruise Go Notifier” in “Collision/Detection Systems” under Vehicle Personalization 136.
When the vehicle ahead drives away, press RES+ or the accelerator pedal to resume ACC. If stopped for more than two minutes or if the driver door is opened and the driver seat belt is unbuckled, ACC automatically applies the Electric Parking Brake (EPB) to hold the vehicle. The Electric Parking Brake light will turn on. See Electric Parking Brake 197.
A DIC warning message may display indicating to shift to P (Park) before exiting the vehicle. See Vehicle Messages 135
Warning
If ACC has stopped the vehicle, and if ACC is disengaged, turned off, or canceled, the vehicle will no longer be held at a stop. The vehicle can move. When ACC is holding the vehicle at a stop, always be prepared to manually apply the brakes.
Warning
Leaving the vehicle without placing it in P (Park) can be dangerous. Do not leave the vehicle while it is being held at a stop by ACC. Always place the vehicle in P (Park) and turn off the ignition before leaving the vehicle.
ACC Override
If using the accelerator pedal while ACC is active, the ACC indicator turns blue on the instrument cluster and in the HUD (if equipped) indicating ACC braking will not occur. ACC will resume operation when the accelerator pedal is not being pressed.
Warning
The ACC will not automatically apply the brakes if your foot is resting on the accelerator pedal. You could crash into a vehicle ahead of you.
Curves in the Road
Warning
On curves, ACC may not detect a vehicle ahead in your lane. You could be startled if the vehicle accelerates up to the set speed, especially when following a vehicle exiting or entering exit ramps. You could lose control of the vehicle or crash. Do not use ACC while driving on an entrance or exit ramp. Always be ready to use the brakes if necessary.
Warning
On curves, ACC may respond to a vehicle in another lane, or may not have time to react to a vehicle in your lane. You could crash into a vehicle ahead of you, or lose control of your vehicle. Give extra attention in curves and be ready to use the brakes if necessary. Select an appropriate speed while driving in curves.
ACC may operate differently in a sharp curve. It may reduce the vehicle speed if the curve is too sharp.
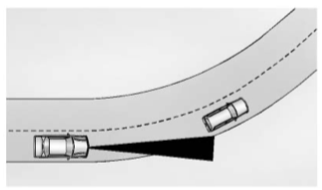
When following a vehicle and entering a curve, ACC may not detect the vehicle ahead and accelerate to the set speed. When this happens, the vehicle ahead indicator will not appear.
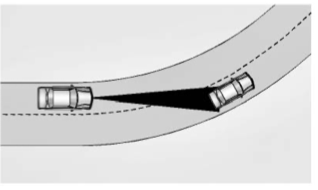
ACC may detect a vehicle that is not in your lane and apply the brakes.
ACC may occasionally provide an alert and/or braking that is considered unnecessary. It could respond to vehicles in different lanes, signs, guardrails, and other stationary objects when entering or exiting a curve. This is normal operation. The vehicle does not need service.
Other Vehicle Lane Changes
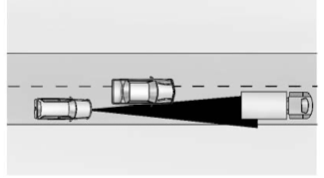
ACC will not detect a vehicle ahead until it is completely in the lane. The brakes may need to be manually applied.
Objects Not Directly in Front of Your Vehicle
The detection of objects in front of the vehicle may not be possible if:
Driving in Narrow Lanes
Vehicles in adjacent traffic lanes or roadside objects may be incorrectly detected when located along the roadway.
Do Not Use ACC on Hills and When Towing a Trailer
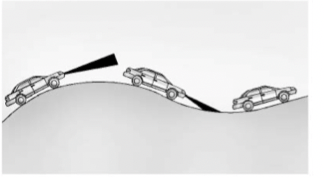
Do not use ACC when driving on steep hills or when towing a trailer. ACC will not detect a vehicle in the lane while driving on steep hills. If the brakes are applied, ACC disengages.
Disengaging ACC
There are three ways to disengage ACC:
.
Erasing Speed Memory
The cruise control set speed is erased from memory if is pressed or if the ignition is turned off.
Cleaning the Sensing System
The camera sensor on the windshield behind the rearview mirror can become blocked by snow, ice, dirt, mud, or debris. This area needs to be cleaned for ACC to operate properly.
The vehicle headlamps may need to be cleaned due to dirt, snow, or ice. Objects that are not illuminated correctly may be difficult to detect.
If ACC will not operate, regular cruise control may be available. See “Switching Between ACC and Regular Cruise Control” previously in this section. Always consider driving conditions before using either cruise control system.
For cleaning instructions, see “Washing the Vehicle” under Exterior Care 319.