

User Guide
Illustrations in this guide are provided for
reference only and may differ from actual
product appearance.

Copyright
© 2020 Roku, Inc. All rights reserved. ROKU, the ROKU Logo, and “NOW THIS IS TV” are trademarks and/or registered trademarks of Roku, Inc.
Material in this User Manual is the property of Roku, Inc., and is protected under US and International copyright and/or other intellectual
property laws. Reproduction or transmission of the materials, in whole or in part, in any manner, electronic, print, or otherwise, without the
prior written consent of Roku, Inc., is a violation of Roku, Inc.’s, rights under the aforementioned laws.
No part of this publication may be stored, reproduced, transmitted or distributed, in whole or in part, in any manner, electronic or otherwise,
whether or not for a charge or other or no consideration, without the prior written permission of Roku, Inc.
Requests for permission to store, reproduce, transmit or distribute materials shall be made to both of the following address:
Roku, Inc.
1155 Coleman Avenue,
San Jose, CA 95110
Product name: TCL TCL Roku TV™
Document name: TCL TCL Roku TV™ User Guide
Document revision: 9.3 – United States, English
Publication date: 7/10/2020

iii
!
!
!
Contents
Welcome ........................................................................................................................................ 1
The new standard in Smart TVs ................................................................................................................................ 1
Get the most out of your new TV ............................................................................................................................. 1
Connections and setup ................................................................................................................... 5
Before initial setup .................................................................................................................................................... 5
Protect against power surges ............................................................................................................................... 5
Safety information ................................................................................................................................................ 5
Avoid audio interference ...................................................................................................................................... 5
Avoid direct light .................................................................................................................................................. 5
Set up your new TV ................................................................................................................................................... 6
What’s in the box ................................................................................................................................................. 6
To mount on a wall ............................................................................................................................................... 6
To use the stand ................................................................................................................................................... 7
Connecting an antenna, cable, or satellite box ......................................................................................................... 8
Connecting external equipment with a composite AV video cable .......................................................................... 8
Connecting external equipment with an HDMI
®
cable ............................................................................................. 9
Connecting headphones or analog soundbar ........................................................................................................... 9
Connecting an AV receiver or digital soundbar ...................................................................................................... 10
Preparing for Internet connectivity ........................................................................................................................ 11
AC power ................................................................................................................................................................ 12
Roku remote batteries ............................................................................................................................................ 12
TCL Roku TV remote ............................................................................................................................................... 12
Panel button ........................................................................................................................................................... 16
Single button ...................................................................................................................................................... 16
Guided Setup ................................................................................................................................ 17
Starting Guided Setup ............................................................................................................................................. 17
Guided Setup .......................................................................................................................................................... 18
Network connection ........................................................................................................................................... 21
Activation ........................................................................................................................................................... 25
Connect your devices ......................................................................................................................................... 26
The Home screen ......................................................................................................................... 29
Personalize your Home screen ........................................................................................................................... 30

iv
Benefits of connecting ................................................................................................................. 32
Connecting brings out your TV’s full potential! ...................................................................................................... 32
Take advantage of awesome features .................................................................................................................... 33
What is streaming? ................................................................................................................................................. 34
What if I didn’t connect my TV? ............................................................................................................................. 36
Setting up live TV ......................................................................................................................... 37
How do I set up the TV tuner? ................................................................................................................................ 38
Using your TV ............................................................................................................................... 42
Status indicator ....................................................................................................................................................... 42
Standby mode energy savings ................................................................................................................................ 43
Getting help ............................................................................................................................................................ 43
Opting in to Smart TV experience ........................................................................................................................... 44
Disable Smart TV experience .............................................................................................................................. 44
Disable Auto Notifications .................................................................................................................................. 45
Watching live TV channels ...................................................................................................................................... 45
Changing channels .............................................................................................................................................. 45
Favorite Channels in non-connected mode ........................................................................................................ 46
Smart Guide ........................................................................................................................................................ 48
Viewing program information ............................................................................................................................ 50
Adjusting settings while watching a program .................................................................................................... 52
Pausing live TV ........................................................................................................................................................ 52
Requirements ..................................................................................................................................................... 52
Enabling Live TV Pause ....................................................................................................................................... 53
Using Live TV Pause ............................................................................................................................................ 53
Notes about Live TV Pause ................................................................................................................................. 55
More Ways to Watch .............................................................................................................................................. 55
Using More Ways to Watch ................................................................................................................................ 55
Getting the most from More Ways to Watch ..................................................................................................... 58
Switching TV inputs ................................................................................................................................................. 58
Auto-detecting devices ....................................................................................................................................... 58
Adjusting audio/video settings ........................................................................................................................... 58
Setting preferred audio language for streaming channels ................................................................................. 58
Playing content from USB storage devices ............................................................................................................. 59
Auto player launch ............................................................................................................................................. 59
Playing content from local network media servers ................................................................................................ 60
Setting up a payment method ................................................................................................................................ 60
Using your TV in a hotel or dorm room .................................................................................................................. 61
About using your TV on a restricted public network .......................................................................................... 61
Getting your Roku TV on line on a restricted public network ............................................................................ 62
Roku voice remotes (select models only) ............................................................................................................... 64
Re-pairing your Roku voice remote .................................................................................................................... 64
Checking the Roku voice remote battery level ................................................................................................... 65

v
!
!
!
Finding your Roku Enhanced Voice Remote ....................................................................................................... 65
Changing and previewing the Enhanced Voice Remote finder sound ................................................................ 66
Adjusting TV settings .................................................................................................................... 67
Settings menu ......................................................................................................................................................... 67
Options menu ......................................................................................................................................................... 68
Options menu settings ............................................................................................................................................ 69
Accessibility ............................................................................................................................................................. 71
Accessibility menu settings ................................................................................................................................. 71
Video description through Secondary Audio Program (SAP) .................................................................................. 73
Picture settings ....................................................................................................................................................... 74
Picture settings menu options ............................................................................................................................ 74
Auto Low Latency Mode (ALLM) ........................................................................................................................ 77
Variable refresh rate (VRR) ................................................................................................................................. 77
Sound settings ........................................................................................................................................................ 78
Roku Smart Soundbar ......................................................................................................................................... 78
Volume mode (select models only) .................................................................................................................... 80
Sound settings – Dolby
®
Audio Processing (select models only) ........................................................................ 81
Sound settings – DTS
®
TruSurround / DTS
®
Studio Sound (select models only) ................................................. 82
Sound settings – Sonic Emotion
™
Premium (select models only) ....................................................................... 83
Sonic Emotion™ settings .................................................................................................................................... 84
Expert Picture Settings (4K models only) ................................................................................................................ 85
Changing privacy settings ....................................................................................................................................... 85
Advertising .......................................................................................................................................................... 85
Microphone ........................................................................................................................................................ 86
Featured Free ............................................................................................................................... 89
My Feed ....................................................................................................................................... 90
Movies Coming Soon .............................................................................................................................................. 90
Movies, TV programs, and people .......................................................................................................................... 90
Searching for something to watch ............................................................................................... 91
How do I search? .................................................................................................................................................... 91
Keyboard search using the remote ..................................................................................................................... 92
Voice Search from a Roku voice remote ............................................................................................................. 92
Searching from the Roku mobile app ................................................................................................................. 93
Searching with Google Assistant ........................................................................................................................ 93
Searching with Amazon Alexa ............................................................................................................................ 94
Direct-to-playback search results ....................................................................................................................... 94
Searching for free content .................................................................................................................................. 95
I searched for a program. Now what? .................................................................................................................... 95
Follow on Roku ....................................................................................................................................................... 96
Recent Searches ...................................................................................................................................................... 96

vi
Roku Zones .............................................................................................................................................................. 97
Using the Roku Channel Store ...................................................................................................... 98
Automatic Account Link .......................................................................................................................................... 99
Customizing your TV .................................................................................................................. 100
Add TV inputs ........................................................................................................................................................ 100
Add streaming channels ....................................................................................................................................... 101
Rename inputs ...................................................................................................................................................... 101
Remove unwanted tiles ........................................................................................................................................ 102
Rearrange tiles ...................................................................................................................................................... 103
Change the look and feel with themes ................................................................................................................. 104
Edit live TV channel lineup .................................................................................................................................... 105
Change menu volume ........................................................................................................................................... 106
Configure power settings ...................................................................................................................................... 106
Power on settings ............................................................................................................................................. 106
Auto power savings .......................................................................................................................................... 107
Standby LED On/Off .......................................................................................................................................... 107
Fast TV start ...................................................................................................................................................... 107
Configure accessibility .......................................................................................................................................... 108
Captions mode .................................................................................................................................................. 108
Captions preferred language ............................................................................................................................ 108
Captions style ................................................................................................................................................... 109
Audio Guide settings ........................................................................................................................................ 110
Customize the Home screen ................................................................................................................................. 110
Parental controls ........................................................................................................................ 112
Creating a parental control PIN ............................................................................................................................ 112
Blocking broadcast TV programs .......................................................................................................................... 113
Enabling parental control of TV programs ........................................................................................................ 113
Blocking based on US TV ratings ....................................................................................................................... 114
Blocking based on US movie ratings ................................................................................................................. 115
Blocking based on Other ratings ....................................................................................................................... 115
Blocking based on Canadian English ratings ..................................................................................................... 116
Blocking based on Canadian French ratings ..................................................................................................... 117
Blocking unrated programs .............................................................................................................................. 118
What happens when a TV program is blocked? ................................................................................................... 119
Changing the parental control PIN ........................................................................................................................ 121
Resetting parental controls .................................................................................................................................. 121
More settings ............................................................................................................................. 122
Guest Mode .......................................................................................................................................................... 122
Network settings ................................................................................................................................................... 124
ZIP Code ................................................................................................................................................................ 125

vii
!
!
!
Time settings ......................................................................................................................................................... 125
Scan again for live TV channels ............................................................................................................................. 126
HDMI
®
mode (4K models only) ............................................................................................................................. 126
Control by mobile apps ......................................................................................................................................... 127
Roku TV premium audio ....................................................................................................................................... 128
Home theater configuration ................................................................................................................................. 128
Turning off the TV speakers for home theater use .......................................................................................... 128
Setting up a digital audio connection ............................................................................................................... 128
Choosing an audio format ................................................................................................................................ 129
Turning off the TV screen while listening to music ........................................................................................... 130
Controlling other devices through CEC ............................................................................................................. 131
Restart the TV ....................................................................................................................................................... 133
Reset the TV .......................................................................................................................................................... 133
Reset audio/video settings ............................................................................................................................... 133
Factory reset everything ................................................................................................................................... 133
What if I can’t access the Factory Reset option? .............................................................................................. 134
Network connection reset ................................................................................................................................ 135
Roku account PIN .................................................................................................................................................. 135
Update the TV ....................................................................................................................................................... 136
Checking for updates on a connected TV ......................................................................................................... 136
Getting updates on a non-connected TV .......................................................................................................... 137
Other devices ............................................................................................................................. 139
Mirror your phone or tablet ................................................................................................................................. 139
Roku mobile app ................................................................................................................................................... 140
Private Listening on the Roku mobile app ........................................................................................................ 140
Universal remotes ................................................................................................................................................. 141
FAQ ............................................................................................................................................. 142
Other information ...................................................................................................................... 143
Battery Caution and Disposal Information ........................................................................................................... 143
Electronics Recycling Information For Consumers ............................................................................................... 143
Care and Cleaning ................................................................................................................................................. 143
Television Specifications ....................................................................................................................................... 144
Notices .................................................................................................................................................................. 144
TTE Technology, Inc. (“TTE”) Limited Warranty ............................................................................................... 144
Important information
viii
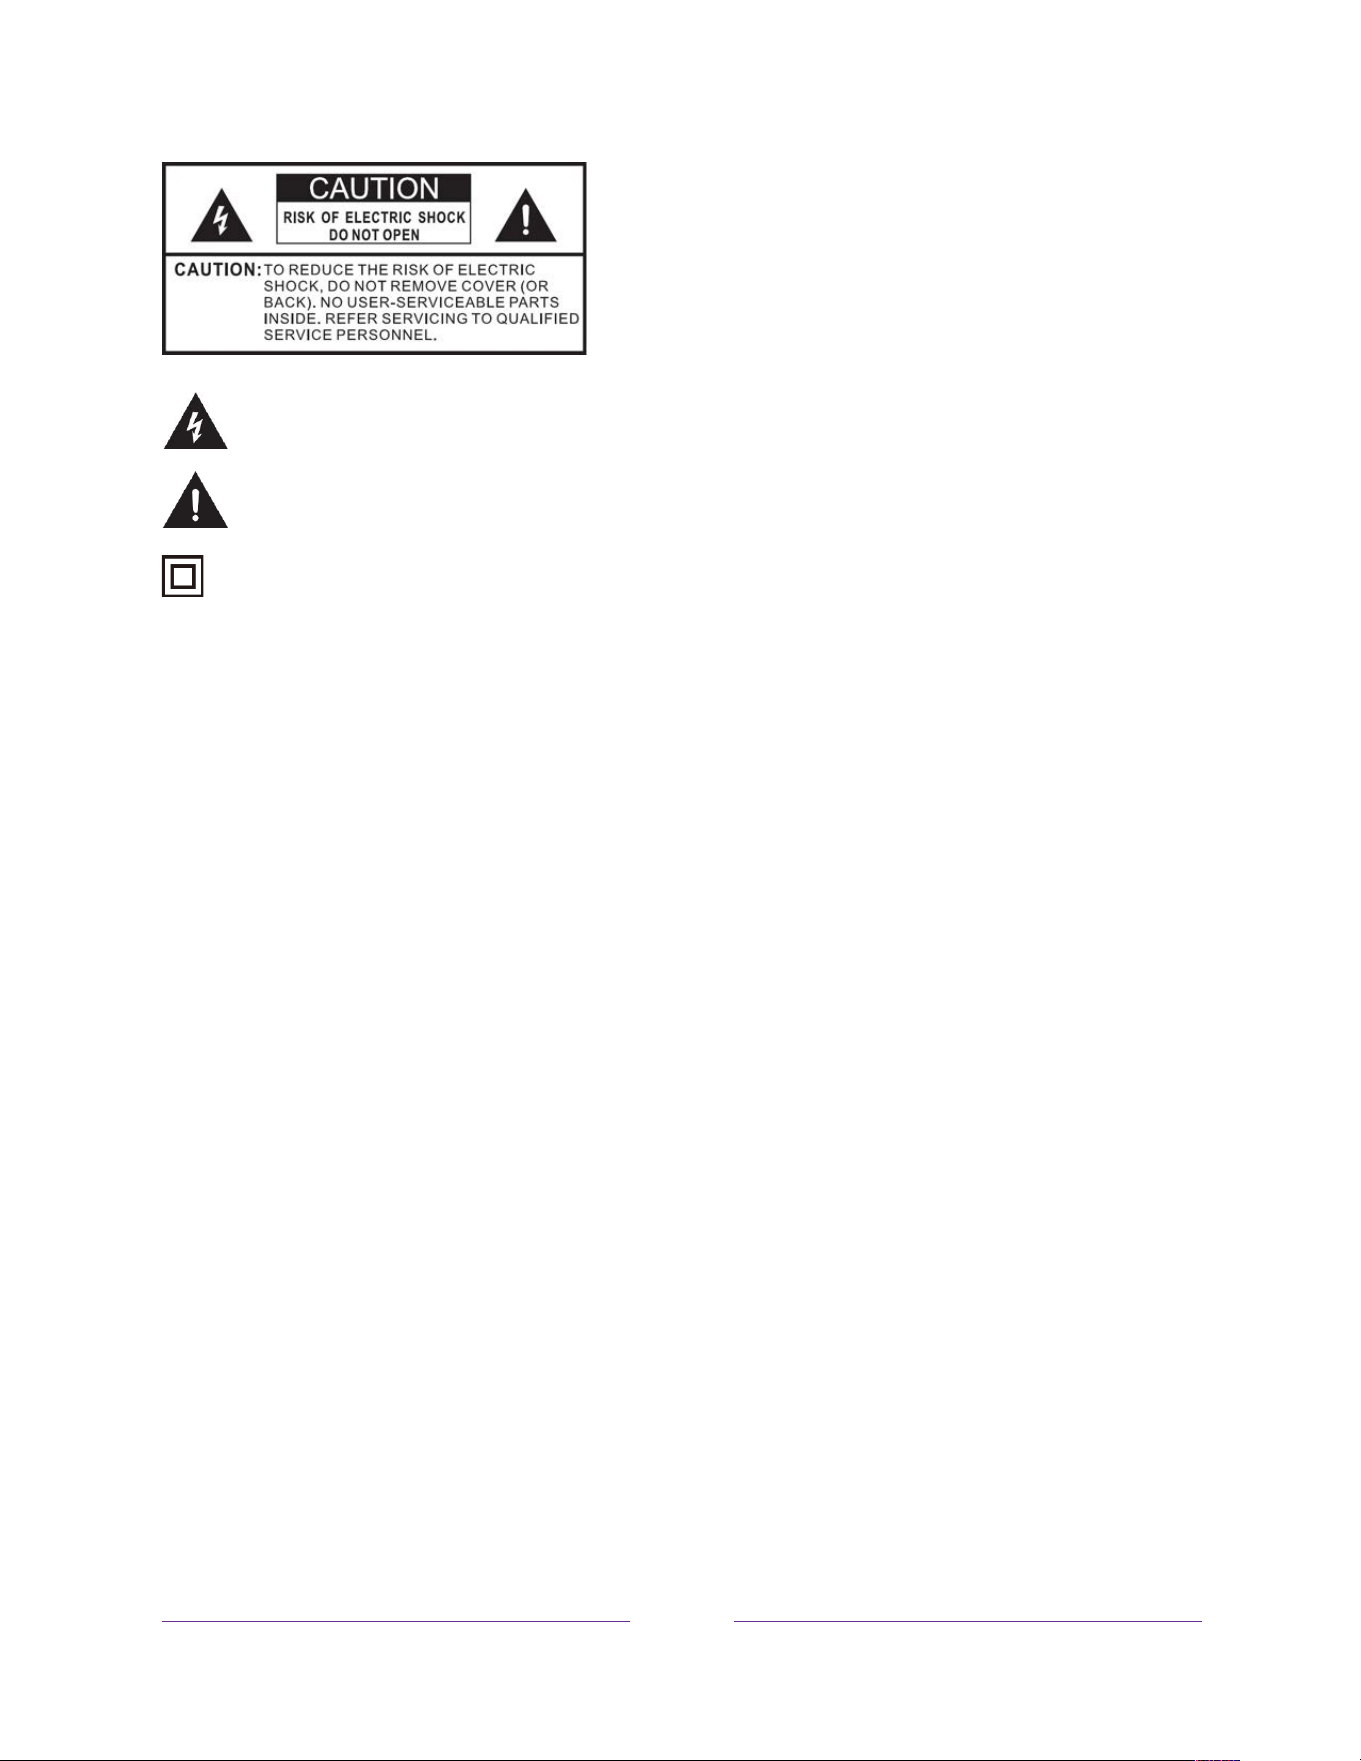
The lightning flash with arrowhead symbol, within an equilateral triangle is intended to alert the user to the presence of
uninsulated dangerous voltage within the product's enclosure that may be of sufficient magnitude to constitute a risk of electric
shock.
The exclamation point within an equilateral triangle is intended to alert the user to the presence of important operating and
maintenance (servicing) instructions in the literature accompanying the product.
This symbol indicates that this product incorporates double insulation between hazardous main voltage and user accessible parts.
When servicing, use only identical replacement parts.
WARNING: To reduce the risk of fire or electric shock, do not expose this product to rain or moisture. This product should not be exposed to
dripping or splashing. No objects filled with liquids, such as vases, should be placed on or near the product.
WARNING: The TV is unstable if it is not properly attached to the base or mounted to the wall. Be sure to follow the base or wall mounting
instructions provided in the User’s Guide to ensure your safety.
WARNING: Do not expose batteries to excessive heat such as sunshine, fire, and so forth.
Proper operating voltage
Refer to the identification/rating label located on the back panel of your product for its proper operating voltage.
Cable TV installer notice of proper grounding
This reminder is provided to call your attention to Article 820-40 of the National Electrical Code (Section 54 of the Canadian Electrical Code, Part
1) which provides guidelines for proper grounding and, in particular, specifies that the cable ground should be connected to the grounding
system of the building as close to the point of cable entry as practical.
Installation location
Important: This television is a table model and is designed to sit on a firm, flat surface. Don’t place the TV on soft carpeting or similar surface
because the ventilation slots on the bottom of the unit will be blocked, resulting in reduced lifetime from overheating. To assure adequate
ventilation for this product, maintain a spacing of 4 inches from the top and side of the TV receiver and 2 inches from the rear of the TV receiver
and other surfaces.
Also, make sure the stand or base you use is of adequate size and strength to prevent the TV from being accidentally tipped over, pushed off, or
pulled off the stand. This could cause personal injury and/or damage to the TV. Refer to the Important Safety Instructions on the following
pages.
Low power standby mode
The Power button (indicated by the power symbol) on this TV and its remote control puts the TV into a very low power standby mode but does
not completely turn the power off. To completely shut the power off, you must disconnect the power cord from the power outlet. The main
plug/appliance coupler is used as a disconnect device. Therefore, you should be sure that the TV is installed in a manner to enable the power
cord to be disconnected when necessary.
Note: In situations where the power plug or appliance coupler is used as the disconnect device, the disconnect device shall remain readily
Accessible and operable.

ix
!
!
!
x
Product Registration
1. Please register your purchase on-line at www.TCL.com. It will make it easier to contact you should it ever be necessary. Registration
is not required for warranty coverage.
Product Information
Keep your sales receipt to obtain warranty parts and service and for proof of purchase. Attach it here and record the serial and model numbers
in case you need them. These numbers are located on the product.
Model No. ____________________________________________
Serial No. _____________________________________________
Purchase Date ________________________________________
Dealer/Address/Phone __________________________________
Important safety instructions
1. Read instructions. Read all the safety and operating instructions before operating the product.
2. Retain instructions. Retain the safety and operating instructions for future reference.
3. Heed warnings. Adhere to all warnings on the product and in the operating instructions.
4. Follow instructions. Follow all operating and use instructions.
5. Water and moisture. Do not use this product near water.
6. Cleaning. Clean only with a dry cloth.
7. Ventilation. Do not block any ventilation openings. Install in accordance with the manufacturer’s instructions.
8. Heat. Do not install near any heat sources such as radiators, heat registers, stoves, or other apparatus (including amplifiers) that
produce heat.
9. Grounding or polarization. Do not defeat the safety purpose of the polarized or grounding-type plug. A polarized plug has two
blades with one wider than the other. A grounding type plug has two blades and a third grounding prong. The wide blade or the
third prong are provided for your safety. If the provided plug does not fit into your outlet, consult an electrician for replacement of
the obsolete outlet.
10.
Power cord protection. Protect the power cord from being walked on or pinched particularly at plugs, convenience receptacles,
and the point where it exits from the product.
11. Accessories. Use only attachments/accessories specified by the manufacturer.
12. Stand/cart. Use only with the cart, stand, tripod, bracket, or table specified by the manufacturer, or sold with the
apparatus. When a cart is used, use caution when moving the cart/apparatus combination to avoid injury from
tip-over.
13. Power. Unplug this apparatus during lightning storms or when unused for long periods of time.
14. Servicing. Refer all servicing to qualified service personnel. Servicing is required when the apparatus has been damaged in any way,
such as power-supply cord or plug damaged, liquid has been spilled or objects have fallen into the apparatus, the apparatus has
been exposed to rain or moisture, does not operate normally, or has been dropped.
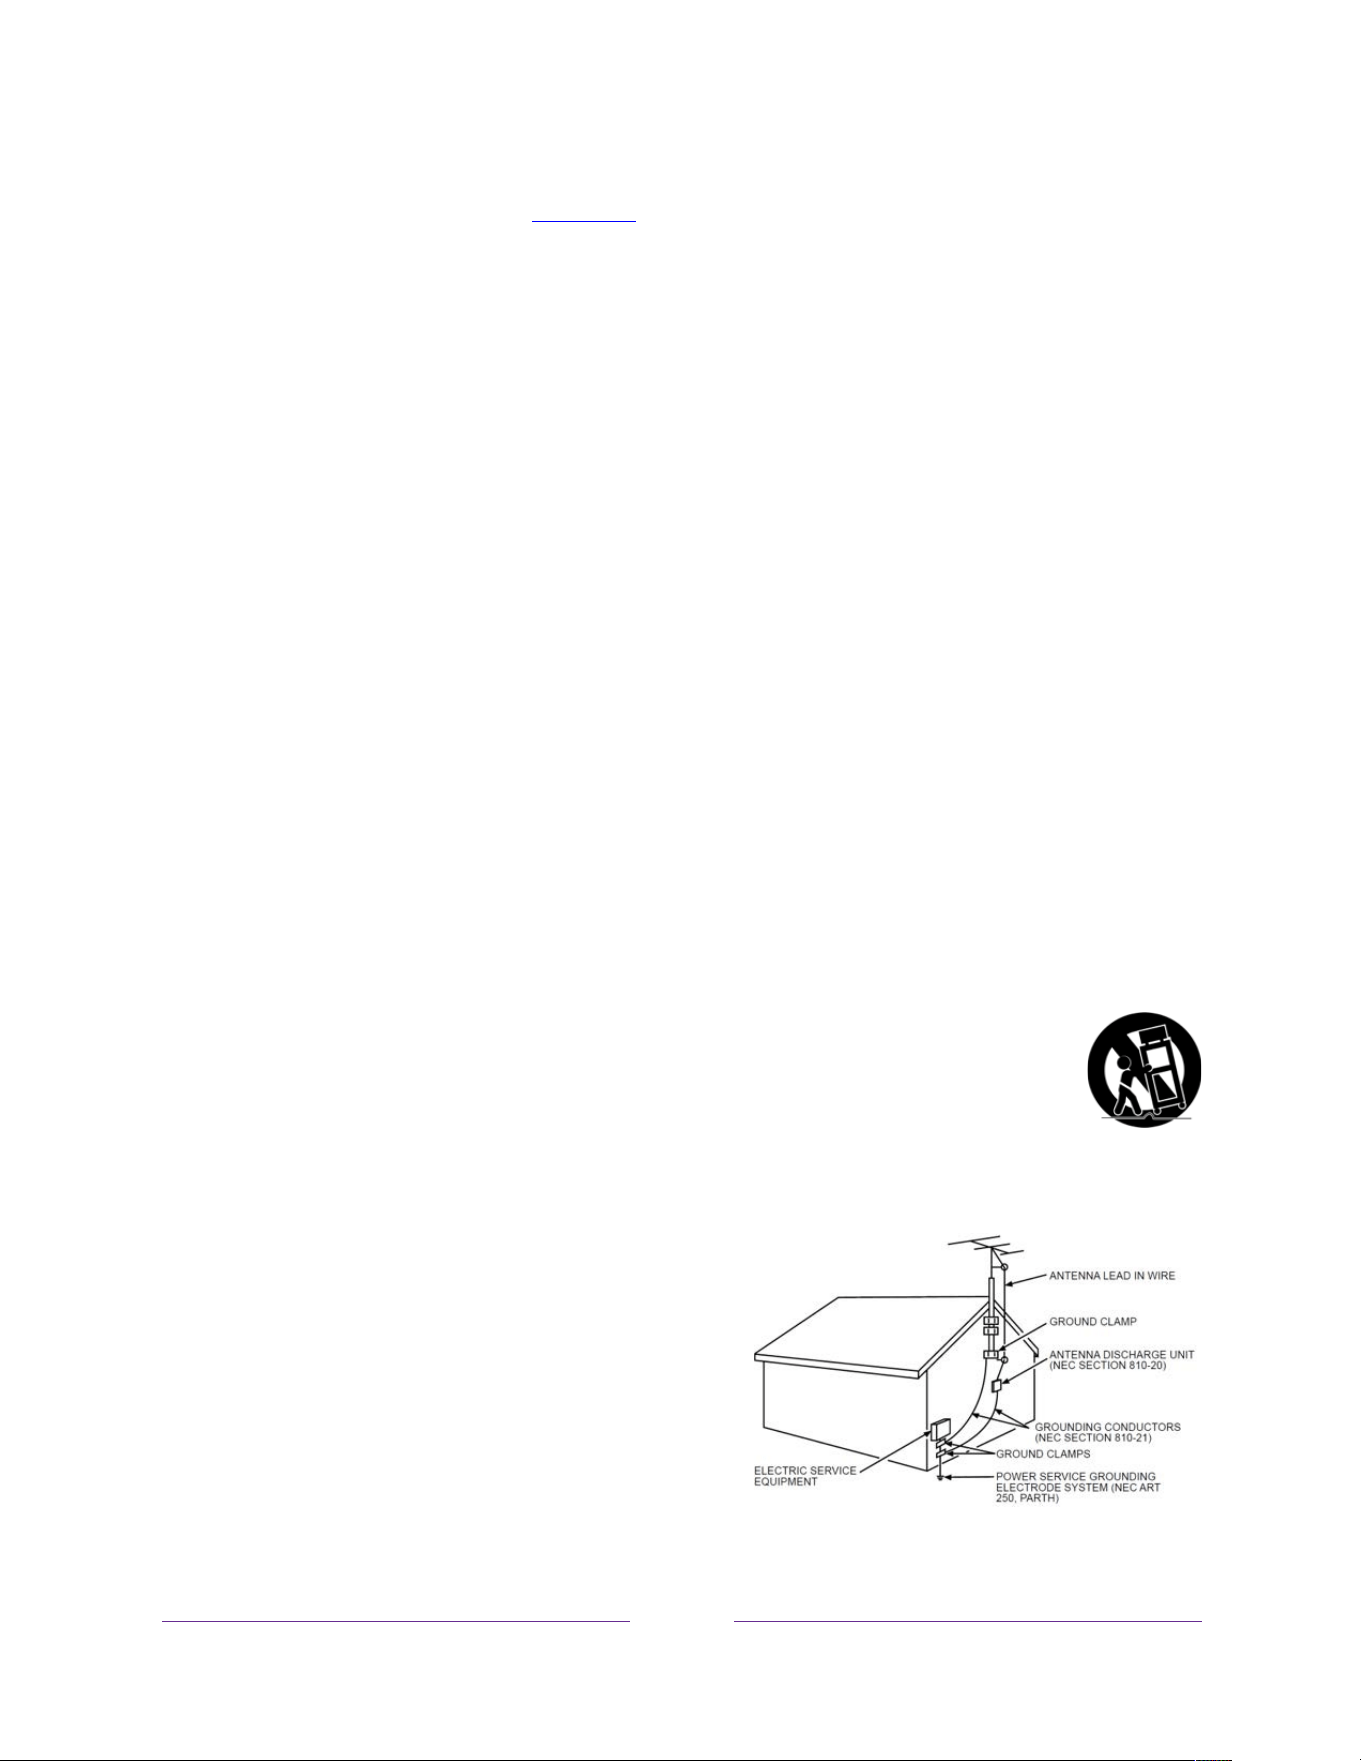
15. If an outside antenna or cable system is connected to the product,
be sure the antenna or cable system is grounded so as to provide
some protection against voltage surges and built-up static charges.
Section 810 of the National Electrical Code, ANSI/NFPA No. 70-2011
(Section 54 of Canadian Electrical Code, Part 1) provides
information with respect to proper grounding of the mast and
supporting structure, grounding of the lead-in wire to an antenna-
discharge unit, size of grounding conductors, location of antenna-
discharge unit, connection to grounding electrodes, and
requirements for the grounding electrode. See following example:

!
!!
1
!
!
!
Welcome
Congratulations on the purchase of your new Roku TV! Discover the joy of endless entertainment. After
it’s set up, you’ll be able to access a world of streaming content channels that may include paid
subscription channels and thousands of free channels.
Important: Your TV receives automatic updates from time to time, enabling new content and features.
This edition of the User Guide describes Roku TV version 9.3. To determine the current version of your
Roku TV, go to Settings > System > About after you complete Guided Setup.
The new standard in Smart TVs
Welcome to TV like you’ve most likely never seen before—a home screen that you can personalize with
your favorite devices and streaming channels. Choose from hundreds of thousands of streaming movies
and TV episodes, plus music, sports, kids, family, international and much more. You should never run
out of things to watch.
Note: A paid subscription or other payments may be required for some channel content. Channel
availability is subject to change and varies by country.
Get the most out of your new TV
Follow these steps to get the most out of your new TV.
• Connect to the Internet
• It’s easy, and it will unlock a world of entertainment. All you need is a network connection.
There are hundreds of free streaming channels, paid subscription services, and convenient
ways to rent or buy a favorite movie or program.

!
2
!
!
!
• Pick your favorite streaming channels
• Find the entertainment you love. From the latest blockbuster movies to your favorite TV
programs, with tons of live sports, a broad selection of music streaming channels, popular
programming in a dozen international languages, 24x7 live news and so much more, your
new Roku TV has your sweet spot. A paid subscription or other payments may be required
for some channels.
• Find live TV programs in the Smart Guide
• Use the Smart Guide to see not only what’s on TV right now, but what will be on in the
coming two weeks. And for many over-the-air programs, if you start watching the program
after it is already in progress, or you see something you missed in the Smart Guide, you can
use More Ways to Watch to find streaming channels where you can see the program from
the beginning, find other episodes, or entire seasons of the program, if applicable.
• Use Roku’s Smart TV experience to discover More Ways to Watch
• Enables you to stream TV programs from the beginning, find more episodes of the TV
program, discover similar programs and movies, and see the full description of the TV
program.
• Personalize your Home screen
• Put your favorite streaming channels, and TV inputs front-and-center on the Home screen.
No more flipping through inputs or wading through complicated menus. You can even
customize the names of each input and move tiles around so your most-often used devices
and streaming channels are only a click away.
• Search for your favorite movie, TV program, actor, or director
• Once you’re connected to the Internet, you can easily search across top streaming channels
and live TV channels. Search by movie or TV program title, actor or director—all from one
place. Search by typing words or phrases using the on-screen keyboard or on your mobile
device, or speak words or phrases in a conversational tone using Voice Search. Some
channels and content require payment.
• Receive a Roku Zone when you search by popular genres or subjects. A Roku Zone is a
collection of relevant entertainment organized into browsable rows such as New Releases,
Free, and Rent or Buy. On 4K TVs, include “4K” in your search to see 4K movies and
programs in the 4K Movies & TV Zone.
• Pause live TV
• Pause, resume, fast forward, and rewind TV programs by connecting your own USB drive to
the TV and pause live TV for up to 90 minutes.
Note: Live TV Pause is available on digital TV programs received on the ANT input, and only
when the TV is linked to a valid Roku account.

!
!!
3
!
!
!
• Watch the Roku Tips & Tricks channel
• Tune in to the Roku Tips & Tricks channel to watch videos and learn more about your TV’s
features, new products, and popular support topics.
• Control your TV with voice commands
• Use your Roku Voice Remote (select models), Enhanced Voice Remote (select models), or
the free Roku mobile app to control your Roku TV. Use conversational voice commands to
search for programs by title, actor, director, or genre. Also, use voice commands to launch
streaming channels, switch inputs, or change live TV channels.
1
While you’re at it, explore these additional voice features:
• Set sleep timers. For example, say “Turn the TV off in 30 minutes”, or “Go to sleep at 11
p.m.”
• Go directly to playing a program whenever your search command can be uniquely
identified and the requested content is available at no additional cost to you.
2
• Search for movies based on popular quotes. For example, say “What movie is this from –
‘Here’s looking at you, kid’.”
• Only on 4K TVs, say “Show me 4K movies” to see a list of 4K movies available across
participating streaming channels.
• Use voice commands to turn the display off (for enjoying streaming music), turn closed
captions on or off, and to replay the last few seconds of a movie or TV program.
• Control the Roku Media Player to play your personal music and show movies and
photos. Say commands like, “Play classic rock on Roku Media Player,” “Skip ahead 20
seconds,” or “Play the next song.”
• Use your voice to open the Smart Guide to see what’s currently playing on your TV or on
select live streaming channels.
• Use Google Home, Google Pixel phone, or the Google Home mobile app to control your
Roku TV. You can search for movies and TV programs, launch most channels, control
playback, adjust the volume, switch inputs, turn the TV on and off, and more. Control
multiple Roku devices by including the location of the device in your commands. For
example, say “Hey Google, turn off Roku in the bedroom.” For information on linking and
controlling your Roku TV, see https://support.roku.com/article/360009649613-how-do-i-
control-my-roku-streaming-device-with-the-google-assistant-.
• Use Amazon Echo Dot, Echo Plus, Echo Show, or the Amazon Alexa mobile app to control
your Roku TV. You can search for movies and TV programs, launch most channels, control
1
Voice features support English and Spanish languages when the corresponding TV language is selected.
2
Direct-to-playback commands work with selected streaming channels. Direct playback occurs only when there is a high
confidence of match, the content is free or you are already subscribed, and the channel is already added to your Home screen.

!
4
!
!
!
playback, adjust the volume, switch inputs, turn the TV on and off, and more. Control
multiple Roku devices by including the location of the device in your commands. For
example, say “Hey Alexa, pause Roku in the living room.” For information on adding the
Alexa Roku skills and controlling your Roku TV, see:
https://support.roku.com/article/360017961074-how-do-i-use-amazon-alexa-with-my-roku-
streaming-device-
• Send your personal media to the big screen
• Send personal photos, videos, and music from your compatible smartphone or tablet to the
TV screen in just a few taps. Plus, with certain channels, you can send movies, programs,
sport highlights, and more directly to your TV.
• Follow movies coming soon
• Use My Feed to choose from and follow a list of upcoming movies, and then watch for alerts
each time one of your followed movies becomes available or changes price.
• Take charge with a smartphone or tablet
• Control your TV from your compatible smartphone or tablet with the free mobile app for
iOS
®
and Android™ mobile devices
1
. Browse channels, view My Feed, listen to audio from
live TV and streaming channels. Search more easily using your mobile device’s keyboard and
Voice Search.
2
• Mirror your compatible smartphone or tablet on your TV. Share videos, photos, web pages,
and more from compatible devices.
• Connect your TCL Roku TV to networks found in hotels and college dorms
• Temporarily link your smartphone or tablet to your TV to agree to any terms, enter codes, or
provide required information before you can get Internet access in locations that require
these additional steps (also known as restricted public networks.
Note: Using your Roku TV on a restricted public network requires wireless availability and use
of your network-connected smartphone, tablet, or computer to authenticate access to your
account. You must use your Roku TV remote, and not the Roku mobile app, to initiate the
connection process. Streaming content might be limited due to your geographic location or
due of restrictions imposed by the network host.
Go to support.roku.com for device compatibility information.
Let’s get started.
1
IOS® is a trademark or registered trademark of Cisco in the U.S. and other countries and is used under license. Android™ is a
trademark of Google Inc.
2
Voice features support English and Spanish languages.

!
!!
5
!
!
!
Connections and setup
Before initial setup
Protect against power surges
• Connect all components before you plug any power cords into the wall outlet or power strip.
• NEVER plug your TCL Roku TV into an outlet that is controlled by a wall switch.
• Turn off the TV before you connect or disconnect any cables.
• Make sure all antennas and cables are properly grounded. Refer to the Important Safety
Instructions.
Safety information
• Prevent TV from overheating by placing in an area with good ventilation.
• Do not block ventilation holes on the TV. Position the TV so air can circulate freely on all sides.
• Do not stack objects on the TV.
• If you place the TV on a stand, make sure you allow adequate ventilation.
• If you connect an audio receiver or amplifier to the TV, place it on the top shelf so the heated air
will not overheat the TV.
Avoid audio interference
• Position cables properly; insert each cable firmly into the designated jack.
• Route all cables down one side of the back of the TV instead of straight down the middle.
• If your antenna uses 300-ohm twin lead cables, do not coil the cables.
• Keep twin lead cables away from audio/video cables.
Avoid direct light
Do not place the TV where sunlight or room lighting is directed toward the screen. Use soft or indirect
lighting.
!
6
!
!
!
Set up your new TV
Open the box and remove the TV and other items. Be careful, the TV is heavy! We strongly recommend
that two people unbox the TV.
Be sure to check all the foam packaging as the stands from some TV’s are stored in the foam for
protection.
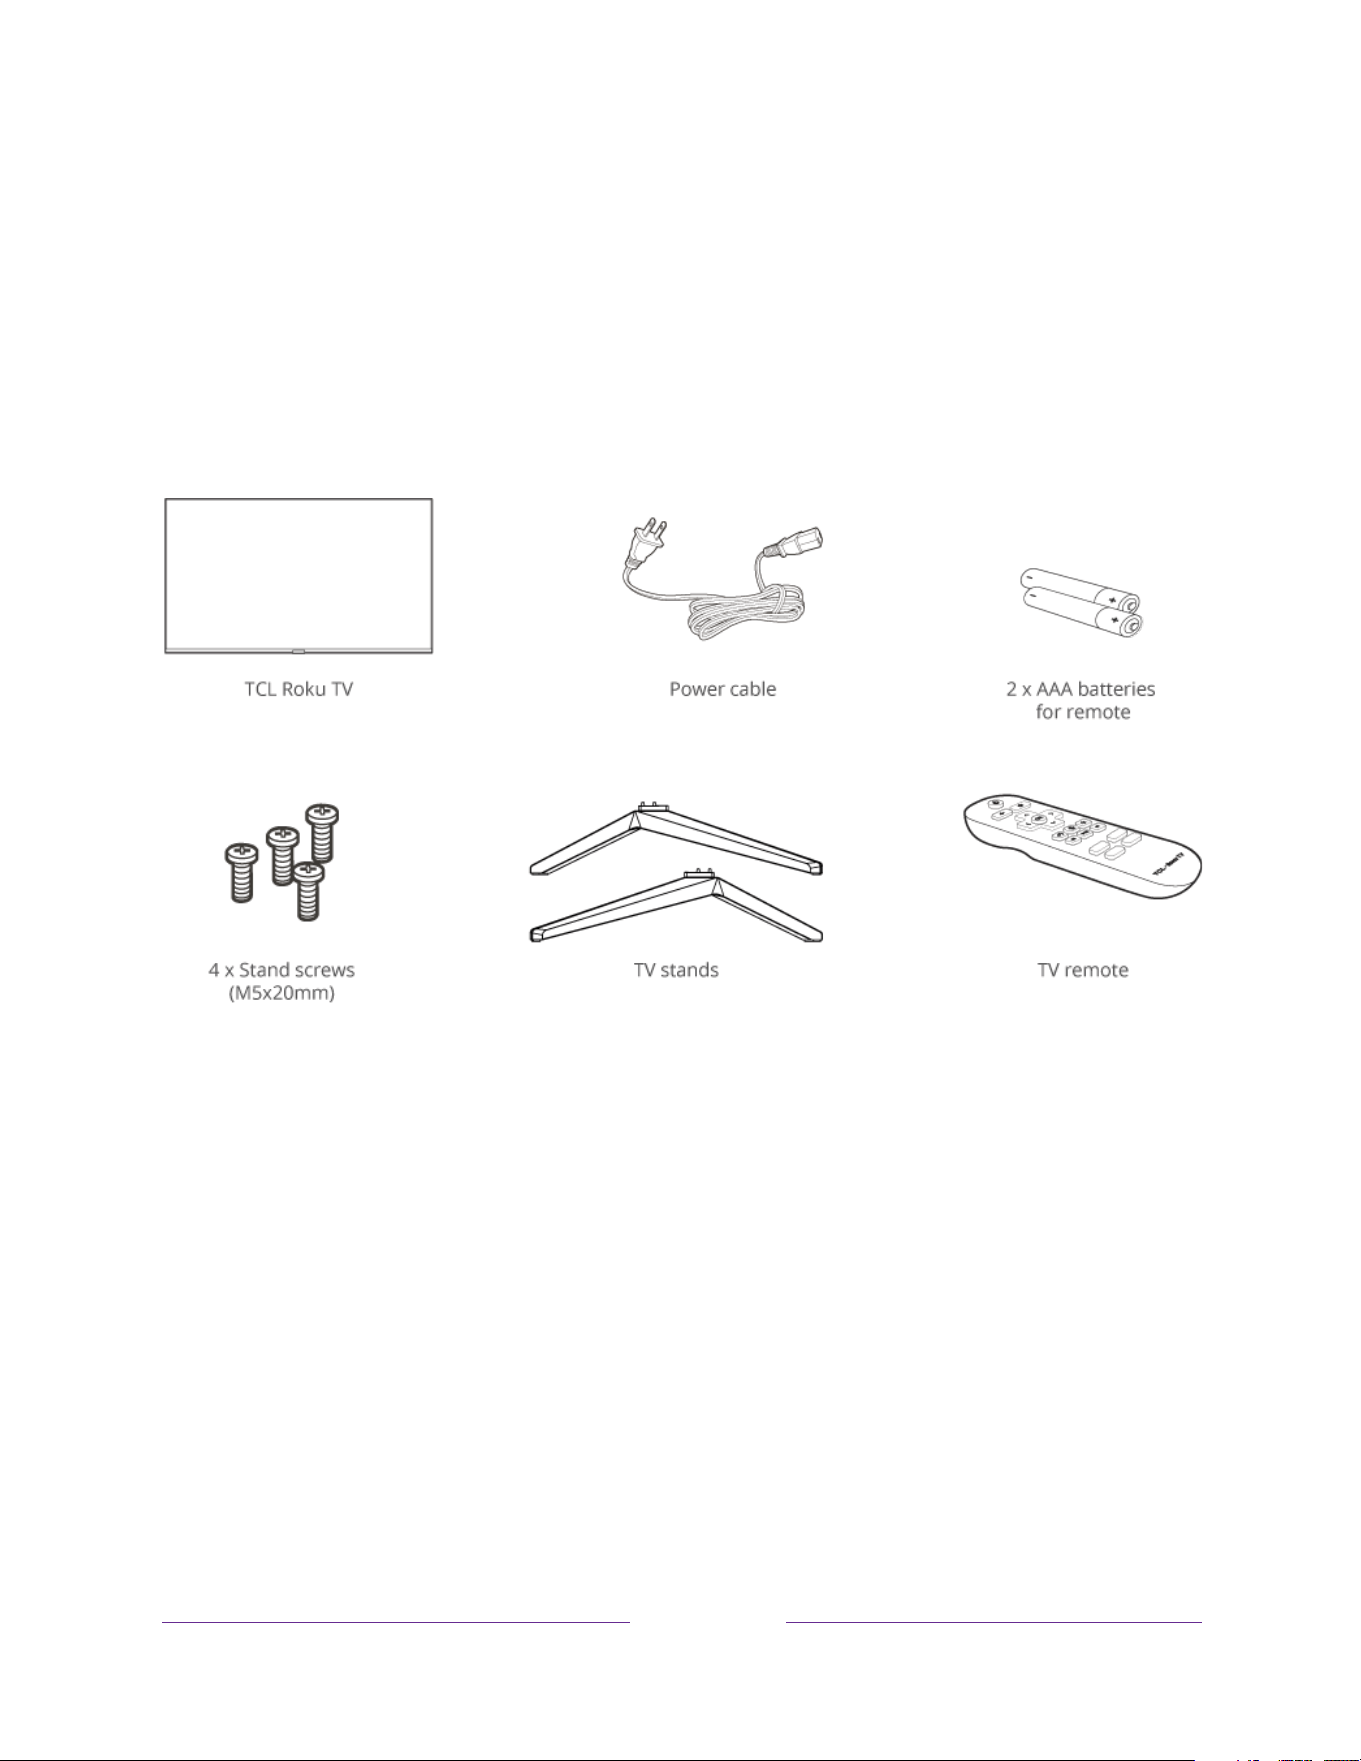
What’s in the box
To mount on a wall
If you are mounting your TCL Roku TV to the wall, do not attach the TV base stand or TV stand column.
To mount your TV to the wall, purchase the one of the following VESA wall mounts:
• 55" model VESA 300 x 300, 4 M6 x 20mm screws
• 65" model VESA 300 x 300, 4 M6 x 20mm screws
• 75" model VESA 400 x 300, 4 M6 x 20mm screws
The VESA number is the horizontal and vertical measurement of the mounting holes. For example, 200 x
200 indicates that the mounting holes are spaced 200mm horizontally and 200mm vertically.
!
!!
7
!
!
!
Follow the directions supplied with the wall mount to mount the TV to the wall.
Caution: Your wall mount must be able to bear a minimum of five times the TVs net weight to avoid
damage.
Note: The wall mount bracket and the screws are not included
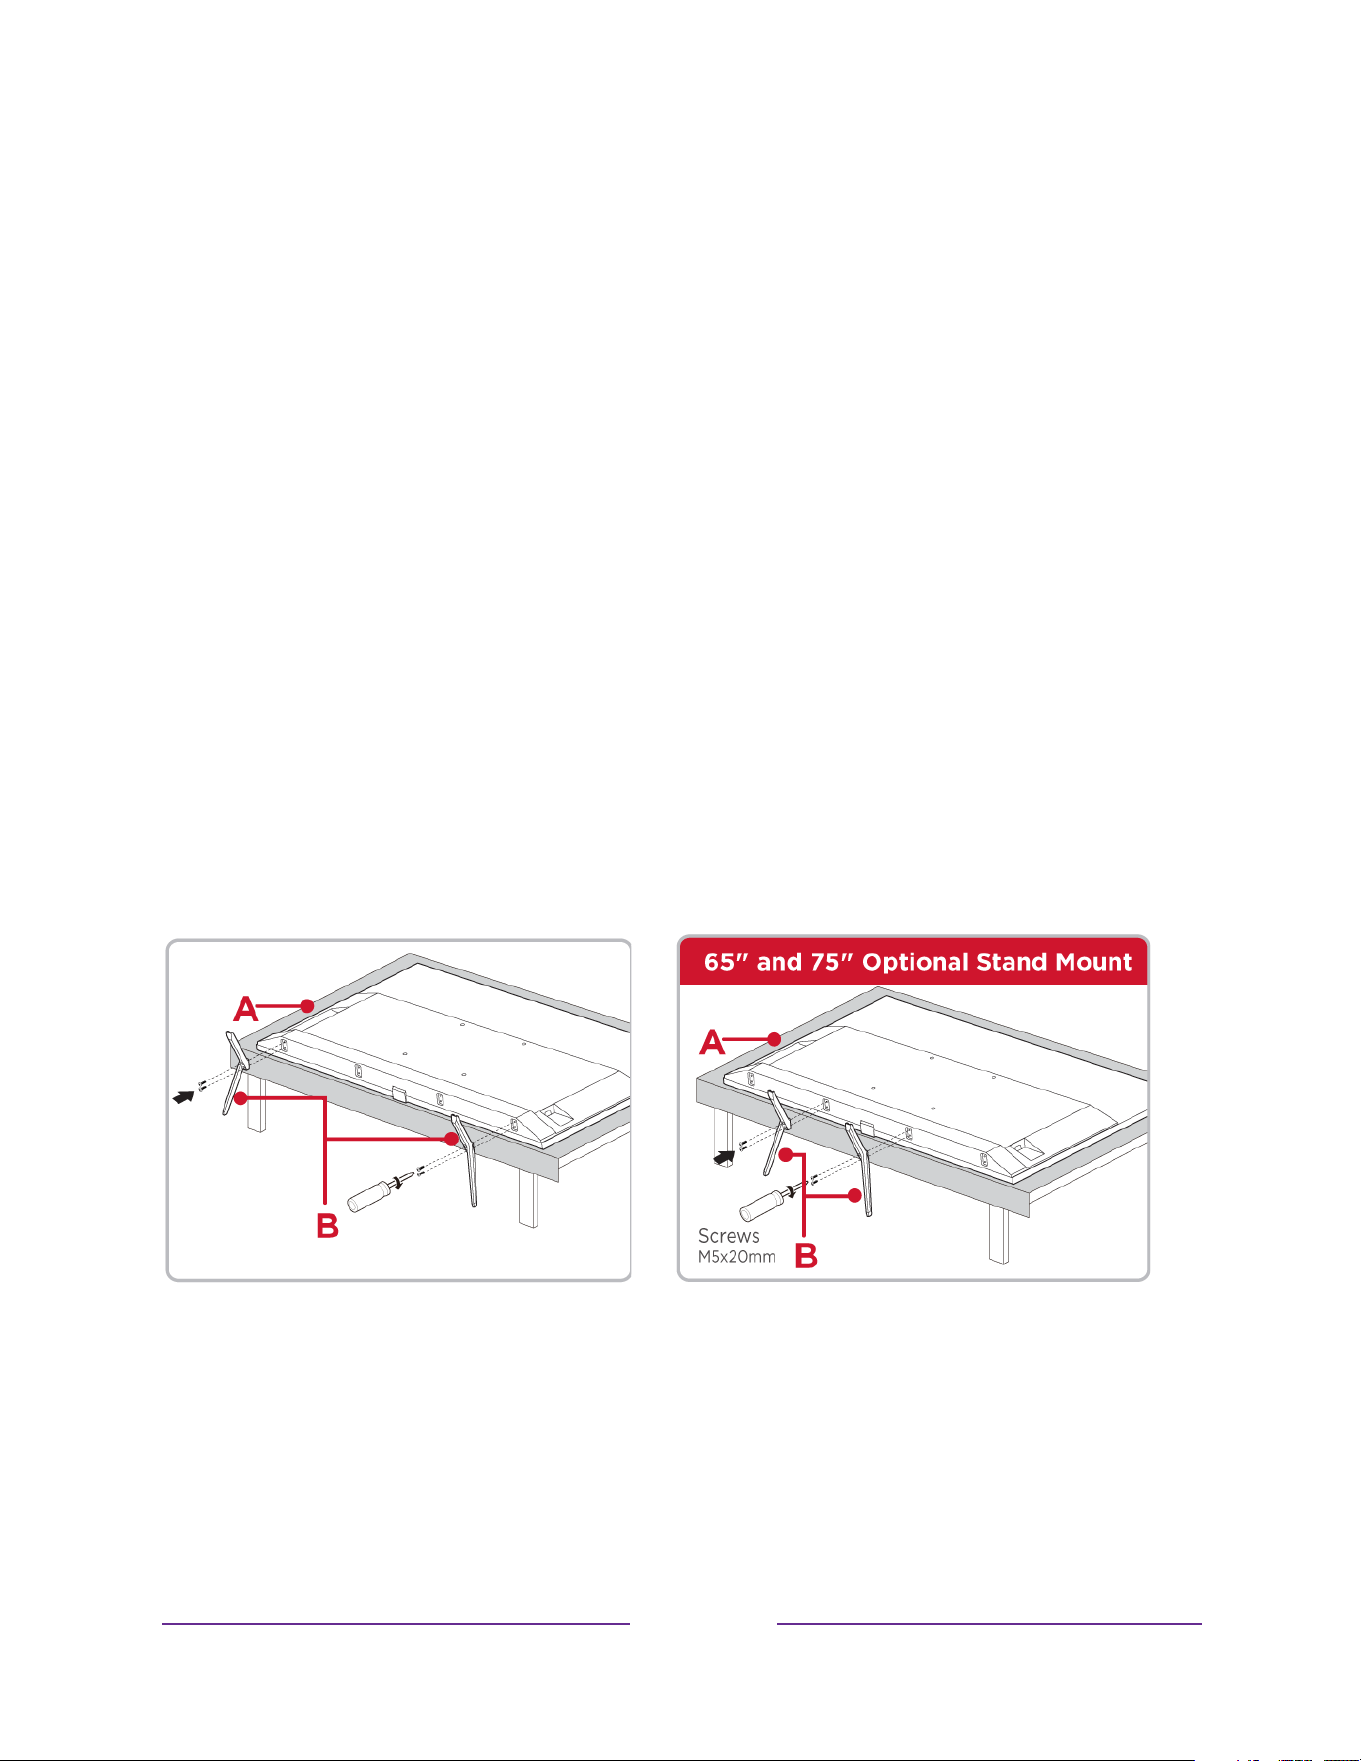
To use the stand
Your TCL Roku TV comes without the stands attached so that you can choose to use the stands or mount
your TV to a wall using a wall mount (sold separately). If you want to mount your TV to the wall, don’t
attach the stand legs.
A – To prevent damage to the screen, carefully place your TV on a soft, cushioned surface.
B – Put the column of the stands into the TV, align the stands with the screw holes located on the TV.
Secure the stands to the TV with four (4) screws.
For 65” and 75” models, you have another option to mount the stands to the middle of the TV bottom.
Refer to your TV’s Quick Start Guide or other provided documentation to for model-specific information
about attaching the base or a wall mount and making connections to AC power and to your other
audio/video devices. The following information applies to all Roku TV models.

!
8
!
!
!
Connecting an antenna, cable, or satellite box
If you are using an antenna, CATV cable without a set-top box, or a cable or satellite box that has only an
antenna output, connect a 75-ohm coaxial cable (not provided) from the device to the ANT/CABLE
input on the TV.
Tip: If you are using an antenna with a 300-ohm twin-lead cable, you need to use a 300-to-75-ohm
adapter (not provided) to adapt the twin-lead cable to a connection that is compatible with the TV’s
antenna input.
Tip: If you receive your TV stations through a set top box from a cable or satellite TV provider, connect it
to the TV using the best connection method available. From most to least desirable:
• HDMI
®
input – Digital HD and SD video
• AV input – analog SD video
• Antenna input – analog SD video using NTSC
Connecting external equipment with a composite
AV video cable
If the best connection available on your device is AV or composite video output, connect it to the TV
using a composite AV cable (not provided). Composite AV cables typically have three RCA-type plugs on
each end, color coded as follows:
• Yellow – Video
• Red – Audio, right channel
• White or black – Audio, left channel
Connect each plug to the corresponding connector on the device and on the TV.
!
!!
9
!
!
!
Note: Select models have an AV Input that looks like a headphone jack. Use the breakout cable
(included) to adapt this input to the three RCA-type plugs on your composite cable.
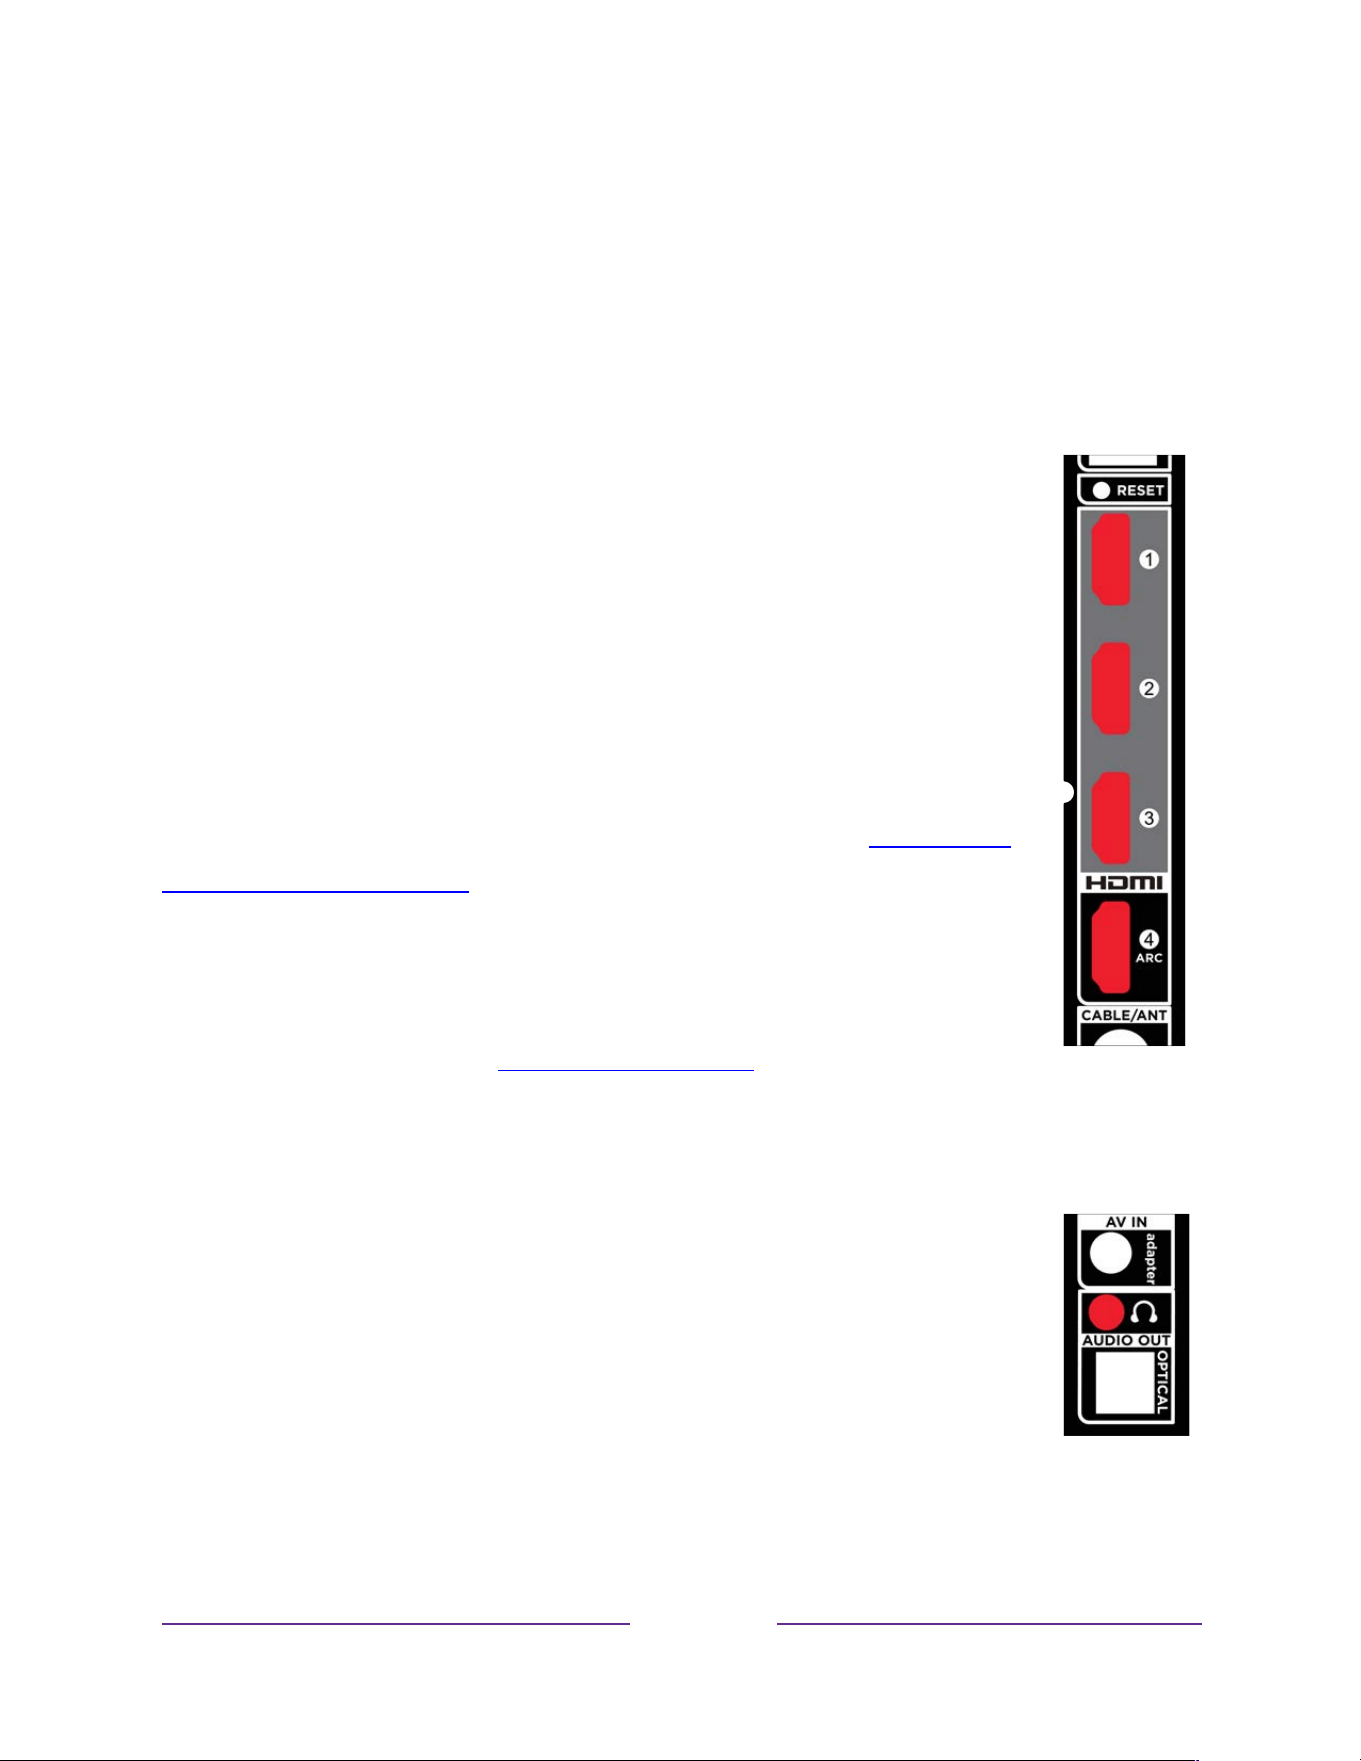
Connecting external equipment with an HDMI
®
cable
If possible, connect your devices using HDMI
®
cables (not provided). They help to
provide the best video quality and also carry audio signals, so that only one cable is
needed. For better picture quality, we recommend that you use cables designated as
High Speed HDMI
®
Cables.
Tip: You might need to configure the device to send its signal through its HDMI
®
connector.
The connector labeled HDMI (ARC) has the additional ability to use the audio return
channel to send digital audio to a receiver or soundbar, as explained in Connecting an
AV receiver or digital soundbar.Only on select models: The connector labeled HDMI
(eARC) provides the same functionality as the HDMI ARC connector, plus the ability
to pass through full-resolution sound formats such as Dolby Atmos and DTS:X from and
to devices that support these formats, without additional processing by the TV.
Additional details are provided in Choosing an audio format.
Connecting headphones or analog soundbar
You can connect headphones or an analog soundbar (not provided) to the TV’s
headphone jack.
Tip: Inserting a plug in the headphone jack disables the sound from the TV’s built-in
speakers.
Warning: Loud noise can damage your hearing. When using headphones, use the lowest volume setting
on your headphones that still lets you hear the sound.

!
10
!
!
!
Select models also have an audio line out connection that is not affected by TV volume or mute settings
and does not disable the TV speakers. Use this connection when you want to use your amplifier or
soundbar to control the TV volume. To turn off the TV’s built-in speakers, from the Home screen menu,
navigate to Settings > Audio > TV speakers and change the setting.
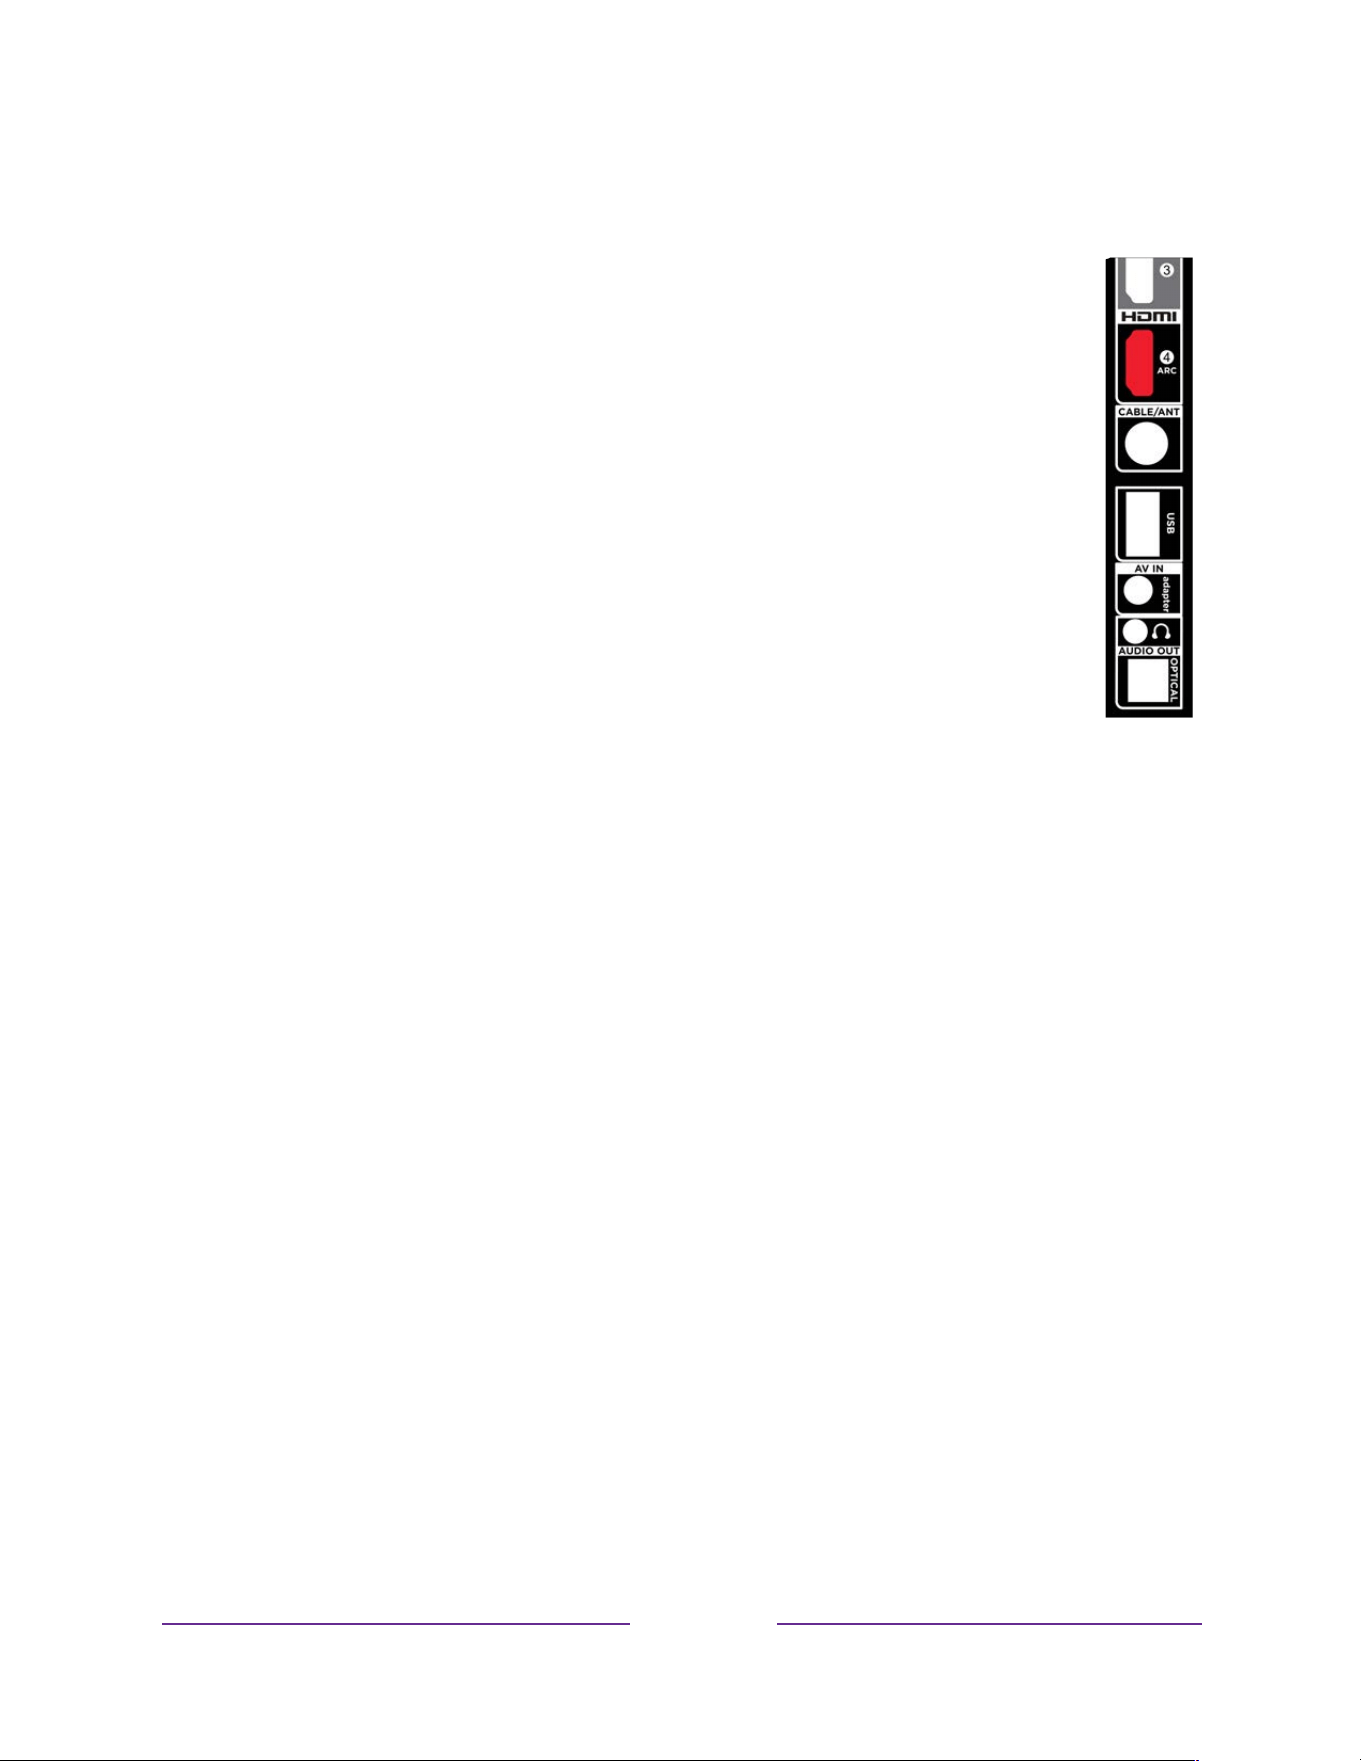
Connecting an AV receiver or digital soundbar
You can enjoy Dolby Audio™ multichannel sound from your TV if you connect a digital amplifier or
soundbar (not provided) in either of two ways:
Digital optical audio out (S/PDIF) – Connect a TOSLINK optical cable (not provided) from the TV to the
Optical input on your receiver or soundbar.
HDMI® ARC – Connect an HDMI
®
cable (not provided) from the HDMI (ARC) connector to the HDMI
®
input on your receiver or soundbar. This connection uses the Audio Return Channel (ARC) feature of
HDMI
®
to output sound from the TV to a compatible device. To use this feature, you must configure the
TV to enable HDMI
®
ARC, as explained in Enable HDMI
®
ARC.
HDMI® eARC – Select models only: Connect an HDMI
®
cable (not provided) from the HDMI (eARC)
connector to the HDMI (ARC) or HDMI (eARC) input on your receiver or soundbar. If your receiver or
soundbar supports HDMI enhanced ARC (eARC), the TV can pass through full-resolution sound from
programs containing enhanced audio. If your receiver or soundbar does not support eARC, use the TV’s
eARC port to make the ARC connection. The eARC port is backward compatible with the ARC standard.
!
!!
11
!
!
!
Preparing for Internet connectivity
If you want to watch streaming content and take advantage of most of the cool features of
your Roku TV, connect it to the Internet through a wireless modem/router or a wireless
access point (not provided). The TV has a built-in wireless LAN adapter.
Note: The TV supports only its internal wireless network adapter—it does not support the
use of a USB network adapter.
Select models have both wired and wireless network connectivity. To use the wired network
connection, connect an RJ-45 Ethernet cable (not provided) from the jack on the back of
your TV to your network router or switch. The wired connection automatically supports both
10 Base-T and 100 Base-T Ethernet.
!
12
!
!
!
AC power
Plug your TV into a power outlet. You can tell that the TV has power because the status indicator lights
up when the TV is off.
The topic Status indicator explains how the status indicator shows what is happening with the TV.
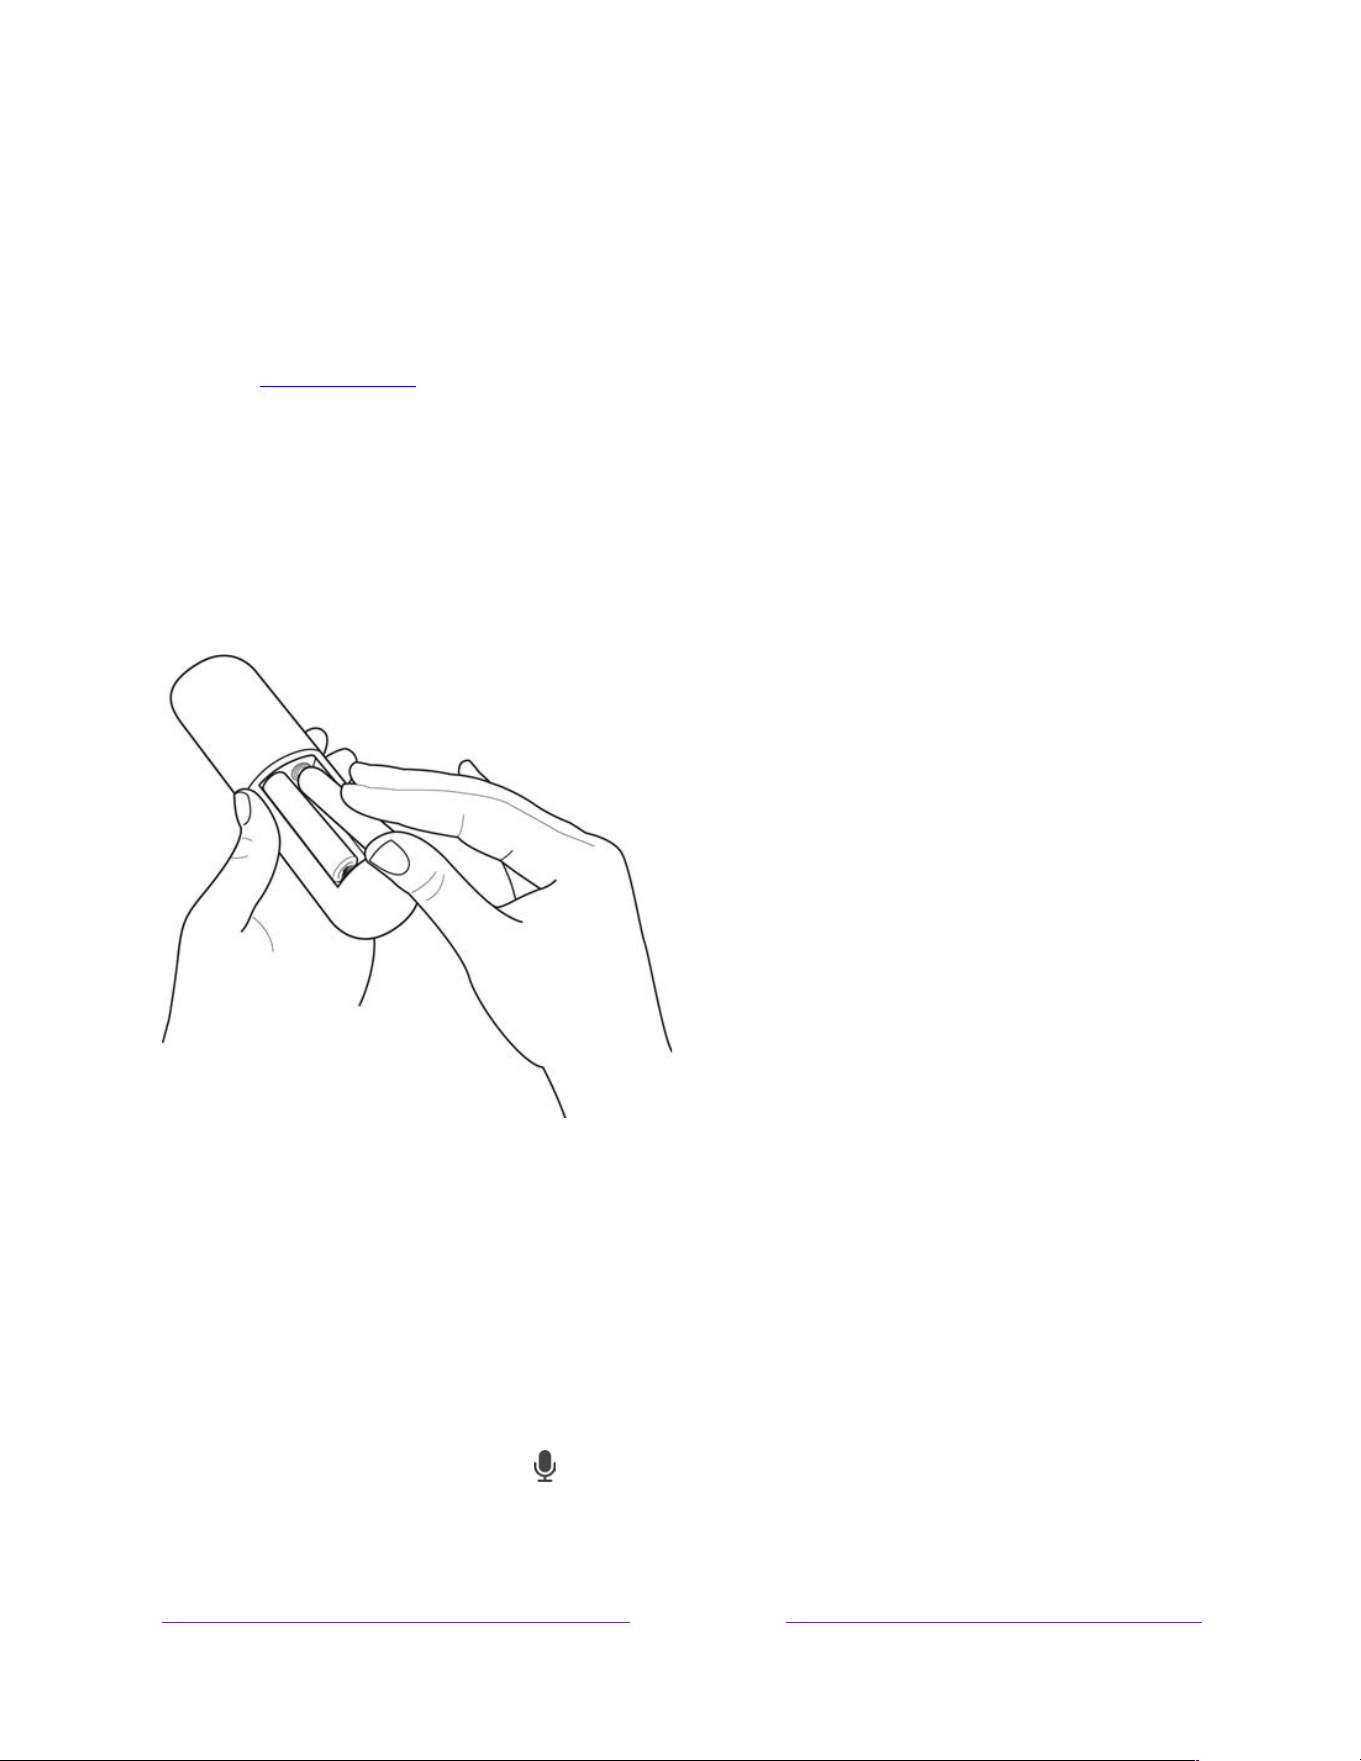
Roku remote batteries
Open the back of your Roku remote and insert the included batteries, observing the proper orientation
as indicated in the battery compartment. Reattach the back cover.
TCL Roku TV remote
Use the following information to identify the buttons on your Roku remote.
Note: Remote buttons and features vary somewhat by model. Your remote might not have all buttons or
features listed.
• If your remote has a VOICE just below the purple pad, you have a Roku Voice Remote.
• If your remote has a headphone jack on its left edge, you have a Roku Enhanced Voice Remote.
!
!!
13
!
!
!
Roku voice remotes have additional capabilities as noted in the following table.
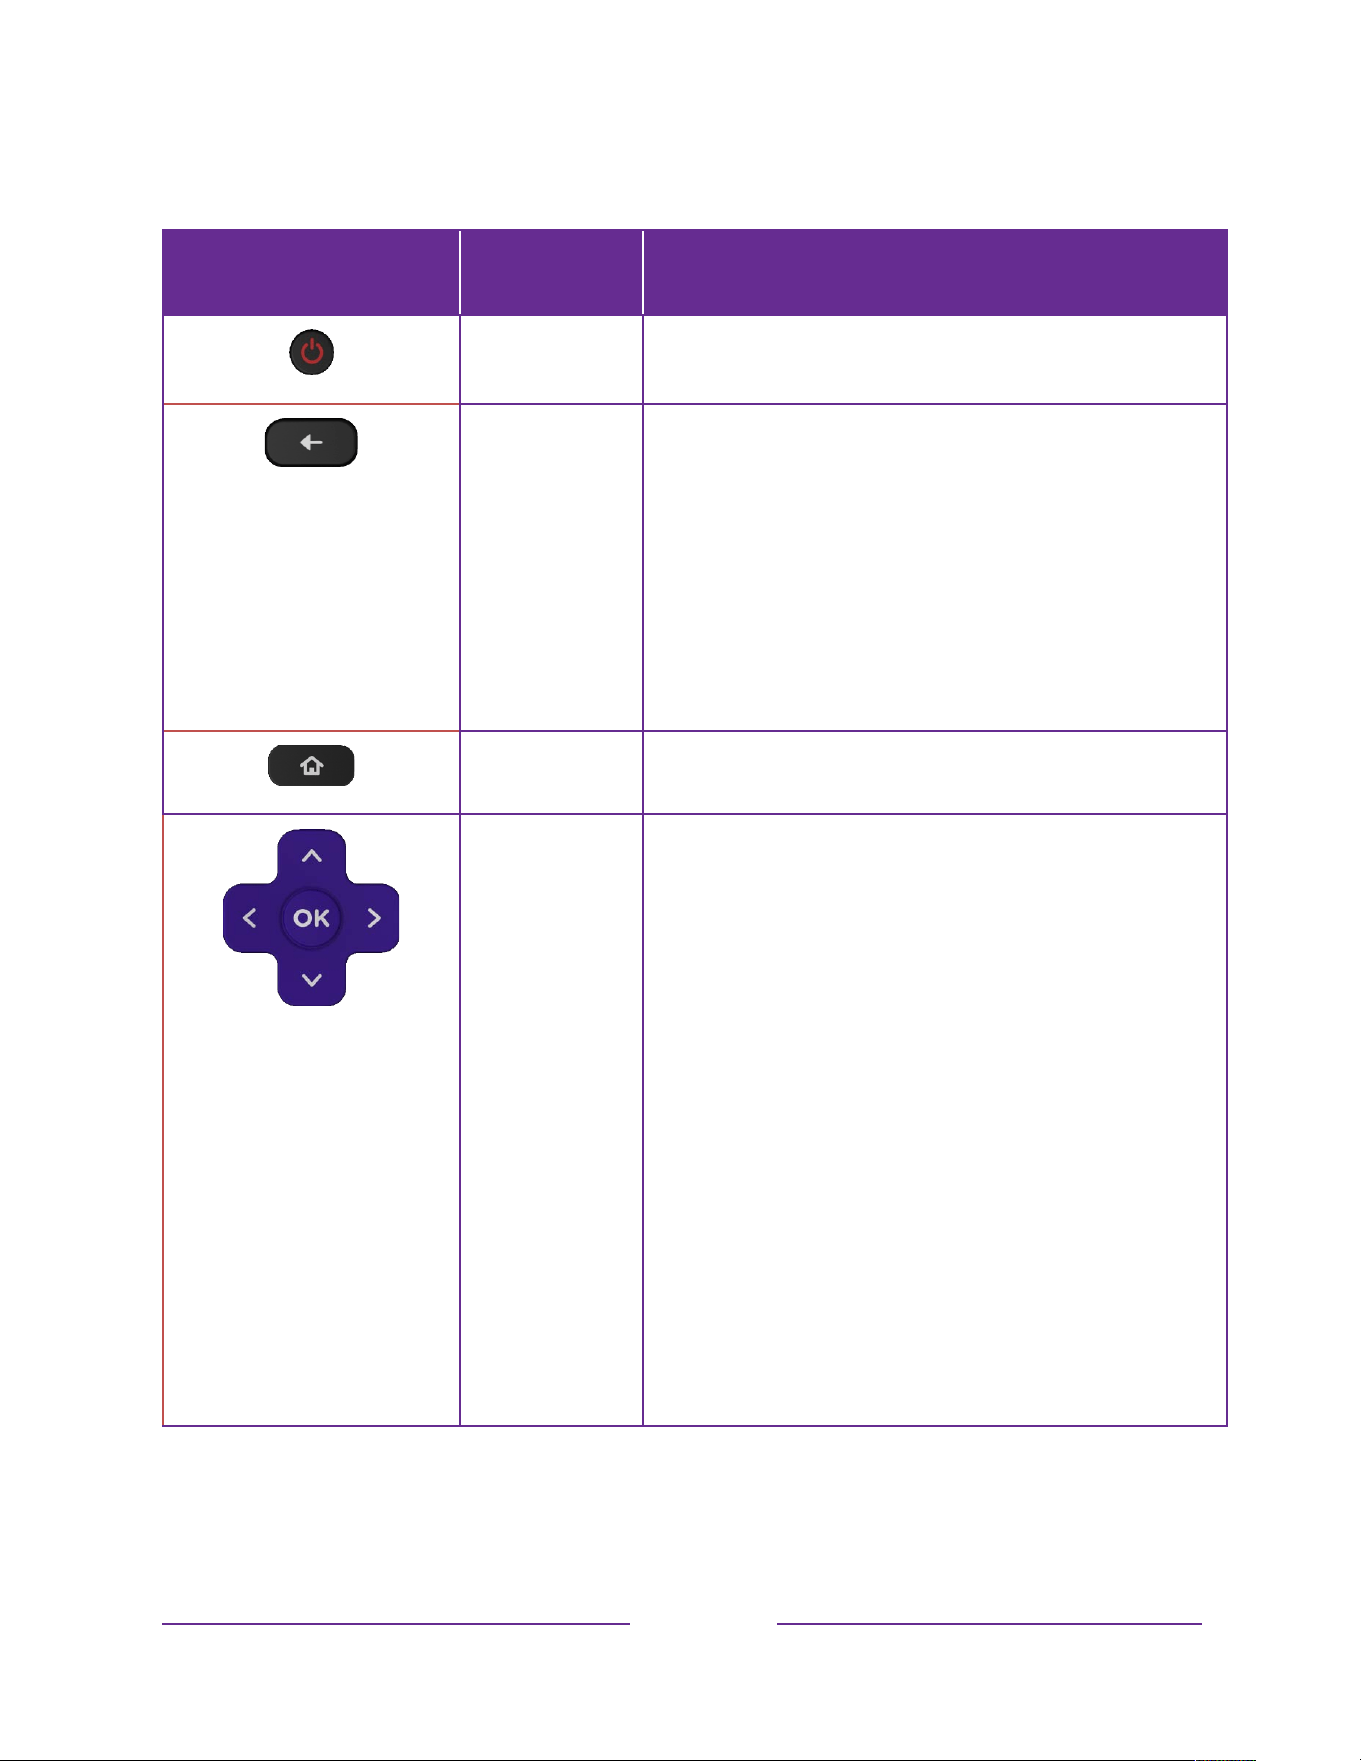
BUTTON
FUNCTION
DESCRIPTION
POWER
Turns TV on and off.
BACK
• Menu: Goes back to previous menu/screen.
• Home screen tile: Moves highlight back to the Home screen
option.
• Watching live TV or a TV input: Returns to Home screen.
• Playing streaming content: Stops playing stream and returns
to the previous menu or screen.
• Browsing streaming content: Goes to the previous level in the
content tree.
HOME
Immediately returns to the Home screen.
DIRECTIONAL PAD
• Moves the highlight in the corresponding direction.
• OK chooses the highlighted option.
While watching TV:
• UP/DOWN changes channel.
• LEFT displays the Smart Guide (connected mode) or channel
list (non-connected mode).
• LEFT/RIGHT TVs operating in non-connected mode: while in
the channel list switches between ALL CHANNELS and
FAVORITE CHANNELS.
TVs with Live TV Pause enabled: when the program is paused,
moves backward/forward approximately 10 seconds in the
program buffer.
• While in the channel list, OK selects the highlighted channel.
While watching live TV: displays the program information
banner.
!
14
!
!
!
BUTTON
FUNCTION
DESCRIPTION
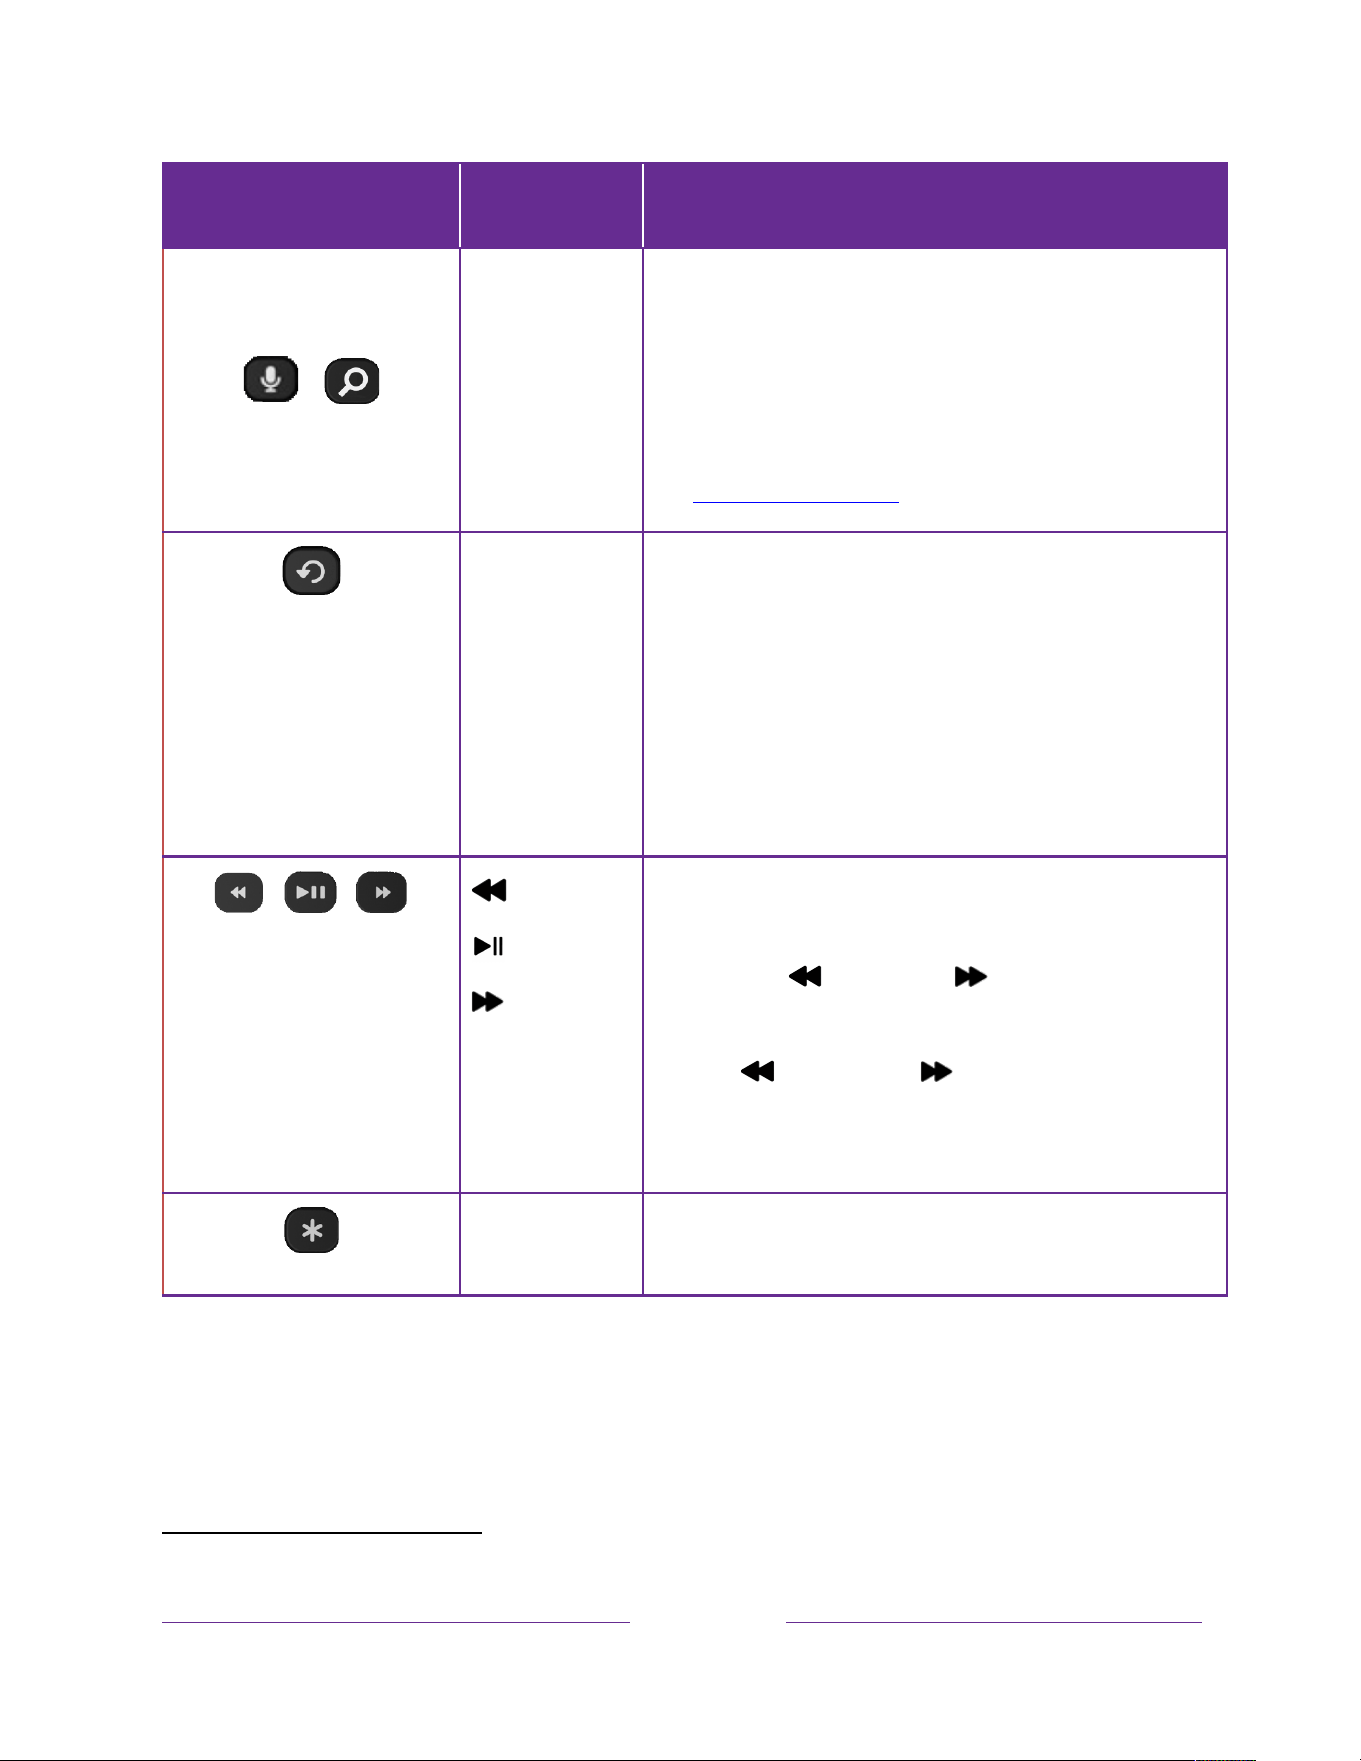
or
VOICE or SEARCH
Only on select models with Roku voice remotes, hold and say the
name of a movie, TV program, actor, director, or genre, including
the special genres “free” and “4K.” Or, say a command to start
streaming, change a channel, and more
1
.
For more information, go to:
go.roku.com/voicesearch
REPLAY
Select models. Streaming programs that support this feature and TVs
with Live TV Pause enabled, jumps back a few seconds with each
press and resumes playing.
If Live TV Pause is disabled, jumps to previous channel.
When using an on-screen keyboard: Backspaces in the text you are
entering.
In the Smart Guide
2
: Returns to the current day and time.
REWIND
PLAY/PAUSE
FAST FWD
Scan backward, pause, play, and scan forward in streaming content
and live TV channels (if Live TV Pause is enabled).
Press REWIND or FAST FWD one, two, or three times to
control the speed of the operation.
REWIND and FAST FWD also jump backward and
forward one screen at a time when viewing long lists, such as when
you are browsing programs in the channel list or Smart Guide
1
.
STAR
Displays additional options when available. On-screen hints let you
know when this button is active.
1
Voice features support English and Spanish languages.
2
Smart Guide is available only in the United States.
!
!!
15
!
!
!
BUTTON
FUNCTION
DESCRIPTION
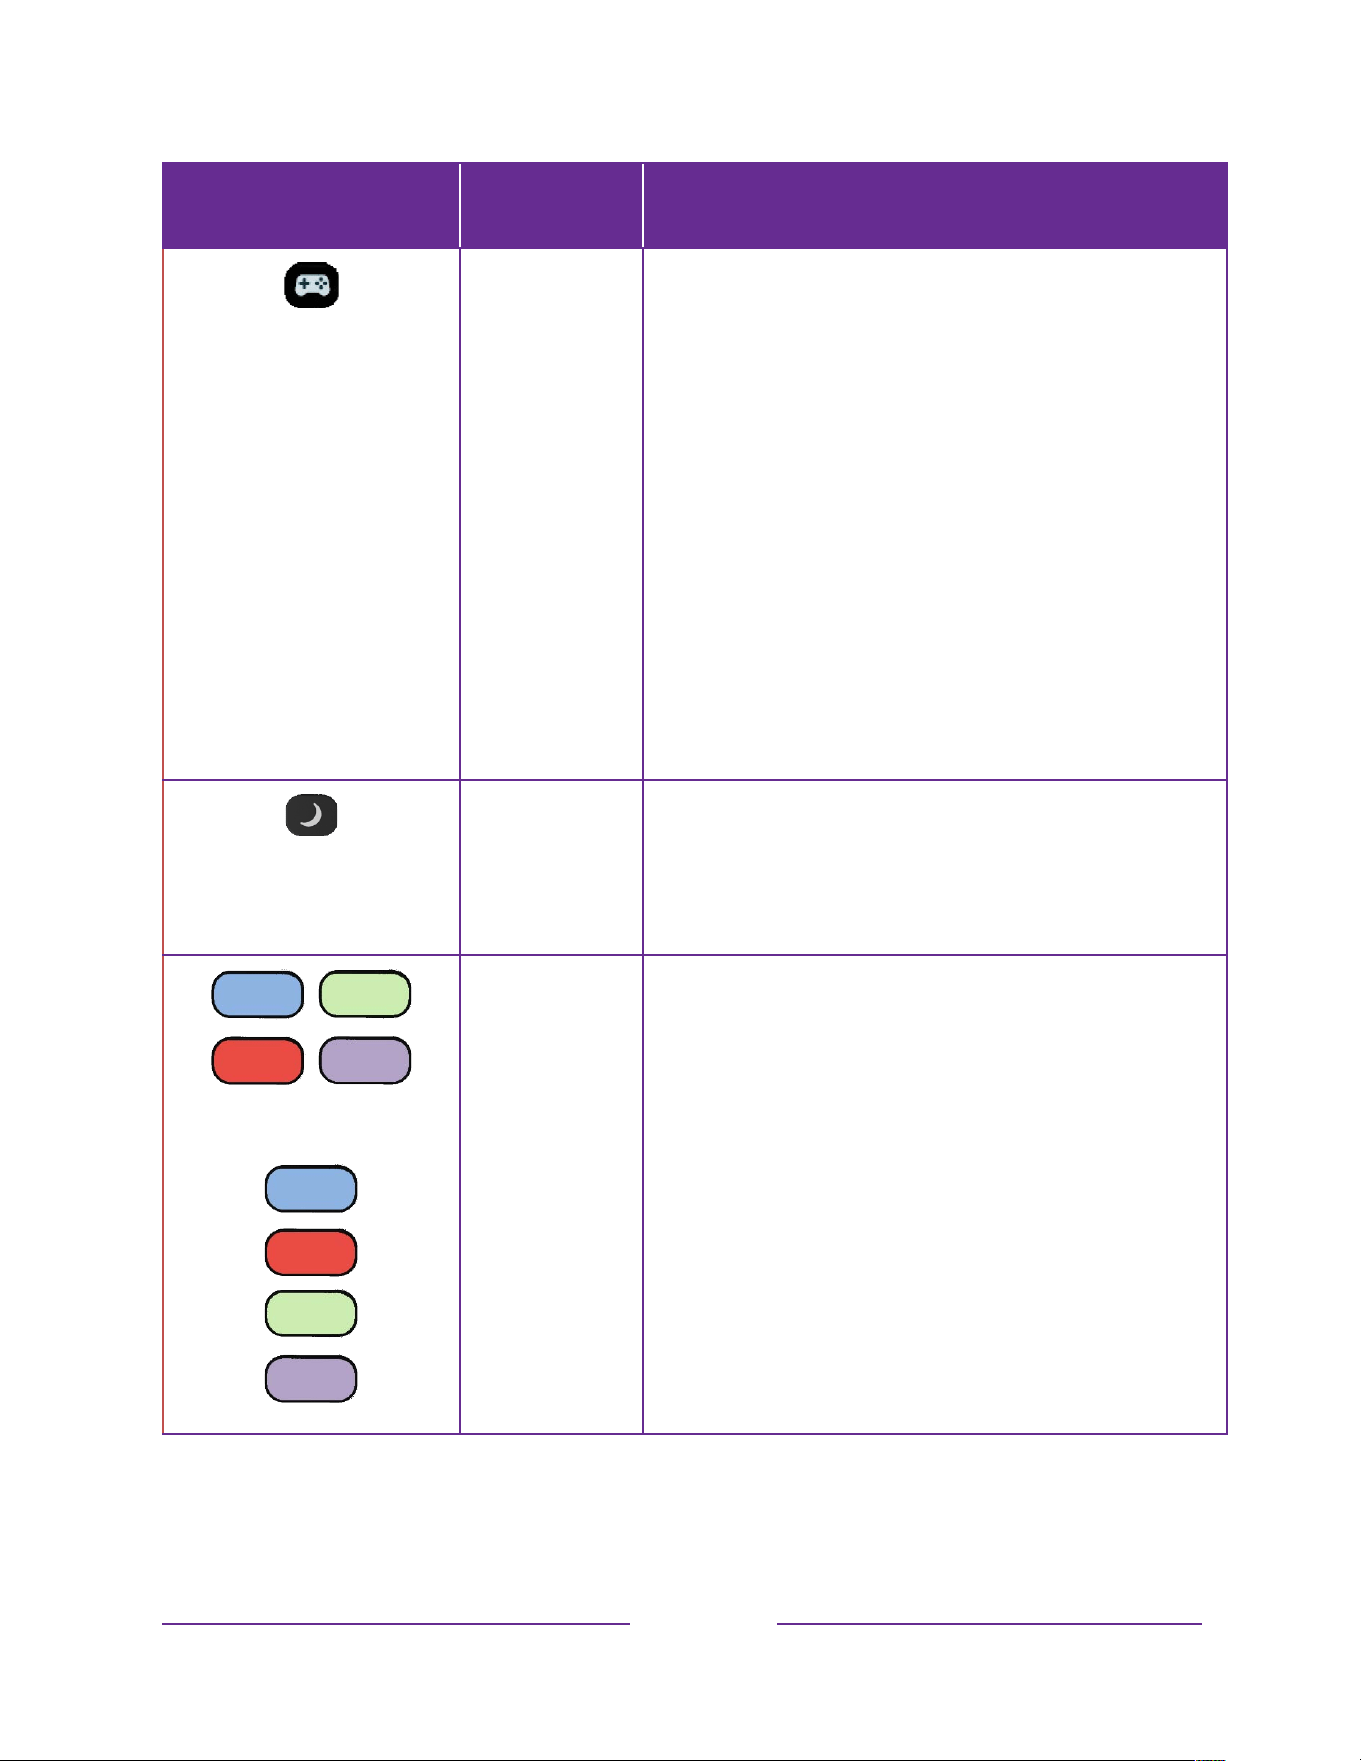
GAME MODE
Only on HDMI and AV inputs on select models. Displays a banner
showing whether Game mode is on or off, or “Not available at this
time.” Subsequent presses toggle Game mode. When On, the TV
performs less image processing and has less input lag, producing a
better experience with action games.
Select models. Auto Low Latency Mode (ALLM) detects certain game
consoles connected to an HDMI input and automatically switches to
the best settings for action games. When ALLM is active, the manual
Game mode
setting is unavailable.
Select models: Variable refresh rate (VRR) allows a compatible game
console or computer to control the refresh rate of the TV. The result
is smoother image animation with a lower instance of stutter or
tearing.
SLEEP
Select models. Displays a banner showing the remaining sleep time,
if any, or “Sleep timer is off.” Subsequent presses cycle among the
preset sleep time intervals. Once set, the sleep timer remains in
effect unless you cancel it.
or
FACTORY ASSIGNED
CHANNEL
SHORTCUT
Dedicated buttons show the logo of a preset streaming content
provider. Dedicated content providers vary by model and region.
Pressing a button:
• Displays the streaming channel’s main page if you have
already added the channel to your Home screen.
• Displays the streaming channel’s sign-up page if you have not
already added the channel.
!
16
!
!
!
BUTTON
FUNCTION
DESCRIPTION
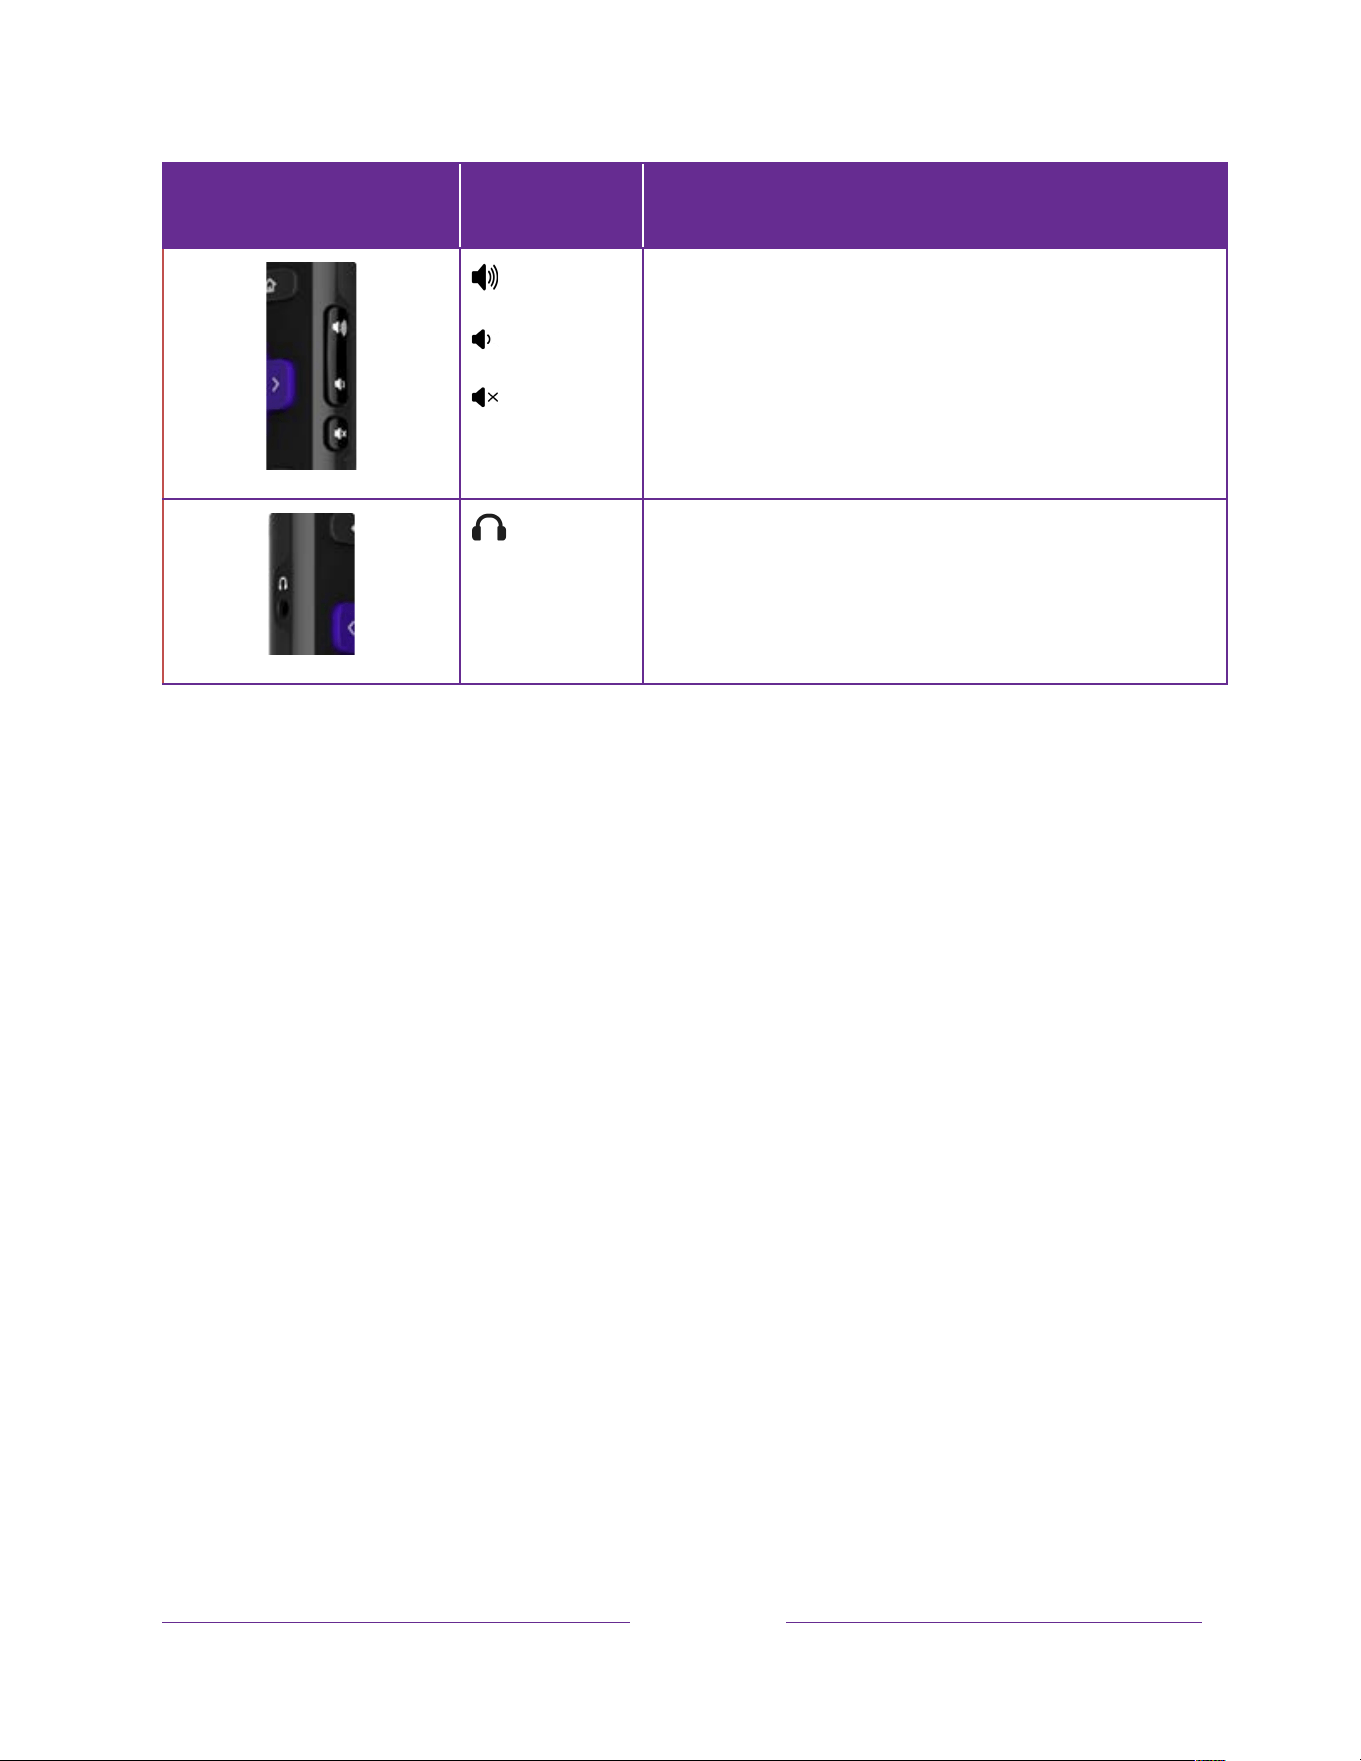
UP
DOWN
MUTE
Located on the right edge of the remote. Increases/decreases
volume and mutes the TV sound.
Note: If the TV is muted, pressing VOLUME UP unmutes. Pressing
VOLUME DOWN does not unmute the sound.
HEADPHONE
Select models with Roku Enhanced Voice Remote. Connect
headphones to the jack on the left edge of the remote to listen
privately. Plugging in headphones mutes the TV speakers.
Panel button
Your TV has buttons on its side, bottom, or back panel that perform simple control functions. The TV
panel buttons are not a substitute for the remote, as they do not give you access to all TV functions.
Depending on model, your TV model has one of several different panel button designs. Choose the one
that applies to your TV from the following list:
Single button
If your TV has this style of panel button, you can perform the following functions:
• Turn TV on: short press.
• Display the Input List: short press when TV is on.
• Select the next input in the Input List: short press while the TV is showing the Input List.
• Dismiss the Input List without changing inputs: no press.
• Turn TV off: long press.
Short press = less than two seconds
Long press = more than two seconds
No press = no press within two seconds

!
!!
17
!
!
!
Guided Setup
With the preliminaries out of the way, it’s time to turn on your TV. As the TV starts for the first time, it
leads you through Guided Setup, which configures the TV before you start to use it.
During Guided Setup, you’ll:
• Answer a few questions
• Provide network connection information
• Get a software update
• Link your TV to your Roku account.
• Connect devices such as a DVD player, game console, or cable box.
Starting Guided Setup
To start Guided Setup, press POWER on the remote to turn on your TV.
Note: Guided Setup normally runs only once, the first time you turn on your TV. If you need to run Guided
Setup again, you must perform a factory reset as explained in Factory reset everything.
When you first turn on your TV, it will take a few seconds to get itself ready. You’ll notice the following
things happening:
1. The status indicator blinks every time the TV is busy doing something; in this case it’s powering
up and getting ready for you.
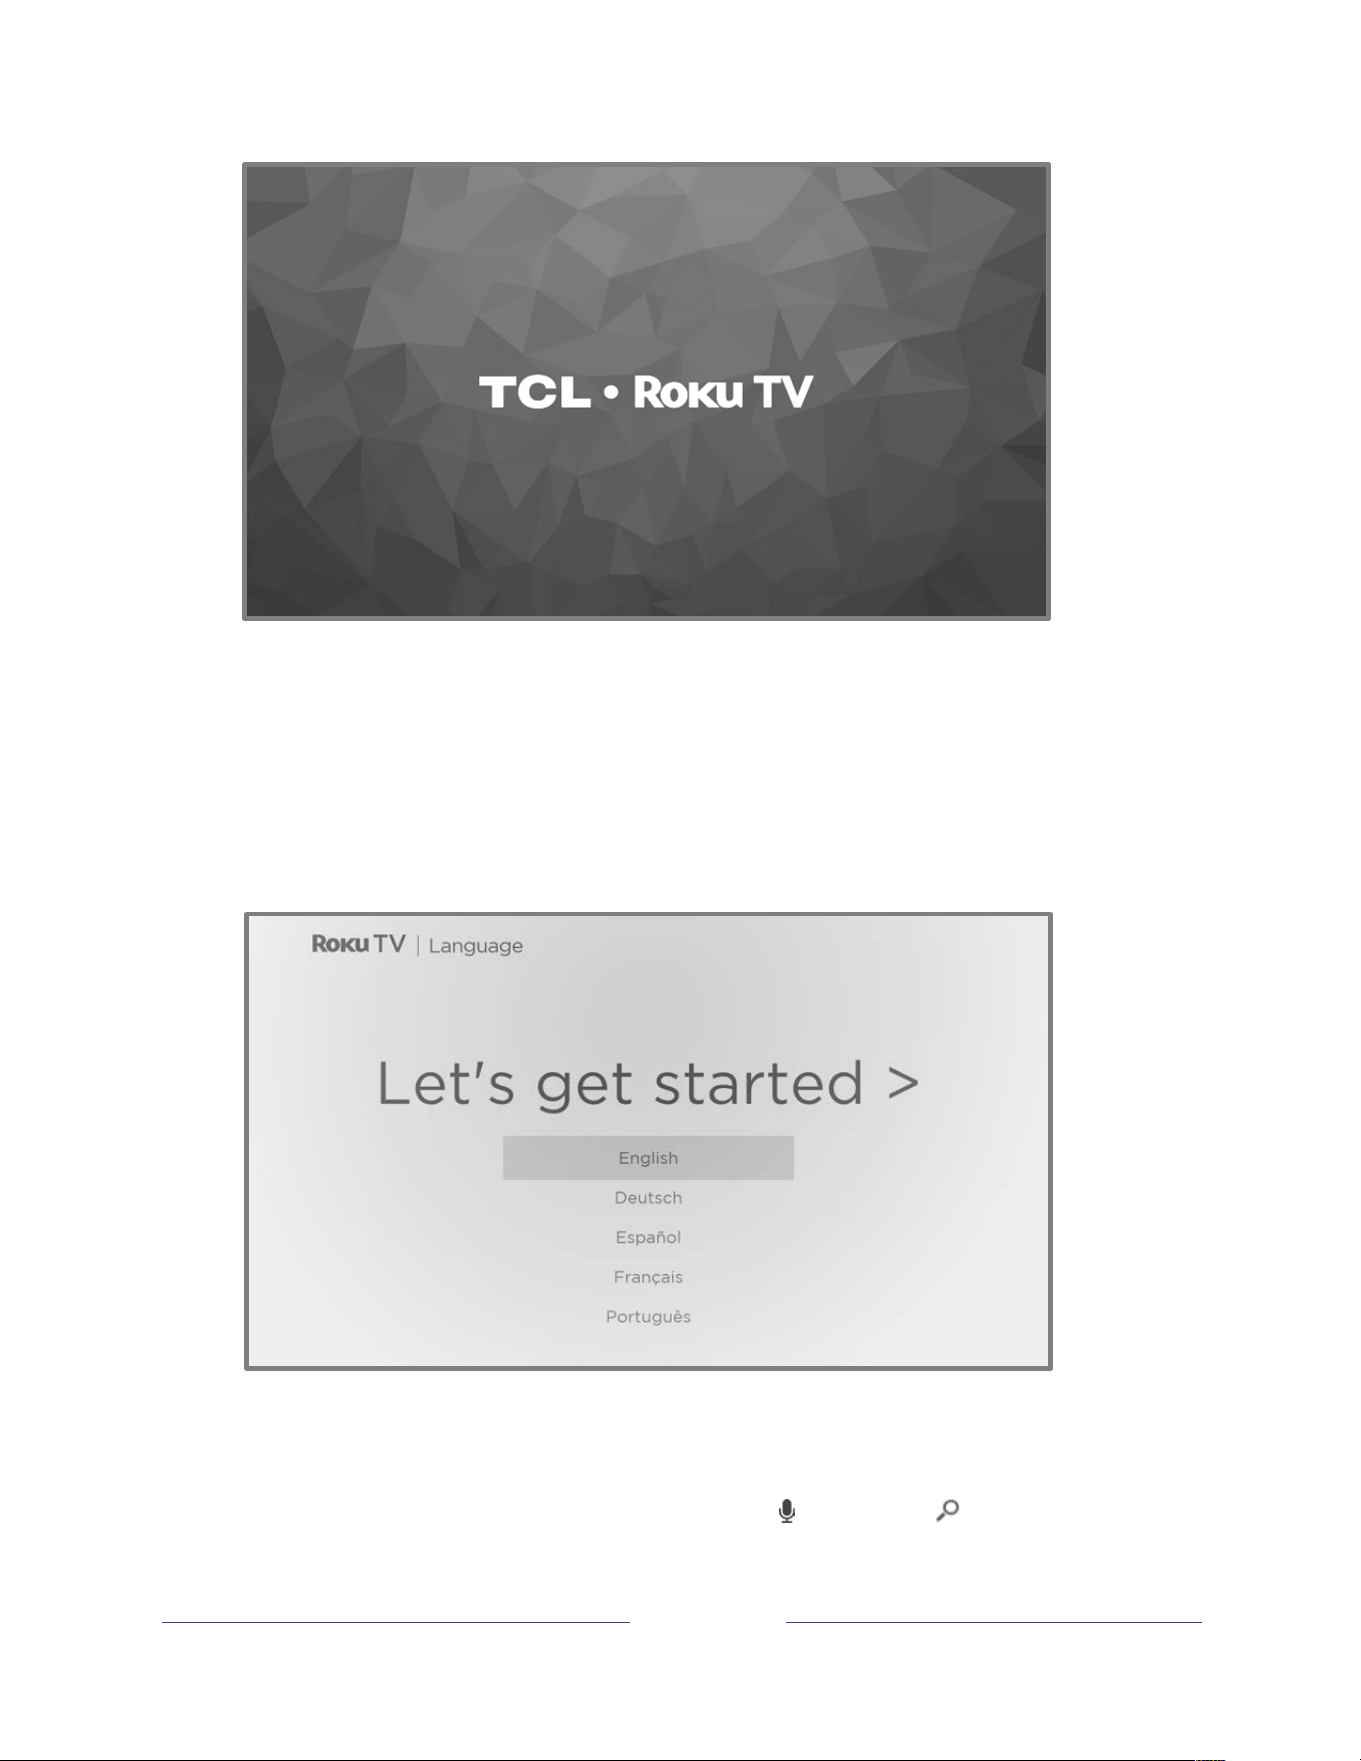
2. The splash screen appears and the status indicator blinks slowly for a few more seconds. The
power-on screen shows TCL • Roku TV logo while the TV starts up.
!
18
!
!
!
3. After a few seconds, Guided Setup starts.
Guided Setup
At this point, you should be seeing the Language screen.
1. Only on models that have a Roku voice remote: A few moments after the Let’s get started
screen appears, Guided Setup starts the pairing process for the voice remote. (You’ll know if
you have this type of remote because it has a VOICE or SEARCH button just below the
!
!!
19
!
!
!
purple directional pad.) If the voice remote does not pair automatically, follow the instructions
on the screen to complete the pairing process.
Accessibility: On TVs sold in the United States, if you are blind or visually impaired, you can
activate Audio Guide, a text-to-speech screen reader to help you navigate the TV’s menus and
commands. To enable the Audio Guide, press STAR
Þ
four times in rapid succession. Repeat to
disable Audio Guide. (STAR
Þ
is located directly below the purple directional pad on the right
side of the Roku remote.)
If you enabled Audio Guide, choosing any language other than English disables it.
2. Press DOWN on the purple directional pad to highlight your preferred language, and then press
OK.
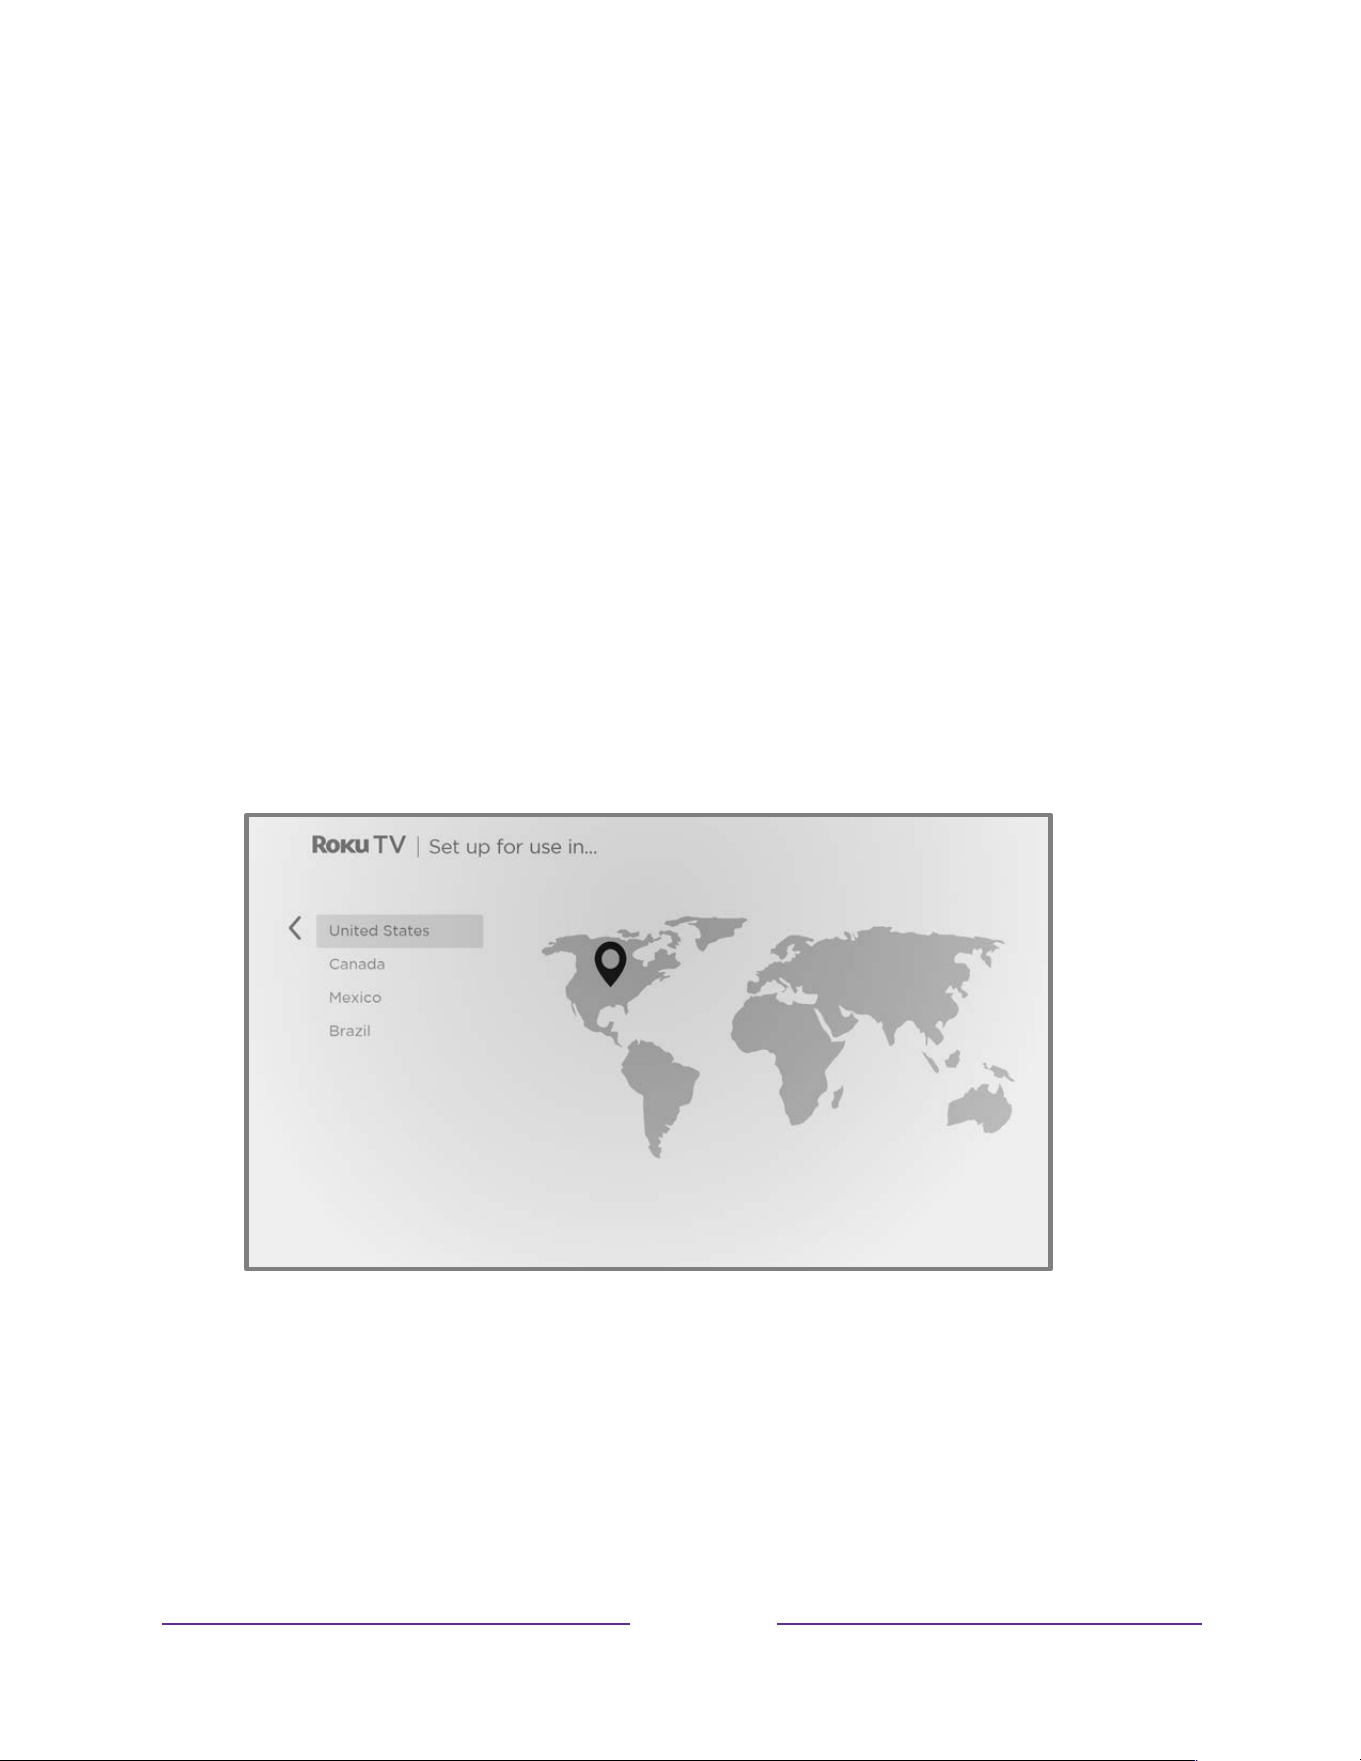
3. Some models have a country selection screen: If you don’t see this screen, skip ahead to the next
step.
If you see this screen, select your country, and then press OK.
Accessibility: If you enabled Audio Guide, choosing any country other than United States
disables it.
!
20
!
!
!
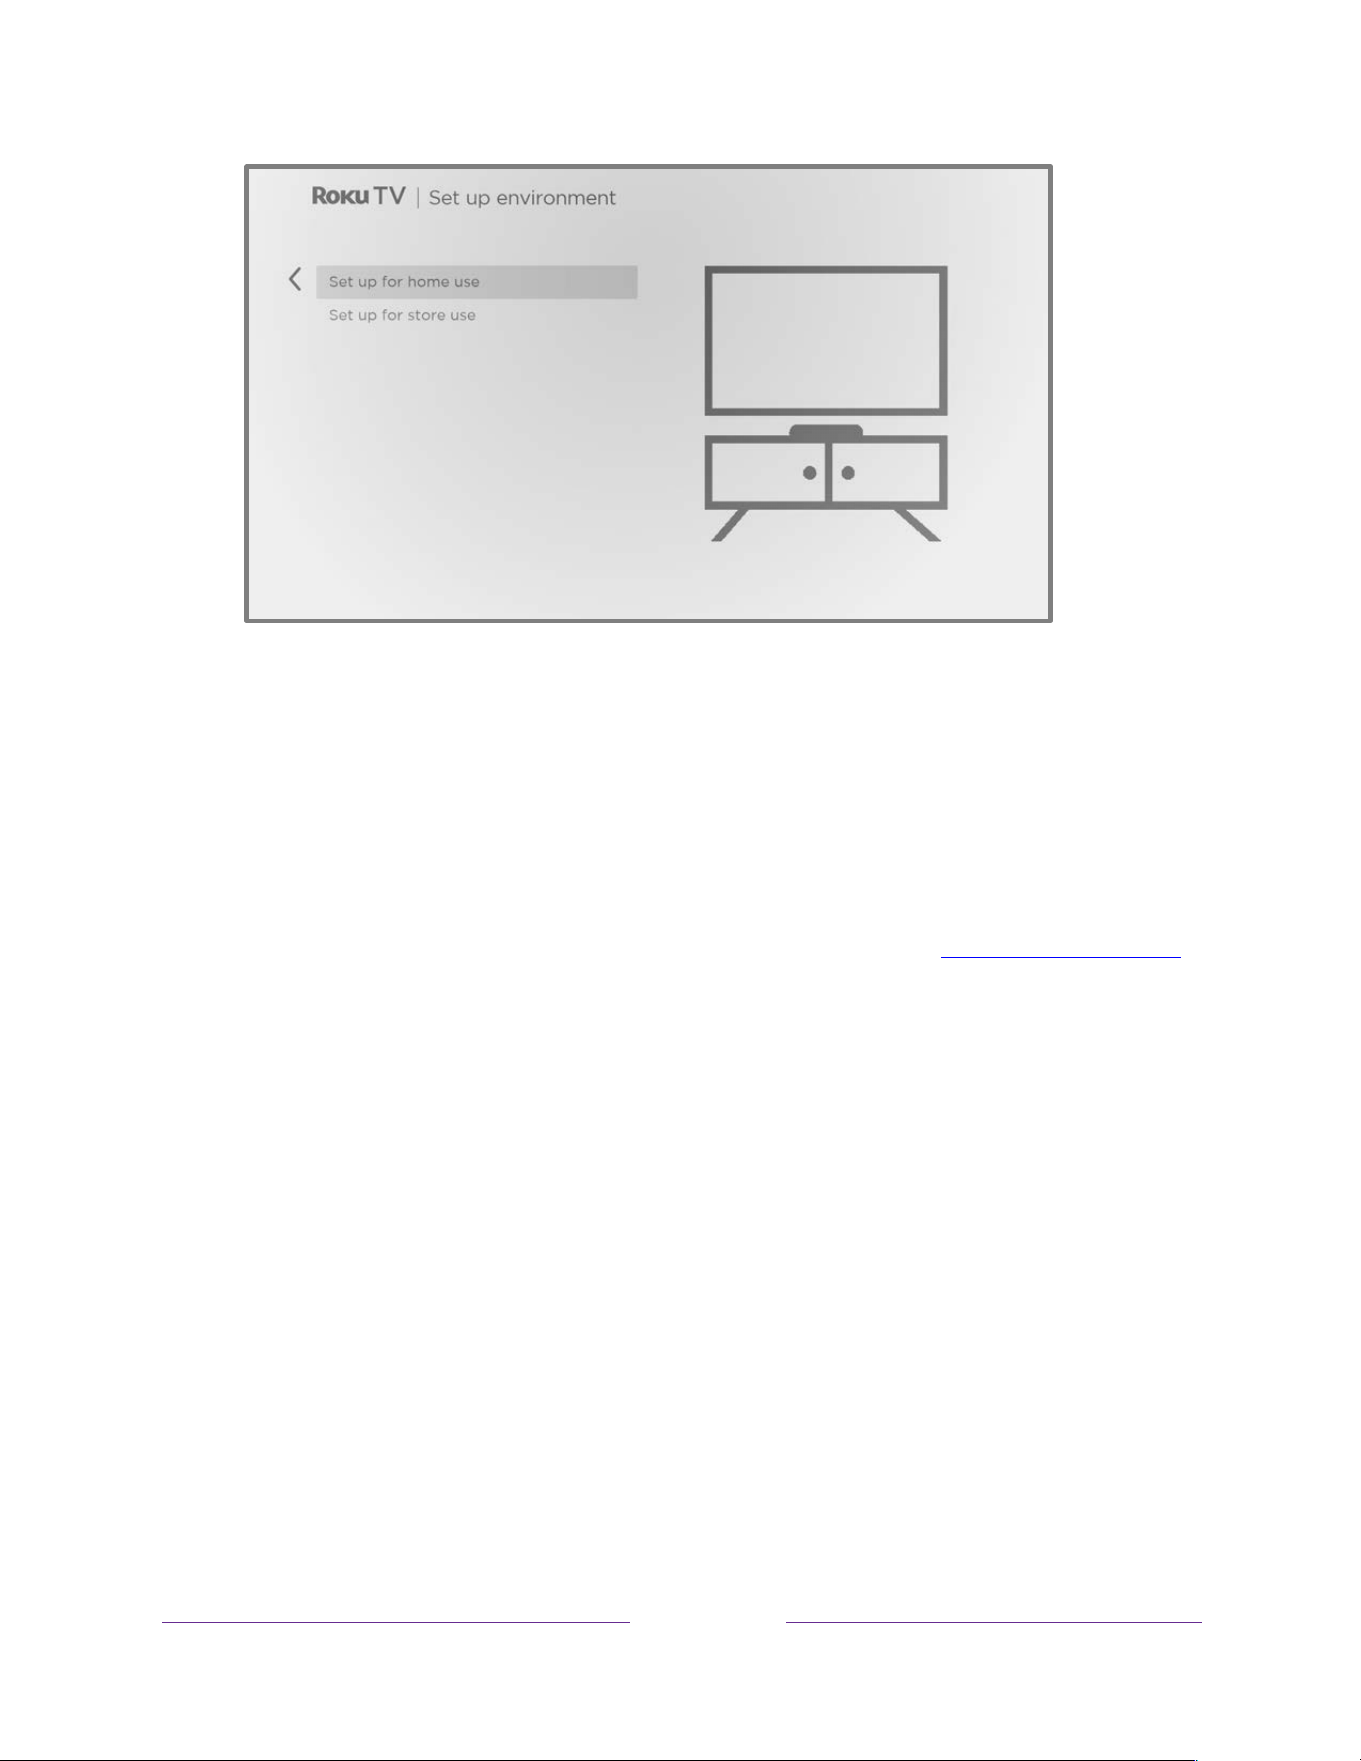
Note: Some models show the title First things first instead of Set up environment.
4. Press OK to select Set up for home use. This is the right choice for enjoying your TV at home.
It provides energy saving options as well as access to all features of the TV.
Note: Set up for store use configures the TV for retail display and is not recommended for any
other use. In store mode, some features of the TV are missing or limited. To switch from one
mode to the other, you have to perform a factory reset as explained in Factory reset everything,
and then repeat Guided Setup.
!
!!
21
!
!
!
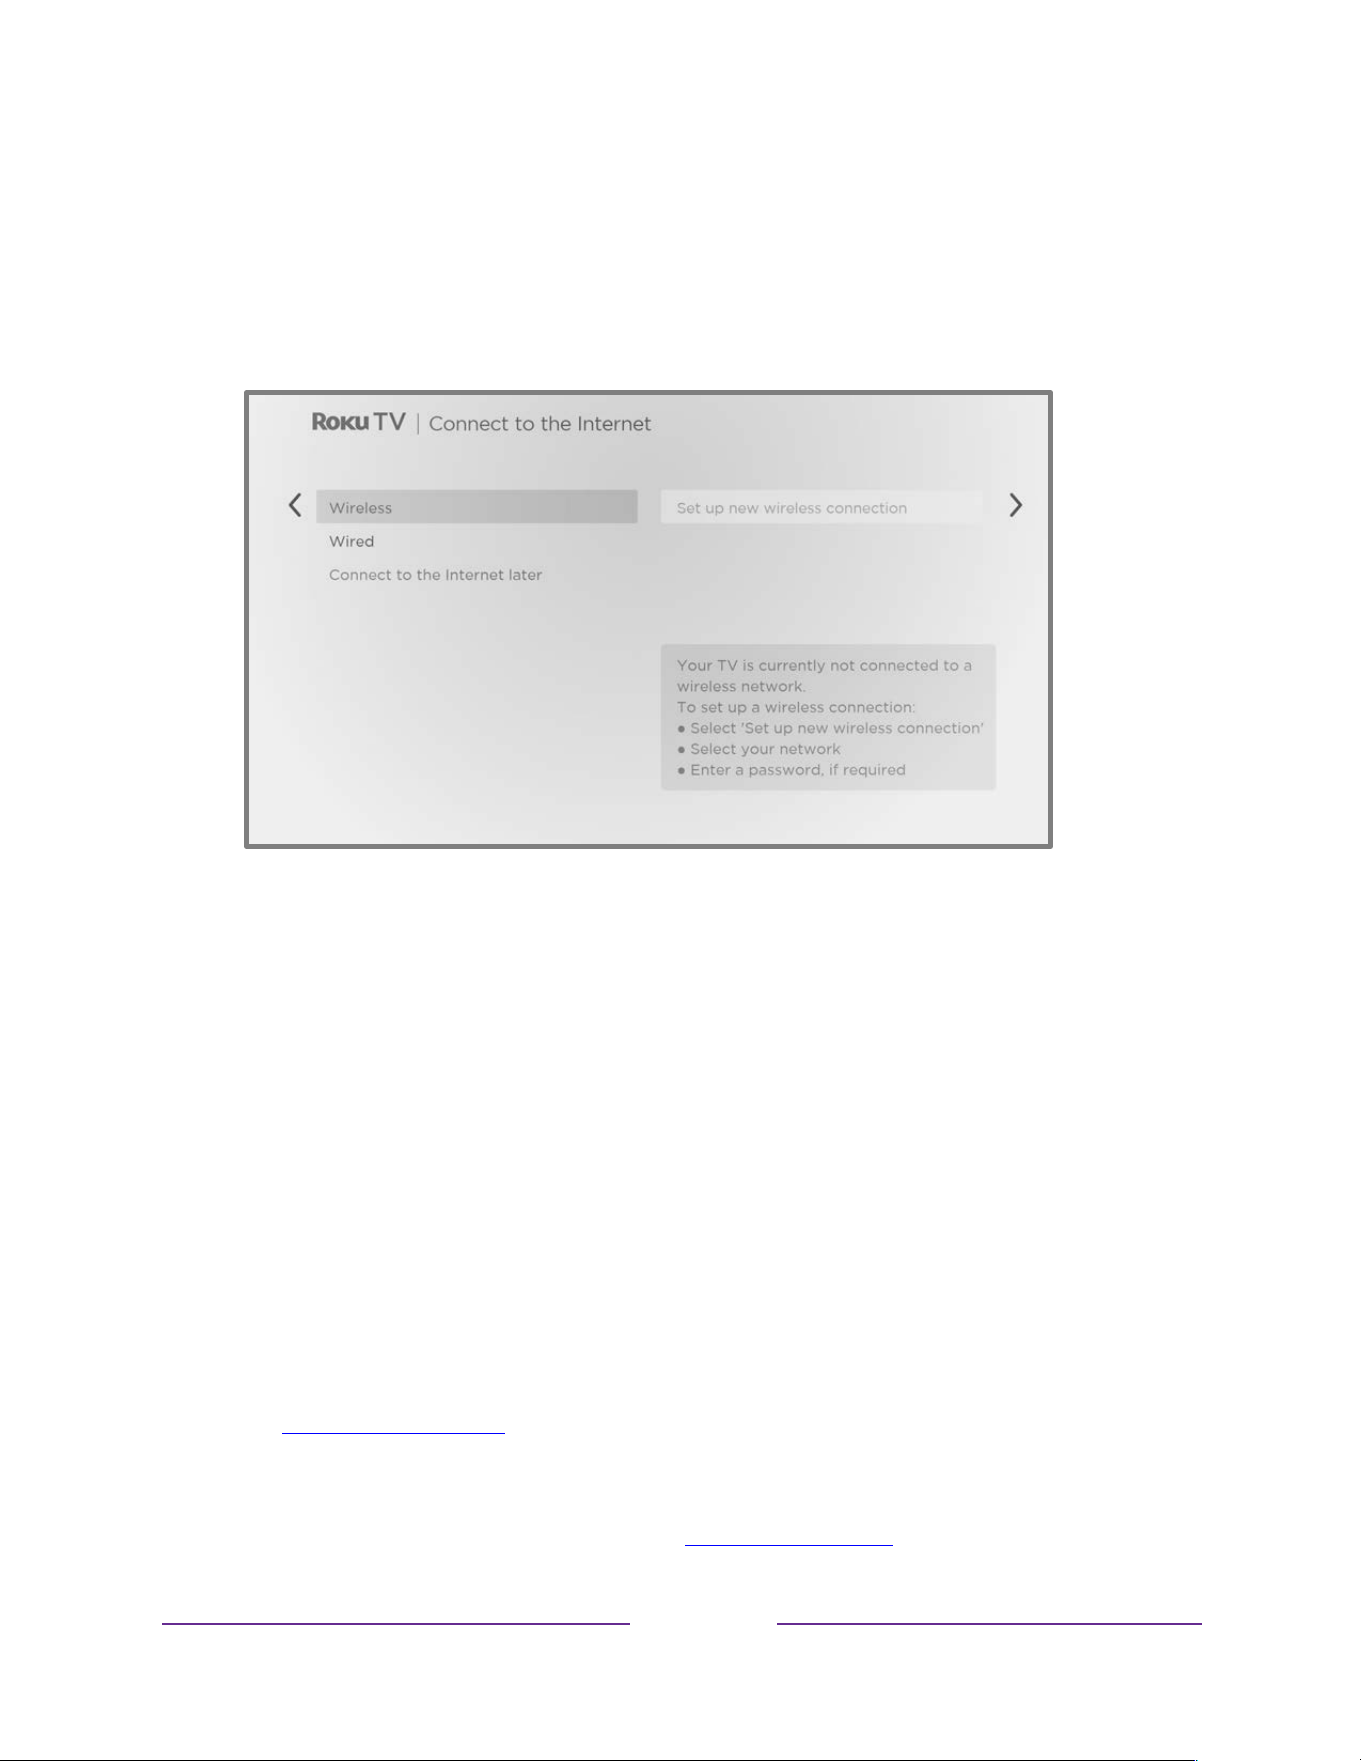
Network connection
After you select Set up for home use, the TV prompts you to make a network connection. If your
TV has both wired and wireless connections, you’ll see the following screen. If your TV has only
wireless connectivity, skip the following step.
5. Only on models that display the Connect to the Internet screen: Make a selection:
• Wireless connection – Highlight Set up new wireless connection and press OK. The TV
prompts you through wireless setup. Skip ahead to the next step for help with the process.
• Wired connection – Highlight Connect to wired network and press OK. The TV
immediately attempts to connect to your wired network, your local network, and then the
Internet. Go to Step 9 to continue with Guided Setup.
• Connect to the Internet later – If you don’t want to connect to the Internet right now, you
can select this option, and then press OK. You can still use the TV to watch live TV channels,
and connect your devices to play games, watch DVDs, or watch channels from a cable box or
another streaming device. When you’re ready to connect, it’s easy. We’ll show you how in
Benefits of connecting.
Note: If you decide not to connect, Guided Setup skips ahead to setting up the devices that
you’ve connected to your TV. Jump ahead to Connect your devices to complete Guided Setup.
!
22
!
!
!
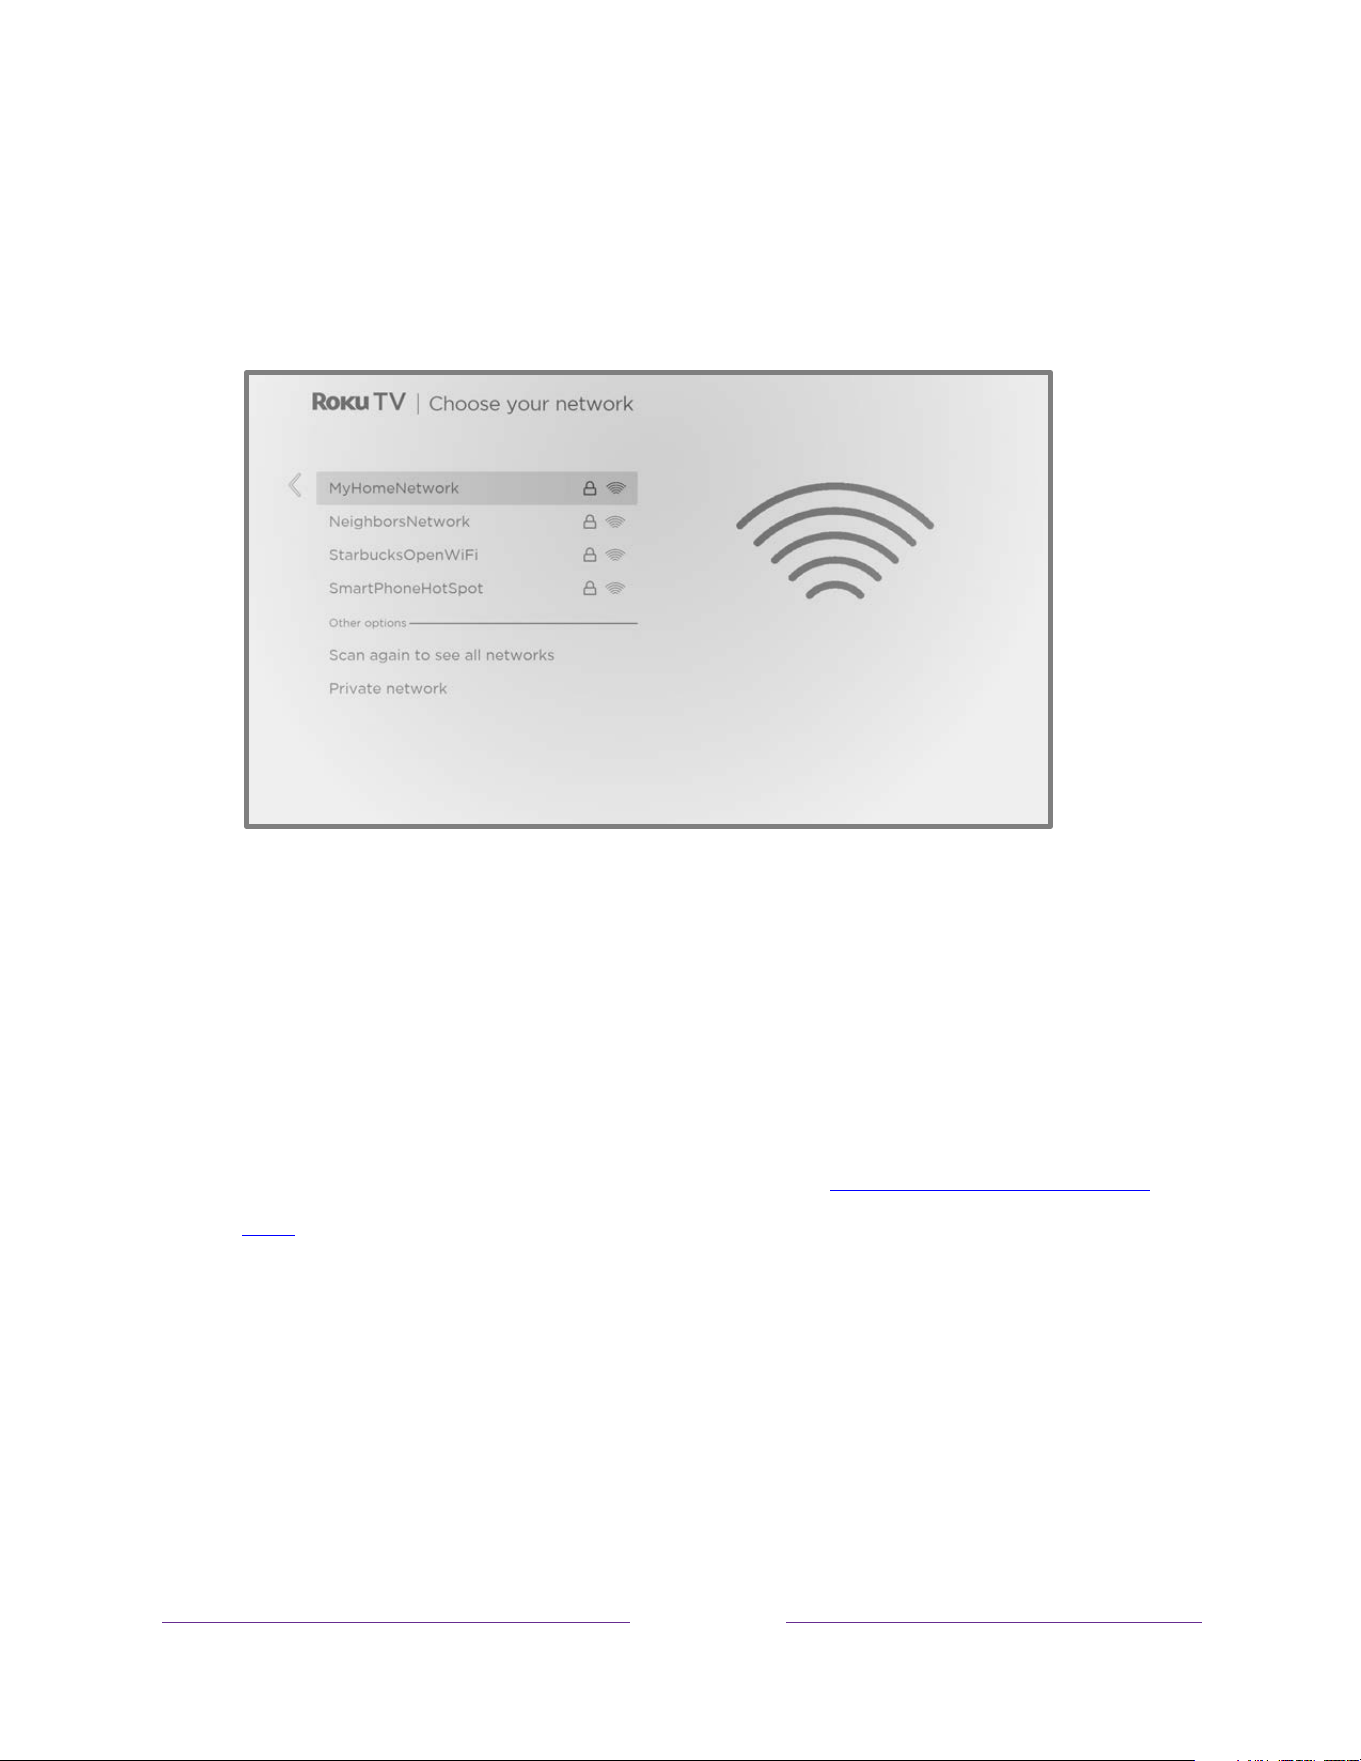
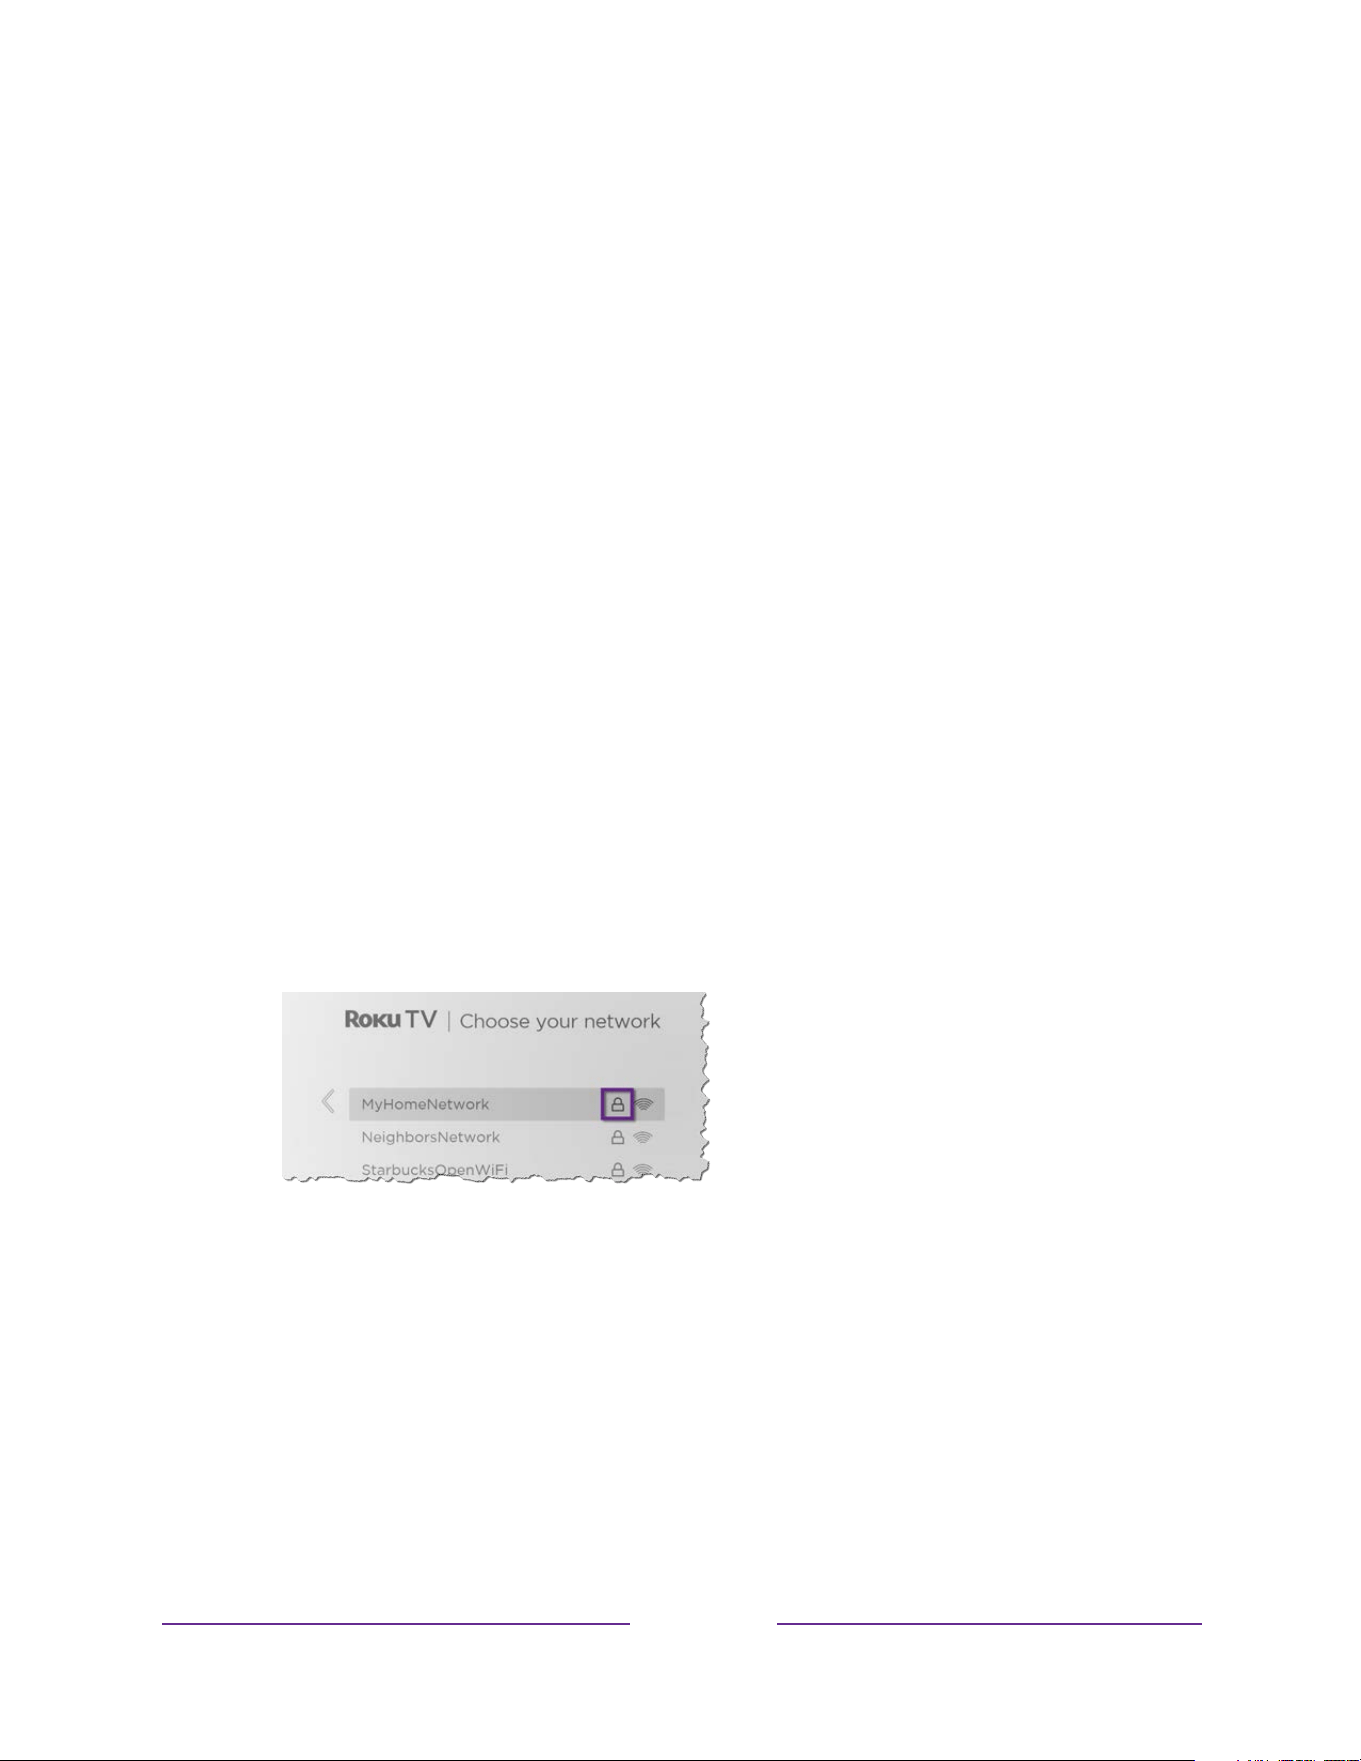
6. On models that have wireless only, and models with both wired and wireless when you’ve
selected Wireless: The TV scans for the wireless networks within range and displays them in
order, with the strongest signals first. In addition to your own wireless signal, the TV might pick
up signals from your neighbors.
Press UP or DOWN to highlight the name of your wireless network, and then press OK to
select it.
Note: Some networks, such as those often found in dorm rooms, hotels, and other public places,
require you to read and agree to terms, enter a code, or provide identifying information before
letting you connect to the Internet. If your Roku TV detects that you are connecting to such a
network, it prompts you through the connection process using your smartphone or tablet to
provide the needed information. For more information, see Using your TV in a hotel or dorm
room.
Other options
• Scan again / Scan again to see all networks – The name of this option depends on the
number of wireless networks within range.
• Scan again appears if the list already shows all available wireless networks within
range. If you don’t see your wireless network name in the list, you might need to adjust
the location of your wireless router or the TV, turn on your router, or make other
!
!!
23
!
!
!
changes. When everything is ready, select Scan again to see if your network name now
appears in the list.
• Scan again to see all networks appears if there are more wireless networks than the
strongest ones it initially listed. If you don’t see your wireless network name in the list,
this option displays the complete list. If you still don’t see your network name, you
might have your router configured to provide wireless service as a “private network.”
Note: Highlighting either of these options displays an informational panel with the
unique media access control (MAC) address of your Roku TV. You will need the MAC
address if your wireless router is configured to use MAC address filtering.
• Private network – If your wireless network name is hidden, it won’t appear in the list.
Select Private network and then press OK to display an on-screen keyboard. Use the
keyboard to enter your network name. Unless you changed the factory-set network name,
you can find the name (also called SSID) on a label on the router.
Tip: Wireless networks that are password-protected display a “padlock” icon adjacent to the
name. This icon enables you to know that you are going to be prompted to enter a password
after you select that network.
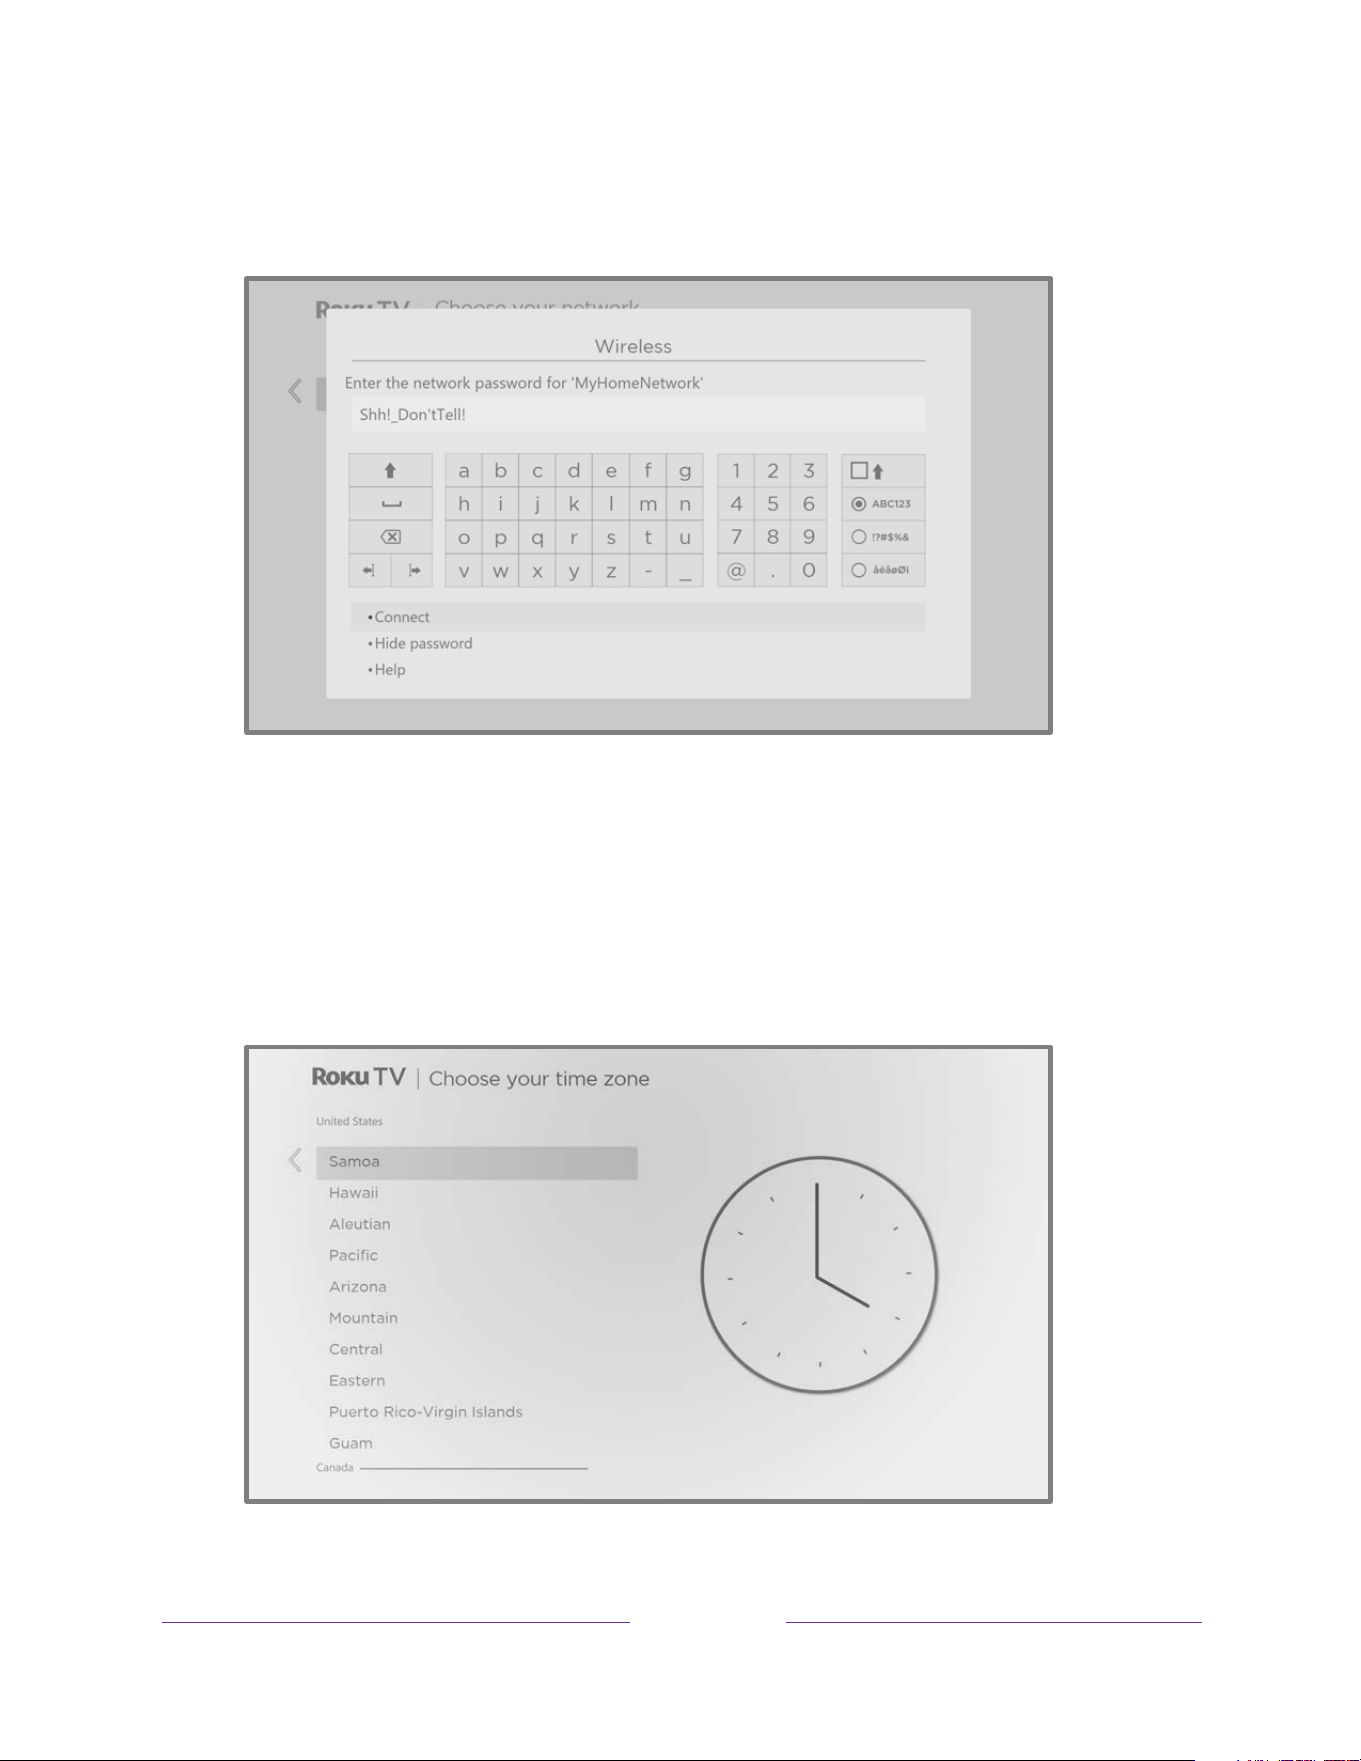
7. Only if you select a password protected wireless network: An on-screen keyboard appears. Enter
your wireless network password by using the purple directional pad to navigate the keyboard,
!
24
!
!
!
and pressing OK to select a highlighted letter, number, or symbol. When you finish, press
DOWN to select Connect, and then press OK.
After you select Connect, the TV displays progress messages as it connects to your wireless
network, your local network, and the Internet.
8. Only if your TV cannot get the correct time zone and current time from your network service
provider: The Choose your time zone screen appears. Press UP or DOWN to highlight your
time zone, and then press OK.

!
!!
25
!
!
!
Tips: Your TV needs to know the local time zone so that it can correctly display information
about the program you are currently watching.
Your TV automatically checks for updates periodically. These updates provide new features and
improve your overall experience with the TV. After an update, you might notice that some
options have moved, and that there are new options or features. This User Guide describes
version 9.3. To determine your current Roku TV software version, go to Settings > System >
About after you complete Guided Setup. You can download an updated User Guide that matches
your Roku TV software version from the Roku TV web site.
Activation
After the TV restarts, it prompts you through activation.
9. Use a computer, tablet, or smartphone with an Internet connection to link to a new or existing
Roku account.
Note: Roku does not charge for activation support – beware of scams.
Why do I need a Roku account?
You need a Roku account for several reasons:
• It links you, your Roku TV, and your other Roku streaming devices to the Roku Channel Store and
billing service.
• Streaming content providers know that it’s OK to send content you request to your Roku TV.
• Roku can automatically send updates to your device.
You need a Roku account to activate your device and access entertainment across thousands of streaming
channels. Linking to a Roku account also activates several advanced features on your TV, such as Guest
Mode, the Roku mobile app, and Live TV Pause, to name just a few. Roku accounts are free, and while a
valid credit card number is not required to create your account, providing your credit card information
makes renting, purchasing, and subscribing to entertainment from the Roku Channel Store fast and
convenient.

!
26
!
!
!
After you activate your TV, the TV gets an acknowledgement, and then adds your newly-
selected and pre-existing streaming channels from other Roku devices on the same account.
This process is automatic and takes a few moments—a little longer if you have added a lot of
streaming channels.
Tip: Streaming channels from all of the Roku streaming devices associated with your account are
synchronized periodically. All of your Roku streaming devices therefore display the same set of
channels (subject to compatibility with the device).
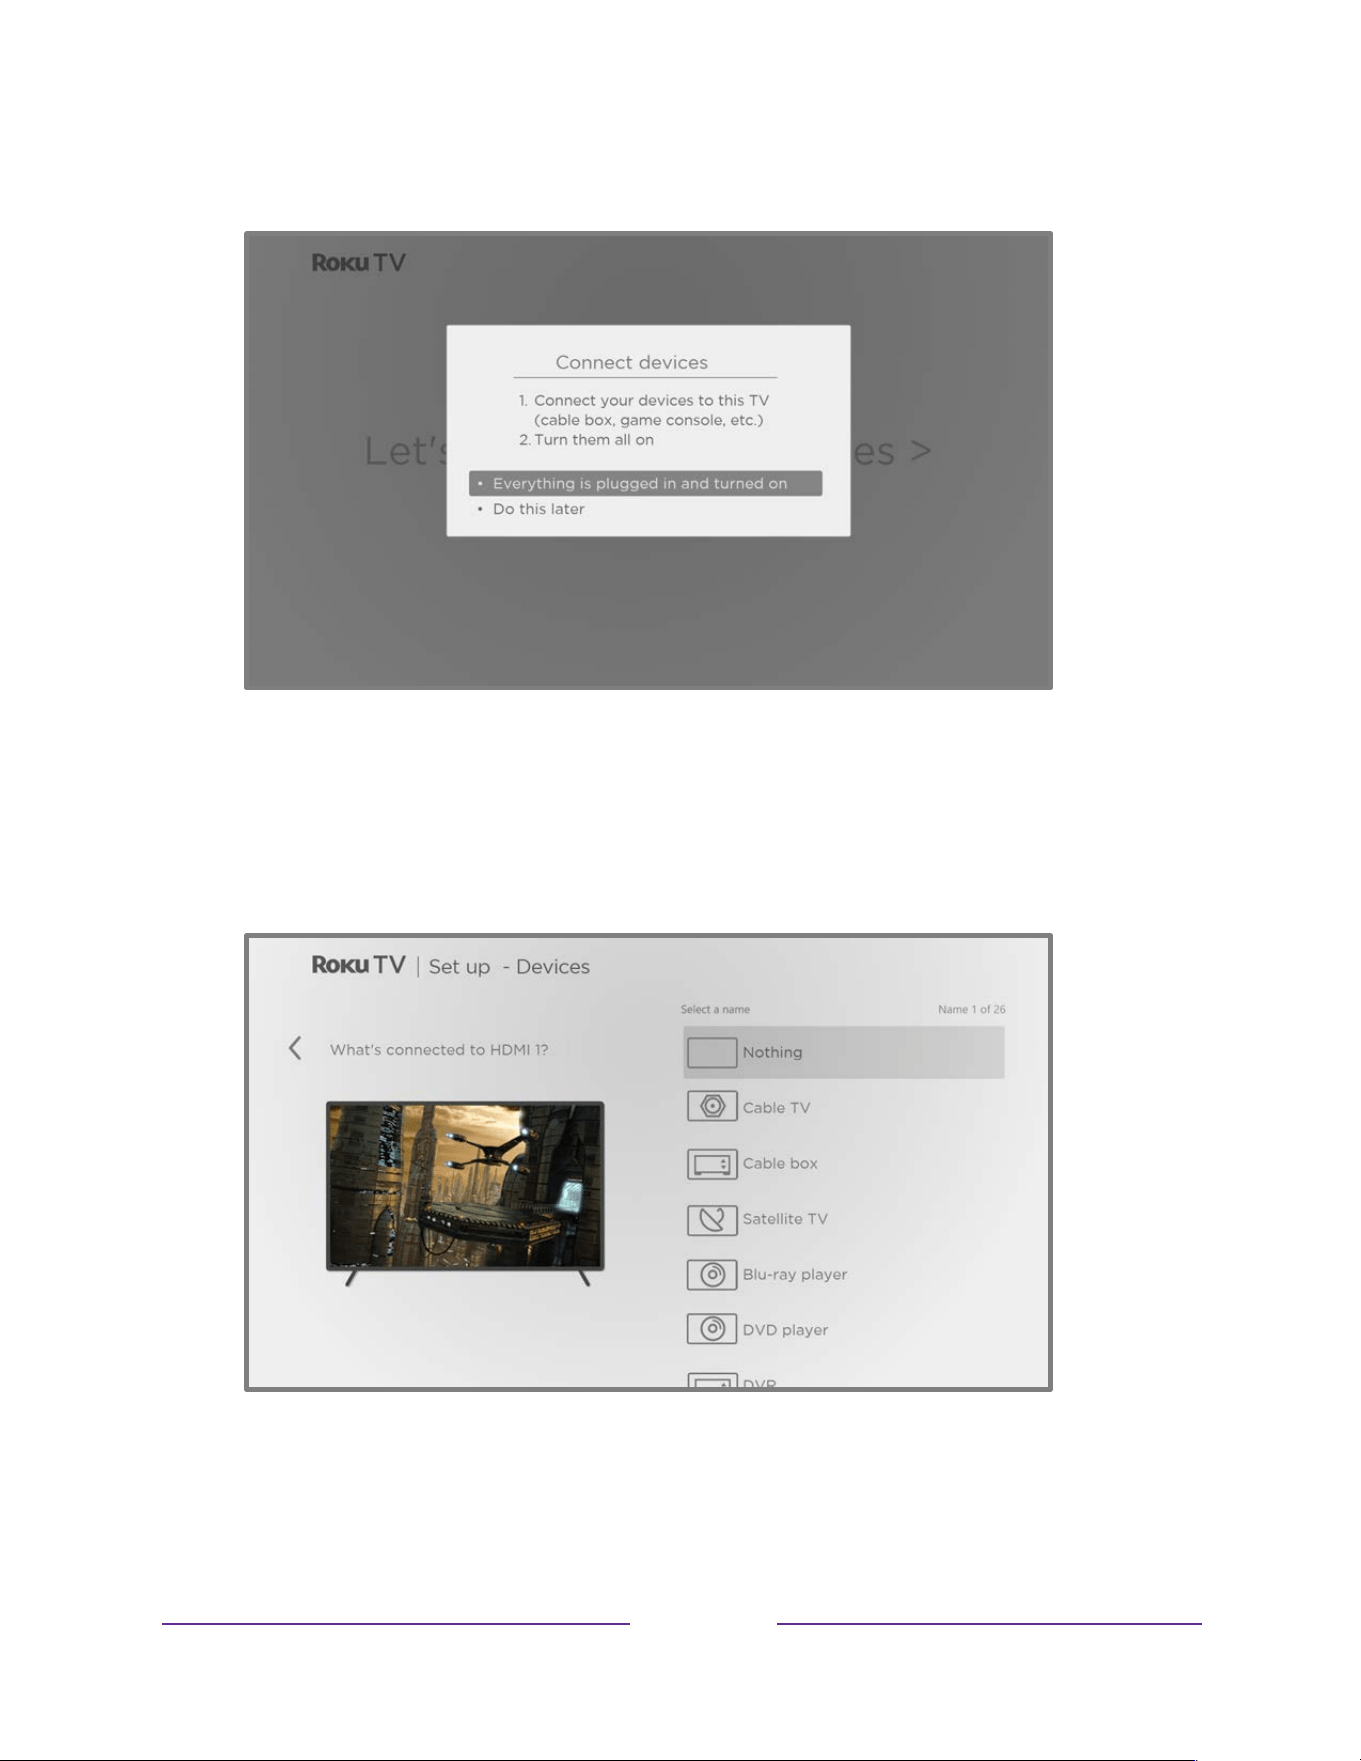
Connect your devices
Next, Guided Setup helps you set up the external devices that you want to use with it, such as a
cable box, Blu-ray™ player, or game console.
!
!!
27
!
!
!
10. Press OK to proceed:
11. Connect all the devices you plan to use with your TV, turn them all on, and then select
Everything is plugged in and turned on. The TV now takes you step by step through each of
its inputs and asks what kind of device you have connected. For each input that has a connected
and active device, you can see its picture and hear its sound.
12. Press UP or DOWN to highlight the label you want to associate with the input, and then press
OK. If you are not using the input, select Nothing, and the input won’t appear on the Home
screen.
!
28
!
!
!
13. While setting up your devices, rather than using the predefined names and icons, you can set a
custom name and icon. To do so, scroll up or down to highlight Set custom name & icon, and
then press OK. Follow the instructions on the screen to enter a name and select an icon for the
input. See Rename inputs for more information.
Note: If you specify a custom name for an input, voice commands will not reliably switch to that
input. Voice commands typically can only switch among inputs that use built-in names, such as
“AV,” and “Cable Box,” and “DVR.”
14. Repeat the previous step for each input.
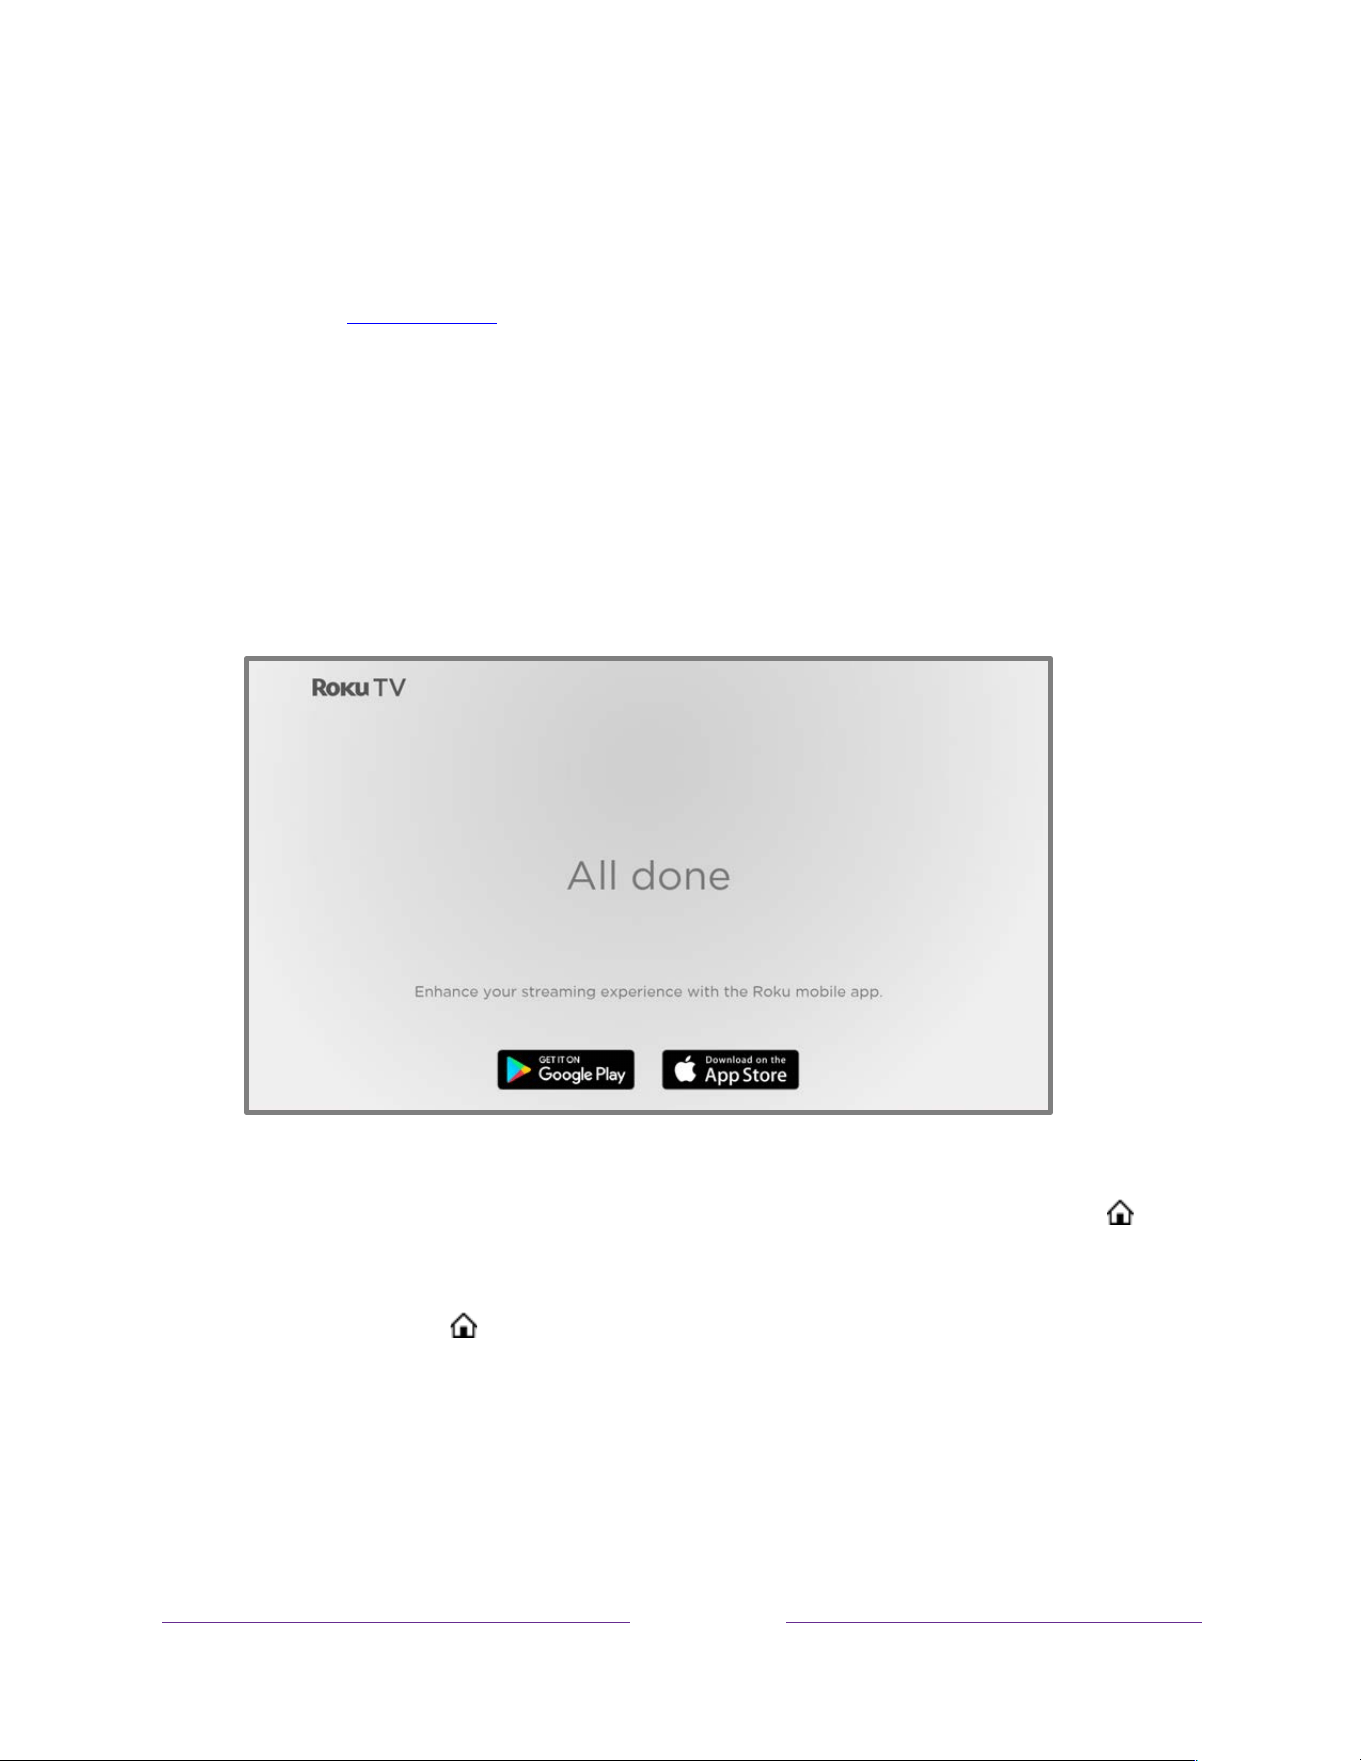
You’re done with Guided Setup.
Note: Some Roku TVs, depending on where you live and other factors, show you an introductory video
filled with some great hints and tips. If you’re not interested in viewing this video, press HOME on
the remote to go to the Roku TV Home screen.
Whenever you press HOME , the Home screen greets you.
From here, you can explore everything your TV has to offer. Use the purple directional pad to move
around, and then press OK to select a highlighted item. We’ve designed the TV to encourage you to
explore, and you can probably figure out most of the capabilities and settings on your own. If you have
any questions or difficulties, you can find answers and solutions in this guide.
!
!!
29
!
!
!
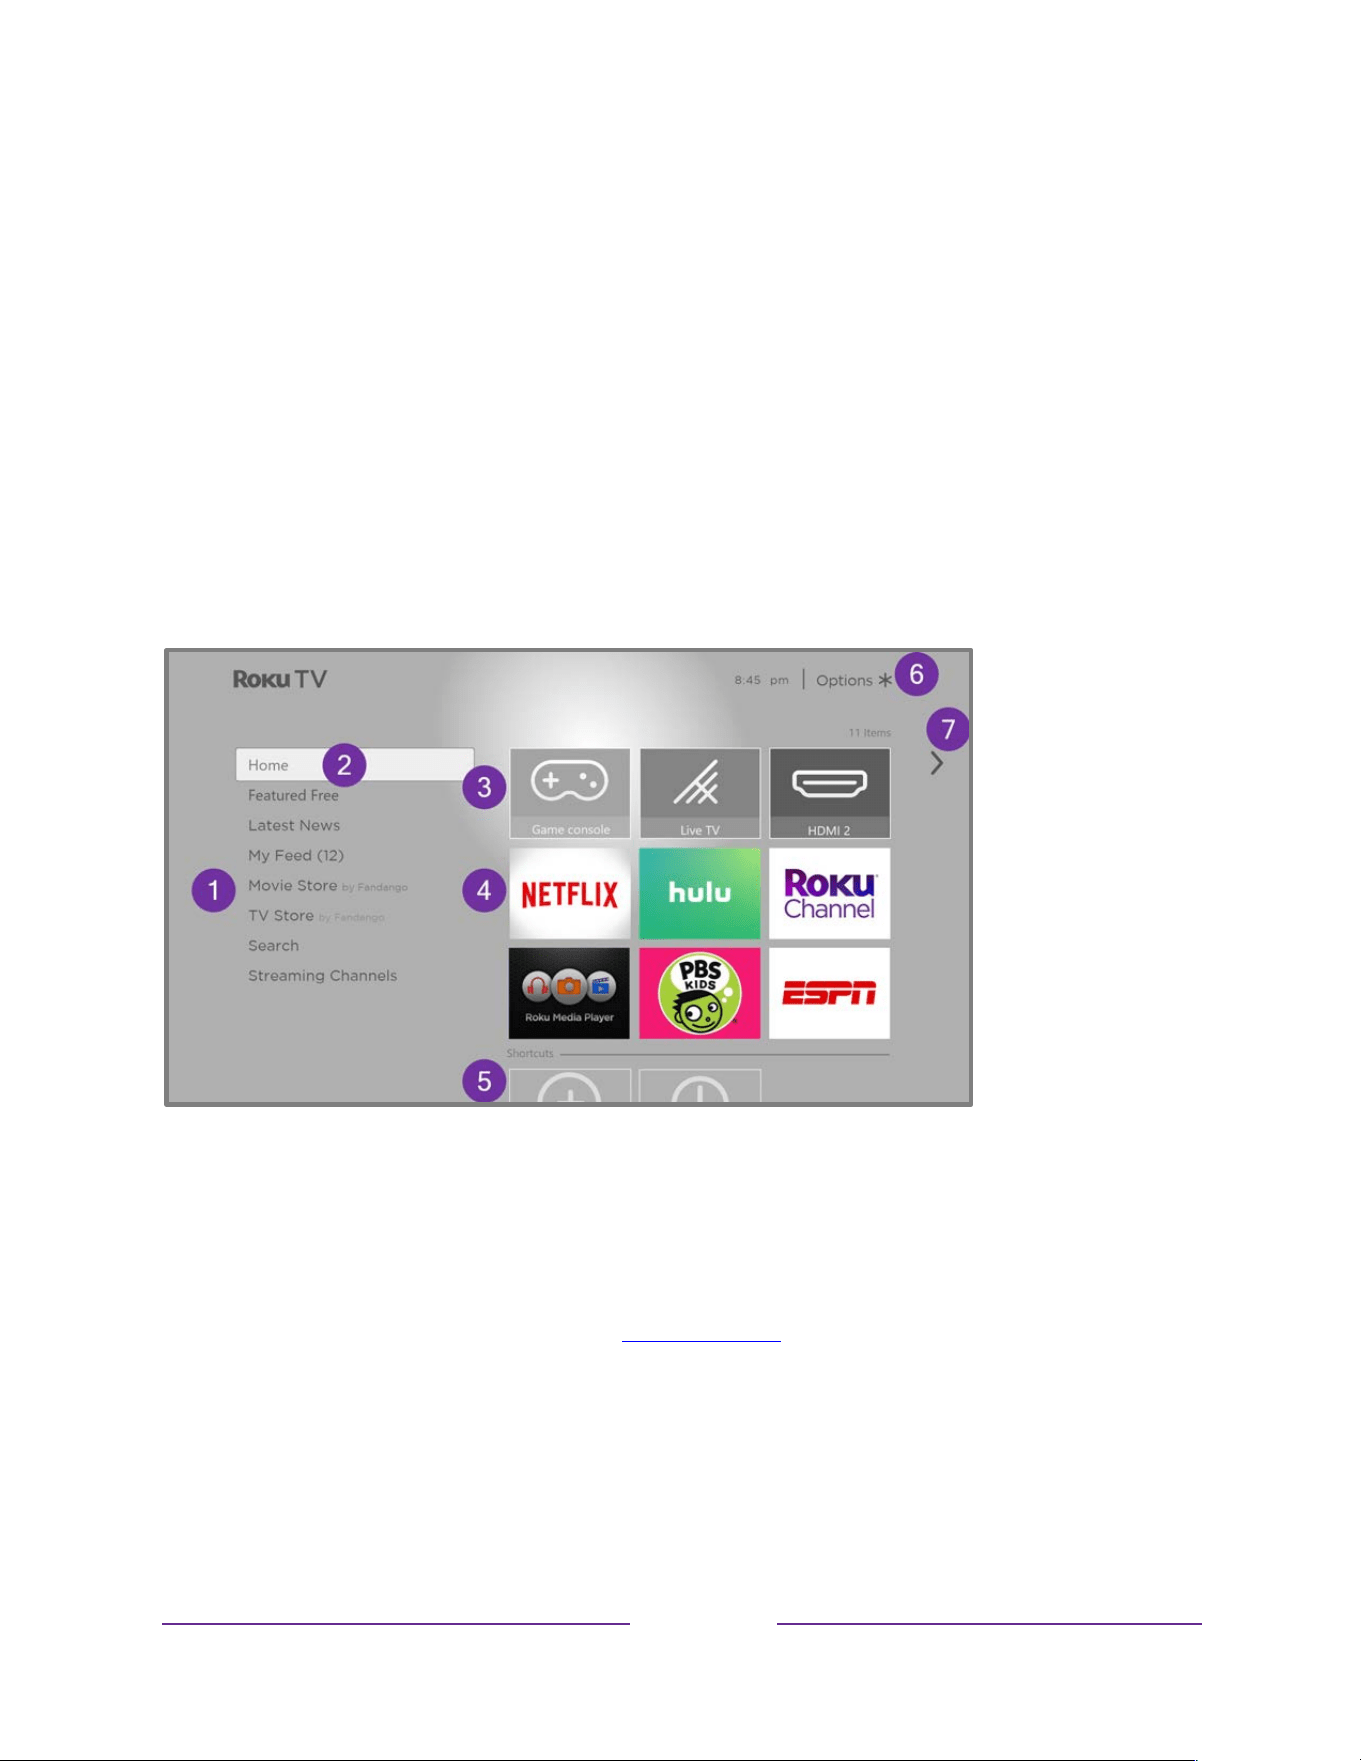
The Home screen
The following illustrations show typical Home screens, which vary depending on location, connected
mode, selected theme, number of TV inputs enabled, and streaming channels and apps added.
Note: A paid subscription or other payments may be required for some channel content. Channel
availability is subject to change and varies by country. Not all content is available in countries or regions
where Roku
®
products are sold.
Typical connected Home screen
1. Home screen menu—shows options available to you when you are on the Home screen.
2. Highlighted option—press OK to select.
3. TV input tiles—select an input to watch the connected device.
4. Streaming channel and app tiles—select a tile and press OK to go to the indicated streaming channel or application.
You can add any number of channels from the Roku Channel Store.
5. Direct access tiles – shortcuts to often used features.
6. Options hint—press STAR
Þ to see options when this symbol is present.
7. Next screen hint—press RIGHT to see the next screen.
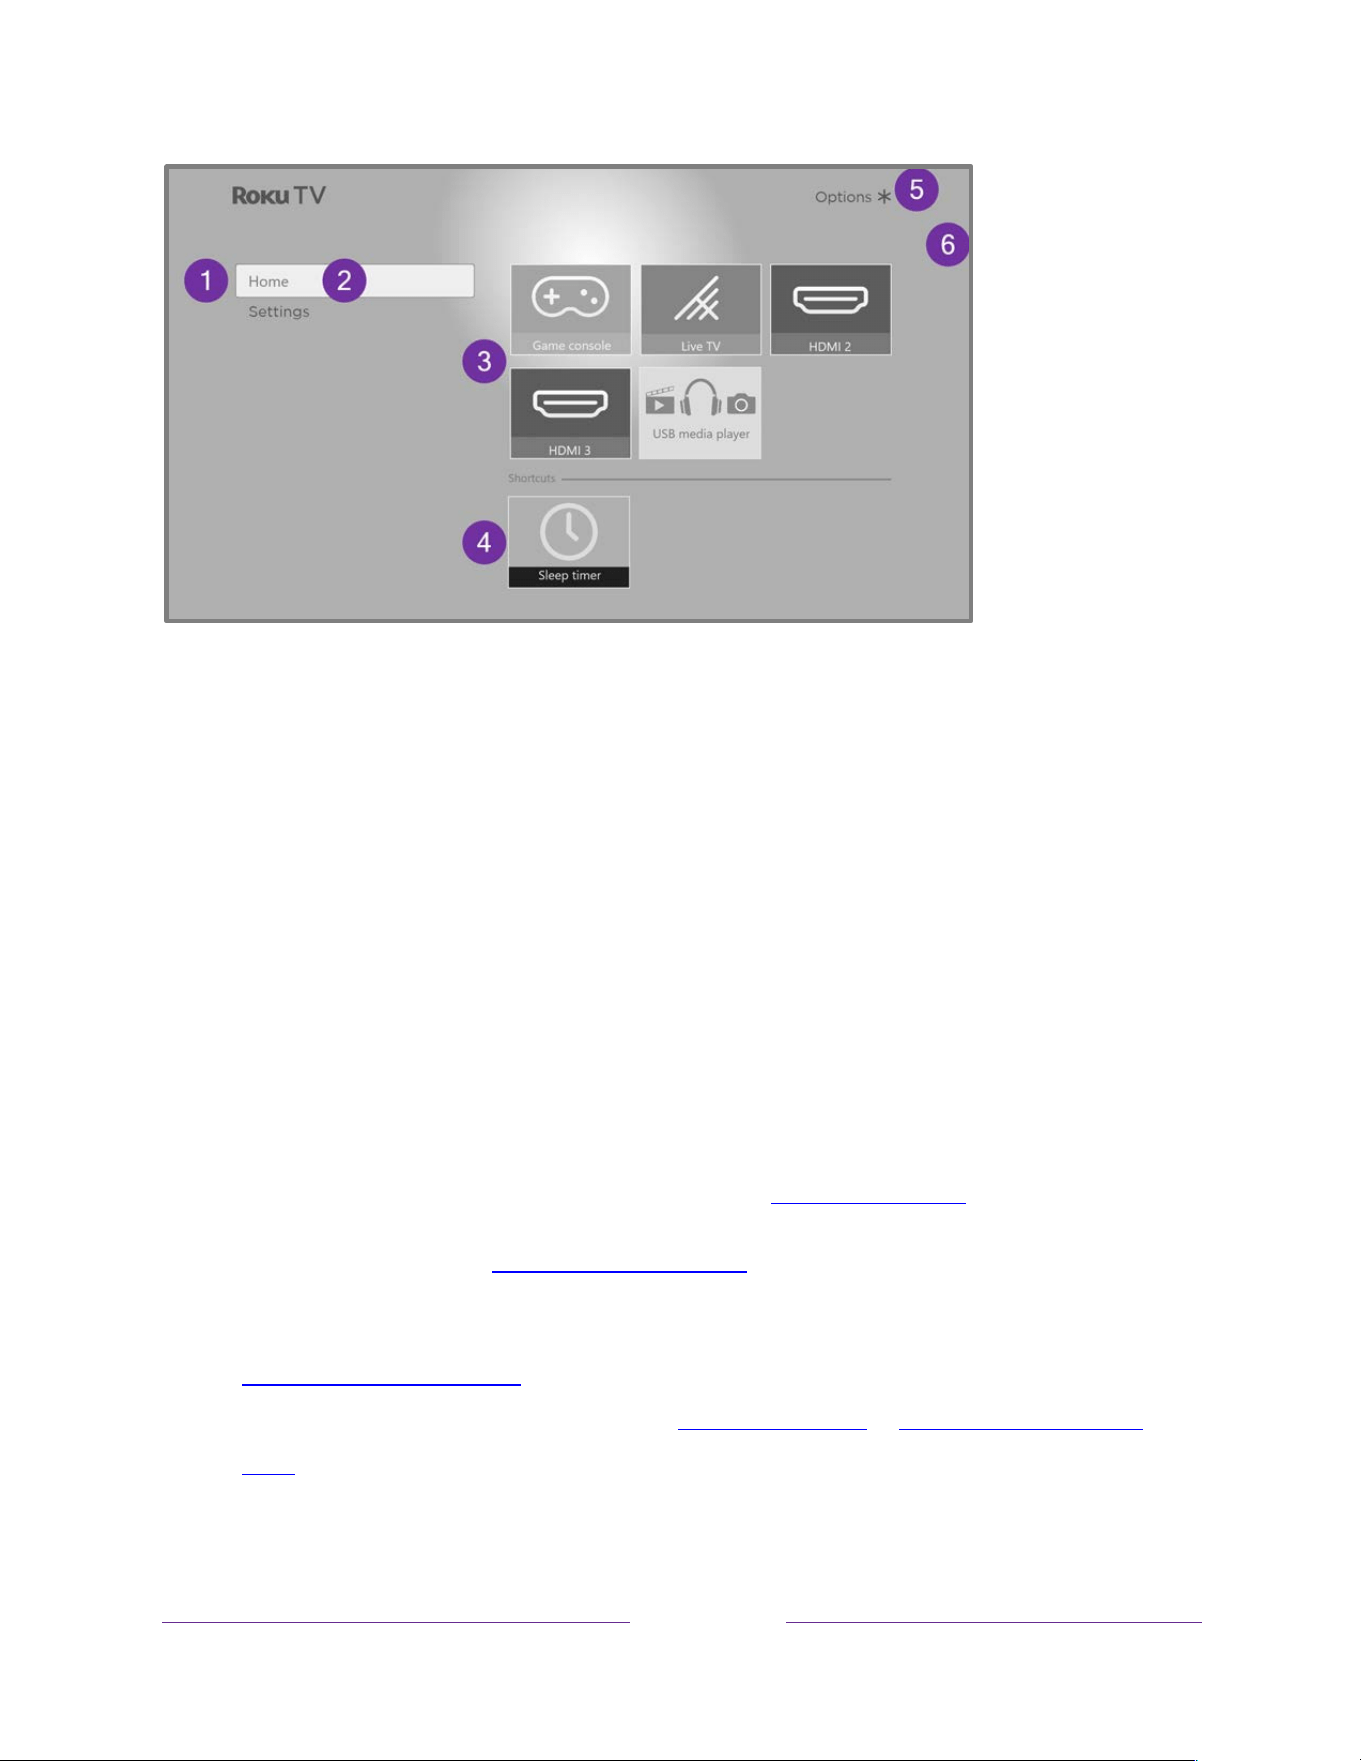
!
30
!
!
!
Typical non-connected Home screen
1. Home screen menu—shows options available to you when you are on the Home screen.
2. Highlighted option—press OK to select.
3. TV input tiles—select an input and press OK to watch the connected device.
4. Direct access tiles – shortcuts to often used features.
5. Options hint—press STAR
Þ for options when this symbol is present.
6. Next screen hint—press RIGHT to see the next screen.
Personalize your Home screen
There are many things you can do to personalize your Home screen and make it just right for you and
your family:
• Only in connected mode: Add streaming channels by using the Streaming Channels menu
option or the Add Channels shortcut to browse the Roku Channel Store.
• Only in connected mode: Change the screen theme by going to Settings > Themes to find and
pick one to suit your mood.
• Customize the Home screen. Hide or show the shortcut tiles that appear at the bottom of your
Home screen grid. Only in connected mode, hide Featured Free or hide Movie Store and TV
Store.
• Remove a tile by highlighting it and pressing STAR Þ. Then highlight Remove input or
Remove channel and press OK.

!
!!
31
!
!
!
• Move a tile by highlighting it and pressing STAR Þ. Then highlight Move input or Move
channel and press OK. Use the purple directional pad to move the tile, and then press OK to
lock it in its new location. Move the shortcut tiles within the shortcut area only. Shortcuts are
designed to always appear at the very bottom of the grid, so you can access them quickly by
pressing UP once when you’re at the top of the grid.
• Rename a TV input tile by highlighting it and pressing STAR Þ. Then highlight Rename input
and press OK. Highlight a new name in the list, and then press OK to assign that name to the
tile.
Rather than using the predefined names and icons, you can set a custom name and icon. To do
so, scroll up or down to highlight Set custom name & icon, and then press OK. Follow the
instructions on the screen to enter a name and select an icon for the input.
Note: If you specify a custom name for an input, voice commands will not reliably switch to that
input. Voice commands typically can only switch among inputs that use built-in names, such as
“AV,” and “Cable Box,” and “DVR.”

!
32
!
!
!
Benefits of connecting
Connecting brings out your TV’s full potential!
Make any night a movie night
Thousands of movies to choose from, across all major streaming movie channels
1
.
You’ll never run out of
something new to watch.
Check out The Roku Channel
Use The Roku Channel as your new home page for a huge assortment of free on-demand and streaming
movies, programs, live news, and kid’s TV. Add premium subscriptions to watch many of your favorite
channels in one place, and manage them all through your Roku account. Use the live TV Channel Guide
to see what’s on live streaming channels right now.
Get in the groove
Stream endless hours of music from free and subscription-based channels. With almost instant access to
thousands of music artists, your favorite beats are just as close as your remote.
Explore your passions
In addition to the most popular streaming channels, your Roku TV also offers hundreds of other
streaming channels to fuel your passions—including fitness, cooking, religion, outdoors, international
programming and much more.
1
A paid subscription or other payments may be required for some channels. Channel availability is subject to change and varies by country. Not
all content is available in countries or regions where Roku® products are sold.

!
!!
33
!
!
!
Enjoy FREE trials of popular channels
Your Roku TV comes loaded with special offers, including free trials (if eligible) from popular streaming
channels. REMEMBER THAT YOU MUST CANCEL BEFORE THE FREE TRIAL ENDS TO AVOID SUBSCRIPTION
FEES.
Take advantage of awesome features
Powerful, voice-enabled search lets you use voice commands to find movies and TV programs by title,
actor, director, or genre across multiple streaming channels
1
. Additionally, your search commands can
include popular movie quotes, and words like “free” and “4K.” In addition to streaming channels, your
search results include live TV programs airing in your region.
Automatic account linking keeps track of supported streaming subscriptions on other Roku devices, so
that you won’t have to re-enter your user name and password when adding the same channel on your
newly-activated Roku TV.
2
Smart Guide is an electronic program guide that is available any time you are watching live broadcast
programs and live streaming programs on The Roku Channel. You can scroll up and down to see your
channels. If you highlight a program that has a purple asterisk (Þ), you can press STAR Þ to see More
Ways to Watch. And you can make your recently-watched channels easier to find by grouping them
together in the Smart Guide.
More Ways to Watch gives you recommendations about the program you are watching on the Live
TV, HDMI, or AV input, gives you options to stream the current program from the beginning, the entire
season, or the entire series, and recommends other programs with similar themes. It also uses the
shows you watch to display ads that are more relevant to you.
Roku Zones organize your search results into browsable rows, such as New Release, Free, and Rent or
Buy, so you can see at a glance how a program is offered. If you have a 4K Roku TV, results also include a
4K Spotlight Zone.
1
Voice features support English and Spanish languages.
2
Not all streaming channels currently support automatic account linking.

!
34
!
!
!
4K Spotlight Channel now has a new look and simpler navigation to help you find 4K entertainment
quickly. Launching the channel takes you to the 4K Movies and TV Zone, where you’ll find a regularly
updated, hand-curated selection of 4K entertainment from channels across the Roku platform. You can
browse a wide variety of 4K titles across a number of categories such as Most Popular, Action, and
more, to find the perfect movie or program to enjoy in beautiful 4K resolution.
Live TV Pause lets you connect a USB drive (not provided) and pause live TV for up to 90 minutes.
After pausing, you can play, fast-forward, rewind, and pause again to any point within the rolling 90-
minute window.
Voice commands with multiple device support let you use your Roku Voice Remote, Roku Enhanced
Voice Remote, Google Assistant, Amazon Alexa, or the Roku mobile app to change stations, TV inputs,
launch streaming channels, and more. Include a location in your command such as “in the bedroom” to
specify which Roku device you want to control.
Tips & Tricks channel is packed with videos created by Roku to help you learn more about features,
new products, and popular support topics.
My Offers show up in the Home screen menu if you are eligible for special offers or discounts on Roku
products.
Mobile Private Listening on the Roku mobile app lets you listen to streaming programs and live TV
programs on headphones (not provided) plugged into your IOS
®
or Android™ mobile device.
What is streaming?
Streaming is viewing or listening to video or audio content that is sent over the Internet, or located on a
network-connected media server or on a USB device plugged into the TV’s USB port.
With streaming, you can buy or rent most programs on demand, when it’s convenient for you, and you
can also watch live streaming channels and events. Also, you can play, pause, rewind, and fast forward
most on-demand streaming programs.
Tip: Some content cannot be paused or skipped. For example, if you are viewing live programming or a
program that is supported by ads, you might not be allowed to skip the ads.

!
!!
35
!
!
!
Your Roku TV lets you choose from thousands of streaming channels that offer a huge selection of
entertainment:
• Thousands of movies and TV episodes, both live and on-demand
• Unlimited music, live and on-demand
• Tons of live and on-demand sports
• Commercial-free programming for kids and family
• International programming in 22 languages
• 24x7 news and in-depth news commentary
Many streaming channels are free. Some streaming channels let you purchase or rent the latest movie
releases or popular TV series. Some channels charge a monthly subscription fee and others are available
at no additional cost if you subscribe to a companion service through your cable or satellite provider.
If you have an existing subscription to a streaming provider, you can just sign in with your existing user
name and password.
To play streaming content, add one or more streaming channels to your Home screen. Use the Add
Channels shortcut on the Home screen or the Streaming Channels option on the Home screen menu
to go to the Channel Store, and then select the streaming channel you want to add. The channel remains
on your Home screen unless you remove it, and you can watch it at any time.
For more information on using the Roku Channel Store feature, see Using the Roku Channel Store.
Note: A paid subscription or other payments may be required for some channels. Channel availability is
subject to change and varies by country. Not all content is available in countries or regions where Roku
®
products are sold.

!
36
!
!
!
What if I didn’t connect my TV?
What if you went through Guided Setup and chose Connect to the Internet later? No worries. Your
Roku TV makes it easy to connect whenever you want. As you move around the Home screen, you’ll see
several places where you can start the connection process. For example:
• Now and then you’ll see a message appear on the panel to the right of the Home screen offering a
Connect Now option. You can highlight and select the Connect Now option to get started.
• Use the Connect and activate now option. From the Home screen menu, select Settings, then
Network, and then Connect and activate now.
• If you want to start over from the beginning, do a Factory reset, and then go through Guided Setup
again. This time, select your home network when prompted.

!
!!
37
!
!
!
Setting up live TV
In addition to the other entertainment possibilities of your Roku TV, you might want to watch broadcast
channels from an antenna or cable TV service connected to the ANT input. On your Roku TV, you can
watch broadcast TV in much the same way you watch other entertainment choices: select the Live TV
tile from the Home screen.
The first time you select the Live TV tile, you have to set up the TV tuner. Setting up the TV tuner scans
for active channels and adds them to your Live TV channel list.
Why do I have to set up the TV tuner?
Not everyone needs to use the TV tuner. For example, you might have a set top box provided by a cable or satellite
company that receives all of your channels. Most of these set top boxes use an HDMI
®
connection.
More and more people are watching only streaming TV and do not have a TV antenna or cable/satellite service. If
you don’t need the TV tuner, you can bypass setting it up and instead remove it from the Home screen as
explained in Remove unwanted tiles.
When you set up live TV, the TV scans the signals on its antenna input for channels with a good signal, and adds
those to the channel list, skipping dead channels and channels with a very weak signal.
The TV lets you add two analog channels, even if they have no signal, for the purpose of using an older set top box,
VCR, or game console that can only output a signal on analog channel 3 or 4. Typically, you’ll only need one of
these channels, but both are provided to make setup simpler. You can hide the one you don’t want as explained in
Edit live TV channel lineup.
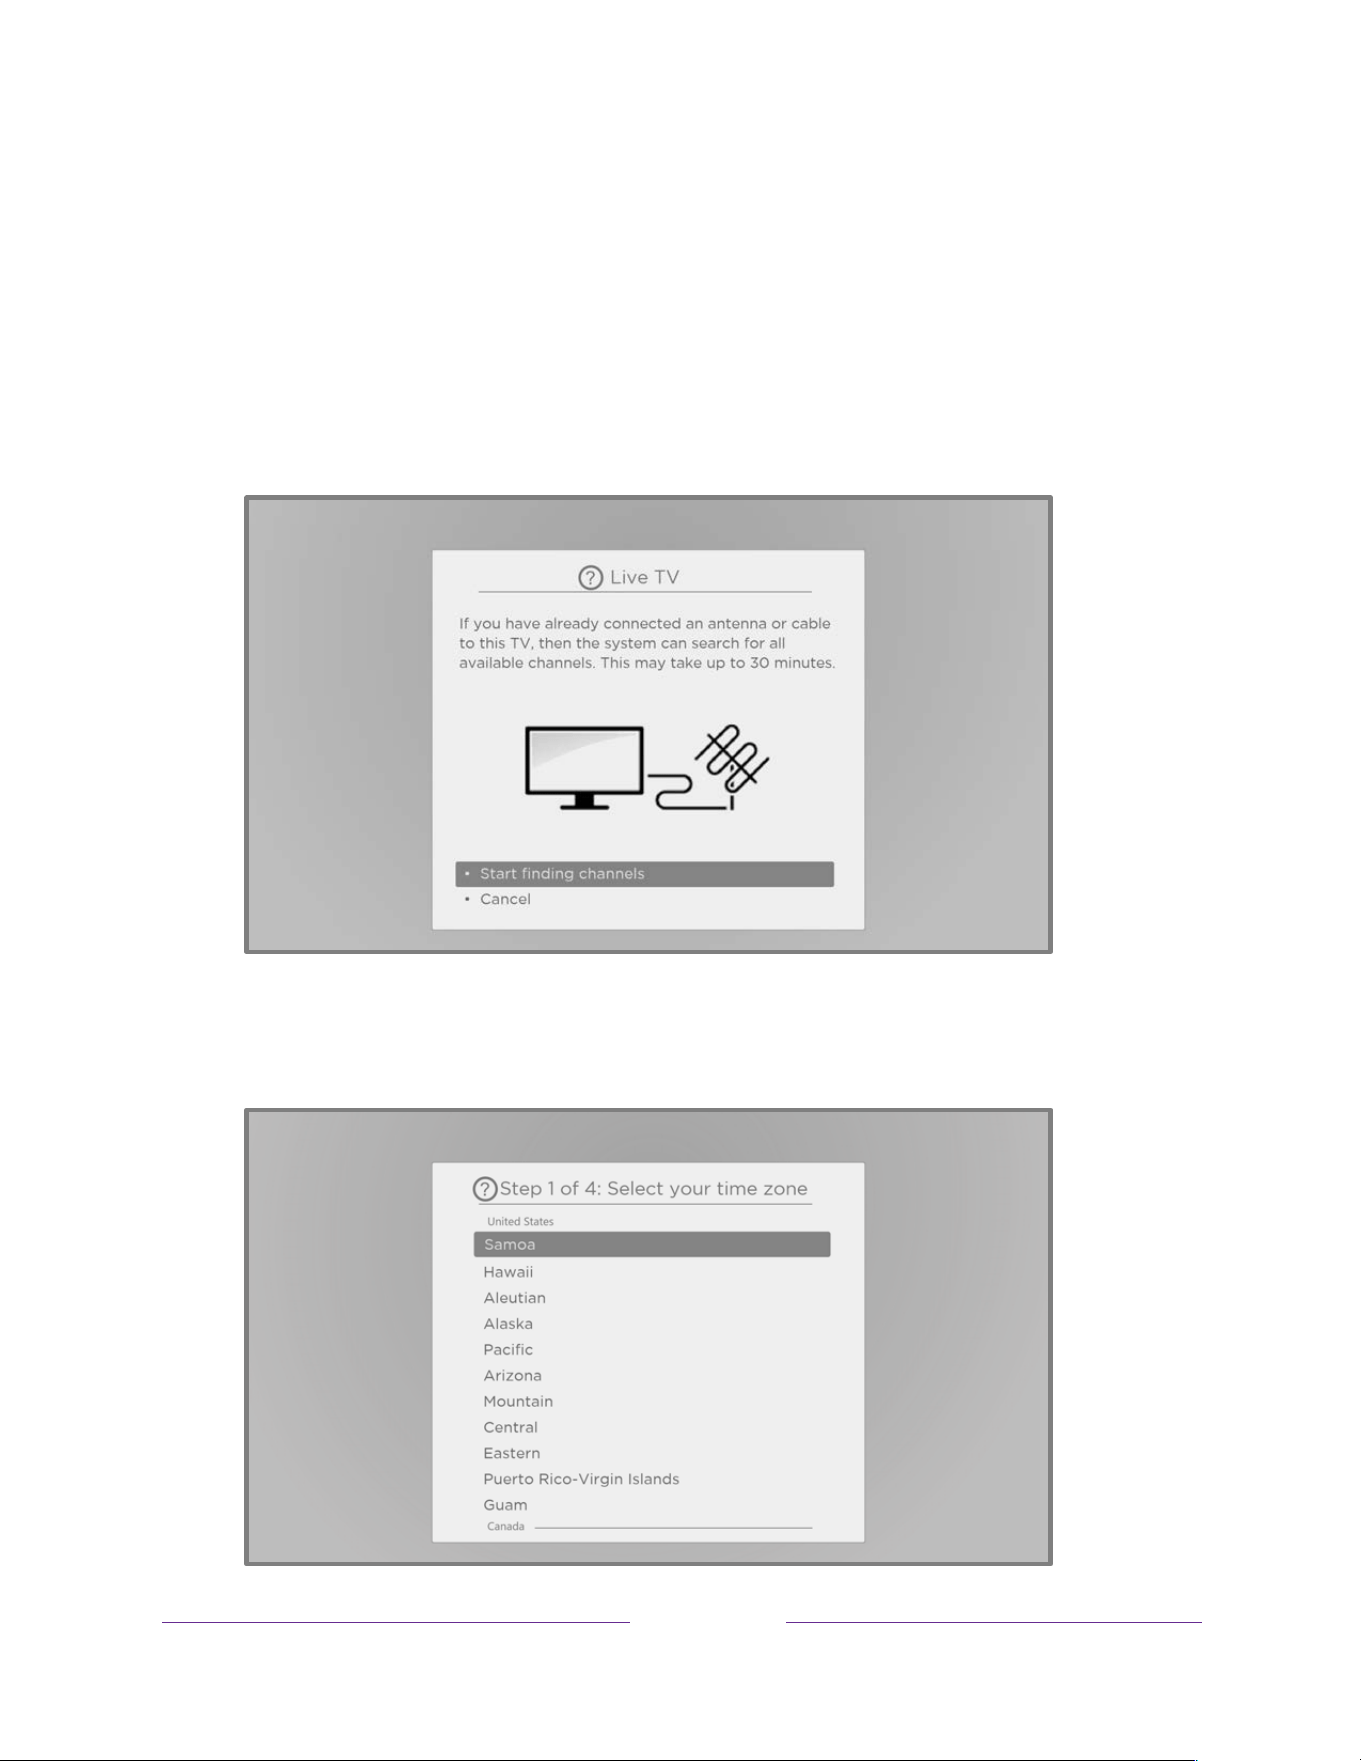
!
38
!
!
!
How do I set up the TV tuner?
1. Make sure your antenna (not provided) or TV cable is connected to the TV’s ANT/CABLE input.
2. On the Home screen, select the Live TV tile. If it is not on your Home screen, go to Settings >
TV Inputs to add it.
3. Read the simple on-screen instructions, and then select Start finding channels.
4. If prompted, select your time zone. You’ll only need to do this if the TV can’t figure out your
time zone from your Internet connection.
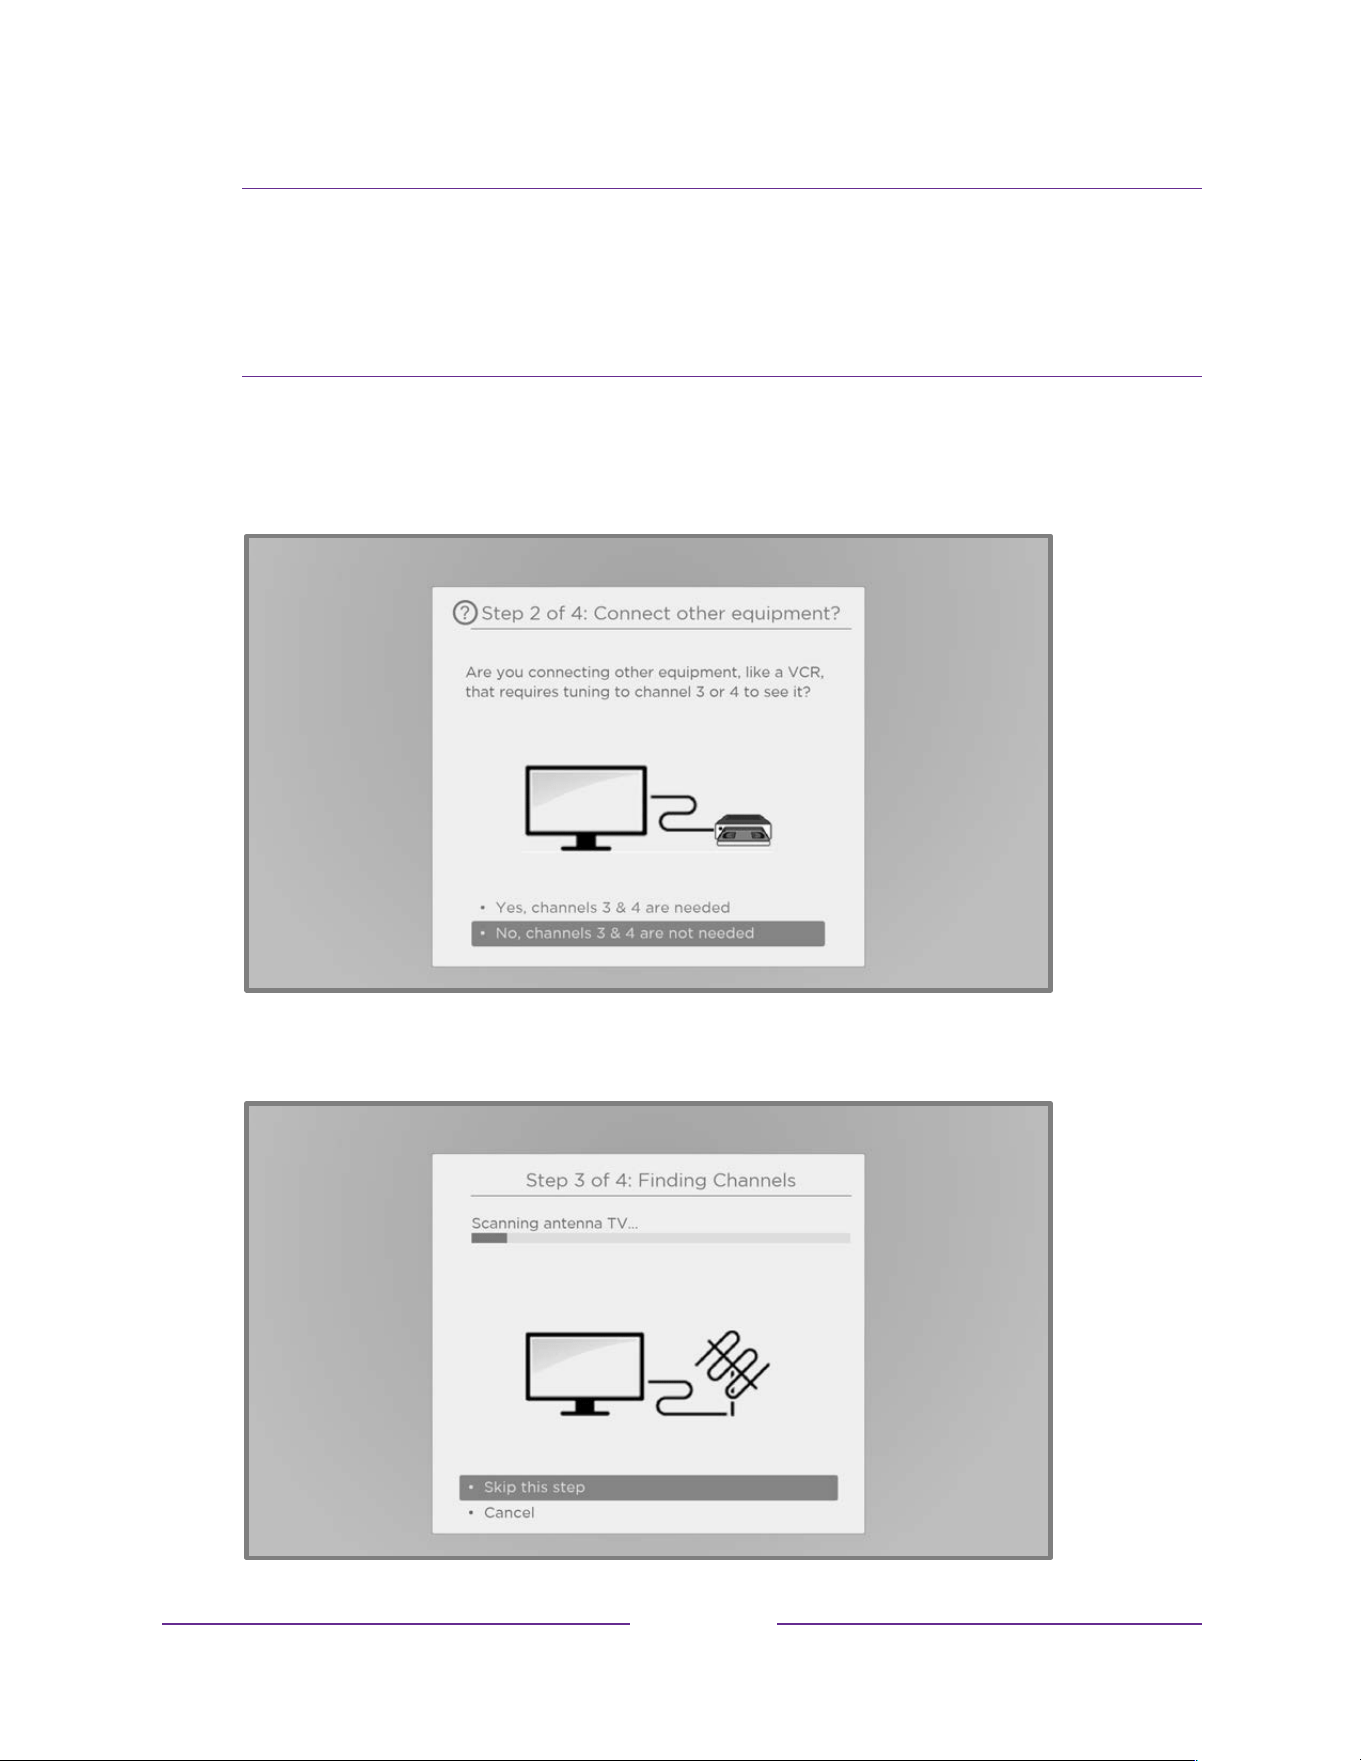
!
!!
39
!
!
!
Why does the TV need my time zone?
The TV needs to know your time zone so that it can correctly display time information about the program
you are currently watching. In most cases, it can get the time zone automatically and skips this step.
5. When prompted, select whether to add analog channels 3 and 4. These channels enable you to
connect older set top boxes, VCRs, or game consoles.
6. Wait while your TV scans for live TV stations…
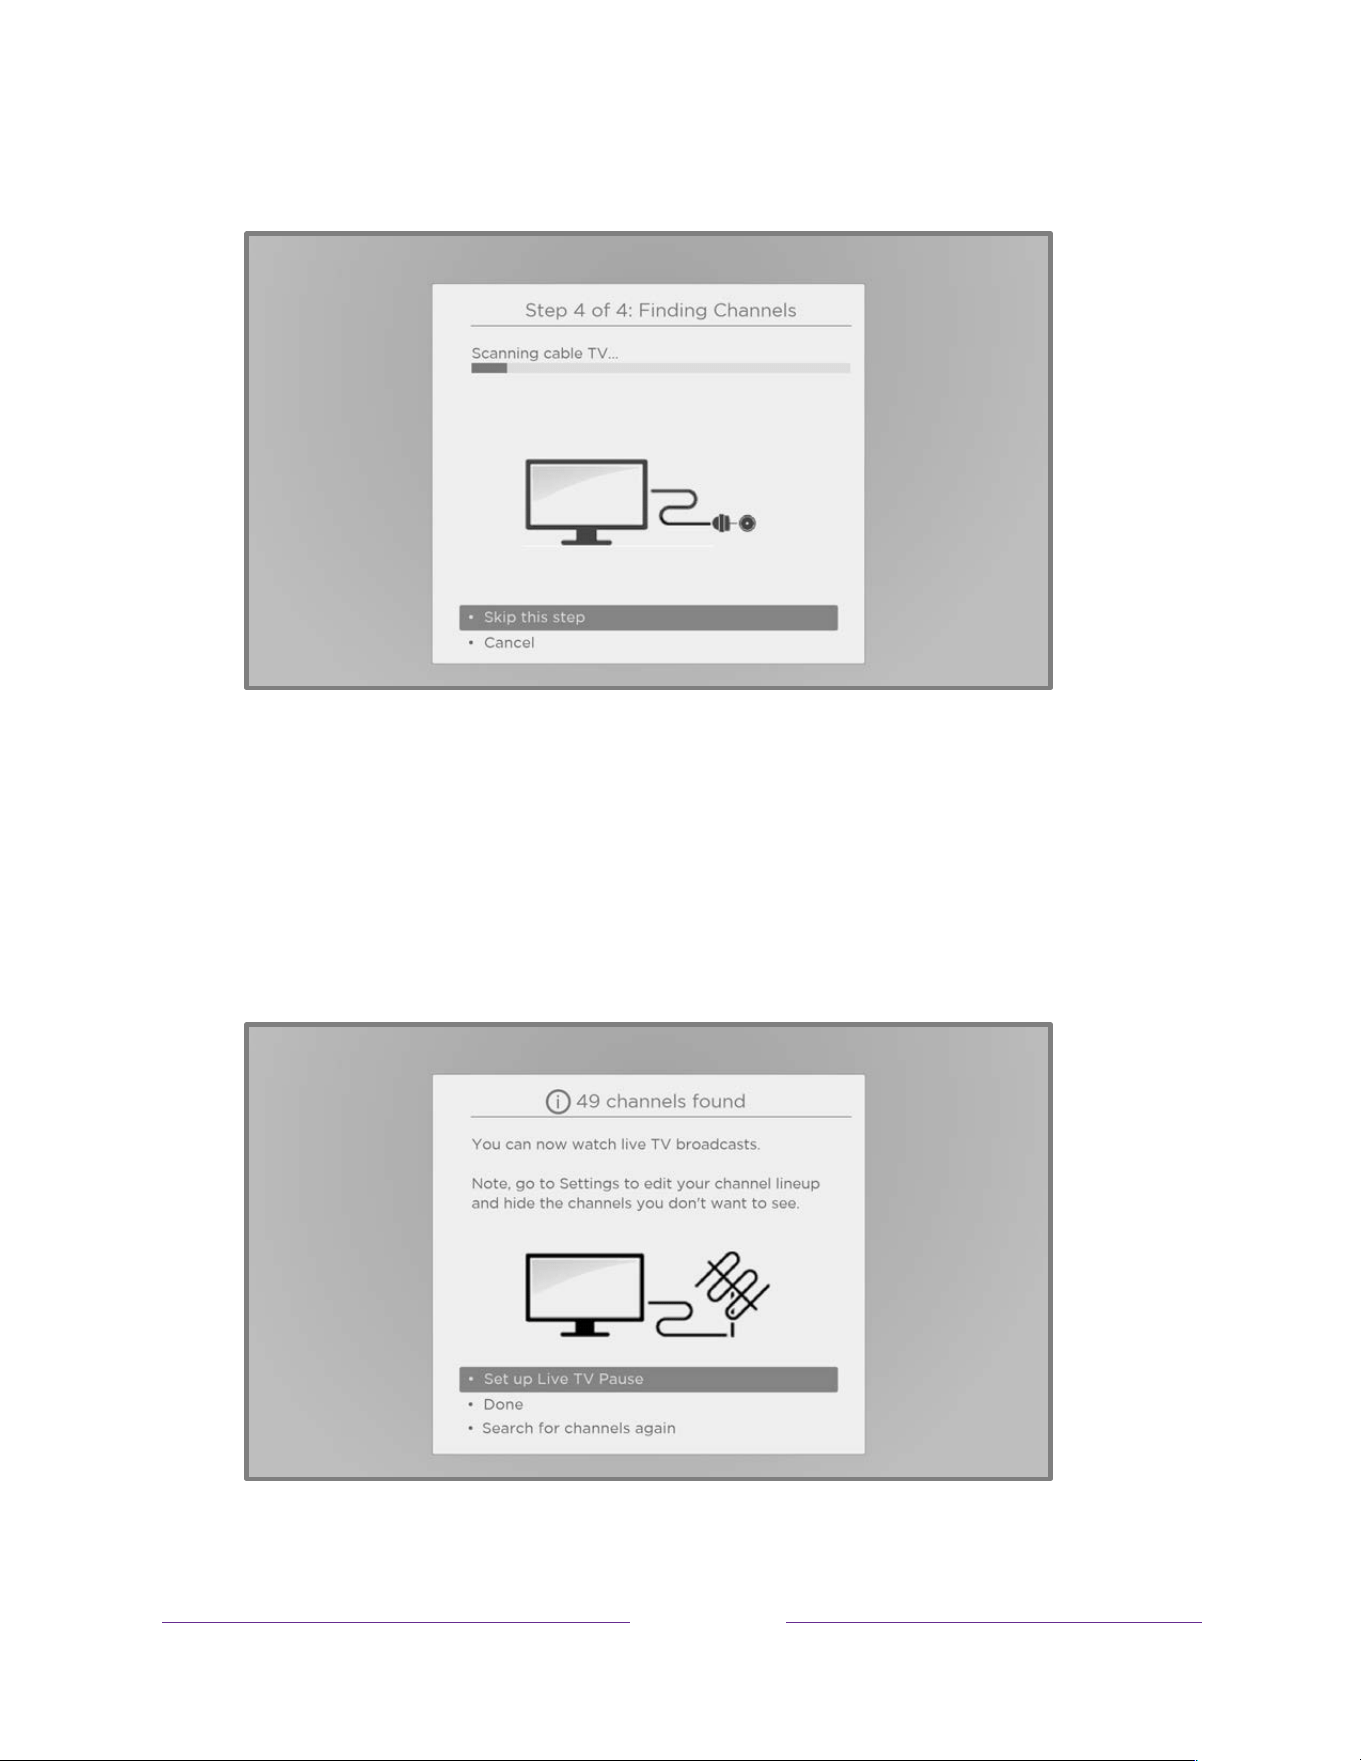
!
40
!
!
!
… and then cable TV channels.
Scanning for channels can take several minutes.
Tip: If you use a set-top box to receive cable TV channels (and don’t have your cable connected
directly to the TV’s ANT input), you can save time by skipping the cable TV portion of the
channel scan.
7. When the channel scans finish, the TV shows the number of channels it added.

!
!!
41
!
!
!
8. Only in connected mode, you have the option of setting up Live TV Pause. Pausing live TV
explains how to set up and use this feature. If you don’t want to set up Live TV Pause, or if this
option is not available to you, select Done to start watching live TV.
Tip: Repeat the channel scan from time to time to make sure you are receiving all of the latest
channels. Broadcasters add and remove channels, move channels to different parts of the spectrum,
and change the power levels of their channels periodically. Your antenna reception and picture
quality depend on the position of your antenna and on your location relative to the antennas of
broadcasters in your area. To repeat the channel scan, use the purple directional pad to highlight the
Live TV tile, press STAR
Þ
, select Scan for channels, and then press OK.
You’ll also have to repeat the channel scan if you remove and re-add the Live TV tile from the Home
screen or perform a factory reset.
Now, you’re ready to watch live TV! While you’re watching, try the following tips:
• Press UP or DOWN to change channels.
• Press LEFT to display the channel list (non-connected mode) or Smart Guide (connected
mode), and then press UP or DOWN to select a channel to watch. Or press REWIND or
FAST FWD to jump through the channel list or Smart Guide a page at a time.
• Press OK to display information about the current program.
• Press STAR Þ to see options for picture and sound settings.
• Only in connected mode, use a Roku Voice Remote, the Roku mobile app, Google Assistant, or
Amazon Alexa to search for programmes by title, actor, director, or genre. The TV or the Roku
mobile app displays the results along with the streaming channels that offer the requested
content.
Note: If your TV did not come with a Roku Voice Remote, you can order one from
https://www.roku.com/products/accessories/roku-tv.

!
42
!
!
!
Using your TV
This section provides information on using the day-to-day features of your TV.
Status indicator
Your TV has a single status indicator. It goes on and off and blinks in different ways depending on the
status of the TV, as shown in the following table:
TV CONDITION
STATUS INDICATOR
MEANING
On (screen is active)
Off
Screen is communicating that TV is on.
Screensaver (screen is active)
Off
Screen is communicating that TV is on.
Off (no power)
Off
TV is not connected to power.
Off (standby)
On
TV is connected to power and is ready to use.
Starting up from off state
Slow pulsing blink until startup
completes
TV is doing something.
On (receiving update from USB)
Slow pulsing blink until update
completes
TV is doing something.
Remote command received
Dims on/off once
TV has received your command.
Network connection lost
Two short blinks, pause, repeat
TV was connected and paired with a Roku
account and now has no network connection.
Powering down to standby mode
Slow pulsing blink until the TV
reaches standby.
TV is doing something.

!
!!
43
!
!
!
Standby mode energy savings
When you turn off your TV, it remains in a higher power mode for a few minutes, after which it goes into
a very low power standby mode. If you turn on the TV again before it has entered the very low power
mode, it turns on immediately. After the TV goes into the lower power standby mode, it takes a few
seconds longer to start up.
Only in connected mode, you can optionally enable Fast TV start. When this option is enabled, your TV
starts up almost immediately regardless of how long it has been turned off, but uses somewhat more
power in standby mode. Fast TV start also gives you access to some additional features, such as turning
on the TV with voice commands and turning off the screen when listening to music. For more
information, see Fast TV start.
Getting help
Only in connected mode, the Roku Tips & Tricks channel has helpful videos about many aspects of using
your TV. You can access the channel in two ways:
• Select the Roku Tips & Tricks channel on the Home screen.
• Navigate from the Home screen menu to Settings > Help and select Launch Roku Tips &
Tricks.
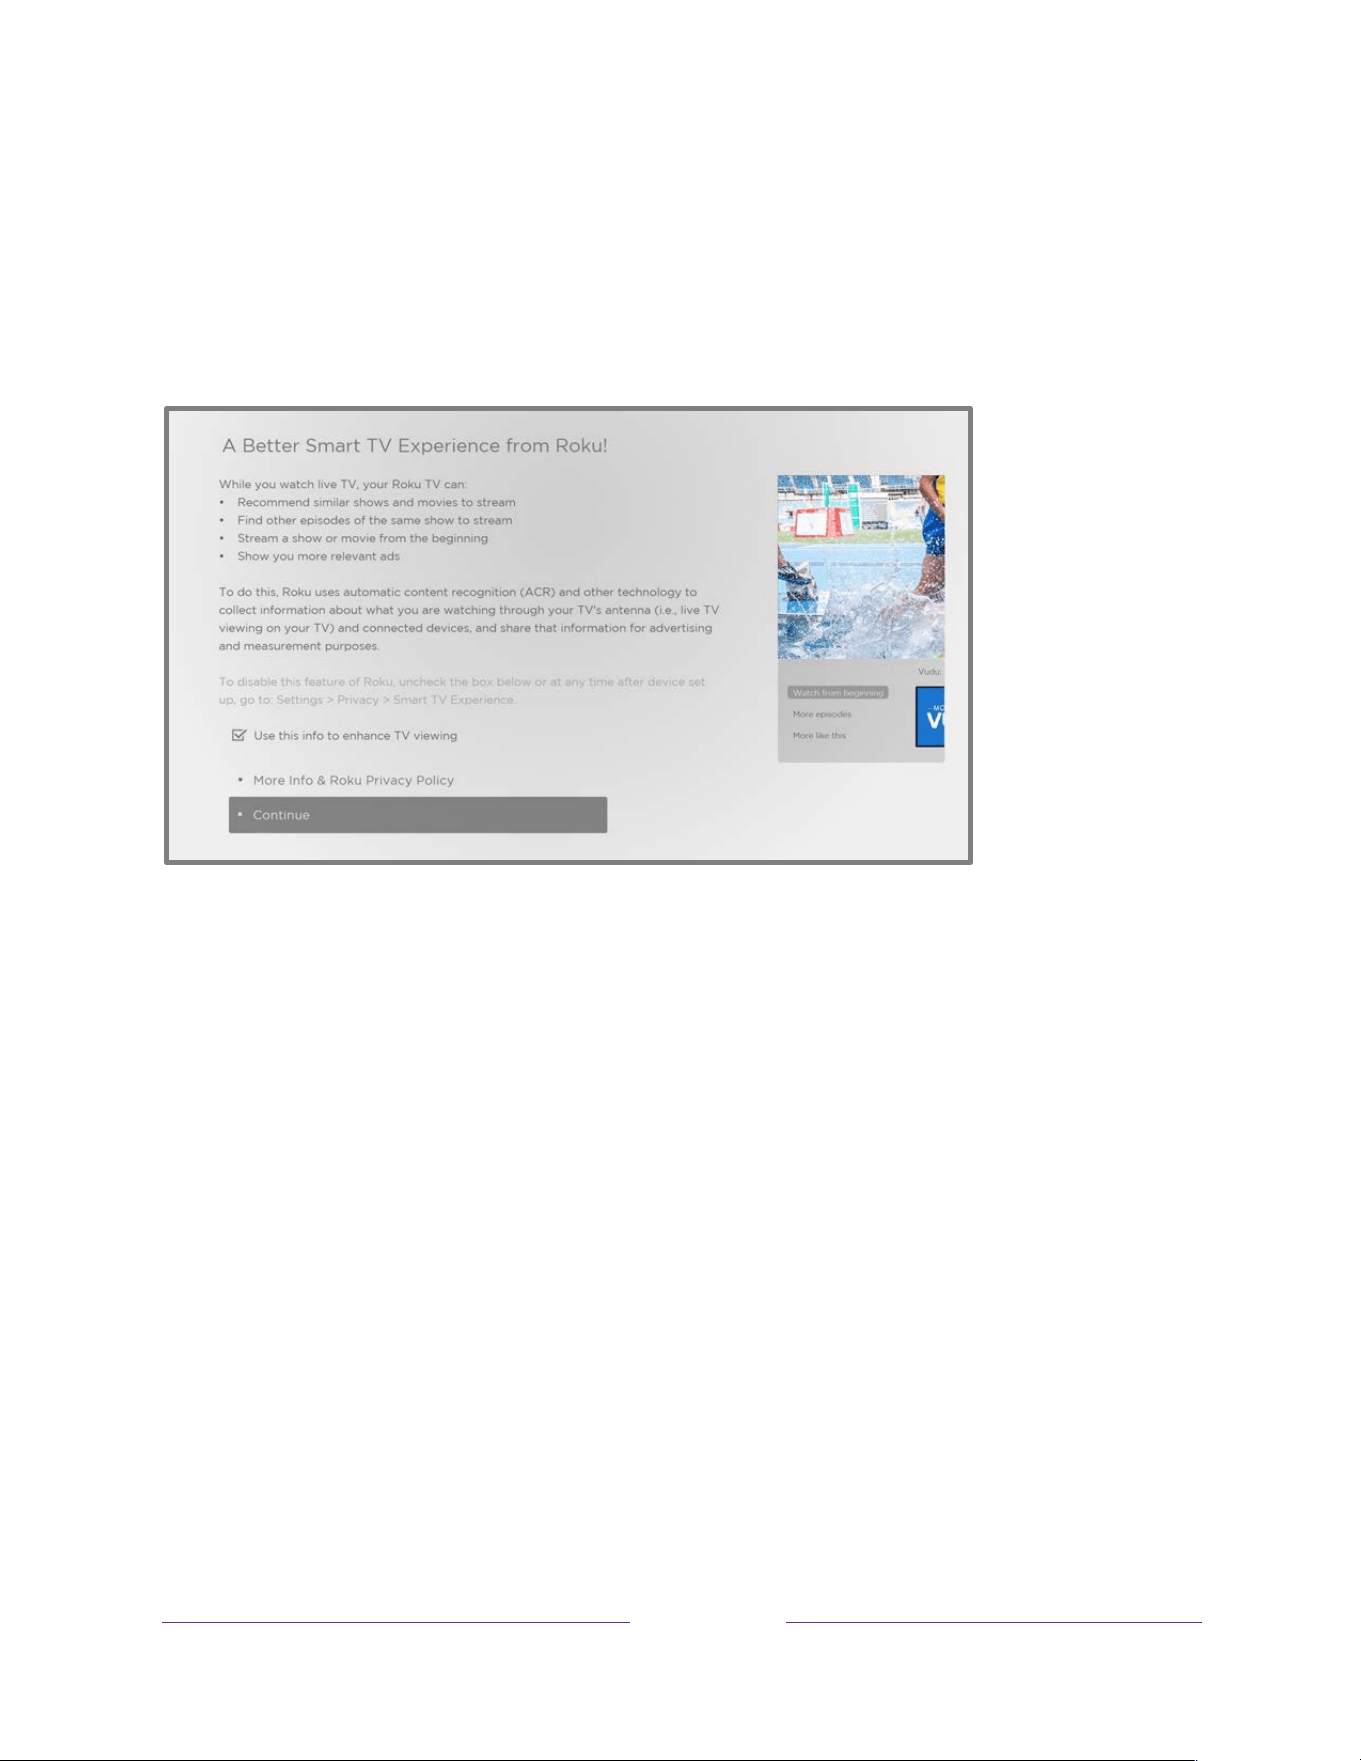
!
44
!
!
!
Opting in to Smart TV experience
Only in connected mode, the first time you select live TV, an HDMI input, or AV input, your TV offers to
enable the Smart TV experience. If you decide to enable it at this time, you’re all set to enjoy its
recommendations and features.
The Smart TV experience uses automatic content recognition (ACR) and other technology to collect
information about what you watch on live TV, and on devices like media players and cable boxes
connected to the HDMI or AV inputs. Opting in means that you give permission to analyze the
programs you watch for the purpose of making recommendations, as well as showing ads that are more
relevant to you.
If you decide not to enable the Smart TV experience at this first opportunity, you can enable it later. Or,
if you decide you’d rather not use the feature, you can disable it, but be aware that previously collected
information is retained and not deleted.
Disable Smart TV experience
If you decide you want to disable Smart TV experience, follow these steps:
1. From the Home screen menu, go to Settings > Privacy > Smart TV experience.
2. Navigate to the right to highlight Use info from TV inputs.

!
!!
45
!
!
!
3. Press OK on the remote to clear the check box.
Disable Auto Notifications
If you want to keep the Smart TV experience enabled, but you do not want to see notifications while you
are watching programs, you can disable notifications. To do so, follow these steps:
1. From the Home screen menu, go to Settings > Privacy > Smart TV experience.
2. Navigate to the right to highlight Use info from TV inputs.
3. Press DOWN to highlight Enable auto notifications.
4. Press OK to clear the check box.
Note: These settings do not affect recommendations for More Ways to Watch that you see in the Smart
Guide when watching live TV channels. Those recommendations show up only in the Smart Guide and do
not rely on ACR technology.
Watching live TV channels
Select the Live TV tile in the Home screen. Your TV remembers the last channel you watched and starts
with that channel playing.
Changing channels
To change channels, you can do any of the following:
• Press UP to change to the next higher channel.
• Press DOWN to change to the next lower channel.
• Press LEFT to display the channel list (in non-connected mode) or Smart Guide
1
(in connected
mode), and then press the arrow keys to select the channel or program you want to watch.
Press REWIND or FAST FWD to move through the list one page at a time. When
1
Smart Guide is available only in the United States.

!
46
!
!
!
you’ve highlighted the channel or program you want to watch, press OK. (If you decide you
don’t want to change channels, press BACK .)
• Only if Live TV Pause is not enabled, press REPLAY to jump to the previous channel. Press
again to return to the channel you were watching before you pressed REPLAY .
Note: If REPLAY is not available on your remote, you can use this feature in the Roku mobile
app. For more information, see Roku mobile app.
Favorite Channels in non-connected mode
You can quickly change from surfing among all channels or only your favorite channels. First, you have to
mark one or more channels as your favorites.
Mark your favorite channels
In non-connected mode, you can make any channel a favorite whenever you’re watching live TV
channels.
1. Press LEFT to display the channel list. Notice that the words All channels appear at the top of
the channel list.
2. Scroll up or down to highlight a channel that you want to make a favorite.
3. Press STAR Þ. At this point, you’ll see two options:
• Add to favorites
• Back
4. With Add to favorites highlighted, press OK. A FAVORITE symbol appears adjacent to
the channel to indicate that it is now a favorite.
5. Repeat these steps to add more favorite channels.

!
!!
47
!
!
!
Surf only your favorite channels
In non-connected mode, after you’ve marked one or more channels as favorites, you can switch to your
favorite channels whenever you’re watching live TV channels.
1. Press LEFT to display the channel list.
2. Press LEFT or RIGHT once to switch to Favorites. Notice that the word Favorites appears at
the top of the channel list.
3. Highlight a channel and press OK to select one of the channels in the Favorites channel list, or
wait a few moments until the channel list disappears.
4. Press UP or DOWN to change to the previous or next favorite channel. Each channel you select
in this way is a favorite channel. Your channel surfing is limited to favorite channels only.
Your favorite channel list remains in effect even if you turn off or unplug your TV, until you switch back
to all channels.
Note that when you press OK to view the program information banner while watching a program, a
FAVORITE
symbol appears below the channel number.
Surf all channels again
In non-connected mode, you can switch back to all channels whenever you’re watching live TV channels.
1. Press LEFT to display the channel list.
2. Press LEFT or RIGHT once to switch to All channels. Notice that the words All channels
appear at the top of the channel list.
3. Highlight a channel and press OK to select one of the channels in the All channels list, or wait a
few moments until the channel list disappears.
4. Press UP or DOWN to change to the previous or next channel among all your available
channels. You can surf among all channels in your channel list.

!
48
!
!
!
Remove a channel from your favorites
In non-connected mode, you can remove a channel from your favorites whenever you’re watching the
Live TV input.
1. Press LEFT to display either channel list—All channels or Favorites.
2. Scroll up or down to highlight a favorite channel that you want to remove from your favorites.
3. Press STAR Þ on your remote. At this point, you’ll see two options:
• Remove from favorites
• Back
4. With Remove from favorites highlighted, press OK. The FAVORITE symbol adjacent to
the channel disappears.
5. Repeat these steps to remove other channels from Favorites.
Smart Guide
Only in connected mode, use the Smart Guide to find both over-the-air and live streaming TV programs.
The Smart Guide lets you scroll through all the TV channels you receive (except those you have hidden, if
any), plus a large number of live streaming programs from The Roku Channel. You can see what’s on
right now and the upcoming 14 days.
For live, over-the-air TV programs, you can use More Ways to Watch to find the program you’re
watching and start watching it from the beginning from one of your streaming channels. Your clue that
there are More Ways to Watch a program is a purple star (Þ) next to the program name in the guide.
For example, you might turn on your TV at 10 minutes past the hour and discover you are missing the
current episode of Empire. But there is a purple star next to the program title, so you can press STAR Þ
and find that there are several streaming channels where you can watch the current episode from the
beginning. You also can find more episodes of Empire, and other programs that have a similar theme.
Note: A paid subscription or other payments may be required for some streaming channels.
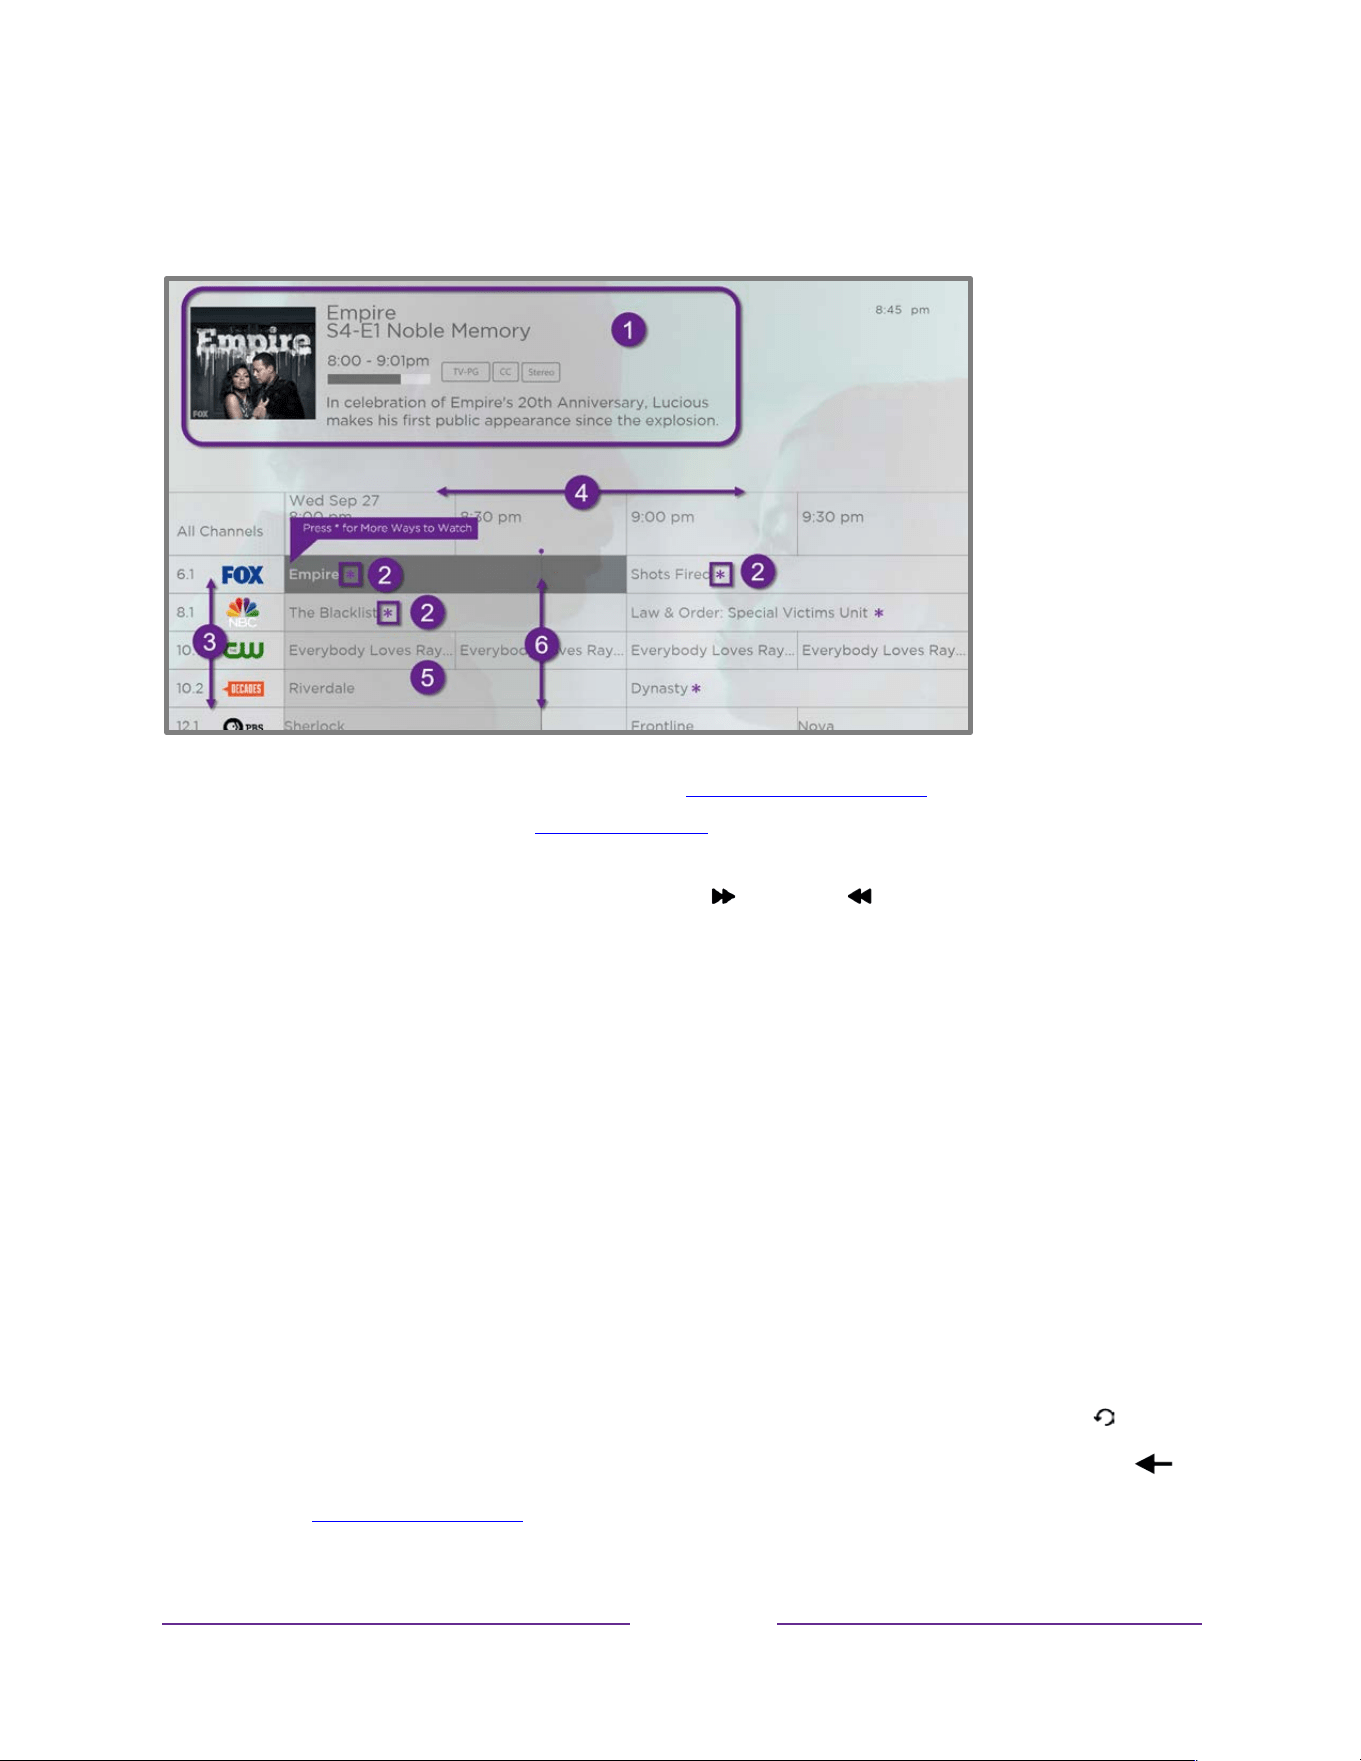
!
!!
49
!
!
!
To view the Smart Guide, press LEFT while watching live TV. The Smart Guide opens with the name of
the current program highlighted, and a lot more information.
1. Program information for the highlighted program. See Viewing program information for details.
2. More Ways to Watch indicator. See More Ways to Watch for more information.
3. Channel list. Navigate UP or DOWN.
4. Time slots. Navigate LEFT or RIGHT. Press FAST FWD or REWIND to skip ahead or back a screen at a
time.
5. Program list
6. Progress bar showing the approximate time with respect to the time slots.
When you are viewing the current time slot, notice that the Smart Guide shows a light gray background
for portions of programs before the current time, and a dark background for programs and portions of
programs that have not yet aired. The line dividing these two zones is the progress bar.
Navigating the Smart Guide
• Use the purple directional pad to move up, down, left, and right.
• To switch to a program that is currently in progress, highlight it, and then press OK. (Note that
pressing OK on a past or future program does nothing.)
• To return to the current time after navigating to a different time slot, press REPLAY .
• To return to the currently airing program without causing a channel change, press BACK .
• To see More Ways to Watch, highlight any program that has a purple asterisk (Þ), and then
press STAR Þ.

!
50
!
!
!
Recently watched channels in the Smart Guide
By default, the Smart Guide lists channels in channel number order, with broadcast TV channels first,
followed by live streaming channels. You can instead list channels in order of recently watched.
Switch between all channels and recent channels
1. While viewing the Smart Guide, navigate all the way to the left until you highlight the channel
logo.
2. Press STAR Þ.
3. In the View Options box, press OK to switch to the other option. That is, if you are viewing All
Channels, press OK to switch to Recent Channels, and if you are viewing Recent Channels,
press OK to switch to All Channels.
Recent Channels holds a maximum of 50 recent channels, so you might not see all of your channels
listed in this mode.
Viewing program information
You can view program information in different ways:
• Only in connected mode, view program information for any program listed in the Smart Guide.
Press LEFT while watching live TV to see the Smart Guide. For more information, see Smart
Guide.
• Whenever you are viewing a program and no other guides or menus are open, press OK to view
program information in a banner at the bottom of the screen. This program information appears
both in connected and non-connected modes. The following illustration shows the information
that is available:

!
!!
51
!
!
!
Program information banner
Program information might include any or all of the following, depending on availability within the
broadcast information:
• Channel number
• Channel call sign
• Favorite channel icon
• Signal strength
• Program title and episode name/number
• Start time, end time, and graph of program length showing current position
• Content rating
• Video resolution (480i, 480p, 720p, 1080i, 1080p, 4K)
• Frame rate (24Hz, 30Hz, 60Hz for television sources, 60Hz, 70Hz, 72Hz, 75Hz for computer sources)
• Audio format (Mono, Stereo, Dolby Audio™ logo)
• Audio features (SAP/MTS)
• Only on select 4K models: HDR or Dolby Vision™
1
logo (HDMI® and streaming sources)
• Closed captioning (CC)
• Current time
• Program description.
1
The Dolby Vision™ logo appears only on Dolby Vision™-certified models when displaying Dolby Vision™ content.

!
52
!
!
!
Tip: If you’ve set up Live TV Pause and you’re watching live TV, you’ll also see a progress bar showing the
current playback position within the rolling 90-minute pause time. For more information, see Pausing live
TV.
Adjusting settings while watching a program
Press STAR Þ to display the Options menu. Press UP or DOWN to highlight an option, and then press
LEFT or RIGHT to change the setting. The topic Adjusting TV settings explains each of the settings in
detail.
Pausing live TV
Live TV Pause gives your Roku TV the ability to pause, play, fast forward, and rewind live TV received on
the ANT input. You can pause live TV for up to 90 minutes.
Requirements
To use this feature, you need to:
1. Connect your TV to the Internet. If you didn’t connect during Guided Setup, see What if I didn’t
connect my TV?.
2. Provide your own dedicated USB flash drive (thumb drive} with the following minimum
specifications.
• 16 GB
• 15 Mbps read/write speed
• USB 2.0 compliant
A USB flash drive (thumb drive) meeting the minimum requirements is highly recommended
over an externally-powered hard disk drive. Note that you can use any larger size drive—there is
no limit to the maximum size—but using a larger drive does not extend the 90-minute pause
time.
Important: After warning you and giving you a chance to cancel Live TV Pause setup, all existing
content on your USB drive is erased when you enable this feature.
3. Connect your USB drive to the TV’s USB port.

!
!!
53
!
!
!
Important: Some TV models have more than one USB port. You can connect your Live TV Pause
USB drive to any port, but make sure that nothing is connected to other USB ports while enabling
Live TV Pause. Reconnect other USB devices after you have finished enabling Live TV Pause.
4. Enable Live TV Pause, as explained in the following topic.
Enabling Live TV Pause
You can start setting up Live TV Pause in any of the following ways:
• After completing a channel scan, select Set up Live TV Pause from the available options.
• Press PLAY/PAUSE on the Roku remote while watching a live TV channel.
• Highlight the Live TV tile on the Home screen, press STAR Þ on the remote, and then select
Enable Live TV Pause.
After starting setup of Live TV Pause in any of these ways, the TV prompts you through the steps needed
to enable this feature. Setup takes only a few moments.
Note: Use of a USB hub is not supported.
Using Live TV Pause
If you have used the Roku remote to watch streaming channels, using Live TV Pause should be very
familiar to you.
• While watching a digital live TV channel, press PLAY/PAUSE to pause or play the content.
After the TV program has been paused for 90 minutes, the TV resumes playing from the point in
the program where it was paused.
• After watching a channel for a while, press REWIND to jump back up to the point where
you first started watching the channel, up to 90 minutes.
• After pausing or rewinding, press FAST FWD to jump ahead up to the point where you are
once again watching the live TV program.
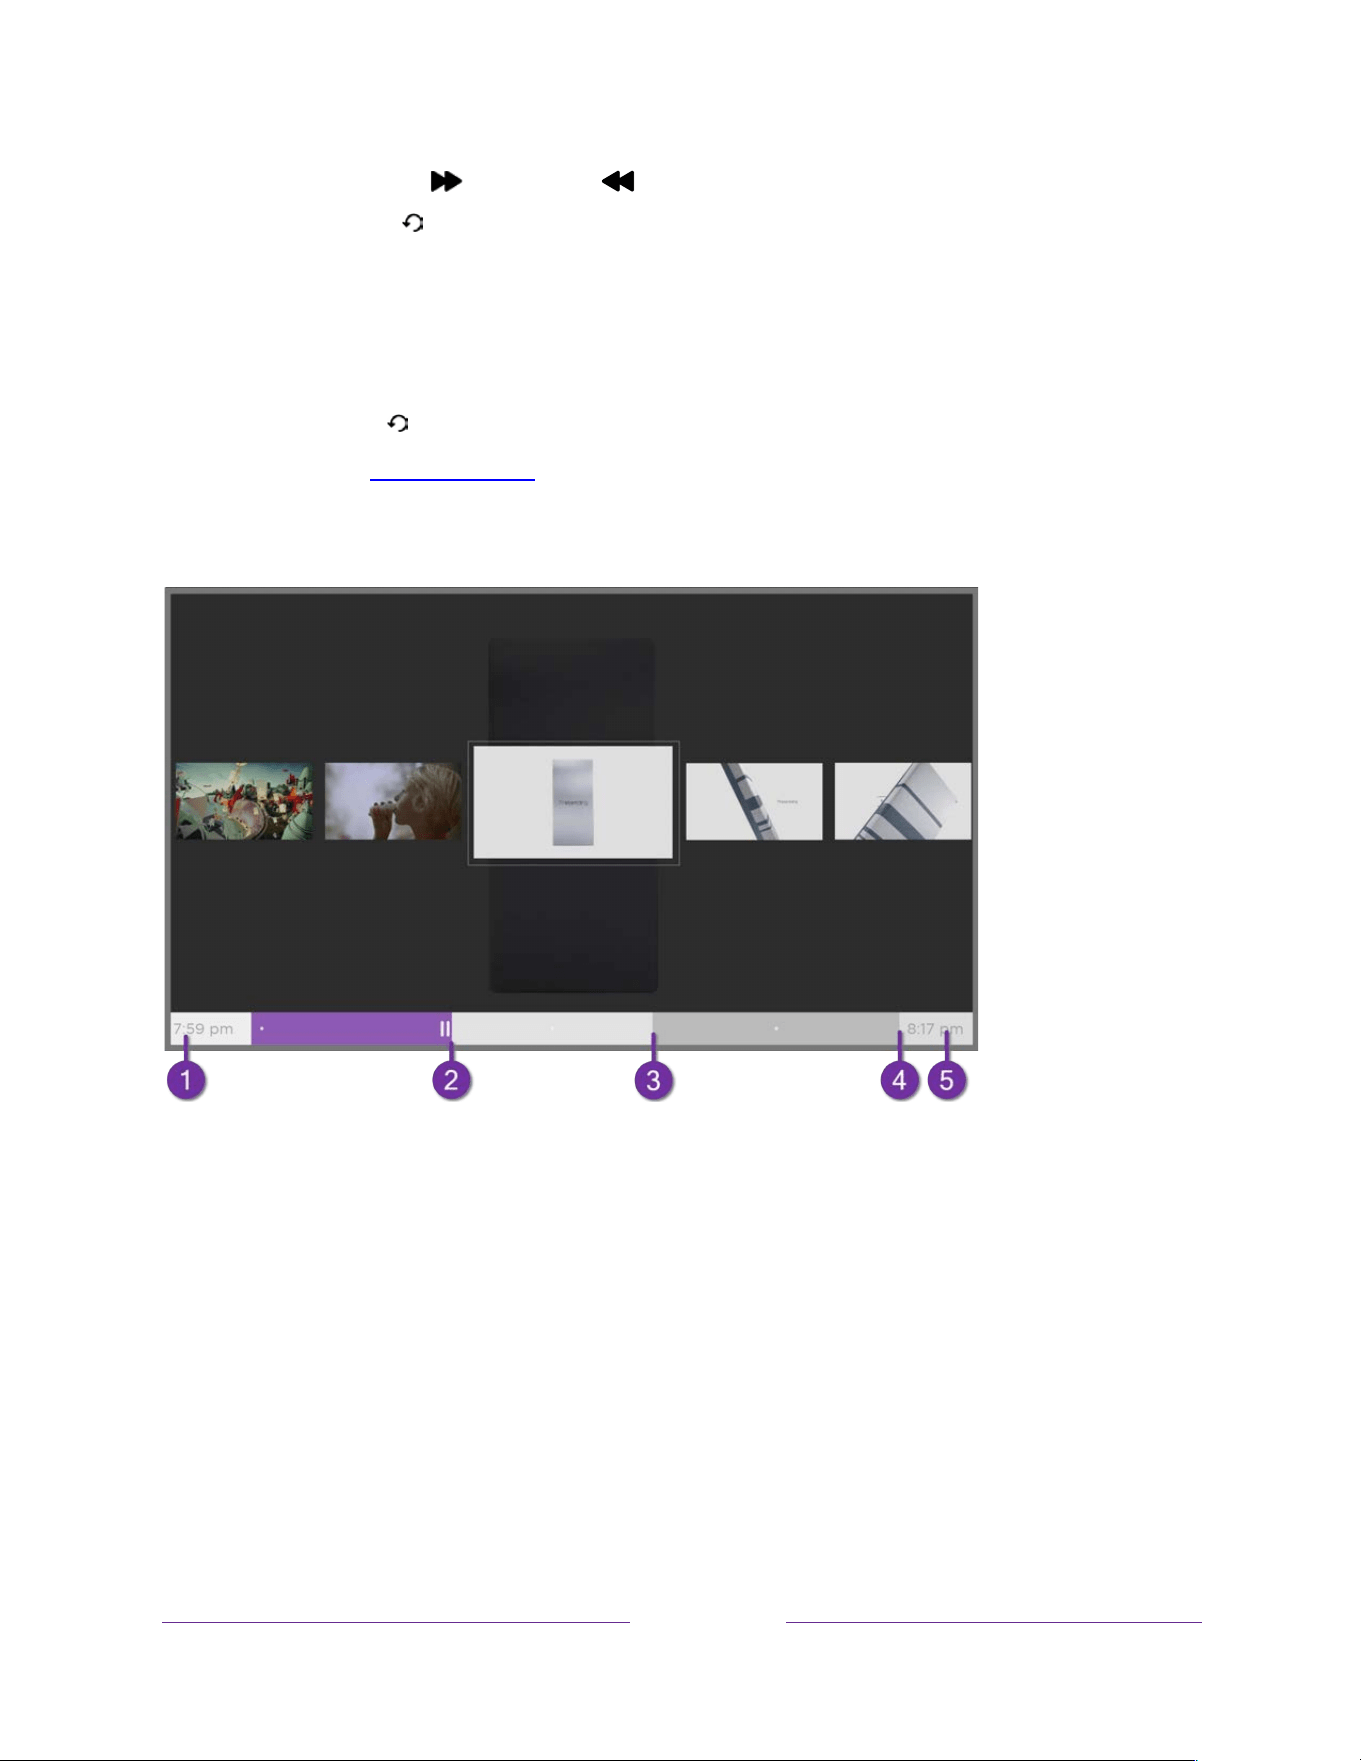
!
54
!
!
!
• Press FAST FWD or REWIND repeatedly to cycle through 1x, 2x, and 3x skip speeds.
Press REPLAY to play back the last several seconds of the program.
• When the program is paused, press LEFT or RIGHT to move backward or forward through the
program approximately 10 seconds per press. Small frames appear across the screen to identify
your location in the program.
Note: If REPLAY is not available on your remote, you can use the Roku mobile app. For more
information, see Roku mobile app.
Whenever you use any of the Live TV Pause features, the TV momentarily displays a progress bar:
1. Time at current playback position.
2. Current playback position
3. Extent of pause time, representing the amount of time this channel has been buffered, up to 90 minutes.
4. 90-minute mark, representing the maximum extent of pause time.
5. Current time.
The progress bar also shows tick marks at each half hour point, to help you locate the boundaries where
one program ends and a new one begins.

!
!!
55
!
!
!
Notes about Live TV Pause
• You can use Live TV Pause only with digital broadcast and cable channels received through the
TV’s ANT input (ATSC and Clear QAM channels).
• Changing channels erases and restarts the Live TV Pause buffer.
• Returning to the Home screen, selecting another input, or turning off the TV erases and resets
the Live TV Pause buffer.
• Disconnecting the USB drive erases the Live TV Pause buffer.
More Ways to Watch
Only in connected mode, More Ways to Watch gives you recommendations about the programs you’re
watching on the ANT, HDMI, and AV inputs. You will automatically get these recommendations in the
Smart Guide for live TV programs. However, before you can get recommendations for programs you’re
watching through the HDMI or AV inputs, you must opt into the Smart TV experience to acknowledge
that you want to allow the TV to use automatic content recognition (ACR). See Opting in to Smart TV
experience for details.
Using More Ways to Watch
Not every program provides recommendations. As you use More Ways to Watch, be aware that you’ll
only see suggestions on your TV when all of the following conditions are met:
• Your TV is operating in connected mode in the United States.
• You have enabled Smart TV experience if you are watching programs through an HDMI or AV
input. (If you are watching live TV from the ANT input, this setting does not matter.)
• The program you’re watching contains the information needed to identify it. Note that some
programs, such as the daily news, typically do not activate More Ways to Watch.
• At least one participating streaming channel offers the movie or TV program you are watching,
or other episodes, or more programs like the one you are watching.
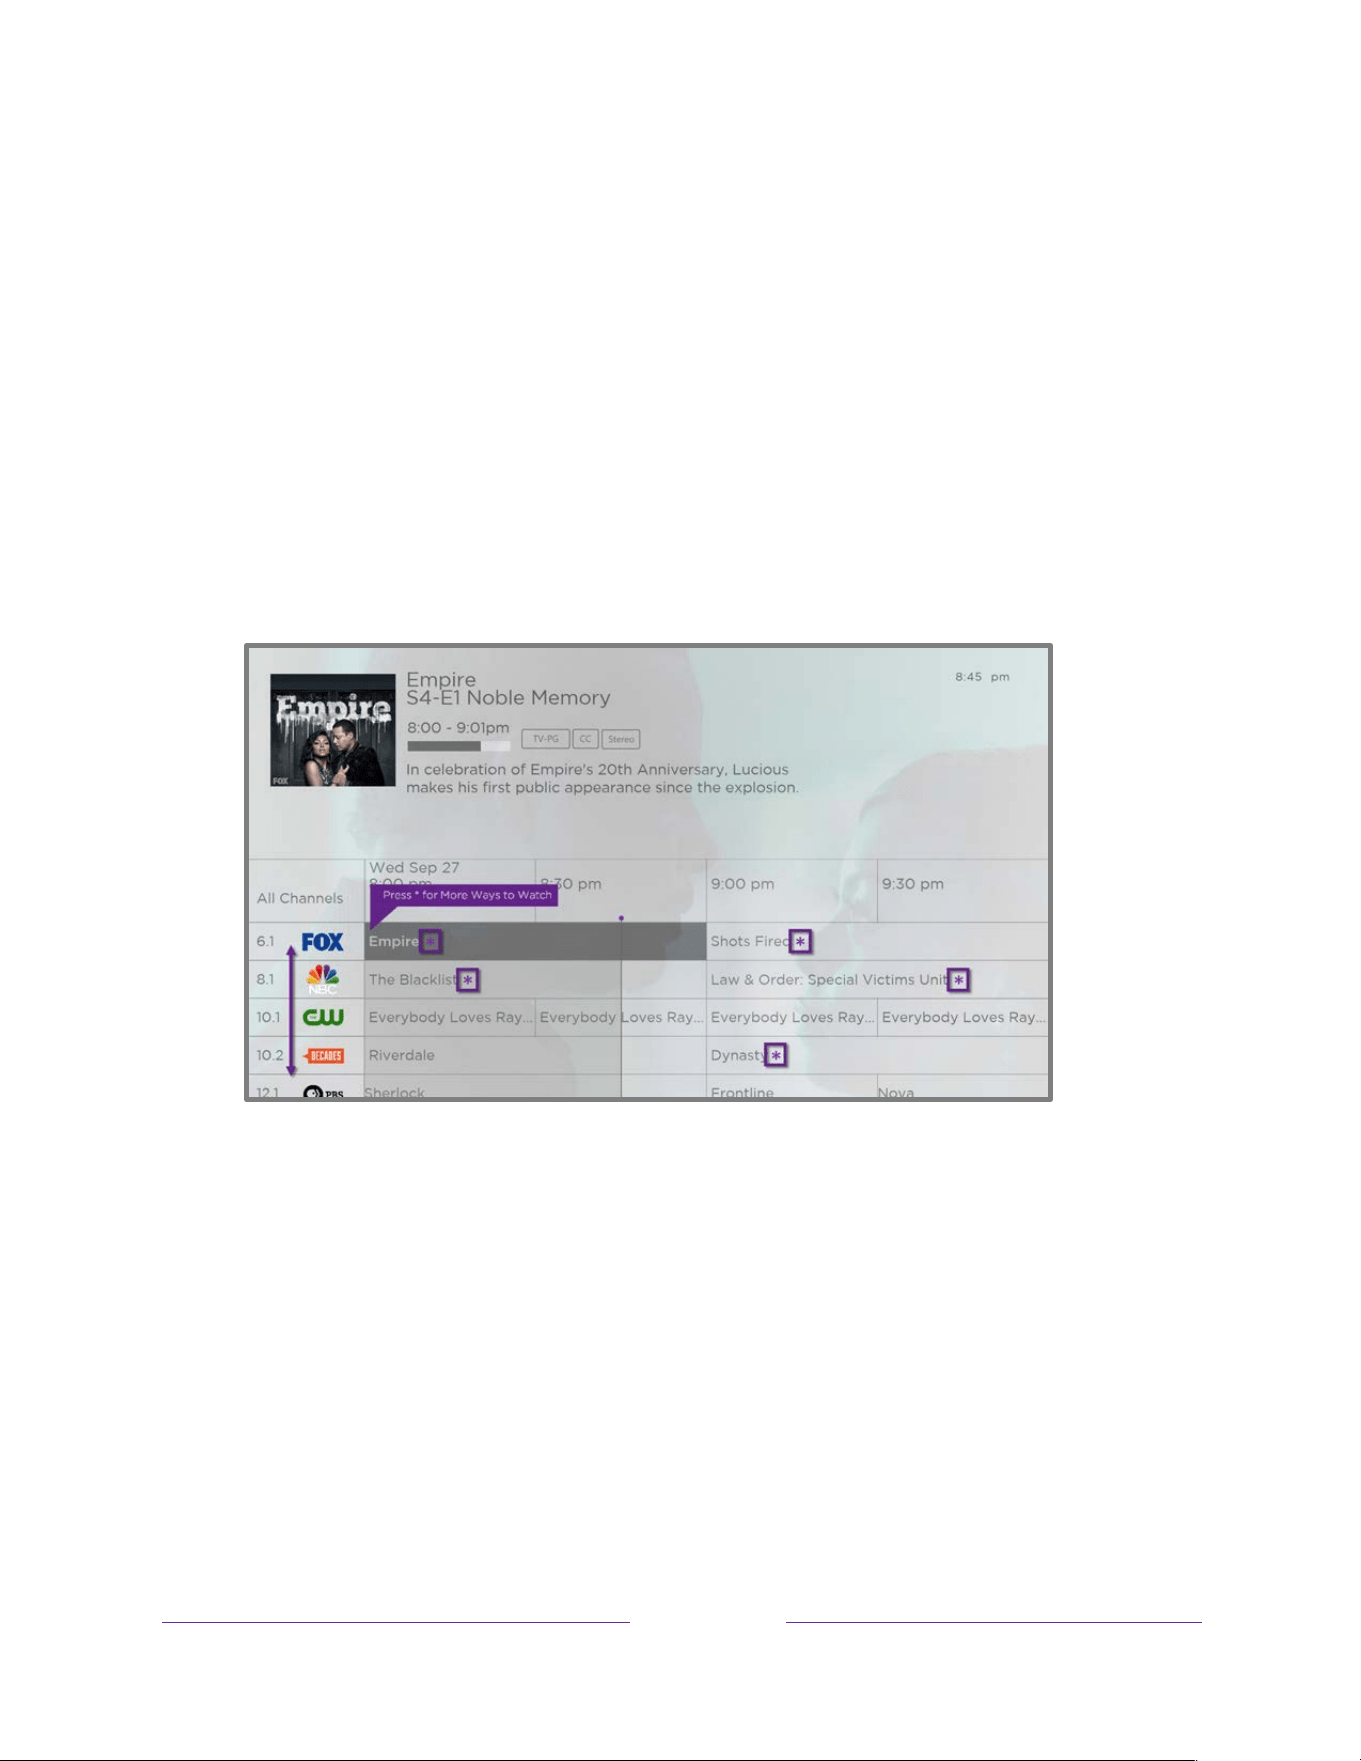
!
56
!
!
!
If all of these conditions are met, you can view the suggestions. More Ways to Watch recommendations
appear in two different places:
• When watching the HDMI and AV inputs, you’ll see a More Ways to Watch notification in the
lower right corner of the screen for a few seconds unless you have disabled Enable auto
notifications. Press STAR Þ to see the list of matching programs.
Note: After this banner disappears, you can restore the More Ways to Watch prompt by
pressing OK.
• In the Smart Guide, all programs that meet the criteria for More Ways to Watch display a purple
asterisk Þ next to their titles:
Highlight the program of interest and press STAR Þ to see recommendations.
Regardless of how you got to this point, the options you’ll see depend on the type of program you’re
watching and the available ways there are to watch, so you might see any or all of the following:

!
!!
57
!
!
!
• Watch from beginning – Streaming channels on which the same TV program or movie is
available. Generally, this option does not appear on first run programs, because streaming
content is not available until a later date.
• More episodes – Streaming channels where you can find other episodes of the TV program you
are watching. Does not apply to movies.
• More like this –TV programs or movies with a similar theme.
• View full description – Full description of the selected program.
Press DOWN to select an option, and then press RIGHT to select the streaming channel you want to
watch.
Assuming you’ve already added the channel and completed any required sign-in, More Ways to Watch
takes you directly to the program in the streaming channel where you can select and watch the
program. Otherwise, it prompts you to add the channel and, if you do, then takes you to the program.

!
58
!
!
!
Getting the most from More Ways to Watch
• Streaming channels you’ve already installed appear first in the list of suggestions.
• When you select a streaming channel, you leave the program you are currently watching.
• If you’ve used the Live TV Pause feature to pause the program, your paused program buffer is
deleted. In other words, you cannot return to a live TV channel and resume watching from
where you left off.
Switching TV inputs
Switch TV inputs to access the device connected to that input, for example, a Blu-ray™ player. Switching
inputs is as easy as highlighting the input’s tile in the Home screen, and pressing OK. The video signal on
the input, if any, plays on the screen.
Tip: To learn how to add, remove, rename, and rearrange the tiles on your Home screen, see
Customizing your TV.
Auto-detecting devices
Your TV automatically detects when you connect a new device to an HDMI input and turn on its power.
The input is automatically added to the Home screen if it isn’t already present.
Adjusting audio/video settings
While watching video content on any input, press STAR Þ to display the Options menu. Press UP or
DOWN to highlight an option, and then press LEFT or RIGHT to change the setting. To learn about
each of the audio and video settings, see Adjusting TV settings.
Setting preferred audio language for streaming channels
You can select the preferred language for the audio played by streaming channels. If the selected
language is available in the streaming content, the TV plays that language.
To set the preferred audio language:

!
!!
59
!
!
!
1. From the Home screen menu, navigate to Settings > Audio > Audio preferred language.
2. Press RIGHT to highlight one of the languages.
3. Press UP or DOWN to highlight the language you want to use.
4. Press OK.
Note: Many streaming channels have an option to select the language while you are watching a
program. The Audio preferred language setting sets the default for that option.
Playing content from USB storage devices
Only in connected mode, your Home screen has the Roku Media Player tile. Otherwise, the Home
screen has the USB Media Player tile. With either player, you can play personal music, video, and
photo files from a personal USB flash drive or hard disk connected to the TV’s USB port.
To use this feature, make sure your media files are compatible with the Roku/USB Media Player. To see
the latest list of supported formats, view Help in the Media Player
1
. The Roku/USB Media Player
displays supported file types only, and hides file types it knows it cannot play.
Note: If you do not see the Roku Media Player on your Home screen, it might have been uninstalled. You
can reinstall it from the Roku Channel Store by using the Streaming Channels menu option or the Add
Channels shortcut. The USB Media Player in non-connected mode cannot be uninstalled.
For more information about playing back your personal videos, music, and photos, go to the following
link on the Roku web site:
go.roku.com/rokumediaplayer
Auto player launch
Only in connected mode, you can set your TV to automatically open the Roku Media Player when you
connect a USB drive with a recognizable file system (such as FAT16/32, NTFS, HFS+ or EXT2/3). To
1
There are many variants of each supported media format. Some variants may not play at all or may have issues or inconsistencies during
playback.

!
60
!
!
!
configure this setting, from the Home screen menu, navigate to Settings > System > USB media. At
this point, the following options are available:
• Auto-launch – Select Prompt, On, or Off, as desired.
• Prompt – (default) Display a prompt each time a recognized USB drive is connected. The
prompt provides options to launch the Roku Media Player as well as to change future auto-
play behavior.
• On – Always launch the Roku Media Player whenever you connect a recognized USB drive.
• Off – Never launch the Roku Media Player automatically.
• Launch channel – Select the app you want to use to play back media files.
Playing content from local network media servers
Only in connected mode, your TV can play personal video, music, and photo files from a media server on
your local network. Media servers include personal computers running media server software such as
Plex or Windows Media Player, network file storage systems that have built-in media server software,
and other devices that implement the specifications of the Digital Living Network Alliance. Some servers
do not fully implement the DLNA specification but are UPNP (Universal Plug and Play) compatible. The
Roku Media Player can connect to them as well.
Some media servers can convert files into Roku compatible formats. Digital Rights Management (DRM)
protected content is not supported.
Setting up a payment method
For Movie Store, TV Store, and other channels that allow you to pay through your linked Roku account,
you can enter a payment method directly on your TV. Entering a payment method on your TV means
that you don’t need to go to a computer or mobile device to set up a payment method.
To add a payment method:

!
!!
61
!
!
!
1. From the Home screen menu, navigate to Settings > Payment method > Add payment
method.
2. Use the on-screen number pad to enter your credit/debit card number, expiration date, CVV
number, and ZIP Code.
Note: If you have already set up a payment method on my.roku.com, that payment method is
identified here in such a way as not to expose any personal data. You can use this screen to
change your payment method, if desired.
3. Select Save Card, and then press OK.
To manage your saved payment method and to see other payment methods, log into your account at
go.roku.com/pay.
Using your TV in a hotel or dorm room
Hotels, school dorms, conference facilities, and similar locations with public wireless Internet access
often require you to interact with a web page to authenticate your access. These types or networks are
called restricted public networks. When you select a network of this type, the TV automatically detects
that additional information is needed and prompts you through using another wireless device to supply
the requested information.
About using your TV on a restricted public network
Here are some points to keep in mind when using your TV on a restricted public network:
• Using your Roku TV on a hotel or dorm room network requires wireless availability and a
network-connected smartphone, tablet, or computer to authenticate access to your wireless
access point.
• You will need your Roku TV remote.
• Some content might be limited or unavailable if you try to connect outside your home country
due to geo-filtering.

!
62
!
!
!
Getting your Roku TV on line on a restricted public network
1. Either during Guided Setup or after using the Settings > Network menu to set up a new
connection, the TV automatically detects that you are connecting to a restricted network and
displays the following prompt:
Tip: Your TV can connect to a restricted network only if Enable ‘Device connect’ is selected in
Settings > System > Advanced system settings. (Device connect is enabled by default, but
if you have disabled it, the TV cannot complete the connection.)
Note: Device connect is not present if the TV is in non-connected mode.

!
!!
63
!
!
!
2. After selecting the correct network, highlight I am at a hotel or college dorm, and then press
OK. The TV prompts you to use your smartphone, tablet, or laptop to complete the connection.
3. Use a mobile phone, tablet, or wireless-enabled computer to detect wireless networks. In most
cases, you can simply open the device’s Wi-Fi Settings or Network Settings screen to start
scanning.
Note: The mobile phone, tablet, or computer must be on the same wireless network to which
you are connecting the TV.
4. Connect to the network named on your TV screen. The actual network name varies.
Note: The previous step connects your smartphone, tablet, or computer directly to the TV. No
connection charges apply and the connection does not impact your device’s data plan.
5. The wireless connection process prompts you for a password. Enter the password as shown on
the TV screen. The actual password varies.
6. Start the web browser on your mobile phone, tablet, or computer. When you attempt to open
any web page, the restricted connection will prompt you for whatever information it needs. In
most cases, you must agree to terms and conditions, provide identifying information, or enter a
password, PIN, or room number to proceed. The information requested depends on the
organization that controls the wireless connection.

!
64
!
!
!
7. After you enter the requested information, the TV automatically proceeds to complete its
connection and resumes normal operation.
8. If the TV prompts you to link to your Roku account, use your mobile phone, tablet, or computer
to activate your Roku TV.
Roku voice remotes (select models only)
Only on TVs with the Roku voice remotes: The following topics explain how to get the most out of your
TV when it includes a Roku Voice Remote or Roku Enhanced Voice Remote.
Re-pairing your Roku voice remote
The Roku voice remotes operate with wireless radio-frequency signals and must be paired with your TV.
You initially paired the remote when you set up your TV during Guided Setup. But if your remote loses
its pairing with the TV for some reason, you can easily re-pair it using either of the following methods:
1. Remove the battery cover from the back of the remote.
2. Press and hold down the pairing button for 3 seconds or longer, until the adjacent LED lights up.
3. Do one of the following:
• Turn on the TV using the power button on the TV side or back panel. Pairing occurs as the TV
starts up.
• Use the Roku mobile app or a different remote to navigate to Settings > Remotes &
devices > Pair new device > Remote.
Tip: If the remote fails to pair with the TV, try installing new batteries. Also, it’s helpful to hold the
remote within two to three feet of the TV to ensure successful pairing.

!
!!
65
!
!
!
Checking the Roku voice remote battery level
You can check the condition of the batteries in your Roku voice remote at any time by navigating to
Settings > Remotes & devices, and then pressing OK to select your remote below My paired
devices. With your remote selected, navigate right to About > Remote to view its Battery level. The
resulting screen displays not only the battery level, but also other information that can be useful when
you need technical support with your remote.
Tip: When you first turn on the TV, a battery level indicator appears in the upper right corner of the
screen for a few seconds.
Finding your Roku Enhanced Voice Remote
Only on TVs with the Roku Enhanced Voice Remote, when your remote has found its way down into the
sofa cushions or your dog has hidden it in the corner, you can use the Find Remote feature to find out
where it’s hiding. This feature has a limited range, and is designed to find your Enhanced Voice Remote
somewhere in the same room as the TV.
Select Find Remote on the Settings > Remotes & devices > Remote settings menu to see brief
instructions on how to activate the Find Remote feature. Note, however, that selecting this option
doesn’t actually activate the feature. Here are the complete instructions:

!
66
!
!
!
Activate Find Remote
• If your TV has a joystick-style control, press to the Left or Right to open the Inputs menu, and
then press Right to scroll down to Find Remote.
• If your TV has a column of labeled panel buttons, press the INPUT button to open the Inputs
menu, and then press the INPUT button again until you highlight Find Remote.
A moment or two after highlighting Find Remote, the Roku Enhanced Voice Remote starts playing your
selected Find Remote sound to let you know where it is hiding. The sound automatically stops after a
minute, or after you find the remote and press any button.
Changing and previewing the Enhanced Voice Remote finder
sound
Only on TVs with the Roku Enhanced Voice Remote, you can customize the sound your remote makes
when you use the Find Remote feature. To customize the sound, navigate to Settings > Remotes &
devices > Remote settings > Change remote finder sound. Select the sound you want to use from
the available settings.
To preview the sound you have chosen, select Preview remote finder sound, and then hold down OK
on the remote to play the sound. When you release the OK button, the sound will stop.

!
!!
67
!
!
!
Adjusting TV settings
You can adjust most picture and sound settings while you are watching a program by pressing STAR Þ
to open the Options menu. There are some additional picture and sound settings in the Settings menu.
In most cases, the changes you make apply only to the input you are using. Live TV, each HDMI
®
input,
and the AV input have their own settings that the TV remembers when you return to that input. The TV
also separately remembers the settings you specify while viewing streaming content.
Settings menu
Use the Settings menu to adjust overall TV settings. Press HOME to go to the Home screen menu,
and then navigate to Settings > TV picture settings.
You can adjust the following overall TV picture settings from the Settings screen:
• TV brightness – Provide a better viewing experience in darker or brighter rooms. Increases or
decreases the TV’s general brightness across all TV inputs.
Note: This setting is identical to the TV brightness setting you can access in the Options menu
while watching a program.
• HDR notification – On select models only: Controls whether the TV displays a notification in the
upper right corner of the screen for a few seconds when HDR or Dolby Vision content begins to
play.
• On – The TV displays a notification when HDR or Dolby Vision content begins to play.
• Off – The TV does not display a notification when HDR or Dolby Vision content begins to
play.

!
68
!
!
!
Note: This setting does not affect the HDR or Dolby Vision notification that always appears in the
program information banner. Press OK while watching a program to open the program
information banner.
• Settings per input – Lists each TV input. Select an input, and then press STAR Þ to display the
Options menu where you can adjust the input’s settings while watching a live picture and
listening to the sound from that input.
Tip: You don’t have to go to the Settings menu first—you can display an input’s Options menu
and adjust its settings whenever you are watching the input by pressing STAR Þ.
Options menu
The Options menu for each TV input provides many settings for controlling the appearance of the
picture and the quality of the audio. To view the Options menu, press STAR Þ whenever you are
watching a TV input or streaming a video (except when you are viewing the program information
banner). The Options menu is a panel that appears over the left side of the screen:
Typical Options menu
To adjust the settings on the Options menu, press UP or DOWN to highlight a setting, and then press
LEFT or RIGHT to change the setting. You’ll see the changes you make right away in picture
appearance or audio quality.

!
!!
69
!
!
!
Tip: When you highlight a setting, the header text explains the effect of its current value. When you
begin to adjust a setting, the other options are hidden so you can see more of the screen. Even though
the other settings are hidden, you can move the highlight up or down to adjust the other settings. As
soon as you press UP or DOWN, the other settings become visible again.
Note: Some streaming channels assign STAR Þ to a different function (or no function at all), meaning it
will not open the Options menu. In these cases, use a different channel, such as The Roku Channel, to
configure options. The selected settings remain active for all streaming channels.
Options menu settings
• Sleep timer – Sets a timer that turns off the TV after the specific amount of time. This setting
remains in effect even if you stop watching the current input.
• TV brightness – Affects the overall brightness of the picture. This setting applies across the
entire TV; that is, to all TV inputs and is identical to the TV brightness setting under Settings >
TV picture settings.
• Picture size – Adjusts the aspect ratio of the picture, enabling you to view a picture in its
original format, or zoom or stretch it to fill the screen. The Auto setting has been found to
produce the best picture in most cases.
• Picture mode – Provides picture presets for various viewing preferences. This setting applies to
the currently-selected input only.
• Sound mode – Adjusts the sound quality output from the TV speakers. This setting applies
across the entire TV; that is, to all TV inputs. It does not affect the sound quality for headphones,
HDMI (ARC) HDMI (eARC), or S/PDIF (TOSLINK) connectors.

!
70
!
!
!
• Closed captioning – Controls when you see captions. This setting is only offered for live TV, the
AV input, streaming content and videos played in the media player. Any set value remains in
effect across only these inputs.
• Live TV – Set captions to off, always on, on only when the TV sound is muted, or on only
during instant replay (when Live TV Pause has been enabled).
• AV input – Set captions to off, always on, or on only when the TV sound is muted.
• Streaming video channel or media player – For streaming content that provides closed
captions, set captions to off, always on, on only when the TV sound is muted, or on only
during instant replay (for streaming content that supports instant replay). Note that some
streaming channels have other methods for turning captions on and off. In these cases, the
Closed captioning option does not appear on the Options menu.
Note: If REPLAY is not available on your remote, you can use this feature in the Roku
mobile app. For more information, see Roku mobile app.
• SAP – Selects whether to play a secondary audio program or multichannel television sound,
and which choice to play. This setting applies only to live TV on digital channels.
• Picture settings – Shows the Picture settings menu.
• Sound settings – Only on select models: Shows the Sound settings menu.
Tip: To dismiss the Options menu, just wait a few seconds without pressing any buttons. Or press STAR
Þ again to dismiss the menu immediately.

!
!!
71
!
!
!
Accessibility
The settings on the Accessibility menu enable you to change the TV’s accessibility settings without
leaving the program you are watching. These settings are also available on the Home screen menu
under Settings > Accessibility.
Note: Some streaming channels assign STAR Þ to a different function, meaning it will not open the
Options menu. In these cases, use a different channel, such as The Roku Channel, to configure
accessibility options.
Accessibility menu settings
• Audio Guide – Turn the Audio Guide on or off. The Audio Guide is a text-to-speech screen
reader that helps blind and low-vision users navigate the Roku user interface and on-screen
menus. When enabled, the Audio Guide reads out text, menus, and other on-screen items.
Accessibility: If Shortcut is enabled, you can enable or disable the Audio Guide by pressing the
STAR Þ four times in quick succession. (STAR Þ is located directly below the purple
directional pad on the right side of the Roku remote.)
• Speech rate – Select the speed at which the TV speaks Audio Guide prompts.
• Volume – Set the volume of the Audio Guide in relation to the main TV volume.

!
72
!
!
!
• Shortcut – Enable or disable the shortcut feature. When disabled, pressing STAR Þ four times
in quick succession does not enable or disable the Audio Guide.
• Closed captioning – Controls when you see captions. This setting is only offered for the ANT
and AV inputs, and streaming/media player videos. Any set value remains in effect across only
these inputs.
• Live TV – Set captions to off, always on, on only when the TV sound is muted, or on only
during instant replay (when Live TV Pause has been enabled).
• AV input – Set captions to off, always on, or on only when the TV sound is muted.
• Streaming video channel or media player – For streaming content that provides closed
captions, set captions to off, always on, on only when the TV sound is muted, or on only
during instant replay (for streaming content that supports instant replay). Note that some
streaming channels have other methods for turning captions on and off. In these cases, the
Closed captioning option does not appear on the Options menu.
Note: If REPLAY is not available on your remote, you can use this feature in the Roku
mobile app. For more information, see Roku mobile app.
• Captioning track – Selects which caption track to display when closed captioning is on. This
setting remains in effect on all inputs that provide captions.
• SAP – Selects whether to play a secondary audio program or multichannel television sound,
and which choice to play. This setting applies only to live TV on digital channels.

!
!!
73
!
!
!
Video description through Secondary Audio
Program (SAP)
Video description of the action in a program helps individuals who are blind or visually impaired enjoy
programs. You enable video description by selecting one of the Secondary Audio Program (SAP) options.
To hear video description narrations in programs that have them, turn on SAP. If there are multiple
SAP options for a channel, such as Spanish and French, try each one to determine which setting
carries the video description track.
Accessibility: Broadcasters provide video descriptions only on a small number of programs. If you are
unable to hear video descriptions after following these instructions, the program you are viewing does
not provide them.
For more details about video description, go to:
https://www.fcc.gov/consumers/guides/audio-description

!
74
!
!
!
Picture settings
The Picture settings menu for each TV input provides settings for fine tuning the appearance of the
picture. All of the settings in this menu apply only to the currently-selected input.
To use the Picture settings menu, first press STAR Þ to display the Options menu. Then select
Picture settings.
Typical Picture settings menu
Note: Some streaming channels assign STAR Þ to a different function, meaning it will not open the
Options menu. In these cases, use a different channel, such as The Roku Channel, to configure Picture
settings. The selected settings remain active for all streaming channels.
Picture settings menu options
Note: Picture settings vary by brand and model. Not all settings are available on all TVs. Names of
certain settings also vary by brand and might differ from the names listed here.
• Picture mode – Provides picture presets for various viewing preferences. This setting duplicates
the one on the Options menu. When you change the Picture mode, other picture settings
adjust accordingly. For example, setting the Picture mode to Vivid sets Brightness, Contrast,
Sharpness, and other values to produce a very vibrant picture. Setting Picture mode to Movie
changes the settings to produce a picture suitable for enjoying movies in a darkened room. If

!
!!
75
!
!
!
you make changes to the individual picture settings—for example, Contrast, or Sharpness—
these settings are saved for the current input and the current picture mode. In this way, you can
set HDMI 1 input’s Movie picture mode to use different settings than the HDMI 2 input’s
Movie picture mode and the Live TV input’s Movie picture mode. Use Reset picture settings,
described below, to return the input’s selected picture mode to its original values.
• Local dimming – Only on select models: Sets the amount of dimming applied to multiple areas
of the screen’s backlight intensity. This setting can make dark areas darker without affecting the
brightness of light areas.
• Dynamic contrast – Only on select models: Automatically adjusts the backlight level to achieve
the optimum contrast and prevent excessive differences between light and dark areas of the
screen.
• Micro contrast – Only on select models: Improves image contrast.
• Backlight - Adjusts the overall light intensity of the screen.
• Brightness – Adjusts the dark level of the picture.
• Contrast – Adjusts the white level of the picture.
• Sharpness – Adjusts the sharpness of edges in the picture.
• Color – Adjusts the saturation of colors in the picture. A setting of 0 removes all color and
displays a black and white picture.
• Tint – Adjusts the color balance from green to red to obtain accurate colors in the picture.
• Color temperature – Adjusts the overall color tones in the picture from Normal to slightly more
bluish (Cool) to slightly more reddish (Warm).
• Frame rate conversion – Only on select models. Each TV brand uses a different name for this
option. Adjusts the amount of motion processing applied to the video signal. A higher setting
results in more smoothing, but can cause undesirable picture artifacts in certain types of
content. Each Picture mode has a different default setting.

!
76
!
!
!
• Film mode – Only on select models. Each TV brand uses a different name for this option. When
enabled, this feature reduces “judder” that is often present when 24 frame-per-second movies
are upscaled to 60Hz TV standards. Film mode is On by default in Movie and HDR Dark
picture modes, and Off by default in other picture modes.
• Blur reduction – Only on select 120Hz models. Each TV brand uses a different name for this
option. Reduces blur, especially for fast-moving images such as sports.
• Black frame insertion – Only on select models that also have the local dimming feature. Each
TV brand uses a different name for this option. Reduces motion blur caused by the refresh rate
of the screen. Enabling this feature inserts black frames between picture frames in a way that
improves the clarity of fast moving objects. It provides an improved viewing experience for
video games and sporting events, but reduces the brightness of the picture. You can select
settings of Low, Medium, High, or Off to achieve the desired picture quality.
• Game mode – Only on HDMI
®
and AV inputs: Controls whether Game mode is enabled. When
On, the TV performs less image processing and has less input lag. When Off, the TV performs
more image processing and has more input lag, which is less desirable for action games.
• Reset picture settings – Returns all picture settings for the input’s currently-selected Picture
mode to their original values.

!
!!
77
!
!
!
Auto Low Latency Mode (ALLM)
Only on select models: Auto Low Latency Mode (ALLM) detects when certain game consoles are
connected to an HDMI input, and then automatically configures the best settings for action games
when that input is selected. When ALLM is active, the manual Game mode setting is not available.
Variable refresh rate (VRR)
Only on select models: Variable refresh rate (VRR) allows a compatible game console or computer
connected via HDMI to control the refresh rate of the TV. This feature helps to ensure that the TV
does not begin to display a video frame until the video source has completely rendered it. The result
is smoother image animation with a lower instance of stutter or tearing. Use of this feature requires
that:
• Variable refresh rate is turned On in the HDMI settings for the input. This setting is Off by
default.
• The HDMI mode is set to Auto or HDMI 2.0 in the HDMI settings for the input.
• Game mode is enabled.
• The connected device supports VRR.
Tip: To dismiss the Picture settings menu, just wait a few seconds without pressing any buttons. Or
press STAR Þ again to dismiss the menu immediately.

!
78
!
!
!
Sound settings
Your TV model might have any one of the following premium sound settings available in the Options
menu:
• No Sound settings
• Roku Smart Soundbar
• Volume mode
• Dolby
®
Audio Processing
Roku Smart Soundbar
You can purchase and connect a Roku Smart Soundbar to the HDMI ARC or HDMI eARC port on any
model of Roku TV. When you do, you can put away your Roku Smart Soundbar remote control, because
the Sound settings menu on the TV provides direct access to the soundbar settings. These settings
replace the premium sound settings, if any, that might be available when the Roku Smart Soundbar is
not connected.
Tip: The TV automatically hides the HDMI port to which you connect your Roku Smart Soundbar on the
basis that you never will need to worry about accessing it directly. If you want to access the soundbar
directly rather than through your Roku TV, you can add the HDMI ARC or HDMI eARC input to your
Home screen.
To access Roku Smart Soundbar settings, first press STAR Þ to display the Options menu, then select
Sound settings.

!
!!
79
!
!
!
Sound settings menu – Roku Smart Soundbar
• Sound mode – Select from among various preset sound modes to make shows and music
sound its best.
• Volume mode – Select from among modes for normal listening, volume leveling, and night
listening.
• Speech clarity – Select Off, Low, or High to make voices easier to hear above the rest of the
program.
• Expanded stereo – Select one of the available settings to simulate surround sound or, only
with Roku Wireless TV Speakers in the rear channel position, to play stereo sound from all
speakers.
• Reset sound settings – Returns all sound settings to their defaults.

!
80
!
!
!
Volume mode (select models only)
To access Volume mode, first press STAR Þ to display the Options menu, then select Sound
settings
1
.
Sound settings menu for models with Volume mode
Tip: Some streaming channels assign STAR
Þ
to a different function, meaning it will not open the
Options menu. In these cases, use a different channel, such as The Roku Channel, to set the Volume
mode. The selected mode remains active for all streaming channels.
Sound settings menu - Volume mode
• Off – Volume mode is inactive and content volume is unmodified.
• Leveling – Provides a consistent volume level across different types of content, so that you
need not change the volume every time you switch channels or when a commercial comes on.
• Night – Soft sounds, such as whispers, are increased while loud sounds, such as explosions, are
decreased, making it easier to hear your TV at night without disturbing others.
1
On some models the Volume mode option is in the Options menu rather than in Sound settings.

!
!!
81
!
!
!
Sound settings – Dolby
®
Audio Processing (select models only)
Each TV input has separate settings for fine tuning sound quality. All of the settings in this menu apply
only to the currently-selected input. To access the DAP settings, first press STAR Þ to display the
Options menu, then select Sound settings.
Sound settings menu for models with Dolby® Audio Processing
Tip: Some streaming channels assign STAR Þ to a different function, meaning it will not open the
Options menu. In these cases, use a different channel, such as The Roku Channel, to configure Dolby
®
Audio Processing. The selected settings remain active for all streaming channels.
Sound settings menu– Dolby
®
Audio Processing
• Sound mode – Select from among various preset sound modes to improve speech, make music
sound its best, boost bass or treble, or simulate a theater. Use Reset audio settings, described
below, to return the input’s current settings to their original values.
• Virtual surround (Only on select models) – Options vary by TV model. Simulates surround sound
that otherwise would require installation of a surround sound audio system. Sometimes, the
effect interferes with dialog clarity. Use the Dialog enhancer option to compensate.
• Dialog enhancer – Improves the clarity of speech when on.
• Reset sound settings – Returns Virtual surround and Dialog enhancer settings to their
default settings for the selected Sound mode.

!
82
!
!
!
Sound settings – DTS
®
TruSurround / DTS
®
Studio Sound (select
models only)
Each TV input has separate settings for fine tuning sound quality. All of the settings in this menu apply
only to the currently-selected input. To access the DTS
®
settings, first press STAR Þ to display the
Options menu, then select Sound settings.
Sound settings menu for models with DTS® TruSurround/Studio Sound
Tip: Some streaming channels assign STAR Þ to a different function, meaning it will not open the
Options menu. In these cases, use a different channel, such as The Roku Channel, to configure DTS
®
Studio Sound. The selected settings remain active for all streaming channels.
Sound settings menu– DTS
®
TruSurround / DTS
®
Studio Sound
• Sound mode – Select from among various preset sound modes to improve speech, make music
sound its best, boost bass or treble, or simulate a theater. Use Reset audio settings, described
below, to return the input’s current settings to their original values.
• DTS TruSurround –Simulates surround sound that otherwise would require installation of a
surround sound audio system. Sometimes, the effect interferes with dialog clarity. Use the
Dialog clarity option to compensate.
• Dialog Clarity – Available only when DTS TruSurround is On. Choose among Low, Medium,
and High settings to improve the clarity of dialog when you are using the TruSurround feature.

!
!!
83
!
!
!
• TruVolume – Minimizes annoying volume fluctuations in programs.
• Reset sound settings – Returns DTS TruSurround, Dialog Clarity, and TruVolume settings,
to their default settings for the selected Sound mode.
Sound settings – Sonic Emotion
™
Premium (select models only)
Sonic Emotion™ Premium is an audio technology that enables your TV to produce a more immersive
sound experience. Each TV input has separate settings for fine tuning sound quality. All of the settings in
this menu apply only to the currently-selected input. To access the Sonic Emotion™ settings, first press
STAR Þ to display the Options menu, then select Sound settings.
Sound settings menu for models with Sonic Emotion™ Premium
Tip: Some streaming channels assign STAR Þ to a different function, meaning it will not open the
Options menu. In these cases, use a different channel, such as The Roku Channel, to configure Sonic
Emotion™. The selected settings remain active for all streaming channels.
Sound settings menu– Sonic Emotion
™
Premium
• Sound mode – Select from among various preset sound modes to improve speech, make music
sound its best, boost bass or treble, or simulate a theater. Use Reset audio settings, described
below, to return the input’s current settings to their original values.

!
84
!
!
!
• Sonic Emotion Premium – Displays a menu with individual Sonic Emotion™ audio settings, as
described in Sonic Emotion settings.
• Reset sound settings – Returns Sonic emotion settings to their default settings for the
selected Sound mode.
Sonic Emotion™ settings
When you select Sonic Emotion Premium from the Sound settings menu, these additional settings
become available:
Sonic Emotion settings menu for models with Sonic Emotion™ Premium
• Dialog Enhancement – Enhances your ability to hear and understand dialog in the program.
• Bass Enhancement – Enhances the low frequency sound component in the program.
• Absolute 3D Sound – Simulates sound from multiple speakers that would otherwise require
installation of a surround sound audio system.

!
!!
85
!
!
!
Expert Picture Settings (4K models only)
4K (UHD) TV models have additional picture settings for demanding home theater enthusiasts. Expert
Picture Settings include gamma, noise reduction, 11-point white balance adjustment, and extended
color space management.
You can access Expert Picture Settings only by using the Roku mobile app on an iOS
®
or Android™ mobile
device. For more information, go to the following link on the Roku web site:
go.roku.com/expertpicturesettings
Changing privacy settings
Note: Privacy settings are not present on TVs operating in non-connected mode.
Advertising
Only in connected mode, by default your TV uses an advertising identifier to track your TV usage. You
can change the privacy settings on your TV in two ways: resetting the advertising identifier and limiting
ad tracking.
Reset the advertising identifier
Resetting the advertising identifier clears the prior usage history that your TV stores, and then begins
tracking again. From that point forward, your new usage patterns affect the advertisements you see on
your TV.
1. From the Home screen menu, navigate to Settings > Privacy > Advertising.
2. Highlight Reset advertising identifier. Press STAR Þ to view more information about this
option. When you finish reading the information, press OK to close the More Information
window.
3. Press OK to reset the advertising identifier, and then press OK again to dismiss the verification
message.

!
86
!
!
!
Limit ad tracking
You can limit Roku’s tracking of your usage behavior by limiting ad tracking. When you do, your TV will
display ads that are not personalized based on your TV’s advertising identifier.
1. From the Home screen menu, navigate to Settings > Privacy > Advertising.
2. Highlight Limit ad tracking. Press STAR Þ to view more information about this option. When
you finish reading the information, press OK to close the More Information window.
3. Press OK to select the Limit ad tracking check box.
Note: If you perform a factory reset and then reconnect your TV, ad tracking is restored until you repeat
these steps.
Microphone
Your Roku TV does not have a built-in microphone. However streaming channel providers can use the
microphone on Roku voice remotes (only on select models) or on your mobile device when the Roku
mobile app is running. You can control whether streaming channels have permission to use the
microphone.
Note: These settings affect only streaming channel access to the microphone. They do not affect your
Roku TV’s Voice Search feature.
Channel microphone access
You can control which streaming channels have permission to use the microphone, giving you control
over how the microphone is used by each streaming channel. The default setting is Prompt, so channels
will not be able to turn on the microphone without your permission.

!
!!
87
!
!
!
To change microphone access settings:
1. From the Home screen menu, navigate to Settings > Privacy > Microphone.
2. Select Channel microphone access.
3. Select one of the following settings:
• Prompt – Display a notification the first time a streaming channel requests the use of the
microphone. When such a notification appears, you can select either Allow microphone
access or Deny microphone access on a per-channel basis. If you choose to allow
microphone access, you’ll be prompted to confirm your choice by entering a numeric code
that appears on the screen.
• Always allow – Do not prompt, but always allow any streaming channel to use the
microphone.
• Never allow – Do not prompt, but never allow any streaming channel to use the
microphone.
Channel permissions
After granting or denying microphone access on a per-channel basis, you can reset channel permissions
to enable them to follow the system-wide setting you specify under Channel microphone access.
To reset channel permissions:
1. From the Home screen menu, navigate to Settings > Privacy > Microphone.
2. Select Channel permissions.
3. Highlight Reset channel permissions, or highlight a specific listed channel, and then press OK
to deny microphone access to all or to a specific channel.

!
88
!
!
!
Smart TV experience
If you have connected your TV to the Internet, your TV prompts you to opt in to the Smart TV
experience when you first start watching TV programs. Regardless of your decision at that time, you can
change your decision later.
To change your Smart TV experience choices:
1. From the Home screen menu, navigate to Settings > Privacy > Smart TV experience.
2. Highlight the setting you want to change, and then press OK to enable or disable it.
• Use info from TV inputs – Authorizes Roku to collect and share information about what,
when, and how you are watching and use this to make recommendations.
• Enable auto notifications – Displays brief notifications from the Smart TV experience
across the bottom of the screen when recommendations are available.
Note: These settings do not affect recommendations for More Ways to Watch that you see in the
Smart Guide when watching live TV channels.

!
!!
89
!
!
!
Featured Free
Only in connected mode, use Featured Free to discover content that is free to watch.
As you browse through the programs, the featured channel’s icon appears in the upper left corner of the
screen. Use the purple directional pad to highlight a program, and then press OK to see more
information about it.
Once you are viewing a program’s details, press OK to start playing the program. If you’ve already
added the channel, you’ll be taken directly to the channel and the program will begin to play. If you have
not added the channel, it will be added for you before playing the program.
If you don't want to see Featured Free on the Home screen menu, you can hide it.
To hide Featured Free:
1. From the Home Screen menu, navigate to Settings > Home screen, and then press RIGHT.
2. Select Featured Free.
3. Highlight Hide, and then press OK.

!
90
!
!
!
My Feed
Only in connected mode, use My Feed to find out when you can watch movies coming soon, and to get
updates on movies, TV programs, and actors that you are following.
Movies Coming Soon
My Feed gives you updates on your list of movies that are coming soon to theaters. With My Feed, you’ll
know when your favorite movie is ready to stream, the channels it is on, and how much it will cost.
Select the movies you want to follow by going to My Feed > Movies Coming Soon. You’ll then see a
list of newly released movies that are not yet available on Roku streaming devices. Select a movie, and
then select Follow this movie on Roku. When you return to the main My Feed screen, you’ll see
banners for each of your newly-followed movies along with banners for movies and TV programs you’re
already following.
Movies, TV programs, and people
In addition to following movies coming soon, you can follow any movie, TV program, or actor across top
streaming channels. To follow a program, search to find the movie, TV program, or name that you want
to follow, and then select Follow this movie/TV show/person on Roku. For more information, see
Searching for something to watch.
Note: The TV takes a bit of time to update your newly-followed programs. Until it finds at least one
channel offering the movie, the content banner in My Feed shows Check back later for updates.
My Feed alerts you any time a movie or TV program you are following becomes available on another
channel and whenever its price changes. A number in parentheses next to My Feed in the Home screen
menu means that My Feed has updated information that you haven’t viewed yet. For example, if three
of your followed programs have updates, you’ll see My Feed (3).
Note: When a movie or TV program you are following becomes available, the streaming channel offering
the movie might require that you subscribe or pay a fee to view it.

!
!!
91
!
!
!
Searching for something to
watch
Searching for movies and programs across streaming channels and live TV is one of the unique features
of your Roku TV. Within a single search operation, you can search by:
• Movie name
• TV program name
• Actor or director name
• Streaming channel name
• Interactive game name
• Popular quotes, such as “May the Force be with you.”
• Genre, including the special genres, “free” and “4K.”
Note: Roku Search is only available if your TV is operating in connected mode and linked to a Roku
account. Roku Search doesn’t search across all streaming channels, but searches across lots of popular
streaming channels. The actual channels it searches vary by locale.
How do I search?
You can search in several different ways:
• By using an on-screen keyboard that you navigate using the purple directional pad on your
remote
• By typing on the Roku mobile app on your phone or tablet
• By speaking search phrases in English or Spanish using a Roku voice remote, the Roku mobile
app, Alexa, or Google Home Assistant.
For more details about Voice Search, go to go.roku.com/voicesearch
.

!
92
!
!
!
Keyboard search using the remote
1. Select Search on the Home screen menu.
2. Use the purple directional pad to navigate the on-screen keyboard, entering a few characters of
the search term.
Each additional character you enter narrows down the search, making the search results more
relevant. You’ll often see the results you are seeking after entering only a few letters.
3. When you see the program you are searching for, press RIGHT to highlight it. Continue
pressing RIGHT to see more details about how to watch the program.
Voice Search from a Roku voice remote
Only with models that have a Roku Voice Remote or Roku Enhanced Voice Remote:
1. Press and hold either VOICE or SEARCH , depending on your remote.
Hint: Tap the button to see on-screen tips about searching. Repeat to see a different set of tips.
2. While holding down the button, say the name of a movie, TV program, actor, director, or genre
(including the special genres, “free” and “4K”). Or say, for example, “What movie is this from
‘May the Force be with you’,” to search for a movie based on a popular quote. You also can
search for news programs. Say things like, “Show the news,” “Play news,” or “Play news on
newsy.”
Note: You can use either English or Spanish for voice searches, according to the TV language you
set in Settings > System > Language.
The TV lists the results of your search across many streaming channels and live TV channels.
3. Press RIGHT to move the highlight into the list of search results.
4. Press UP or DOWN to scroll through the list of search results to highlight the item you want to
view.

!
!!
93
!
!
!
Searching from the Roku mobile app
Use the free Roku mobile app on your compatible smartphone or tablet to make searching even faster.
Use your mobile device’s keypad to type more quickly and easily than with the on-screen keyboard on
your TV. Or, search by touching the Voice Search icon and saying the name of the movie, TV program,
actor, director, genre, streaming channel, or game.
When you use the Roku mobile app to search, search results are shown on your mobile device instead of
on the TV screen. When you make a selection from the search results, the TV starts playing the selected
program.
For more information, see Roku mobile app.
Searching with Google Assistant
Use your Google Home, Google Pixel phone, or the Google Home mobile app to search for programs:
1. Link your Roku account to your Google account using the Google Home mobile app on your iOS
or Android device.
2. Start your command with “Hey Google” or “OK Google,” and follow the command with “on
Roku.” Some examples:
• “Hey Google, show me documentaries on Roku.”
• “OK Google, show me comedies on Roku.”
Note: You also can issue commands to control your Roku TV. And, if you have enabled Fast TV
Start on your TV, you can turn on your TV by saying, “OK Google, turn on Roku.”
For more information about setting up and using Google Assistant with your Roku TV, see
https://support.roku.com/article/360009649613-how-do-i-control-my-roku-streaming-device-with-the-
google-assistant-.

!
94
!
!
!
Searching with Amazon Alexa
Use your Amazon Echo Dot, Echo Plus, Echo Show, or the Amazon Alexa mobile app to search for
programs:
1. Link your Roku account to your Amazon account using the Amazon Alexa app on your iOS or
Android device.
2. Start your command with “Alexa,” and follow the command with “on Roku.” Some examples:
• “Alexa, turn up the volume on Roku.”
• “Alexa, show me documentaries on Roku.”
Note: You also can issue commands to control your Roku TV. And, if you have enabled Fast TV
Start on your TV, you can turn on your TV by saying, “Alexa, turn on Roku.”
For more information about setting up and using Google Assistant with your Roku TV, see
https://support.roku.com/article/360017961074-how-do-i-use-amazon-alexa-with-my-roku-streaming-
device-.
Direct-to-playback search results
With direct-to-playback, voice search results jump directly to and start playing the program whenever
your search command can be uniquely identified and the requested content is available at no additional
cost to you.
1
1
Direct-to-playback commands work with selected streaming channels. Direct playback occurs only when there is a high
confidence of match, the content is free or you are already subscribed, and the channel is already added to your Home screen.

!
!!
95
!
!
!
Searching for free content
You’ll discover an almost endless list of content through your Roku TV, and much of it is free. You can
easily find free content by including the word “free” in your search. For example:
• Roku Voice Remote or Roku mobile app—Say, “Show me free comedies” or “Show me free
romance,” or simply, “Show me free shows.”
• Google Home, Google Pixel phone, or the Google Home mobile app—Say “OK Google,
show me free programs on Roku,” or “Hey Google, show me free documentaries on Roku.”
• Amazon Alexa—Say “Alexa, show me free miniseries on Roku” or “Alexa, show me free dramas
on Roku.”
I searched for a program. Now what?
Now that you’ve highlighted the program, movie, actor, game, or streaming channel you were looking
for, press RIGHT.
If your search result was an actor, director, or other item that does not represent a single item of
content, you’ll see another list to narrow down your search. If you do a Roku Voice search, the TV shows
visual search results rather than a list of text results. In all cases, use the purple directional pad to find
the program you want to watch.
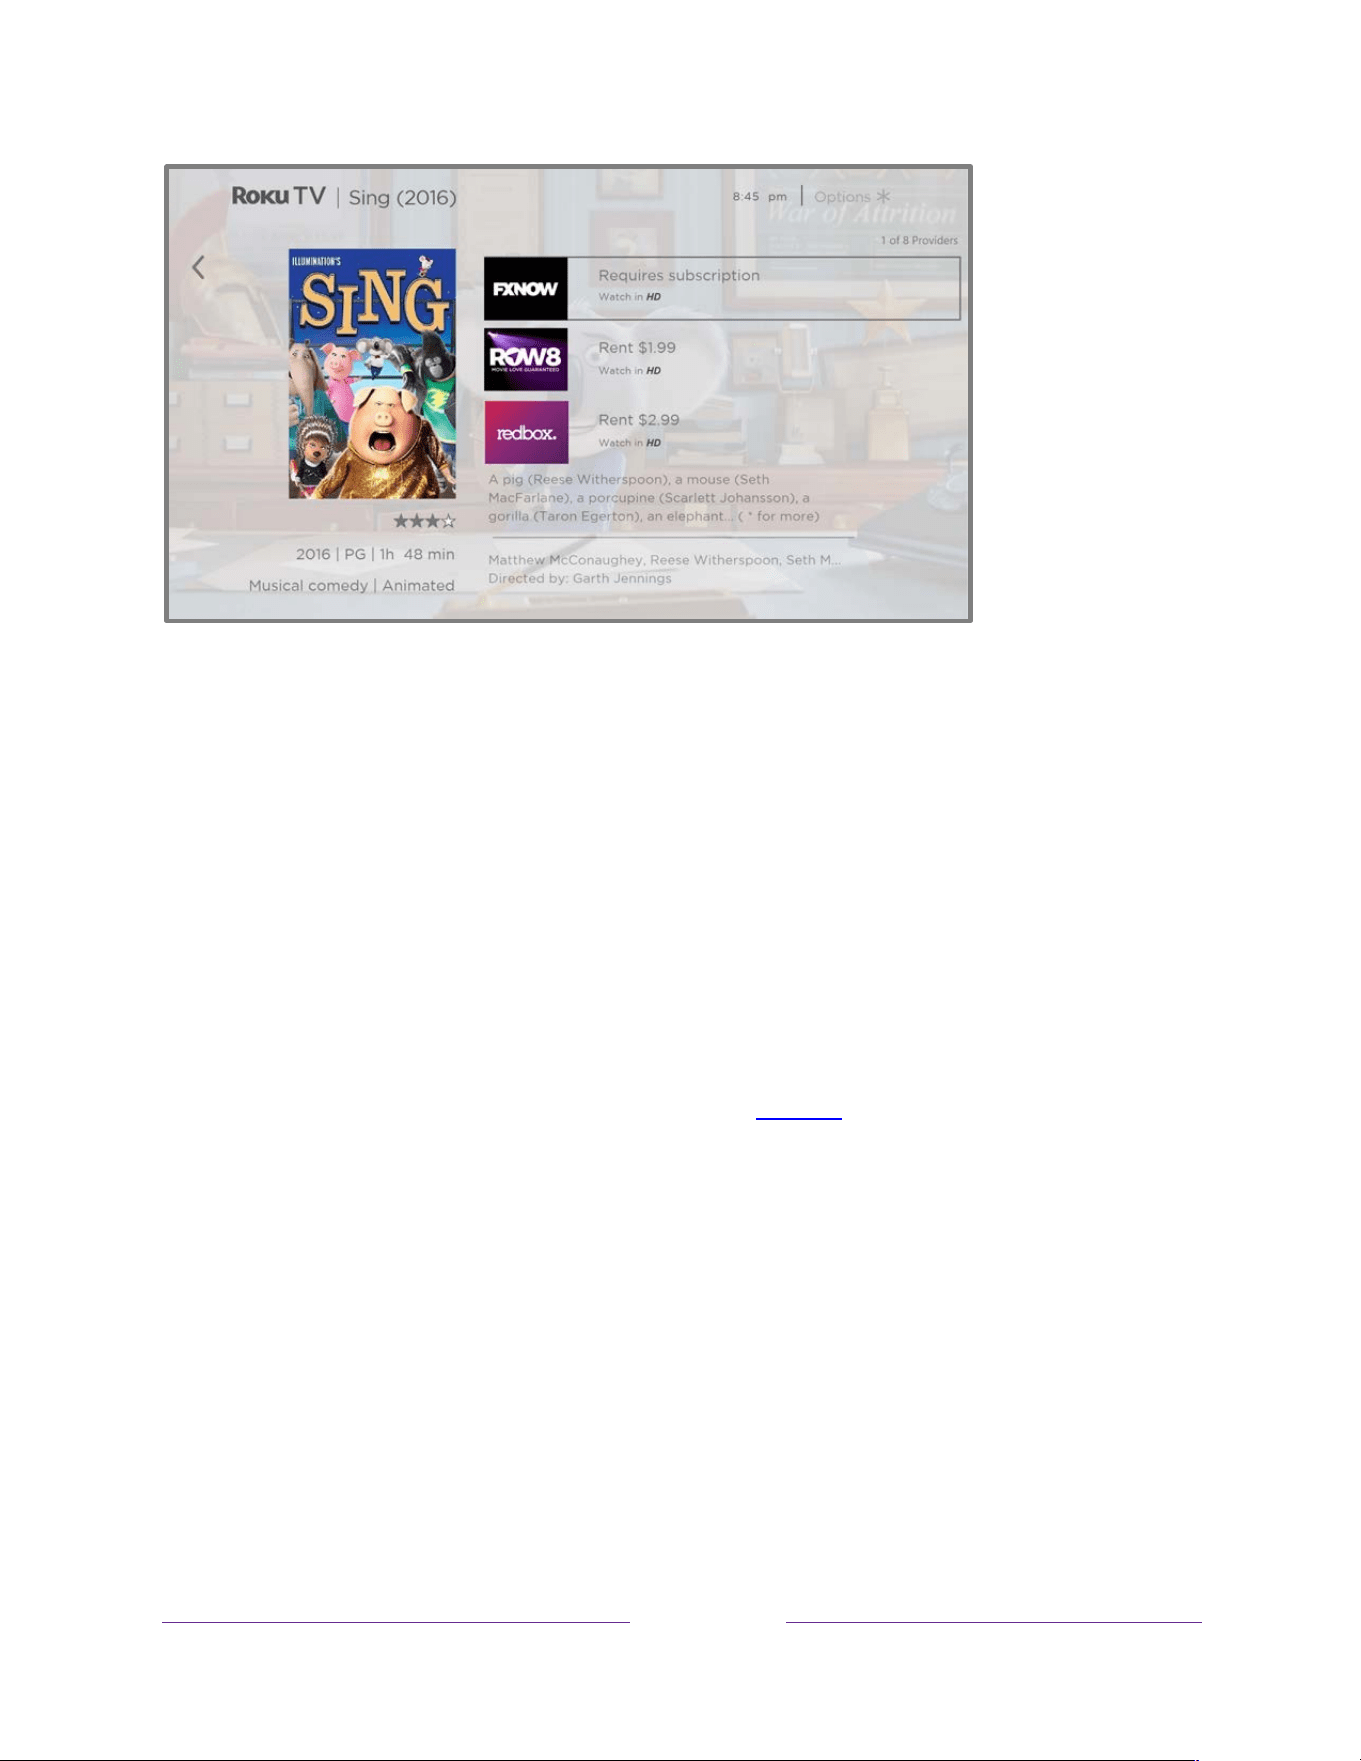
!
96
!
!
!
If your search result was a game or a streaming channel, you will see detailed information, images, and
available actions, such as a list of results and the cost, if any, of using the item or channel.
Note: Some channels may require a paid subscription.
Follow on Roku
Rather than watch the program you found in Search, you can add it to My Feed and wait until it’s
available on a particular streaming channel or available at a better price. From the search results screen,
select Follow on Roku. Then go to My Feed periodically to check for updates to each of your followed
movies, TV programs, or people. For more information, see My Feed.
Recent Searches
The next time you use Search from the Home screen menu, the Search screen displays a list of recent
search selections in place of the search instructions.
Using the recent search selections list makes it easy to quickly get to a previously found item, for
example, to find another movie with the same actor, or another TV program in the same series.

!
!!
97
!
!
!
Roku Zones
Roku Zones are search results grouped within popular genres, for example, “action,” “comedy,” and
“horror." To see Roku Zones in search results, search for a genre name and look for the word Zone
added to the end of a search result. Or, to see all Roku Zones, search for “zone” and then scroll down in
the results until you pass other programs beginning with “zone.”
When you open a Roku Zone, the results are organized into browsable rows such as “New Releases,”
“Included With Subscription,” “Free,” “Rent / Buy,” “Rent for $3 or less,” “Classic Movies & TV Shows,”
and others. If you’re searching on a 4K Roku TV, results also include an “Available in 4k” row.
You can select a title to view channel availability and pricing information, and then select the channel to
watch. To go back without making a selection, press BACK .

!
98
!
!
!
Using the Roku Channel Store
Only in connected mode, either the Streaming Channels menu option or the Add Channels shortcut
takes you to the Roku Channel Store, where you can add new subscription based and free streaming
channels to your TV.
Tip: Search for streaming channels by using the Search option, as explained in Searching for something
to watch. Use Roku Voice Search if you prefer. When you use Voice Search, if your TV recognizes a
channel name, it launches the channel if you already have installed it. Otherwise, it offers to install it for
you. At that point, you can choose to install or cancel.
To make it easier to find what you want, the streaming channels in the Roku Channel Store are
categorized by topic. Press UP or DOWN to highlight the category you want, and then press RIGHT to
move the highlight into the grid of streaming channel tiles.
When you find a streaming channel you want to add or learn more about, highlight it and press OK to
display more details.
• If the streaming channel you are adding is free, you can select Go to channel to start watching
it immediately.
• If there is a one-time or recurring fee associated with using the streaming channel, you must
agree to the terms and conditions, accept the fee, and—if you created one when you activated
your Roku TV—enter your Roku PIN code to authorize the charges.
• If you already have a subscription to the channel—for example, you already subscribe to Netflix
or you receive HBO through your cable TV provider—you must complete a different, simple
authorization step to add the streaming channel.
You need only complete the authorization or activation step one time, when you initially add the
streaming channel. After that, you just select the streaming channel tile from the Home screen to start
watching. (Channel and content availability are subject to change. Charges may apply to your selection.)

!
!!
99
!
!
!
Tip: New streaming channels are added continuously to the Roku Channel Store, so be sure to check back
frequently for new options.
Note: If you don’t remember your PIN, or if you want to change whether you need to use a PIN to make
purchases on your Roku account, see Roku account PIN.
Automatic Account Link
Some subscription channels take advantage of Automatic Account Link. If you have multiple Roku
devices, channels that support this feature require you to supply your user name and password on only
one device. For a growing list of channels that support this feature, see:
https://support.roku.com/article/360021586854-how-do-i-set-up-my-subscription-channels-on-
a-second-roku-streaming-device-

!
100
!
!
!
Customizing your TV
There are several things you can do to personalize your TV.
Add TV inputs
As you use your TV, you might find that you need to add a TV input tile that you did not add during
Guided Setup. To add a TV input:
1. From the Home screen menu, navigate to Settings > TV inputs. Notice that the list of inputs is
divided into two sections: Inputs being used and Inputs not used.
2. Press UP or DOWN to highlight an input in the Inputs not used section of the list.
3. Press RIGHT to move the highlight to Set up input.
4. Press OK to add the input.
5. Press HOME to return to the Home screen. Notice that the input has been added to the top
of the Home screen. If you want to move the input tile to a different position in the grid, see
Rearrange tiles.
Tip: If you purchase and connect a Roku Smart Soundbar, your Roku TV automatically controls all
required sound settings, power, volume, and mute through your TV’s remote control, and hides the HDMI
port to which you connected it. If you want to access the soundbar directly rather than through your
Roku TV, you can add its HDMI input to your Home screen.

!
!!
101
!
!
!
Add streaming channels
You can add streaming channels by searching in the Roku Channel Store from any of the following
locations:
• Streaming channels option
• Search (including Roku Voice Search)
• Add Channels shortcut
New streaming channels are added to the bottom of the Home screen. If you want to move the channel
tile to a different position in the grid, see Rearrange tiles.
Hint: If you have multiple Roku devices, they all show the same set of streaming channels after their next
daily update, unless the channel is not compatible with the device. So don’t be surprised when you add a
channel to your Roku TV and then see it the next day on your Roku Streaming Stick or Roku Premiere.
Rename inputs
Rather than trying to remember that your Blu-ray™ player is connected to HDMI 1 and your game
console is connected to HDMI 3, you can rename the TV inputs to match the connected device.
Note: Renaming an input also changes the icon associated with it.
To rename an input, you can either:
• Highlight the input tile in the Home screen, and then press STAR Þ to display a list of options.
From the list of options, select Rename input. Then select a new name and icon.
or
• From the Home screen menu, navigate to Settings > TV inputs. On the TV inputs screen,
select the input you want to rename, select Rename, and then select a new name and icon
from the provided list.

!
102
!
!
!
Rather than using the predefined names and icons, you can set a custom name and icon. To do so, scroll
up or down to highlight Set custom name & icon, and then press OK. Follow the instructions on the
screen to enter a name and select an icon for the input.
Press HOME to return to the Home screen. The new name and icon are now in effect.
Remove unwanted tiles
It’s easy to remove unused TV inputs and unwanted channel or app tiles. For example, if you never use
the HDMI 3 input, or if you don’t like the weather app you added from the Roku Channel Store, you can
remove them from your Home screen.
Note: You also can remove the Live TV tile if you never use the TV tuner. But be aware that removing
the Live TV tile also deletes the channel list. You’ll have to set up the TV tuner again next time you want
to view live TV. Instructions for setting up the TV tuner can be found in Setting up live TV.
• To remove any tile, highlight the tile in the Home screen, and then press STAR Þ to display a
list of options. From the list of options, select Remove input. In the screen that follows, confirm
you want to remove the input.
• Alternatively, to remove a TV input tile, navigate to Settings > TV inputs. On the TV inputs
screen, select the input you want to remove, and then select Remove > Confirm. Then press
HOME to return to the Home screen.
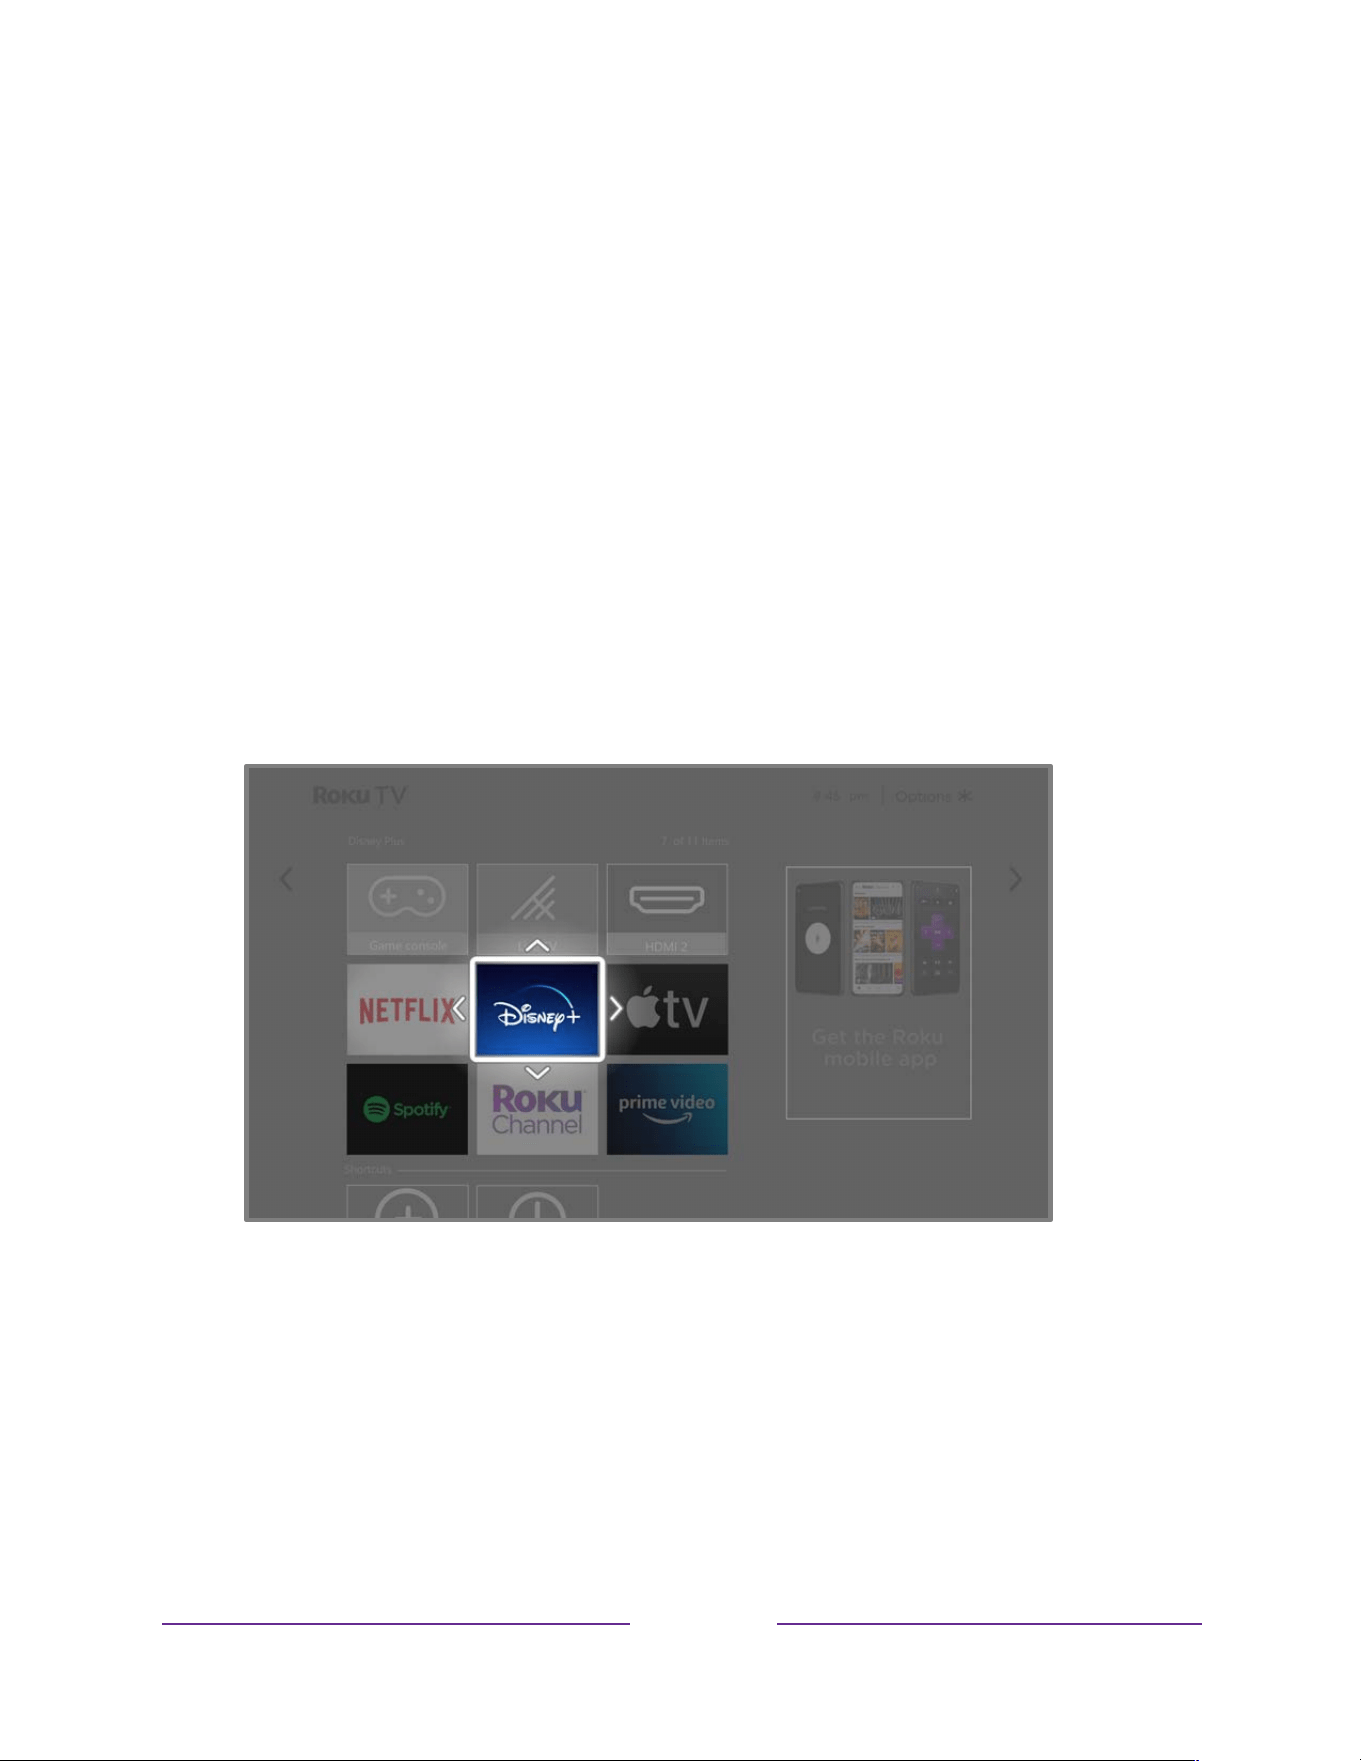
!
!!
103
!
!
!
Rearrange tiles
When you add a TV input tile, it’s added at the top of your Home screen. When you add a new
streaming channel, it’s added at the bottom of your Home screen.
You can easily rearrange the order of the tiles on the Home screen to suit your viewing preferences. For
example, you might want Live TV to be the first tile in your Home screen. But if you mostly watch one
streaming channel, you might want its tile to be the first one on your Home screen.
1. On the Home screen, highlight one of the tiles you want to move.
2. Press STAR Þ to display a list of options for the type of tile you selected.
3. Select Move input or Move channel. The list of options disappears and the highlighted tile
shows arrows indicating how it can be moved.
Note: A paid subscription or other payments may be required for some channels. Channel
availability is subject to change and varies by country. Not all content is available in countries or
regions where Roku
®
products are sold.
4. Use the purple directional pad to move the highlighted tile to its new position. As you move the
tile, it pushes other tiles out of its way.
5. Press OK to lock the tile into its new position.

!
104
!
!
!
6. Repeat these steps to move other tiles until you have arranged your Home screen to your liking.
Change the look and feel with themes
Only in connected mode, another way to customize your TV is to change its theme. The theme
establishes the look and feel of the TV through colors, designs, fonts, wallpaper (background) and
screensaver.
To change the theme, from the Home screen menu navigate to Settings > Theme. In the Themes
screen, choose from the following options:
• Wallpapers – Select a wallpaper of your choice.
• Screensavers – Select a screensaver of your choice.
• Theme packs – Choose from a selection of packages that include coordinated wallpapers and
screensavers.
• Seasonal themes – Turn seasonal themes on or off. When this feature is on, Roku overrides
your selected theme with a theme of their own choosing for various holidays and significant
events. After the holiday or event passes, the TV reverts to your selected theme.
• Screensaver wait time – Select the idle time after which you want your selected screensaver
to appear.
• Restore default theme – Every Roku TV has a theme based on the TV brand and model. Use
this option to restore that default theme.
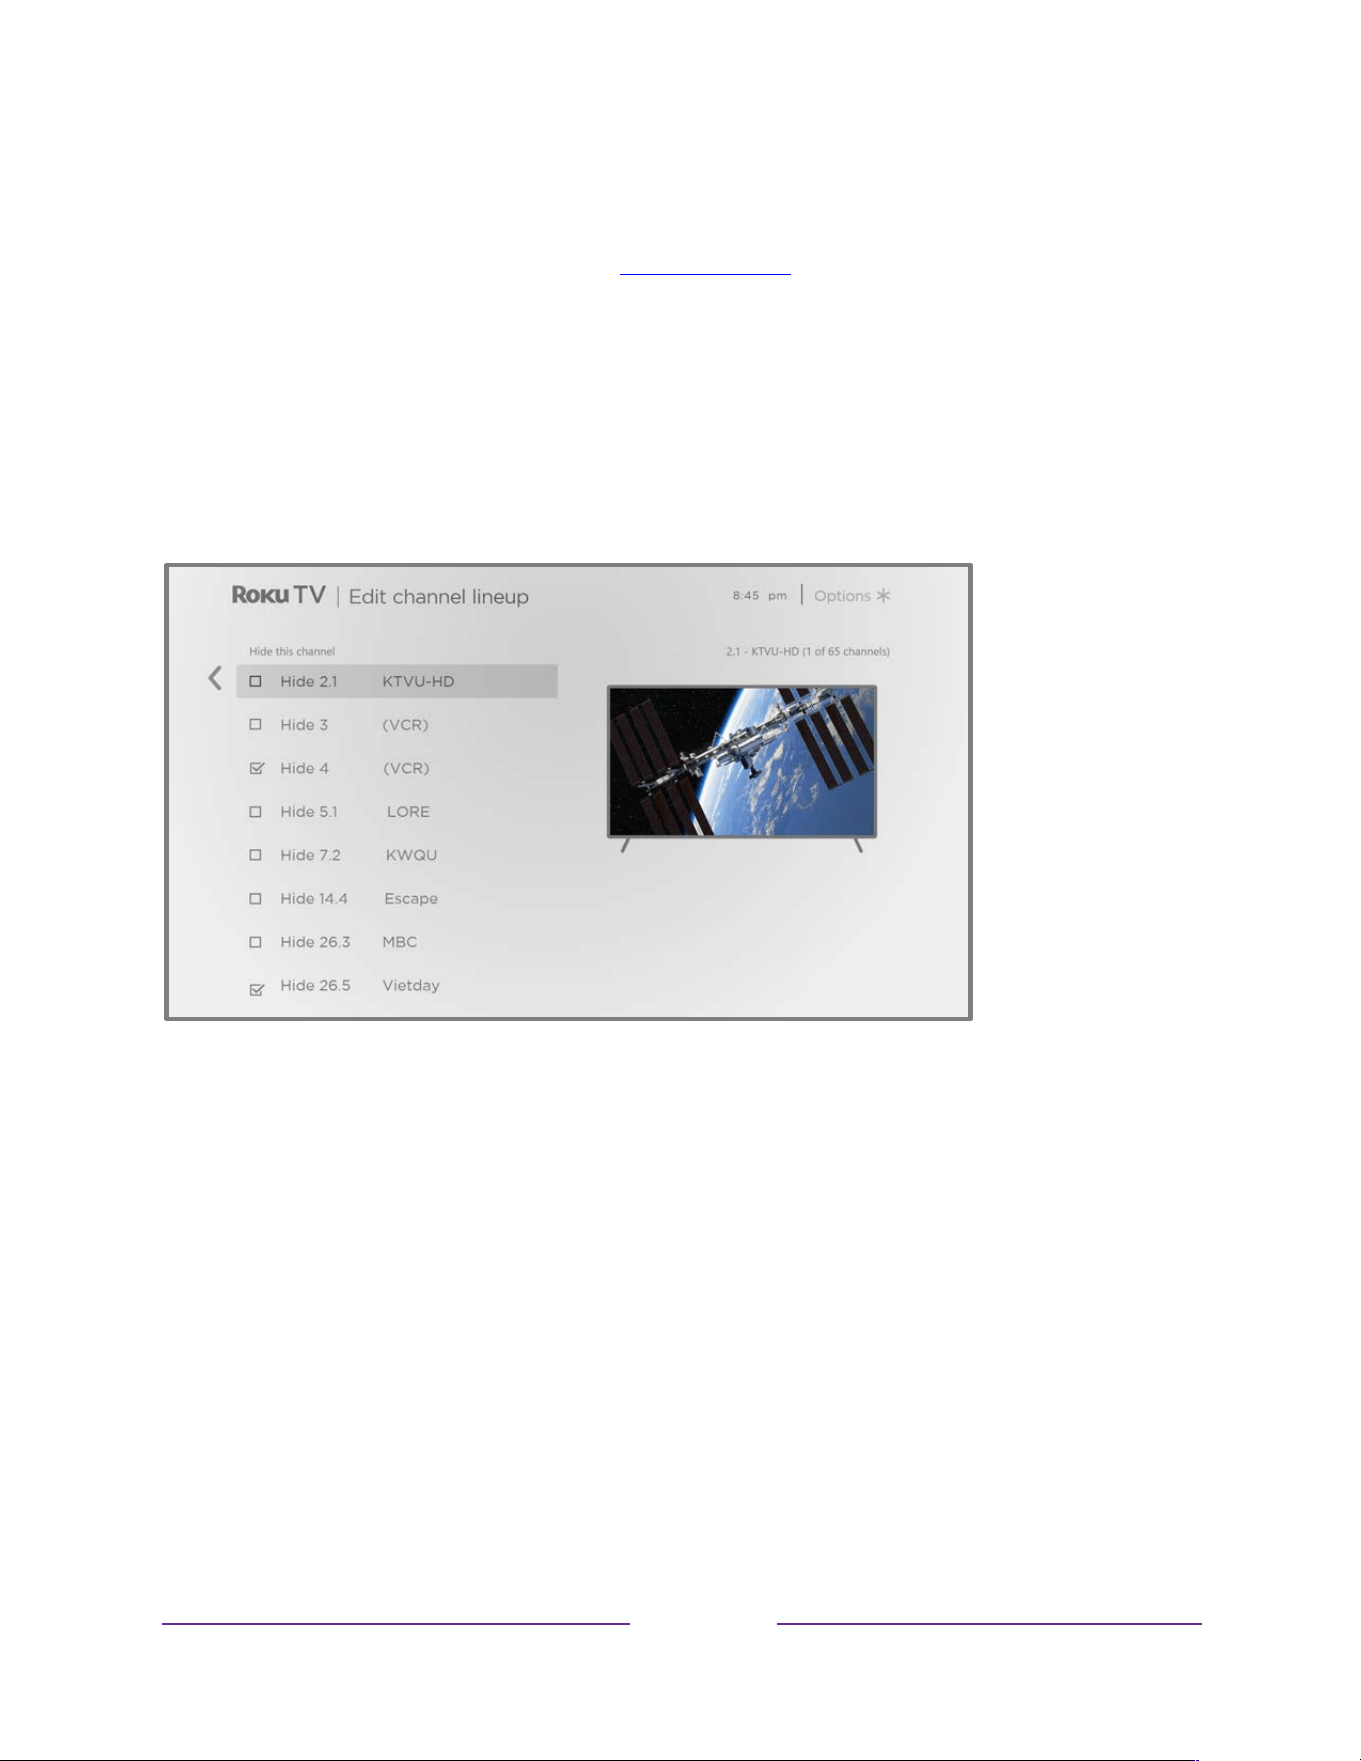
!
!!
105
!
!
!
Edit live TV channel lineup
When you set up the TV tuner as described in Setting up live TV, the TV adds all the channels with good
signals that it can detect in your area. It’s likely that you now have more channels than you want in your
channel list.
To edit the channel lineup, from the Home screen menu, navigate to Settings > TV inputs > Live TV >
Edit channel lineup. You’ll see a screen listing all of your channels. Adjacent to the list of channels is a
miniature TV screen playing the highlighted channel’s picture and sound.
For each channel you want to hide, highlight it, and then press OK to select its check box.
Tip: If you need to view the highlighted channel to decide whether to hide it, wait a couple of seconds for
the TV to start playing the channel’s picture and sound. If you’ve enabled parental controls and the
program on the current channel is blocked, you won’t see a picture or hear sound while editing the
channel lineup.
Note: Repeating the live TV channel scan unhides all hidden channels.
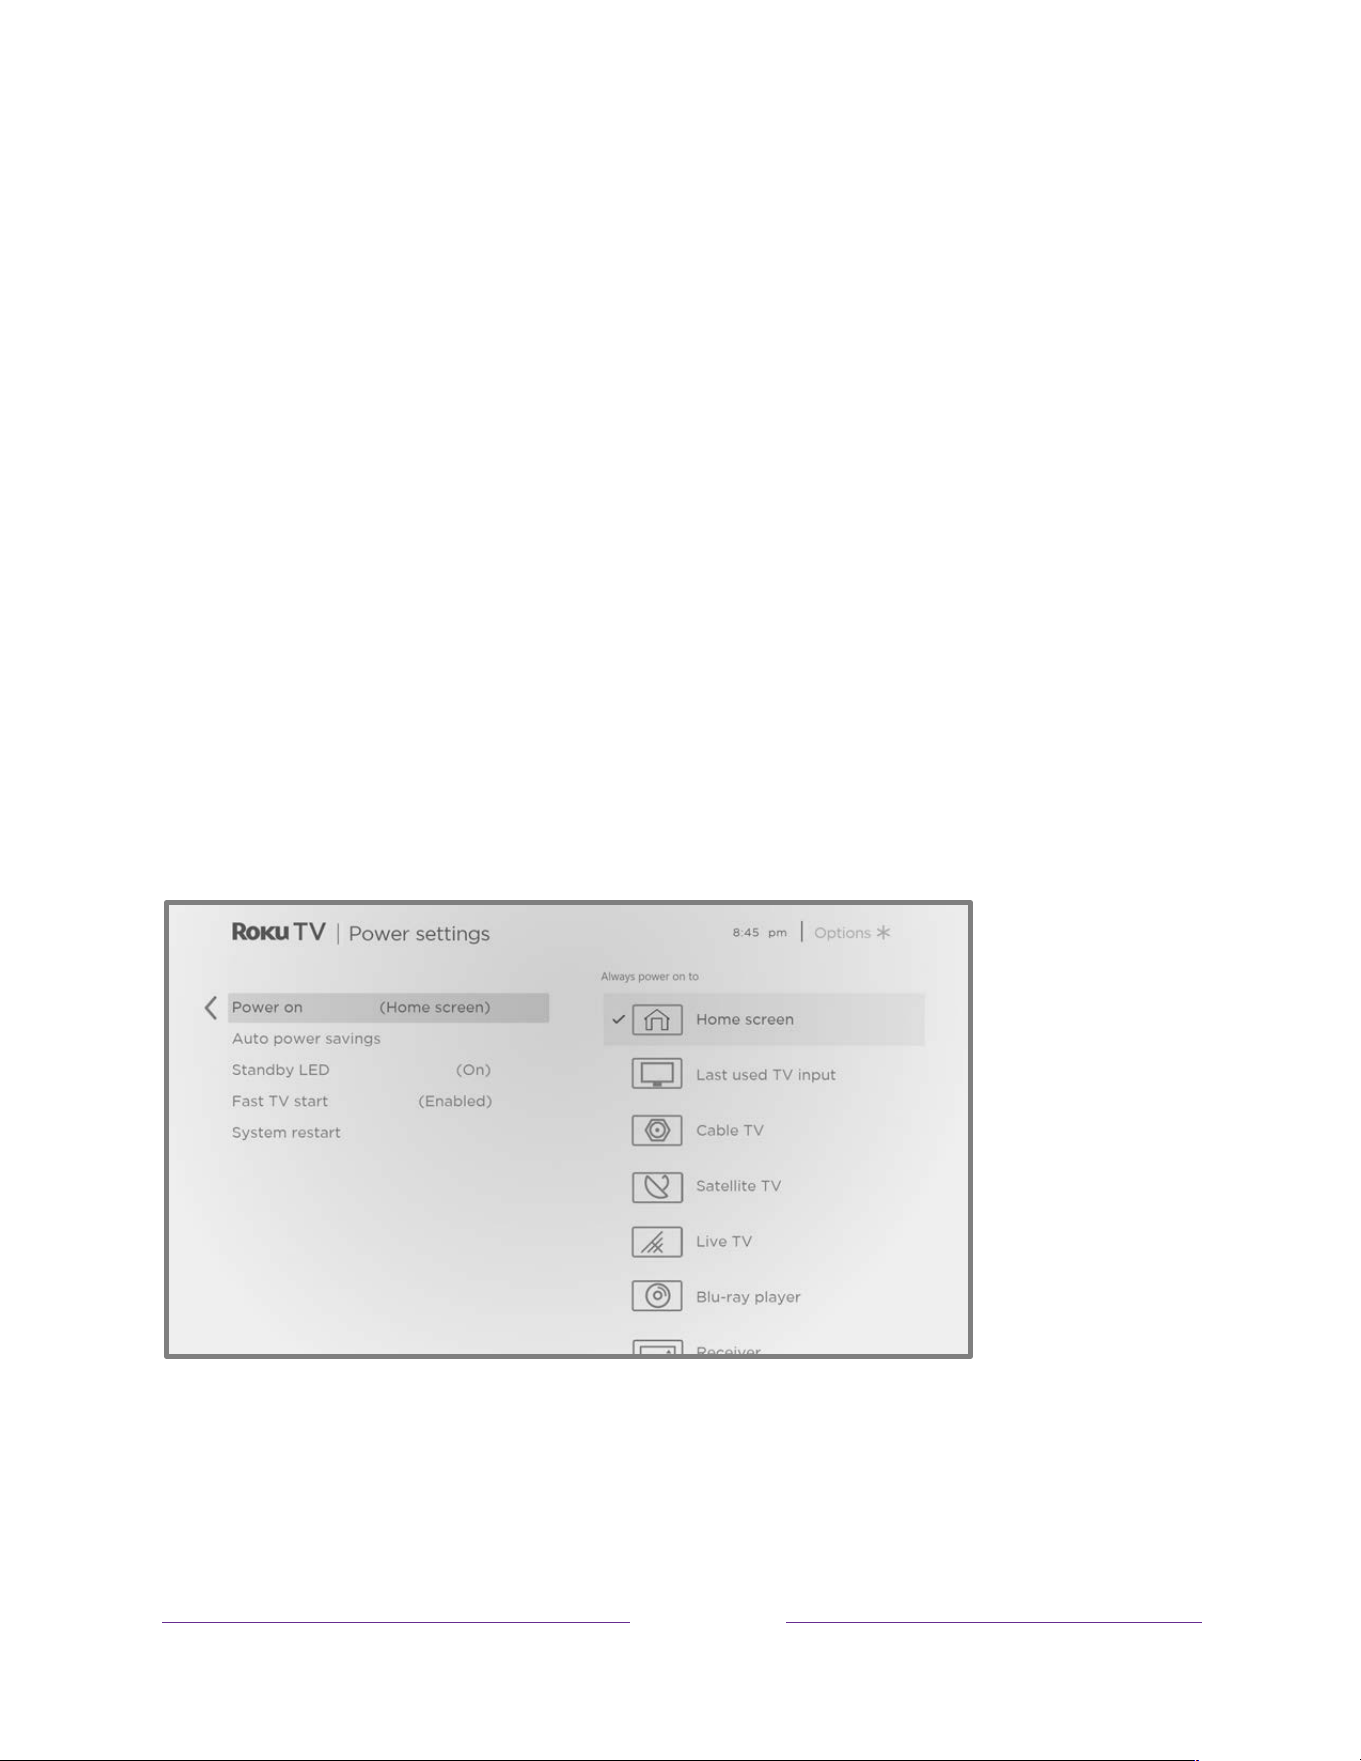
!
106
!
!
!
Change menu volume
Menu sounds are the noises the TV makes to let you know it received your command. You can change
the volume of these menu sounds or turn them off.
To adjust the menu volume, from the Home screen menu, navigate to Settings > Audio > Menu
volume. Navigate to the right and then change the setting to High, Medium, Low, or Off.
Configure power settings
Power settings configure features related to how your TV’s power settings work.
Power on settings
Power on settings tell the TV what to do when you turn on the power. To configure the power on
settings, from the Home screen, navigate to Settings > System > Power > Power on. Highlight the
preferred power on location in the list, and then press OK.

!
!!
107
!
!
!
Auto power savings
To help you save energy, your TV can automatically turn itself off after a period of inactivity or a period
during which no signal has been detected. It is factory-configured to do both of these things, but you can
change these settings if needed.
To configure automatic power off, from the Home screen menu navigate to Settings > System >
Power > Auto power savings. In the Power settings screen, highlight the following options and press
OK to turn them on or off:
• Reduce power after 15 minutes – If no video or audio activity and no user interaction occur
for 15 minutes, the TV automatically turns off the screen and sound.
• Turn off after 4 hours – If no video or audio activity and no user interaction occur for 4 hours,
the TV goes into standby mode.
Standby LED On/Off
Normally, the status indicator is lit whenever the TV is in standby mode. If you prefer the status
indicator to not be lit in standby mode, you can turn it off. To do so, from the Home screen menu,
navigate to Settings > System > Power > Standby LED, and then select Off.
After making this change, the status indicator still performs all other indication functions.
Fast TV start
Only in connected mode, you can enable Fast TV start. As you might expect, Fast TV start lets you
start watching your TV almost instantly after turning it on. But it also enables other convenient features,
such as the ability to listen to certain music channels with the TV screen off and the convenience of
being able to turn on and control your TV using voice commands.
Be aware that enabling Fast TV start makes your TV use somewhat more power when it is powered off
to standby mode.

!
108
!
!
!
Configure accessibility
Accessibility settings enable users with vision or hearing impairment to use the TV more effectively.
Accessibility settings are located under Settings > Accessibility.
Captions mode
The Captions mode settings specify when closed captions appear. Change caption settings from the
Home screen menu by selecting Settings > Accessibility > Captions mode. At this point, you can
choose among the following options:
• Off – No captions appear.
• On always– Captions appear whenever they are available from the program source.
• On replay– Captions appear only when you use the replay feature, and only when you are
watching a streaming program that supports instant replay, watching a video through the Roku
or USB media player, or watching a TV channel after enabling Live TV Pause.
• On mute – Captions appear only when the TV is muted.
Tip: You can change the captions mode while watching a program. Press STAR Þ to display the
Options menu, and then select Closed captioning. However, some streaming channels require you to
enable captions through a setting within their channel even though you have turned on captions
elsewhere.
Note: Once enabled, the captions mode applies to all inputs that support captions and remains enabled
until you turn it off.
Captions preferred language
Use the Captions preferred language setting to select the language in which you want closed
captioning to appear, when that language is available. If your preferred language is not available, then
captioning reverts to the default language for the program, which usually is English.
Highlight the language you prefer, and then press OK to select it.

!
!!
109
!
!
!
Captions style
Use the Captions style settings to control how closed captions look when displayed on your TV. Access
caption style settings from the Home screen menu by selecting Settings > Accessibility > Captions
style. At this point, you can choose among the following options:
• Text style – Choose from a list of fonts. As you move the highlight to each font, you can see a
sample of the result in an adjacent panel.
• Text edge effect – Choose from a list of edge effect styles, such as raised, depressed, and
various shadows. As you move the highlight to each effect, you can see a sample of the result in
an adjacent panel.
• Text size – Choose from a list of sizes. As you move the highlight to each size, you can see a
sample of the result in an adjacent panel.
• Text color - Choose from a list of colors for the text. As you move the highlight to each color,
you can see a sample of the result in an adjacent panel.
• Text opacity - Choose from a list of opacity settings for the text. This setting determines how
much the area behind the text shows through the text. A value of 100% blocks all of the content
behind the text. As you move the highlight to each setting, you can see a sample of the result in
an adjacent panel.
• Background color - Choose from a list of colors for the background area behind the text. As
you move the highlight to each color, you can see a sample of the result in an adjacent panel.
Note that you won’t see any change unless you set the Background opacity to a value other
than Off.
• Background opacity - Choose from a list of opacity settings for the background of the caption.
This setting determines how much the area behind the caption background shows through the
background. A value of 100% blocks all of the content behind the background. As you move the
highlight to each setting, you can see a sample of the result in an adjacent panel.

!
110
!
!
!
• Window color - Choose from a list of colors for the window rectangle surrounding the entire
caption. As you move the highlight to each color, you can see a sample of the result in an
adjacent panel. Note that you won’t see any change unless you set the Window opacity to a
value other than Default or Off.
• Window opacity - Choose from a list of opacity settings for the window rectangle surrounding
the entire caption. This setting determines how much the area behind the caption window
shows through the window. A value of 100% blocks all of the content behind the window. As
you move the highlight to each setting, you can see a sample of the result in an adjacent panel.
Audio Guide settings
Audio Guide settings help users who are blind or visually impaired to configure the text-to-speech
reader, enabling them to operate their TV more easily. Audio Guide uses voice prompts that speak
volume and channel changes, menu options, and setting changes. Access Audio Guide settings from the
Home screen menu by navigating to Settings > Accessibility, and then select from the following
options in the Audio Guide section:
• Audio Guide – Turn Audio Guide on or off.
• Speech rate – Select one of four speeds at which to hear spoken guide information: Slow,
Normal, Fast, or Very Fast.
• Volume – Select the volume at which to hear spoken guide information, relative to the main TV
volume.
• Shortcut – Enable or disable the shortcut feature. When enabled (the default), pressing STAR
Þ four times in quick succession enables or disables the Audio Guide.
Customize the Home screen
If you prefer to not see certain features on the Home screen, you can hide them.
To hide Shortcuts:
1. From the Home Screen menu, navigate to Settings > Home screen, and then press RIGHT.

!
!!
111
!
!
!
2. Select Shortcuts.
3. Highlight Hide, and then press OK.
To hide Featured Free:
1. From the Home Screen menu, navigate to Settings > Home screen, and then press RIGHT.
2. Select Featured Free.
3. Highlight Hide, and then press OK.
To hide Movie Store and TV Store:
1. From the Home Screen menu, navigate to Settings > Home screen, and then press RIGHT.
2. Select Movie Store and TV Store.
3. Highlight Hide, and then press OK.
Once hidden, you can restore any or all of these features by following the same steps, replacing Hide
with Show.

!
112
!
!
!
Parental controls
Parental controls enable you to control whether the members of your household can view certain kinds
of broadcast TV programs. When a program or feature is blocked, you can unblock it by entering a
parental control PIN that only you know.
Note: Parental controls block content from the TV tuner and from streaming options, if any, on the
Home screen menu. Parental controls do not block content on other TV inputs or content from streaming
channels you add to your TV.
Creating a parental control PIN
The first time you access the Parental controls screen, you must create a new parental control PIN.
Thereafter, whenever you want to change parental control settings, unblock programming that has been
blocked, change the PIN, or disable parental controls, you must enter your parental control PIN.
Tip: Your parental control PIN has no connection to your Roku account PIN. You can make them the
same if you want—this is entirely your choice.
To create a new parental control PIN, from the Home screen menu navigate to Settings > Parental
controls. The screen displays a numeric keypad. Use the purple directional pad to enter a four-digit
code, and then press OK. Then repeat the process to enter the same PIN again, just to make sure you
correctly entered the PIN you want to use.
Important: If you forget your parental control PIN, the only way to recover is to perform a factory
reset operation, as explained in Factory reset everything.

!
!!
113
!
!
!
Blocking broadcast TV programs
For broadcast TV, parental controls use information embedded in the broadcast signal to determine
whether to allow a program to be displayed. Parents can configure parental controls to block broadcast
TV programs that meet or exceed a specific rating, so they cannot be viewed or heard unless the correct
parental control PIN is entered.
Note: Rating standards differ by country.
Enabling parental control of TV programs
The first step in blocking TV programs is to enable parental control of TV programs.
This setting is provided separately to make it easier for you to turn parental control of TV programs on
and off without disturbing their settings. For example, your kids are going to summer camp for two
weeks, and while they are gone, you don’t want to have to deal with unblocking programs that you want
to watch by entering your parental control PIN. All you need to do is clear Enable parental controls,
and all TV programs are unblocked. When the kids return, select Enable parental controls again, and
all of your parental control settings are restored in a single operation.
To enable parental control of TV programs:
1. In the Home screen menu, navigate to Settings > Parental controls, and then enter your
parental control PIN.
2. In the Parental controls screen, navigate to TV tuner > Parental control of TV shows.
3. Make sure the check box next to Enable parental controls is checked. If not, highlight it and
press OK.

!
114
!
!
!
Blocking based on US TV ratings
Most broadcast US TV programs—other than movies—contain rating data that enables parental controls
to block programs that parents don’t want others to view. The ratings are divided into two groups that
function independently:
• Youth group – TV-Y, TV-Y7
• Main group – TV-G, TV-PG, TV-14, TV-MA
Within each of these groups, the ratings interact such that if you block a particular level of content, the
TV also blocks all content with a higher rating. Conversely, if you unblock a particular level of content,
the TV also unblocks all content with a lower rating. For example, if you block TV-PG programs, the TV
also blocks TV-14 and TV-MA programs. If you subsequently unblock TV-14 programs, TV-PG programs
are also unblocked, but TV-MA programs remain blocked.
Similarly, within the main group, content types can be individually blocked. For example, you can block
just coarse language in programs with a TV-PG rating. If you do, then the TV also blocks programs with
coarse language in the higher ratings (TV-14 and TV-MA). Subsequently unblocking coarse language in
TV-14 ratings does not unblock coarse language in TV-MA programs, but it does unblock coarse
language in TV-PG programs.
To block TV programs based on US television ratings:
1. From the Home screen menu, navigate to Settings > Parental controls, and then enter your
parental control PIN.
2. In the Parental controls screen, navigate to TV tuner > TV ratings. Choose among the
following settings:
• Entire ratings – Highlight the rating you want to block, and then navigate to the right and
select the first option that blocks the entire rating level (and all higher rating levels).
• Individual content types – Highlight the rating that contains the content type you want to
block, and then select the content types you want to block from among those listed.
Remember that blocking a content type in one rating blocks the equivalent content type in
all higher rating levels.

!
!!
115
!
!
!
Blocking based on US movie ratings
Most movies in the US are rated by the Motion Picture Association of America, or MPAA, so the ratings
are known as MPAA ratings. TV broadcast signals carry movie rating data that enables parental controls
to block programs that parents don’t want others to see. The ratings are:
• G – General audiences
• PG – Parental guidance suggested
• PG-13 – Parents strongly cautioned for children age 13 or younger
• R – Restricted
• NC-17 – Not for age 17 or younger
Unlike US TV ratings, there are no individual content types within the ratings. But like TV ratings,
blocking movies with a particular rating also blocks movies with a higher rating, and unblocking movies
with a particular rating also unblocks movies with a lower rating.
Tip: Blocking movies with an NC-17 rating also blocks programs with the now-obsolete X rating, which
can still occur in the program data of older movies.
To block movies based on MPAA ratings:
1. From the Home screen menu, navigate to Settings > Parental controls, and then enter your
parental control PIN.
2. In the Parental controls screen, navigate to TV Tuner > Movie ratings.
3. Select the rating level you want to block. You need only select one rating level, and all higher
levels are automatically blocked.
Blocking based on Other ratings
Your TV can block programs having ratings that had not been defined when the TV was manufactured. It
does this by detecting a new Rating Region Table in a program and then downloading the new table and
displaying its rating in the Parental controls.
When the TV downloads a new Rating Region Table, it adds a new option to the list of rating types:
Other ratings. If you see this option in the Parental controls screen, you have tuned to a station that

!
116
!
!
!
has implemented a new rating table. Once the new rating table has been downloaded to the TV, it
remains in the TV until it is factory reset, and you can configure blocking based on the new ratings.
New Region Rating Tables can have independent rating levels, or rating levels that interact in the same
ways as the built-in US TV and MPAA Movie ratings.
Tip: If your TV downloads a new Region Rating Table, you’ll have to experiment with its settings to
understand how to use it.
Blocking based on Canadian English ratings
Canadian-English language and third-language programs that are broadcast in Canada are rated by the
Action Group on Violence on Television, or AGVOT. TV broadcast signals carry rating data that enables
parental controls to block programs that parents don’t want others to view based on content containing
violence, language, sex, or nudity. The ratings are:
• C – Children under 8 years
• C8 – Children 8 years and older
• G – Generally suitable for all age groups
• PG – Parental guidance suggested for viewers under 14 years
• 14+ – Generally not suitable for viewers under 14 years
• 18+ – Generally not suitable for viewers under 18 years
Blocking content with a particular rating also blocks content with a higher rating, and unblocking
content with a particular rating also unblocks movies with a lower rating.
To block programs based on AGVOT ratings:
1. From the Home screen menu, navigate to Settings > Parental controls, and then enter your
parental control PIN.
2. In the Parental controls screen, navigate to TV tuner > Canadian English ratings.
3. Select the rating level you want to block. You need only select one rating level, and all higher
levels are automatically blocked.

!
!!
117
!
!
!
Blocking based on Canadian French ratings
Canadian-French language programs that are broadcast in Canada are rated by Québec’s Ministry of
Culture and Communications. TV broadcast signals carry rating data that enables parental controls to
block programs that parents don’t want others to view based on content containing violence, language,
sex, or nudity. The ratings are:
• G – Generally suitable for all age groups
• 8+ – Viewers 8 years and older
• 13+ – Viewers 13 years and older
• 16+ – Viewers 16 years and older
• 18+ – Adults only
Blocking content with a particular rating also blocks content with a higher rating, and unblocking
content with a particular rating also unblocks movies with a lower rating.
To block programs based on Canadian-French ratings:
1. From the Home screen menu, navigate to Settings > Parental controls, and then enter your
parental control PIN.
2. In the Parental controls screen, navigate to TV tuner > Canadian French ratings.
3. Select the rating level you want to block. You need only select one rating level, and all higher
levels are automatically blocked.

!
118
!
!
!
Blocking unrated programs
Some broadcast TV programs and movies do not have an assigned rating, and are considered to be
“Unrated”. Whether or not such programs contain content that is objectionable to you cannot be
determined. However, you can choose to block such programs.
To block all unrated broadcasts:
1. From the Home screen menu, navigate to Settings > Parental controls, and then enter your
parental control PIN.
2. In the Parental controls screen, navigate to TV tuner > Block all unrated programs.
3. Highlight Unrated programs and press OK. When blocking is enabled, the adjacent padlock
icon changes from unlocked to locked.
Tip: Blocking programs that have not been assigned a rating does not block programs that specifically
have been assigned a US TV rating of “None” (for example a broadcast of a local town council meeting).
Programs that do not have an assigned rating display Rating NA (for “not applicable,” meaning a rating
is not needed).
In the absence of other ratings for a program, the parental controls do not consider the MPAA US movie
rating N/A (MPAA rating not applicable to this content) and NR (applicable content not rated by the
MPAA) to be ratings. In these cases, the TV handles the program as though it is unrated, blocking the
program if Unrated programs blocking is enabled.
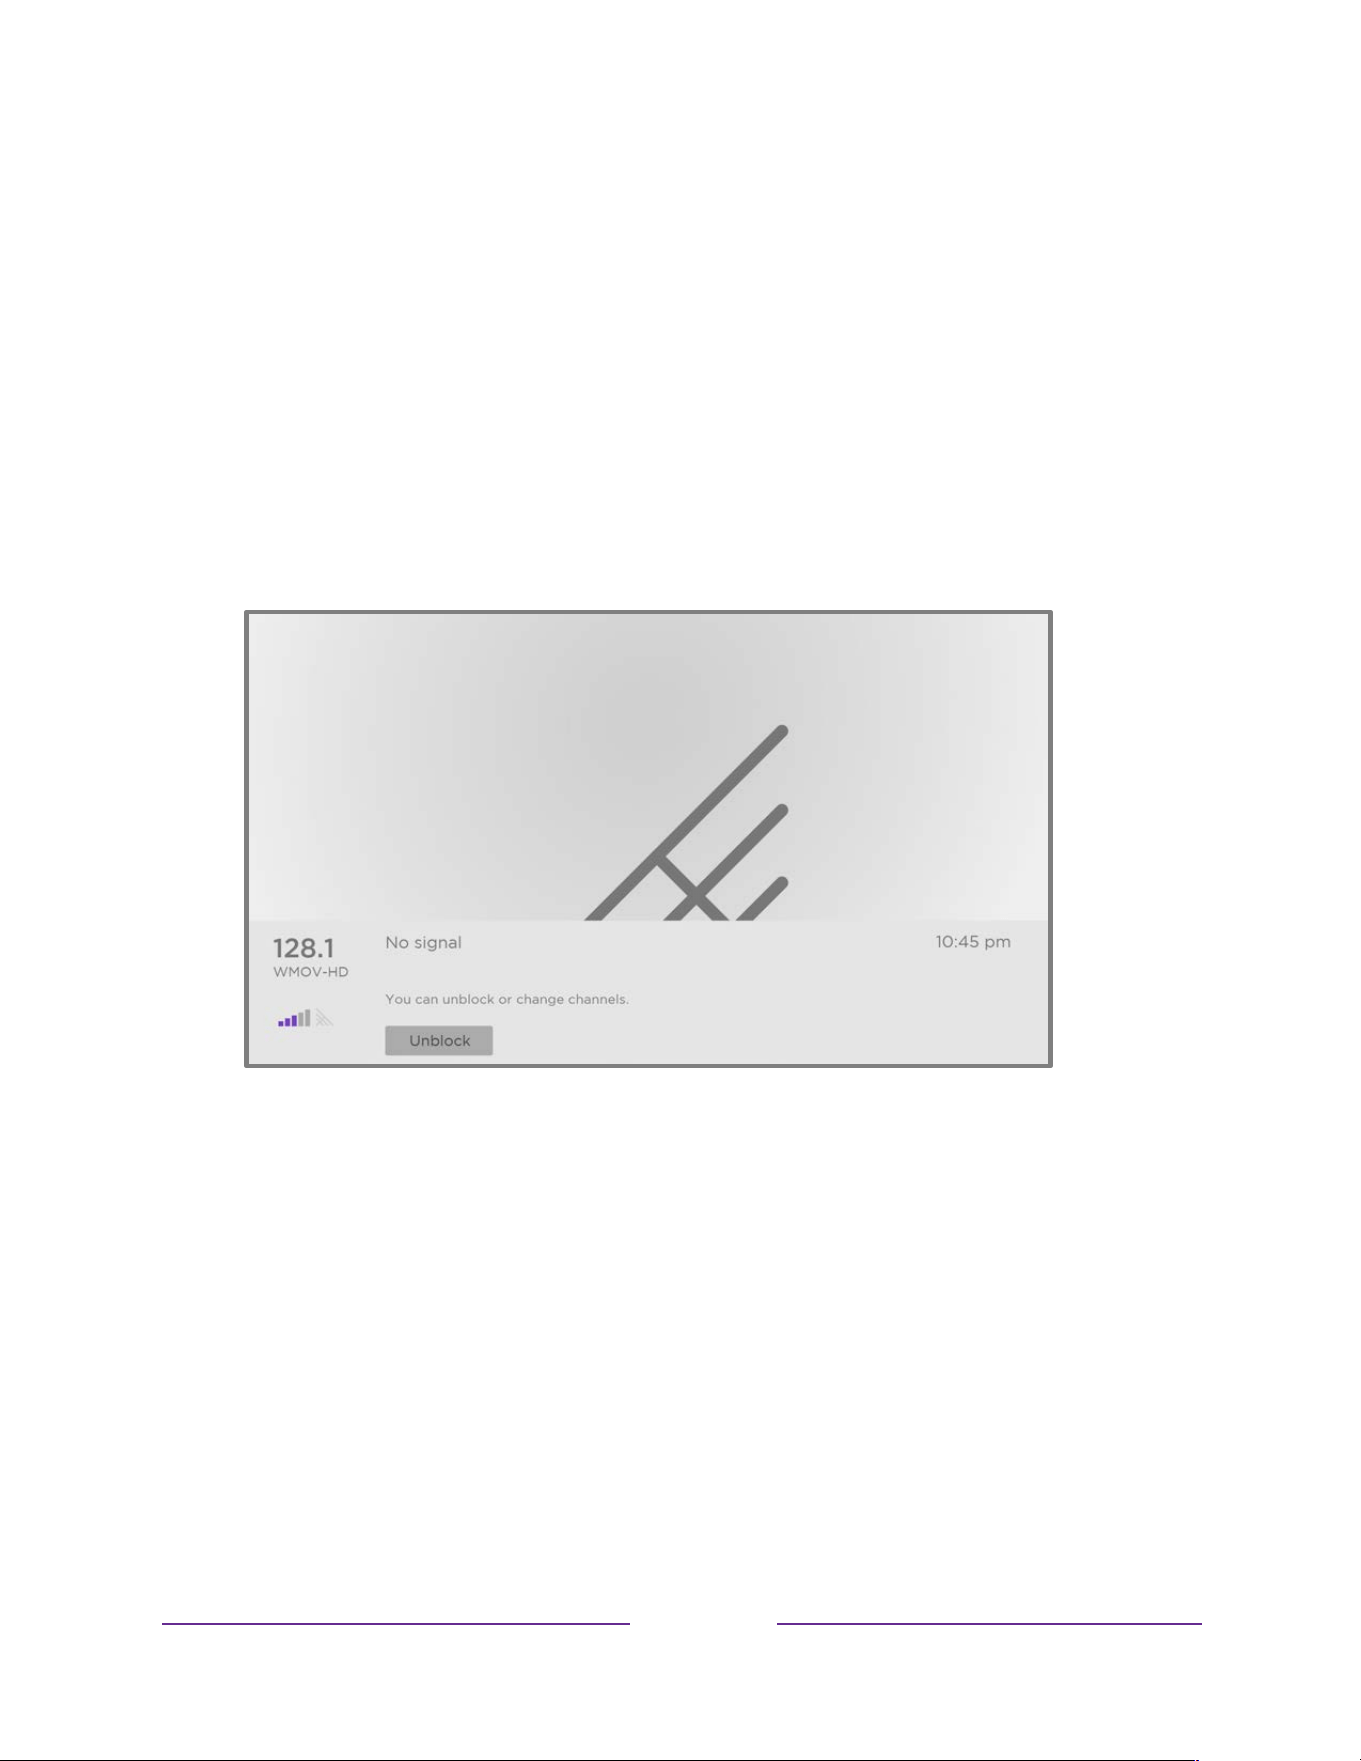
!
!!
119
!
!
!
What happens when a TV program is blocked?
After you’ve set up parental controls, TV programs and movies are blocked:
• When you change channels and the new channel is playing a program whose rating exceeds
your settings.
• When a new program comes on the channel you are watching and its rating exceeds your
settings.
When a program is blocked by parental control settings, the TV displays a blocked message:
Whenever this blocked message appears, both the video and audio of the program are blocked, as well
as program data that would normally appear in the area at the bottom of the screen. Only in connected
mode: program title and information show as “Blocked” as well.
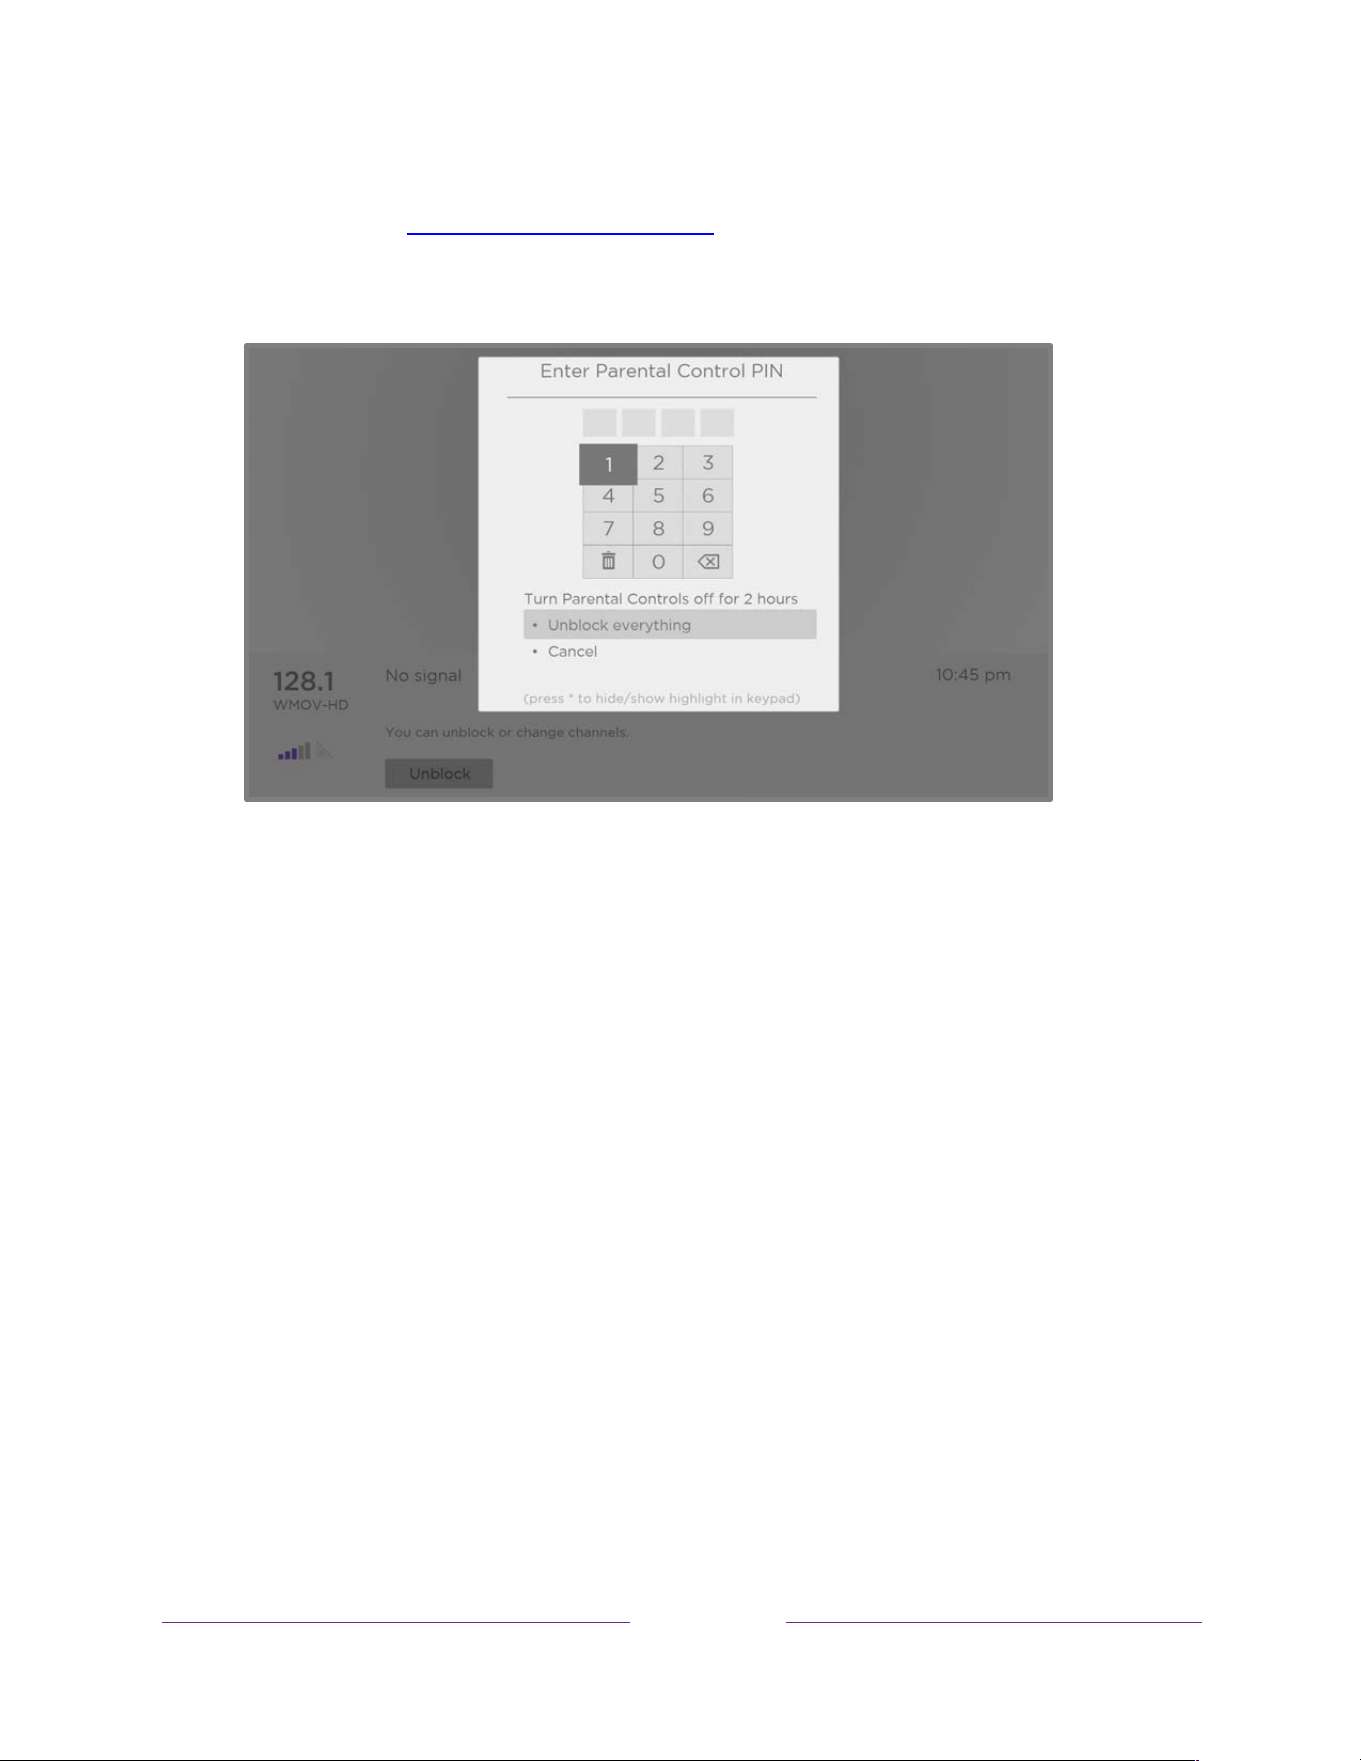
!
120
!
!
!
To watch the blocked program, you need to know the PIN code defined when you enabled parental
controls, as explained in Creating a parental control PIN.
1. Press OK to select Unblock. The Parental Control PIN pad appears.
2. Use the purple directional pad to enter your parental control PIN code, and then press OK to
select Unblock everything.
Tip: To shield your parental control PIN from others in the room, press STAR
Þ
to hide the highlighted
number. When you hide the highlight, you will have to count key presses to keep track of which number
is selected.
After unblocking programs that have been blocked, all blocking is disabled for two hours or until you
turn off the TV.

!
!!
121
!
!
!
Changing the parental control PIN
To change your parental control PIN:
1. From the Home screen menu, navigate to Settings > Parental controls, and then enter your
parental control PIN.
2. In the Parental controls screen, highlight Change PIN.
3. Move the highlight into the adjacent keypad, and then use the purple directional pad to enter a
four-digit code, and then press OK. Then repeat the process to enter the same PIN again, just to
make sure you correctly entered the PIN you want to use.
Resetting parental controls
So now your kids have grown up and gone away to college, and you no longer want to deal with blocked
programs.
To erase all parental control settings:
1. From the Home screen menu, navigate to Settings > Parental controls, and then enter your
parental control PIN.
2. In the Parental controls screen, highlight Reset parental controls.
3. Follow the instructions on the screen to confirm that you want to erase all parental control
settings.
Tip: Resetting parental controls also erases your parental control PIN.

!
122
!
!
!
More settings
This section describes the features and settings of the TV that were not covered in the other parts of this
guide.
Guest Mode
Only in connected mode, when you enable Guest Mode, your guests can sign in to subscription channels
using their own account credentials instead of using yours. Your guests’ credentials are then
automatically removed on the date they specify.
By enabling Guest Mode, your guests won’t have access to your personal streaming channel accounts
and won’t be able use your Roku account to make purchases. Instead, your guests can safely access their
own subscription channels. And they won’t have to remember to sign out before they leave.
To enable Guest Mode:
1. From the Home screen menu, navigate to Settings > System > Guest Mode.
2. Select Enter Guest Mode.
3. Use the purple directional pad to enter your Roku account PIN in the on-screen keypad.
4. Select OK to confirm and put the TV into Guest Mode.
Note: You also can enable and disable Guest Mode remotely logging in to my.roku.com on your
computer or smart phone, logging in to your account, scrolling down to My linked devices, and then
selecting Enable Guest Mode or Disable Guest Mode, respectively.
After you put your TV into Guest Mode, it is ready to welcome your guests, allowing them to select a
sign-out date. On the home screen, they will find an assortment of default subscription channels They
can enjoy free content from The Roku Channel and many others, or sign-in and watch movies and TV
programs from their own subscriptions and saved content libraries. Your guests can use the Roku

!
!!
123
!
!
!
Channel Store to find and add channels they watch at home with confidence that they automatically will
be removed on their sign-out date.
For more information about the experience your guests will have when Guest Mode is enabled, see:
https://support.roku.com/article/360015612834--how-do-i-set-up-auto-sign-out-mode-for-my-
guests-
To disable Guest Mode:
1. Press HOME to return to the Home screen menu.
2. Navigate to Settings > System > Guest Mode.
3. Select Exit Guest Mode.
4. Use the purple directional pad to enter your Roku account PIN in the on-screen keypad.
5. Select OK and confirm that you want to disable Guest Mode.
After you disable Guest Mode, all of your original settings are restored and your channels are
reinstalled. You might need to sign in to your subscription channels again to access your content.
Note: Any game data that was stored on your Roku device is not restored.

!
124
!
!
!
Network settings
If needed, you can change your network settings at any time. For example, if you change the name of
your wireless network (its SSID) or its password, you will need to change your TV’s settings so that it can
continue to connect. Also, if you decided not to connect to the Internet in Guided Setup, you can use
network settings to connect at a later time.
To change network settings, from the Home screen menu, navigate to Settings > Network, and then
press RIGHT. At this point, you can choose from among the following options:
• About – Lists important information about your current network connection, such as status,
connection type, IP addresses, and MAC address. This information is often useful when
contacting customer support with connection issues.
• Check connection – Select your existing network connection type, and then press OK to start
checking the network connection. The TV uses your current network information to reconfirm
the wireless or wired network connection to the local network and the Internet connection.
• Set up connection – Select a network connection type, and then select the option to set up a
new connection. Follow the on-screen instructions to complete the network connection. For
help with each of the steps, see Network connection.
• Bandwidth saver – Enable or disable this feature as appropriate. If On, your TV prompts you to
stop streaming if you haven’t used the remote control within the past four hours. If you do not
respond, streaming stops to save your data allocation and increase the network bandwidth
available to other devices in your home. Change to Off to disable the automatic bandwidth
saving feature.
Note: Some networks, such as those found in dorm rooms, hotels, and other public places, may
require you to read and agree to terms, enter a code, or provide identifying information before
letting you connect to the Internet. For more information, see Using your TV in a hotel or dorm room.

!
!!
125
!
!
!
ZIP Code
Your TV needs to know your ZIP Code so that it can display the correct channels and program guide
information. It attempts to determine your location by using information from your Internet connection;
however, the information available from this source is not always accurate. To ensure you have the
most accurate program guide information, use the ZIP Code option to enter your correct code.
To set your correct ZIP Code, from the Home screen menu, navigate to Settings > System > ZIP
Code, and then pressing RIGHT. Use the purple directional pad to enter your ZIP Code in the on-screen
keypad, and then select OK.
Time settings
You can change time settings to suit your preferences. You can find the following settings by navigating
from the Home screen menu to Settings > System > Time:
• Sleep timer – Set a time delay after which the TV will automatically shut off. This setting
reflects the setting you can make in the Options menu from any TV input, as explained in
Options menu settings.
Note: The sleep timer setting is not input specific, and also can be set by using the Sleep timer
shortcut in the Home screen grid.
• Time zone – Correct time zone information is needed to correctly display program data.
Choose whether to set the time zone automatically or manually, and if set manually, select your
current time zone. Usually, a TV connected to the Internet can discover its own time zone
automatically, but sometimes a TV that is not connected to the Internet cannot and so must be
set manually. Initially, this setting is made when you set up the TV tuner, as explained in Setting
up live TV.
• Clock format – Choose whether to display time in a 12-hour or 24-hour format, or to turn off
time display. This setting is available only on TVs that are connected to the Internet. Non-
connected TVs do not display the time.

!
126
!
!
!
Scan again for live TV channels
There will be times when you need to create a new channel list. For example, you:
• Change cable providers
• Reorient your TV antenna
• Move to a different city with different channels
Whenever you need to update your TV channel list, you can repeat the channel scan.
Tip: Even if you don’t change anything related to your TV channel reception, you should repeat the
channel scan from time to time to make sure you are receiving all of the latest channels. Broadcasters
add and remove channels, move channels to different parts of the spectrum, and change the power
levels of their channels periodically.
Note: Repeating the tuner channel scan unhides all hidden channels.
To repeat the channel scan, highlight the Live TV tile on the Home screen, and then press STAR Þ.
Next, select Scan for channels and press OK. After that, the screens and options that appear during
this process are identical to those described in How do I set up the TV tuner?
HDMI
®
mode (4K models only)
On 4K (UHD) TVs, you can independently configure each HDMI input to match the capabilities of the
connected device. From the Home screen menu, navigate to Settings > TV inputs, and then select an
enabled HDMI input. Next, select HDMI mode and then select one of the following settings:
• Auto – Let the TV determine the best setting. Use this option unless your HDMI
®
device does not
correctly communicate its HDMI
®
version information.
• HDMI 1.4 – Configure the input for compatibility with HDMI
®
version 1.4, which supports a
maximum refresh rate of 30 Hz at full UHD resolution. Most HDMI
®
devices will work correctly
with the TV in this mode.

!
!!
127
!
!
!
• HDMI 2.0 – Configure the input for compatibility with HDMI
®
version 2.0, which supports a
maximum refresh rate of 60 Hz at full UHD resolution. You must use this mode to view HDR
content from the device connected to this HDMI input. However, note that many older HDMI
®
devices do not work correctly when the TV’s HDMI input is set to this mode.
Control by mobile apps
You can choose the level of control you want to allow your TV to accept from external devices, such as
smart phones, tablets, and virtual assistants. Device connect settings enable other devices, including the
Roku mobile app, to control your TV over the local area network in your home.
To adjust the level of external control access:
1. From the Home screen menu, navigate to Settings > System > Advanced system settings >
Control by mobile apps.
2. Select Network access.
3. Select one of the following settings:
• Default – Devices can connect only through a private network address, and accept
commands only from other private network addresses on your home network. This setting is
suitable for most cases, including use of the Roku mobile app on your smartphone.
• Permissive – Devices can connect under all conditions, but accept commands only from
private network addresses or the same subnetwork within your home network. This setting
might be required when attempting to operate the TV from a third-party application, for
example, one of the Internet of Things (IoT) applications such as ifttt.com.
• Disabled – Device connection is completely disabled. The TV does not accept external
commands from any source, including the Roku mobile app.

!
128
!
!
!
Roku TV premium audio
Your Roku TV works with several Roku premium audio products, including Roku TV Wireless Speakers
and the Roku Wireless Subwoofer. Just plug the speakers into a power outlet, and then on the TV
remote, hold down HOME for a few seconds. Follow the instructions on your TV screen to complete
pairing.
With Roku TV Wireless Speakers, you can listen to all of your TV programs as well as the sound from any
streaming channel. Certain audio-only channels even let you listen to music with the TV screen turned
off. After you have paired your Roku TV Wireless Speakers with your Roku TV, all sound normally comes
from the Roku TV Wireless Speakers instead of the internal TV speakers.
Home theater configuration
Your TV has several features that make it an ideal TV for a home theater. But you might not notice them
because they remain in the background until you decide to use them.
Turning off the TV speakers for home theater use
You can turn off the TV’s built-in speakers if desired by changing the setting under Settings > Audio >
Speakers and change the setting. However, if you use an HDMI ARC or HDMI eARC connection with
CEC enabled, the TV automatically mutes its internal speakers when it sends sound to an external
device. It also mutes all sound when you use the headphone jack on the TV, private listening through the
Roku Enhanced Remote Control or the Roku mobile app.
Setting up a digital audio connection
To take advantage of your TV’s advanced audio capabilities, connect it to an external amplifier, receiver,
or soundbar by using either of these two digital audio connections:
• HDMI ARC or HDMI eARC – The HDMI
®
Audio Return Channel (ARC) or on select TVs
only, the HDMI
®
Enhanced ARC (eARC) connector enables the TV to output digital audio
on one of its HDMI
®
connectors. The connected amplifier then can function
simultaneously as an input source to the TV, if needed, without the need to use additional

!
!!
129
!
!
!
cables.
To use the ARC or eARC capability, you must connect an HDMI
®
cable from your amplifier’s
HDMI
®
ARC or eARC connector to the HDMI ARC or HDMI eARC connector on the TV. You
also must do the following:
• Be sure your HDMI
®
cable is HDMI
®
certified.
• Enable HDMI ARC under Settings > System > Control other devices (CEC), as
explained in Enable HDMI
®
ARC.
• S/PDIF optical – The S/PDIF optical connector outputs a digital audio signal. To use
the optical output, connect a TOSLINK optical cable from the amplifier to the
Optical or S/PDIF connector on the TV.
Important: To make sure the S/PDIF outputs audio reliably, you must turn off the TV’s speakers.
To do so, from the Home screen menu, navigate to Settings > Audio > Speakers and change
the setting to Off.
Note: Dolby Audio™ support for Dolby Digital Plus™ format is not available through the S/ PDIF
optical output. This format is only available through the HDMI ARC connection.
Tip: Even when you use S/PDIF for audio, the TV can correctly detect more audio formats if you
connect an HDMI
®
cable between the TV’s HDMI ARC or HDMI eARC port and the receiver’s
ARC or eARC port.
Choosing an audio format
After making the required HDMI
®
ARC, eARC, or S/PDIF optical connection, go to Settings > Audio >
S/PDIF and ARC option and select the audio format to use.
Choosing Auto detect is the easy solution, and generally provides good results. However, if you have a
high-end sound system and want to make sure you are getting the best sound quality available in the
programs you are watching, you can choose another setting.

!
130
!
!
!
• Auto detect – Automatically detects the incoming audio format and transcodes it to a
compatible available format for the audio output (ARC, eARC, or S/PDIF).
• Auto passthrough – Passes through the input audio to the connected receiver without
transcoding, sometimes resulting in better audio quality especially for high-end audio formats
such as those that take advantage of the higher bandwidth of eARC, including Dolby MAT and
Dolby Digital Plus 7.1, among others.
• PCM-Stereo – Always outputs pulse-code modulated stereo, regardless of input audio format.
• Dolby Digital – Converts all input formats to Dolby Digital.
• Dolby Digital Plus – Converts all input formats to Dolby Digital Plus.
• Dolby Digital – DTS – Converts all inputs except DTS to Dolby Digital. If DTS is detected and
the receiver supports DTS, passes through the DTS audio without modification.
• Dolby Digital Plus – DTS – Converts all input formats except DTS to Dolby Digital Plus. If DTS is
detected and the receiver supports DTS, passes through the DTS audio without modification.
Note: DTS audio formats are meant to be used with ARC, eARC, or S/PDIF connections to a DTS-
capable home theater receiver. If you use one of the DTS options with the TV speakers, you might not
hear any audio.
Turning off the TV screen while listening to music
Certain music channels enable you to turn off the TV screen while streaming music to your TV speakers,
soundbar, home theater receiver, or Roku TV Wireless Speakers.
To turn off the TV screen on supported channels:
1. Press STAR Þ to display the Options menu.
2. Press DOWN to highlight Turn off display.
3. Press OK.

!
!!
131
!
!
!
Note: This feature is available only on select streaming audio channels, and only when the TV is
operating in connected mode with Fast TV Start enabled. To enable Fast TV Start, from the Home
screen menu, navigate to Settings > System > Power.
Controlling other devices through CEC
Consumer Electronics Control (CEC) enables your TV and other CEC-compatible home entertainment
devices to control one another in various ways. First, the CEC-compatible devices must “discover” one
another and report their capabilities. After this, one device can control another according to the
features you enable. For example, playing a disc on a Blu-ray™ player could switch the TV to the Blu-
ray™ player’s input. Or, powering off the TV could also power off the Blu-ray™ player and the home
theater receiver.
Discover connected CEC devices
To discover CEC devices:
1. Make sure that your CEC-compatible devices are connected to the TV with a suitable certified
HDMI
®
Cable that supports HDMI
®
ARC and CEC control.
2. Turn on each device and make sure all devices are CEC enabled.
Tip: Some manufacturers have their own branded names for CEC functionality, so you might
need to read the product documentation to correctly identify the CEC features of the device.
3. On the TV’s Home screen menu, navigate to Settings > System > Control other devices
(CEC) and then select Search for CEC devices. Press OK to repeat the discovery process, if
necessary.
When finished, the TV displays a list of CEC devices that are connected to each HDMI input, as well as
any devices that had previously been connected. The TV remembers the names of multiple CEC devices
even when they are no longer connected. If the list is longer than the allowed space, press STAR Þ to
see a complete list in a scrollable window.

!
132
!
!
!
Enable HDMI
®
ARC or eARC
HDMI
®
ARC, or on selected TVs, eARC, is the audio return channel that is available on one of the TV’s
HDMI ports. The audio return channel enables you to send Dolby Audio™ content or DTS audio content
back to a home theater receiver that is also sending an audio and video signal into the TV. Using HDMI
®
ARC or eARC reduces the number of cables needed and controls the volume and mute state of the
receiver while watching TV.
HDMI
®
ARC or eARC is disabled by default. To enable it, in the Home screen menu, navigate to Settings
> System > Control other devices (CEC), and then highlight HDMI ARC. Press OK to enable or
disable the feature.
Enable 1-touch play
1-touch play enables a device to control which TV input is active. For example, pressing Play on your
Blu-ray™ player switches the TV to the Blu-ray™ input.
1-touch play is disabled by default. To enable 1-touch play, from the Home screen menu, navigate to
Settings > System > Control other devices (CEC) and highlight 1-touch play. Press OK to enable or
disable the feature.
Enable system standby
The system standby feature causes other devices to power off when you power off your TV. Depending
on the CEC System Standby implementation, it also might enable connected devices to power off your
TV when you power off the device.
System standby is disabled by default. To enable system standby, in the Home screen menu, navigate to
Settings > System > Control other devices (CEC) and highlight System standby. Press OK to
enable or disable the feature.

!
!!
133
!
!
!
Restart the TV
You can restart the TV when necessary. Restarting has the same effect as unplugging the TV power and
then plugging it in again.
To restart the TV, navigate to Settings > System > Power, and then select System restart. Highlight
Restart, and then press OK to confirm restart.
While the TV restarts, the screen goes dark for a few seconds, and then displays the startup screen for a
few more seconds. When the restart operation completes, the TV displays the activity you selected in
Power on settings.
Reset the TV
You can choose to reset only the TV picture and audio settings to their original values, or perform a full
factory reset to return the TV to the state it was in when you first unpacked and turned it on.
Reset audio/video settings
To reset only the TV picture and audio settings to their original values, navigate to Settings > System >
Advanced system settings > Factory reset, and then highlight Reset TV audio/video settings. Read
the information on the screen to make sure you understand what the reset operation does.
To proceed with the reset operation, press PLAY/PAUSE three times in a row.
Factory reset everything
A full factory reset returns the TV’s settings to their original state and removes all personally identifiable
information from the TV. When finished, you must repeat Guided Setup, reconnecting to the Internet,
re-linking your Roku account, and reloading any streaming channels. You also must repeat live TV setup
and input configuration.
Factory reset is the recommended choice if you want to transfer the TV to another owner, and it is the
only choice if you want to switch from Store mode to Home mode (if you inadvertently selected Store
mode during Guided Setup).

!
134
!
!
!
To perform a factory reset, navigate to Settings > System > Advanced system settings > Factory
reset, and then highlight Factory reset everything. Read the information on the screen to make sure
you understand what this reset operation does.
To proceed with the full factory reset, use the on-screen number pad to enter the code displayed on the
screen, and then select OK to proceed.
When the factory reset operation completes, the TV restarts and displays the first Guided Setup screen.
What if I can’t access the Factory Reset option?
It is possible for your TV to get into a state where you cannot access the various menus, including the
menu option that lets you perform a factory reset operation. If that happens, you can force the TV to
reset by following these steps.
Models with a RESET button
1. Using a straightened paper clip or ball-point pen, press and hold the recessed RESET button on
the TV connector panel.
2. Continue to hold the RESET button for approximately 12 seconds.
When the reset cycle completes, the status indicator comes on dim.
3. Release the RESET button. The TV is now powered off.
4. Turn on the TV and proceed through Guided Setup. See Guided Setup.
Models without a RESET button
1. On the TV panel (not the remote) press and hold down the MUTE and POWER buttons.
2. Unplug the TV power, and then plug it in while continuing to hold down the MUTE and POWER
buttons.
3. When you see the startup screen appear on the TV, release the buttons.
4. Turn on the TV and proceed through Guided Setup. See Guided Setup.

!
!!
135
!
!
!
Network connection reset
If you want to remove your network connection information without disturbing other settings, navigate
from the Home screen menu to Settings > System > Advanced systems settings > Network
connection reset, and then select Reset connection.
When you select this option, the TV removes your wireless network information, including the name of
the connection (its SSID) and your wireless password, if any, and then it restarts. After restarting, your
TV retains all of its other settings including its association with your Roku account.
After resetting your network connection, navigate from the Home screen menu to Settings > Network
> Set up new connection to set up your network connection and enjoy all of the benefits of your
connected TV.
Roku account PIN
When you created your Roku account, you were given the opportunity to create a PIN code and to
specify when it must be used. Roku lets you optionally require that users enter your PIN as an additional
verification method when making purchases through the TV or adding items from the Roku Channel
Store. In addition, you must have a Roku account PIN before you can enable or disable Guest Mode.
If you created a Roku account PIN and want to change it, or you don’t remember your PIN, or if you
didn’t create a Roku account PIN and want to add one, you can easily make these changes.
1. On a computer, tablet, or smartphone, use your web browser to go to https://my.roku.com and
sign in.
After signing in, the My account page appears.
2. Under PIN preference, click Update to open the Choose your PIN preferences page.
3. Skip this step if you just want to change your PIN. Otherwise, choose the option you prefer from
among those listed:
• Require a PIN to make purchases or to add any item from the Channel Store.
• Require a PIN to make purchases.

!
136
!
!
!
• Do not require a PIN to make purchases.
4. If you choose either of the first two options, enter your PIN twice in the appropriate boxes.
5. Click Save Changes to save your changes and return to the My Account page. Note that your
current setting is described under PIN preference.
Update the TV
If your TV is operating in connected mode, it will automatically get updates from time to time. You don’t
need to do anything. But if you are aware that an update is available and you don’t want to wait until
the TV updates itself, you can manually check for updates.
If your TV is operating in non-connected mode, you can still get updates by using a USB flash drive.
You can download an updated User Guide that matches your Roku TV software version from the Roku
web site at:
www.roku.com/support
To determine your current Roku TV software version, go to Settings > System > About, and then press
OK or navigate to the right.
Checking for updates on a connected TV
If you’re one of those people who has to have the latest, most up-to-date features the moment they are
available, you can check for updates as often as you want.
To check for updates, navigate to Settings > System > System update, and then select Check now.
The TV responds either with a message saying that your TV is up to date, or with a message saying that
an update is available.
Follow the instructions on the screen to install the system update.
Note: Sometimes system updates install new system software, and other times they install new features
for streaming channels. Therefore, you won’t always see a change in the behavior of your TV after a
system update.
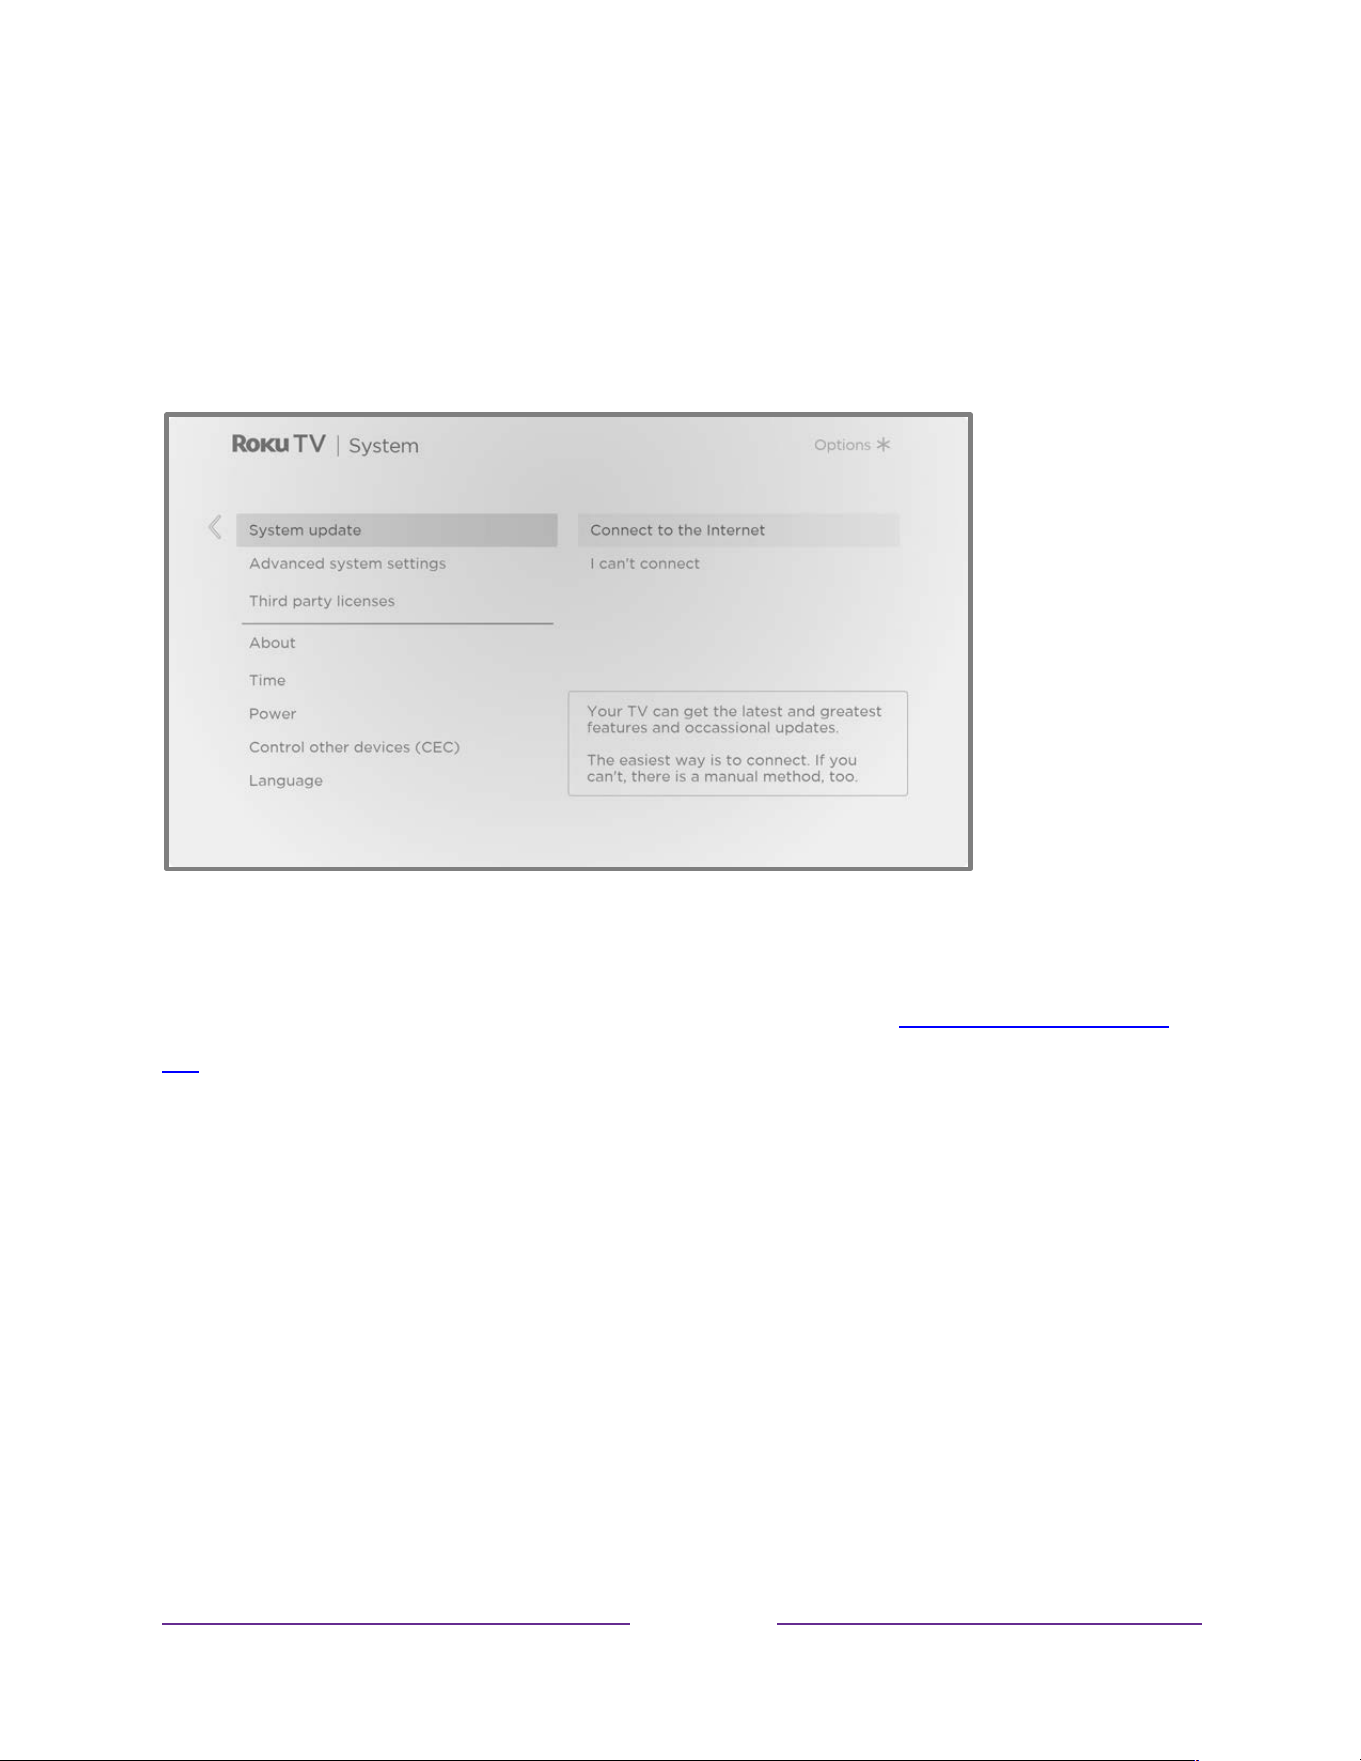
!
!!
137
!
!
!
Getting updates on a non-connected TV
If your TV is not connected to the Internet, you can still get system updates by using a USB flash drive
and a computer with an Internet connection.
To get a system update, navigate to Settings > System > System update:
The System update screen on a non-connected TV gives you the opportunity to connect your TV to the
Internet to automatically receive updates. We recommend this option if it is possible in your situation.
To proceed, select Connect to the Internet and follow the instructions in What if I didn’t connect my
TV?.
Otherwise, if you can’t connect to the Internet, select I can’t connect, and then follow the instructions
on the screen. Here’s a summary:
1. On an Internet-connected computer, go to the web site displayed on the System update
screen.
2. On the USB Update web page, select the correct brand and model, and then click Next.
3. Click Download Software, and then save the file to the root folder of a standard USB flash
drive.

!
138
!
!
!
USB flash drive
Any normal USB flash drive will work, provided it has a FAT-16 or FAT-32 file system format. (This is the
default for most flash drives.)
The size of the download is small—usually less than 100 MB—and so will fit on most any size flash drive
you might have.
4. When the download finishes, take the USB flash drive to the TV and plug it into the USB port.
When you do, the TV validates the files on the flash drive and displays a 12-digit code.
5. Write down the code and the web address, and take this information back to your Internet-
connected computer.
6. On the 12-digit code page, enter the code your TV displayed, and then click Next.
7. On the 6-digit code page, write down the 6-digit code that appears, and then take it back to
your TV.
12- and 6-digit codes
The USB update process uses a pair of codes to validate that you are authorized to install an update, and
to ensure you are not attempting to install an old, unsupported version of the system software.
8. Using the TV remote, select Next to move to the next screen, and then use the on-screen
keyboard to enter the 6-digit code. When finished, select OK. The system update begins. Do not
remove the USB flash drive until the TV restarts.
When the update finishes, the TV restarts. You can check the new version number by navigating to
Settings > System > About.

!
!!
139
!
!
!
Other devices
Mirror your phone or tablet
Only in connected mode, your TV has a feature called screen mirroring that lets you mirror your
compatible smartphone or tablet on your TV. Share videos, photos, web pages, and more from
compatible devices.
By default, your TV’s screen mirroring mode is set to Prompt. In this mode, when your TV receives a
screen mirroring request, it prompts you with the following options, unless you have previously selected
Always allow or Never allow for the device:
• Always accept – Always accept mirrored content from the mobile device without additional
prompting in the future for this device.
• Accept – Accept mirrored content from the mobile device this time only. Prompt again next
time this device attempts to mirror content.
• Ignore – Do not accept mirrored content from the mobile device at this time. Prompt again next
time this device attempts to mirror content.
• Always ignore – Never accept mirrored content from this mobile device.
Note: You can manage and change the list of devices that are set to Always allow or Never allow
by navigating from the Home screen menu to Settings > System > Screen mirroring > Screen
mirroring devices.
• If you prefer to always allow all screen mirroring attempts without prompting, go to Settings >
System > Screen mirroring, and then change the Screen mirroring mode to Always allow.
• If you prefer to never allow screen mirroring from any device, change the Screen mirroring
mode to Never allow.

!
140
!
!
!
For information on which devices may work with screen mirroring and instructions on how to use it, go
to the following link on the Roku web site:
go.roku.com/screenmirroring
Roku mobile app
Roku makes the Roku mobile app free for compatible iOS
®
and Android™ mobile devices.
The Roku mobile app is an alternative control center for your Roku TV, plus a way to stream Roku
content while you are on the go. The Roku mobile app helps you find and add new Roku Channels, more
easily search and find something to watch and even use your voice to search without typing.
Find more information and get the Roku mobile app by using the following link to the Roku web site:
go.roku.com/mobileapp
Private Listening on the Roku mobile app
Only on compatible Apple and Android devices, the Roku mobile app enables you to use headphones
connected to your device to listen to streaming programs and live digital TV channels. Make sure you
have the latest version of the Roku mobile app before using this feature.
For more information, go to the following link on the Roku web site:
go.roku.com/privatelistening

!
!!
141
!
!
!
Universal remotes
In many cases, you can program your cable or satellite universal remote to also control your TV. You will
need to have instructions for programming the remote handy. Check with your cable or satellite
provider for instructions.
For details on how to set up the TV to work with universal remotes, go to the following link on the Roku
web site:
go.roku.com/universalremote

!
142
!
!
!
FAQ
For the latest answers to Frequently Asked Questions, visit the Roku support website:
go.roku.com/support

!
!!
143
!
!
!
Other information
Battery Caution and Disposal Information
• For best results, use alkaline batteries.
• Install only new batteries of the same type in your product.
• Failure to insert batteries in the correct polarity, as indicated in the battery compartment,
may shorten the life of the batteries or cause batteries to leak.
• Do not mix old and new batteries.
• Do not use Rechargeable (Nickel Cadmium) or (Nickel Metal Hydride) batteries.
• Do not mix Alkaline, Standard (Carbon-Zinc) or Rechargeable (Nickel Cadmium) or (Nickel Metal
Hydride) batteries.
• Do not dispose of batteries in fire.
• Recycle or dispose of batteries as per state and local guidelines.
Electronics Recycling Information For Consumers
TCL strives to provide a high level of service to our customers and in the communities we serve, and
recommends that consumers always look for a recycling or reuse alternative to throwing away
televisions and other electronics. We encourage customers to recycle end-of-life electronic devices
using one of the many convenient methods available today. In many states, TCL has programs in place to
enable consumers to drop-off and recycle televisions free of charge. For information on electronics
recycling in all 50 states, including drop-off locations, please visit the “Electronics Recycling” area of the
TCL USA website at www.tclusa.com.
Care and Cleaning
• Caution: Turn off your TV before cleaning.
• Clean the TV as needed using a soft lint-free cloth. Be sure to occasionally dust the ventilation
slots in the cabinet to help assure adequate ventilation.
• IMPORTANT: Never use strong cleaning agents, such as ammonia-based cleaners, or
abrasive powder. These types of cleaners will damage the TV. The TV’s screen may be
cleaned with a soft, lint-free cloth as well. Take care not to scratch or mar the screen. If
necessary, you may use a cloth dampened with warm water. While cleaning, do not spray
liquid directly on the screen, or allow liquid to run down the screen and inside the TV. Also,

!
144
!
!
!
never place drinks or vases with water on top of the TV. This could increase the risk of fire,
shock hazard or damage to the TV.
Television Specifications
• Broadcasting system
US System NTSC-M, ATSC standard (8VSB), QAM
• Receiving Channels
VHF2-13, UHF14-69, CATV 14-36 (A)-(W), 37-59
(AA)- (WW), 60-85 (AAA)-(ZZZ), 86-94 (86)-(94), 95-99
(A-5)-(A-1), 100-135(100)-(135), 01 (4A)
• Tuner type
Frequency synthesized
• Operating Temperature
5°C to 35°C (41°F to 95°F)
• Operating Humidity
20% to 80%, non-condensing
• Storage Temperature
-15°C to 45°C (5°F to 113°F)
• Storage Humidity
10% to 90%, non-condensing
Notices
TTE Technology, Inc. (“TTE”) Limited Warranty
All TCL LCD/LED Models
What your warranty covers: Defects in materials or workmanship to the original owner of this TCL
product when purchased as new from an Authorized Dealer of TCL brand products in the United States
and packaged with this warranty statement.
New LCD/LED Televisions (Non-Commercial Use)
For how long after your purchase:
•
One (1) year from date of purchase for parts and labor for non-commercial use.
New LCD/LED Televisions (Commercial Use)
For how long after your purchase:
•
Six (6) months from date of purchase for parts and labor for commercial use.
• Commercial use includes, but is not limited to, the use of this product in a commercial or
business environment, the use of this product in an institution or for institutional purposes, or
other commercial purposes including rental purposes.

!
!!
145
!
!
!
What we will do
• At TTE’s discretion, (1) pay an Authorized TCL Service Center for both labor charges and parts to
repair your television, or (2) replace your television with a new or refurbished/remanufactured
equivalent value product. The decision to repair or replace will be made solely by TTE. See “How
to get service”.
How to get service
• Please have your original purchase receipt or proof of purchase (bill of sale or receipted invoice)
which states that condition of the unit (New, Used, etc.), the unit’s date of purchase, place of
purchase and model/serial number ready. The model/serial number information can be found
on the back of your unit.
• Call 1-877-300-8837 or visit www.TCLUSA/SUPPORT
• A representative must troubleshoot your problem over the telephone or through e-mail before
receiving service. If it is determined that your unit requires service, the service location will be at
the sole discretion of TTE based upon the TTE Limited Warranty Statement.
• At the sole discretion of TTE, television screen sizes 43” and smaller will either be repaired at an
Authorized TCL Service Center or directly exchanged for a new or refurbished/recertified unit. At
the sole discretion of TTE, television screen sizes 44” through 65” or larger will either be
repaired or directly exchanged for a new or refurbished/recertified unit at an Authorized TCL
Service Center or repaired in-home.
• If repaired at an Authorized TCL Service Center, TTE is not responsible for transportation costs to
the Authorized TCL Service Center. However, TTE will pay for return shipping. TTE will provide
instructions for packaging and shipping the unit. Units that are improperly packed and
damaged during shipping are not covered under your product warranty.
• Proof of purchase in the form of a bill of sale or receipted invoice from an Authorized Dealer
which is evidence that the product is within the warranty period must be presented to obtain
warranty service.
• In the event that a unit is to be replaced, a picture of the back of the unit showing the model
and serial number and picture of the issue itself may be required.
• PRE-AUTHORIZATION MUST BE OBTAINED BEFORE (1) SENDING ANY PRODUCT TO AN
AUTHORIZED TCL SERVICE CENTER, OR (2) OBTAINING ANY IN-HOME REPAIR/REPLACEMENT/
RENTAL SERVICES.
What your warranty does not cover
• A unit sold in “As-Is”, “Used”, “Factory Reconditioned”, “Factory Re-Certified”, or
“Refurbished”, condition or with faults.
• Units physically broken during shipment from a Retailer. Please contact your Retailer for
assistance.
• Extended Service Plans purchased from Retailers. Please contact your Retailer for assistance.
• Customer instruction. (Your Owner’s Manual describes how to install, adjust, and operate your
unit. Any additional information should be obtained from your Authorized Dealer).
• Installation and related adjustments, or damage resulting from installation.
• Damage resulting from non-approved installation methods.
• Signal reception problems not caused by your unit.
• Damage from misuse, abuse, neglect, normal wear and tear, cosmetic damage, mishandling,
faulty installation, or power line surges.

!
146
!
!
!
• Markings or images on the television’s panel resulting from viewing fixed images (including but
not limited to certain 4:3 images on wide screen televisions, or data or images in fixed screen
locations from banners, video games, or certain broadcast networks).
• Batteries.
• A television that has been modified or incorporated into other products.
• A unit purchased or serviced outside the USA.
• Acts of nature or God, such as but not limited to earthquake or lightning damage.
• Special, incidental or consequential damages.
LIMITATION OF WARRANTY
• THE WARRANTY STATED ABOVE IS THE ONLY WARRANTY APPLICABLE TO THIS PRODUCT. NO
VERBAL OR WRITTEN INFORMATION GIVEN BY TTE TECHNOLOGY, INC., ITS AGENTS OR
EMPLOYEES SHALL CREATE A GUARANTY OR IN ANY WAY INCREASE OR MODIFY THE SCOPE OF
THIS WARRANTY.
• REPAIR OR REPLACEMENT AS PROVIDED UNDER THIS WARRANTY IS THE EXCLUSIVE REMEDY OF
THE CONSUMER. TTE TECHNOLOGY, INC. SHALL NOT BE LIABLE FOR SPECIAL, INCIDENTAL, OR
CONSEQUENTIAL DAMAGES RESULTING FROM THE USE OF THIS PRODUCT OR ARISING OUT OF
ANY BREACH OF ANY EXPRESS OR IMPLIED WARRANTY ON THIS PRODUCT. THIS DISCLAIMER OF
WARRANTIES AND LIMITED WARRANTY ARE GOVERNED BY THE LAWS OF THE STATE OF
CALIFORNIA. EXCEPT TO THE EXTENT PROHIBITED BY APPLICABLE LAW, ANY IMPLIED
WARRANTY OF MERCHANTABILITY OR FITNESS FOR A PARTICULAR PURPOSE ON THIS PRODUCT
IS LIMITED TO THE APPLICABLE WARRANTY AND WARRANTY PERIOD SET FORTH ABOVE. THIS
WARRANTY IS SUBJECT TO CHANGE WITHOUT NOTICE. PLEASE VISIT WWW.TCLUSA.COM TO
VIEW THE MOST CURRENT VERSION.
How State Law relates to this warranty
• Some states do not allow the exclusion or limitation of incidental or consequential damages, or
limitations on how long an implied warranty lasts, so the above limitations or exclusions may
not apply to you.
• This warranty gives you specific legal rights, and you also may have other rights that vary from
state to state.
If you purchased your unit outside the United States or seek warranty coverage outside the United
States: This warranty does not apply. Contact your dealer for warranty information.
Service calls which do not involve defective materials or workmanship are not covered by this
warranty. Costs of such service calls are the sole responsibility of the purchaser.

!
!!
147
!
!
!
Legal statement
Please note—Use of the Roku TV is governed by the Roku TV End User License Agreement (see below). In addition, an end user online profile
and billing account with Roku, Inc. (“Roku”) on Roku’s website (“Roku Account”) is required to stream content via the Internet using your Roku
TV. A Roku Account gives you access to movies, television shows, and other audio-visual entertainment in the “Roku Channel Store,” a
storefront of applications provided by Roku via your device’s on-screen menu. After your Roku Account is created, you can link your Roku TV to
your account. By using the Roku TV, you agree to these statements. For the avoidance of doubt, the content disclaimer set forth herein shall
refer to all content and channels accessible and available on the Roku TV, including those available via the Roku
®
streaming platform, as well as
broadcast cable.
Due to the various capabilities of the Roku TV, as well as limitations in the available content available therein, certain features, applications, and
services may not be available on all Roku TV s, or in all territories. Some features on the Roku TV may also require additional peripheral devices
or membership fees that are sold separately. Please visit the Roku, Inc. website for more information on the Roku TV and content availability.
The services and availability of content on the Roku TV are subject to change from time to time without prior notice.
All content and services accessible through the Roku TV belong to Roku, Inc. or third parties and are protected by copyright, patent, trademark
and/or other intellectual property laws. Such content and services are provided solely for your personal noncommercial use. You may not use
any content or services in a manner that has not been authorized by the content owner or service provider. Without limiting the foregoing, you
may not modify, copy, republish, upload, post, transmit, translate, sell, create derivative works, exploit, or distribute in any manner or medium
any content or services displayed through the Roku TV.
Third party services may be changed, suspended, removed, terminated or interrupted, or access may be disabled at any time, without notice,
and Roku makes no representation or warranty that any content or service will remain available for any period of time. Content and services
are transmitted by third parties by means of networks and transmission facilities over which Roku has no control. Without limiting the
generality of this statement, Roku expressly disclaims any responsibility or liability for any change, interruption, disabling, removal of or
suspension of any content or service made available through the Roku TV. Roku, the content providers, or the service providers may impose
limits on the use of or access to certain services or content, in any case and without notice or liability. Any questions or requests for service
relating to the content or services made available on the Roku TV should be submitted to the respective cable content or service provider or as
described in the Roku TV User Guide.
In the event of a conflict between the Roku TV End User Agreement and the terms set forth in this Legal Statement, the Roku TV End User
Agreement shall prevail and control in all circumstances.
END USER LICENSE AGREEMENT (FOR ROKU TV)
IMPORTANT: READ THIS END USER LICENSE AGREEMENT CAREFULLY BEFORE YOU USE A ROKU TV.
ALSO REVIEW THE IMPORTANT PRODUCT INFORMATION THAT MAY HAVE BEEN PROVIDED WITH YOUR
ROKU TV.
Overview
This End User License Agreement (“EULA”) between you and Roku, Inc. (“Roku”) governs the use of: (a) your television which uses the Roku
platform to play digital content over the Internet (“Television”), and (b) any firmware and software that have been pre-installed on the
Television and the firmware and software updates Roku provides to you for the Television (collectively, the “Software”). By linking the
Television to your account on Roku’s website (“Roku Account”) or using the Television, you are agreeing to this EULA. If you are a resident of
the European Economic Area, by agreeing to this EULA, you expressly agree to waive your right to withdraw.
If you do not agree to this EULA, you do not have the right to use the Television or the Software. If you are within the allowable time period for
returns under the applicable return policy, you may return the Television to your seller for a refund, subject to the terms of such return policy.
You should perform a factory reset before you return it to erase data that may be stored on the Television. For instructions on how to reset
your Television, please visit www.roku.com/support.
In this EULA, “Channel” means an application in the Roku Channel Store; “Content” means movies, television shows, music and other audio
and visual materials and entertainment; “Content Provider” means any provider of Content; and “Roku Channel Store” means the
storefront of applications provided by Roku via the Television’s on-screen menu.
Changes to This EULA
Roku may amend this EULA at any time in its discretion. Such amendments shall be effective immediately upon posting of the amended EULA
on Roku’s website or via the Television or your Roku Account, whichever occurs first. If you have a Roku Account that is linked to your
Television, then in its option, Roku may also notify you of the amended EULA by sending a notice to the last email address you have provided to
Roku. You agree to provide accurate and complete information if and when you set up your Roku Account, and you agree to promptly update
your account information (including contact information) to keep it accurate and complete. You can do this at any time by signing in to your
Roku Account. Following such posting or notice by any of the methods described above, continued use of your Television or Roku Account
means you accept and agree to the amended EULA. If you do not agree to the amended EULA, Roku may not be able to provide updates,
upgrades or enhancements to your Television, and you may not be able to continue using your Television or Roku Account.

!
148
!
!
!
Permitted Use and Restrictions
The Television and the Software are for personal, non-commercial use only. Copying or redistribution of any Content delivered via the
Television is strictly prohibited and we may prevent or restrict you from copying or re-distributing any elements of the Software or Content
using digital rights management or other technologies. The Television and the Software are for use only in those countries where the
manufacturer of your Television has authorized its sale. If you are using the Television and the Software outside of these countries, the rights
granted under this EULA do not apply. Some of the Content Providers use technologies to verify your geographic location, and you may not be
able to use the Television or the Software to access any Content outside of the country or location authorized by Roku or the Content Provider.
Except as expressly provided under this EULA, you do not acquire any intellectual property or other proprietary rights in or to the Television,
the Software or the Content, including any rights in patents, inventions, improvements, designs, trademarks, database rights or copyrights, nor
do you acquire any rights in any confidential information or trade-secrets. All rights not expressly granted to you in this EULA are reserved by
Roku or its applicable licensors. You may not remove, obscure, alter or conceal any trademark, logo, copyright or other proprietary notice in or
on any Television, Software or Content.
The Software is proprietary to Roku or its third party licensors and may be used only with the Television. Subject to this EULA and, where
appropriate, the applicable third party licenses, you have a non-exclusive, non-transferable license to run the Software and any updated
versions provided to you by Roku, only in and as incorporated in the Television. This is a license and not a sale. You may not (a) copy, assign,
sublicense, lease, sell or rent the Software, (b) distribute or otherwise transfer the Software except as incorporated in the Television, provided
that, you do not retain any copies of the Software and the recipient reads and agrees to this EULA (including all amendments); (c) modify,
adapt, translate, or create derivative works of the Software (except only to the extent any of the foregoing restriction is prohibited by
applicable law or as may be permitted by the license terms governing any Separately Licensed Code included with the Software); (d) decompile,
disassemble, reverse engineer or otherwise derive source code from the Software, except to the extent such actions cannot be prohibited
under applicable law because they are essential to achieve inter-operability of the Software with another software program, and provided that
the information obtained by you during such activities is (i) used only to achieve such inter-operability; (ii) not disclosed without Roku’s prior
written consent; and (iii) not used to create any software that is substantially similar to the Software; (e) defeat, bypass, circumvent or interfere
with any security mechanism or access control measures, or (f) have any of the foregoing done for you by a third party. This license does not
include the right to receive Software upgrades or updates. Your right to use the Television and the Software will immediately terminate upon
your breach of this EULA.
Software Updates
IN ITS SOLE DISCRETION, ROKU MAY PROVIDE UPDATES TO YOUR PLAYER VIA THE INTERNET, INCLUDING BUG FIXES AND UPDATES, CHANGES
IN THE USER INTERFACE OR HOW YOU ACCESS CONTENT, AND OTHER CHANGES THAT MAY ADD, ALTER OR REMOVE FUNCTIONALITIES AND
FEATURES. YOU ACKNOWLEDGE THAT THESE UPDATES: (A) MAY HAPPEN AUTOMATICALLY IN THE BACKGROUND AT ANY TIME (AND THAT
THEY CANNOT BE DISABLED BY YOU); AND (B) WILL REQUIRE AN INTERNET CONNECTION AND YOU MAY INCUR ADDITIONAL DATA CHARGES
FROM THE PROVIDER OF THE INTERNET CONNECTION. YOU UNDERSTAND THAT THESE UPDATES ARE NECESSARY TO MAINTAIN
COMPATIBILITY WITH OTHER UPDATES TO ROKU’S PRODUCTS OR SERVICES AND MAY BE REQUIRED FOR SECURITY REASONS. BY USING THE
PLAYER, YOU HEREBY AGREE TO RECEIVE SUCH UPDATES.
Separately Licensed Code
Certain software components of the Software are provided under separate third party license terms (“Separately Licensed Code”) and your
right to use such components is governed by such license terms. Please visit go.roku.com/seperatelylicensedcode for more information.
Voice Services
You can use your voice to control your Television (e.g., search for content, switch inputs, launch channels, and launch Smart Guide) via (i) the
Roku mobile app, if you have downloaded the Roku mobile app to your phone or mobile device; or (ii) a compatible voice remote if your
Television supports voice services in your country of residence. When you choose to use your voice to control your Television, you agree that
Roku and third parties who fulfill your requests and/or provide services for us have your consent to record, process and store your voice inputs
(e.g., a recording and the interpretation of what was said), and use such voice inputs with other information about your Television (e.g., device
identifier) to provide services to you, to improve the accuracy and quality of the service, and as described in Roku’s Privacy Policy. To learn
more about voice services, visit the FAQ pages of Roku’s website at www.roku.com/support.
NO WARRANTY FROM ROKU; LIMITATION OF LIABILITY
YOUR WARRANTY WITH RESPECT TO THE TELEVISION IS PROVIDED BY THE TELEVISION’S MANUFACTURER, and not by Roku. ROKU OFFERS NO
WARRANTY TO YOU UNDER THIS EULA. WITHOUT LIMITING THE GENERALITY OF THE FOREGOING DISCLAIMER, TO THE MAXIMUM EXTENT
PERMITTED BY APPLICABLE LAW:
(A) THE SEPARATELY LICENSED CODE AND THE SOFTWARE ARE PROVIDED “AS IS”, WITH ALL FAULTS AND WITHOUT WARRANTY OF ANY
KIND. ROKU DISCLAIMS ALL OTHER WARRANTIES AND CONDITIONS, INCLUDING THE IMPLIED WARRANTY OF MERCHANTABILITY,
SATISFACTORY QUALITY, FITNESS FOR A PARTICULAR PURPOSE AND NON-INFRINGEMENT. ROKU DOES NOT GUARANTEE,
REPRESENT, OR WARRANT THAT THE TELEVISION, THE SEPARATELY LICENSED CODE AND THE SOFTWARE WILL BE: (I) SECURE,
VIRUS-FREE OR ERROR-FREE, OR (II) FREE FROM ATTACK OR SECURITY INTRUSION.
(B) IN NO EVENT SHALL ROKU, ITS DIRECTORS, OFFICERS OR EMPLOYEES BE LIABLE TO YOU FOR PERSONAL INJURY OR PROPERTY
DAMAGE, OR ANY SPECIAL, INCIDENTAL, EXEMPLARY, PUNITIVE, INDIRECT OR CONSEQUENTIAL DAMAGES OF ANY KIND ARISING
OUT OF ANY TELEVISION, THE SEPARATELY LICENSED CODE, THE SOFTWARE, OR YOUR USE THEREOF; AND

!
!!
149
!
!
!
(C) YOU AGREE THAT (I) THE TOTAL CUMULATIVE LIABILITY OF ROKU, ITS DIRECTORS, OFFICERS AND EMPLOYEES UNDER THIS EULA,
INCLUDING LIABILITY RELATING TO ALL TELEVISIONS LINKED TO YOUR ROKU ACCOUNT, AND THE SEPARATELY LICENSED CODE AND
THE SOFTWARE IN SUCH TELEVISIONS, AND YOUR USE THEREOF, SHALL NOT EXCEED THE AMOUNT SET FORTH IN THE ROKU
ACCOUNT TERMS AND CONDITIONS YOU AGREED TO FOR YOUR ROKU ACCOUNT, AND (II) ROKU, ITS DIRECTORS, OFFICERS AND
EMPLOYEES SHALL NOT BE LIABLE TO YOU UNDER THIS EULA FOR ANY DIRECT DAMAGES ARISING OUT OF, OR IN CONNECTION
WITH THE TELEVISION. THE FOREGOING LIMITATIONS SHALL APPLY EVEN IF THE REMEDY PROVIDED HEREIN FAILS ITS ESSENTIAL
PURPOSE AND EVEN IF ROKU, ITS DIRECTORS, OFFICERS OR EMPLOYEES HAVE BEEN ADVISED OF THE POSSIBILITY OF SUCH
LIABILITY.
Some jurisdictions do not allow exclusions OF CERTAIN warranties OR LIMITATIONS OF LIABILITY FOR CERTAIN TYPES OF DAMAGES, so SOME
OF the ABOVE LIMITATIONS IN THIS SECTION MAY NOT apply to You. NOTHING IN THESE TERMS OF USE SHALL AFFECT ANY NON-WAIVABLE
STATUTORY RIGHTS THAT APPLY TO YOU, AND You may also have other rights that vary from jurisdiction to jurisdiction.
Export Controls
You agree not to download any Content or Software, nor otherwise export or re-export any Television or the Software into (or to a national or
resident of) Cuba, Iraq, Libya, North Korea, Iran, Syria or any other country as to which the United States or your country has embargoed goods,
or to anyone on the U.S. Treasury Department's List of Specially Designated Nationals or the U.S. Commerce Department's Table of Denial
Orders or on similar restricted lists published by your government from time to time. By using any Television or the Software, you are
representing and warranting that you are not located in, under the control of, or a national or resident of any such country or on any such list.
Choice of Law; Dispute Resolution
A. If you are a consumer and a resident in any country in the European Economic Area where the sale of the Television is expressly
authorized by its manufacturer, this EULA does not apply to you.
B. In all other cases, including if you are a resident of the United States (and its possessions and territories) or Canada, you agree that
this EULA shall be governed by the laws of the State of California without regard to any conflict of laws principles that may provide
the application of the law of another jurisdiction; and:
1. You and Roku agree to be bound by the procedures set forth below to resolve any and all claims between you and Roku arising
out of or relating to any aspect of this EULA, whether based in contract, tort, statute, fraud, misrepresentation or any other
legal theory, including but not limited to, claims between you and Roku related to the Television and the Software. Each such
claim is referred to individually as “Claim” and collectively as “Claims”.
2. YOU AND ROKU AGREE THAT, EXCEPT FOR THE CLAIMS IDENTIFIED IN PARAGRAPH 4 OF THIS SECTION
BELOW, ANY AND ALL CLAIMS BETWEEN YOU AND ROKU SHALL BE FINALLY SETTLED BY BINDING
ARBITRATION. The arbitration shall take place in Santa Clara County, California and shall be administered by the American
Arbitration Association (“AAA”) pursuant to the AAA’s then-current rules, including (if applicable) the AAA’s Supplementary
Procedures for Consumer-Related Disputes. Please be aware there is no judge or jury in arbitration. Arbitration procedures are
simpler and more limited than the rules applicable in court, and review of the arbitrator’s decision by a court is limited. YOU
AND ROKU FURTHER AGREE THAT EACH OF YOU MAY BRING CLAIMS AGAINST THE OTHER ONLY ON AN
INDIVIDUAL BASIS AND NOT AS A PLAINTIFF OR CLASS MEMBER IN ANY PURPORTED CLASS OR
REPRESENTATIVE ACTION OR PROCEEDING. The arbitrator may not consolidate or join more than one person’s
claim and may not preside over any consolidated, representative or class proceeding. Also, the arbitrator may award
relief (including monetary, injunctive or declaratory relief) only on an individual basis and may not award any form of
consolidated, representative or class-wide relief. Notwithstanding any provision in these terms to the contrary, if the class-
action waiver in this provision is deemed invalid or unenforceable, or if an arbitration is allowed to proceed on a class basis,
then neither you nor Roku are entitled to arbitrate the Claims. This arbitration provision is subject to the Federal Arbitration
Act. The arbitrator’s award shall be binding on you and Roku, and may be entered in any court of competent jurisdiction.
3. Information on AAA and how arbitration is initiated can be found at www.adr.org or by calling 800-778-7879. For Claims
between You and Roku of $75,000 or less, you will be responsible for the initial arbitration filing fee, up to the amount of the
initial filing fee if you were to initiate a lawsuit against Roku based on such Claims in court. If the arbitrator finds such Claims to
be non-frivolous, Roku will pay any difference in such filing fees plus the arbitrator fees. For Claims between You and Roku in
excess of $75,000, if you are able to demonstrate that the costs of arbitration will be prohibitive as compared to the costs of
litigation, Roku will pay as much of your actual filing fees and the arbitrator fees for the arbitration as the arbitrator deems
necessary to prevent the arbitration from being cost-prohibitive as compared to the cost of litigation.
4. This agreement to arbitrate does not apply to any Claim (a) in which a party is attempting to protect its intellectual property
rights (such as its patent, copyright, trademark, trade secret, or moral rights, but not including its privacy or publicity rights), or
(b) that may be brought in small-claims court.
5. If the agreement to arbitrate in this provision is found to be invalid, unenforceable or inapplicable to a given Claim between
You and Roku, then any and all proceedings to resolve such Claim must be brought exclusively in a federal court of competent
jurisdiction in the Northern District of California or in a state court in Santa Clara County, California. You hereby irrevocably
consent to the exclusive jurisdiction and venue of such courts.

!
150
!
!
!
6. 30-Day Right to Opt Out: You have the right to opt out of this agreement to arbitrate by sending a written notice of your
decision to opt out to the following address: Legal Department, Roku, Inc. 1155 Coleman Avenue, San Jose, CA 95110, USA;
provided that, such notice must be postmarked on or before the 30th day after the first to occur of the following events if you
do not already have a Roku Account: (a) the date of purchase of Your Television, or (b) the date you create your Roku Account.
If you have an existing Roku Account, all devices you choose to link to your Roku Account, and all services provided by Roku
which are accessed using these devices, will be subject to this agreement to arbitrate. Your notice should include your full
name, your current postal address, telephone number and email address, the product name and serial number for Your
Television, and a copy of the original proof of purchase for your Television. If you timely send a notice in compliance with this
paragraph 6, the agreement to arbitrate will not apply to either you or Roku. If you do not timely send this notice, then you
agree to be bound by this agreement to arbitrate.
7. Notwithstanding any provision in this EULA to the contrary, you agree that, if Roku seeks to delete or materially modify the
agreement to arbitrate described herein, any such deletion or modification will not apply to any individual Claim of which you
have notified Roku prior to such modification.
Miscellaneous
Roku may transfer its rights and obligations under this EULA to another organization. You may only transfer your rights or your obligations
under this EULA to another person if Roku agrees in writing. This EULA is between you and Roku. No other person shall have any rights to
enforce these terms. Each of the paragraphs of this EULA operates separately. If any court or relevant authority decides that any of them are
unlawful, the remaining paragraphs will remain in full force and effect. If Roku fails to insist that you perform any of your obligations under this
EULA, or if Roku does not enforce its rights against you, or if Roku delays in doing so, that will not mean that Roku has waived its rights against
you, or that you do not have to comply with those obligations. If Roku does waive a default by you, Roku will only do so in writing, but that will
not mean that Roku will automatically waive any later default by you.
Contact Information
If you wish to contact Roku, please send your correspondence by mail to Roku, Inc. 1155 Coleman Avenue, San Jose, CA 95110, USA, or by
email to [email protected].
Last Updated: 20 Aug-2018
Dolby Audio™
Manufactured under license from Dolby Laboratories. Dolby, Dolby Audio, and the double-D symbol are
trademarks of Dolby Laboratories. Copyright 1992-2015 Dolby Laboratories. All rights reserved.
Dolby Vision™
Dolby, Dolby Vision, and the double-D symbol are trademarks of Dolby Laboratories. Manufactured under
license from Dolby Laboratories. Confidential unpublished works. Copyright © 2013-2015 Dolby
Laboratories. All rights reserved.
HDMI
®
The terms HDMI
®
and HDMI
®
High-Definition Multimedia Interface, and the HDMI
®
Logo are trademarks or
registered trademarks of HDMI
®
Licensing LLC in the United States and other countries.
Roku
ROKU, ROKU TV and the ROKU logo are the trademarks or registered trademarks of Roku, Inc. All other
trademarks and logos herein are the property of their respective owners.
