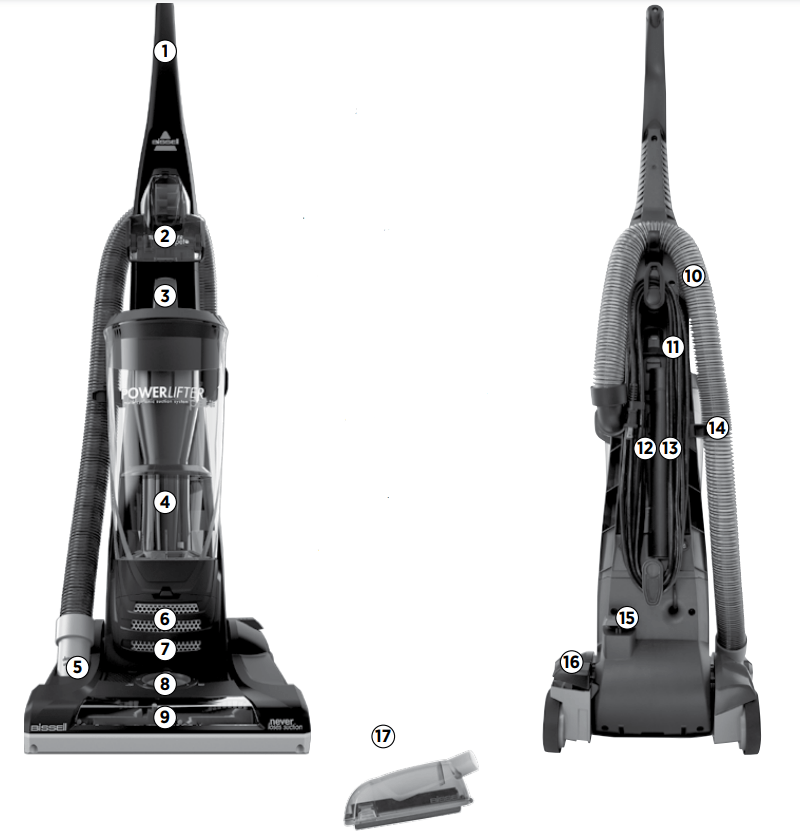
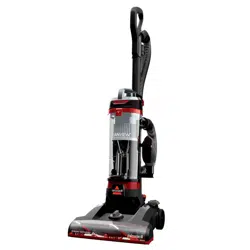
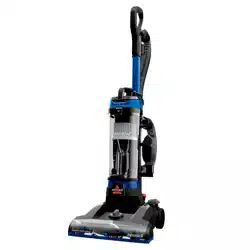
1. Handle 2. Pet TurboEraser™ Tool or TurboBrush™ Tool (select models) 3. Dirt Tank Release Button 4. Dirt Tank 5. Hose Wand Base (remove to use tools) 6. Pre-Motor Filter (located under dirt tank) 7. Post Motor Filter Door Access 8. Height Adjustment Knob 9. OnePass™ Brush Roll
10. Stretch Hose 11. Power Cord 12. Crevice Tool or Pet Crevice Tool (select models) 13. Extension Wand 14. Hose Clip 15. Power Switch 16. Detent Pedal 17. Pet Hair Eraser™ Tool (select models and does not store on vacuum)
WARNING Plastic film can be dangerous. To avoid danger of suffocation, keep away from babies and children.
WARNING Do not plug in your vacuum cleaner until you are familiar with all instructions and operating procedures.
WARNING To reduce the risk of electric shock, turn power switch off and disconnect polarized plug from electrical outlet before performing maintenance or troubleshooting checks.
Assembly
You will need a Phillips screwdriver for assembly.
WARNING Plastic film can be dangerous. To avoid danger of suffocation, keep away from babies and children.
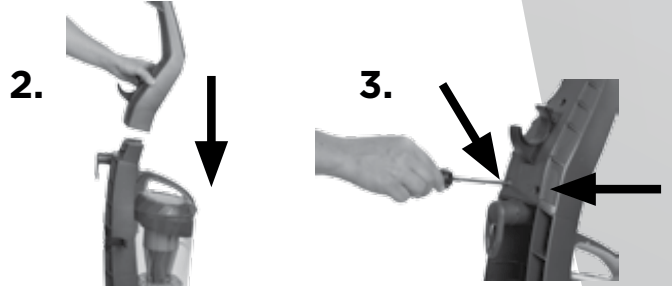
Attach handle
Locate the handle and the two screws taped to the handle.
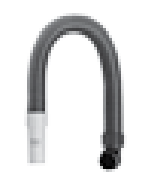
Slide the handle downward over the body of the vacuum.
Insert two screws and fasten using screwdriver.
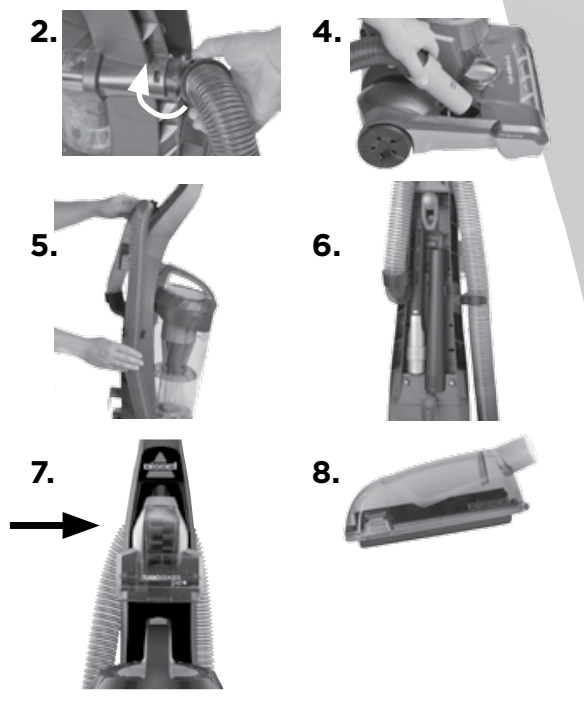
Attach hose and tools
Remove hose from package
Insert the hose with elbow end facing downwards and align locking tab with slot.
Rotate clockwise until snapped into place
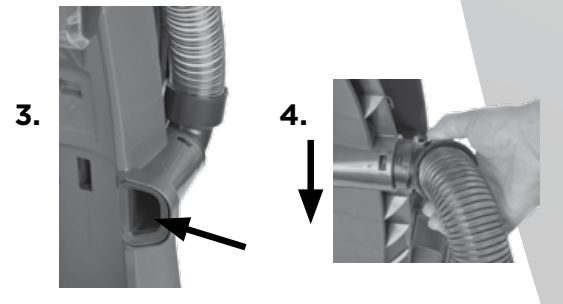
Take the opposite end and use the hose end to open the foot base door, insert into foot, and push into place.
Stretch hose and clip into the side and upper hose clips.
Install extension wand and crevice tool in the back of the unit as shown.
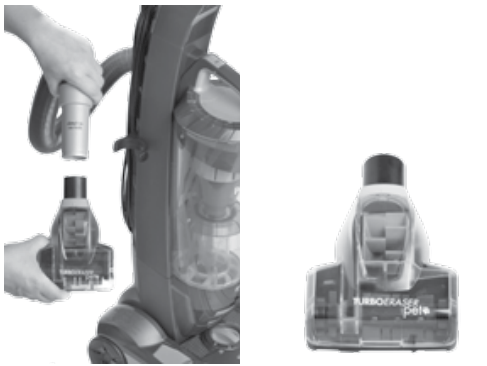
Remove Pet TurboEraser Tool from packaging. Install on front of vacuum by inserting end upward into the handle. There will be a click when fully installed.
The Pet Hair Eraser Tool does not store on-board (see Tools section for usage).
Take cord and wrap around the two cord wraps located on the back of the vacuum.
Filter assembly
Remove the dirt tank by pushing release button on tank handle and lifting away.
Remove instruction tag and discard.
Remove foam filter from packaging and install into vacuum, yellow side down.
Replace dirt tank back onto vacuum. There will be a click when tank is locked into place
Operations
Remove cord from unit by twisting cord wrap and plug into outlet.
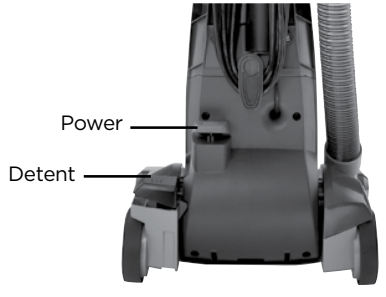
To power on the vacuum, push the RED POWER SWITCH located near the bottom of the appliance on the back side of the vacuum. Push the pedal on ON (I) to vacuum, and OFF (O) when cleaning is complete.
For normal cleaning mode, push downward on detent pedal with foot and recline the vacuum. For low, hard to reach areas, push the detent pedal again and the vacuum will recline even lower from normal cleaning mode.
Height Adjustments
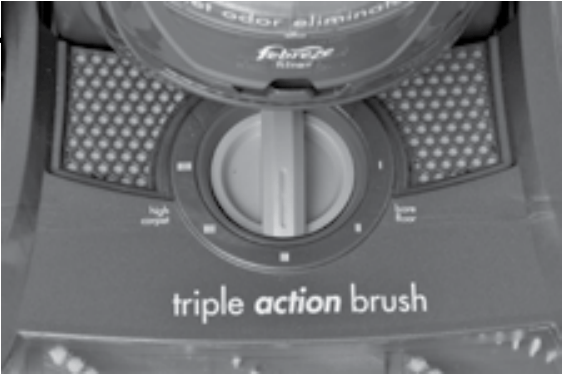
Turn dial on powerfoot to adjust to one of 5 height adjustments.
Lowest Setting: For low pile carpet and bare floors.
Medium Setting: For medium pile carpet.
Highest Setting: For high pile and most shag carpet. Adjust to high setting if difficult to push.
NOTE: For optimal carpet cleaning performance, adjust to the lowest practical setting. If your vacuum is difficult to push, or is pushing larger debris, adjust to the next higher setting..
NOTICE: The floor brush will continue to rotate while you use your vacuum for above floor cleaning. To prevent carpet damage, do not lean on the vacuum or let the power foot tilt forward.
Tools
With the vacuum in upright position, remove the lower hose end from the foot of the vacuum and from both hose clips. Attach desired tool by firmly inserting the tool into the hose end..
Pet TurboEraser™ Tool
Remove tool by pulling away and downwards from vacuum.
Use rotation brush action for small flat areas such as stairs and cushions. Press gently down and pull towards you in raking motion; too much pressure will cause brush to stop rotating. The brush easily stores on the handle.
NOTE: The Pet TurboEraser Tool, Pet Crevice Tool, and Pet Hair Eraser Tool are not to be used on pets.
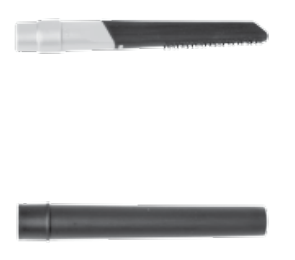
Pet Crevice Tool
Remove tool from back of vacuum, it is easier to remove the tool if the cord is removed first. Twist handle to the END side to use as a standard crevice tool to clean corners and tight spaces. Twist handle to the SIDE to open up suction across the rubber fingers to clean upholstery and other larger surface areas.
Extension Wand
Attach with desired tool for longer reach.
Pet Hair Eraser Tool
Tool does not store on-board. Connect the hose to use with vacuum or you can use without hose connection.
Grasp handle and move sweeper from side to side, using short strokes. When you hear click, reverse the motion.
Clean inside the dirt bin by pressing on the side tabs gently to open. You can use a damp cloth or towel to clean excess dirt and any excess hair.
Hard Surface Soleplate Tool
For maximum pickup on hard surfaces, attach the hard surface soleplate tool to the existing soleplate. Push tabs to remove for maximum pickup on carpet.
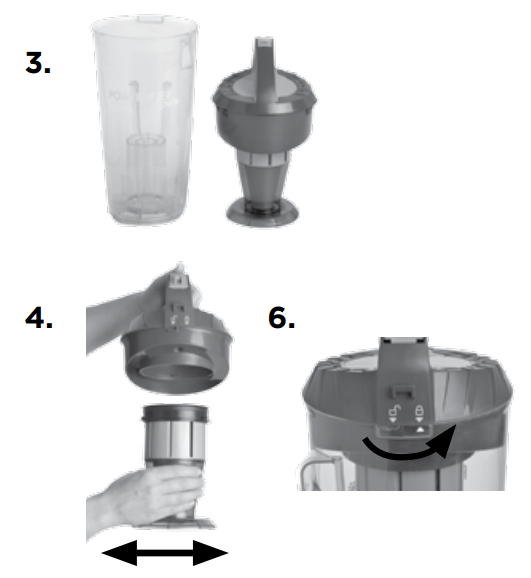
Empty Dirt Tank
For best performance, empty when the dirt reaches the full line on the container.
Turn POWER OFF and unplug from outlet
Remove tank by pressing the release button on the tank handle.
Visually check the pre-motor filter located directly under the dirt tank. If there is debris, follow filter instructions in the maintenance section.
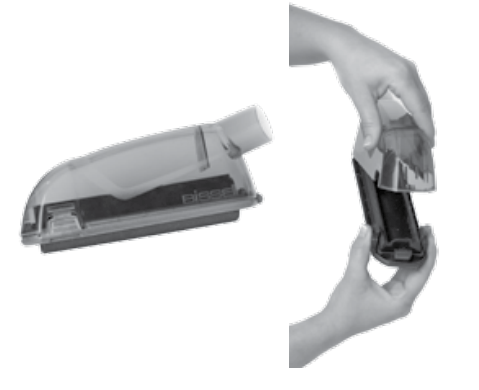
Grasp handle on back of the tank with one hand and the top handle with the other.
Over a trash container, twist the top handle counterclockwise until the latches release.
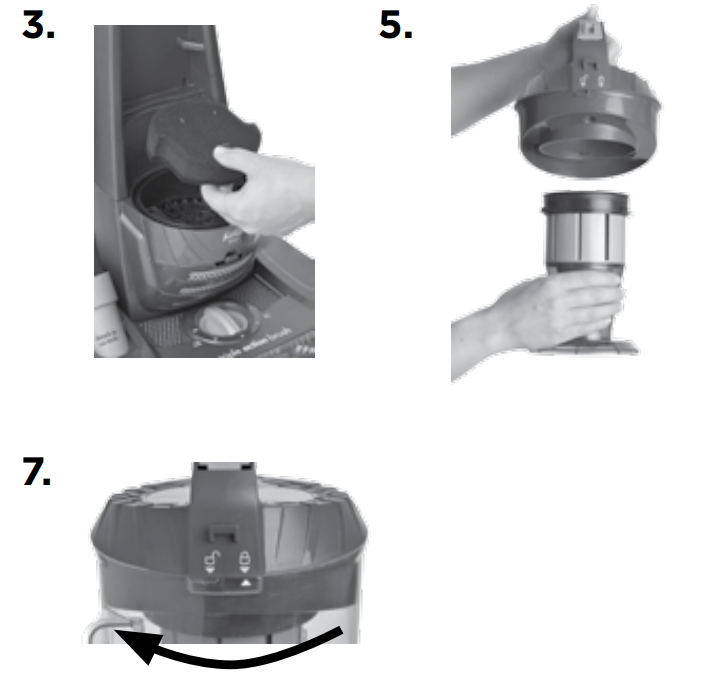
Pull the top handle piece straight from the dirt tank. Empty contents of dirt tank into trash container, and gently shake the top handle piece to remove build up.
NOTE: If you notice excess build up around the top of the tank, before removing top piece, gently tap the tank to allow contents to settle.
Place the top handle piece straight downward into the dirt tank. Align the latch arrows and gently twist clockwise. When fully assembled, the tank will click into place.
Replace the tank back onto the vacuum – the tank will click into place when fully installed.
Maintenance & Care
WARNING To reduce the risk of electric shock, turn power switch off and disconnect polarized plug from electrical outlet before performing maintenance or troubleshooting checks.
WARNING Do not operate vacuum with damp or wet filters or without all filters in place.
PLEASE VISIT BISSELL.COM FOR QUICK AND EASY MAINTENACE VIDEOS.
To maintain best performance, check and clean your filters regularly. If you notice a decrease, in performance check your filters by following these steps. It is recommended to check your filters as often as you check and clean your dryers lint trap.
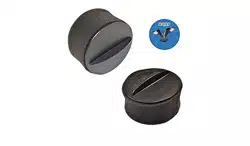
Pre-Motor Filter
The pre-motor filter is located directly under the dirt tank.
Remove dirt tank by pressing release button and remove from vacuum.
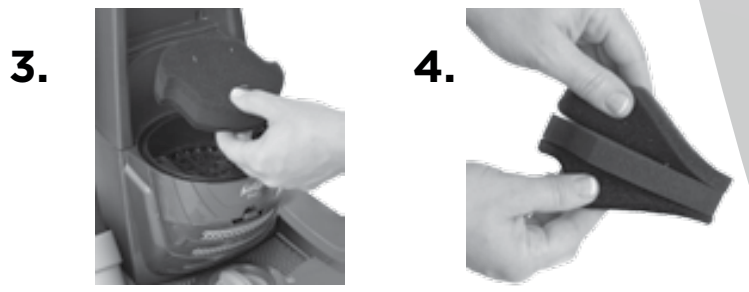
Grasp filter and remove from the vacuum.
While holding over trash, gently separate layers of filter (being careful not to rip filter layers) and shake out excess debris.
Filter can be rinsed in warm water.
Allow the filter to air dry completely before replacing.
If you notice the filter is damaged, reference the replacement parts section to order a new filter.
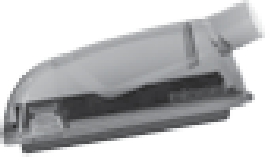
Post-Motor Filter
8. The post-motor filter is located on the front of the vacuum near the height adjust knob.
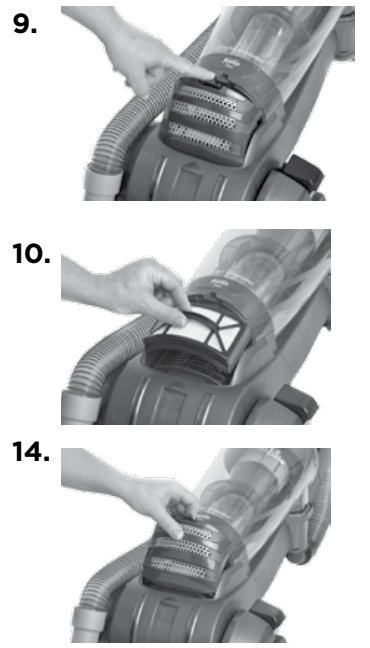
9. Remove filter door by pressing latch downward. It is easiest to have the vacuum fully reclined to access the filter.
10. Remove the filter by grasping the handle on the front of the filter and pulling out from vacuum.
11. The filter can be washed in warm water with mild detergent.
12. Allow the filter to air dry completely before replacing.
13. If you notice the filter is damaged, reference the replacement parts section to order a new filter.
14. Replace filter in unit with handle facing you. Replace the door by hooking the bottom into the grooves and rotate towards unit snapping into place.
Checking the rotating floor brush roll and drive belt
Check your vacuum’s rotating floor brush and drive belt regularly for wear or damage.
Turn power OFF. Unplug vacuum cord from electrical outlet.
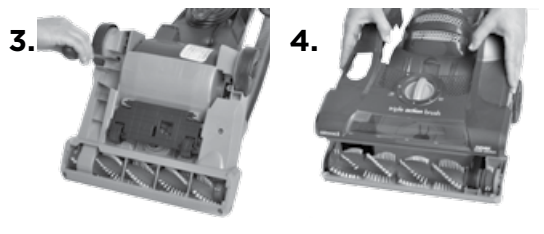
Place handle in low position, remove hose end from foot and turn the vacuum over so bottom side is facing up.
Using a long Phillips screwdriver remove the 7 screws and rotate unit back to front.
NOTE: For ease of screw removal and replacement, use a magnetic Phillips screwdriver. You also may remove the height adjustment plate by gently prying each latch on the sides free from the foot and rotate out to remove.
If removed, replace the height adjustment plate by aligning the ends opposite of the wheel to the latches and push down
Lift top over straight up and set aside
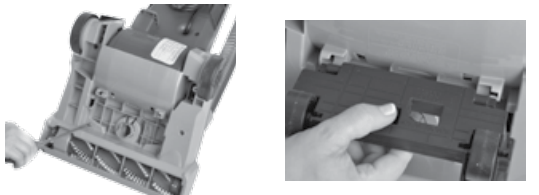
Grasp rotating floor brush at both ends and lift up and away to remove. 6. Clean strings, hair and other debris from rotating floor brush, motor pulley and drive belt areas.
Check drive belt for wear, cuts or stressed areas.
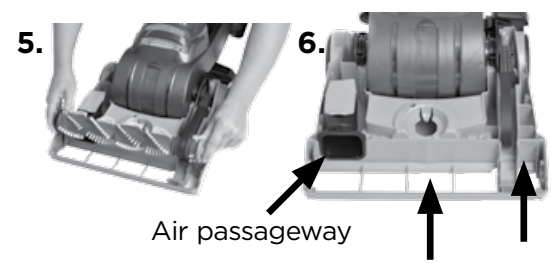
Check air passageway for obstructions.
Remove debris from this area. Replacement belts, if needed, can be ordered on BISSELL
WARNING: To reduce the risk of electric shock, turn power switch off and disconnect plug from electrical outlet before performing maintenance or troubleshooting checks.
REMOVING HEIGHT ADJUSTMENT PLATE
Replacing the drive belt
You should check your vacuum cleaner’s rotating floor brush and drive belt regularly for wear or damage. You should also clean the brush and brush ends of strings, hair and carpet fibers. These can wrap around the brush and hamper its ability to effectively clean your carpet. Also remove any debris that has accumulated under the brush cover.
Turn power OFF. Unplug vacuum cord from electrical outlet.
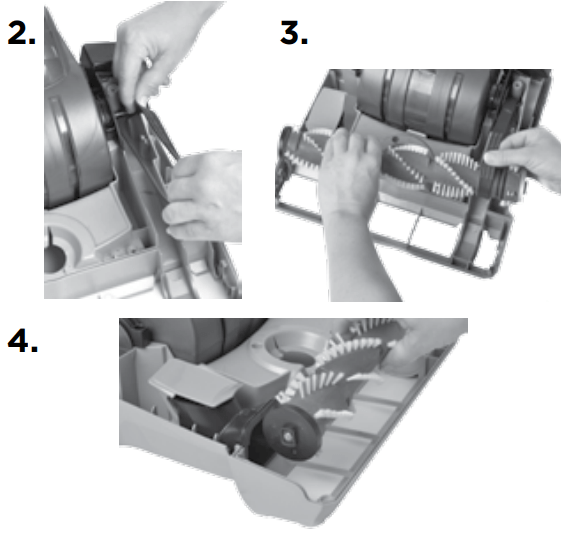
With rotating brush removed (steps 1-4 of checking rotating floor brush and drive belt), grasp old drive belt and remove from motor pulley. Discard old drive belt.
Place new drive belt over motor pulley and stretch other end over rotating floor brush in the space between the bristles.
Place ends of rotating floor brush down into slots.
Turn rotating floor brush by hand in the direction of the motor pulley. If properly installed, drive belt will center itself on rotating brush.
Reposition top cover and rotate on back side
.NOTE: It is recommended to replace screws near height adjustment plate first.
WARNING: To reduce the risk of electric shock, turn power switch off and disconnect plug from electrical outlet before performing maintenance or troubleshooting checks.
Cleaning the dirt tank and separator
Turn power OFF. Unplug vacuum cord from electrical outlet.
Empty the dirt tank by following the instructions in the previous Operations section.
With top handle piece removed you can wash the dirt tank in warm water with mild detergent. Allow tank to air dry completely before reassembling.
Clear any debris from the top piece. Grasp top handle and the round separator piece and twist counterclockwise to release. The separator can be washed in warm water with mild detergent. Make sure there is no dirt build up between the openings around the separator. Allow top handle piece to dry completely before reassembling.
Replace the separator back into the top handle piece by aligning the tabs and turning clockwise to lock into position.
Place the top handle piece straight downward into the dirt tank. Align the latch arrows and gently twist clockwise. When fully assembled, the tank will click into place.
WARNING To reduce the risk of electric shock, turn power switch off and disconnect plug from electrical outlet before performing maintenance or troubleshooting checks.
Clearing a clog
Low suction or poor pickup may be due to a clog in the vacuum cleaner. If you notice a change in the sound of the motor or a reduction in the spinning action of the dirt or brush roll, check for clogs.
Turn power OFF. Unplug vacuum cord from electrical outlet.
Empty and clean dirt tank, ensuring there is no dirt around the separator
With dirt tank removed, check the suction inlet located on the body of the vacuum, remove any debris.
Grasp the upper hose end and twist elbow counterclockwise to remove. Remove the lower hose end by gently pulling out of vacuum base.
Unclog with long, narrow object such as broom stick.
If the clog persists, follow the instructions for Checking the rotating floor brush on page 11 and inspect the air passageway for obstructions.
Troubleshooting
WARNING To reduce the risk of electric shock, turn power switch off and disconnect polarized plug from electrical outlet before performing maintenance or troubleshooting checks.
Problem
Possible causes
Remedies
Vacuum cleaner won’t turn on
Power cord not plugged in
Check electrical plug
Blown fuse/tripped breaker
Check/replace fuse or reset breaker
Damaged cord
Refer to a BISSELL authorized service center for repair or replacement
Vacuum cleaner won’t pick up dirt
Incorrect height adjustment
Adjust powerfoot to correct height setting
Hose not attached to suction opening
Grasp the hose wand and firmly push into the hose wand base
Crack or hole in hose
Check hose and replace if needed
Broken or worn drive belt
Replace drive belt
Rotating floor brush bristles worn
Replace brush
Rotating floor brush jammed
Remove brush and clean debris from brush ends
Clog in vacuum
Follow instructions for clearing clogs
Dirt tank full
Empty dirt tank
Dirt tank or upper tank not installed properly
Position correctly and lock in place
Filters are dirty
Check and clean or replace pre-motor and post-motor filters
Tool won’t pick up
Crack or hole in hose
Check hose and replace if needed
Clog in vacuum
Follow instructions for clearing clogs
Dirt tank full
Empty dirt tank
Dirt tank or upper tank not installed properly
Position correctly and lock in place
Filters are dirty
Check and clean or replace pre-motor and post-motor filters see pages 9, 10
Visible dirt escaping from cleaner
Dirt tank full
Empty dirt tank
Filters missing or installed incorrectly
Check pre-motor and post-motor filters for correct installation
Q: How much water to put in machine I put water in machine and it just ran out below machine I have given up on it it’s brand new I have put it in the closet Reply
Q: I cannot find were all the screws go back l find 8 but there's 9 Reply