
Automatic Breadmaker
Machine à pain automatique
OPERATING INSTRUCTIONS AND RECIPES (Household Use only)
NOTICE D’UTILISATION ET RECETTES (Usage domestique uniquement)
Model No./Modèle n°
SD-YR2500
Thank you for purchasing this Panasonic product.
Please read these instructions thoroughly before using this product and save
this manual for future use.
This product is intended for household use only.
Nous vous remercions d’avoir choisi ce produit Panasonic.
Veuillez lire cette notice minutieusement avant d’utiliser ce produit et conservez-
la à titre de référence ultérieure.
Ce produit est destiné aux particuliers uniquement.
English Français
Panasonic Corporation
Web Site: www.panasonic.com
DZ50AXXX
FXX15D0
Printed in China
Imprimé en Chine
仮

EN2 EN3
English Français
IMPORTANT SAFEGUARDS
When using electrical appliances, basic safety precautions should always be followed including the following:
1. READ ALL INSTRUCTIONS BEFORE USE.
2. Follow all warnings and instructions marked on the product.
3. Do not touch hot surfaces. Use mitts when handling hot materials, and allow metal parts to cool before cleaning or taking off parts.
4. To protect against electrical shock do not immerse unit, cord or plug in water or other liquid. Use a soft sponge and mild detergent when
cleaning the inside of the bread pan or kneading blade. The cabinet may be cleaned with a cloth, dampened with a mild soap and water
solution.
5. Close supervision is necessary when any appliance is used by or near children.
6. Unplug this product from outlet when not in use, before putting on or taking off parts, and before cleaning.
7. Do not operate any appliance with a damaged cord or plug or after the appliance malfunctions or is dropped or has been damaged in any
manner. Return appliance to an authorized Panasonic service center for examination, repair, or electrical or mechanical adjustment.
8. The use of attachments not recommended or sold by the manufacturer may cause fire, electric shock, damage or injuries.
9. Do not use outdoors.
10. Do not let cord hang over edge of table or counter, or touch hot surfaces.
11. Do not place on or near a hot gas or electric burner, or in a heated oven.
12. Extreme caution must be used when moving an appliance containing hot contents or liquids.
13. To disconnect, turn any control to “off”, then grip plug and pull from wall outlet.
Never pull on cord.
14. Do not touch moving parts.
15. Do not use appliance for other than intended use.
16. The unit may vibrate or move during the kneading process. Do NOT place the unit near the edge of a countertop. Place the unit on a flat,
stable surface where movement of the unit will not cause it to fall off the countertop. (See P. EN6)
17. Do not allow anything to rest on power cord. Do not plug in cord where persons may walk on or trip over it.
18. This appliance is not intended for commercial use. It is for household use only.
SAVE THESE INSTRUCTIONS
Warning:
A. A short power-supply cord is provided to reduce the risk resulting from becoming entangled in or tripping over a longer cord.
B. Extension cords are available and may be used if care is exercised in their use.
C. If extension cord is used:
(1) the marked electrical rating of the extension cord should be at least as great as the electrical rating of the appliance,
and
(2) the longer cord should be arranged so that it will not drape over the countertop or tabletop where it can be pulled on by children or
tripped over unintentionally.
D. This appliance has a polarized plug (one blade is wider than the other). As a safety feature, this plug will fit in a polarized outlet only one
way. If the plug does not fit fully in the outlet, reverse the plug. If it still does not fit, contact a qualified electrician.
Do not attempt to defeat this safety feature.
PRÉCAUTIONS IMPORTANTES
Quand vous utilisez des appareils électriques, prenez toujours des mesures de sécurité, en particulier ce qui suit:
1. LISEZ TOUTES LES NOTICES AVANT UTILISATION.
2. Respectez tous les avertissements et instructions marqués sur le produit.
3. Ne touchez jamais les surfaces chaudes. Utilisez des gants de cuisine quand vous manipulez des matériaux chauds, et laissez les parties
en métal refroidir avant de les nettoyer ou de les démonter.
4. Pour éviter tout choc électrique, ne plongez jamais la machine, son cordon ou sa fiche électrique dans de l’eau ou autre liquide. Utilisez une
éponge douce et un détergent doux pour nettoyer l’intérieur du moule à pain ou le bras pétrisseur. Le coffret de la machine peut être nettoyé
avec un chiffon humecté d’eau légèrement savonneuse.
5. Une surveillance attentive est nécessaire quand un appareil est utilisé par des enfants ou près d’enfants.
6. Débranchez cette machine de la prise électrique quand vous ne l’utilisez pas, avant de monter ou déposer des pièces, et avant de la
nettoyer.
7. Ne pas utiliser un appareil électrique dont la fiche ou le cordon électrique est endommagé, ou après un fonctionnement défectueux, une
chute ou un dégât de l’appareil, quel qu’il soit. L’appareil doit être retourné à un centre de service après-vente Panasonic autorisé pour une
inspection, une réparation, ou un réglage électrique ou mécanique.
8. L’utilisation d’un accessoire ni recommandé ni vendu par le fabricant peut être la cause d’un incendie, d’un choc électrique, de dégâts ou de
blessures.
9. L’appareil ne doit pas être utilisé en extérieur.
10. Ne laissez pas le cordon électrique pendre sur le bord de la table ou toucher une surface brûlante.
11. Ne posez pas la machine sur ou près d’un brûleur à gaz ou électrique, ou dans un four chaud.
12. Faites extrêmement attention quand vous déplacez un appareil qui contient des solides ou des liquides brûlants.
13. Pour débrancher la machine, éteignez-la d’abord, puis tirez sur la fiche électrique pour la débrancher de la prise murale.
Ne tirez jamais sur le cordon proprement dit.
14. Ne touchez pas les pièces en mouvement.
15. N’utilisez pas un appareil électrique pour une utilisation autre que celle prévue.
16. La machine peut vibrer ou bouger pendant le pétrissage. Ne PAS placer la machine près du bord d’un comptoir. Posez la machine sur une
surface plane et stable, d’où elle ne risque pas de tomber à cause de ses mouvements. (Voir P. FR4)
17. Aucun objet ne doit être posé sur le cordon électrique. Ne faites pas passer le cordon électrique dans un endroit où des gens pourraient
marcher dessus ou se prendre les pieds dedans.
18. Cette machine n’est pas prévue pour une utilisation commerciale, mais destinée aux particuliers.
CONSERVEZ CETTE NOTICE
Avertissement:
A. Le cordon électrique fourni est court pour éviter que des personnes se prennent les pieds dedans ou trébuchent.
B. Des rallonges sont disponibles et peuvent être utilisées, mais avec précaution.
C. Si une rallonge est utilisée:
(1) Les caractéristiques électriques de la rallonge doivent être égales ou supérieures à celles de la machine,
et
(2) Le plus long cordon doit être disposé de manière qu’il ne passe pas sur un comptoir ou une table accessible à des enfants, ou à un
endroit où il pourrait faire trébucher une personne qui passe.
D. Cette machine présente une fiche polarisée (une lame est plus large que l’autre). Par mesure de sécurité, cette fiche ne se branche sur une
prise polarisée que dans un sens. Si la fiche n’entre pas dans la prise, tournez-la. Si elle n’entre toujours pas, contactez un électricien
qualifié. N’essayez pas d’aller à l’encontre de ce mécanisme de sécurité.
EN4 EN5
English
Safety Instructions
In order to prevent accidents or injuries to the user, other people, and damage to property, please follow the instructions below.
The following chart indicates the degree of damage caused by improper operation.
Warning:
Indicates serious injury or death
Caution:
Indicates risk of injury or property
damage if the appliance was
mishandled.
The symbols are classified and explained as follows.
This symbol indicates prohibition.
This symbol indicates requirement that must be
followed.
Warning
To prevent electric shock, fire or serious injury:
Do not damage the power cord or power plug.
Do not use the appliance if the power cord or power plug is damaged or the power plug is loosely connected to the power
outlet.
If the power cord is damaged, it must be replaced only by a Panasonic authorized service center.
Do not plug or unplug the power cord with wet hands.
Do not immerse the appliance in water or splash it with water.
Do not disassemble, repair or modify this appliance.
Contact a Panasonic authorized service center. See pages FR30, FR31.
Do not touch, block or cover the steam vent holes during use.
This appliance is not intended for use by persons (including children) with reduced physical, sensory or mental capabilities,
or lack of experience and knowledge, unless they have been given supervision or instruction concerning use of the
appliance by a person responsible for their safety. Children should be supervised to ensure that they do not play with the
appliance.
Fully insert the power plug.
Clean the power plug regularly.
This product is intended for use only on a 120 V, 60 Hz supply.
Discontinue use the appliance immediately in the unlikely event that this appliance stops working properly.
Examples: for abnormal or breaking down
●
The power plug and/or the power cord become abnormally hot.
●
The power cord is damaged or power failure.
●
The main body is deformed or is abnormally hot.
●
The appliance makes abnormal turning noise during use.
Unplug the appliance immediately and contact a Panasonic authorized service center. See pages FR30, FR31.
Contents
Before Use
Important Safeguards ························································································································································ EN2
Safety Instructions ····························································································································································· EN5
List of Bread Types and Baking Options ································································································································· EN7
Accessories/Parts Identification ············································································································································ EN8
How to Use
Bread-making Ingredients ··················································································································································EN10
Baking bread ···································································································································································EN12
Making Dough ·································································································································································EN14
•
When adding extra ingredients ·········································································································································EN15
Making Pasta ··································································································································································EN16
Baking Cake ···································································································································································EN17
Baking Gluten Free Bread ··················································································································································EN24
Recipes
Bread Recipes ·································································································································································EN18
Dough Recipes ································································································································································EN20
Cake Recipes ··································································································································································EN23
Gluten Free Recipes
•
Gluten Free Bread ·························································································································································EN25
•
Gluten Free Pizza ··························································································································································EN26
•
Gluten Free Pasta ··························································································································································EN26
How to Clean
Care & cleaning ·······························································································································································EN27
To Protect the Non-stick Finish
To protect the non-stick finish ·············································································································································EN28
Troubleshooting
Troubleshooting ·······························································································································································EN28
Specifications
Specifications ·································································································································································EN31
Warranty
Limited Warranty (ONLY FOR U.S.A. AND PUERTO RICO) ······································································································FR30
Exchange Program ···························································································································································FR31
EN6 EN7
English
List of Bread Types and Baking Options
n
Function Availability and Time Required
•
Time required for each process will differ according to room temperature.
Options Processes
Menu
Number
Menu
Size Crust
Timer
Rest Knead Rise Bake Total
Bake
1
Basic
l l l
30 min
–60 min
15 min–
30 min
1 hr 55 min–
2 hr 10 min
50 min 4 hours
2
Basic Raisin
nut
l l l
30 min
–60 min
15 min–
30 min
1 hr 55 min–
2 hr 10 min
50 min 4 hours
3
Basic Rapid
l l
— —
20 min–
25 min
55 min–
60 min
35 min 1 hr 55 min
4
Basic Rapid
Raisin nut
l l
— —
20 min–
25 min
55 min–
60 min
35 min 1 hr 55 min
5
French
— —
l
40 min–
1 hr 55 min
15 min–
25 min
2 hr 55 min–
4 hr
55 min 6 hours
6
French Raisin
nut
— —
l
40 min–
1 hr 55 min
15 min–
25 min
2 hr 55 min–
4 hr
55 min 6 hours
7
Gluten Free
—
l
— —
20 min–
25 min
1
45 min–
50 min
50 min–
55 min
2 hr–
2 hr 5 min
8
Bake only
— — — — — —
30 min–
1 hr 30 min
30 min–
1 hr 30 min
Dough
9
Basic
— — —
30 min–
50 min
15 min–
30 min
1 hr 15 min–
1 hr 20 min
—
2 hr 20 min
10
Basic Raisin
nut
— — —
30 min–
50 min
15 min–
30 min
1 hr 15 min–
1 hr 20 min
—
2 hr 20 min
11
French
— — —
40 min–
1 hr 35 min
15 min–
25 min
1 hr 45 min–
2 hr 30 min
—
3 hr 35 min
12
French Raisin
nut
— — —
40 min–
1 hr 35 min
15 min–
25 min
1 hr 45 min–
2 hr 30 min
—
3 hr 35 min
13
Pizza
— — — —
20 min–
25 min
20 min–
25 min
—
45 min
14
Gluten-Free
Pizza
— — — —
20 min–
30 min
1
15 min–
25 min
—
45 min
15
Pasta
— — — —
20 min
— —
20 min
16
GIuten-Free
Pasta
— — — —
20 min
1
— —
20 min
1 There is a period of scrape off the flour, press ‘Start’ after 2 minutes.
• The breadmaker will operate for a short time during the rise period (to ensure optimal gluten development).
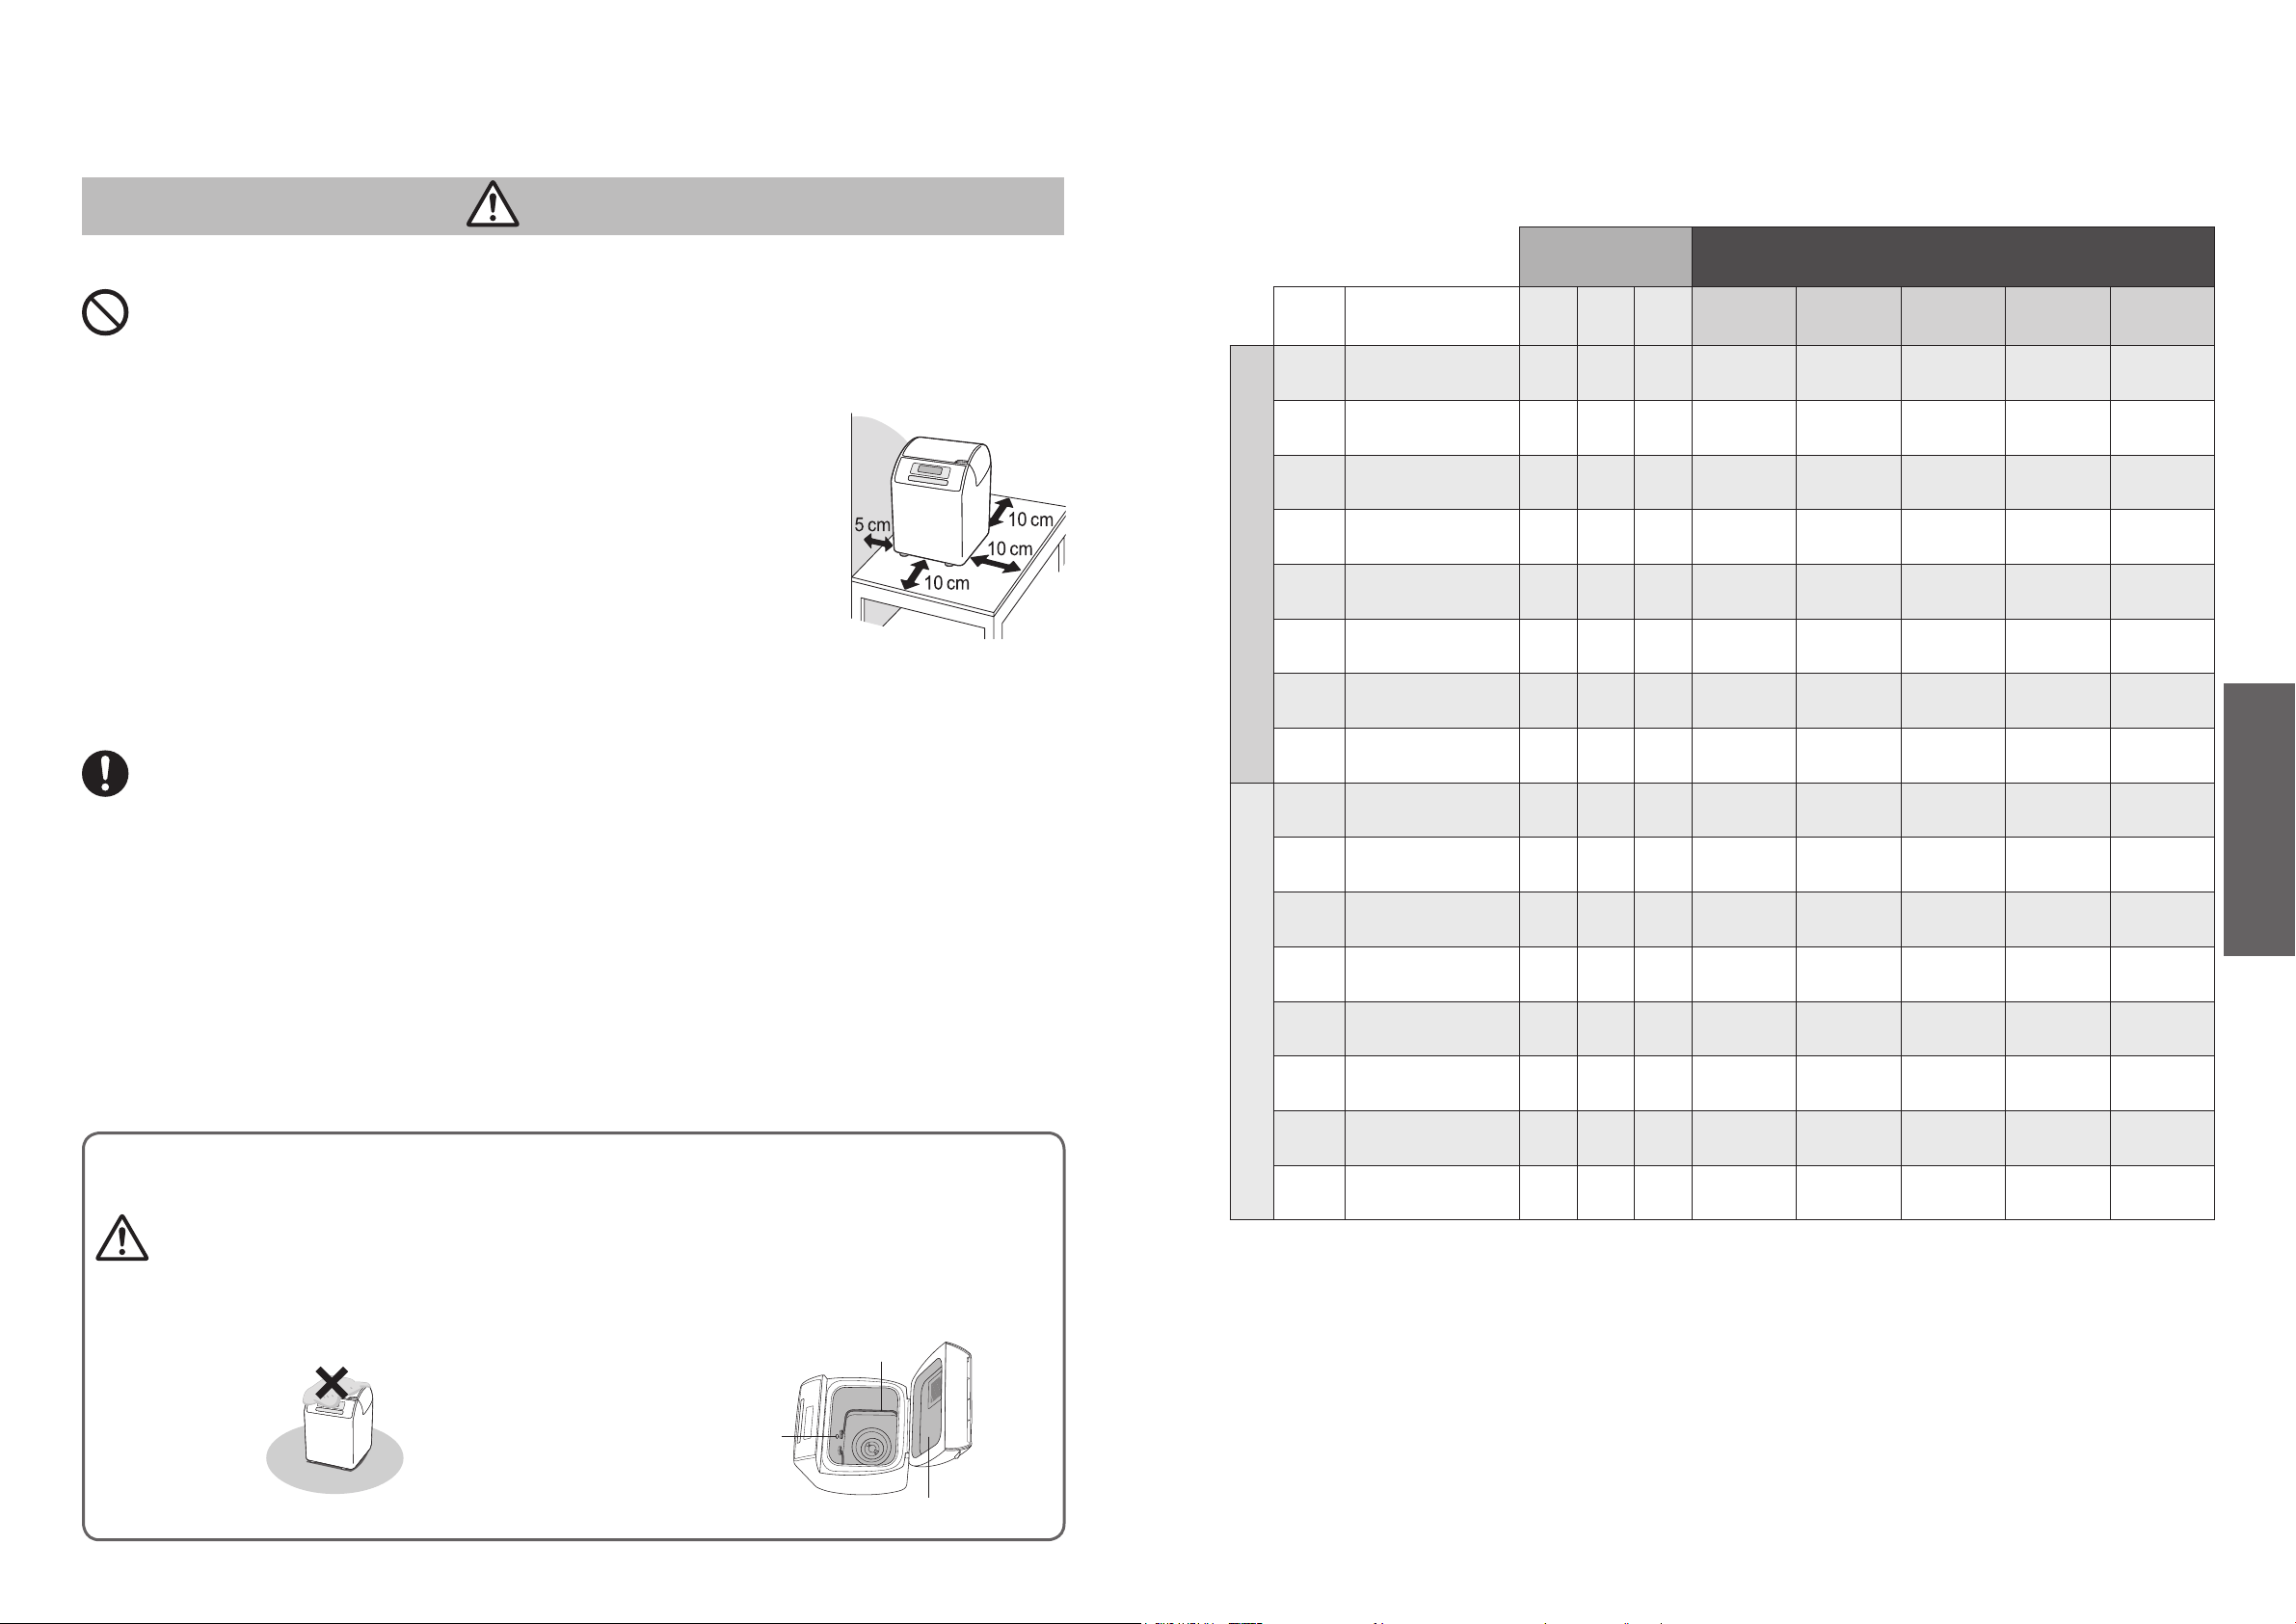
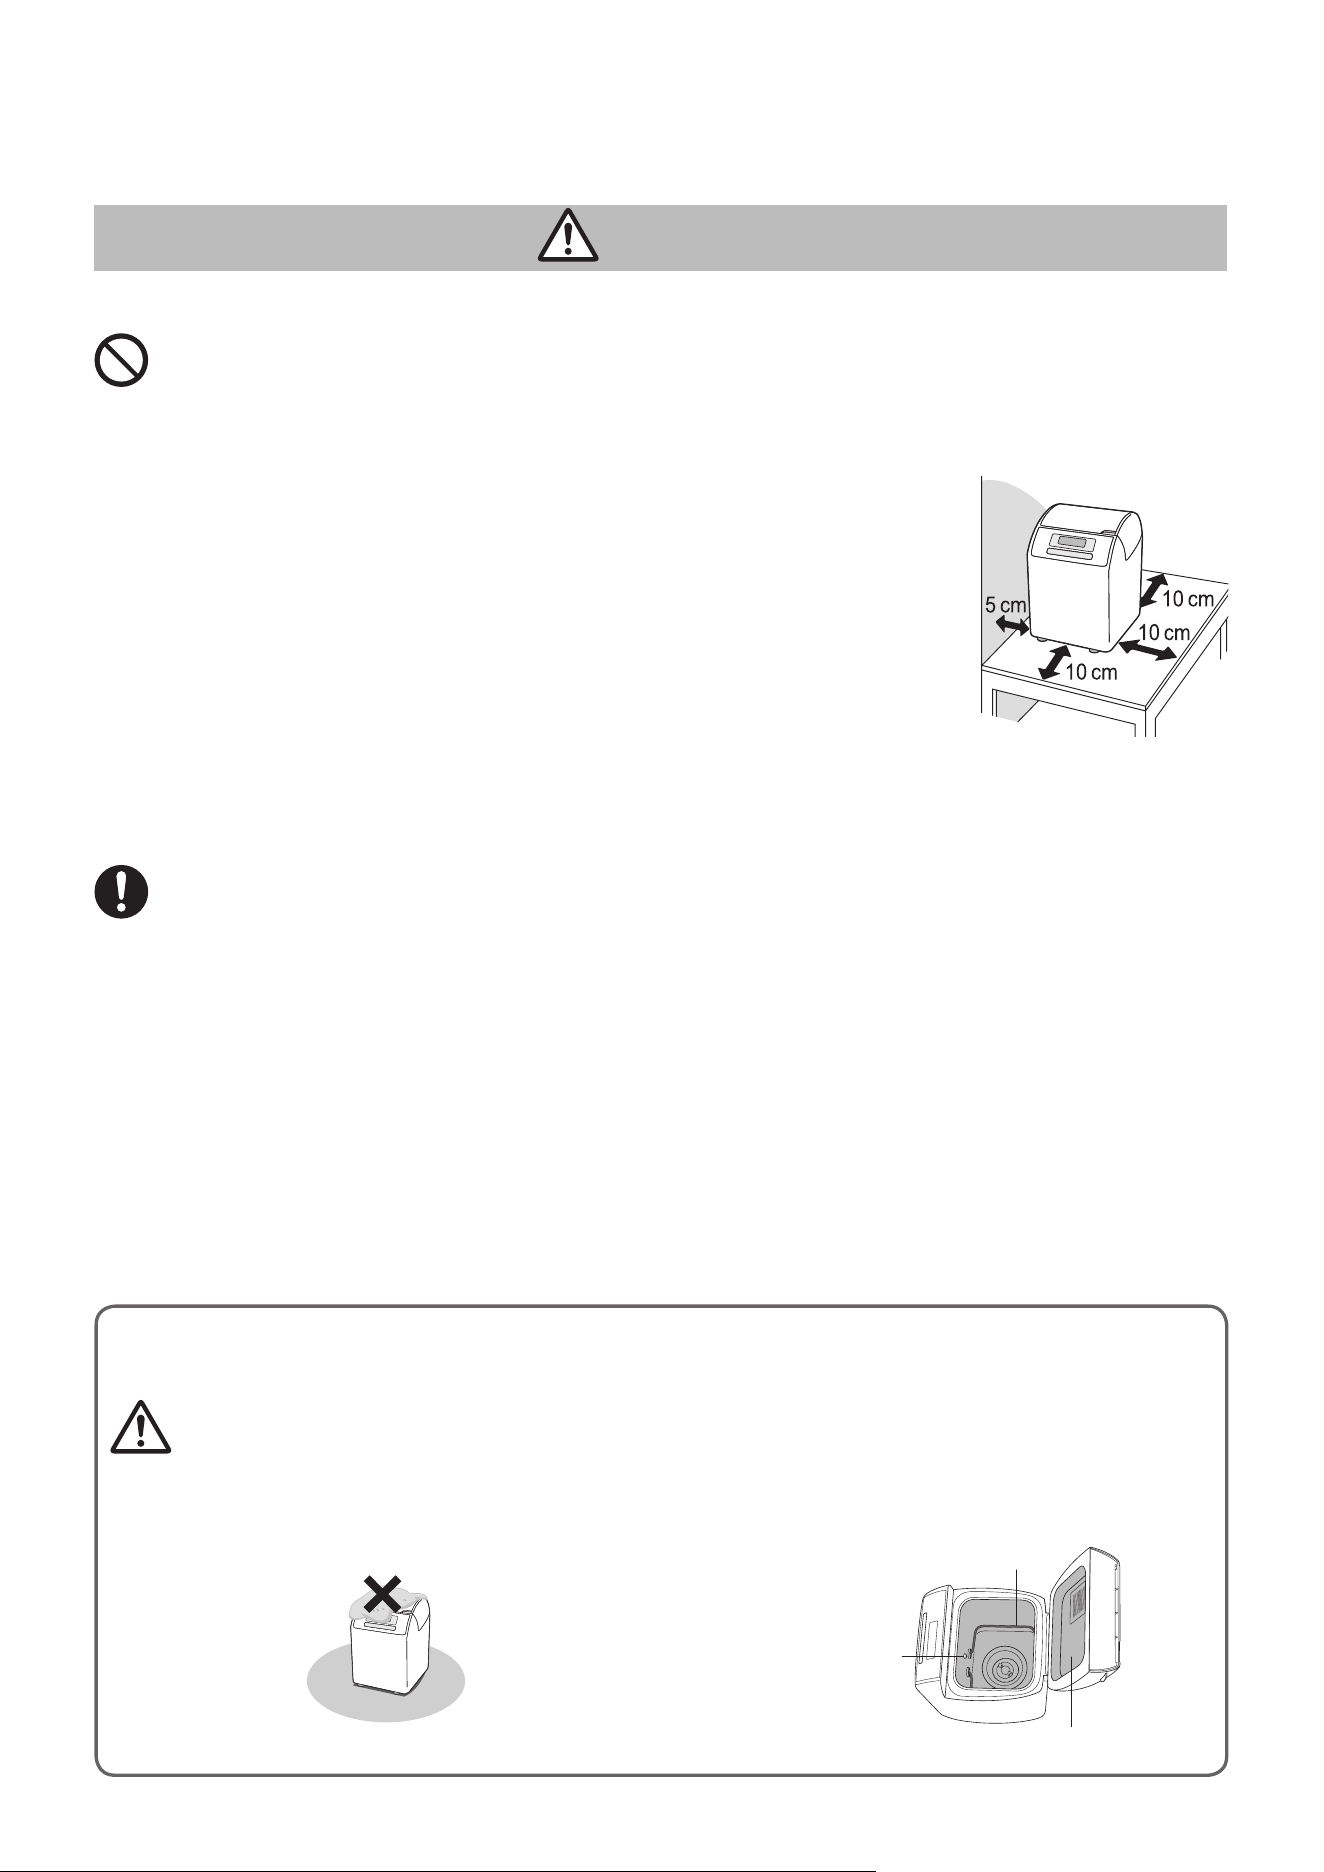
Caution
To prevent electric shock, smoke, fire, injury or property damage:
Do not touch hot area such as bread pan, main body, heating element or inside of lid while the appliance is in use or soon
after use.
To avoid burns, always use oven mitts when removing the bread pan or the finished bread.
(Do not use wet oven mitts) Also take care when removing the kneading blade. Be careful when removing the kneading blade if
hot.
Do not use the appliance on following places.
●
Do not use the appliance outdoors, in the immediate vicinity of heat sources or in rooms of high
humidity.
●
Position the breadmaker on a firm, dry, clean, flat heatproof worktop at least 10 cm (4 inches)
from the edge of the worktop.
●
Do not place on unstable surfaces on electrical appliances such as a refrigerator, on materials
such as tableclothes or on carpet, etc.
●
During baking the unit heats up. The breadmaker should be placed at least 5 cm (2 inches) from
adjacent walls and other objects.
Do not allow the power cord to hang over the edge of the worktop or touch a hot surface.
Do not remove the bread pan or unplug the breadmaker during its operation.
(If the program is stopped midway, operation will discontinue unless the breadmaker is restarted or the power is restored within
10 minutes.)
Allow the appliance to cool down before cleaning it.
Be sure to grasp the power plug when unplugging the unit.
Unplug the power plug when the appliance is not in use.
Always keep the inside of the unit and the bread pan clean to ensure proper performance.
(To ensure programs work successfully)
This product is only intended to be used to make bread, dough and cakes as detailed in these instructions.
It is not intended to be operated by means of an external timer or separate remote control system.
Important Information
Caution
Do not place dishcloths etc. on the appliance.
It may cause a malfunction or it may deform.
Do not use excessive force on the parts below.
It may cause a malfunction or it may deform.
Temperature sensor
Heating element
Inside of the lid
Safety Instructions
EN6 EN7
English
List of Bread Types and Baking Options
n
Function Availability and Time Required
•
Time required for each process will differ according to room temperature.
Options Processes
Menu
Number
Menu
Size Crust
Timer
Rest Knead Rise Bake Total
Bake
1
Basic
l l l
30 min
–60 min
15 min–
30 min
1 hr 55 min–
2 hr 10 min
50 min 4 hours
2
Basic Raisin
nut
l l l
30 min
–60 min
15 min–
30 min
1 hr 55 min–
2 hr 10 min
50 min 4 hours
3
Basic Rapid
l l
— —
20 min–
25 min
55 min–
60 min
35 min 1 hr 55 min
4
Basic Rapid
Raisin nut
l l
— —
20 min–
25 min
55 min–
60 min
35 min 1 hr 55 min
5
French
— —
l
40 min–
1 hr 55 min
15 min–
25 min
2 hr 55 min–
4 hr
55 min 6 hours
6
French Raisin
nut
— —
l
40 min–
1 hr 55 min
15 min–
25 min
2 hr 55 min–
4 hr
55 min 6 hours
7
Gluten Free
—
l
— —
20 min–
25 min
1
45 min–
50 min
50 min–
55 min
2 hr–
2 hr 5 min
8
Bake only
— — — — — —
30 min–
1 hr 30 min
30 min–
1 hr 30 min
Dough
9
Basic
— — —
30 min–
50 min
15 min–
30 min
1 hr 15 min–
1 hr 20 min
—
2 hr 20 min
10
Basic Raisin
nut
— — —
30 min–
50 min
15 min–
30 min
1 hr 15 min–
1 hr 20 min
—
2 hr 20 min
11
French
— — —
40 min–
1 hr 35 min
15 min–
25 min
1 hr 45 min–
2 hr 30 min
—
3 hr 35 min
12
French Raisin
nut
— — —
40 min–
1 hr 35 min
15 min–
25 min
1 hr 45 min–
2 hr 30 min
—
3 hr 35 min
13
Pizza
— — — —
20 min–
25 min
20 min–
25 min
—
45 min
14
Gluten-Free
Pizza
— — — —
20 min–
30 min
1
15 min–
25 min
—
45 min
15
Pasta
— — — —
20 min
— —
20 min
16
GIuten-Free
Pasta
— — — —
20 min
1
— —
20 min
1 There is a period of scrape off the flour, press ‘Start’ after 2 minutes.
• The breadmaker will operate for a short time during the rise period (to ensure optimal gluten development).
Caution
To prevent electric shock, smoke, fire, injury or property damage:
Do not touch hot area such as bread pan, main body, heating element or inside of lid while the appliance is in use or soon
after use.
To avoid burns, always use oven mitts when removing the bread pan or the finished bread.
(Do not use wet oven mitts) Also take care when removing the kneading blade. Be careful when removing the kneading blade if
hot.
Do not use the appliance on following places.
●
Do not use the appliance outdoors, in the immediate vicinity of heat sources or in rooms of high
humidity.
●
Position the breadmaker on a firm, dry, clean, flat heatproof worktop at least 10 cm (4 inches)
from the edge of the worktop.
●
Do not place on unstable surfaces on electrical appliances such as a refrigerator, on materials
such as tableclothes or on carpet, etc.
●
During baking the unit heats up. The breadmaker should be placed at least 5 cm (2 inches) from
adjacent walls and other objects.
Do not allow the power cord to hang over the edge of the worktop or touch a hot surface.
Do not remove the bread pan or unplug the breadmaker during its operation.
(If the program is stopped midway, operation will discontinue unless the breadmaker is restarted or the power is restored within
10 minutes.)
Allow the appliance to cool down before cleaning it.
Be sure to grasp the power plug when unplugging the unit.
Unplug the power plug when the appliance is not in use.
Always keep the inside of the unit and the bread pan clean to ensure proper performance.
(To ensure programs work successfully)
This product is only intended to be used to make bread, dough and cakes as detailed in these instructions.
It is not intended to be operated by means of an external timer or separate remote control system.
Important Information
Caution
Do not place dishcloths etc. on the appliance.
It may cause a malfunction or it may deform.
Do not use excessive force on the parts below.
It may cause a malfunction or it may deform.
Temperature sensor
Heating element
Inside of the lid
Safety Instructions
EN8 EN9
English
Raisin nut dispenser
Place the extra ingredients in the raisin nut dispenser if you wish to add them in.
The raisin nut dispenser will open automatically for all programs.
Turn to P. EN15 for ingredients which may be placed in the raisin nut dispenser.
Accessories/Parts Identification
Main Unit
Accessories
Measuring cup
To measure out liquids
Menu label
Measuring spoon
To measure out sugar, salt, yeast, etc.
(15 mL/
1
⁄2 oz.) (5 mL/
1
⁄6 oz.)
Tablespoon
•
1
⁄2 marking
Teaspoon
•
1
⁄4,
1
⁄2,
3
⁄4
markings
•
10 mL increments
(max. 250 mL/8
1
⁄2 oz.)
Plug
Dispenser lid
Yeast dispenser
Bread pan
Control panel
Lid
Handle
Raisin nut dispenser
flap
Kneading blade
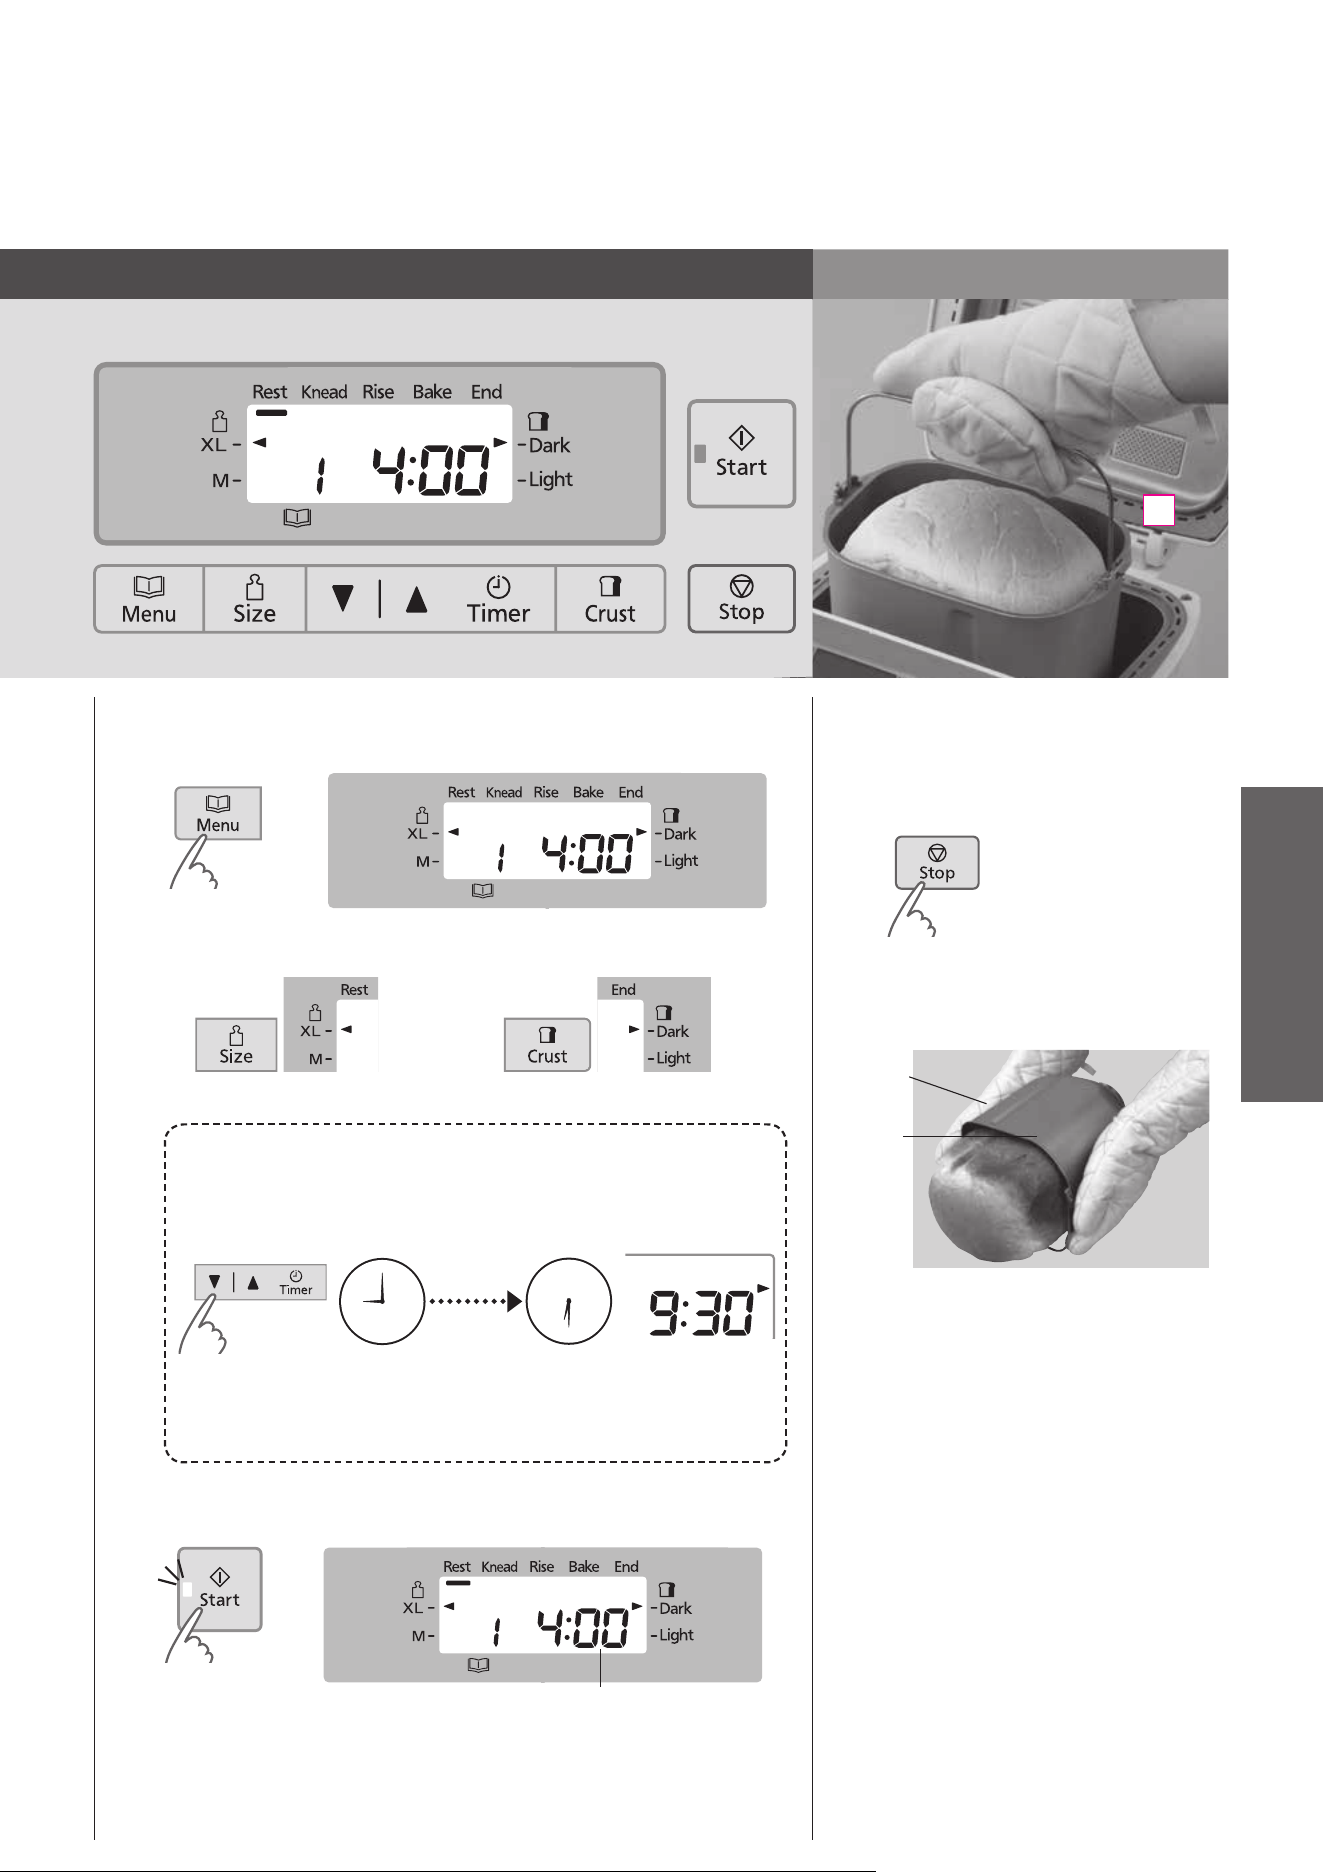
Control Panel
* This picture shows all words and symbols, but during operation only relevant ones will be displayed.
Menu
Choose menu. Menu number will
display and each time this button is
pressed, menu number will change to
the next choice.
(Hold the button to advance more
quickly)
See P. EN7 for menu number.
n
Operation status
: displayed for the current stage of the program. Ingredients are being regulated on the
‘Rest’ stage before kneading.
: displayed when there is a problem with the power supply.
: displayed when adding ingredients manually on menu 2, 4, 6, 10 and 12.
n
Time remaining until ready
Also when adding ingredients manually, display will
show the time until adding extra ingredients in the
program.
Size
Choose bread size. See
P. EN7 for available
menu.
•
XL
•
M
Crust
Choose crust color.
See P. EN7 for
available menu.
•
Dark
•
Light
Start
Start the program.
Stop
Cancel/stop the program.
(To cancel/stop, hold for more
than 1 second.)
Timer
Set delay timer (time until
bread is ready) or set the
baking time for menu 8.
‘▲’Pressthisbuttonto
increase the time.
‘▼’Pressthisbuttonto
decrease the time.
仮
仮
仮
EN8 EN9
English
Raisin nut dispenser
Place the extra ingredients in the raisin nut dispenser if you wish to add them in.
The raisin nut dispenser will open automatically for all programs.
Turn to P. EN15 for ingredients which may be placed in the raisin nut dispenser.
Accessories/Parts Identification
Main Unit
Accessories
Measuring cup
To measure out liquids
Menu label
Measuring spoon
To measure out sugar, salt, yeast, etc.
(15 mL/
1
⁄2 oz.) (5 mL/
1
⁄6 oz.)
Tablespoon
•
1
⁄2 marking
Teaspoon
•
1
⁄4,
1
⁄2,
3
⁄4
markings
•
10 mL increments
(max. 250 mL/8
1
⁄2 oz.)
Plug
Dispenser lid
Yeast dispenser
Bread pan
Control panel
Lid
Handle
Raisin nut dispenser
flap
Kneading blade
Control Panel
* This picture shows all words and symbols, but during operation only relevant ones will be displayed.
Menu
Choose menu. Menu number will
display and each time this button is
pressed, menu number will change to
the next choice.
(Hold the button to advance more
quickly)
See P. EN7 for menu number.
n
Operation status
: displayed for the current stage of the program. Ingredients are being regulated on the
‘Rest’ stage before kneading.
: displayed when there is a problem with the power supply.
: displayed when adding ingredients manually on menu 2, 4, 6, 10 and 12.
n
Time remaining until ready
Also when adding ingredients manually, display will
show the time until adding extra ingredients in the
program.
Size
Choose bread size. See
P. EN7 for available
menu.
•
XL
•
M
Crust
Choose crust color.
See P. EN7 for
available menu.
•
Dark
•
Light
Start
Start the program.
Stop
Cancel/stop the program.
(To cancel/stop, hold for more
than 1 second.)
Timer
Set delay timer (time until
bread is ready) or set the
baking time for menu 8.
‘▲’Pressthisbuttonto
increase the time.
‘▼’Pressthisbuttonto
decrease the time.
仮
仮
仮
EN10 EN11
English
Bread-making Ingredients
Flour
Main ingredient of bread, produces gluten. (helps the bread to rise,
gives it a firm texture)
Use bread flour and all-purpose flour.
Do not use soft or plain flour.
Flour must be weighed on scales.
Bread flour and all-purpose flour are milled
from hard wheat and have a high content of
protein which is necessary for the
development of gluten.
Carbon dioxide produced
during fermentation is trapped
within the elastic network of
gluten, thus making the
dough rise.
White flour
Made by grinding wheat
kernel, excluding bran and
germ. The best kind of flour
for baking bread is a flour
marked “for bread baking”.
Using bread flour, instead of
all-purpose flour, will produce
a much better quality bread
loaf.
Do not use plain or self-raising
flour as a substitute for bread
flour.
Whole wheat
flour
Made by grinding entire
wheat kernel, including bran
and germ. Makes very
healthy bread.
This bread is lower in height and
heavier than bread baked with
white flour.
Dairy Products
Add flavour and nutritional value.
If you use milk instead of water, the nutritional value of
the bread will be higher, but do not use in timer setting as
it may not keep fresh overnight.
Reduce the amount of water proportionally to the
amount of milk.
Water
Use plain tap water.
Use tepid water if using menu 3, 4 or 7 in a cold room.
Use chilled water if using ‘french’ program/setting in a hot room.
Always measure out liquids using the measuring cup provided.
Salt
Improves the flavour and strengthens gluten to
help the bread rise.
The bread may lose size/flavour if measuring is inaccurate.
Fat
Adds flavour and softness to the bread.
Using butter (unsalted) or margarine is recommended.
Sugar
(granulated sugar, brown sugar, honey,
treacle etc)
Food for the yeast, sweetens and adds flavour to
the bread, changes the color of the crust.
Use less sugar if using raisins or other fruits, which contain
fructose.
Dry Yeast
Enables the bread to rise.
Be sure to use dry yeast that does not require pre-fermentation (do not use fresh yeast or dry yeast requiring
fermentation before using)
Yeast which has ‘instant yeast’ or ‘rapid rise yeast’ written on the packet is recommended.
When using yeast from sachets, seal the sachet again immediately after use, and keep in the fridge. (Use within the
manufacturer’s recommended time)
If using a bread mix...
Bread mixes including yeast
1
Place the mix in the bread pan, then add water. (Follow
instructions on the packet for the quantity of water)
2
Select the menu 3, choose a size according to the
volume of the mix, and start the baking.
•
600 g/21.2 oz. – XL
•
400 g/14.1 oz. – M
With some mixes, it is not clear how much yeast is
included, so some trial and error may be required to
obtain better results.
Bread mix with separate yeast sachet
1
First place the yeast in the bread pan, then the bread
mix, then the water.
2
Set the machine on ‘basic’ program and start the
baking.
You can make your bread taste better by adding other
ingredients:
Eggs
Improve the nutritional value and coloring
of the bread. (Water amount must be
reduced proportionally)
Beat eggs when adding them.
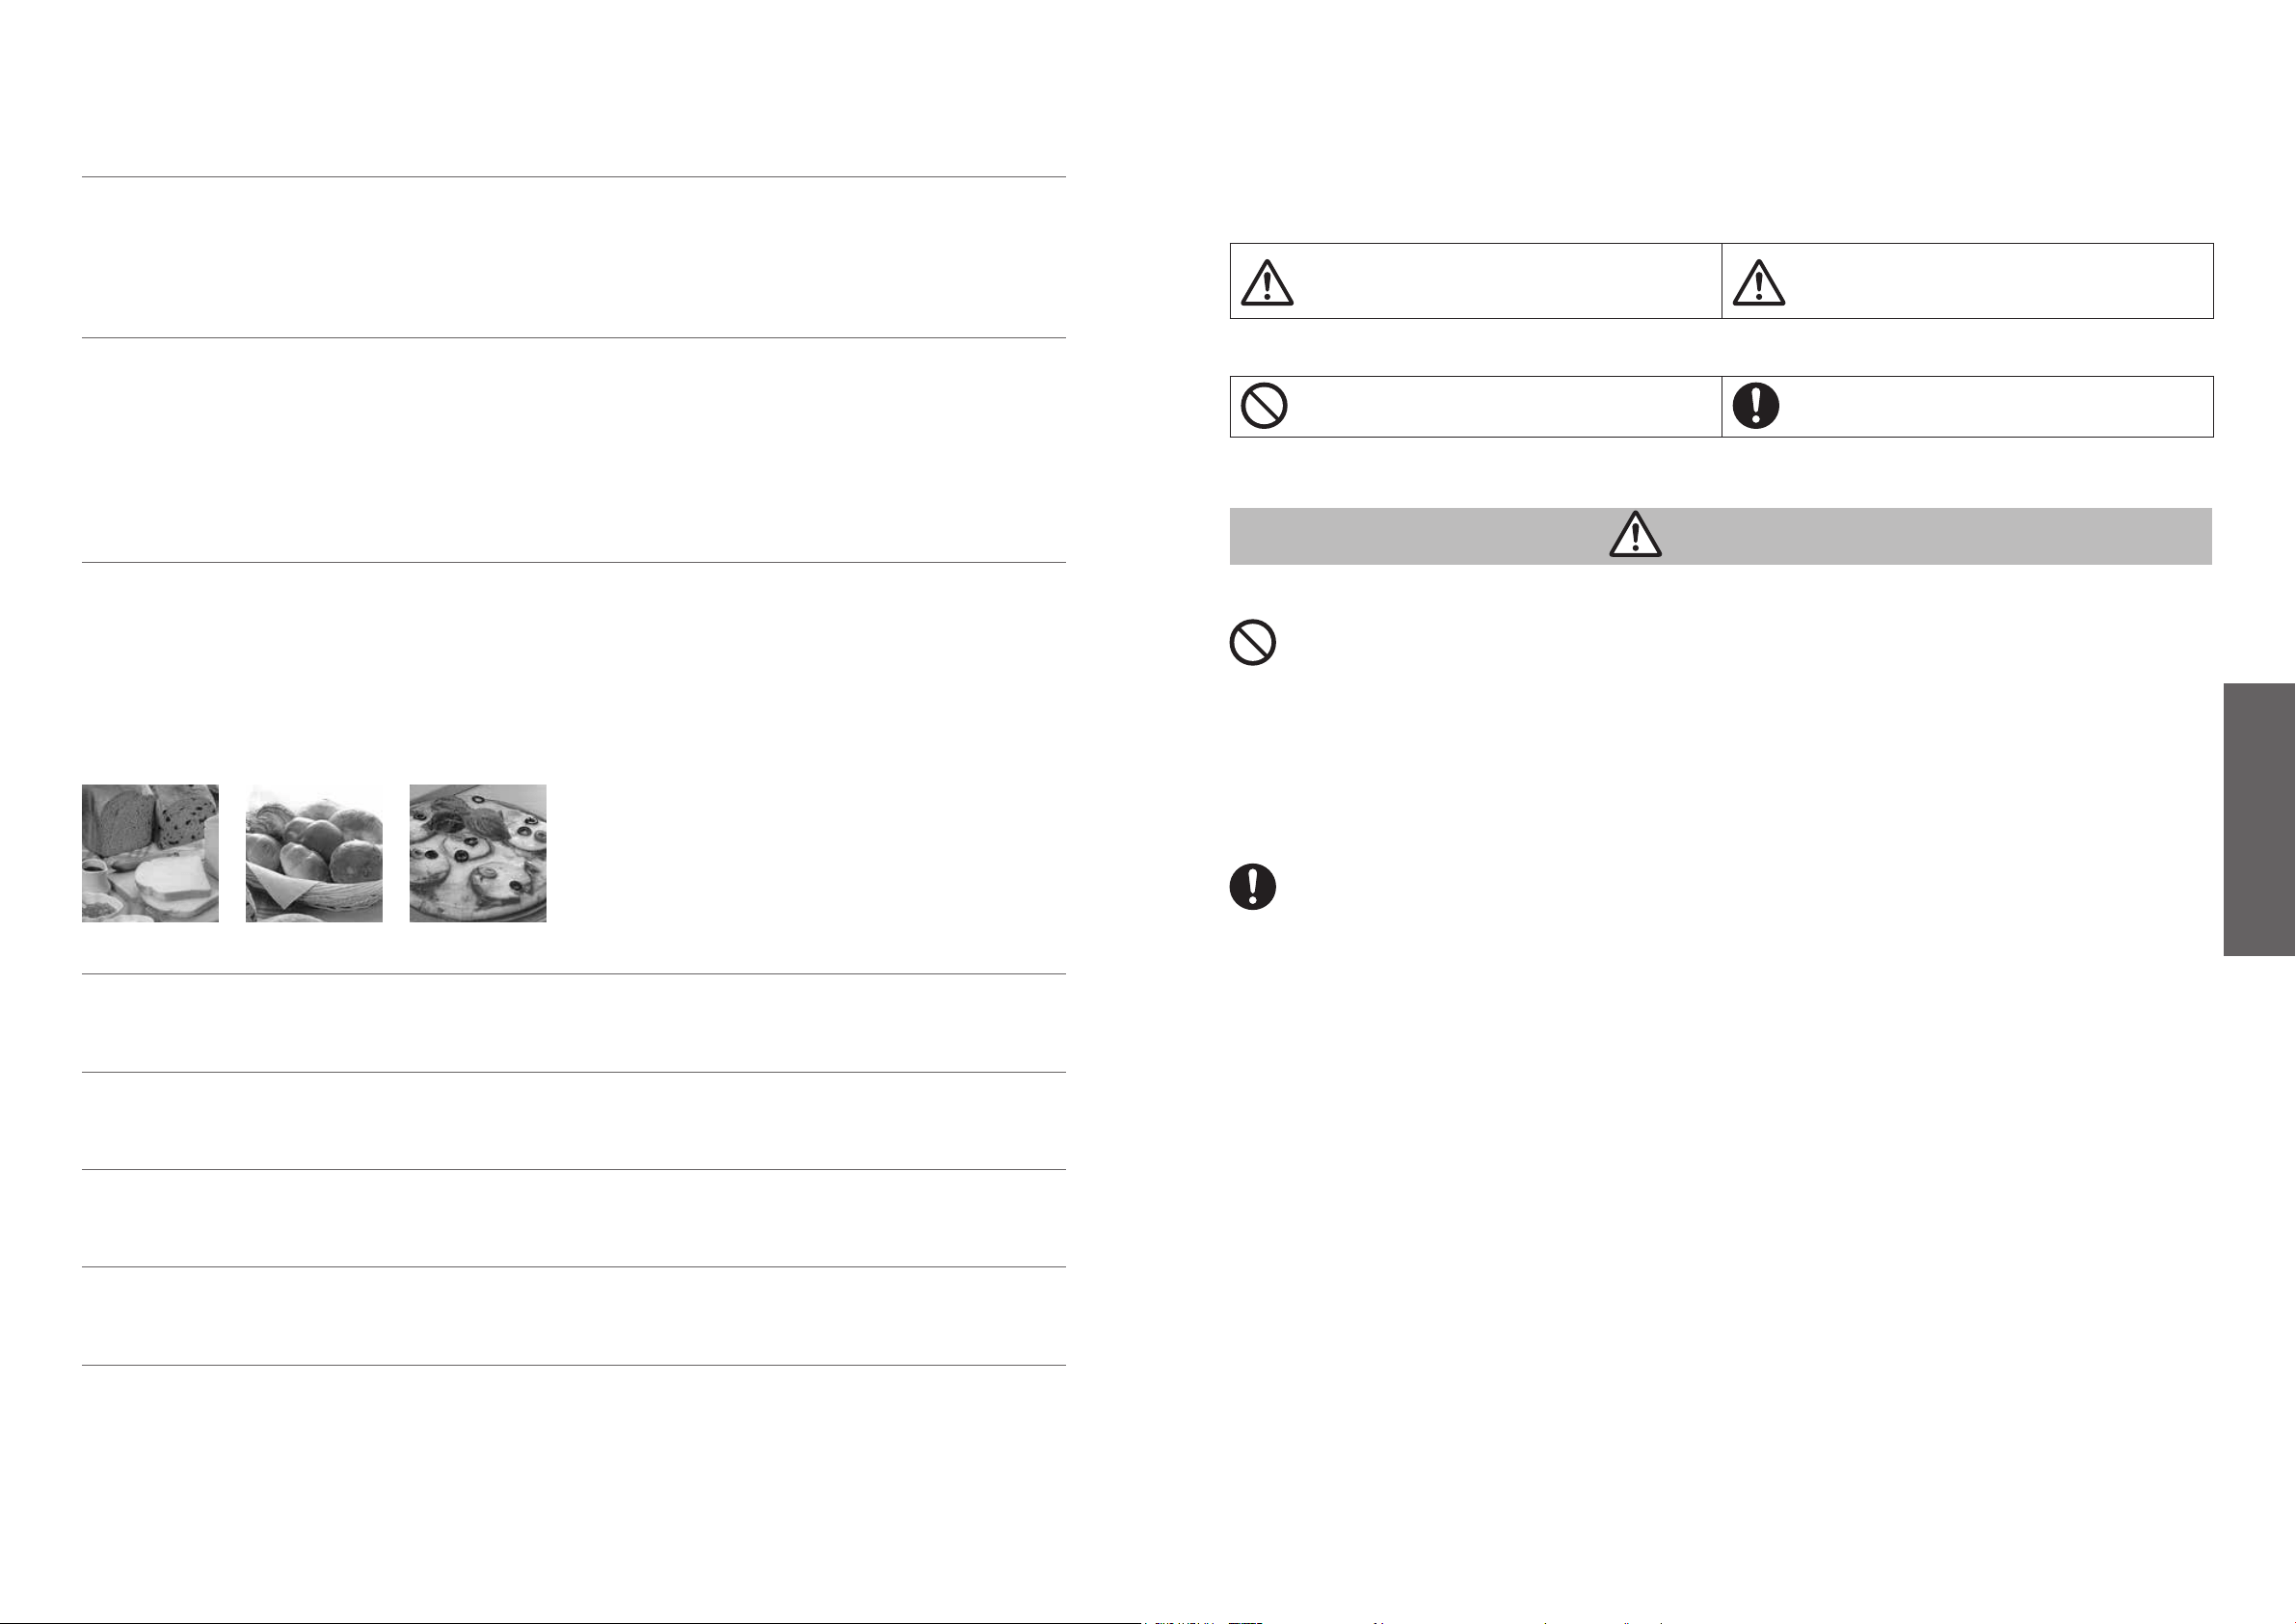
Bran
Increases the bread’s fibre content.
•
Use max. 75 mL (5 tbsp).
Wheat germ
Gives the bread a nuttier flavour.
•
Use max. 60 mL (4 tbsp).
Spices
Enhance the flavour of the bread.
•
Only use a small amount (1–2 tbsp).

EN10 EN11
English
Bread-making Ingredients
Flour
Main ingredient of bread, produces gluten. (helps the bread to rise,
gives it a firm texture)
Use bread flour and all-purpose flour.
Do not use soft or plain flour.
Flour must be weighed on scales.
Bread flour and all-purpose flour are milled
from hard wheat and have a high content of
protein which is necessary for the
development of gluten.
Carbon dioxide produced
during fermentation is trapped
within the elastic network of
gluten, thus making the
dough rise.
White flour
Made by grinding wheat
kernel, excluding bran and
germ. The best kind of flour
for baking bread is a flour
marked “for bread baking”.
Using bread flour, instead of
all-purpose flour, will produce
a much better quality bread
loaf.
Do not use plain or self-raising
flour as a substitute for bread
flour.
Whole wheat
flour
Made by grinding entire
wheat kernel, including bran
and germ. Makes very
healthy bread.
This bread is lower in height and
heavier than bread baked with
white flour.
Dairy Products
Add flavour and nutritional value.
If you use milk instead of water, the nutritional value of
the bread will be higher, but do not use in timer setting as
it may not keep fresh overnight.
Reduce the amount of water proportionally to the
amount of milk.
Water
Use plain tap water.
Use tepid water if using menu 3, 4 or 7 in a cold room.
Use chilled water if using ‘french’ program/setting in a hot room.
Always measure out liquids using the measuring cup provided.
Salt
Improves the flavour and strengthens gluten to
help the bread rise.
The bread may lose size/flavour if measuring is inaccurate.
Fat
Adds flavour and softness to the bread.
Using butter (unsalted) or margarine is recommended.
Sugar
(granulated sugar, brown sugar, honey,
treacle etc)
Food for the yeast, sweetens and adds flavour to
the bread, changes the color of the crust.
Use less sugar if using raisins or other fruits, which contain
fructose.
Dry Yeast
Enables the bread to rise.
Be sure to use dry yeast that does not require pre-fermentation (do not use fresh yeast or dry yeast requiring
fermentation before using)
Yeast which has ‘instant yeast’ or ‘rapid rise yeast’ written on the packet is recommended.
When using yeast from sachets, seal the sachet again immediately after use, and keep in the fridge. (Use within the
manufacturer’s recommended time)
If using a bread mix...
Bread mixes including yeast
1
Place the mix in the bread pan, then add water. (Follow
instructions on the packet for the quantity of water)
2
Select the menu 3, choose a size according to the
volume of the mix, and start the baking.
•
600 g/21.2 oz. – XL
•
400 g/14.1 oz. – M
With some mixes, it is not clear how much yeast is
included, so some trial and error may be required to
obtain better results.
Bread mix with separate yeast sachet
1
First place the yeast in the bread pan, then the bread
mix, then the water.
2
Set the machine on ‘basic’ program and start the
baking.
You can make your bread taste better by adding other
ingredients:
Eggs
Improve the nutritional value and coloring
of the bread. (Water amount must be
reduced proportionally)
Beat eggs when adding them.
Bran
Increases the bread’s fibre content.
•
Use max. 75 mL (5 tbsp).
Wheat germ
Gives the bread a nuttier flavour.
•
Use max. 60 mL (4 tbsp).
Spices
Enhance the flavour of the bread.
•
Only use a small amount (1–2 tbsp).

EN12 EN13
English
Baking bread
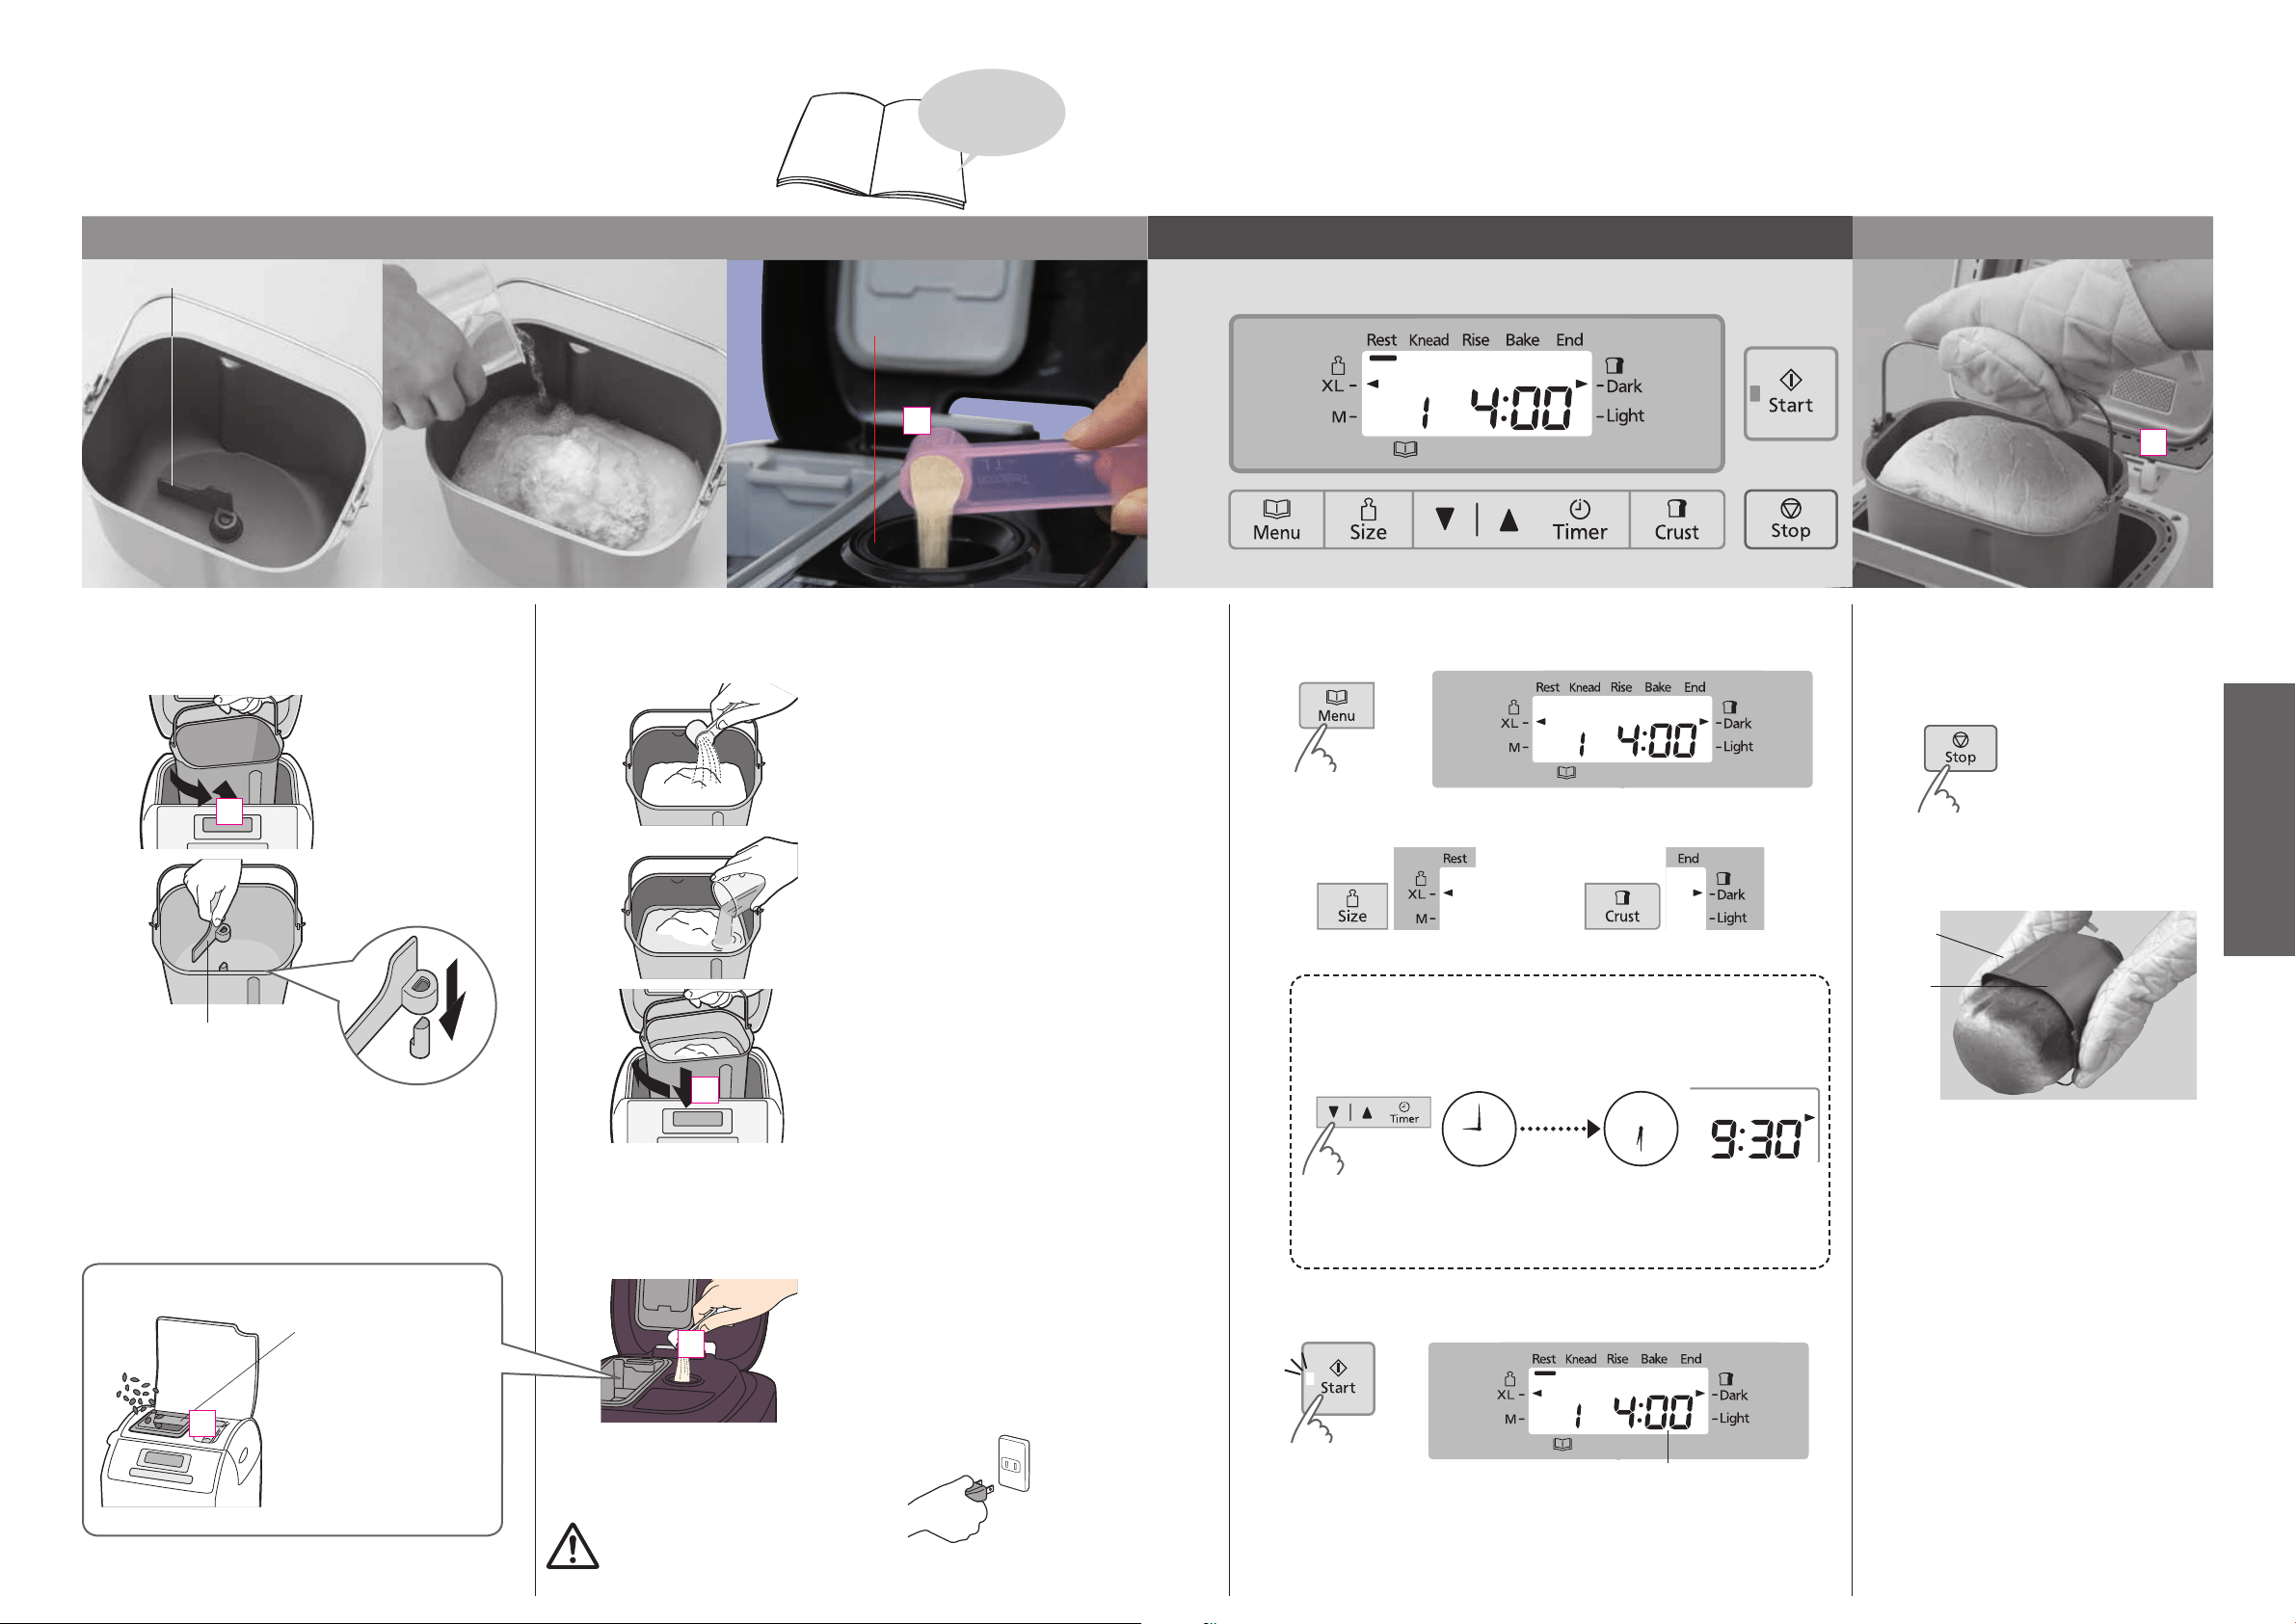
Turn to
P. EN18–EN19 for
bread recipes
Insert the ingredients in the bread pan Set the program and start Remove the bread
Kneading blade
Yeast dispenser
1
Remove the bread pan and
set the kneading blade
1
Twist the bread pan
counter-clockwise.
2
Remove the bread pan.
Check around the shaft and inside
the kneading blade and ensure
that they are clean. (P. EN27)
3
Place the kneading
blade firmly into the
shaft.
•
The blade fits loosely into place, but it must touch the
bottom of the bread pan.
2
Place the measured ingredients
in the bread pan
1
Place the dry ingredients except
dry yeast. (flour, sugar, salt, etc.)
• Flour must be weighed on
scales.
2
Pour in the water and any other
liquids.
3
Wipe off any moisture and flour
from the outside of the bread
pan.
Place the bread pan inside the
breadmaker by turning it slightly
clockwise. Fold the handle down.
Close the lid.
•
Don’t open the lid until bread is
complete (affects bread quality).
3
Insert the dry yeast in the yeast
dispenser
If the yeast dispenser is wet, absorb
wetness with tissue etc.
(Do not rub the yeast dispenser,
otherwise the yeast will not drop
into the bread pan due to static.)
4
Plug the breadmaker
into a 120 V outlet
Caution:
To prevent electric shock, be sure your hands are dry.
5
Choose a bake menu
(The display shows when menu ‘1’ is selected.)
n
To change the size
n
To change the crust color
See P. EN7 for availability of size and crust.
n
To set the timer
e.g. It is 9:00 PM now, and you want the bread to be ready at 6:30 the next
morning.
Set the timer to ‘9:30’ (9 hours 30 minutes from now).
12
9
6
3
12
9
6
3
9hr 30min
from now
Current time Ready time
•
Pressing the button once will advance the timer by 10 minutes up to
13 hours (hold to advance more quickly).
6
Press ‘Start’ button
Estimated time until the selected program is complete
When ‘Start’ is first pressed, menu 1 will start.
7
Turn off the power
when the bread is ready
(machine beeps 8 times and the bar at
‘End’ flashes.)
8
Remove the bread
immediately,
Bread pan
Oven glove
allow to cool, for example, on a wire rack
9
Unplug (holding the
plug) after use
If you do not press ‘stop’ and remove the
bread from the unit to cool it, the
breadmaker will proceed to keep warm
to reduce condensation of steam within
the loaf.
This will accelerate the browning of the
crust, therefore, upon completion of
baking, switch off the unit and remove
the bread immediately from the unit to
cool it.
If you leave the bread to cool down in
the bread pan, it will cause
condensation. Therefore, cool on a wire
rack to ensure better quality loaf.
Baking bread with added ingredients
Clean and dry
beforehand
1
Open the dispenser lid.
2
Insert the ingredients
inside.
3
Close the lid.
(P. EN15)
仮
仮
仮
仮
仮
仮
EN12 EN13
English
Baking bread
Turn to
P. EN18–EN19 for
bread recipes
Insert the ingredients in the bread pan Set the program and start Remove the bread
Kneading blade
Yeast dispenser
1
Remove the bread pan and
set the kneading blade
1
Twist the bread pan
counter-clockwise.
2
Remove the bread pan.
Check around the shaft and inside
the kneading blade and ensure
that they are clean. (P. EN27)
3
Place the kneading
blade firmly into the
shaft.
•
The blade fits loosely into place, but it must touch the
bottom of the bread pan.
2
Place the measured ingredients
in the bread pan
1
Place the dry ingredients except
dry yeast. (flour, sugar, salt, etc.)
• Flour must be weighed on
scales.
2
Pour in the water and any other
liquids.
3
Wipe off any moisture and flour
from the outside of the bread
pan.
Place the bread pan inside the
breadmaker by turning it slightly
clockwise. Fold the handle down.
Close the lid.
•
Don’t open the lid until bread is
complete (affects bread quality).
3
Insert the dry yeast in the yeast
dispenser
If the yeast dispenser is wet, absorb
wetness with tissue etc.
(Do not rub the yeast dispenser,
otherwise the yeast will not drop
into the bread pan due to static.)
4
Plug the breadmaker
into a 120 V outlet
Caution:
To prevent electric shock, be sure your hands are dry.
5
Choose a bake menu
(The display shows when menu ‘1’ is selected.)
n
To change the size
n
To change the crust color
See P. EN7 for availability of size and crust.
n
To set the timer
e.g. It is 9:00 PM now, and you want the bread to be ready at 6:30 the next
morning.
Set the timer to ‘9:30’ (9 hours 30 minutes from now).
12
9
6
3
12
9
6
3
9hr 30min
from now
Current time Ready time
•
Pressing the button once will advance the timer by 10 minutes up to
13 hours (hold to advance more quickly).
6
Press ‘Start’ button
Estimated time until the selected program is complete
When ‘Start’ is first pressed, menu 1 will start.
7
Turn off the power
when the bread is ready
(machine beeps 8 times and the bar at
‘End’ flashes.)
8
Remove the bread
immediately,
Bread pan
Oven glove
allow to cool, for example, on a wire rack
9
Unplug (holding the
plug) after use
If you do not press ‘stop’ and remove the
bread from the unit to cool it, the
breadmaker will proceed to keep warm
to reduce condensation of steam within
the loaf.
This will accelerate the browning of the
crust, therefore, upon completion of
baking, switch off the unit and remove
the bread immediately from the unit to
cool it.
If you leave the bread to cool down in
the bread pan, it will cause
condensation. Therefore, cool on a wire
rack to ensure better quality loaf.
Baking bread with added ingredients
Clean and dry
beforehand
1
Open the dispenser lid.
2
Insert the ingredients
inside.
3
Close the lid.
(P. EN15)
仮
仮
仮
仮
仮
仮

EN14 EN15
English
Making Dough
1
32
Turn to
P. EN20–EN22 for
dough recipes
n
To cancel/stop once
started
(hold for more than 1 second)
Preparations
(P. EN12)
1
Place the kneading blade into the bread pan.
2
Insert the ingredients in the bread pan in the order listed in the recipe.
3
Set the bread pan into the main unit, and plug the breadmaker into the outlet.
1
Choose dough menu
(The display shows when menu ‘9’ is selected.)
Timer is not available on Dough menus.
If you would like to add extra ingredients to your
dough (P. EN15), insert in the raisin nut dispenser
or the bread pan.
2
Start the machine
Estimated time until the selected program is complete
The start light will come on.
3
Press ‘Stop’ and remove dough
when machine beeps 8 times and the bar at ‘End’ flashes
The flashing start light will go off.
Shape the finished dough and allow it to rise until
doubled in size according to the recipe, then bake
in the oven.
When adding extra ingredients
Adding extra ingredients to bread or dough
By selecting a menu with Raisin (2, 4, 6, 10 or 12), you can mix your favourite ingredients into the dough to make all kinds of flavoured breads.
Simply insert the extra
ingredients in the dispenser or
the bread pan before start.
We recommend selecting crust color ‘Dark’
to get better baking results when
ingredients are added on the
menu 3 or 4.
Dry ingredients,
insoluble ingredients
Insert the extra ingredients in the raisin nut
dispenser and set the machine.
Correct Incorrect
Do not overfill the raisin nut dispenser.
Moist/viscous ingredients, soluble
ingredients*
Insert these ingredients together
with the others into the bread pan.
Dried fruits
Cut up roughly into approx. 5 mm (
1
⁄5 inch) cubes.
Sugar-coated ingredients may stick to the raisin nut
dispenser and not fall into the bread pan.
Fresh fruits, fruits pickled in alcohol
Only use quantities as in the recipe, as
the water content of the ingredients will
affect your bread.
Nuts
Chop finely.
Nuts impair the effect of gluten, so avoid using too
much.
Cheese, chocolate
* These ingredients cannot be inserted in the raisin nut
dispenser as they will stick to the dispenser and not fall into
the bread pan.
Chop chocolate finely.
Cut the cheese into 1 cm (
2
⁄5 inch) cubes.
Seeds
Using large, hard seeds may scratch the coating of
the dispenser and bread pan.
Herbs
Use up to 1–2 tbsp of dried herbs. For fresh herbs,
follow the instructions in the recipe.
Bacon,
salami, olive
Sometimes oily ingredients may stick to the raisin nut
dispenser and not fall into the bread pan.
Cut the bacon and the salami into 1 cm (
2
⁄5 inch)
cubes.
Cut the olive into
1
⁄4.
•
Follow the recipe for the quantities for each ingredient.
Without raisin nut
dispenser
Wait for the beep, and then add
the necessary ingredients to the
bread pan.
仮
仮

EN16 EN17
English
Making Pasta
1
32
Turn to P. EN22 for
dough recipes
n
To cancel/stop once
started
(hold for more than 1 second)
Preparations
(P. EN12)
1
Place the kneading blade into the bread pan.
2
Insert the ingredients in the bread pan in the order listed in the recipe.
3
Set the bread pan into the main unit, and plug the breadmaker into the outlet.
1
Select menu ‘15’
(The display shows when menu ‘15’ is selected.)
Timer is not available on menu 15.
2
Start the machine
Estimated time until the selected program is complete
The start light will come on.
3
Press ‘Stop’ and remove dough
when machine beeps 8 times
4
Wrap the dough in the plastic wrap and
Rest the dough
Rest the dough for 1 hour in the refrigerator.
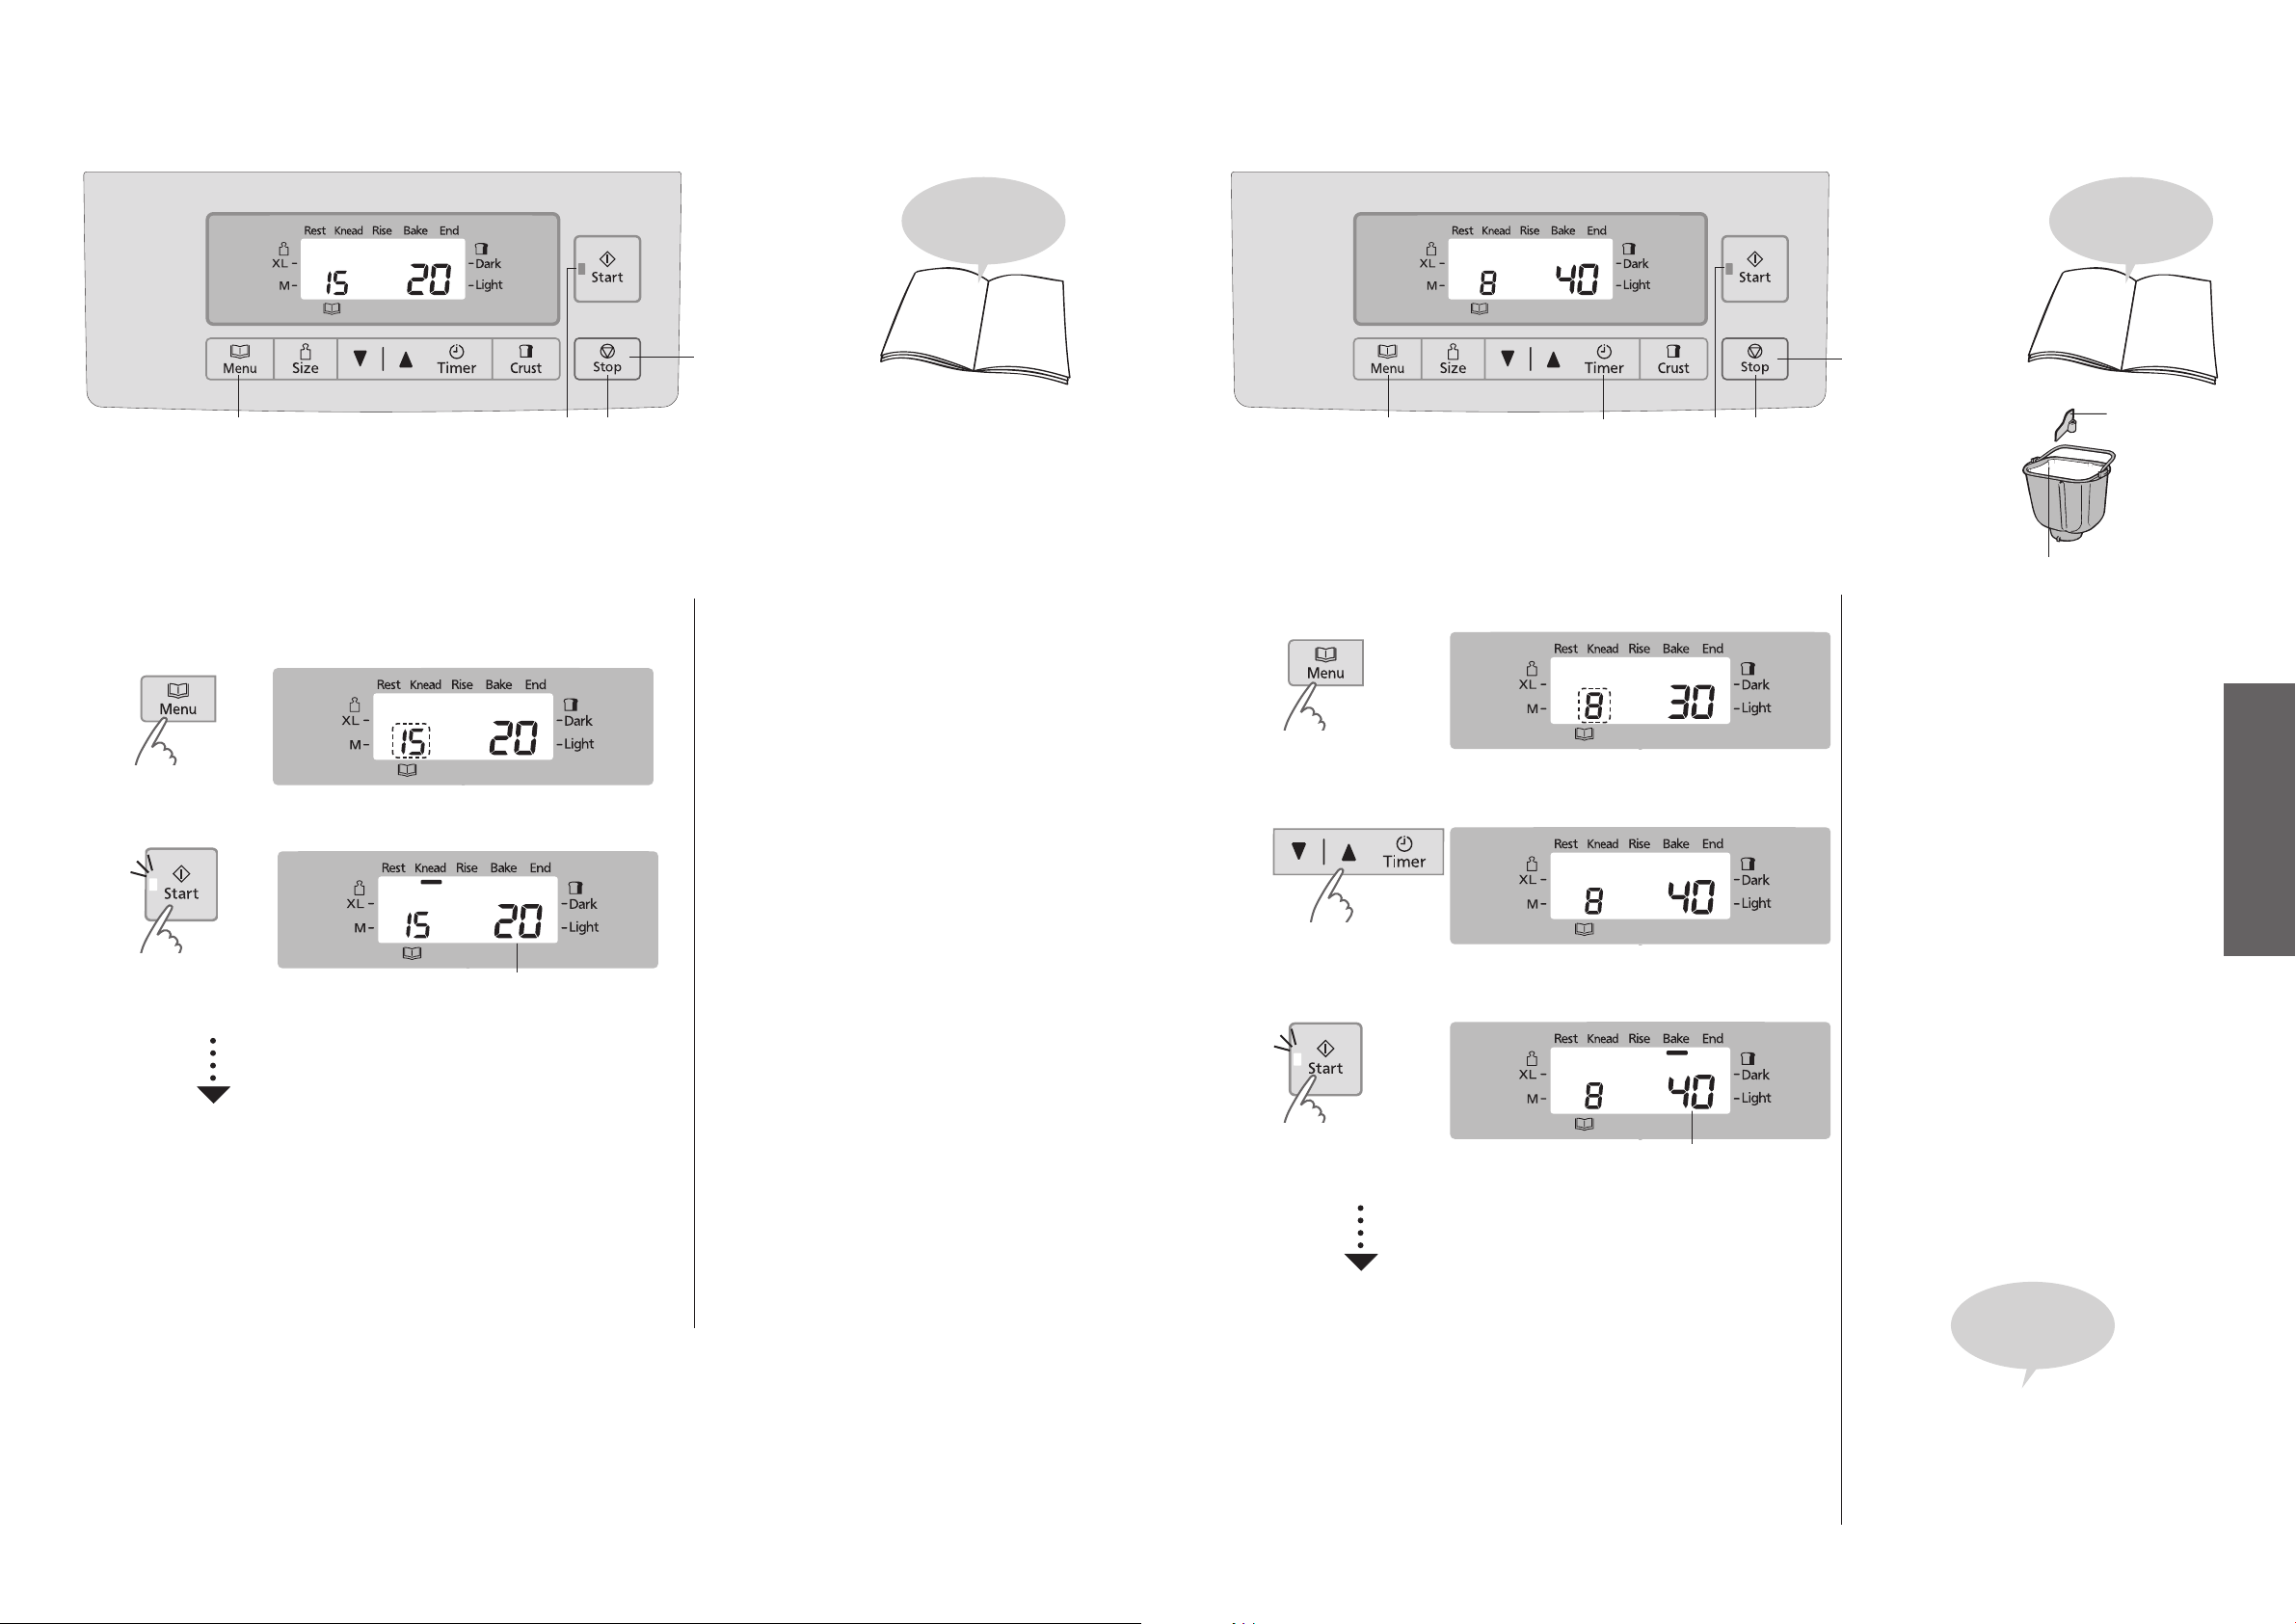
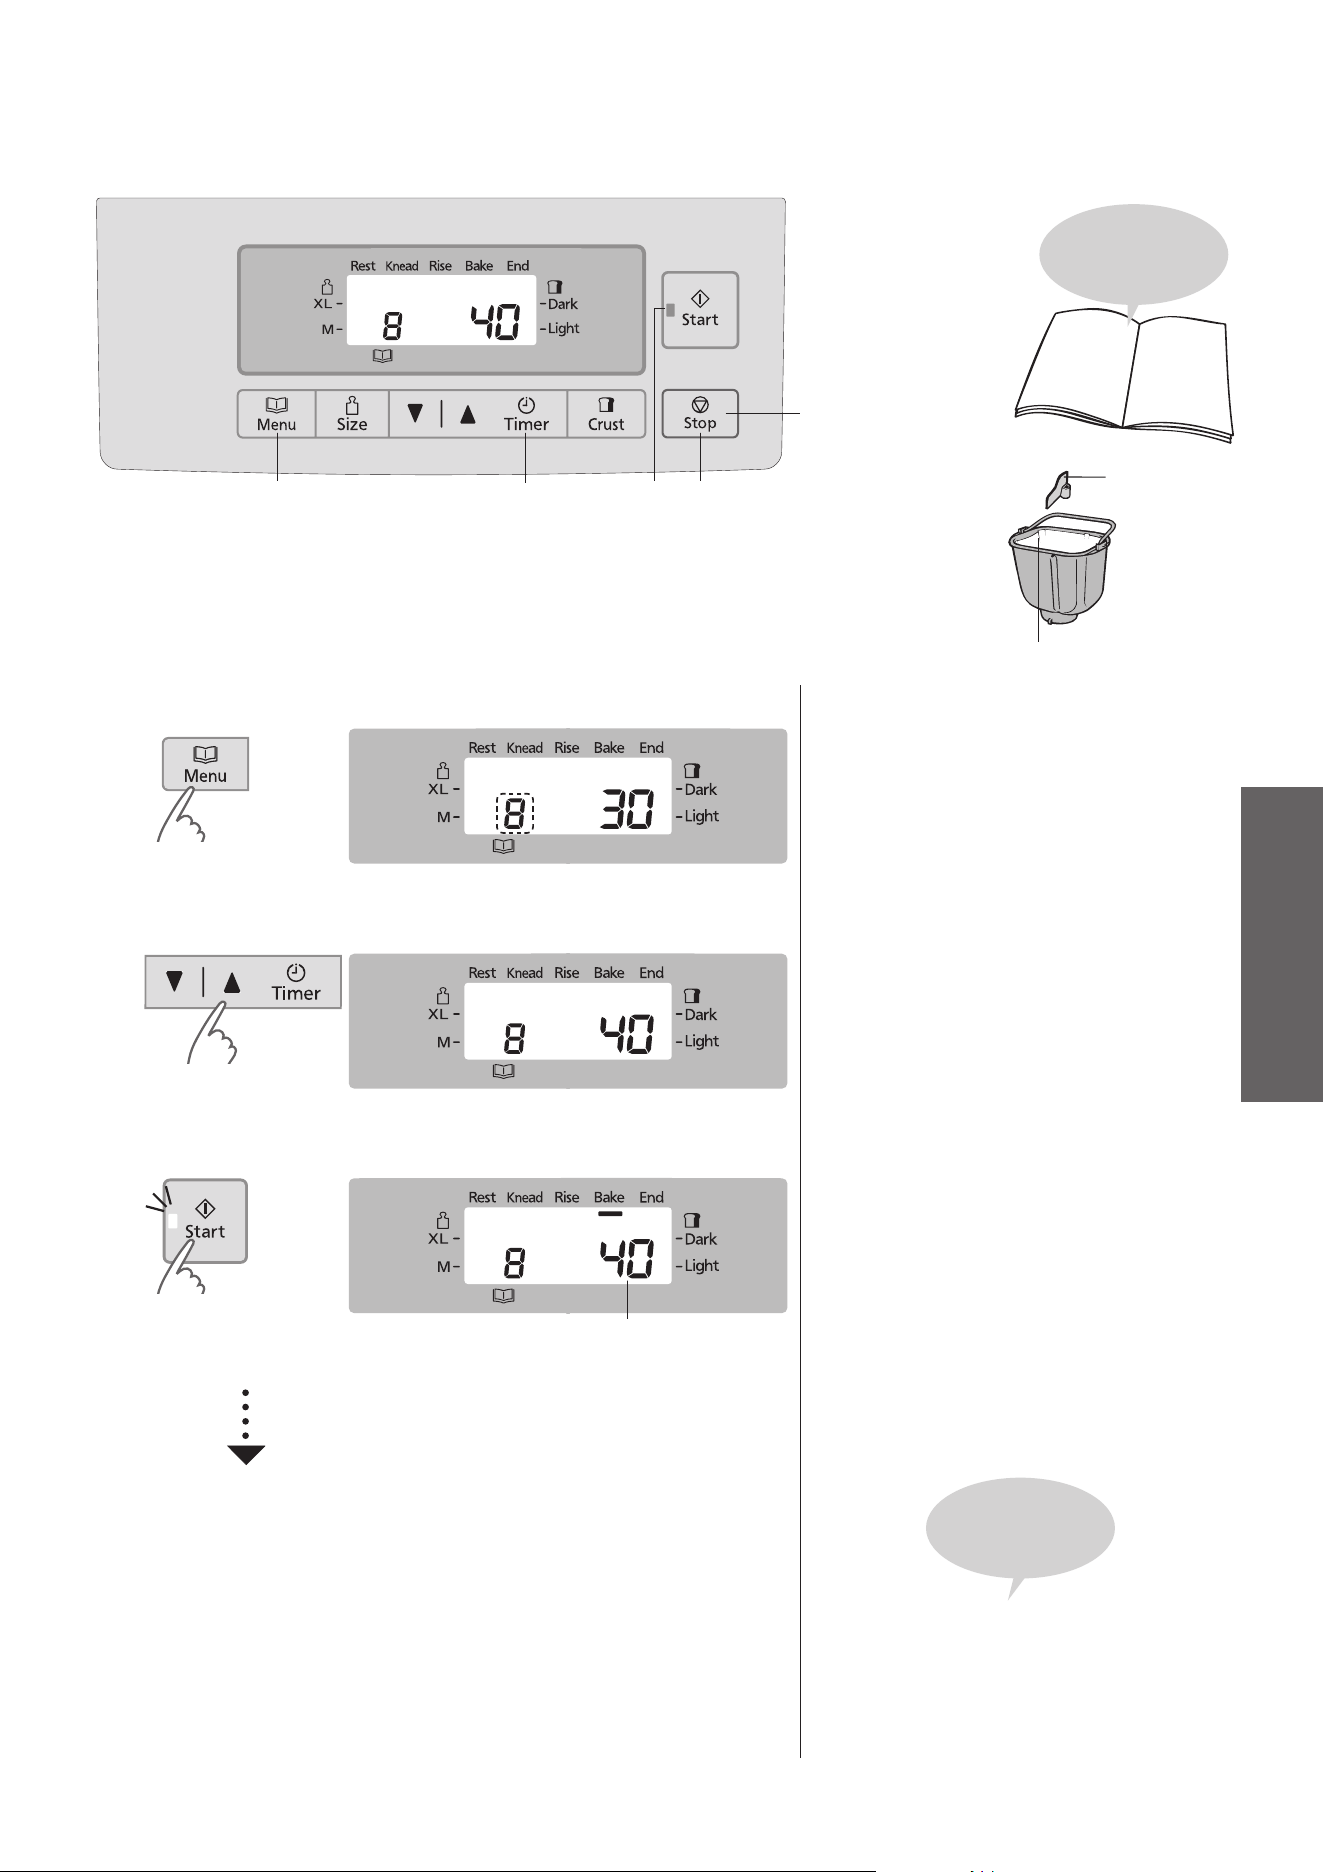
Baking Cake
1
4
2
3
Turn to P. EN23 for
cake recipe
n
To cancel/stop once
started
(hold for more than
1 second)
Preparations
(P. EN12)
1
Prepare the ingredients according to the recipe.
2
Line the bread pan with a waxed baking paper and pour in the mixed ingredients.
3
Set the bread pan into the main unit, and plug the breadmaker into the outlet.
1
Select menu ‘8’
Timer is not available on menu 8.
(The Timer button only sets the duration of the
baking time.)
2
Set the baking time
You cannot use the timer function for menu 8.
(This key only sets the duration of the baking
time.)
3
Start the machine
Estimated time until the selected program is complete
The start light will come on.
4
Press ‘Stop’ when the machine beeps and the bar at ‘End’ flashes,
check that baking is complete, and
remove the bread pan
The flashing start light will go off.
n
If baking is not complete
Repeat steps 1–3
(Additional cooking time can be made up to twice.
Each time should be within 50 minutes.
The timer will start again from 1 minute when the unit is hot. Increase the
time by pressing the timer button as required.)
Be careful!
It’s hot!
To check whether baking is complete, insert a
skewer into the center of the cake or tea bread – it
is ready if there is no mixture stuck to the skewer
when you remove it.
•
Line with a waxed baking paper.
(Cake or teabread will burn if
directly touches the bread pan.)
•
Remove the
kneading blade
delete
EN16 EN17
English
Making Pasta
1
32
Turn to P. EN22 for
dough recipes
n
To cancel/stop once
started
(hold for more than 1 second)
Preparations
(P. EN12)
1
Place the kneading blade into the bread pan.
2
Insert the ingredients in the bread pan in the order listed in the recipe.
3
Set the bread pan into the main unit, and plug the breadmaker into the outlet.
1
Select menu ‘15’
(The display shows when menu ‘15’ is selected.)
Timer is not available on menu 15.
2
Start the machine
Estimated time until the selected program is complete
The start light will come on.
3
Press ‘Stop’ and remove dough
when machine beeps 8 times
4
Wrap the dough in the plastic wrap and
Rest the dough
Rest the dough for 1 hour in the refrigerator.
Baking Cake
1
4
2
3
Turn to P. EN23 for
cake recipe
n
To cancel/stop once
started
(hold for more than
1 second)
Preparations
(P. EN12)
1
Prepare the ingredients according to the recipe.
2
Line the bread pan with a waxed baking paper and pour in the mixed ingredients.
3
Set the bread pan into the main unit, and plug the breadmaker into the outlet.
1
Select menu ‘8’
Timer is not available on menu 8.
(The Timer button only sets the duration of the
baking time.)
2
Set the baking time
You cannot use the timer function for menu 8.
(This key only sets the duration of the baking
time.)
3
Start the machine
Estimated time until the selected program is complete
The start light will come on.
4
Press ‘Stop’ when the machine beeps and the bar at ‘End’ flashes,
check that baking is complete, and
remove the bread pan
The flashing start light will go off.
n
If baking is not complete
Repeat steps 1–3
(Additional cooking time can be made up to twice.
Each time should be within 50 minutes.
The timer will start again from 1 minute when the unit is hot. Increase the
time by pressing the timer button as required.)
Be careful!
It’s hot!
To check whether baking is complete, insert a
skewer into the center of the cake or tea bread – it
is ready if there is no mixture stuck to the skewer
when you remove it.
•
Line with a waxed baking paper.
(Cake or teabread will burn if
directly touches the bread pan.)
•
Remove the
kneading blade
delete
EN18 EN19
English
Recipes
●Formenu3or4: Addextra
3
⁄4 tsp of dry yeast and only XL size add extra 20 mL (
3
⁄4 oz.) of water or other
liquid on top of that.
●C=cup(s),tsp=teaspoon(s),tbsp=tablespoon(s)
Measure the ingredients accurately.
Accurate measurement is essential in achieving good baking results. Weighing the ingredients would be more accurate than measuring them in
cups. This is why in this book’s recipes, many ingredients are given in weight as well as in cup/spoon measurements.
The only ingredients that may be appropriate in measuring by volume, that is, by cups and spoons, are liquids and very small quantities of dry
ingredients, such as the yeast and spices. These are difficult to weigh by a kitchen scale. Even in such instances, measure the amount
accurately by scooping the ingredients in the measuring cup or the spoon of the desired size until the measure is more than full.
Level the top with the straight edge of a metal spatula to remove the excess. Do not tap the bottom of the cup or spoon on the table to hold
another scoop.
Correct way to use a measuring cup.
(Use store-bought measuring cup for
flour.)
1
2
Scoop the ingredient until the cup is
more than full.
Level the top with the straight edge of
a metal spatula to remove the excess.
Bread
[1 Basic] [2 Basic Rasin nut] [3 Basic Rapid] [4 Basic Rapid Rasin nut]
Basic White Bread
select menu ‘1’
XL M
Bread flour 600 g/21 oz. (4
1
⁄4 C) 400 g/14
1
⁄10 oz. (2
7
⁄8 C)
Salt 2 tsp 1
1
⁄2 tsp
Dry milk 3 tbsp 2 tbsp
Butter 3 tbsp 2 tbsp
Sugar 2 tbsp 1
1
⁄2 tbsp
Water 400 mL/13
1
⁄2 oz./1
11
⁄16 C 270 mL/9
1
⁄10 oz./1
1
⁄8 C
Dry yeast
3
⁄4 tsp
3
⁄4 tsp
( ): measurements not as precise as weight measurements.
Basic White Rapid Bread
select menu ‘3’
XL M
Bread flour 600 g/21 oz. (4
1
⁄4 C) 400 g/14
1
⁄10 oz. (2
7
⁄8 C)
Salt 2 tsp 1
1
⁄2 tsp
Dry milk 3 tbsp 2 tbsp
Butter 3 tbsp 2 tbsp
Sugar 2 tbsp 1
1
⁄2 tbsp
Water 400 mL/13
1
⁄2 oz./1
11
⁄16 C 270 mL/9
1
⁄10 oz./1
1
⁄8 C
Dry yeast 1
1
⁄2 tsp 1
1
⁄2 tsp
( ): measurements not as precise as weight measurements.
Basic Raisin Bread
select menu ‘2’ or ‘4’
XL M
Bread flour 600 g/21 oz. (4
1
⁄4 C) 400 g/14
1
⁄10 oz. (2
7
⁄8 C)
Salt 2 tsp 1
1
⁄2 tsp
Dry milk 3 tbsp 2 tbsp
Butter 3 tbsp 2 tbsp
Sugar 2 tbsp 1
1
⁄2 tbsp
Cinnamon 1
1
⁄2 tsp 1 tsp
Water 400 mL/13
1
⁄2 oz./1
11
⁄16 C 280 mL/9
1
⁄2 oz./1
3
⁄16 C
Dry yeast [menu 2]
3
⁄4 tsp
3
⁄4 tsp
Dry yeast [menu 4] 1
1
⁄2 tsp 1
1
⁄2 tsp
*Raisin 120 g/4.2 oz. 85 g/3 oz.
( ): measurements not as precise as weight measurements.
●Ifyoufindthattheraisinsdonotgetmixedintothedoughbutremainburntonthe
surface of the loaf and then come off after being baked, add 1–2 tablespoons of
water to make the dough softer the next time.
Carrot Spice Bread
select menu ‘1’ or ‘3’
XL M
Bread flour 600 g/21 oz. (4
1
⁄4 C) 400 g/14
1
⁄10 oz. (2
7
⁄8 C)
Salt 2 tsp 1
1
⁄2 tsp
Dry milk 3 tbsp 2 tbsp
Butter 3 tbsp 2 tbsp
Carrot, grated 55 g (
1
⁄4 C) 2 tbsp
Allspice 4 tsp 2 tsp
Honey 2 tbsp 1
1
⁄2 tbsp
Water 350 mL/11
4
⁄5 oz./1
7
⁄16 C 240 mL/8
1
⁄10 oz./1 C
Dry yeast [menu 1]
3
⁄4 tsp
3
⁄4 tsp
Dry yeast [menu 3] 1
1
⁄2 tsp 1
1
⁄2 tsp
( ): measurements not as precise as weight measurements.
Cranberry Bread
select menu ‘1’ or ‘3’
XL M
Bread flour 600 g/21 oz. (4
1
⁄4 C) 400 g/14
1
⁄10 oz. (2
7
⁄8 C)
Salt 2 tsp 1
1
⁄2 tsp
Dry milk 3 tbsp 2 tbsp
Butter 3 tbsp 2 tbsp
Sugar 2 tbsp 1
1
⁄2 tbsp
Cranberry juice 180 mL/6
1
⁄10 oz./
3
⁄4 C 120 mL/4
1
⁄10 oz./
1
⁄2 C
Water 220 mL/7
1
⁄2 oz./
15
⁄16 C 150 mL/5
1
⁄10 oz./
5
⁄8 C
Dry yeast [menu 1]
3
⁄4 tsp
3
⁄4 tsp
Dry yeast [menu 3] 1
1
⁄2 tsp 1
1
⁄2 tsp
( ): measurements not as precise as weight measurements.
Spicy Cheese
select menu ‘1’ or ‘3’
XL M
Bread flour 600 g/21 oz. (4
1
⁄4 C) 400 g/14
1
⁄10 oz. (2
7
⁄8 C)
Salt 2 tsp 1
1
⁄2 tsp
Dry milk 3 tbsp 2 tbsp
Sugar 2 tbsp 1
1
⁄2 tbsp
Dry mustard 2 tsp 1 tsp
Black pepper
1
⁄2 tsp
1
⁄4 tsp
Butter 3 tbsp 2 tbsp
Provolone cheese, chopped 60 g (
3
⁄8 C) 30 g (
3
⁄16 C)
Worcester sauce 2 tbsp 1 tbsp
Water 400 mL/13
1
⁄2 oz./1
11
⁄16 C 270 mL/9
1
⁄10 oz./1
1
⁄8 C
Dry yeast [menu 1]
3
⁄4 tsp
3
⁄4 tsp
Dry yeast [menu 3] 1
1
⁄2 tsp 1
1
⁄2 tsp
( ): measurements not as precise as weight measurements.
●Foradditionofingredientswith*,followprogramminginstructionsonP.EN15.
Bread
Fruit Nut Bran Bread
select menu ‘2’ or ‘4’
XL M
Bread flour 600 g/21 oz. (4
1
⁄4 C) 400 g/14
1
⁄10 oz. (2
7
⁄8 C)
Salt 2 tsp 1
1
⁄2 tsp
Dry milk 3 tbsp 2 tbsp
Butter 3 tbsp 2 tbsp
Sugar 2 tbsp 1
1
⁄2 tbsp
Bran Flakes 20 g (
1
⁄4 C) 10 g (
1
⁄8 C)
Sliced Almonds 30 g (
3
⁄8 C) 20 g (
1
⁄4 C)
Water 400 mL/13
1
⁄2 oz./1
11
⁄16 C 280 mL/9
1
⁄2 oz./1
3
⁄16 C
Dry yeast [menu 2]
3
⁄4 tsp
3
⁄4 tsp
Dry yeast [menu 4] 1
1
⁄2 tsp 1
1
⁄2 tsp
*Dried fruit bits 100 g/3
1
⁄2 oz. 55 g/2 oz.
( ): measurements not as precise as weight measurements.
Milk Bread
select menu ‘1’ or ‘3’
XL M
Bread flour 600 g/21 oz. (4
1
⁄4 C) 400 g/14
1
⁄10 oz. (2
7
⁄8 C)
Salt 2 tsp 1
1
⁄2 tsp
Dry milk 3 tbsp 2 tbsp
Butter 3 tbsp 2 tbsp
Sugar 2 tbsp 1
1
⁄2 tbsp
Milk 400 mL/13
1
⁄2 oz./1
11
⁄16 C 270 mL/9
1
⁄10 oz./1
1
⁄8 C
Dry yeast [menu 1]
3
⁄4 tsp
3
⁄4 tsp
Dry yeast [menu 3] 1
1
⁄2 tsp 1
1
⁄2 tsp
( ): measurements not as precise as weight measurements.
Pepperoni & Cheese Bread
select menu ‘1’ or ‘3’
XL M
Bread flour 600 g/21 oz. (4
1
⁄4 C) 400 g/14
1
⁄10 oz. (2
7
⁄8 C)
Salt 2 tsp 1
1
⁄2 tsp
Dry milk 3 tbsp 2 tbsp
Sugar 2 tbsp 1
1
⁄2 tbsp
Pepperoni, finely chopped 110 g/4 oz. 55 g/2 oz.
Provolone cheese, chopped 60 g (
3
⁄8 C) 20 g (
1
⁄8 C)
Parmesan cheese, grated 18 g (
3
⁄16 C) 6 g (
1
⁄16 C)
Garlic powder
1
⁄2 tsp
1
⁄4 tsp
Onion powder
1
⁄2 tsp
1
⁄4 tsp
Oregano
1
⁄4 tsp
1
⁄4 tsp
Olive oil 1 tbsp 1 tsp
Water 400 mL/13
1
⁄2 oz./1
11
⁄16 C 270 mL/9
1
⁄10 oz./1
1
⁄8 C
Dry yeast [menu 1]
3
⁄4 tsp
3
⁄4 tsp
Dry yeast [menu 3] 1
1
⁄2 tsp 1
1
⁄2 tsp
( ): measurements not as precise as weight measurements.
Zucchini
select menu ‘2’ or ‘4’
XL M
Bread flour 600 g/21 oz. (4
1
⁄4 C) 400 g/14
1
⁄10 oz. (2
7
⁄8 C)
Salt 2 tsp 1
1
⁄2 tsp
Dry milk 3 tbsp 2 tbsp
Sugar 2 tbsp 1
1
⁄2 tbsp
Cinnamon 2 tsp 1 tsp
Cloves powder 1 tsp
1
⁄4 tsp
Butter 2
1
⁄2 tbsp 1
1
⁄2 tbsp
Zucchini, grated 65 g (
5
⁄16 C) 40 g (
3
⁄16 C)
Water 360 mL/12 oz./1
1
⁄2 C 250 mL/8
1
⁄2 oz./1
1
⁄16 C
Dry yeast [menu 2]
3
⁄4 tsp
3
⁄4 tsp
Dry yeast [menu 4] 1
1
⁄2 tsp 1
1
⁄2 tsp
*Walnut, finely chopped 30 g/1 oz. 20 g/0.7 oz.
( ): measurements not as precise as weight measurements.
30% Whole Wheat Bread
select menu ‘1’
XL M
Whole wheat flour 180 g/6
1
⁄4 oz. (1
1
⁄4 C) 125 g/4
1
⁄4 oz. (
7
⁄8 C)
Bread flour 430 g/15
1
⁄4 oz. (3
1
⁄8 C) 295 g/10
1
⁄2 oz. (2
1
⁄8 C)
Salt 2 tsp 1
1
⁄2 tsp
Dry milk 3 tbsp 2 tbsp
Butter 2
1
⁄2 tbsp 1
1
⁄2 tbsp
Molasses 2 tbsp 1
1
⁄2 tbsp
Water 380 mL/12
3
⁄4 oz./1
9
⁄16 C 280 mL/9
1
⁄2 oz./1
3
⁄16 C
Dry yeast 1
1
⁄4 tsp 1 tsp
( ): measurements not as precise as weight measurements.
30% Whole Wheat Honey Walnut Bread
select menu ‘2’
XL M
Whole wheat flour 180 g/6
1
⁄4 oz. (1
1
⁄4 C) 125 g/4
1
⁄4 oz. (
7
⁄8 C)
Bread flour 430 g/15
1
⁄4 oz. (3
1
⁄8 C) 295 g/10
1
⁄2 oz. (2
1
⁄8 C)
Salt 2 tsp 1
1
⁄2 tsp
Dry milk 3 tbsp 2 tbsp
Butter 2
1
⁄2 tbsp 1
1
⁄2 tbsp
Honey 2 tbsp 1
1
⁄2 tbsp
Water 380 mL/12
3
⁄4 oz./1
9
⁄16 C 280 mL/9
1
⁄2 oz./1
3
⁄16 C
Dry yeast 1
1
⁄4 tsp 1 tsp
*Walnut, finely chopped 50 g/1.7 oz. 25 g/0.8 oz.
( ): measurements not as precise as weight measurements.
30% Whole Wheat Raisin & Apricot Bread
select menu ‘2’
XL M
Whole wheat flour 180 g/6
1
⁄4 oz. (1
1
⁄4 C) 125 g/4
1
⁄4 oz. (
7
⁄8 C)
Bread flour 430 g/15
1
⁄4 oz. (3
1
⁄8 C) 295 g/10
1
⁄2 oz. (2
1
⁄8 C)
Salt 2 tsp 1
1
⁄2 tsp
Dry milk 3 tbsp 2 tbsp
Butter 2
1
⁄2 tbsp 1
1
⁄2 tbsp
Molasses 2 tbsp 1
1
⁄2 tbsp
Water 380 mL/12
3
⁄4 oz./1
9
⁄16 C 280 mL/9
1
⁄2 oz./1
3
⁄16 C
Dry yeast 1
1
⁄4 tsp 1 tsp
*Raisin 60 g/2.2 oz. 40 g/1.5 oz.
*Dried apricot (diced) 60 g/2.2 oz. 40 g/1.5 oz.
( ): measurements not as precise as weight measurements.
●Ifyoufindthattheraisinsdonotgetmixedintothedoughbutremainburntonthe
surface of the loaf and then come off after being baked, add 1–2 tablespoons of
water to make the dough softer the next time.
[5 French]
French Bread
select menu ‘5’
Bread flour 420 g/14
3
⁄4 oz. (3 C)
Salt 1
1
⁄2 tsp
Butter 1 tbsp
Water 310 mL/10
1
⁄2 oz./1
5
⁄16 C
Dry yeast
3
⁄4 tsp
( ): measurements not as precise as weight measurements.
●Foradditionofingredientswith*,followprogramminginstructionsonP.EN15.
EN20 EN21
English
Recipes ●C=cup(s),tsp=teaspoon(s),tbsp=tablespoon(s)
Dough
[9 Basic]
Dinner Roll (Yield 18)
select menu ‘9’
Bread flour 455 g/16 oz. (3
1
⁄4 C)
Sugar 50 g (
1
⁄4 C)
Salt 1
1
⁄2 tsp
Dry milk 3 tbsp
Butter or margarine 3 tbsp
Water 230 mL/7
3
⁄4 oz./
15
⁄16 C
Dry yeast 1
1
⁄2 tsp
Egg, beaten for brushing on top 1
Poppy seeds for sprinkling on top (optional)
3
⁄4 tbsp
Sesame seeds for sprinkling on top (optional)
3
⁄4 tbsp
Variation: Whole Wheat Dinner Rolls
Replace 1 cup bread flour with whole wheat flour.
( ): measurements not as precise as weight measurements.
1
Make the dough according to instructions on P. EN14.
2
Divide the dough into 18 equal portions.
Roll each portion into a ball. Cover with
a plastic wrap and rest for 20 minutes.
3
Roll one end of the ball on a lightly floured surface to make a
cone.
4
Roll each cone into a wedge shape, approximately 6 mm
(
1
⁄4 inch) thick, using a rolling pin.
5
Starting with the wider end, roll up the wedge loosely towards
the narrower end.
6
Place seam side down on a greased baking pan.
7
Spray water on top. Proof at 32°C/90°F
for 30–50 minutes or until nearly
doubled.
8
Brush rolls with beaten egg, sprinkle with poppy seeds or
sesame seeds if desired.
9
Bake in a 175°C/350°F oven for 10–15 minutes or until golden
brown.
Croissant (Yield 18)
select menu ‘9’
Bread flour 455 g/16 oz. (3
1
⁄4 C)
Sugar 2 tbsp
Dry milk 3 tbsp
Salt 1
1
⁄2 tsp
Water 240 mL/8 oz./1 C
Dry yeast 2 tsp
Butter or margarine 2 tbsp
Butter or margarine, chilled for folding in the dough 199 g/7 oz.
Egg, beaten for brushing on top 1
( ): measurements not as precise as weight measurements.
1
Make the dough according to instructions on P. EN14.
2
Place the dough in a greased bowl. Cover it with a plastic wrap.
Rest the dough in the refrigerator for 30 minutes.
3
Roll 7 oz. of chilled butter between two
sheets of plastic wrap into a 25
18 cm
(10
7 inches) rectangle. Place back in
the refrigerator Chill at least 1 hour.
4
Roll out the dough on a lightly floured surface into a 30 cm
(12 inches) square.
5
Place the rolled out butter over two–
thirds of the dough. Fold the third without
butter over the center third.
6
Fold the remaining third on top. Seal edges. Rest the dough in
the refrigerator for 20–30 minutes.
7
Place the dough at right angles to the
previous position in step 5. Roll out into
30 cm (12 inches) square. Fold into
thirds. Cover them with a plastic wrap
and place into refrigerator for
20–30 minutes.
Fold and roll twice more. Wrap and chill after each rolling.
After the final folding, chill several hours or overnight.
8
Roll out the dough and divide into 9 squares. Cut each square
into two triangles.
9
Roll up each triangle loosely, starting
from the side opposite the point. Curve
ends.
10
Place seam side down on a greased
baking pan. Spray water on top. Proof at
32°C/90°F for 30–50 minutes or until
nearly doubled.
11
Brush them with a beaten egg. Bake in a
175°C/350°F oven for 10–15 minutes or until golden brown.
[11 French]
Baguette (French sticks ) (Yield 2)
select menu ‘11’
Bread flour 420 g/14
3
⁄4 oz. (3 C)
Sugar 1 tbsp
Salt 1
1
⁄2 tsp
Dry milk 1 tbsp
Butter 1 tbsp
Water 260 mL/8
3
⁄4 oz./1
1
⁄16 C
Dry yeast 1
1
⁄4 tsp
Poppy seeds for sprinkling on top (optional) 3 tbsp
( ): measurements not as precise as weight measurements.
1
Make the dough according to instructions on P. EN14.
2
Divide the dough into 2 equal portions. Roll each portion into a
ball.
3
Place the dough in a greased bowl. Cover it with a plastic wrap.
Rest for about 20 minutes. (Place in the refrigerator during the
summer time.)
4
Roll each ball into a rectangle, using a rolling pin.
5
Starting at one short edge, roll the dough up tightly into a thin
log, pinching the edges to seal. Taper and round ends.
6
Place on a greased baking pan. Spray water on top. Proof at
32°C/90°F for 60 minutes or until nearly doubled.
7
Brush with water. With a sharp knife, make 3 or 4 diagonal cuts
about 6 mm (
1
⁄4 inch) deep across top of the logs.
8
Sprinkle with poppy seeds if desired.
9
Bake in a 190°C/375°F oven for 25–30 minutes or until golden
brown.
If your oven allows for steaming, bake with steam for the first
10 minutes.
[13 Pizza]
Pizza
select menu ‘13’
Ingredients: Makes 6 small or 2 large
Bread flour 475 g/16
3
⁄4 oz. (3
3
⁄8 C)
Milk powder 1 tbsp
Sugar 1
3
⁄4 tbsp
Salt 1 tsp
Butter 1 tbsp
Water 340 mL/11
1
⁄2 oz./1
7
⁄16 C
Dry yeast 1 tsp
2
⁄3 cup tomato paste for brushing on top, 3 cups Mozzarella cheese for
sprinkling on top
( ): measurements not as precise as weight measurements.
1
Make the dough according to instructions on P. EN14.
2
Knead dough on a lightly floured surface until it becomes elastic
and springs back when touched.
3
Divide into 6 balls or 2 large balls, and place in warm area for
10 minutes.
4
Shape each ball into a flat circle. Place the circles on a baking
pan and prick with a fork.
5
Let rest for 15 minutes at room temperature.
6
Brush each circle with 2 tablespoons tomato paste. Sprinkle with
Mozzarella cheese. Top with your favorite topping, such as sliced
onions, pepperoni, proscuitto ham, olives.
7
Bake in a preheated 170°C/340°F oven for 15–20 minutes.

EN22 EN23
English
Recipes ●C=cup(s),tsp=teaspoon(s),tbsp=tablespoon(s)
Dough
[13 Pizza]
Focaccia
select menu ‘13’
Ingredients: Makes 1 large
Bread flour 475 g/16
3
⁄4 oz. (3
3
⁄8 C)
Milk powder 2 tbsp
Sugar 2 tbsp
Salt 2 tsp
Olive oil 2 tbsp
Water 330 mL/11 oz./1
3
⁄8 C
Dry yeast 2 tsp
Topping:
Olive oil 4 tbsp
Fine sea salt 1 tbsp
Dried oregano 2 tsp
Dried basil 2 tsp
(1 cup bread flour, extra for kneading)
Optional: Olives (canned) 30 g/1 oz.
Dry and chop before inserting in the raisin nut dispenser
( ): measurements not as precise as weight measurements.
1
Make the dough according to instructions on P. EN14.
2
Knead dough on a lightly floured surface until it becomes elastic
and springs back when touched.
3
Shape into a flat circle, place on a baking pan, make holes with
the end of a wooden spoon 5 cm (2 inches) apart over the
surface of the dough.
4
Cover it with a plastic wrap and let rest in a warm place for
20–25 minutes until almost doubled in size.
5
Brush surface with olive oil, sprinkle with sea salt, oregano and
basil.
6
Bake in a preheated 170°C/340°F oven for 26–30 minutes.
[15 Pasta]
Basic Egg Pasta
select menu ‘15’
Bread flour 450 g/15
3
⁄4 oz. (3
1
⁄4 C)
Eggs 3
*Water combined with the egg total 260 mL/8
3
⁄4 oz./1
1
⁄16 C
Salt 1
1
⁄2 tsp
Olive oil 2 tsp
Optional: Black pepper (powder)
1
⁄2 tsp
Insert in the raisin nut dispenser
*use tepid water when room temperature lower than 20°C/70°F
*mix eggs and water and salt well beforehand
1
Make the dough according to instructions on P. EN16.
2
Wrap the dough in a plastic wrap and rest for 1 hour in the
refrigerator.
3
Lightly floured on the surface of dough, roll out dough to 1 mm
(
1
⁄16 inch) thickness.
4
Cut it into the width of 3 mm (
1
⁄8 inch) or 5 mm (
3
⁄16 inch).
5
Boil them in boiling hot water for 3–4 minutes.
6
Drain the pasta, and toss the noodles with your favorite sauce.
Spinach Pasta
select menu ‘15’
Bread flour 450 g/15
3
⁄4 oz. (3
1
⁄4 C)
Eggs 3
*Water combined with the egg total 210 mL/7 oz./
7
⁄8 C
Salt 1
1
⁄2 tsp
**Spinach paste 3 tbsp
Olive oil 1 tbsp
*use tepid water when room temperature is lower than 20°C/70°F
*mix eggs and water and salt well beforehand
**boiled and mashed
Tomato Pasta
select menu ‘15’
Bread flour 450 g/15
3
⁄4 oz. (3
1
⁄4 C)
Eggs 3
*Water combined with the egg total 210 mL/7 oz./
7
⁄8 C
Salt 1
1
⁄2 tsp
Tomato puree 3 tbsp
Olive oil 1 tbsp
*use tepid water when room temperature is lower than 20°C/70°F
*mix eggs and water and salt well beforehand
Cake
This program can be used for baking cakes and tea breads. It is not suitable for all types of cake, such as light sponge cakes, Christmas
pudding, or those that require going into a hot oven.
Make sure that the kneading blade is removed from the bread pan and the bottom and sides of the bread pan are lined with a waxed baking
paper before the cake mixture is added.
Ensure that the cake mixture is kept inside the waxed baking paper.
The maximum baking time is 1 hour and 30 minutes.
[8 Bake only]
Banana Tea Loaf
select menu ‘8’
Self raising flour 230 g/8 oz. (1
5
⁄8 C)
Baking soda
1
⁄4 tsp
Salt
1
⁄2 tsp
Butter 85 g/3 oz.
Caster sugar 55 g/2 oz.
Bananas (with skin), peel & mash 500 g (1 lb. 2 oz.)
Medium sized egg, beaten 1
Optional glaze: apricot jam
walnut/banana chips
( ): measurements not as precise as weight measurements.
1
Sieve flour, salt, bicarbonate of soda together into a bowl.
2
Rub the butter into the flour until it resembles fine bread crumbs.
3
Stir in the sugar, bananas and the beaten egg, mix well.
4
Remove the kneading blade from the bread pan and line the
bottom and sides with the waxed baking paper.
5
Insert the mixture into the bread pan, being careful to ensure that
the mixture is inside the waxed baking paper.
6
Select menu 8 and enter 45 minutes on the timer.
7
After baking, test with a skewer to see if the cake is cooked. If
the cake requires extra time, select the bake only program again
and enter a further 3–5 minutes on the timer. If it is still just
slightly sticky, this will cook through during the stand period.
8
Take the bread pan out of the breadmaker using oven mitts and
leave to stand for 5–10 minutes before removing from the bread
pan and allowing to cool.
9
Glaze if desired. Soften the jam, spread over the top of the warm
tea bread, and sprinkle with walnut or banana chips.
Fruit Cake
select menu ‘8’
Mixed dried fruit 340 g/12 oz.
Chopped dates 55 g/2 oz.
Chopped walnuts 55 g/2 oz.
Chopped cherries 110 g/4 oz.
Water 300 mL/10 oz./1
1
⁄4 C
Butter 85 g/3 oz.
Medium sized eggs, beaten 3
Plain flour 255 g/9 oz. (1
13
⁄16 C)
Baking soda 1 tsp
( ): measurements not as precise as weight measurements.
1
Insert the fruit, dates, walnuts, cherries, water and butter
together and heat until the fat has melted and the liquid is hot.
This can be done on the hob or in the microwave oven. (High
power for 4–5 minutes)
2
Allow to cool slightly, then add eggs, flour and the baking soda.
Mix well.
3
Remove the kneading blade from the bread pan and line the
bottom and sides with the waxed baking paper.
4
Insert the mixture into the bread pan, being careful to ensure that
the mixture is inside the waxed baking paper.
5
Select menu 8 and enter 55 minutes on the timer.
6
After baking, test with a skewer to see if the cake is cooked. If
the cake requires extra time, select the bake only program again
and enter a further 3–5 minutes on the timer. If it is still slightly
sticky, this will cook through during the stand period.
7
Take the bread pan out of the breadmaker using oven mitts and
leave to stand for 5–10 minutes before removing from the bread
pan and allowing to cool.
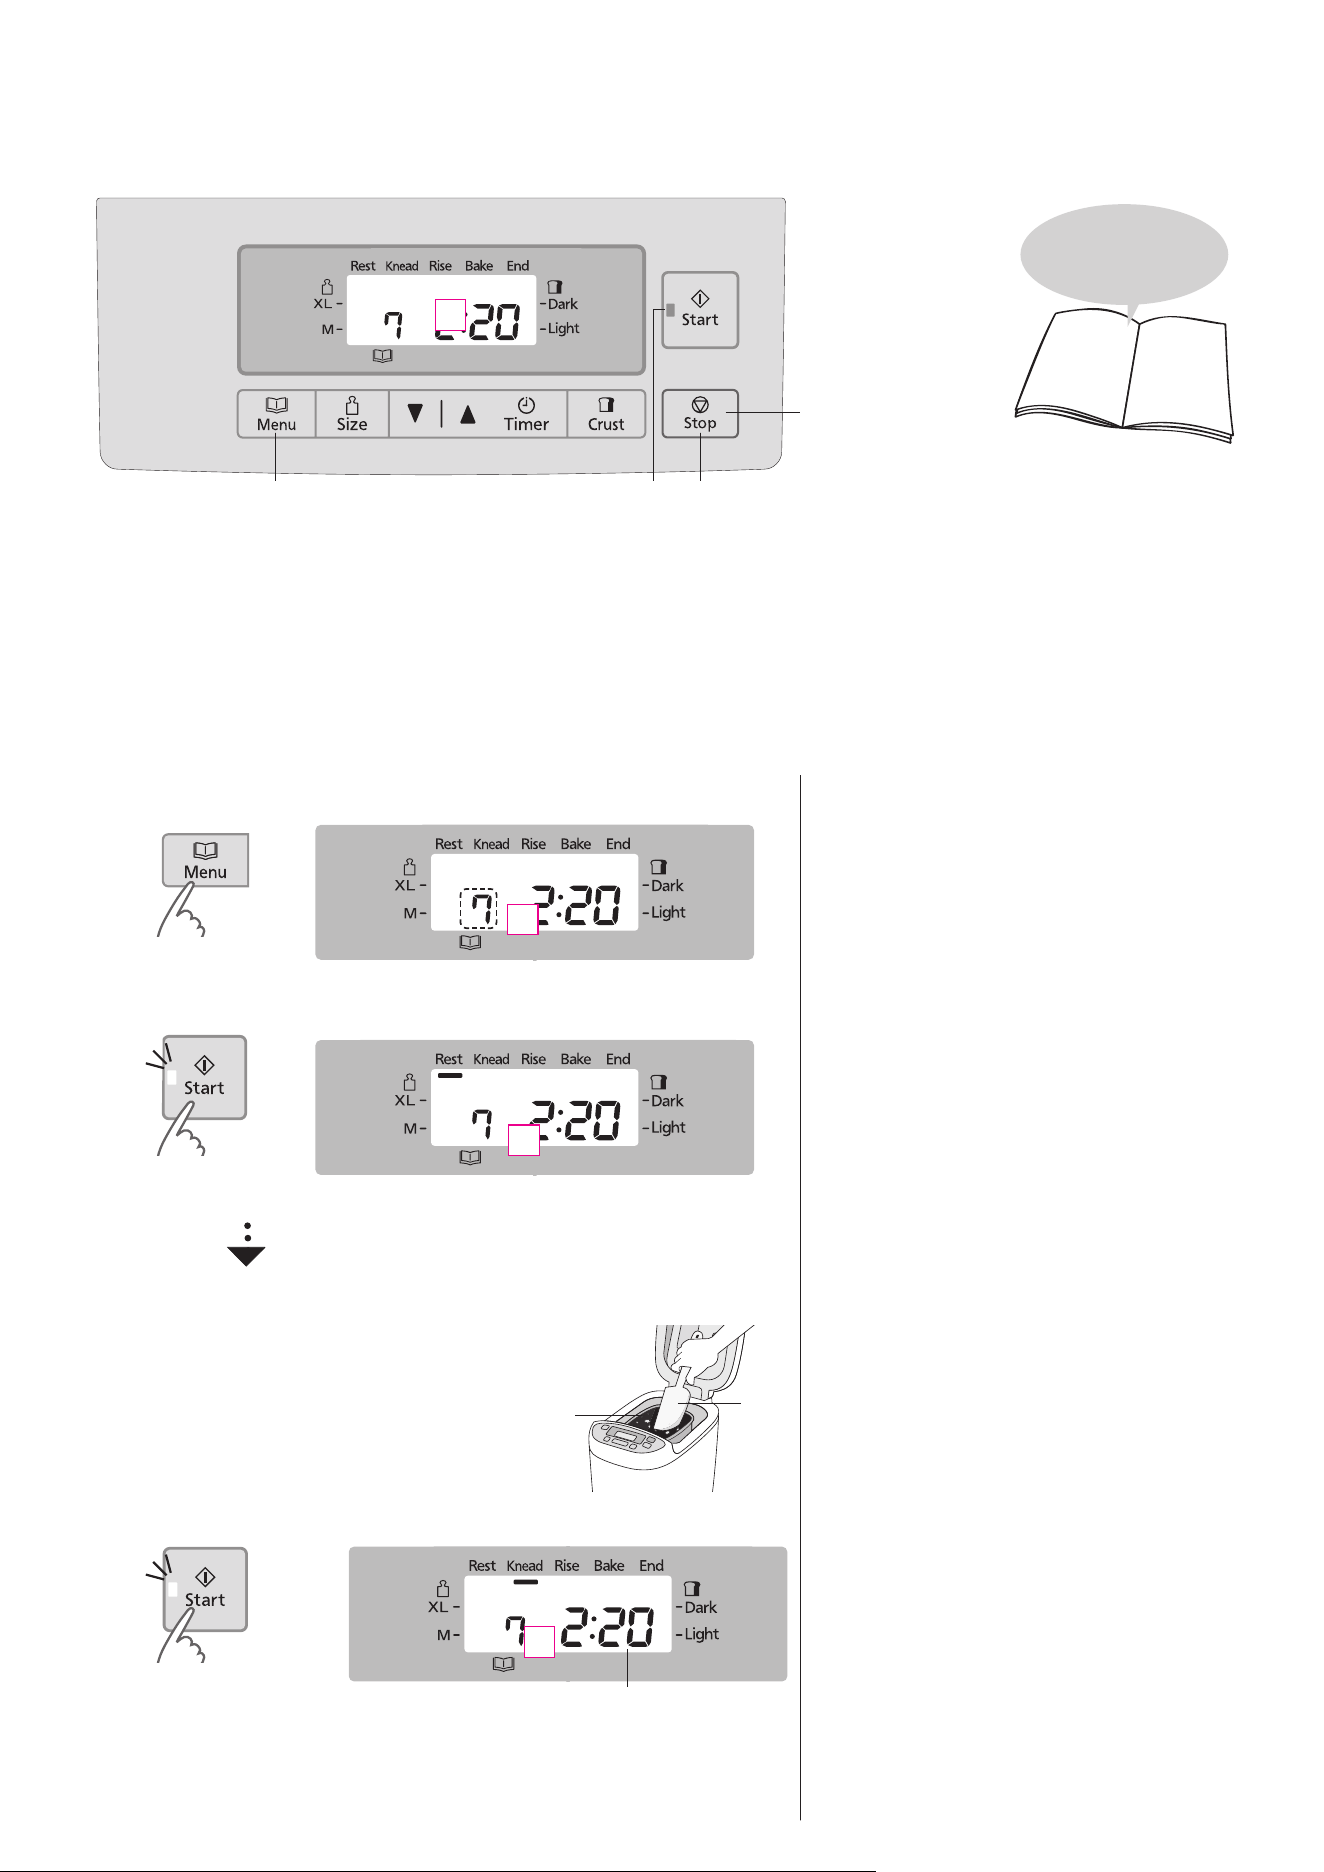
EN24 EN25
English
Gluten Free Recipes
As with all gluten-free cooking, cleaning and hygiene precautions must be taken when using this breadmaker.
To avoid cross contamination (gluten accidentally getting into food during processing, cooking or serving) please take particular care when
washing the bread pan and the kneading blade, etc.
If the breadmaker has been, or is also used, for food which contains gluten, please take all precautions to avoid any cross contamination.
Additional bread pans and kneading blades can be bought via the following:
Customer Care Center: 1-XXX-XXX-XXXX
Directly Online: shop.panasonic.com
(NEED TO CONFIRM IF WE CAN OFFER ADDITIONAL PARTS)
Bread
[7 Gluten Free]
Gluten Free Bread Recipes
select menu ‘7’
<HODGSON>
Warm milk (43 °C/110 °F) 360 mL/8 oz./1
1
⁄2 C
Melted butter 55 g/2 oz./
1
⁄4 C
Egg
2 Whole eggs (Add extra egg white to
equal
2
⁄3 C) 160 g/5
3
⁄5 oz.
Cider vineger 1 tsp
Hodson mix flour 454 g/16 oz. (3
1
⁄4 C)
Dry yeast Enterire packet (6 g/
1
⁄5 oz.)
<Bobʼs Red Mill GLUTEN FREE BREAD MIX>
Milk 400 mL/8 oz./1
2
⁄3 C
Melted butter 55 g/2 oz./
1
⁄4 C
Egg
1 Whole egg (Add extra egg white to
equal
3
⁄4 C) 180 g/6
3
⁄10 oz.
Cider vineger 1 tsp
Hodson mix flour 453 g/16 oz. (3
1
⁄4 C)
Dry yeast Enterire packet (7 g/
1
⁄5 oz.)
( ): measurements not as precise as weight measurements.
Baking Gluten Free Bread
1
52, 4
Turn to P. EN25–EN26
for gluten free recipes
n
To cancel/stop once
started
(hold for more than 1 second)
Preparations
(P. EN12)
1
Have all ingredients at room temperature.
2
Be sure to whisk milk, eggs, melted butter, and vinegar together until very smooth before adding to breadmaker.
3
Place the kneading blade into the bread pan.
Insert the ingredients in the bread pan in the following:
theliquidingredients→flour
Insert the dry yeast in the yeast dispenser.
Set the bread pan into the main unit, and plug the breadmaker into the outlet.
1
Select menu ‘7’
Timer is not available on menu 7.
2
Start the machine
After 2minutes
3
Open the lid, and scrape off the flour
within 5 mimnutes when
the beep sound
Bread
pan
Rubber
spatula
Use the rubber spatula to avoid damaging the
bread pan. Do not use the metal spatula.
After 5 minutes have passed in step 3, the beeps
sound and ‘Knead’ starts automatically.
4
Press ‘Start’ again
Estimated time until the selected program is complete
5
Press ‘Stop’ and remove bread
when machine beeps 8 times and the bar at ‘End’ flashes
仮
仮
仮
仮
仮

EN26 EN27
English
Care & cleaning
Caution:
Unplug your breadmaker and allow it to cool down before cleaning.
To avoid damaging your breadmaker...
Do not use abrasives, such as cleansers,
scouring pads etc.
Do not wash any part of your
breadmaker in the dishwasher.
Do not use benzine, thinners, or alcohol.
After rinsing the washable parts, wipe with cloth.
Always keep the breadmaker parts clean and dry.
• The color of the inside of the machine may
change with use.
Dispenser lid
Remove and wash with water
Open the dispenser lid to approximately
75 degrees to line up connections on
both side and pull it towards you to
remove.
75 degrees
Be careful not to damage the seal.
(Damage could lead to leakage of
steam, condensation, or deformation)
Yeast dispenser
Wipe with a damp cloth and dry naturally.
If wipe with a dry cloth, dry yeast will not
drop into the bread pan due to static.
Bread pan &
kneading blade
Remove any leftover dough and wash with
water.
If it is difficult to remove the kneading
blade, soak in warm water for
5–10 minutes. Do not submerge the
bread pan in water.
Measuring spoon & cup
Wash with water.
Not dishwasher safe
Raisin nut dispenser
Remove and wash with water
Wash after each
use to remove
any residue.
Body, lid and steam vent
Wipe with a damp cloth
Wipe gently to avoid damaging the
temperature sensor.
Temperature
sensor
Gluten Free Recipes
Dough
[14 Gluten-Free Pizza]
Gluten Free Pizza Recipes
select menu ‘14’
<CIA Recipe base> for 4 servings
Water 430 mL/15 oz./1
19
⁄20 C
White rice flour (red mill) 150 g/5
3
⁄10 oz. (1
1
⁄14 C)
Soy flour (red mill) 150 g/5
3
⁄10 oz. (1
1
⁄14 C)
Tapioca flour (red mill) 150 g/5
3
⁄10 oz. (1
1
⁄14 C)
Guar gum 1 tsp
Vegetable oil 3
1
⁄2 tsp
Salt 1 tsp
Dry yeast 1 tsp
<Arranged Recipe 1> for 4 servings
Water 480 mL/17 oz./2 C
White rice flour (red mill) 400 g/14
1
⁄10 oz. (2
6
⁄7 C)
Potato flour (red mill) 71 g/2
1
⁄2 oz. (
1
⁄2 C)
Vegetable oil 1
3
⁄4 tbsp
Salt 1 tsp
Dry yeast 1 tsp
<Arranged Recipe 2> for 4 servings
Water 380 mL/12
3
⁄4 oz./1
5
⁄8 C
White rice flour (red mill) 475 g/16
4
⁄5 oz. (3
5
⁄14 C)
Vegetable oil 1
3
⁄4 tbsp
Salt 1 tsp
Dry yeast 1 tsp
( ): measurements not as precise as weight measurements.
Preparations
1
Mix all flour in a bowl.
2
Place the kneading blade in to the bread pan.
3
Insert the ingredients in the bread pan in the following:
theliquidingredients→flour
Insert the dry yeast in the yeast dispenser.
Set the bread pan into the main unit, and plug the breadmaker
into the outlet.
1
Select menu ‘14’.
2
Make the gluten free pizza according to instruction on P. EN24
Step 2–5.
3
Press out dough using spoon or spatula to two 20 cm (7.9 inch)
circles for thin and crispy base on a greased baking tray.
4
Add topping of your choice and bake in a preheated oven at
220°C/425°F/Gas Mark 7 for 15–20 mins, depending on amount
of topping.
●Tofreezepizzabasesfollowmethodtostep3andbakewithouttoppingsfor
5 mins. Allow to cool, freeze. To use remove from freezer immediately add topping
(not too much) and bake as above step 4.
Margerita
Topping for 1 piece
Tomato sauce 3 tbsp
Mozzarella cheese 100 g/3
1
⁄2 oz.
Piece leaves of the basil 4–8
Anchovy, Olive and Onion
Topping for 1 piece
Tomato sauce 3 tbsp
Grated cheese 80 g/2
4
⁄5 oz.
Anchovy 10 g/
2
⁄5 oz.
Sliced olive 10 g/
2
⁄5 oz.
Sliced onion 20 g/
7
⁄10 oz.
Sliced garlic 5 g/
1
⁄5 oz.
[16 GIuten-Free Pasta]
Gluten Free Pasta Recipes
select menu ‘16’
<CIA Recipe base>
Water 200 mL/7 oz./
4
⁄5 C
Mixed eggs 2 whole eggs
White rice flour (red mill) 220 g/7
4
⁄5 oz. (1
4
⁄7 C)
Potato flour (red mill) 80 g/2
4
⁄5 oz. (
4
⁄7 C)
Tapioca flour (red mill) 100 g/3
1
⁄2 oz. (
5
⁄7 C)
Guar gum 10 g/
2
⁄5 oz.
Vegetable oil 2 tbsp
Salt 1 tsp
( ): measurements not as precise as weight measurements.
Preparations
1
Mix three flour and guar gum in a bowl.
2
Place the kneading blade in to the bread pan.
3
Insert the ingredients in the bread pan in the following:
theliquidingredients→flour
Set the bread pan into the main unit, and plug the breadmaker
into the outlet.
1
Select menu ‘16’.
2
Make the gluten free pasta according to instruction on P. EN24
Step 2–5.
3
Warp the dough in a plastic wrap and rest for 1 hour in the
refrigerator.
4
Lightly floured on the surface of dough, desire shapes such a
gnocchi or ravioli.
5
Boil them in boiling hot water for 2–3 minutes until pasta is
completely cooked through.
6
Drain them, and toss the pasta with your favorite sauce.
Tomato sauce
Chopped gralic 2 pieces/10 g/
2
⁄5 oz.
Chopped onion 300 g/10
3
⁄5 oz.
Sliced bacon 200 g/7 oz.
Olive oil 6 tbsp
Tomato puree 800 g/12
1
⁄10 oz./1 lb
Grated cheese 30 g/1
1
⁄5 oz.
Basil 8
Mushroom cream sauce
Chopped gralic 2 pieces/10 g/
2
⁄5 oz.
Chopped onion 300 g/10
3
⁄5 oz.
Butter 2 tbsp
Sliced bacon 200 g/7 oz.
Mushroom 200 g/7 oz.
White rice flour (red mill) 40 g/1
2
⁄5 oz. (
2
⁄7 C)
Fresh cream 200 mL/7 oz./
4
⁄5 C
Water 400 mL/13
1
⁄2 oz./1
11
⁄16 C
Salt a pinch
仮
仮
仮
仮
仮
仮
仮
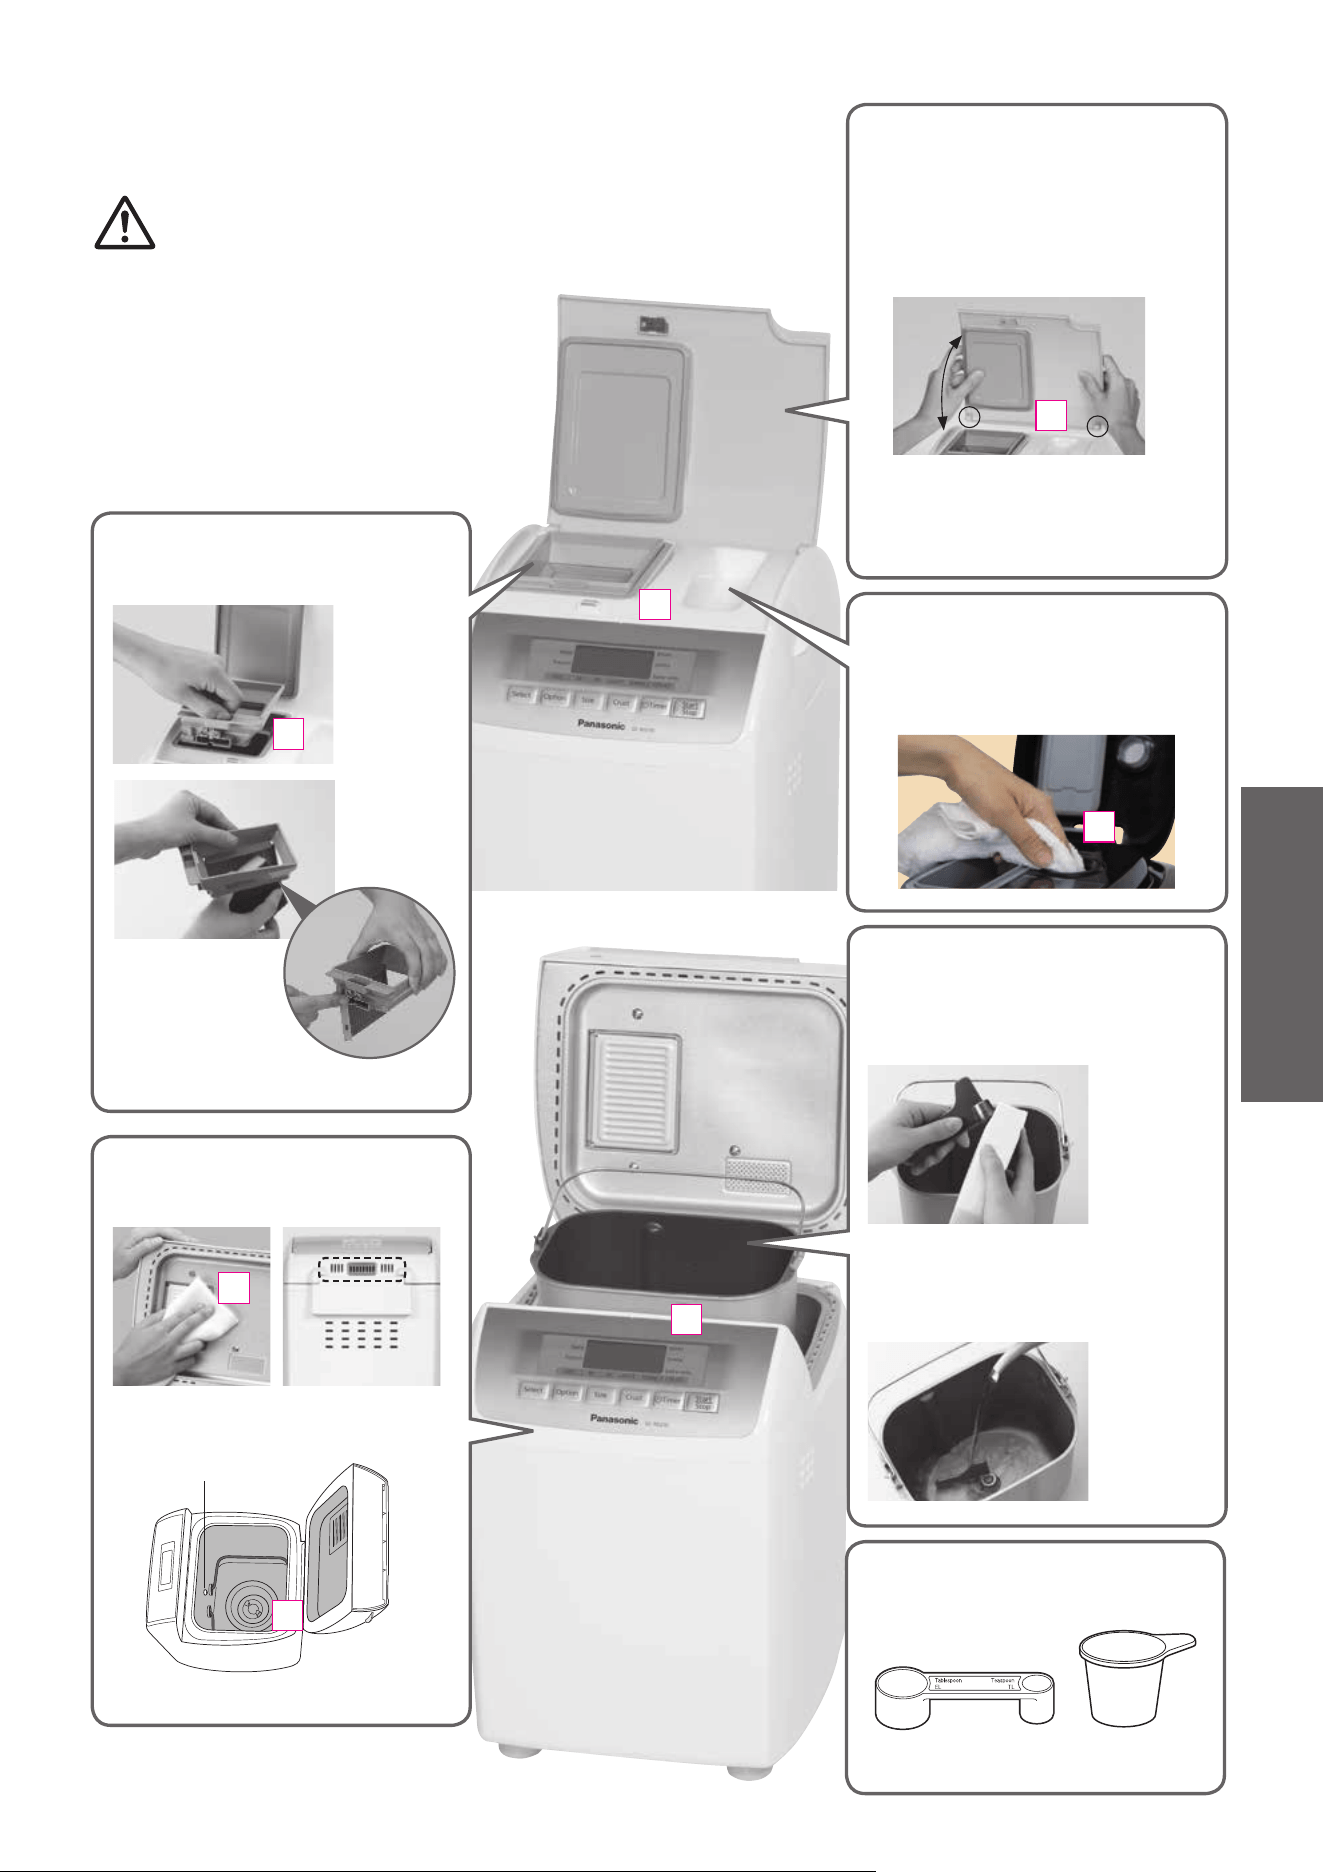

EN28 EN29
English
To protect the non-stick finish
Bread pan and kneading blade are coated with a non-stick finish to avoid stains and to make it easier when removing
bread.
To avoid damaging it, please follow the instructions below.
•
Do not use hard utensils such as a knife or a fork when removing bread from the bread pan.
(If the bread cannot be easily removed from the bread pan, leave the bread pan for 5-10 minutes to cool,
making sure that it is not left unattended where somebody or something may get burnt.)
After that, shake the bread pan several times using oven mitts.
(Hold the handle down so that it does not get in the way of the bread.)
•
Ensure that the kneading blade is not embedded in the bread loaf before slicing it.
If it is embedded, wait for the loaf to cool and remove it.
(Do not use hard or sharp utensils such as a knife or a fork.)
Be careful not to get burns as the kneading blade may still be hot.
•
Use the soft sponge when cleaning the bread pan and the kneading blade.
Do not use anything abrasive such as cleansers or scouring pads.
Hard, coarse or large ingredients such as flours with whole or ground grains, sugar, or the addition of nuts and seeds may damage the
non-stick finish of the bread pan. If using large chunks of ingredients, break into small pieces. Please make sure to follow the recipe quantities
stated.
Troubleshooting
Before calling for service, please check through this section.
Problem
Cause
Action
My bread does not rise
The top of my bread is uneven
The quality of the gluten in your flour is poor, or you have not used bread flour and all-purpose
flour. (Gluten quality can vary depending on temperature, humidity, how the flour is stored, and
the season of harvest)
Try another type, brand or another batch of flour.
The dough has become too firm because you haven’t used enough liquid.
Bread flour and all-purpose flour with higher protein content absorbs more water than others,
so try adding an extra 10–20 mL of water.
You are not using the right type of yeast.
Use a dry yeast from a sachet, which has ‘instant yeast’ or ‘rapid rise yeast’ written on it.
This type does not require pre-fermentation.
You are not using enough yeast, or your yeast is old.
Use the measuring spoon provided. Check the yeast’s expiry date. (Keep in fridge)
The yeast has touched the liquid before kneading.
Check that you have put in the ingredients in the correct order according to the instructions,
adding the water and liquids last. (P. EN12)
You have used too much salt, or not enough sugar.
Check the recipe and measure out the correct amounts using the measuring spoon provided.
Check that salt and sugar are not included in other ingredients.
My bread is full of air holes
You have used too much yeast.
Check the recipe and measure out the correct amount using the measuring spoon
provided.
You have used too much liquid.
Some types of flour absorb more water than others, so try using 10–20 mL less water.
My bread seems to have
collapsed after rising.
The quality of your flour isn’t very good.
Try using a different brand of flour.
You have used too much liquid.
Try using 10–20 mL less water.
Problem
Cause
Action
My bread has risen too much.
You have used too much yeast/water.
Check the recipe and measure out the correct amount using the measuring spoon (yeast)/
cup (water) provided.
Check that excess water amount is not included in other ingredients.
You have not used enough flour.
Carefully weigh the flour using scales.
Why is my bread pale and
sticky?
You are not using enough yeast, or your yeast is old.
Use the measuring spoon provided. Check the yeast’s expiry date. (Keep in fridge)
There has been a power failure, or the machine has been stopped during breadmaking.
The machine switches off if it is stopped for more than 10 minutes. You will need to remove
the bread from the bread pan and start again with new ingredients.
There is excess flour around the
bottom and sides of my bread.
You have used too much flour, or you are not using enough liquid.
Check the recipe and measure out the correct amount using scales for the flour or the
measuring cup provided for liquids.
Why has my bread not mixed
properly?
You haven’t put the kneading blade in the bread pan.
Make sure the blade is in the bread pan before you put in the ingredients.
There has been a power failure, or the machine has been stopped during breadmaking.
The machine switches off if it is stopped for more than 10 minutes. You might be able to start
the loaf again, though this might give poor results if kneading had already begun.
My bread has not been baked.
TheʻDoughʼmenuwasselected.
TheʻDoughʼmenudoesnotincludeabakingprocess.
There has been a power failure, or the machine has been stopped during breadmaking.
The machine switches off if it is stopped for more than 10 minutes. You can try baking the
dough in your oven if it has risen and proved.
There is not enough water and the motor protection device has activated.
This only happens when the machine is overloaded and excessive force is applied to the motor.
Visit place of purchase for a service consultation. Next time, check the recipe and measure
out the correct amount using the measuring cup provided.
You have forgotten to attach the kneading blade.
Make sure you attach the blade first (P. EN12).
The kneading mounting shaft in the bread pan is stiff and does not rotate.
If the kneading mounting shaft does not rotate when the blade is attached, you will need to
replace the kneading mounting shaft unit (consult the place of purchase or contact our
Customer Care Center).
Dough leaks out of the bottom of
the bread pan.
A small amount of dough will escape through
the ventilation holes (so that it does not stop the
rotating parts from rotating). This is not a fault,
but check occasionally that the kneading
mounting shaft rotate properly.
If the kneading mounting shaft does not
rotate when the blade is attached, you will
need to replace the kneading mounting shaft
unit (from the place of purchase or contact
our Customer Care Center).
Ventilation holes
(4 in total)
(Bottom of bread pan)
Kneading mounting shaft
Kneading mounting shaft
unit
Part no. ADA29E165
The sides of my bread have
collapsed and the bottom is
damp.
You have left the bread in the bread pan for too long after baking.
Remove the bread promptly after baking.
There has been a power failure, or the machine has been stopped during breadmaking.
The machine switches off if it is stopped for more than 10 minutes. You may try baking the
dough in your oven.
EN30 EN31
English
Problem
Cause
Action
The kneading blade rattles.
This is because the blade fits loosely on the shaft. (This is not a fault)
I can smell burning while the
bread is baking.
Smoke is coming out of the
steam vent.
Ingredients may have spilled on the heating element.
Sometimes a little flour, raisins or other ingredients may be flicked out of the bread pan
during mixing. Simply wipe the element gently after baking once the breadmaker has cooled
down.
Remove the bread pan from the breadmaker to insert ingredients.
The kneading blade stays in the
bread when I remove it from the
bread pan.
The dough is a little stiff.
Allow the bread to cool completely before removing the blade carefully.
Some types of flour absorb more water than others, so try adding an extra 10–20 mL of
water next time.
Crust has built up underneath the blade.
Wash the blade and its spindle after each use.
The crust creases and goes soft
after cooling.
The steam remaining in the bread after cooking can pass into the crust and soften it slightly.
To reduce the amount of steam, try using 10–20 mL less water or half the amount of sugar.
How can I keep my crust crispy?
To make your bread crispier, you could use the ‘french’ program or even bake it in the oven at
200°C (392°F)/gas mark 6 for an extra 5–10 minutes.
My bread is sticky and slices
unevenly.
It was too hot when you sliced it.
Allow your bread to cool on rack before slicing to release the steam.
U50 appears on the display.
The unit is hot (above 40°C/105°F). This may occur with repeated use.
Allow the unit to cool down to below 40°C/105°F before using it again (U50 will disappear).
appears on the display.
There has been a power failure for approx. 10 minutes (the plug has been accidentally pulled
out, or the breaker has been activated), or there is another problem with the power supply.
The operation will not be affected if the problem with the power supply is only momentary.
The breadmaker will operate again if its power is restored within 10 minutes, but the end
result may be affected.
1 appears on the display.
There has been a power failure for a certain amount of time (differs depending on the
circumstances - e.g. mains power failure, unplugging, malfunctioning fuse or breaker).
Remove the dough and start again using new ingredients.
When program is completed, the
raisin nut dispenser is opened.
The dispenser will open automatically for all programs. This is not malfunction.
When ingredients such as raisins and nuts are inserted in the dispenser on the bake only
program, ingredients will be dropped on to the cake only half side of it.
H01–H02 appears on the
display.
The display indicates a problem with the breadmaker.
Consult the place of purchase or a Panasonic authorized service center.
The bread does not come out.
If the bread cannot be easily removed from the bread pan, leave the bread pan for
5–10 minutes to cool, making sure that it is not left unattended where somebody or something
may get burnt.
After that, shake the bread pan several times using oven gloves.
(Hold the handle down so that it does not get in the way of bread.)
Dry yeast will not drop into the
bread pan.
The timing of yeast dispenser activation is different depending on the menu program and room
temperature.
Yeast dispenser is wet, or there may be a static build up.
Wipe with a damp cloth and dry naturally.
Dry yeast is damped.
Use new dry yeast.
Problem
Cause
Action
Extra ingredients does not fall
into the bread pan from the
raisin nut dispenser.
Is the surface of the extra ingredients higher than the edge of the raisin nut dispenser?
Put the extra ingredients so that its surface is lower than the edge of the raisin nut dispenser.
(P. EN15)
The capacity of the raisin nut dispenser is 150 g, however depending on the state and the
type of ingredients, they may overflow.
Specifications
Power supply 120 V 60 Hz
Power consumed 550 W
Capacity
(All-purpose flour) max. 620 g (21
3
⁄4 oz.) min. 420 g (14
3
⁄4 oz.)
(Dry yeast) max. 5.6 g (
1
⁄5 oz.) min. 2.1 g (
1
⁄14 oz.)
Capacity of raisin nut dispenser max. 150 g (5.3 oz.) raisins
Timer Digital timer (up to 13 hours)
Dimensions (H
W
D) approx. 37.0
28.2
32.5 cm (14.6
11.1
12.8 inches)
Weight approx. 6.9 kg (15.0 lb.)
Accessories Measuring cup, measuring spoon
Troubleshooting
Before calling for service, please check through this section.
仮
delete

Automatic Breadmaker
Machine à pain automatique
OPERATING INSTRUCTIONS AND RECIPES (Household Use only)
NOTICE D’UTILISATION ET RECETTES (Usage domestique uniquement)
Model No./Modèle n°
SD-YR2500
Thank you for purchasing this Panasonic product.
Please read these instructions thoroughly before using this product and save
this manual for future use.
This product is intended for household use only.
Nous vous remercions d’avoir choisi ce produit Panasonic.
Veuillez lire cette notice minutieusement avant d’utiliser ce produit et conservez-
la à titre de référence ultérieure.
Ce produit est destiné aux particuliers uniquement.
English Français
Panasonic Corporation
Web Site: www.panasonic.com
DZ50AXXX
FXX15D0
Printed in China
Imprimé en Chine
仮