User Manual for Washer
Before you start
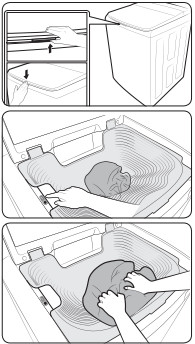
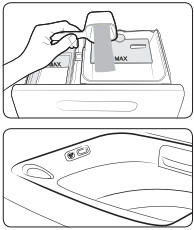
Prewash (Water Jet & Built-in sink)
Water Jet and Built-in sink help you hand-wash before the washing machine starts operation. Water Jet is available only when the door is open and the water level set to less than High. For prewashing, use the Built-in sink that is designed for hand-washing
CAUTION
• Do not excessively use Water Jet. Excessive use of Water Jet increases water consumption.
• Gently run water into the tub. Otherwise, water may overflow.
 |
|
1. Press the release lever on the middle of the door. Put laundry in the Built-in sink.
2. Press Water Jet to supply water to the Built-in sink, and then hand-wash.
3. When done, you can either reuse the water for the main cycle or simply drain.
• To reuse the water, gently lift up the Built-in sink to drain water into the tub.
• To drain the water, press Activ Dual Wash, and then select Drain.
NOTE
• If you want to hand-wash while the washing machine is operating, press START/PAUSE to stop operation, and then follow steps 1-3 above.
• If you open both the door and the Builtin sink, manually lower the Built-in sink.
|
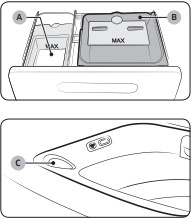
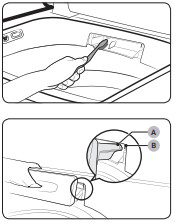
Detergent guidelines
The washing machine provides a two-compartment dispenser for detergent and fabric softener. The bleach compartment is located on the left side of the tub.
|
|
• Softener compartment (A): Add a recommended amount of fabric softener into the softener compartment.
• Liquid detergent compartment (B): Apply a recommended amount of liquid detergent into the compartment. To use powdered detergent, remove the liquid detergent compartment. The washing machine does not dispense the powdered detergent from the liquid detergent compartment.
• Bleach compartment (C): Add nonchlorine bleach as instructed by the manufacturer.
NOTE
• Do not pour color-safe bleach into the bleach compartment.
• Use the softener compartment only for liquid fabric softeners.
|
To apply detergents
1. Open the door.
2. Locate the detergent drawer, and slide it open.
3. Apply liquid detergent into the liquid detergent compartment.
NOTE For powder detergent, remove the liquid detergent compartment.
4. Add a recommended amount of fabric softener into the softener compartment.
5. Add a recommended amount of non-chlorine bleach into the bleach compartment.
NOTE
• Do not exceed the max line when applying the cleaning agents.
• To ensure maximum cleaning results, it is recommended that powdered detergent should be thoroughly dissolved in a small amount of water before adding to the machine.
CAUTION
• Do not pour undiluted liquid chlorine bleach directly onto the load or into the tub. This may cause fabric damage.
NOTE
• It is normal for a small amount of water to remain in the detergent compartments at the end of the cycle.
• When adding color-safe bleach, it is recommended to use liquid detergent.
• Do not use liquid fabric softener that is too sticky as it may not mix with the water sufficiently
Smart Check
To enable this function, you must first download the Samsung Smart Washer app at the Play Store or the Apple Store, and install it on a mobile device featuring a camera function.
The Smart Check function has been optimized for Galaxy & iPhone series (applicable models only).
1. Press and hold Rinse Times + Spin Speed simultaneously for 3 seconds to enter the Smart Check mode.
2. The washing machine starts the selfdiagnosis procedure and displays an information code if a problem is detected.
3. Run the Samsung Smart Washer app on your mobile device, and tap Smart Check.
4. Put the mobile device close to the washing machine’s display so that the mobile device and the washing machine face each other. Then, the information code will be recognized automatically by the app.
5. When the information code is recognized correctly, the app provides detailed information about the problem with applicable solutions.
NOTE
• The function name, Smart Check, may differ depending on the language.
• If there is strong reflected light on the washing machine display, the app may fail to recognize the information code.
• If the app fails to recognize the Smart Check code consecutively, enter the information code manually onto the app screen.
Laundry guidelines
Checkpoints
• Check for stains or dirt. Apply a little detergent to a white towel. Rub the white towel and the dirty clothes together to transfer the dirt or color to the white towel.
• Before washing, pre-treat the sleeves, collars, dress hems, and pockets by brushing with detergent.
• Wrinkle-processed clothes made of wool must be specially treated by tightening them with threads before washing. Remove the threads after washing and drying is complete.
CAUTION
• Do not place or keep blankets in the tub.
• Do not put candles or a heat source in or on the washing machine.
• Do not wash these clothes:
• Neckties, brassieres, jackets, suits, and coats can be easily deformed by shrinking or discoloring on the surface. These clothes are mostly made of rayon, polynosic, cuff, and/or blended fabric.
• Wrinkle-processed, embossed, or resin processed clothes easily deform merely by soaking in water.
• Clothes that are easily discolored made from cotton, wool, wrinkled silk, leather wear and accessories, and leather ornamented clothes and accessories.
• Waterproof sheets, mattresses, or wool quilts, rain covers, fishing jackets and trousers, skiwear, sleeping bags, diaper covers, sweat suits, vehicle covers for automobiles, bicycles, and motorcycles, bath rugs, and other waterproof items.
STEP 1 Sort
Sort the laundry according to these criteria:
- Care Label: Sort the laundry into cottons, mixed fibres, synthetics, silks, wools, and rayon.
- Color: Separate whites from colors.
- Size: Mixing different-sized items together in the tub improves the washing performance.
- Sensitivity: Follow the cloth-specific instructions on the care label of delicate items such as pure, new woollen items, curtains, and silk items.
NOTE
Make sure to check the care label on the clothing, and sort them accordingly before starting the wash.
STEP 2 Empty pockets
Empty all the pockets of your laundry items, and remove dirt and/or soils from them.
- Metal objects such as coins, pins, and buckles on clothing may damage other laundry items as well as the tub.
- Turn clothing with buttons and embroideries inside out.
- If pants or jacket zippers are open while washing, the tub may be damaged.
- Zippers should be closed and fixed with a string.
- Clothing with long strings may become entangled with other clothes. Make sure to tie the strings before washing.
STEP 3 Use a laundry net or wash certain items separately
- Brassieres (water washable) must be placed in a laundry net. Metal parts of the brassieres may break through and tear other laundry items.
- Cashmilon, large volume garments, and lightweight clothes (lace-decorated clothes, lingerie, nylon stocking, and synthetic fabrics) may float on water during washing and cause problems to the machine. Use the laundry net or wash them separately.
- Do not wash the laundry net by itself without other laundry. This may cause abnormal vibrations that could move the washing machine and result in injury
CAUTION
Make sure to soak inflatable items (such as blankets, and cotton-filled or microfibre quilets) in water before you run a cycle.
- Inflatable items may cause damage to the laundry or the machine during the wash or drying process.
- Regardless of the size, blankets or quilts are safer and cleaner to wash one item at a time. Two different-sized blankets in the same load may compromise the drying performance due to unbalanced loads.
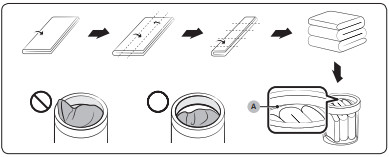
To input a blanket
Fold the blanket as shown, and then put it on the plastic area (A) of the tub before inserting into the tub.
STEP 4 Prewash (if necessary)
- To remove stains and dirt on collars, sleeves, hems, and pockets, apply detergent lightly and brush off.
- Use powder or liquid detergents. Do not use soap, as this may remain on the tub after washing.
- Prewash white socks, sleeves, and collars with a little detergent and a brush.
CAUTION Make sure the laundry is inserted completely.
• Any exposed part of the laundry may cause damage to the machine or the laundry itself, or a water leak
• Make sure the laundry does not exceed the plastic area (A) in the above figure.
STEP 5 Determine the load capacity
Make sure the laundry does not exceed the plastic area (A) in the figure on page 27. Otherwise, it may cause the washing machine to not wash properly or cause damage to the machine or the laundry itself, or a water leak.
NOTE
When washing bedding or bedding covers, the wash time may be lengthened or the spin efficiency may be reduced. For bedding or bedding covers, the recommended load capacity is kg or less.
CAUTION
If the laundry is unbalanced and the “Ub” information code is displayed, redistribute the load. Unbalanced laundry may reduce the spinning performance and cause damage to the machine or the laundry itself.
STEP 6 Apply a proper detergent type
The type of detergent depends on the type of fabric (cotton, synthetic, delicate items, wool), color, wash temperature, and degree of soiling. Always use “low suds” laundry detergent, which is designed for automatic washing machines.
CAUTION
- Use an appropriate amount of detergent. Excess amounts of detergent do not produce much improvement in washing results but cause damage to the laundry due to deteriorated rinsing performance.
- Bleach is strong alkali in nature, causing damage to or discoloration of the laundry.
- Use a longer or added rinse cycle when using powder detergent that is very likely to remain on the laundry and cause bad odors after washing is complete.
- If an excessive amount of detergent is used especially in cold water, the detergent doesn’t dissolve well, ending up with contaminated laundry, hoses, and/or tub.
- In case of timed washing, do not apply detergent directly to laundry or the tub. The laundry may be discolored. Use the detergent drawer.
- When washing wool using the Wool cycle, use only a neutral detergent to avoid discoloring the laundry.
NOTE
- Follow the detergent manufacturer’s recommendations based on the weight of the laundry, the degree of soiling, and the hardness of the water in your local area. If you are not sure about the water hardness, contact a local water authority.
- Do not use detergent that tends to be hardened or solidified. This detergent may remain after the rinse process, blocking the drain outlet.
Operations
Control panel
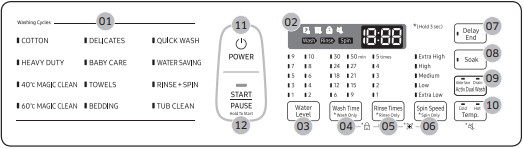
| 01 Cycle Panel |
Press to select a cycle. |
| 02 Display |
Displays the current cycle information and estimated time remaining, or an information code if the washing machine needs to be checked. |
| 03 Water Level |
Press to change the water level manually. |
| 04 Wash Time |
Press to adjust the wash time between 6 to 50 minutes or press and hold to start wash cycle only |
| 05 Rinse Times |
Press to change the number of rinses (maximum 5 rinses) or press and hold to start rinse cycle only |
| 06 Spin Speed |
Press to select a different spin speed or press and hold to start spin cycle only. |
| 07 Delay End |
Press to finish the wash at a specified time. To cancel the Delay End settings, simply turn off the washing machine. You can set the Delay End time up to 24 hours |
| 08 Soak |
Press to add soaking time at the start of a cycle for better stain removal. |
| 09 Activ Dual Wash |
This button provides two options, and is available only when the washing machine is stopped or in standby.
• Water Save (default): Select to reuse water remaining in the tub after using Water Jet. The water will be used for the main cycle.
• Drain: Select to drain water that remains after using Water Jet. When draining is complete, the washing machine switches to Water Save mode automatically.
|
| 10 Temp. |
Press to toggle between two different water temperature options.
• Cold: For brightly colored, very lightly soiled items.
• Hot: For colorfast items.
|
| 11 POWER |
Press to turn on/off the washing machine |
| 12 START/PAUSE |
Press and hold to start an operation, or press to stop an operation temporarily |
Simple steps to start
1. Press POWER to turn on the washing machine.
2. Select a cycle in the cycle panel.
3. Change the cycle settings (water level, wash time, rinse count, and/or spinning speed) as necessary.
4. To add an option such as Delay End and Soak, press the corresponding button.
5. Press and hold START/PAUSE.
To change the cycle during operation
1. Press START/PAUSE to stop operation.
2. Select a different cycle, and repeat steps 2-3 above if necessary.
3. Press and hold START/PAUSE again to start the new cycle.
Auto cycles
| Cycle |
Description |
| COTTON |
• For most fabrics including cottons, linens, and normally soiled items. |
| HEAVY DUTY |
• For sturdy, colorfast fabrics and heavily soiled items |
| 40 °C MAGIC CLEAN |
• Heats the supplied water up to a custom temperature of 40 °C and uses the water to clean heavily soiled or stubborn items in an effective way. |
| 60 °C MAGIC CLEAN |
• Heats the supplied water up to a custom temperature of 60 °C and uses the water to clean heavily soiled or stubborn items in an effective way. |
| DELICATES |
• For sheer fabrics, bras, lingerie, silks, and other handwashonly fabrics. For best results, use liquid detergent. |
| BABY CARE |
• Featuring a high-temperature wash and extra rinses to help remove the remaining detergent effectively. |
| TOWELS |
• For bath towels, washcloths, and mats |
| BEDDING |
• For bulky items such as comforters, blankets, and sheets.
• For best results, wash only a single type of bedding.
|
| QUICK WASH |
• For lightly soiled items that you want to finish washing quickly |
| WATER SAVING |
• Select this to wash effectively with a minimum amount of water.
• WA13M8700** : "Water Saving, Water Level 8, Wash Time 50min, Rinse 3, Spin Medium, Temp. Cold & Hot" is recommended for a normally soiled cotton load.
NOTE Energy and water labelling test program in accordance with AS/ NZS 2040.
|
| RINSE+SPIN |
• For loads that need rinsing only or to add rinse-aided fabric softener to. |
| TUB CLEAN |
• Select this to clean the tub. The powerful spinning force removes impurities and bad odors from inside the tub.
• A blinking reminds you that it is time to clean the tub using Tub Clean. For details, see the Cleaning section in this manual. reminds you that it is time to clean the tub using Tub Clean. For details, see the Cleaning section in this manual.
|
Special features
Child Lock
Child Lock is designed to prevent accidents by children or infants, such as drowning.
- Press Power.
- To activate the Child Lock, hold down Wash Time and Rinse Times simultaneously for 3 seconds. The indicator blinks.
- To deactivate the Child Lock, hold down Wash Time and Rinse Times simultaneously for 3 seconds. The indicator turns off. If the tub has contained water, simply restart the machine and hold down two buttons simultaneously for 3 seconds to deactivate the Child Lock.
With the Child Lock enabled
- You can still manipulate on the control panel while the door is closed. If you open the door, an information code (CL, dC) appears with an alarm. Then, the machine starts forced draining after 30 seconds in order to prevent infant or child accidents such as drowning.
- Only when water supply is complete, the Child Lock becomes active.
- If the door leaves open for 30 seconds with the tub containing water, the machine drains the water with the “CL” code, which you cannot stop.
- To add detergent or more laundry in the tub, or to change the cycle settings, you must first deactivate the Child Lock
WARNING If you open the door with the Child Lock enabled, the machine starts forced draining to prevent accidents such as drowning.
NOTE The Child Lock remains active after you power off the machine. You cannot deactivate the Child Lock as long as the “CL” code appears on the display. But, you can deactivate when the dC code appears by holding down two buttons simultaneously.
Delay End
You can set the washing machine to finish a cycle later. The hour displayed indicates the time the wash will finish.
- Select a cycle. Then, change the cycle settings if necessary.
- Press Delay End repeatedly until a desired end time is set.
- Press and hold START/PAUSE. The lamp indicator next to the Delay End button turns on, and the timer starts.
- To cancel Delay End, restart the washing machine by pressing POWER.
Real-life case
You want to finish a two-hour cycle 3 hours from now. To do this, add the Delay End option to the current cycle with a 3-hour setting, and then press and hold START/PAUSE at 2:00 p.m. The washing machine starts operating at 3:00 p.m. and ends at 5:00 p.m. Provided below is the timeline for this example.

Soak
Use Soak if the laundry is heavily contaminated or stained. Soak improves the wash performance by adding a soak cycle.
- Soak adds 20 minutes to the cycle time.
- When Soak is complete, the wash cycle starts without draining water.
Sound
To turn the sound on or off, press and hold Temp. for 3 seconds.
- You can turn the sound on or off for all cycles.
- When the sound is off,
 turns on.
Maintenance
Cleaning
Keep the washing machine clean to prevent deteriorated performance and to preserve its life cycle.
Exterior
- Use a soft cloth to wipe up all detergent, bleach, or other spills as they occur.
- Clean the control panel with a soft, damp cloth. Do not use abrasive powders or cleaning pads. Do not spray cleaners directly on the panels.
Tub Clean
Regularly run this cycle to clean the tub and to remove bacteria from it.
- Makes sure the tub is completely empty.
- Press POWER to turn on the washing machine.
- Press TUB CLEAN. You can also use Delay End with Tub Clean.
- Press and hold START/PAUSE.
CAUTION Only run Tub Clean when the tub is completely empty. This may cause damage to the laundry or a problem with the washing machine.
Tub Clean reminder
- The indicator reminds you of cleaning the tub when necessary. If you happen to see the indicator blinking after washing is complete, remove the laundry and run the Tub Clean cycle.
- You can ignore this reminder and continue to run cycles normally because this is not a system failure. However, the reminder remains active for 6 consecutive cycles immediately after each cycle is complete.
- The reminder is activated once every 1-3 months, depending on the cycle count.
- To keep the tub clean, it is recommended to run Tub Clean on a regular basis.
Built-in sink
- Open the door, and use a cloth or sponge to clean the Built-in sink.
- Press Water Jet to supply water to the board. Use this water to rinse the board.
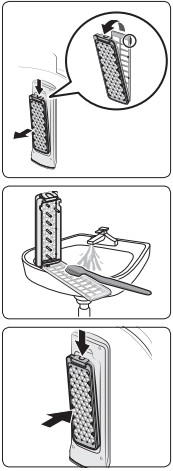
Magic filter
 |
|
1. Press down the upper area of the filter case to remove.
2. Unlock the cover, and clean the filter with running water and a brush.
3. When cleaning is complete, close the cover and reinsert the filter case to the original position. You will hear a clicking sound when the filter case fits in
|
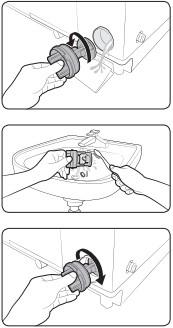
Pump filter (applicable models only)
 |
|
1. Put a floor-cloth or towel under the Pump filter. Turn the filter knob anticlockwise to remove.
2. Clean the filter with running water and a soft brush.
3. Reinsert the filter, and turn clockwise until it locks into position.
|
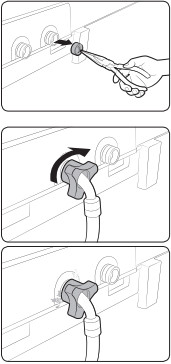
Mesh filter
 |
|
1. Use pliers to pull out the mesh filter from inside the water inlet as shown.
2. Use a soft brush to clean the mesh filter with running water.
3. Reinsert the filter. Make sure it is tightened against water leaks.
|
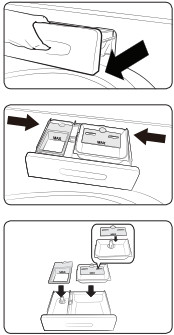
Detergent drawer
|
|
|
1. Fully pull out the detergent drawer.
2. To remove, pull the detergent drawer while pushing the ends of each side.
3. Remove the inserts from the compartments. Rinse the inserts and the drawer in warm water and clean with a soft brush.
4. Clean the drawer opening thoroughly with a small, non-metallic brush.
5. Return the insert to the proper compartments. Replace the drawer by placing the drawer rail (A) on the compartment rail (B) while tilting the drawer downward.
6. Fully push the drawer back to close.
|
Troubleshooting
Checkpoints
If you encounter a problem with the washing machine, first check the table below and try the suggestions.
| Problem |
Action |
| Does not turn on. |
• Make sure you use rated power for the product.
• Make sure the power cord is completely plugged in.
• Check the fuse or reset the circuit breaker.
|
| Does not start. |
• Make sure the door is closed.
• Make sure the water taps are open.
• Make sure to press or tap START/PAUSE to start the washing machine.
• Make sure Child Lock is not activated.
• Before the washing machine starts to fill, it will make a series of clicking noises to check the door lock and does a quick drain.
• Was the door opened during the spinning cycle? Close the door, and press or tap START/PAUSE to resume.
• The machine enters Standby or is in a soaking cycle. Please wait.
• Check the fuse or reset the circuit breaker.
|
| Water is not supplied. |
• Make sure you press or tap START/PAUSE after selecting the water supply.
• Make sure the water taps are open.
• Is the filter net at the water supply hose connector clogged? Clean the filter net by brushing with a toothbrush.
• Is the water supply cut off? If the water supply is cut off, close the tap and power off.
• Straighten the water supply hoses.
• Open and close the door, then press or tap START/PAUSE.
• If the water pressure is low, it takes longer to start washing.
• If the water level is not as high as necessary or lower than expected, use the level selector to adjust the water level.
|
| After a cycle, detergent remains in the automatic dispenser. |
• Make sure the washing machine is running with sufficient water pressure.
• Make sure the detergent drawer is properly inserted.
• Remove and clean the detergent drawer, and then try again.
|
| Vibrates excessively or makes noise. |
• Make sure the washing machine is set on a level floor. If the floor is not level, use the levelling feet to adjust the washing machine.
• Make sure the washing machine is not contacting any other object.
• Make sure the laundry load is balanced.
• Make sure the laundry is spread evenly in the washing machine. Spread out the laundry evenly and start again.
• Make sure the space around the washing machine is free of objects.
• Humming is produced normally during operation.
• Objects such as coins can cause noise. Remove these objects from the washing machine after washing is complete.
|
| Stops. |
• Plug the power cord into a live electrical outlet.
• Check the fuse or reset the circuit breaker.
• Close the door, and press or tap START/PAUSE to start the washing machine. For your safety, the washing machine will not spin unless the door is closed.
• Before the washing machine starts to fill, it will make a series of clicking noises to check the door lock and does a quick drain.
• There may be a pause or soak period in the cycle. Wait briefly and the washing machine may start.
• Make sure the inlet hose screens at the taps are not clogged. Periodically clean the screens.
• This problem occurs temporarily due to low voltages, and will be solved when power recovers
|
| The Tub Clean alarm does not turn off. |
• When the machine is diagnosed to be cleaned, the indicator blinks for an hour. This recurs 6 consecutive times until you run the Tub Clean cycle. This is normal, and not a system failure. To keep the tub clean, it is recommended to run the cycle once every 1-3 months. indicator blinks for an hour. This recurs 6 consecutive times until you run the Tub Clean cycle. This is normal, and not a system failure. To keep the tub clean, it is recommended to run the cycle once every 1-3 months. |
| Fills with the wrong temperature water. |
• Fully open both water taps.
• Make sure the temperature selection is correct.
• Make sure the hoses are connected to the correct water taps. Flush water lines.
• Disconnect the hoses and clean the screens. The hose filter screens may be clogged.
• While the washing machine fills, the water temperature may change as the automatic temperature control feature checks incoming water temperature. This is normal.
• While the washing machine fills, you may notice just hot and/ or just cold water going through the dispenser when cold or warm temperatures are selected. This is a normal function of the automatic temperature control feature as the washing machine determines the water temperature.
|
| Door (Lid) locked or will not open. |
• While the washing machine is operating, press or tap START/ PAUSE to stop the washing machine.
• It may take a few moments for the door lock mechanism to disengage.
|
| Does not drain and/ or spin. |
• Check the fuse or reset the circuit breaker.
• Make sure the electrical voltage is normal.
• Make sure the washing machine is plugged in.
• Make sure the drain hose is pointed downward. (Natural drain models only)
• Make sure the drain hose is not clogged.
• Make sure the drain hose is not kinked.
• Straighten the drain hose. If there is a drain restriction, call for service.
• Close the door, and press or tap START/PAUSE. For your safety, the washing machine will not spin unless the door is closed.
|
| Load is wet at the end of the cycle. |
• Use the High or Extra High spin speed. (Applicable model only)
• Use high efficiency (HE) detergent to reduce oversudsing.
• Load is too small. Small loads (one or two items) may become unbalanced and not spin completely
|
| Leaks water. |
• Make sure all hose connections are tight.
• Make sure the water supply hose's rubber packing is in the correct position. Screw tightly again.
• Make sure the end of the drain hose is correctly inserted and secured to the drain system.
• Avoid overloading.
• Use high efficiency (HE) detergent to prevent oversudsing.
• Make sure the water supply hose is not kinked.
• If the water supply is too strong, water may leak. Close the water tap a little.
• Make sure water is not leaking from the water tap. If so, repair the water tap.
|
| Excessive suds. |
• Use high efficiency (HE) detergent to prevent oversudsing.
• Reduce the detergent amount for soft water, small loads, or lightly soiled loads.
• Non-HE detergent is not recommended.
|
| The spin basket or drain/supply hose is frozen. |
• Use warm water to disconnect the water supply hose and drain hose. Soak them in warm water.
• Fill the spin basket with warm water, and then wait for about 10 minutes.
• Put a hot towel on the drain hose connector.
• Reconnect the water supply hose and drain hose, and check if water is supplied properly.
|
| Water drains out immediately |
• Make sure the drain hose is not clogged, and is hung over the drain hose hook. Fill the spin basket halfway with water, and try spinning again.
• Lift the end of the drain hose to prevent water from draining. Fill the spin basket halfway with water, and then run spinning after releasing the drain hose.
• Make sure the drain hose is installed correctly. See the installation section of this user manual and adjust the position of the drain hose as instructed.
|
| Stains on clothes. |
• Clean the magic filter |
| Has odors. |
• Excessive suds collect in recesses and can cause foul odors.
• Run cleansing cycles to sanitize periodically.
• Dry the washing machine interior after a cycle has finished.
|
If a problem persists, contact a local Samsung service center.
Information codes
If the washing machine fails to operate, you may see an information code on the display. Check the table below and try the suggestions.
| Code |
Action |
| 1C |
The WaterLevel sensor is not working properly.
• Check WaterLevel Sensor wire harness.
• If the information code remains, contact a customer service center.
NOTE When the washing machine displays “1C”, the washing machine drains for 3 minutes and the POWER button is inoperative during this time.
|
| 3C |
Check the motor for operation.
• Try restarting the cycle.
• If the problem continues, call for service.
|
| 4C |
Water is not supplied.
• Make sure the water taps are open.
• Make sure the water hoses are not clogged.
• Make sure the water taps are not frozen.
• Make sure the washing machine is operating with sufficient water pressure.
• Make sure that the cold water tap and the hot water tap are properly connected.
• Clean the mesh filter as it may be clogged.
NOTE When the washing machine displays “4C”, the washing machine drains for 3 minutes and the POWER button is inoperative during this time.
|
| 4C2 |
• Make sure the cold water supply hose is firmly connected to the cold water tap. If it is connected to the hot water tap, the laundry may be deformed with some cycles. |
| 5C |
Water is not draining.
• Make sure the drain hose is not frozen or clogged.
• Make sure the drain hose is positioned correctly, depending on the connection type.
• Clean the debris filter as it may be clogged.
• Make sure the drain hose is straightened all the way to the drain system.
• If the information code remains, contact a customer service center
|
| 9C1 |
The electronic control needs to be checked (Over Voltage Error).
• Check the PCB and wire harness.
• Check if power is supplied properly.
• If the information code remains, contact a customer service center
|
| 9C2 |
Low voltage detected
• Check if the power cord is plugged in.
• If the information code remains, contact a customer service center
|
| AC6 |
Inverter Communication problem
• Check the Inverter PCB and wire harness.
• If the information code remains, contact a customer service center.
|
| dC |
Operating the washing machine with the door open.
• Make sure the door is properly closed.
• Make sure laundry is not caught in the door
|
| HC |
High temperature heating check.
• If the information code remains, contact a customer service center.
|
| LC |
Check the drain hose.
• Make sure the end of the drain hose is placed on the floor.
• Make sure the drain hose is not clogged.
• If the information code remains, contact a customer service center.
NOTE When the washing machine displays “LC”, the washing machine drains for 3 minutes and the POWER button is inoperative during this time.
|
| OC |
Water is overflowed.
• Restart after spinning.
• If the information code remains on the display, contact a local Samsung service center
|
| PC |
When position of the clutch can't be detected.
• If the information code remains, contact a customer service center
|
| PC1 |
After position of the clutch is detected, if the signal of the clutch hall goes wrong.
• If the information code remains, contact a customer service center.
|
| Ub |
Spinning does not work.
• Make sure laundry is spread out evenly.
• Make sure the washing machine is on a flat, stable surface.
• Redistribute the load. If only one item of clothing needs washing, such as a bathrobe or pair of jeans, the final spin result might be unsatisfactory, and an “Ub” check message will be shown in the display.
|
| Ur |
Display for additional rinsing.
• Show additional rinsing is sensing unbalance.
• Method of releasing the display.
- Any key input.
|
If any information code keeps appearing on the screen, contact a local Samsung service center.