Use & Care Guide
Guide d’Utilisation et d’Entretien
Models/Modèles: 795.7401*
Bottom Freezer Refrigerator
Congélateur Inférieur Réfrigérateur
* = color number, le numéro de la couleur
Sears Brands Management Corporation
Hoffman Estates, IL 60179 U.S.A.
www.kenmore.com
Sears Canada Inc.
Toronto, Ontario, Canada M5B 2C3
www.sears.com
www.sears.ca
English / French

2
TABLE OF CONTENTS
Warranty............................................................................. 3
Protection Agreements
.............................................. 4
Important Safety Instructions
........................... 5-7
Electrical & Grounding Requirements
..............7
Parts and Features
....................................................... 8
Refrigerator Installation .............................. 9-16
Unpacking Your Refrigerator ..........................9
Installation
.................................................................... 10
Removing/Replacing Your Refrigerator and
Freezer Handles, Doors and Drawers
.......11-15
Leveling and Door Alignment ......................16
Using Your Refrigerator ............................17-28
Setting the Controls ..................................17-19
Food Storage Guide .................................... 20
Automatic Icemaker ..................................... 21
Refrigerator Section
Refrigerator Shelves
................................................22
Humidity Controlled Crisper ........................ 23
Temperature Controlled Pantry Drawer .......23
Door Bin ............................................................ 23
Air Filter .......................................................... 24
Freezer Section
Extra Ice Bin ................................................. 24
Pullout Drawer .............................................. 25
Durabase ........................................................ 25
Durabase Divider .......................................... 25
Water Filter ............................................... 26-29
Care And Cleaning ....................................30-31
General Cleaning Tips ................................ 30
Exterior .......................................................... 30
Inside Walls ................................................... 30
Door Liner And Gaskets ............................... 30
Plastic Parts .................................................... 30
Condenser Coils ............................................. 30
Light Bulb Replacement ................................ 31
Power Interruptions ........................................ 31
When You Go On Vacation ......................... 31
When You Move ............................................. 31
Connecting the Water Line ...................... 32-34
Troubleshooting Guide ..............................35-41
Kenmore Connect™ ................................. 42
Service ...............................................Back Cover

3
WARRANTY
REFRIGERATOR WARRANTY
KENMORE ELITE LIMITED WARRANTY
WITH PROOF OF SALE, the following warranty coverage applies when this appliance is correctly installed, operated
and maintained according to all supplied instructions. To arrange for warranty service, call: 1-800-4-MY-HOME®
(1-800-469-4663)
FOR ONE YEAR from the date of sale this appliance is warranted against defects in material or workmanship.
A defective appliance will receive free repair or replacement at option of seller. This warranty coverage applies for
only 90 days from the sale date in the United States, and is void in Canada, if the appliance is ever used for other than
private household purposes.
FOR FIVE YEARS from the date of sale, the sealed refrigerant system of this appliance is warranted against defects
in material or workmanship. New system components will be supplied for defective ones free of charge. You are
applies for only one year from the sale date in the United States, and is void in Canada, if the appliance is ever used
for other than private household purposes.
FOR TEN YEARS from the date of sale, the linear compressor of this appliance is warranted against defects in material
or workmanship. A new linear compressor will be supplied free of charge. You are responsible for the labor cost of
sale date in the United States, and is void in Canada, if the appliance is ever used for other than private household
purposes.
This warranty covers ONLY defects in material and workmanship, and will NOT pay for:
bulbs and bags.
2. A service technician to instruct the user in correct product installation, operation or maintenance.
3. A service technician to clean or maintain this product.
4. Damage to or failure of this product if it is not installed, operated or maintained according to all instructions
supplied with the product.
5. Damage to or failure of this product resulting from accident, abuse, misuse or use for other than its intended
purpose.
6. Damage to or failure of this product caused by the use of detergents, cleaners, chemicals or utensils other than
those recommended in all instructions supplied with the product.
Disclaimer of implied warranties; limitation of remedies
Customer’s sole and exclusive remedy under this limited warranty shall be product repair as provided herein. Implied
Customer’s sole and exclusive remedy under this limited warranty shall be product repair or replacement as provided
year or the shortest period allowed by law. Seller shall not be liable for incidental or consequential damages. Some
states and provinces do not allow the exclusion or limitation of incidental or consequential damages, or limitation on the
This warranty applies only while this appliance is used in the United States or Canada*.
* In-home repair service is not available in all Canadian geographical areas, nor will this warranty cover user or
Inc.) where an authorized servicer is not available.
Sears Brands Management Corporation, Homan Estates, IL 60179
Sears Canada Inc., Toronto, Ontario, Canada M5B 2C3

4
PROTECTION AGREEMENTS
PRODUCT RECORD
Master Protection Agreements
Congratulations on making a smart purchase. Your new
Kenmore Elite
®
product is designed and manufactured
for years of dependable operation. But like all products,
it may require preventive maintenance or repair from
time to time. That’s when having a Master Protection
Agreement can save you money and aggravation.
The Master Protection Agreement also helps extend
the life of your new product. Here’s what the
Agreement* includes:
Parts and labor needed to help keep products
operating properly under normal use, not just defects.
Our coverage goes well beyond the product warranty.
No deductibles, no functional failure excluded from
coverage— real protection.
Expert service by a force of more than 10,000
authorized Sears service technicians, which means
someone you can trust will be working on your product.
Unlimited service calls and nationwide service, as
often as you want us, whenever you want us.
“No-lemon” guarantee – replacement of your covered
product if four or more product failures occur within
twelve months.
Product replacement if your covered product can’t be
Annual Preventive Maintenance Check at your request
– no extra charge.
Fast help by phone – we call it Rapid Resolution
– phone support from a Sears representative on all
products. Think of us as a “talking owner’s manual.”
Power surge protection against electrical damage due
$250 Food Loss Protection annually for any food
spoilage that is the result of mechanical failure of any
covered refrigerator or freezer.
Rental reimbursement if repair of your covered
product takes longer than promised.
25% discount
repair service and related installed parts.
Once you purchase the Agreement, a simple phone call
is all that it takes to schedule service. You can call at
any time day or night, or schedule a service appointment
online.
The Master Protection Agreement is a risk free purchase.
If you cancel for any reason during the product warranty
period, we will provide a full refund or a prorated refund
anytime after the product warranty period expires.
Purchase your Master Protection Agreement today!
Some limitations and exclusions apply.
For prices and additional information in the
U.S.A. call 1-800-827-6655.
* Coverage in Canada varies on some items. For full
details call Sears Canada at 1-800-361-6665.
Sears Installation Service
For Sears professional installation of home appliances,
garage door openers, water heaters, and other major
home items, in the U.S.A. or Canada call
1-800-4-MY-HOME
®
.
items of information available whenever you contact Sears concerning your product.
Model No.___________________ Date of Purchase ___________________
Serial No.___________________
Save these instructions and attach your sales receipt for future reference.
5
IMPORTANT SAFETY INSTRUCTIONS
WARNING
SAVE THESE INSTRUCTIONS
To reduce the risk of re, electric shock, or personal
injury when using your product, basic safety precautions
should be followed, including the following.
Read all instructions before using this appliance.
NEVER unplug your refrigerator by pulling on the
straight out from the outlet.
If the supply cord is damaged, it must be replaced
by the manufacturer or its service agent or a similarly
a cord that shows cracks or abrasion damage along its
length or at either the plug or connector end.
Do not modify or extend the power cord length. It
When moving your refrigerator away from the wall,
be careful not to roll over or damage the power cord.
BASIC SAFETY PRECAUTIONS
This guide contains many important safety messages. Always read and obey all safety messages.
This is the safety alert symbol. It alerts you to safety messages that inform you of hazards that can kill
or hurt you or others, or cause damage to the product.
All safety messages will be preceded by the safety alert symbol and the hazard
signal word DANGER, WARNING or CAUTION. These words mean:
You will be killed or seriously injured if you do not follow instructions.
You can be killed or seriously injured if you do not follow instructions.
Indicates an imminently hazardous situation which, if not avoided,
may result in minor or moderate injury, or product damage.
All safety messages will identify the hazard, tell you how to reduce the chance of injury, and tell you what can happen
if the instructions are not followed.
vapors and liquids in the vicinity of this or any other
appliance.
DO NOT allow children to climb, stand, or hang on the
refrigerator doors or shelves in the refrigerator. They
could damage the refrigerator and seriously injure
themselves.
between the doors and cabinets are necessarily small.
Be careful closing doors when children are in the area.
Unplug your refrigerator before cleaning or making
any repairs.
NOTE: It is strongly recommended that any service be
DANGER
WARNING
CAUTION
6
WARNING
DANGER: RISK OF CHILD ENTRAPMENT
SAVE THESE INSTRUCTIONS
Before replacing a burned-out or broken light bulb,
breaker or fuse box in order to avoid contact with a live
NOTE: Some models have LED interior lighting and
WARNING: Setting either or both controls to the OFF
position does not remove power to the light circuit.
the electrical source and reset the controls (Thermostat,
Refrigerator Control, and or Freezer Control, depending
on the model) to the desired setting.
This refrigerator must be properly installed in
accordance with the Attention Installer Instructions that
were taped to the front of the refrigerator.
After your refrigerator is in operation, do not touch the
cold surfaces in the freezer compartment when hands
are damp or wet. Skin may adhere to the extremely cold
surfaces.
Junked or abandoned refrigerators are dangerous, even
if they are sitting for only a few days. If you are getting
rid of your old refrigerator, please follow the instructions
at right to help prevent accidents (child entrapment and
DO NOT touch the automatic ice making mechanism
while the refrigerator is plugged in.
DO NOT refreeze frozen foods which have thawed
completely. The United States Department of
Agriculture in Home and Garden Bulletin No. 69 says:
…You may safely refreeze frozen foods that have
thawed if they still contain ice crystals or if they are
still cold—below 39°F (4°C).
not be eaten. Thawed ice cream should be discarded.
If the odor or color of any food is poor or questionable,
dispose of it. The food may be dangerous to eat.
Even partial thawing and refreezing reduces the
eating quality of foods, particularly fruits, vegetables
and prepared foods. The eating quality of red meats
refrozen foods as soon as possible to save as much of
their quality as you can.
BEFORE YOU THROW AWAY
YOUR OLD REFRIGERATOR
OR FREEZER:
Leave the shelves in place so that
children may not easily climb inside
.
WARNING : This product contains chemicals known to the State of California to cause cancer and
birth defects or other reproductive harm.
Wash hands after handling.
7
CFC/HCFC DISPOSAL
ELECTRICAL & GROUNDING REQUIREMENTS
WARNING
Your old refrigerator may have a cooling system
believed to harm stratospheric ozone if released to the
atmosphere. Other refrigerants may also cause harm to
the environment if released to the atmosphere.
IMPORTANT: Please read carefully.
TO CONNECT ELECTRICITY
RECOMMENDED GROUNDING METHOD
The refrigerator should always be plugged into its own
individual properly grounded electrical outlet rated for
115 Volts, 60 Hz, AC only, and fused at 15 or 20 amperes.
This provides the best performance and also prevents
hazard from overheated wires. It is recommended that a
separate circuit serving only this appliance be provided.
or pull chain. Do not use an extension cord.
Where a standard two-prong wall outlet is encountered,
it is your personal responsibility and obligation to have
it replaced with a properly grounded three-prong wall
outlet.
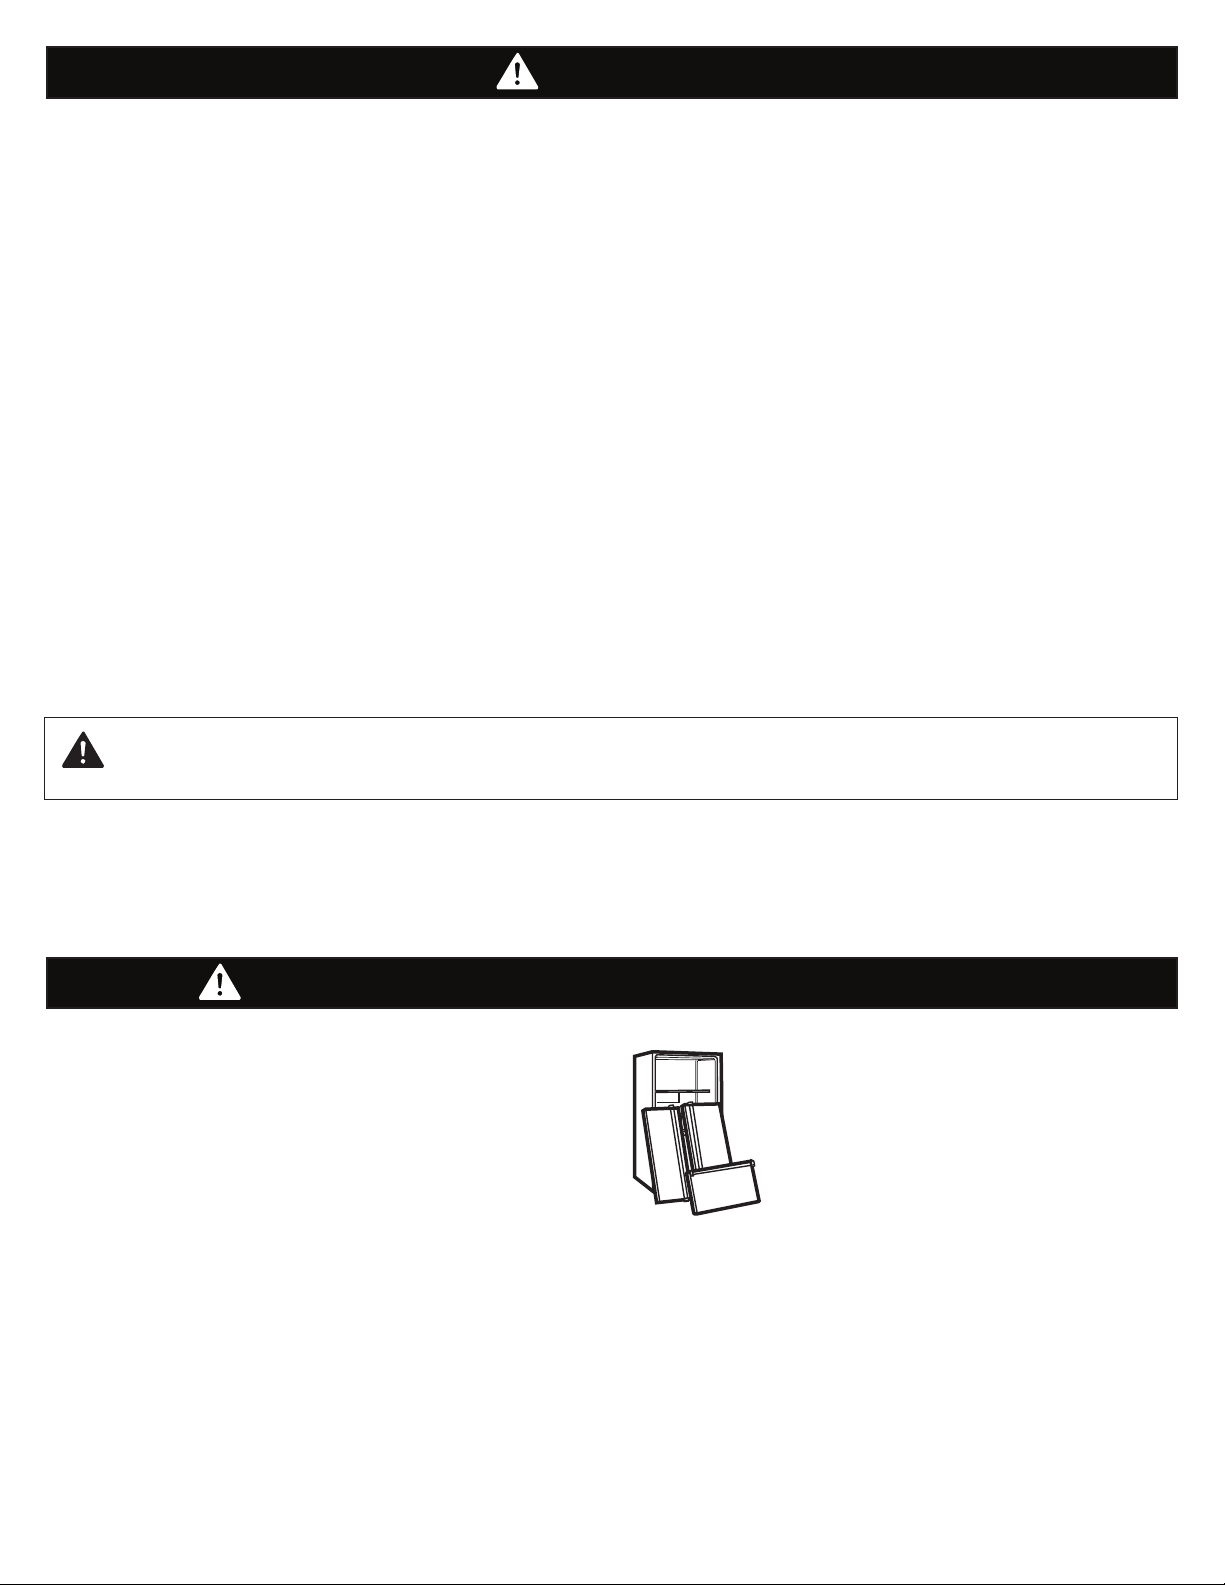
Electrical Shock Hazard
FOR PERSONAL SAFETY, this appliance must be
properly grounded. Have the wall outlet and the circuit
outlet is properly grounded.
If you are throwing away your old refrigerator, make
sure the refrigerant is removed for proper disposal
under provisions of environmental legislation.
USE OF EXTENSION CORDS
Because of potential safety hazards under certain
conditions, the use of an extension cord is not
recommended. However, if you still elect to use an
extension cord, it is absolutely necessary that it be a UL-
listed (USA), 3-wire grounding type appliance extension
cord having a grounding type plug and outlet, and that
the electrical rating of the cord be 15 amperes (minimum)
and 120 volts.
Use of an extension cord will increase the clearance
needed for the back of the refrigerator.
3-prong
grounding
plug
3-prong
grounding type
wall receptacle
Ensure proper
ground exists
before use.
8
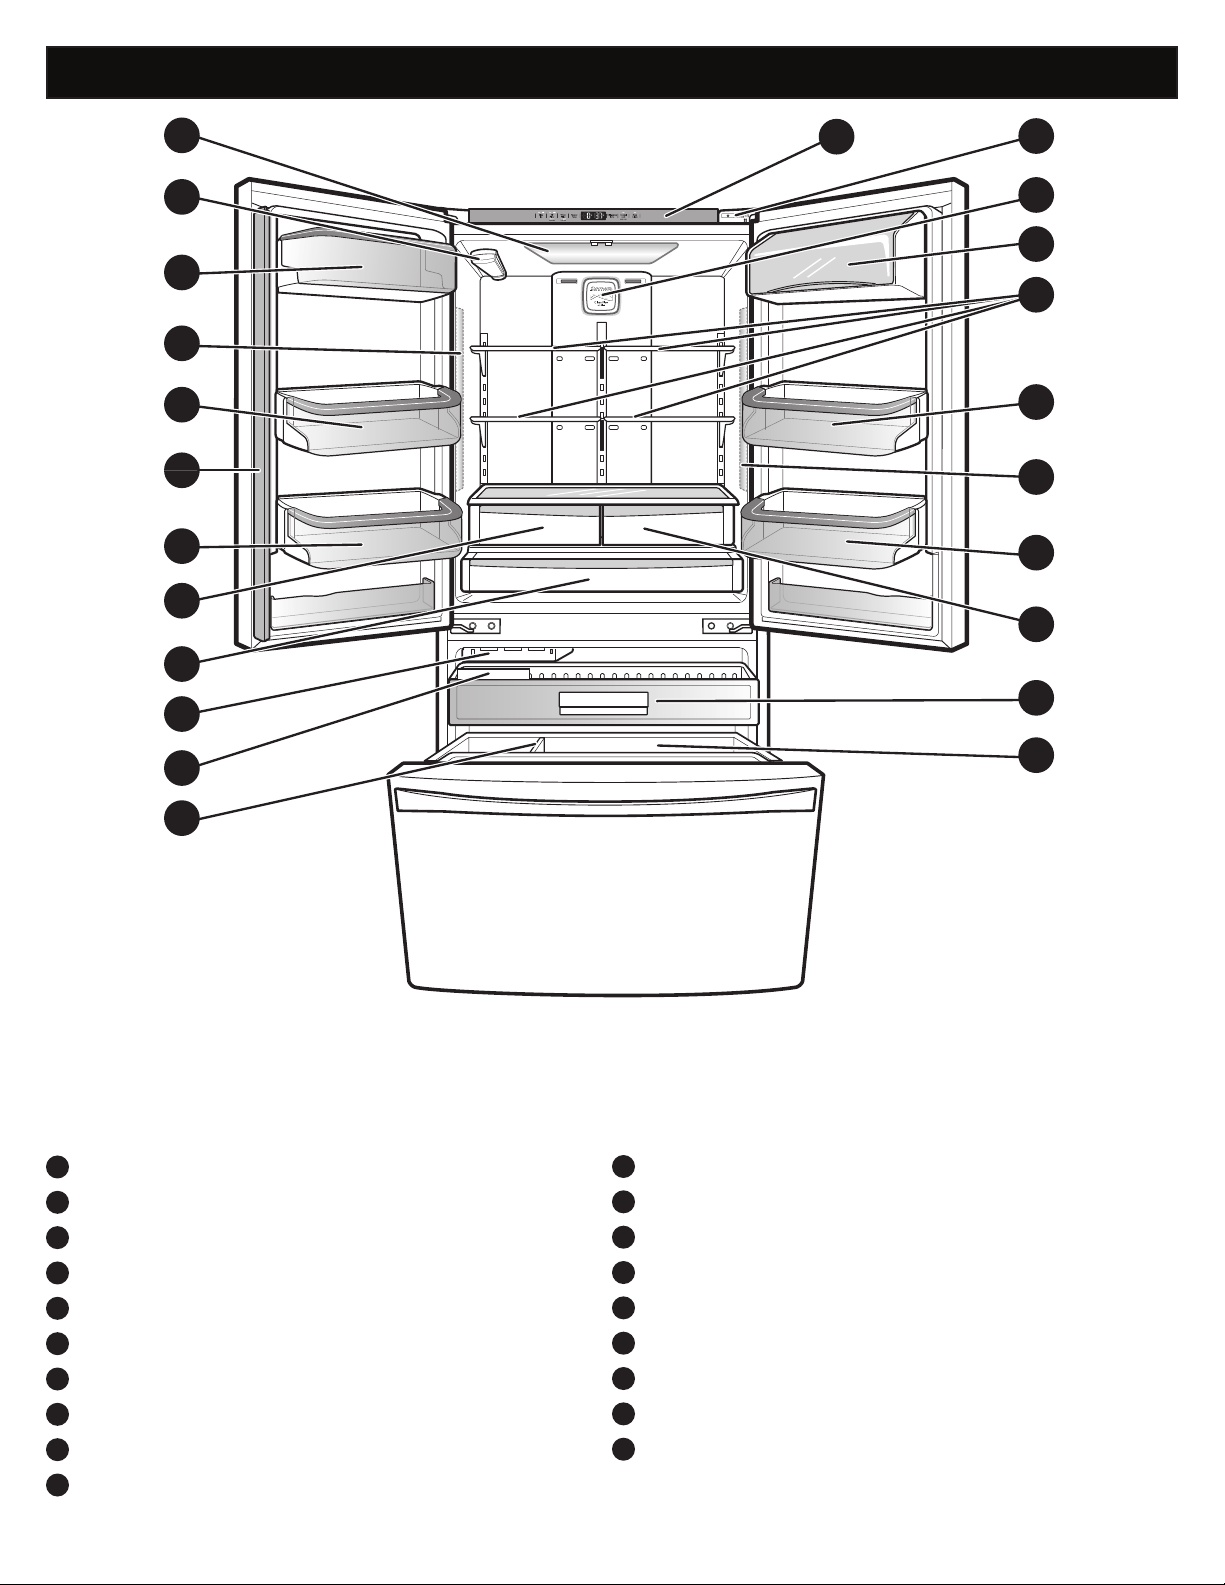
PARTS AND FEATURES
Use this page to become more familiar with the parts and features of your refrigerator.
NOTE:
listed below. The locations of the features shown below may not match your model.
K
Control Panel
L
Kenmore Connect™ Speaker
M
Air Filter
N
Adjustable Dairy Bin
O
Refrigerator Shelves
P
Adjustable Door Bins
Q
Air Tight Crisper
R
Pullout Drawer
S
Durabase
A
Refrigerator Light
B
Water Filter
C
Modular Door Bins
D
Refrigerator Light (side)
E
Articulating Mullion
F
Humidity Controlled Crisper
G
Temperature Controlled Pantry Drawer
H
Automatic Icemaker
I
Ice Bin
J
Durabase Divider
A
B
D
F
G
H
I
J
N
L
K
M
D
O
P
P
S
R
Q
E
C
C
C
9
REFRIGERATOR INSTALLATION
WARNING WARNING
WARNING
UNPACKING YOUR REFRIGERATOR
Remove tape and any temporary labels from your
refrigerator before using. Do not remove any warning-
type labels, the model and serial number label, or
the Tech Sheet that is located under the front of the
refrigerator.
To remove any remaining tape or glue, rub the area
briskly with your thumb. Tape or glue residue can also be
easily removed by rubbing a small amount of liquid dish
water and dry.
products can damage the surface of your refrigerator.
Refrigerator shelves are installed in the shipping position.
Please reinstall shelves according to your individual
storage needs.
Excessive Weight Hazard:
Use two or more people to move and install the
refrigerator. Failure to do so can result in back or
other injury.
Excessive Weight Hazard:
Your refrigerator is heavy. When moving the
refrigerator for cleaning or service, be sure to protect
moving it. Do not wiggle or walk the refrigerator when
Explosion Hazard:
gasoline, away from the refrigerator. Failure to do so
10
REFRIGERATOR INSTALLATION
INSTALLATION (continued)
1. To avoid noise and vibration, the unit must be leveled
adjust the leveling legs to compensate for unevenness
the rear to aid in door closing. Leveling legs can be
turned easily by tipping the cabinet slightly. Turn the
leveling legs to the left to raise the unit or to the right to
lower it. (See LEVELING AND DOOR ALIGNMENT.)
NOTE: Installing on carpeting, soft tile surfaces,
a platform or weakly supported structure is not
recommended.
2. Install this appliance in an area where the temperature
is between 55°F (13°C) and 110°F (43°C). If the
temperature around the appliance is too low or high,
3. Select a place where a water supply can be easily
connected for the automatic icemaker.
NOTE: The water pressure must be from 20-120 psi or
138-827 kPa or 1.4-8.4 kgf/cm². If the refrigerator is
installed in an area with low water pressure (below 20
psi), you can install a booster pump to compensate for
the low pressure.
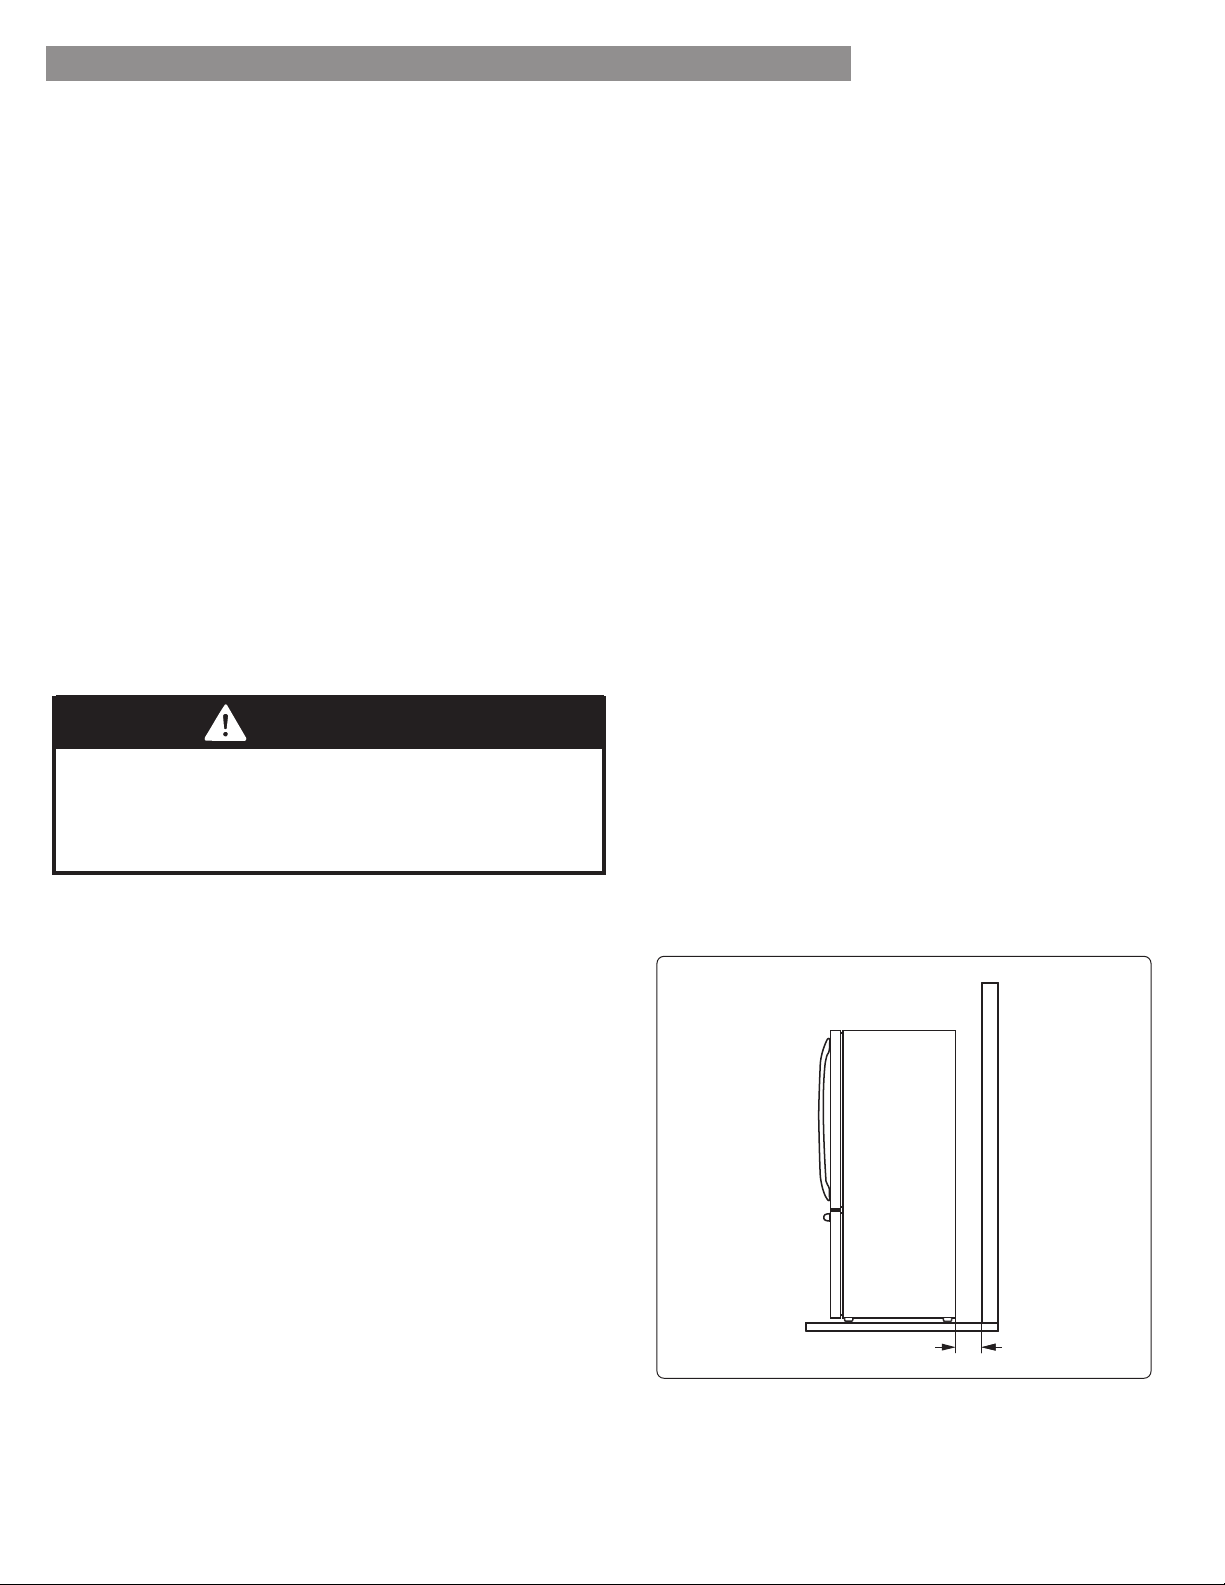
4. Too small of a distance from adjacent items may
result in lowered freezing capability and increased
electricity consumption charges. Allow at least 24
inches (61 cm) in front of the refrigerator to open the
doors and at least 2 inches (5.08 cm) between the
back of the refrigerator and the wall.
PRIOR TO USE
1.
dust that accumulated during shipping.
2. Install accessories such as ice cube bin, drawers,
shelves, etc., in their proper places. They are packed
together to prevent possible damage during shipment.
3. Allow your refrigerator to run for at least two to three
cold air in the freezer compartment to ensure proper
cooling. Your refrigerator is now ready for use.
INSTALLATION
The refrigerator should always be plugged into its own
individual properly grounded electrical outlet rated for
115 Volts, 60 Hz, AC only, and fused at 15 or 20 amperes.
This provides the best performance and also prevents
hazard from overheated wires. It is recommended that a
separate circuit serving only this appliance be provided.
2" (5.08 cm)
Shock Hazard:
To reduce the risk of electric shock, do not install the
refrigerator in a wet or damp area.
WARNING
11
REFRIGERATOR INSTALLATION
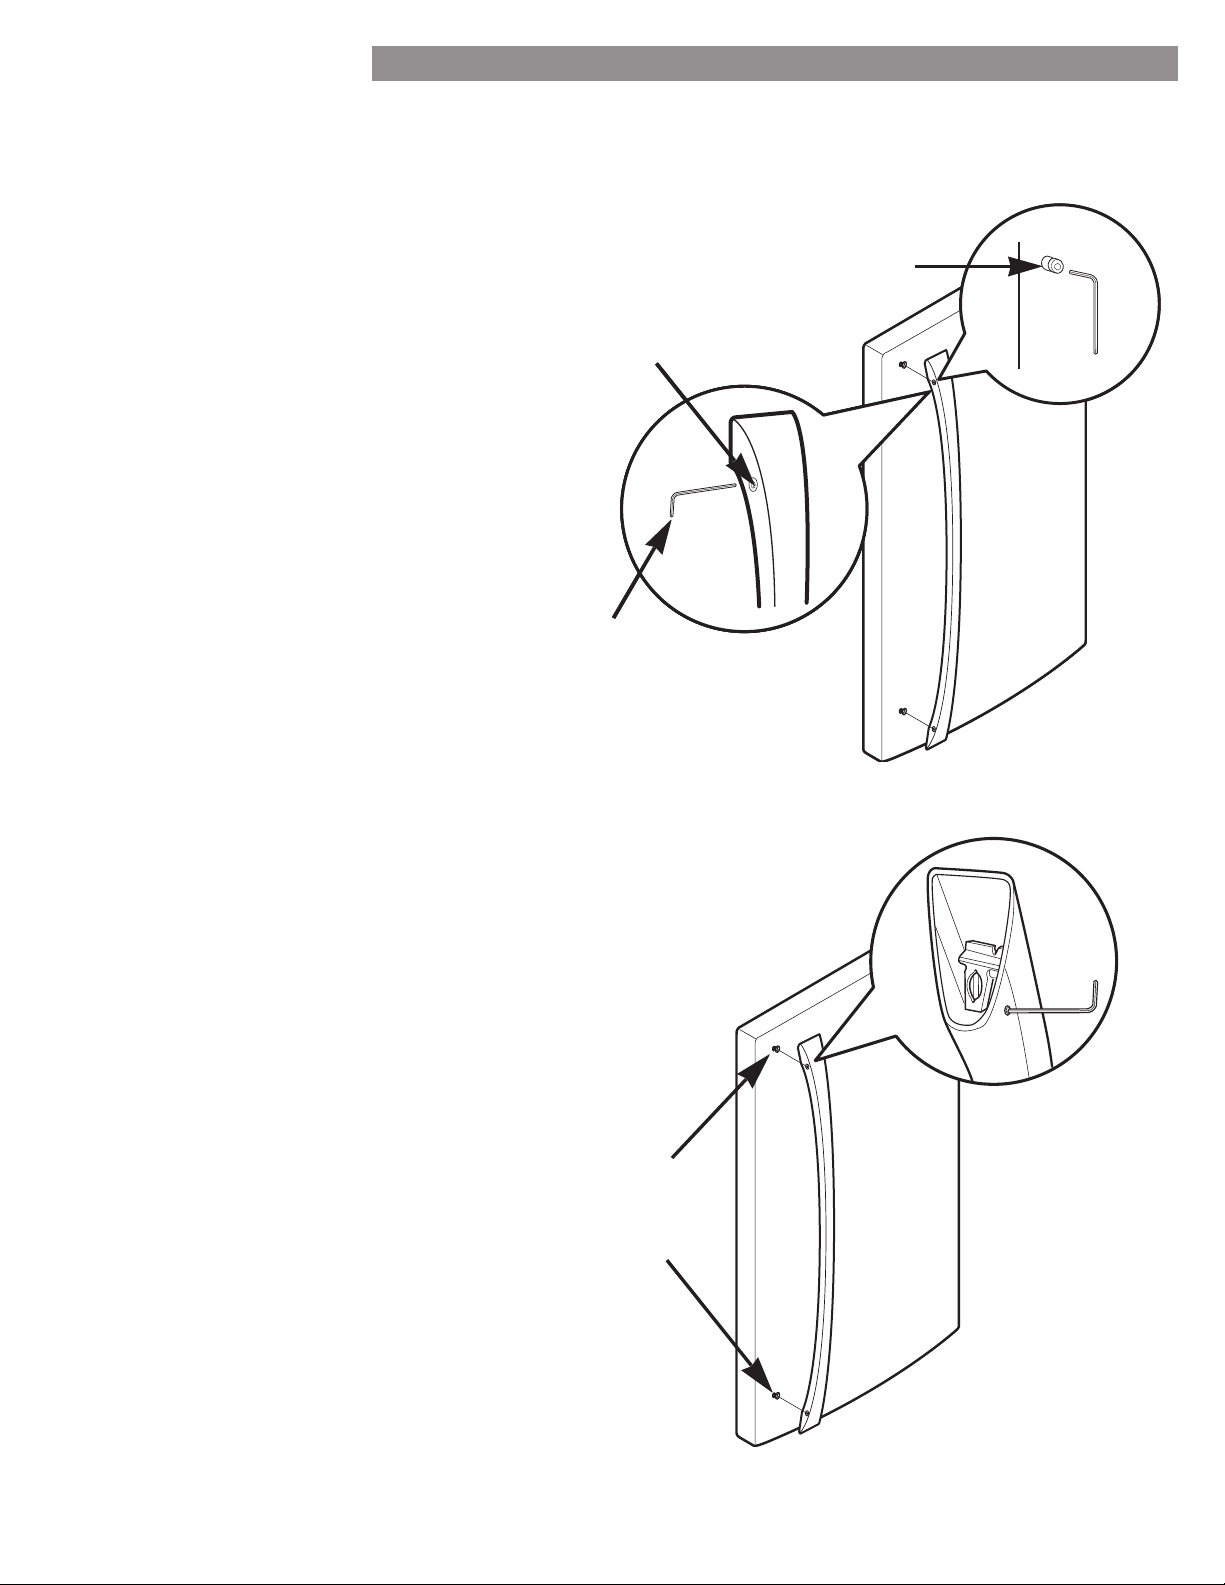
HOW TO REMOVE REFRIGERATOR
DOOR HANDLE
NOTE: Handle appearance may vary from the
illustrations on this page.
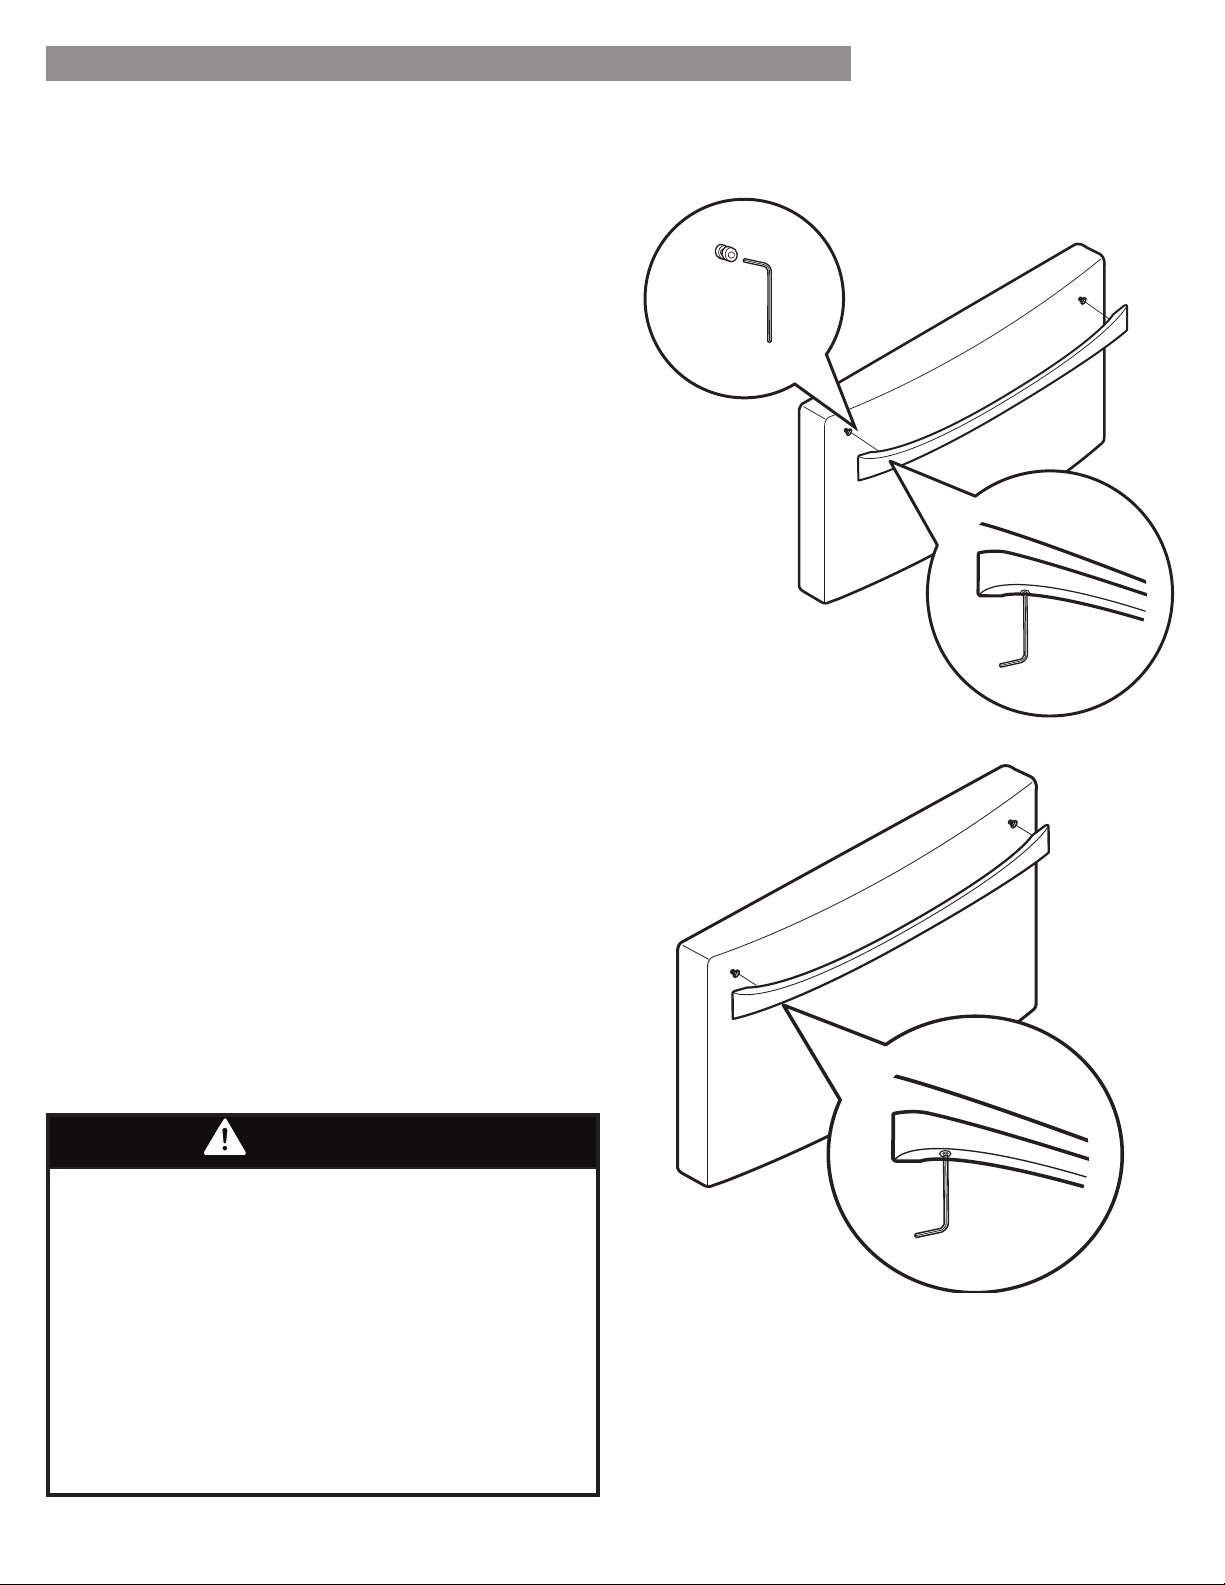
Removing Refrigerator Handle
Loosen the set screws with a / in. Allen
wrench and remove the handle.
NOTE: If the handle mounting fasteners need
to be tightened or removed, use a ¼ in. Allen
wrench.
NOTE: Removing the doors is always recommended when it is necessary to move the refrigerator through a narrow
opening. If it is necessary to remove the handles, follow the directions below.
Mounting
Fasteners
Set Screw
Allen
Wrench
HOW TO REPLACE REFRIGERATOR
DOOR HANDLE
NOTE: Handle appearance may vary from the
illustrations on this page.
Replacing Refrigerator Door Handle
the handle footprints over the mounting
fasteners and tightening the set screws
with a / in Allen wrench.
NOTE: If the handle mounting fasteners
need to be tightened or removed, use a
¼ in. Allen wrench.
Mounting
Fasteners
12
REFRIGERATOR INSTALLATION
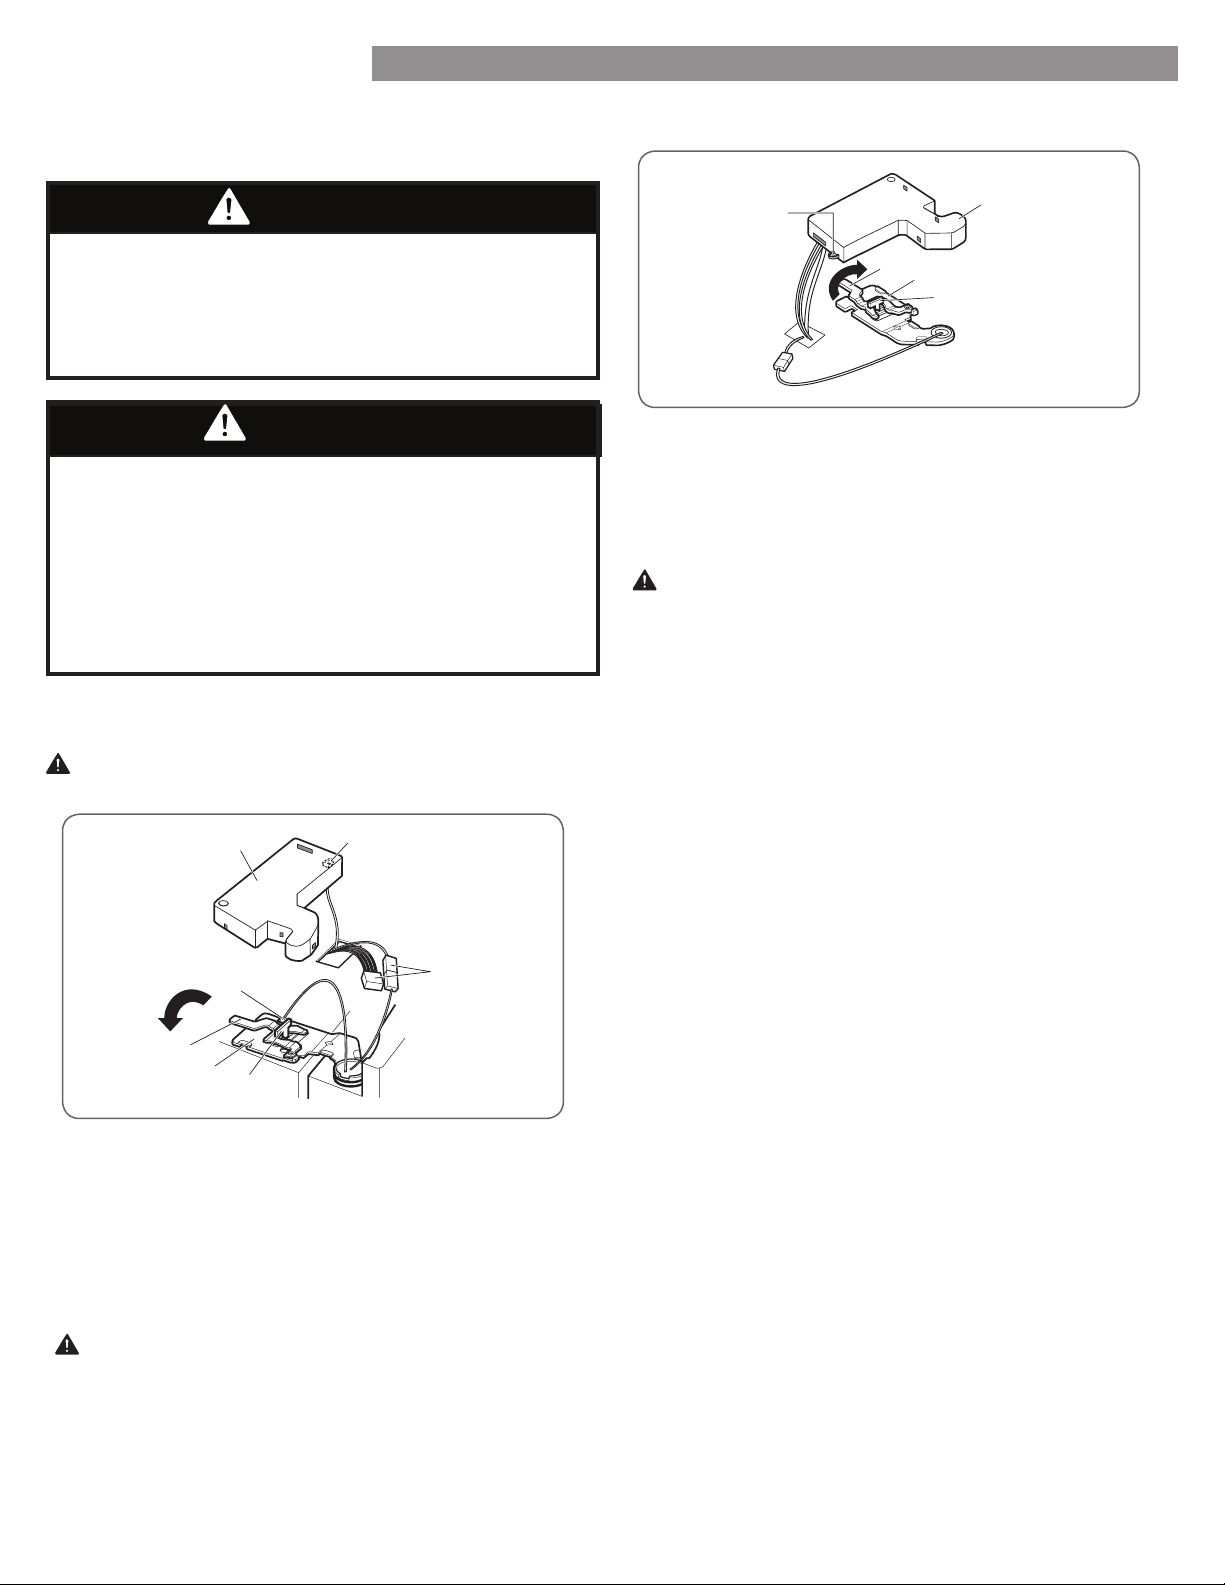
HOW TO REPLACE FREEZER DOOR HANDLE
NOTE: Handle appearance may vary from the illustrations
on this page.
Replacing Freezer Drawer Handle
footprints over the mounting fasteners and tightening
NOTE: If the handle mounting fasteners need to be
tightened or removed, use a ¼ in. Allen wrench.
HOW TO REMOVE FREEZER DOOR HANDLE
NOTE: Handle appearance may vary from the illustrations
on this page.
Removing Freezer Drawer Handle
Loosen the set screws located on the lower side of
handle.
NOTE: If the handle mounting fasteners need to be
tightened or removed, use a ¼ in. Allen wrench.
NOTE: Removing the doors is always recommended when it is necessary to move the refrigerator through a narrow
opening. If it is necessary to remove the handles, follow the directions below.
When assembling or disassembling the handles:
cause injury.
Prevent the handle from swinging toward nearby
people or animals.
Insert the bracket hole of the handle into the stopper
bolt of the door exactly, then assemble the set screws
Check for any gap between the door and handle after
WARNING
13
REFRIGERATOR INSTALLATION
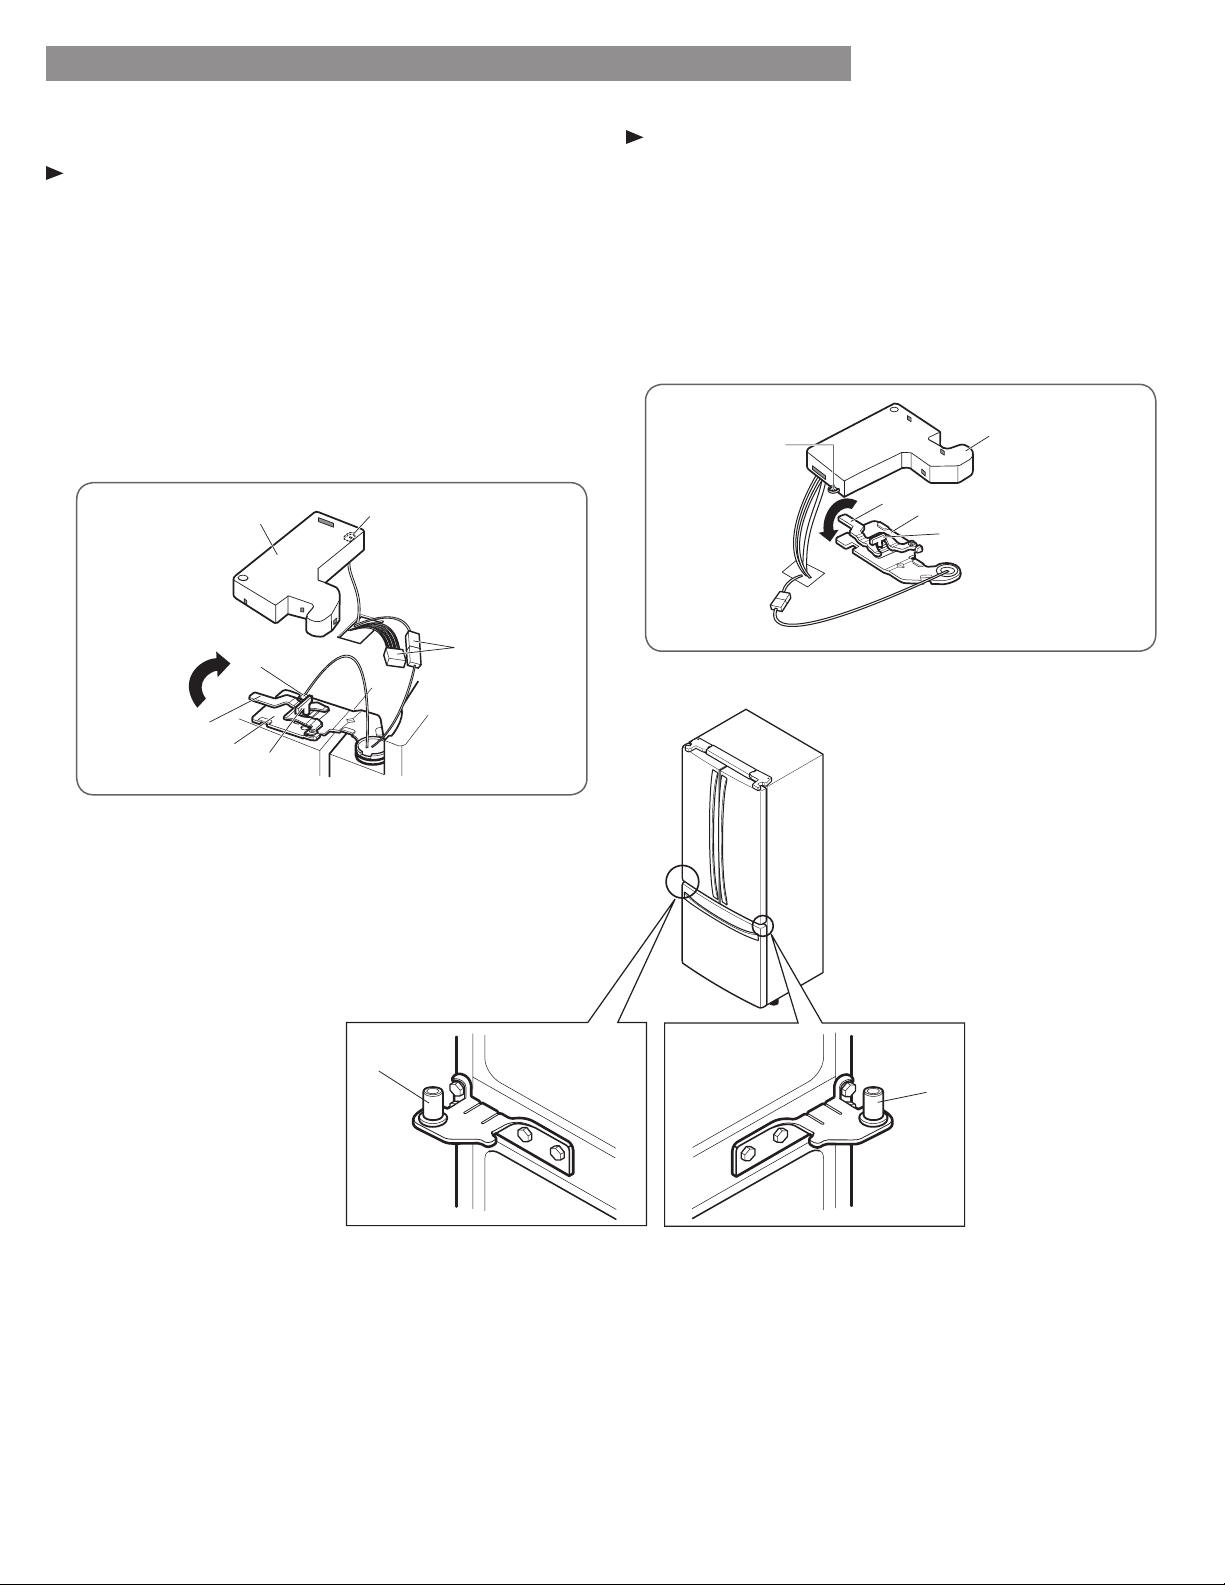
To remove the left refrigerator door:
1. Open the door. Remove the top hinge cover screw (1).
Lift up the cover (2).
2. Remove the cover.
3. Disconnect all wire harnesses (3).
4. Remove the grounding screw (4).
5. Rotate hinge lever (5) counterclockwise. Lift the top
hinge (6) free of the hinge lever latch (7).
CAUTION: When lifting the hinge free of the latch,
be careful that the door does not fall forward.
6. Lift the door from the middle hinge pin and remove
the door.
7. Place the door, inside facing up, on a non-scratching
surface.
1. Open the door. Remove the top hinge cover screw (1).
Lift up the cover (2).
2. Remove the cover.
3. Rotate the hinge lever (3) clockwise. Lift the top hinge
(4) free of the hinge lever latch (5).
CAUTION: When lifting the hinge free of the latch, be
careful that the door does not fall forward.
4. Lift the door from the middle hinge pin and remove
the door.
5. Place the door, inside facing up, on a non-scratching
surface.
WARNING
Electrical Shock Hazard
Disconnect the electrical supply to the refrigerator
before installing. Failure to do so could result in
serious injury or death.
Do not put hands, feet or other objects into the air
vents or bottom of the refrigerator. You may be
injured or receive an electrical shock.
To remove the right refrigerator door:
REMOVING AND REPLACING
REFRIGERATOR DOORS
CAUTION: Before you begin, remove food and bins
from the doors.
WARNING
Excessive Weight Hazard:
Use two or more people to remove and install the
refrigerator doors. Failure to do so can result in back or
other injury.
(2)
(3)
(4)
(5)
(1)
(1)
(2)
(5)
(6)
(7)
(3)
(4)
14
REFRIGERATOR INSTALLATION
Reinstalling the Refrigerator Door
Left Door
1. Lower the door onto the middle hinge pin (9).
2. Fit the top hinge (6) over the hinge lever latch (7) and
into place. Rotate the lever (5) clockwise to secure the
hinge.
3. Install the grounding screw (4) and connect the two
wire harnesses (3).
4. Hook the tabs on the left side of the hinge cover (1)
under the edge of the top hinge (6) and position the
cover in place. Insert and tighten the cover screw (1).
Right Door
1. Lower the door onto the middle hinge pin (9).
2. Fit the top hinge (4) over the hinge lever latch (5) and
into place. Rotate the lever (3) counterclockwise to
secure the hinge.
3. Hook the tabs on the right side of hinge cover (2)
under the edge of the top hinge (4) and position the
cover in place. Insert and tighten the cover screw (1).
(8)
(9)
(2)
(5)
(1)
(3)
(4)
(1)
(5)
(6)
(7)
(3)
(4)
(2)
15
REFRIGERATOR INSTALLATION
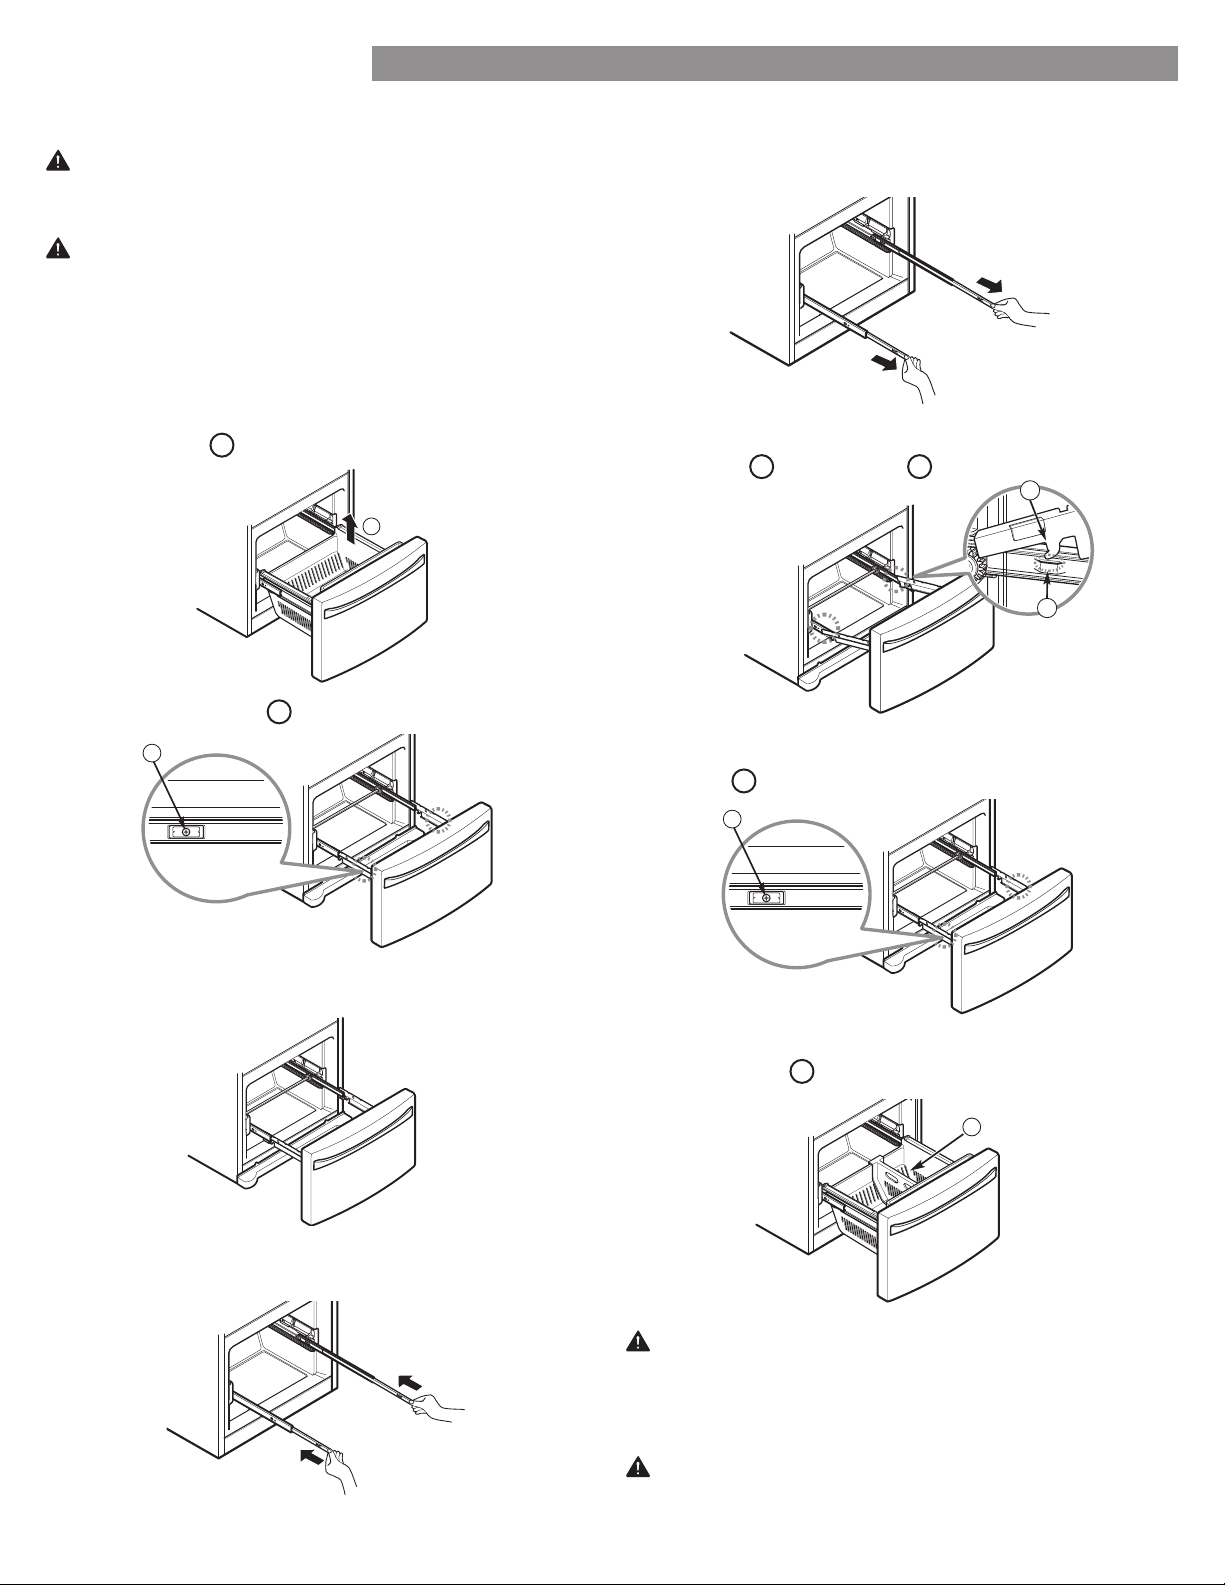
Pull the drawer open to full extension. Remove the
lower basket
1
by lifting the basket from the rail
system.
Remove the screws
2
from the rail on both sides.
Grasp the drawer on each side and pull it up to
separate it from the rails.
With both hands, slide each bar in simultaneously.
CAUTION: Do not hold the handle when removing or
could cause personal injury.
2
Pull out each rail to full extension.
screws
3
located on both sides.
With the drawer pulled out to full extension, insert the
lower basket
4
in the rail assembly.
Grasp the drawer on each side and hook drawer
supports
1
into rail tabs
2
located on both sides.
WARNING: If the Durabase divider is removed, there is
enough open space for children or pets to crawl inside.
To prevent accidental child and pet entrapment or
near the freezer drawer.
WARNING: DO NOT step or sit down on the freezer
drawer.
3
HOW TO REMOVE THE FREEZER DRAWER
HOW TO INSTALL THE FREEZER DRAWER
2
1
WARNING: Use two or more people to remove and
install the freezer drawer. Failure to do so can result in
back or other injury.
NOTE:
located above the freezer drawer is not shown for
clarity.
15
2
1
3
4
Pull the drawer open to full extension. Remove the
lower basket
1
by lifting the basket from the rail
system.
Remove the screws
2
of the rail on both sides.
Grasp the drawer on each side and pull it up to
separate it from the rails.
With hands hold the each rail, slide and push it
In to slide.
CAUTION: Do not hold the handle when removing or
replacing the drawer. The handle may come off and it
could cause personal injury.
REFRIGERATOR INSTALLATION
Fully extend the rails by grasping each rail, slide with
hands and pulling straight out.
Lower the door into final position and tighten the
screws
3
located on both sides.
With the drawer pulled out to full extension, insert the
lower basket
4
in the rail assembly.
Grasp the drawer on each side and hook door
supports
1
into rail tabs
2
located on both sides.
WARNING: If the Durabase divider is removed, there
is enough open space for children or pets to crawl
inside.
To prevent accidental child and pet entrapment or
suffocation risk, DO NOT allow them to touch or go
near the freezer drawer.
WARNING: DO NOT step or sit down on freezer
drawer.
HOW TO REMOVE THE FREEZER DRAWER
HOW TO INSTALL THE FREEZER DRAWER
WARNING: Use two or more people to remove and
install the freezer drawer. Failure to do so can result in
back or other injury.
NOTE: In the following figures, the Pullout Drawer
located above the freezer drawer is not shown for
clarity.
1
2
4
1
16
REFRIGERATOR INSTALLATION
LEVELING AND DOOR ALIGNMENT
Leveling
After installing, plug the refrigerator’s power cord into a
3-prong grounded outlet and push the refrigerator into the
Your refrigerator has two front leveling legs—one on the
right and one on the left. Adjust the legs to alter the tilt
from front-to-back or side-to-side. If your refrigerator
seems unsteady, or you want the doors to close more
easily, adjust the refrigerator’s tilt using the instructions
below:
NOTE: Tools Required: /
screwdriver.
1. Turn the leveling leg to the left to raise that side of
the refrigerator or to the right to lower it. It may take
several turns of the leveling leg to adjust the tilt of the
refrigerator.
NOTE: Having someone push backward against the top of
This makes it easier to adjust the legs.
2. Open both doors again and check to make sure that
they close easily. If the doors do not close easily, tilt
the refrigerator slightly more to the rear by turning
both leveling legs to the left. It may take several more
turns, and you should turn both leveling legs the same
amount.
NOTE: Your refrigerator is uniquely designed with
two fresh food doors. Either door can be opened or
closed independently of the other. You may have to
exert slight pressure on the doors to get them to close
completely.
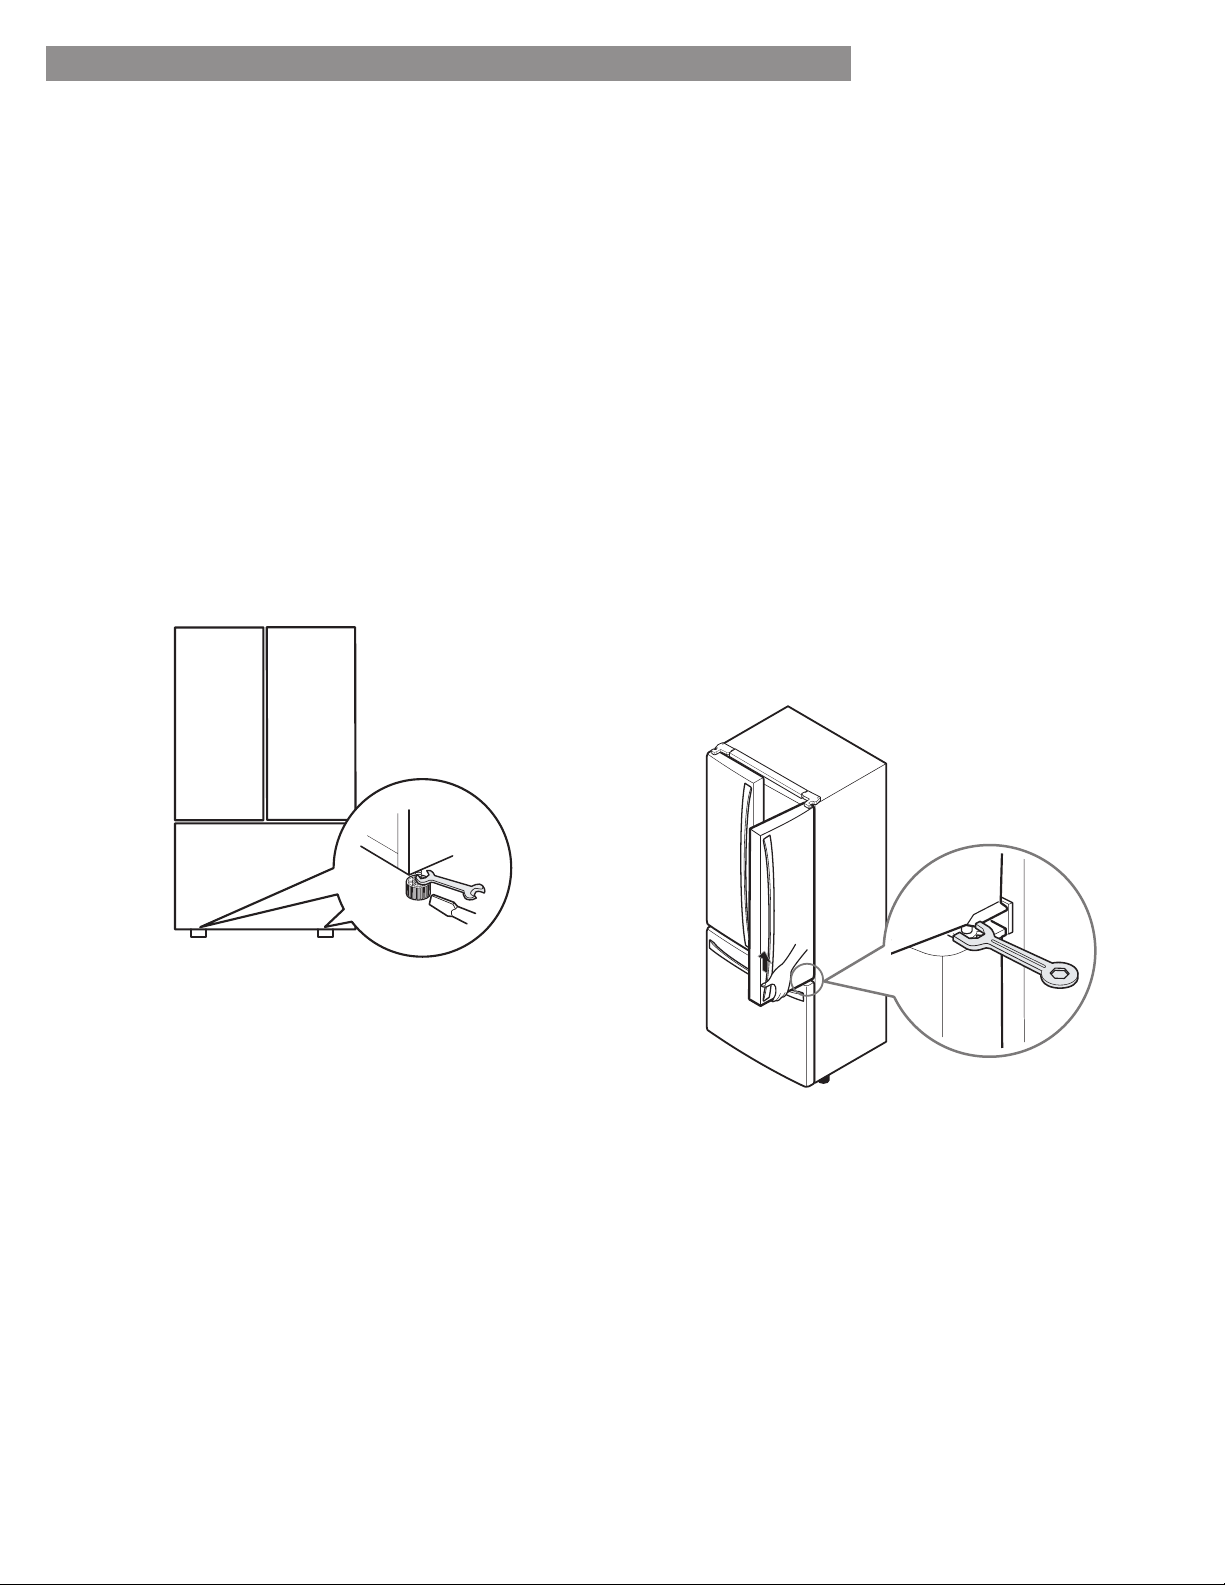
Door Alignment
Both the left and right refrigerator doors have an
adjustable nut, located on the bottom hinge, to raise and
lower them to align properly.
If the space between your doors is uneven, follow the
instructions below to align the doors evenly:
Use the wrench (included with the Use & Care Guide) to
turn the nut in the door hinge to adjust the height. To the
right to raise or to the left to lower the height.
17
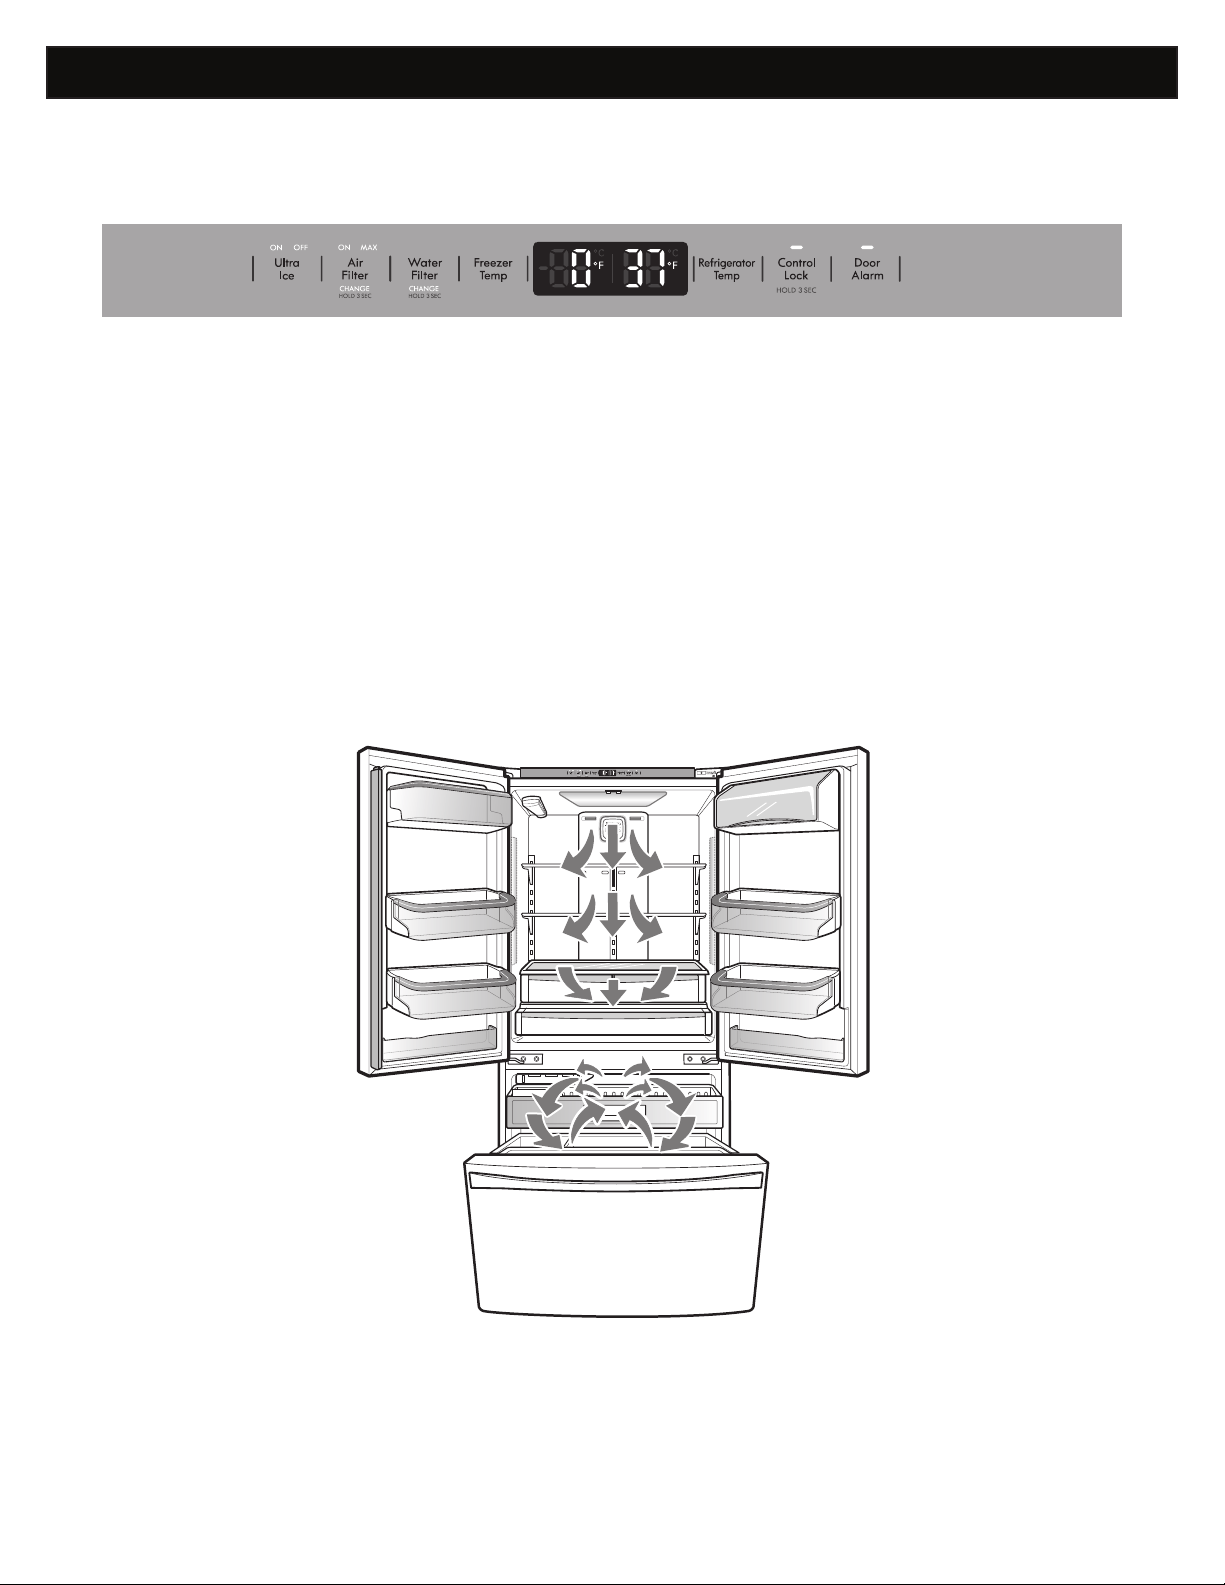
USING YOUR REFRIGERATOR
SETTING THE CONTROLS
The Refrigerator Temp Control ranges from 33°F to •
46°F (1°C to 8°C). Press the Refrigerator Temp button
to cycle through the available temperature settings one
increment at a time.
The Freezer Temp Control range is from -6°F to 8°F •
(-21°C to -13°C). Press the Freezer Temp button to cycle
through the available temperature settings one increment
at a time.
NOTE: When changing control settings, wait 24 hours
before making additional adjustments. The controls are set
correctly when milk or juice is as cold as you would like
compartment is too cold or too warm, change the setting
one increment at a time. Wait 24 hours for the change to
stabilize before adjusting again.
Airow
Temperature
18
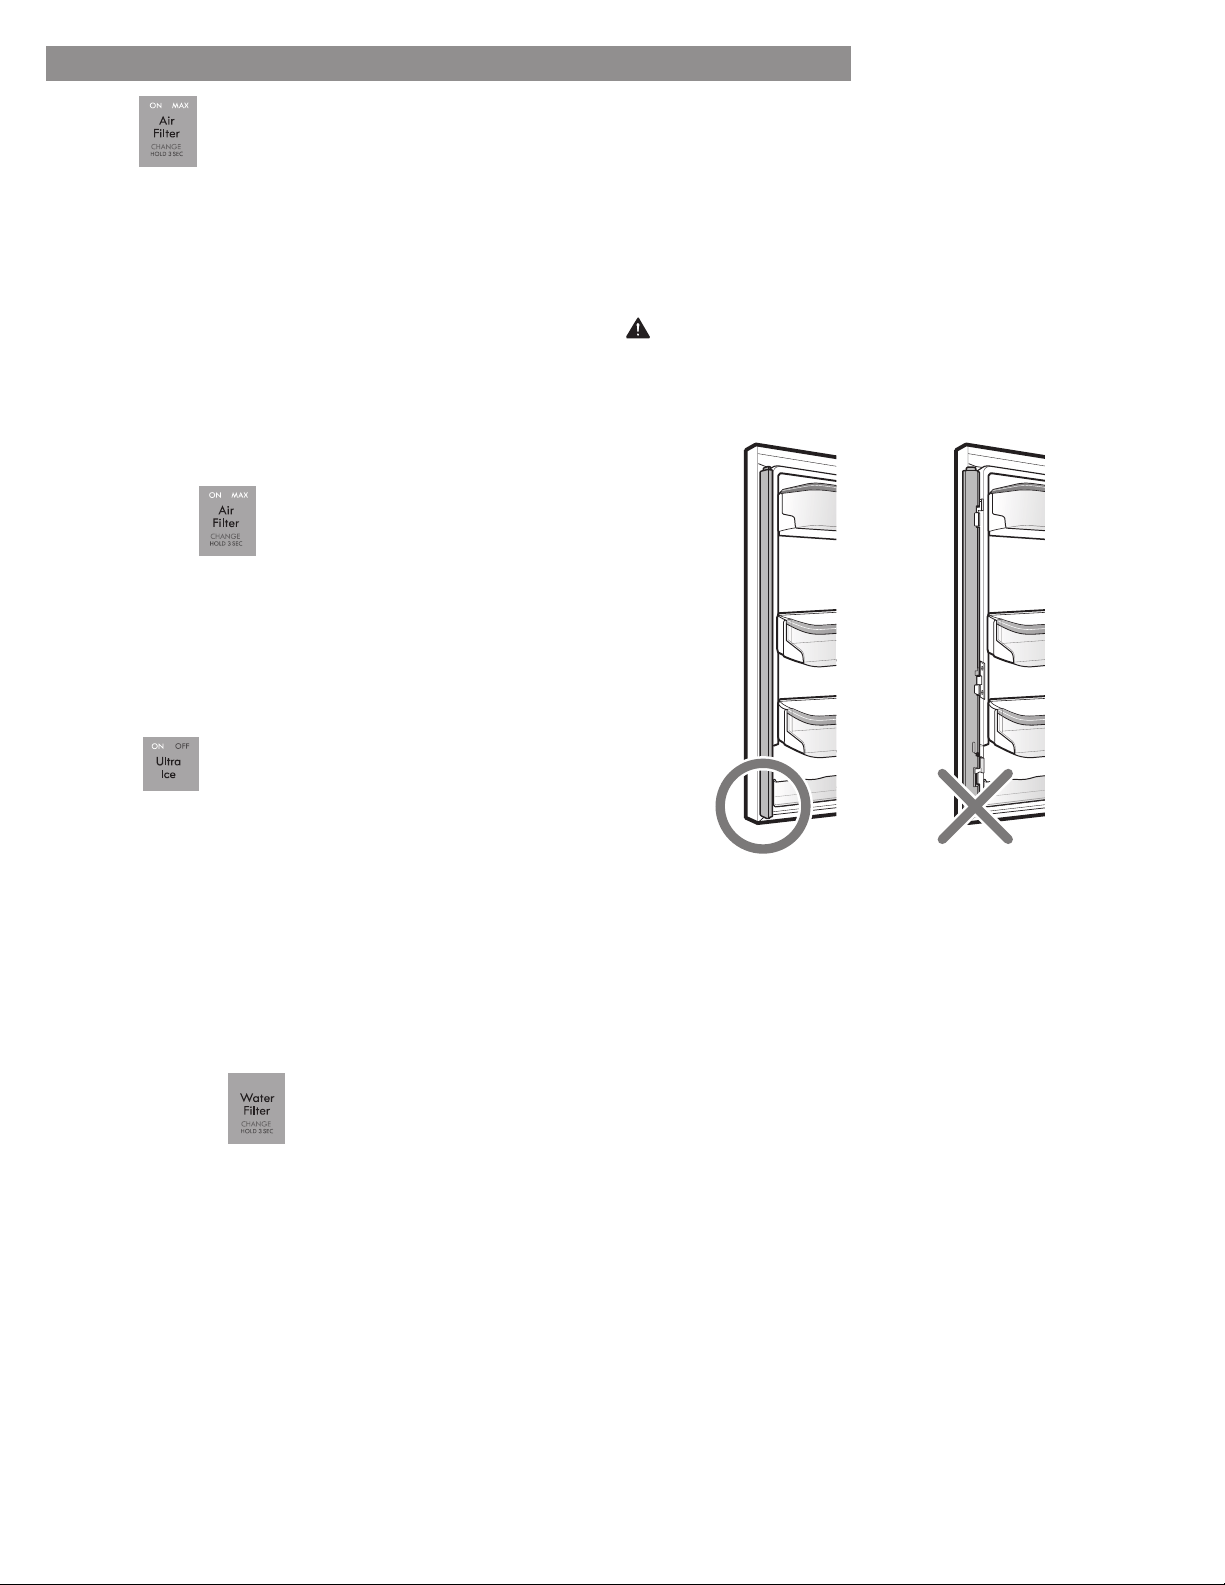
USING YOUR REFRIGERATOR
CAUTION
To reduce the risk of scratching the door or breaking the
door mullion, make sure that the refrigerator door mullion
is always folded in.
Articulating Mullion
This feature is a metal strip attached to the left door
that articulates (rotates) 90 degrees as the door is
closed, forming a mullion (base) for the left and right
door gaskets to seal against.
Air Filter
The Air Filter helps remove odors from the
refrigerator. The Air Filter has two settings, Auto and
MAX. In Auto mode, the Air Filter will cycle on and
AX mode, the Air Filter will stay
After four hours, the Air Filter will switch to Auto
mode.
Auto mode is the default mode.
Press the Air Filter button once for MAX mode.
Air Filter Reset
When the CHANGE
hold the Air Filter button for three seconds to turn the
Ultra Ice
The Ultra Ice function increases both ice making
and freezing capabilities by running the freezer
compartment at the coldest setting for a 24-hour
period.
When you press the Ultra Ice button, the “ON” LED will
illuminate and will continue for 24 hours. The function
You can stop the function manually by pressing the
button one more time.
Water Filter Reset
When the CHANGE icon turns on, you need to
Water Filter button for
months.
19
USING YOUR REFRIGERATOR
Door Alarm
When power is connected to the refrigerator, the door
alarm is initially set to ON. When you press the Door
Alarm button, the display will change to OFF and the
Door Alarm function will deactivate.
When either the refrigerator or the freezer door is left
open for more than 60 seconds, the alarm tone will
sound to let you know that the door is open.
When you close the door, the door alarm will stop.
Control Lock
When power is initially connected to the refrigerator,
the Lock
If you want to activate the Lock function to lock other
buttons, press and hold the Control Lock button for
three seconds or more. The Control Lock button will
illuminate and the Lock function is now enabled.
When the Lock function is activated, no other buttons
will work.
To disable the Lock function, press and hold the Control
Lock button for approximately three seconds.
Temperature Mode Switch Function (°F <->°C)
If you want to convert °F to °C or vice versa, press and
hold the Freezer Temp and Refrigerator Temp buttons at
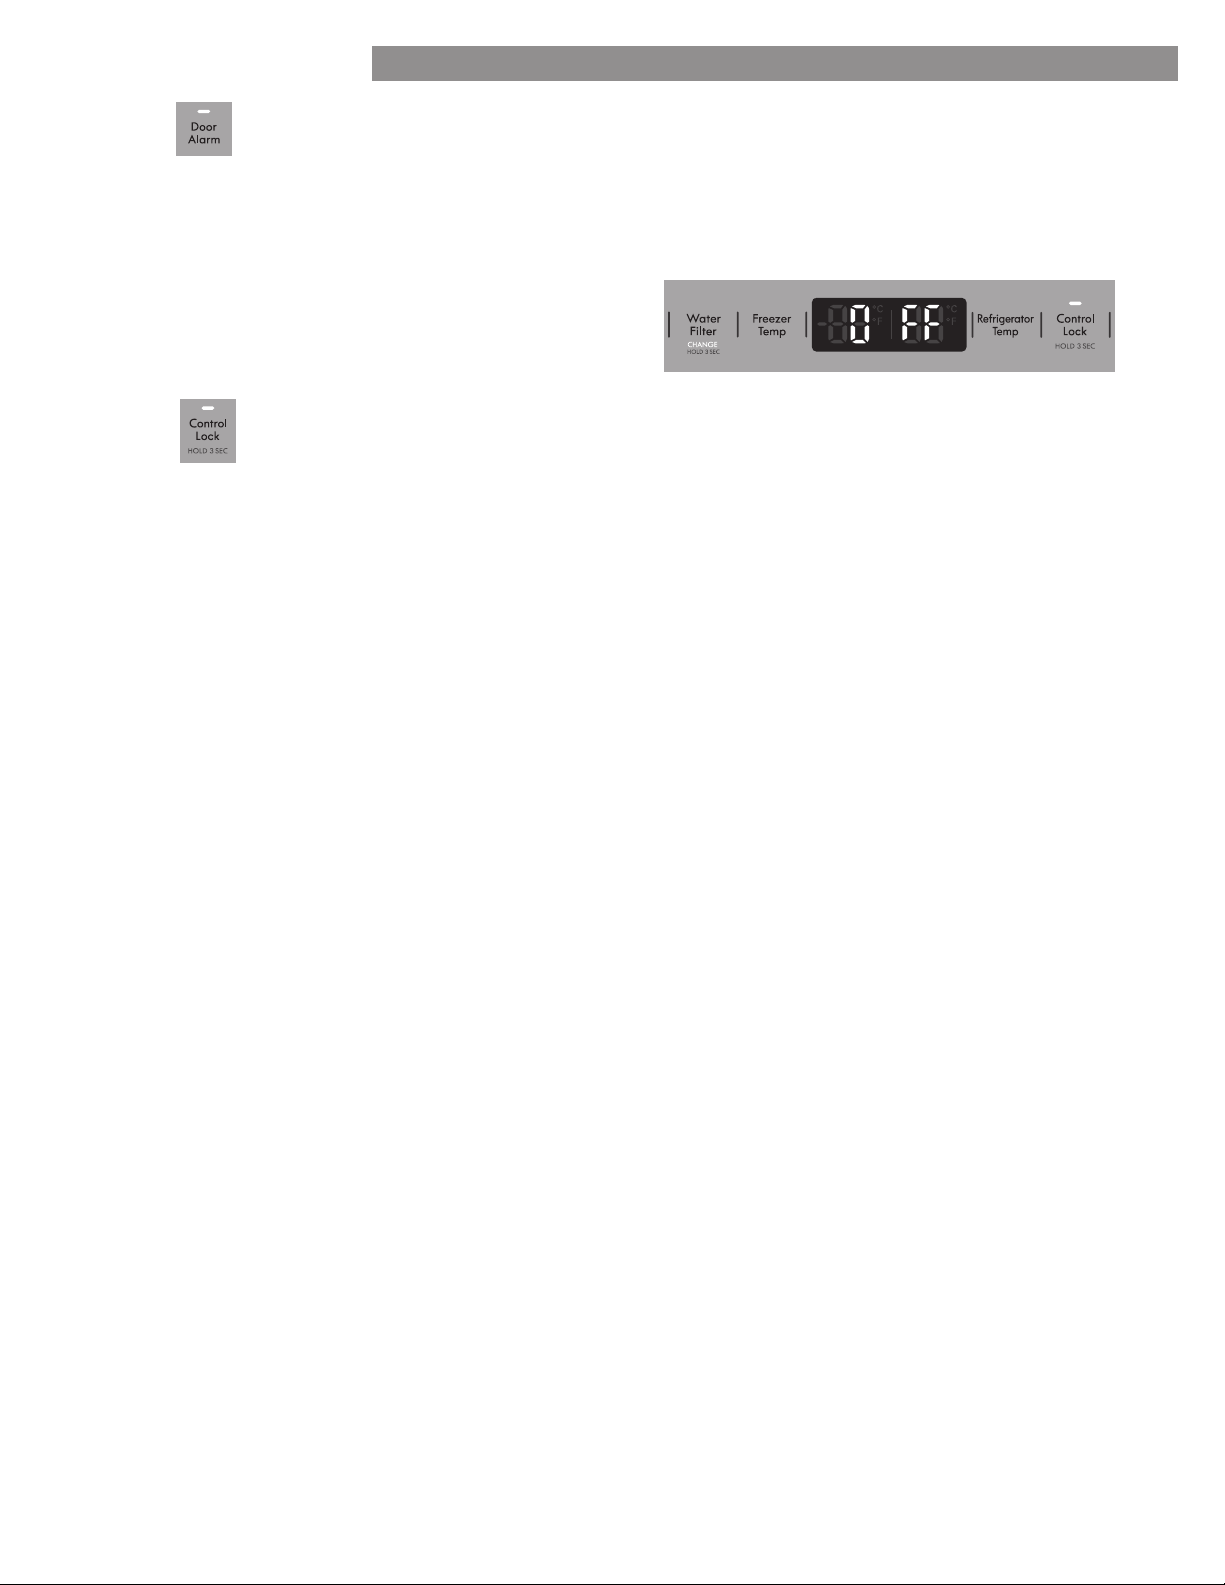
Demo Mode (For Store Use Only)
The Demo Mode disables all cooling in the refrigerator
and freezer sections to conserve energy while on display
in a retail store. When activated, OFF will display on the
control panel.
To deactivate:
With either refrigerator door opened, press and hold the
Refrigerator Temp and Ice Maker buttons at the same
Demo
Mode is deactivated. Use the same procedure to activate
the Demo Mode.
20
USING YOUR REFRIGERATOR
FOOD STORAGE GUIDE
Wrap or store food in the refrigerator in airtight and
moisture-proof material unless otherwise noted. This
prevents food odor and taste transfer throughout the
refrigerator. For dated products, check date code to
ensure freshness.
STORING FROZEN FOOD
NOTE: Check a freezer guide or a reliable cookbook
for further information about preparing food for
freezing or food storage times.
Freezing
Your freezer will not quick-freeze a large quantity of
food. Do not put more unfrozen food into the freezer
than will freeze within 24 hours (no more than 2 to 3
lbs. of food per cubic foot of freezer space). Leave
enough space in the freezer for air to circulate around
packages. Be careful to leave enough room at the
front so the door can close tightly.
Storage times will vary according to the quality and
type of food, the type of packaging or wrap used
(how airtight and moisture-proof) and the storage
temperature. Ice crystals inside a sealed package are
normal. This simply means that moisture in the food
and air inside the package have condensed, creating
ice crystals.
NOTE: Allow hot foods to cool at room temperature
for 30 minutes, then package and freeze. Cooling hot
foods before freezing saves energy.
Packaging
Successful freezing depends on correct packaging.
When you close and seal the package, it must not
allow air or moisture in or out. If it does, you could
have food odor and taste transfer throughout the
refrigerator and could also dry out frozen food.
Packaging recommendations:
Straight-sided canning/freezing jars
Heavy-duty aluminum foil
Plastic-coated paper
Non-permeable plastic wraps
Follow package or container instructions for proper
freezing methods.
Do not use
Bread wrappers
Non-polyethylene plastic containers
Containers without tight lids
Wax paper or wax-coated freezer wrap
Thin, semi-permeable wrap
CAUTION: Do not keep beverage cans or plastic
food containers in the freezer compartment. They
may break or burst if they freeze.
Items How to
Butter or
margarine
Cheese
Milk
Eggs
Fruit
Leafy
vegetables
Vegetables
with skins
(carrots,
peppers)
Fish
Leftovers
Keep opened butter in a covered
dish or closed compartment.
When storing an extra supply,
wrap in freezer packaging and
freeze.
Store in the original wrapping
until you are ready to use it. Once
opened, rewrap tightly in plastic
wrap or aluminum foil.
Wipe milk cartons. For best
storage, place milk on interior
shelf, not on door shelf.
Store in original carton on interior
shelf, not on door shelf.
Do not wash or hull the fruit
until it is ready to be used. Sort
and keep fruit in its original
container, in a crisper, or store in a
completely closed paper bag on a
refrigerator shelf.
Remove store wrapping and trim
areas. Wash in cold water and
drain. Place in plastic bag or
plastic container and store in
crisper.
Place in plastic bags or plastic
container and store in crisper.
the freezer section if they are not
being consumed the same day of
purchase. It is recommended to
same day purchased.
Cover leftovers with plastic wrap
or aluminum foil, or store in plastic
containers with tight lids.
21
USING YOUR REFRIGERATOR
A newly-installed refrigerator may take
12 to 24 hours to begin making ice.
NOTE: The water pressure must be between 20 and 120
normal amount and size cubes.
The icemaker will produce 12 cubes per cycle—
approximately 100 cubes in a 24-hour period, depending
on freezer compartment temperature, room temperature,
number of door openings and other operating conditions.
made to the icemaker, set the power switch to OFF (O).
supply, set the power switch to ON (I).
freezing. A newly-installed refrigerator may take 12 to
24 hours to begin making ice cubes.
line to clear.
Arm, the icemaker will stop producing ice. It is normal
for several cubes to be stuck together.
cloudy, taste stale, and shrink.
WHEN YOU SHOULD SET THE ICEMAKER
POWER SWITCH TO OFF (O)
minute or two.
NORMAL SOUNDS YOU MAY HEAR
with water.
NOTE: If the house water supply (cold water only) is
not hooked up or not turned on fully, turn the icemaker
damage. Do not turn the icemaker On (I) until an
adequate water supply is connected.
PREPARING FOR VACATION
the water supply to the refrigerator.
If the ambient temperature will drop below freezing,
ruptured water lines or connections.
Power Switch
Automatic
WARNING
Personal Injury Hazard
icemaking mechanism while the refrigerator is
plugged in.
AUTOMATIC ICEMAKER
22
USING YOUR REFRIGERATOR
REFRIGERATOR SECTION
REFRIGERATOR SHELVES
The shelves in your refrigerator are adjustable to meet
your individual storage needs. Your model may have glass
or wire shelves.
also reduce the amount of time the refrigerator door is
open which will save energy.
IMPORTANT: Do not clean glass shelves with warm water
while they are cold. Shelves may break if exposed to
sudden temperature changes or impact.
CAUTION: Glass shelves are heavy. Use special care
when removing them.
Adjusting Shelves (Cantilever)
Remove shelves from the shipping position and replace
shelves in the position you want.
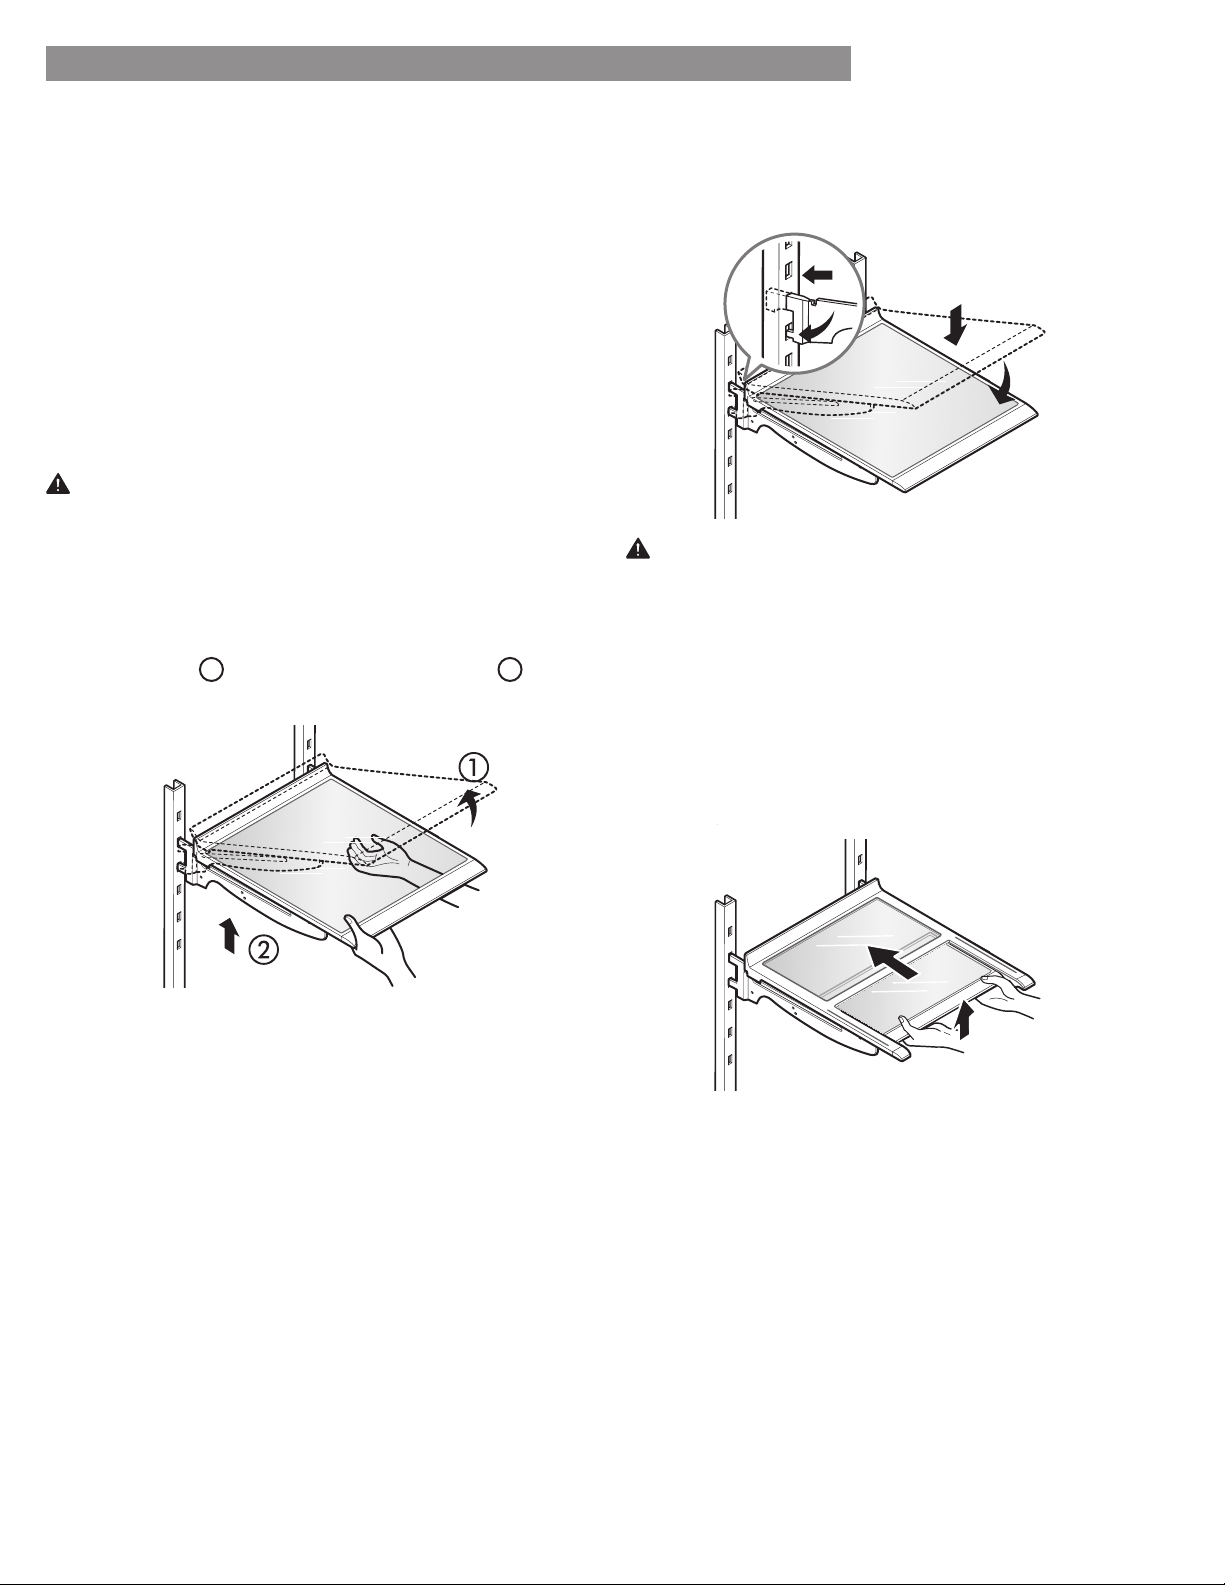
To remove a shelf—Tilt up the front of the shelf in the
direction of
1
and lift it in the direction of
2
. Pull
the shelf out.
To reinstall a shelf—Tilt the front of the shelf up and
guide the shelf hooks into the slots at a desired height.
Then, lower the front of the shelf so that the hooks
drop into the slots.
Folding Shelf (on some models)
You can store taller items, such as a gallon container
or bottles, by simply pushing the front half of the shelf
underneath the back half of the shelf. Pull the front of the
shelf toward you to return to a full shelf.
CAUTION: Make sure that shelves are level from one
side to the other. Failure to do so may result in the shelf
falling or spilling food.
25
REFRIGERATOR SHELVES
The shelves in your refrigerator are adjustable to meet
your individual storage needs. Your model may have glass
or wire shelves.
Adjusting the shelves to fit different heights of items will
make finding the exact item you want easier. Doing so will
also reduce the amount of time the refrigerator door is
open which will save energy.
IMPORTANT: Do not clean glass shelves with warm water
while they are cold. Shelves may break if exposed to
sudden temperature changes or impact.
NOTE: Glass shelves are heavy. Use special care when
removing them.
Adjusting Shelves (Cantilever)
Remove shelves from the shipping position and replace
shelves in the position you want.
To remove a shelf—Tilt up the front of the shelf in the
direction of
1
and lift it in the direction of
2
. Pull
the shelf out.
To reinstall a shelf—Tilt the front of the shelf up and
guide the shelf hooks into the slots at a desired height.
Then, lower the front of the shelf so that the hooks
drop into the slots.
Folding Shelf (on some models)
You can store taller items, such as a gallon container
or bottles, by simply pushing the front half of the shelf
underneath the back half of the shelf. Pull the front of the
shelf toward you to return to a full shelf.
CAUTION: Make sure that shelves are level from one
side to the other. Failure to do so may result in the shelf
falling or spilling food.
USING YOUR REFRIGERATOR
23
USING YOUR REFRIGERATOR
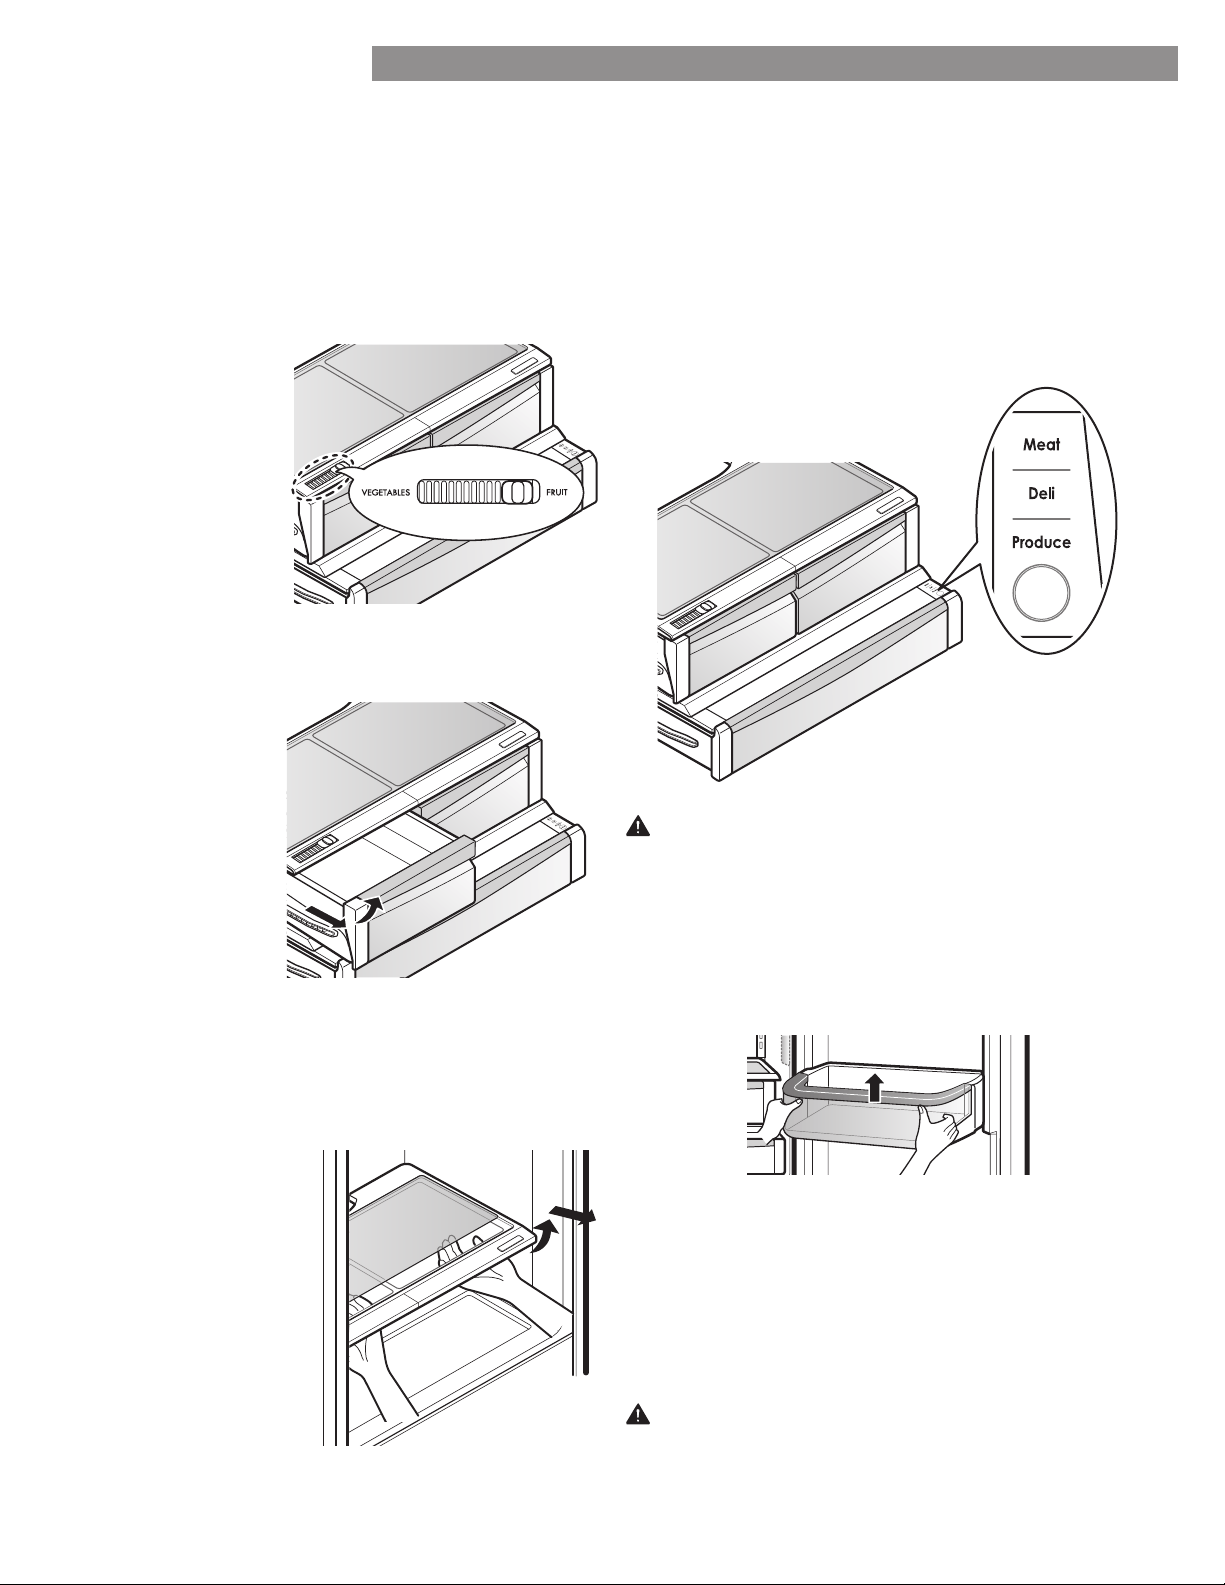
HUMIDITY CONTROLLED CRISPER
The crispers provide fresher tasting fruit and vegetables by
letting you easily control humidity inside the drawer.
You can control the amount of humidity in the moisture-
sealed crispers by adjusting the control to any setting
between VEGETABLES and FRUIT.
VEGETABLES•
keeps moist air in
the crisper for best
storage of fresh,
leafy vegetables.
FRUIT• lets moist air
out of the crisper for
best storage of fruit.
To remove the glass
1. Lift up the glass under
the crisper cover.
2. Pull the glass up and
out.
NOTE: Pantry drawer not
shown for clarity.
TEMPERATURE CONTROLLED PANTRY DRAWER
The Temperature Controlled Pantry Drawer provides
storage space with a variable temperature control
temperature than the refrigerator section. This
drawer can be used for large party trays, deli items
and beverages. (This drawer should not be used for
vegetables that require high humidity.)
Press the button to choose between Produce (Cold), Deli
(Colder) and Meat (Coldest).
REMOVING THE HUMIDITY CONTROLLED CRISPER
1. To remove, pull the
drawer out to full
extension.
2. Lift the front of the
crisper up, then pull
it straight out.
3. To install, slightly tilt up the front, insert the drawer into
the frame and push it back into place.
CAUTION: Do not store glass bottles in the pantry. If
they are frozen, they can break and cause personal
injury.
CAUTION:
into door bins. Doing so may cause damage to the bin
or personal injury if items are removed with excessive
force.
DOOR BIN
The door bins are removable for easy cleaning and
adjustment.
1. To remove the bin, simply lift the bin up and pull
straight out.
2. To replace the bin, slide it in above the desired support
and push down until it snaps into place.
NOTE: Some bins may vary in appearance and will
24
USING YOUR REFRIGERATOR
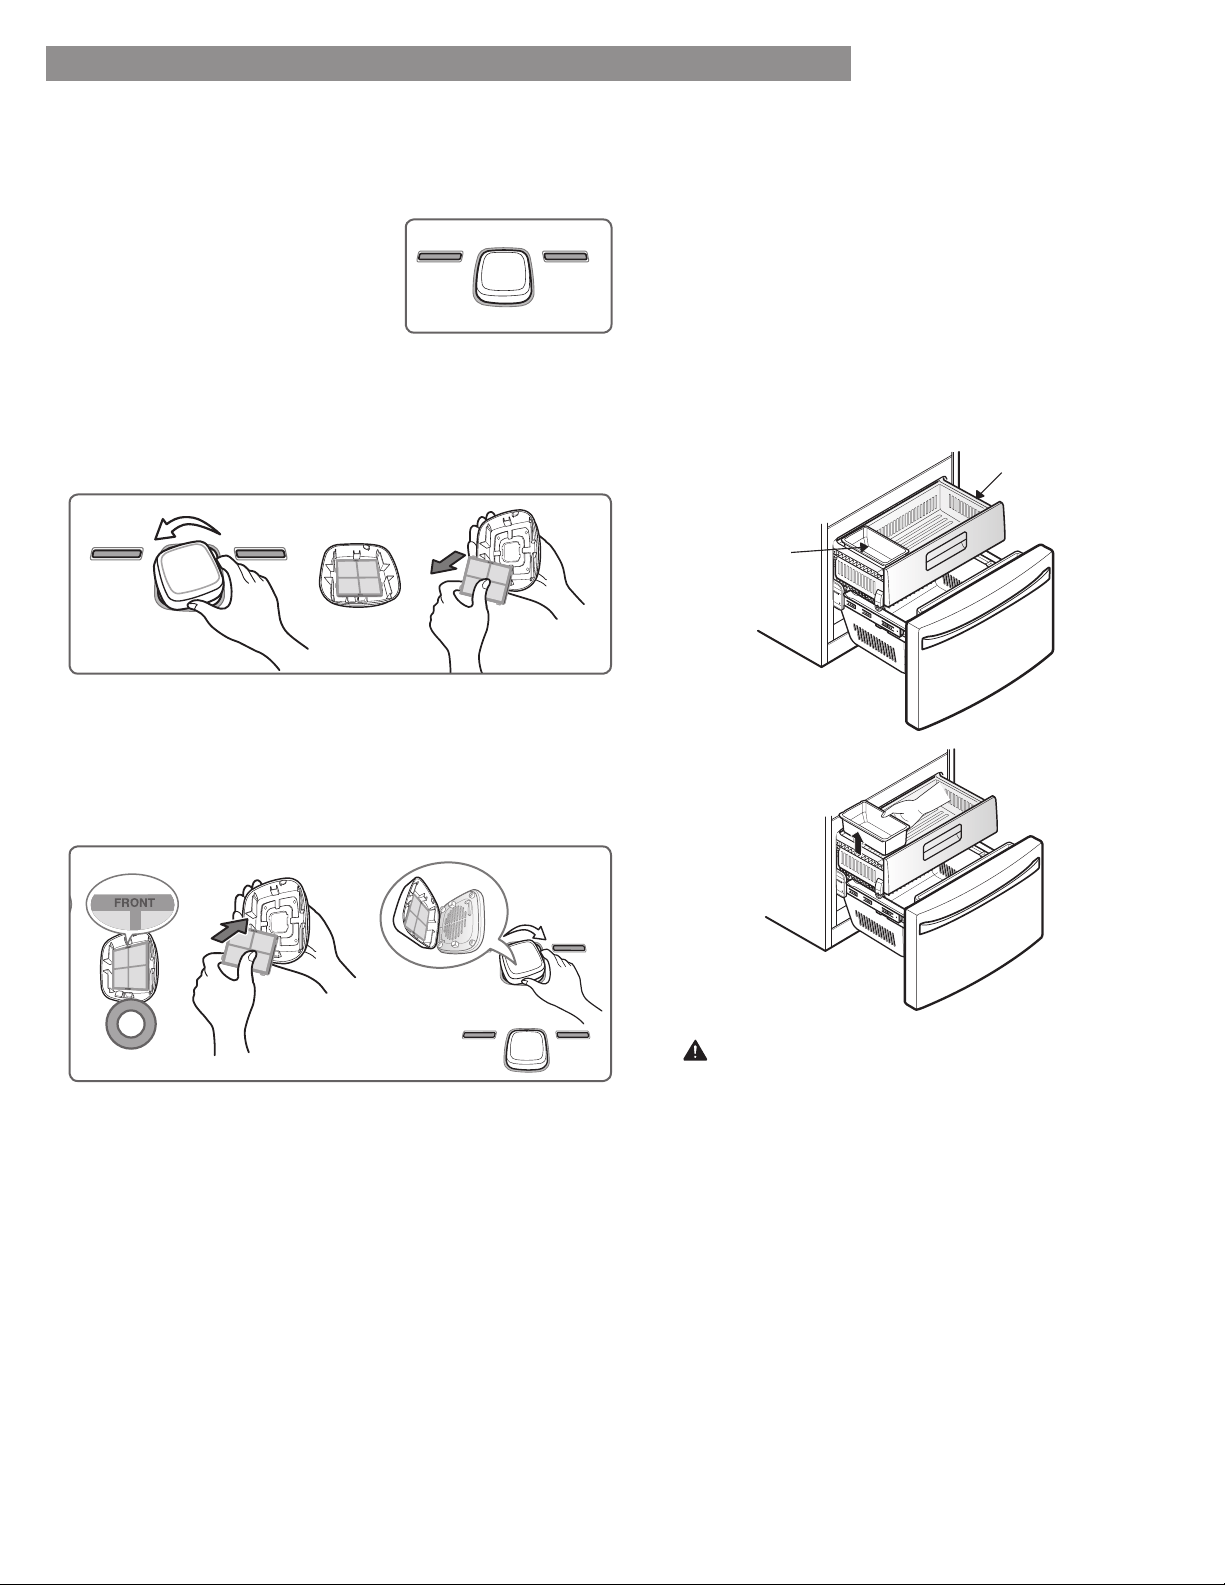
REPLACING THE AIR FILTER
Approximately every six months.
When the CHANGE AIR FILTER
light turns on.
1. Remove the Old Filter
right to attach it to the refrigerator wall.
2. Install a New Air Filter.
FREEZER SECTION
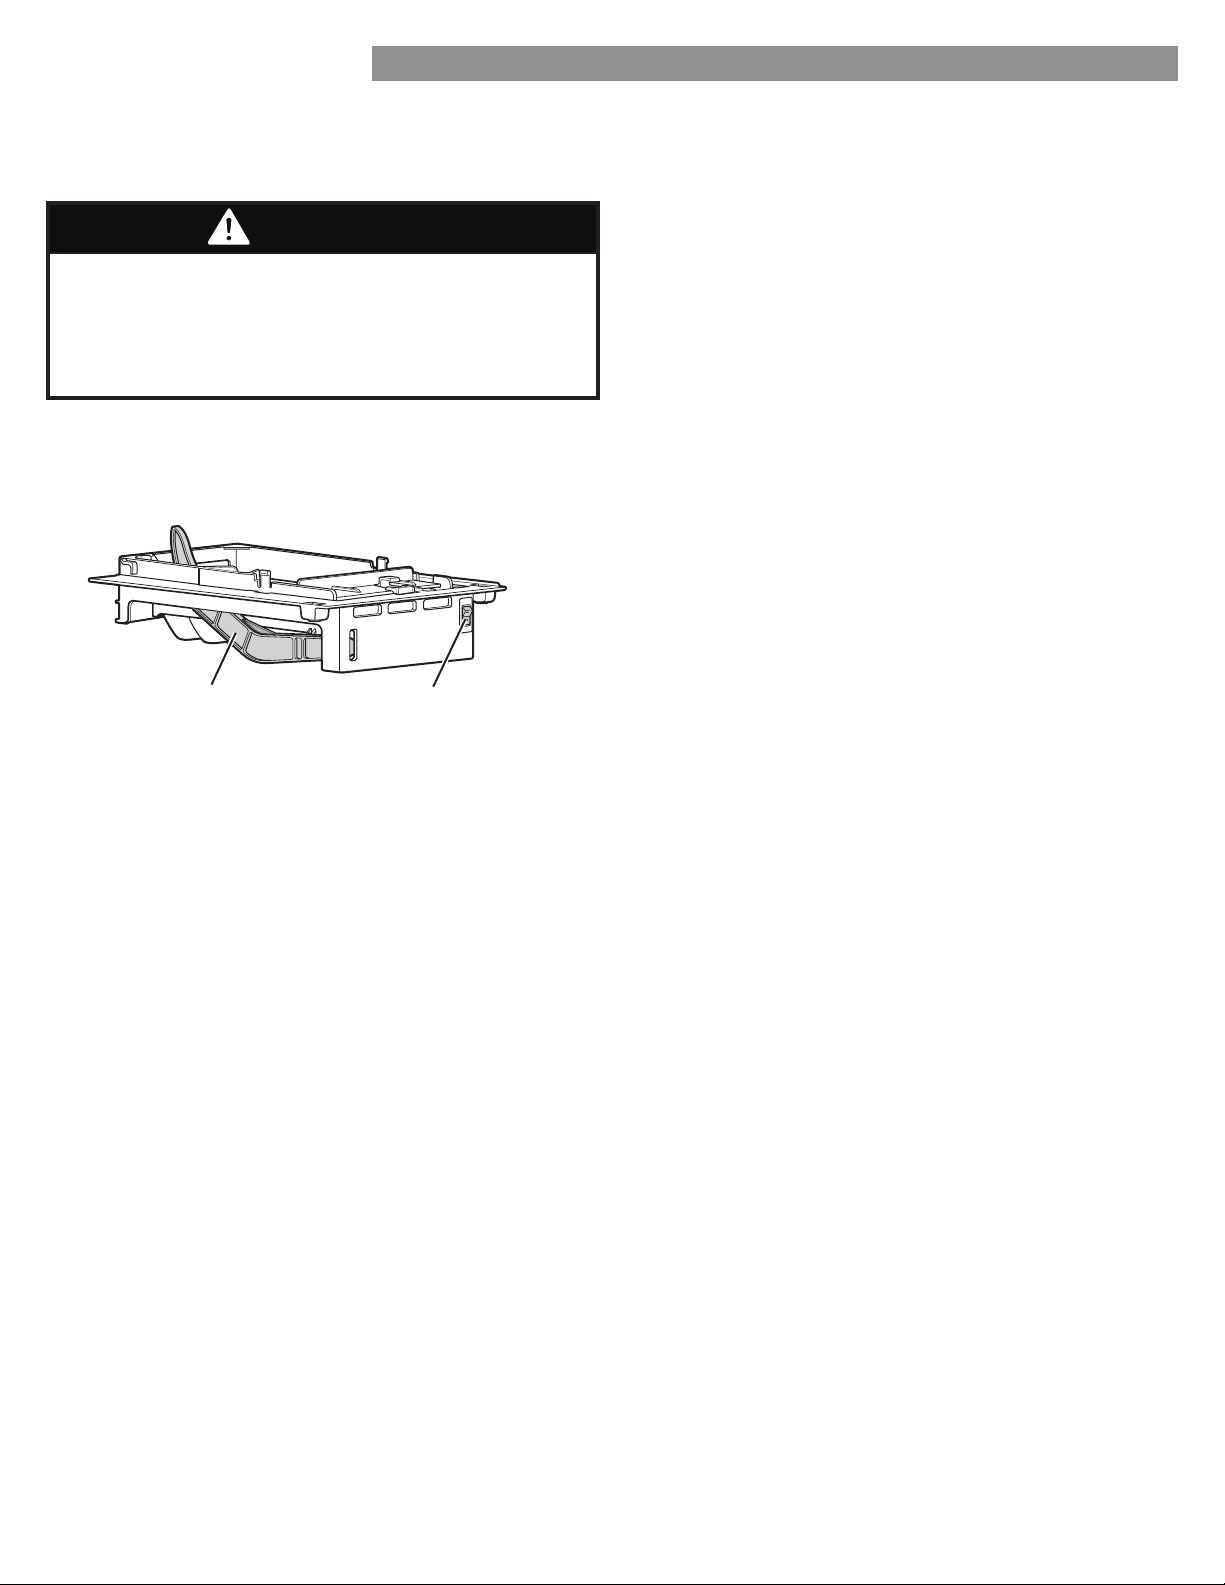
EXTRA ICE BIN
1. Pull the Freezer Drawer and the top Pullout Drawer out
as far as possible to remove the Extra Ice Bin.
2. Gently lift and pull out the ice bin.
3. To replace, pull both drawers out as far as possible,
and set the bin in its correct position in the Pullout
Drawer. Close the Pullout Drawer and then the Freezer
Drawer.
CAUTION: Pinch hazard! Keep hands and feet
clear of the bottom of the freezer drawer when
opening and closing.
NOTE:
store or call 1-800-4-MY-HOME
®
. Also, you may order
on-line at www.sears.com/partsdirect.
Extra Ice Bin
Pullout Drawer
25
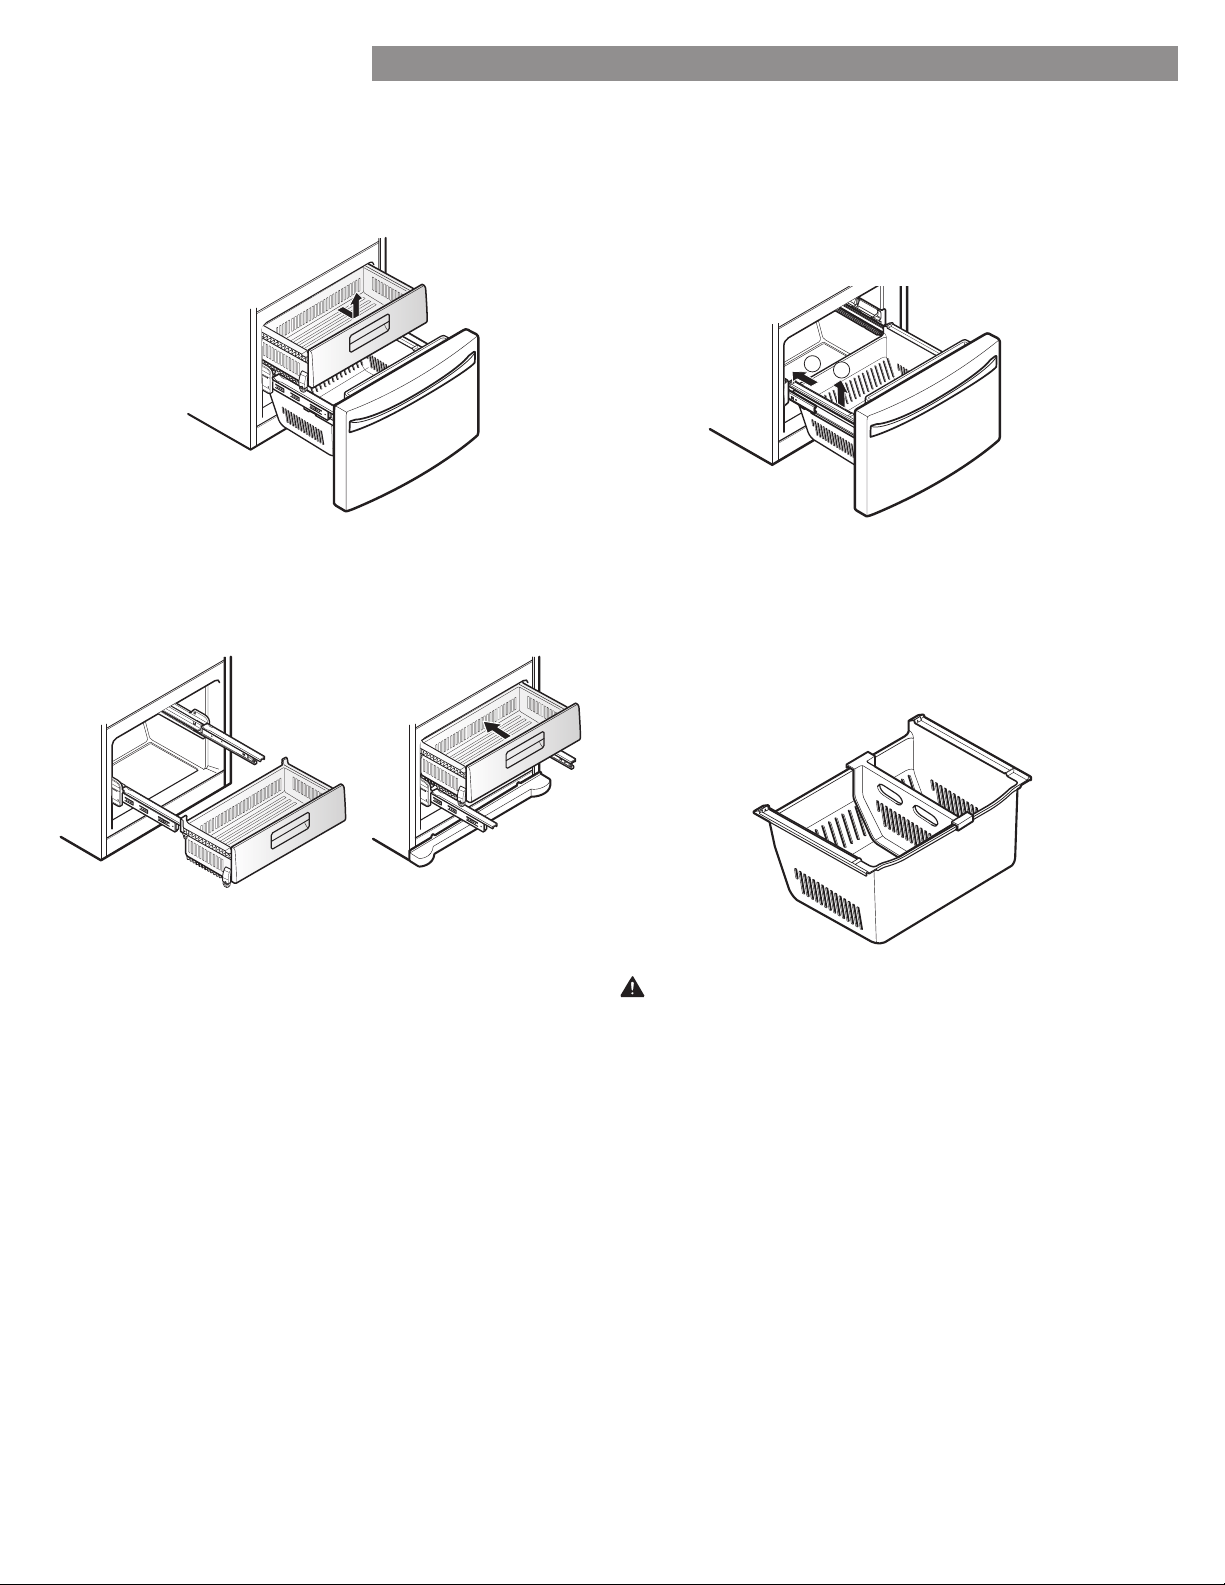
USING YOUR REFRIGERATOR
DURABASE
1. To remove the Durabase, push it to the back as much
as possible. Tilt up the front of the Durabase and pull
straight out.
2. To replace, insert the Durabase in the rail assembly.
PULLOUT DRAWERS
1. To remove, pull the drawer out to full extension.
Lift the front of the drawer up, then pull it straight out.
2. To install, slightly tilt up the front, insert the drawer into
the frame and push it back into place.
DURABASE DIVIDER
The Durabase divider allows you to organize the
Durabase area into sections. It can be adjusted from side
1
2
WARNING: If the Durabase divider is removed, there is
enough open space for children or pets to crawl inside.
To prevent accidental child and pet entrapment or
touch or go near the drawer.
26
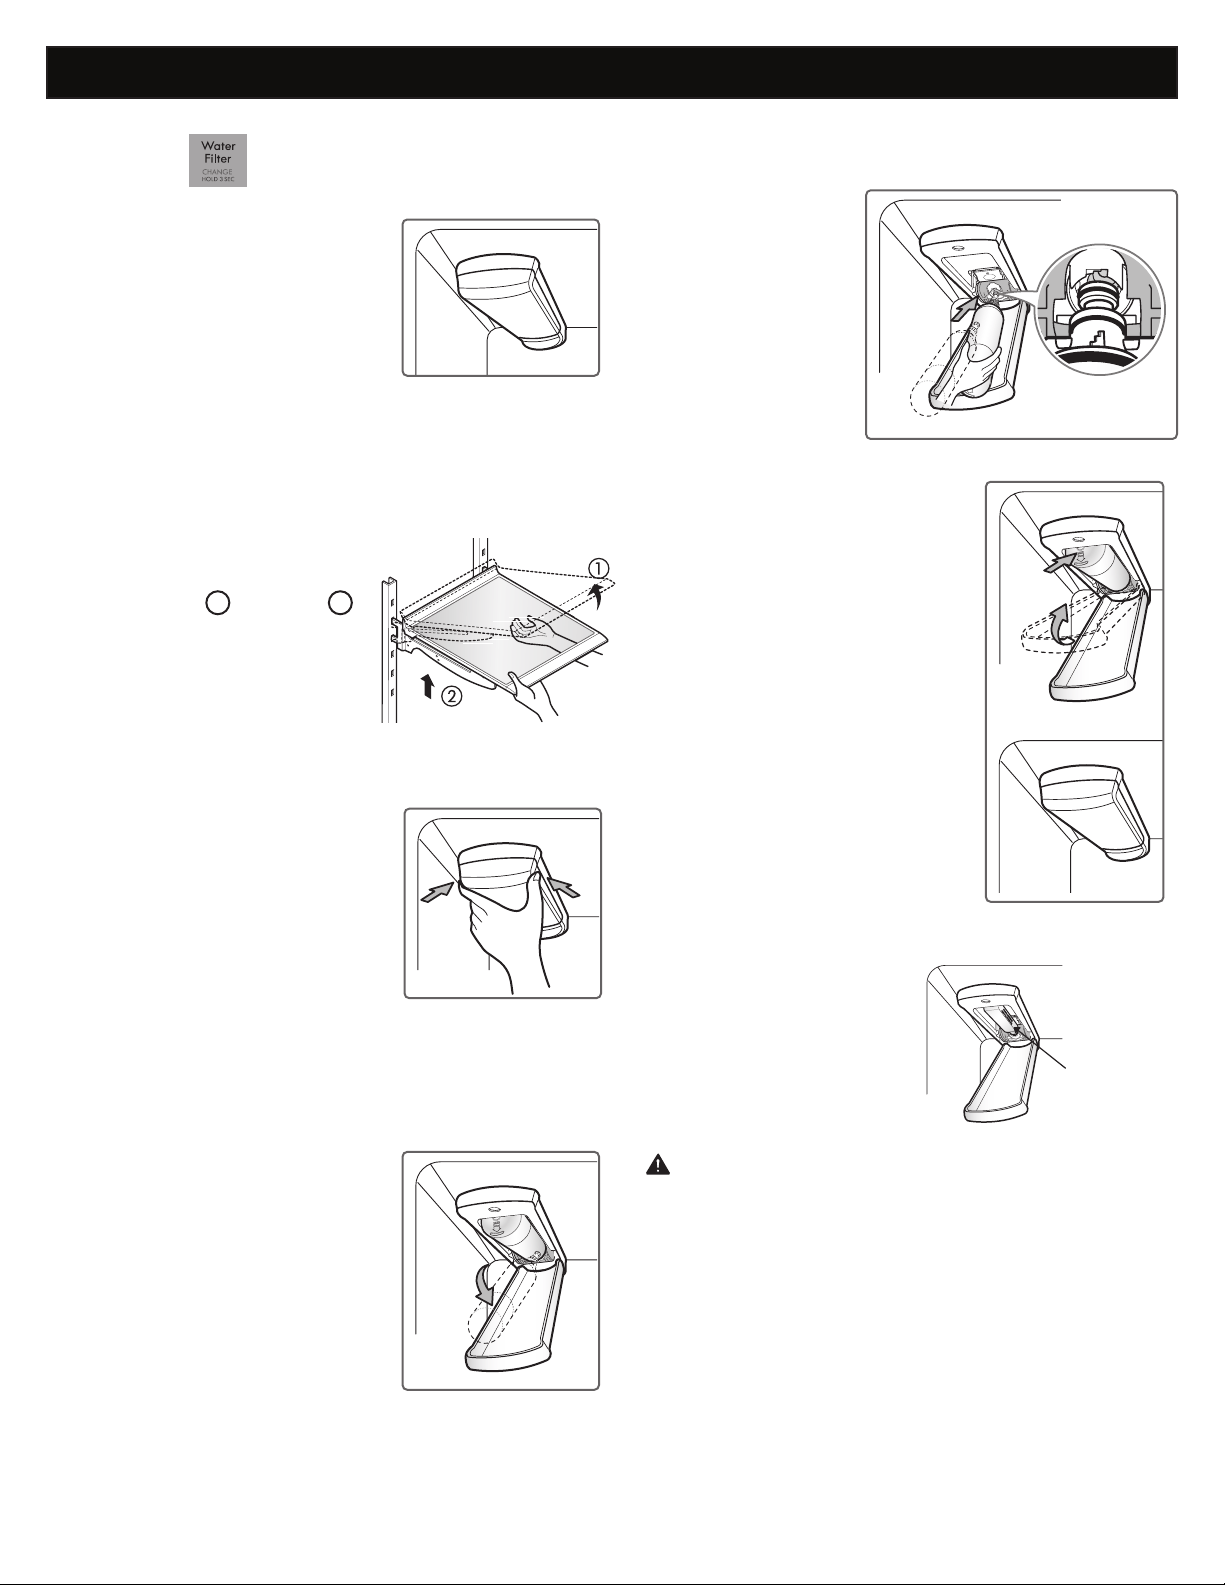
WATER FILTER
WATER FILTER
Approximately every six months.
turns on.
When the ice cubes are smaller
than normal.
position and close the cover.
The cover will click when closed
correctly.
3. Water Filter Bypass Plug
bypass plug. You MUST
bypass plug when a
replacement water
available.
CAUTION: DO NOT operate refrigerator without
NOTE:
Sears store or call 1-800-4-MY-HOME
®
. Also, you may
order on-line at www.sears.com/partsdirect
1. Remove the old water filter.
Lower or remove the top left shelf
all the way down.
Pinch the sides to open the
NOTE:
causes a small amount of water
(around 1 oz. or 25 cc) to drain. Place
a cup under the front end of the water
removed, to prevent any remaining water
and pull out. Make sure to rotate
pulling it out of the manifold hole.
Before Replacing the Water Filter:
highest position, it will need to be removed prior to
To remove any shelf–Tilt up the
front of the shelf
1
and lift it
2
.
Pull the shelf out.
2. Replace with a new water lter.
Take the new
of its packing
and remove the
protective cover
from the o-rings.
With water
horizontal position,
push the new
manifold hole until
it stops.
Water Filter
Bypass Plug
25
REFRIGERATOR SHELVES
The shelves in your refrigerator are adjustable to meet
your individual storage needs. Your model may have glass
or wire shelves.
Adjusting the shelves to fit different heights of items will
make finding the exact item you want easier. Doing so will
also reduce the amount of time the refrigerator door is
open which will save energy.
IMPORTANT: Do not clean glass shelves with warm water
while they are cold. Shelves may break if exposed to
sudden temperature changes or impact.
NOTE: Glass shelves are heavy. Use special care when
removing them.
Adjusting Shelves (Cantilever)
Remove shelves from the shipping position and replace
shelves in the position you want.
To remove a shelf—Tilt up the front of the shelf in the
direction of
1
and lift it in the direction of
2
. Pull
the shelf out.
To reinstall a shelf—Tilt the front of the shelf up and
guide the shelf hooks into the slots at a desired height.
Then, lower the front of the shelf so that the hooks
drop into the slots.
Folding Shelf (on some models)
You can store taller items, such as a gallon container
or bottles, by simply pushing the front half of the shelf
underneath the back half of the shelf. Pull the front of the
shelf toward you to return to a full shelf.
CAUTION: Make sure that shelves are level from one
side to the other. Failure to do so may result in the shelf
falling or spilling food.
USING YOUR REFRIGERATOR
27
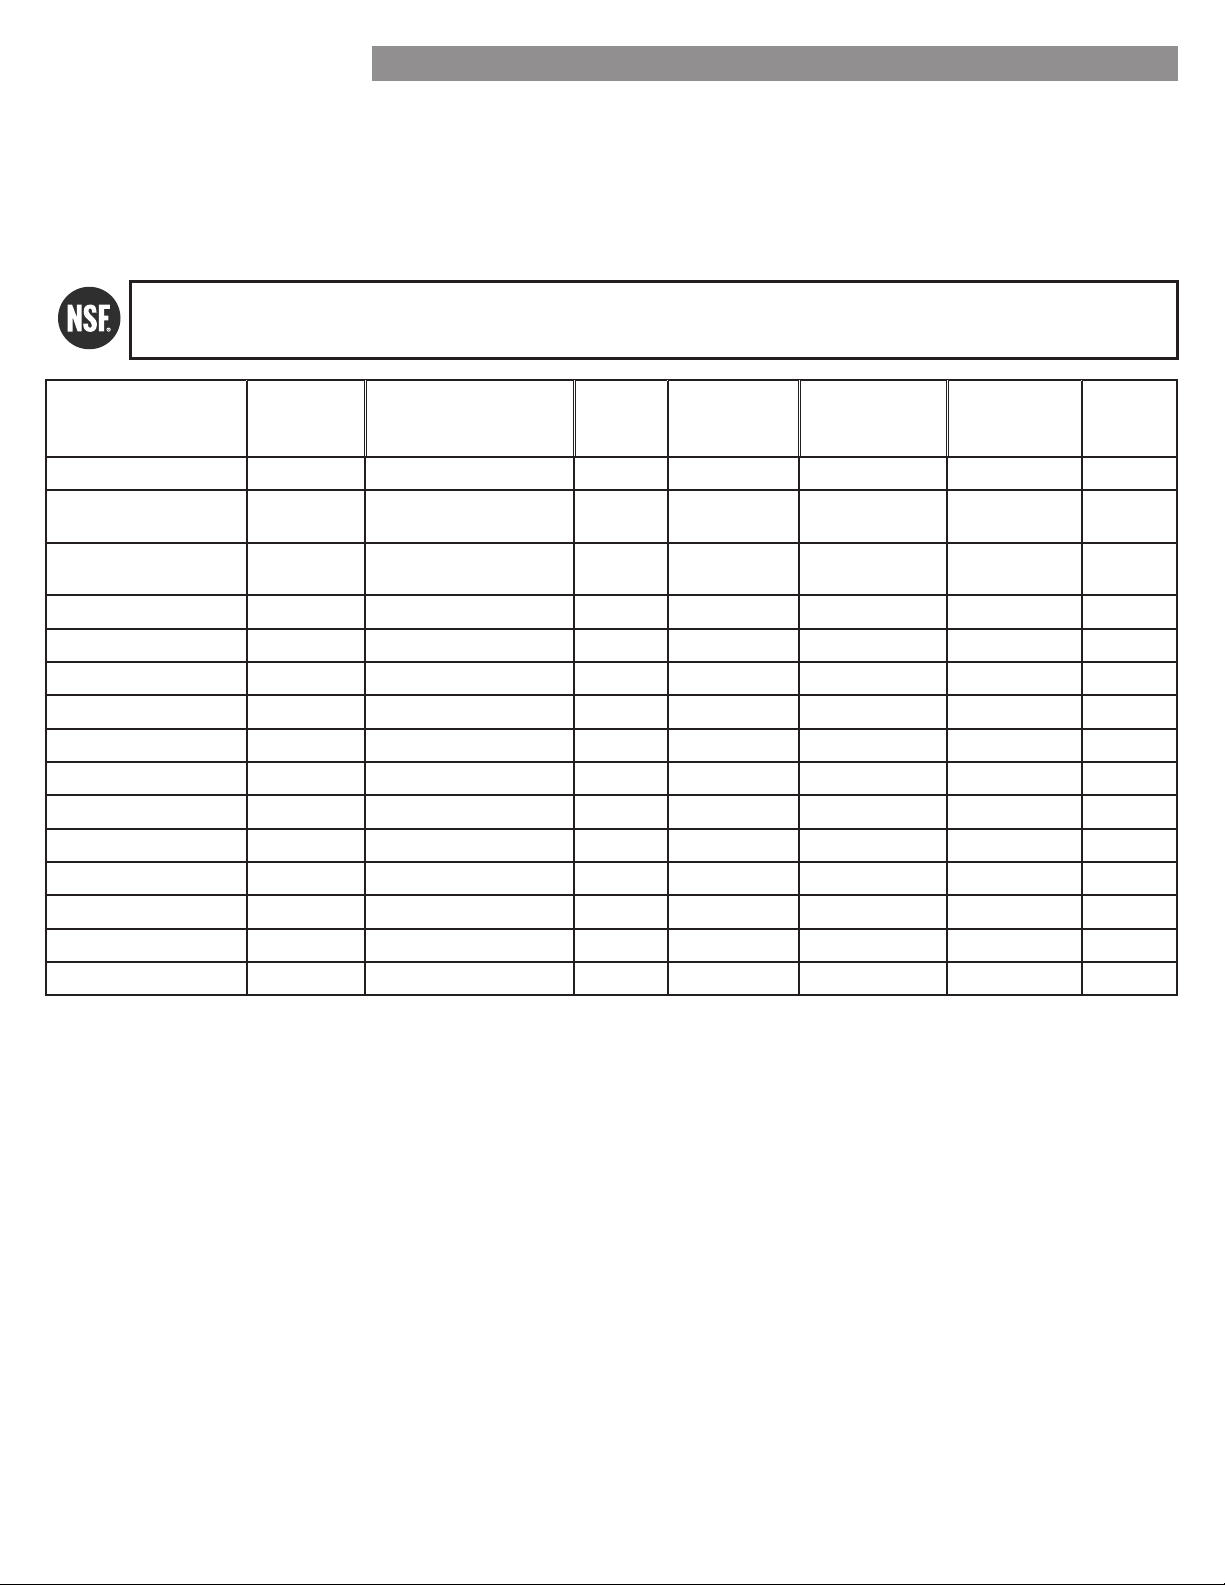
WATER FILTER
Performance Data Sheet
Use Replacement Cartridge: 04609690000P
The concentration of the indicated substances in water entering the system was reduced to a concentration less than or
reduction of substances listed below.
Contaminant Reduction
Average
Inuent
NSF specied Challenge
Concentration
Avg %
Reduction
Average
Product Water
Concentration
Max Permissible
Product Water
Concentration
NSF Reduction
Requirements
NSF Test
Report
Chlorine Taste and Odor 2.1 mg/L 2.0 mg/L ± 10% 97.2% 0.06 mg/L N/A J-00049247
Nominal Particulate Class I, ,
5,600,000
pts/mL
At least 10,000 particles/mL 98.7% 73,000 pts/ml N/A J-00049282
Asbestos 190 MFL
>99% N/A J-0004928
Atrazine 0.0094 mg/L 0.009 mg/L ± 10% 94.7% 0.00005 mg/L 0.003 mg/L N/A J-00049293
Benzene 0.016 mg/L 0.015 mg/L ± 10% 96.7% 0.005 mg/L 0.005 mg/L N/A J-00049300
Carbofuran 0.08 mg/L 0.08 mg/L ± 10% 98.1% 0.002 mg/L 0.04 mg/L N/A J-00049294
Lindane 0.002 mg/L 0.002 mg/L ± 10% 98.2% 0.00004 mg/L 0.0002 mg/L N/A J-00051975
P-Dichlorobenzene 0.22 mg/L 0.225 mg/L ± 10% 99.8% 0.0005 mg/L 0.075 mg/L N/A J-00049298
Toxaphene 0.014 mg/L 0.015 mg/L ± 10% 93% 0.001 mg/L 0.003 mg/L N/A J-00049302
2,4-D 0.213 mg/L 0.210 mg/L ± 10% 95.2% 0.009 mg/L 0.07 mg/L N/A J-00049284
Lead pH @6.5 0.150 mg/L 0.15 mg/L ± 10% >99.3% 0.001 mg/L 0.010 mg/L N/A J-00051974
Lead pH @8.5 0.150 mg/L 0.15 mg/L ± 10% >99.3% 0.001 mg/L 0.010 mg/L N/A J-00049277
Mercury @ pH 6.5 0.0059 mg/L 0.006 mg/L ± 10% 96.1 0.0002 mg/L 0.002 mg/L N/A J-00053886
Mercury @ pH 8.5 0.0058 mg/L 0.006 mg/L ± 10% 90.1 0.0006 mg/L 0.002 mg/L N/A J-00051972
Cyst* 120,000 cysts/L Minimum 50,000 cysts/L 99.99% N/A J-00049281
* Based on the use of Cryptosporidium parvum oocysts
28
WATER FILTER
It is essential that the manufacturer’s recommended
requirements be carried out for the product to perform as
advertised.
NOTE: While the testing was performed under standard
laboratory conditions, actual performance may vary.
For estimated costs of replacement elements, please call
1-800-469-4663 or visit our website at
www.sears.com/partsdirect
3M is a trademark of 3M Company.
NSF is a trademark of NSF International.
© 2009 3M Company. All rights reserved.
WARNING
CAUTION
To reduce the risk associated with ingestion of
contaminants: Do not use with water that is
microbiologically unsafe or of unknown quality
without adequate disinfection before and after the
system.
cysts. EPA Establishment Number 10350-MN-005
To reduce the risk associated with property damage
due to water leakage:
Read and follow • the Water Filter instructions before
installation and use of this system.
Installation and use MUST comply with all state and
local plumbing codes.
Do not• install if water pressure exceeds 120 psi (827
kPa). Contact a plumbing professional if you are
uncertain of how to check your water pressure.
Do not• install where water hammer conditions may
occur. If water hammer conditions exist, you must
install a water hammer arrester. Contact a plumbing
professional if you are uncertain of how to check for
this condition.
Do not• install on hot water supply lines.
The maximum operating water temperature of this
Protect water lter from freezing. • Do not operate
refrigerator in ambient conditions below 55°F
(12.7°C).
temperatures below 40°F (4.4°C).
six months, at the rated capacity, or if a noticeable
Application Guidelines/Water Supply Parameters
Service Flow 0.5 gpm (1.9 lpm)
Water Supply Potable Water
Water Pressure 20-120 psi (138 - 827 kPa)
Water Temperature 33°F - 100°F (0.6°C - 38°C)

29
WATER FILTER
State of California
Department of Public Health
Water Treatment Device
Certificate Number
Date Issued: December 15, 2009
201909-
Manufacturer:
Sears Roebuck and Co.
The water treatment device(s) listed on this certificate have met the testing requirements pursuant to Section
116830 of the Health and Safety Code for the following health related contaminants:
sotsebsAstsyC
Lead
Mercury
2,4-D Reduction
Atrazine
Benzene
Carbofuran
Lindane
p-Dichlorobenzene
Toxaphene
Microbiological Contaminants and Turbidity
Inorganic/Radiological Contaminants
Organic Contaminants
200 gal
Rated Service Capacity:
0.5 gpm
Rated Service Flow:
Conditions of Certification:
30
CARE AND CLEANING
WARNING
Explosion Hazard
Both the refrigerator and freezer sections defrost
month to prevent odors. Wipe up spills immediately.
GENERAL CLEANING TIPS
Unplug refrigerator or disconnect power.
Remove all removable parts, such as shelves, crispers,
etc. Refer to sections in Using Your Refrigerator for
removal instructions.
Use a clean sponge or soft cloth and a mild detergent
in warm water. Do not use abrasive or harsh cleaners.
Hand wash, rinse and dry all surfaces thoroughly.
Plug in refrigerator or reconnect power.
EXTERIOR
Waxing external painted metal surfaces helps provide
rust protection. Do not wax plastic parts. Wax painted
metal surfaces at least twice a year using appliance wax
(or auto paste wax). Apply wax with a clean, soft cloth.
For products with a stainless steel exterior, use a clean
sponge or soft cloth and a mild detergent in warm water.
Do not use abrasive or harsh cleaners. Dry thoroughly
with a soft cloth.
INSIDE WALLS (allow freezer to warm up so
the cloth will not stick)
To help remove odors, you can wash the inside of the
refrigerator with a mixture of baking soda and warm
water. Mix 2 tablespoons of baking soda to 1 quart of
water (26 g soda to 1 liter water.) Be sure the baking soda
is completely dissolved so it does not scratch the surfaces
of the refrigerator.
DOOR LINERS AND GASKETS
Use a clean sponge or soft cloth and a mild detergent
in warm water. Do not use cleaning waxes, concentrated
detergents, bleaches, or cleaners containing petroleum on
plastic refrigerator parts.
PLASTIC PARTS (Covers and Panels)
Use a clean sponge or soft cloth and a mild detergent
in warm water. Do not use window sprays, abrasive
damage the material.
CONDENSER COILS
Use a vacuum cleaner with
an attachment to clean the
condenser cover and vents.
Do not remove the panel
covering the condenser
coil area.
CAUTION: While cleaning the inside, do not spray
water.

31
CARE AND CLEANING
LIGHT BULB REPLACEMENT
NOTE: The refrigerator and freezer compartment
lights have LED interior lighting, and service should be
POWER INTERRUPTIONS
1. If the power will be out for 24 hours or less, keep all
refrigerator doors closed to help foods stay cold and
frozen.
2. If the power will be out for more than 24 hours, remove
all frozen food and store it in a frozen food locker.
WHEN YOU GO ON VACATION
If you choose to leave the refrigerator on while you are
away, follow these steps to prepare your refrigerator
before you leave.
1. Use up any perishables and freeze other items.
2.
If you choose to turn the refrigerator o before you leave,
follow these steps.
1. Remove all food from the refrigerator.
2. Depending on your model, set the thermostat control
(refrigerator control) to OFF. See the Setting the
Controls section.
3. Clean the refrigerator, wipe it and dry well.
4. Tape rubber or wood blocks to the tops of both doors
to prop them open far enough for air to get in. This
stops odor and mold from building up.
Electrical Shock Hazard
Before replacing a Compartment Lamp, either unplug
or fuse box.
WHEN YOU MOVE
When you are moving your refrigerator to a new home,
follow these steps to prepare it for the move.
1. Remove all food from the refrigerator and pack all
frozen food in dry ice.
2. Unplug the refrigerator.
3. Clean, wipe and dry thoroughly.
4. Take out all removable parts, wrap them well and
tape them together so they do not shift and rattle
during the move. Refer to the Using your Refrigerator
section for removable instructions.
5. Depending on the model, raise the front of the
refrigerator so it rolls easier OR screw in the leveling
the Door Closing section.
6. Tape the doors shut and tape the power cord to the
refrigerator cabinet.
When you get to your new home, put everything back and
refer to the Refrigerator Installation section for preparation
instructions.
WARNING
32
CONNECTING THE WATER LINE
BEFORE YOU BEGIN
This water line installation is not covered by the refrigerator
warranty. Follow these instructions carefully to minimize the
risk of expensive water damage.
Water hammer (water banging in the pipes) in house
plumbing can cause damage to refrigerator parts and can
to correct water hammer before installing the water supply
line to the refrigerator.
CAUTION: To prevent burns and product damage, only
connect the refrigerator water line to a cold water supply.
If you use your refrigerator before connecting the water
line, make sure the icemaker is turned OFF at the control
panel.
CAUTION: Do not install the icemaker tubing in areas
where temperatures fall below freezing.
WATER PRESSURE
A cold water supply. The water pressure must be between
20 and 120 psi. If the refrigerator is installed in an area
with low water pressure (below 20 psi), you can install a
booster pump to compensate for the low pressure.
If a reverse osmosis water ltration system is connected
to your cold water supply, this water line installation is not
covered by the refrigerator warranty. Follow the following
instructions carefully to minimize the risk of expensive water
damage.
If a reverse osmosis water ltration system is connected
to your cold water supply, the water pressure to the
reverse osmosis system needs to be a minimum of 40 to
60 psi (276-414 kPa or 2.8-4.2 kgf/cm², less than 2.0-3.0
If the water pressure from the reverse osmosis system is less
than 20 psi or 138 kPa or 1.4 kgf/cm² (takes more than 4.0
Allow the storage tank on the reverse osmosis system to
If the issue concerning water pressure from reverse
All installations must be in accordance with local
plumbing code requirements.
CAUTION: Wear eye protection during installation to
prevent injury.
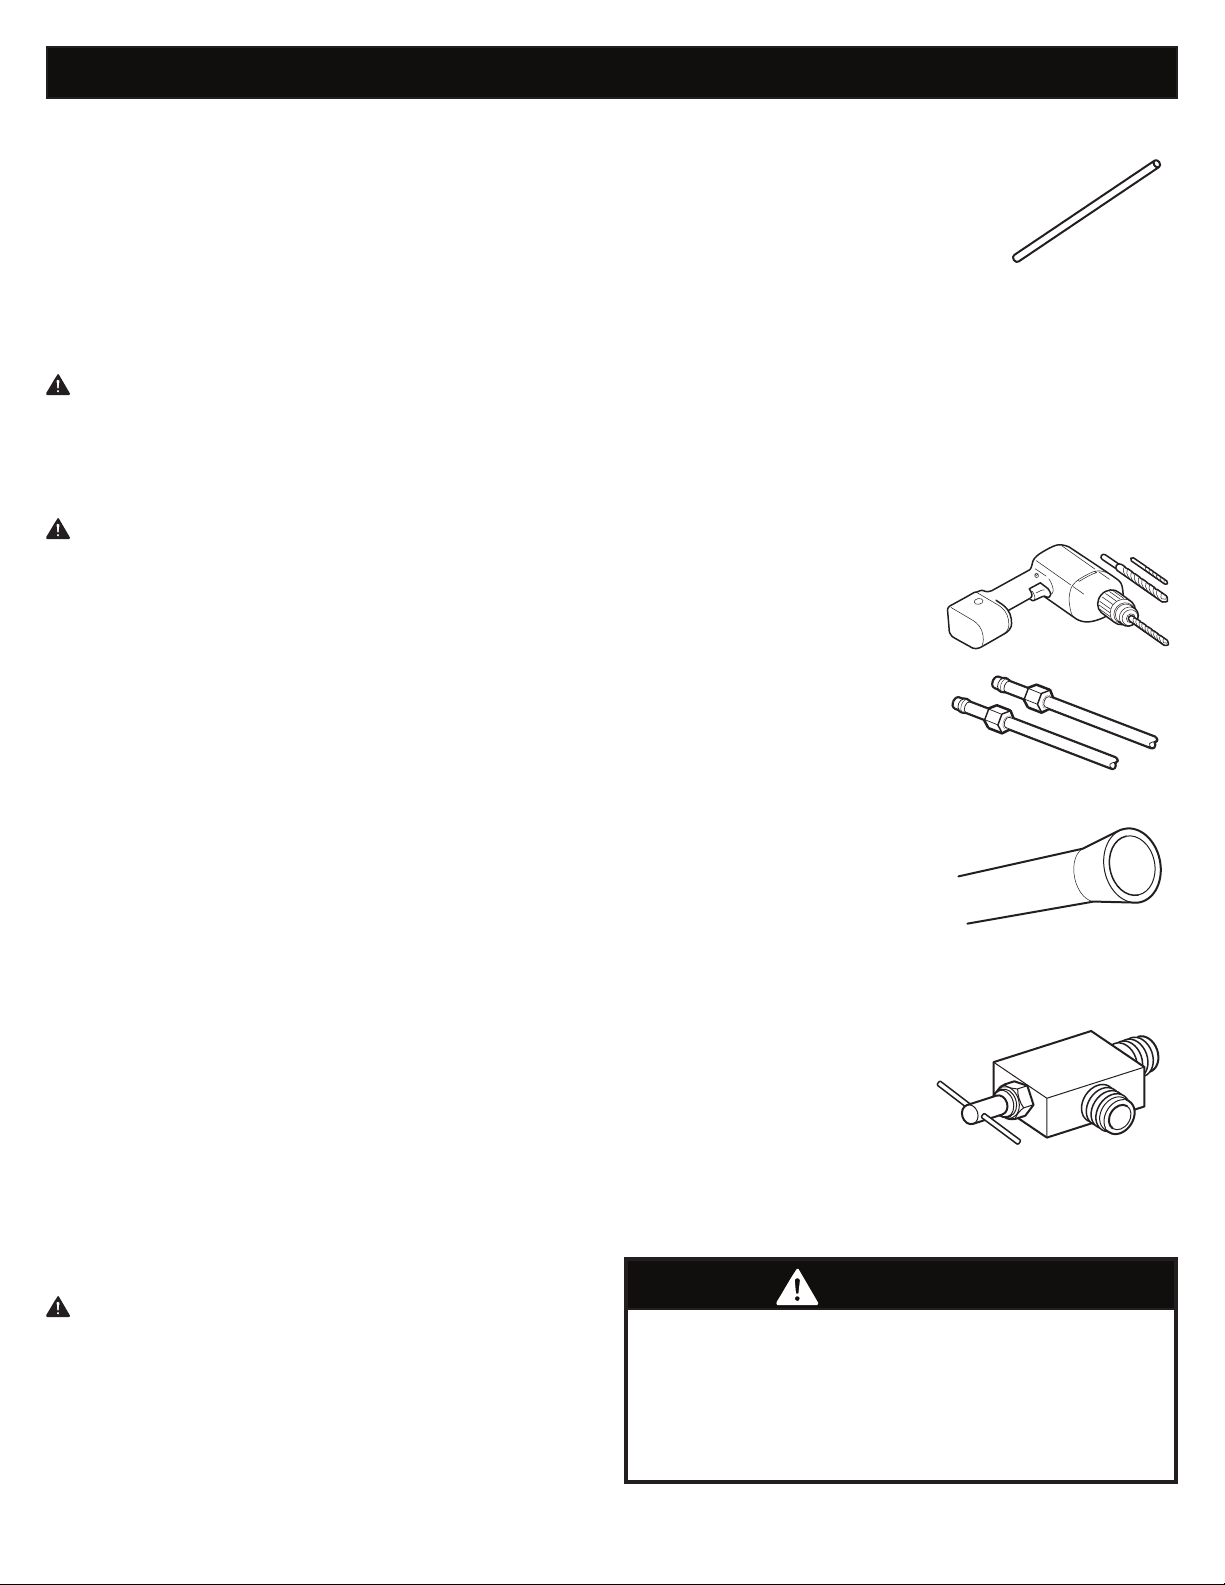
WHAT YOU WILL NEED
Copper Tubing,• ¼ in. outer
diameter, to connect the refrigerator
to the water supply. Be sure both
ends of the tubing are cut square.
To determine how much tubing you
need: measure the distance from the water valve on the
back of the refrigerator to the water supply pipe. Then,
(about 8 feet [2.4 m] coiled into 3 turns of about 10 in.
[25 cm] diameter) to allow the refrigerator to move out
from the wall after installation.
Power drill.•
½ in. or adjustable wrench.•
Flat blade and Phillips head screwdrivers.•
Two ¼ in. outer diameter •
compression nuts and
2 ferrules (sleeves) to
connect the copper tubing
refrigerator water valve.
If your existing copper water
end, you will need an adapter
(available at plumbing supply
stores) to connect the water line
to the refrigerator OR you can
a tube cutter and then use a
Shuto valve to connect •
to the cold water line. The
inside diameter of / in. at the point of connection
to the COLD WATER LINE.
are included in many water
supply kits. Before purchasing,
make sure a saddle-type
valve complies with your local
plumbing codes.
NOTE: A Self Piercing Saddle Type Water Valve should
not be used.
WARNING
Electrical Shock Hazard
When using any electrical device (such as a power
drill) during installation, be sure the device is battery
powered, double insulated or grounded in a manner that
will prevent the hazard of electric shock.
33
CONNECTING THE WATER LINE
INSTALLATION INSTRUCTIONS
drinking water line.
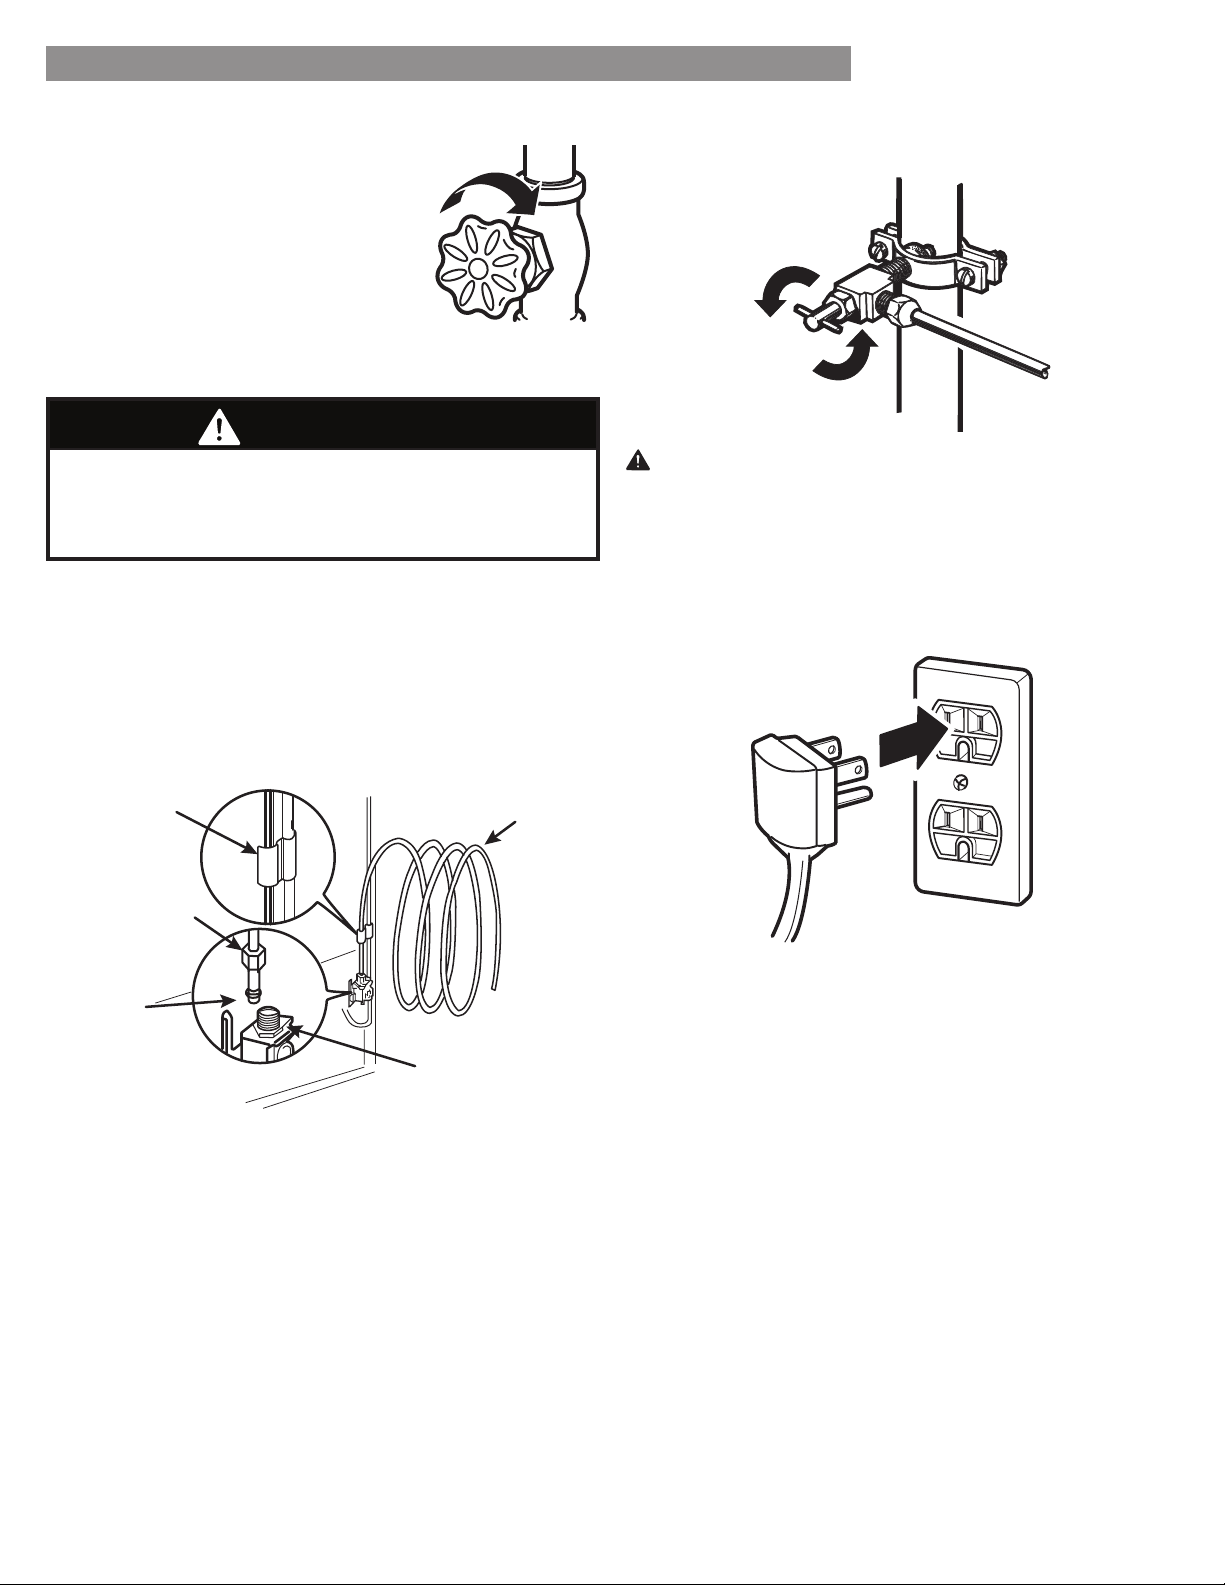
1. SHUT OFF THE MAIN WATER SUPPLY
Turn on the nearest faucet to relieve the pressure on the
line.
2. CHOOSE THE VALVE LOCATION
Choose a location for the valve that is
easily accessible. It is best to connect
into the side of a vertical water pipe.
When it is necessary to connect into
a horizontal water pipe, make the
connection to the top or side, rather
than at the bottom, to avoid drawing
3. DRILL THE HOLE FOR THE VALVE
Drill a ¼ in. hole in the water pipe using a sharp bit.
Remove any burrs resulting from
drilling the hole in the pipe. Be
careful not to allow water to
drain into the drill. Failure to
drill a ¼ in. hole may result
in reduced ice production or
smaller cubes.
NOTE: The hookup line cannot be white, plastic
tubing. Licensed plumbers must use only copper
tubing (NDA tubing #49595 or #49599) or Cross Link
Polyethylene (PEX) tubing.
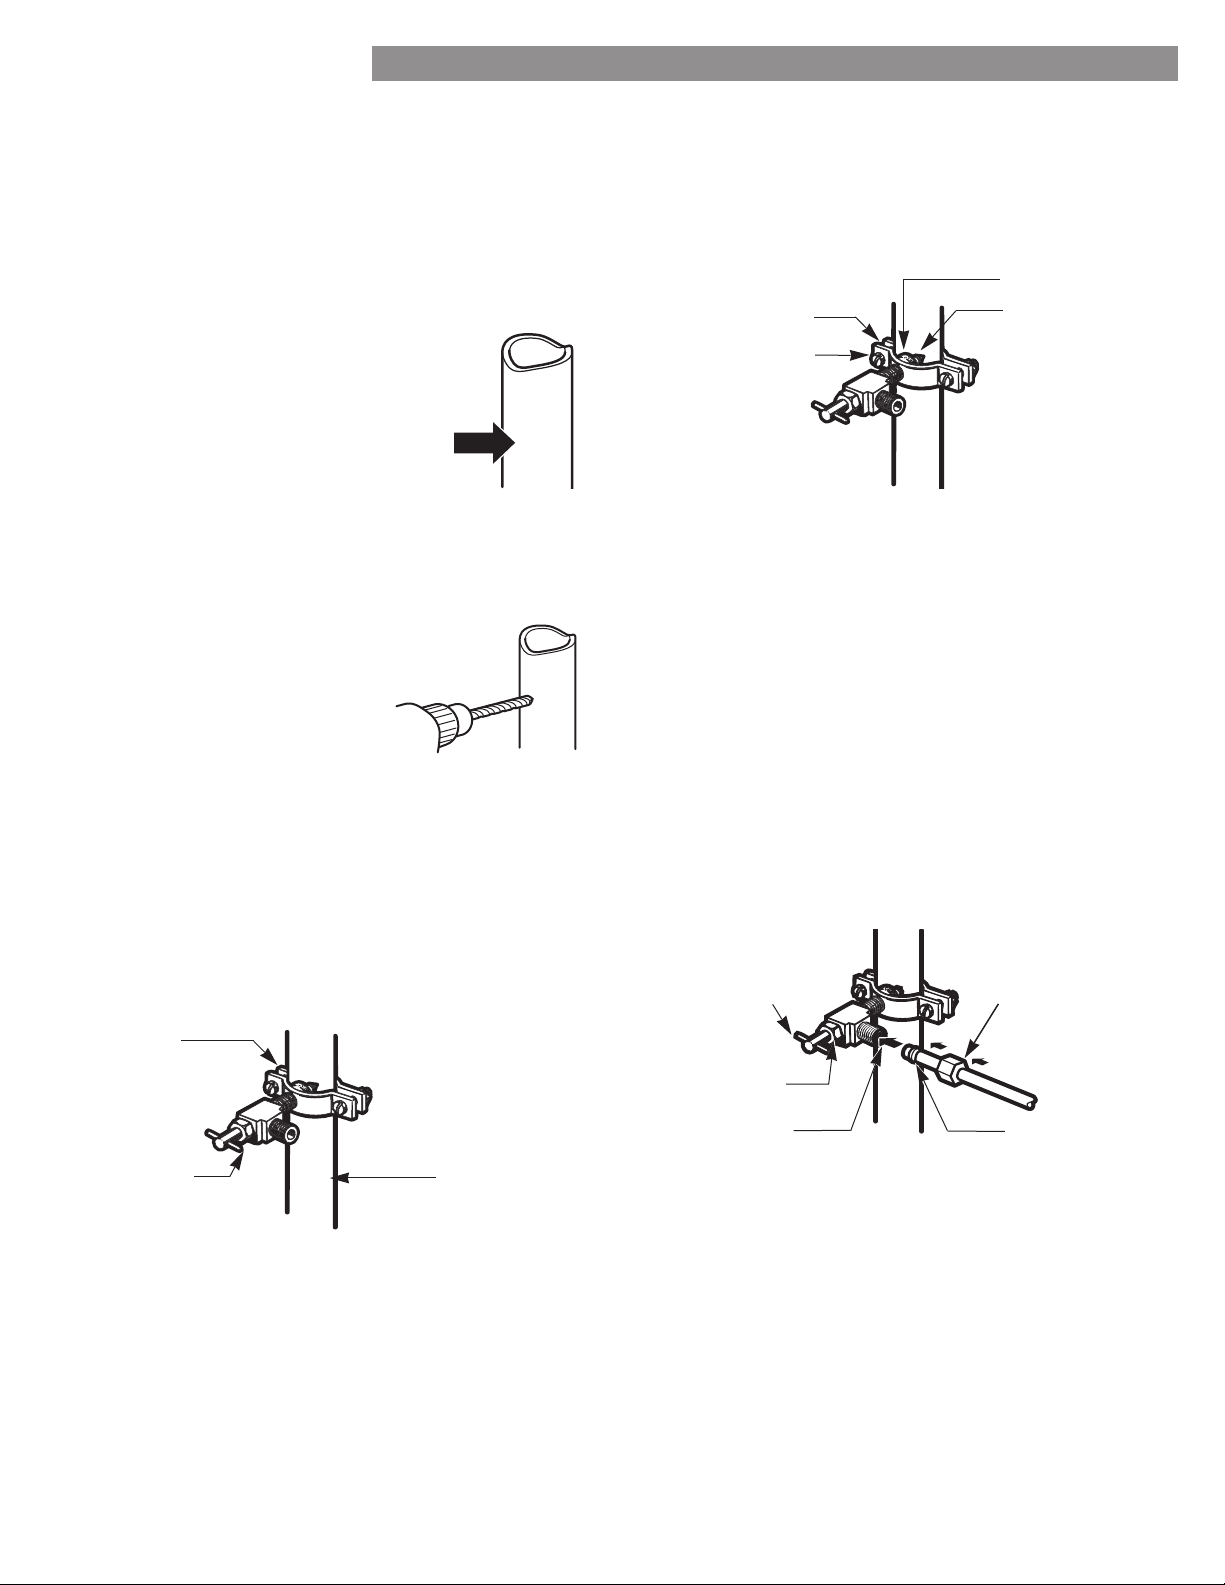
4. FASTEN THE SHUTOFF VALVE
the pipe clamp.
NOTE: Commonwealth of Massachusetts Plumbing
Codes 248CMR shall be adhered to. Saddle valves are
illegal and use is not permitted in Massachusetts.
Consult with your licensed plumber.
5. TIGHTEN THE PIPE CLAMP
Tighten the clamp screws until the sealing washer
begins to swell.
NOTE: Do not overtighten clamp or you may crush the
tubing.
6. ROUTE THE TUBING
Route the tubing between the cold water line and the
refrigerator.
Route the tubing through a hole drilled in the wall or
as close to the wall as possible.
NOTE:
8 feet coiled into 3 turns of about 10 in. diameter) to
allow the refrigerator to move out from the wall after
installation.
7. CONNECT THE TUBING TO THE VALVE
Place the compression nut and ferrule (sleeve) for
copper tubing onto the end of the tubing and connect
inserted into the valve. Tighten the compression nut
securely.
NOTE: Commonwealth of Massachusetts Plumbing
Codes 248CMR shall be adhered to. Saddle valves are
illegal and their use is not permitted in
Massachusetts. Consult with your licensed plumber.
Pipe Clamp
Saddle-Type
Vertical Cold
Water Pipe
Pipe Clamp
Clamp Screw
Washer
Inlet End
Saddle-Type
Packing Nut
Outlet Valve
Compression Nut
Ferrule (sleeve)
34
CONNECTING THE WATER LINE
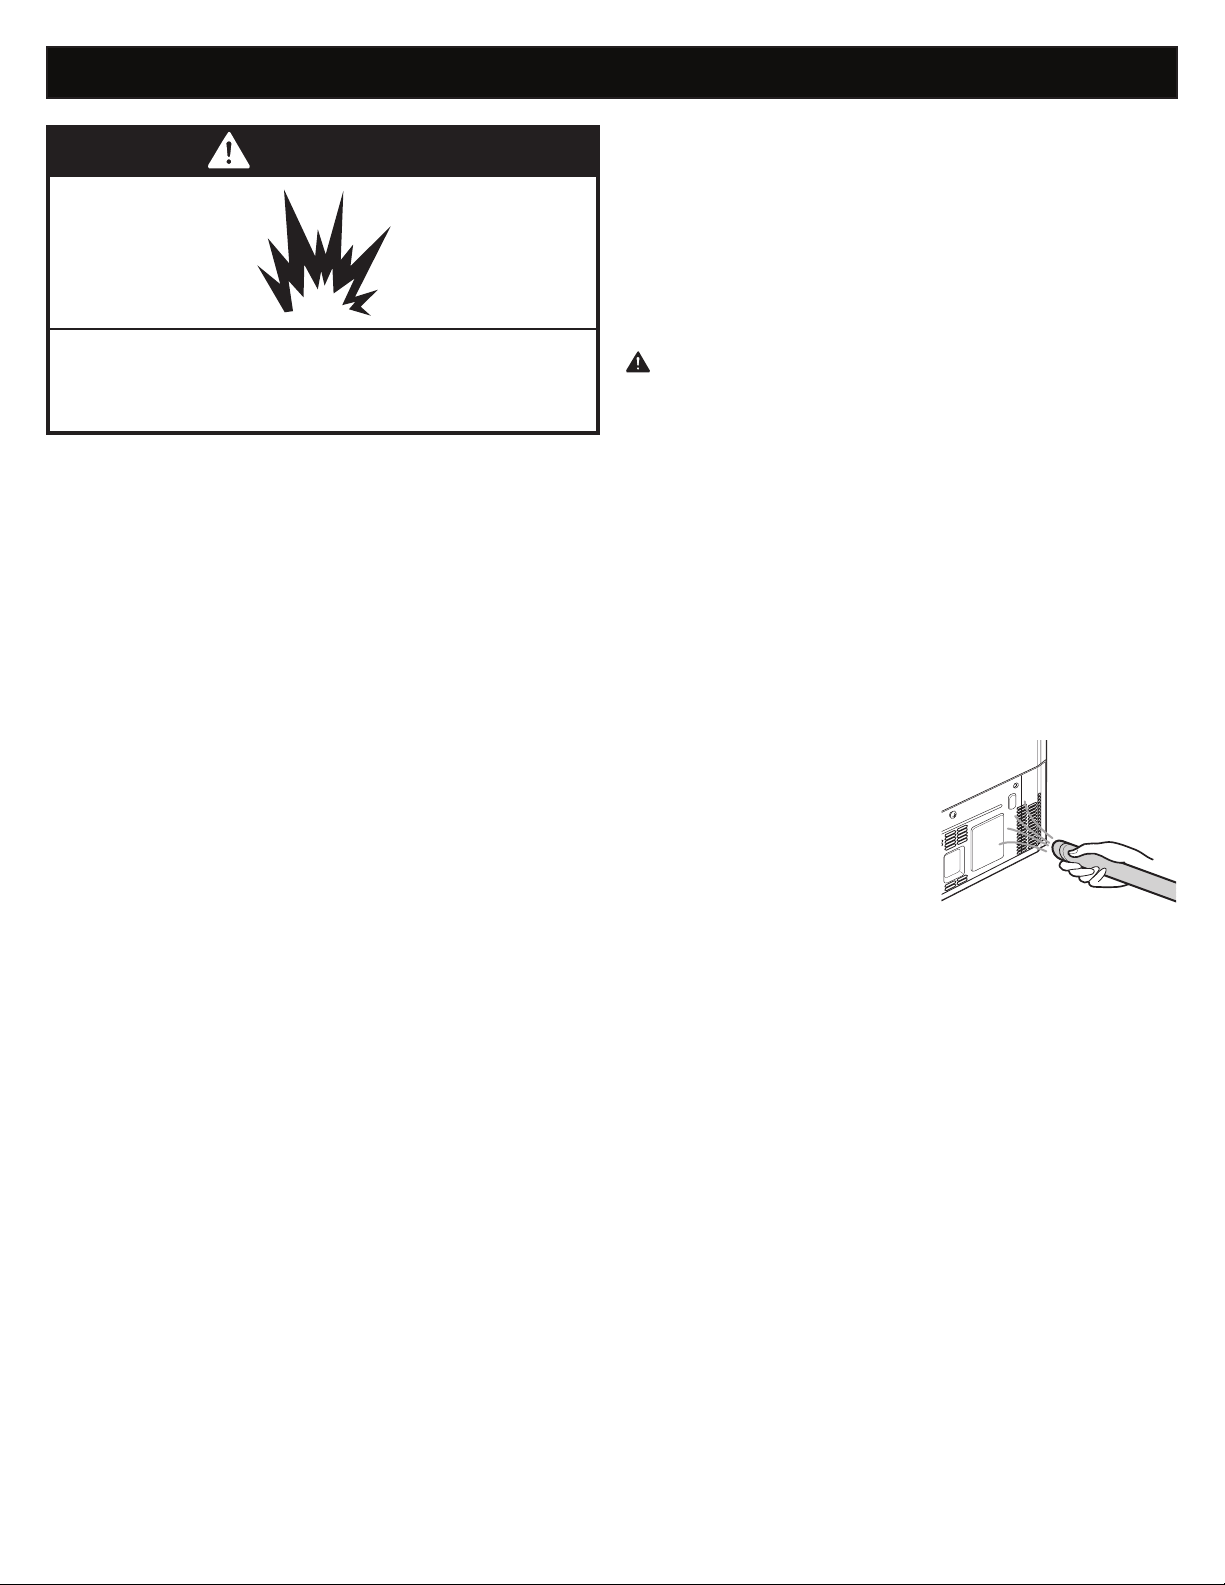
8. FLUSH OUT THE TUBING
Turn the main water supply on and
is clear.
valve after about one quart of
tubing.
9. CONNECT THE TUBING TO THE REFRIGERATOR
1.
2. Place the compression nut and ferrule (sleeve) onto the
end of the tubing as shown.
3. Insert the end of the copper tubing into the connection
as far as possible. While holding the tubing, tighten the
10. TURN THE WATER ON AT THE SHUTOFF VALVE
Tighten any connections that leak.
11. PLUG IN THE REFRIGERATOR
Arrange the coil of tubing so that it does not vibrate
against the back of the refrigerator or against the wall.
Push the refrigerator back to the wall.
12. START THE ICEMAKER
Turn the icemaker ON at the control panel.
The icemaker will not begin to operate until it reaches
its operating temperature of 15°F (–9°C) or below. It
will then begin operation automatically if the icemaker
button has been turned ON.
CAUTION: Check to see if leaks occur at the water line
connections.
Tubing Clamp
¼ in. Tubing
¼ in.
Compression
Nut
Refrigerator
Connection
Ferrule
(sleeve)
WARNING
Before making the connection to the refrigerator, be sure
that the refrigerator power cord is not plugged into the
wall outlet.

35
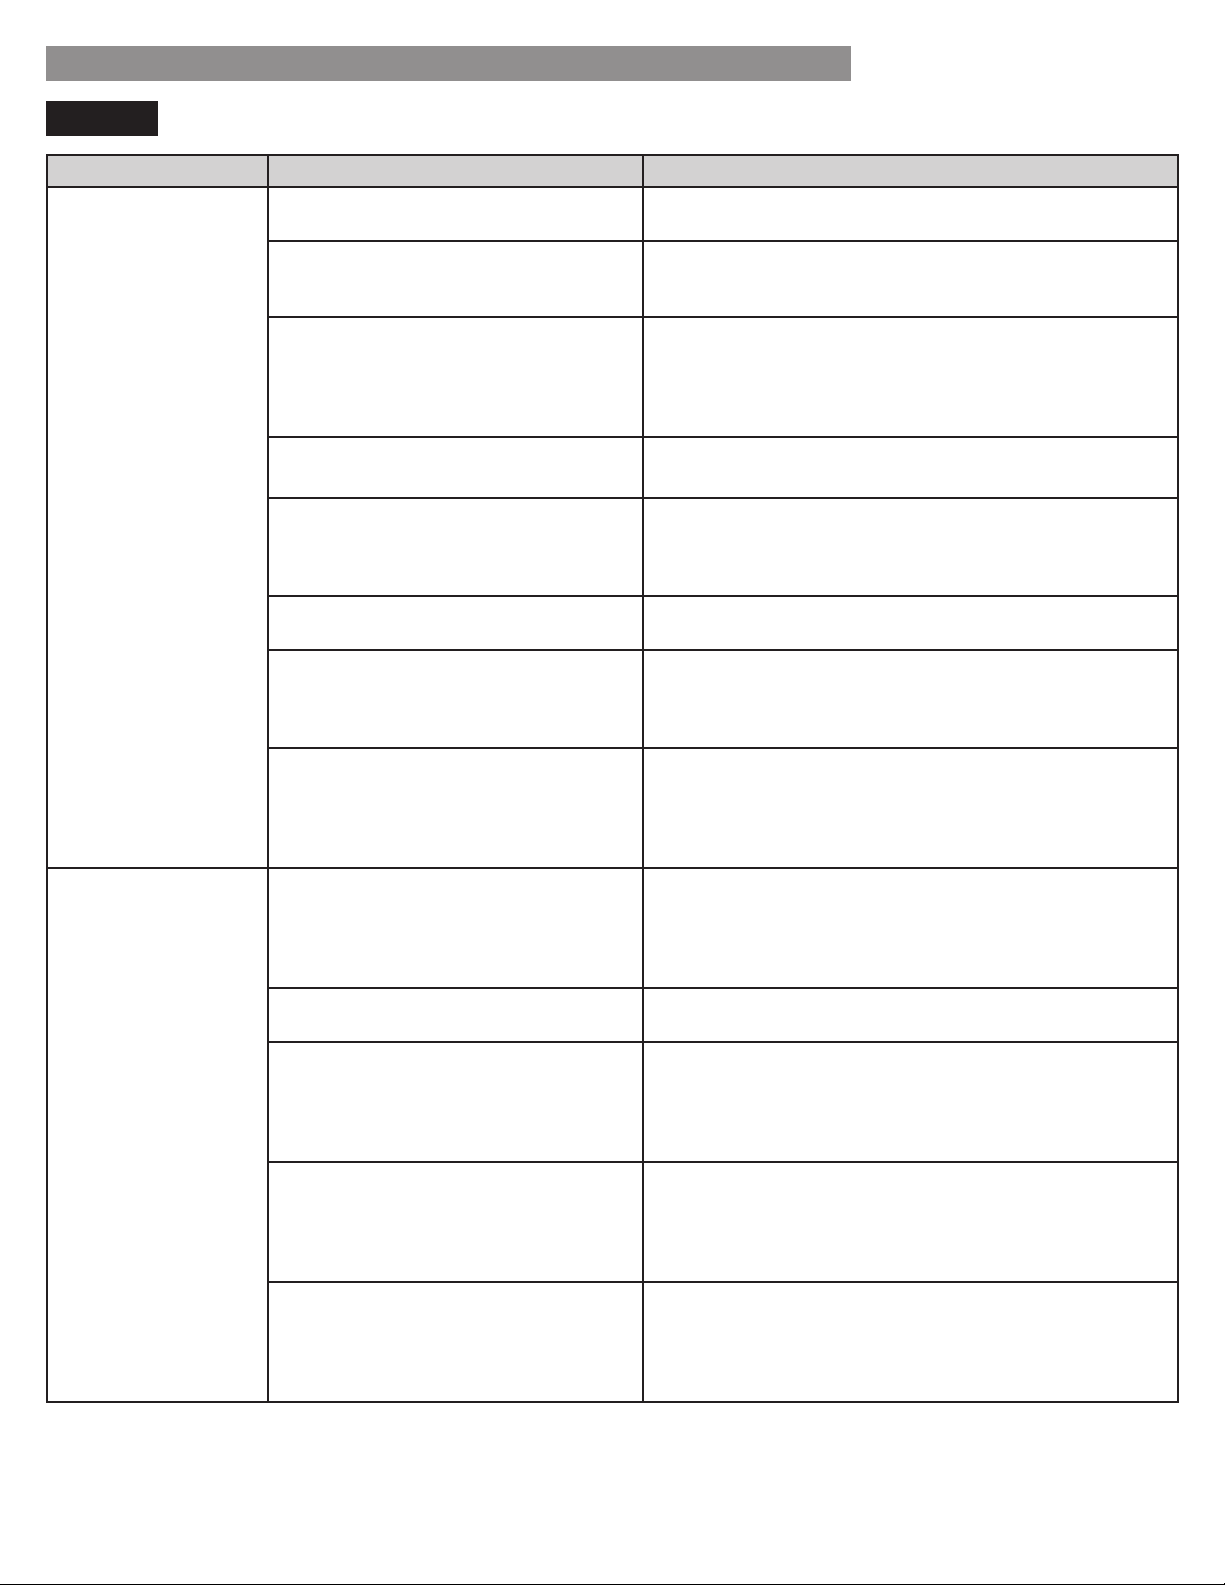
TROUBLESHOOTING GUIDE
Problem Possible Causes Solutions
Refrigerator and
Freezer section are
not cooling.
The refrigerator control is set to OFF
(some models).
Turn the control ON. Refer to the Setting the Controls
section for proper temperature settings.
Refrigerator is set to demo mode. Demo Mode allows the lights and control display to
work normally while disabling cooling to save energy
Setting the
Controls section for instructions on how to disable
Demo Mode.
Refrigerator is in the defrost cycle. During the defrost cycle, the temperature of each
compartment may raise slightly. Wait 30 minutes and
once the defrost cycle has completed.
Refrigerator was recently installed. It may take up to 24 hours for each compartment to
reach the desired temperature.
Refrigerator was recently relocated. If the refrigerator was stored for a long period of time
or moved on its side, it is necessary for the refrigerator
to stand upright for 24 hours before connecting it to
power.
Cooling System runs
too much.
Refrigerator is replacing an older
model.
Modern refrigerators require more operating time but
Refrigerator was recently plugged in
or power restored.
The refrigerator will take up to 24 hours to cool
completely.
Door opened often or a large amount
of food / hot food was added.
Adding food and opening the door warms the
refrigerator, requiring the compressor to run longer in
order to cool the refrigerator back down. In order to
conserve energy, try to get everything you need out of
the refrigerator at once, keep food organized so it is
removed. (Refer to the Food Storage Guide.)
Doors are not closed completely. Firmly push the doors shut. If they will not shut all the
way, see the Doors will not close completely or pop
open section in Parts & Features Troubleshooting.
Refrigerator is installed in a hot
location.
The compressor will run longer under warm conditions.
At normal room temperatures (70°F) expect your
compressor to run about 40% to 80% of the time.
Under warmer conditions, expect it to run even more
often. The refrigerator should not be operated above
110°F.
Condenser / back cover is clogged. Use a vacuum cleaner with an attachment to clean the
condenser cover and vents. Do not remove the panel
covering the condenser coil area.
Before conducting troubleshooting, make sure that the following basic requirements are met:
Service Flow 0.5 gpm (1.9 lpm)
Water Supply Potable Water
Water Pressure 20-120 psi (138 - 827 kPa)
Operating Ambient Temperature Limits 55°F - 110°F
Electrical Ratings 115 Volts, 60 Hz, AC only, and fused at 15 or 20 amperes.
COOLING
36
TROUBLESHOOTING GUIDE
Problem Possible Causes Solutions
Refrigerator or
Freezer section is too
warm.
Refrigerator was recently installed. It may take up to 24 hours for each compartment to
reach the desired temperature.
Air vents are blocked.
Using Your Refrigerator section.
Doors are opened often or for long
periods of time.
When the doors are opened often or for long periods
of time, warm, humid air enters the compartment.
This raises the temperature and moisture level within
frequency and duration of door openings.
Unit is installed in a hot location. The refrigerator should not be operated in
temperatures above 110F.
A large amount of food or hot food
was added to either compartment.
Adding food warms the compartment requiring the
cooling system to run. Allowing hot food to cool to
room temperature before putting it in the refrigerator
Doors not closed correctly. See the Doors will not close correctly or pop open
section in Parts & Features Troubleshooting.
Temperature control is not set
correctly.
If the temperature is too warm, adjust the control one
increment at a time and wait for the temperature to
stabilize. Refer to the Setting the Controls section for
more information.
Defrost cycle has recently completed. During the defrost cycle, the temperature of each
compartment may raise slightly and condensation may
the proper temperature has been restored once the
defrost cycle has completed.
Interior moisture
buildup.
Doors are opened often or for long
periods of time.
When the doors are opened often or for long periods
of time, warm, humid air enters the compartment.
This raises the temperature and moisture level within
frequency and duration of door openings.
Doors not closed correctly. See the Doors will not close correctly section in the
Troubleshooting section.
Weather is humid. Humid weather allows additional moisture to enter the
compartments when the doors are opened leading to
condensation or frost. Maintaining a reasonable level
of humidity in the home will help to control the amount
of moisture that can enter the compartments.
Defrost cycle recently completed. During the defrost cycle, the temperature of each
compartment may raise slightly and condensation may
that the proper temperature has been restored once
the defrost cycle has completed.
Food is not packaged correctly. Food stored uncovered or unwrapped, and damp
containers can lead to moisture accumulation within
each compartment. Wipe all containers dry and store
food in sealed packaging to prevent condensation and
frost.
COOLING
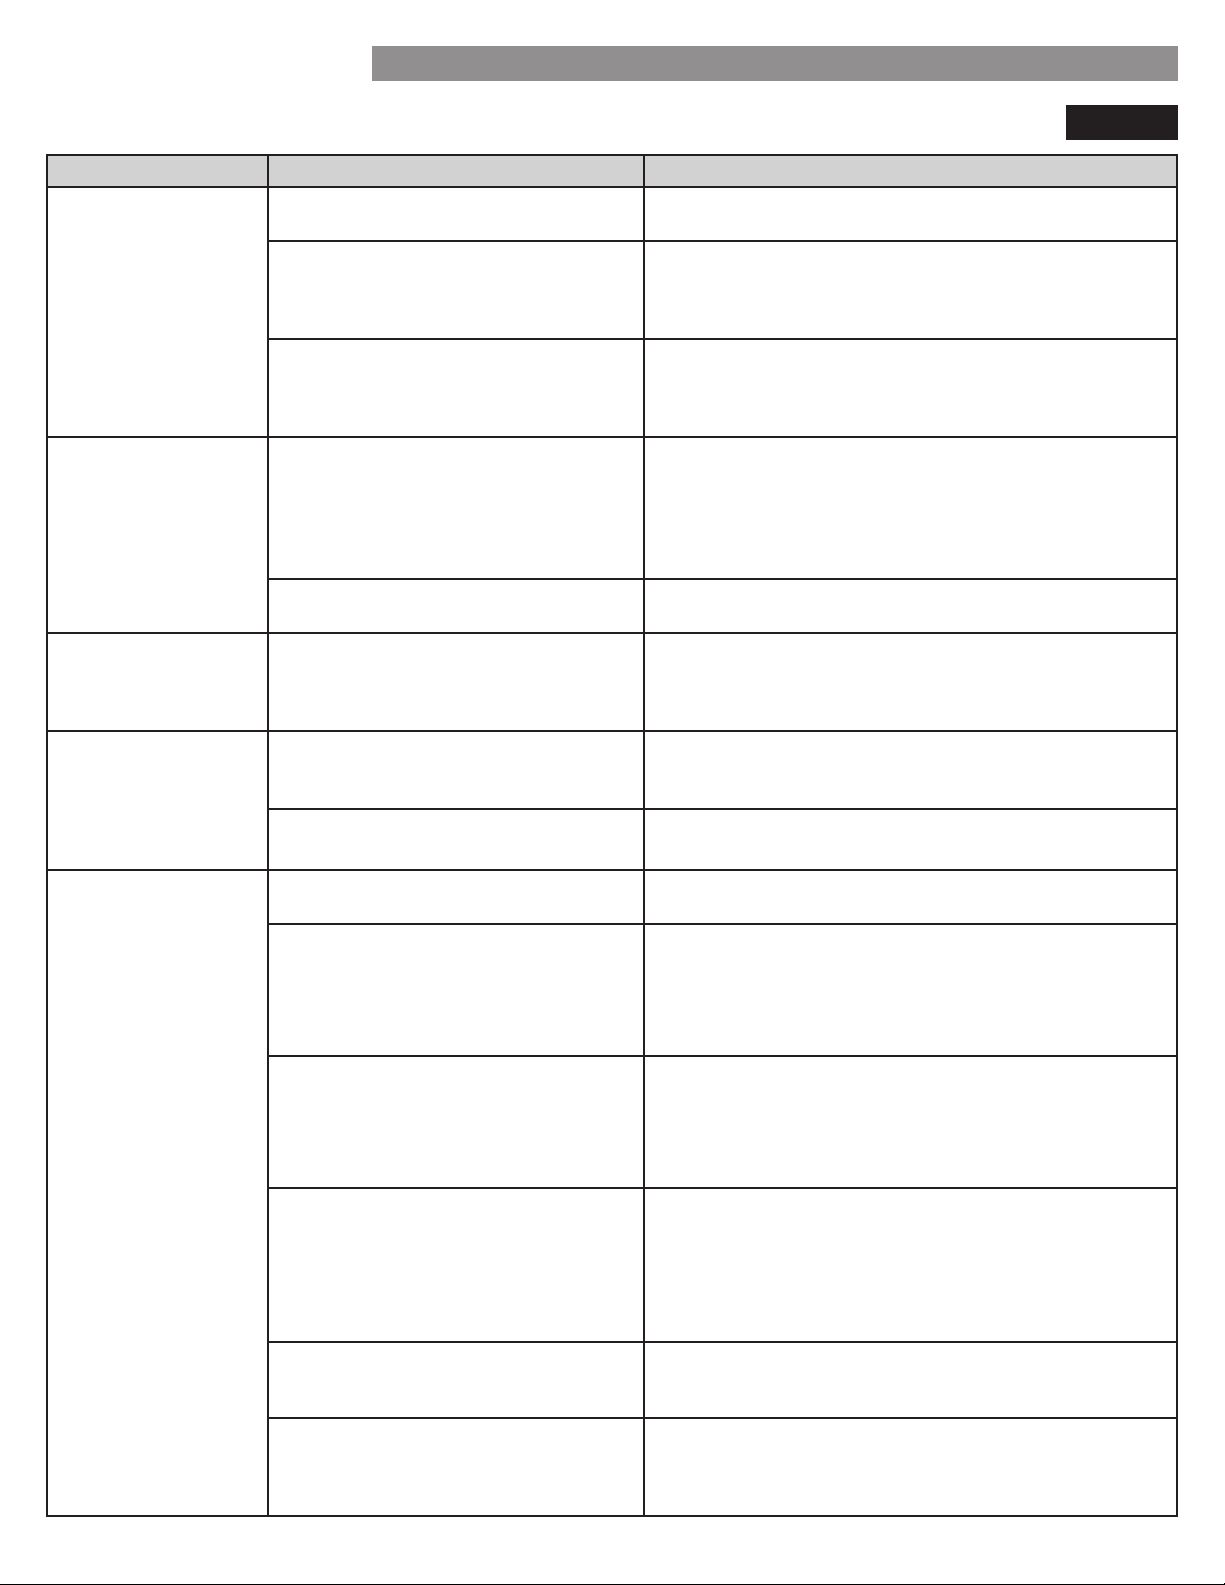
37
TROUBLESHOOTING GUIDE
Problem Possible Causes Solutions
Food is freezing
in the refrigerator
compartment.
Food with high water content was
placed near an air vent.
Rearrange items with high water content away from air
vents.
Refrigerator temperature control is set
incorrectly.
If the temperature is too cold, adjust the control one
increment at a time and wait for the temperature to
stabilize. Refer to the Setting the Controls section for
more information.
Refrigerator is installed in a cold
location.
When the refrigerator is operated in temperature
below 41°F (5°C), food can freeze in the refrigerator
compartment. The refrigerator should not be operated in
temperature below 55°F (13°C).
Frost or ice crystals
form on frozen food
(outside of package).
Door is opened frequently or for long
periods of time.
When the doors are opened often or for long periods
of time, warm, humid air enters the compartment. This
raises the temperature and moisture level within the
compartment. Increased moisture will lead to frost and
and duration of door openings.
Door is not closing properly. Refer to the Doors will not close correctly or pop open
section in the Troubleshooting section.
Refrigerator or
Freezer section is too
cold.
Incorrect temperature control settings. If the temperature is too cold, adjust the control one
increment at a time and wait for the temperature to
stabilize. Refer to the Setting the Controls section for
more information.
Frost or ice crystals
on frozen food
(inside of sealed
package).
Condensation from food with a high
water content has frozen inside of the
food package.
This is normal for food items with a high water content.
Food has been left in the freezer for a
long period of time.
Do not store food items with high water content in the
freezer for a long period of time.
Icemaker is not
making enough ice.
Demand exceeds ice storage capacity. The icemaker will produce approximately 50-100 cubes in
a 24 hour period.
House water supply is not connected,
valve is not turned on fully, or valve is
clogged.
Connect the refrigerator to a cold water supply with
open.
If the problem persists, it may be necessary to contact a
plumber.
Approximately every six months.
When the water dispenser output decreases.
When the ice cubes are smaller than normal.
Low house water supply pressure. The water pressure must be between 20 and 120 psi on
If the problem persists, it may be necessary to contact a
plumber or install a booster pump to compensate for the
low pressure.
used.
pressure below the minimum amount and result in
icemaker issues. (Refer to Water Pressure section.)
Tubing connecting refrigerator to house
supply valve is kinked.
The tubing can kink when the refrigerator is moved during
Straighten or repair the water supply line and arrange it
to prevent future kinks.
COOLING/ICE
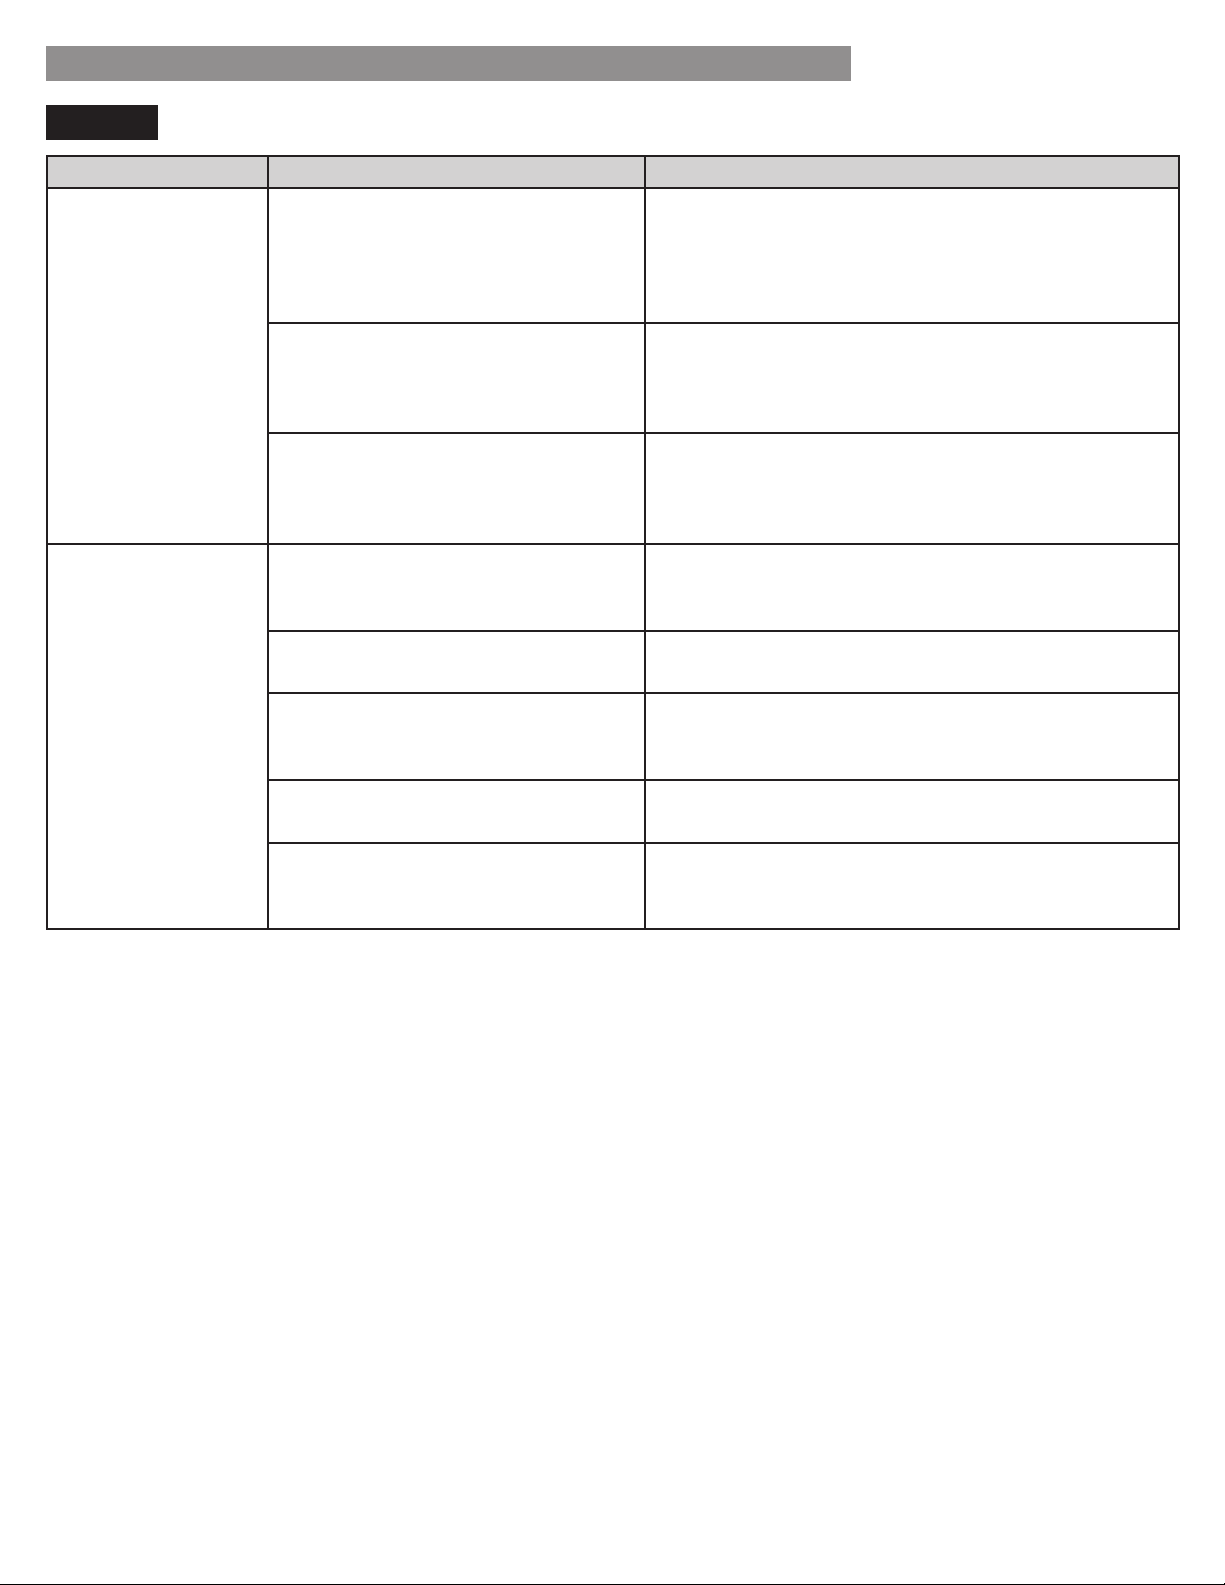
38
TROUBLESHOOTING GUIDE
Problem Possible Causes Solutions
Icemaker is not
making enough ice
(continued).
Doors are opened often or for long
periods of time.
If the doors of the unit are opened often, ambient
air will warm the refrigerator which will prevent the
unit from maintaining the set temperature. Lowering
the refrigerator temperature can help, as well as not
opening the doors as frequently.
Doors are not closed completely. If the doors are not properly closed, ice production
Doors will not close
completely or pop open section in Parts & Features
Troubleshooting for more information.
The temperature setting for the
freezer is too warm.
The recommended temperature for the freezer
compartment for normal ice production is 0°F. If the
freezer temperature is warmer, ice production will be
Icemaker is not
making ice.
Refrigerator was recently installed or
icemaker recently connected.
It may take up to 24 hours for each compartment to
reach the desired temperature and for the icemaker to
begin making ice.
Icemaker not turned on. Locate the icemaker ON/OFF
it is turned ON.
The refrigerator is not connected to
valve is not turned on.
Connect refrigerator to the water supply and turn the
obstructed.
make sure that the arm moves freely.
system is connected to your cold
water supply.
pressure below the minimum amount and result in
icemaker issues. (Refer to the Water Pressure section.)
ICE

39
TROUBLESHOOTING GUIDE
Problem Possible Causes Solutions
Ice has bad taste or
odor.
Water supply contains minerals such
as sulfur.
taste and odor problems.
NOTE:
be possible to remove all minerals / odor / taste in all
water supplies.
Icemaker was recently installed.
or bad tasting ice.
Ice has been stored for too long. Ice that has been stored for too long will shrink,
become cloudy, and may develop a stale taste. Throw
away old ice and make a new supply.
The food has not been stored
properly in either compartment.
Rewrap the food. Odors may migrate to the ice if
food is not wrapped properly.
The interior of the refrigerator needs
to be cleaned.
See the Care and Cleaning section for more
information.
The ice storage bin needs to be
cleaned.
Empty and wash the bin (discard old cubes). Make
sure that the bin is completely dry before reinstalling
it.
Icemaker is making
too much ice.
obstructed.
Empty the ice bin. If your icemaker is equipped with
freely. Reinstall the ice bin and wait 24 hours to
ICE

40
TROUBLESHOOTING GUIDE
Problem Possible Causes Solutions
Clicking The defrost control will click when
the automatic defrost cycle begins
and ends. The thermostat control (or
refrigerator control on some models)
will also click when cycling on and
Normal Operation
Rattling Rattling noises may come from the
the back of the unit, or items stored
on top of or around the refrigerator.
Normal Operation
Refrigerator is not resting solidly on
Floor is weak or uneven or leveling legs need to be
adjusted. See the Door Alignment section.
Refrigerator with linear compressor
was jarred while running.
Normal Operation
Whooshing Evaporator fan motor is circulating
air through the refrigerator and
freezer compartments.
Normal Operation
Air is being forced over the condenser
by the condenser fan.
Normal Operation
Gurgling
cooling system.
Normal Operation
Popping Contraction and expansion of the
inside walls due to changes in
temperature.
Normal Operation
Sizzling Water dripping on the defrost heater
during a defrost cycle.
Normal Operation
Vibrating If the side or back of the refrigerator
is touching a cabinet or wall, some of
the normal vibrations may make an
audible sound.
To eliminate the noise, make sure that the sides and
back cannot vibrate against any wall or cabinet.
Dripping Water running into the drain pan
during the defrost cycle.
Normal Operation
Pulsating or High-
Pitched Sound
Your refrigerator is designed to run
items at the desired temperature. The
your new refrigerator to run longer
than your old one, but it is still more
While the refrigerator is running, it is
normal to hear a pulsating or high-
pitched sound.
Normal Operation
NOISE
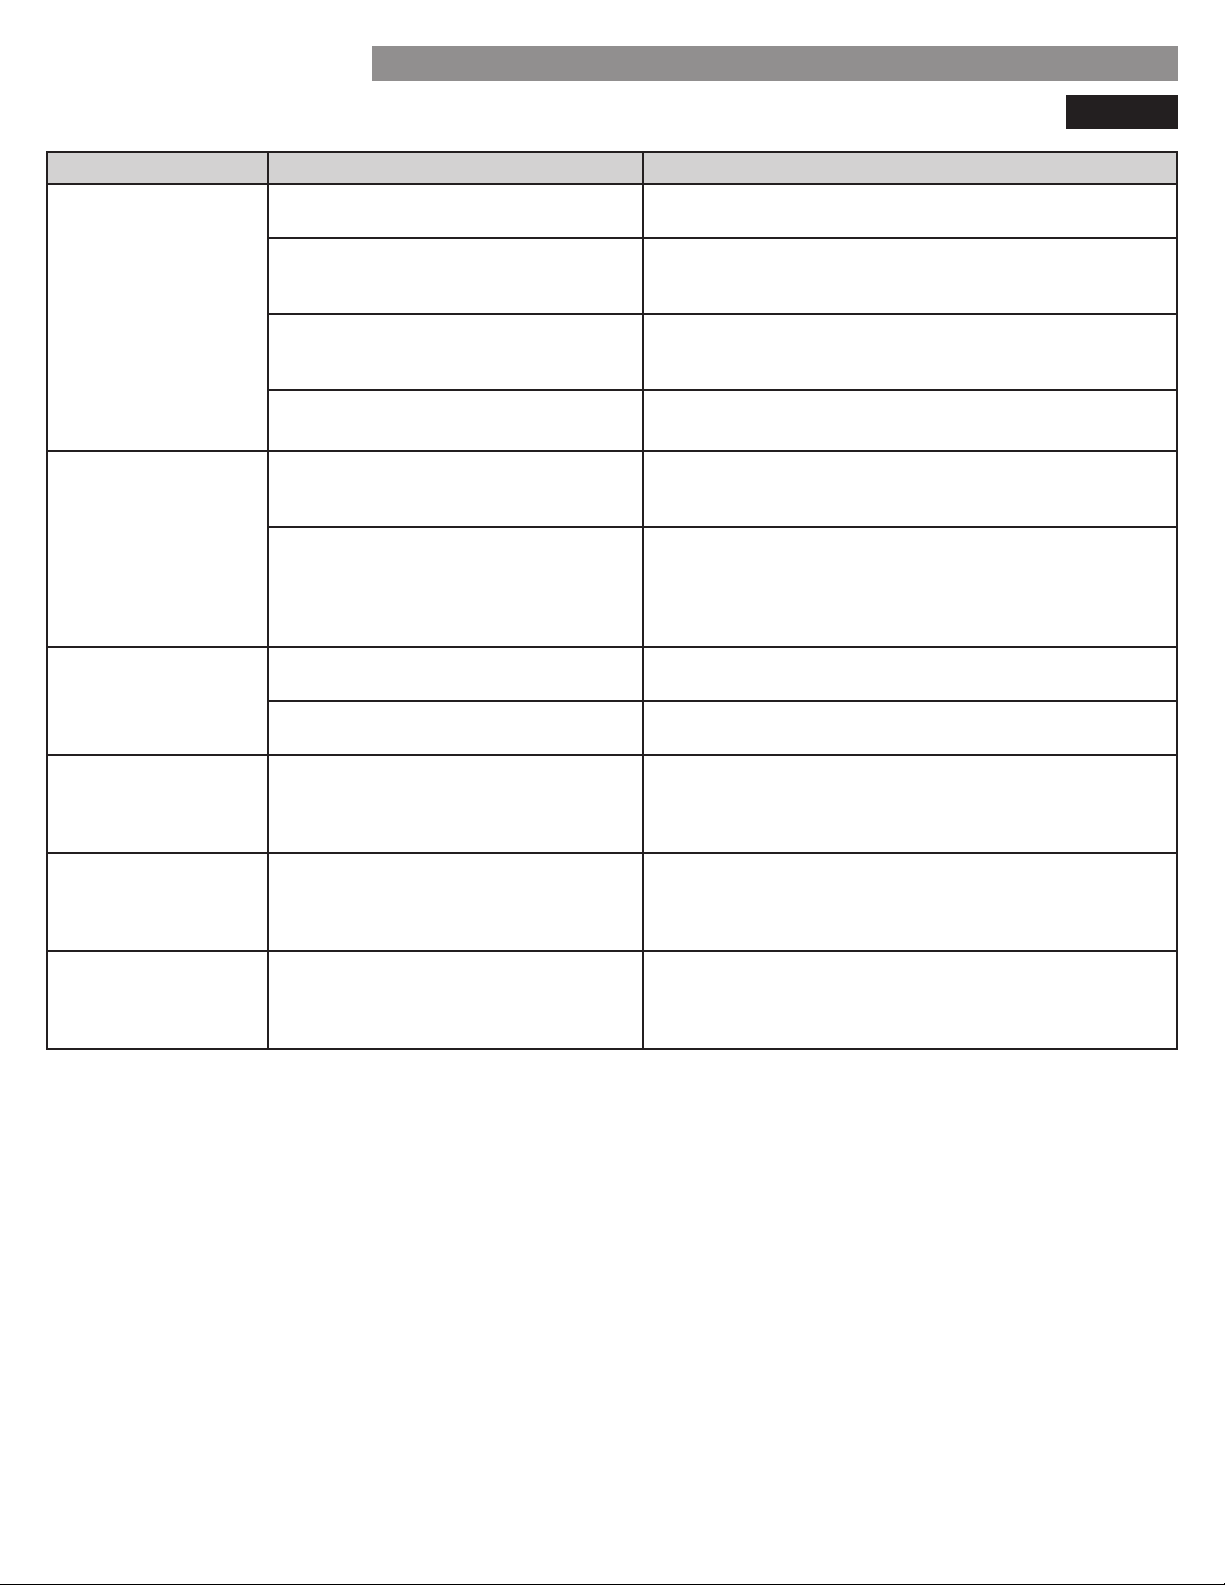
41
TROUBLESHOOTING GUIDE
Problem Possible Causes Solutions
Doors will not close
correctly or pop
open.
Food packages are blocking the door
open.
Rearrange food containers to clear the door and door
shelves.
Ice bin, crisper cover, pans, shelves,
door bins, or baskets are out of
position.
Push bins all the way in and put crisper cover, pans,
shelves and baskets into their correct positions. See the
Using Your Refrigerator section for more information.
The doors were removed during
product installation and not properly
replaced.
Remove and replace the doors according to the
Removing and Replacing Refrigerator Handles and
Doors section.
Refrigerator is not leveled properly. See Door Alignment in the Refrigeration Installation
section to level refrigerator.
open.
The gaskets are dirty or sticky. Clean the gaskets and the surfaces that they touch.
Rub a thin coat of appliance polish or kitchen wax on
the gaskets after cleaning.
Door was recently closed. When you open the door, warmer air enters the
refrigerator. As the warm air cools, it can create a
vacuum. If the door is hard to open, wait one minute
to allow the air pressure to equalize, then see if it
opens more easily.
Refrigerator wobbles
or seems unstable.
Leveling legs are not adjusted
properly.
Refer to the Leveling and Door Alignment section.
Floor is not level. It may be necessary to add shims under the leveling
legs or rollers to complete installation.
Lights do not work. LED interior lighting failure. The refrigerator compartment lamp is LED interior
lighting, and service should be performed by
Light Bulb
Replacement section.
Refrigerator has an
unusual odor.
The Air Filter may need to be set to
the MAX setting or replaced.
Set the Air Filter to the MAX setting. If the odor does
replaced. See the Replacing the Air Filter section for
replacement instructions.
The interior of
the refrigerator is
covered with dust or
soot.
or candle.
Make sure that the refrigerator is not located near a
PARTS & FEATURES
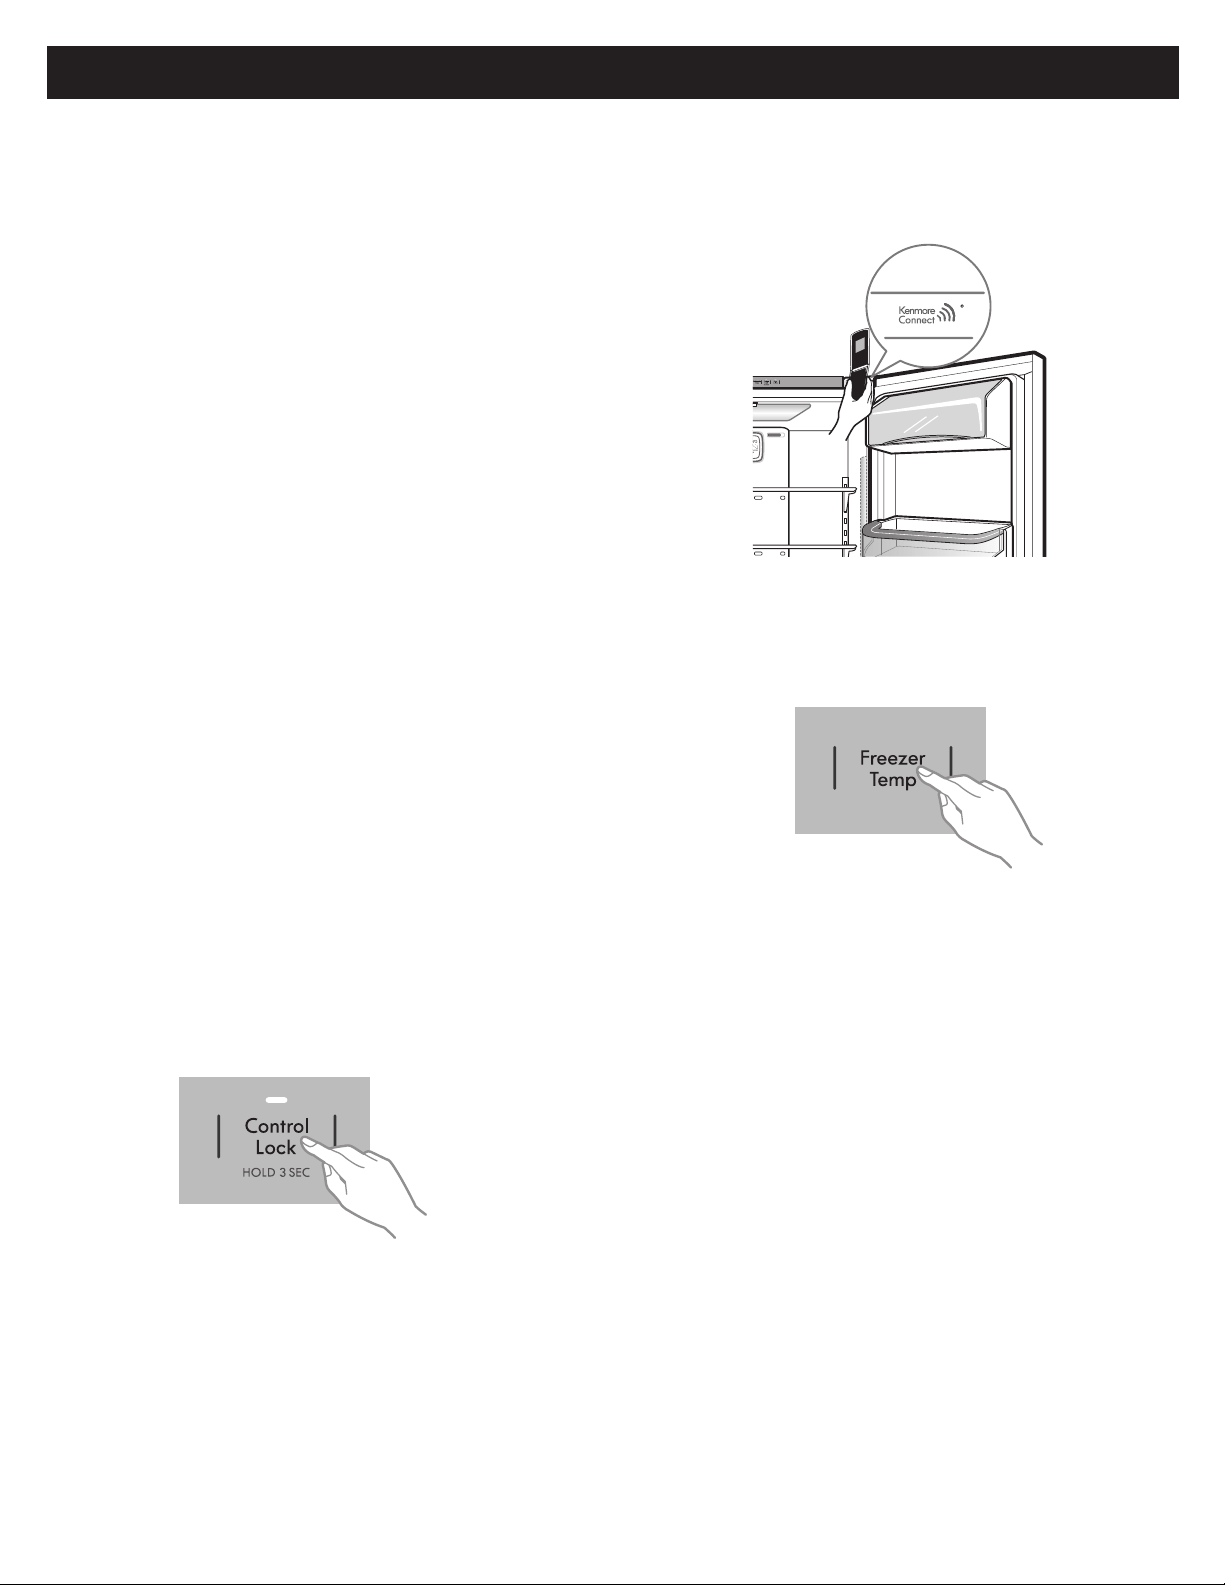
42
KENMORE CONNECT™ SYSTEM
Kenmore Connect™ (On some models)
Should you experience any problems with your
refrigerator, it has the capability of transmitting data
via your telephone to the Kenmore Connect™ Team.
This gives you the capability of speaking directly to
our trained specialists. The specialist records the data
transmitted from your machine and uses it to analyze the
issue, providing a fast ective diagnosis.
If you experience problems with your refrigerator, call
1-800-4MY-HOME (1-800-469-4663). Only use the
Kenmore Connect™ feature when instructed to do so by
the Kenmore Connect™ Team agent. The transmission
sounds that you will hear are normal and sound similar to
a fax machine.
Kenmore Connect™ cannot be activated unless your
refrigerator is connected to power. If your refrigerator
is unable to turn on, then troubleshooting must be done
without using Kenmore Connect™.
Using Kenmore Connect™
First, call 1-800-4MY-HOME (1-800-469-4663). If the
associated with your refrigerator, you will be quickly
relayed to a Kenmore Connect™ team agent. Only use
the Kenmore Connect™ feature when instructed to do so
by the Kenmore Connect™ Team agent.
1. Lock the display. To lock the display, press and hold
the Control Lock button for three seconds. (If the
deactivate the lock and then reactivate it.)
3. Hold the mouthpiece of your phone in front of the
speaker that is located on the right hinge of the
refrigerator door, when instructed to do so by the call
center.
4. Press and hold the Freezer Temp button for three
seconds while continuing to hold your phone to the
speaker.
5. After you hear three beeps, release the Freezer Temp
button.
6. Keep the phone in place until the tone transmission has
the countdown is over and the tones have stopped,
resume your conversation with the specialist, who will
then be able to assist you in using the information
transmitted for analysis.
NOTE:
- For best results, do not move the phone while the tones
are being transmitted.
- If the call center agent is not able to get an accurate
recording of the data, you may be asked to try again.
2. Open the right refrigerator door.

84
TABLE DES MATIÈRES
Garantie ...............................................................................85
Contrats de protection
................................................86
Consignes de sécurité importantes
.......... 87-89
Conditions électriques et de mise
à la masse
..........................................................................89
Pièces et fonctionnalités
.......................................... 90
Installation du réfrigérateur ................... 91-106
.......................... 91
Installation
.......................................................................92
..................... 93-97
Mise à niveau et alignement des portes ... 98
Utilisation du réfrigérateur .................... 99-106
........................... 99-101
Guide de stockage des aliments ...............102
La machine à glaçons automatique ..........103
Section réfrigérateur
................................... 104
........105
.......................................................... 105
Bac de porte ................................................... 105
Filtre d’air ......................................................106
Compartiment congélateur
.......................106
Tiroir coulissant ............................................ 107
Durabase ...................................................... 107
Diviseur du Durabase ................................. 107
Filtre à eau .........................................108-111
Entretien et nettoyage .............................112-113
................112
Exterieur .........................................................112
...........................................112
Contre-porte et joints ...................................112
Pièces en plastique .......................................112
.................................112
Remplacement d’une ampoule
.....................................................113
Coupures de courant ....................................113
Lorsque vous partez en vacances ...............113
.............................113
Connexion du tuyau d’eau .....................114-116
Guide de dépannage .............................117-123
Kenmore Connect™ ......................................124
Service ..................................................Plat verso
85
GARANTIE
GARANTIE DU RÉFRIGÉRATEUR
GARANTIE LIMITÉE KENMORE ELITE
appelez le 1-800-4-MY-HOME® (1-800-469-4663).
garantie ne s’applique que pendant 90 jours à compter de la date de la vente aux États-Unis et est nulle au Canada si l’appareil est
la date de la vente. Cette couverture de garantie ne s’applique que pendant un an à compter de la date de la vente aux États-Unis
Cette garantie couvre UNIQUEMENT les défauts de fabrication et de main-d’œuvre et ne paiera PAS les éléments suivants :
ampoules à visser et sacs.
fournies avec le produit.
Déni de garanties implicites; limitation des recours
Cette garantie s’applique uniquement à une utilisation de cet appareil aux États-Unis ou au Canada*.
l’autre.
Sears Brands Management Corporation, Homan Estates, IL 60179, États-Unis
Sears Canada Inc., Toronto, Ontario, M5B 2C3, Canada

86
CONTRATS DE PROTECTION
ENREGISTREMENT DU PRODUIT
Contrats de protection étendue
Nous vous remercions d’avoir choisi notre produit. Votre
nouveau produit Kenmore Elite
®
Le contrat* inclut notamment :
Les pièces et la main-d’œuvre requis pour garantir le
bon fonctionnement des produits dans le cadre d’une
utilisation normale,
couverture va bien au-delà de la garantie du produit.
couverture— protection réelle.
Services d’experts par plus de 10 000 techniciens
d’entretien agréés Sears,
votre produit.
Appels d’intervention illimités et service à l’échelle du
pays, aussi souvent que vous le souhaitez, où que vous
vous trouviez.
Garantie « anti-citron » – remplacement du produit
de douze mois.
Remplacement du produit si le produit couvert ne peut
Contrôle de maintenance préventive annuel à votre
Aide rapide au téléphone – nous l’appelons Résolution
rapide
tous les produits. Ce sera votre « manuel de l’utilisateur
parlant ».
Protection contre les surtensions contre les dommages
Protection contre les pertes de nourriture de 250 $
Remboursement de location
couvert est plus longue que promise.
25 % de remise sur le prix normal d’un service de
Vous pouvez
appeler à toute heure du jour et de la nuit, ou programmer
un rendez-vous d’entretien en ligne.
Si vous l’annulez pour une raison quelconque au cours de
remboursement complet ou un remboursement au prorata
Certaines restrictions et exclusions s’appliquent.
Pour les prix et des informations supplémentaires aux
États-Unis composez le 1-800-827-6655.
* La couverture au Canada varie sur certains articles. Pour
plus de détails, appelez Sears Canada au 1-800-361-6665.
Service d’installation Sears
Pour une installation professionnelle Sears d’appareils
eau, et autres articles domestiques majeurs, aux États-Unis
ou au Canada, composez le 1-800-4-MY-HOME
®
.
la main lorsque vous contactez Sears au sujet de votre produit.
___________________ Date d’achat___________________
87
CONSIGNES DE SÉCURITÉ IMPORTANTES
AVERTISSEMENT
CONSERVEZ CES INSTRUCTIONS
Pour réduire les risques d’incendie, d’électrocution ou
de blessure lors de l’utilisation du produit, les consignes
de sécurité de base doivent être suivies, notamment les
consignes suivantes.
Lisez toutes les instructions avant d’utiliser cet appareil.
le cordon d’alimentation. Saisissez toujours fermement
craquelures ou des dommages d’abrasion sur toute sa
prolongez jamais. Une telle intervention pourrait
d’incendie.
à ne pas endommager le cordon d’alimentation.
PRÉCAUTIONS DE SÉCURITÉ DE BASE
Lisez et observez
de mort ou de blessures, ou des risques de dommages du produit.
Vous serez
Vous pouvez-
tions.
pourrait
pourrait se produire si les instructions ne sont pas suivies.
Ne JAMAIS entreposer ni utiliser d’essence ou autres
appareil ou de tout autre appareil.
gravement.
entre les portes et les armoires sont
REMARQUE :
DANGER
AVERTISSEMENT
ATTENTION
88
AVERTISSEMENT
DANGER : RISQUE DE PIÉGEAGE DES ENFANTS
CONSERVEZ CES INSTRUCTIONS
REMARQUE :
AVERTISSEMENT :
Instructions à l’intention de l’installateur
Ne recongelez PAS des aliments ayant complètement
dans sa publication Home and Garden Bulletin No. 69
glace ou s’ils sont toujours froids, sous 4°C.
semble suspecte, jetez l’aliment. La consommation de
que celle des autres aliments. Utilisez les aliments
AVANT DE JETER VOTRE ANCIEN RÉFRI-
GÉRATEUR OU CONGÉLATEUR :
Retirez les portes.
les enfants ne puissent pas grimper
.
AVERTISSEMENT :
Ce produit contient des produits chimiques pouvant, d'après l'État de Californie, causer le cancer ou des
Lavez-vous les mains après usage.
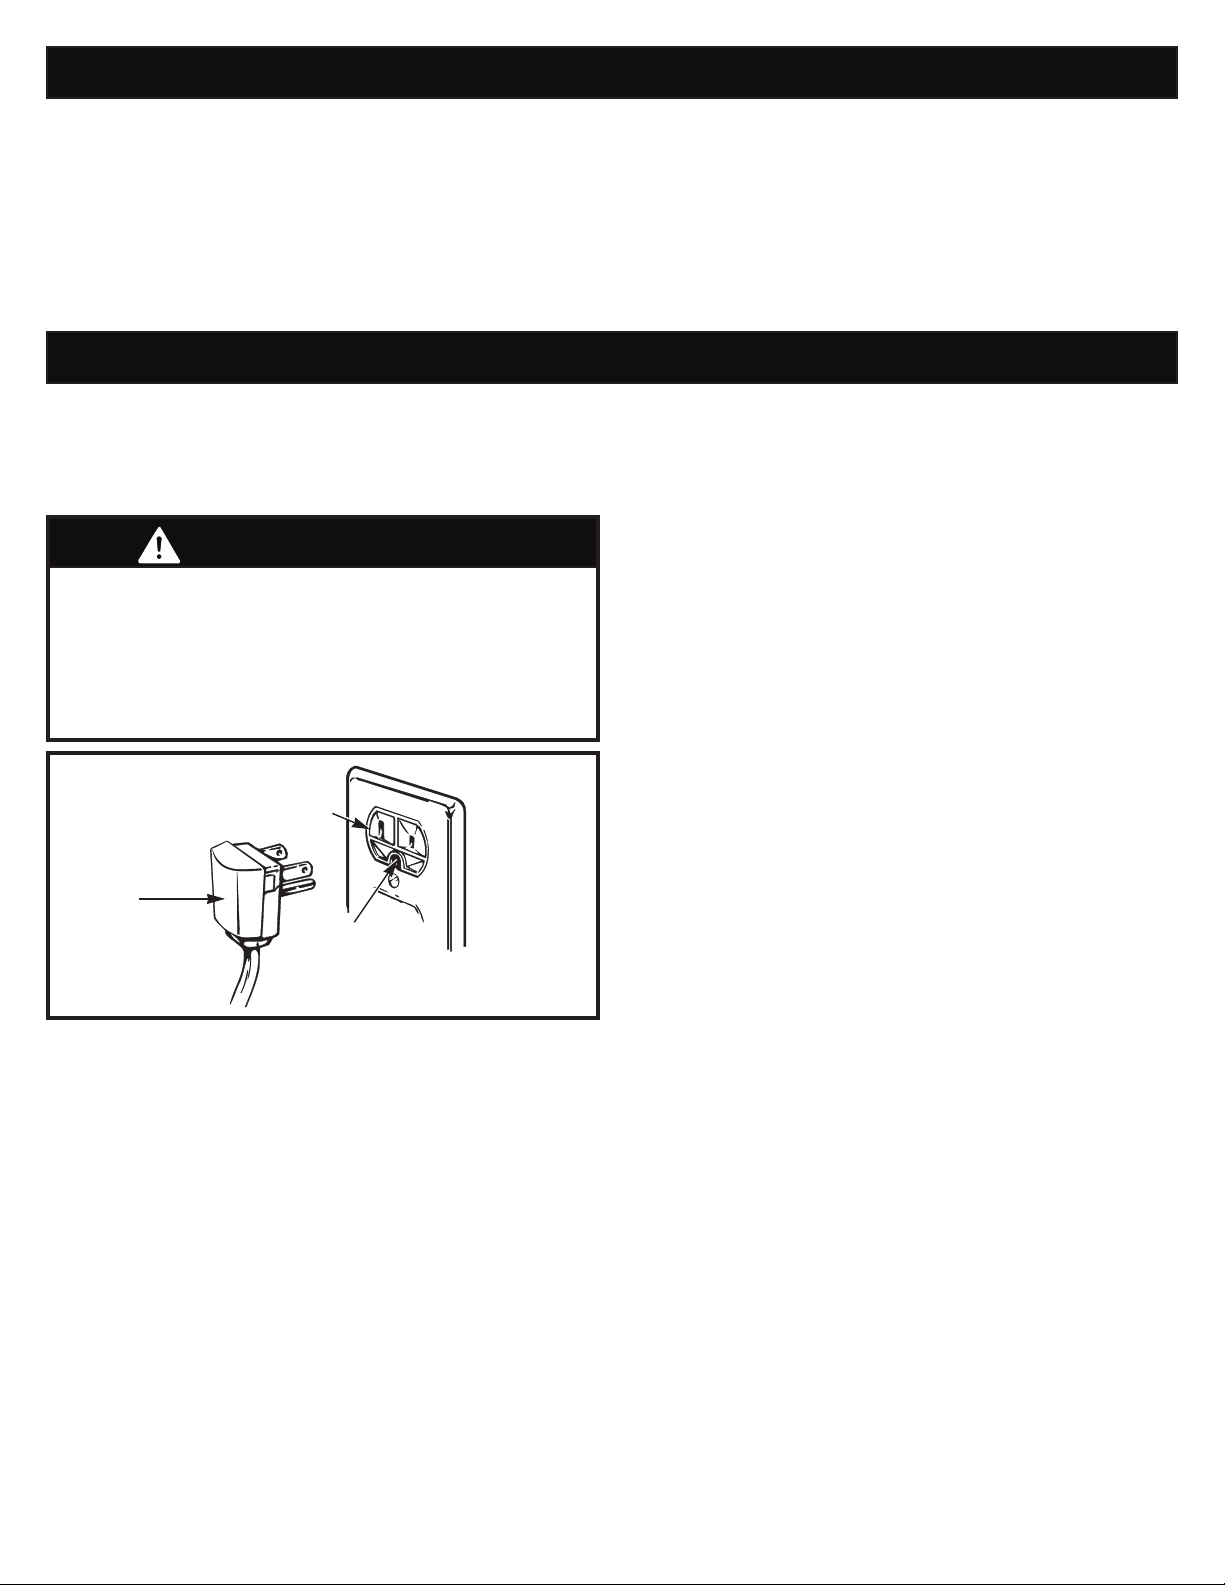
89
ÉLIMINATION DES CFC
CONDITIONS ÉLECTRIQUES ET DE MISE À LA MASSE
AVERTISSEMENT
IMPORTANT : Veuillez lire attentivement.
POUR EFFECTUER LES BRANCHEMENTS
ÉLECTRIQUES
MÉTHODE DE MISE À LA TERRE
RECOMMANDÉE
prise secteur correctement mise à la terre avec des valeurs
15 ou 20 ampères. Cela garantit les meilleures performances
alimenter cet appareil.
par un interrupteur. N’utilisez pas de rallonge.
à 3 connecteurs correctement mise à la terre.
Risque d’électrocution
POUR GARANTIR LA SÉCURITÉ,
que la prise est correctement mise à la terre.
UTILISATION DE RALLONGES
En raison de risques en matière de sécurité dans
certaines conditions, l’utilisation d’une rallonge n’est pas
recommandée.
une rallonge UL (États-Unis) à 3 conducteurs avec broche
de 15 ampères (minimum) et 120 volts.
Fiche à trois
connecteurs
avec mise à
la terre
Prise murale de
type mise à la terre
à 3 connecteurs
l’existence d’une mise à la
commencer l’utilisation.
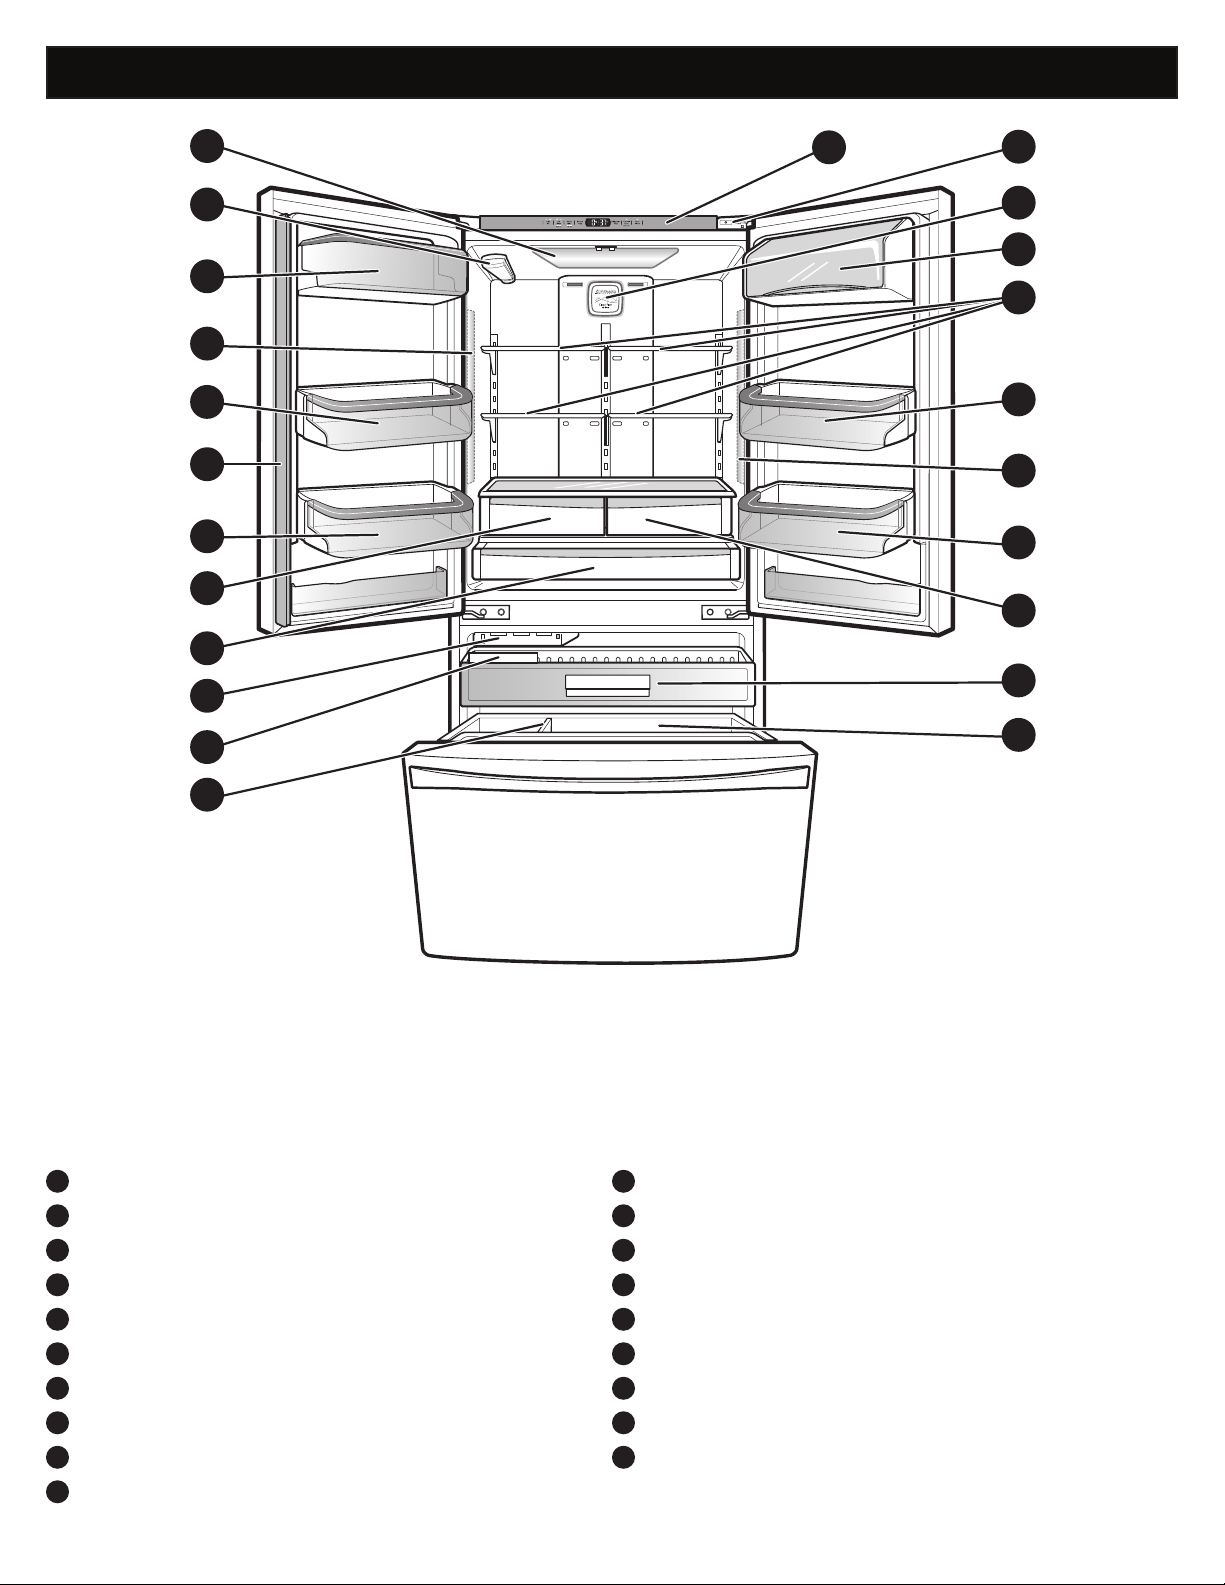
90
PIÈCES ET FONCTIONNALITÉS
REMARQUE :
correspondre à votre modèle.
A
B
D
F
G
H
I
J
N
L
K
M
D
O
P
P
S
R
Q
E
C
C
C
K
Panneau de commande
L
Kenmore Connect™
M
Filtre d’air
N
Bac à produits laitiers réglable
O
Étagères du réfrigérateur
P
Bacs de porte ajustables
Q
Air tiroir serrés
R
Tiroir coulissant
S
Durabase
A
Éclairage du réfrigérateur
B
Filtre à eau (intérieur)
C
Bacs modulables de porte
D
Éclairage du réfrigérateur
E
Meneau articulé
F
Bac à légumes à humidité contrôlée
G
Tiroir garde-manger à température contrôlée
H
Machine à glaçons automatique
I
Bac à glace
J
Diviseur de durabase
91
INSTALLATION DU RÉFRIGÉRATEUR
AVERTISSEMENT AVERTISSEMENT
AVERTISSEMENT
DÉBALLAGE DU RÉFRIGÉRATEUR
N’utilisez pas d’instruments pointus, d’alcool à friction, de
de vos besoins de stockage.
Risques liés au poids excessif :
au dos ou d’autres blessures.
Risques liés au poids excessif :
en le maintenant bien droit à la verticale lorsque vous
basculements successifs, vous risquez d’endommager le sol.
Risque d’explosion :
provoquer un incendie, une explosion ou des blessures
mortelles.
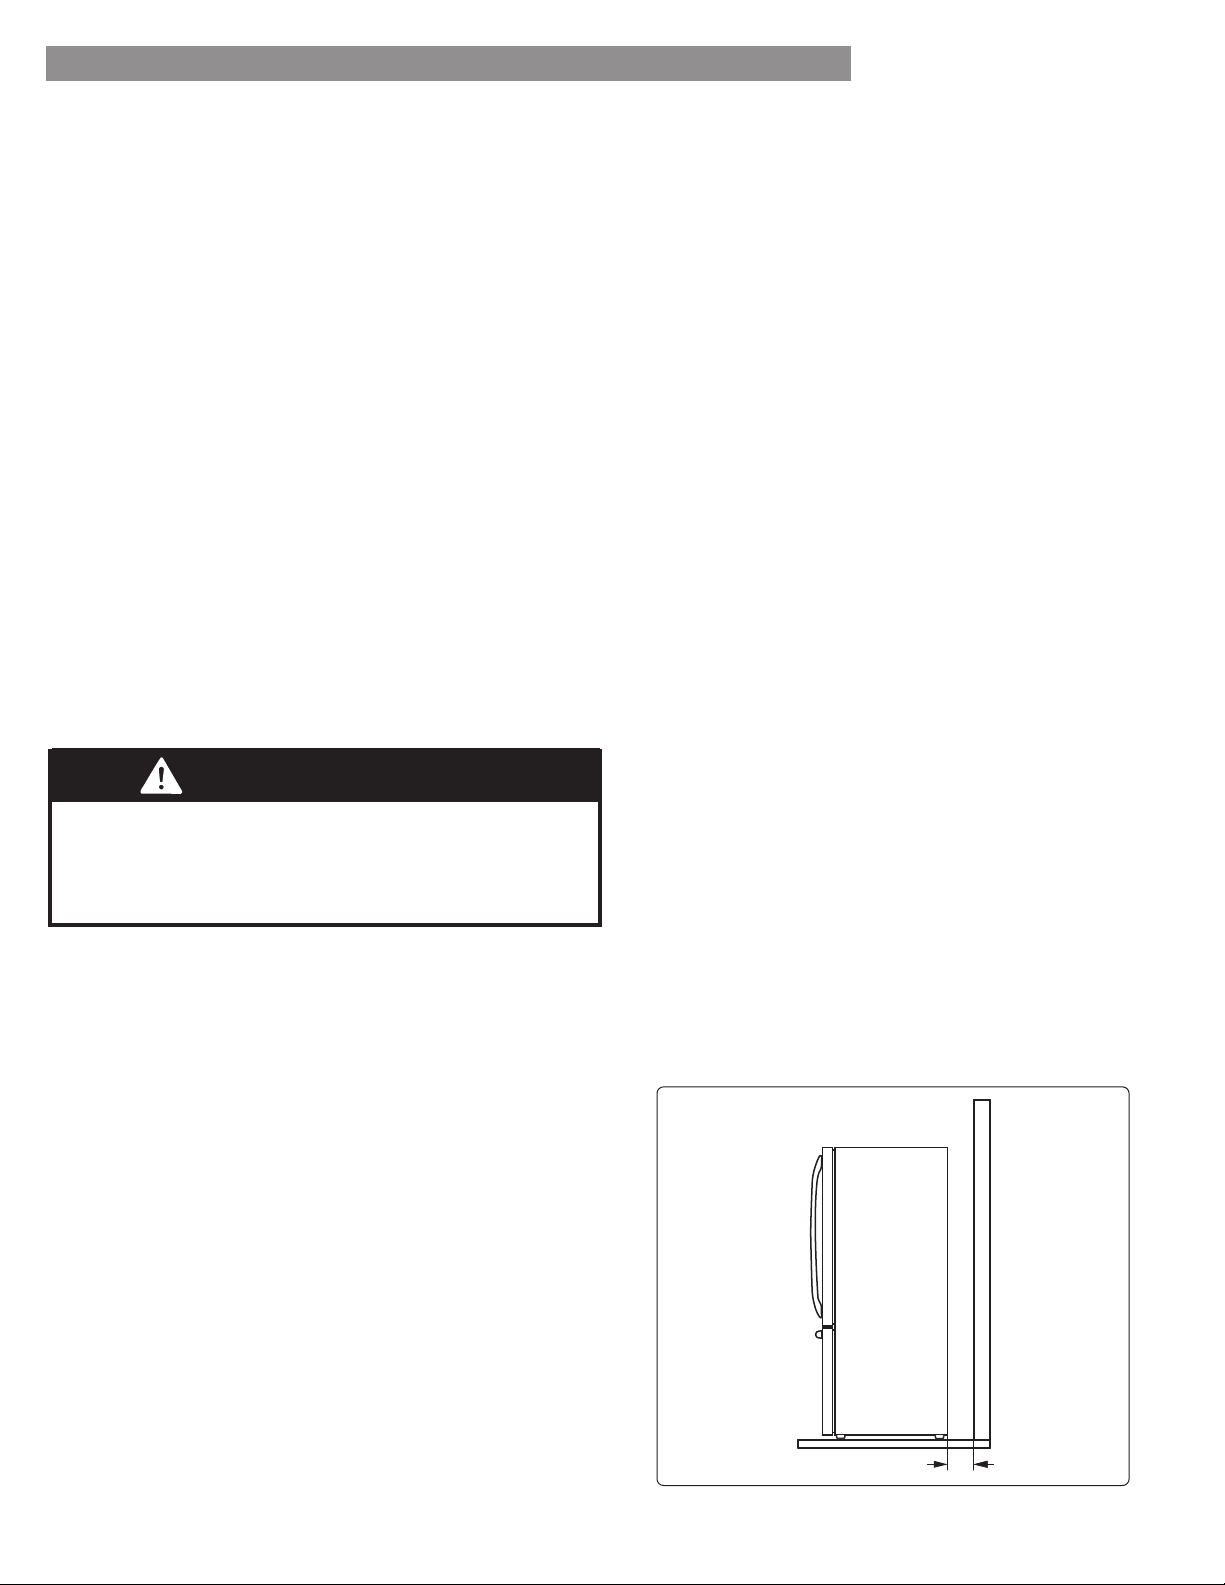
92
INSTALLATION DU RÉFRIGÉRATEUR
INSTALLATION (suite)
1.
le sens inverse des aiguilles d’une montre pour l’abaisser.
(Voir MISE À NIVEAU ET ALIGNEMENT DES PORTES.)
REMARQUE : L’installation sur de la moquette, des
2.
est comprise entre 55°F (13°C) et 110°F (43°C). Si la
compromise.
3. Choisissez un emplacement où un approvisionnement
à glaçons automatique.
REMARQUE :
1,38 bar, soit 20 psi), vous pouvez installer une pompe
d’appoint pour compenser cette pression faible.
4.
moins une distance de 24 pouces (61 cm.) devant le
et le mur.
AVANT L’UTILISATION
1.
2. Installez les accessoires tels que le bac à glaçons, les
3.
deux à trois heures avant d’y placer des aliments.
INSTALLATION
prise secteur correctement mise à la terre avec des valeurs
ou 20 ampères. Cela garantit les meilleures performances et
cet appareil.
Risque d’électrocution :
AVERTISSEMENT
5,08 cm (1 po.)
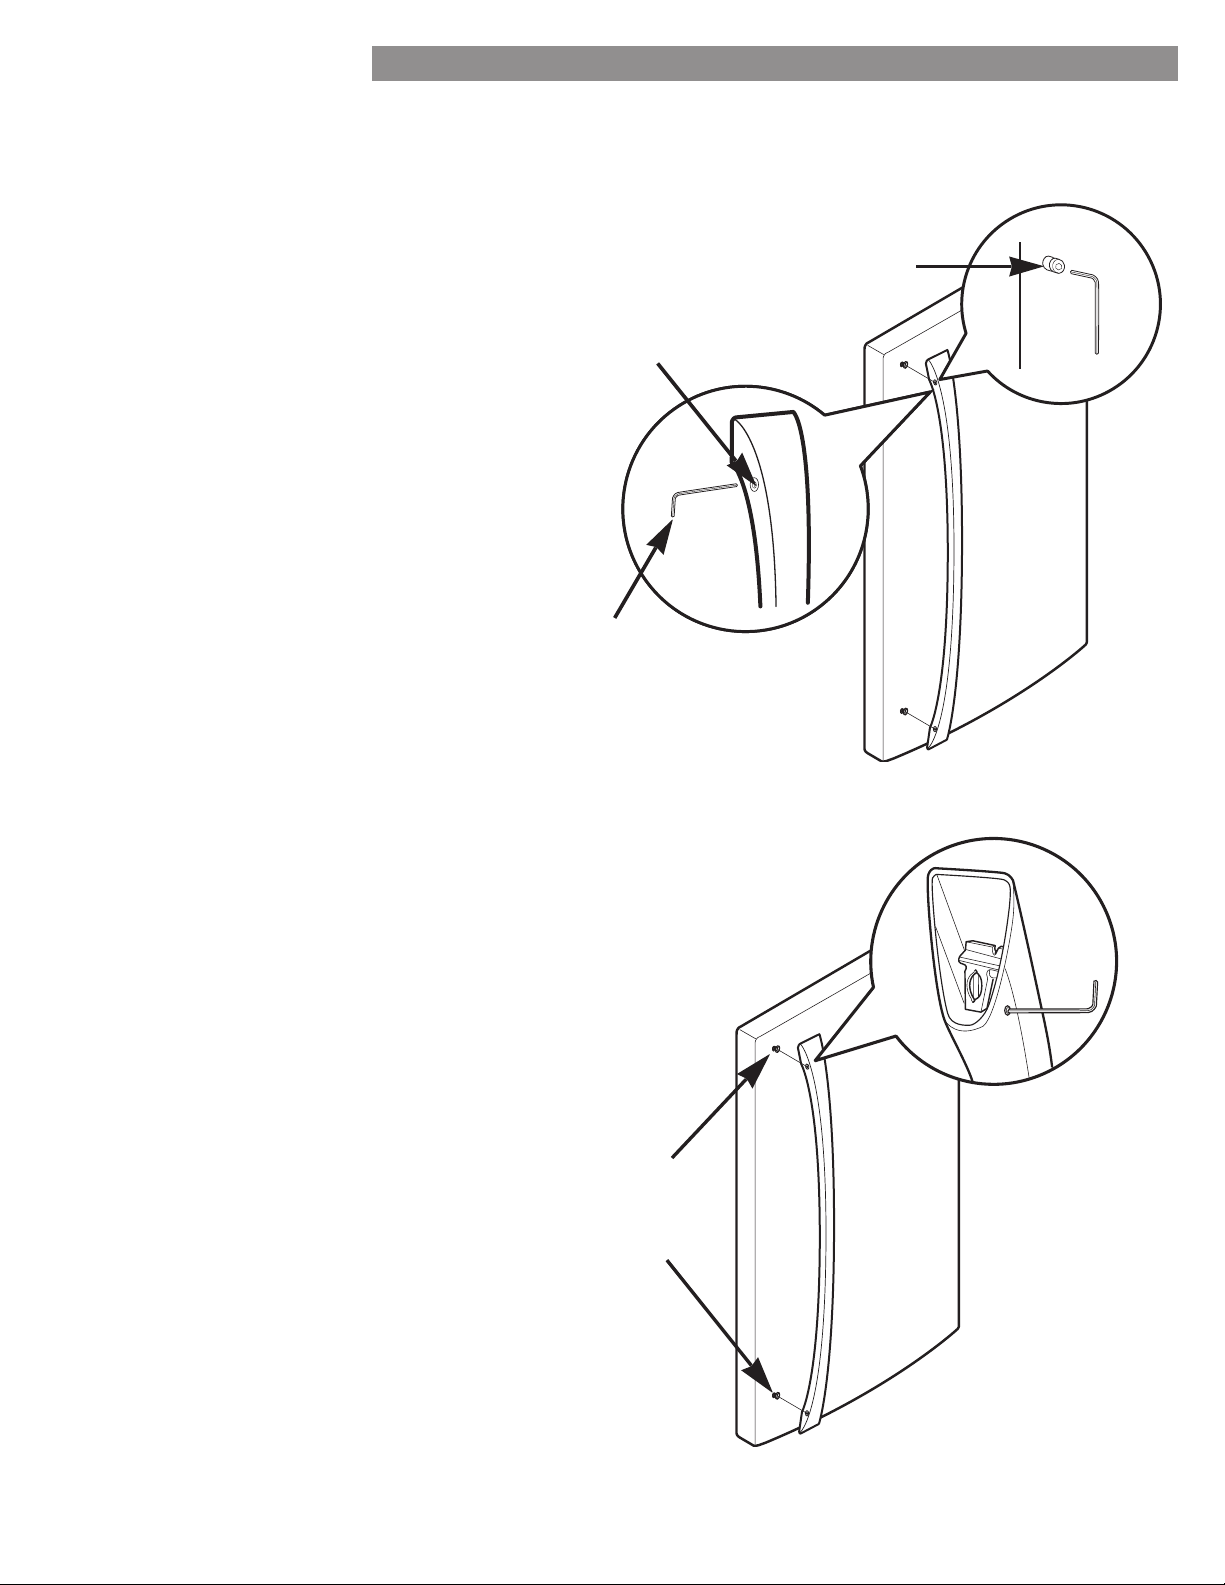
93
INSTALLATION DU RÉFRIGÉRATEUR
COMMENT RETIRER LA POIGNÉE DE
LA PORTE DU RÉFRIGÉRATEUR
REMARQUE :
Retrait de la poignée du réfrigérateur
hexagonale de / po. (2,5 mm) et retirez
REMARQUE : Si les attaches de montage de la
REMARQUE :
Attaches de
montage
Vis de pression
hexagonale
COMMENT REMETTRE EN PLACE
LA POIGNÉE DE LA PORTE DU
RÉFRIGÉRATEUR
REMARQUE :
Remise en place de la poignée de porte
du réfrigérateur
de montage et en serrant les vis de pression
/ po. (2.5 cm).
REMARQUE : Si les attaches de montage de
Attaches
de montage
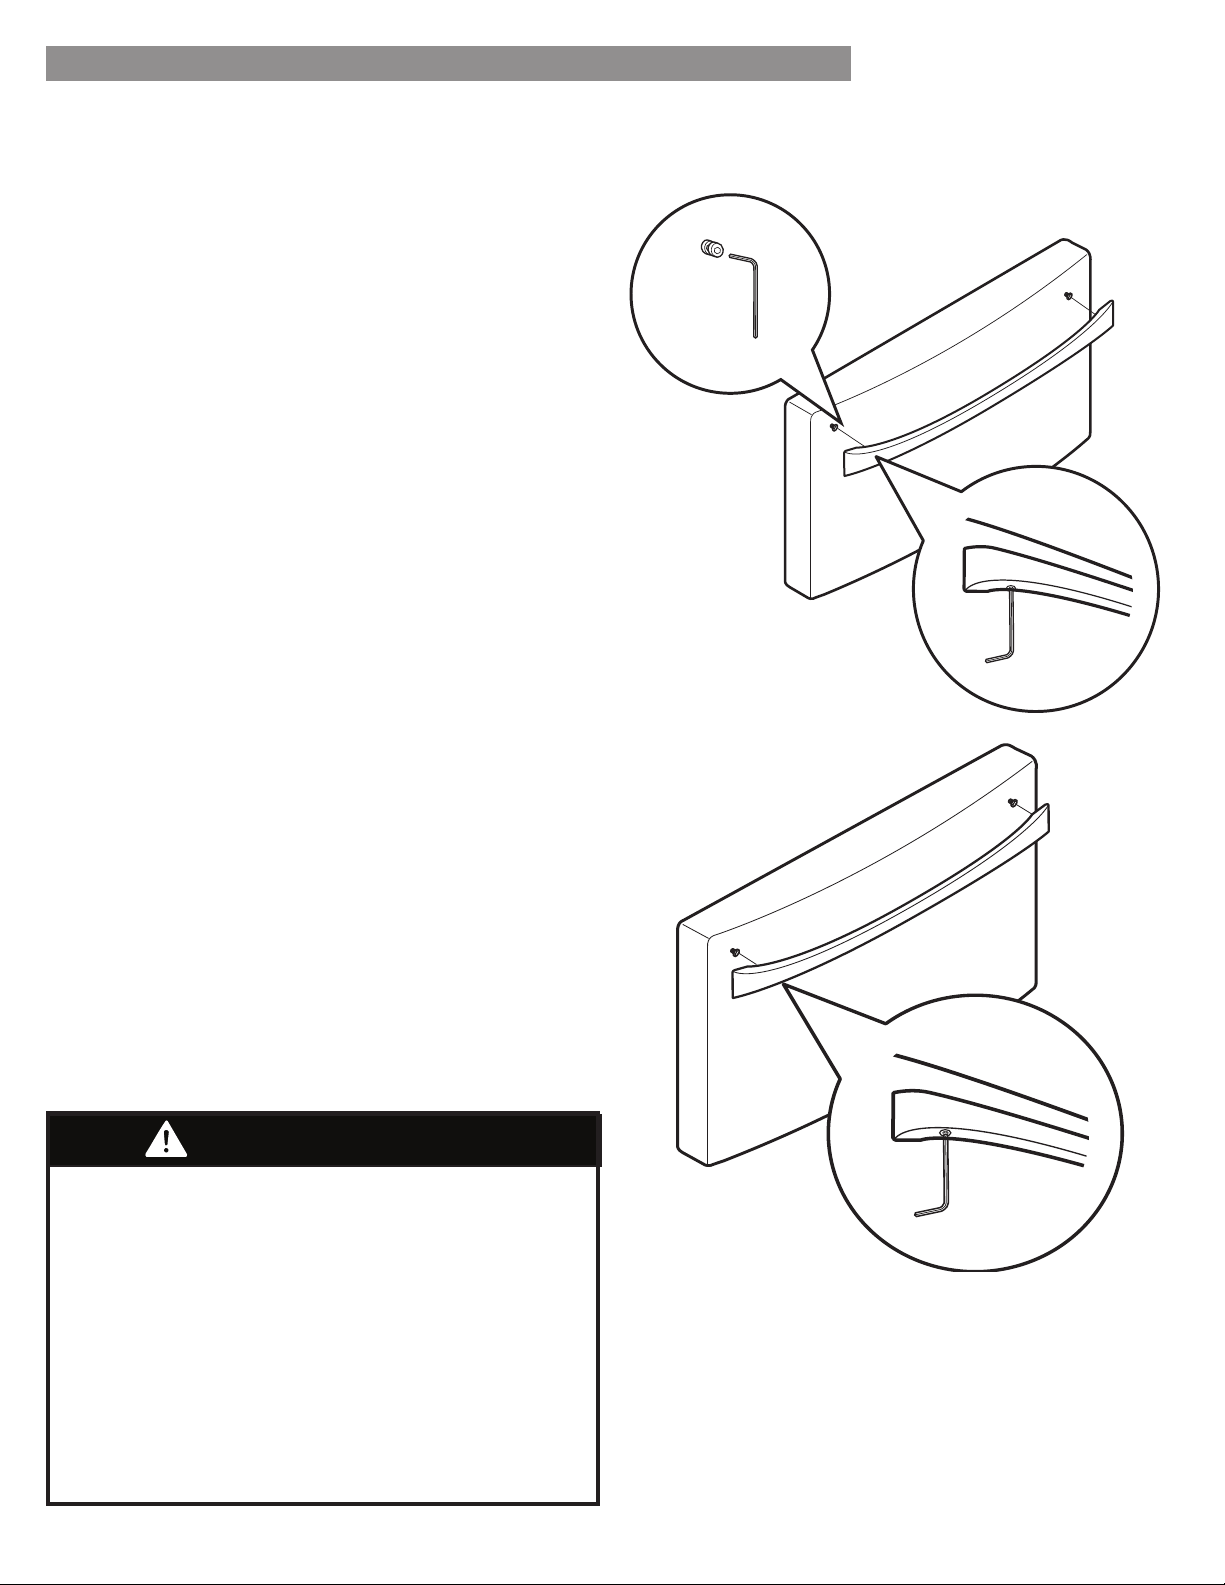
94
INSTALLATION DU RÉFRIGÉRATEUR
COMMENT REMETTRE EN PLACE LA
POIGNÉE DE LA PORTE DU CONGÉLATEUR
REMARQUE :
celui des illustrations sur cette page.
Remise en place de la poignée du tiroir du congélateur
REMARQUE :
de ¼ po. (6,4 mm).
COMMENT RETIRER LA POIGNÉE
DE LA PORTE DU CONGÉLATEUR
REMARQUE :
de celui des illustrations sur cette page.
Retrait de la porte du tiroir du congélateur
REMARQUE :
de ¼ po. (6,4 mm).
REMARQUE :
AVERTISSEMENT
pas et ne provoque pas de blessures.
ou des animaux.
Alignez exactement les trous de la plaque de la
Assurez-vous qu’il n’y a pas d’interstice entre la porte et
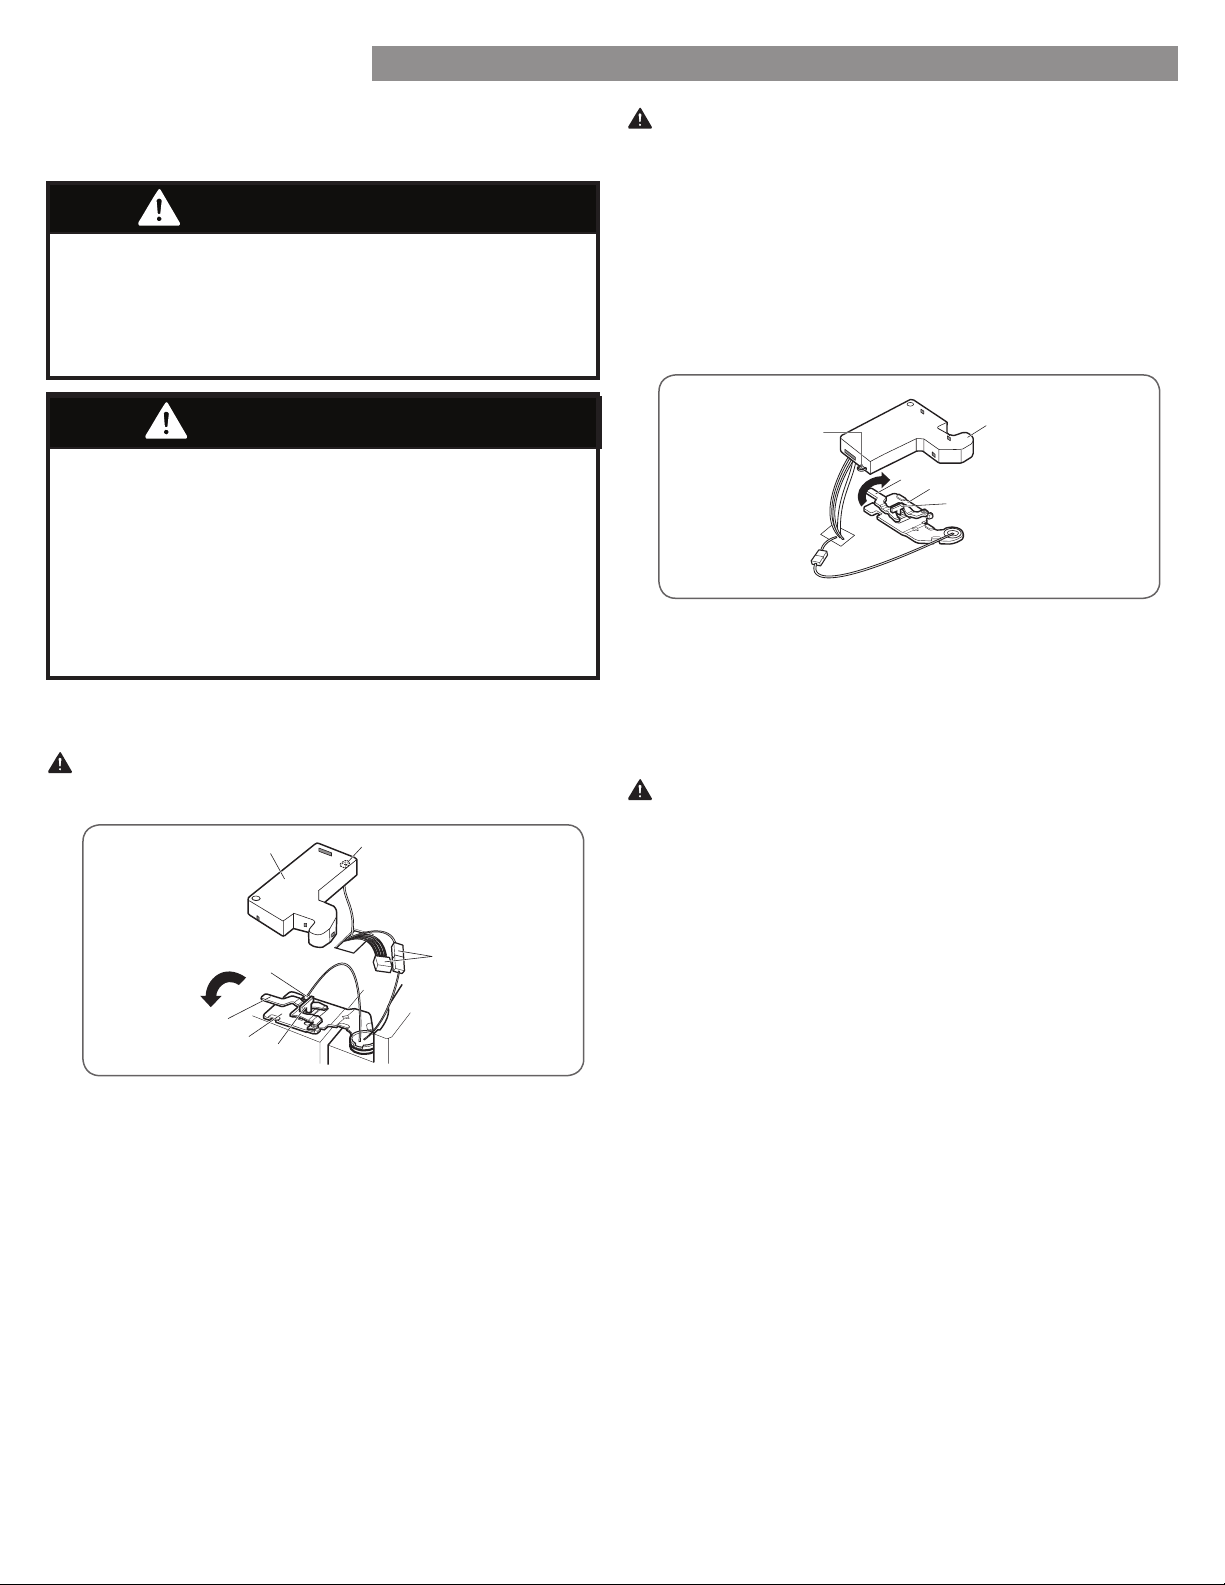
95
INSTALLATION DU RÉFRIGÉRATEUR
Pour retirer la porte de gauche du réfrigérateur :
1. Ouvrez la porte. Retirez la vis du couvercle de la
2. Utilisez un tournevis à lame plate pour soulever vers
couvercle (2). Soulevez le couvercle.
4. Retirez la vis de mise à la terre (4).
5. Faites pivoter le levier de la charnière (5) dans le sens
inverse des aiguilles d’une montre. Soulevez la charnière
la charnière (7).
ATTENTION : Lors du soulèvement de la charnière du
levier de fermeture, veillez à ce que la porte ne tombe
pas en avant.
6. Soulevez la porte de la tige d’articulation du milieu et
retirez la porte.
1. Ouvrez la porte. Retirez la vis du couvercle de la
2. Retirez le couvercle.
3. Faites pivoter le levier de la charnière (3) dans le sens des
ATTENTION : Lors du soulèvement de la charnière du
levier de fermeture, veillez à ce que la porte ne tombe
pas en avant.
4. Soulevez la porte de la tige d’articulation du milieu et
retirez la porte.
AVERTISSEMENT
Risque d’électrocution
de vous blesser ou de subir une issue fatale.
Ne placez pas les mains, les pieds ou autres objets
Pour retirer la porte droite du réfrigérateur :
RETRAIT ET REMISE EN PLACE
DES PORTES DU RÉFRIGÉRATEUR
ATTENTION : Avant de commencer, retirez des portes les
aliments et les bacs.
AVERTISSEMENT
Risques liés au poids excessif :
Faites appel à au moins deux personnes pour retirer et
au dos ou d’autres blessures.
(2)
(3)
(4)
(5)
(1)
(1)
(2)
(5)
(6)
(7)
(3)
(4)
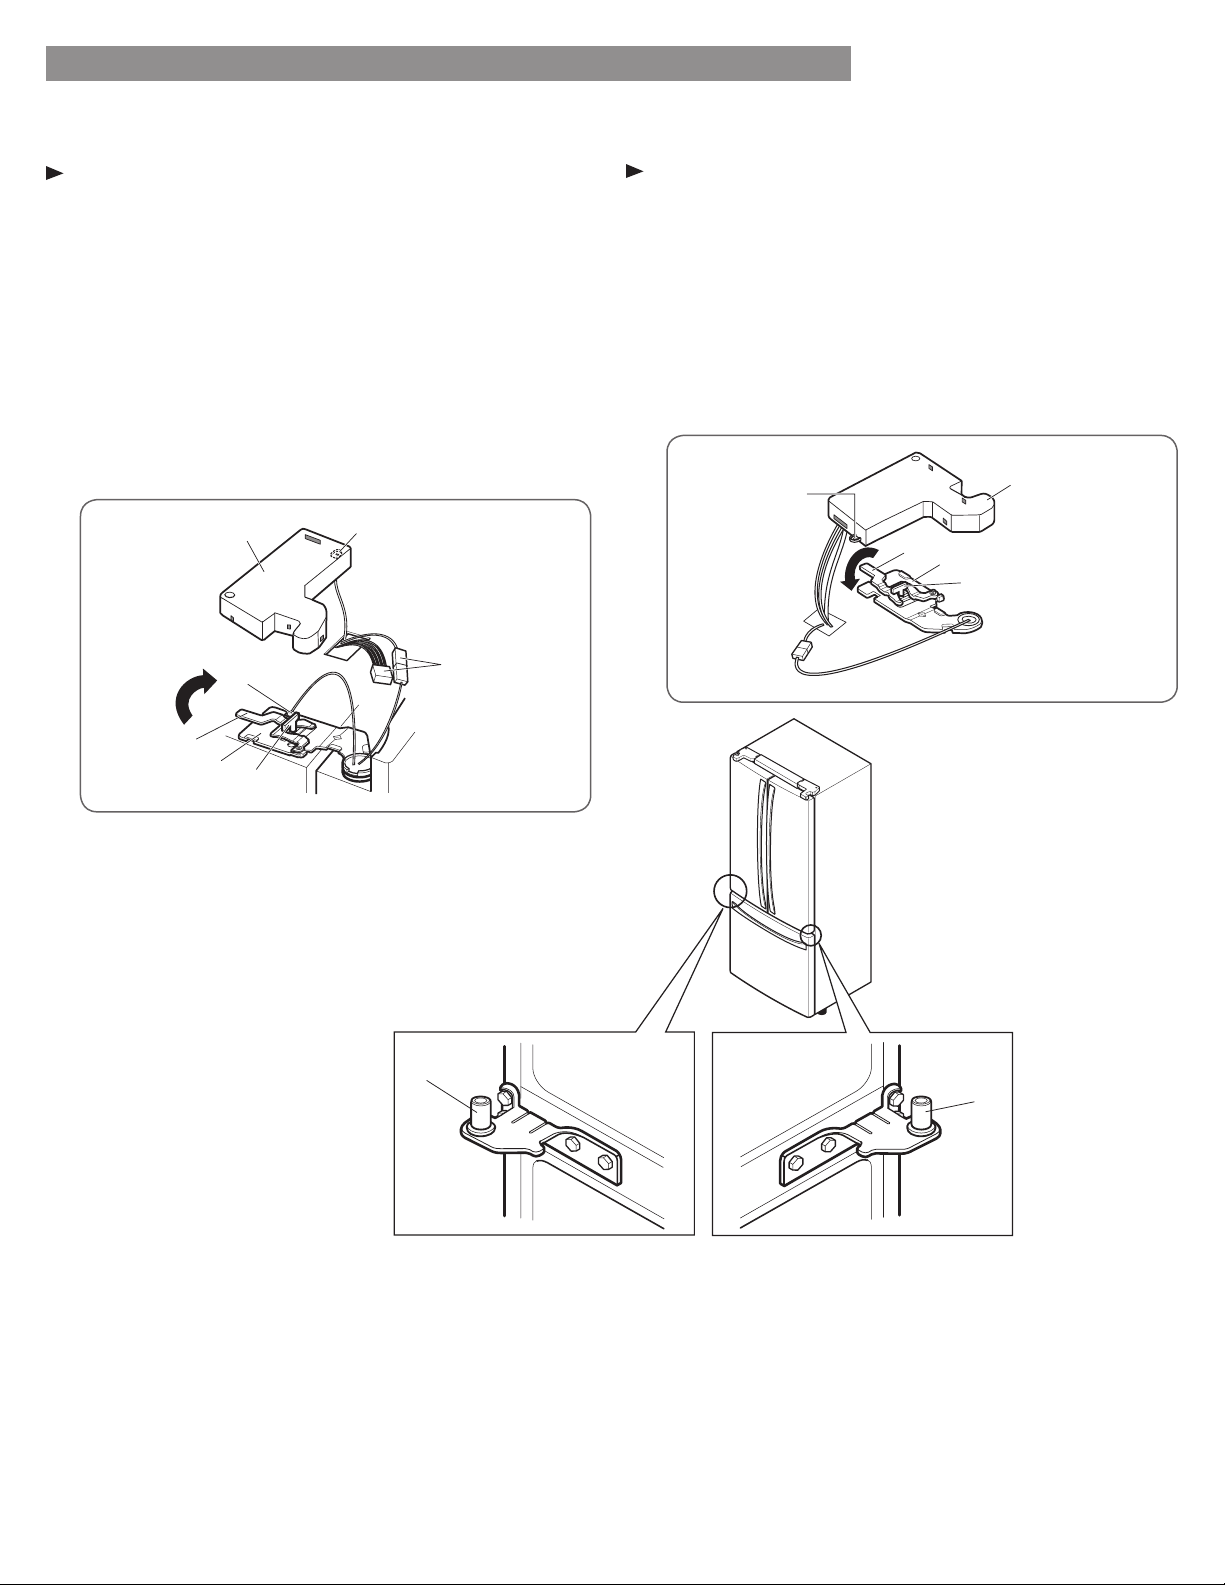
96
INSTALLATION DU RÉFRIGÉRATEUR
Réinstallation de la porte du réfrigérateur
Porte gauche
1. Posez la porte sur la tige d’articulation du milieu (9).
fermeture de la charnière (7) et en position. Faites
pivoter le levier (5) dans le sens des aiguilles d’une
3. Installez la vis de mise à la terre (4) et connectez les
la vis du couvercle (1).
Porte droite
1. Posez la porte sur la tige d’articulation du milieu (9).
fermeture de la charnière (5) et en position. Faites
pivoter le levier (3) dans le sens inverse des aiguilles
vis du couvercle (1).
(8)
(9)
(2)
(5)
(1)
(3)
(4)
(1)
(5)
(6)
(7)
(3)
(4)
(2)
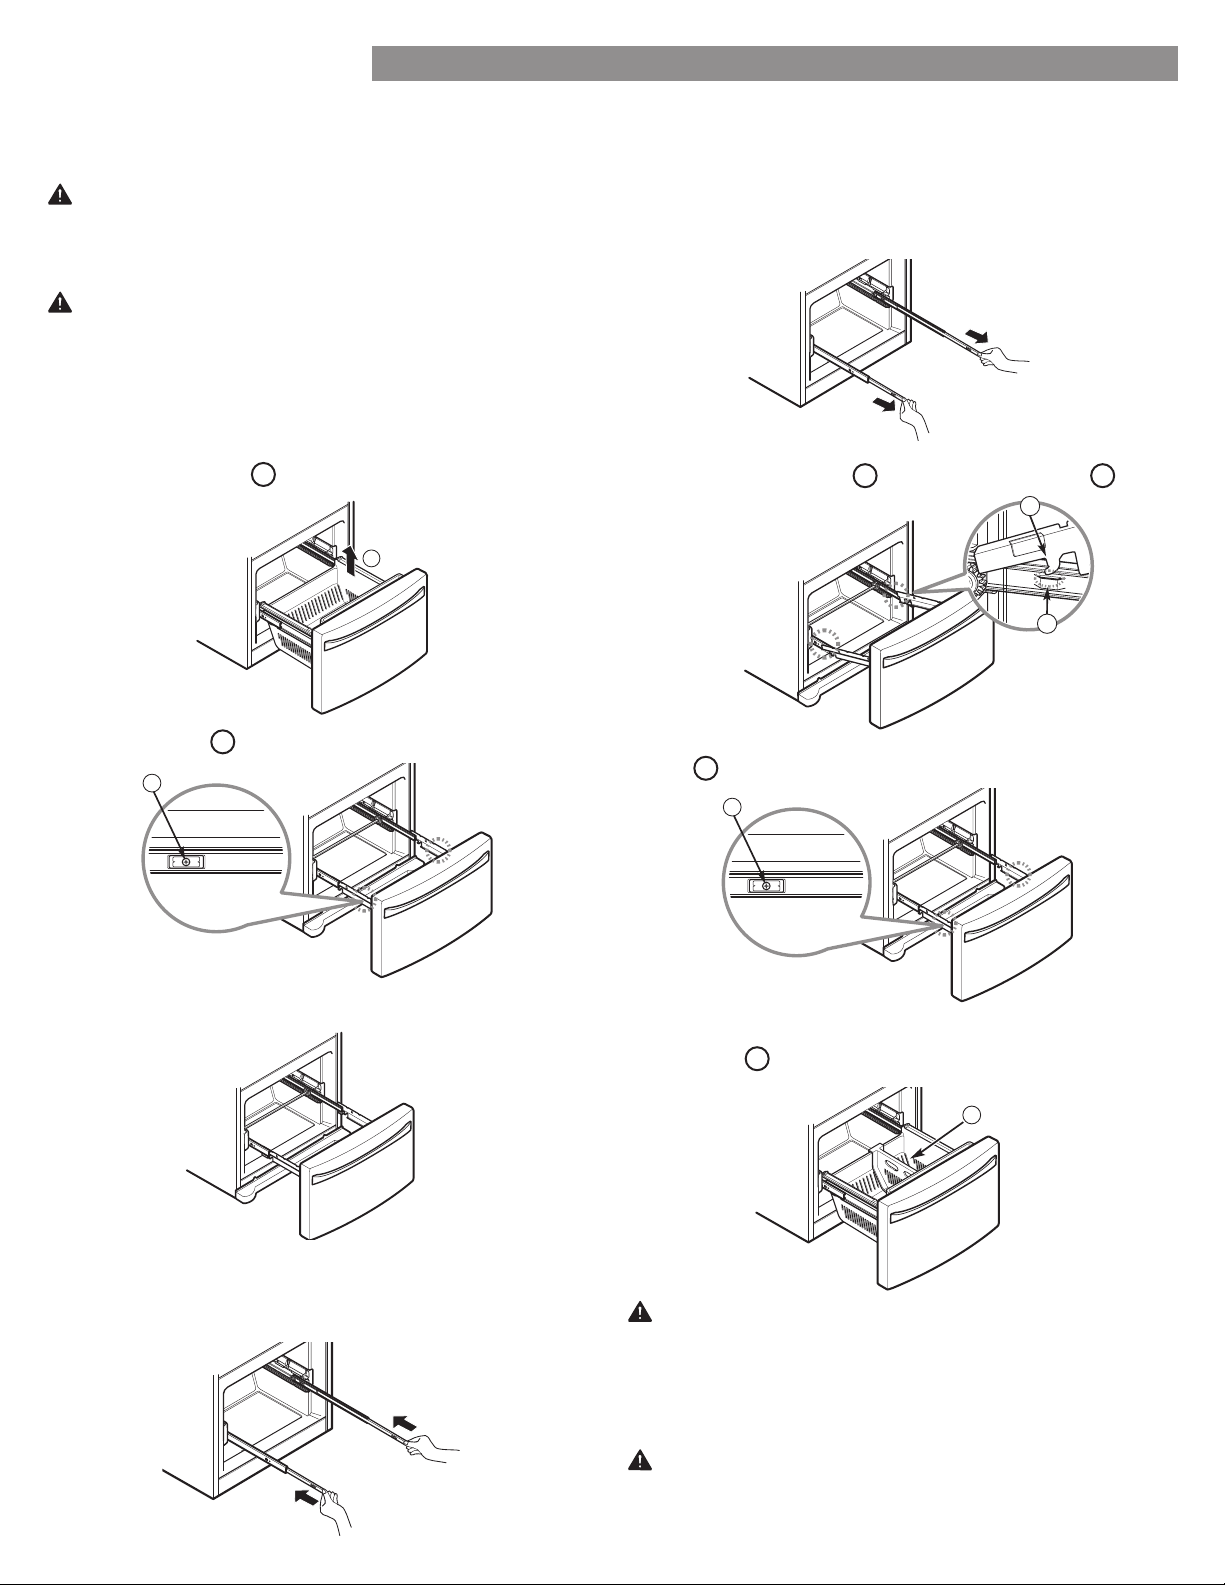
97
INSTALLATION DU RÉFRIGÉRATEUR
Tirez le tiroir en position d’ouverture maximale. Retirez
1
en soulevant le panier du système
de rails.
Retirez les vis
2
Des deux mains, tenez la barre centrale et poussez-la
ATTENTION :
tomber et provoquer une blessure.
2
Des deux mains, saisissez la barre centrale et tirez-
entièrement sortis.
vis
3
4
dans le rail.
supports de la porte
1
dans les pattes du rail
2
AVERTISSEMENT :
AVERTISSEMENT : NE montez PAS et n vous asseyez pas
3
COMMENT RETIRER LE TIROIR
DU CONGÉLATEUR
COMMENT INSTALLER LE TIROIR
DU CONGÉLATEUR
2
1
AVERTISSEMENT : Faites appel à au moins deux personnes
risque de blessures au dos ou d’autres blessures.
REMARQUE :
15
2
1
3
4
Pull the drawer open to full extension. Remove the
lower basket
1
by lifting the basket from the rail
system.
Remove the screws
2
of the rail on both sides.
Grasp the drawer on each side and pull it up to
separate it from the rails.
With hands hold the each rail, slide and push it
In to slide.
CAUTION: Do not hold the handle when removing or
replacing the drawer. The handle may come off and it
could cause personal injury.
REFRIGERATOR INSTALLATION
Fully extend the rails by grasping each rail, slide with
hands and pulling straight out.
Lower the door into final position and tighten the
screws
3
located on both sides.
With the drawer pulled out to full extension, insert the
lower basket
4
in the rail assembly.
Grasp the drawer on each side and hook door
supports
1
into rail tabs
2
located on both sides.
WARNING: If the Durabase divider is removed, there
is enough open space for children or pets to crawl
inside.
To prevent accidental child and pet entrapment or
suffocation risk, DO NOT allow them to touch or go
near the freezer drawer.
WARNING: DO NOT step or sit down on freezer
drawer.
HOW TO REMOVE THE FREEZER DRAWER
HOW TO INSTALL THE FREEZER DRAWER
WARNING: Use two or more people to remove and
install the freezer drawer. Failure to do so can result in
back or other injury.
NOTE: In the following figures, the Pullout Drawer
located above the freezer drawer is not shown for
clarity.
1
2
4
1
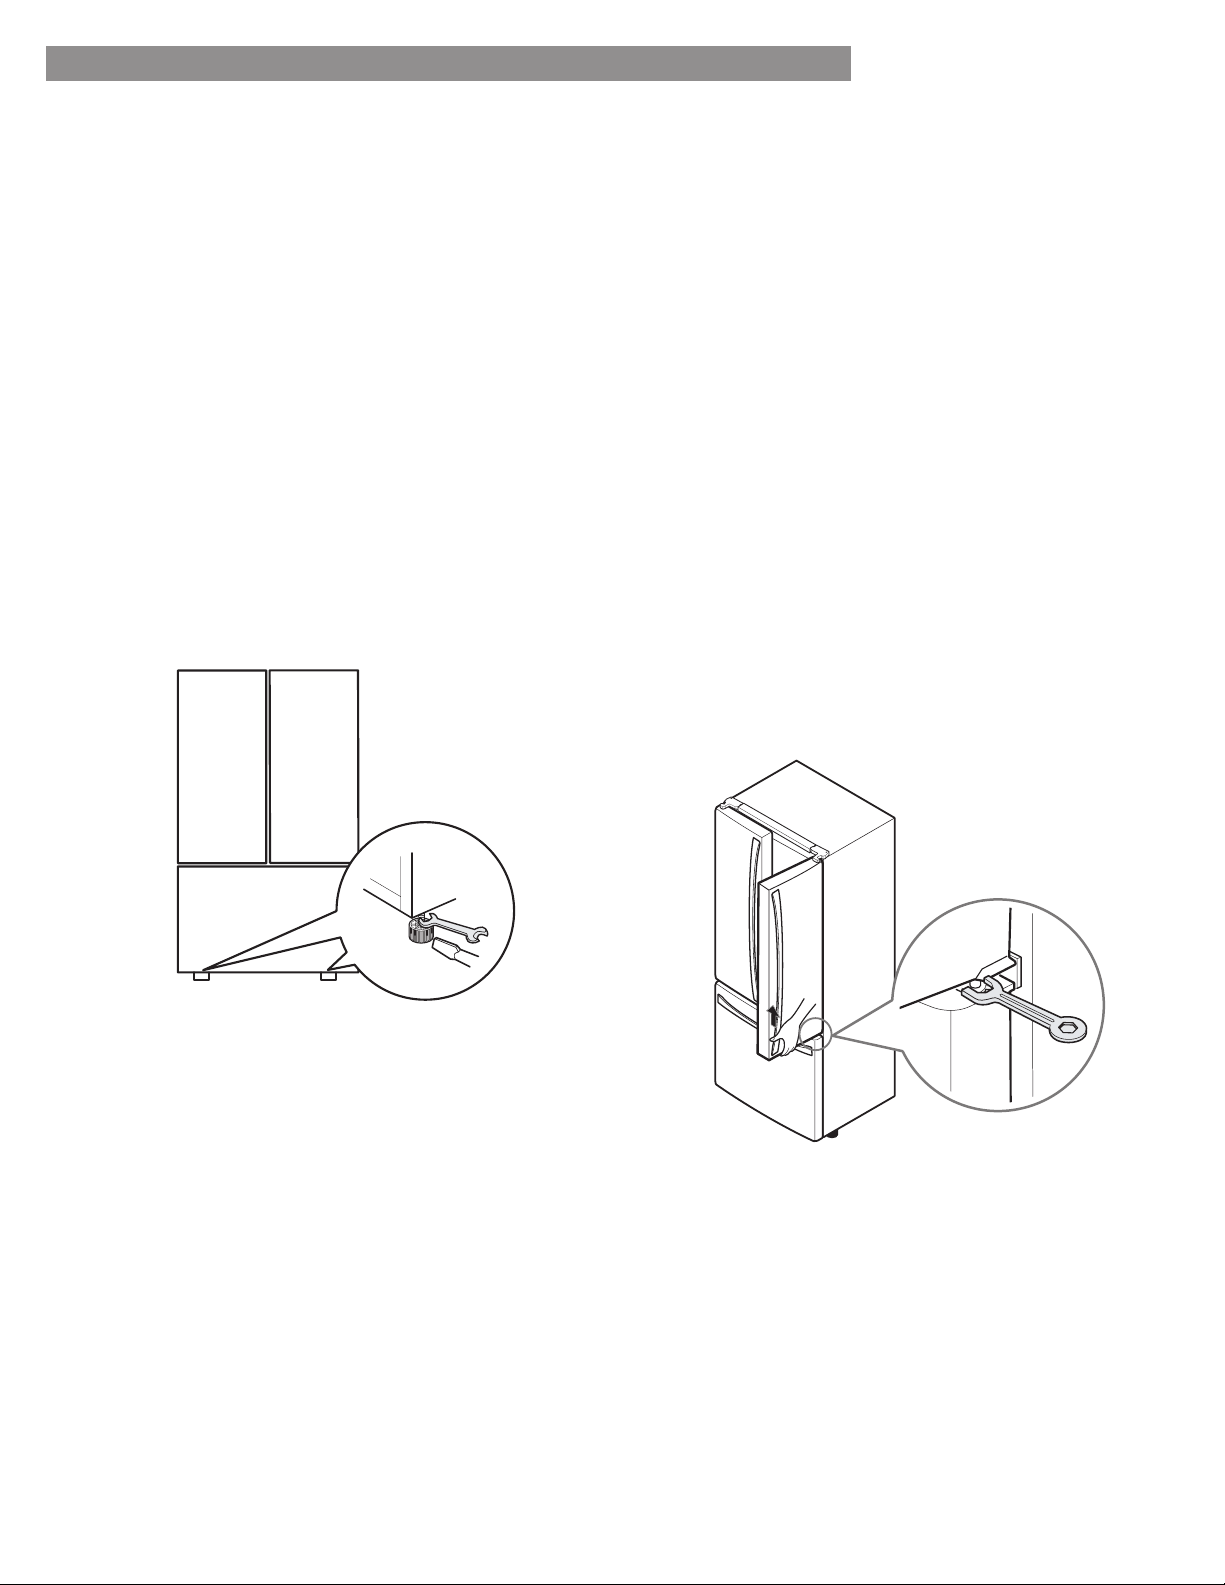
98
INSTALLATION DU RÉFRIGÉRATEUR
MISE À NIVEAU ET ALIGNEMENT DES PORTES
Mise à niveau
Après l’installation, branchez le cordon d’alimentation du
dessous :
REMARQUE : Outils requis : / po. (18 mm) ou
tournevis à lame plate.
1.
REMARQUE : Demandez à une personne de pousser vers
cales.
2.
se ferment facilement. Si les portes ne se ferment pas
le sens inverse des aiguilles d’une montre. Il faudra
REMARQUE :
complètement.
Alignement des portes
Si l’espace entre vos portes n’est pas uniforme, suivez les
instructions ci-dessous pour les aligner :
aiguilles d’une montre pour augmenter la hauteur ou dans
le sens inverse des aiguilles d’une montre pour la diminuer.
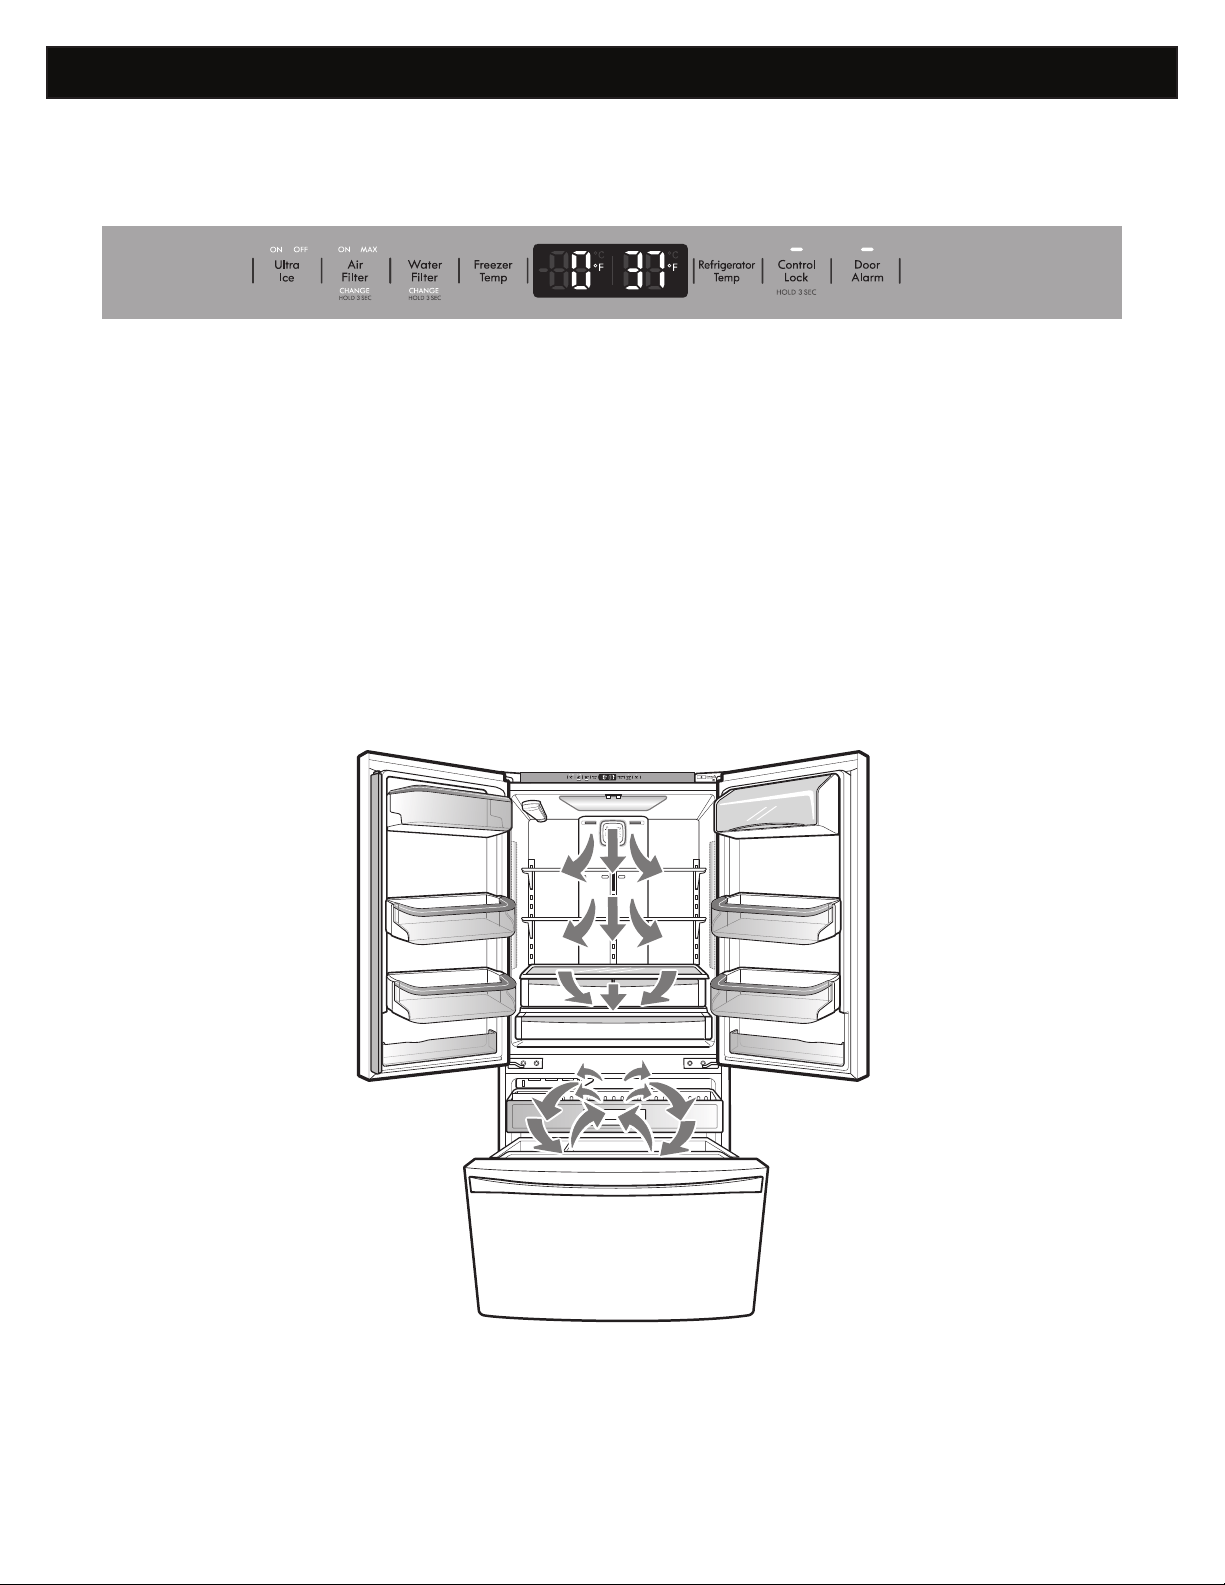
99
UTILISATION DU RÉFRIGÉRATEUR
RÉGLAGE DES CONTRÔLES
Le contrôle Refrigerator Temp va de 33°F à 46°F (1°C •
à 8°C). Appuyez sur le bouton Refrigerator Temp pour
Le contrôle Freezer Temp va de -6°F à 8°F (-21°C à -13°C). •
Appuyez sur le bouton Freezer Temp pour parcourir les
REMARQUE :
Attendez 24 heures que le changement se stabilise avant de
Circulation d’air
Température
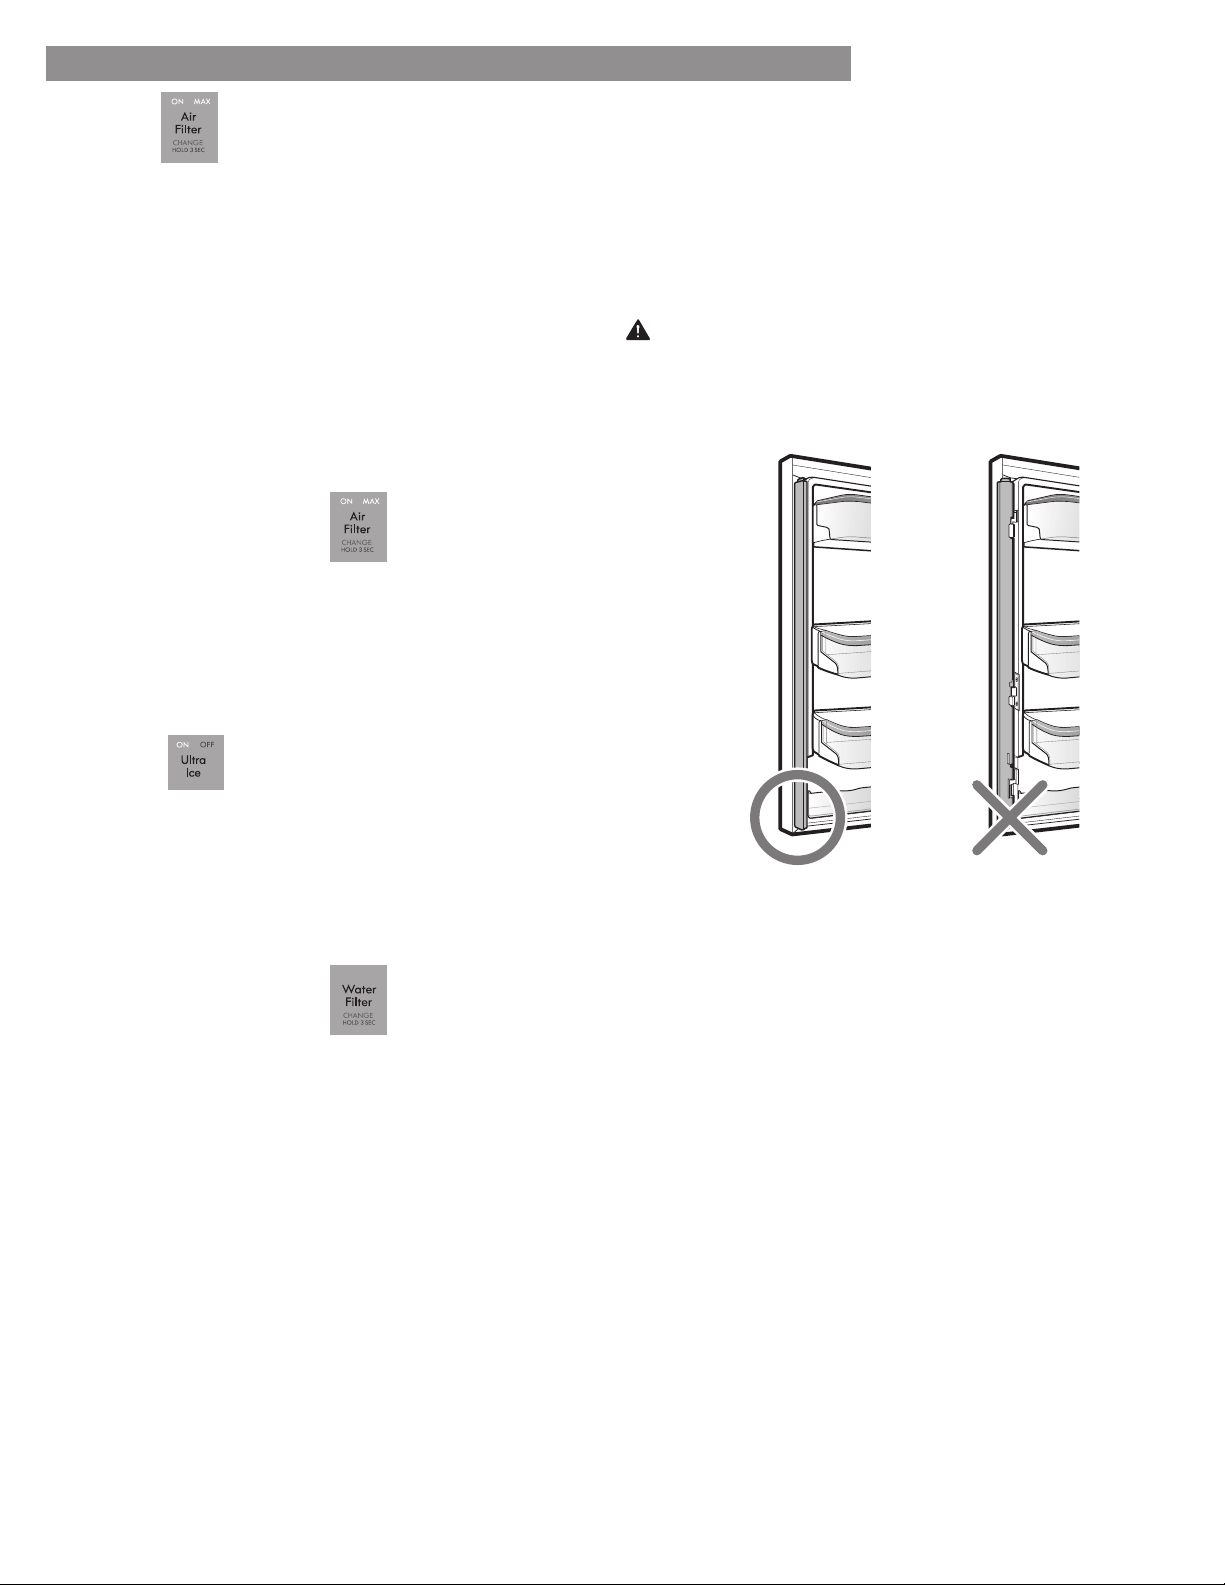
100
UTILISATION DU RÉFRIGÉRATEUR
ATTENTION
rupture du meneau de la porte, veuillez vous assurer que le
Meneau articulé
portes gauche et droite.
Filtre d’air
air restera en marche continuellement pendant quatre
mode MAX
Réinitialisation du Filtre d’air
sur le bouton du Filtre d’air pendant trois secondes
Extra glace
Le mode Ultra Ice permet d’accroître la vitesse de
Appuyez une fois sur le bouton Ultra Ice pour activer le
mode.
Réinitialisation du ltre à eau
Ice maker (Filtre
mois.
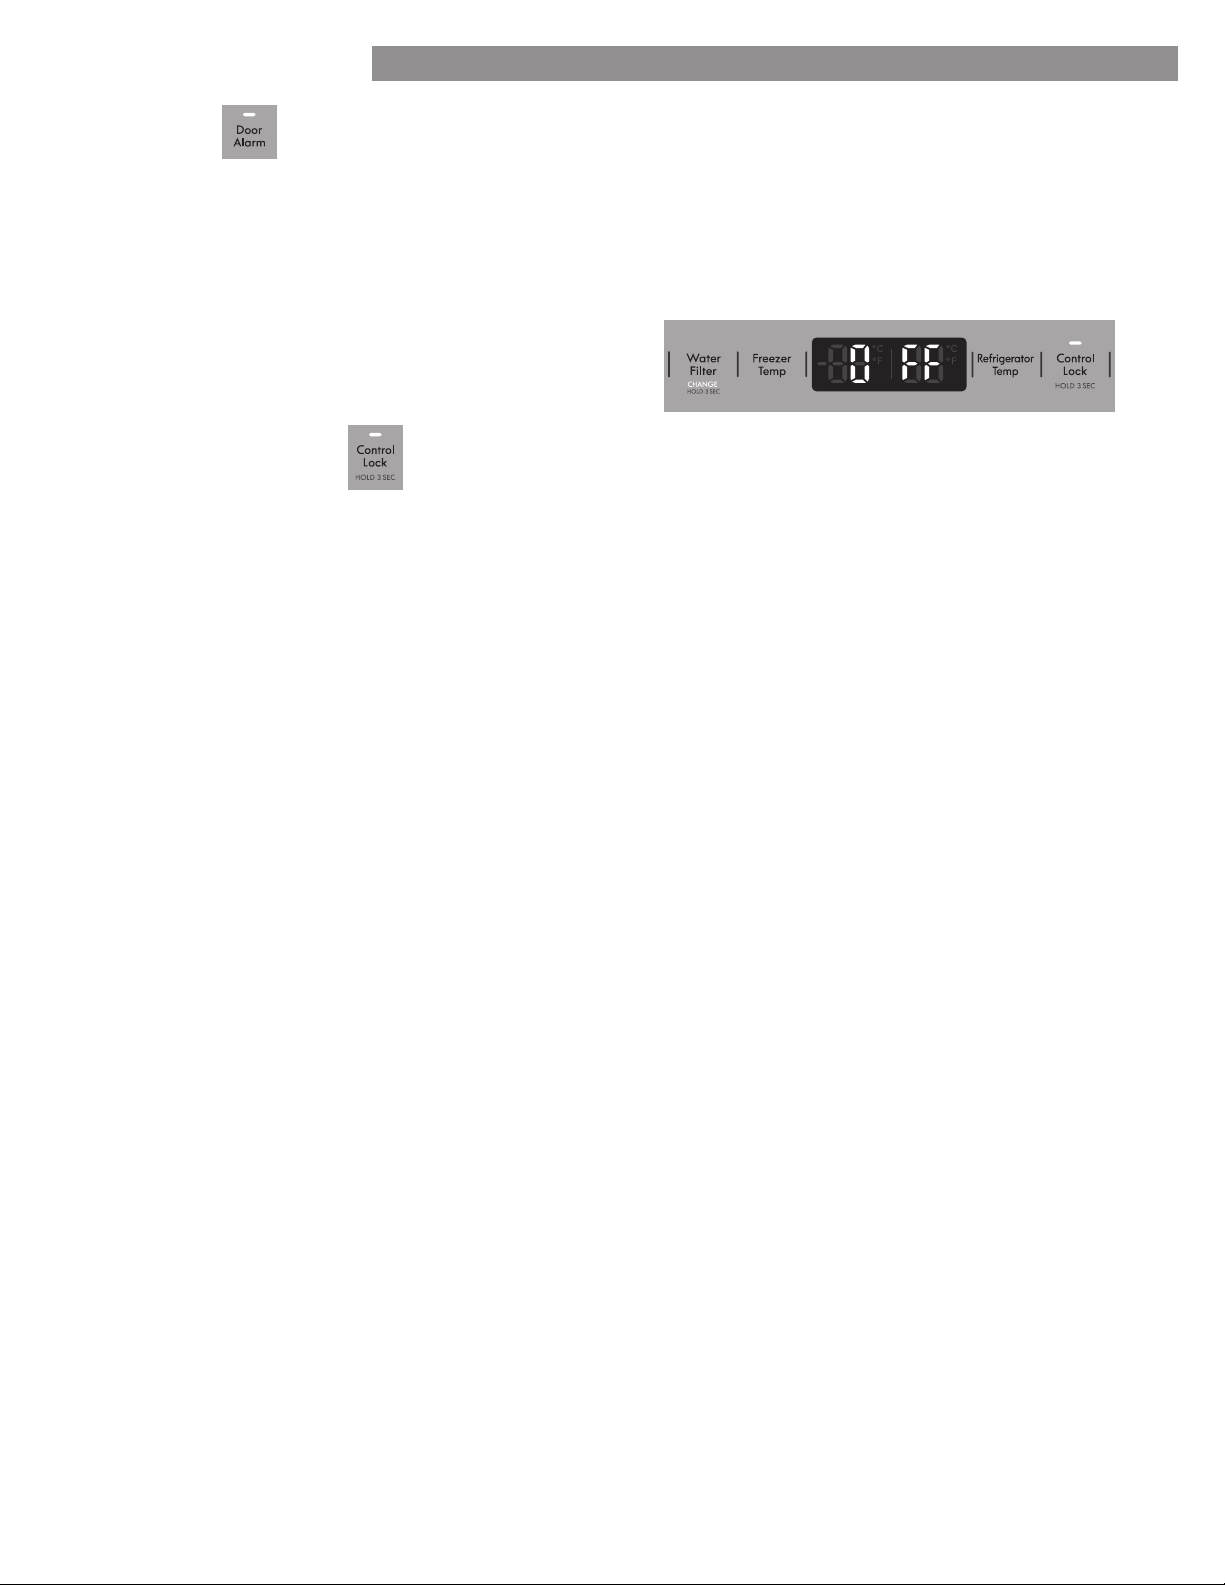
101
UTILISATION DU RÉFRIGÉRATEUR
Alarme de porte
Door Alarm,
Door Alarm se
retentit pour vous indiquer que la porte est ouverte.
De commande de verrouillage
Verrou
Si vous souhaitez activer la fonction Verrou pour
bouton Control Lock pendant plus de trois secondes.
Control LockVerrou est
Lorsque la fonction Verrou
bouton ne fonctionne. Le bloc du distributeur est
Verrou
le bouton Control Lock pendant environ trois secondes.
Fonction de changement de mode de température (°F <->°C)
Si vous souhaitez passer de °F à °C ou vice versa, maintenez
Freezer Temp et Refrigerator Temp
Le mode Démonstration (pour utilisation en magasin seule-
ment)
Le mode Démonstration
panneau de commande.
Pour désactiver cette fonction :
Refrigerator Temp et Ice Maker
mode
Démonstration
le mode Démonstration.
102
UTILISATION DU RÉFRIGÉRATEUR
GUIDE DE STOCKAGE DES ALIMENTS
fraîcheur des aliments.
STOCKAGE DES ALIMENTS CONGELÉS
REMARQUE :
Congélation
congeler en moins de 24 heures (pas plus de 2 à 3 livres
permettre la circulation de l’air entre les paquets. Veillez
des cristaux de glace.
REMARQUE : Laissez les aliments chauds refroidir à la
et congelez. Le refroidissement des aliments chauds avant
Emballage
Recommandations d’emballage :
Contenants en plastique rigide avec couvercle
Suivez les instructions de l’emballage ou du contenant
N’utilisez pas
Papier d’emballage de pain
ATTENTION : Ne placez pas les boîtes de boissons
ou les contenants de nourriture en plastique dans le
Produits Procédure
Beurre ou
margarine
Fromage
Lait
Œufs
Fruit
Légume-
feuille
Légumes à
peau (carottes,
poivrons)
Poisson
Restes
Gardez le beurre ouvert dans
une assiette couverte ou un
congelez le produit.
Stockez dans un emballage
d’origine jusqu’à utilisation. Une fois
papier d’aluminium.
Essuyez les cartons de lait. Pour un
meilleur stockage, placez le lait sur
Stockez dans le carton d’origine sur
Ne pas laver ou peller un fruit
originaux, dans un bac, ou les
garder dans un sac en papier
Retirez l’emballage du magasin
et enlevez les zones meurtries ou
conteneur en plastique, et rangez
Placez dans des sacs ou un
conteneur en plastique, et rangez
Garder le poisson cru et les fruits
vous nous les consommez pas le
consommer le poisson cru et les
fruits de mer le jour de l’achat.
plastique, du papier d’aluminium ou
des contenants en plastique avec
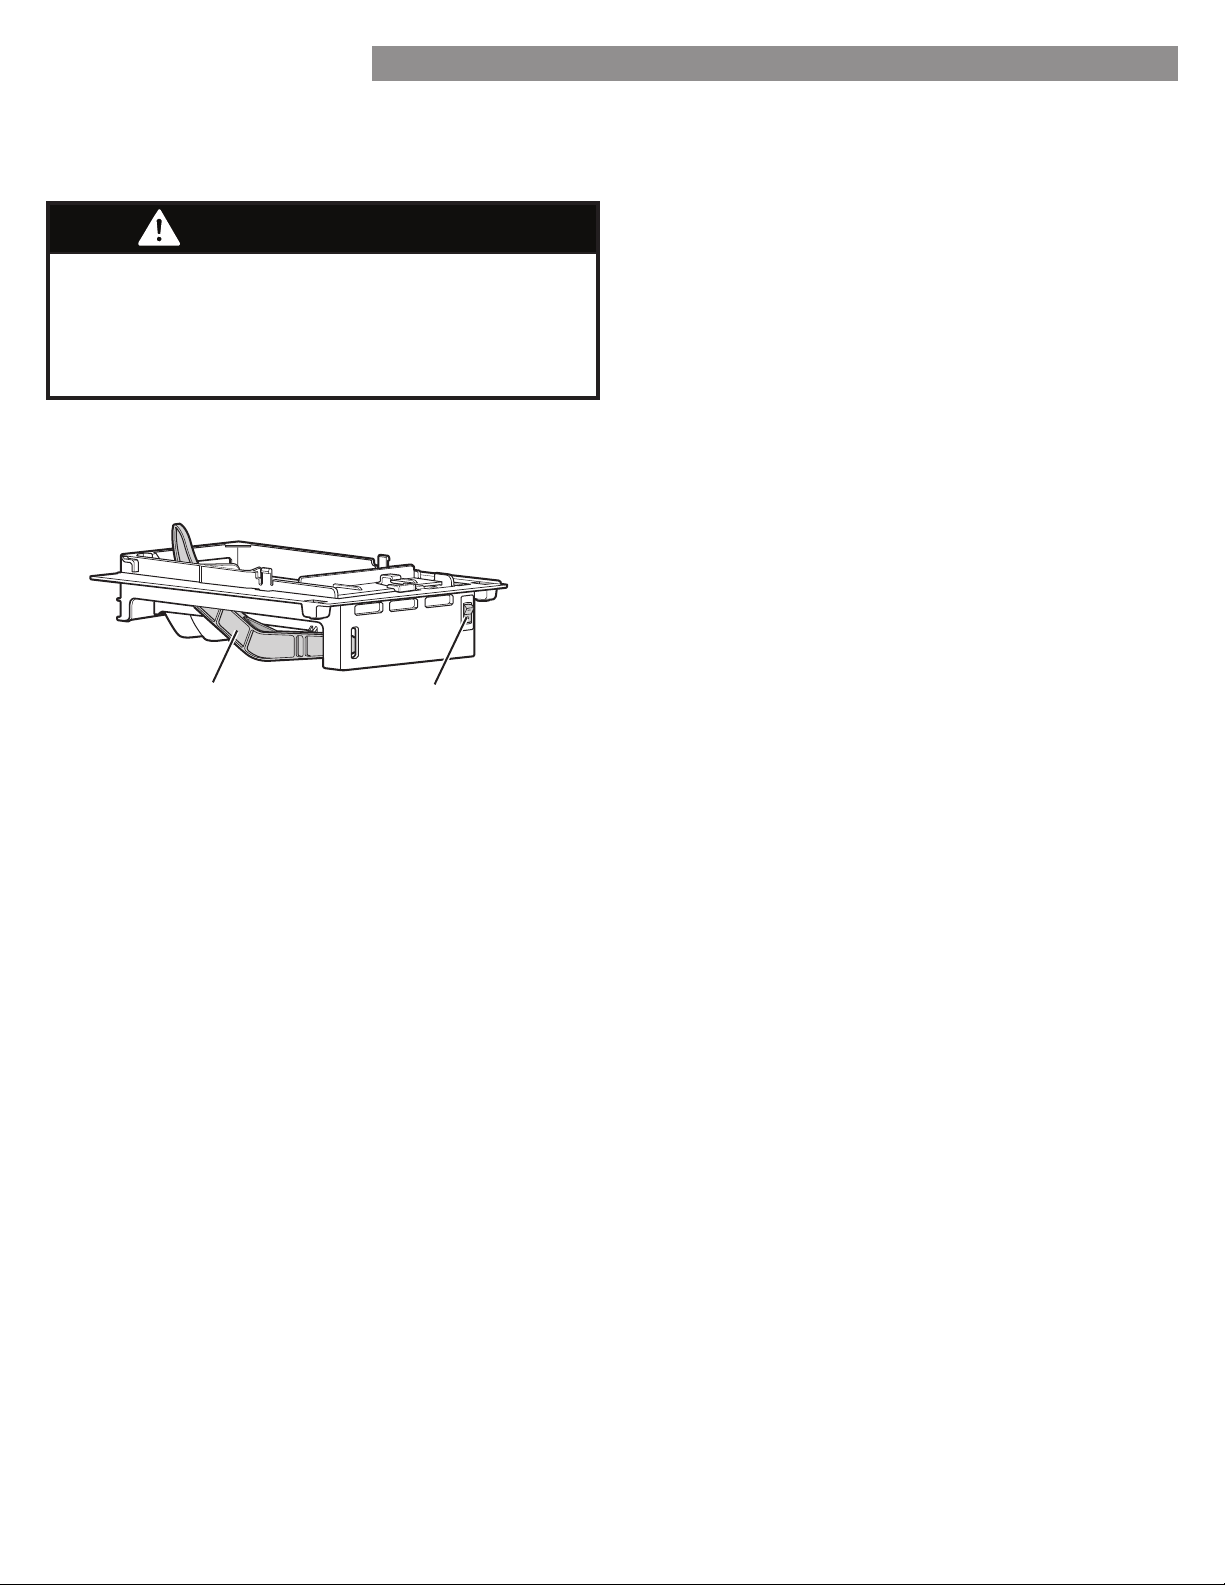
103
UTILISATION DU RÉFRIGÉRATEUR
Un réfrigérateur qui vient d’être installé peut tarder de
12 à 24 heures à fabriquer de la glace.
REMARQUE:
glaçons produit 12 glaçons par cycle, environ 100 en 24
ouvertes et de conditions de service.
raccordement de l’eau à la machine à glaçons, mettez
l’interrupteur en OFF (O).
mettez l’interrupteur en ON (I).
glaçons.
se vider.
Lorsque le compartiment atteint le niveau du bras palpeur,
QUAND VOUS DEVEZ METTRE
L’INTERRUPTEUR DE LA MACHINE À
GLAÇONS EN OFF (O)
plusieurs heures.
deux minutes.
plusieurs jours.
BRUITS NORMAUX QUE VOUS POUVEZ
ENTENDRE
lorsque la machine se remplit d’eau.
REMARQUE: Si l’alimentation en eau de la maison
pas entièrement ouverte, mettez la machine à glaçons
dommages. Ne mettez pas la machine à glaçons sur On (I)
de l’eau coulant dans les tuyaux lors du remplissage de la
machine à glaçons.
PRÉPARATION POUR LES VACANCES
Mettez l’interrupteur de la machine à glaçons en OFF (O) et
Interrupteur
Bras palpeur
AVERTISSEMENT
Risque de blessures personnelles
de fabrication de glace automatique quand le
LA MACHINE À GLAÇONS AUTOMATIQUE
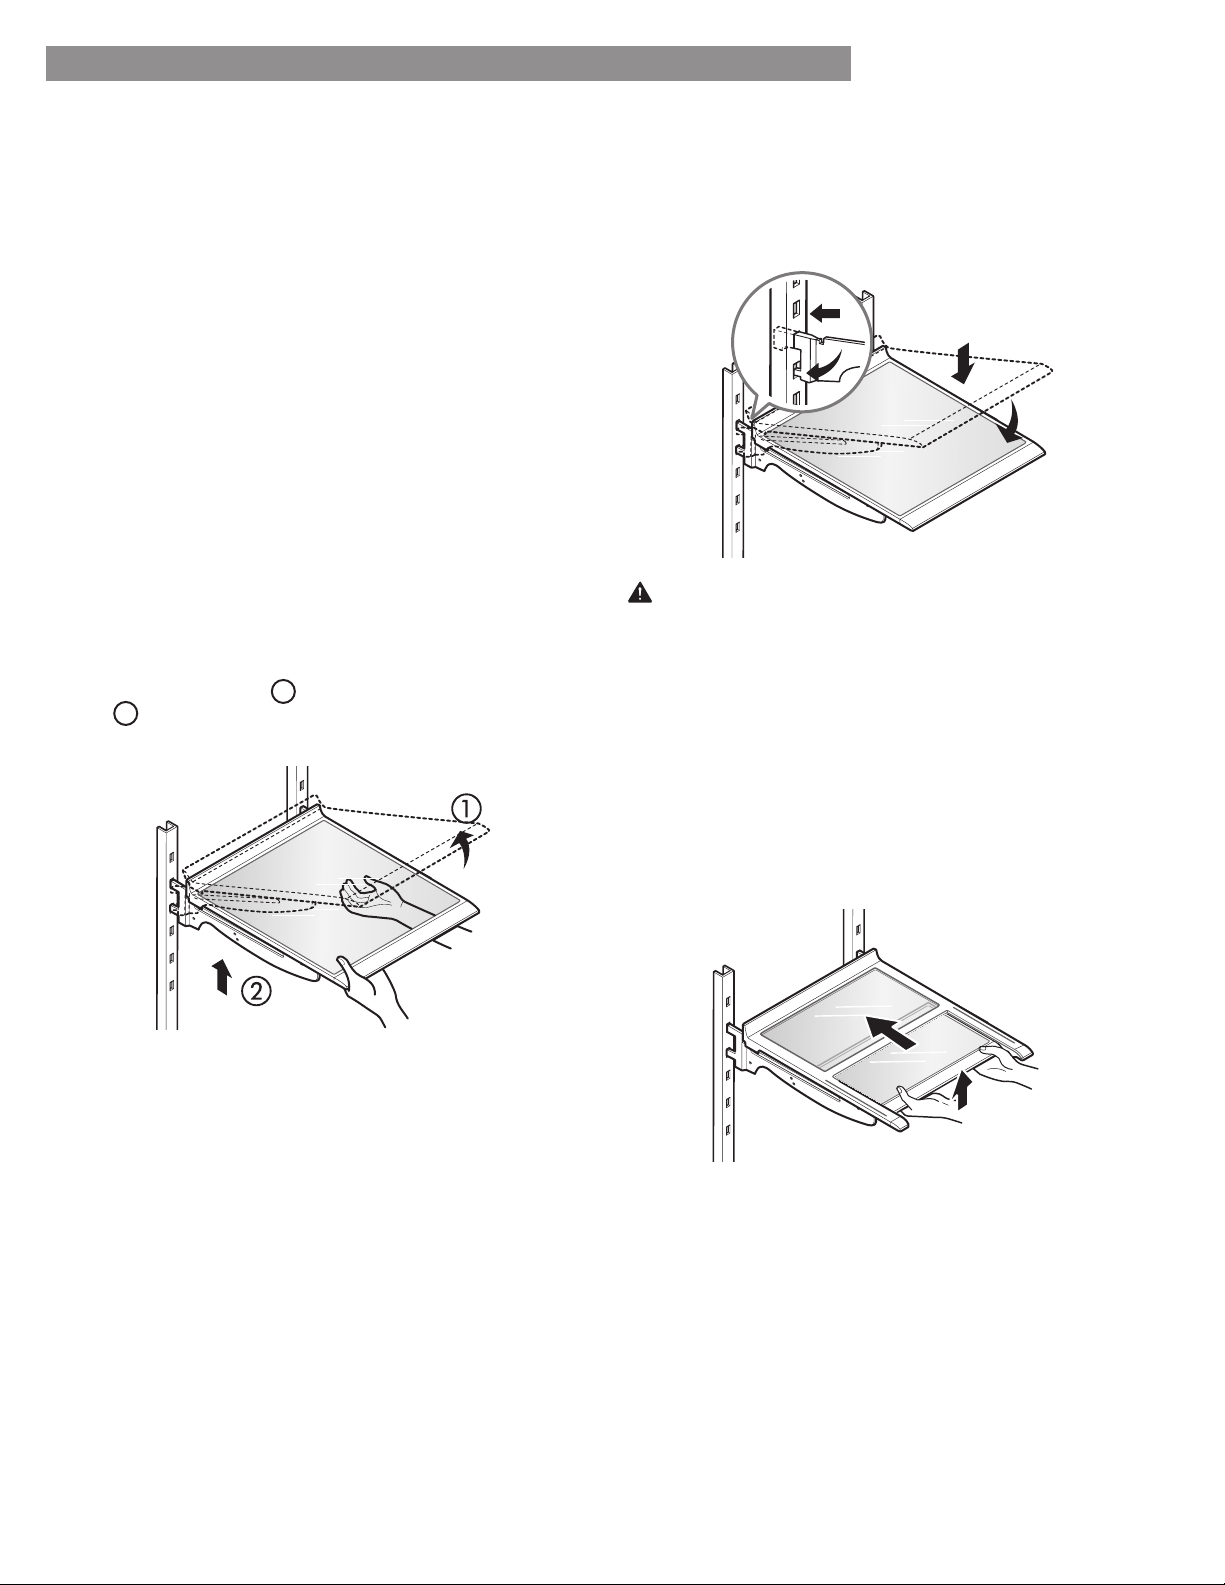
104
UTILISATION DU RÉFRIGÉRATEUR
SECTION RÉFRIGÉRATEUR
ÉTAGÈRES DU RÉFRIGÉRATEUR
IMPORTANT :
pourraient se casser si elles sont soumises à de brusques
REMARQUE :
lors de leur retrait.
Réglage des étagères (en porte-à-faux)
Pour retirer une étagère
dans la direction de
1
et soulevez-la dans la direction
de
2
Pour réinstaller une étagère—Inclinez l’avant de
crochets se positionnent dans les fentes.
Étagère coulissante
Vous pouvez ranger des articles plus hauts, par exemple
des contenants ou des bouteilles d’un gallon, en poussant
ATTENTION :
ou renverser des aliments.
25
REFRIGERATOR SHELVES
The shelves in your refrigerator are adjustable to meet
your individual storage needs. Your model may have glass
or wire shelves.
Adjusting the shelves to fit different heights of items will
make finding the exact item you want easier. Doing so will
also reduce the amount of time the refrigerator door is
open which will save energy.
IMPORTANT: Do not clean glass shelves with warm water
while they are cold. Shelves may break if exposed to
sudden temperature changes or impact.
NOTE: Glass shelves are heavy. Use special care when
removing them.
Adjusting Shelves (Cantilever)
Remove shelves from the shipping position and replace
shelves in the position you want.
To remove a shelf—Tilt up the front of the shelf in the
direction of
1
and lift it in the direction of
2
. Pull
the shelf out.
To reinstall a shelf—Tilt the front of the shelf up and
guide the shelf hooks into the slots at a desired height.
Then, lower the front of the shelf so that the hooks
drop into the slots.
Folding Shelf (on some models)
You can store taller items, such as a gallon container
or bottles, by simply pushing the front half of the shelf
underneath the back half of the shelf. Pull the front of the
shelf toward you to return to a full shelf.
CAUTION: Make sure that shelves are level from one
side to the other. Failure to do so may result in the shelf
falling or spilling food.
USING YOUR REFRIGERATOR
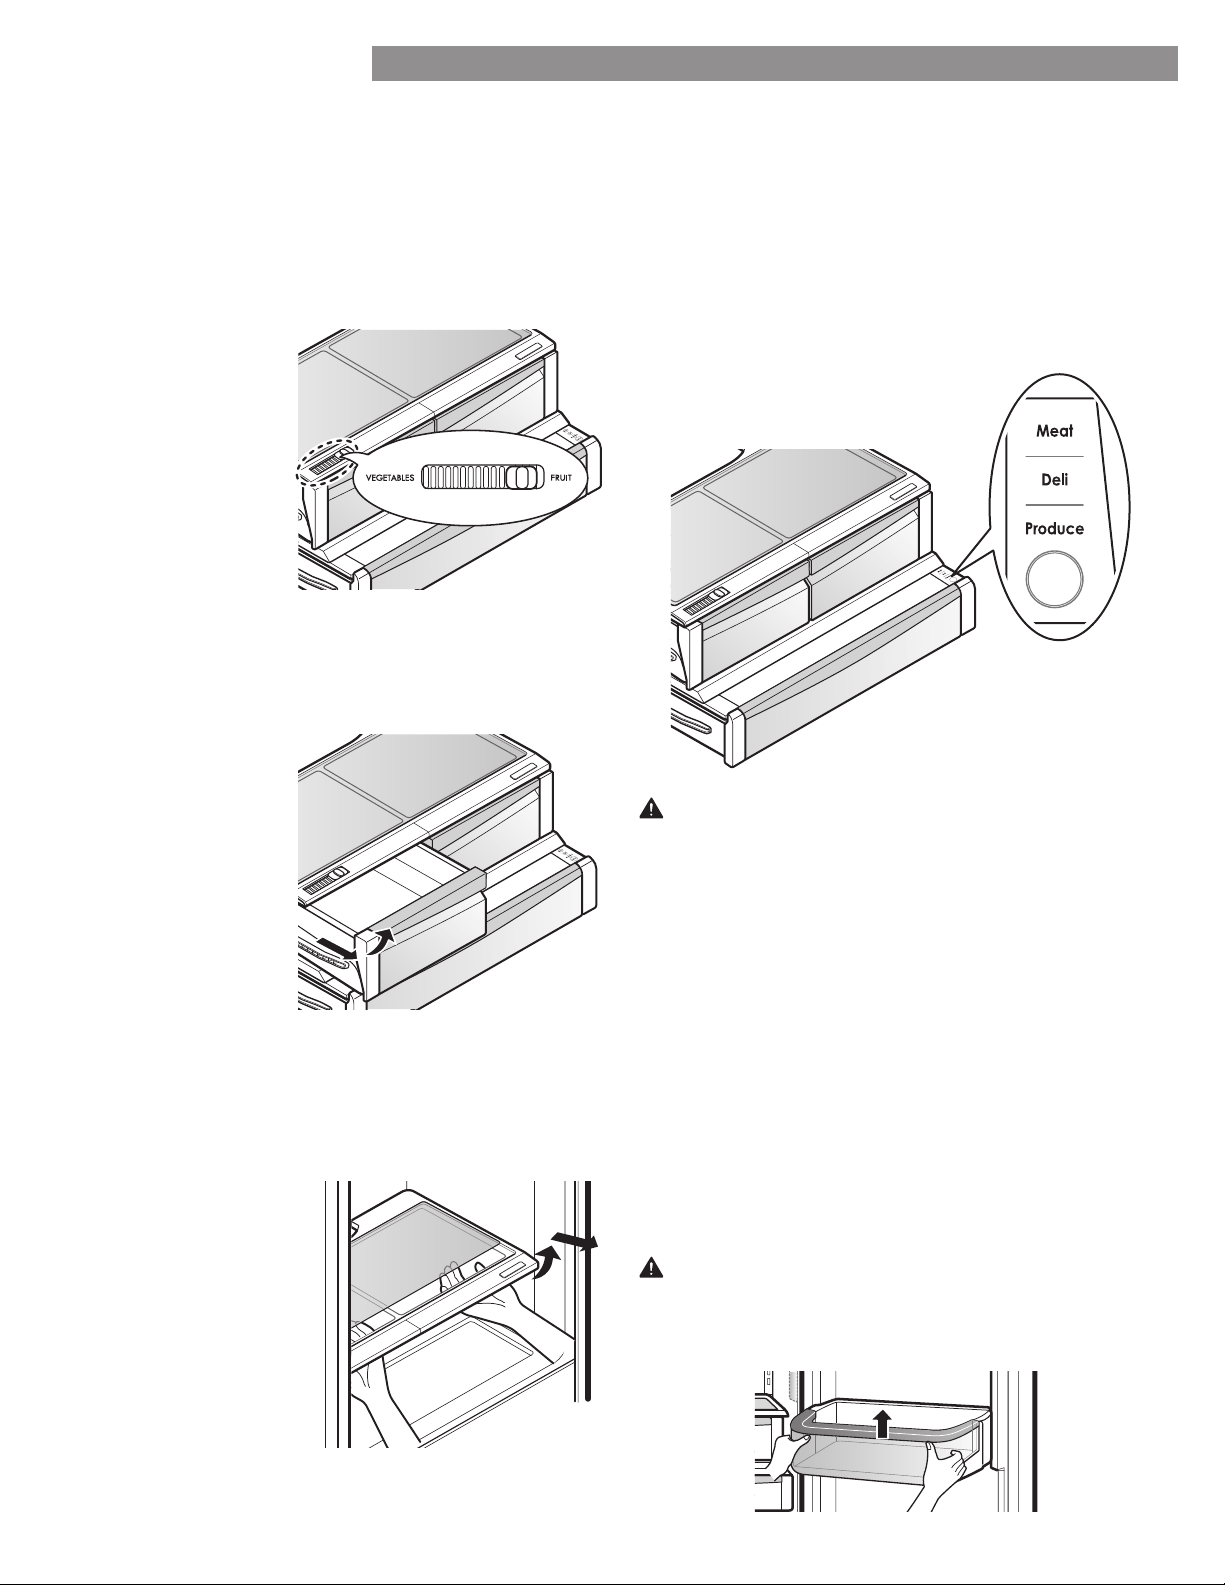
105
UTILISATION DU RÉFRIGÉRATEUR
BAC À LÉGUMES À HUMIDITÉ CONTRÔLÉE
entre VEGETABLES et FRUIT.
VEGETABLES•
maintient l’air
humide dans le bac
meilleure conservation
frais.
FRUIT• laisse sortir
l’air humide du bac
meilleure conservation
des fruits.
Pour retirer le verre
1. Soulevez le verre sous
le couvercle du bac à
2. Tirez le verre vers le haut
et sortez-le.
REMARQUE : (Tiroir non
TIROIR GARDE-MANGER À TEMPÉRATURE CONTRÔLÉE
Le tiroir garde-manger à température contrôlée fournit un
Appuyez sur le bouton pour choisir entre Meat, Deli
et Produce.
ATTENTION : Ne placez pas de bouteilles en verre
risquent de se briser et de provoquer des blessures.
ATTENTION : ne remplissez pas trop les balconnets et
ne serrez pas trop les aliments dedans. Vous risquez
sinon d’endommager le balconnet ou de vous blesser si
RETRAIT DU BAC À LÉGUMES À HUMIDITÉ CONTRÔLÉE
1. Pour le retirer, tirez
le tiroir pour le sortir
complètement.
2. Soulevez l’avant
puis tirez-le vers
sortir.
3.
place.
BAC DE PORTE
1. Pour retirer le bac, soulevez-le simplement et tirez-le vers
2. Pour remettre en place le bac, faites-le glisser à
vers le bas pour l’enclencher.
REMARQUE : Certains bacs peuvent avoir un aspect
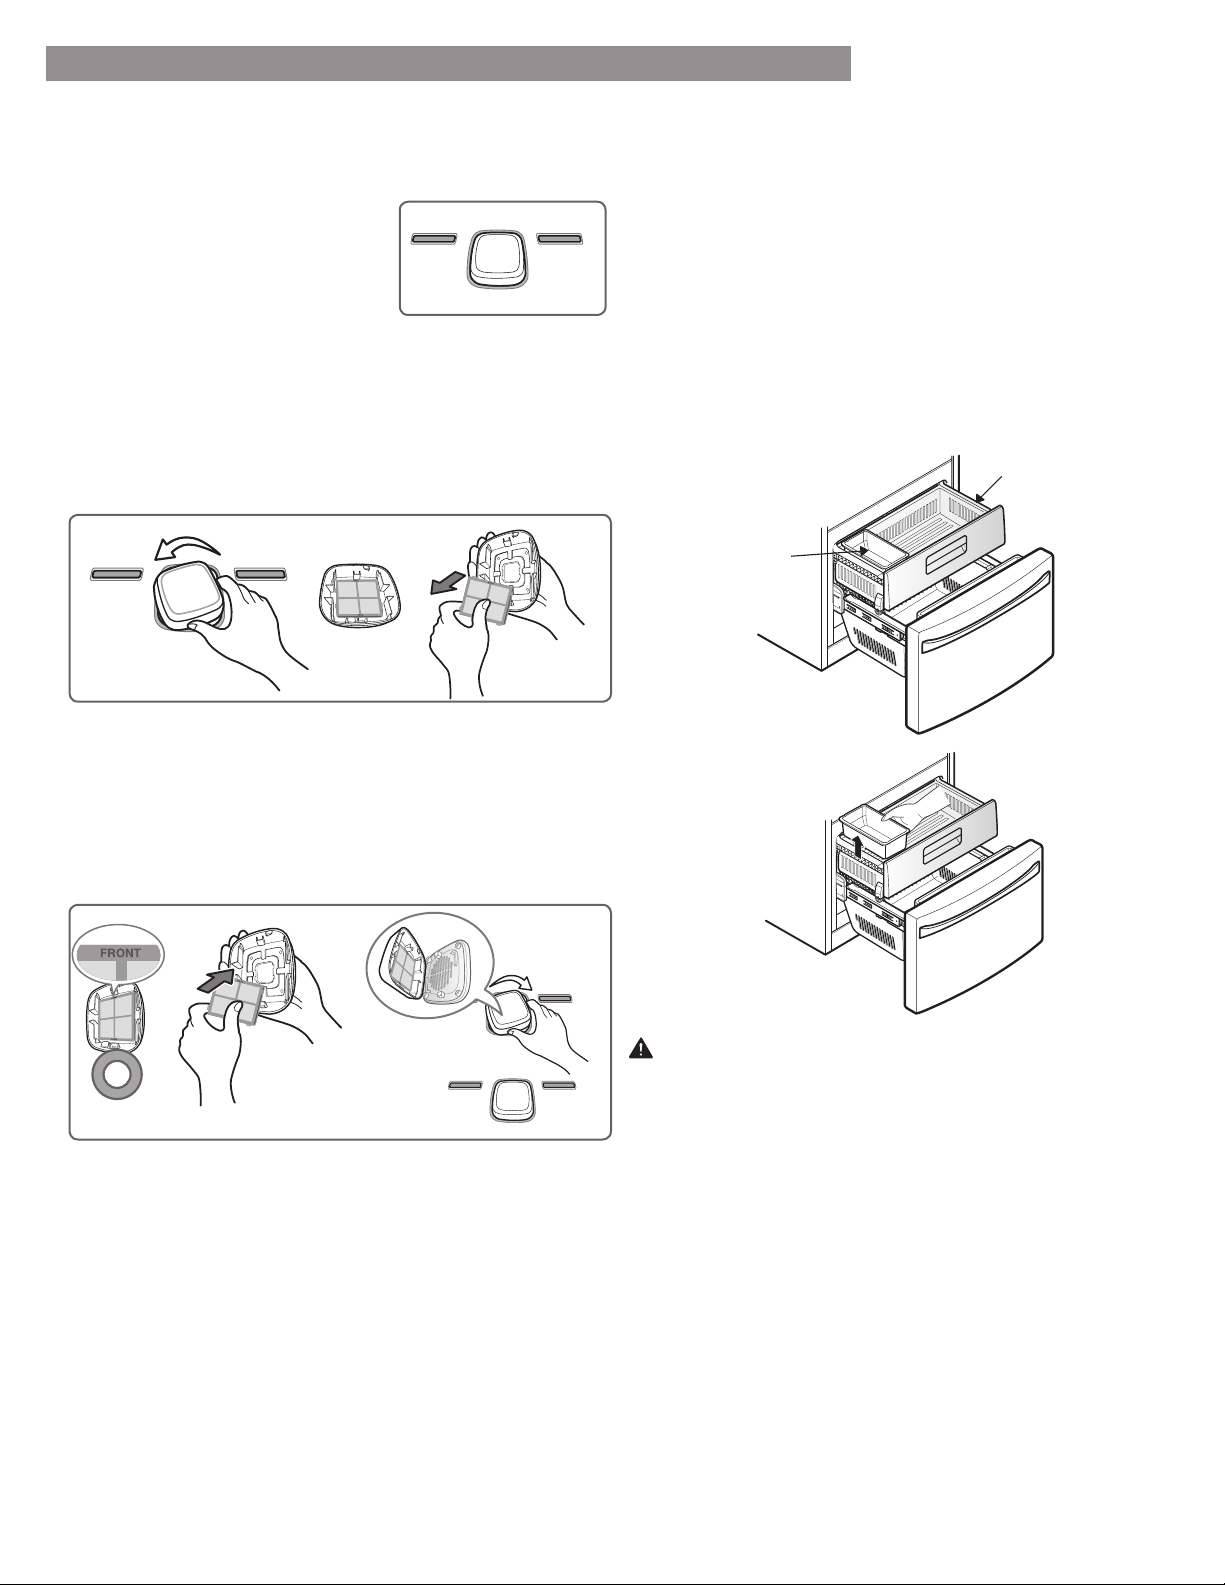
106
UTILISATION DU RÉFRIGÉRATEUR
SECTION CONGÉLATEUR
BAC À GLAÇONS SUPPLÉMENTAIRES
1.
2.
3. Pour remettre en place, tirez les deux tiroirs le plus loin
le tiroir coulissant. Fermez le tiroir coulissant, puis le tiroir
REMPLACEMENT DU FILTRE D’AIR
Tous les six mois.
s’allume.
2. Installer un nouveau ltre d’air
NOTE:
un magasin Sears ou appeler le 1-800-4-MY-HOME
®
.
Commander en ligne: www.sears.com/partsdirect
ATTENTION : Risque de pincement! N’approchez pas
l’ouverture et de la fermeture.
Tiroir coulissant
Bac à glace
1. Retirer le ltre utilisé
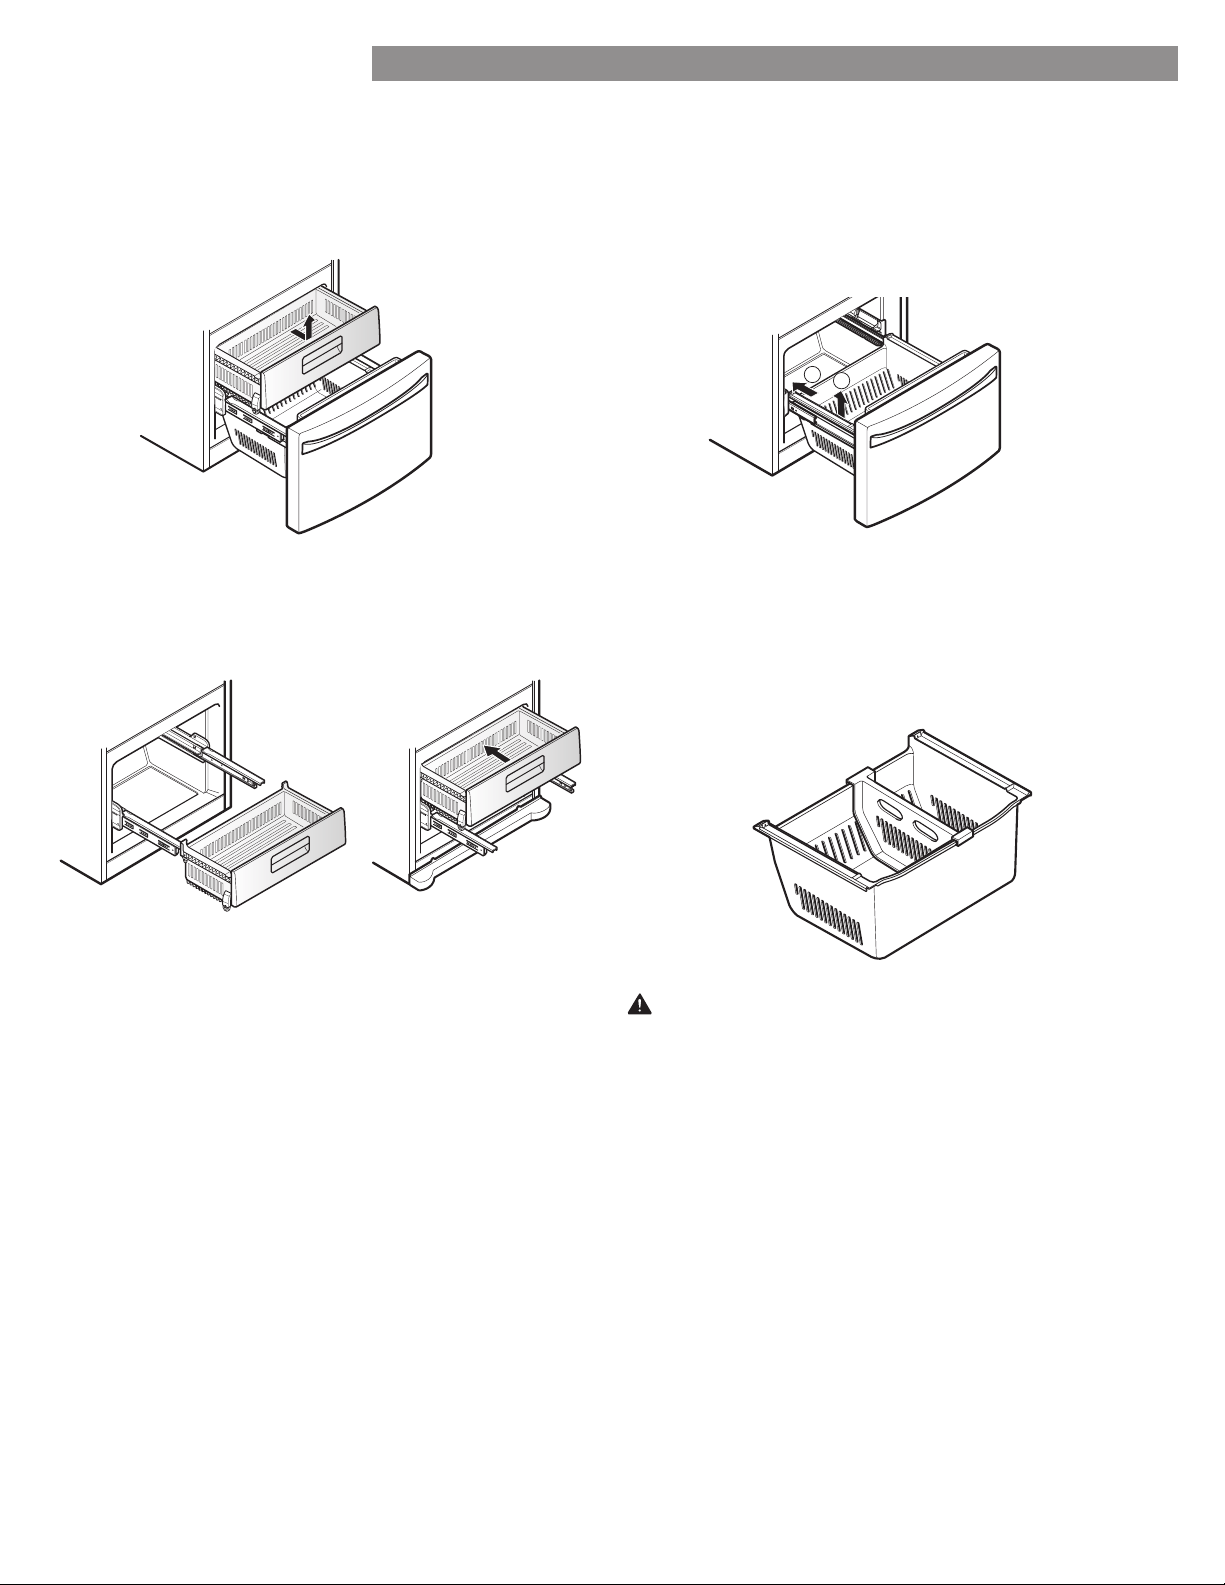
107
UTILISATION DU RÉFRIGÉRATEUR
DURABASE
1. Pour retirer le Durabase, poussez-le vers l’arrière le plus
loin possible. Inclinez l’avant du Durabase et tirez-le vers
2.
TIROIR COULISSANT
1. Pour l’enlever, ouvrez complètement le tiroir.
Soulevez la partie avant du tiroir, puis tirez le tiroir vers
2. Pour le replacer, inclinez à peine le front du bac à
jusqu’à la position originelle.
DIVISEUR DU DURABASE
Le diviseur du Durabase permet d’organiser le volume du
AVERTISSEMENT :
qu’un enfant ou des animaux s’y glissent.
toucher le tiroir ou s'en approcher.
1
2
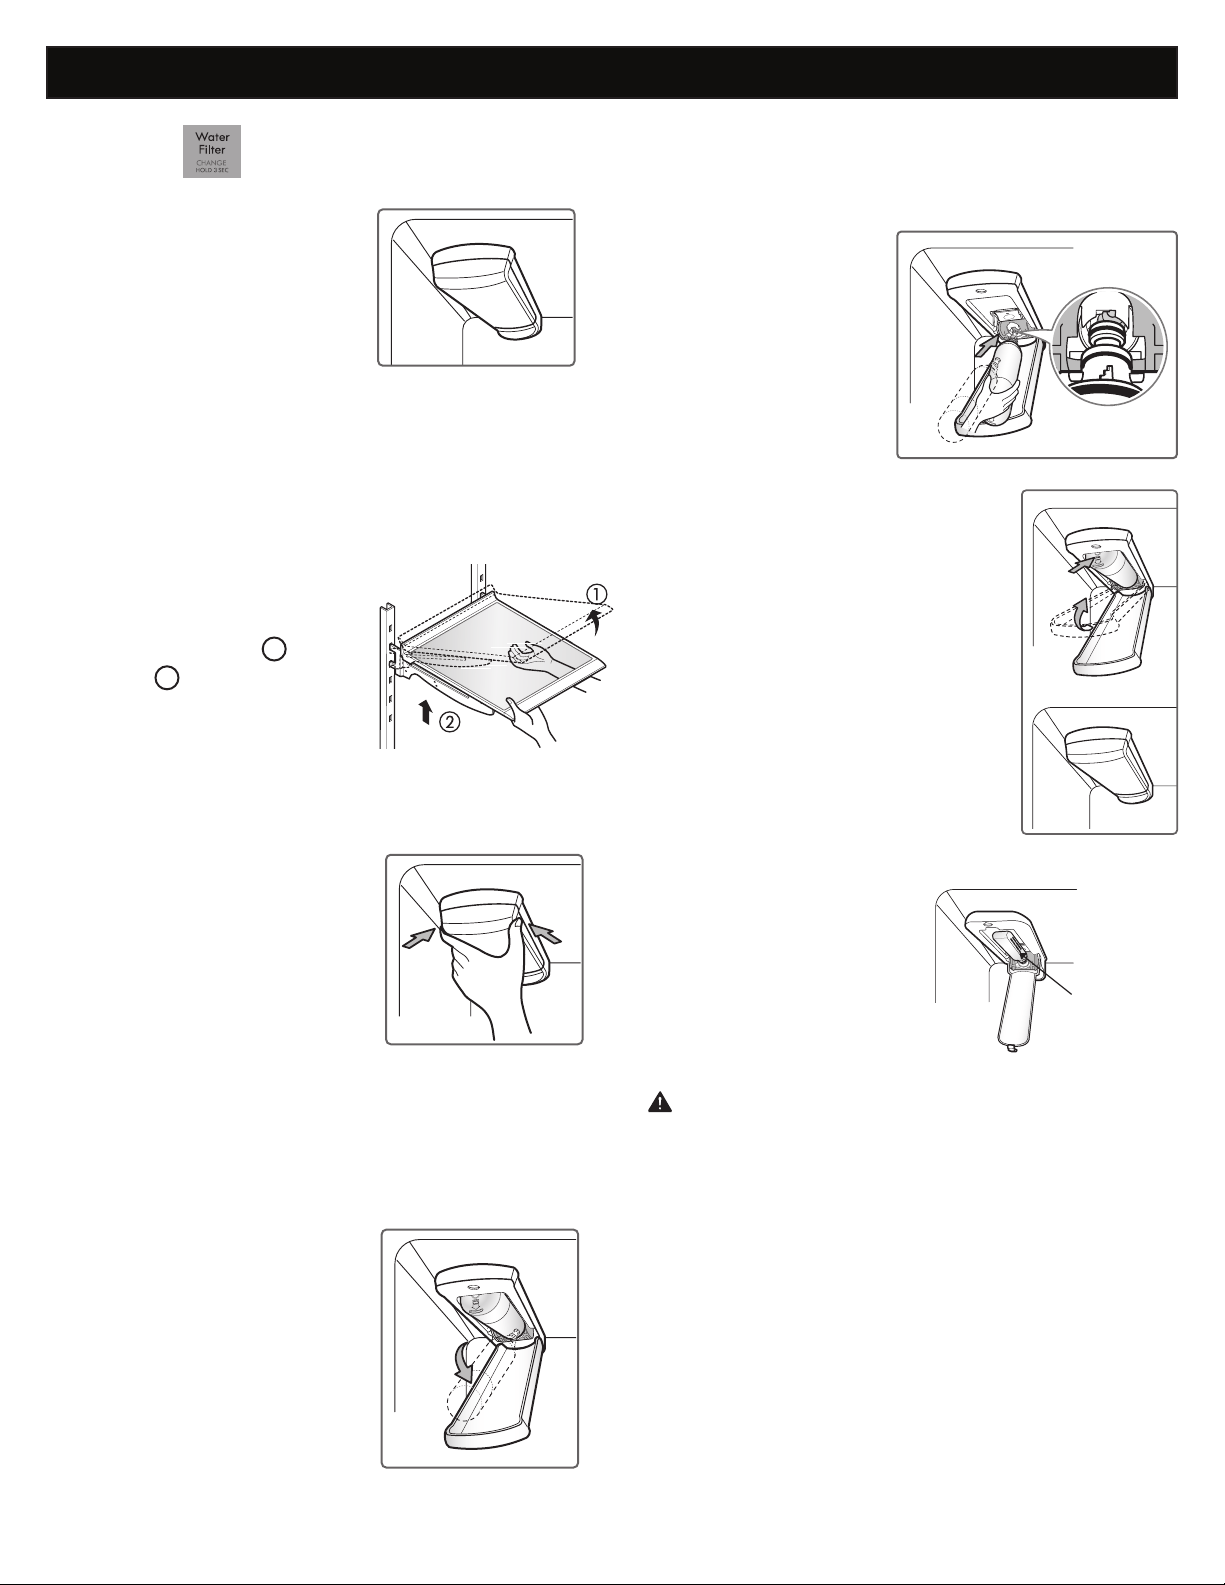
108
2. Remplacez par un nouveau ltre à eau.
puis retirez l’enveloppe de protection des joints
toriques. Les pattes du
en position horizontale,
introduisez le nouveau
le collecteur.
FILTRE À EAU
FILTRE À EAU
Environ tous les 6 mois.
s’allume.
Lorsque les cubes de glace sont
plus petits que d’habitude.
position et fermez le couvercle.
Le couvercle s’enclenche s’il est
3. Bouchon de dérivation du ltre à eau
Conservez le bouchon
eau. Vous DEVEZ utiliser
de remplacement n’est pas
disponible.
ATTENTION :
REMARQUE :
rendez-vous dans un magasin Sears ou composez le 1-800-
4-MY-HOME
®
. En outre, vous pouvez commander en ligne à
l'adresse www.sears.com/partsdirect
1. Retirez l'ancien ltre à eau.
complètement.
Appuyez sur le bouton-poussoir
eau.
REMARQUE : Le remplacement du
1 once ou 25 cc). Placez une tasse sous
Bouchon de
Avant de remplacer le ltre à eau :
Pour retirer une clayette –
Inclinez la partie avant de
la clayette vers le haut
1
et
soulevez-la
2
pour la retirer.
25
REFRIGERATOR SHELVES
The shelves in your refrigerator are adjustable to meet
your individual storage needs. Your model may have glass
or wire shelves.
Adjusting the shelves to fit different heights of items will
make finding the exact item you want easier. Doing so will
also reduce the amount of time the refrigerator door is
open which will save energy.
IMPORTANT: Do not clean glass shelves with warm water
while they are cold. Shelves may break if exposed to
sudden temperature changes or impact.
NOTE: Glass shelves are heavy. Use special care when
removing them.
Adjusting Shelves (Cantilever)
Remove shelves from the shipping position and replace
shelves in the position you want.
To remove a shelf—Tilt up the front of the shelf in the
direction of
1
and lift it in the direction of
2
. Pull
the shelf out.
To reinstall a shelf—Tilt the front of the shelf up and
guide the shelf hooks into the slots at a desired height.
Then, lower the front of the shelf so that the hooks
drop into the slots.
Folding Shelf (on some models)
You can store taller items, such as a gallon container
or bottles, by simply pushing the front half of the shelf
underneath the back half of the shelf. Pull the front of the
shelf toward you to return to a full shelf.
CAUTION: Make sure that shelves are level from one
side to the other. Failure to do so may result in the shelf
falling or spilling food.
USING YOUR REFRIGERATOR

109
FILTRE À EAU
Fiche technique de performances
Cartouche de remplacement à utiliser : 04609690000P
Réduction des
contaminants
Concentration
moyen
Concentration seuil
dans l’eau
% moyen
de
réduction
Concentration
autorisée du
produit
dans l’eau
Concentration
maximale
autorisée du
produit dans
l’eau
Conditions de
réduction
NSF
Rapport
de
test NSF
Goût et odeur de chlore 2,1 mg/L 2,0 mg/L ± 10% 97,2% 0,06 mg/L S/O J-00049247
Classe particulaire nominale I,
5,600,000
pts/mL
Au moins 10 000 particules/mL 98,7% 73 000 pts/ml S/O J-00049282
Amiante 190 MFL
>99% S/O J-0004928
Atrazine 0,0094 mg/L 0,009 mg/L ± 10% 94,7% 0,00005 mg/L 0,003 mg/L S/O J-00049293
Benzène 0,016 mg/L 0,015 mg/L ± 10% 96,7% 0,005 mg/L 0,005 mg/L S/O J-00049300
Carbofuran 0,08 mg/L 0,08 mg/L ± 10% 98,1% 0,002 mg/L 0,04 mg/L S/O J-00049294
Lindane 0,002 mg/L 0,002 mg/L ± 10% 98,2% 0,00004 mg/L 0,0002 mg/L S/O J-00051975
P-Dichlorobenzène 0,22 mg/L 0,225 mg/L ± 10% 99,8% 0,0005 mg/L 0,075 mg/L S/O J-00049298
Toxaphène 0,014 mg/L 0,015 mg/L ± 10% 93% 0,001 mg/L 0,003 mg/L S/O J-00049302
2,4-D 0,213 mg/L 0,210 mg/L ± 10% 95,2% 0,009 mg/L 0,07 mg/L S/O J-00049284
Plomb pH @6,5 0,150 mg/L 0,15 mg/L ± 10% >99,3% 0,001 mg/L 0,010 mg/L S/O J-00051974
Plomb pH @8,5 0,150 mg/L 0,15 mg/L ± 10% >99,3% 0,001 mg/L 0,010 mg/L S/O J-00049277
Mercure @ pH 6,5 0,0059 mg/L 0,006 mg/L ± 10% 96,1 0,0002 mg/L 0,002 mg/L S/O J-00053886
Mercure @ pH 8,5 0,0058 mg/L 0,006 mg/L ± 10% 90,1 0,0006 mg/L 0,002 mg/L S/O J-00051972
Sporocyste*
120 000
sporocystes/L
50 000 sporocystes/L minimum 99,99% S/O
J-00049281
110
FILTRE À EAU
REMARQUE :
peuvent varier.
veuillez composer le 1-800-469-4663 ou visitez notre site
Web à l’adresse www.sears.com/partsdirect
3M est une marque commerciale de 3M Company.
NSF est une marque commerciale de NSF International.
AVERTISSEMENT
ATTENTION
Pour réduire les risques associés à l’ingestion de
contaminants : N’utilisez pas d’eau présentant une
insécurité microbiologique ou de qualité inconnue
sans une désinfection préalable avant et après le
système.
Pour réduire les risques associés aux dommages
matériels dus aux fuites d’eau :
Lisez et appliquez•
d’installer et d’utiliser ce système.
L’installation et l’utilisation DOIVENT
aux codes de plomberie locaux.
Ne procédez pas• à l’installation si la pression de
un plombier professionnel en cas de doute sur la
Ne procédez pas•
un antibellier. Contactez un plombier professionnel
Ne procédez pas• à l’installation sur des lignes
d’adduction d’eau chaude.
Protégez le ltre à eau du gel. • N’utilisez pas le
Directives d’application/Paramètres d’approvisionnement
d’eau
0,5 gpm (1,9 lpm)
Approvisionnement d’eau Eau potable
Pression de l’eau 20-120 psi (138 - 827 kPa)
33°F - 100°F (0,6°C - 38°C)

111
FILTRE À EAU
State of California
Department of Public Health
Water Treatment Device
Certificate Number
Date Issued: December 15, 2009
201909-
Manufacturer:
Sears Roebuck and Co.
The water treatment device(s) listed on this certificate have met the testing requirements pursuant to Section
116830 of the Health and Safety Code for the following health related contaminants:
sotsebsAstsyC
Lead
Mercury
2,4-D Reduction
Atrazine
Benzene
Carbofuran
Lindane
p-Dichlorobenzene
Toxaphene
Microbiological Contaminants and Turbidity
Inorganic/Radiological Contaminants
Organic Contaminants
200 gal
Rated Service Capacity:
0.5 gpm
Rated Service Flow:
Conditions of Certification:
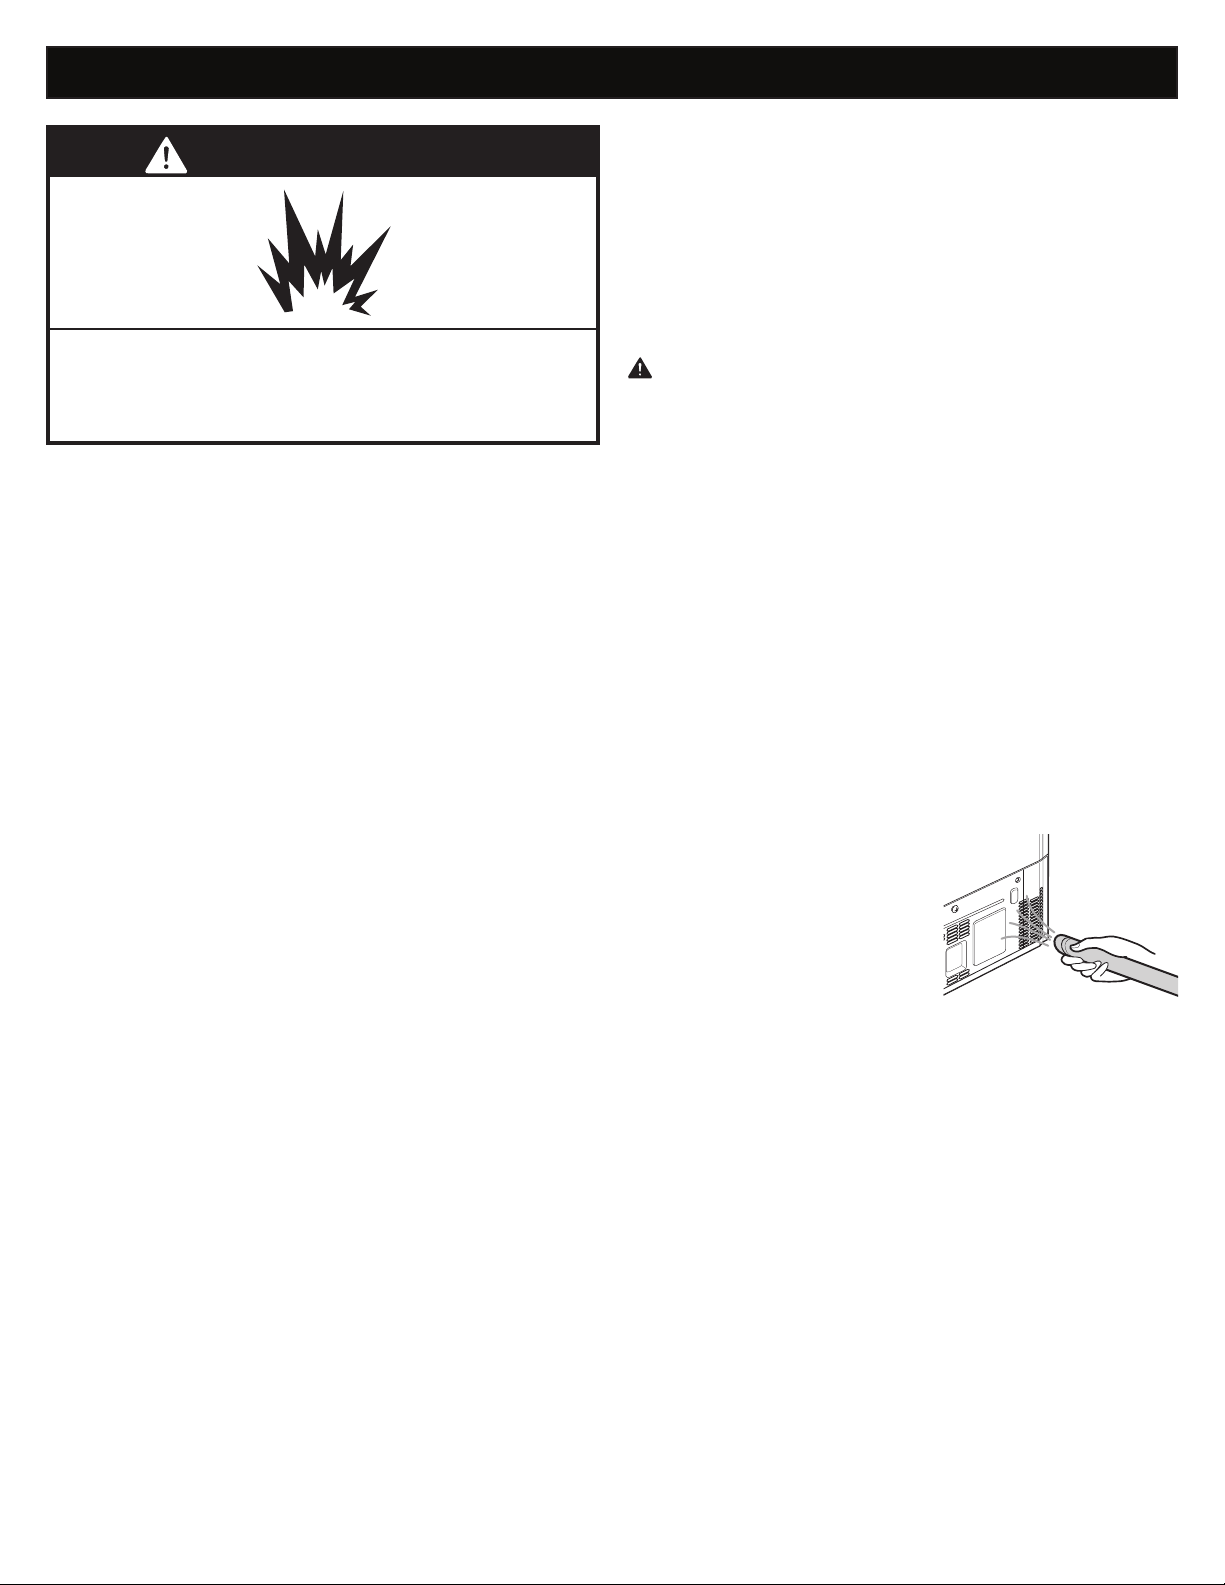
112
ENTRETIEN ET NETTOYAGE
AVERTISSEMENT
Risque d’explosion
vous risquez de provoquer un incendie, une explosion ou
des blessures mortelles.
CONSEILS DE NETTOYAGE GÉNÉRAUX
de courant.
Utilisation de votre réfrigérateur pour consulter les
instructions de retrait.
de produits de nettoyage abrasifs ou corrosifs.
Lavez, rincez et essuyez à la main toutes les surfaces.
EXTÉRIEUR
la protection contre la rouille. Ne cirez pas les pièces en
de produits de nettoyage abrasifs ou corrosifs. Essuyez
PAROIS INTÉRIEURES (laissez le congélateur se réchauer
an d’éviter que le chion ne colle à la surface)
de bicarbonate de soude à une pinte d’eau (26 g de
CONTRE-PORTES ET JOINTS
PIÈCES EN PLASTIQUE (couvercles et panneaux)
SERPENTINS RÉFRIGÉRANTS
rallonge pour nettoyer le couvercle
Ne retirez pas le panneau
couvrant la zone du
ATTENTION :
n’aspergez pas d’eau.

113
ENTRETIEN ET NETTOYAGE
REMPLACEMENT D’UNE AMPOULE D’ÉCLAIRAGE
AVERTISSEMENT
Risque d’électrocution
l’alimentation au niveau du disjoncteur ou d’une boîte
de fusibles.
LORSQUE VOUS DÉMÉNAGEZ
1.
dans de la glace sèche.
2.
3.
4. Retirez toutes les pièces amovibles, emballez-les et
qu’elles ne s’entrechoquent pas pendant le transport.
Reportez-vous à la section Utilisation du réfrigérateur
pour les instructions concernant les pièces amovibles.
5.
raient le plancher. Reportez-vous à la section Fermeture
des portes.
6.
Lorsque vous arrivez dans votre nouvelle maison, remettez
tout en place et reportez-vous à la section Installation du
réfrigérateur
REMARQUE :
Pour changer la lampe du compartiment congélateur
1.
2. Retirez la vis au moyen d’un tournevis.
3. Saisissez le couvercle de l’ampoule, tirez le couvercle
vers le bas.
COUPURES DE COURANT
1. En cas de coupure de courant de 24 heures ou moins,
2. Si la coupure de courant devait durer plus que 24 heures,
LORSQUE VOUS PARTEZ EN VACANCES
Si vous choisissez de laisser en service le réfrigérateur
pendant votre voyage, suivez les instructions suivantes pour
1.
2.
Si vous choisissez de mettre hors tension le réfrigérateur avant
votre départ,
1.
2.
la section Réglage des contrôles.
3.
4.
ou de bois en haut des deux portes pour les maintenir
et de moisissures.
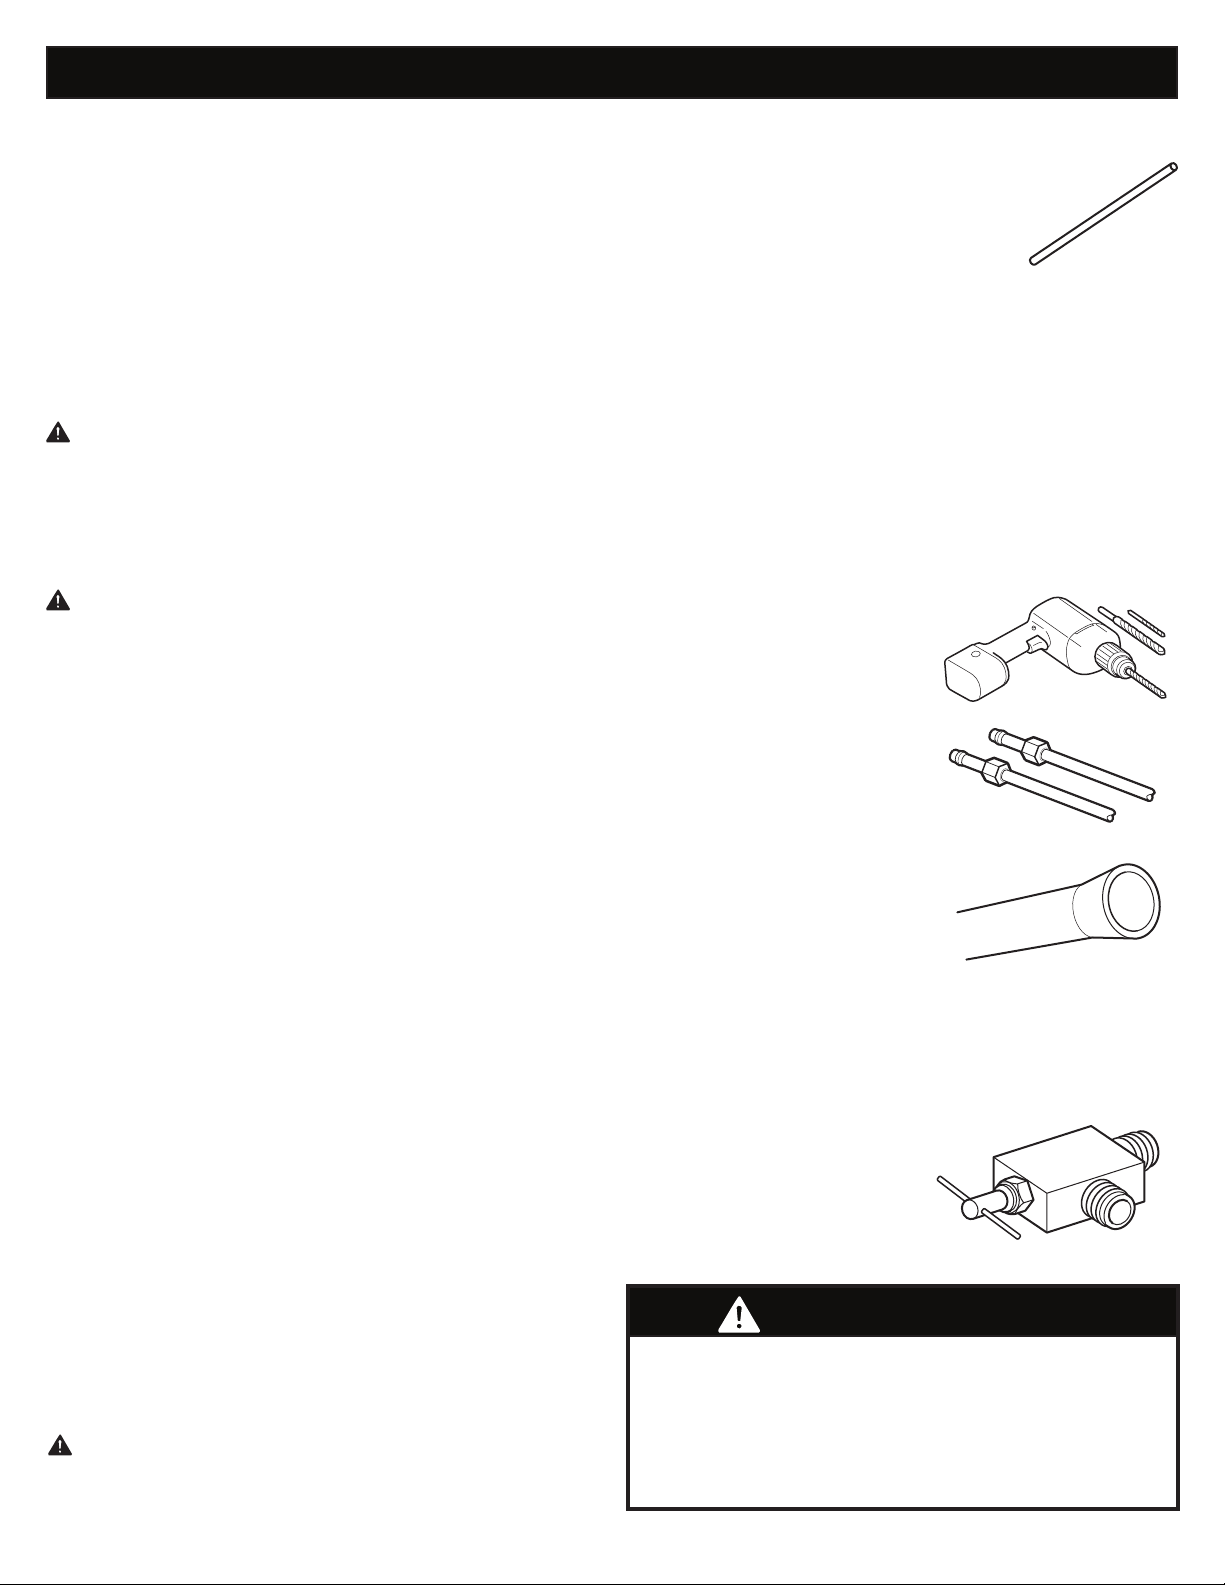
114
CONNEXION DU TUYAU D’EAU
AVANT DE COMMENCER
Cette installation de raccordement d’eau n’est pas couverte
eaux.
tuyaux) dans une plomberie domestique peuvent endommager
ATTENTION :
à un approvisionnement d'eau froide.
ATTENTION : N’installez pas la tuyauterie de la machine
niveau du gel.
PRESSION DE L’EAU
Un approvisionnement d’eau froide. La pression de l’eau
pompe d’appoint pour compenser cette pression faible.
Si un système de ltration d’eau à osmose inverse
à votre approvisionnement d’eau froide, cette installation de
raccordement d’eau n’est pas couverte par la garantie du
Si un système de ltration d’eau par osmose inverse est
comprise au minimum entre 2,76 et 4,14 bars (40-60 psi),
soit moins de 2 à 3 secondes pour remplir une tasse de 20 cl.
Si la pression d’eau depuis le système par osmose inverse est
inverse se remplir après une utilisation intensive.
Si le problème de la pression d’eau du système à osmose
conditions du code de plomberie local.
ATTENTION : Portez une protection des yeux pendant
CE DONT VOUS AUREZ BESOIN
Tuyau de cuivre,• ¼ po. de diamètre
à l’approvisionnement d’eau. Assurez-
ont une coupe perpendiculaire.
et la conduite d’approvisionnement d’eau. Ajoutez
ensuite 8 pieds (2,4 m). Assurez-vous qu’il y a une section
Perceuse.•
Clé de ½ po. ou clé à ouverture variable.•
Tournevis à lame plate et à pointe cruciforme.•
Deux écrous de serrage •
d’un diamètre extérieur de
¼ po. et 2 bagues (gaines)
pour raccorder les tuyaux de
Si votre conduite d’eau
adaptateur (disponible dans les
magasins d'articles de plomberie)
pour raccorder la conduite d'eau
coupeur de tuyau et utiliser un
dispositif de serrage.
Vanne d’arrêt pour raccorder la conduite d’eau froide.• La
/ po. au point de raccordement à la
sont incluses dans plusieurs kits d’approvisionnement d’eau.
Avant d’en acheter, assurez-vous
est conforme aux codes de
plomberie locaux.
REMARQUE : Une vanne à eau
AVERTISSEMENT
Risque d’électrocution
perceuse) pendant l’installation, assurez-vous que le
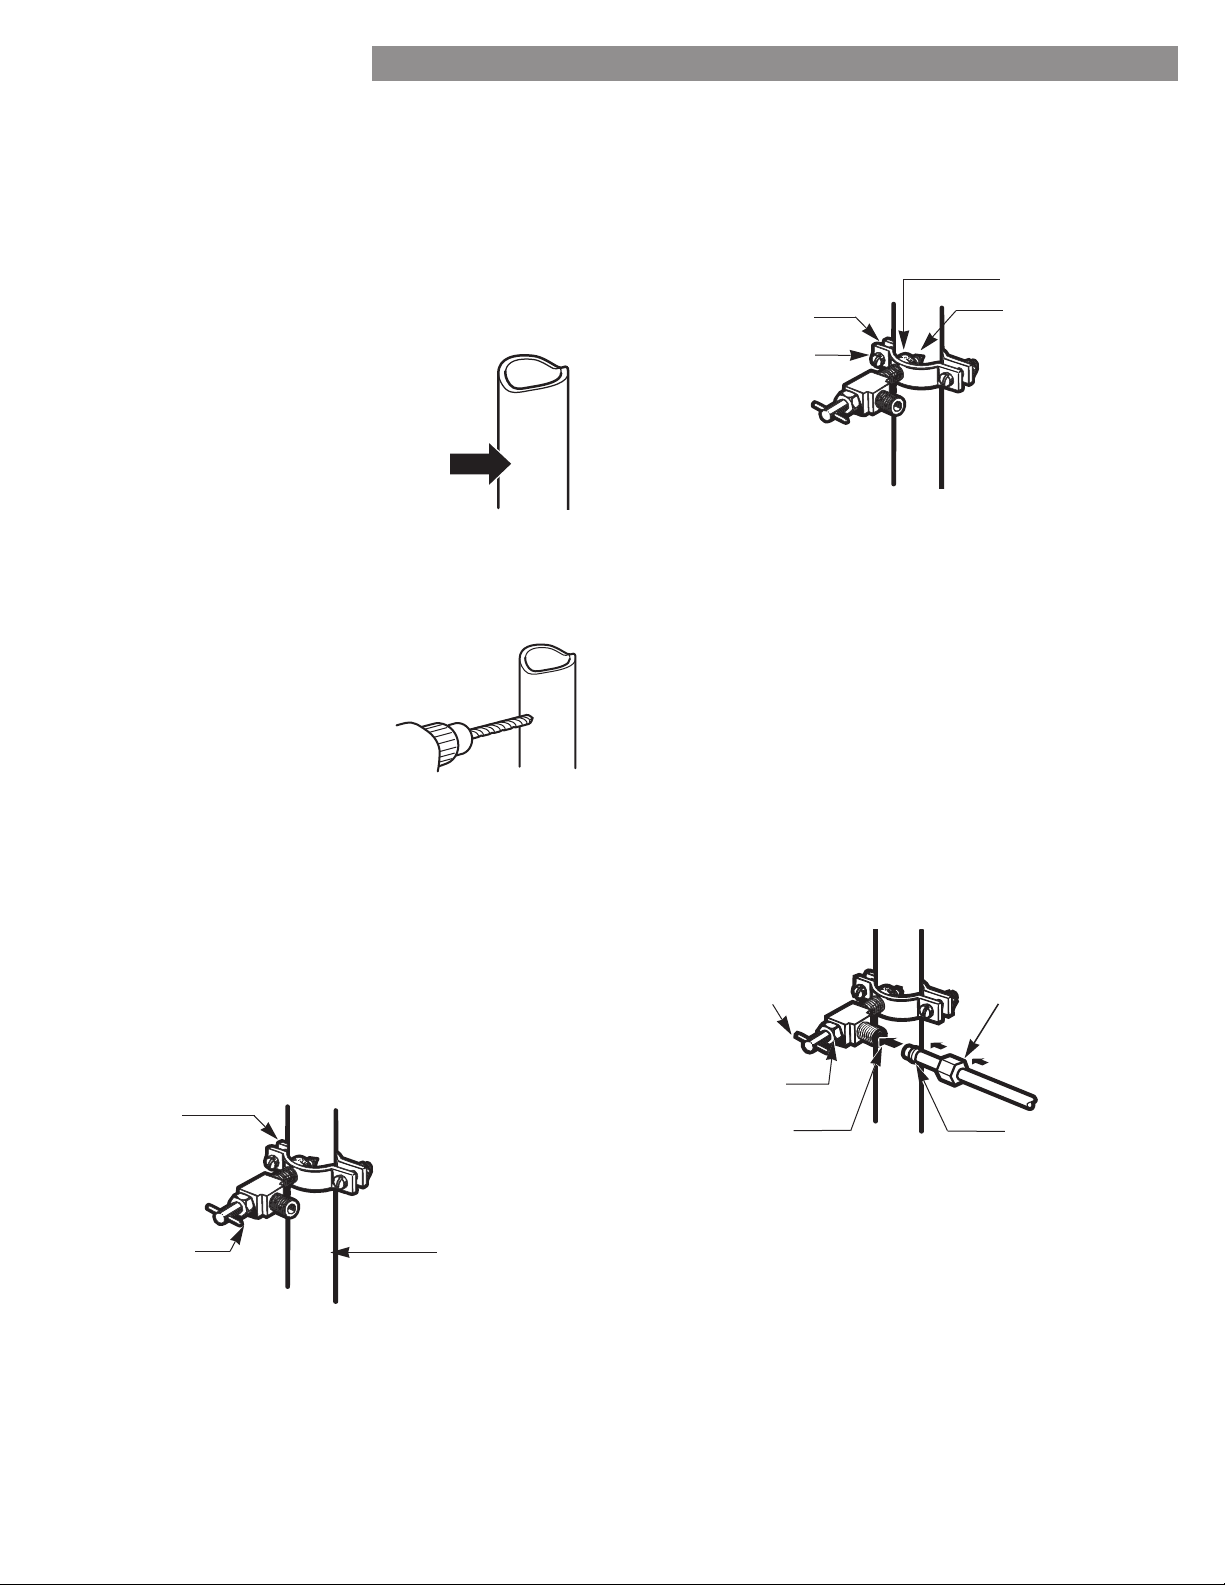
115
CONNEXION DU TUYAU D’EAU
INSTRUCTIONS D’INSTALLATION
1. ARRÊTEZ L’APPROVISIONNEMENT D’EAU PRINCIPAL
Ouvrez le robinet le plu
sur la ligne.
2. CHOISISSEZ L’EMPLACEMENT DE LA VANNE
Choisissez un emplacement facilement
accessible pour la vanne. Il est
raccordement dans un tuyau d’eau
3. PERCEZ LE TROU POUR LA VANNE
Percez un trou de ¼ po. dans le tuyau d’eau avec une
trou dans le tuyau. Veillez à ne
perceuse. Si vous ne percez pas
un trou de ¼ po., il est possible
que la production de glace soit
plus petits.
REMARQUE : La conduite de raccordement ne peut pas
ne doivent utiliser que des tuyaux en cuivre NDA n°
(PEX).
4. FIXEZ LA VANNE D’ARRÊT
collier de serrage pour tuyau.
REMARQUE : Les codes de plomberie Commonwealth of
5. SERREZ LE COLLIER DE SERRAGE
Serrez les vis du collier de serrage jusqu’à ce que la
REMARQUE : Ne serrez pas trop le collier de serrage,
6. ACHEMINEZ LA TUYAUTERIE
Acheminez la tuyauterie entre la conduite d’eau froide et
base adjacente) aussi près que possible du mur.
REMARQUE : Assurez-vous qu’il y a une section
7. RACCORDEZ LA TUYAUTERIE À LA VANNE
serrage.
REMARQUE : Les codes de plomberie Commonwealth of
Collier pour
tuyaux
Tuyau d’eau
froide vertical
Collier pour
tuyaux
Vis de serrage
Rondelle
Écrou de
presse-
garniture
Vanne
de sortie
Écrou de serrage
Bague (gaine)
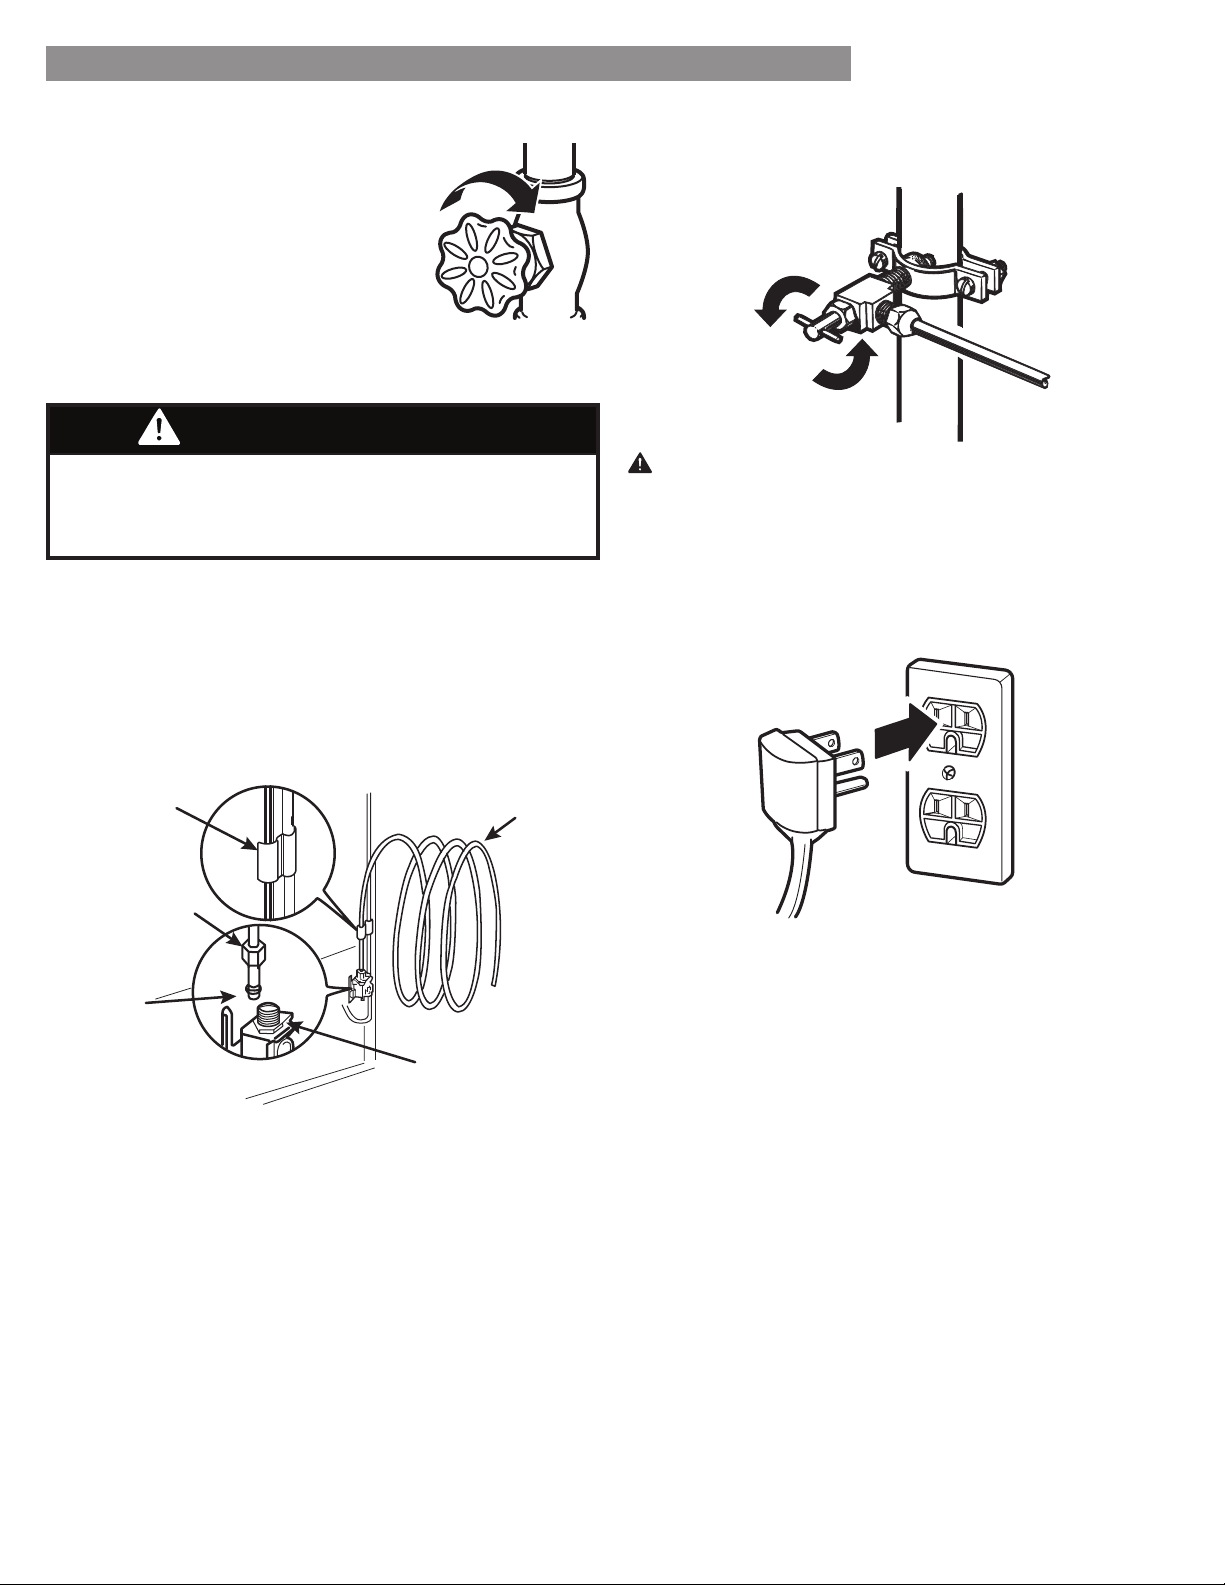
116
CONNEXION DU TUYAU D’EAU
8. LAVEZ LA TUYAUTERIE
Ouvrez l’approvisionnement d’eau
principal et laissez couler l’eau
jusqu’à ce que l’eau soit propre.
environ une pinte d’eau par la
tuyauterie.
9. RACCORDEZ LE TUYAU AU RÉFRIGÉRATEUR
1.
2.
3.
le plus loin possible. Tout en tenant la tuyauterie, serrez le
raccord.
10. OUVREZ L’EAU SUR LA VANNE D’ARRÊT
11. BRANCHEZ LE RÉFRIGÉRATEUR
Disposez le cheminement de la tuyauterie de façon à
12. DÉMARREZ LA MACHINE À GLAÇONS
Mettez en marche la fabrique de glace via le panneau
de commande.
La machine à glaçons commence à fonctionner jusqu’à
fonctionnera ensuite automatiquement si la touche
Marche.
Collier pour
tuyauterie
Tuyauterie de
¼ po.
Écrou de
serrage de
¼ po.
Raccordement
Bague
(gaine)
ATTENTION :
raccordements à la conduite d’eau.
AVERTISSEMENT

117
GUIDE DE DÉPANNAGE
Problème Causes possibles
Solutions
Les compartiments
refroidissent pas
Le système de
refroidissement est trop
puissant
sous tension
que les aliments sont sortis. (Veuillez vous reporter à la section
Guide de Stockage des Aliments)
Poussez les portes fermement. Si elles ne se ferment pas
complètement, reportez vous à la section Les portes ne se
ferment pas complètement ou s’ouvrent toutes seules de la partie
environnement chaud
Le compresseur fonctionnera plus longtemps dans un
normale (70°F), votre compresseur doit fonctionner entre 40% et
80% du temps. Si la pièce est plus chaude, attendez-vous à ce
110°F.
Le condensateur / couvercle arrière est
Utilisez un aspirateur muni d’un embout pour nettoyer la protection
recouvrant la bobine du condensateur.
REFROIDISSEMENT
0.5 gpm (1.9 lpm)
Eau Potable
Pression Hydraulique 20-120 psi (138 -827 kPa)
Fonctionnement
55°F - 110°F
Valeurs Électriques 115 Volts, 60 Hz, CA uniquement, fusible de 15 ou 20 ampères
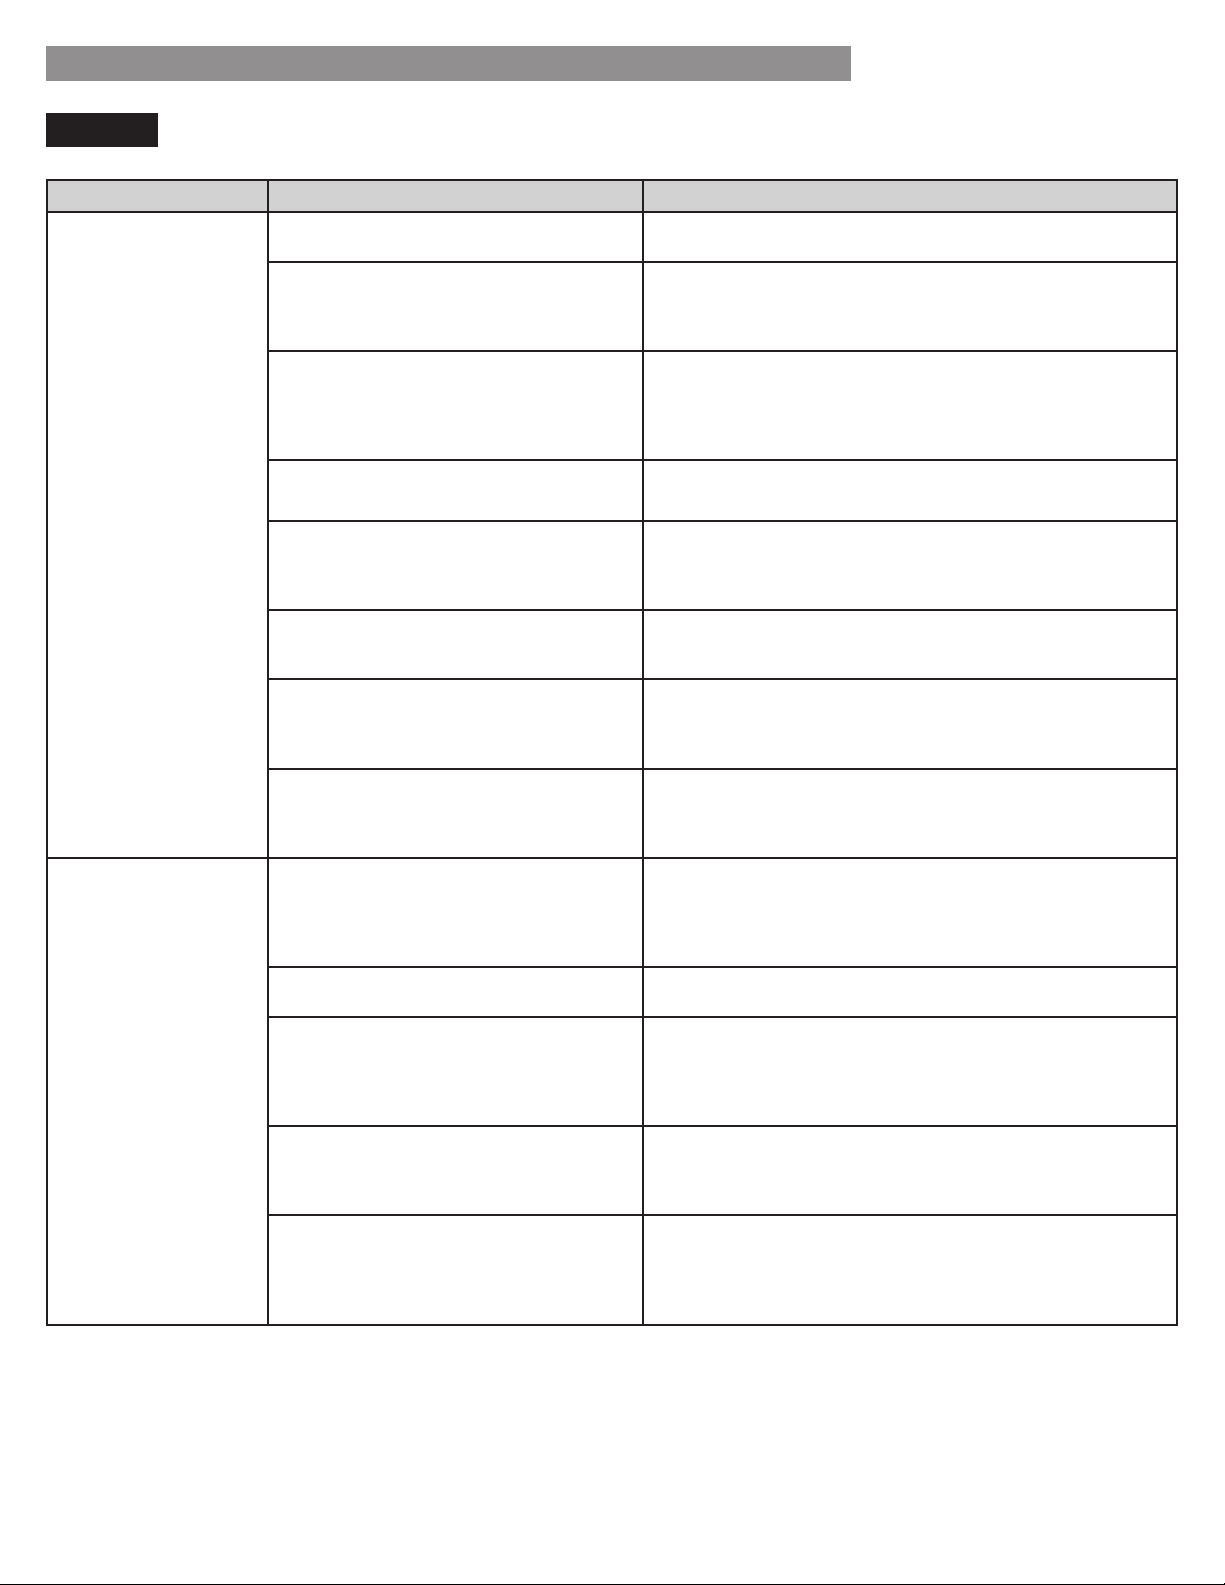
118
GUIDE DE DÉPANNAGE
Problème Causes possibles
Solutions
Le compartiment
chaud
diagramme de circulation de l’air dans la section Utilisation de
Les portes sont souvent ouvertes ou restent
ouvertes pendant longtemps.
Lorsque les portes sont souvent ouvertes ou restent ouvertes
pendant longtemps, de l’air chaud et humide entre dans
Beaucoup d’aliments ou des aliments chauds
Veuillez vous reporter à la section Les portes ne se ferment pas
des Pièces & Fonctions
correctement
d’informations
Les portes sont trop souvent ouvertes ou
restent ouvertes trop longtemps
Lorsque les portes sont souvent ouvertes ou restent ouvertes
pendant longtemps, de l’air chaud et humide entre dans
Veuillez vous reporter à la section Les portes ne se ferment pas
L’atmosphère est humide
Les aliments ne sont pas correctement
les compartiments. Essuyez bien tous les compartiments et rangez
condensation et le givre
REFROIDISSEMENT
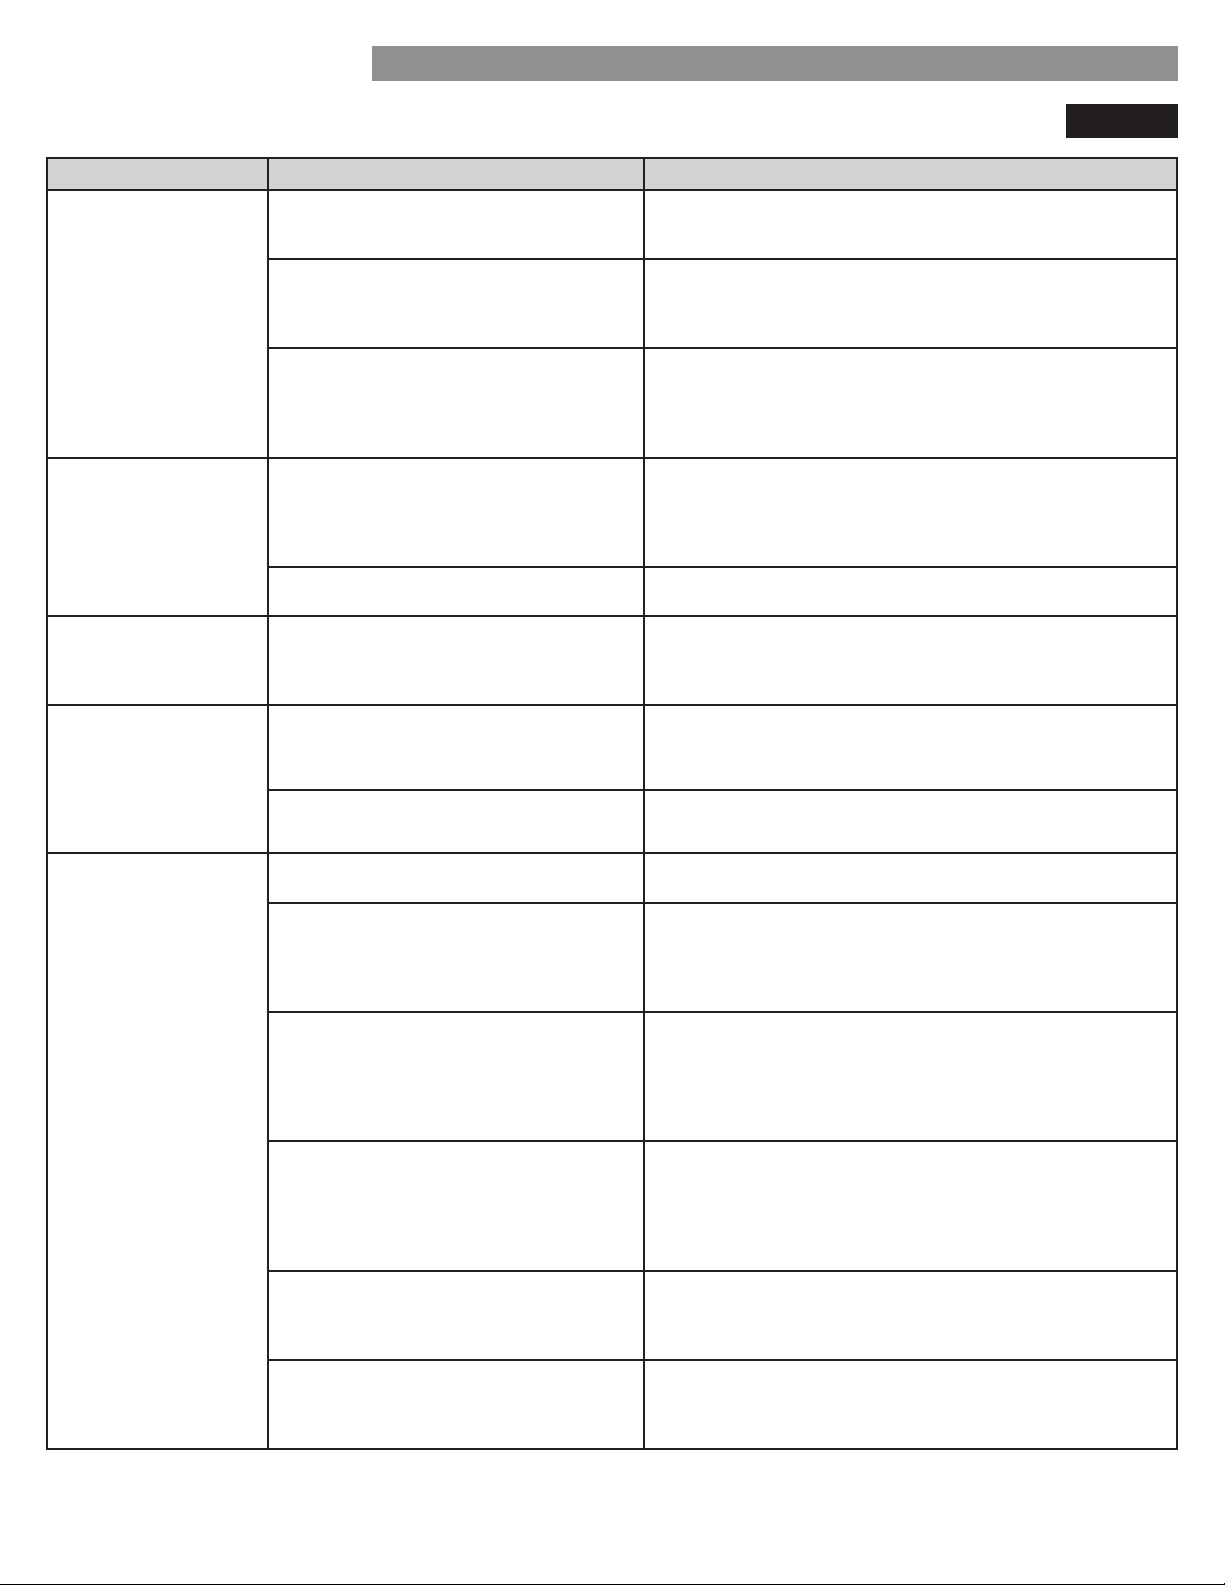
119
GUIDE DE DÉPANNAGE
Problème Causes possibles
Solutions
Les aliments congèlent
dans le compartiment
Des aliments avec une teneur en eau
d’informations
froid
(13°C).
Du givre ou des cristaux
de glace se forment sur
l’emballage)
La porte est souvent ouverte ou reste ouverte
pendant longtemps
Lorsque les portes sont souvent ouvertes ou restent ouvertes
pendant longtemps, de l’air chaud et humide entre dans
La porte ne se ferme pas correctement Veuillez vous reporter à la section Les portes ne se ferment pas
Le compartiment
chaud
d’informations
Du givre ou des cristaux
de glace se forment sur
La condensation issue d’aliments à haute
l’emballage alimentaire.
eau.
Ne stockez pas des aliments à haute teneur en eau dans le
Le distributeur de
glace ne produit pas
production de glace
Le distributeur de glace peut produire approximativement 50-100
un plombier.
Tous les six mois environ
Lorsque la sortie de la distribution d’eau diminue
Lorsque les cubes de glace sont plus petits que la normale
trop faible
plombier ou d’installer une pompe d’appoint pour compenser la
pression faible.
est en cours de fonctionnement
pression de l’eau en dessous de sa valeur minimale et occasionner
un disfonctionnement du distributeur de glace. (Veuillez vous
reporter à la section pression de l’eau).
REFROIDISSEMENT / GLACE
120
GUIDE DE DÉPANNAGE
Problème Causes possibles
Solutions
Le distributeur de
glace ne produit pas
(suite)
Les portes sont trop souvent ouvertes ou
restent ouvertes trop longtemps
Lorsque les portes de l’appareil sont souvent ouvertes, l’air
Les portes ne se ferment pas complètement
Les portes ne se ferment pas correctement ou s’ouvrent toutes
d’informations.
est trop chaud.
pour la production normale de glace est de 0°F. Si la
Le distributeur de glace
ne produit pas de glace
distributeur de glace se mette à fonctionner.
Le distributeur de glace n’est pas mis en
marche
assurez-vous que celui-ci pivote normalement.
pression de l’eau en dessous de sa valeur minimale et occasionner
un disfonctionnement du distributeur de glace. (Veuillez vous
reporter à la section pression de l’eau).
GLACE
121
GUIDE DE DÉPANNAGE
Problème Causes possibles
Solutions
La glace a un mauvais
goût ou une mauvaise
odeur
du soufre
NOTE
ayant mauvais goût.
Veuillez vous reporter à la section Entretien & Nettoyage pour
plus d’informations
Videz et lavez le bac (jetez les vieux glaçons). Assurez-vous que
Le distributeur de glace
produit trop de glace
GLACE

122
GUIDE DE DÉPANNAGE
Problème Causes possibles
Solutions
Clic
cycle.
Fonctionnement normal
Cliquetis
Fonctionnement normal
manière stable
section Alignement de la Porte
Fonctionnement normal
circuler de l’air à travers les compartiments
Fonctionnement normal
ventilateur du condensateur
Fonctionnement normal
Gargouillement
système de refroidissement
Fonctionnement normal
Pop Contraction et expansion des parois internes
Fonctionnement normal
Fonctionnement normal
Vibration
un meuble ou un mur, certaines des vibrations
normales de l’appareil peuvent rendre un son
audible
Égouttement
Fonctionnement normal
Pulsations ou son aigu
Le compresseur à haute performance peut
anciens modèles. Il est normal d’entendre
des pulsations ou un son aigu au cours du
Fonctionnement normal
BRUIT
123
GUIDE DE DÉPANNAGE
Problème Causes possibles
Solutions
Les portes ne se ferment
pas complètement ou
s’ouvrent toutes seules
Des emballages alimentaires bloquent la
fermeture de la porte
Le bac à glace, le couvercle du bac à
correctement.
Poussez les bacs jusqu’au fond et placez le couvercle du bac à
position normale. Veuillez consulter la section Utilisation de votre
correctement remises en place
l’horizontale
Veuillez vous reporter à la section Alignement des Portes dans la
celui-ci
à ouvrir
Les joints sont sales ou collants
avec du lustre ou de la cire pour meubles sur les joints après les
Lorsque vous ouvrez la porte, de l’air tiède entre dans le
patienter une minute pour permettre à la pression de l’air de
parait instable
Les pieds de nivellement ne sont pas
Veuillez vous reporter à la section Positionnement et Alignement
des Portes
nivellement pour terminer l’installation
pas
Remplacement d’une ampoule.
une odeur inhabituelle
Veuillez vous reporter à la section Remplacement du Filtre à Air
pour les consignes de remplacement.
est couvert de poussière
ou de suie.
à bois ou une bougie.
PIÈCES & FONCTIONS
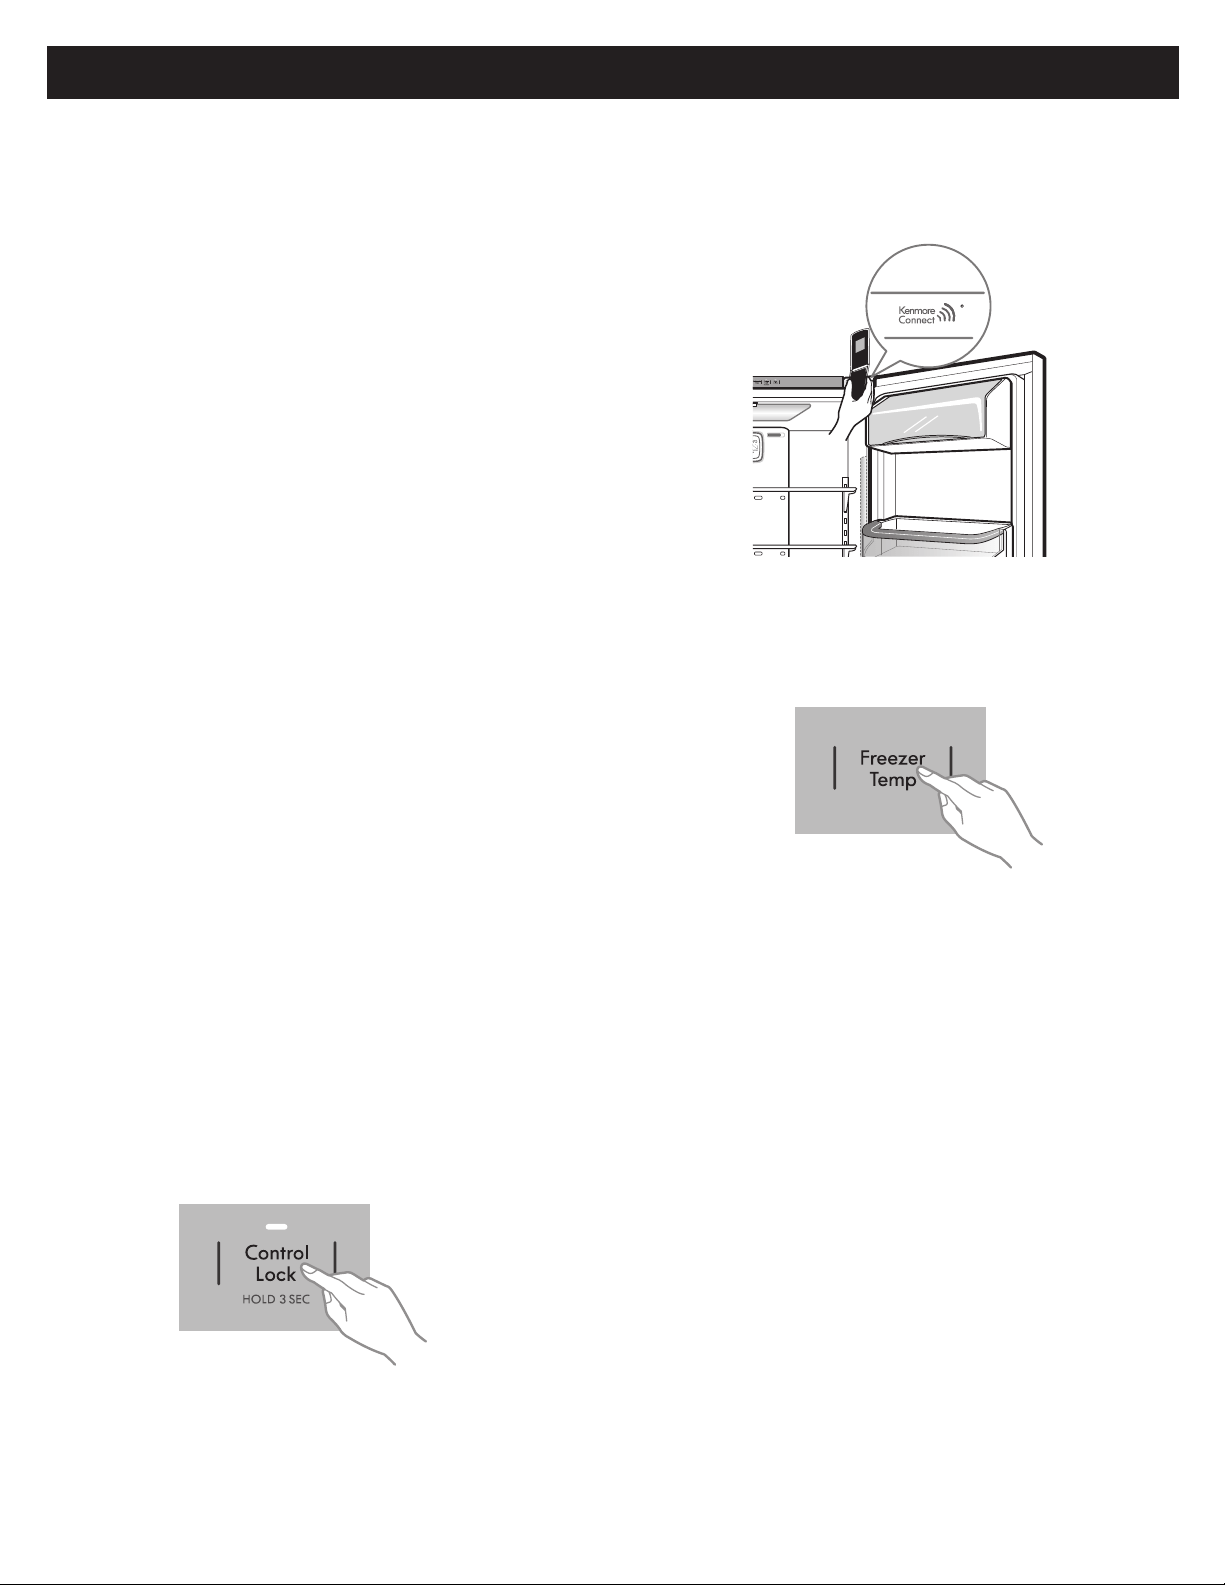
124
SYSTÈME KENMORE CONNECT™
Kenmore Connect™ (certains modèles
uniquement)
vous pouvez transmettre des informations via votre
Vous pourrez ainsi parler directement à l’un de nos
techniciens. Le technicien enregistre les informations
appelez le 1-800-4MY-HOME (1-800-469-4663).
N’utilisez la fonction Kenmore Connect™ que si l’agent de
Les bruits de transmission que vous entendrez sont
se faire sans la fonction Kenmore Connect™.
Utilisation de la fonction Kenmore Connect™
Tout d’abord, appelez le 1-800-4MY-HOME (1-800-
Kenmore Connect™. N’utilisez la fonction Kenmore
vous le demande.
1.
3. Lorsque l’agent du centre d’appels vous le demande,
4.
5.
sonores.
6.
conversation avec le technicien qui pourra alors vous
aider à utiliser les informations fournies pour l’analyse.
REMARQUE:
- Si l’agent du centre d’appels n’est pas en mesure
2.


® Registered Trademark /
TM
Trademark of KCD IP, LLC in the United States, or Sears Brands, LLC in other countries
® Marca Registrada /
TM
Marca de Fábrica de KCD IP, LLC en Estados Unidos, o Sears Brands, LLC in otros países
MC
Marque de commerce /
MD
Marque déposée de Sears Brands, LLC
Get it fixed, at your home or ours!
Your Home
For troubleshooting, product manuals and expert advice:
www.managemylife.com
For repair – in your home – of all major brand appliances,
lawn and garden equipment, or heating and cooling systems,
no matter who made it, no matter who sold it!
For the replacement parts, accessories and
owner’s manuals that you need to do-it-yourself.
For Sears professional installation of home appliances
and items like garage door openers and water heaters.
1-800-4-MY-HOME
®
(1-800-469-4663)
Call anytime, day or night(U.S.A. and Canada)
www.sears.com www.sears.ca
Our Home
For repair of carry-in items like vacuums, lawn equipment,
and electronics, call anytime for the location of your nearest
Sears Parts & Repair Service Center
1-800-488-1222 (U.S.A.) 1-800-469-4663 (Canada)
www.sears.com www.sears.ca
To purchase a protection agreement on a product serviced by Sears:
1-800-827-6655 (U.S.A.) 1-800-361-6665 (Canada)
Para pedir servicio de reparación
a domicilio, y para ordenar piezas:
1-888-SU-HOGAR
®
(1-888-784-6427)
www.sears.com
Au Canada pour service en français:
1-800-LE-FOYER
MC
(1-800-533-6937)
www.sears.ca