LIQUID CRYSTAL DISPLAY CAMCORDER
OPERATION MANUAL
MODEL
VL-Z7U
Important
Model No.:
Serial No.:
Please read this operation manual
carefully before using the camcorder.
For assistance in reporting the theft or
loss of
this product, record on the line
below the
model number and serial number which
are located on the bottom of the unit.
Please retain this information.
• See page 94 for use of Demo mode.
ii
Thank you for purchasing this camcorder from SHARP.
The camcorder will enhance your home video enjoyment and allow you to
capture those special moments. Please read this operation manual to familiarize
yourself with the camcorder’s features, so that you will get the most out of it. The
video techniques section will help you fully enjoy the many features this
camcorder offers, and expand your video world.
CAUTION
RISK OF ELECTRIC SHOCK
DO NOT OPEN
This symbol warns the user of uninsulated voltage
within the unit that can cause dangerous electric
shocks.
This symbol alerts the user that there are important
operating and maintenance instructions in the litera-
ture accompanying this unit.
CAUTION:
TO REDUCE THE RISK OF ELEC-
TRIC SHOCK, DO NOT REMOVE
COVER. NO USER-SERVICEABLE
PARTS INSIDE. REFER SERVICING
TO QUALIFIED SERVICE PERSON-
NEL.
TO REDUCE THE RISK OF FIRE OR ELECTRIC
SHOCK, DO NOT EXPOSE THIS APPLIANCE TO
RAIN OR MOISTURE.
Important Information for Consumers in
the U.S.
WARNING:

iii
PRODUCT DISPOSAL
This Product utilizes tin-lead solder, and a fluorescent lamp containing a
small amount of mercury. Disposal of these materials may be regulated
due to environmental considerations. For disposal or recycling informa-
tion, please contact your local authorities or the Electronics Industries
Alliance: www.eiae.org.
CAUTION
CAUTION
If the AC adapter is misplaced or
needs to be replaced, obtain the
same type of adapter from a
SHARP service center or your
local dealer.
BATTERY DISPOSAL
CONTAINS LITHIUM-ION RECHARGEABLE BATTERY. MUST BE
RECYCLED OR DISPOSED OF PROPERLY. CONTACT LOCAL AGEN-
CIES FOR INFORMATION ON RECYCLING AND DISPOSAL PLANS IN
YOUR AREA.
TO PREVENT ELECTRIC
SHOCK, MATCH WIDE BLADE
OF PLUG TO WIDE SLOT, FULLY
INSERT.
(applies to the supplied AC adapter)
CAUTION ON LITHIUM BATTERY
(for Camcorder and Remote Control unit)
If a battery is reversed (positive end where the negative end belongs
and vice versa), it can overheat and rupture. This has happened when
young children install batteries backwards. Warn children
not
to take out
batteries or install them.
Parents should install the lithium battery in the
camcorder.
COPYRIGHT WARNING: It is the intent of SHARP that this unit be used in full com-
pliance with the copyright laws of the United States and
that prior permission be obtained from copyright owners
whenever necessary.

iv
WARNINGCFCC Regulations state that any unauthorized changes
or modifications to this equipment not expressly approved by the manu-
facturer could void the user’s authority to operate this equipment.
INFORMATION
This equipment has been tested and found to comply with the limits for a
Class B digital device, pursuant to Part 15 of the FCC Rules. These limits
are designed to provide reasonable protection against harmful interfer-
ence in a residential installation. This equipment generates, uses, and
can radiate radio frequency energy and, if not installed and used in ac-
cordance with the instructions, may cause harmful interference to radio
communications. However, there is no guarantee that interference will
not occur in a particular installation. If this equipment does cause harm-
ful interference to radio or television reception, which can be determined
by turning the equipment off and on, the user is encouraged to try to cor-
rect the interference by one or more of the following measures:
CReorient or relocate the receiving antenna.
CIncrease the separation between the equipment and receiver.
CConnect the equipment into an outlet on a circuit different from that to
which the receiver is connected.
CConsult the dealer or an experienced radio/TV technician for help.
DECLARATION OF CONFORMITY
Sharp Camcorder, Model VL-Z7U
This device complies with Part 15 of the FCC Rules. Operation is subject to
the following two conditions: (1) This device may not cause harmful interfer-
ence, and (2) this device must accept any interference received, including
interference that may cause undesired operation.
RESPONSIBLE PARTY:
SHARP ELECTRONICS CORPORATION
Sharp Plaza, Mahwah, New Jersey 07430
Phone: 1-800-BE-SHARP
Trademarks
• Microsoft and Windows are either registered trademarks or trademarks of Microsoft
Corporation in the United States and/or other countries.
• DPOF is a trademark of CANON INC., Eastman Kodak Company, Fuji Photo Film
Co., Ltd. and Matsushita Electric Industrial Co., Ltd.
• All other brand or product names are registered trademarks or trademarks of their
respective holders.
NOTE
The LCD panel of this camcorder is a very high technology product with more than
215,000 thin-film transistors*, giving you fine picture detail. Occasionally, a pixel may ap-
pear on the screen as a fixed point of blue, green, red, or black. Please note that this
does not affect your camcorder’s performance.
*Specifications are subject to change without notice.
v
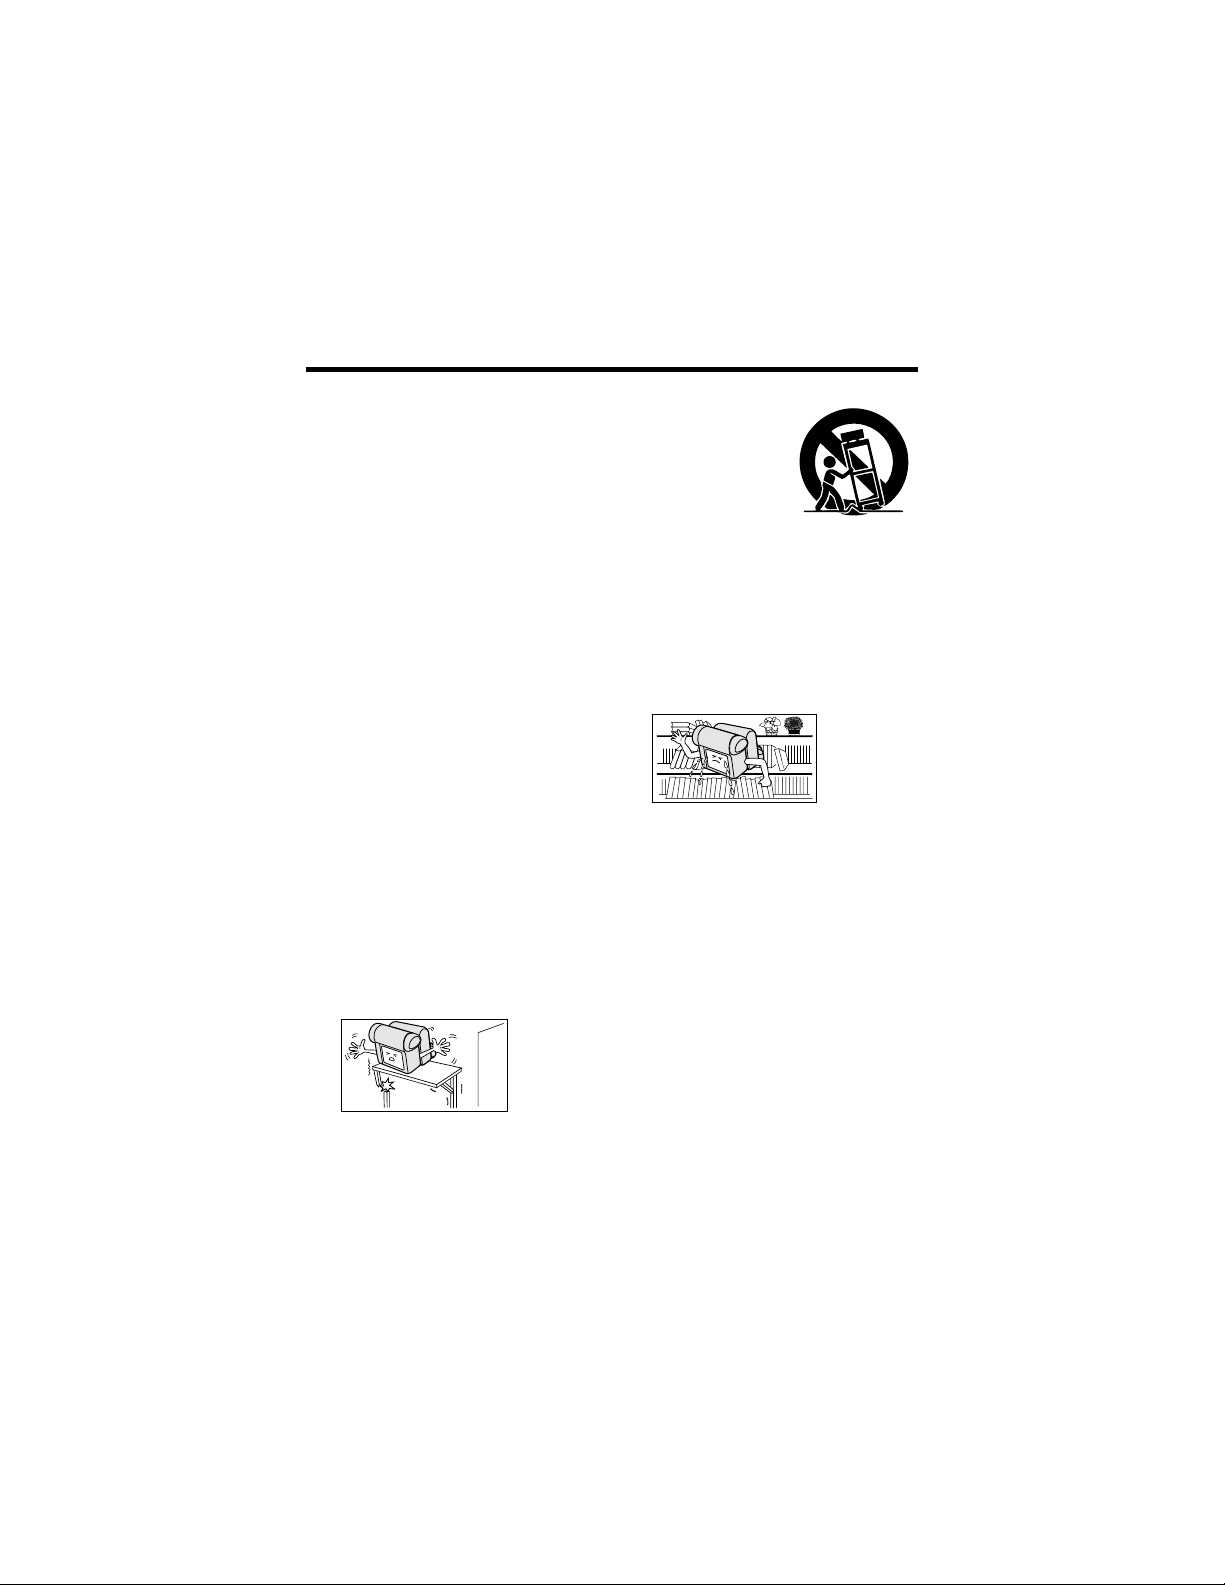
9. A product and
cart combination
should be
moved with care.
Quick stops,
excessive force,
and uneven
surfaces may cause the product
and cart combination to overturn.
10. VentilationCSlots and openings in
the cabinet are provided for
ventilation and to ensure reliable
operation of the product and to
protect it from overheating, and
these openings must not be
blocked or covered. The openings
should
never be
blocked by
placing the
product on
a bed,
sofa, rug, or other similar surface.
This product should not be placed
in a built-in installation such as a
bookcase or rack unless proper
ventilation is provided or the
manufacturer’s instructions have
been adhered to.
11. Power SourcesCThis product
should be operated only from the
type of power source indicated on
the marking label. If you are not
sure of the type of power supply to
your home, consult your product
dealer or local power company.
For products intended to operate
from battery power, or other
sources, refer to the operating
instructions.
1. Read InstructionsCAll the safety
and operating instructions should
be read before the product is
operated.
2. Retain InstructionsCThe safety
and operating instructions should
be retained for future reference.
3. Heed WarningsCAll warnings on
the product and in the operating
instructions should be adhered to.
4. Follow InstructionsCAll operating
and use instructions should be
followed.
5. CleaningCUnplug this product
from the wall outlet before
cleaning. Do not use liquid
cleaners or aerosol cleaners. Use
a damp cloth for cleaning.
6. AttachmentsCDo not use attach-
ments not recommended by the
product manufacturer as they may
cause hazards.
7. Water and MoistureCDo not use
this product near waterCfor
example, near a bath tub, wash
bowl, kitchen sink, or laundry tub;
in a wet basement; or near a
swimming pool; and the like.
8. AccessoriesCDo not place this
product on an unstable cart,
stand, tripod, bracket, or table.
The product may fall, causing
serious
injury to a
child or
adult, and
serious
damage to
the product. Use only with a cart,
stand, tripod, bracket, or table
recommended by the manu-
facturer, or sold with the product.
Any mounting of the product
should follow the manufacturer’s
instructions, and should use a
mounting accessory recom-
mended by the manufacturer.
IMPORTANT SAFEGUARDS

vi
12. Grounding or PolarizationCThis
product may be equipped with a
polarized alternating-current line
plug (a plug having one blade
wider than the other). This plug
will fit into the power outlet only
one way. This is a safety feature. If
you are unable to insert the plug
fully into the outlet, try reversing
the plug. If the plug should still fail
to fit, contact your electrician to
replace your obsolete outlet. Do
not defeat the safety purpose of
the polarized plug.
13. Power-Cord ProtectionCPower-
supply cords should be routed so
that they are not likely to be
walked on or pinched by items
placed upon or against them,
paying particular attention to
cords at plugs, convenience
receptacles, and the point where
they exit from the product.
14. LightningCFor added protection
for this product during a lightning
storm, or when it is left unattended
and unused for long periods of
time, unplug it from the wall outlet
and disconnect the antenna or
cable system. This will prevent
damage to the product due to
lightning and power-line surges.
15. Power LinesCAn outside antenna
system should not be located in
the vicinity of overhead power
lines or other electric light or
power circuits, or where it can fall
into such power lines or circuits.
When installing an outside
antenna system, extreme care
should be taken to keep from
touching such power lines or
circuits as contact with them might
be fatal.
16. OverloadingCDo not overload
wall outlets, extension cords, or
integral convenience receptacles
as this can result in a risk of fire or
electric shock.
17. Object and Liquid EntryCNever
push objects of any kind into this
product through openings as they
may touch
dangerous
voltage
points or
short-out
parts that
could result in a fire or electric
shock. Never spill liquid of any
kind on the product.
18. ServicingCDo not attempt to
service this product yourself as
opening or removing covers may
expose you to dangerous voltage
or other hazards. Refer all
servicing to qualified service
personnel.

vii
19. Damage Requiring
ServiceCUnplug this product from
the wall outlet and refer servicing
to qualified service personnel
under the following conditions:
a. When the power-supply cord or
plug is damaged,
b. If liquid has been spilled, or
objects have fallen into the
product,
c. If the product has been
exposed to rain or water,
d. If the product does not operate
normally by following the
operating instructions. Adjust
only those controls that are
covered by the operating
instructions as an improper
adjustment of other controls
may result in damage and will
often require extensive work by
a qualified technician to restore
the product to its normal
operation,
e. If the product has been
dropped or damaged in any
way, and
f. When the product exhibits a
distinct change in
performanceCthis indicates a
need for service.
20. Replacement PartsCWhen
replacement parts are required,
be sure the service technician has
used replacement parts specified
by the manufacturer or have the
same characteristics as the
original part. Unauthorized
substitutions may result in fire,
electric shock, or other hazards.
21. Safety CheckCUpon completion
of any service or repairs to this
product, ask the service techni-
cian to perform safety checks to
determine that the product is in
proper operating condition.
22. Wall or Ceiling MountingCThe
product should be mounted to a
wall or ceiling only as recom-
mended by the manufacturer.
23. HeatCThe product should be
situated away from heat sources
such as radiators, heat registers,
stoves, or other products (includ-
ing amplifiers) that produce heat.

viii
Part Names ............................................................. 1
Warning Indicators ..................................................4
Operation References
Preparation
Basic Operations
Attaching and Removing the Battery Pack ............. 6
Charging the Battery Pack ...................................... 8
Powering the Camcorder from an AC Outlet ..........9
Inserting and Removing a Cassette ..................... 10
Inserting and Removing a Card ............................ 11
Installing the Lithium Batteries .............................. 12
Setting the Date and Time .................................... 14
Using the Lens Cap ..............................................15
Adjusting the Hand Strap ..................................... 16
Using the Grip ....................................................... 16
Detaching the Lens Hood ..................................... 17
Using the Viewfinder ............................................. 17
Using the LCD Monitor ......................................... 19
Tips on Recording Positions ................................. 20
Camera Recording
Selecting the Camcorder Mode ............................ 21
Easy Camera Recording on Tape in Full Auto Mode ..
22
Zooming ................................................................ 23
Power Standby Mode ........................................... 24
Turning on/off the Backlight ..................................24
Auto Focus ............................................................ 25
Macro Shots .......................................................... 25
Remaining Recording Time Display ..................... 26
Remaining Battery Power Display ........................ 26
Playback
Tape Playback ......................................................27
Volume Control ......................................................28
Still ........................................................................ 28
Video Search .........................................................28
Using Earphones (Commercially Available) ......... 29
Adjusting the Phones Volume ............................... 29
Watching Playback on a TV ..................................30
Contents
Supplied Accessories ........................................................................................ xi
Optional Accessories ......................................................................................... xi
Precautions ....................................................................................................... xii

ix
Useful Features
Control Buttons .....................................................31
Using the Mode Screens ...................................... 31
Using the Menu Screens....................................... 32
Camera Recording
Setting the Digital Zoom ....................................... 33
Backlight Compensation (BLC) ............................ 34
Gain-up .................................................................35
Fade In and Fade Out ........................................... 36
Quick Return .........................................................37
Edit Search............................................................ 38
Still Recording on Tape .........................................38
Digital Image Stabilization (DIS) ........................... 39
Self Recording ...................................................... 40
Wide Screen (16:9) ...............................................42
Recording in LP (Long Play Recording) Mode .....43
Using the Zoom Microphone
(Optional Accessory) .........................................44
Windbreak ............................................................. 45
Selecting the 16-bit Audio Recording Mode......... 46
Playback
Using the Remote Control ..................................... 47
Tape Playback Functions with the Remote
Control ................................................................48
Selecting the Date and Time of Recording
Display................................................................49
Picture Effect Playback .........................................50
Rotate Playback .................................................... 51
Copying an Image from Tape to Card ..................52
Advance Features
Camera Recording
Manual Focus ....................................................... 53
Returning to Auto Focus .......................................54
Displaying the Manual Setting Screen .................. 54
White Balance Lock ..............................................55
Manual Iris ............................................................ 56
Manual Gain .......................................................... 57
Setting the Camcorder to Full Auto Mode............. 58
Scene Menu (Program AE) ................................... 59
x
Advanced Features
Playback
Using the Time Code ............................................60
Editing ................................................................... 61
Recording from an External Source ...................... 62
Editing with the DV Terminal (IEEE1394) .............. 64
Using the Camcorder as a Converter ................... 66
Audio Dubbing Feature......................................... 68
Selecting the Audio Playback Mode ..................... 70
Digital Still Camera
Features
Camera Recording
Selecting the Picture Quality and Image Size....... 71
Card Recording ....................................................73
Selecting the Flash Mode .....................................74
Red-eye Reduction ...............................................75
Recording with the Self-timer ................................ 76
Formatting a Card ................................................. 77
Setting the File Numbering Method ...................... 78
Playback
Card Playback ...................................................... 79
Playback Zoom .....................................................80
Delete Protection................................................... 81
Deleting Stored Images ........................................82
Print Order............................................................. 84
Transferring Data on Card to Computer ............... 86
Installing the USB Driver ...................................86
Slide Show Playback ............................................ 89
Appendix
Picture/Backlight Adjustments .............................. 90
Turning off the Confirmation Sound ...................... 91
Selecting the Language for the Information
Display................................................................92
Setting the Camcorder to Factory Presettings ...... 93
Demonstration Mode ............................................ 94
Useful Information ................................................. 95
Troubleshooting .................................................. 101
Specifications ..................................................... 105
On-screen Display Index ....................................106
Note:
• Before requesting service, please read “Troubleshooting” carefully. (See pages
101–104.)
• Guía de operación rápida en español ................................................................. 110
Contents
xi
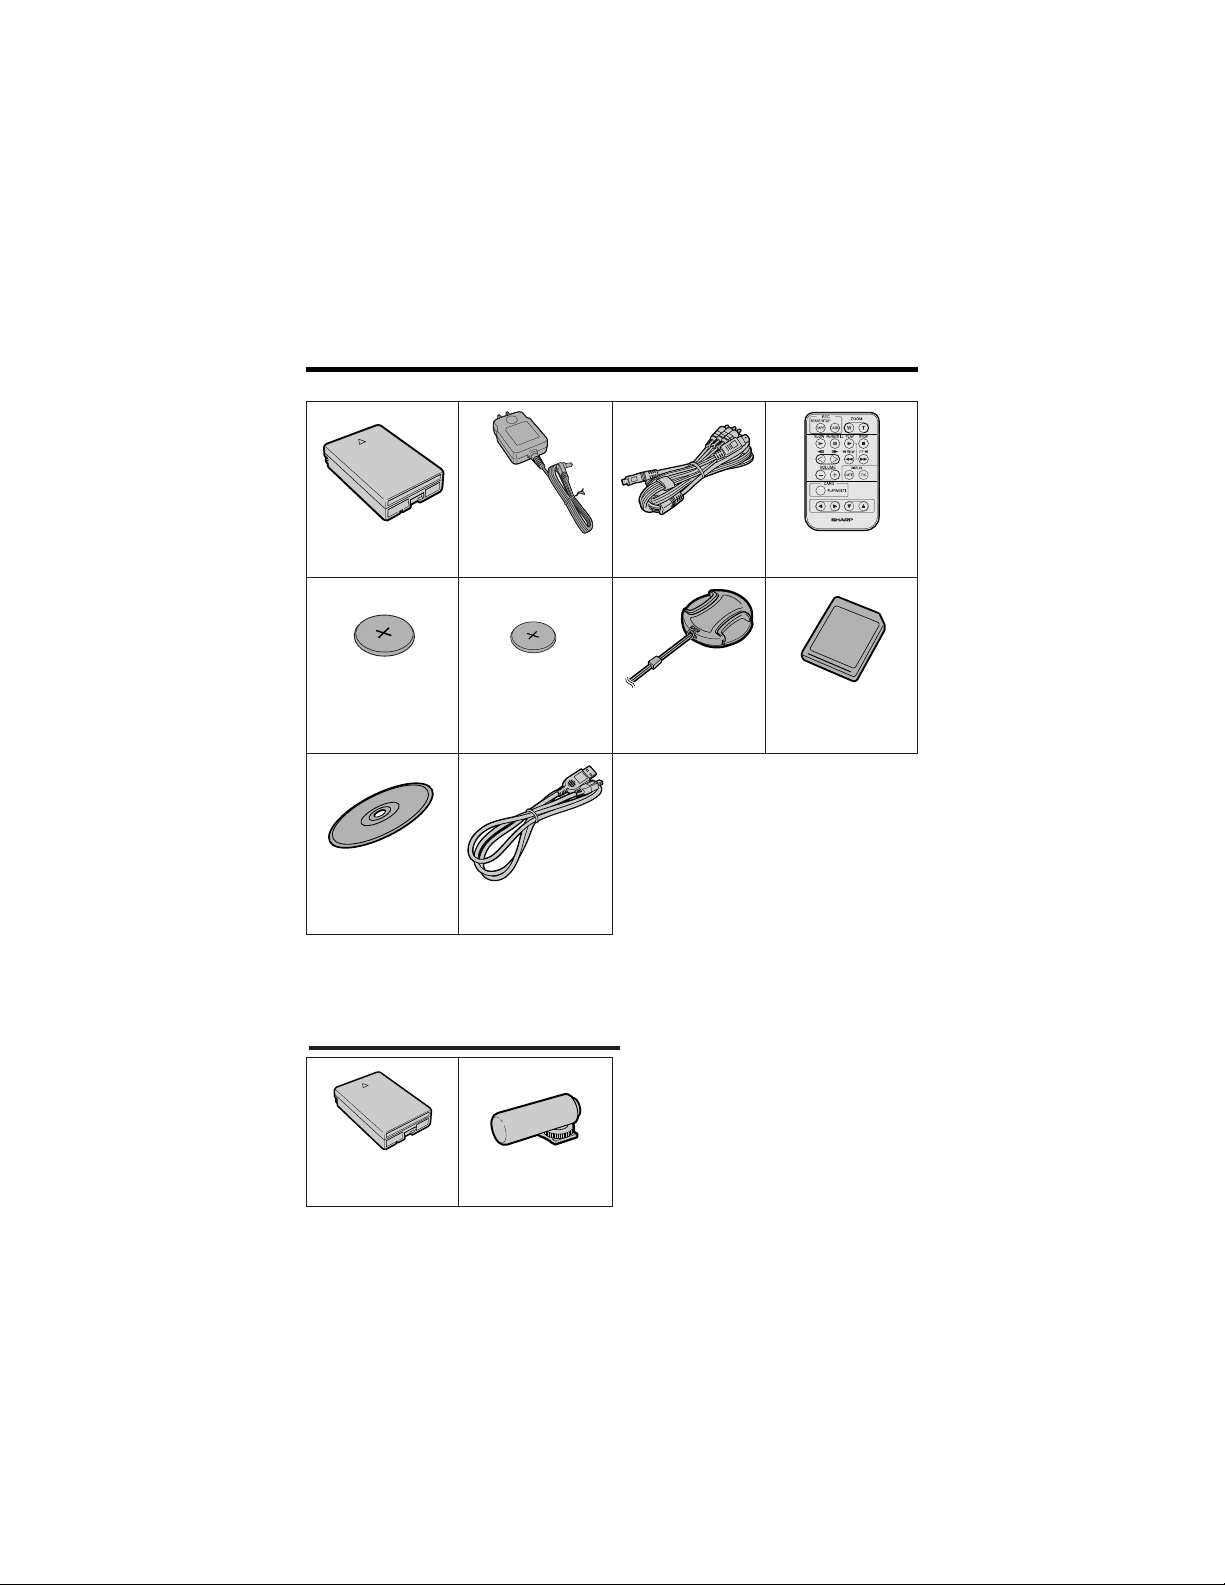
Supplied Accessories
Battery pack
BT-L226U*
AC adapter
UADP-0339TAZZ*
Audio/video/S-video
cable
QCNW-B173WJZZ
CR2025 type
lithium battery
for remote control
CR1216 type
lithium battery
for camcorder
Lens cap
GCOVHA002WJZZ
CD-ROM
CDSKAA028WJ01
8 MB SD Memory Card
Remote control
RRMCGA149WJSA
USB cable
QCNW-A703WJZZ
* The part numbers for the AC adapter and battery pack supplied with this camcorder are valid
only in the U.S. and Latin America. If this camcorder was purchased outside of these areas, the
part numbers may be different. Please refer to the part numbers printed on the labels of the
supplied AC adapter and battery pack.
Standard-life
battery pack
BT-L226U
Zoom microphone
VR-8MCN
Optional Accessories
Note:
• The listed model names are for U.S. accessories.
For optional and additional accessories, contact your local dealer, call the Sharp Accessories
and Supply Center at 1-800-642-2122, or visit SHARP’s website (http://www.sharpusa.com).
xii
Precautions
• Before recording an important scene,
please perform the recording test, then
playback to check if the scene was re-
corded properly. If noise occurs, use a
commercially available cleaning tape to
clean the video heads (see page xiv).
• When the camcorder is not in use, re-
member to remove the cassette tape,
turn off the power, and disconnect the
camcorder from the power source.
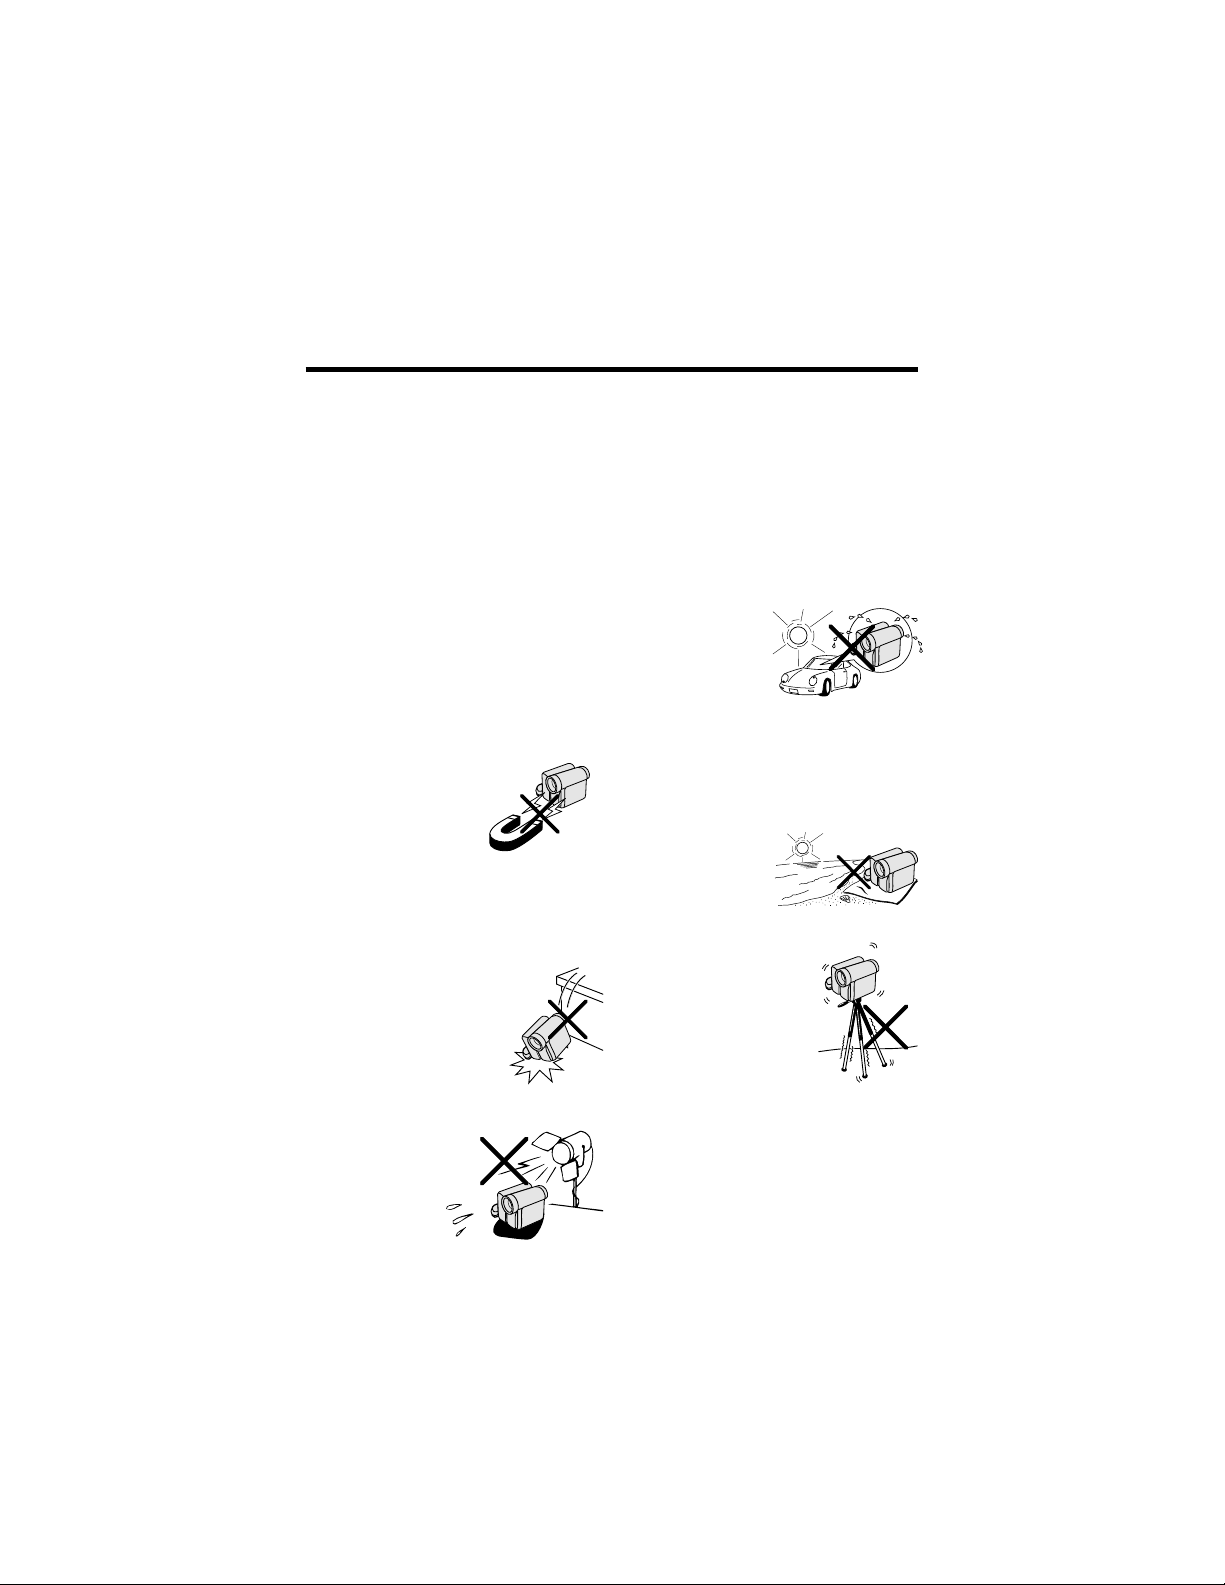
• Do not aim the lens at the sun.
Do not allow direct sunlight to strike the
camcorder lens or LCD monitor screen,
whether or not recording is in progress, as
it may damage the CCD sensor or LCD
screen surface. Be particularly careful
when recording outside.
• Avoid magnetic sources.
Using the camcorder near
strong fluorescent lights,
motors, televisions, or
other magnetic sources
may adversely affect re-
corded images.
• Using the camcorder near a broad-
casting station or other powerful trans-
mission source may cause buzzing or
picture deterioration.
• Avoid shocks and dropping.
Do not drop or otherwise sub-
ject the camcorder to hard
shocks or strong vibrations.
Bumping or striking the unit
during recording will gener-
ate noise in the recorded im-
age.
• Avoid placing the
camcorder in close
proximity to lighting
equipment.
The heat from in-
candescent lights
may deform the
camcorder, or
cause it to malfunction.
• Always respect prohibitions or restric-
tions on the use of electronic equipment
on commercial flights or in other sensi-
tive areas.
• Be aware of the temperature and humid-
ity.
You can use your camcorder at 32°F to
104°F (0°C to L40°C), and at 30% to 80%
relative humidity. Do not store the unit in an
unventilated car in the summer, in direct
sunlight, or near
strong heat
sources; this can
result in severe
damage to the unit
casing and cir-
cuitry.
• Avoid situations where water, sand, dust
or other foreign matter could get on or
inside the camcorder, and do not use or
leave your camcorder in areas with ex-
cessive smoke, steam or moisture.
Such environments can cause malfunc-
tions or cause mil-
dew to form on the
lenses. Be sure to
keep the unit in a
well-ventilated loca-
tion.
• Some small, portable tri-
pods may be difficult to
attach and may not be
sturdy enough to sup-
port your camcorder. Be
sure to use only a
strong, stable tripod.
• When using your camcorder in a cold
environment, the LCD monitor screen of-
ten appears less bright immediately af-
ter the power is turned on. This is not a
malfunction. To prevent the camcorder
from becoming too cold, wrap it in a
thick cloth (a blanket, etc.).
xiii
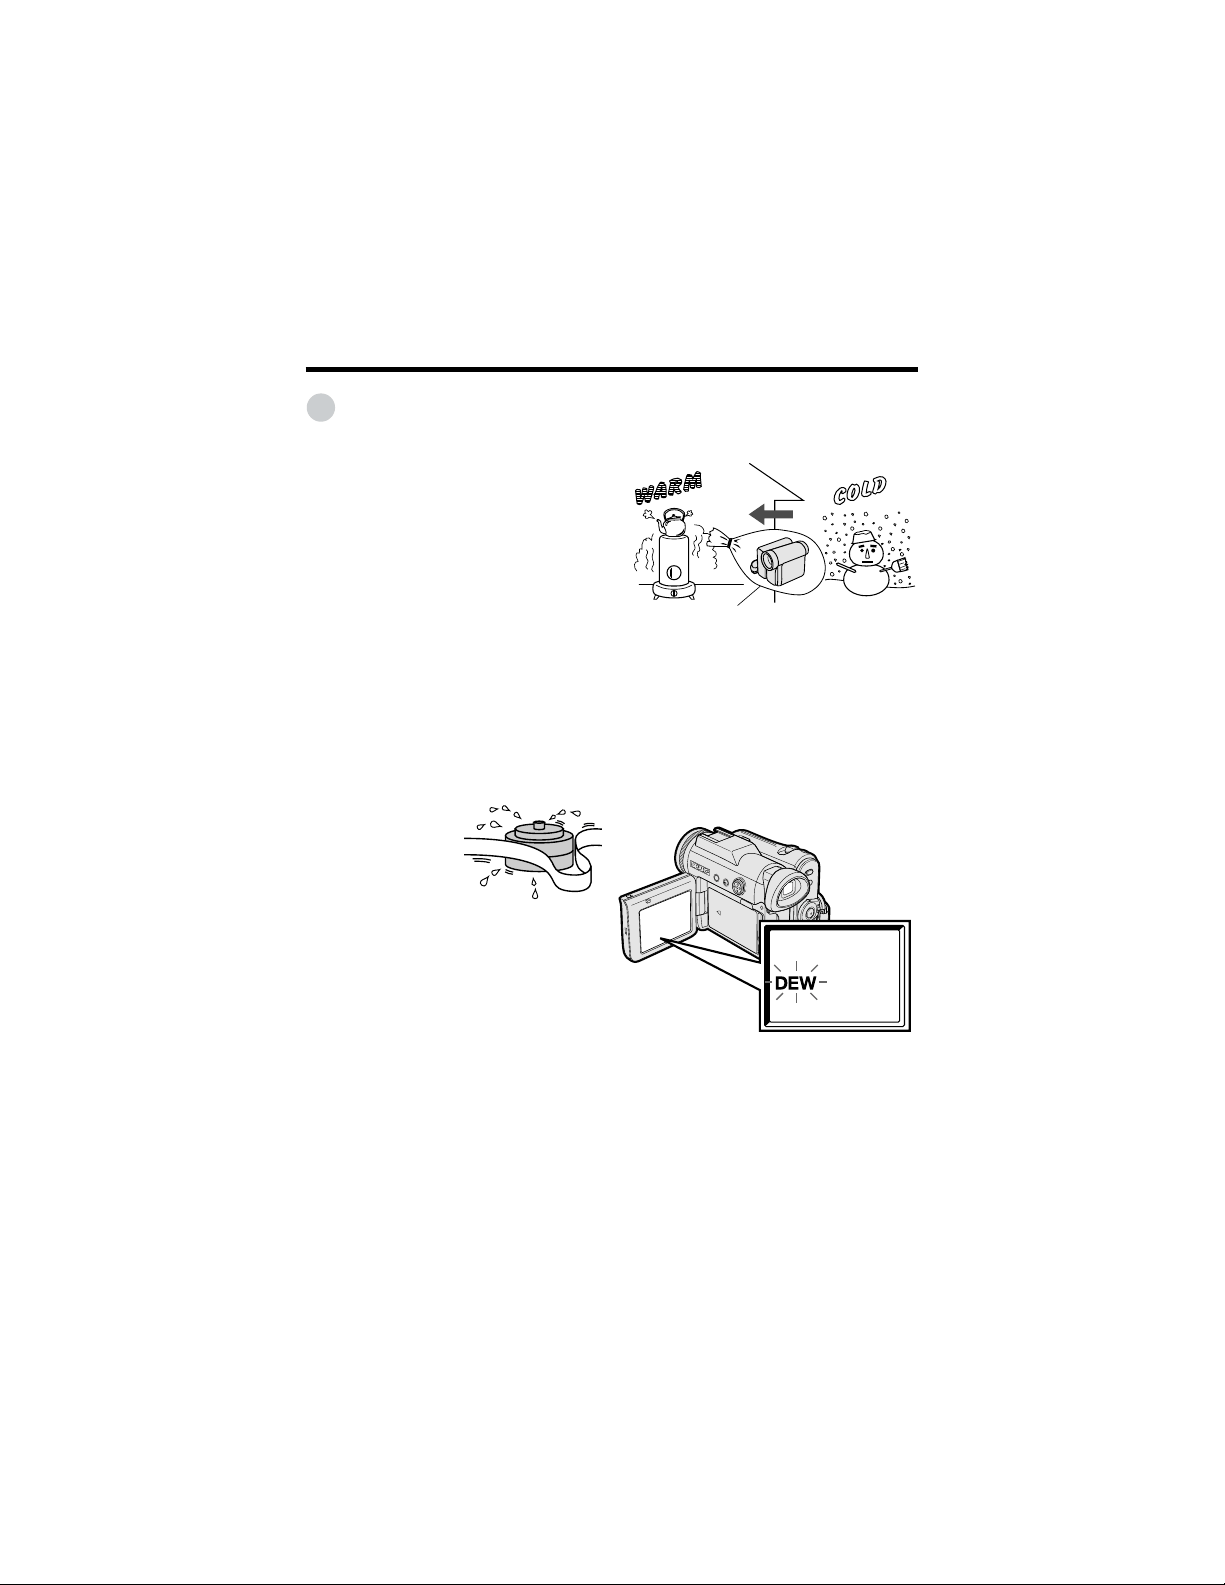
Dew Formation
• What is “dew formation”?
When cold water is poured into a glass,
dew drops form on the glass. This clinging
of water drops is called dew formation.
• When dew forms in your camcorder.
Dew will gradually form on the head drum
of your camcorder and make the video
tape stick to the head. This causes
damage both to the head and the tape.
When dew forms, recording and playback
may not function properly.
Dew is likely to form in the following
circumstances:
—When moving the camcorder from a
cold place to a warm place.
—When placing the camcorder in a cold
room which is then heated rapidly.
—When moving the camcorder outdoors
from an air conditioned room or car.
—When placing the camcorder in the
direct path of air
blowing from an air
conditioner.
—When placing the
camcorder in a
humid room.
• How to prevent trouble.
When using the camcorder in a place
where dew is likely to form, allow the
camcorder and the video tape to
acclimate to the surroundings for about
one hour.
For example, when bringing the
camcorder indoors after skiing, place it in
a plastic bag.
1 Be sure to tightly seal the plastic bag
containing the camcorder.
2 Remove the bag when the air tem-
perature inside it reaches the tempera-
ture of the room.
• “Dew” warning feature
If dew forms, the word “DEW” flashes on
the screen, and the power will automati-
cally turn off in approximately 10 seconds.
Plastic bag
1 If “DEW” flashes, remove the cassette,
leave the cassette compartment open,
and wait for a few hours to allow the
camcorder to acclimate to the
surrounding temperature.
2 To use the camcorder again, turn on the
power after waiting for a few hours. Be
sure that “DEW” has disappeared.
3 Do not insert a cassette while “DEW” is
flashing; this may result in damage to
the tape.
4 Since dew forms gradually, it may take
10 to 15 minutes before the dew
warning feature engages.
xiv
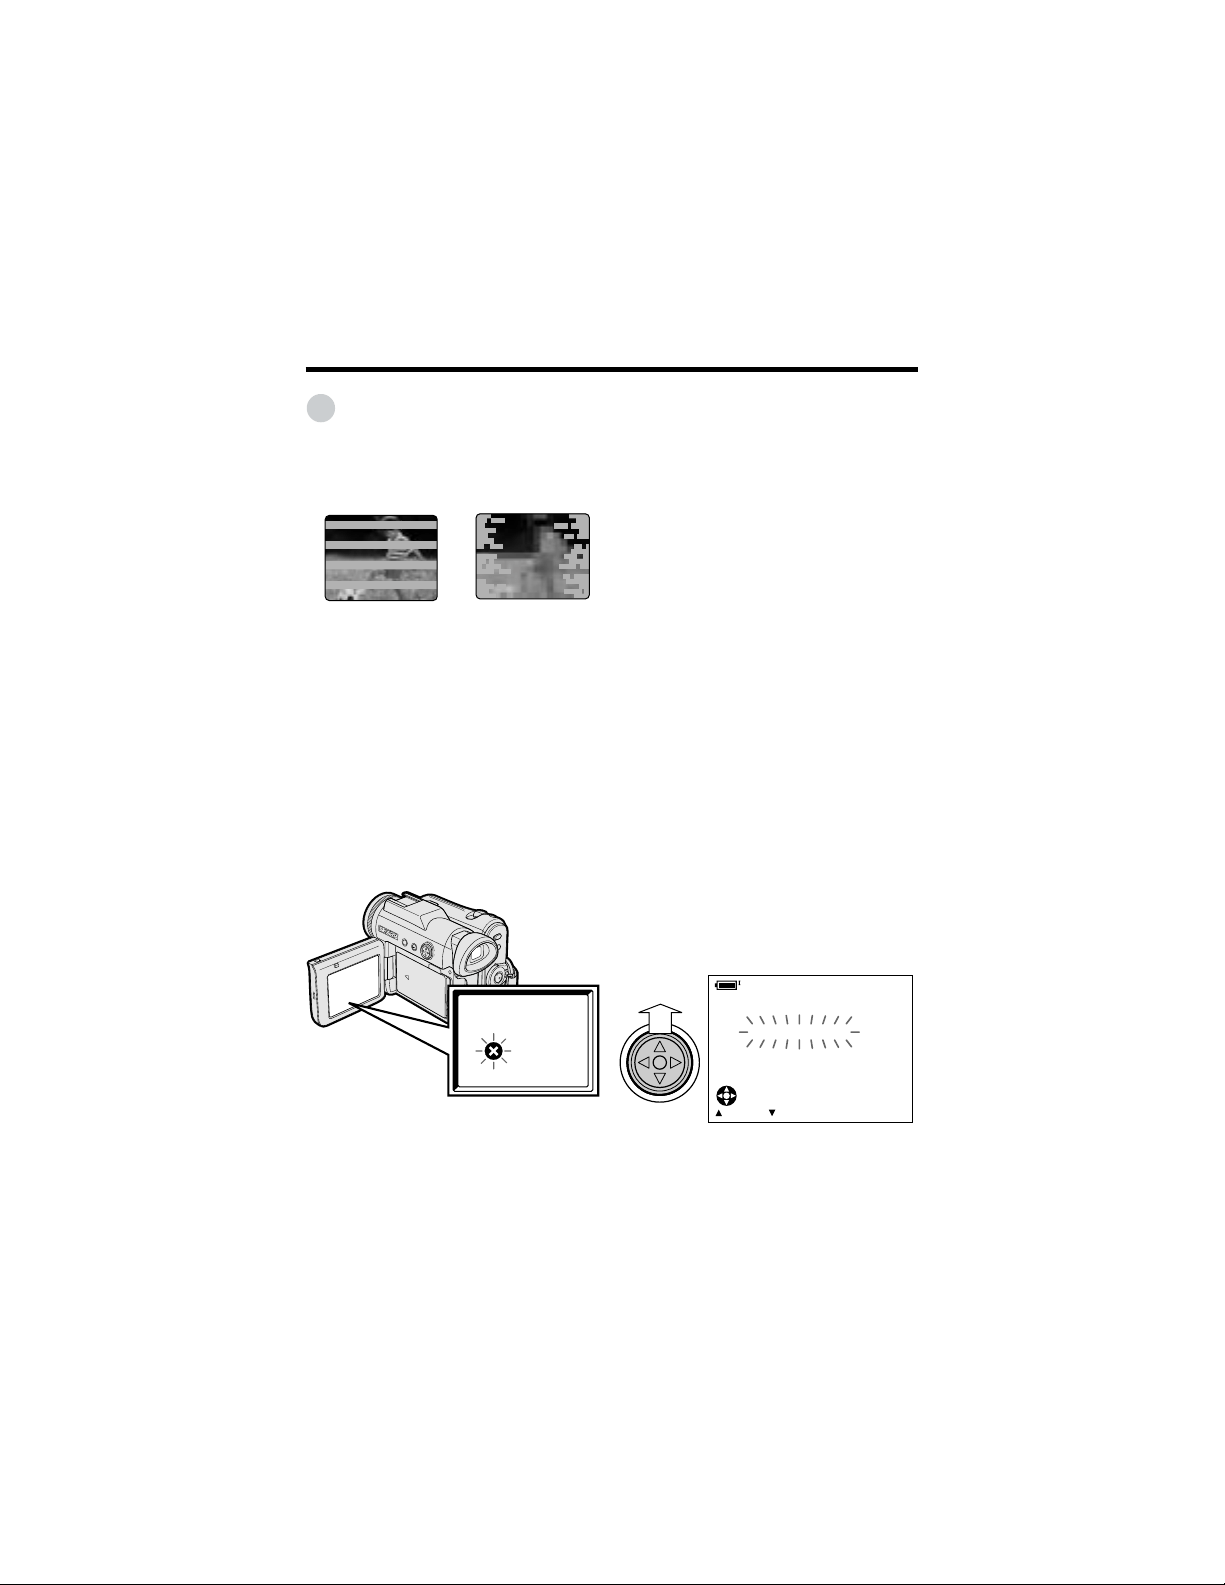
Dirty Video Heads
When the video heads have become
clogged with dirt (dust and tape coating
particles),
• mosaic-like noise appears on the
playback picture. (See illustrations above.)
• playback pictures do not move.
• during playback, the whole screen
becomes blue.
Using a Cleaning Tape (Commer-
cially Available)
Available mode:
Tape Playback
You can clean the video head with a
commercially available cleaning tape.
Notes:
• Excessive use of the cleaning tape may
cause damage to the video heads. Please
read the instructions accompanying the
cleaning tape carefully before using it.
• The fast forward and rewind functions cannot
be used when the cleaning tape is in the
camcorder.
• If the video heads again become clogged
with dirt soon after cleaning, this might be
caused by a damaged tape. In this case,
stop using that cassette immediately.
1 Insert a cleaning tape into the
camcorder.
2 Set the camcorder to Tape Playback
mode.
• The video head cleaning screen
appears.
3 Press m on the Operation button to
begin video head cleaning.
• “NOW CLEANING” flashes during
cleaning.
• After about 20 seconds, video head
cleaning automatically finishes, and
“EJECT THE CASSETTE.” displays.
4 Remove the cleaning tape.
To cancel cleaning, press l.
Causes of video head clogging
• High-temperature and high-humidity
environment
• A lot of dust in the air
• Damaged tape
• Worn tape
• Long-time use
• Dew formation
If the video heads become clogged, the
v indicator appears on the screen. Contact
the nearest SHARP service center or your
dealer for further advice.
Precautions
STOPSTART
CLEANING
CLEANINGNOW
Striped noise
Mosaic noise
1
Operation References
Operation References
Part Names
For details on the use of each part, refer to the page number indicated in
parentheses.
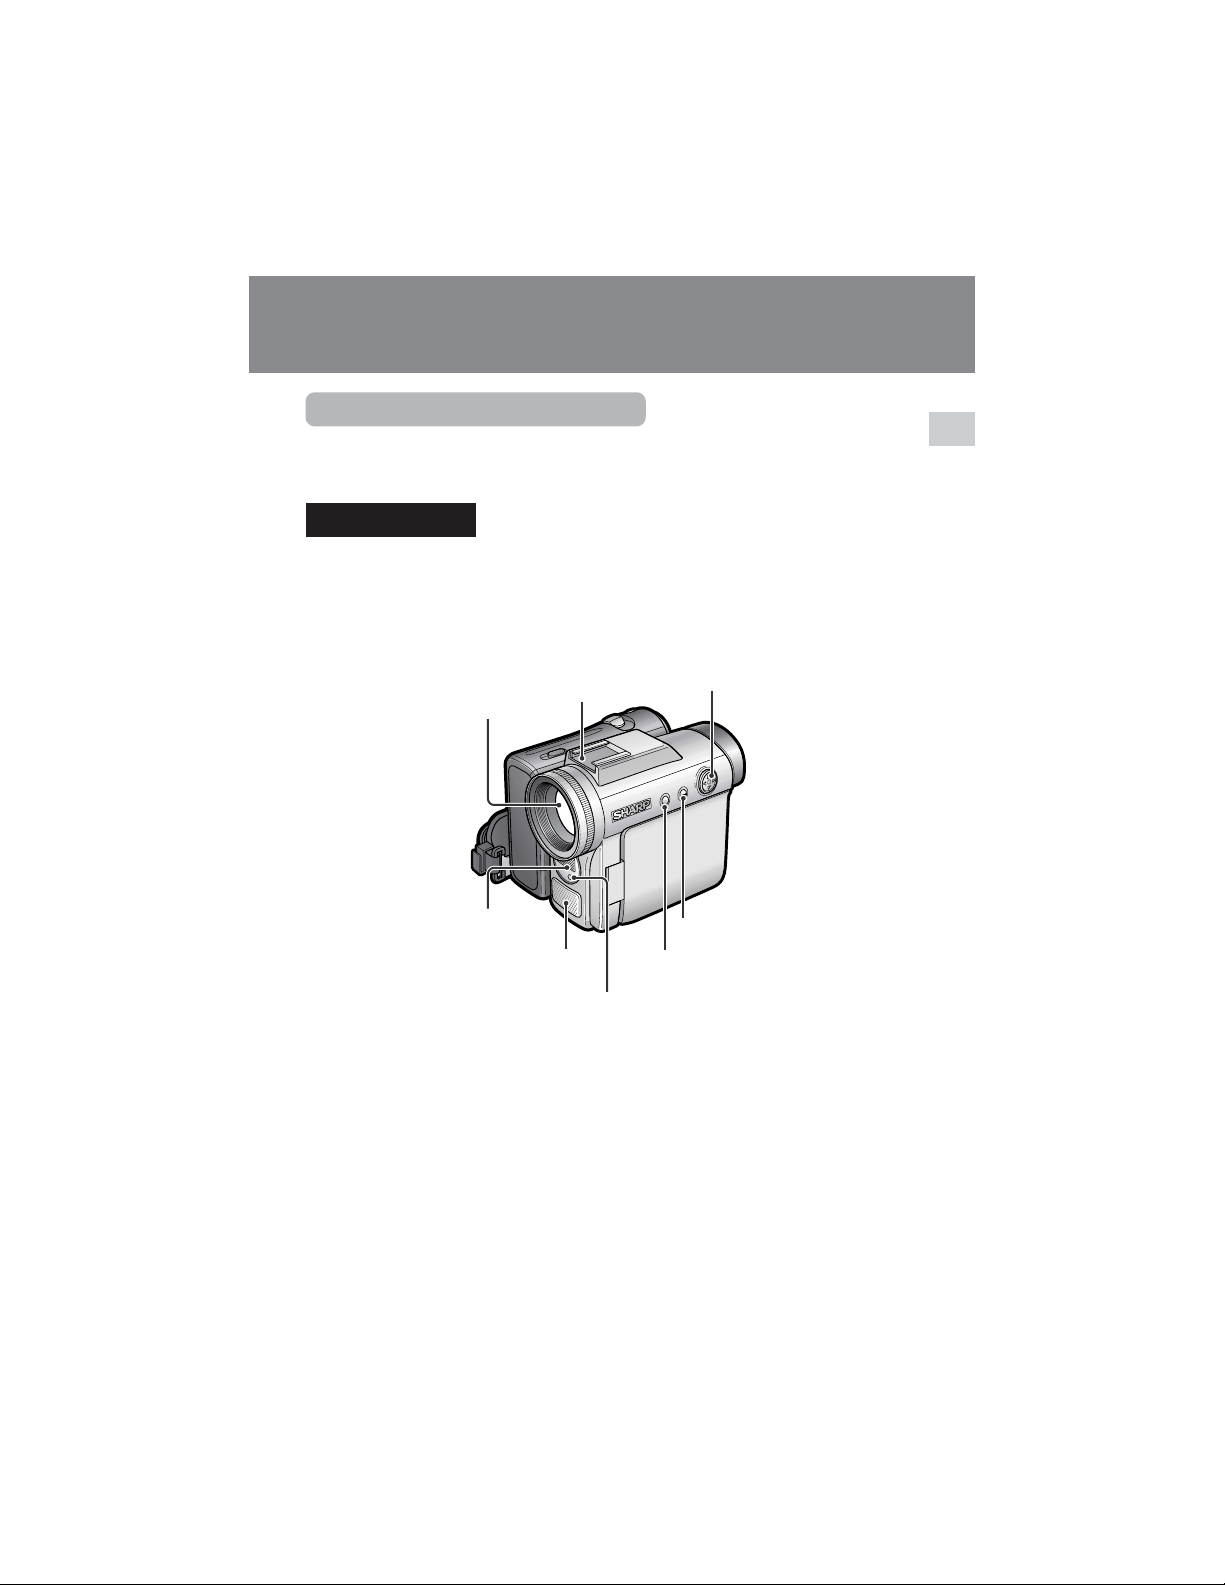
Front view
Zoom lens
DISPLAY button (p. 31)
Operation button (p. 31)
Flash (p. 74)
Zoom microphone
shoe (p. 44)
Stereo microphone
LCD LAMP button (p. 24)
Flash sensor (p. 74)
2
Operation References
Operation References
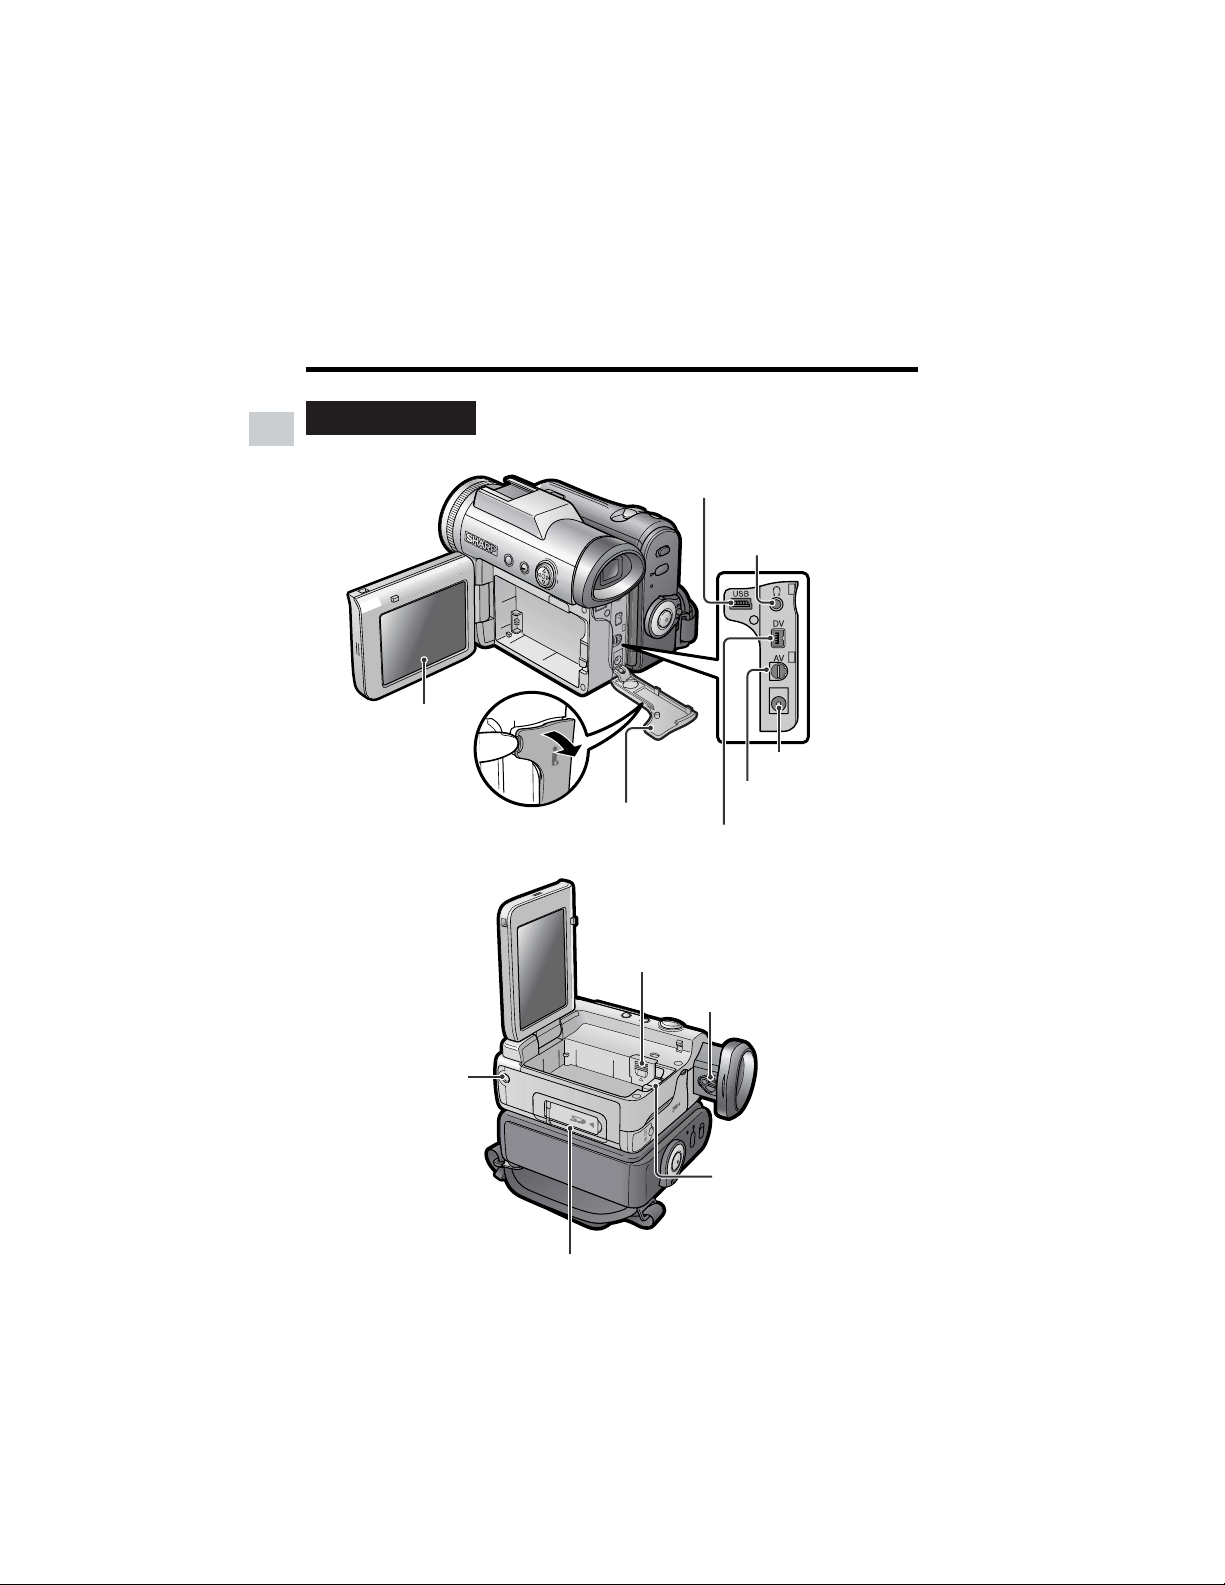
Lithium battery cover (p. 12)
Tripod socket*
Card slot cover (p. 11)
Left view
Diopter adjustment dial (p. 18)
Battery release (pp. 7, 12)
* When attaching a tripod
with a guide pin, do not
attach the pin to the bottom
of the camcorder.
LCD monitor
(p. 19)
Earphones jack
(p. 29)
DV terminal (pp. 64, 66)
USB terminal (p. 87)
DC IN jack (pp. 8, 9)
AV terminal
(pp. 30, 61, 62, 66)
Terminal cover
(pp. 29, 30, 61, 62, 64, 66, 87)
3
Operation References
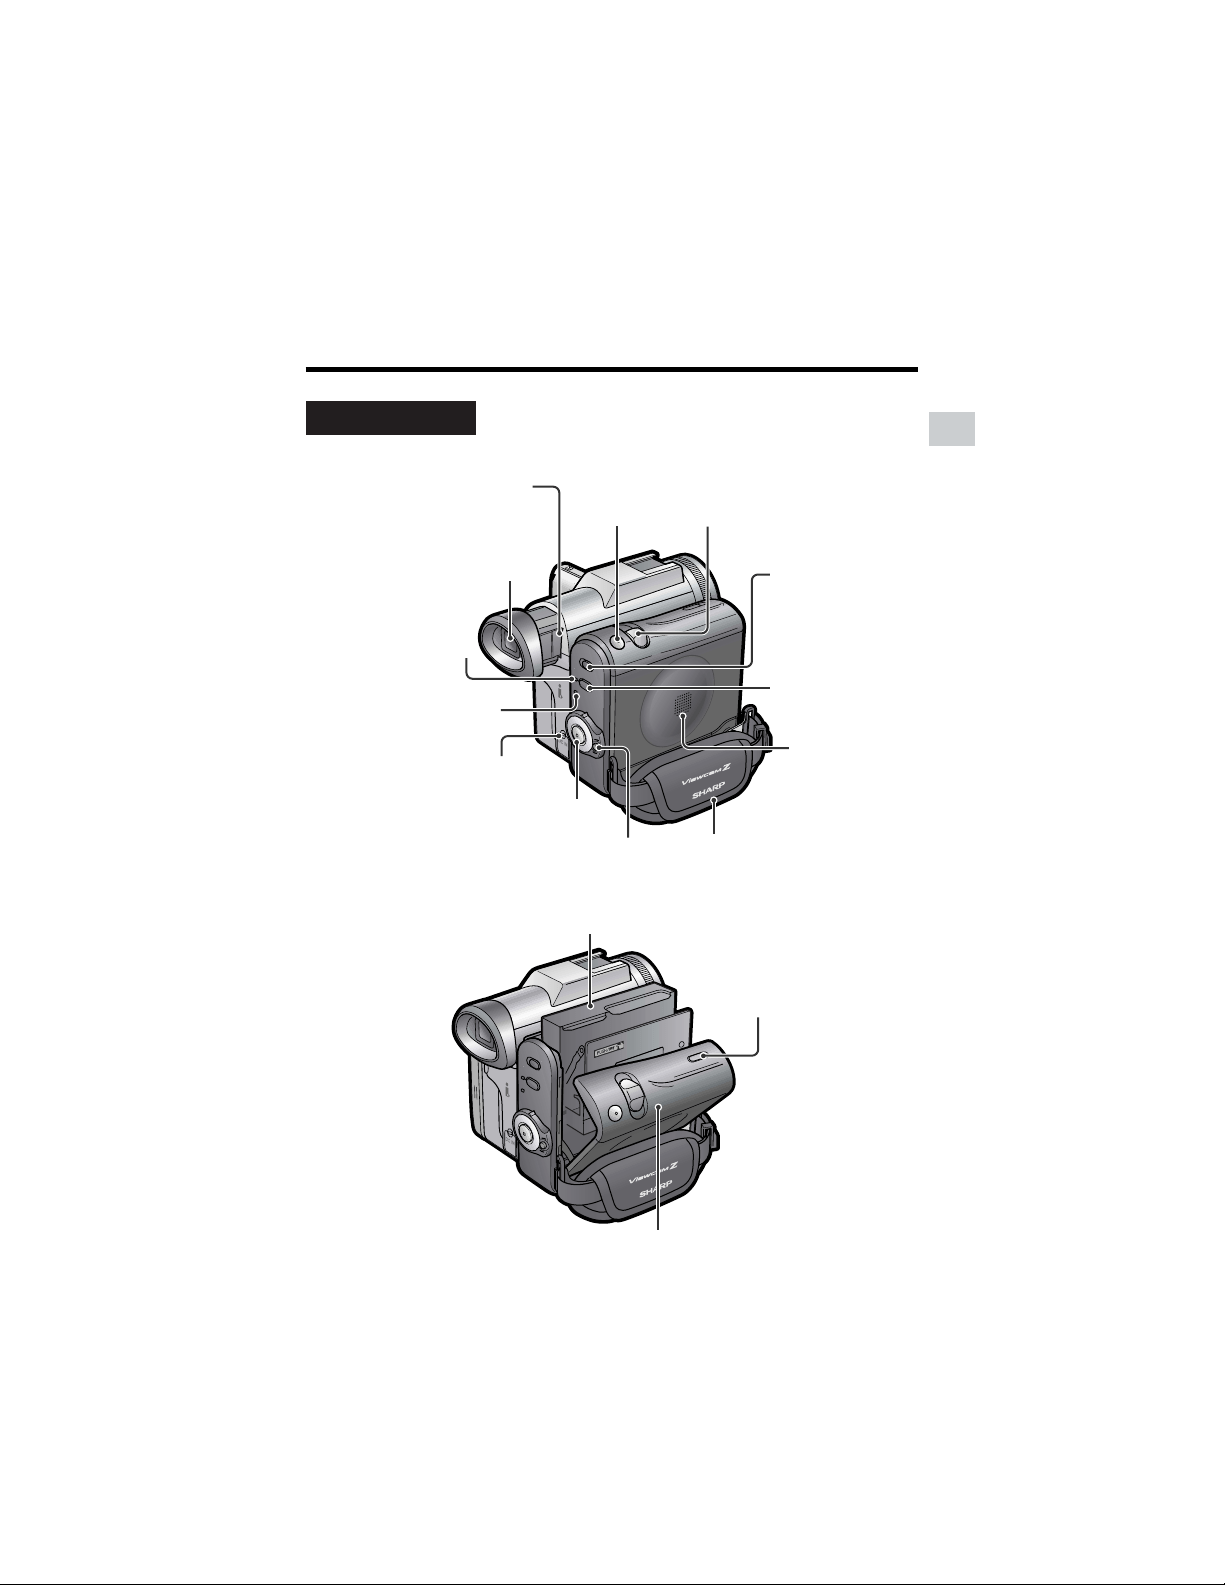
Viewfinder (pp. 17, 18)
Power Zoom Wide angle/
Telephoto control (p. 23)/
VOLume control (p. 28)
Media Selection
switch (V Tape
mode/u Card
mode selection
switch) (p. 21)
Start/Stop button
(p. 22)
PHOTO button
(pp. 38, 52, 73)
Power switch (v Camera
Recording mode/w Playback
mode select switch) (p. 21)
STANDBY button
(p. 24)
STANDBY indicator
(p. 24)
POWER/CHARGE
(RED) indicator
(pp. 8, 9, 22)
DC IN jack cover
(pp. 8, 9)
Cassette holder (p. 10)
Cassette compartment
door release (p. 10)
Cassette compartment door (p. 10)
Right view
Hand strap (p. 16)
Speaker
Window cleaning cover
(p. 99)

4
Operation References
Operation References
Warning Indicators
If a warning indicator appears on the screen, follow the specified instructions.
Displayed for the
first 3 seconds
Displayed after
3 seconds
Description of warning
There is no video cassette in the camcorder.
Insert a cassette (see page 10).
INSERT
A CASSETTE.
BATTERY IS
TOO LOW.
PROTECT. TAB
CHANGE THE
CASSETTE.
EJECT THE
CASSETTE.
EJECT THE
CASSETTE.
CASSETTE NOT
RECORDABLE.
The video cassette is defective and should be
removed (see page 10).
The erasure protect tab on the video cassette
has been slid to the record-protect position,
preventing recording (see page 96).
The tape is about to end. Prepare a new
cassette.
THE
ENDS SOON.
TAPE
DEW
LAMP
LAMP
DEW
The tape has reached the end. Replace it with a
new cassette (see page 10).
The battery is almost depleted. Replace it with
a fully charged battery pack (see pages 6 and
7).
Dew has formed inside the camcorder. Wait a
few hours for the dew to dry away (see page
xiii).
About 10 seconds after this warning appears,
the camcorder automatically turns off.
The video heads are clogged and should be
cleaned (see page xiv).
The fluorescent lamp behind the LCD monitor is
close to the end of its service life. Call your local
authorized Sharp dealer to have it replaced.
TAPE END
TAPE END
The battery is almost depleted when the
camcorder transfers data through the USB
cable. Use the AC adapter or fully charged
battery pack as the power source (see pages
6–9, 88).
USB
USB

5
Operation References
Note:
• N indicates a flashing display.
Displayed for
5 seconds
Description of warning
The card is not inserted or is inserted improperly. Check that it is
properly inserted (see page 11).
The capacity of the card is full and cannot store any more images.
Delete unnecessary images (see page 82) or replace the card with
a new one (see page 11).
The card has no images recorded in the format the camcorder can
recognize.
The images in the card are corrupted or recorded in a format
which is not compatible with this camcorder. Format the card to
use it with this camcorder (see page 77)*.
The card has not been formatted with this camcorder. Format the
card (see page 77)*.
The card is write-protected (see page 11).
You are trying to delete a protected image. Cancel the protection
setting (see page 81).
The selected image cannot be read by this camcorder. Format the
card to use it with this camcorder (see page 77)*.
The card cannot record any data due to a problem with the card or
data on the card. Replace the card (see page 11).
NO
MEMORY CARD
MEMORY
FULL
CARD
NO DATA ON
MEMORY CARD
MEMORY CARD
ERROR
FORMAT
MEMORY CARD
MEMORY CARD
PROTECTED
PROTECTED
DATA
MEMORY CARD
READ ERROR
CANNOT
STORE DATA
The camcorder cannot record with the Start/Stop button in Card
Recording mode. Press the PHOTO button (see page 73).
PLEASE USE
PHOTO BUTTON
The print order cannot be set to more than 999 images.
MAX I MUM
999 IMAGES
You cannot record any image with a file number bigger than 999–
9999. Set FILE NO. menu item to “RESET” (see page 78), then
format the card (see page 77)* or replace the card with a new one
(see page 11).
* Formatting a card erases all stored images, including delete-protected images. Be sure to
backup important data on your computer or other media before formatting the card.
MAX I MUM
F I LE NUMBER
6
Preparation
Preparation
Preparation
Attaching and
Removing the Battery
Pack
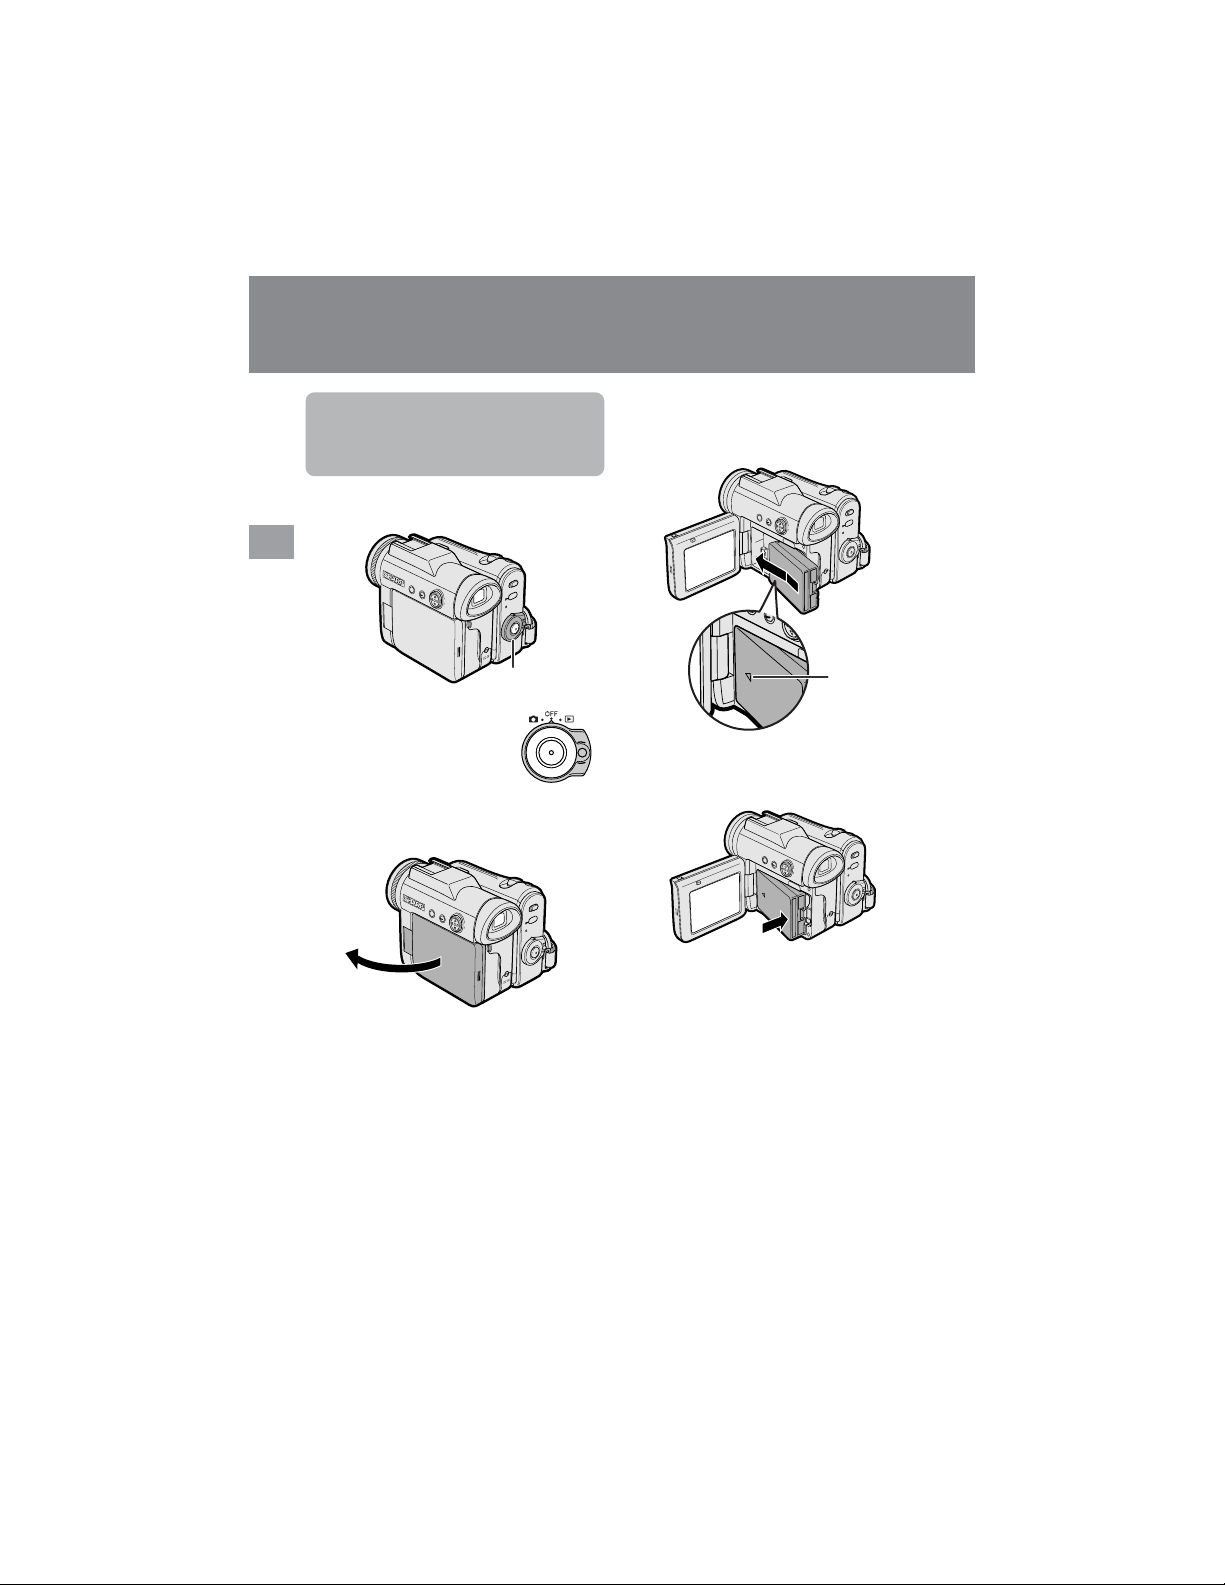
Attaching
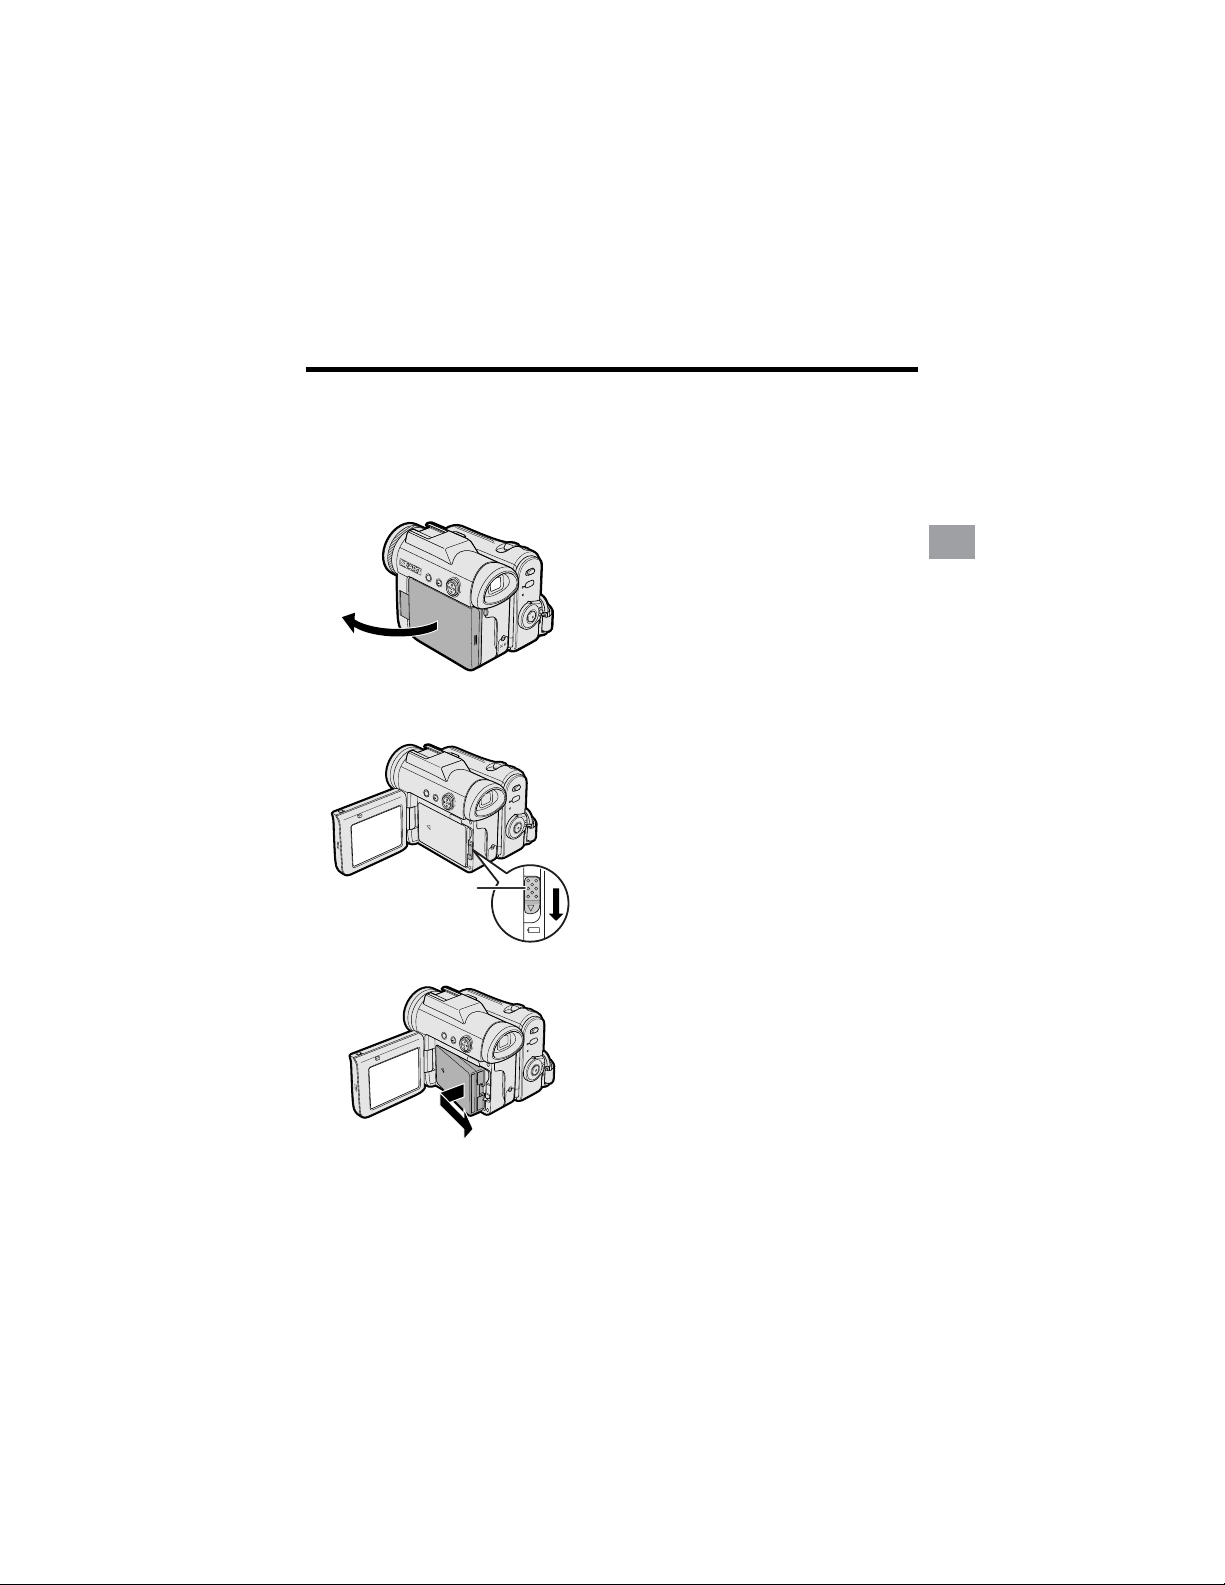
1 Make sure that the Power
switch is set to OFF.
2 Open the LCD monitor to a 90° angle
to the camcorder body.
3 Slide the battery pack in the direction
of the arrow with the “m” mark facing
out.
4 Push the battery pack in the direction
of the arrow until it clicks.
90˚
Power switch
“m” mark
7
Preparation
Removing
1 Make sure that the Power switch is
set to OFF, then open the LCD
monitor to a 90° angle to the
camcorder body.
90˚
2 Slide the battery release in the
direction of the arrow.
3 Take the battery pack out.
Notes:
• BEFORE REMOVING THE BATTERY PACK,
ALWAYS STOP RECORDING OR PLAY-
BACK AND TURN THE POWER OFF.
Removing the battery pack while shooting or
during playback may damage the tape by
causing it to wrap around the video head
drum or destroy the card, rendering it
unreadable and unwritable.
• Remove the battery pack from the camcorder
if you will not use the camcorder for a long
period of time.
• Make sure that the battery pack is firmly
attached during operation. If it is not, the
battery pack may come off or camcorder
operation may fail because of the poor
contact pressure.
• To prevent damage to the battery pack when
removing, be sure to firmly hold the battery
pack while pressing the release.
• Use only SHARP model BT-L226 battery
packs with this camcorder. Use of other
batteries may create a risk of fire or
explosion.
• Before closing the LCD monitor, make sure
the battery pack is properly attached to the
camcorder, otherwise the monitor may be
damaged.
Battery release
8
Preparation
Preparation
Charging the Battery
Pack
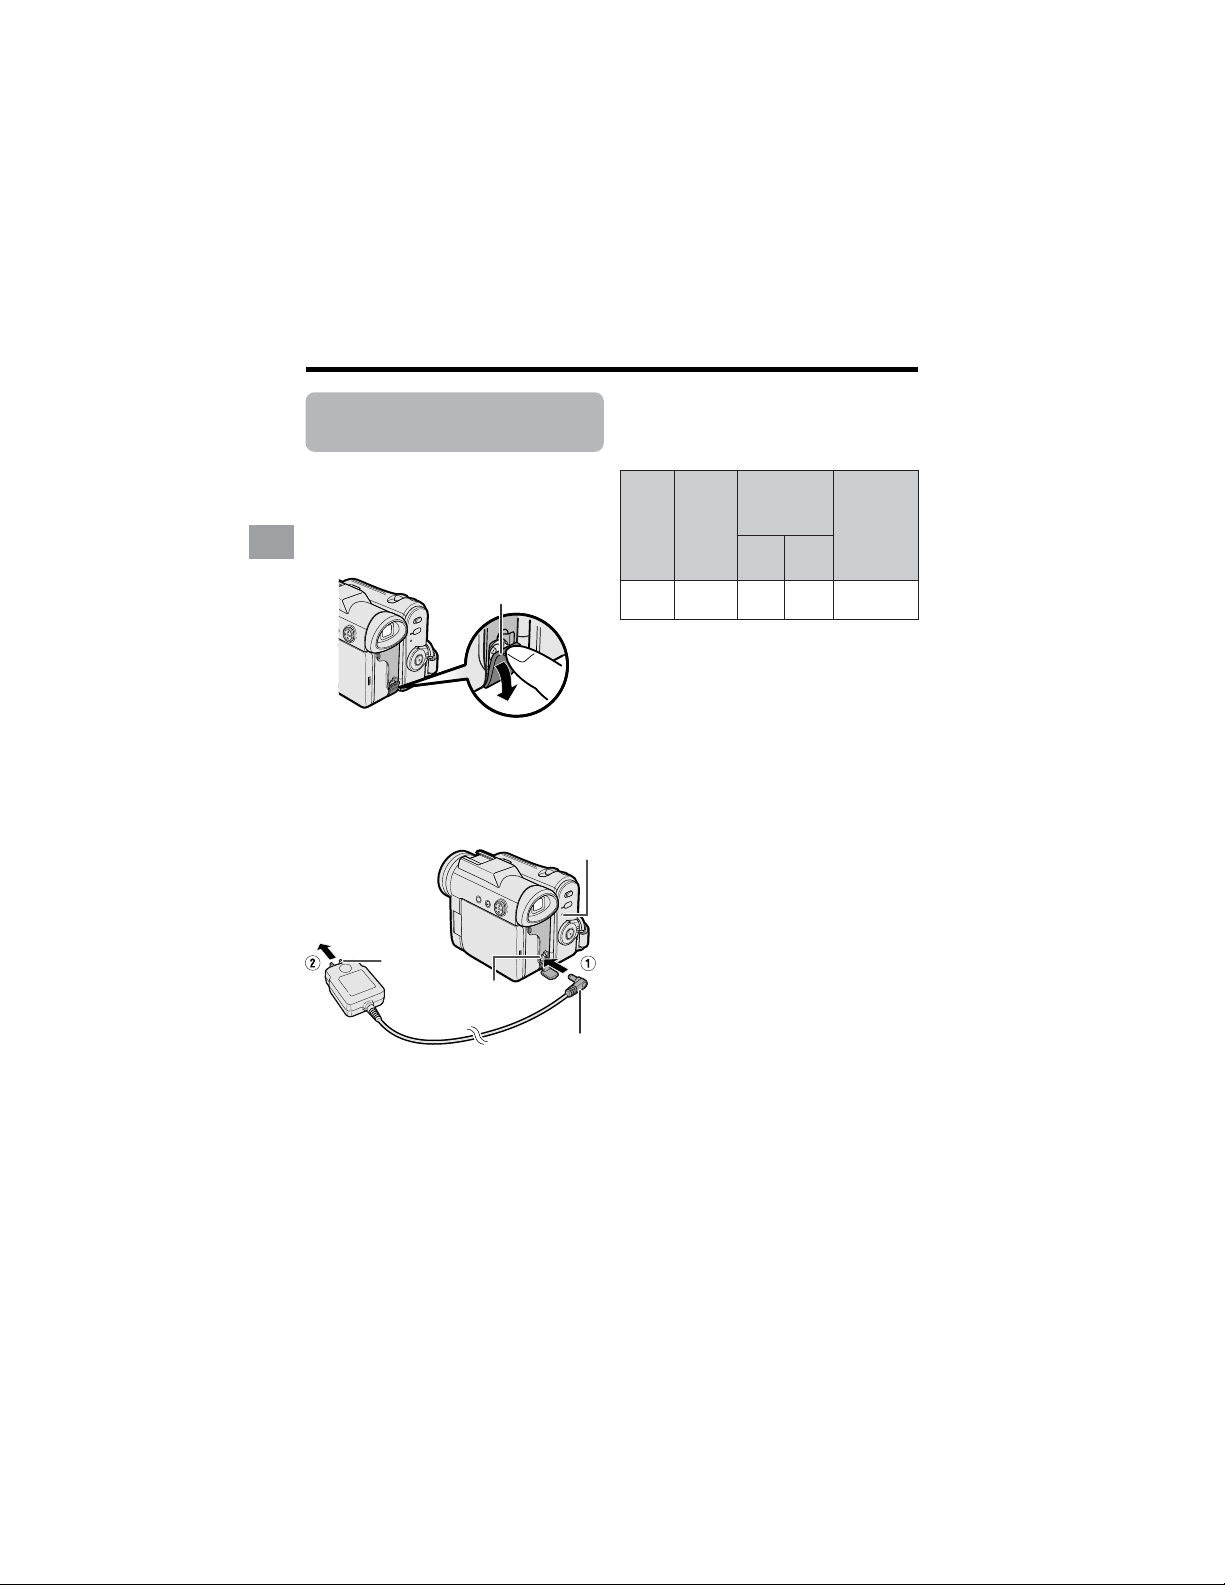
1
Attach the battery pack on the
camcorder, and make sure that the
Power switch is set to OFF.
2 Open the DC IN jack cover.
3 Insert the DC plug into the DC IN
jack of the camcorder (1), and plug
the AC plug into a power outlet (2).
• The POWER/CHARGE (RED)
indicator lights up red.
• The POWER/CHARGE (RED)
indicator turns off when the battery is
charged.
4 Remove the DC plug from the DC IN
jack, then remove the AC adapter
from the power outlet.
• The chart specifies the approximate times in
minutes.
Notes:
• Charge the battery pack between 50°F and
86°F (10°C and 30°C). The battery pack
may not charge properly at temperatures
too low or too high.
• The battery pack and AC adapter become
warm during charging. This is not a
malfunction.
• Using the zoom (see page 23) and other
functions or turning the power on and off
frequently will increase power consump-
tion. This may result in a decrease in the
actual recording time compared to the
maximum continuous recording time listed
above.
• The charging time and recording time may
vary depending on the ambient tempera-
ture and the condition of the battery pack.
• See pages 98 and 99 for more information on
using the battery pack.
• Charge only SHARP model BT-L226 battery
packs. Other types of battery packs may
burst, causing personal injury and damage.
• When attaching the supplied audio/video/S-
video cable or USB cable, remove the DC
plug, open the terminal cover and connect it.
BT-L226
Charging
time
Battery
pack
Max.
continuous
recording time
Max.
continuous
playback time
on LCD
120
115 100
Charging time and maximum
continuous recording and playback
times in Tape modes
LCD
closed
LCD
open
100
DC IN jack cover
DC plug
To power outlet
DC IN jack
AC plug
POWER/CHARGE (RED)
indicator
9
Preparation
Powering the
Camcorder from an
AC Outlet
You can also power the camcorder from a
power outlet by using the supplied AC
adapter.
Note:
• The supplied AC adapter is specially
designed for use with this camcorder, and
should not be used as a power supply for
other camcorders.
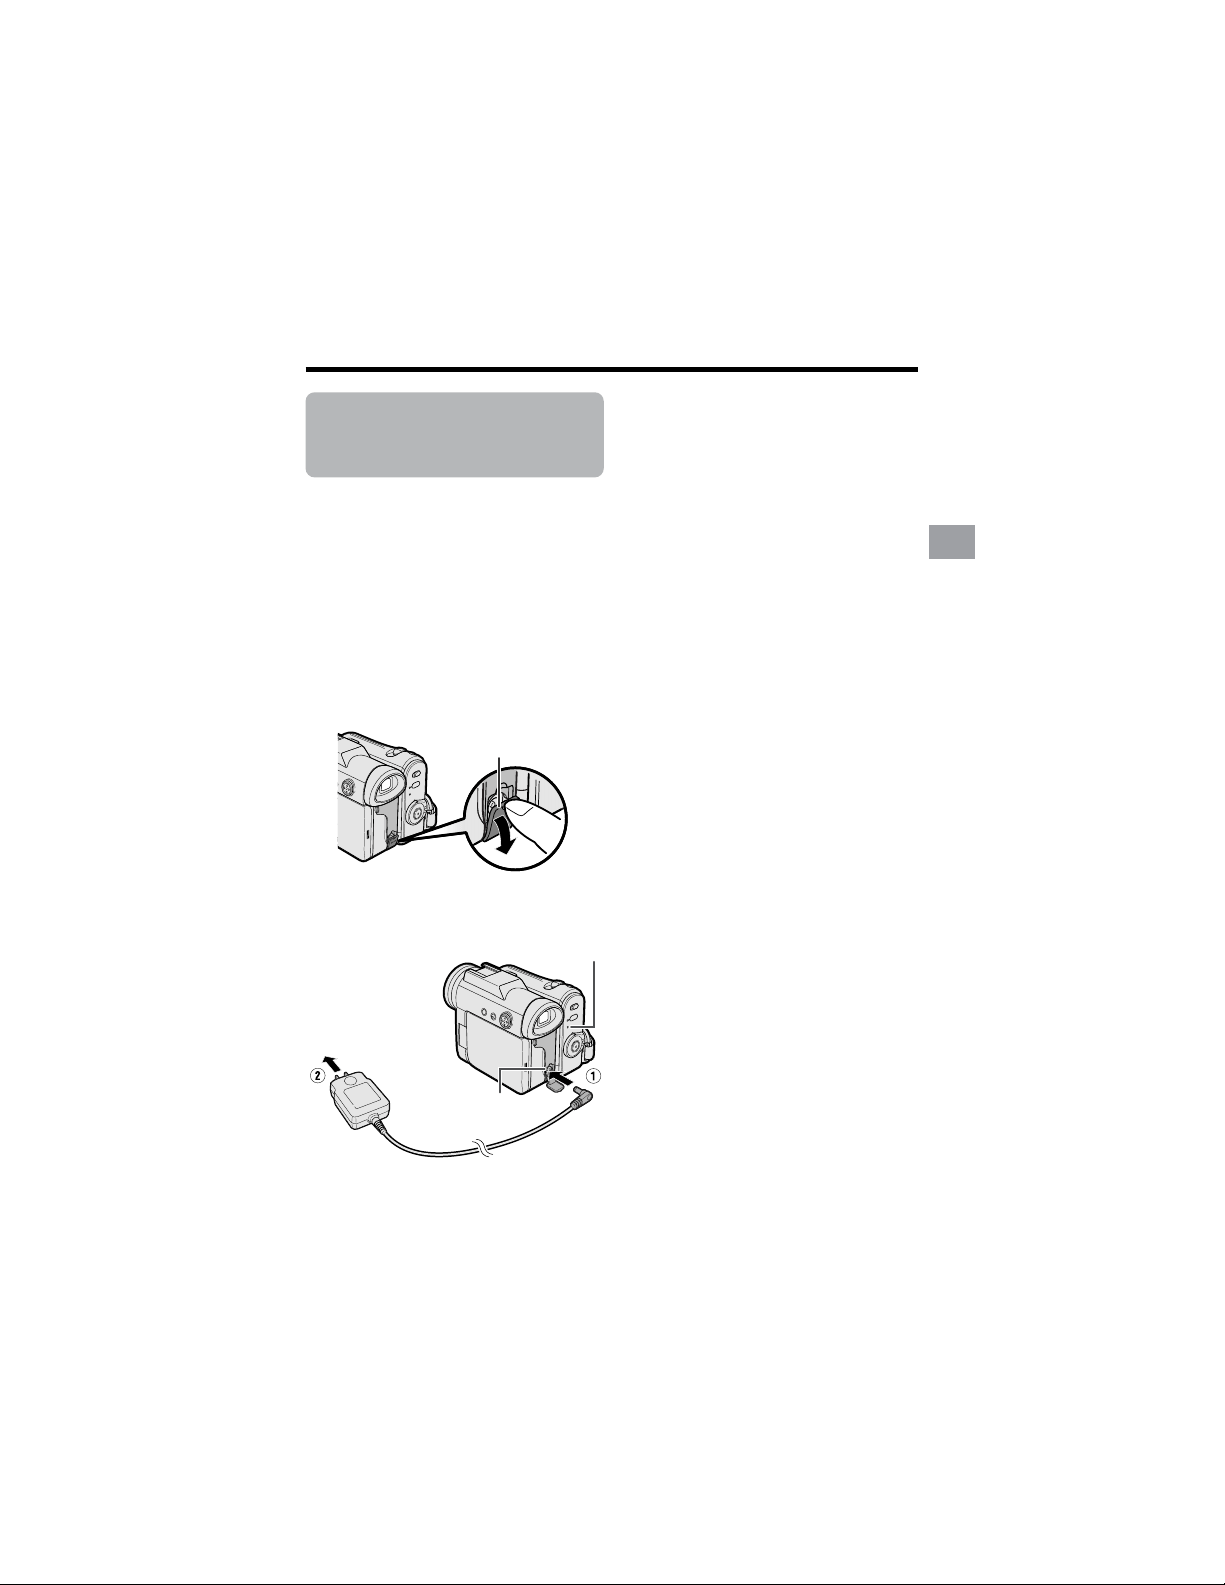
1 Make sure that the Power switch is
set to OFF.
2 Open the DC IN jack cover.
3 Insert the DC plug into the DC IN
jack of the camcorder (1), and plug
the AC plug into a power outlet (2).
4 Hold down the Lock button and set
the Power switch to v or w.
• The POWER/CHARGE (RED)
indicator lights up green.
DC IN jack
Notes:
• BEFORE REMOVING THE DC PLUG,
ALWAYS STOP RECORDING OR PLAY-
BACK AND TURN THE POWER OFF.
Removing the DC plug while shooting or
during playback may damage the tape by
causing it to wrap around the video head
drum or destroy the card, rendering it
unreadable and unwritable.
• Disconnect the AC adapter from the
camcorder if you will not use the camcorder
for a long period of time.
DC IN jack cover
POWER/CHARGE (RED) indicator
To power outlet
10
Preparation
Preparation
Inserting and
Removing a Cassette
Inserting
1 Attach the power source to the
camcorder, then slide and hold the
cassette compartment door release
as you open the cassette compart-
ment door.
• After confirmation sound, the
cassette holder extends and opens
automatically.
2 Insert a commercially available Mini
DV cassette fully with the window
facing outwards, and with the erasure
protect tab facing upwards.
3 Press the “PUSH” mark gently until
the cassette holder clicks into place.
• The cassette holder retracts
automatically.
4 Wait for the cassette holder to fully
retract. Close the compartment door
by pressing its center until it clicks
into place.
Removing
Perform step 1 above, then take out the
cassette.
Notes:
• Do not try to close the cassette compartment
door while the cassette holder is extending or
retracting.
• Be careful not to get your fingers caught in
the cassette holder.
• Do not apply force to the cassette holder
except when pressing the “PUSH” mark to
close it.
• Do not tilt the camcorder or hold it upside
down when you are inserting or removing a
cassette. It may damage the tape.
• Remove the cassette if you will not use the
camcorder for a long period of time.
• If you do not correctly close the cassette
holder in step 3, the cassette protection
mechanism of the camcorder might eject the
cassette. If this happens, repeat the insertion
procedure.
• Do not attempt to pick up the camcorder by
the cassette compartment door.
• If the battery power is too low, you may not
be able to eject the cassette. Replace the
battery pack with a fully charged one.
• You can only use Mini DV cassettes. Large
DV cassettes cannot be used. Be sure to use
Mini DV cassettes with the i
mark.
• See page 96 for more information on the
video cassette tapes intended for use with
this camcorder.
SAVE
REC
Cassette compartment door release
“PUSH” mark
Erasure protect tab

11
Preparation
Inserting and
Removing a Card
You can use an SD Memory Card (supplied)
or a MultiMediaCard (commercially
available) for storing still images.
Inserting
1 Make sure that the Power switch is
set to OFF.
2 Open the card slot cover.
3 Insert a card into the slot as shown
below, and push it in fully.
4 Close the card slot cover securely.
Back view
Locked position
Unlocked position
Removing
Perform steps 1 and 2 above, push the card
and release slowly (1). Then pull the card
straight out (2) as shown below.
Notes:
• You can use only the SD Memory Card or the
MultiMediaCard (see page 97).
• The supplied card is preformatted for
immediate use.
• See page 97 for more information on the
cards intended for use with this camcorder.
• Do not remove the card from the
camcorder while recording data on the
card (S indicator flashes during record-
ing). This may delete the recorded image
or damage the card.
• You cannot insert or remove the card when
using a tripod.
About the write-protect
switch
SD Memory Card has a write-protect switch.
When the switch is set to the locked
position, you cannot record/delete data or
format the card. Set it to the unlocked
position to record/delete data or format the
card.
Card slot cover
Write-protect
switch
Label
Clipped corner
12
Preparation
Preparation
Installing the Lithium
Batteries
Installing the Memory Battery
The supplied CR 1216 type lithium battery is
used to store the memory of the date and
time settings.
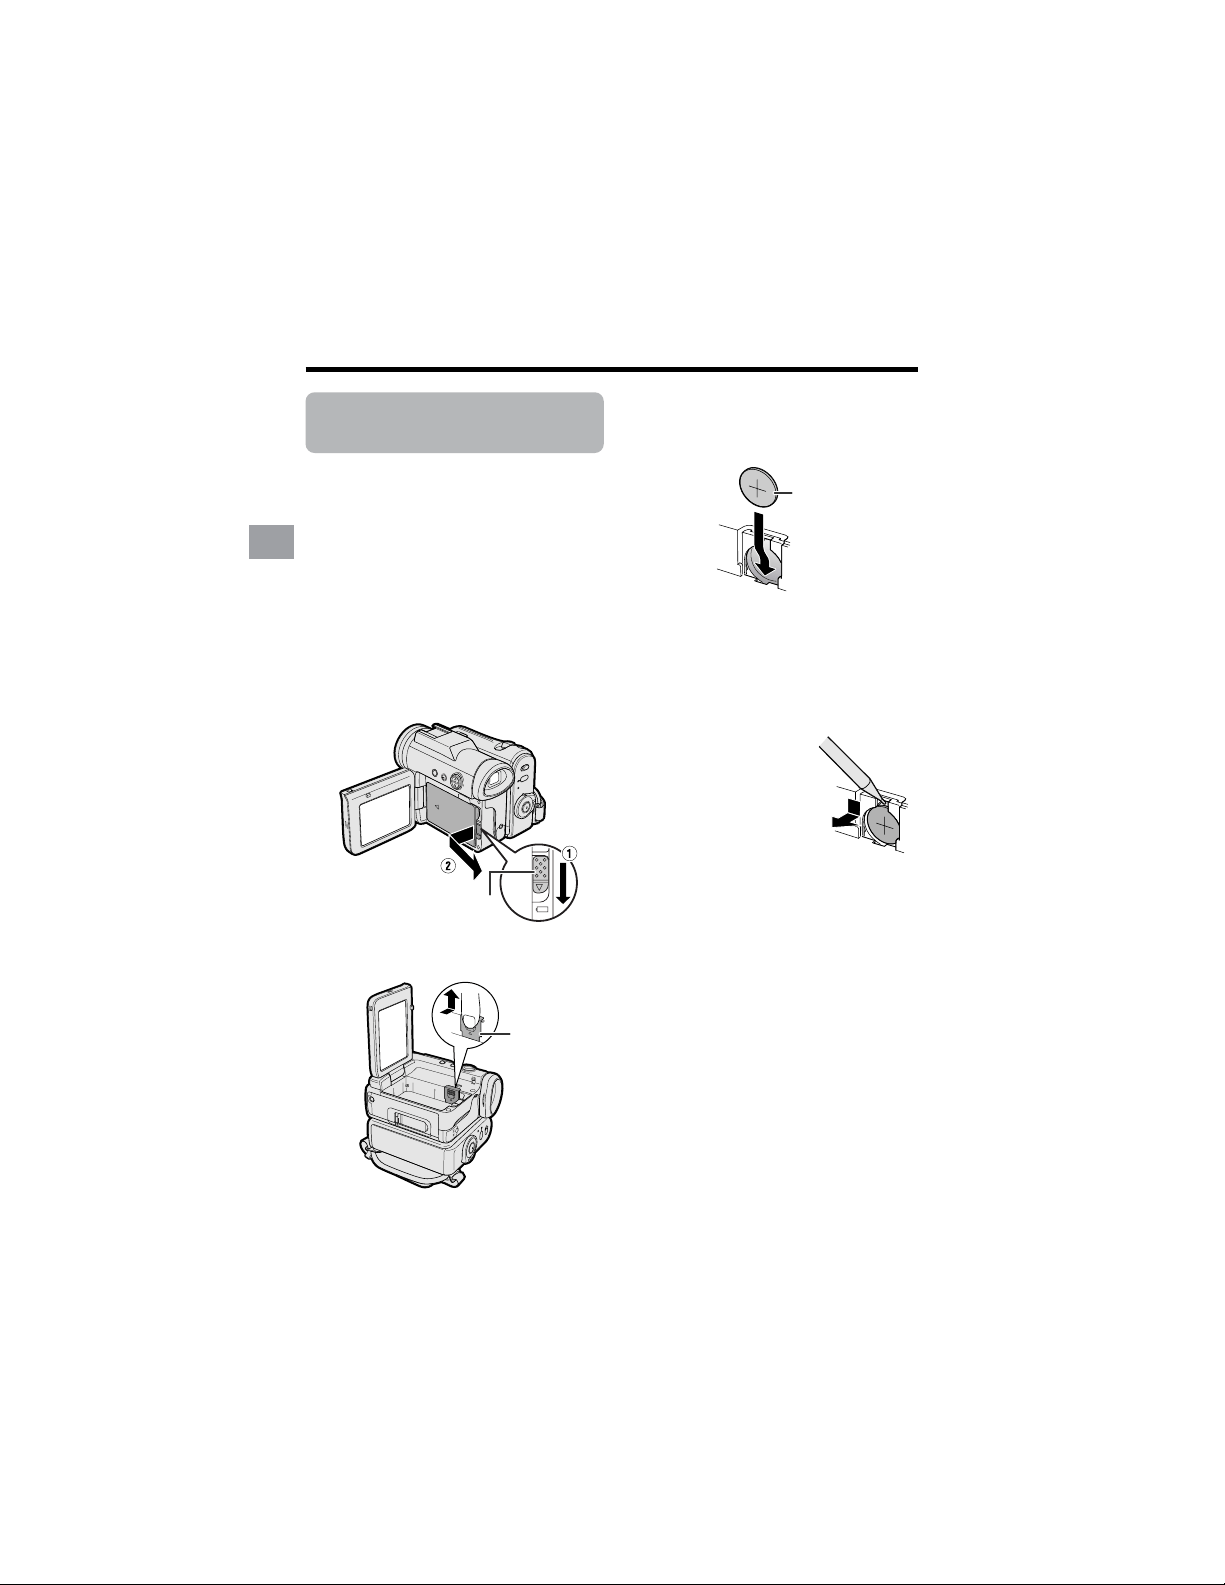
1 Make sure that the Power switch is
set to OFF.
2 Open the LCD monitor to a 90° angle
to the camcorder body.
3 Slide the battery release in the
direction of the arrow, then take the
battery pack out.
4 Pull out the lithium battery cover in
the direction of the arrow.
5 Insert the smaller lithium battery into
the compartment with the H side of
the battery facing out.
6 Close the lithium battery cover firmly
until it clicks into place.
Removing the Memory
Battery
Perform steps 1 and 4
above, then lift out the
battery by using a pointed
object such as the tip of a
ballpoint pen.
Battery release
Lithium
battery cover
CR 1216 type
lithium battery
13
Preparation
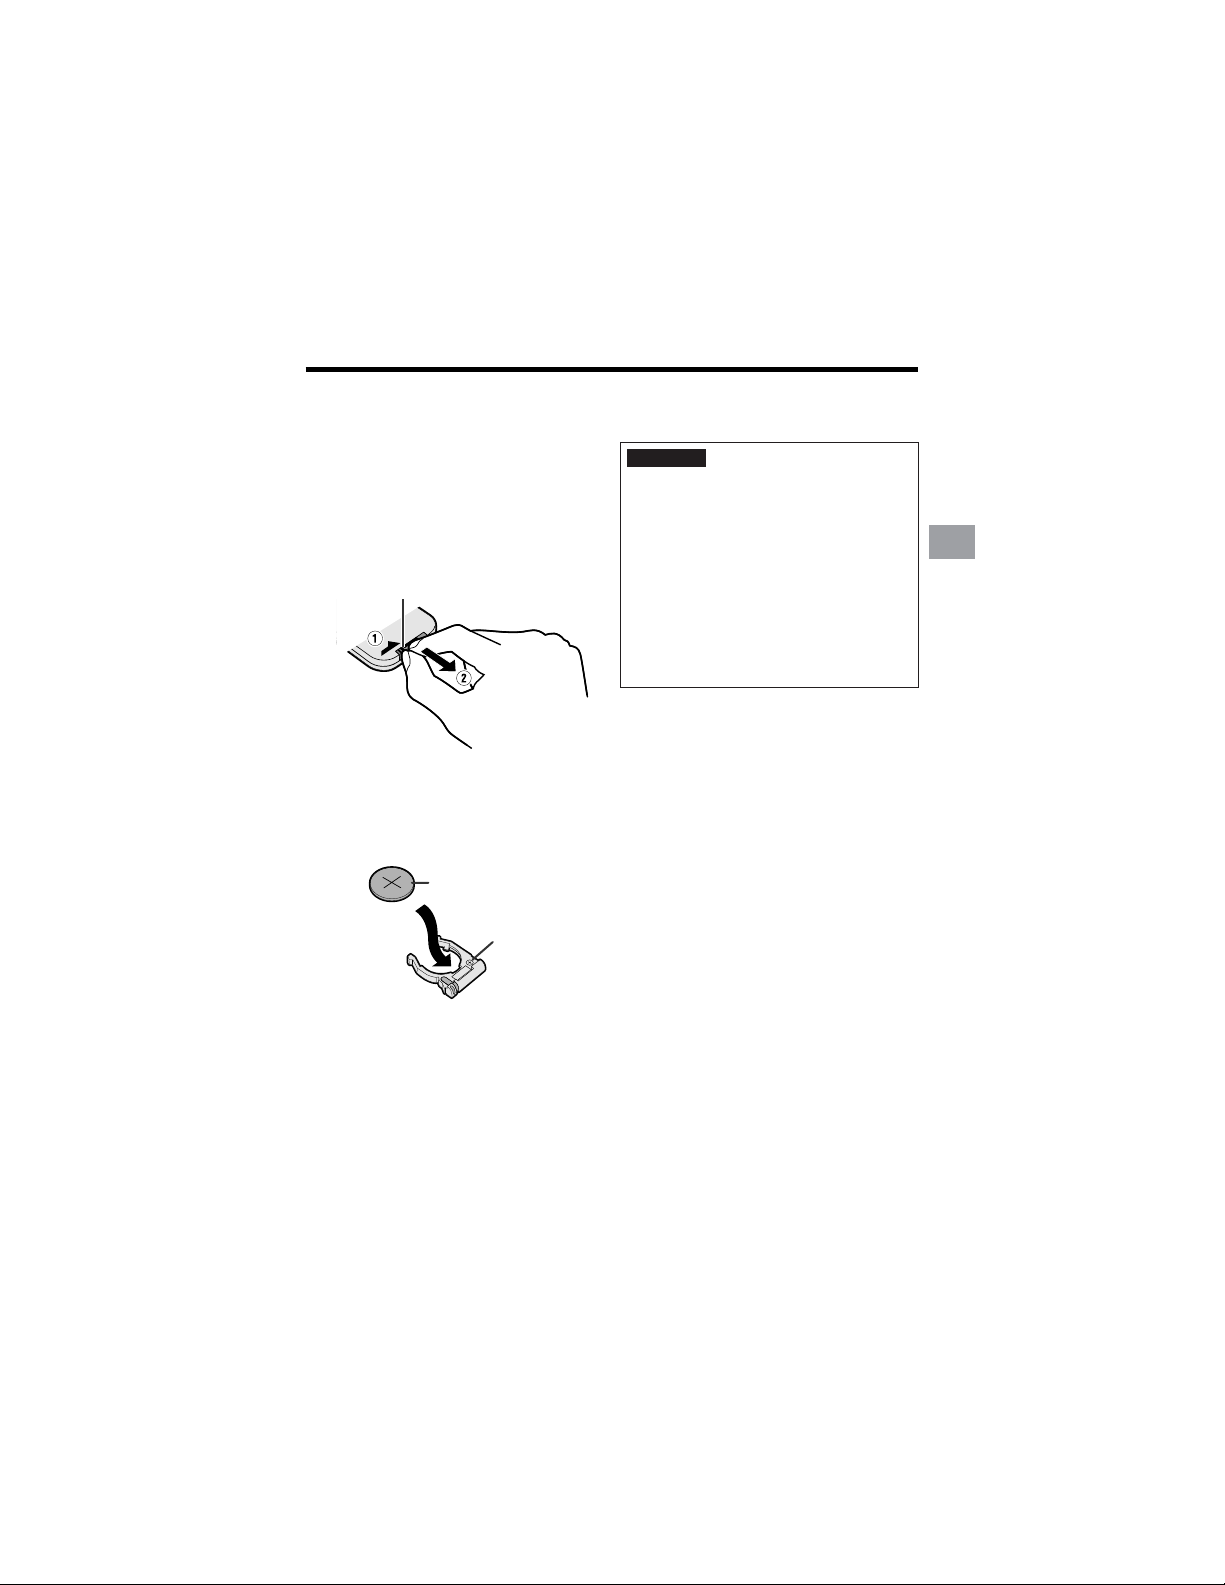
Installing the Battery to
Remote Control
The supplied CR 2025 type lithium
battery is used to power the remote
control unit.
1 Hold the remote control facing down,
and pull out the battery holder while
pressing the tab toward the center.
2 Insert the larger lithium battery into
the battery holder with the H side of
the battery facing the m side of the
holder.
3 Insert the battery holder back into
position.
Notes on the Use of the Lithium
battery
• Do not short-circuit, recharge, disassemble,
or heat the lithium battery.
• Should the lithium battery leak, wipe the
battery compartment clean, and then insert a
new battery.
• The lithium batteries will last about one year
under normal usage.
CAUTION The battery used in this
device may present a risk of fire of
chemical burn if mistreated. Do not
recharge, disassemble, heat above
212°F (100°C) , or incinerate. Replace
battery with the type CR1216 for the
camcorder and the type CR2025 for the
remote control unit of Toshiba Battery
Co., Ltd. only. Use of another battery
may present a risk of fire or explosion.
Dispose of used battery promptly. Keep
away from children. Do not disassemble
and do not dispose of in fire.
“m” side
H side, CR 2025 type
lithium battery
Ta b
14
Preparation
Preparation
4 Press m or l to select “EXECUTE”,
then press the center of the Operation
button.
5 Press the center of the Operation
button.
6 Press m or l to select “JUN”
(month), then press the center of the
Operation button.
7 Press m or l to select “2” (day),
then press the center of the Operation
button.
8 Press m or l to select “2004” (year),
then press the center of the Operation
button.
9 Press m or l to select “10 AM”
(hour), then press the center of the
Operation button.
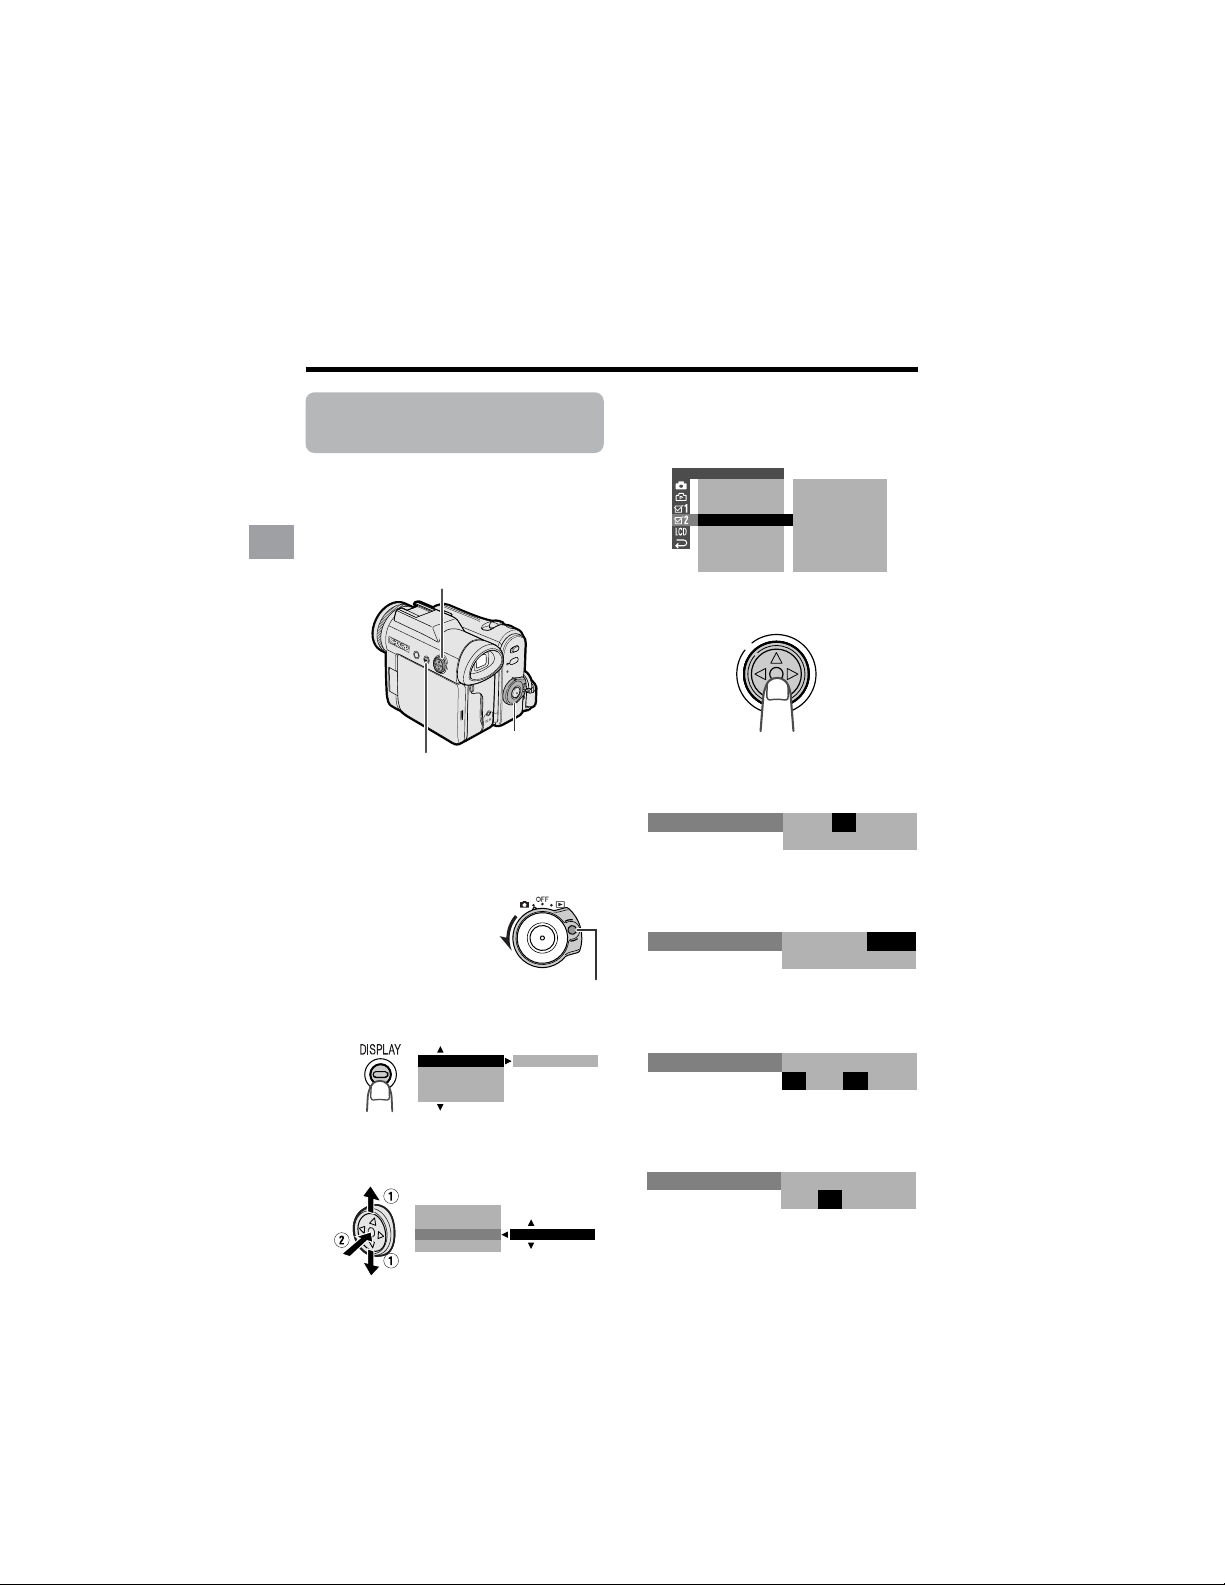
Setting the Date and
Time
Available modes:
Tape Camera, Card Camera
Example: Setting the date to June 2, 2004
(JUN. 2. 2004) and the time to 10:30 am
(10:30 AM).
Note:
• Before performing the steps below, make
sure that the CR1216 type lithium battery has
been installed (see page 12).
• The example screens shown are for Tape
Camera mode.
1 Hold down the Lock
button and set the
Power switch to v.
2 Press the DISPLAY button until the
mode screen appears.
3 Press l or m on the Operation
button to select “MENU”, then press
the center of the Operation button.
BLC GAIN/ OFF
FADE
M
ENU
SCENE
M
ENU
EXECUTE
FADE
M
ENU
SCENE
M
ENU
BLC GAIN/
OTHERS 2
RETURN
T IME CODE OFF
OFFTC OUT
SETTING
12H
12H
24H/
JAN. 1 20
12 00AM:
03.
JUN.
12 00AM
:
1 2003.
SETT ING
JUN.
12 00AM
:
2 2003.
SETT ING
JUN.
12 00AM
:
2 2004.
SETT ING
JUN.
10 00AM
:
2 2004.
SETT ING
Operation button
Power switch
DISPLAY button
Lock button
15
Preparation
Changing to the 24-hour
Time Mode
1 After performing step 10 above, press
l or m to select “12H/24H”, then
press the center of the Operation
button.
2 Press l or m to select “24H”, then
press the center of the Operation
button.
3 Press the DISPLAY button to turn off
the menu screen.
Notes:
• The date and time, once set, are internally
recorded even when not displayed on the
screen.
• The menu screen automatically turns off if no
settings are made within 5 minutes.
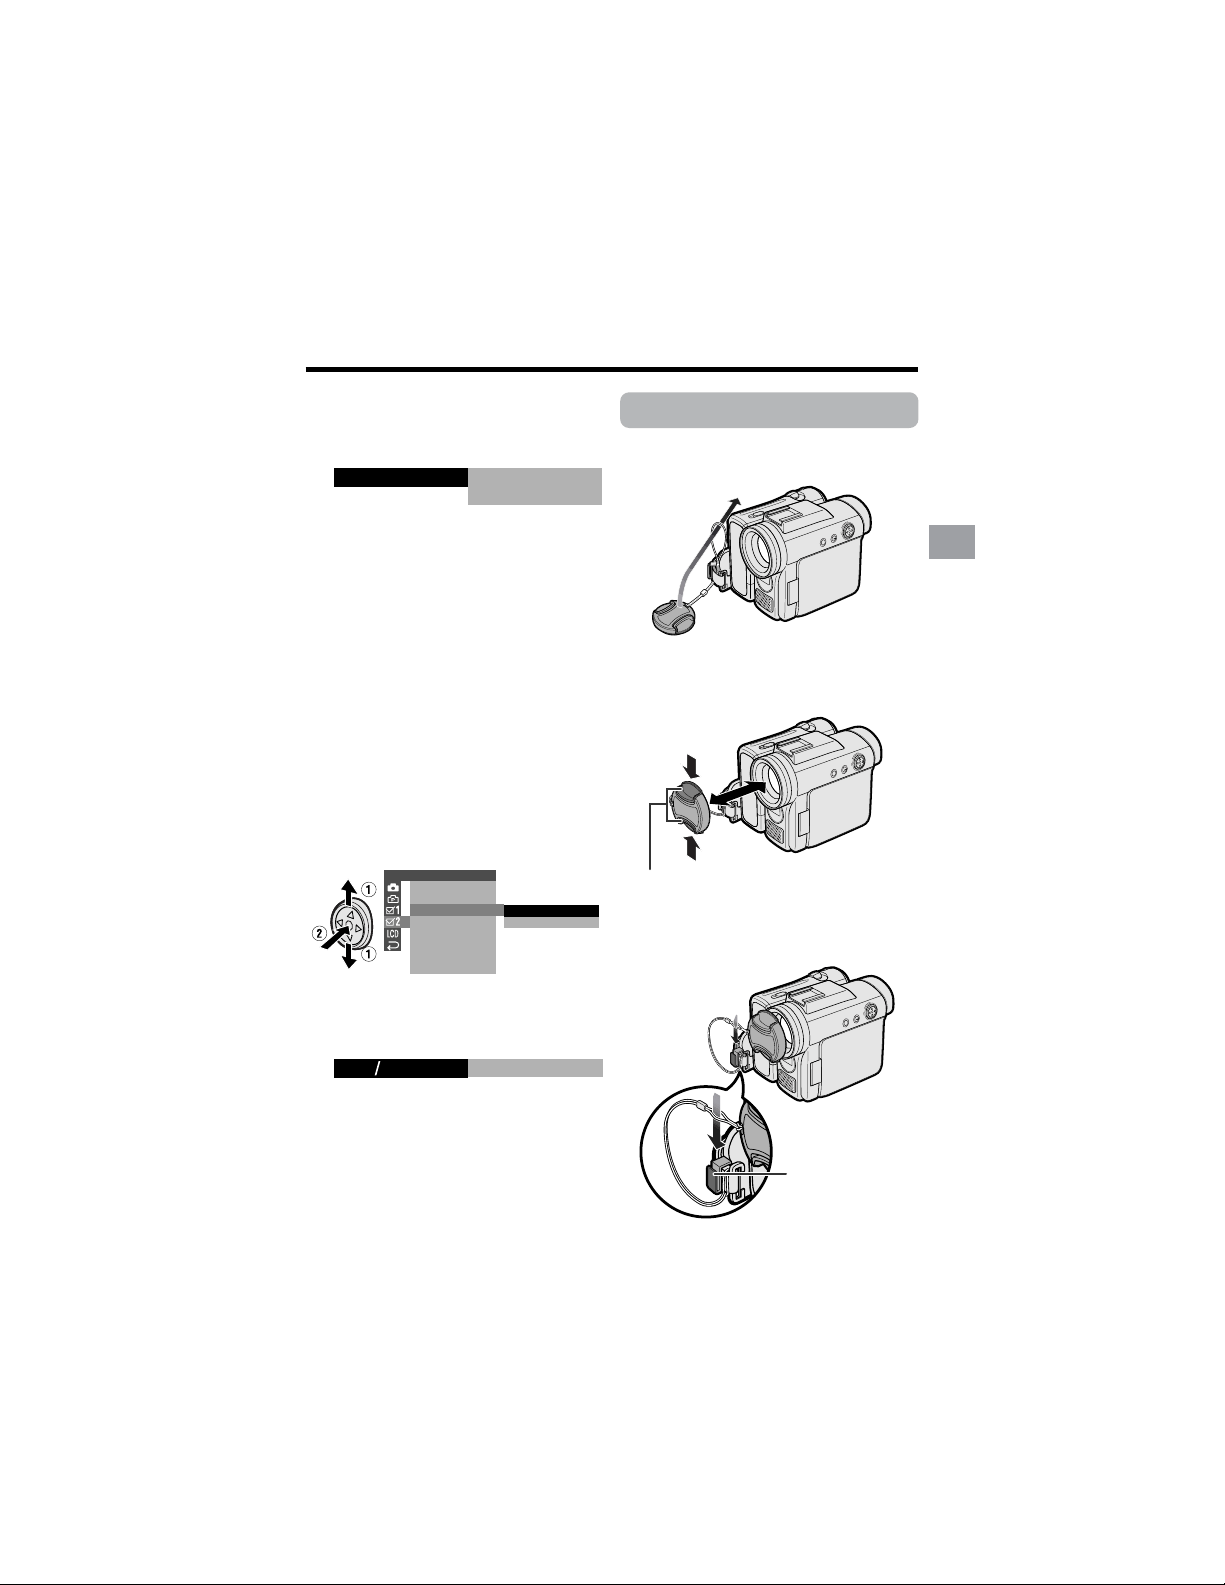
Using the Lens Cap
Attach the strap of the lens cap to the hand
strap as shown below.
When attaching or removing the lens cap,
grasp the indents on both sides of the cap.
When recording, remove the lens cap and
attach the lens cap cord to the fastener so
that the cap will not get in the way.
Note:
• Always attach the lens cap over the lens
when not using the camcorder.
24H
21H24H
10
Press m or l to select “30” (minute),
then press the center of the Operation
button.
• The internal clock now starts
operating with the seconds display.
11
Press the DISPLAY button to turn off
the menu screen.
Note:
• If the date and time have been set, the
SETTING 1 screen (T) appears in step 4.
Select “SETTING” in the OTHERS 2 screen
(~) using the Operation button.
JUN.
100030 AM
::
2 2004.
SETT ING
OTHERS 2
T IME CODE
TC OUT
24H
12H
RETURN
SETTING
12H 24H/
Indents
Fastener
16
Preparation
Preparation
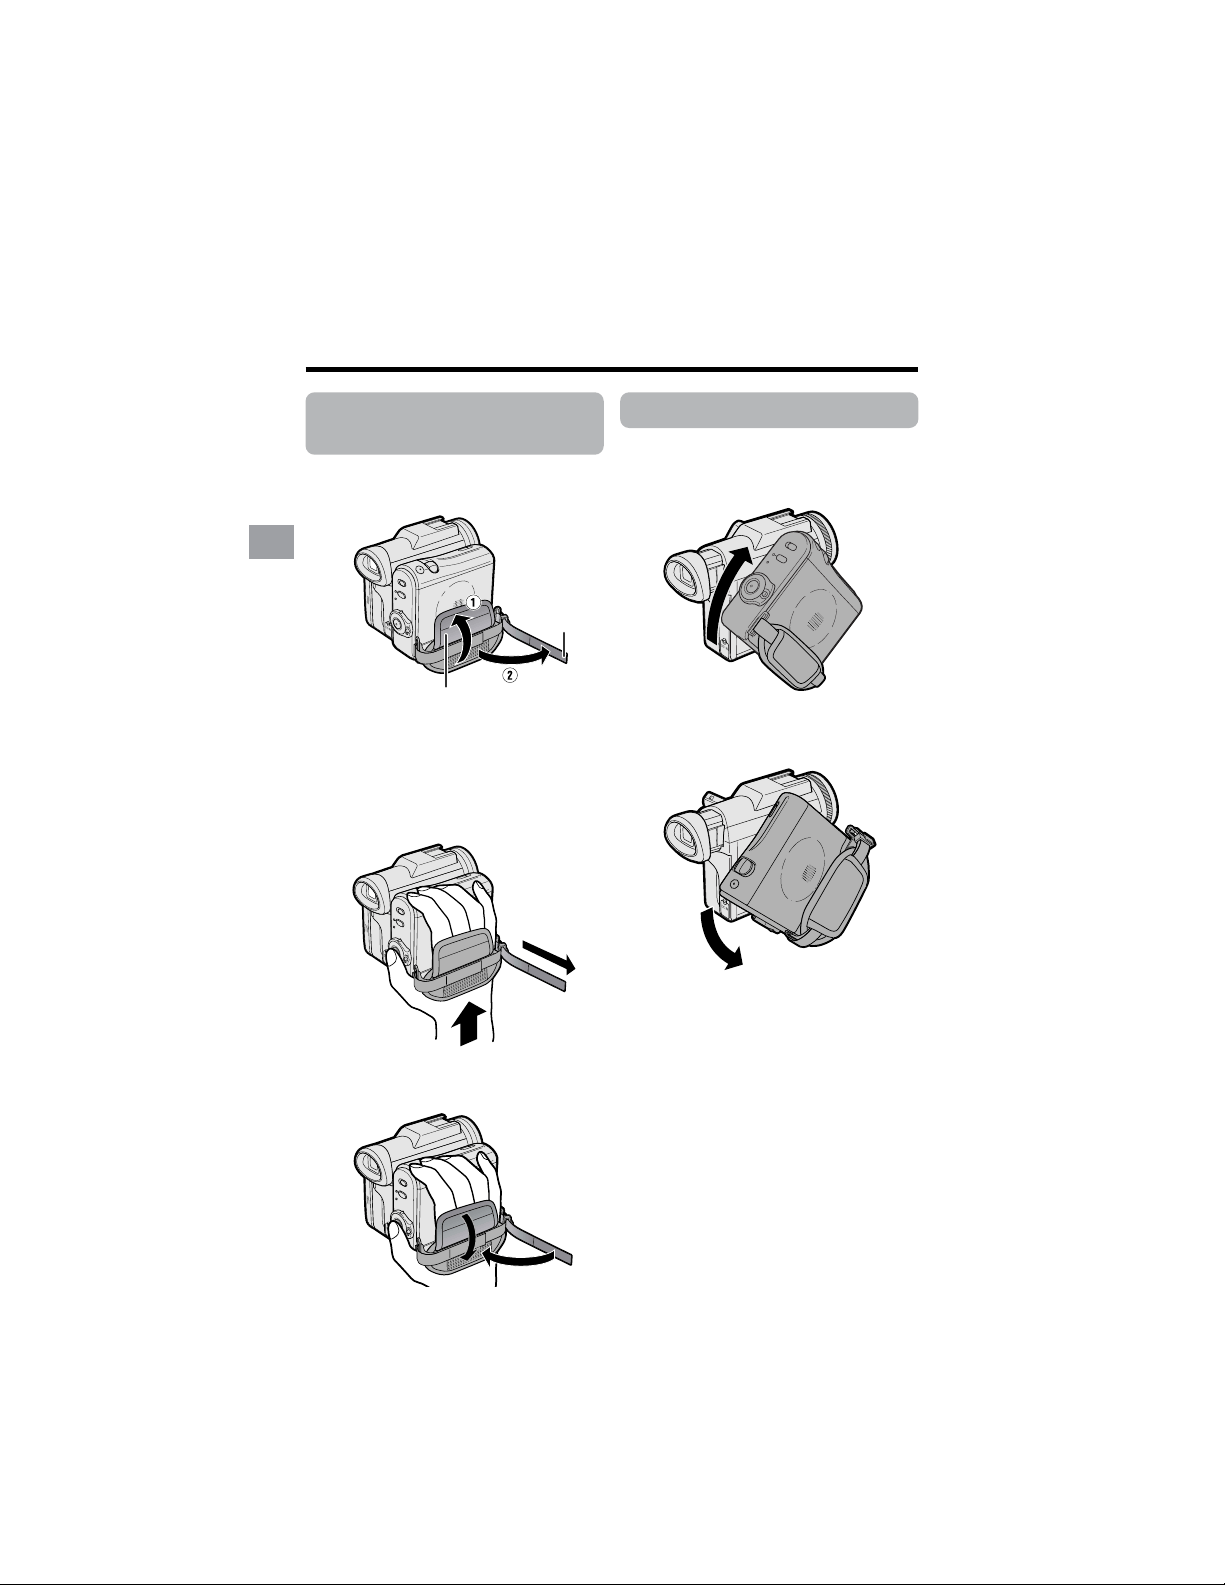
Adjusting the Hand
Strap
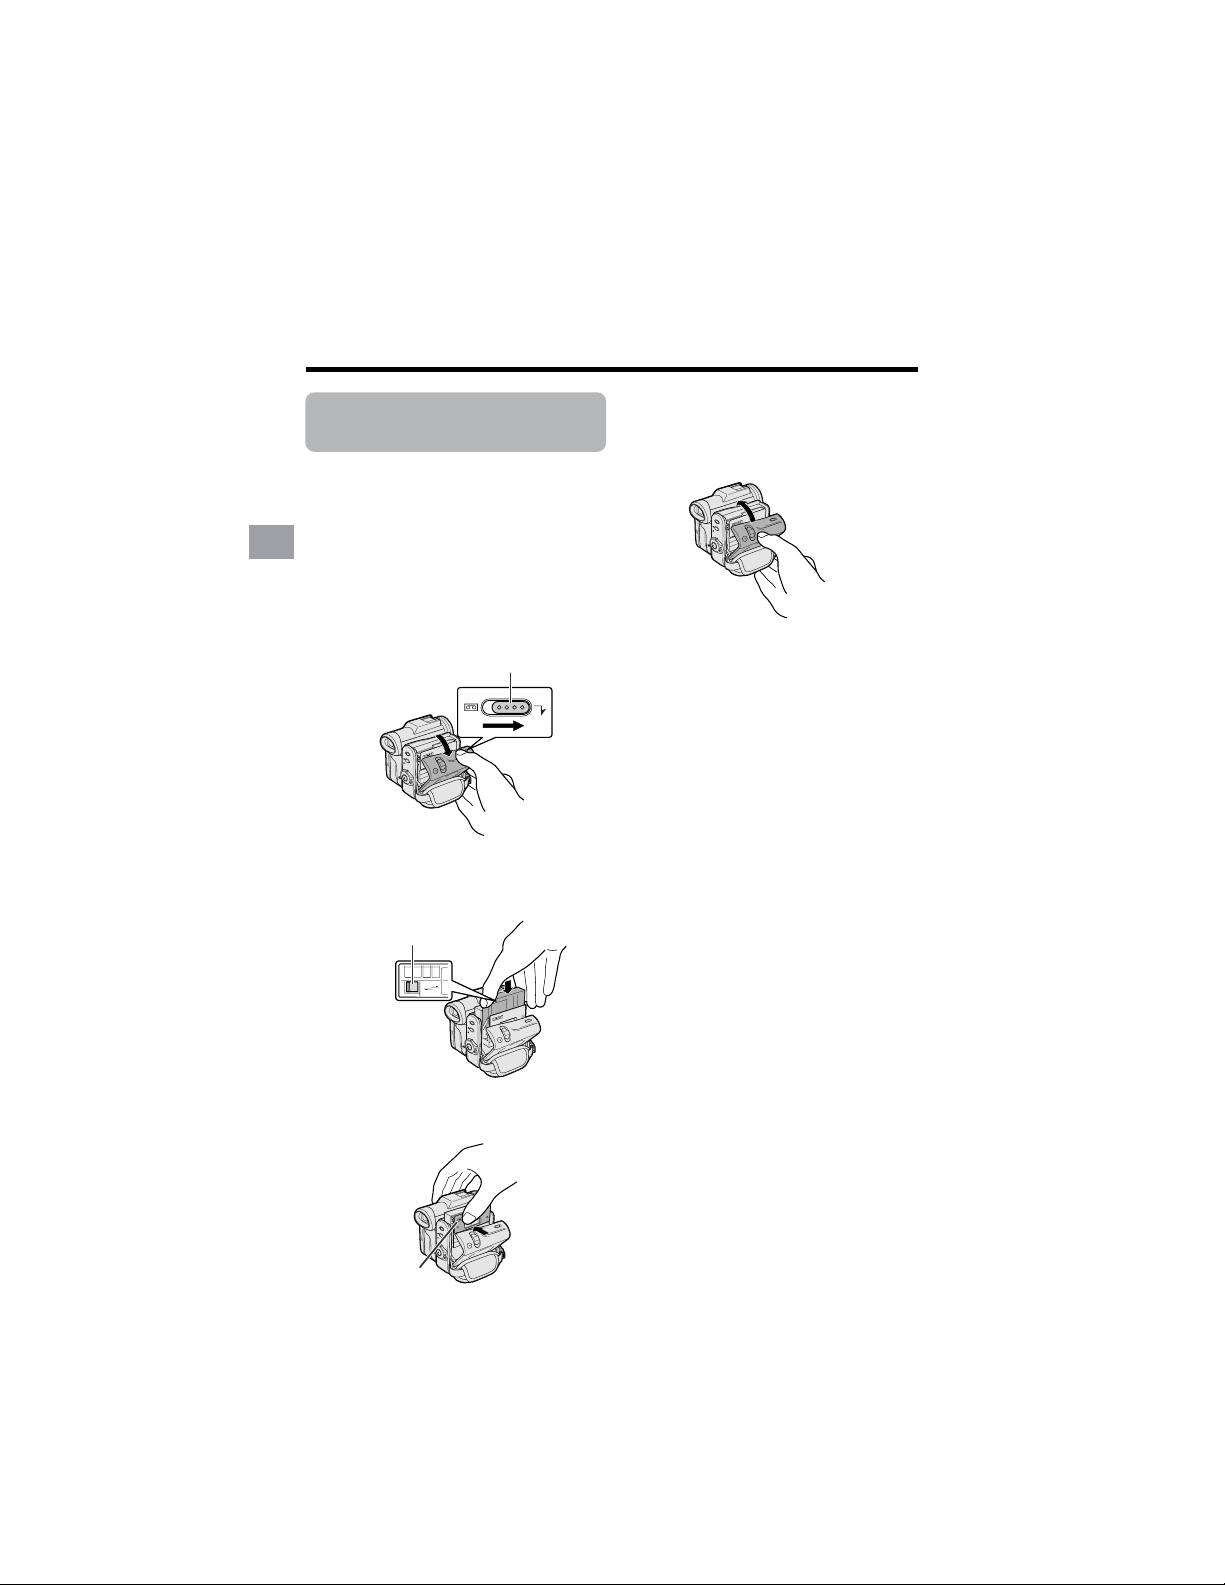
1
Open the hand strap flap (1) and grip
strap (2).
2 Loosen the grip strap, pass your right
hand through the hand strap, and put
your thumb close to the Start/Stop
button and your middle finger on the
Power Zoom control. Then, pull the
grip strap tight until it fits snugly.
3 Seal the Velcro
®
fasteners of the grip
strap and the hand strap flap.
Using the Grip
Rotate the grip 135° forward or 90°
downward so that you can record images
easily from high or low angle (see page 20).
Note:
• The grip cannot rotate when a tripod is
attached.
Grip strap
Hand strap flap
135°
90°
17
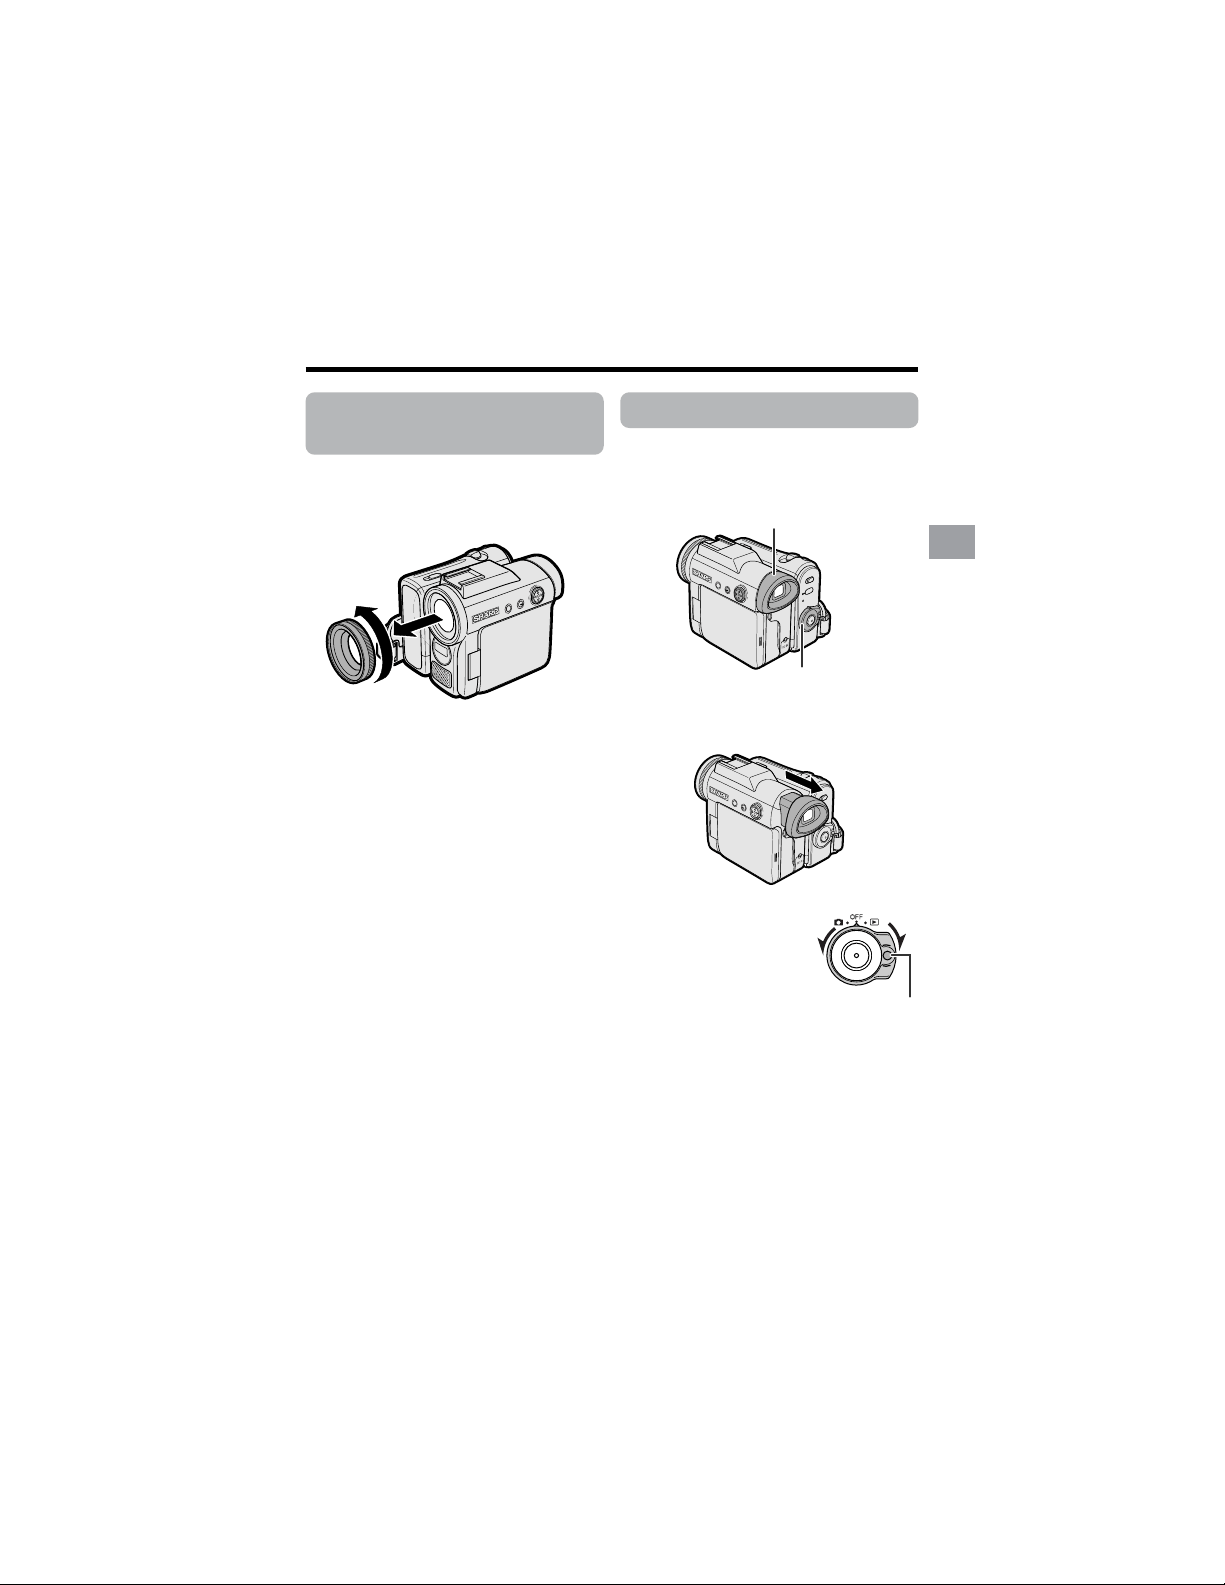
Preparation
Using the Viewfinder
You can record the subject using the
electronic viewfinder. You can also watch
playback through the viewfinder.
1 Pull out the viewfinder completely.
2 Hold down the Lock
button and set the
Power switch to v or
w.
Detaching the Lens
Hood
Before using a commercially available
conversion lens, detach the lens hood as
shown below.
(Continued on the next page)
Note:
• You cannot attach the supplied lens hood or
lens cap to a conversion lens.
Power switch
Viewfinder
Lock button
18
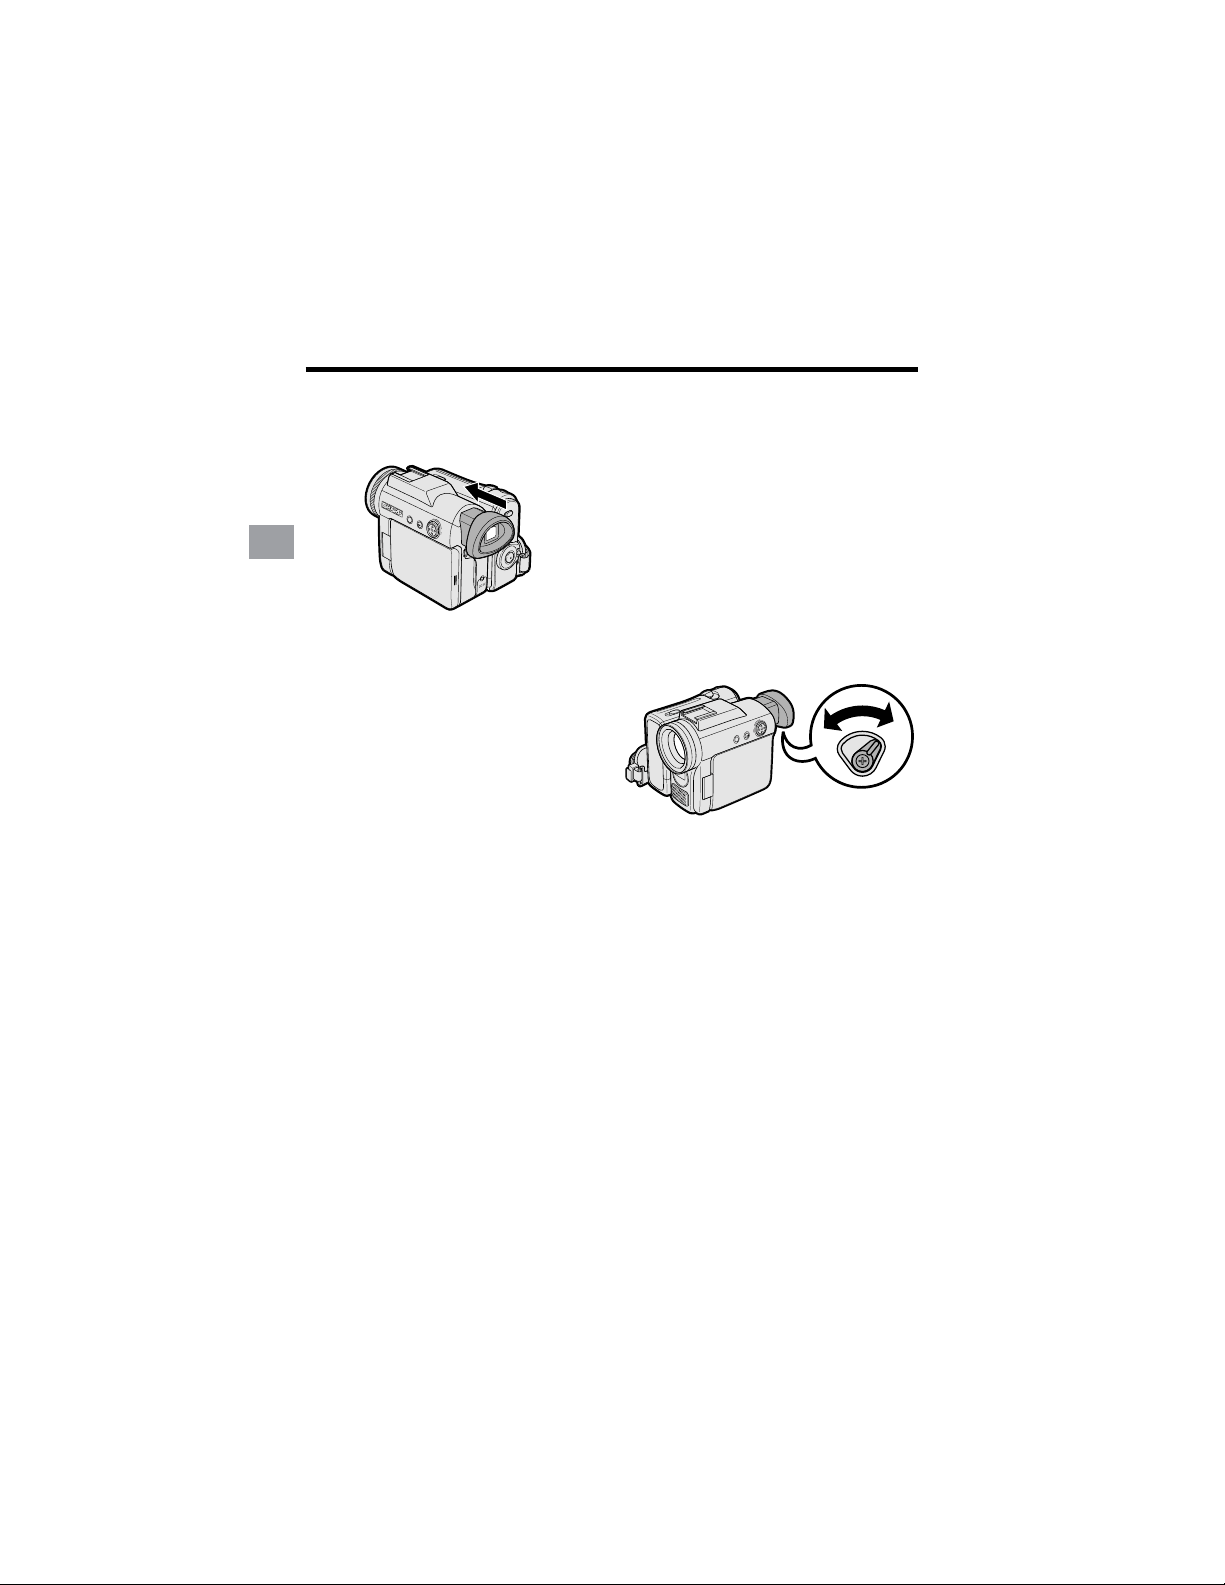
Preparation
Preparation
Closing the viewfinder
Push in the viewfinder completely.
Notes:
• Do not use excessive force when moving
the viewfinder.
• Do not pick up the camcorder by the
viewfinder.
• The viewfinder automatically turns off when
the LCD monitor is opened. If the vertical
rotation of the monitor is 180° when in Tape
Camera or Card Camera mode, however, the
viewfinder is on and the subject is displayed
both in the viewfinder and on the monitor
(see page 40).
• You can adjust the settings on the MENU
screen through the viewfinder by using the
Operation button (see page 31 for use of the
Operation button).
• Be sure to close the viewfinder after use.
Adjusting the diopter
Adjust the diopter according to your
eyesight when the picture in the viewfinder
or the characters on the on-screen display
is not clear.
1 Pull out the viewfinder completely.
2 Hold down the Lock button and set
the Power switch to v.
3 While looking through the viewfinder,
turn the diopter adjustment dial until
the indicators in the viewfinder are
clearly visible.
Note:
• For cleaning the viewfinder, see page 99.
Diopter adjustment dial
19
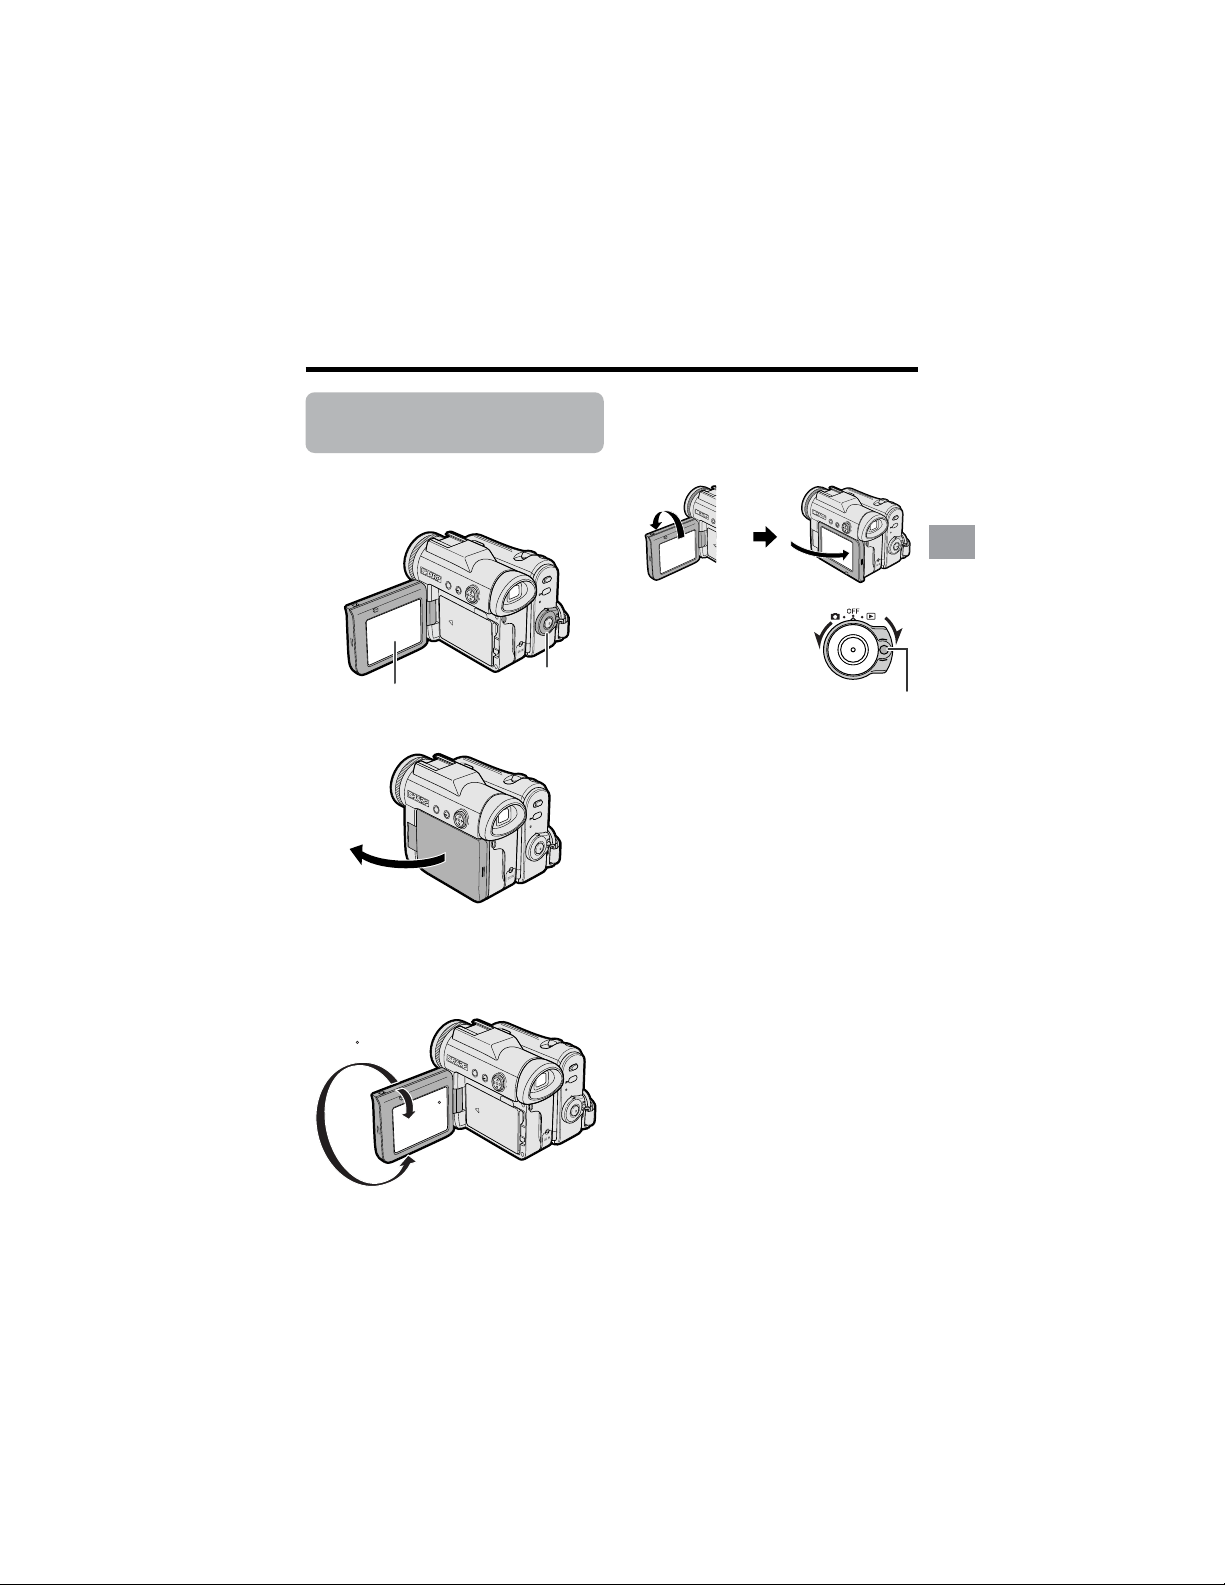
Preparation
Using the LCD
Monitor
You can use the LCD monitor to play back
recordings that you have made or to watch
the subject during recording.
1 Open the LCD monitor to a 90° angle
to the camcorder body.
2 Adjust the LCD monitor to an angle
that allow easy viewing of the on-
screen picture.
• The LCD monitor rotates 270°
vertically.
Note: Do not try to rotate the LCD
monitor vertically until the monitor is
completely opened.
• You can also fold the LCD monitor
into the camcorder with the screen
facing out for watching playback on
the monitor.
3 Hold down the Lock
button and set the
Power switch to v or
w.
• A picture displays on
the LCD monitor.
Note:
• Battery consumption is larger when the LCD
monitor is opened. Use the viewfinder instead
of the LCD monitor when you want to save
the battery power.
Closing the LCD monitor
Return the LCD monitor to the vertical 90°
position with the screen facing in, and fold if
into the camcorder into place.
Notes:
• Do not use excessive force when moving
the LCD monitor.
• When closing the LCD monitor, do not tilt
it; otherwise the monitor may not close
properly and may become damaged.
• Do not pick up the camcorder by the LCD
monitor.
• Do not place the camcorder with the LCD
monitor screen facing down.
• Close the LCD monitor completely with the
screen facing in when not in use.
• Before closing the LCD monitor, make sure
the battery pack is properly attached to the
camcorder, otherwise the monitor may be
damaged.
90˚
180
90
90
Lock button
LCD monitor
Power switch
20
Preparation
Preparation
Tips on Recording
Positions
Turn the LCD
monitor so that the
screen faces
upward.
Balance your
weight on both
legs.
Turn the LCD
monitor so that the
screen faces
downward.
Place your elbows
against your sides.
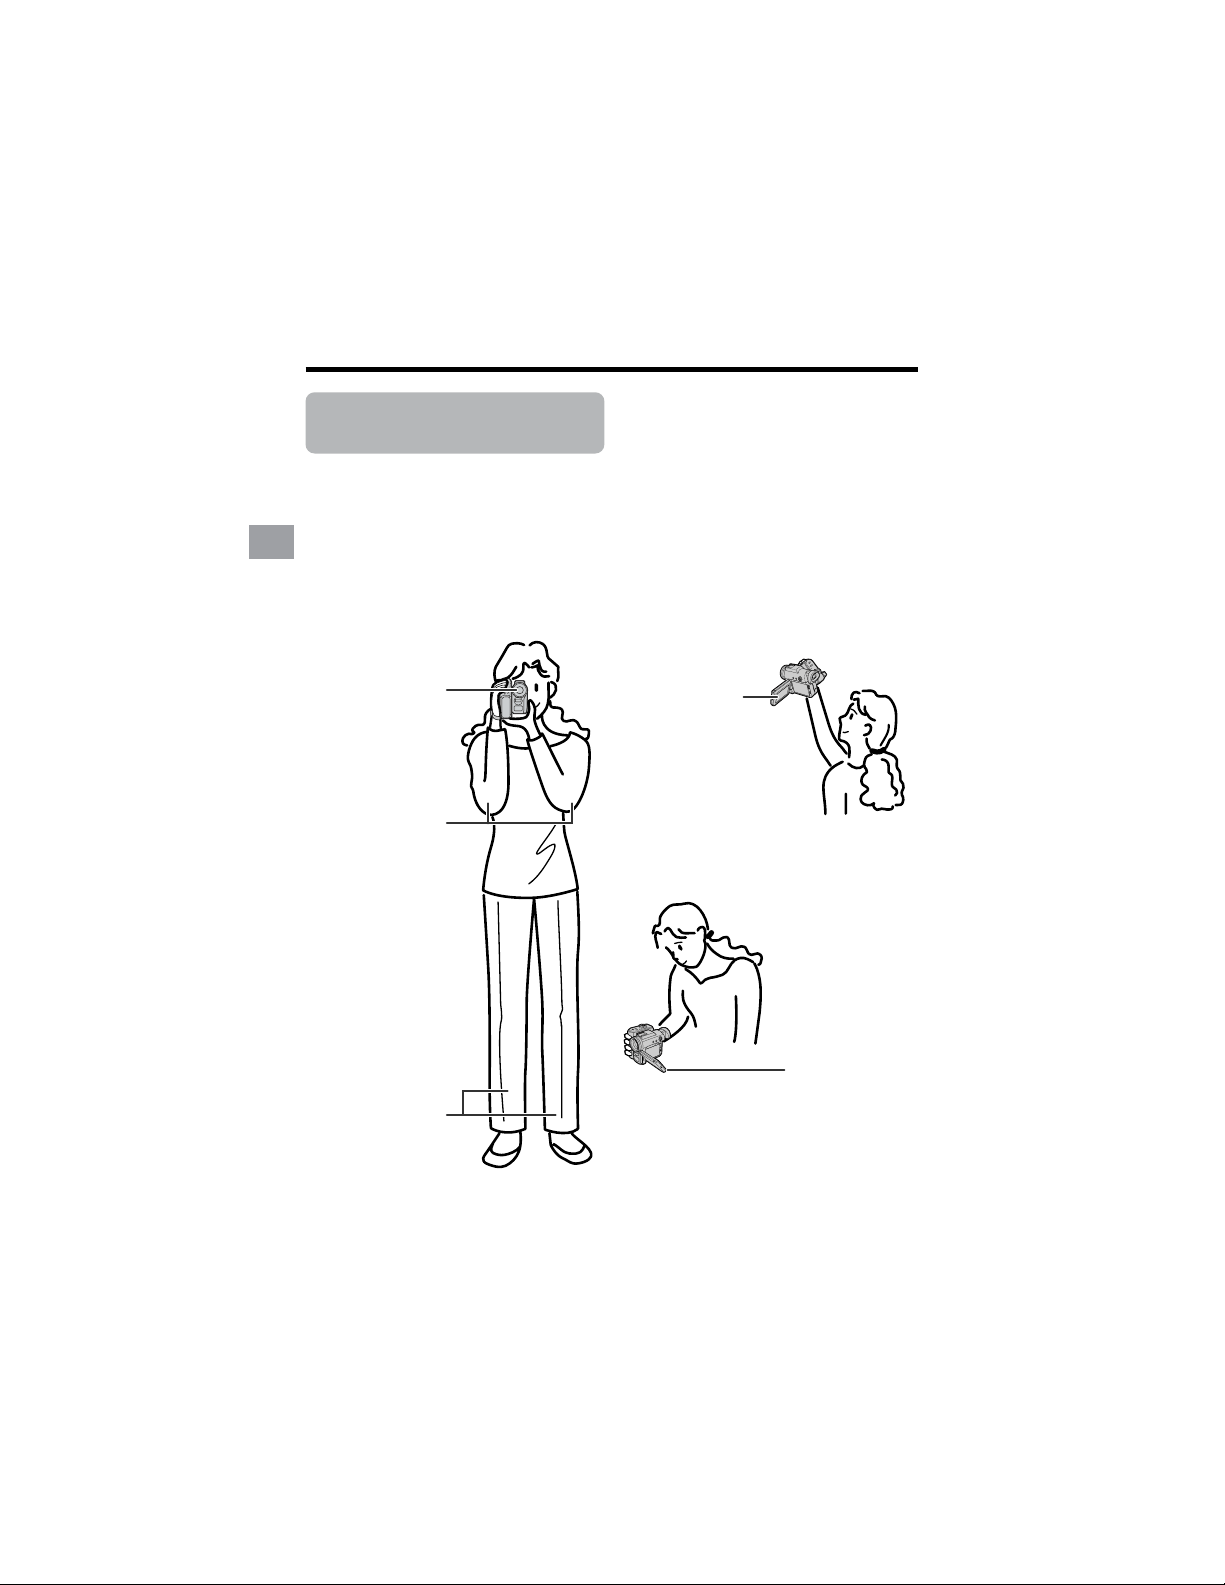
To create images that are easy to watch during playback, try to record with an upright
posture and steady hands to prevent a shaky image.
Holding the camcorder
Put your right hand through the hand strap, and place your left hand under the camcorder
for support.
Basic posture
Place the viewfinder
eyecup firmly against
your eye.
Shooting from a low angle
Shooting from a high angle
Note:
• Take care not to touch the microphone with your fingers during recording. It will cause noise on
the audio track. Also, take care not to touch the flash or flash sensor with your fingers during
Card Recording.
21
Basic Operations
Basic Operations
Camera Recording
Selecting the Camcorder Mode
This camcorder includes functions for use as both a
video camera for recording and playing back images
on tapes and as a digital still camera for recording and
playing back still images on cards. One of the following
camcorder modes needs to be set before starting any
operation.
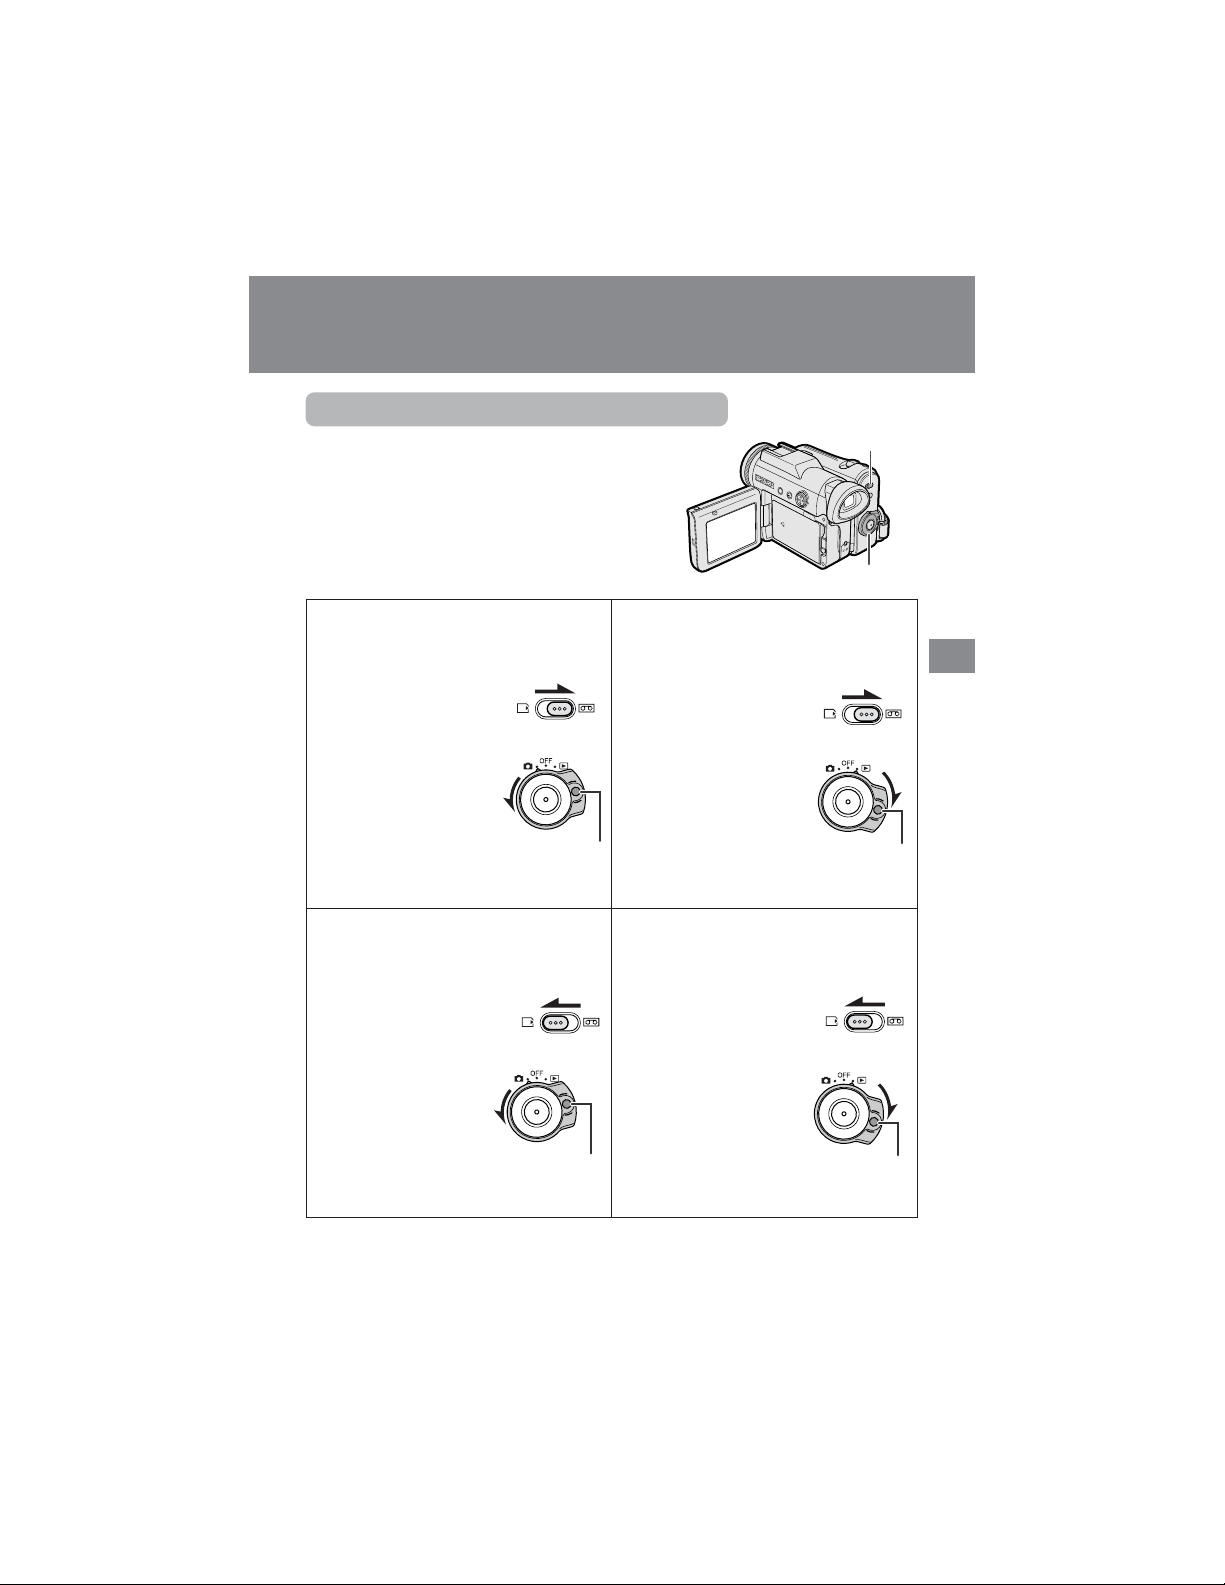
Camcorder modes
Tape Playback mode
For playing back or editing motion and still
images recorded on a tape.
1 Set the Media Selection
switch to V.
2 Hold down the Lock
button and set the
Power switch to w.
Card Camera mode
For recording still images on a card.
1 Set the Media Selection
switch to u.
2 Hold down the Lock
button and set the
Power switch to v.
Tape Camera mode
For recording motion and still images on
a tape.
1 Set the Media
Selection switch to V.
2 Hold down the Lock
button and set the
Power switch to v.
Card Playback mode
For playing back still images recorded on
a card.
1 Set the Media Selection
switch to u.
2 Hold down the Lock
button and set the
Power switch to w.
Notes:
• To turn the power off, set the Power switch to OFF without pressing the Lock button.
• Do not change the camcorder mode by operating the Media Selection switch during recording
or playback, as this may cause damage to the tape or card.
Power switch
Media Selection
switch
Lock button
Lock button
Lock button
Lock button
22
Basic Operations
Basic Operations
Camera Recording
Easy Camera
Recording on Tape in
Full Auto Mode
Available mode:
Tape Camera
• Before you start recording, perform the
operations described on pages 6 through
20 to prepare your camcorder for
recording.
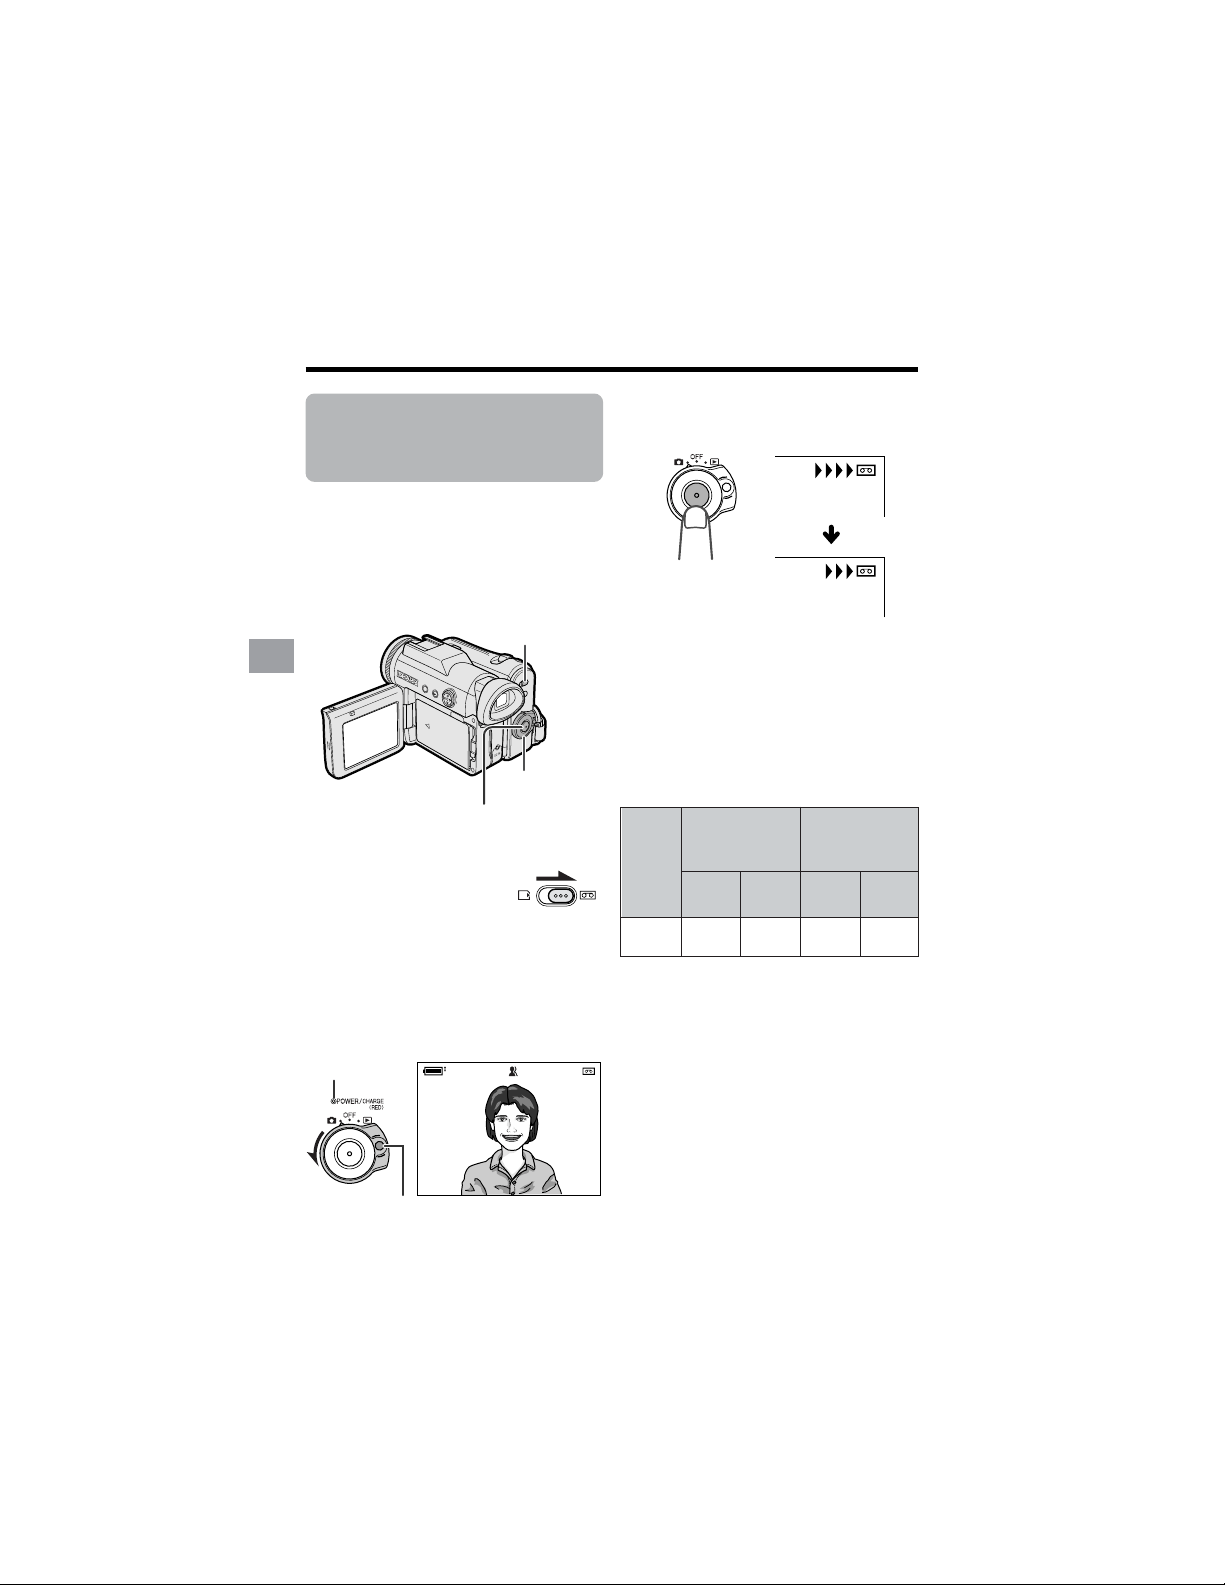
1 Remove the lens cap.
2 Set the Media Selection
switch to V.
3 Hold down the Lock button and set
the Power switch to v.
• The picture from the lens now
displays and the POWER/CHARGE
(RED) indicator lights up green.
• The camcorder is now ready to
record (Recording Standby mode).
Note:
• If “AUTO” is not displayed at this time,
set the camcorder to Full Auto mode
(see page 58).
AU T OAUTO
4 Press the Start/Stop button to begin
recording.
REC
Note:
• Before recording an important scene,
please perform the recording test, then
playback to check if the scene was
recorded properly. If noise occurs, use a
commercially available cleaning tape to
clean the video heads (see page xiv).
Maximum continuous recording and
actual recording times in Tape
Camera mode
Note:
• Using the zoom (see page 23) and other
functions or turning the power on and off
frequently will increase power consump-
tion. This may result in a decrease in the
actual recording time compared to the
maximum continuous recording time listed
above.
Media Selection switch
Start/Stop button
Power switch
Lock button
BT-L226
Battery
pack
Max. continuous
recording time
115
LCD
closed
LCD
open
100
POWER/CHARGE
(RED) indicator
Actual
recording time
55
LCD
closed
LCD
open
50
23
Basic Operations
PAUSE
To pause recording
Press the Start/Stop button again. Record-
ing pauses, and the camcorder enters
Recording Standby mode.
To turn the power off
Set the Power switch to OFF without
pressing the Lock button.
Note:
• If the camcorder remains in Recording
Standby mode for more than 5 minutes in
Tape Camera mode, the power will automati-
cally turn off to save battery power and to
protect the tape from being damaged. To
resume recording, set the Power switch to
OFF and then back to v. (The camcorder
will make a confirmation sound when it is left
in Recording Standby mode for about 4
minutes.)
Zooming
Available modes:
Tape Camera, Card Camera
Zooming allows you to move visually closer
to or farther from a subject without physi-
cally changing your position.
When using the optical zoom, you can
enlarge the subject up to 10K.
Zooming in
Push the Power Zoom control to the T
(telephoto) side to get a close-up view (1).
Zooming out
Push the Power Zoom control to the W (wide
angle) side to get a wide field of view (2).
• The zoom range indicator shows you the
current zoom setting.
• The zoom speed depends on how far you
push the Power Zoom control.
Notes:
• The camcorder is unable to focus when
zooming in on subjects within 5 feet (1.5 m).
• See page 33 for how to use the digital zoom.
Zooming in (when you want to center
attention on the subject)
Zooming out (when you want to include
the surroundings)
WT3ZOOM
Power Zoom
control
Zoom range indicator
24
Basic Operations
Basic Operations
Camera Recording
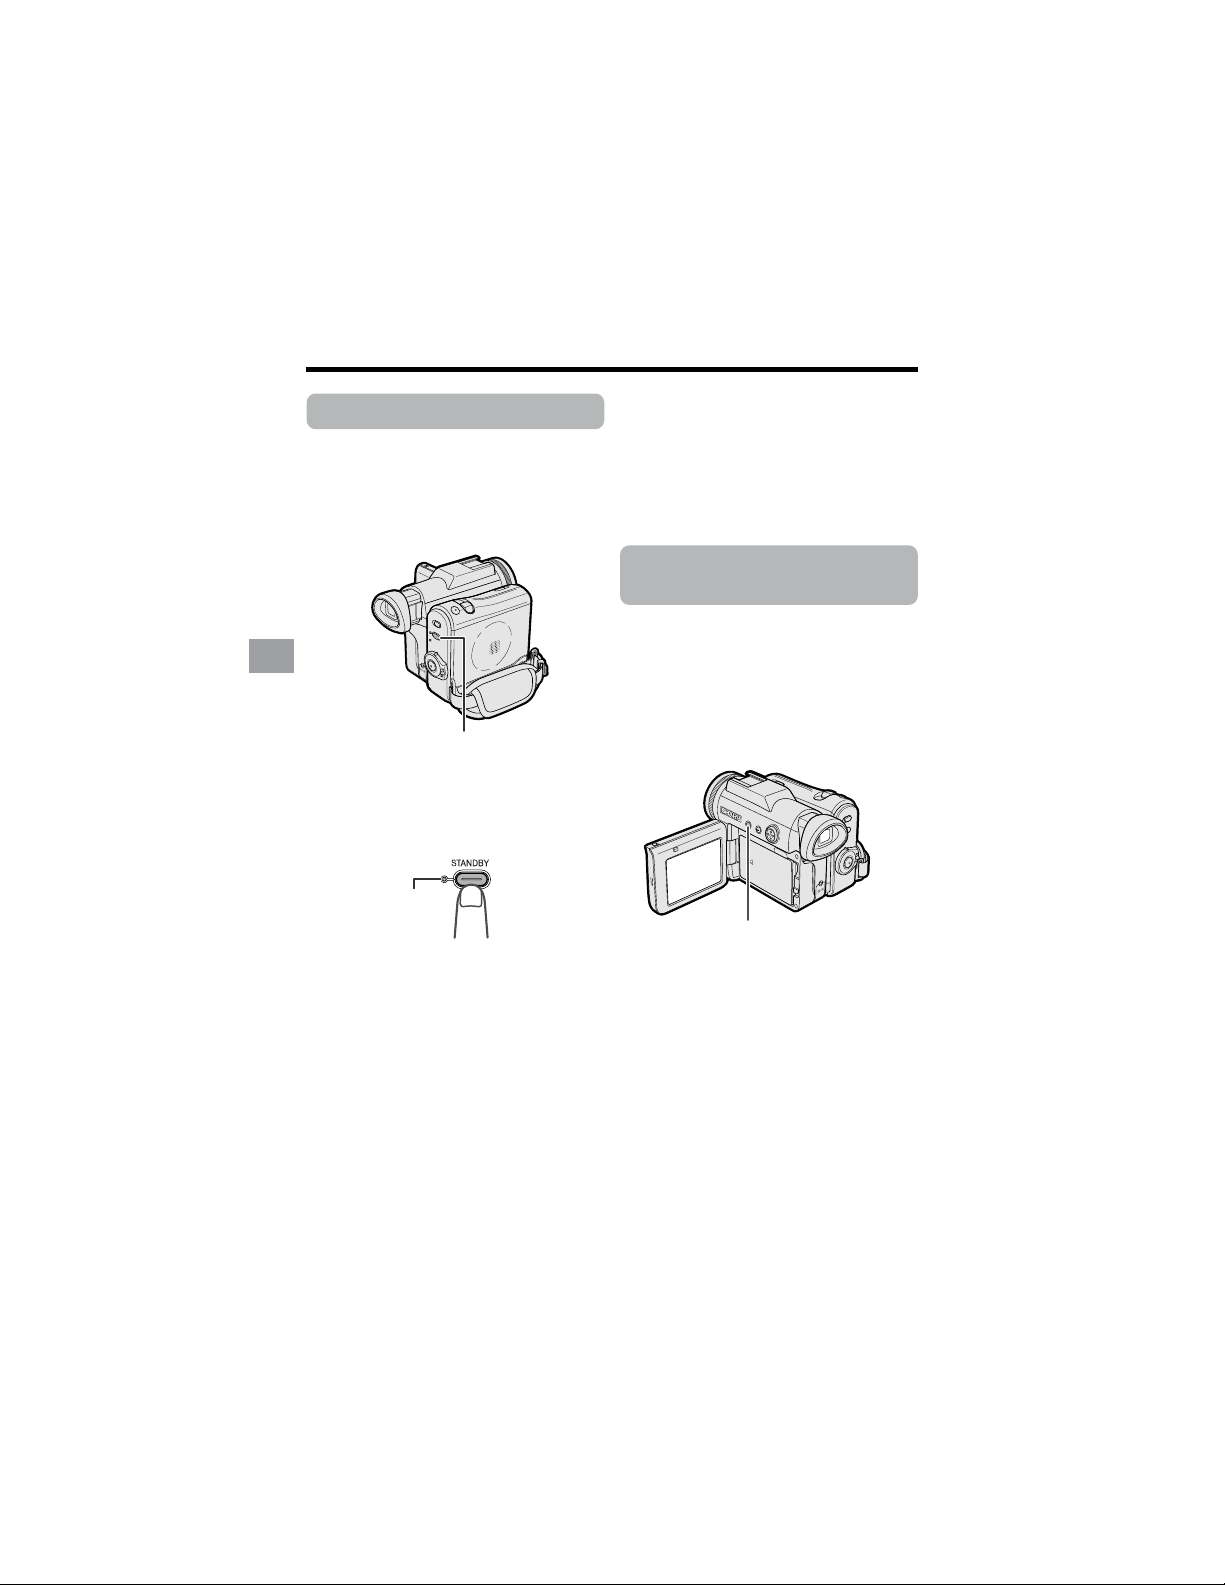
Power Standby Mode
Available mode:
Tape Camera
Power Standby mode allows you to prevent
accidental recording by locking all
operations except canceling the mode.
Hold down the STANDBY button for more
than 2 seconds when you pause record-
ing in Tape Camera mode.
• The screen turns off and the STANDBY
indicator lights up.
Turning on/off the
Backlight
Available modes:
All modes
You can see the on-screen display outdoors
on a sunny day or in a location with bright
lighting even when the backlight turns off.
Also, this function is useful when watching
playback on a TV.
Hold down the LCD LAMP button for
more than 2 seconds to turn off the
backlight.
• “BACKLIGHT OFF” will flash for two seconds,
then H appears on the LCD screen.
To turn on the backlight
Press the LCD LAMP button.
Note:
• The BACKLIGHT OFF mode will cancel when
you close the LCD monitor.
To resume operation
Press the STANDBY button again to
return to the Recording Standby mode.
• It takes about 2 seconds to be able to start
recording.
Notes:
• Power Standby will cancel and the STANDBY
indicator will turn off in these situations below:
— When the camcorder remains in Power
Standby mode more than 5 minutes
— When the camcorder is set to Card
Camera, Tape Playback or Card Playback
mode
— When removing the battery pack
— When removing a cassette
• The camcorder will turn off automatically in 5
minutes after setting Power Standby mode if
it remains in Recording Standby mode after
canceling Power Standby mode.
— When Power Standby mode, for example,
is canceled after 3 minutes, the
camcorder will turn off if recording is not
started within 2 minutes.
STANDBY indicator
STANDBY button
LCD LAMP button

25
Basic Operations
Auto Focus
Available modes:
Tape Camera, Card Camera
The camcorder is preset to Auto Focus
mode, which is designed to focus on most
types of subjects. In Auto Focus mode, the
camcorder automatically focuses on the
subject in the center of the scene. Always
keep the subject in the center of the scene.
Notes:
• If no subject is in the center of the scene, the
focus area will expand and the subject
nearest the center will be focused on.
• Auto Focus may not work in the situations
described on page 53. In these situations,
use the manual focus function.
• The camcorder may not be able to focus
correctly if the subject is closer than
approximately 5 feet (1.5 m). Set the zoom
control to wide angle, and try refocusing
again.
• If the lens is dirty or fogged, the camcorder
may not be able to focus correctly.
Macro Shots
Available modes:
Tape Camera, Card Camera
This camcorder lets you shoot close-up
images of small objects such as flowers and
insects, or make title frames for your videos.
When you want to record a magnified image
of a subject which is within approximately 5
feet (1.5 m) of the camcorder, do not zoom
in on it. Instead, zoom out all the way by
pushing the Power Zoom control to the W
side, and then move the camcorder closer
to the subject until you obtain the desired
angle of view. The camcorder will automati-
cally focus on the subject when the lens is
set for the widest angle.
Note:
• When you are recording a macro shot, be
sure that the subject receives sufficient
illumination.
Power Zoom
control
26
Basic Operations
Basic Operations
Camera Recording
30
min
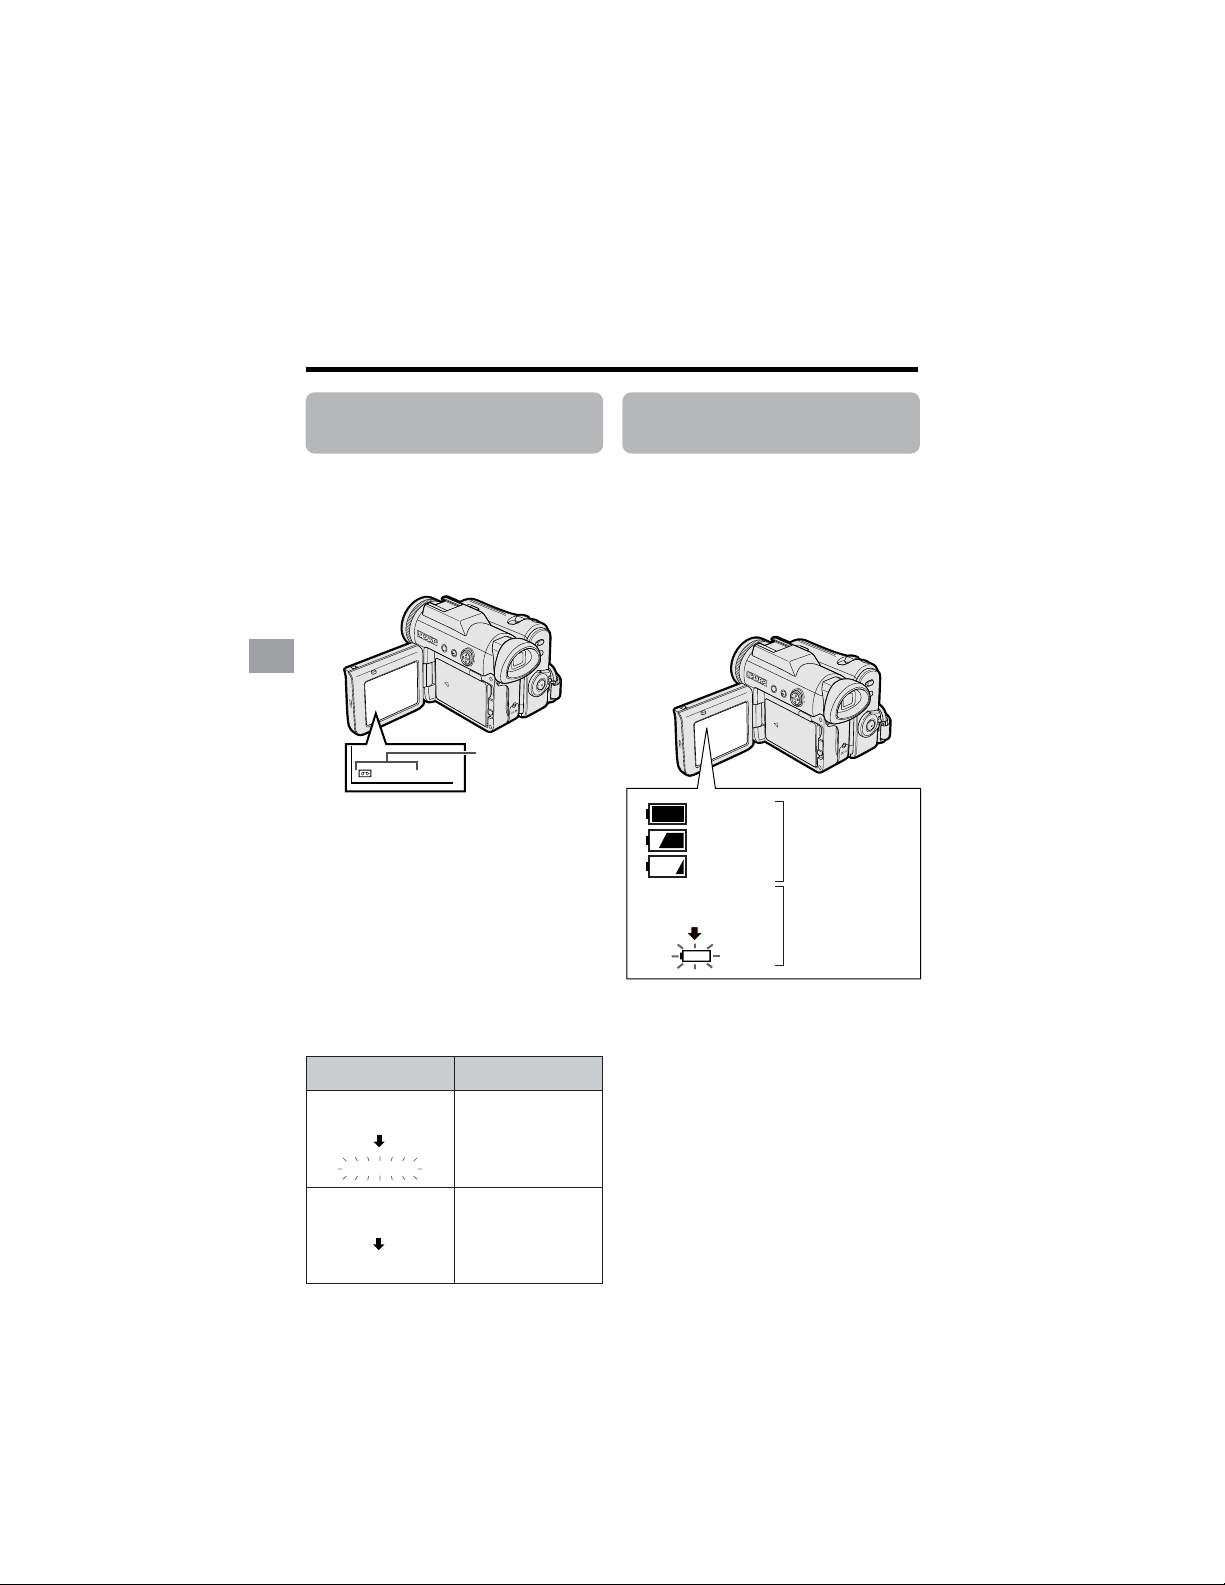
Remaining Battery
Power Display
Available modes:
All modes
When using the camcorder with the battery
pack as the power source, the remaining
battery power indicator is displayed. If the
battery power becomes very low, a warning
indicator appears. Replace the battery
pack.
Notes:
• The remaining battery power indicator
appears when the on-screen indicators are
turned on.
• Use the remaining battery power indicator
only as an approximate indication.
• The remaining battery power indicator may
change to either a higher or lower level if you
set the Power switch to OFF and then back to
v or w.
• In cold environments, the red remaining
battery power indicator may appear sooner.
• Use of the zoom functions when the warning
indicator is displayed may cause the
camcorder to suddenly lose power.
THE
ENDS SOON.
TAPE
TAPE END
Warning indicator
Approx. remaining
time
Less than 1 min.
Remaining Recording
Time Display
Available mode:
Tape Camera
When the camcorder is recording in Tape
Camera mode, an on-screen indicator
displays the approximate remaining tape
time in minutes.
The tape has reached
the end.
CHANGE THE
CASSETTE.
TAPE END
BATTERY IS
TOO LOW.
Remaining
recording time
indicator
Remaining
battery power
indicator
Notes:
• The remaining recording time indicator
appears when the on-screen indicators are
turned on.
• The remaining recording time indicator
appears 10 seconds after pressing the
Start/Stop button to begin recording.
• The remaining recording time indicator only
shows the approximate time left. Also, it
varies slightly depending on the length of the
tape used. (This function is based on the
DVM60 tape standard.)
When the remaining recording time reaches
1 minute, a warning indicator will appear.
Prepare a new cassette.
Warning
indicator
(Green)
(Green)
(Red)
27
Basic Operations
Note:
• If you press the Start/Stop button in Tape
Playback mode, the “g” mark appears and
the camcorder enters Recording Standby
mode. If you do not intend to record, press
l to turn the “g” mark off, then press m to
begin playback. This will ensure your
previous recording is not erased (see pages
62–65).
To stop playback
Press l.
To turn the power off
Set the Power switch to OFF without
pressing the Lock button.
Note:
• The tape automatically rewinds when
playback reaches the end of the tape.
Watching the playback in
the viewfinder
You can also watch the playback in the
viewfinder by closing the LCD monitor with
the screen facing in. You cannot monitor the
sound through the speaker when watching
the playback in the viewfinder.
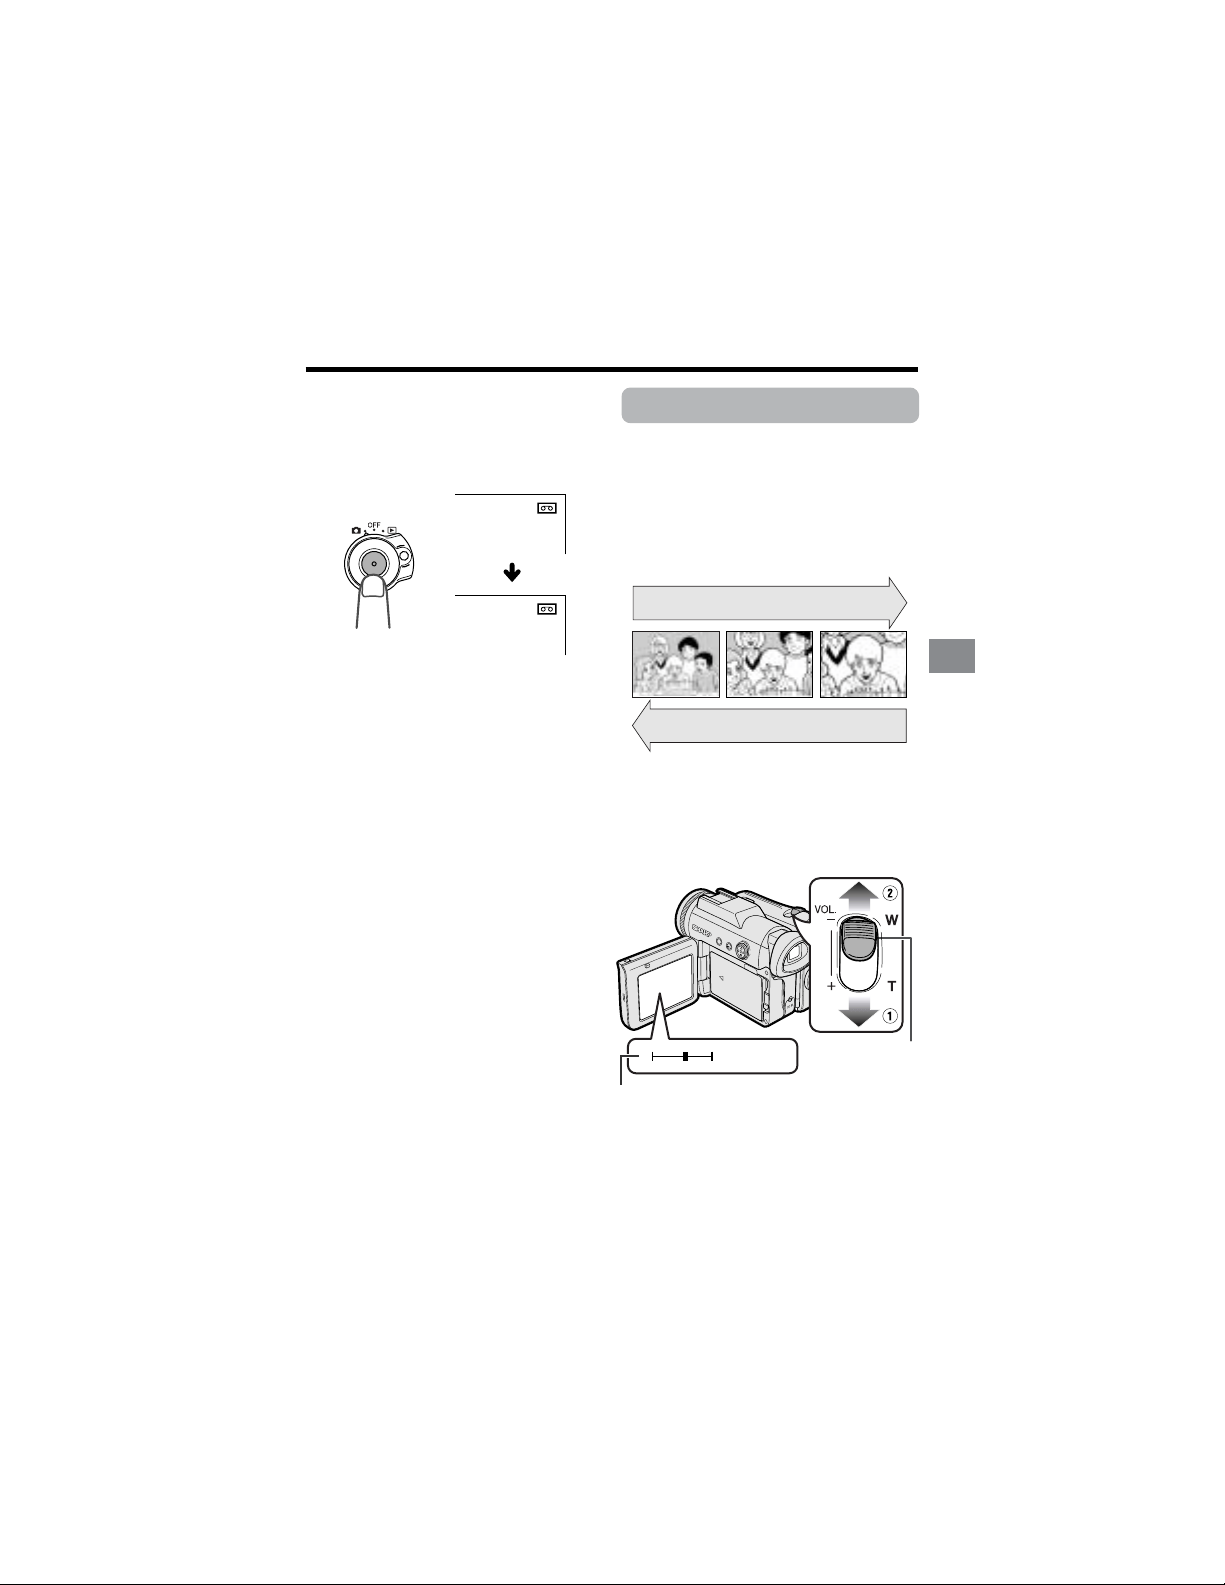
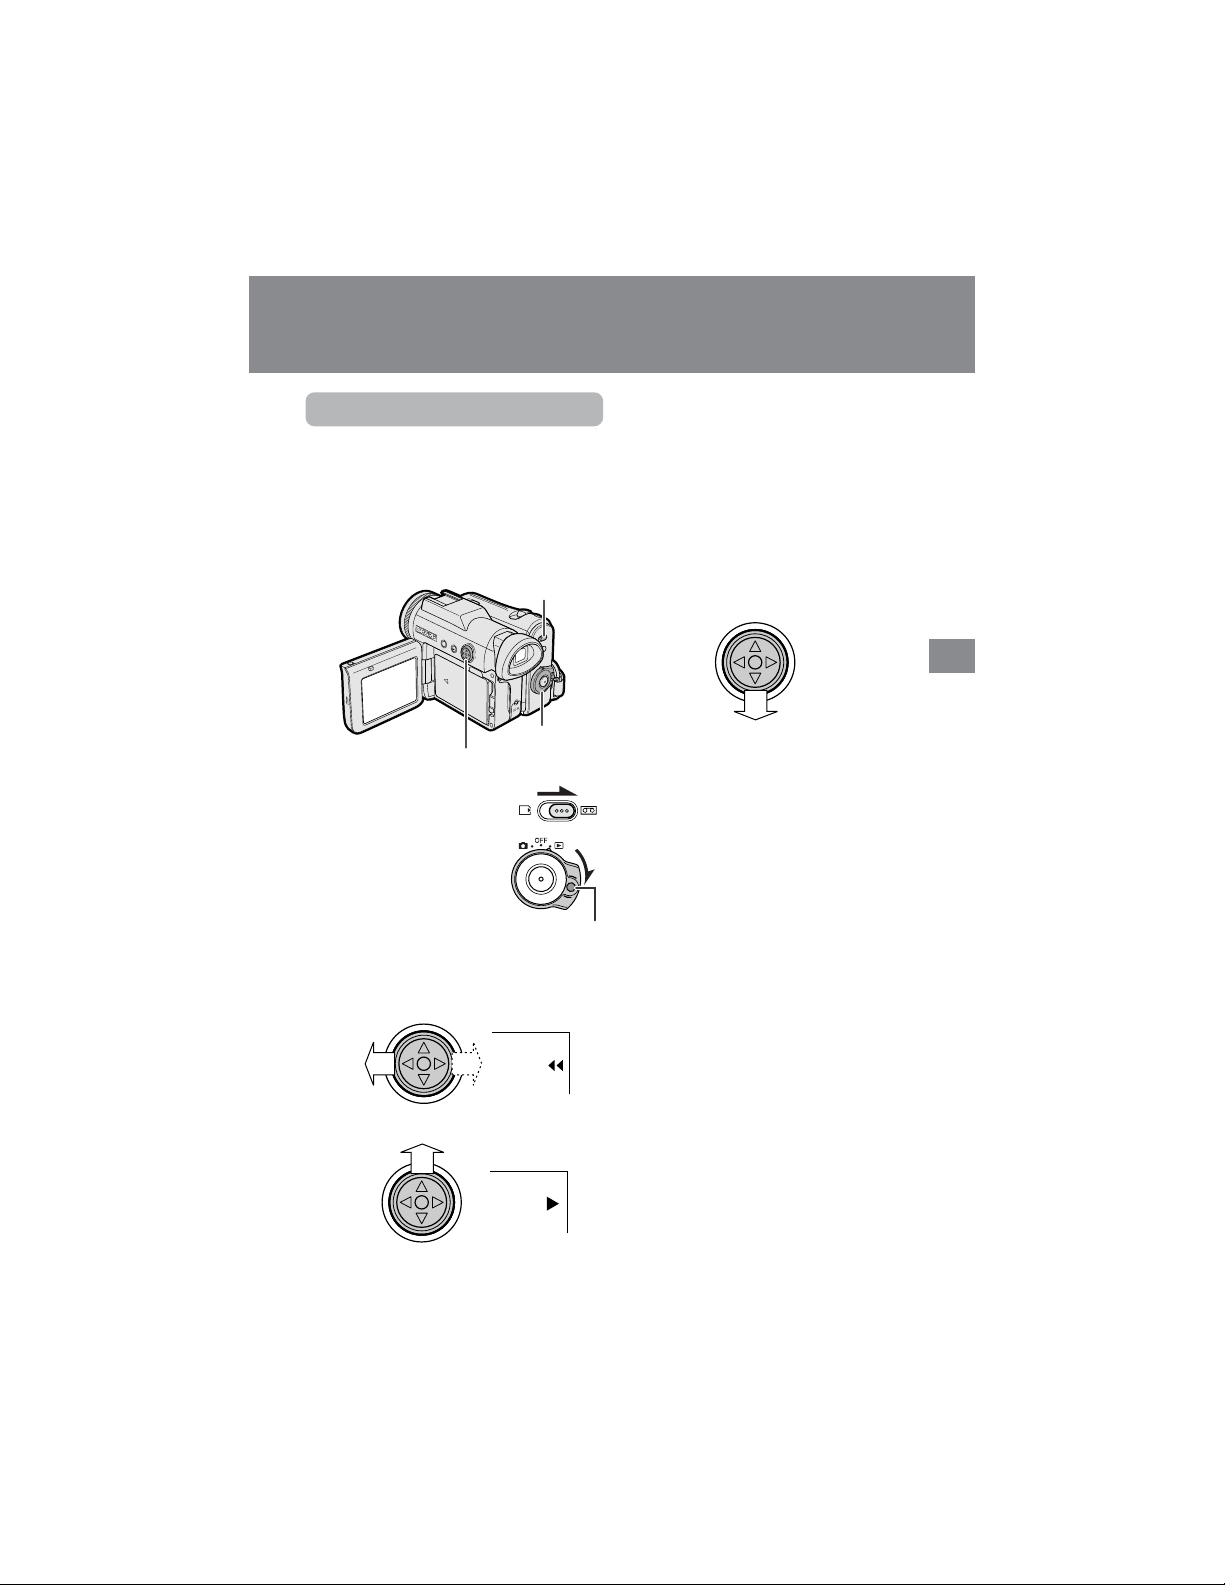
Tape Playback
Available mode:
Tape Playback
The LCD monitor screen functions as a
handy playback monitor. Nothing needs to
be connected, allowing instant on-screen
playback with the sound through the built-in
speaker.
1 Set the Media Selection
switch to V.
2 Hold down the Lock
button and set the
Power switch to w.
3 Press j (or k) on the Operation
button to rewind (or fast forward) the
tape to the desired point.
4 Press m to begin playback.
Basic Operations
Playback
Power switch
Operation button
Lock button
Media Selection
switch
Basic Operations
Playback
28
Basic Operations
VOLUME
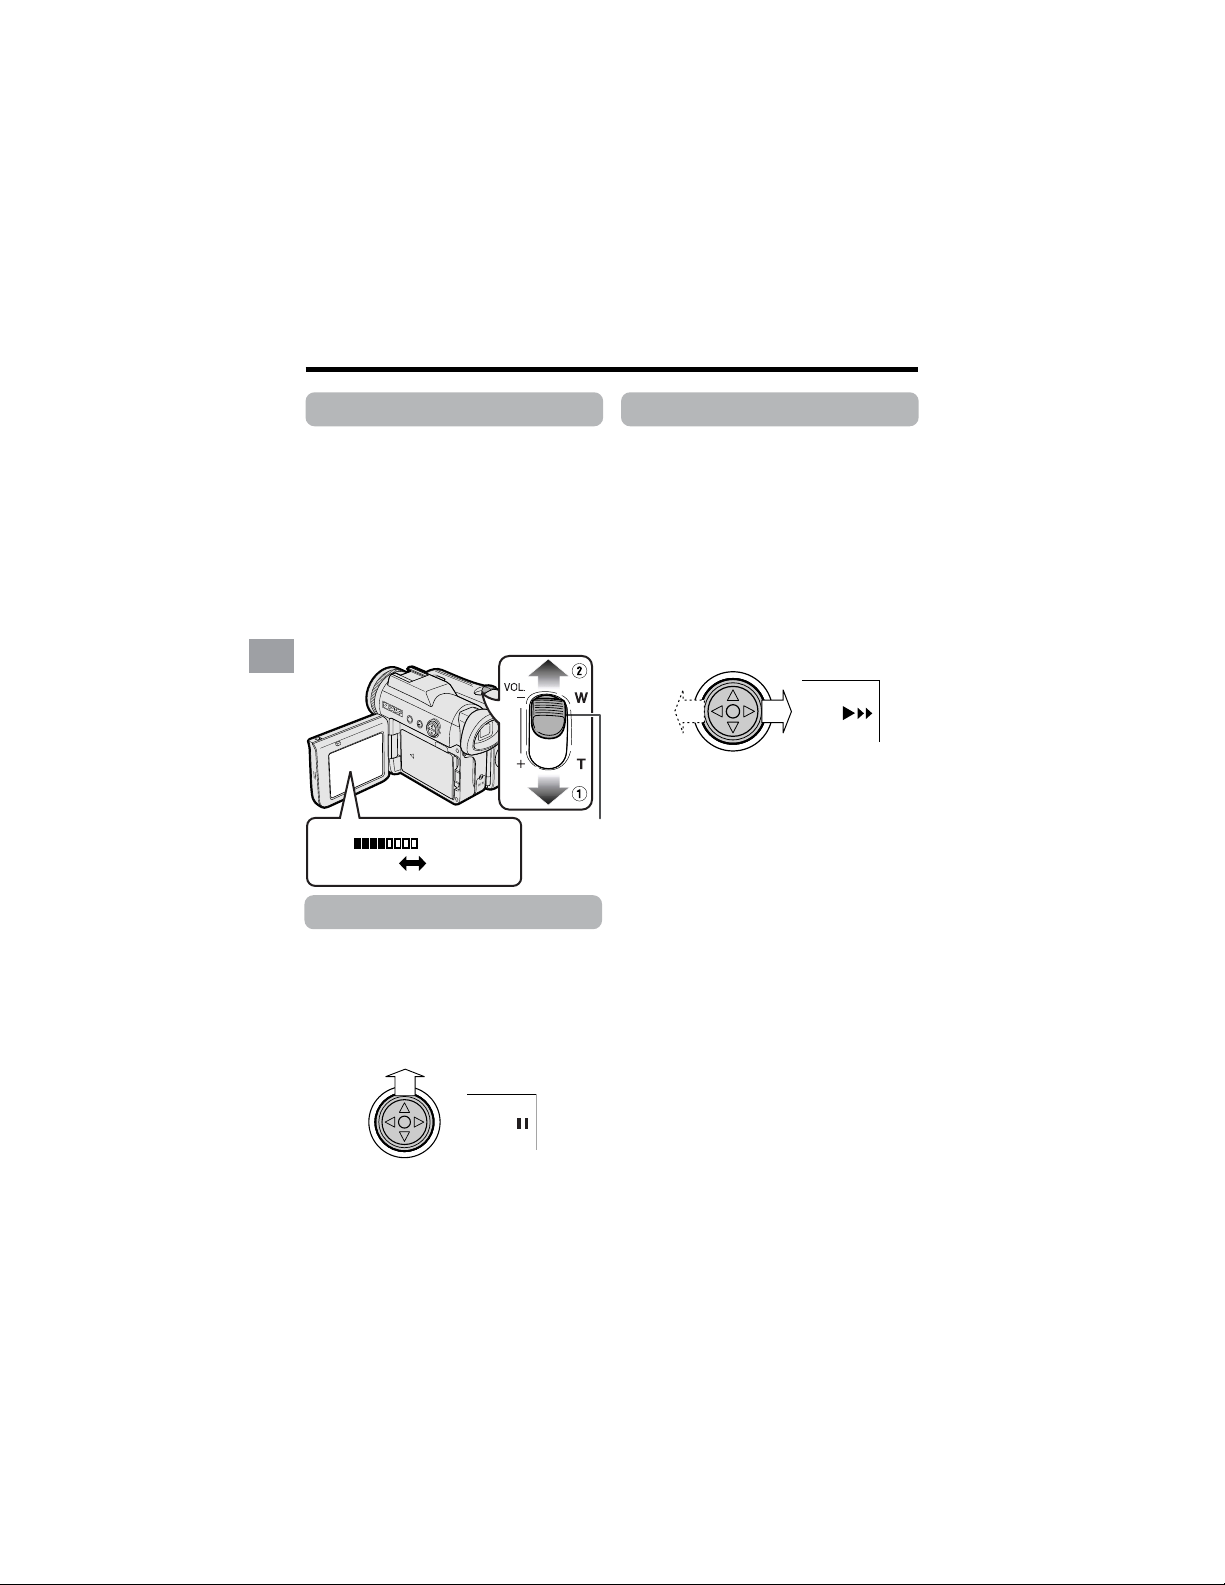
Video Search
Available mode:
Tape Playback
The video search function makes it easy to
search for a desired scene on the tape.
Searching for a Scene Near
the Current Tape Position
1 During Tape Playback, press k (or
j) on the Operation button.
• The playback picture fast forwards
(or reverses).
2 When you find the scene, press m to
return to normal playback.
Searching for a Scene Far
from the Current Tape Posi-
tion
1 During fast forward (or rewind) in
Tape Playback mode, press and hold
k (or j) on the Operation button.
• The fast forward (or rewind) picture
displays.
2 If the scene is still rather far from the
current tape position, release the
Operation button to normal fast
forward (or rewind).
3 Repeat steps 1 and 2 above until you
find the scene.
4 Press m to begin normal playback.
Notes:
• The sound is off during search.
• You may experience picture noise during
search. This is not a malfunction.
Still
Available mode:
Tape Playback
The still function allows you to pause in
Tape Playback mode.
During Tape Playback, press m on the
Operation button.
To return to normal playback, press m
again.
Notes:
• The sound is off in Still mode.
• To protect the tape, the camcorder automati-
cally returns to normal playback if it is left in
Still mode for more than 5 minutes.
Volume Control
Available mode:
Tape Playback
When the camcorder is in Tape Playback
mode, push the Volume control to the L or
+ side to increase (1) or decrease (2) the
volume.
The volume level indicator will appear on
the LCD screen during adjustment only.
Once the Volume control is released, the
volume level indicator will disappear shortly
afterwards.
Volume
control
IncreaseDecrease

29
Basic Operations
OTHERS 1
ENGL I SH
EXECUTE
ON
ON
OFF
–+
BEEP
REMOTE
DEFAULT
PHONES VOL
DEMO MODE
LANGUAGE
RETURN
–+
PHONES VOL
Using Earphones
(Commercially
Available)
Available modes:
Tape Playback, Tape Camera
You can monitor the sound via stereo
earphones (commercially available) during
playback or recording. Stereo earphones
with a 3.5 mm diameter plug can be used
with this camcorder.
Connect the plug of stereo earphones to the
earphones jack on the camcorder as shown
below.
Notes:
• Before connecting stereo earphones, turn the
camcorder volume down to the lowest
setting.
• The built-in speaker automatically turns off
when stereo earphones are connected to the
earphones jack.
Adjusting the Phones
Volume
Available mode:
Tape Camera
You can adjust the phones volume if sound
through the earphones is difficult to hear.
1 Set the Media Selection switch to V,
then hold down the Lock button and
set the Power switch to v (see page
21).
2 Press the DISPLAY button until the
mode screen appears (see page 31).
3 Press l or m on the Operation
button to select “MENU”, then press
the center of the Operation button.
4 Press l or m to select “EXECUTE”,
then press the center of the Opera-
tion button.
5 Press l or m to select Z, then
press the center of the Operation
button.
6 Press l or m to select “PHONES
VOL” , then press the center of the
Operation button.
7 Press j or k to adjust to the desired
volume level, then press the center of
the Operation button.
8 Press the DISPLAY button to turn off
the menu screen.
Earphones jack
Decrease Increase
Basic Operations
Playback
30
Basic Operations
Watching Playback
on a TV
Available modes:
Tape Playback, Card Playback
You can connect the camcorder to a TV to
allow a larger audience to enjoy playback.
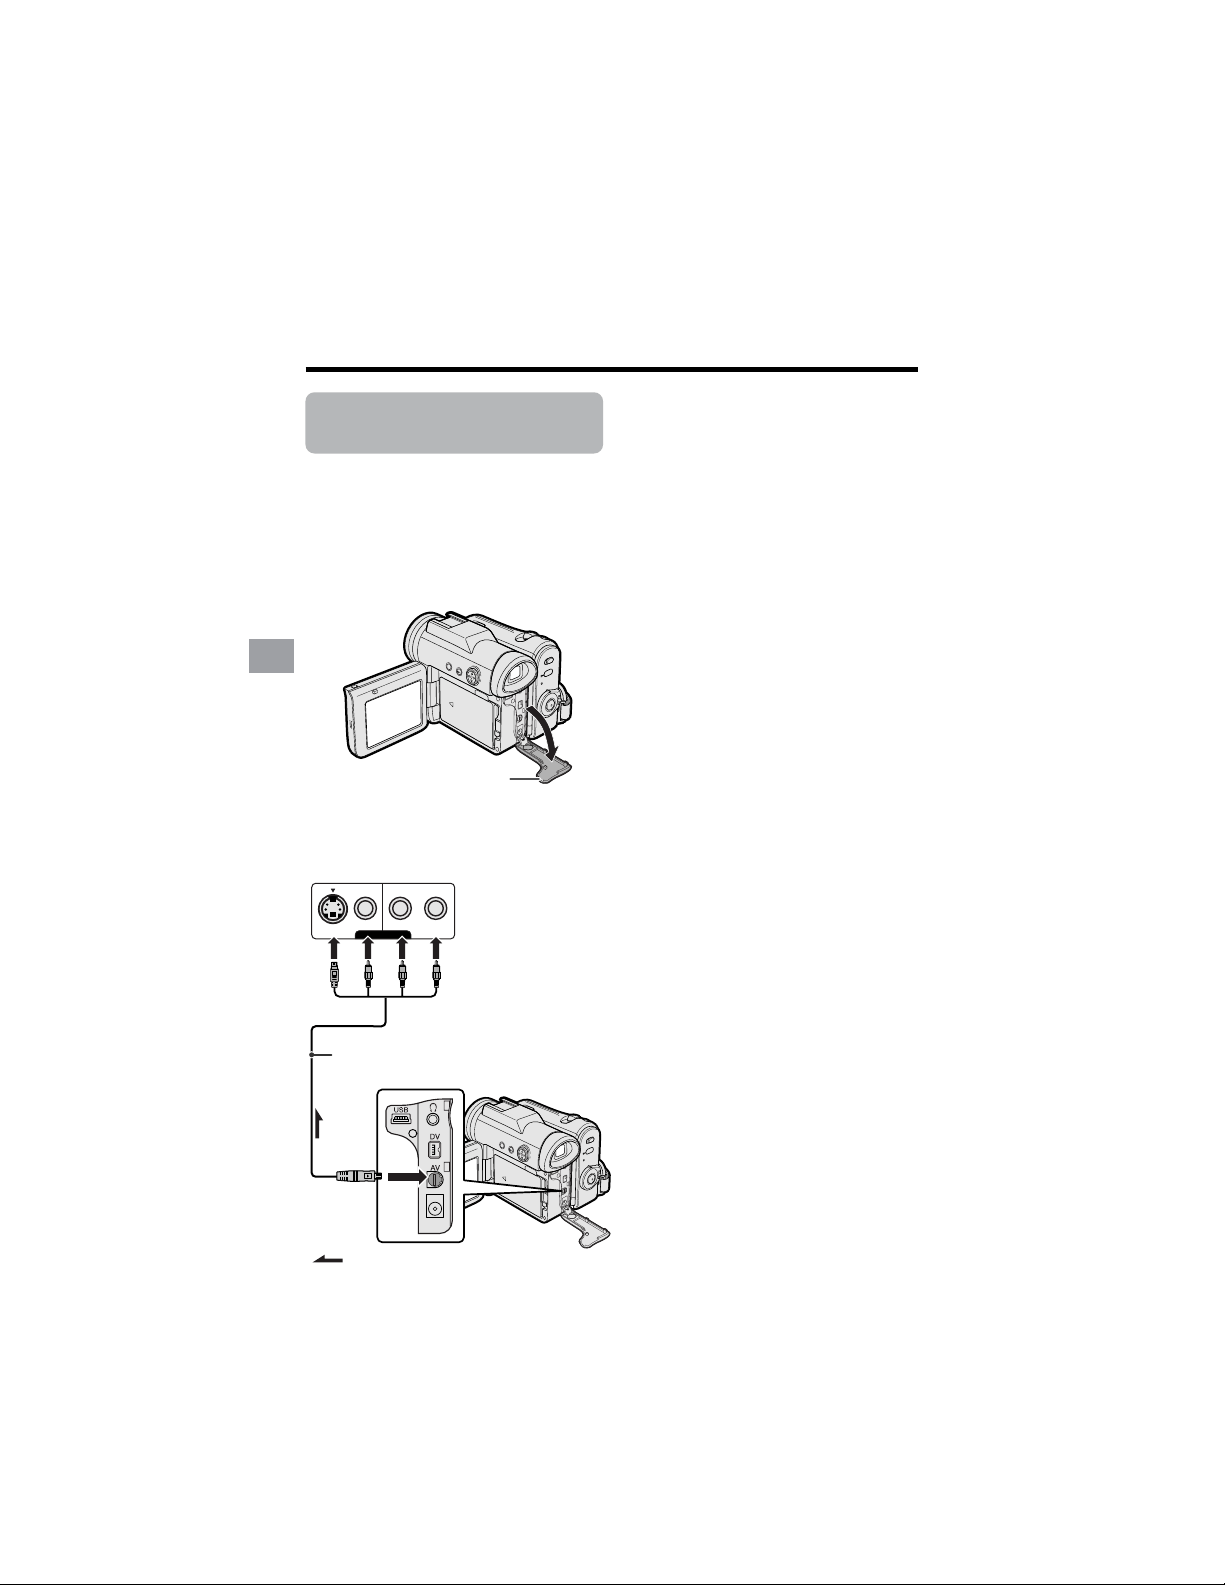
1 Open the terminal cover on the
camcorder (see page 2).
2 Connect the camcorder to your TV (or
VCR) with the supplied audio/video/S-
video cable, as shown.
About the S-video socket
S-video sockets are used to separately pass
the chroma (color) and luminance (bright-
ness) components of video signals. They
serve to improve the picture quality in both
recording and playback.
Note:
• Check that the camcorder, TV, VCR and
other equipment to be used are turned
off before making any connections.
Picture noise or malfunction may occur
if any of the above is left on while
making a connection.
3 Turn on the TV and set it to the “AV”
or “VIDEO” channel. (See the
operation manual of your TV.)
• When connecting to a TV via a VCR,
turn on the VCR and set it to the “AV”
or “LINE” input channel. Operate the
TV as you normally do to view the
signal from the VCR. (See the
operation manuals of your TV and
VCR.)
4 Set the Power switch on the
camcorder to w, and begin playback
(see page 27).
Notes:
• If your TV or VCR has only one audio input
jack, use the white plug for the audio
connection on the TV or VCR.
• If your TV or VCR has an S-video input
socket, you do not need to connect the
yellow video plug.
• Close the terminal cover after use.
VIDEO
S-VIDEO
L-AUDIO-R(MONO)
AV-IN
:
Terminal cover
To AV
terminal
Black: To S-video input socket
Yellow: To video input jack
White: To audio input (L) jack
Red: To audio input (R) jack
Audio/video/S-video cable (supplied)
The arrow shows the signal flow.
TV or VCR
31
Useful Features
Operation button
Media Selection switch
DISPLAY button
Power switch
Information
display on
Mode screen
Information
display off
Example
Example
Useful Features
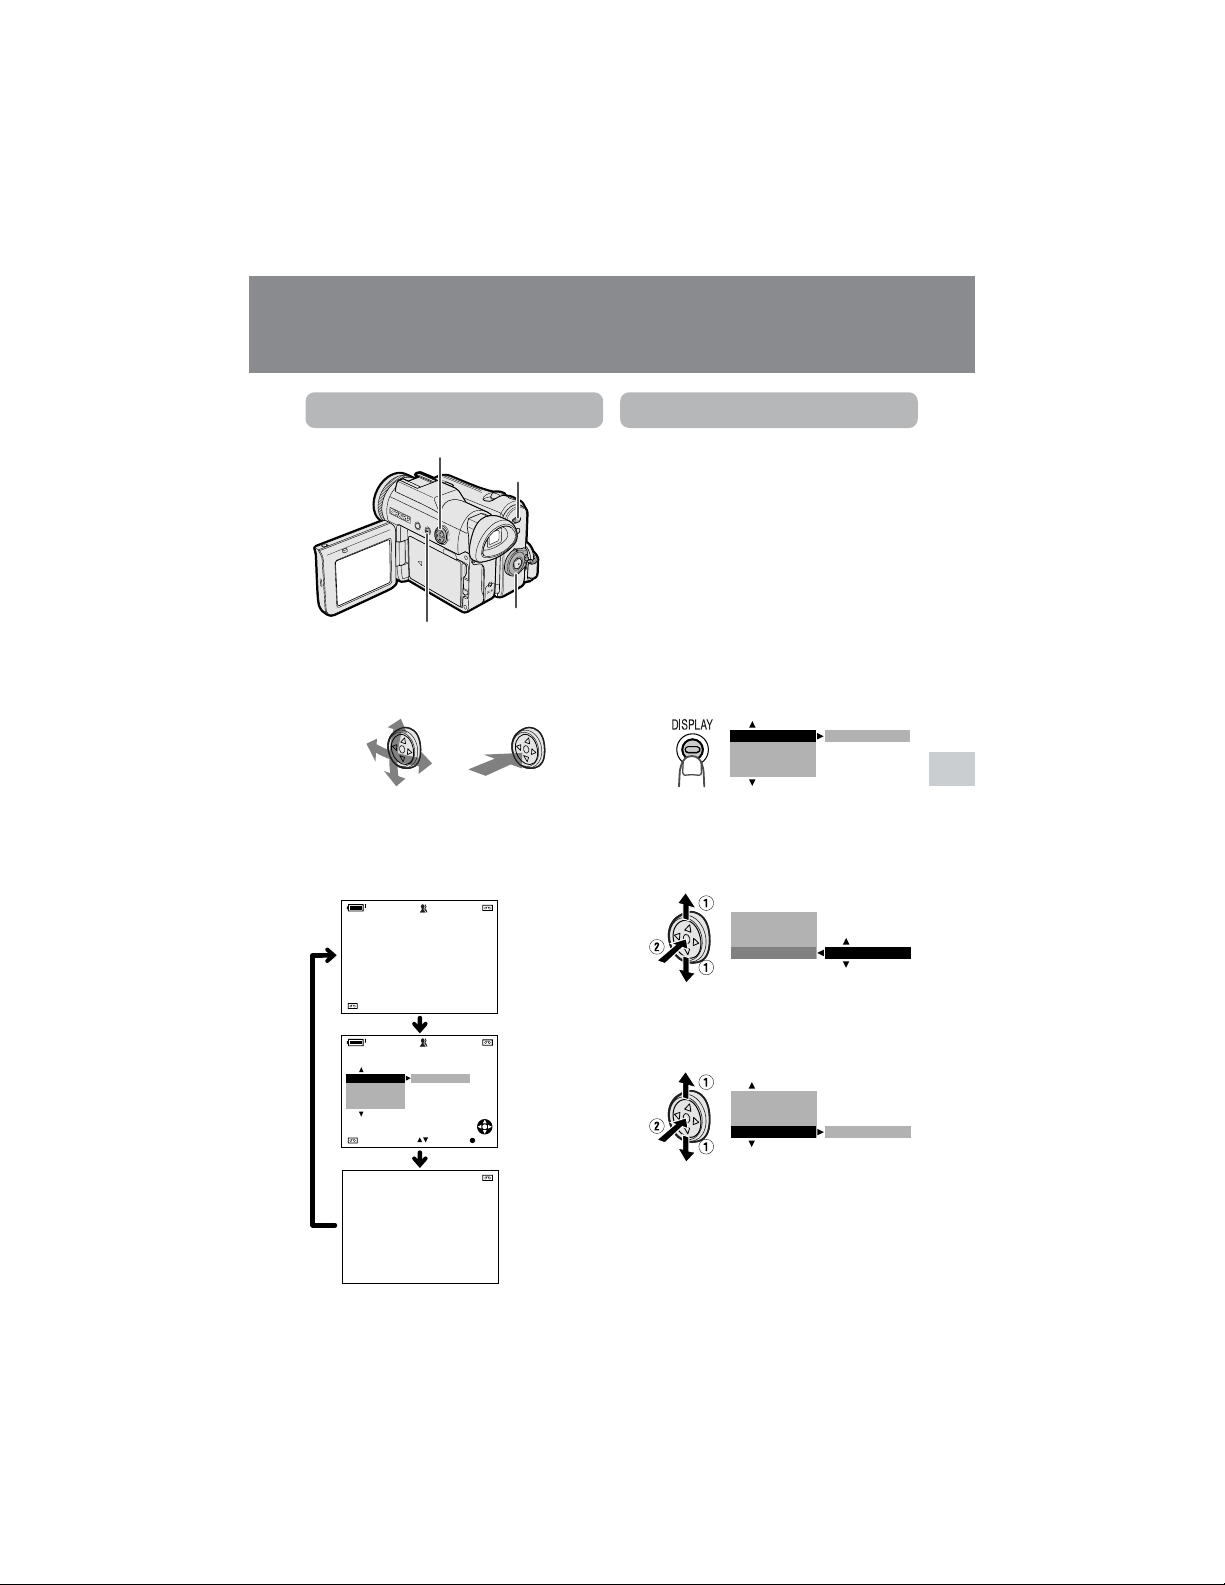
Control Buttons
Operation button
Use the Operation button to select and set
the desired setting.
Using the Mode Screens
In the mode screens, you can adjust the
camcorder settings by using the Operation
button.
1 Set to the desired camcorder mode
by using the Media Selection switch
and the Power switch (see page 21).
• See pages 106 to 109 for the mode
items you can select in each
camcorder mode.
• Steps 2 to 4 show how to change the
SCENE MENU setting in Tape
Camera mode.
2 Press the DISPLAY button until the
mode screen appears.
3 Press l or m on the Operation
button to select the desired mode
item (SCENE MENU), then press the
center of the Operation button.
4 Press l or m to select the desired
mode setting (DUSK), then press the
center of the Operation button.
To turn off the mode screen
Press the DISPLAY button.
Note:
• Items that are not selectable are grayed out.
4002.2
03MA:01
JUN.
3 0min
AUTO
3 0min
AUTO
SELECT SET
OFF
FADE
M
ENU
SCENE
M
ENU
BLC GAIN/
BLC GAIN/ OFF
FADE
M
ENU
SCENE
M
ENU
FADE
M
ENU
SCENE
M
ENU OFF
BLC GAIN/
SCENE
M
ENU
FADE
M
ENU
DUSK
BLC GAIN/
DISPLAY button
Each time you press the DISPLAY button,
the screen changes as shown below.
• The example screens shown are for Tape
Camera mode.
32
Useful Features
Useful Features
DISPLAY button
Operation button
Media Selection switch
Power switch
Example
Example
Example
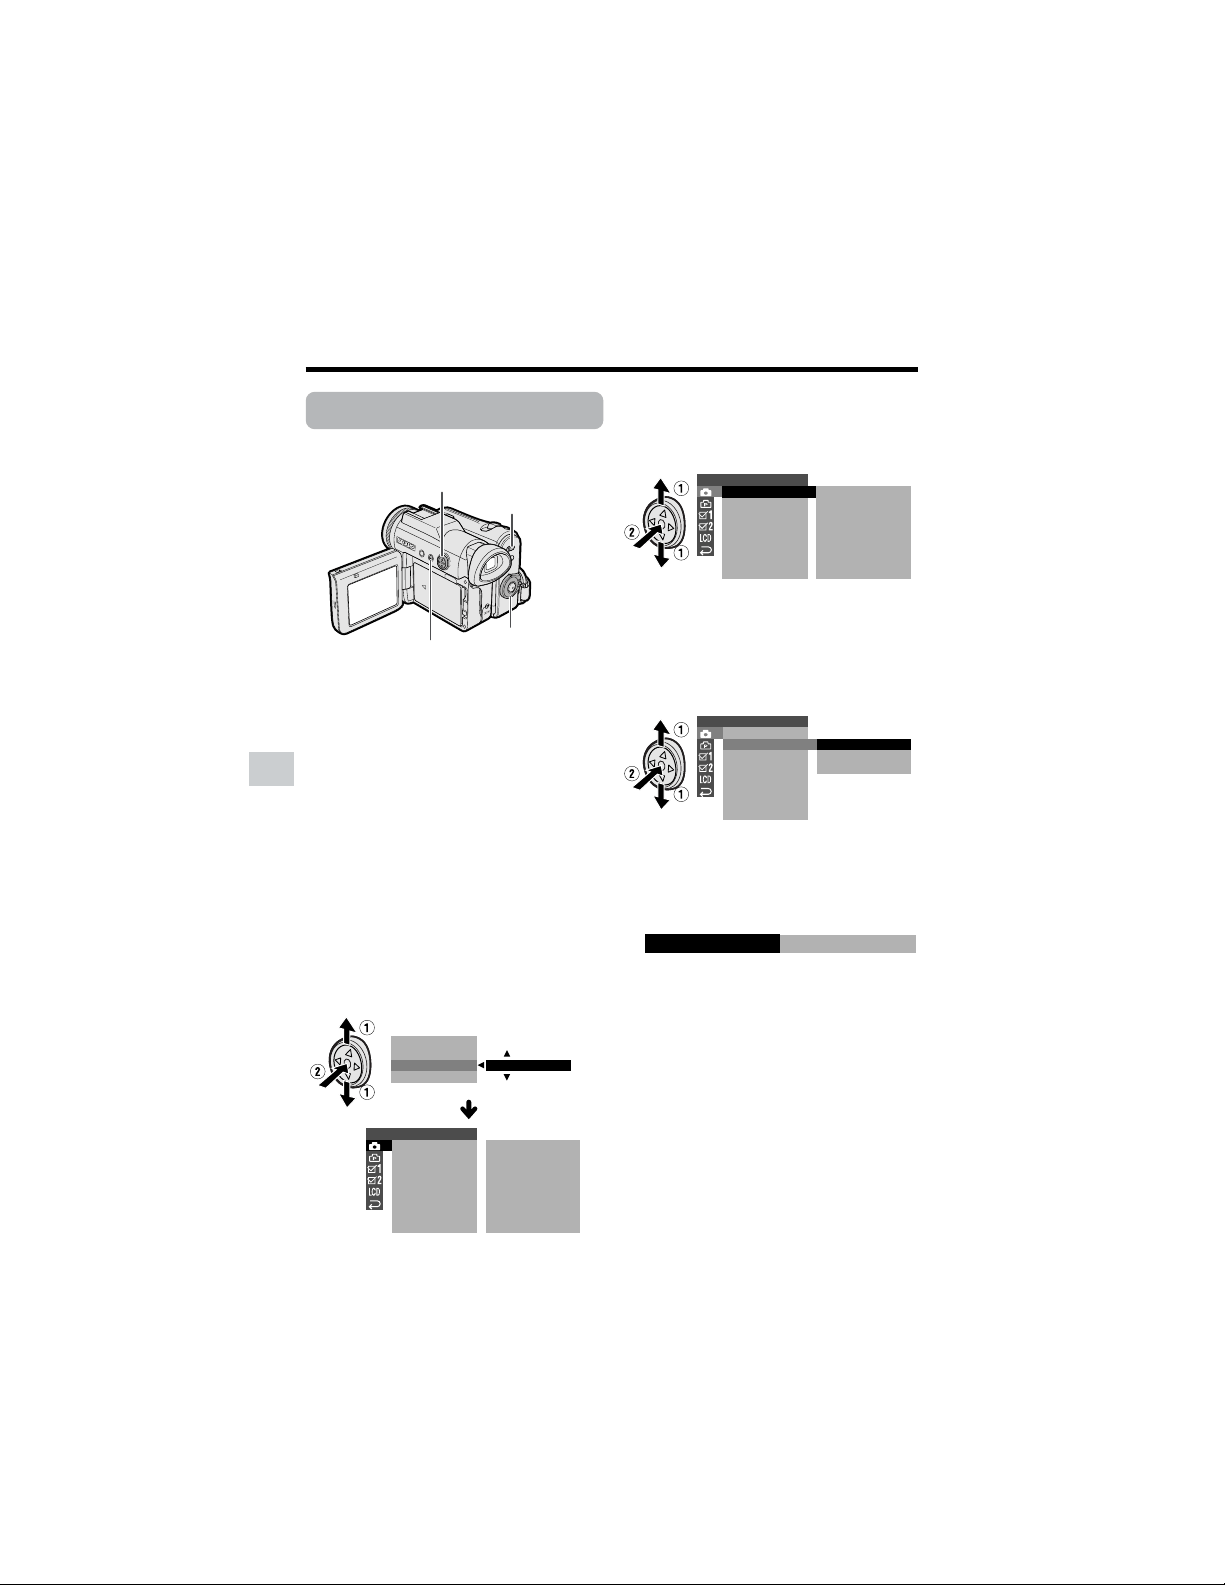
Using the Menu Screens
Use the menu screens to adjust the various
camcorder settings.
1 Set to the desired camcorder mode
by using the Media Selection switch
and the Power switch (see page 21).
• See pages 106 to 109 for the menu
items you can select in each
camcorder mode.
• Steps 2 to 8 show how to change the
DGTL ZOOM menu setting in Tape
Camera mode.
2 Press the DISPLAY button until the
mode screen appears (see page 31).
3 Press l or m on the Operation
button to select “MENU”, then press
the center of the Operation button.
4 Press l or m to select “EXECUTE”,
then press the center of the Operation
button.
Note:
• The menu screen does not appear
during recording.
5 Press l or m to select the desired
menu screen (T), then press the
center of the Operation button.
• You can press k, instead of the
center of Operation button.
6 Press l or m to select the desired
menu item (DGTL ZOOM), then press
the center of the Operation button.
• You can press k, instead of the
center of the Operation button.
7 Press l or m to select the desired
menu setting (40), then press the
center of the Operation button.
• You can press j, instead of the
center of the Operation button.
• To adjust another menu item, press
l or m to select “RETURN” and
press the center of the Operation
button, then perform steps 5 to 7.
8 Press the DISPLAY button to turn off
the menu screen.
Notes:
• Certain menu items are common to all
camcorder modes. If the BEEP menu item, for
example, is set to “OFF” in Tape Camera
mode, it will be automatically set to “OFF” in
other modes.
• The menu screen automatically turns off if no
settings are made within 5 minutes.
• Items that are not selectable are grayed out.
SETTING 1
QK.
DGTL
RETURN
ZOOM
TAPE SPEED
ZOOM MI C
RETURN
START
OFF
SP
AUTO
SCENE MENU
EXECUTE
M
ENU
FADE
BLC GAIN/
SETTING 1
QK.
DGTL
RETURN
ZOOM MI C
ZOOM
TAPE SPEED
RETURN
START
OFF
SP
AUTO
SETTING 1
QK.
DGTL
RETURN
ZOOM MI C
ZOOM
TAPE SPEED
RETURN
OFF
40
500
04
DGTL ZOOM
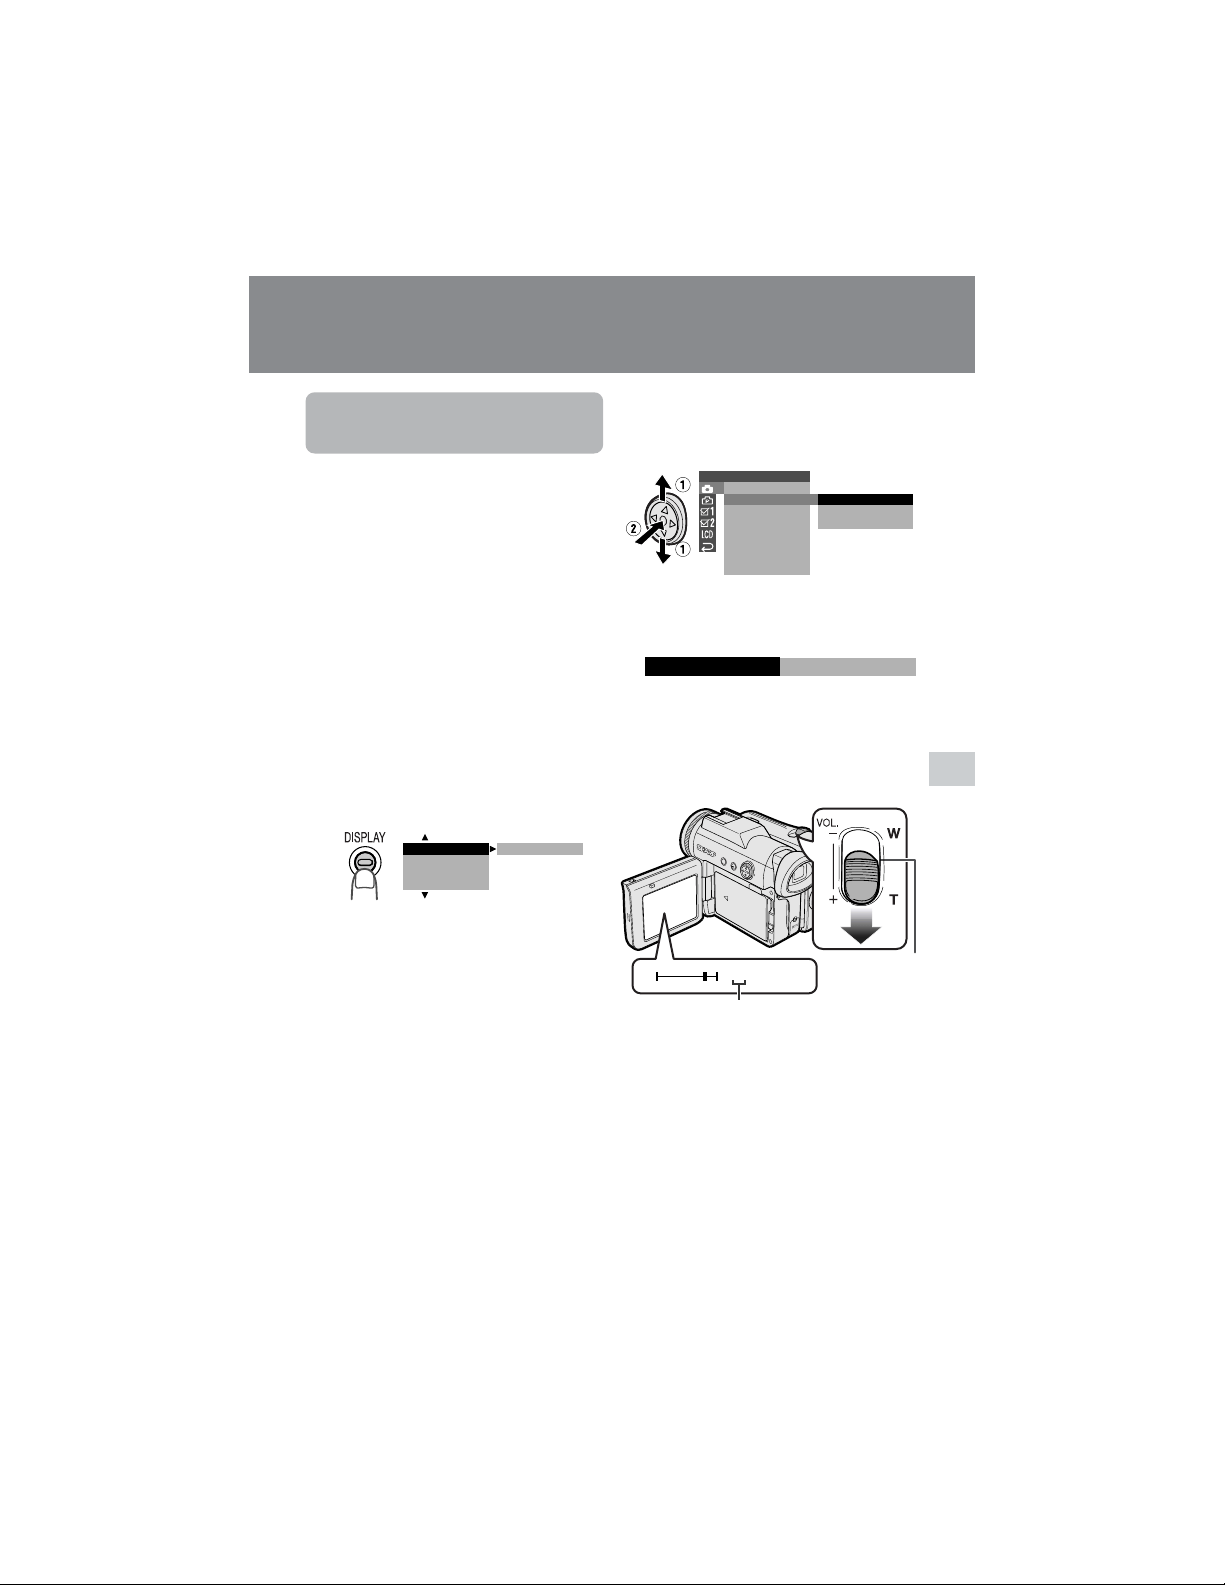
33
Useful Features
Power Zoom
control
Digital zoom indicator
Useful Features
Camera Recording
5
Press l or m to select “DGTL
ZOOM”, then press the center of the
Operation button.
6 Press l or m to select “40” or “500”,
then press the center of the Operation
button.
7 Press the DISPLAY button to turn off
the menu screen.
The “D” digital zoom indicator is displayed
during digital zooming.
To use optical zoom only
Select “OFF” in step 6 above.
Setting the Digital
Zoom
Available mode:
Tape Camera
You can select three different zoom ranges:
1–10K (optical zoom), 10–40K (digital
zoom) or 10–500K (digital zoom). The
digital zoom allows you to record powerful
close-up pictures with the same operation
as normal zooming.
Notes:
• The digital zoom is in addition to the optical
zoom giving a combined maximum zoom
range of 1–500K.
• As the image is enlarged digitally, the
picture quality decreases when higher
digital zoom settings are used.
1 In Tape Camera mode, press the
DISPLAY button until the mode
screen appears.
2 Press l or m on the Operation
button to select “MENU”, then press
the center of the Operation button.
3 Press l or m to select “EXECUTE”,
then press the center of the Operation
button.
4 Press l or m to select T, then
press the center of the Operation
button.
BLC GAIN/ OFF
FADE
M
ENU
SCENE
M
ENU
SETTING 1
QK.
DGTL
RETURN
ZOOM MI C
ZOOM
TAPE SPEED
RETURN
OFF
40
500
WT 52D
-
ZOOM
04
DGTL ZOOM

34
Useful Features
Camera Recording
Useful Features
Backlight
Compensation (BLC)
Available modes:
Tape Camera, Card Camera
When the subject is backlit, the image will
appear dark if it is recorded normally. Use
the backlight compensation (BLC) function
to improve the picture.
• The example screens shown are for Tape
Camera mode.
1 In Tape Camera or Card Camera
mode, press the DISPLAY button until
the mode screen appears.
2 Press l or m on the Operation
button to select “BLC/GAIN”, then
press the center of the Operation
button.
3 Press l or m to select “ON x”,
then press the center of the Operation
button.
BLC GAIN/ OFF
FADE
M
ENU
SCENE
M
ENU
BLC /GAI N ON
AU T OAUTO
3 0min3 0min
4 Press the DISPLAY button to turn off
the mode screen.
•“x” appears when on-screen
indicators are turned on, indicating that
the backlight compensation is now
working.
To cancel the backlight compensa-
tion function
Select “OFF” in step 3 above.

35
Useful Features
Gain-up
Available modes:
Tape Camera, Card Camera
When you are recording in a dark or poorly
illuminated location, “LIGHT” is displayed
on the screen. Use the gain-up function to
record a brighter picture.
Note:
• At locations where lighting is adequate,
“LIGHT” will not appear. The gain-up function
cannot be used in this case.
• The example screens shown are for Tape
Camera mode.
1 In Tape Camera or Card Camera
mode, press the DISPLAY button until
the mode screen appears.
AUTO
3 0min
min
30min
BLC /GAI N ON
To cancel the gain-up function
Select “OFF” in step 3 above.
Notes:
• You may experience some picture noise in
Gain-up mode, which increases when the
e appears.
• When the e indicator appears, you may
get a shadow image behind a subject that is
moving around a lot.
• Fine brightness adjustments are possible
when using manual iris (see page 56).
• The e indicator will disappear and
Gain-up mode will cancel if you aim the
camcorder in a bright location.
2 Press l or m on the Operation
button to select “BLC/GAIN”, then
press the center of the Operation
button.
3 Press l or m to select “ON e”,
then press the center of the Operation
button.
4 Press the DISPLAY button to turn off
the mode screen.
•“e” appears when on-screen
indicators are turned on, indicating that
the gain-up function is now working.
BLC GAIN/ OFF
FADE
M
ENU
SCENE
M
ENU
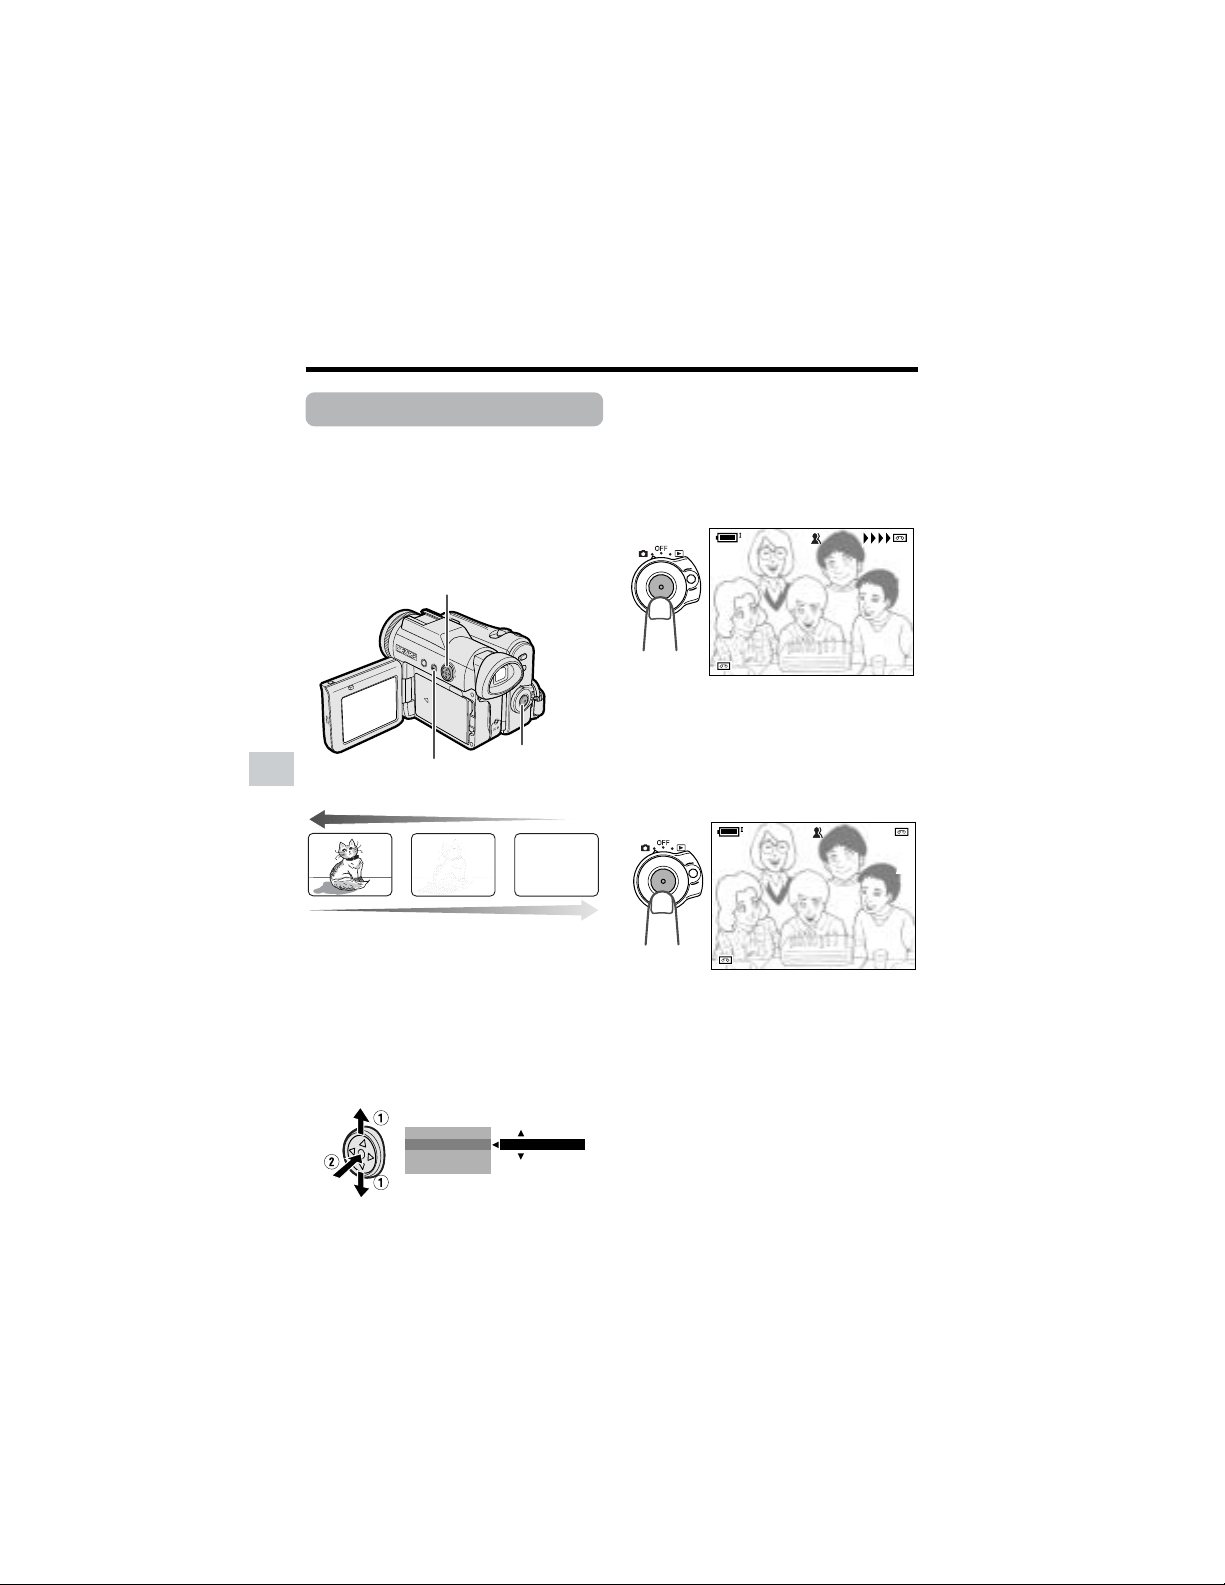
36
Useful Features
Camera Recording
Useful Features
Fade In and Fade Out
Available mode:
Tape Camera
The fade function allows you to gradually
bring the image and sound in or out at the
beginning or end of a scene for creating
scene transitions. This is especially effective
in creating a dramatic change in scenery.
4 Press the DISPLAY button until on-
screen indicators appear.
5 Press the Start/Stop button to begin
recording.
• The picture turns white, and the
image and sound fade in.
6 Press the Start/Stop button at the
point where you wish to stop
recording.
• The image and sound fade out as the
picture gradually turns white. The
camcorder then returns to Recording
Standby mode.
To cancel Fade mode
Select “OFF” in step 3 above.
To use Fade Out only
1 During camera recording in Tape
Camera mode, press the DISPLAY
button until the mode screen appears.
2 Perform steps 2 and 3 in “Using”.
3 Press the Start/Stop button at the
point where you wish to stop
recording.
Note:
• Fade mode automatically cancels after Fade
Out.
Using
1 In Tape Camera mode, press the
DISPLAY button until the mode
screen appears.
2 Press l or m on the Operation
button to select “FADE”, then press
the center of the Operation button.
3 Press l or m to select “ON”, then
press the center of the Operation
button.
FADE
M
ENU
SCENE
M
ENU
OFF
BLC GAIN/
REC
REC
3 0min
min
AU TO
F AD E I N
REC
30min
AUTO
FADE IN
RE C
2 727min
min
AU TO
F AD E OUTOUT
min
AUTO
FADE
Fade in
Fade out
Operation button
DISPLAY button
Start/Stop button

37
Useful Features
Quick Return
Available mode:
Tape Camera
If while playing back your tape you want to
quickly return to the last recorded scene
and start recording again, use the quick
return function.
1 Set the camcorder to Tape Camera
mode.
2 In Recording Standby mode, press
the DISPLAY button until the mode
screen appears.
3 Press l or m on the Operation
button to select “MENU”, then press
the center of the Operation button.
4 Press l or m to select “EXECUTE”,
then press the center of the Operation
button.
5 Press l or m to select T, then
press the center of the Operation
button.
6 Press l or m to select “QK.
RETURN”, then press the center of
the Operation button.
7 Press l or m to select “START”,
then press the center of the Operation
button.
• “SEARCH” flashes, and the tape
begins fast forwarding or rewinding
to the end of the last recorded scene.
• When the tape reaches the end of
the last recorded scene, “FINISHED”
is displayed, and the camcorder
enters Recording Standby mode.
8 Press the DISPLAY button to turn off
the menu screen.
Notes:
• To cancel the quick return function while
“SEARCH” is flashing, press the center of
Operation button twice.
• Quick return will not work if you remove the
cassette and reload it after recording or if
nothing has been recorded since loading.
SETTING 1
QK.
DGTL
RETURN
ZOOM MI C
ZOOM
TAPE SPEED
RETURN
START
STOP
SEARCH
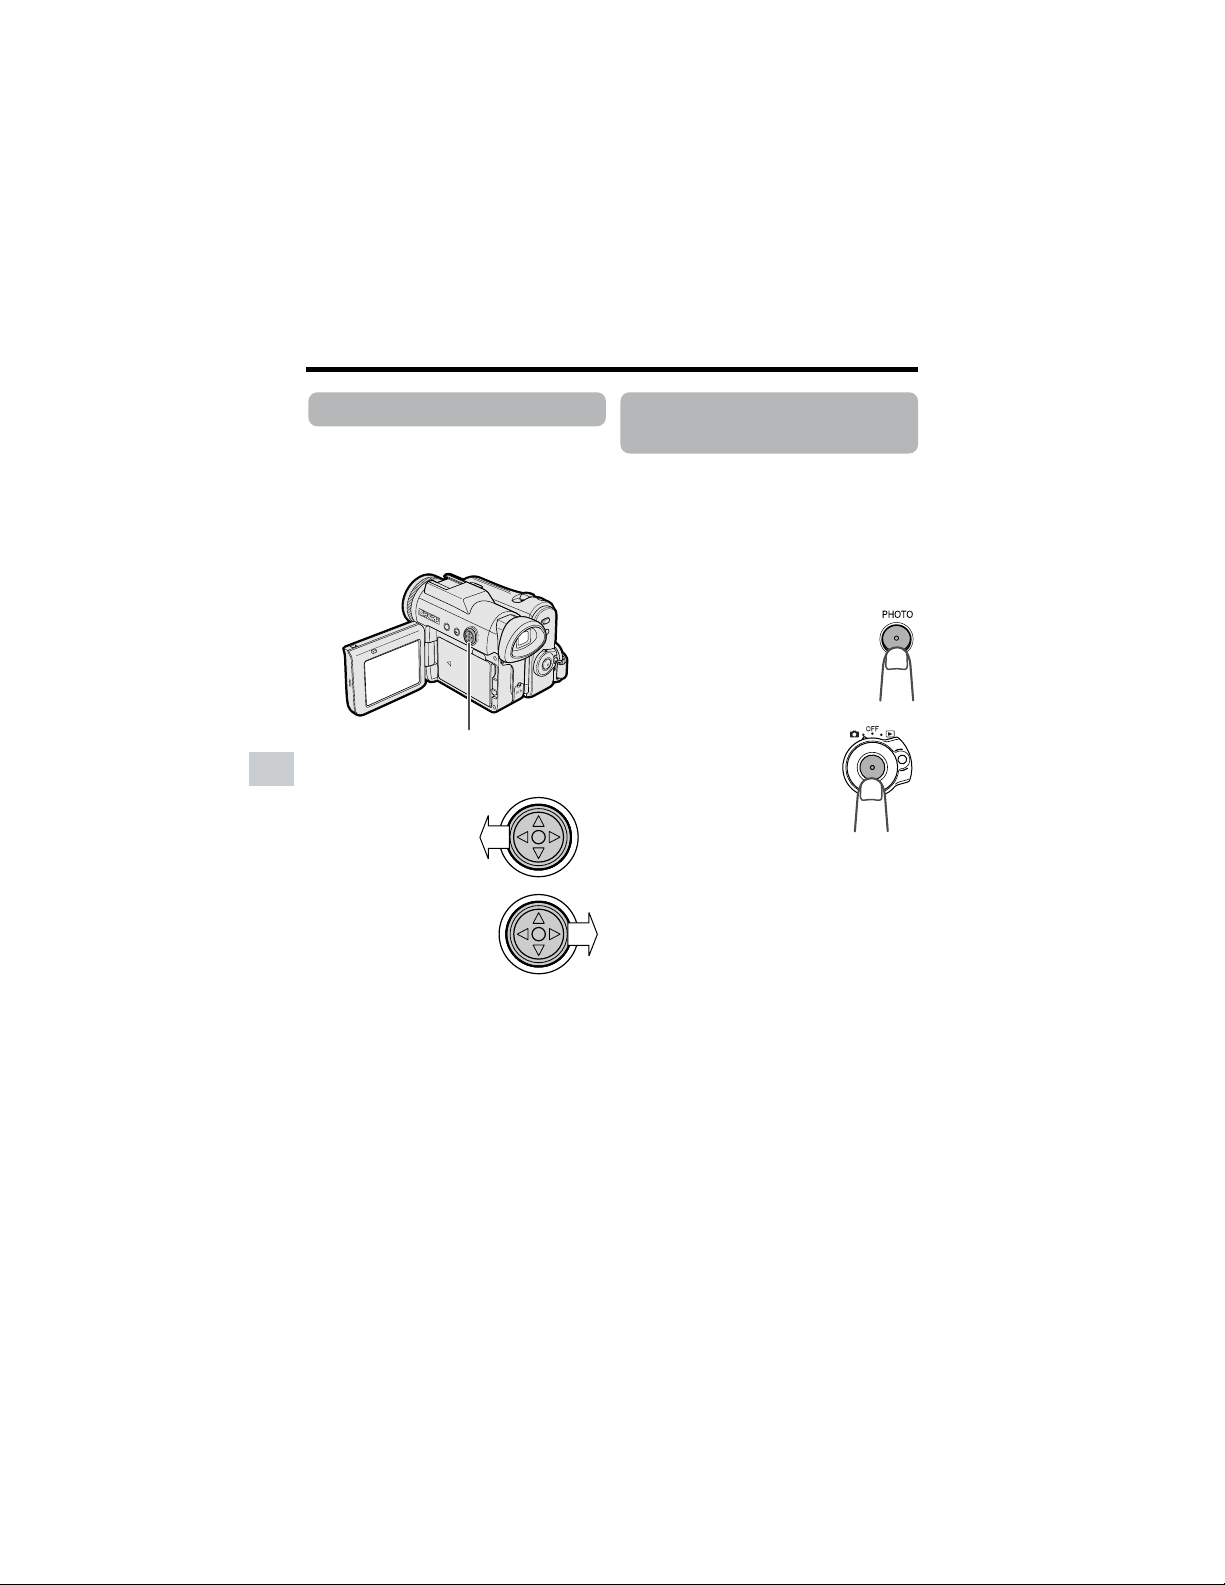
38
Useful Features
Camera Recording
Useful Features
Still Recording on
Tape
Available mode:
Tape Camera
You can record continuous still images of
subjects.
1 Set the camcorder to Tape Camera
mode.
2 In Recording Standby mode,
press the PHOTO button fully.
• A still image of the subject is
displayed.
3 Press the Start/Stop
button.
• The still image of the
subject will be recorded.
To pause recording
Press the Start/Stop button.
To cancel the still image
Press the PHOTO button fully.
Notes:
• Still Recording can also be used during
recording by pressing the PHOTO button
fully.
• The picture quality in Still Recording function
will be slightly lower than normal pictures.
Edit Search
Available mode:
Tape Camera
The edit search function lets you search,
without switching from Tape Camera mode
to Tape Playback mode, for the point on the
tape where you wish to start recording next.
1 Set the camcorder to Tape Camera
mode.
2 In Recording
Standby mode,
press and hold
down j (reverse
edit search) or k
(forward edit
search) on the
Operation button.
3 When you find the point where you
want to begin recording, release the
button.
Notes:
• The sound is off during search.
• Forward edit search is performed at the same
speed as normal playback, and reverse edit
search at 5.5 times the normal playback.
• You may experience picture noise during
reverse edit search.
Operation button

39
Useful Features
Digital Image
Stabilization (DIS)
Available mode:
Tape Camera
The digital image stabilization (DIS) function
allows you to stabilize the image by
electronically compensating for relatively
minor image shaking that is often annoying
in close-up shots.
1 In Tape Camera mode, press the
DISPLAY button until the mode
screen appears.
2 Press l or m on the Operation
button to select “MENU”, then press
the center of the Operation button.
3 Press l or m to select “EXECUTE”,
then press the center of the Operation
button.
4 Press l or m to select Y, then
press the center of the Operation
button.
5 Press l or m to select “DIS”, then
press the center of the Operation
button.
6 Press l or m to select “ON”, then
press the center of the Operation
button.
7 Press the DISPLAY button to turn off
the menu screen.
• The DIS indicator only appears when
the on-screen indicators are turned
on.
To cancel DIS function
Select “OFF” in step 6 above. The z
indicator will disappear.
Notes:
• The DIS function cannot compensate for
excessive image shaking.
• When image shaking does not occur (e.g.
when using the camcorder on a tripod), turn
off the DIS function. The picture will appear
more natural when the DIS function is off.
SETT ING 2
DIS
16 9:
AUDI O MODE
RETURN
W
IND
ON
OFF
T A PE
ONDIS
DIS indicator
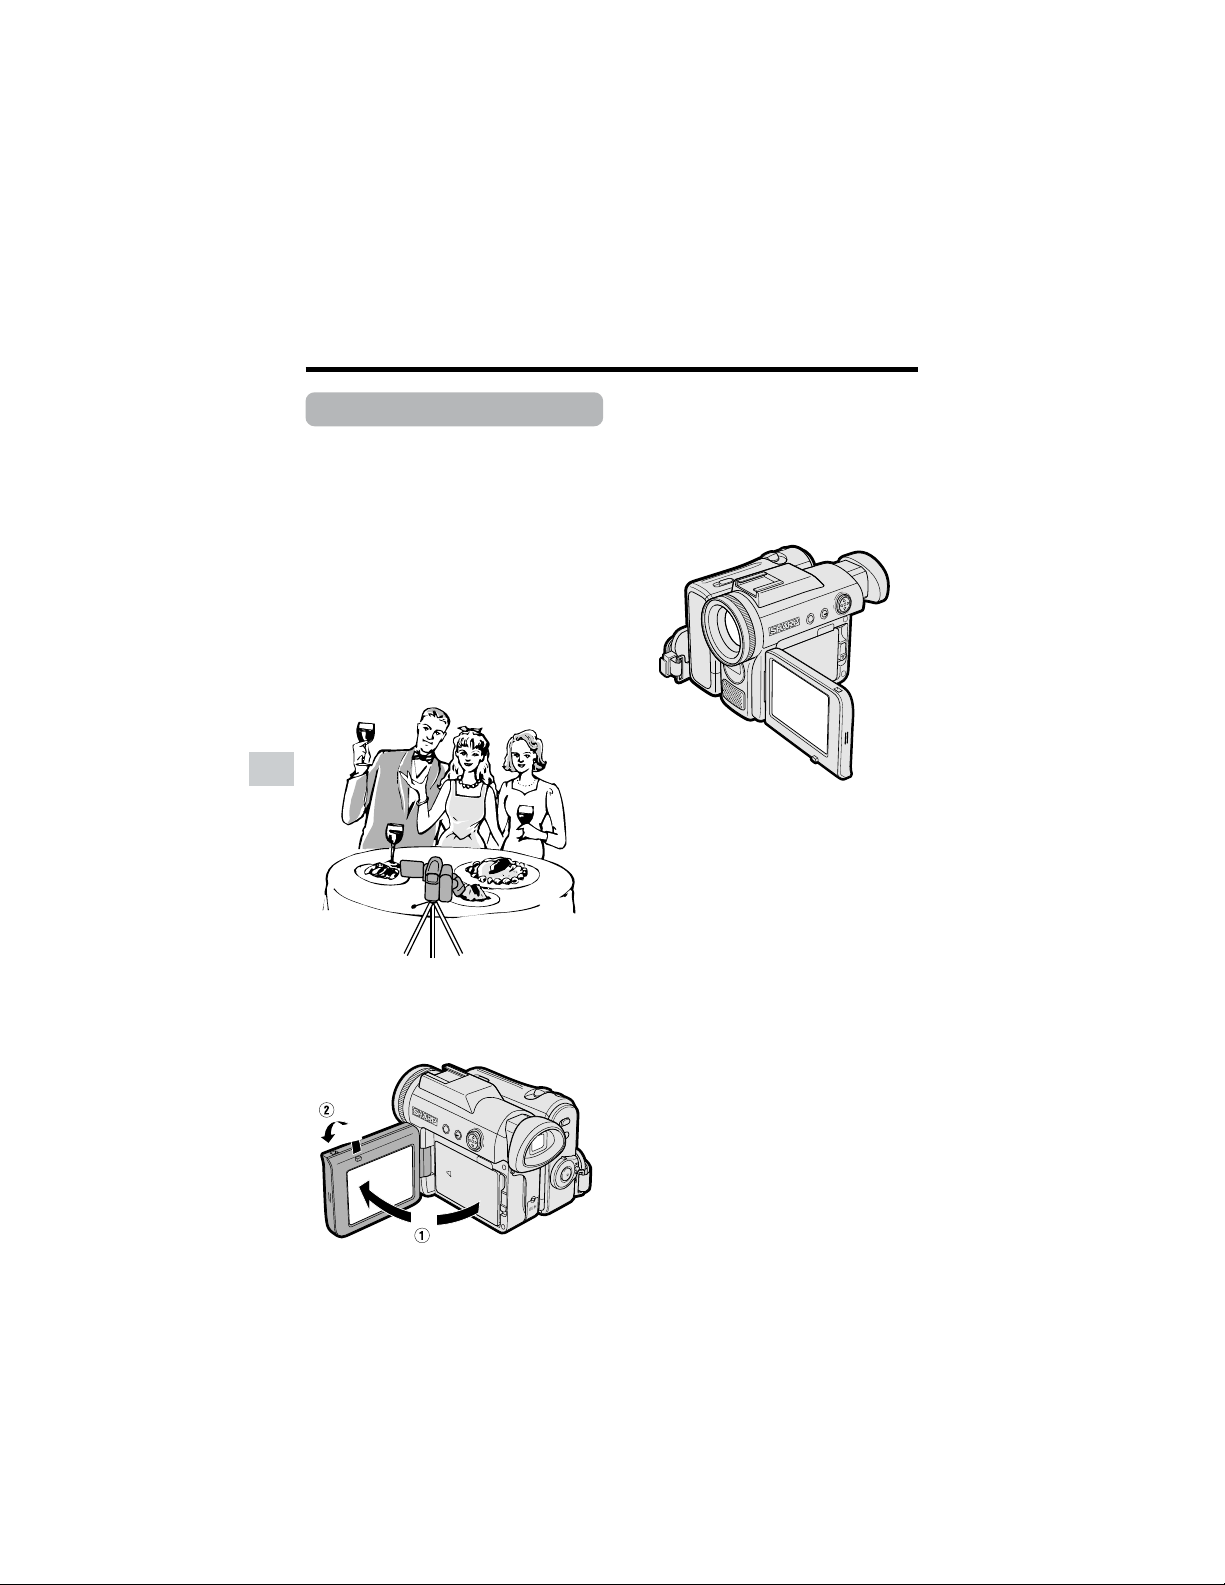
40
Useful Features
Camera Recording
Useful Features
Self Recording
Normal self recording
Available modes:
Tape Camera, Card Camera
Open the LCD monitor and rotate it 180°
vertically so that the screen faces the other
way and the subject can monitor the shot
while you are recording with the viewfinder.
If the camcorder is steadied, you can record
yourself in the scene by watching yourself
on the LCD monitor. The remote control is
useful for such occasions.
1 Pull out the viewfinder completely.
Open the LCD monitor to a 90° angle
to the camcorder body (1), and then
rotate it 180° vertically (2).
180˚
90˚
2 Set the Media Selection switch to V
or u.
3 Set the Power switch to v.
• The subject is displayed in the
viewfinder, and a mirror image of the
subject is displayed on the LCD
monitor.
4 Begin recording.
Notes:
• Use the remote control to begin/stop
recording on tape.
• You can play back images while the monitor
is in the self recording position. Set the
camcorder to Tape Playback or Card
Playback mode.
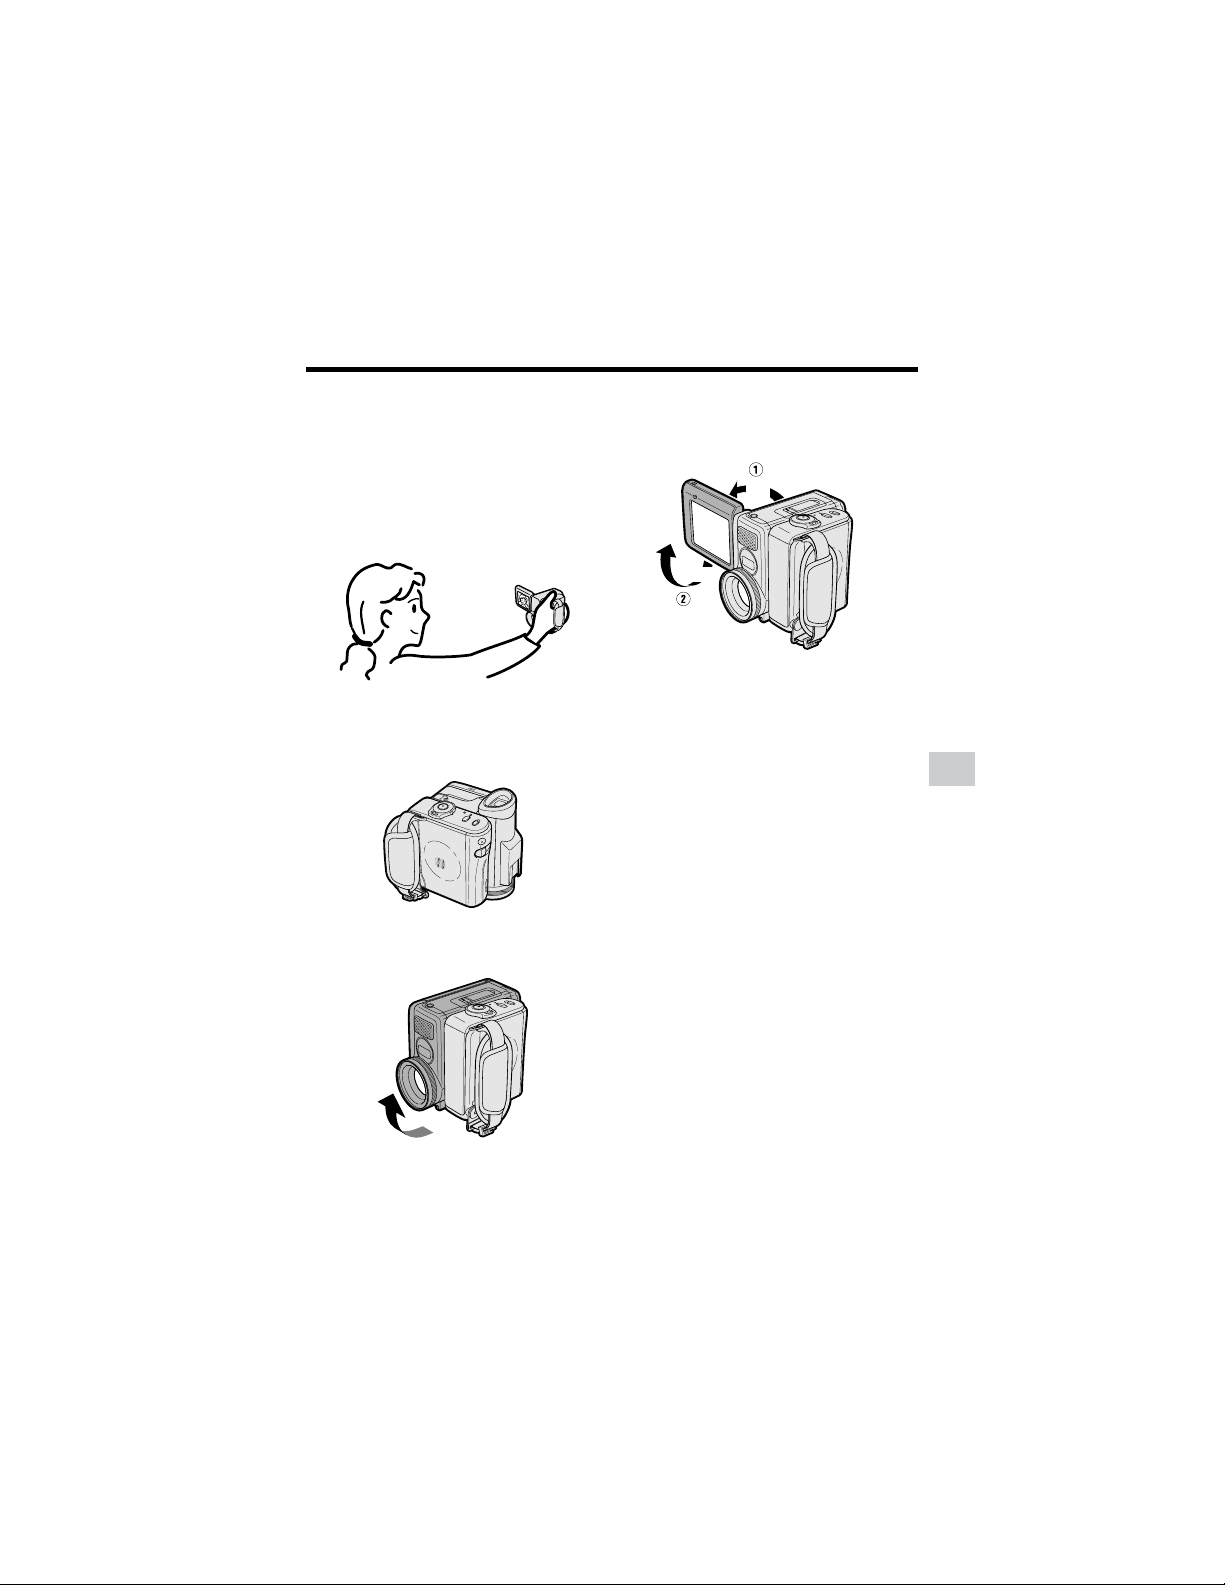
41
Useful Features
Self recording with reversed
grip
Available mode:
Tape Camera
Rotate the grip 90° and the LCD monitor
180° vertically so that you can record
yourself while holding the grip.
3 Open the LCD monitor to a 90° angle
to the camcorder body (1), and then
rotate it 180° vertically (2).
4 Set the Media Selection switch to V.
5 Set the Power switch to v.
6 Begin recording.
Notes:
• Do not rotate the monitor section to the self
recording position during recording or
playback.
• During self recording, the mode or menu
screen cannot be displayed.
• All of the manual settings are set to AUTO
and some other settings will set to OFF in self
recording.
• You may experience image noise when using
self recording.
• To operate self recording with reversed grip
correctly, make sure to turn the grip and the
lens section so that the Start/Stop button and
the tripod socket face upward, and the lens
faces toward you. The I indicator will
appear.
• Be sure that the LCD monitor rotation is
exactly 180°, otherwise the image recorded
will be rotated 180° upside-down.
• In self recording with reversed grip in Card
Camera mode, the still images will be
recorded rotated 180° upside down. The J
indicator will appear in this case.
• The viewfinder does not work in self
recording with reversed grip.
1 Turn the camcorder downward as
shown below.
2 Rotate the lens section 90° vertically
as shown below.
180°
90°
90°

42
Useful Features
Camera Recording
Useful Features
Wide Screen (16:9)
Available mode:
Tape Camera
The wide screen function lets you record
scenes with the wide-screen feel of a movie
shown in a theater. The top and bottom of
the picture are masked with black bands to
produce an effective screen aspect ratio of
16:9.
1 In Tape Camera mode, press the
DISPLAY button until the mode
screen appears.
2 Press l or m on the Operation
button to select “MENU”, then press
the center of the Operation button.
3 Press l or m to select “EXECUTE”,
then press the center of the Operation
button.
4 Press l or m to select Y, then
press the center of the Operation
button.
5 Press l or m to select “16:9”, then
press the center of the Operation
button.
6 Press l or m to select “ON”, then
press the center of the Operation
button.
• The picture is displayed with the top
and bottom portions masked.
7 Press the DISPLAY button to turn off
the menu screen.
To return to normal screen
Select “OFF” in step 6 above.
BLC GAIN/ OFF
FADE
M
ENU
SCENE
M
ENU
SETTING 2
DIS
16 9:
AUDI O MODE
RETURN
W
IND
ON
OFF
ON
16 9:
Normal screen Wide screen
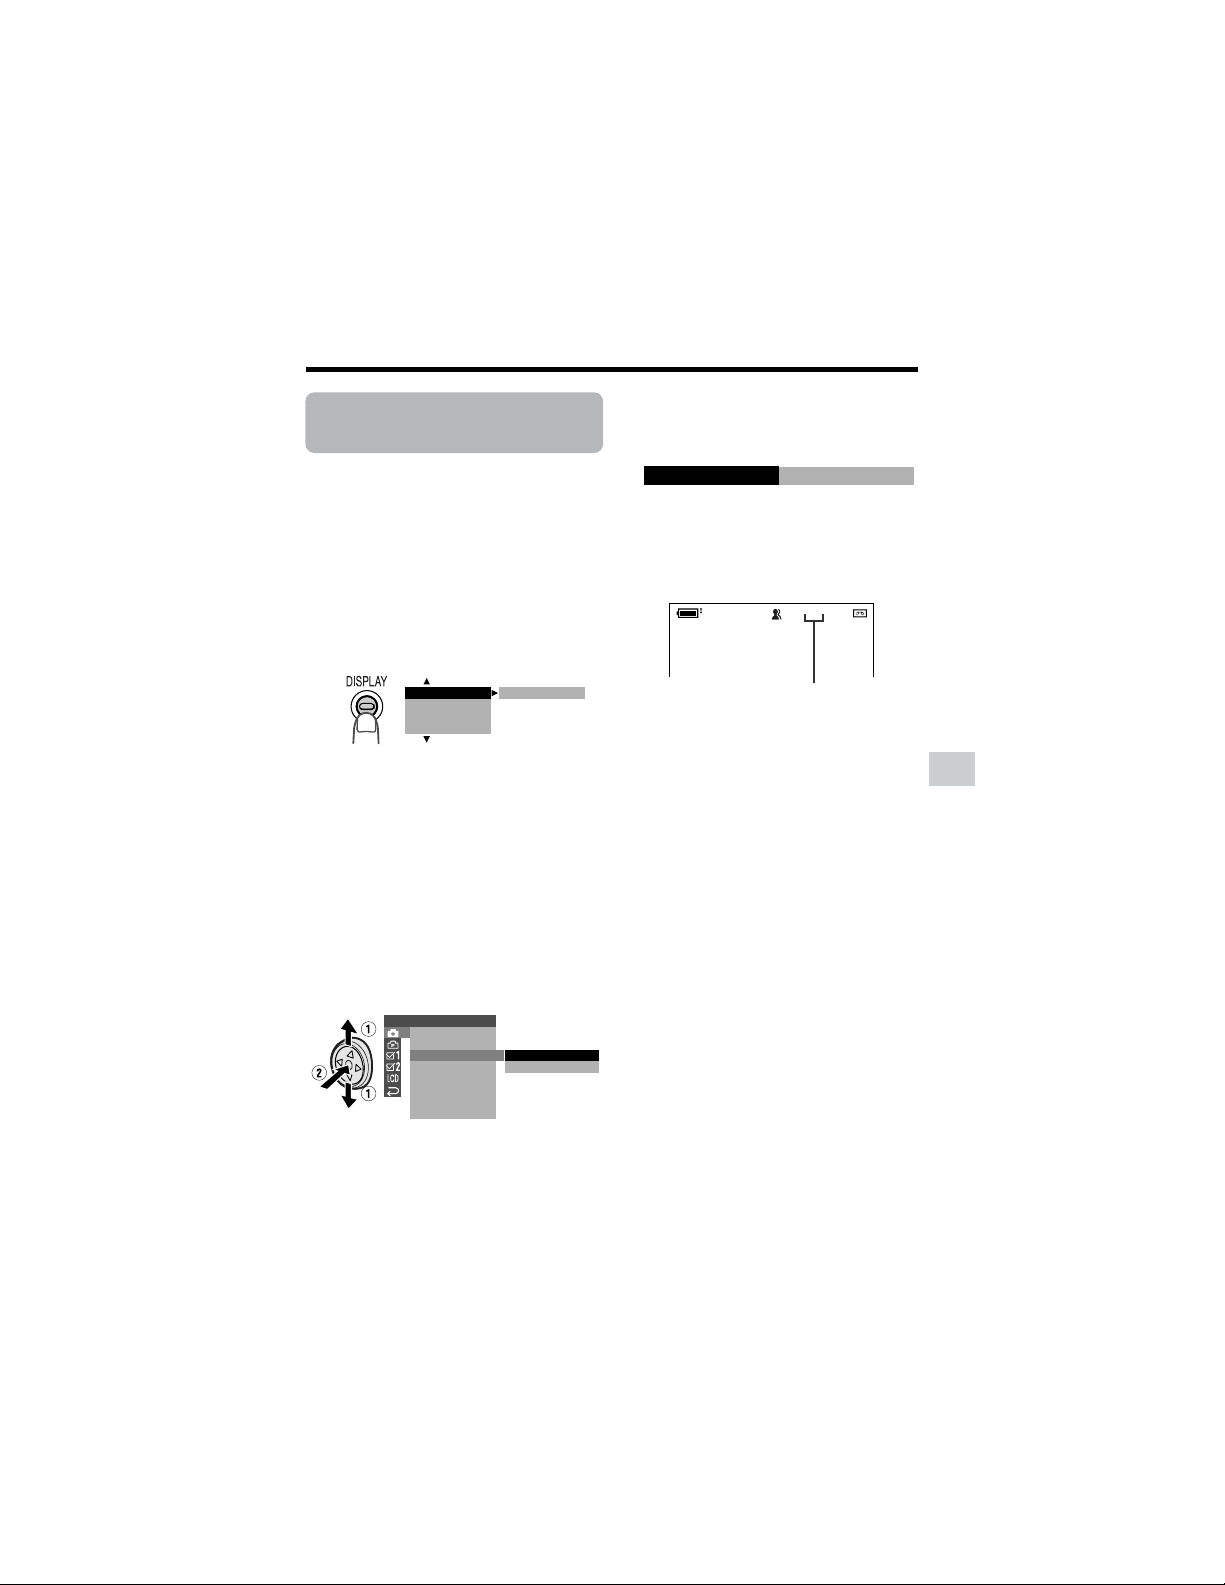
43
Useful Features
Recording in LP (Long
Play Recording) Mode
Available mode:
Tape Camera
This camcorder allows you to record in LP
(Long Play Recording) mode for approxi-
mately 50% more recording time with the
same picture quality as that in SP (Standard
Play Recording) mode.
1 In Tape Camera mode, press the
DISPLAY button until the mode
screen appears.
2 Press l or m on the Operation
button to select “MENU”, then press
the center of the Operation button.
3 Press l or m to select “EXECUTE”,
then press the center of the Operation
button.
4 Press l or m to select T, then
press the center of the Operation
button.
5 Press l or m to select “TAPE
SPEED”, then press the center of the
Operation button.
6 Press l or m to select “LP”, then
press the center of the Operation
button.
7 Press the DISPLAY button to turn off
the menu screen.
• The long play recording mode
indicator only appears when the on-
screen indicators are turned on.
To return to SP mode
Select “SP” in step 6 above.
Notes on the use of LP
mode
• To record in LP mode, be sure to use a
Mini DV cassette labeled for use with LP
mode.
• Frozen images, mosaic-pattern picture
noise, audio interruptions or audio loss
may occur in the following cases:
—When using a tape which is not
designated for use with LP mode.
—When a tape recorded in LP mode
under high temperature conditions is
played back.
—When a tape recorded in LP mode with
the camcorder is played back on a Mini
DV player or camcorder from another
manufacturer.
—When a tape recorded in LP mode is
played back on a Mini DV player or
camcorder without an LP function.
• Audio dubbing is not possible with LP
mode recording.
BLC GAIN/ OFF
FADE
M
ENU
SCENE
M
ENU
SETTING 1
QK.
DGTL
RETURN
ZOOM MI C
ZOOM
TAPE SPEED
RETURN
SP
LP
T A PE
LP
LP
TAPE SPEED
Long play recording mode indicator
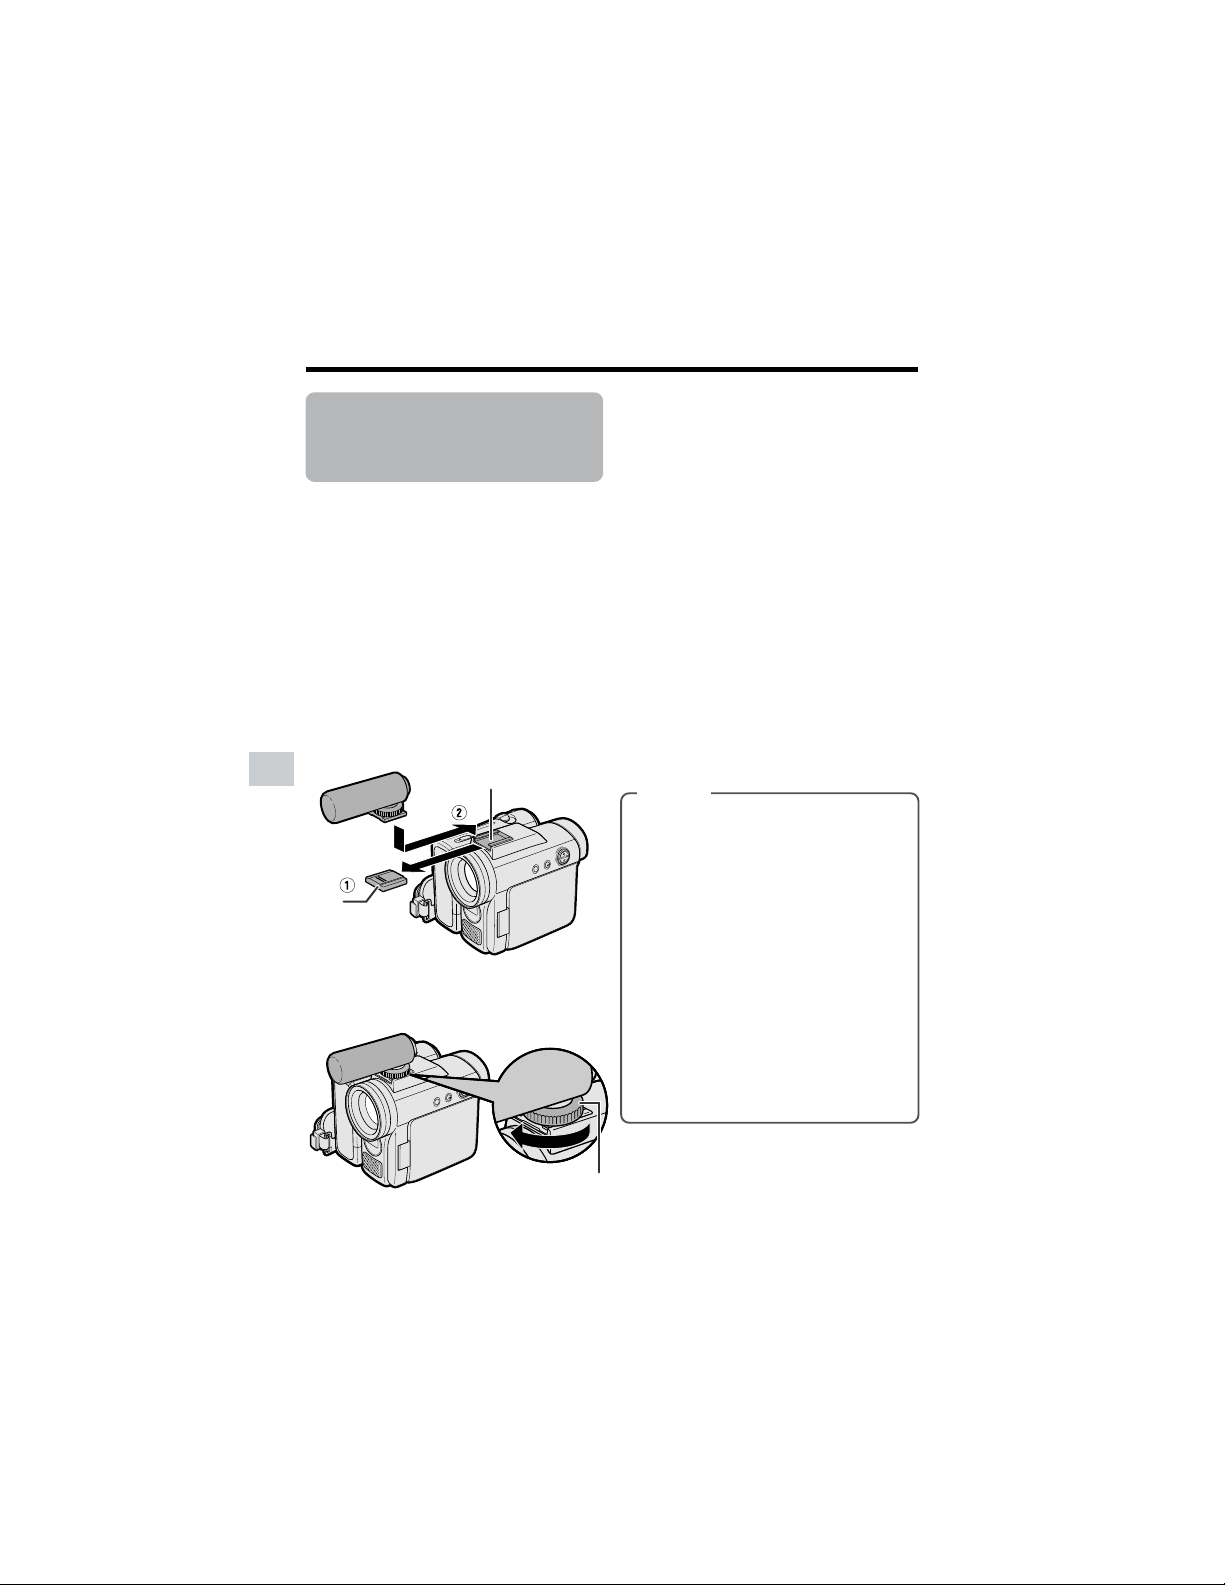
44
Useful Features
Camera Recording
Useful Features
Using the Zoom
Microphone (Optional
Accessory)
Available mode:
Tape Camera
With the optional zoom microphone VR-
8MCN, you can record audio according to
the magnification of the zoom lens for
producing the optimum sound.
Mounting
1 After detaching the shoe cover, align
the zoom microphone with the zoom
microphone shoe on the camcorder,
and slide it in the direction of the
arrow until it locks into place.
2 Turn the screw in the direction of the
arrow to secure the microphone.
Removing
Turn the screw in the opposite direction than
when mounting, then pull off the zoom
microphone.
Notes:
• Do not pick up the camcorder by the zoom
microphone, as this may damage the
equipment.
• The zoom microphone shoe on the
camcorder is designed only for use with
the specified equipment.
• When not using the zoom microphone, be
sure to attach the shoe cover for protecting
the zoom microphone shoe.
Selecting the Zoom Micro-
phone Mode
Select a zoom microphone mode when the
zoom microphone is mounted.
Types
AUTO: The camcorder automatically
selects the optimum sound accord-
ing to the magnification of the zoom
lens. When the zoom lens is at a
wide-angle setting, the built-in
microphone is used to record
sounds. As the zoom magnification
increases, the sounds from the zoom
microphone and built-in microphone
are mixed according to the zoom
setting.
TELE: The zoom microphone is fixed
to record sounds at a distance. (The
built-in microphone is turned off.)
OFF: The zoom microphone is turned
off. (The built-in microphone is on.)
Zoom microphone shoe
Shoe
cover
Screw
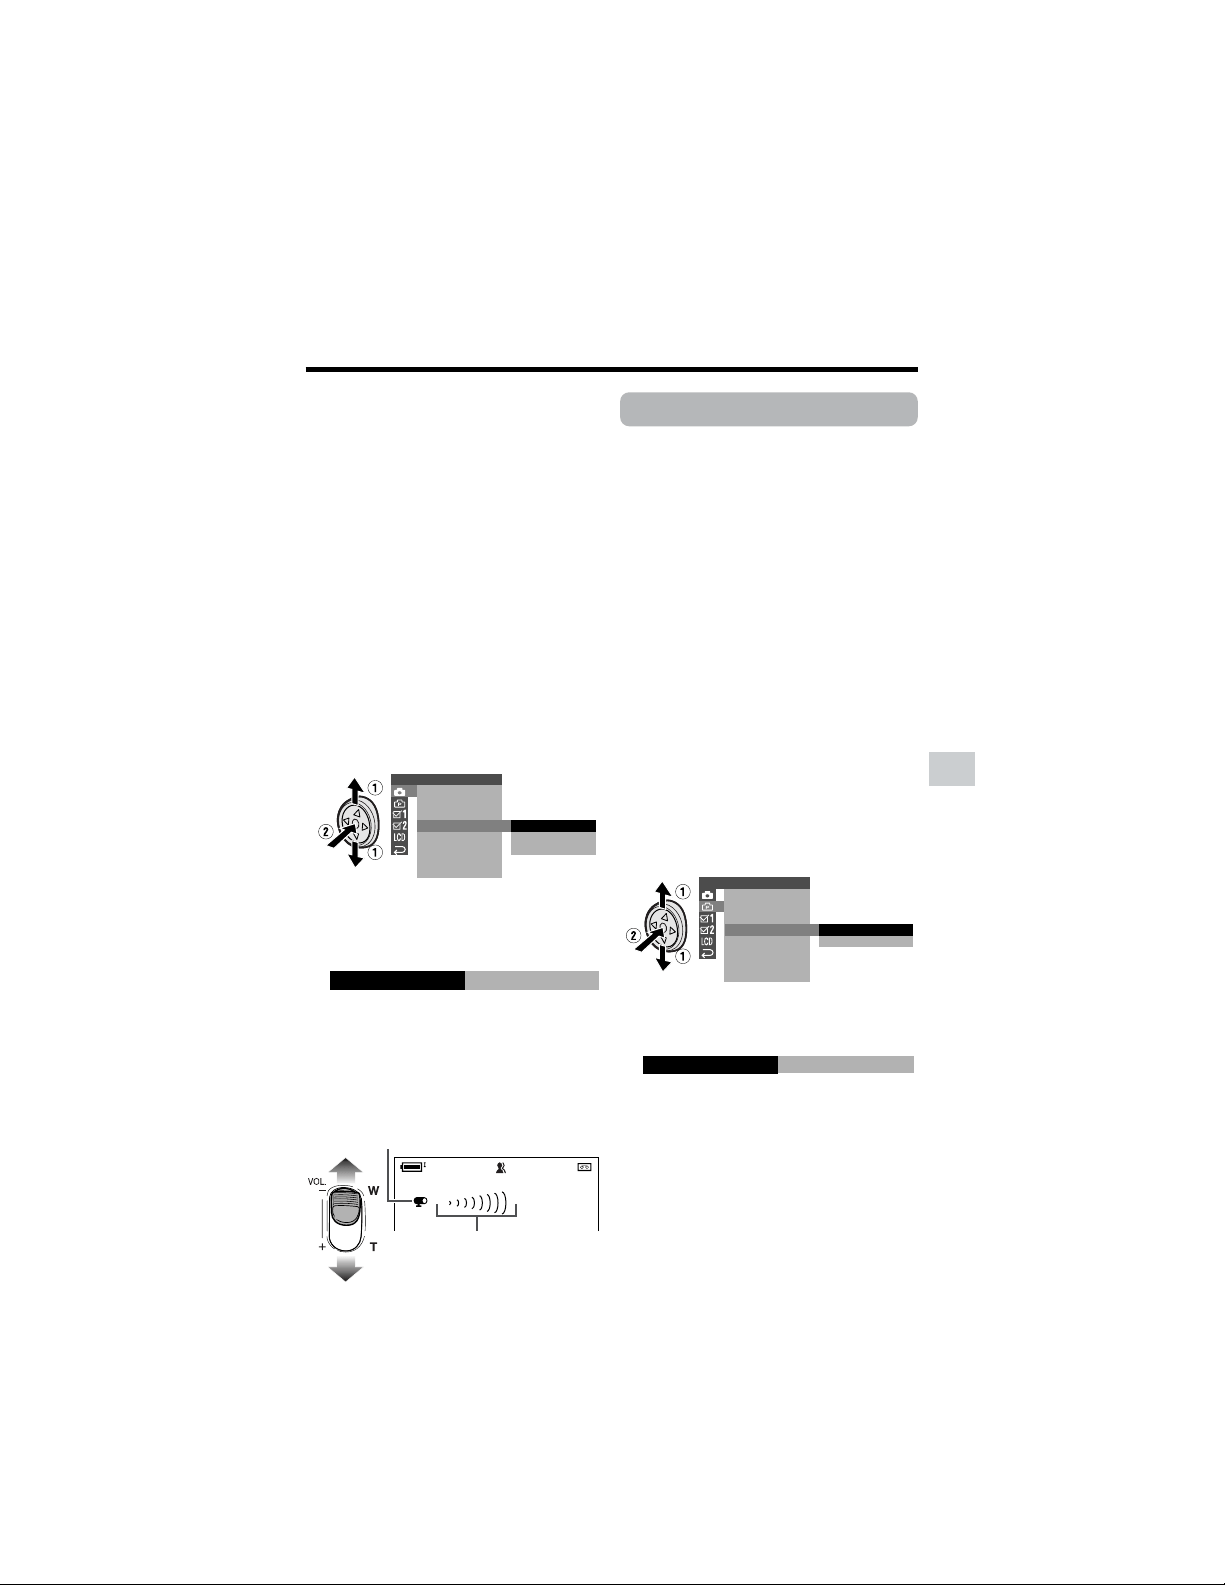
45
Useful Features
Windbreak
Available mode:
Tape Camera
The windbreak function allows you to
reduce annoying noise from strong winds
when recording.
1 In Tape Camera mode, press the
DISPLAY button until the mode
screen appears (see page 31).
2 Press l or m on the Operation
button to select “MENU”, then press
the center of the Operation button.
3 Press l or m to select “EXECUTE”,
then press the center of the Operation
button.
4 Press l or m to select Y, then
press the center of the Operation
button.
5 Press l or m to select “WIND”, then
press the center of the Operation
button.
6 Press l or m to select “ON”, then
press the center of the Operation
button.
7 Press the DISPLAY button to turn off
the menu screen.
To cancel Windbreak
Select “OFF” in step 6 above.
Note:
• Keep the windbreak function off during
normal recording. If left on, the recorded
audio may sound somewhat muffled when
played back.
1 Mount the optional zoom microphone
to the camcorder.
2 In Tape Camera mode, press the
DISPLAY button until the mode
screen appears (see page 31).
3 Press l or m on the Operation
button to select “MENU”, then press
the center of the Operation button.
4 Press l or m to select “EXECUTE”,
then press the center of the Operation
button.
5 Press l or m to select T, then
press the center of the Operation
button.
6 Press l or m to select “ZOOM MIC”,
then press the center of the Operation
button.
7 Press l or m to select the desired
zoom microphone mode, then press
the center of the Operation button.
8 Press the DISPLAY button to turn off
the menu screen.
When the zoom microphone is active, the
zoom microphone indicator appears and
the zoom range indicator changes as shown
below.
SETTING 1
QK.
DGTL
RETURN
ZOOM MI C
ZOOM
TAPE SPEED
AUTO
TELE
OFF
RETURN
TELEZOOM MIC
SETTING 2
DIS
16 9:
AUDI O MODE
RETURN
W
IND
OFF
ON
ON
W
IND
WT10ZOOM
Zoom range indicator
Zoom microphone indicator

46
Useful Features
Camera Recording
Useful Features
Selecting the 16-bit
Audio Recording
Mode
Available mode:
Tape Camera
The camcorder normally records audio in
the 12-bit audio recording mode. For higher-
quality audio recording, select the 16-bit
audio recording mode.
1 In Tape Camera mode, press the
DISPLAY button until the mode
screen appears (see page 31).
2 Press l or m on the Operation
button to select “MENU”, then press
the center of the Operation button.
3 Press l or m to select “EXECUTE”,
then press the center of the Operation
button.
4 Press l or m to select Y, then
press the center of the Operation
button.
5 Press l or m to select “AUDIO
MODE”, then press the center of the
Operation button.
6 Press l or m to select “16bit”, then
press the center of the Operation
button.
7 Press the DISPLAY button to turn off
the menu screen.
• The 16-bit audio recording mode
indicator only appears when the on-
screen indicators are turned on.
To return to 12-bit audio recording
mode
Select “12bit” in step 6 above.
Note:
• When using Audio Dubbing with 16-bit audio
recordings, both the dubbed and original
sounds will be recorded in mono (see page
68).
16bit
AUD IO MODE
SETTING 2
DIS
16 9:
AUDI O MODE
RETURN
W
IND
1
1
2
6
bit
bit
T A PE
16bit
16-bit audio recording mode indicator
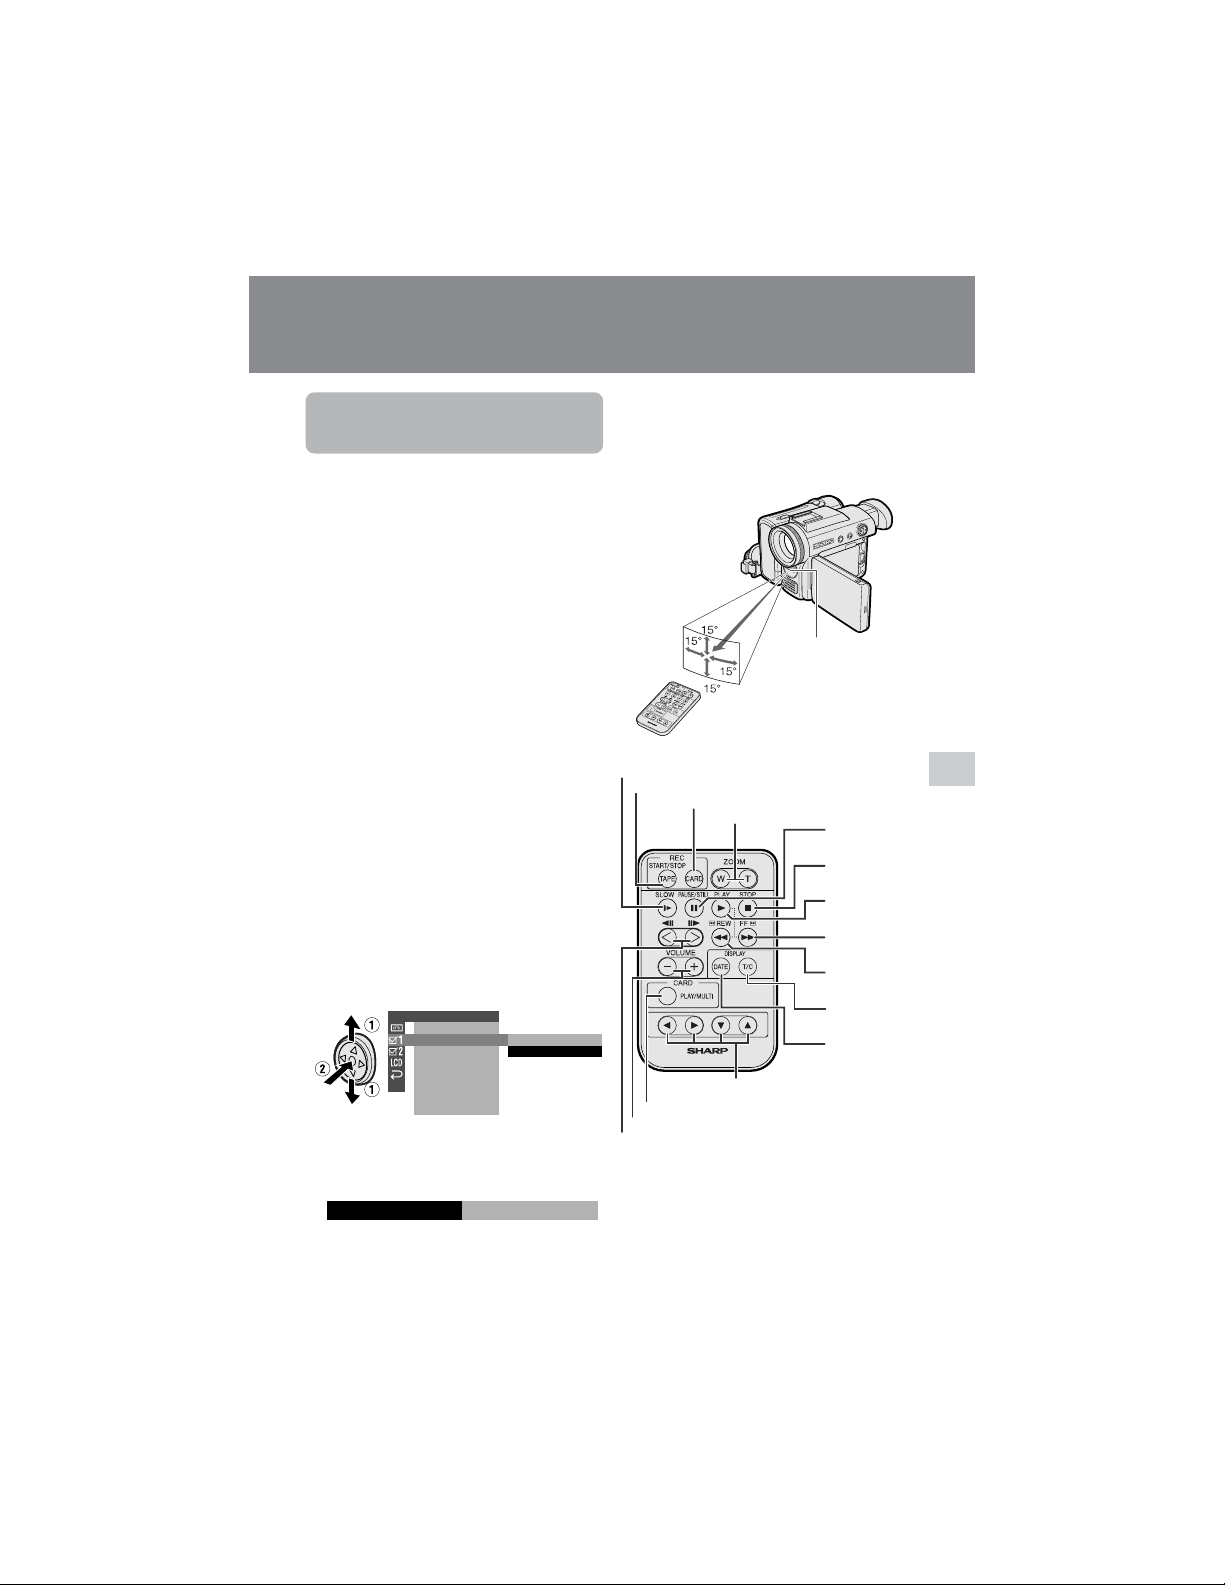
47
Useful Features
Using the Remote
Control
Available modes:
All modes
Use the remote control to operate the
camcorder from a distance, such as when
you want to record yourself in a scene, or
when the camcorder is connected to a TV
for use as a VCR.
Activating
• The example screens shown are for Tape
Playback mode.
1 Press the DISPLAY button until the
mode screen appears.
2 Press l or m on the Operation
button to select “MENU”, then press
the center of the Operation button.
3 Press l or m to select “EXECUTE”,
then press the center of the Operation
button.
4 Press l or m to select Z, then
press the center of the Operation
button.
5 Press l or m to select “REMOTE”,
then press the center of the Operation
button.
6 Press l or m to select “ON”, then
press the center of the Operation
button.
7 Press the DISPLAY button to turn off
the menu screen.
Useful Features
Playback
Operating
Aim the remote control at the remote sensor
of the camcorder, and press the control
buttons to operate.
Notes:
• Be careful not to expose the remote sensor to
direct sunlight or strong interior lighting, as
this may prevent the remote control from
operating properly.
• Be sure that there are no obstacles between
the remote control and the remote sensor.
OTHERS 1
BEEP
REMOTE
DEFAULT
RETURN
ON
OFF
REMOTE
ON
ZOOM (W/T) buttons
SLOW button
Remote sensor
16 ft
(5 m)
CARD PLAY/MULTI button
Advance/reverse buttons
Shift buttons
VOLUME +/L buttons
PLAY button
STOP button
PAUSE/STILL
button
REW button
FF button
DATE button
T/C (Time
Code) button
CARD REC button
TAPE REC START/STOP button
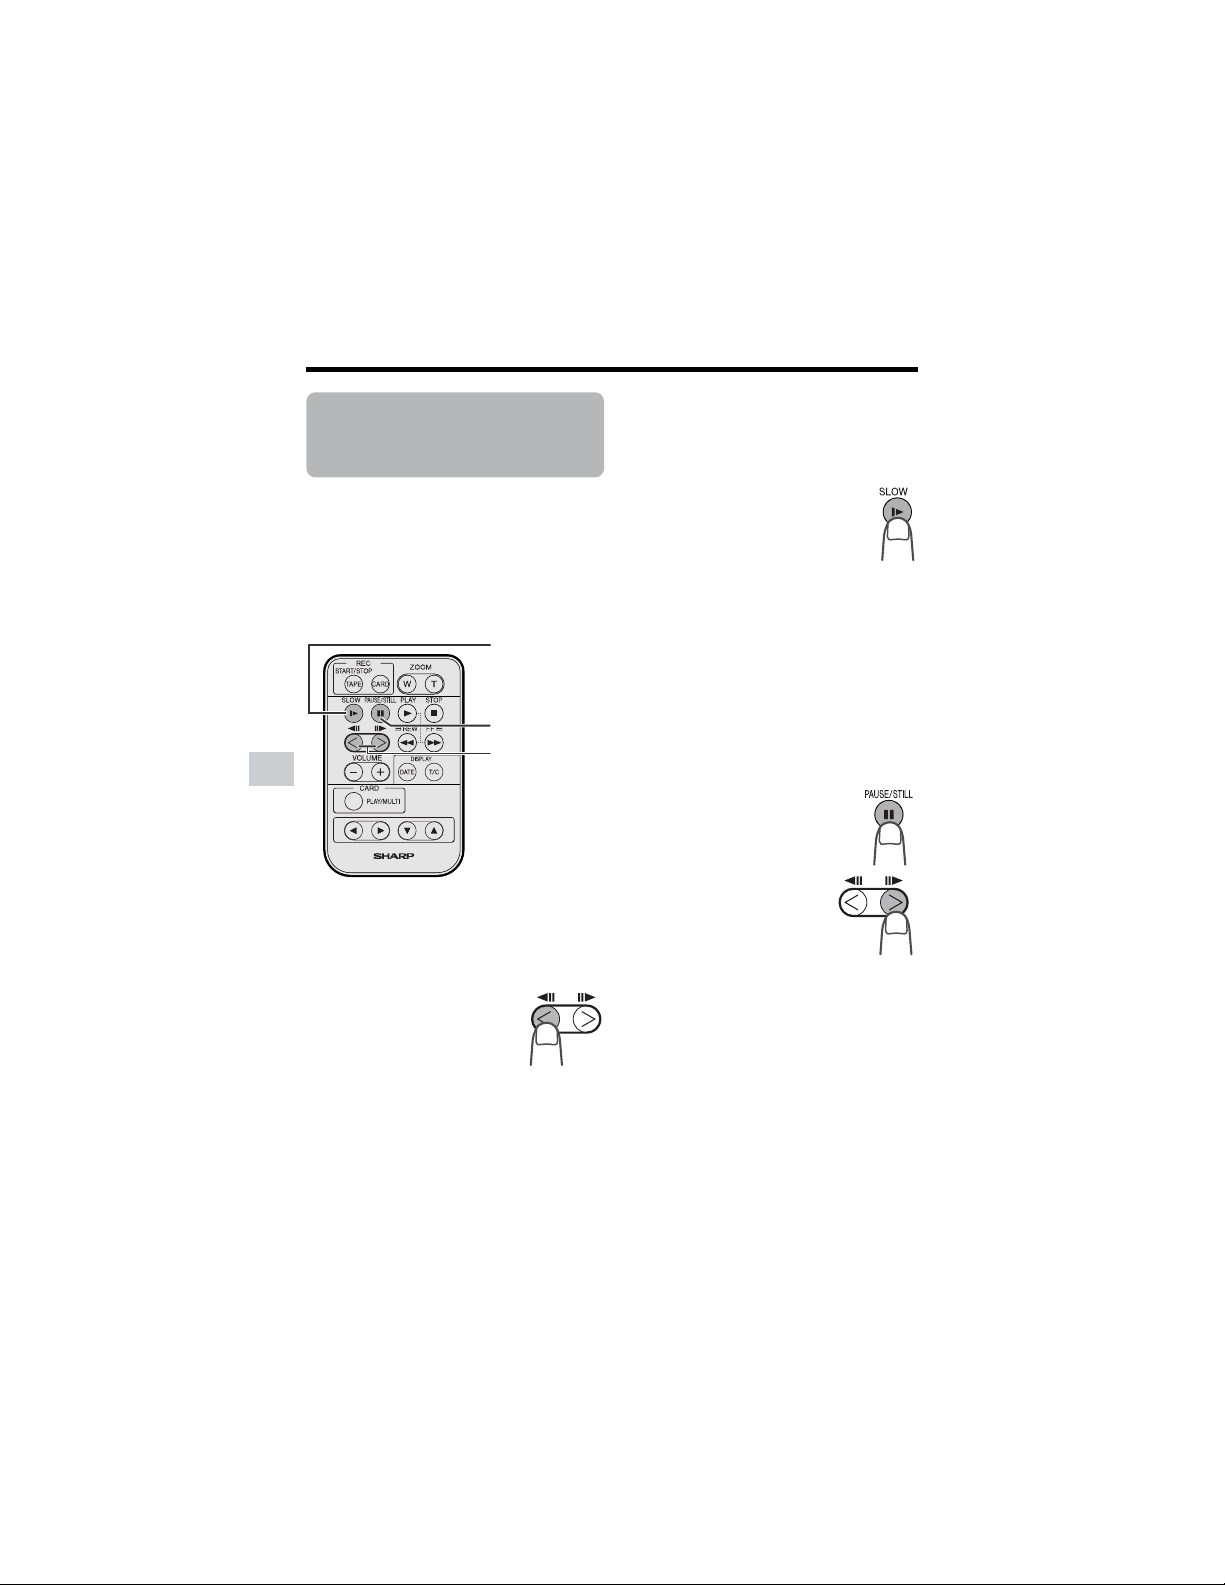
48
Useful Features
Playback
Useful Features
Tape Playback
Functions with the
Remote Control
Available mode:
Tape Playback
You can use the following playback
functions with the supplied remote control.
(See page 47 for use of the remote control.)
The reverse playback function allows you to
play back images in reverse.
During Tape Playback, press the
j button.
Slow
The slow function allows you to play back
images in slow motion.
During Tape Playback, press the
SLOW button (f).
Then, select the tape direction using
the advance/reverse buttons (j or
h).
To return to normal playback, press the
PLAY button (t).
Note:
• To protect the tape, the camcorder automati-
cally returns to normal playback if it is left in
Slow mode for more than 10 minutes.
Frame Advance
The frame advance function allows you to
play back still images frame by frame.
1 During Tape Playback, press
the PAUSE/STILL button (g)
to pause playback.
2 Press the h (or j)
button.
• Each time you press the
button, the picture
advances one frame
forward (or backward).
To return to normal playback, press the
PLAY button (t).
Notes:
• The sound is off during reverse, slow, and
frame advance playback.
• If you use the slow or frame advance function
with the tape recorded in LP mode, the
picture may advance several frames at a
time.
• The reverse frame advance moves about 30
frames.
To return to normal playback, press the
PLAY button (t).
Note:
• The camcorder automatically returns to
normal playback if it is left in reverse
playback for more than 30 minutes.
Reverse Playback
Advance/reverse
buttons
PAUSE/STILL
button
SLOW button
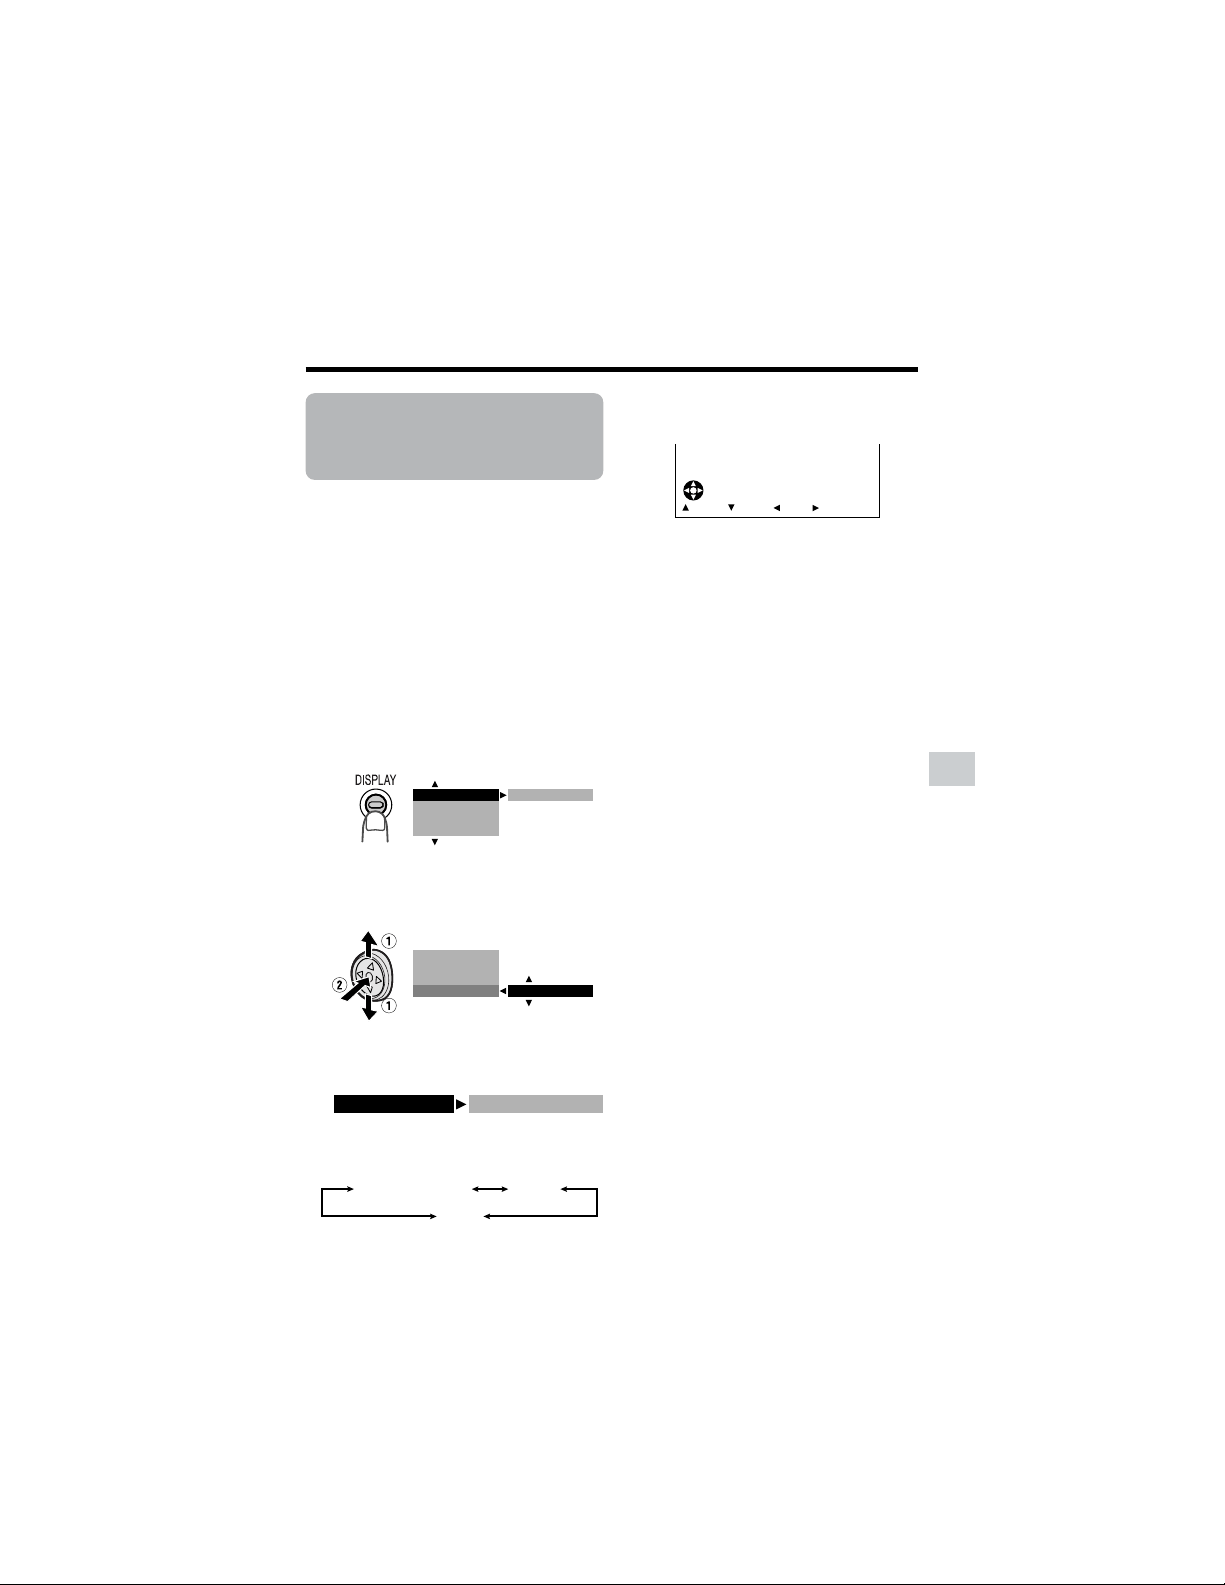
49
Useful Features
Selecting the Date
and Time of
Recording Display
Available modes:
All modes
Follow the procedure below to select the
date, or both the date and time, of recording
display on the screen. You can display the
date and time during both recording and
playback.
• The example screens shown are for Tape
Playback mode.
1 Hold down the Lock button and set
the Power switch to v or w.
2 Press the DISPLAY button until the
mode screen appears.
3 Press l or m on the Operation
button to select “DATE DISP.”, then
press the center of the Operation
button.
4 Press l or m to select the desired
setting, then press the center of the
Operation button.
• Each time you press l or m, the
setting changes as shown below.
5 Press the DISPLAY button until the
date (or date and time) appears.
Notes:
• The date (or date and time) appears when
the on-screen indicators are turned on.
• Before recording, make sure that the date
and time have been correctly set. If they have
not been set, the display will be left blank
when playing back the recording. (The
display will also be left blank for unrecorded
or damaged portions of the tape.)
• In Tape Playback mode, the current date and
time are displayed when the tape is not being
played back.
• You can also press the DATE button on the
remote control to display the date (or date
and time).
OFF
AUD I O DUB
M
ENU
DATE D I SP.
PIC. EFFECT
DATE D I SP.
DATE
+
TIME
AUD I O DUB
PIC.EFFECT
M
ENU
DATE
OFF
DATE
+
TIME
4002.2JUN.
FFREWSTOPPLAY
DATE DISP. DATE
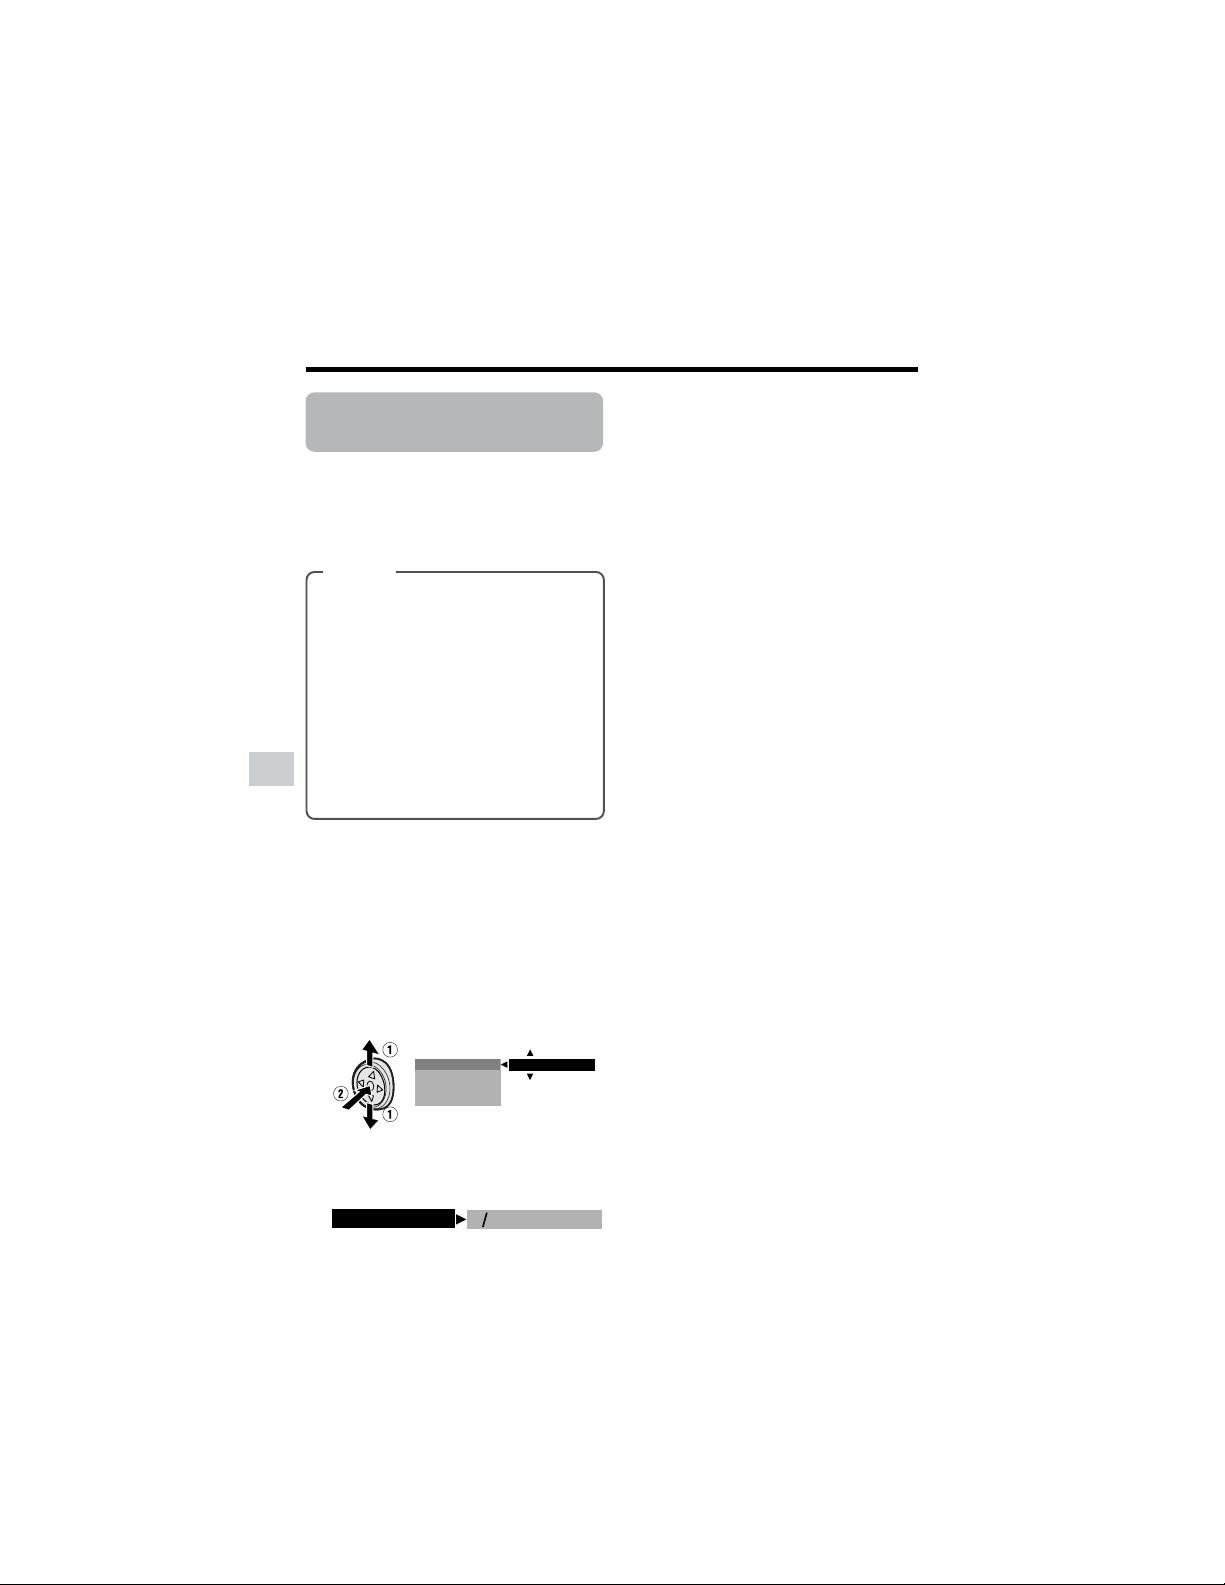
50
Useful Features
Playback
Useful Features
Picture Effect
Playback
Available modes:
Tape Playback, Card Playback
These picture effects let you play back
images with a more dramatic effect.
4 Press the DISPLAY button to turn off
the mode screen.
To cancel Picture Effect Playback
Select “OFF” in step 3 above.
Notes:
• Video images in Picture Effect Playback
mode cannot be transferred via DV cable to a
personal computer.
• You cannot use Picture Effect Playback with
Slide Show Playback.
Types
B/W: The picture is displayed in
black-and-white.
SEPIA: The picture is displayed in
sepia color similar to that of an old
photograph.
SOLARI: The contrast of the subject
is enhanced, creating an unique
artistic image.
NEGA: The blacks and whites of the
image are reversed and colors of the
image are inverted.
• The example screens shown are for Tape
Playback mode.
1 During Tape Playback (or Card
Playback), press the DISPLAY button
until the mode screen appears.
2 Press l or m on the Operation
button to select “PIC. EFFECT”, then
press the center of the Operation
button.
3 Press l or m to select the desired
picture effect, then press the center of
the Operation button.
DATE D I SP.
OFF
AUD I O DUB
PIC.EFFECT
M
ENU
BW
PIC. EFFECT
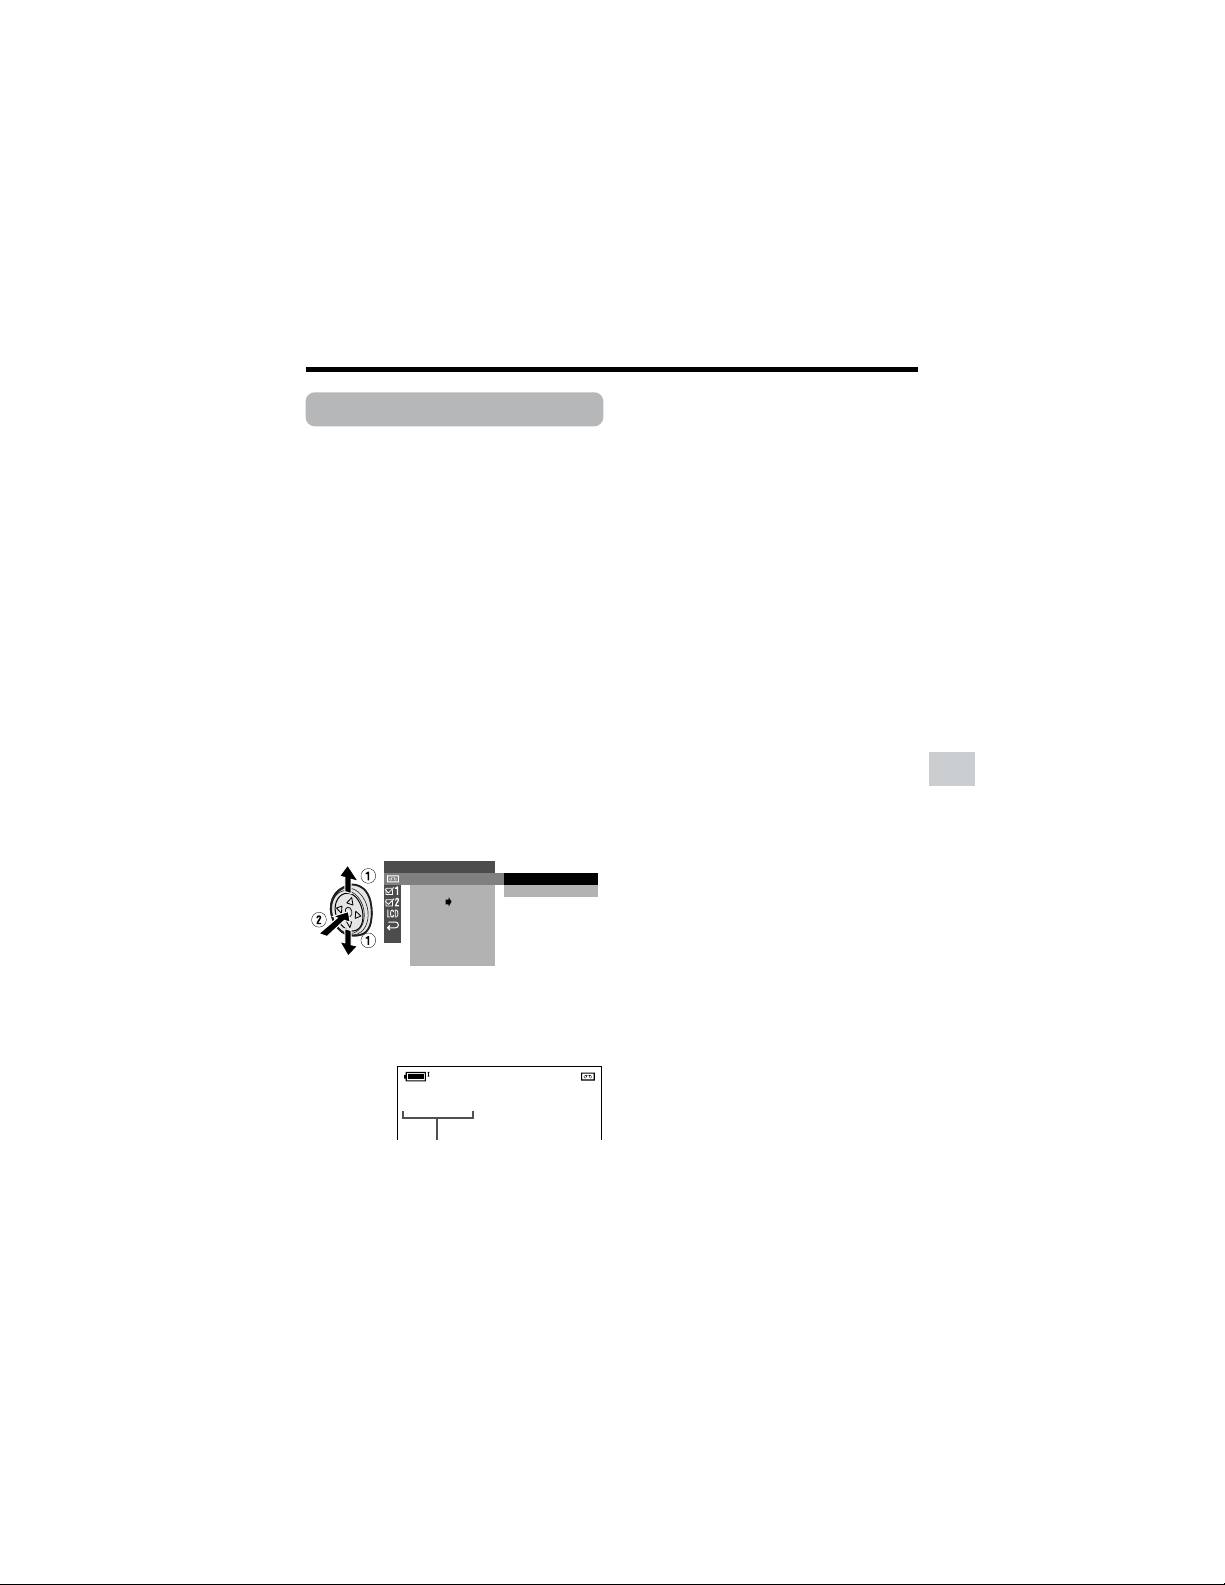
51
Useful Features
Rotate Playback
Available mode:
Tape Playback
This function allows you to play back
images rotated 180°.
1 In Tape Playback mode, press the
DISPLAY button until the mode
screen appears.
2 Press l or m on the Operation
button to select “MENU”, then press
the center of the Operation button.
3 Press l or m to select “EXECUTE”,
then press the center of the Operation
button.
4 Press l or m to select V, then
press the center of the Operation
button.
5 Press l or m to select “ROTATE
PB”, then press the center of the
Operation button.
6 Press l or m to select “EXECUTE”,
then press the center of the Operation
button.
• Rotate Playback indicator appears.
7 Press m to begin Rotate Playback.
• The image is rotated 180° upside
down.
PLAYBACK
AUDI O
ANLG DGTL
RETURN
SET
EXECUTE
RETURN
ROTATE PB
AUDIO
ROT ATE PB
21
+
To cancel Rotate Playback
Press the center of the Operation button
in step 7 above.
Notes:
• When executing Rotate Playback during Tape
Playback, playback will stop. Press m to
begin Rotate Playback.
• Even if the camcorder is in Rotate Playback
mode, the image output via a DV connection
will display as normal playback.
• The camcorder will stop and cancel Rotate
Playback when the LCD monitor is closed.
• When you want to display the menu screen
during Rotate Playback, press the center of
the Operation button.
• In Rotate Playback mode, you cannot
perform frame advance, slow, and picture
effect playback or copying an image from
tape to card.
Rotate Playback indicator
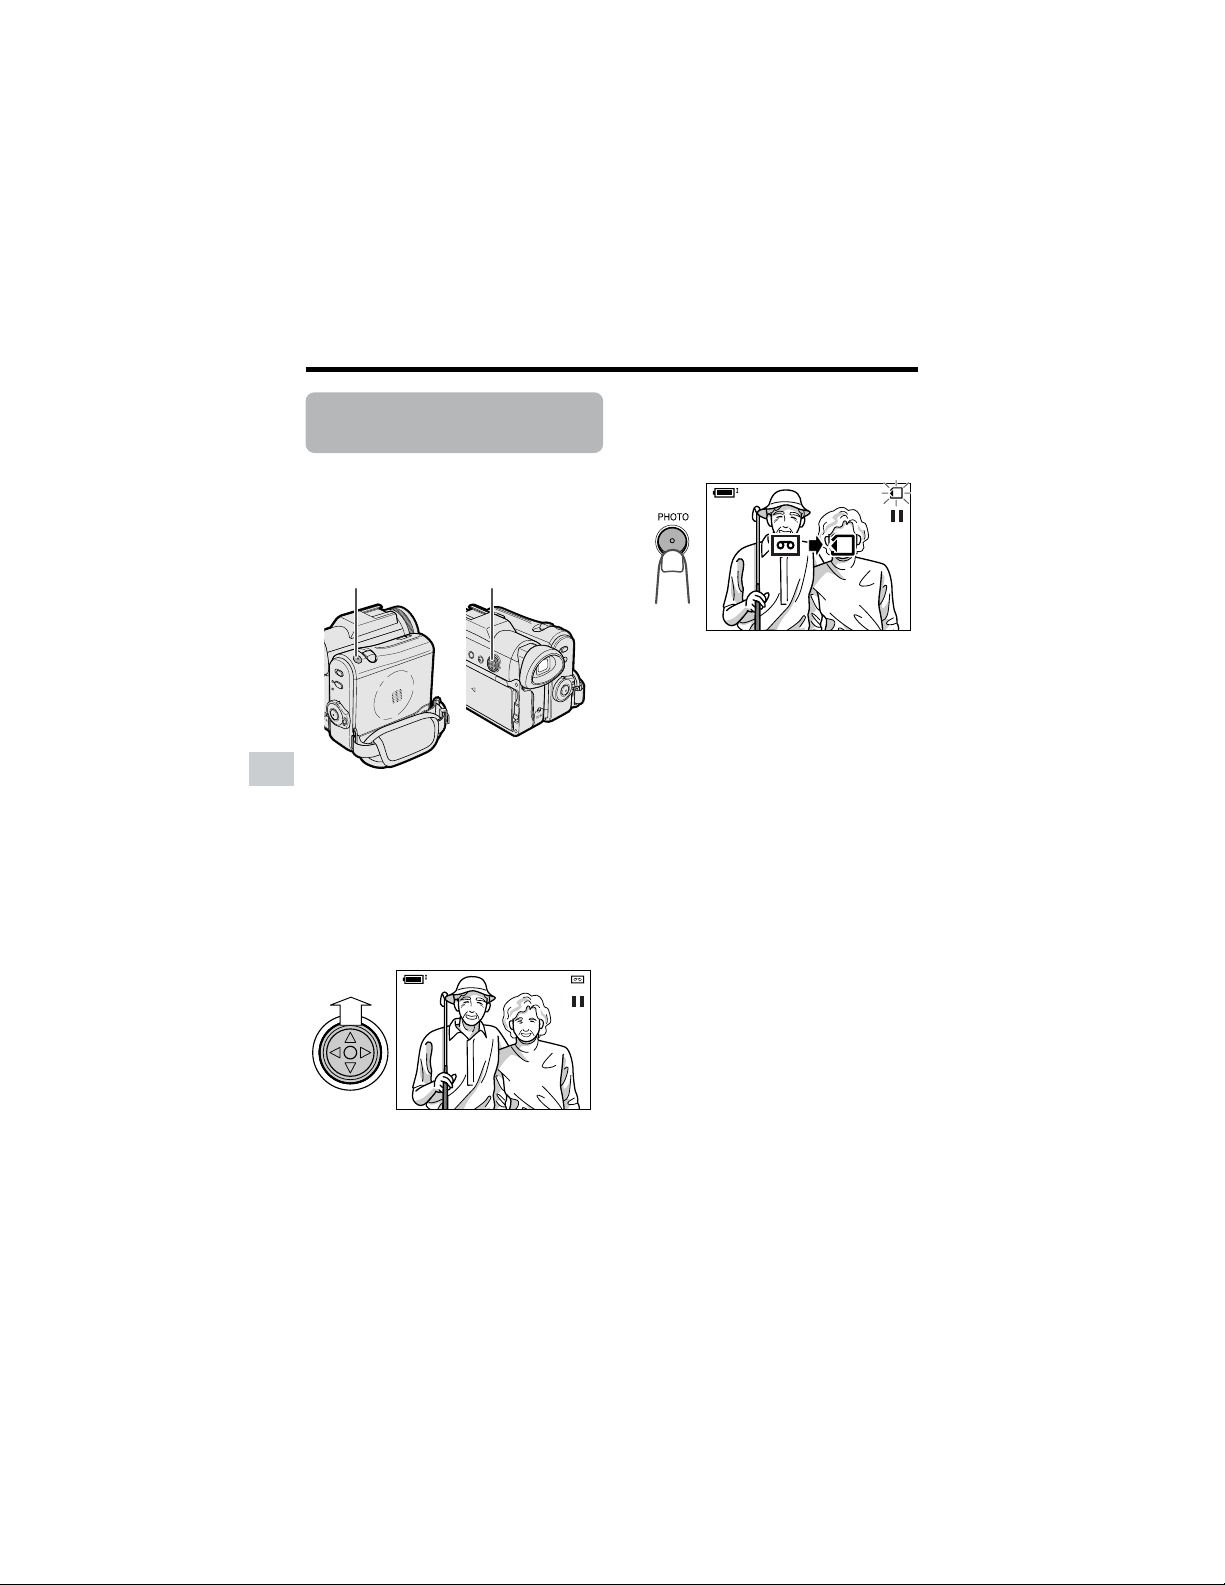
52
Useful Features
Playback
Useful Features
Copying an Image
from Tape to Card
Available mode:
Tape Playback
You can capture your favorite image frame
from a video tape recording and save it on
card.
1 Insert the recorded Mini DV cassette
and a card in the camcorder.
2 Set the camcorder to Tape Playback
mode, then begin tape playback.
3 Press m on the Operation button at
the point where the desired image
appears.
• A still picture of the image appears.
Note:
• To cancel the still picture, press m
again.
4 Press the PHOTO button to copy the
image to the card.
• The S indicator flashes red while the
image is copied.
AUDIO
2
+
21
+
AUDIO
2
+
21
+
PHOTO button
Operation button
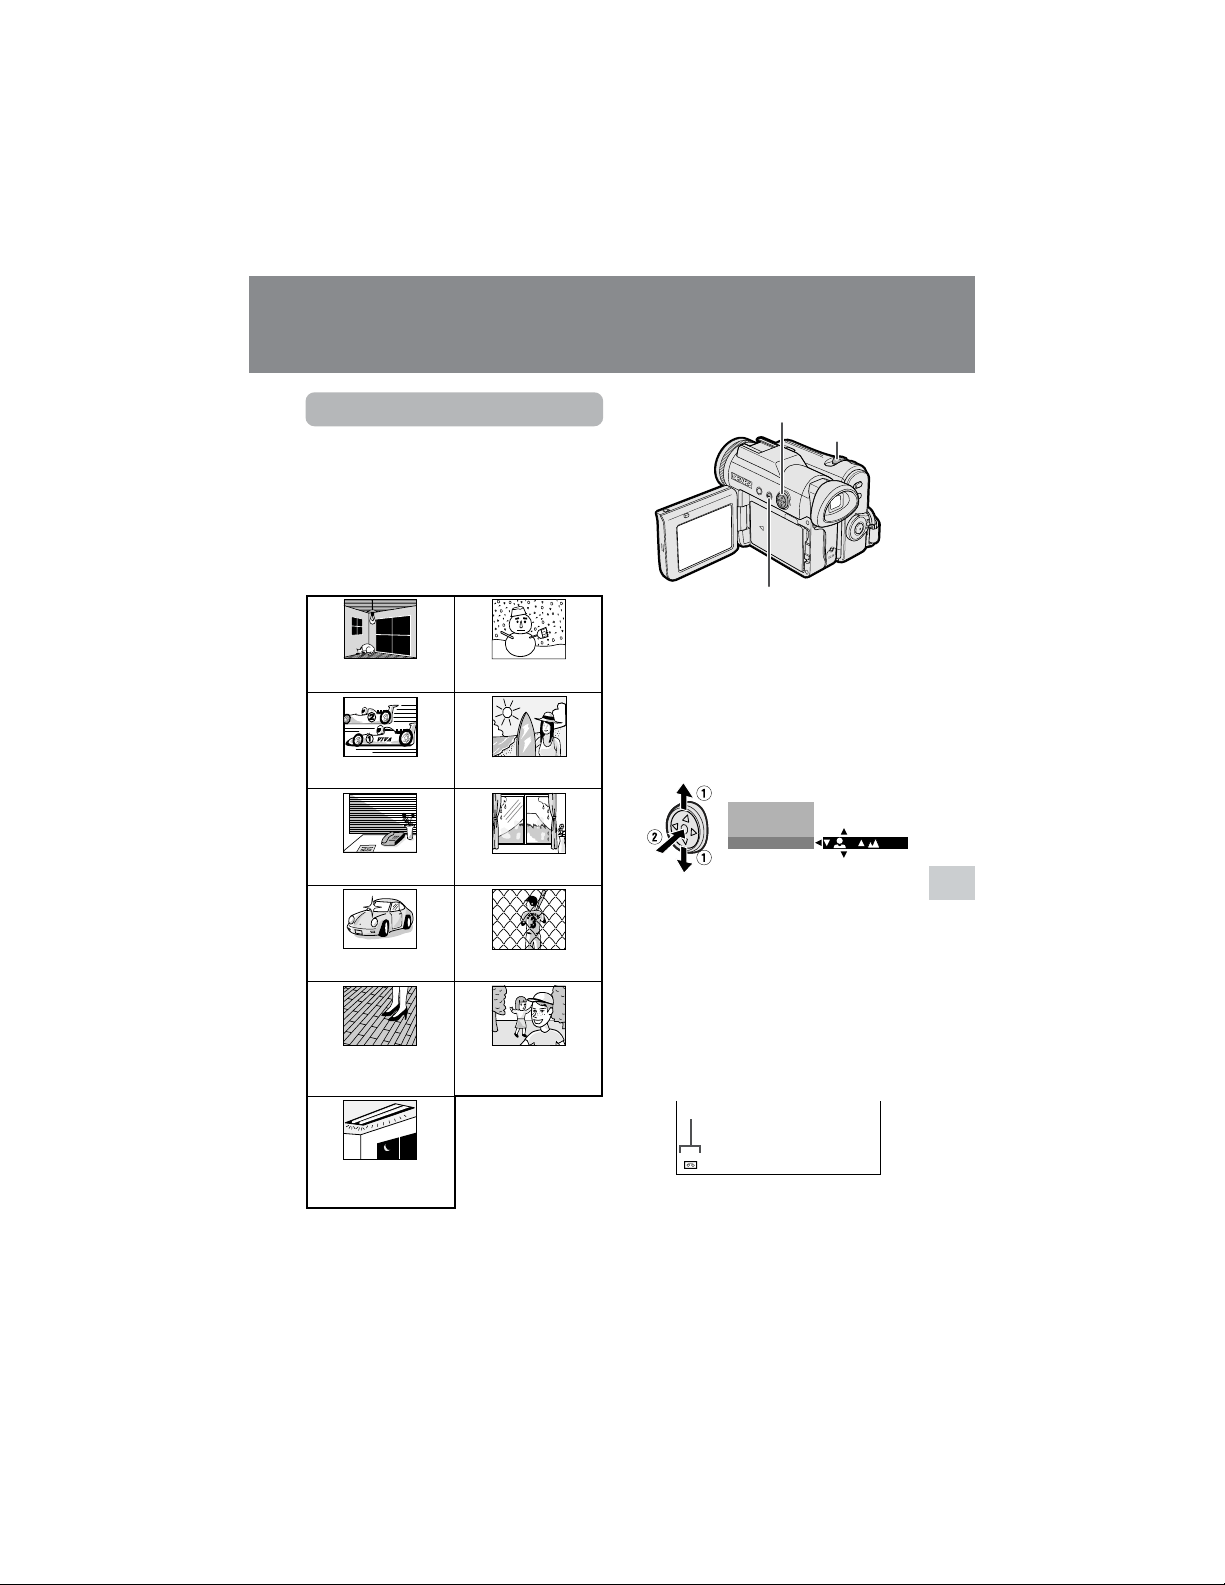
53
Advanced Features
Power Zoom control
Operation button
DISPLAY button
Manual focus indicator
Manual Focus
Available modes:
Tape Camera, Card Camera
Auto Focus may not be able to focus on the
subject in the situations shown below. In
such situations, set the camcorder to
Manual Focus mode and focus manually.
Fast-speed shutter being
used under fluorescent
lighting.
Subject is too dark.
Lack of contrast, e.g.
snow scene.
Fast-moving subject. Background is too bright.
Subject has horizontal
stripes.
Subject is being shot through a
dirty or wet window.
Light reflects off the
subject.
Two subjects at different distances
overlap in the same scene.
Subject has fine, repeated
patterns.
Subjects at different distances
appear in the center of the scene
at the same time.
Advanced Features
Camera Recording
• The example screens shown are for Tape
Camera mode.
1 In Tape Camera or Card Camera
mode, press the DISPLAY button until
the mode screen appears.
2 Press l or m on the Operation
button to select “FOCUS”, then press
the center of the Operation button.
3 Adjust the Power Zoom control to
frame the subject as you desire.
4 Press l or m to focus on the
subject.
p: To focus on a closer subject
o: To focus on a more distant subject
5 Press the DISPLAY button to turn off
the mode screen.
• “MF” appears when the on-screen
indicators are turned on.
Note:
• When “MF” is displayed, you can manually
adjust the focus by pressing l or m, even if
the focus setting screen is not displayed.
SCENE MENU
SET
M
ANUAL
FOCUS
/
M
ENU
3 0min30min
MF
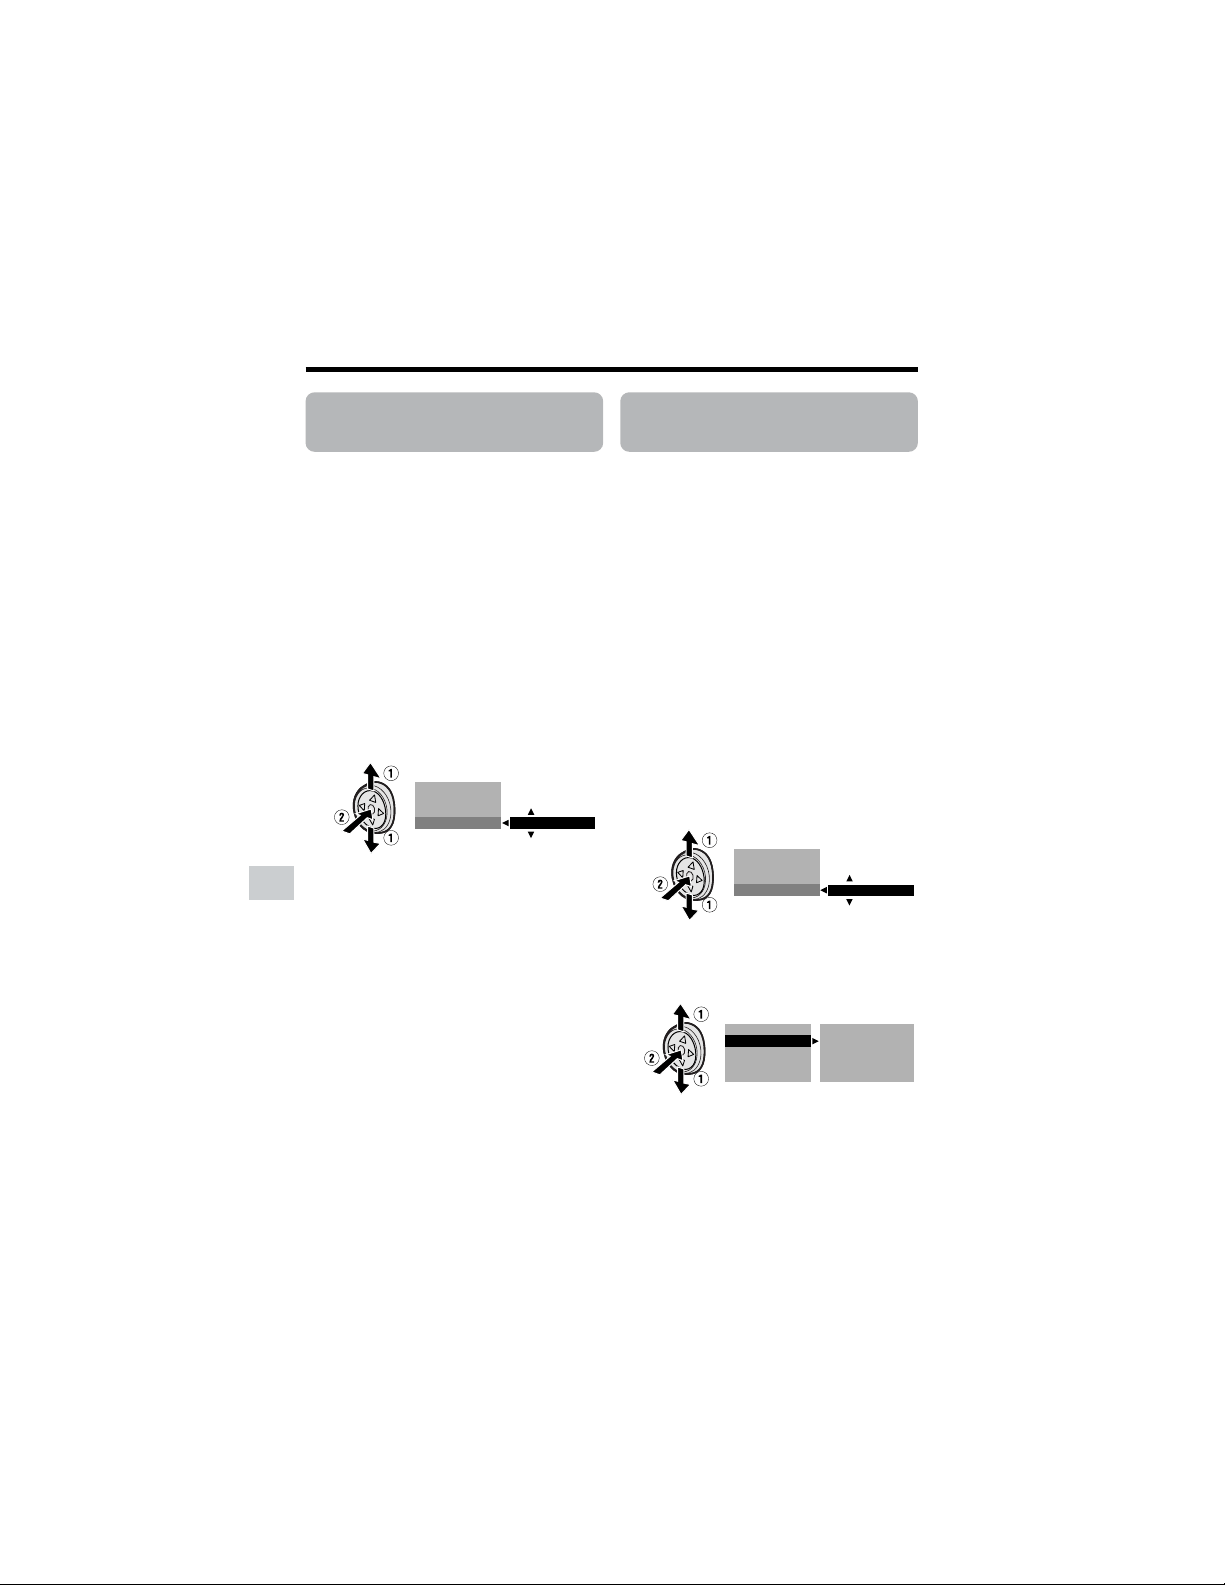
54
Advanced Features
Camera Recording
Advanced Features
Displaying the Manual
Setting Screen
Available modes:
Tape Camera, Card Camera
You can manually adjust these settings as
shown below in the manual setting screen.
• White Balance (see page 55)
• Manual Iris (see page 56)
• Manual Gain (see page 57)
• The example screens shown are for Tape
Camera mode.
1 In Tape Camera or Card Camera
mode, press the DISPLAY button until
the mode screen appears.
2 Press l or m on the Operation
button to select “MANUAL SET”, then
press the center of the Operation
button.
3 Press l or m to select “EXECUTE”,
then press the center of the Operation
button.
Notes:
• Tape Camera and Card Camera mode do not
share manual settings.
• Items that are not selectable are grayed out.
Returning to Auto
Focus
Available modes:
Tape Camera, Card Camera
You can set Manual Focus mode to Auto
Focus mode with the operation below.
• The example screens shown are for Tape
Camera mode.
1 In Tape Camera or Card Camera
mode, press the DISPLAY button until
the mode screen appears.
2 Press l or m on the Operation
button to select “AUTO FOCUS”, then
press the center of the Operation
button.
3 Press l or m to select “EXECUTE”,
then press the center of the Operation
button.
• The FOCUS setting returns to Auto
Focus mode.
4 Press the DISPLAY button to turn off
the mode screen.
SCENE MENU
SET
M
ANUAL
FOCUS
AUTO FOCUS EXECUTE
SCENE MENU
EXECUTE
M
ENU
FADE
SET
M
ANUAL
W
HITE BAL.
IRIS
GA IN
FULL AUTO
RETURN
EXECUTE
AUTO
AUTO
AUTO
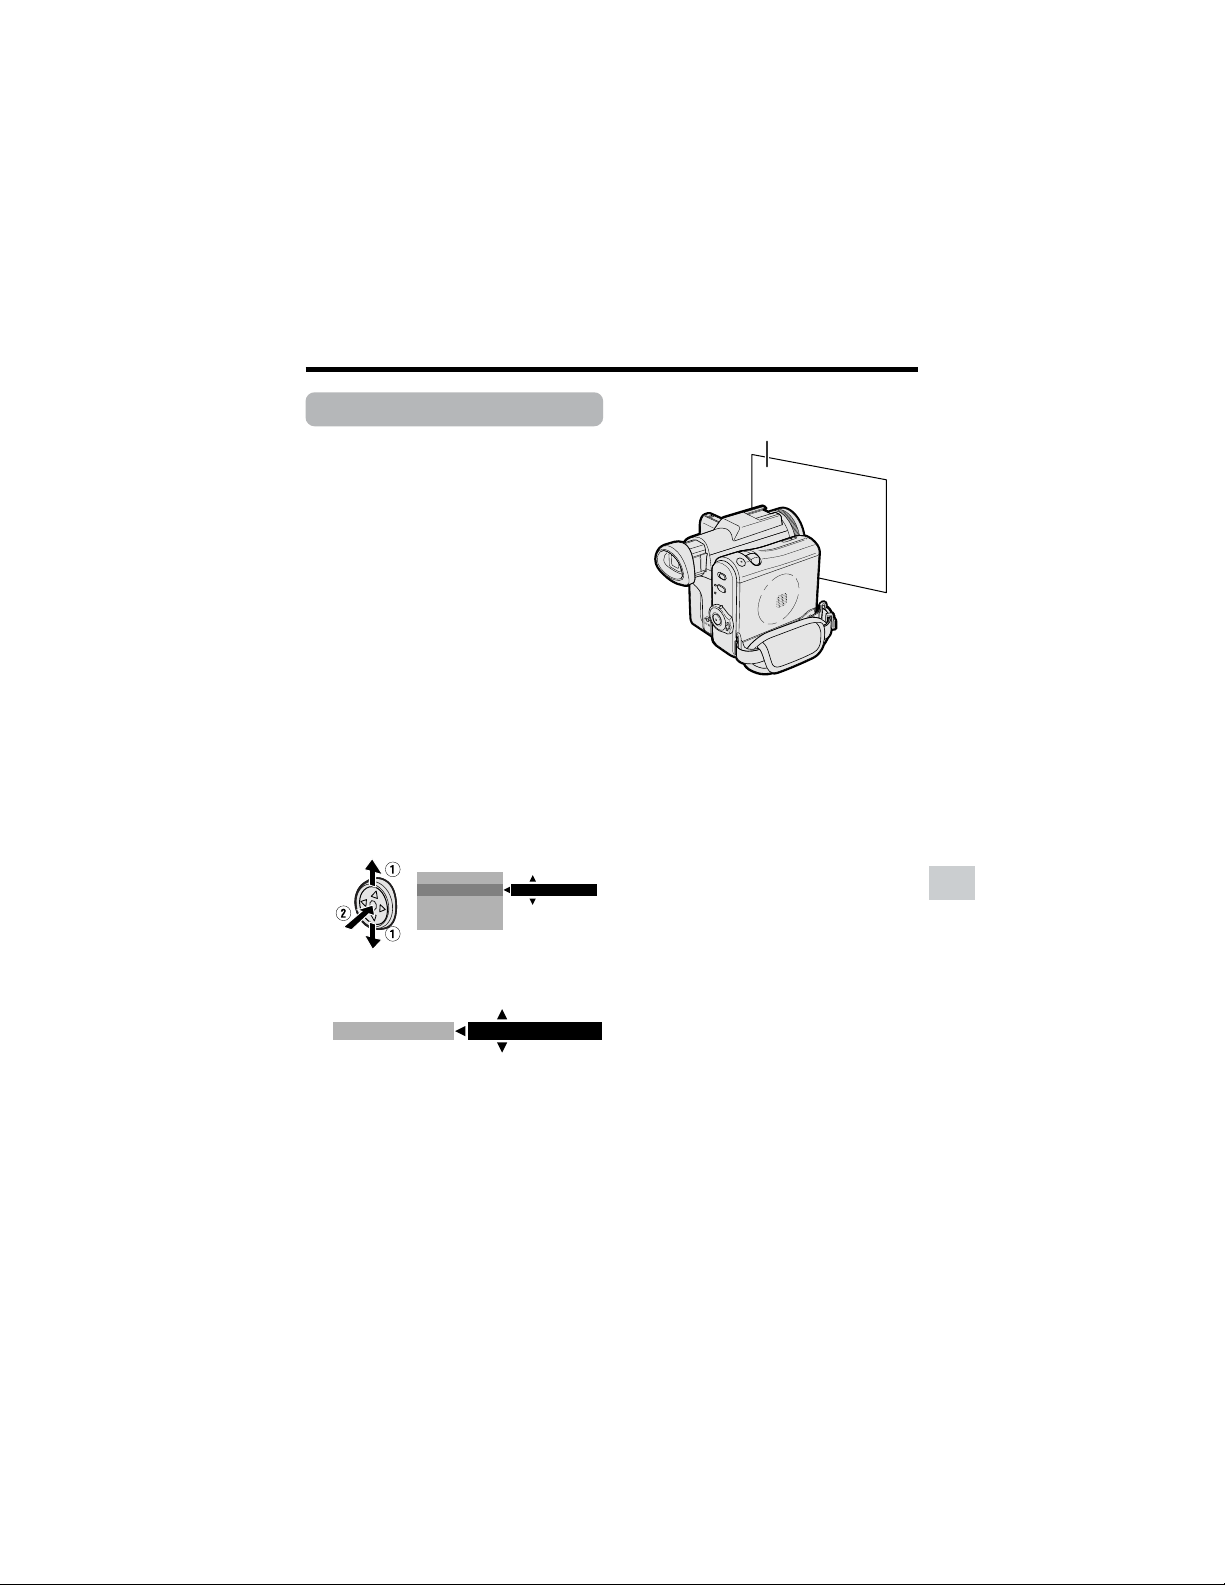
55
Advanced Features
White paper or white cloth
White Balance Lock
Available modes:
Tape Camera, Card Camera
The color of the subject on the screen looks
different depending on lighting conditions.
Lock the White Balance if the Auto White
Balance does not work properly.
1 In Tape Camera or Card Camera
mode, press the DISPLAY button until
the mode screen appears.
2 Press l or m on the Operation
button to select “MANUAL SET”, then
press the center of the Operation
button (see page 54).
3 Press l or m to select “EXECUTE”,
then press the center of the Operation
button.
4 Press l or m to select “WHITE
BAL.”, then press the center of the
Operation button.
5 Press l or m to select “LOCK
MODE”.
6 Aim the lens at a white object.
• Adjust the distance of the object so
that the entire screen is white.
7 Press the center of the Operation
button to set the white balance lock.
• “LOCK MODE” will change to
“LOCK” after pressing the center of
the Operation button.
• “LOCK” flashes during the locking
procedure, and stops flashing after
locking the white balance.
Note:
• If you move the camcorder while
“LOCK” is flashing, “LOCK” may not
stop flashing. If this occurs, repeat
step 7.
8 Press the DISPLAY button to turn off
the MANUAL SET screen.
To return to Auto White Balance
mode
Press k in step 5 above, then press the
center of the Operation button.
To return to Full Auto mode
Set the camcorder to Full Auto mode (see
page 58).
Note:
• White Balance setting cannot be used
when a scene setting is selected.
W
HITE BAL.
IRIS
AUTO
GA IN
FULL AUTO
RETURN
LOCK MODE
W
HITE BAL.

56
Advanced Features
Camera Recording
Advanced Features
Manual Iris
Available modes:
Tape Camera, Card Camera
The camcorder is preset to Auto Iris mode,
which automatically selects the optimal
aperture. However, when there is too much
contrast in brightness between the subject
and background, you may not be able to
record a clear image. In this case, use the
manual iris function to correct the iris value.
Background is too bright and subject too
dark (backlit subject).
• Decrease the iris value to allow more light
through the lens.
Subject is too bright against background.
• Increase the iris value to allow less light
through the lens.
1 In Tape Camera or Card Camera
mode, press the DISPLAY button until
the mode screen appears.
2 Press l or m on the Operation
button to select “MANUAL SET”, then
press the center of the Operation
button (see page 54).
3 Press l or m to select “EXECUTE”,
then press the center of the Operation
button.
4 Press l or m to select “IRIS”, then
press the center of the Operation
button.
5 Press l or m to select the desired
iris value, then press the center of the
Operation button.
• The number shown is the selected
iris value. The adjustment range is 15
steps from F1.8 (most light) to F19
(least light).
6 Press the DISPLAY button to turn off
the MANUAL SET screen.
To return to Auto Iris mode
Press k in step 5 above, then press the
center of the Operation button.
To return to Full Auto mode
Set the camcorder to Full Auto mode (see
page 58).
Note:
• Manual Iris mode cannot be used when a
scene setting is selected.
W
HITE BAL.
IRIS
AUTO
GA IN
FULL AUTO
RETURN
W
HITE BAL.
IRIS
GA IN
FULL AUTO
RETURN
F2.0
EXECUTE
AUTO
AUTO
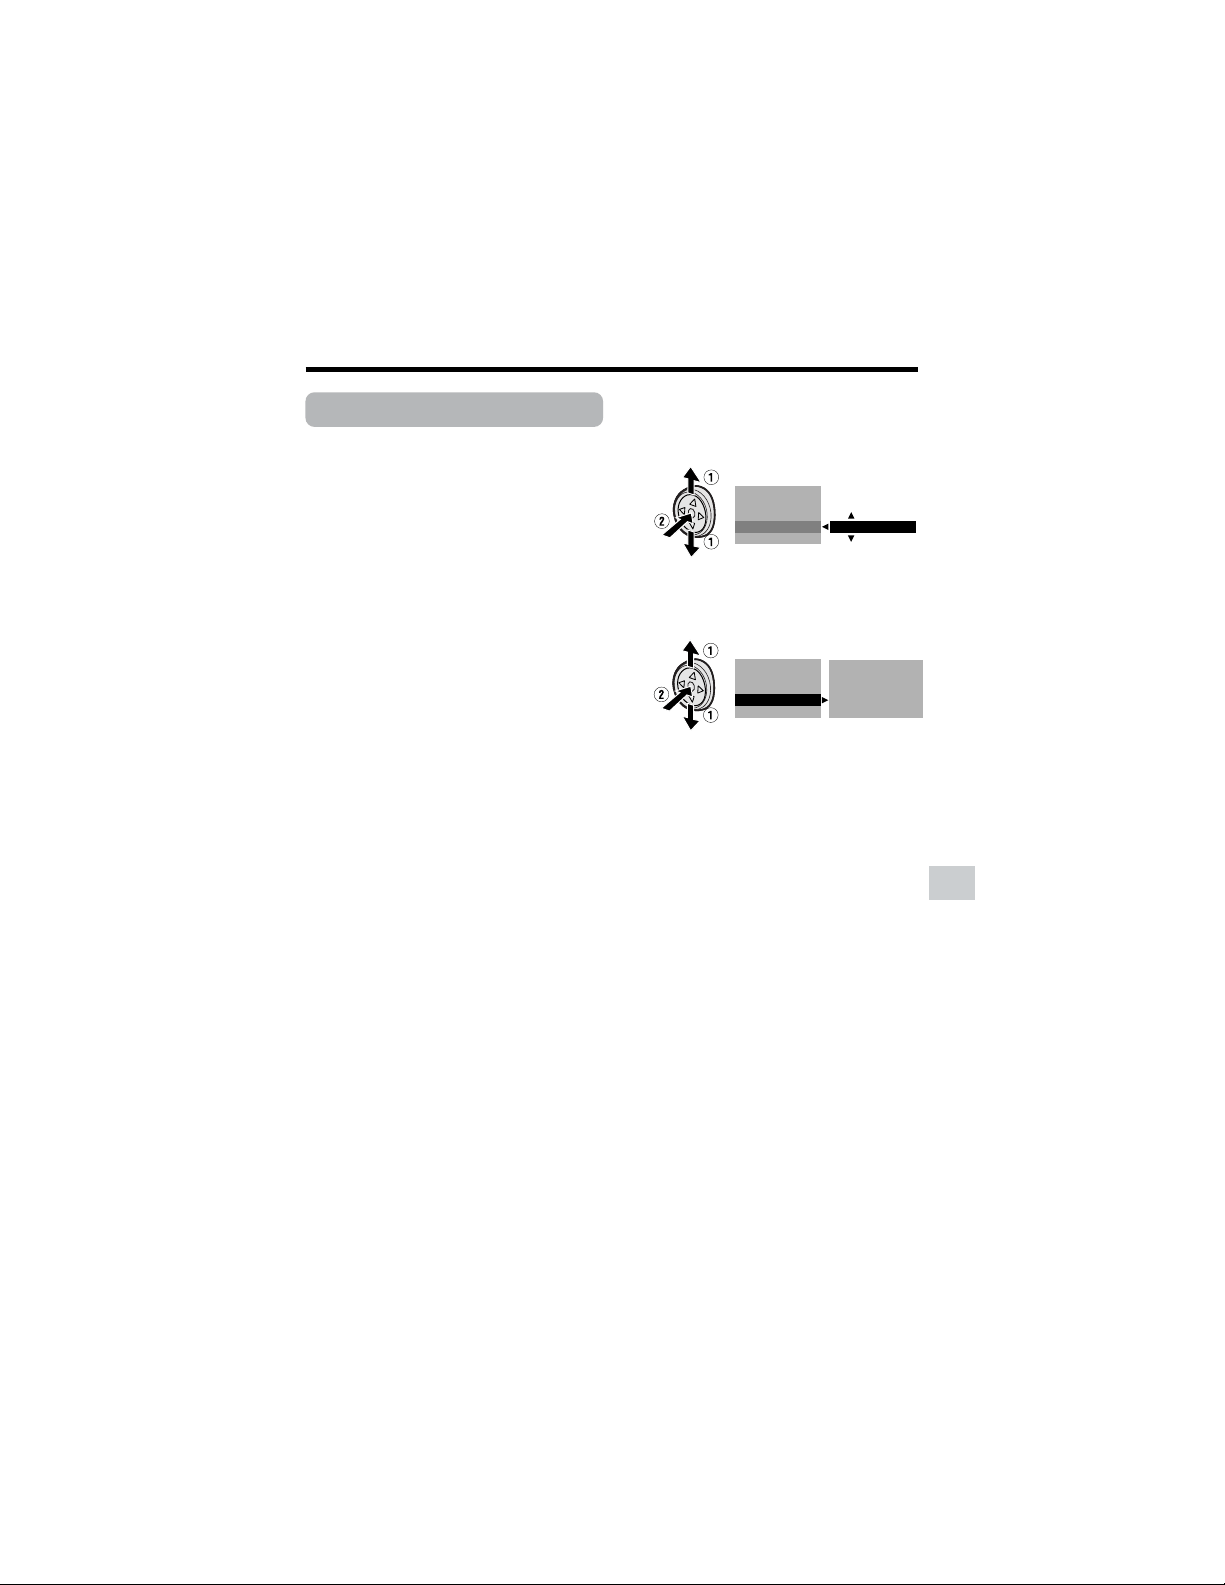
57
Advanced Features
Manual Gain
Available modes:
Tape Camera, Card Camera
When recording in a dark or poorly
illuminated location with Auto Gain mode,
the light sensitivity of the camcorder (gain)
will be automatically adjusted and the
recorded image may be brighter than the
subject actually is. If you want to faithfully
record a dark scene in this case, use the
manual gain function. You can also adjust
the gain to record a backlit subject brighter.
Example of use
Faithfully recording a dark scene
• Select a smaller gain value (to decrease the
light sensitivity).
Background is too bright and subject is
too dark (backlit subject)
• Select a larger gain value (to increase the
light sensitivity).
1 In Tape Camera or Card Camera
mode, press the DISPLAY button until
the mode screen appears.
2 Press l or m on the Operation
button to select “MANUAL SET”, then
press the center of the Operation
button (see page 54).
3 Press l or m to select “EXECUTE”,
then press the center of the Operation
button.
4 Press l or m to select “GAIN”, then
press the center of the Operation
button.
5 Press l or m to select the desired
gain value, then press the center of
the Operation button.
• The number shown is the selected
gain value. The adjustment range is 7
steps from 0dB (lowest sensitivity) to
L18dB (highest sensitivity).
Note: If you select a large gain value,
the image may appear grainy.
6 Press the DISPLAY button to turn off
the MANUAL SET screen.
To return to Auto Gain mode
Press k in step 5 above, then press the
center of the Operation button.
To return to Full Auto mode
Set the camcorder to Full Auto mode (see
page 58).
Note:
• Manual Gain mode cannot be used when a
scene setting is selected.
W
HITE BAL.
IRIS
AUTO
GA IN
FULL AUTO
RETURN
W
HITE BAL.
IRIS
GA IN
FULL AUTO
RETURN
+
3dB
EXECUTE
AUTO
AUTO
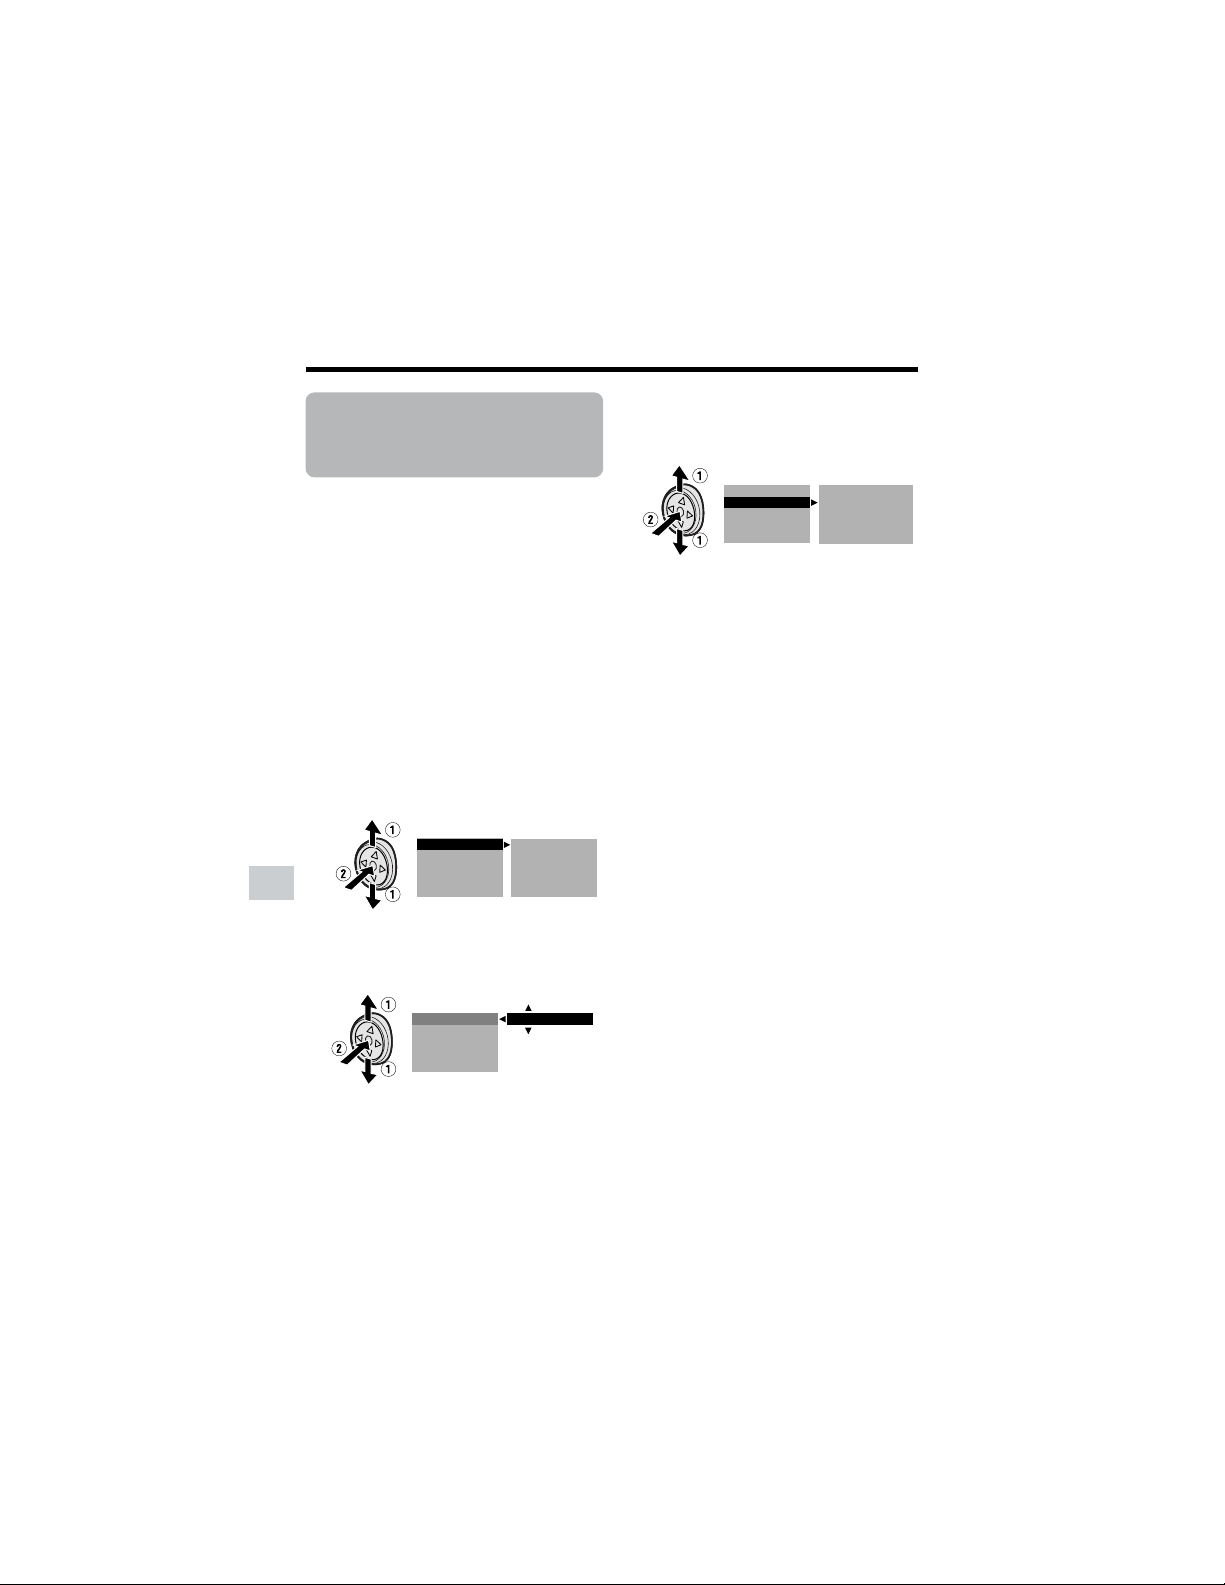
58
Advanced Features
Camera Recording
Advanced Features
Setting the
Camcorder to Full
Auto Mode
Available modes:
Tape Camera, Card Camera
You can set all manual settings, including
white balance, iris, gain, but not focus, to
Full Auto mode in one operation.
1 In Tape Camera or Card Camera
mode, press the DISPLAY button until
the mode screen appears.
2 Press l or m on the Operation
button to select “MANUAL SET”, then
press the center of the Operation
button (see page 54).
3 Press l or m to select “EXECUTE”,
then press the center of the Operation
button.
4 Press l or m to select “FULL
AUTO”, then press the center of the
Operation button.
W
HITE BAL.
IRIS
EXECUTE
LOCK
GA IN
FULL AUTO
RETURN
+
3dB
F4 0.
W
HITE BAL.
IRIS
GA IN
FULL AUTO
RETURN
EXECUTE
AUTO
AUTO
AUTO
5 Press l or m to select “EXECUTE”,
then press the center of the Operation
button.
6 Press the DISPLAY button to turn off
the MANUAL SET screen.
Note:
• You cannot select “FULL AUTO” when no
manual settings are currently in use.
W
HITE BAL.
IRIS
EXECUTE
GA IN
FULL AUTO
RETURN
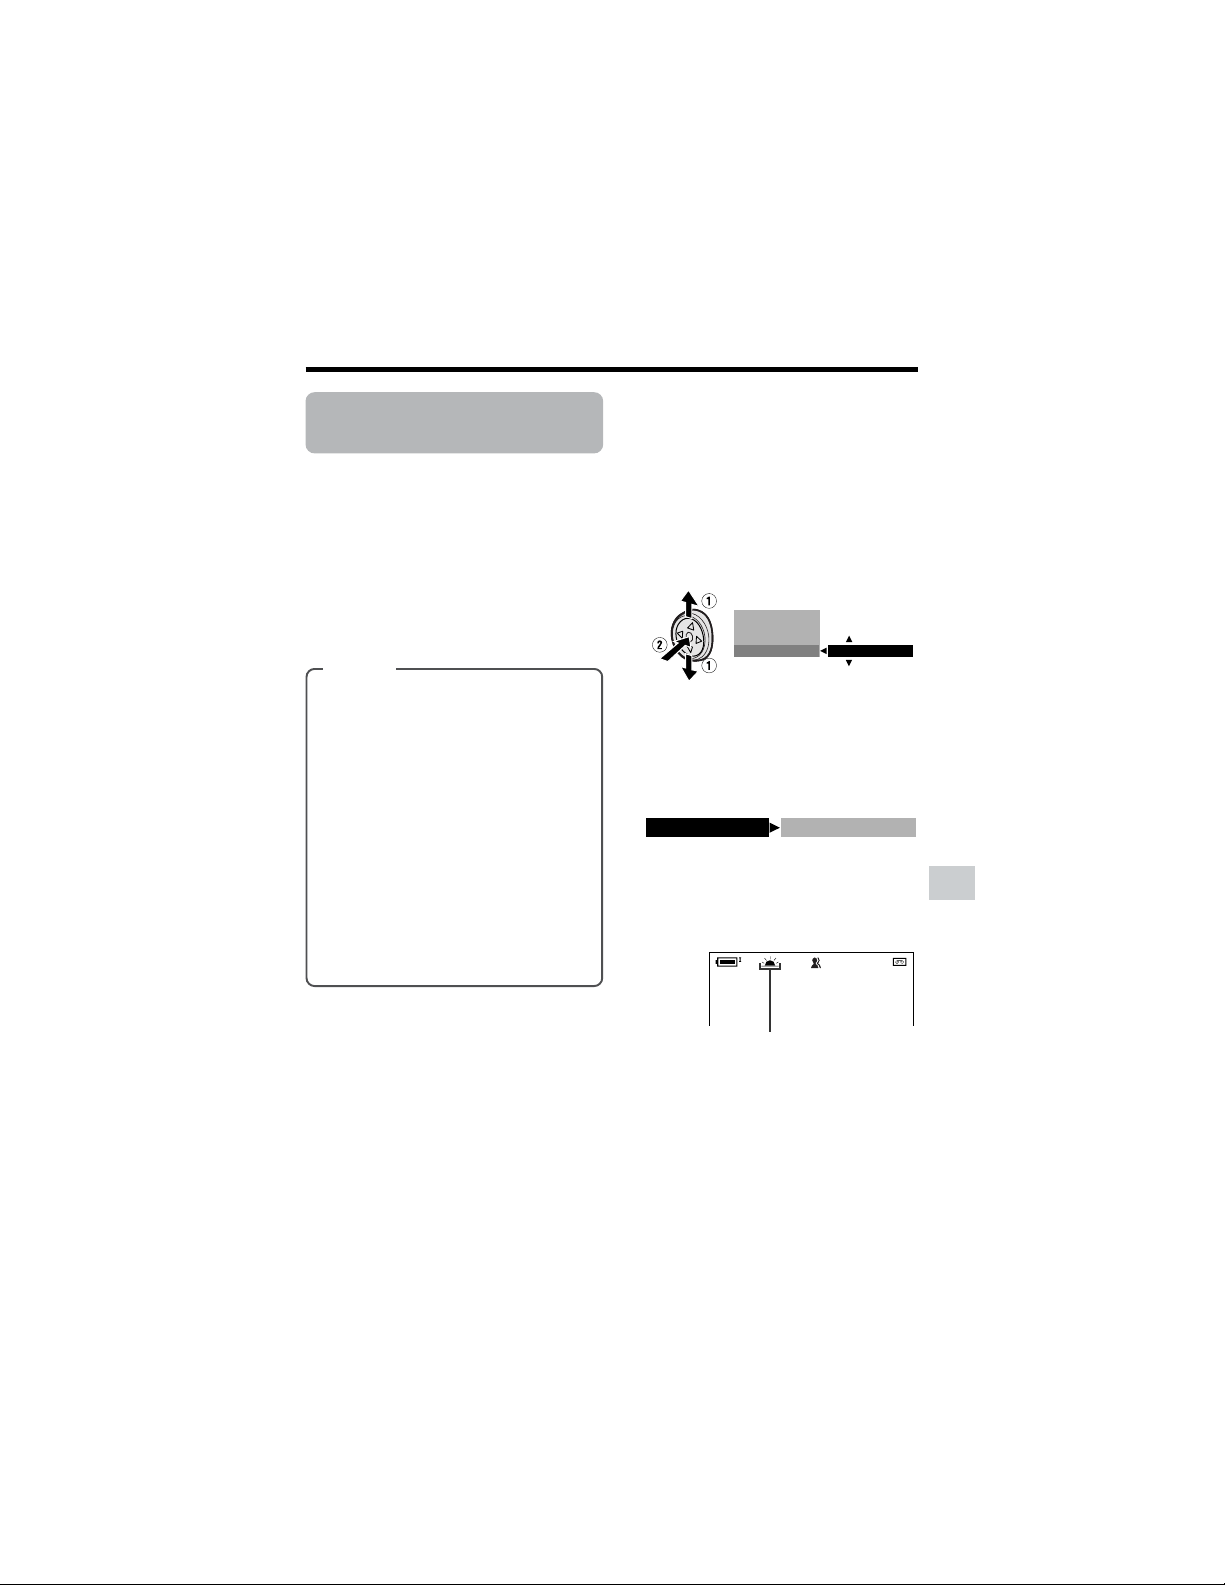
59
Advanced Features
Scene setting indicator
Scene Menu
(Program AE)
Available modes:
Tape Camera, Card Camera
You can set the camcorder to a shooting
mode that will create the best results for a
specific situation. Just select one of the six
scene settings shown below. The
camcorder will automatically set the
exposure, white balance, and shutter speed
to produce the optimum picture quality for
the selected situation.
• The example screens shown are for Tape
Camera mode.
1 In Tape Camera or Card Camera
mode, press the DISPLAY button until
the mode screen appears.
2 Press l or m on the Operation
button to select “SCENE MENU”,
then press the center of the Operation
button.
3 Press l or m to select the scene
setting that best fits the recording
situation, then press the center of the
Operation button.
• The selected scene setting displays
on the mode screen.
4 Press the DISPLAY button to turn off
the mode screen.
• The selected scene setting indicator
displays when the on-screen
indicators are turned on.
To cancel the scene setting
Select “OFF” in step 3 above.
Note:
• Scene settings cannot be used when using
any manual setting except focus. Also not
selectable when e displays.
Types
SPORT (A): When you want to record
a fast-moving subject.
DUSK (B): When you want to
faithfully record the red of the setting
sun, and the surrounding twilight.
SUNLIGHT (F): When background is
very bright.
PARTY (C): When the illumination is
from a spotlight or candle.
NIGHT LUMI (D): When you want to
record fireworks or an illuminated
object in the dark.
SLOW SHUT. (E): When you want to
record an object in a dim place and
make it emerge brightly.
SCENE MENU
OFF
BLC GAIN/
FADE
M
ENU
T A PE
DUSK
SCENE MENU
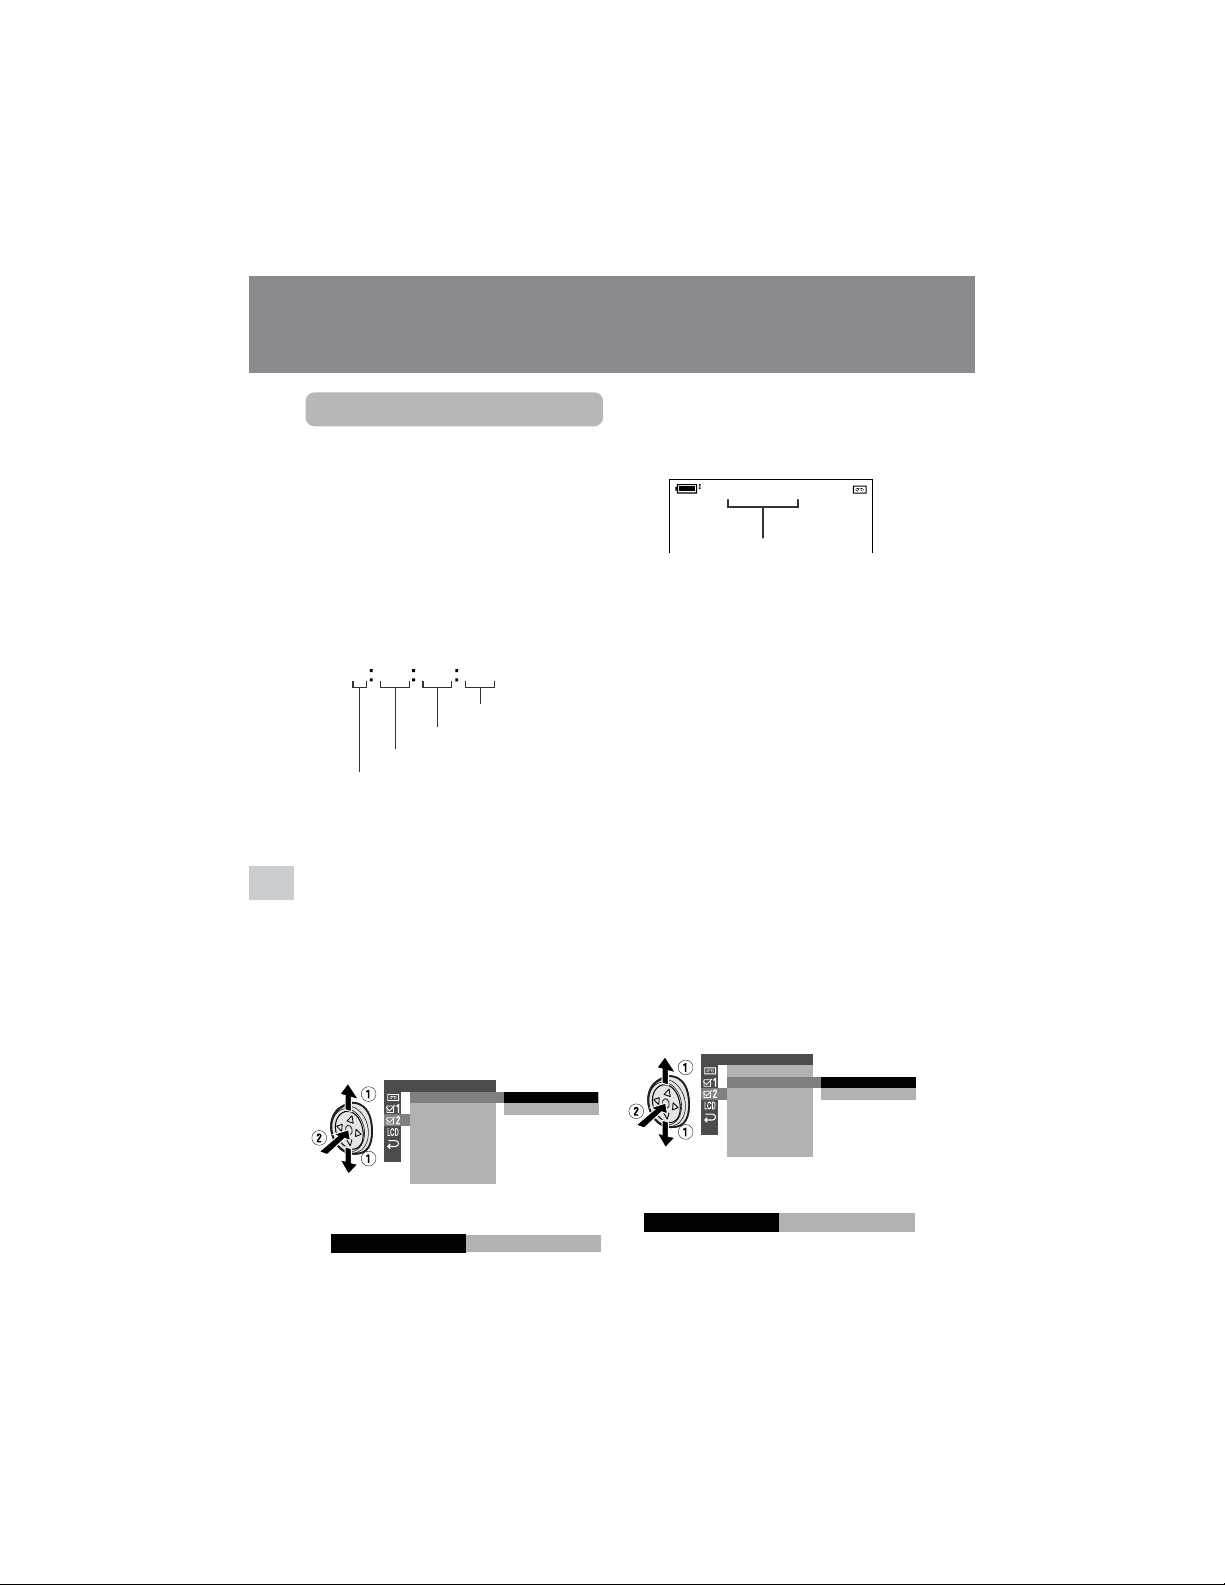
60
Advanced Features
Playback
Advanced Features
Using the Time Code
Available modes:
Tape Camera, Tape Playback
The time code shows the hour, minute and
second of recording, and the frame number
(1 frame = approx. 1/30 sec.). This is
automatically recorded along with the
subject when you are recording on the tape.
You can display the time code on the screen
as an accurate counter in both Tape
Playback and Tape Camera modes.
Display format
• The example screens shown are for Tape
Playback mode.
1 During playback or camera recording
in Tape mode, press the DISPLAY
button until the mode screen appears.
2 Select “MENU”, then “EXECUTE” by
using the Operation button (see page
32).
3
Press l or m to select ~, then press
the center of the Operation button.
4 Press l or m to select “TIME
CODE”, then press the center of the
Operation button.
5
Press l or m to select “ON”, then press
the center of the Operation button.
0 00 10 20TC
Advanced Features
Playback
6 Press the DISPLAY button to turn off
the menu screen.
• The time code appears when the on-
screen indicators are turned on.
Minute
Hour
ON
TIME CODE
OTHERS 2
T IME CODE
TC OUT
RETURN
S
-
VIDEO
IN
OFF
ON
01:02:0
TC
AUDIO
21
+
Displaying the time code on
a TV during playback
1 In Tape Playback mode, press the
DISPLAY button until the mode
screen appears.
2 Select “MENU”, then “EXECUTE” by
using the Operation button (see page
32).
3
Press l or m to select ~, then press
the center of the Operation button.
4 Press l or m to select “TC OUT”,
then press the center of the Opera-
tion button.
5
Press l or m to select “ON”, then press
the center of the Operation button.
6 Press the DISPLAY button to turn off
the menu screen.
OTHERS 2
T IME CODE
TC OUT
RETURN
S
-
VIDEO
IN
OFF
ON
ON
TC OUT
To turn off the time code
Select “OFF” in step 5 above.
Notes:
• When the tape reaches an unrecorded
section, the time code returns to zero
(TC0:00:00). Once recorded, the time code
cannot be changed.
• You can also press the T/C button on the
remote control to display the time code.
Second
Frame number*
* Displayed during still or
frame advance playback.
Time code
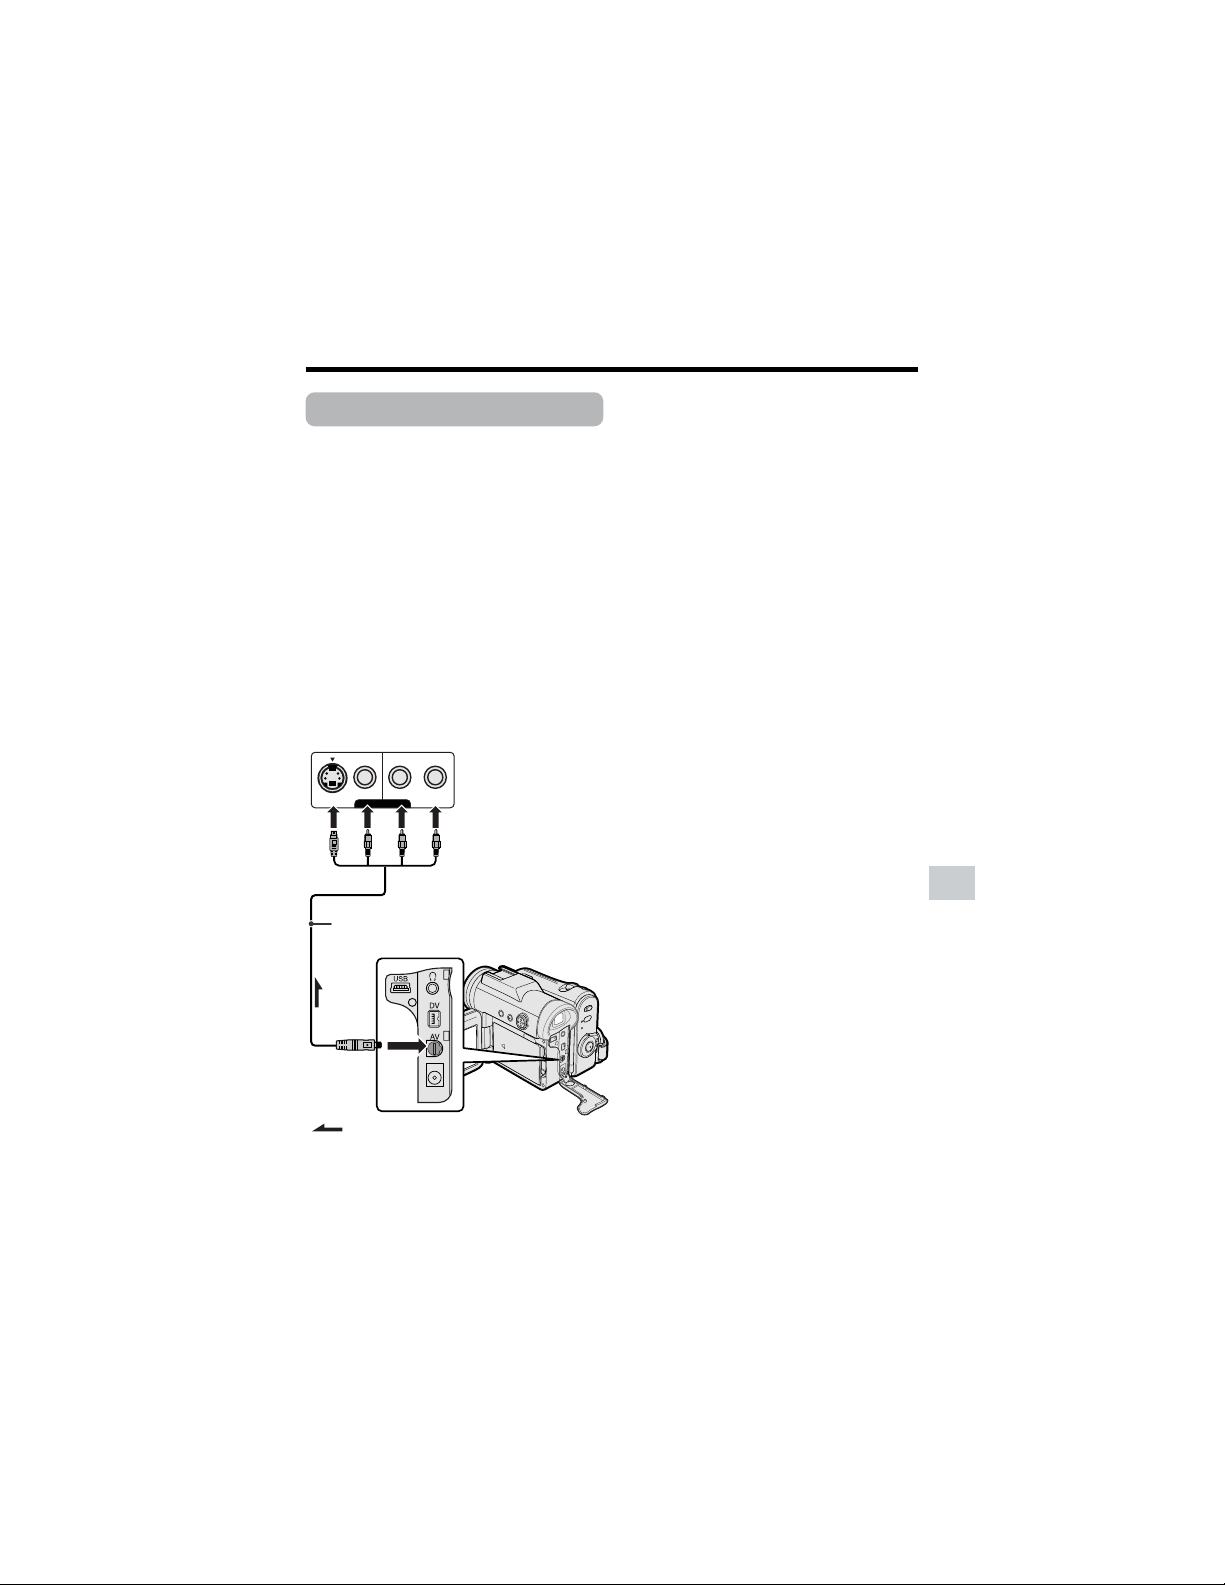
61
Advanced Features
Editing
Available mode:
Tape Playback
Video editing lets you refine your videos by
removing unwanted sequences from your
tape, or transposing one sequence with
another.
This camcorder lets you monitor the source
program on the built-in LCD monitor without
having to connect it to an external TV or
video monitor.
Preparation
Connect the camcorder to a VCR with the
supplied audio/video/S-video cable, as
shown.
Notes:
• See page 2 for how to open the terminal
cover.
• If your VCR has only one audio input jack,
use the white plug for the audio connection
on the VCR.
• If your VCR has an S-video input socket, you
do not need to connect the yellow video plug.
Cutting Unwanted Se-
quences
1 Play back the tape to be edited on the
camcorder, and locate the beginning
and end of the sequence you wish to
cut. Write down the time code reading
at the beginning and end of that
sequence (see page 60). Then,
rewind the tape to before the
beginning of the portion that you wish
to keep.
2 Load a video cassette into the
recording VCR.
3 Press m on the camcorder to begin
playback, then press the Record
button on the VCR to begin recording.
4 Press the Pause/Still button on the
VCR to pause recording when the
source tape reaches the beginning of
the sequence to be cut.
5 Press the Pause/Still (or Record)
button on the VCR to resume
recording when the source tape
reaches the end of the sequence to
be cut.
To stop editing
Press l on the camcorder and press the
Stop button on the VCR.
Notes:
• Some of the transitions between edited
sequences may be slightly off.
• There may be picture noise during video
search or still playback. This does not imply a
defect in the camcorder.
• The time code display will be recorded along
with the edited sequences if the TC OUT
menu item is set to “ON”. Set to “OFF” before
editing (see page 60).
VIDEO
S-VIDEO
L-AUDIO-R
(MONO)
AV-IN
:
To AV
terminal
Recording (VCR)
Audio/video/S-video cable (supplied)
Playback
The arrow shows the signal flow.
Black: To S-video input socket
Yellow: To video input jack
White: To audio input (L) jack
Red: To audio input (R) jack
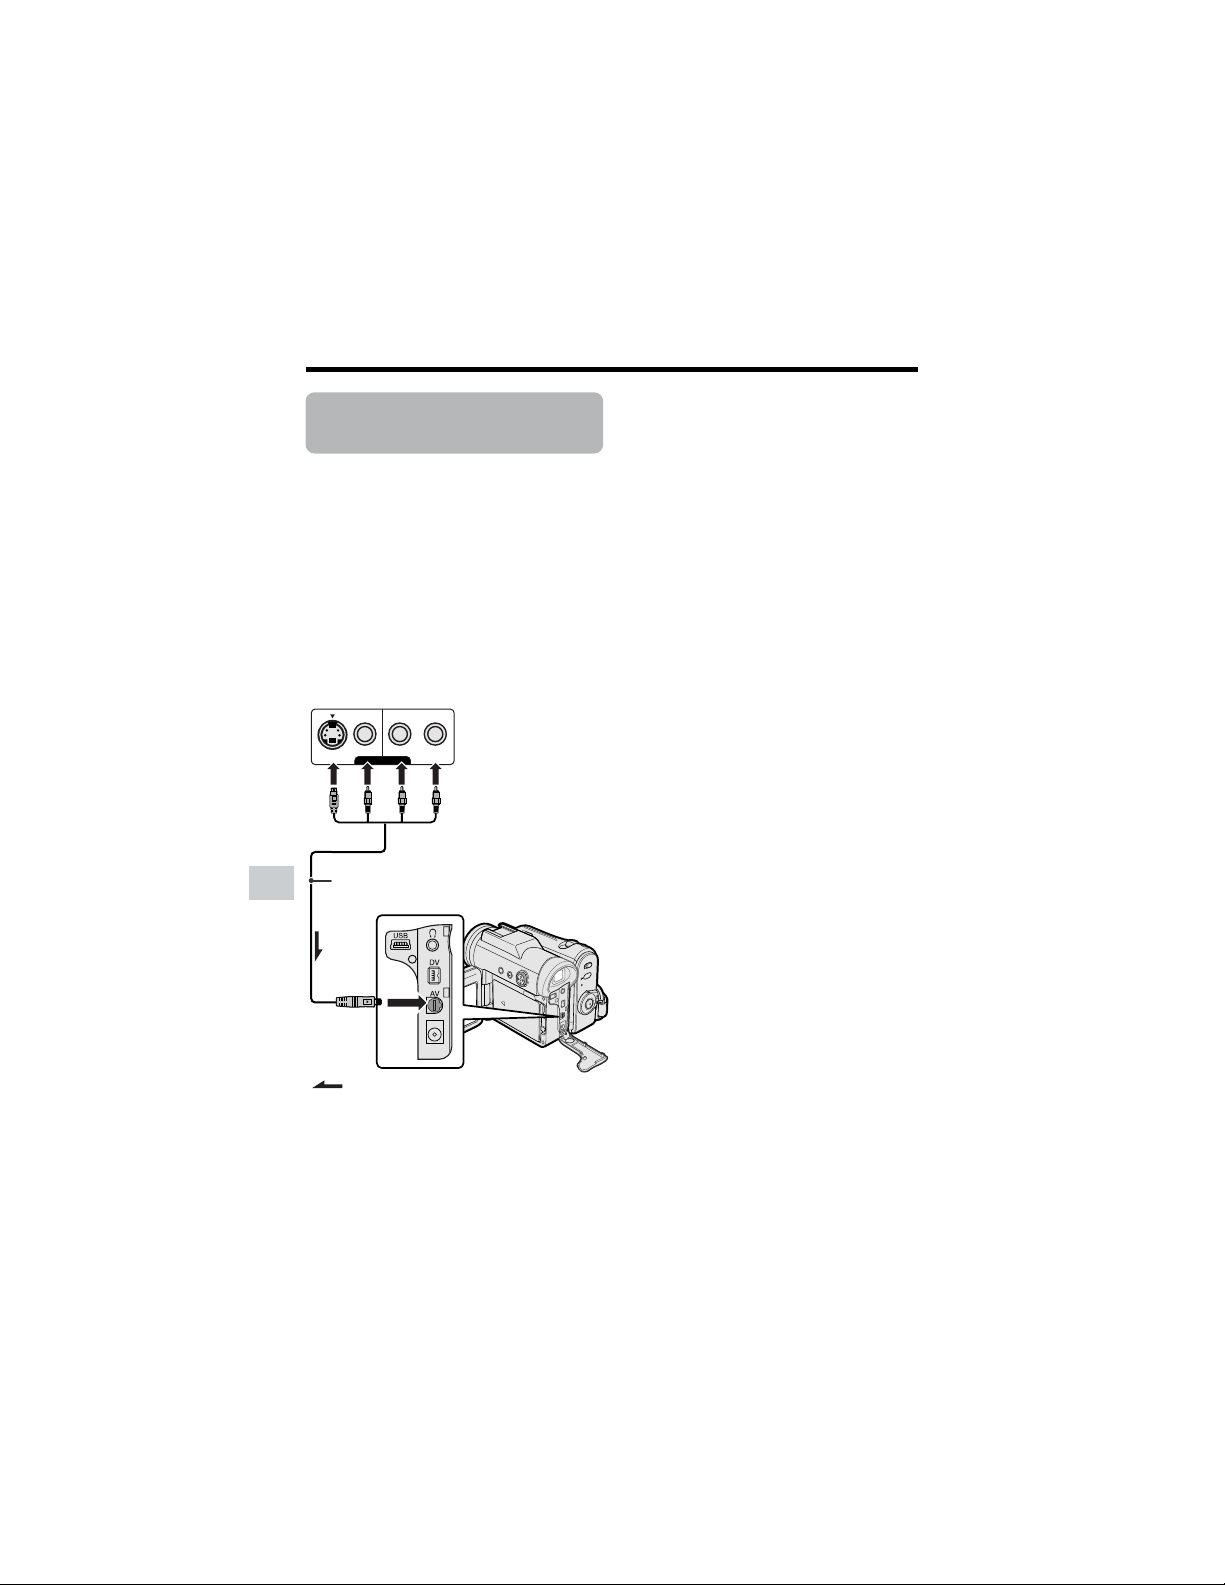
62
Advanced Features
Playback
Advanced Features
Recording from an
External Source
Available mode:
Tape Playback
You can use this camcorder to record or
edit videos from another source, such as a
VCR or TV.
Preparation
Connect the camcorder to the source
equipment with the supplied audio/video/S-
video cable, as shown.
Notes:
• See page 2 for how to open the terminal
cover.
• If the source equipment has only one audio
output jack, use the white plug for the audio
connection on the source equipment. (The
input audio will only be recorded on the left
channel of the tape.)
• Even if the source equipment has an S-video
output socket, connect both the yellow video
plug and S-video plug.
VIDEO
S-VIDEO
L-AUDIO-R
(MONO)
AV-OUT
:
Recording
To AV
terminal
Audio/video/S-video cable (supplied)
Black: To S-video output socket
Yellow: To video output jack
White: To audio output (L) jack
Red: To audio output (R) jack
The arrow shows the signal flow.
Playback
(VCR or TV)

63
Advanced Features
To Record from an External
Source
1 In Tape Playback mode, press the
DISPLAY button until the mode
screen appears.
2 Select “MENU”, then “EXECUTE” by
using the Operation button (see page
32).
3 Press l or m to select ~, then
press the center of the Operation
button.
4 Press l or m to select “S-VIDEO
IN”, then press the center of the
Operation button.
5 Press l or m to select “ON” (for S-
video connection) or “OFF” (for video
connection), then press the center of
the Operation button.
6 Press the DISPLAY button to turn off
the menu screen.
• “S-VIDEO” appears on the screen
during a pause or Recording
Standby mode when you set the S-
VIDEO IN menu item to “ON” in step
5 above.
7 Begin playback on the source
equipment connected to the
camcorder.
• Check the camcorder screen to see if
the picture is properly received.
8 Press the Start/Stop button on the
camcorder, then press m to begin
recording.
OTHERS 2
T IME CODE
TC OUT
RETURN
S
-
VIDEO
IN
OFF
ON
Notes:
• To pause recording, press m. Press m again
to resume recording.
• To operate by remote control, perform steps 1
to 7 above, and press the TAPE REC START/
STOP button, then press the PAUSE/STILL
button (g).
• If “NO SIGNAL” is displayed on the
camcorder screen, check that the audio/
video/S-video cable is properly connected.
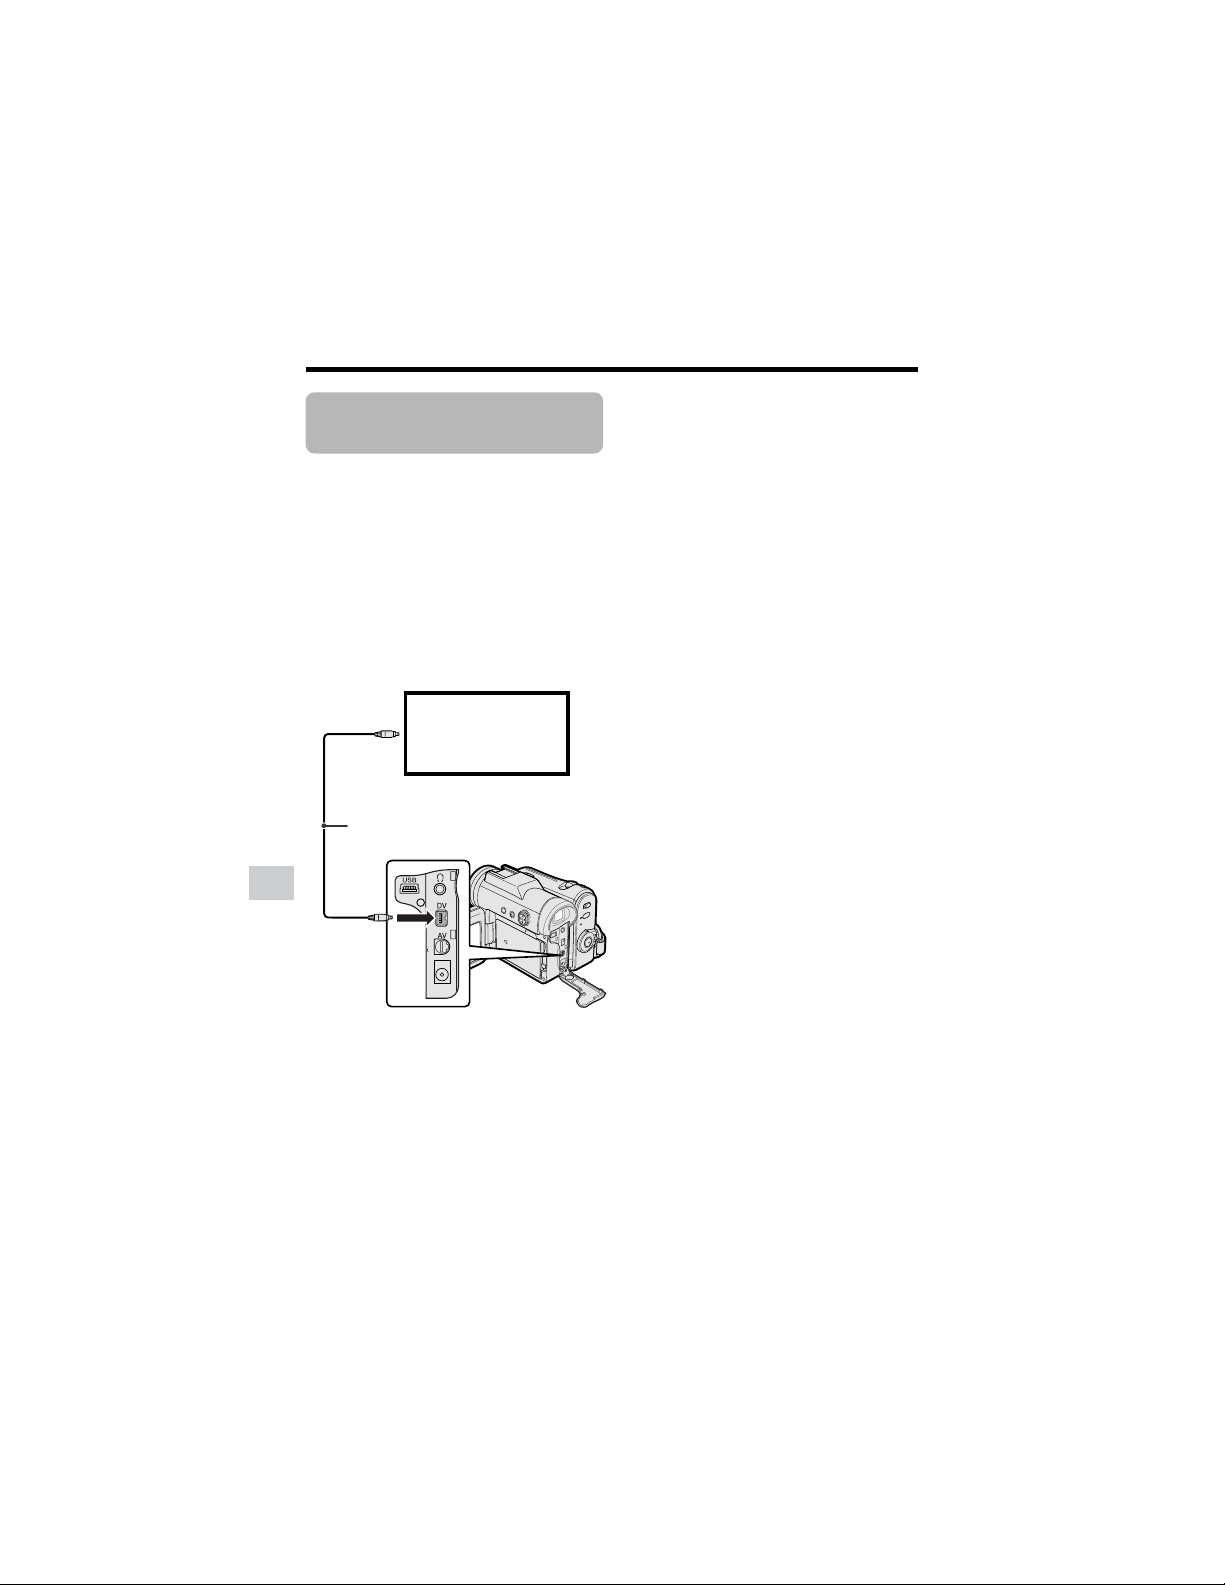
64
Advanced Features
Playback
Advanced Features
Editing with the DV
Terminal (IEEE1394)
Available mode:
Tape Playback
This camcorder can be used as a digital
video editor. A DV cable transfers all
dubbing signals including video and audio
directly to the camcorder.
Preparation
Connect the camcorder to video equipment
with a DV terminal using a commercially
available DV cable.
To Record to Video Equip-
ment
See “Cutting Unwanted Sequences” on
page 61, using the video equipment as the
recording source.
Note:
• Make sure that the video equipment to which
you are recording can input dubbing signals
via the DV terminal.
To DV
terminal
To DV
terminal
DV cable (commercially available)
Video equipment
with DV terminal
(e.g. DV camcorder)

65
Advanced Features
To Record from Video Equip-
ment
1 Set the camcorder to Tape Playback
mode, and insert a Mini DV cassette.
2 Begin playback on the video equip-
ment connected to the camcorder.
• Check the camcorder screen to see if
the picture is properly received.
3 Press the Start/Stop button on the
camcorder.
• The camcorder enters Recording
Standby mode.
4 Press m on the Operation button to
begin recording.
To stop recording
Press l on the Operation button.
Cutting Unwanted Sequences
1 Press m to pause recording when the
source tape reaches the beginning of
the sequence to be cut.
2 Press m to resume recording when
the source tape reaches the end of
the sequence to be cut.
Notes:
• Make sure that the video equipment from
which you are recording can output dubbing
signals via the DV terminal.
• If the video equipment is not set to playback
mode or the DV cable is not properly
connected, “NO SIGNAL” is displayed on the
camcorder screen.
• If no picture or sound is input to the
camcorder even if the DV cable is properly
connected and you are playing back the
source media from the video equipment, set
the Power switch on the camcorder to OFF
and then back to w, or disconnect the DV
cable and connect it again.
• If a digital video recording with a copyright
protection signal is used as the playback
source, “COPYRIGHT PROTECTED.”
appears on the camcorder monitor and the
recording function is disabled (see page 96).
• When displaying the playback picture on the
PC, you may find black bands around the
image. This is caused by the differences of
the image display sizes.
• “i.Link” refers to the IEEE1394-1995 industry
specification and extensions thereof. The z
logo is used for products compliant with the
i.Link standard.
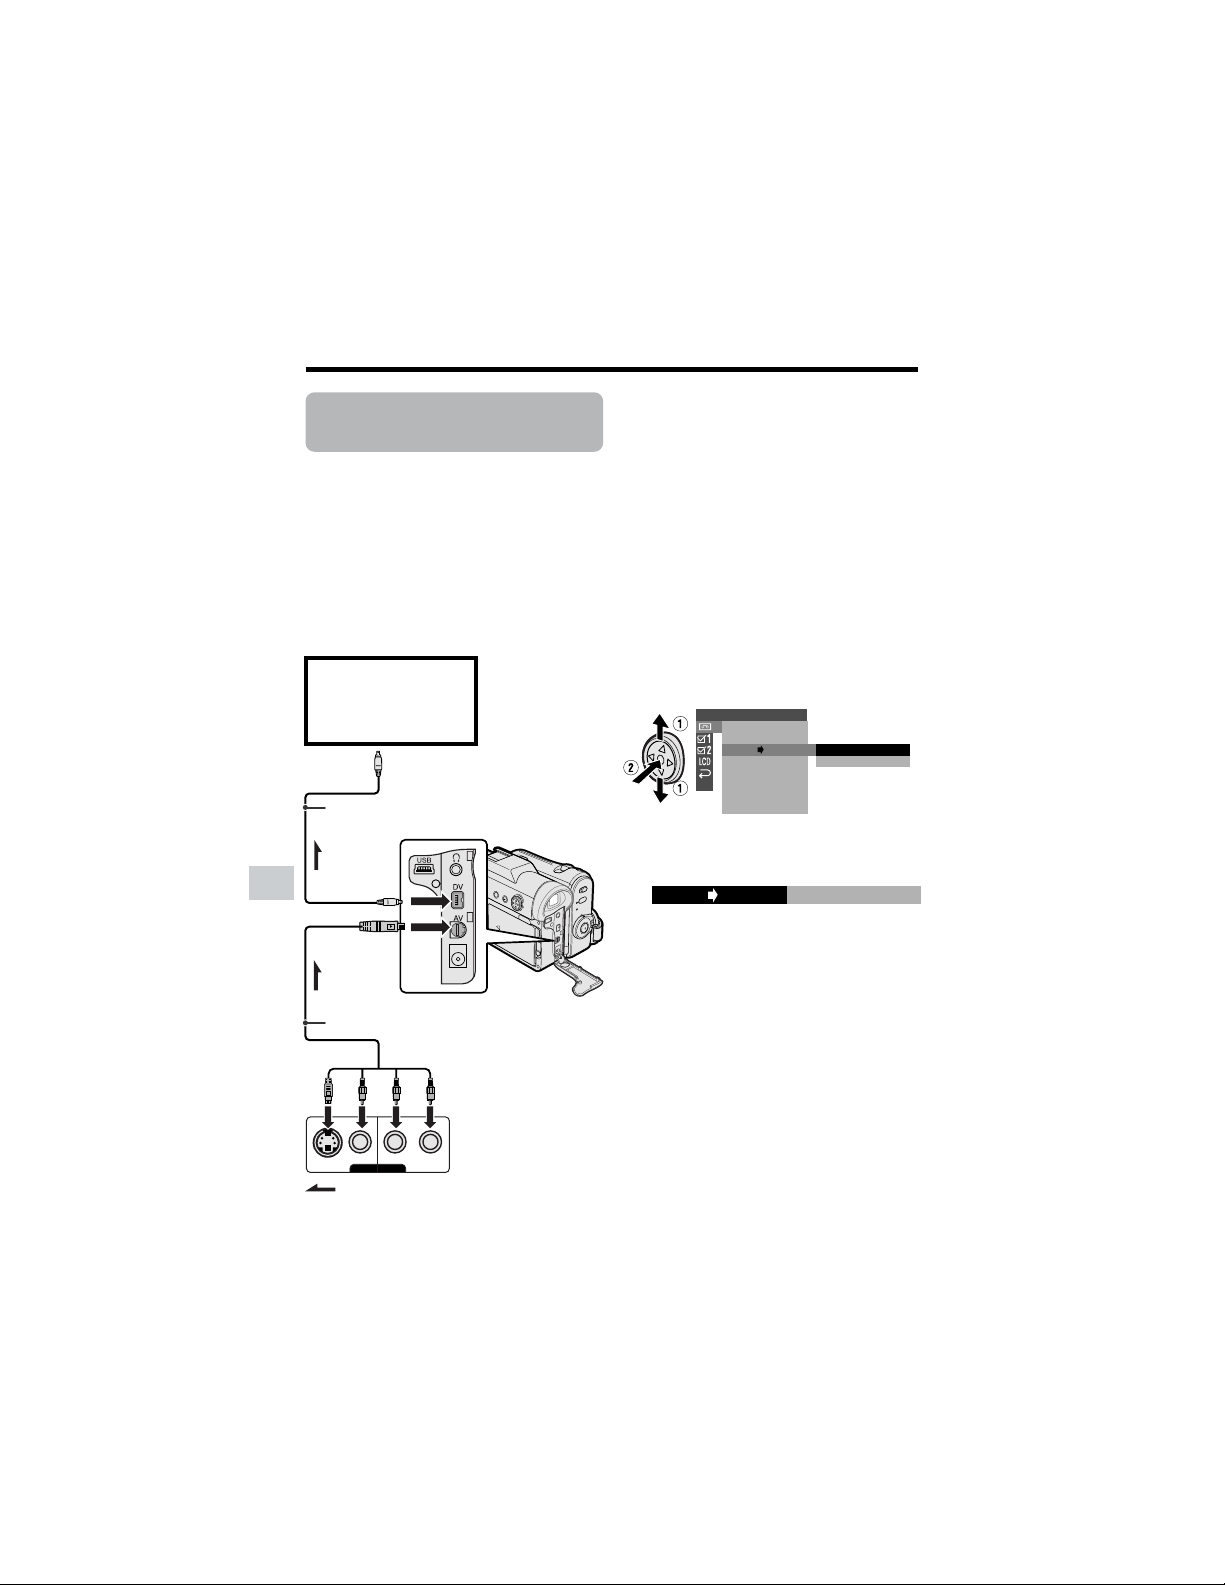
66
Advanced Features
Playback
Advanced Features
AV-OUT
VIDEO
S-VIDEO
L-AUDIO-R
(MONO)
:
Using the Camcorder
as a Converter
Available mode:
Tape Playback
You can use this camcorder to convert from
analog signal (e.g. video recorded on 8 mm
or Hi8 tapes) to digital signal.
Preparation
Connect the audio/video/S-video cable and
DV cable as shown below.
Note:
• See page 2 for how to open the terminal
cover.
PLAYBACK
AUDI O
ANLG DGTL
RETURN
SET
OFF
ON
ROTATE PB
ONANLG DGTL
1 Set the camcorder to Tape Playback
mode, and make sure that playback is
stopped.
2 Press the DISPLAY button until the
mode screen appears.
3 Select “MENU”, then “EXECUTE” by
using the Operation button (see page
32).
4 Press l or m to select V, then
press the center of the Operation
button.
5 Press l or m to select
“ANLGyDGTL”, then press the center
of the Operation button.
6 Press l or m to select “ON”, then
press the center of the Operation
button.
To DV terminal
To AV terminal
To DV terminal
DV cable (commercially available)
Playback
(analog equipment)
e.g. 8 mm or Hi8
camcorder
Black: To S-video output socket
Yellow: To video output jack
White: To audio output (L) jack
Red: To audio output (R) jack
Analog
signal
Audio/video/S-video cable (supplied)
Digital
signal
Recording
(digital equipment)
e.g. computer
The arrow shows the signal flow.

67
Advanced Features
7 Press the DISPLAY button to turn off
the menu screen.
8 Press the Play button on the analog
equipment
• Check the monitor on the digital
equipment to see if the picture is
being properly received.
9 Press the Record button on the digital
equipment.
Notes:
• The camcorder is not guaranteed to work
with all digital/analog equipment. Contact the
manufacturer of your equipment for advice.
• If the camcorder outputs a video recording
with a copyright signal, the digital equipment
cannot record or save it.
• The camcorder may not convert some input
video recordings properly (e.g. discoloration,
picture noise, muted sound), depending on
the input condition.
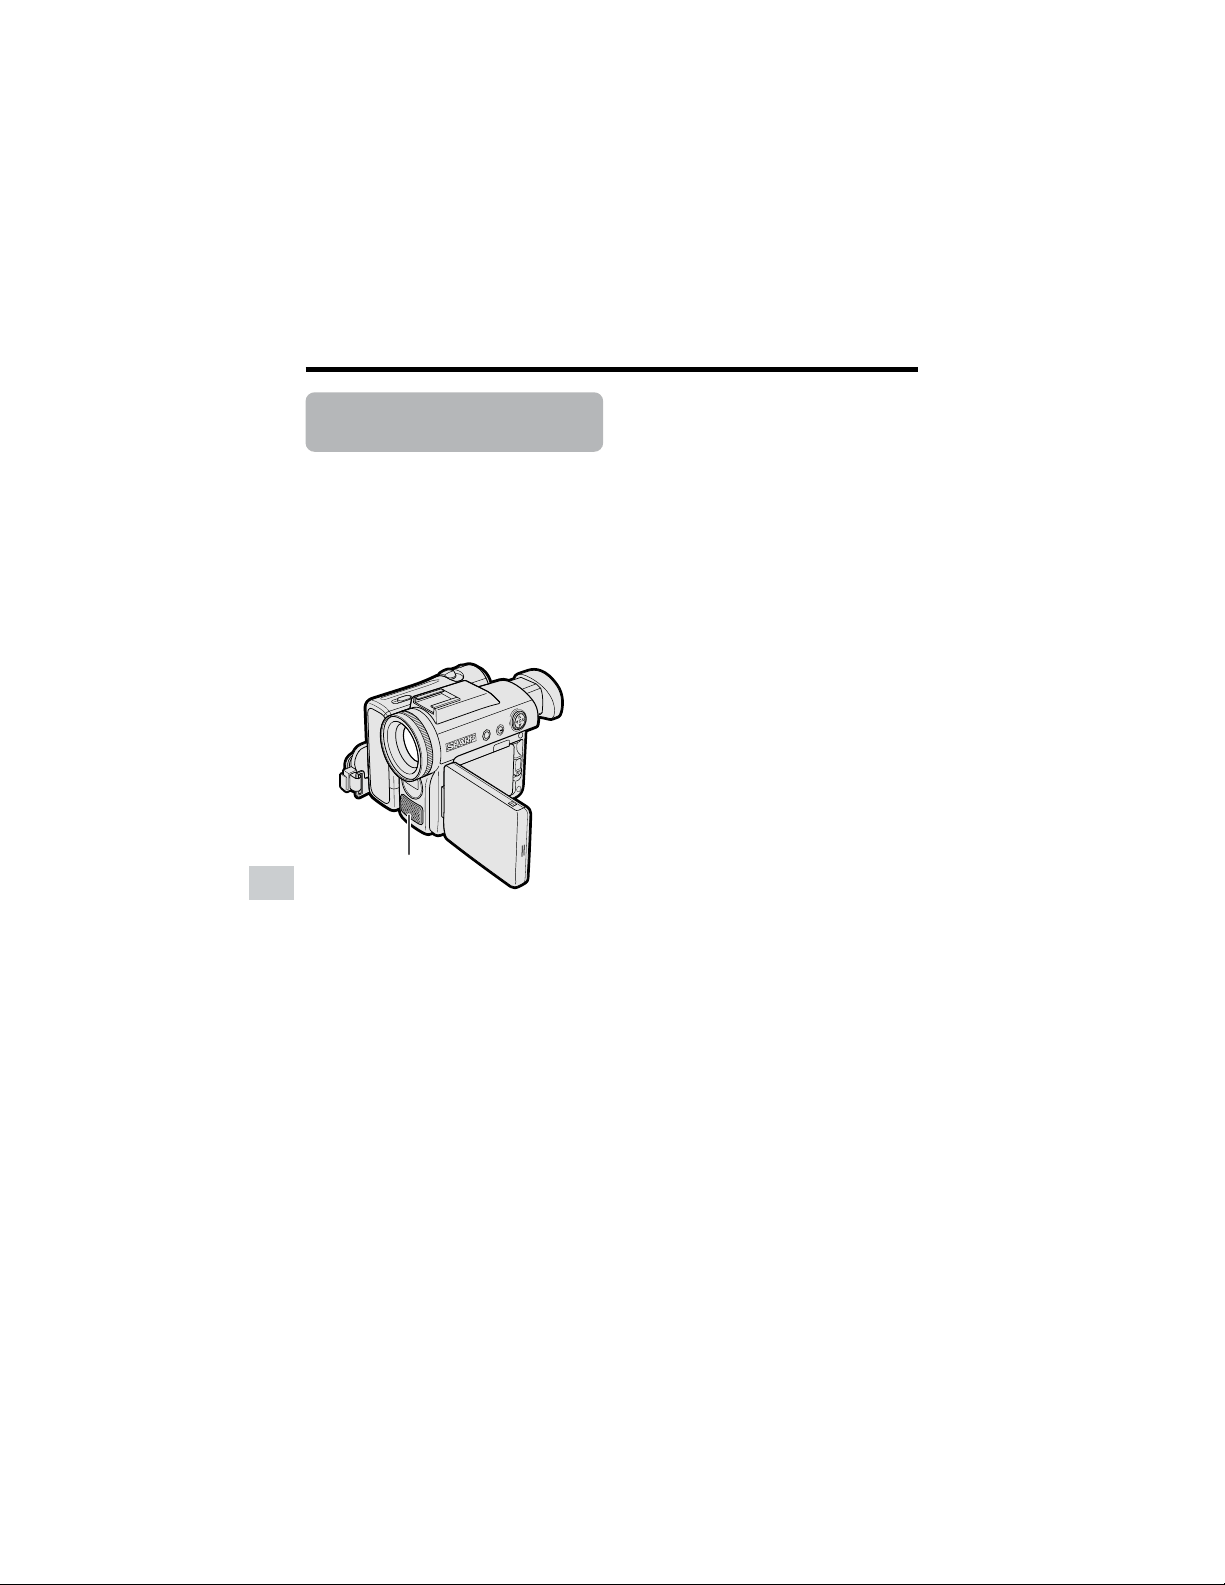
68
Advanced Features
Playback
Advanced Features
Audio Dubbing
Feature
Available mode:
Tape Playback
You can add narration to recordings made
with this camcorder, while preserving the
original audio and video recordings.
Microphone for Audio Dubbing
You can use the built-in stereo microphone
to record narration.
Notes:
• Audio dubbing does not function through the
DV terminal.
• You cannot use audio dubbing with
recordings made in LP mode.
• You cannot use the built-in stereo microphone
for audio dubbing when the audio/video/S-
video cable is connected.
• You cannot use the zoom microphone to
record narration.
Audio Recording
In normal recording mode
12-bit audio recording
The audio is recorded in stereo on Audio 1.
Audio 1: Stereo (left and right) sound
Audio 2: No audio
16-bit audio recording
The audio is recorded in stereo with the left
and right sound on two separate channels.
Audio 1: Left sound
Audio 2: Right sound
In Audio Dubbing mode
12-bit audio recording
The dubbed audio is recorded on Audio 2.
Audio 1: Original stereo (left and right)
sound
Audio 2: Dubbed stereo (left and right)
sound
16-bit audio recording
The dubbed audio is recorded on Audio 2
over the original right sound. Both dubbed
and original sounds are mono.
Audio 1: Original left sound
Audio 2: Dubbed sound
Note:
• You can select the 12-bit or 16-bit audio
recording mode by performing the procedure
on page 46.
Built-in stereo microphone
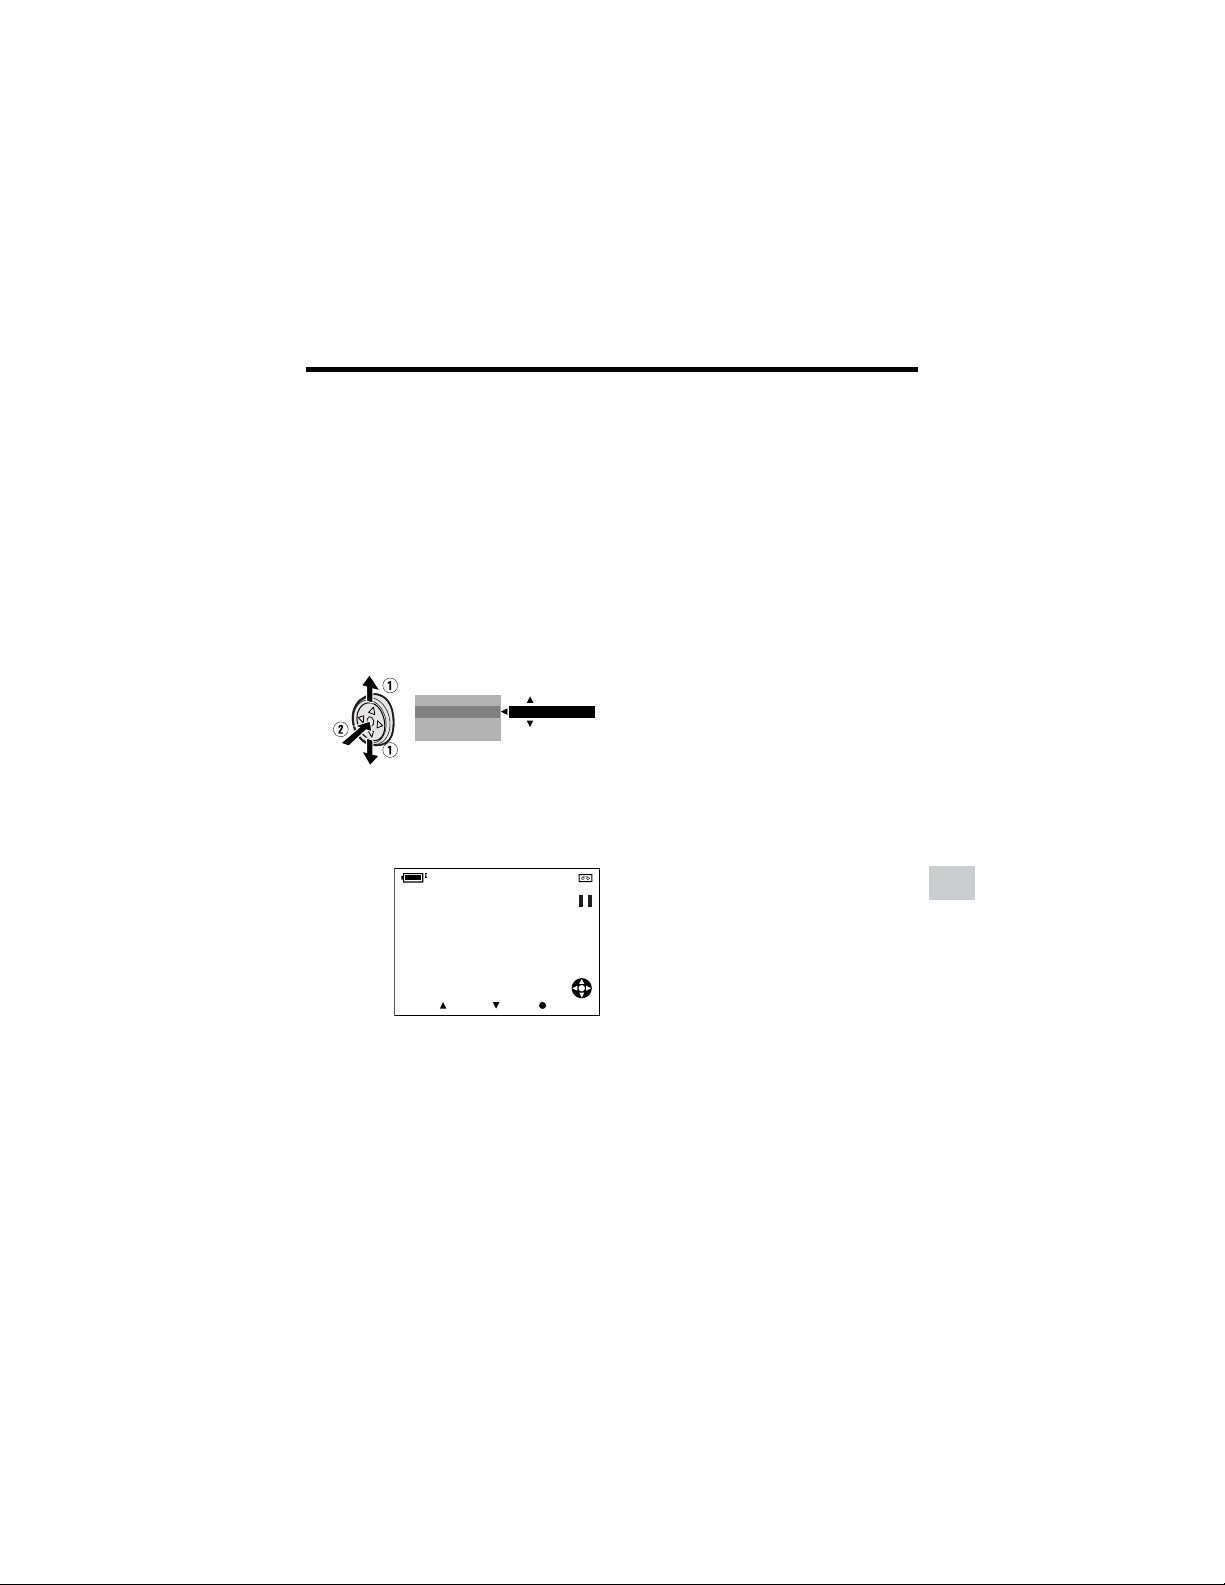
69
Advanced Features
Audio Dubbing
1 Play back the Mini DV cassette
recorded in SP mode and locate the
tape position where you wish to start
audio dubbing.
2 Press m on the Operation button to
pause playback.
3 Press the DISPLAY button until the
mode screen appears.
4 Press l or m to select “AUDIO
DUB”, then press the center of the
Operation button.
5 Press l or m to select “EXECUTE”,
then press the center of the Operation
button.
• The audio dubbing screen appears.
6 Press m to begin audio dubbing.
Record your narration.
To pause audio dubbing
Press l. To resume audio dubbing, press
m again.
To cancel audio dubbing
Press the center of the Operation button in
step 5. The audio dubbing screen disap-
pears.
If you wish to change the
dubbed audio or dub addi-
tional scenes
1 Press the DISPLAY button to turn off
the audio dubbing screen.
2 Repeat steps 1 to 6 above.
Notes:
• It is recommended that you use Audio
Dubbing only with recordings made with this
camcorder. Use of recordings made with
other digital video equipment may result in
poor audio quality.
• Audio dubbing will automatically pause if the
original audio changes from 12-bit mode to
16-bit mode or vice versa. Press m to
resume operation.
• Audio dubbing will automatically stop if a
portion recorded in LP mode or an unre-
corded portion of the tape is encountered.
• You can play back the dubbed audio and the
original audio together or separately (see
page 70).
• “AUDIO DUB” cannot be selected when the
Mini DV cassette is recorded in LP mode.
DATE D I SP.
AUD I O DUB
PIC.EFFECT
M
ENU
EXECUTE
AUDIO
AUDIO DUB
21
+
START STOP CANCEL
00:00:0
TC

70
Advanced Features
Playback
Advanced Features
Selecting the Audio
Playback Mode
Available mode:
Tape Playback
You can select any of the following audio
playback modes.
Audio 1H2
• 12-bit recording in stereo (Audio 1
and Audio 2 channels)
• 16-bit recording in stereo (left and
right channels)
Audio 1
• 12-bit recording in stereo (Audio 1
channel only)
• 16-bit recording in mono (left channel
only)
Audio 2
• 12-bit recording in stereo (Audio 2
channel only)
• 16-bit recording in mono (right
channel only)
1 Playback a Mini DV cassette with
dubbed audio.
2 Press the DISPLAY button until the
mode screen appears.
3 Select “MENU”, then “EXECUTE” by
using the Operation button (see page
32).
4 Press l or m to select V, then
press the center of the Operation
button.
5 Press l or m to select “AUDIO”,
then press the center of the Operation
button.
6 Press l or m to select the desired
audio playback mode, then press the
center of the Operation button.
PLAYBACK SET
1
1
2
+
2
AUDI O
ROTATE PB
ANLG DGTL
RETURN
AUDIO
21
+
AUDIO
12
+
7 Press the DISPLAY button to turn off
the menu screen.
• The selected audio playback mode
indicator only appears when the on-
screen indicators are turned on.
Note:
• The audio playback mode indicator,
“AUDIO”, displays in different colors
depending on the recording mode (12- or 16-
bit) used for the recording being played
back. A white display indicates 12-bit
recording mode, while a green indicates 16-
bit.
Audio playback mode indicator
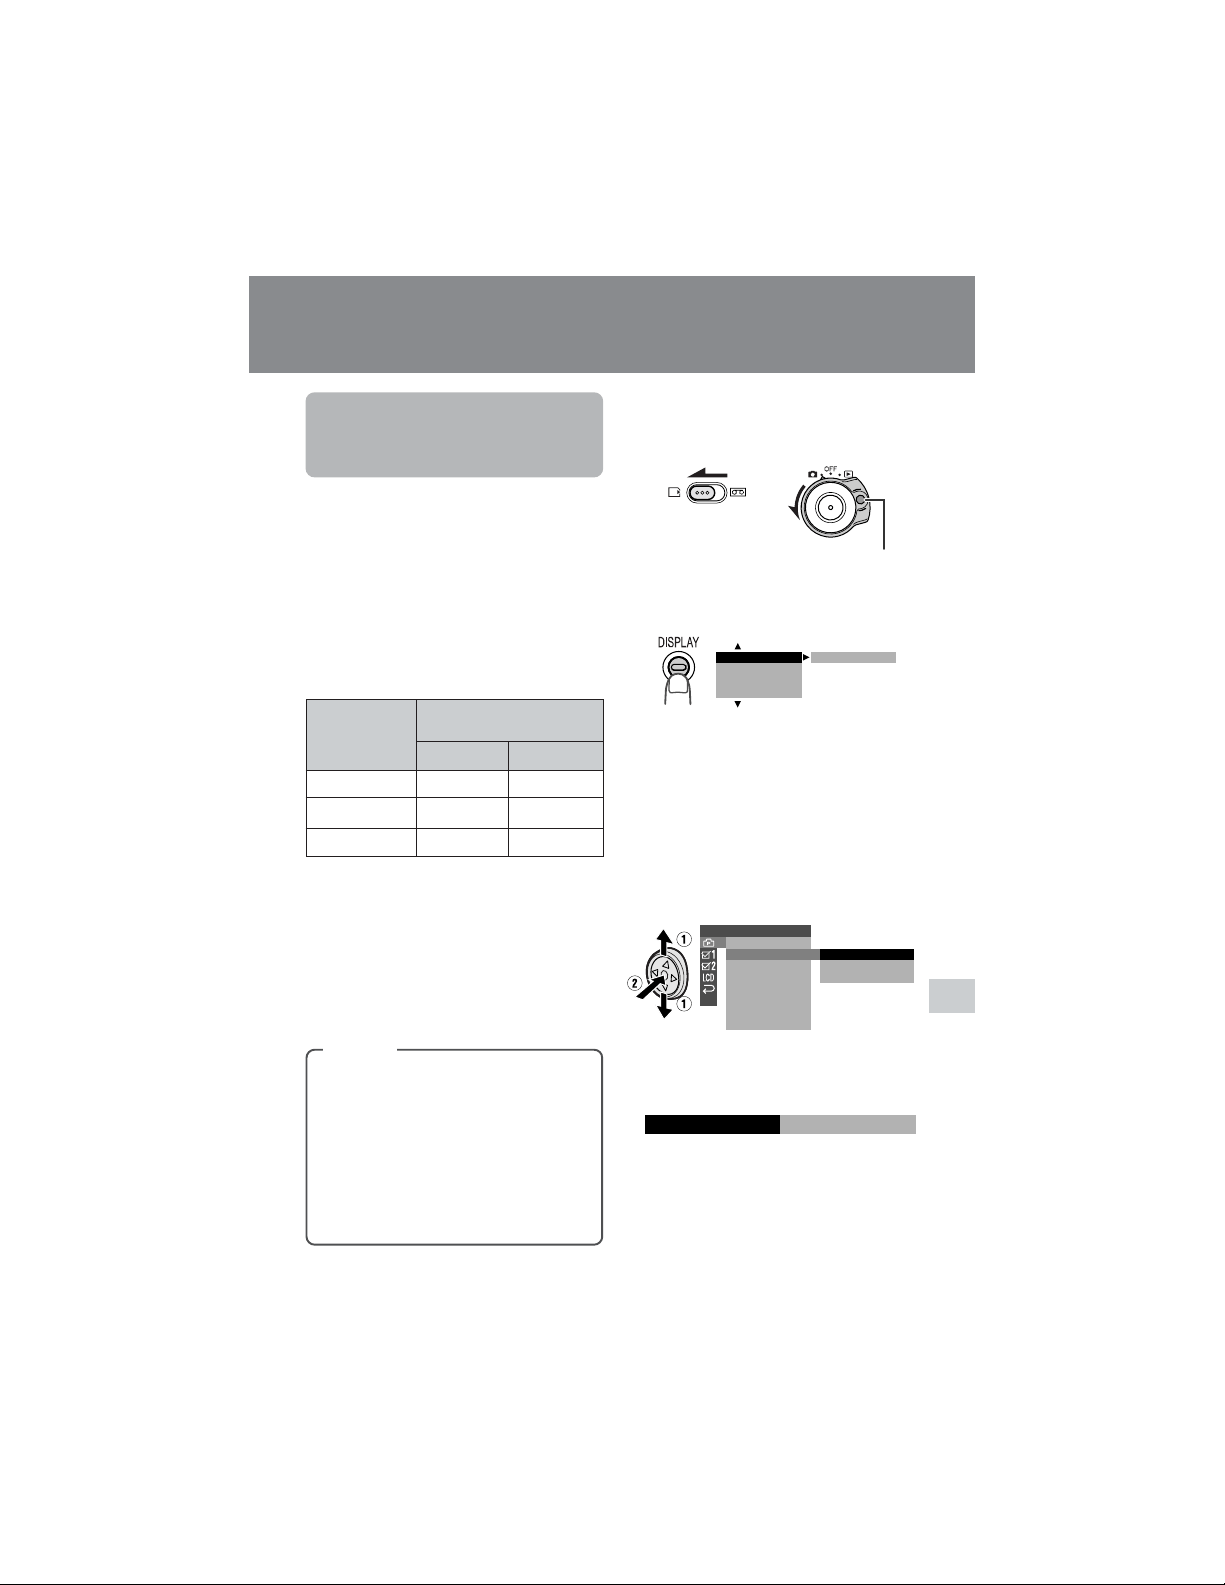
71
Digital Still Camera Features
Lock button
Approximate number of record-
able images with the supplied 8
MB SD memory card
Selecting the Picture
Quality and Image
Size
Available mode:
Card Camera
The picture quality of still images recorded
on the card depends on the picture quality
and image size setting. Select the appropri-
ate setting to match your recording
objectives.
Note:
• The number of recordable images differs
depending on the combination of picture
quality settings used and the images shot.
Approx. number of images
NORMAL
ECONOMY
FINE
Types
NORMAL: Records images with
standard picture quality.
ECONOMY: Allows you to take more
shots than in NORMAL mode but with
lower quality.
FINE: Records images with higher
quality than in NORMAL mode but
with lower number of recordable
images.
640 G 480
90
160
50
Picture quality
setting
Digital Still Camera Features
Camera Recording
Selecting the Picture Quality
The camcorder compresses each image
with the picture quality setting to save
memory on a card.
1280 G 960
20
40
10
1 Set the Media Selection switch to u,
then hold down the Lock button and
set the Power switch to v.
2 In Card Camera mode, press the
DISPLAY button until the mode
screen appears.
3 Select “MENU”, then “EXECUTE” by
using the Operation button (see page
32).
4 Press l or m to select Y, then
press the center of the Operation
button.
5 Press l or m to select “REC
MODE”, then press the center of the
Operation button.
6 Press l or m to select the desired
setting, then press the center of the
Operation button.
OFF
SCENE MENU
TIMER
M
ENU
SELF
BLC GAIN/
SETTING 1
RETURN
FLASH
REC
F I LE NO.
MODE
IMAGE SI ZE
RED EYE
NORMAL
ECONOMY
FINE
REC MODE
ECONOMY
(Continued on the next page)

72
Digital Still Camera Features
Camera Recording
Digital Still Camera Features
Picture quality indicator
Image size indicator
3 Press l or m to select Y, then
press the center of the Operation
button.
4 Press l or m to select “IMAGE
SIZE”, then press the center of the
Operation button.
5 Press l or m to select “1280G960”
or “640G480”, then press the center
of the Operation button.
6 Press the DISPLAY button to turn off
the menu screen.
• The selected image size indicator
appears when the on-screen
indicators are turned on.
7 Press the DISPLAY button to turn off
the menu screen.
• The selected picture quality indicator
only appears when the on-screen
indicators are turned on.
Note:
• The picture quality indicator is also displayed
in Card Camera mode. The picture quality
indicator displayed during playback is based
on the amount of data for that recorded
image. Since the amount of data differs
depending on factors such as image detail,
sometimes the picture quality indicator
displayed during playback may not match
the picture quality setting used during
recording.
0821
][
/040
E C ONOMY
SETTING 1
RETURN
FLASH
REC MODE
IMAGE SI ZE
RED EYE
1280 960
640 480
F I LE NO.
0821
][
/
ECONOMY
040
IMAGE S IZE
1280 960
Selecting the Image Size
Still images recorded on a card are made
up of pixels. You can select the number of
pixels in still images. Larger numbers of
pixels provide greater image detail, but also
use more card memory.
Types
1280G960 (1280): Images are
recorded in 1280K960 pixels.
640G480 (640): Images are recorded
in 640K480 pixels.
1 In Card Camera mode, press the
DISPLAY button until the mode
screen appears.
2 Select “MENU”, then “EXECUTE” by
using the Operation button (see page
32).
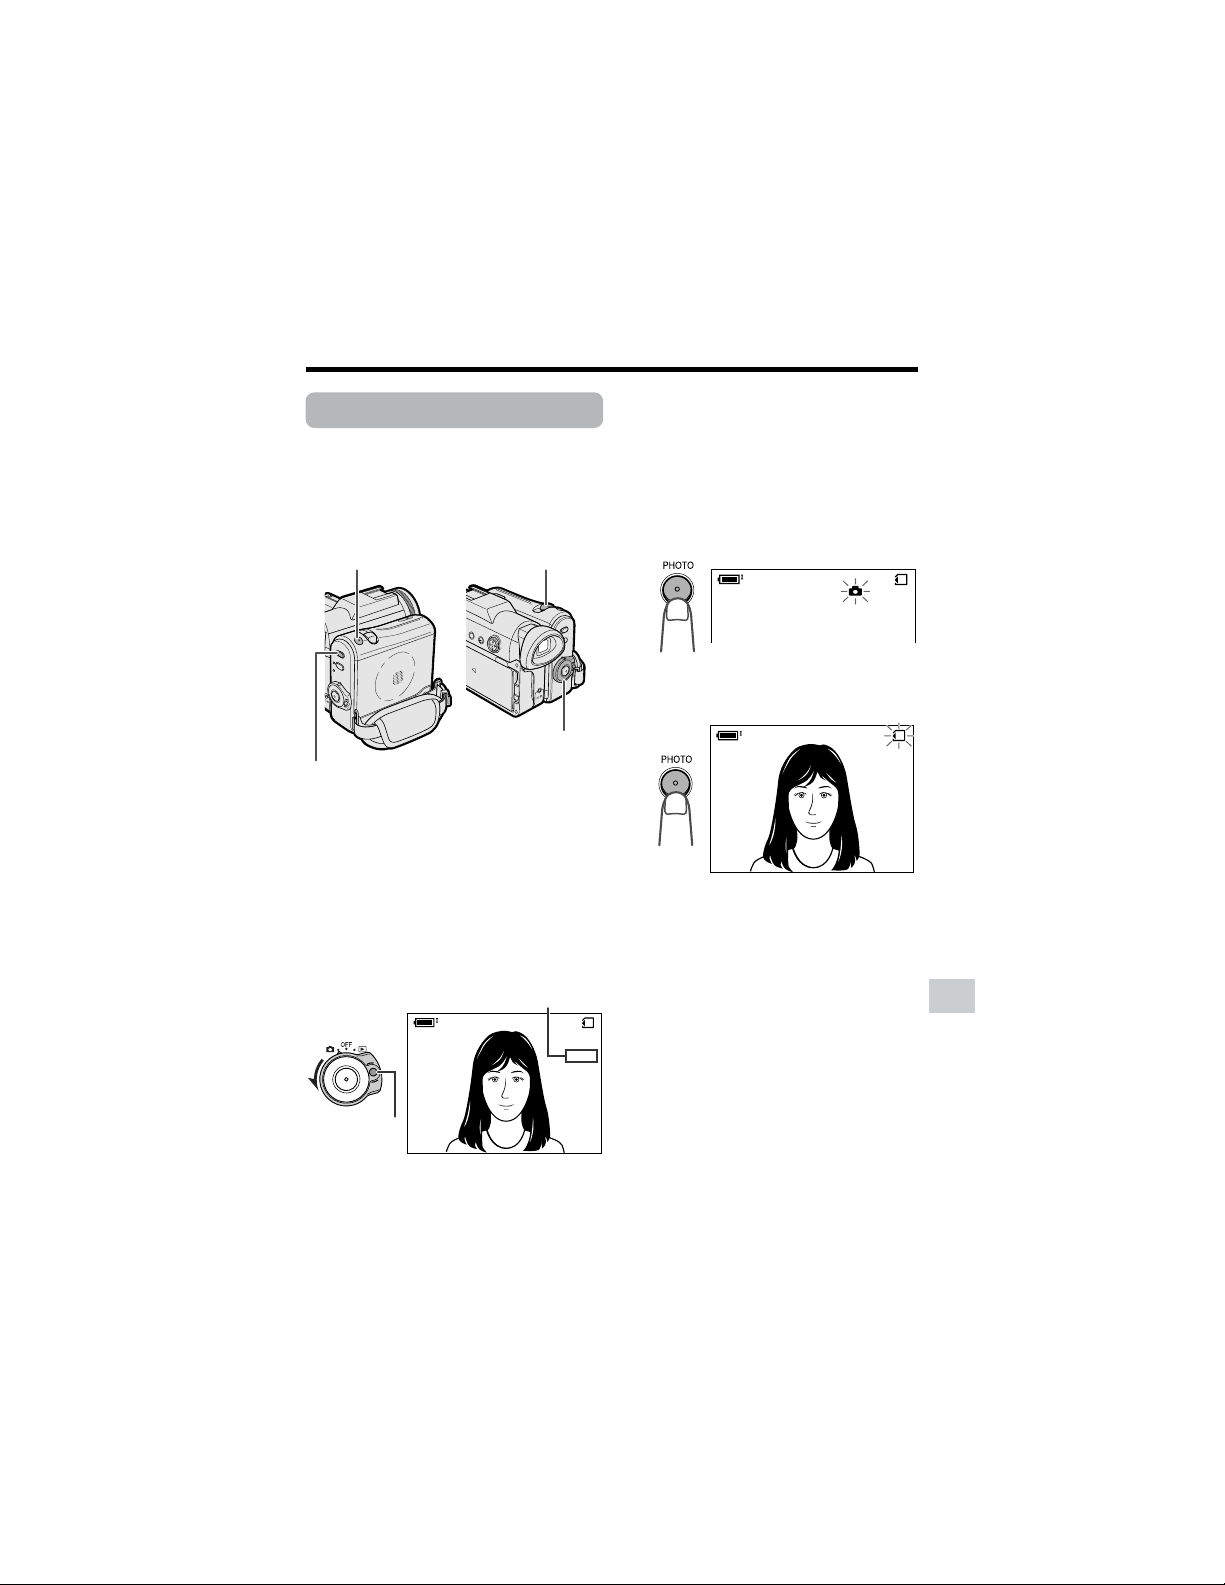
73
Digital Still Camera Features
Number of shots taken/remaining
Power switch
Media Selection switch
PHOTO button
Lock button
Power Zoom control
Card Recording
Available mode:
Card Camera
You can take a still picture in the same way
as you do with a standard camera and
record that image on the card.
1 Insert a card into the camcorder (see
page 11).
2 Remove the lens cap.
3 Set the Media Selection switch to u.
4 Hold down the Lock button and set
the Power switch to v.
• The picture from the lens now
displays.
5 Adjust the Power Zoom control to
frame the subject as you desire.
6 Press the PHOTO button half-way
down to focus on the subject.
• The camcorder automatically focuses
on the subject. When it is set, you will
hear a sound and see T mark, then
the camcorder locks the focus.
7 Press the PHOTO button fully to
begin recording.
• The S indicator flashes red while
data is being recorded on the card,
and returns to white when recording
completes.
• To record another image, release the
PHOTO button and make sure the
picture is not frozen in the monitor,
then perform steps 6 and 7.
Notes:
• Recording under insufficient lighting may
result in blurred images. It is recommended
that you use a tripod to record insufficiently
illuminated subjects.
• Recording under the light of a fluorescent,
mercury, or sodium lamp may cause
flickering in the image and, depending on the
timing of the shot, may result in changes to
color hue in the image.
• Set the BEEP menu item to “OFF” to turn off
the focus locking sound.
• Do not turn the power off or remove the
card while the S indicator is flashing in
step 7.
0821
][
/911
NORMAL
AUTO
0821
][
/911
NORMAL
0821
][
/911
NORMAL
AUTO
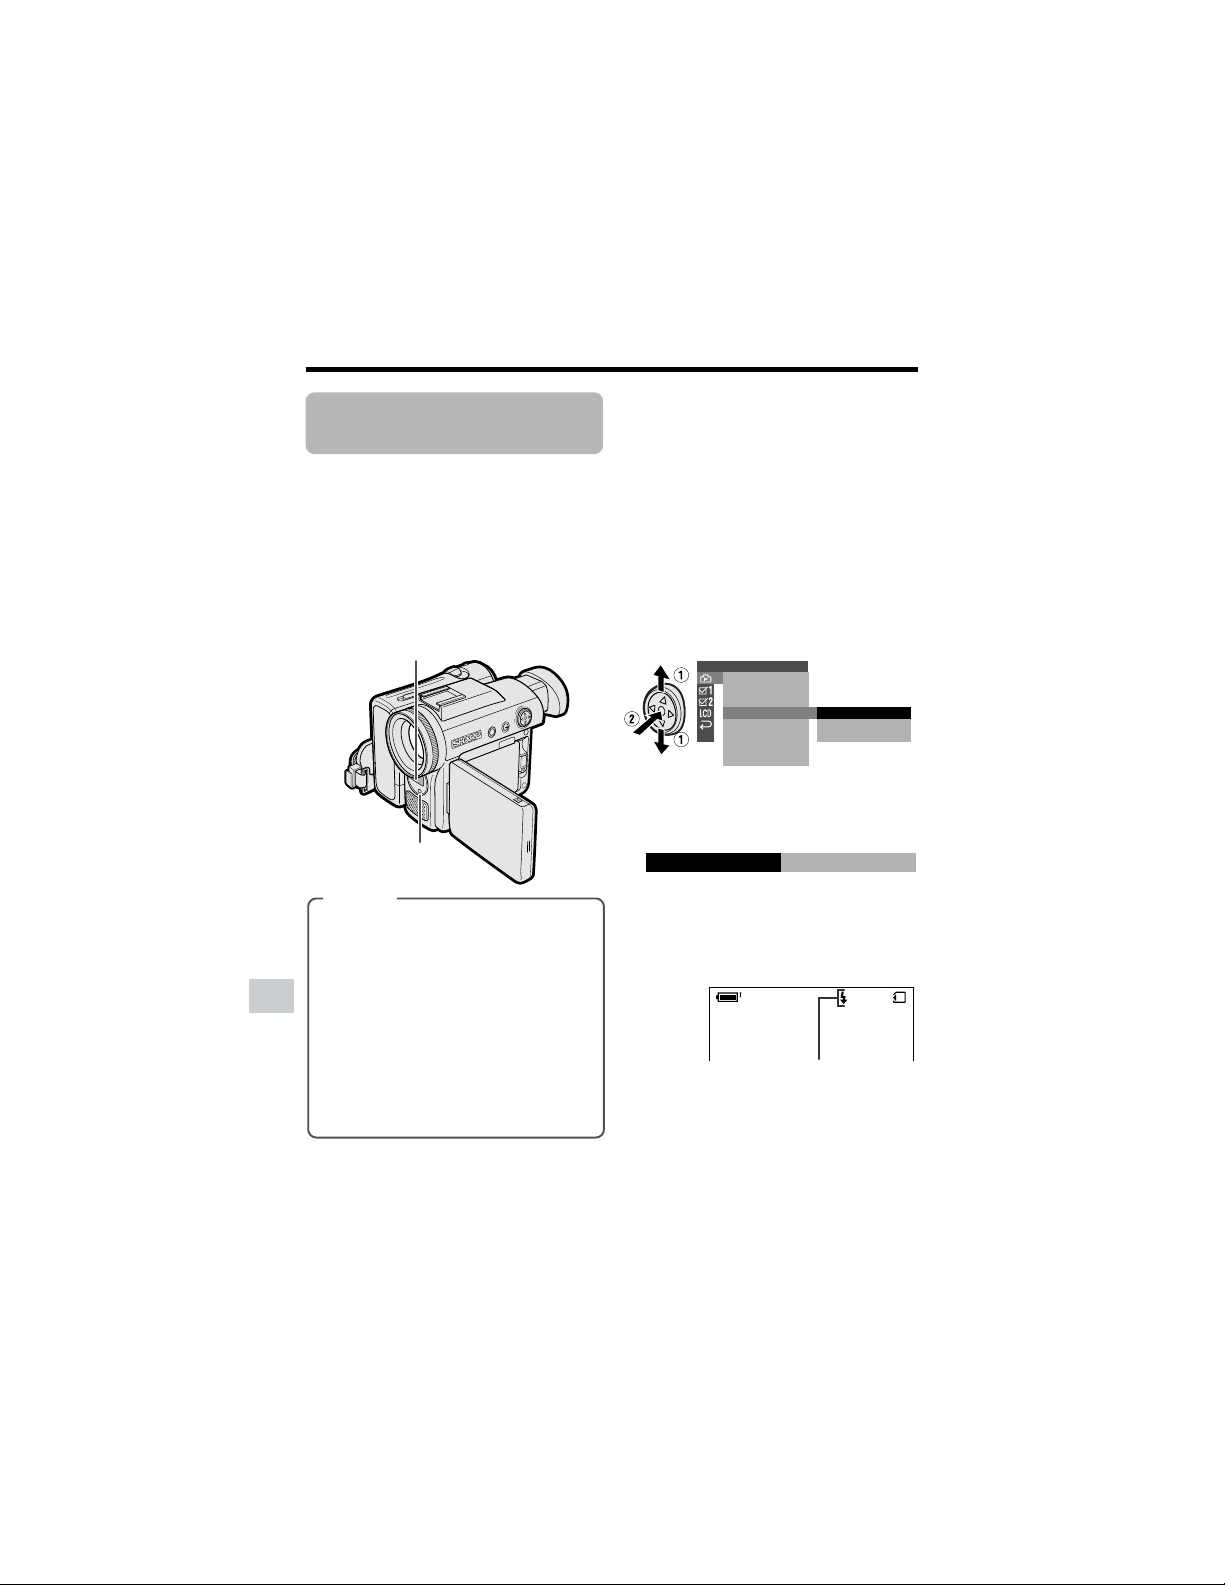
74
Digital Still Camera Features
Camera Recording
Digital Still Camera Features
Flash indicator
Flash sensor
Flash
Selecting the Flash
Mode
Available mode:
Card Camera
Using the flash function enables you to
record good-quality still images even in
dark locations.
Note:
• The effective flash range for both wide angle
and telephoto is about 3 to 8 feet (1 to 2.5 m).
Types
AUTO: Flash automatically fires in
dark locations (when “LIGHT” is
displayed on the screen) each time
you press the PHOTO button. The s
indicator appears when on-screen
indicators are turned on.
ON: Flash fires every time you press
the PHOTO button. The q indicator
appears when on-screen indicators
are turned on.
OFF: Flash does not fire.
1 In Card Camera mode, press the
DISPLAY button until the mode
screen appears.
2 Select “MENU”, then “EXECUTE” by
using the Operation button (see page
32).
3 Press l or m to select Y, then
press the center of the Operation
button.
4 Press l or m to select “FLASH”,
then press the center of the Operation
button.
5 Press l or m to select the desired
flash mode, then press the center of
the Operation button.
6 Press the DISPLAY button to turn off
the menu screen.
• The flash indicator appears when
on-screen indicators are turned
on.
Notes:
• Do not use the flash in front of a person’s
eyes, especially children, as flashing
directly into the eyes from close range can
damage vision. Be particularly careful
around children and maintain a distance of
3 feet (1 m) or more from your subject.
• Do not block the flash sensor with fingers
when using the flash.
• The q indicator flashes while the flash is
being charged.
SETTING 1
RETURN
FLASH
REC MODE
IMAGE SI ZE
RED EYE
AUTO
ON
OFF
F I LE NO.
0821
][
/
911
NORMAL
FLASH
ON
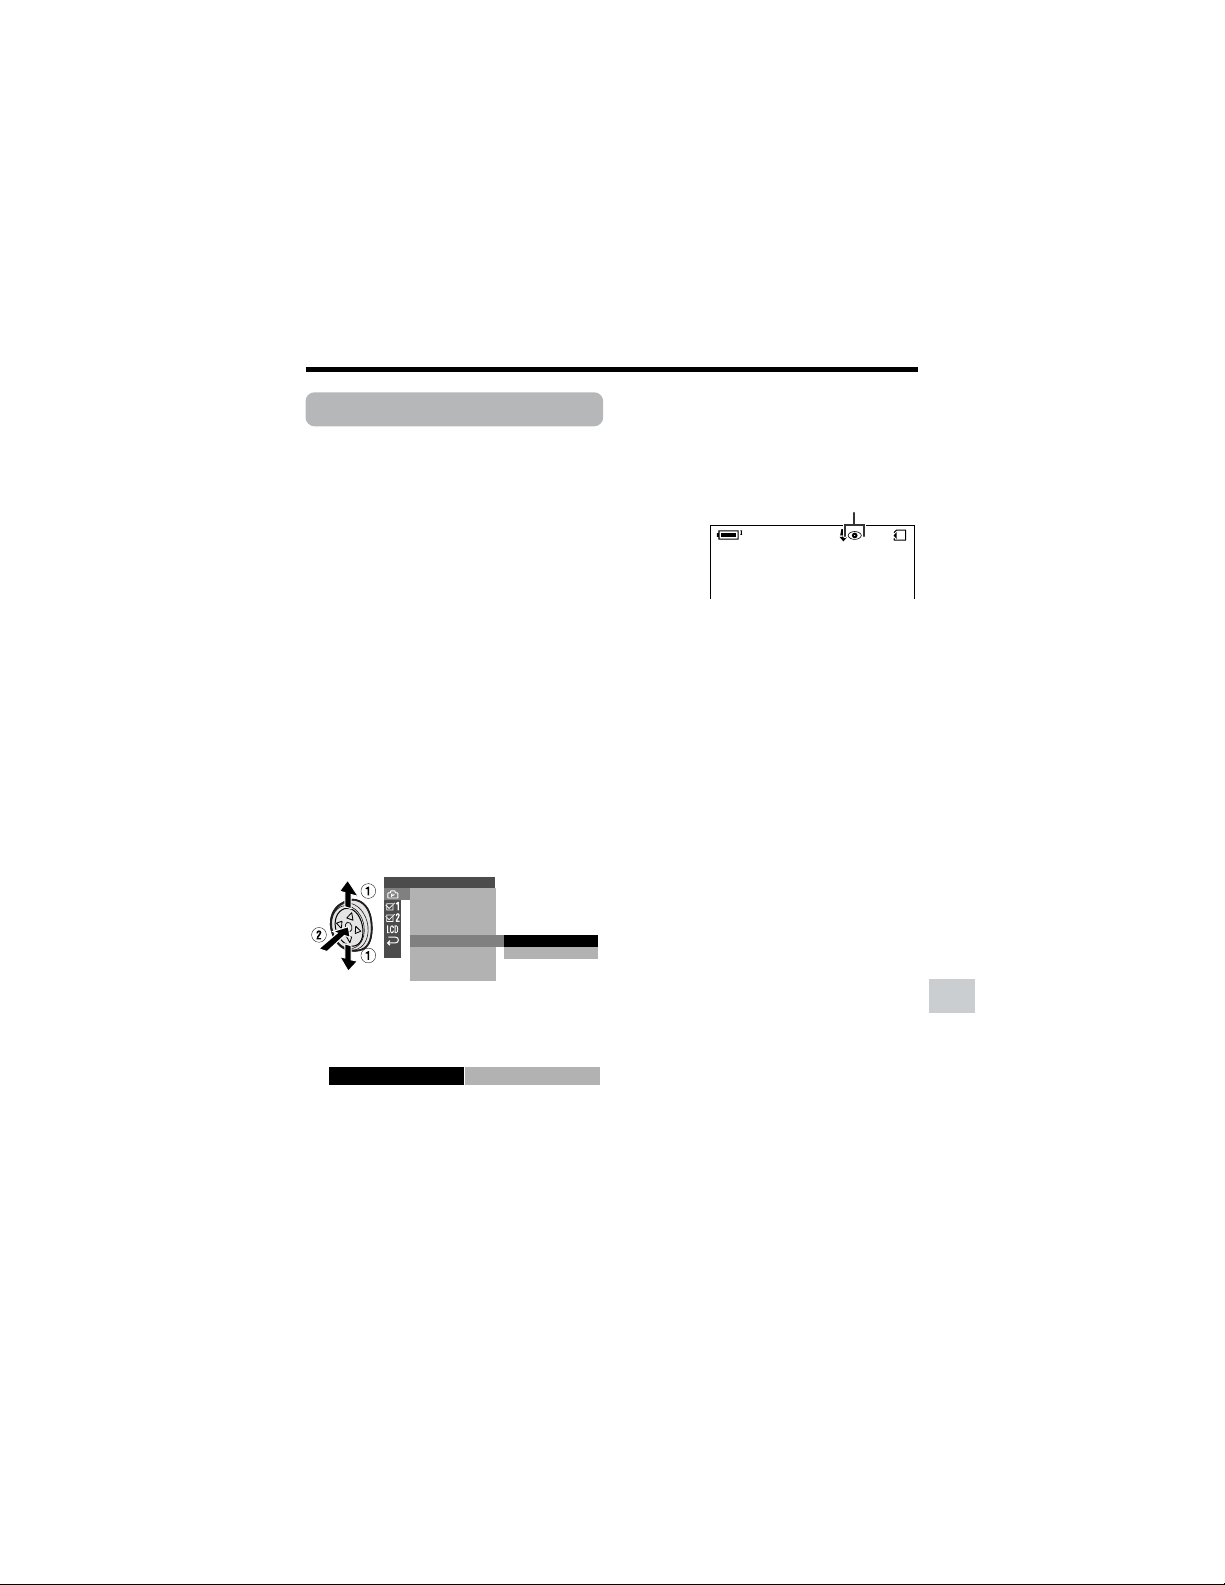
75
Digital Still Camera Features
Red-eye indicator
Red-eye Reduction
Available mode:
Card Camera
Red-eye reduction allows you to minimize
the camera flash capturing the red at the
back of the iris.
1 In Card Camera mode, press the
DISPLAY button until the mode
screen appears.
2 Select “MENU”, then “EXECUTE” by
using the Operation button (see page
32).
3 Press l or m to select Y, then
press the center of the Operation
button.
4 Make sure the flash mode is set to
“AUTO” or “ON”. If not, set to either
one (see page 74).
5 Press l or m to select “RED EYE”,
then press the center of the Operation
button.
6 Press l or m to select “CORRECT”,
then press the center of the Operation
button.
SETTING 1
RETURN
FLASH
REC MODE
IMAGE SI ZE
RED EYE
OFF
CORRECT
F I LE NO.
0821
][
/
911
NORMAL
CORRECTRED EYE
7 Press the DISPLAY button to turn off
the menu screen.
• Red-eye indicator appears when
on-screen indicators are turned
on.
Notes:
• The flash fires twice when the red-eye
reduction is set to “CORRECT”. The first flash
is to reduce the “red-eye”, and the second
flash is for recording the still image.
• The effect of red-eye reduction depends on
individual. Reduction may not be as effective
as desired on conditions like shooting
distance or the subject not watching the pre-
flash.
• Red-eye cannot be used when the flash is
set to “OFF”.
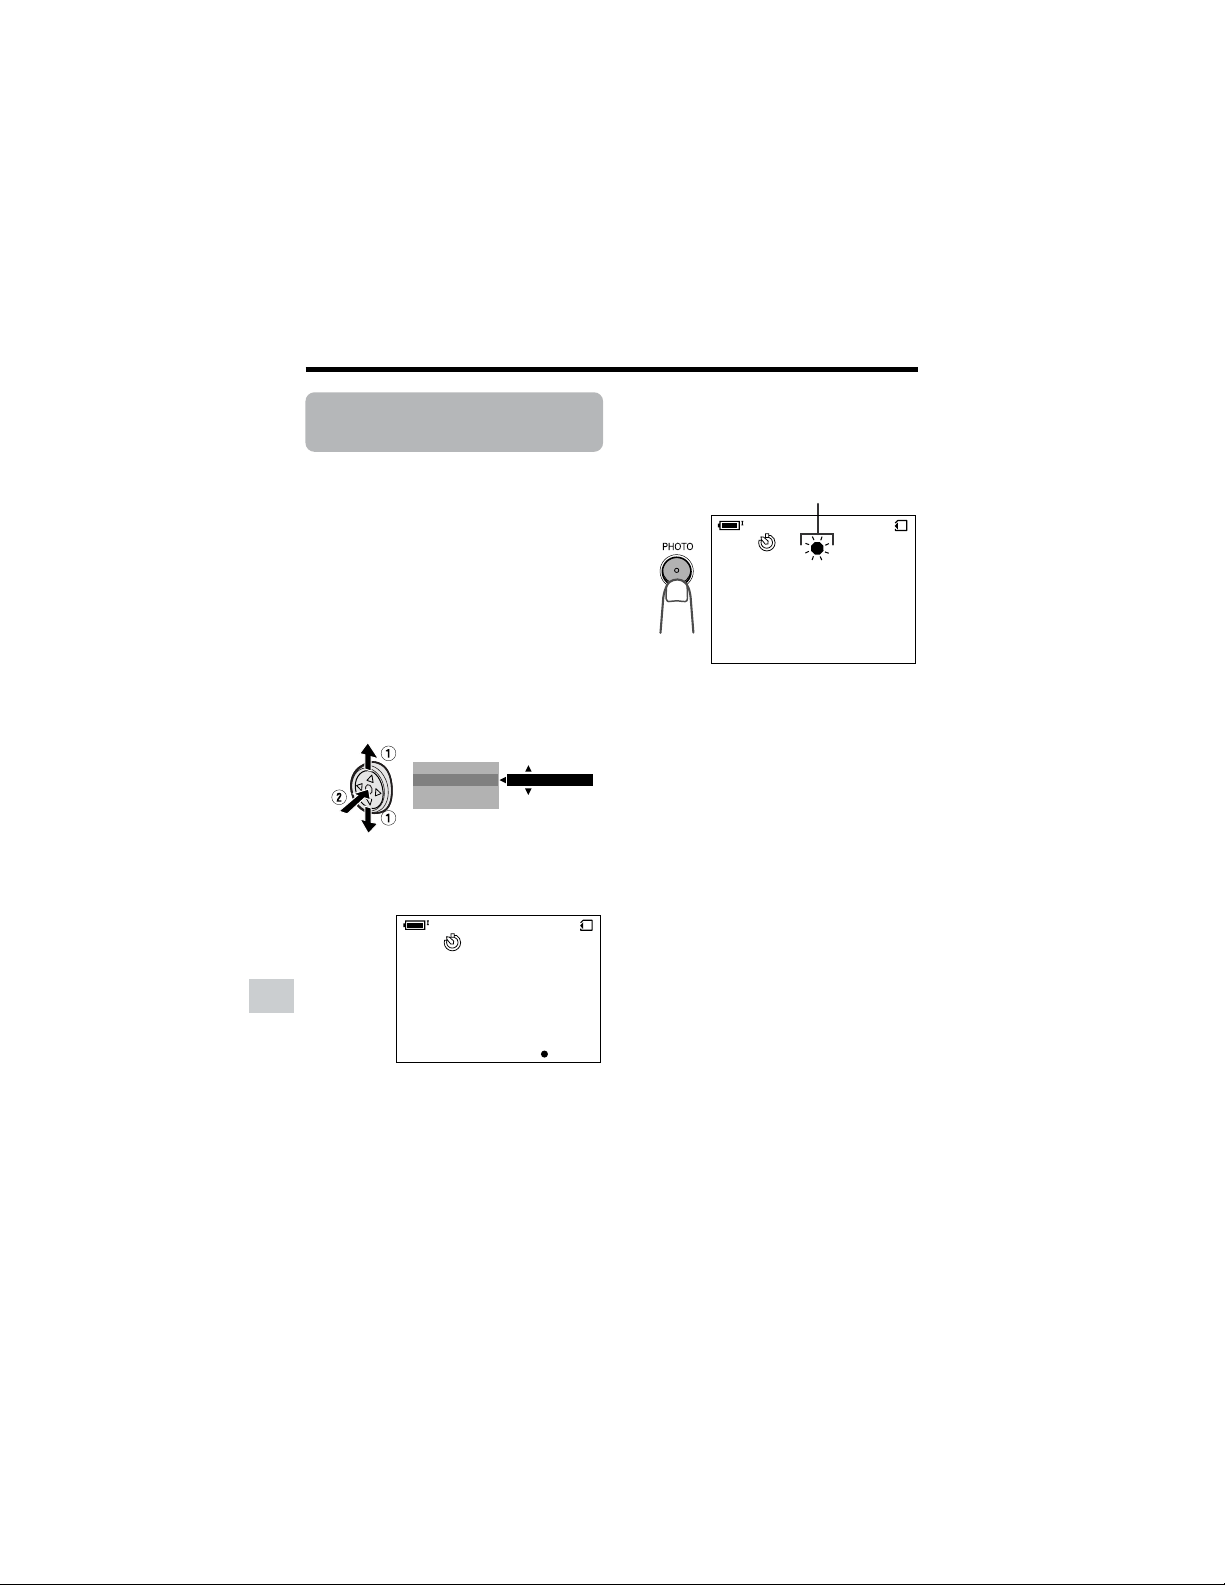
76
Digital Still Camera Features
Camera Recording
Digital Still Camera Features
Self-timer operating indicator
Recording with the
Self-timer
Available mode:
Card Camera
The self-timer function allows you to record
images after a time-lag of 10 seconds. This
is convenient when you want to record an
image of you and your friends together.
1 In Card Camera mode, press the
DISPLAY button until the mode
screen appears.
2 Press l or m on the Operation
button to select “SELF TIMER”, then
press the center of the Operation
button.
3 Press l or m to select “EXECUTE”,
then press the center of the Operation
button.
4 Press the PHOTO button to start the
self-timer.
• The self-timer operating indicator
flashes while the timer counts down.
• The shutter automatically releases
after 10 seconds, and a still image of
the subject is recorded.
To cancel the countdown
Press the PHOTO button in step 4.
To cancel the self-timer
Press the center of the Operation button
again in step 3.
Notes:
• When recording with the self-timer, stabilize
the camcorder in the horizontal plane by
attaching it to a tripod, etc.
• Self-timer mode cancels after recording one
image. Repeat steps 1 to 4 to record another
image with the self-timer.
• Do not turn the power off or remove the card
once the self-timer operating indicator begins
flashing.
M
ENU
SCENE
M
ENU
EXECUTESELF T IMER
BLC GAIN/
0821
11/9
NORMAL
][
AUTO
0821
11/9
NORMAL
][
AUTO
CANCEL
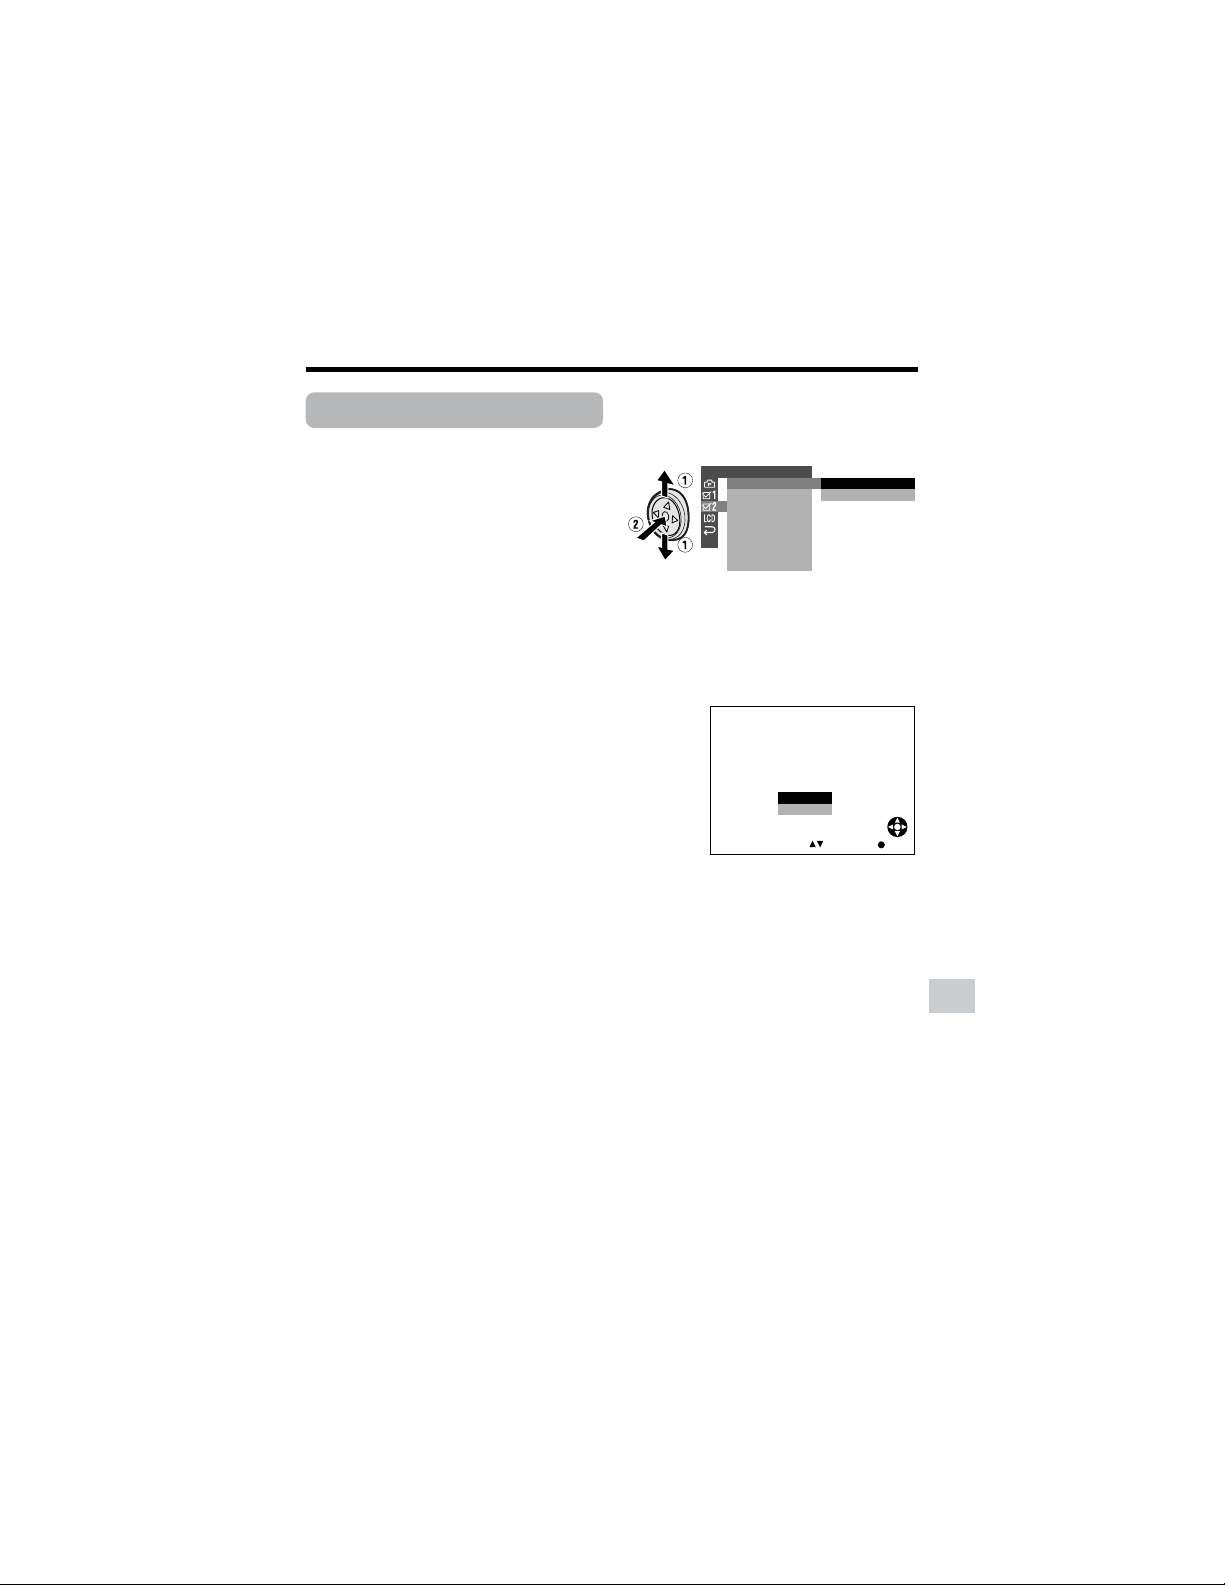
77
Digital Still Camera Features
SELECT
FORMAT
ALL DATA
BE
NO
YES
ERASED.
WI LL
SET
Formatting a Card
Available mode:
Card Camera
Before using a commercially available card
with this camcorder, you must first have it
formatted. Also, if any of the following
warning indicators displays, you will need to
format your card.
• “FORMAT MEMORY CARD”
• “MEMORY CARD ERROR”
• “MEMORY CARD READ ERROR”
• “CANNOT STORE DATA”
Notes:
• Formatting a card erases all stored images,
including delete-protected images. Be sure
to backup important data on your computer
or other media before formatting the card
(see pages 86–88).
• Do not remove the power source during
formatting, as this may cause damage to the
camcorder or card. It is recommended that
you use the AC outlet for the power supply.
1 In Card Camera mode, press the
DISPLAY button until the mode
screen appears.
2 Select “MENU”, then “EXECUTE” by
using the Operation button (see page
32).
3 Press l or m to select ~, then
press the center of the Operation
button.
4 Press l or m to select “FORMAT”,
then press the center of the Operation
button.
5 Press l or m to select “EXECUTE”,
then press the center of the Operation
button.
• To cancel formatting, press l or m
to select “RETURN”, then press the
center of the Operation button.
6 Press l or m to select “YES”, then
press the center of the Operation
button to begin formatting.
• The menu screen displays when
formatting finishes.
7 Press the DISPLAY button to turn off
the menu screen.
Notes:
• The supplied card is preformatted for
immediate use.
• Use this camcorder to format a card. The
camcorder may not recognize the images
on a card formatted by a computer or other
equipment.
OTHERS 2
RETURN
EXECUTE
RETURN
FORMAT
SETTING
12H 24H/

78
Digital Still Camera Features
Camera Recording
Digital Still Camera Features
Setting the File
Numbering Method
Available mode:
Card Camera
The camcorder automatically assigns file
numbers to captured images. You can
select two different methods of file number-
ing.
1 In Card Camera mode, press the
DISPLAY button until the mode
screen appears.
2 Select “MENU”, then “EXECUTE” by
using the Operation button (see page
32).
3 Press l or m to select Y, then
press the center of the Operation
button.
4 Press l or m to select “FILE NO.”,
then press the center of the Operation
button.
Types
SERIAL: Defines file numbers by
incrementing up from the last image
captured when inserting a new card.
RESET: Defines a new set of file
numbers when inserting a new card.
SETTING 1
FLASH
SERIAL
REC MODE
IMAGE
SIZE
RETURN
RED EYE
F I LE NO.
RESET
RESETFILE NO.
5 Press l or m to select “SERIAL” or
“RESET”, then press the center of the
Operation button.
6 Press the DISPLAY button to turn off
the menu screen.
Note:
• When a warning indicator “MAXIMUM FILE
NUMBER” appears on the screen, set FILE
NO. menu item to “RESET”, then format the
card (see page 77) or replace the card with a
new one (see page 11).
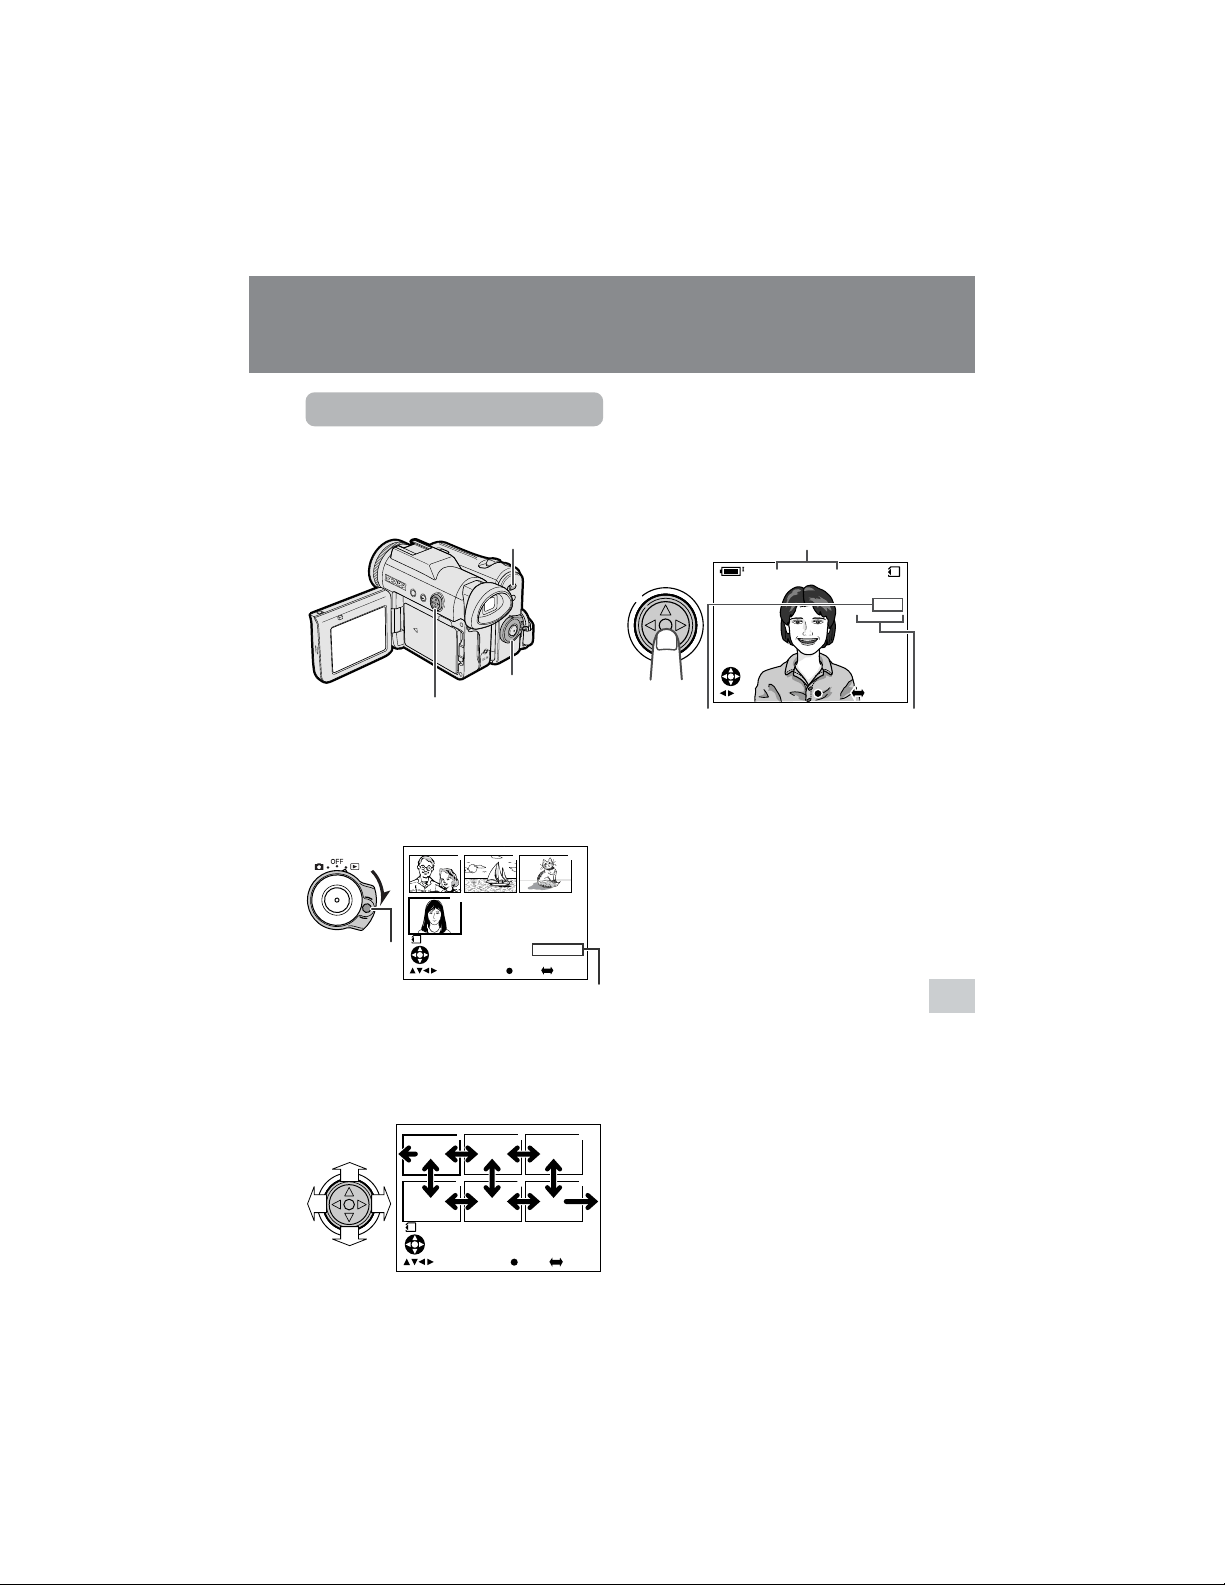
79
Digital Still Camera Features
Playback image number/
number of recordings
Lock button
Page number/total thumbnail pages
Media Selection switch
Operation button
Power switch
Image file name
Picture quality
indicator
Digital Still Camera Features
Playback
Card Playback
Available mode:
Card Playback
You can play back and view still images
recorded on a card on the LCD monitor.
1 Set the Media Selection switch to u.
2 Hold down the Lock button and set
the Power switch to w.
• The images recorded on the card are
displayed in a thumbnail format.
3 Press j, k, l or m on the Opera-
tion button to move the selection
frame to the desired image.
• Each time you press j, k, l or m,
the selection frame moves as shown
below.
Note:
• Holding down j or k increases the
speed of motion of the selection frame.
4 Press the center of the Operation
button.
• The selected image displays in full-
screen.
Available Operations during
Full-screen Display
• You can display the full-screen picture of
the previous or next image by pressing j
or k.
• When holding down j or k, you can
search through the images on the card.
The search can be very fast, so it is
recommended that the on-screen
indicators turns on to display the image
number.
• To return to a thumbnail of the images,
press the center of the Operation button
again.
Notes:
• You can also set in the mode screen to display
the images in full screen or thumbnails.
• Depending on the amount of data for the
recorded image, the picture quality indicator
displayed during playback may not match the
picture quality setting used during recording.
• The images bigger than 1280K960, e.g. images
recorded on other equipment, display as
thumbnails, not full screen.
• Do not play back any card storing a defective
image (with noise and distortion) created on
other equipment. If you mistakenly play back
data on such a card, set the Power switch to
OFF, remove, and never use it with this
camcorder.
0100
-
00
2/2PAGE
NORMAL
1
FULLSELECT IMG MULTI
7
01
89
1000
-
00
2/1PAGE
NORMAL
1
1
4
2
5
3
6
FULLSELECT IMG MULTI
0821
1 0/1
CARD
NORMA
L
][
0
-
0 0 1001
F UL
UL
LS E L E C T I MG MUL
UL
T I
0821
10/1
NORMAL
][
0
-
001001
FULLSELECT IMG MULT I
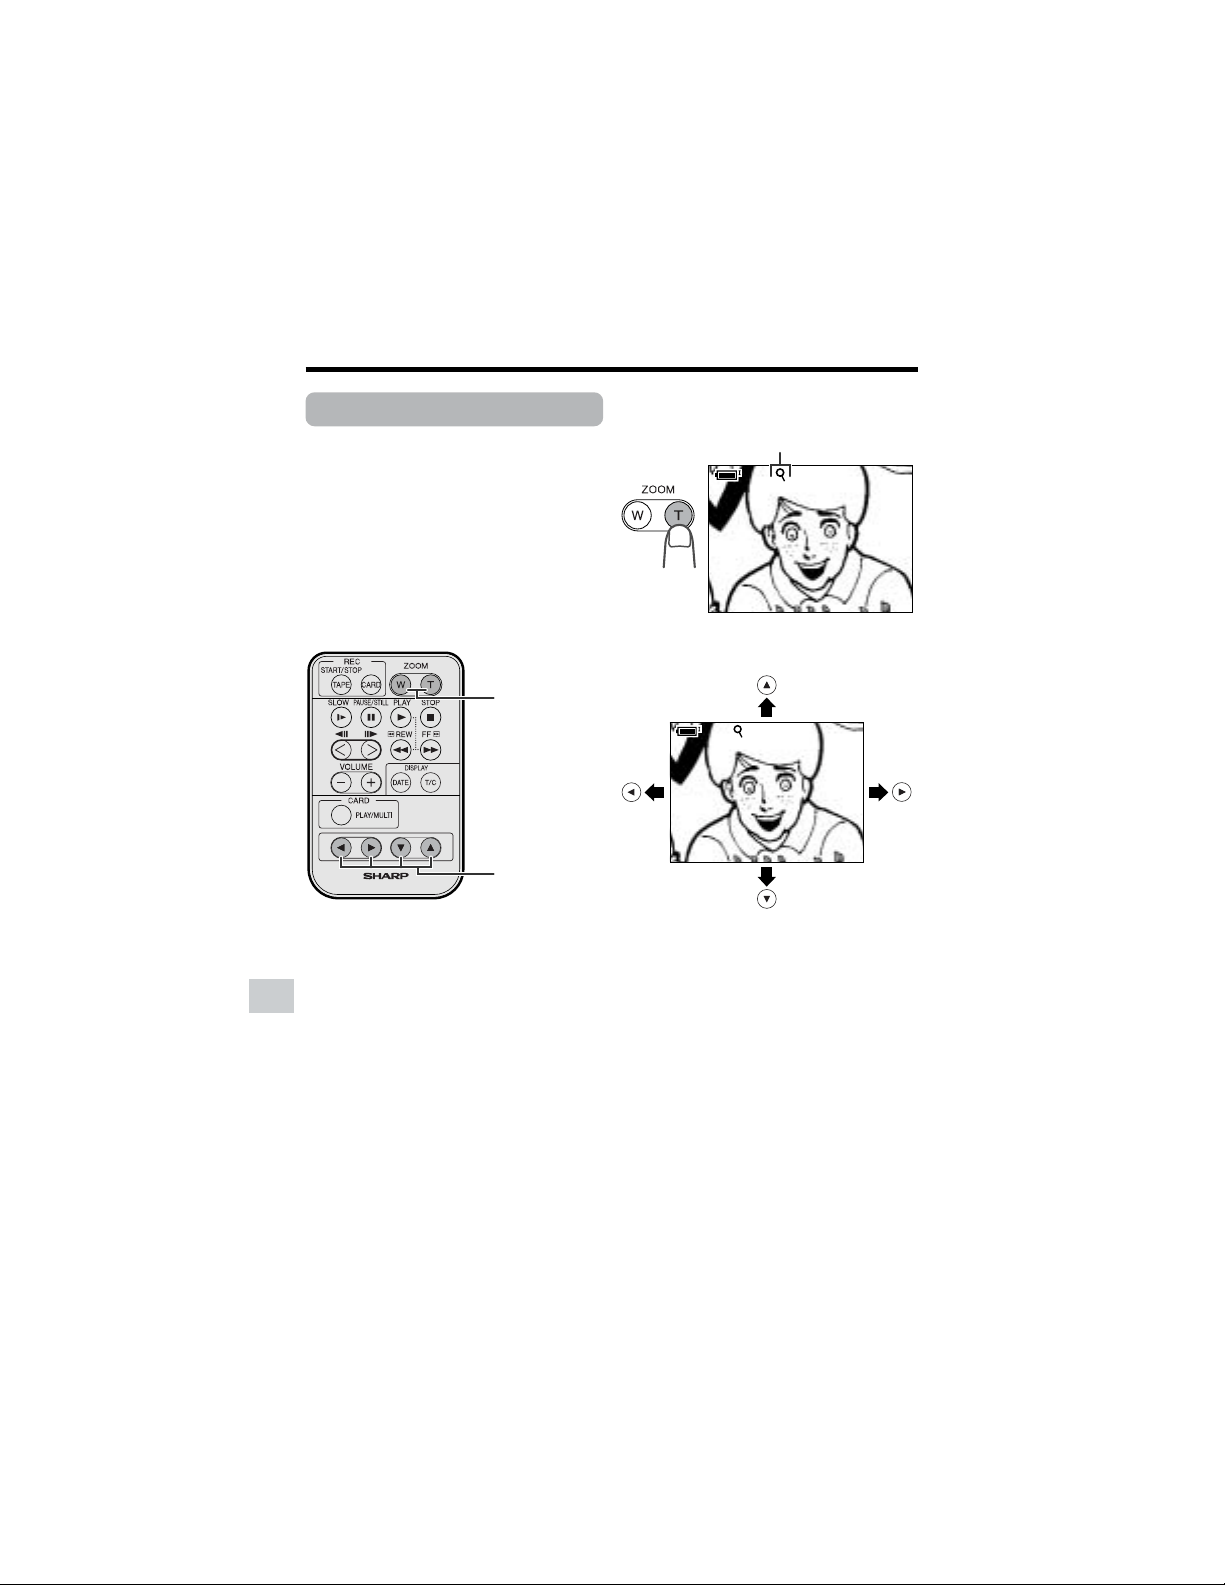
80
Digital Still Camera Features
Playback
Digital Still Camera Features
ZOOM button
Playback zoom indicator
Playback Zoom
Available mode:
Card Playback
The playback zoom function allows you to
magnify the playback picture up to 10 times
its original size and shift the magnified
picture by using the remote control. (See
page 47 for use of the remote control.)
Note:
• Playback Zoom does not work in Tape
Playback mode.
1 During Card Playback, press the
ZOOM T button to zoom in.
2 Press the Shift q, w, a, or s button
to shift the displayed image.
To cancel Playback Zoom
Press the ZOOM W button, which zooms out
to the widest angle.
Note:
• Use of Playback Zoom may cause a
reduction in picture quality for still images.
Shift buttons
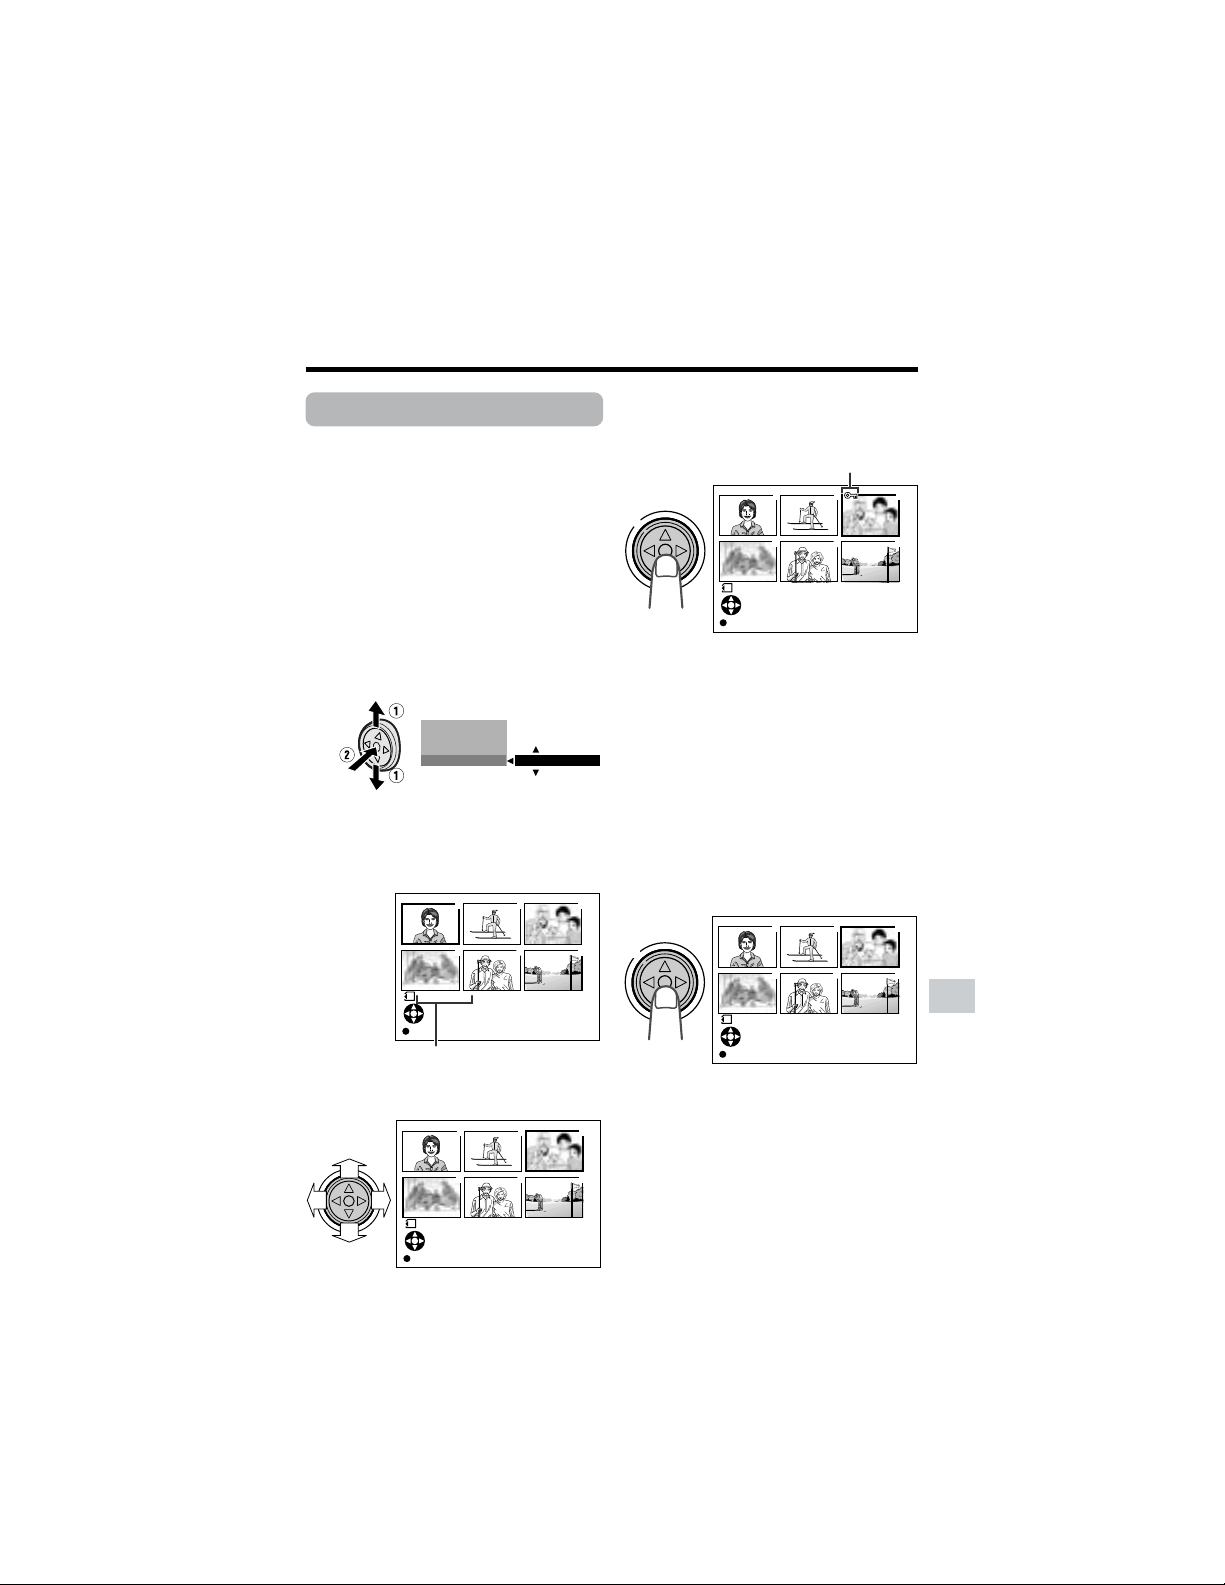
81
Digital Still Camera Features
Delete protection indicator
PROTECT indicator
Delete Protection
Available mode:
Card Playback
You can prevent your important images
recorded on the card from accidental
erasure.
1 In Card Playback mode, press the
DISPLAY button until the mode
screen appears.
2 Press l or m on the Operation
button to select “PROTECT”, then
press the center of the Operation
button.
3 Press l or m to select “EXECUTE”,
then press the center of the Operation
button.
• The PROTECT indicator appears.
4 Press j, k,l or m to select the
image for delete protection.
5 Press the center of the Operation
button to set delete protection.
• The R indicator appears.
• If you want to protect another image,
repeat steps 4 to 5.
6 Press the DISPLAY button to finish
the setting.
To cancel the protection
setting
1 Select the image for delete protection
cancellation in step 4 above.
2 Press the center of the Operation
button to cancel the protection.
• The R indicator disappears.
3 Press the DISPLAY button to finish
the setting.
Note:
• Formatting a card erases all stored images,
including delete-protected images.
EXECUTE
M
ENU
PROTECT
DELETE ALL
DELETE ONE
1000
-
00
2/1PAGE
NORMAL
1
PROTECT
SET DISPLAY CANCEL:
][
1
4
2
5
3
6
3000
-
00
2/1PAGE
NORMAL
1
PROTECT
SET DISPLAY CANCEL:
][
1
4
2
5
3
6
3000
-
00
2/1PAGE
NORMAL
1
PROTECT
SET DISPLAY CANCEL:
][
1
4
2
5
3
6
3000
-
00
2/1PAGE
NORMAL
1
PROTECT
SET DISPLAY CANCEL:
][
1
4
2
5
3
6
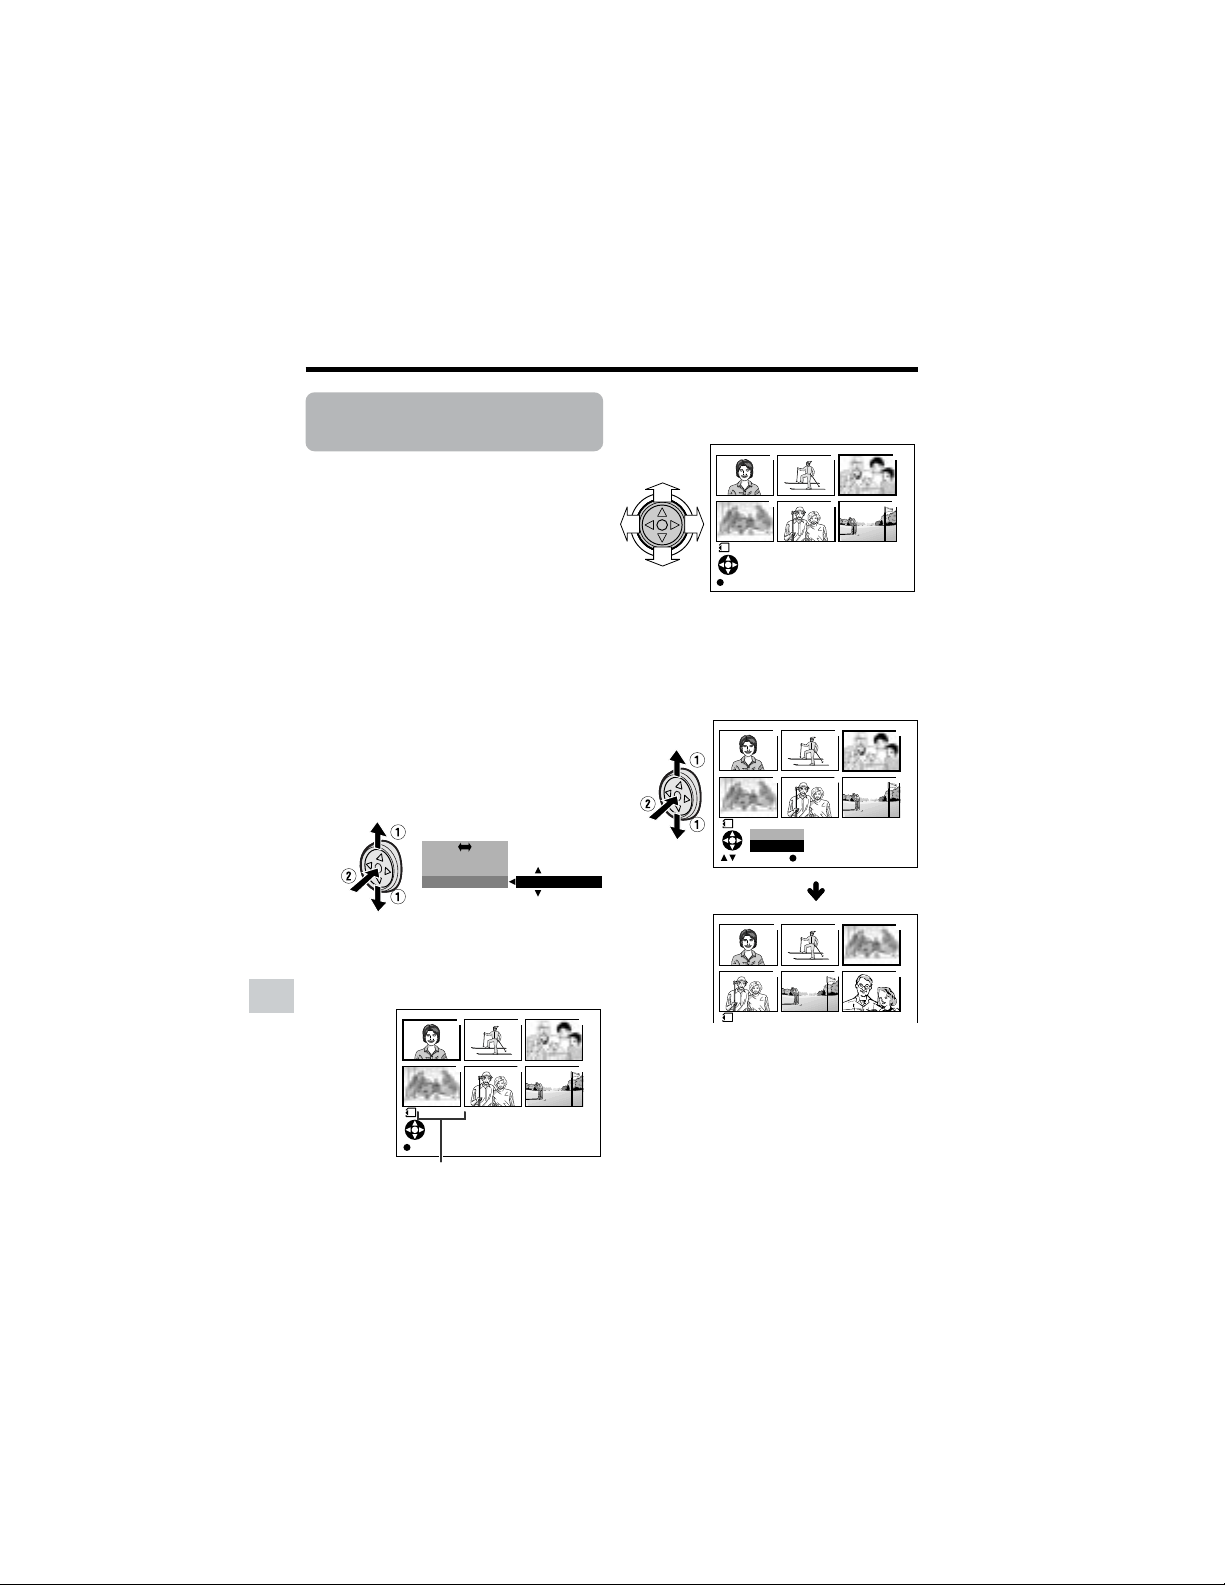
82
Digital Still Camera Features
Playback
Digital Still Camera Features
DELETE indicator
Deleting Stored
Images
Available mode:
Card Playback
Deleting One Stored Image
You can delete unwanted images to free up
memory of a card for new images.
Note:
• Deleted images cannot be restored. Check
whether or not you want the images before
performing the procedure below.
1 In Card Playback mode, press the
DISPLAY button until the mode
screen appears.
2 Press l or m on the Operation
button to select “DELETE ONE”, then
press the center of the Operation
button.
3 Press l or m to select “EXECUTE”,
then press the center of the Operation
button.
• The DELETE indicator appears.
4 Press j, k, l or m to select the
image to be deleted.
5 Press the center of the Operation
button to set the image.
6 Press l or m to select “YES”, then
press the center of the Operation
button to delete the image.
• To cancel the setting, select “NO”.
• If you want to delete another image,
repeat steps 4 to 6.
7 Press the DISPLAY button to finish
the setting.
Notes:
• The protected images cannot be deleted.
Cancel the protection setting to delete the
image (see page 81).
• Do not turn the power off while deleting an
image.
EXECUTE
FULL MULTI
M
ENU
DEL ETE ONE
PIC.EFFECT
1000
-
00
1/1PAGE
NORMAL
1
DELETE
SET DISPLAY CANCEL:
][
1
4
2
5
3
6
3000
-
00
2/1PAGE
NORMAL
1
DELETE
SET DISPLAY CANCEL:
][
1
4
2
5
3
6
3000
-
00
NORMAL
1
1
4
2
5
3
6
DELETE?
NO
YES
SETSELECT
4000
-
001
DELETE
1
4
2
5
3
6
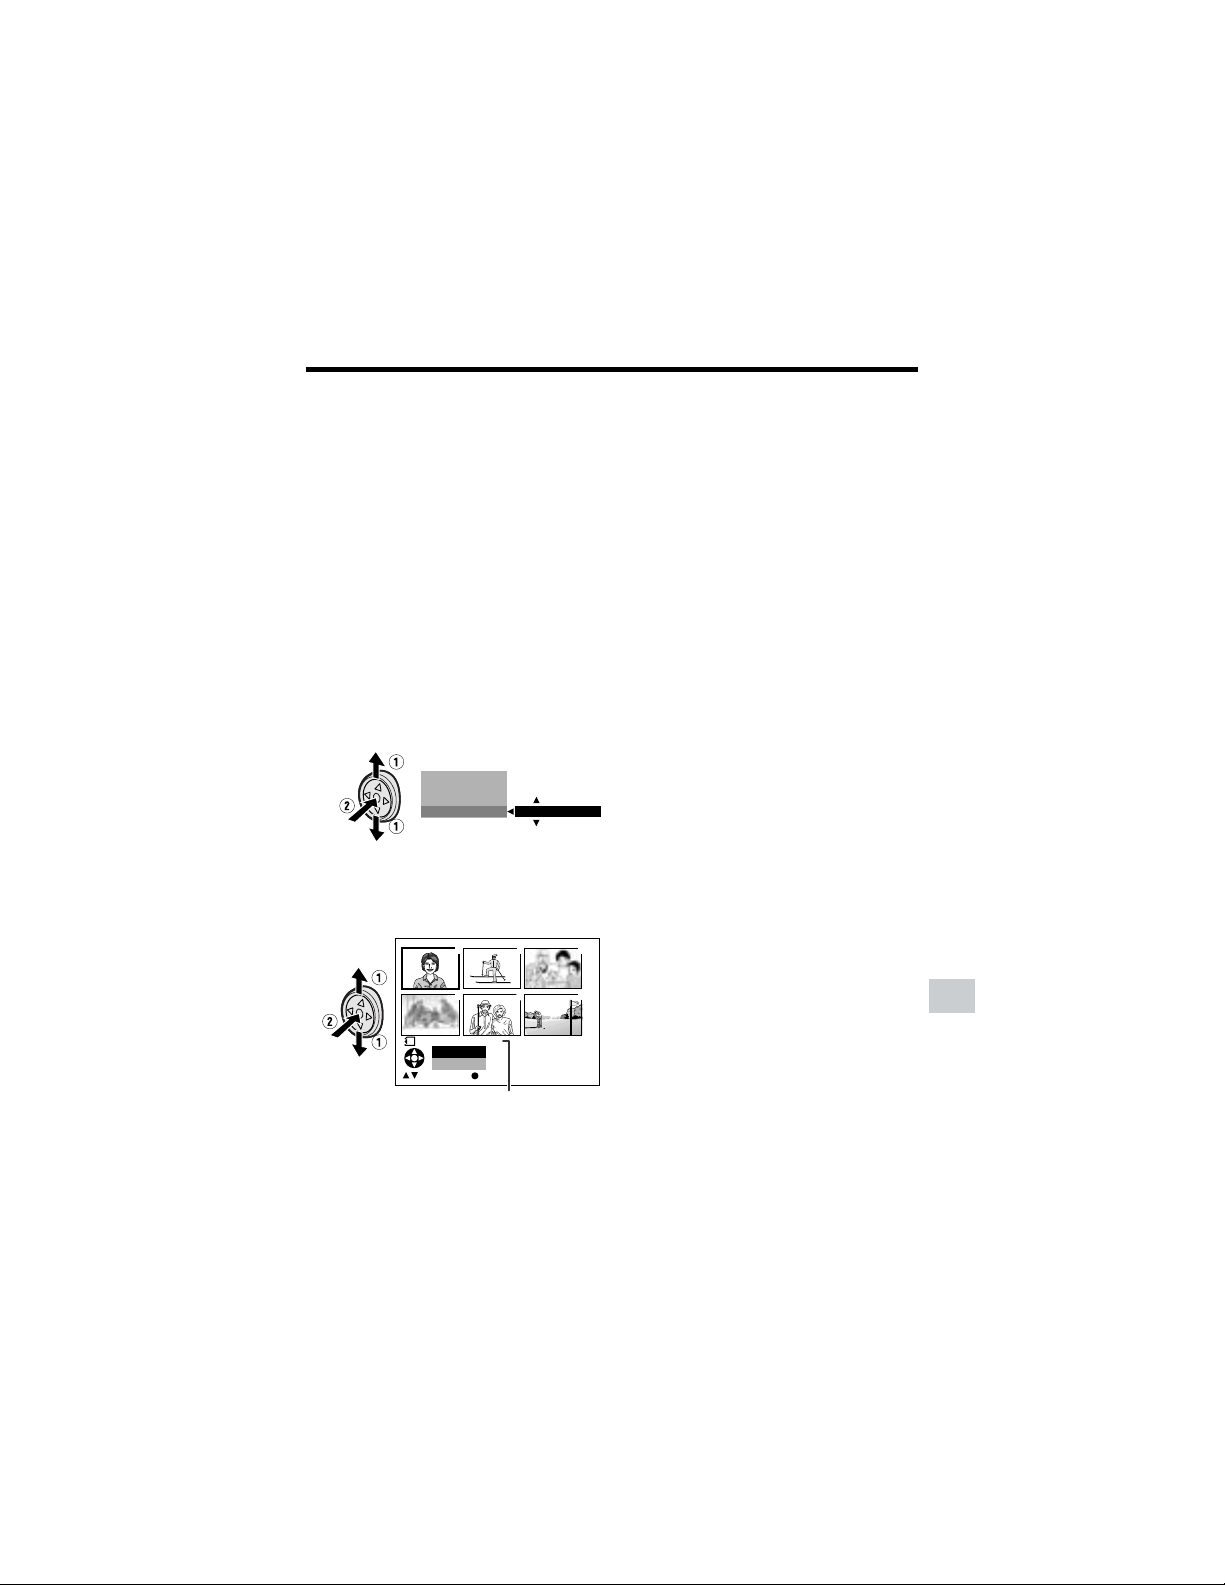
83
Digital Still Camera Features
DELETE ALL? indicator
Deleting All Stored Images
You can delete all stored images on a card
in one operation.
Notes:
• Deleted images cannot be restored. Check
whether or not you want the images before
performing the procedure below.
• If you want to keep some images on the card,
first delete-protect them (see page 81), and
then perform the procedure below.
1 In Card Playback mode, press the
DISPLAY button until the mode
screen appears.
2 Press l or m on the Operation
button to select “DELETE ALL”, then
press the center of the Operation
button.
3 Press l or m to select “EXECUTE”,
then press the center of the Operation
button.
• The DELETE ALL? indicator appears.
4 Press l or m to select “YES”, then
press the center of the Operation
button.
• To cancel the setting, select “NO”.
5 Press the DISPLAY button to finish
the setting.
Notes:
• The protected images cannot be deleted.
Cancel the protection setting to delete the
image (see page 81).
• If a print order is assigned to delete-
protected images and you perform the
procedure above, the print order will cancel
(the protection setting will not cancel).
• It may take several seconds to delete all
images from the card.
• Do not turn the power off while deleting
images.
EXECUTE
M
ENU
DEL ETE ONE
DEL ETE ALL
PIC.EFFECT
1000
-
00
NORMAL
1
1
4
2
5
3
6
ALL?
NO
YES
SETSELECT
DELETE
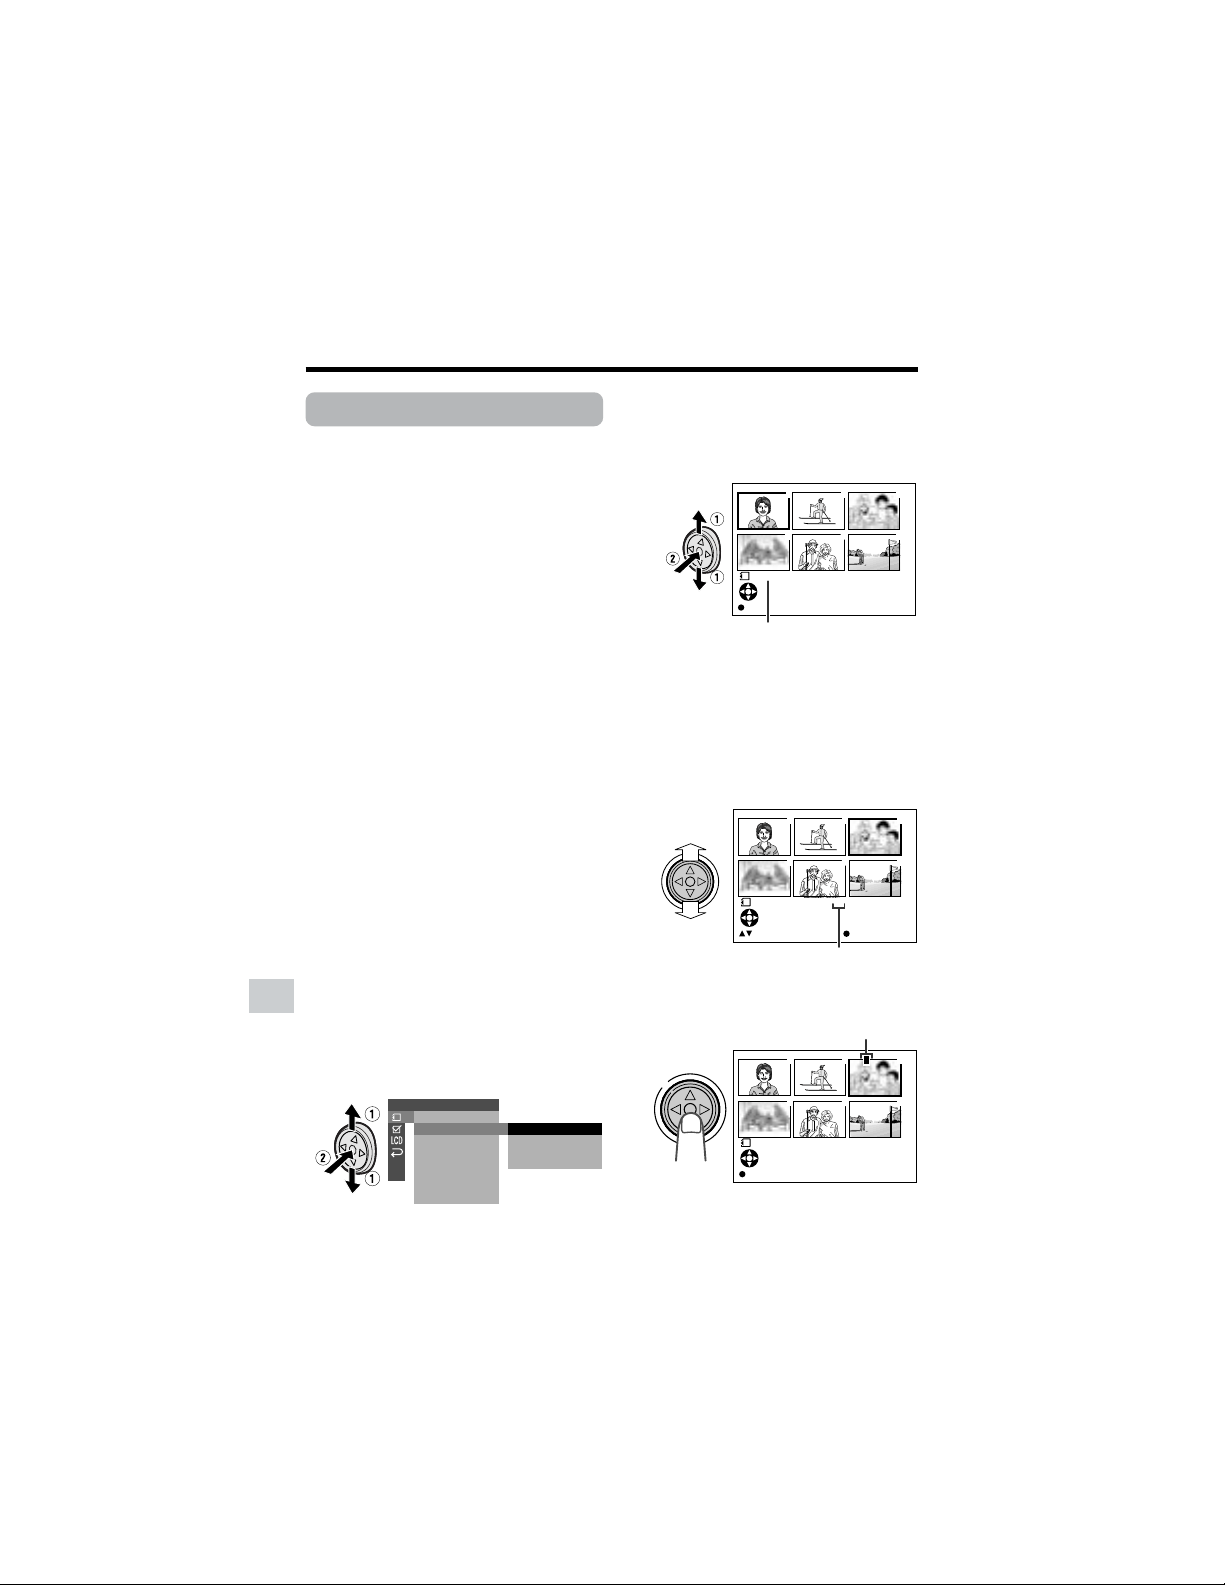
84
Digital Still Camera Features
Playback
Digital Still Camera Features
Number of printouts
PRINT indicator
M indicator
Print Order
Available mode:
Card Playback
The print order function allows you to add
print information called DPOF to still images
recorded on a card.
About DPOF
DPOF (Digital Printing Order Format)
defines the print information for the specific
images and number of each image on
memory cards. In the near future you will be
able to easily make prints on a DPOF-
compatible printer or order copies at your
local print shop.
Note:
• You can print an image even if no print order
has been assigned.
Assigning Print Order to an
Image
1 In Card Playback mode, press the
DISPLAY button until the mode
screen appears.
2 Select “MENU”, then “EXECUTE” by
using the Operation button (see page
32).
3 Press l or m to select S, then
press the center of the Operation
button.
4 Press l or m to select “PRI.
ORDER”, then press the center of the
Operation button.
5 Press l or m to select “PRI.
SELECT”, then press the center of
the Operation button.
• The PRINT indicator appears.
6 Press j, k, l or m to select the
image to which you want to assign a
print order.
7 Press the center of the Operation
button, then press l or m to select
the number of printouts.
• 1 through 99 can be set for the
number of printouts.
8 Press the center of the Operation
button to set the print order.
• The M indicator appears.
• If you want to assign another print
order, repeat steps 6 to 8.
9 Press the DISPLAY button to finish
the setting.
PLAYBACK SET
PRI.SELECT
PRI. ALL
PR I . NONE
RETURN
SL IDE SHO
W
PRI.
RETURN
ORDER
1000
-
00
2/1PAGE
NORMAL
1
PRINT
SET DISPLAY CANCEL:
][
1
4
2
5
3
6
3000
-
00
2/1PAGE
NORMAL
11
PRINT
1
4
2
5
3
6
SETPRINT NUMBER
P
3000
-
00
2/1PAGE
NORMAL
1
PRINT
SET DISPLAY CANCEL:
][
1
4
2
5
3
6
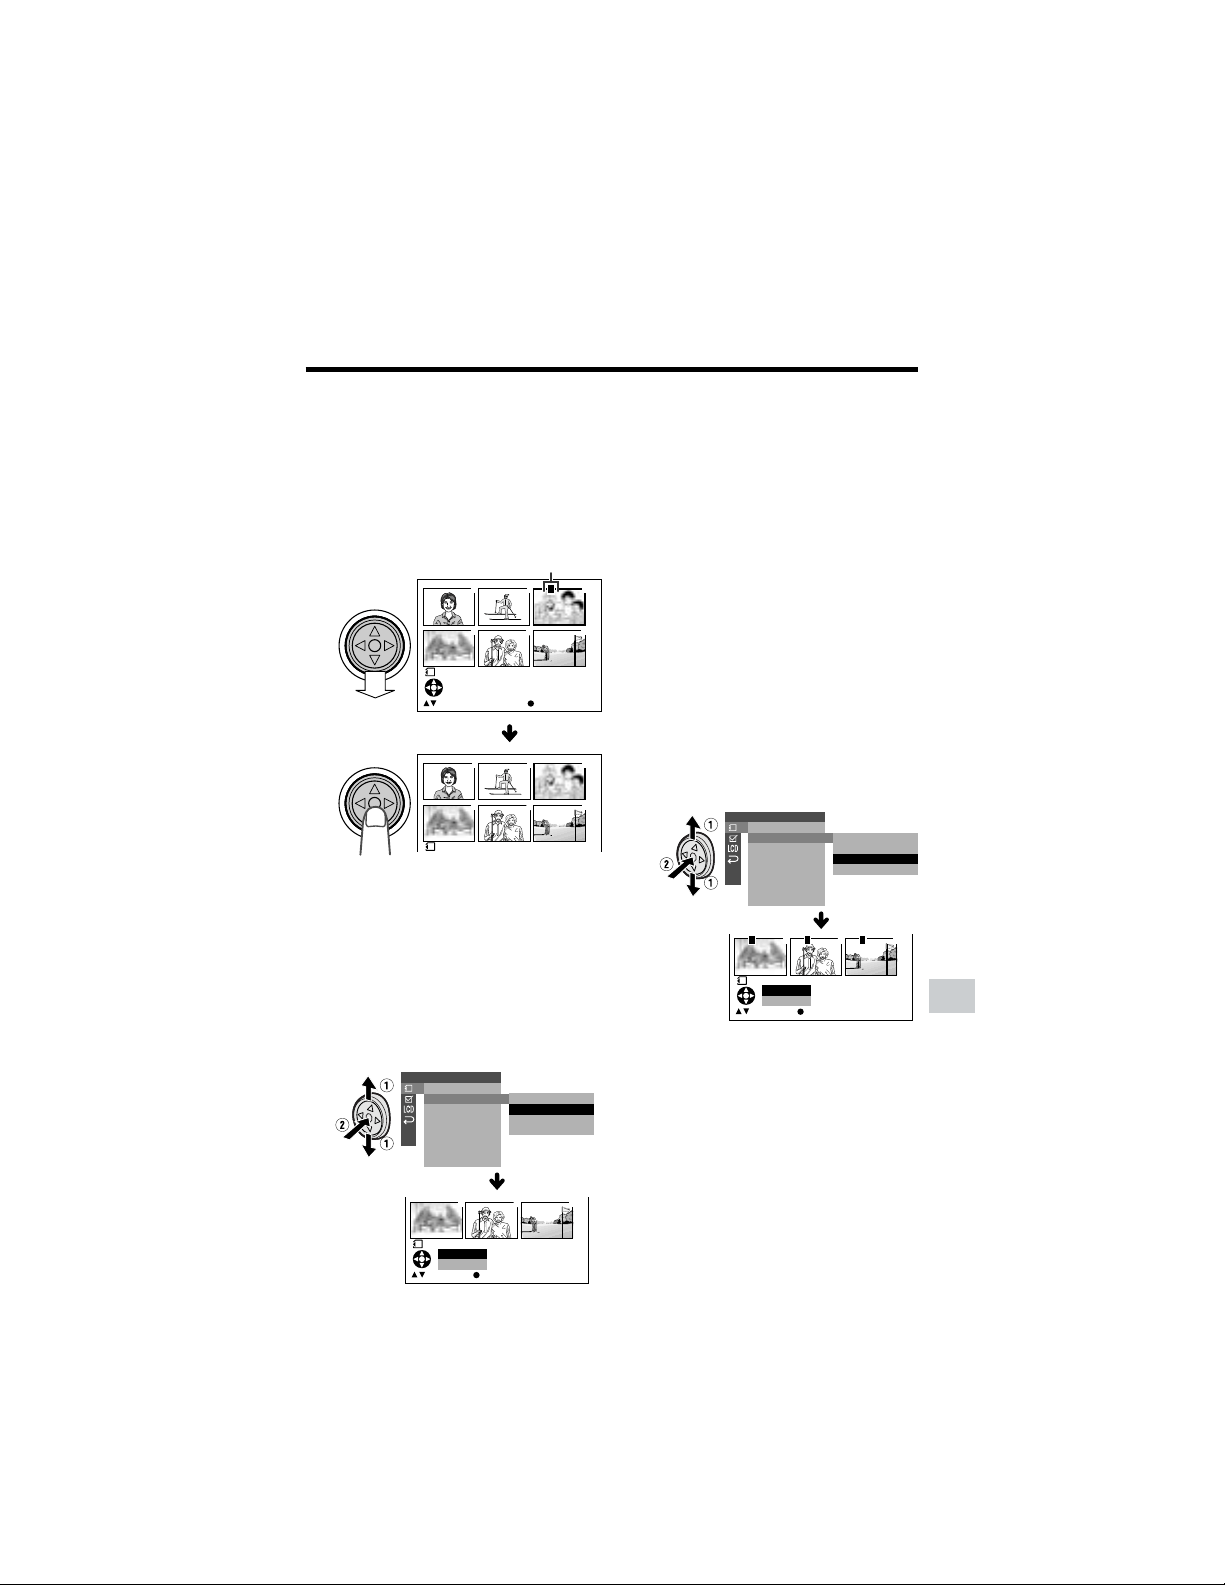
85
Digital Still Camera Features
M indicator
To cancel the print order for an image
1 Select the image for canceling out of
print order in step 6 above, then press
the center of the Operation button.
2 Press l to select “0”, then press the
center of the Operation button.
• The M indicator disappears.
3 Press the DISPLAY button to finish
the setting.
Assigning Print Order to All
Images
1 Perform steps 1 to 4 in “Assigning
Print Order to an Image”.
2 Press l or m to select “PRI. ALL”,
then press the center of the Operation
button.
Note:
• A warning indicator appears when the
print order is set to more than 999
images. To turn off the warning
indicator, press the Operation button.
3 Press l or m to select “YES”, then
press the center of the Operation
button.
• The M indicators appear, and each
image is set to 1 print out.
• To cancel the setting, select “NO”.
To cancel the print order for all
images
1 Perform steps 1 to 4 in “Assigning
Print Order to an Image”.
2 Press l or m to select “PRI. NONE”,
then press the center of the Operation
button to cancel the print order for all
images.
3 Press l or m to select “YES”, then
press the center of the Operation
button.
• The M indicators are turned off.
• To cancel the setting, select “NO”.
P
3000
-
00
2/1PAGE
NORMA L
10
PRINT
1
4
2
5
3
6
SETPRI NT NUMBER
3000
-
001
PRINT
1
4
2
5
3
6
PLAYBACK SET
PRI.SELECT
PRI. ALL
PR I. NONE
RETURN
SL IDE SHO
W
PRI.
RETURN
ORDER
1000
-
00
NORMAL
1
456
ALL?
NO
YES
SETSELECT
PRINT
PLAYBACK SET
PRI.SELECT
PRI. ALL
PR I. NONE
RETURN
SL IDE SHO
W
PRI.
RETURN
ORDER
1000
-
00
NORMA L
1
456
NONE?
NO
YES
SETSELECT
PRINT
P P P

86
Digital Still Camera Features
Playback
Digital Still Camera Features
Transferring Data on Card to Computer
Using the supplied USB cable, you can transfer still images to a computer.
System Requirements
• Operating systems
—Microsoft Windowsb XP Home Edition/Professional
—Microsoft Windowsb 2000 Professional
—Microsoft Windowsb Me
—Microsoft Windowsb 98 Second Edition
—Microsoft Windowsb 98
• USB terminal
• CD-ROM drive (for driver installation)
• Mouse or other pointing device
Note:
• The USB driver is not compatible with Macintosh operating systems.
Installing the USB Driver
For installing the USB driver in Windowsb XP or Windowsb 2000, you need to log in as the
system administrator.
1 Turn on the PC.
• Do not connect the camcorder to the PC with the USB cable at this point.
2 Insert the supplied CD-ROM containing the USB driver into the CD-ROM drive.
• The Setup screen will display automatically.
• The example screen shown is for Windowsb XP.
Note:
• When the Setup screen does not appear,
1 select “Run...” in Windowsb “Start” menu, then
2 type “R:\SETUP.EXE”, and then click on the “OK” button.
• In the example above the CD-ROM drive letter is taken as “R:”. Select the correct drive
letter according to your operating environment.

87
Digital Still Camera Features
3 Click the “USB driver” button.
• Welcome screen appears.
4 Click the “Next” button.
• Information screen appears
5 Click the “Next” button.
• Installation begins.
6 Confirm the message on the screen, and then click the “Finish” button to complete
the installation.
Note:
• If your computer gives you the option to restart, you may do so.
7 Insert a card that contains recorded still images into camcorder.
8 Connect the camcorder to the PC with the supplied USB cable as shown below.
• It is recommended to use the AC adapter as a power source for extended periods of
use.
To USB terminal
To USB terminal
USB cable (supplied)
9 Set the Media Selection switch to u.
10
Hold down the Lock button and set the Power switch to w.
• PC will recognize the camcorder automatically.
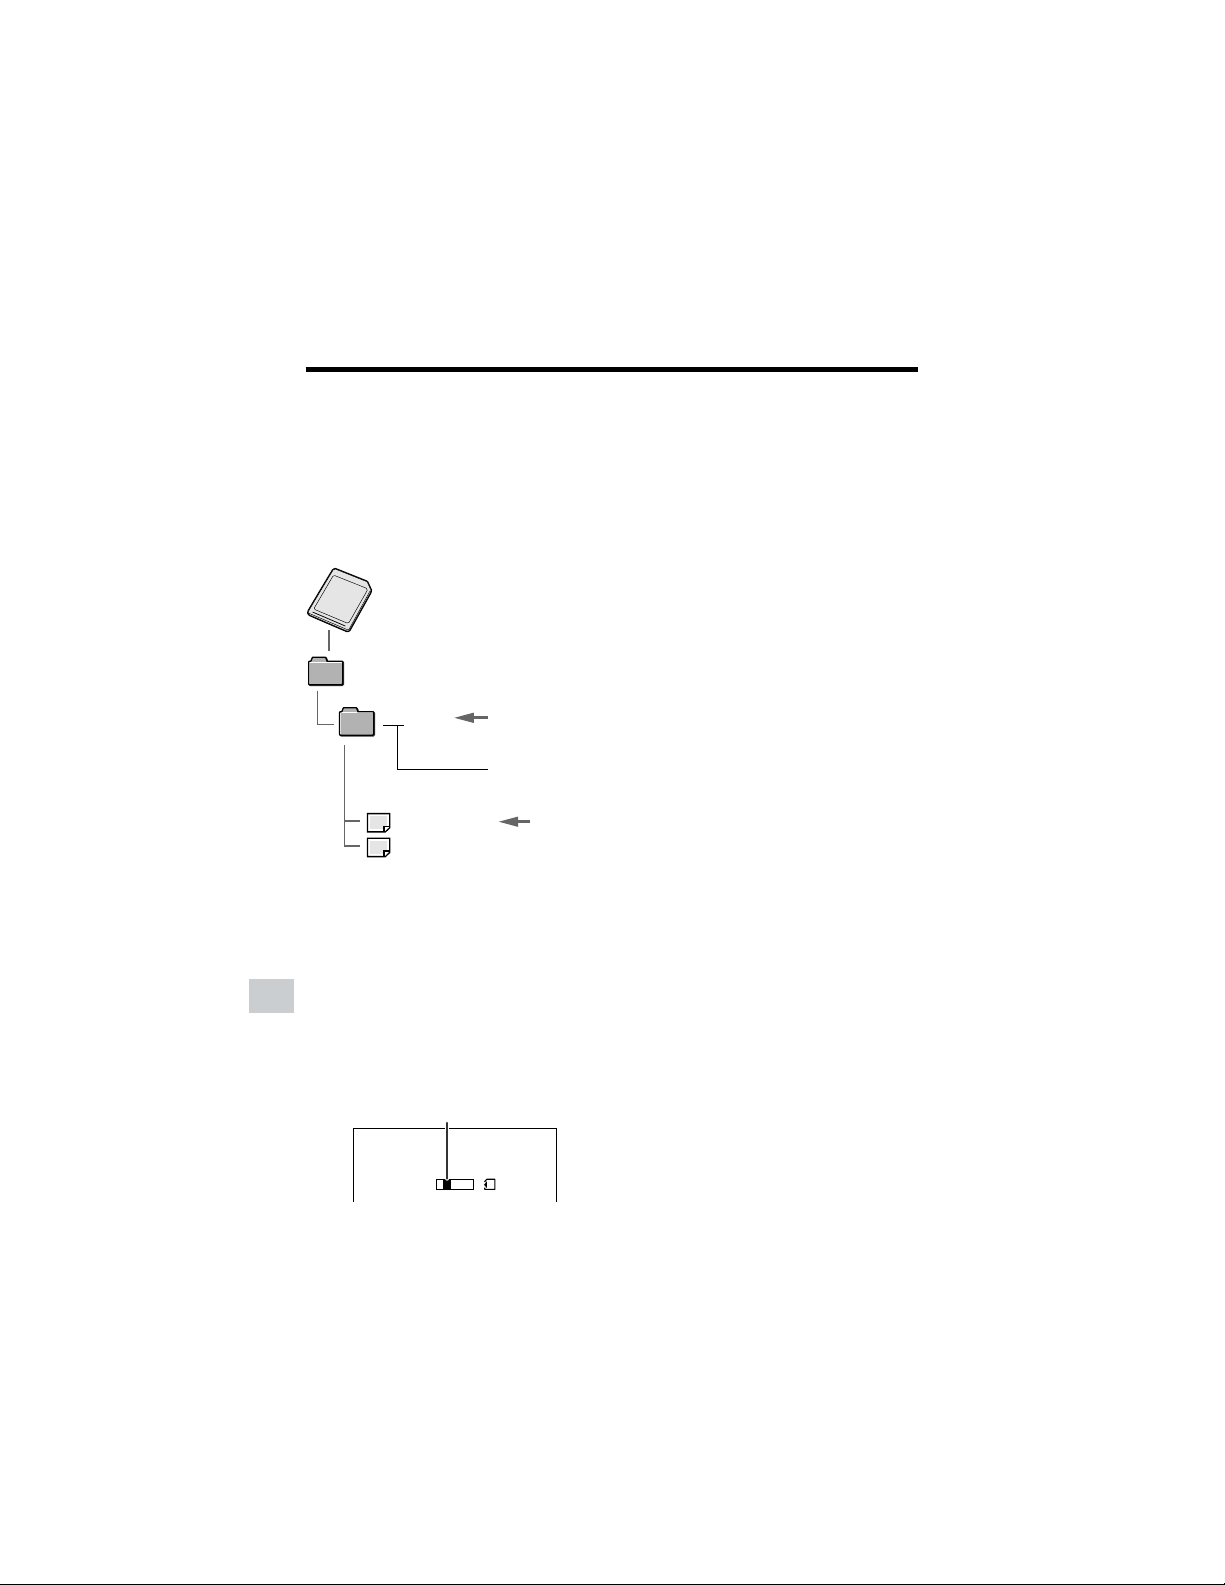
88
Digital Still Camera Features
Playback
Digital Still Camera Features
Serial number
(100 to 999)
Sub-folder of still
images
Folder of still image files
Still
image
Transfer indicator
Image Folders and File
Names
Double-click the My Computer icon on the
PC and find a new drive called “Removable
Disk (F:)” (or other drive letter, depending
on your PC configuration). Still images
recorded using the camcorder are stored in
files and on a card as shown below.
Note:
• If you copy any data incompatible with this
camcorder to the card, the camcorder will not
be able to recognize it.
Caution on transferring data
While transferring data, the transfer
indicator moves. Do not execute the
operations below.
• Disconnecting the USB cable
• Switching the power on/off
• Turning off the PC or setting it to Standby
• Removing the card
Note:
• In case of data transfer error, disconnect the
USB cable, then connect it again, or set the
Power switch to OFF, then set it to w again.
DCIM
100SHARP
DVC00001.JPG
DVC00002.JPG
••••••
Disconnecting the USB
cable
Windows Me/2000/XP
1 Close Explorer or any open applica-
tions.
2 Click the “Safely Remove Hardware”
(or “Unplug or Eject Hardware”) icon
that appears on the task bar, and
choose an applicable hard drive to
stop.
3 After the message “Safety To Remove
Hardware” appears, disconnect the
USB cable.
Notes:
• See Windows Help for the procedure
of disconnecting USB cable in detail.
Windows 98
1 Close Explorer or any open applica-
tions.
2 When data is not being transferred
(the indicator on LCD display stays
still), right-click on the disk drive icon,
which appears on explorer window, to
eject the disk. After that, disconnect
the USB cable.
USB
TRANSMI TT I NG
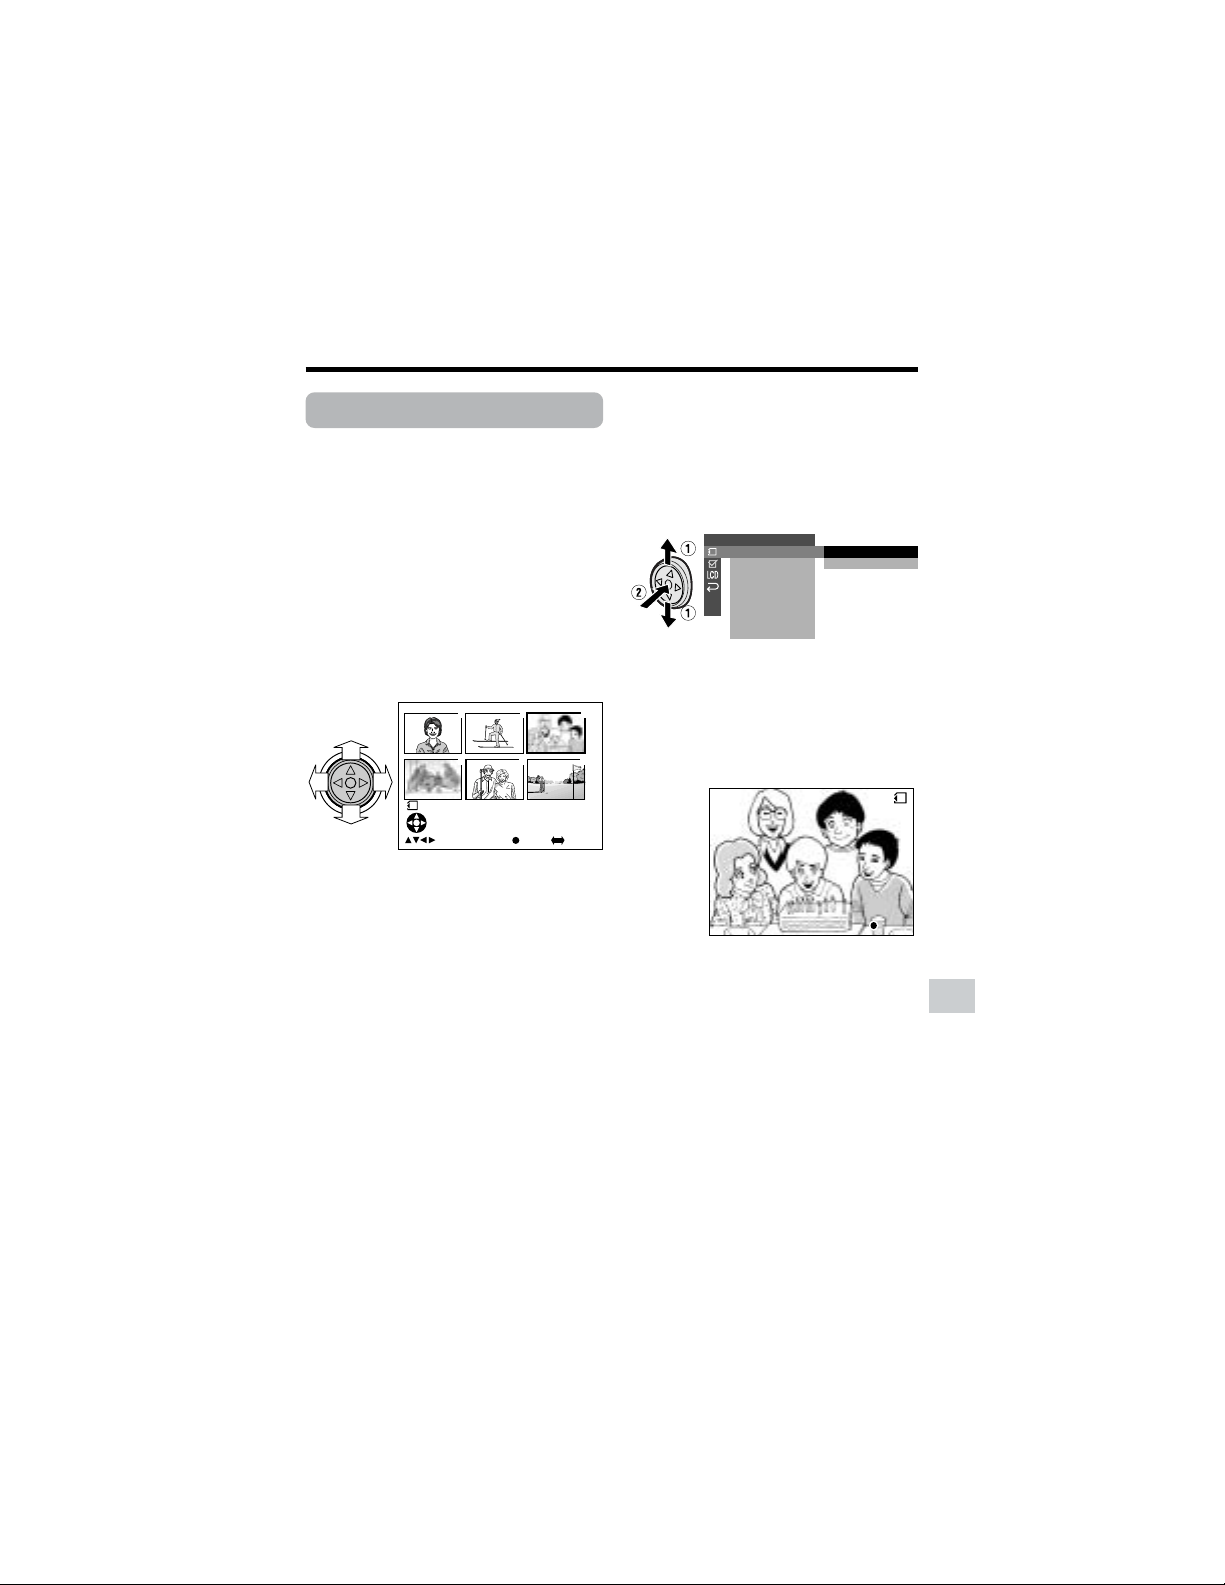
89
Digital Still Camera Features
Slide Show Playback
Available mode:
Card Playback
You can automatically play back consecu-
tive still images recorded on a card at
intervals of 5 seconds. This is useful when
confirming the data recorded on a card.
1 Set the camcorder to Card Playback
mode.
2 Press j, k, l or m on the
Operation button to select the image
from which you want to begin slide
show playback.
3 Press the DISPLAY button until the
mode screen appears.
4 Press l or m to select “MENU”, then
press the center of the Operation
button.
5 Press l or m to select “EXECUTE”,
then press the center of the Operation
button.
6 Press l or m to select S, then
press the center of the Operation
button.
7 Press l or m to select “SLIDE
SHOW”, then press the center of the
Operation button.
8 Press l or m to select “EXECUTE”,
then press the center of the Operation
button.
• Beginning from the image selected in
step 2, the recorded images will
display in full-screen one after
another in order of recording.
• After playing back all the images on
the card once, slide show playback
automatically stops.
9 Press the DISPLAY button to turn off
the menu screen.
To stop slide show playback
During slide show playback, press the
center of the Operation button.
3000
-
00
2/1PAGE
NORMAL
1
1
4
2
5
3
6
F U L LS E L E C T I MG MU L T IFULLSELECT IMG MULTI
PLAYBACK SET
EXECUTE
RETURN
SL IDE SHO
W
PRI.
RETURN
ORDER
S L I D E S HOWSL IDE SHOW
S T OP
STOP
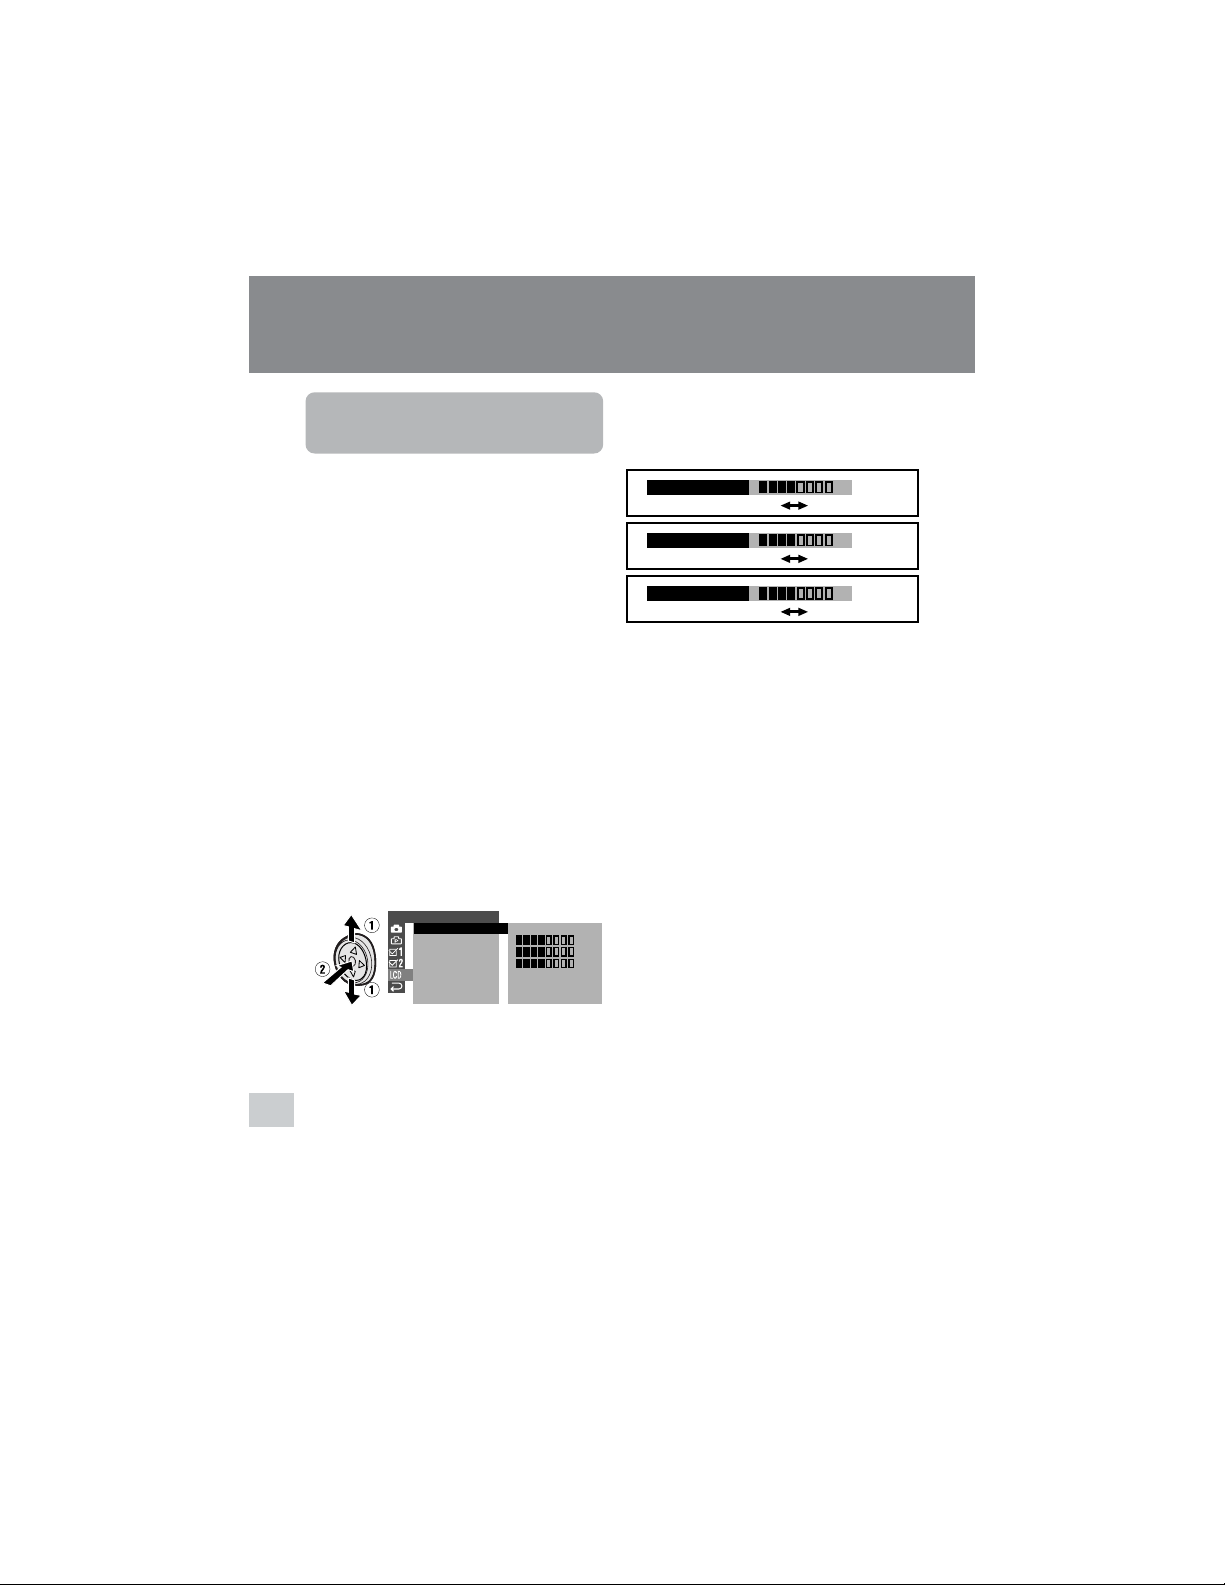
90
Appendix
Appendix
Darker
Brighter
Decrease
Darker
Increase
Brighter
–
+
–
+
–
+
LCD BRIGHT
LCD COLOR
VF BRIGHT
6 Press j or k to adjust the item to
the desired setting, then press the
center of the Operation button.
Appendix
Picture/Backlight
Adjustments
Available modes:
All modes
If the picture is difficult to see due to
ambient light or other factors, adjust the
monitor picture settings.
• The example screens shown are for Tape
Camera mode.
Adjusting the Picture
1 Press the DISPLAY button until the
mode screen appears.
2 Press l or m on the Operation
button to select “MENU”, then press
the center of the Operation button.
3 Press l or m to select “EXECUTE”,
then press the center of the Operation
button.
4 Press l or m to select O, then
press the center of the Operation
button.
5 Press l or m to select “LCD
BRIGHT”, “LCD COLOR” or “VF
BRIGHT”, then press the center of
the Operation button.
LCD SET
BACKL I GHT
LCD BRI GHT
LCD COLOR
RETURN
NORMAL
VF BRIGHT
–
+
–
+
–
+
7 Press the DISPLAY button to turn off
the menu screen.
Notes:
• When adjusting the color, the picture on the
LCD monitor may differ from the picture
actually recorded. Do not change the color
setting unless necessary. (This adjustment
only affects the monitor picture, not the
recorded image.)
• The viewfinder turns on if you select “VF
BRIGHT”.

91
Appendix
Adjusting the Backlight
1 Press the DISPLAY button until the
mode screen appears.
2 Press l or m on the Operation
button to select “MENU”, then press
the center of the Operation button.
3 Press l or m to select “EXECUTE”,
then press the center of the Operation
button.
4 Press l or m to select O, then
press the center of the Operation
button.
5 Press l or m to select “BACK-
LIGHT”, then press the center of the
Operation button.
6 Press l or m to select “NORMAL” or
“BRIGHT”, then press the center of
the Operation button.
NORMAL: For use indoors or under
moderate lighting conditions.
BRIGHT: For use outdoors under
strong lighting conditions, such
as bright daylight.
7 Press the DISPLAY button to turn off
the menu screen.
LCD SET
BACKL I GHT
LCD BRI GHT
LCD COLOR
RETURN
VF BRIGHT
NORMAL
BRI GHT
BACKL IGHT
BRIGHT
Turning off the
Confirmation Sound
Available modes:
All modes
A confirmation sound is made when you
turn on or off the Power switch, press the
Start/Stop button, or perform other
designated operations. Use the procedure
below to turn off the confirmation sounds.
• The example screens shown are for Tape
Camera mode.
1 Press the DISPLAY button until the
mode screen appears.
2 Press l or m on the Operation
button to select “MENU”, then press
the center of the Operation button.
3 Press l or m to select “EXECUTE”,
then press the center of the Operation
button.
4 Press l or m to select Z, then
press the center of the Operation
button.
5 Press l or m to select “BEEP”, then
press the center of the Operation
button.
6 Press l or m to select “OFF”, then
press the center of the Operation
button.
OTHERS 1
BEEP
REMOTE
DEFAULT
LANGUAGE
RETURN
ON
OFF
PHONES VOL
DEMO MODE
OFFBEEP
7 Press the DISPLAY button to turn off
the menu screen.
Note:
• If you select “OFF”, the focus confirmation
sound in Card Camera mode will turn off.

92
Appendix
Appendix
Information display
OTHERS 1
BEEP
REMOTE
DEFAULT
LANGUAGE
RETURN
ENGL I SH
FRAN
Ç
AIS
ESPA
Ñ
OL
PHONES VOL
DEMO MODE
LANGUE
FRAN
Ç
AIS
AU TO
4002.2
03MA:01
JUN.
3 0min
AUTO
Selecting the
Language for the
Information Display
Available modes:
Tape Camera, Card Camera
This camcorder allows you to choose
English, French or Spanish as the informa-
tion display language.
• The example screens shown are for Tape
Camera mode.
1 Press the DISPLAY button until the
mode screen appears.
2 Press l or m on the Operation
button to select “MENU”, then press
the center of the Operation button.
3 Press l or m to select “EXECUTE”,
then press the center of the Operation
button.
4 Press l or m to select Z, then
press the center of the Operation
button.
5 Press l or m to select “LAN-
GUAGE”, then press the center of the
Operation button.
6 Press l or m to select the desired
language, then press the center of
the Operation button.
7 Press the DISPLAY button to turn off
the menu screen.
• The information display appears in
the language selected when the on-
screen display turns on.
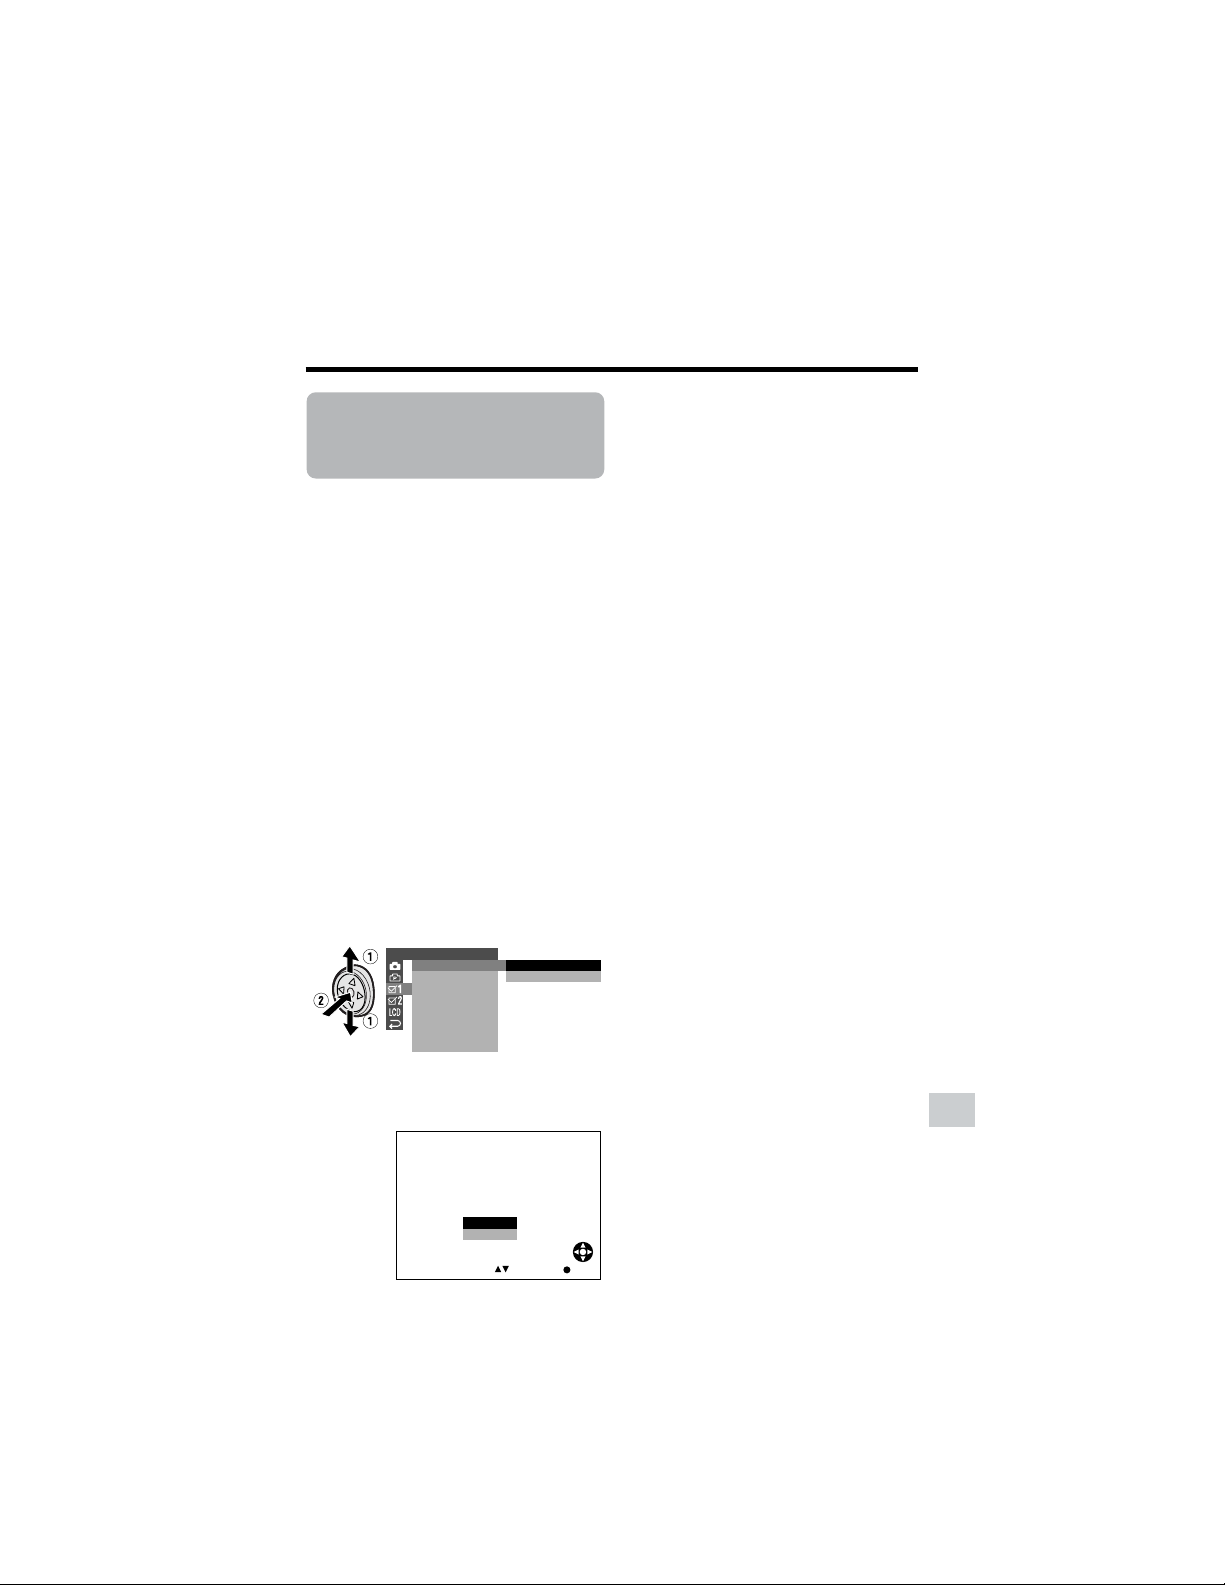
93
Appendix
Setting the
Camcorder to
Factory Presettings
Available modes:
All modes
You can set the camcorder to the factory
presettings in one operation.
• The example screens shown are for Tape
Camera mode.
1 Press the DISPLAY button until the
mode screen appears.
2 Press l or m on the Operation
button to select “MENU”, then press
the center of the Operation button.
3 Press l or m to select “EXECUTE”,
then press the center of the Operation
button.
4 Press l or m to select Z, then
press the center of the Operation
button.
5 Press l or m to select “DEFAULT”,
then press the center of the Operation
button.
6 Press l or m to select “EXECUTE”,
then press the center of the Operation
button.
OTHERS 1
BEEP
REMOTE
DEFAULT
RETURN
LANGUAGE
PHONES VOL
DEMO MODE
EXECUTE
RETURN
7 Press l or m to select “YES”, then
press the center of the Operation
button.
• To cancel the setting, select “NO”.
8 Press the DISPLAY button to turn off
the menu screen.
Note:
• Even when you perform the steps above, the
clock and language setting maintain the
memory.
SELECT
DEFAULT
RETURN PRESETT I NGSTO
EXCEPT CERTAI N I TEMS.
NO
YES
SET

94
Appendix
Appendix
Demonstration Mode
Available modes:
Tape Camera, Card Camera
You can watch a brief demonstration of the
special camcorder features in Demo mode.
If the demonstration appears on the screen
when you turn on the camcorder for the first
time, cancel the Demo mode to use your
camcorder.
Watching
• The example screens shown are for Tape
Camera mode.
1 Remove the Mini DV cassette from
the camcorder (see page 10).
2 In Tape Camera or Card Camera
mode, press the DISPLAY button until
the mode screen appears.
3 Press l or m on the Operation
button to select “MENU”, then press
the center of the Operation button.
4 Press l or m to select “EXECUTE”,
then press the center of the Operation
button.
5 Press l or m to select Z, then
press the center of the Operation
button.
6 Press l or m to select “DEMO
MODE”, then press the center of the
Operation button.
7 Press l or m to select “ON”, then
press the center of the Operation
button.
8 Set the Power switch to OFF, then
hold down the Lock button and set
the Power switch to v.
• The demonstration begins.
Canceling
1 During the demonstration, press the
center of the Operation button to
pause the demonstration.
2 Perform step 3 to 6 in “Watching”,
then select “OFF” in step 7.
Notes:
• The demonstration will pause if you press the
center of the Operation button. If you leave it
for 60 seconds, or turn the power off
temporarily and then set the Power switch to
v, the demonstration will begin again.
• Demonstration mode does not work in self
recording with reversed grip.
OTHERS 1
RETURN
DEMO MO D E
OFF
ON
PHONES VOL
BEEP
REMOTE
DEFAULT
LANGUAGE
ON
DEMO MODE

95
Appendix
Position the
subject in the
center.
Focus manually when
you need to position
the subject off center
(see page 53).
Useful Information
Hints for Better Shooting
• Position the subject in the center of the
scene. When using auto focus, whatever
is in the center of the scene is kept in
focus.
• Avoid backlit subjects. For the best
picture, shoot with the light source behind
you.
When the background is brighter than the
subject, the subject often becomes too
dark. If you have to record in this lighting,
use Backlight Compensation or correct
the iris value to improve the picture (see
pages 34 and 56).
• Before zooming, think about how to best
frame the shot. Frequent zooming
produces unattractive pictures. It also runs
down the battery more quickly.
• When image shaking is noticeable during
zoomed-in telephoto shooting, use a
tripod or push the Power Zoom control to
the W side to zoom out.
Light from behind Backlighting
• Horizontal panning (lateral movement) and
tilting (vertical movement) should be done
slowly to emphasize the wide expanse of
a scene or the height of a building, and to
make scenes easy to watch during
playback.
• Use a wide-angle setting for fast-moving
subjects.
Note:
• It may take longer to focus when zooming
and panning are used frequently.
About PRINT Image Match-
ing L
This product supports PRINT Image
Matching K. When used in combination,
PRINT Image Matching K enabled digital
still cameras, printers and software, help
photographers to produce images more
faithful to their intentions.
PRINT Image Matching is a trademark of
Seiko Epson Corporation.
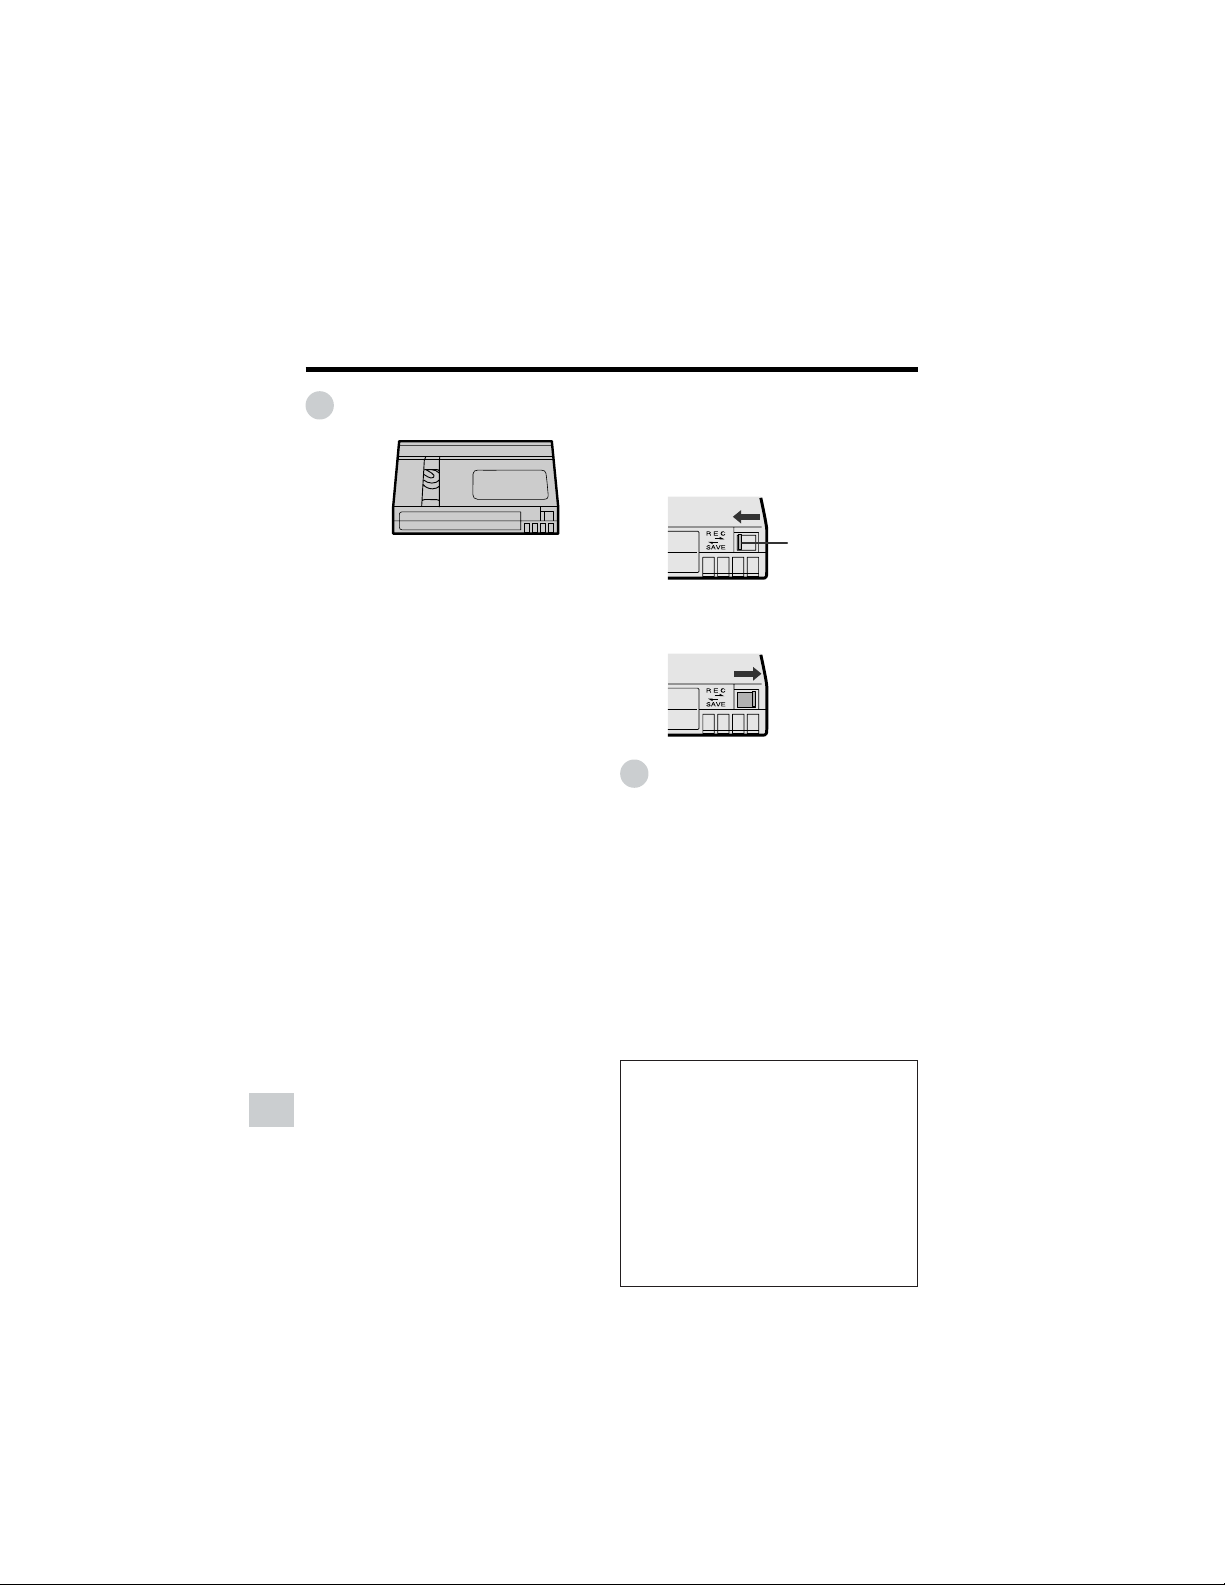
96
Appendix
Appendix
Mini DV Cassette
Precautions when using a Mini DV
cassette
• Be sure to use only Mini DV cassettes with
the i mark.
• This camcorder can record and play back
using Mini DV cassettes with cassette
memory, but it cannot record or play back
this memory.
• To record in LP mode, use a Mini DV
cassette labeled for use with LP mode.
• Do not insert anything into the holes on the
bottom of the Mini DV cassette or block
them in any way.
• Avoid placing the Mini DV cassette in
areas conducive to dust or mold.
• Do not place the Mini DV cassette near
magnetic sources such as electric clocks
or magnetic devices as this may adversely
affect recorded material.
• When a previously recorded Mini DV
cassette is used again for recording, the
previously recorded material will be
automatically erased.
• The Mini DV cassette will not operate if
inserted in the wrong direction.
• Do not repeatedly insert and eject the Mini
DV cassette without running the tape as
this may cause uneven tape winding and
damage the tape.
• Do not place the Mini DV cassette in direct
sunlight, near strong heat sources, or in
areas with excessive steam.
• Store the Mini DV cassette in its case and
stand it in an upright position.
• If the tape is not properly wound, rewind
the tape.
• Do not drop the Mini DV cassette or
subject it to excessive shocks.
To protect recordings against
accidental erasure
Slide the protect tab on the rear of the Mini
DV cassette to the “SAVE” position.
To record over a previously recorded tape,
slide the protect tab to the “REC” position.
Erasure protect tab
Copyright Protection
The digital VCR has far superior recording
and playback ability than the traditional
analog VCR, and in order to protect digital
video software copyrights, a system for
managing copyrights has been established.
Some digital video recording with prere-
corded copyright protection signals can still
be played back on this camcorder. If you
play a digital video recording that has a
copyright protection signal on video
equipment with a DV terminal and attempt
to record a copy of that software on this
camcorder, “COPYRIGHT PROTECTED.”
appears on the screen and the recording is
disabled.
This product incorporates copyright
protection technology that is protected
by method claims of certain U.S. patents
and other intellectual property rights
owned by Macrovision Corporation and
other rights owners. Use of this copyright
protection technology must be autho-
rized by Macrovision Corporation, and is
intended for home and other limited
viewing uses only unless otherwise
authorized by Macrovision Corporation.
Reverse engineering or disassembly is
prohibited.
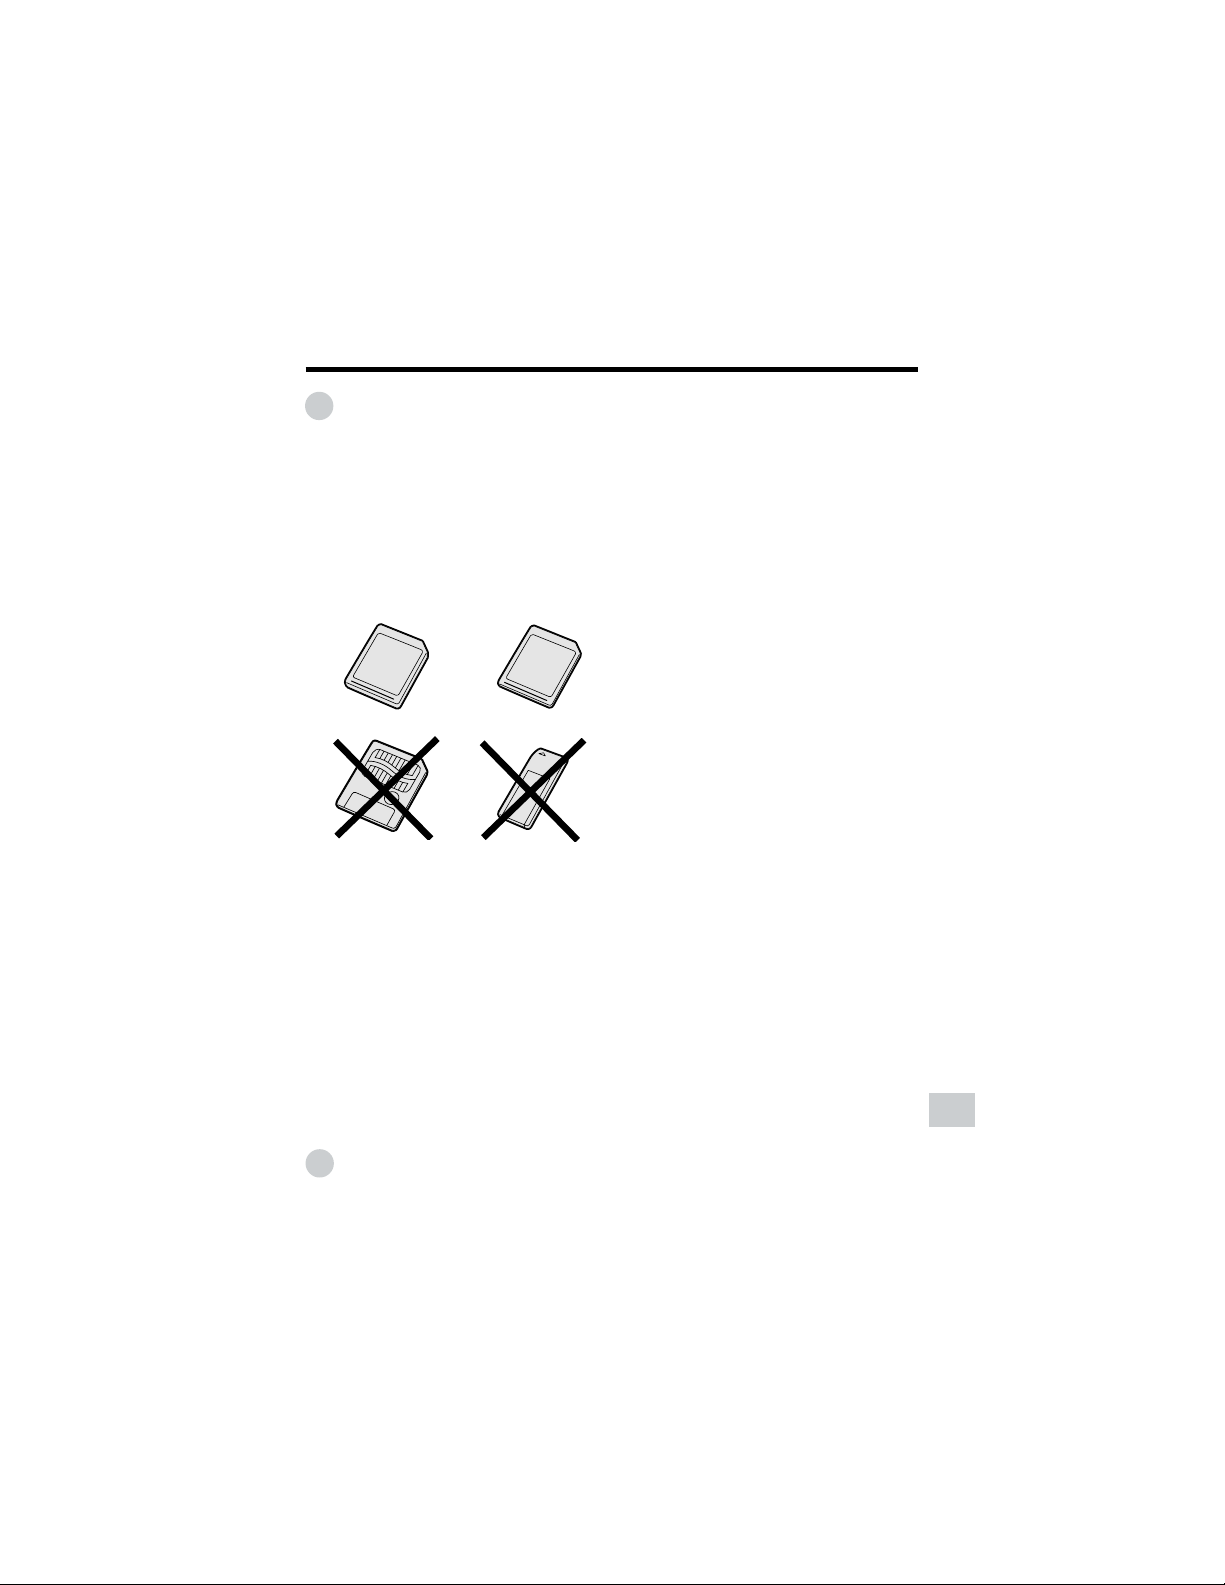
97
Appendix
SD\ Memory Card and
MultiMediaCard\
SD (Secure Digital) Memory Cards and
MultiMediaCards are small, handy and flexible
storage media used in a variety of mobile
applications. They are one of the smallest
memory solutions available on the market.
This camcorder uses either an SD Memory
Card or a MultiMediaCard. It cannot use a
SmartMedia/ card or Memory Stickb.
Memory Stickb media
SD/ Memory Card MultiMediaCard/
SmartMedia\ card
Precautions
• Be sure to insert the card in the correct
direction. Do not try to force the card in.
• Store the card in its antistatic plastic case
when not in use.
• Do not disassemble or modify the card.
• Do not strike, bend or drop the card.
• Do not allow the card to become wet.
• Do not peel off the card label.
• Do not attach other labels or stickers to the
card.
• Do not expose to extreme heat sources (e.g.
sunlight, heating appliances).
• Do not store in a highly humid or dusty place.
• Do not store in a place exposed to corrosive
gas.
• Do not use in a place exposed to strong
electromagnetism.
Protecting your images
• Select the write-protect switch on the exterior
card casing to protect your images. (SDMC)
• Do not power off any devices while transfer-
ring data, as this may destroy the data.
• Back up your image data often to a hard disk
or other permanent storage media.
• Be aware that formatting will erase all image
data stored on the card.
Note:
• Sharp Corporation cannot be held liable
for data that is lost through improper
handling of the storage media.
Cleaning
• Be careful not to allow dirt and finger grime
buildup around the card contacts.
• Be careful about static electricity, which can
suddenly erase data.
• If you notice dirt or static electricity, clean the
card with a soft, dry cloth.
Condensation
• Be careful about condensation forming on the
card surface, which can cause malfunction.
• If you notice beads of water on the card,
allow it to evaporate and dry naturally.
• An SD Memory Card has more advanced
features than a MultiMediaCard, including
cryptographic security for copyrighted
data and a selectable mechanical write-
protect switch.
•
The card slot on this camcorder is compat-
ible with an SD Memory Card or
MultiMediaCard.
• An SD Memory Card and a
MultiMediaCard are cross-compatible.
Data stored on one can be easily
transferred to the other.
Note:
• This camcorder is verified to work properly
with the following card memory types.
—SD Memory Card: 128 MB or less
—MultiMediaCard: 64 MB or less
Removable Storage Care
Below are some precautions to ensure a
long life and perfect performance from your
SD Memory Card (SDMC) or
MultiMediaCard (MMC). Information specific
to one card is attached with the card’s
acronym (either SDMC or MMC).

98
Appendix
Appendix
Battery Pack
This camcorder uses a lithium-ion type
battery pack.
Charging
• Charge the battery pack immediately (or a
day) before use. The battery pack
gradually self-discharges even if stored in
a fully charged state.
• Charge the battery pack between 50°F
and 86°F (10°C and 30°C).
• Fully charge the battery pack. Use of an
insufficiently charged battery pack will
shorten actual time of use.
• Refresh (discharging before charging) is
unnecessary.
Use
• To conserve battery power, be sure to turn
off the camcorder power when not in use.
• Battery consumption may vary depending
on the condition of use. Recording with
many starts and stops, frequent zooming,
and recording in low temperatures will
shorten actual recording times.
• Use of a weak battery pack may cause
loss of power while operating the
camcorder. Use a fully charged battery
pack to protect both the battery pack and
the unit.
• It is recommended that you have enough
battery packs on hand to handle two or
three times your estimated recording time.
See page 22 for the approximate times of
actual recording for the battery packs.
Battery power is consumed even when
the camcorder power is turned off. If you
are not going to use your camcorder
immediately, remove the battery pack
(see page 7).
Note:
• Use only SHARP BT-L226 battery packs.
These are designed specifically for use with
this camcorder.
Storage
• Store the battery pack in a fully dis-
charged state.
• Store the battery pack in a dry, cool place.
• When storing the battery pack, put it in the
original protective plastic bag.
Notes:
• Improper handling of the battery pack may
present a risk of fire or explosion. Pay close
attention to the following:
—Do not allow metallic objects to come in
contact with the terminals. This can
cause a short circuit.
—Do not disassemble or repair the
battery pack by yourself.
—Do not use any battery charging
equipment other than that designed for
use with these battery packs.
—Do not place the battery pack under
direct sunlight or in excessively hot
places (over 140°F or 60°C) such as the
dashboard of cars.
—Do not expose the battery pack to
moisture or water.
—Do not drop the battery pack or subject
it to strong force.
—Keep the battery pack out of reach of
children.
—Dispose of used battery packs
promptly. Do not dispose of them in fire.
• To protect the terminals, put the cover on the
battery pack when it is not in use.
• The battery pack will become warm during
charging and use. This is not a malfunction.
• The battery pack has a limited service life. If
the period of use becomes noticeably shorter
with a normal charge, the battery pack is at
the end of its service life. Replace it with a new
battery pack.
• If the terminals of the battery pack are dirty,
wipe the terminals with a soft, dry cloth.
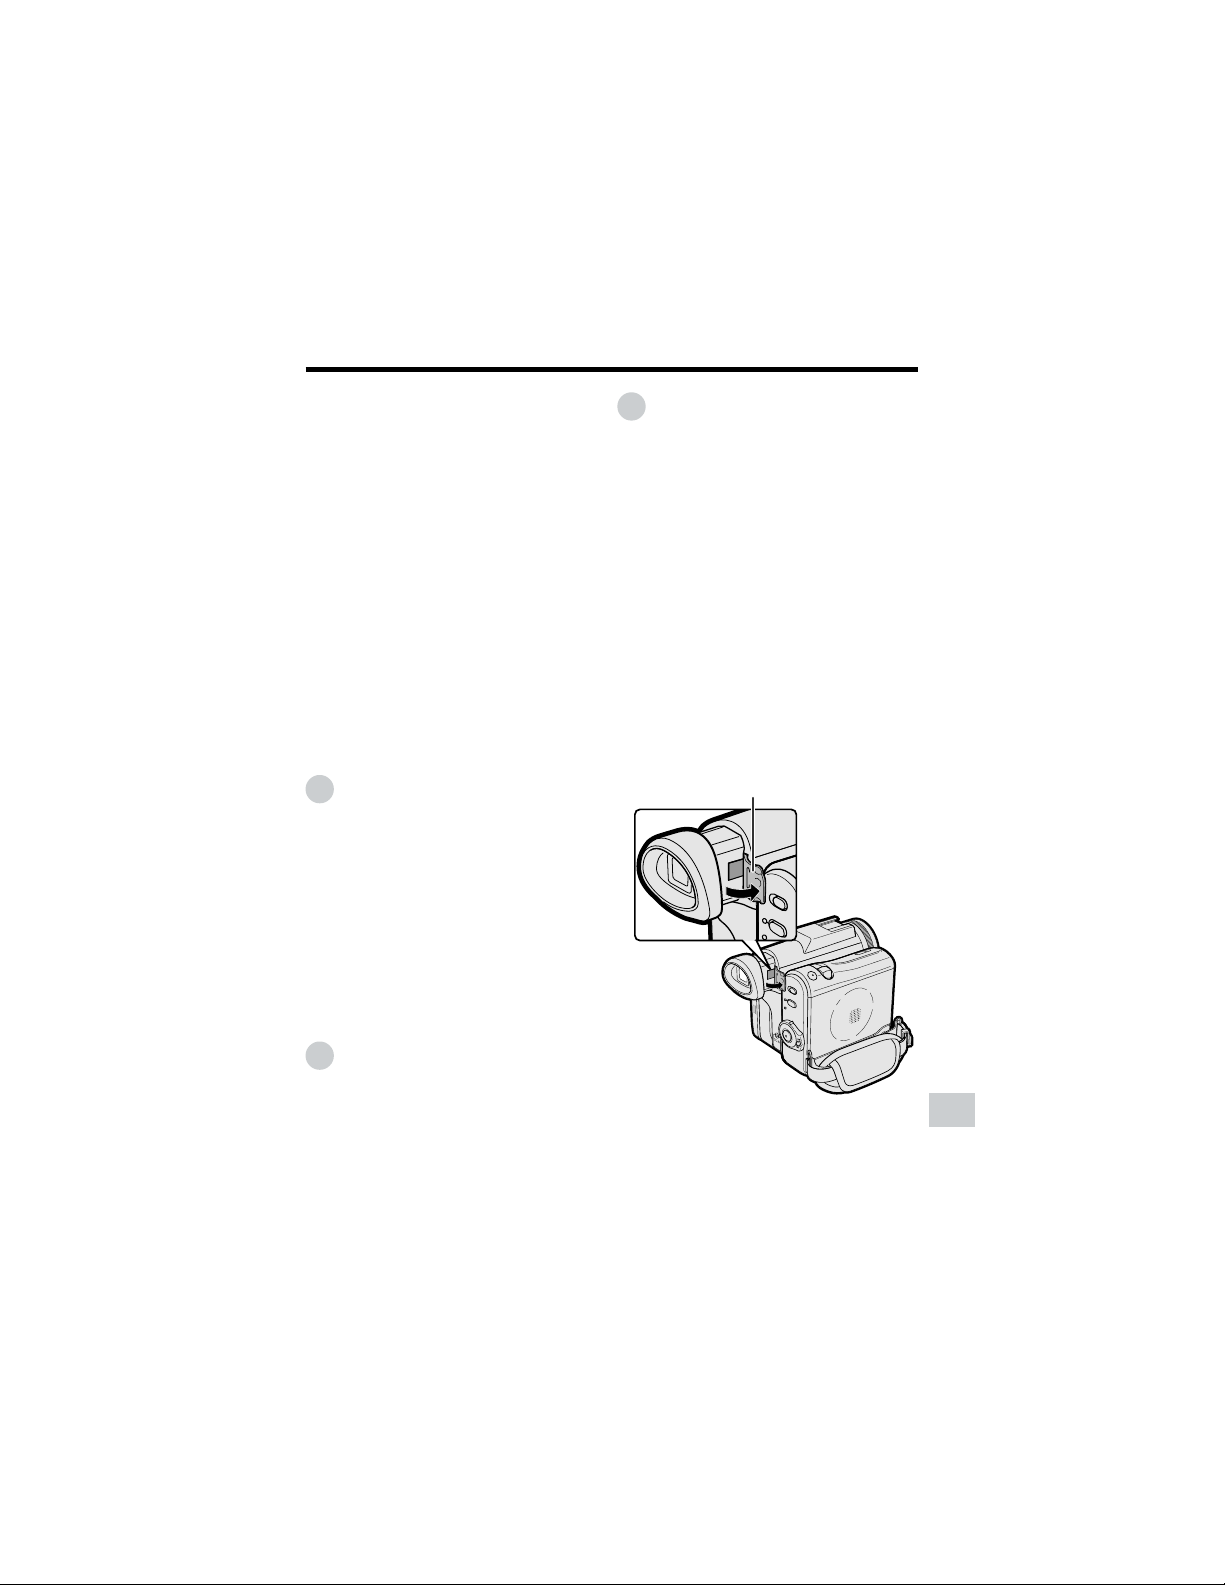
99
Appendix
Window cleaning cover
AC Adapter
• The AC adapter may interfere with
reception if used near a radio.
• Prevent flammables, liquids, and metal
objects from entering the adapter.
• The adapter is a sealed unit. Do not
attempt to open or modify it.
• Do not damage, drop, or subject the
adapter to vibration.
• Do not leave the adapter in direct sunlight.
• Avoid using the adapter in humid or
extremely hot places.
Replacing the Fluorescent
Lamp
This camcorder uses a fluorescent lamp to
backlight the LCD monitor. If the monitor
becomes dark or difficult to view, the
fluorescent lamp may need to be replaced.
Contact the nearest SHARP service center
or your dealer for further advice.
Cleaning
• Many plastic parts are used in the
camcorder casing. Do not use thinner,
benzene or other strong chemical
cleaners. These may cause discoloration
and damage to the casing.
• Clean the casing with a soft, dry cloth. If
the casing is particularly dirty, wipe the
casing with a tightly wrung cloth damp-
ened with a diluted, neutral detergent.
Then wipe it again with a soft, dry cloth.
• Use a soft cloth to wipe finger marks and
other smudges off the LCD screen.
• Use a soft cloth, or compressed air and
lens paper designed for photographic
lenses to clean the lens.
• Pull out the viewfinder and open the
window cleaning cover as shown below so
that you can clean up the inside of the
viewfinder with a camera blower.
Extending battery pack life
Even when the battery pack is not used, the
capacity of the battery pack will naturally
deteriorate over time. To limit the deteriora-
tion of the capacity, it is recommended to
perform the following procedure at least
once every six months:
1 Charge the battery pack until the
POWER/CHARGE (RED) indicator turns
off.
2 Attach the battery pack to the
camcorder, and set the Power switch to
v without inserting a cassette. Allow
the battery power to fully discharge by
leaving it on the camcorder until the
camcorder power automatically turns
off.
3 Remove the battery pack and store it
between 50°F and 68°F (10°C and
20°C).
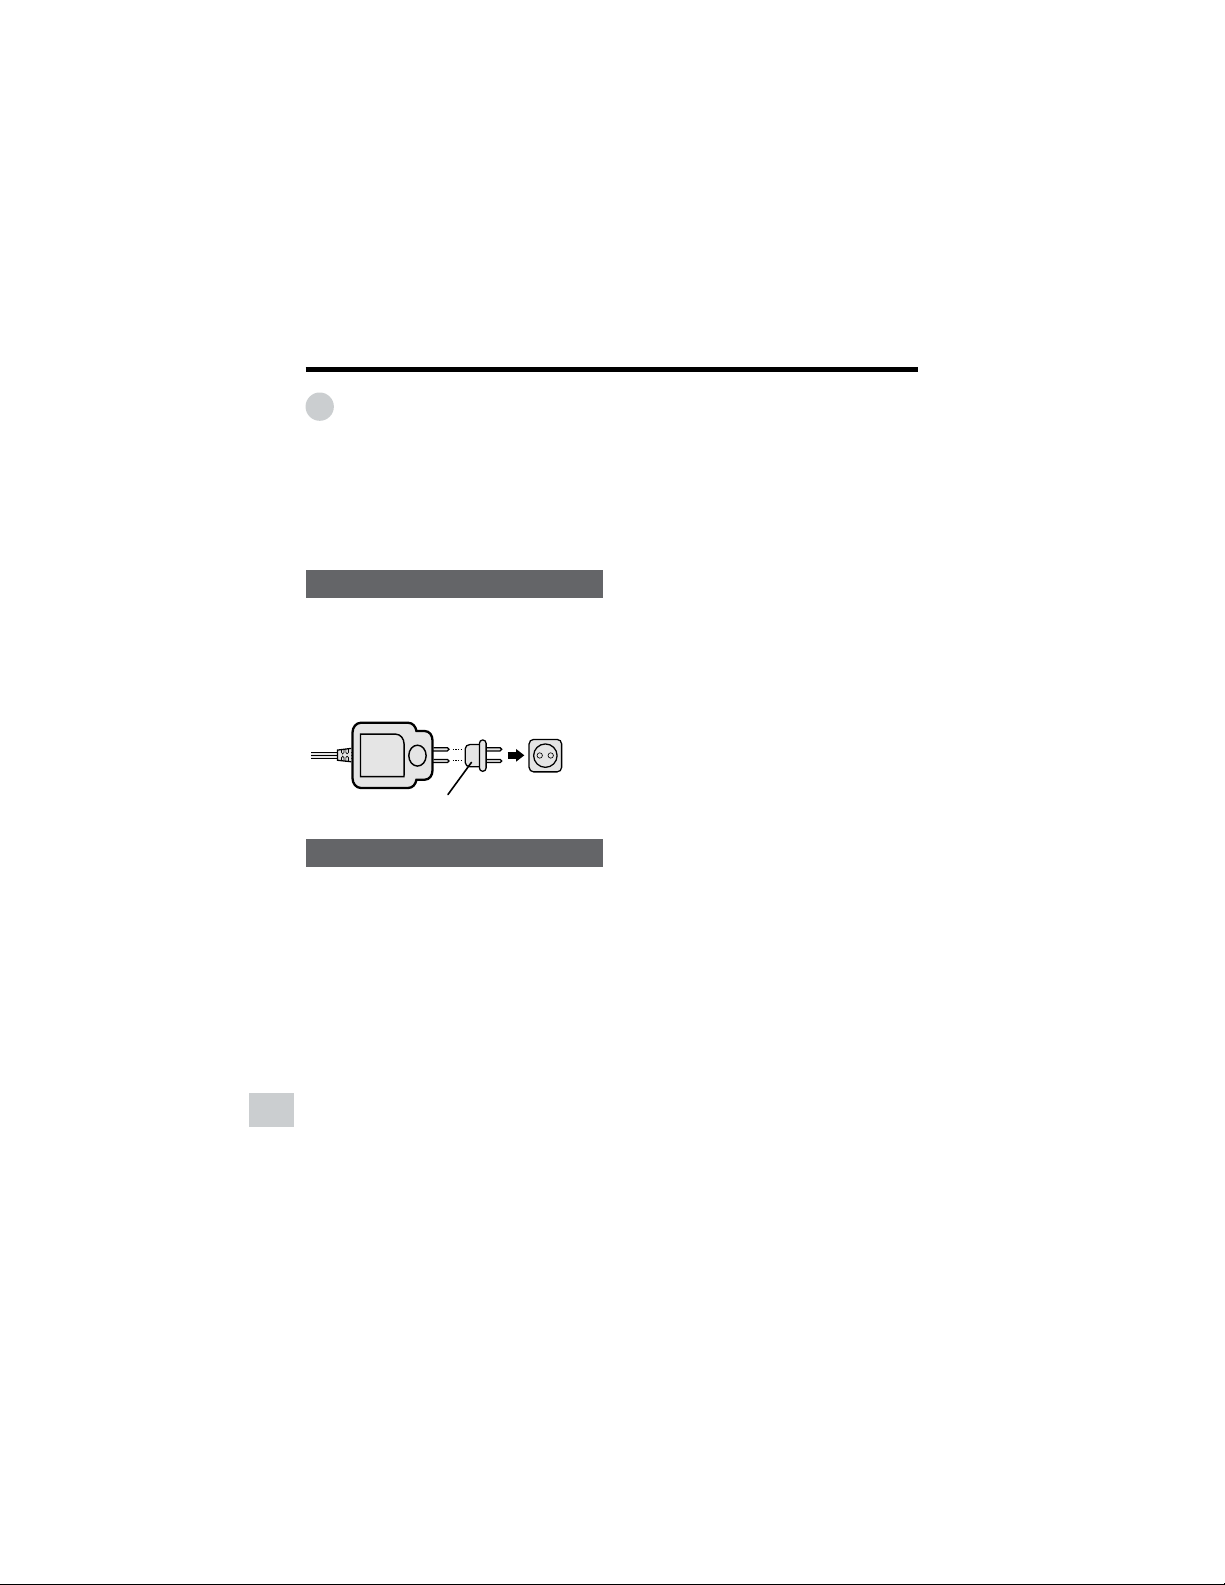
100
Appendix
Appendix
A commercially available
AC plug adaptor
AC 110–240 V
Using Your Camcorder
Abroad
Television signal standards and electrical
voltages and frequencies vary substantially
from country to country. When you are
abroad, check the sections below before
using the AC adapter or connecting the
camcorder to a TV.
AC Adapter (Supplied Accessory)
The supplied AC adapter is compatible with
50 Hz and 60 Hz electrical systems in the
range of 110 V to 240 V AC.
Use a commercially available AC plug
adaptor, if necessary, depending on the
design of the wall outlet.
Television Signal Standards
In any country, you can always watch the
video picture by using the LCD monitor
screen. However, if you want to watch the
picture on a TV screen, the TV must be
NTSC-M system compatible. NTSC-M is
used in the following areas:
The Bahamas, Barbados, Bermuda,
Myanmar (previously Burma), Canada,
Chile, Colombia, Costa Rica, Cuba, the
Dominican Republic, Ecuador, El Salvador,
Greenland, Guam, Guatemala, Haiti,
Honduras, Jamaica, Japan, South Korea,
Mexico, the Netherland Antilles, Nicaragua,
Panama, Peru, the Philippines, Puerto Rico,
St. Kitts, St. Lucia, Surinam, Taiwan,
Trinidad, the U.S.A., Venezuela, Southern
Vietnam, and the Virgin Islands.

101
Appendix
Troubleshooting
Before calling for service, please check the following troubleshooting table.
Symptom
No power.
Start/Stop button
does not work.
Power suddenly turns
off.
Auto focus does not
work.
Bright subject pro-
duces wide vertical
lines.
Display automatically
changes in Tape
Camera mode.
Power
Camera mode
Suggested solution
Connect power source properly
(pp. 6, 9).
Charge battery pack sufficiently
(p. 8).
Wait until dew dries (p. xiii).
Set Power switch to OFF and re-
move battery pack. Wait for 2 sec-
onds, then reinstall battery pack
and turn on power (pp. 6, 7).
Close tab or use a new cassette
(p. 96).
Set Power switch to OFF and then
back to Camera mode.
Set to Auto Focus mode (p. 54).
Zoom out from subject (p. 23).
Focus manually (p. 53).
——
Set the DEMO MODE menu item to
“OFF” (p. 94).
Possible cause
Power source is not properly con-
nected.
Battery pack is not charged.
Dew in camcorder.
Safety function is in effect.
Erasure-protect tab on video cas-
sette is open.
Camcorder left in Recording
Standby mode for 5 minutes in
Tape Camera mode.
Manual Focus mode is engaged.
Zoom used on close subject.
Subject has little contrast in bright-
ness, or is full of horizontal or verti-
cal stripes.
Occurs when shooting subject with
strong contrast to the background.
Does not indicate a malfunction.
Camcorder is in Demo mode.

102
Appendix
Appendix
Symptom
No image appears
on connected TV
screen.
No image from an ex-
ternal source ap-
pears on the
camcorder screen.
Cannot rewind or fast
forward tape.
Video noise in image.
No sound.
Tape does not work.
Still images in Card
mode are rotated
180° upside down.
Motion images are
rotated 180° upside
down.
Possible cause
Video input channel on TV or TV
channel is not selected properly.
Audio/video/S-video cable is not
properly connected.
DV cable or audio/video/S-video
cable is not properly connected.
The cable connection does not
match the S-VIDEO IN menu setting.
Position at beginning or end of tape.
Using a cleaning tape
Dirty video heads.
Old or worn tape.
Using a 12-bit recording tape with
AUDIO menu item set to “AUDIO 2”.
Power switch is set to Camera
mode.
Media Selection switch is set to
Card mode.
Battery pack is depleted.
The images are recorded in self re-
cording with reversed grip.
Improper self recording.
Suggested solution
Select video input channel or TV
channel properly (p. 30).
Connect audio/video/S-video cable
properly (p. 30).
Connect DV cable or audio/video/S-
video cable properly (pp. 61, 62,
66).
Set the S-VIDEO IN menu item to
“ON” for S-video connection, or
“OFF” for video connection (p. 63).
Rewind or fast forward tape to de-
sired point (p. 27).
The cleaning tape will automatically
rewind after cleaning finishes (p.
xiv).
Call for service (p. 105) or use a
commercially available cleaning
tape (p. xiv).
Use a new cassette.
Set the AUDIO menu item to “AU-
DIO 1” or “AUDIO 1L2” (p. 70).
Set the Power switch to Playback
mode (p. 21).
Set the Media Selection switch to
Tape mode (p. 21).
Charge battery pack or replace it
with a fully charged one (pp. 6–8).
Transfer the data to PC (pp. 86–88),
and rotate the images 180° back by
using a commercially available edit-
ing software.
Turn on Rotate Playback (p. 51).
Playback mode

103
Appendix
Symptom
Cannot delete image
on card.
Cannot format card.
Battery pack is easily
depleted.
Clock has been re-
set.
Cassette will not
eject.
No image on monitor.
Viewfinder picture is
hard to see.
Monitor picture is
hard to see.
POWER/CHARGE
(RED) indicator
flashes in red when
charging battery
pack.
Cannot edit to con-
nected VCR.
Possible cause
Image is delete-protected.
——
Using camcorder in extremely cold
environment.
Battery pack is not fully charged.
Lithium battery is not properly in-
stalled.
Lithium battery is depleted.
Power source is not properly con-
nected.
Battery pack is not charged.
Camcorder is recording.
Backlight has been turned off.
Fluorescent lamp has burned out.
Viewfinder diopter is not properly
adjusted.
Inappropriate picture adjustments.
Inappropriate picture adjustments.
AC adapter or battery pack may
have malfunctioned.
Audio/video/S-video cable is not
properly connected.
Suggested solution
Cancel the protection setting (p.
81).
Contact your dealer for advise.
Warm up battery pack, for example
in your pocket, just before using it.
Charge battery pack sufficiently (p.
8).
Install lithium battery properly (p.
12).
Replace new lithium battery (p. 12).
Connect power source properly
(pp. 6, 9).
Charge battery pack sufficiently
(p. 8).
Stop recording and try again (p. 22).
Turn on backlight (p. 24).
Call for service (p. 105).
Adjust diopter (p. 18).
Adjust picture (p. 90).
Adjust picture (p. 90).
Call for service (p. 105).
Connect audio/video/S-video cable
properly (p. 61).
General
Card mode

104
Appendix
Appendix
Notes:
• This unit is equipped with a microprocessor. Its performance could be adversely affected by
external electrical noise or interference. If this should happen, turn off the power and disconnect
the unit from any power sources, including the lithium battery, etc. Then reconnect the power
sources to resume operation.
• If the characters displayed in the viewfinder or on the LCD monitor screen appear to malfunc-
tion, disconnect the power source and remove the lithium battery, then reconnect the power
source, insert the lithium battery, and turn the power on again. The characters on the monitor
should be normal. Set the date and time, then resume operation.
Symptom
Remote control does
not function.
“E007” is displayed
on the screen, and
unable to operate
normally.
Possible cause
REMOTE menu item is set to “OFF”.
Remote control battery has run
down.
Remote control used beyond oper-
ating range.
Intense daylight falling on
camcorder remote sensor.
Obstacle between remote control
and camcorder remote sensor.
The camcorder may be damaged.
Suggested solution
Set REMOTE menu item to “ON”
(p. 47).
Replace remote control battery with
new one (p. 13).
Use remote control within operating
range (p. 47).
Protect remote sensor from expo-
sure to intense daylight (p. 47).
Remove obstacle or use remote
control from different angle (p. 47).
Do not take out a cassette, and call
for service (p. 105).
General

105
Appendix
Specifications
Camcorder
Signal System: NTSC standard
Recording System: 2 rotary heads, helical scanning system
Cassette: Digital VCR Mini DV video cassette
Recording/Playback Time: 90 minutes (DVM60, LP mode)
Tape Speed: SP mode: 18.812 mm/second
LP mode: 12.555 mm/second
Pickup Device:
1
⁄
4
" (6.4 mm, effective size: 4.5 mm) CCD image sensor
(with approx. 1,330,000 pixels including optical black,
effective pixels: 690,000 pixels in Tape Camera mode,
1,250,000 pixels in Card Camera mode)
Lens: 10K optical zoom lens (F1.8, f=3.8–38.0 mm)
Lens Filter Diameter: 30 mm
Monitor: 2.5" (6.4 cm) CGSilicon
Built-in microphone: Electret stereo microphone
Color Temperature Compensation: Auto white balance with white balance lock
Minimum Illumination: 3 lux (15 lux measured by EIA standard) (with gain-up,
F1.8)
Still Image Compression System: JPEG base line conformance
Still Image Recording Format: JPEG (Exif2.2)
Still Image Recording Medium: SD Memory Card, MultiMediaCard
Power Requirement: DC 7.4 V
Power Consumption: 4.0 W (during camera recording in Tape Camera mode
using the viewfinder in Full Auto mode with the DIS
function on)
4.6 W (during camera recording in Tape Camera mode
using the LCD monitor in Full Auto mode with the DIS
function on and backlight in normal mode)
Operating Temperature: 32°F to 104°F (0°C to L40°C)
Operating Humidity: 30% to 80%
Storage Temperature: +4°F to 140°F (+20°C to L60°C)
Dimensions (WKHKD) (approx.): 3
1
⁄
4
"K 3
13
⁄
32
"K 4
1
⁄
16
"
(82.8 mm K 86.2 mm K 103.5 mm)
Weight (approx.): 1.12 lbs (510 g) (without battery pack, lithium battery,
video cassette, lens cap and card)
AC Adapter (UADP-0339TAZZ)
Power Requirement: AC 110–240 V, 50/60 Hz
DC Output: 10 V
Dimensions (WKHKD) (approx.): 1
31
⁄
32
"K 1
1
⁄
16
"K 2
19
⁄
32
"
(50.0 mm K 27.0 mm K 65.5 mm)
Weight (approx.): 0.22 lbs (100 g)
Specifications are subject to change without notice.
SERVICE INFORMATION (For the U.S.)
For the location of the nearest Sharp Authorized Service, or to obtain product literature,
accessories, supplies or customer assistance, please call 1-800-BE SHARP (1-800-237-
4277) or visit SHARP’s website (http://www.sharpusa.com).
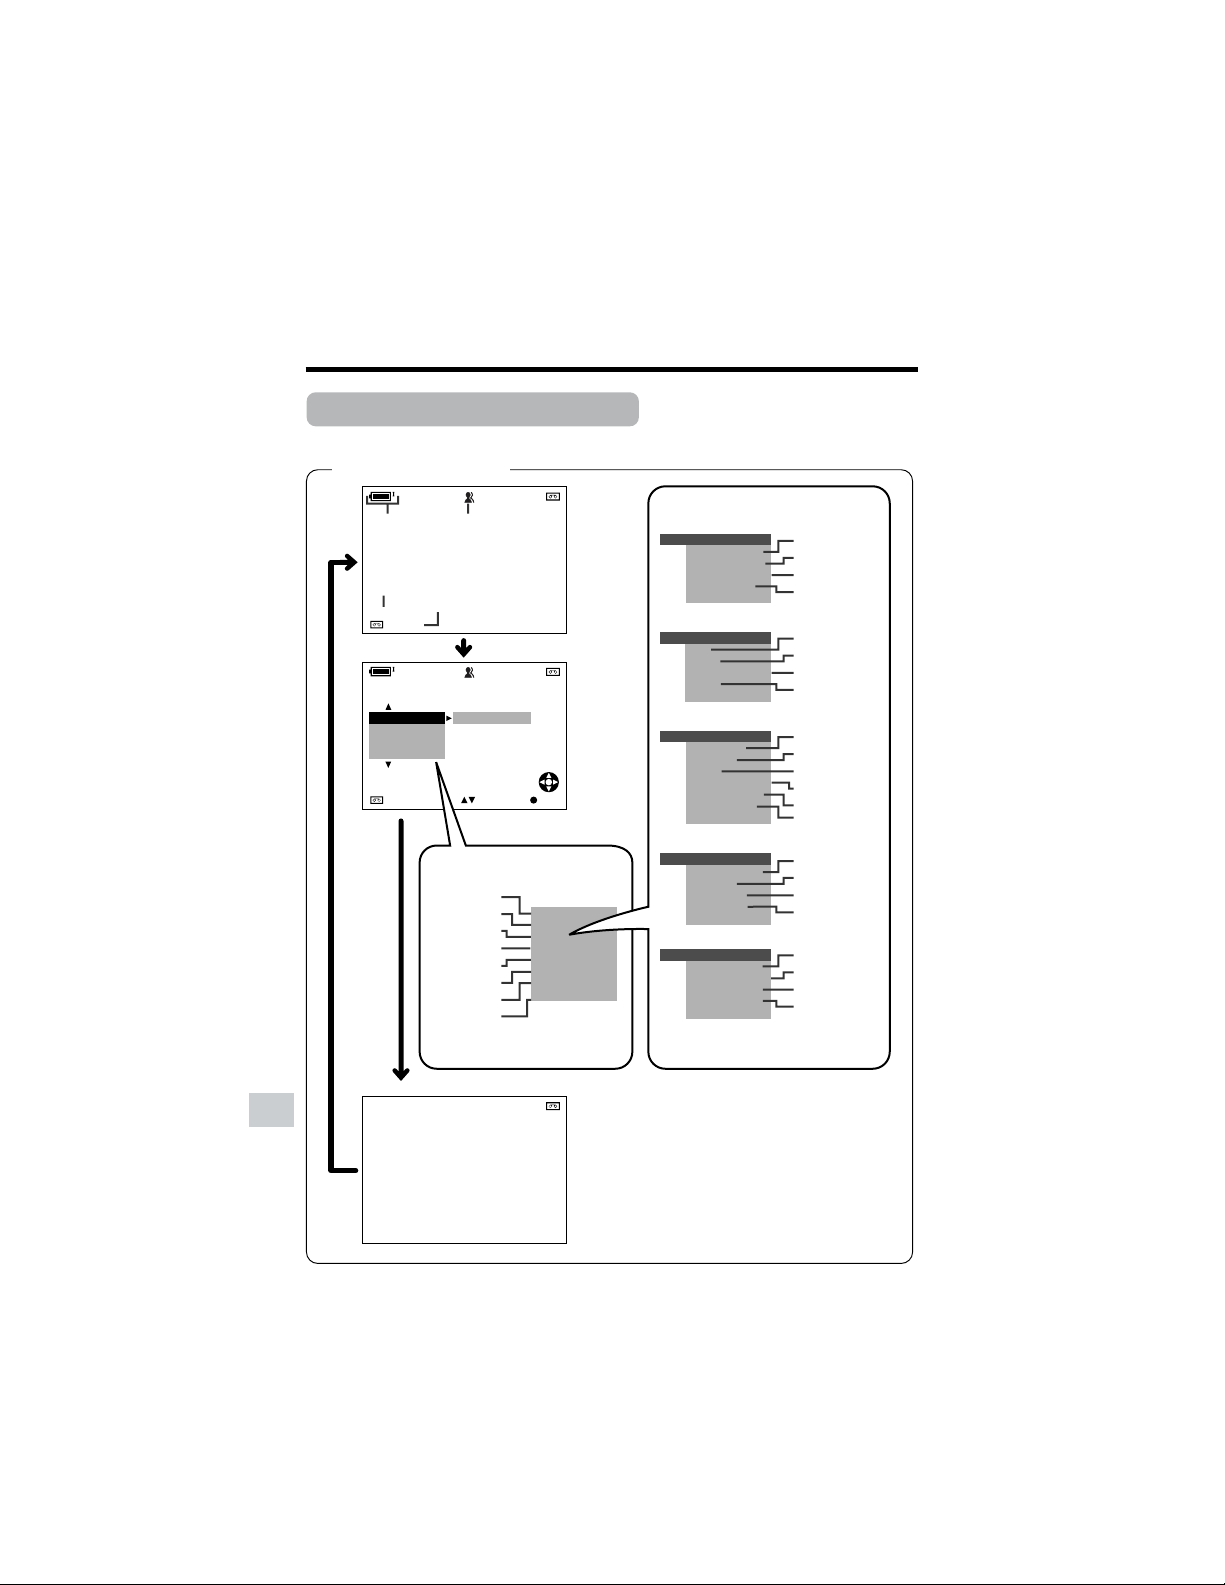
106
Appendix
Appendix
On-screen Display Index
AU TOAUTO
4002.2
03MA:01
JUN.
3 0min
AUTO
AU TOAUTO
3 0min
AUTO
SELECT
SET
BLC GAIN/
OFF
FADE
M
ENU
SCENE
M
ENU
FADE
M
ENU
SCENE
M
ENU
M
ANUAL SET
FOCUS
AUTO FOCUS
DATE DISP.
SETTING 1
QK.
DGTL
RETURN
ZOOM MI C
ZOOM
TAPE SPEED
RETURN
SETTING 2
DIS
16 9:
AUDI O MODE
RETURN
W
IND
OTHERS 1
OTHERS 2
LCD SET
BACKL I GHT
LCD BRI GHT
LCD COLOR
RETURN
VF BRIGHT
RETURN
DEMO MO D E
PHONES VOL
BEEP
REMOTE
DEFAULT
LANGUAGE
RETURN
T IME CODE
TC OUT
SETTING
12H 24H/
BLC GAIN/
p. 37
p. 33
p. 43
p. 45
Tape Camera mode
p. 39
p. 42
p. 46
p. 45
p. 93
p. 47
p. 91
p. 29
p. 94
p. 92
p. 60
p. 60
p. 15
p. 14
p. 91
p. 90
p. 90
p. 90
pp. 34, 35
p. 36
p. 32
p. 59
p. 54
p. 53
p. 54
p. 49
p. 26
p. 39
p. 58
p. 26
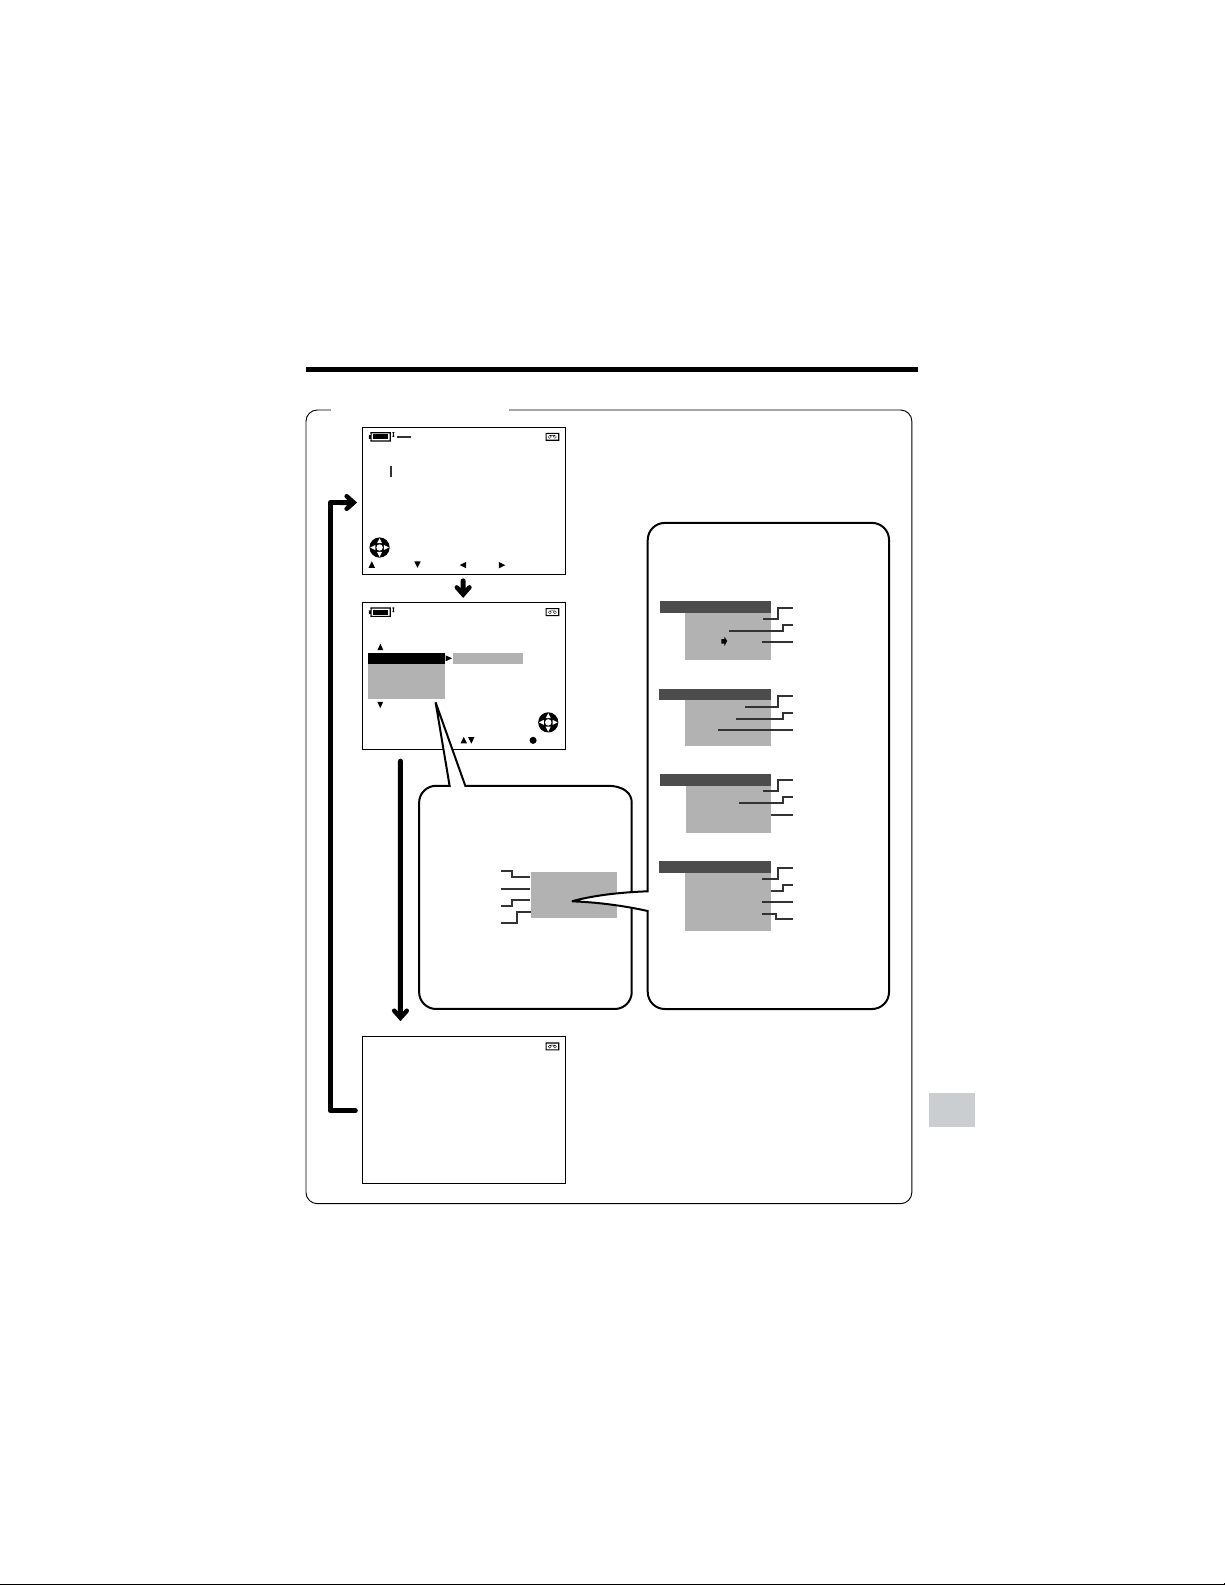
107
Appendix
DISP.
DUB
EFFECT
4002.2
03MA:01
JUN.
SELECT SET
OFF
OTHERS 1
BEEP
REMOTE
DEFAULT
RETURN
LCD SET
BACKL I GHT
LCD BRI GHT
LCD COLOR
RETURN
VF BRIGHT
DATE D I SP.
AUD I O DUB
PIC.EFFECT
M
ENU
DATE
AUDIO
PIC.
M
ENU
PLAYBACK
AUDI O
ANLG DGTL
RETURN
SET
OTHERS 2
T IME CODE
TC OUT
RETURN
S
-
VIDEO
IN
ROTATE PB
AUDIO
21
+
FFREWSTOPPLAY
p. 51
p. 70
p. 66
Tape Playback mode
p. 93
p. 47
p. 91
p. 60
p. 60
p. 63
p. 91
p. 90
p. 90
p. 90
p. 50
p. 69
p. 32
p. 49
p. 26
p. 70
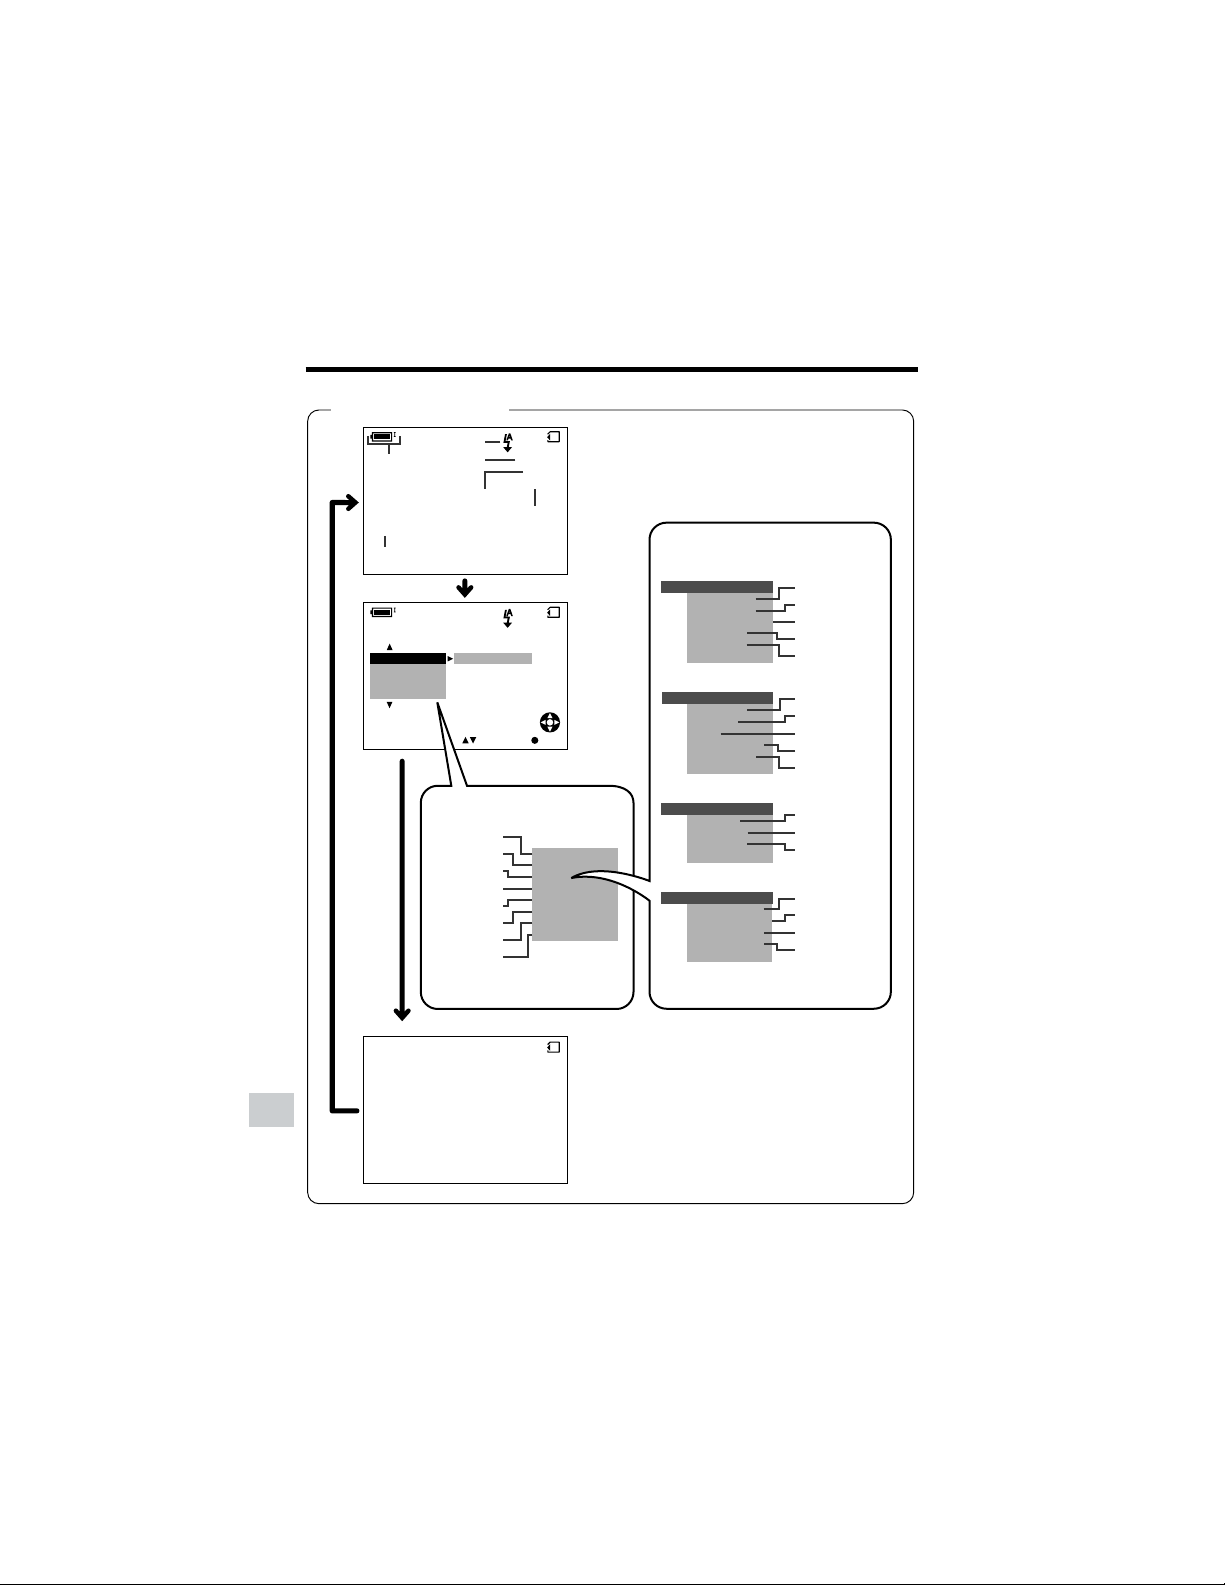
108
Appendix
Appendix
AU TOAUTO
4002.2
03MA:01
JUN.
AUTO
AU TOAUTO
AUTO
SELECT SET
OFF
M
ENU
SCENE
M
ENU
SELF T IMER
M
ENU
SCENE
M
ENU
M
ANUAL
SELF T I
M
ER
SET
FOCUS
AUTO FOCUS
DATE DISP.
LCD SET
BACKL I GHT
LCD BRI GHT
LCD COLOR
RETURN
VF BRIGHT
0821
][
/1219
ECONOMY
0821
][
/1219
SETTING 1
OTHERS 2
OTHERS 1
BEEP
REMOTE
DEFAULT
RETURN
LANGUAGE
DEMO
RETURN
FORMAT
SETTING
12H 24H/
RETURN
FLASH
REC
F I LE NO.
MODE
MODE
IMAGE SI ZE
RED EYE
BLC GAIN/
BLC GAIN/
p. 78
p. 71
p. 72
p. 74
p. 75
Card Camera mode
p. 93
p. 47
p. 91
p. 94
p. 92
p. 77
p. 15
p. 14
p. 91
p. 90
p. 90
p. 90
pp. 34, 35
p. 76
p. 32
p. 59
p. 54
p. 53
p. 54
p. 49
p. 26
p. 58
p. 73
p. 72
p. 74
p. 72
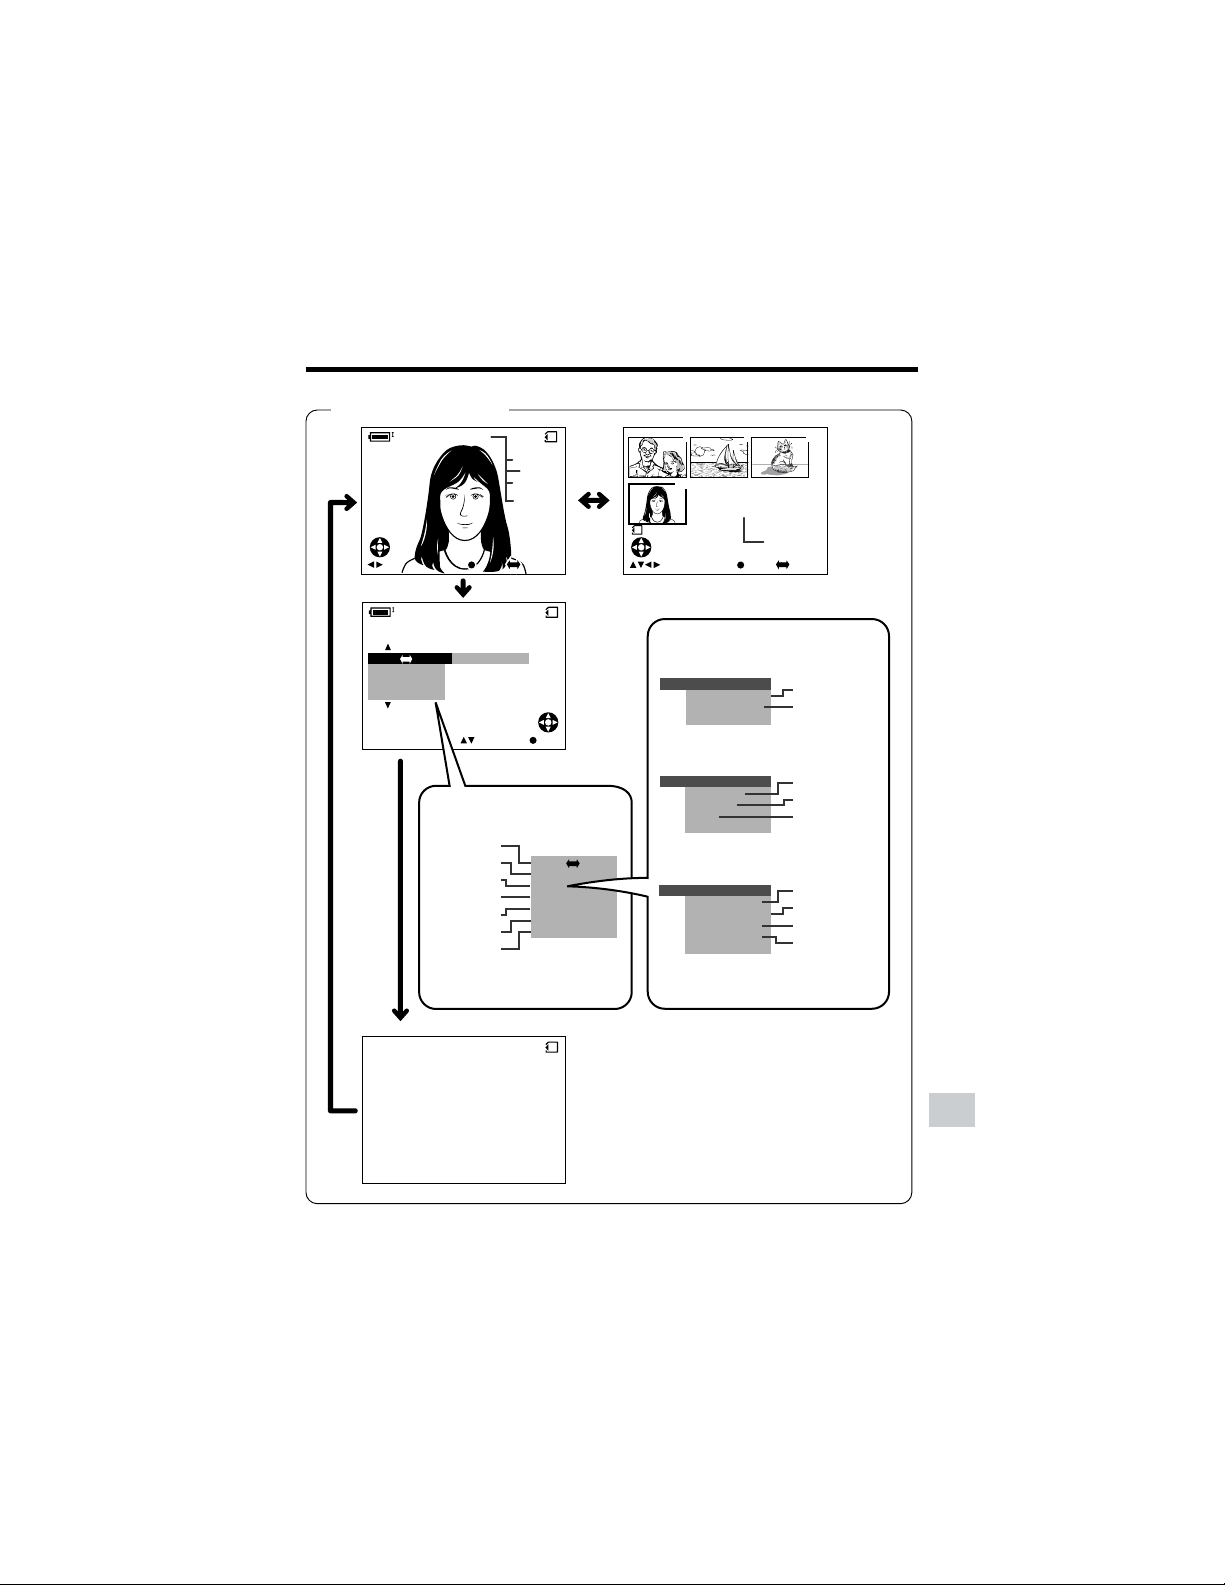
109
Appendix
SELECT SET
EXECUTE
LCD SET
BACKL I GHT
LCD BRI GHT
LCD COLOR
RETURN
VF BRIGHT
0821
][
/0110
OTHERS
BEEP
REMOTE
DEFAULT
RETURN
0100
-
00
2/2PAGE
NORMAL
1
FULLSELECT IMG MULTI
7
01
89
0821
][
/0110
NORMAL
F UL
UL
LS E L E C T I MG MULT IFULLSELECT IMG MULTI
FULL MULTI
M
ENU
DEL ETE ONE
PIC.EFFECT
DELETE ALL
DAT E DI SP.
PROTECT
PLAYBACK SET
SL IDE SHO
W
PRI.
RETURN
ORDER
FULL MULTI
M
ENU
DEL ETE ONE
PIC.EFFECT
0
-
010001
0
-
010001
Card Playback mode
p.89
pp. 84, 85
p. 93
p. 47
p. 91
p. 91
p. 90
p. 90
p. 90
p. 79
p. 50
p. 32
p. 82
p. 83
p. 81
p. 49
p. 79
p. 79
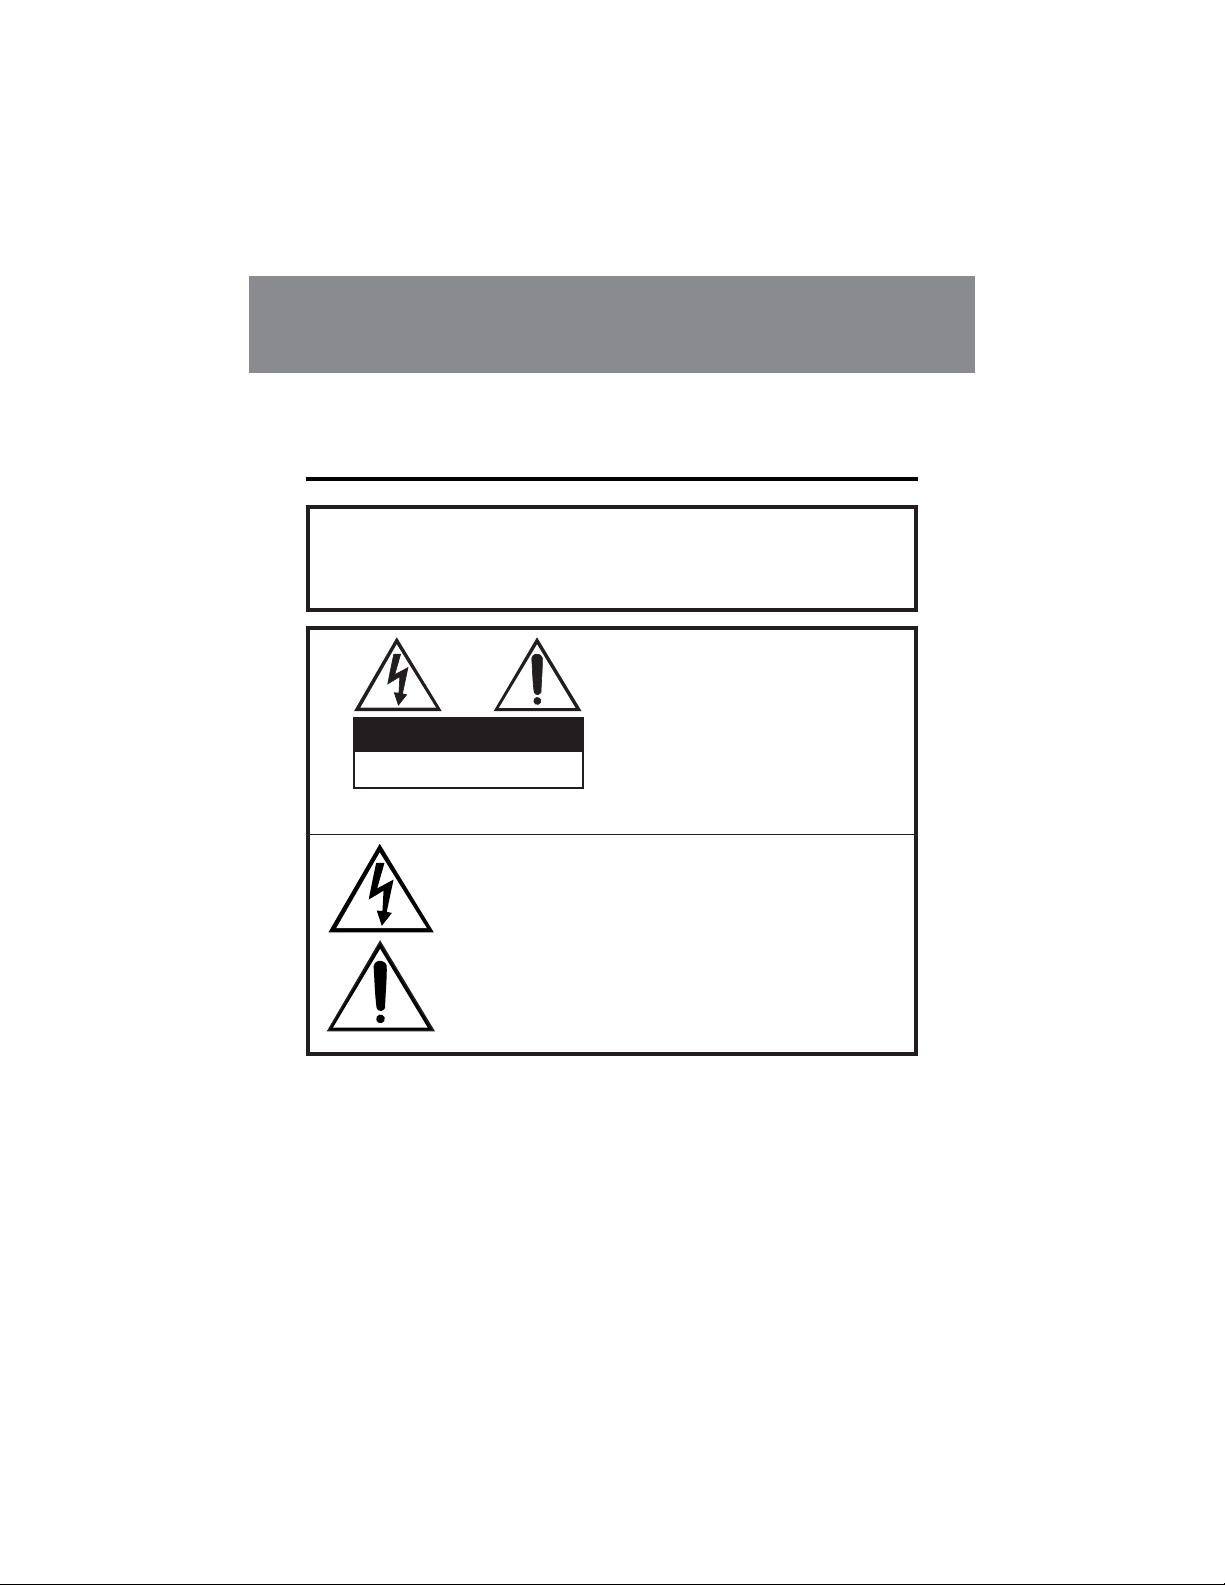
110
Guía de operación rápida
PRECAUCION
RIESGO DE SACUDIDA
ELÉCTRICA. NO ABRIR.
Información importante para los
consumidores de los EE.UU.
ADVERTENCIA: PARA REDUCIR EL RIESGO DE CAUSAR UN
INCENDIO O RECIBIR UNA DESCARGA
ELÉCTRICA, NO EXPONGA ESTE APARATO A LA
LLUVIA NI A LA HUMEDAD.
PRECAUCION:
PARA REDUCIR EL RIESGO DE
RECIBIR UNA DESCARGA
ELÉCTRICA NO RETIRE LA TAPA. EN
EL INTERIOR NO HAY PARTES QUE
DEBA REPARAR EL USUARIO.
SOLICITE LAS REPARACIONES AL
PERSONAL DE SERVICIO
CUALIFICADO.
Este símbolo avisa al usuario de la presencia de tensión
sin aislar en el interior del aparato que puede causar
descargas eléctricas peligrosas.
Este símbolo alerta al usuario de que existen instrucciones
de manejo y mantenimiento importantes en la información
escrita entregada con este aparato.
Guía de operación rápida en español

111
PRECAUCION
PARA IMPEDIR DESCARGAS
ELÉCTRICAS, INTRODUZCA LA
PATILLA ANCH
A EN LA RANURA
ANCHA, E INTRODUZCA
COMPLETAMENTE LA CLAVIJA.
(se aplica al adaptador de CA
suministrado)
PRECAUCION
Si el adaptador de CA se extravía
o tiene que ser cambiado,
adquiera otro del mismo tipo en el
centro de servicio SHARP de su
concesionario.
PARA TIRAR LA BATERÍA
CONTIENE BATERÍA DE IONES DE LITIO. ÉSTA DEBE RECICLARSE O
TIRARSE DE LA FORMA APROPIADA. PÓNGASE EN CONTACTO CON LAS
AGENCIAS LOCALES PERTINENTES PARA OBTENER INFORMACIÓN
SOBRE LOS PLANES DE RECICLADO Y ELIMINACIÓN EXISTENTES EN SU
ZONA DE RESIDENCIA.
PARA TIRAR EL PRODUCTO
Este producto utiliza soldadura de estaño y plomo, y su lámpara fluorescente
contiene una pequeña cantidad de mercurio. Debido a la conservación del
medio ambiente, puede que para tirar estos materiales deban seguirse
ciertos reglamentos. Para obtener información sobre cómo tirar o reciclar
estos materiales, póngase en contacto con las autoridades de su localidad o
con Electronics Industries Alliance (Alianza de Industrias de la Electrónica)
en la dirección de Internet: www.eiae.org.
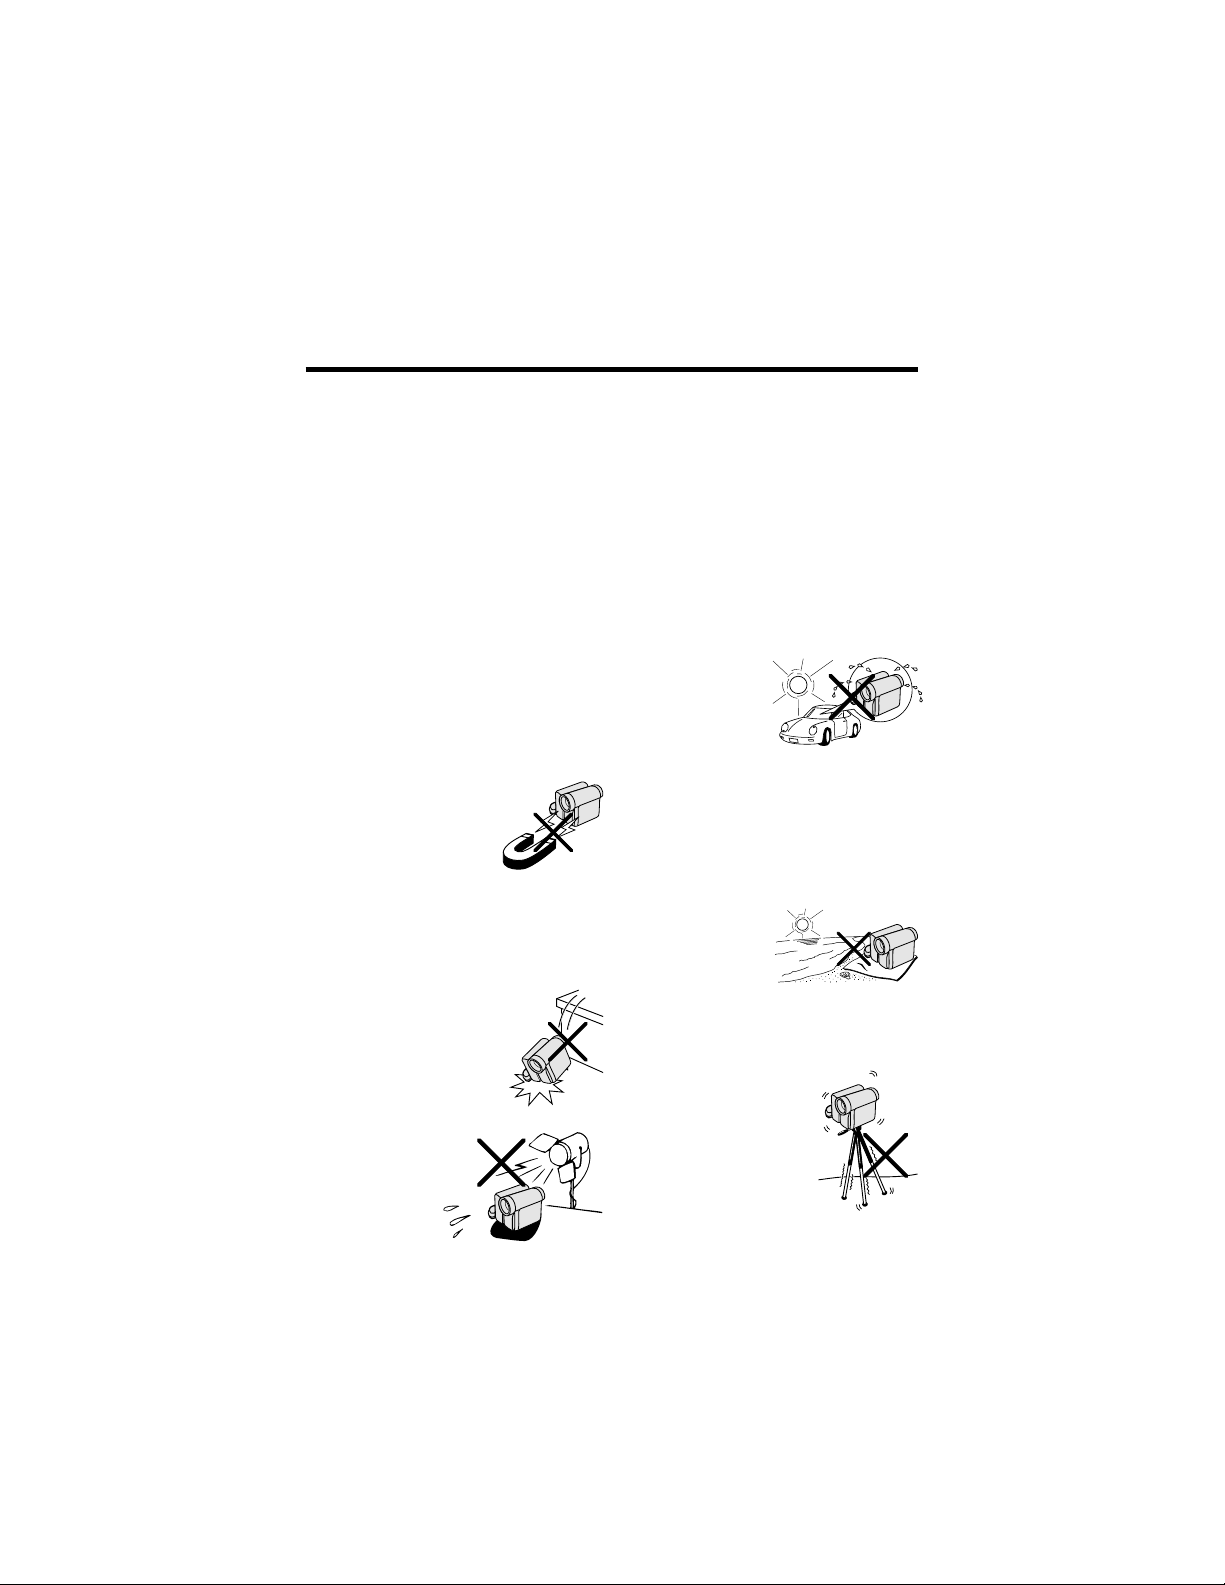
112
• Antes de grabar una escena importante,
realice una prueba de grabación, y luego
reproduzca para comprobar si la escena
se grabó correctamente. Si se produce
ruido, utilice una cinta de limpieza de
venta en el comercio para limpiar las
cabezas de vídeo (consulte la página xii).
• Cuando no utilice la videocámara, no
se olvide de extraer el videocasete,
desconectar la alimentación y
desenchufar la videocámara de la
fuente de alimentación.
• No dirija el objetivo hacia el sol.
No permita que la luz del sol directa
llegue al objetivo ni a la pantalla del
monitor LCD de la videocámara, tanto si
está realizando la grabación como si no,
porque esto podría dañar el sensor de
CCD o la superficie de la pantalla LCD.
Tenga mucho cuidado especialmente
cuando grabe en exteriores.
• Evite los campos magnéticos.
La utilización de la
videocámara cerca de
lámparas fluorescentes
fuertes, motores,
televisores u otros
campos magnéticos puede afectar
negativamente a las imágenes grabadas.
• La utilización de la videocámara cerca
de una emisora u otra fuente potente de
transmisión puede causar zumbidos o
deterioro en la imagen.
• Evite golpearla o dejarla caer.
No deje caer la videocámara ni
tampoco la someta a golpes
o vibraciones intensas. Los
golpes producidos durante
la grabación ocasionarán
ruidos en la imagen
grabada.
• Evite poner la
videocámara cerca
de equipos de
iluminación.
El calor producido
por las luces
incandescentes
puede deformar la videocámara o hacer
que ésta funcione mal.
• Respete siempre las prohibiciones o
restricciones relacionadas con la
utilización de equipos electrónicos en
vuelos comerciales o en otras áreas
susceptibles.
• Tenga cuidado con la temperatura y la
humedad.
Podrá utilizar su videocámara a
temperaturas de entre 32°F y 104°F (0°C y
L40°C), con una humedad relativa de
entre el 30% y el 80%. Durante el verano,
no deje el aparato en el interior de un
automóvil sin ventilación; no lo deje
tampoco bajo la luz del sol directa ni
cerca de fuentes
de calor intenso;
esto podría
estropear
considerablemente
la caja del aparato
y su circuito.
• Evite situaciones en las que el agua, la
arena, el polvo u otras sustancias
extrañas puedan entrar en la
videocámara, y no utilice ni deje su
videocámara en lugares con excesivo
humo, vapor o humedad.
En estos ambientes pueden producirse
fallos en el funcionamiento o se puede
formar moho en el
objetivo. Asegúrese
de guardar este
aparato en un lugar
bien ventilado.
•
Algunos trípodes pequeños y portátiles
quizá se acoplen mal a la videocámara, y
puede que no sirvan de apoyo seguro.
Utilice siempre trípodes fuertes y estables.
• Cuando utilice su
videocámara en un
ambiente frío, la pantalla
del monitor LCD
aparecerá a menudo
menos brillante
inmediatamente después
de conectar la
alimentación. Esto no es
ningún fallo de funcionamiento. Para
evitar que la videocámara se enfríe
excesivamente, envuélvala en un paño
grueso (una manta, etc.).
Precauciones

113
siguiendo las instrucciones del
fabricante, y utilizando los accesorios
de montaje recomendado por él.
9. La combinación
del producto y un
carrito deberá
moverse con
mucho cuidado.
Las paradas
repentinas, la
fuerza excesiva y las superficies
irregulares pueden ser la causa de
que la combinación del producto y
el carrito se vuelquen.
10. Ventilación—Las ranuras y aberturas
de la caja sirven para la ventilación
del producto, y para asegurar un
funcionamiento fiable del mismo y
evitar que éste se recaliente, por lo
tanto, éstas no deberán taparse. Las
aberturas no deberán taparse nunca
colocando
el producto
en una
cama, sofá,
alfombra u
otras
superficies similares. Este producto
no deberá colocarse en una
instalación empotrada como, por
ejemplo, un mueble librería o una
estantería, a menos que disponga de
la ventilación apropiada o se
cumplan las instrucciones del
fabricante.
11. Fuentes de alimentación—Este
producto sólo deberá ser utilizado
con el tipo de fuente de
alimentación indicado en la etiqueta
de características. Si no está seguro
del tipo de alimentación empleado
en su casa, consulte a su
concesionario o a la compañía
eléctrica local. Para los productos
que van a ser utilizados con energía
de baterías u otras fuentes, consulte
las instrucciones de manejo.
1. Lectura de las instrucciones—Antes
de utilizar este producto deberán
leerse todas las instrucciones de
seguridad y manejo.
2. Conservación de las instrucciones—
Las instrucciones de seguridad y
manejo deberán guardarse para
poder consultarlas en futuro en caso
de ser necesario.
3. Cumplimiento de las advertencias—
Deberán cumplirse todas las
advertencias del producto y de las
instrucciones de manejo.
4. Cumplimiento de las instrucciones—
Deberán seguirse todas las
instrucciones de manejo.
5. Limpieza—Desenchufe este
producto de la toma de corriente de
la pared antes de limpiarlo. No
utilice agentes de limpieza líquidos
ni en aerosol. Utilice un paño
húmedo para hacer la limpieza.
6. Aditamentos—No utilice aditamentos
que no sean recomendados por el
fabricante del producto, porque
pueden causar peligros.
7. Agua y humedad—No utilice este
producto cerca del agua y la
humedad como, —por ejemplo, cerca
de una bañera, lavabo, fregadero de
cocina o lavadora; no lo utilice
tampoco en un sótano húmedo, cerca
de una piscina o en otros lugares
similares.
8. Accesorios—No coloque este
producto sobre un carrito, soporte,
trípode, ménsula o mesa inestable. El
producto podría caerse y causar
lesiones
graves a un
niño o a un
adulto, y
también
podría
estropearse. Utilícelo solamente con
un carrito, soporte, trípode, ménsula o
mesa recomendado por el fabricante,
o vendido con el producto. Cuando
quiera que monte el producto hágalo
AVISOS DE SEGURIDAD IMPORTANTES

114
12. Puesta a tierra o polarización—Este
producto puede estar equipado con
una clavija de alimentación de
corriente alterna polarizada (una
clavija con una patilla más ancha
que la otra). Esta clavija sólo entrará
en la toma de corriente de una
forma, lo que constituye una
característica de seguridad. Si no
puede introducir a fondo la clavija en
la toma de corriente, pruebe
invirtiendo la clavija. Si la clavija
sigue sin poder introducirse en la
toma de corriente, póngase en
contacto con un electricista para que
le cambie la toma de corriente
obsoleta. No anule la característica
de seguridad de la clavija
polarizada.
13. Protección de cables de
alimentación—Los cables de
alimentación deberán instalarse de
forma que nadie camine sobre ellos
ni queden pellizcados por objetos
colocados encima o contra ellos,
poniendo mucha atención a las
clavijas, receptáculos y al punto
donde entran y salen del producto.
14. Tormentas eléctricas—Para que este
producto disponga de una mayor
protección durante una tormenta
eléctrica, o para cuando se deje sin
atender durante un largo periodo de
tiempo, desenchúfelo de la toma de
corriente y desconecte la antena o
el sistema de cable. Esto impedirá
que el producto se estropee debido
a las tormentas eléctrica o a la
sobretensión en la línea de
alimentación.
15. Líneas de alimentación—Una
antena exterior no deberá colocarse
cerca de líneas de alimentación
elevadas ni tampoco cerca de luces
eléctricas o circuitos de
alimentación, ni donde pueda caer
encima de tales líneas de
alimentación o circuitos. Cuando
instale un sistema de antena exterior
deberá tener mucho cuidado para
que éste no toque tales líneas de
alimentación o circuitos porque el
contacto con ellos podría causar un
accidente mortal.
16. Sobrecarga—No sobrecargue las
tomas de corriente de la pared, los
cables de extensión o los
receptáculos integrales de otros
equipos porque existe el riesgo de
que se produzca un incendio o una
descarga eléctrica.
17. Entrada de objetos y líquidos—No
meta nunca objetos de ningún tipo
en este producto a través de las
aberturas
porque
pueden tocar
puntos de
tensión
peligrosos o
cortocircuitar partes que puedan
causar un incendio o una descarga
eléctrica. No derrame nunca líquidos
de ningún tipo en el producto.
18. Servicio—No intente reparar este
producto usted mismo ya que al
abrirlo o retirar las cubiertas puede
exponerse a una tensión peligrosa o
a otros peligros. Solicite las
reparaciones al personal de servicio
cualificado.

115
19. Daños que requieren ser
reparados—Desenchufe este
producto de la toma de corriente y
solicite las reparaciones al personal
de servicio cualificado cuando se
produzcan las condiciones
siguientes:
a. Cuando el cable de alimentación
o su clavija estén estropeados.
b. Si se ha derramado líquido, o
han entrado objetos, en el interior
del producto.
c. Si el producto ha estado
expuesto a la lluvia o al agua.
d. Si el producto no funciona
normalmente siguiendo las
instrucciones de manejo. Ajuste
solamente los controles indicados
en las instrucciones de manejo, ya
que el ajuste incorrecto de otros
controles puede causar daños y
tal vez se requiera un trabajo de
reparación extensivo por parte de
un técnico cualificado para
devolver el producto a su estado
de funcionamiento normal.
e. Si el producto se ha caído o se
ha estropeado de cualquier
forma.
f. Cuando el producto muestre un
cambio visible en su
rendimiento,—esto indica la
necesidad de tener que realizar
reparaciones.
20. Partes de recambio—Cuando sea
necesario utilizar partes de
recambio, asegúrese de que el
técnico de servicio emplee aquellas
que hayan sido especificadas por el
fabricante o que tengan las mismas
características que las partes
originales. Los cambios no
autorizados pueden causar un
incendio, descargas eléctricas u
otros peligros.
21. Comprobación de seguridad—Al
terminar cualquier trabajo de
mantenimiento o reparación en este
producto, pida al técnico de servicio
que realice las comprobaciones de
seguridad para determinar si el
producto se encuentra en
condiciones de funcionamiento
apropiadas.
22. Montaje en la pared o en el techo—
El producto deberá montarse en una
pared o en un techo sólo como lo
recomienda su fabricante
23. Calor—El producto deberá
instalarse lejos de fuentes de calor
tales como radiadores, salidas de
calor, estufas y otros aparatos
(incluyendo amplificadores) que
produzcan calor.
• No cortocircuite, cargue, desmonte o
caliente la pila de litio.
• Si la pila de litio tuviera fugas retírela,
limpie bien su compartimiento y luego
introduzca una pila nueva.
• La pila de litio durará un año
aproximadamente si se utiliza bajo
condiciones normales.
Notas acerca de la utilización
de la pila de litio
AVISO La pila utilizada en este aparato
puede constituir un riesgo de incendio o
quemadura química si no se maneja de
la manera apropiada. No la cargue,
desarme, caliente a más de 100°C ni
incinere. Cambie la pila por una del tipo
CR1216 en el caso de la videocámara y
por una del tipo CR2025 en el caso del
mando a distancia. Las pilas de
recambio deberán haber sido fabricadas
por la compañía Toshiba Battery Co., Ltd.
El uso de otras pilas podría presentar un
riesgo de incendio o explosión. Retire
rápidamente la pila usada, y manténgala
alejada de los niños. No desarme la pila
ni la tire al fuego.
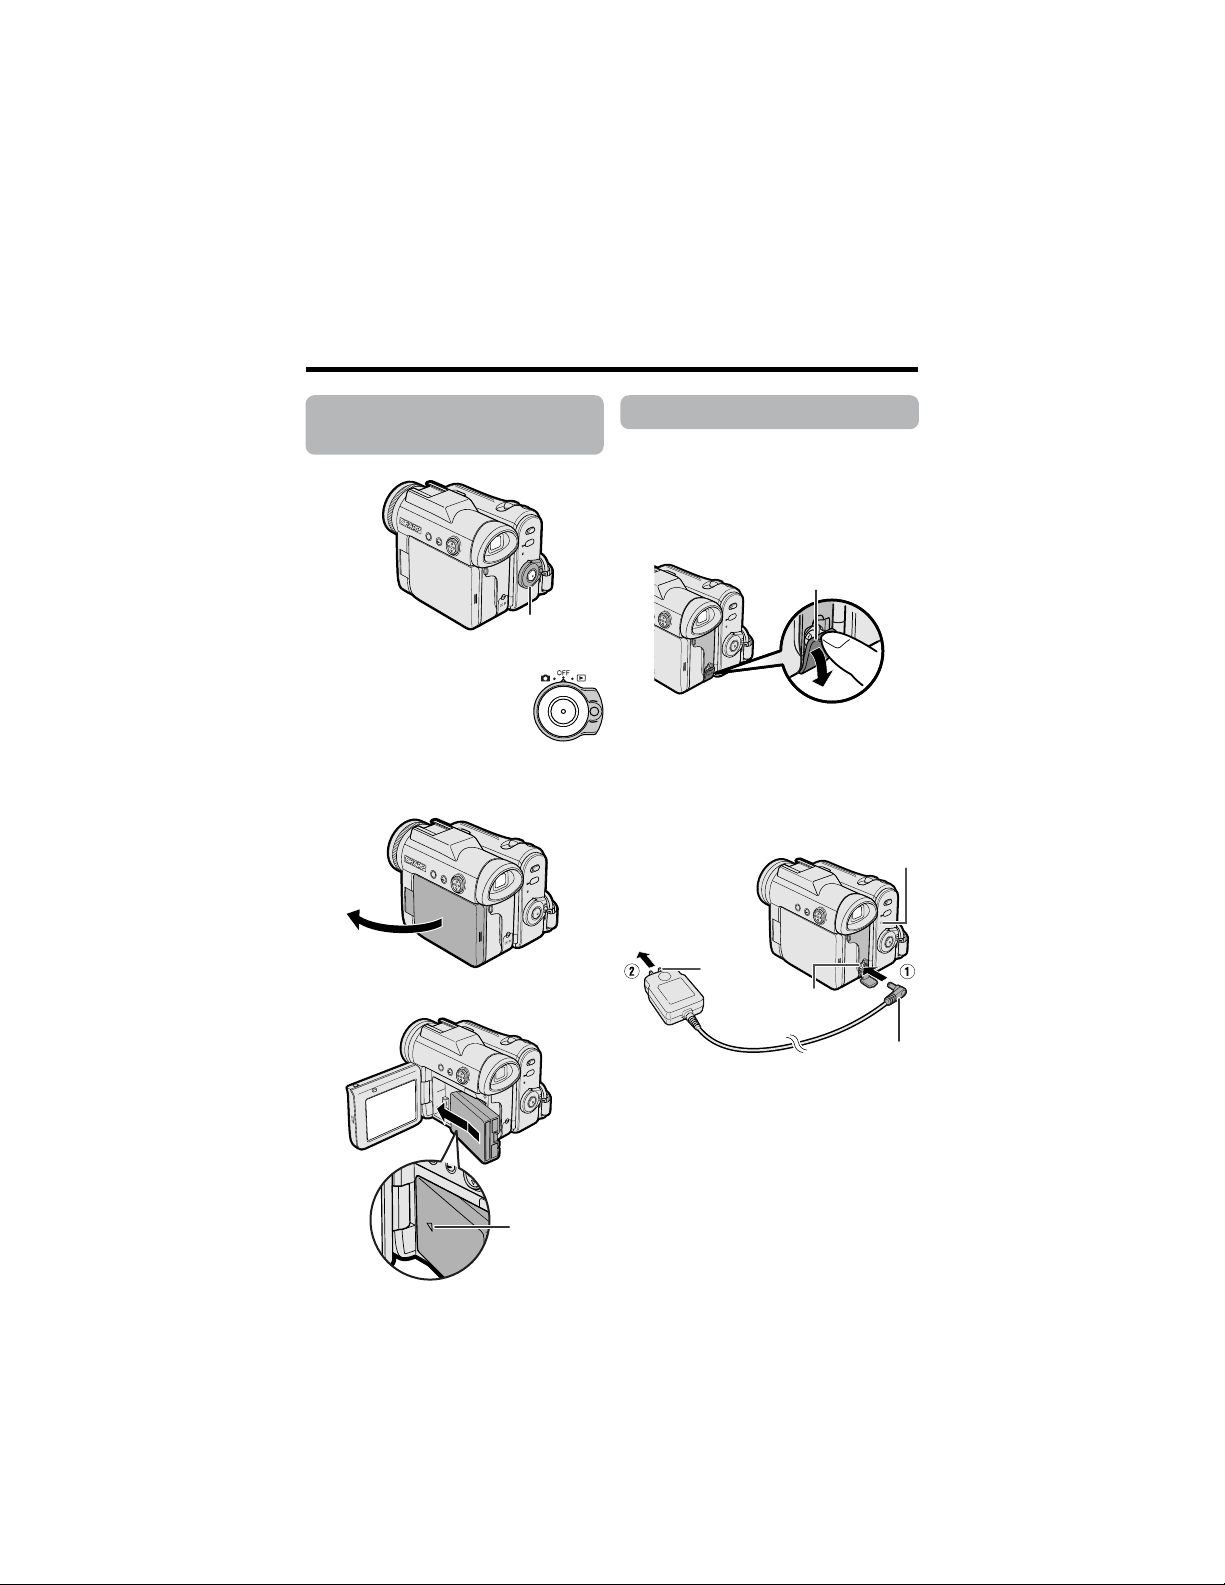
116
Guía de operación rápida
90˚
Colocación de la
batería
1
Asegúrese de que el
interruptor de
alimentación esté en
OFF.
2 Abra el monitor LCD de manera que
forme un ángulo de 90° con el cuerpo
de la videocámara.
3 Deslice la batería en el sentido de la
flecha con la marca “m” hacia fuera.
Carga de la batería
1
Coloque la batería en la videocámara
y asegúrese de que el interruptor de
alimentación esté en OFF.
2 Abra la cubierta de la toma DC IN.
3 Inserte la clavija de CC en la toma
DC IN de la videocámara (1) y
enchufe la clavija de CA en una toma
de corriente (2).
• El indicador POWER/CHARGE (RED)
se enciende en rojo.
• El indicador POWER/CHARGE (RED)
se apaga cuando se carga la
batería.
4 Desconecte la clavija de CC de la
toma DC IN, y luego desconecte el
adaptador de CA de la toma de
corriente.
Interruptor de
alimentación
Cubierta de la toma DC IN
A una toma de
corriente
Clavija de
CA
Toma DC IN
Clavija de CC
Indicador POWER/CHARGE
(RED)
Marca “m”
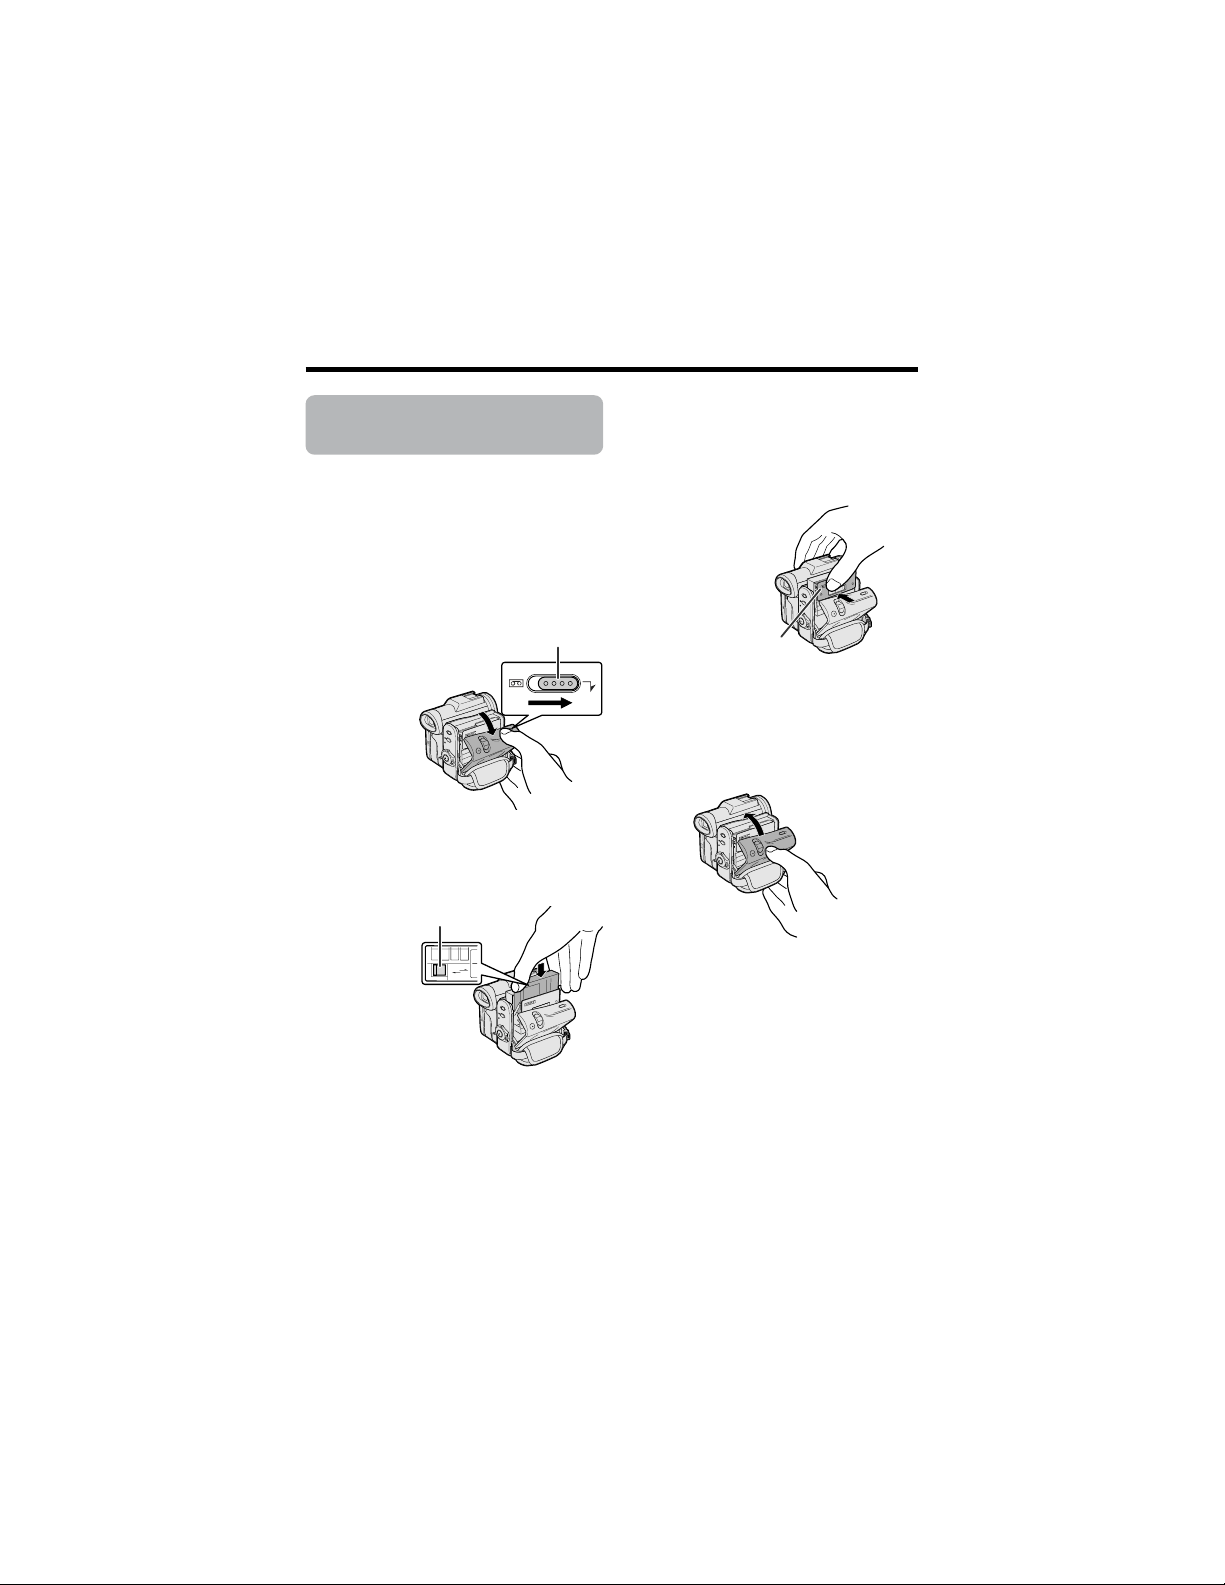
117
SAVE
REC
Inserción de un
casete
1 Coloque la fuente de alimentación en
la videocámara, y luego deslice y
sujete el dispositivo de abertura de la
puerta del videocompartimiento del
casete según abre la puerta.
• Después del sonido de confirmación,
el portavideocasete se extenderá y
abrirá automáticamente.
2 Inserte completamente un
minivideocasete DV de venta en el
comercio con la ventanilla hacia
fuera, y con la lengüeta de protección
contra borrado hacia arriba.
3
Pulse suavemente la marca “PUSH”
hasta que el portavideocasete encaje
en posición produciendo un chasquido.
• El portavideocasete se introducirá
automáticamente.
4 Espere a que el portavideocasete se
pliegue completamente. Cierre la
puerta del compartimiento
presionando sobre el centro hasta
que quede cerrada haciendo un ruido
seco.
Extracción
Realice el paso 1 de arriba y luego saque el
videocasete.
Dispositivo de abertura de la puerta del
compartimiento del casete
Lengüeta de protección contra
borrado
Marca “PUSH”
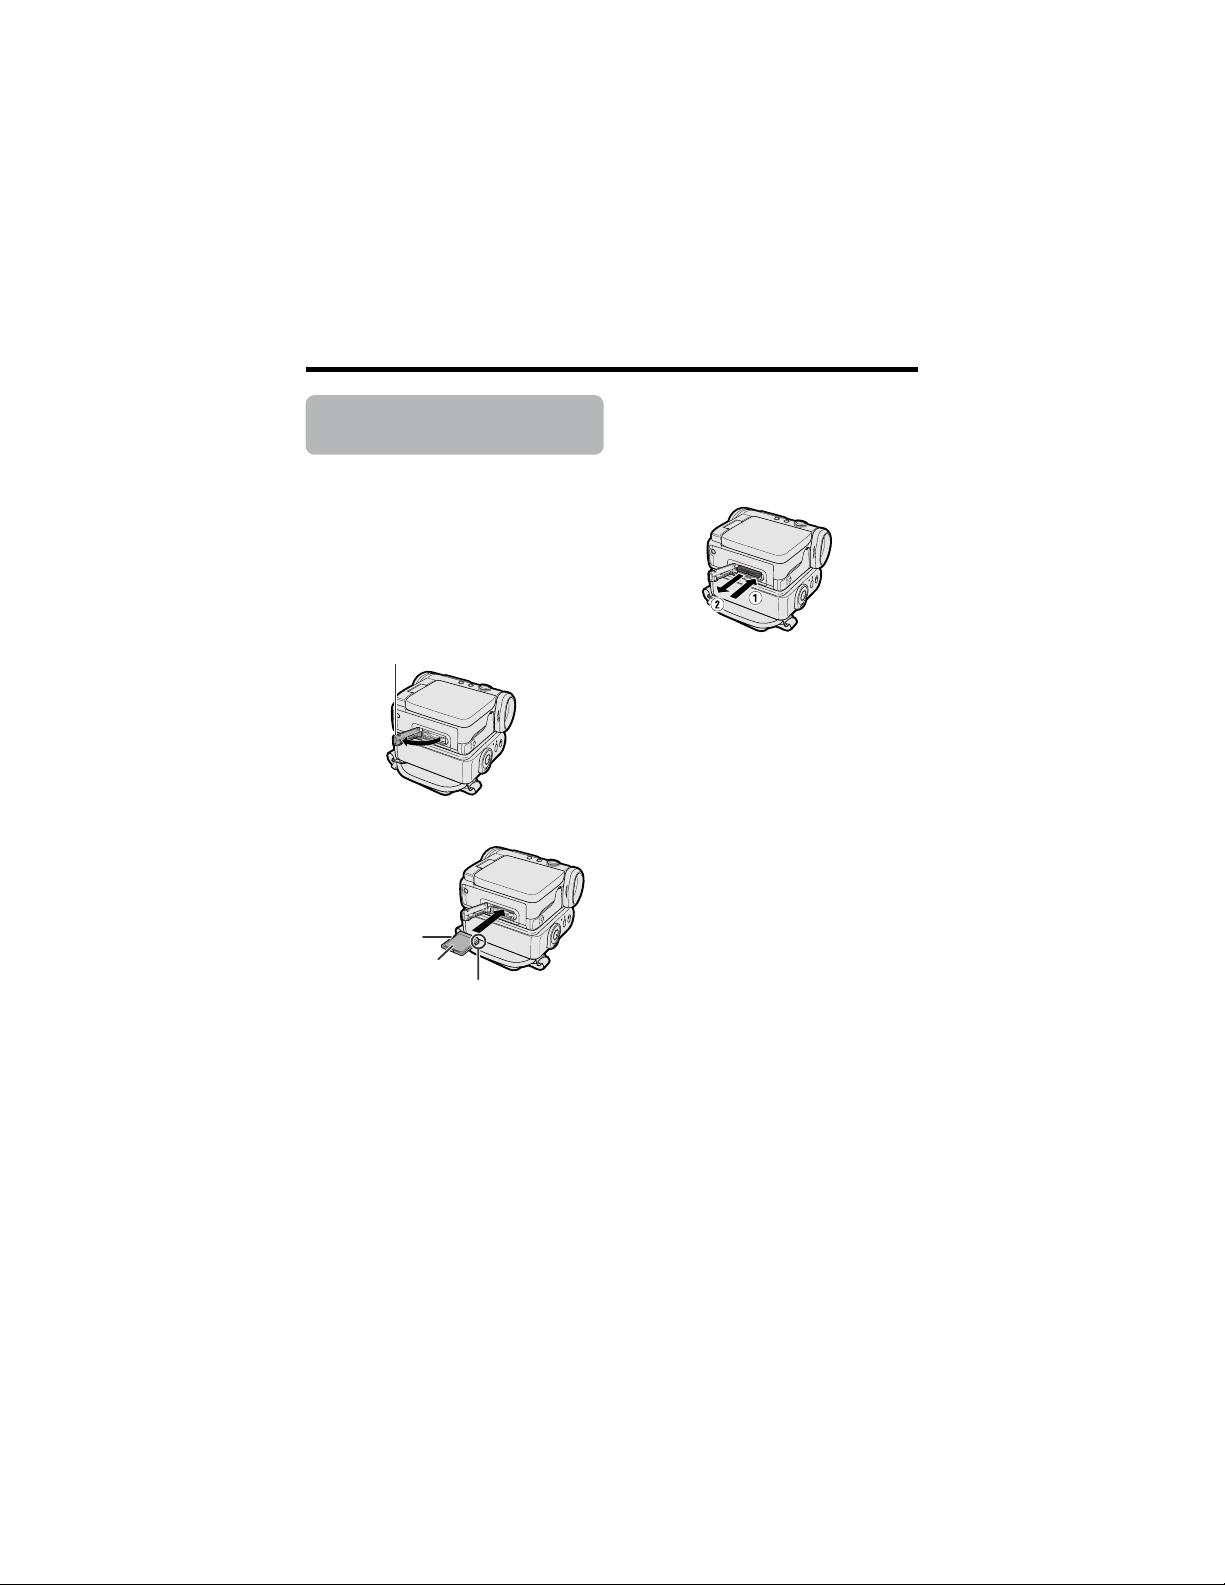
118
Guía de operación rápida
Inserción de una
tarjeta
Para almacenar imágenes fijas podrá
utilizar una tarjeta de memoria SD
(suministrado) o una tarjeta MultiMediaCard
(de venta en el comercio).
1 Asegúrese de que el interruptor de
alimentación esté en OFF.
2 Abra la cubierta de la ranura de la
tarjeta.
3 Inserte a fondo una tarjeta en la
ranura como se muestra abajo.
4 Cierre firmemente la cubierta de la
ranura de la tarjeta.
Extracción
Realice los pasos 1 y 2 anteriores, empuje
la tarjeta y retírela lentamente (1). Luego
saque la tarjeta recta (2) como se muestra
más abajo.
Nota:
• No puede utilizar una tarjeta SmartMediaE
ni el medio Memory StickE. En este
manual de manejo, “tarjeta” se refiere a la
tarjeta de memoria SD o a la tarjeta
MultiMediaCard.
Cubierta de la ranura de tarjeta
Interruptor de
protección
contra escritura
Esquina recortada
Etiqueta
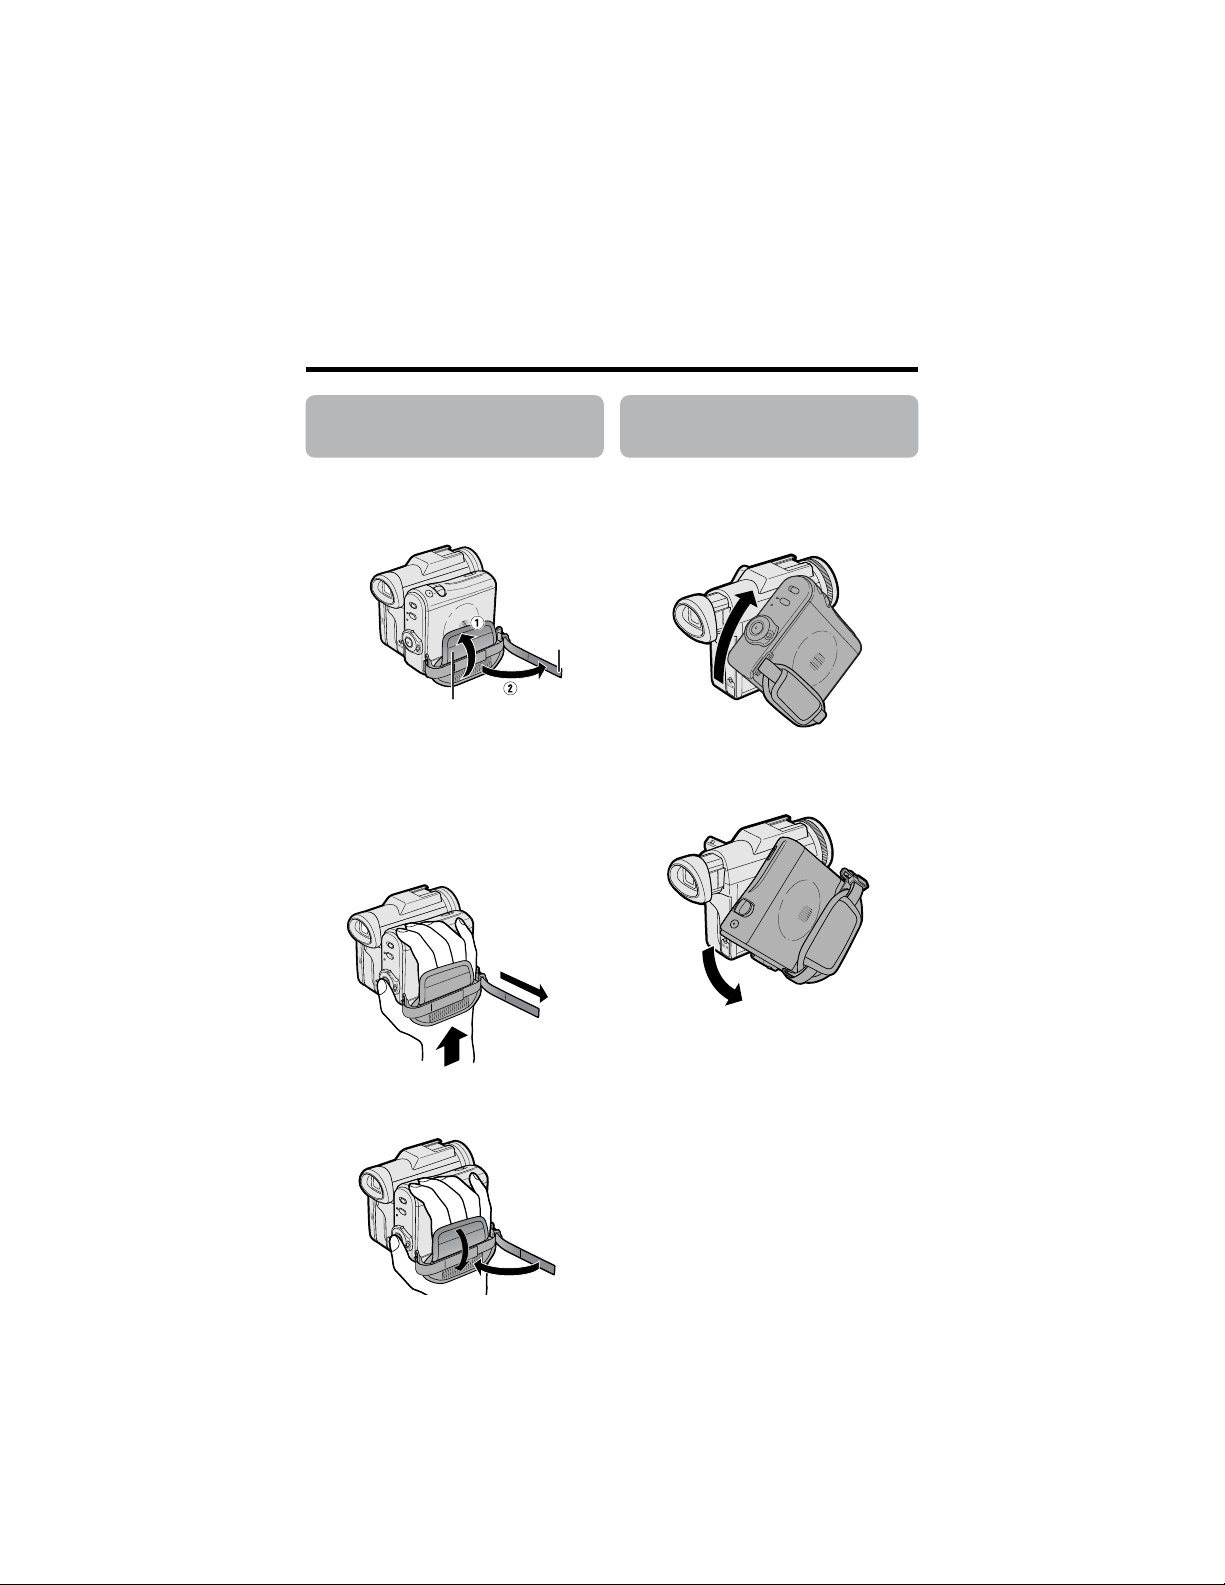
119
Ajuste de la correa
para la mano
1
Abra la solapa de la correa para la
mano (1) y la correa de empuñadura
(2).
2 Afloje la correa de empuñadura, pase
su mano derecha a través de la
correa para la mano, y ponga su
dedo pulgar cerca del botón de inicio/
parada y su dedo corazón encima del
control del zoom motorizado. Luego,
tire firmemente de la correa de
empuñadura hasta que quede bien
colocada.
3 Pliegue los cierres Velcrob de la
correa de empuñadura y de la solapa
de la correa para la mano.
Utilización de la
empuñadura
Gire la empuñadura 135° hacia delante o
90° hacia abajo para poder grabar
imágenes fácilmente desde un ángulo alto o
bajo (consulte la página 20).
Nota:
• La empuñadura no puede girar cuando la
videocámara está instalada en un trípode.
Correa de
empuñadura
Solapa de la correa para la mano
135°
90°
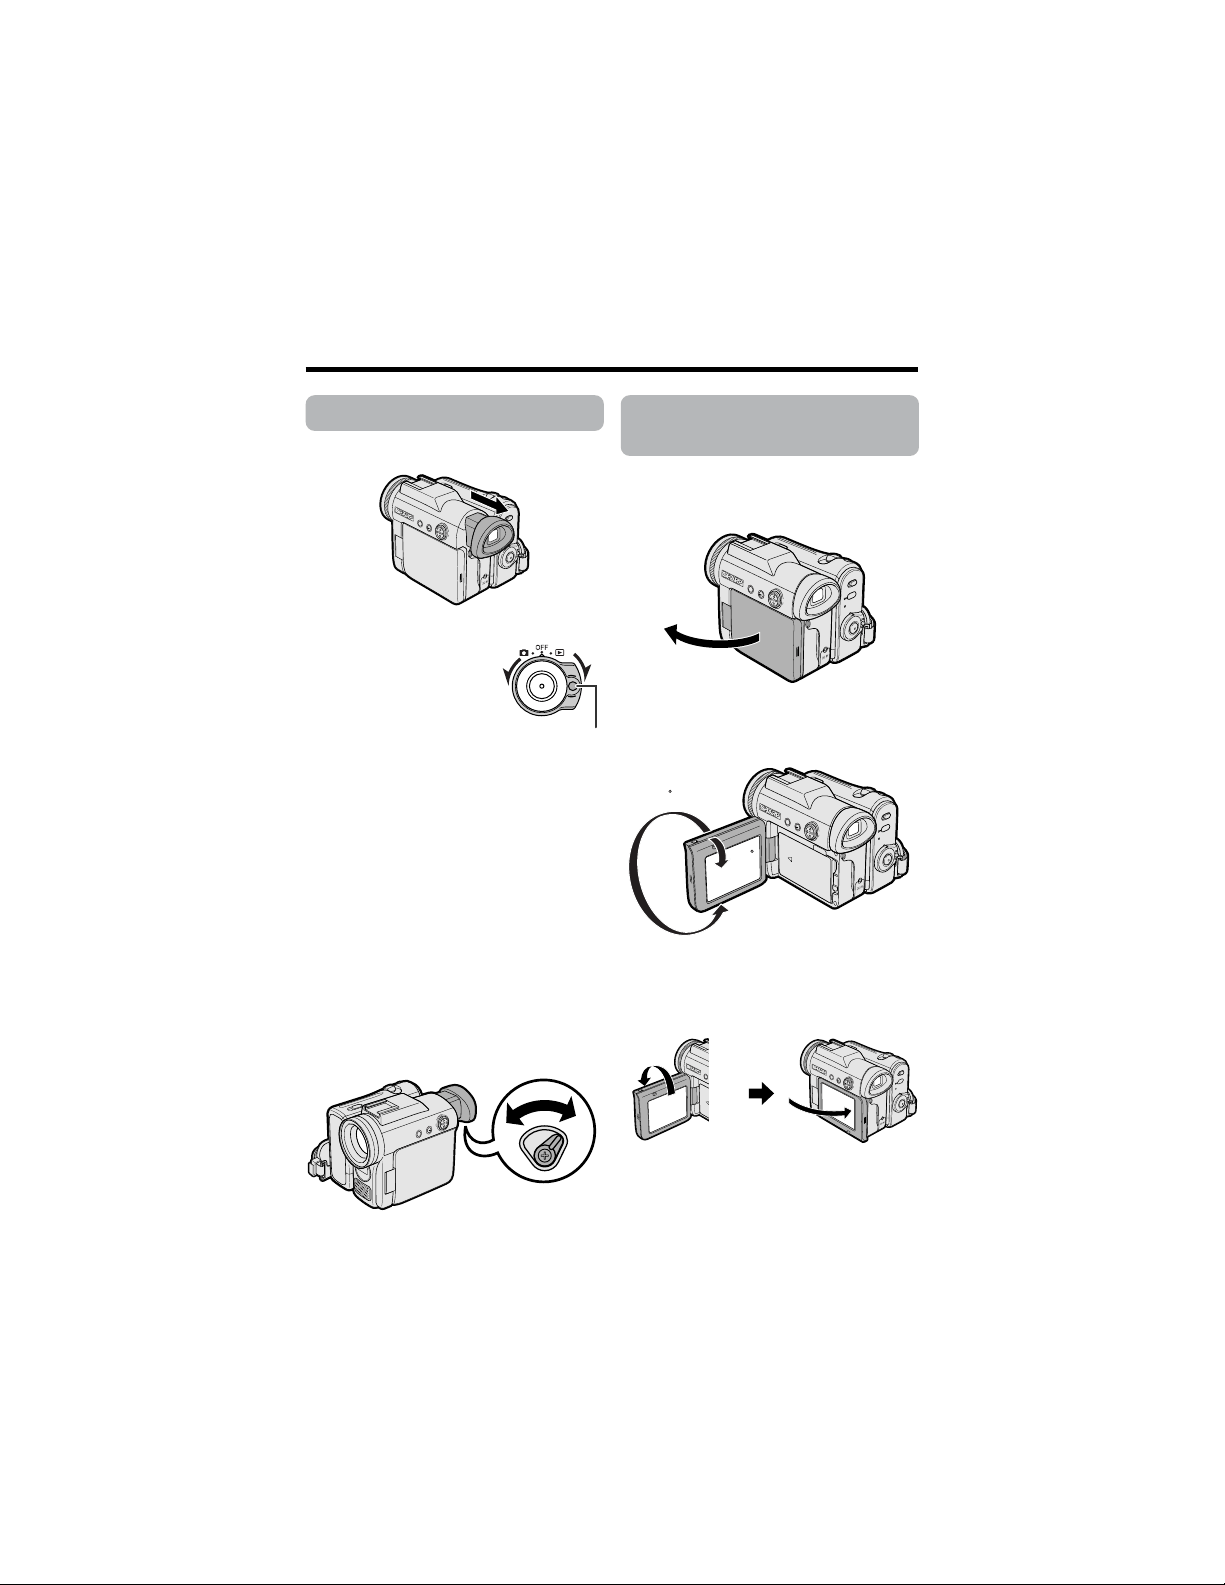
120
Guía de operación rápida
Utilización del visor
1
Saque completamente el visor.
2 Mantenga pulsado el
botón de bloqueo y
ponga el interruptor de
alimentación en v o
w.
Ajuste de dioptrías
Ajuste las dioptrías según su vista cuando
no pueda ver claramente la imagen del
visor o los caracteres de la visualización en
pantalla.
1 Saque completamente el visor.
2 Mantenga pulsado el botón de
bloqueo y ponga el interruptor de
alimentación en v.
3 Mientras mira a través del visor, gire
el dial ajuste de dioptrías hasta que
los indicadores del visor puedan
verse claramente.
Utilización del
monitor LCD
1
Abra el monitor LCD de manera que
forme un ángulo de 90° con el cuerpo
de la videocámara.
2 Ajuste el monitor LCD con un ángulo
que permita ver fácilmente la imagen
en la pantalla.
• También puede plegar el monitor
LCD dentro de la videocámara con la
pantalla hacia fuera para ver la
reproducción en el monitor.
90˚
180
90
90
Botón de bloqueo
Dial de ajuste de dioptrías
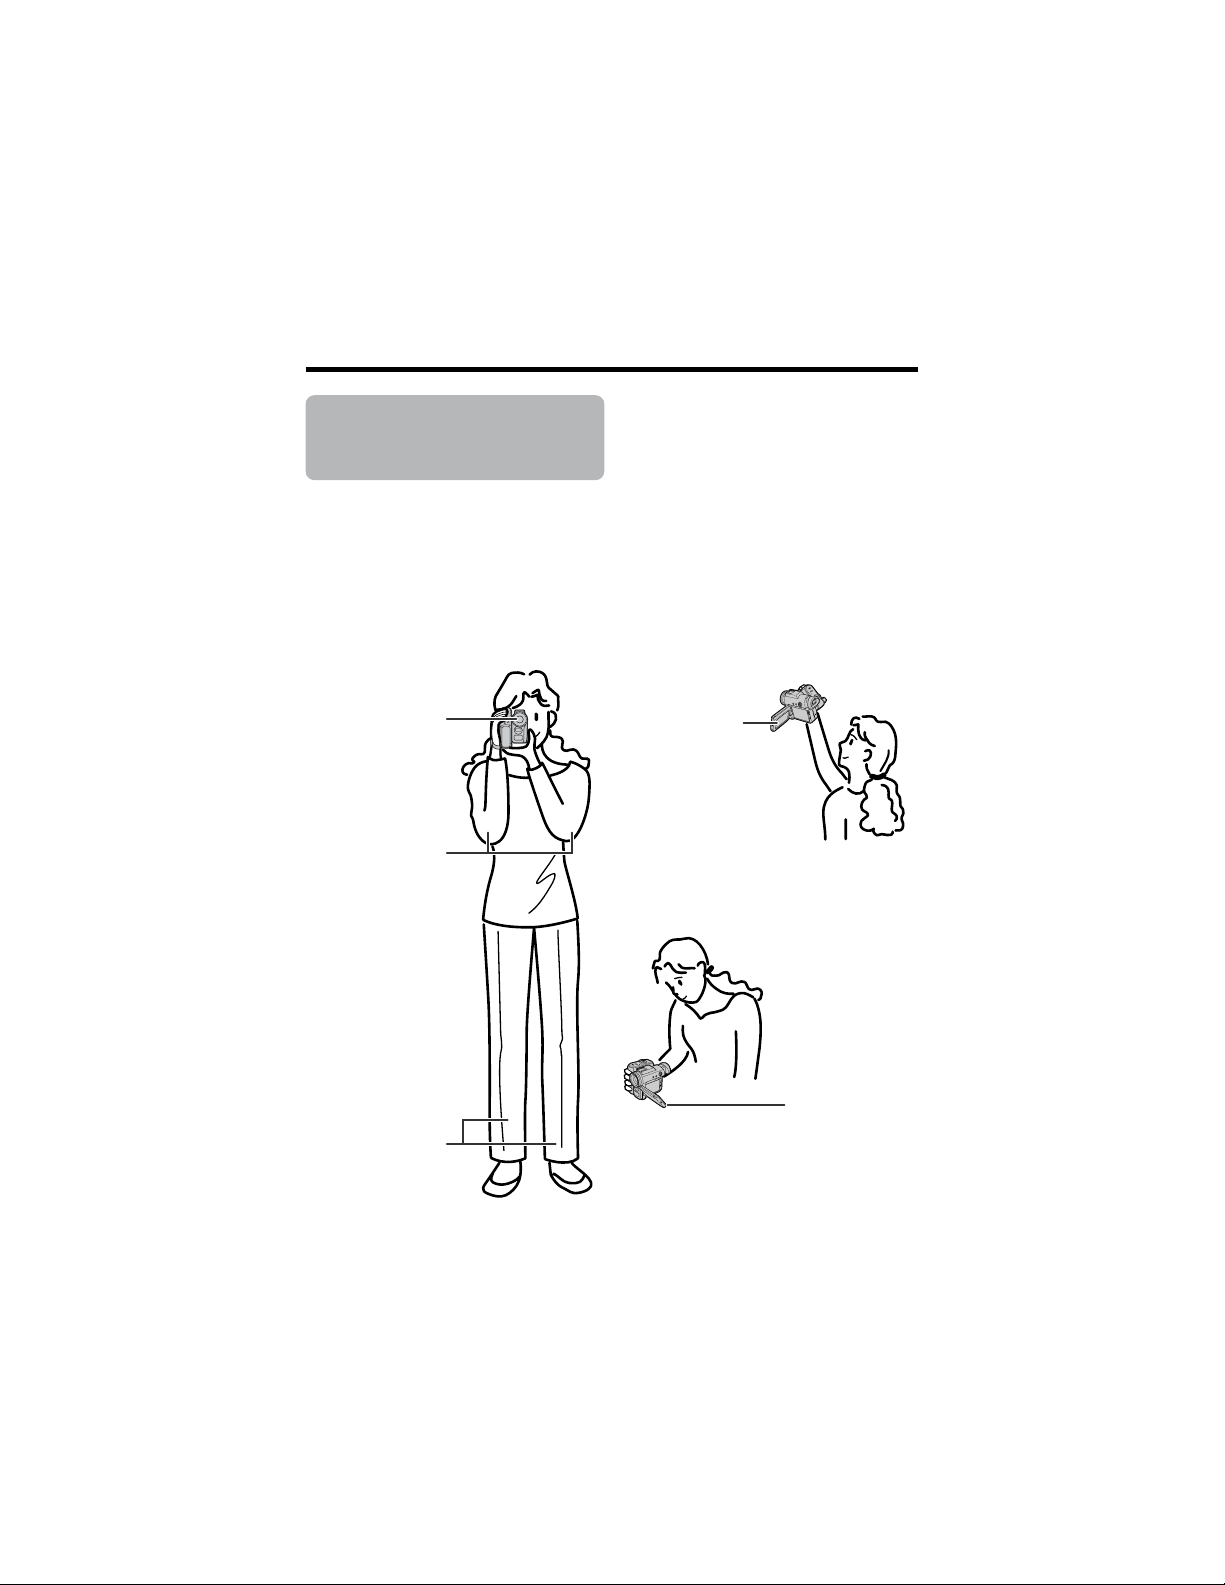
121
Sugerencias sobre
las posiciones de
grabación
Para crear imágenes que puedan verse fácilmente durante la reproducción, intente grabar
con una postura estable y apoyando bien la videocámara, para impedir la sacudida de las
imágenes.
Sujeción de la videocámara
Pase su mando derecha a través de la correa para la mano, y ponga su mano izquierda
debajo de la videocámara para apoyarla.
Postura básica
Filmación desde un ángulo
bajo
Filmación desde un ángulo
alto
Nota:
• Tenga cuidado para no tocar el micrófono con sus dedos durante la grabación. Esto causará
ruidos en la pista de audio. Además, tenga cuidado de no tocar el flash ni el sensor del flash
con sus dedos mientras graba con la tarjeta.
Gire el monitor LCD
para que la
pantalla quede
hacia arriba.
Balancee su peso
en ambas piernas.
Gire el monitor
LCD para que la
pantalla quede
hacia abajo.
Coloque sus codos
contra sus costados.
Apoye firmemente
el ocular del visor
contra su ojo.
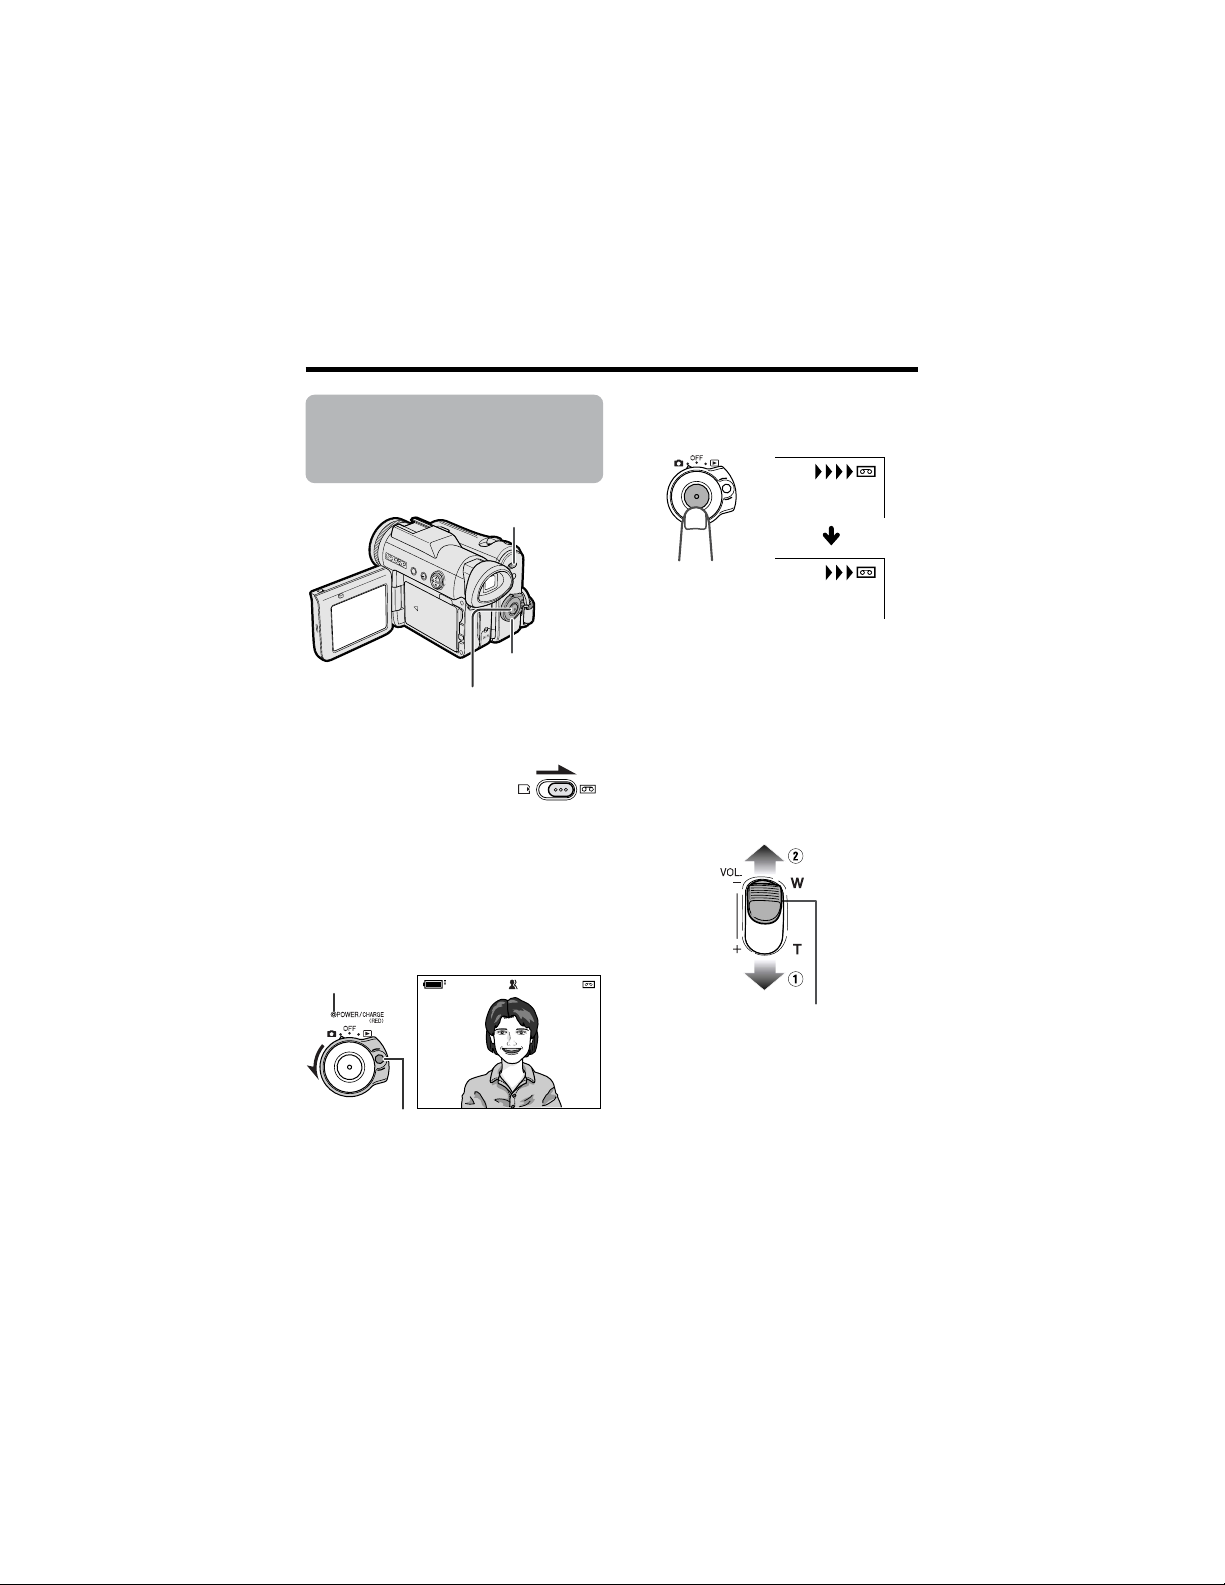
122
Guía de operación rápida
Grabación fácil con
la videocámara en
una cinta
1
Inserte un casete en la videocámara.
2 Ponga el conmutador
selector de medio en V.
3 Mantenga pulsado el botón de
bloqueo y ponga el interruptor de
alimentación en v.
• Ahora se visualiza la imagen captada
por el objetivo, y el indicador
POWER/CHARGE (RED) se enciende
en verde.
AU T OAUTO
REC
4 Pulse el botón de inicio/parada para
empezar a grabar.
Para hacer una pausa en la
grabación
Pulse de nuevo el botón de inicio/
parada.
Empleo del zoom
Pulse el control del zoom motorizado hacia
el lado de la T (1) (telefoto) o el lado de la
W (2) (granangular).
Botón de inicio/parada
Interruptor de
alimentación
Conmutador
selector de medio
Indicador POWER/
CHARGE (RED)
Botón de bloqueo
Control del zoom
motorizado
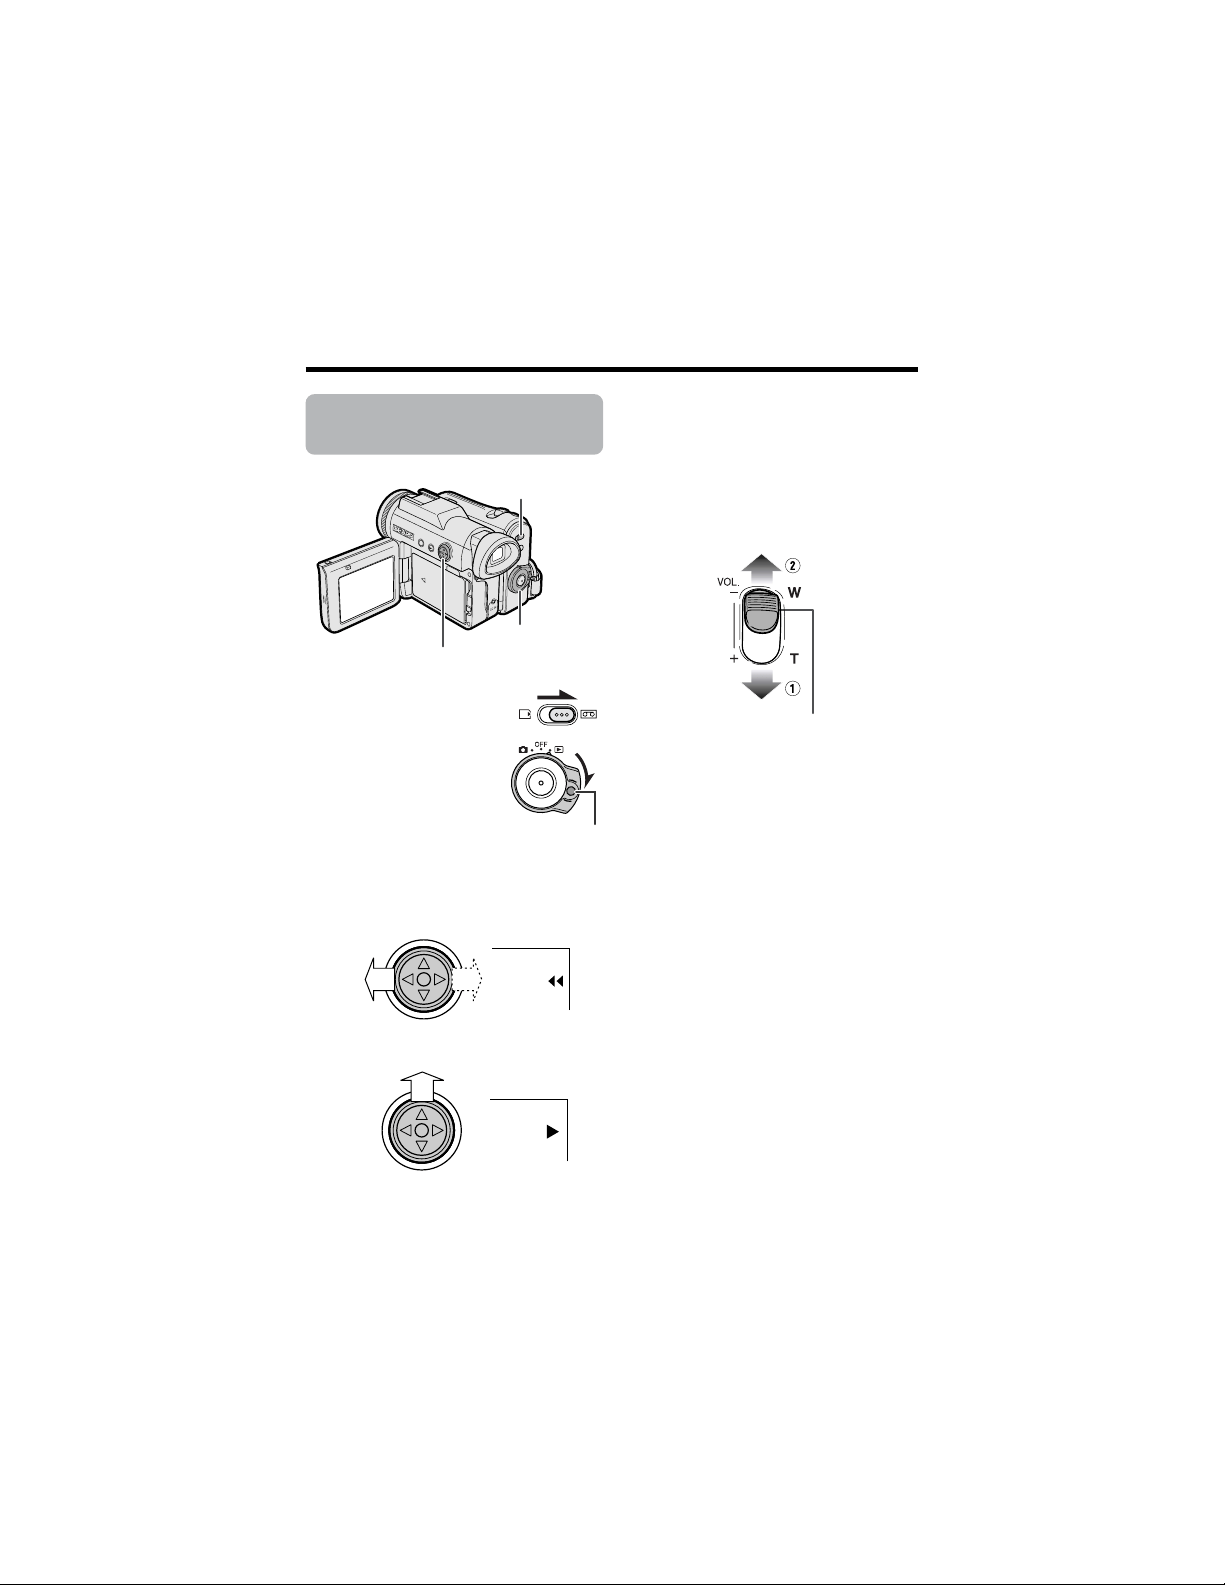
123
Reproducción de
cinta
1
Ponga el conmutador
selector de medio en V.
2 Mantenga pulsado el
botón de bloqueo y
ponga el interruptor de
alimentación en w.
3 Pulse j (o k) del botón de
funcionamiento para rebobinar (o
avanzar rápidamente) la cinta hasta
el punto deseado.
4 Pulse m para iniciar la reproducción.
Para detener la reproducción
Pulse l.
Control de volumen
Pulse el control de volumen hacia el lado L
o + para aumentar (1) o disminuir (2) el
volumen.
Botón de funcionamiento
Conmutador
selector de medio
Botón de bloqueo
Interruptor de
alimentación
Control de volumen
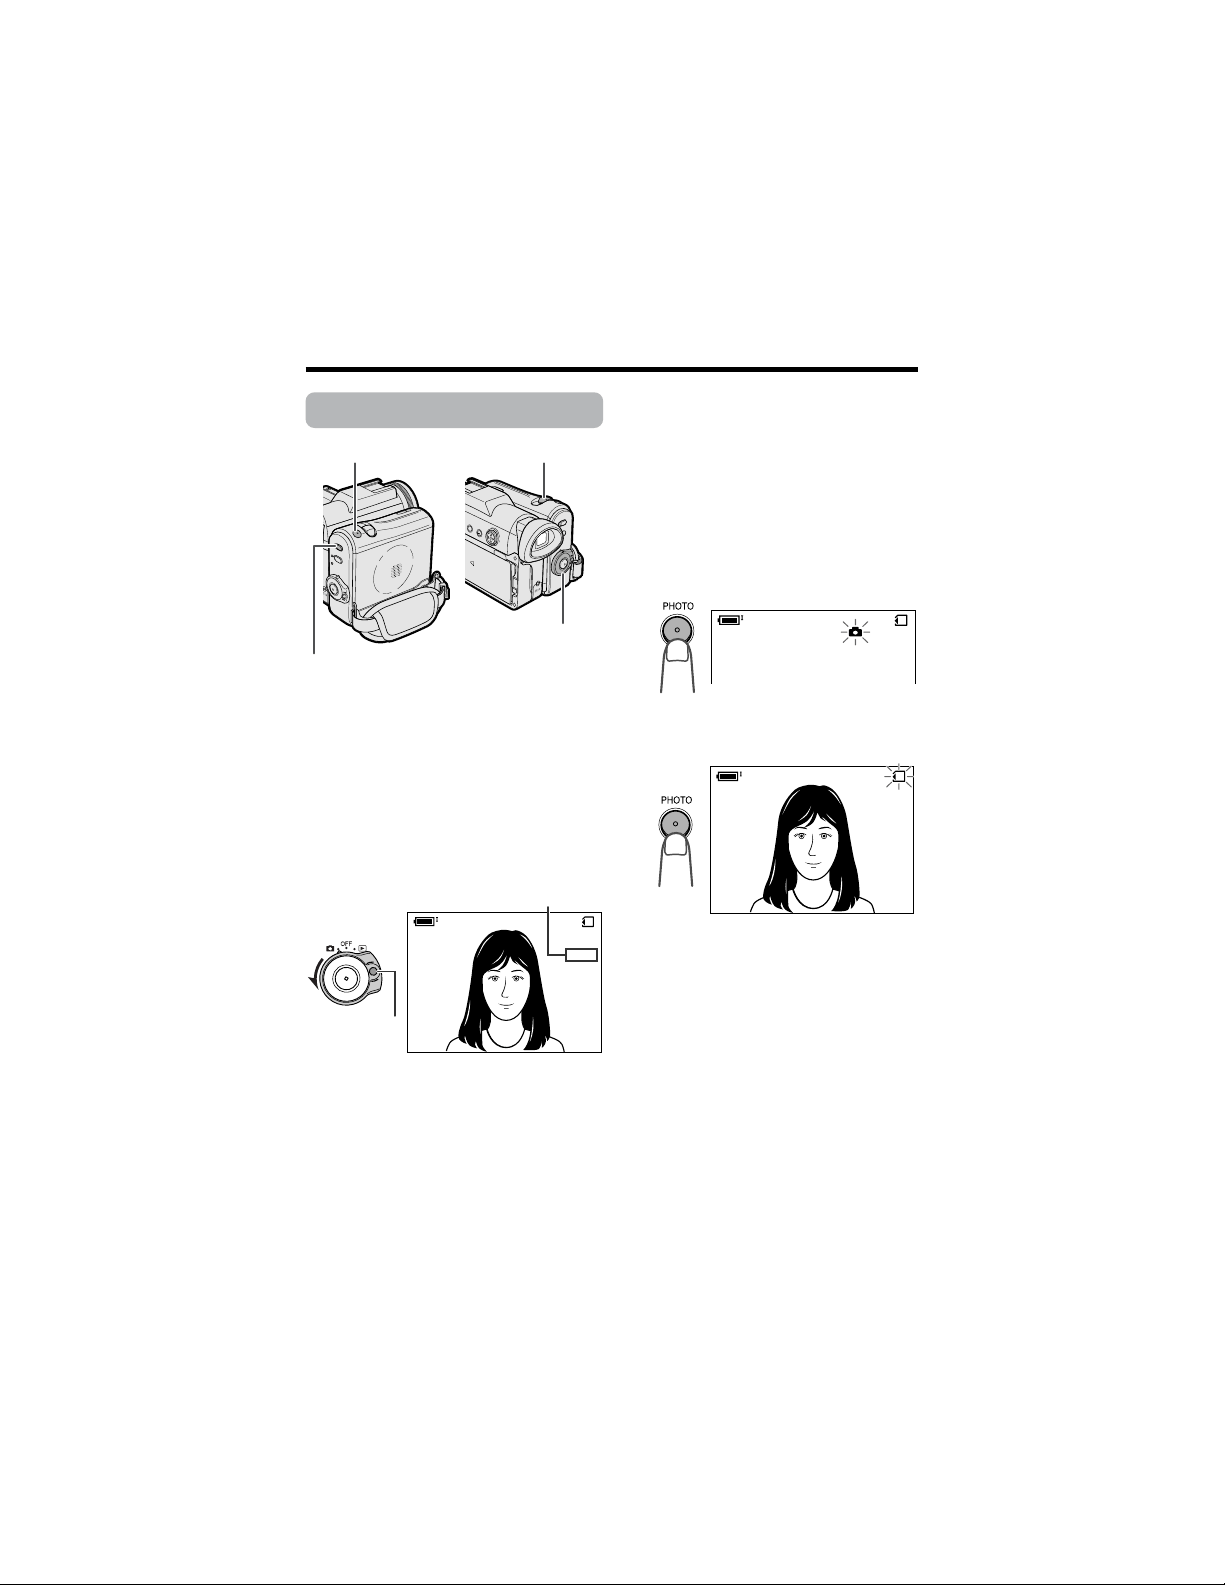
124
Guía de operación rápida
Grabación con tarjeta
1
Inserte una tarjeta en la videocámara.
2 Ponga el conmutador selector de
medio en u.
3 Mantenga pulsado el botón de
bloqueo y ponga el interruptor de
alimentación en v.
• La imagen captada por el objetivo se
visualiza ahora.
4 Ajuste el control del zoom motorizado
para encuadrar el motivo como usted
desee.
5 Pulse hasta la mitad el botón PHOTO
para enfocar el motivo.
• La videocámara enfoca
automáticamente el motivo. Cuando
lo enfoque oirá un sonido y verá la
marca v. Luego, la videocámara
bloqueará el enfoque.
6 Pulse completamente el botón
PHOTO para iniciar la grabación.
• El indicador S parpadea en rojo
mientras los datos están siendo
grabados en la tarjeta, y cambia a
blanco cuando termina la grabación.
0821
][
/911
NORMAL
AUTO
0821
][
/911
NORMAL
0821
][
/911
NORMAL
AUTO
Botón PHOTO
Control de zoom motorizado/
control de volumen
Conmutador selector de
medio
Botón de
bloqueo
Número de tomas realizadas/restantes
Interruptor de
alimentación
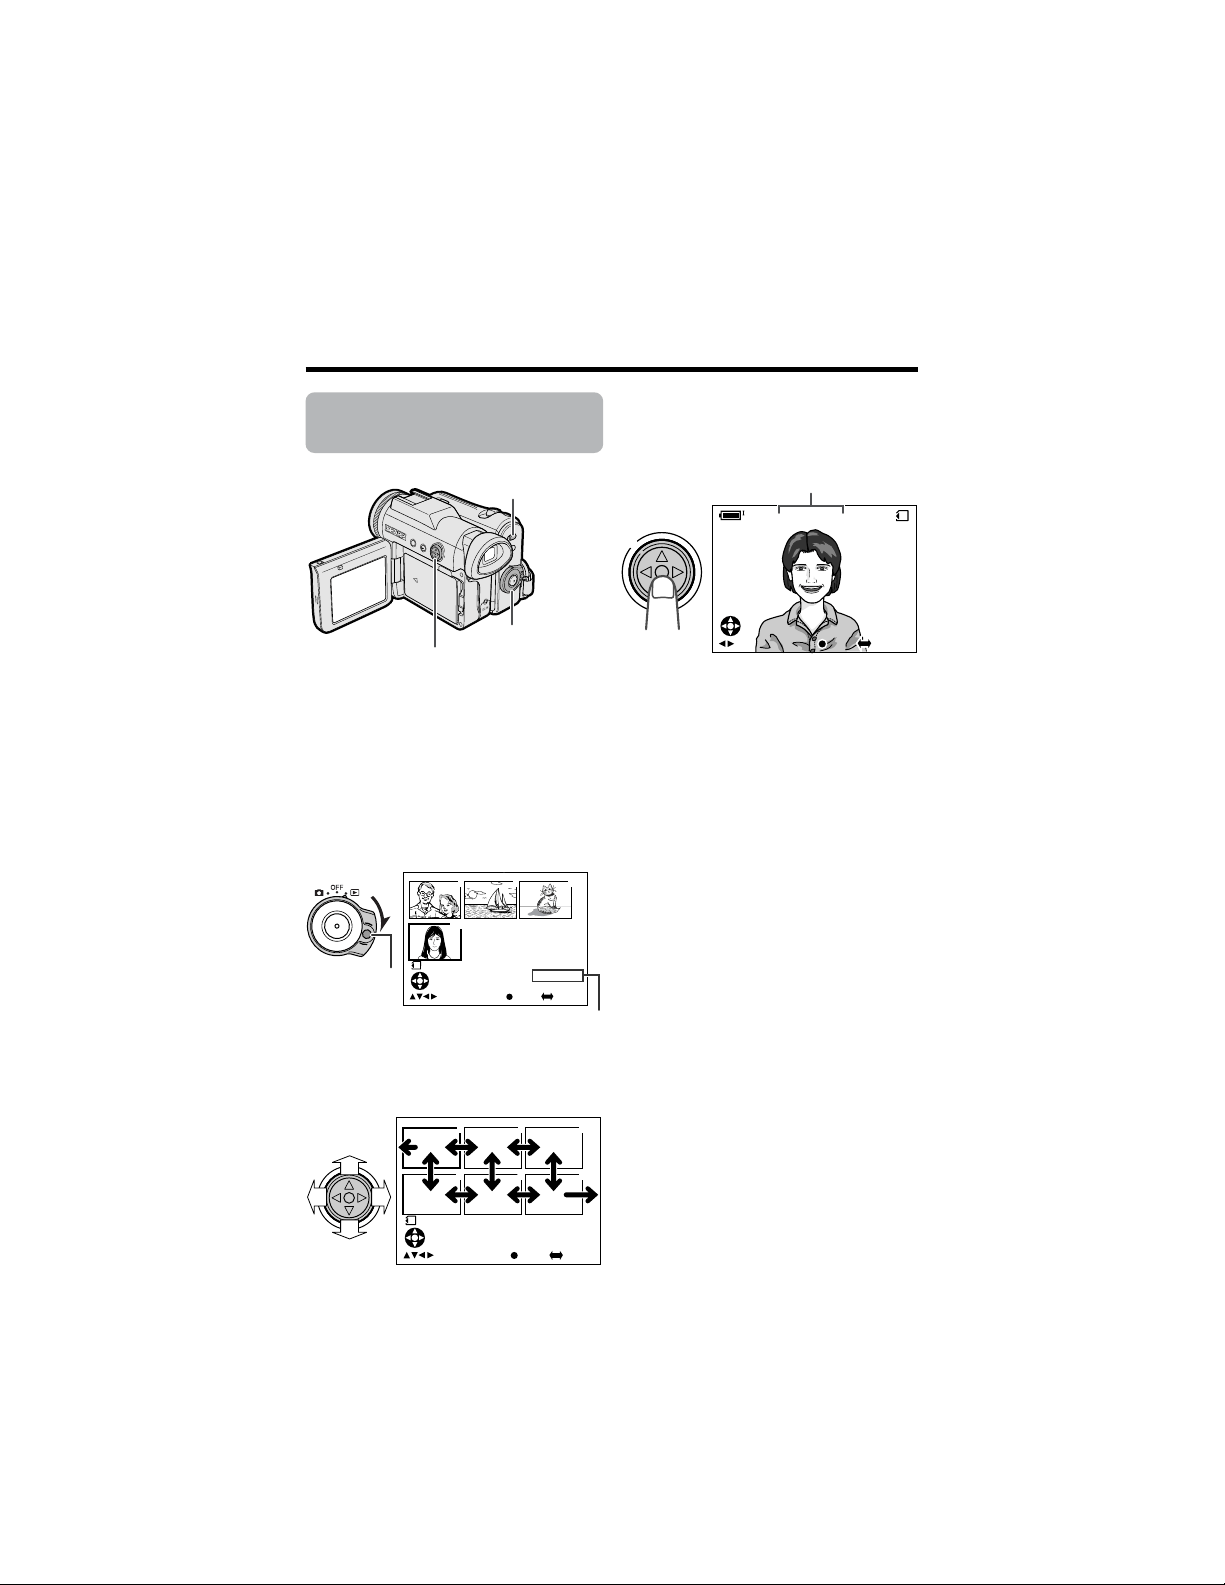
125
Reproducción de
tarjeta
1
Ponga el conmutador selector de
medio en u.
2 Mantenga pulsado el botón de
bloqueo y ponga el interruptor de
alimentación en w.
• Las imágenes grabadas en la tarjeta
se visualizan en el formato de
imagen miniatura.
3 Pulse j , k, l o m del botón de
operación para mover el cuadro de
selección hasta la imagen deseada.
4 Pulse el centro del botón de
funcionamiento.
• La imagen seleccionada se visualiza
en toda la pantalla.
0100
-
00
2/2PAGE
NORMAL
1
FULLSELECT IMG MULTI
7
01
89
1000
-
00
2/1PAGE
NORMAL
1
1
4
2
5
3
6
FULLSELECT IMG MULTI
0821
1 0/1
CA RD
NORMA L
][
0
-
0 0 1001
F U L LS E L E C T I MG MU L T I
0821
10/1
NORMAL
][
0
-
001001
FULLSELECT IMG MULTI
Botón de
funcionamiento
Interruptor de
alimentación
Nombre de archivo de imágenes
Número de página/páginas totales de
imágenes miniatura
Botón de
bloqueo
Conmutador selector
de medio

Valid for warranty service in the U.S. only
CONSUMER LIMITED WARRANTY
SHARP ELECTRONICS CORPORATION warrants to the first consumer purchaser that this Sharp brand
product (the “Product”), when shipped in its original container, will be free from defective workmanship
and materials, and agrees that it will, at its option, either repair the defect or replace the defective
Product or part thereof with a new or remanufactured equivalent at no charge to the purchaser for parts
or labor for the period(s) set forth below.
This warranty does not apply to any appearance items of the Product nor to the additional excluded
item(s) set forth below nor to any Product the exterior of which has been damaged or defaced, which
has been subjected to improper voltage or other misuse, abnormal service or handling, or which has
been altered or modified in design or construction.
In order to enforce the rights under this limited warranty, the purchaser should follow the steps set forth
below and provide proof of purchase to the servicer.
The limited warranty described herein is in addition to whatever implied warranties may be granted to
purchasers by law. ALL IMPLIED WARRANTIES INCLUDING THE WARRANTIES OF MERCHANTABILITY
AND FITNESS FOR USE ARE LIMITED TO THE PERIOD(S) FROM THE DATE OF PURCHASE SET FORTH
BELOW. Some states do not allow limitations on how long an implied warranty lasts, so the above
limitation may not apply to you.
Neither the sales personnel of the seller nor any other person is authorized to make any warranties other
than those described herein, or to extend the duration of any warranties beyond the time period
described herein on behalf of Sharp.
The warranties described herein shall be the sole and exclusive warranties granted by Sharp and shall
be the sole and exclusive remedy available to the purchaser. Correction of defects, in the manner and
for the period of time described herein, shall constitute complete fulfillment of all liabilities and
responsibilities of Sharp to the purchaser with respect to the Product, and shall constitute full
satisfaction of all claims, whether based on contract, negligence, strict liability or otherwise. In no event
shall Sharp be liable, or in any way responsible, for any damages or defects in the Product which were
caused by repairs or attempted repairs performed by anyone other than an authorized servicer. Nor
shall Sharp be liable or in any way responsible for any incidental or consequential economic or property
damage. Some states do not allow the exclusion of incidental or consequential damages, so the above
exclusion may not apply to you.
THIS WARRANTY GIVES YOU SPECIFIC LEGAL RIGHTS. YOU MAY ALSO HAVE OTHER RIGHTS
WHICH VARY FROM STATE TO STATE.
Model Specific Section
Your Product Model
Number & Description:
Warranty Period for this Product:
Additional Item(s) Excluded
from Warranty Coverage (if any):
Where to Obtain Service:
What to do to Obtain Service:
VL-Z7U Camcorder
(Be sure to have this information available when you need service
for your Product.)
One (1) year parts and ninety (90) days labor from date of pur-
chase except for the rechargeable battery incorporated in this Prod-
uct which is warranted for thirty (30) days from date of purchase.
Disk Media supplied with this Product is warranted for replacement
only and limited to ninety (90) days from date of purchase. Non-
rechargeable batteries are excluded from warranty coverage.
From a Sharp Authorized Servicer located in the United States. To
find the location of the nearest Sharp Authorized Servicer, call Sharp
toll free at 1-800-BE-SHARP.
Ship prepaid or carry in your Product to a Sharp Authorized Servicer.
Be sure to have Proof of Purchase available. If you ship the Prod-
uct, be sure it is insured and packaged securely.
TO OBTAIN SUPPLY, ACCESSORY OR PRODUCT INFORMATION, GO TO OUR WEBSITE AT www.sharpusa.com
OR CALL 1-800-BE-SHARP
SHARP ELECTRONICS CORPORATION
Sharp Plaza, Mahwah, New Jersey 07430-2135
SHARP CORPORATION
Osaka, Japan
Printed in Japan
TINSEA044WJZZ
03P02-JWG