Documents: Go to download!
User Manual
- Owner's manual - (English, French)
- Supplemental - (English)
- Installation Instructions - (English)
- Product Spec Sheet - (English)
- Getting Started
- Operation - Cooktop
- Operation - Oven
- Operation - Warming Drawer
- Getting the Most Out of Your Cooktop
- Getting the Most Out of Your Oven
- Getting the Most Out of Your Warming Drawer
- Cleaning and Maintenance
- Use these suggestions before calling for service to avoid service charges
Table of contents
User Manual Electric Ranges
Getting Started
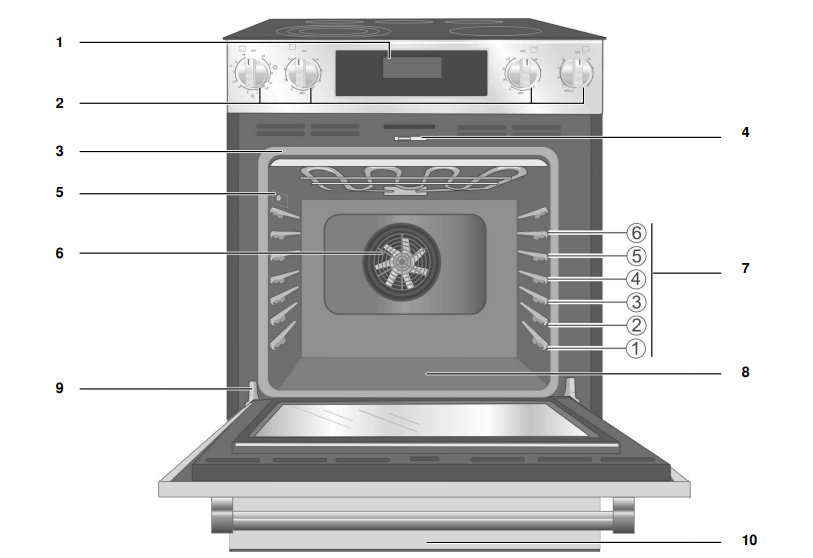
Range Parts Key
1 Oven Control Panel
2 Cooktop Control Knobs
3 Door Gasket
4 Door Latch
5 Probe Jack
6 Convection Fan
7 Rack Position Guides with 6 rack positions
8 Oven Bottom
9 Door Hinge
10 Warming Drawer
Range Features
Radiant Elements
The radiant element uses a wire ribbon located under the glass ceramic surface to provide the heat for cooking. The radiant element will cycle on and off by design (see Temperature Limiter).
Single Element
The single element consists of only one radiant element in the heating area. The unit temperature can be adjusted from Hi to Lo to provide the desired cooking performance.
Double Element (some models) The dual element consists of two (a small and a large) radiant element within the same heating area. Either the small element, or both elements may be selected for use.
Triple Element (some models)
The triple element consists of three (small, medium and large) radiant ribbon elements within the same heating area. Either the small element, the small and medium element or all three elements may be selected for use, in order to better match the size of cookware.
Power Element (some models)
This element is used for faster time to boil and low simmer, all in one element. There are two elements that are the full size of the cooking zone. Warming Zone The warming element consists of one radiant element. The temperature is preset to the warming temperature set by the oven control panel.
Retained Heat
The glass cooking surface retains heat and stays hot after the element(s) have been turned off. The retained heat may be used to hold foods at serving temperatures for a short time. If a hot surface light is on, use caution when working or cleaning around the cooktop as the cooktop is still hot.
Temperature Limiter
Each radiant heating element has its own sensor to protect the glass cooking surface from extreme high temperatures. The limiters will operate automatically by cycling the element off regardless of the cook setting.
Although cycling is normal, any one of the following conditions can activate the limiter and cause it to cycle on and off more than usual:
• The base of the pan is not making full contact with the heating surface (due to a warped or uneven base).
• The pan is too small for the element.
• The pan has boiled dry.
• The material or shape of the pan is slow to transfer the heat.
Hot Surface Indicator
The cooktop displays a hot indicator light to show when the cooking surface is too hot to touch. If a hot surface light is on, use caution when working or cleaning around the cooktop as the cooktop is still hot.
Oven Features
Cooling Fan
The cooling fan runs during all cooking modes. The fan can be heard when it is running, and warm air may be felt as it is released from the oven vent. The fan may also run after the oven is off.
Convection Fan
The convection fan operates during any convection mode. When the oven is operating in the convection mode, the fan will turn off automatically when the door is opened. The convection fan does run during Self Clean, although not at the beginning of the mode.
Note: On some models, the convection fan also runs during preheat for the bake mode.
Oven Bottom
The oven bottom conceals the lower heating element. As a result the element is protected from damage and spills. Note: Do not place food directly on the oven bottom.
Oven Vent
The oven vent is located at the top back of the range. Warm air may be released from the vent before, during and after cooking. It is normal to see steam escaping from the vent and condensation may collect in this area. This area may be hot when the oven is in use. Do not block the vent as it is important for air circulation
Automatic
Shutoff The oven will automatically shut off after 24 hours.
Self-Cleaning
The oven features a self-cleaning function that eliminates the manual labor involved with cleaning your oven.
Indicators and Other Features
Default Settings - The cooking modes automatically select the default temperature. These can be changed when a different one is needed.
E Number Codes -These codes display when there is a problem with the range.
Standby Mode Standby mode means that the oven has power but no cooking mode or timer is running.
Accessories
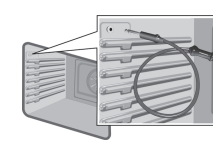 |
Probe (some models) The probe can be used to determine the internal doneness or the end temperature of many foods, especially meats and poultry. Do not clean in the Self Clean oven or dishwasher. |
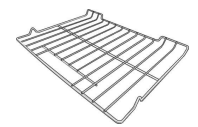 |
Flat Rack Use for most cooking. Can use multiple racks in some modes. Do not clean in the Self Clean oven. |
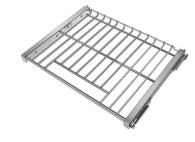 |
Telescopic Rack (some models) additional 30-inch racks available from e-Shop # HEZTR301 Use with heavier dishes to make it easier to place dishes into the oven, check on food while cooking and remove dishes from oven when done. Do not clean in the Self Clean oven. |
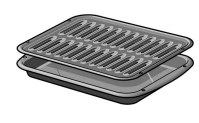 |
Broiling Pan (available via eShop) Pan: #00449757 Grill (top): #00449756 |
Inserting Racks
CAUTION
To avoid burns, place oven racks in desired positions before turning oven on. Always use oven mitts when the oven is warm. If a rack must be moved while the oven is hot, do not let oven mitts contact hot heating elements.
Use caution when removing an oven rack from the lowest rack position to avoid contact with the hot oven door.
To avoid possible injury or damage to the appliance, ensure racks are installed exactly per installation instructions and not backwards or upside down.
Flat Rack
The rack is designed with a stop so it will stop before coming completely out of the oven and not tilt. To insert the flat rack into the oven:
1. Grasp rack firmly on both sides.
2. Insert rack (see picture).
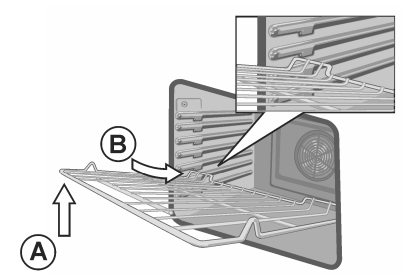
3. Tilt rack up (A) to allow the upwardly sloped rear of the rack to slide under the stop molded into the front portion of the rack guide above.
4. When the back of the rack is past this stop, lower the front of the rack to a horizontal position (B) and push it the rest of the way in. The rack should be straight and flat, not crooked.
To remove the flat rack from the oven:
1. Grasp rack firmly on both sides and pull rack toward you.
2. When the stop is reached, tilt rack up so that the upwardly sloped back of the rack can pass
Telescopic Rack (some models)
To insert the telescopic rack into the oven:
1. Slide the rack in evenly until the rear of the rack is about 2 inches from the back of the oven.
2. Tilt the front of the rack up about 3/4’s of an inch (A) and finish pushing the rack all the way back (B)
Note: Avoid striking the oven light cover glass when pushing the rack into position.
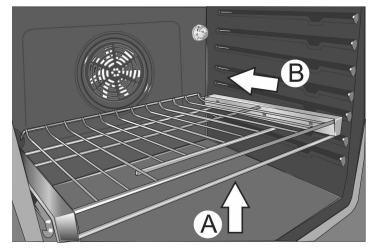
3. The back of the telescopic rack drops into place.
4. Pull the rack forward to engage the bottom of the rack onto the rear of the rack position guide.
5. Lower the front of the rack to finish seating it on the rack guide. The rack should feel stable when properly seated.
6. Slide the movable part of the telescopic rack in and out a few times to make sure it is able to move freely and that the non-moving part of the telescopic rack is securely anchored.
To remove the telescopic rack from the oven:
1. Lift the front of the telescopic rack assembly about 1/2 inch and push the rack to the rear about 3/4 inch. This allows the rack to disengage from the rack position guide.
2. Lift the rear of the telescopic rack assembly so it clears the rack position guide and gently pull the rack from the oven.
Note: Take care to avoid pulling the rack unevenly which will cause it to bind during removal, catching on the oven walls.
Operation - Cooktop
Setting the Element Heat Level
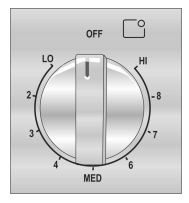
Single Element Control Knob
To turn on a single element, push in on the control knob and turn in either direction to the desired heat setting. The small icon above the control knob shows the location of the element controlled by the knob.
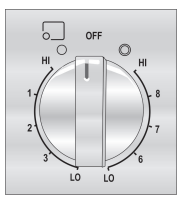
Double Element Control Knob
To turn ON the small inner element, push in on the control knob and turn it counterclockwise to the desired heat setting. To turn ON both the inner and the outer elements together, push in on the control knob and turn it clockwise to the desired heat setting. The small icon above the control knob shows the location of the burner controlled by the knob.
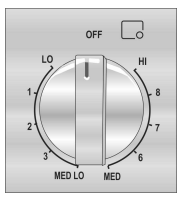
Power Element Control Knob (some models)
This element is used for faster time to boil and low simmer, all in one element. There are two elements that are the full size of the cooking zone.
To turn ON the lower heating element, push in on the control knob and turn it counterclockwise. Set to desired heat setting from Lo to Med Lo.
To use both elements, push in on the control knob and turn it clockwise. Set to desired heat setting from Hi to Med. On the High setting, you may see part of the element cycling on and off.
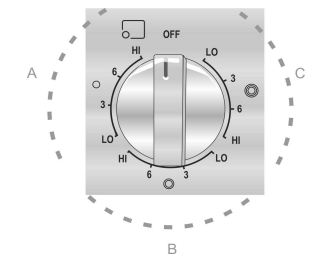
Triple Element Control Knob (some models)
To turn on the small inner element only, push in on the control knob and turn it to the symbol  (counterclockwise).
Turn knob left or right to set the heat level. To turn on the inner and middle elements, push in and turn the control knob to the  symbol. Turn knob left or right to set the heat level.
To turn on all three elements, push in and turn the control knob to the  icon. Turn knob left or right to set the heat level. For each of the three element sets (A,B,C) the unit temperature can be adjusted from LO to HI to provide a more precise temperature setting.
Warming Zone The warming zone is controlled through the oven control panel.
To turn on the warming zone
1. Press the Warming Zone button.
2. Press Enter.
To turn off the warming zone
1. Press the Warming Zone button.
Surface Element On/Hot Indicators
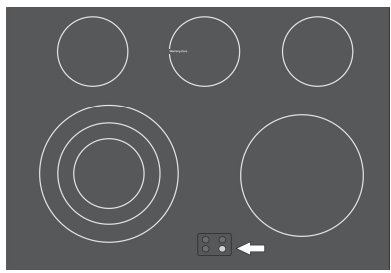
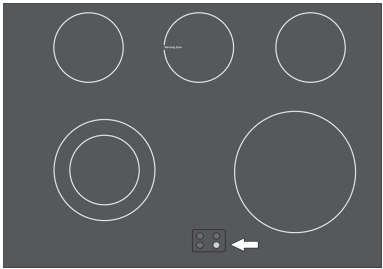
There is an embedded panel near the front of the cooktop with individual lights representing each element. These lights are illluminated when an element is “on”. The light remains on as long as the element is hot. When the element is sufficiently cooled down, the light goes out
Cooktops with a triple front element
Cooktops with a double front element
Surface Elements Disabled During Self Clean
All surface elements are automatically disabled during Self Clean Operation only. This is normal. Once the Self Clean cycle is complete and the oven has cooled, the elements become operable once again.
Operation - Oven
Oven Control Panel
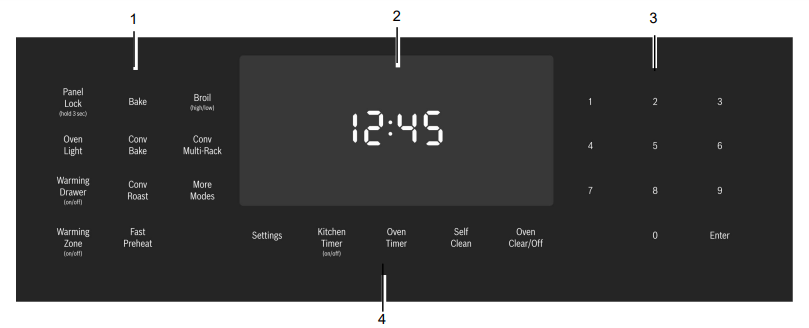
800 Series Oven Control Panel
1 Mode Selection Buttons
2 Display
3 Numeric Keypad Buttons
4 Special Function Buttons
Button Descriptions
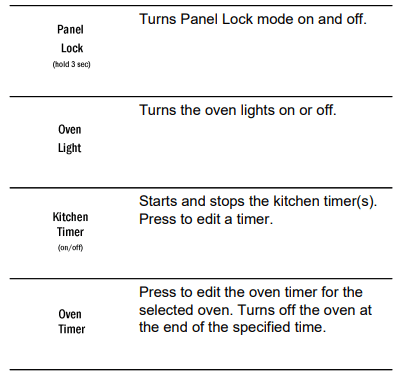
Buttons
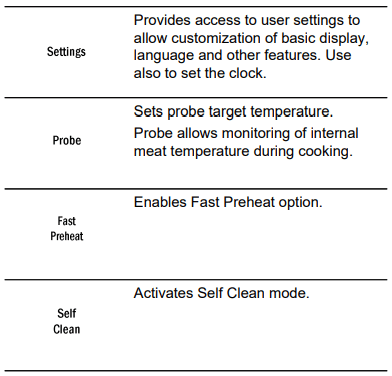
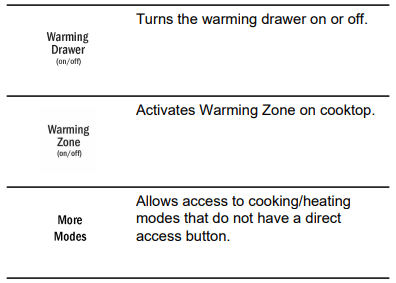
More Modes
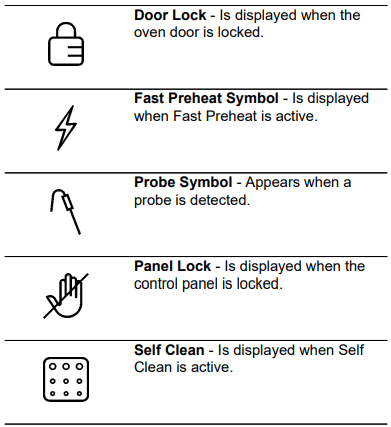
Basic Features
Setting the Clock
To set the clock
1. The oven must be in Standby mode (oven is powered on, but no cooking mode or timer in operation).
2. To access the clock set mode: Press the Settings button. The display shows “SET CLOCK”. Press Enter to edit the clock.
3. Use the numeric keypad to enter the desired time. Each number pressed is entered at the right and moving previously entered digits to the left. To set “12:45 pm”, press 1, 2, 4, 5.
4. When the desired time is entered, set the time by pressing Enter. The clock is now set and running.
Setting the Cooking Mode and Temperature
To set the Cooking Mode first, then the temperature
1. Press the desired Cooking Mode button. The cooking mode and default temperature are displayed. The temperature flashes to show it can be edited.
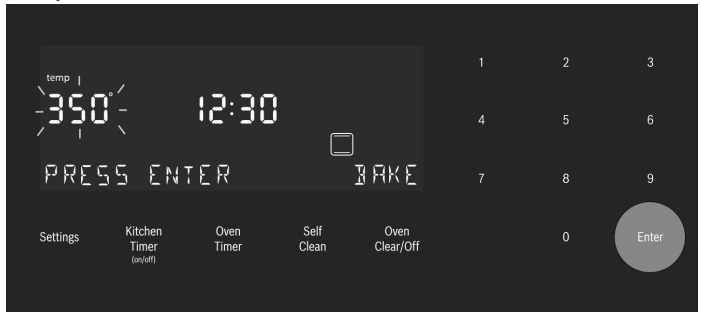
2. Press Enter to start the mode using the default temperature.
3. To change the temperature, enter the new temperature using the numeric buttons. 375° is used for this example. Press Enter to set the updated temperature. Note: The new temperature is automatically set after 10 seconds if Enter is not pressed.
4. Preheating starts.
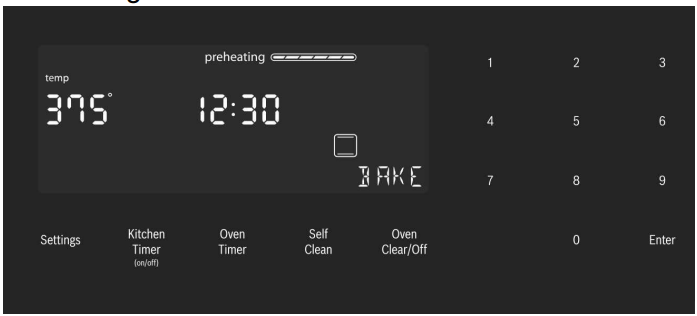
Note: If a temperature is entered that is not within the allowed range for the mode, an error tone will sound and the lower part of the screen will display “TEMP NOT ALLOWED”.
To set the Temperature first and then the Cooking Mode (not for Broil or Convection Broil)
1. Press the numeric keys to enter the desired temperature setting. The temperature entered is displayed beside the current time.
2. Select a cooking mode that is compatible with the temperature entered. If no cooking mode is selected within 5 seconds of setting the temperature, an error tone sounds and a SELECT MODE message is displayed and blinks.
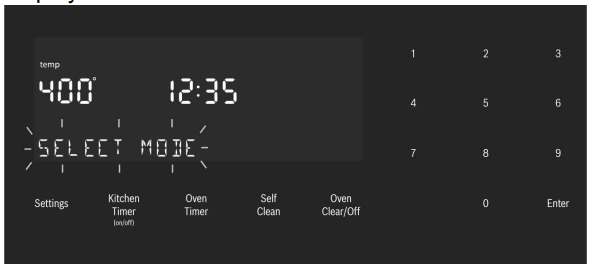
3. Press a Mode Selection button to select a cooking mode. The new mode and temperature set automatically after 10 seconds if Enter is not pressed.
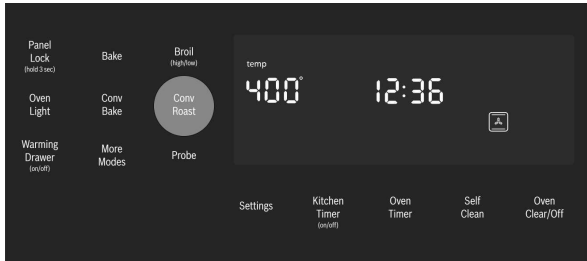
Note: If a temperature is entered that is not within the allowed range for the mode selected an error tone will sound and the lower part of the screen will display “TEMP NOT ALLOWED”.
To change the Oven Temperature
1. Press the Cooking Mode button.
2. The current temperature flashes. Use the numeric buttons to enter a new temperature. Press Enter.
Heating Time Limitation

Timer
Kitchen Timer - is a countdown timer that has no affect on oven heating. The kitchen timer is used for general kitchen timing needs.
Oven Timer - is a countdown timer which upon reaching 00:00 turns the oven off, stopping the current mode. The oven timer is used to set how long a mode will run. Not available for Broil, Convection Broil, or Proof.
To set a kitchen timer
1. Press the Kitchen Timer On/Off button. 0:00 is displayed and blinks in the display. Enter the desired timer value in H/MM format using the numeric keypad.
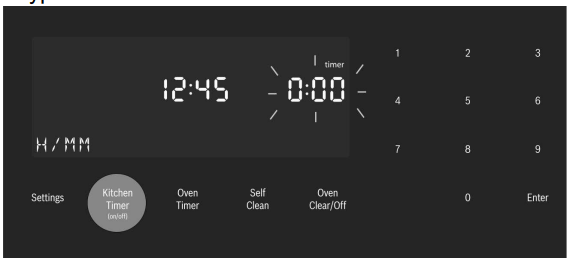
2. Press Enter. The kitchen timer starts.
3. When the kitchen timer has counted down to zero an alarm tone sounds every 10 seconds for 2 minutes and the message “TIMER END” is displayed. Cancel the kitchen timer - by pressing the Kitchen Timer On/Off button.
To edit a kitchen timer
1. Press the Kitchen Timer On/Off button.
2. The current time value blinks and can be edited.
To set an oven timer (for setting a timer to turn the oven off)
1. Press the Oven Timer button.
2. Select mode, press Enter. 0:00 is displayed and blinks in the display. Enter the desired timer value in H/MM format using the numeric keypad.
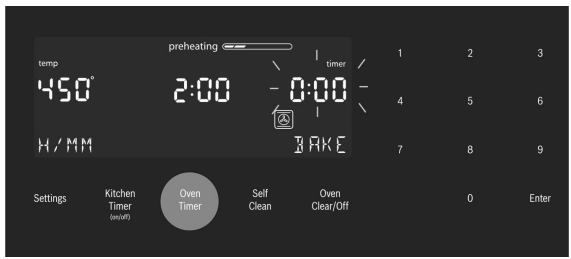
Press the Enter button. The oven timer counts down to 0:00.
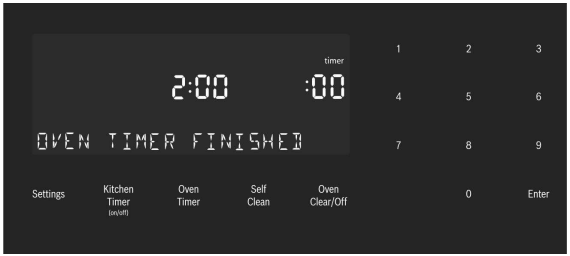
3. When the timer reaches :00 the cooking mode ends and the message “OVEN TIMER FINISHED” is displayed. The oven alarm tone sounds every 10 seconds for 2 minutes.
Editing the oven timer
1. If the oven timer is running and the time remaining needs to be changed, enter the oven timer mode by pressing the Oven Timer button.
2. The temperature blinks, indicating it can be edited. Input a new temperature or press Enter for no change.
3. The timer value blinks, indicating it can be edited. Input the new time and restart the timer by pressing the Enter button. The oven timer may be cleared by entering 0:00.
Fast Preheat
To set Fast Preheat
1. Press Fast Preheat.
The fast preheat icon  appears in the display just above the mode name.
2. Press Start.
Fast Preheat can be turned off by pressing Fast Preheat again
Special Features
Probe (some models
Remove Safety Cap before Using Probe
Cap before Using Probe Some models include a temperature probe used to sense internal tempererature of meats during cooking. The probe ships with a black plastic safety cap over the pointed metal end of the probe. The cap must be removed prior to use.
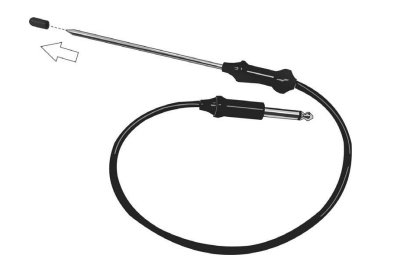
Inserting the probe:
To use the probe:
1. Insert the probe into the meat as described above. The probe symbol is displayed.
2. Connect the probe to the oven. If the probe is not connected to the oven prior to starting Probe mode, an error tone sounds and the message “INSERT PROBE” is displayed.
3. Set the cooking mode and temperature.
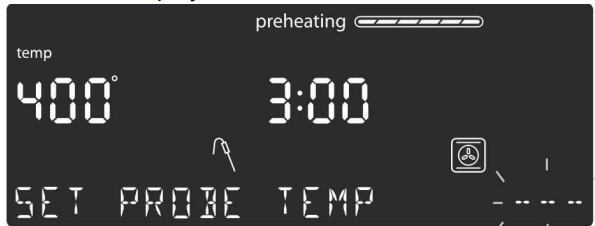
4. The Set Probe Temp screen is displayed. A three digit input prompt “- - -” blinks in the lower right corner. Use the numeric keypad to enter the desired probe temperature and press Enter.
Note: The minimum probe temperature that can be set is 100° F (40° C) and the maximum is 200° F (100° C). If the probe temperature entered is outside this range, an error is displayed.
5. The probe current temperature and target temperature are both displayed in the format “105 / 180” at the lower right corner of the display. The actual temperature will display < 80 until the food temperature reaches 80° F. The displayed probe temperature is updated in increments of 5° F during the cooking process.
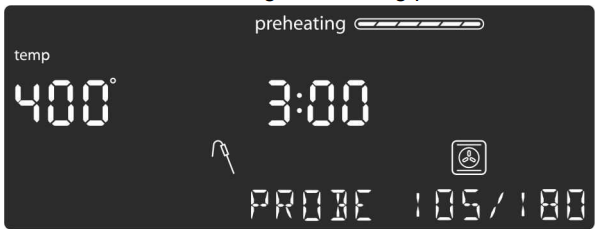
6. When the probe temperature reaches the set temperature, the cooking mode turns off. The current time is displayed and the message “COOKING COMPLETE” blinks at the bottom left of the display. An alarm tone sounds every 10 seconds for 2 minutes.
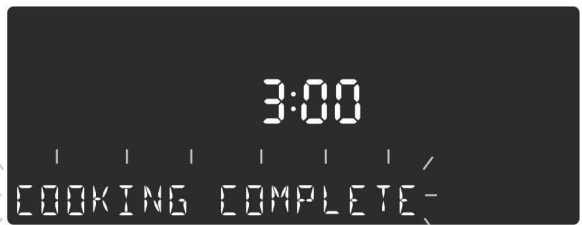
This screen remains in the display until it is cleared by pressing the Oven Clear/Off button or until the probe is removed. The display then goes back to Standby mode.
Sabbath Mode
To set the Sabbath Mode:
No kitchen timers or oven timers may be running when Sabbath Mode is entered.
1. Begin a Bake operation. While Bake is running, press and hold the Oven Timer button for five seconds. If a timer is running when Sabbath Mode attempts to start, the display blinks the message: “SABBATH NOT AVAILABLE”.
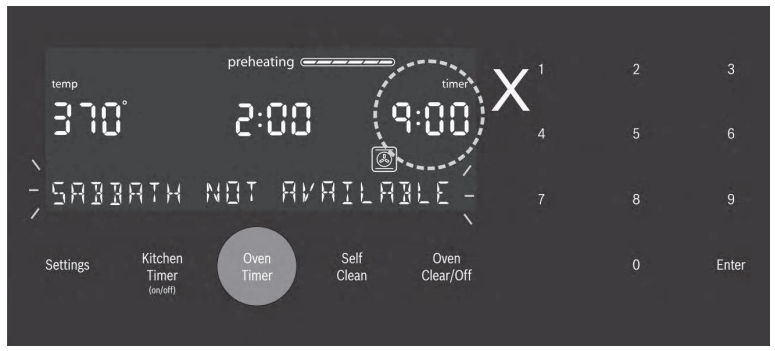
If no timers are running, the Sabbath Mode settings appear in the display. The Sabbath Mode timer blinks showing the value can be edited. The default value is 74:00 (the maximum number of hours for which Sabbath Mode can be set).
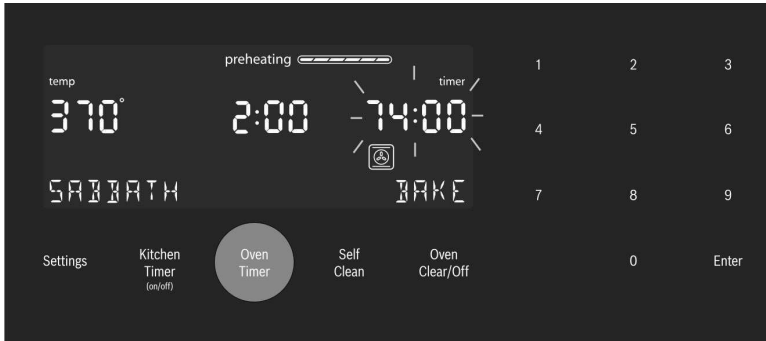
2. Press Enter to accept the default 74:00 hours and start Sabbath Mode, or use the numeric keypad to enter the desired Sabbath Mode timer value. Timer values between 0:01 and 74:00 can be entered. Note: If no changes are made within 10 seconds, Sabbath Mode auto starts.
3. Once Sabbath Mode has begun, the display changes to show the message “SABBATH ON”.
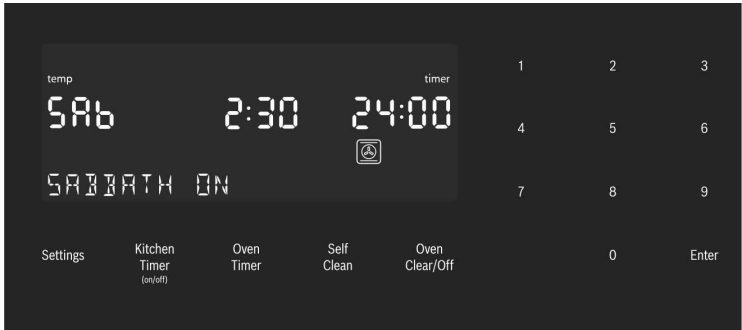
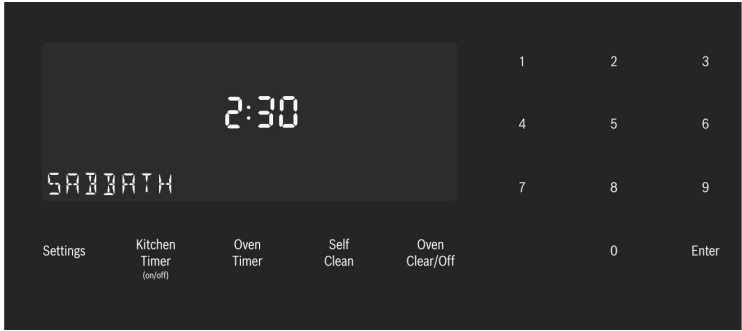
4. After the Sabbath Mode countdown reaches zero, the oven displays the current time and the message “SABBATH”. No changes can be made at this point. To end the Sabbath Mode and return to normal function, press the Oven Clear/Off button.
To edit the Sabbath Temperature
While editing the temperature in Sabbath Mode, there is no feedback from the control. If an invalid temperature is set, the oven will default back to the previous running temperature.
1. Press the Bake button.
2. Enter the new desired set temperature.
3. Press Enter.
The oven will adjust its set temperature after a randomized delay.
Panel Lock
1. To enable Panel Lock, press and hold the Panel Lock button for 3 seconds (in Standby mode).
2. To disable Panel Lock, press and hold the Panel Lock button for 3 seconds. The display returns to Standby mode.
Settings Menu
To make changes to Settings Menu Items
1. Press the Settings button.
2. The first setup item is displayed. The display shows “SET CLOCK”. Press Settings again to access the settings menu.
3. To display a different setup item, press the number corresponding to that setting (see table following or press the Settings button to cycle through available options).
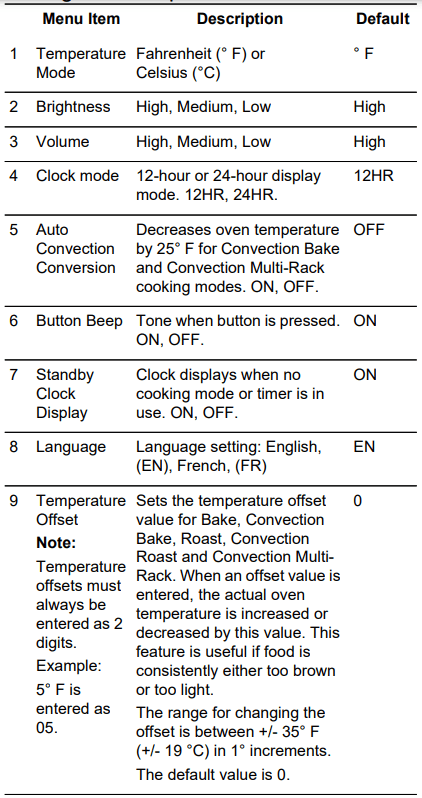
4. To change the value for the displayed setting press the Enter button to enter the edit mode. Use the numeric keypad to change the setting value. The corresponding setting value is shown in the table following. For the temperature offset, with the item in edit mode, press “-” or “+” first, then the numeric offset value. The new value is automatically accepted as the display reverts from edit mode back to display mode.
To exit the Settings menu
Press the Oven Clear/Off button.
Oven Temperature Offset
Settings Menu Options
Operation - Warming Drawer
Warming Drawer Specifications
Drawer Interior: 25" W x 17" D x 3" H
Dish sizes:
• 2 -9 x 13" Pyrex 3-quart dishes, side by side
• 2 -9 1/2 x 15" Pyrex 4-quart dishes, side by side
• 4 -10 1/2" plates, single or stacked
• 3 -11" plates, single or stacked
Operation
CAUTION
To maintain food safety, follow these guidelines:
• DO NOT use the warming drawer to heat cold food (exception: it is safe to use the drawer to crisp crackers, chips or dry cereal and to warm plates).
• Be sure to maintain proper food temperature. The USDA recommends holding hot food at 140° F or warmer.
• DO NOT warm food for longer than one hour.
• Plastic containers, plastic wrap or aluminum foil can melt if in direct contact with the drawer or a hot cooking container. If it melts onto the drawer, it may not be removable.
Preheating
Preheat Times
• Low: 10 minutes
• Medium: 15 minutes
• High: 20 minutes
Turning Warming Drawer On and Off
1. Press the Warming Drawer button.
2. “WARMING DRAWER” will be displayed with the default setting “MED”. The warming drawer amber icon is displayed below the clock.
3. To accept the “MED” setting, press Enter. The setting is accepted and the warming drawer icon remains illuminated. If enter is not pressed, the warming drawer setting is not accepted and the warming drawer turns off.
4. To change the setting, when “MED” is displayed, press the Warming Drawer button again. The setting changes to “HIGH”. Press the Warming Drawer button again to change the setting to “LOW”. To accept a setting, press Enter. The displayed setting will be accepted and the warming drawer icon is illuminated below the clock, indicating that the warming drawer is active.
5. To turn the warming drawer off, press the Warming Drawer button and the warming drawer will turn off. The warming drawer icon will no longer appear under the clock.
Warming Empty
Serving Bowls and Plates
• Use only heat-safe dishes.
• Warm on low setting for cooking containers.
• Check dish temperature during warming period.
• Place empty plates or dishes in a cold warming drawer. Do not preheat drawer prior to placing dishes.
Getting the Most Out of Your Cooktop
Cooktop Cooking Guide
Boiling Water
Time to boil can vary greatly depending on environmental conditions. Try the following tips to decrease boil time:
• Use a lid.
• Use a pan that is appropriately sized for the amount of water and the size of the element.
• Select a pan with a flat base (See “Cookware Selection Guide” in the next column for details).
• Choose a medium-weight pan (rather than a heavyweight one).
• Make sure that the pan is positioned so that the entire base is in contact with the element.
• Start with water that is already warm.
• Boil the smallest amount of water necessary. Smaller volumes will boil faster than larger volumes.
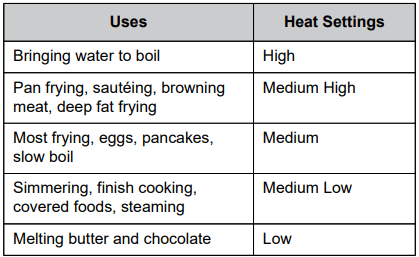
Recommended Settings
Use this chart as a guide for heat settings. A range of heat settings are listed because the actual setting depends on:
• type and quality of pan (See “Selecting Cookware”),
• type, quantity and temperature of the food,
• element used and
• the cook’s preference.
The Heat Settings recommended are based on a 240 volt power source. If your cooktop is connected to 208 volts, the same heat settings apply but foods may take a little longer to finish cooking.
Table 1: Cooking Guide
Cookware Selection Guide
Cookware Characteristics
Pan selection directly affects cooking speed and uniformity. For best results select pans with flat bases. When a pan is hot, the base (pan bottom) should rest evenly on the surface without wobbling (rocking). Flat, medium-to-heavyweight pans are best.
To Test the Flatness of Your Pans
Turn the pan upside down on the countertop and place a ruler flat against the bottom of the pan. The bottom of the pan and the straight edge of the ruler should be flush against each other.

Another simple test to determine even heat distribution across the cookware bottom is to place 1” (25.4 mm) of water in the pan. Bring the water to a boil and observe the location of the bubbles as the water starts to boil. Good, flat cookware will have an even distribution of bubbles over the bottom surface area.
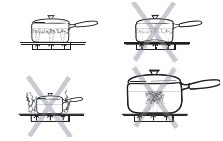
Matching Diameters – The base of the pan should cover or match the diameter of the element being used. Pans may overhang the element area by 1" (25.4 mm) all around.
Tight Fitting Lids – A lid shortens cooking/boiling time by holding heat inside the pot.
Cookware Tips
• Use of pots and pans with rounded (either concave or convex) warped or dented bottoms should be avoided.
• Make sure the bottom of the pot or pan being used is clean and dry.
• Use pots and pans with thick, smooth metal bottoms.
• Do not slide metal pots across the cooktop. Pans may leave marks which need to be removed immediately. See Care and Cleaning Section.
• Do not use glass pans as they may scratch the surface.
Specialty Pans
Specialty pans such as griddles, roasters, pressure cookers, woks, water bath canners and pressure canners must have the same features as described above. Use only a flat-bottomed wok. Never place a support ring, such as a wok ring or trivet, on the cooking surface.
Getting the Most Out of Your Oven
Pan Placement
Baking results are better if pans are placed in the center of the oven. If baking more than one pan on a rack, allow at least 1" to 1 ½" of air space around the pan. When baking four cake layers at the same time, stagger pans on two racks so that one pan is not directly above the other.
Rack Position
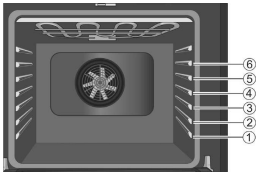
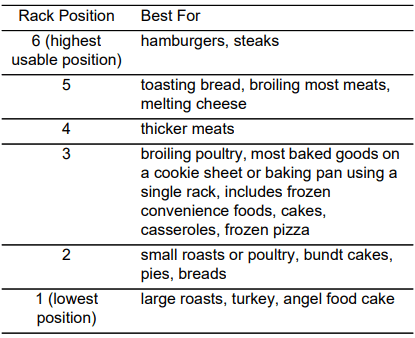
Rack positions are numbered from 1 to 6, from bottom to top. Consult the food cooking charts at the back of this manual for recommended rack positions.
The rail at the top of the oven is used as the guide for the top rack (position 6). Use rack positions 1 through 6 only. DO NOT attempt to use the top guide to support an oven rack.
Aluminum Foil
Do not use aluminum foil or protective liners to line any part of the appliance, especially the oven bottom. Installing these liners may result in risk of electric shock or fire.
Preheating the Oven
• Place oven racks in desired position before heating the oven.
• Preheat the oven when using the Bake, Convection Bake, Convection Multi Rack, Pizza, Broil, Convection Broil, and Warm modes.
• Preheat is not used for Roast, Convection Roast and Proof modes.
• Allow oven to preheat while preparing recipe ingredients or food items.
• Setting a higher temperature does not shorten preheat time.
• Once oven is preheated, place food in the oven as quickly as possible to minimize the loss of heat and reduction of oven temperature.
• Use Fast Preheat to speed up preheating time.
Preheat Reminders
Your oven has one of the fastest preheat times in the market using a concealed bake element. The lower element is hidden under the oven bottom. It is normal that the preheat time is different than your previous oven that had an exposed element on the bottom.
• Cleaning the oven is easier because there is no cleaning around a coil element showing on the bottom of the oven. The hidden lower element is protected from food soils and spills. Wiping up excess spills is easy.
• Preheating is not necessary for meats, poultry, casseroles and some frozen foods.
• Preheat time will be longer when the electrical supply to your house is less than 240 volts.
• Increasing the oven temperature will require a longer preheat time. For example, the preheat time for 425° F is longer than the preheat time for 350° F.
When broiling, preheat the oven 3-4 minutes. Do not preheat for more than 5 minutes.
Baking Pans and Dishes
• Glass baking dishes absorb heat. Reduce oven temperature 25° F when baking using glass dishes.
• Preheat the oven before adding glass baking dishes.
• Use pans that provide the desired browning. For tender, light, golden-brown crusts, use light, anodized or shiny metal bakeware.
• Dark, rough or dull pans (nonstick or anodized) will absorb heat and result in a browner, crisper crust. Some manufacturers recommend reducing the temperature 25° F when using this type of pan. Follow manufacturers' recommendations.
• Insulated cookie sheets or bakeware will increase the length of cooking time.
• Do not set any heavy object on the open oven door.
• Do not keep empty pans or pizza stones in the oven during cooking as this could change the cooking performance. Store pans outside the oven.
Opening the Oven Door
• Open and close the appliance door only by holding the door handle. To avoid risk of burns, do not touch any other parts of the door.
High Altitude Baking
• When cooking at high altitudes, recipes and cooking times will vary.
• For accurate information, write the Extension Service, Colorado State University, Fort Collins, Colorado 80521. There may be a cost for the guides. Specify which high altitude food preparation guide you prefer: general information, cakes, cookies, breads, etc.
Condensation
• It is normal for a certain amount of moisture to evaporate from the food during any cooking process. The amount depends on the moisture content of the food. The moisture may condense on any surface cooler than the inside of the oven, such as the control panel.
Getting the Most Out of Your Warming Drawer
Preheating the Warming Drawer

Warming Food
1. Preheat warming drawer.
2. Place cooked, hot food in the drawer.
It is okay to leave food in the cookware it was prepared. Alternatively, you can transfer food to a heat-safe serving dish before placing it in the warming drawer.
Aluminum foil or lid may be used to cover food.
Warming Plates and Bowls
Use only heat-safe dishes. Place empty dishes or plates in a cold warming drawer. No need to preheat. Select LOW.
Crisping Stale Items
Place food in low sided dishes or pans.
1. Press LOW.
2. Preheat for 10 minutes, then place dish in drawer.
3. Set the warming timer.
4. Check crispness after 45 minutes. Add time as needed.
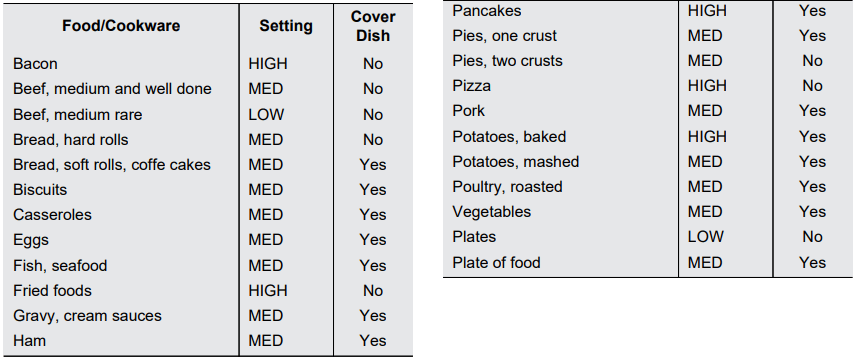
Temperature Recommendations
Cleaning and Maintenance
Care and Cleaning
Cleaning the Cooktop
Precautions for Long Life and Good Appearance of the Surface
• Regular, daily care using the glass ceramic cooktop cleaner will protect the surface and make it easier to remove food soil and water spots.
• The glass ceramic cooking surface is a durable material resistant to impact but not unbreakable if a pan or other object is dropped on it.
• Never cook food directly on the glass.
• Avoid placing a wok support ring, trivet or other metal stand on glass surface.
• Do not use the glass surface as a cutting board.
• Do not slide cookware across the cooking surface; it may scratch the glass.
• Do not place wet pans on the glass surface.
Daily Cleaning Techniques
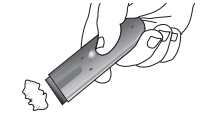
1. Clean the surface when completely cool with the glass ceramic cooktop cleaner. Exception: Remove dry sugar, sugar syrup, tomato products and milk immediately with the razor blade scraper (See Cooktop Care Chart, next page).
2. Wipe off spatters with a clean, damp sponge or paper towel. Rinse and dry. Use white vinegar if smudge remains; rinse.
3. Apply a small amount of the glass ceramic cooktop cleaner. When dry, buff surface with a clean paper towel or cloth.
Using the Razor Blade Scraper
Use the scraper to remove dried or baked on foods. Hold the scraper at a 30° angle. Move it over the soil to lift it off of the cooktop. Finish with a clean, damp sponge or paper towel. Apply white vinegar if smudge remains and rinse.
Cleaning the Control Knobs
1. Pull out and off to remove both knob. Wipe with hot, soapy cloth, rinse and dry. Do not soak.
2. To replace, push knob straight onto shaft.
Do Not Use the Following Cleaners
• Glass cleaners which contain ammonia or chlorine bleach. These ingredients may permanently etch or stain the cooktop
.• Caustic Cleaners
• Oven cleaners such as Easy Off® may etch the cooktop surface.
• Abrasive Cleaners
• Metal scouring pads and scrub sponges such as Scotch Brite® can scratch and/or leave metal marks.
• Soap-filled scouring pads such as SOS® can scratch the surface.
• Powdery cleaners containing chlorine compounds can permanently stain cooktop.
• Flammable cleaners such as lighter fluid or WD-40.
Cooktop Care Chart
| Type of Soil | Possible Solution |
| Dry sugar, sugar syrup, milk or tomato spills. Melted plastic film or foil. All these items require immediate removal. Remove only these types of spills while the surface is hot using the razor blade scraper. Be sure to use a new, sharp razor in your scraper. |
Remove pan and turn off the element. Wearing an oven mitt, hold scraper at After the surface has cooled, remove the residue and apply the glass ceramic cooktop cleaner. |
| Burned-on food soil, dark streaks, and specks | Soften by laying a damp paper towel or sponge on top of soil for about 30 minutes. Use a plastic scrubber and glass ceramic cooktop cleaner or use the razor blade scraper. Rinse and dry. |
| Greasy spatters | Use a soapy sponge or cloth to remove grease; rinse thoroughly and dry. Apply glass ceramic cooktop cleaner. |
| Metal marks: Iridescent stain | Pans with aluminum, copper or stainless steel bases may leave marks. Treat immediately after surface has cooled with glass ceramic cooktop cleaner. If this does not remove the marks, try a mild abrasive (Bon Ami®, Soft Scrub® without bleach), Bar Keeper’s Friend® with a dampened paper towel. Rinse and reapply creme. Failure to remove metal marks before the next heating makes removal very difficult. |
| Hard Water Spots - Hot cooking liquids dripped on surface | The minerals in some water can be transferred onto the surface and cause stains. Use undiluted white vinegar, rinse and dry. Recondition with glass ceramic cooktop cleaner |
| Surface scratches - Small scratches are to be expected on the glass surface, but do not affect cooking. In time, small scratches will become smoother and much less noticeable with daily use of the glass ceramic cooktop cleaner. | Apply Cleaning Creme before using to remove sandlike grains and grit such as salt and seasoning. Can be reduced by using pans with bases that are smooth, clean, and dry before use. Use recommended glass ceramic cooktop cleaner daily on the cooktop. |
Cleaning the Oven
Self Clean
To set the Self Clean mode
1. Remove all accessories and racks from the oven.
2. If there is a cooking mode on, press Oven Clear/Off to end the running mode.
3. Press the Self Clean button below the display.
The Self Clean icon  appears in the display. The Self Clean timer default (4:00) hours blinks to indicate it can be accepted or changed.
To accept the 4:00 hour default Self Clean time, press Enter on the numeric keypad. To enter a different number of hours use the numeric keypad. The value entered must be within the range of 2:00 to 4:00 hours. Entering a value less than 2:00 or greater than 4:00 results in an error tone and message. Use a longer setting for a heavily soiled oven.
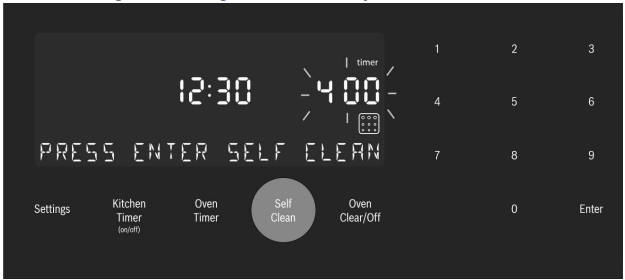
4. When the desired Self Clean time is displayed, press Enter. The oven door locks prior to starting Self Clean. The door lock symbol  is displayed and blinks while the door is being locked. Once locked, the door lock symbol is continuously illuminated (not blinking).
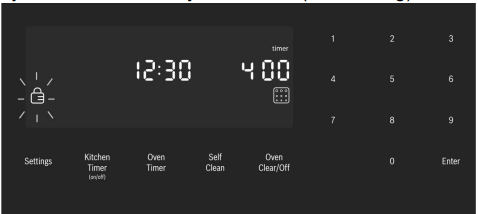
The door lock symbol remains illuminated as long as the Self Clean mode is running.
Note: The door remains locked until the oven has cooled down after self-cleaning. The door can be opened again only after “SELF CLEAN” disappears from the display.
5. Self Clean starts and the oven Self Clean timer begins its countdown.
To Cancel Self Clean
Clean Press the Oven Clear/Off button to cancel Self Clean. When the Self Clean timer ends, for safety the unit must cool down before the door can unlock. During this period the message “COOLING DOWN” is displayed
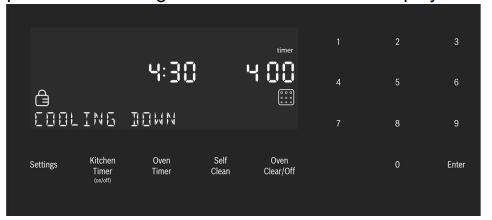
6. When the cool down is complete, the message “SELF CLEAN FINISHED” is displayed. Continue to use caution when opening the oven door.
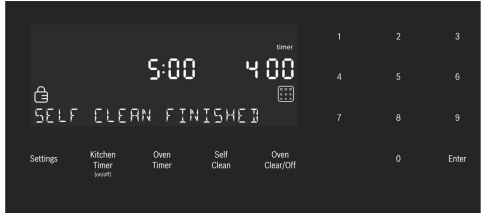
7. Press Oven Clear/Off to clear the display when Self Clean is finished.
8. After the oven has cooled down and the door is unlocked, wipe remaining ash from the oven using a moist cloth.
Note:
• The oven light cannot be turned on during selfcleaning.
• The special heat-resistant enamel and the polished components in the oven can become discolored over time. This is normal and does not affect operation. Do not use scouring pads or abrasive cleaners to treat discolorations.
Avoid These Cleaners
Do not use commercial oven cleaners such as Easy Off®. They may damage the oven finish or parts. Chlorine or chlorine compounds in some cleansers are corrosive to stainless steel. Check ingredients on label. Never use scouring pads or abrasive cleaners.
Oven Cleaning Guide
| Part | Recommendations |
| Flat Rack |
Wash with hot soapy water. Rinse thoroughly and dry, or gently rub with cleansing powder or soap-filled pads as directed. DO NOT clean the rack in the self-cleaning oven. If flat racks are cleaned in the oven during the Self Clean mode, they will loose their shiny finish and may not glide smoothly. If this happens wipe the rack edges with a small amount of vegetable oil. Then wipe off excess |
| Telescopic Rack |
Wash with soapy water. Rinse thoroughly and dry, or gently rub with cleansing powder or soap-filled pads as directed. Avoid getting cleansing powder in the telescopic slides. Re-lubrication may become necessary. Use only hightemperature food-grade lubricants to re-lubricate slides. DO NOT clean the rack in the selfcleaning oven. DO NOT leave the rack in the oven during Self Clean. If the telescopic rack is cleaned in the oven during the Self Clean mode it will loose its shiny finish and will not glide smoothly. |
| Fiberglass Gasket | DO NOT CLEAN GASKET. |
| Glass | Wash with soap and water or glass cleaner. Use Fantastik® or Formula 409® to remove grease spatters and stubborn stains. |
| Painted Surfaces | Clean with hot soapy water or apply Fantastik® or Formula 409® to a clean sponge or paper towel and wipe clean. Avoid using powder cleaning agents, steel wool pads and oven cleaners. |
| Porcelain Surfaces | Immediately wipe up acid spills like fruit juice, milk and tomatoes with a dry cloth. Do not use a moistened sponge/cloth on hot porcelain. When cool, clean with hot soapy water or apply Bon-Ami® or Soft Scrub® to a damp sponge. Rinse and dry. For stubborn stains, use soap-filled pads. It is normal for porcelain to show fine lines with age due to exposure to heat and food soil. |
| Stainless Steel Surfaces |
Always wipe or rub in the direction of the grain. Clean with a soapy sponge, then rinse and dry, or wipe with Fantastik® or Formula 409® sprayed on a paper towel. Protect and polish with Stainless Steel Magic® and a soft cloth. Remove water spots with a cloth dampened with white vinegar. Do not use any abrasives such as steel wool pads, Softscrub®, or BonAmi©. Chlorine or chlorine compounds in some cleaners are corrosive to stainless steel. Check ingredients on label before using. |
| Black Stainless Surfaces | For black stainless steel and antifingerprint surfaces, use a soft, dry towel. For stubborn dirt, use warm water diluted with a non-abrasive, mild cleansing soap. Never use stainless steel polish. |
| Probe | Wipe with soapy water. Do not submerge. Do not wash in the dishwasher |
| Printed Areas (Words and Numbers) | Do not use abrasive cleansers. When cool, clean with soapy water, rinse, dry. |
| Plastic & Controls | When cool, clean with soapy water, rinse and dry. Do not use any abrasives such as steel wool pads, Softscrub®, or BonAmi©. |
Cleaning the Warming Drawer
| Part | Recommendations |
| Drawer interior (polished stainless steel) | Use dish detergent. Wash, rinse well and dry. For hard water spots or scale, use white vinegar. Apply with a sponge or cloth, rinse, and dry. Chlorine or chlorine compounds in some cleansers are corrosive to stainless steel. Check ingredients on label. |
| Painted surfaces | Use hot soapy water or mild cleaners such as Fantastik or Formula 409.Wash, rinse well and dry. Avoid using abrasive cleaning agents, steel wool pads and oven cleaners. |
| Drawer exterior frame (brushed stainless s | Always wipe or rub in the direction of the grain. Clean with a soapy sponge, then rinse and dry, or wipe with Fantastik® or Formula 409® sprayed on a paper towel. Protect and polish with Stainless Steel Magic® and a soft cloth. Remove water spots with a cloth dampened with white vinegar. Use Bar Keeper's Friend® to remove heat discoloration. Chlorine or chlorine compounds in some cleansers are corrosive to stainless steel. Check ingredients on label. |
Maintenance
Cooktop Maintenance
Glass Ceramic Cooktop Models
• Regular, daily care using the glass ceramic cooktop cleaner will protect the surface and make it easier to remove food soil and water spots.
• The glass ceramic cooking surface is a durable material resistant to impact but not unbreakable if a pan or other object is dropped on it.
• Avoid placing a wok support ring, trivet or other metal stand on the glass surface.
Oven Maintenance
Replacing an Oven Light
Bulb specifications
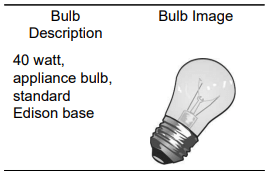
To change the bulb
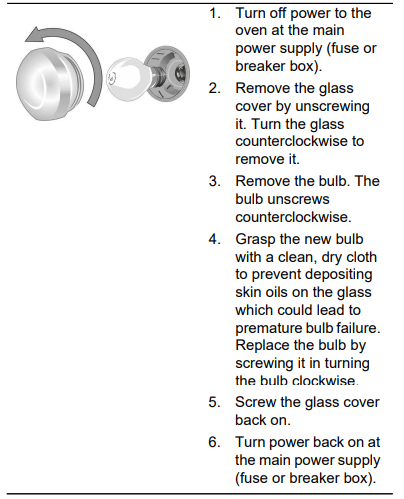
Removing the Oven Door
To remove the oven door
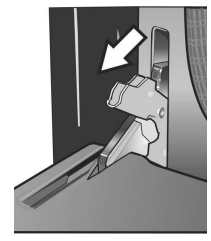 |
To help avoid injury or damage be sure to read the above WARNING before attempting to remove the oven door. 1. Open the oven door to its fully open, horizontal position. 2. Flip levers on hinges toward you. Note: It may be necessary to use a tool, such as a screwdriver, to gently pry the upper part of the lever away from the housing. Take care to avoid scratching the housing. 3. Bring both door hinge levers to their fullest down position as shown in the illustration. The left and right door hinges may differ slightly but operate in the same manner. |
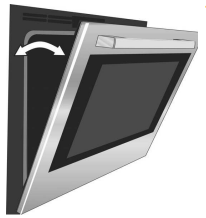 |
4. Close the oven door until it catches on the hinge stop levers, locking the hinges at the proper angle for door removal. The door will be open about 7 inches at the top. This takes the spring tension off the hinges so the door can be easily lifted out. |
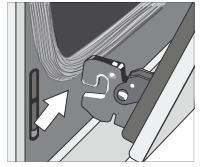 |
5. The door is heavy. Use both hands to firmly grip it by the sides. Do not grip the door by the handle. Maintaining the door angle, lift the door straight up approximately 3/4" to unhook the hinges from the slots and then pull it out towards you until the hinges are clear of the oven housing. 6. Place the door in a convenient and stable location for cleaning. |
To replace the oven door
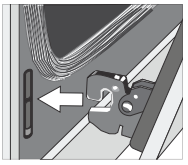 |
1. Holding the door firmly in both hands, grip it on either side, not by the handle. 2. Tilt the door back slightly towards you until it opens about 7" at the top. 3. Slide the hinges into the slots as far as they will go and then lower the door straight down. The angle of the door may need to be adjusted slightly to allow the hinges to engage properly and the door to lower into place. The door should lower about 3/4" and stop. If not, the hinges have not engaged properly and the door could fall if it is released. 4. Once both hinges are fully engaged as described in Step 3, gently open the door until it is fully open |
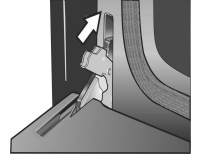 |
5. Push the levers on both the hinges up and forward until they are locked into the slot, flush with the front of the oven body. 6. Close and open door slowly to be sure it is correctly and securely in place. |
Warming Drawer Maintenance
Removing Drawer from Housing
1. Remove the drawer from the drawer housing.
- Pull drawer to fully open position.
- Press down right drawer release lever.
- Lift up left drawer release lever.
- Firmly pull the drawer straight out.
- Retract cabinet rails while drawer is removed.
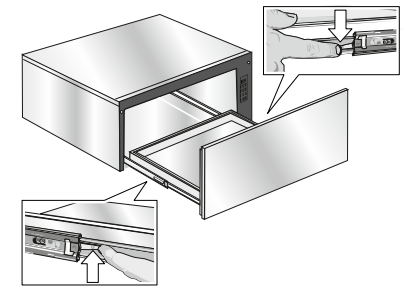
2. Grasp both sides of the drawer and pulling straight and level, carefully remove the drawer housing. This step may require light to moderate force to completely remove drawer.
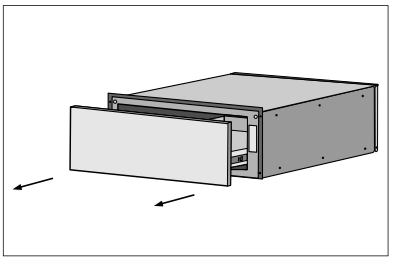
3. Install or service (clean) housing with drawer removed.
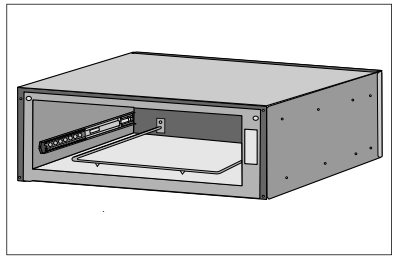
Installing Drawer to Housing
The slides mounted to each side of the housing wall have two moving components, an inner rail and a ball bearing carrier which need to be in the proper orientation for accurate installation and alignment. There is also a visible locking mechanism located at the rear of each slide.
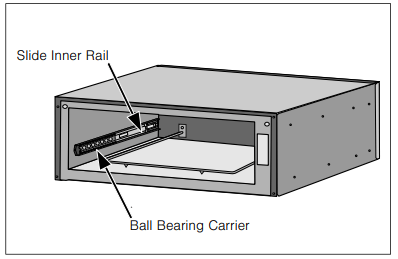
Note: The housing of your warming drawer should match the image below identically before starting your installation. The ball bearing carrier should be locked in to the inner rail’s black plastic rail tip at the front of the inner rail.
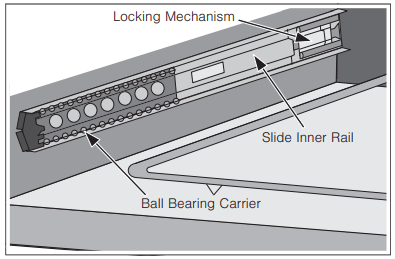
1. With the drawer removed, set the slide inner rail to the drawer locked position by pushing the slide inner rail toward the rear of the housing until it locks in place.
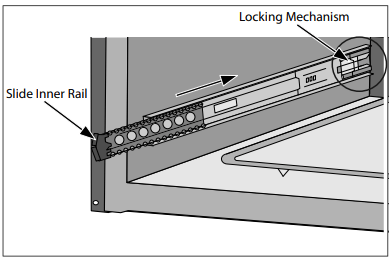
Note: A moderate force pushing on the black plastic ball carrier locking mechanism is required to set the slide to the drawer locked position. The drawer is locked when it remains in place and does not spring back to the open position.
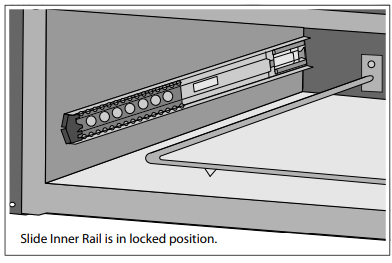
2. Position the drawer assembly in front of the housing assembly and align the rail (plastic rail tip) to the slide ball carrier assembly. Keeping the drawer assembly level and square to the housing, gently insert the drawer to the housing assembly.
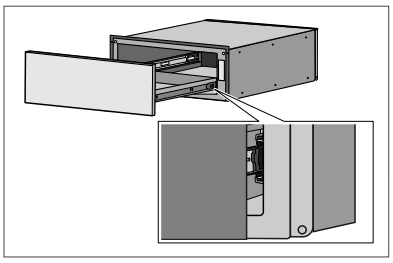
3. Continue to insert the drawer keeping the drawer level and square to the housing until a slight increase in resistance is felt at the approximate position shown below.
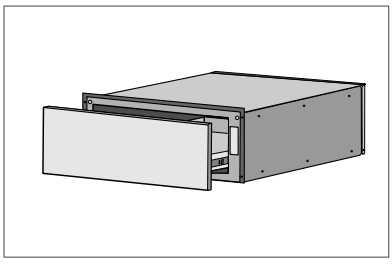
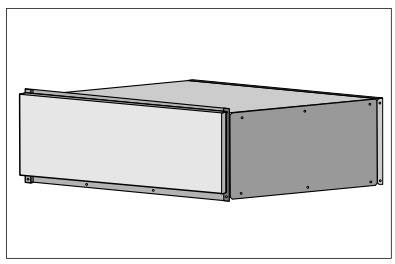
4. Test the operation of the PTO drawer by pushing on the center lower portion of the drawer front (optimum location for function).
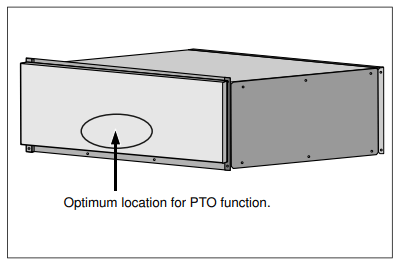
Note: It should be noted the recommended and optimum location for opening the drawer is the lower center front. The drawer will operate with an opening force applied to any location on the drawer front, however a slight increase in opening force may be required.
Use these suggestions before calling for service to avoid service charges
| Oven Problem | Possible Causes and Suggested Solutions |
| The oven mode or temperature selected or the numbers selected do not appear in the display | Review manual instructions when setting clock, timer, or Self Clean. |
| Oven door is locked and will not release, even after cooling | Turn the oven off at the circuit breaker and wait 5 minutes. Turn breaker back on. The oven should reset itself and will be operable. |
| Oven is not heating | Check circuit breaker or fuse box to your house. Make sure there is proper electrical power to the oven. Be sure oven temperature has been selected. |
| Oven is not cooking evenly | Adjust oven calibration if necessary (see “Change the Oven Temperature Offset” in this manual). Refer to cooking charts for recommended rack position. |
| Baking results are not as expected | Refer to cooking charts for recommended rack position. Check “Getting the Most out of Your Oven” for tips and suggestions. Adjust oven calibration if necessary |
| Food takes longer to cook than expected | The oven is carefully calibrated to provide accurate results. However, the temperature can be offset if food is consistently too brown or too light. |
| Food is overcooked | The oven is carefully calibrated to provide accurate results. However, the temperature can be offset if food is consistently too brown or too light. See “Oven Temperature Offset” on page 18 |
| Convection Bake or Convection MultiRack Results are not as Expected | If the Automatic Convection Conversion Feature is turned off, the temperature must be manually reduced by 25° F. If the feature is active, the temperature is automatically adjusted. See “Turn Automatic Convection Conversion ON or OFF” for more information. Refer to cooking charts and tips for rack positions, cooking times and pan selection. Adjust oven calibration if necessary. See “Oven Temperature Offset” on page 18 |
| Oven temperature is too hot or too cold | The oven thermostat needs adjustment. See “Oven Temperature Offset” on page 18. |
| Oven light is not working properly | Replace or reinsert the light bulb if loose or defective. Touching the bulb with fingers may cause the bulb to burn out. |
| Oven light will not turn off | Check for obstruction in oven door. Check to see if hinge is bent. When the Sabbath feature is activated, the oven light will stay on or off (as selected during set-up) during the entire Sabbath Mode. |
| Cannot remove lens cover on light | There may be soil build-up around the lens cover. Wipe lens cover area with a clean dry towel prior to attempting to remove the lens cover. |
| Oven will not Self Clean properly | There may be soil build-up around the lens cover. Wipe lens cover area with a clean dry towel prior to attempting to remove the lens cover. |
| Oven will not Self Clean properly | Allow the oven to cool before running Self Clean. Always wipe out loose soils or heavy spillovers before running Self Clean. If oven is badly soiled, set oven for a four-hour Self Clean. See Preparing the Oven to Self Clean |
| Clock and timer are not working properly | Make sure there is electrical power to oven. See Clock and Timer sections. |
| Porcelain chips | When oven racks are removed and replaced, always tilt racks upward and do not force them to avoid chipping the porcelain. |
| “F” and a number appears in display and control beeps | This is a fault code. Press Off to clear the display and stop beeping. Reset oven if necessary. If fault code remains and beep continues, record fault code, cancel oven and call authorized service technician. |
| With a new range there is a strong odor when oven is turned on | This is normal with a new range and will disappear after a few uses. Operating the Self Clean cycle will also “burn-off” the smell more quickly. |
| Control does not react when the pad is touched | Be sure that pad is clean. Touch the center of the button. Use the flat part of your finger. |
| Fan is running during modes that don’t use convection | On some models, the convection fan will run while the oven is preheating for the bake mode. This is normal. Slide-in models also have a cooling fan that runs during every cooking mode. |
| Warm air or steam escapes from oven vent | It is normal to see or feel steam or warm air escaping from the oven vent. Do not block the vent. |
| Cooling fan runs after oven is turned off (Slide-in ranges only) | This is normal. When the oven has cooled to a pre-determined temperature, the cooling fan turns off. |
| The cooktop does not operate during Self Clean | This is normal for some models. Operation will return once Self Clean is complete. |
See other models: HEI8046C KGN39IJ3A/05 WTVC6330US/10 HEIP056C HEI8046U
 angle, using care not to gouge or scratch the glass. Push soil off the heated area.