Owner Manual Refrigerator
INTRODUCTION
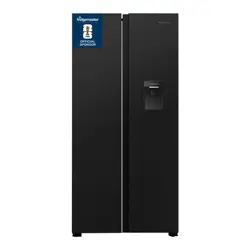
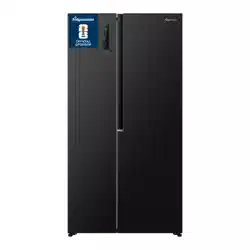
Thank you for buying a Fisher & Paykel side by side refrigerator.
This refrigerator combines size and storage space with the latest features and functions. Many hours have been spent researching how you, our customer, use your refrigerator and what we can do to make life easier for you.
As your life changes, so can your refrigerator. This book explains the features and functions, and will help you get the most out of your refrigerator.
We hope you enjoy your new refrigerator.
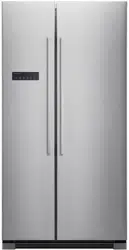
RX611DUX
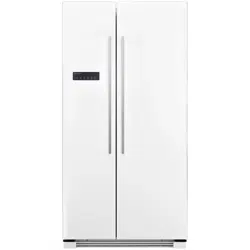
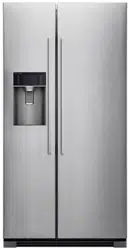
RX628DW/RX628DX
ABOUT YOUR REFRIGERATOR
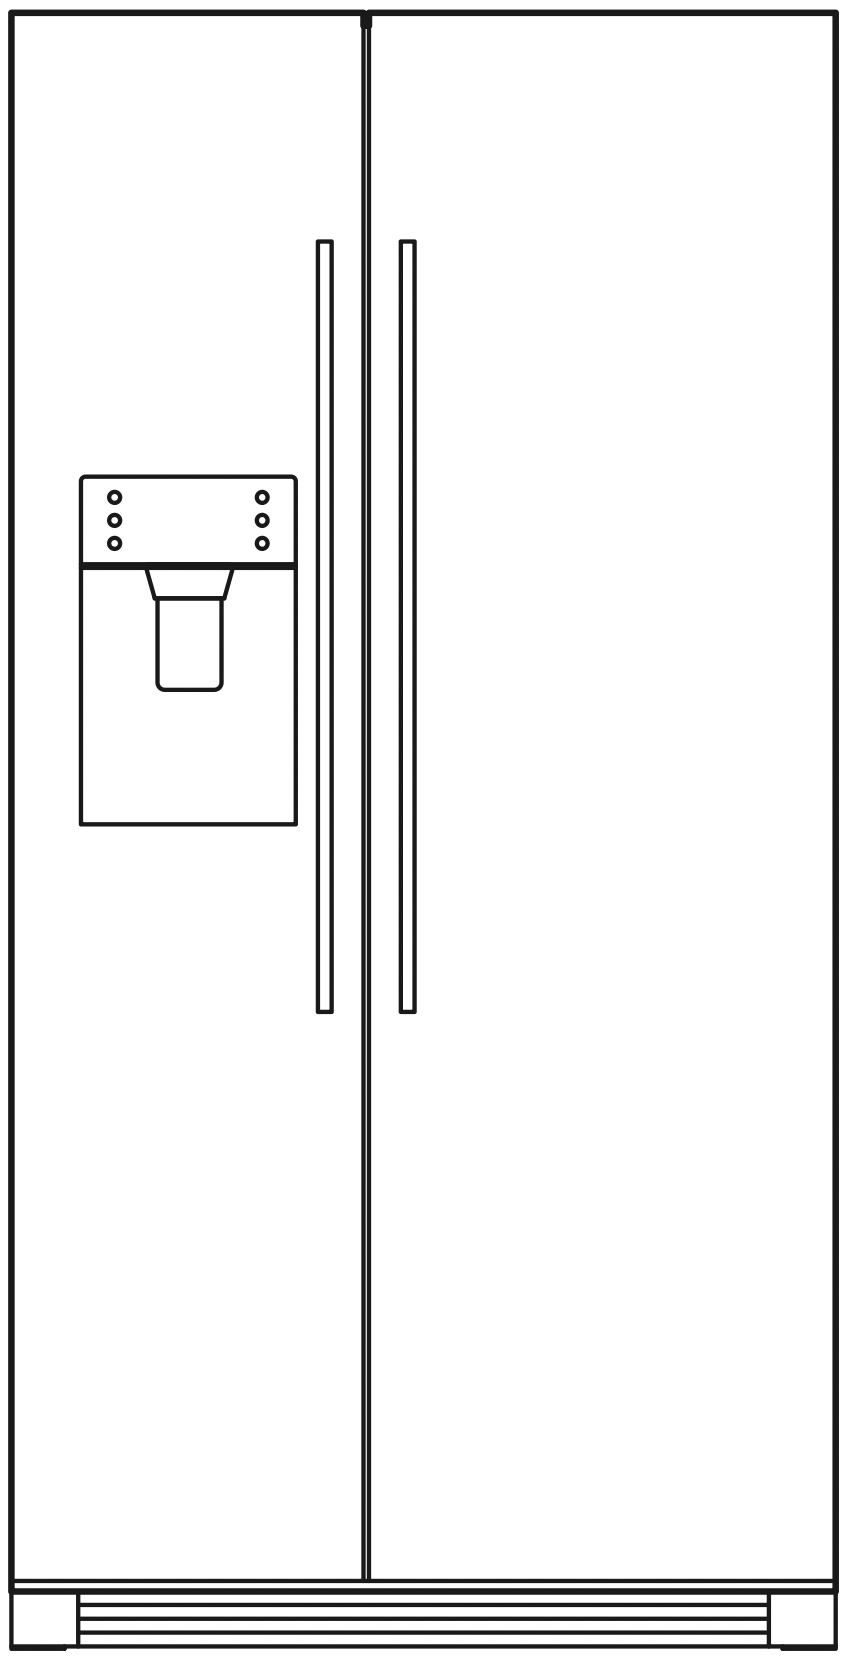
ICE & WATER
RX611DUX
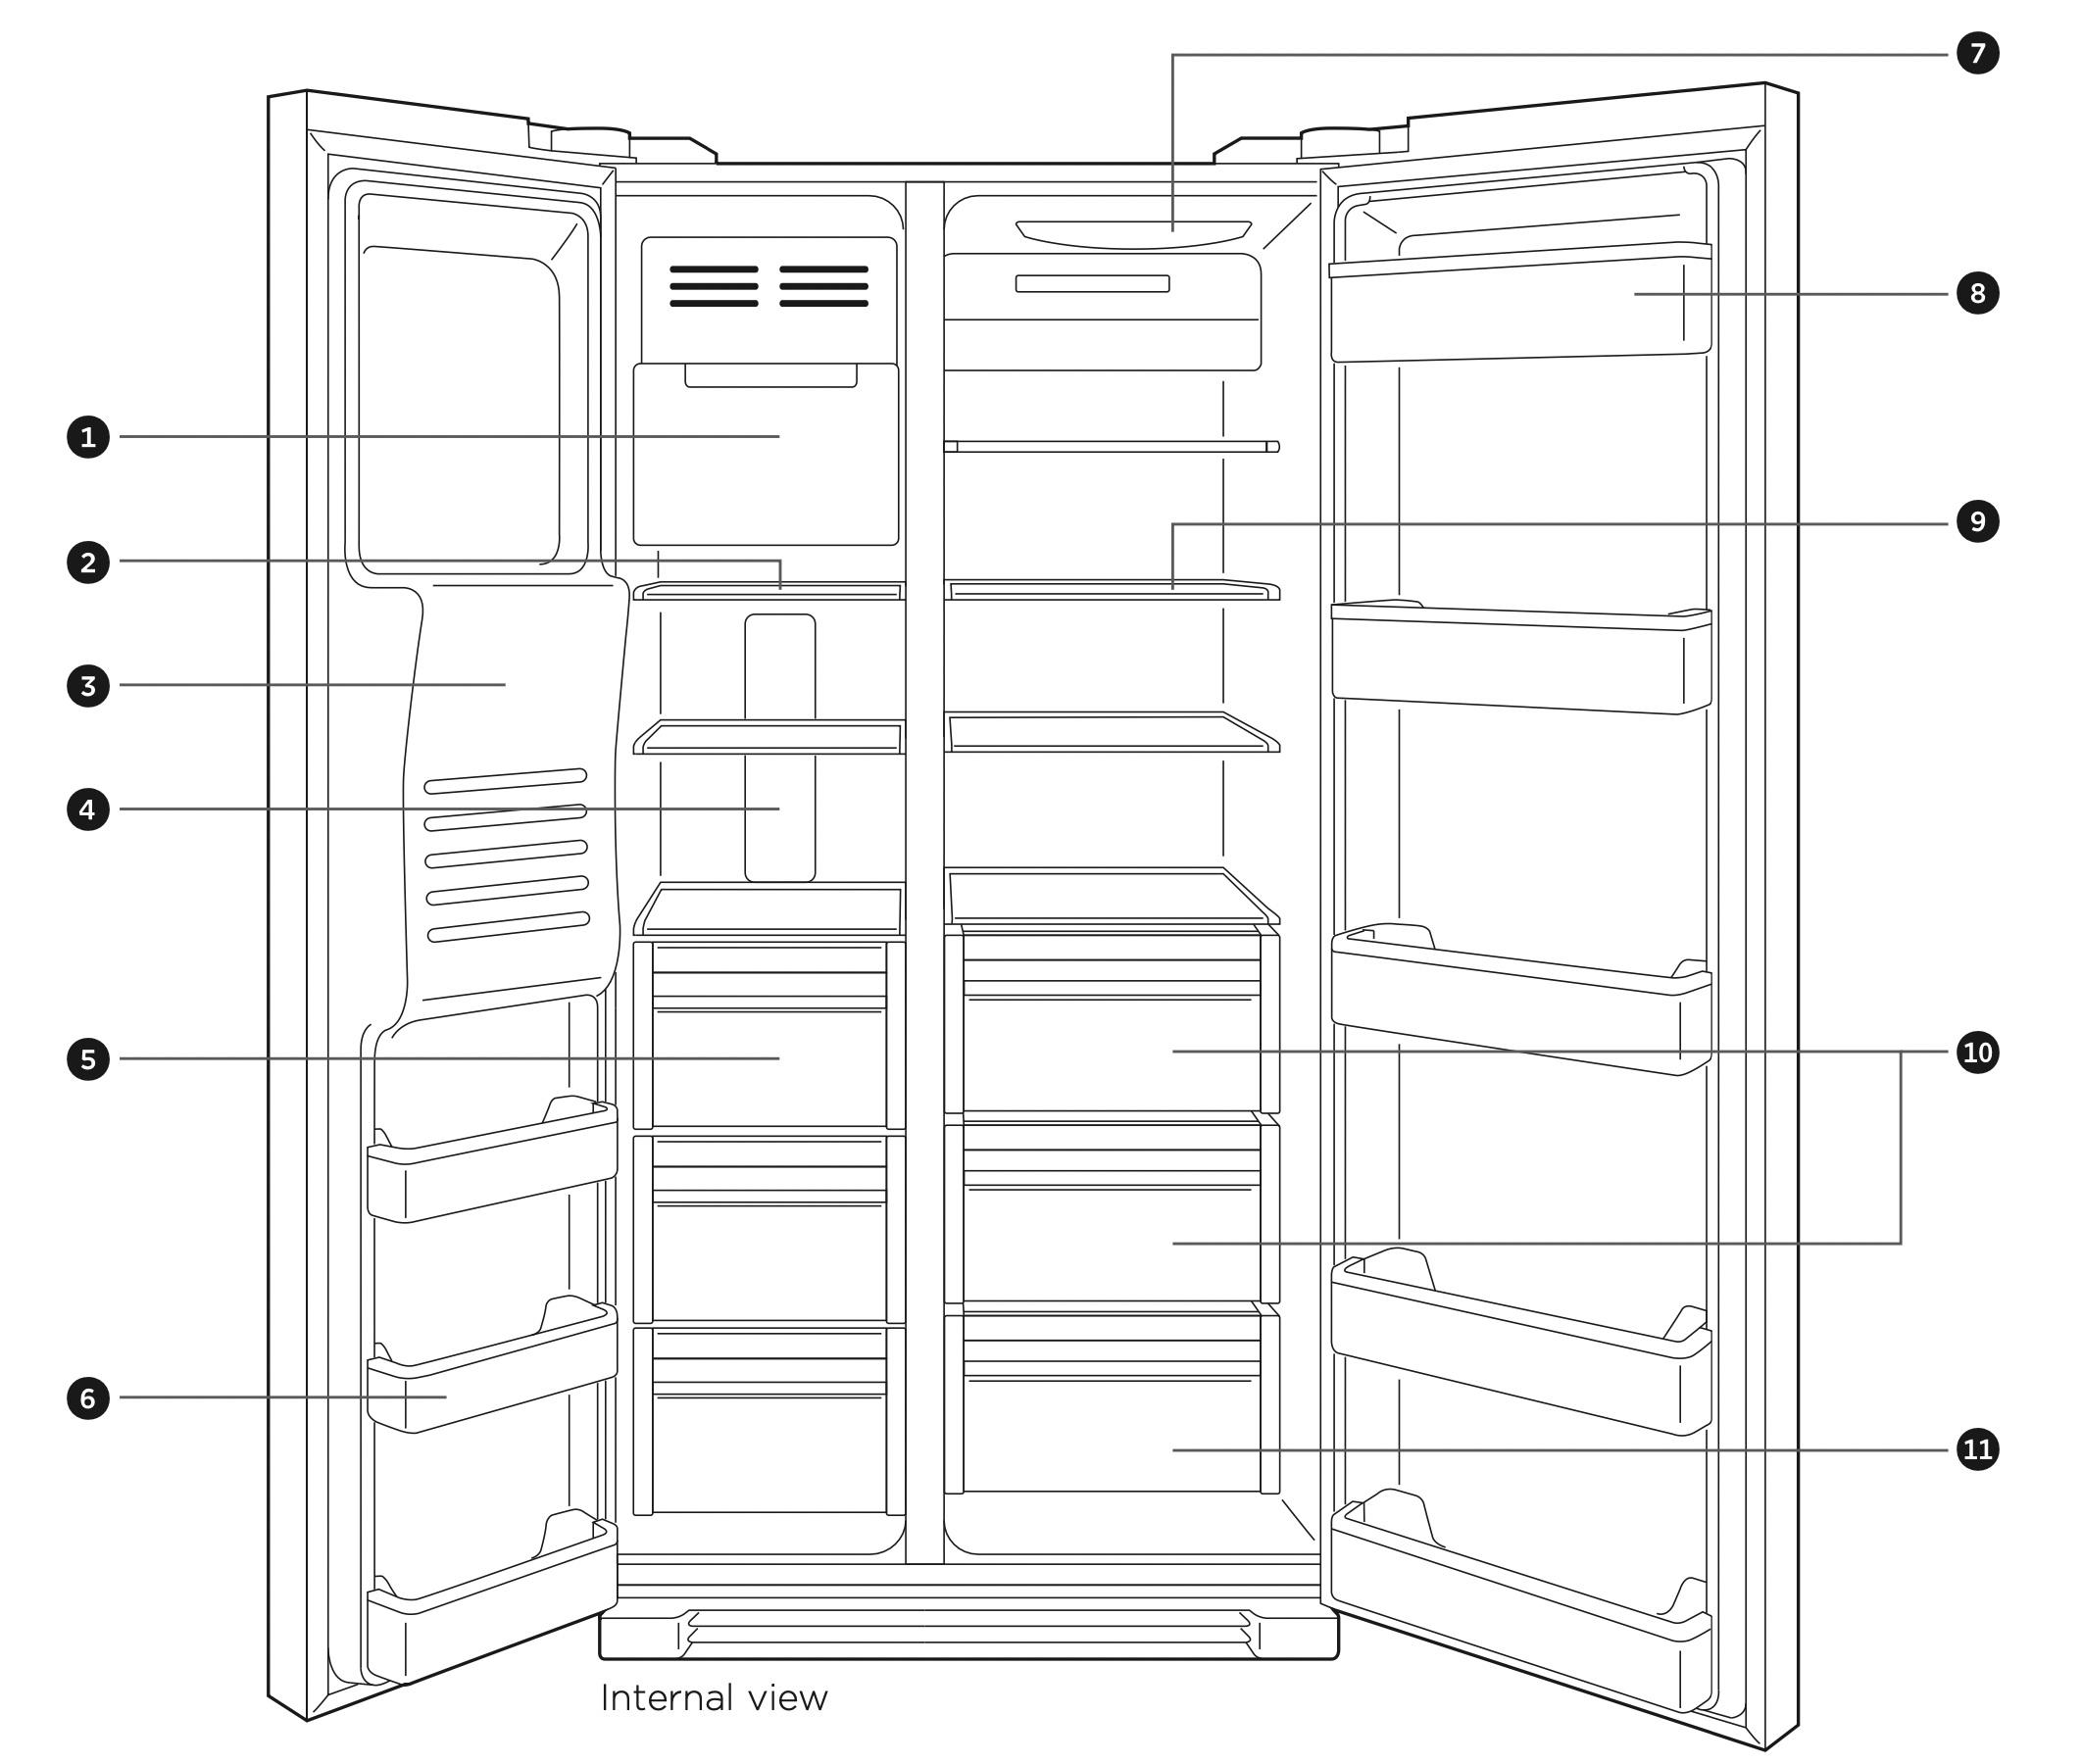
- Ice maker/ice box
- Freezer main shelves
- Ice & water dispenser
- Freezer light
- Freezer drawers
- Freezer door shelves
- Fridge light
- Fridge door shelves
- Fridge main shelves
- Vegetable drawers
- Fridge drawer
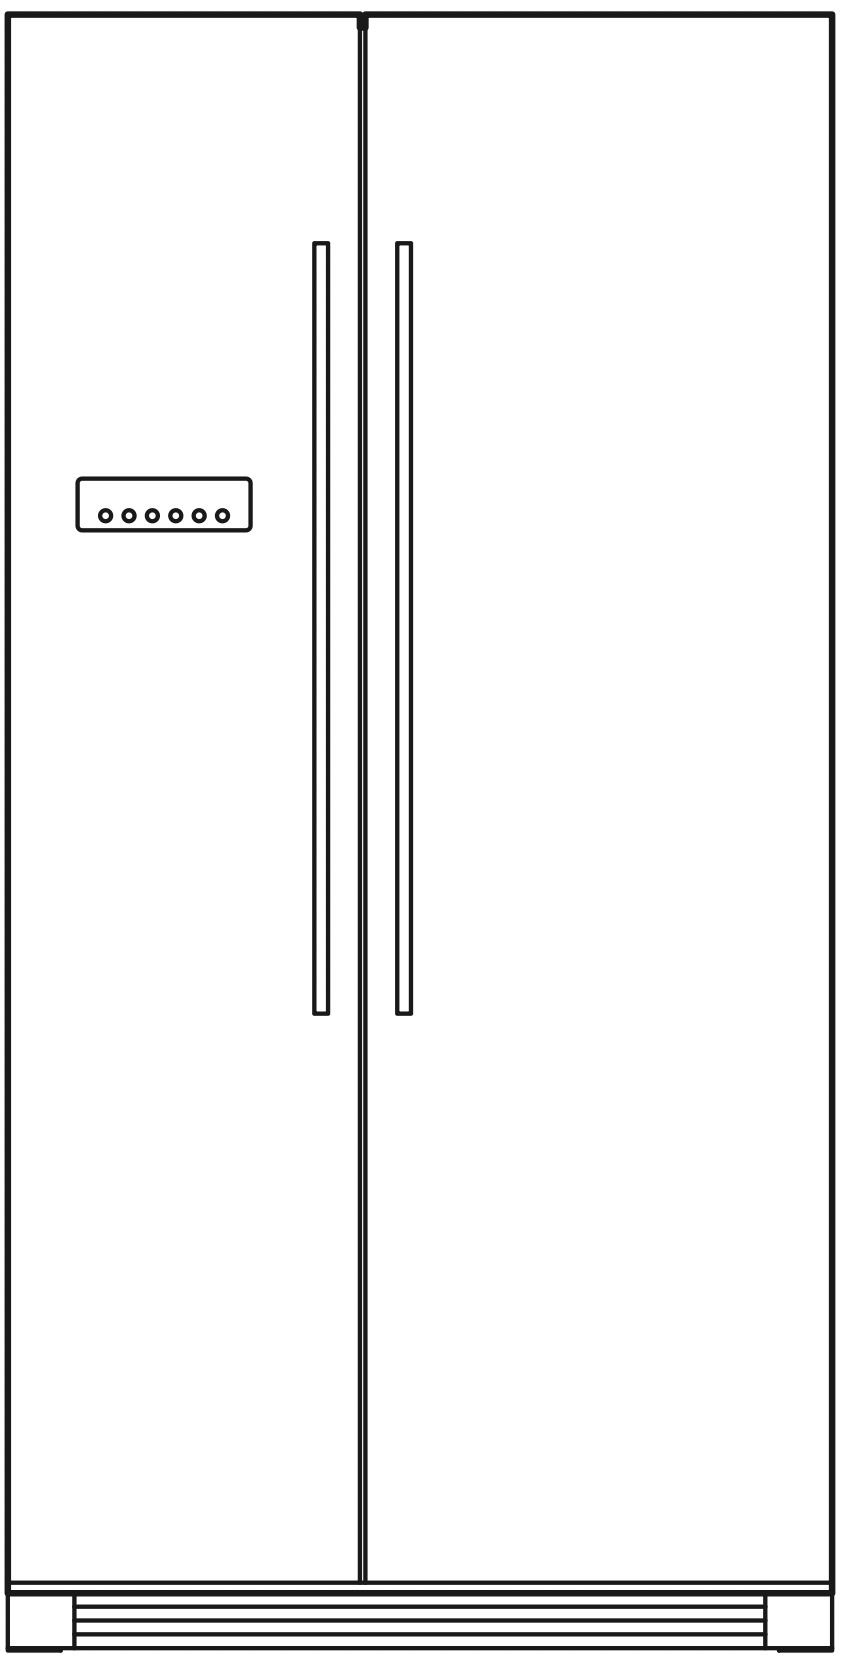
NON ICE & WATER
RX628DX and RX628DW
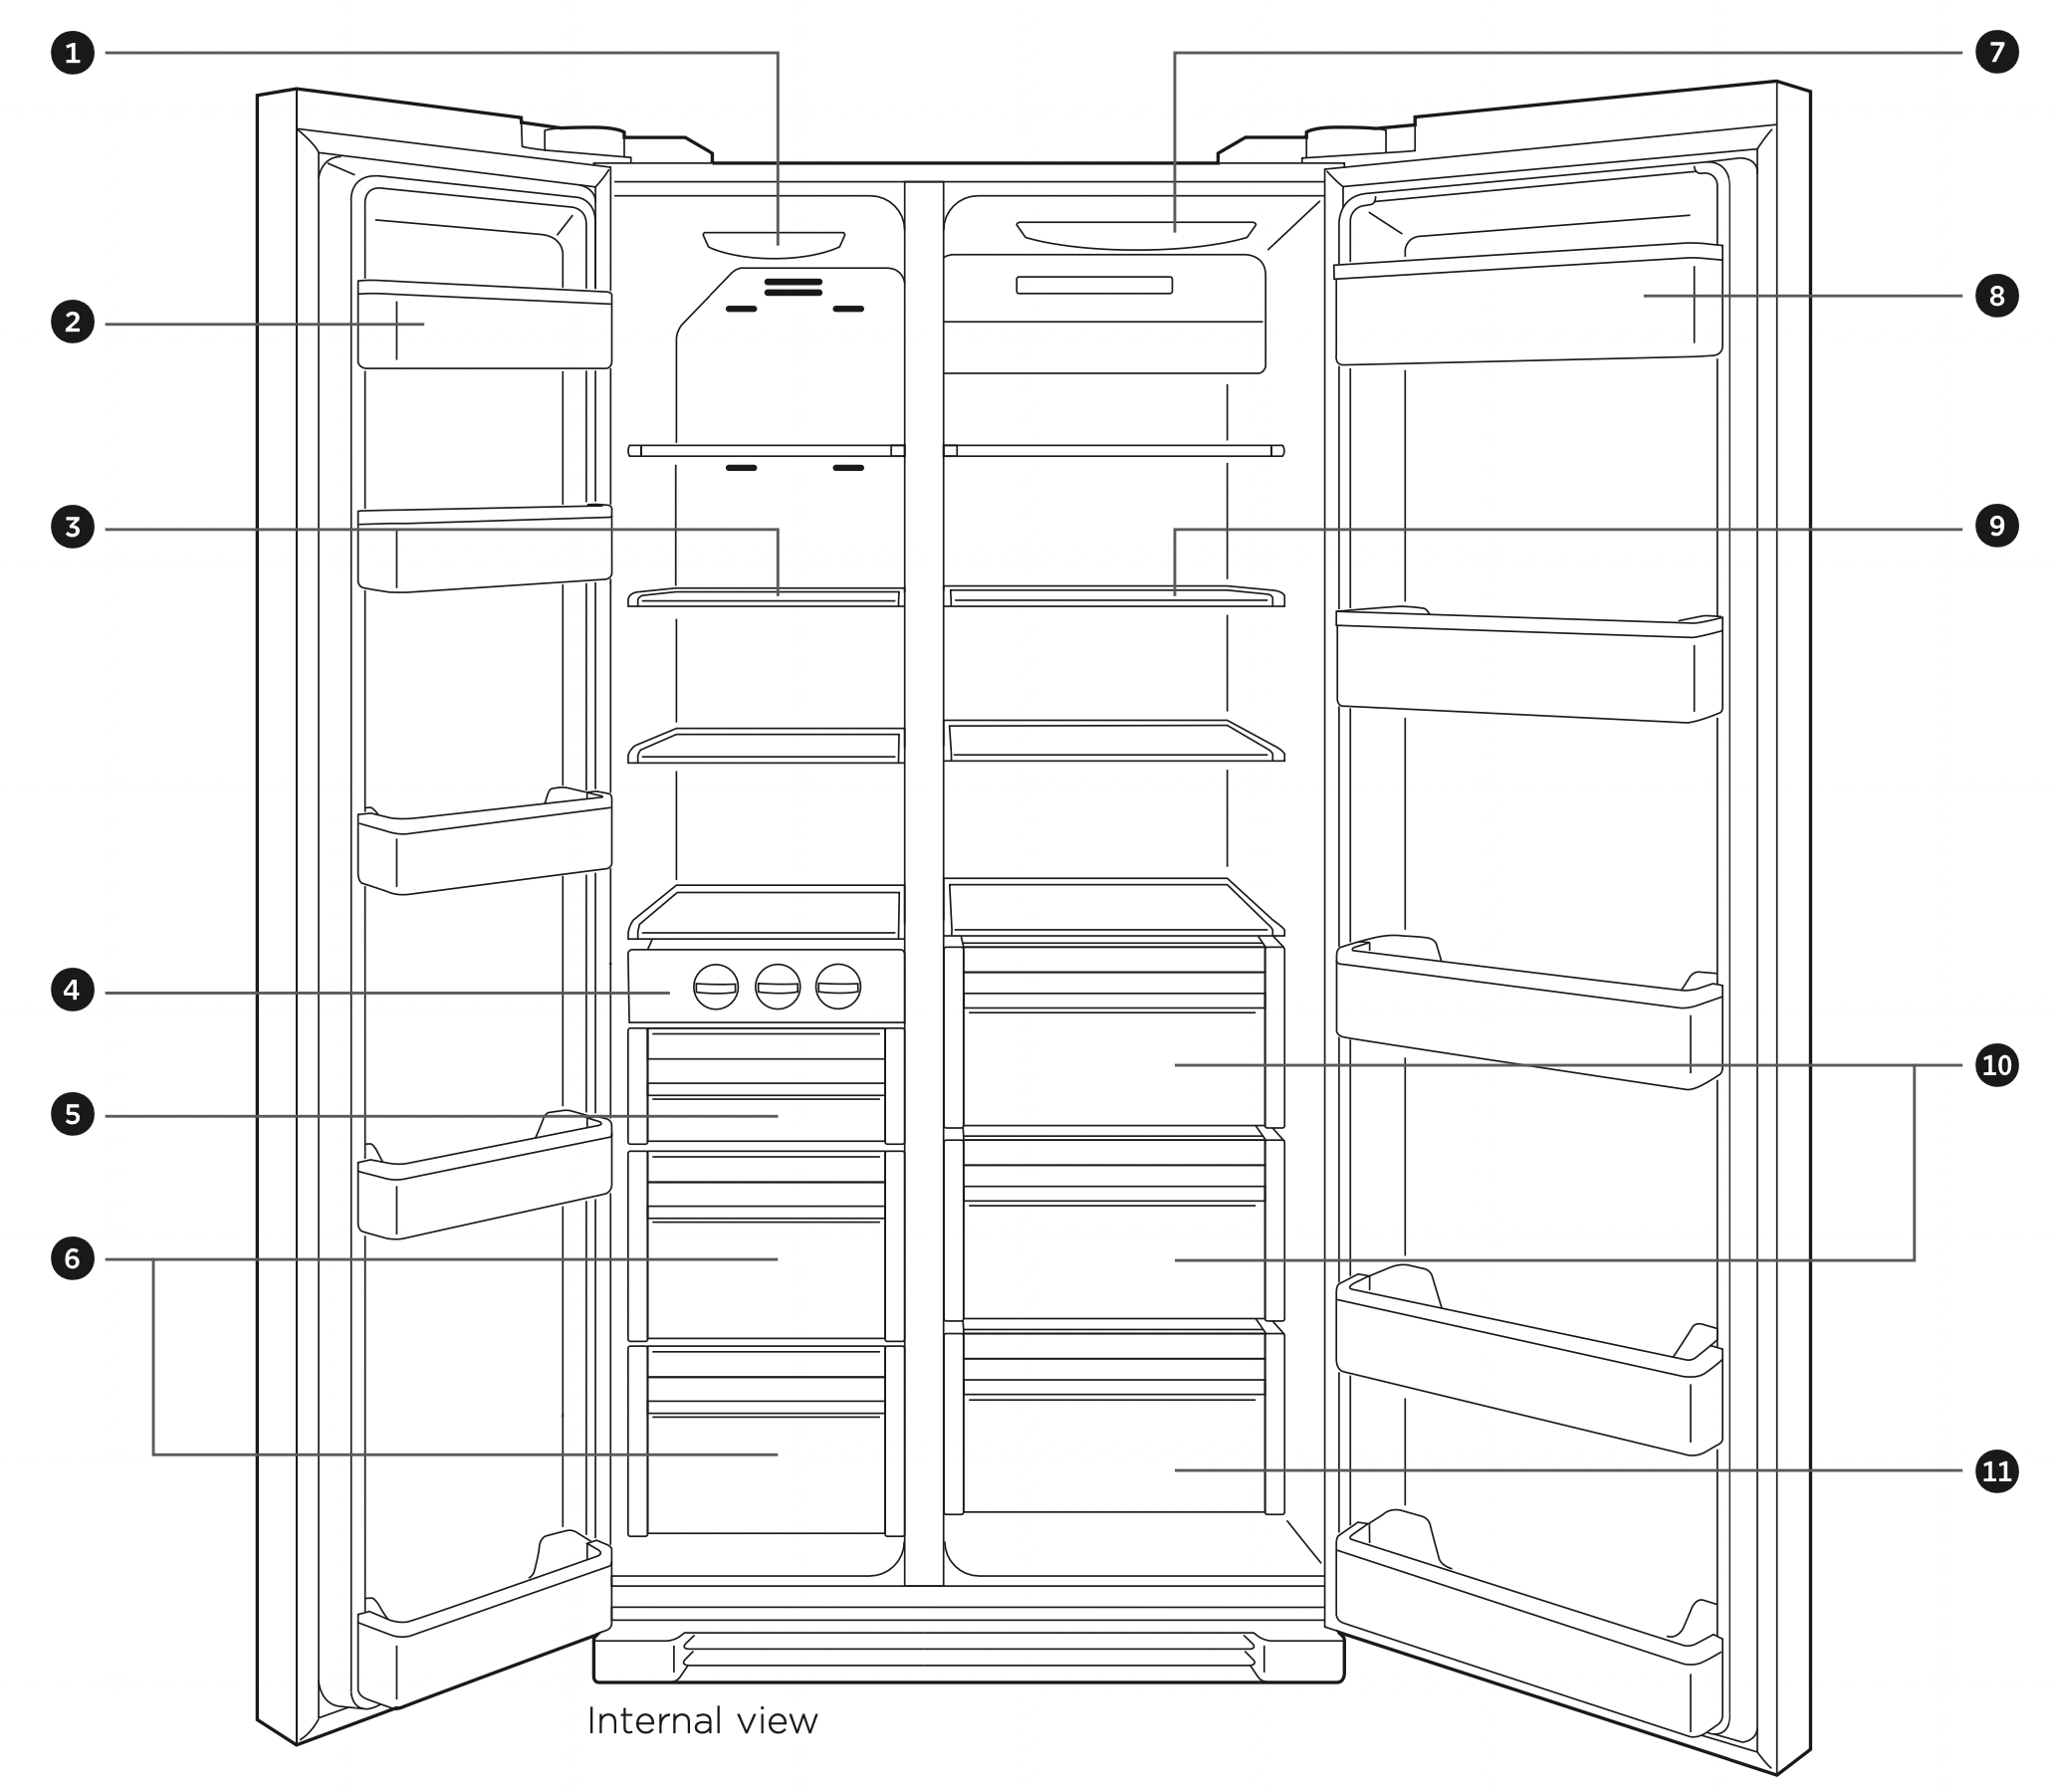
- Freezer light
- Freezer door shelves
- Freezer main shelves
- Ice trays
- Ice box
- Freezer drawers
- Fridge light
- Fridge door shelves
- Fridge main shelves
- Vegetable drawers
- Fridge drawer
OPERATING INSTRUCTIONS
ICE & WATER CONTROL PANEL
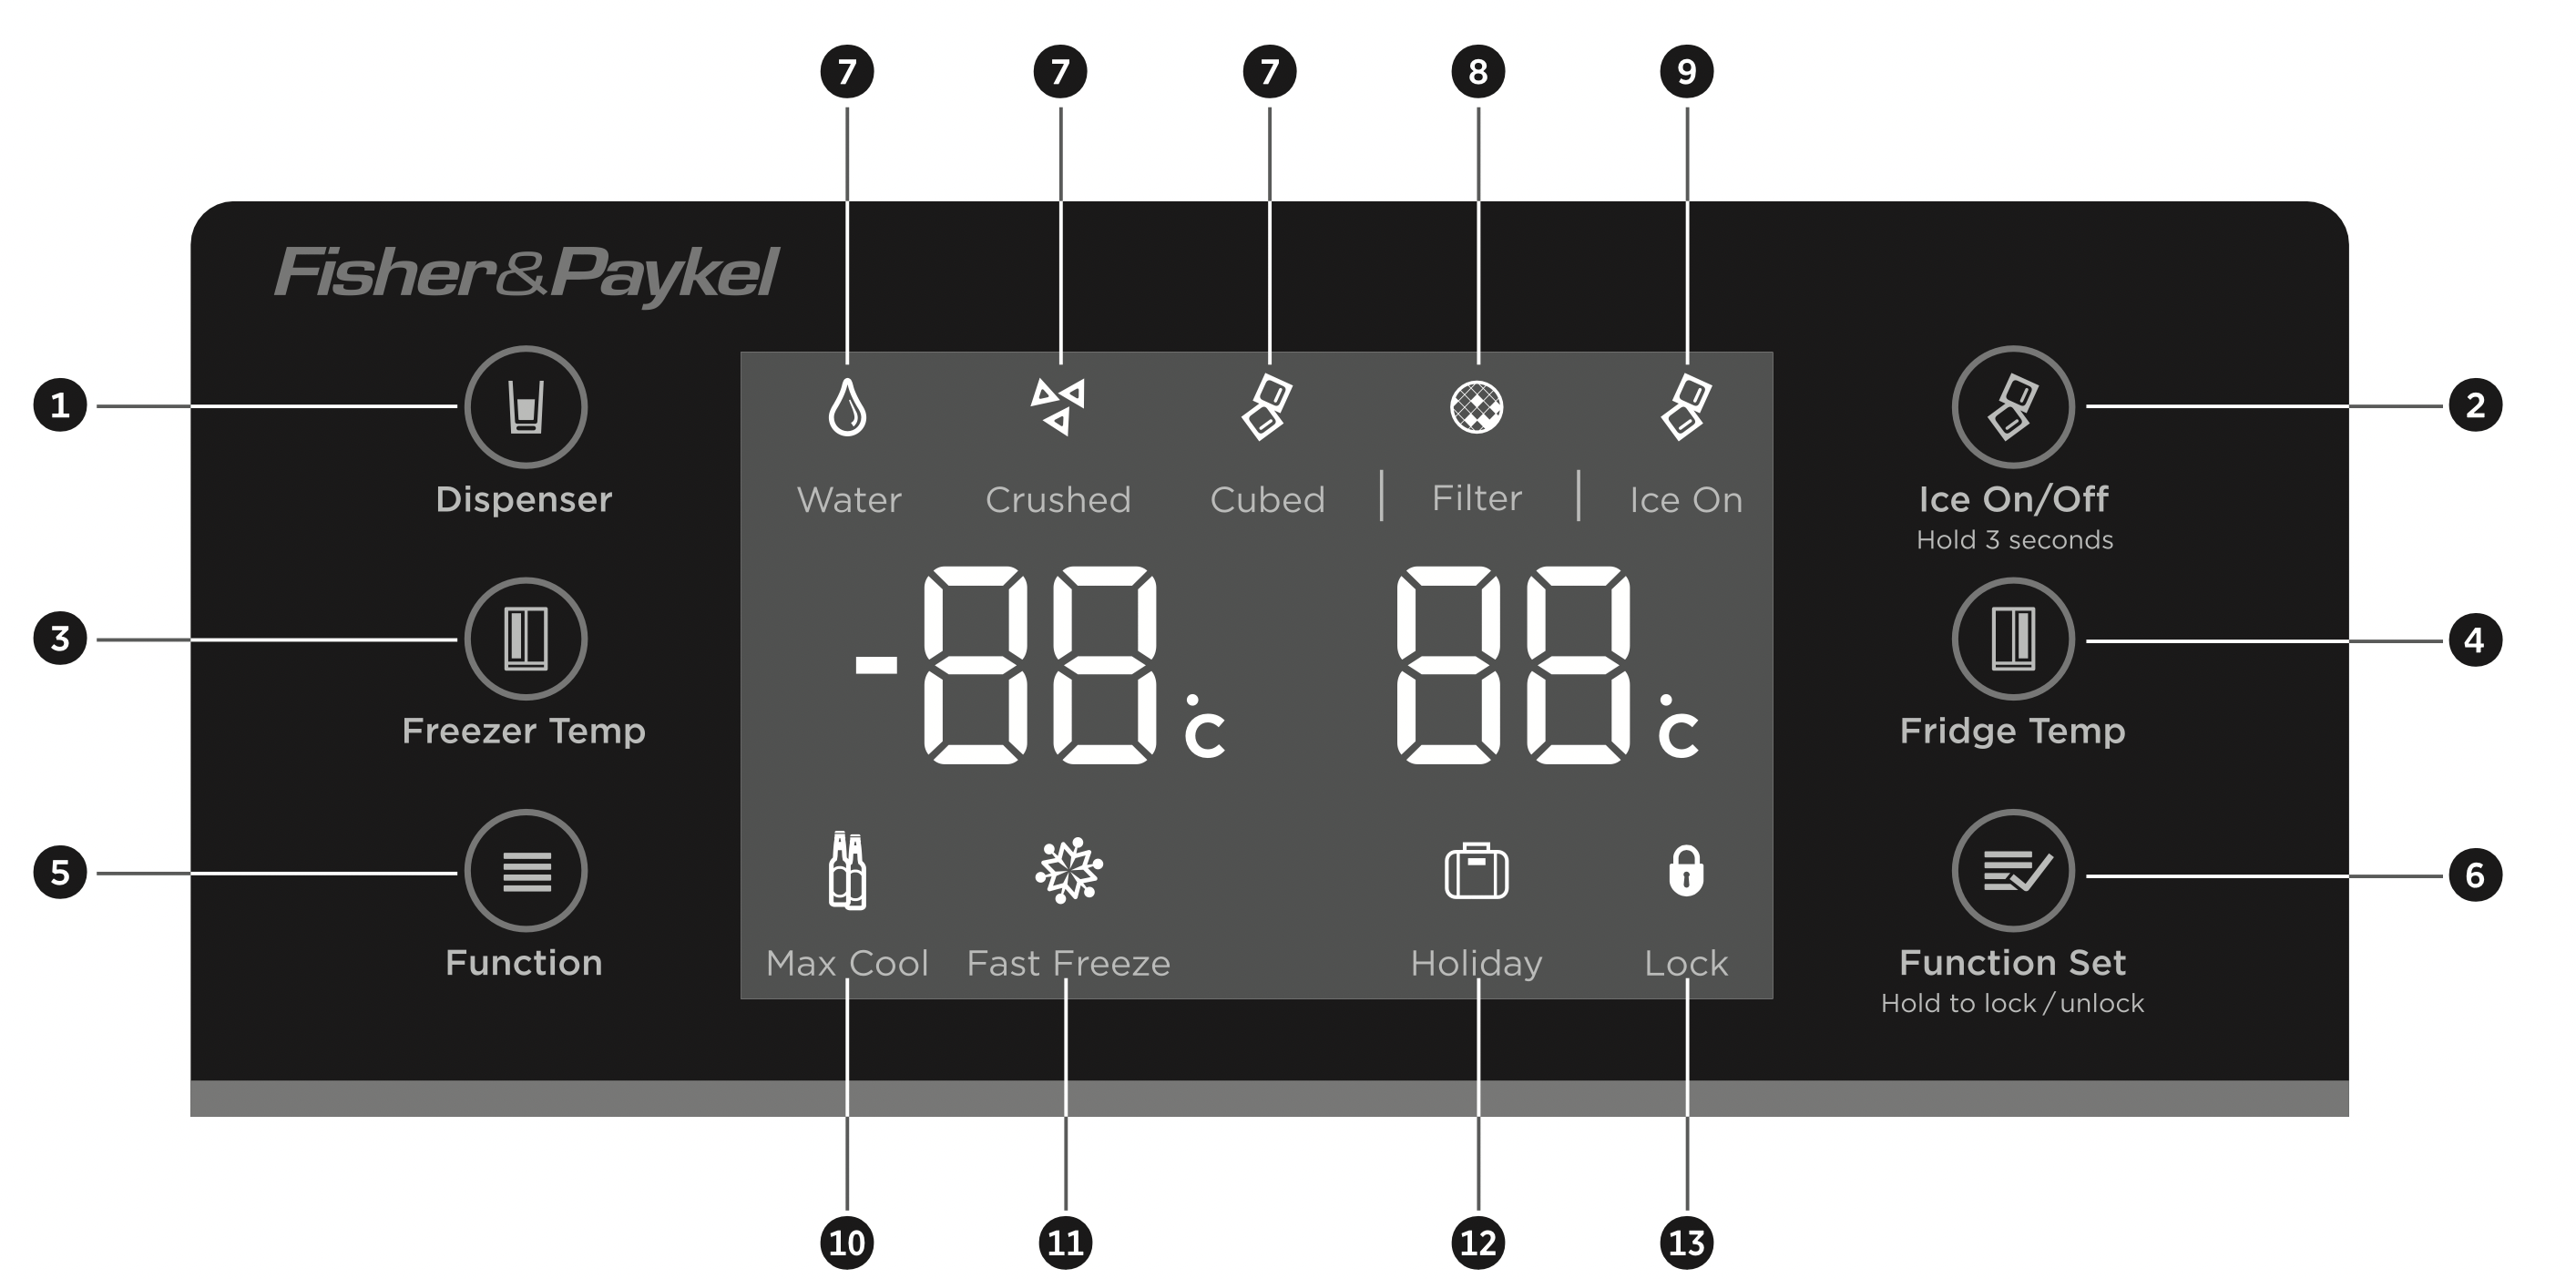
- Water and ice dispenser button
- Ice maker on/off button
- Freezer temperature button
- Fridge temperature button
- Function select button
- Function set button
- Dispenser status icons
- Filter change status icon
- Ice maker on status icon
- Max Cool icon
- Fast Freeze icon
- Holiday icon
- Lock icon
Lock function

This feature will lock the temperature and function settings preventing these from being changed. This is useful when cleaning your refrigerator. When locked, the Lock icon will blink and a beep will sound.
To lock
Press and hold Function Set  for 3 seconds. The Lock icon will appear and the refrigerator settings will be locked.
To unlock
Press and hold Function Set  for 3 seconds. The Lock icon will turn off and the refrigerator settings will be unlocked.
Holiday function
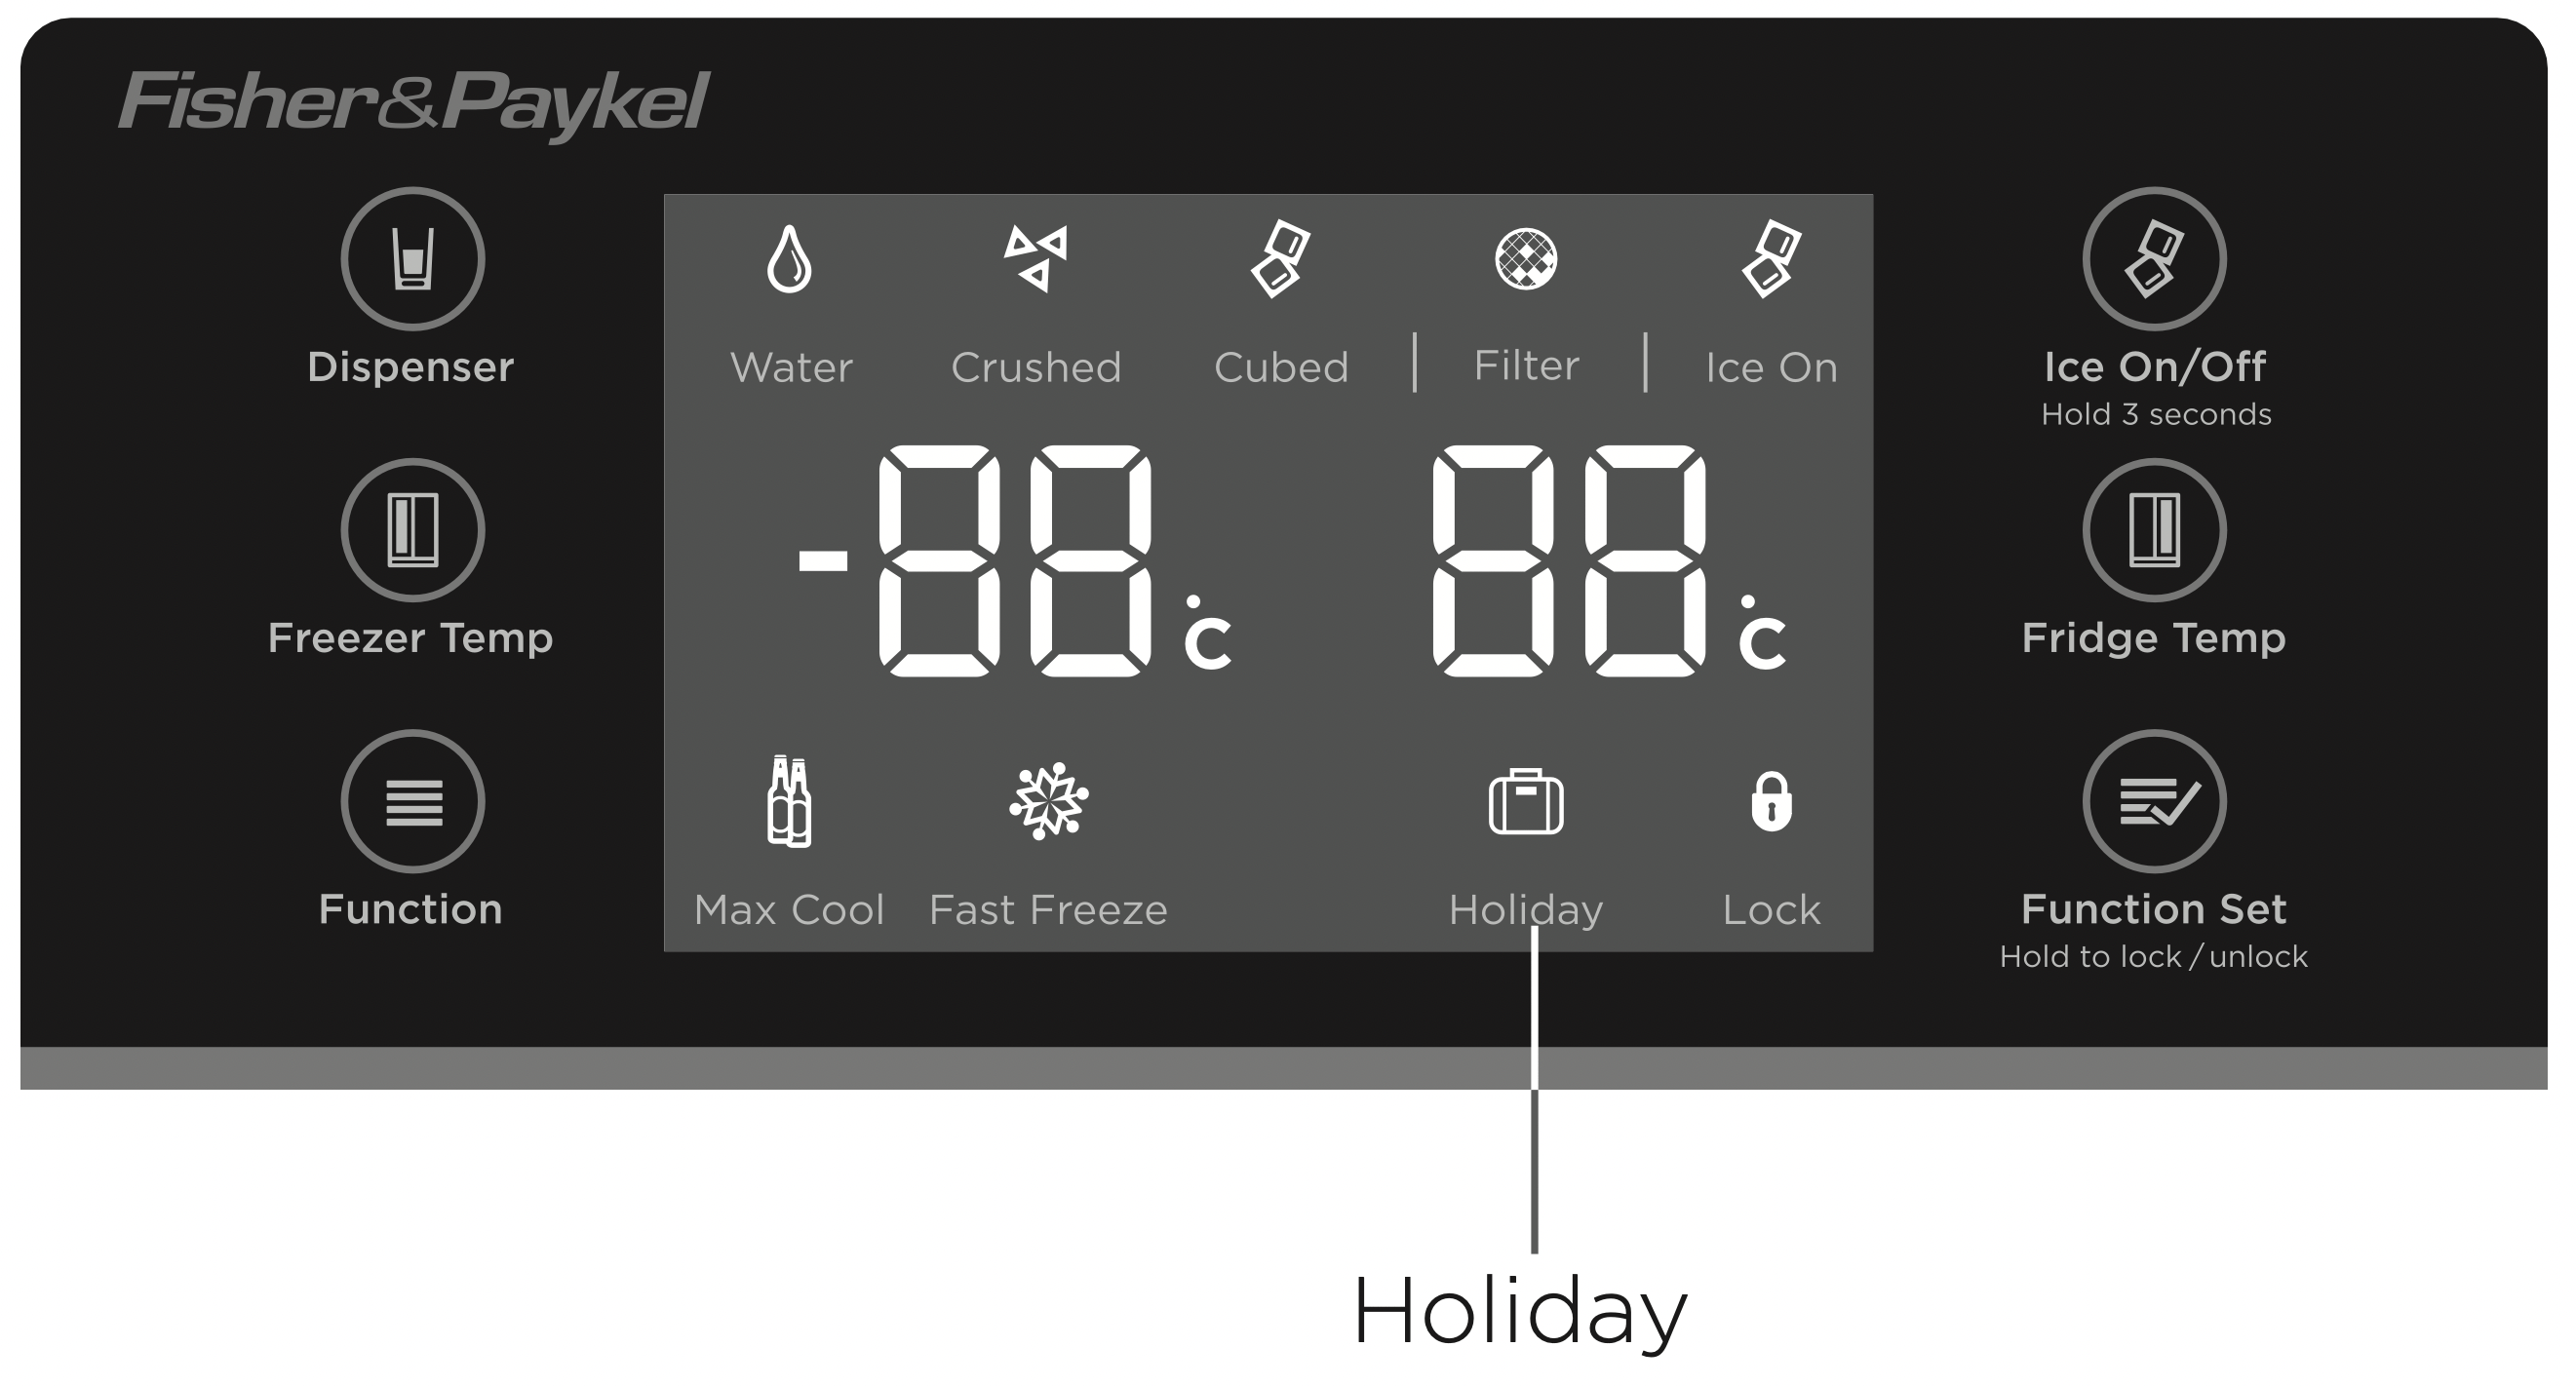
IMPORTANT! Before selecting the holiday function remove all perishable food and drink from the fridge compartment as perishable items may become unsafe to consume.
This feature allows you to leave the fridge section unused while the freezer section operates as normal. When in this function, the fridge temperature will be automatically set to 17°C.
To turn on
- Press Function
 until the Holiday icon is selected.
- Press Function Set
 , the Holiday function will be activated.
To turn off
- Press Function
 until the Holiday icon is selected.
- Press Function Set
 , the Holiday icon will turn off. Holiday function is now deactivated.
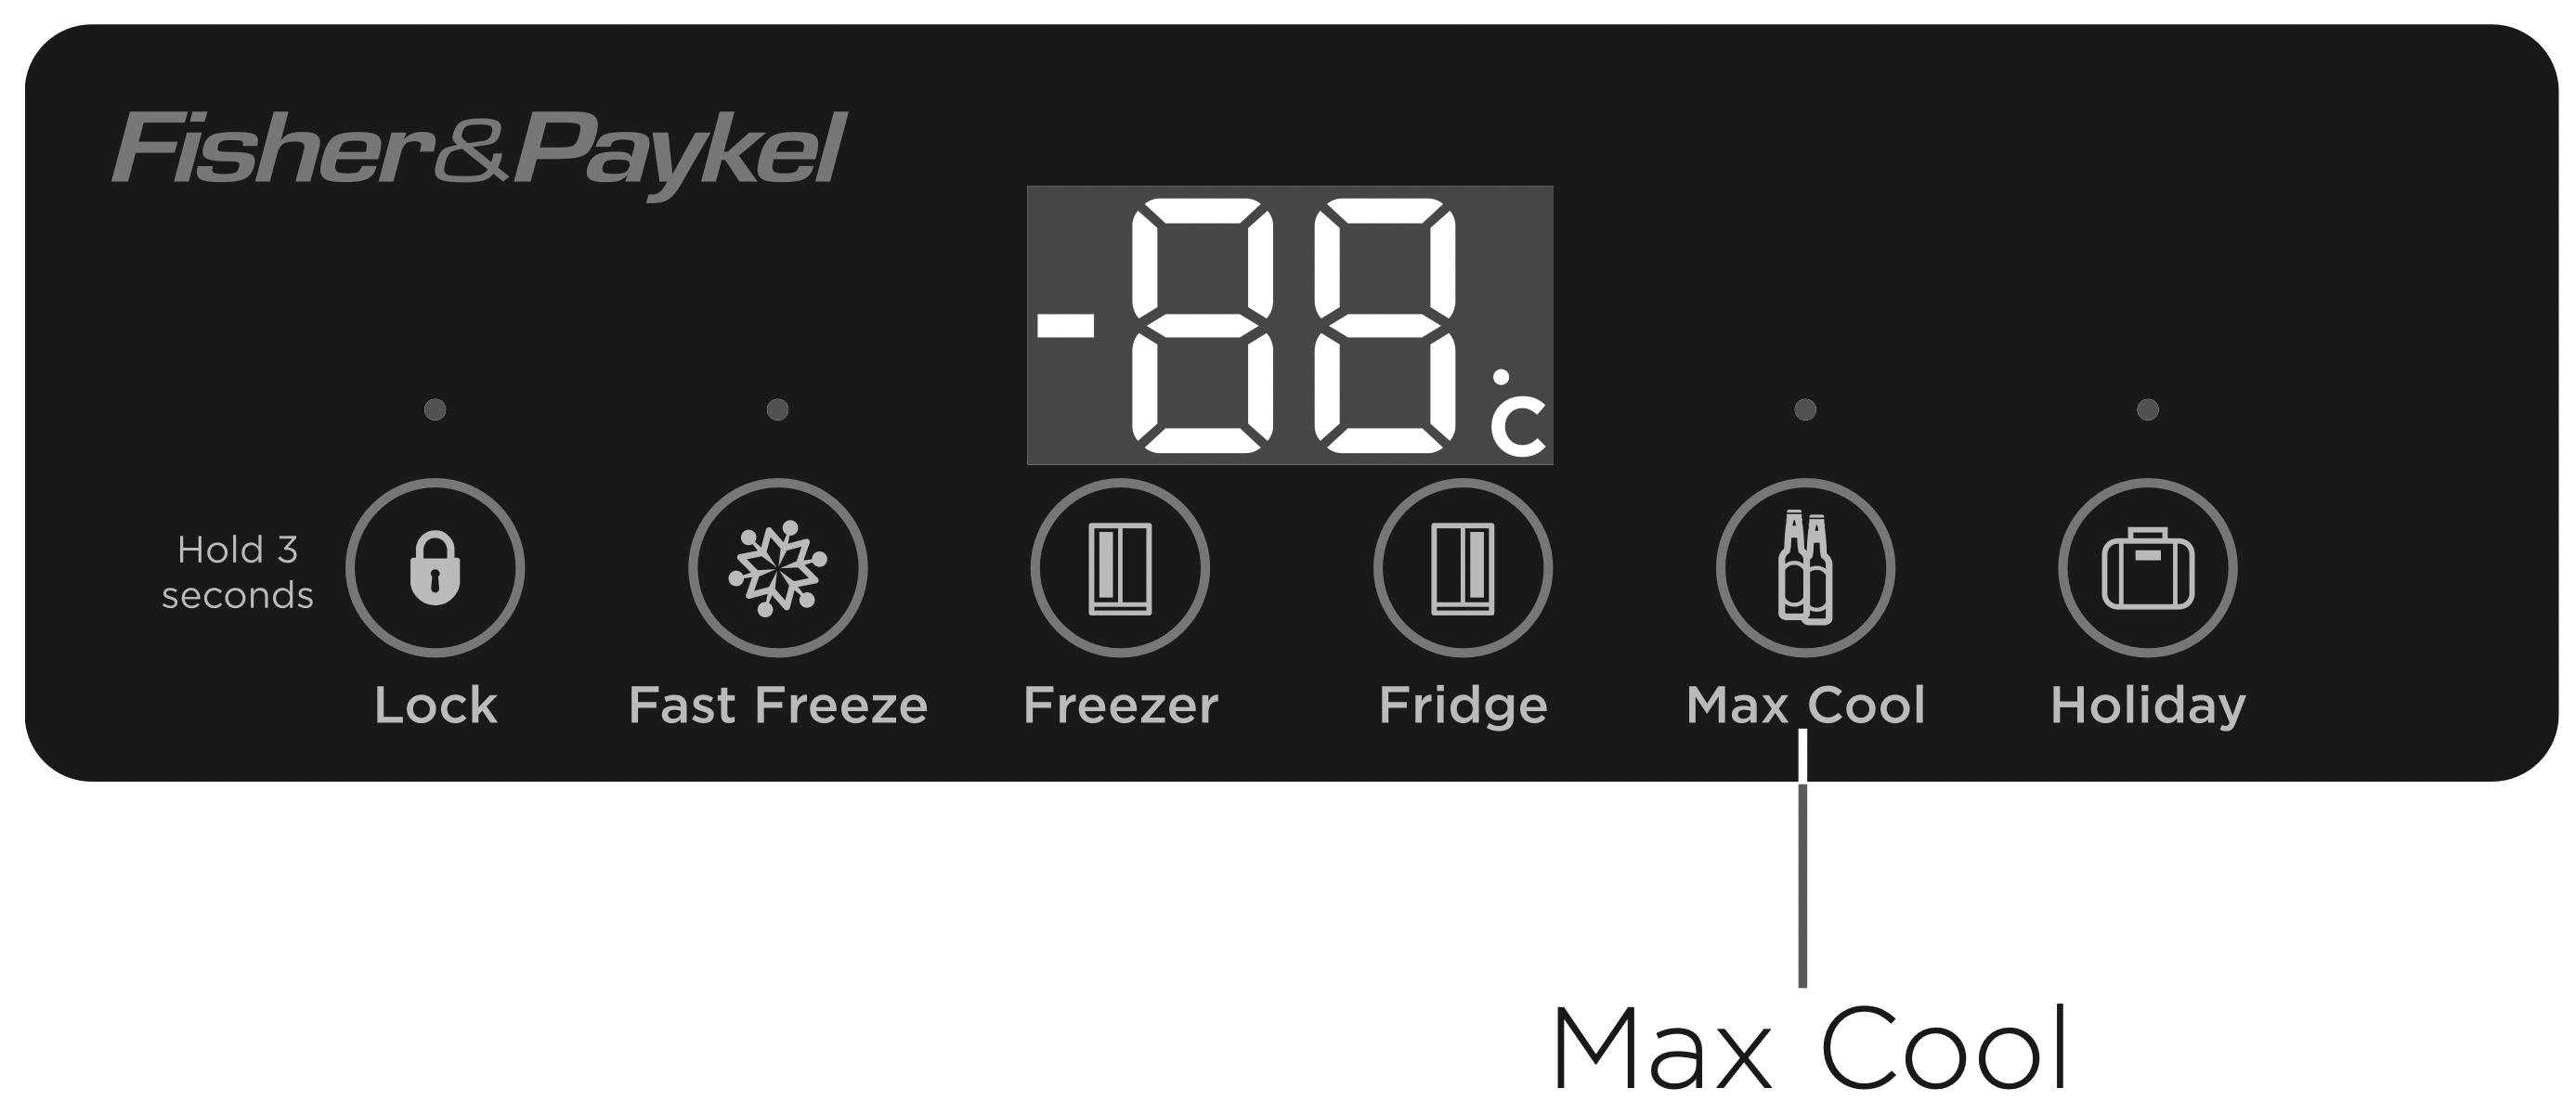
Max Cool
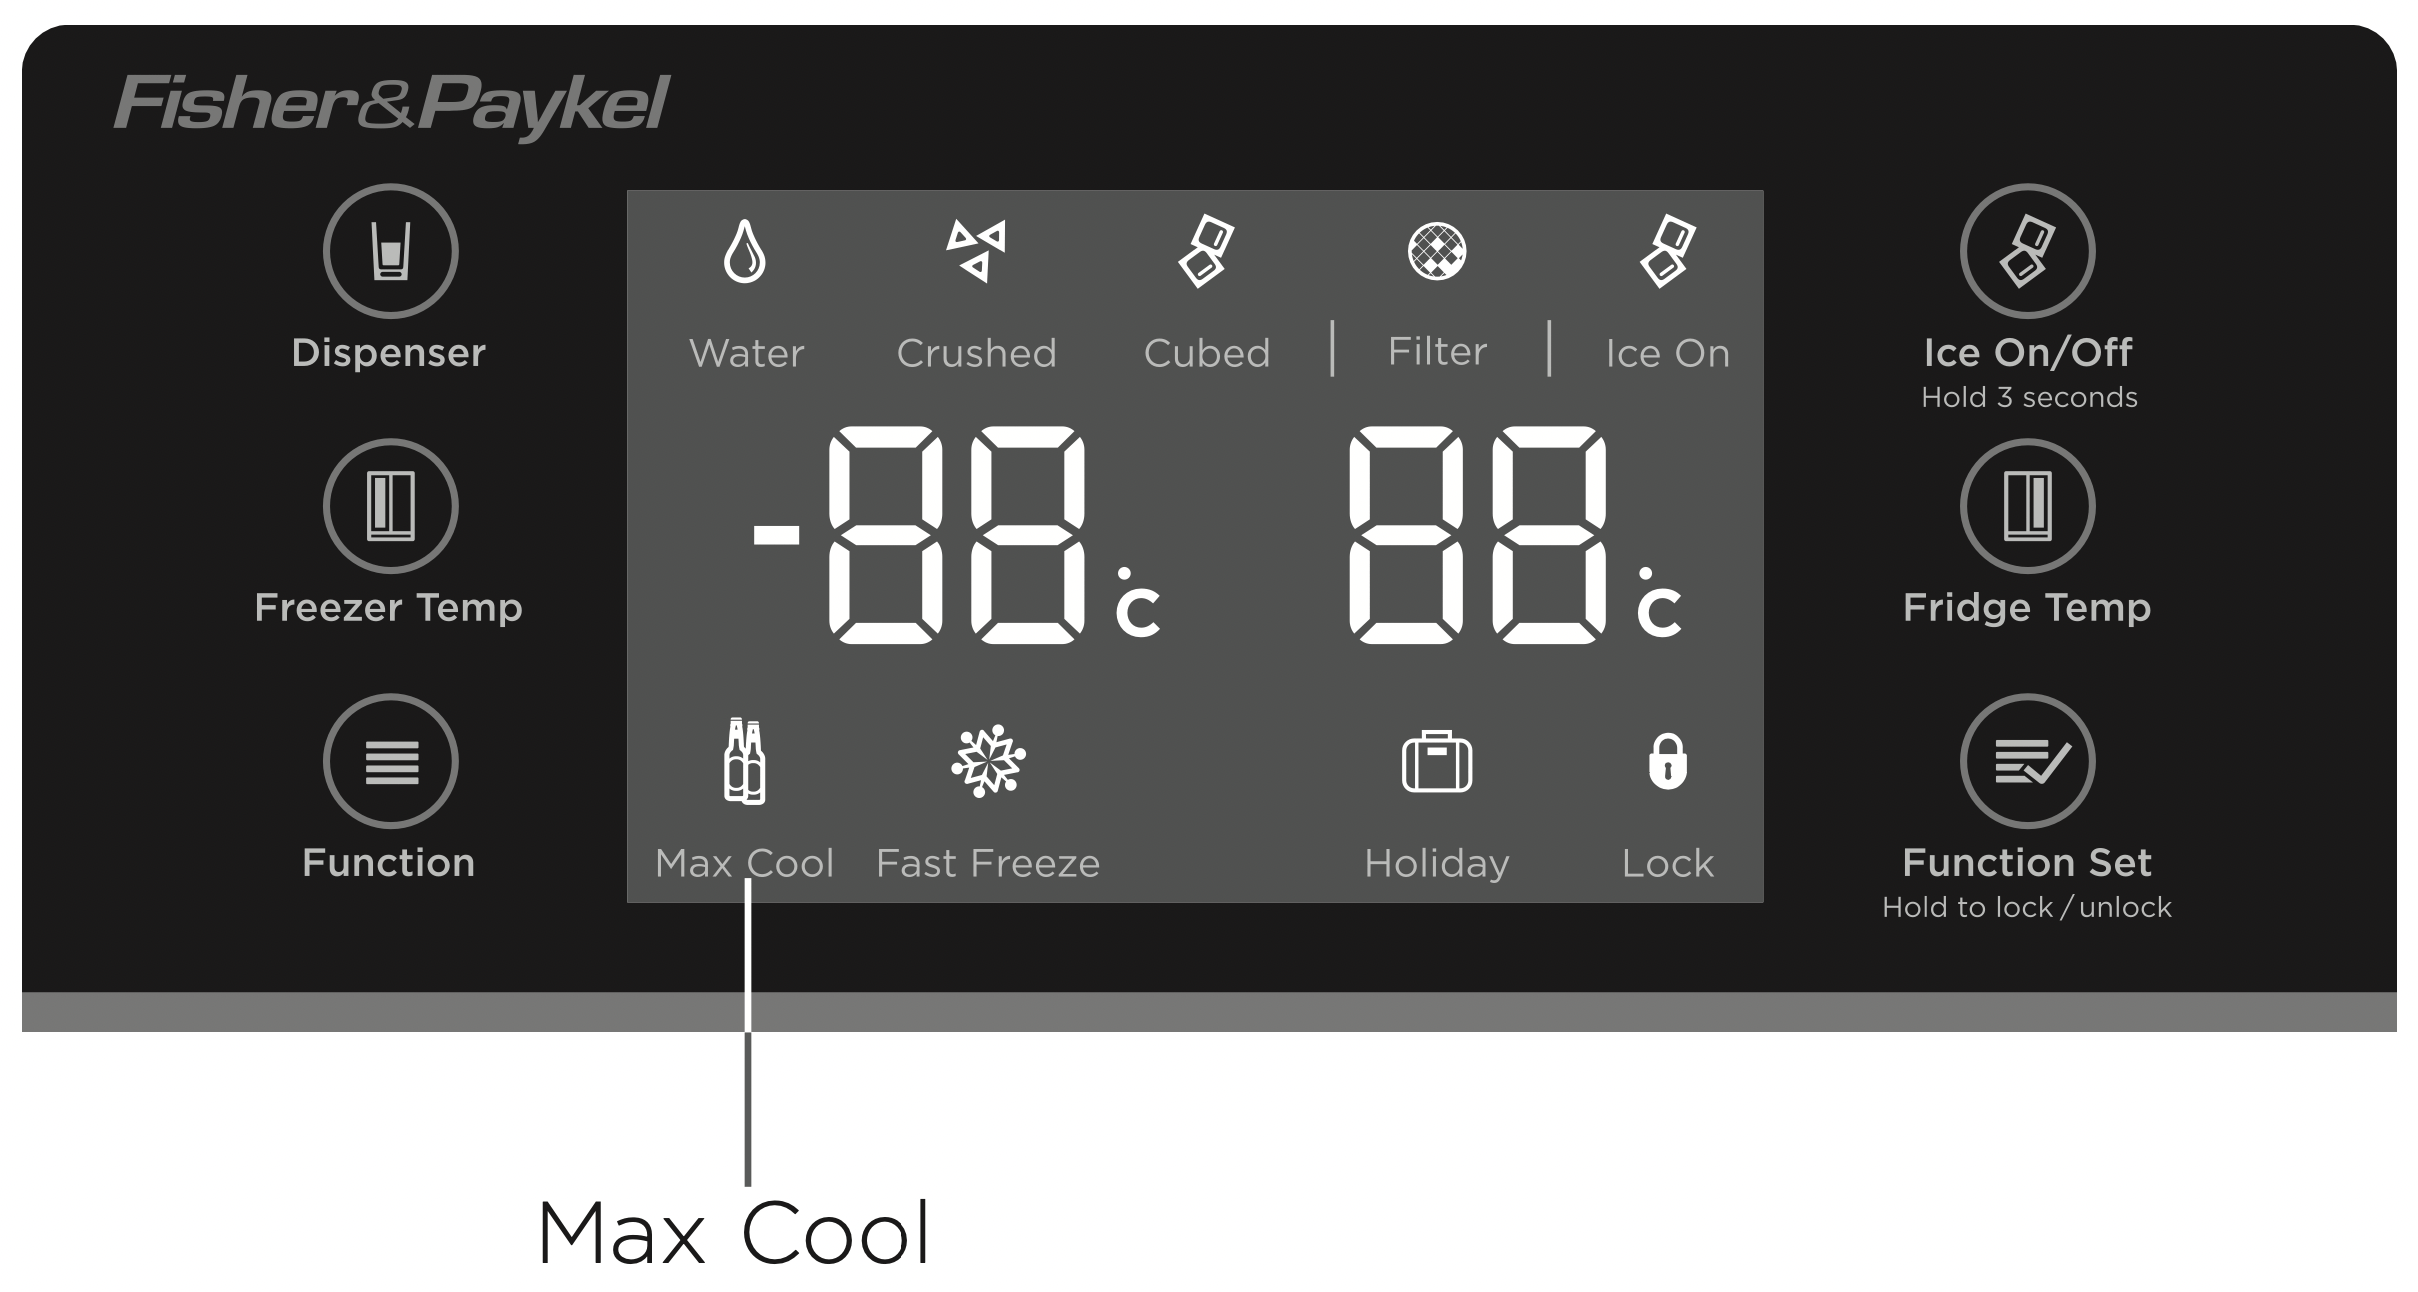
This function is designed to chill food quickly to retain freshness and quality. Use this feature before putting large quantities of food into the fridge compartment.
The Max Cool function will automatically deactivate once the fridge compartment has reached the set temperature.
To turn on
- Press Function
 until the Max Cool icon is selected.
- Press Function Set
 , the Max Cool function will activate.
To turn off, before automatic deactivation
- Press Function
 until the Max Cool icon is selected.
- Press Function Set
 , the Max Cool icon will turn off. The Max Cool function is now deactivated.
IMPORTANT! You cannot adjust the temperature settings when in fast freeze or when Lock has been activated. If you try to adjust the settings under these conditions, the special function icon beside the freezer temperature display will blink, and a beep will sound to indicate that the adjustment cannot be made at this time.
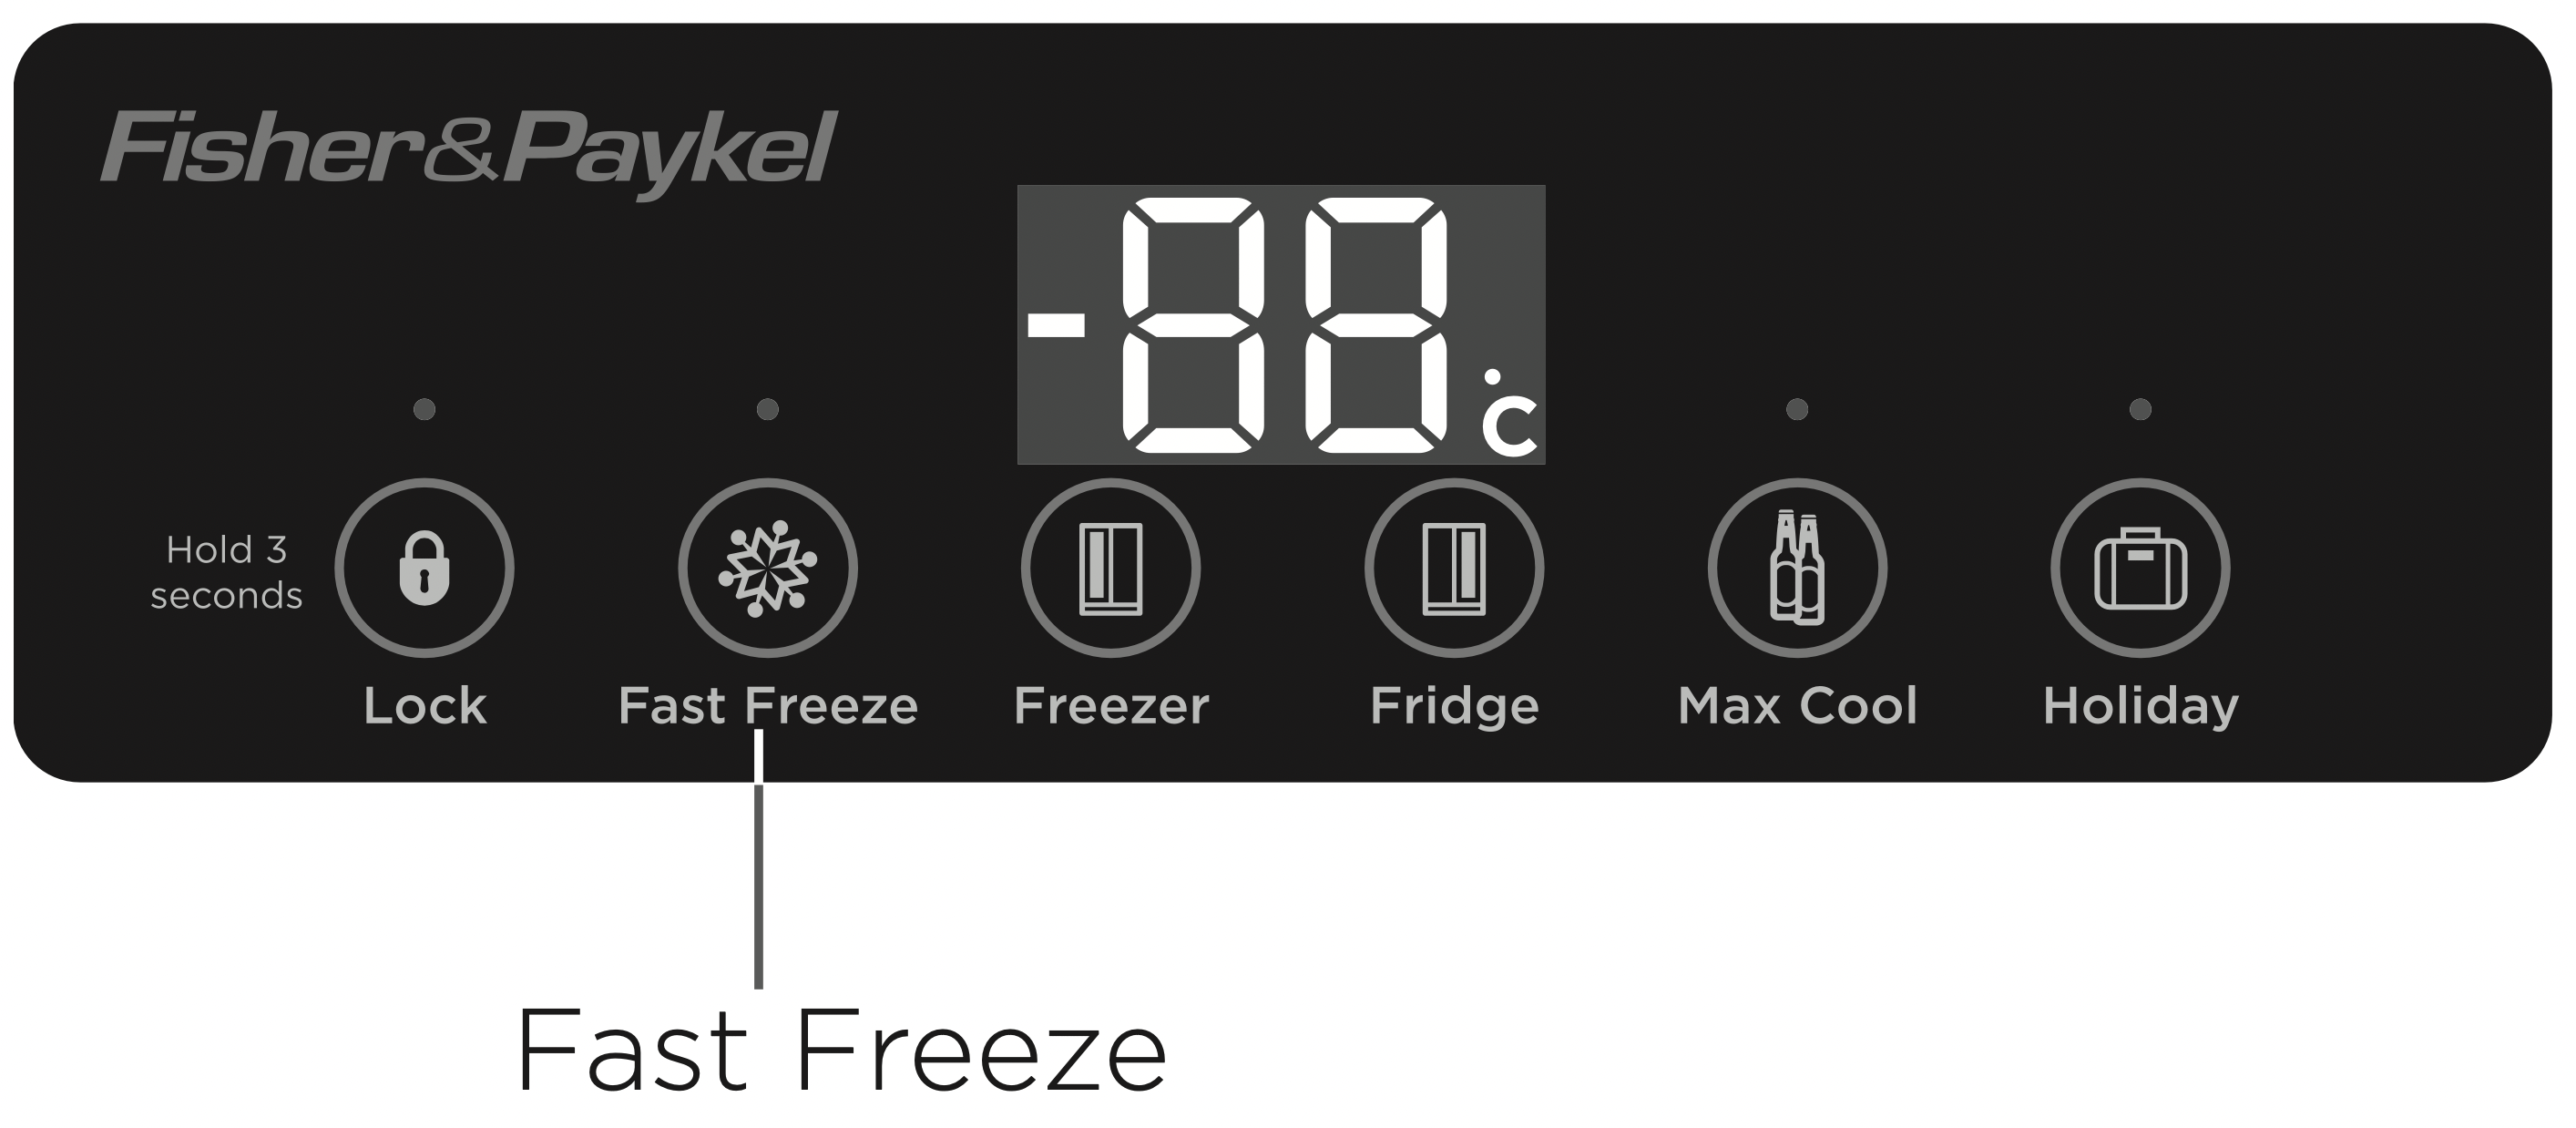
Fast Freeze
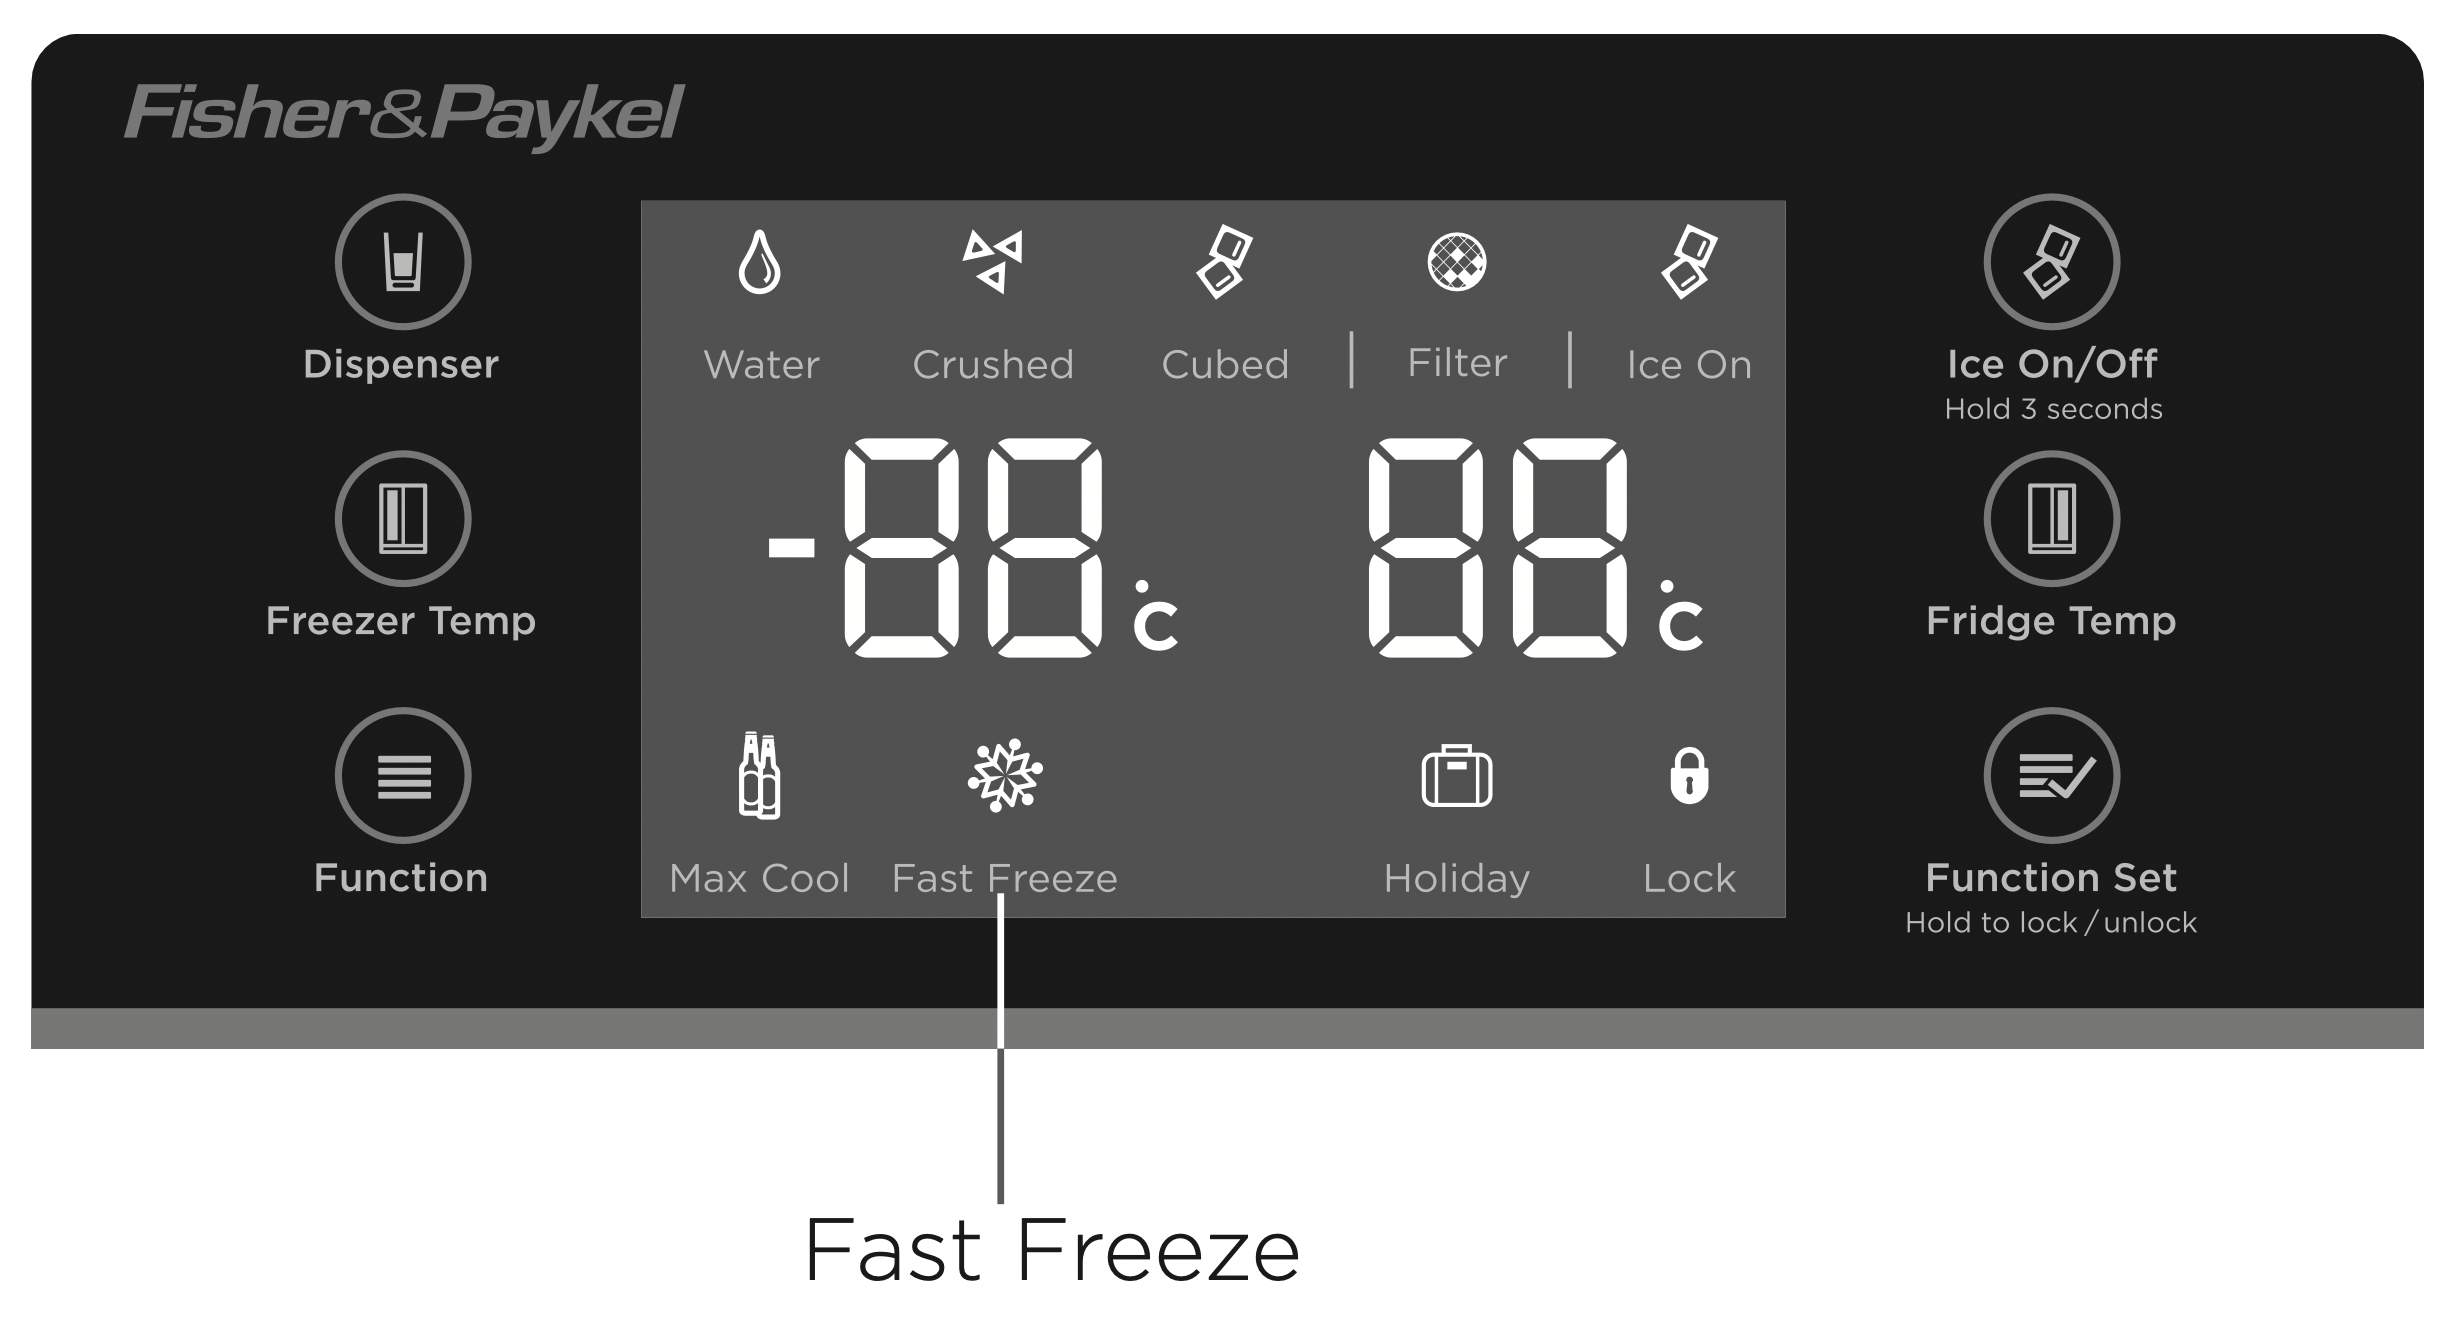
This function is designed to freeze food quickly to ensure freshness, texture and taste are retained during the freezing process.
The Fast Freeze function will automatically deactivate after a set time period.
Use this feature before putting large quantities of food into the freezer (for example after food shopping). For best results we recommend that the Fast Freeze function be turned on 12 hours before food is placed into the freezer.
To turn on
- Press Function
 until the Fast Freeze icon is selected.
- Press Function Set
 , the Fast Freeze function will activate.
To turn off, before automatic deactivation
- Press Function
 until the Fast Freeze icon is selected.
- Press Function Set
 , the Fast Freeze icon will turn off. The Fast Freeze function is now deactivated.
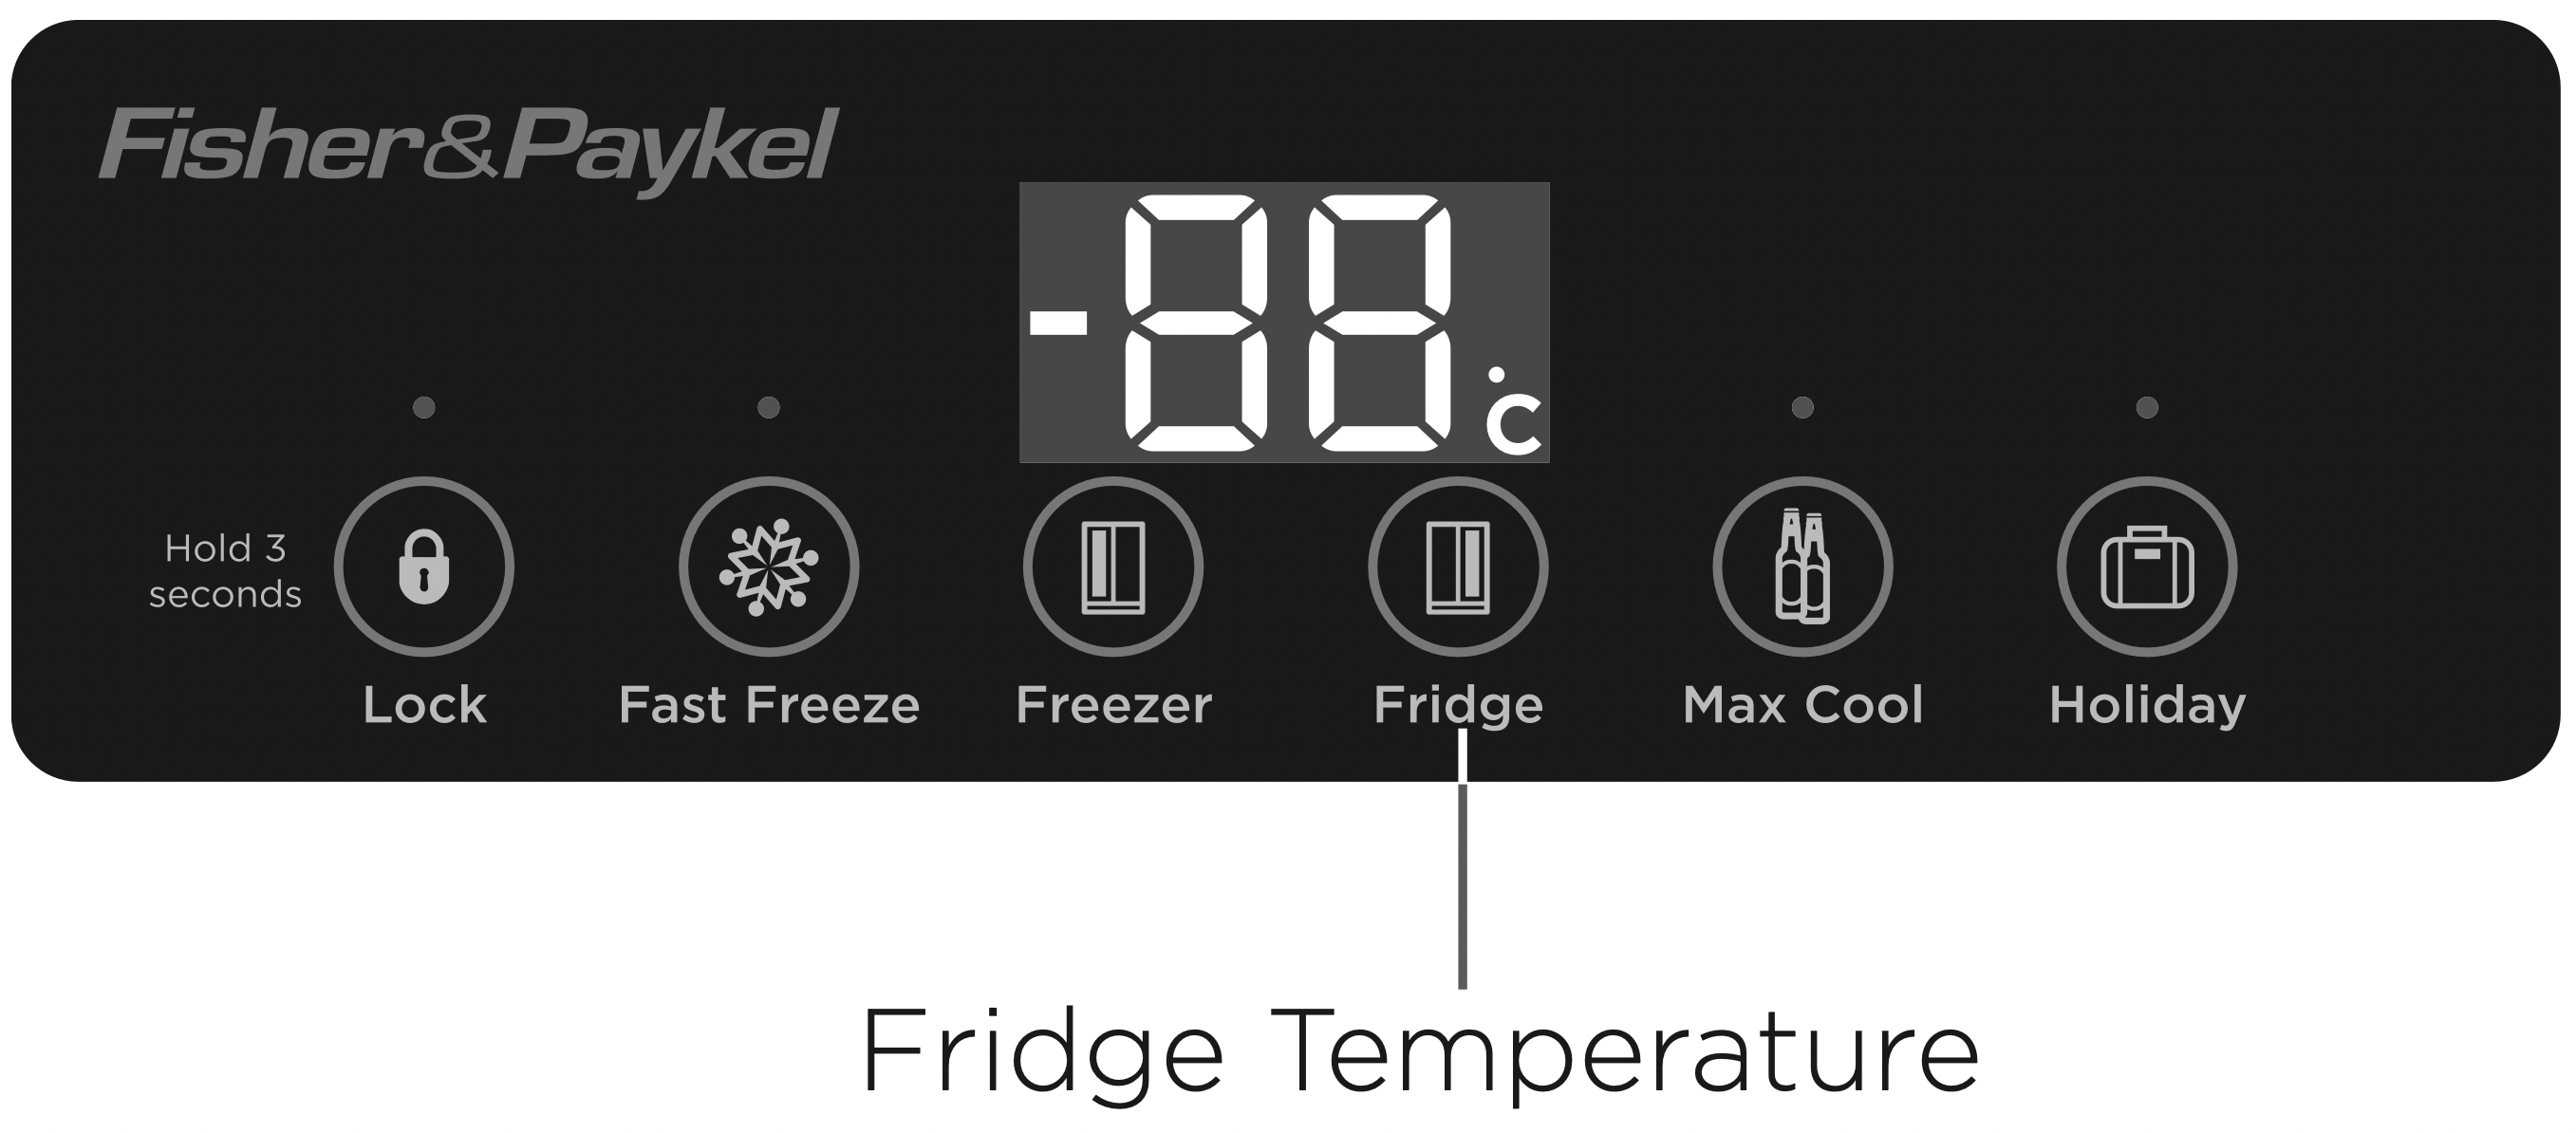
Adjusting the fridge temperature.
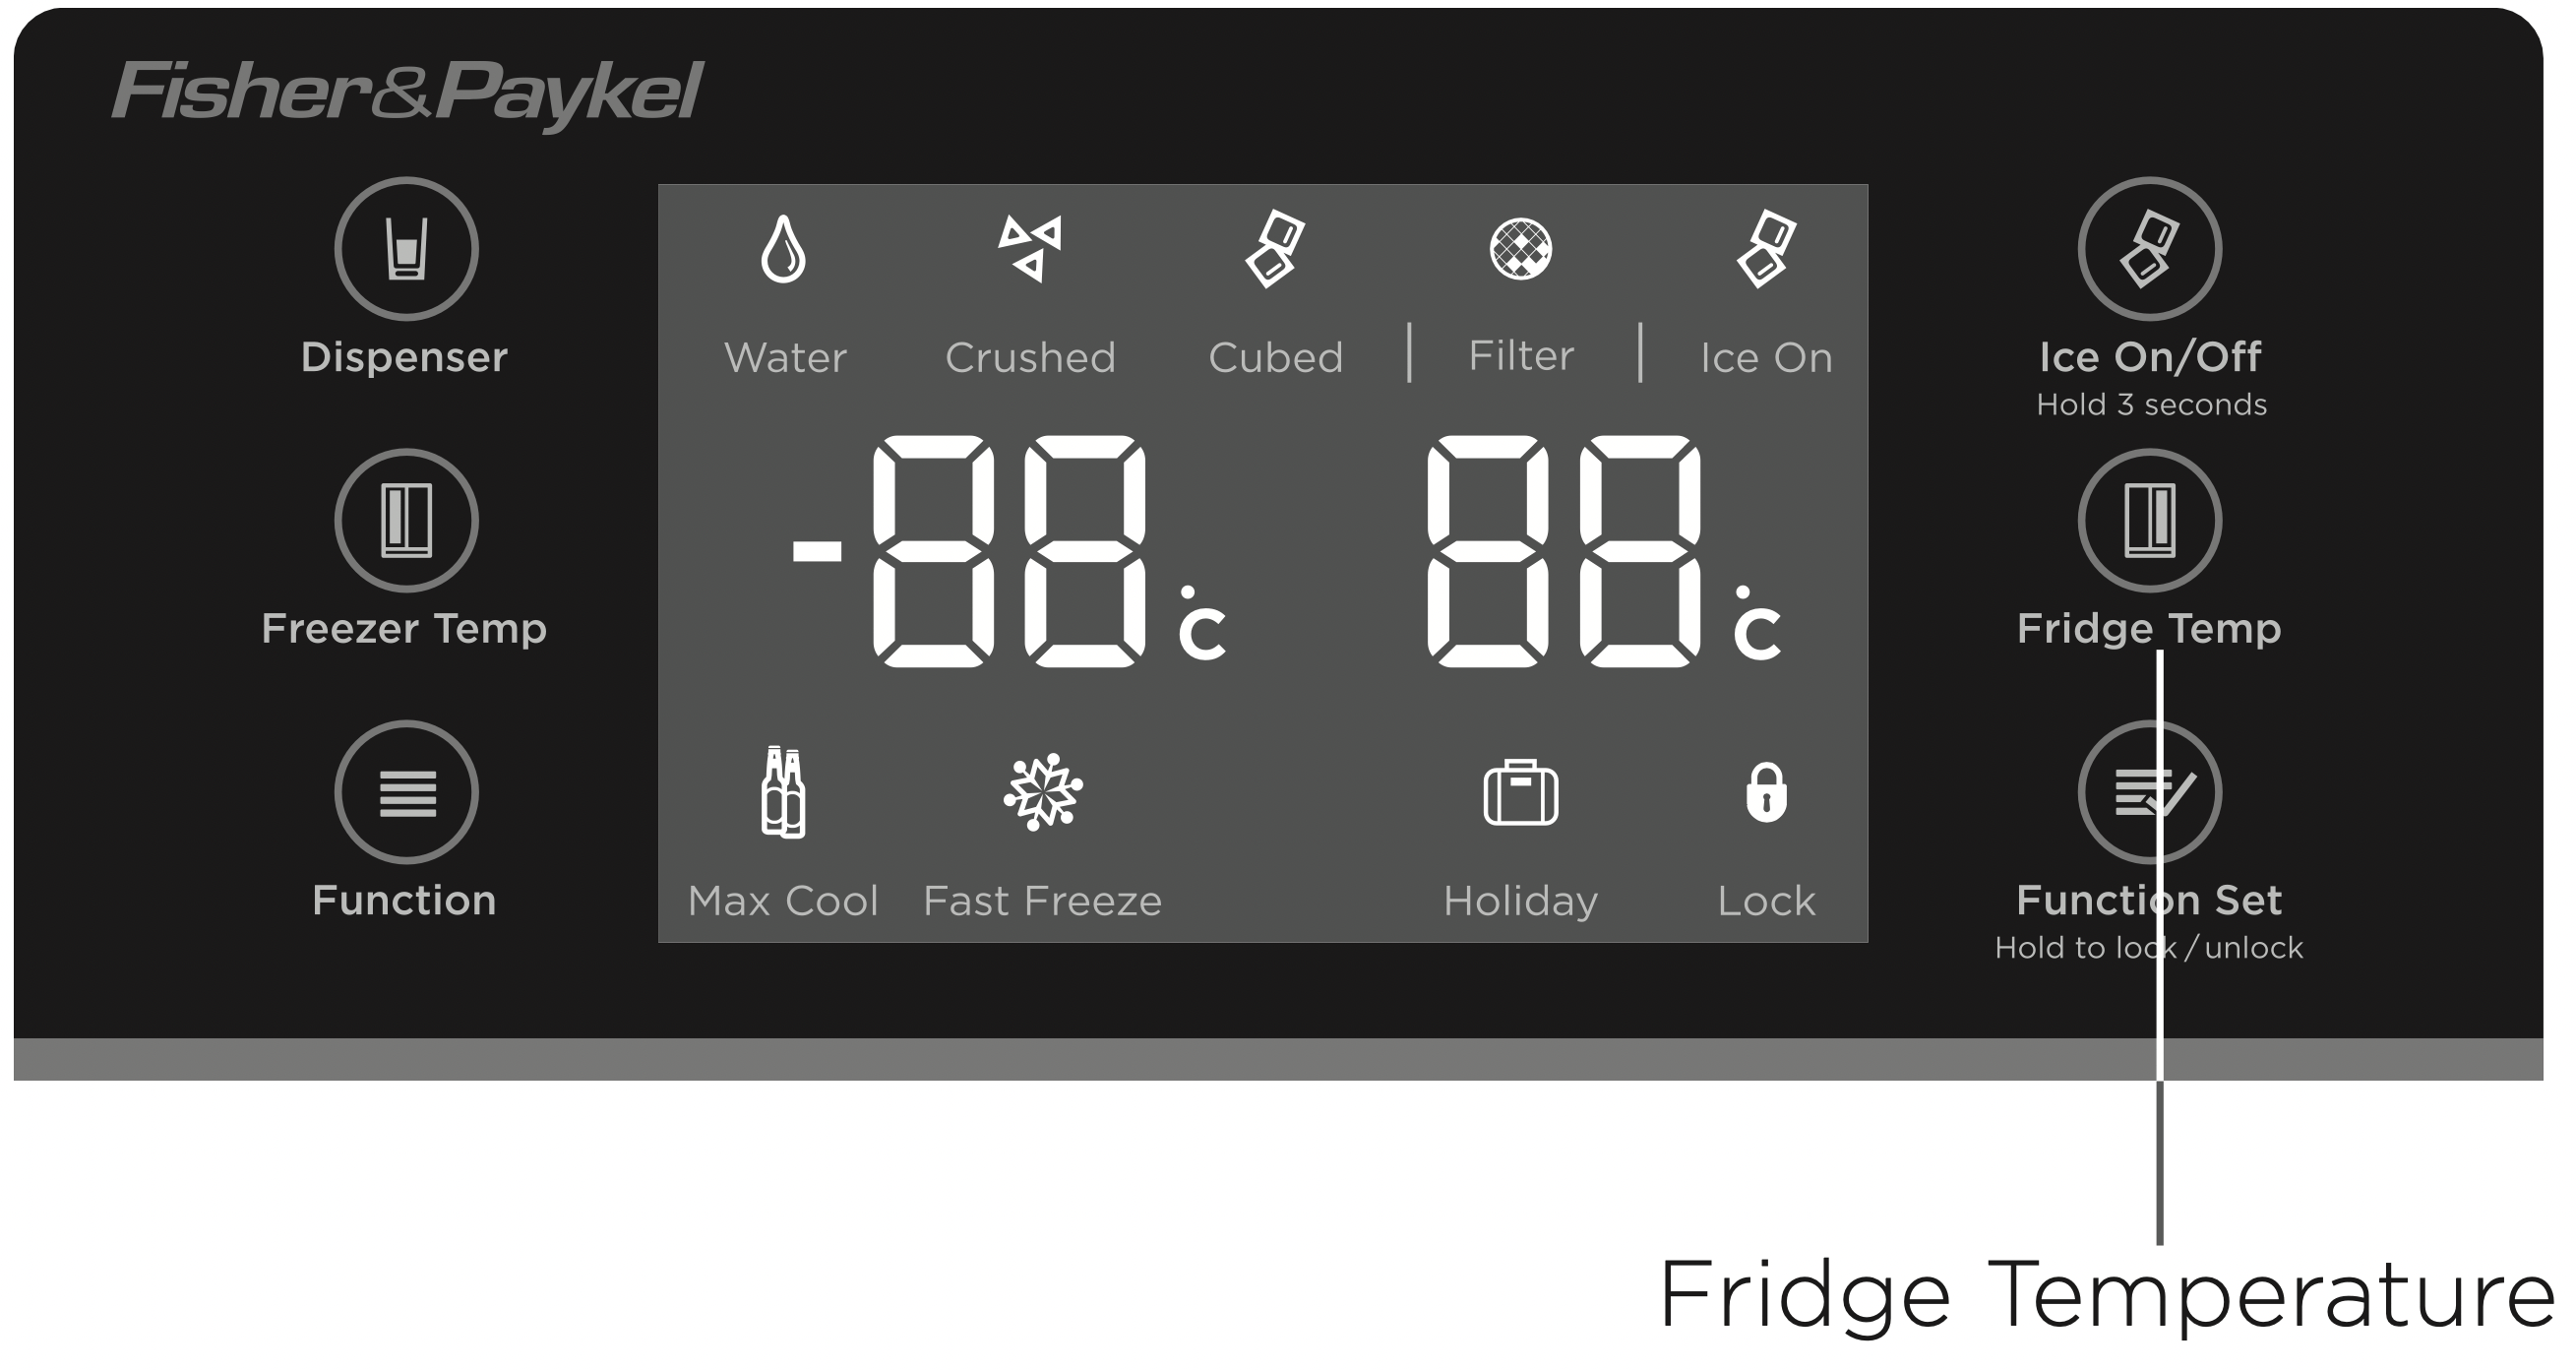
- Press
 . The fridge temperature display will start blinking, indicating that the fridge is in the temperature setting mode.
- Press
 to scroll though the fridge temperature range from 9°C to 1°C.
When the desired temperature is displayed, wait 5 seconds. The blinking will stop and the temperature will be set. Alternatively press any other button on the control panel within 5 seconds to set the temperature.
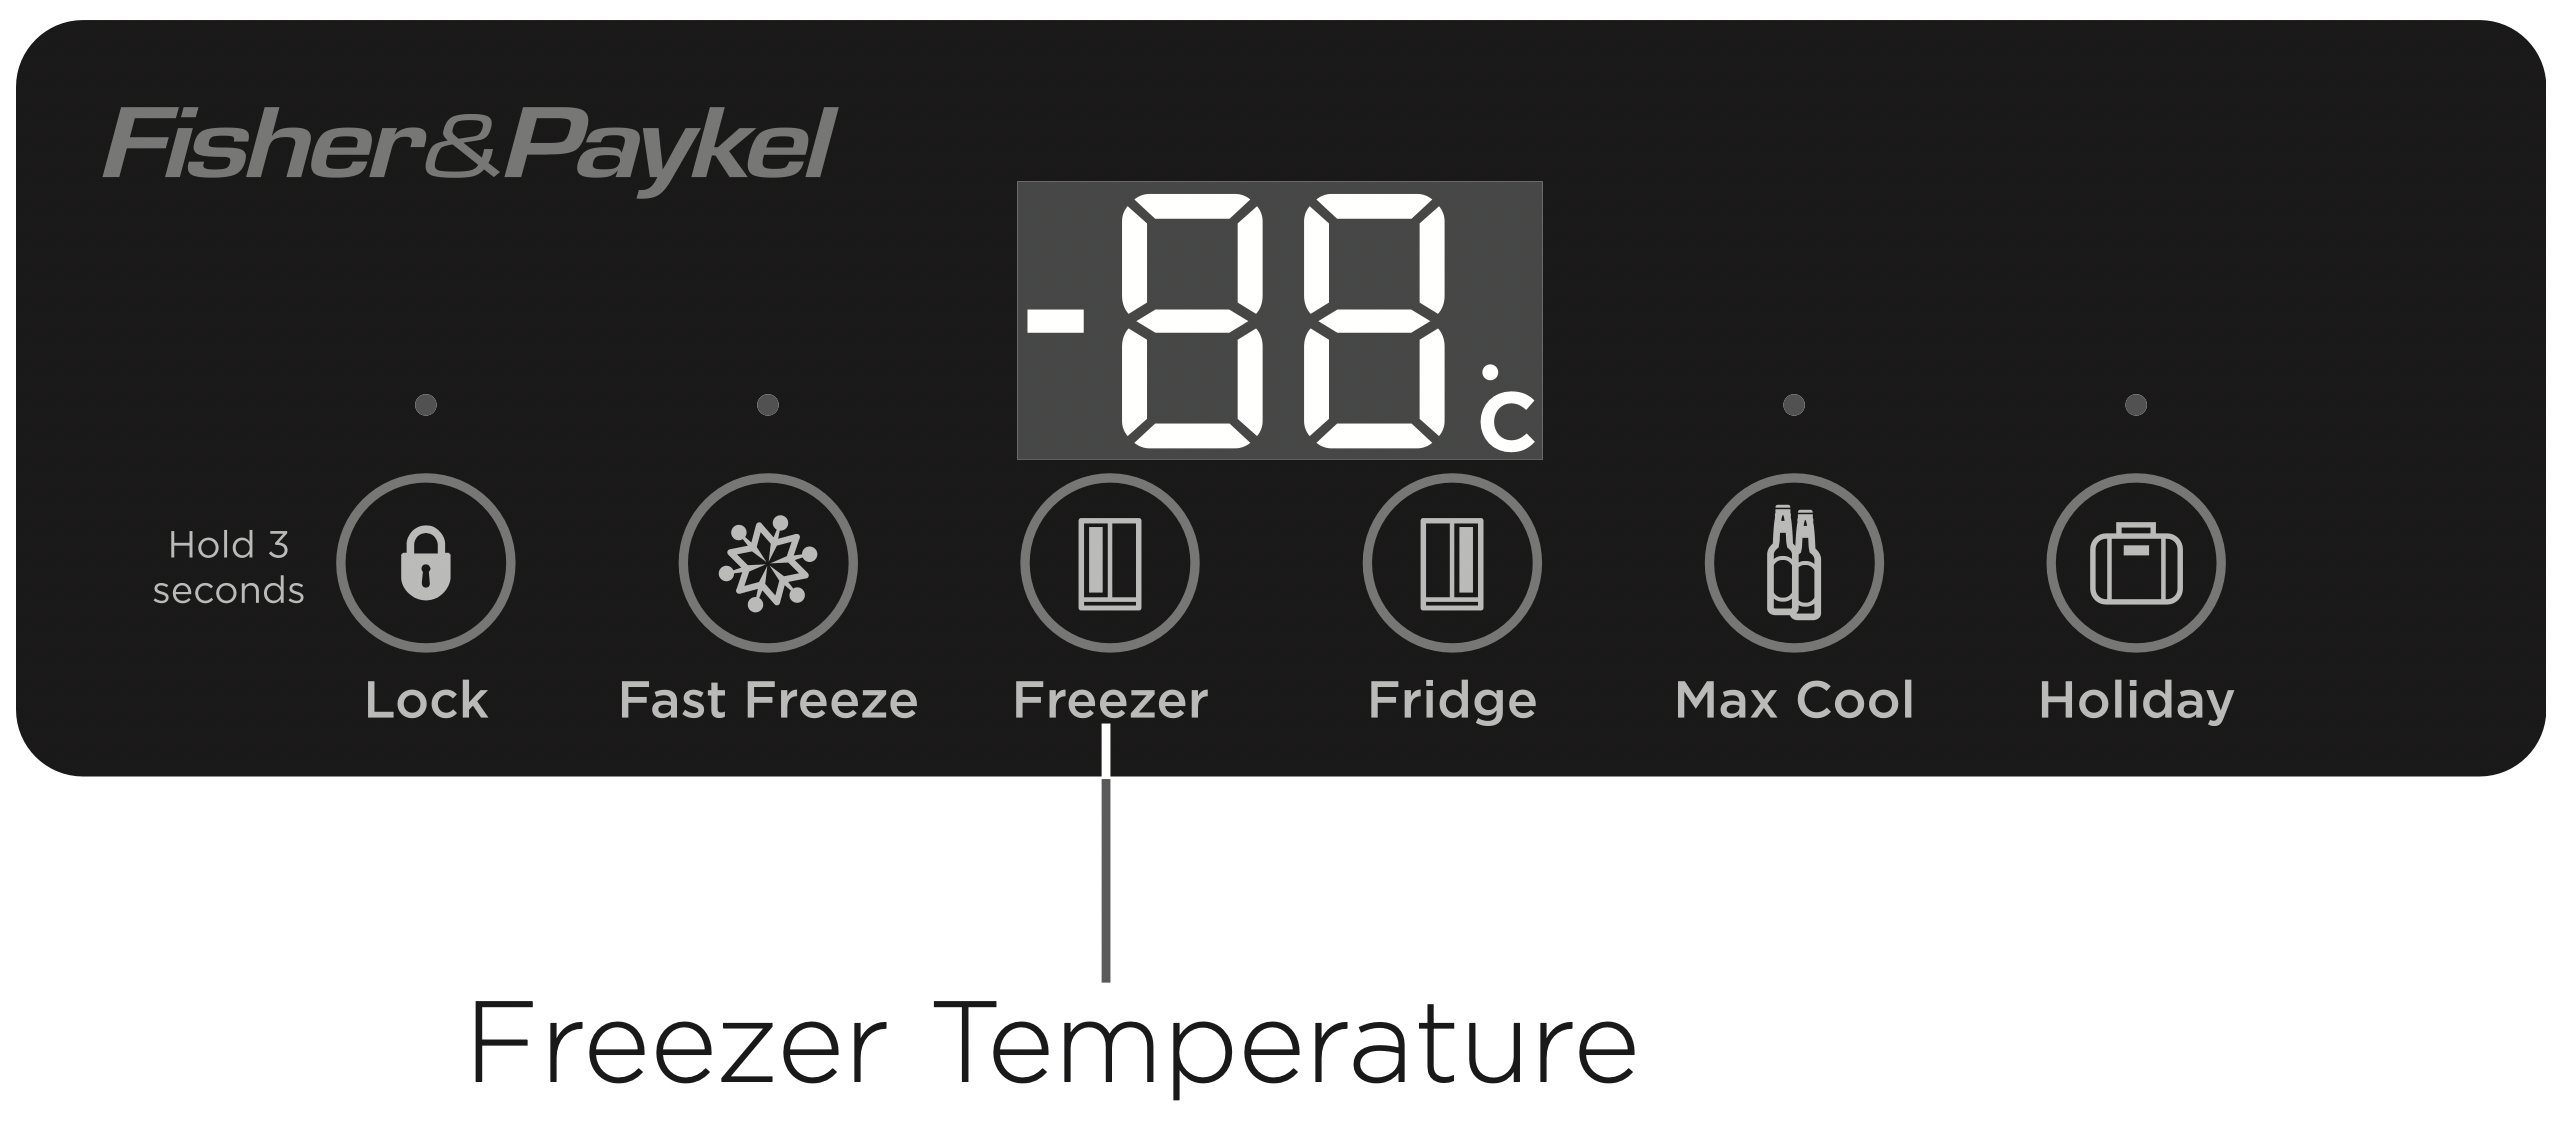
Adjusting the freezer temperature
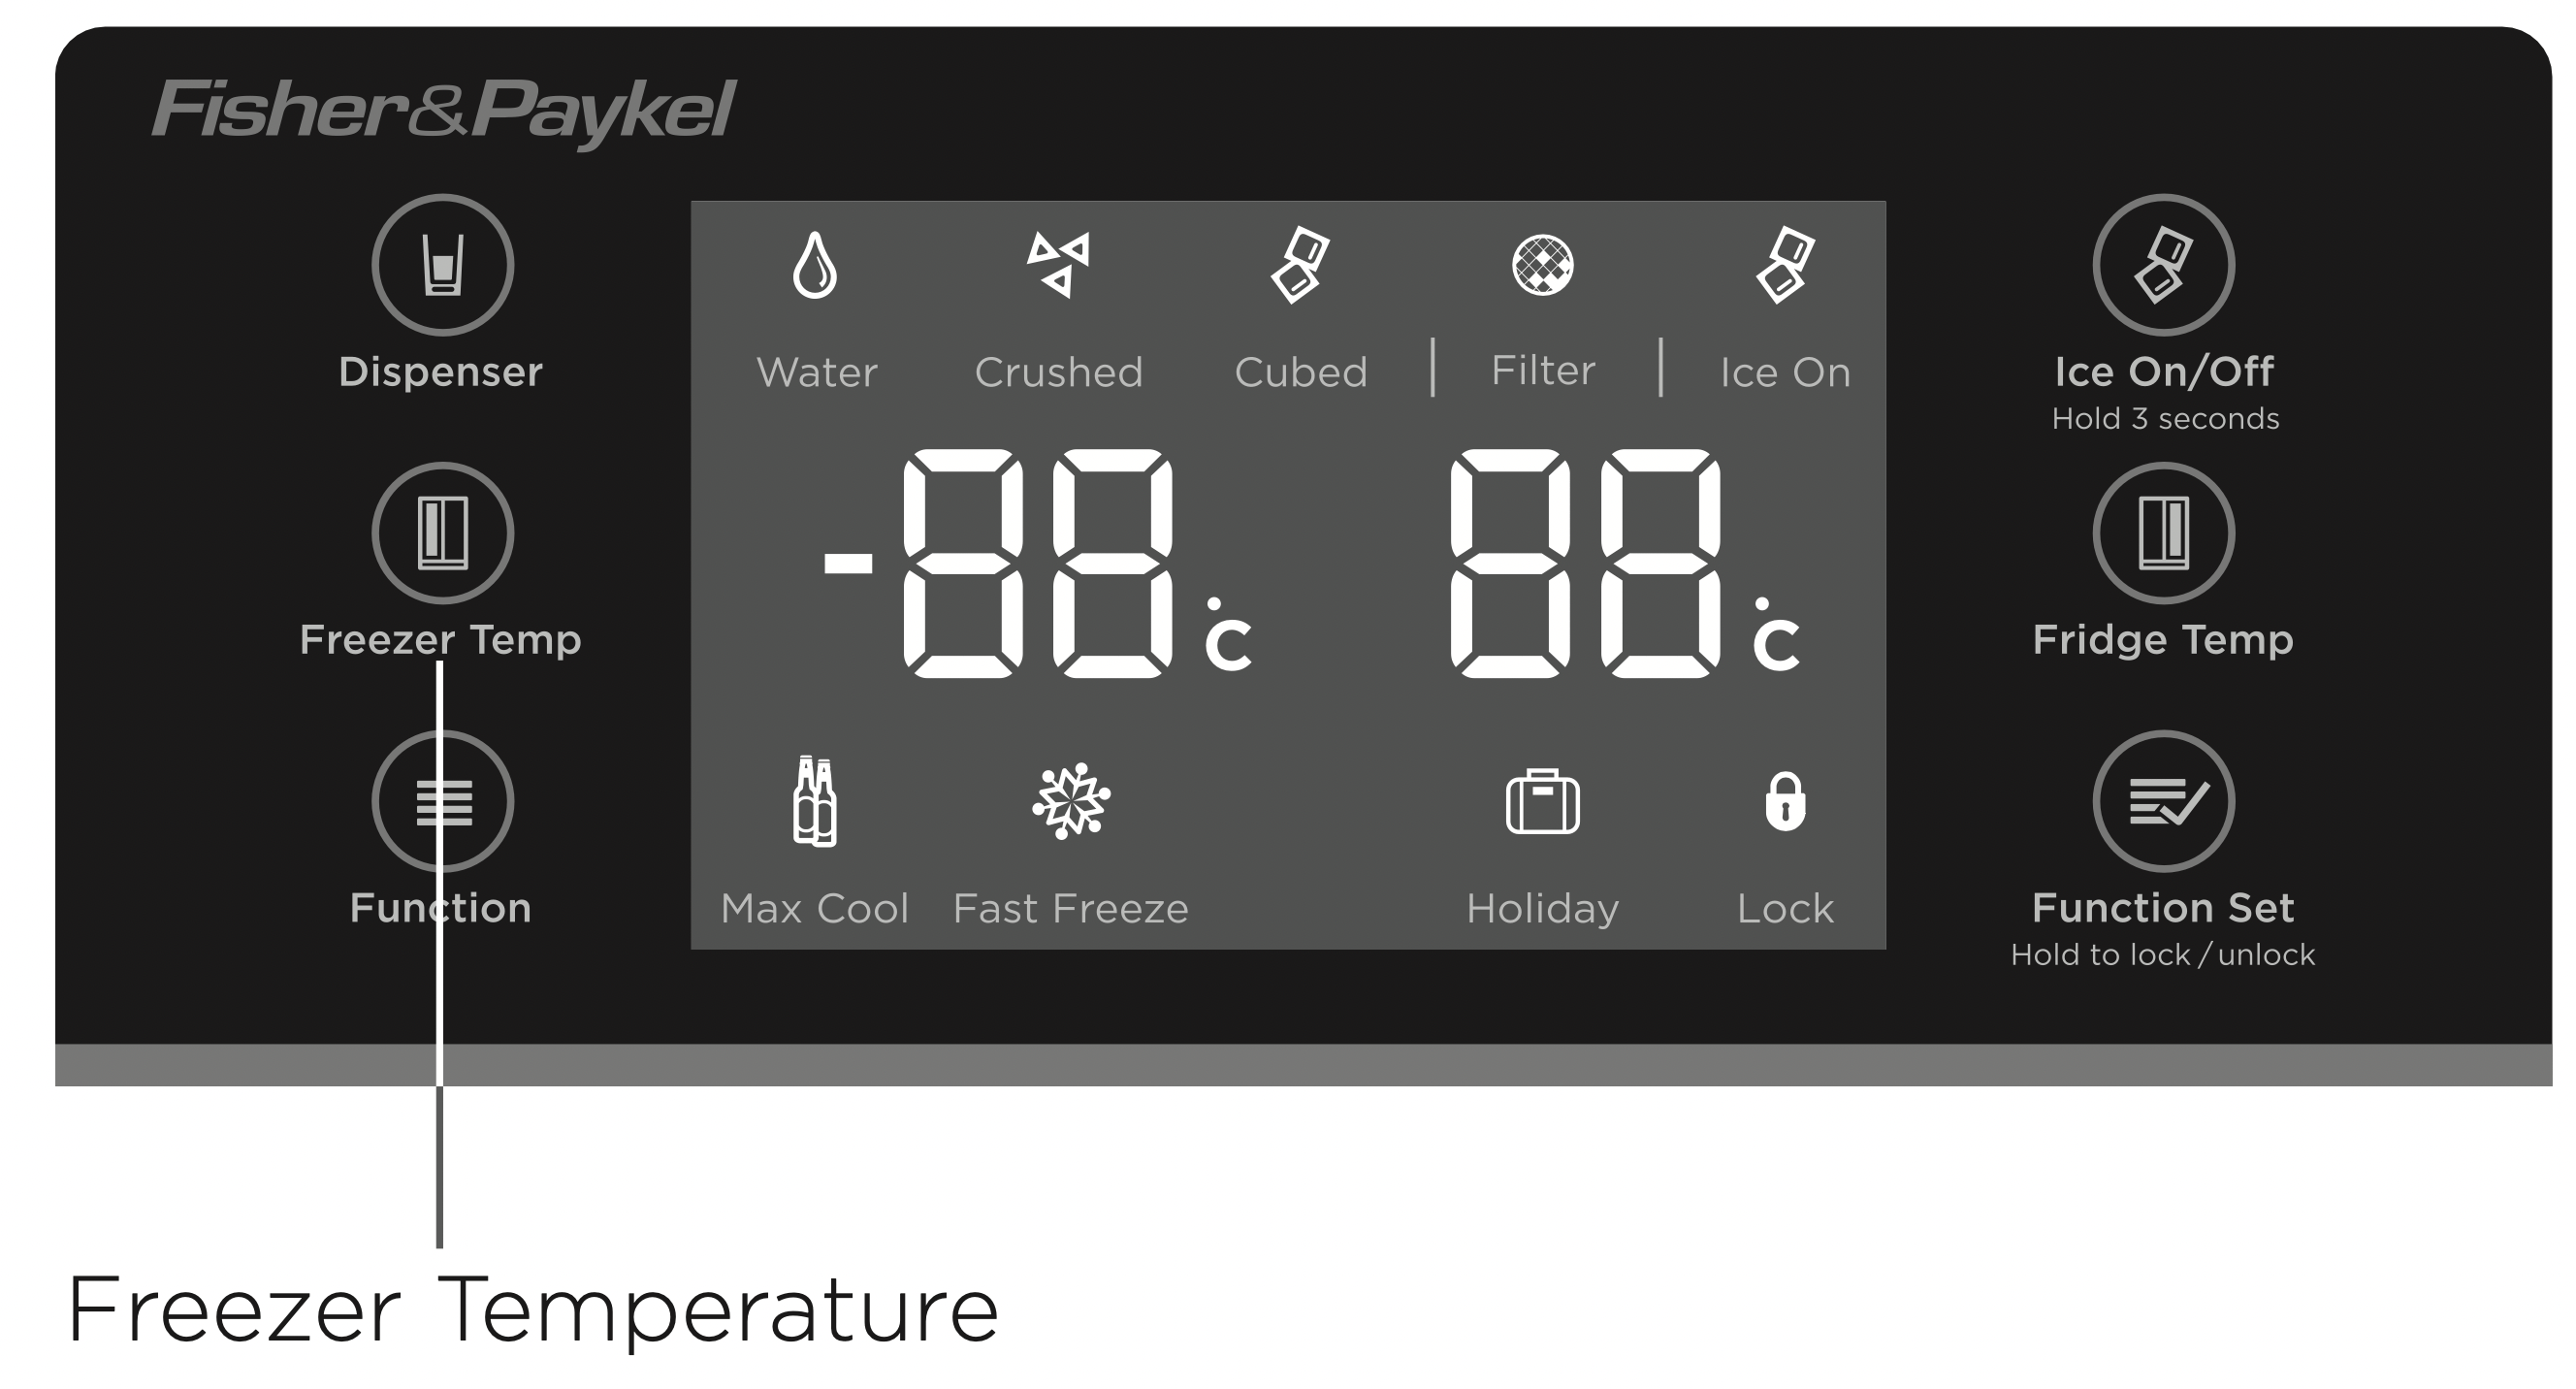
- Press
 . The freezer temperature display will start blinking, indicating that the freezer is in the temperature setting mode.
- Press to scroll through the freezer temperature range from -14°C to -24°C.
When the desired temperature is displayed, wait 5 seconds. The blinking will stop and the temperature will be set. Alternatively press any other button on the control panel within 5 seconds to set the temperature.
Dispenser button
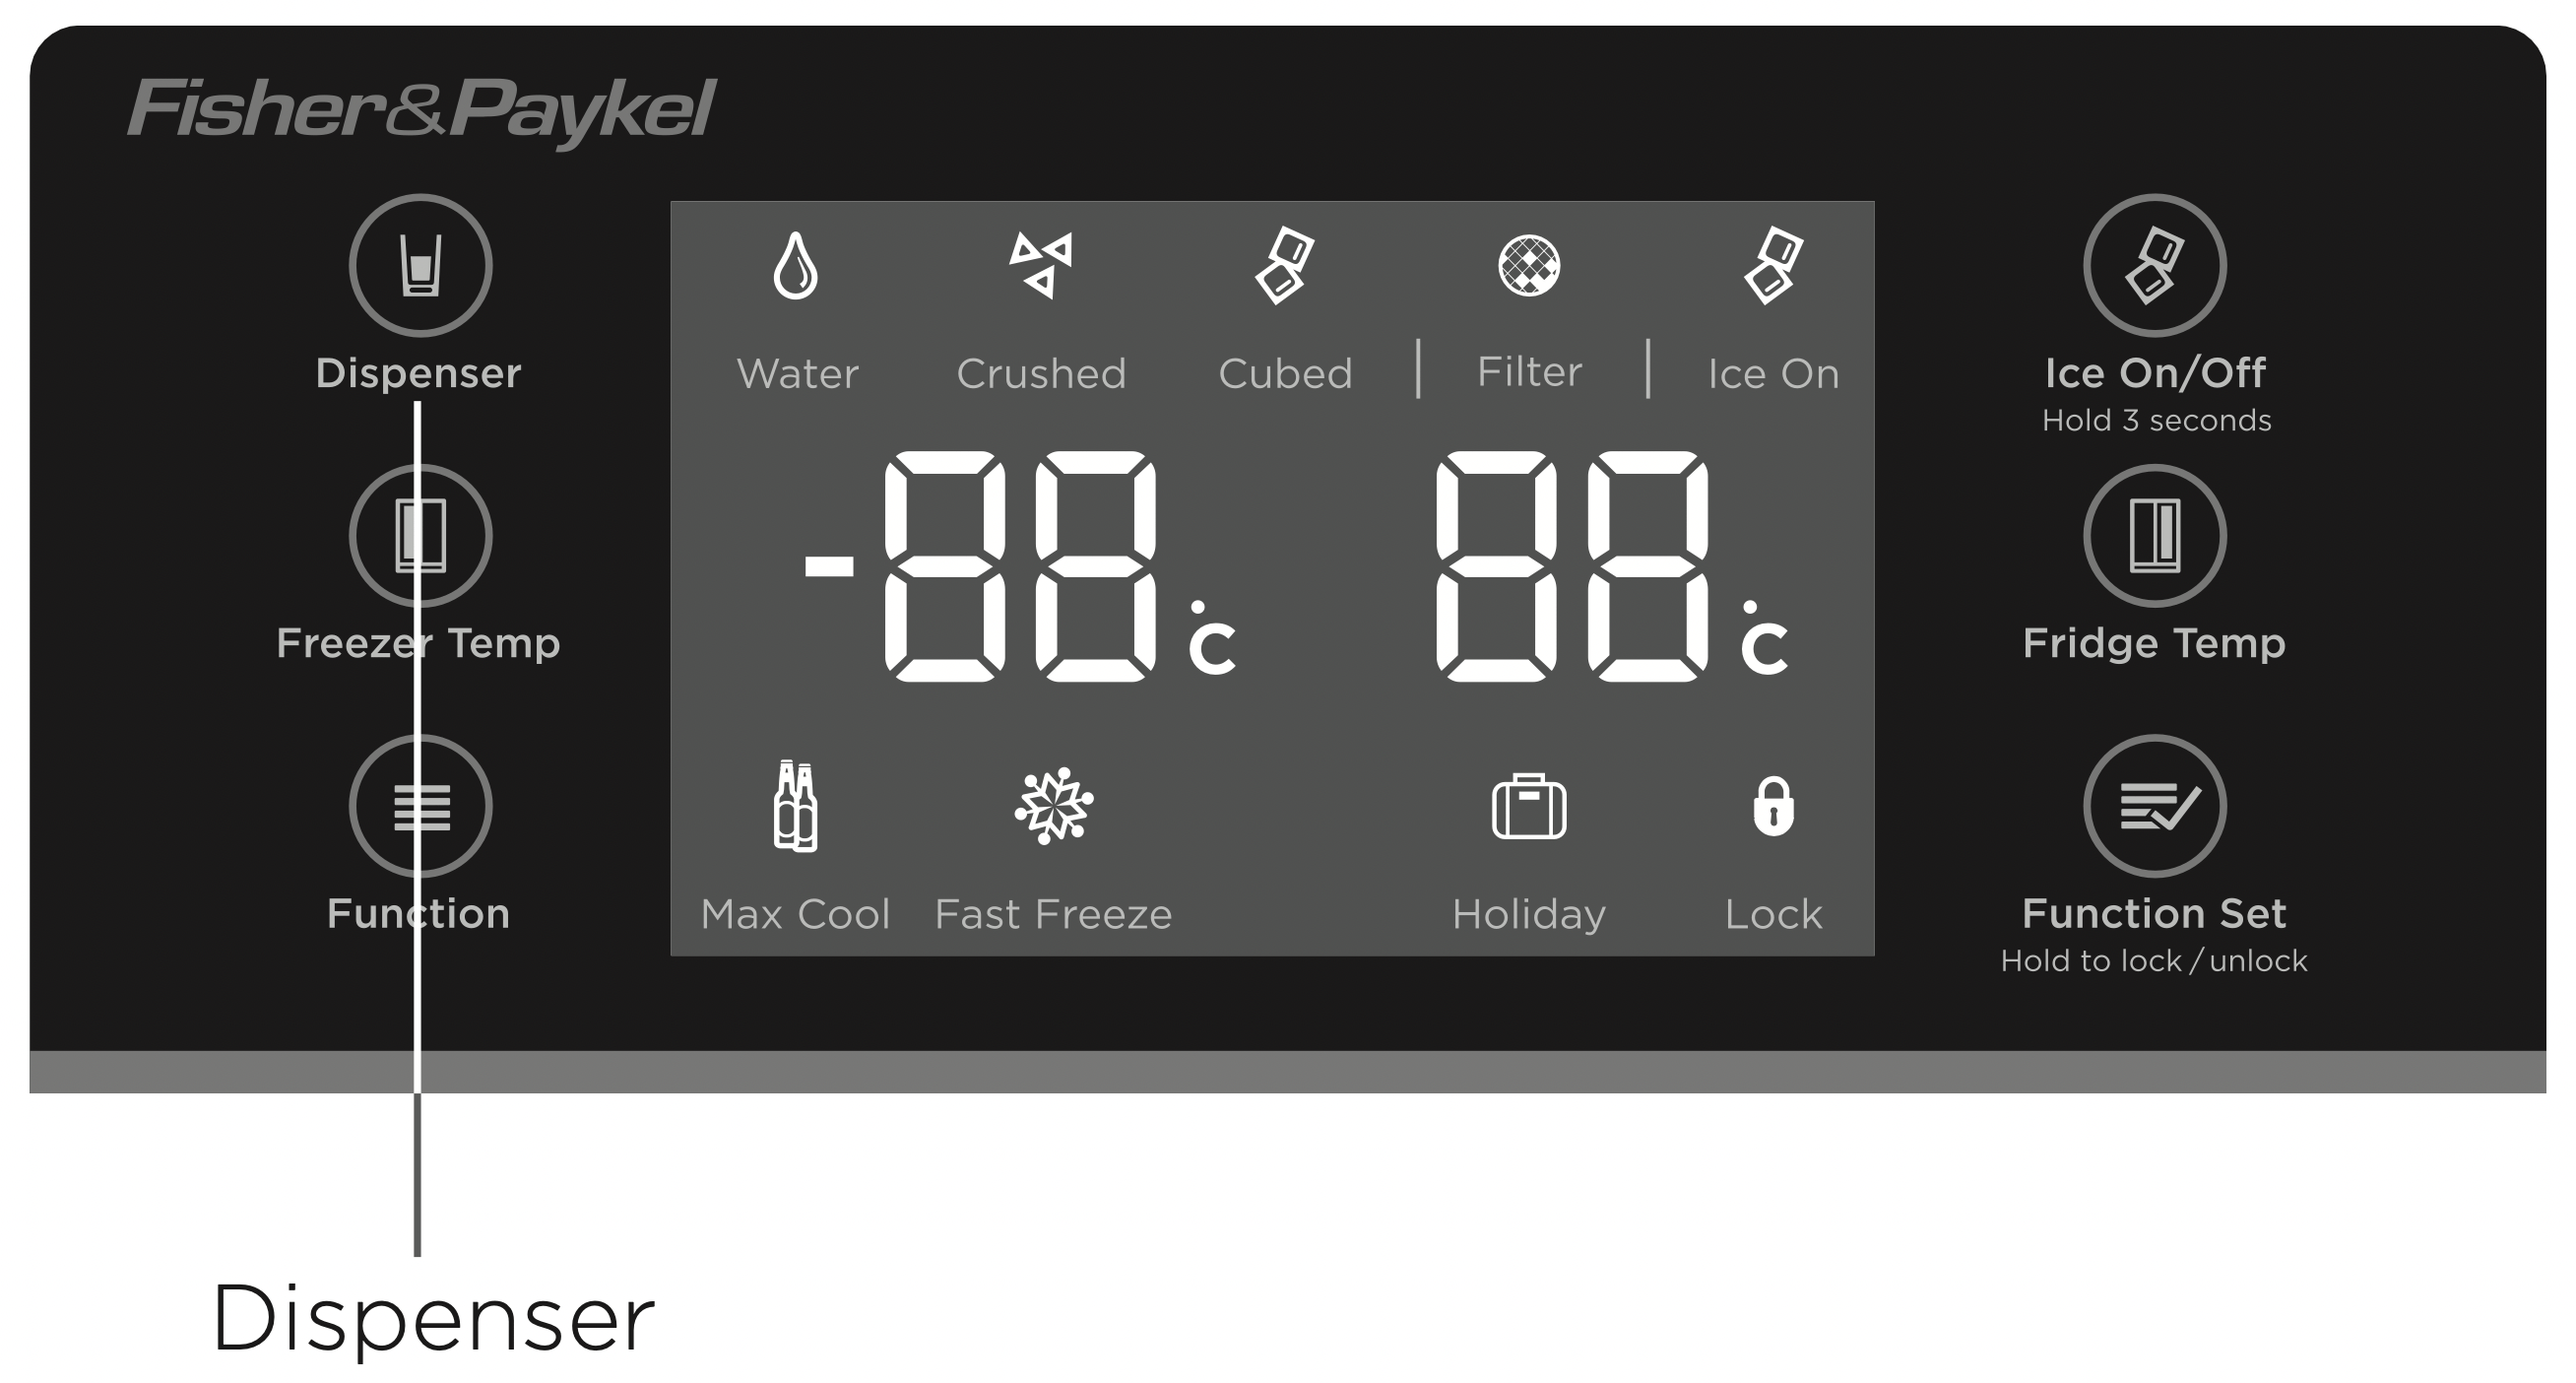
Press  to scroll through dispensing options: water, crushed ice or cubed ice. Once an icon is illuminated the dispensing mode will change to the function selected.
Ice On/Off
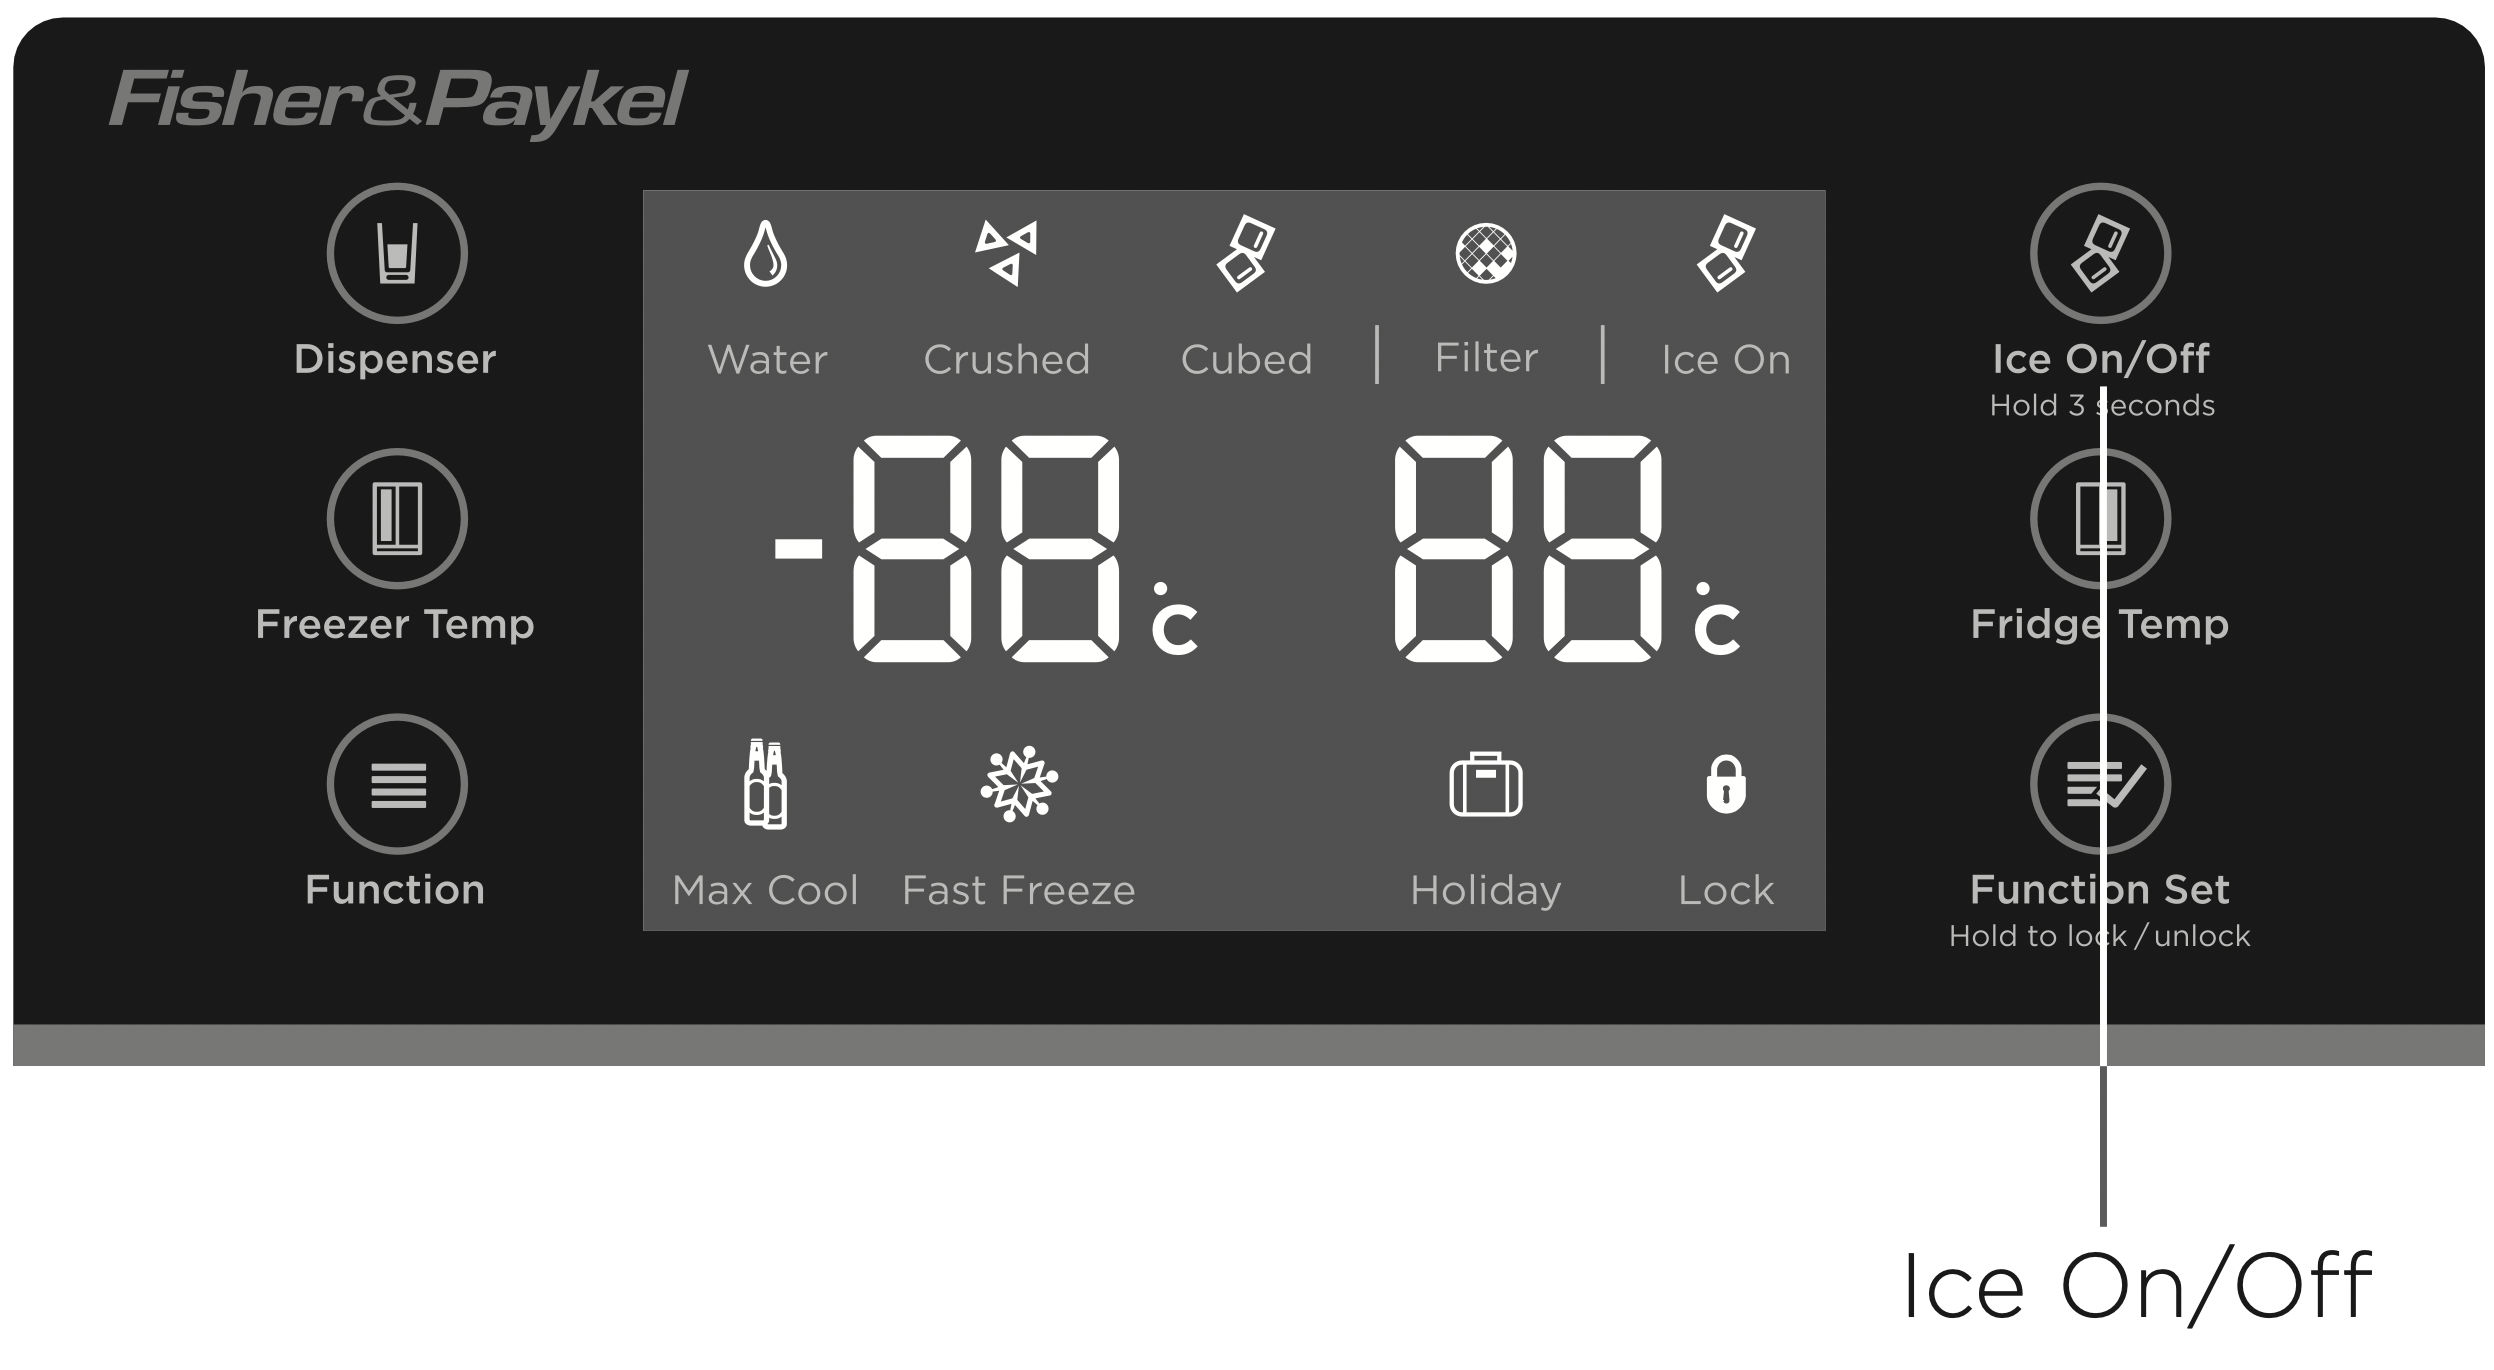
To turn on
Press and hold  for three seconds. The Ice On icon will turn on, indicating that the ice maker is now functioning.
To turn off
Press and hold  for three seconds. The icon will turn off, indicating that the ice maker is now off.
NON ICE & WATER CONTROL PANEL

- Lock button
- Fast Freeze button
- Freezer temperature button
- Fridge temperature button
- Max Cool button
- Holiday button
Lock
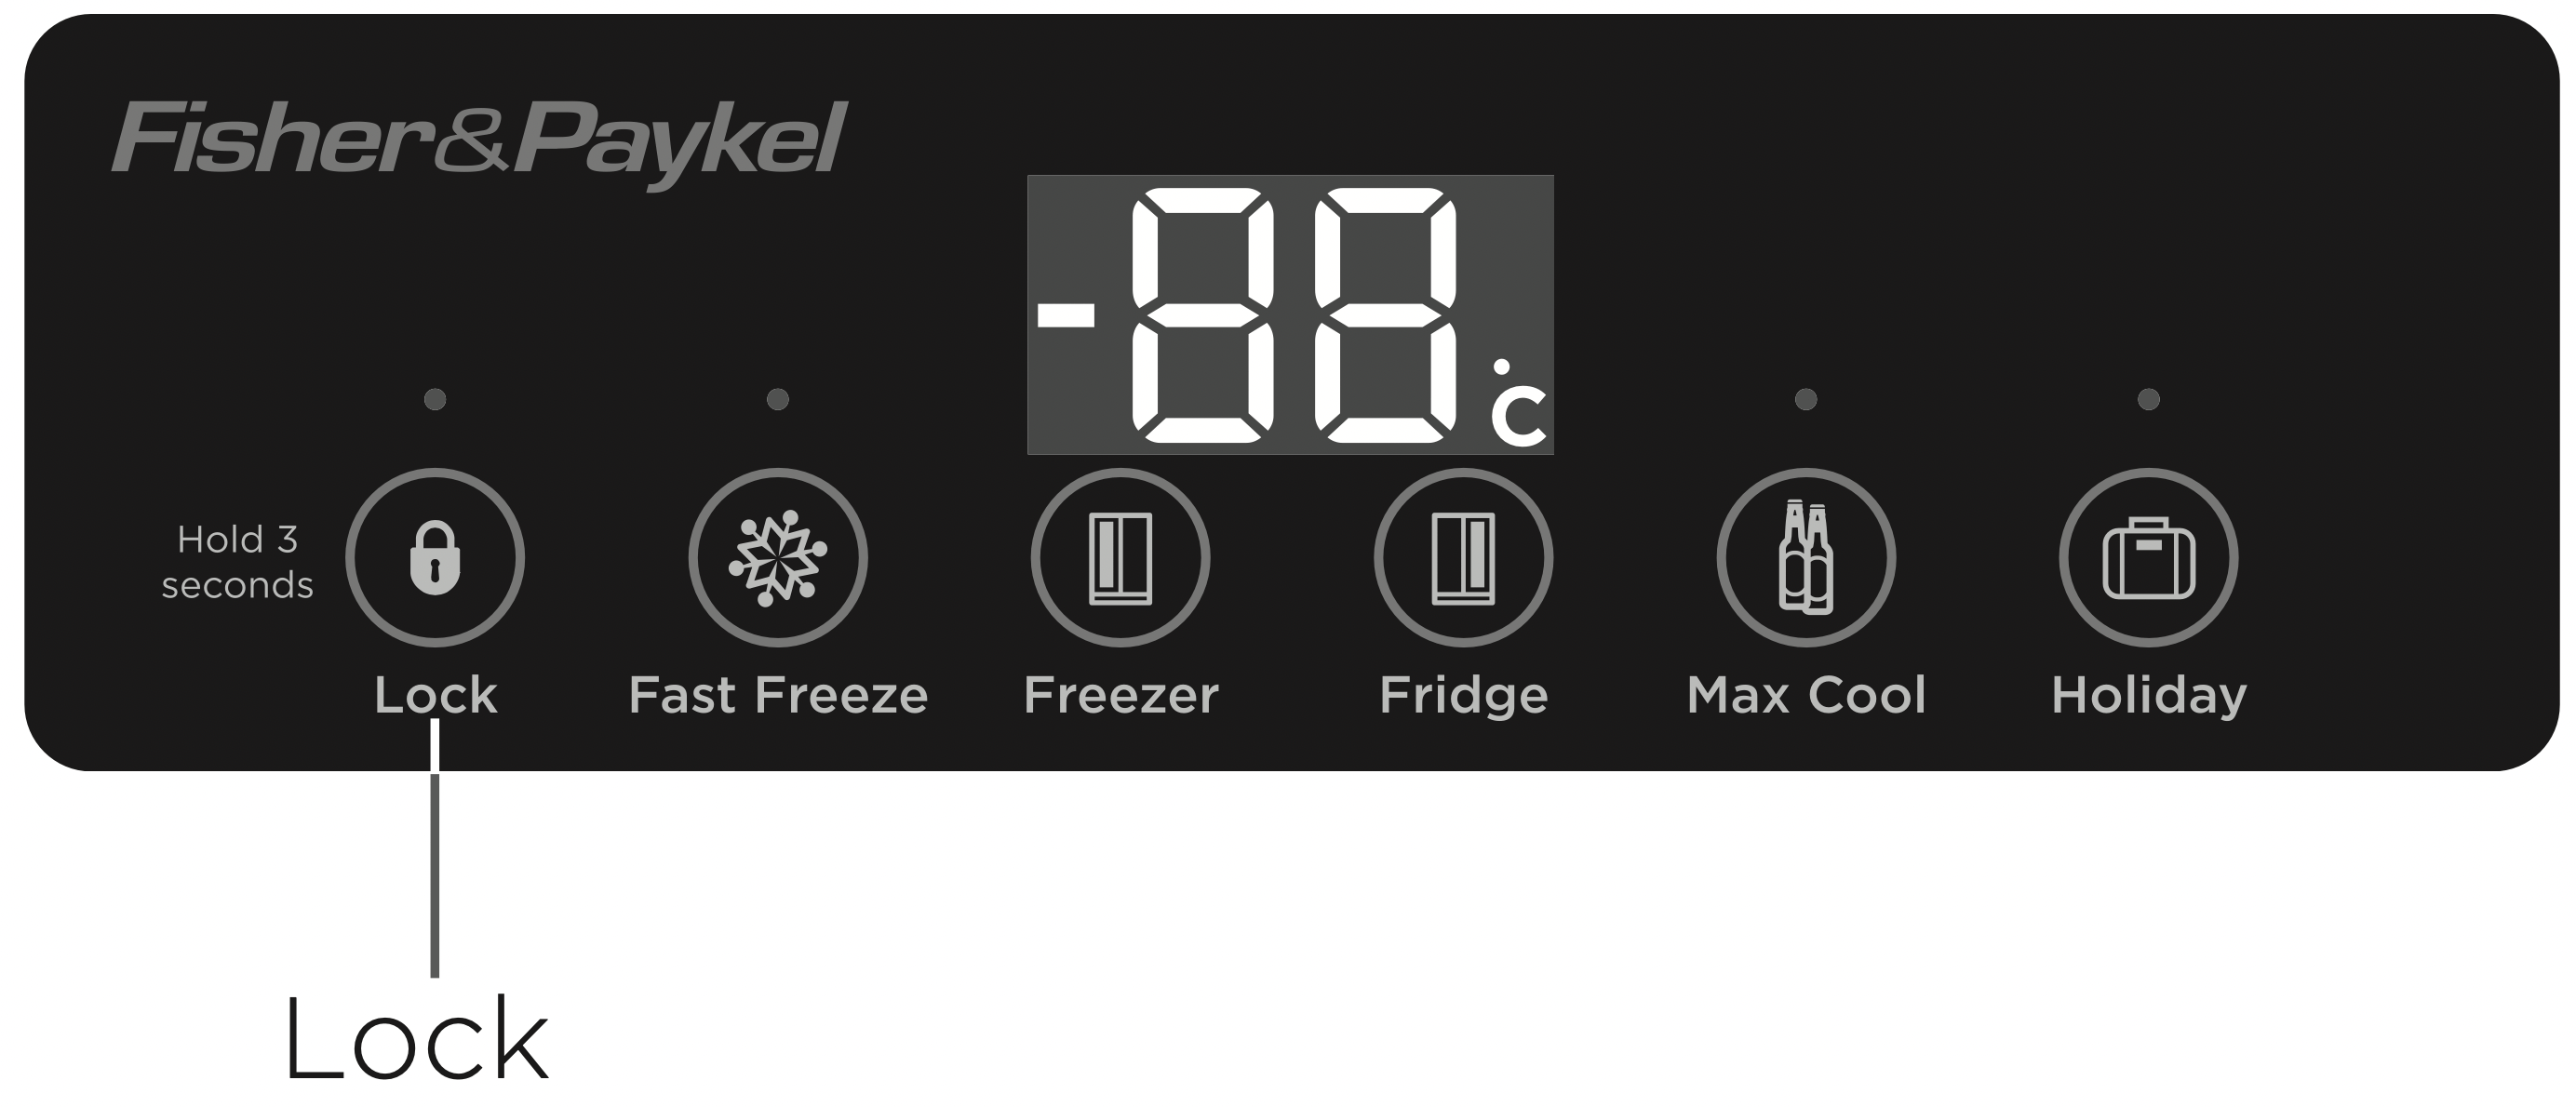
This feature will lock the temperature and function settings, preventing these from being changed. This is useful when cleaning your refrigerator. When locked, the Lock icon will blink and a beep will sound.
To turn on
Press and hold  for 3 seconds, a white LED will turn on above Lock icon. The refrigerator settings will be locked.
To turn off
Press and hold  for 3 seconds, the LED above the Lock icon LED will turn off. The refrigerator settings will be unlocked.
Holiday
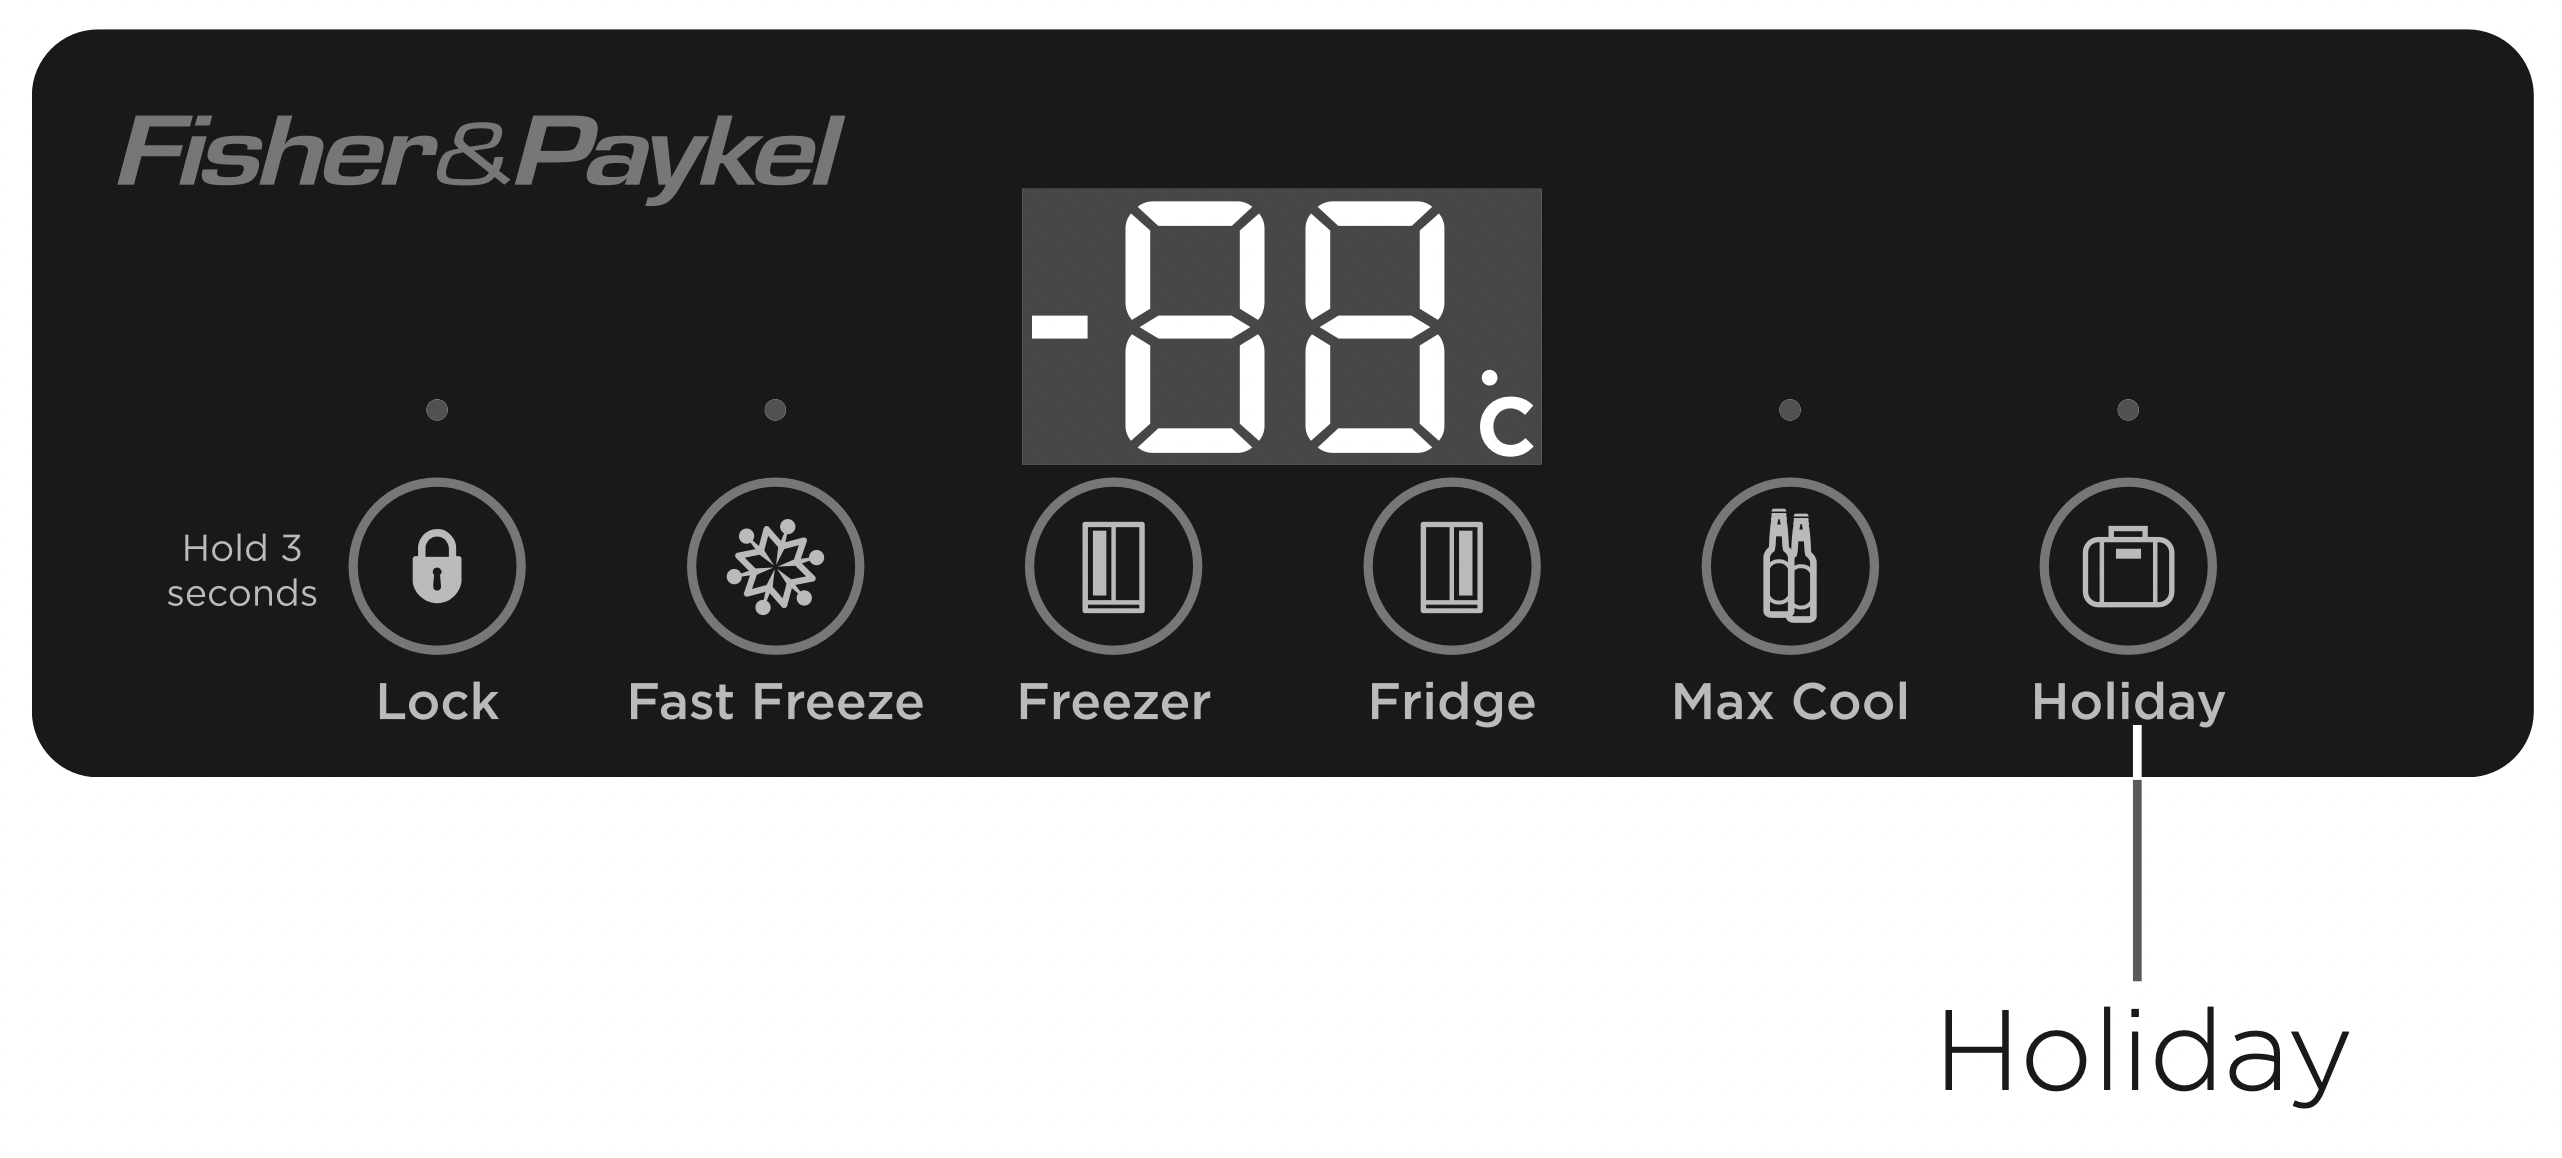
IMPORTANT! Before selecting the holiday function remove all perishable food and drink from the fridge compartment as perishable items may become unsafe to consume.
This feature allows you to leave the fridge section unused while the freezer section operates as normal. When in this function, the fridge temperature will be automatically set to 17°C.
To turn on
Press  , a white LED will turn on above the Holiday icon. The Holiday function is now activated.
To turn off
Press  . The LED above the Holiday icon will turn off. The Holiday function is now deactivated.
Max Cool
This function is to chill food quickly to retain freshness and quality. Use this feature before putting large quantities of food into the fridge compartment.
The Max Cool function will automatically deactivate once the fridge compartment has reached the set temperature.
To turn on
Press  . A white LED will turn on above the Max Cool icon. The Max Cool function is now activated.
To turn off, before automatic deactivation
Press  . The LED above the Max Cool icon will turn off. The Max Cool function is now deactivated.
Fast Freeze
This function is designed to freeze food quickly to ensure freshness, texture and taste are retained during the freezing process.
The Fast Freeze function will automatically deactivate after a set time duration.
Use this feature before putting large quantities of food in to the freezer (for example after food shopping). For best results we recommend that the Fast Freeze function be turned on 12 hours before food is placed into the freezer.
To turn on
Press  , a white LED will turn on above the Fast Freeze icon. The Fast Freeze function is now activated.
To turn off, before automatic deactivation
Press  . The LED above the Fast Freeze icon will turn off. The Fast Freeze function is now deactivated.
Adjusting the fridge temperature
- Press
 . The fridge temperature display will start blinking, indicating that the fridge is in the temperature setting mode.
- Press
 to scroll though the fridge temperature range from 9°C to 1°C.
When the desired temperature is displayed, wait 5 seconds. The blinking will stop and the temperature will be set. Alternatively press any other button on the control panel within 5 seconds to set the temperature.
Adjusting the freezer temperature
- Press
 . The Freezer temperature display will start blinking, indicating that the freezer section is in the temperature setting mode.
- Press
 to scroll through the freezer temperature range from -14°C to -24°C.
When the desired temperature is displayed, wait 5 seconds. The blinking will stop and the temperature will be set. Alternatively press any other button on the control panel within 5 seconds to set the temperature.
USING YOUR WATER DISPENSER / ICE MAKER – ICE & WATER
First use of the ice maker/water dispenser
- Check your refrigerator is switched on and has been cooling for at least 2 hours before use (refer to page 21 – The temperature of your refrigerator and freezer).
- Check that the water isolation tap has been connected and turned on.
- Press dispenser pad and discard the first 3 L of water, stopping intermittently to remove trapped air in the system. Failure to do this will result in excessive dripping from your dispenser. This will make sure that the pipes are cleared. If in doubt, keep re-using the dispenser until the water runs clear.
- Please discard the first few batches of ice after start up.
Note: the first time the water dispenser is used, there will be a 1 – 2 minute delay while the tank fills, before water is dispensed.
Storing ice for extended periods
Storing ice for long periods of time can effect its appearance and odour. We recommend that you dispose of any ice which has been stored for extended periods and remove and clean the icebox. Allow the ice box to dry thoroughly and cool down before replacing into the appliance to prevent ice from sticking to the bin.
Water filter
- The Filter icon
 on the control panel will appear when the filter needs replacing. To maintain water quality we recommend the water filter be replaced every 6 months. Replace the water filter as per manufacturers instructions or follow instructions below. After changing, press the Function button
  for 3 seconds, the Filter icon will disappear and the filter timer will reset.
- Replacement cartridges are available from your Fisher & Paykel Service Agent (Kemflo Aicro filter part number 0060823485).
To replace the water filter
- Turn off the water supply.
- Remove the locking key at one end of the filter and then disconnect the water tube. Repeat on the other end of the filter.
- To fit the new filter insert the water tube at the inlet end of the filter, secure with locking clip and flush 3 L of water through the filter. Note the flow direction on the filter (see page 13). Check for leaks.
- Turn off water supply and connect water tube to the outlet end of the filter, secure with locking clip.
IMPORTANT
- To avoid serious illness or death, do not use water of unsafe or of unknown quality.
- The water filter cartridge needs to be changed when the Filter icon
 appears on the interface panel or after 6 months of use.
- If the water filtration system has been allowed to freeze, replace filter cartridge.
- Filter replacement is the consumer’s responsibility and will not be covered by the warranty except in the case of faulty parts or materials within the filter cartridge.
- If the water has not been dispensed for some time or has an unpleasant taste or odour, flush 10 L of water through the system. If unpleasant taste or odour persists, fit a new filter cartridge.
Removing and replacing the ice box
To remove the icebox, lift the box and then pull towards you, releasing the unit (Fig. 11).
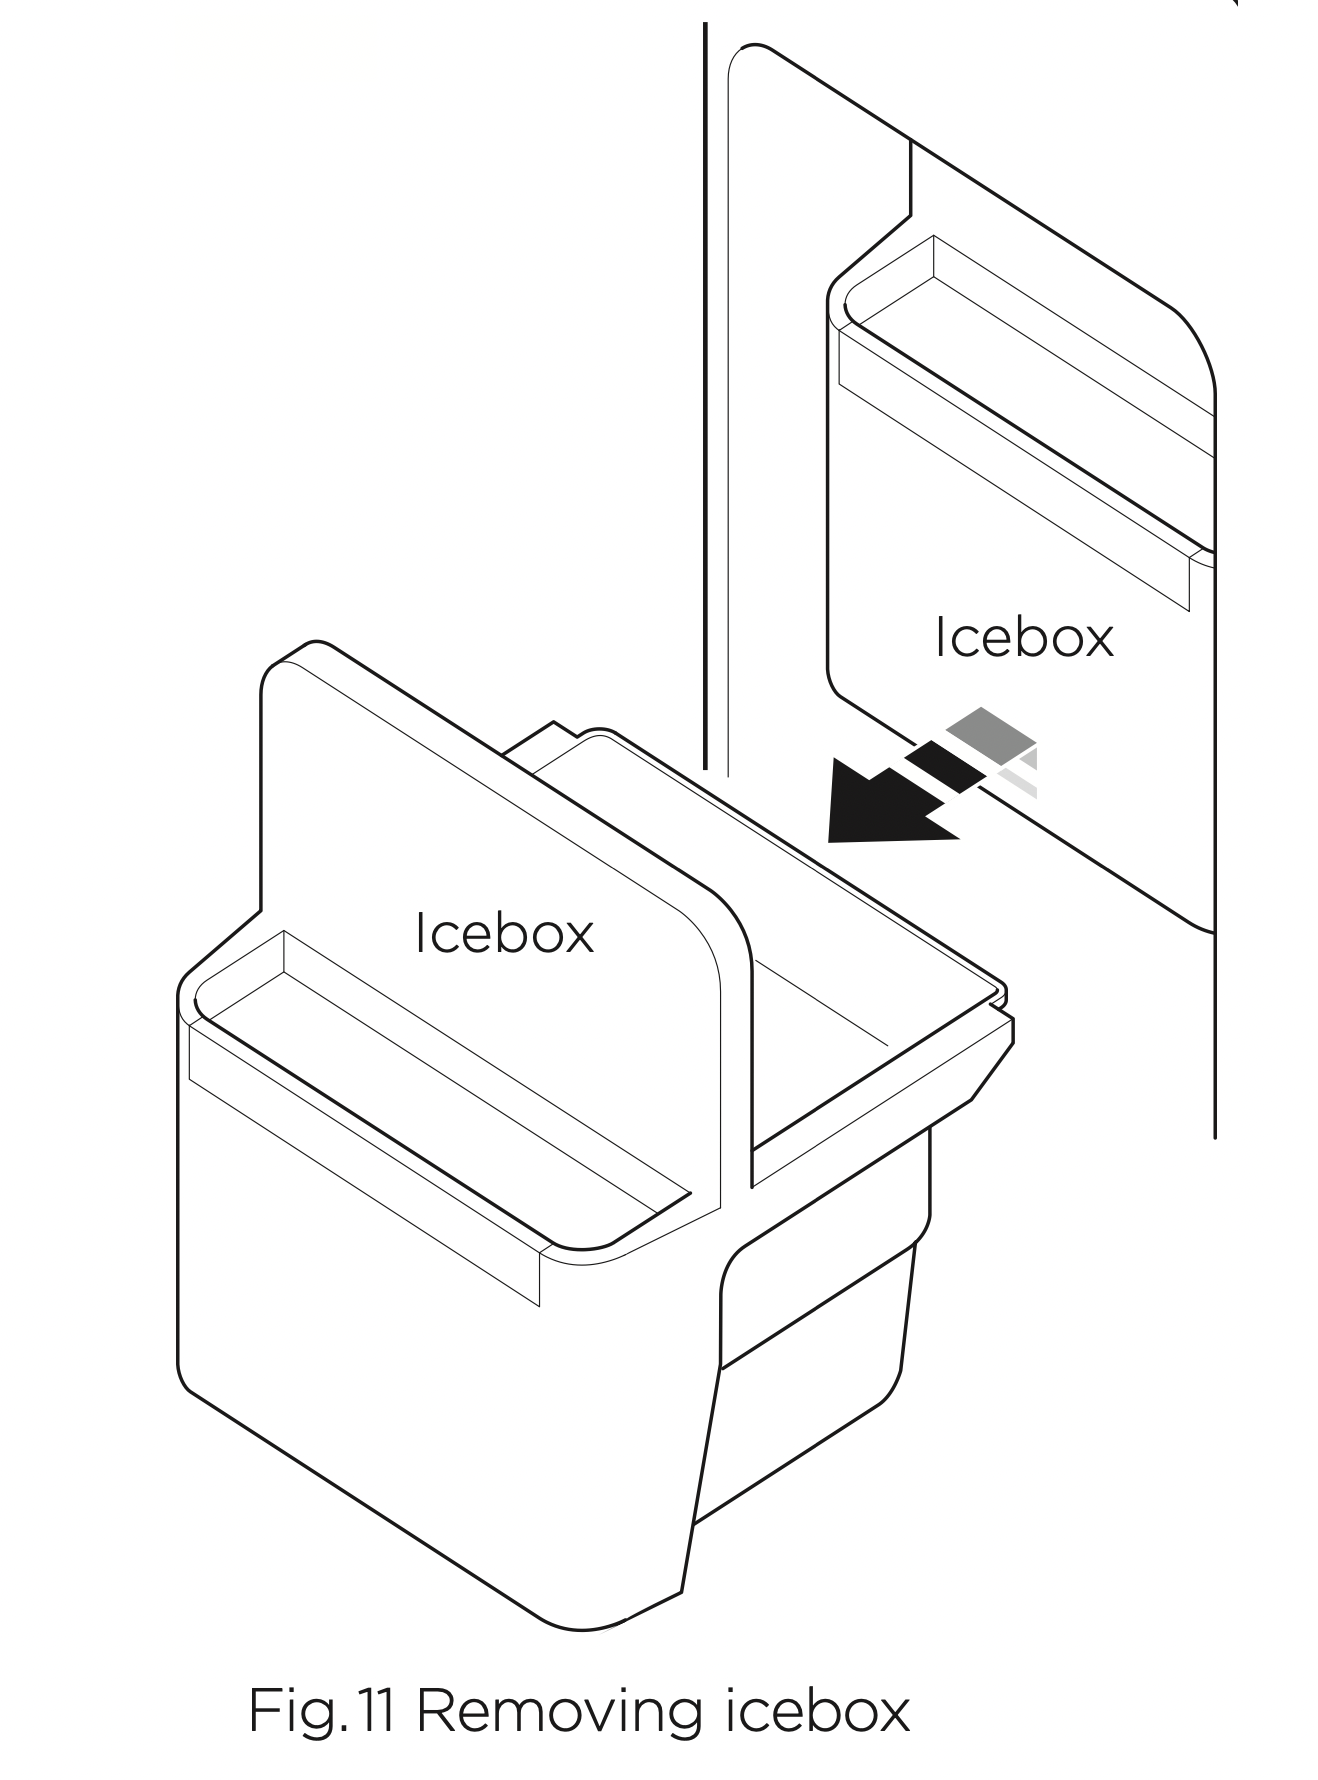
Note: Water moisture may have condensed and frozen the icebox in place.
When replacing the ice bin, if it does not fit easily, remove the box and turn the cam mechanism 90° clockwise (Fig. 12). Reinstall the icebox, making sure that the catch on the tray fits into the shelf slot.

If the ice maker does not work properly
The volume of the icebox equals the quantity of ice cubes, which the appliance can make in one day. Occasionally a small number of ice cubes may remain inside the box. If the ice gets stuck, this will result in abnormal operation of the ice cube maker. To avoid this problem, remove the icebox and rearrange the ice cubes, and remove the ice cubes which cannot be separated. You may hear ice being dropped into the storage compartment. This is normal.
IMPORTANT!
- Always keep the ice cube outlet clean and clear of obstructions.
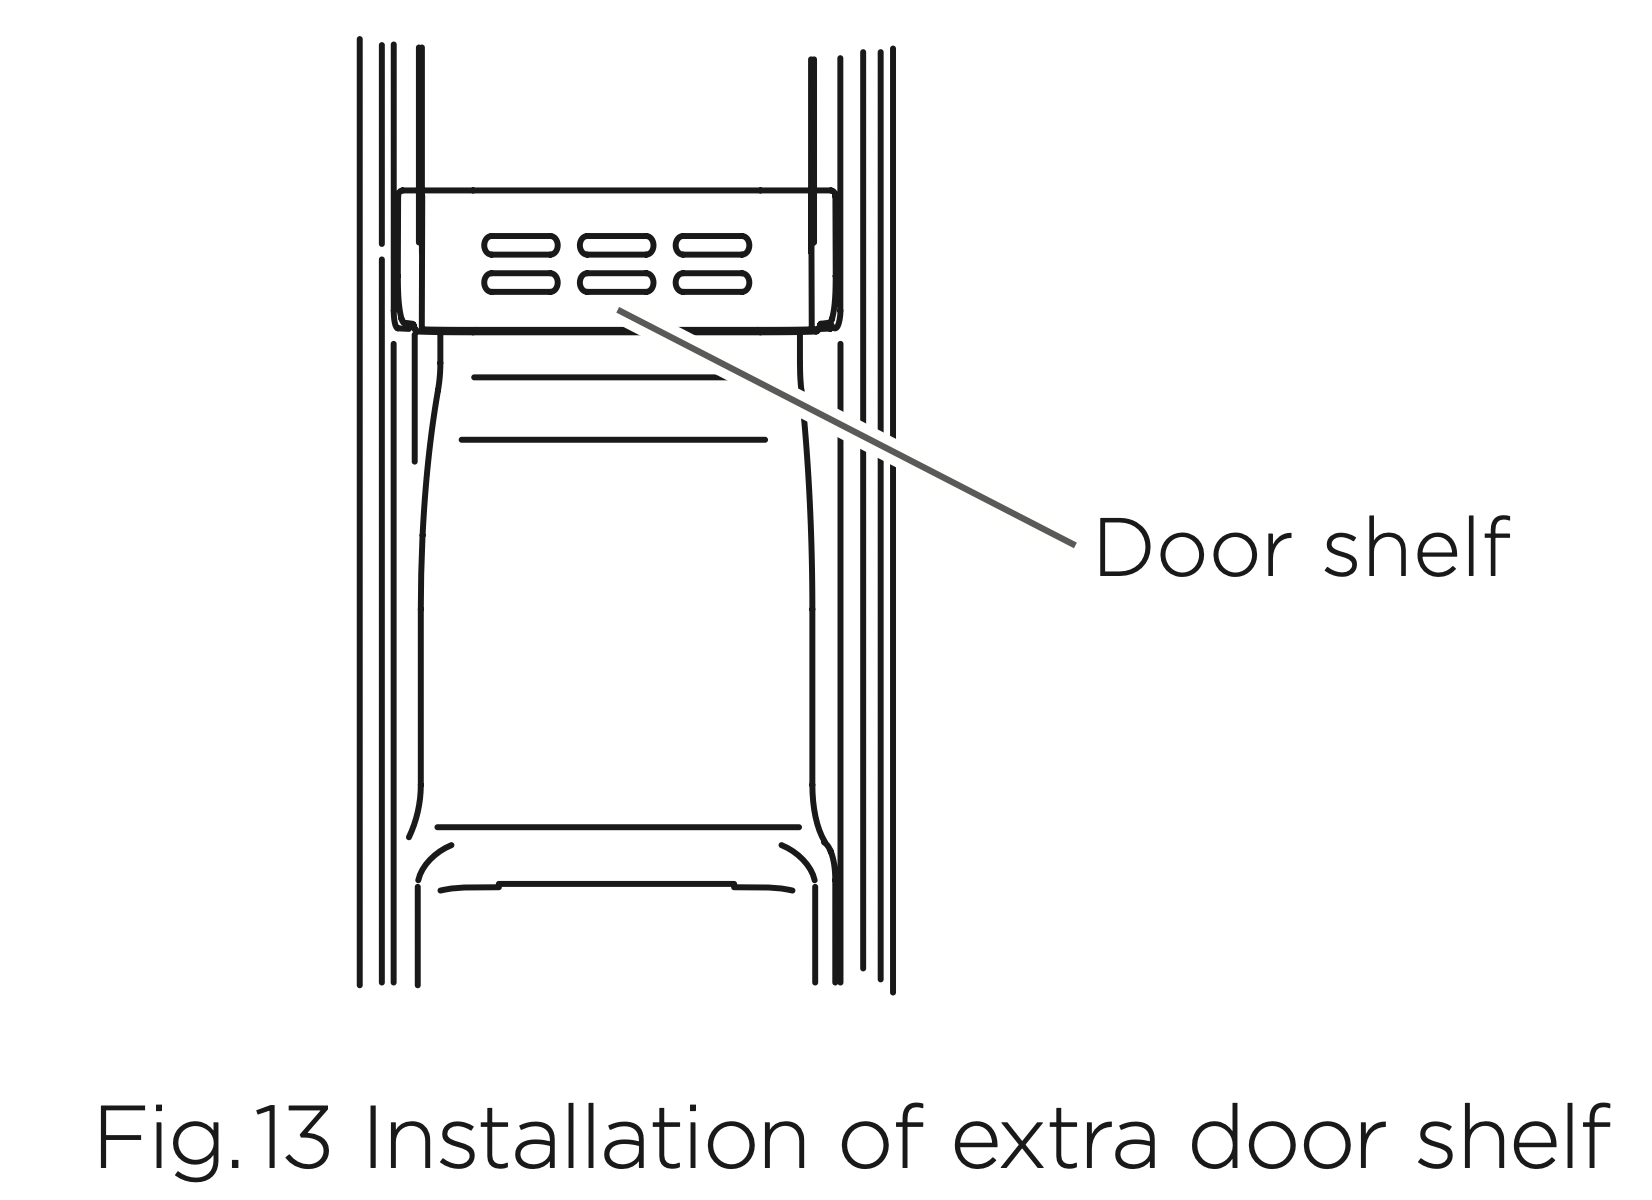
- Turning the ice maker off and removing the icebox enables extra space for food storage. Install the additional door shelf at the position above the inlet on the freezer door (fig. 13).
- Avoid contact with the moving parts of the ice maker and do not place your fingers on the automatic ice making mechanism while the refrigerator is in operation.
- Do not use ice cubes which have become discoloured, usually appearing a greenishblue. If discolouration is observed, contact your fisher & Paykel service agent.
- Ensure the ice maker is connected to the filter and to a potable water supply.
- Installation of the water connection must be completed by a qualified service technician or qualified plumber.
SPECIAL FEATURES
Fruit and vegetable bins
The fruit and vegetable bin provides a humid environment for your produce ensuring moisture and nutrients are retained, and your fruit and vegetables are kept fresher for longer.
To remove the bin, pull it out until it stops, then lift and continue to slide the bin until it is fully extended.
Fruit and vegetable bin humidity slide
The bin has a humidity control slide that can be adjusted to the fruit or vegetable setting depending on what is being stored in the bins.
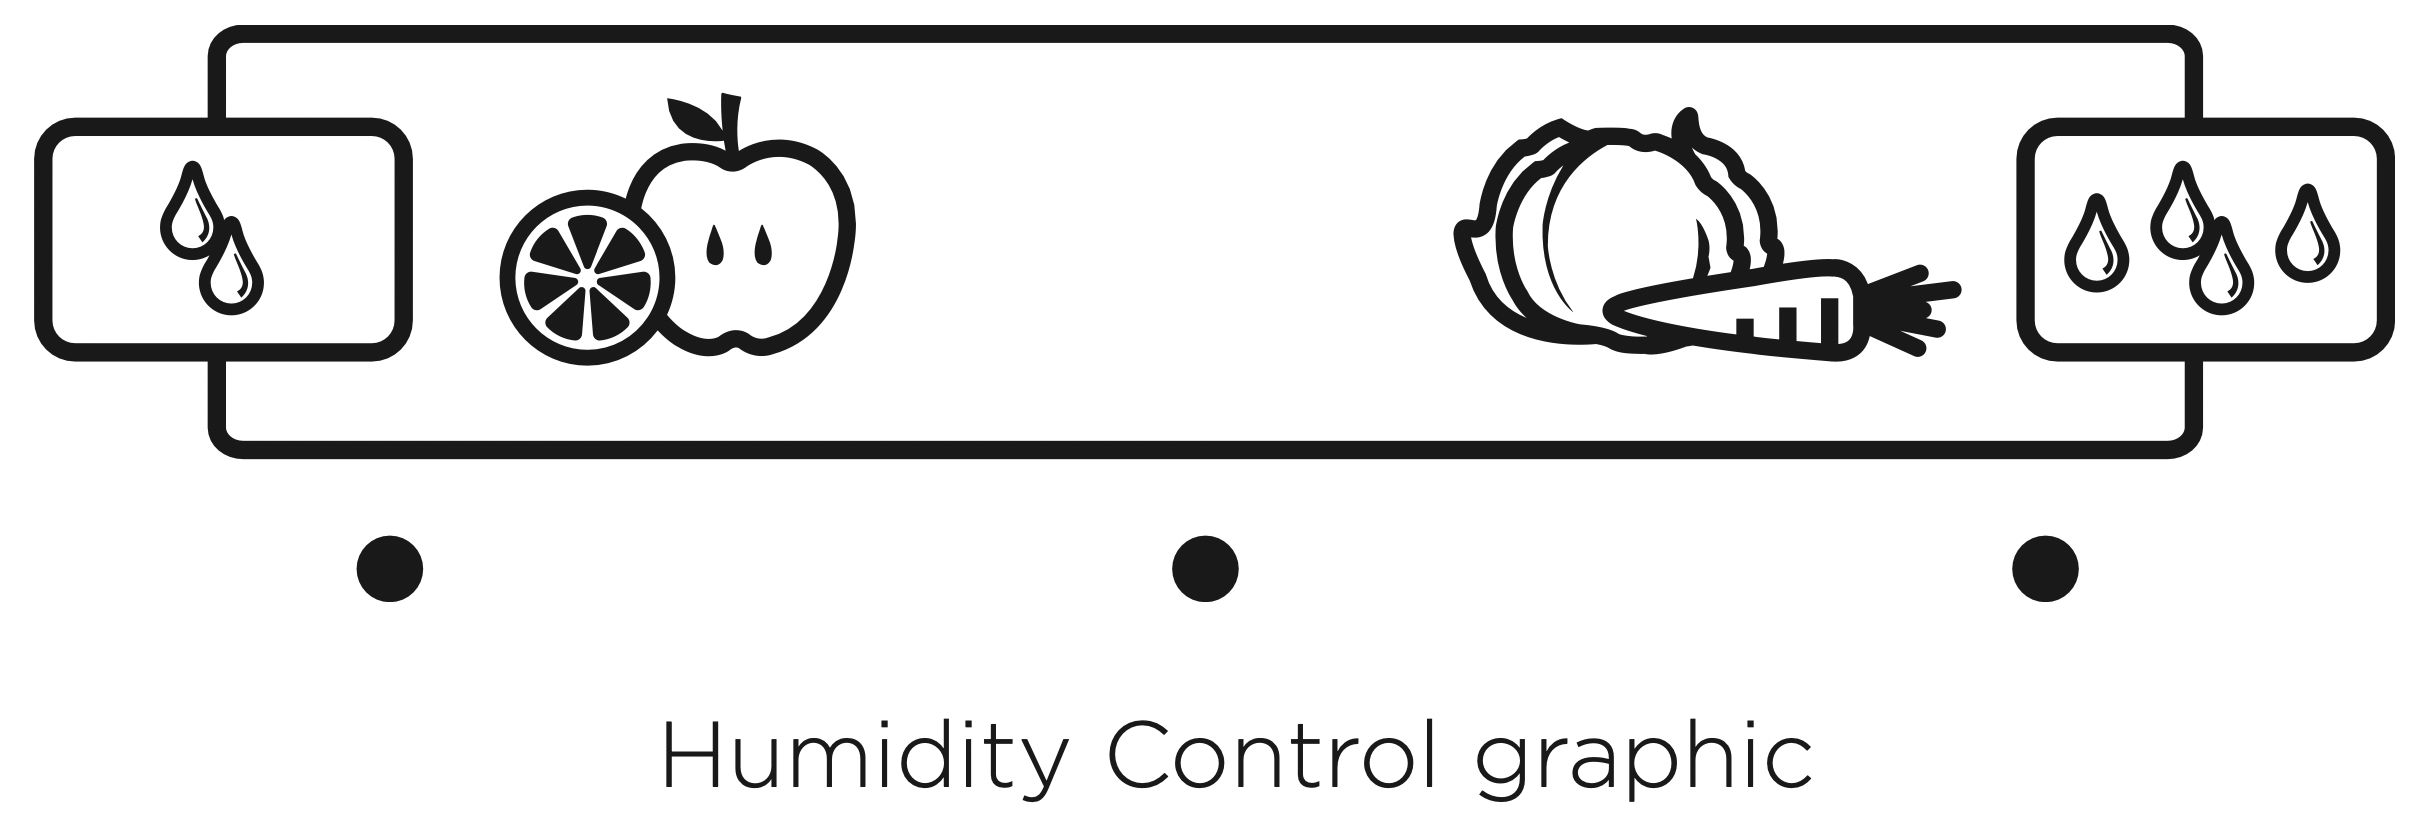
- If you are storing fruit, set the humidity slide to the fruit setting (left side).
- If you are storing vegetables, set the humidity slide to the vegetable setting (right side).
- If you are storing a mixture of fruit and vegetables, position the humidity slide in the centre.
Door alarms
If the refrigerator or freezer door is left open the alarm will beep at regular intervals to remind you to close the door.
Fault alarms
In the unlikely event of a fault, a fault code will be displayed on the control panel. Please take note of the fault code and contact our Customer Care Centre. Contact details are in the back of the book.
Water dispenser (Ice & water models only)
The water dispenser is located on the front of the small door. When pressing the dispenser pad, the selection chosen on the control panel will dispense (water, cubed ice or crushed ice).
Drip tray (Ice & water models only)
The tray at the bottom of the dispenser is designed to collect small spills. It has been designed to be removed for cleaning purposes. It does not drain; to empty remove the drip tray and wipe up overflow.
CLEANING CARE
Exterior
Stainless exterior doors
- It is important when cleaning the exterior door surface of your refrigerator, to only use liquid dishwashing detergent dissolved in warm water and a soft cloth.
- Dry the door with a clean, lint free cloth.
- The use of any abrasive or stainless steel cleaners and solvents will damage the door surface.
Other exterior surfaces
- Clean all other exterior surfaces with a mix of warm water and liquid dishwashing detergent, and a soft cloth.
- If necessary, clean the magnetic door gasket and the centre door gaskets with an old toothbrush, warm water and liquid dishwashing detergent.
Water dispenser pad (Ice & Water models only)
Clean the dispenser pad and drip tray with a mixture of warm water and a mild detergent. Dry thoroughly.
Interior
- It is important to keep the interior of the refrigerator and freezer clean to help prevent food from becoming contaminated during storage.
- The amount and types of food stored determines how often cleaning should be carried out (ideally once every 1 to 2 weeks) in the refrigerator.
- Remove the shelves, door shelves and bins and rinse these parts in a mixture of warm water and liquid dishwashing detergent. Rinse and dry the shelves and bins thoroughly before replacing them into the refrigerator.
- Wipe over the interior surfaces with a mixture of warm water and liquid dishwashing detergent or baking soda dissolved in warm water (add 1 tsp of baking soda to each 500 mls of water). Rinse with clean water.
- To help remove “old stale refrigerator” smells add a few drops of vanilla essence or vinegar to the water before cleaning.
- Do not use harsh, abrasive cloths or cleaners or highly perfumed, strong smelling cleaners or solvents on any part of the refrigerator as they can cause damage.
Glass shelves
Clean with warm water and detergent or a glass cleaner. If cleaning the shelves without removing from the cabinet, use only warm water and detergent as a glass cleaner can damage the plastic components of your refrigerator.
To remove the shelf, tilt the front upwards so that the restraining pegs are clear of the side guides and pull towards you. Keep the shelf tilted to allow the retaining stops to clear the side guides.
When repositioning, make sure the shelf is pushed back fully and the retaining stops have located securely.
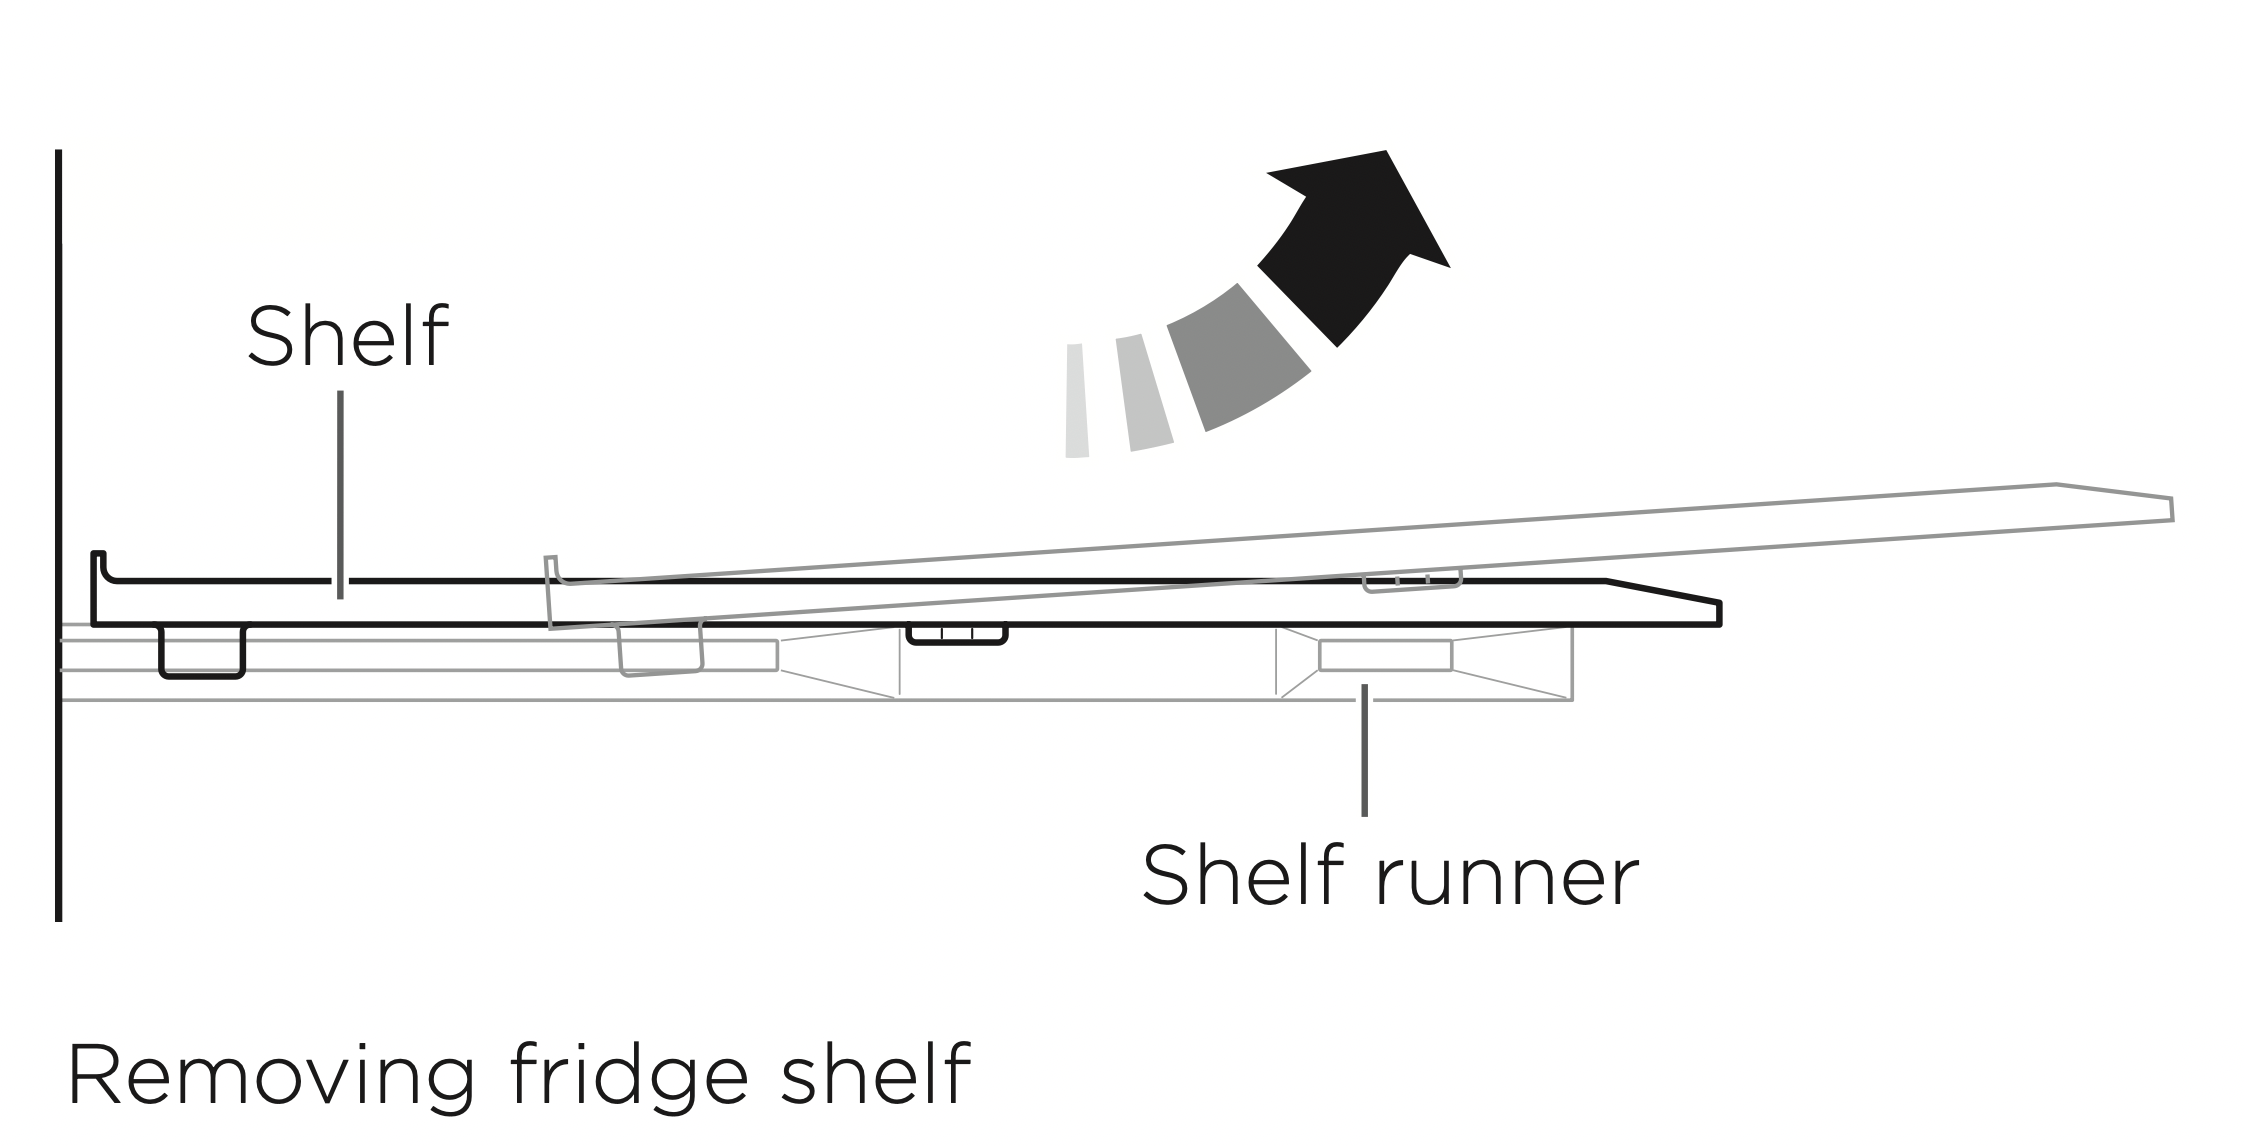
IMPORTANT! When adjusting the height of a shelf, first remove any food placed on the shelf.
STORING FOOD IN YOUR REFRIGERATOR
Your refrigerator helps to extend the storage times of fresh perishable foods. The cold temperature slows down the major causes of food spoilage – namely, the growth of bacteria, moulds and yeasts, and any chemical and physical reactions.
Fresh food care
The quality of food before it is placed in the refrigerator is critical to successful storage. For best results:
- Select foods that are very fresh and of high quality.
- Buy only the amount that you will use within the recommended storage time. If you buy extra, plan to freeze it.
- Ensure that food is well wrapped or covered before it is stored. This will prevent food from dehydrating, deteriorating in colour or losing flavour and will help maintain freshness. It will also prevent odour transfer. Fruit and vegetables need not be wrapped provided they are stored in the vegetable bins of the refrigerator.
- Make sure that strong smelling foods are wrapped or covered and stored away from foods such as butter, milk and cream which can be easily tainted by strong odours.
- Refrigerate fresh, perishable foods as soon as possible after purchase. If left at room temperature for any length of time the rate of deterioration will be accelerated.
- Avoid placing food directly in front of air outlets, as it may freeze and cold air needs to circulate to maintain safe food storage.
- Do not open the refrigerator door unnecessarily.
- Cool hot foods down before placing them in the refrigerator. This should be done quickly. It can be aided by placing the container of food in a bowl of ice and water; renew the ice as necessary. (Note hot containers may damage shelves and walls of the refrigerator).
- Store raw and cooked food in separate containers or packaging to prevent cross contamination.
In addition:
- Keep the refrigerator clean. Wipe the inside walls and shelves frequently (refer to ‘Cleaning Care’) and place only clean containers in the refrigerator.
- Keep a close check on the quality of food in your refrigerator. Discard any food that shows signs of spoilage. Pay particular attention to meat, fish and poultry, as these foods are highly perishable. Use food within the recommended storage times.
Dairy foods and eggs
- Most pre-packed dairy foods have a recommended ‘use by/best before/best by’ date stamped on them. Store them in the refrigerator and use within the recommended time.
- Butter can become easily tainted by strong smelling foods so it is best stored in a sealed container.
- Eggs should be stored in the refrigerator. For best results, especially when baking, remove the eggs from the refrigerator two hours before they are to be used.
Red meat
- Place fresh red meat on a plate and loosely cover with waxed paper, plastic wrap or foil.
- Store cooked and raw meat on separate plates. This will prevent any juices lost from the raw meat contaminating the cooked product.
- Delicatessen meats should be used within the recommended storage time.
Poultry
- Fresh whole birds should be rinsed inside and out with cold running water. Dry and place on a plate. Cover loosely with plastic wrap or foil.
- Poultry pieces should also be stored this way. Whole poultry should never be stuffed until just before cooking, otherwise food poisoning may result.
- Cool and refrigerate cooked poultry quickly. Remove stuffing from poultry and store separately.
Fish and seafood
- Whole fish and fillets should be used on the day of purchase. Until required, refrigerate on a plate loosely covered with plastic wrap, waxed paper or foil.
- If storing overnight or longer, take particular care to select very fresh fish. Whole fish should be rinsed in cold water to remove loose scales and dirt and then patted dry with paper towels. Place whole fish or fillets in a sealed plastic bag.
- Keep shellfish chilled at all times. Use within 1 – 2 days.
Precooked foods and leftovers
- These should be stored in suitable covered containers so that the food will not dry out.
- Keep for only 1 – 2 days.
- Reheat leftovers only once and until steaming hot.
Fruit and vegetable bins
- Although most fruit and vegetables keep best at low temperatures, take care not to store the following at temperatures of less than 7°C for long periods: Citrus fruit, tropical fruit, tomatoes, cucumbers.
- Undesirable changes will occur at low temperatures such as softening of the flesh, browning, accelerated decaying and/or loss of flavour.
- Do not refrigerate avocados (until they are ripe), bananas, mangoes or pepinos.
- If possible store fruit and vegetables separately, ie fruit in one bin and vegetables in the other.
- Each fruit and vegetable bin has a humidity control slide that can be adjusted depending on what is stored in the bins. For more information on using the Humidity Control refer to page 27.
STORING FOOD IN YOUR FREEZER
We recommend the use of temperatures -18°C or colder to store food. This means that the food can be kept for longer periods than when refrigeration temperatures are used. This is because the growth of bacteria, moulds and yeasts are stopped, and chemical and physical reactions are severely restricted at such low temperatures.
Frozen food care
For best results:
- Choose only high quality foods that freeze well.
- For best results store at -18°C or colder. Take care to maintain this low storage temperature, eg try to avoid opening the freezer door unnecessarily. If your ice cream is soft you are running your freezer too warm.
- Leave space at the top of containers, glass jars or plastic bags containing liquids or semi-solid foods. These expand as they freeze. Usually 20 – 50 mm head space is recommended. Seal. Ideally, remove all the air from the package after food is frozen.
- Packages or containers of solid foods should have the air removed from them and be sealed tightly before freezing.
- Use the Fast Freeze function when freezing fresh food. This helps to speed up the freezing process, giving optimum freezing results. It is recommended that the function is activated approximately 2 hours before required. For more information refer to page 26.
- Freeze immediately or as quickly as possible. Freeze only small quantities of food at any one time. For best results we recommend that only 1 kg of food be frozen per 25 L of freezer storage volume at any one time. (About 3 kg in small freezers and 4 kg in larger freezers). For faster freezing, we recommend that fresh food is placed at the top of the freezer compartment close to the air vent.
- Thaw foods preferably in a refrigerator, or using a microwave oven or multifunction oven.
- Keep a constant turnover of food. Use older items of food first and do not exceed recommended storage times.
- Use good quality freezer proof packaging to maintain food quality.
- If food is only covered in plastic film place inside a freezer-proof plastic bag.
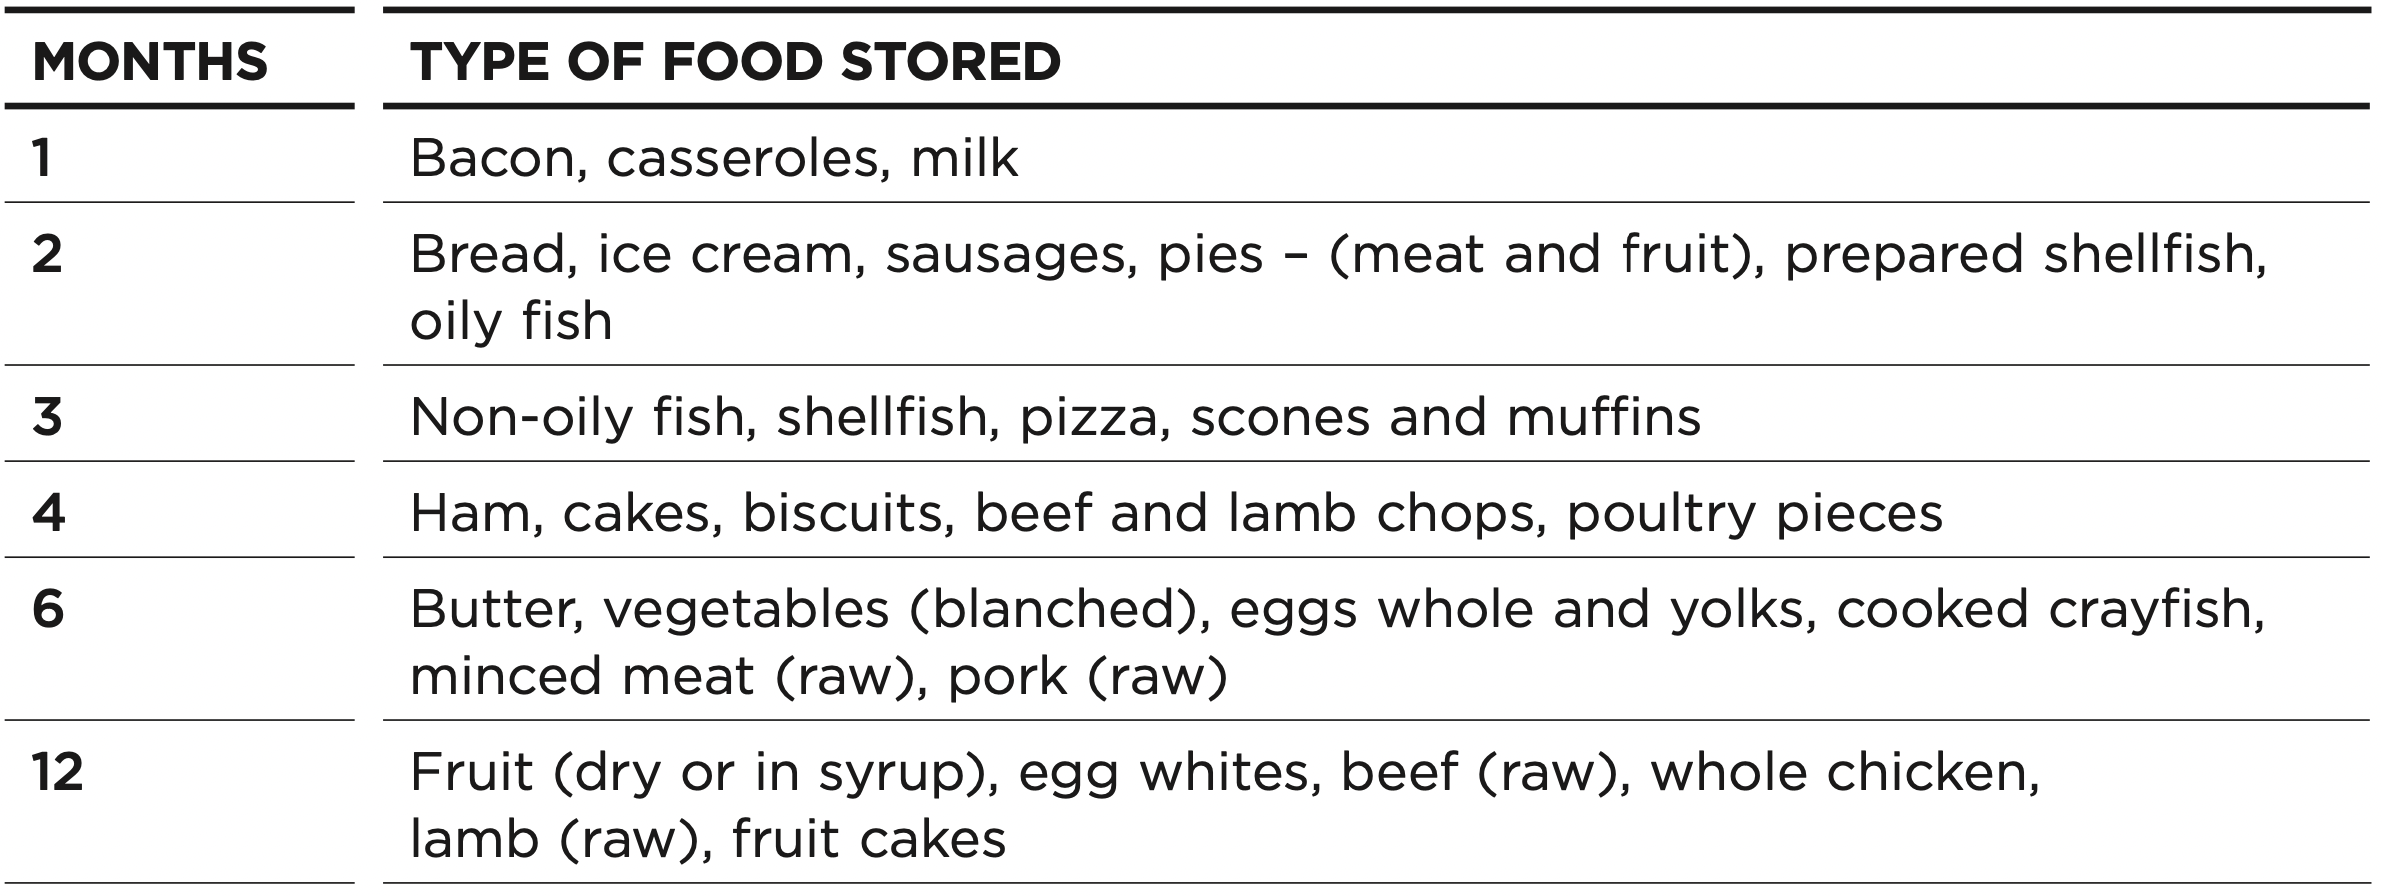
Recommended freezer storage times
These times should not be exceeded.
Meat, poultry and game
- Do not try to freeze more than 1 kg meat per 25 L of freezer storage volume at any one time. Meat must be frozen quickly in order to maintain its texture.
- Do not stuff poultry before freezing.
- Red meat can be cooked from frozen, or from the partly or completely thawed states. Remember to allow extra cooking time if cooking from frozen.
- Always thaw poultry completely before cooking.
Fish
- Fish is best frozen commercially. If, however, you do want to freeze fish at home, make sure the fish is very fresh and of high quality.
- Clean, scale and preferably leave whole. All fish should be wrapped in two layers of packaging as depending on the type of fish, odours and flavours can be readily transferred either to or from it. Seal well.
- For best results, cook from either the frozen or partly thawed state.
Fruit
- Choose high quality, mature, and ready to eat fruit. Preferably select varieties recommended for freezing.
- Avoid unripe and over-ripe fruit.
- The way fruit is packed depends on how it is to be used. Fruits packed in syrup are ideal for desserts, whereas fruits packed without sugar are better used for cooking. Most fruits can be stored for 8 – 12 months.
Vegetables
- Most vegetables freeze well, although ‘salad’ vegetables lose their crispness. Other vegetables, eg celery, onion and tomatoes, should only be used in cooked dishes as they soften on freezing.
- Freeze only high quality, mature, ready-to-eat vegetables.
- Sort and discard any vegetables that are damaged.
- It is necessary to blanch most raw vegetables prior to freezing.
- Blanching involves a short cooking period during which vegetable enzymes are destroyed. If these enzymes are not destroyed they cause undesirable physical and chemical changes during freezer storage.
- Vegetables can be blanched in boiling water, steam or microwave oven. If using boiling water, boil vegetables for 2 – 4 minutes and cool quickly.
- In general, frozen vegetables are best cooked from their frozen state.
Prepared and cooked foods
- Most cooked foods can be frozen but it is not recommended to freeze the following: Cooked egg white, custards, cream fillings and milk puddings, gelatine or jelly-like dishes, mayonnaise and similar salad dressings, meringue toppings. These tend to separate on thawing.
TROUBLESHOOTING
If there is a problem with your appliance, please check the following points before contacting your local Fisher & Paykel Authorised Repairer or the Customer Care Centre.
All models
| PROBLEM |
POSSIBLE CAUSES |
WHAT TO DO
|
| Appliance does not operate. |
No electricity at power outlet. |
Check that the plug is correctly connected and power switched on.
|
|
Check another appliance at the same outlet.
|
|
Check house fuse.
|
| Light not working. |
Light not functioning. |
The LED light cannot be serviced by the user. Contact your Fisher & Paykel Dealer or Fisher & Paykel Authorised Repairer.
|
| Refrigerator not working. |
Check refrigerator is turned on at wall.
|
| Motor operates for long periods. |
Hot weather.
|
Minimise door openings to allow temperature to stabilise.
|
|
Frequent door openings.
|
|
Large amount of food recently added.
|
|
Temperature control set too low.
|
See ‘Operating Instructions’ section (pages 18 – 23). |
| Doors not sealing properly. |
Check that cabinet is level and gasket seals are clean.
|
|
Storage compartments too warm.
|
Temperature setting not correct.
|
See ‘Operating Instructions’ section (pages 18 – 23). |
|
Frequent door openings.
|
Minimise door openings to allow temperature to stabilise.
|
|
Large amount of food recently added.
|
| Food freezing in the fridge compartment. |
Temperature setting not correct. |
See ‘Operating Instructions’ section (pages 18 – 23).
|
|
Food placed directly in front of air outlets.
|
Move chill sensitive foods away from the centre back of the shelves.
|
| Unfamiliar noises. |
Cabinet not stable or level.
|
See ‘Installation Instructions’ (pages 6 – 13).
|
|
Freezer is defrosting.
|
| Water in the vegetable bins. |
Condensation is formed by the water produced by fruit and vegetables. |
A small amount of condensation is beneficial for fruit and vegetable storage.
|
|
Wipe out water with a cloth.
|
|
Exterior of cabinet is warm.
|
This is normal. |
|
|
Condensation on outside of refrigerator/ freezer.
|
Not unusual during periods of high humidity. |
Wipe dry. |
|
Condensation inside fridge compartment.
|
Frequent or long door openings.
|
Minimise door openings. |
| Door gasket leaking. |
Check that gasket is sitting flat and sealing tightly.
|
|
Not unusual during periods of high humidity.
|
Wipe dry. |
|
Door handles out of alignment.
|
With time and usage, movement may occur. |
See ‘Installation instructions’ – ‘Stability instructions’ (page 11). |
|
Tray/bin does not slide in and out evenly.
|
Packaging trapped. |
Check to ensure no food or packaging is trapped behind the tray/bin.
|
|
Taste of odour in ice cubes.
|
Transfer of odour/taste from strong smelling foods.
|
Wrap or cover strong smelling foods. |
| Excessive gasket noise. |
May be due to a build up of dirt and/or grime. |
Clean gasket and apply Armorall.
|
|
Door not closing.
|
An obstruction is blocking door closing. |
Move obstruction. |
Ice & water models only
| PROBLEM |
POSSIBLE CAUSES |
WHAT TO DO |
| Automatic ice maker does not work. |
Ice maker has not been turned on. |
Switch on ice maker (refer to page 25).
|
| Water supply turned off or not connected. |
Connect water supply.
|
| Freezer compartment not working. |
Contact Customer Care.
|
| Water pressure too low. |
Check water pressure.
|
| Water line kinked/squashed. |
Check water line for kinks/squashing.
|
| Filter clogged. |
Water filter may need replacing.
|
| Ice cubes stick in ice bin. |
Remove ice bin, loosen cubes and remove clumped ice. Refit ice box.
|
| Ice cubes have odour/taste. |
Unsealed packages may be transmitting odour/taste. |
Old cubes need to be discarded.
|
|
Ensure food packaging is sealed.
|
| Interior of freezer needs cleaning. |
Ice storage bin needs to be emptied and washed.
|
|
Clean refrigerator (refer to page 29).
|
| Poor taste from incoming water. |
Filter may need changing.
|
|
A new filter may need to be installed.
|
| Slow ice cube freezing. |
Door may have been left ajar. |
Close door.
|
| Freezer compartment too warm. |
Turn temperature to a colder setting (refer to pages 18 – 23).
|
| Wet ice/ ice clumping. |
Low water pressure.
|
Check water pressure. |
| Filter blocked. |
Replace filter (refer to page 13).
|
|
Long freezer door openings.
|
Gently tap ice to unstick or, if large clumps occur, empty ice bin and make new ice.
|
|
High ambient temperature.
|
|
Ice bin left out of freezer compartment for a length of time.
|
|
Ice will stick together over time.
|
| Water has poor taste/odour. |
Refrigerator not used for an extended period. |
Dispense 10 L of water so fresh water supply is replenished.
|
| Water dispenser does not work. |
Water supply turned off or not connected.
|
Turn water on.
|
|
Press dispenser for 1 minute to remove trapped air from water line and to fill the water system.
|
| Supply line may be blocked. |
Check supply for kinks or leaks.
|
|
On first installation there may be air in water system.
|
To remove air, run 3 L of water through the dispenser. |
| Filter may be blocked and need replacing. |
Replace filter (see back of this booklet for Customer Care contact details).
|
| Water frozen in tank. |
Increase temperature to a warmer setting in fresh food compartment and freezer.
|
|
Water in first glass is warm.
|
Water dispenser not used for extended period.
|
Discard first glass of water dispensed. |
|
Tank capacity used recently.
|
Allow water time to cool. |
|
Drips overflow drip-shelf.
|
Air trapped in tank.
|
Flush 3 L water through dispenser, stopping intermittently. |
| New filter installed. |
Flush 10 L water through filter and then 3 L through dispenser.
|
|
Water flow rate has slowed down.
|
Filter cartridge is restricted. |
Replace filter as soon as possible (see pages 12 – 13).
|
| Ice buildup inside freezer compartment. |
Freezer door not closing tightly. |
Arrange items in freezer so door can close tightly.
|
|
Check and clean door gasket seal.
|
| Ice maker sounds. |
Normal ice maker operation. |
Refer to refrigerator sounds (refer to page 25).
|
| Small or large ice cubes. |
Insufficient or excessive water pressure. |
Check water pressure.
|