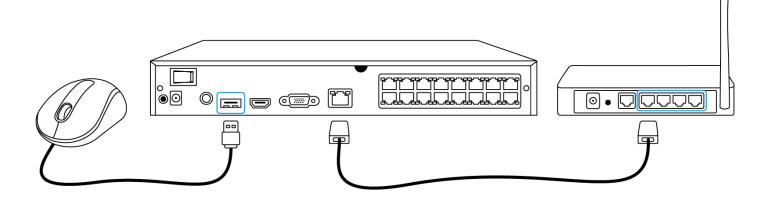
1. Connect the NVR’s LAN port to router by Ethernet cable, and connect the mouse to the USB port of the NVR.
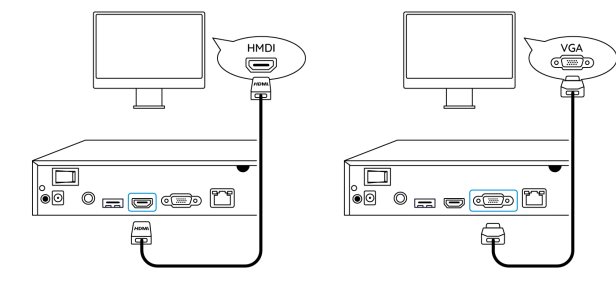
2. Connect the NVR to a monitor with HDMI or VGA cable.
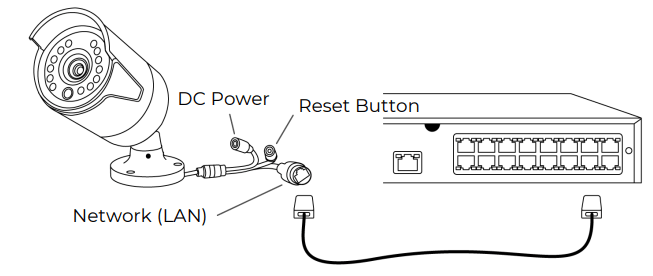
3. Connect the PoE camera to PoE port of the NVR. Or if you want to use a WiFi camera, please connect the camera to the WiFi of the same router as NVR.
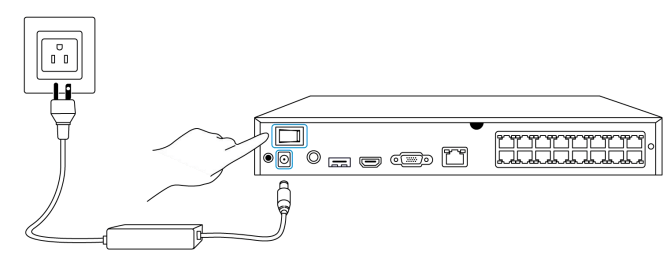
4. Connect the power adapter to the NVR, and switch on the NVR.
Set up the NVR on the Monitor
Please power on the NVR and connect it to a monitor by VGA or HDMI cable. After the NVR is powered on, wait a few seconds it’ll show a setup wizard on the monitor. Follow the setup wizard to set up the NVR system.
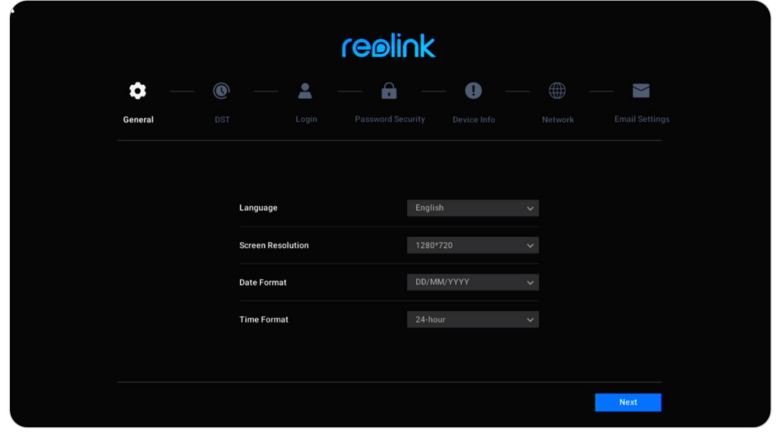
1. General: Set up the NVR Language, Screen Resolution, Date Format and Time Format. Click Next.
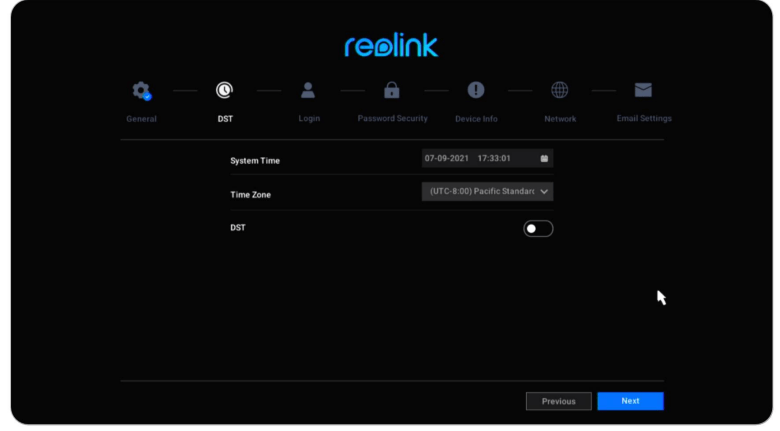
2. DST: Set up the System Time, Time Zone and choose if to enable DST (Daylight Saving Time). Click Next.
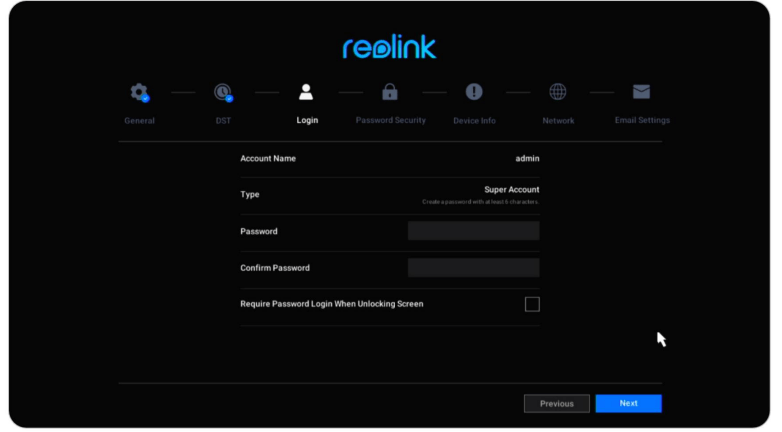
3. Login: Set up the NVR account password. If you check “Require Password Login When Unlocking Screen”, the NVR will automatically lock the screen and ask for the password when you want to operate the system.
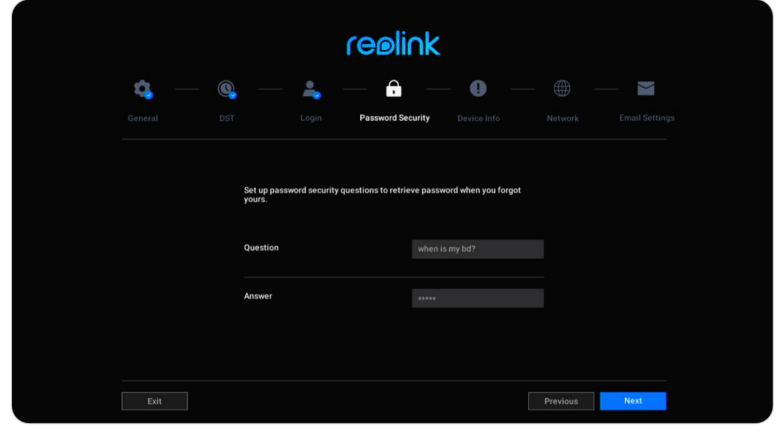
4. Password Security: Set a password security question and answer. In the case the NVR password is forgotten, you can retrieve the password via this password security question
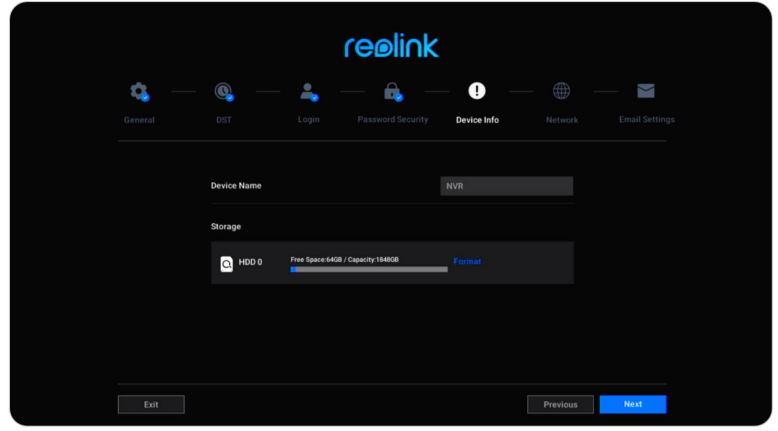
5. Device Info: Set a name for the NVR, and click Format to format the HDD.
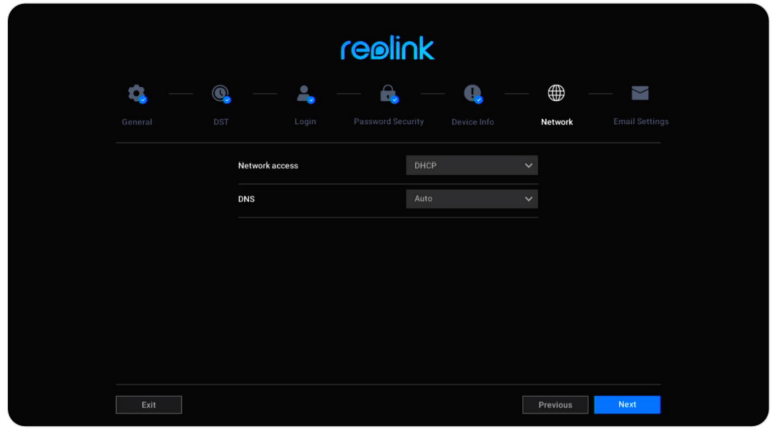
6. Network: Suggest to keep Network access as DHCP and DNS as Auto. It’ll obtain the network connection from a router automatically, when the NVRis connected to the router with an Ethernet cable
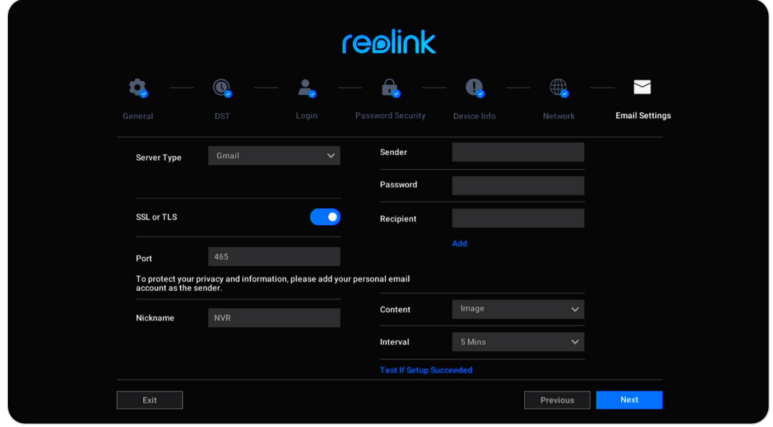
7. Email Settings: Configure the email settings for sending alarm emails. You can skip this step and set it up later when you need to use this feature.
Install the NVR and Camera
NVR is suggested to directly placed on a table, while for the camera you are able to find installation guides and tips on the camera’s user manual.
Use Your System
Live View
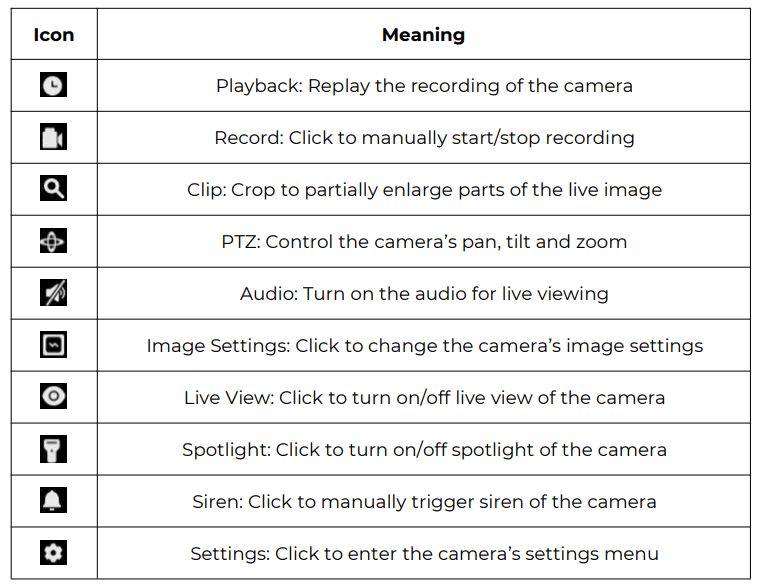
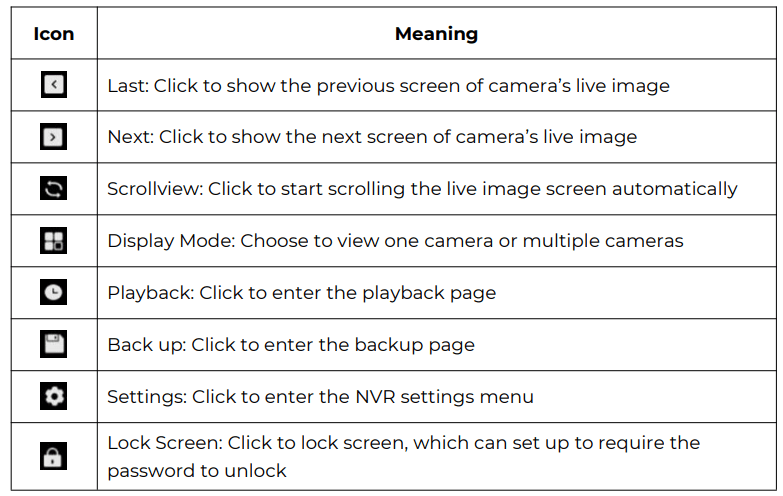
Introduce Icons on the Live View Page
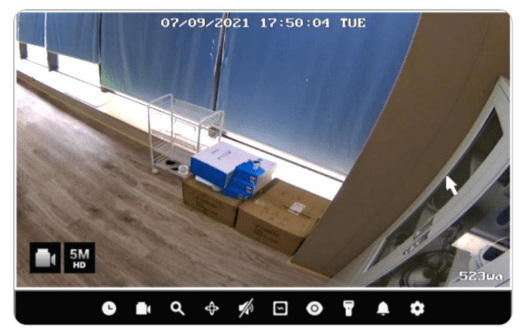
Icons at the Bottom of the Live View Page
Right-click on the live image screen to display a list of icons at the bottom of the screen.
Camera Settings
Stream
Go to Settings > Camera > Stream, here you can change the resolution, frame rate and bit rate of the camera. Set up a higher resolution provides a better image quality, but also requires a much higher network bandwidth and uses up more storage space while recording.
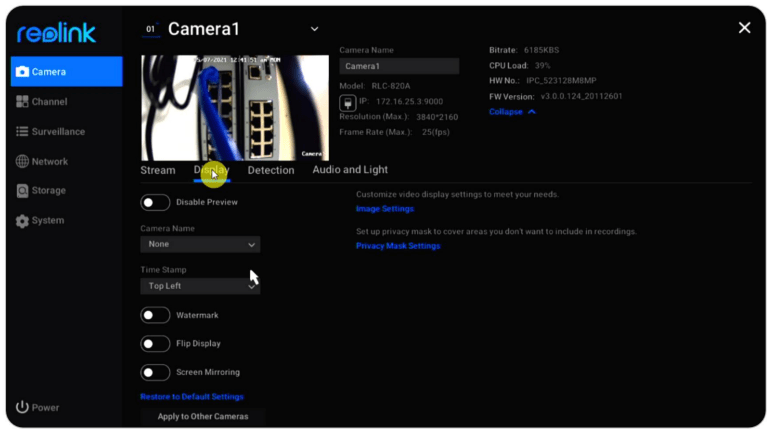
Display
Go to Settings > Camera > Display, here you can set up the Camera Name, TimeStamp, Watermark, Flip and Mirror etc.
Disable Preview: Turn on or off live view of the camera.
Camera Name: Set a name for the camera.
Time Stamp: Set the position of the Time Stamp, you can choose from top left, Top Right, Bottom Left, and Bottom Right.
Watermark: Turn on or off the Reolink Logo on the live view.
Flip Display: Turn the camera’s image upside down when enable this option.
Screen Mirroring: Mirror the camera’s image when enable this option.
Image Settings: Click Image Settings, here you can adjust the Brightness, Contrast, Saturation and Sharpness of the camera’s image.
Click Advanced, you can set up image settings below
Anti-Flicker: Choose from Off, 50Hz, 60Hz, or Other.
Day/Night: Set the Day/Night mode of the camera from Auto, Color, Black &White, or Off.
Exposure: Set from Auto, Low Noise, Frame Rate or Manual.
Backlight: Set from Off, Backlight Control or Dynamic Range Control.
Usually, it’s suggested to keep these image settings at default.
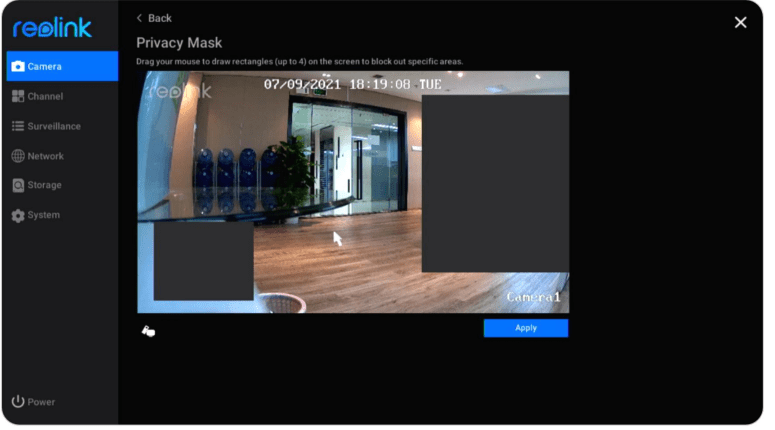
Privacy Mask Settings
You can set the privacy zone to block parts of the live image to protect your privacy. After setup, the privacy zone will be blocked in both live view and recordings. Click Privacy Mask Settings, use your mouse to drag up to 4 zones. Then click Apply to save the change.
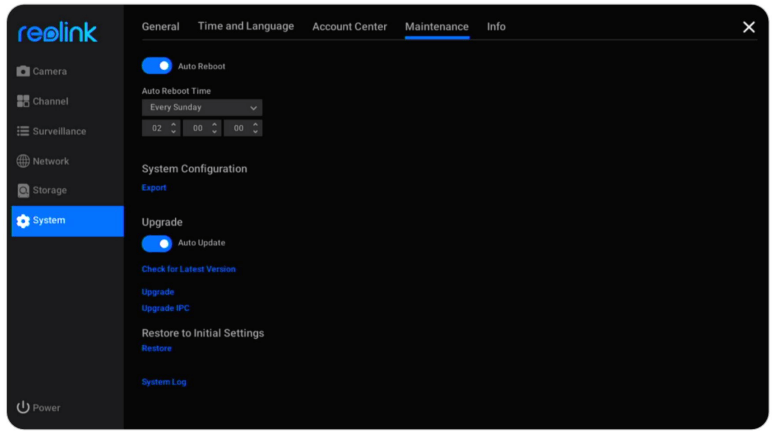
Maintenance
Go to System > Maintenance page, here you can set up auto reboot, upgrade thedevice or restore the system to default.
Click to enable Auto Reboot, you can set the NVR to automatically reboot at a weekly or daily base.
Upgrade the Firmware
Before upgrade, please download the firmware file from Download Center. Unzip it and copy the file to a USB drive, then plug the USB drive to the USB port of the NVR.
To upgrade the firmware for NVR, please click Upgrade. Choose the firmware file to upgrade.
To upgrade the firmware for Camera, please click Upgrade IPC. Click Local Upgrade and choose the firmware file to upgrade.
Attention for firmware upgrade:
If you don't want to restore your camera settings to factory status, please uncheck the "Update Configuration Files" option during the upgrade.
During the upgrading procedure, please do not power off the camera.
Make sure your camera or NVR has the same model and hardware version that matches the new firmware
FAQs and Troubleshooting
FAQs
1. How many cameras can I connect to this NVR?
A: For RLN8-410, you can connect up to 8 cameras. For RLN16-410, you can connect up to 16 cameras.
2. What to do if I lost login password of the NVR?
A: Login password of NVR can be restored by pressing a hard reset button or restored via Reolink software. If the camera isn’t accessible by software, you can also use security password on the monitor to retrieve the password.
3. Can I connect the NVR to two monitors at the same time?
A: The NVR can plug into up to two monitors via the HDMI and VGA ports. It will display all the cameras connected to the NVR on each monitor simultaneously.
4. How to connect the NVR to a router?
A: The NVR can be connected to a router only via the Ethernet cable.
5. What's the max Ethernet cable length between the camera and NVR?
A: The Ethernet cables for all PoE ports of the NVR is up to 270 feet for Cat5. If you use Cat6 or upper, the Ethernet cables can be up to 330 feet. Note, NVR can use CAT5, CAT6 or CAT7 with 8 PIN Ethernet cable.
6. Which camera models are supported to work with the NVR?
A: Except Reolink battery-powered cameras, all other cameras can work withtheReolink PoE NVR. Note to use the cameras with same or lower resolution as theNVR itself.
7. Can this NVR work with Smart Home?
A: The NVR system or camera connected to the NVR directly doesn't support working with Smart Home.
8. Can I use the camera without directly connecting to the NVR?
A: Yes, Reolink cameras can be connected to a router or PoE switch that is as the same local network as the NVR, and you can still add the cameras to NVR to use.
9. Can I connect a Wi-Fi camera to the PoE NVR?
A: Yes, connect the Wi-Fi camera to the same router as the PoE NVR, then the camera can be added to the NVR.
10. Can I use the NVR system without internet access?
A: Yes, the NVR can be used locally with the monitor. Only that the functions that require internet network access won’t work anymore.
Troubleshooting
1. Camera shows video loss/connection failed on the NVR monitor.
The camera is connected to the NVR, but on the monitor screen the camera doesn’t display the live video but shows as video loss or connection failed. Please check troubleshooting steps below to fix the issue.
Cause 1. Incorrect camera password
Solution:
Log into the NVR and go to Menu -> IP Channel or Channel Management to check the Status of the channel with Video Loss. For older UI, If it shows Invalid PWD, please drag the bar in the bottom to the right to enter the correct password of your camera, then click Apply to save the change. For new UI, please click Modify to directly enter the correct password of the camera. In the case you forgot the camera’s password, please directly press the reset button on the camera to hard reset it.
Cause 2. The camera is not properly connected to the NVR
Solution:
(1) Please check whether the network cable is plugged into the RJ45 port tightly.
(2) If the connection is tightened, please observe the port LED lights. When the connection is normal, there must be flashing yellow light and solid green light.
If the port LED lights don't turn on, please change another working network cable and another working PoE port to connect the camera to the NVR, then check whether the port LED lights will
If the green light turns on but the yellow light doesn't flash, please scan the IP channel again to check whether there is a camera scanned but failed to connect to NVR. If there is no scanned camera, please check whether the camera can work again.
Cause 3. The camera is not powered by the NVR.
Solution:
Please check the solution for “Camera cannot be powered properly by the NVR”.
Cause 4. The camera is not assigned the Channel.
Solution:
This is mainly for PoE NVR with older UI. Please select a unique channel number for the camera, and then click Apply. If all channels are taken, please change the offline camera’s channel to None then assign that channel to the camera.
Cause 5. The NVR itself isn’t working properly.
Solution:
If the camera is powered on and has connected to NVR properly but still cannot show live video, please restore the NVR to default to check again.
2. Camera cannot be powered properly by the NVR
For PoE cameras that are connected directly to the PoE NVR but cannot be powered on or the camera is dead, please check the troubleshooting steps below.
(1) Cover the camera lens to check if the IR lights of the camera turn red in dark.
(2) When connecting the camera to NVR, please check if the LEDs on the PoE port are on.
(3) Please change another Ethernet cable and PoE port on NVR.
(4) If the camera still won’t power on, please reset the camera by pressing the reset button on the camera.
(5) Use a 12V DC power adapter to power the camera instead.
3. Cannot access the NVR remotely
Please check the troubleshooting steps below for the issue that NVR cannot be accessed remotely.
Firstly, please ensure the NVR is accessible from the same network. Then check the listed steps below
(1) Please ensure the NVR’s UID is enabled. You can check it on the NVR monitor, go to System > Info page, here enable the option "Allow other Reolink software to access current device via UID".
(2) Please add the NVR to Reolink App or Reolink Client software by its UID.
(3) Check Sync NTP to see if it’s successful. On the NVR monitor, go to Network>Advanced, then click NTP Settings. Click Synchronize to sync the NVR data and time to the NTP server immediately. If it’s unsuccessful, that means the NVR isn’t connected to the internet.
(4) Check the router firewall settings. Ensure it has allowed the NVR to connect internet, and please make sure that the UDP port is enabled on your router.
(5) Ensure the phone or computer itself has internet access, and has allowedtheReolink App or Reolink Client software to access internet.
(6) Please check there’s no firewall, proxy or VPN on the phone and computer that might block the NVR to connect.
(7) Ensure the network connection has enough bandwidth to stream the video, you can switch to fluent mode to help connect the live video
4. NVR has no display on the monitor screen.
When the NVR is connected to a monitor, but it has no display, please check the troubleshooting tips below.
Cause 1. The video output resolution of the NVR is not supported by the monitor.
Solution:
Ensure the lowest resolution of the TV/monitor is no less than 720p, or it won't be able to display any video from the NVR.
Power on the NVR to see whether the Reolink logo will be displayed on the screen.
Try to log into the NVR locally on Reolink Client and change the output resolution of the NVR and try again.
Cause 2. The system program is frozen when booting up
Solution:
If the NVR was once working properly, power on the NVR to see if the Reolink log will be displayed on the screen but then turn to black.
Contact the support team with your device model for a repair tool to fix the issue.
Cause 3. HDMI/VGA cable or the TV/monitor is defective
Solution:
Check whether the cable is defective by using it to connect other devices to see if it works.
If it doesn't work, please use another HDMI/VGA cable that is shorter than 15 and try again.
Try with another monitor.
Cause 4. HDMI/VGA port on the NVR is defective.
Solution:
Ensure the cables and TV/monitor you used are working properly.
Try to log in to the NVR via Reolink App or Reolink Client on the same network to see if it will work.
Cause 5. NVR cannot be powered on.
Solution:
Ensure the power outlet is working. If not, please plug the NVR power adapter into another outlet.
Check whether the LED on the DC power adapter is on.
Check the LEDs status on the front panel of the NVR.
If the problem still cannot be solved, please contact the support team with the test results.
5. Forget the password to login the NVR.
If you still have a phone or computer that can access the NVR, please directly restore the NVR via the software. After restoration, you can create a new password.
For Reolink App, go to NVR Settings > Advanced page, click Restore.
For Reolink Client, go to NVR Settings > System > Maintenance, click Restore.
If currently no device has access to the NVR, you can reset it via the monitor with super Password (for old UI) or security question (for new UI). Or directly press the reset button within the NVR
For using super password, please refer to: Use Super Password to Reset the Admin Password on Reolink NVR.
For using security question, please click Forget Password on the monitor screen, enter the answer for your security question to reset the NVR password.
For resetting the NVR, please open the box of the NVR. Keep the monitor screen on the live video page, then press and hold the reset button for 5-10 seconds.
6. NVR cannot detect the HDD.
For the issue of NVR cannot properly detect or recognize the HDD, please check the troubleshooting steps below.
Cause 1. The compatibility issue between HDD and NVR.
Solution:
If you added an HDD yourself, please check the size and type of the HDDreferringto the HDD compatibility list. For the supported HDD size, please check it via the hardware version of the NVR.
Please note, the HDD designed for PC can't work with the NVR.
Cause 2. The firmware version of the NVR is outdated.
Solution:
Please check firmware version of the NVR on the Info page, and download the latest firmware from Download Center to upgrade it.
Cause 3. The connection of the HDD is lost.
Solution:
Unplug the HDD then re-plug it.
Cause 4. The format of the HDD is wrong
Solution:
Please format/init the HDD on the NVR monitor to try again.
Cause 5. NVR software issue.
Solution:
Please restore the NVR to default.
Cause 6. Defective HDD.
Solution:
Change another HDD to test whether it's the problem of a bad HDD.
7. NVR reboots itself automatically
NVR reboots itself automatically may behave with any of the phenomena below:
①NVR reboots constantly.
②NVR reboots randomly (for example 2-3 times per day).
③Random gaps in the playback timeline. (All channels lost the recordings at the same time, and the gap is greater than 30s.)
④A lot of "startup" on the NVR's log page.
Cause 1. UPS issue.
Solution:
If you use the UPS to power the NVR on, please plug the NVR directly to a wall socket and have it run one or two day(s) then check if the NVR reboots. If the NVR doesn't reboot, the issue should be on the UPS. Please make sure the UPS's wattage is higher than the NVR adapter's wattage. If the NVR still reboots, please refer to the following troubleshooting tips.
Cause 2. The HDD issue.
Solution:
Please unplug the HDD and have the NVR run one or two day(s), then check if the NVR reboots.
Cause 3. The NVR and the cameras are both being grounded.
Solution:
Please unplug all the cameras from the NVR and have the NVR run on its own for one or two day(s) and check if it still reboots. Please disable auto-reboot before you run the test.
If the NVR doesn't reboot, the issue may be caused by both the NVR and the cameras being grounded. Then please unground either the NVR or the cameras to fix the issue.
Note: The NVR carries out the lightning protection and grounding treatment on its own and if users also ground the cameras, it will cause a certain potential difference. And when the potential difference is higher than 64V, it will trigger the NVR'S protection mechanism and the NVR will power off itself.
A: Unground the cameras to fix the issue
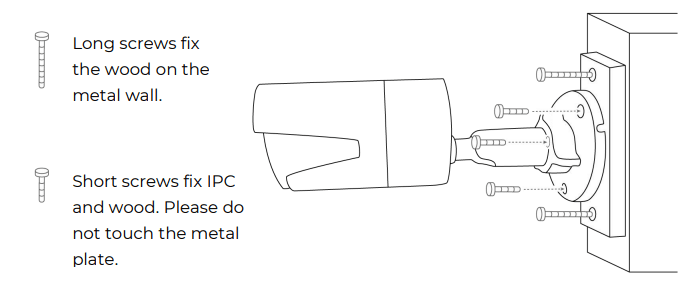
In this case, please do not ground the cameras additionally. Check if you connect the cameras to the ground wire of your house. If yes, please disconnect the cameras from the ground wire. And please do not install the cameras on the metal wall or ceiling etc. If you have to install the camera on a metal wall or ceiling in your situation, you may add an insulator between the camera and the wall/ceiling to have it ungrounded. Please refer to the picture below and install the insulator
B: Unground the NVR to fix the issue
Please unground the NVR and the monitor connected to the NVR.
Note: In this case, please don't put either the NVR or the monitor on the metal plate/shelf.
(1) You may cut off the grounded pin on the plug on both the NVR and the monitor to have it ungrounded.
(2) You may use a 3 pin-to-2 pin converter on both the NVR and the monitor to have it ungrounded. And you may use the converters below to have the NVR not grounded. Please pay attention to the version of the converter and make sure to order the correct version. For example, If the NVR is installed in the US, please order the US version of the converter.
converter 1
converter 2
converter 3
If you use converter 2, please do not have the third pin grounded.
Cause 4. Insufficient power supply
If the NVR doesn't reboot when fewer cameras are plugged, the issue may be caused by the two reasons below.
Reason 1: If you unplug one or two certain camera(s) and the NVR won't reboot anymore, the issue is probably caused by the NVR and the cameras both being grounded. Please refer to Cause 3.
Reason 2: If you unplug one or two camera(s), the NVR won't reboot anymore. Inthis way, the issue is probably caused by the insufficient power supply. Please refer to how many cameras can I add to the NVR.
8. NVR cannot be accessed by Reolink software locally
For computer or phone that’s on the same network cannot access the NVR, please check the troubleshooting steps below
Cause 1. The NVR isn’t connected to a router.
Solution:
Please power on the NVR, and connect it to a router by the Ethernet cable.
Cause 2. The NVR failed to obtain IP address information from a router.
Solution:
Please make sure the DHCP server on the router is enabled, so it can assign an IP to the NVR.
Go to NVR monitor, check Network > Network Status, here you can view the IP address, Default Gateway and DNS of the NVR. Ensure they all have numbers.
Cause 3. The LAN port of the NVR is defective.
Solution:
Please check if there’s a status LED on the LAN port of the NVR.
Use another Ethernet cable to connect the NVR and router.
Cause 4. The NVR and computer/phone are not on the same network.
Solution:
Please ensure you don’t have several subnet masks in the network, and connect the NVR and computer/phone to the same router directly
9. NVR cannot be powered on anymore.
If the NVR itself cannot be powered on, please check the troubleshooting steps below.
Cause 1. The power adapter issues.
Solution:
Check the status LED on the power adapter of the NVR. If the LED isn't on, please plug the power adapter into another socket as well as change another working power adapter (48V) for a try. If the LED is on, please check the HDD issue below
Cause 2. The HDD issues.
Solution:
Please unplug the HDD and check if the NVR will power on without HDD.
Cause 3. The voltage is not sufficient.
Solution:
Unplug all cameras. If the NVR power LED is on, please re-plug the camera in sequence to see how many cameras the NVR can provide power normally before the issue started.
10. Camera randomly disconnects from the NVR.
If you found that the cameras disconnect and show video loss/connection failed randomly on your NVR monitor, or the camera loses recordings randomly, here are some possible causes and solutions for your reference.
Cause 1. Poor connection between camera and NVR.
Solution:
(1) If you connect your camera to the NVR via the Ethernet cable directly, please make sure that the length between them is less than 260 feet.
(2) Please change with another short cable and plug it into another PoE port. If possible, please connect only one camera to the NVR to test whether the issue still exists.
(3) Please lower the bitrate of the camera and check if the issue can be fixed.
If you connect the camera to the router by PoE switch/ injector and add your camera to the NVR, the issue may cause by the poor network of the router.
(1) Please reboot the router and camera to try again.
(2) If you have connected several devices to the router, please only connect the camera to the router to test the issue.
(3) Please also lower the bitrate of the camera and check if the issue can be fixed.
(4) Please connect the camera directly to the PoE port of the NVR to check whether the issue still exists.
Cause 2. Software issue.
Solution:
Please check the firmware version of the camera and NVR, keep both of them updated.
Cause 3. Incorrect power supply for the NVR.
Solution:
(1) It might be the problem of the NVR’s power adapter. Please try again with a different power outlet and power adapter. Note: For the 8 channel PoE NVR the power adapter is 48V 1.87A. And for the 16 channel PoENVR, it’s 48V 2.5A.
(2) If you have a 12V DC adapter on hand, you may use the adapter to power the camera and connect the camera directly to the router. Please check again whether the camera displays video loss on your NVR
#1 What is the length of the cables? Can I place a camera as much as 100 feet from the recording unit?
The cables in the kit are 59ft. All of the cameras can work with 330ft CAT6 cable in the system.
#2 I do not wish to attach to internet at all, ever. Does it still operate and can I access data by downloading to a thumb drive?
Yes. The system has HDMI and VGA output, coming with HDMI cable. You may download the recording files to a thumb drive in MP4 file It can playback on any video player. Or you may also playback it directly on the NVR from the HDMI or VGA monitor.
#3 Can i connect the four cameras to a poe switch in a remote area then run one ethernet cable from the switch to one of the 8 camera ports on the nvr?
Sorry, this way can not work. However, you may connect your PoE switch and NVR LAN PORT to the same router by one single network cable.Then, connect all the 4 cameras to the PoE switch to assign IP to the NVR system.
#4 How can i review the footage for playback? the nvr is going to be away from the computer, is there a way to link them up through wifi?
There are 2 ways to review the footage for playback: 1. connect the NVR to a monitor and playback in SEARCH->PLAYBACK menu. 2. connect the NVR to a router and remote access it via reolink client and playback in PLAYBACK-->REMOTE PLAYBACK.