Electric Cooktop Manual
Cooktop Features
READ THESE INSTRUCTIONS CAREFULLY BEFORE USING THE COOKTOP
CAUTION The Cooking Zones may appear to be cool while turned ON and after they have been turned OFF. The glass surface may be HOT form residual heat transferred from the cookware and burns may occur.
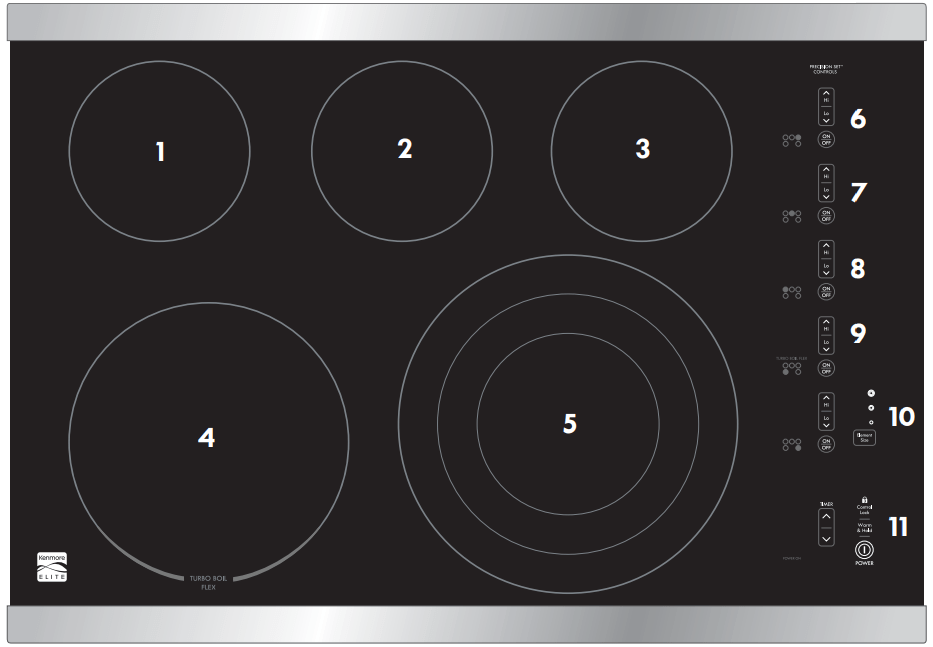

1. Left Rear Single Radiant Element
2. Center Rear Single Radiant Element
3. Right Rear Single Radiant Element
4. Left Front Turbo Boil Flex Radiant Element
5. Right Front Triple radiant Element
6. Right Rear Single Element Control Pads
7. Center Rear Single Element Control Pads
8. Left Rear Single Element Control Pads
9. Left Front Turbo Boil Flex Control Pads
10. Right Front Triple Element Control Pads
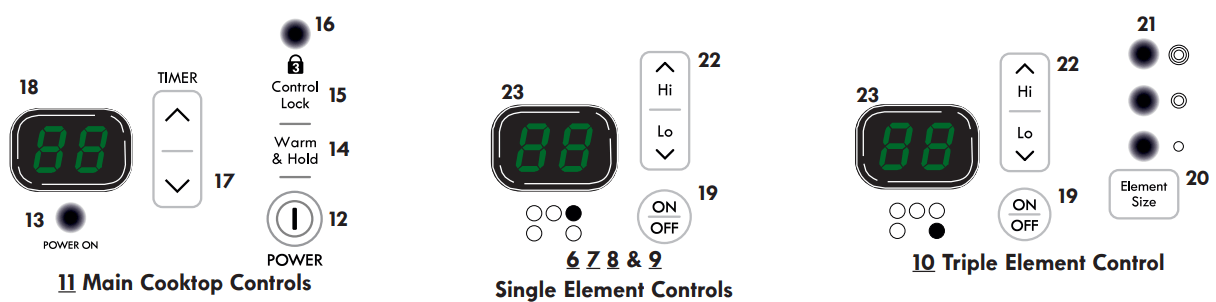
11. Main Cooktop Controls
12. Cooktop Power Key Pad
13. Cooktop Power Indicator Light |
14. Warm & Hold Setting Key Pad
15. Controls Lock Key Pad
16. Controls Lockout Indicator Light
17. Minute Timer Setting Key Pads
18. Minute Timer Display (displays up
to 99 min.)
19. Element On/Off Key Pad
20. Element Size Key Pad
(Triple element only)
21. Element Size Indicator Light
(Triple elements only)
22. Increase and Decrease Key pads
(for each element)
23. Element Power Level Display
(for each element) |
Setting Surface Controls
General Cooktop Information About the Ceramic Glass Cooktop
The ceramic cooktop has radiant surface elements located below the surface of the glass. The design of the ceramic cooktop outlines the area of the surface element underneath. Make sure the diameter of the pan matches the diameter of the element outline on the cooktop.
Heat is transferred up through the surface of the cooktop to the cookware. Only flat-bottom cookware should be used. The type and size of cookware, the number of surface elements in use and their settings, are all factors that will aff ect the amount of heat that will spread to areas beyond the surface elements. The areas surrounding the elements may become hot enough to cause burns.
About the Radiant Surface Elements
The element temperature rises gradually and evenly. As the temperature rises, the element will glow red. To maintain the selected setting, the element will cycle on and off . The heating element retains enough heat to provide a uniform and consistent heat during the off cycle. For energy efficient cooking, turn off the element several minutes before cooking is complete. This will allow residual heat to complete the cooking process.
Locations of the Radiant Surface Elements and
Controls
Your cooktop is equipped with radiant surface elements with diff erent wattage ratings. The ability to heat food quicker and in larger volumes increases as the element wattage increases.
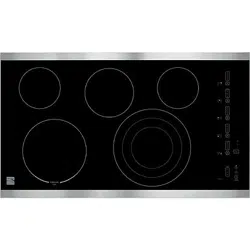
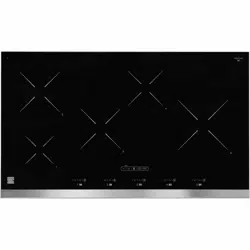
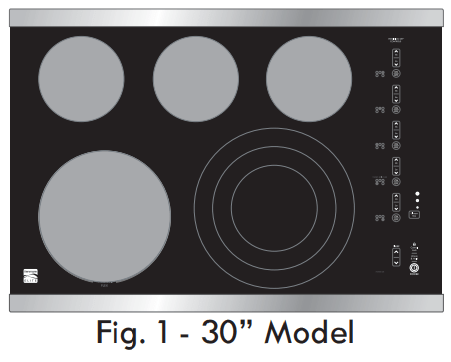
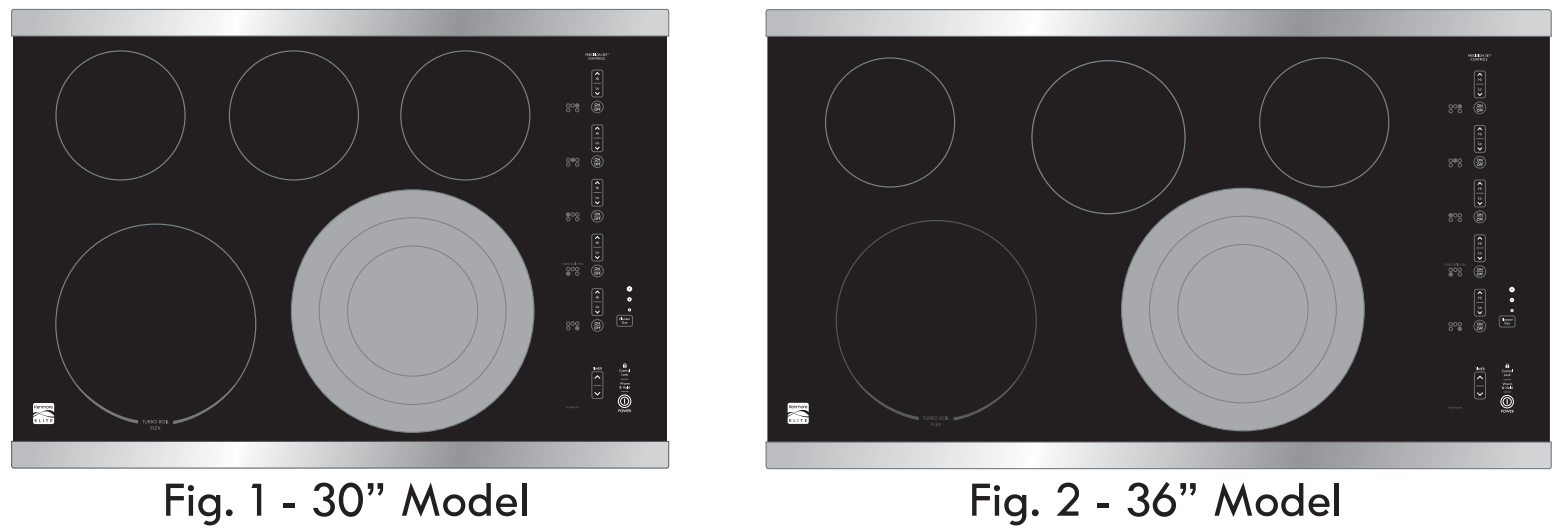
The radiant surface elements are located on the 30" cooktop as follows (See Fig. 1):
- Three small 6 inch radiant elements located at the right, center and left rear positions.
- One Triple 12 inch radiant element located at the right front position.
- One large 9 inch Turbo Boil Flex radiant element located at the left front position.
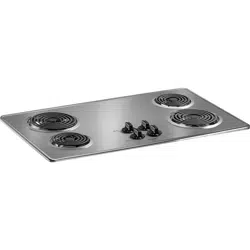
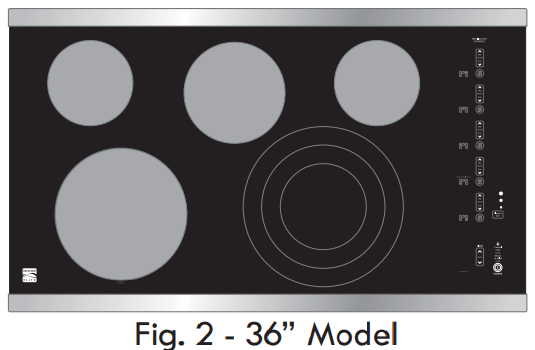
The radiant surface elements are located on the 36" cooktop as follows (See Fig. 2):
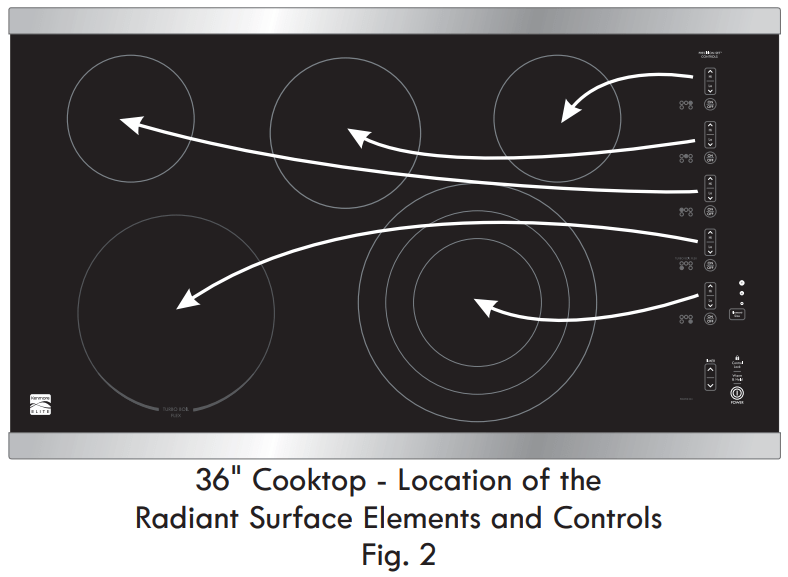
- Two small 6 inch radiant elements located at the right and left rear positions.
- One 7 inch radiant element located at the center rear positions.
- One large 9 inch Turbo Boil Flex radiant element located at the left front position.
- One Triple 12 inch radiant element located at the right front position.
NOTE: Please read detailed instructions for ceramic glass cooktop cleaning in the General Care & Cleaning section and Before You Call checklist section of this Use and Care Guide.
NOTE: Radiant elements have a limiter that allows the element to cycle on and off to maintain consistent heat even at the HI setting. This helps to prevent damage to the ceramic cooktop. Cycling is normal and will occur even more often if the cookware is too small for the radiant element or if the cookware bottom is not flat
For information concerning cookware, refer to Use Proper Cookware on page 6 of this Use and Care Guide)
NOTE: (White glass cooktops only). Due to the high intensity of heat generated by the surface elements, the glass surface will turn green when the element is turned off . This phenomenon is normal and the glass will come back to its original white color after it has completely cooled down.
Using the Touch Control
Be sure that your finger is placed in the center of the touch pad. If the finger is not placed on the center of a pad, the cooktop may not respond to the selection made.
Lightly contact the pad with the flat part of your entire fingertip. Do not just use the narrow end of your fingertip.
LED Messages or Light Indicators Displayed by Main Control
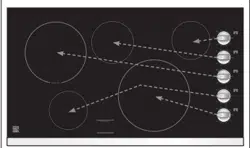
CONTROLS LOCK- This feature allows the cooktop to be locked when no cooking zones are active. If the cooktop is in use, it will not be possible to lock the controls. Touch and hold the LOCK key pad for few seconds. A beep will sound and the Lock indicator light will glow (Fig. 2). Once locked no Cooking Zones will activate. To turn the Controls Lock OFF, touch and hold the LOCK key pad for few seconds. A beep will sound, the Lock indicator light will turn OFF (Fig. 1) and the cooktop may be used normally.
fingertip
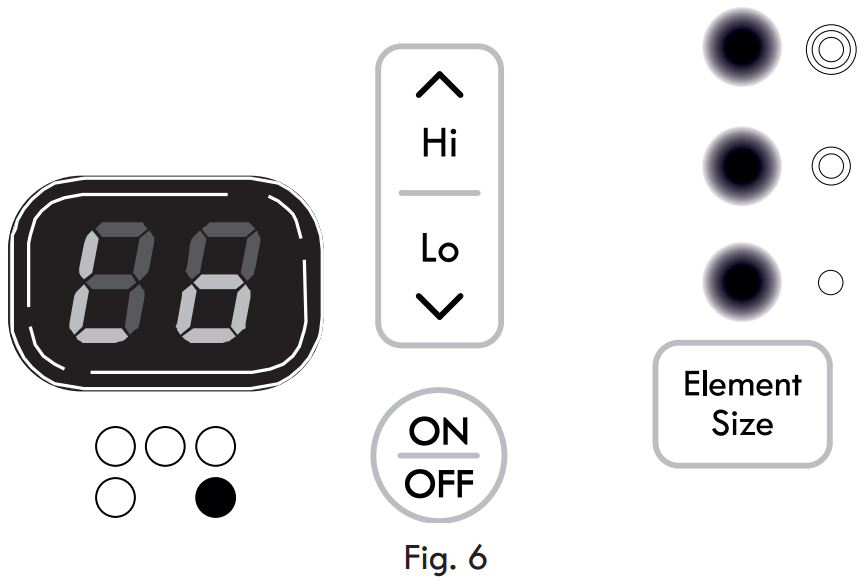
COOKTOP POWER - The Cooktop POWER key pad activates the entire Cooktop. To power the cooktop, touch and hold the POWER key pad. A beep will sound and the Power LED will glow (See Fig. 4). The cooktop will be in a ready mode. If no other key pads are touched the
Cooktop Main POWER will turn OFF automatically. To turn the Main Power OFF, touch and hold the Main POWER key pad. A beep will sound and the Power Indicator Light will turn OFF (See Fig. 3).

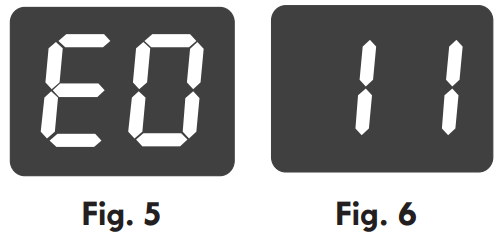
ERROR CODES E0 XX- The element power level displays can show error codes. When this happen, two displays are used to show the error code in format "E0" "XX" where XX indicates the error code (Figs. 5 & 6). If this happen, please refer to section "Before you call" in this manual.
LED Messages or Light Indicators Displayed by Cooking Element Controls
COOKING ZONE ON/OFF PAD- Each Cooking Element has separate ON/OFF key pads. Once the Main Power key pad has been touched to activate the cooktop, touch the corresponding Cooking Element ON/OFF key pad once to active the Cooking Zone needed. "- -" will appear in the LED display. If the corresponding  (increase) /
  (decrease) key pad is not touched, the request to turn the Cooking Element ON will cancel and the Cooktop Main Power will turn OFF. To set a Cooking Element power level touch the corresponding Cooking Element (increase) or (decrease) key pad once. To turn OFF a Cooking Element, touch the Cooking Element ON/OFF key pad once. The Cooking Element Indicator Light will turn OFF.
The Electronic Surface Element Control (ESEC)
The Electronic Surface Element Control (ESEC) feature provides a digital display of the radiant surface elements on the cooktop. The ESEC display in combination with the touch pads is designed to replace conventional control knobs.
The available ESEC Window Display Settings
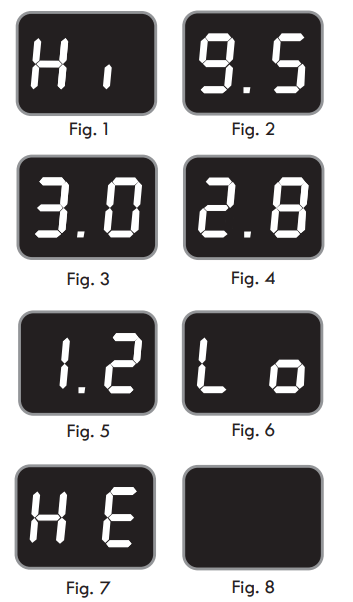
The ESEC control will display heat levels ranging from Hi (Fig. 1) to Lo (Fig. 6) and
OFF (Fig. 8). The settings between 9.5(Fig. 2) and 3.0 (Fig. 3) decrease or increase in increments of .5. The settings between 3.0 (Figure 3) and 1.2 (Fig. 5) are Simmer settings which decrease or increase in increments of .2 to Lo (Fig. 6, lowest Simmer setting) for more precise settings at lower heat levels. Use the Recommended Surface Setting Chart to determine the correct setting for the kind of food you are preparing.
Hot Surface Indicators
After using any of the radiant element positions the cooktop will become very hot.
After turning any of these elements OFF, the cooktop will remain HOT for some time.
HE" (hot element) will appear in the element power level display while the element is still hot. The HE indicator (See Fig. 7) will remain in the display until the element has cooled sufficiently.
Recommended Surface Cooking Settings
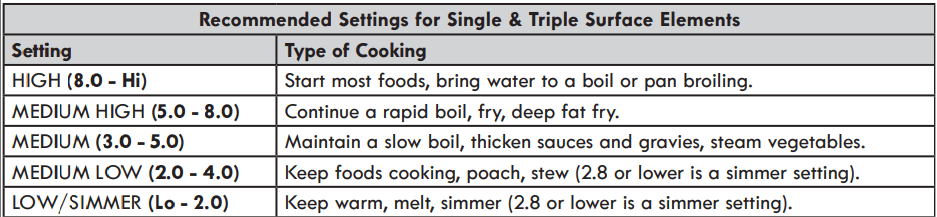
Note: The size and type of cookware used will influence the setting needed for best cooking results. The Simmer settings are used to simmer and keep larger quantities of foods warm such as stews and soups. The lower Simmer settings are ideal for delicate foods and melting chocolate or butter.
Operating Single Radiant Surface Elements
The cooktop has 4 SINGLE radiant surface elements: the RIGHT REAR, LEFT REAR, CENTER REAR and the LEFT FRONT positions (Fig. 1 & 2).
To Operate the Single Radiant Surface Elements:
1. Place correctly sized cookware on the radiant surface element.
2. Touch and hold the  key pad until a beep sounds. The power indicator light will turn ON.
Note: If no key pad is touched within 10 seconds the request to Power ON the cooktop will clear.
3. Touch the  pad for the desired element position until a beep is heard. The display will show "--". Note: If no further pads are touched within 10 seconds the request to power the element ON will clear.
4.Touch pad once to turn ON the power level to HI (See Fig. 3). Touch pad once for Lo.

5. Each touch of the or pad will decrease or increase the power level from 9.5 through 3.0 by .5 increments. Simmer power levels between 3.0 and 1.2 will decrease or increase by .2 increments. Lo is the lowest power level available. Note:
The power level may be adjusted at any time while the element is ON.
6. Start most cooking operations on a higher setting and then turn to a lower setting to finish cooking. Each surface element provides a constant amount of heat at each setting. A glowing red surface heating area extending beyond the bottom edge of the cookware indicates the cookware is too small for the surface heating area.
7. When cooking has been completed touch the pad once to turn the element QOFF and if no other surface element is used touch the key pad to turn off the cooktop.
Note: The HE (hot element) message will remain ON if the cooktop is still hot and will remain ON until the heating surface area has cooled sufficiently.
CAUTION
- Radiant surface elements may appear to have cooled after they have been turned off . The glass surface may still be hot and burns may occur if the glass surface is touched before it has cooled sufficiently.
- Do not place plastic items such as salt and pepper shakers, spoon holders or plastic wrappings on top of the range when it is in use. These items could melt or ignite. Potholders, towels or wooden spoons could catch fire if placed too close to the surface elements.
- Do not allow aluminum foil, or ANY material that can melt to make contact with the ceramic glass cooktop. If these items melt on the cooktop they will damage the ceramic cooktop
Operating the Triple Surface Element
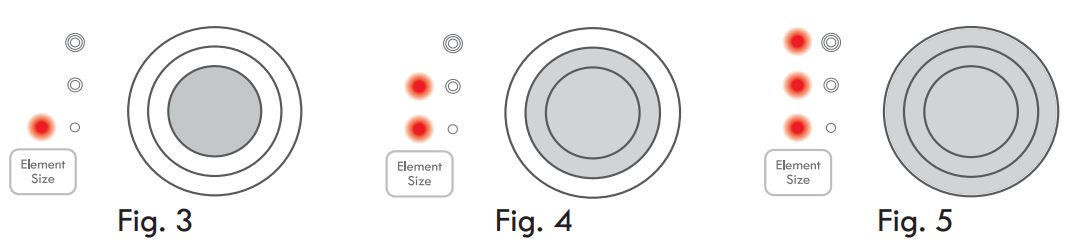
The cooktop is equipped with a Triple radiant surface element located at the right front cooktop position (Figures 1 & 2). Indicator lights on the control panel at that position are used to indicate what portions of the Triple radiant element will heat.
The  light indicates that only the inner element will heat. The
  light indicates that both inner and double elements will heat together. The light indicates that all 3 portions of the element will heat. You may switch between all of these diff erent settings at any time during cooking.
To Operate the Triple Surface Element:
1. Place correctly sized cookware on the radiant surface element.
2. Touch and hold the key pad until a beep sounds. The power indicator light will turn ON. Note: If no key pad is touched within 10 seconds the request to Power ON the cooktop will clear.
3. Touch the pad for the Triple element position until a beep is heard. The display will show "- -". Note: If no further pads are touched within 10 seconds the request to power the element ON will clear.
4. Select the  (See Fig. 3),
  (See Fig. 4) or
  3 elements (See Fig. 5) to heat by pressing the
  pad once, twice or three times (Figures 5 & 6 show indicator lights with ALL 3 elements selected).
5. Touch HI pad once to turn ON the power level to HI. Touch Lo pad once for Lo (See Fig. 6).
6. Each touch of the or Lo pad will decrease or increase the power level from 9.5 through 3.0 by .5 increments. Simmer power levels between 3.0 and 1.2 will decrease or increase by .2 increments. Lo is the lowest power level available.
Note: The power level may be adjusted at any time while the element is ON.
7. Start most cooking operations on a higher setting and then turn to a lower setting to finish cooking. Each surface element provides a constant amount of heat at each setting. A glowing red surface heating area extending beyond the bottom edge of the cookware indicates the cookware is too small for the surface heating area.
8. When cooking has been completed touch the pad once to turn the element OFF and if no other surface element is used touch the key pad to turn off the cooktop.
Note: The HE (hot element) message will remain ON if the cooktop is still hot and will remain ON until the heating surface area has cooled sufficiently.
CAUTION
- Radiant surface elements may appear to have cooled after they have been turned off . The glass surface may still be hot and burns may occur if the glass surface is touched before it has cooled sufficiently.
- Do not place plastic items such as salt and pepper shakers, spoon holders or plastic wrappings on top of the range when it is in use. These items could melt or ignite. Potholders, towels or wooden spoons could catch fire if placed too close to the surface elements.
- Do not allow aluminum foil, or ANY material that can melt to make contact with the ceramic glass cooktop. If these items melt on the cooktop they will damage the ceramic cooktop.
Warm & Hold Feature

The Warm & Hold feature may be used with any of the Cooking Elements.
To Turn the Warm & Hold Feature ON:
- To select the Warm & Hold feature for any Cooking Element touch the key pad for the corresponding Cooking Element.
- Touch the
 key pad located in the main control area. The associated display will show LH (low heat) indicating that the Cooking Element is properly set to Warm & Hold. If no other key pads are pressed the control will activate the desired Cooking Element at the Warm & Hold setting.
Locking the controls
The Cooktop Controls can be locked in order to prevent the cooktop from accidentally being turned ON. This feature can be activated only when no cooking zone is active. If the cooktop is in use, it will not be possible to lock the controls.
To Turn ON the Controls Lock Feature:
Touch and hold the  key pad. After a few seconds a beep will sound. The Lock Indicator Light above the key pad will turn
ON indicating the cooktop is locked. This will keep any Cooking Element or Cooktop functions from being accidentally turned ON.
Note: If the cooktop is in used when the Control Lock Feature is activated, the command will be ignored.
To Turn OFF the Controls Lock Feature:
Touch and hold the key pad. After a few seconds a beep will sound. The Lock Indicator Light above the key pad will turn OFF indicating the cooktop is unlocked. The Cooking Elements or any of the other Cooktop functions may now be used.
Minute Timer
The Minute Timer feature may be useful in the kitchen if a recipe calls for keeping track of time. This feature will keep track of time from 1 to 99 minutes. The Minute Timer Display located to the left of the Timer UP/DOWN arrow key pads will begin to count down minutes once set.
To Set the Minute Timer:
- Touch the
 located above TIMER. Touching and releasing the or
  the key pads will increase or decrease the Minute Timer setting by 1 minute with each key press (up to 99 minutes).
- Once the Minute Timer display shows the desired amount of time, release the UP or DOWN Arrow key pads to allow the minute timer to begin the countdown. Once the Minute Timer reaches 00 the buzzer sounds for 3 seconds each minute indicating that the time is up. To stop the control from beeping, touch the and key pads at the same time.
To Cancel the Minute Timer:
- Touch the and key pads at the same time or touch and hold either the or key pad and scroll to 00.
- If cancelling the Minute Timer using the scrolling method, once the Minute Timer display reaches 00, release the Arrow key pad.
- The set time will disappear from the Minute Timer display indicating that the Minute Timer is no longer active.
General Care & Cleaning
Cleaning Various Parts of Your Cooktop
Before cleaning any part of the cooktop, be sure all controls are turned OFF and the cooktop is COOL. REMOVE SPILLOVERS AND HEAVY SOILING AS SOON AS POSSIBLE. REGULAR CLEANINGS NOW WILL REDUCE THE DIFFICULTY AND EXTENT OF A MAJOR CLEANING LATER.
| Surfaces |
How to Clean |
| Aluminum (Trim Pieces) |
Use hot, soapy water and a cloth or paper towel. Dry with a clean cloth. |
| Painted and Plastic Control Knobs, Body Parts, and Decorative Trim |
For general cleaning, use hot soapy water and a cloth. For more difficult soils and built-up grease, apply a liquid detergent directly onto the soil. Leave on soil for 30 to 60 minutes. Rinse with a damp cloth and dry. DO NOT use abrasive cleaners on any of these materials; they can scratch or dull the finish |
| Stainless Steel, Chrome parts Decorative Trim Cooktop |
Clean with hot, soapy water and a dishcloth. Rinse with clean water and cloth. Do not use cleaners with high concentrations of chlorides or chlorines. Do not use harsh scrubbing cleaners. Only use kitchen cleaners that are especially made for cleaning stainless steel. Always be sure to rinse the cleaners off from the surface as bluish stains may occur during heating that cannot be removed. |
| Ceramic Glass Cooktop |
See Ceramic Glass Cooktop Cleaning & Maintenance in this Use & Care Guide |
Ceramic Glass Cooktop Cleaning & Maintenance
Consistent and proper cleaning is essential to maintaining your Ceramic glass cooktop
Prior to using your cooktop for the first time, apply the recommended CookTop® Cleaning Creme to the ceramic surface (on the web visit www.sears.com for replacement cooktop cleaner, item number 40079). Buff with a non-abrasive cloth or no-scratch cleaning pad. This will make cleaning easier when soiled from cooking. The special cooktop cleaning cream leaves a protective finish on the glass to help prevent scratches and abrasions.
Sliding aluminum or copper clad bottom pans on the cooktop can cause metal markings on the cooktop surface. These marks should be removed immediately after the cooktop has cooled using the cooktop cleaning cream. Metal marks can become permanent if not removed prior to future use.
Cookware (cast iron, metal, ceramic or glass) with rough bottoms can mark or scratch the cooktop surface. Do not slide anything metal or glass across the cooktop. Do not use your cooktop as a cutting board or work surface in the kitchen. Do not cook foods directly on the cooktop surface without a pan. Do not drop heavy or hard objects on the glass cooktop, because they may cause it to crack.
Cleaning Recommendations for the Ceramic Glass Cooktop
CAUTION Before cleaning the cooktop, be sure the controls are turned to OFF and the cooktop is COOL.
WARNING DO NOT use a cooktop cleaner on a hot cooktop. The fumes can be hazardous to your health, and can chemically damage the ceramic glass surface.
For light to moderate soil:
Apply a few drops of CookTop® Cleaning Creme directly to the cooktop. Use a paper towel or use a non-abrasive plastic type no-scratch pad to clean the entire cooktop surface. Make sure the cooktop is cleaned thoroughly, leaving no residue.
For heavy, burned on soil:
Apply a few drops of CookTop® Cleaning Creme directly to the soiled area. Rub the soiled area using a non-abrasive plastic type no-scratch pad, applying pressure as needed. Do not use the pad you use to clean the cooktop for any other purpose.
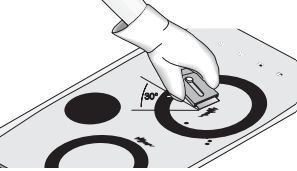
If soils remain, carefully scrape soils with a metal razor blade scraper, holding scraper at a 30 degree angle to the surface. Reapply CookTop® Cleaning Creme and buff surface clean.
IMPORTANT NOTE: Damage to the ceramic glass cooktop may occur if you use an abrasive type scratch pad. Only use cleaning products that have been specifically designed for ceramic glass cooktop.
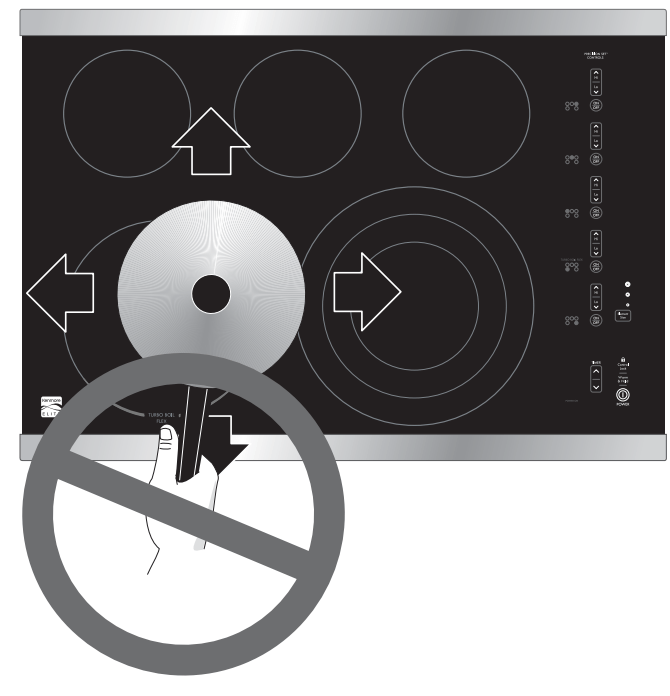
Plastic or foods with a high sugar content: These types of soils need be removed immediately if spilled or melted onto the ceramic cooktop surface. Permanent damage (such as pitting of the cooktop surface) may occur if not removed immediately. After turning the surface elements OFF, use a razor blade scraper or a metal spatula with a mitt and scrape the soil from the hot surface (as illustrated). Allow the cooktop to cool, and use the same method for heavy or burned on soils.
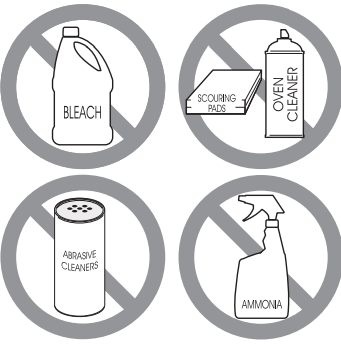
Do not use the following on the ceramic glass cooktop:
- Do not use abrasive cleaners and scouring pads, such as metal and some nylon pads. They may scratch the cooktop, making it more difficult to clean.
- Do not use harsh cleaners, such as chlorine bleach, ammonia or oven cleaners, as they may etch or discolor the cooktop.
- Do not use dirty sponges, cloths or paper towels, as they can leave soil or lint on the cooktop which can burn and cause discoloration.
Special Caution for Aluminum Foil and Aluminum Cooking Utensils
Use of aluminum foil will damage the cooktop. Do not use under any circumstances.
Since the melting point of aluminum is much lower than that of other metals, care must be taken when aluminum pots or pans are used. Pans that boil dry may permanently damage cooktop by breaking, fusing to, or marking it.
Care and Cleaning of Stainless Steel (some models)
Some models are equipped with stainless steel exterior parts. Special care and cleaning are required for maintaining the appearance of stainless parts. Refer to the General Care & Cleaning table for detailed cleaning instructions.
Before You Call
|
OCCURRENCE
|
POSSIBLE CAUSE/SOLUTION
|
|
Entire cooktop does not operate.
|
House fuse has blown or circuit breaker has tripped. Check/reset breaker or replace fuse. If the problem is a circuit overload, have this situation corrected by a qualified electrician.
|
| |
Wiring connection is not complete. Call 1-800-4-MY-HOME® for service (see back cover).
|
| |
Power outage. Check house lights to be sure. Call your local electric company for service. |
|
Error code is shown
|
Mechanical interference with control panel touch pads. Make sure nothing rest on the control panel. Clean cooktop surface is required. Call 1-800-4-MY-HOME® for service (see back cover).
|
|
Surface element does not heat.
|
No power to the appliance. Check steps under "Entire Cooktop Does Not Operate" in this Before You Call checklist.
|
| |
Too low heat setting. Turn control to a slightly higher setting until element comes on.
|
| |
Incorrect control is on. Be sure to use correct control for the element to be used. |
|
Surface element too hot or not hot enough.
|
Incorrect control setting. Raise or lower setting until proper amount of heat is obtained. Dial markings are an indicator of relative heat settings and will vary slightly.
|
| |
Voltage is incorrect. Be sure appliance is properly connected to the specified power source. If you are not sure about this requirement call 1-800-4-MY-HOME® for service (see back cover).
|
| |
Lightweight or warped pans were used. Be sure to use proper cookware. Use only flat bottom, evenly balanced medium or heavyweight cookware. Heavy and medium weight pans heat evenly. Because lightweight pans heat unevenly, foods may burn easily. |
|
Food not heating evenly.
|
Lightweight or warped pans were used. Be sure to use proper cookware. Use only flat bottom, evenly balanced medium or heavyweight cookware. Heavy and medium weight pans heat evenly. Because lightweight pans heat unevenly, foods may burn easily.
|
| |
Incorrect control setting. Raise or lower setting until proper amount of heat is obtained.
|
|
Scratches or abrasions on Ceramic glass cooktop surface.
|
Coarse particles such as salt or sand between cooktop and utensils can cause scratches. Be sure cooktop surface and bottoms of utensils are clean before usage. Small scratches do not affect cooking and will become less visible with time.
|
| |
Cleaning materials not recommended for ceramic-glass cooktop have been used. See Ceramic Glass Cooktop Cleaning & Maintenance in this Use and Care Guide.
|
| |
Cookware with rough bottom has been used. Use smooth, flat-bottomed cookware. |
|
Metal marks on Ceramic glass cooktop surface.
|
Sliding or scraping of metal utensils on cooktop surface. Do not slide metal utensils on cooktop surface. Use a ceramic-glass cooktop cleaning cream to remove the marks. See Ceramic Glass Cooktop Cleaning & Maintenance in this Use and Care Guide.
|
|
Brown streaks and specks on Ceramic glass cooktop surface.
|
Boilovers have cooked onto surface. Use razor blade scraper to remove soil. See Ceramic Glass Cooktop Cleaning & Maintenance in this Use and Care Guide.
|
| |
Cleaning materials not recommended for ceramic-glass cooktop have been used. Use recommended cleaners and cleaning method. See Ceramic Glass Cooktop Cleaning & Maintenance in this Use and Care Guide.
|
|
Areas of discoloration on Ceramic glass cooktop surface.
|
Mineral deposits from water and food. Remove using a ceramic-glass cooktop cleaning creme. To avoid this occurrence use cookware with clean, dry bottoms.
|