ENGLISH FraNçaIS
MFL69282802_08
LRG5115**
OWNER’S MANUAL
GAS RANGE
Read this owner’s manual thoroughly before operating the appliance
and keep it handy for reference at all times.
•
Do not store or use gasoline or other flammable vapors and liquids in the
vicinity of this or any other appliance.
•
WHAT TO DO IF YOU SMELL GAS
- Do not try to light any appliance.
- Do not touch any electrical switch.
- Do not use any phone in your building.
- Immediately call your gas supplier from a neighbor's phone. Follow the
gas supplier's instructions.
- If you cannot reach your gas supplier, call the fire department.
•
Installation and service must be performed by a qualified installer, service
agency, or the gas supplier.
If the information in this manual is not followed exactly, a fire or explosion
may result causing property damage, personal injury or death.
WARNING
www.lg.com
Copyright © 2015 - 2019 LG Electronics Inc. All Rights Reserved.

2
TABLE OF CONTENTS
TABLE OF CONTENTS
3
PRODUCT FEATURES
4
IMPORTANT SAFETY
INSTRUCTIONS
12
PRODUCT OVERVIEW
12 Parts
12 Accessories
13
INSTALLATION
13 Before Installing the Range
14 Installing the Range
16 Providing Adequate Gas Supply
17 Connecting the Range to Gas
18 Electrical Connections
18 Sealing the Openings
19 Assembling the Surface Burners
19 Checking Ignition of the Surface Burners
20 Leveling the Range
20 Engaging the Anti-tip Device
21
OPERATION
21 Gas Surface Burners
22 Burner Locations
22 Setting the Flame Size
23 Using a Wok
24 Using the Griddle
25 The Oven
26 Control Panel Overview
27 Changing Oven Settings
27 Clock
27 Oven Light
27 Minimum & Maximum Default Settings
28 Timer On/Off
28 Settings
-
Setting the Hour Mode
-
Setting Convection Auto Conversion
-
Adjusting the Oven Thermostat
-
Turning the Preheat Alarm Light On/Off
-
Adjusting the Beeper Volume
-
Selecting Fahrenheit or Celsius
29 Lockout
30 Start Time (Delayed Timed Cook)
30 Cook Time (Timed Cook)
31 Recommended Baking and Roasting Guide
32 Bake
33 Convection Bake
34 Cookware for Convection Cooking
34 Convection Roast
35 Broil
37 Pizza
37 Warm
38 Proof
38 Operating the Warming Drawer
40
SMART FEATURES
40 Before Using Tag On
40 Using the Tag On Function
41 Using Tag On with Applications
42
MAINTENANCE
42 Removing and Replacing the Gas Surface
Burners
44 Cleaning the Exterior
45 Door Care Instructions
45 EasyClean
®
48 Self Clean
50 Changing the Oven Light
50 Removing and Replacing the Lift-Off Oven
Doors and Drawer
52
TROUBLESHOOTING
52 FAQs
54 Before Calling for Service
56
SMART DIAGNOSIS™
56 Using Smart Diagnosis™
57
LIMITED WARRANTY
3
PRODUCT FEATURES
ENGLISH
PRODUCT FEATURES
Multiple Gas Burner Sizes
Choose a burner to fit the size of your cookware.
Cooking multiple items at once is possible by using different burners at the
same time.
Safe and Convenient Gas Range
Provides safety and convenience for cooking.
Self Clean & EasyClean
®
Useful for easy cleaning.

4
IMPORTANT SAFETY INSTRUCTIONS
IMPORTANT SAFETY INSTRUCTIONS
Read and follow all instructions when using the range to prevent the risk of fire, electric
shock, personal injury, or damage. This guide does not cover all possible conditions that
may occur. Always contact your service agent or manufacturer about problems that you do
not understand.
Download this owner's manual at: http://www.lg.com
This is the safety alert symbol. This symbol alerts you to potential hazards that
can result in property damage and/or serious bodily harm or death.
All safety messages will follow the safety alert symbol and either the word
WARNING or CAUTION. These words mean:
WARNING
-
Indicates a hazardous situation which, if not avoided, could result
in death or serious injury.
CAUTION
-
Indicates a hazardous situation which, if not avoided, could result
in minor or moderate injury.
ANTI-TIP DEVICE
WARNING
•
ALL RANGES CAN TIP
•
INJURY TO PERSONS COULD RESULT
•
INSTALL ANTI-TIP DEVICES PACKED WITH RANGE
•
SEE INSTALLATION INSTRUCTIONS
•
A child or adult can tip the range and be killed.
•
Install the anti-tip device to the structure and/or the range. Verify the anti-tip device
has been properly installed and engaged by following the guide of the Anti tip bracket
template.
•
Engage the range to the anti-tip device by following the guide of the Anti tip bracket
template. Ensure the anti-tip device is re-engaged when the range is moved by
following the guide of the Anti tip bracket template.
•
Re-engage the anti-tip device if the range is moved. Do not operate the range without
the anti-tip device in place and engaged.
•
See installation instructions for details.
•
Failure to do so can result in death or serious burns to children or adults.
•
To avoid tipping, do not step or sit on the door. Install the anti-tip bracket packed with this
range.
- The range could be tipped and injury might result from spilled hot liquid, food, or the
range itself.
- If the range is pulled away from the wall for cleaning, service, or any other reason,
ensure that the anti-tip device is properly reengaged when the range is pushed back
against the wall.
Anti-tip bracket
Approximately
0.65" (16.5 mm)
Screw must
enter wood or
concrete
Wall plate

5
IMPORTANT SAFETY INSTRUCTIONS
ENGLISH
•
To reduce the risk of the range tipping over, the range must be secured by properly
installing the anti-tip devices.
•
To check that the anti-tip bracket is properly installed: Remove any items on the cooktop.
Grasp the top rear edge of the range back guard and carefully attempt to tilt it forward.
Verify that the anti-tip devices are engaged.
•
Remove the warming or storage drawers and visually inspect that the rear leveling leg is
fully inserted into the anti-tip bracket.
•
Refer to the installation manual for proper anti-tip bracket installation.
IMPORTANT SAFETY NOTICE
Gas appliances can cause minor exposure to four of these substances, namely benzene,
carbon monoxide, formaldehyde and soot, caused primarily by the imperfect combustion
of natural or LP gas. Correctly adjusted burners, indicated by a bluish rather than a yellow
flame, will minimize imperfect combustion. Exposure to these substances can be minimized
by opening windows or using a ventilation fan or hood.
WARNING
•
Never use your range as a space heater to heat or warm the room. Doing so may result
in carbon monoxide poisoning and overheating of the oven.
•
Never wear loose fitting or hanging garments while using the appliance. Be careful
when reaching for items placed in cabinets over the range. Flammable materials could
be ignited if brought in contact with flame or hot oven surfaces and may cause severe
burns.
•
Do not place or use combustible materials such as gasoline or other flammable vapors
and liquids in the vicinity of this or any other appliance.
•
Do not place flammable materials in the oven or near the cooktop.
•
Do not allow cooking grease or other flammable materials in or near the range.
•
Do not use water on grease fires. Never touch a flaming pan. Turn the controls off.
Smother a flaming pan on a surface burner by covering the pan completely with a
well-fitting lid, cookie sheet or flat tray. Use a multi-purpose dry chemical or foam-type
fire extinguisher.
A grease fire can be put out by covering it with baking soda or, if available, by using a
multi-purpose dry chemical or foam-type fire extinguisher.
Flame in the oven or the drawer can be smothered completely by closing the oven door
or drawer and turning the control to off or by using a multi-purpose dry chemical or
foam-type fire extinguisher.
•
Do not use the oven or the drawer for storage.
•
Let the burner grates and other surfaces cool before touching them.
•
Never block the vents (air holes) of the range. They provide the air inlet and outlet
necessary for the range to operate properly with correct combustion. Air openings are
located at the rear of the cooktop, at the top and bottom of the oven door, and at the
bottom of the range.
•
Never obstruct the flow of combustion and ventilation air by blocking the oven vent
or air intakes. Doing so restricts air to the burner and may result in carbon monoxide
poisoning.
6
IMPORTANT SAFETY INSTRUCTIONS
WARNING
•
Never cover any slots, holes or passages in the oven bottom or cover an entire rack
with materials such as aluminum foil. Doing so blocks air flow through the oven and
may cause carbon monoxide poisoning. Aluminum foil linings may also trap heat,
causing a fire hazard.
•
Large scratches or impacts to glass doors can lead to broken or shattered glass.
•
Stepping, leaning or sitting on the doors or drawers of this range can result in serious
injuries and also cause damage to the range. Do not allow children to climb or play
around the range. The weight of a child on an open door may cause the range to tip,
resulting in serious burns or other injury.
•
Leak testing of the appliance must be conducted according to the manufacturer’s
instructions.
•
Gas leaks may occur in the system and result in a serious hazard. Gas leaks may
not be detected by smell alone. Gas suppliers recommend you purchase and install
a UL approved gas detector. Install and use in accordance with the gas detector
manufacturer’s instructions.
•
Do not use commercial oven cleaners on the oven finish or around any part of the
oven. They will damage the finish.
•
To prevent staining or discoloration, clean appliance after each use.
•
Do not attempt to open or close the door or operate the oven until the door is properly
installed.
•
Never place fingers between the hinge and front oven frame. Hinge arms are spring
mounted. If accidentally hit, the hinge will slam shut against the oven frame and injure
your fingers.
CAUTION
•
Items of interest to children should not be placed in cabinets above the range or on
the backsplash of the range - children climbing on the range to reach items could be
seriously injured.
•
Do not leave children alone or unattended where a range is hot or in operation. They
could be seriously burned.
•
Do not let anyone climb, stand or hang on the oven door, warming drawer or cooktop.
They could damage the range or tip it over, causing severe personal injury.
•
Wear gloves when cleaning the range to avoid injury or burns.
•
Do not use the oven for storing food or cookware.
•
To prevent damage to the oven door, do not attempt to open the door when Lock is
displayed.
•
Do not stand or place excessive weight on an open door. This could tip the range,
break the door, or injure the user.
•
Do not use delayed baking for highly perishable foods such as dairy products, pork,
poultry, or seafood.

7
IMPORTANT SAFETY INSTRUCTIONS
ENGLISH
INSTALLATION SAFETY PRECAUTIONS
Have the installer show you the location of the range gas shut-off valve and how to shut it
off if necessary.
WARNING
•
Make sure your range is properly installed and grounded by a qualified installer,
according to the installation instructions. Any adjustment and service should be
performed only by qualified gas range installers or service technicians.
•
Make sure your range is properly adjusted by a qualified service technician or installer
for the type of gas (natural or LP) that is to be used. Your range can be converted for
use with either type of gas. See the installation instructions.
•
These adjustments must be done by a qualified service technician according to the
manufacturer’s instructions and all codes and requirements of the authority having
jurisdiction. Failure to follow these instructions could result in serious injury or property
damage. The qualified agency performing these adjustments assumes responsibility for
the conversion.
•
Disconnect the electrical supply before servicing the appliance.
•
Never use the appliance door as a step stool or seat, as this may result in possible
tipping of the appliance and serious injuries.
•
This product should not be installed below ventilation type hood systems that direct air
in a downward direction.
Doing so may cause ignition and combustion problems with the gas burners resulting in
personal injury and may affect the cooking performance of the unit.
•
Plug your range into a 120-volt grounded outlet only. Do not remove the round
grounding prong from the plug. If in doubt about the grounding of the home electrical
system, it is your personal responsibility and obligation to have an ungrounded outlet
replaced with a properly grounded, three-prong outlet in accordance with the National
Electrical Code. Do not use an extension cord with this range.
•
To prevent fire hazard or electrical shock, do not use an adapter plug, an extension
cord, or remove the grounding prong from the electrical power cord. Failure to follow
this warning can cause serious injury, fire or death.
•
To prevent poor air circulation, place the range out of the kitchen traffic path and out of
drafty locations.
•
Do not attempt to repair or replace any part of your range unless it is specifically
mentioned in this manual. All other services should be referred to a qualified technician.
•
Make sure that all packaging materials are removed from the range before operating it
to prevent fire or smoke damage should the packaging material ignite.
8
IMPORTANT SAFETY INSTRUCTIONS
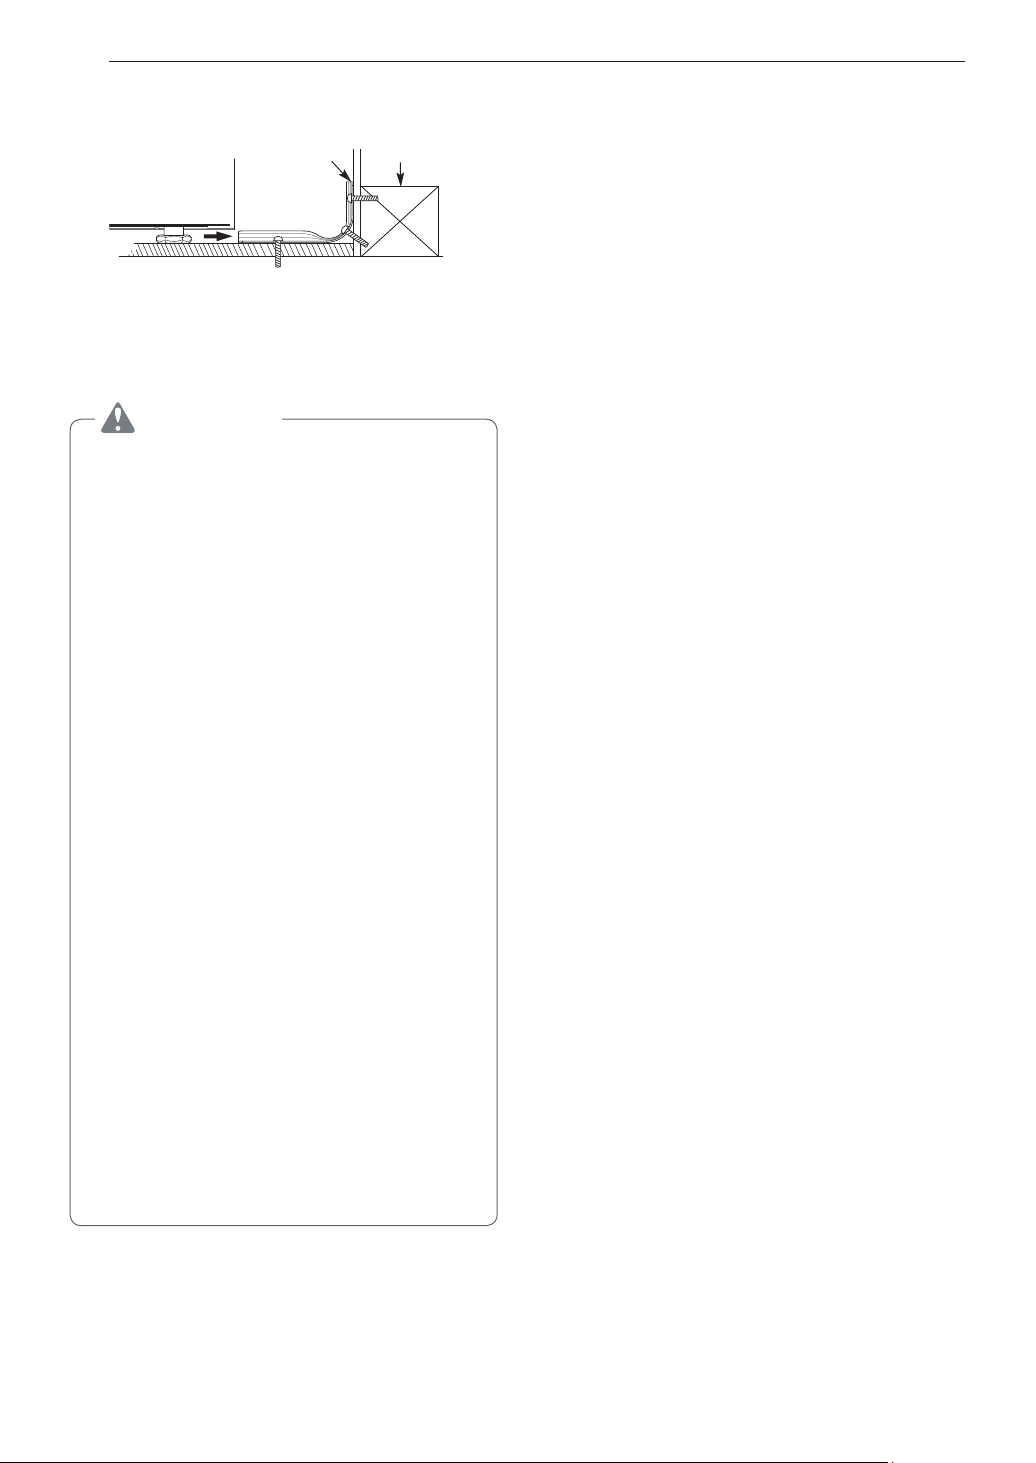
WARNING
•
To shut off the gas supply to the range, close the range gas shutoff valve by turning it
clockwise.
Adapter(
1
/
2
"-14 NPT)
1
/
2
" Adapter
Lever open(use)
position
Pressure regulator
Range gas shut-off valve
Remove this label
Gas Flow into Range
Installer: Inform the consumer of the location of the gas shut-off valve.
•
After using your range for an extended period of time high floor temperatures may
result. Many floor coverings will not withstand this kind of use.
•
Never install the range over vinyl tile or linoleum that cannot withstand such type of
use. Never install it directly over interior kitchen carpeting.
SURFACE BURNERS
WARNING
•
Even if the top burner flame goes out, gas is still flowing to the burner until the knob is
turned to the Off position. If you smell gas, immediately open a window and ventilate
the area for five minutes prior to using the burner. Do not leave the burners on
unattended.
•
Use proper pan size. Do not use pans that are unstable or that can be easily tipped.
Select cookware with flat bottoms large enough to cover burner grates. To avoid
spillovers, make sure the cookware is large enough to contain the food properly. This
will both save cleaning time and prevent hazardous accumulations of food, since heavy
spattering or spillovers left on the range can ignite. Use pans with handles that can be
easily grasped and remain cool.

9
IMPORTANT SAFETY INSTRUCTIONS
ENGLISH
CAUTION
•
Be sure that all surface controls are set in the Off position prior to supplying gas to the
range.
•
Never leave the surface burners unattended at high flame settings. Boilovers may
cause smoke and greasy spillovers that may ignite.
•
Always turn the knobs to the Lite position when igniting the top burners and make sure
the burners have ignited.
•
Control the top burner flame size so it does not extend beyond the edge of the
cookware. Excessive flame is hazardous.
•
Only use dry pot holders- moist or damp pot holders on hot surfaces may result in
burns from steam. Do not let pot holders come near open flames when lifting cookware.
Do not use towels or other bulky cloth items. Use a pot holder.
•
If using glass cookware, make sure the cookware is designed for range-top cooking.
•
To prevent burns from ignition of flammable materials and spillage, turn cookware
handles toward the side or back of the range without extending them over adjacent
burners.
•
Never leave any items on the cooktop. The hot air from the vent may ignite flammable
items and will increase pressure in closed containers, which may cause them to burst.
•
Carefully watch foods being fried at a high flame setting.
•
Always heat fat slowly, and watch as it heats.
•
If frying combinations of oils and fats, stir together before heating.
•
Use a deep fat thermometer if possible to prevent overheating fat from heating beyond
the smoking point.
•
Use the least possible amount of fat for effective shallow or deep fat frying. Filling the
pan with too much fat can cause spillovers when food is added.
•
Do not cook foods directly on an open flame on the cooktop.
•
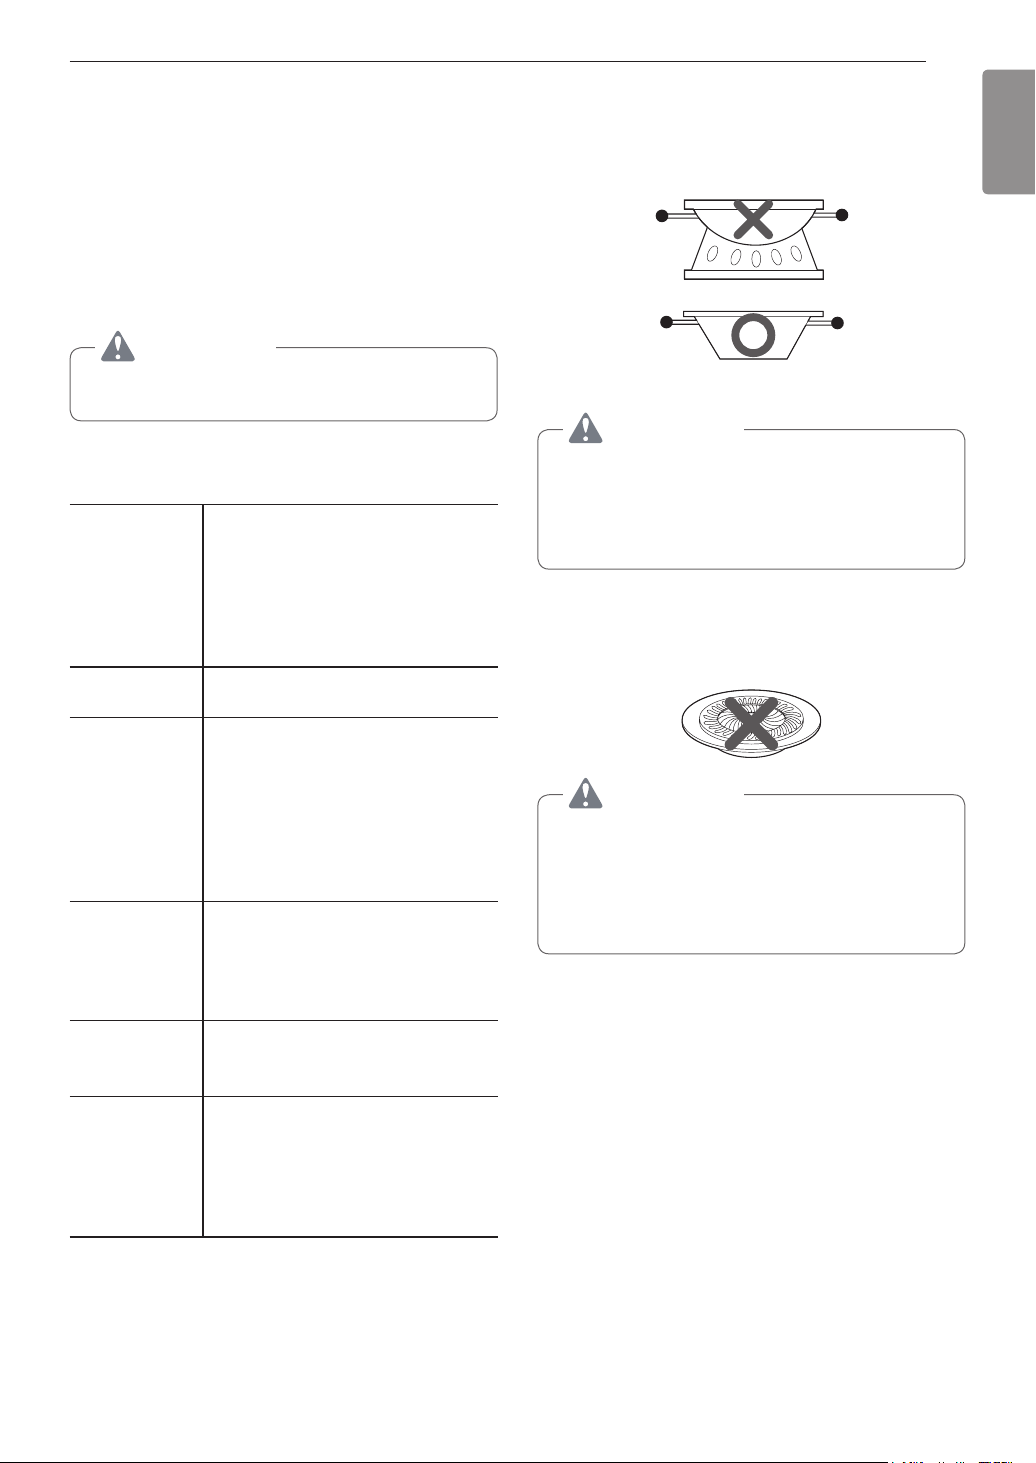
Do not use a wok on the surface burners if the wok has a round metal ring that is
placed over the burner grate to support the wok. This ring acts as a heat trap, which
may damage the burner grate and burner head. It may also cause the burner to work
improperly. This may cause carbon monoxide levels which are higher than what is
allowed by current standards, resulting in a health hazard.
•
Foods for frying should be as dry as possible. Frost or moisture on foods can cause hot
fat to bubble up and spill over the sides of the pan.
•
Never try to move a pan of hot fat, especially a deep fryer. Wait until the fat is cool.
•
Do not place plastic items on the cooktop- they may melt if left too close to the vent.
•
Keep all plastics away from the surface burners.
•
To prevent burns, always be sure that the controls for all burners are in the Off position
and all grates are cool before attempting to remove them.
•
If you smell gas, turn off the gas to the range and call a qualified service technician.
Never use an open flame to locate a leak.
•
Always turn the knobs to the Off position before removing cookware.
•
Do not lift the cooktop. Lifting the cooktop can cause damage and improper operation
of the range.
•
If the range is located near a window, do not hang long curtains that could blow over
the surface burners and catch on fire.
•
Use care when cleaning the cooktop. The pointed metal ends on the electrodes could
cause injury.
10
IMPORTANT SAFETY INSTRUCTIONS
BROILER
Always use a broiler pan and a grid for excess fat and grease drainage. This will help to
reduce splatter, smoke, and flare-ups.
WARNING
When using your broiler, the temperature inside the oven will be extremely high. Take
caution to avoid possible burns by:
•
Keeping the door closed when broiling (refer to Broil section of the manual)
•
Always wearing oven mitts when inserting or removing food items
COOK MEAT AND POULTRY THOROUGHLY
To protect against food-borne illnesses, cook meat and poultry thoroughly—meat to at least
an INTERNAL temperature of 160 °F, poultry to at least an INTERNAL temperature of 165 °F
and beef, pork, veal & lamb steaks & chops to at least an INTERNAL temperature of 145 °F.
SELF-CLEANING OVEN
Make sure to wipe off excess spillage before operating the Self Clean function.
CAUTION
•
Do not leave food, broiler trays, cooking utensils, racks, etc. in the oven during the self
clean cycle.
•
Do not use oven cleaners. No commercial oven cleaner or oven liner protective coating
of any kind should be used in or around any part of the oven. Residue from oven
cleaners will damage the inside of the oven when the self clean cycle is used.
•
Remove oven racks and other items from oven before starting the self clean cycle.
•
Only clean the parts listed in this manual.
•
Do not manually clean the door gasket. The door gasket is necessary for a good seal.
Care should be taken not to rub, damage or move the gasket.
•
If the self cleaning mode malfunctions, turn the range off and disconnect the power
supply. Have it serviced by a qualified technician.
•
It is normal for parts of the oven to become hot during a Self Clean cycle.
•
Avoid touching the door, window or oven vent area during a Self Clean cycle.
OVEN
When opening the door of a hot oven, stand away from the range. The hot air and steam
that escape can cause burns to hands, face and eyes.
WARNING
•
Never block any slots, holes or passages in the oven bottom or cover an entire rack
with materials such as aluminum foil. Doing so blocks air flow through the oven and
may cause carbon monoxide poisoning. Aluminum foil linings may trap heat, causing a
fire hazard.
•
Do not heat food in closed containers. Pressure inside the container could increase and
cause the container to burst, resulting in injury.

11
IMPORTANT SAFETY INSTRUCTIONS
ENGLISH
WARNING
•
Do not line oven walls or bottom with aluminum foil or allow them to contact exposed
heating elements in the oven. Doing so could create a fire hazard or cause damage to
the range.
•
Do not use the oven for storage. Items stored in the oven can catch on fire.
•
Keep the oven free from grease buildup.
•
Insert the oven racks in the desired position while the oven is cool.
•
To prevent burns when removing food, slide racks out until the stop engages, then
remove food items. This may also protect you from getting burnt by touching hot
surfaces of the door or oven walls.
•
When placing or removing a griddle, always wear oven mitts.
•
When using cooking or roasting bags in the oven, follow the manufacturer’s directions.
•
Use only glass cookware that is recommended for use in gas ovens.
•
Always remove the broiler pan from the range after you finish broiling. Grease left in the
pan can catch fire if the oven is used without removing the grease from the broiler pan.
•
If meat is too close to the flame while broiling, the fat may ignite. Trim excess fat to
prevent excessive flare-ups.
•
Make sure the broiler pan is in place correctly to minimize the possibility of grease fires.
•
If you have a grease fire in the broiler pan, touch Clear/Off and keep the oven door
closed to contain the fire until it burns out.
•
For safety and better cooking performance, always bake and broil with the oven door
closed. Open door baking or broiling can cause damage to the knobs or valves.
Do not leave the oven door open during cooking or while the oven is cooling down.
ENERGY SAVING TIPS
•
Multiple-rack cooking saves time and energy. Whenever possible, cook foods requiring the
same cooking temperature together in one oven.
•
For optimal performance and energy savings, follow the guides on page 31 for proper rack
and pan placements.
•
Match the size of the cookware to the amount of food being cooked to save energy when
heating. Heating ½ quart of water requires more energy in a 3-quart pot than in a 1-quart
pot.
•
Use cookware with flat bottoms to provide the best contact with the cooktop surface when
cooking on the glass-ceramic cooktop.
•
Match the size of the cooktop burner or element to the size of the cookware in use. Using
a large element for a small pan wastes heating energy, and the exposed surface of the
element is a burn or fire hazard.
•
Reduce energy use by cleaning light oven soils with the EasyClean
®
feature instead of
self-clean.
•
Avoid opening the oven door more than necessary during use. This helps the oven
maintain temperature, prevents unnecessary heat loss, and saves on energy use.
Read all instructions before using the appliance.
SAVE THESE INSTRUCTIONS
12
PRODUCT OVERVIEW
PRODUCT OVERVIEW
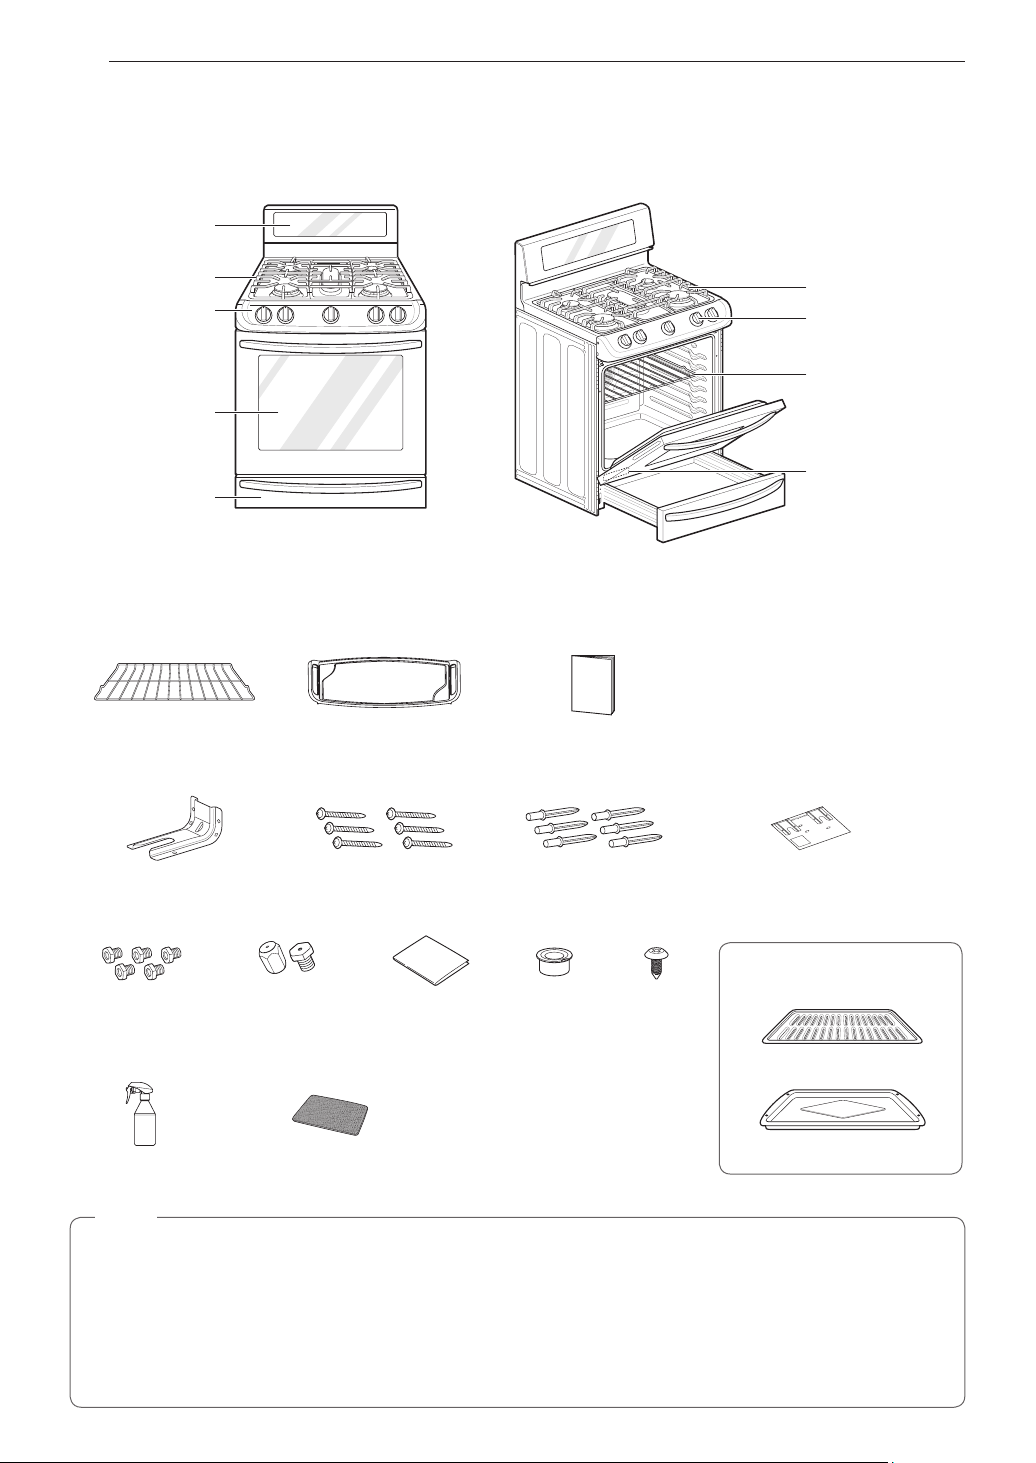
Parts
Burner control knob
Model & serial
number plate
Grate
Rack
Cooktop
controller
Warming drawer
Oven door
Cooktop
Oven
control panel
Accessories
Included Accessories
Standard rack (3ea) Griddle (1ea) Owner’s manual (1ea)
Anti-tip kit
Anti-tip (1ea) Screws (6ea) Anchors (6ea) Template (1ea)
LP nozzle conversion kit
Optional Accessories
Broiler pan
Grid
Cooktop Nozzles
(5ea)
Oven Nozzles
(2ea)
Installation Guide
(1ea)
Choke
(1ea)
Set Screw
(1ea)
EasyClean™ kit
Spray bottle
(1ea)
Non-scratch scouring pad
(1ea)
NOTE
•
Contact LG Customer Service at 1-800-243-0000 (1-888-542-2623 in Canada) if any accessories are
missing.
•
For your safety and for extended product life, only use authorized components.
•
The manufacturer is not responsible for product malfunction or accidents caused by the use of separately
purchased, unauthorized components or parts.
•
The images in this guide may be different from the actual components and accessories, which are subject
to change by the manufacturer without prior notice for product improvement purposes.
13
INSTALLATION
ENGLISH
INSTALLATION
Before Installing the Range
Make sure your range is properly installed and grounded by a qualified installer, according to the installation
instructions. Any adjustment and service should be performed only by qualified gas range installers or service
technicians.
In the Commonwealth of Massachusetts
•
This product must be installed by a licensed plumber or gas fitter.
•
When using ball type gas shut-off valves, they must be the T-handle type.
•
When using a flexible gas connector, it must not exceed 3 feet in length.
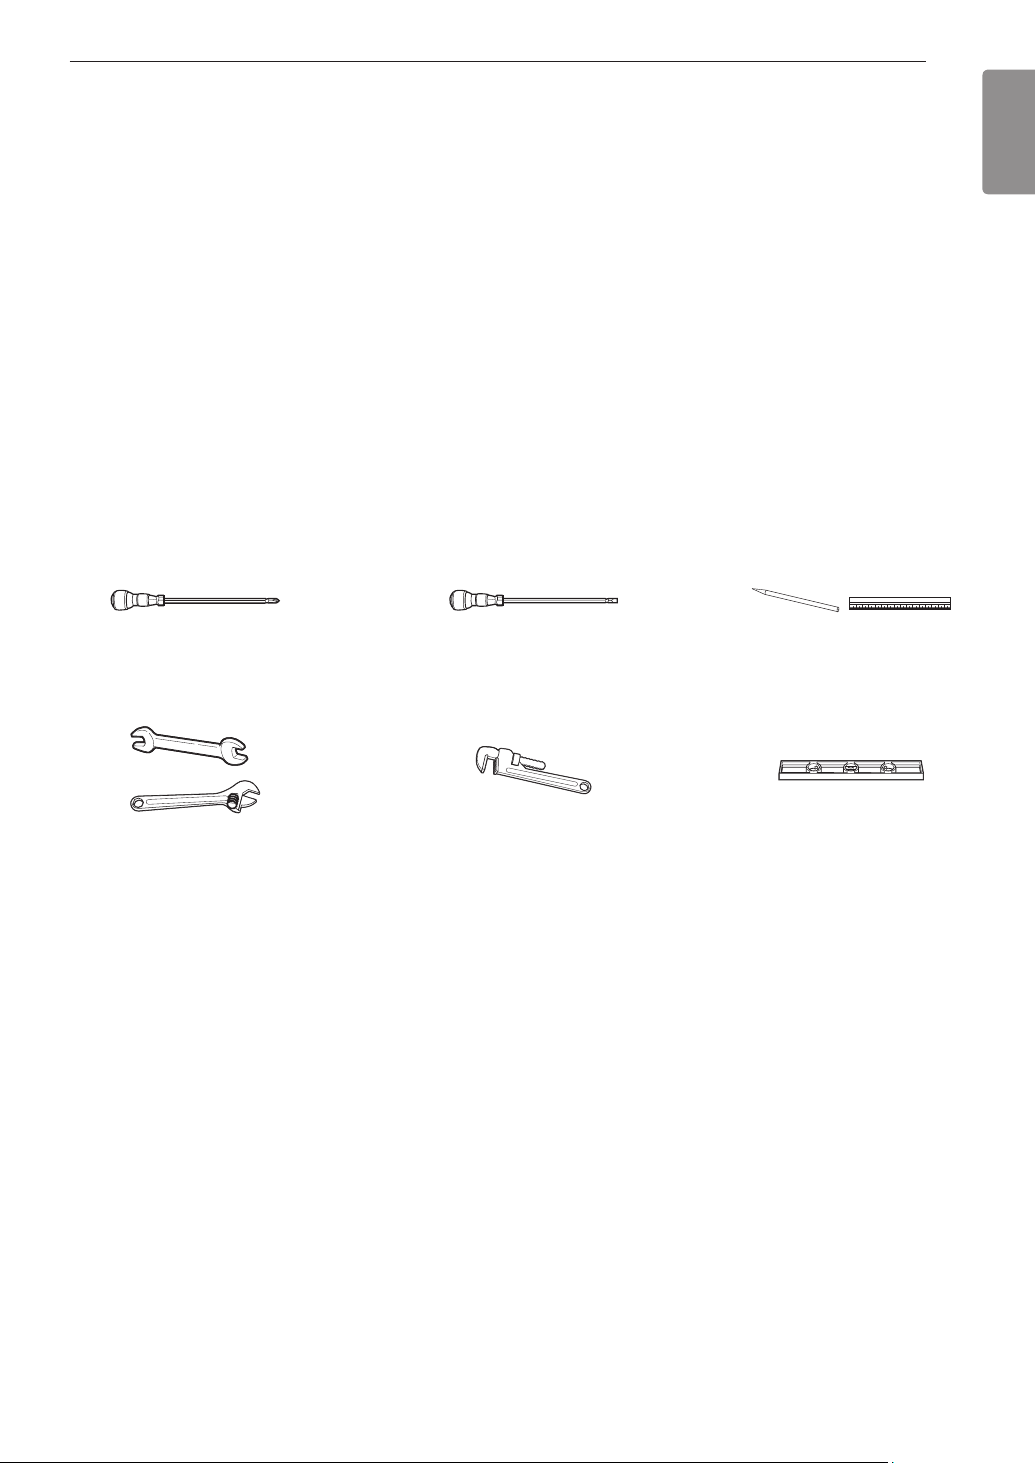
Preparing for Installation
Tools Needed
Phillips screwdriver
Open-end or adjustable
wrench
Pencil and ruler
Level
Flat-blade screwdriver
Pipe wrench (2)
(one for support)
Materials You May Need
•
Gas line shut-off valve
•
Pipe joint sealant that resists action of natural and LP gases
•
Flexible metal appliance connector (
3
/
4
" or
1
/
2
" NPT x
1
/
2
" I.D.)
Never use an old connector when installing a new range.
•
Flare union adapter for connection to gas supply line (
3
/
4
" or
1
/
2
" NPT x
1
/
2
" I.D.)
•
Flare union adapter for connection to pressure regulator on range (
1
/
2
" NPT x
1
/
2
" I.D.)
•
Liquid leak detector or soapy water
•
Lag bolt or
1
/
2
" O.D. sleeve anchor (for concrete floors only)

14
INSTALLATION
Installing the Range
Unpacking and Moving the Range
CAUTION
•
You should use two or more people to move
and install the range. (Excessive Weight
Hazard) Failure to do so can result in back or
other injury.
•
Do not use the door handles to push or
pull the range during installation or when
moving the range out for cleaning or
service. Doing so can result in serious damage
to the door of the range.
Remove packing material, tape and any temporary
labels from your range before using. Do not remove
any warning-type labels, the model and serial number
label, or the Tech Sheet that is located on the back of
the range.
To remove any remaining tape or glue, rub the area
briskly with your thumb. Tape or glue residue can also
be easily removed by rubbing a small amount of liquid
dish soap over the adhesive with your fingers. Wipe
with warm water and dry.
Do not use sharp instruments, rubbing alcohol,
flammable fluids, or abrasive cleaners to remove tape
or glue. These products can damage the surface of
your range.
Your range is heavy and can be installed on soft
floor coverings such as cushioned vinyl or carpeting.
Use care when moving the range on this type of
flooring. Use a belt when moving the range to prevent
damaging the floor. Or slide the range onto cardboard
or plywood to avoid damaging the floor covering.
Choosing the Proper Location
Do not locate your range where it may be subject to
strong drafts. Any openings in the floor or wall behind
the range should be sealed. Make sure the openings
around the base of the range that supply fresh air
for combustion and ventilation are not blocked by
carpeting or woodwork.
Your range, like many other household units, is heavy
and can be installed on soft floor coverings such as
cushioned vinyl or carpeting. Use care when moving
the range on this type of flooring.
This appliance must not be installed with a ventilation
system that blows air downward toward the range.
This type of ventilation system may cause ignition and
combustion problems with the gas cooking appliance
resulting in personal injury or unintended operation.
When the floor covering ends at the front of the
range, the area that the range will be installed on
should be built up with plywood to the same level
or higher than the floor covering. This will allow the
range to be moved for cleaning and servicing, as well
as provide proper air flow to the range.
Also, make sure the floor covering can resist
temperatures of at least 167 °F (75 °C). See the
Installation Safety Instructions included in this
manual.
Make sure the wall coverings around your range
can resist the heat generated up to 194 °F (90 °C)
by the range. See the Installation Safety Instructions
included in this manual.
Gas Pipe and Electrical Outlet
Locations
30"
(76.2 cm)
7
14
/
16
"
(20 cm)
11
13
/
16
"
(30 cm)
3
6
/
16
"
(8.5 cm)
3"
(7.6 cm)
17
15
/
16
"
(45.6 cm)
5
14
/
16
"
(15 cm)
6
11
/
16
"
(17 cm)
15
INSTALLATION
ENGLISH
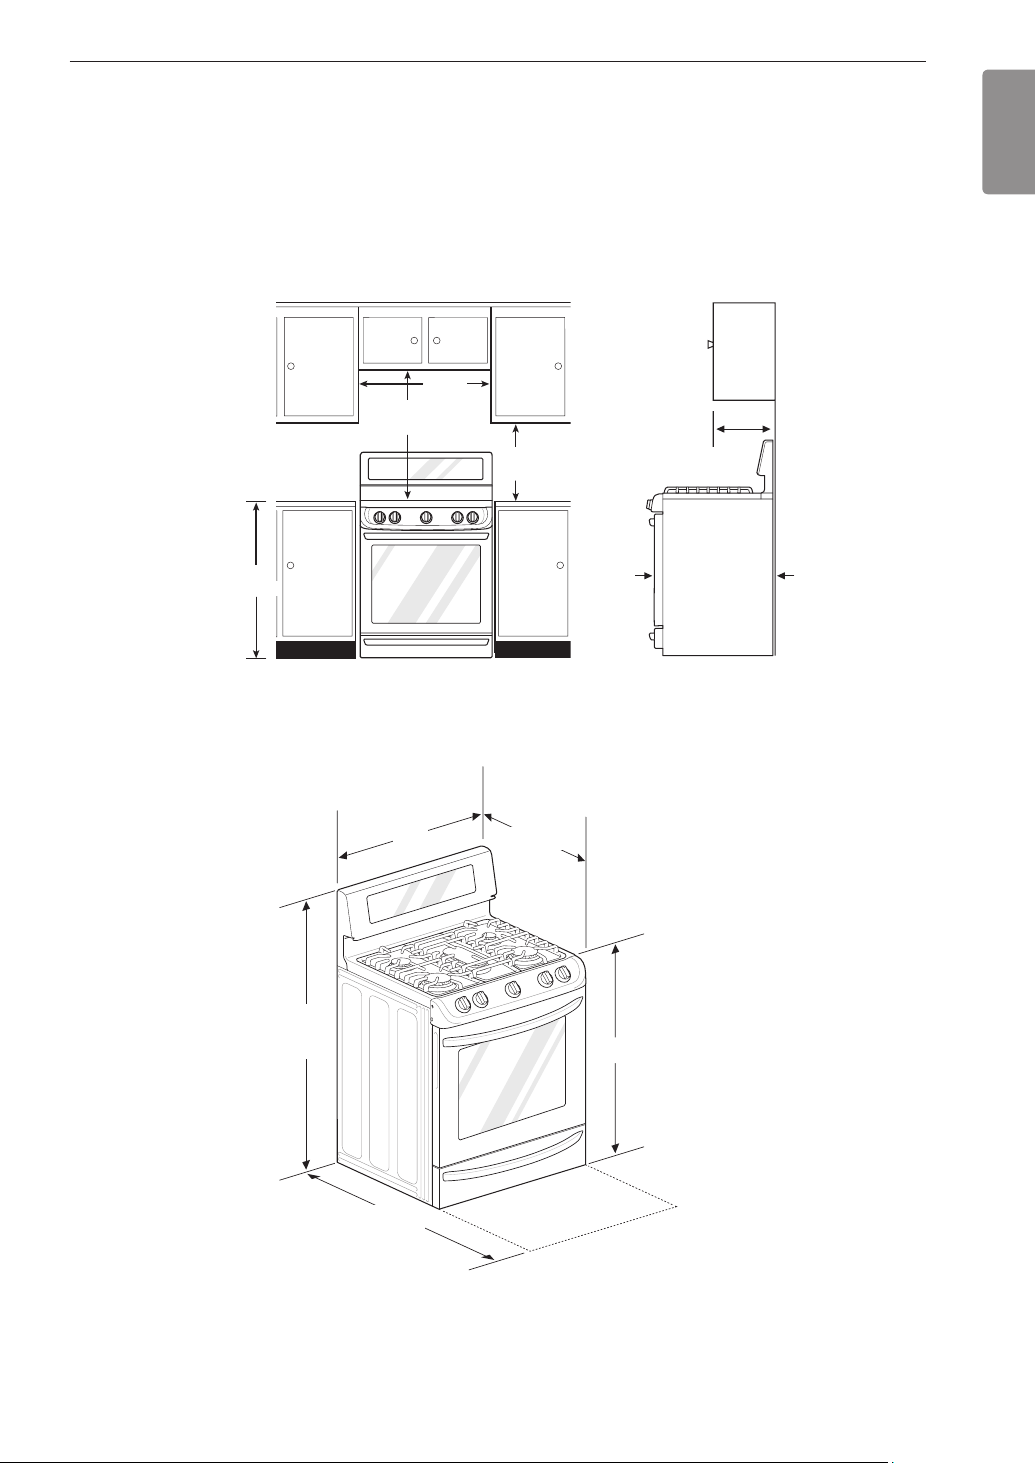
Dimensions and Clearances
Provide proper clearance between the range and adjacent combustible surfaces. These dimensions must be met
for safe use of your range. The location of the electrical outlet and pipe opening (see Gas Pipe and Electrical
Outlet Locations, page 14) may be adjusted to meet specific requirements. The range may be placed with 0"
clearance (flush) at the back wall.
Maximum
depth for
cabinets
above
coutertops
Front edge
of the range
side panel
forward from
cabinet
To cabinets
below
cooktop and
at the range
back
Depth with door closed
(includes door handle)
30"
(76.2 cm)
30" (76.2 cm)
Minimum
15"
(38.1 cm)
36"
(91.4 cm)
1
/
4
"
28
15
/
16
"
36" ±
1
/
4
"
Height
47
5
/
16
"
Depth with door open
43
5
/
32
"
29
7
/
8
"
13"
0"
Dimensions
Installation Clearances
16
INSTALLATION
Installing the Anti-tip Device
Anti-tip
bracket
Wall plate
Screw must
enter wood or
concrete
The anti-tip bracket is packaged with an installation
template. The instructions include necessary
information to complete the installation. Read and
follow the range installation instruction sheet.
WARNING
•
Range must be secured with an approved
anti-tip device.
•
The range could be tipped by standing, sitting
or leaning on an open door if the range or
anti-tip device is not properly installed.
•
After installing the anti-tip device, verify that it is
in place by carefully attempting to tilt the range
forward.
•
This range has been designed to meet all
recognized industry tip standards for all normal
conditions.
•
The installation of the anti-tip device must meet
all local codes for securing the appliance.
•
The use of this device does not preclude tipping
of the range when not properly installed.
•
A child or adult can tip the range and be killed.
•
Install the anti-tip device to the structure and/
or the range. Verify the anti-tip device has been
properly installed and engaged by following the
guide of the Anti tip bracket template.
•
Engage the range to the anti-tip device by
following the guide of the Anti tip bracket
template. Ensure the anti-tip device is re-
engaged when the range is moved by following
the guide of the Anti tip bracket template.
•
Re-engage the anti-tip device if the range is
moved. Do not operate the range without the
anti-tip device in place and engaged.
•
See installation instructions for details.
•
Failure to do so can result in death or serious
burns to children or adults.
Providing Adequate Gas
Supply
Your range is designed to operate at a pressure of
5" of water column on natural gas or 10" of water
column on LP.
Make sure you are supplying your range with the type
of gas for which it is configured.
This range is convertible for use on natural or LP gas.
When using this range on LP gas, conversion must
be made by a qualified LP installer before attempting
to operate the range.
For proper operation, the pressure of natural gas
supplied to the regulator must be between 5" and 13"
of water column.
For LP gas, the pressure supplied to the regulator
must be between 10" and 13" of water column. When
checking for correct operation of the regulator, the
inlet pressure must be at least 1" more than the
operating (manifold) pressure as given above.
The pressure regulator located at the inlet of the
range must remain in the supply line regardless of
which type of gas is being used.
A flexible metal appliance connector used to connect
the range to the gas supply line should have an I.D.
of
5
/
8
" and a maximum length of 5 feet. In Canada,
flexible connectors must be single wall metal
connectors less than 6 feet in length.
17
INSTALLATION
ENGLISH
Connecting the Range to Gas
Shut off the range gas supply valve before removing
the old range and leave it off until the new hook-up
has been completed.
Because hard piping restricts movement of the range,
the use of a CSA International-certified flexible metal
appliance connector should be used unless local
codes require a hard-piped connection.
A manual valve shall be installed in an accessible
location in the gas piping external to the appliance
for the purpose of turning on or shutting off gas to the
appliance.
Never reuse an old connector when installing a new
range.
To protect against gas leaks, use a qualified pipe joint
sealant on all external threads.
1
Install a male
1
/
2
" or
3
/
4
" flare union adapter to the
NPT internal thread of the manual shut-off valve,
taking care to back-up the shut-off valve to keep
it from turning.
2
Install a male
1
/
2
" flare union adapter to the
1
/
2
"
NPT internal thread at the inlet of the pressure
regulator. Use a backup wrench on the pressure
regulator fitting to prevent damage.
Check that the gas pressure regulator valve is in the
open position.
Lever’s open
position
Lever’s closed
position
NOTE
•
The gas pressure regulator valve is open when
shipped. If the range does not work properly
after installation, make sure the regulator valve
is still open.
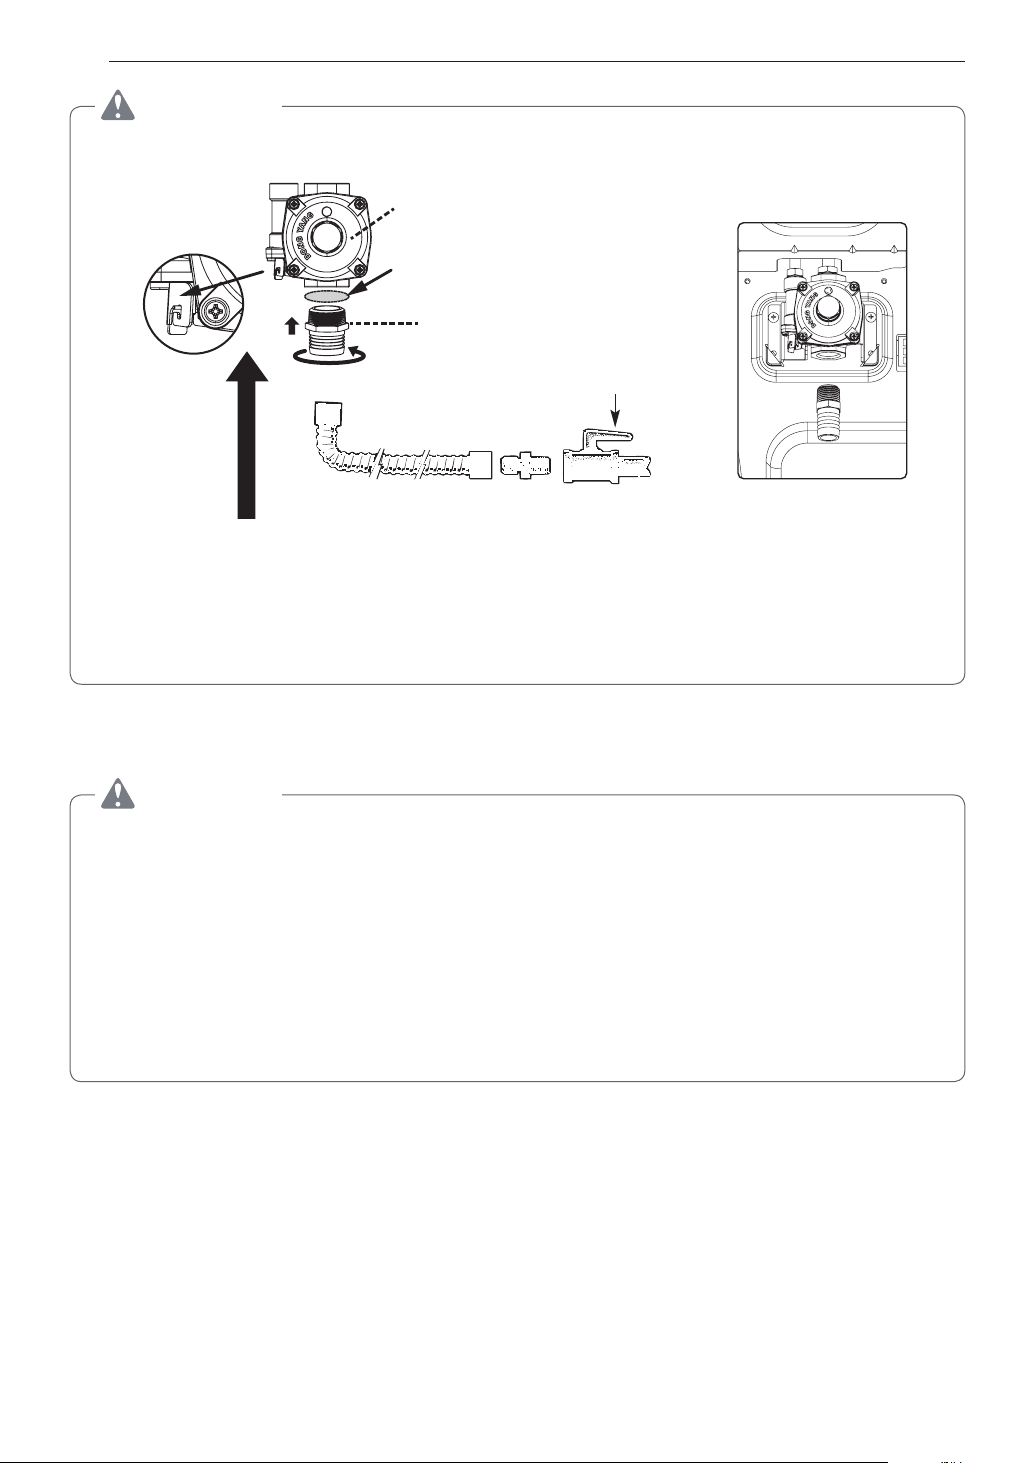
3
Connect a flexible metal appliance connector to
the adapter on the range. Position the range to
permit connection at the shut-off valve.
4
When all connections have been made, be sure
all range controls are in the OFF position and the
pressure regulator valve is open before turning
on
the main gas supply valve. Gas leaks may
occur in
your system and create a hazard. Gas
leaks may not
be detected by smell alone.
Check all gas connection joints and fittings for
leaks with a non-corrosive leak detection fluid,
then wipe off.
Gas suppliers recommend you purchase and
install a UL approved gas detector. Install
and use in accordance with the installation
instructions.
WARNING
•
Do not use a flame to check for gas leaks.
•
Isolate the range from the gas supply system
by closing its individual shut-off valve during
any pressure testing of the gas supply system
at test pressures equal to or less than
1
/
2
" psig
(3.5 kPa).
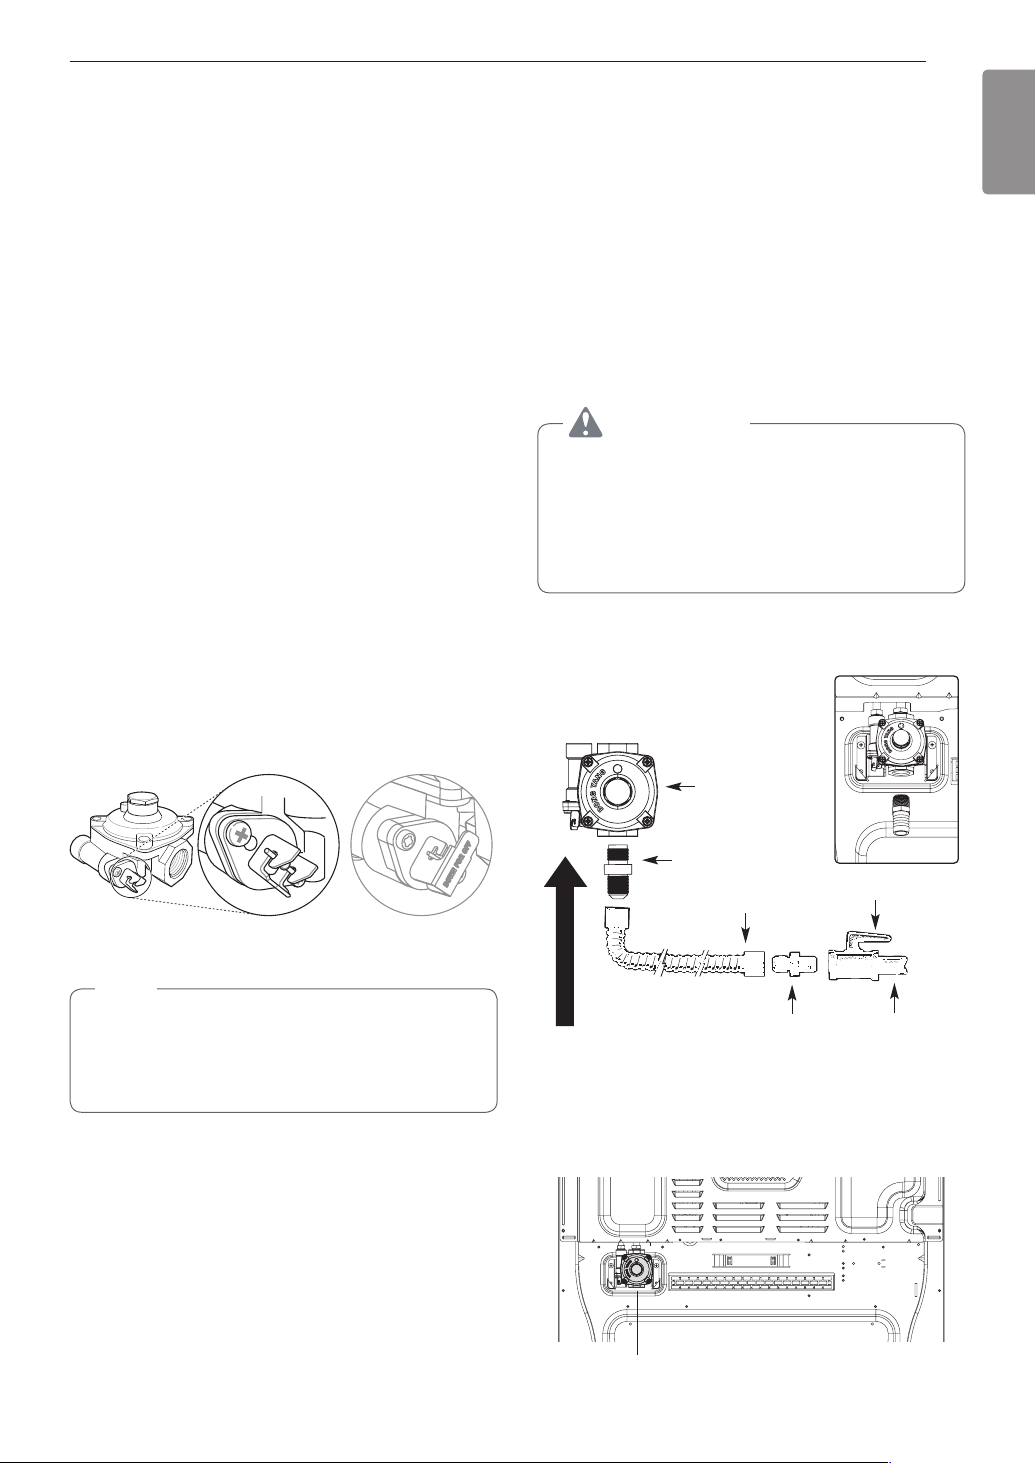
Flexible Connector Hookup
1
/
2
"
Adapter
1
/
2
" Adapter
1
/
2
"
Adapter
Pressure
regulator
Flex connector
(6 ft. max.)
Gas shut-off valve
1
/
2
" or
3
/
4
"
Gas pipe
Gas Flow into Range
Installer: Inform the consumer of the location of the gas
shut-off valve
.
Pressure Regulator Position
Pressure Regulator
18
INSTALLATION
Electrical Connections
Electrical Requirements
120 Volt, 60 Hz, properly grounded dedicated circuit
protected by a 15 or 20 Amp circuit breaker, or slow
blow fuse.
If an external electrical source is utilized, the
appliance, when installed, must be electrically
grounded in accordance with local codes or, in the
absence of local codes, with the National Electrical
Code, ANSI/NFPA 70.
Grounding
IMPORTANT: FOR PERSONAL SAFETY, THIS
APPLIANCE MUST BE PROPERLY GROUNDED.
The power cord of this appliance is equipped with
a 3-prong (grounding) plug which mates with a
standard 3-prong grounding wall receptacle to
minimize the possibility of electric shock hazard from
this appliance.
The customer should have the wall receptacle and
circuit checked by a qualified electrician to make sure
the receptacle is properly grounded.
Where a standard two-prong wall receptacle is
encountered, it is the personal responsibility and
obligation of the customer to have it replaced with a
properly grounded three-prong wall receptacle.
DO NOT, UNDER ANY CIRCUMSTANCES, CUT OR
REMOVE THE THIRD (GROUND) PRONG FROM
THE POWER CORD.
A word about GFCI’s – GFCI’s are not required or
recommended for gas range receptacles.
Ground Fault Circuit Interrupters (GFCI’s) are
devices that sense leakage of current in a circuit
and automatically switch off power when a threshold
leakage level is detected. These devices must
be manually reset by the consumer. The National
Electrical Code requires the use of GFCI’s in kitchen
receptacles installed to serve countertop surfaces.
Performance of the range will not be affected
if operated on a GFCI-protected circuit but the
occasional resetting of the circuit can become an
annoyance.
Ensure proper ground
exists before use
Preferred
Method
CAUTION
Have the circuit checked by a qualified electrician
to make sure the receptacle is properly grounded.
Do not use an adapter plug. Disconnecting of the
power cord places undue strain on the adapter
and leads to eventual failure of the adapter ground
terminal.
Installation must conform with local codes or, in the
absence of local codes, with the National Fuel Gas
Code, ANSI Z223.1/NFPA 54.
The installation of appliances designed for mobile
home installation must conform with the Manufactured
Home Construction and Safety Standard, Title 24
CFR, Part 3280 (formerly the Federal Standard
for Mobile Home Construction and Safety, Title
24, HUD, Part 280) or, when such standard is not
applicable, the Standard for Manufactured Home
Installations, latest edition (Manufactured Home Sites,
Communities and Set-Ups), ANSI A225.1, latest
edition, or with local codes. In Canada, mobile home
installation must be in accordance with the current
CAN/CSA Z240/MH Mobile Home Installation Code.
Sealing the Openings
Seal any openings in the wall and floor after electrical
and gas supplies are completed.
19
INSTALLATION
ENGLISH
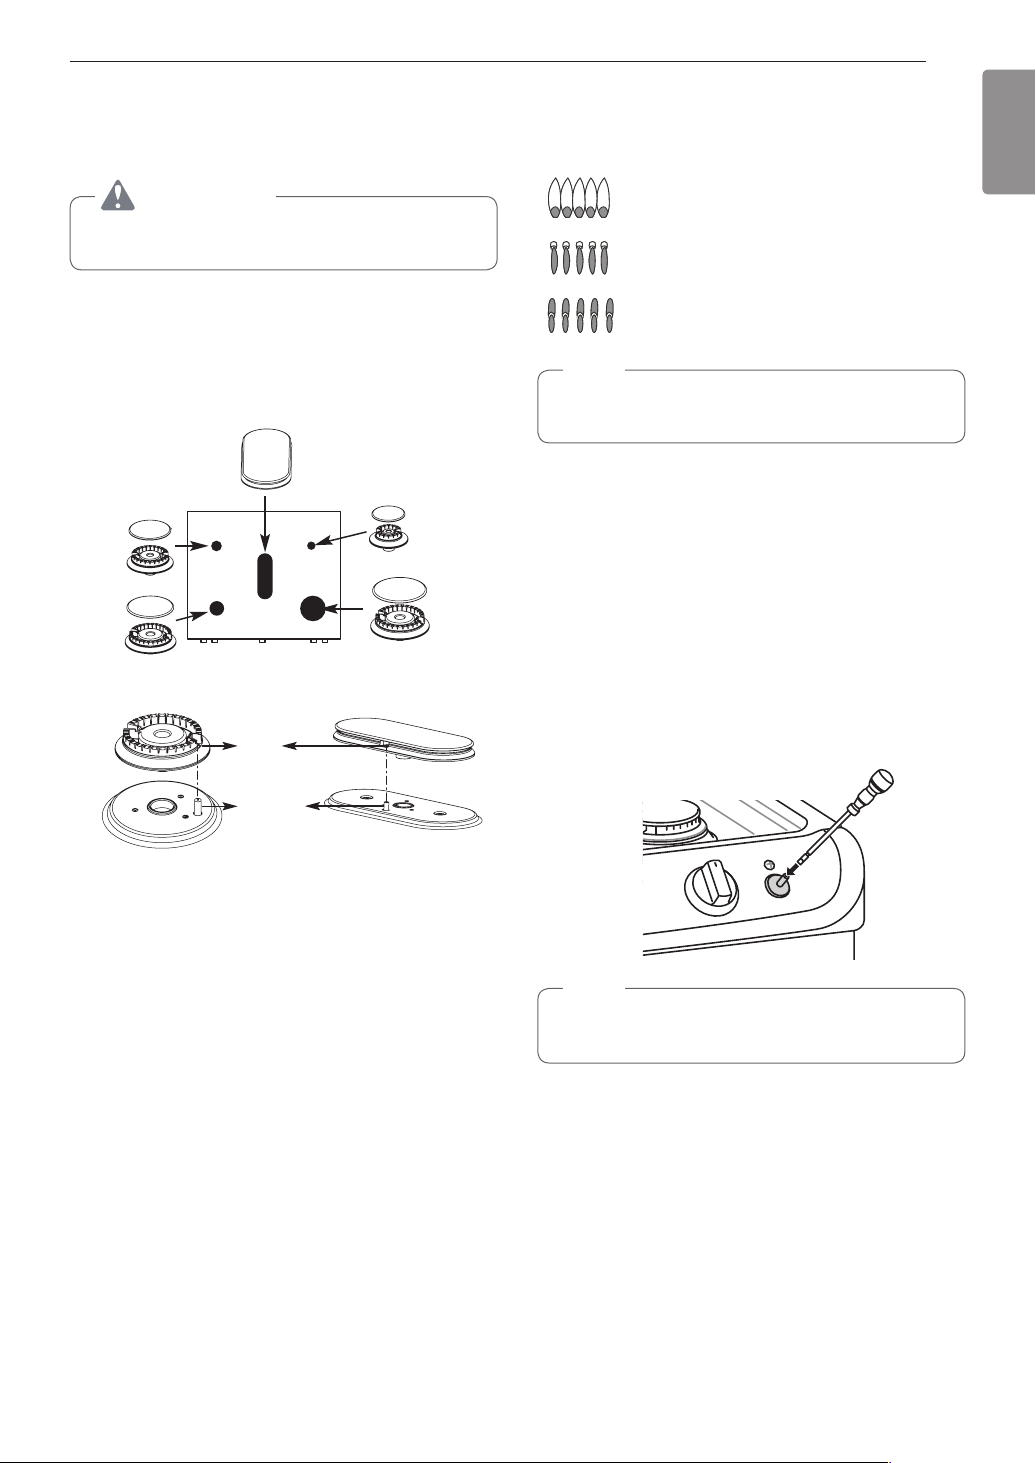
Assembling the Surface
Burners
CAUTION
Do not operate the burners without all parts in
place.
Place the burner caps and heads on the cooktop.
Make sure that the caps and heads are placed in the
correct locations. There is one small, one medium,
one large, one oval(center), and one extra large
burner head and cap.
Center Burner
Small burner
head and
cap
Medium
burner
head
and cap
Large burner
head and cap
Front of range
Extra large burner
head and cap
Oval (Center) burner
head/cap assembly
Hole
Electrode
Make sure the hole in the burner head is positioned
over the electrode.
Checking Ignition of the
Surface Burners
Electric Ignition
Select a surface burner knob and simultaneously
push in and turn to the Lite position. You will hear
a clicking sound indicating proper operation of the
spark module.
Once the air has been purged from the supply lines
the burner should ignite within 4 seconds. After the
burner ignites, rotate the knob out of the Lite position.
Try each burner in succession until all burners have
been checked.
Quality of Flames
The combustion quality of the burner flames needs to
be confirmed visually.
A Yellow flames - Call for service.
B Yellow tips on outer cones - This
is normal for LP gas.
C Soft blue flames - This is normal
for natural gas.
NOTE
•
With LP gas, some yellow tipping on outer
cones is normal.
Adjusting the Surface Burner to the
Low Flame (Simmer) Setting
1
Light all surface burners.
2
Turn the knob on the burner being adjusted to
Lo.
3
Remove the knob.
4
Insert a small, flat-blade screwdriver into the
valve shaft.
NOTE
Hold the valve shaft with one hand while turning
the screw to adjust with the other.
5
Replace the knob.
6
Test the flame stability.
Test 1: Turn the knob from Hi to Lo quickly. If the
flame goes out, increase the flame size and test
again.
Test 2: With the burner on a Lo setting, open
and close the oven door quickly. If the flame is
extinguished by the air currents created by the
door movement, increase the flame height and
test again.
7
Repeat steps 1-6 for each surface burner.

20
INSTALLATION
Checking Operation of Bake / Broil
Burners
To check ignition of the Bake burner, follow the steps
below
1
Remove all packing materials from inside the
oven cavity.
2
Touch Bake. 350 °F appears in the display.
3
Touch Start.
It may take between 30 and 90 seconds for the
burner to start heating.
To check ignition of the Broil burner, follow the steps
below
1
Touch Broil. Hi appears in the display.
2
Make sure the door is closed.
3
Touch Start.
It may take between 30 and 90 seconds for the
burner to start heating.
NOTE
Do not try to light either the Bake or Broil burners
during a power outage. The range has an
electrical ignition system and cannot be used
without power.
Adjusting Air Shutters (for LP
Conversions)
The range comes from the factory with the air
shutters adjusted for proper air flow for natural gas.
If converted to LP, follow the instructions provided in
the conversion kit to properly adjust the air shutters.
LP conversion must be performed by a qualified
technician.
Leveling the Range
Level the range by adjusting the leveling legs.
Extending the legs slightly may also make it easier to
insert the rear leg into the anti-tip bracket.
Use a level to check your adjustments. Place the level
diagonally on the oven rack, and check each direction
for level.
First check direction
.
Then check direction
. If the level doesn’t show level
on the rack, adjust the leveling legs.
1
2
Engaging the Anti-tip Device
Anti-tip
bracket
Leveling leg
1
Slide the range against the wall, making sure
the back leg slides into and engages the anti-tip
bracket.
2
Check for proper installation by grasping
the front edge of the cooktop and carefully
attempting to tilt the range forward.
21
OPERATION
ENGLISH
OPERATION
Gas Surface Burners
Before Use
Read all instructions before using.
Make sure that all burners are properly placed.
Make sure that all grates are properly placed
before using the burner.
CAUTION
Do not operate the burner for an extended period
of time without cookware on the grate.
The finish on the grate may chip without cookware
to absorb the heat.
Make sure the burners and grates are cool before
touching them, or placing a pot holder, cleaning
cloth, or other materials on them.
Touching grates before they cool down may cause
burns.
CAUTION
WHAT TO DO IF YOU SMELL GAS
•
Open windows.
•
Do not try to light any appliance.
•
Do not touch any electrical switch.
•
Do not use any phone in your building.
•
Immediately call your gas supplier from a
neighbor’s phone. Follow the gas supplier’s
instructions.
•
If you cannot reach your gas supplier, call the
fire department.
NOTE
Electric spark igniters from the burners cause
a clicking noise. All the spark igniters on the
cooktop will activate when igniting just one burner.
22
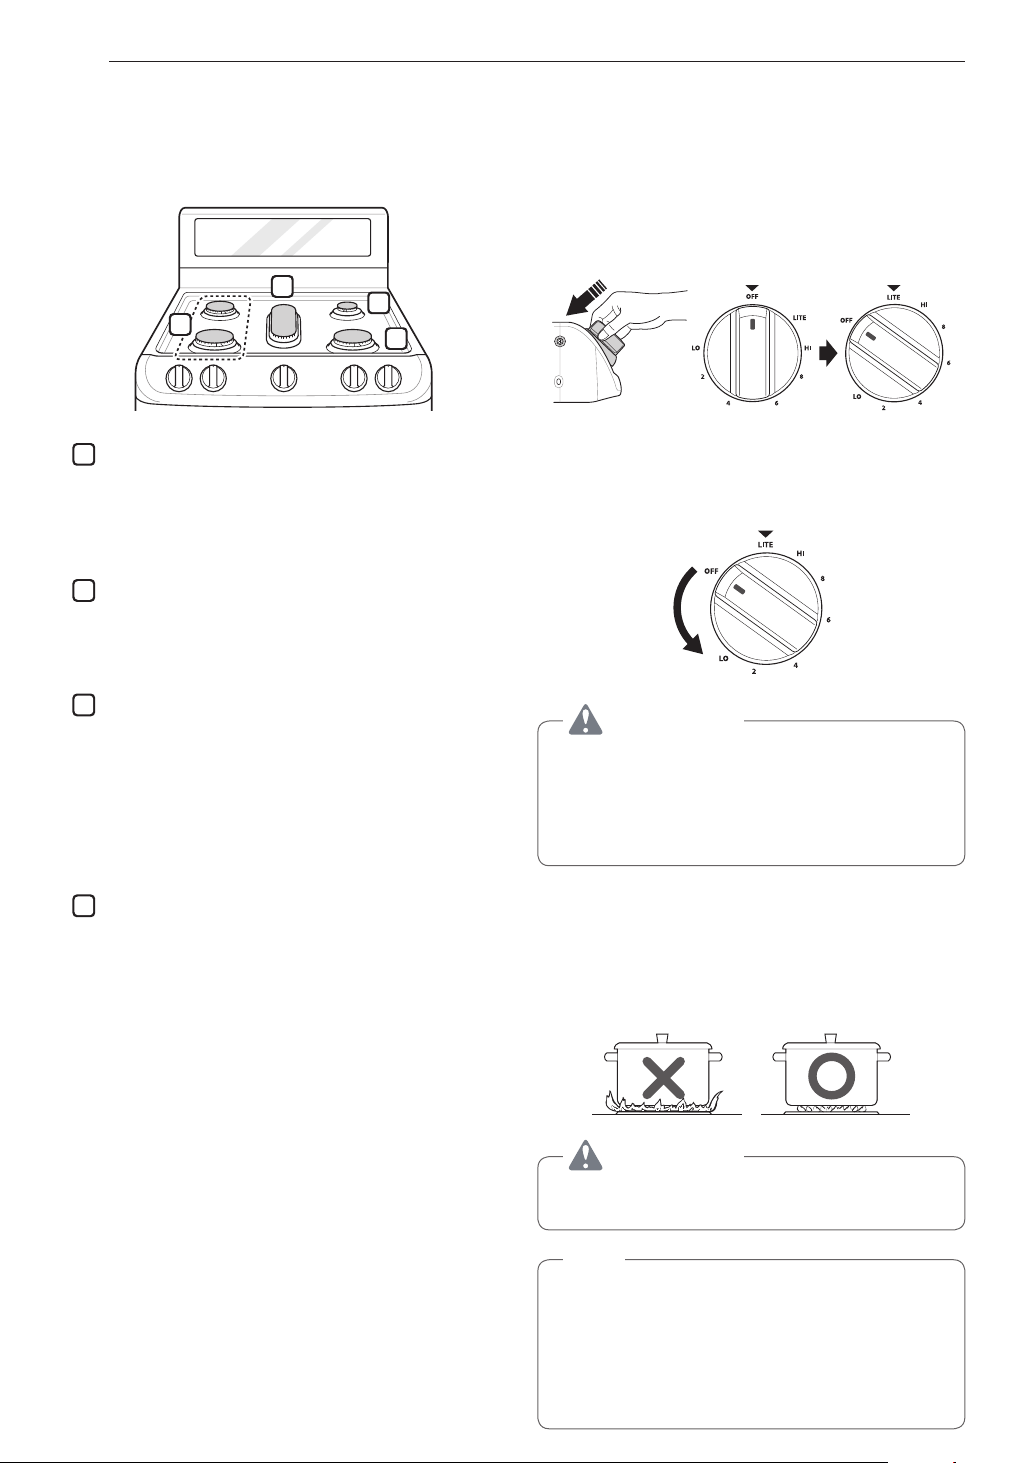
OPERATION
Burner Locations
Your gas range cooktop has four or five sealed gas
burners, depending on the model. These can be
assembled and separated. Follow the guide below.
1
4
2
3
1
Medium and Large Burners
The medium and large burners are the primary
burners for most cooking. These general
purpose burners can be turned down from Hi to
Lo to suit a wide range of cooking needs.
2
Small Burner
The smallest burner is used for delicate foods
such as sauces or foods that require low heat for
a long cooking time.
3
Extra Large Burner
The extra large burner is the maximum output
burner. Like the other four burners, it can be
turned down from Hi to Lo for a wide range
of cooking applications. This burner is also
designed to quickly bring large amounts of liquid
to a boil. It can be used with cookware 10 inches
or larger in diameter.
4
Oval Burner
The center, oval burner is for use with a griddle
or oval pots.
Using the Gas Surface Burners
1
Be sure that all of the surface burners and grates
are placed in the correct positions.
2
Place cookware on the grate.
3
Push the control knob and turn to the Lite
position.
The electric spark ignition system makes a
clicking noise.
4
Turn the control knob to control the flame size.
CAUTION
Do not attempt to disassemble or clean around
any burner while another burner is on. All the
burners spark when any burner is turned to Lite.
An electric shock may result causing you to knock
over hot cookware.
Setting the Flame Size
Watch the flame, not the knob, as you reduce heat.
Match the flame size on a gas burner to the cookware
being used for fastest heating.
CAUTION
Never let the flames extend up the sides of the
cookware.
NOTE
•
The flames on the surface burners may burn
yellow in the presence of high humidity, such as
a rainy day or a nearby humidifier.
•
After LP gas conversion, flames can be bigger
than normal when you put a pot on the surface
burner.
23
OPERATION
ENGLISH
In Case of Power Failure
In case of a power failure, you can light the gas
surface burners on your range with a match.
Surface burners in use when an electrical power
failure occurs will continue to operate normally.
1
Hold a lit match to the burner, then push in the
control knob.
2
Turn the control knob to the Lo position.
CAUTION
Use extreme caution when lighting burners with a
match. It can cause burns and other damage.
Range-Top Cookware
Aluminum
Medium-weight cookware is
recommended because it heats
quickly and evenly. Most foods
brown evenly in an aluminum
skillet. Use saucepans with tight
fitting lids when cooking with
minimum amounts of water.
Cast-Iron
If heated slowly, most skillets will
give satisfactory results.
Stainless Steel
This metal alone has poor
heating properties and is usually
combined with copper, aluminum
or other metals for improved heat
distribution. Combination metal
skillets work satisfactorily if they
are used with medium heat as the
manufacturer recommends.
Enamelware
Under some conditions, the
enamel of this cookware may melt.
Follow cookware manufacturer’s
recommendations for cooking
methods.
Glass
There are two types of glass
cookware. Those for oven use only
and those for top-of-range cooking.
Heatproof
Glass Ceramic
Can be used for either surface or
oven cooking. It conducts heat very
slowly and cools very slowly. Check
cookware manufacturer’s directions
to be sure it can be used on gas
ranges.
Using a Wok
If using a wok, use a 14-inch or smaller flat-bottomed
piece of wok. Make sure that the wok bottom sits flat
on the grate.
Use at-bottomed
wok
CAUTION
Do not use a wok support ring. Placing the ring
over the burner or grate may cause the burner
to work improperly, resulting in carbon monoxide
levels above allowable standards. This can be
hazardous to your health.
Using Stove-Top Grills
Do not place stove-top grills on the burner.
CAUTION
Do not use stove top grills on the surface burners.
Using a stove top grill on the surface burner will
cause incomplete combustion and can result
in exposure to carbon monoxide levels above
allowable current standards. This can be a health
hazard.

24
OPERATION
Using the Griddle
The non-stick coated griddle provides an extra-large
cooking surface for meats, pancakes or other food
usually prepared in a frying pan or skillet.
NOTE
It is normal for the griddle to become discolored
over time.
How to Place the Griddle: The griddle can only be
used with the center burner. The griddle must be
properly placed on the center grate, as shown below.
Front
CAUTION
•
Do not remove the center grate when using the
griddle.
•
Do not remove the griddle plate until the
cooktop grates, surfaces and griddle plate have
completely cooled.
•
The griddle plate on the cooktop may become
very hot when using the cooktop, oven or
broiler systems. Always use oven mitts when
placing or removing the griddle plate.
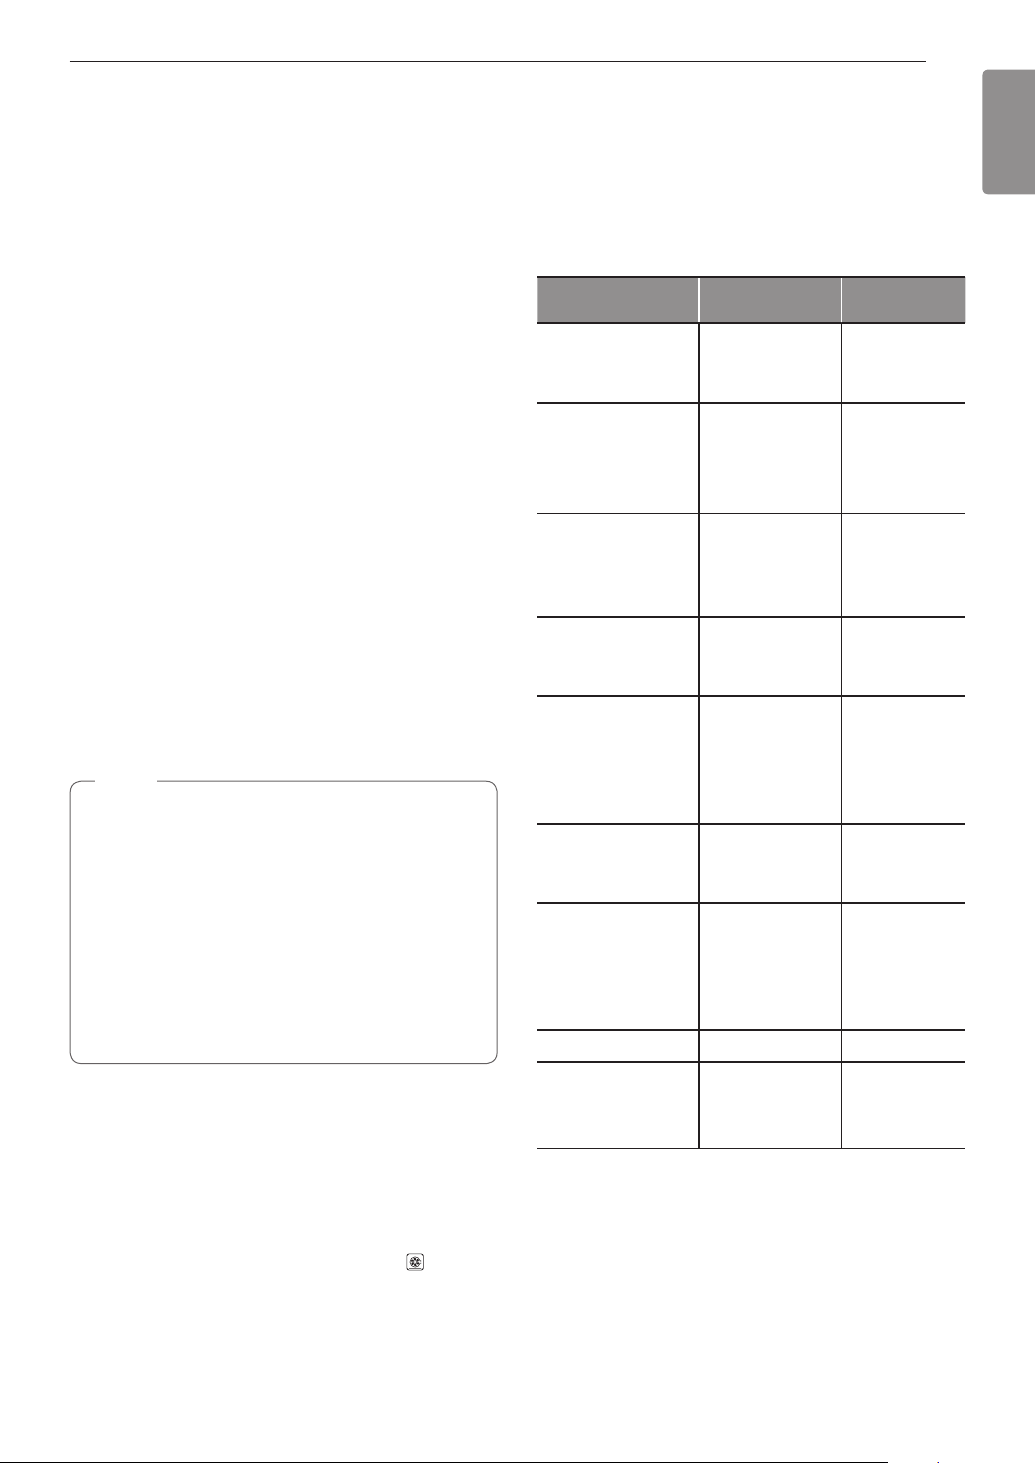
Preheat the griddle according to the guide below and
adjust for the desired setting.
Type of Food
Preheat
Conditions
Cook
Setting
Warming Tortillas - 5 (MED)
Pancakes HI 5 min. HI
Hamburgers HI 5 min. HI
Fried Eggs HI 5 min. HI
Bacon HI 5 min. HI
Breakfast Sausage
Links
HI 5 min. HI
Hot Sandwiches HI 5 min. HI
NOTE
After cooking on the griddle for an extended
period, adjust the griddle temperature settings as
the griddle retains heat.
IMPORTANT NOTES
•
Avoid cooking extremely greasy foods as grease
spillover can occur.
•
The griddle can become hot when surrounding
burners are in use.
•
Do not overheat the griddle. This can damage the
non stick coating.
•
Do not use metal utensils that can damage the
griddle surface. Do not use the griddle as a cutting
board.
•
Do not place or store items on the griddle.
25
OPERATION
ENGLISH
The Oven
Before Use
Read all instructions before using.
Make sure the electrical power cord and the gas
valve are properly connected.
Confirm the correct usage of the range for the
type of food you will cook.
Make sure you know how to use the oven
(temperature setting, time setting and recipe) for best
results.
CAUTION
WHAT TO DO IF YOU SMELL GAS
•
Open windows.
•
Do not try to light any appliance.
•
Do not touch any electrical switch.
•
Do not use any phone in your building.
•
Immediately call your gas supplier from a
neighbor’s phone. Follow the gas supplier’s
instructions.
•
If you cannot reach your gas supplier, call the
fire department.
NOTE
If using an oven thermometer in the oven cavity,
temperatures may differ from the actual set oven
temperature with all modes.
In case of power failure, do not use the oven.
The oven and broiler cannot be used during a power
outage. If the oven is in use when a power failure
occurs, the oven burner shuts off and cannot be re-lit
until power is restored. Once power is restored, you
will need to reset the oven (or Broil function).
BlackOut
CAUTION
Do not attempt to operate the electric ignition
during an electrical power failure.
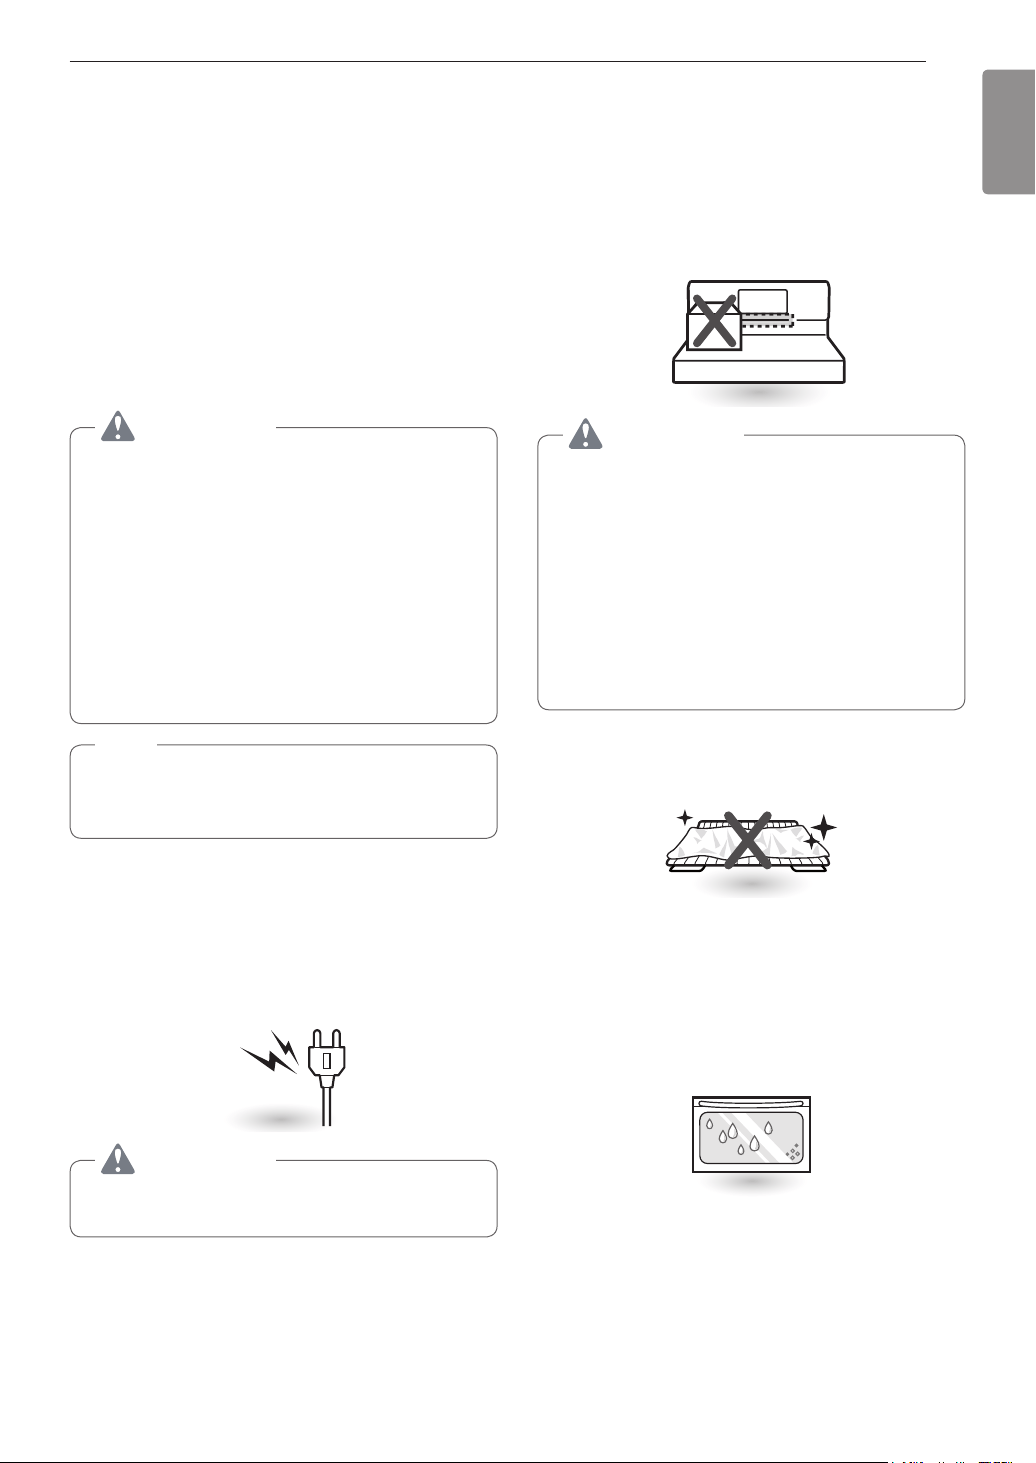
Do not block, touch or place items around the
oven vent during cooking.
Your oven is vented through ducts at the center above
the burner grate. Do not block the oven vent when
cooking to allow for proper air flow. Do not touch
vent openings or nearby surfaces during any cooking
operation.
CAUTION
•
Do not place plastic or flammable items on the
cooktop. They may melt or ignite if left too close
to the vent.
•
Do not place closed containers on the cooktop.
The pressure in closed containers may
increase, which may cause them to burst.
•
Metal items will become very hot if they are left
on the cooktop, and could cause burns.
•
Handles of pots and pans on the cooktop may
become hot if left too close to the vent.
Do not cover racks or oven bottom with aluminum
foil.
You may see condensation on the oven door
glass.
As the oven heats up, the heated air in the oven
may cause condensation to appear on the oven
door glass. These water drops are harmless and will
evaporate as the oven continues to heat up.
26
OPERATION
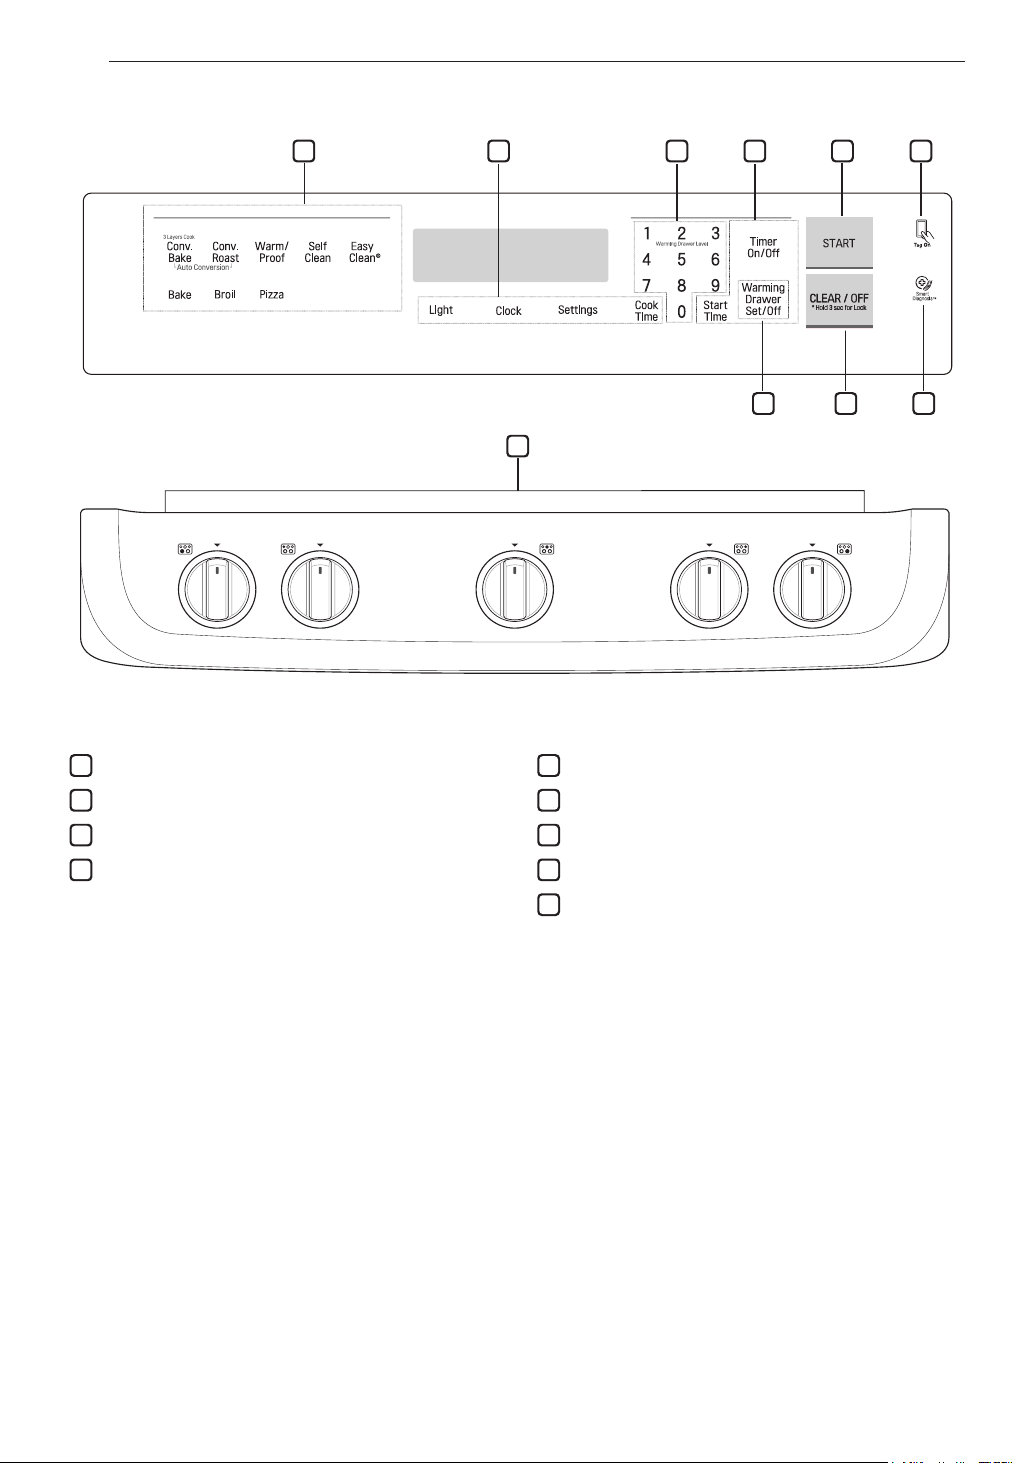
Control Panel Overview
8
1
7 6
2 3 2 4 5
9
Flashing Time
If the oven displays a flashing clock, touch Clock and reset the time, or touch any key to stop the flashing.
1
Oven Controls
2
Features
3
Number Keys
4
Start Key
5
NFC Tag On
6
Smart Diagnosis
TM
7
Clear Off / Lockout Key
8
Warming Drawer Set/Off Key
9
Gas Surface Burners
27
OPERATION
ENGLISH
Changing Oven Settings
Clock
The clock must be set to the correct time of day in
order for the automatic oven timing functions to work
properly.
1
Touch Clock.
2
Touch the numbers to enter the time. For
example, to set the clock for 10:30, touch the
numbers: 1, 0, 3 and 0.
3
Touch Start.
NOTE
•
The time of day cannot be changed during a
timed baking or self-clean cycle.
•
To check the time of day when the display is
showing other information, touch Clock.
•
If no other keys are touched within 25 seconds
of touching Clock, the display reverts to the
original setting.
•
If the display time is blinking, there may have
been a power failure. Reset the time.
Oven Light
The interior oven light automatically turns on when
the door is opened. Touch Light to manually turn the
oven light on.
NOTE
The oven light cannot be turned on if the Self
Clean function is active.
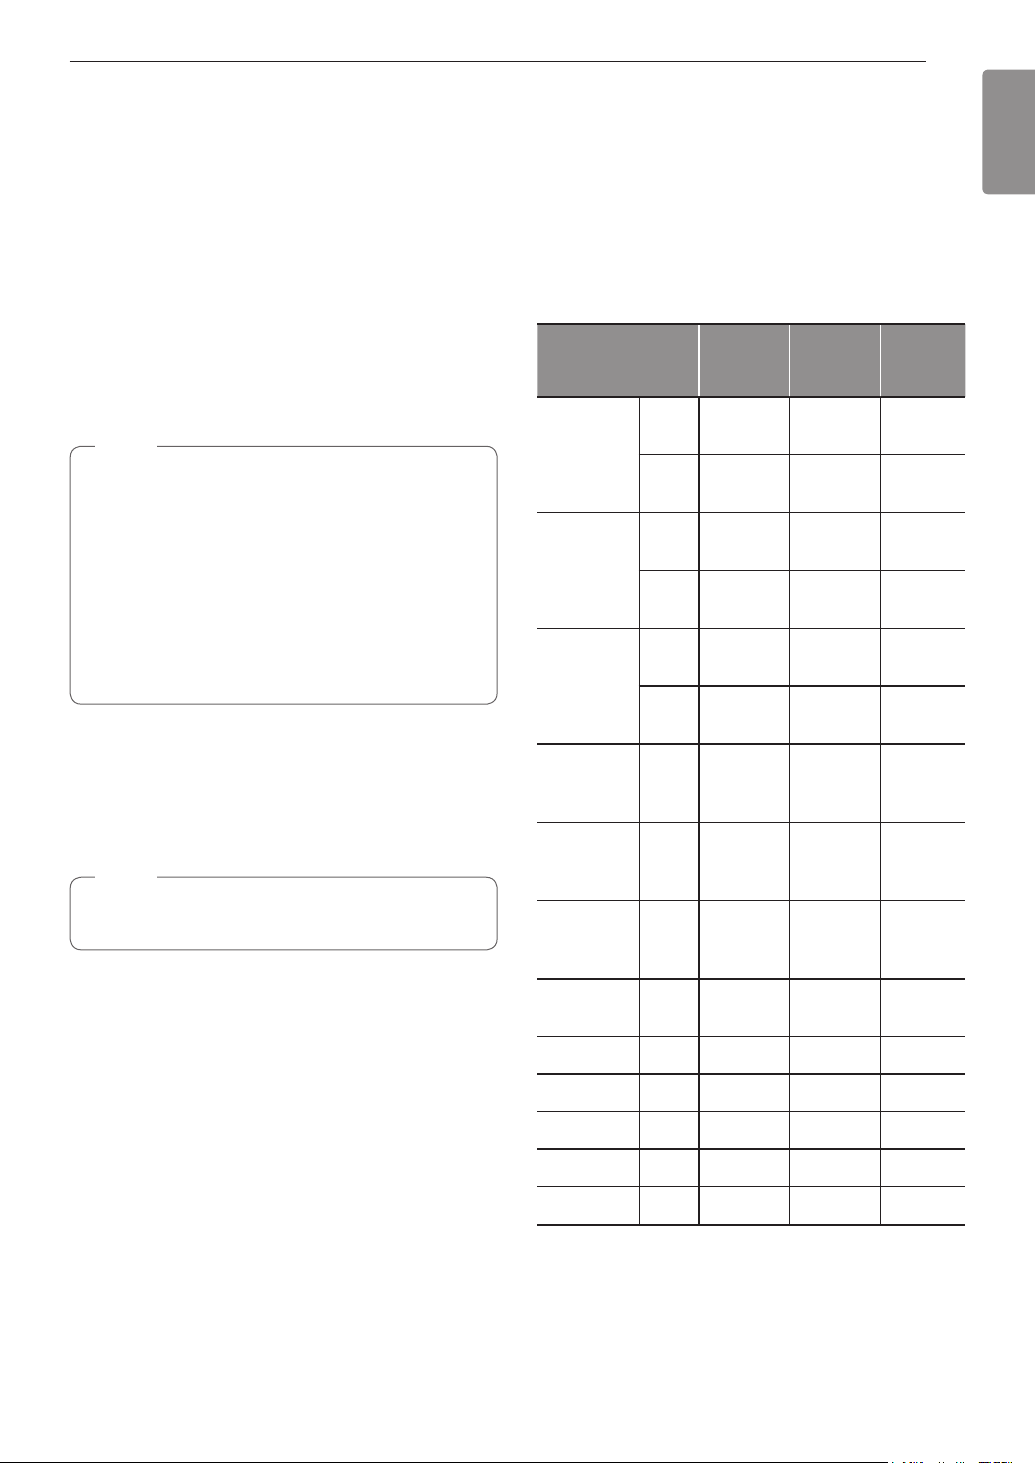
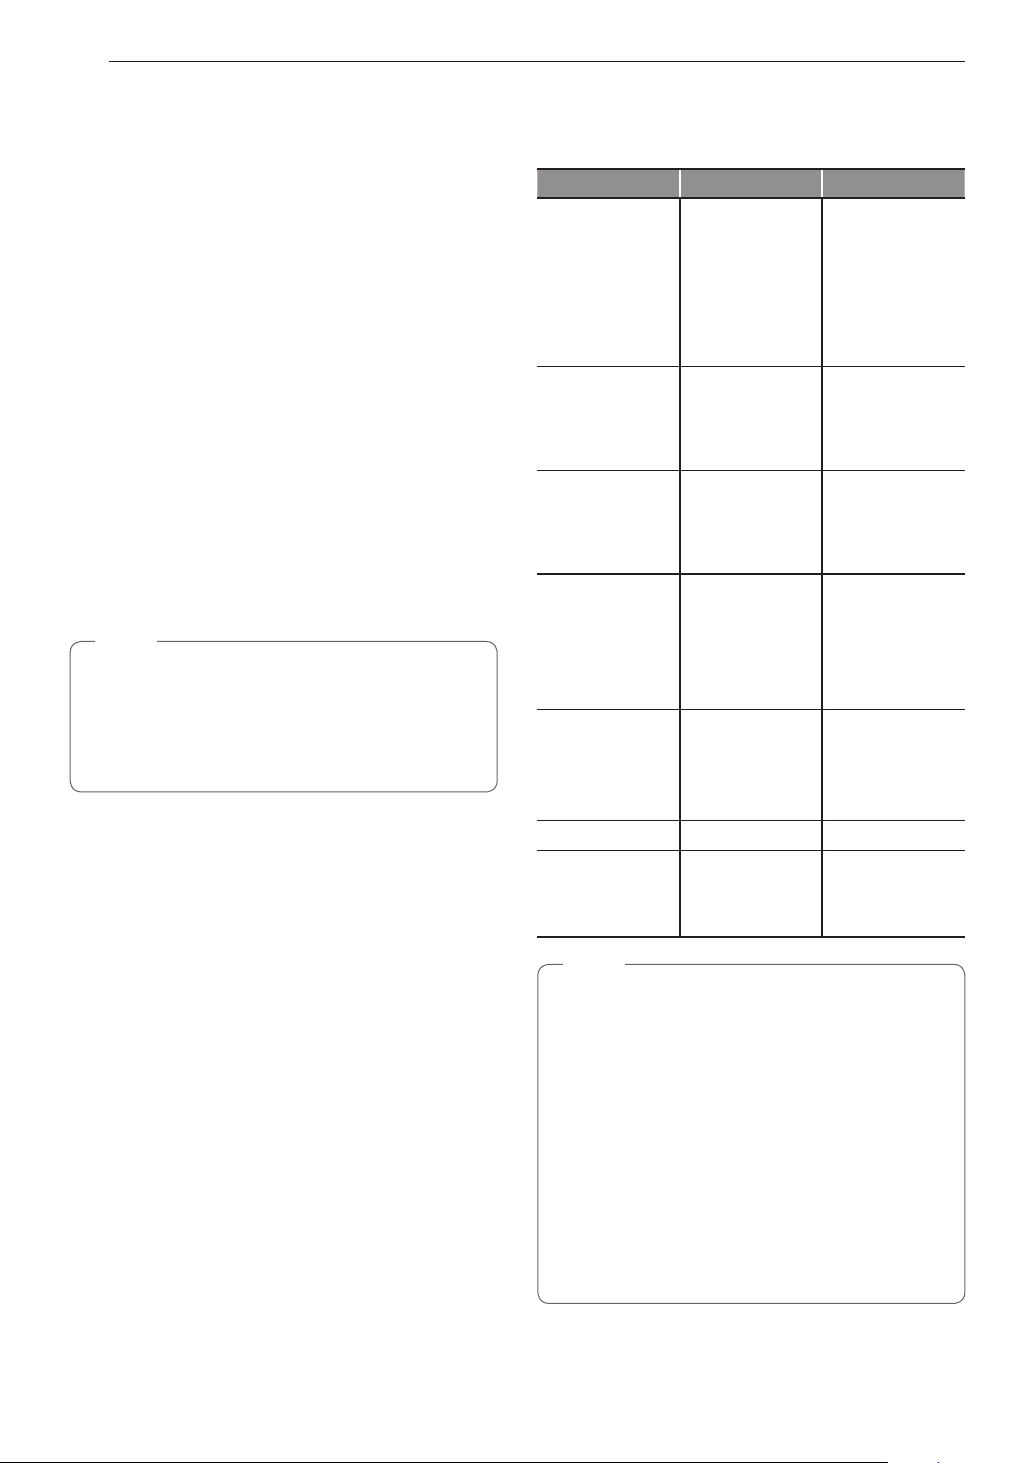
Minimum & Maximum Default
Settings
All of the features listed have a minimum and a
maximum time or temperature setting that can be
entered into the control. A beep sounds each time a
control key is touched.
Two short tones sound if the entry of the temperature
or time is below the minimum or above the maximum
setting for the feature.
Feature
min.
Temp. /
Time
max.
Temp. /
Time
Default
Clock
12 Hr.
1:00
Hr. / min.
12:59
Hr. / min.
24 Hr.
0:00
Hr. / min.
23:59
Hr. / min.
Timer
12 Hr.
0:01
min. / sec.
11:59
Hr. / min.
24 Hr.
0:01
min. / sec.
11:59
Hr. / min.
Cook Time
12 Hr.
0:01
Hr. / min.
11:59
Hr. / min.
24 Hr.
0:01
Hr. / min.
11:59
Hr. / min.
Conv. Bake
300 °F /
150 °C
550 °F /
285 °C
350 °F
(*325 °F)/
12 Hr.
Conv.
Roast
300 °F /
150 °C
550 °F /
285 °C
350 °F
(*325 °F)/
12 Hr.
Broil
Lo
300 °F /
150 °C
Hi
400 °F /
204 °C
Hi /
3 Hr.
Bake
170 °F /
80 °C
550 °F /
285 °C
350 °F /
12 Hr.
Proof 12 Hr.
Pizza 12 Hr.
Warm 3 Hr.
Self Clean 2 Hr. 5 Hr. 3 Hr.
EasyClean
®
10 min.
* Using Auto Conversion
•
Default cook mode times are without setting cook
time.
28
OPERATION
Timer On/Off
The Timer On/Off serves as an extra timer in the
kitchen that beeps when the set time has run out. It
does not start or stop cooking.
The Timer On/Off feature can be used during any of
the other oven control functions.
For example to set 5 minutes
1
Touch Timer On/Off once.
0:00 appears and Timer flashes in the display.
2
Touch 5.
0:05 appears in the display.
3
Touch Timer On/Off to start the Timer. The
remaining time countdown appears in the
display.
NOTE
If Timer On/Off is not touched, the timer returns
to the time of day.
4
When the set time runs out, End shows in the
display. The indicator tones sound every 15
seconds until Timer On/Off is touched.
NOTE
•
If the remaining time is not in the display, recall
the remaining time by touching Timer On/Off.
•
Touch Timer On/Off twice to set the time in
minutes and seconds.
•
Touch Timer On/Off once to set the time in
hours and minutes.
Cancelling the Timer
1
Touch Timer On/Off once.
The display returns to the time of day.
Settings
Touch the Settings key repeatedly to toggle through
and change oven settings.
The Settings key allows you to:
•
set the hour mode on the clock (12 or 24 hours)
•
enable/disable convection auto conversion
•
adjust the oven temperature
•
activate/deactivate the preheating alarm light
•
set the beeper volume
•
switch the temperature scale between Fahrenheit
and Celsius
Setting the Hour Mode
The control is set to use a 12-hour clock. To reset the
clock to 24-hour mode, follow the steps below.
1
Touch Settings once.
2
Touch 1 to toggle between a 12-hour and
24-hour clock.
3
Touch Start to accept the change.
Setting Convection Auto Conversion
When Conv. Bake and Conv. Roast are selected,
Convection Auto Conversion automatically converts the
standard recipe temperature entered to a convection
temperature by subtracting 25 °F / 14 °C. This
auto-converted temperature shows on the display. For
example, select Conv. Bake, enter 350 °F, and 325 °F
shows on the display after preheat.
Convection Auto Conversion is enabled by default. To
change the setting, follow these instructions.
1
Touch Settings repeatedly until Auto appears in
the display.
2
Touch 1 to disable or enable auto conversion.
3
Touch Start to accept the change.
29
OPERATION
ENGLISH
Adjusting the Oven Thermostat
Your new oven may cook differently from the one
it replaced. Use your new oven for a few weeks to
become more familiar with it before changing the
temperature settings. If after familiarizing yourself
with the new oven, you still think that it is too hot or
too cold, you can adjust the oven thermostat yourself.
NOTE
To begin, either raise or lower the thermostat
15 °F (8 °C). Try the oven with the new setting. If
the oven still needs adjustment, raise or lower the
thermostat again, using the first adjustment as a
gauge. For example, if the adjustment was too
much, raise or lower the thermostat 10 °F (5 °C).
If the adjustment was not enough, raise or lower
the thermostat 20 °F (12 °C). Proceed in this way
until the oven is adjusted to your satisfaction.
1
Touch Settings repeatedly until AdJU appears
in the display.
2
Use the number keys to enter the number of
degrees you want to adjust the oven thermostat.
3
Adjust the thermostat either up or down by
touching Settings repeatedly to toggle between
plus (+) or minus (-).
4
Touch Start to accept the change.
NOTE
•
This adjustment does not affect the broiling
or Self Clean temperatures. The adjustment
is retained in memory after a power failure.
The oven thermostat can be increased (+) or
decreased (-) as much as 35 °F or 19 °C.
•
Once the thermostat is increased or decreased,
the display shows the adjusted temperature
until it readjusts.
Turning the Preheat Alarm Light On/Off
When the oven reaches its set temperature, the
preheating alarm light flashes until the oven door is
opened.
You can activate or deactivate the preheating alarm
light.
1
Touch Settings repeatedly until PrE appears in
the display.
2
Touch 1 to turn the light on/off.
3
Touch Start to accept the change.
Adjusting the Beeper Volume
1
Touch Settings repeatedly until Beep appears in
the display.
2
Touch 1 to select Hi, Lo or Off.
3
Touch Start to accept the change.
Selecting Fahrenheit or Celsius
Set the oven temperature display to show either
Fahrenheit (°F) or Celsius (°C) units. The oven
defaults to Fahrenheit unless changed by the user.
1
Touch Settings repeatedly until Unit appears in
the display.
2
Touch 1 to select F (Fahrenheit) or C (Celsius).
3
Touch Start to accept the change.
Lockout
The Lockout feature automatically locks the oven
door and prevents most oven from being turned on. It
does not disable the timer and the interior oven light.
1
Touch and hold Clear/Off for three seconds.
2
The lock melody sounds, Loc appears in the
display and the lock
blinks in the display.
3
Once the oven door is locked, the lock
indicator stops blinking and remains on.
4
To deactivate the Lockout feature, touch and
hold Clear/Off for three seconds. The unlock
melody sounds and the door and the controls
unlock.
30
OPERATION
Start Time (Delayed Timed Cook)
The automatic timer of the Delayed Timed Cook
function turns the oven on and off at the time you
select. This feature can be used with the Bake, Conv.
Bake and Conv. Roast modes.
Setting a Delayed Timed Cook
For example, to bake at 300 °F and delay the start
of baking until 4:30, first set the clock for the correct
time of day.
1
Touch Bake. 350 °F appears in the display.
2
Set the temperature: touch 3, 0 and 0.
3
Touch Cook Time and touch the number keys to
set the baking time.
4
Touch Start Time.
5
Set the start time: touch 4, 3 and 0 for 4:30.
6
Touch Start. A short beep sounds and Timed
Delay and the start time appear in the display.
The oven begins baking at the set start time.
NOTE
•
To cancel the Delayed Timed Cook function,
touch Clear/Off at any time.
•
To change the cooking time, repeat step 3 and
touch Start.
•
If the oven clock is set as a 12-hour clock, you
can delay the cook time for 12 hours. If the
oven clock is set as a 24-hour clock, you can
delay the cook time for 24 hours.
The oven will continue to cook for the set amount
of time and then turn off automatically. When the
cooking time has elapsed:
•
End and the time of day show in the display.
•
The cook end indicator tone sounds every 60
seconds until Clear/Off is touched.
•
When Warm is set, the warming function is
activated after the cooking time ends.
CAUTION
•
Use the automatic timer when cooking cured or
frozen meats and most fruits and vegetables.
Foods that can easily spoil, such as milk, eggs,
fish, meat or poultry, should be chilled in the
refrigerator. Even when chilled, they should
not stand in the oven for more than 1 hour
before cooking begins, and should be removed
promptly when cooking is completed.
•
Eating spoiled food can result in sickness from
food poisoning.
Cook Time (Timed Cook)
Set the oven to cook for a specific length of time
using the Timed Cook feature. This feature can only
be used with the Bake, Conv. Bake and Conv. Roast
modes.
Setting a Timed Cook
For example, to bake at 300 °F for 30 minutes, first
set the clock to the correct time of day.
1
Touch Bake. 350 °F appears in the display.
2
Set the temperature.
Touch 3, 0 and 0.
3
Touch Cook Time. Timed flashes in the display.
Bake, 0:00 and 300 °F appear in the display.
4
Set the baking time: touch 3 and 0 (for 30
minutes). The baking time can be set for any
amount of time between 1 minute and 11 hours
and 59 minutes.
5
Touch Start.
NOTE
To activate the Warm function at the end of the
timed cook cycle, repeat steps 1-4 and then touch
Warm. Warm appears in the display.
(Refer to the Warm section on page 37)
The oven will continue to cook for the set amount
of time and then turn off automatically. When the
cooking time has elapsed:
•
End and the time of day show in the display.
•
The cook end indicator tone sounds every 60
seconds until Clear/Off is touched.
•
When Warm is set, the warming function is
activated after the cooking time ends.
Changing the Cook Time during Cooking
For example, to change the cook time from 30
minutes to 1 hour and 30 minutes, do the following.
1
Touch Cook Time.
2
Change the baking time: touch 1, 3, 0.
3
Touch Start to accept the change.
31
OPERATION
ENGLISH
Removing and Replacing the Oven
Racks
CAUTION
•
Replace the oven racks before turning the oven
on to prevent burns.
•
Do not cover the racks with aluminum foil, or
any other material, or place anything on the
bottom of the oven. Doing so will result in poor
baking performance and may damage the oven
bottom.
•
Only arrange oven racks when the oven is cool.
Removing Racks
1
While wearing oven mitts, grasp the oven rack*.
2
Pull the rack straight out until it stops.
3
Lift up the front of the rack.
4
Pull out the rack.
* When possible, adjust oven racks before using the
oven. Always wear oven mitts if adjusting racks while
the oven is on.
Replacing Racks
1
While wearing oven mitts, place the end of the
rack on the support*
2
Tilt the front end of the rack up.
3
Push the rack in.
4
Check that the rack is properly in place.
*When possible, adjust oven racks before using the
oven. Always wear oven mitts if adjusting racks while
the oven is on.
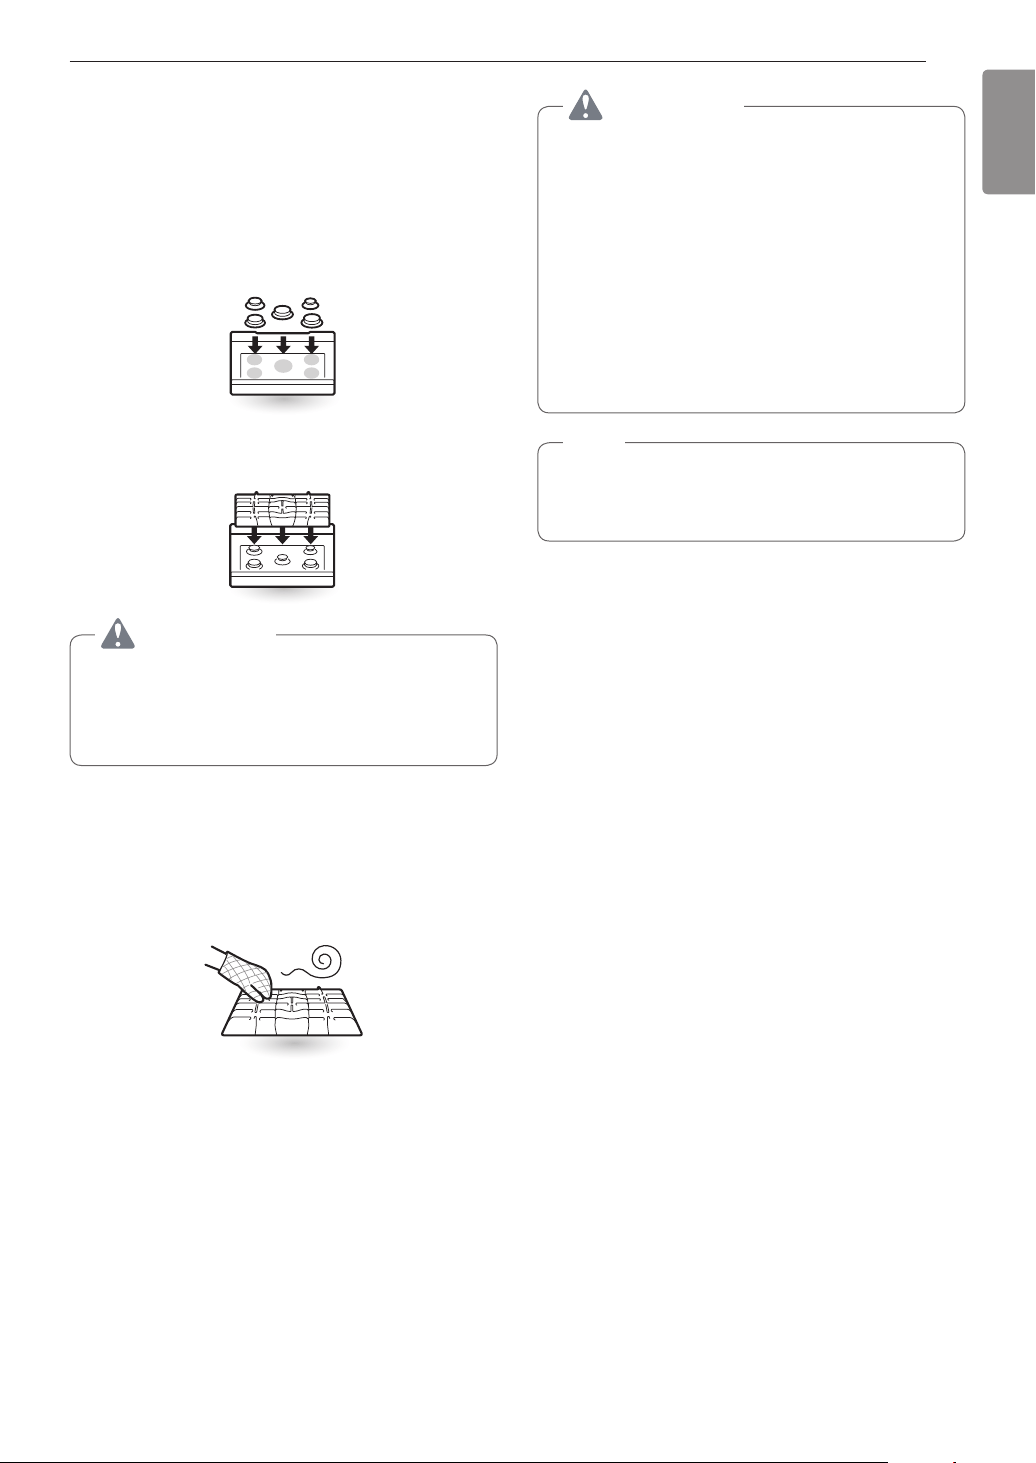
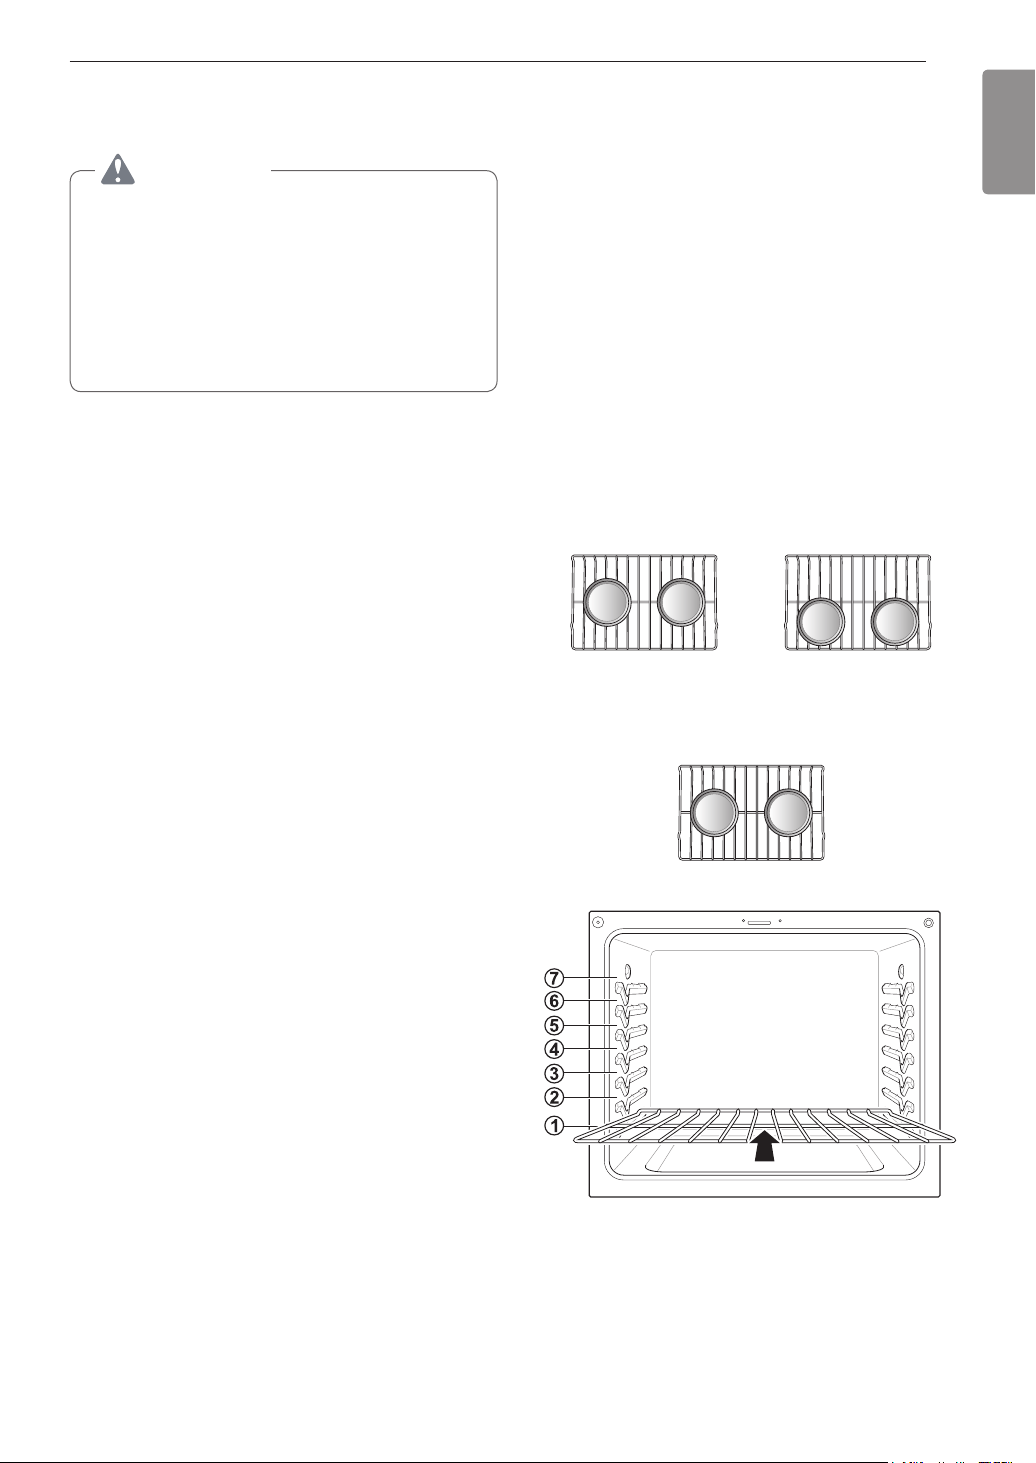
Recommended Baking and Roasting
Guide
•
Center pans on racks for best baking results. If
baking with more than one pan, place the pans so
that each one has at least 1" to 1
1
/
2
" of air space
around it. Do not allow pans to touch the walls of
the oven.
•
If cooking on single rack, place the standard rack in
the position suggested in the charts on the following
pages. Center the cookware as shown in the upper
rack of the multiple rack image.
•
If cooking on multiple racks in the oven, place
standard racks in positions 1 and 4. For best
results, place the cookware as shown, centered
on the top rack and toward the front on the bottom
rack.
Multiple rack baking
Standard rack
(Position 4)
Standard rack
(Position 1)
Single rack baking
Standard rack
32
OPERATION
Bake
Bake is used to prepare foods such as pastries,
breads and casseroles. The oven can be programmed
to bake at any temperature from 170 °F (80 °C) to
550 °F (285 °C). The default temperature is 350 °F
(175 °C).
Setting the Bake Function (example, 375 °F)
1
Touch Bake.
2
Set the oven temperature: touch 3, 7 and 5.
3
Touch Start. The oven starts to preheat.
As the oven preheats, the temperature is displayed
and rises in 5-degree increments. Once the oven
reaches the set temperature, a tone sounds and the
oven light blinks on and off.
4
When cooking is complete, touch Clear/Off.
5
Remove food from the oven.
NOTE
•
It is normal for the convection fan to operate
periodically throughout a normal bake cycle in
the oven. This is to ensure even baking results.
•
The convection fan may continue to run for a
short time after the oven is turned off.
Baking Chart
This chart is only for reference and can be used for
oven. Adjust the cook time according to your recipe.
Food Oven Temperature Rack position
Cakes
- Layer cake
- Bundt cake
- Cupcakes
- Pound cake
- Carrot cake
(from scratch)
350 °F (175 °C)
350 °F (175 °C)
350 °F (175 °C)
350 °F (175 °C)
350 °F (175 °C)
5
3
3
3
3
Cookies
- Sugar cookies
- Chocolate chip
- Brownies
350 °F (175 °C)
350 °F (175 °C)
350 °F (175 °C)
5
5
5
Pizza
- Rising
- Frozen
- Fresh
400 °F (204 °C)
400 °F (204 °C)
425 °F (218 °C)
4
4
4
Breads
- Biscuits
(canned)
- Biscuits
(from scratch)
- Muffins
350 °F (175 °C)
375 °F (190 °C)
400 °F (204 °C)
4
4
4
Fruits and
Vegetables
- Apples (baked)
- Potatoes
(baked)
375 °F (190 °C)
425 °F (218 °C)
2
2
Angel food cake 350 °F (175 °C) 1
Custards
- Cheesecake,
crème brulée
325 °F (161 °C)
-
350 °F (175 °C)
2
NOTE
•
Because the oven temperature cycles, an oven
thermometer placed in the oven cavity may not
show the same temperature that is set on the
oven.
•
It is normal for the convection fan to run while
preheating during a regular bake cycle.
•
The convection fan motor may run periodically
during a regular bake cycle.
•
The bake burner turns off if the door is left
open during baking. If the door is left open for
longer than 30 seconds during baking, the bake
burner turns off. The bake burner turns back on
automatically once the door is closed.
33
OPERATION
ENGLISH
Convection Mode
The convection system uses a fan to circulate heat
evenly within the oven. This improves heat distribution
and allows for even cooking and excellent results,
especially when using multiple racks. Convection
cooking can also shorten cooking times.
Convection Bake
Setting the Conv. Bake Function (example: to
Conv. Bake 375 °F)
1
Touch Conv. Bake. The display flashes 350 °F.
2
Set the oven temperature: touch 3, 7 and 5.
•
Convection Bake cooks faster and more evenly
when cooking foods like cookies, biscuits, rolls,
or other baked goods on a single rack. Cookies,
muffins, and biscuits will have very good results
when using multiple racks.
•
Multiple rack cooking may slightly increase times
for some foods, but the overall time is reduced.
•
Convection Bake gives excellent results for quick
breads and yeast breads of all kinds, and breads
and pastries brown more evenly.
•
Do not use Convection Bake for delicate items like
custards, souffles, or cheesecakes, which may be
disturbed by the convection fan.
NOTE
•
The convection cooking modes automatically
reduce the oven temperature by 25 °F (14 °C).
The display shows the changed temperature.
•
This feature is called auto conversion.
•
The range comes with this feature enabled.
•
To disable the auto conversion feature, see
Setting Convection Auto Conversion, page 28.
•
The oven fan runs while convection baking. If
the door is left open for longer than 30 seconds
during baking, the fan stops.
3
Touch Start. The display shows Conv. Bake and
the converted temperature starting at 100 °F. As
the oven preheats, the displayed temperature
will increase in 5-degree increments.
4
Once the oven reaches the desired temperature,
a tone sounds and the oven light blinks on and
off. The display shows the auto converted oven
temperature 350 °F, Conv. Bake and .
Convection Baking Chart
If auto conversion is disabled, reduce standard
recipe temperature by 25 °F (14 °C) for Convection
Bake. Temperatures have been adjusted in this
chart. Multi-rack cooking may slightly increase cook
times for some foods, but the overall time is reduced.
This chart is only for reference. Adjust cooking time
according to your preference.
Food
Oven Temperature
(converted)
Rack position
Cakes
- Layer cakes
- Bundt cakes
325 °F (161 °C)
325 °F (161 °C)
3
3
Cakes, Specialty
- Popovers
- Cupcakes
- Pound cakes
400 °F (204 °C)
325 °F (161 °C)
325 °F (161 °C)
3
3
3
Cookies
- Sugar cookies
- Chocolate chips
- Brownies
325 °F (161 °C)
325 °F (161 °C)
325 °F (161 °C)
3
3
3
Pizza
- Frozen
- Fresh
375 °F (190 °C)
400 °F (204 °C)
4
4
Breads
- Biscuit, canned
- Biscuit, from scratch
- Muffins
- White bread, loaf
325 °F (161 °C)
350 °F (175 °C)
375 °F (190 °C)
400 °F (204 °C)
4
4
4
4
Pastry Crust
- From scratch
- Refrigerator
400 °F (204 °C)
400 °F (204 °C)
4
4
Desserts
- Fruit crisps and
cobblers, from
scratch
- Pies, from scratch,
2 crust fruit
350 °F (175 °C)
350 °F (175 °C)
3
3
Angel food cake
325 °F (161 °C) 1
Custards
- Cheesecake,
crème brulée
300 °F (149 °C)
-
325 °F (161 °C)
2

34
OPERATION
Cookware for Convection Cooking
Any cookware safe for use in a conventional oven will
work in a convection oven. But for best results, keep
the following in mind.
•
Make sure pans don’t touch the oven walls when
centered on the racks. Use cookware that leaves
room for air circulation in the oven for best results
when convection cooking.
•
Leave space between pans. Make sure pans don't
touch each other or the oven walls.
•
Do not use pans with high sides. Use flat pans with
no sides for cookies or biscuits. Use a pan with low
sides for oven-baked chicken.
•
Metal pans heat the fastest. Heat-resistant paper
and plastic containers that are recommended for
use in regular ovens can be used in convection
ovens. Glass and ceramic pans can also be used.
However, metal pans heat the fastest and are
recommended for convection cooking.
•
Food cooked on pans with dark or matte finishes
cooks faster than food on pans with shiny finishes.
•
Use the pan size recommended in the recipe.
NOTE
•
Some frozen foods have been developed to use
commercial convection ovens. For best results
in this oven, preheat the oven and use the
temperature recommended on the packaging.
•
If a food manufacturer gives specific convection
cooking instructions, remember that convection
autoconversion will reduce the set temperature
by 25 °F (14 °C). If auto-conversion is enabled,
add 25 °F (14 °C) when setting the temperature
to get a resulting converted temperature which
matches the recipe.
Convection Roast
The Convection Roast feature is designed to give
optimum roasting performance. Convection Roast
combines cooking with the convection fan to roast
meats and poultry. The heated air circulates around
the food from all sides, sealing in juices and flavors.
Food cooked in this manner is crispy brown on the
outside while staying moist on the inside.
Setting the Conv. Roast Function (example: to
Conv. Roast 375 °F)
1
Touch Conv. Roast. The display shows 350 °F.
2
Set the oven temperature: touch 3, 7 and 5.
NOTE
The convection cooking modes automatically
reduce the oven temperature by 25 °F (14 °C).
The display shows the changed temperature.
This feature is called auto conversion. The range
comes with this feature enabled. To disable the
auto conversion feature, see Setting Convection
Auto Conversion, page 28.
3
Touch Start. The display shows Conv. Roast
and the changing temperature starting at 100 °F.
As the oven preheats, the displayed temperature
will increase in 5-degree increments.
4
Once the oven reaches the desired temperature,
a tone sounds and the oven light flashes on and
off. The display shows the auto converted oven
temperature 350 °F, Conv. Roast and .
5
Place food in oven.
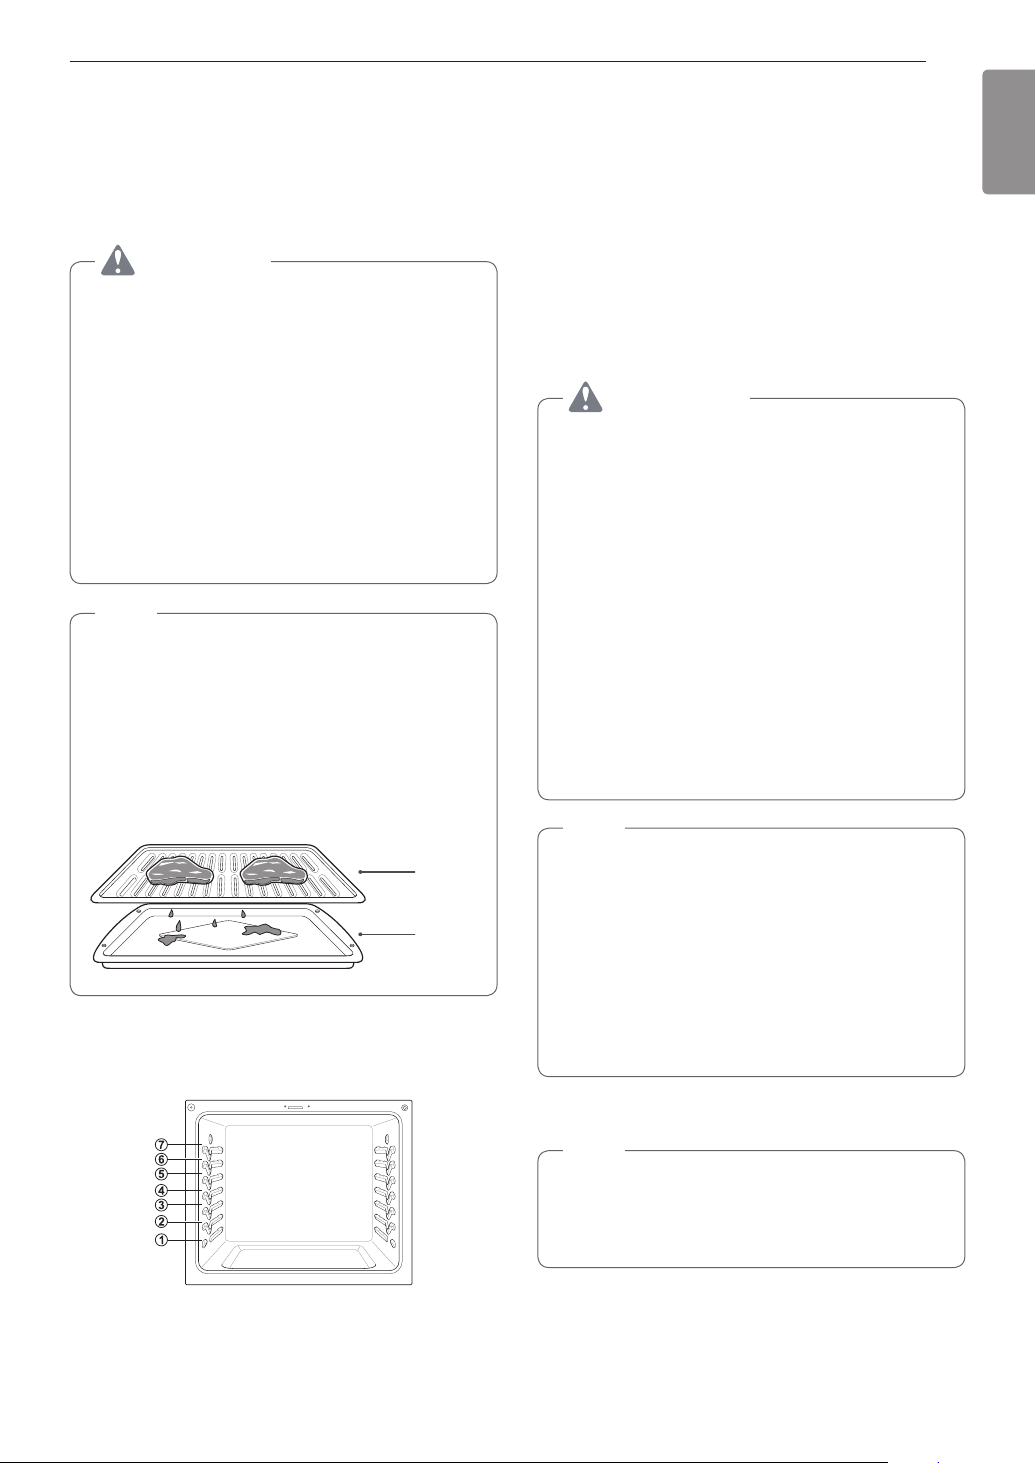
35
OPERATION
ENGLISH
Broil
Your oven is designed for closed-door broiling. Broil
uses an intense heat radiation from the upper gas
burner.
The Broil function works best when broiling thin,
tender cuts of meat (1" or less), poultry or fish.
CAUTION
•
Do not use a broiler pan without a grid. The oil
can cause a grease fire.
•
Do not cover the grid and broiler pan with
aluminum foil. Doing so will cause a fire.
•
Always use a broiler pan and grid for excess fat
and grease drainage. This will help to reduce
splatter, smoke, and flare-ups.
•
Never use a broiler pan that is not thoroughly
cleaned and at room temperature. If your
broiler pan is damaged, warped, or has heavy
permanent soiling, consider replacing it to
reduce the amount of smoke you experience
during broiling.
NOTE
•
Use Lo broil to broil foods such as poultry and
thick cuts of meat.
•
Remove the pan from the oven to cool down for
easy cleaning.
•
For best results, use a pan designed for
broiling, as shown below. The broiler pan will
catch grease spills and the grid will help prevent
grease splatters.
Grid
Broiler pan
When broiling refer to the broiling guide for placing
the rack.
Setting the oven to Broil
1
Touch Broil once for Hi and twice for Lo.
2
Touch Start.
3
Allow the broiler to preheat for five minutes.
4
Place food in the oven.
5
Close the oven door. The oven door must be
closed during broiling.
WARNING
When using your broiler, the temperature inside
the oven is extremely hot. Take caution to avoid
possible burns by:
•
Keeping the door closed when broiling
•
Always wearing oven mitts when inserting/
removing food items
Improper use of the broiler may result in
excessive smoke or a grease fire. Improper use
conditions include, but are not limited to:
•
Broiling on standard rack in position 6.
•
Setting the broiler to a higher power level than
recommended.
•
Using dirty/greasy broiler pans.
•
Broiling beyond recommended cooking times.
NOTE
•
This range is designed for closed-door broiling.
Close the door to set the Broil function. If the
door is open, the Broil function cannot be set
and door appears on the display. Close the
door and reset the Broil function. Opening the
door turns off the broil burner during broiling.
If the door is opened during broiling, the broil
burner turns off after five seconds. The broiler
turns back on automatically once the door is
closed.
6
When broiling is finished, touch Clear/Off.
NOTE
During any Broil function, it is normal for the
broiler to cycle on and off. The igniter for the broil
burner on the ceiling of the oven glows orange
periodically during normal broil operation.
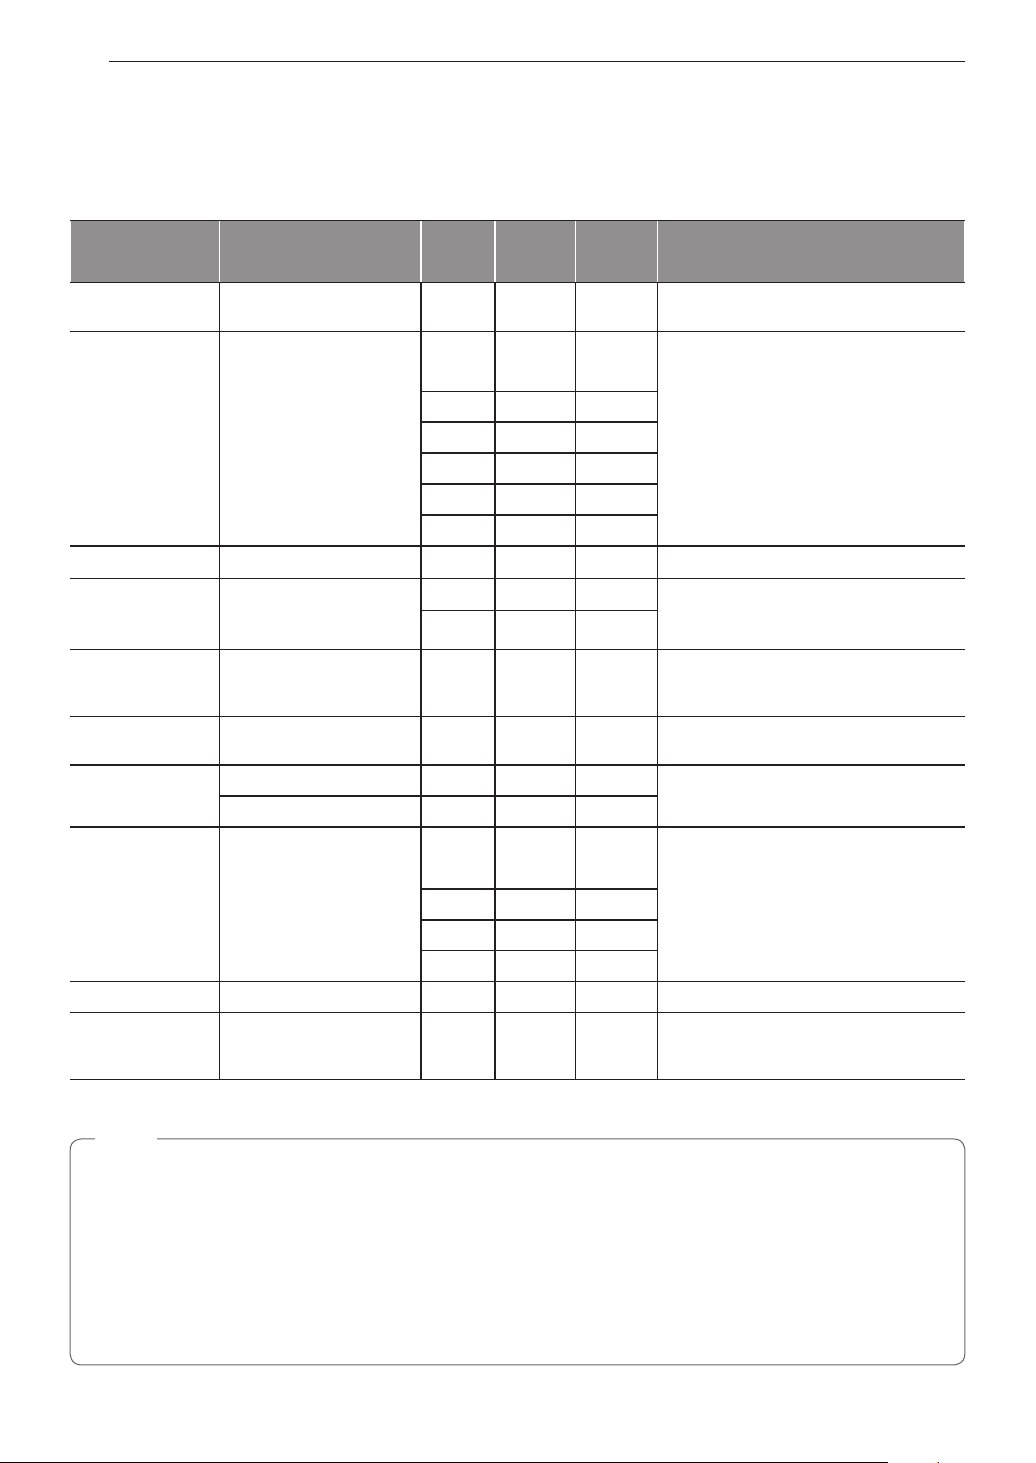
36
OPERATION
Recommended Broiling Guide
The size, weight, thickness, starting temperature, and your preference of doneness will affect broiling times.
This guide is based on meats at refrigerator temperature. For best results when broiling, use a pan designed for
broiling.
Food Quantity and/or Thickness
Rack
Position
First Side
(minutes)
Second
Side
(minutes)
Comments
Ground Beef
Well done
1 lb. (4 patties)
1
/
2
to
3
/
4
" thick
6 5-7 3-4
Space evenly. Up to 8 patties may be
broiled at once.
Beef Steaks
Rare 6 7 5
Steaks less than 1" thick cook
through before browning. Pan frying is
recommended. Slash fat.
1" thick
1 to 1
1
/
2
lbs.
Medium 6 12 5-6
Well Done 6 13 8-9
Rare
1
1
/
2
" thick
2 to 2
1
/
2
lbs.
4 10 6-7
Medium 4 12-15 10-12
Well Done 4 25 16-18
Toast
1 to 9 pieces
5 1-2 1-2
Chicken
1 whole 2 to 2
1
/
2
lbs.,
split lengthwise
4 bone-in breasts
2 35-40 25 Brush each side with melted butter.
Broil skin-side down.
2 25-30 10-15
Fish Fillets
1
/
4
to
1
/
2
" thick 5 7-8 6 Handle and turn very carefully.
Brush with lemon butter before and during
cooking, if desired.
Ham Slices
(precooked)
1" thick
1
/
2
" thick
3
4
10
7
5
4
Increase time 5 to 10 minutes per side for
1
1
/
2
" thick or home-cured ham.
Pork chops
Well Done
2 (
1
/
2
" thick) 4 10 8 Slash fat.
2 (1" thick) about 1lb. 4 13 8-9
Lamb Chops Slash fat.
Medium
2 (1" thick) about
10 to 12 oz.
5 6 4-7
Well Done 5 10 10
Medium
2 (
1
/
2
" thick) about 1lb.
5 10 4-6
Well done 5 17 12-14
Bacon
1
/
2
lb. (about 8 thin slices) 4 8 3 Arrange in single layer.
Lobster Tails 2-4
6 to 8 oz. each
3 13-16 Do not
turn over.
Cut through back of shell. Spread open.
Brush with melted butter before broiling
and after half of broiling time.
•
This guide is only for reference. Adjust cook time according to your preference.
NOTE
The USDA advises that consuming raw or undercooked fish, meat, or poultry can increase your risk of food-
borne illness.
The USDA has indicated the following as safe minimum internal temperatures for consumption:
•
Ground beef: 160 °F (71.1 °C)
•
Poultry: 165 °F (73.9 °C)
•
Beef, veal, pork, or lamb: 145 °F (62.8 °C)
•
Fish / Seafood: 145 °F (62.8 °C)

37
OPERATION
ENGLISH
Pizza
This function automatically sets the oven temperature
to cook either frozen pizza with regular or rising crust,
or freshly made pizza. Simply choose the type of
pizza (see chart) and set the desired cook time.
Setting the Oven for Pizza
1
Touch Pizza once. P1 appears in the display.
Touch Pizza repeatedly to toggle between P1,
P2, and P3. Select the desired option. (See
Pizza Chart below.)
2
Touch Start. The oven starts to preheat.
As the oven preheats, the temperature is displayed
and rises in 5-degree increments. Once the oven
reaches the set temperature, a tone sounds and the
oven light blinks on and off.
3
Place pizza in the oven, close the door and set
the timer following the suggestions in the chart.
4
When cooking is complete touch Clear/Off.
5
Remove the food from the oven.
NOTE
Preheating is necessary for better cooking results.
Place the food in the oven after preheating.
Pizza Chart
Display Mode Item Rack position
Recom-
mended time
(minutes)
P1
Frozen
pizza,
Regular
crust
4 14-16
P2
Frozen
pizza, Rising
crust
4 19-21
P3 Fresh Pizza 4 8-10
Warm
This function will maintain an oven temperature of
170 °F. The Warm function will keep cooked food
warm for serving up to three hours after cooking has
finished. The Warm function may be used without any
other cooking operations or can be used after cooking
has finished using a Timed Cook or a Delayed Timed
Cook.
Setting the Warm Function
1
Touch Warm/Proof to toggle between warm and
proof.
2
Touch Start.
3
Touch Clear/Off at any time to cancel.
Setting the Warm Function after a Timed Cook
1
Select the cooking function.
2
Enter the oven temperature using the number
keys.
3
Touch Cook Time and enter the cook time using
the number keys.
4
Touch Warm/Proof.
5
Touch Start.
6
When cooking is finished, touch Clear/Off to
cancel the Warm function.
NOTE
•
The Warm function is intended to keep food
warm. Do not use it to cool food down.
•
It is normal for the fan to operate during the
Warm function.
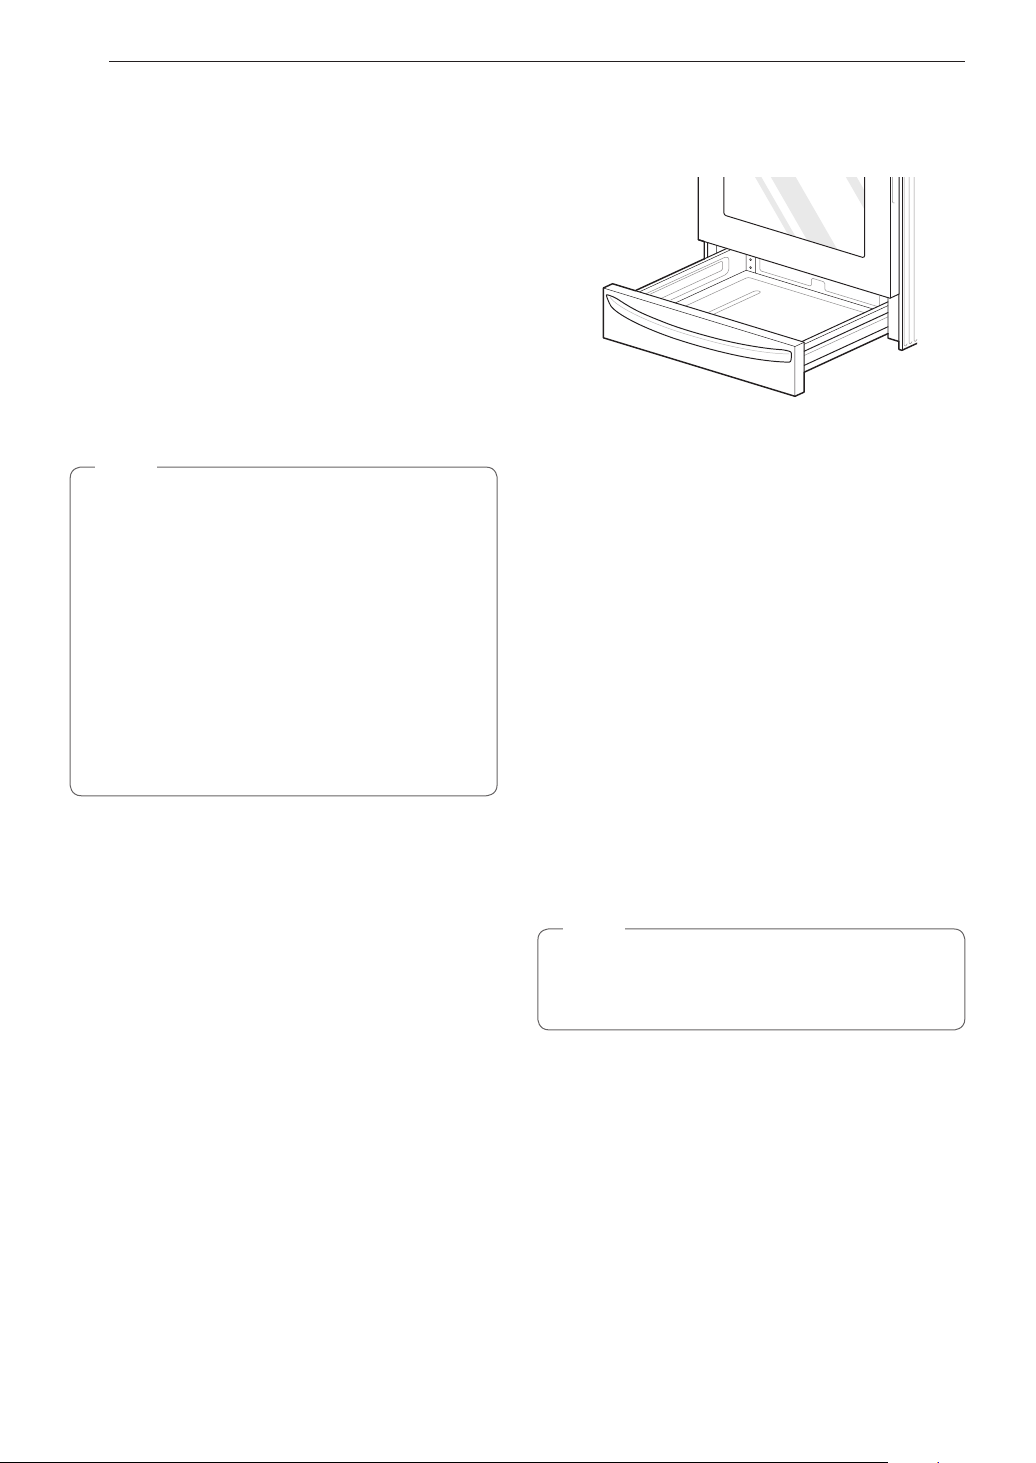
38
OPERATION
Proof
This feature maintains a warm oven for rising yeast
leavened products before baking.
Setting the Proof Function
1
Use rack position 2 or 3 for proofing.
2
Touch Warm/Proof until Proof appears in the
display.
3
Touch Start.
4
Touch Clear/Off when proofing is finished.
NOTE
•
To avoid lowering the oven temperature and
lengthening proofing time, do not open the oven
door unnecessarily. Check bread products early
to avoid over proofing.
•
Do not use the proofing mode for warming
food or keeping food hot. The proofing oven
temperature is not hot enough to keep foods
at safe temperatures. Use the Warm feature
to keep food warm. Proofing does not operate
when the oven is above 125 °F. Hot shows in
the display.
•
It is normal for the fan to operate during the
Proof function.
Operating the Warming
Drawer
The Warming Drawer keeps hot cooked foods at
serving temperature.
All food placed in the Warming Drawer should be
covered with an oven-safe lid or aluminum foil to
maintain quality. Do not place foil on bottom or
sides of drawer. Do not use plastic wrap to cover
food. Plastic may melt onto the drawer and be very
difficult to clean. Use only utensils and cookware
recommended for oven use in the Warming Drawer.
Setting the Warming Drawer Control
1
Touch Warming Drawer Set/Off. The indicator
light will flash. (If no further buttons are touched
within 25 seconds, the display will clear.)
2
Use the number key to set the power level: 1 for
Low, 2 for Medium, and 3 for High.
3
When the food is ready, or to cancel, touch
Warming Drawer Set/Off.
NOTE
•
The Warming Drawer shuts off automatically
after three hours.
•
Do not heat cold food in the Warming Drawer.
39
OPERATION
ENGLISH
Warming Drawer food/power level
recommendations
Setting Type of Food
Low
•
Rolls (Soft)
•
Empty dinner plates
Medium
•
Gravies
•
Casseroles
•
Eggs
•
Vegetables
•
Biscuits
•
Rolls (hard)
•
Pastries
•
Roasts
High
•
Bacon
•
Hamburger patties
•
Poultry
•
Pork chops
•
Pizza
•
Fried Foods
Different types of food may be placed in the warming
drawer at the same time. For best results, do not
leave food in the warming drawer for more than one
hour. Do not leave smaller quantities or heat-sensitive
food, such as eggs, in the warming drawer more than
30 minutes. The maximum operating time is three
hours.
CAUTION
•
Do not use the warming drawer for storage
of racks, broiler pans, insert pans, plates,
or utensils. The warming drawer contains a
heating element which may damage any items
not specifically designed to be used with it
and should only be used to store cookware
specifically supplied by LG with your range.
•
Do not put food or foil directly on the surface
or base of the warming drawer. This may result
in damage to your drawer and may spoil your
food.
•
Do not place plastic wrap in the warming
drawer or use it to cover food being heated
in the warming drawer. Plastic may melt onto
the drawer or surrounding areas and is very
difficult to remove. Use only aluminum foil or
cookware that is capable of withstanding baking
temperature to heat or cover your food.
•
Do not use the warming drawer to heat water
or any other liquids. Spilled liquids may cause
an electrical short or result in severe personal
injury, electric shock or death.
•
Never place plastics, paper, canned foods or
other combustible material into the warming
drawer. These items pose a severe risk of fire,
damage and injury.
•
In the unlikely event that an item falls behind
the warming drawer, always turn the power off
and wait for the warming drawer to cool before
retrieving the item. Never attempt to retrieve
any items that fall behind the warming drawer
without first turning the power off and ensuring
the warming drawer cavity has cooled off.
Failure to do so may result in severe personal
injury, electric shock or death.
•
Do not touch the surface of the warming drawer
while it is in operation. Use oven mitts or hot
pads when inserting or removing food to avoid
burns or other injury.
•
Do not leave food in the warming drawer for
longer than one hour. Eating food which has
been heated for too long at low temperatures
can lead to food-borne illnesses.
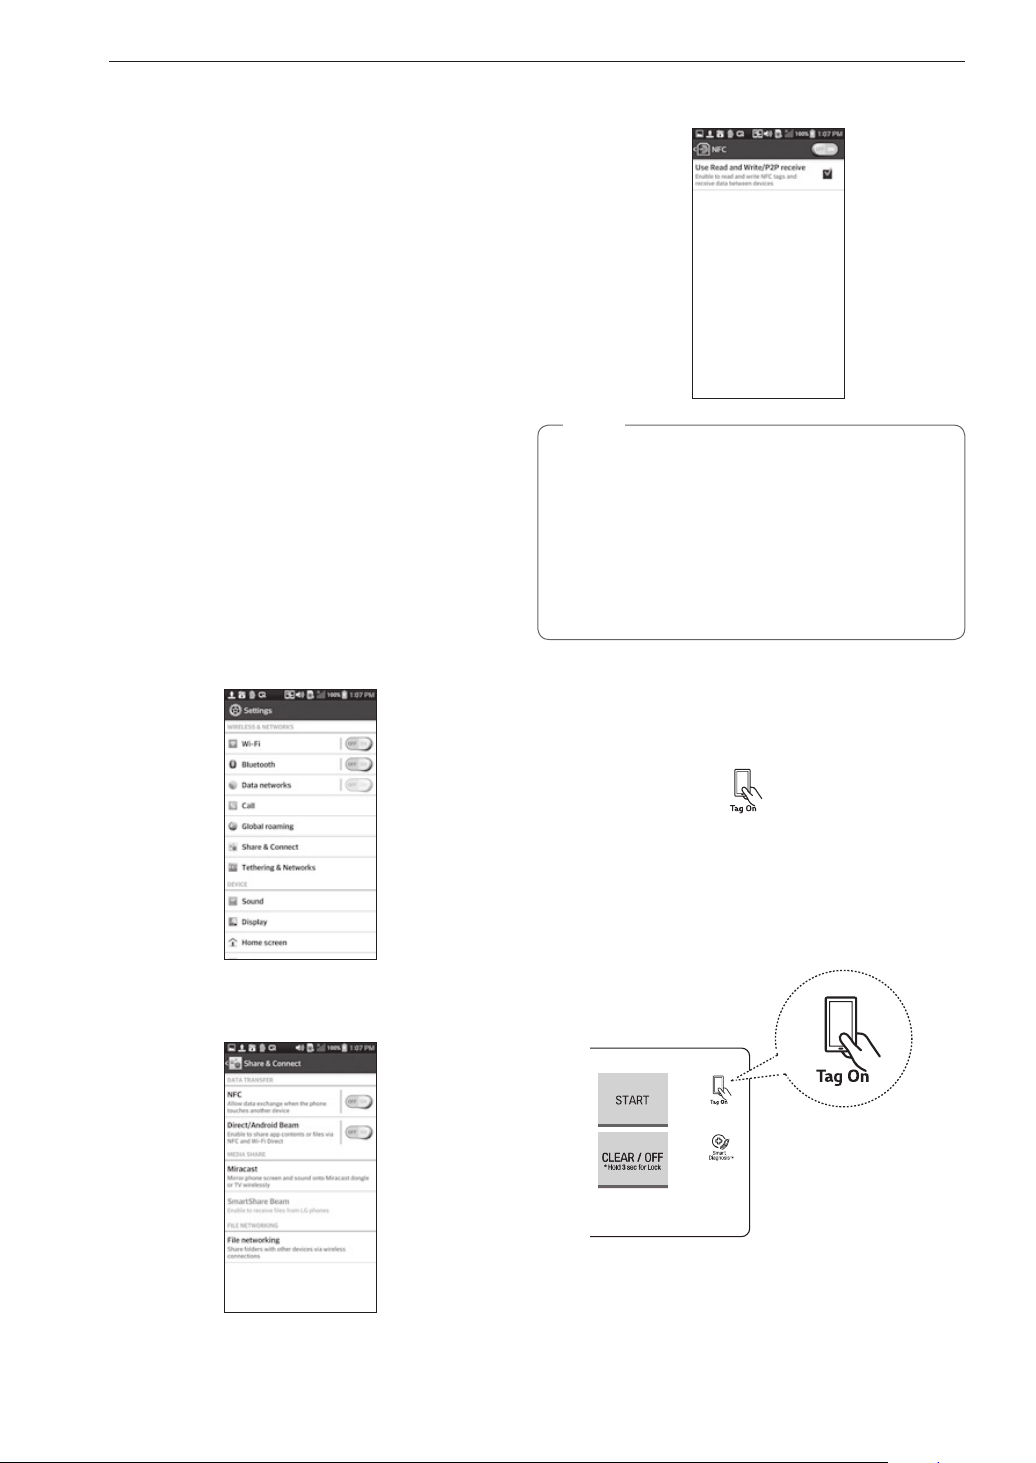
40
SMART FEATURES
SMART FEATURES
Before Using Tag On
The Tag On function allows you to conveniently
use LG Smart Diagnosis™, set the cook mode and
EasyClean
®
features, and communicate with your
appliance using a smart phone. To use the Tag On
function:
1
Download the LG Smart ThinQ application to a
smart phone.
2
Turn on the NFC (Near Field Communication)
function in the smart phone. The Tag On function
is only compatible with smart phones that are
equipped with the NFC function and based on
the Android 4.0 (Ice Cream Sandwich) or later
OS (operating system).
Turning On the Smart Phone's NFC
Function
1
Enter the Settings menu of the smart phone
and select Share & connect under WIRELESS
NETWORKS.
2
Set NFC and Direct/Android Beam to ON and
select NFC.
3
Check Use Read and Write/P2P receive.
NOTE
•
Depending on the smart phone manufacturer
and Android OS version, the NFC activation
process may differ. Refer to the manual of the
smart phone for details.
•
You can activate Tag On function by using the
Android 4.0 smart phone with NFC function or
higher. NFC function may not work depending
on smart phones.
Using the Tag On Function
The Tag On Icon
Look for the Tag On icon next the Start key on
the control panel. Position the smart phone next
to the icon when using the Tag On function with
the LG Smart Diagnosis™, cook mode setting
and EasyClean
®
features of the LG Smart ThinQ
application.
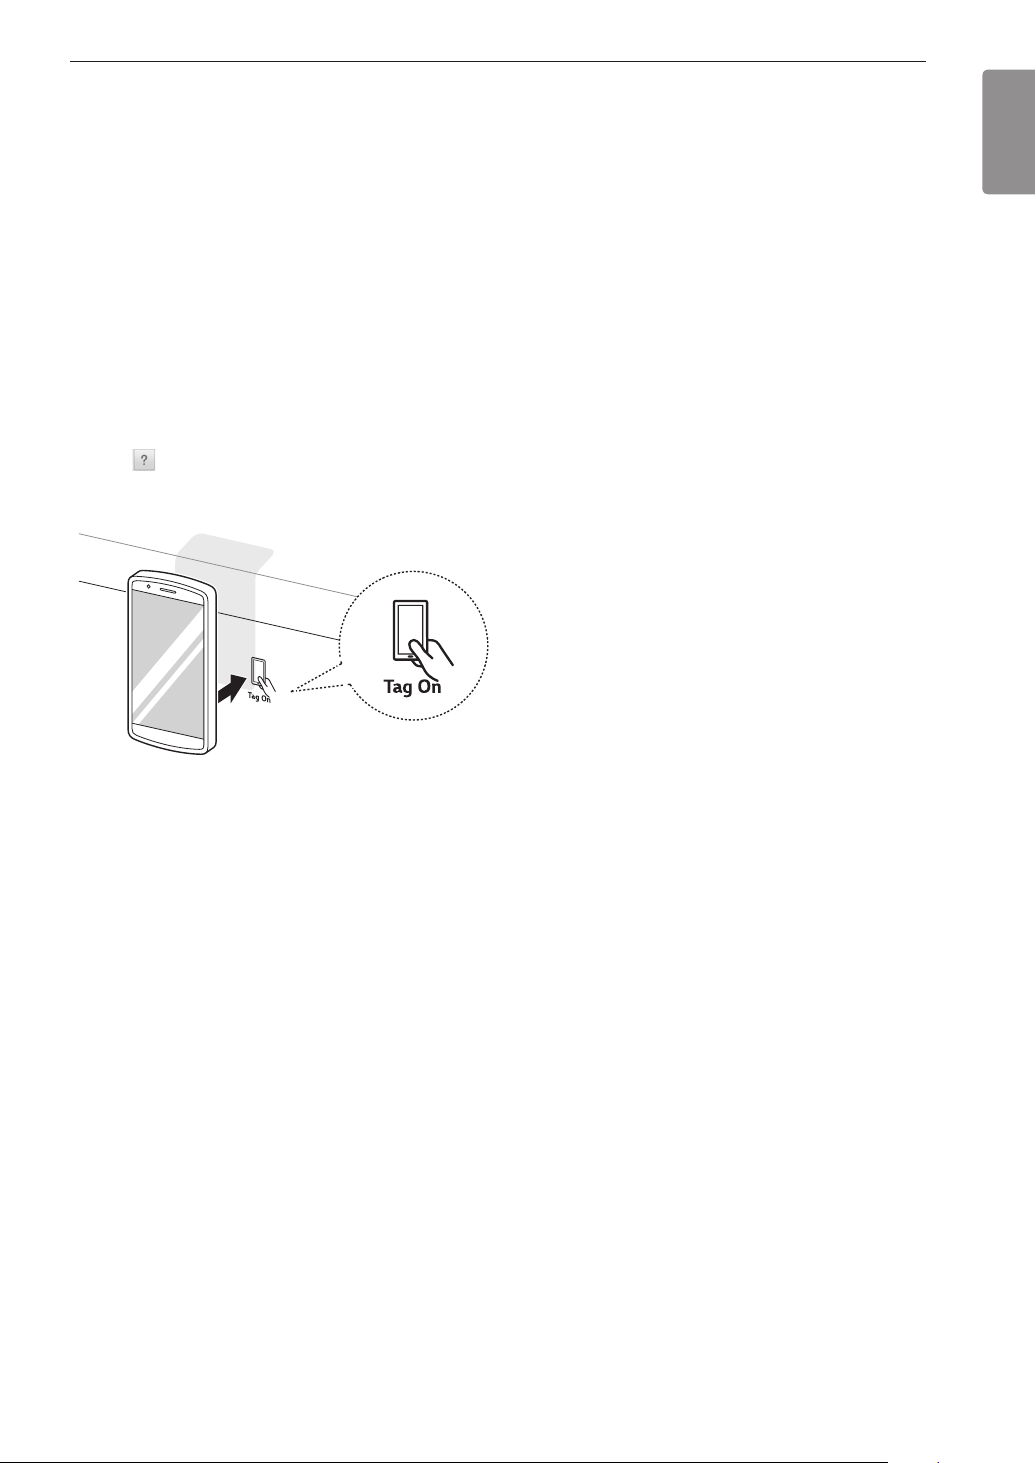
41
SMART FEATURES
ENGLISH
The NFC Antenna Position
When using the Tag On function, position the smart
phone so that the NFC antenna inside the back of the
smart phone matches the position of the Tag On icon
on the appliance.
If the application is not able to show a target range,
position the center back of the smart phone over
the Tag On icon on the appliance. If the connection
is not made immediately, move the smart phone
very slightly in a widening circular motion until the
application verifies the connection.
Because of the characteristics of NFC, if the
transmission distance is too far, or if there is a metal
sticker or a thick case on the phone, transmission will
not be good.
Touch [
] in the LG Smart ThinQ application for
a more detailed guide on how to use the Tag On
function.
Using Tag On with
Applications
Touch an LG appliance's Tag On logo with an
NFC-equipped smart phone to use the LG Smart
ThinQ application's LG Smart Diagnosis™, Oven
Settings, and EasyClean
®
features.
Smart Diagnosis™
Allows you to diagnose and troubleshoot problems
with your range.
EasyClean
®
Allows you to set EasyClean
®
alerts, read the
instruction guide, and simulate and compare energy
consumption when using EasyClean
®
versus
self-clean cycles.
Oven Settings
Allows the user to change oven settings, including
the hour mode, preheat alarm light, beeper volume,
temperature units, convection auto conversion, and
thermostat adjustment.
IMPORTANT : Features could be added or deleted
when the LG Smart ThinQ application is updated.
Data saved on the LG Smart ThinQ application could
be deleted when the application is updated or your
smart phone is changed.
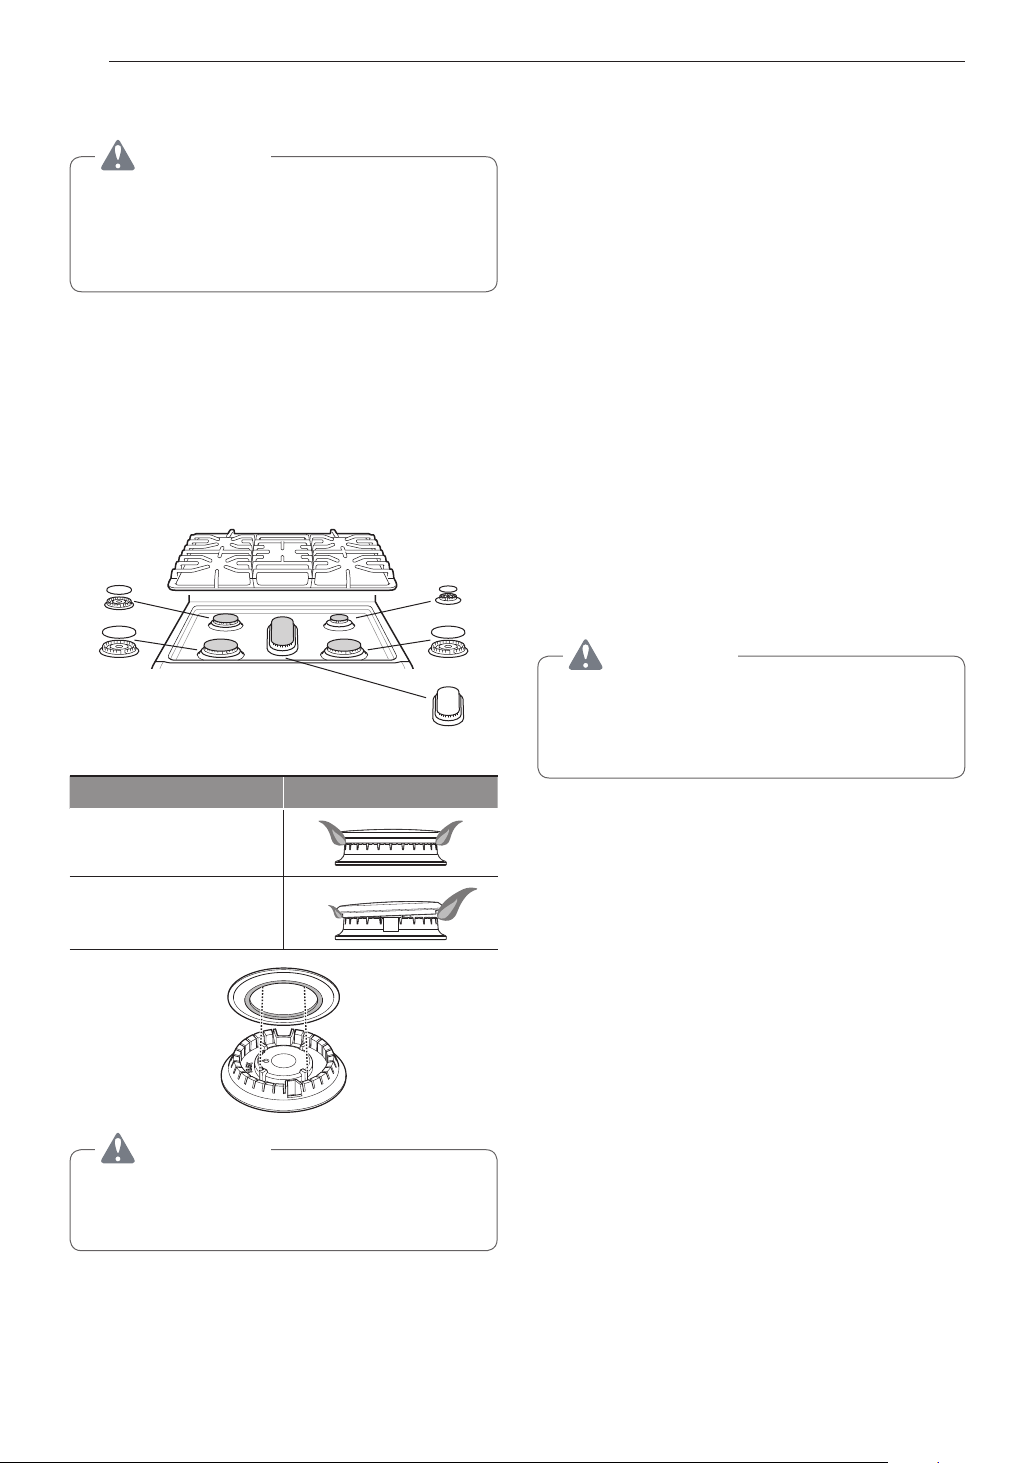
42
MAINTENANCE
Cleaning Burner Heads/Caps
For even and unhampered flame, the slits in the
burner heads must be kept clean at all times.The
burner heads and caps (and the oval burner head
and cap assembly) can be lifted off. Do not attempt to
remove the oval burner cap.
•
Wash the burner caps in hot soapy water and rinse
with clean water. Run water through the oval burner
from the bottom stem to flush out debris.
•
Use care when cleaning the cooktop. The pointed
metal ends on the electrodes could cause injury.
Hitting an electrode with a hard object may damage
it.
•
To remove burnt-on food, soak the burner heads
in a solution of mild liquid detergent and hot water
for 20–30 minutes. For stubborn stains, use a
toothbrush or wire brush.
•
The burners will not operate properly if the burner
ports or electrodes are clogged or dirty.
•
Burner caps and heads should be cleaned routinely,
especially after excessive spillover.
•
Burners will not light if the cap is removed.
CAUTION
•
Do not hit the electrodes with anything hard.
Doing so could damage them.
•
Do not use steel wool or scouring powders to
clean the burners.
After Cleaning the Burner Heads/
Caps
Shake out any excess water and then let them dry
thoroughly. Placing the oval burner upside down will
allow the water to drain out more easily. Replace
the burner heads and caps over the electrodes on
the cooktop in the correct locations according to
their size. Make sure the hole in the burner head is
positioned over the electrode.
MAINTENANCE
CAUTION
•
Do not clean this appliance with bleach.
•
To prevent burns, wait until the cooktop has
cooled down before touching any of its parts.
•
Always wear gloves when cleaning the cooktop.
Removing and Replacing the
Gas Surface Burners
Grates and burner heads/caps can be removed for
care and cleaning.
General burner
Burner cap is properly
set.
Burner cap is NOT
properly set.
CAUTION
Make sure Burner heads and caps are reinstalled
properly. They will be stable and rest flat when
correctly installed.
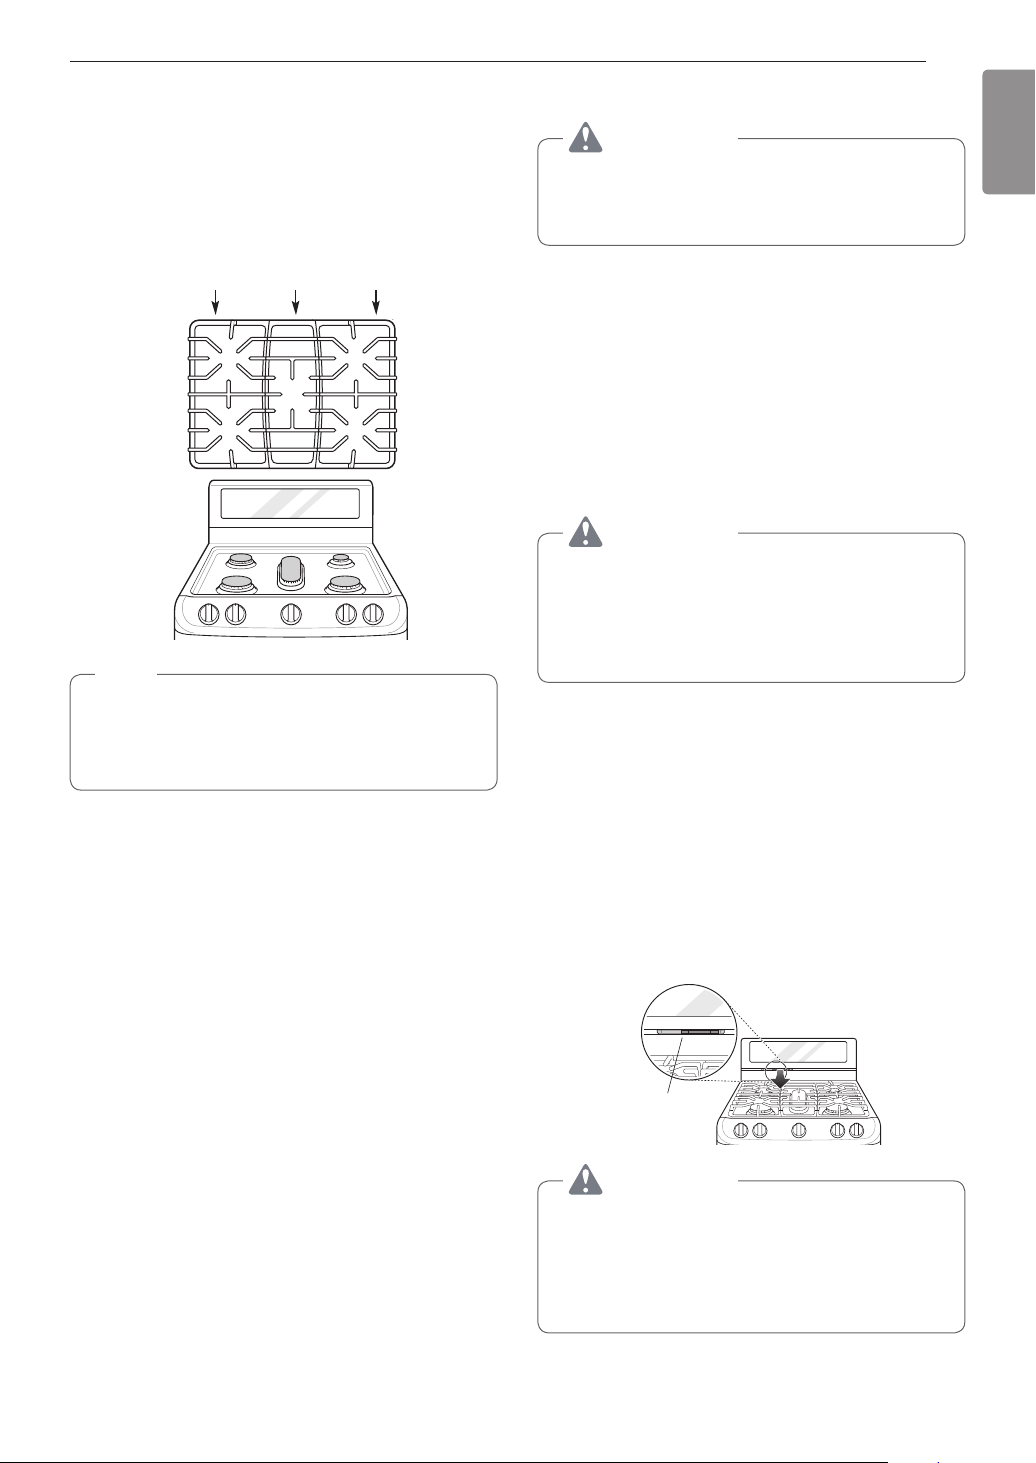
43
MAINTENANCE
ENGLISH
Burner Grates
The range consists of three separate professional-
style grates. For maximum stability, these grates
should only be used when in their proper position.
The two side grates can be interchanged from left
to right and front to back. The center grate can be
interchanged from front to back.
Side grate Center grate Side grate
NOTE
Do not operate a burner for an extended period
of time without cookware on the grate. The finish
on the grate may chip without cookware to absorb
the heat.
Cleaning the Burner Grates
CAUTION
•
Do not lift the grates out until they have cooled.
•
Do not put the grate in the oven during self
cleaning mode.
•
Grates should be washed regularly and after
spillovers.
•
Wash the grates in hot, soapy water and rinse with
clean water.
•
The grates are dishwasher safe.
•
After cleaning the grates, let them dry completely
and securely position them over the burners.
Cleaning the Cooktop Surface
CAUTION
•
To avoid burns, do not clean the cooktop
surface until it has cooled.
•
Do not lift the cooktop surface. Lifting the
cooktop surface can lead to damage and
improper operation of the range.
Foods with high acid or sugar content may cause a
dull spot if allowed to set. Wash and rinse soon after
the surface has cooled. For other spills such as oil/
grease spattering, etc., wash with soap and water
when the surface has cooled, then rinse and polish
with a dry cloth.
Oven Air Vents
Air openings are located at the rear of the cooktop,
at the top and bottom of the oven door, and at the
bottom of the range.
Oven Air Vent
CAUTION
•
The edges of the range vent are sharp. Wear
gloves when cleaning the range to avoid injury.
•
Clean ventilating hoods frequently. Grease
should not be allowed to accumulate on the
hood or filter.

44
MAINTENANCE
NOTE
Do not block the vents and air openings of the
range. They provide the air inlet and outlet that
are necessary for the range to operate properly
with correct combustion.
Control Panel
To prevent activating the control panel during
cleaning, unplug the range. Clean up splatters with
a damp cloth using a glass cleaner. Remove heavier
soil with warm, soapy water. Do not use abrasives of
any kind.
Front Manifold Panel and Knobs
It is best to clean the manifold panel after each use
of the range. For cleaning, use a damp cloth and mild
soapy water or a 50/50 solution of vinegar and water.
For rinsing, use clean water and polish dry with a soft
cloth.
CAUTION
•
Do not use abrasive cleansers, strong liquid
cleaners, plastic scouring pads or oven
cleaners on the manifold panel. Doing so will
damage the finish.
•
Do not try to bend the knobs by pulling them
up or down, and do not hang a towel or other
objects on them. This can damage the gas
valve shaft.
•
The control knobs may be removed for easy
cleaning.
•
To clean the knobs, make sure that they are in
the Off position and pull them straight off the
stems.
•
To replace the knobs, make sure the knob has
the Off position centered at the top, and slide
the knob directly onto the stem.
NOTE
To prevent scratching, do not use abrasive
cleaners on any of these materials.
Cleaning the Exterior
Painted and Decorative Trim
For general cleaning, use a cloth with hot soapy
water. For more difficult soils and built-up grease,
apply a liquid detergent directly onto the soil. Leave it
on for 30 to 60 minutes. Rinse with a damp cloth and
dry. Do not use abrasive cleaners.
Stainless Steel Surfaces
To avoid scratches, do not use steel wool pads.
1
Place a small amount of stainless steel
appliance cleaner or polish on a damp cloth or
paper towel.
2
Clean a small area, rubbing with the grain of the
stainless steel if applicable.
3
Dry and buff with a clean, dry paper towel or soft
cloth.
4
Repeat as necessary.
NOTE
•
Do not use a steel wool pad; it will scratch the
surface.
•
To clean the stainless steel surface, use warm
sudsy water or a stainless steel cleaner or
polish.
•
Always wipe in the direction of the metal
surface finish.
•
To purchase stainless steel appliance cleaner
or polish, or to locate a dealer near you, call our
toll-free customer service number:
1-800-243-0000 (USA),
1-888-542-2623(CANADA)
or visit our website at: www.lg.com
Oven Door
•
Use soapy water to thoroughly clean the oven door.
Rinse well. Do not immerse the door in water.
•
You may use a glass cleaner on the outside glass
of the oven door. Do not spray water or glass
cleaner on the door vents.
•
Do not use oven cleaners, cleaning powders, or
harsh abrasive cleaning materials on the outside of
the oven door.
•
Do not clean the oven door gasket. The oven door
gasket is made of a woven material that is essential
for a good seal. Care should be taken not to rub,
damage, or remove this gasket.

45
MAINTENANCE
ENGLISH
CAUTION
Do not use harsh cleaners or harsh abrasive
cleaning materials on the outside of the oven
door. Doing so can cause damage.
Don’t hand
clean oven
door gasket
Do hand
clean door
Door Care Instructions
Most oven doors contain glass that can break.
CAUTION
•
Do not close the oven door until all the oven
racks are fully in place.
•
Do not hit the glass with pots, pans, or any
other object.
•
Scratching, hitting, jarring, or stressing the
glass may weaken its structure causing an
increased risk of breakage at a later time.
Oven Racks
Remove the oven racks before operating the self
clean cycle and EasyClean®.
1
Food spilled into the tracks could cause the
racks to become stuck. Clean with a mild,
abrasive cleaner.
2
Rinse with clean water and dry.
NOTE
If the racks are cleaned using the self clean cycle
(not recommended), the color will turn slightly
blue and the finish will become dull. After the self
clean cycle is complete, and the oven has cooled,
rub the sides of the racks with wax paper or a
cloth containing a small amount of oil. This will
make the racks glide more easily into the rack
tracks.
EasyClean
®
LG’s EasyClean
®
enamel technology provides two
cleaning options for the inside of the range. The
EasyClean
®
feature takes advantage of LG’s new
enamel to help lift soils without harsh chemicals, and
it runs using ONLY WATER for just 10 minutes in low
temperatures to help loosen LIGHT soils before hand-
cleaning.
While EasyClean
®
is quick and effective for small
and LIGHT soils, the Self Clean feature can be
used to remove HEAVY, built up soils. The intensity
and high heat of the Self Clean cycle may result in
smoke which will require the opening up of windows
to provide ventilation. Compared to the more intense
Self Clean process, your LG oven gives you the
option of cleaning with LESS HEAT, LESS TIME, and
virtually NO SMOKE OR FUMES.
When needed, the range still provides the self clean
option for longer, more thorough oven cleaning for
heavier, built up soils.
Benefits of EasyClean
®
•
Helps loosen light soils before hand-cleaning
•
EasyClean
®
only uses water; no chemical cleaners
•
Makes for a better self-clean experience
- Delays the need for a self-clean cycle
- Minimizes smoke and odors
- Can allow shorter self-clean time
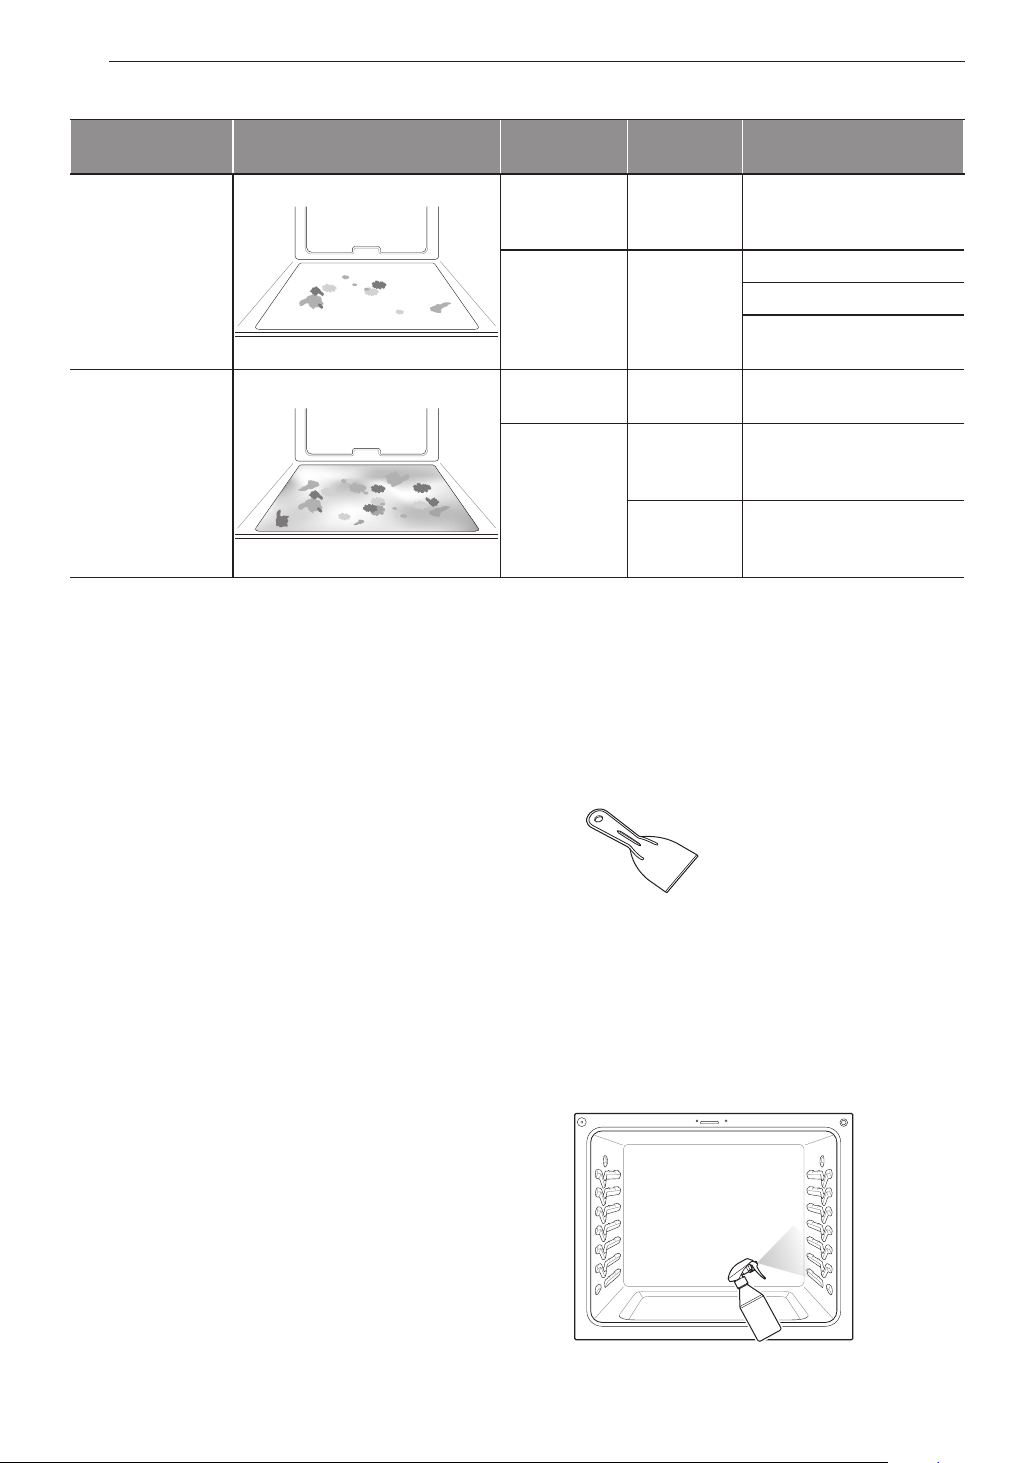
46
MAINTENANCE
When to Use EasyClean
®
Suggested
Cleaning Method
Example of Oven Soiling Soil Pattern
Types of
Soils
Common Food Items
That Can Soil Your Oven
EasyClean
®
Small drops or
spots
Cheese
or other
ingredients
Pizza
Light splatter Fat/grease
Steaks, broiled
Fish, broiled
Meat roasted at low
temperatures
Self Clean*
Medium to
heavy splatter
Fat/grease
Meat roasted at high
temperatures
Drops or spots
Filling or
sugar based
soils
Pies
Cream or
tomato
sauce
Casseroles
* The Self Clean cycle can be used for soil that has been built up over time.
Cleaning Tips
•
Allow the oven to cool to room temperature before
using the EasyClean
®
cycle. If your oven cavity is
above 150 °F (65 °C), Hot will appear in the display,
and the EasyClean
®
cycle will not be activated until
the oven cavity cools down.
•
A plastic spatula can be used as a scraper to
scrape off any chunks or debris before and during
oven cleaning.
•
Using the rough side of a non-scratch scouring pad
may help to take off burnt-on stains better than a
soft sponge or towel.
•
Certain non-scratch scrubbing sponges, such as
those made of melamine foam, available at your
local stores, can also help improve cleaning.
•
The range should be level to ensure that the bottom
surface of the oven cavity is entirely covered by
water at the beginning of the EasyClean
®
cycle.
•
For best results, use distilled or filtered water. Tap
water may leave mineral deposits on the oven
bottom.
•
Soil baked on through several cooking cycles will
be more difficult to remove with the EasyClean
®
cycle.
•
Do not open the oven door during the EasyClean
®
cycle. Water will not get hot enough if the door is
opened during the cycle.
•
For hard to reach areas such as the back surface
of the oven, it is better to use the Self Clean cycle.
EasyClean
®
Instruction Guide
1
Remove oven racks and accessories from the
oven.
2
Scrape off and remove any burnt-on debris with
a plastic scraper.
Suggested plastic scrapers:
•
Hard plastic spatula
•
Plastic pan scraper
•
Plastic paint scraper
•
Old credit card
3
Fill a spray bottle (10 oz or 300 ml) with water
and use the spray bottle to thoroughly spray the
inside surfaces of the oven.
4
Use at least
1
/
5
(2 oz or 60 ml) of the water in the
bottle to completely saturate the soil on both the
walls and in the corners of the oven.
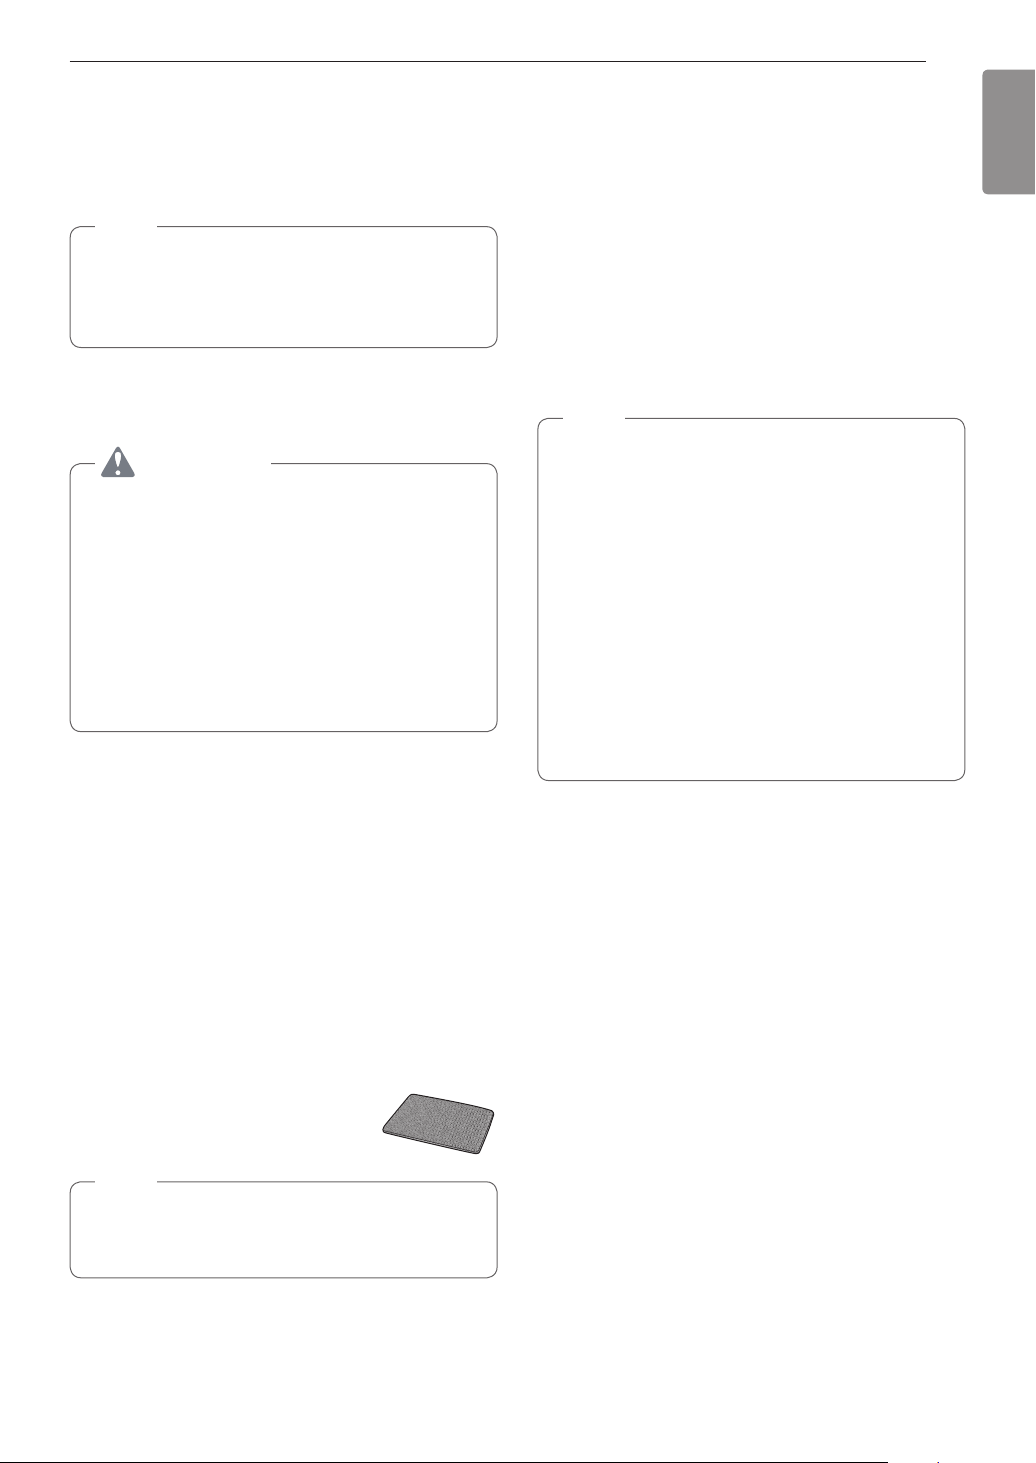
47
MAINTENANCE
ENGLISH
5
Spray or pour the remaining water (8 oz or 240
ml) onto the bottom center of the oven cavity.
The indentation on the oven bottom should be
fully covered to submerge all soils. Add water if
necessary.
NOTE
If cleaning multiple ovens, use an entire bottle
of water to clean each oven. Do not spray water
directly on the door. Doing so will result in water
dripping to the floor.
6
Close the oven door.
Touch EasyClean
®
.
Touch Start.
CAUTION
•
Some surfaces may be hot after the
EasyClean® cycle. Wear rubber gloves while
cleaning to prevent burns.
•
During the EasyClean® cycle, the oven
becomes hot enough to cause burns. Wait
until the cycle is over before wiping the inside
surface of the oven. Failure to do so may result
in burns.
•
Avoid leaning or resting on the oven door glass
while cleaning the oven cavity.
7
A tone will sound at the end of the 10 minute
cycle. Touch Clear/Off to clear the display and
end the tone.
8
After the cleaning cycle and during
hand-cleaning, enough water should remain
on the oven bottom to completely submerge all
soils. Add water if necessary. Place a towel on
the floor in front of the oven to capture any water
that may spill out during hand-cleaning.
9
Clean the oven cavity immediately after the
EasyClean
®
cycle by scrubbing with a wet,
non-scratch scouring sponge or pad. (The
scouring side will not scratch the finish.) Some
water may spill into the bottom vents while
cleaning, but it will be captured
in a pan under the oven cavity
and will not hurt the burner.
NOTE
Do not use any steel scouring pads, abrasive
pads or cleaners as these materials can
permanently damage the oven surface.
10
Once the oven cavity is cleaned, wipe any
excess water with a clean dry towel. Replace
racks and any other accessories.
11
If some light soils remain, repeat the above
steps, making sure to thoroughly soak the
soiled areas. If stubborn soils remain after
multiple EasyClean
®
cycles, run the Self
Clean cycle. Be sure that the oven cavity is
empty of oven racks and other accessories,
and that the oven cavity surface is dry before
running the Self Clean cycle. Consult the Self
Clean section of your owner’s manual for
further details.
NOTE
•
If you forget to saturate the inside of the oven
with water before starting EasyClean
®
, touch
Clear/Off to end the cycle. Wait for the range
to cool to room temperature and then spray
or pour water into the oven and start another
EasyClean
®
cycle.
•
The cavity gasket may be wet when the
EasyClean
®
cycle finishes. This is normal. Do
not clean the gasket.
•
If mineral deposits remain on the oven bottom
after cleaning, use a cloth or sponge soaked in
vinegar to remove them.
•
It is normal for the fan to operate during the
EasyClean
®
cycle.
48
MAINTENANCE
Self Clean
The Self Clean cycle uses extremely hot temperatures
to clean the oven cavity. While running the Self Clean
cycle, you may notice smoking or an odor. This is
normal; especially if the oven is heavily soiled.
During Self Clean, the kitchen should be well
ventilated to minimize the odors from cleaning.
Before Starting Self Clean
•
Remove the oven racks, broiler pan, broiler grid, all
cookware, aluminum foil or any other material from
the oven.
•
The kitchen should be well ventilated to minimize
the odors from cleaning.
•
Wipe any heavy spillovers on the bottom of the
oven.
•
Make sure that the oven light bulb cover is in place
and the oven light is off.
•
The oven light cannot be turned on during a Self
Clean cycle. The oven light cannot be turned on
until the oven temperature has cooled below
500 ˚F (260 ˚C) after a Self Clean cycle is complete.
CAUTION
•
Do not leave small children unattended near
the appliance. During the Self Clean cycle, the
outside of the range can become very hot to
the touch.
•
If you have pet birds, move them to another
well-ventilated room. The health of some birds
is extremely sensitive to the fumes given off
during the Self Clean cycle of any range.
•
Do not line the oven walls, racks, bottom or any
other part of the range with aluminum foil or
any other material. Doing so will destroy heat
distribution, produce poor baking results and
cause permanent damage to the oven interior
(aluminum foil will melt to the interior surface of
the oven).
•
Do not force the door open. This can damage
the automatic door locking system. Use care
when opening the oven door after the Self
Clean cycle. Stand to the side of the oven when
opening the door to allow hot air or steam to
escape. The oven may still be VERY HOT.
During the Self Clean cycle, the cooktop elements
and warming drawer cannot be used.
NOTE
•
Remove oven racks and accessories before
starting the Self Clean cycle.
•
If oven racks are left in the oven cavity during
the Self Clean cycle, they will discolor and
become difficult to slide in and out.
•
Clean the frame of the oven and door with hot
soapy water. Rinse well.
•
Do not clean the gasket. The fiberglass material
of the oven door gasket cannot withstand
abrasion. It is essential for the gasket to remain
intact. If you notice it becoming worn or frayed,
replace it.
•
Wipe up any heavy spillovers on the oven
bottom.
•
Make sure that the oven light bulb cover is in
place and the oven light is off.
•
It is normal for the fan to operate during the Self
Clean cycle.
Setting Self Clean
The Self Clean function has cycle times of 2, 3, or 5
hours.
Self Clean Soil Guide
Soil Level Cycle Setting
Lightly Soiled Oven Cavity 2-Hour Self Clean
Moderately Soiled Oven Cavity 3-Hour Self Clean
Heavily Soiled Oven Cavity 5-Hour Self Clean
1
Remove all racks and accessories from the
oven.
2
Touch Self Clean. The oven defaults to the
recommended three-hour self clean for a
moderately soiled oven. Touch twice for a
five-hour self clean or three times for a two-hour
self clean.
3
Touch Start.
4
Once the self-clean cycle is set, the oven door
locks automatically and the lock icon displays.
You will not be able to open the oven door
until the oven has cooled. The lock releases
automatically when the oven has cooled.

49
MAINTENANCE
ENGLISH
CAUTION
Do not force the oven door open when the lock
icon is displayed. The oven door remains locked
until the oven temperature has cooled. Forcing
the door open will damage the door.
Setting Self Clean with a Delayed
Start
1
Remove all racks and accessories from the
oven.
2
Touch Self Clean. The oven defaults to the
recommended three-hour self clean for a
moderately soiled oven. Touch twice for a
five-hour self clean or three times for a two-hour
self clean.
3
Touch Start Time.
4
Use the number keys to enter the time of day
you would like the Self Clean to start.
5
Touch Start.
NOTE
It may become necessary to cancel or interrupt a
Self Clean cycle due to excessive smoke or fire in
the oven. To cancel the Self Clean function, touch
Clear/Off.
During Self Clean
•
The Self Clean cycle uses extremely hot
temperatures to clean the oven cavity. While
running the Self Clean cycle, you may notice
smoking or an odor. This is normal, especially if the
oven is heavily soiled.
•
As the oven heats, you may hear sounds of metal
parts expanding and contracting. This is normal
and will not damage the oven.
•
Do not force the oven door open when the lock
is displayed. The oven door remains locked until
the oven temperature has cooled. Forcing the door
open will damage the door.
After the Self Clean Cycle
•
The oven door remains locked until the oven
temperature has cooled.
•
You may notice some white ash in the oven. Wipe it
off with a damp cloth or a soap-filled steel wool pad
after the oven cools. If the oven is not clean after
one self-clean cycle, repeat the cycle.
•
If oven racks were left in the oven and do not slide
smoothly after a self-clean cycle, wipe racks and
rack supports with a small amount of vegetable oil
to make them glide more easily.
•
Fine lines may appear in the porcelain because it
went through heating and cooling. This is normal
and will not affect performance.
NOTE
•
The Self Clean cycle cannot be started if the
Lockout feature is active.
•
Once the Self Clean cycle is set, the oven door
locks automatically. You will not be able to open
the oven door until the oven is cooled. The lock
releases automatically.
•
Once the door has been locked, the lock
indicator light stops flashing and remains on.
Allow about 15 seconds for the oven door lock
to activate.
•
If the clock is set for a 12-hour display (default)
the Delayed Self Clean can never be set to
start more than 12 hours in advance.
•
After the oven is turned off, the convection
fan keeps operating until the oven has cooled
down.
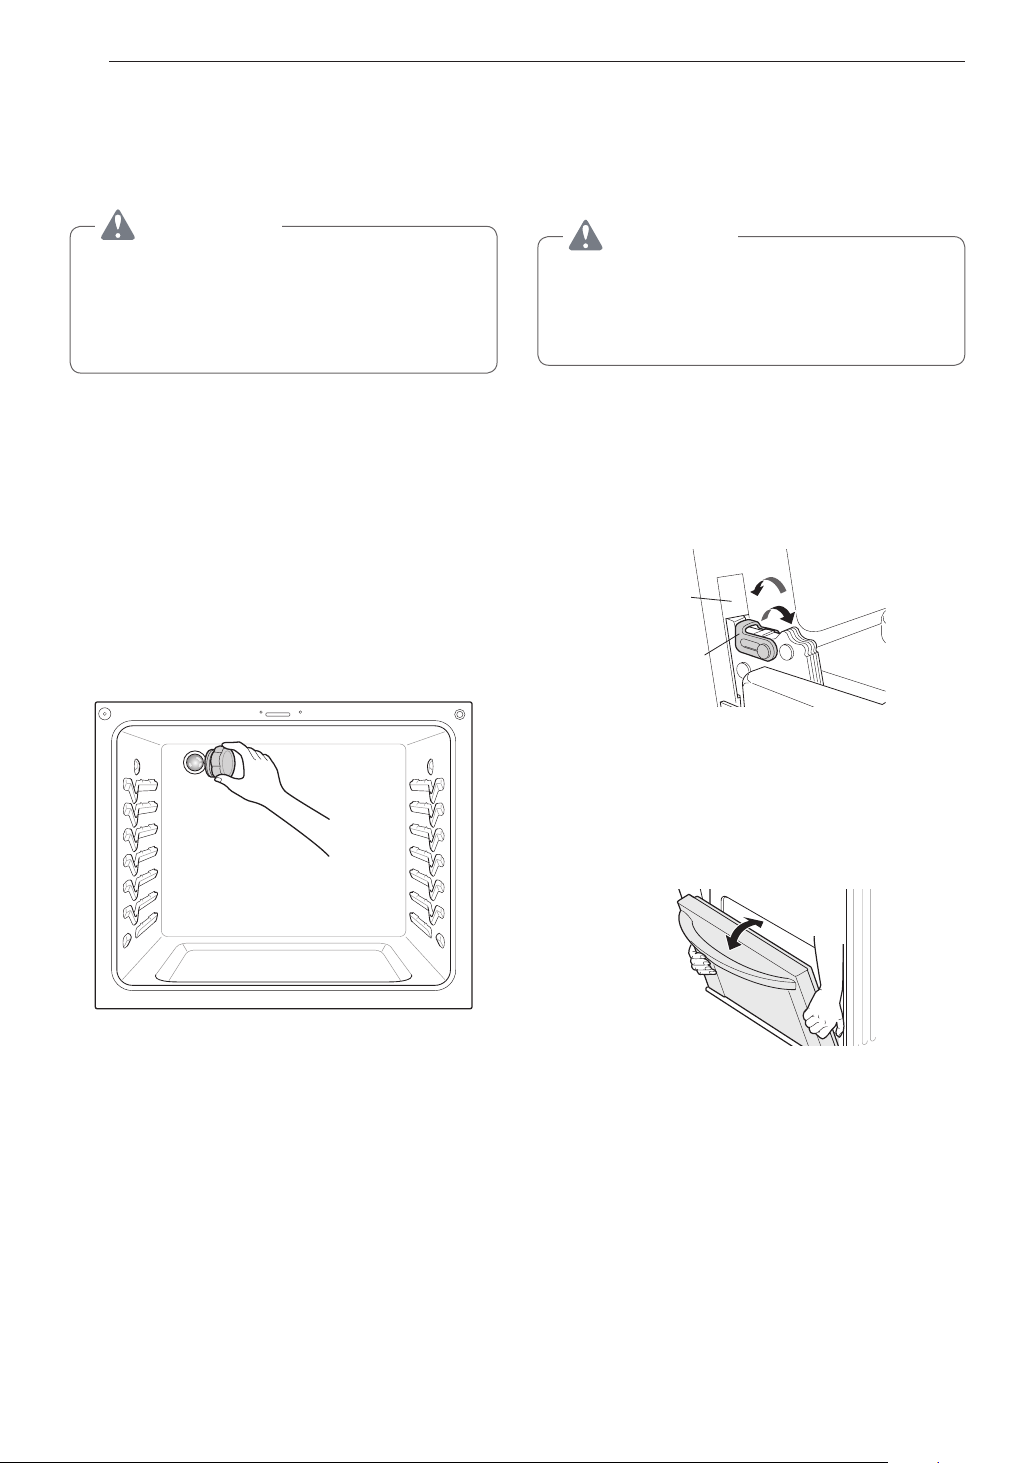
50
MAINTENANCE
Changing the Oven Light
The oven light is a standard 40-watt appliance bulb. It
turns on when the oven door is open. When the oven
door is closed, touch Light to turn it on or off.
WARNING
•
Make sure that the oven and bulb are cool.
•
Disconnect the electrical power to the range at
the main fuse or circuit breaker panel. Failure
to do so can result in severe personal injury,
death, or electrical shock.
1
Unplug the range or disconnect power.
2
Turn the glass bulb cover in the back of the oven
counterclockwise to remove.
3
Turn the bulb counterclockwise to remove it from
the socket.
4
Insert the new bulb and turn it clockwise.
5
Insert the glass bulb cover and turn it clockwise.
6
Plug in the range or reconnect the power.
Removing and Replacing
the Lift-Off Oven Doors and
Drawer
CAUTION
•
Be careful when removing and lifting the
door.
•
Do not lift the door by the handle. The door
is very heavy.
Removing the Door
1
Fully open the door.
2
Unlock the hinge locks, rotating them as far
toward the open door frame as they will go.
Slot
Lock
Unlock
Hinge
lock
3
Firmly grasp both sides of the door at the top.
4
Close the door to the removal position
(approximately five degrees) which is halfway
between the broil stop position and fully closed.
If the position is correct, the hinge arms will
move freely.
about 5°
5
Lift door up and out until the hinge arms are
clear of the slots.
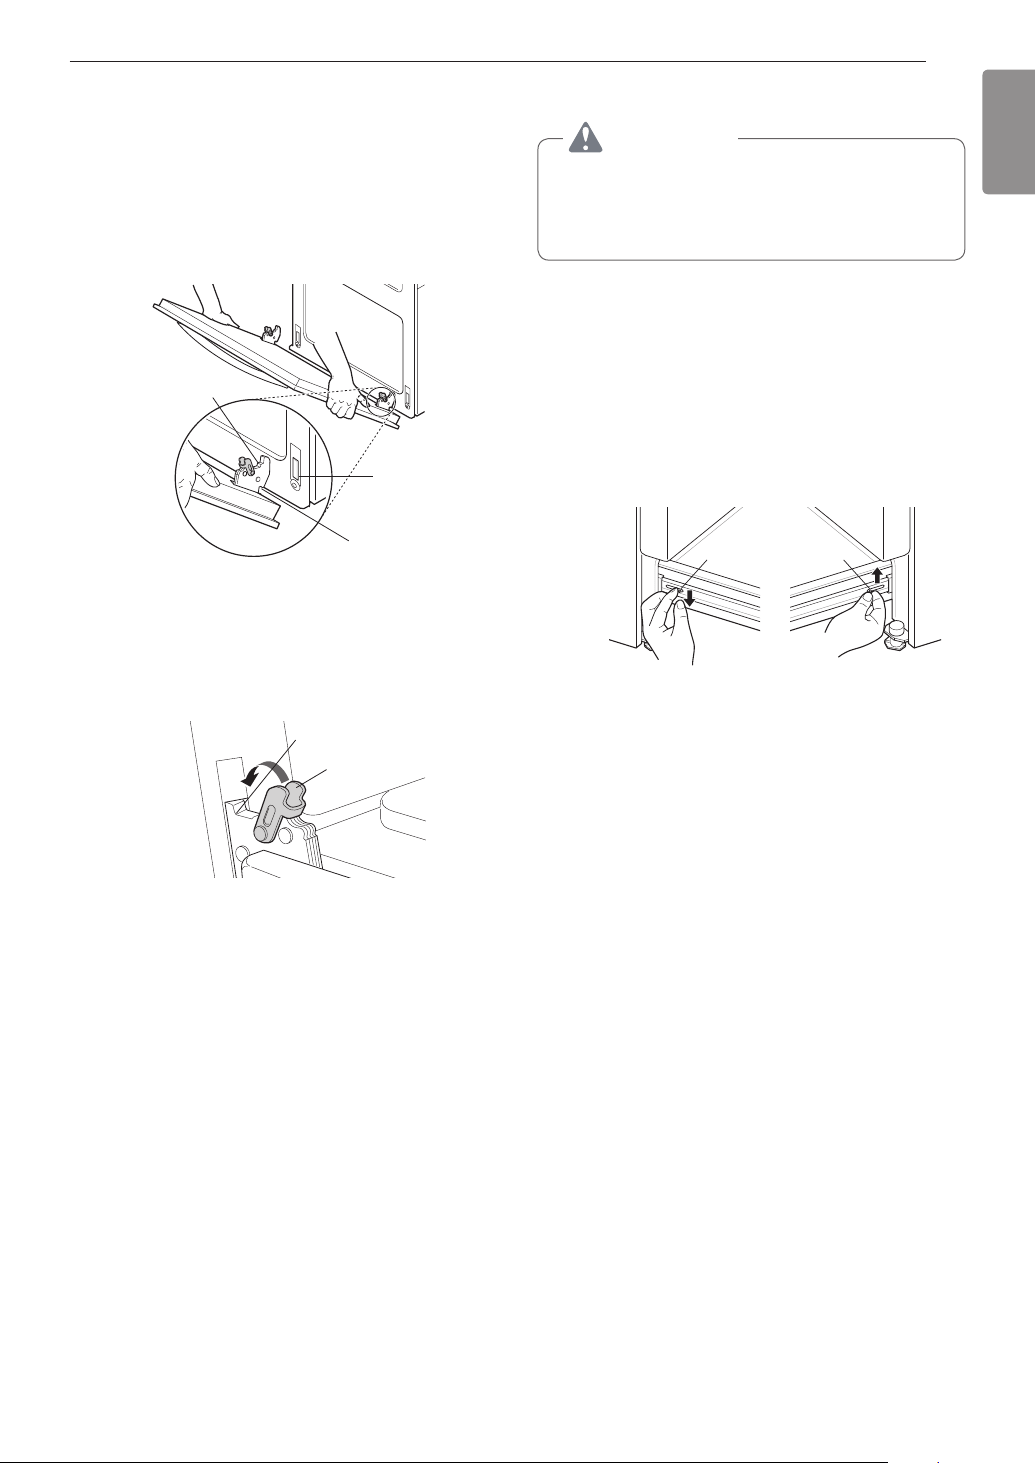
51
MAINTENANCE
ENGLISH
Replacing the Door
1
Firmly grasp both sides of the door at the top.
2
With the door at the same angle as the removal
position, seat the indentation of the hinge arms
into the bottom edge of the hinge slots. The
notch in the hinge arms must be fully seated into
the bottom edge of the slots.
Hinge arm
Indentation
Bottom
edge of slot
3
Open the door fully. If the door will not open fully,
the indentation is not seated correctly in the
bottom edge of the slots.
4
Lock the hinge locks, rotating them back toward
the slots in the oven frame until they lock.
Hinge arm
Hinge lock
5
Close the oven door.
Removing the Drawer
CAUTION
Disconnect the electrical power to the range at
the main fuse or circuit breaker panel. Failure to
do so can result in severe personal injury, death,
or electrical shock.
Most cleaning can be done with the drawer in place;
however, the drawer may be removed if further
cleaning is needed. Use warm water to thoroughly
clean.
1
Fully open the drawer.
2
Locate the glide lever on each side of the
drawer. Push down on the left glide lever and
pull up on the right glide lever.
Lever
Push down with nger Pull up with nger
Lever
3
Pull the drawer away from the range.
Replacing the Drawer
1
Pull the bearing glides to the front of the chassis
glide.
2
Align the glide on each side of the drawer with
the glide slots on the range.
3
Push the drawer into the range until levers click
(approximately 2 inch).
4
Pull the drawer open again to seat bearing glides
into position.
52
TROUBLESHOOTING
TROUBLESHOOTING
FAQs
What types of cookware are recommended for
use with the cooktop?
•
The pans must have a flat bottom and straight
sides.
•
Only use heavy-gauge pans.
•
The pan size must match the amount of food to be
prepared and the size of the surface element.
•
Use tight fitting lids.
•
Only use flat-bottom woks.
Why do the heating elements appear to be turning
ON and OFF during use of the cooktop or oven?
Depending on your cooktop element setting or the
temperature selected in your oven it is NORMAL for
the cooking elements to cycle on and off.
My new oven doesn’t cook like my old one. Is
there something wrong with the temperature
settings?
No, your oven has been factory tested and calibrated.
For the first few uses, follow your recipe times and
temperatures carefully. If you still think your new
oven is too hot or too cold, you can adjust the oven
temperature yourself to meet your specific cooking
needs. Refer to the Oven Temperature Adjustment
section in this manual for easy instructions on how to
adjust your thermostat.
Is it normal to hear a clicking noise coming from
the back of my oven when I am using it?
Your new range is designed to maintain a tighter
control over your oven’s temperature. You may hear
your oven’s heating elements click on and off more
frequently on your new oven. This is NORMAL.
Why is the time flashing?
This means that the product has just been plugged
in, or that it has experienced a power interruption. To
clear the flashing time, touch any button and reset the
clock if needed.
During convection cooking the fan stops when I
open the door. Is that normal?
Yes, this is normal. When the door is opened, the
convection fan will stop until the door is closed.
Can I use aluminum foil to catch drippings in my
oven cavity?
Never use aluminum foil to line the bottom or sides of
the oven or the warming drawer. The foil will melt and
stick to the bottom surface of the oven and will not be
removable. Use a sheet pan placed on a lower oven
rack to catch drippings instead. (If foil has already
melted onto the bottom of the oven, it will not interfere
with the oven’s performance.)
Can I use aluminum foil on the racks?
Do not cover racks with aluminum foil. Covering
entire racks with foil restricts air flow, leading to poor
cooking results. Use a sheet pan lined with foil under
fruit pies or other acidic or sugary foods to prevent
spillovers from damaging the oven finish.
CAUTION
Foil may be used to wrap food in the oven or
warming drawer, but do not allow the foil to come
into contact with the exposed heating/broiling
elements in the oven. The foil could melt or ignite,
causing smoke, fire, or injury.
Can I leave my racks in the oven when running a
Self Clean cycle?
No. Although it will not damage the racks, it will
discolor them and may make them hard to slide in
and out during use. Remove all items from the oven
before starting a Self Clean cycle.
What should I do if my racks are sticky and have
become hard to slide in and out?
Over time, the racks may become hard to slide in
and out. Apply a small amount of olive oil to the ends
of the racks. This will work as a lubricant for easier
gliding.
What should I do for hard to remove stains on my
cooktop?
The cooktop should be cleaned after every use to
prevent permanent staining. When cooking foods with
high sugar content, such as tomato sauce, clean the
stain off with a scraper while the cooktop is still warm.
Use an oven mitt when scraping to prevent burns.
Refer to the MAINTENANCE section of this owner's
manual for further instruction.

53
TROUBLESHOOTING
ENGLISH
Why aren't the function buttons working?
Make sure that the range is not in Lockout mode. The
lock
will show in the display if Lockout is activated.
To deactivate Lockout, touch and hold Clear/Off for
three seconds. The unlock melody sounds and Loc
appears in the display until the controls are unlocked.
My range is still dirty after running the
EasyClean
®
cycle. What else should I do?
The EasyClean
®
cycle only helps to loosen light soils
in your oven range to assist in hand-cleaning of your
oven. It does not automatically remove all soils after
the cycle. Some scrubbing of your oven range is
required after running the EasyClean
®
cycle.
I tried scrubbing my oven after running
EasyClean
®
, but some soils still remain. What can
I do?
The EasyClean
®
feature works best when the soils
are fully soaked and submerged in water before
running the cycle and during hand-cleaning. If soils
are not sufficiently soaked in water, it can negatively
affect the cleaning performance. Repeat the
EasyClean
®
process using sufficient water.
Sugar-based and certain greasy soils are especially
hard to clean. If some stubborn soils remain, use the
Self Clean feature to thoroughly clean your oven.
Soils on my oven walls are not coming off. How
can I get my walls clean?
Soils on the side and rear walls of your oven range
may be more difficult to fully soak with water. Try
repeating the EasyClean
®
process with more than
the ¼ cup (2 oz or 60 ml) of spray recommended.
Will EasyClean
®
get all of the soils and stains out
completely?
It depends on the soil type. Sugar-based and certain
grease stains are especially hard to clean. Also, if
stains are not sufficiently soaked in water, this can
negatively affect cleaning performance. If stubborn
or built-up stains remain, use the Self Clean feature.
Refer to the Self Clean section of your owner's
manual.
Are there any tricks to getting some of the
stubborn soils out?
Scraping the soils with a plastic scraper before
and during hand-cleaning is recommended. Fully
saturating soils with water is also recommended.
However, certain types of soils are harder to clean
than others. For these stubborn soils, the Self Clean
cycle is recommended. Consult the Self Clean section
of your owner's manual for details.
Is it safe for my convection fan, broil burner or
heater element to get wet during EasyClean
®
?
Yes. The convection fan, broiler burner or heater
element may get a little wet during cleaning. However,
direct spray onto the broil burner and heater elements
is not necessary because these are self-cleaning
during regular use.
Do I need to use all 1
1
/
4
cups (10 oz or 300 ml) of
water for EasyClean
®
?
Yes. It is highly recommended that 1 cup (8 oz or
240 ml) of water be sprayed or poured on the bottom
and an additional
1
/
4
cup (2 oz or 60 ml) of water
be sprayed on walls and other soiled areas to fully
saturate the soils for better cleaning performance.
I see smoke coming out of my oven range’s
cooktop vents during EasyClean
®
. Is this normal?
This is normal. This is not smoke. It is actually water
vapor (steam) from the water in the oven cavity. As
the oven heats briefly during EasyClean
®
, the water
in the cavity evaporates and escapes through the
oven vents.
How often should I use EasyClean
®
?
EasyClean
®
can be performed as often as you wish.
EasyClean
®
works best when your oven is LIGHTLY
soiled from such things as LIGHT grease splatter
and small drops of cheese. Please refer to the
EasyClean
®
section in your owner's manual for more
information.
What is required for EasyClean
®
?
A spray bottle filled with 1¼ cups (10 oz or 300 ml) of
water, a plastic scraper, a non-scratch scrubbing pad
and a towel. You should not use abrasive scrubbers
such as heavy-duty scouring pads or steel wool.
Except for a towel, all of the materials you need are
included in a special cleaning kit with your new range.
Is it safe for water to spill into the oven bottom
vents during cleaning?
Some water spillage into the oven bottom vents (gas
range) is okay. However, it is recommended to try
avoid spilling too much water into the vents.
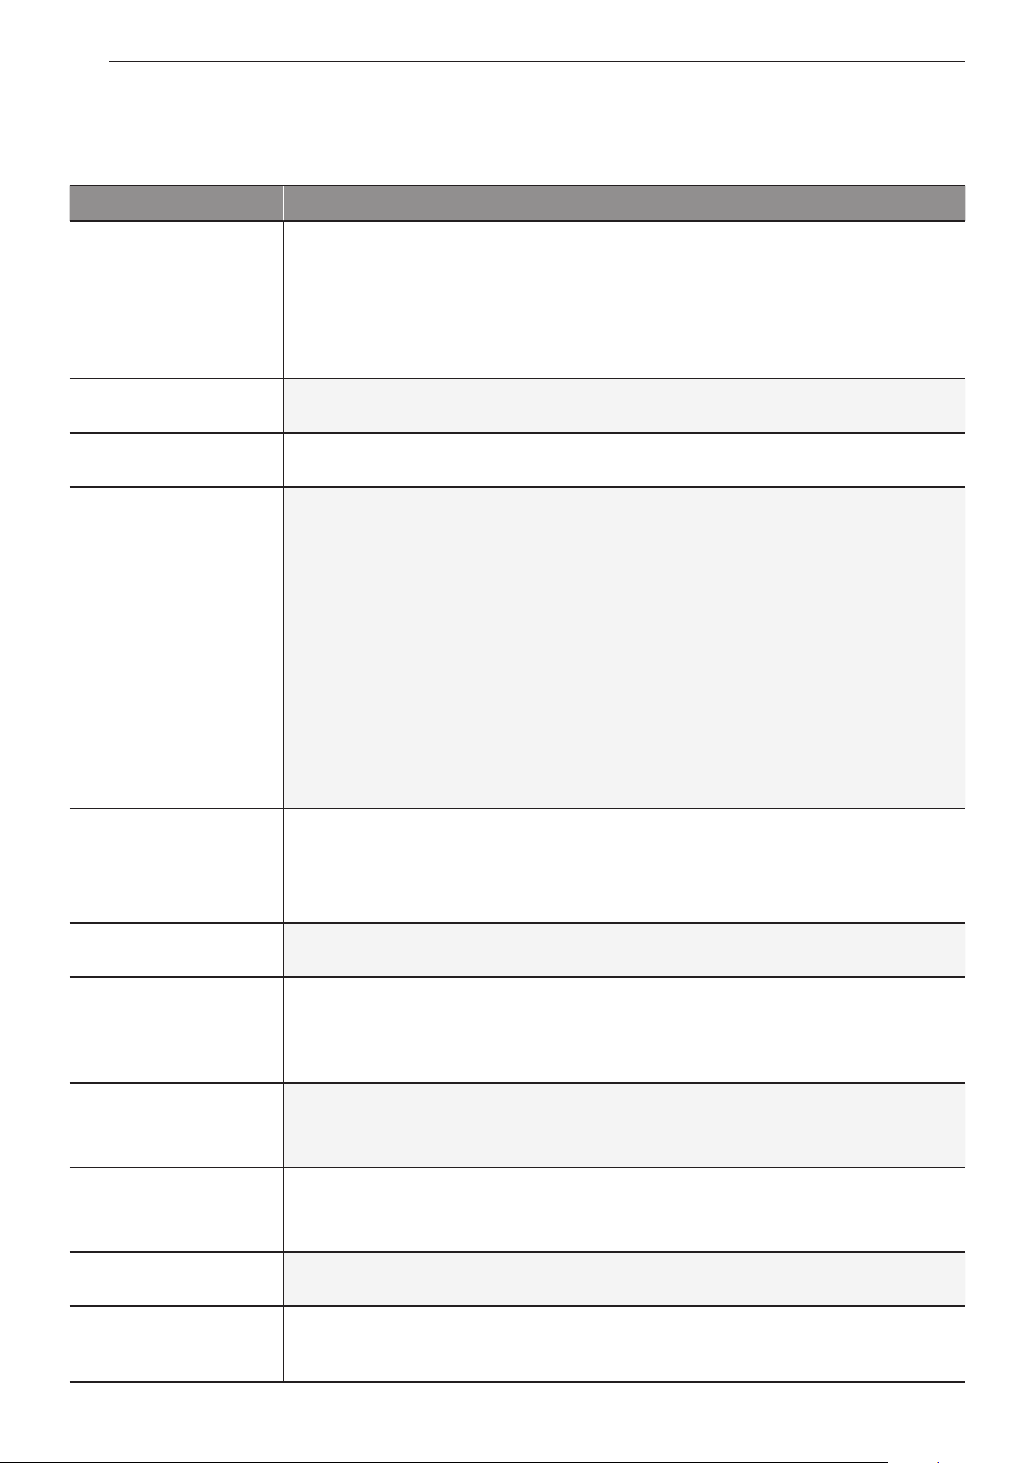
54
TROUBLESHOOTING
Before Calling for Service
Before you call for service, review this list. It may save you time and expense. The list includes common
occurrences that are not the result of defective workmanship or materials in this appliance.
Symptoms Possible Cause / Solution
Top burners do not
light or do not burn
evenly.
•
Make sure that the electrical plug is inserted into a live, properly grounded outlet.
•
Remove the burners and clean them. Check the electrode area for burnt on food
or grease. See Cleaning Burner Heads/Caps in the MAINTENANCE section.
•
Make sure that the burner parts are installed correctly.
See Removing and Replacing the Gas Surface Burners in the MAINTENANCE
section.
Burner flames are
very large or yellow.
If the range is connected to LP gas, contact the technician who installed your
range or made the conversion.
Surface burners light
but the oven does not.
Make sure that the oven gas shut-off valve, located behind the range, is fully open.
Food does not bake
or roast properly.
•
Incorrect oven control settings. See Control Panel Overview in the OPERATION
section.
•
Incorrect rack position. See Removing and Replacing the Oven Racks in the
OPERATION section.
•
Incorrect cookware is being used. See Convection Bake in the OPERATION
section.
•
Oven thermostat needs adjustment.
•
See Adjusting the Oven Thermostat in the OPERATION section.
•
The Clock is not set correctly. See Changing Oven Settings in the OPERATION
section.
•
Aluminum foil used improperly in the oven. See Removing and Replacing the
Oven Racks.
Food does not broil
properly in the oven.
•
Incorrect oven control settings. See Control Panel Overview in the OPERATION
section.
•
The oven door is not closed. See Broil in the OPERATION section.
•
Aluminum foil used on the broiling pan and grid is not fitted properly.
Oven temperature is
too hot or too cold.
The oven thermostat needs adjustment. See Adjusting the Oven Thermostat in the
OPERATION section.
Clock and timer does
not work.
•
Make sure the electrical plug is inserted into a live, properly grounded outlet.
Replace the fuse or reset the circuit breaker.
•
Improper oven control settings. See Changing Oven Settings in the OPERATION
section.
Oven light does not
work.
•
The light bulb is loose or defective. Tighten or replace the bulb.
•
The plug on the range is not completely inserted in the electrical outlet. Make
sure the electrical plug is inserted into a live, properly grounded outlet.
Self Clean is not
working.
•
The oven temperature is too high to set a self clean operation. Allow the range to
cool down to room temperature and reset the controls.
•
Improper oven control settings. See Self Clean in the MAINTENANCE section.
“Crackling” or
“popping” sound.
•
This is the sound of the metal heating up and cooling down during both the
cooking and cleaning functions. This is normal.
Too much smoke
during the Self Clean
cycle.
Too much soil in the oven. Open the windows to get rid of the smoke from the
room. Touch the Clear/Off key. Wait until the light goes off before trying to open
the oven door. Wipe up the excess soil and reset the clean cycle.
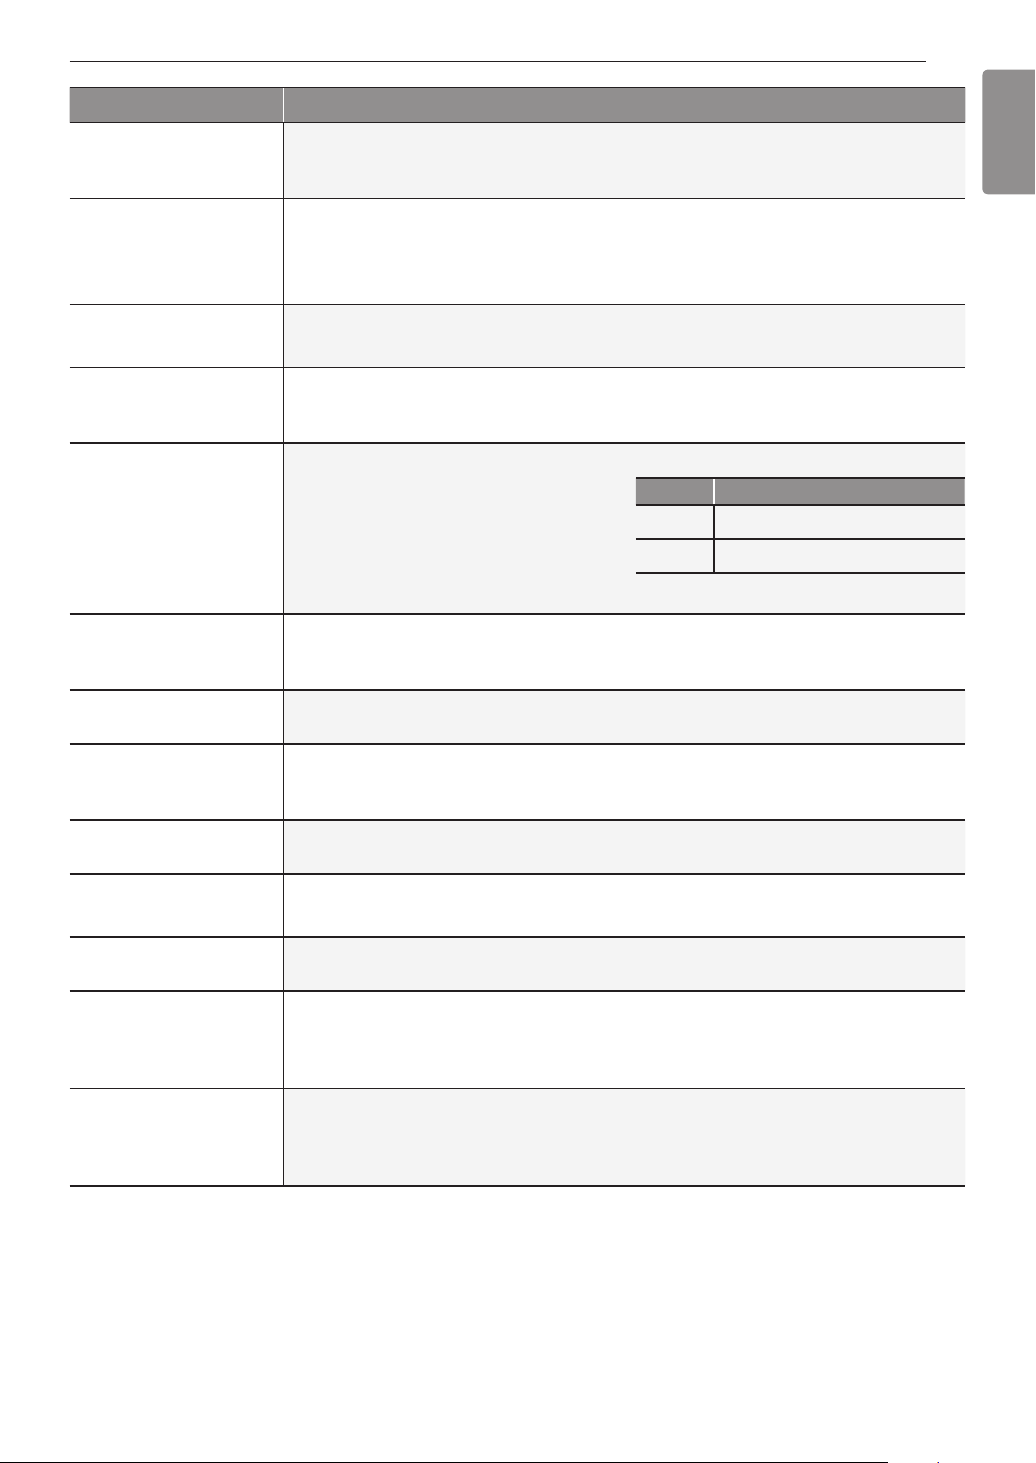
55
TROUBLESHOOTING
ENGLISH
Symptoms Possible Cause / Solution
The oven door does
not open after a Self
Clean cycle.
The oven temperature is too high. Wait up to one hour for it to cool down.
The oven door is
not clean after a Self
Clean cycle.
•
Incorrect oven control settings. See Self Clean in the MAINTENANCE section.
•
The oven was heavily soiled. Clean up heavy spills before beginning the Self
Clean cycle. Heavily soiled ovens may need either a longer Self Clean or two
Self Clean cycles.
Clean and door flash
in the display.
•
The self clean cycle has been selected, but the door is not closed.
- Close the oven door.
"Loc" message
appears when you
want to cook.
The oven door is locked because the temperature inside of the oven is too high.
Touch the Clear/Off key.
Oven control beeps
and displays an F
error code.
•
Check the main gas shut-off valve or
the oven gas shut-off valve and call
for service.
•
Remove the power from the range
for five minutes and then reconnect
the power. If the function error code
repeats, call for service.
CODE CAUSE
F-3 Touch key error
F-9 Oven not heating
The oven racks were
cleaned in a Self
Clean cycle.
Apply a small amount of vegetable oil to a paper towel and wipe the edges of the
oven racks. Do not use lubricant sprays.
Clock is flashing.
Power outage or surge. Reset the clock. If the oven was in use, you must reset it
by touching the Clear/Off key. Reset the clock and any cooking function.
“Burning” or “oily”
odor emitting from the
vent.
This is normal in a new oven and will disappear with use. To speed the process,
set a Self Clean cycle for a minimum of three hours. See Self Clean in the
MAINTENANCE section.
Strong odor.
An odor from the insulation around the inside of the oven is normal for the first few
times the oven is used.
Fan noise
The convection fan may turn on and off automatically.
This is normal.
Fan operation
It is normal for the fan to operate periodically throughout a normal bake cycle in the
oven. This is to ensure even baking results.
Burners are not
lighting properly after
cleaning the cooktop
surface.
Make sure that the burner heads and caps are completely dry and properly
positioned.
When lighting just one
burner, clicking noise
is heard from all the
burners.
This is normal. Electric spark igniters from the burners cause the clicking noise. All
the spark igniters on the cooktop will activate when igniting just one burner.

56
SMART DIAGNOSIS™
SMART DIAGNOSIS™
Should you experience any problems with your range,
it has the capability of transmitting data to your smart
phone using the LG Smart ThinQ application or via
your telephone to the LG call center.
Smart Diagnosis™ cannot be activated unless your
range is turned on by touching the Start button. If
your range is unable to turn on, then troubleshooting
must be done without using Smart Diagnosis™.
Using Smart Diagnosis™
Smart Diagnosis™ Using Your Smart
Phone
1
Download the LG Smart ThinQ application on
your smart phone.
2
Open the LG Smart ThinQ application on your
smart phone. Touch Smart Diagnosis™ button to
advance to the next screen.
3
Follow directions of the application. Using ‘Tag
On’ is recommended but, if it does not work well,
the application will show how to use Audible
Diagnosis.
4
Touch [ ] in the LG Smart ThinQ application
for a more detailed guide on how to use the Tag
On function.
NOTE
•
Call quality differences by region may affect the
function.
•
Use the home telephone for better
communication performance, resulting in better
service.
•
Bad call quality may result in poor data
transmission from your phone to the machine,
which could cause Smart Diagnosis™ to
malfunction.
Smart Diagnosis™ Through the Call
Center
1
Call the LG call center at: (LG U.S.) 1-800-243-
0000 (LG Canada) 1-888-542-2623.
2
When instructed to do so by the call center
agent, hold the mouthpiece of your phone over
the Smart Diagnosis™ logo on the machine.
Hold the phone no more than one inch from (but
not touching) the machine.
NOTE
Do not touch any other buttons or icons on the
display screen.
3
Touch and hold the Start button for three
seconds.
4
Keep the phone in place until the tone
transmission has finished. This takes about 6
seconds and the display will count down the
time.
5
Once the countdown is over and the tones have
stopped, resume your conversation with the call
center agent, who will then be able to assist you
in using the information transmitted for analysis.
NOTE
•
For best results, do not move the phone while
the tones are being transmitted.
•
If the call center agent is not able to get an
accurate recording of the data, you may be
asked to try again.

57
LIMITED WARRANTY
ENGLISH
LIMITED WARRANTY (CANADA)
ARBITRATION NOTICE: THIS LIMITED WARRANTY CONTAINS AN ARBITRATION PROVISION THAT
REQUIRES YOU AND LG TO RESOLVE DISPUTES BY BINDING ARBITRATION INSTEAD OF IN COURT,
UNLESS THE LAWS OF YOUR PROVINCE OR TERRITORY DO NOT PERMIT THAT, OR, IN OTHER
JURISDICTIONS, IF YOU CHOOSE TO OPT OUT. IN ARBITRATION, CLASS ACTIONS AND JURY TRIALS
ARE NOT PERMITTED. PLEASE SEE THE SECTION TITLED “PROCEDURE FOR RESOLVING DISPUTES”
BELOW.
Should your LG Gas Oven ("Product") fail due to a defect in materials or workmanship under normal and proper
use, during the warranty period set forth below, LG Electronics Canada, Inc. (“LGECI”) will, at its option, repair
or replace the Product upon receipt of proof of the original retail purchase. This limited warranty is valid only to
the original retail purchaser of the Product and applies only to a Product distributed, purchased and used within
Canada, as determined at the sole discretion of LGECI.
WARRANTY PERIOD: (Note: If the original date of purchase cannot be verified, the warranty will begin
sixty (60) days from the date of manufacture).
Gas Oven
One (1) year from the date of original retail purchase
Parts and Labor (internal/functional parts only)
•
Replacement products and parts are warranted for the remaining portion of the original warranty period or
ninety (90) days, whichever is greater.
•
Replacement products and parts may be new, reconditioned, refurbished, or otherwise factory remanufactured,
all at the sole discretion of LGECI.
•
Proof of original retail purchase specifying the Product model and date of purchase is required to obtain
warranty service under this Limited Warranty.
LGECI’S SOLE LIABILITY IS LIMITED TO THE LIMITED WARRANTY SET OUT ABOVE. EXCEPT
AS EXPRESSLY PROVIDED ABOVE, LGECI MAKES NO, AND HEREBY DISCLAIMS, ALL OTHER
WARRANTIES AND CONDITIONS RESPECTING THE PRODUCT, WHETHER EXPRESS OR IMPLIED,
INCLUDING BUT NOT LIMITED TO, ANY IMPLIED WARRANTY OR CONDITION OF MERCHANTABILITY
OR FITNESS FOR A PARTICULAR PURPOSE, AND NO REPRESENTATIONS SHALL BE BINDING ON
LGECI. LGECI DOES NOT AUTHORIZE ANY PERSON TO CREATE OR ASSUME FOR IT ANY OTHER
WARRANTY OBLIGATION OR LIABILITY IN CONNECTION WITH THE PRODUCT. TO THE EXTENT THAT
ANY WARRANTY OR CONDITION IS IMPLIED BY LAW, IT IS LIMITED TO THE WARRANTY PERIOD SET
OUT ABOVE. UNDER NO CIRCUMSTANCES SHALL LGECI, THE MANUFACTURER OR DISTRIBUTOR
OF THE PRODUCT, BE LIABLE FOR ANY INCIDENTAL, CONSEQUENTIAL, SPECIAL, DIRECT, INDIRECT,
PUNITIVE OR EXEMPLARY DAMAGES, INCLUDING, WITHOUT LIMITATION, LOSS OF GOODWILL, LOST
PROFITS, LOSS OF ANTICIPATED PROFITS, LOST REVENUE, LOSS OF USE, OR ANY OTHER DAMAGE,
WHETHER ARISING DIRECTLY OR INDIRECTLY FROM ANY CONTRACTUAL BREACH, FUNDAMENTAL
BREACH, TORT OR OTHERWISE, OR FROM ANY ACTS OR OMISSIONS. LGECI’S TOTAL LIABILITY, IF
ANY, SHALL NOT EXCEED THE PURCHASE PRICE PAID BY YOU FOR THE PRODUCT.
This Limited Warranty gives you specific legal rights. You may also have other rights that vary from province to
province depending on applicable provincial laws. Any term of this Limited Warranty that negates or varies any
implied condition or warranty under provincial law is severable where it conflicts with such provincial law without
affecting the remainder of this warranty’s terms.
THIS LIMITED WARRANTY DOES NOT COVER:
•
Service trips to i) deliver, pick up, or install or; educate on how to operate the Product; ii) correct wiring or
plumbing; or iii) correct unauthorized repairs or installations of the Product;
•
Damage or failure of the Product to perform during power failures and interrupted or inadequate electrical
service;
•
Damage or failure resulting from operating the Product in a corrosive atmosphere or contrary to the
instructions outlined in the Product’s owner’s manual;
•
Damage or failure to the Product caused by accidents, pests and vermin, lightning, wind, fire, floods, acts of
God, or any other causes beyond the control of LGECI or the manufacturer;
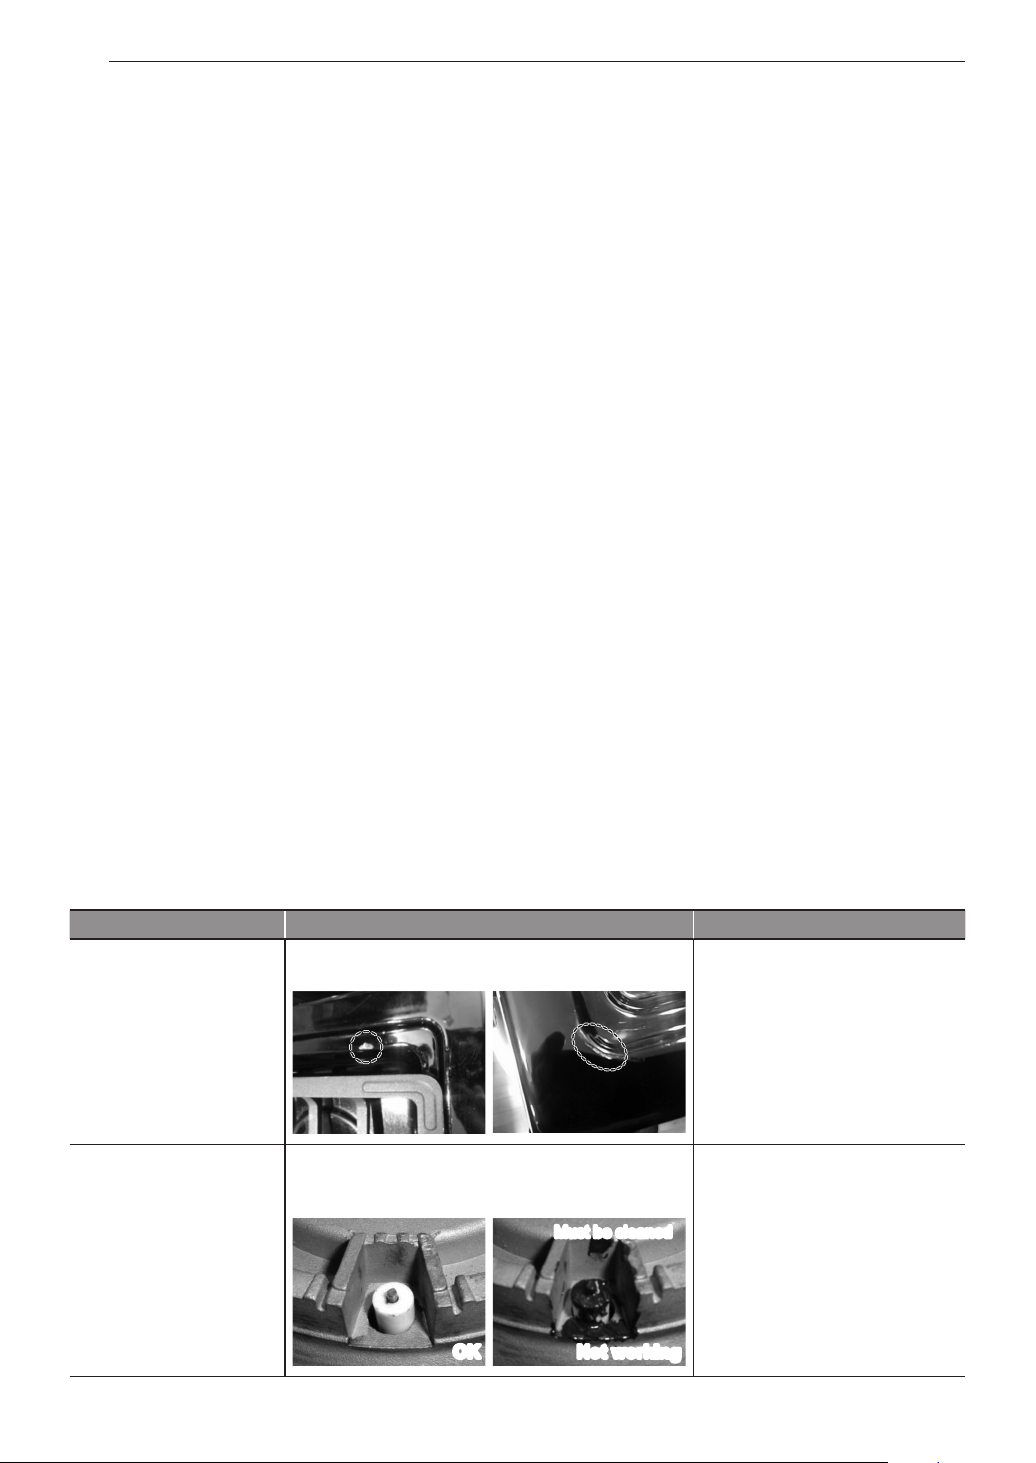
58
LIMITED WARRANTY
•
Damage or failure resulting from misuse, abuse, improper installation, repair, or maintenance of the
Product. Improper repair includes use of parts not authorized or specified by LGECI. Improper installation or
maintenance includes installation or maintenance contrary to the Product’s owner’s manual;.
•
Damage or failure caused by unauthorized modification or alteration of the Product, or if used for other than
the intended household purpose/use of the Product, or damage or failure resulting from any water leakage due
to improper installation of the Product;
•
Damage or failure caused by incorrect electrical current, voltage or plumbing codes;
•
Damage or failure caused by use that is other than normal household use, including, without limitation,
commercial or industrial use, including use in commercial offices or recreational facilities, or as otherwise
outlined in the Product’s owner’s manual;
•
Damage or failure caused by transportation and handling, including scratches, dents, chips and/or other
damage to the finish of the Product, unless such damage results from defects in materials or workmanship
and is reported to LGECI within one (1) week of delivery of the Products;
•
Damage or missing items to any display, open box, refurbished or discounted Product;
•
Refurbished Product or any Product sold “As Is”, “Where Is”, “With all Faults”, or any similar disclaimer;
•
Products with original serial numbers that have been removed, altered or cannot be readily determined at the
discretion of LGECI;
•
Increases in utility costs and additional utility expenses in any way associated with the Product;
•
Any noises associated with normal operation of the Product;
•
Replacement of light bulbs, filters, fuses or any other consumable parts;
•
Replacement of any part that was not originally included with the Product;
•
Costs associated with removal and/or reinstallation of the Product for repairs; and
•
Shelves, drawers, handle and accessories to the Product, except for internal/functional parts covered under
this Limited Warranty.
•
Conversion of products from natural gas or L.P. gas;
•
Coverage for "in Home" repairs, for products in-warranty, will be provided if the Product is within a 150 km
radius from the nearest authorized service center (ASC), as determined by LG Canada. If your Product is
located outside a 150 km radius from a ASC, as determined by LG Canada, it will be your responsibility to
bring the Product, at your sole expense, to the ASC for in-warranty repair.
Not Covered by Warranty
Problem Cause Prevention
•
Cooktop enamel
chipping off
Improper usage
•
Do not hit enamel cooktop
•
Burners do not light Clogged or dirty burner ports or electrodes will
not allow the burner to operate properly
•
Check and clean the gas
electrode.
OK Not working
Must be cleaned
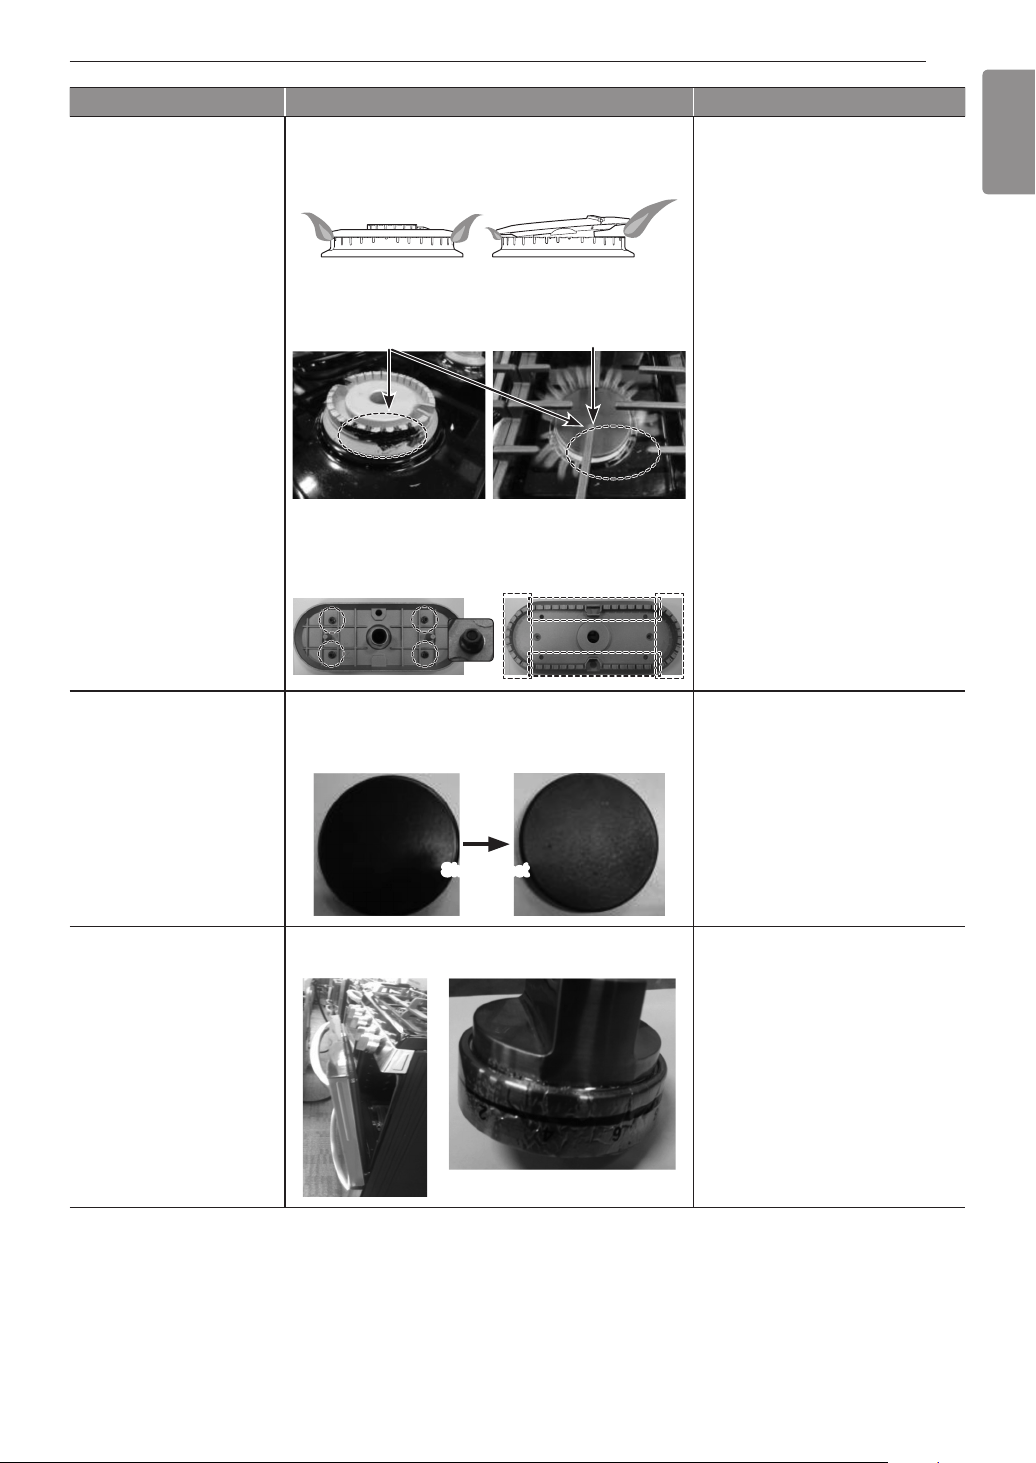
59
LIMITED WARRANTY
ENGLISH
Problem Cause Prevention
•
Uneven flame 1. Improper burner cap installation
•
Check installation of burner
head and cap
Burner cap is
properly seated.
Burner cap is NOT
properly seated.
2. Burner ports clogged by food residue
•
Hardened residue should be
removed using a toothbrush.
Ports blocked by dirt Flames uneven
* Oval burner
•
Oval burner
1) Release 4 nuts
2) Clean residue using
toothbrush
To clean: Release 4 nuts
Clean red part with toothbrush
•
Burner cap color
change and lost shine
1. Scratching
2. Use of detergent or abrasive cleansers
•
Do not use steel wool or
abrasive cleansers to clean.
•
To remove burnt-on food,
soak the burner heads in hot
water for 20–30 minutes. (Do
not use detergent)
Shine is lost
•
Knobs melt Improper usage
•
Do not leave door at stop
position during Broil/Bake
mode or right after cooking.
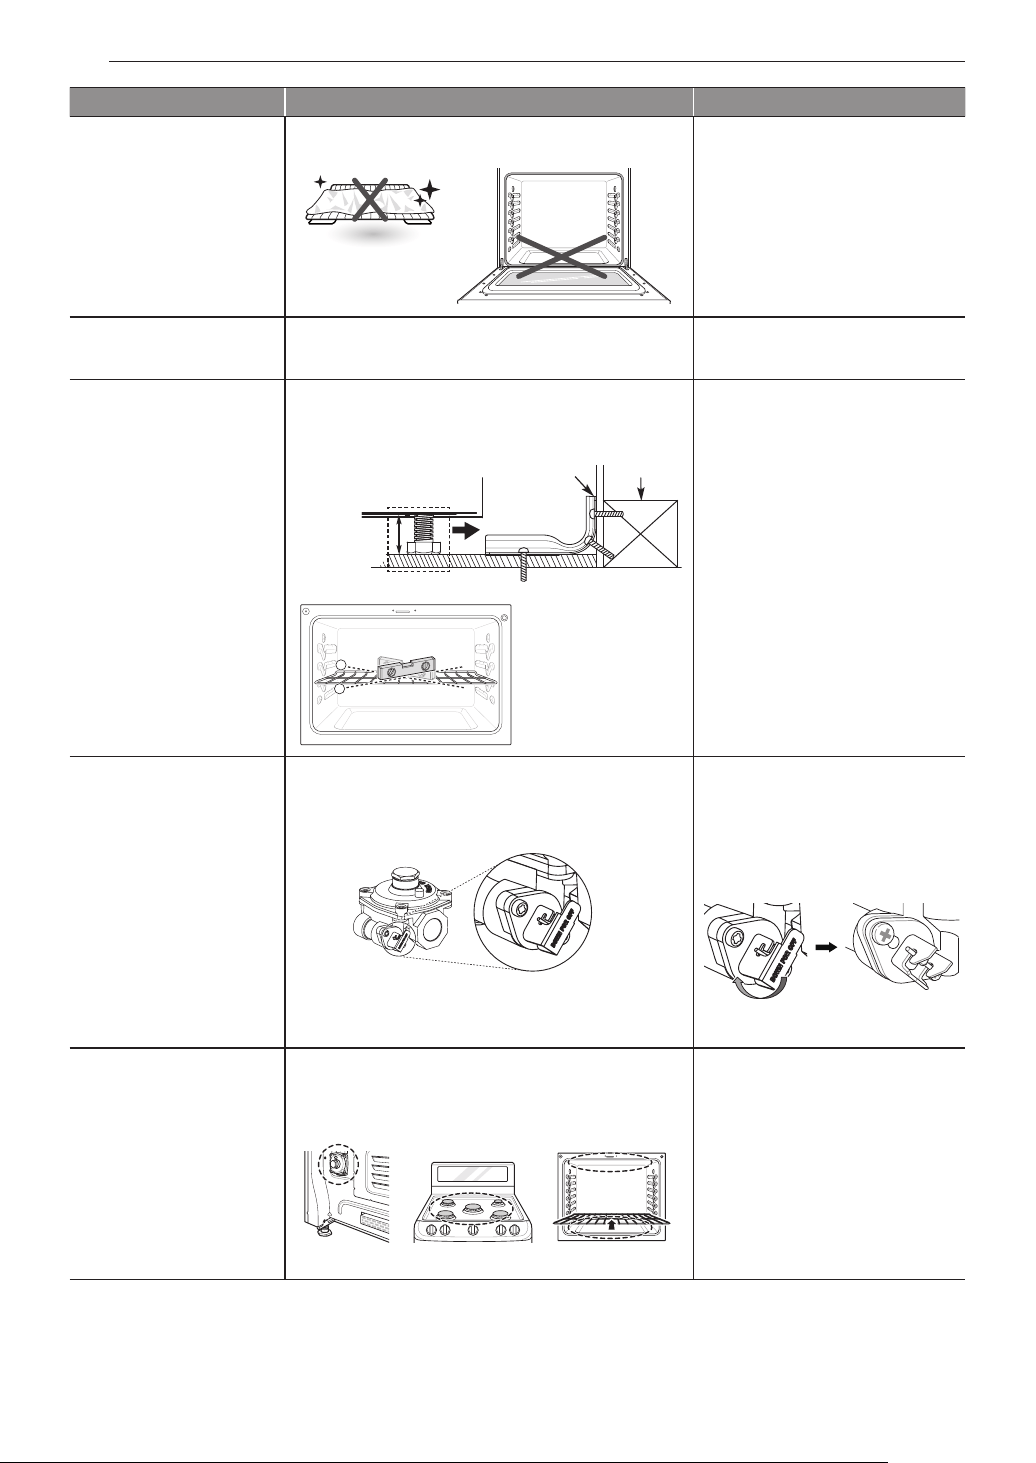
60
LIMITED WARRANTY
Problem Cause Prevention
•
Oven or racks are
stained after using
aluminum foil
Aluminum foil has melted in the oven
•
Never cover the oven bottom
or cover an entire rack with
materials such as aluminum
foil.
•
If the foil has already melted
onto the oven, it will not
affect the performance of the
oven.
•
Flame or power is
weak
Gas pressure may be weak
•
Check with gas supplier first
•
Surface is not level
•
Oven is tipping
1. Range not leveled
2. Anti-tip device not installed correctly
•
Check with installer first
Anti-tip bracket
Approximately
0.65"
(16.5 mm)
Level both sides of range
Screw must
enter wood or
concrete
Wall plate
1
2
Use carpenter’s level to
check level.
•
Oven shows error
code (F9, F19) but
cooktop burners are
working.
The gas pressure regulator valve is closed.
•
Check that the regulator
valve is in the open position.
•
If the regulator valve
is
closed, rotate the lever to
open the valve.
Lever’s closed position
Lever’s open
position
Lever’s closed
position
•
Flames too bigon
converted cooktop
(NP
LP)
The installer missed part of the conversion.
(Check 3 parts: regulator, cooktop valve, broil/
bake valve.)
•
Check with installer first
•
Refer to installation manual
regulator
cooktop valve broil/bake valve
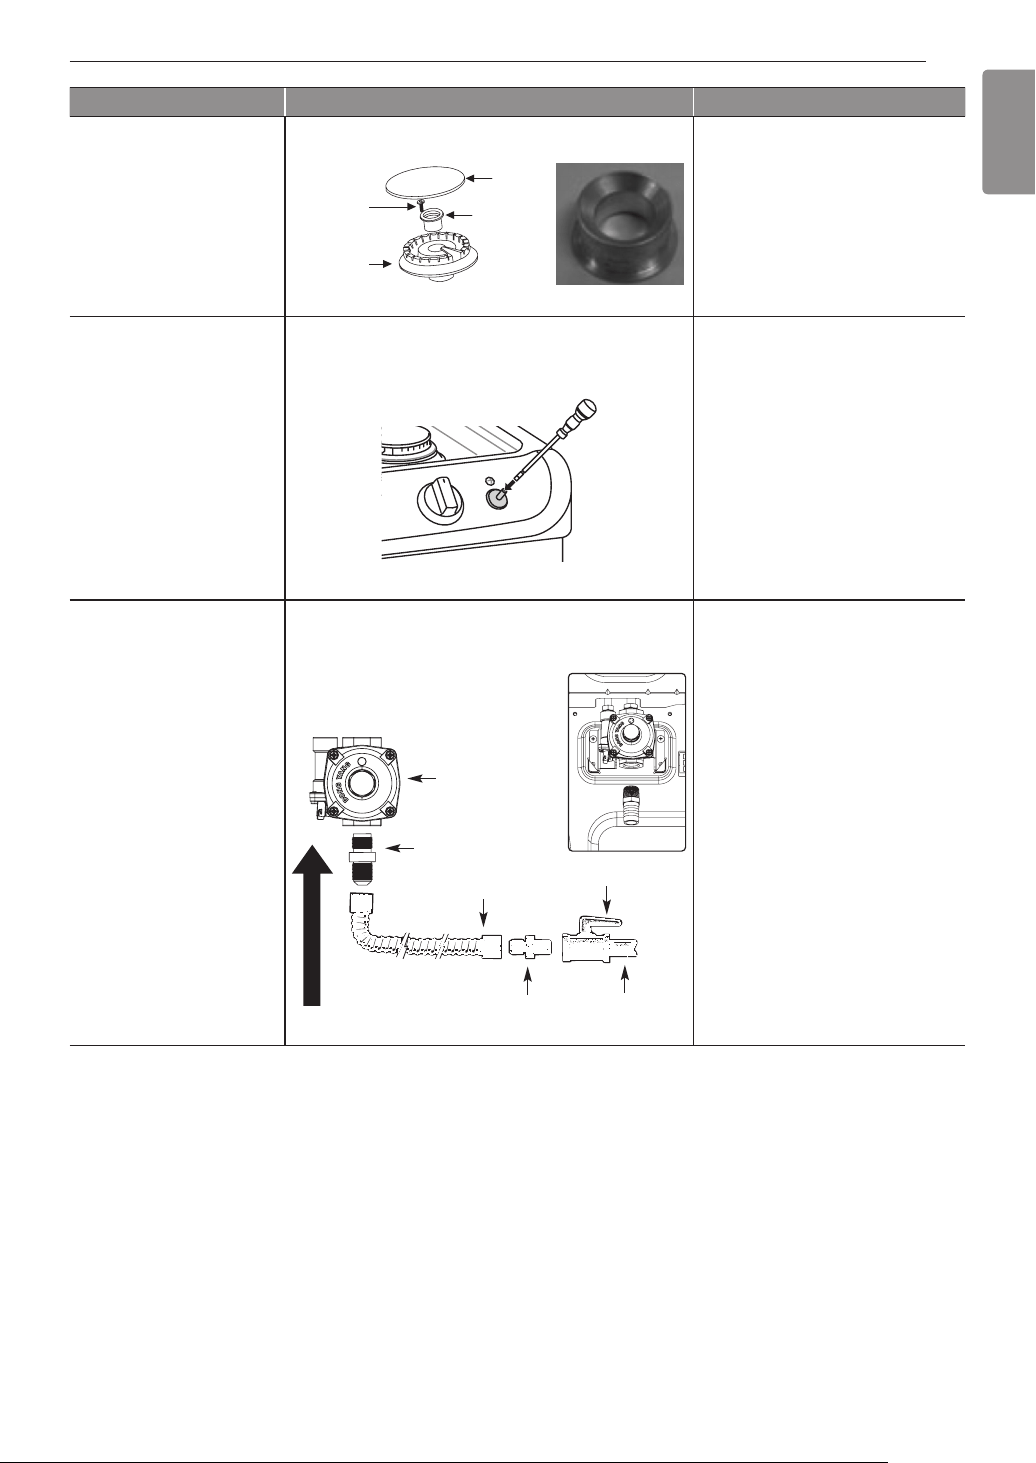
61
LIMITED WARRANTY
ENGLISH
Problem Cause Prevention
17K/18.5K burner needs choke.
•
Check with installer first
•
Refer to installation manual
choke
Burner
cap
Set Screw
Burner
base
Choke
•
Flame is too small or
too large
1. Variable gas pressure
2. Installer did not check
•
Check with installer first
Center adjustment screw
•
Gas smell Improper connection
•
Check with installer first
1
/
2
"
Adapter
1
/
2
"
Adapter
1
/
2
"
Adapter
Pressure
regulator
Flex connector
(6 ft. max.)
Gas shut-off valve
1
/
2
" or
3
/
4
"
Gas pipe
Gas Flow into Range
Flexible Connector Hookup
All costs and expenses associated with the above excluded circumstances, listed under the heading,
This Limited Warranty Does Not Cover, shall be borne by the consumer.
TO OBTAIN WARRANTY SERVICE AND ADDITIONAL INFORMATION, PLEASE CALL OR VISIT OUR
WEBSITE:
Call 1-888-542-2623 (7 A.M. to 12 A.M., 365 days a year) and select the appropriate option from the menu, or
visit our website at http://www.lg.com

62
LIMITED WARRANTY
PROCEDURE FOR RESOLVING DISPUTES:
EXCEPT WHERE PROHIBITED AT LAW, ALL DISPUTES BETWEEN YOU AND LG ARISING OUT OF
OR RELATING IN ANY WAY TO THIS LIMITED WARRANTY OR THE PRODUCT SHALL BE RESOLVED
EXCLUSIVELY THROUGH BINDING ARBITRATION, AND NOT IN A COURT OF GENERAL JURISDICTION.
EXCEPT WHERE PROHIBITED AT LAW, YOU AND LG BOTH IRREVOCABLY AGREE TO WAIVE THE RIGHT
TO A JURY TRIAL AND TO BRING OR PARTICIPATE IN A CLASS ACTION.
Definitions. For the purposes of this section, references to “LG” mean LG Electronics Canada, Inc., its parents,
subsidiaries and affiliates, and each of their officers, directors, employees, agents, beneficiaries, predecessors
in interest, successors, assigns and suppliers; references to “dispute” or “claim” shall include any dispute,
claim or controversy of any kind whatsoever (whether based in contract, tort, statute, regulation, ordinance,
fraud, misrepresentation or any other legal or equitable theory) arising out of or relating in any way to the sale,
condition or performance of the product or this Limited Warranty.
Notice of Dispute. In the event you intend to commence an arbitration proceeding, you must first notify LG in
writing at least 30 days in advance of initiating the arbitration by sending a letter to LGECI Legal Team at 20
Norelco Drive, North York, Ontario, Canada M9L 2X6 (the “Notice of Dispute”). You and LG agree to engage
in good faith discussions in an attempt to amicably resolve your claim. The notice must provide your name,
address, and telephone number; identify the product that is the subject of the claim; and describe the nature
of the claim and the relief being sought. If you and LG are unable to resolve the dispute within 30 days of LG’s
receipt of the Notice of Dispute, the dispute shall be resolved by binding arbitration in accordance with the
procedure set out herein. You and LG both agree that, during the arbitration proceeding, the terms (including any
amount) of any settlement offer made by either you or LG will not be disclosed to the arbitrator until the arbitrator
determines the dispute.
Agreement to Binding Arbitration and Class Action Waiver. Upon failure to resolve the dispute during the 30
day period after LG’s receipt of the Notice of Dispute, you and LG agree to resolve any claims between you and
LG only by binding arbitration on an individual basis, unless you opt out as provided below, or you reside in a
jurisdiction that prevents full application of this clause in the circumstances of the claims at issue (in which case
if you are a consumer, this clause will only apply if you expressly agree to the arbitration). To the extent permitted
by applicable law, any dispute between you and LG shall not be combined or consolidated with a dispute
involving any other person’s or entity’s product or claim. More specifically, without limitation of the foregoing,
except to the extent such a prohibition is not permitted at law, any dispute between you and LG shall not under
any circumstances proceed as part of a class or representative action. Instead of arbitration, either party may
bring an individual action in small claims court, but that small claims court action may not be brought on a class
or representative basis except to the extent this prohibition is not permitted at law in your province or territory of
jurisdiction as it relates to the claims at issue between you and LG.
Arbitration Rules and Procedures. To begin arbitration of a claim, either you or LG must make a written
demand for arbitration. The arbitration will be private and confidential, and conducted on a simplified and
expedited basis before a single arbitrator chosen by the parties under the provincial or territorial commercial
arbitration law and rules of the province or territory of your residence. You must also send a copy of your written
demand to LG at LG Electronics, Canada, Inc., Attn: Legal Department- Arbitration, 20 Norelco Drive, North York,
Ontario M9L 2X6. This arbitration provision is governed by your applicable provincial or territorial commercial
arbitration legislation. Judgment may be entered on the arbitrator’s award in any court of competent jurisdiction.
All issues are for the arbitrator to decide, except that, issues relating to the scope and enforceability of the
arbitration provision and to the arbitrability of the dispute are for the court to decide. The arbitrator is bound by
the terms of this provision.
Governing Law. The law of the province or territory of your purchase shall govern this Limited Warranty and
any disputes between you and LG except to the extent that such law is preempted by or inconsistent with
applicable federal or provincial/territorial law. Should arbitration not be permitted for any claim, action, dispute or
controversy between you and LG, you and LG attorn to the exclusive jurisdiction of the courts of the province or
territory of your purchase for the resolution of the claim, action, dispute or controversy between you and LG.

63
LIMITED WARRANTY
ENGLISH
Fees/Costs. You do not need to pay any fee to begin an arbitration. Upon receipt of your written demand for
arbitration, LG will promptly pay all arbitration filing fees unless you seek more than $25,000 in damages, in
which case the payment of these fees will be governed by the applicable arbitration rules. Except as otherwise
provided for herein, LG will pay all filing, administration and arbitrator fees for any arbitration initiated in
accordance with the applicable arbitration rules and this arbitration provision. If you prevail in the arbitration, LG
will pay your attorneys’ fees and expenses as long as they are reasonable, by considering factors including, but not
limited to, the purchase amount and claim amount. Notwithstanding the foregoing, if applicable law allows for an
award of reasonable attorneys’ fees and expenses, an arbitrator can award them to the same extent that a court
would. If the arbitrator finds either the substance of your claim or the relief sought in the demand is frivolous or
brought for an improper purpose (as measured by the applicable laws), then the payment of all arbitration fees
will be governed by the applicable arbitration rules. In such a situation, you agree to reimburse LG for all monies
previously disbursed by it that are otherwise your obligation to pay under the applicable arbitration rules. Except
as otherwise provided for, LG waives any rights it may have to seek attorneys’ fees and expenses from you if LG
prevails in the arbitration.
Hearings and Location. If your claim is for $25,000 or less, you may choose to have the arbitration conducted
solely (1) on the basis of documents submitted to the arbitrator, (2) through a telephonic hearing, or (3) by an in-
person hearing as established by the applicable arbitration rules. If your claim exceeds $25,000, the right to a
hearing will be determined by the applicable arbitration rules. Any in-person arbitration hearings will be held at
the nearest, most mutually-convenient arbitration location available within the province or territory in which you
reside unless you and LG both agree to another location or agree to a telephonic arbitration.
Severability and Waiver. If any portion of this Limited Warranty (including these arbitration procedures) is
unenforceable, the remaining provisions will continue in full force and effect to the maximum extent permitted by
applicable law. Should LG fail to enforce strict performance of any provision of this Limited Warranty (including
these arbitration procedures), it does not mean that LG intends to waive or has waived any provision or part of
this Limited Warranty.
Opt Out. You may opt out of this dispute resolution procedure. If you opt out, neither you nor LG can require the
other to participate in an arbitration proceeding. To opt out, you must send notice to LG no later than 30 calendar
days from the date of the first consumer purchaser’s purchase of the product by either (i) sending an e-mail to
[email protected], with the subject line: “Arbitration Opt Out;” or (ii) calling 1-800-980-2973. You must include in
the opt out e-mail or provide by telephone: (a) your name and address; (b) the date on which the product was
purchased; (c) the product model name or model number; and
(d) the serial number (the serial number can be found (i) on the product; or (ii) online by accessing https://www.
lg.com/ca_en/support/repair-service/schedule-repair and clicking on “Find My Model & Serial Number”).
In the event that you “Opt Out”, the law of the province or territory of your residence shall govern this Limited
Warranty and any disputes between you and LG except to the extent that such law is preempted by or
inconsistent with applicable federal or provincial/territorial law. Should arbitration not be permitted for any claim,
action, dispute or controversy between you and LG, you and LG agree to attorn to the exclusive jurisdiction
of the courts of the province or territory of your residence for the resolution of the claim, action, dispute or
controversy between you and LG.
You may only opt out of the dispute resolution procedure in the manner described above (that is, by e-mail or
telephone); no other form of notice will be effective to opt out of this dispute resolution procedure. Opting out of
this dispute resolution procedure will not affect the coverage of the Limited Warranty in any way, and you will
continue to enjoy the full benefits of the Limited Warranty. If you keep this product and do not opt out, then you
accept all terms and conditions of the arbitration provision described above.
Conflict of Terms. In the event of a conflict or inconsistency between the terms of this Limited Warranty and the
End User License Agreement (“EULA”) in regards to dispute resolution, the terms of this Limited Warranty shall
control and govern the rights and obligations of the parties and shall take precedence over the EULA.

64
MEMO
MEMO
FRANÇAIS
MANUEL DU PROPRIÉTAIRE
CUISINIÈRE À
GAZ
•
•
•
LRG5115**
MFL69282802_08
www.lg.com
Copyright © 2015 - 2019 LG Electronics Inc. Tous droits réservés.

2 TABLE DES MATIÈRES
3
4
12
12 Pièces
12 Accessoires
13
13 Avantd᾿installerlacuisinière
14 Installation de la cuisinière
16 Alimentation en gaz adéquat
17 Branchement de la cuisinière au conduit de gaz
18 Branchements électriques
18 Scellage des ouvertures
19 Assemblage des brûleurs de surface
19 Vérificationdel᾿allumagedesbrûleursdesurface
20 Mise au niveau de la cuisinière
20 Enclenchement du dispositif antibasculement
21
21 Brûleurs de surface au gaz
22 Emplacements des brûleurs
22 Ajustementdel᾿intensitédelaflamme
23 Utilisationd᾿unwok
24 Utilisation de la plaque chauffante
25 Four
26 Aperçu du panneau de commande
27 Modification des réglages du four
27 Clock(Horloge)
27 OvenLight(Lampedufour)
27 Réglages minimum et maximum par défaut
28 TimerOn/Off(Marche/Arrêtdelaminuterie)
28 Settings(Réglages)
-
Réglage du mode horaire
-
Convection à conversion automatique
-
Réglage de la température du four
-
Activation ou désactivation du voyant
d᾿alarmedepréchauffage
-
Réglageduvolumedel᾿avertisseur
-
Sélection des degrés Fahrenheit ou Celsius
29 Lockout(Verrouillage)
30 StartTime[DelayedTimedCook](Heurede
miseenmarche[Cuissonminutéedifférée])
30 CookTime[TimedCook](Tempsdecuisson
[Cuissonminutée])
31 Recommandations pour la cuisson et le
rôtissage au four
32 Bake(Cuisson)
33 Cuisson par convection
34 Plats pour cuisson par convection
34 Rôtissage par convection
35 Broil(Grillage)
37 Pizza
37 Warm(Réchaud)
38 Proof(Levagedupain)
38 Utilisation du tiroir-réchaud
40
40 Avantd᾿utiliserlafonctionTagOn
40 Utilisation de la fonction Tag On
41 Utilisation de Tag On avec des applications
42
42 Retrait et remplacement des brûleurs de surface au
gaz
44 Nettoyagedel᾿extérieur
45 EasyClean
®
48 SelfClean(Autonettoyage)
50 Remplacement de la lampe du four
50 Retrait et remise en place de la porte du four et du
tiroir amovibles
52
52 FAQ
54 Avantd᾿appelerleréparateur
56
56 Utilisation de Smart Diagnosis
MC
57
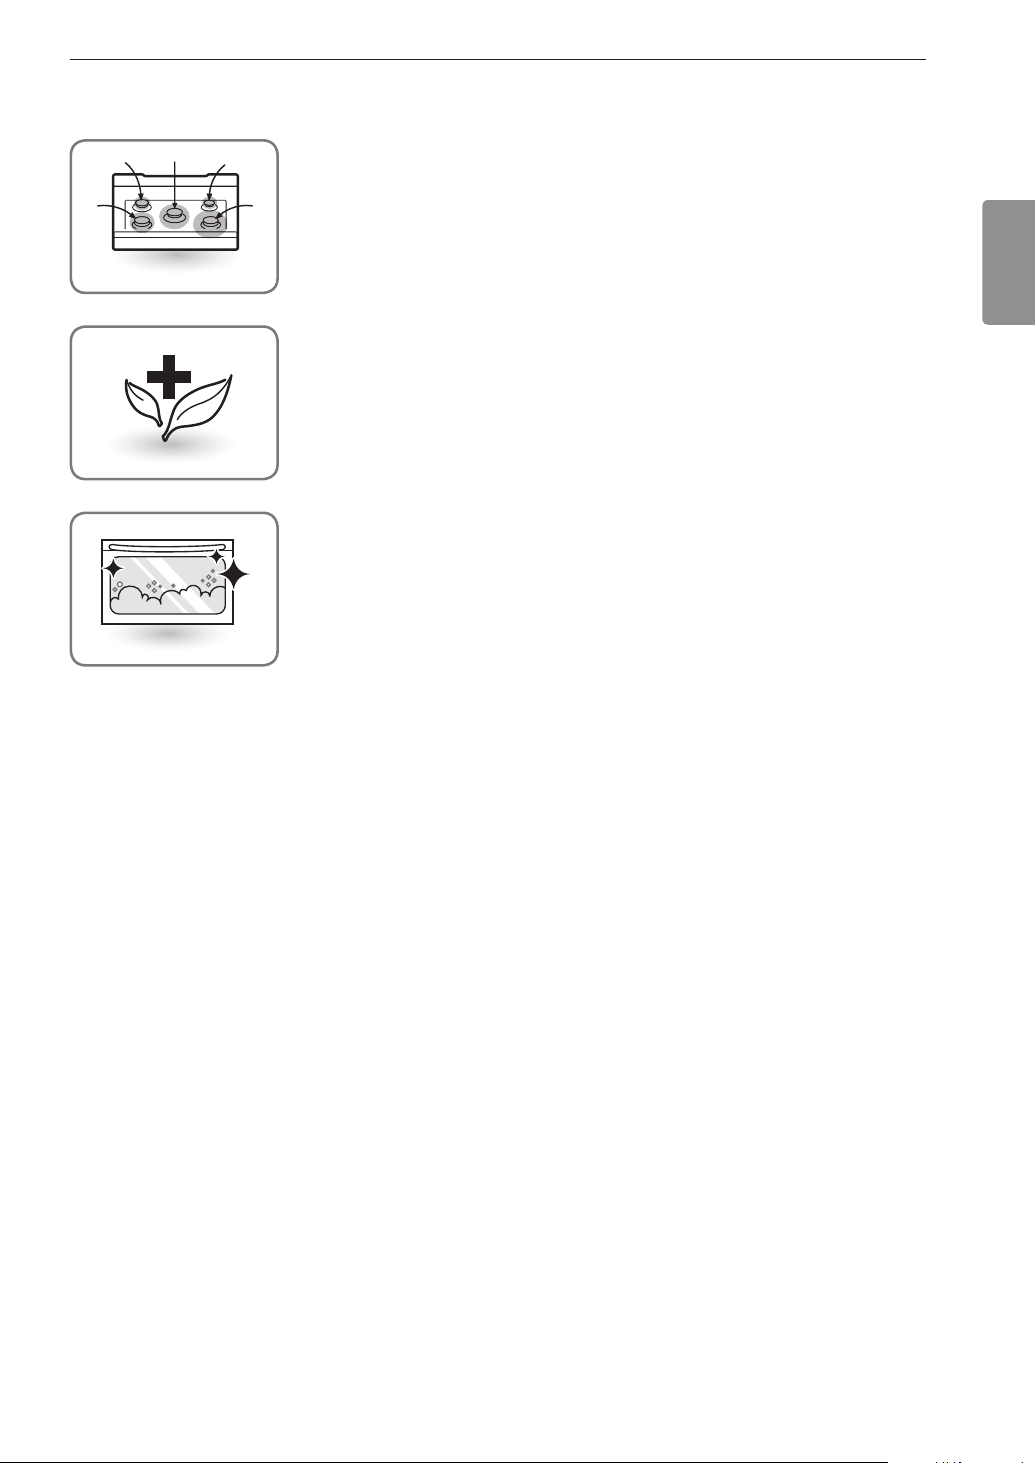
3CARACTÉRISTIQUES DE L'APPAREIL
FRANÇAIS
Choisissezlebrûleurleplusappropriéenfonctiondesdimensionsdel᾿ustensilede
cuisson utilisé.
Vouspouvezutiliserplusieursbrûleursenmêmetempspourpréparerdifférentsplats.
Permet de cuisiner de manière pratique et sécuritaire.
®
Fonctions utiles facilitant le nettoyage.

4 CONSIGNES DE SÉCURITÉ IMPORTANTES
Lisezetsuiveztouteslesconsignesavantd᾿utilisercettecuisinièreafind᾿évitertoutrisqued᾿incendie,
dedéchargeélectrique,deblessureoudedommage.Ceguidenecouvrepastouteslessituations
susceptibles de survenir. Communiquez toujours avec votre agent de service ou le fabricant
concernant les problèmes que vous ne comprenez pas.
Vouspouveztéléchargerlemanueldupropriétaireauhttp://www.lg.com.
Ceciestlesymboled᾿alertedesécurité.Cesymbolevousindiquelesdangerspotentielspouvant
provoquerdesdommagesmatériels,desblessurescorporellesgravesoulamort.
Touslesmessagesdesécuritéserontprécédésdusymboled᾿alertedesécurité,ainsique
du mot « AVERTISSEMENT » ou « MISE EN GARDE ». Voici le message que ces mots
véhiculent :
-
Indiqueunesituationdangereusequi,sinonévitée,
pourrait entraîner la mort ou des blessures graves.
-
Indiqueunesituationdangereusequi,sinonévitée,pourrait
entraîner des blessures légères ou de gravité moyenne.
•
TOUTE CUISINIÈRE PEUT BASCULER.
•
DES BLESSURES PEUVENT EN RÉSULTER.
•
INSTALLEZ LES SUPPORTS ANTIBASCULEMENT FOURNIS AVEC LA CUISINIÈRE.
•
CONSULTEZLESDIRECTIVESD᾿INSTALLATION.
•
Unepersonne,enfantouadulte,peutfairebasculerlacuisinièreetsubirdesblessures
mortelles.
•
Installerledispositifantibasculementsurlastructureousurlacuisinière(ousurlesdeux).
Vérifier si le dispositif antibasculement est installé et engagé convenablement en suivant le
guide du gabarit de l’équerre antibasculement.
•
Engager la cuisinière dans le dispositif antibasculement en en suivant le guide du gabarit
de l’équerre antibasculement. S’assurer que le dispositif antibasculement est engagé de
nouveau après un déplacement de la cuisinière en suivant le guide du gabarit de l’équerre
antibasculement.
•
Engager de nouveau le dispositif antibasculement si la cuisinière est déplacée. Ne pas utiliser la
cuisinière lorsque le dispositif antibasculement n’est pas installé et engagé.
•
Voir les directives d’installation pour obtenir de plus amples renseignements.
•
Toute omission de le faire expose les enfants et les adultes à un risque de décès ou de brûlures
graves.
•
Pouréviterlebasculement,nelaissezpersonnemonterous᾿asseoirsurlaporte.Installezle
support antibasculement fourni avec cette cuisinière.
- Lacuisinièrepourraitalorsbasculeretdesblessurespourraientêtrecauséespardesliquides
chaudsoudesalimentsrenversés,ouparlacuisinièreelle-même.
- Silacuisinièredoitêtredéplacéeloindumuràdesfinsdenettoyage,deréparationoupourd᾿autres
raisons,veillezàcequelesupportantibasculementsoitcorrectementréenclenchéaumomentde
sa remise en place contre le mur.
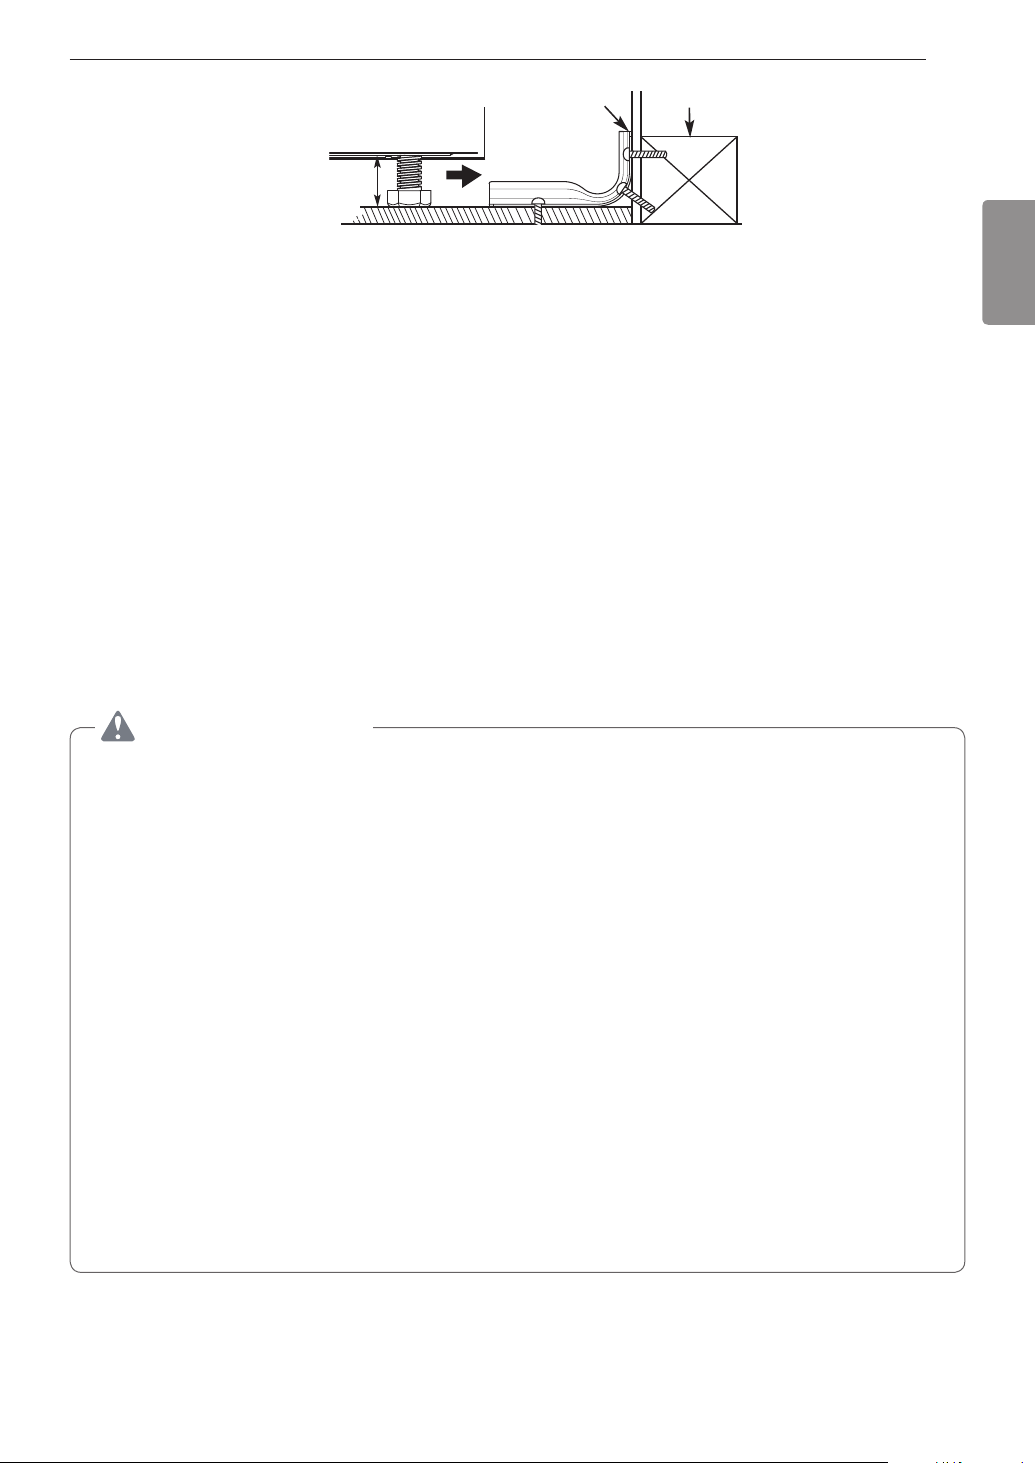
5CONSIGNES DE SÉCURITÉ IMPORTANTES
FRANÇAIS
Support antibasculement
Environ0,65po
(16,5mm)
La vis doit
pénétrer dans le
bois ou le béton.
Plaque murale
•
Pourréduirelerisquedebasculementdelacuisinière,celle-cidoitêtrestabiliséeparl᾿installation
adéquate des supports antibasculement.
•
Pourvérifiersilesupportantibasculementestadéquatementinstallé,enleveztoutobjetdela
tabledecuisson.Saisissezl᾿extrémitéarrièresupérieuredudosseretdelacuisinièreetessayez
delabasculeravecprécautionversl᾿avant.Assurez-vousquelessupportsantibasculementsont
engagés.
•
Retirez le tiroir-réchaud ou le tiroir de rangement et vérifiez visuellement si le pied de nivellement
arrière est bien inséré dans le support antibasculement.
•
Reportez-vousaumanueld᾿installationpourinstallercorrectementlesupportantibasculement.
Les appareils fonctionnant au gaz peuvent occasionner une exposition mineure à quatre de ces
substances,àsavoirlebenzène,lemonoxydedecarbone,leformaldéhydeetlasuie,dessubstances
issues principalement de la combustion incomplète du gaz naturel ou des gaz de pétrole liquéfiés.
Silesbrûleurssontrégléscorrectement(présenced᾿uneflammebleueetnonjaune),lerisquede
combustionincomplèteestgrandementdiminué.Onpeutlimiterl᾿expositionàcessubstancesen
ouvrantlesfenêtresouenutilisantunventilateurouunehotte.
•
N᾿utilisezjamaisvotrecuisinièrepourchaufferouréchaufferlapièce.Celapeutentraînerune
intoxication au monoxyde de carbone et la surchauffe du four.
•
Neportezjamaisdevêtementsamplesoutombantslorsquevousutilisezvotrecuisinière.Soyez
prudent lorsque vous désirez atteindre des objets placés dans des armoires situées au-dessus
delacuisinière.Lesmatériauxinflammablespeuventprendrefeus᾿ilsentrentencontactavec
uneflammeoulessurfaceschaudesdufour,etcauserdesbrûluresgraves.
•
Neplacezpasoun᾿utilisezpasdematériauxcombustibles(commedel᾿essence)oud᾿autres
vapeurs et liquides inflammables à proximité de cet appareil ou de tout autre appareil.
•
Ne placez jamais de matériaux inflammables dans le four ou près de la table de cuisson.
•
Évitezdelaisserdelagraissedecuissonoud᾿autresmatériauxinflammablesàl᾿intérieurouà
proximité de la cuisinière.
•
N᾿éteignezpasunfeudegraisseavecdel᾿eau.Netouchezjamaisunepoêleouunecasserole
enflammée.Fermezl᾿appareil.Surunbrûleurdesurface,étouffezlesflammesd᾿unecasserole
enfeuenlarecouvrantcomplètementavecuncouvercleajusté,uneplaqueàbiscuitsouun
plateau. Utilisez un produit chimique sec multifonction ou un extincteur à mousse.
Ilestpossibled᾿éteindreunfeudegraisseenlerecouvrantdebicarbonatedesoudeoubienà
l᾿aided᾿unproduitchimiquesecmultifonctionoud᾿unextincteuràmousse.
Ilestpossibled᾿éteindrelesflammesdanslefourouletiroirenfermantlaportedufourou
dutiroiretenarrêtantl᾿appareil,ouenutilisantunproduitchimiquesecmultifonctionouun
extincteur à mousse.
6 CONSIGNES DE SÉCURITÉ IMPORTANTES
•
N᾿utilisezpaslefourouletiroirpourrangerdesobjets.
•
Laissez refroidir les grilles des brûleurs et les autres surfaces avant de les toucher.
•
N᾿obstruezjamaislesévents(trousd᾿aération)delacuisinière.Ilspermettentunecirculation
d᾿airdanslesdeuxsens,cequiestnécessaireaubonfonctionnementdelacuisinièreetpour
unecombustionadéquate.Lesouverturesd᾿aérationsetrouventàl᾿arrièredelatablede
cuisson,auhautetaubasdelaportedufourainsiqu᾿aubasdelacuisinière.
•
N᾿obstruezjamaislefluxd᾿airdecombustionetdeventilationenbloquantl᾿éventoulesentrées
d᾿airdufour.Celalimiteraitlacirculationdel᾿airverslesbrûleursetpourraitentraînerune
intoxication au monoxyde de carbone.
•
Nerecouvrezjamaisentièrementunegrilledepapierd᾿aluminiumoud᾿autresmatériaux,etne
couvrezpaslesfentes,lestrousoulespassagesdanslefonddufour.Celabloquelacirculation
del᾿airdanslefouretpeutcauseruneintoxicationaumonoxydedecarbone.Lepapier
d᾿aluminiumpeutaussiemprisonnerlachaleuretreprésenterunrisqued᾿incendie.
•
Les rayures importantes ou les chocs sur les portes en verre peuvent causer le bris ou
l᾿éclatementduverre.
•
Lefaitdeposerlespieds,des᾿appuyeroudes᾿asseoirsurlesportesoulestiroirspourrait
causer des blessures graves et aussi endommager la cuisinière. Ne laissez jamais les enfants
grimpersurlacuisinièreoujoueràproximité.Lepoidsd᾿unenfantsuruneporteouvertepeut
faire basculer la cuisinière et entraîner des brûlures ou des blessures graves.
•
L᾿essaid᾿étanchéitédel᾿appareildoitêtreréaliséconformémentauxinstructionsdufabricant.
•
Des fuites de gaz peuvent se produire dans le système et représenter un risque sérieux. Une
fuitedegazpeutnepasêtredétectéeparl᾿odeur.Lesfournisseursdegazrecommandent
d᾿acheteretd᾿installerundétecteurdegazapprouvéparl᾿UL.L᾿installationetl᾿utilisation
doiventêtreconformesauxinstructionsdufabricantdudétecteurdegaz.
•
N᾿appliquezaucunnettoyantàfourcommercialsurlefinidufournisurtouteautrepartiede
celui-ci. Cela endommagerait le fini.
•
Pouréviterl᾿apparitiondetachesouladécoloration,nettoyezl᾿appareilaprèschaqueutilisation.
•
N᾿essayezpasd᾿ouvriroudefermerlaportenid᾿utiliserlefourtantquelaporten᾿estpas
installée correctement.
•
Ne mettez jamais les doigts entre une charnière et le cadre avant du four. Les bras de la
charnièresontmontéssurressort.Sielleestaccrochéeaccidentellement,lacharnièrese
refermera brusquement contre le cadre du four et causera des blessures aux doigts.
•
Touslesobjetsrevêtantunintérêtpourlesenfantsnedoiventpasêtreplacésdansdesarmoires
situéesau-dessusd᾿unecuisinièreousurledosseretdecelle-ci.Engrimpantsurlacuisinière
pourattrapercesobjets,lesenfantsrisquentd᾿êtreblessésgravement.
•
Nelaissezpaslesenfantsseulsousanssurveillanceprèsd᾿unecuisinièrechaudeouen
marche. Ils pourraient subir de graves brûlures.
•
Neleslaissezpassesuspendreauxcomposantsdelacuisinière(portedufour,tiroir-réchaud,
tabledecuisson),ygrimperous᾿ytenir.Celapourraitendommagerlacuisinièreoulafaire
basculer et ainsi entraîner des blessures graves.
•
Portezdesgantspournettoyerlacuisinièreafind᾿éviterlesblessuresoulesbrûlures.
•
N᾿utilisezpaslefourpourrangerdesalimentsoudesplatsdecuisson.
•
Pouréviterd᾿endommagerlaportedufour,n᾿essayezpasdel᾿ouvrirlorsquel᾿indicationLock
(Verrouillage)estaffichée.
•
Ne posez pas un poids excessif sur la porte ouverte ou ne montez pas sur celle-ci. Cela peut
fairebasculerlacuisinière,casserlaporteouvousblesser.
•
N᾿utilisezpaslacuissonprogramméeendifférépourdesalimentstrèspérissablescommeles
produitslaitiers,leporc,lavolailleoulesfruitsdemer.

7CONSIGNES DE SÉCURITÉ IMPORTANTES
FRANÇAIS
Demandezàl’installateurdevousmontreroùsetrouvelerobinetd’arrêtdugazdelacuisinièreet
commentlefermer,sinécessaire.
•
Assurez-vous que votre cuisinière est installée et mise à la terre correctement par un installateur
qualifiéetconformémentauxinstructionsd᾿installation.Touslestravauxderéglageoude
réparationdoiventêtreréalisésexclusivementpardesinstallateursdecuisinièresàgazoudes
techniciens qualifiés.
•
Assurez-vous que votre cuisinière a été réglée correctement par un technicien ou un installateur
qualifiéselonletypedegaz(dugaznatureloudesgazdepétroleliquéfiés)quiserautilisé.
Votrecuisinièrepeutêtretransforméepouruneutilisationavecl᾿undesdeuxtypesdegaz.
Reportez-vousauxinstructionsd᾿installation.
•
Cesréglagesdoiventêtreréalisésparuntechnicienqualifiéetconformémentauxinstructionsdu
fabricantetàl᾿ensembledescodesetdesprescriptionsdel᾿autoritéjuridiquementcompétente.
Le non-respect de ces consignes peut causer des blessures graves ou des dommages matériels.
L᾿agencequalifiéeréalisantcesréglagesassumelaresponsabilitédelaconversion.
•
Débranchezl᾿alimentationélectriqueavantderéparerl᾿appareil.
•
N᾿utilisezjamaislaportedel᾿appareilenguised᾿escabeauoudesiège,carcelapeutfaire
basculerl᾿appareiletcauserdesblessuresgraves.
•
Ceproduitnedoitpasêtreinstalléendessousd᾿unehottedeventilationquidirigel᾿airvers
lebas.Celapeutentraînerdesproblèmesd᾿allumageetdecombustiondesbrûleursaugaz,
provoquantdesblessures,etpeutaffecterlesperformancesdecuissondel᾿appareil.
•
Branchez votre cuisinière uniquement sur une prise de 120 volts mise à la terre. Ne retirez pas
labrochedemiseàlaterrerondeducordond᾿alimentation.Encasdedouteconcernantlamise
àlaterredusystèmeélectriquedubâtiment,vousêtespersonnellementresponsableetobligé
de faire remplacer toute prise sans mise à la terre par une prise à trois broches mise à la terre
correctementetconformémentauCodenationaldel᾿électricité.N᾿utilisezpasderallongeavec
cette cuisinière.
•
Afind᾿évitertoutrisqued᾿incendieoudedéchargeélectrique,n᾿utilisezpasdefiched᾿adaptation
ouderallonge,etneretirezpaslabrochedemiseàlaterreducordond᾿alimentationélectrique.
Lenon-respectdecetavertissementpeutprovoquerdesblessuresgraves,unincendieoula
mort.
•
Pouréviterunemauvaisecirculationdel᾿air,placezlacuisinièrehorsdelatrajectoiredela
circulationdanslacuisineetdesemplacementsexposésauxcourantsd᾿air.
•
N᾿essayezpasderéparerouderemplacerunepiècedevotrecuisinière,saufsicelaest
explicitementmentionnédanscemanuel.Touteautreréparationdoitêtreconfiéeàuntechnicien
qualifié.
•
Assurez-vousquetouslesmatériauxd᾿emballageontétéretirésdelacuisinièreavantde
l᾿utiliser,sansquoiilspourraients᾿enflammeretlesflammesoulafuméepourraientcauserdes
dommages.
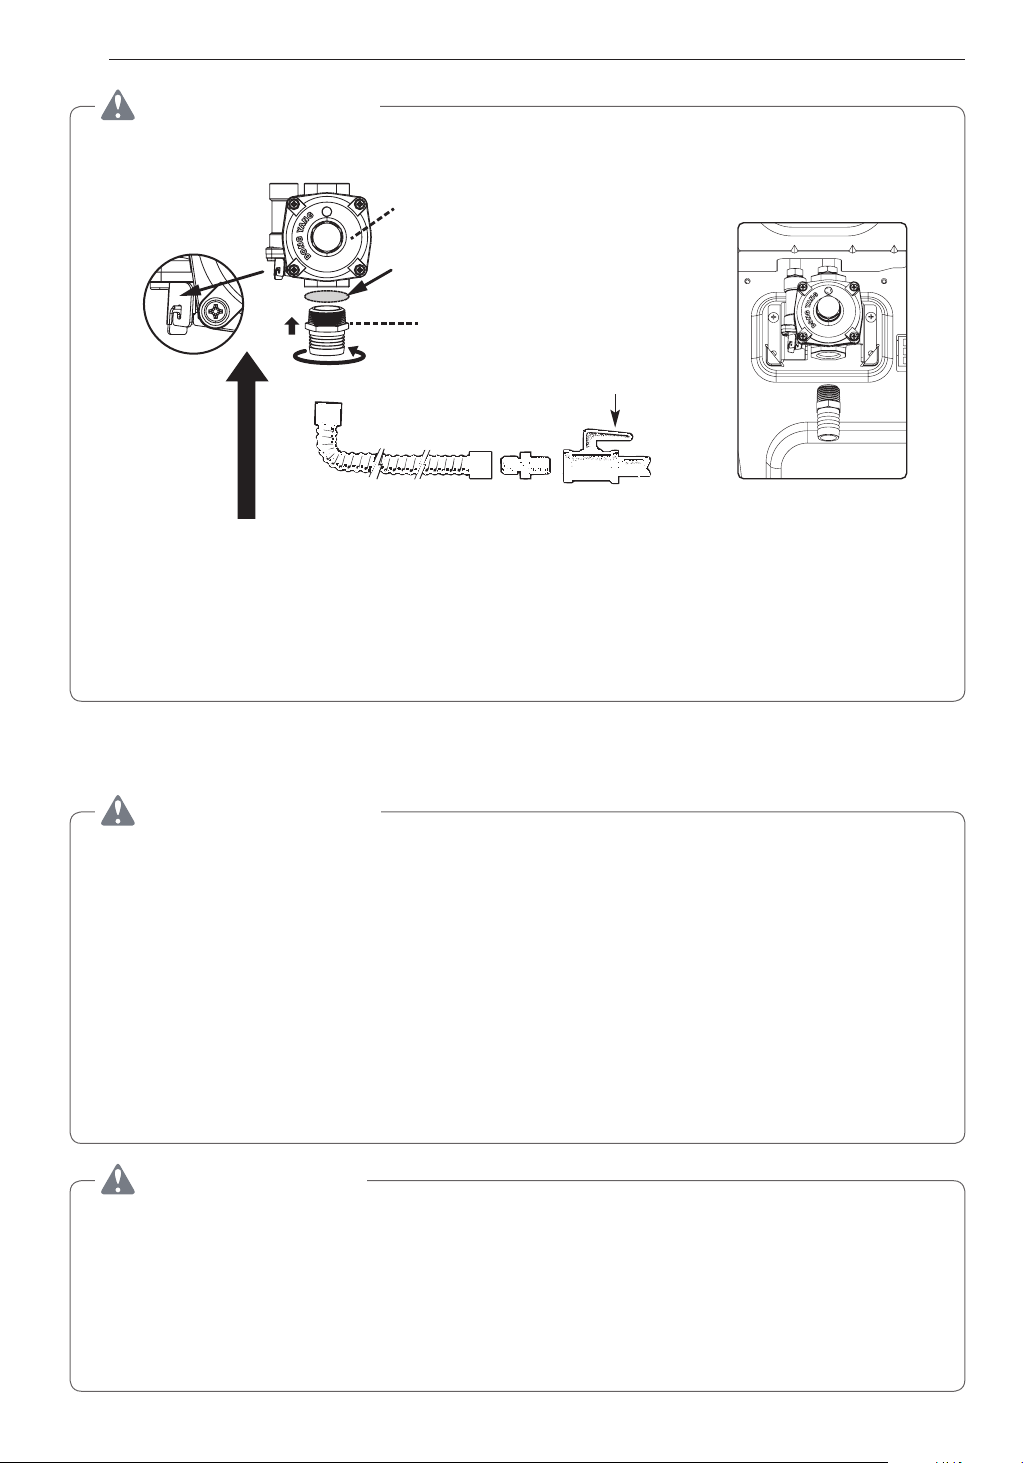
8 CONSIGNES DE SÉCURITÉ IMPORTANTES
•
Pourcouperl’alimentationengazdelacuisinière,fermezlavanned’alimentationengazdela
cuisinière en la tournant dans le sens des aiguilles d’une montre.
Raccord(
1
/
2
po-14NPT)
1
/
2
po Raccord
D’ouverture
(utilisation)dulevier
Régulateur de pression
Robinetd’arrêtdugaz
Retirez cette étiquette
Débit de gaz dans la cuisinière
Installateur:Informezleclientdel’emplacementdurobinetd’arrêtdugaz.
•
Sivousutilisezvotrecuisinièrependantunelonguepériode,ilsepeutqueleplancherdevienne
chaud.Denombreuxrevêtementsdesolnesontpasfaitspourcegenred᾿usage.
•
N᾿installezjamaislacuisinièresurdescarreauxenvinyleousurdulinoquineseraientpas
faitspourrésisteràcegenred᾿usage.N᾿installezjamaislacuisinièredirectementsuruntapis
intérieur de cuisine.
•
Mêmesilaflammedubrûleurs᾿éteint,legazcirculetoujoursjusqu᾿aubrûleurtantquelebouton
n᾿estpasenposition.Sivoussentezuneodeurdegaz,ouvrezimmédiatementlafenêtre
etaérezlapiècependantcinqminutesavantd᾿utiliserlebrûleur.Nelaissezpaslesbrûleurs
allumés sans surveillance.
•
.N᾿utilisezpasdecasserolesquinesontpas
stables ou qui peuvent basculer facilement. Choisissez une casserole avec un fond plat et
suffisammentlargepourrecouvrirlesgrillesdesbrûleurs.Pourprévenirdesdébordements,
veillez à ce que la casserole soit suffisamment large pour contenir les aliments comme il
sedoit.Celadiminueraletempsdenettoyageetempêcheradesdépôtsdenourriturequi
peuvents᾿avérerdangereuxpuisquelesrestesforméspardegrosseséclaboussuresoudes
débordements et se trouvant sur la cuisinière peuvent prendre feu. Utilisez des casseroles avec
despoignéesquipeuventêtrefacilementsaisiesetquirestentfroides.
•
Assurez-vous que toutes les commandes sont en position avantd᾿alimenterlacuisinièreen
gaz.
•
Ne laissez jamais les brûleurs de surface sans surveillance à des réglages de feu vif. Le
débordement de liquide en ébullition peut causer de la fumée et les débordements de corps gras
peuvents᾿enflammer.
•
Lorsquevousallumezlesbrûleursdesurface,tourneztoujourslesboutonsàlaposition et
assurez-vous que les brûleurs sont bien allumés.

9CONSIGNES DE SÉCURITÉ IMPORTANTES
FRANÇAIS
•
Limitezlahauteurdelaflammedesbrûleursdesurfacedesortequ᾿ellenedépassepasle
rebord des casseroles. Une flamme trop forte est dangereuse.
•
Utiliseztoujoursdespoignéessèches,carunepoignéehumideoumouilléesurunesurface
chaudepeutproduiredelavapeuretprovoquerdesbrûlures.N᾿approchezpaslespoignées
tropprèsdelaflammenuelorsquevoussoulevezunecasserole.N᾿utilisezpasdetorchonsou
de tissus épais. Utilisez plutôt une poignée.
•
Sivousutilisezdesustensilesdecuisineenverre,assurez-vousqu᾿ilssontconçuspourlatable
de cuisson.
•
Pouréviterlesbrûlurescauséesparlesmatériauxinflammablesetlesdéversements,orientez
lespoignéesdescasserolesverslecôtéoul᾿arrièredelacuisinièreenévitantdeleslaisser
au-dessus des brûleurs adjacents.
•
Nelaissezaucunobjetsurlatabledecuisson.L᾿airchaudprovenantdel᾿éventpeutenflammer
les objets inflammables ou augmenter la pression dans des récipients fermés et les faire éclater.
•
Surveillez attentivement les aliments en cours de friture sur une flamme réglée au maximum.
•
Chauffeztoujourslesmatièresgrasseslentement,etsurveillez-lespendantqu᾿elleschauffent.
•
Sivousutilisezunmélanged᾿huilesetdegraissespourlafriture,veillezàbienlesmélanger
avant de les faire chauffer.
•
Sipossible,utilisezunthermomètredefriturepouréviterquelesgraisseschauffentau-delàdu
point de fumée.
•
Utilisez la plus petite quantité possible de matières grasses pour obtenir une friture plate ou une
fritureenbainefficace.Unepoêlequicontienttropdematièresgrassespeutoccasionnerdes
déversements lorsque la nourriture est ajoutée.
•
Necuisezjamaislesalimentsdirectementsurlaflammenueàmêmelatabledecuisson.
•
N᾿utilisezpasdewokavecsupportmétalliquerondplacéau-dessusdelagrilled᾿unbrûleur
desurface.Cetanneauemprisonnelachaleur,cequipeutendommagerlagrilleetlatêtedu
brûleur. Cela peut entraîner le dysfonctionnement du brûleur. Cela peut aussi entraîner une
hausse des niveaux de monoxyde de carbone au-dessus des seuils autorisés et comporter des
risques pour la santé.
•
Lesalimentsdestinésàêtrefritsdoiventêtreaussisecsquepossible.Laprésencedegelou
d᾿humiditésurlesalimentspeutfairebouillonnerlagraissechaudequipeutdéborderdela
casserole.
•
N᾿essayezjamaisdedéplacerunecasserolerempliedegraissechaude,enparticulierune
friteuse. Attendez que la graisse soit froide.
•
Neplacezjamaisd᾿objetsenplastiquesurlatabledecuisson,carilspourraientfondres᾿ilssont
laisséstropprèsdel᾿évent.
•
Tenez tout objet en plastique éloigné des brûleurs de surface.
•
Pouréviterdevousbrûler,assurez-vousquechaquecommandedebrûleurestàlaposition
etquetouteslesgrillessontfroidesavantd᾿essayerdelesenlever.
•
Sivoussentezuneodeurdegaz,coupezl᾿arrivéedegazdelacuisinièreetappelezun
technicienqualifié.N᾿utilisezjamaisdeflammenuepourlocaliserunefuite.
•
Tournez toujours le bouton à la position avant de retirer une casserole.
•
Ne soulevez pas la table de cuisson. Le fait de soulever la table de cuisson peut endommager la
cuisinière et provoquer son dysfonctionnement.
•
Silacuisinièresetrouveàproximitéd᾿unefenêtre,n᾿installezpasderideauxlongs,carlevent
pourrait les pousser au-dessus des brûleurs de surface et ils pourraient prendre feu.
•
Faites attention lorsque vous nettoyez la table de cuisson. Les pointes de métal des électrodes
pourraient causer des blessures.
10 CONSIGNES DE SÉCURITÉ IMPORTANTES
Utiliseztoujoursunelèchefriteetunegrillepourledrainagedel᾿excédentdegrasetdematières
grasses.Cecipermettraderéduirelesprojections,lafuméeetlesflambées.
Lorsdel᾿utilisationdugril,latempératureàl᾿intérieurdufourestextrêmementchaude.Pouréviter
toute brûlure :
•
gardezlaporteferméelorsdel᾿utilisationdugril(consultezlasection«Gril»duprésentmanuel);
portez toujours des gants de cuisine lorsque vous placez ou retirez des aliments dans le four.
Pouréviterlesmaladiescauséesparlanourriture,cuisezàfondlesviandesetlavolaille,soitàune
températureINTERNEminimalede160°Fetde165°Frespectivement;cuisezlessteaksetles
côtelettesdebœuf,deporc,deveauetd᾿agneauàunetempératureINTERNEminimalede145°F.
Veillezàbienessuyertoutrésiduexcessifavantd᾿utiliserlafonctiond᾿autonettoyage.
•
Nelaissezpasdesaliments,desplateauxdegril,desustensiles,desgrilles,etc.danslefour
pendantlecycled᾿autonettoyage.
•
N᾿utilisezpasdeproduitsnettoyantspourlefour.Aucunproduitnettoyantcommercialpourfour
ouaucunrevêtementdeprotectiondesparoisdelacaviténedoitêtreutilisésurlefourousur
toutepartiedecelui-ci.Lesrésidusdesproduitsdenettoyagevontendommagerl᾿intérieurdu
fourlorsducycled᾿autonettoyage.
•
Retirezlesgrillesetd᾿autresobjetsdufouravantd᾿activerlecycled᾿autonettoyage.
•
Nettoyez uniquement les pièces énumérées dans ce manuel.
•
Nenettoyezpaslejointdelaporteàlamain.Lejointdelaportegarantitl᾿étanchéitéde
l᾿appareil.Ilfautveillerànepasfrotter,endommagerouenlevercejointd᾿étanchéité.
•
Silafonctiond᾿autonettoyagenefonctionnepasadéquatement,éteignezlacuisinièreet
débranchezlecordond᾿alimentation.Faitesréparerlacuisinièreparuntechnicienqualifié.
•
Ilestnormalquelespiècesdufourdeviennentchaudespendantuncycled᾿autonettoyage.
•
Évitezdetoucheràlaporte,auhublotouauxfentesd᾿aérationdufourpendantuncycle
d᾿autonettoyage.
Sivousouvrezlaported᾿unfourchaud,nevousapprochezpastropprèsdelacuisinière.L᾿airchaud
etlavapeurquis᾿échappentpeuventcauserdesbrûluresauxmains,auvisageetauxyeux.
•
N᾿obstruezjamaislesfentes,lestrousoulespassagesdelapartieinférieuredufouretne
recouvrezpasunegrillecomplètedematériauxcommedupapierd᾿aluminium.Celabloque
lacirculationdel᾿airdanslefouretpeutcauseruneintoxicationaumonoxydedecarbone.Le
papier d'aluminium peut emprisonner la chaleur et représenter un risque d'incendie.
•
Neréchauffezpaslesalimentsdansunrécipientfermé.Lapressioncroissanteàl᾿intérieurdu
récipient pourrait le faire éclater et causer des blessures.

11CONSIGNES DE SÉCURITÉ IMPORTANTES
FRANÇAIS
•
Nerecouvrezpaslesparoisoulefonddufouravecdupapierd᾿aluminiumetnelaissezpas
dupapierd᾿aluminiumtoucherlesélémentschauffantsàl᾿intérieurdufour.Celapourrait
représenterunrisqued᾿incendieouendommagerlacuisinière.
•
N᾿utilisezpaslefourcommeespacederangement.Lesarticlesrangésdanslefourpeuvent
prendre feu.
•
Nelaissezpaslagraisses᾿accumulerdanslefour.
•
Insérez les grilles du four dans la position souhaitée quand le four est froid.
•
Pouréviterdevousbrûlerlorsquevousretirezlesalimentsdufour,faitesd᾿abordglisserles
grillesversl᾿extérieurjusqu᾿auxbutées.Ainsi,enplus,vousnerisquerezpasdevousbrûlersur
les surfaces chaudes de la porte ou sur les parois du four.
•
Lorsquevousinsérezouretirezunegrille,porteztoujoursdesgantsdecuisine.
•
Suivezlesconsignesdufabricantlorsdel᾿utilisationdesachetsdecuissonouderôtissage.
•
Utilisez uniquement des plats en verre recommandés pour les fours à gaz.
•
Retirez toujours la lèchefrite de la cuisinière une fois la cuisson au gril terminée. Les résidus de
graisseprésentsdanslalèchefritepeuvents᾿enflammersilefourestutilisésansquevousne
les ayez retirés au préalable.
•
Silaviandeesttropprèsdelaflammependantlacuissonaugril,lagraissepeuts᾿enflammer.
Enlevezl᾿excédentdegraissepouréviteruneflambée.
•
Assurez-vous que la lèchefrite est correctement en place afin de minimiser le risque que la
graisses᾿enflamme.
•
S᾿ilseproduitunfeudegraissedanslalèchefrite,appuyezsurlatouche et laissez la
portedufourferméedemanièreàcontenirlefeujusqu᾿àcequ᾿ils᾿éteigne.
•
Parmesuredesécuritéetpouruneefficacitédecuissonoptimale,laisseztoujourslaporte
fermée pendant la cuisson au four et au gril. Cuire au four ou au gril pendant que la porte est
ouverte peut endommager les boutons ou les robinets.
Ne laissez pas la porte du four ouverte pendant la cuisson ou le refroidissement du four.
•
Lacuissonsurplusieursgrillespermetd᾿économisertempseténergie.Danslamesuredupossible,
faitescuiredanslemêmefourlesalimentsquiexigentlamêmetempérature.
•
Pouroptimiserlerendementetleséconomies,suivezlesétapesduguideàlapage31poursavoir
comment disposer la grille et les casseroles adéquatement.
•
Utilisezl᾿ustensiledelataillecorrespondantauplatàcuisinerpouréconomiserdel᾿énergiependant
lacuisson.Chaufferunedemi-pinted᾿eau(env.473ml)dansunchaudrondetroispintesexigeplus
d᾿énergiequedansunchaudrond᾿unepinte.
•
Pourunmeilleurcontactaveclatabledecuissonenvitrocéramique,utilisezdesustensilesde
cuisson à fond plat.
•
Utilisezl᾿élémentdelatabledecuissonoul᾿élémentchauffantdelataillecorrespondantauplatà
cuisiner.L᾿utilisationdechaudronspluspetitsquel᾿élémentdelatabledecuissonestuneperte
d᾿énergie,etlasurfacedel᾿élémentexposéeconstitueunrisquedebrûlureoud᾿incendie.
•
Ilestpossiblederéduirelaconsommationd᾿énergieennettoyantlessaletéslégèresdanslefour
avec la fonction EasyClean
®
plutôtqu᾿aveccelled᾿autonettoyage.
•
Évitezd᾿ouvrirlaportedufourinutilementpendantqu᾿ilestenmarche.Celaaideàmaintenirla
températuredufour,àéviterqu᾿ilperdesachaleurinutilementetàéconomiserdel᾿énergie.
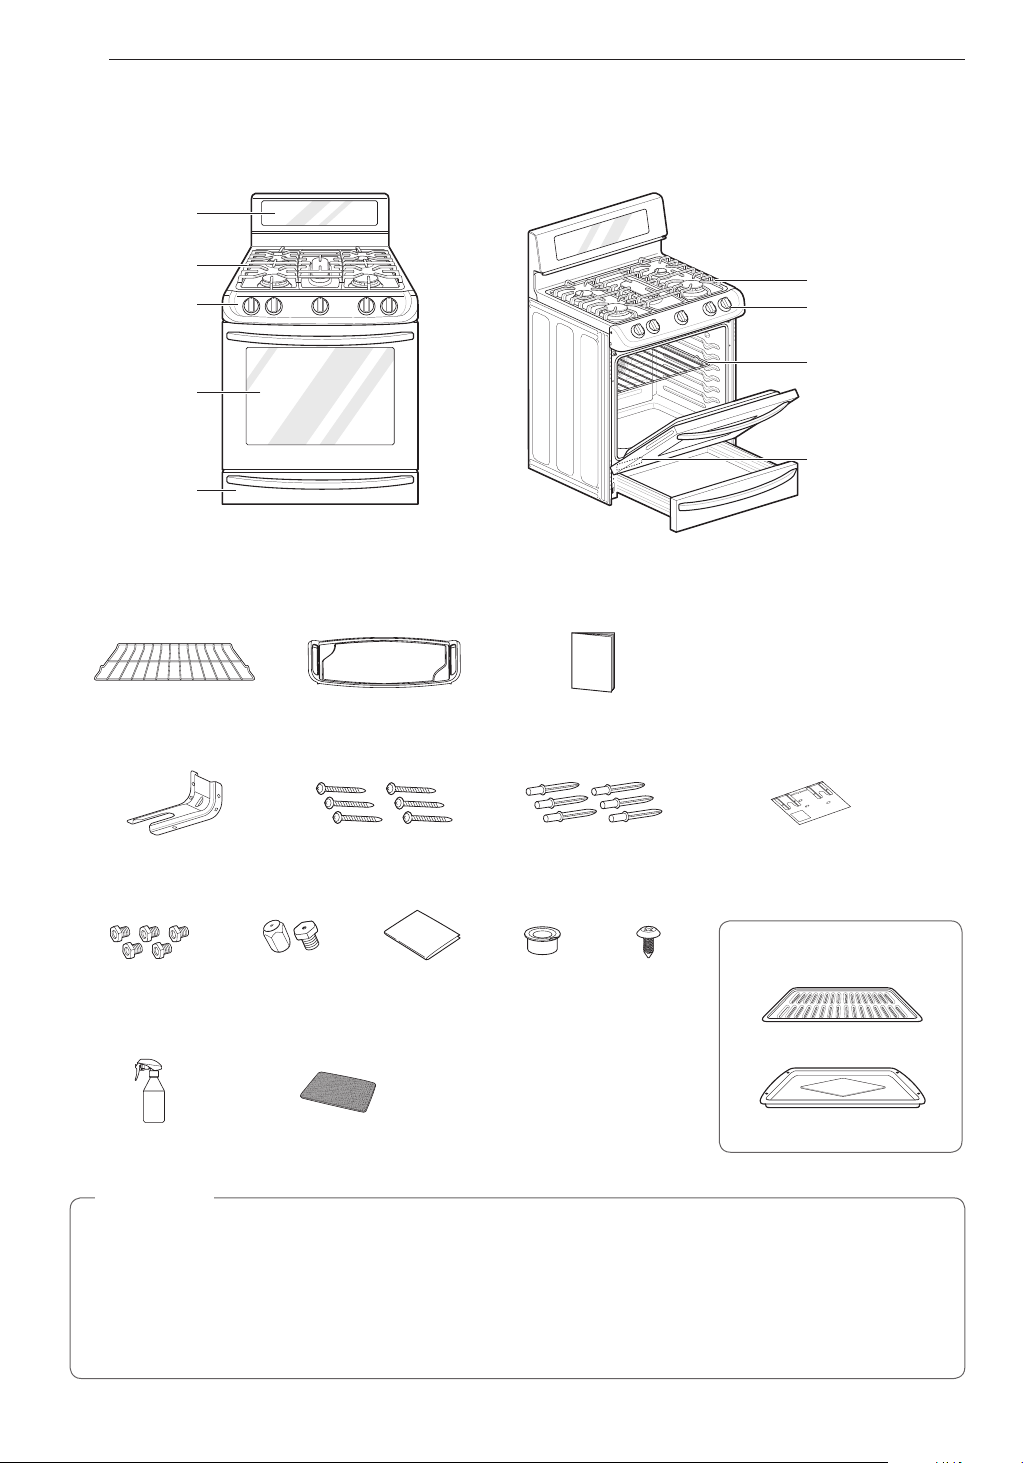
12 APERÇU DU PRODUIT
Bouton de contrôle
du brûleur
Foyer
Grille
Plaque du numéro de
modèle et de série
Panneau de
contrôle du four
Porte du four
Tiroir-réchaud
Table de cuisson
Panneau de
commande de la
table de cuisson
Grillestandard(3ch.) Plaque(1ch.) ManuelDuPropriétaire(1ch.)
Supportantibasculement(1ch.) Vis(6ch.) Piècesd᾿ancrage(6ch.) Gabarit(1ch.)
Lèchefrite
Plaque chauffante
Buses de surface de
cuisson(5ch.)
Buses de four
(2ch.)
Guide d’installation
(1ch.)
Détendeur
(1ch.)
Vis de serrage
(1ch.)
Flacon pulvérisateur
(1ch.)
Tampon à récurer antirayure
(1ch.)
•
CommuniquezavecleserviceàlaclientèledeLGau1800243-0000(1888542-2623auCanada)s᾿ilmanquedes
accessoires.
•
Pourvotresécuritéetpourassurerlalongévitéduproduit,utilisezexclusivementlescomposantsautorisés.
•
Lefabricantdéclinetouteresponsabilitéencasdedysfonctionnementduproduitoud᾿accidentsconsécutifsàl᾿utilisationde
pièces non autorisées et achetées de façon isolée.
•
Lesillustrationsfourniesdanscemanuelpeuventêtredifférentesdescomposantsetdesaccessoiresréels,lesquelspeuvent
fairel᾿objetdemodificationsparlefabricantsansavispréalableàdesfinsd᾿améliorationduproduit.
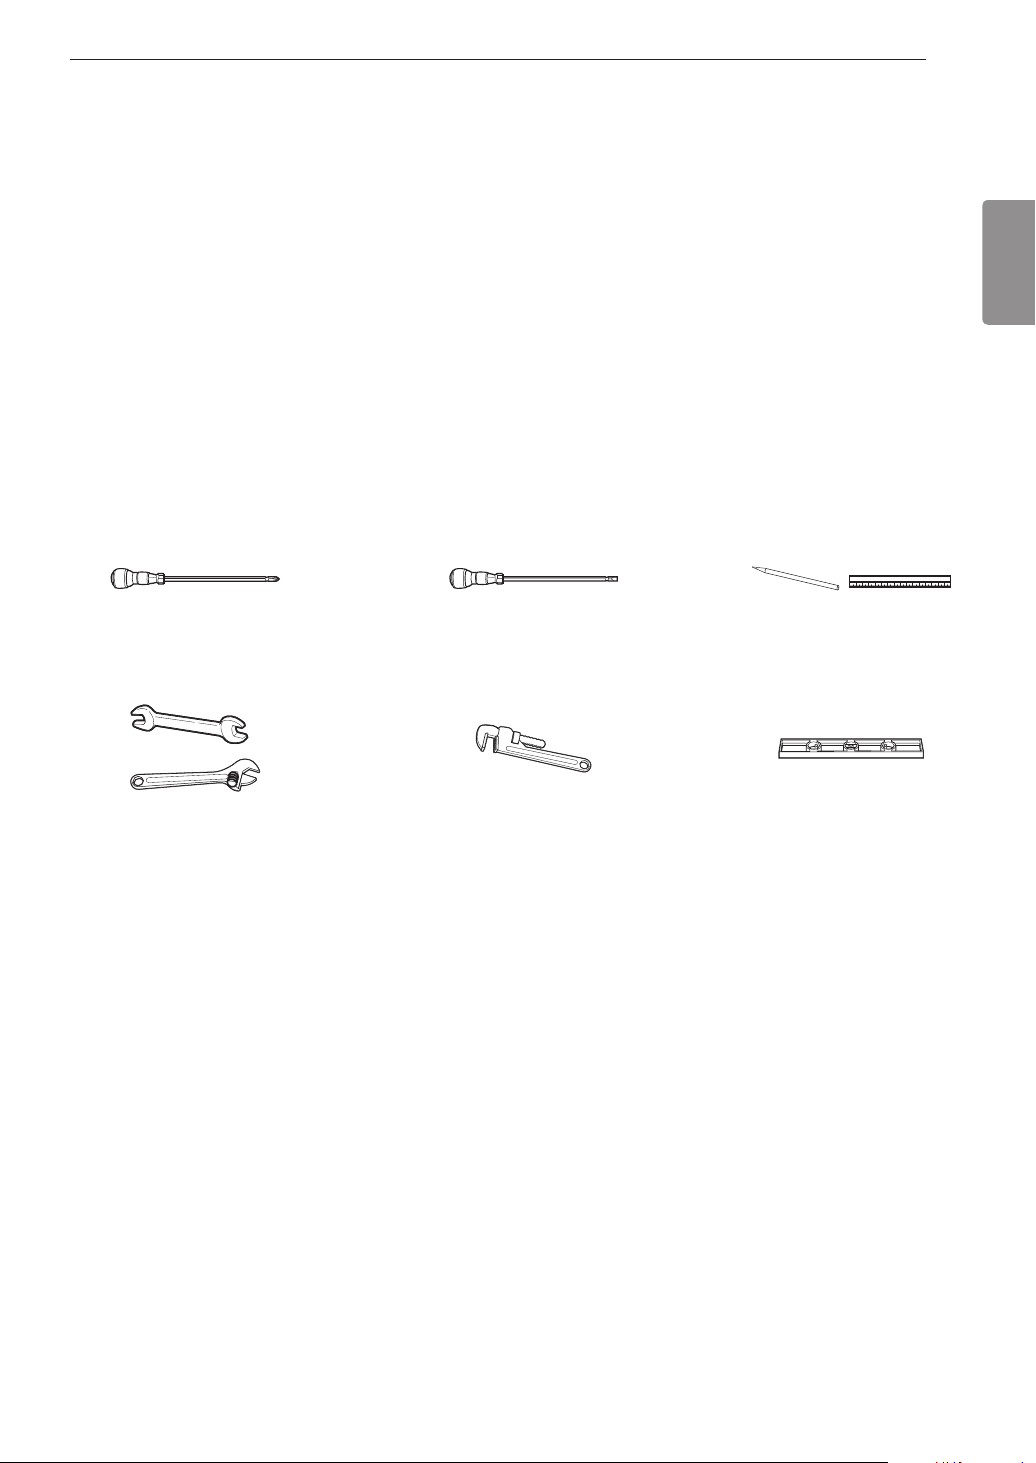
13INSTALLATION
FRANÇAIS
Assurez-vous que votre cuisinière est installée et mise à la terre correctement par un installateur qualifié et conformément aux
instructionsd᾿installation.Touslestravauxderéglageouderéparationdoiventêtreréalisésexclusivementpardesinstallateursde
cuisinières à gaz ou des techniciens qualifiés.
•
Ceproduitdoitêtreinstalléparunplombierouunmonteurd᾿installationsaugazautorisé.
•
Lorsdel᾿utilisationderobinetsd᾿arrêtdelaconduitedegazdutypeàbille,letypeàmancheenformedeTdoitêtreutilisé.
•
Lorsdel᾿utilisationd᾿unconnecteurdegazflexible,celui-cinedoitpasmesurerplusde3piedsdelongueur.
Tournevis Phillips
Clé à molette ou clé ajustable
Crayon et règle
Niveau
Tournevis plat
Cléàtube(2)
(unepourlesupport)
•
Robinetd᾿arrêtdelaconduitedegaz
•
Scellantdejointdeconduiterésistantàl᾿actiondugaznatureloudesgazdepétroleliquéfiés
•
Connecteurd᾿appareildemétalflexible(
3
/
4
po ou NPT de
1
/
2
po x diamètre intérieur de
1
/
2
po)
N᾿utilisezjamaisunvieuxconnecteurlorsquevousinstallezunenouvellecuisinière.
•
Raccordunionévasépourbranchementauconduitd᾿alimentationengaz(
3/
4
po ou NPT de
1
/
2
po x diamètre intérieur de
1/
2
po)
•
Raccordunionévasépourbranchementaurégulateurdepressiondelacuisinière(NPTde
1
/
2
po x diamètre intérieur de
1
/
2
po)
•
Détecteur de fuite liquide ou eau savonneuse
•
Tire-fondouancragespourlamaçonneried᾿undiamètreextérieurde
1
/
2
po(pourplanchersdebétonseulement)
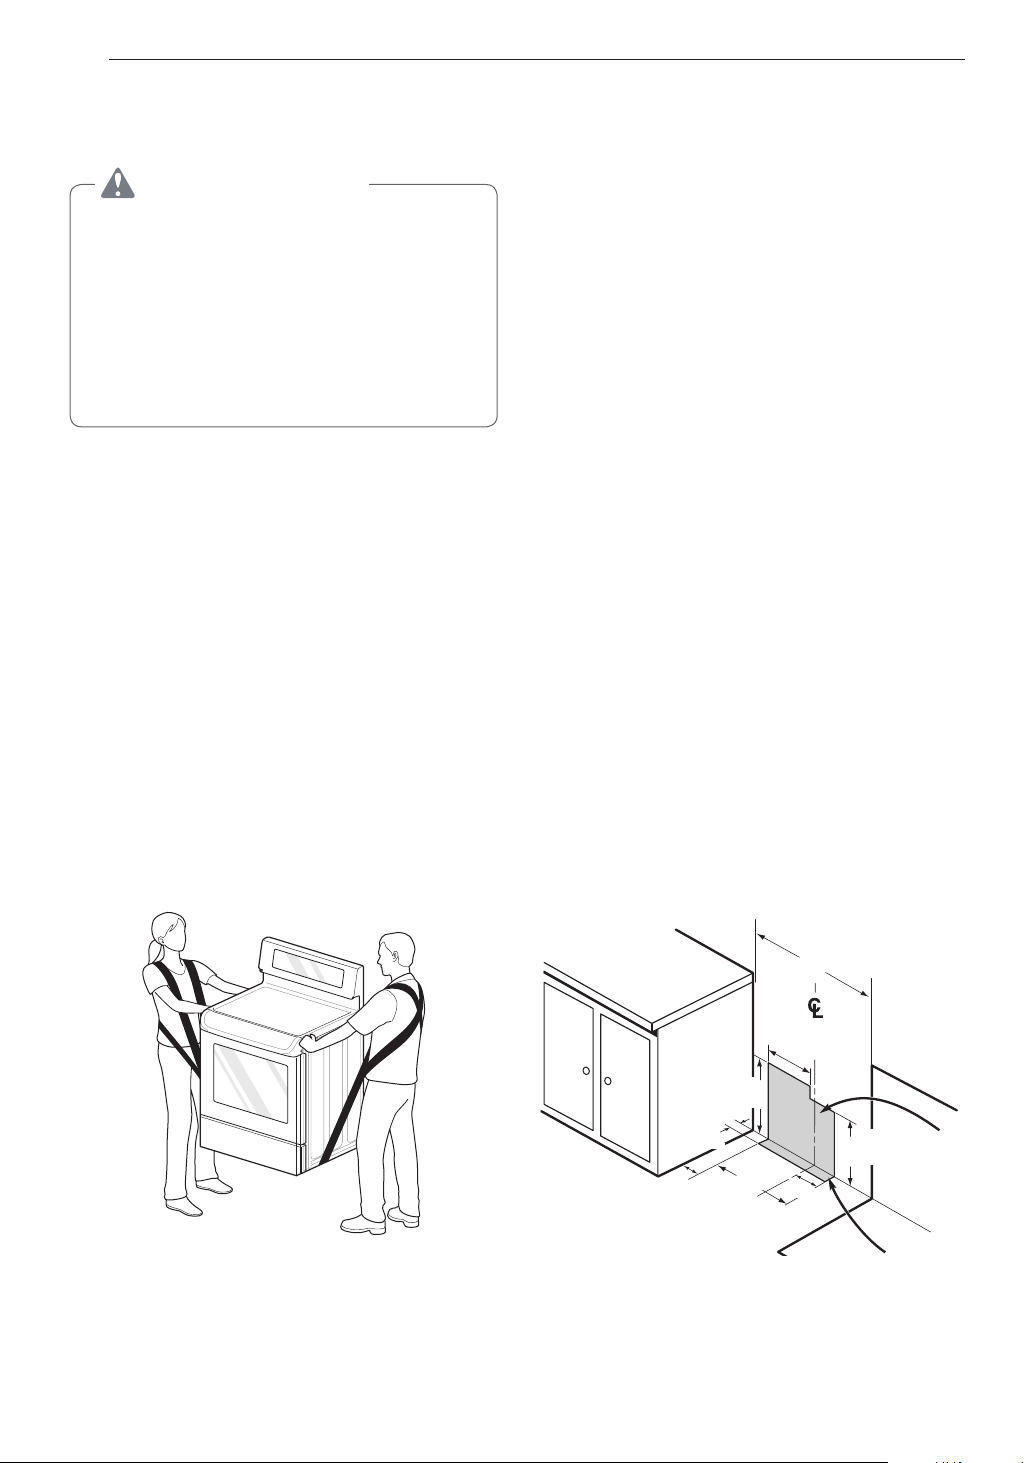
14 INSTALLATION
•
Le
non-respect de cette consigne peut occasionner des
blessuresaudosoud᾿autresblessures.
•
Ceci pourrait entraîner des dommages à la porte du
four.
Retirezl᾿emballage,lerubanetlesétiquettestemporairesde
lacuisinièreavantdel᾿utiliser.Neretirezpaslesétiquettes
d᾿avertissement,l᾿étiquettesignalétiqueaffichantlemodèleet
lenumérodesérieoulafichetechniqueapposéeàl᾿arrièrede
la cuisinière.
Frottez énergiquement avec le pouce pour retirer le ruban ou
la colle restés à la surface. On peut aussi facilement retirer le
ruban ou la colle en les frottant avec les doigts après y avoir
versédusavonliquideàvaisselle.Nettoyezlasurfaceàl᾿eau
tièdeetessuyez-lapourqu᾿ellesoitsèche.
Neretirezpaslerubanoulacolleaumoyend᾿instruments
pointus,d᾿alcoolàfriction,deliquidesinflammablesoude
nettoyants abrasifs. Ces produits peuvent endommager la
surface de la cuisinière.
Lacuisinièreestlourdeetpeutêtreinstalléesurun
revêtementdesolmoucommeduvinylecoussinéoudela
moquette. Déplacez la cuisinière avec prudence sur ce type
derevêtementdesol.Utilisezuneceinturepourdéplacerla
cuisinièresansendommagerlesol.Ouencore,faitesglisser
la cuisinière sur un carton ou une planche de bois pour éviter
d᾿endommagerlerevêtementdesol.
Neplacezpasvotrecuisinièreàunendroitoùellepourraitêtre
exposéeàdefortscourantsd᾿air.Touteouvertureduplancher
oud᾿unmurderrièrelacuisinièredoitêtrescellée.Assurez-
vous que les ouvertures autour de la base de la cuisinière
quiserventàfournirdel᾿airfraispourlacombustionetla
ventilation ne sont pas bloquées par un tapis ou des boiseries.
Commeplusieursautresappareilsménagers,lacuisinière
estlourdeetpeutêtreinstalléesurunrevêtementdesolmou
comme du vinyle coussiné ou de la moquette. Déplacez la
cuisinièreavecprudencesurcetypederevêtementdesol.
Cetappareilnedoitpasêtreinstalléavecunsystèmede
ventilationquidirigel᾿airverslebasetverslacuisinière.
Ce type de système de ventilation peut causer des problèmes
d᾿allumageetdecombustionàl᾿appareildecuissonaugaz.
Il peut en résulter des blessures ou un fonctionnement non
désiré.
Lorsquelerevêtementdeplancherseterminedevantla
cuisinière,l᾿espacesurlequellacuisinièreserainstalléedoit
êtresurélevéavecducontreplaquéafinqu᾿ellesoitàlamême
hauteurquelerevêtementouplushaut.Celapermettraàla
cuisinièred᾿êtredéplacéeauxfinsdenettoyageetd᾿entretien,
enplusd᾿assurerunebonnecirculationd᾿air.
Deplus,assurez-vousquelerevêtementdeplancherpuisse
résisteràdestempératuresd᾿aumoins167°F(75°C).
Consultez
lesconsignesdesécuritépourl᾿installationcomprisesdansle
présent manuel.
Assurez-vousquelesrevêtementsmurauxautourdevotre
cuisinière puissent résister à la chaleur générée par la
cuisinière,soitjusqu᾿à194°F(90°C).Consultezlesconsignes
desécuritépourl᾿installationcomprisesdansleprésent
manuel.
30 po
(76.2cm)
7
14
/
16
po
(20cm)
11
13
/
16
po
(30cm)
3
6
/
16
po
(8.5cm)
3 po
(7.6cm)
17
15
/
16
po
(45.6cm)
5
14
/
16
po
(15cm)
6
11
/
16
po
(17cm)
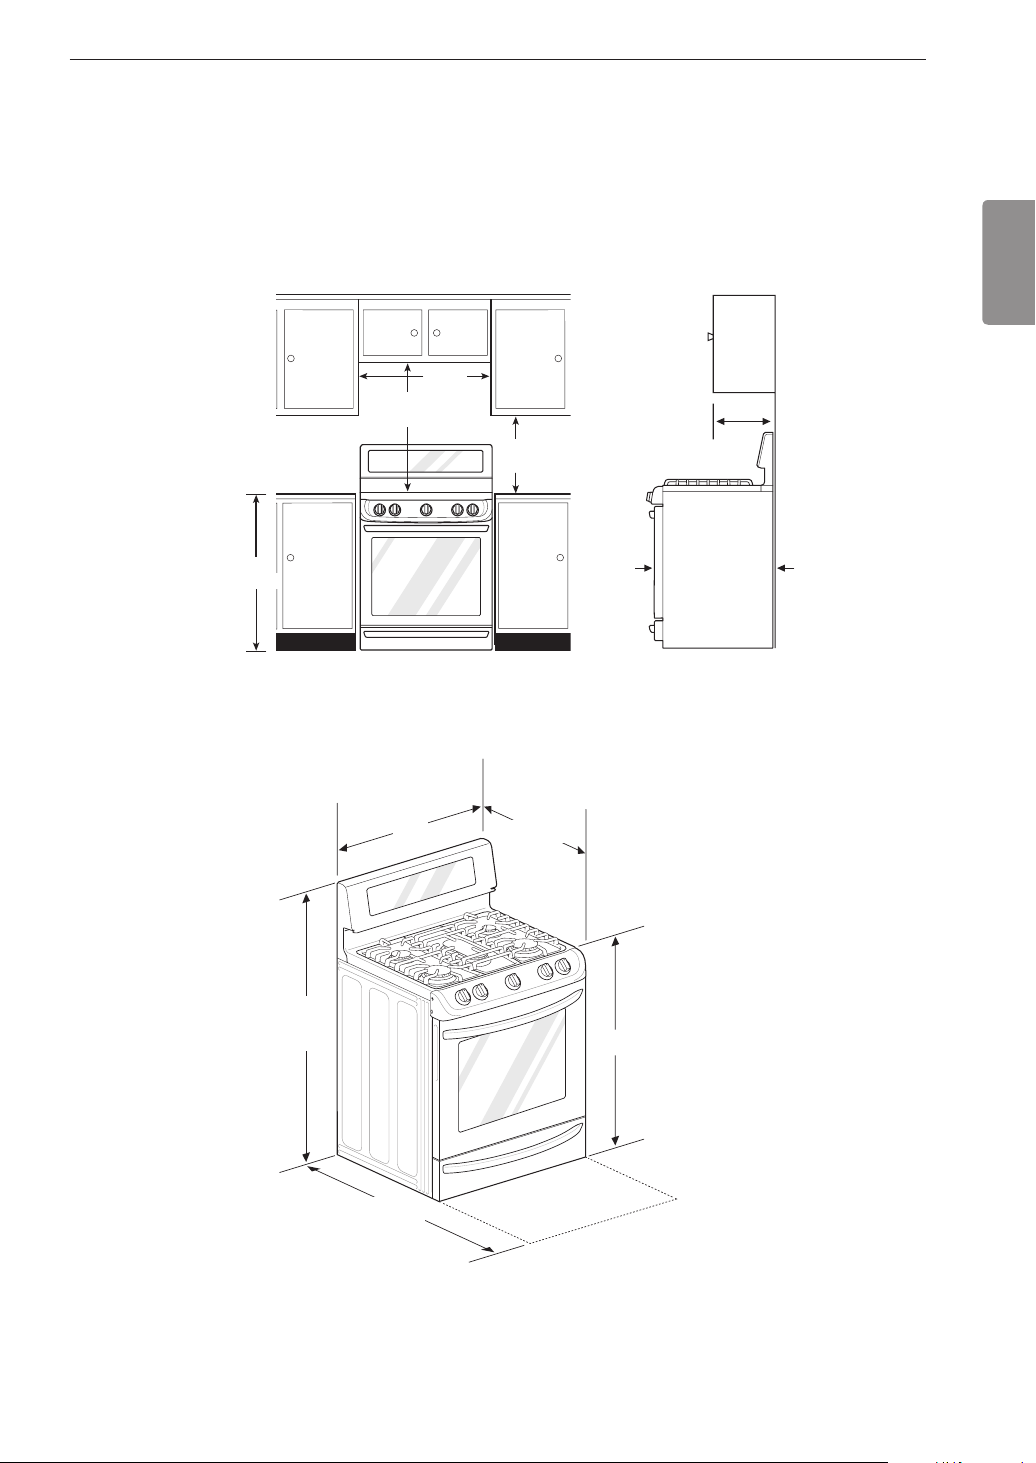
15INSTALLATION
FRANÇAIS
Laissezunespacesuffisantentrelacuisinièreetlessurfacescombustiblesadjacentes.Cesdimensionsdoiventêtrerespectées
pouruneutilisationsécuritairedevotrecuisinière.L᾿emplacementdelapriseélectriqueetdel᾿ouverturedeconduite(voirlasection
«Emplacementsdelaconduitedegazetdelapriseélectrique»,àlapage14)peutêtreajustépourrépondreauxbesoinsprécis.
Lacuisinièrepeutêtreplacéeà0po(accotée)dumurarrière.
Profondeur
maximale
pour les
armoires
au-dessus
des
comptoirs
Partie avant
du panneau
latéral de la
cuisinière
devant
l᾿armoire
Pour les armoires
au-dessous des
comptoirs et à
l᾿arrièredela
cuisinière
Profondeur avec porte fermée
(ycomprislapoignée)
30 po
(76,2cm)
30po(76,2cm)
Minimum
15 po
(38,1cm)
36 po
(91,4cm)
1
/
4
po
(0,635cm)
28
15
/
16
po
36 po ±
1
/
4
po
Hauteur
47
5
/
16
po
Profondeur avec la
porte ouverte
43
5
/
32
po
29
7
/
8
po
13 po
0 po

16 INSTALLATION
Support
antibasculement
Plaque murale
La vis doit
pénétrer dans le
bois ou le béton.
Lesupportantibasculementsetrouvedansl᾿emballage,
accompagnédugabaritd᾿installation.Lesinstructions
contiennent les renseignements nécessaires pour effectuer
l᾿installation.Lisezlefeuilletd᾿instructionsd᾿installationdela
cuisinière et suivez les étapes.
•
Lacuisinièredoitêtrefixéeàl᾿aided᾿unsupport
antibasculement approuvé.
•
Silacuisinièreoulesupportantibasculementn᾿est
pasbieninstallé,lacuisinièrepourraitbasculersiune
personneposelespieds,s᾿appuieous᾿assoitsurla
porte ouverte.
•
Aprèsl᾿installationdusupportantibasculement,vérifiez
qu᾿ilestenplaceententantdebasculerlacuisinière
versl᾿avant.
•
La cuisinière a été conçue pour répondre à toutes
lesnormesdebasculementdel᾿industriedansdes
conditions normales.
•
L᾿installationdusupportantibasculementdoitrépondre
àtouslescodeslocauxrelatifsàlafixationd᾿appareils.
•
L᾿utilisationdecesupportneprotègepascontrele
basculementdelacuisinièresil᾿installationn᾿estpas
adéquate.
•
Unepersonne,enfantouadulte,peutfairebasculerla
cuisinière et subir des blessures mortelles.
•
Installer le dispositif antibasculement sur la structure
ousurlacuisinière(ousurlesdeux).Vérifiersile
dispositif antibasculement est installé et engagé
convenablement en suivant le guide du gabarit de
l’équerre antibasculement.
•
Engager la cuisinière dans le dispositif antibasculement
en en suivant le guide du gabarit de l’équerre
antibasculement. S’assurer que le dispositif
antibasculement est engagé de nouveau après un
déplacement de la cuisinière en suivant le guide du
gabarit de l’équerre antibasculement.
•
Engager de nouveau le dispositif antibasculement si
la cuisinière est déplacée. Ne pas utiliser la cuisinière
lorsque le dispositif antibasculement n’est pas installé et
engagé.
•
Voir les directives d’installation pour obtenir de plus
amples renseignements.
•
Toute omission de le faire expose les enfants et les
adultes à un risque de décès ou de brûlures graves.
Votre cuisinière est conçue pour fonctionner à une pression
de5podecolonned᾿eaupourlegaznatureloude10pode
colonned᾿eaupourlesgazdepétroleliquéfiés.
Assurez-vousd᾿alimentervotrecuisinièreavecletypedegaz
pour lequel elle est configurée.
Cette cuisinière est convertible pour utilisation au gaz naturel
ou aux gaz de pétrole liquéfiés. Avant que vous tentiez de faire
fonctionnercettecuisinièreavecdesgazdepétroleliquéfiés,
un installateur de gaz de pétrole liquéfiés qualifié doit effectuer
la conversion.
Pourquel᾿appareilfonctionneadéquatement,lapressiondu
gaznaturelfournieaurégulateurdoitêtreentre5poet13po
decolonned᾿eau.
Danslecasdesgazdepétroleliquéfiés,lapressiondugaz
naturelfournieaurégulateurdoitêtreentre10poet13pode
colonned᾿eau.Lorsdelavérificationdubonfonctionnement
durégulateur,lapressiond᾿entréedoitêtred᾿aumoins1pode
plusquelapressiondeservice(collecteur),commeindiqué
ci-dessus.
Lerégulateurdepressionsituéàl᾿entréedelacuisinièredoit
demeurerdansleconduitd᾿alimentation,peuimporteletype
de gaz utilisé.
Leconnecteurd᾿appareilmétalliqueflexibleutilisépour
brancherlacuisinièreauconduitd᾿alimentationengazdoit
avoir un diamètre intérieur de
5
/
8
po et une longueur maximale
de5pi.AuCanada,lesconnecteursflexiblesdoiventêtredes
connecteursmétalliquesmurauxsimplesd᾿unelongueurde
moins de 6 pi.

17INSTALLATION
FRANÇAIS
Fermezlerobinetd᾿alimentationengazdelacuisinièreavant
deretirerl᾿anciennecuisinièreetlaissez-leferméjusqu᾿àce
que le nouveau branchement ait été fait.
Comme des conduites rigides restreignent le déplacement
delacuisinière,ilestrecommandéd᾿utiliserunconnecteur
d᾿appareilmétalliqueflexiblecertifiéparlaCSAàl᾿échelle
internationale,saufsilescodeslocauxrequièrentun
branchementàl᾿aidedeconduitesrigides.
Unrobinetmanueldoitêtreinstalléàunendroitaccessible
danslacanalisationdegazàl᾿extérieurdel᾿appareilpour
permettred᾿ouvriretdefermerl᾿alimentationengaz.
Ne réutilisez jamais un vieux connecteur lorsque vous installez
une nouvelle cuisinière.
Pourvousprotégercontrelesfuitesdegaz,utilisezunscellant
de joint de conduite homologué sur tous les filets extérieurs.
1
Installez un raccord union évasé mâle de
1
/
2
po ou
de
3
/
4
podanslefiletintérieurNPTdurobinetd᾿arrêt,
enfaisantattentionderetirerlerobinetd᾿arrêtpour
l᾿empêcherdetourner.
2
Installez un raccord union évasé mâle de
1
/
2
po sur le
filet intérieur NPT de
1
/
2
poàl᾿entréedurégulateurde
pression.Pouréviterd᾿endommagerl᾿appareil,utilisez
une clé supplémentaire sur le raccord du régulateur de
pression.
Assurez-vous que la vanne du régulateur de pression de gaz
est en position ouverte.
Position ouverte du
levier
Position fermée du
levier
•
Lorsdel’expédition,lavannedurégulateurdepression
de gaz est en position ouverte. Si la cuisinière ne
fonctionnepascorrectementaprèsl’installation,
assurez-vous que la vanne du régulateur est toujours
ouverte.
3
Branchezunconnecteurd᾿appareilmétalliqueflexibleà
l᾿adaptateursurlacuisinière.Positionnezlacuisinière
pourpermettrelebranchementaurobinetd᾿arrêt.
4
Lorsquetouslesbranchementsontétéeffectués,
assurez-vous que toutes les commandes de la cuisinière
sont en position fermée et que la vanne du régulateur de
pression est ouverte avant d’ouvrir la vanne d’alimentation
principale en gaz. Des fuites de gaz peuvent se produire
dansvotresystèmeetêtredangereuses.Unefuitede
gazpeutnepasêtredétectéeparl'odeur.
Vérifiez tous les joints de branchement de gaz et les
raccordspourydétecterdesfuitesàl᾿aided᾿unliquide
dedétectiondefuitenoncorrosif,puisessuyezlesjoints.
Lesfournisseursdegazrecommandentd᾿acheter
etd᾿installerundétecteurdegazapprouvéparl᾿UL.
L᾿installationetl᾿utilisationdoiventêtreconformesaux
instructionsd᾿installation.
•
N᾿utilisezpasdeflammepourvérifierlesfuitesdegaz.
•
Isolezlacuisinièredusystèmed᾿alimentationengaz
enfermantsonrobinetd᾿arrêtindividuellorsdetoute
vérificationdepressiondusystèmed᾿alimentationen
gaz à des pressions égales ou inférieures à
1
/
2
po psig
(3,5kPa).
1
/
2
po Raccord
1
/
2
po Raccord
1
/
2
po Raccord
Régulateur de
pression
Connecteurexible
(6pimaximum)
Robinetd’arrêtdugaz
Conduite de gaz de
1
/
2
po ou de
3
/
4
po
Débit de gaz dans la cuisinière
Installateur:Informezleclientdel’emplacementdurobinetd’arrêtdu
gaz
.
Régulateur de pression

18 INSTALLATION
Circuitdédié,adéquatementmisàlaterre,de120volts,60Hz
protégé par un disjoncteur de 15 ou 20 ampères ou un fusible
à fusion lente.
Si une source électrique externe est utilisée lors de
l᾿installation,l᾿appareildoitêtremisàlaterreconformément
auxcodeslocaux,ou,àdéfautdecodeslocaux,àlanorme
ANSI/NFPA70duCodenationaldel᾿électricité.
IMPORTANT : POUR DES RAISONS DE SÉCURITÉ
PERSONNELLE,CETAPPAREILDOITÊTRE
CORRECTEMENT MIS À LA TERRE.
Lecordond᾿alimentationdecetappareilestmunid᾿uneprise
àtroisbroches(miseàlaterre)correspondantàuneprise
murale de mise à la terre à trois broches afin de minimiser la
possibilité de danger de décharge électrique provenant de cet
appareil.
Le client doit faire vérifier la prise murale et le circuit par un
électricienqualifiépours᾿assurerquelapriseestcorrectement
mise à la terre.
S᾿iltrouveuneprisemuraleàdeuxbroches,leclientala
responsabilitépersonnelleetl᾿obligationdelafaireremplacer
par une prise murale à trois broches correctement mise à la
terre.
VOUS NE DEVEZ EN AUCUN CAS COUPER OU RETIRER
LATROISIÈMEBROCHE(MISEÀLATERRE)DUCORDON
D᾿ALIMENTATION.
Des disjoncteurs de fuite de terre ne sont pas requis ou
recommandés pour les prises de cuisinière au gaz.
Les disjoncteurs de fuite de terre sont des appareils qui
détectentlesfuitesdecourantd᾿uncircuitetéteignent
automatiquementlecourantlorsqu᾿unseuildefuiteest
détecté.Cesappareilsdoiventêtremanuellementréinitialisés
parleclient.LeCodenationaldel᾿électricitéexigel᾿utilisation
de disjoncteurs de fuite de terre pour des prises de cuisine
installées sur des surfaces de comptoir.
Le rendement de la cuisinière ne sera pas affecté si elle
fonctionne sur un circuit protégé par un disjoncteur de fuite de
terre,maislaréinitialisationoccasionnelleducircuitpeutêtre
embêtante.
Assurez-vous que la mise
à la terre a été effectuée
adéquatement avant
l᾿utilisation.
Faites vérifier la prise murale et le circuit par un électricien
qualifié pour vous assurer que la prise est correctement
mise à la terre.
N᾿utilisezpasdeprised᾿adaptateur.Ledébranchementdu
cordond᾿alimentationexerceunepressionexcessivesur
l᾿adaptateuretcauseladéfaillanceéventuelledelabornede
terredel᾿adaptateur.
L᾿installationdoitêtreconformeauxcodeslocaux,ou,àdéfaut
decodeslocaux,àlanormeANSIZ223.1/NFPA54duNational
Fuel Gas Code.
L᾿installationd᾿appareilsconçuspouruneinstallationdans
une maison mobile doit respecter la norme de réglementation
américainesurlesmaisonspréfabriquées(Manufactured
HomeConstructionandSafetyStandard,Title24CFR,
Part3280[anciennementlaFederalStandardforMobileHome
ConstructionandSafety,Title24,HUDPart280])oubien,
quandunetellenormen᾿estpasapplicable,ladernièreédition
de la norme sur les installations de maisons préfabriquées
ANSIA225.1(ManufacturedHomeSites,Communitiesand
Set-Ups)oulescodeslocaux.AuCanada,l᾿installationdans
unemaisonmobiledoitêtreconformeauxnormesd᾿installation
dansdesmaisonsfabriquéesenusineCAN/CSAZ240/MH.
Scellez toutes les ouvertures du mur et du plancher une fois
lesbranchementsdel᾿alimentationenélectricitéetengaz
terminés.
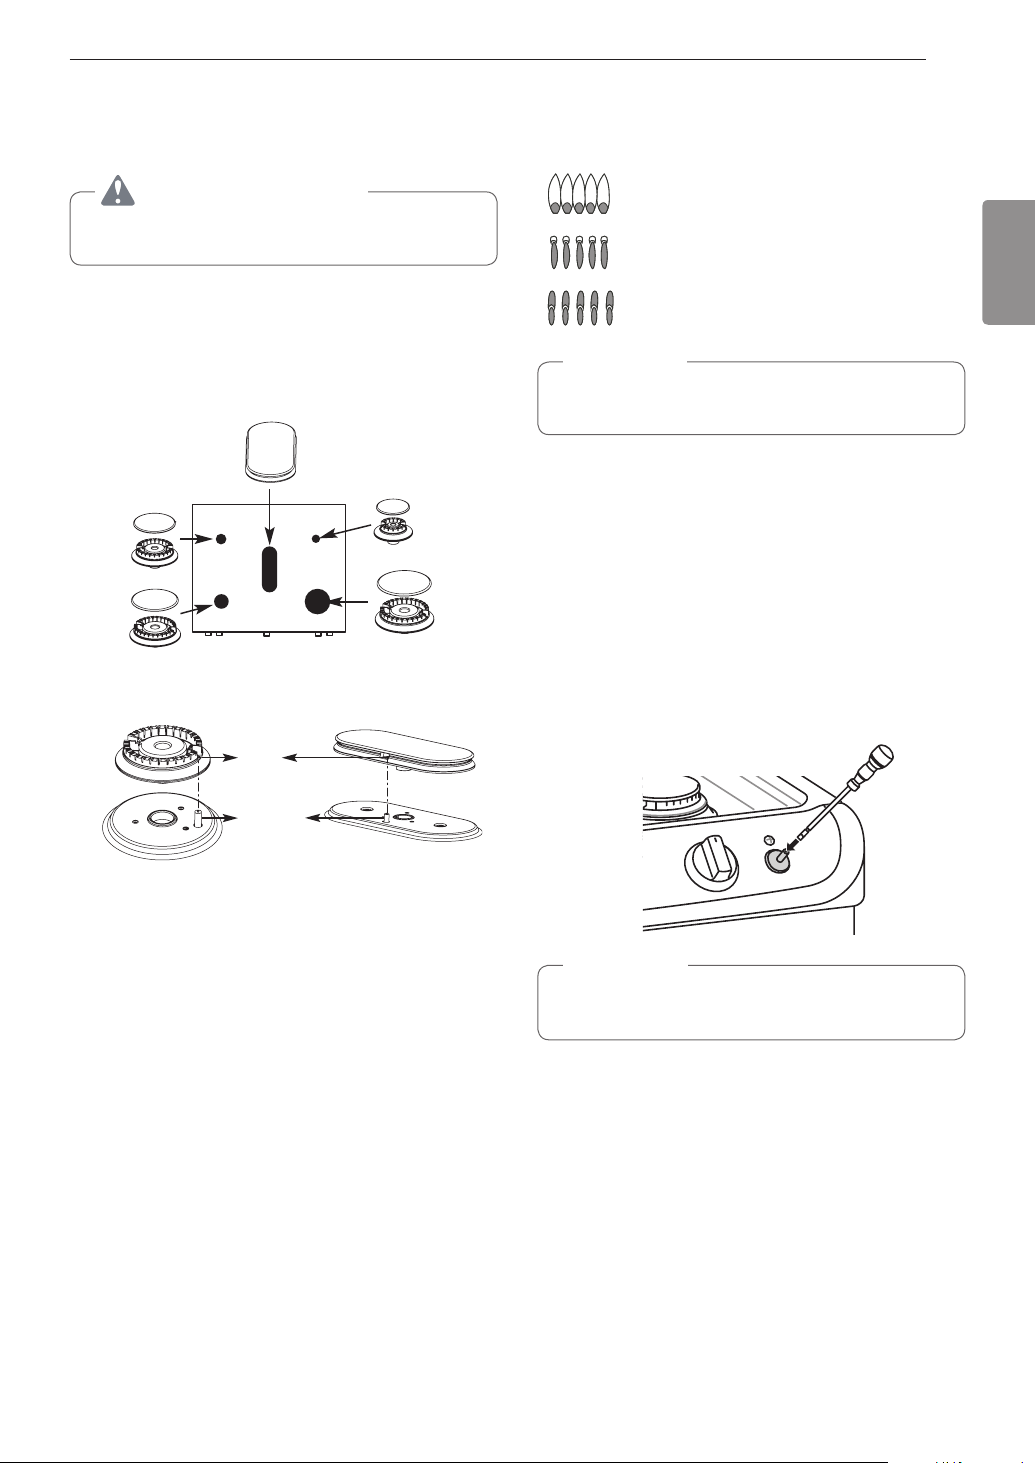
19INSTALLATION
FRANÇAIS
Ne faites pas fonctionner les brûleurs sans que toutes les
pièces soient en place.
Placezlescapuchonsdesbrûleursetlestêtessurlatablede
cuisson.Assurez-vousquelescapuchonsetlestêtessont
placésauxbonsendroits.Ilyauncapuchonetunetêtepour
lepetit,lemoyen,legrandetletrèsgrandbrûleurainsique
pourceluiducentre(oval).
Brûleur central
Assemblage de la
tête/ducapuchondu
brûleurcentral(ovale)
Têteet
capuchon de
brûleur de
petite taille
Têteet
capuchon
de brûleur
de taille
moyenne
Têteetcapuchon
de brûleur de
grande taille
Avant de la
cuisinière
Têteetcapuchon
de brûleur de très
grande taille
Trou
Électrode
Assurez-vousquel᾿ouverturedelatêtedubrûleurestbien
au-dessusdel᾿électrode.
Sélectionnez un bouton de brûleur et enfoncez celui-ci tout en
le tournant en position . Vous entendrez un clic indiquant le
bonfonctionnementdumoduled᾿allumage.
Unefoisl᾿airpurgédesconduitesd᾿alimentation,lebrûleur
devraits᾿allumerdanslesquatresecondes.Unefoislebrûleur
allumé,tournezleboutonenposition. Essayez chaque
brûleursuccessivementjusqu᾿àcequechacund᾿entreeuxait
été vérifié.
Laqualitédelacombustiondesflammesdubrûleurdoitêtre
confirmée visuellement.
A – Appelez un technicien.
B –
Cela est normal pour les gaz de pétrole liquéfiés.
C – Cela est normal
pour le gaz naturel.
•
Danslecasdesgazdepétroleliquéfiés,despointes
jaunes sur les cônes externes sont normales.
1
Allumez tous les brûleurs.
2
Tournez le bouton du brûleur qui est ajusté à .
3
Retirez le bouton.
4
Insérezunpetittournevisàtêteplatedanslatigedela
soupape.
Retenez la tige de la soupape avec une main tout en
tournantlavispourl᾿ajusteravecl᾿autremain.
5
Replacez le bouton.
6
Vérifiez la stabilité de la flamme.
Vérification 1 : Tournez rapidement le bouton de Hi à .
Silaflammes᾿éteint,augmentezlatailledelaflammeet
revérifiez.
Vérification 2 : Avec le brûleur à ,ouvrezetfermez
rapidement la porte du four. Si la flamme est éteinte par
lescourantsd᾿aircréésparlemouvementdelaporte,
augmentez la taille de la flamme et vérifiez à nouveau.
7
Répétez les étapes 1 à 6 pour chaque brûleur.

20 INSTALLATION
Pourvérifierlebrûleurdecuisson,suivezlesétapes
ci-dessous :
1
Retireztoutl᾿emballagedelacavitédufour.
2
Appuyez sur .350°Fs᾿afficheàl᾿écran.
3
Appuyez sur .
Cela peut prendre de 30 à 90 secondes avant que le brûleur
commencer à chauffer.
Pourvérifierlebrûleurdegrillage,suivezlesétapes
ci-dessous :
1
Appuyez sur . L᾿indicationHiapparaîtàl᾿écran.
2
Assurez-vous que la porte est fermée.
3
Appuyez sur .
Cela peut prendre de 30 à 90 secondes avant que le brûleur
commencer à chauffer.
N᾿essayezpasd᾿allumerlesbrûleursdecuissonoude
grillagependantunepanned᾿électricité.Lacuisinièreaun
systèmed᾿allumageélectriqueetnepeutpasêtreutilisée
sans courant.
Lacuisinièreestconfiguréeenusineaveclesobturateursd᾿air
ajustéspourunecirculationd᾿airadéquatepourlegaznaturel.
Sielleestconvertieencuisinièreauxgazdepétroleliquéfiés,
suivez les instructions fournies dans la trousse de conversion
pourajusteradéquatementlesobturateursd᾿air.Laconversion
encuisinièreauxgazdepétroleliquéfiésdoitêtreeffectuée
par un technicien qualifié.
Mettez la cuisinière au niveau en réglant les pieds de
nivellement. Le fait de dévisser un peu les pieds de nivellement
arrière pourrait faciliter leur insertion dans le support
antibasculement.
Utilisez un niveau pour vérifier les réglages. Placez le niveau
en diagonale sur la grille du four pour vérifier le niveau dans
chaque sens.
Vérifiezd᾿abordlesens
.
Vérifiez ensuite le sens
. Si le niveau ne montre pas que la
grilleestauniveau,réglezlespiedsdenivellement.
1
2
Support
antibasculement
Pied de
nivellement
1
Glissez la cuisinière contre le mur en vous assurant que
le pied arrière glisse dans le support antibasculement.
2
Vérifiez si la cuisinière est bien installée en agrippant
la partie avant de la table de cuisson et en tentant
doucementdebasculerlacuisinièreversl᾿avant.
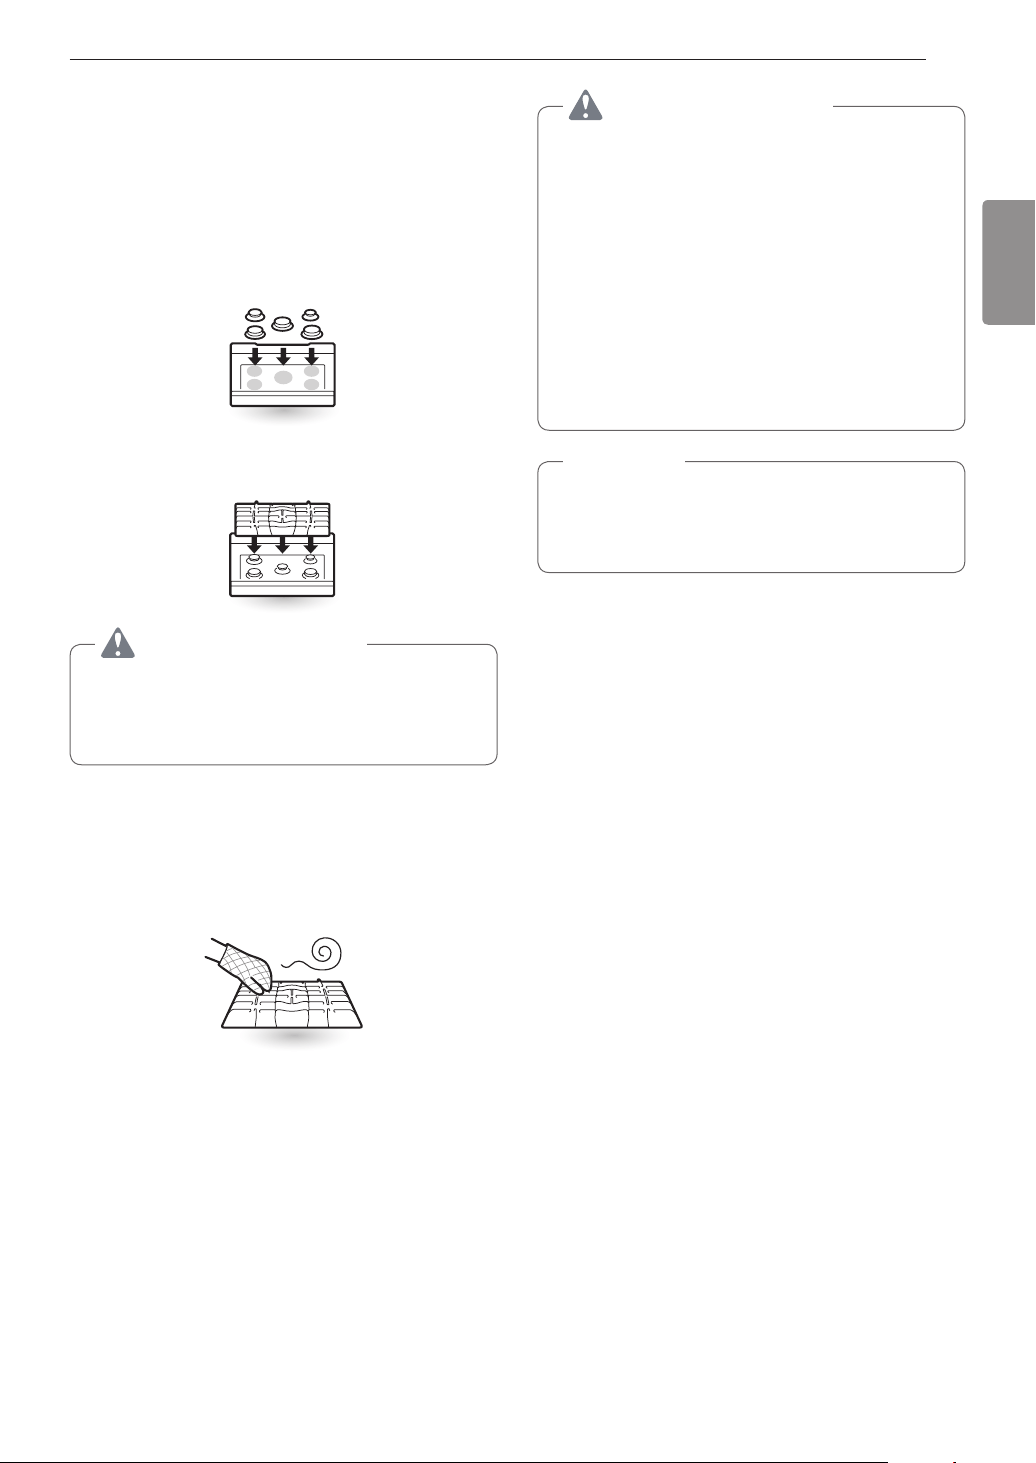
21FONCTIONNEMENT
FRANÇAIS
Liseztouteslesinstructionsavantd᾿utiliserleproduit.
N᾿utilisezpaslebrûleurpendantunepériodeprolongée
sans casserole sur le foyer.
Lefinidufoyerpourraits᾿ébréchersiaucunecasserole
n᾿absorbesachaleur.
Toucherlesgrillesavantqu᾿ellesrefroidissentpeutcauserdes
brûlures.
•
Ouvrezlesfenêtres.
•
N᾿essayezpasd᾿allumerunappareil.
•
Ne touchez aucun interrupteur électrique.
•
N᾿utilisezaucuntéléphoneàl᾿intérieurdel᾿appartement
ou de la maison.
•
Appelez immédiatement votre fournisseur de gaz à
partirdutéléphoned᾿unvoisin.Suivezlesdirectivesde
votre fournisseur de gaz.
•
Sivousn᾿arrivezpasàjoindrevotrefournisseurdegaz,
appelezleserviced᾿incendie.
Les allumeurs à étincelle électrique des brûleurs causent
un clic. Tous les allumeurs à étincelle de la table de
cuissons᾿activerontmêmesivousn᾿allumezqu᾿un
brûleur.
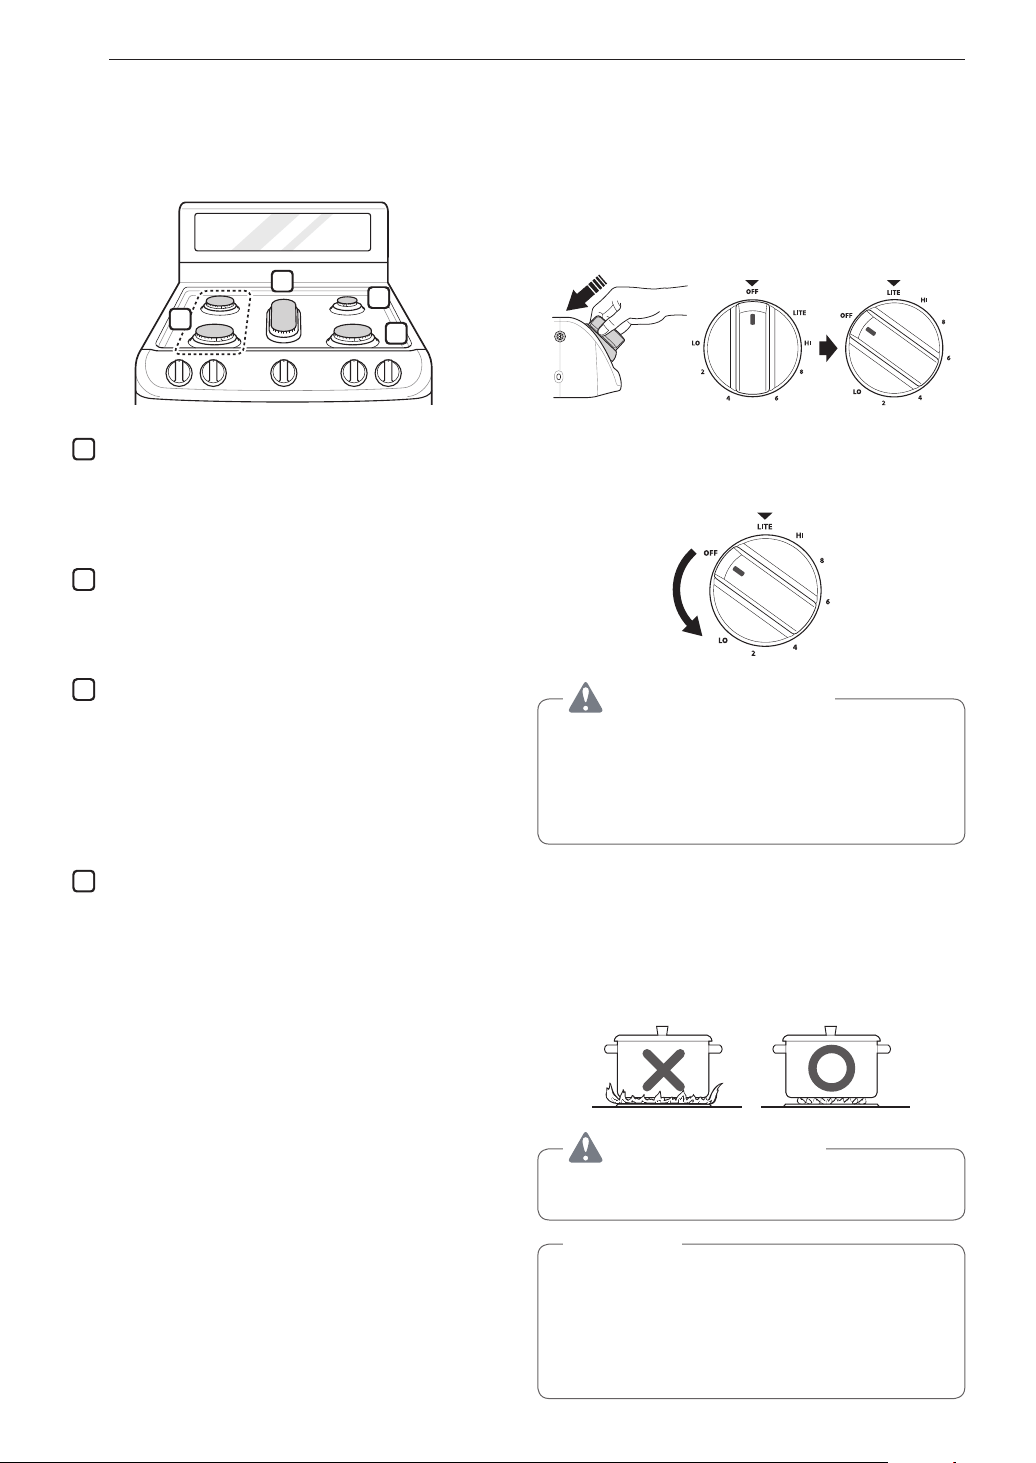
22 FONCTIONNEMENT
La table de cuisson de votre cuisinière au gaz possède quatre
oucinqbrûleursscellés,selonlemodèle.Ceux-cipeuventêtre
montés et démontés. Suivez les instructions ci-dessous.
1
4
2
3
1
Le grand et le moyen brûleurs sont les brûleurs
principaux pour la plupart des opérations de cuisson. Ces
brûleurspolyvalentspeuventêtreréglésdeHi à pour
répondre aux diverses exigences en matière de cuisson.
2
Le plus petit brûleur est utilisé pour des mets délicats
comme les sauces ou des aliments qui nécessitent une
température faible pour une cuisson de longue durée.
3
Le très grand brûleur est celui qui offre un rendement
maximum.Toutcommelesautresbrûleurs,ilpeutêtre
réglé de Hi à pourunegrandevariétéd᾿applications
culinaires. Ce brûleur est également conçu pour faire
bouillir rapidement une grande quantité de liquide. Il peut
êtreutiliséavecunecasserolede10pooud᾿undiamètre
plus grand.
4
Lebrûleurovale(aucentre)estdestinéàêtreutiliséavec
uneplaqueàcuissonouunepoêleovale.
1
Assurez-vous que tous les éléments de cuisson et que
toutes les grilles sont placés dans la position appropriée.
2
Placezl᾿ustensiledecuissonsurlagrille.
3
Appuyezsurleboutondecommandeettournezjusqu᾿à
la position .
Vousentendrezunclicprovenantdusystèmed᾿allumage
par étincelle électrique.
4
Tournez le bouton pour régler la taille de la flamme.
N᾿essayezpasdedémonteroudenettoyerlescontours
d᾿unbrûleurlorsqu᾿unautrebrûleurestallumé.Lorsque
vous réglez un brûleur sur ,touslesautresbrûleurs
émettent des étincelles. Il y a un risque de décharge
électrique qui pourrait vous amener à faire tomber une
casserole chaude.
Observez la flamme et non le bouton lorsque vous réduisez
lachaleur.Lorsquevousavezbesoind᾿unchauffagerapide,
la taille de la flamme du brûleur au gaz doit correspondre à la
taille de la casserole que vous utilisez.
Ne laissez jamais les flammes dépasser les bords de la
casserole.
•
Les flammes des brûleurs peuvent sembler jaunes en
présenced᾿untauxélevéd᾿humidité,parexemplelorsd᾿une
journée pluvieuse ou si un humidificateur est à proximité.
•
Aprèslaconversionauxgazdepétroleliquéfiés,les
flammespeuventêtreplusgrossesquelanormale
lorsque vous mettez une casserole sur le brûleur.
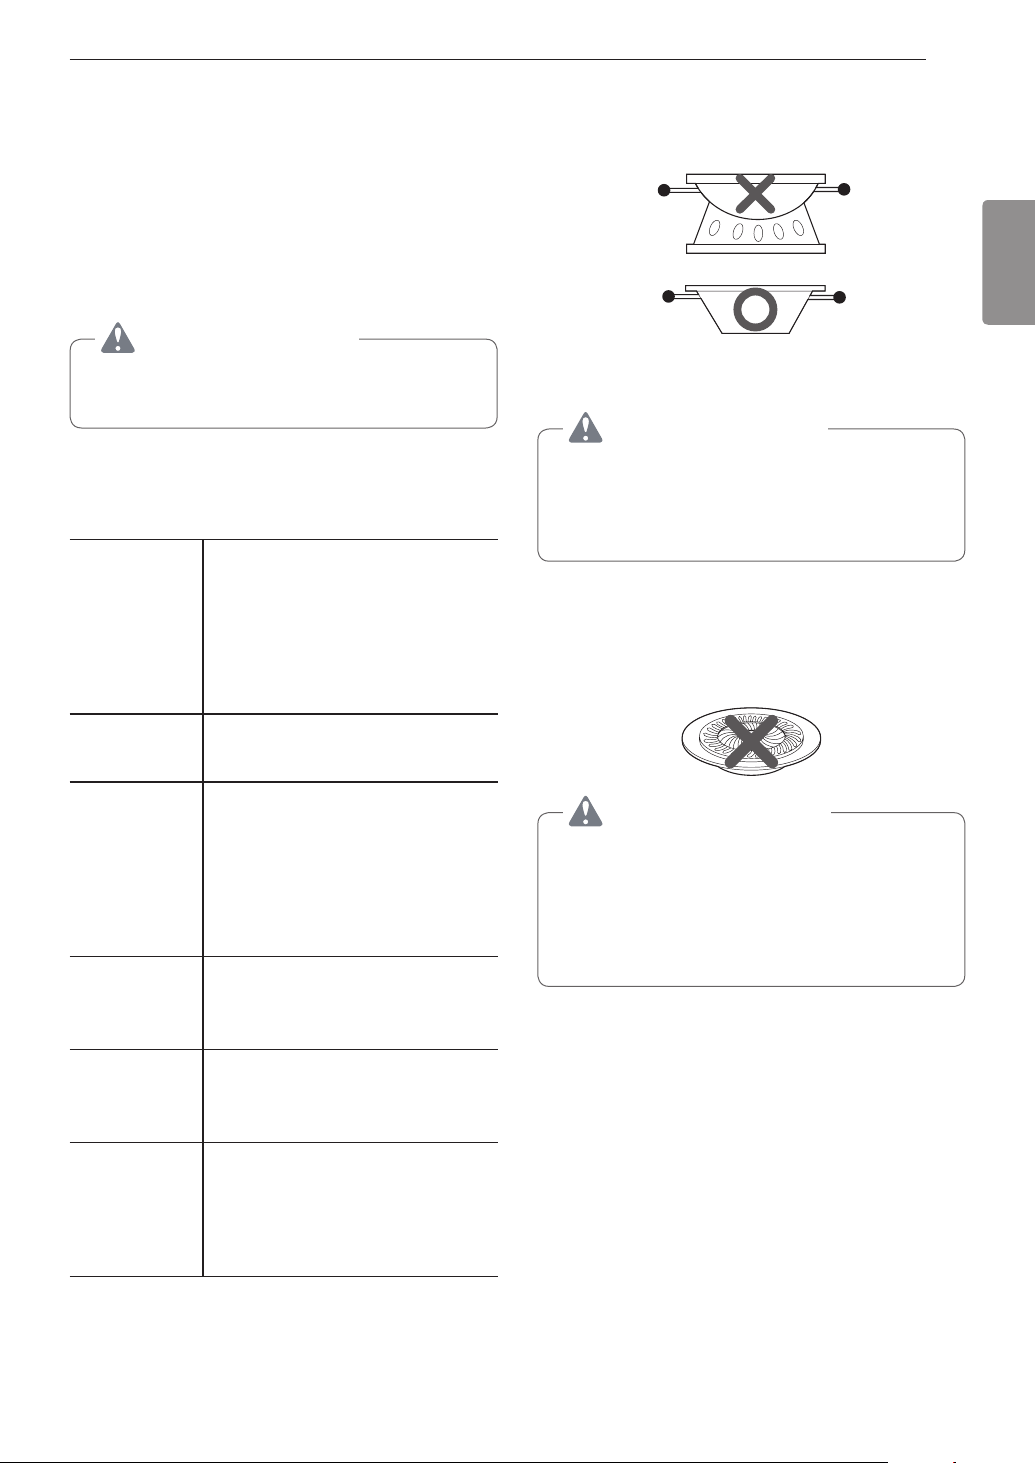
23FONCTIONNEMENT
FRANÇAIS
Encasdepannedecourant,vouspouvezallumerlesbrûleurs
devotrecuisinièreàl᾿aided᾿uneallumette.
Lesbrûleursquifonctionnentdéjàlorsqu᾿unepannedecourant
se produit continueront à fonctionner normalement.
1
Maintenezl᾿allumettealluméeàproximitédubrûleur,
puis enfoncez le bouton de commande.
2
Tournez le bouton de commande en position .
Faitespreuved᾿uneextrêmeprudenceenallumantdes
brûleursàl᾿aided᾿uneallumette.Sinon,vousrisquezde
vousbrûleroudesubird᾿autresblessures.
Aluminium
Une casserole de poids moyen est
recommandéeparcequ᾿ellechauffe
rapidement et de manière uniforme.
La plupart des aliments brunissent
uniformémentdansunepoêleen
aluminium. Utilisez des casseroles avec
des couvercles hermétiques pour cuire
avecunepetitequantitéd᾿eau.
Fonte
Siellessontchaufféeslentement,la
plupartdespoêlesfournissentdes
résultats satisfaisants.
Acier inoxydable
Ce métal est un mauvais conducteur de
chaleur. On le combine habituellement
aucuivre,àl᾿aluminiumouàd᾿autres
métaux pour améliorer la distribution de la
chaleur.Lespoêlesenmétauxcombinés
donnent normalement de bons résultats
àfeumoyen,commelerecommandele
fabricant.
Émail
Danscertainesconditions,l᾿émailde
certaines casseroles peut fondre. Suivez
les recommandations du fabricant de la
casserole pour les méthodes de cuisson.
Verre
Il existe deux types de plats en verre :
ceux qui sont utilisés uniquement pour
le four et ceux qui sont destinés à une
cuisson sur la table de cuisson.
Vitrocéramique
calorifuge
Peutêtreutilisésurlatabledecuisson
ou dans le four. Conduit la chaleur très
lentement et se refroidit aussi lentement.
Consultez les directives du fabricant de la
casserolepourvousassurerqu᾿ellepeut
êtreutiliséesurdescuisinièresàgaz.
Utilisezunwokde14pooumoinsetàfondplat.Assurez-vous
quelefondduwokestbienàplatsurlagrille.
Utilisez des ustensiles de
cuissondotésd᾿unfondplat
N᾿utilisezpasd᾿anneaudesupportpourwok.Lefaitde
placerl᾿anneausurlebrûleuroulagrillepourraitaltérer
lefonctionnementdubrûleur,causantdesniveaux
de monoxyde de carbone plus élevés que la norme
recommandée.Celapeutêtredangereuxpourvotresanté.
Ne placez pas les grils de la table de cuisson sur le brûleur.
N᾿utilisezpaslesgrilsdelatabledecuissonsurvos
brûleurs de surface. Si vous utilisez le gril de la table
decuissonsurlebrûleurdesurface,celaprovoquera
une combustion insuffisante et pourrait entraîner une
exposition à des niveaux de monoxyde de carbone au-
dessusdesseuilsadmissibles.Celapeutêtredangereux
pour votre santé.
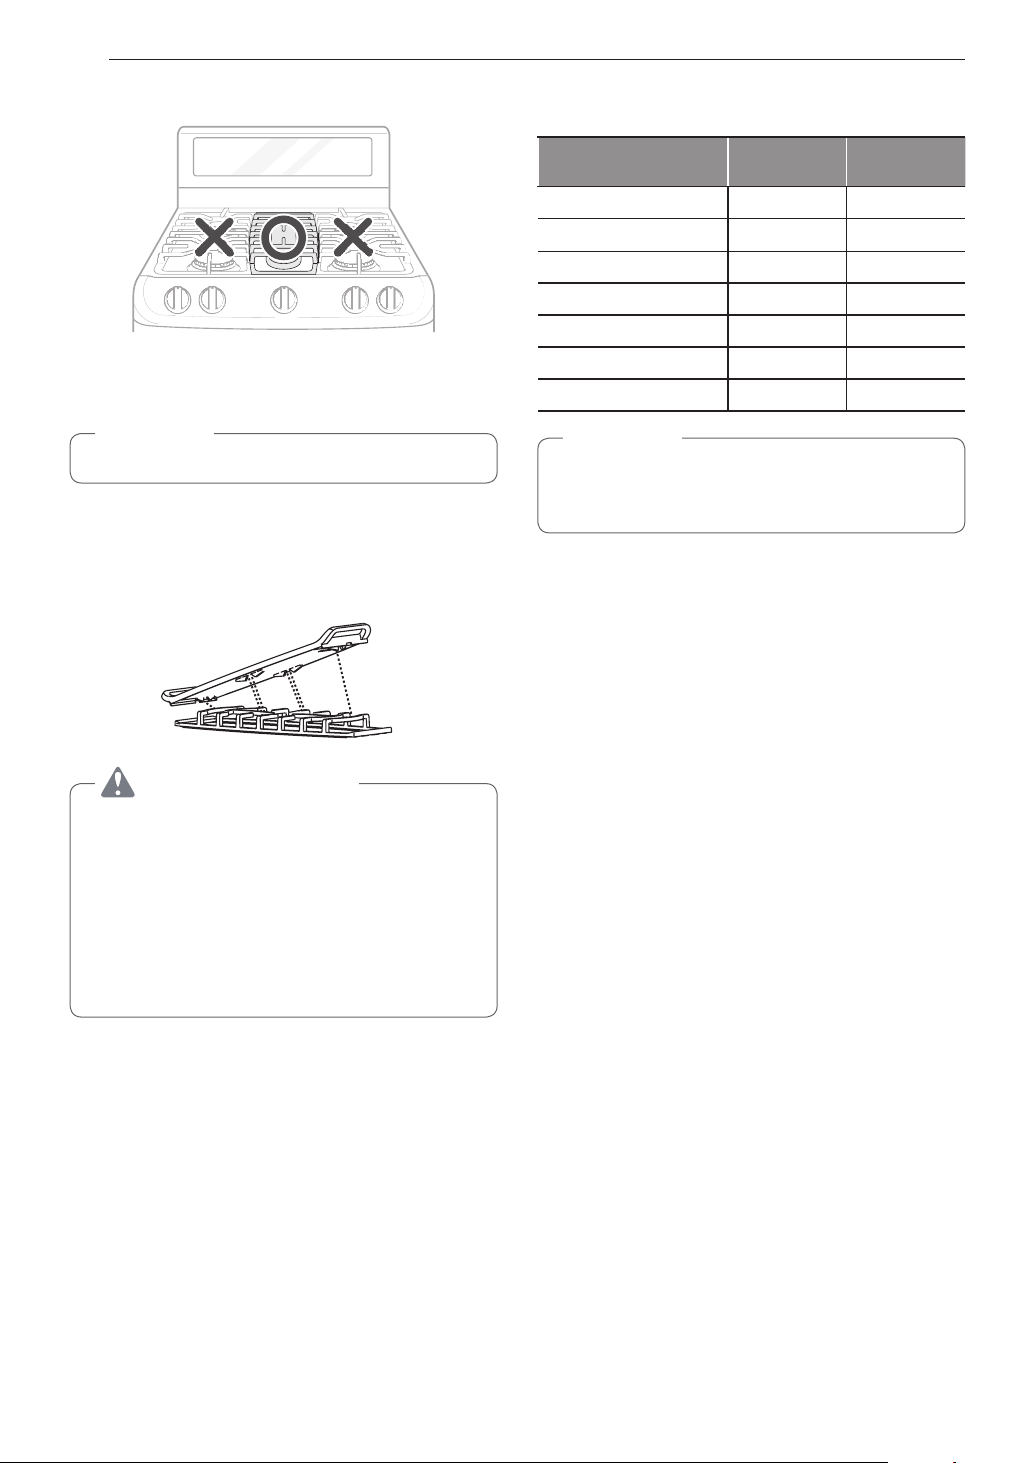
24 FONCTIONNEMENT
Laplaqueavecrevêtementantiadhésifoffreunetablede
cuissonextralargepourlesviandes,lescrêpesoud᾿autres
alimentsgénéralementpréparésavecunepoêleàfrire.
Il est normal que la plaque se décolore au fil du temps.
: La plaque peut uniquement
êtreutiliséeaveclebrûleurcentral.Elledoitêtreplacée
correctementsurlefoyercentral,commeindiquédansle
schéma ci-dessous.
Avant
•
Neretirezpaslefoyercentrallorsdel᾿utilisationdela
plaque.
•
Neretirezpaslaplaquechauffantejusqu᾿àceque
lesgrillesdecuisson,latabledecuissonetlaplaque
chauffante soient complètement refroidies.
•
La plaque sur la table de cuisson peut devenir très
chaudelorsdel᾿utilisationdelatabledecuisson,du
four ou du gril. Utilisez toujours des gants de cuisine
pour placer ou retirer la plaque.
Préchauffez la plaque conformément aux instructions
ci-dessous et ajustez le réglage souhaité.
Réchauffage de tortillas - 5(Moyen)
Crêpes Élevé 5 min Élevé
Hamburgers Élevé 5 min Élevé
Œufspoêlés Élevé 5 min Élevé
Bacon Élevé 5 min Élevé
Saucisses Élevé 5 min Élevé
Sandwichschauds Élevé 5 min Élevé
Après la cuisson sur la plaque pendant une période
prolongée,ajustezlesréglagesdetempératuredela
plaquepourqu᾿elleconservelachaleur.
•
Évitezdecuisinerdesalimentstropgras,carlagraisse
risque de couler.
•
La plaque peut devenir chaude si les brûleurs adjacents sont
utilisés.
•
Ne surchauffez pas la plaque. Cela peut endommager le
revêtementantiadhésif.
•
N᾿utilisezpasdesustensilesenmétalpouvantendommager
lasurfacedelaplaque.N᾿utilisezpaslaplaqueenguisede
planche à découper.
•
Neplacezpasetnestockezpasd᾿objetssurlaplaque.
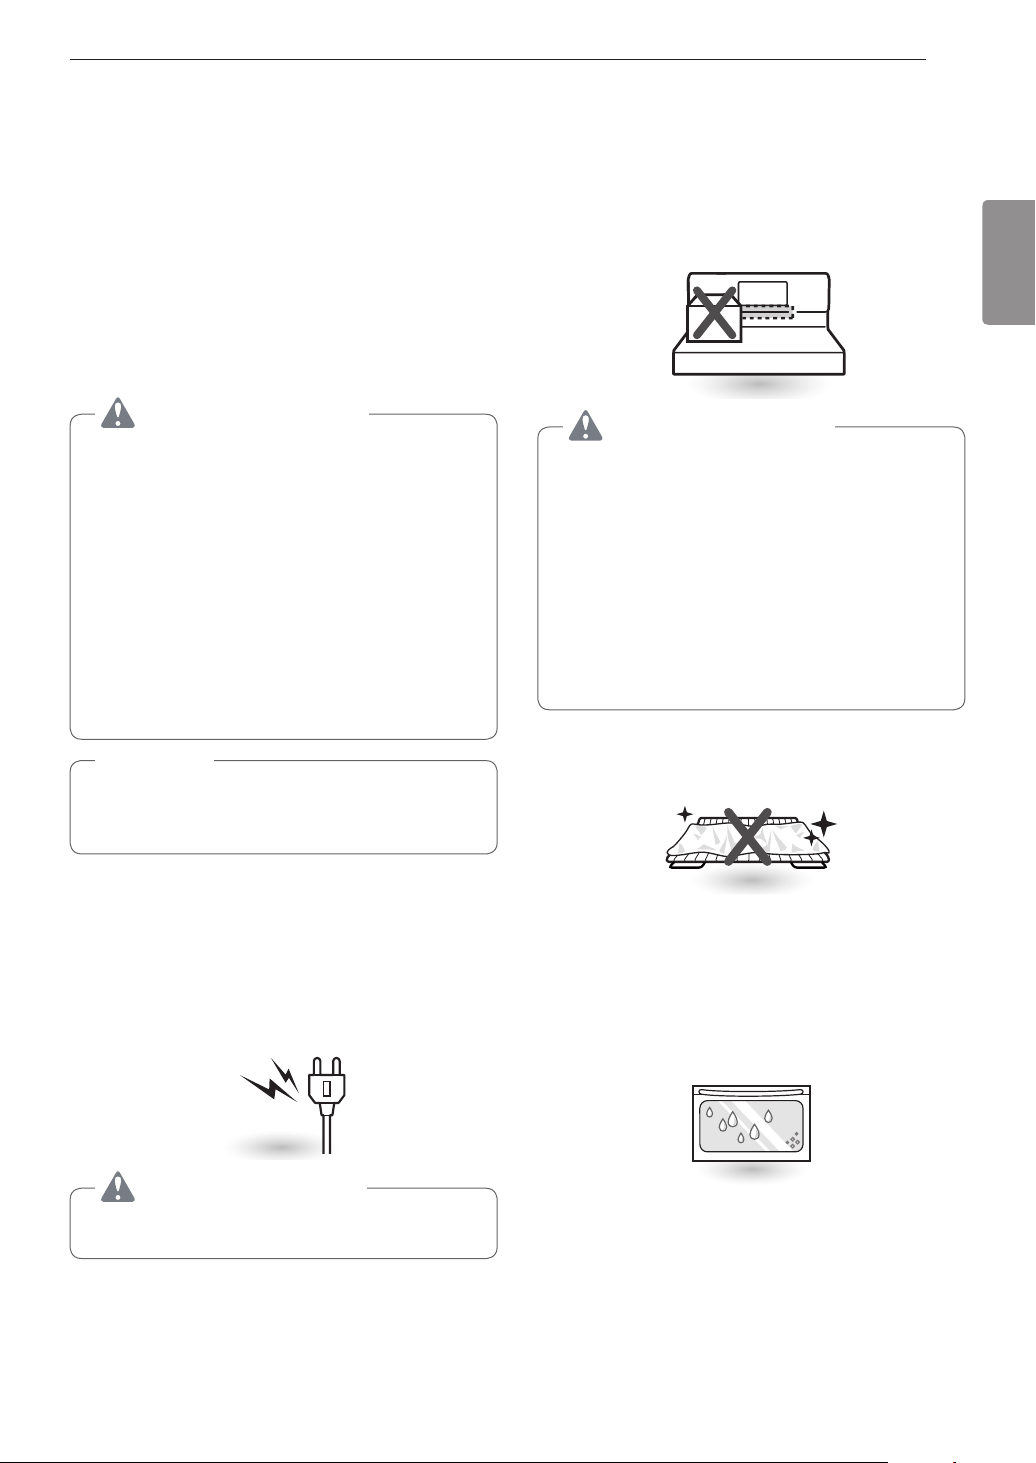
25FONCTIONNEMENT
FRANÇAIS
Liseztouteslesinstructionsavantd᾿utiliserleproduit.
Assurez-vousquevousmaîtrisezlemoded᾿emploidufour
(réglagedelatempérature,dutempsetpréparationdes
recettes)pourobtenirdesrésultatsoptimaux.
•
Ouvrezlesfenêtres.
•
N᾿essayezpasd᾿allumerunappareil.
•
Ne touchez aucun interrupteur électrique.
•
N᾿utilisezaucuntéléphoneàl᾿intérieurdel᾿appartement
ou de la maison.
•
Appelez immédiatement votre fournisseur de gaz à
partirdutéléphoned᾿unvoisin.Suivezlesdirectivesde
votre fournisseur de gaz.
•
Sivousn᾿arrivezpasàjoindrevotrefournisseurdegaz,
appelezleserviced᾿incendie.
Lorsque vous utilisez un thermomètre de four dans
lacavitédufour,latempératurepeutdifférerdela
températureréglée,etce,surtouslesmodes.
Lefouretlegrilnepeuventpasêtreutiliséspendantune
pannedecourant.Silefourestdéjàencoursd᾿utilisation
lorsquelapannedecourantseproduit,lebrûleurdufour
s᾿éteintetnepeutpasêtrerallumétantquelecourantn᾿est
pasrétabli.Unefoislecourantrétabli,vousdevrezréinitialiser
lefour(oulafonctiondegrillage).
N᾿essayezpasd᾿utiliserl᾿allumageélectriquependantune
panne de courant.
Votre four est aéré grâce à des conduites au centre et
au-dessusdelagrilledubrûleur.N᾿obstruezpasl᾿éventdu
fourlorsd᾿unecuissonpourpermettreunecirculationcorrecte
del᾿air.Netouchezpaslesouverturesdel᾿éventoules
surfaces proches pendant la cuisson.
•
Neplacezpasd᾿objetsenplastiqueouinflammablessur
latabledecuisson.Ilspeuventfondreous᾿enflammer
s᾿ilssontplacéstropprèsdel᾿évent.
•
Ne placez pas de récipients fermés sur la table de
cuisson.Lapressionàl᾿intérieurdesrécipientsfermés
peut augmenter et faire éclater le couvercle.
•
Tout objet métallique laissé sur la table de cuisson peut
devenir très chaud et ainsi provoquer des brûlures.
•
Lespoignéesdecasserolesoudepoêlespeuvent
devenir chaudes si elles sont placées trop près de
l᾿évent.
Pendantquevotrefourpréchauffe,l᾿airchauffédanslefour
peut faire apparaître de la condensation dans la vitre de la
porte.Cesgouttesd᾿eausontsansdangerets᾿évaporerontau
fur et à mesure que le four continue de préchauffer.
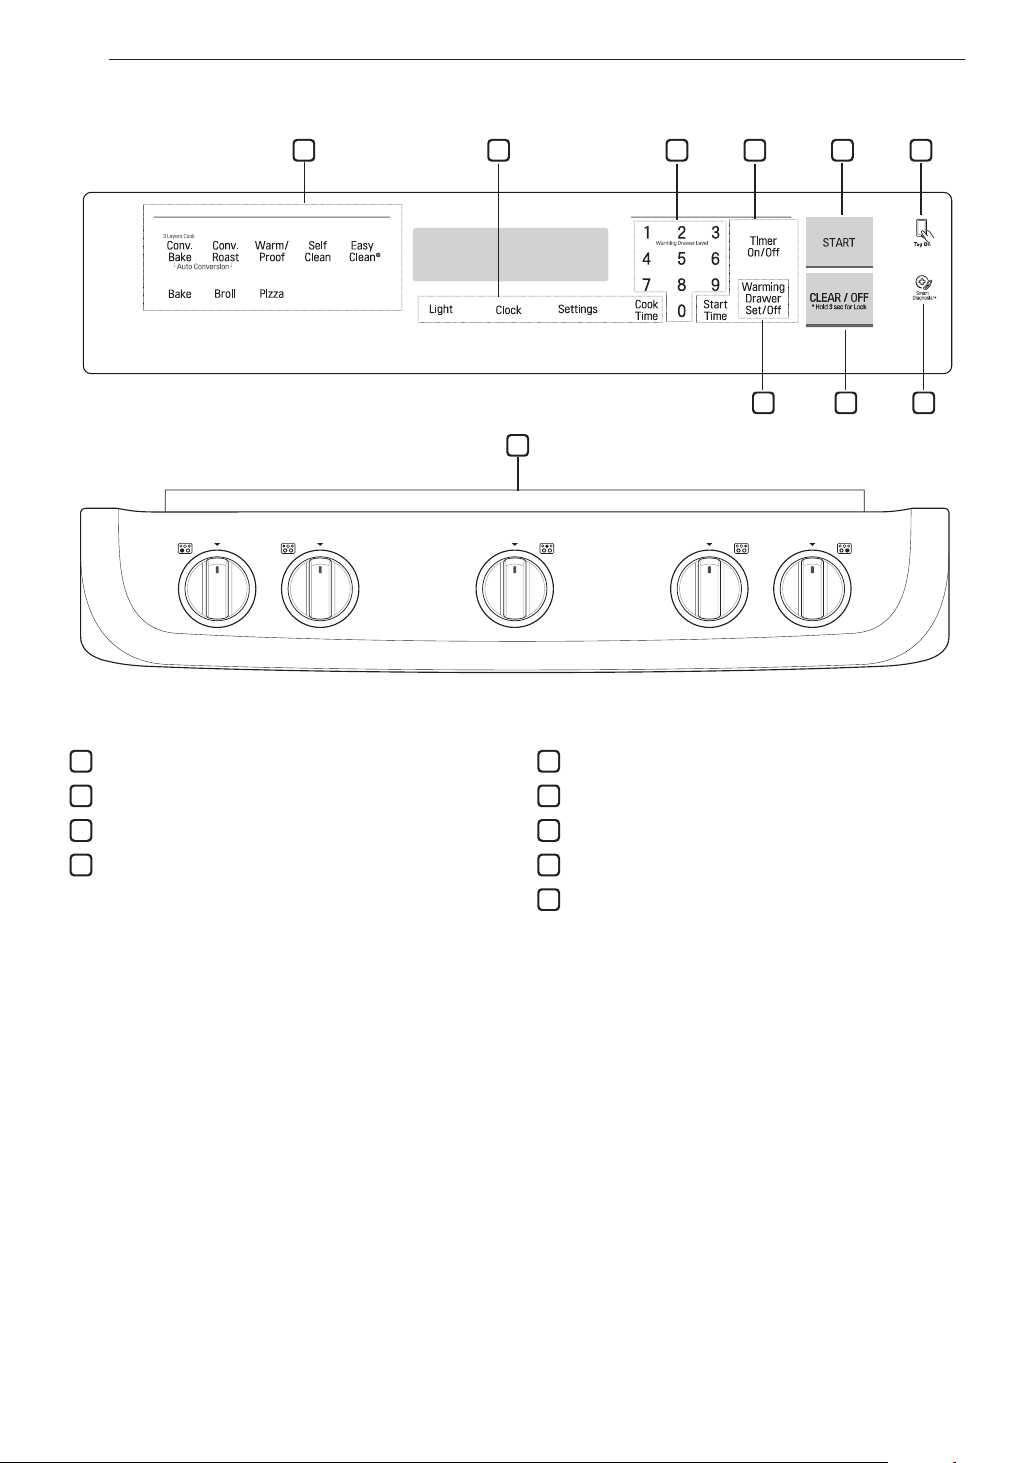
26 FONCTIONNEMENT
8
1
7 6
2 3 2 4 5
9
Sivotrefourafficheunehorlogequiclignote,appuyezsuretréinitialisezl᾿heureouappuyezsurn᾿importequelletouchepour
arrêterleclignotement.
1
2
3
4
5
6
7
8
9
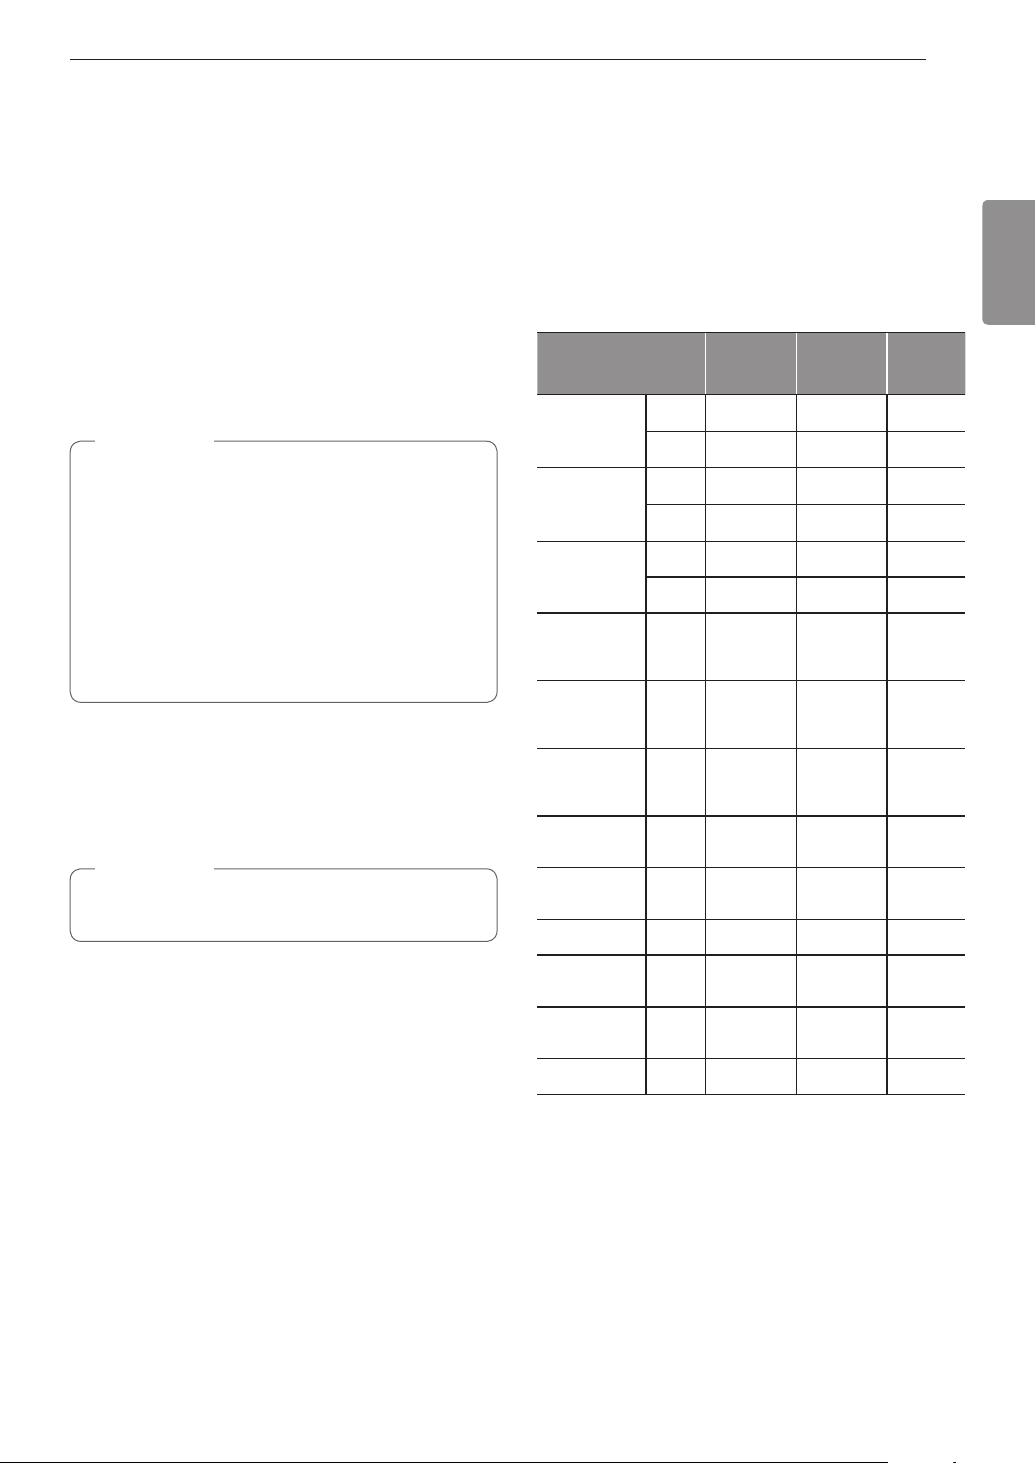
27FONCTIONNEMENT
FRANÇAIS
L᾿horlogedoitêtrerégléeàlabonneheuredujourafinqueles
fonctions de minuterie automatique du four fonctionnent bien.
1
Appuyez sur .
2
Appuyezsurlesnombrespourentrerl᾿heure.Par
exemple,pourréglerl᾿heureà10h30,appuyezsurles
chiffres 1,0,3 et 0.
3
Appuyez sur .
•
L᾿heuredujournepeutpasêtrechangéedurantun
cycledecuissonminutéeoud᾿autonettoyage.
•
Pourvérifierl᾿heuredujourpendantques᾿affichent
d᾿autresinformations,appuyezsur.
•
Sionn᾿appuiesuraucunetouchenumériquedansles
25 secondes après avoir appuyé sur la touche ,
l᾿affichageretourneauréglageinitial.
•
Sil᾿heureaffichéeclignote,c᾿estqu᾿ilyaeu
probablementunepanneélectrique.Réglezl᾿heurede
nouveau.
L᾿éclairageintérieurdufours᾿allumeautomatiquementdès
quel᾿onouvrelaportedufour.Appuyezsur pour allumer
manuellement la lampe du four.
Lalampedufournepeutpasêtrealluméesilafonction
Autonettoyage est activée.
Toutes les fonctions répertoriées ont des valeurs de réglage
minimum et maximum en termes de temps ou de température
qu᾿ilestpossibled᾿entrerdanslacommande.Unsignal
sonoreretentitchaquefoisquel᾿onappuiesurunetouchede
commande.
Deux sons brefs se font entendre si la température ou la durée
quel᾿onentreestinférieureauréglageminimalousupérieure
au réglage maximal de la caractéristique.
durée
minimale
durée
Clock(Horloge)
12 h 1 h 00 min 12 h 59 min
24 h 0 h 00 min 23 h 59 min
Timer
(Minuterie)
12 h 00 min 01 s 11 h 59 min
24 h 00 min 01 s 11 h 59 min
CookTime
(Tempsde
cuisson)
12 h 0 h 01 min 11 h 59 min
24 h 0 h 01 min 11 h 59 min
Conv.Bake
(Cuissonpar
convection)
300 °F /
150 °C
550 °F /
285 °C
350 °F/
(*325°F)/
12 h
Conv. Roast
(Rôtissagepar
convection)
300 °F /
150 °C
550 °F /
285 °C
350 °F/
(*325°F)/
12 h
Broil(Grillage)
Bas
300 °F /
150 °C
Élevé
400 °F /
204 °C
Élevé
/ 3 h
Bake(Cuisson)
170 °F /
80 °C
550 °F /
285 °C
350 °F /
12 h
Proof(Levage
dupain)
12 h
Pizza 12 h
Warm
(Réchaud)
3 h
Self Clean
(Autonettoyage)
2 h 5 h 3 h
EasyClean
®
10 min
*Utilisationdelaconversionautomatique
•
Aveclestempsdemodedecuissonpardéfaut,iln᾿estpas
nécessaire de régler le temps de cuisson.

28 FONCTIONNEMENT
LafonctionMarche/Arrêtdelaminuteriesertdeminuterie
suplémentaire dans la cuisine et émet un signal sonore
lorsque le temps réglé est écoulé. La minuterie ne permet pas
d᾿allumeroud᾿éteindrelefour.
OnpeututiliserlestouchesMarche/Arrêtdelaminuteriedu
four avec toutes les autres fonctions des commandes du four.
1
Appuyez sur une fois.
0:00s᾿afficheet clignote.
2
Appuyez sur 5.
0:05s᾿affiche.
3
Appuyez sur pour mettre en marche
la minuterie. Le compte à rebours du temps restant
s᾿affiche.
Sionn᾿appuiepassur,laminuterierevient
àl᾿heuredujour.
4
Lorsqueletempsrégléestécoulé,lemessageEnd
s᾿affichera.Unetonalitéseferaentendretoutesles
15secondesjusqu᾿àcequel᾿onappuiesurlatouche
.
•
Siletempsrestantn᾿estpasaffiché,appuyezsurla
touche pourl᾿afficherànouveau.
•
Appuyez sur deuxfoispourréglerl᾿heure
en minutes et en secondes.
•
Appuyez sur une fois pour régler le temps
en heures et en minutes.
1
Appuyez sur unefois.L᾿affichagerevientà
l᾿heuredujour.
Appuyez sur la touche plusieurs fois pour faire défiler
les réglages du four et les modifier.
La touche vous permet ceci :
•
réglerlemoded᾿affichagedel᾿horloge(12ou24heures)
•
activer ou désactiver la convection à conversion automatique
•
régler la température du four
•
activer ou désactiver le voyant de préchauffage
•
régler le volume du signal sonore
•
changerl᾿échelledetempérature(degrésFahrenheitou
Celsius)
Cettecommandeestrégléepourl᾿utilisationd᾿unehorlogeen
mode12heures.Pourutiliserunehorlogeenmode24heures,
suivez les étapes ci-après.
1
Appuyez sur .
2
Appuyez sur 1 pour passer du mode 12 heures au
mode 24 heures.
3
Appuyez sur pour accepter cette modification.
Quand et
sontsélectionnés,la
convection à conversion automatique change automatiquement
la température de la recette standard qui a été entrée en
température par convection par le retrait de 25 °F/14 °C.
Cettetempératuredeconversionautomatiques᾿affiche.
Par
exemple,sélectionnez
,entrez350°F,puis
325°Fs᾿afficheaprèslepréchauffage.
La fonction Convection à conversion automatique est activée
pardéfaut.Pourmodifierceréglage,suivezcesinstructions:
1
Appuyez sur plusieursfoisjusqu᾿àceque
s᾿affiche.
2
Appuyez sur 1 pour désactiver ou activer la conversion
automatique.
3
Appuyez sur pour accepter cette modification.

29FONCTIONNEMENT
FRANÇAIS
Il est possible que votre nouveau four ait une cuisson différente
de celle de votre four précédent. Avant de modifier les réglages
detempérature,familiarisez-vousavecvotrenouveaufour
enl᾿utilisantpendantquelquessemaines.Aprèsquoi,sivous
trouvezqu᾿ilestencoretropchaudoutropfroid,vouspourrez
ajustervous-mêmelatempérature.
Pourcommencer,montezoubaissezlethermostatde
15°F(8°C).Essayezlenouveauréglage.Silefour
nécessited᾿autresajustements,montezoubaissezle
thermostatencore,envousservantdupremierréglage
pourvousguider.Parexemple,silepremierréglageétait
exagéré,montezoubaissezlethermostatde10°F(5°C).
Silepremierréglageétaitinsuffisant,montezoubaissez
lethermostatde20°F(12°C).Procédezainsijusqu᾿àce
que le four soit réglé à votre satisfaction.
1
Appuyez sur plusieursfoisjusqu᾿àceque
s᾿afficheàl᾿écran.
2
Utilisez les touches numériques pour entrer les degrés
que vous souhaitez obtenir.
3
Montez ou baissez la température en appuyant sur
plusieursfoispourpasseràplus(+)ouà
moins(-).
4
Appuyez sur pour accepter cette modification.
•
Ce réglage ne modifiera pas les températures de
grillagenid᾿autonettoyage.Ceréglageresteraconservé
danslamémoiremêmeaprèsunepanneélectrique.Le
thermostatdufourpeutêtreaugmenté(+)oudiminué(-)
jusqu᾿àconcurrencede35°Fou19°C.
•
Unefoisquelethermostatestaugmentéoudiminué,la
températuremodifiées᾿afficherajusqu᾿àcequ᾿ellesoit
modifiée de nouveau.
Quandlefouratteintlatempératuredemandée,levoyantde
préchauffageclignotejusqu᾿àl᾿ouverturedelaportedufour.
Vouspouvezactiveroudésactiverlevoyantd᾿alarmede
préchauffage.
1
Appuyez sur plusieursfoisjusqu᾿àceque
s᾿affiche.
2
Appuyez sur 1 pour allumer ou éteindre le voyant.
3
Appuyez sur pour accepter cette modification.
1
Appuyez sur plusieursfoisjusqu᾿àceque
s᾿affiche.
2
Appuyez sur 1 pour sélectionner ou .
3
Appuyez sur pour accepter cette modification.
Réglezl᾿affichagedelatempératuredufourpourafficherles
degrésFahrenheit(°F)ouCelsius(°C).Lestempératures
par défaut du four sont en Fahrenheit sauf si elles ont été
changéesparl᾿utilisateur.
1
Appuyez sur plusieursfoisjusqu᾿àcequeUnit
s᾿affiche.
2
Appuyez sur 1 pour sélectionner (Fahrenheit)ouC
(Celsius).
3
Appuyez sur pour accepter cette modification.
La fonction Verrouillage verrouille automatiquement la porte
dufouretempêchelaplupartdescommandesdufourd᾿être
activées. Elle ne désactive pas la minuterie ni la lampe
intérieure du four.
1
Appuyez sur la touche et maintenez-la
enfoncée pendant trois secondes
2
Lamélodiedeverrouillagesefaitentendre,s᾿affiche
et le cadenas
clignote.
3
Lorsquelaportedufourestverrouillée,l᾿icônedu
cadenas
cesse de clignoter et demeure allumée.
4
Pourdésactiverlafonctiondeverrouillage,appuyezsur
la touche et maintenez-la enfoncée pendant
trois secondes. La mélodie de déverrouillage se fait
entendre,laporteetlescommandessedéverrouillent.

30 FONCTIONNEMENT
La minuterie automatique de la fonction de cuisson minutée
différéeallumeraetéteindralefouràl᾿heurequevousavez
sélectionnée.Cettefonctionpeutêtreutiliséeaveclesmodes
, et .
Parexemple,pourcuireà300°Fetréglerl᾿heuredemiseen
marchedelacuissondifféréeà4h30,réglezd᾿abordl᾿horloge
àl᾿heuredujourexacte.
1
Appuyez sur . 350°Fs᾿affiche.
2
Réglez la température : appuyez sur 3,0 et 0.
3
Appuyez sur et sur les touches numériques
pourentrerl᾿heuredudébutdelacuisson.
4
Appuyez sur .
5
Réglezl᾿heuredemiseenmarche:appuyezsur4,3 et
sur 0pourindiquer4:30(4h30min).
6
Appuyez sur .Unbipretentitetl᾿heurededébutet
s᾿affichentàl᾿écran.Lefourcommencela
cuissonàl᾿heureprogrammée.
•
PourannulerlafonctionCuissonminutéedifférée,
appuyez sur en tout temps.
•
Pourmodifierladuréedecuisson,répétezl᾿étape3et
appuyez sur .
•
Sil᾿horlogedevotrefourestrégléeenmode12h,vous
pouvezdifférerletempsdecuissonjusqu᾿à12heures.
Sil᾿horlogedevotrefourestrégléeenmode24h,vous
pouvezdifférerletempsdecuissonjusqu᾿à24heures.
Le four continuera la cuisson pendant la période de temps
réglée,puiss᾿arrêteraautomatiquement.Lorsqueletempsde
cuisson est écoulé :
•
Le mot Endetl᾿heuredujours᾿affichent.
•
Le signal sonore de fin de cuisson retentit toutes les
60secondesjusqu᾿àcequevousappuyiezsurlebouton
.
•
Quand Warmestactivé,lafonctionderéchauds᾿activedès
que le temps de cuisson est écoulé.
•
Utilisez la minuterie automatique lorsque vous faites
cuire des viandes fumées ou congelées et la plupart des
fruits et légumes. Les aliments qui peuvent se détériorer
facilement,telsquelelait,lesœufs,lepoisson,la
viandeoulavolaille,doiventtoutd᾿abordêtreplacés
dansleréfrigérateur.Mêmelorsqu᾿ilssontréfrigérés,
ilsnedoiventpasresterdanslefourplusd᾿uneheure
avantledébutdelacuissonetdoiventêtreretirés
immédiatement une fois que la cuisson est terminée.
•
Manger des aliments gâtés peut provoquer un
empoisonnement alimentaire.
Réglezlefourpourunecuissond᾿uneduréedéterminéeà
l᾿aidedelafonctionCuissonminutée.Cettefonctionpeutêtre
utilisée uniquement avec les modes , et
.
Parexemple,pourunecuissonà300°Fpendant30minutes,
réglezd᾿abordl᾿horlogeàl᾿heuredujourexacte.
1
Appuyez sur .350°Fs᾿affiche.
2
Réglez la température : appuyez sur 3,0 et 0.
3
Appuyez sur . clignote. ,0:00et
300°Fs᾿affichent.
4
Réglez le temps de cuisson : appuyez sur 3 et 0(pour30
minutes).Laduréedutempsdecuissonpeutêtreréglée
entre 1 minute et 11 heures et 59 minutes.
5
Appuyez sur .
Pour activer la fonction Réchaud à la fin du cycle de
cuissonminutée,refaiteslesétapes1à4,puisappuyez
sur Warm. Warms᾿affiche.
(Consultezlasection«Réchaud»àlapage37.)
Le four continuera la cuisson pendant la période de temps
réglée,puiss᾿arrêteraautomatiquement.Lorsqueletempsde
cuisson est écoulé :
•
Le mot Endetl᾿heuredujours᾿affichent.
•
Le signal sonore de fin de cuisson retentit toutes les
60secondesjusqu᾿àcequevousappuyiezsurlebouton
.
•
Quand Warmestactivé,lafonctionderéchauds᾿activedès
que le temps de cuisson est écoulé.
Parexemple,pourremplacerletempsdecuissonde
30minutespar1heure30minutes,faitesceci:
1
Appuyez sur .
2
Modifiez le temps de cuisson : appuyez sur 1,3,0.
3
Appuyez sur pour accepter cette modification.
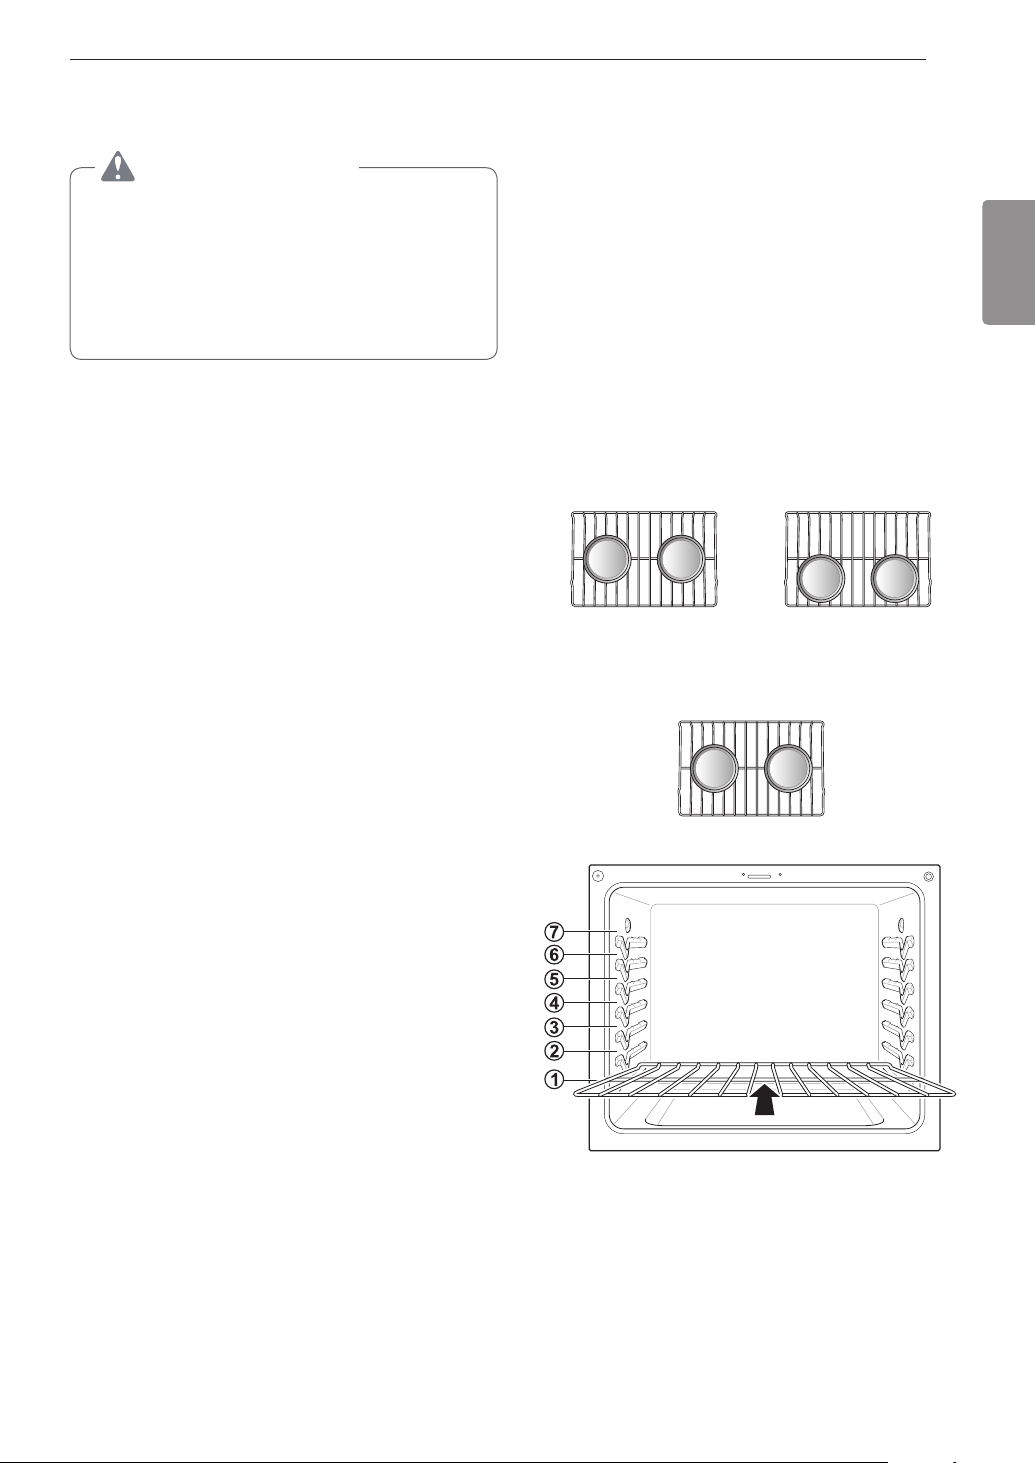
31FONCTIONNEMENT
FRANÇAIS
•
Replacezlesgrillesdufouravantd᾿allumerlefourpour
prévenir les brûlures.
•
Necouvrezpaslesgrillesavecdupapierd᾿aluminium
outoutautrematériau,etneplacezrienaufonddufour.
Cela pourrait nuire à la cuisson et pourrait endommager
le fond du four.
•
Attendez que le four soit froid pour placer les grilles.
1
Saisissezlagrilledufouràl᾿aidedegantsdecuisine*.
2
Tirezlagrillejusqu᾿àcequ᾿ellesebloque.
3
Soulevezl᾿avantdelagrille.
4
Retirez la grille.
*Lorsquepossible,ajustezlesgrillesavantd᾿utiliserlefour.
Portez toujours des gants de cuisine lorsque vous ajustez les
grilles pendant que le four est allumé.
1
Àl᾿aidedegantsdecuisine,placezl᾿extrémitédela
grillesurlesupport*.
2
Inclinezl᾿extrémitéavantdelagrilleverslehaut.
3
Poussezlagrilleàl᾿intérieur.
4
Vérifiez que la grille est correctement en place.
*Lorsquepossible,ajustezlesgrillesavantd᾿utiliserlefour.
Portez toujours des gants de cuisine lorsque vous ajustez les
grilles pendant que le four est allumé.
•
Centrez les plats sur les grilles pour des résultats de cuisson
optimaux.Sivouscuisezplusieursplats,placezceux-cien
laissantsuffisammentd᾿espaceautourd᾿eux(1poà
1
1
/
2
po).Assurez-vousquelesplatsnetouchentpasles
parois du four.
•
Sivousutilisezuneseulegrille,placezlagrillestandardàla
position proposée dans les tableaux des pages suivantes.
Centrezleplatsurlagrillesupérieurecommel᾿indique
l᾿imagedelacuissonàplusieursgrilles.
•
Sivousutilisezplusieursgrillesdanslefour,placezles
grilles standard aux positions 1 et 4. Pour obtenir de
meilleursrésultats,placezleplatcommeindiqué,centrésur
lagrillesupérieureetàl᾿avantdelagrilleinférieure.
Grille standard
(Position4)
Grille standard
(Position1)
Grille standard
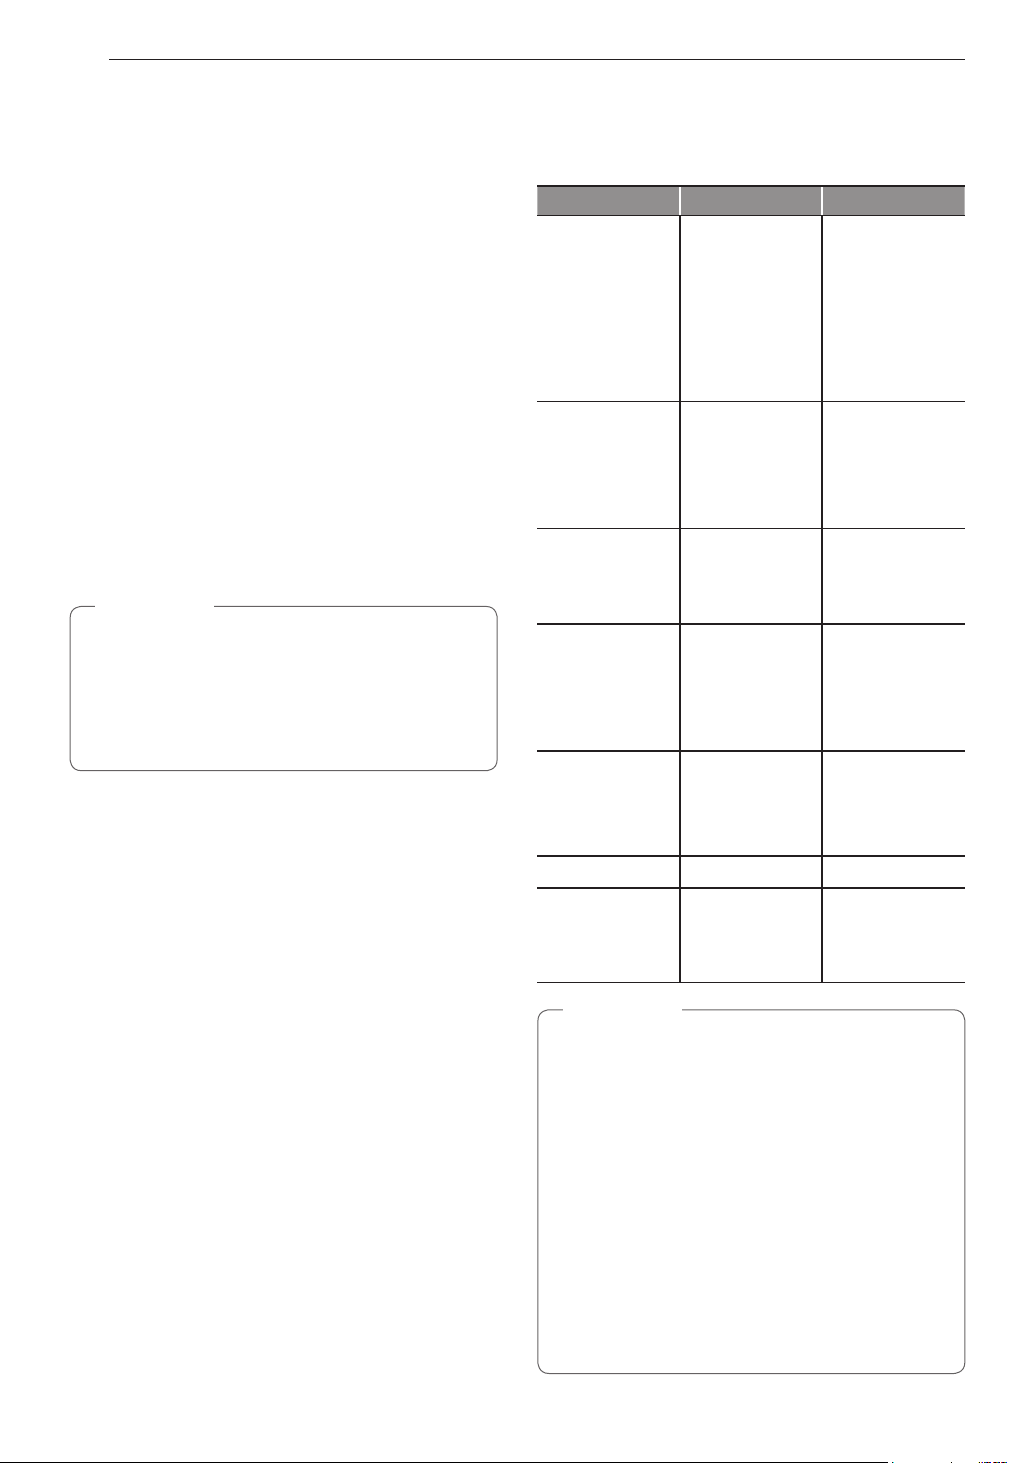
32 FONCTIONNEMENT
Bake (Cuisson)
La fonction Cuisson sert à préparer notamment des pâtisseries,
du pain et des ragoûts. Le four peut être programmé pour cuire à
n᾿importe quelle température située entre 170 °F (80 °C) et 550
°F
(285 °C). La température par défaut est 350 °F (175 °C).
Réglage de la fonction Cuisson (p. ex., 375 °F)
1
Appuyez sur Bake.
2
Réglez la température du four : appuyez sur 3, 7 et 5.
3
Appuyez sur Start. Le préchauffage du four commence.
Pendant que le four préchauffe, la température s᾿affiche et
augmente par tranche de 5 degrés. Une fois que le four atteint
la température établie, un signal sonore se fait entendre et la
lampe du four clignote.
4
Quand la cuisson est terminée, appuyez sur Clear/Off.
5
Enlevez la nourriture du four.
REMARQUE
•
Il est normal que le ventilateur de convection fonctionne
périodiquement tout au long du cycle de cuisson normal
du four, ce qui permet d᾿obtenir des résultats uniformes.
•
Le ventilateur à convection peut continuer de
fonctionner pendant un court moment une fois le four
éteint.
Tableau de cuisson
Ce tableau ne sert qu᾿à des fins de référence et peut être
utilisé pour le four. Réglez le temps de cuisson selon votre
recette.
Aliment Température du four Position de la grille
Gâteaux
– Gâteau étagé
– Gâteau Bundt
– Petits gâteaux
(cupcakes)
– Quatre-quarts
(pound cake)
– Gâteau aux
carottes (maison)
350 °F (175 °C)
350 °F (175 °C)
350 °F (175 °C)
350 °F (175 °C)
350 °F (175 °C)
5
3
3
3
3
Biscuits
– Biscuits au sucre
– Biscuits aux
morceaux de
chocolat
– Brownies
350 °F (175 °C)
350 °F (175 °C)
350 °F (175 °C)
5
5
5
Pizza
– Pizza à pâte levée
– Pizza congelée
– Pizza fraîche
400 °F (204 °C)
400 °F (204 °C)
425 °F (218 °C)
4
4
4
Pain
– Biscuit (petit pain)
(en conserve)
– Biscuit (petit pain)
(maison)
– Muffins
350 °F (175 °C)
375 °F (190 °C)
400 °F (204 °C)
4
4
4
Fruits et légumes
– Pommes (cuites
au four)
– Pommes de terre
(cuites au four)
375 °F (190 °C)
425 °F (218 °C)
2
2
Gâteau des anges
350 °F (175 °C)
1
Crèmes anglaises
-
Gâteau au
fromage,
Crème brûlée
325 °F (161 °C)
-
350 °F (175 °C)
2
REMARQUE
•
En raison des cycles de température du four, un
thermomètre placé dans la cavité du four peut indiquer
une température différente de celle que le four affiche.
•
Il est normal pour le ventilateur de convection de
fonctionner durant le préchauffage d᾿un cycle de
cuisson régulier.
•
Le moteur du ventilateur de convection peut fonctionner
de façon sporadique durant un cycle de cuisson
régulier.
•
Les éléments chauffants s᾿éteignent si la porte
est laissée ouverte pendant la cuisson. Si la porte
reste ouverte pendant plus de 30 secondes lors de
la cuisson, les éléments chauffants s᾿éteignent. Les
éléments chauffants se rallument automatiquement dès
que la porte est refermée.
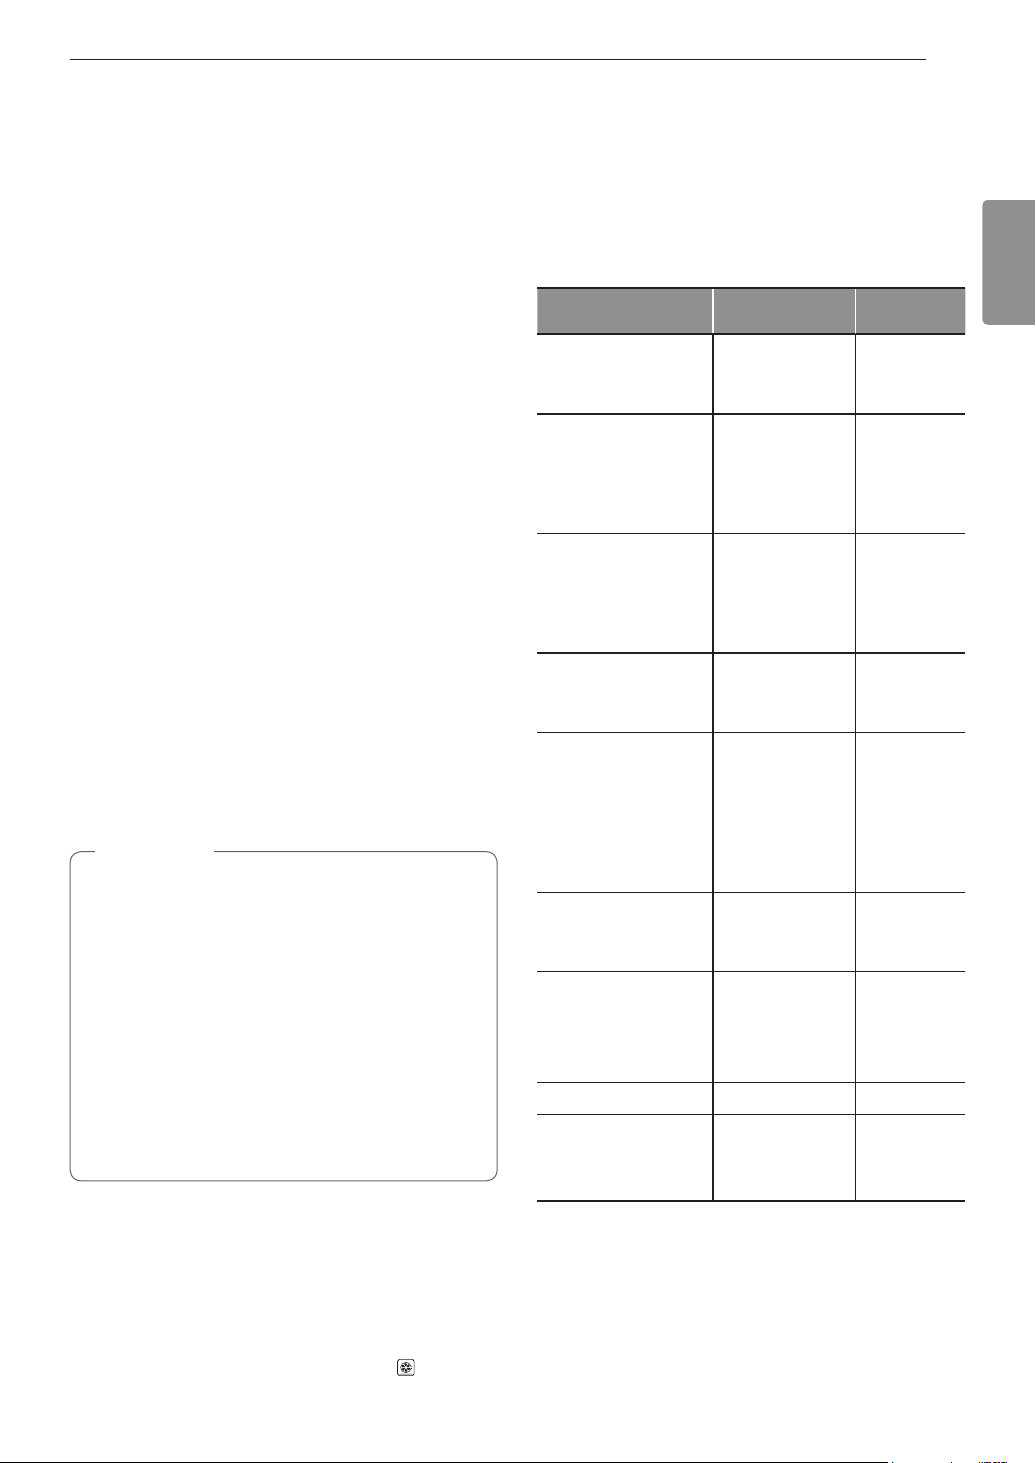
33FONCTIONNEMENT
FRANÇAIS
Le système de convection utilise un ventilateur pour faire
circuler la chaleur de façon uniforme dans le four. Ce procédé
améliore la distribution de la chaleur et offre une cuisson
uniformeetd᾿excellentsrésultats,surtoutlorsqu᾿onutilise
plusieurs grilles. La cuisson par convection peut également
raccourcir le temps de cuisson.
1
Appuyez sur . 350 °F clignote sur lécran.
2
Réglez la température du four : appuyez sur 3,7 et 5.
•
La cuisson par convection cuit plus rapidement et plus
uniformémentlorsquedesalimentscommedesbiscuits,
despetitspains,desrouleauxoud᾿autresproduitsde
boulangerie et de pâtisserie sont sur une seule grille. Les
biscuits,lesmuffinsetlespetitspainsaurontd᾿excellents
résultats lorsque vous utilisez plusieurs grilles.
•
Le fait de cuire avec plusieurs grilles peut augmenter
légèrementlestempsdecuissonpourcertainsaliments,
maisglobalement,letempsdecuissonseraréduit.
•
Lacuissonparconvectiondonned᾿excellentsrésultats
pour des pains rapides et des pains au levain de tout
type.Deplus,lespainsetlespâtisseriesbrunissentplus
uniformément.
•
N᾿utilisezpaslacuissonparconvectionpourdesaliments
délicatscommelespuddingsaulait,lessoufflésoules
gâteauxaufromage,quipourraientêtreabîmésparle
ventilateur à convection.
•
Les modes de cuisson par convection réduisent
automatiquement la température du four de 25 °F
(14°C).L᾿écranaffichelatempératuremodifiée.
•
Cette caractéristique est connue sous le nom de
conversion automatique.
•
Cette fonction est activée pour cette cuisinière.
•
Pourdésactiverlafonctiondeconversionautomatique,
voir«Convectionàconversionautomatique»,àla
page 28.
•
Le ventilateur du four fonctionne pendant la cuisson par
convection. Le ventilateur cesse de fonctionner lorsque
la porte est ouverte pendant plus de 30 secondes lors
de la cuisson.
3
Appuyez sur . Lécran indique et la
températureconvertie,commençantà100°F.Pendant
quelefourpréchauffe,l᾿écranaffichelahaussedela
température par tranche de 5 degrés.
4
Unefoisquelefouratteintlatempératuredésirée,
un signal sonore se fait entendre et la lampe du four
clignote.L᾿écranaffichelatempératuredufourconvertie
automatiquementà350°F, et .
Silaconversionautomatiqueestdésactivée,réduisezde
25°F(14°C)latempératuresuggéréeparlarecettepourla
cuisson par convection. Les températures ont été ajustées
dans le tableau suivant. Le fait de cuire avec plusieurs grilles
peut augmenter légèrement les temps de cuisson pour certains
aliments,maisglobalement,letempsdecuissonseraréduit.
Ce tableau est présenté à titre de référence seulement. Réglez
le temps de cuisson selon vos préférences.
Gâteaux
– Gâteau étagé
– Gâteau Bundt
325°F(161°C)
325°F(161°C)
3
3
Gâteaux spécialisés
– Gâteaux popover
–Petitsgâteaux(cupcakes)
–Quatre-quarts(pound
cake)
400°F(204°C)
325°F(161°C)
325°F(161°C)
3
3
3
Biscuits
– Biscuits au sucre
– Biscuits aux morceaux de
chocolat
–Brownies
325°F(161°C)
325°F(161°C)
325°F(161°C)
3
3
3
Pizza
– Pizza congelée
– Pizza fraîche
375°F(190°C)
400°F(204°C)
4
4
Pain
–Biscuit(petitpain)en
conserve
–Biscuit(petitpain),
maison
– Muffins
–Painblanc,miche
325°F(161°C)
350°F(175°C)
375°F(190°C)
400°F(204°C)
4
4
4
4
Croûte à tarte
– Maison
– Réfrigérée
400°F(204°C)
400°F(204°C)
4
4
Desserts
– Croustade ou pavé aux
fruits,maison
–Tarteauxfruits,maison,
à deux croûtes
350°F(175°C)
350°F(175°C)
3
3
Gâteau des anges
325°F(161°C) 1
Crèmes anglaises
- Gâteauaufromage,
Crème brûlée
300°F(149°C)
-
325°F(161°C)
2

34 FONCTIONNEMENT
Toutplatpouvantêtreutilisédansunfourconventionnelpeut
êtreutilisédansunfouràconvection.Pourdesrésultats
optimaux,gardezcequisuitàl᾿esprit.
•
Assurez-vous que les plats ne touchent pas les parois du
fourlorsqu᾿ilssontcentréssurlesgrilles.Pourdemeilleurs
résultats,utilisezdesplatsquilaissentdel᾿espacepourque
l᾿aircirculedanslefourlorsquevousutilisezlacuissonpar
convection.
•
Laissezdel᾿espaceentrelesplats.Assurez-vousqueles
plats ne se touchent pas ou ne touchent pas aux parois du
four.
•
N᾿utilisezpasdeplatsavecdescôtéshauts.Pourdes
biscuitsoudespetitspains,utilisezdesplatsdecuisson
plats.Pourunpoulet,utilisezunplatàcôtésbas.
•
Les plats métalliques se réchauffent le plus rapidement. Des
récipients en papier et en plastique résistants à la chaleur
etrecommandéspourdesfourstraditionnelspeuventêtre
utilisés dans des fours à convection. Des plats en verre et
encéramiquepeuventégalementêtreutilisés.Toutefois,les
plats en métal chauffent plus vite et sont recommandés pour
la cuisson par convection.
•
La nourriture placée dans des plats au fini foncé ou mat cuit
plus rapidement que dans des plats au fini brillant.
•
Utilisez la taille de plat recommandée dans la recette.
•
Certains aliments surgelés ou congelés ont été préparés
spécialement pour les fours à convection. Pour de
meilleursrésultatsaveccefour,préchauffezlefouret
utilisezlatempératurerecommandéesurl᾿emballage
des aliments.
•
Si un fabricant de produits alimentaires donne des
instructionsdecuissonparconvectionprécises,
n᾿oubliezpasquelaconversionautomatiquepourla
convection réduira les réglages de la température de
25°F(14°C).Silafonctiondeconversionautomatique
estactivée,ajoutez25°F(14°C)auxréglagesde
température pour obtenir une température convertie qui
s᾿apparenteàcelleindiquéepourlacuisson.
La fonction Rôtissage par convection est conçue pour
fournir une performance de rôtissage optimale. Le rôtissage
par convection combine la cuisson avec le ventilateur de
convectionpourrôtirlesviandesetlavolaille.L᾿airréchauffé
circuletoutautourdelanourriture,emprisonnantlesjusetles
saveurs. Les aliments cuits de cette manière sont brunis et
croustillantsdel᾿extérieurtoutenrestantjuteuxàl᾿intérieur.
1
Appuyez sur . Lécran indique 350 °F
(175°C).
2
Réglez la température du four : appuyez sur 3,7 et 5.
Les modes de cuisson par convection réduisent
automatiquement la température du four de 25 °F
(14°C).L᾿écranaffichelatempératuremodifiée.Cette
caractéristique est connue sous le nom de conversion
automatique. Cette fonction est activée pour cette
cuisinière. Pour désactiver la fonction de conversion
automatique,voir«Convectionàconversionautomatique»,
à la page 28.
3
Appuyez sur .L᾿affichageindique et
latempératurequichangeàpartirde100°F(38°C).
Pendantquelefourpréchauffe,latempératureaffichée
augmentera par tranche de 5 degrés.
4
Unefoisquelefouratteintlatempératuredésirée,
un signal sonore se fait entendre et la lampe du four
clignote.L᾿écranaffichelatempératuredufourconvertie
automatiquementà350°F, et .
5
Placez les aliments à cuire dans le four.
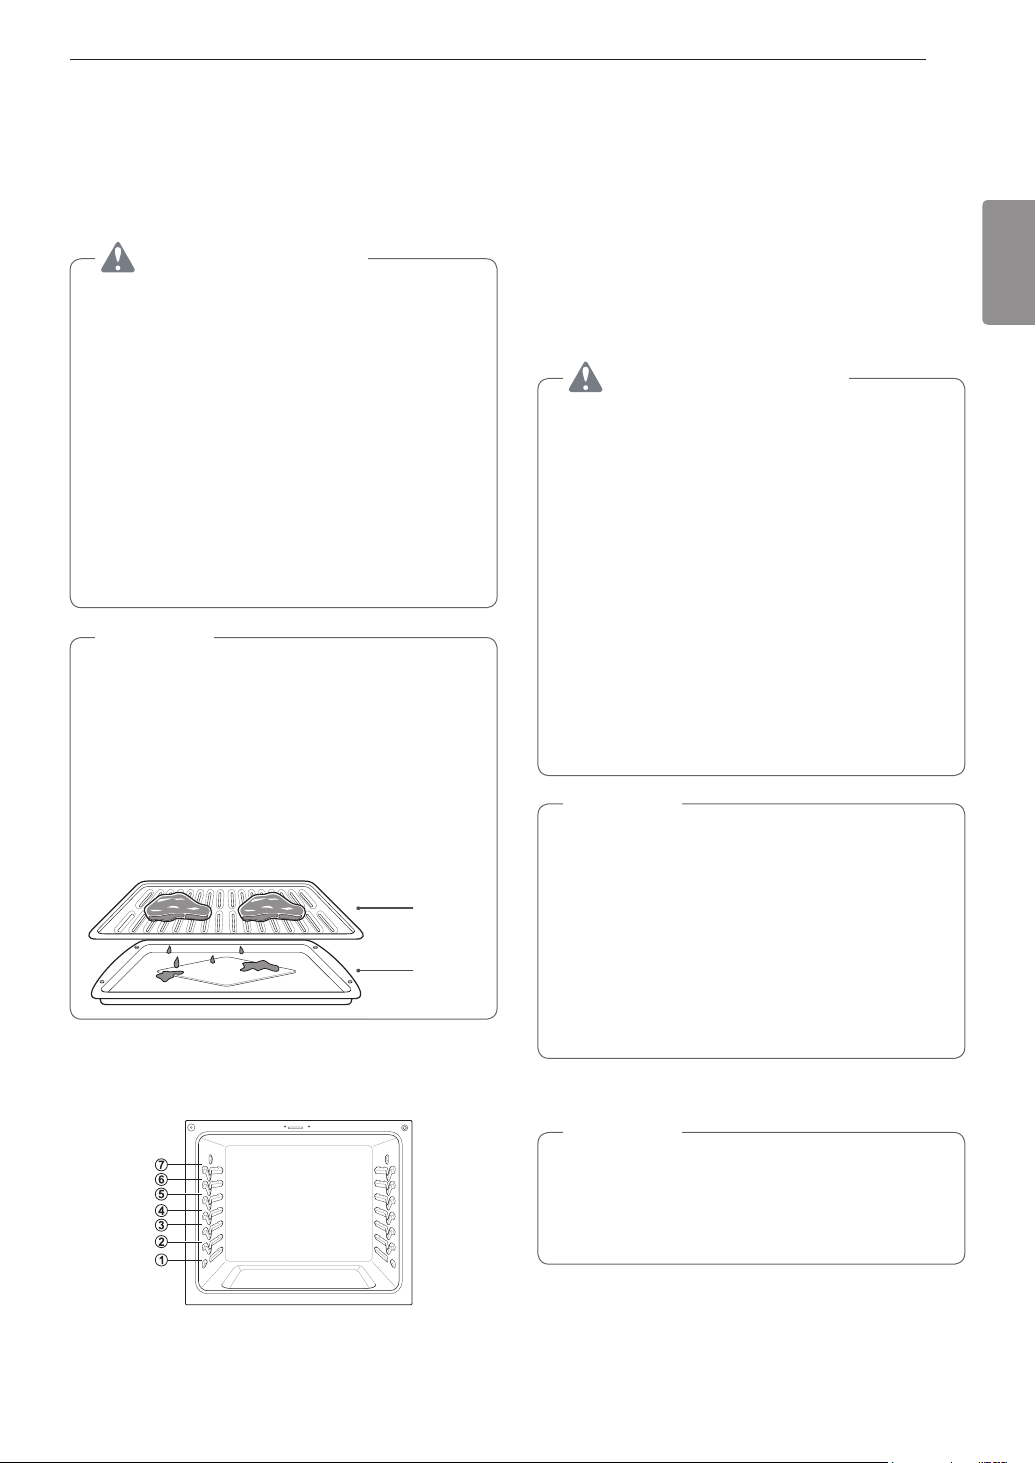
35FONCTIONNEMENT
FRANÇAIS
Votre four a été conçu pour utiliser la fonction de grillage avec
la porte fermée. La fonction de grillage utilise un rayonnement
de chaleur intense provenant du brûleur de gaz supérieur.
Ce mode fonctionne parfaitement avec des morceaux fins et
tendresdeviande(1pooumoins),devolailleoudepoisson.
•
N᾿utilisezpasunelèchefritesanslagrille. Le gras
pourrait causer un feu de graisse.
•
Ne couvrez pas la grille ni la lèchefrite de papier
d᾿aluminium.Cecipourraitcauserunfeu.
•
Utilisez toujours une lèchefrite et une grille pour le
drainagedel᾿excédentdegrasetdematièresgrasses.
Cecipermettraderéduirelesprojections,lafuméeet
les flambées.
•
N᾿utilisezjamaisunelèchefritequin᾿apasété
soigneusement nettoyéeetquin᾿estpasàla
température de la pièce. Si votre lèchefrite est
endommagée,bosseléeoutrèssouilléedefaçon
permanente,pensezàlaremplacerafinderéduire
les émissions de fumée qui se produisent pendant la
cuisson au grilloir.
Grille
Lèchefrite
•
Réglez le four à Lo broil pour griller la volaille et les
tranches épaisses de viande.
•
Retirezlalèchefritedufourpourlafairerefroidir,cequi
facilite le nettoyage.
•
Pourdesrésultatsoptimaux,utilisezunelèchefrite
conçuepourlacuissonaugrilloir,telqu᾿illustré
ci-dessous. La lèchefrite récupérera les suintements de
gras,etlagrillepermettradeprévenirlesprojectionsde
graisse.
Encequiconcernelafonctiondegrillage,consultezleguide
de grillage pour placer la grille.
1
Appuyez sur une fois pour Hi et deux fois pour .
2
Appuyez sur .
3
Laissez préchauffer le gril cinq minutes.
4
Placez les aliments à cuire dans le four.
5
Fermezlaportedufour.Laportedufourdoitêtrefermée
aucoursdel᾿utilisationdugril.
Lorsquevousutilisezlegrilloir,latempératuredufourest
extrêmementélevée.Pourévitertoutebrûlure:
•
Gardez la porte du four fermée pendant la cuisson au
grilloir.
•
Portez toujours des gants de cuisine pour mettre des
aliments au four ou les en retirer.
L᾿utilisationinappropriéedelafonctiondegrillagepeut
causer de la fumée excessive ou un feu de graisse. Parmi
lesconditionsd᾿utilisationnonadéquates,onretrouve:
•
Le grillage sur la grille standard en position 6.
•
Le réglage du grilloir à une température plus élevée que
celle recommandée.
•
L᾿utilisationdelèchefritesgraisseusesousales.
•
La cuisson au grilloir plus longue que la durée de
cuisson recommandée.
•
Cette cuisinière est conçue pour utiliser la fonction de
grillage avec la porte fermée. Fermez la porte pour
réglerlafonctiondegrillage.Silaporteestouverte,la
fonctiondegrillagenepeutpass᾿activeretlemot
apparaîtra sur lécran. Fermez la porte et réinitialisez la
fonction.L᾿ouverturedelaporteéteintlesélémentsde
grillage lors de la cuisson au gril. Si la porte est ouverte
pendantlacuissonaugril,lesélémentsdegrillage
s᾿éteignentauboutdecinqsecondes.Leséléments
se rallument automatiquement dès que la porte est
refermée.
6
Lorsquelegrillageestterminé,appuyezsur.
PendantlafonctionGrillage,ilestnormalquele
grilloirs᾿allume,s᾿éteigneetserallume.L᾿allumeur
du grilloir se trouvant dans la partie supérieure du four
passe régulièrement à la couleur orange pendant le
fonctionnement normal du grilloir.
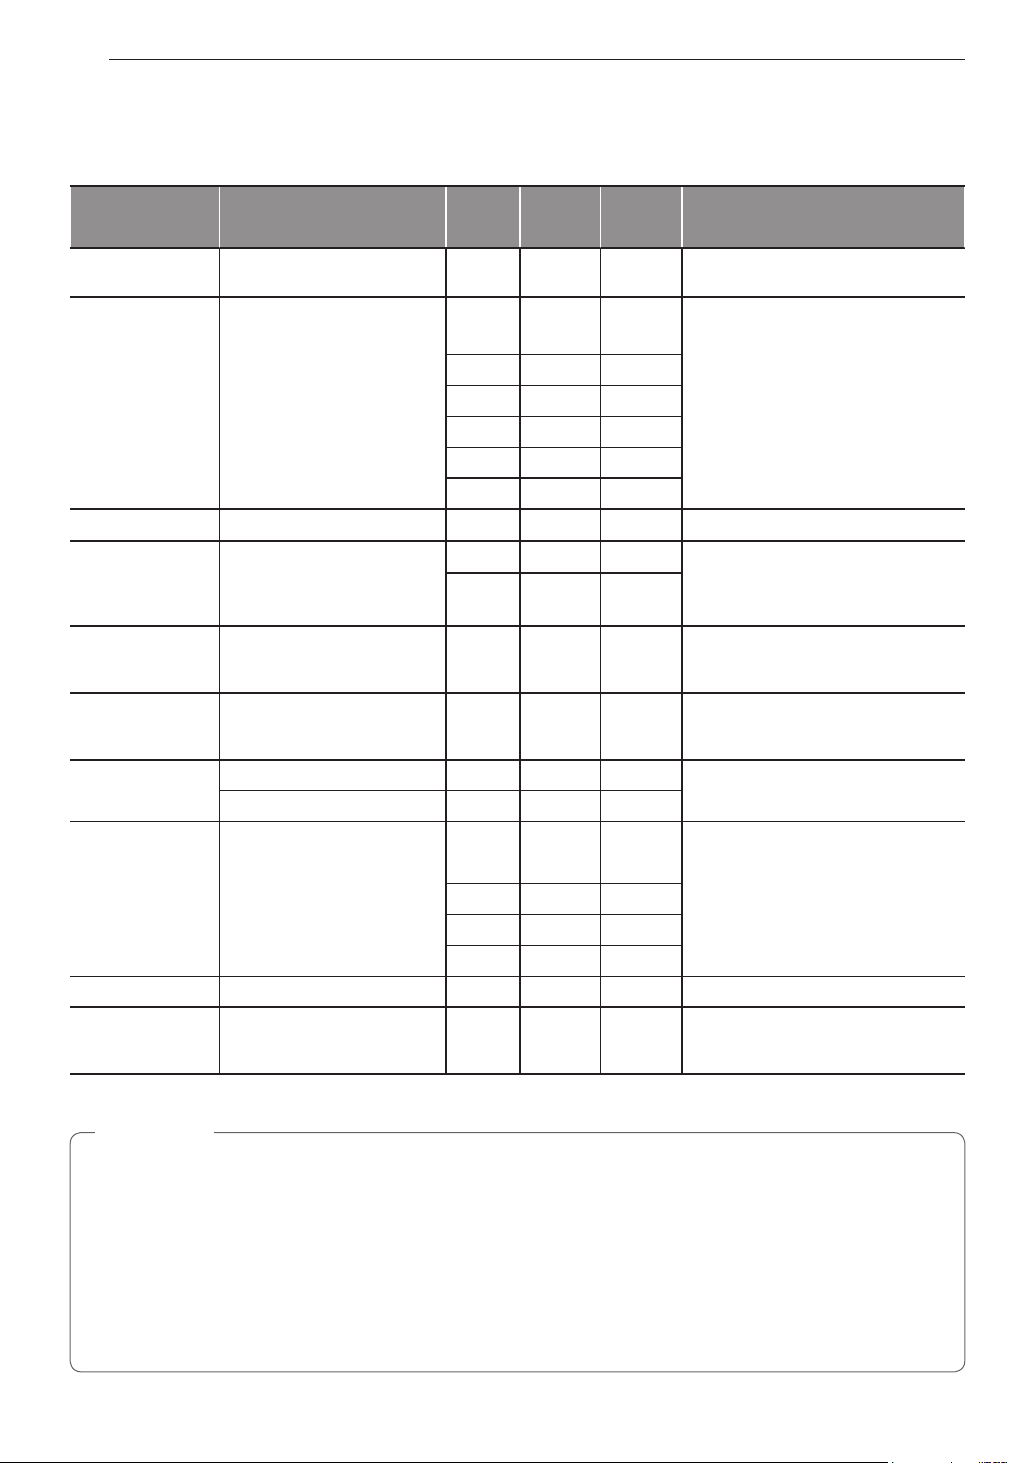
36 FONCTIONNEMENT
Lataille,lepoids,l᾿épaisseur,latempératurededépartetvospréférencesdecuissonmodifientletempsdegrillage.Lesduréesde
cuissonontétéétabliesd᾿aprèsdestempératuresdeviandesconservéesauréfrigérateur.Pourobtenirdemeilleursrésultatsde
grillage,utilisezunelèchefriteconçuepourlegrillage.
de la
Bien cuit
1lb(4galettes)
1
/
2
à
3
/
4
pod᾿épaisseur
6 5 à 7 3 à 4
Espacez uniformément. On peut faire
grillerjusqu᾿àhuitgalettesàlafois.
Saignant 6 7 5
Lesbiftecksdemoinsde1pod᾿épaisseur
cuisent complètement avant de brunir.
Lacuissonàlapoêleestrecommandée.
Dégraissez.
1pod᾿épaisseur
De 1 à 1
1
/
2
lb
À point 6 12 5 à 6
Bien cuit 6 13 8 à 9
Saignant
1
1
/
2
pod᾿épaisseur
De 2 à 2
1
/
2
lb
4 10 6 à 7
À point 4 12 à 15 10 à 12
Bien cuit 4 25 16 à 18
De 1 à 9 tranches
5 1 à 2 1 à 2
1 poulet entier de 2
à
2
1
/
2
lb,découpésurla
longueur,4poitrinesavecos
2 35 à 40 25 Badigeonnez chaque côté de beurre
fondu.
Grillez avec le côté de la peau en
dessous.
2 25 à 30 10 à 15
1
/
4
po à
1
/
2
pod᾿épaisseur 5 7 à 8 6 Manipulez et tournez avec soin.
Badigeonnez de beurre au citron avant et
pendantlacuisson(facultatif).
(précuites)
1pod᾿épaisseur
1
/
2
pod᾿épaisseur
3
4
10
7
5
4
Augmentez le temps de cuisson de 5 à 10
minutes par côté pour du jambon de
1
1
/
2
pod᾿épaisseuroudujambonfumé.
Bien cuit
2(
1
/
2
pod᾿épaisseur) 4 10 8 Dégraissez.
2(1pod᾿épaisseur),environ1lb 4 13 8 à 9
Dégraissez.
À point 2(1pod᾿épaisseur),environ10
à 12 oz
5 6 4 à 7
Bien cuit 5 10 10
À point
2(
1
/
2
pod᾿épaisseur),environ
1 lb
5 10 4 à 6
Bien cuit 5 17 12 à 14
1
/
2
lb(environ8tranchesminces) 4 8 3 Placez sur une seule couche.
De 2 à 4
De 6 à 8 oz chacune
3 13 à 16 Ne pas
tourner
Coupez le dos de la carapace. Écartez.
Badigeonnez de beurre fondu avant le
grillage et à la mi-temps de grillage.
•
Ce guide est offert à titre de référence seulement. Réglez le temps de cuisson selon vos préférences.
Ledépartementdel᾿AgriculturedesÉtats-Unisindiquequelaconsommationdepoisson,deviandeoudevolaillecrusoupas
assezcuitspeutaccroîtrelesrisquesdemaladied᾿originealimentaire.
Ledépartementdel᾿Agricultureaindiquél᾿utilisationdestempératuresinternesminimalessécuritairessuivantespourla
consommation :
•
Bœuf:160°F(71,1°C)
•
Volaille:165°F(73,9°C)
•
Bœuf,veau,porcouagneau:145°F(62,8°C)
•
Poisson/fruitsdemer:145°F(62,8°C)
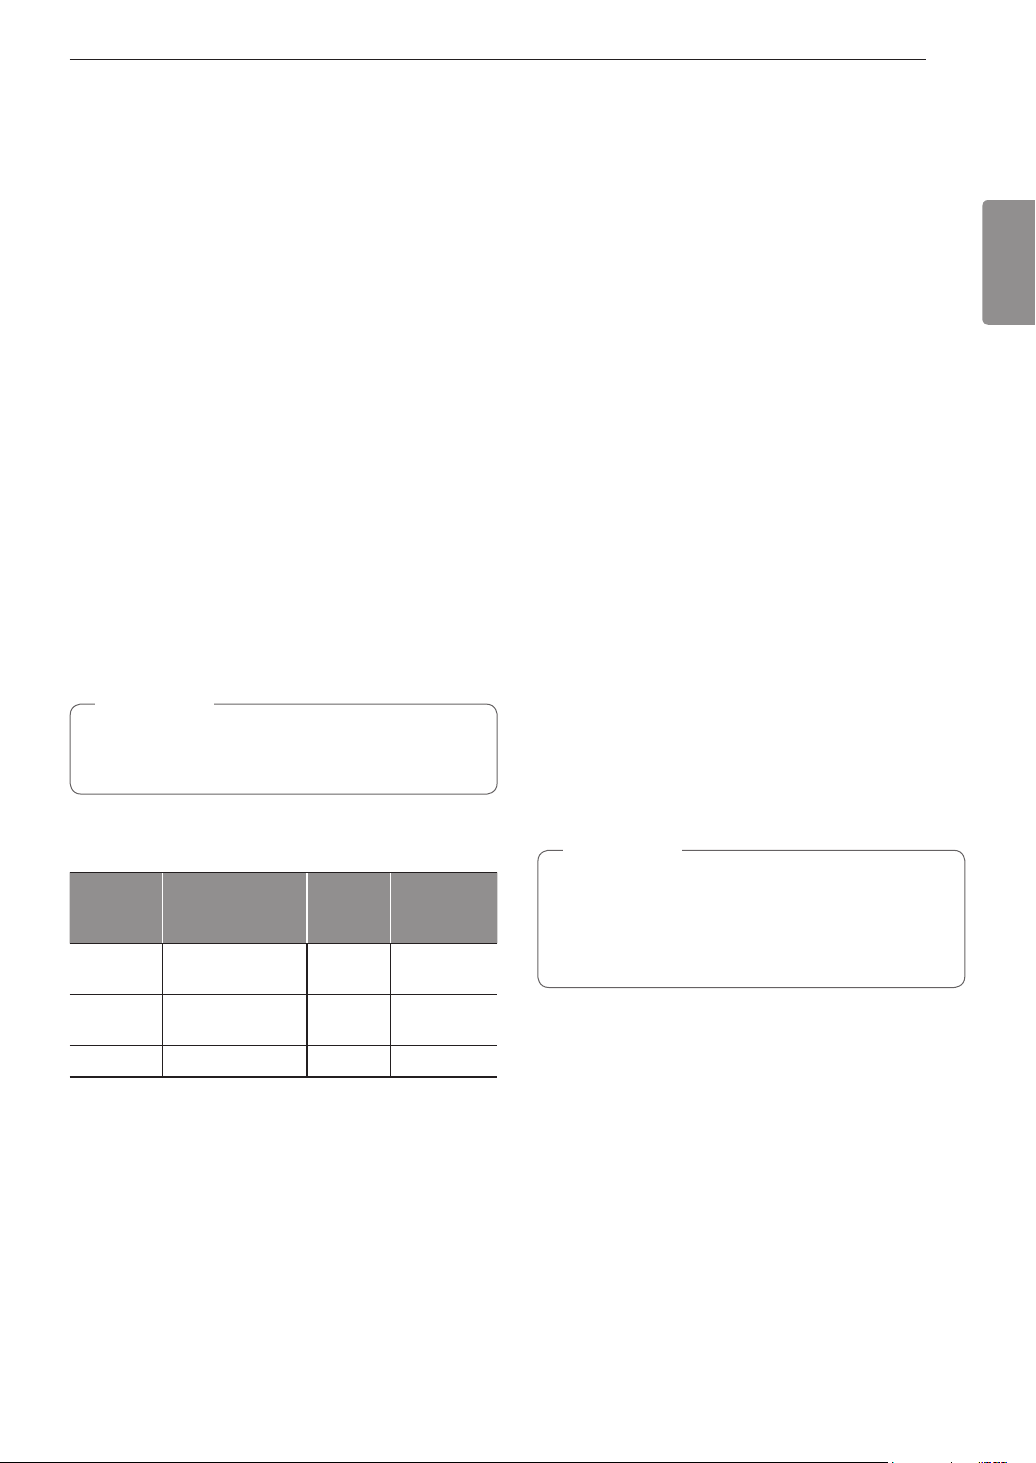
37FONCTIONNEMENT
FRANÇAIS
Cette fonction règle automatiquement la température du four
pour la cuisson des pizzas surgelées à croûte ordinaire ou à
pâte levée ou encore des pizzas fraîches faites à la maison.
Choisissezsimplementletypedepizza(voirletableau),et
réglez le temps de cuisson désiré.
1
Appuyez sur une fois. s᾿affiche.Appuyez
plusieurs fois sur pour passer de à ou à .
Sélectionnezl᾿optionsouhaitée.(Consutezletableaude
cuissondespizzasci-dessous.)
2
Appuyez sur . Le préchauffage du four commence.
Pendantquelefourpréchauffe,latempératures᾿afficheet
augmente par tranche de 5 degrés. Une fois que le four atteint
latempératureétablie,unsignalsonoresefaitentendreetla
lampe du four clignote.
3
Placezlapizzadanslefour,fermezlaporteetréglez
la minuterie selon les suggestions présentées dans le
tableau.
4
Lorsquelacuissonestterminée,appuyezsur.
5
Enlevez les aliments du four.
Le préchauffage du four est nécessaire pour de meilleurs
résultats. Placez les aliments dans le four après le
préchauffage.
4 14 à 16
4 19 à 21
4 8 à 10
Cette fonction maintiendra la température du four à 170 °F. La
fonction Réchaud gardera le plat cuisiné chaud pour le servir
jusqu᾿àtroisheuresaprèssacuisson.LafonctionRéchaud
peutêtreutiliséesansautresopérationsdecuissonouunefois
la cuisson terminée après avoir utilisé les fonctions Cuisson
minutée ou Cuisson minutée différée.
1
Appuyez sur pour passer à Réchaud ou à
Levage du pain.
2
Appuyez sur .
3
Appuyez sur en tout temps pour annuler.
1
Réglez la fonction de cuisson.
2
Entrezlatempératuredufouràl᾿aidedestouches
numériques.
3
Appuyez sur et entrez la durée de cuisson au
moyen des touches numériques.
4
Appuyez sur .
5
Appuyez sur .
6
Quandlacuissonestterminée,appuyezsur
pour annuler la fonction Réchaud.
•
La fonction Réchaud est conçue pour maintenir la
chaleurdesalimentscuits.Nel᾿utilisezpaspour
refroidir la nourriture.
•
Il est normal que le ventilateur fonctionne quand la
fonction Réchaud est activée.
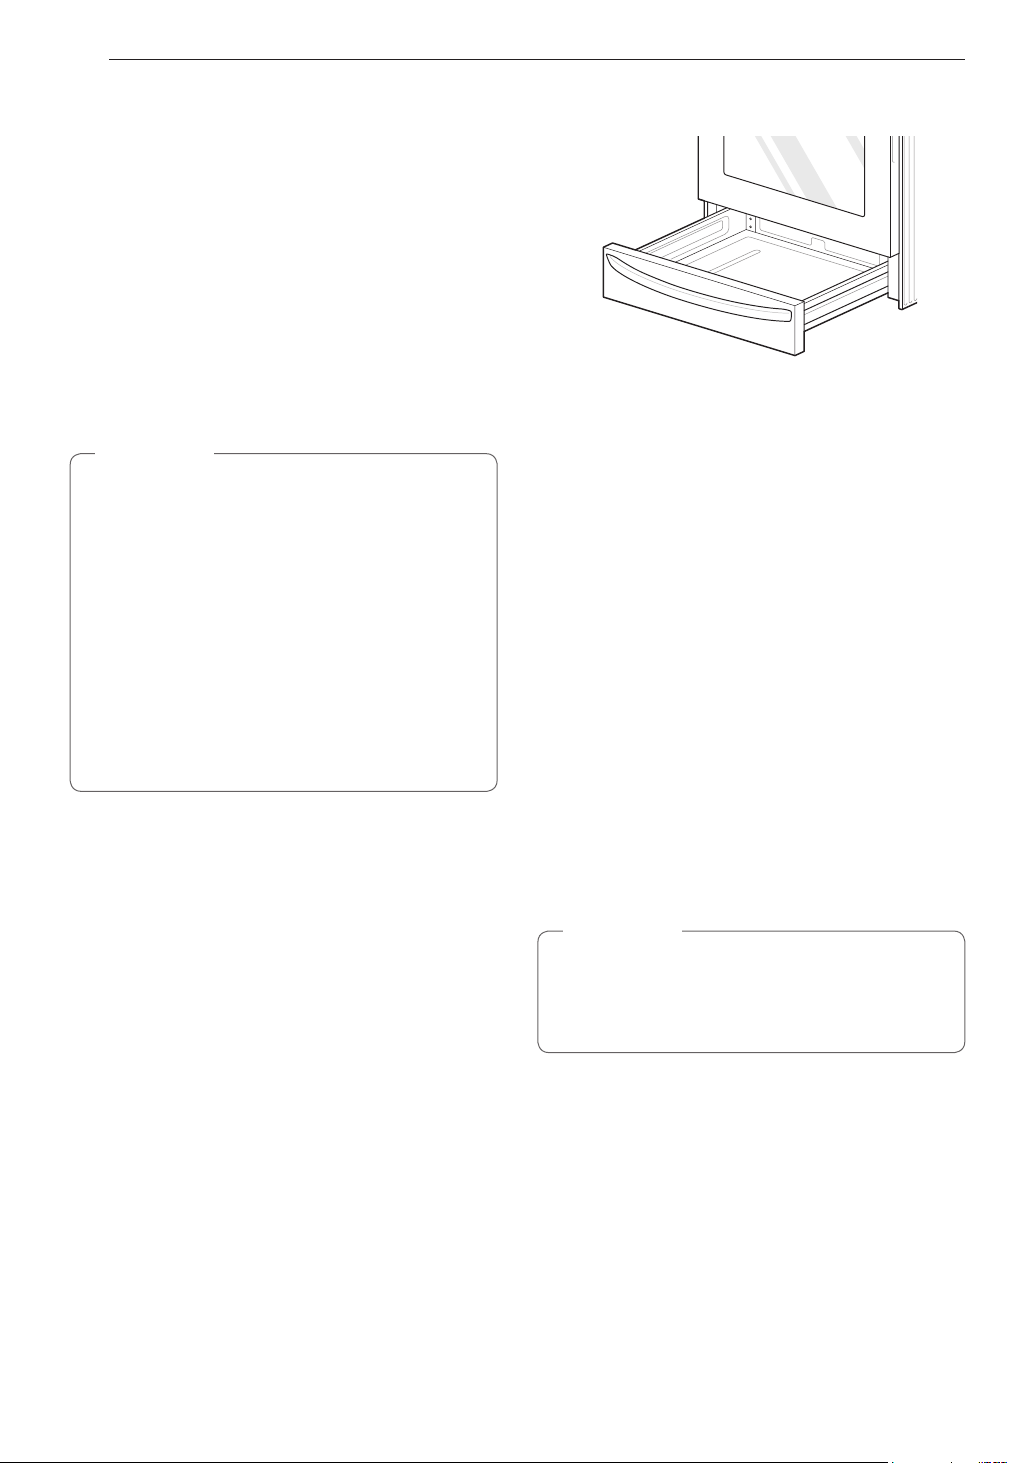
38 FONCTIONNEMENT
Cette fonction garde le four chaud pour faire lever les produits
à base de levain avant la cuisson.
1
Utilisez la position 2 ou 3 de la grille pour le levage du
pain.
2
Appuyez sur jusqu᾿àceques᾿affiche.
3
Appuyez sur .
4
Appuyez sur quand le levage du pain est
terminé.
•
Pour éviter de réduire la température du four et de
prolongerletempsdelevage,n᾿ouvrezpaslaportedu
four sans raison. Ne tardez pas à vérifier les produits
panifiés pour éviter un excès de levage.
•
N᾿utilisezpaslemodedelevagepourréchaufferde
la nourriture ou la garder chaude. La température de
levagedufourn᾿estpassuffisammentchaudepour
garder les aliments à des températures sécuritaires.
Utilisez la fonction Réchaud pour garder les aliments
chauds. Le levage du pain ne fonctionne pas quand la
températuredufourdépasseles125°F.L᾿affichage
indique .
•
Il est normal que le ventilateur fonctionne quand la
fonction Levage du pain est activée.
Le tiroir-réchaud garde les aliments cuits chauds à la
température permettant de les consommer.
Tous les aliments placés dans le tiroir-réchaud doivent
êtrerecouvertsd᾿uncouvercleallantaufouroudepapier
d᾿aluminiumpourmaintenirleurqualité.Neplacezpas
depapierd᾿aluminiumdanslefondousurlescôtésdu
tiroir.N᾿utilisezpasdepelliculedeplastiquepourcouvrirla
nourriture. La pellicule de plastique peut fondre dans le tiroir
et il sera très difficile de le nettoyer. Utilisez uniquement des
ustensiles et des casseroles recommandés pour lutilisation au
four dans le tiroir-réchaud.
1
Appuyez sur . Le voyant
lumineuxclignotera.(Siaucunautreboutonn᾿est
actionnépendant25secondes,l᾿affichagedisparaîtra.)
2
Utilisez les touches numériques pour régler la puissance :
1pourLow(Bas),2pourMedium(Moyen),3pourHigh
(Élevé).
3
Lorsquelanourritureestprête,oupourannuler,appuyez
sur .
•
Letiroir-réchauds᾿éteintautomatiquementaprès
trois heures.
•
Neréchauffezpasd᾿alimentsfroidsdansle
tiroir-réchaud.
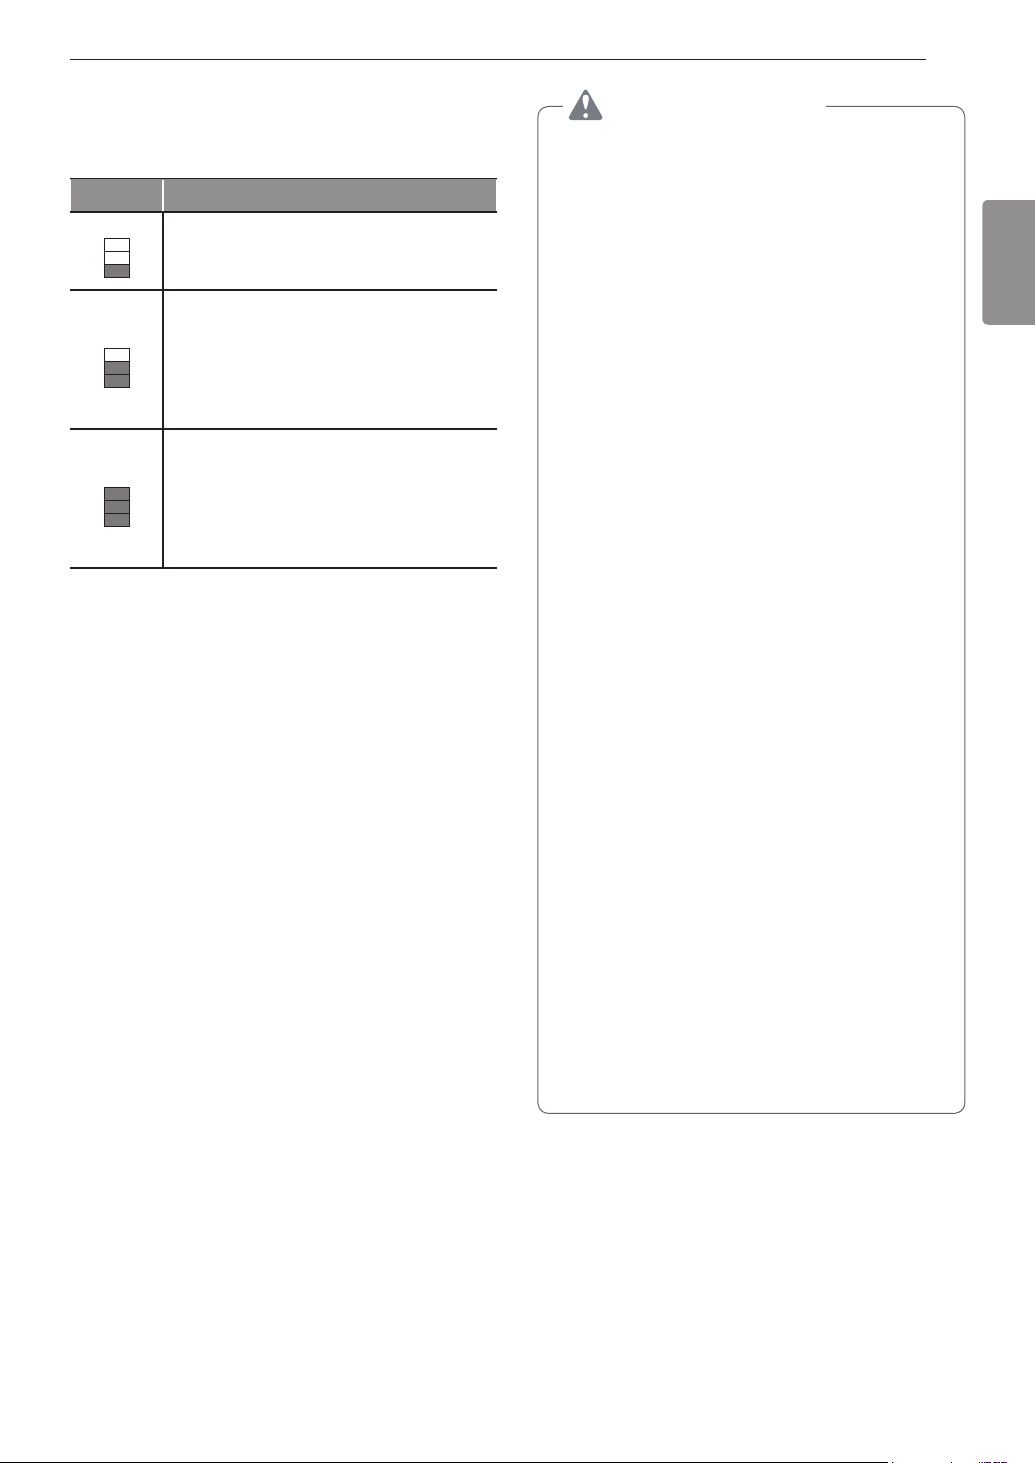
39FONCTIONNEMENT
FRANÇAIS
Bas
•
Rouleaux(souples)
•
Assiettes à dîner vides
Moyen
•
Sauces
•
Plats mijotés
•
Œufs
•
Légumes
•
Biscuits
•
Rouleaux
(rigides)
•
Pâtisseries
•
Rôtis
Élevé
•
Bacon
•
Boulettes de
hamburger
•
Volaille
•
Côtelettes de porc
•
Pizza
•
Aliments frits
Différentstypesd᾿alimentspeuventêtreplacésdansle
tiroir-réchaudenmêmetemps.Pourobtenirdesrésultats
optimaux,nelaissezpasd᾿alimentsdansletiroir-réchaud
pendantplusd᾿uneheure.Nelaissezpasdepetitesquantités
dalimentsoudesalimentssensiblesàlachaleur,parexemple
desœufs,dansletiroir-réchaudplusde30minutes.Ladurée
maximale de fonctionnement est de trois heures.
•
N᾿utilisezpasletiroir-réchaudpourrangerdesgrilles,
deslèchefrites,descantines,desassiettesoudes
ustensiles. Le tiroir-réchaud contient un élément
chauffant qui peut endommager des éléments qui ne
sontpasspécialementconçuspourêtreutilisésavec
celui-cietildoituniquementêtreutilisépourrangerdes
ustensiles de cuisine spécialement fournis par LG avec
la cuisinière.
•
Nemettezpasd᾿alimentsoudepapierd᾿aluminium
directement sur la surface ou la base du tiroir-réchaud.
Cela peut endommager le tiroir et gâcher la nourriture.
•
N᾿utilisezpasdepelliculeenplastiquedansle
tiroir-réchaud ou pour couvrir la nourriture en cours de
réchauffement dans le tiroir-réchaud. Le plastique peut
fondre dans le tiroir ou autour et il sera très difficile de le
retirer.Utilisezseulementdupapierd᾿aluminiumoudes
ustensiles de cuisine qui sont capables de résister à la
chaleur pour réchauffer ou couvrir les aliments.
•
N᾿utilisezpasletiroir-réchaudpourfairebouillirde
l᾿eauoutoutautreliquide.Leséclaboussuresdeliquide
peuvent provoquer un court-circuit électrique ou causer
desblessuresgraves,unedéchargeélectriqueoula
mort.
•
Neplacezjamaisdeplastique,depapier,d᾿alimentsen
conserve ou tout autre matériau combustible dans le
tiroir-réchaud. Ces éléments constituent un risque grave
d᾿incendie,dedommagesoudeblessures.
•
Dans le cas improbable où quelque chose tomberait
derrièreletiroir-réchaud,metteztoujoursl᾿appareilhors
tension et attendez que le tiroir-réchaud refroidisse
avantderécupérerl᾿élément.Netentezjamaisde
récupérer tout élément qui se trouve derrière le
tiroir-réchaudsanséteindred᾿abordl᾿appareiletvous
assurer que la cavité du tiroir-réchaud a refroidi. Le
non-respect de cette consigne peut occasionner des
blessurescorporellesgraves,unedéchargeélectrique
ou la mort.
•
Ne touchez pas la surface du tiroir-réchaud pendant
son fonctionnement. Utilisez des gants de cuisine pour
insérerouretirerdesalimentsafind᾿éviterlesbrûlures
ou dautres blessures.
•
Nelaissezpasd᾿alimentsdansletiroir-réchaudpendant
plusd᾿uneheure.L᾿ingestiondenourritureréchauffée
trop longtemps à température basse peut causer des
maladiesd᾿originealimentaire.

40 FONCTIONS INTELLIGENTES
LafonctionTagOnpermetd᾿utiliserfacilementlesfonctions
LG Smart Diagnosis
MC
,deréglagesdumodedecuissonet
EasyClean
®
,etdecommuniqueravecvotreappareilen
utilisant un téléphone intelligent. Pour utiliser la fonction
Tag On :
1
Téléchargezl᾿applicationLG Smart ThinQ sur un
téléphone intelligent.
2
ActivezlafonctionNFC(NearFieldCommunication)sur
letéléphoneintelligent.LafonctionTagOnn᾿est
compatiblequ᾿aveclestéléphonesintelligentsdotés
de la technologie NFC et fonctionnant avec Android 4.0
(IceCreamSandwich)ouunsystèmed᾿exploitationplus
récent.
1
Affichez le menu du téléphone intelligent
et sélectionnez sous
.
2
Activez et ,etsélectionnez
.
3
Cochez .
•
Leprocessusd᾿activationdelafonctionNFCpeut
différer selon le fabricant du téléphone intelligent et la
versiond᾿Android.Consultezlemanueldutéléphone
intelligent pour en savoir plus.
•
VouspouvezactiverlafonctionTagOnàl᾿aided᾿un
téléphone intelligent Android 4.0 ou supérieur doté de la
fonction NFC.
Il est possible que la fonction NFC ne soit pas offerte
sur certains téléphones intelligents.
Trouvezl᾿icôneTagOnprèsdubouton sur le panneau
decommande.Placezletéléphoneintelligentprèsdel᾿icône
lorsque vous utilisez la fonction Tag On avec les fonctions
LG Smart Diagnosis
MC
,deréglagesdumodedecuissonet
EasyClean
®
del᾿applicationLG Smart ThinQ.
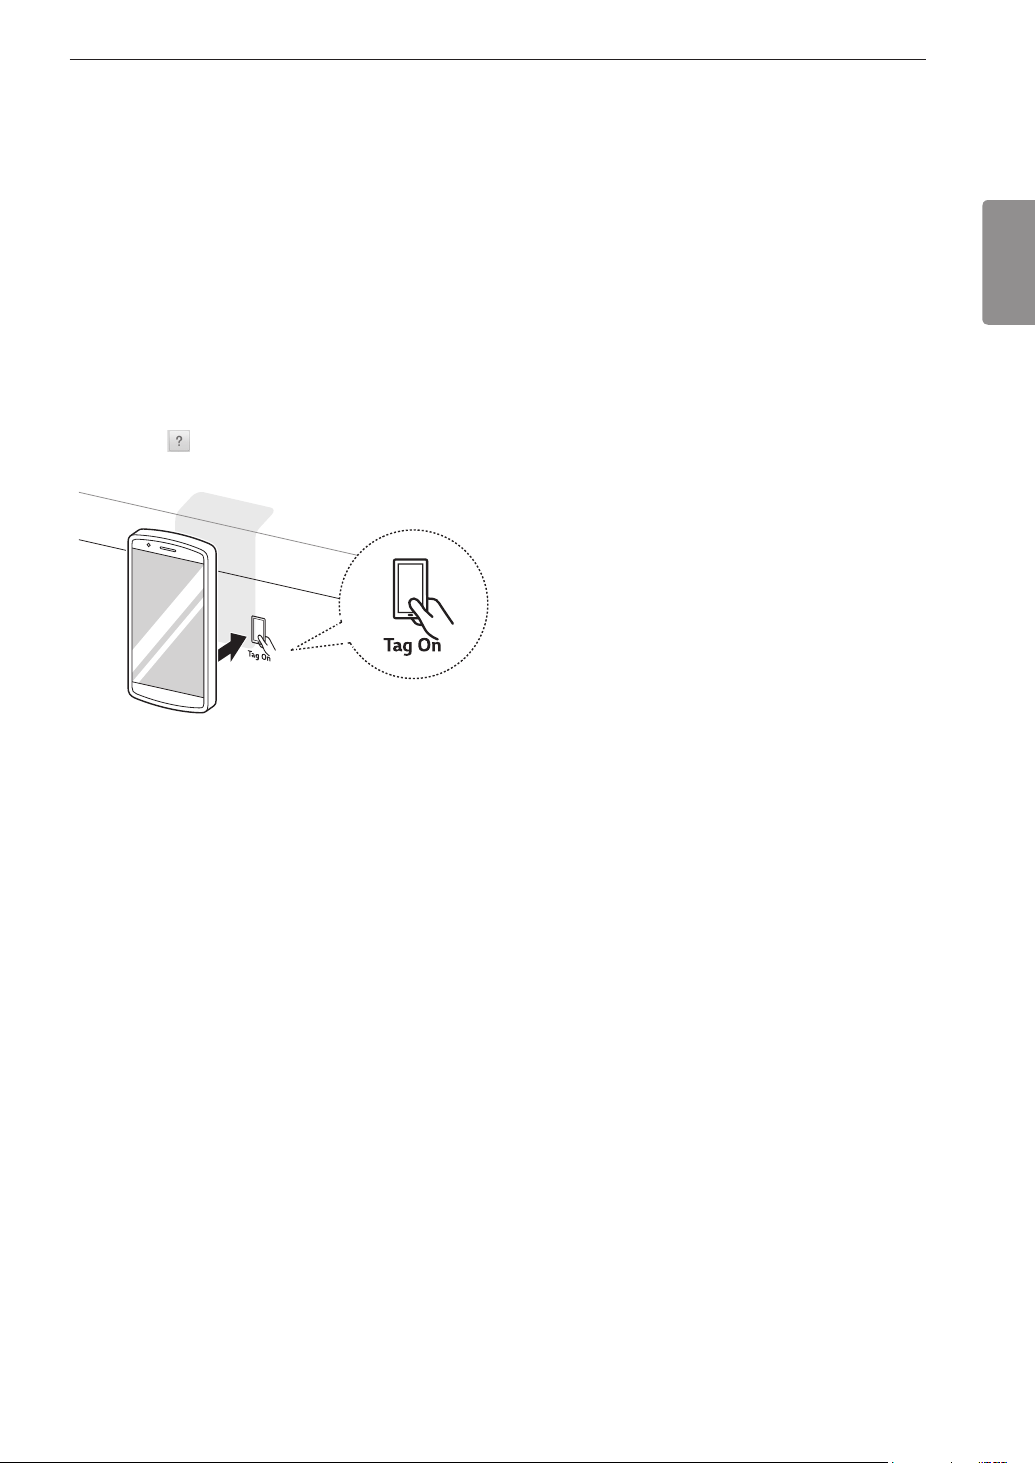
41FONCTIONS INTELLIGENTES
FRANÇAIS
LorsquevousutilisezlafonctionTagOn,placezletéléphone
intelligentdemanièreàcequel᾿antenneNFCintérieure,à
l᾿arrière,soitdanslamêmepositionàcequel᾿icôneTagOn
sur la cuisinière.
Sil᾿applicationneparvientpasàtrouverlabonnecuisinière,
placezlecentredel᾿arrièredutéléphoneintelligentsurl᾿icône
TagOndel᾿électroménager.Silaconnexionnesefaitpas
immédiatement,faitesuntrèslégermouvementcirculaireavec
letéléphoneintelligentenagrandissantlecerclejusqu᾿àce
quel᾿applicationvérifielaconnexion.
ÀcausedescaractéristiquesdelafonctionNFC,siladistance
de transmission est trop longue ou si le boîtier du téléphone
esttropépaisoucomporteuneétiquettemétallique,la
transmission sera mauvaise.
Appuyez sur [
]dansl᾿applicationLG Smart ThinQ afin
d᾿obtenirunguideplusdétaillésurlafonctionTagOn.
TouchezaulogoTagOnd᾿unappareilélectroménagerdeLG
avec un téléphone intelligent doté de la fonction NFC pour
utiliser les fonctions LG Smart Diagnosis
MC
,deréglagesdufour
et EasyClean
®
del᾿applicationLGSmartThinQ.
Permet le diagnostic et le dépannage de votre cuisinière.
®
Permet de programmer des alertes EasyClean
®
,delirele
guided᾿instructionsetdesimulerlaconsommationd᾿énergie
aux fins de comparaison entre EasyClean
®
et le cycle
d᾿autonettoyage.
Permetàl᾿utilisateurdemodifierlesréglagesdufour,y
comprislemodehoraire,levoyantd᾿alarmedepréchauffage,
levolumedel᾿avertisseur,lesunitésdetempérature,la
convection à conversion automatique et le thermostat.
:Descaractéristiquespeuventêtreajoutéesou
suppriméeslorsdesmisesàjourdel᾿applicationLG Smart
ThinQ. Il est possible que les données sauvegardées dans LG
Smart ThinQsoientsuppriméesàlamiseàjourdel᾿application
ou si vous changez de téléphone intelligent.
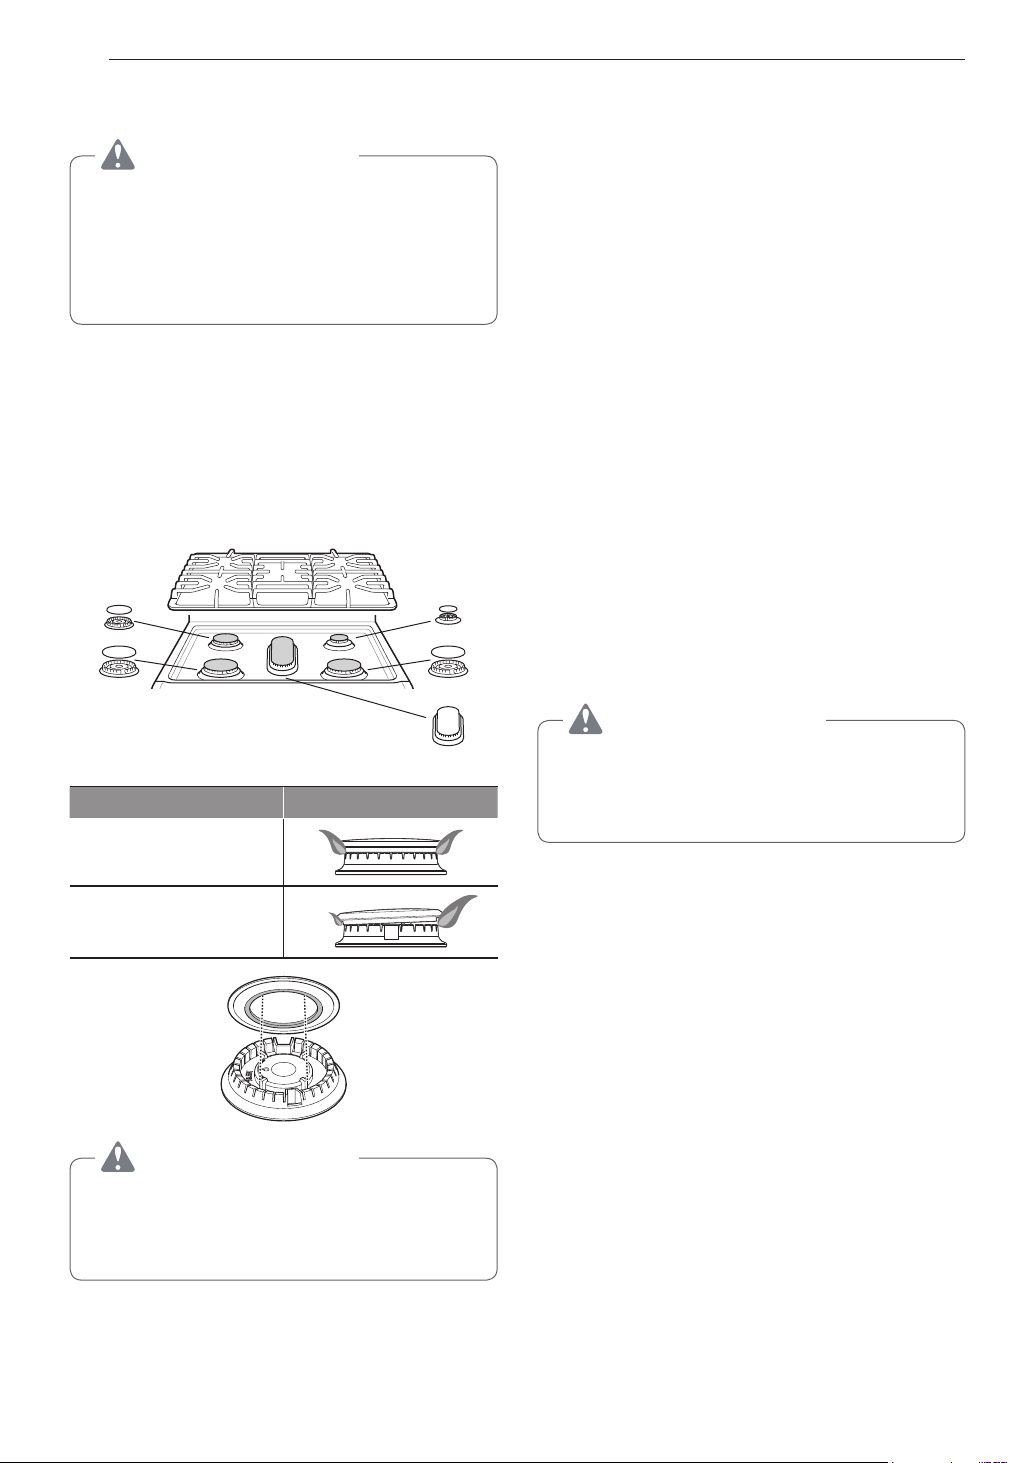
42 ENTRETIEN
•
Ne nettoyez pas cet électroménager avec un produit
javellisant.
•
Pourprévenirlesbrûlures,attendezquelatablede
cuissonaitrefroidiavantd᾿enmanipulerlespièces.
•
Portez toujours des gants pour nettoyer la table de
cuisson.
Lesfoyersainsiquelestêtesetlescapuchonsdesbrûleurs
peuventêtreretiréspourl᾿entretienetlenettoyage.
Le capuchon de brûleur est
correctement installé.
Lecapuchondebrûleurn᾿est
PAS correctement installé.
Assurez-vousquetouslestêtesetlescapuchonsdes
brûleur sont correctement réinstallés. Ils seront stables
et reposeront à plat lorsqu'ils seront correctement
positionnés.
Pourobtenirdesflammesuniformesetlibres,lesfentesdela
têtedubrûleurdoiventêtrepropresentouttemps.Pourretirer
lestêtesetlescapuchonsdesbrûleur(etl᾿assemblagedu
brûleurovale),ilsuffitdelessoulever.Netentezpasderetirer
le capuchon du brûleur ovale.
•
Lavezlescapuchonsdesbrûleursàl᾿eauchaude
savonneuseetrincez-lesàl᾿eauclaire.Faitescoulerde
l᾿eaudanslebrûleurovaleplacétêteenbaspourquel᾿eau,
enpénétrantparlatige,éliminelesrésidus.
•
Faites attention lorsque vous nettoyez la table de cuisson.
Les pointes de métal des électrodes pourraient causer des
blessures.Nefrappezpaslesélectrodesavecunobjetdur,
car cela risquerait de les abîmer.
•
Pourretirerlesdépôtsd᾿alimentsbrûlés,laisseztremper
lestêtesdesbrûleursdansunesolutiond᾿eauchaudeetde
détergent liquide doux pendant 20 ou 30 minutes. Pour les
tachesrebelles,utilisezunebrosseàdentsouunebrosse
métallique.
•
Les brûleurs ne fonctionneront pas correctement si leurs
orifices sont bouchés ou si les électrodes sont encrassées.
•
Lescapuchonsetlestêtesdesbrûleursdoiventêtre
nettoyésrégulièrement,enparticulieraprèsqu᾿une
casserole ait débordé.
•
Lesbrûleursnes᾿allumerontpassileurcapuchonestretiré.
•
Ne frappez pas les électrodes avec un objet dur. Cela
pourrait les endommager.
•
N᾿utilisezpasdelained᾿acieroudepoudresabrasives
pour nettoyer les brûleurs.
Secouez-lespouréliminerl᾿eaurésiduelle,puislaissez-les
séchercomplètement.Placezlebrûleurovaletêteenbas,ce
quipermettraàl᾿eaudes᾿échapperplusfacilement.Remettez
lestêtesetlescapuchonsdesbrûleurssurlesélectrodesdela
tabledecuissonàl᾿emplacementcorrespondantàleurtaille.
Assurez-vousquel᾿ouverturedelatêtedebrûleurestbien
au-dessusdel᾿électrode.
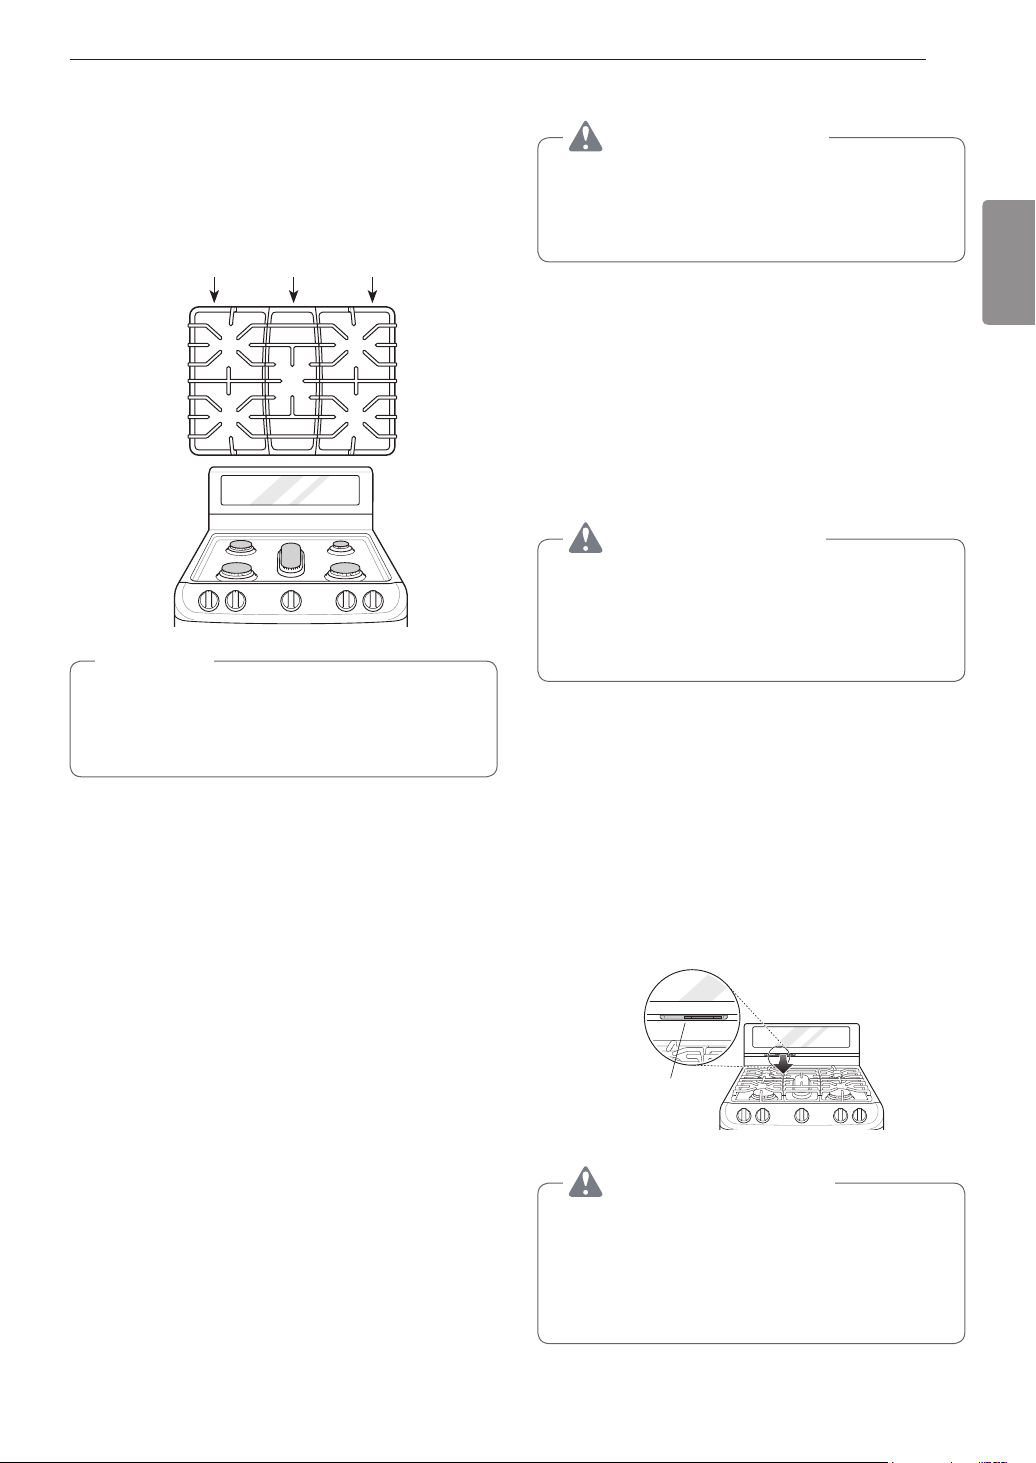
43ENTRETIEN
FRANÇAIS
La cuisinière est composée de trois foyers distincts de type
professionnel.Pourunestabilitémaximale,cesfoyersne
doiventêtreutilisésquelorsqu᾿ilssontplacéscorrectement.
Lesdeuxfoyerslatérauxsontinterchangeables,tantde
gaucheàdroitequedel᾿avantàl᾿arrière.Lefoyercentralpeut
êtrepermuté,soitàl᾿avantouàl᾿arrière.
Foyer latéral Foyer central Foyer latéral
N᾿utilisezpaslebrûleurpendantunepériodeprolongée
sans déposer une casserole sur le foyer. Le fini du foyer
pourraits᾿ébréchersiaucunecasserolen᾿absorbesa
chaleur.
•
Attendez que les foyers aient refroidi avant de les
retirer.
•
Ne placez pas de foyer dans le four pendant que le
moded᾿autonettoyageestactivé.
•
Lesfoyersdoiventêtrenettoyésrégulièrementetchaque
fois que des aliments sont renversés.
•
Lavezlesfoyersàl᾿eauchaudesavonneuseetrincez-lesà
l᾿eauclaire.
•
Les foyers sont lavables au lave-vaisselle.
•
Aprèslenettoyagedesfoyers,laissez-lessécher
complètement et placez-les soigneusement sur les brûleurs.
•
Pouréviterlesbrûlures,nenettoyezlatabledecuisson
quelorsqu᾿ellearefroidi.
•
Ne tentez pas de soulever la table de cuisson.
Cela pourrait causer des dommages et le mauvais
fonctionnement de la cuisinière.
Les aliments très acides ou sucrés risquent de ternir la table de
cuissons᾿ilsnesontpasnettoyésrapidement.Lavezetrincez
latabledecuissondèsqu᾿ellearefroidi.Quantauxautres
taches,tellesleséclaboussuresd᾿huileoudegraisse,elles
doiventêtreenlevéesausavonetàl᾿eaudèsquelatablede
cuissonarefroidi,etêtrerincéesetessuyéesauchiffonsec.
Lesouverturesd᾿aérationsetrouventàl᾿arrièredelatablede
cuisson,auhautetaubasdelaportedufourainsiqu᾿aubas
de la cuisinière.
Évent du four
•
Portez des gants lorsque vous nettoyez la
cuisinière,afind᾿éviterlesblessures.
•
Nettoyezlahotted᾿aspirationfréquemment.Vousne
devezpaslaisserlagraisses᾿accumulersurlahotteou
sur le filtre.
44 ENTRETIEN
Nebloquezpasleséventsetlesouverturesd᾿aérationde
lacuisinière.Ilspermettentunecirculationd᾿airdansles
deuxsens,cequiestnécessaireaubonfonctionnement
de la cuisinière et pour une combustion adéquate.
Pouréviterd᾿activerlepanneaudecontrôlelorsdunettoyage,
débranchez la cuisinière. Nettoyez les éclaboussures avec
un chiffon humide et du produit à vitre. Nettoyez les parties
excessivementsouilléesavecdel᾿eauchaudesavonneuse.
N᾿utilisezaucunproduitabrasif.
avant
Il est recommandé de nettoyer le panneau du collecteur après
chaqueutilisationdelacuisinière.Pourlenettoyage,utilisez
unchiffonhumideetdel᾿eausavonneuseouunesolution
composéed᾿unepartdevinaigrepourunepartd᾿eau(50/50).
Pourlerinçage,utilisezdel᾿eauclaireetfrottezàsecàl᾿aide
d᾿unchiffondouxpourpolirlepanneauetlesboutons.
•
N᾿utilisezpasdeproduitsnettoyantsabrasifs,de
nettoyantsliquidesforts,delainesd᾿acieroudeproduits
nettoyants pour four sur le panneau du collecteur avant.
Cela pourrait endommager le fini.
•
Évitez de déformer les boutons en les tirant vers le haut
ouverslebas,etnelesutilisezpaspoursuspendredes
serviettesoud᾿autresobjets.Celapourraitendommager
la tige du robinet de gaz.
•
Il est possible de retirer les boutons pour en faciliter le
nettoyage.
•
Pournettoyerlesboutons,assurez-vousqu᾿ilssontàla
position et retirez-les des tiges en tirant simplement.
•
Pourreplacerlesboutons,assurez-vousquela
position duboutonestcentréeauhaut,etinsérezle
bouton directement sur la tige.
Pourprévenirleségratignures,n᾿utilisezpasdenettoyants
abrasifs sur ces pièces.
Pourunnettoyagegénéral,utilisezunchiffonavecdel᾿eau
savonneuse chaude. Pour des saletés plus coriaces et une
accumulationdegraisse,appliquezundétergentliquide
directement sur la saleté. Laissez agir le détergent pendant
30 à 60 minutes. Rincez avec un chiffon humide et séchez.
N᾿utilisezpasdesproduitsànettoyerabrasifs.
Pouréviterleségratignures,n᾿utilisezpasdetamponsenlaine
d᾿acier.
1
Placez une petite quantité de détergent ou de produit à
polir pour les appareils en acier inoxydable sur un chiffon
humide ou un papier essuie-tout.
2
Nettoyezunepetitesurface,enfrottantdanslesensdes
fibresdel᾿acierinoxydable,s᾿ilyalieu.
3
Séchez et polissez avec un essuie-tout ou un chiffon
doux propre et sec.
4
Répétez au besoin.
•
N᾿utilisezpasdetamponsenlained᾿acier,carils
égratigneraient les surfaces.
•
Pournettoyerlessurfacesenacierinoxydable,utilisez
del᾿eautièdesavonneuseouencoredudétergentouun
produitàpolirpourl᾿acierinoxydable.
•
Essuyez toujours une surface métallique dans le sens
des fibres du fini.
•
Pourl᾿achatdedétergentoud᾿unproduitàpolirpour
lesappareilsenacierinoxydable,ouencorepour
trouverunfournisseurdansvotrelocalité,appeleznotre
service à la clientèle en composant le numéro sans frais
suivant:1800243-0000(États-Unis),1888542-2623
(Canada),ouvisiteznotresiteWebàl᾿adresse
www.lg.com.
•
Utilisezdel᾿eausavonneusepournettoyerlaportedufour
enprofondeur.Rincezbien.N᾿immergezpaslaportedans
l᾿eau.
•
Vous pouvez utiliser un produit de nettoyage pour vitre sur la
vitre extérieure de la porte du four. Ne vaporisez pas deau
ou un produit de nettoyage pour vitre sur les évents de la
porte.
•
N᾿utilisezpasdesproduitsdenettoyagepourfour,des
poudres de nettoyage ou des matériaux de nettoyage
abrasifssurl᾿extérieurdelaportedufour.
•
Nenettoyezpaslejointd᾿étanchéitédelaportedufour.Ce
joint est fait dunmatériautissé,lequelestessentielpourun
scellementadéquat.Veillezànepasfrotter,endommagerou
enlevercejointd᾿étanchéité.
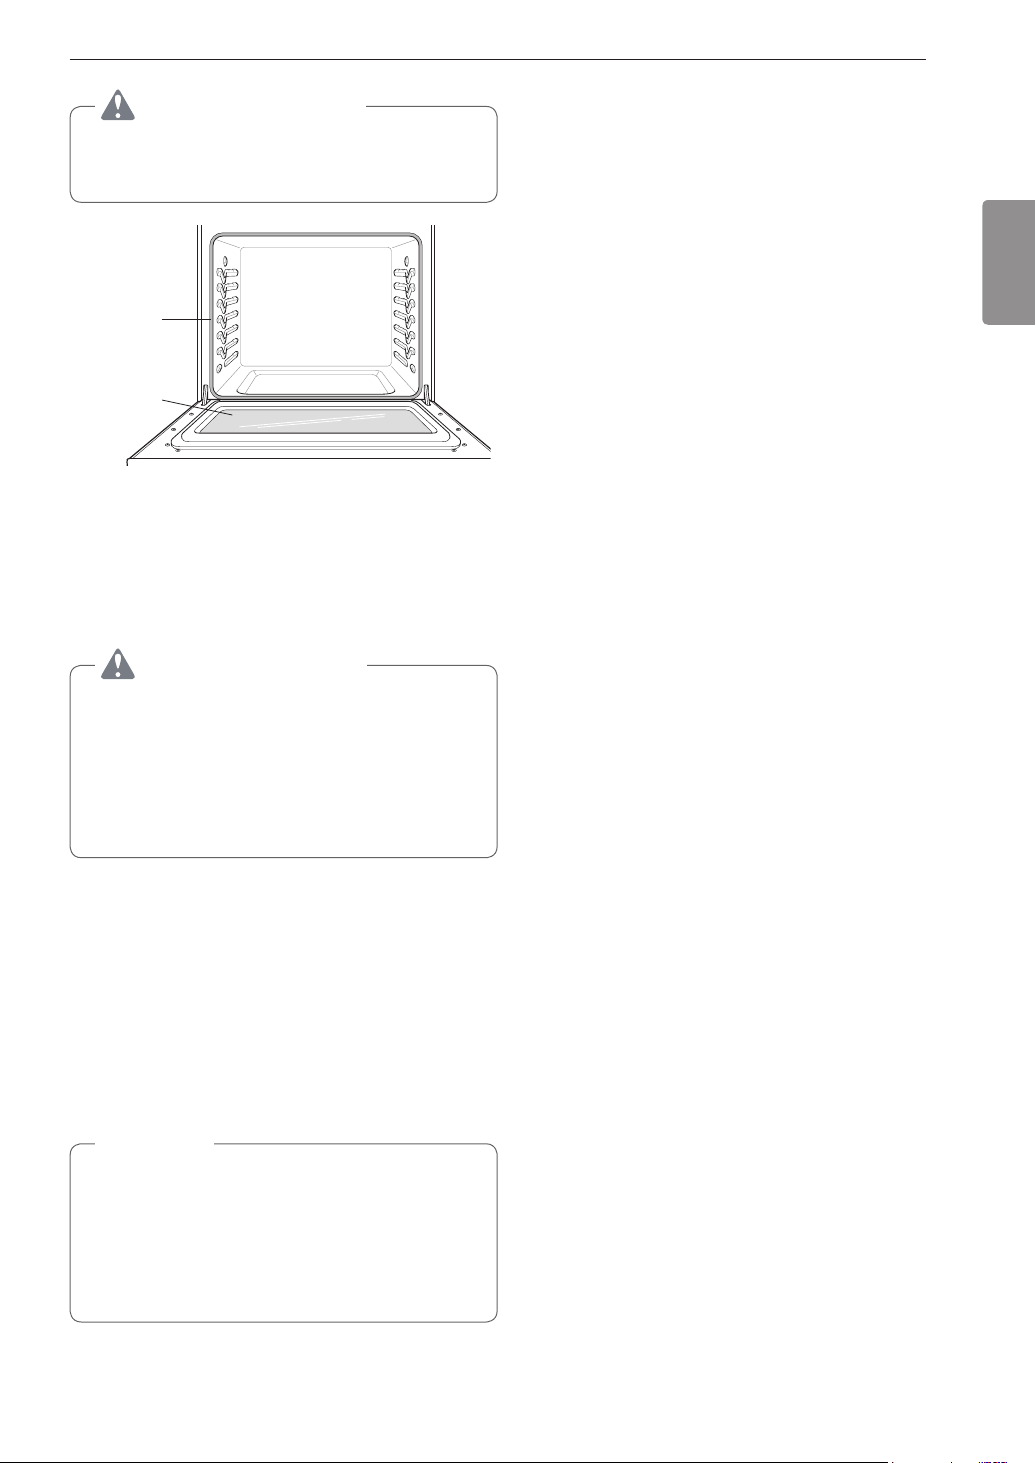
45ENTRETIEN
FRANÇAIS
N᾿utilisezpasdesproduitsdenettoyageagressifsoudes
matériauxdenettoyageabrasifssurl᾿extérieurdelaporte
du four. Ceci pourrait causer des dommages.
ÉVITEZ de
nettoyer
le joint
d᾿étanchéité
de la porte du
four à la main.
Nettoyez la
porte du four
à la main.
La plupart des portes de four contiennent du verre pouvant se
briser.
•
Ne fermez pas la porte du four tant que toutes les grilles
du four ne sont pas en place.
•
Nefrappezpasleverreavecdesmarmites,des
casserolesoud᾿autresobjets.
•
Lefaitd᾿érafler,deheurter,desecoueroudecomprimer
le verre pourrait en affaiblir la structure et augmenter le
risque de bris dans le futur.
Retirez les grilles du four avant de démarrer le cycle
d᾿autonettoyageetEasyClean
®
.
1
Les aliments renversés dans les montants des grilles
pourraient coincer les grilles. Nettoyez tout déversement
avec un produit faiblement abrasif.
2
Rincezlesgrillesetlesmontantsàl᾿eauclaireet
séchez-les.
Si les grilles sont nettoyées pendant le cycle
d᾿autonettoyage(nonrecommandé),lacouleurvirera
légèrement au bleu et le fini deviendra terne. Une fois le
cycled᾿autonettoyageterminéetlefourrefroidi,frottez
les côtés des grilles avec un papier ciré ou un chiffon
contenantunepetitequantitéd᾿huile.Celaaiderales
grilles à glisser plus facilement dans les montants.
®
Latechnologied᾿émailEasyClean
®
de LG permet
deuxméthodesdenettoyagepourl᾿intérieurdelacuisinière.
La fonction EasyClean
®
tire profit du nouvel émail de LG
pourdélogerlessaletéssansproduitschimiquesagressifs;
enseulement10minutes,àl᾿aided᾿EAUUNIQUEMENTetà
bassetempérature,elleaideàdélogerlessaletésLÉGÈRES
avant le nettoyage à la main.
La fonction EasyClean
®
est rapide et efficace pour les saletés
petitesetLÉGÈRES,tandisquelafonctiond᾿autonettoyage
permetd᾿enleverlesGROSSESsaletésincrustées.L᾿intensité
etlachaleurélevéeducycled᾿autonettoyagepeuvent
provoquerdelafuméenécessitantl᾿ouverturedefenêtres
pourl᾿aération.Enplusduprocessusd᾿autonettoyageintense,
LG vous offre une option de nettoyage qui exige MOINS DE
CHALEUR,MOINSDETEMPSetquineproduitpresque
AUCUNE FUMÉE OU ÉMANATION.
Aubesoin,l᾿autonettoyageesttoujoursdisponiblepourun
nettoyage plus long et plus en profondeur des saletés plus
résistantes et incrustées.
®
•
Permet de détacher la saleté légère avant le nettoyage à la
main.
•
EasyClean
®
n᾿utilisequedel᾿eauetnenécessiteaucun
produit chimique.
•
Rendl᾿autonettoyageplusfacile
- retardelanécessitéducycled᾿autonettoyage;
- minimiselafuméeetlesodeurs;
- permetdestempsd᾿autonettoyagepluscourts.
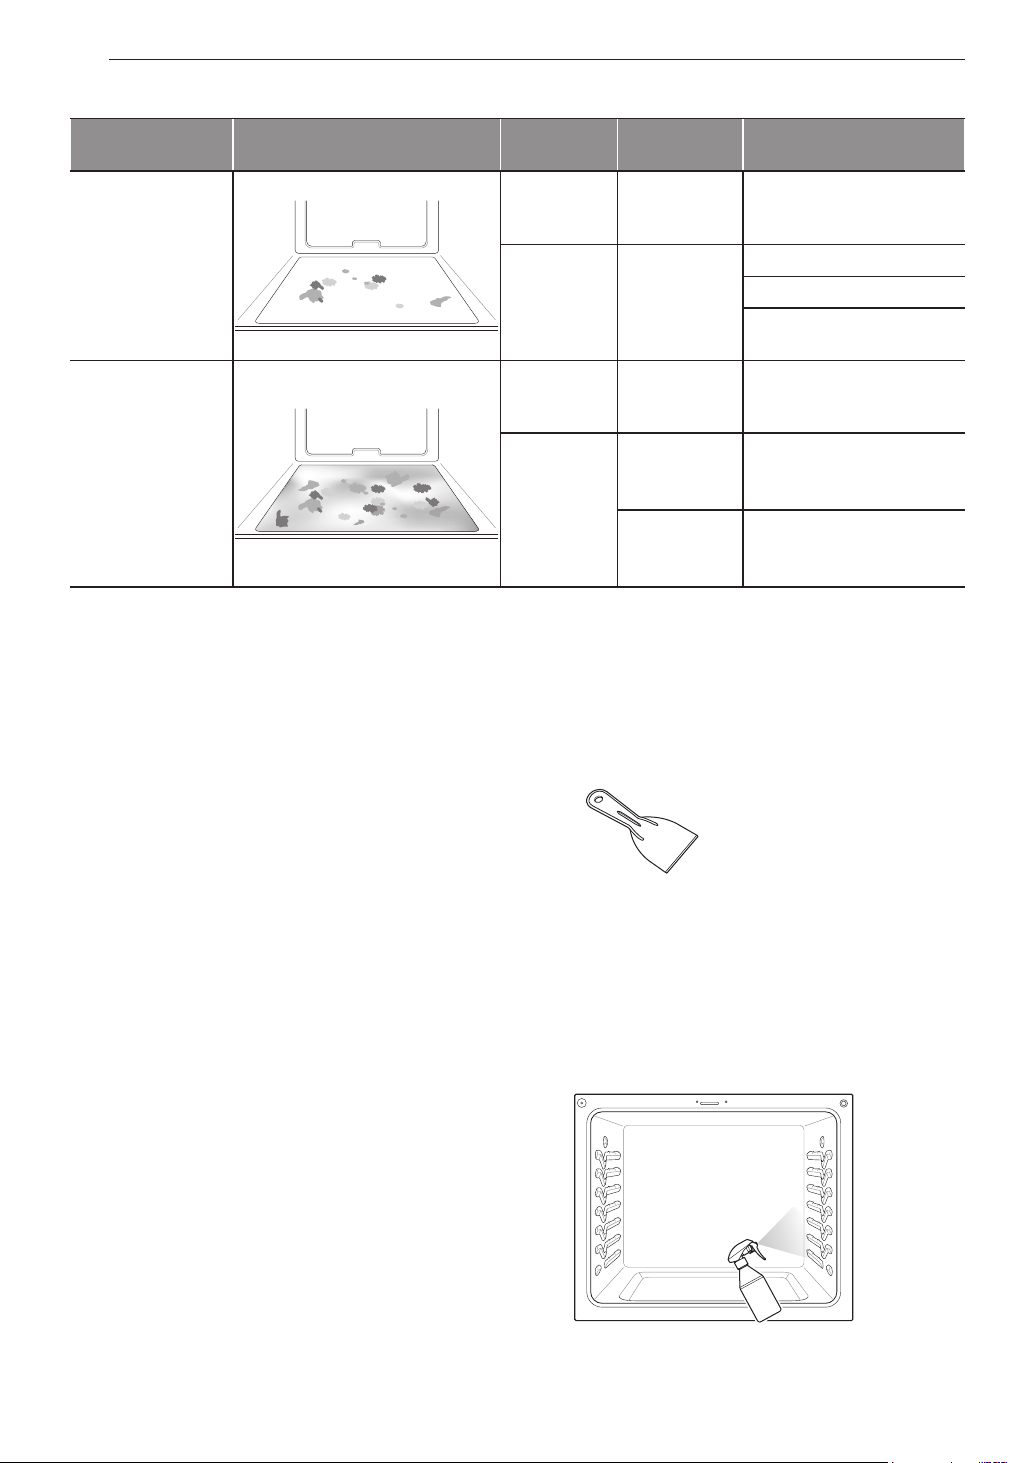
46 ENTRETIEN
®
saleté
®
Petites gouttes
ou taches
Fromage ou
autres
ingrédients
Pizza
Petite
éclaboussure
Matière grasse /
graisse
Steaks,grillés
Poisson,grillé
Viande rôtie à basse
température
Éclaboussure
moyenne ou
importante
Matière grasse /
graisse
Viande rôtie à haute
température
Gouttes ou
taches
Garnitures
ou matières
sucrées
Tartes
Crème ou sauce
tomate
Plats mijotés
*Lautonettoyagepeutêtreutilisépourlasaletéquis᾿accumuleaufildutemps.
•
Laissez le four refroidir à la température de la pièce avant
d᾿utiliserlecycleEasyClean
®
. Le message s᾿afficheet
le cycle EasyClean
®
ne démarre pas tant que la cavité du
fourestpluschaudeque65°C(150°F).
•
Unespatuledeplastiquepeutêtreutiliséecommegrattoir
afin de déloger les morceaux ou les débris avant ou pendant
le nettoyage du four.
•
Utiliserlecôtérugueuxd᾿untamponàrécurerquine
provoque pas de rayures peut aider à mieux enlever les
taches incrustées quavec une éponge ou une serviette.
•
Certaines éponges à récurer qui ne provoquent pas de
rayures,commecellesfabriquéesenmoussedemélamine,
enventeàvotresupermarchélocal,peuventégalement
améliorer le nettoyage.
•
Lacuisinièredoitêtreauniveaupourassurerquelefond
dufourestentièrementrecouvertd᾿eauaudébutducycle
EasyClean
®
.
•
Pourdemeilleursrésultats,utilisezdel᾿eaudistilléeou
filtrée.L᾿eaudurobinetpourraitlaisserdesdépôtsminéraux
sur la paroi inférieure du four.
•
La saleté recuite pendant plusieurs cycles de cuisson sera
plus difficile à enlever au moyen du cycle EasyClean
®
.
•
N᾿ouvrezpaslaportedufourpendantlecycleEasyClean
®
.
L᾿eaunedeviendrapasassezchaudesilaportes᾿ouvre
durant le cycle.
•
Pourlesendroitsdifficilesàatteindre,commel᾿arrière
delasurfacedufour,ilestconseilléd᾿utiliserlecycle
d᾿autonettoyage.
1
Retirez les grilles et les accessoires du four.
2
Grattez et retirez tout débris incrusté avec un grattoir de
plastique.
Grattoirs de plastique suggérés :
•
Une spatule de plastique rigide
•
Unracloiràpoêleenplastique
•
Un grattoir à peinture en
plastique
•
Une vieille carte de crédit
3
Remplissezunvaporisateurd’eau(10ozou300ml)et
pulvérisez abondamment toutes les surfaces intérieures
du four.
4
Utilisez au moins
1
/
5
(2ozou60ml)del’eaudu
vaporisateur pour saturer complètement la saleté sur les
parois latérales et dans les coins.
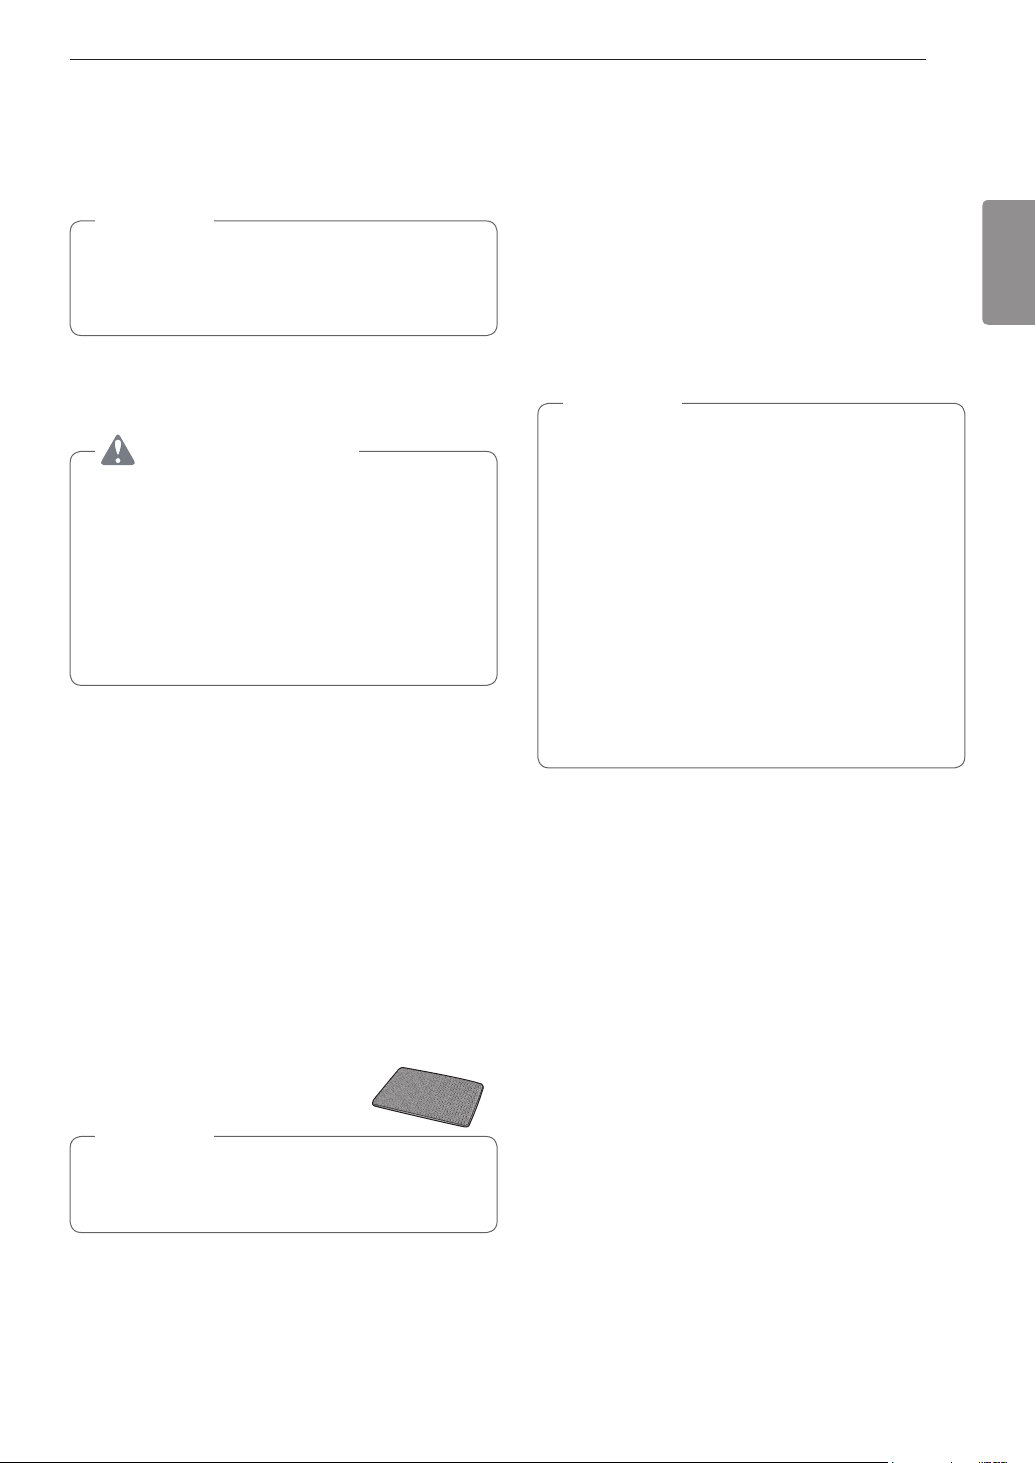
47ENTRETIEN
FRANÇAIS
5
Vaporisez ou versez les
4
/
5
(8ozou240ml)d’eau
restantes dans le centre inférieur de la cavité du four. Les
renfoncements sur la partie inférieure du four devraient
êtreentièrementrecouvertsafind’immergertoutela
saleté. Ajoutez de l’eau au besoin.
Utilisezlamêmequantitéd’eauchaquefoisquevous
nettoyez une cavité de four. Ne vaporisez pas d’eau
directementsurlaporte.Autrement,del’eaucoulerasurle
plancher.
6
Fermez la porte du four.
Appuyez sur la touche
®
.
Appuyez sur .
•
Certainessurfacespeuventêtretrèschaudesaprès
le cycle EasyClean
®
. Portez des gants de caoutchouc
pendantlenettoyageafind᾿éviterlesbrûlures.
•
Pendant le cycle EasyClean
®
,lefourdevientassez
chaud pour causer des brûlures. Attendez la fin du
cycleavantd᾿essuyerlasurfaceinternedufour.Nepas
respecter cette directive pourrait causer des brûlures.
•
Évitez de vous appuyer sur la porte en vitre du four
pendant le nettoyage de celui-ci.
7
Une tonalité se fera entendre à la fin du cycle de
10 minutes. Appuyez sur la touche pour effacer
l᾿affichageetarrêterlatonalité.
8
À la fin du cycle de nettoyage et durant le nettoyage
àlamain,ildevraitresterassezd᾿eaudanslapartie
inférieure du four pour submerger complètement toutes
lessaletés.Ajoutezdel᾿eauaubesoin.Placezune
serviette sur le plancher devant le four pour recueillir
l᾿eauquipourraits᾿écoulerpendantlenettoyageàla
main.
9
Immédiatement après le cycle EasyClean
®
,nettoyezla
cavité du four avec une éponge ou un tampon à récurer
antiégratignuremouillé.(Lecôtérécurantnecauserapas
derayuressurlefini.)Del᾿eaupeuts᾿écoulerdansles
éventsinférieurspendantlenettoyage,maissera
recueillie dans un bac sous la cavité du four et
n᾿endommagerapasl᾿élémentde
cuisson.
N᾿utilisezpasdetamponsàrécurerenmétal,detampons
oudenettoyantsabrasifs,carcesmatériauxpeuvent
endommager de façon permanente la surface du four.
10
Unefoisquelacavitédufourestpropre,essuyez
toutexcèsd᾿eauavecuneserviettesècheetpropre.
Replacez les grilles et les autres accessoires.
11
S᾿ilresteunpeudesaletés,répétezlesétapes
ci-dessus,envousassurantd᾿épongerentièrement
lesrégionssouillées.S᾿ilrestedessaletéstenaces
après plusieurs cycles EasyClean
®
,exécutezlecycle
d᾿autonettoyage.Assurez-vousquelacavitédufour
ne contient pas les grilles et les autres accessoires de
four et que la surface de la cavité du four est sèche
avantdefairedémarrerlecycled᾿autonettoyage.Voir
lasection«Autonettoyage»dumanueld᾿utilisation
pour plus de détails.
•
Sivousavezoubliédesaturerl᾿intérieurdufouravec
del᾿eauavantdedémarrerlecycleEasyClean
®
,
appuyez sur le bouton afind᾿arrêterlecycle.
Attendez que la cuisinière refroidisse à la température
delapièce,vaporisezouversezdel᾿eaudanslefour,
et démarrez un autre cycle EasyClean
®
.
•
Lejointdelacavitédufourpeutêtremouilléàlafindu
cycle EasyClean
®
. Cela est normal. Ne nettoyez pas le
joint.
•
Si des dépôts minéraux demeurent sur la paroi
inférieuredufouraprèslenettoyage,utilisezunlingeou
une éponge mouillée dans le vinaigre afin de retirer les
dépôts.
•
Il est normal que le ventilateur fonctionne pendant le
cycle EasyClean
®
.
48 ENTRETIEN
LecycleAutonettoyageutilisedestempératuresextrêmement
chaudes pour nettoyer la cavité du four. Lorsque le cycle
Autonettoyageestenfonction,vouspourriezremarquerdela
fuméeouuneodeur.Ceciestnormal,notammentsilefourest
très sale.
DurantlecycleAutonettoyage,lacuisinedoitdoncêtrebien
aérée.
•
Enlevezlesgrillesdufour,lalèchefrite,lagrilledugrilloir,
touslesustensilesdecuisine,lepapierd᾿aluminiumoutout
autre matériel du four.
•
Lacuisinedoitêtrebienventiléepourminimiserlesodeurs
émanantdel᾿autonettoyage.
•
Essuyez tout déversement important dans le fond du four.
•
Assurez-vousquelecouvercledel᾿ampouleélectriquedu
four est en place et que la lampe du four est éteinte.
•
Lalampedufournedoitpasêtrealluméependantlecycle
Autonettoyage.Lalampedufournedoitpasêtreallumée
tantquelatempératuren᾿estpasinférieureà260°C(500°F)
après le cycle Autonettoyage.
•
Ne laissez pas les jeunes enfants sans surveillance
àproximitédufour.DurantlecycleAutonettoyage,
l᾿extérieurdelacuisinièrepeutdevenirtrèschaud.
•
Sivousavezdesoiseaux,déplacez-lesdansuneautre
pièce bien aérée. La santé de certains oiseaux est
extrêmementsensibleauxfuméesquisedégagent
durant le cycle Autonettoyage de toute cuisinière.
•
Necouvrezpaslesparois,lesgrilles,lefondoutoute
autrepartiedelacuisinièreavecdupapierd᾿aluminium
ou tout autre matériau. Ceci pourrait perturber la
distributiondechaleur,produiredemauvaisrésultats
de cuisson et causer des dommages permanents à
l᾿intérieurdufour(lepapierd᾿aluminiumfondrasurla
surfaceintérieuredufour).
•
Ne forcez pas la porte à rester ouverte. Ceci peut
endommager le système de verrouillage automatique
de la porte. Soyez prudent lorsque vous ouvrez la porte
du four après le cycle Autonettoyage. Tenez-vous sur le
côté du four lorsque vous ouvrez la porte pour laisser
l᾿airchaudoulavapeurs᾿échapper.Lefourpourrait
êtreencoreTRÈSCHAUD.
DurantlecycleAutonettoyage,lesélémentsdelatablede
cuissonetletiroir-réchaudnepeuventpasêtreutilisés.
•
Enlevez les grilles et les accessoires avant de démarrer
le cycle Autonettoyage.
•
Si les grilles sont laissées dans la cavité du four durant
lecycleAutonettoyage,ellesvontsedécoloreretseront
plus difficiles à enlever et à replacer.
•
Nettoyezlecadredufouretlaporteavecdel᾿eau
savonneuse. Rincez bien.
•
Nenettoyezpaslejointd᾿étanchéité.Lematériaude
fibredeverresurlejointd᾿étanchéitédelaportene
résistepasàl᾿abrasion.Ilestessentielquelejoint
d᾿étanchéitédemeureintact.Sivousremarquezqu᾿il
devientuséoueffiloché,remplacez-le.
•
Essuyez tout déversement important dans le fond du
four.
•
Assurez-vousquelecouvercledel᾿ampouleélectrique
du four est en place et que la lampe du four est éteinte.
•
Il est normal que le ventilateur fonctionne pendant le
cycle Autonettoyage.
LafonctionAutonettoyageoffredestempsdecyclede2,3ou
5 heures.
saleté
Niveau de saleté
Cavité du four légèrement sale 2 heures
Cavité du four moyennement sale 3 heures
Cavité du four très sale 5 heures
1
Enlevez toutes les grilles et les accessoires du four.
2
Appuyez sur . Le four est réglé par défaut au
cycled᾿autonettoyagedetroisheures,recommandépour
un four modérément sale. Appuyez deux fois pour un
cycled᾿autonettoyagedecinqheuresoutroisfoispour
un cycle de deux heures.
3
Appuyez sur .
4
UnefoislafonctionAutonettoyageactivée,laportedu
fourseverrouilleautomatiquementetl᾿icônedecadenas
s᾿affiche.Vousnepourrezpasouvrirlaportedufour
jusqu᾿àcequelefouraitrefroidi.Leverrousedébloque
automatiquement une fois le four refroidi.
49ENTRETIEN
FRANÇAIS
Ne forcez pas la porte du four à rester ouverte lorsque
l᾿icônedecadenasestaffichée.Laportedufourrestera
verrouilléejusqu᾿àcequelatempératureaitdiminué.
Forcer la porte à rester ouverte endommagera la porte.
1
Enlevez toutes les grilles et les accessoires du four.
2
Appuyez sur . Le four est réglé par défaut au
cycled᾿autonettoyagedetroisheures,recommandépour
un four modérément sale. Appuyez deux fois pour un
cycled᾿autonettoyagedecinqheuresoutroisfoispour
un cycle de deux heures.
3
Appuyez sur .
4
Utilisezlestouchesnumériquespourentrerl᾿heureà
laquellevousaimeriezquel᾿autonettoyagecommence.
5
Appuyez sur .
Ilpourraitêtrenécessaired᾿annuleroud᾿interromprele
cycled᾿autonettoyageenraisond᾿unefuméeexcessive
oud᾿unfeuquiseproduitdanslefour.Pourannulerla
fonctionAutonettoyage,appuyezsur.
•
Le cycle Autonettoyage utilise des températures
extrêmementchaudespournettoyerlacavitédufour.
LorsquelecycleAutonettoyageestenfonction,vous
pourriez remarquer de la fumée ou une odeur. Ceci est
normal,notammentsilefouresttrèssale.
•
Aufuretàmesurequelefourchauffe,vouspourriez
entendredesbruitsdepiècesmétalliquesquis᾿étirentetse
contractent.Ceciestnormaletn᾿endommagerapasvotre
four.
•
Ne forcez pas la porte du four à rester ouverte lorsque
l᾿icône
de cadenas est affichée. La porte du four restera
verrouilléejusqu᾿àcequelatempératureaitdiminué.Forcer
la porte à rester ouverte endommagera la porte.
•
Laportedufourresteraverrouilléejusqu᾿àcequela
température ait diminué.
•
Vous pourriez voir des cendres de couleur blanche dans
le four. Essuyez-les avec un chiffon humide ou une laine
d᾿acierimbibéedesavonunefoisquelefourarefroidi.Si
lefourn᾿estpaspropreaprèsuncycled᾿autonettoyage,
répétez le cycle.
•
Si les grilles ont été laissées dans le four et ne glissent pas
facilementaprèsuncycled᾿autonettoyage,enduisezlebord
desgrillesetleurssupportsd᾿unmincefilmd᾿huilevégétale.
•
Deslignesfinespourraientapparaîtredanslaporcelaine,
car celle-ci est passée à travers un cycle de chaleur et
derefroidissement.Ceciestnormaletn᾿affecterapasla
performance de votre four.
•
Le cycle Autonettoyage ne peut pas démarrer si la
fonction de verrouillage est activée.
•
UnefoislafonctionAutonettoyageactivée,laportedu
four se verrouille automatiquement. Vous ne pourrez
pasouvrirlaportedufourjusqu᾿àcequelefourait
refroidi. Le verrou se débloque automatiquement.
•
Unefoislaporteverrouillée,levoyantlumineuxdu
cadenas
arrêtedeclignoteretresteallumé.Ilfaut
attendre environ 15 secondes pour que le verrou de la
portedufours᾿enclenche.
•
Sil᾿affichagedel᾿horlogeestenmode12heures
(réglagepardéfaut),l᾿autonettoyagedifférénepeutpas
êtreréglépourdémarrerplusde12heuresenavance.
•
Unefoislefouréteint,leventilateuràconvection
continue de fonctionner jusqu’au refroidissement du
four.
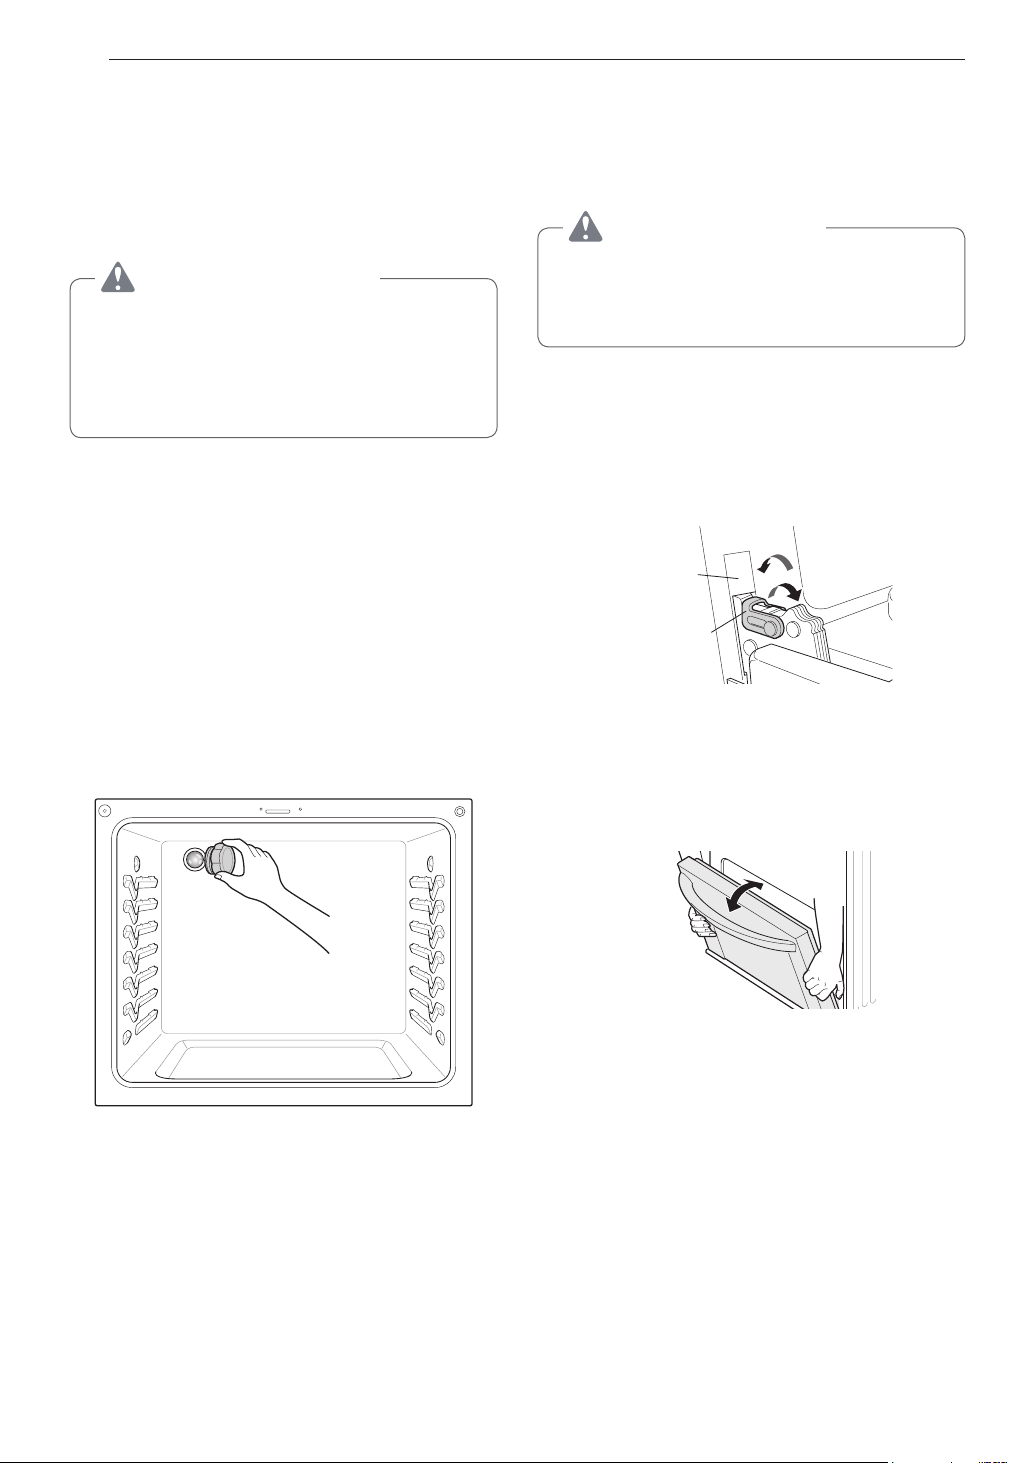
50 ENTRETIEN
Lalampedufourestuneampoulede40wattsstandard.Elle
s᾿allumelorsqu᾿onouvrelaportedufour.Pourl᾿allumerou
l᾿éteindrelorsquelaportedufourestfermée,appuyezsurle
bouton .
•
Assurez-vousquelefouretl᾿ampouleontrefroidi.
•
Déconnectez le courant électrique de la cuisinière
à partir du fusible principal ou du panneau des
disjoncteurs. Le non-respect de cette consigne peut
occasionnerdesblessurescorporellesgraves,lamort
ou un choc électrique.
1
Débranchez la cuisinière ou coupez le courant électrique.
2
Tournezlecouvercledel᾿ampouleenverresituéà
l᾿arrièredufourdanslesensantihorairepourleretirer.
3
Tournezl᾿ampouledanslesensantihorairepourl᾿enlever
de la douille.
4
Insérez la nouvelle ampoule et tournez-la dans le sens
horaire.
5
Insérezlecouvercledel᾿ampouleenverreettournez-le
dans le sens horaire.
6
Branchez la cuisinière ou rebranchez le courant
électrique.
•
•
La porte est
très lourde.
1
Ouvrez complètement la porte.
2
Dégagez les verrous de charnière en les faisant pivoter
jusqu᾿àcequ᾿ilss᾿appuientsurlecadre.
Fente
Verrouiller
Déverrouiller
Verrou de
charnière
3
Saisissez fermement les deux côtés de la porte par le
haut.
4
Placezlaporteenpositionderetrait(ferméeà5degrés
environ),soitàmi-cheminentrel᾿interruptiondugril
etlafermeture.Silapositionestcorrecte,lesbrasde
charnière bougent librement.
environ 5°
5
Soulevezlaporteverslehautetl᾿extérieurjusqu᾿àce
que les bras de charnière soient complètement sortis des
fentes.
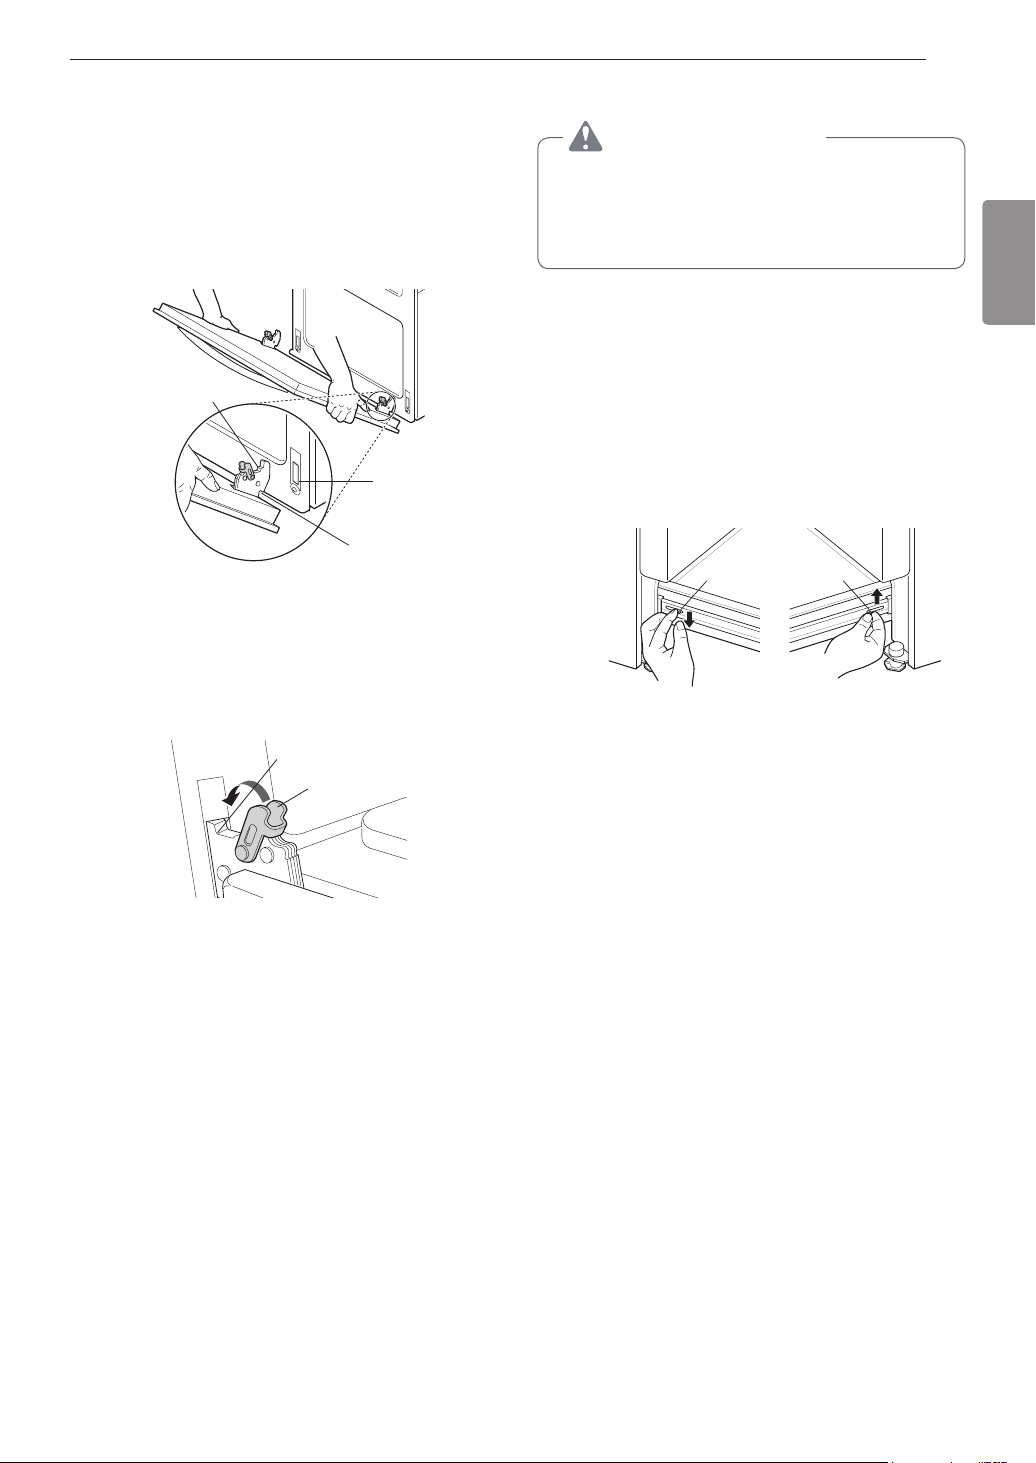
51ENTRETIEN
FRANÇAIS
1
Saisissez fermement les deux côtés de la porte par le
haut.
2
Quandlaporteestaumêmeanglequelorsquevous
lavezenlevée,placezlecrandesbrasdecharnièresur
le bord inférieur des fentes de charnière. Le cran des
bras de charnière doit bien reposer sur le bord inférieur
des fentes.
Bras de
charnière
Cran
Bord inférieur
de la fente
3
Ouvrezcomplètementlaporte.Silaportenes᾿ouvrepas
complètement,c᾿estquelecrann᾿estpasbienplacésur
le bord inférieur des fentes.
4
Enclenchez les verrous de charnière en les faisant
pivoterenarrièreverslesfentesducadredufourjusqu᾿à
cequ᾿ilssoientengagés.
Bras de charnière
Verrou de charnière
5
Fermez la porte du four.
Déconnectez le courant électrique de la cuisinière à partir
du fusible principal ou du panneau des disjoncteurs.
Le non-respect de cette consigne peut occasionner
desblessurescorporellesgraves,lamortouunchoc
électrique.
Laplupartdesopérationsdenettoyagepeuventêtreeffectuées
lorsqueletiroirestenplace;toutefois,letiroirpeutêtreretirési
un nettoyage plus en profondeur est nécessaire. Servez-vous
d᾿eauchaudepournettoyeràfond.
1
Ouvrez complètement le tiroir.
2
Repérez les leviers de glissement de chaque côté du
tiroir. Poussez vers le bas le levier de glissement de
gauche,ettirezverslehautlelevierdeglissementde
droite.
Levier
Poussez vers le bas
avec un doigt
Tirez vers le haut avec
un doigt
Levier
3
Enlevez le tiroir.
1
Tirez sur les roulements à billes pour les amener à
l᾿avantdesglissièresduchâssis.
2
Alignez les glissières de chaque côté du tiroir avec les
fentes sur la cuisinière.
3
Poussezletiroirdanslacuisinièrejusqu᾿àcequeles
leviersfassententendreunclic(environ2pouces).
4
Ouvrez encore une fois le tiroir pour que les roulements
à billes soient en position.

52 DÉPANNAGE
•
Les casseroles doivent avoir un fond plat et des côtés droits.
•
Utilisez seulement des casseroles très épaisses.
•
La grandeur de la casserole doit correspondre à la quantité
denourritureàêtrepréparéeetàlagrandeurdel᾿élément
de la table de cuisson.
•
Utilisez des couvercles hermétiques.
•
Utilisezdeswoksàfondplatseulement.
Selonleréglagedel᾿élémentdecuissondelatabledecuisson
oulatempératuresélectionnéepourlefour,ilestNORMAL
que les éléments de cuisson fonctionnent par intermittence.
Non,votrefouraététestéenusineetcalibré.Lespremières
foisquevousutilisezvotreappareil,suivezlestempsetles
températures de vos recettes avec attention. Si vous croyez
toujoursquevotrenouveaufouresttropchaudouqu᾿iln᾿est
pasassezchaud,vouspouvezajusterlatempératureselonvos
besoins. Consultez la section « Ajustement de la température
du four » de ce manuel pour obtenir des instructions faciles sur
le réglage du thermostat.
Votre nouvelle cuisinière assure un contrôle plus strict de la
température du four. Votre nouvelle cuisinière émet un clic plus
fréquemmentaurythmedel᾿intermittencedesélémentsde
cuisson du four. Cela est NORMAL.
Cecisignifiequeleproduitvientd᾿êtrebranchéouqu᾿ilyaeu
unepannedecourant.Afind᾿arrêterleclignotement,appuyez
surn᾿importequelletoucheetréglezl᾿heure,aubesoin.
Cela est tout à fait normal. Le ventilateur se remettra en
marche dès que la porte sera refermée.
N᾿utilisezjamaisdepapierd᾿aluminiumpourprotégerlefond
oulescôtésdufouroudutiroir-réchaud.L᾿aluminiumva
fondre et coller à la surface inférieure du four et il ne sera plus
possibledel᾿enlever.Placezplutôtuneplaqueàpâtisseriesur
unegrilleinférieuredufourpourrecueillirleségouttements.(Si
l᾿aluminiumadéjàfondudanslefonddufour,celan᾿aurapas
d᾿incidencesurlaperformancedufour.)
Necouvrezpaslesgrillesdepapierd᾿aluminium.Cela
bloqueralacirculationdel᾿air,entraînantunemauvaisecuisson
des aliments. Placez une plaque à pâtisserie recouverte de
papierd᾿aluminiumsouslestartesauxfruitsoulesautres
alimentscontenantbeaucoupd᾿acideoudesucrepournepas
endommager le fini du four avec les déversements.
Dupapierd᾿aluminiumpeutêtreutilisépourenvelopper
lesalimentsdanslefourouletiroir-réchaud,maisilne
doit pas entrer en contact avec les éléments chauffants ou
degrillageexposésdanslefour.Lepapierd᾿aluminium
peutfondreous᾿enflammer,provoquantdelafumée,un
incendie,ouencoredesblessures.
Non.Lesgrillesneseraientpasendommagées,maiselles
pourraient se décolorer et devenir plus difficiles à enlever et à
replacer. Enlevez tout ce qui se trouve dans le four avant de
lancer le cycle Autonettoyage.
Avecletemps,lesgrillespourraientdevenirdifficilesàglisserà
l᾿intérieurethorsdufour.Appliquezunepetitequantitéd᾿huile
d᾿olivesurlesextrémitésdesgrilles.Celafonctionneracomme
un lubrifiant pour faciliter le glissement.
Latabledecuissondoitêtrenettoyéeaprèschaqueutilisation
pour prévenir un maculage permanent. Lorsque vous faites
cuiredesalimentsàforteteneurensucre,commedela
saucetomate,ilestrecommandédenettoyerlestachesavec
un grattoir alors que la table de cuisson est encore chaude.
Utilisez des gants de cuisine pour éviter de vous brûler en
maniant le grattoir. Reportez-vous à la section « Entretien » de
ce manuel du propriétaire pour des instructions plus détaillées.

53DÉPANNAGE
FRANÇAIS
Assurez-vousquelacuisinièren᾿estpasenmodeVerrouillage.
On voit le symbole de cadenas
surl᾿écransileverrouillage
estactivé.Pourdésactiverleverrouillagedufour,maintenezle
bouton enfoncé pendant trois secondes. La mélodie
de déverrouillage se fait entendre et le message s᾿affiche
jusqu᾿àcequelescommandessoientdébloquées.
®
Le cycle EasyClean
®
soulève simplement la saleté légère
de votre four pour en faciliter le nettoyage à la main. Il ne
retire pas automatiquement toute la saleté après le cycle.
Vous devrez frotter la cuisinière après avoir utilisé le cycle
EasyClean
®
.
®
Le cycle EasyClean
®
fonctionne mieux lorsque les saletés
sontimbibéesd᾿eauetsubmergéesavantlelancementdu
cycleetpendantlenettoyageàlamain.Silasaletén᾿est
passuffisammenttrempéedansl᾿eau,celapeutaffecter
négativement la performance de nettoyage. Répétez le
processus EasyClean
®
enutilisantsuffisammentd᾿eau.
Certaines saletés à base de sucre et certaines graisses
sont très difficiles à nettoyer. Si certaines saletés tenaces
demeurent,utilisezl᾿optionAutonettoyagepourfinirdenettoyer
votre four.
Les saletés sur les parois du fond et des côtés de votre four
peuventêtreplusdifficilesàtremperdansl᾿eau.Essayezde
répéter le processus EasyClean
®
en vaporisant plus que le
quartdetassed᾿eau(2ozou60ml)recommandé.
®
Cela dépend du type de saletés. Certaines taches à base de
sucre et certaines graisses sont très difficiles à nettoyer. De
plus,silestachesnesontpassuffisammentimprégnéesdeau,
cela peut affecter négativement le rendement du nettoyage. Si
certainestachestenacesouaccumuléesdemeurent,utilisez
l᾿optionAutonettoyage.Pourplusdedétails,consultezla
section « Autonettoyage » de ce manuel.
Il est conseillé de gratter les saletés avec un grattoir
de plastique avant et pendant le nettoyage à la main.
Saturerentièrementlasaletéavecdel᾿eauestégalement
recommandé.Parcontre,certainstypesdesaletéssontplus
difficilesànettoyerqued᾿autres.Pourcessaletéstenaces,la
fonctionAutonettoyageestrecommandée.Pourplusdedétails,
consultez la section « Autonettoyage » de ce manuel.
®
;
Oui.Leventilateurdeconvection,l᾿élémentchauffantou
lebrûleurdugrilpeuventêtreunpeumouillésaucoursdu
nettoyage.Parcontre,unjetdirectsurlebrûleurdugriletles
élémentschauffantsn᾿estpasnécessaire,carilssenettoient
automatiquementaucoursdel᾿utilisationnormale.
®
Oui. Il est fortement recommandé de pulvériser ou de verser
unetassed᾿eau(8ozou240ml)surlefonddufouretd᾿en
vaporiserunquartdetasse(2ozou60ml)surlesparoisetles
autres surfaces sales afin de saturer les saletés pour obtenir
une efficacité de nettoyage supérieure.
®
Celaestnormal.Cen᾿estpasdelafumée.Cesontdes
vapeursd᾿eauprovenantdel᾿eaudanslacavitédufour.
Étant donné que le four chauffe brièvement pendant le cycle
EasyClean
®
,l᾿eaudanslacavités᾿évaporeets᾿échappepar
les évents du four.
®
Le cycle EasyClean
®
peutêtreeffectuéaussisouventque
vous le désirez. Le cycle EasyClean
®
fonctionne mieux lorsque
lefourestLÉGÈREMENTsouilléd᾿éclaboussuresLÉGÈRES
degraisseetdepetitesgouttesdefromage,parexemple.
Veuillez consulter la section « EasyClean
®
» de votre manuel
pourplusd᾿information.
®
Unflaconpulvérisateurcontenant1¼tassed᾿eau
(10ozou300ml),ungrattoirenplastique,untamponàrécurer
antirayure et une serviette. Vous ne devriez pas utiliser de
récureur abrasif comme les tampons à récurer robustes ou la
lained᾿acier.Saufuneserviette,toutcedontvousavezbesoin
fait partie de la trousse de nettoyage comprise avec votre
nouveau four.
Ilestsécuritairequedel᾿eauserépandedanslesévents
inférieursdufour.Ilestcependantrecommandéd᾿éviterd᾿yen
répandre une grande quantité.
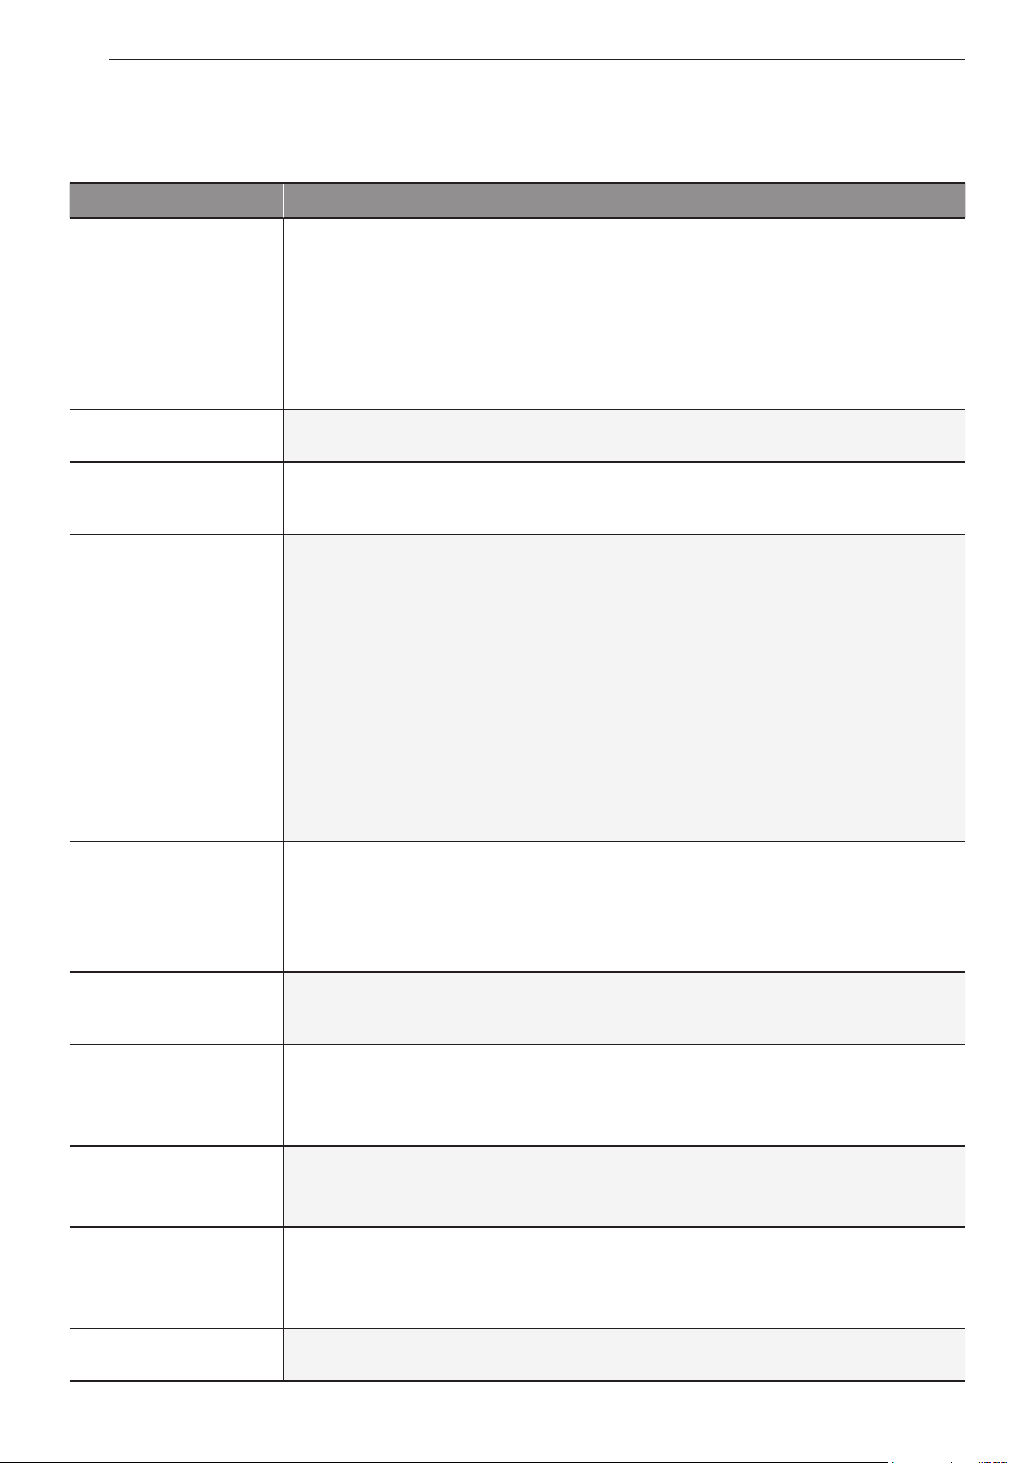
54 DÉPANNAGE
Avantd᾿appelerleréparateur,examinezlalisteci-après.Celapeutvouspermettred᾿économisertempsetargent.Lalistecomprend
desproblèmescourantsquinesontpaslerésultatd᾿undéfautdematériauxoudefabricationdel᾿appareilélectroménager.
•
Assurez-vous que la fiche électrique est branchée dans une prise sous tension correctement
mise à la terre.
•
Retirezlesbrûleursetnettoyez-les.Vérifiezlazonedesélectrodes;ilpourraityavoirdes
alimentsoudelagraissebrûlés.Reportez-vousàlasection«Entretien»,sous«Nettoyage
destêtesetdescapuchonsdesbrûleurs».
•
Assurez-vous que les parties du brûleur sont installées correctement.
Reportez-vous à « Retrait et remplacement des brûleurs de surface au gaz » dans la section
« Entretien ».
Silacuisinièreestreliéeàunearrivéedegazdepétroleliquéfiés,communiquezavecle
technicien qui a installé votre cuisinière ou effectué la conversion.
Vérifiezquelerobinetdegazdufour,situéàl᾿arrièredelacuisinière,estgrandouvert.
•
Réglages du four incorrects. Reportez-vous au paragraphe « Aperçu du panneau de
commande»,danslasection«Fonctionnement».
•
La position de la grille est incorrecte. Reportez-vous au paragraphe « Retrait et remise en
placedesgrillesdufour»,danslasection«Fonctionnement».
•
Batterie de cuisine incorrecte. Reportez-vous à « Cuisson par convection » dans la section
« Fonctionnement ».
•
Lethermostatdufourdoitêtreréglé.
•
Reportez-vous à « Réglage du thermostat du four » dans la section « Fonctionnement ».
•
L᾿horlogeestmalréglée.Reportez-vousà«Modificationdesréglagesdufour»dansla
section « Fonctionnement ».
•
Dupapierd᾿aluminiumaétéutilisédemanièreinappropriéedanslefour.Reportez-vousà
« Retrait et remise en place des grilles du four ».
•
Réglages du four incorrects. Reportez-vous au paragraphe « Aperçu du panneau de
commande»,danslasection«Fonctionnement».
•
Laportedufourn᾿estpasfermée.Reportez-vousà«Grillage»danslasection
« Fonctionnement ».
•
Lepapierd᾿aluminiumdelaplaquechauffanteetdelalèchefriten᾿estpasbienajusté.
Lethermostatdufourdoitêtreréglé.Reportez-vousà«Réglageduthermostatdufour»dansla
section « Fonctionnement ».
•
Vérifiez que la prise de courant est branchée à une prise sous tension et reliée à la terre.
Remplacez le fusible ou réenclenchez le disjoncteur.
•
Réglages du four incorrects. Reportez-vous à « Modification des réglages du four » dans la
section « Fonctionnement ».
•
L᾿ampouleestdévisséeoudéfectueuse.Resserrezouremplacezl᾿ampoule.
•
Lafichedelacuisinièren᾿estpascomplètementinséréedanslapriseélectrique.Vérifiezque
la prise de courant est branchée à une prise sous tension et reliée à la terre.
•
Latempératuredufouresttropélevéepourrégleruncycled᾿autonettoyage.Laissezla
cuisinière refroidir à la température ambiante et réessayez.
•
Réglagesdufourincorrects.Reportez-vousauparagraphe«Autonettoyage»,danslasection
« Entretien ».
•
Cessonssontproduitsparlemétalquisedilateenchauffantetsecontracteenrefroidissant,
pendant la cuisson et le nettoyage. Cela est normal.
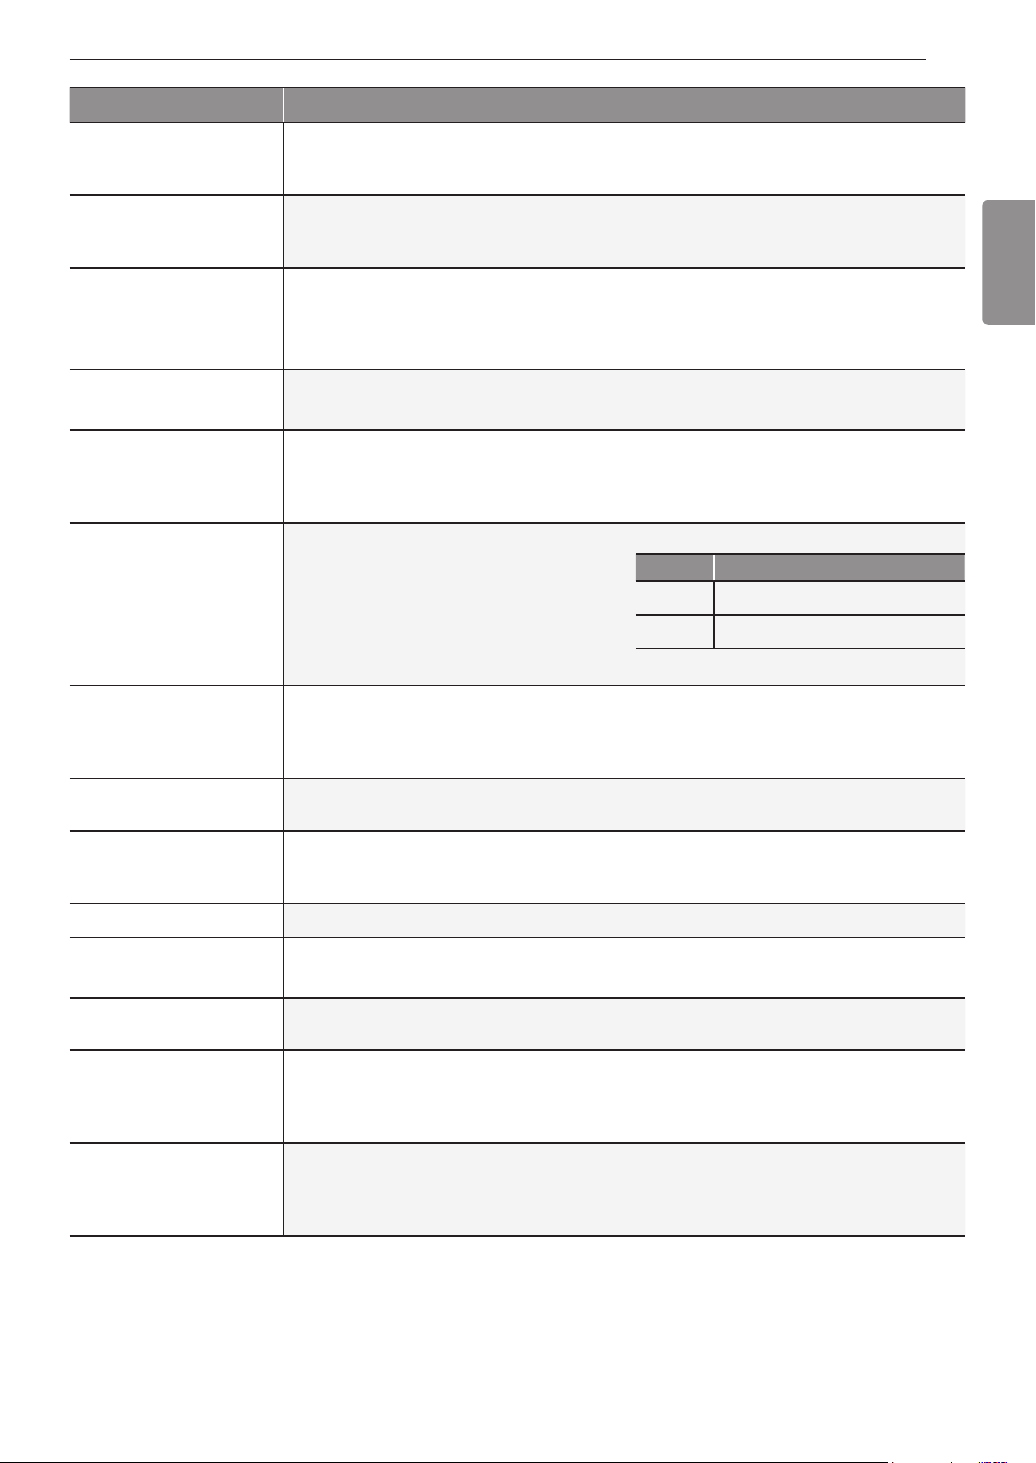
55DÉPANNAGE
FRANÇAIS
Lefouresttropencrassé.Ouvrezlesfenêtrespourévacuerlafuméedelapièce.Appuyezsur
le bouton .Attendezquelevoyants᾿éteigneavantd᾿ouvrirlaportedufour.Essuyezla
saletéexcédentaireetredémarrezl᾿autonettoyage.
La température du four est trop élevée. Laissez-le refroidir pendant une heure.
•
Réglagesdufourincorrects.Reportez-vousauparagraphe«Autonettoyage»,danslasection
« Entretien ».
•
Lefouresttrèssale.Nettoyezlestacheslesplusimportantesavantdelancerl᾿autonettoyage.
Unfourtrèsencrassépeutnécessiteruncycled᾿autonettoyagepluslong,voiredeuxcycles.
•
Lecycled᾿autonettoyageaétésélectionné,maislaporten᾿estpasfermée.
- Fermez la porte du four.
Laportedufourestverrouilléeparcequelatempératureàl᾿intérieuresttropélevée.Appuyez
sur le bouton .
•
Vérifiezlerobinetprincipald᾿arrêtdugaz
etceluidufour,puisappelezleservicede
réparation.
•
Coupezl᾿alimentationélectriquedela
cuisinièrependantcinqminutes,puis
rebranchez-la. En cas de répétition du code
d᾿erreur,appelezleservicederéparation.
F-3 Erreur liée à une touche
F-9 Le four ne chauffe pas.
Appliquezunepetitequantitéd᾿huilevégétalesuruneservietteenpapier,puisfrottezlesbords
desgrillesdufour.N᾿utilisezpasdevaporisateurslubrifiants.
Pannedecourantousurtension.Remettezl᾿horlogeàl᾿heure.Silefourétaitenmarche,vous
devez le remettre à zéro en appuyant sur .Réglezl᾿horlogeetlesfonctionsdecuisson.
C᾿estnormalquandlacuisinièreestneuve;l᾿odeurdisparaîtraaufildutemps.Pouraccélérer
leprocessus,lancezuncycled᾿autonettoyaged᾿aumoinstroisheures.Reportez-vousau
paragraphe«Autonettoyage»,danslasection«Entretien».
Lorsdespremièresutilisationsdufour,ilestnormaldesentirl᾿odeurdel᾿isolationintérieure.
Leventilateurdeconvectionpeuts᾿allumerets᾿éteindreautomatiquement.
Cela est normal.
Il est normal que le ventilateur de fonctionne périodiquement tout au long du cycle de cuisson
normaldanslefour,cequipermetd’obtenirdesrésultatsuniformes.
Vérifiezquelestêtesetlescapuchonsdesbrûleurssontcomplètementsecsetbienenplace.
Celaestnormal.Lesallumeursàétincelleélectriquedesbrûleurssontàl᾿origineduclic.Tousles
allumeursàétincelledelatabledecuissons᾿activerontmêmesivousn᾿allumezqu᾿unbrûleur.
56 SMART DIAGNOSIS
MC
Encasdeproblème,votrecuisinièrepeuttransmettredes
donnéesàvotretéléphoneintelligentaumoyendel᾿application
LG Smart ThinQ ou au centre de service LG au moyen de
votre téléphone.
La fonction Smart Diagnosis
MC
nepeutêtreactivéequesila
cuisinière a été mise sous tension au moyen de la touche .
Sivousn᾿arrivezpasàmettrevotrecuisinièresoustension,le
dépannagedevraêtreeffectuésansSmartDiagnosis
MC
.
1
Téléchargezl᾿application LG Smart ThinQ sur votre
téléphone intelligent.
2
Ouvrez une session LG Smart ThinQ. Appuyez sur Smart
Diagnosis
MC
pourpasseràl᾿écransuivant.
3
Suivezlesinstructionsdel᾿application.Ilest
recommandéd᾿utiliserTagOn,maissicelanefonctionne
pasbien,l᾿applicationexpliqueracommentutiliserle
diagnostic sonore.
4
Appuyez sur [ ]dansl᾿applicationLGSmartThinQ
afind᾿obtenirunguideplusdétaillésurlafonctionTag
On.
•
Les différences de qualité entre les régions peuvent
affecter la fonction.
•
Vous obtiendrez une meilleure qualité de communication
et un meilleur service si vous utilisez votre téléphone
fixe.
•
Unemauvaisequalitéd᾿appelpeutcauserune
mauvaise transmission des données entre votre
téléphoneetlacuisinière,etdoncunmauvais
fonctionnement de la fonction Smart Diagnosis
MC
.
1
AppelezlecentredeserviceLG:auCanada,1888542-
2623;auxÉtats-Unis,1800243-0000.
2
Lorsquel᾿agentducentredeserviceledemande,
tenez le microphone du téléphone près du logo Smart
Diagnosis
MC
sur la cuisinière. Tenez-le à moins de 1 po
(2,5cm),maissanstoucherlacuisinière.
Netouchezaucunautreboutonouicônesurl᾿écran.
3
Appuyez sur et maintenez la touche enfoncée
pendant trois secondes.
4
Tenezletéléphoneenplacejusqu᾿àcequela
transmissionsonores᾿arrête.Ilfautenvironsixsecondes
etvousverrezledécomptesurl᾿écran.
5
Unefoisledécompteetlatransmissionsonorearrêtés,
reprenezlaconversationavecl᾿agentducentrede
service,quiseraalorsenmesuredevousaidergrâceà
l᾿analysedesdonnéestransmises.
•
Pourobtenirlesmeilleursrésultats,évitezdebougerle
téléphone pendant la transmission sonore.
•
Sil᾿agentducentredeservicen᾿apaspuobtenirun
enregistrementexactdesdonnées,ilsepeutqu᾿ilvous
demanded᾿essayerdenouveau.
57GARANTIE LIMITÉE
FRANÇAIS
AVIS D'ARBITRAGE : LA PRÉSENTE GARANTIE LIMITÉE CONTIENT UNE DISPOSITION SUR L'ARBITRAGE QUI EXIGE
QUE LE RÈGLEMENT DES DIFFÉRENDS ENTRE VOUS ET LG S’EFFECTUE PAR ARBITRAGE EXÉCUTOIRE PLUTÔT
QUEDEVANTUNTRIBUNAL,ÀMOINSQUELESLOISDEVOTREPROVINCEOUTERRITOIREL'INTERDISENTOUQUE,
DANSUNAUTRETERRITOIREDECOMPÉTENCE,VOUSVOUSPRÉVALIEZD'UNEOPTIONDERETRAIT.LESRECOURS
COLLECTIFS ET LES PROCÈS DEVANT JURY NE SONT PAS AUTORISÉS PAR LE PROCESSUS D'ARBITRAGE. VEUILLEZ
VOUS RÉFÉRER CI-DESSOUS À L'ARTICLE « PROCÉDURE DE RÈGLEMENT DE DIFFÉREND ».
SivotrecuisinièreàgazLG(«Produit»)atombéenpanneenraisond'undéfautdematériauxoudefabricationsousuneutilisation
normaleetappropriée,pendantlapériodedegarantieindiquéeci-dessous,LGElectronicsCanadaInc.(«LGECI»),àsongré,
réparera ou remplacera le «Produit» après réception de la preuve d'achat originale au détail. Cette garantie limitée est valable
uniquementqu’àl'acheteuroriginaldu«Produit»dudétaillantets'appliqueuniquementàunproduitdistribué,achetéetutiliséau
Canada,telquedéterminéàlaseulediscrétionde«LGECI».
Cuisinière à gaz
Un(1)anàcompterdeladated᾿achatinitiale
Piècesetmain-d᾿oeuvre(piècesinternesfonctionnellesseulement)
•
Les produits et pièces de remplacement sont garantis pour la portion restante de la période de garantie originale ou quatre-vingt-
dix(90)jours,selonlapériodelapluslongue.
•
Lesproduitsetpiècesderechangepeuventêtreneufs,reconditionnés,remisàneufouautrementfabriquésenusine,tousàla
seule discrétion de «LGECI».
•
La preuve de l'achat de détail original spécifiant le modèle du produit et la date d'achat est requise pour obtenir un service sous
garantie en vertu de la présente garantie limitée.
Cette garantie limitée vous donne des droits légaux spécifiques. Vous pouvez également avoir d'autres droits qui varient d'une
province à l'autre selon les lois provinciales applicables. Tout terme de cette Garantie limitée qui nie ou modifie toute condition ou
garantie implicite en vertu de la loi provinciale est divisible lorsqu'elle est en conflit avec cette loi provinciale sans affecter le reste
des termes de cette garantie.
•
Toutdéplacementdutechnicienpour:i)livrer,reprendre,installerou;éduquercommentutiliserleProduit;ii)corrigerlecâblage
ouplomberie;ouiii)rectifiertouteréparationouinstallationnon-autoriséeduProduit;
•
DommageoupanneduProduitàperformerlorsdepannedecourantetserviceélectriqueinadéquatouinterrompu;
•
Dommage ou panne résultant de l’utilisation du Produit dans un environnement corrosif ou contraire aux instructions détaillées
danslemanueld’utilisationduProduit;
•
DommageoupanneduProduitenraisond’accidents,ravageursetparasites,foudre,vent,feu,inondations,actesdeDieuou
touteautreraisonhorsducontrôledeLGECIoudufabricant;
•
Dommageoupannerésultantd’utilisationinappropriéeouabusiveoud’installation,réparationouentretienimparfaitduProduit.
Réparation imparfaite inclut l’utilisation de pièces non autorisées ou spécifiées par LGECI. Installation ou entretien imparfait inclut
touteinstallationouentretiencontraireauxinstructionsdétailléesaumanueld’utilisationduProduit’;
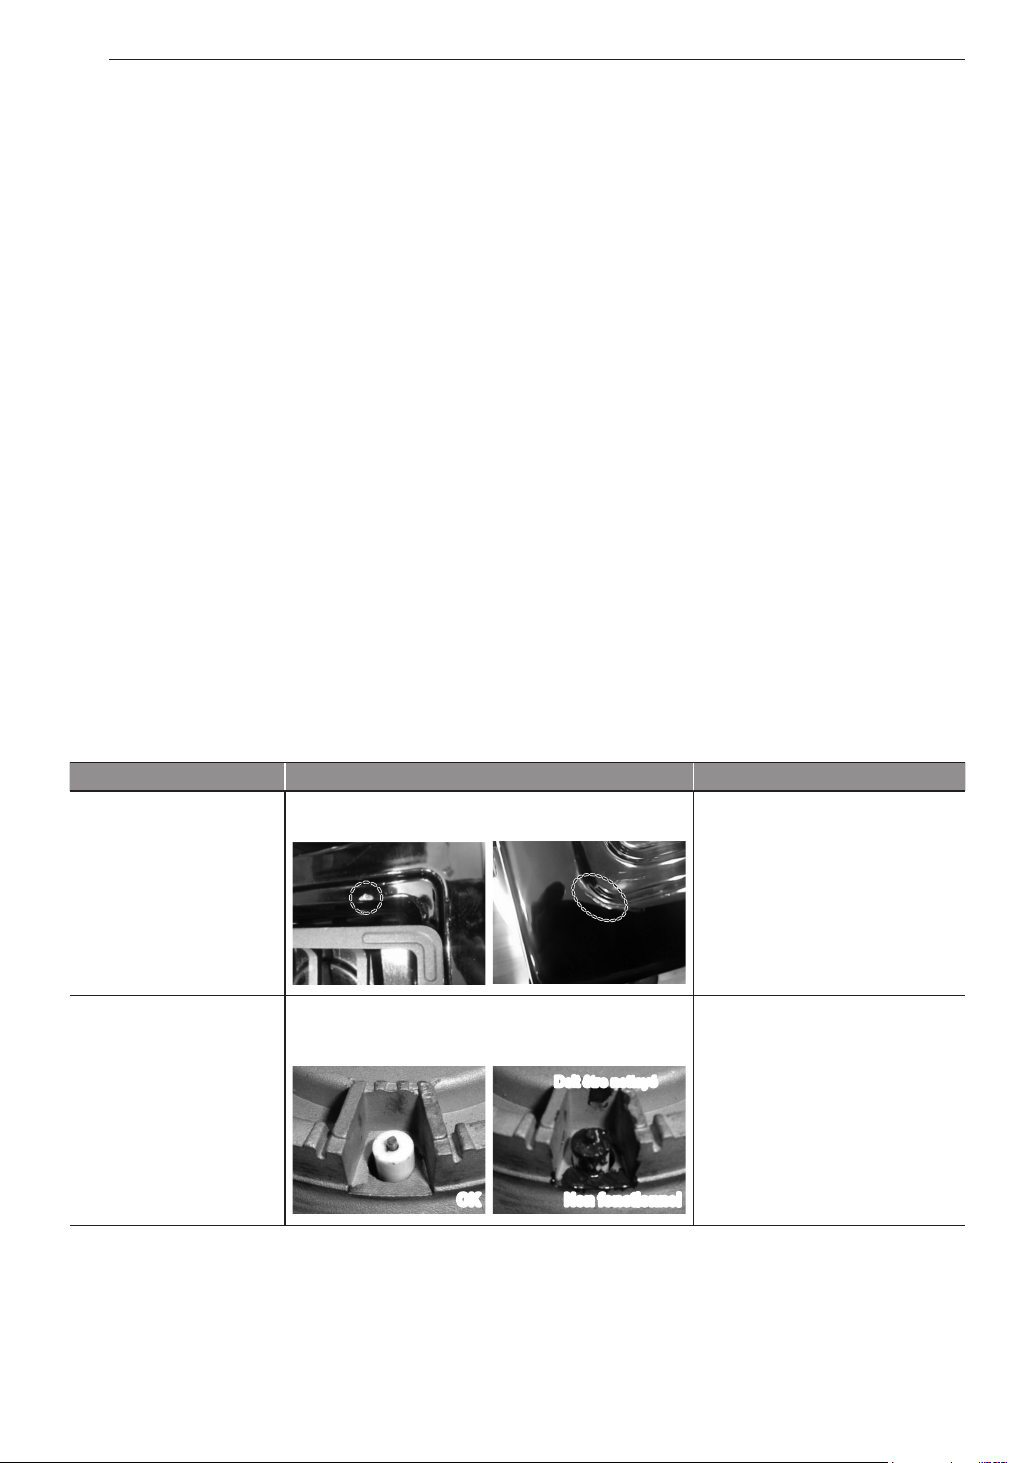
58 GARANTIE LIMITÉE
•
DommageoupanneenraisondemodificationoualtérationnonautoriséeduProduit,ousiutilisépourfinsautresquecelle
d’appareilménagerdomestique,oudommageoupannerésultantdetoutefuited'eaudueàunemauvaiseinstallationduproduit;
•
Dommageoupanneenraisondecourantélectrique,tensionoucodesdeplomberieincorrects;
•
Dommageoupanneenraisond’utilisationautrequecelled’appareilménagerdomestiquenormale,incluant,sanslimite,l’utilisation
commercialeouindustrielle,incluantl’utilisationaubureaucommercialoucentrerécréatif,oudétailléeautrementaumanuel
d’utilisationduProduit;
•
Dommageoupanneprovoquéparletransportetmanipulation,incluantrayures,bosses,écaillageet/ouautreendommagementà
lafinitionduProduit,teldommageaitrésultédefabricationoumatériauxdéfectueuxetrapporteràLGECIdansla(1)
semainesuivantlivraisonduProduit;
•
DommageorarticlesabsentsdetoutProduitdémonstrateur,boîteouverte,réusinéouescompté;
•
ProduitréusinéoutoutProduitvendu“Telquel”,“Oùest”,“Avectousdéfauts”,outoutemiseengardesimilaire;
•
Produitdontlenumérodesérieoriginalaitétéretiré,altéréounepeutêtrefacilementdéterminéàladiscrétiondeLGECI;
•
Augmentationdelafactured’électricitéetdépensesadditionnellesd’utilitédequelquemanièreassociéeauProduit;
•
ToutbruitassociéaufonctionnementnormalduProduit;
•
Remplacementdesampoules,filtres,fusiblesoutoutautreélémentconsommable;
•
Remplacementdetoutepiècen’étantpasoriginalementinclueavecleProduit;
•
Coûtsassociésairetraitet/ouréinstallationduProduitpourfinsderéparation;et
•
Lesclayettes,tiroirs,poignéesetaccessoiresduProduit,sauflespiècesinternes/fonctionnellescouvertesparcettegarantie
limitée.
•
Conversiondel’électroménagerdugaznaturelaugazpropaneliquéfié;
•
Couverturepourréparationsàdomicile,pourproduitsousgarantie,serafourniesileProduitsetrouvedansunrayonde150
kmducentredeserviceautorisé(ASC)leplusprès,telquedéterminéparLGCanada.SivotreProduitestsituéàl’extérieurdu
rayonde150kmd’uncentredeserviceautorisé,telquedéterminéparLGCanada,ileniradevotreresponsabilitéd’apporter
votreProduit,àvosfrais,aucentredeservice(ASC)pourréparationsousgarantie.
Cause
•
Écaillage de l'émail de la
table de cuisson
Utilisation incorrecte
•
Ne pas frapper la table de cuisson
en émail
•
Les brûleurs ne s'allument
pas
Les ports de brûleur bouchés ou sales ou les électrodes
ne permettent pas le fonctionnement adéquat du brûleur.
•
Vérifier et nettoyer l'électrode à
gaz.
Doitêtrenettoyé
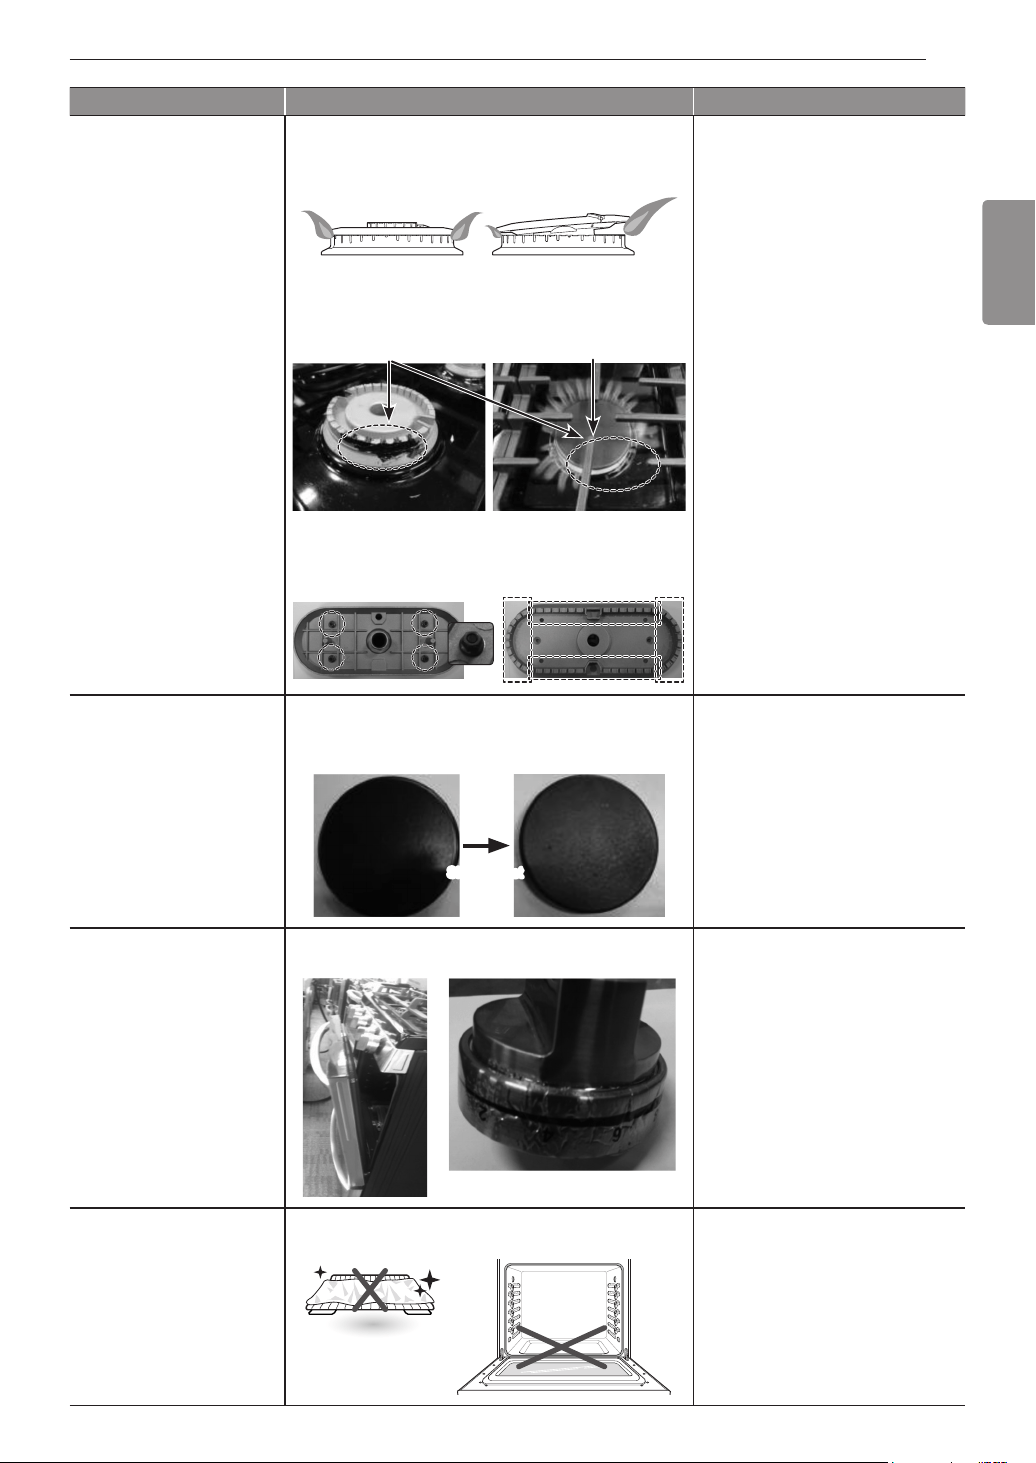
59GARANTIE LIMITÉE
FRANÇAIS
Cause
•
Flamme inégale. 1. Installation incorrecte du chapeau du brûleur
•
Vérifierl'installationdelatêteet
du chapeau de brûleur
Le chapeau du brûleur est
correctement en place.
Le chapeau du brûleur n'est
pas correctement en place.
2. Les ports du brûleur sont bouchés par des résidus de
nourriture
•
Lesrésidusdurcisdoiventêtre
enlevés avec une brosse à dents.
Les ports sont bloqués par la
saleté
Flammes inégales
*Brûleurovale
•
Brûleur ovale
1)Libérerles4écroux
2)Nettoyerlesrésidusavecune
brosse à dents
Pour nettoyer: libérer les 4 écroux
Nettoyer la pièce rouge avec une
brosse à dents
•
Le brûleur change de
couleur et perd du lustre
1. Égratignure
2. Utilisation d'un détergent ou de nettoyants abrasifs
•
Ne pas utiliser une laine d'acier ou
des nettoyants abrasifs.
•
Pourenleverlanourriturebrûlée,
tremperlestêtesdebrûleurdans
de l'eau chaude pendant 20 à
30minutes.(Nepasutiliserde
détergent)
Shine is lost
•
Les boutons fondent Utilisation incorrecte
•
Ne pas laisser à porte à une
positiond'arrêtlorsdumodeGril/
Cuisson ou juste après la cuisson.
•
Le four ou les grilles sont
tachées après utilisation
de papier d'aluminium
Le papier d'aluminium a fondu dans le four
•
Ne jamais couvrir le bas du four
ou une grille au complet avec
des produits comme du papier
d'aluminium
•
Si le papier d'aluminium est déjà
fondudanslefour,celan'affecte
pas la performance de ce dernier.
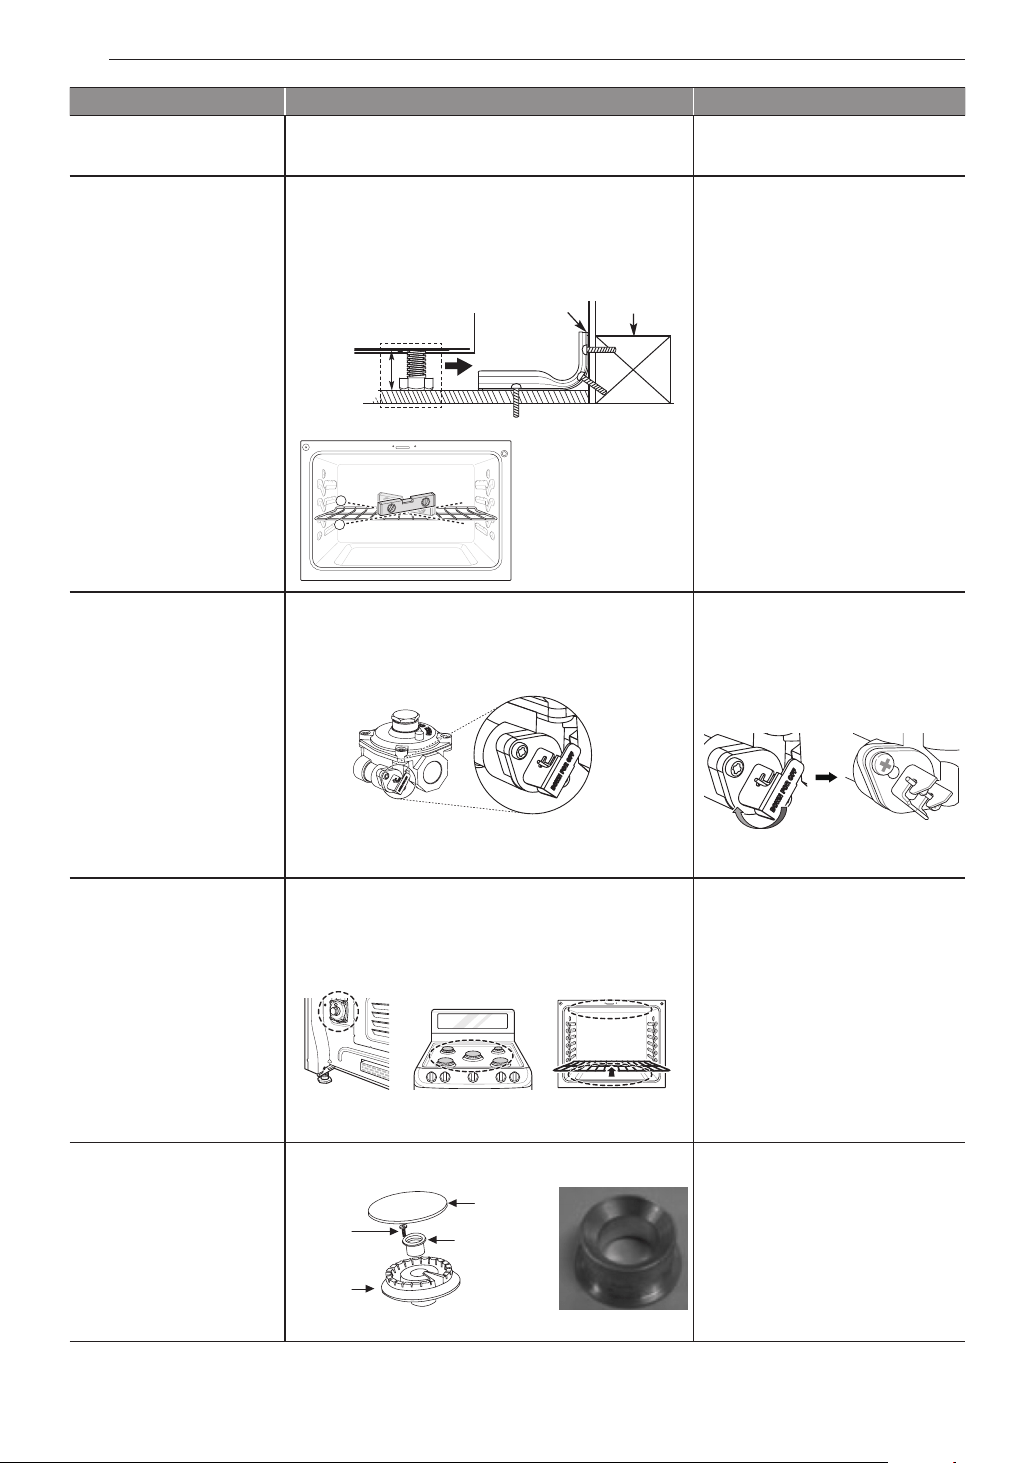
60 GARANTIE LIMITÉE
Cause
•
La flamme ou
l'alimentation est faible
Lapressiondugazpeutêtrefaible
•
Vérifier avant tout avec le
fournisseur de gaz
•
La surface n'est pas à
niveau
•
Le four penche
1. Le fourneau n'est pas à niveau
2. Le dispositif anti-basculement n'est pas installé
correctement
•
Vérifier premièrement avec
l'installateur
Support
anti-basculement
Environ
16,5mm
(0,65po)
Mettre à niveau les deux
côtés du four
La vis doit
entrer dans le
bois ou le béton
Plaque
murale
1
2
Utiliser un niveau de
charpentierpourvérierla
mise à niveau.
•
Le four montre le code
d'erreur(F9,F19)mais
les brûleurs de la table de
cuisson fonctionnent.
La vanne du régulateur de pression de gaz est en
position fermée.
•
Assurez-vous que la vanne du
régulateur est en position ouverte.
•
Si la vanne du régulateur est
fermée,tournezlelevierpour
l’ouvrir.
Position fermée du levier
Position ouverte
du levier
Position fermée
du levier
•
Les flammes sont trop
grosses sur une surface
de cuisson convertie
(gaznaturelaupropane
liquide)
L'installateur a oublié une partie du processus de
conversion.
(Vérifier3pièces:régulateur,valvedelasurfacede
cuisson,valvedugril/cuisson.)
•
Vérifier premièrement avec
l'installateur
•
Consulter le manuel d'installation
régulateur
valve de la surface
de cuisson
valve du gril/
cuisson
Brûleur 17K / 18.5K a besoin d'une Détendeur.
•
Vérifier premièrement avec
l'installateur
•
Consulter le manuel d'installation
Détendeur
Capuchon
du brûleur
Vis à
pression
Base du
brûleur
Détendeur

61GARANTIE LIMITÉE
FRANÇAIS
Cause
•
La flamme est trop petite
ou trop grosse
1. Pression de gaz variable
2. L'installateur n'a pas vérifié
•
Vérifier premièrement avec
l'installateur
Vis de réglage central
•
Odeur de gaz Raccordement incorrect
•
Vérifier avant tout avec
l'installateur
1
/
2
po Raccord
1
/
2
po Raccord
1
/
2
po Raccord
Régulateur de
pression
Connecteurexible
(6pimaximum)
Robinetd’arrêtdugaz
Conduite de gaz de
1
/
2
po ou de
3
/
4
po
Débit de gaz dans la cuisinière
AFIN D’OBTENIR SOUTIEN DE GARANTIE ET INFORMATIONS SUPPLÉMENTAIRES VEUILLEZ NOUS APPELER OU VISITER
NOTRE SITE WEB :
Sansfrais:1-888-542-2623(7hàminuit–l’annéelongue)etsélectionnezl’optionappropriéeaumenu,ou;Visitezlesitewebà:
http://www.lg.com

62 GARANTIE LIMITÉE
SAUFLAOÙLALOIL'INTERDIT,TOUTDIFFÉRENDENTREVOUSETLGASSOCIÉDEQUELQUEFAÇONQUECESOITÀ
LA PRÉSENTE GARANTIE LIMITÉE SE RÈGLE EXCLUSIVEMENT PAR ARBITRAGE EXÉCUTOIRE PLUTÔT QUE DEVANT UN
TRIBUNALDEDROITCOMMUN.SAUFLAOÙLALOIL'INTERDIT,VOUSETLGRENONCEZIRRÉVOCABLEMENTÀTOUT
DROITÀUNPROCÈSDEVANTJURY,AINSIQU'ÀEXERCERUNRECOURSCOLLECTIFOUÀYPARTICIPER.
Auxfinsduprésentarticle,«LG»désigneLGElectronicsCanadaInc.,sessociétésmères,sesfilialesetses
sociétésaffiliéesettousleursdirigeants,administrateurs,employés,agents,bénéficiaires,détenteursprécédentsdesmêmes
droits,successeurs,cessionnairesetfournisseurs;«différend»et«réclamation»englobenttoutdifférend,réclamationoulitige
dequelquesortequecesoit(fondéssuruneresponsabilitécontractuelle,délictuelle,légale,réglementaireoudécoulantd'une
ordonnance,parfraude,faussereprésentationousousquelquerégimederesponsabilitéquecesoit)découlantdequelquefaçon
quecesoitdelavente,desconditionsoudel'exécutionduproduitoudelaprésenteGarantielimitée.
Sivousprévoyezengageruneprocédured’arbitrage,vousdevezd’abordenvoyeràLGunpréavisécritd’au
moins30joursàl’adressesuivante:ÉquipejuridiqueLGECI,NorelcoDrive,NorthYork,Ontario,CanadaM9L2X6(l’«avisde
différend»).VousetLGconvenezdediscuterentoutebonnefoipourtenterderéglerledifférendàl’amiable.L’avisdoitmentionner
votrenom,votreadresse,votrenumérodetéléphone,leproduitfaisantl’objetdelaréclamation,lanaturedelaréclamationet
la réparation demandée. Si vous et LG ne parvenez pas à régler le différend dans les 30 jours suivant la réception de l’avis de
différendparLG,ledifférenddoitêtreréglépararbitrageexécutoireconformémentàlaprocédureétablieauxprésentes.VousetLG
convenezque,toutaulongduprocessusd’arbitrage,lesmodalités(ycomprislesmontants)detouteoffrederèglementformulée
par vous ou par LG ne seront pas divulguées à l’arbitre et resteront confidentielles à moins d’accord contraire entre les deux parties
ou que l’arbitre règle le différend.
Silaréclamationn’apuêtrerégléedansles30jours
suivantlaréceptiondel’avisdedifférendparLG,vousetLGconvenezdeneréglerlesréclamationsvousopposantquepar
arbitrageexécutoireaucasparcas,àmoinsquevousvousprévaliezdel'optionderetraitévoquéeplushautouquevousrésidiez
dansunterritoiredecompétencesquiinterditlapleineapplicationdecetteclausedanslecasderéclamationsdecetype(dans
lequelcas,sivousêtesunconsommateur,cetteclausenes'appliqueraquesivousacceptezexpressémentl'arbitrage).Dansla
mesureoùlaloienvigueurlepermet,aucundifférendentrevousetLGnepeutêtrecombinéouregroupéavecundifférendfaisant
intervenirleproduitoularéclamationd'unepersonneouentitétierce.Plusprécisémentetsanslimiterlaportéedecequiprécède,
saufdanslamesureoùunetelleinterdictionn'estpasautoriséeendroit,enaucuncasundifférendentrevousetLGnepeutêtre
traitédanslecadred'unrecourscollectif.Aulieudel'arbitrage,lespartiespeuventintenteruneactionindividuelledevantunecour
despetitescréances,maiscetteactionnepeutpasêtreintentéedanslecadred'unrecourscollectif,saufdanslamesureoùune
telle interdiction n'est pas autorisée en droit dans votre province ou territoire de compétences pour une réclamation en cause qui
nous oppose.
Poursoumettreuneréclamationàunarbitrage,l'unedesdeuxparties,soitvousouLG,doit
déposer une demande écrite à cet effet. L'arbitrage est privé et confidentiel et s'effectue selon une procédure simplifiée et accélérée
devant un arbitre unique choisi par les parties conformément aux lois et règlements en vigueur portant sur l'arbitrage commercial
de votre province ou territoire de résidence. Vous devez également envoyer une copie de votre demande écrite à LG Electronics
CanadaInc.,LegalDepartment-Arbitration,20NorelcoDrive,NorthYork,OntarioM9L2X6.Laprésentedispositionsurl'arbitrage
est régie par les lois et règlements sur l'arbitrage commercial applicables de votre province ou territoire. La sentence arbitrale
peutdonnerlieuàunjugementden'importequeltribunalcompétent.Touteslesdécisionsrelèventdel'arbitre,àl'exceptiondes
questionsassociéesàlaportéeetàl'applicabilitédeladispositionsurl'arbitrageetàl'arbitrabilitédudifférend,quisontduressort
du tribunal. L'arbitre est tenu de respecter les modalités de la présente disposition.
Les lois de votre province ou territoire de’achat régissent la présente Garantie limitée et tout différend entre
nous,saufdanslamesureoùdetellesloissontsupplantéespardesloisfédérales,provincialesouterritorialesapplicablesousont
incompatiblesaveccesdernières.Sil'arbitragen'estpasautorisépourrégleruneréclamation,unepoursuite,undifférendouun
litigenousopposant,nousnousenremettronsàlacompétenceexclusivedestribunauxdevotreprovinceouterritoirede’achat
compétencepourlerèglementdelaréclamation,delapoursuite,dudifférendoudulitigenousopposant.
Aucuns frais ne sont exigibles pour entamer une procédure d'arbitrage. À la réception de votre demande d'arbitrage
écrite,LGréglerarapidementlatotalitédesfraisdedépôtdelademanded'arbitrage,saufsivousréclamezdesdommages-intérêts
supérieursà25000$.Danscecas,lepaiementdecesfraisserarégiparlesrèglesd'arbitrageapplicables.Saufdisposition
contraireauxprésentes,LGpaieratouslesfraisdedépôtdedemandeetd'administrationainsiqueleshonorairesdel'arbitre
conformémentauxrèglesd'arbitrageapplicablesetàlaprésentedispositionsurl'arbitrage.Sivousremportezl'arbitrage,LGrèglera
vosfraisethonorairesjuridiquesaprèsavoirdéterminés’ilssontraisonnablesensefondantsurdesfacteurscomme,entreautres,
le montant de l’achat et le montant de la réclamation. Si l'arbitre juge que le motif de la réclamation ou les réparations demandées
sontfutilesousefondentsurdesmotifsdéplacés(auregarddesloisapplicables),lepaiementdetouslesfraisd'arbitrageserarégi
parlesrèglesd'arbitrageapplicables.Dansuntelcas,vousacceptezderembourseràLGlatotalitédesmontantsversésqu'ilvous
revientautrementdepayerenvertudesrèglesd'arbitrageapplicables.Saufdispositioncontraireetsielleremportel'arbitrage,LG
renonce à tous ses droits de vous réclamer des frais et horaires juridiques.

63GARANTIE LIMITÉE
FRANÇAIS
Sivotreréclamationestégaleouinférieureà25000$,vouspouvezopterpourunarbitrage
conduitselonl'unedesmodalitéssuivantesuniquement:1)surexamendesdocumentsremisàl'arbitre,2)paraudience
téléphoniqueou3)paraudienceenpersonneselonlesdispositionsdesrèglesd'arbitrageapplicables.Sivotreréclamationdépasse
25000$,ledroitàuneaudienceseradéfiniparlesrèglesd'arbitrageapplicables.Lesaudiencesarbitralesenpersonnese
tiendrontàl'endroitleplusprocheetlepluspratiquepourlesdeuxpartiessituédansvotreprovinceouvotreterritoirederésidence,
sauf si nous convenons mutuellement d'un autre lieu ou d'un arbitrage par téléphone.
SiunepartiedelaprésenteGarantielimitée(ycomprislesprésentesprocéduresd'arbitrage)
n'estpasapplicable,lesdispositionsrestantesdemeurentenvigueurdanslamesurepermiseparlaloiapplicable.Lefaitdene
pasexigerlastricteexécutiond'unedispositiondelaprésenteGarantielimitée(ycomprislesprésentesprocéduresd'arbitrage)ne
signifie pas que nous ayons renoncé ni que nous ayons l'intention de renoncer à toute disposition ou partie de la présente Garantie
limitée.
Vouspouvezvousretirerdelaprésenteprocédurederèglementdedifférend.Danscecas,nivousniLGne
pouvezimposeràl'autrepartiedeparticiperàuneprocédured'arbitrage.Pourvousprévaloirdel'optionderetrait,vousdevez
envoyerunpréavisàLGdanslestrente(30)jourscivilsàcompterdeladatedel'achatduproduitparlepremieracheteuri)dans
uncourrieladresséà[email protected]etdontlaligned'objetportelamention«Retraitdel'arbitrage»ouii)encomposantle1-800-
980-2973.Quecesoitparcourrieloupartéléphone,vousdevrezdonnera)votrenometvotreadresse;b)ladated'achatduproduit;c)
lenomoulenumérodemodèleduproduitetd)lenumérodesérie[qu’ilestpossibledetrouveri)surleproduitouii)enliqneau
https://www.lg.com/ca_fr/soutien/reparation-garantie/demande-reparation,Trouvermesnumérosdemodèleetdesérie].
Sivousvousprévalezdel'optionderetrait,lesloisdevotreprovinceouterritoirederésidencerégissentlaprésenteGarantielimitée
ettoutdifférendentrenous,saufdanslamesureoùdetellesloissontsupplantéespardesloisfédérales,provincialesouterritoriales
applicablesousontincompatiblesaveccesdernières.Sil'arbitragen'estpasautorisépourrégleruneréclamation,unepoursuite,
undifférendouunlitigenousopposant,nousnousenremettronsàlacompétenceexclusivedestribunauxdevotreprovinceou
territoiredecompétencepourlerèglementdelaréclamation,delapoursuite,dudifférendoudulitigenousopposant.
Vousnepouvezvousprévaloirdel'optionderetraitquedelamanièredécriteplushaut(c'est-à-direparcourrieloupartéléphone).
Aucun autre type d'avis ne sera pris en compte pour le retrait de la présente procédure de règlement de différend. Le fait de se
retirer de la présente procédure de règlement de différend ne compromet d'aucune façon la protection accordée en vertu de la
Garantielimitée,etvouscontinuerezàjouirdetouslesavantagesprévusparlaGarantielimitée.Sivousconservezceproduitsans
vousprévaloirdel'optionderetrait,vousacceptezlesconditionsgénéralesdeladispositionsurl'arbitrageénoncéeci-dessus.
En cas de conflit ou d'incompatibilité entre les modalités de la présente garantie limitée et le contrat de
licenced'utilisation(CLU)encequiconcernelerèglementdesdifférends,lesmodalitésdelaprésentegarantielimitéecontrôlentet
régissent les droits et obligations des parties et ont préséance sur le CLU.

LG Customer Information Center
Register your product Online!
www.lg.com
1-800-243-0000
USA
1-888-542-2623
CANADA
Printed in Korea