Website: h_tp://www us Ige corn
GASRANGES
LRG30855ST
LRG30355ST
LRG30355SW
LRG30355SB
)ROUGHLY BEFORE OPERATING.
Printed in Mexico
P/NO.:MFL33029601
Thank you for purchasing an LG gas ranges.
Please record the model number and serial number of Model No.:
this unit for future reference. We also suggest that you Serial No.:
record the details of any contact with LG (LG Dealer:
Electronics USA, Inc.)concerning this unit.
Staple your receipt here to verify your retail purchase.
Dealer Phone No.:
Customer Relations
LG Electronics U.S.A., Inc.
Service DivisionBldg. #3
201 James Record Rd.
Huntsville,AL 38824-0126
CALL 1-800-243-0000
or http://us.lgservice.com
II_'C!!!i
SAFETY .................................................................. 3
- Important safety information ............................. 3
OPERATING INSTRUCTIONS ............................... 8
- Using the gas surface burners ........................... 8
- Using the oven controls ..................................... 10
- Using the oven................................................... 12
- Broiling Guide ..................................................... 15
- Using the clock and timer ................................. 16
- Using the timed baking and roasting features ...17
- Using the probe ................................................. 18
- Using the convection oven ............................... 19
- Convection Roasting Guide ................................ 22
- Using the timed convection baking features ..... 23
- Special features of your oven control ................ 24
- Using the Sabbath Feature ................................ 26
- Adjust the oven thermostat ............................... 27
- The type of margarine will affect baking
performance! ..................................................... 28
- Using the electric warming drawer .................... 28
USING THE SELF-CLEANING OVEN .................... 30
- How to Set the Oven for Cleaning ..................... 30
- How to Delay the Start of Cleaning ................... 31
CARE AND CLEANING OF THE RANGE .............. 32
- Care and cleaning of the range ......................... 32
- Burner Caps and Heads .................................... 33
- Burner Grates ..................................................... 34
- Cooktop Surface ................................................ 34
- Oven Air Vents ................................................... 35
- Control Panel...................................................... 35
- Front Manifold Panel and Knobs ........................ 35
- Oven Door .......................................................... 36
- Oven Bottom ..................................................... 36
- Broiler Pan and Grid ........................................... 36
- Oven Shelves and Drawer Racks ....................... 37
- Oven Light Replacement ................................... 37
- Removable Warming Drawer ............................. 38
INSTALLATION INSTRUCTIONS ......................... 39
TROUBLESHOOTING ............................................ 51
Before calling for service ................................... 51
WARRANTY ........................................................... 55
-2-
For your safety, the information in this manual must be followed to minimize the risk of fire or explosion, electric shock, or to
prevent property damage, personal injury, or loss of life.
®
@
WARNING
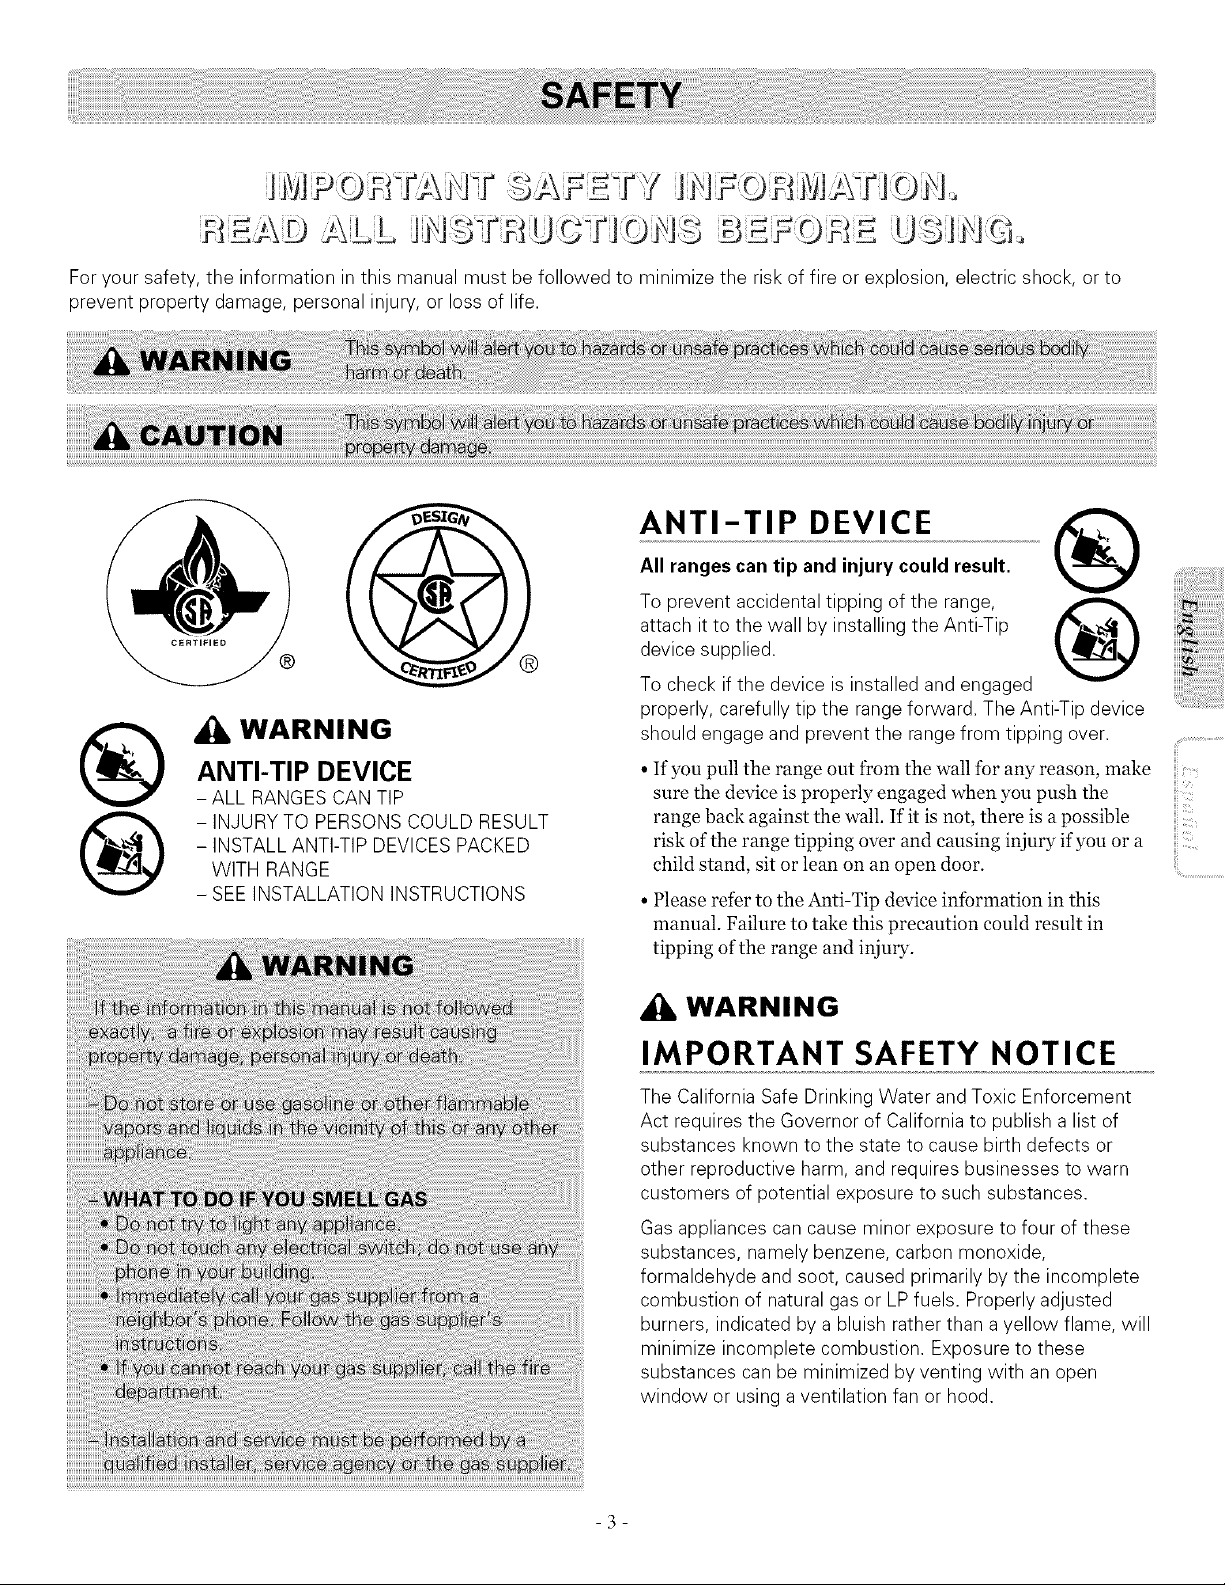
ANTI-TIP DEVICE
- ALL RANGES CAN TIP
-INJURYTO PERSONS COULD RESULT
- INSTALL ANTI-TIPDEVICESPACKED
WITH RANGE
- SEE INSTALLATION INSTRUCTIONS
ANTI-TIP DEVICE
®
@
All ranges can tip and injury could result.
To prevent accidental tipping of the range,
attach itto the wall by installing the Anti-Tip
device supplied.
To check ifthe device is installed and engaged
properly, carefully tip the range forward. TheAnti-Tip device
should engage and prevent the range from tipping over.
• If you pull the range out from the wall for any reason, make
sure the device is properly engaged when you push the
range back against the wall. If it is not, there is a possible
risk of the range tipping over and causing injury ifyou or a
child stand, sit or lean on an open door.
•Please refer to the Anti-Tip device inibrmation in this
manual. Failure to take this precaution could result in
tipping of the range and injury.
WARNING
IMPORTANT SAFETY NOTICE
The California Safe Drinking Water and Toxic Enforcement
Act requires the Governor of California to publish a list of
substances known to the state to cause birth defects or
other reproductive harm, and requires businesses to warn
customers of potential exposure to such substances.
Gas appliances cancause minor exposure to four of these
substances, namely benzene, carbon monoxide,
formaldehyde and soot, caused primarily by the incomplete
combustion of natural gasor LP fuels. Properly adjusted
burners, indicated bya bluish ratherthan a yellow flame, will
minimize incomplete combustion. Exposure to these
substances can be minimized byventing with an open
window or usinga ventilation fan or hood.
i]i;7;................
iii_CI
iii.....
H_.....
ii!i..............................
-3-

;_i!_i!i!i:i
II_'C!!!i
SAFETY PRECAUTIONS
Have the installer show you the location of the range gas
shut-off valve and how to shut it off if necessary.
• Have your range installed and properly grounded by a
qualified installer, in accordance with the Installation
Instructions. Any adjustment and service should be
perfbrmed only by qualified gas range installers or service
technicians.
• Do not attempt to repair or replace any part of your range
unless it is specifically recommended in this manual. All
other service should be referred to a qualified technician.
• Plug your range into a 12o-volt grounded outlet only. Do
not remove the round grounding prong from the plug. If in
doubt about the grounding of the home electrical system, it
is your personal responsibility and obligation to have an
ungrounded outlet replaced with a properly grounded,
three-prong outlet in accordance with the National
Electrical Code. Do not use an extension cord with this
appliance.
• Locate the range out of kitchen traffic path and out of
drafty locations to prevent poor air circulation.
• Be sure all packaging materials are removed from the range
before operating it to prevent fire or smoke damage should
the packaging material ignite.
• Be sure your range is correctly adjusted by a qualified
service technician or installer for the type ofgas (natural or
LP) that is to be used. Your range can be converted for use
with either type ofgas. See the Installation ofthe range
section.
• After prolonged use of a range, high floor temperatures
may result and many floor coverings will not withstand this
kind of use. Never install the range over vinyl tile or
linoleum that cannot withstand such type of use. Never
install it directly over interior kitchen carpeting.
• Do not leave children alone or unattended where a range is
hot or in operation. They could be seriously burned.
• Do not allow anyone to climb, stand or hang on the oven
door, warming drawer or cooktop. They could damage the
range and even tip it over, causing severe personal injury.
• Never wear loose fitting or hanging garments while using
the appliance. Be careful when reaching for items stored in
cabinets over the range. Flammable material could be
ignited if brought in contact with flame orhot oven surfaces
and may cause severe burns.
• Do not store flammable materials in an oven, a range
drawer or near a cooktop.
• Do not store or use combustible materials, gasoline or other
flammable vapors and liquids in the vicinity of this or any
other appliance.
• Do not let cooking grease or other flammable materials
accumulate in or near the range. Do not use water on
grease fires. Never pick up aflaming pan. Turn the controls
off. Smother a flaming pan on a surface burner by covering
the pan completely with a well-fitting lid, cookie sheet or
flat tray. Use a multi-purpose dry chemical or foam-type
fire extinguisher.
Flaming grease outside a pan can be put out by covering it
with baking soda or, if available, by using a multi-purpose
dry chemical or foam-type fire extinguisher.
Flame in the oven or warming drawer can be smothered
completely by closing the oven door or drawer and turning
the control to oft or by using a multi-purpose dry chemical
or foam-type fire extinguisher.
• Let the burner grates and other surfaces cool before
touching them or leaving them where children can reach
them.
-4-
• Never block the vents (air openings) of the range. They
provide the air inlet and outlet that are necessary for the
range to operate properly with correct combustion. Air
openings are located at the rear of the cooktop, at the top
and bottom of the oven door, and at the bottom of the
range under the warming drawer.
• Large scratches or impacts to glass doors can lead to
broken or shattered glass.
SURFACE BURNERS
Use proper pan size--avoid pansthat are unstable or easily
tipped. Select cookware having flat bottoms large enough to
cover burner grates. To avoid spillovers, make sure
cookware is large enough to contain the food properly. This
will both save cleaning time and prevent hazardous
accumulations offood, since heavy spattering or spillovers
left on range can ignite. Use panswith handles that canbe
easily grasped and remain cool.
• Always use the LITE position when igniting the top
burners and make sure the burners have ignited.
• Never leave the surface burners on unattended. Boilovers
cause smoking and greasy spillovers that may catch on fire.
• Adjust the top burner flame size so it does not extend
beyond the edge of the cookware. Excessive flame is
hazardous.
• Use only dry pot holders- moist or damp pot holders on
hot surfaces may result in burns from steam. Do not let pot
holders come near open flames when lifting cookware. Do
not use a towel or other bulky cloth in place of a pot holder.
• When using glass cookware, make sure it is designed for
top-of-range cooking.
• To minimize the possibility of burns, ignition of flammable
materials and spillage, turn cookware handles toward the
side or back ofthe range without extending over adjacent
burners.
• Carefully watch foods being fried at ahigh flame setting.
• Always heat fat slowly, and watch as it heats.
• Do not leave any items on the cooktop. The hot air from the
vent may ignite flammable items and will increase pressure
in closed containers, which may cause them to burst.
• If a combination of oils or fats will be used in frying, stir
together before heating as fats melt slowly.
• Use a deep fat thermometer whenever possible to prevent
overheating fat beyond the smoking point.
• Use the least possible amount of fat for effective shallow or
deep-fat frying. Filling the pan too full of fat can cause
spillovers when food is added.
• Do not flame foods on the cooktop. If you do flame foods
under the hood, turn the fan on.
• Do not use awok on the cooking surface if the wok has a
round metal ring that is placed over the burner grate to
support the wok. This ring acts as a heat trap, which may
damage the burner grate and burner head. Also, it may
cause the burner to work improperly. This may cause a
carbon monoxide level above that allowed by current
standards, resulting in a health hazard.
• Foods for frying should be as dry as possible. Frost on
frozen fbods or moisture on fresh fbods can cause hot fat to
bubble up and over the sides of the pan.
• Never try to move a pan of hot fat, especially a deep fat
fryer. Wait until the fat is cool
• Do not leave plastic items on the cooktop-they may melt if
left too close to the vent.
• Keep all plastics away from the surface burners.
• To avoid the possibility of aburn, always be certain that the
controls for all burners are at the OFF position and all
grates are cool before attempting to remove them.
• If range is located near a window, do not hang long curtains
that could blow over the surface burners and create a fire
hazard.
• If you smell gas, turn off the gas to the range and call a
qualified service technician. Never use an open flame to
locate aleak.
• Always turn the surface burner controls offbefore removing
cookware.
• Do not lift the cooktop. Lifting the cooktop can lead to
damage and improper operation of the range.
ii!i..............................
-5-
;_i!!i!i!i:i
II_'C!!!i
ELECTRIC WARMING DRAWER
• The purpose of the warming drawer is to hold hot cooked
foods at serving temperature. Always start with hot food;
cold food cannot be heated or cooked in the warming
drawer.
* Do not use the drawer to dry newspapers. If overheated,
they can catch on fire.
• Do not leave paper products, plastics, canned food, or
combustible materials in the drawer.
• Never leave jars or cans of fat drippings in or near your
drawer.
• Do not warm food in the drawer for more than two hours.
•Do not touch the heating element or the interior
surface of the drawer. These surfaces may be hot
enough to burn.
I|I!NI!NI}I!II:
The inside surface of the drawer may be hot when the
drawer is opened.
• Use care when opening the drawer. Open the drawer
slightly and let hot air or steam escape before removing or
replacing food. Hot air or steam which escapes can cause
burns to hands, face and/or eyes.
• Do not use aluminum foil to line the warming drawer. Foil
is an excellent heat insulator and will trap heat beneath it.
This will upset the performance of the drawer and it could
damage the interior finish.
SELF-CLEANING THE OVEN
•Be sure to wipe off excess spillage before self cleaning
operation.
• Before self-cleaning the oven, remove the broiler pan,
broiler grid, all cookware, probe and any aluminum foil.
• Nickel oven shelves should be removed from the oven
before beginning the self-clean cycle.
• Clean only parts listed in this Owner's Manual.
• Do not clean the door gasket. The door gasket is essential
for a good seal. Care should be taken not to rub, damage or
move the gasket.
• If the self-cleaning mode malfunctions, turn the oven off
and disconnect the power supply. Have it serviced by a
qualified technician.
• Do not use oven cleaners. No commercial oven cleaner or
oven liner of any kind should be used in or around any part
of the oven. Residue from oven cleaners will damage the
inside of the oven when the self clean cycle is used.
COOK MEAT AND POULTRY
THOROUGHLY...
Cook meat and poultry thoroughly--meat to at least an
INTERNALtemperature of 160°F and poultry to at least an
INTERNALtemperature of 180°F.Cooking to these
temperatures usually protects against foodborne illness.
-6-

OVEN
Stand away from the range when opening the door of a hot
oven. The hot air and steam that escape cancause burns to
hands, face and eyes.
• Do not use the oven for a storage area. Items stored in the
oven can ignite.
• Keep the oven free from grease buildup.
• Place the oven shelves in the desired position while the
oven is cool
• Pulling out the shelf to the stop-lock is a convenience in
lifting heavy foods. It is also a precaution against burns
from touching hot surfaces of the door or oven walls. The
lowest position is not designed to slide.
• Do not heat unopened food containers. Pressure could
build up and the container could burst, causing an injury.
• Do not use your oven to dry newspapers. If overheated,
they can catch fire.
• Use only glass cookware that is recommended for use in gas
ovens.
• Always remove the broiler pan from range as soon as you
finish broiling. Grease left in the pan can catch fire if oven
is used without removing the grease from the broiler pan.
• When broiling, if meat is too close to the flame, the fat may
ignite. Trim excess fat to prevent excessive flare-ups.
• Make sure the broiler pan is in place correctly to reduce the
possibility of grease fires.
• If you should have a grease fire in the broiler pan, press the
CLEAR/OFF pad, and keep the oven door closed to contain
fire until it burns out.
• For safety and proper cooking performance, always bake
and broil with the oven door closed.
ii
ii
ii
ii
ii!i..............................
• Do not use aluminum foil anywhere in the oven except as
described in this manual. Misuse could result in a fire
hazard or damage to the range.
• When using cooking or roasting bags in the oven, follow the
manufacturer's directions.
READ AND FOLLOW THIS SAFETY INFORMATION CAREFULLY.
SAVE THESE INSTRUCTIONS
-7-
iiiii_
;_i!_i!i!i_iI
.............................ii;!,i
USING THE GAS SURFACE
BURNERS.
Throughout this manual, features and appearance may vary
from your model.
Before Lighting a Gas Burner
• Make sure all burners and burner caps are in place.
• Make sure all grates on the range are properly placed
before using any burner.
After Lighting a Gas Burner
• Do not operate the burner for an extended period of time
without cookware on the grate. The finish on the grate may
chip without cookware to absorb the heat.
• Be sure the burners and grates are cool before you place
your hand, a pot holder, cleaning cloths or other materials
on them.
How to Light a Gas Surface Burner
Make sure all the surface burners
are placed in their respective _llll
positions.
Push the control knob in and
turn it to the LITE position.
You will hear a little clicking
noise-the sound of the electric
spark igniting the burner.
Turn the knob to adjust the Push the control knob in
flame size. If the knob stays at and turn it to the LITE
LITE, it will continue to click, position.
When one burner is turned to
LITE, all the burners spark. Do not attempt to disassemble
or clean around any burner while another burner is on. An
electric shock may result, which could cause you to knock
over hot cookware.
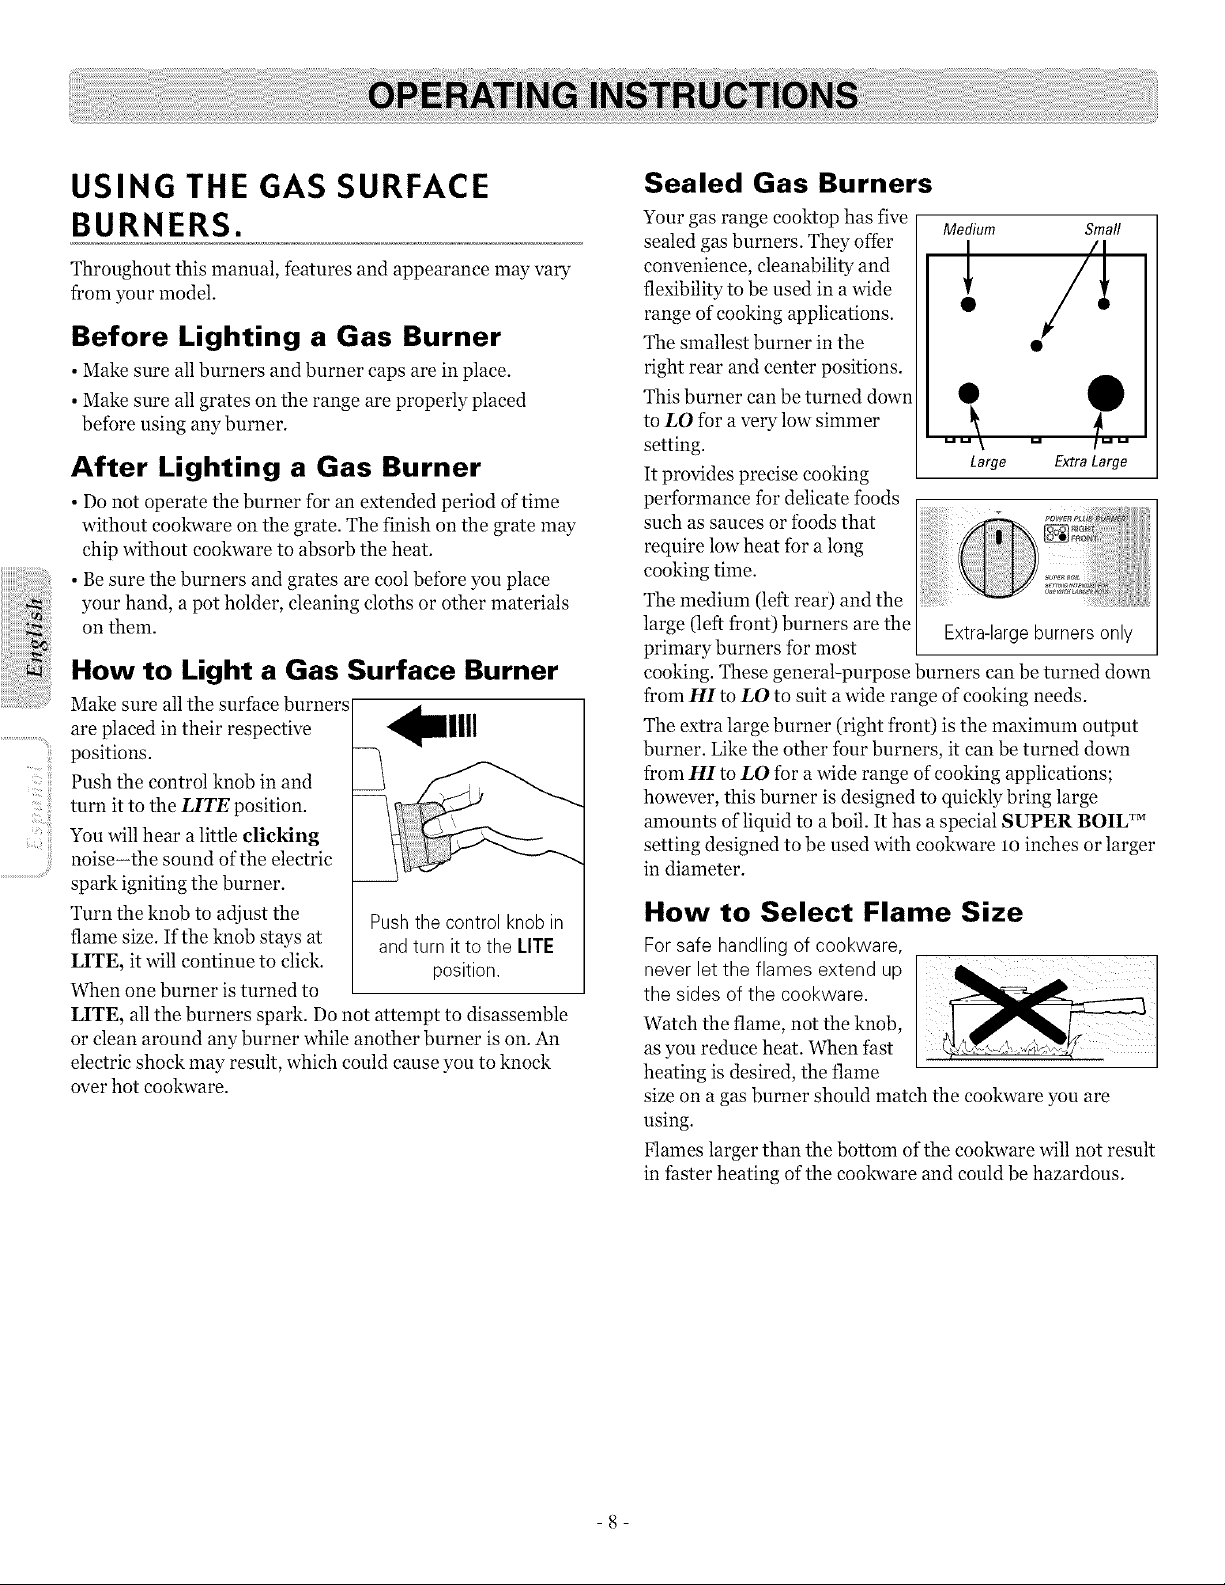
Sealed Gas Burners
Your gas range cooktop has five
sealed gas burners. They offer
convenience, cleanability and
flexibility to be used in a wide
range of cooking applications.
The smallest burner in the
right rear and center positions.
This burner can be turned down
to LO fbr a very low simmer
setting.
It provides precise cooking
performance for delicate foods
such as sauces or foods that
require low heat for a long
cooking time.
The medium (left rear) and the
large (left front) burners are the
primary burners for most
Medium Small
! /'!
• @
Large Extra Large
Extra-largeburnersonly
cooking. These general-purpose burners can be turned down
from HI to LO to suit a wide range of cooking needs.
The extra large burner (right front) is the maximum output
burner. Like the other four burners, it can be turned down
from HI to LO for a wide range of cooking applications;
however, this burner is designed to quickly bring large
amounts of liquid to a boil. It has a special SUPER BOIL TM
setting designed to be used with cookware lo inches or larger
in diameter.
How to Select Flame Size
Forsafe handling of cookware,
never let the flames extend up
the sides ofthe cookware.
Watch the flame, not the knob,
as you reduce heat. When fast
heating is desired, the flame
size on a gas burner should match the cookware you are
using.
Flames larger than the bottom of the cookware will not result
in faster heating of the cookware and could be hazardous.
-8-
Top-of-Range Cookware
Aluminum: Medium-weight cookware isrecommended
because it heats quickly and evenly. Most foods brown evenly
in an aluminum skillet.
Use saucepans with tight-fitting lids when cooking with
mininmm amounts of water.
Cast-Iron: If heated slowly, most skillets will give
satisfactory results.
Enamelware: Under some conditions, the enamel of some
eookware may melt. Follow eookware manufacturer's
recommendations for cooking methods.
Glass: There are two types of glass eookware-those for oven
use only and those for top-of-range cooking (saucepans,
coffee and teapots). Glass conducts heat very slowly.
Heatproof GlassCeramic: Can be used for either surface or
oven cooking. It conducts heat very slowly and cools very
slowly. Check eookware manufacturer's directions to be sure
it can be used on gas ranges.
Stainless Steel: This metal alone has poor heating
properties and is usually combined with copper, aluminum
or other metals for improved heat distribution. Combination
metal skillets usually work satisfactorily ifthey are used with
medium heat as the manufacturer recommends.
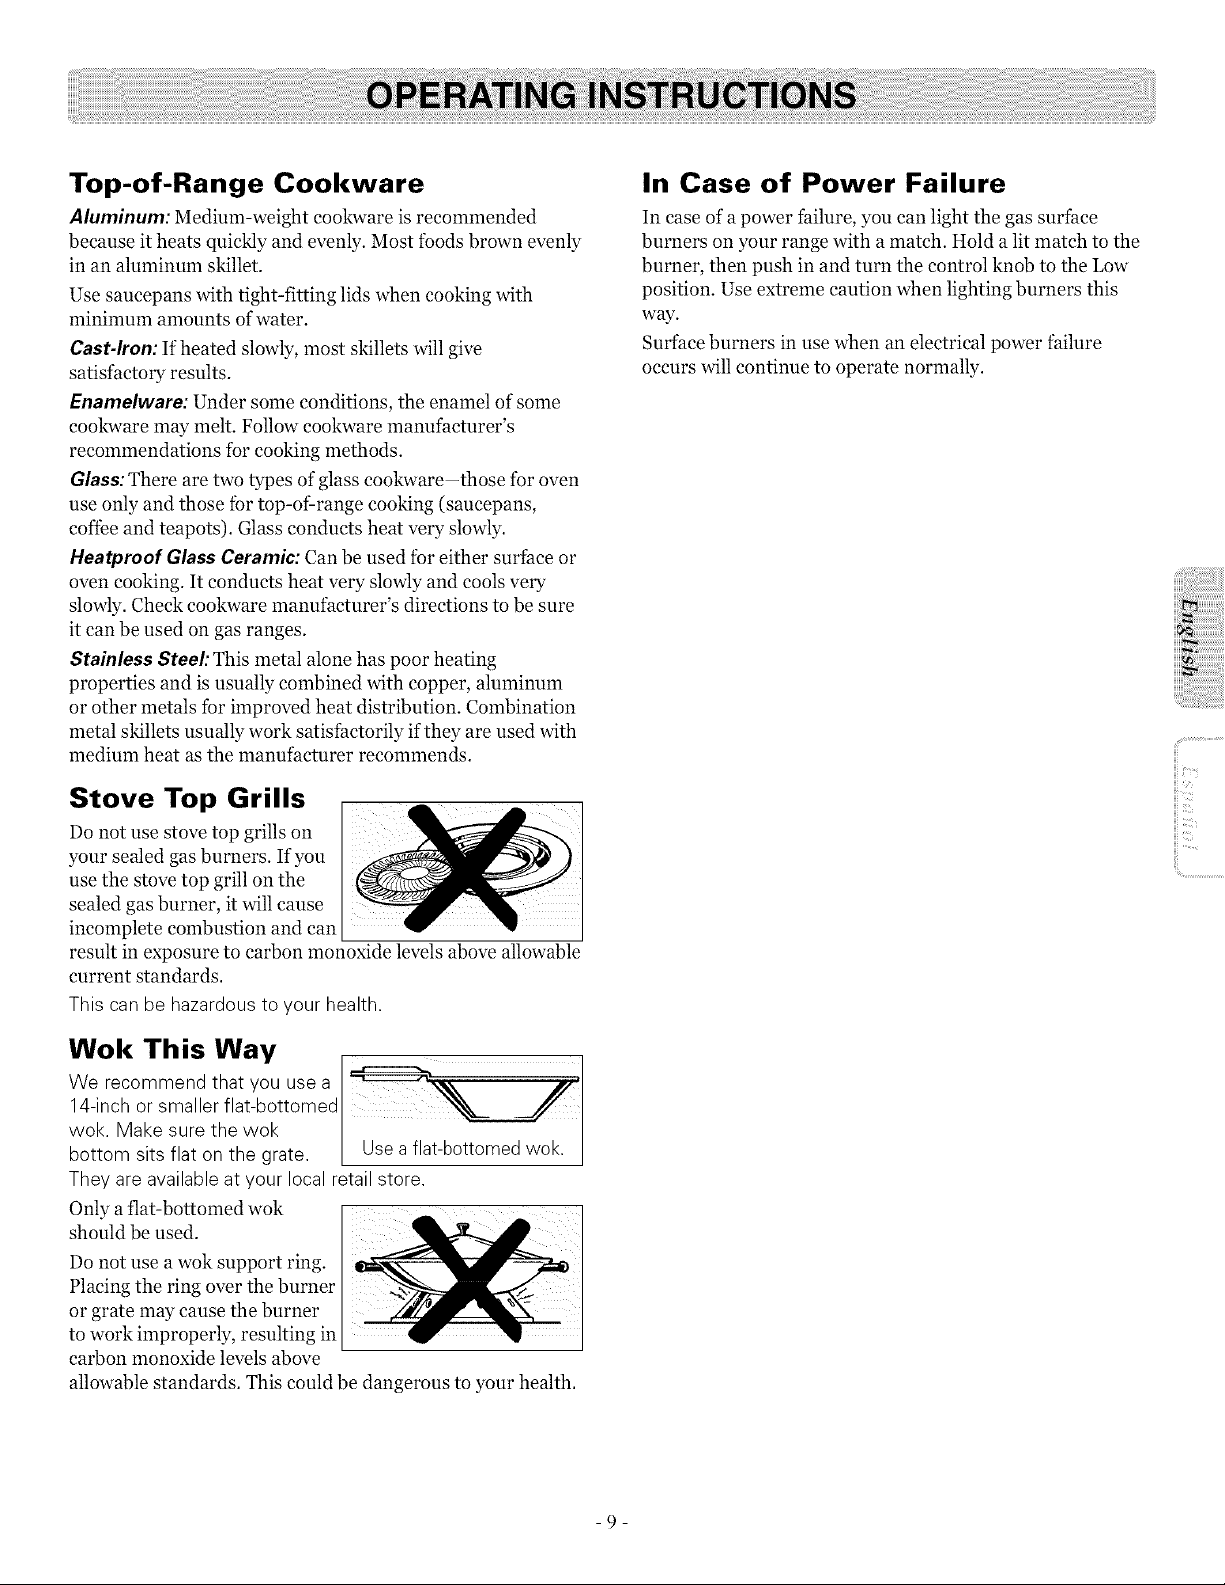
Stove Top Grills
Do not use stove top grills on ...........
your sealed gas burners. If you
use the stove top grill on the
sealed gas burner, it will cause
incomplete combustion and can
result in exposure to carbon monoxide levels above allowable
current standards.
This canbe hazardous to your health.
Wok This Way
We recommend that you usea
14-inch or smaller flat-bottomed
wok. Make sure the wok
bottom sits flat on the grate. Use a flat-bottomed wok.
They are available atyour local retailstore.
Only aflat-bottomed wok
should be used.
Do not use a wok support ring.
Placing the ring over the burner
or grate may cause the burner
to work improperly, resulting in
carbon monoxide levels above
allowable standards. This could be dangerous to your health.
In Case of Power Failure
In ease of a power failure, you can light the gas surface
burners on your range with a match. Hold a lit match to the
burner, then push in and turn the control knob to the Low
position. Use extreme caution when lighting burners this
way.
Surface burners in use when an electrical power failure
occurs will continue to operate normally.
iiii>_
ii!i..............................
-9-
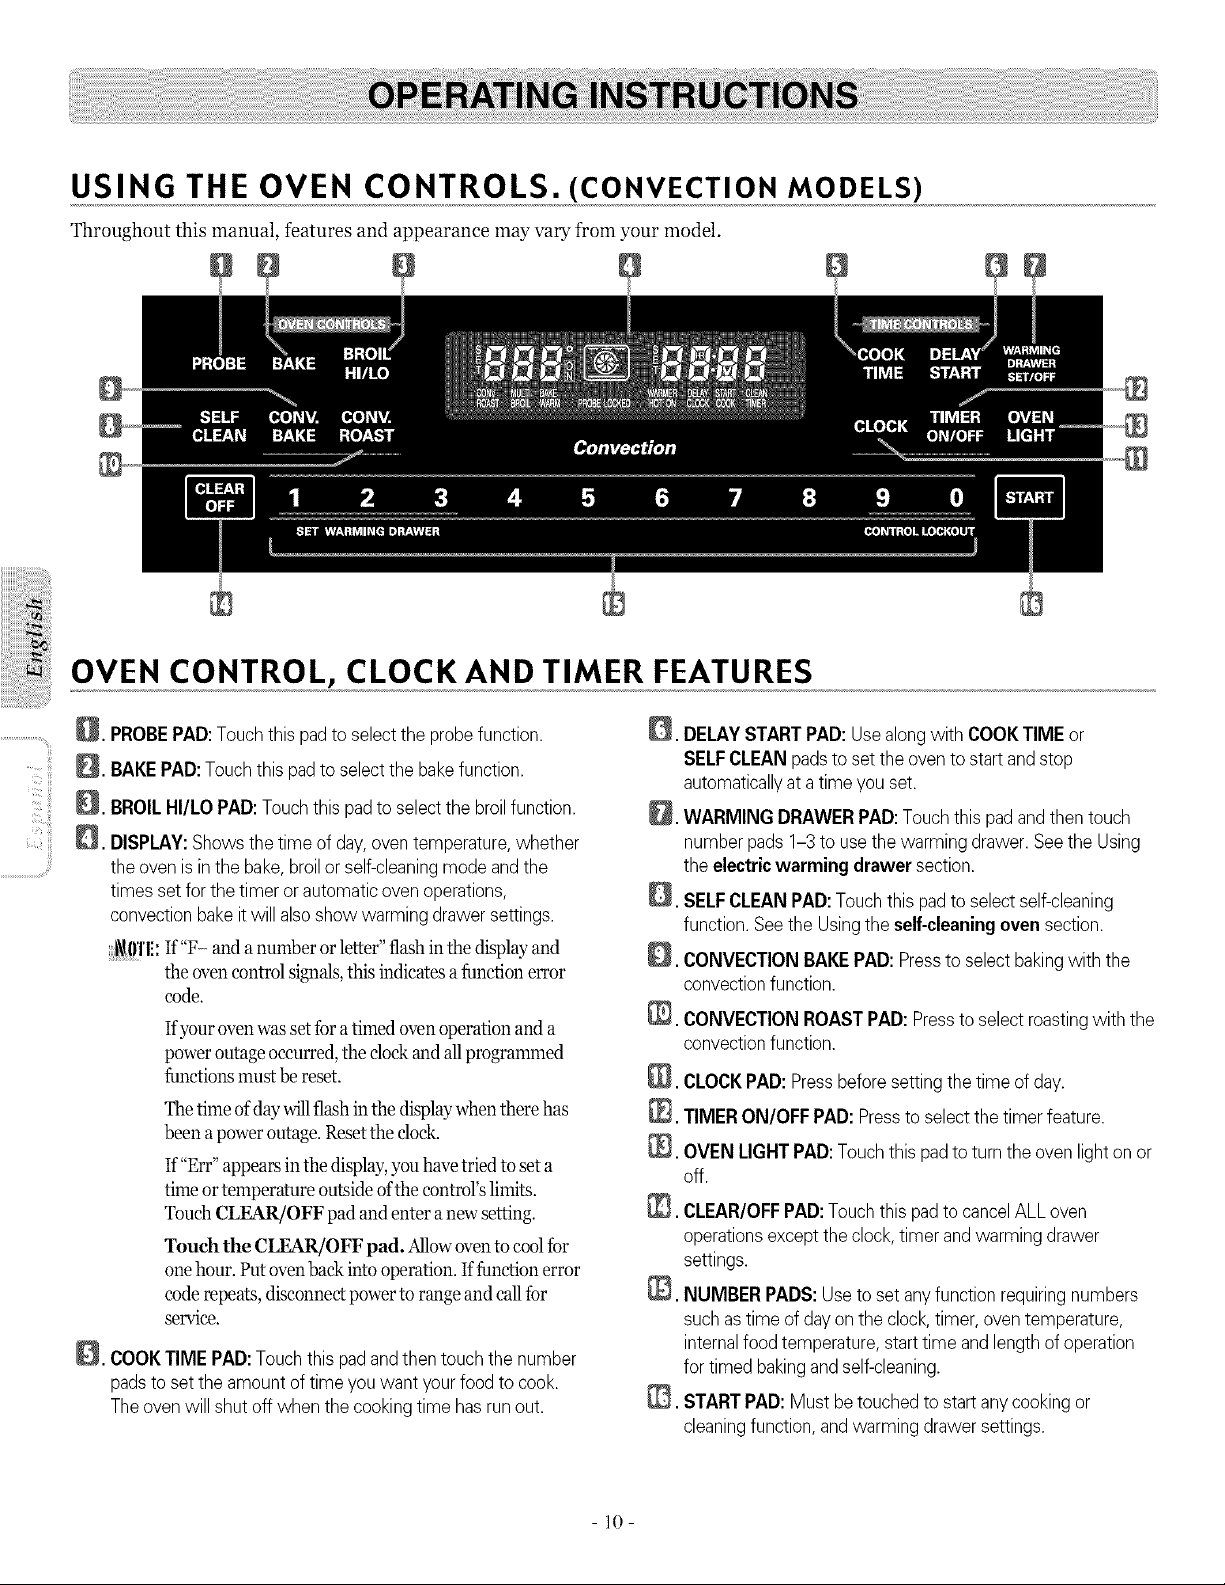
USING THE OVEN CONTROLS. (CONVECTION MODELS)
Throughout this manual, features and appearance may vary from your model.
OVEN CONTROL, CLOCK AND TIMER FEATURES
Q.
Q.
D.
PROBEPAD:Touchthis padtoselect theprobefunction.
BAKEPAD:Touchthis padtoselect thebakefunction.
BROILHI/LOPAD:Touchthis padtoselectthebroilfunction.
DISPLAY:Shows the time ofday,oven temperature,whether
the oven isinthebake,broilor self-cleaningmode andthe
times set forthe timer or automaticoven operations,
convectionbake it willalsoshow warming drawer settings.
i\!0''1 If"F- and anumber orletter" flash inthe display and
the oven control signals, this indicates a function error
code.
Ifyouroven wasset foratimed oven operation and a
power outage occurred,the dock and allprogrammed
functions must be reset.
Thetime of day_dllflash inthe display when there has
been apoweroutage. Reset the dock.
If"Err" appears inthe display, you havetriedto seta
time or temperature outside ofthe control'slimits.
TouchCLEAR/OFF pad and enter a new setting.
Touch the CLEAR/OFF pad. Allow oven to cool for
onehour. Putovenbackinto operation. If function error
coderepeats, disconnec_ power to rangeand call for
service.
_. COOKTIME PAD:Touch this pad andthen touchthenumber
padstoset the amount of time you want yourfoodtocook.
Theoven willshut off whenthe cooking time has run out.
,
D,
Q.
@.
@
@.
@
DELAYSTARTPAD: Use alongwith COOKTIMEor
SELFCLEANpadstoset the oven tostart and stop
automaticallyat atime youset.
WARMINGDRAWERPAD:Touchthis pad and then touch
numberpads 1-3 touse the warming drawer. See theUsing
theelectricwarming drawer section.
SELFCLEAN PAD:Touch this padtoselect self-cleaning
function.SeetheUsingtheself-cleaningoven section.
CONVECTIONBAKEPAD:Presstoselect bakingwith the
convectionfunction.
CONVECTIONROASTPAD: Presstoselect roastingwith the
convectionfunction.
CLOCKPAD: Pressbefore setting the time ofday.
TIMERON/OFF PAD: Pressto select thetimer feature.
OVENLIGHTPAD:Touch this padtoturn theoven light on or
off.
CLEAR/OFFPAD:Touchthis pad to cancelALL oven
operationsexcept the clock,timer and warming drawer
settings.
@. NUMBER PADS:Usetoset any function requiringnumbers
such astime ofday on theclock, timer, oven temperature,
internalfood temperature,starttime and length of operation
fortimed bakingand self-cleaning.
_. STARTPAD:Mustbetouched tostart anycookingor
cleaningfunction, andwarming drawer settings.
10
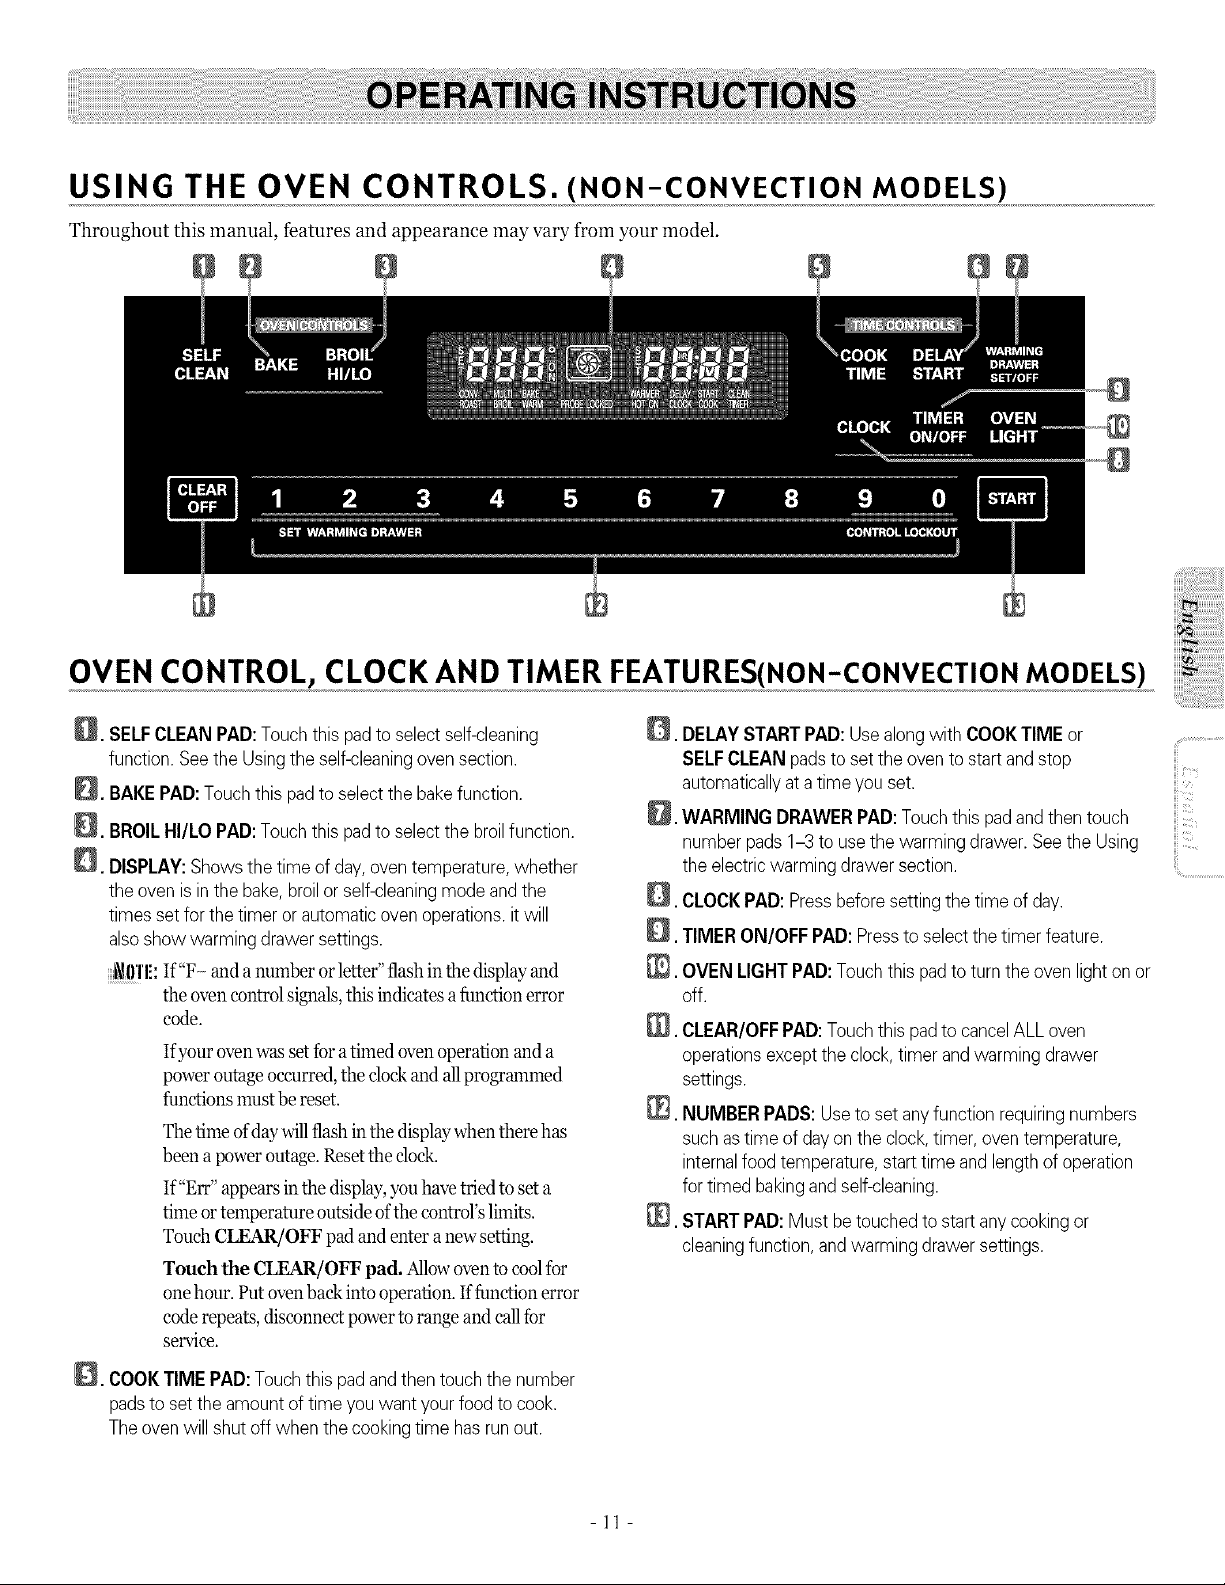
USING THE OVEN CONTROLS. (NON-CONVECTION MODELS)
Throughout this manual, features and appearance may vary from your model.
OVEN CONTROL, CLOCK AND TIMER FEATURES(NON-CONVECTIONMODELS)
_. SELFCLEAN PAD:Touchthis padtoselect self-cleaning
function.SeetheUsingtheself-cleaningoven section.
_. BAKEPAD:Touchthis pad toselectthebakefunction.
_. BROILHI/LO PAD:Touchthis pad toselect thebroilfunction.
_. DISPLAY:Showsthetime ofday, oventemperature,whether
theoven is inthebake,broilor self-cleaningmode and the
timessetforthe timer orautomaticoven operations,it will
alsoshow warming drawer settings.
_0'1'1!: If"F- and anumber or letter" flashinthe display and
the oven controlsignals, this indicates afunction error
code.
Ifyour oven was setfora timed oven operation and a
power outage occurred, the clock and allprogrammed
functions must be reset.
Thetime of daywillflash inthe display when there has
been apoweroutage. Reset the clock.
If"Err" appears in the display, you havetried to set a
time or temperature outside of the control's limits.
Touch CLEAR/OFF padand enter a newsetting.
Touch the CLEAR/OFF pad. Allowoven tocool for
onehour. Putovenbackinto operation. Iffunction error
coderepeats, disconnec_ power to range and call for
service.
_. COOKTIMEPAD:Touchthis pad andthen touch thenumber
padstoset theamount oftime you want your food tocook.
The ovenwillshut off whenthe cooking time hasrunout.
Q.
@.
0. DELAYSTARTPAD:Usealongwith COOKTIME or .................................
SELFCLEAN padsto set theoven to start andstop
automaticallyat a time youset.
iii
_. WARMING DRAWERPAD:Touchthis padandthen touch
numberpads 1-3 to usethewarming drawer. SeetheUsing
theelectricwarming drawersection. ..............................
CLOCKPAD:Pressbeforesetting thetime ofday.
TIMER ON/OFF PAD:Presstoselectthetimer feature.
N,
OVENLIGHTPAD:Touchthis pad to turnthe oven light on or
off.
CLEAR/OFFPAD: Touchthis pad tocancelALL oven
operationsexcepttheclock,timer and warming drawer
settings.
@. NUMBERPADS: Use toset anyfunction requiringnumbers
such astime ofdayon the clock,timer, oven temperature,
internalfood temperature,start time and length ofoperation
fortimed bakingand self-cleaning.
@. START PAD: Mustbe touched tostart any cookingor
cleaningfunction, and warmingdrawer settings.
-11 -

USING THE OVEN Power Outage
%1:,11i_!_i
ii_'C! iii
..............................ill!;
Toavoid possible burns, placethe shelves in the desired
position before you turn the oven on.
Before you begin...
The shelves have stop-locks, so
that when placed correctly on
the shelf supports (A through
E), they will stop before coming
completely out, and will not tilt.
When placing and removing
cookware, pull the shelf out to
the bump on the shelf support.
To remove a shelf, pull it
toward you, tilt the f¥ont end up
and pull it out.
To replace, place the end of
the shelf (stop-locks) on the
support, tilt up the front and
push the shelf in.
_g!'l!: The shelf is not designed to slide out at the special low
shelf (R) position.
Theovenhas 6 shelf
positions.
It alsohasaspecial low
shelf position (R)forextra
large items, such asa large
turkey.
Oven Vent
Your oven is vented through
ducts at the rear ofthe range.
Do not block these ducts when
cooking in the oven-it is
important that the flow of hot
air from the oven and fresh air
to the oven burner be
uninterrupted. Avoid touching
the vent openings or nearby
surfaces during oven or broiler
operation-they may become
hot.
• Handles ofpots and pans on
the cooktop may become hot if
left too close to the vent.
i i
-
Plastic items on the cooktop
may melt ifleft too close to
the vent.
Ventappearance and
location vary.
• Do not leave plastic or flammable items on the cooktop-
they may melt or ignite if left too close to the vent.
• Do not leave closed containers on the cooktop. The
pressure in closed containers may increase, which may
cause them to burst.
• Metal items will become very hot if they are left on the
cooktop, and could cause burns.
The oven or broiler cannot be lit during a power failure. Gas
will not flow unless the glow bar is hot.
If the oven is in use when a power failure occurs, the oven
burner shuts off and cannot be re-lit until power is restored.
This is because the flow of gas is automatically stopped and
will not resume when power is restored until the glow bar
has reached operating temperature.
Oven Light
Touch the OVEN LIGHT pad on the control panel to turn
the light on or off:
- 12-
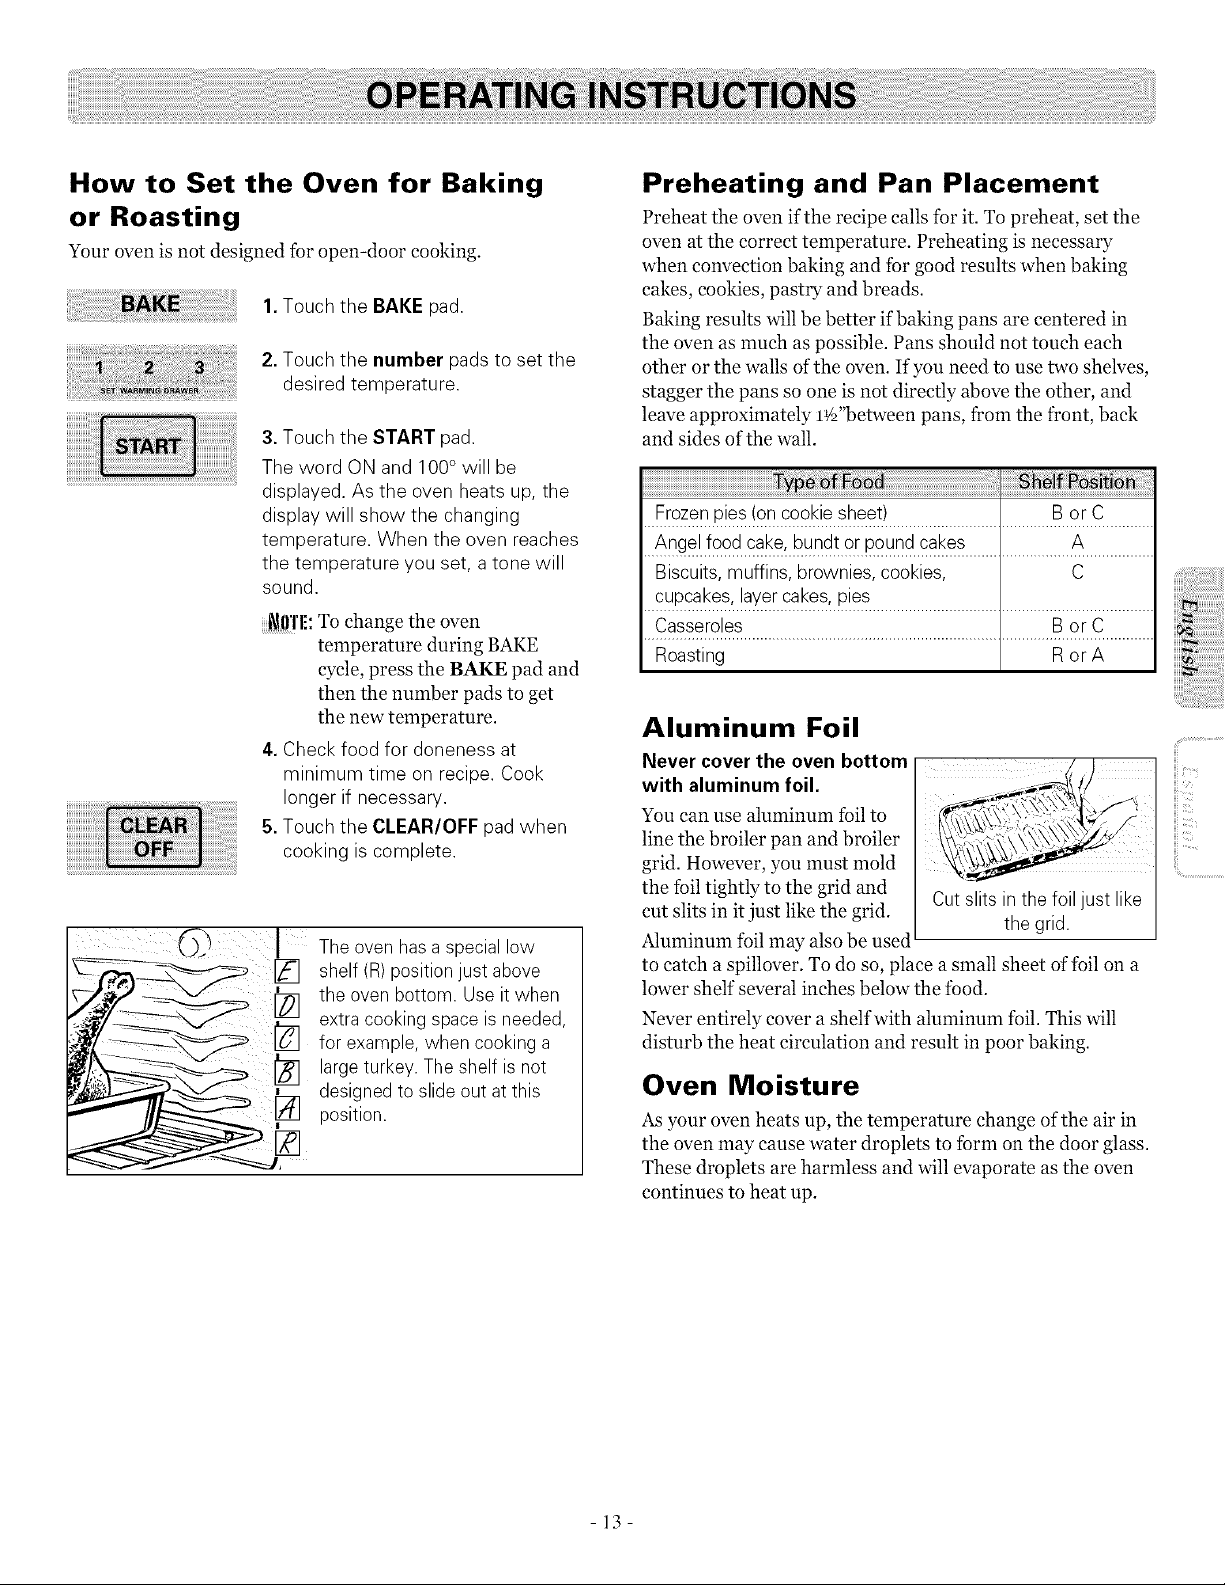
How to Set the Oven for Baking
or Roasting
Your oven is not designed for open-door cooking.
1.Touch the BAKEpad.
2.Touch the number pads to set the
desired temperature.
3.Touch the START pad.
The word ON and 100°will be
displayed. As the oven heats up, the
display will show the changing
temperature. When the oven reaches
the temperature you set, a tone will
sound.
_l!'!'l!: To change the oven
temperature during BAKE
cycle, press the BAKE pad and
then the number pads to get
the new temperature.
4.Check food for doneness at
minimum time on recipe. Cook
longer if necessary,
5.Touch the CLEAR/OFF pad when
cooking iscomplete.
Theovenhas a special low
shelf (R)position just above
the ovenbottom. Use itwhen
extra cooking space isneeded,
for example,when cooking a
largeturkey. Theshelf isnot
designedto slideoutatthis
_/] position.
Preheating and Pan Placement
Preheat the oven ifthe recipe calls for it. To preheat, set the
oven at the correct temperature. Preheating is necessary
when convection baking and for good results when baking
cakes, cookies, pastry and breads.
Baking results will be better if baking pans are centered in
the oven as much as possible. Pans should not touch each
other or the walls of the oven. If you need to use two shelves,
stagger the pans so one is not directly above the other, and
leave approximately l¢_"between pans, from the front, back
and sides of the wall.
i!i!i!i!i!i!i!i!i!i!i!i!i!i!i!i!i!i!i!i!i!i!i!i!i!i!i!i!i!i!i!i!i!i!i!i!i!i!i!i!i!i!i!i!i!i!i!i!i!i!i!i!i!i!i!i!i!i!i!i!i!i!i!i!i!i!i!i!i!i!i!i!i!_i_ii_i_i_ii_¸i_ii_ii:_i_j_iai! ii_i!_il_i!iii,,iiiiiiiiiiiiiiii_i_i_ii_!i_ii_i_ii_ii_i:_!_!_!i__i_i__iii:ii_ii_iii
Frozenpies(on cookie sheet) B or C
Angel food cake, bundtor pound cakes A
Biscuits,muffins, brownies, cookies, C
cupcak?._'..!a_.er,ca_ses'p!es.......................................................................
Casse[5?!fi_.............................................................................B°rC .............
Roasting Ror A
Aluminum Foil
Never cover the oven bottom
with aluminum foil.
You can use aluminum foil to
line the broiler pan and broiler
grid. However, you must mold
the foil tightly to the grid and
cut slits in itjust like the grid.
Aluminum foil may also be used
Cut slits in thefoil just like
the grid.
to catch a spillover. To do so, place a small sheet of foil on a
lower shelf several inches below the food.
Never entirely cover a shelf with aluminum foil. This will
disturb the heat circulation and result in poor baking.
Oven Moisture
As your oven heats up, the temperature change of the air in
the oven may cause water droplets to form on the door glass.
These droplets are harmless and will evaporate as the oven
continues to heat up.
,iiii_i_ii:::ii!i!iiiil;!i!iiiilililili!!iii)iiiiiiii
iii?i
H_.....
iii "
fill.....
-13-

How to Set the Oven for Broiling
Your oven is not designed for open-door cooking.
1.Placethe meat or fish on the
broiler grid in the broiler pan.
2. Follow suggested shelf positions in
the Broiling Guide. (Page 15)
3.The oven door must be closed
during broiling
4.Touch the BROIL HI/LO pad once
for HI Broil. To change to LO
Broil, touch the BROIL HI/LO pad
again.
5.Touch the START pad
.......ii
<iii
6. When broiling isfinished, touch
the CLEAR/OFF pad
Serve the food immediately, and leave the pan outside the
oven to cool during the meal for easiest cleaning.
Use LO Broil to cook foods such as poultry or thick cuts of
meat thoroughly without over-browning them.
/[ /l _i_/[/llIii tT_li]\"i\l\l\\_t
...................................y
Always usethe broiler pan
and grid that came with
your oven.
It is designedto minimize
smoking and spattering by
trappingjuices in the
shielded lower partofthe
pan.
- 14-
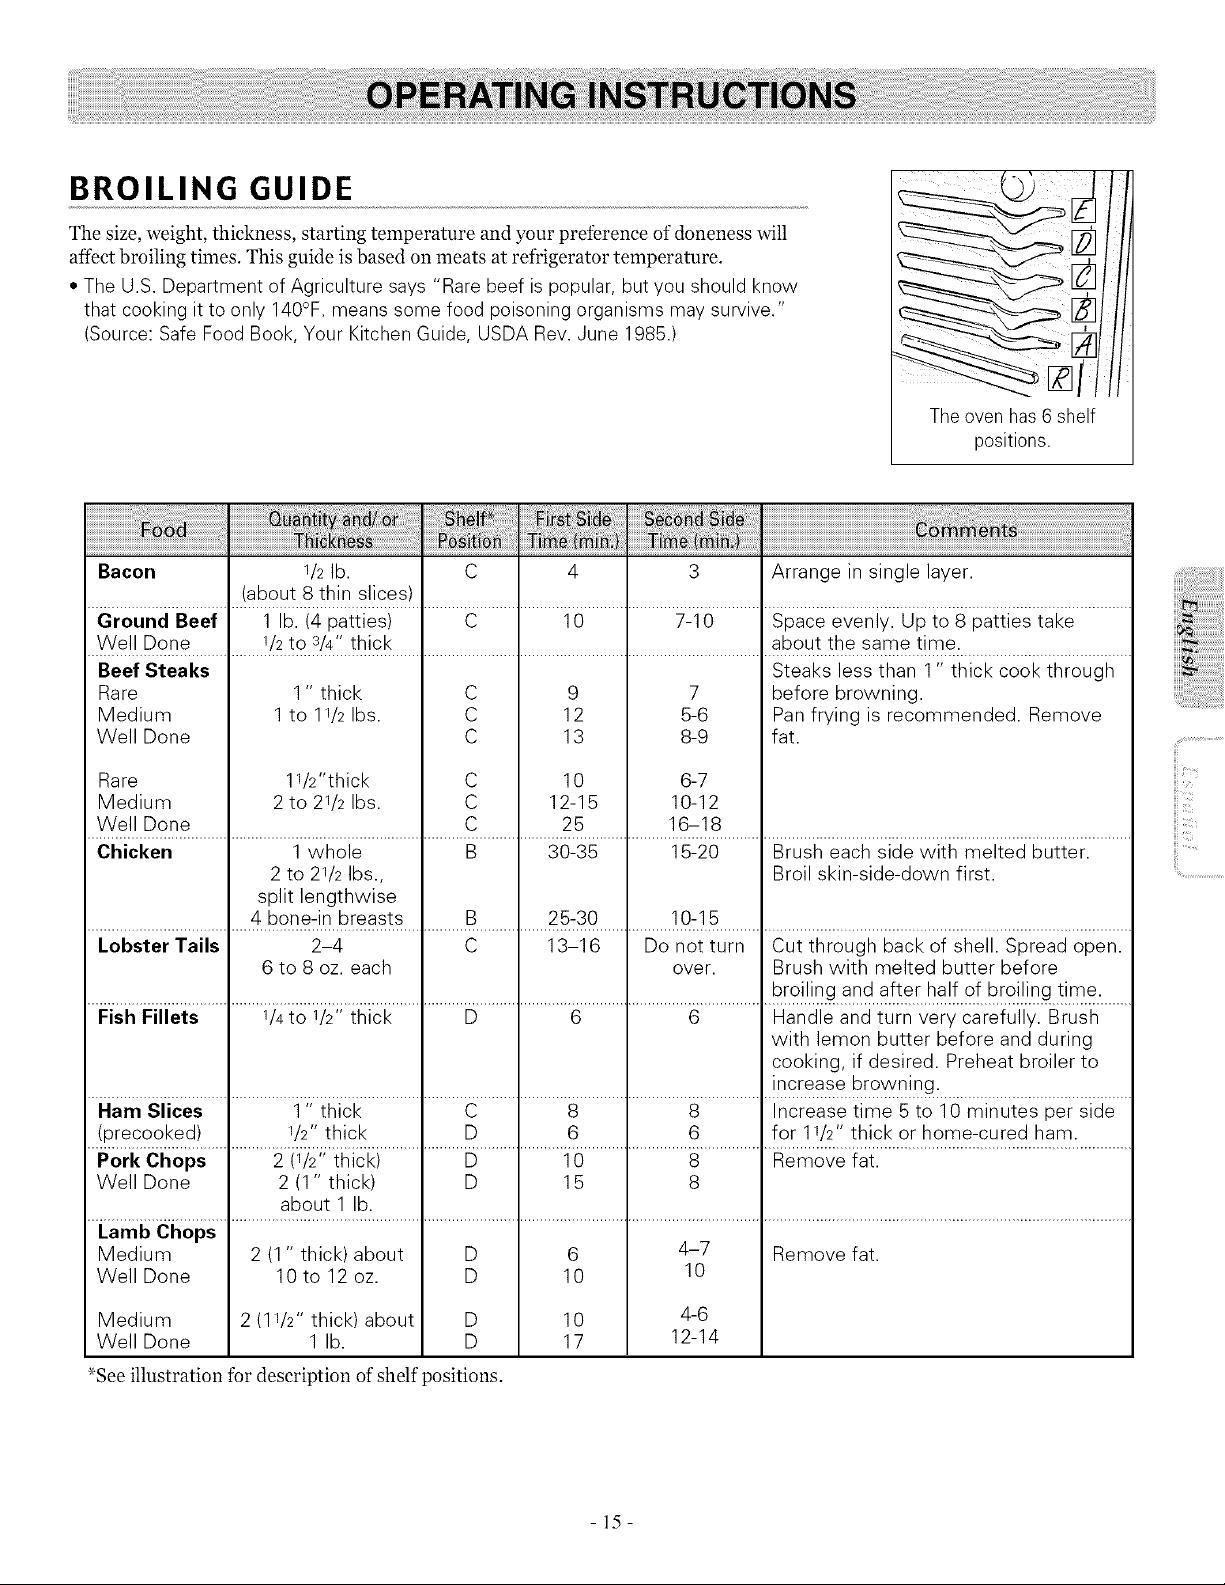
BROILING GUIDE
The size, weight, thickness, starting temperature and your preference ofdoneness will
affect broiling times. This guide is based on meats at refrigerator temperature.
• The U.S.Department of Agriculture says "Rare beef ispopular, butyou should know
that cooking it to only 140°F. means some food poisoning organisms may survive."
(Source: Safe Food Book, Your Kitchen Guide, USDA Rev.June 1985.)
Theovenhas 6 shelf
positions.
a ....
Bacon 1/2lb. C 4 3 Arrange in single layer.
(about 8 thin slices)
Ground Beef 1 lb. (4 patties) C 10 7-10 Space evenly. Up to 8 patties take
Well Done 1/2to s/4" thick about the same time.
Steaks less than 1" thick cook through
Beef Steaks
Rare
Medium
Well Done
11/2"thick
2 to 21/2 Ibs.
Rare
Medium
Well Done
1" thick C
1 to 1I/2 Ibs. C
C
C
C
C
9
12
13
10
12-15
25
7
5-6
8-9
6-7
10-12
16-18
before browning.
Pan frying is recommended. Remove
fat.
Chicken 1 whole B 30-35 15-20 Brush each side with melted butter.
2 to 21/2 Ibs., Broil skin-side-down first.
split lengthwise
4 bone-in breasts B 25-30 10-15
Lobster Tails 2-4 C 13-16 Do not turn Cut through back of shell. Spread open.
6 to 8 oz. each over. Brush with melted butter before
broiling and after half of broiling time.
Fish Fillets 1/4to 1/2" thick D 6 6 Handle and turn very carefully. Brush
with lemon butter before and during
cooking, if desired. Preheat broiler to
increase browning.
Ham Slices 1" thick C 8 8 Increase time 5 to 10 minutes per side
(precooked) 1/2"thick D 6 6 for 11/2" thick or home-cured ham.
Pork Chops 2 (1/2" thick) D 10 8 Remove fat.
Well Done 2 (1" thick) D 15 8
about 1 lb.
Lamb Chops
Medium 2 (1 " thick) about D 6 4-7 Remove fat.
Well Done 10 to 12 oz. D 10 10
Medium 2 (1I/2" thick) about D 10 4-6
Well Done 1 lb. D 17 12-14
_See illustration for description of shelf positions.
iiic_
-15-
ill
ii!iii!!iiii
..............................i;i_
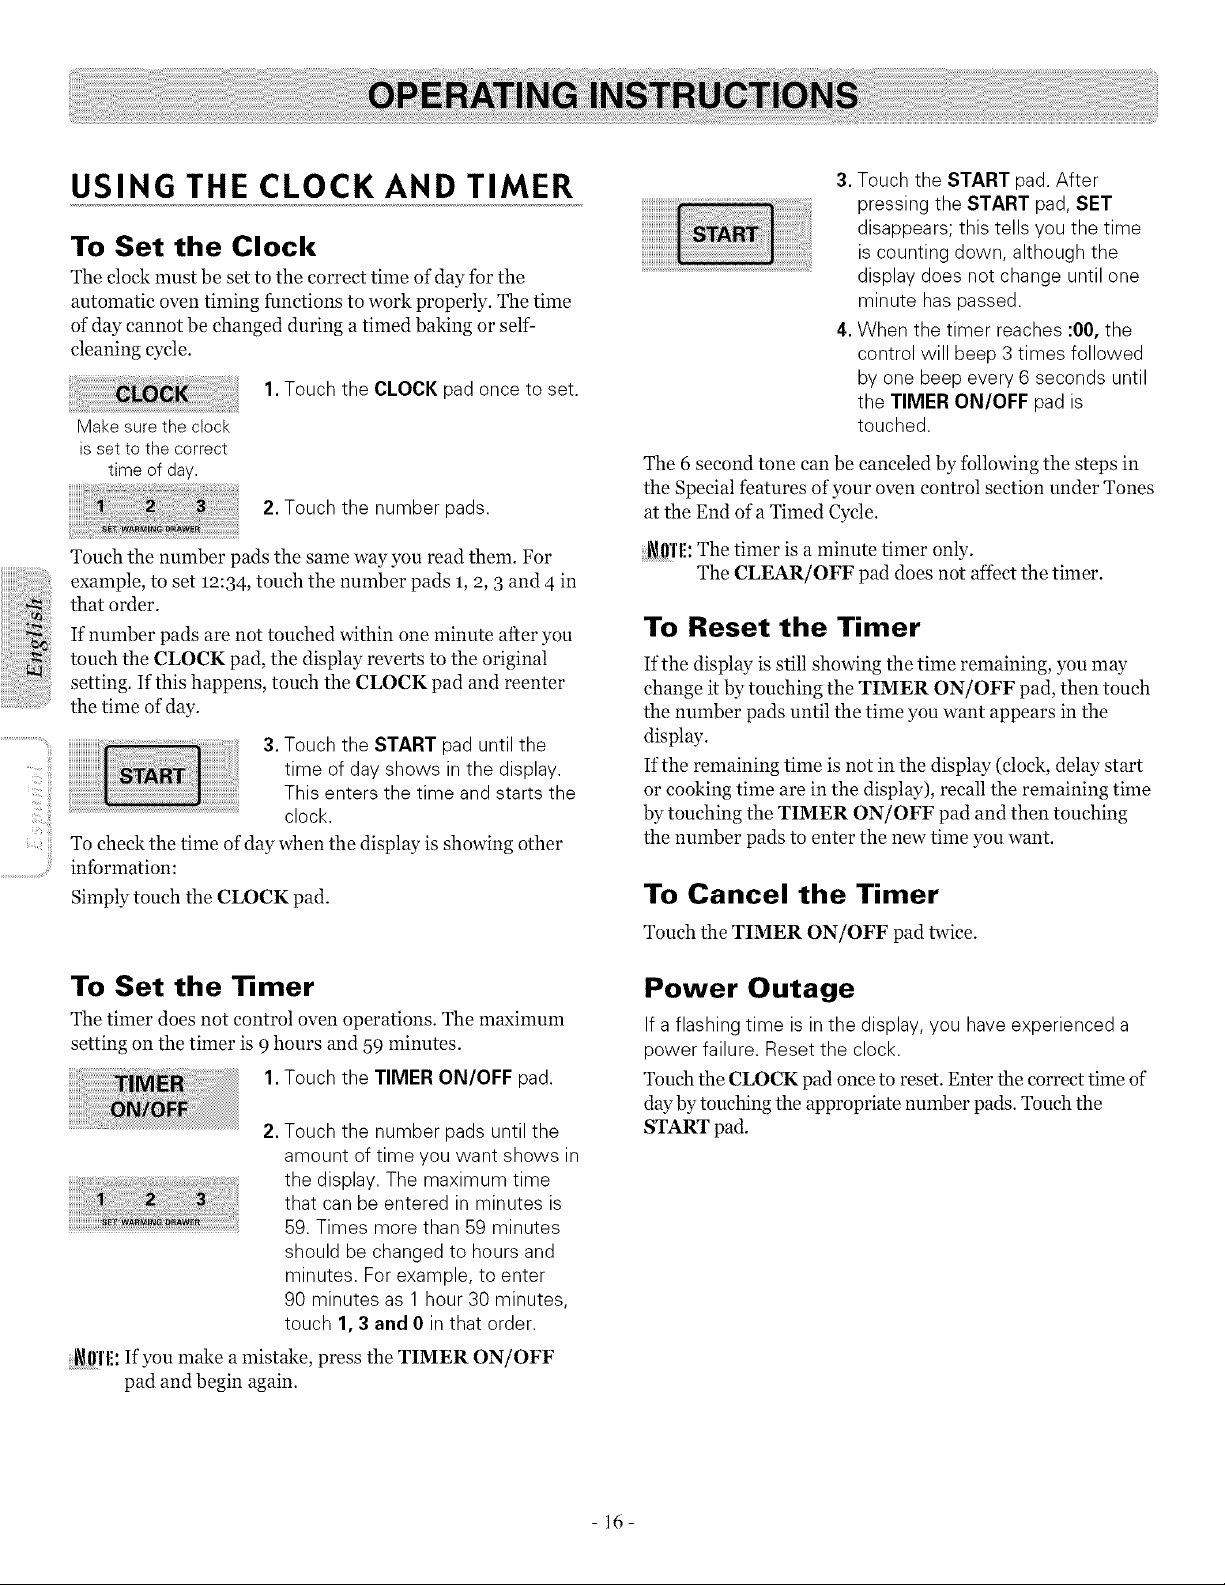
USING THE CLOCK AND TIMER
To Set the Clock
The clock must be set to the correct time of day for the
automatic oven timing functions to work properly. The time
of day cannot be changed during a timed baking or self-
denning cycle.
1. Touch the CLOCK pad once to set.
Make surethe clock
isset to the correct
time of day.
2.Touch the number pads.
Touch the number pads the same way you read them. For
example, to set 12:34 , touch the number pads 1,9, 3 and 4 in
that order.
If number pads are not touched within one minute after you
touch the CLOCK pad, the display reverts to the original
setting. If this happens, touch the CLOCK pad and reenter
the time of day.
3.Touch the START pad until the
time of dayshows in the display.
This enters the time and starts the
clock.
To cheek the time of day when the display is showing other
information:
Simply touch the CLOCK pad.
To Set the Timer
The timer does not control oven operations. The maximum
setting on the timer is 9hours and 59 minutes.
1. Touch the TIMER ON/OFF pad.
2.Touch the number pads until the
amount of time you want shows in
the display. The maximum time
that canbe entered in minutes is
59.Times more than 59 minutes
should be changed to hours and
minutes. Forexample, to enter
90 minutes as 1 hour 30 minutes,
touch 1,3 and 0 in that order.
i_l!'l'l!: If you make amistake, press the TIMER ON/OFF
pad and begin again.
3. Touch the START pad.After
pressing the START pad,SET
disappears; this tells you the time
iscounting down, although the
display does not change until one
minute haspassed.
4.When the timer reaches :00, the
control will beep 3 times followed
by one beep every 6 seconds until
the TIMER ON/OFF pad is
touched.
The 6 second tone can be canceled by following the steps in
the Special features of your oven control section under Tones
at the End of a Timed Cycle.
_ffl'l!: The timer is a minute timer only.
The CLEAR/OFF pad does not affect the timer.
To Reset the Timer
If the display is still showing the time remaining, you may
change it by touching the TIMER ON/OFF pad, then touch
the number pads until the time you want appears in the
display.
If the remaining time is not in the display (clock, delay start
or cooking time are in the display), recall the remaining time
by touching the TIMER ON/OFF pad and then touching
the number pads to enter the new time you want.
To Cancel the Timer
Touch the TIMER ON/OFF pad twice.
Power Outage
If a flashing time isin the display, you haveexperienced a
power failure. Reset the clock.
Touch the CLOCK pad once to reset. Enter the correct time of
day by touching the appropriate number pads. Touch the
START pad.
- 16-
USING THE TIMED BAKING
AND ROASTING FEATURES
_()'l'li: Foods that spoil easily-such as milk, eggs, fish,
stuffings, poultry and pork should not be allowed to
sit for more than 1 hour betbre or after cooking. Room
temperature promotes the growth of harmful bacteria.
Be sure that the oven light is off becanse heat from the
bulb will speed harmful bacteria growth.
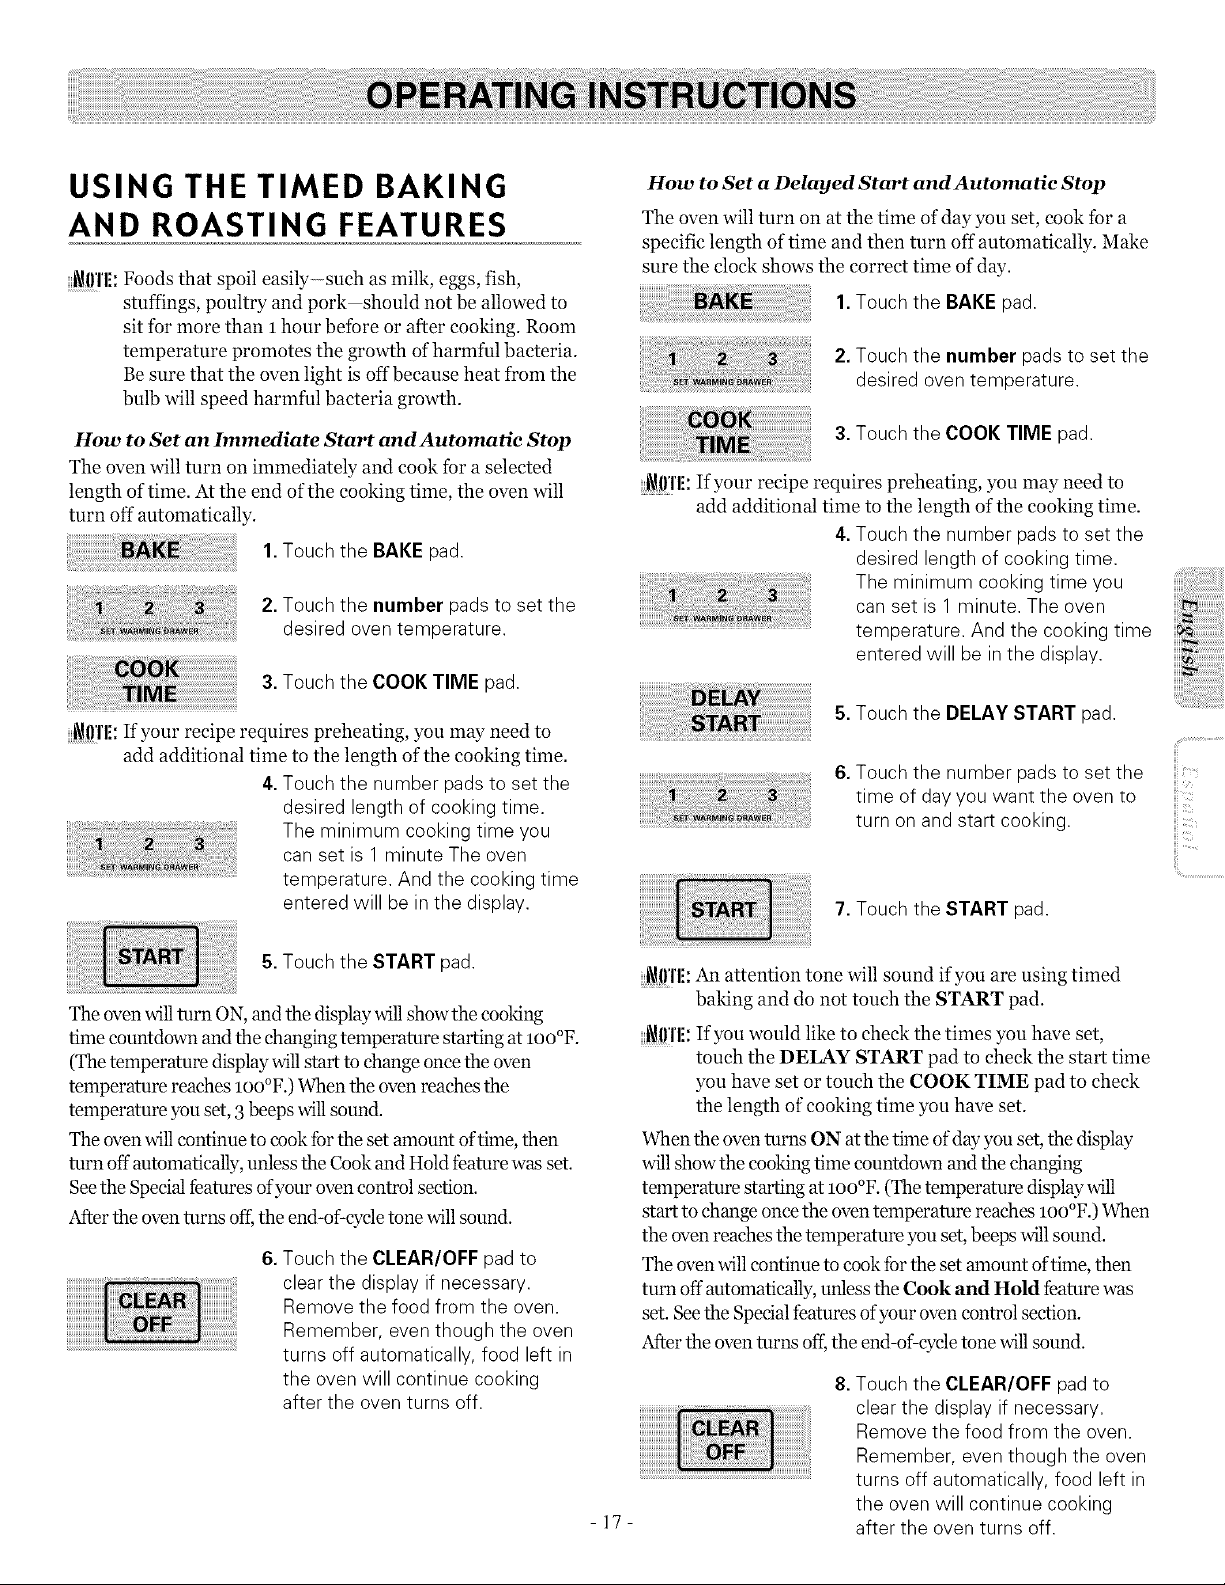
How to Set an Immediate Start and Automatic Stop
The oven will turn on immediately and cook for a selected
length of time. At the end of the cooking time, the oven will
turn off automatically.
1.Touch the BAKEpad.
2.Touch the number pads to set the
desired oven temperature.
3.Touch the COOK TIME pad.
_0'1'1!: If your recipe requires preheating, you may need to
add additional time to the length of the cooking time.
4.Touch the number padsto set the
desired length of cooking time.
The minimum cooking time you
can set is 1 minute The oven
temperature. And the cooking time
entered will be in the display.
How to Set a Delayed Start and Automatie Stop
The oven will turn on at the time of day you set, cook for a
specific length of time and then turn off automatically. Make
sure the do& shows the correct time of day.
1.Touch the BAKEpad.
2.Touch the number pads to set the
desired oven temperature.
3.Touch the COOK TIME pad.
_{!I'IE:If your recipe requires preheating, you may need to
add additional time to the length of the cooking time.
4.Touch the number padsto set the
desired length of cooking time.
The minimum cooking time you
can set is 1 minute. The oven
temperature. And the cooking time
entered will be in the display.
5.Touch the DELAY START pad.
6.Touch the number padsto set the
iii
time of dayyou want the oven to
turn on and start cooking.
7.Touch the START pad.
ii!i..............................
5.Touch the START pad.
The oven willturn ON, and the display willshow the cooking
time countdown and the changing temperature starting at loo°F.
(The temperature display will start to change once the oven
temperature reaches loo°F.) When the oven reaches the
temperature you set, 3beeps will sound.
The oven will continue to cook fbr the set amount of time, then
turn off automatically, unless the Cook and Hold feature was set.
Seethe Special features of your oven control section.
After the oven turns off,the end-of:cycle tone will sound.
6.Touch the CLEAR/OFF pad to
clear the display if necessary.
Remove the food from the oven.
Remember, even though the oven
turns off automatically, food left in
the oven will continue cooking
after the oven turns off.
_{!I'IE:An attention tone will sound if you are using timed
baking and do not touch the START pad.
_0Tli: If you would like to check the times you have set,
touch the DELAY START pad to check the start time
you have set or touch the COOK TIME pad to check
the length of cooking time you have set.
When the oven turns ON at the time of day you set, the display
will show the cooking time countdoml and the changing
temperature starting at loo°F. (The temperature display will
start to change once the oven temperature reaches 100°F.) When
the oven reaches the temperature you set, beeps willsound.
The oven will continue to cook fbr the set amount of time, then
turn off automatically, unless the Cook and Hold feature was
set. See the Special features of your oven control section.
After the oven turns off;the end-of:cycle tone willsound.
-17-
8.Touch the CLEAR/OFF pad to
clear the display ifnecessary.
Remove the food from the oven.
Remember, even though the oven
turns off automatically, food left in
the oven will continue cooking
after the oven turns off.
IL'C!!!i
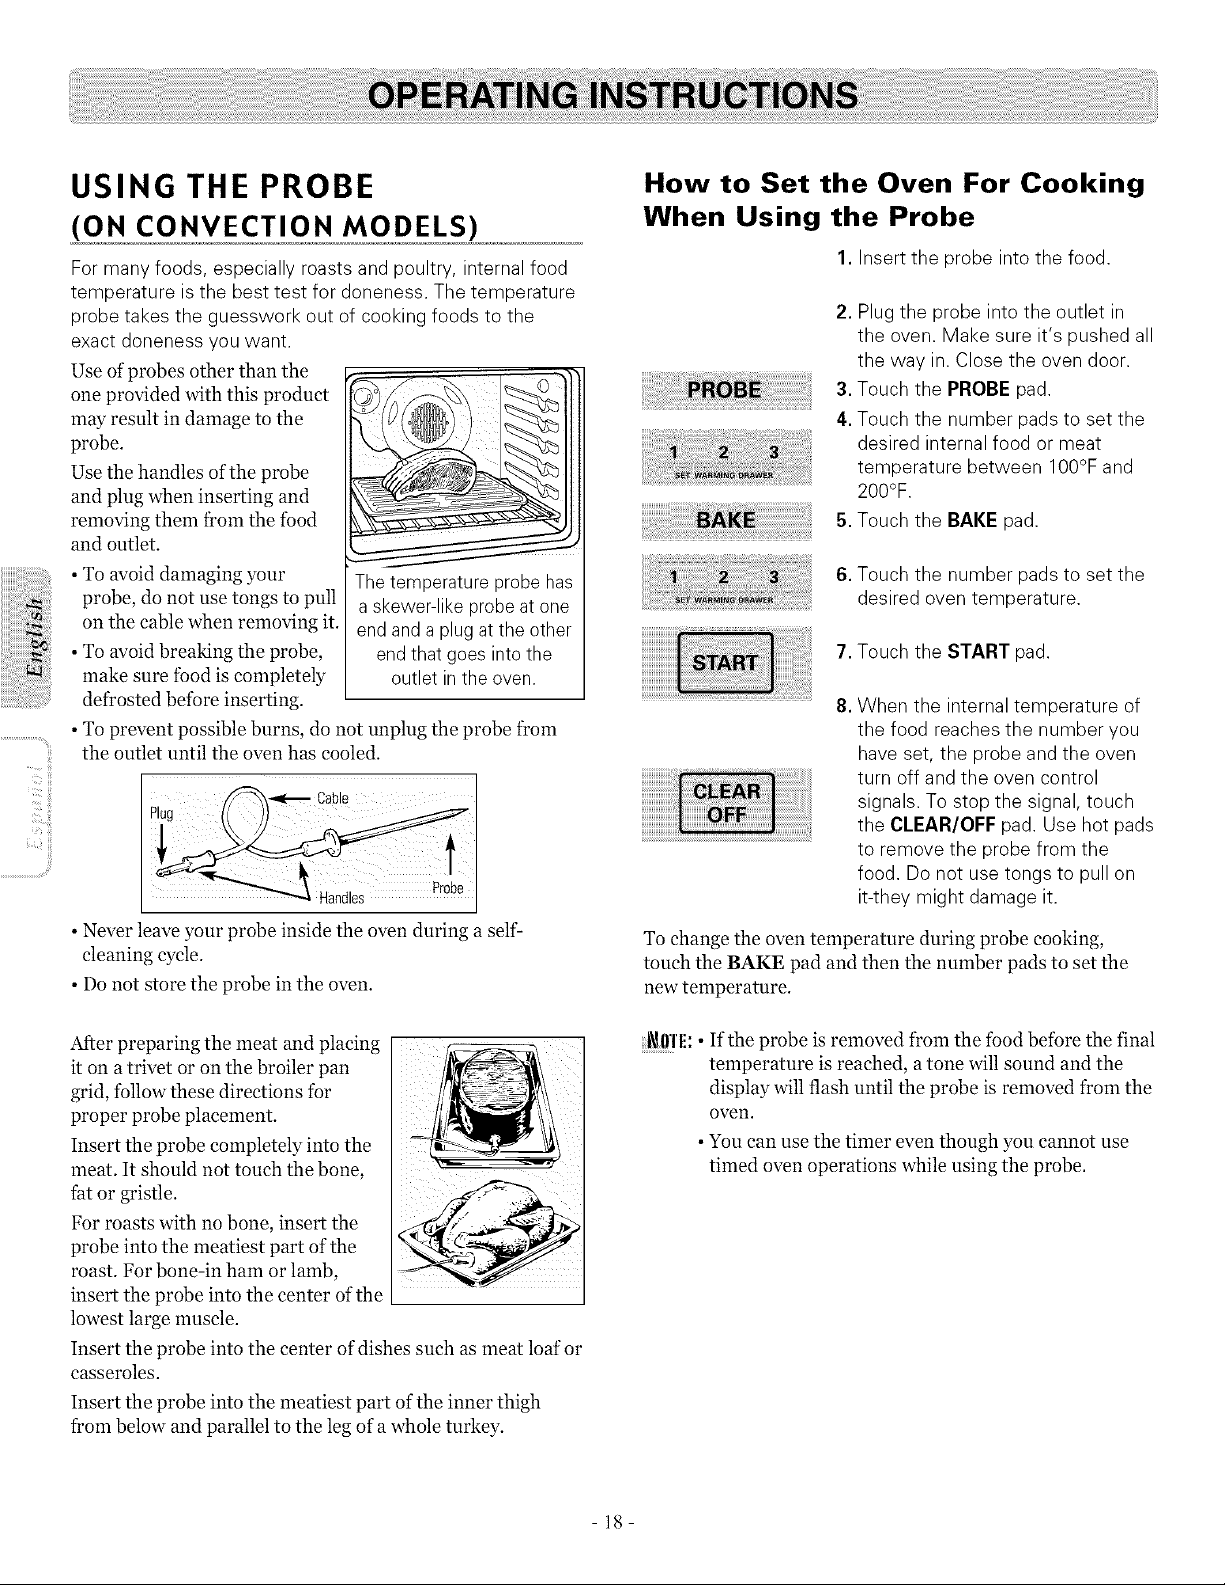
USING THE PROBE
(ON CONVECTION MODELS)
Formany foods, especially roasts and poultry, internal food
temperature isthe best test for doneness. The temperature
probe takes the guesswork out of cooking foods to the
exact doneness you want.
Use of probes other than the
one provided with this product
may result in damage to the
probe.
Use the handles of the probe
and plug when inserting and
removing them f?om the food
and outlet.
• To avoid damaging your The temperature probe has
probe, do not use tongs to pull a skewer-like probe at one
on the cable when removing it. end and a plug at the other
• To avoid breaking the probe, end that goes into the
make sure food is completely outlet inthe oven.
defrosted before inserting.
• To prevent possible burns, do not unplug the probe from
the outlet until the oven has cooled.
/_'-_'_ Cable I
Plug
Handles Pr0be
• Never leave your probe inside the oven during a self-
cleaning cycle.
• Do not store the probe in the oven.
After preparing the meat and placing
it on a trivet or on the broiler pan
grid, follow these directions for
proper probe placement.
Insert the probe completely into the
meat. It should not touch the bone,
fat or gristle.
For roasts with no bone, insert the
probe into the meatiest part of the
roast. For bone-in ham or lamb,
insert the probe into the center ofthe
lowest large muscle.
Insert the probe into the center of dishes such as meat loaf or
casseroles.
Insert the probe into the meatiest part ofthe inner thigh
from below and parallel to the leg of a whole turkey.
How to Set the Oven For Cooking
When Using the Probe
1. Insert the probe into the food.
2. Plug the probe into the outlet in
the oven. Make sure it's pushed all
the way in.Close the oven door.
3. Touch the PROBE pad.
4. Touch the number pads to set the
desired internal food or meat
temperature between 100°F and
200°F.
5. Touch the BAKE pad.
6. Touch the number pads to set the
desired oven temperature.
7. Touch the START pad.
8. When the internal temperature of
the food reaches the number you
haveset, the probe and the oven
turn off and the oven control
signals. To stop the signal, touch
the CLEAR/OFF pad. Use hot pads
to remove the probe from the
food. Donot usetongs to pull on
it-they might damage it.
To change the oven temperature during probe cooking,
touch the BAKE pad and then the number pads to set the
new temperature.
_ffl'l!: • If the probe is removed from the food before the final
temperature is reached, atone will sound and the
display will flash until the probe is removed from the
oven.
• You can use the timer even though you cannot use
timed oven operations while using the probe.
- 18-
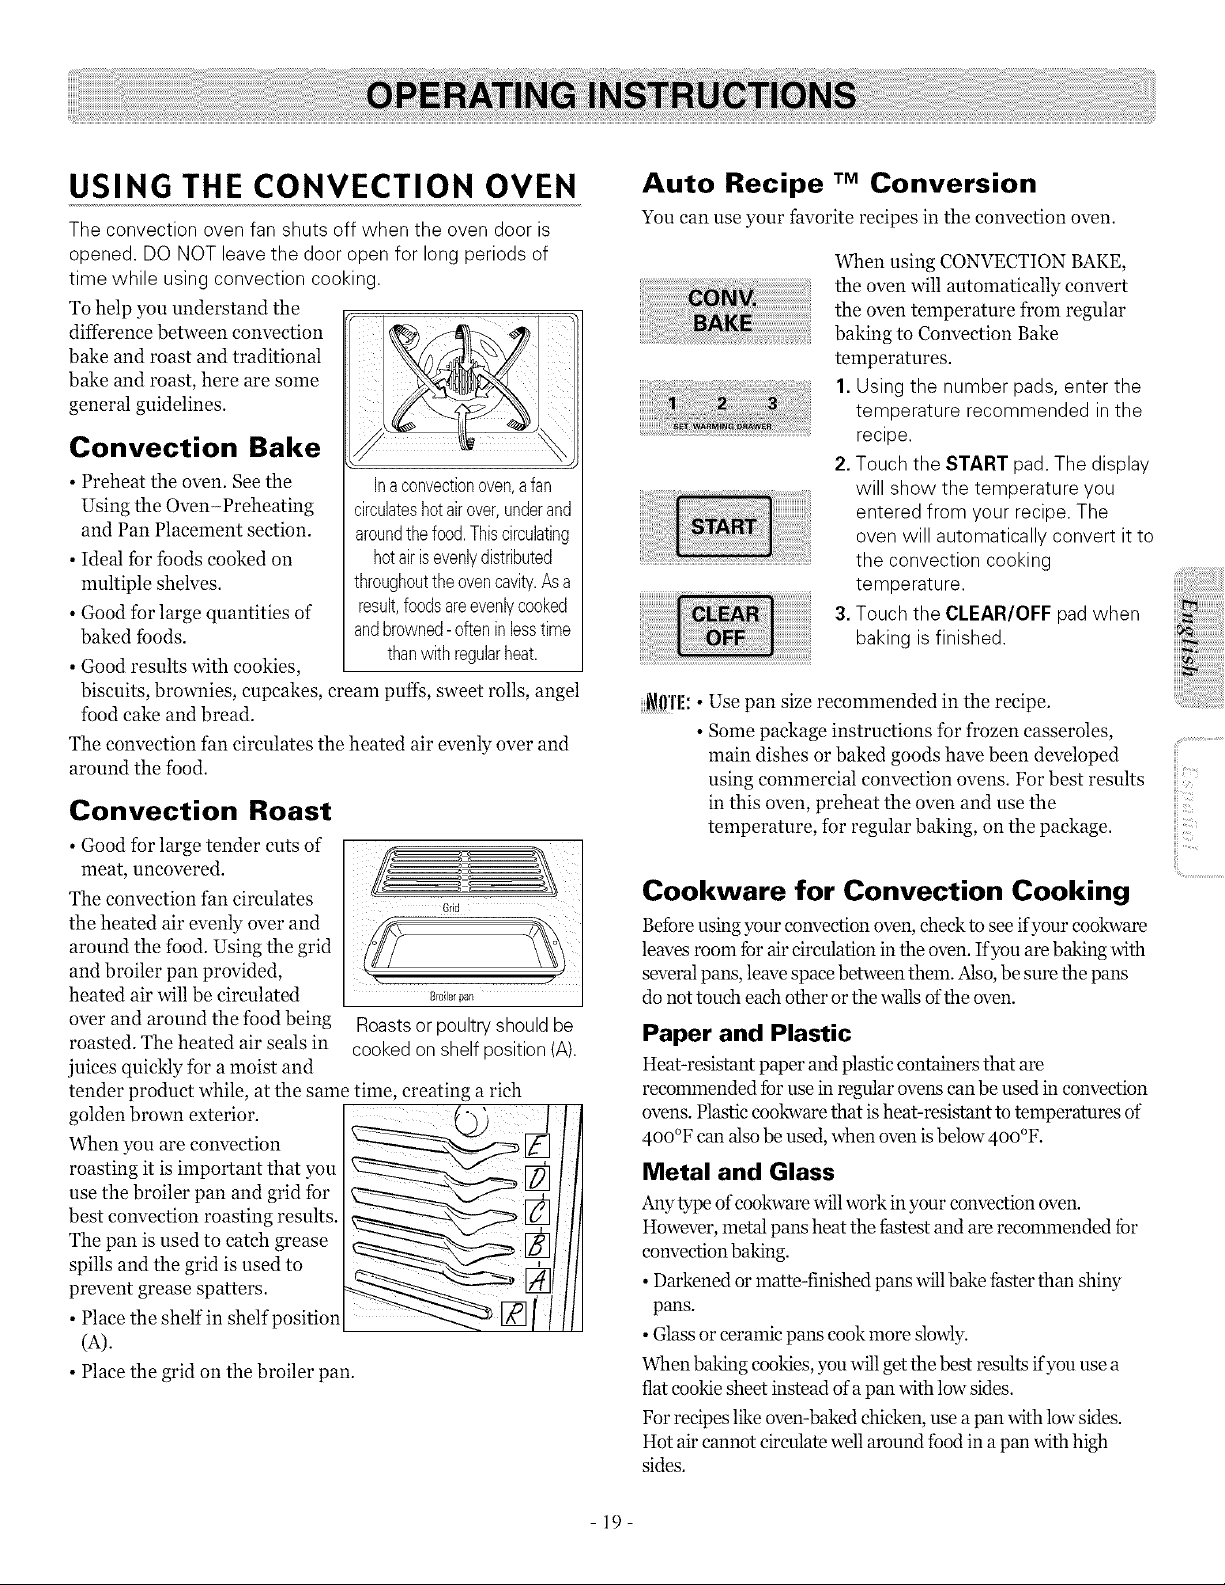
USING THE CONVECTION OVEN
The convection oven fan shuts off when the oven door is
opened. DONOT leavethe door open for long periods of
time while using convection cooking.
To help you understand the
difference between convection
bake and roast and traditional
bake and roast, here are some
general guidelines.
Convection Bake
• Preheat the oven. See the
Using the Oven-Preheating
and Pan Placement section.
• Ideal tbr tbods cooked on
multiple shelves.
• Good for large quantities of
baked tbods.
• Good results with cookies,
Inaconvectionoven,afan
circulateshotairover,underand
aroundthefood.Thiscirculating
hotairisevenlydistributed
throughouttheovencavity.Asa
result,foodsareevenlycooked
andbrowned-oftenin lesstime
thanwithregularheat.
biscuits, brownies, cupcakes, cream puffs, sweet rolls, angel
food cake and bread.
The convection fan circulates the heated air evenly over and
around the food.
Convection Roast
• Good for large tender cuts of
meat uncovered.
The convection fan circulates
the heated air evenly over and
around the food. Using the grid
and broiler pan provided,
heated air will be circulated
over and around the food being
roasted. The heated air seals in
juices quickly for a moist and
tender product while, at the same time, creating a rich
golden brown exterior.
When you are convection
roasting it is important that you
use the broiler pan and grid fbr
best convection roasting results.
The pan is used to catch grease
spills and the grid is used to
prevent grease spatters.
• Place the shelf in shelf position
(A).
• Place the grid on the broiler pan.
8r0iler parl
Roastsor poultry shouldbe
cooked on shelf position (A).
Auto Recipe TM Conversion
You can use your favorite recipes in the convection oven.
I i
When using CONVECTION BAKE,
the oven will automatically convert
the oven temperature from regular
baking to Convection Bake
temperatures.
1. Using the number pads, enter the
temperature recommended in the
recipe.
2.Touch the START pad.The display
will show the temperature you
entered from your recipe. The
oven will automatically convert it to
the convection cooking
temperature.
3.Touch the CLEAR/OFF pad when
baking isfinished.
_0'1'1!:• Use pan size recommended in the recipe.
• Some package instructions for f¥ozen casseroles,
main dishes or baked goods have been developed
using commercial convection ovens. For best results
in this oven, preheat the oven and use the
temperature, for regular baking, on the package.
Cookware for Convection Cooking
Befbre using your convection oven, check to see if your cookware
leaves room fbr air circulation in the oven. If you are baking with
several pans, leave space between them. Also, be sure the pans
do not touch each other or the walls of the oven.
Paper and Plastic
Heat-resistant paper and plastic containers that are
recommended fbr use in regular ovens can be used in convection
ovens. Plastic cookware that isheat-resistant totemperatures of
4oo°F can also be used, when ovenisbelow 4oo°F.
Metal and Glass
Any type of cookware willwork in your convection oven.
However, metal pans heat the fhstest and are recommended fbr
convection baking.
• Darkened or matte-finished pans willbake fhster than shiw
pans.
• Glass or ceramic pans cook more slowly.
When baking cookies, you will getthe best results if you use a
flat cookie sheet instead of a pan with low sides.
Forrecipes likeoven-baked chicken, use apan with low sides.
Hot air cannot circulate well around fbod in apan with high
sides.
iii,.....
iii<i'i
iii:<_
ii!i..............................
-19-
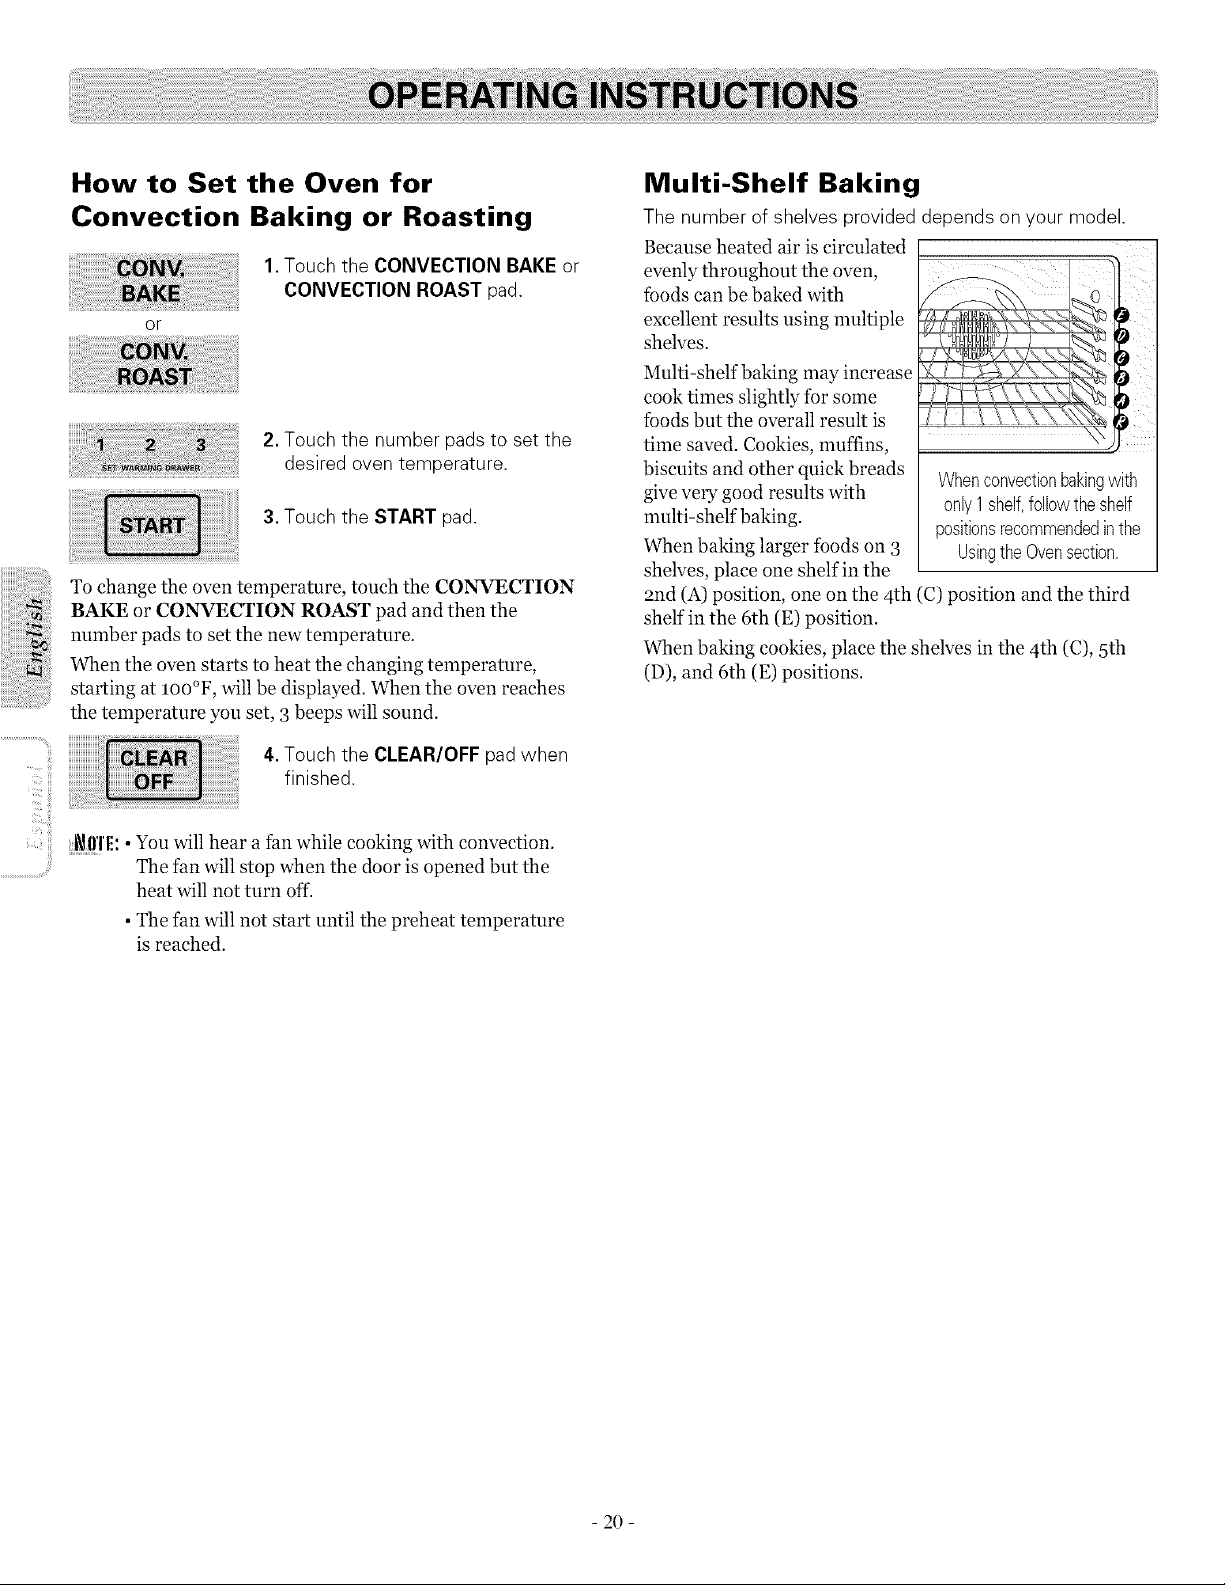
How to Set the Oven for
Convection Baking or Roasting
or
1. Touch the CONVECTION BAKEor
CONVECTION ROAST pad.
2.Touch the number pads to set the
desired oven temperature.
3.Touch the START pad.
To change the oven temperature, touch the CONVECTION
BAKE or CONVECTION ROAST pad and then the
number pads to set the new temperature.
When the oven starts to heat the changing temperature,
starting at IO0°F, will be displayed. When the oven reaches
the temperature you set, 3 beeps will sound.
4.Touch the CLEAR/OFF pad when
.....
[ finished.
_1!1'1!:• You will hear a fan while cooking with convection.
..............................The fan will stop when the door is opened but the
heat will not turn oil.
• The fan will not start until the preheat temperature
is reached.
Multi-Shelf Baking
The number of shelves provided depends on your model.
Because heated air is circulated
evenly throughout the oven,
fbods can be baked with
excellent results using multiple
shelves.
Mnlti-shelf baking may increase
cook times slightly for some
Ibods but the overall result is
time saved. Cookies, muffins,
biscuits and other quick breads
give very good results with
mnlti-shelf baking.
When baking larger foods on 3
shelves, place one shelf in the
and (A) position, one on the 4th (C) position and the third
shelf in the 6th (E) position.
When baking cookies, place the shelves in the 4th (C), 5th
(D), and 6th (E) positions.
Whenconvectionbakingwith
only1shelf,followtheshelf
positionsrecommendedinthe
UsingtheOvensection.
- 20 -

Forbestresultswhenroasting
largeturkeysandroasts,we
recommendusingthe probe
includedintheconvectionoven.
How to Set the Oven for Convection Roasting when
Using the Probe (on convection models)
The display will flash PROBE and the oven control will
signal ifthe probe is inserted into the outlet, and you have
not set a probe temperature and touched the START pad.
1.Placethe shelf in the shelf position
(A). Insert the probe completely
into the food.
2.Plug the probe into the outlet in
the oven. Make sure it ispushed
all the way in.Close the oven door.
3.Touch the CONVECTION ROAST
pad.
4.Touch the number padsto set the
desired oven temperature.
5.Touch the PROBEpad.
6.Touch the number padsto set the
desired internal food temperature.
To change the oven temperature during the Convection Roast
cycle, touch the CONVECTION ROAST pad and then touch
the number pads to set the new desired temperature.
7.Touch the START pad.
]lrfli: • If the probe is removed from the food befbre the final
temperature is reached, a tone will sound and the
display will flash until the probe is removed f?om the
oven.
• You will hear a fan while cooking with this feature.
The fan will stop when the door is opened but the
heat will not turn off.
• You can use the timer even though you
cannot use timed oven operations while
using the probe.
i7i>_
ii!i..............................
When the oven starts to heat, the word LOwill be in the
display.
After the internal temperature of the fbod reaches 1OO°F, the
changing internal temperature will be shown in the display.
,
When the internal temperature of
the food reaches the number you
have set, the probe and the oven
turn off and the oven control
signals. To stop the signal, touch
the CLEAR/OFF pad. Use hot pads
to remove the probe from the
food. Do not usetongs to pull on
it-they might damage it.
- 21 -
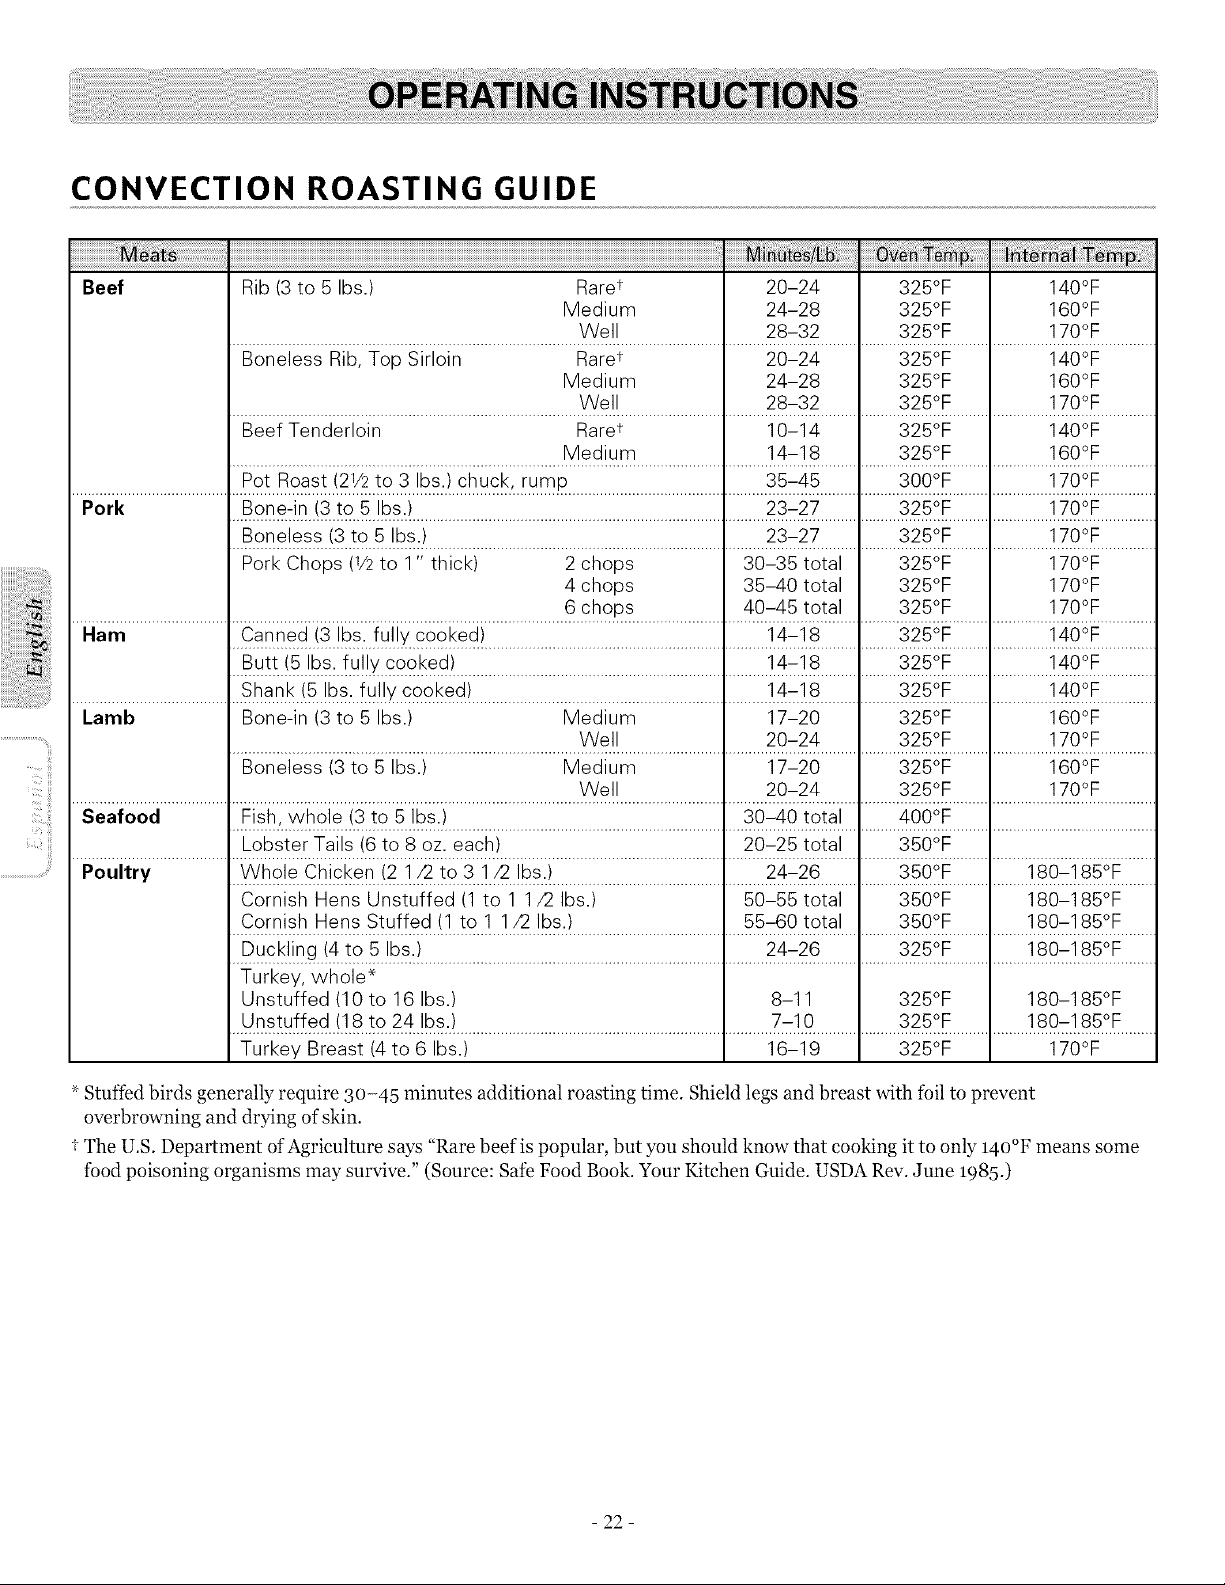
CONVECTION ROASTING GUIDE
Beef Rib(3 to 5 Ibs.) Raret 20-24 325°F 140°F
Medium 24-28 325°F 160°F
Well 28-32 325°F 170°F
Boneless Rib, Top Sirloin Raret 20-24 325°F 140°F
Medium 24-28 325°F 160°F
Well 28-32 325°F 170°F
Beef Tenderloin Raret 10-14 325°F 140°F
Medium 14-18 325°F 160°F
Pot Roast (2V2 to 3 Ibs.)chuck, rump 35-45 300°F 170°F
Pork Bone-in (3 to 5 Ibs.) 23-27 325°F 170°F
Boneless (3 to 5 Ibs.) 23-27 325°F 170°F
Pork Chops (V2 to 1" thick) 2 chops 30-35 total 325°F 170°F
4 chops 35-40 total 325°F 170°F
6 chops 40-45 total 325°F 170°F
Ham ..........................Iiii_i__i_i_i i!_)i_i.ii!_i!!_i_ _i_!iiiiiiiiiiiiiiiiiiiiiiiiiiiiiiiiiiiiiiiiiiiiiiiiiiiiiiiiiiililliiiiiiii)i_!i _iiiiiiii1111111iiiii_i_i_I°_iiiiiiiifillilliiiiiiiii!i_:__°i_iiiiiiiiiiiii
] E}.u_t.!+_+.s:..f.u+_Y_o.+.k+#!..................................................................l...........!.4;!8.........]..........3.2+iF.........]..............!.40°F.............
......................................I Sha.'::'k!bs. '_'ke'#!..............................................................I...........!.4_:!8.........I..........32.++rE.........I..............!.,40OF.............
Lamb Bone-in (3 to 5 Ibs.) Medium 17-20 I 325°F 160°F
,_.......................................................................................yVe._._..........................'_...........2°_24.........'_..........3.2+?F.........'_..............!.7°_F.............
Boneless (3 to 5 Ibs.) Medium 17-20 i 325°F 160°F
I I
......................................'l.......................................................................................SNe!!.........................'.l...........2_c24.........'l..........3.2.+:F.........',..............]._?F.............
Seafood ..............................................................................¢.O0.°F.........I........................................
......................................I h_b.sterTa!!sf6!_8..°zeach.!.......................................................1 20_2_!°t<.l..........3+01F.........I........................................
Poultry _A(h_leC.l_!_ken!2..]._2 Tg.:3..]./2!bs..!......................................................24c26....................:3.I_IDtR...................180c.1851.F........
Cornish Hens Unstuffed (1 to 1 1/2 Ibs.) 50-55 total 350°F 180-185°F
Cornish Hens Stuffed (1 to 1 1/2 Ibs.) 55-60 total 350°F 180-185°F
Duckling (4 to 5 Ibs.) 24-26 325°F 180-185°F
Turkey, whole*
Unstuffed (10 to 16 Ibs.) 8-11 325°F 180-185°F
Unstuffed (18 to 24 Ibs.) 7-10 325°F 180-185°F
Turkey Breast (4 to 6 Ibs.) 16-19 325°F 170°F
_ Stuffed birds generally require 30-45 minutes additional roasting time. Shield legs and breast with foil to prevent
overbrowning and drying of skin.
I The U.S. Department of Agriculture says "Rare beef is popular, but you should know that cooking it to only 140°F means some
food poisoning organisms may survive." (Source: Safe Food Book. Your Kitchen Guide. USDA Rev. June _985.)
- 22 -
USINGTHE TIMED CONVECTION
BAKINGAND ROASTING FEATURES
(ON CONVECTION MODELS)
You will hear a fan while cooking with this feature. The fan will
stop when the door isopened but the heat will not turn off:
_\!lrl'l!:Foods that spoil easily-such as milk, eggs, fish,
stuffings, poultry and pork-should not be allowed to
sit for more than 1 hour before or after cooking. Room
temperature promotes the growth of harmful bacteria.
Be sure that the oven light is off because heat from the
bulb will speed harmful bacteria growth.
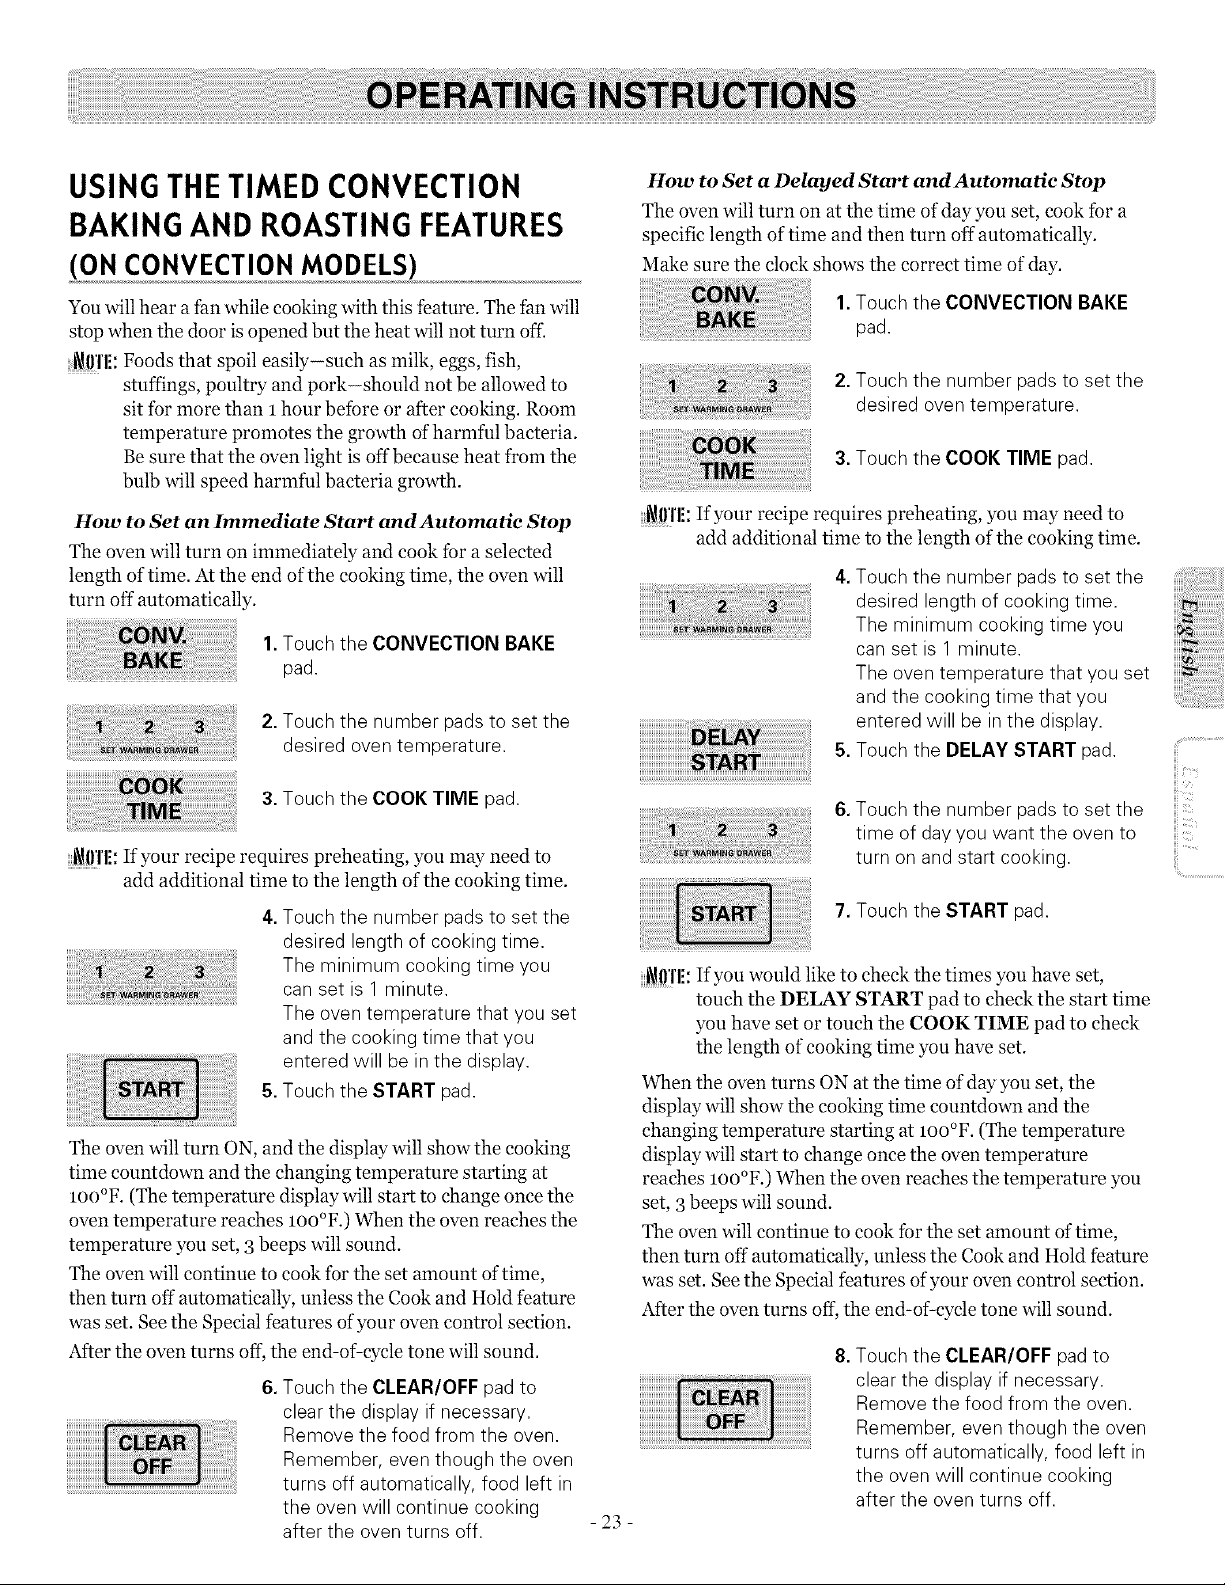
How to Set an Immediate Start and Automatie Stop
The oven will turn on immediately and cook for a selected
length of time. At the end of the cooking time, the oven will
turn off automatically.
1.Touch the CONVECTION BAKE
pad.
2.Touch the number padsto set the
desired oven temperature.
3.Touch the COOK TIME pad.
_!l'l'li: If your recipe requires preheating, you may need to
add additional time to the length of the cooking time.
4.Touch the number padsto set the
desired length of cooking time.
The minimum cooking time you
can set is 1 minute.
The oven temperature that you set
and the cooking time that you
entered will be in the display.
5.Touch the START pad.
Theoven will turn ON, and the display will show the cooking
time countdown and the changing temperature starting at
IO0°F. (The temperature display will start to change once the
oven temperature reaches lOO°F.) When the oven reaches the
temperature you set, 3beeps will sound.
The oven will continue to cook for the set amount oftime,
then turn off automatically, unless the Cook and Hold feature
was set. See the Special features of your oven control section.
After the oven turns off, the end-of-cycle tone will sound.
6.Touch the CLEAR/OFF pad to
clear the display if necessary.
Remove the food from the oven.
Remember, even though the oven
turns off automatically, food left in
the oven will continue cooking
after the oven turns off.
How to Set a Delayed Start and Automatie Stop
The oven will turn on at the time of day you set, cook for a
specific length of time and then turn off automatically.
Make sure the clock shows the correct time of day.
1.Touch the CONVECTION BAKE
pad.
2.Touch the number padsto set the
desired oven temperature.
3.Touch the COOK TIME pad.
i_0'l'li: If your recipe requires preheating, you may need to
add additional time to the length of the cooking time.
4.Touch the number padsto set the
desired length of cooking time.
The minimum cooking time you
can set is 1 minute.
The oven temperature that you set
and the cooking time that you
entered will be in the display.
5.Touch the DELAY START pad.
6.Touch the number padsto set the
time of dayyou want the oven to
turn on and start cooking.
7.Touch the START pad.
_111'1!:If you would like to check the times you have set,
touch the DELAY START pad to check the start time
you have set or touch the COOK TIME pad to check
the length of cooking time you have set.
When the oven turns ON at the time of day you set, the
display will show the cooking time countdown and the
changing temperature starting at loo°F. (The temperature
display will start to change once the oven temperature
reaches loo°F.) When the oven reaches the temperature you
set, 3beeps will sound.
The oven will continue to cook for the set amount of time,
then turn off automatically, unless the Cook and Hold feature
was set. See the Special features of your oven control section.
After the oven turns off, the end-of cycle tone will sound.
- 23 -
8.Touch the CLEAR/OFF pad to
clear the display ifnecessary.
Remove the food from the oven.
Remember, even though the oven
turns off automatically, food left in
the oven will continue cooking
after the oven turns off.
iii "
H_.....
ii!i..............................
SPECIAL FEATURES OF YOUR
OVEN CONTROL
Your new touch pad control hasadditional features that you may
choose to use. The following are thefeaturesand howyou may
activate them.
The special feature modes can onlybe activated while the
display isshowing thetime ofday. They remaininthe control's
memory until thesteps are repeated.
Whenthe display showsyour choice, touch theSTARTpad. The
specialfeatureswill remainin memoryafter a power failure.
;i!i!i!i;;I
'__,i!i! iiiiiiiiiiiiiiiiiiiiiiiiiii
II_'C!!!i
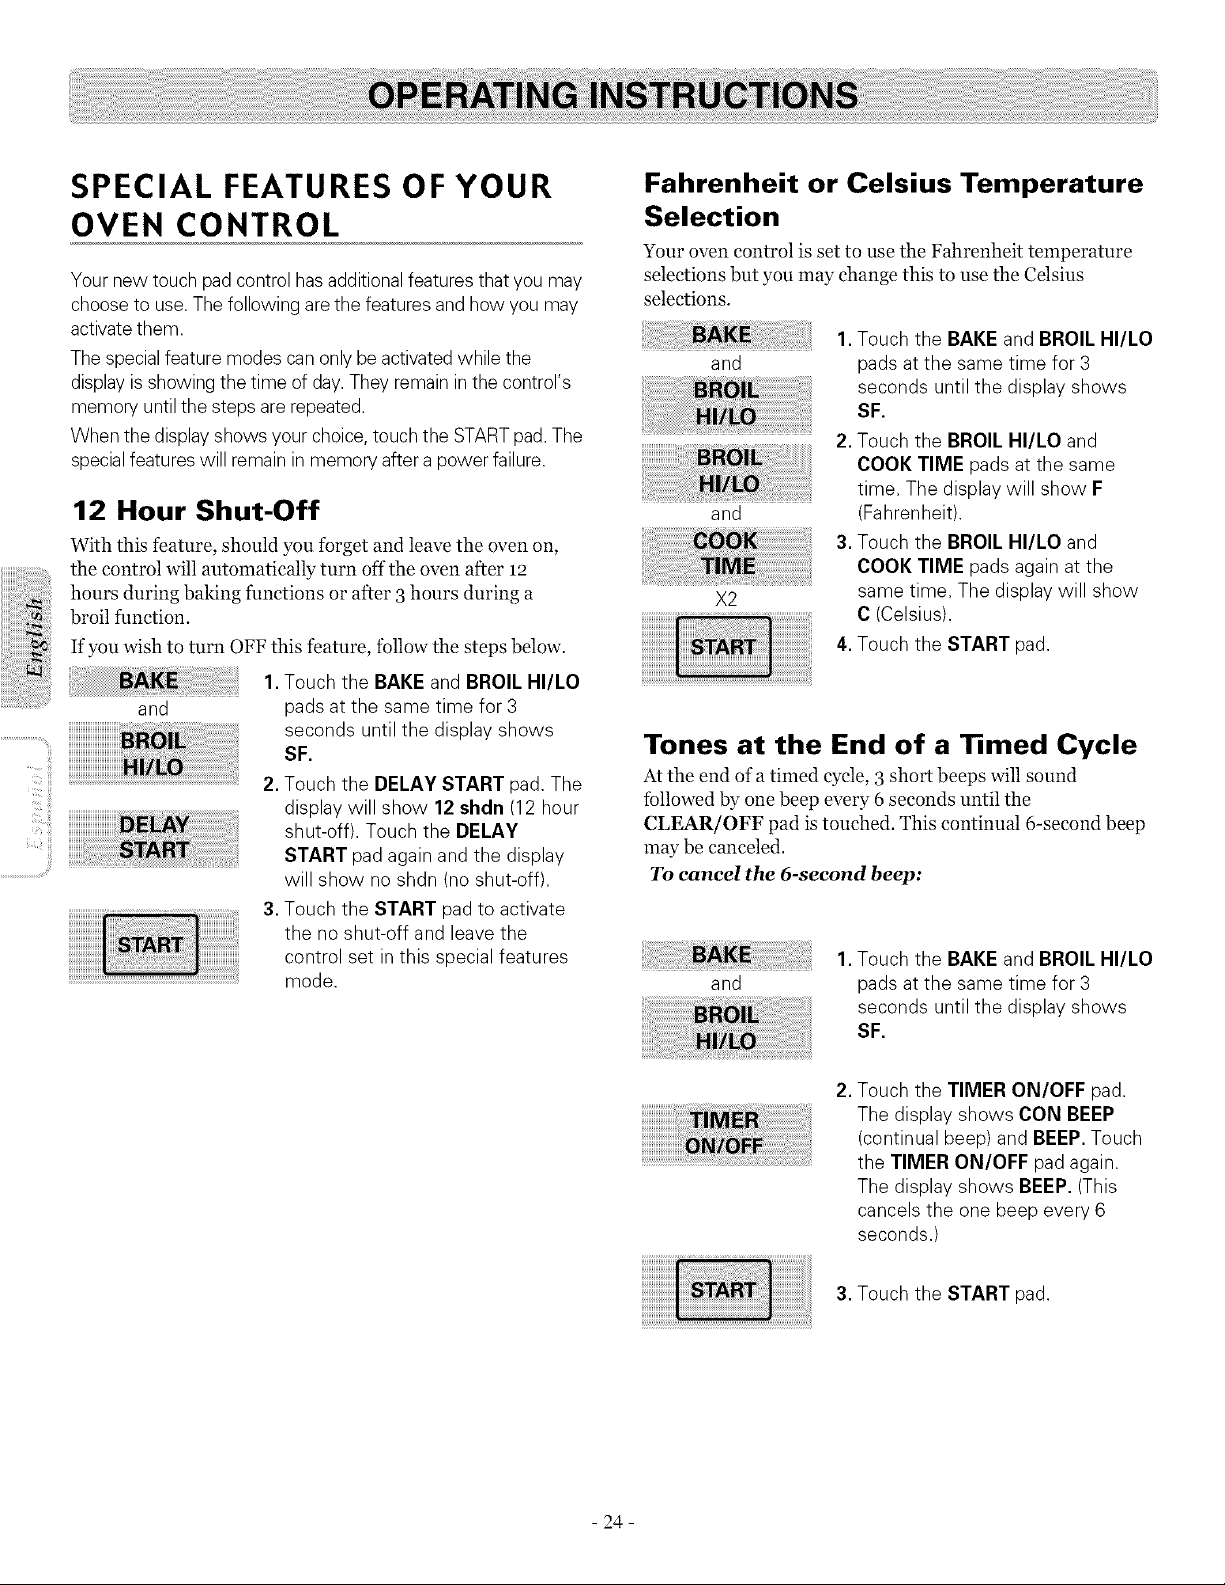
12 Hour Shut-Off
With this feature, should you forget and leave the oven on,
the control will automatically turn off the oven after 12
hours during baking functions or after 3hours during a
broil function.
If you wish to turn OFF this feature, follow the steps below.
1. Touch the BAKEand BROIL HI/LO
and pads at the same time for 3
seconds until the display shows
SF.
2.Touch the DELAY START pad. The
display will show 12 shdn (12 hour
shut-off). Touch the DELAY
START pad again and the display
will show no shdn (no shut-off).
3.Touch the START pad to activate
the no shut-off and leavethe
control set in this special features
mode.
Fahrenheit or Celsius Temperature
Selection
Your oven control is set to use the Fahrenheit temperature
selections but you may change this to use the Celsius
selections.
and
and
X2
1.Touch the BAKEand BROIL HI/LO
pads atthe same time for 3
seconds until the display shows
SF.
2. Touch the BROIL HI/LO and
COOK TIME pads atthe same
time. The display will show F
(Fahrenheit).
3. Touch the BROIL HI/LO and
COOK TIME pads again at the
same time. The display will show
C (Celsius).
4.Touch the START pad.
Tones at the End of a Timed Cycle
At the end of a timed cycle, 3 short beeps will sound
followed by one beep every 6 seconds until the
CLEAR/OFF pad istouched. This continual 6-second beep
may be canceled.
To cancel the 6-second beep:
and
1.Touch the BAKEand BROIL HI/LO
pads atthe same time for 3
seconds until the display shows
SF.
2. Touch the TIMER ON/OFF pad.
The display shows CON BEEP
(continual beep) and BEEP. Touch
the TIMER ON/OFF pad again,
The display shows BEEP.(This
cancels the one beep every 6
seconds.)
3. Touch the START pad.
- 24 -
SPECIAL FEATURES OF YOUR
OVEN CONTROL
Control Lockout
Your control will allow you to lock out the touch pads so
they cannot be activated when touched or cleaning the glass
panel.
To lock the controN:
1. Touch the 9 and 0 touch pads at
the same time for 3 seconds until
the control beeps twice. The
display will show LOC
continuously and the time of day if
not blacked out.
_l!l'l!: All cooking and timing functions will be cancelled
when locking out the control.
2.To unlock the control, touch the 9
and 0 touch padsatthe same time
for 3 seconds until the control
beeps twice, and LOC will be
removed from the display.
12-Hour, 24-Hour or Clock
Blackout
Your control is set to use a 12-hour clock.
If you would prefer to have a 24-hour military time clock or
black out the clock display, follow the steps below.
and
Touch the BAKEand BROIL HI/LO
pads atthe same time for 3
seconds until the display shows
SF.
Cook and Hold
Your new control has a cook and hold feature that keeps
cooked foods warm for up to 3 hours after the cooking
function is finished.
This feature can only be used when timed cooking.
To activate this feature, follow the steps below.
and
1.Touch the BAKEand BROIL HI/LO
pads at the same time for 3
seconds until the display shows
SF.
2.Touch the COOK TIME pad.The
display will show Hid OFF.Touch
the COOK TIME pad again to
activate the feature. The display
will show Hid ON.
3.Touch the START pad to activate
the cook and hold feature and
leavethe control set in this special
features mode.
iii
iii
ii!i..............................
,
Touch the CLOCK pad once.
The display will show 12 hr. If this
isthe choice you want, touch the
START pad.
Touch the CLOCK pad again to change to the 24-hour
military time clock. The display will show 24 hi'. Ifthis is
the choice you want, touch the START pad.
Touch the CLOCK pad again to black out the clo& display.
The display will show OFF. If this is the choice you want,
touch the START pad.
_ffl'li: If the clock is in the black-out mode, you will not be
able to use the Delay Start function.
- 25 -
USING THE SABBATH FEATURE
(DESIGNED FOR USE ON THE
JEWISH SABBATH AND HOLIDAYS)
The Sabbath feature can be used for baking/roasting in the
oven only. It cannot be used for convection, broiling, self-
cleaning or Delay Start cooking.
i_!lf[E:The oven light comes on automatically when the door
is opened and goes off when the door is closed. The
bulb may be removed. See the Oven Light
Replacement section (Page 37)- On models with a light
switch on the control panel, the oven light may be
turned on and left on.
How to Set for Regular
Baking/Roasting (In Sabbath Mode)
Make sure the clock shows the correct time of day and the oven
is off.
and
1.Press and hold both the BAKEand
BROIL HI/LO pads, at the same
time, until the display shows SF.
How to Set for Timed
Baking/Roasting-Immediate Start
and Automatic Stop (In Sabbath
Mode)
Make sure the clock shows the correct time of day and the
oven is of£
and
1. Press and hold both the BAKEand
BROIL HI/LO pads, at the same
time, untilthe display shows SF.
2. Tapthe DELAYSTART pad until
SAb bAtH appears in the display.
3. Touch the START pad and Dwill
appear in the display.
When the display shows D the oven is set in Sabbath. When
the display shows D C the oven is in baking/roasting.
4.Touch the COOK TIME pad.
iiT_!i!!iiii
..........................¢!i¸{¸¸
2.Tap the DELAY START pad until
SAb bAtH appears in the display.
3.Touch the START pad and D will
appear in the display.
When the display shows D the oven is set in Sabbath. When
the display shows D C the oven is in baking/roasting.
4.Touch the BAKEpad. Nosignal
will be given.
5. Using the number pads, enter the
desired temperature between 170°
and 550° .No signalor temperature
will be given.
6.Touch the START pad.
7. After a random delay period of
approximately 30 seconds to 1
minute, DC will appear in the
display indicating that the oven is
baking/roasting. If D C doesn't
appear in the display, start again at
Step 4.
To adjust the oven temperature, touch the BAKE pad, enter
the new temperature using the number pads, and touch the
START pad.
i_0Tl!:The CLEAR/OFF and COOK TIME pads are active
during the Sabbath feature.
5. Touch the number pads to set the
desired length of cooking time
between 1 minute and 9 hours and
99 minutes. The cooking time that
you entered will be displayed.
6. Touch the START pad.
7. Touch the BAKE pad. No signal
will be given.
8. Using the number pads, enter the
desired temperature. Nosignal or
temperature will be given.
- 26 -
9. Touch the START pad.
10.After a random delay period of
approximately 30 seconds to 1
minute, D Cwill appear in the
display indicating that the oven is
baking/roasting. If DC doesn't
appear in the display, start again
at Step 7.
To adjust the oven temperature, touch the BAKE pad, enter
the new temperature using the number pads, and touch the
START pad.
When cooking is finished, the display will change from D C
to D and o:oo will appear, indicating that the oven has
turned OFF but is still set in Sabbath. Remove the cooked
fbod.
How to Exit the Sabbath Feature
,
2.
Touch the CLEAR/OFF pad.
If the oven iscooking, wait for a
random delay period of
approximately 30 seconds to 1
minute, until onlyD isin the
display.
and
3.Press and hold both the BAKE and
BROIL HI/LO pads, at the same
time, until the display shows SF.
4.Tapthe DELAY START pad until
12 shdn or no shdn appears in the
display. 12 shdn indicates that the
oven will automatically turn off
after 12 hours, no shdn indicates
that the oven will not automatically
turn off.
5.Touch the START pad.
_!!'l'li: If a power outage occurred while the oven was in
Sabbath, the oven will automatically turn off and stay
off even when the power returns. The oven control
must be reset.
ADJUST THE OVEN
THERMOSTAT
-DO IT YOURSELF!
You may find that your new oven cooks differently than the
one it replaced. Use your new oven for a few weeks to
become more familiar with it. If you still think your new
oven is too hot or too cold, you can adjust the thermostat
yourself.
Do not use thermometers, such as those found in grocery
stores, to check the temperature setting of your oven.
These thermometers may vary 20-40 degrees.
_l!Tli: This adjustment will not affect the broiling or the self
cleaning temperatures. The adjustment will be
retained in memory after apower failure.
To Adjust the Thermostat
and
1. Touch the BAKE and BROIL I-II/LO
pads at the same time for 3
seconds until the display shows
SF.
2.Touch the BAKE pad. A two digit
number shows in the display.
Touch BAKE once to decrease (-)
the oven temperature, or twice to
increase (+).
3.The oven temperature can be
adjusted up as much as35°F. or
down asmuch as35°F. Touch the
number padsthe same way you
read them. For example, to change
the oven temperature 15°F,touch
1 and 5.
4.When you have madethe
adjustment, touch the START pad
to go back to the time of day
display. Use your ovenasyou
would normally.
i\!lrl'l!:The thermostat adjustment for Baking will also affect
Convection Baking or Convection Roasting.
iii_iiii'i
iii'
ii!i..............................
- 27 -

iiiii_ii!i!i_i
THE TYPE OF MARGARINE
WILL AFFECT BAKING
PERFORMANCE!
Most recipes for baking have been developed using high fat
products such as butter or margarine (8o% fat). If you
decrease the fat, the recipe may not give the same results as
with a higher fat product.
Recipe failure can result if cakes, pies, pastries, cookies or
candies are made with low fat spreads. The lower the fat
content of a spread product, the more noticeable these
differences become.
Federal standards require products labeled "margarine" to
contain at least 80% fat by weight. Low fat spreads, on the
other hand, contain less fat and more water. The high
moisture content of these spreads affects the texture and
flavor of baked goods. For best results with your old favorite
recipes, use margarine, butter or stick spreads containing at
least 70% vegetable oil.
USING THE ELECTRIC
WARMING DRAWER
The warming drawer will keep hot, cooked foods at serving
temperature. Always start with hot food. Do not use to heat
cold fbod other than crisping cra&ers, chips or dry cereal.
To Use the Warming Drawer
1. Touch the WARMING DRAWER
pad. "Hot" and "1" are liton the
display and "Set" begins to blink.
2. On the number pad, press 1 for
Low, 2 for Medium or 3 for High.
The display "1" changes
corresponding tothe number pad
selected.
3.Touch the START pad.
"Hot" and the number remain lit.
"Set" stops blinking.
To cancel the WarmingDrawer
1. Touch the WARMING DRAWER
_RAW_
pad.
1 Lo (pies)
2 Med (casseroles)
3 Hi(meats)
NOTES:
• The warming drawer cannot be used during a self clean
cycle.
• The warming drawer has three settings: 1,2 and 3-
These settings maintain different temperature levels in the
warming drawer.
• On some models, it using the oven at the same time as the
warming drawer, only the oven settings will be displayed.
When Using the Warming Drawer
The warming drawer will keep hot, cooked foods at serving
temperature. Always start with hot food. Do not use to heat
cold food other than crisping crackers, chips or dry cereal.
Do not linethe warming drawer or pan with aluminum
foil. Foil isanexcellent heat insulator and will trap heat
beneath it. This will upset the performance ofthe
drawer and could damage the interior finish.
Allow approximately 25 minutes for the warming
drawer to preheat.
• Do not put liquid or water in the warming drawer.
• For moist foods, cover them with alid or aluminum foil.
• For crisp foods, leave them uncovered.
• Food should be kept hot in its cooking container or
transferred to a heat-safe serving dish.
• Remove serving spoons, etc., before placing containers in
warming drawer.
;i_lfl'l!:Touching the CLEAR/OFF pad does not turn the
warming drawer off.
- 28 -

Temperature Selection Chart
To keep several different foods hot, set the control to the
food needing the highest setting.
• The temperature, type and amount of food, and the time
held will affect the quality of the fbod.
• Food in heat-safe glass and glass-ceramic utensils may
need ahigher control setting as compared to fbod in metal
utensils.
• Repeated opening of the drawer allows the hot air to escape
and the food to cool.
• Allow extra time fbr the temperature inside the drawer to
stabilize after adding items.
• With large loads it may be necessary to use a higher
warming drawer setting and cover some of the cooked food
items.
• Do not use plastic containers or plastic wrap.
Bacon 3
Breads 2
Casserole 2
Chicken,fried 3
Eggs, scrambled 2
Fish 3
Gravy, sauces 3
Ham 3
Muffins 2
Onion rings 3
Pies 1
Pizza 3
Potatoes, baked 3
Potatoes, mashed 2
Tortilla Chips 1
To Crisp Stale Items
• Place food in low-sided dishes or pans.
• Preheat on 1 setting.
• Check crispness after 45 minutes. Add time as needed.
To Warm Serving Bowls and
Plates
To warm serving bowls and plates, set the control on 2.
• Use only heat-safe dishes.
• If you want to heat fine china, please check with the
manufacturer of the dishes for their maximum heat
tolerance.
• You may warm empty serving dishes while preheating the
drawer.
,iiii_i_ii:iii!i!iiiil;!i!iiiilililili!!iii)iiiiiiii
iii
iii
ii!i..............................
- 29 -
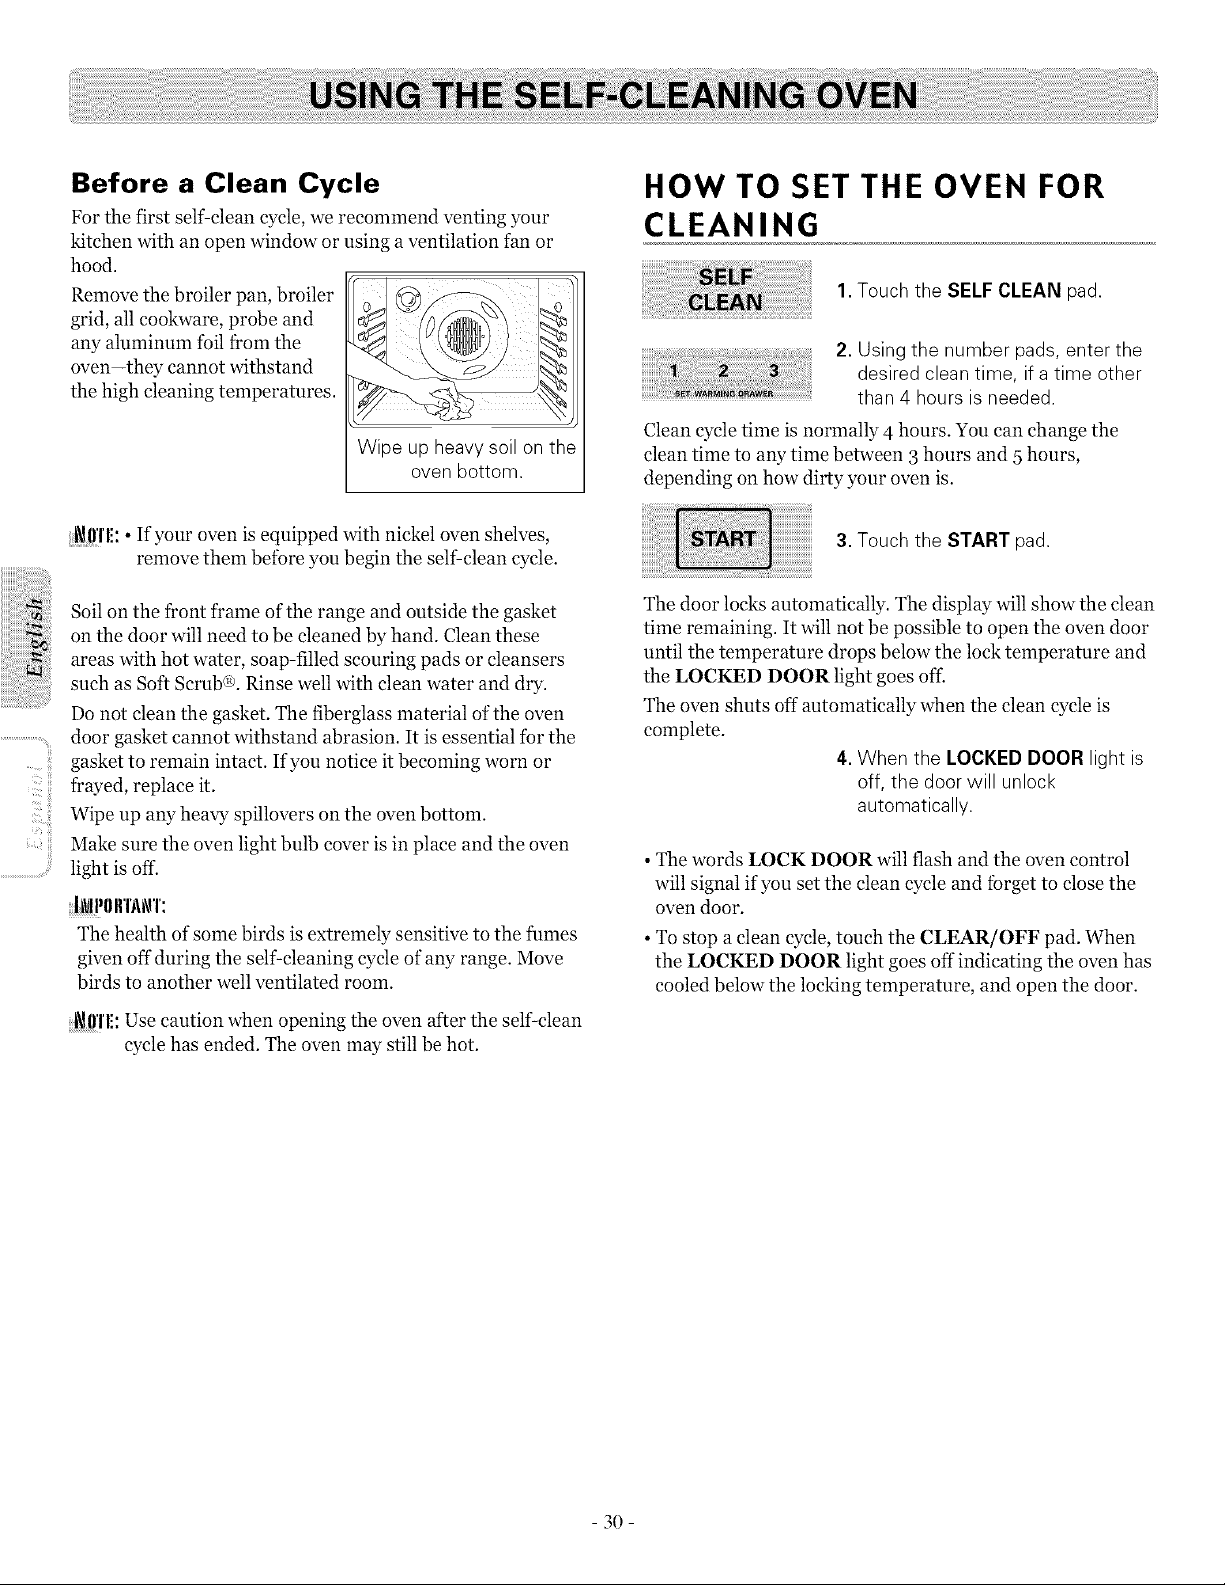
Before a Clean Cycle
For the first self-clean cycle, we recommend venting your
kitchen with an open window or using a ventilation tan or
hood.
Remove the broiler pan, broiler
grid, all cookware, probe and
any aluminum toil from the
oven-they cannot withstand
the high cleaning temperatures.
Wipe up heavy soil on the
oven bottom.
HOW TO SET THE OVEN FOR
CLEANING
1.Touch the SELF CLEAN pad.
2. Using the number pads, enter the
desired clean time, ifa time other
than 4 hours isneeded.
Clean cycle time is normally 4 hours. You can change the
clean time to any time between 3 hours and 5 hours,
depending on how dirty your oven is.
ii_'C! iii
..............................ill!;
_11'1'1!:• If your oven is equipped with nickel oven shelves,
remove them before you begin the self-clean cycle.
Soil on the front frame of the range and outside the gasket
on the door will need to be cleaned by hand. Clean these
areas with hot water, soap-filled scouring pads or cleansers
such as Soft Scrub@. Rinse well with clean water and dry.
Do not clean the gasket. The fiberglass material of the oven
door gasket cannot withstand abrasion. It is essential tbr the
gasket to remain intact. Ifyou notice it becoming worn or
frayed, replace it.
Wipe up any heavy spillovers on the oven bottom.
Make sure the oven light bulb cover is in place and the oven
light is off.
INN)lrl'_\_\q':
The health of some birds is extremely sensitive to the fumes
given off during the self cleaning cycle of any range. Move
birds to another well ventilated room.
;i_!l!'l'l!:Use caution when opening the oven after the self clean
cycle has ended. The oven may still be hot.
3. Touch the START pad.
The door locks automatically. The display will show the clean
time remaining. It will not be possible to open the oven door
until the temperature drops below the lock temperature and
the LOCKED DOOR light goes of£
The oven shuts off automatically when the clean cycle is
complete.
4.When the LOCKED DOOR light is
off, the door will unlock
automatically.
• The words LOCK DOOR will flash and the oven control
will signal if you set the clean cycle and forget to close the
oven door.
• To stop a clean cycle, touch the CLEAR/OFF pad. When
the LOCKED DOOR light goes off indicating the oven has
cooled below the locking temperature, and open the door.
3O

The oven door must be closed and all controls set correctly
for the cycle to work properly.
HOW TO DELAY THE START OF
CLEANING
Make sure the clock shows the correct time of day.
,TouchtheSELFCLEA.pad
2.Using the number pads, enter the
desired clean time.
3.Touch the DELAY START pad.The
earliest start time you canset will
appear in the display.
4.Using the number pads, enter the
time of dayyou want the clean
cycle to start.
5.Touch the START pad.
The door locks automatically. The display will show the start
time. It will not be possible to open the oven door until the
temperature drops below the lock temperature and the
LOCKED DOOR light goes off.
The oven shuts off automatically when the clean cycle is
complete.
6.When the LOCKED DOOR light is
off, the door will unlock
automatically.
• The words LOCK DOOR will flash and the oven control
will signal if you set the clean cycle and forget to close the
oven door.
• To stop a clean cycle, touch the CLEAR/OFF pad. When
the LOCKED DOOR light goes off indicating the oven has
cooled below the locking temperature, and open the door.
After a Clean Cycle
You may notice some white ash in the oven.
Wipe it up with a damp cloth after the oven cools.
If white spots remain, remove them with a soap-filled
scouring pad and rinse thoroughly with a vinegar and water
mixture.
These deposits are usually a salt residue that cannot be
removed by the clean cycle.
If the oven is not clean after one clean cycle, repeat the
cycle.
• You cannot set the oven for cooking until the oven is cool
enough for the door to unlock.
• While the oven is self-cleaning, you can touch the CLOCK
pad to display the time of day. To return to the clean
countdown, touch the COOK TIME pad.
• If the shelves become hard to slide, apply a small amount
of vegetable oil or cooking oil to a paper towel and wipe
the edges of the oven shelves with the paper towel.
ii!i..............................
- 31 -
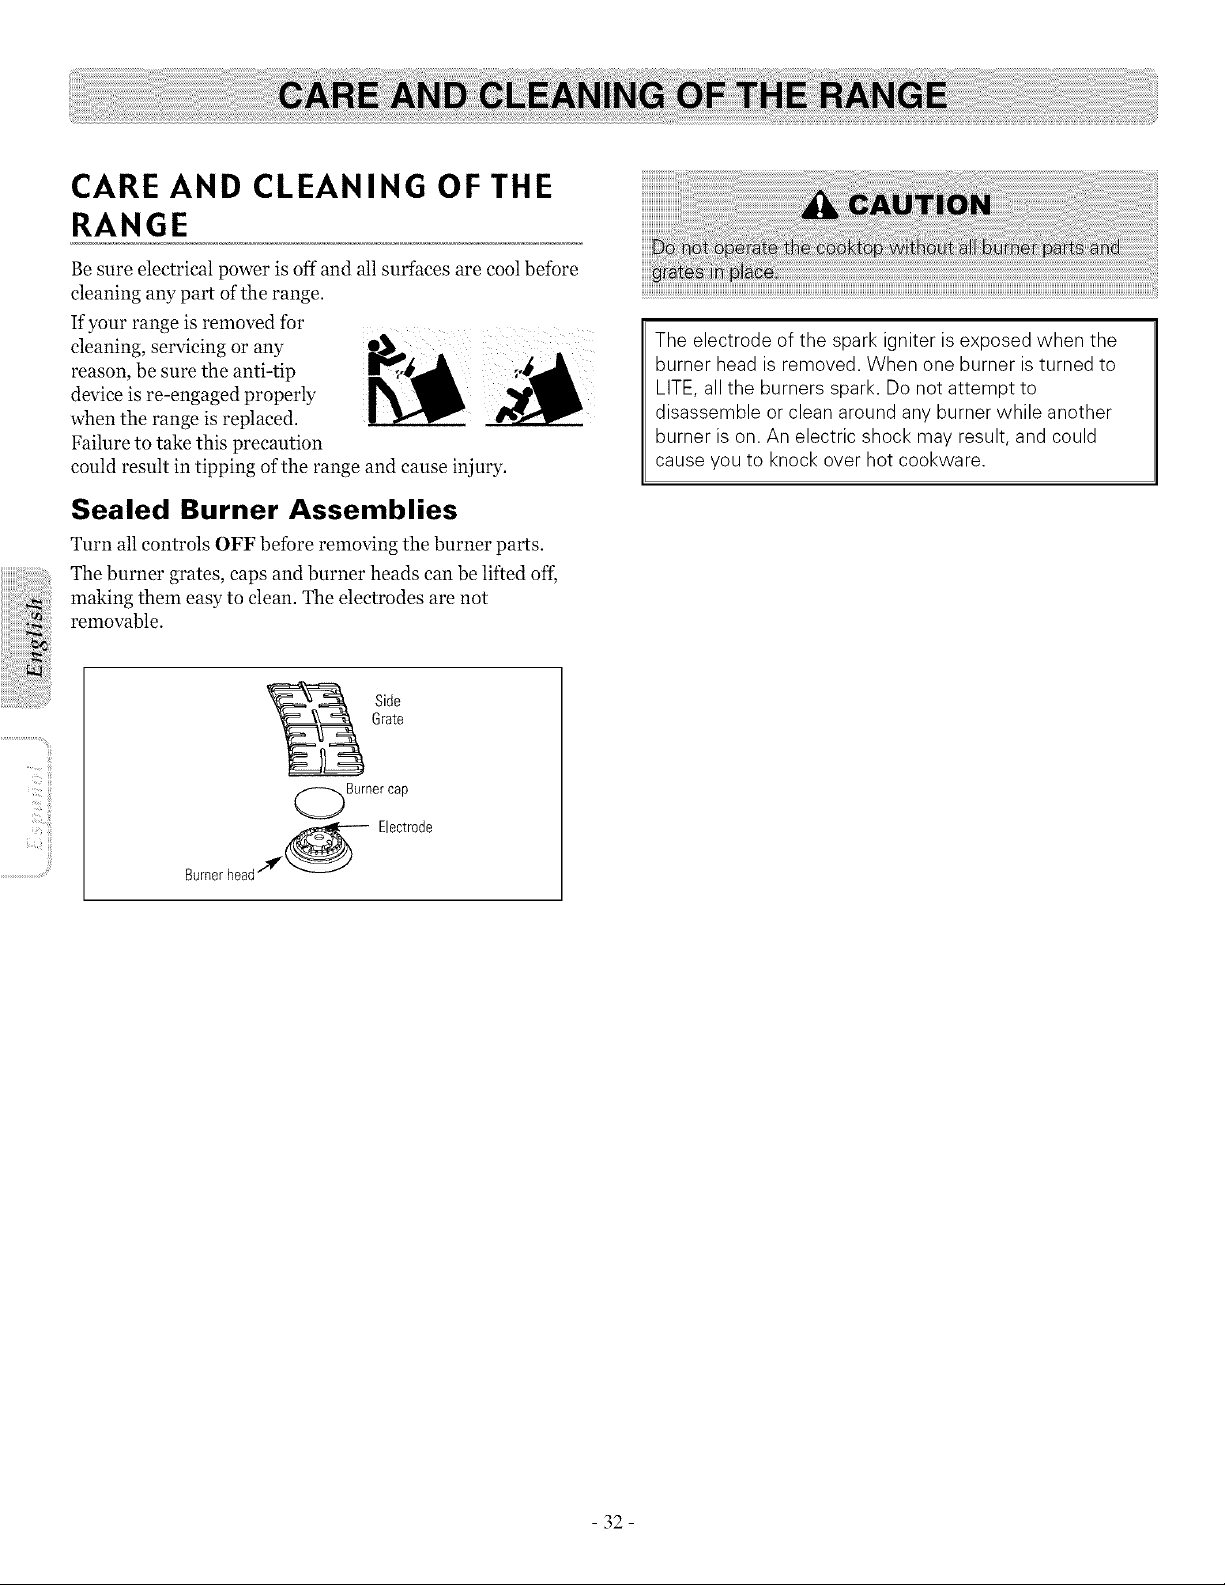
CARE AND CLEANING OF THE
RANGE
Be sure electrical power is off and all surfaces are cool before
cleaning any part of the range.
If your range is removed for
cleaning, servicing or any
reason, be sure the anti-tip
device is re-engaged properly
when the range is replaced.
Failure to take this precaution
could result in tipping of the range and cause injury.
Sealed Burner Assemblies
Turn all controls OFF before removing the burner parts.
The burner grates, caps and burner heads can be lifted ofL
making them easy to clean. The electrodes are not
removable.
The electrode of the spark igniter isexposed when the
burner head is removed. When one burner isturned to
LITE, all the burners spark. Donot attempt to
disassemble or clean around any burner while another
burner ison. An electric shock may result, and could
cause youto knock over hot cookware.
II_'CI!!!i
Side
Grate
Burnercap
Bernerhead__ Electrode
- 32-
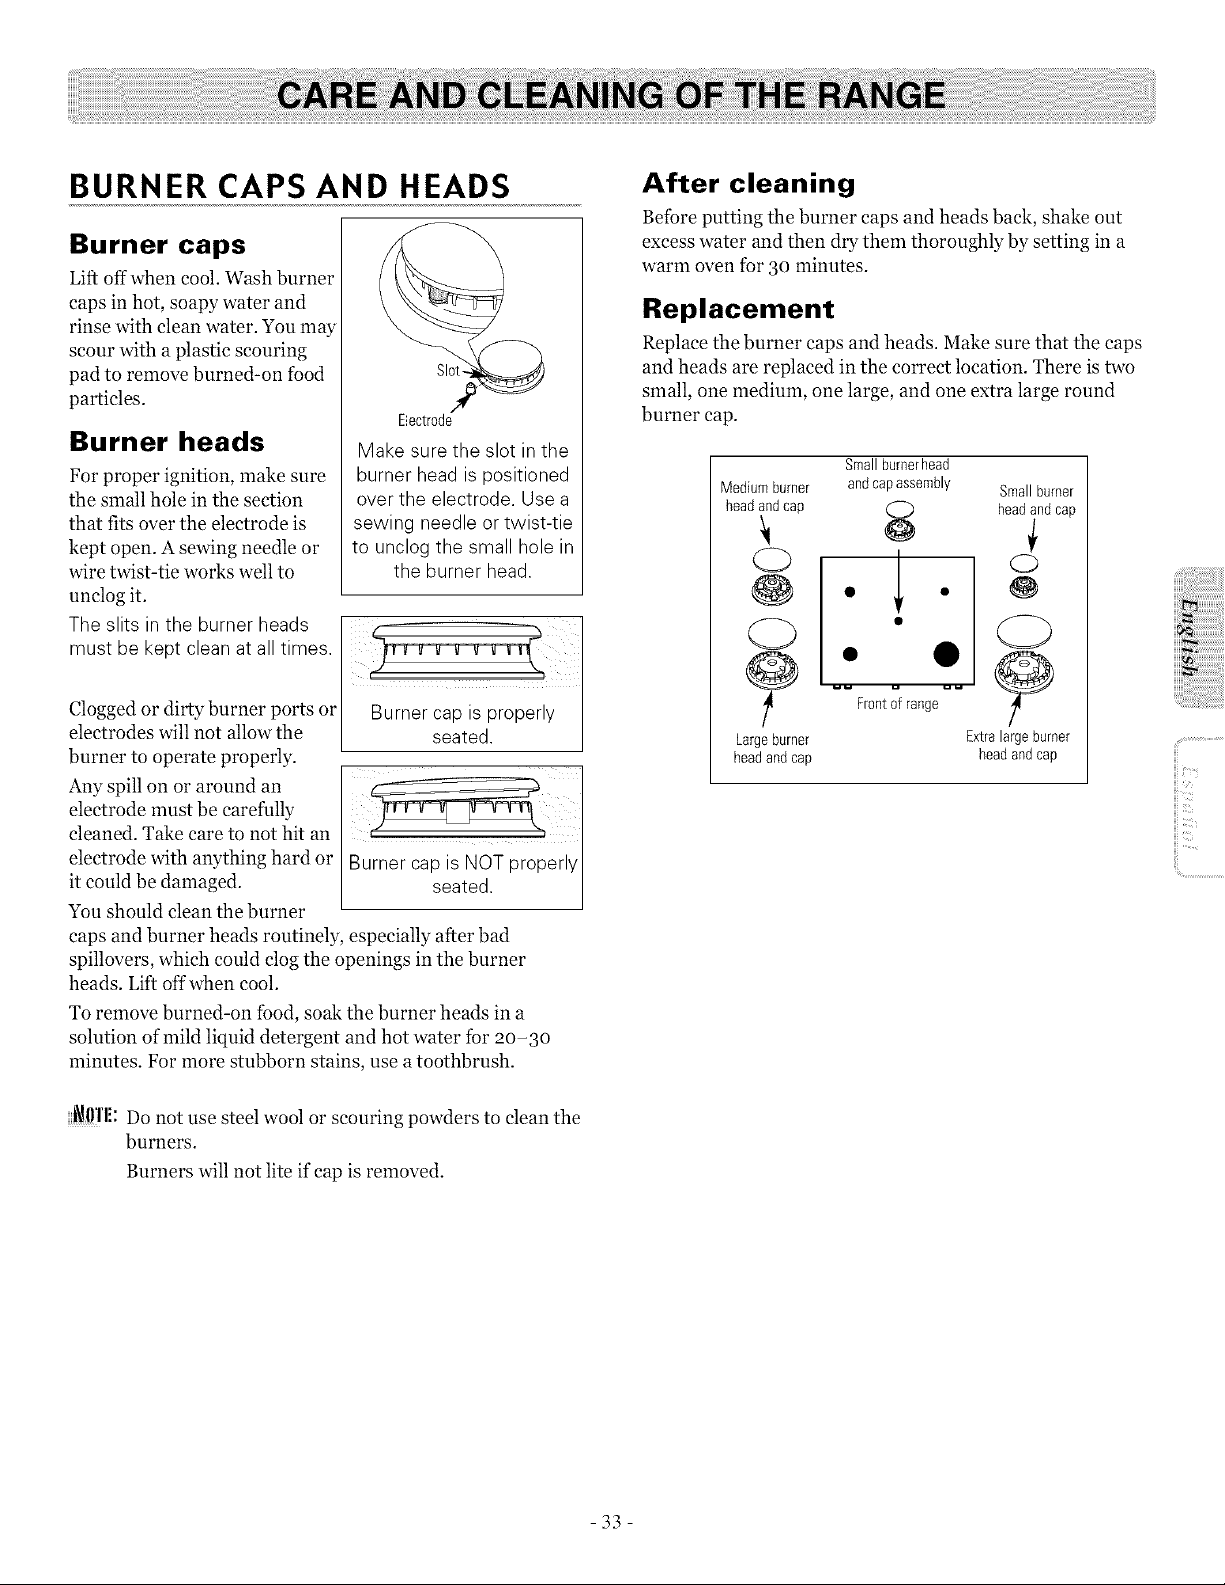
BURNER CAPS AND HEADS
Burner caps
Lift off when cool. Wash burner
caps in hot, soapy water and
rinse with clean water. You may
scour with a plastic scouring
pad to remove burned-on food
particles.
Slot-
Electrode
Make sure the slot in the
burner head ispositioned
over the electrode, Use a
sewing needle or twist-tie
to unclog the small hole in
the burner head.
Burner heads
For proper ignition, make sure
the small hole in the section
that fits over the electrode is
kept open. A sewing needle or
wire twist-tie works well to
unclog it.
The slits in the burner heads I _ _ __
must be kept clean atall times.
Cloggedor dirty burner ports or Burner cap isproperly
electrodes will not allow the seated.
burner to operate properly.
Any spill on or around an
electrode must be carefully
cleaned. Take care to not hit an
electrode with anything hard or
it could be damaged.
You should clean the burner
caps and burner heads routinely, especially after bad
spillovers, which could clog the openings in the burner
heads. Lift offwhen cool.
To remove burned-on food, soak the burner heads in a
solution of mild liquid detergent and hot water tbr 2o-3o
minutes. For more stubborn stains, use atoothbrush.
Burner cap isNOT properly
seated.
_0'1'1!: Do not use steel wool or scouring powders to clean the
burners.
Burners will not lite if cap is removed.
After cleaning
Beibre putting the burner caps and heads back, shake out
excess water and then dry them thoroughly by setting in a
warm oven ibr 3o minutes.
Replacement
Replace the burner caps and heads. Make sure that the caps
and heads are replaced in the correct location. There is two
small, one medium, one large, and one extra large round
burner cap.
Smallburnerhead
Medium burner and capassembly Small burner
head andcap
8 headand cap
° I °
O " I " @
O , • C)
Frontof range
Largeburner Extralarge burner
headand cap headandcap
ii!i..............................
-33-
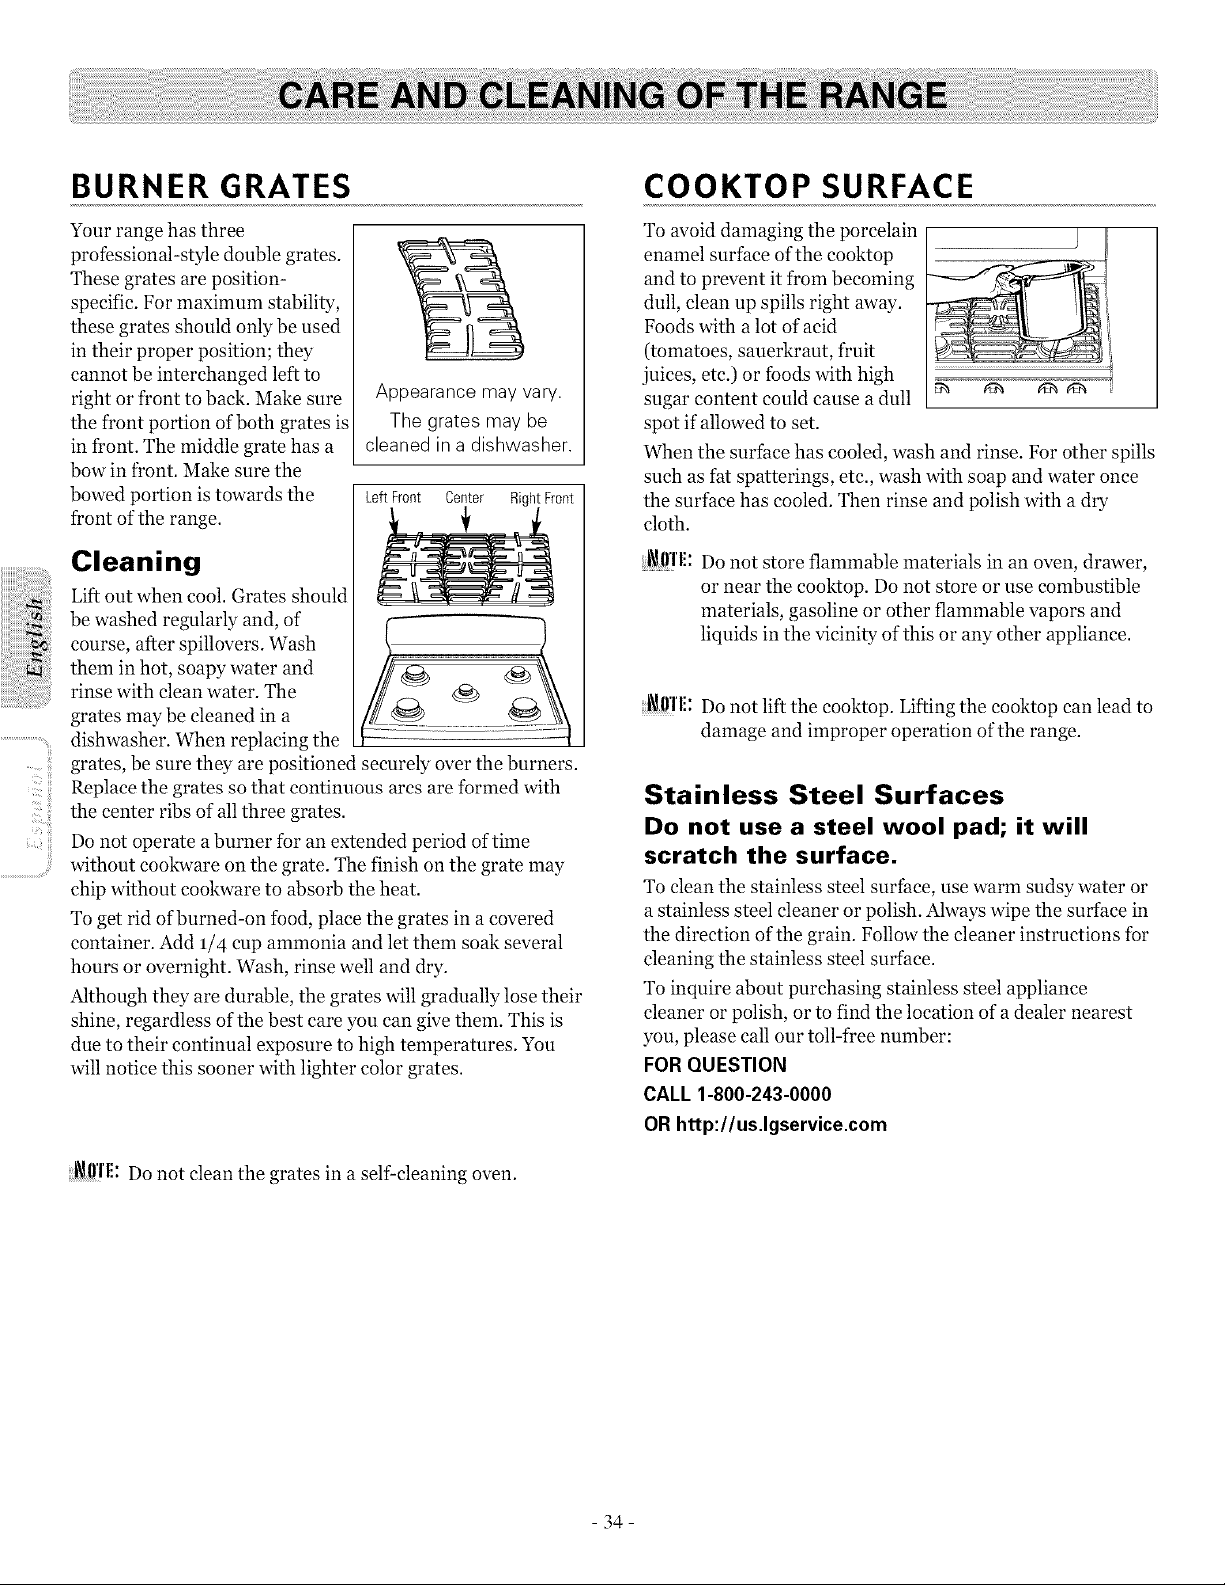
_iiiiiiii
;_i!!i!!!i
..............................i;!'_
BURNER GRATES
Your range has three
professional-style double grates.
These grates are position-
specific. For maximum stability,
these grates should only be used
in their proper position; they
cannot be interchanged left to
right or front to back. Make sure
the front portion of both grates is
in front. The middle grate has a
bow in t¥ont. Make sure the
bowed portion is towards the
front ofthe range.
Cleaning
Lift out when cool. Grates should
be washed regularly and, of
course, after spillovers. Wash
them in hot, soapy water and
rinse with clean water. The
grates may be cleaned in a
dishwasher. When replacing the
Appearance may vary.
The grates may be
cleaned in a dishwasher.
Left Front Center RightFront
grates, be sure they are positioned securely over the burners.
Replace the grates so that continuous ares are formed with
the center ribs of all three grates.
Do not operate aburner for an extended period of time
without cookware on the grate. The finish on the grate may
chip without cookware to absorb the heat.
To get rid of burned-on food, place the grates in a covered
container. Add 1/4 cup ammonia and let them soak several
hours or overnight. Wash, rinse well and dry.
Although they are durable, the grates will gradually lose their
shine, regardless of the best care you can give them. This is
due to their continual exposure to high temperatures. You
will notice this sooner with lighter color grates.
_ffrl!: Do not clean the grates in a self cleaning oven.
COOKTOP SURFACE
To avoid damaging the porcelain
enamel surface of the eooktop
and to prevent it from becoming
dull, clean up spills right away.
Foods with alot of acid
(tomatoes, sauerkraut, fruit
juices, etc.) or foods with high _ _'_ _
sugar content could cause a dull
spot if allowed to set.
When the surface has cooled, wash and rinse. For other spills
such as fat spatterings, etc., wash with soap and water once
the surface has cooled. Then rinse and polish with a dry
cloth.
_ffl'l!: Do not store flammable materials in an oven, drawer,
or near the cooktop. Do not store or use combustible
materials, gasoline or other flammable vapors and
liquids in the vicinity of this or any other appliance.
i_!l!'l'l!:Do not lift the eooktop. Lifting the cooktop can lead to
damage and improper operation of the range.
Stainless Steel Surfaces
Do not use a steel wool pad; it will
scratch the surface.
To clean the stainless steel surface, use warm sudsy water or
a stainless steel cleaner or polish. Always wipe the surface in
the direction of the grain. Follow the cleaner instructions for
cleaning the stainless steel surface.
To inquire about purchasing stainless steel appliance
cleaner or polish, or to find the location of a dealer nearest
you, please call our toll-tree number:
FOR QUESTION
CALL 1-800-243-0000
OR http://us.lgservice.com
- 34-
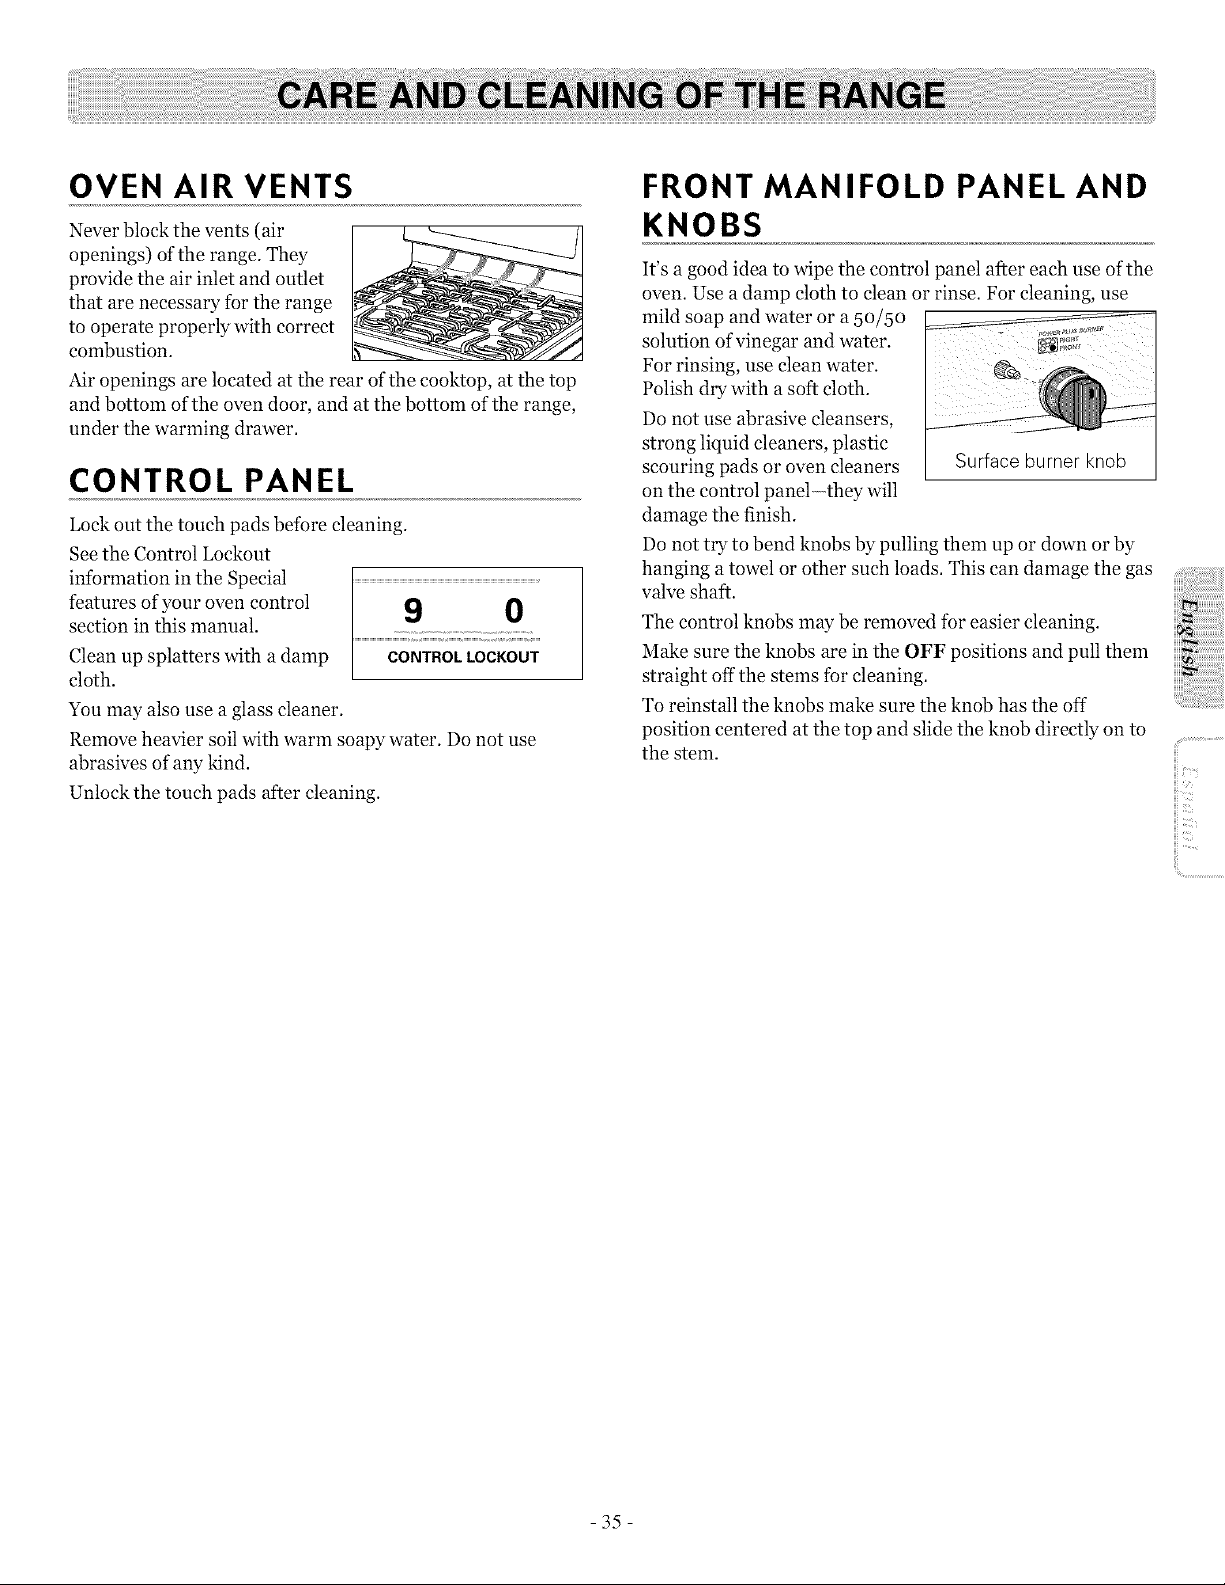
OVEN AIR VENTS
Never block the vents (air
openings) of the range. They
provide the air inlet and outlet
that are necessary for the range
to operate properly with correct
combustion.
Air openings are located at the rear of the cooktop, at the top
and bottom of the oven door, and at the bottom of the range,
under the warming drawer.
CONTROL PANEL
Lock out the touch pads before cleaning.
See the Control Lockout
information in the Special
features of your oven control
section in this manual.
Clean up splatters with a damp
cloth.
You may also use a glass cleaner.
Remove heavier soil with warm soapy water. Do not use
abrasives of any kind.
Unlock the touch pads after cleaning.
9 0
CONTROL LOCKOUT
FRONT MANIFOLD PANEL AND
KNOBS
It's a good idea to wipe the control panel after each use of the
oven. Use a damp cloth to clean or rinse. For cleaning, use
mild soap and water or a 5o/5o
solution of vinegar and water.
For rinsing, use clean water. _.
Polish dry with a soft cloth ................................................
Do not use abrasive cleansers,
strong liquid cleaners, plastic
scouring pads or oven cleaners Surface burner knob
on the control panel-they will
damage the finish.
Do not try to bend knobs by pulling them up or down or by
hanging a towel or other such loads. This can damage the gas
valve shaft.
The control knobs may be removed for easier cleaning.
Make sure the knobs are in the OFF positions and pull them
straight off the stems for cleaning.
To reinstall the knobs make sure the knob has the off
position centered at the top and slide the knob directly on to
the stem.
i!!i..............................
-35-
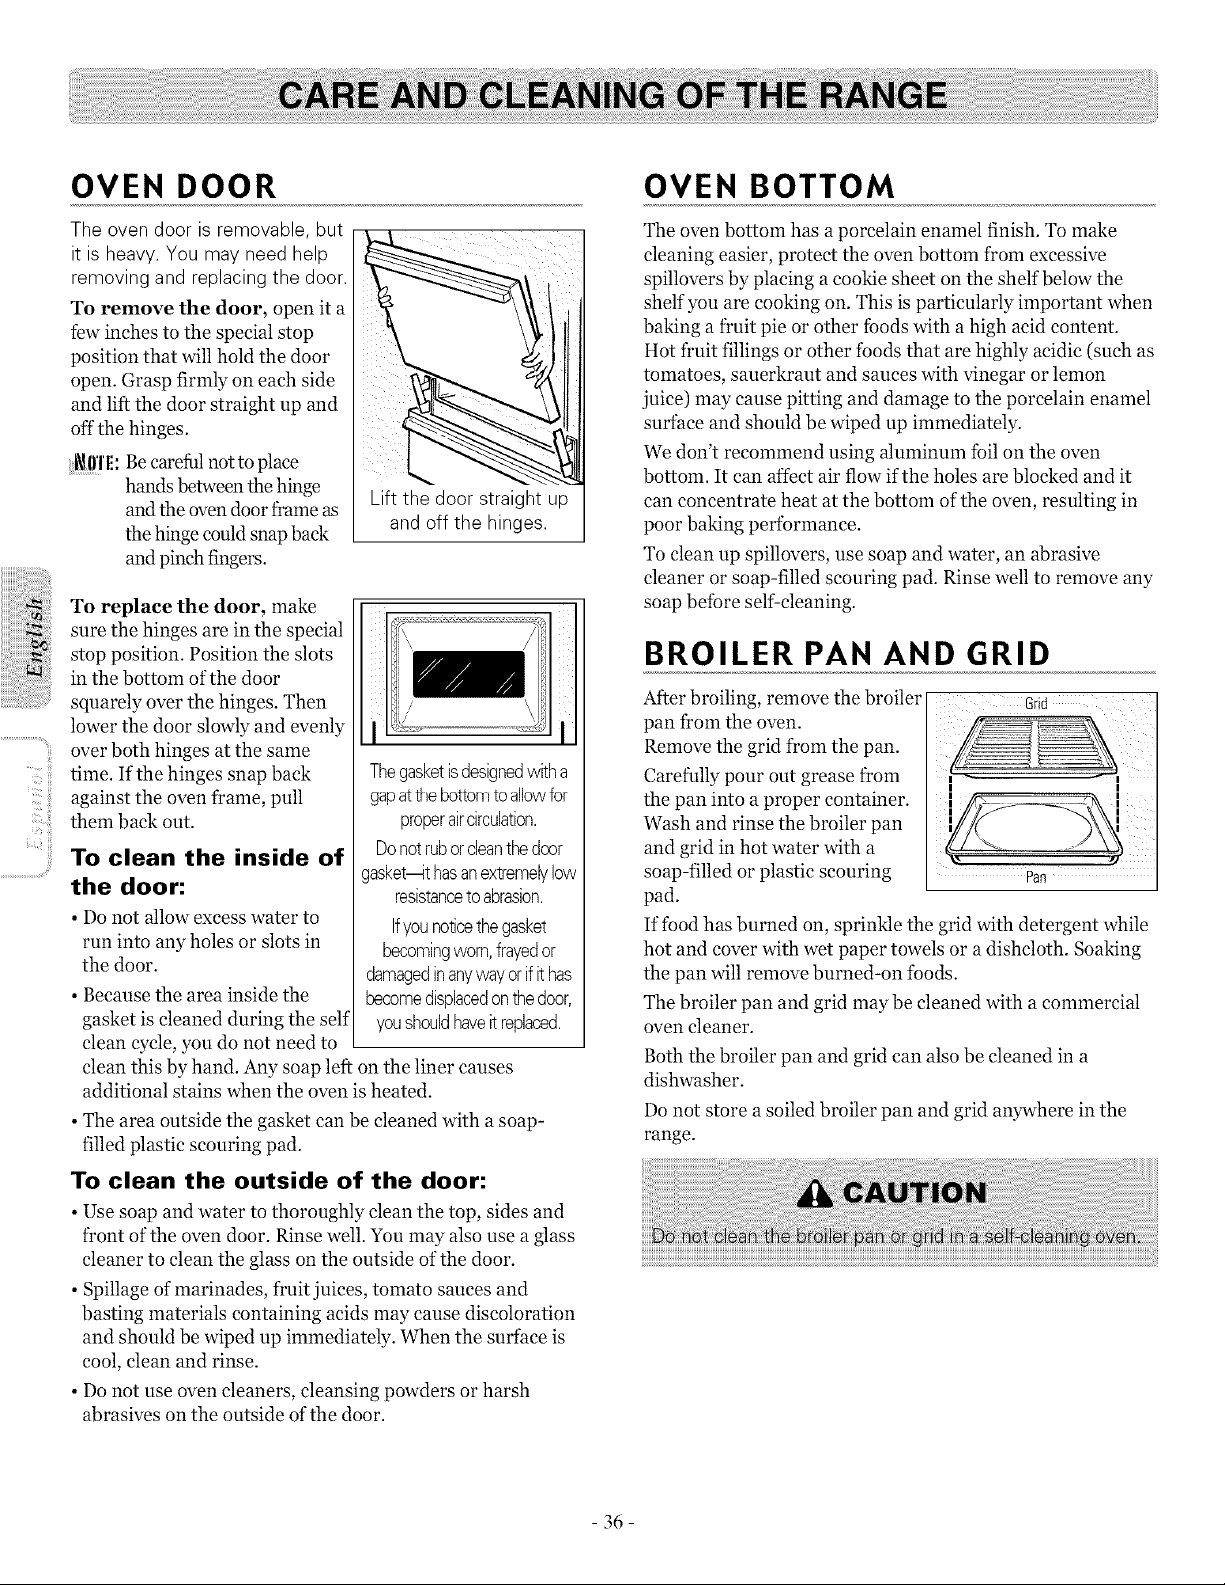
iiiiil;iiii
u
..........................u
OVEN DOOR
The oven door isremovable, but
itis heavy.You may need help
removing and replacing the door.
To remove the door, open it a
few inches to the special stop
position that will hold the door
open. Grasp firmly on each side
and lift the door straight up and
off the hinges.
i_l)'l'l!: Becarefulnot to place
hands between thehinge
andthe oven door frame as
the hinge couldsnap back
andpinch fingers.
Lift the door straight up
and off the hinges.
To replace the door, make
sure the hinges are in the special
stop position. Position the slots
in the bottom of the door
squarely over the hinges. Then
lower the door slowly and evenly
over both hinges at the same
time. Ifthe hinges snap back
against the oven frame, pull
them back out.
To clean the inside of
the door:
• Do not allow excess water to
run into any holes or slots in
the door.
• Because the area inside the
gasket is cleaned during the self
clean cycle, you do not need to
Thegasketisdesignedwitha
gapattile bottomto allowfor
properaircirculation.
Donotruborcleanthedoor
gasket_t hasanextremelylow
resistanceto abrasion.
Ifyounoticethegasket
becomingworn,frayedor
damagedinanywayorifit has
becomedisplacedonthedoor,
youshouldhaveit replaced.
clean this by hand. Any soap left on the liner causes
additional stains when the oven is heated.
• The area outside the gasket can be cleaned with a soap-
filled plastic scouring pad.
To clean the outside of the door:
• Use soap and water to thoroughly clean the top, sides and
front ofthe oven door. Rinse well. You may also use a glass
cleaner to clean the glass on the outside of the door.
• Spillage of marinades, fruit juices, tomato sauces and
basting materials containing acids may cause discoloration
and should be wiped up immediately. When the surface is
cool, clean and rinse.
• Do not use oven cleaners, cleansing powders or harsh
abrasives on the outside of the door.
OVEN BOTTOM
The oven bottom has a porcelain enamel finish. To make
cleaning easier, protect the oven bottom from excessive
spillovers by placing a cookie sheet on the shelf below the
shelf you are cooking on. This is particularly important when
baking a tYuit pie or other foods with a high acid content.
Hot fruit Nlings or other foods that are highly acidic (such as
tomatoes, sauerkraut and sauces with vinegar or lemon
juice) may cause pitting and damage to the porcelain enamel
surface and should be wiped up immediately.
We don't recommend using aluminum foil on the oven
bottom. It can affect air flow ifthe holes are blocked and it
can concentrate heat at the bottom of the oven, resulting in
poor baking performance.
To clean up spillovers, use soap and water, an abrasive
cleaner or soap-filled scouring pad. Rinse well to remove any
soap before self-cleaning.
BROILER PAN AND GRID
After broiling, remove the broiler Grid
pan from the oven.
Remove the grid from the pan.
Carefully pour out grease from ,
the pan into a proper container.
Wash and rinse the broiler pan
and grid in hot water with a
soap-filled or plastic scouring
pad.
If food has burned on, sprinkle the grid with detergent while
hot and cover with wet paper towels or a dishcloth. Soaking
the pan will remove burned-on foods.
The broiler pan and grid may be cleaned with a commercial
oven cleaner.
Both the broiler pan and grid can also be cleaned in a
dishwasher.
Do not store a soiled broiler pan and grid anywhere in the
range.
36
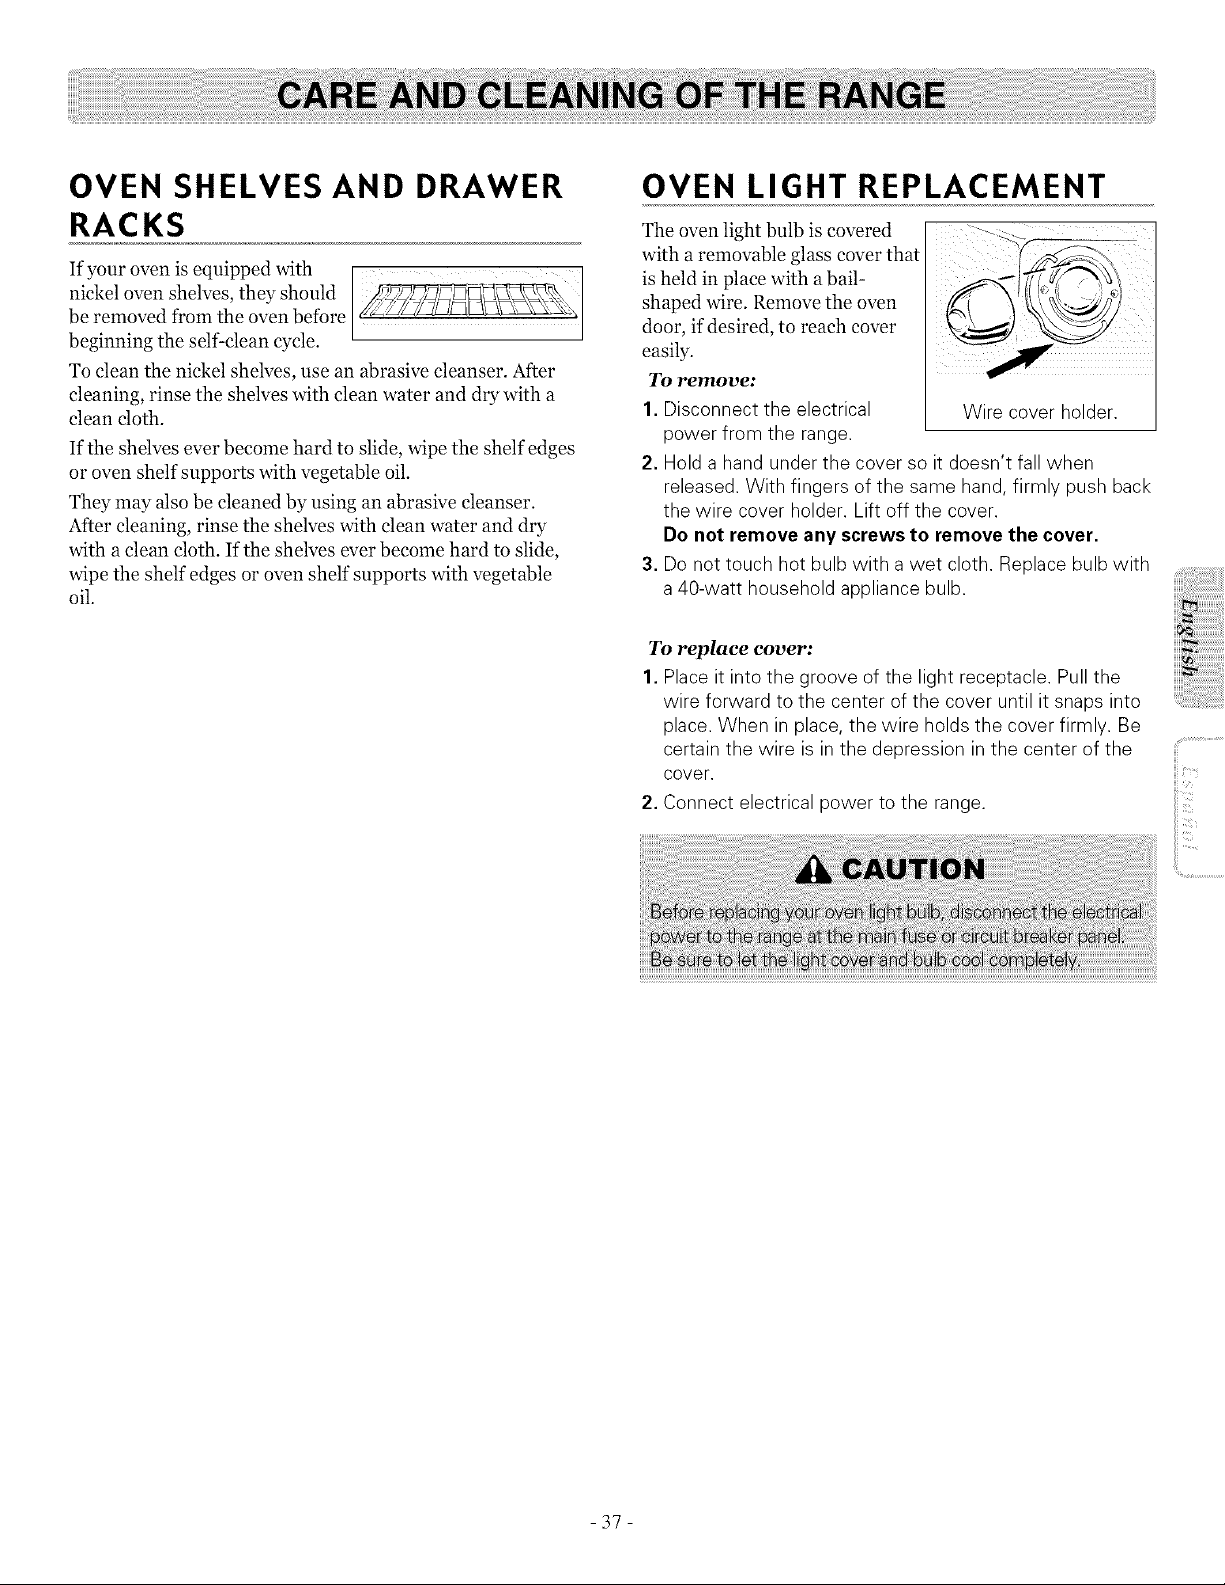
OVEN SHELVES AND DRAWER
RACKS
If your oven is equipped with
nickel oven shelves, they should
be removed from the oven before
beginning the self clean cycle.
To clean the nickel shelves, use an abrasive cleanser. After
cleaning, rinse the shelves with clean water and dry with a
clean cloth.
If the shelves ever become hard to slide, wipe the shelf edges
or oven shelf supports with vegetable oil.
They may also be cleaned by using an abrasive cleanser.
After cleaning, rinse the shelves with clean water and dry
with a clean cloth. If the shelves ever become hard to slide,
wipe the shelf edges or oven shelf supports with vegetable
oil.
OVEN LIGHT REPLACEMENT
The oven light bulb is covered
with a removable glass cover that
is held in place with abail-
shaped wire. Remove the oven
door, if desired, to reach cover
easily.
To remove:
1. Disconnect the electrical Wire cover holder.
power from the range.
2. Holda hand under the cover so it doesn't fall when
released. With fingers of the same hand, firmly push back
the wire cover holder. Lift off the cover.
Do not remove any screws to remove the cover.
3. Donot touch hot bulb with a wet cloth. Replace bulb with
a 40-watt household appliance bulb.
To replace cover:
1. Placeit into the groove of the light receptacle. Pull the
wire forward to the center ofthe cover until it snaps into
place. When in place, the wire holds the cover firmly. Be
certain the wire is in the depression in the center of the
cover.
2. Connect electrical power to the range.
-37-
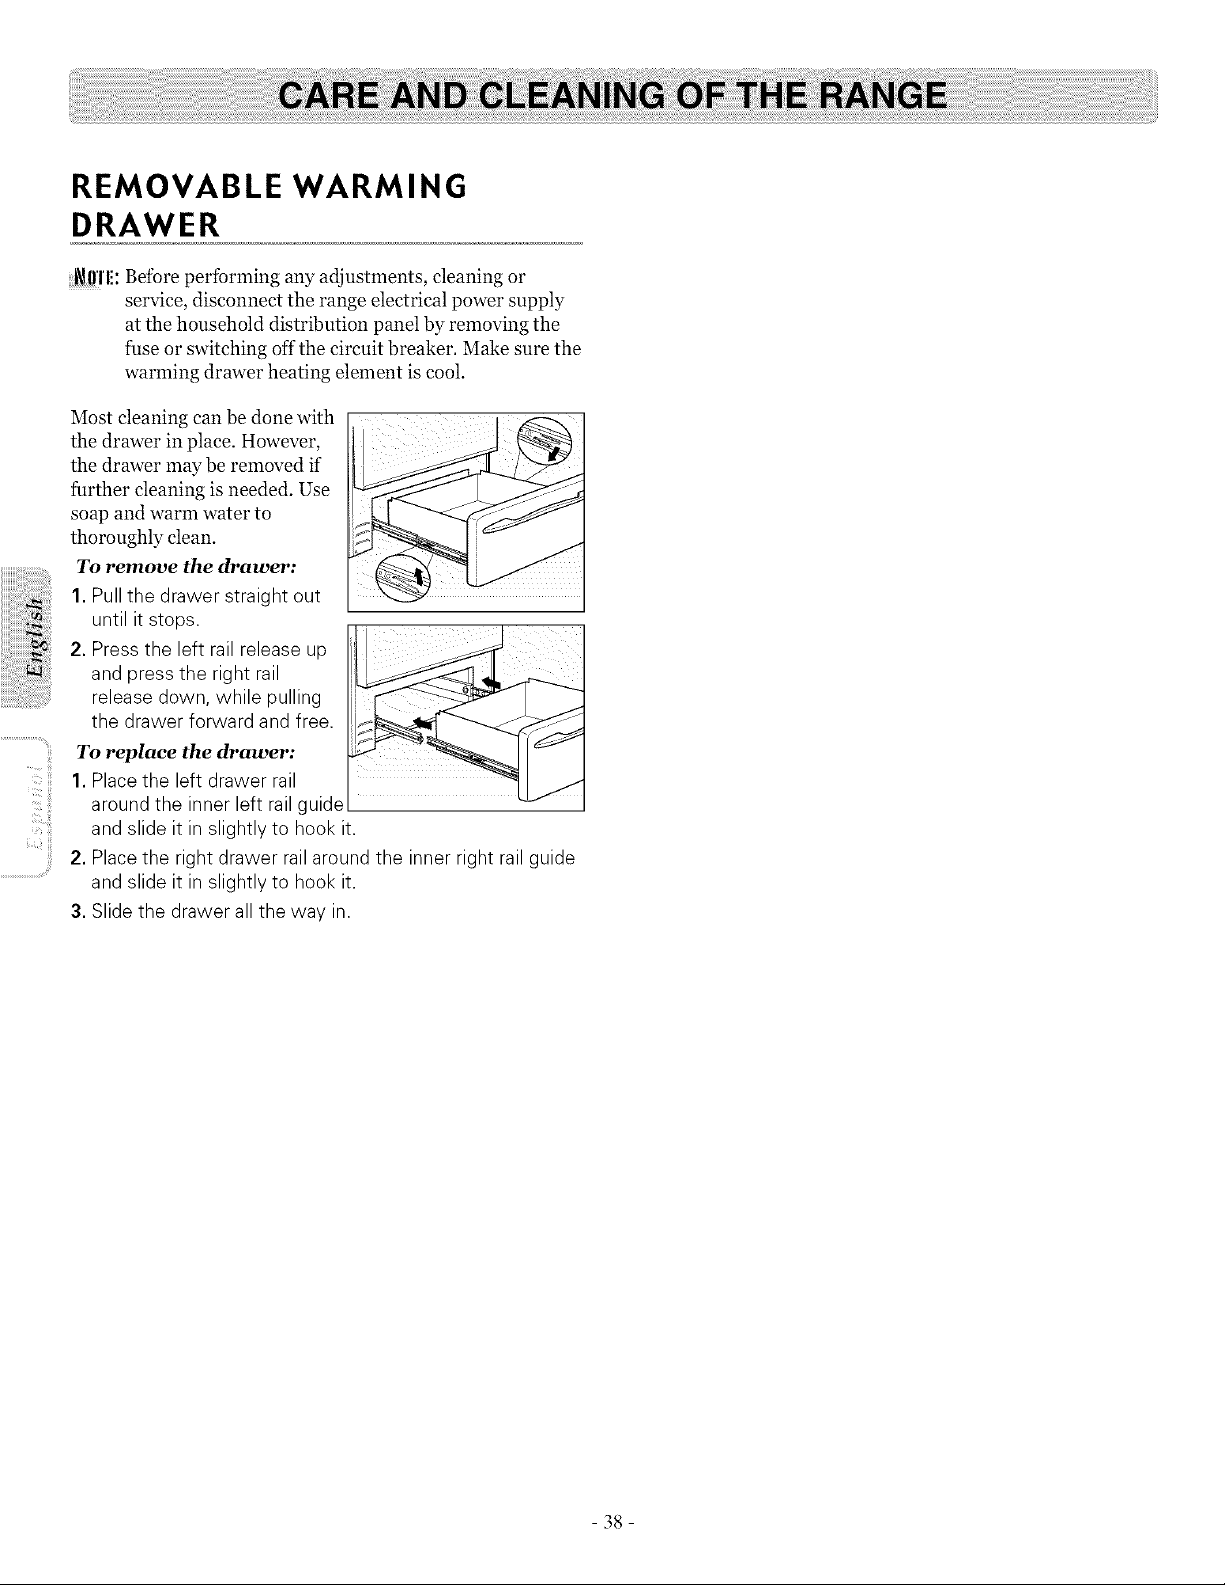
REMOVABLE WARMING
DRAWER
_ffl'l!: Before performing any adjustments, cleaning or
service, disconnect the range electrical power supply
at the household distribution panel by removing the
fuse or switching off the circuit breaker. Make sure the
warming drawer heating element is cool
Most cleaning can be done with
the drawer in place. However,
the drawer may be removed if
further cleaning is needed. Use
soap and warm water to
thoroughly clean.
To remove the drawer:
1.Pull the drawer straight out
until itstops.
2. Press the left rail release up ....
and press the right rail
release down, while pulling
the drawer forward and free.
To replace the drawer:
1.Placethe left drawer rail
around the inner left rail guide
and slide it in slightly to hook it.
2. Placethe right drawer rail around the inner right rail guide
and slide it in slightly to hook it.
3. Slide the drawer all the way in.
38
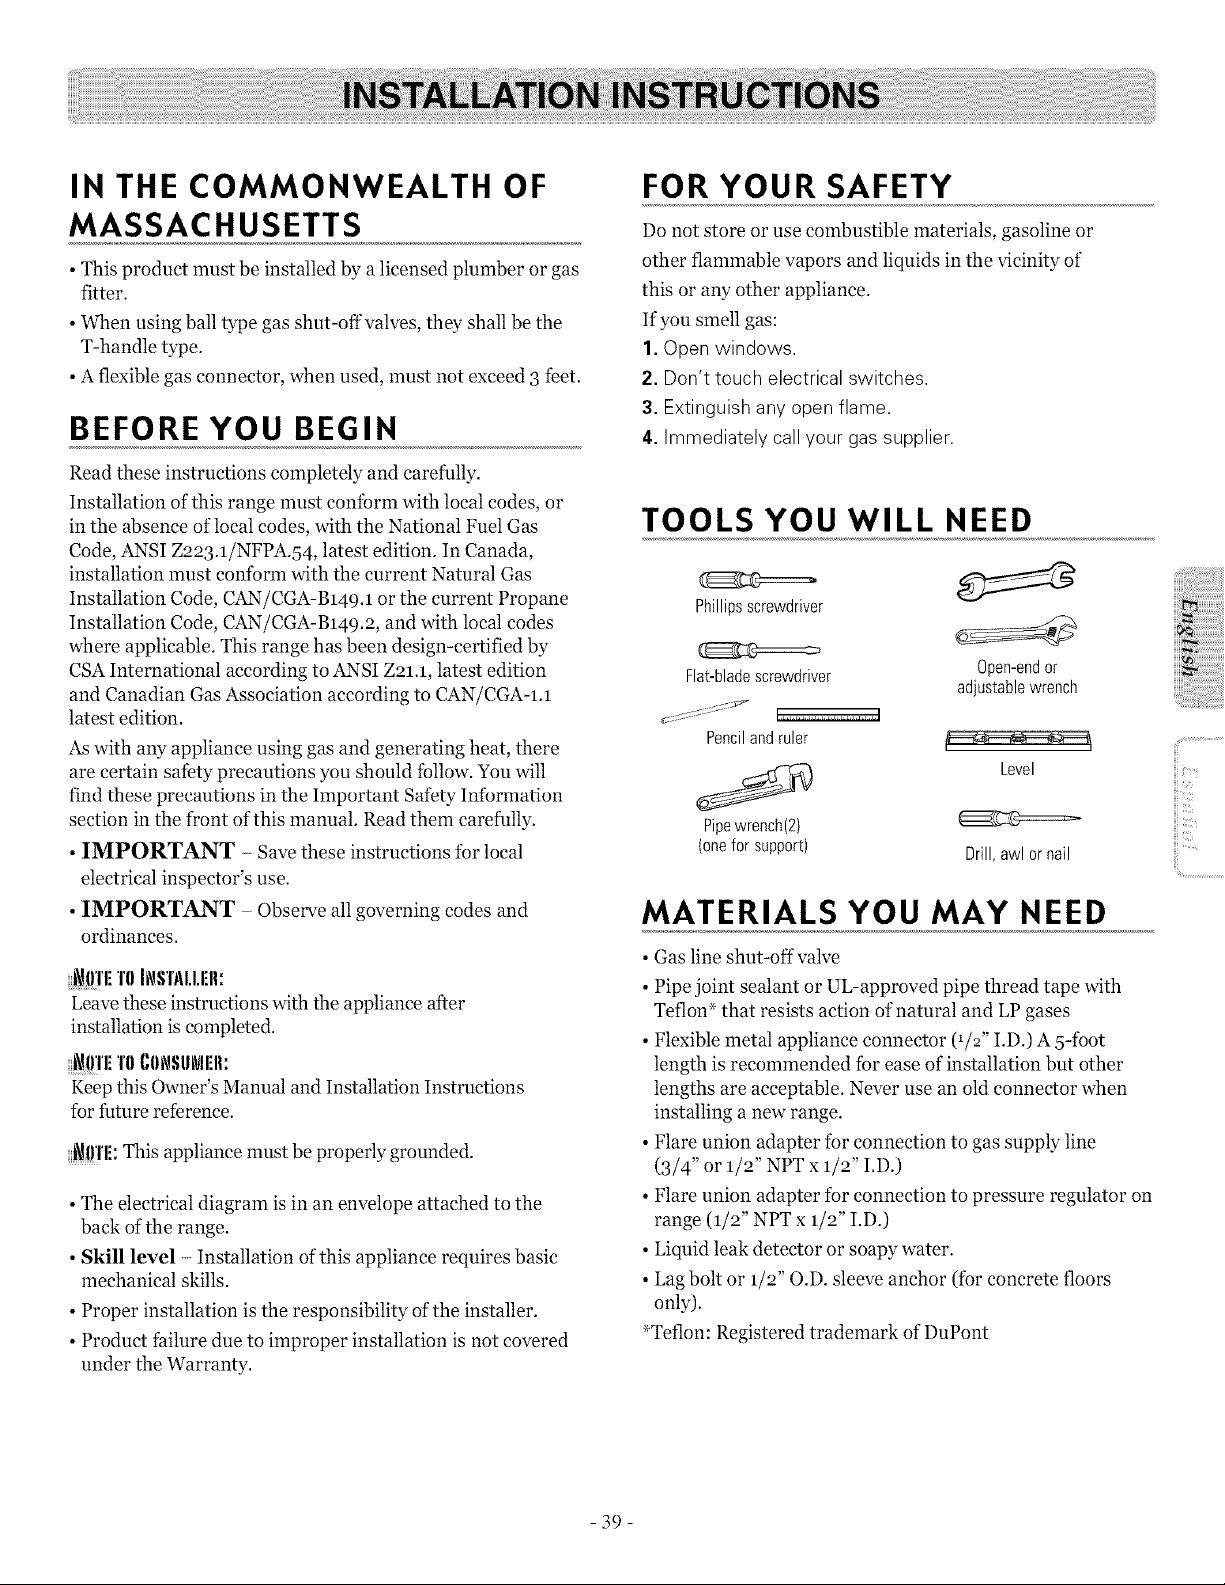
IN THE COMMONWEALTH OF
MASSACHUSETTS
• This product must be installed by a licensed plumber or gas
fitter.
• When using ball type gas shut-off valves, they shall be the
T-handle type.
• Aflexible gas connector, when used, must not exceed 3 feet.
BEFORE YOU BEGIN
Read these instructions completely and carefully.
Installation ofthis range must conibrm with local codes, or
in the absence of local codes, with the National Fuel Gas
Code, ANSI Z223.1/NFPA.54, latest edition. In Canada,
installation nmst conform with the current Natural Gas
Installation Code, CAN/CGA-B149.1 or the current Propane
Installation Code, CAN/CGA-B149.2, and with local codes
where applicable. This range has been design-certified by
CSAInternational according to ANSI Z21.1, latest edition
and Canadian Gas Association according to CAN/CGA-I.1
latest edition.
Aswith any appliance using gas and generating heat, there
are certain safety precautions you should tbllow. You will
find these precautions in the Important Safety Inlbrmation
section in the front of this manual. Read them carefully.
• IMPORTANT - Save these instructions for local
electrical inspector's use.
• IMPORTANT - Observe all governing codes and
ordinances.
_ffl'li T0 INSTI\I.I.rlI.
Leave these instructions with the appliance after
installation is completed.
_l)'l'liTI)(,IINSIINI:II:
Keep this Owner's Manual and Installation Instructions
for future reference.
_!!'l'li: This appliance must be properly grounded.
• The electrical diagram is in an envelope attached to the
back of the range.
• Skill level - Installation of this appliance requires basic
mechanical skills.
• Proper installation is the responsibility of the installer.
• Product failure due to improper installation is not covered
under the Warranty.
FOR YOUR SAFETY
Do not store or use combustible materials, gasoline or
other flammable vapors and liquids in the vicinity of
this or any other appliance.
If you smell gas:
I.Open windows.
2. Don't touch electrical switches.
3. Extinguish any open flame.
4. Immediately callyour gassupplier.
TOOLS YOU WILL NEED
Phillipsscrewdriver
Flat-blade screwdriver Open-end or
adjustablewrench
Penciland ruler
Level
Pipe wrench(2)
(onefor support) Drill, awl or nail
MATERIALS YOU MAY NEED
• Gas line shut-off valve
• Pipe joint sealant or UL-approved pipe thread tape with
Teflon _ that resists action of natural and LP gases
• Flexible metal appliance connector (1/2" I.D.) A 5-ibot
length is recommended ibr ease of installation but other
lengths are acceptable. Never use an old connector when
installing a new range.
• Flare union adapter ibr connection to gas supply line
(3/4" or 1/2" NPT x 1/2" I.D.)
• Flare union adapter ibr connection to pressure regulator on
range (1/2" NPT x 1/2" I.D.)
• Liquid leak detector or soapy water.
• Lag bolt or 1/2" O.D. sleeve anchor (ibr concrete floors
only).
_Teflon: Registered trademark of DuPont
iiii>_
iii',<
ii!i..............................
-39-

.....+i_JlI'IIII'I'ANT:
Remove all packing material and literature from oven before
connecting gas and electrical supply to range.
• Have your range installed by a qualified installer.
• Your range must be electrically grounded in accordance with
local codes or, in the absence of local codes, in accordance
with the National Electrical Code (ANSI/NFPA 7o, latest
edition).
In Canada, electrical grounding must be in accordance with
the current CSA C22.1 Canadian Electrical Code Part 1
and/or local codes. See Electrical Connections in this
section.
• Before installing your range on linoleum or any other
synthetic floor covering, make sure the floor covering can
withstand 180°F without shrinking, warping or discoloring.
Do not install the range over carpeting unless a sheet of 1/4"
thick plywood or similar insulator is placed between the
range and carpeting.
• Make sure the wall coverings around the range can
withstand heat generated by the range up to 2oo°F.
• Avoid placing cabinets above the range. To reduce the hazard
caused by reaching over the open flames of operating
burners, install aventilation hood over the range that
projects forward at least 5" beyond the front of the cabinets.
• The ventilating hood must be constructed of sheet metal not
less than o.o122" thick. Install above the cooktop with a
clearance of not less than 1/4" between the hood and the
underside of the combustible material or metal cabinet. The
hood must be at least as wide as the appliance and centered
over the appliance. Clearance between the cooking surface
and the ventilation hood surface MUST NEVER BE LESS
THAN 94 INCHES.
EXCEPTION: Installation ofa listed microwave oven or
cooking appliance over the cooktop shall conform to the
installation instructions packed with that appliance.
• If cabinets are placed above the range, allow a minimum
clearance of 3o" between the cooking surface and the bottom
of"unprotected cabinets.
• If a 3o" clearance between cooking surface and overhead
combustible material or metal cabinets cannot be
maintained, protect the underside of the cabinets above the
cooktop with not less than 1/4" insulating millboard covered
with sheet metal not less than o.o122" thick. Clearance
between the cooking surface and protected cabinets MUST
NEVER BE LESS THAN 24 INCHES.
• The vertical distance from the plane of the cooking surface to
the bottom ofadjacent overhead cabinets extending closer
than 1"to the plane of the range sides must not be less than
18". (See the Dimensions and Clearances illustration in this
section.)
- 40 -

DIMENSIONS AND CLEARANCES
Provide adequate dearanees between the range and adjacent combustible surfaces. These dimensions must be met for safe use of
your range. The location of the electrical outlet and pipe opening (see Gas Pipe and Electric Outlet Locations) may be adjusted to
meet specific requirements.
The range maybe placed with o" clearance (flush) at the ba& wall.
J
18"-
Minimum to
cabinets on
either side _ 30"
of the range _1 30"
3'N -
Minimum Minimum
clearnace ],
to left wall f
6"Minimum
clearnace to
right wall
Maximum depthl_
for cabinets /
above /
countertops L
Tocabinets
below cooktop
and atthe range
back
Depth with door closed (includes door handle)
I---
Height
473/4"
Depth with door o1: _.
7: .........................
{iv_
iii
iii:
- 41 -
i!;¸¸
II_'C!!!i
@
®
WARNING
ANTI-TIP DEVICE
All ranges can tip and injury could result.
Toprevent accidental tipping of the range,
attach an approved Anti-Tip device to the
wall. (See Installing the Anti-Tip Device in
this section.) To check if the device is
installed and engaged properly, carefully tip
the range forward. The Anti-Tip device
should engage and prevent the range from
tipping over.
If you pull the range out from the wall for
any reason, make sure the Anti-Tip device is
engaged when you push the range back
against the wall.
• For your safety, never use your range for warming or
heating the room. Your oven and cooktop are not
designed to heat your kitchen. Top burners should not be
operated without cookware on the grate. Such abuse
could result in fire and damage to your range and will
void your warranty.
• Do not store or use combustible materials, gasoline or
other flammable vapors and liquids in the vicinity of this
or any other appliance. Explosions or fires could result.
• Do not use oven for a storage area. Items stored in the
oven can ignite.
• Do not let cooking grease or other flammable materials
accumulate in or near the range.
LOCATION
Do not locate the range where it may be subject to
strong drafts. Any openings in the floor or wall
behind the range should be sealed. Make sure the
openings around the base of the range that supply
fresh air for combustion and ventilation are not
obstructed by carpeting or woodwork.
Your range, like many other household items, is heavy and
can settle into soft floor coverings such as cushioned vinyl or
carpeting. Use care when moving the range on this type of
flooring. It is recommended that the following simple and
inexpensive instructions be followed to protect your floor.
The range should be installed on a sheet of plywood (or
similar material). When the floor covering ends at the front
of the range, the area that the range will rest on should be
built up with plywood to the same level or higher than the
floor covering.
This will allow the range to be moved for cleaning or
servicing. Also, make sure your floor covering will withstand
18o°F. (See the Installation Safety Instructions section.)
Make sure the wall coverings around your range can
withstand the heat generated (up to 2oo°F) by the range.
(See the Installation Safety Instructions section.)
IL_II301rI'AN'I':
Remove all tape and packaging. Make sure the burners are
properly seated and level.
Take the accessory pack out of the oven and/or drawer.
Check to be sure that no range parts have come loose during
shipping.
- 42 -
1. PROVIDE ADEQUATE GAS
SUPPLY
Your range is designed to operate at a pressure of 5"
of water column on natural gas or, if designed for LP
gas (propane orbutane), lo" of water column.
Make sure you are supplying your range with the typeof gas
for which it is designed.
This range is convertible for use on natural or propane gas. If
you decide to use this range on LP gas, conversion must be
made by a qualified LP installer before attempting to operate
the range on that gas.
For proper operation, the pressure of natural gas supplied to
the regulator must be between 5" and 13" of water column.
For LP gas, the pressure supplied must be between lo" and 13"
of water column.
When checking for proper operation of the regulator, the inlet
pressure must be at least 1" greater than the operating
(manifold) pressure as given above.
The pressure regulator located at the inlet of the range
manifold must remain in the supply line regardless ofwhether
natural or LP gas isbeing used.
A flexible metal appliance connector used to connect the range
to the gas supply line should have an I.D. of 1/2" and be 5feet
in length for ease of installation. In Canada, flexible
connectors must be single wall metal connectors no longer
than 6feet in length.
2. CONNECT THE RANGE TO
GAS
Shut offthe main gas supply valve before
disconnecting the old range and leave it off until the
new hook-up has been completed. Don't forget to
relight the pilot on other gas appliances when you
turn the gas back on.
Because hard piping restricts movement of the range, the use
of a CSAInternational-certified flexible metal appliance
connector is recommended unless local codes require ahard-
piped connection.
Never use an old connector when installing a new range. Ifthe
hard piping method is used, you must carefully align the pipe;
the range cannot be moved after the connection is made.
To prevent gas leaks, put pipe joint compound on, or wrap
pipe thread tape with Teflon _ around, all male (external) pipe
threads.
A. Install a manual gas line shut-off valve in the gas line in an
easily accessed location outside of the range. Make sure
everyone operating the range knows where and how to shut
offthe gas supply to the range.
B. Install male 1/2" flare union adapter to the 1/2" NPT
internal thread at inlet of regulator. Use asupport wrench
on the regulator fitting to avoid damage.
When installing the range from the front, remove the 9o °
elbow tbr easier installation.
C. Install male 1/2" or 3/4" flare union adapter to the NPT
internal thread of the manual shut-off valve, taking care to
support the shut-off valve to keep it from turning.
D. Connect flexible metal appliance connector to the adapter
on the range. Position range to permit connection at the
shut-offvalve.
E. When all connections have been made, make sure all range
controls are in the off position and turn on the main gas
supply valve. Use aliquid leak detector at alljoints and
connections to check tbr leaks in the system.
When using test pressures greater than 1/2 psig to pressure
test the gas supply system of the residence, disconnect the
range and individual shut-off valve from the gas supply piping.
When using test pressures of 1/2 psig or less to test the gas
supply system, simply isolate the range from the gas supply
system by closing the individual shut-off valve.
_Teflon: Registered trademark ofDuPont
- 43 -
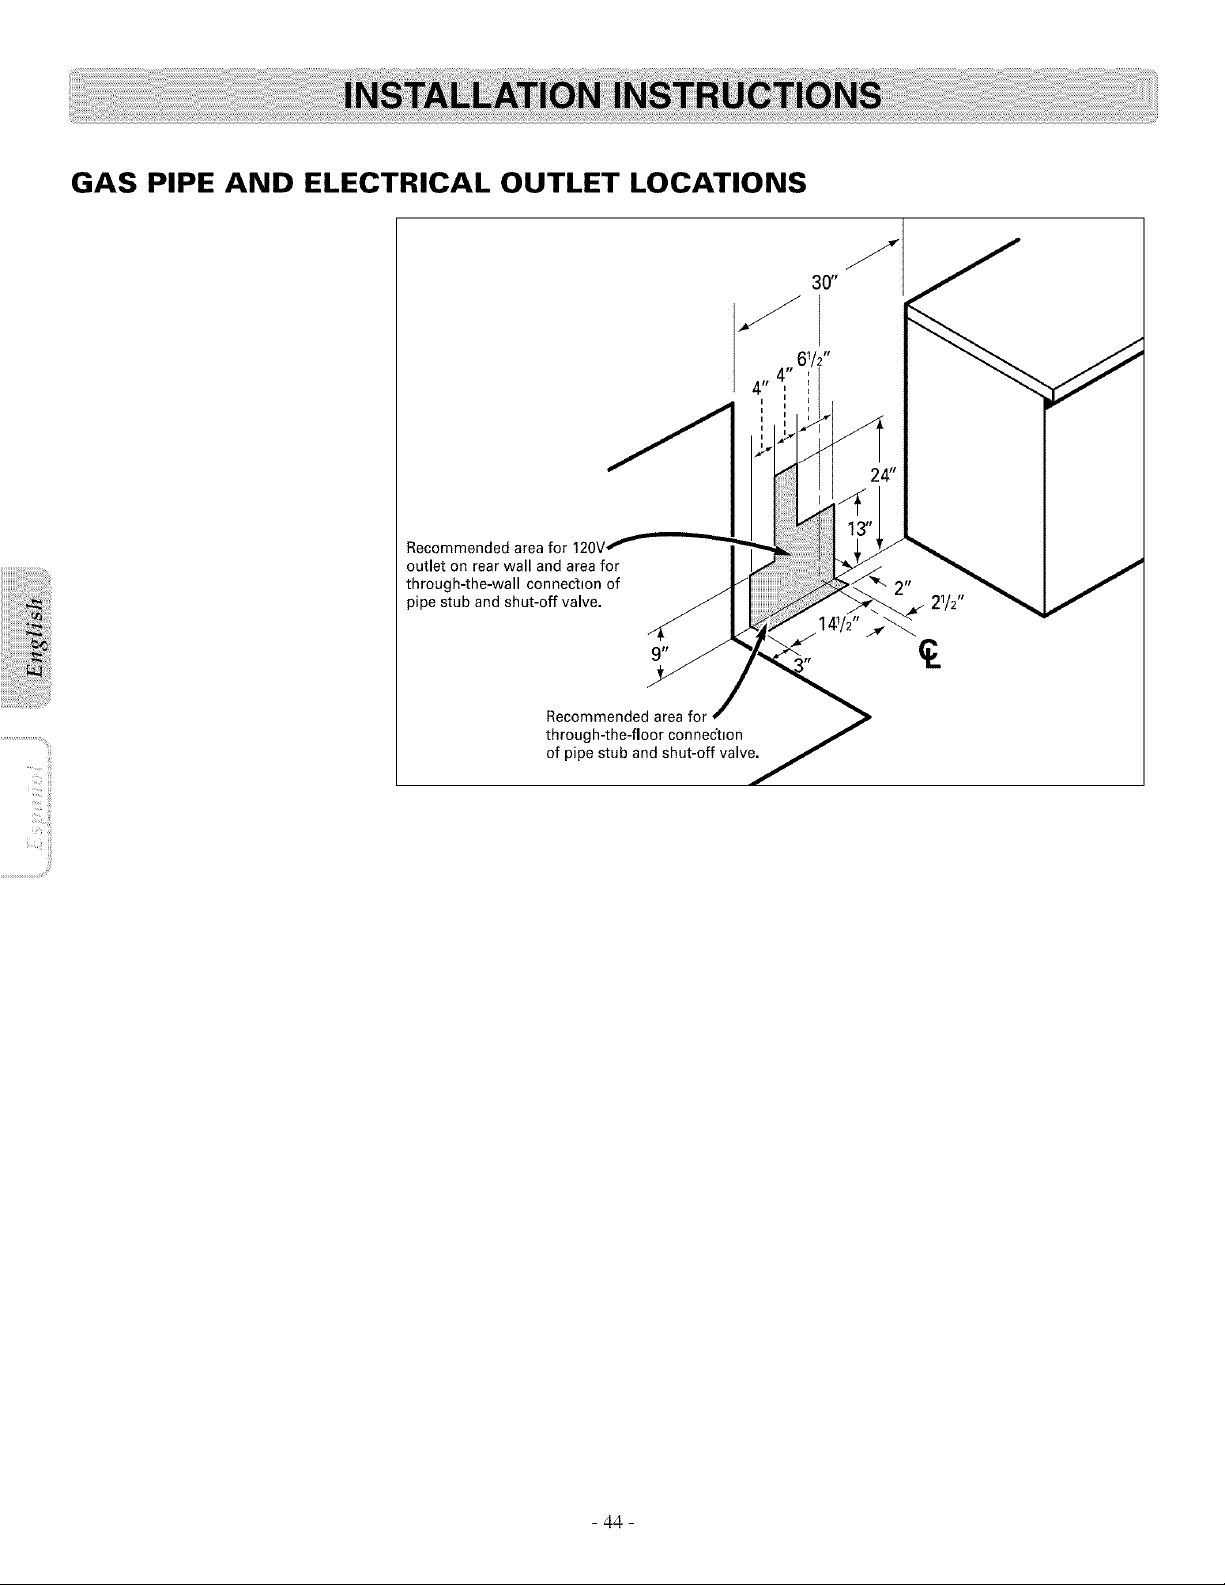
ii_ ii!!!i
GAS PIPE AND ELECTRICAL OUTLET LOCATIONS
Recommended area for
outlet on rear wall and areafor
through-the-wall connection of
pipe stub and shut-off valve. 21/2"
Recommended area for
through-the-floor connec'tlon
of pipe stub and shut-off valve.
- 44 -
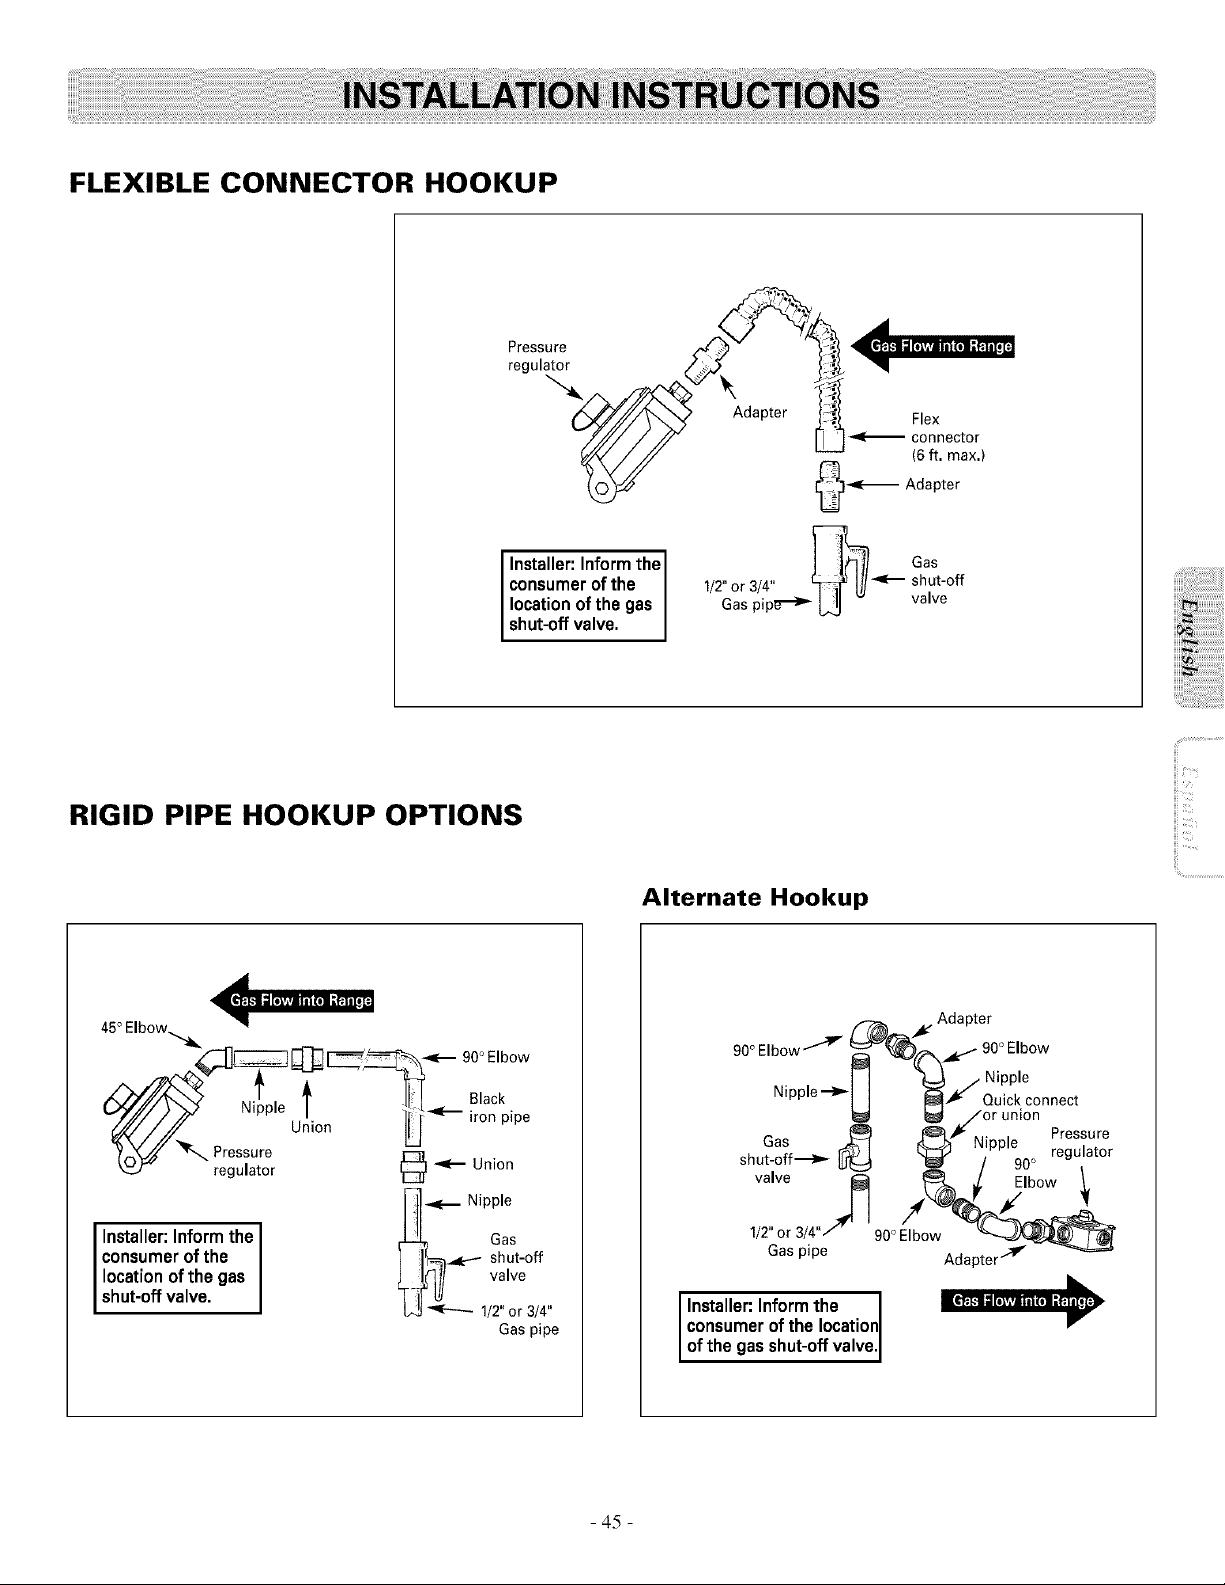
FLEXIBLE CONNECTOR HOOKUP
=='=
r-_
Installer: Inform the ] 1__ Gas
consumer of the 1/2"or3/4" c]_ I1/-<--- shut-off
location of the gas Gas pipe"-_ L_ v vawe
shut-off valve.
RIGID PIPE HOOKUP OPTIONS
Alternate Hookup
i!!i..............................
<==,=
45° Elbow_.
._ _ __- _OOE,bow
_z_ Presii!: 'e U!iOn ' _'__] i°a_iPl pe
',.._F regulator
_ _... Nipple
Installer: Inform the _ Gas
consumer of the ] ]_.,_:.-- shut-off
location of the gas i [_]/ valve
shut-off valve. _-i['I!/b.3_ 1/2"or 3/4"
Gaspipe
f-/b_ . Adapter
90° Elbow""_ _)_%_L-'" 90° EIb°w
_1 ((_ / Nipple
Nipple --_
] ] _ Quick connect
i_l _/or union
L_ _ _ . . Pressure
shu_a;f._>_ r_--I (_ Nipple o regulator
" ttJE::€1 _ / 90 .
valve I_ _ Elbow ./,
1/2"or 3/4"/90 ° Elbow _/-_
Gas pipe Adapter,.,-lv - --_Y'_
Installer: Inform the I
consumer of the location
l-
of the gas shut-off va ve,
- 45 -
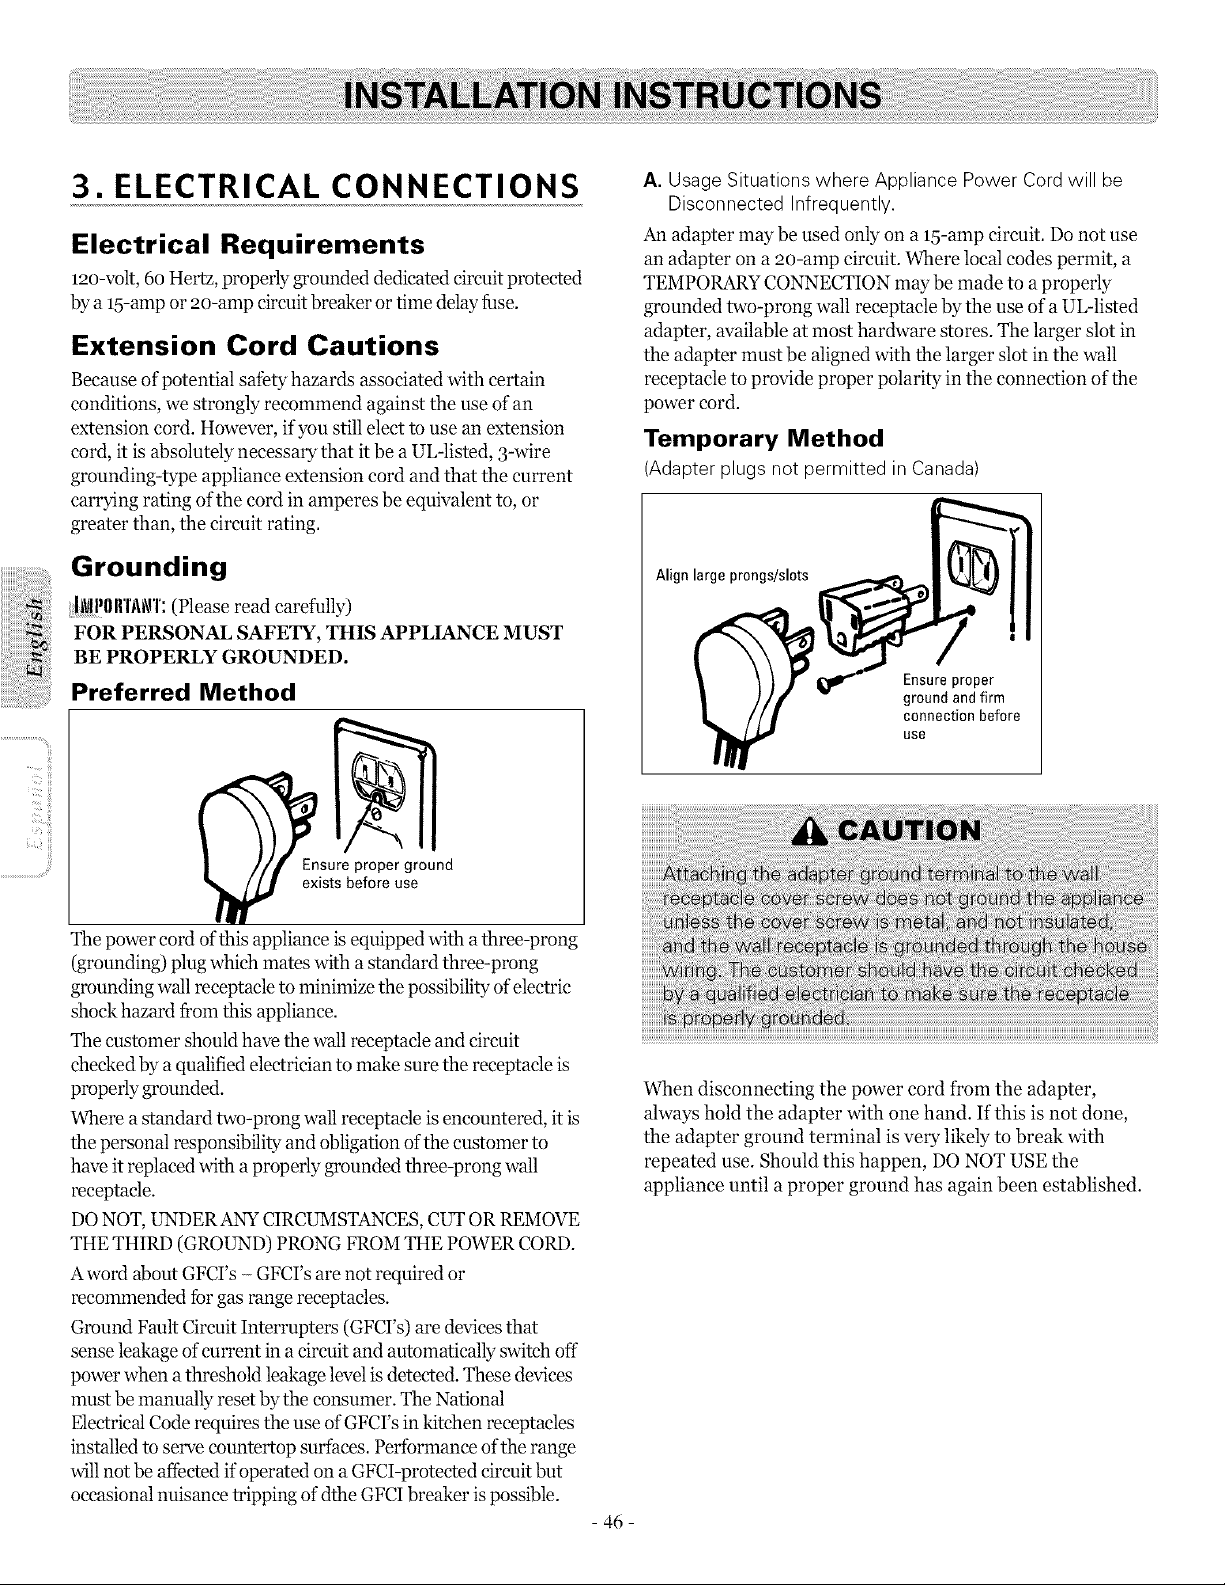
3. ELECTRICAL CONNECTIONS
Electrical Requirements
120-volt, 6o Hertz, properly grounded dedicated circuit protected
by a 15-ampor 20-amp circuit breaker ortime delay fuse.
Extension Cord Cautions
Because of potential safety hazards associated with certain
conditions, we strongly recommend against the use of an
extension cord. However, if you still elect to use an extension
cord, it is absolutely necessary that itbe a UL-listed, 3-wire
grounding-type appliance extension cord and that the current
carrying rating of the cord in amperes be equivalent to, or
greater than, the circuit rating.
Grounding
lflPllllT.i\i\rl':(Please read carefully)
FOR PERSONAL SAFETY, THIS APPLIANCE MUST
BE PROPERLY GROUNDED.
Preferred Method
Ensure proper ground
exists before use
The power cord of this appliance is equipped with athree-prong
(grounding) plug which mates with astandard three-prong
grounding wall receptacle to minimize the possibility of"electric
shock hazard from this appliance.
The customer should have the wall receptacle and circuit
checked by aqualified electrician to make sure the receptacle is
properly grounded.
Where astandard two-prong wall receptacle is encountered, it is
the personal responsibility and obligation of the customer to
have itreplaced with a properly grounded three-prong wall
receptacle.
DONOT, UNDERANY CIRCUMSTANCES, CUT ORREMOVE
THE THIRD (GROUND) PRONG FROM THE POWER CORD.
A word about GFCI's - GFCI's are not required or
recommended fbrgas range receptacles.
Ground Fault Circuit Interrupters (GFCrs) are devices that
sense leakage of current in acircuit and automatically switch off
power when athreshold leakage level is detected. These devices
must be manually reset by the corLsumer. The National
Electrical Code requires the use of GFCI's in kitchen receptacles
installed to serve countertop surfaces. Performance of the range
will not be affected if operated on aGFCI-protected circuit but
occasional nuisance tripping ofdthe GFCIbreaker ispossible.
- 46 -
A. Usage Situations where Appliance Power Cordwill be
Disconnected Infrequently.
An adapter may be used only on a 15-amp circuit. Do not use
an adapter on a _)o-amp circuit. Where local codes permit, a
TEMPORARY CONNECTION may be made to a properly
grounded two-prong wall receptacle by the use of a UL-listed
adapter, available at most hardware stores. The larger slot in
the adapter must be aligned with the larger slot in the wall
receptacle to provide proper polarity in the connection ofthe
power cord.
Temporary Method
(Adapter plugs not permitted in Canada)
Align large prongs/slots
Ensureproper
ground and firm
connection before
use
When disconnecting the power cord from the adapter,
always hold the adapter with one hand. If this is not done,
the adapter ground terminal is very likely to break with
repeated use. Should this happen, DO NOT USE the
appliance until a proper ground has again been established.
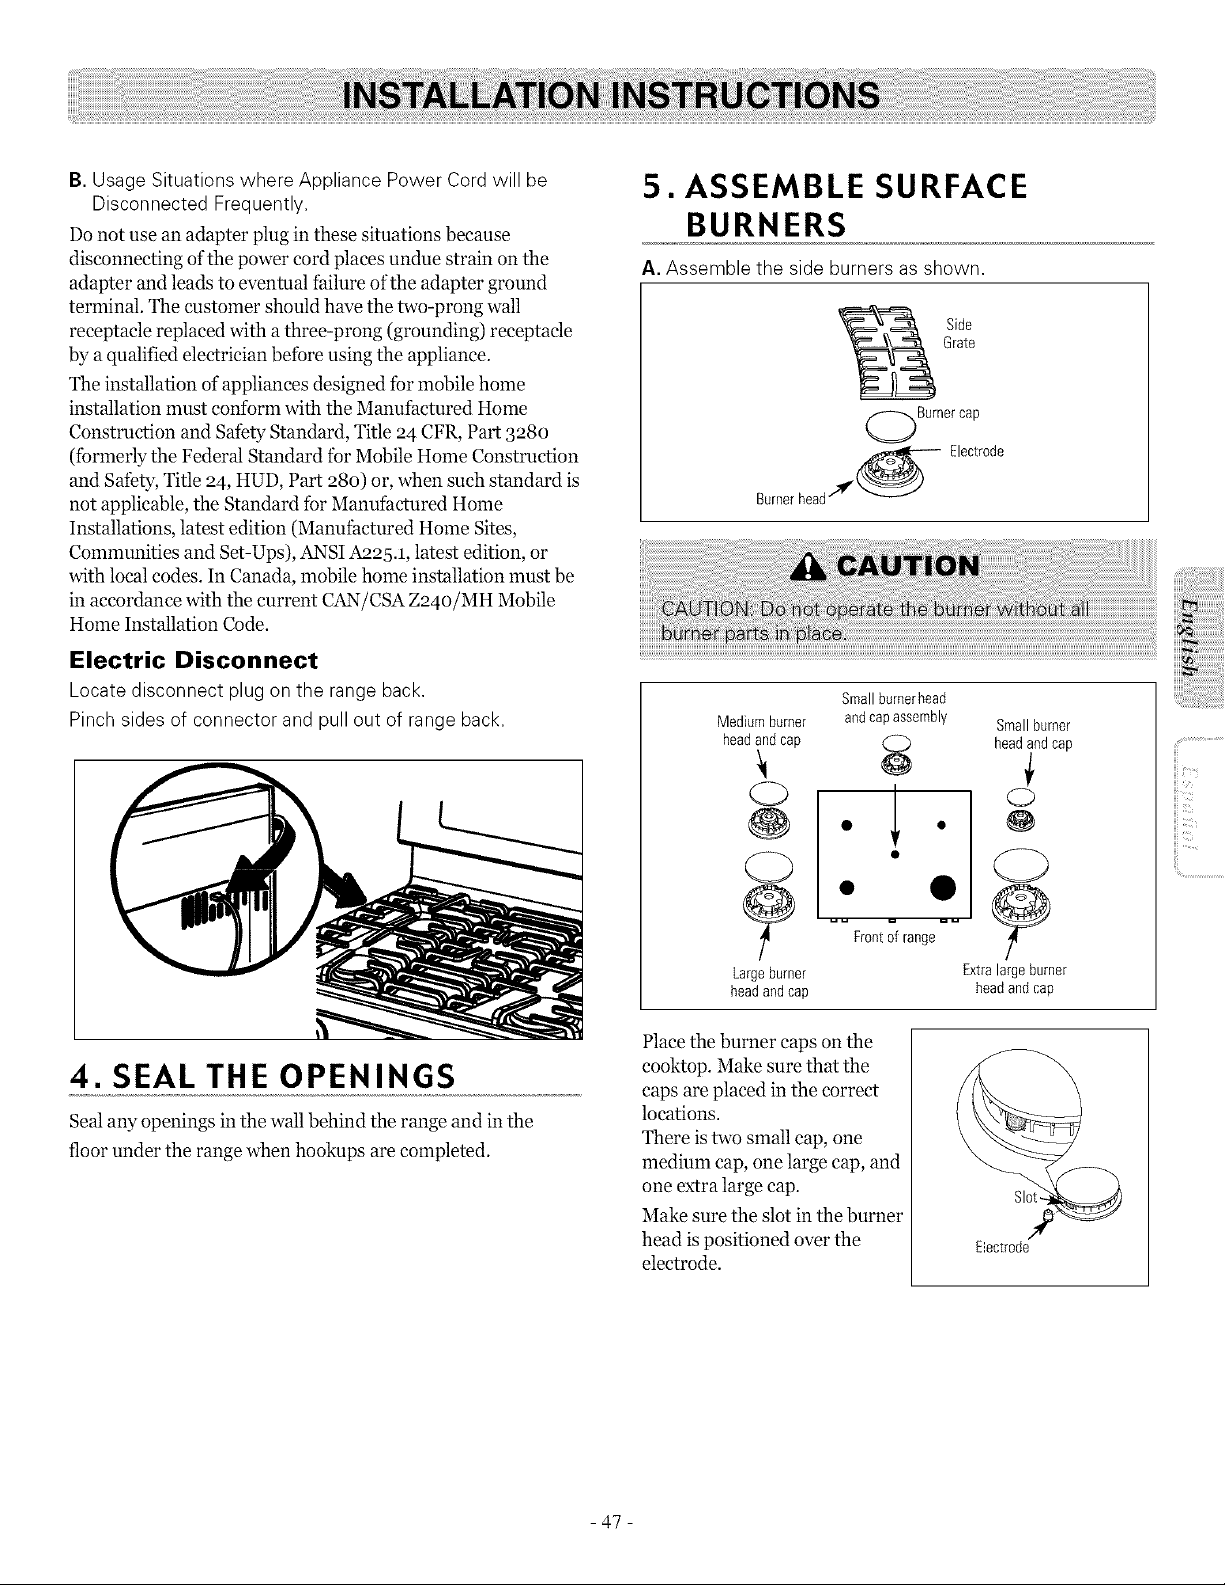
B. Usage Situations where Appliance Power Cord will be
Disconnected Frequently,
Do not use an adapter plug in these situations because
disconnecting ofthe power cord places undue strain on the
adapter and leads to eventual failure of the adapter ground
terminal. The customer should have the two-prong wall
receptacle replaced with athree-prong (grounding) receptacle
by a qualified electrician befbre using the appliance.
The installation of appliances designed fbr mobile home
installation must conform with the Manufactured Home
Construction and Safety Standard, Title 24 CFR, Part 328o
(fbrmerly the Federal Standard for Mobile Home Construction
and Safety, Title 24, HUD, Part 28o) or, when such standard is
not applicable, the Standard for Manufactured Home
Installations, latest edition (Manufactured Home Sites,
Conmmnities and Set-Ups), ANSI Aa25.1, latest edition, or
with local codes. In Canada, mobile home installation must be
in accordance with the current C:_N/CSA Z24o/MH Mobile
Home Installation Code.
Electric Disconnect
Locate disconnect plug on the range back.
Pinchsides of connector and pull out of range back,
4. SEAL THE OPENINGS
Seal any openings in the wall behind the range and in the
floor under the range when hookups are completed.
5. ASSEMBLE SURFACE
BURNERS
A. Assemble the side burners asshown.
Side
Grate
Burnercap
Burnerhead/'Ir_ Electrode
Medium burner
headandcap
(23
@
Largeburner
headandcap
Small burnerhead
and
assembly Smallburner
cap
headand cap
€
1 °
Q
Frontof range
Extralarge burner
headand cap
Place the burner caps on the
cooktop. Make sure that the
caps are placed in the correct
locations.
There istwo small cap, one
medium cap, one large cap, and
one extra large cap.
Make sure the slot in the burner
head ispositioned over the
electrode.
Slo
Electrode
,iiii_i_ii:iii!i!iiiil;!i!iiiilililili!!iii)iiiiiiii
ii_iii:ii:ii:ii:ii:ii:ii:ii:ii:ii:ii:ii:ii:iii!ili_i_ii
iiiii_i!iiiiiiiiiiiiiiiiiiiiiiii!iiii!i
iii
iii
- 47 -
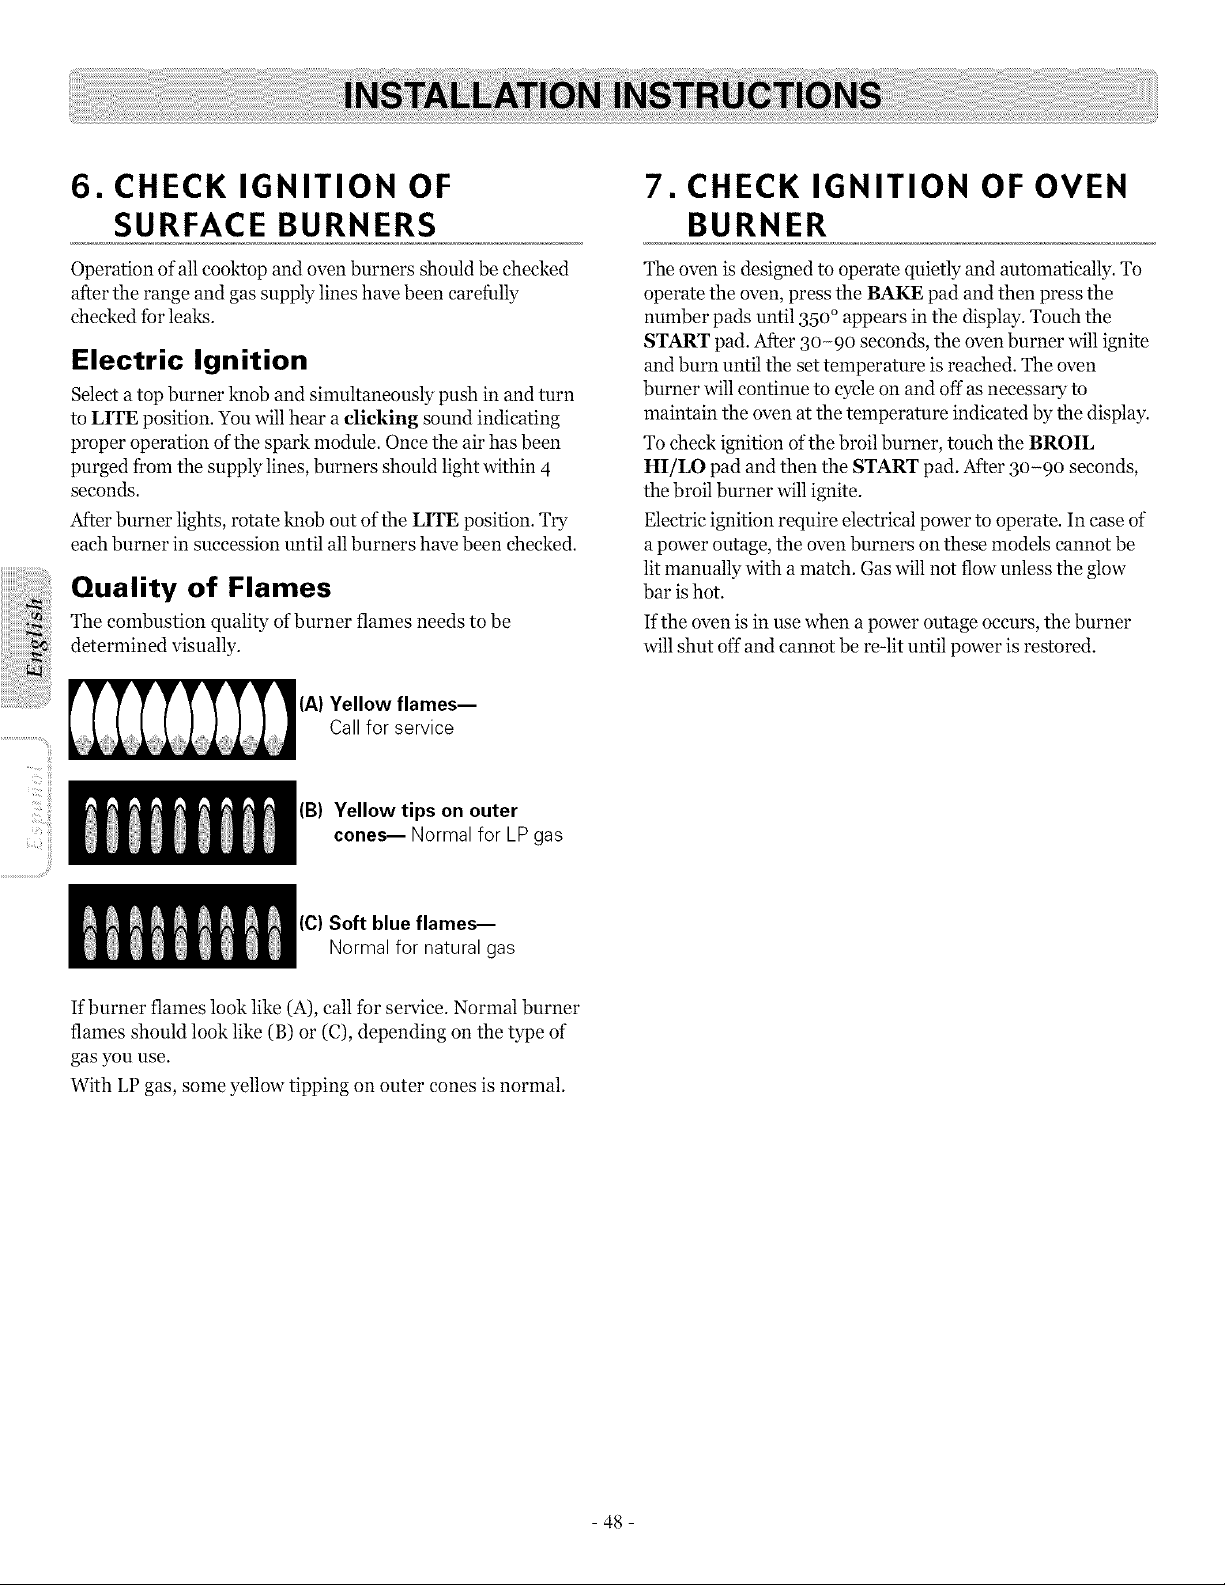
- ii
6. CHECK IGNITION OF
SURFACE BURNERS
Operation of all cooktop and oven burners should be checked
after the range and gas supply lines have been carefully
checked for leaks.
Electric Ignition
Select a top burner knob and simultaneously push in and turn
to LITE position. You will hear aclicking sound indicating
proper operation of the spark module. Once the air has been
purged from the supply lines, burners should light within 4
seconds.
After burner lights, rotate knob out ofthe LIFE position. Try
each burner in succession until all burners have been checked.
Quality of Flames
The combustion quality of burner flames needs to be
determined visually.
(A)Yellow flames--
Call for service
(B) Yellow tips on outer
cones-- Normal for LP gas
(C)Soft blue flames-
Normal for natural gas
7. CHECK IGNITION OF OVEN
BURNER
The oven is designed to operate quietly and automatically. To
operate the oven, press the BAKE pad and then press the
number pads until 35o °appears in the display. Touch the
START pad. After 3o-9o seconds, the oven burner will ignite
and burn until the set temperature is reached. The oven
burner will continue to cycle on and offas necessary to
maintain the oven at the temperature indicated by the display.
To check ignition of the broil burner, touch the BROIL
HI/LO pad and then the START pad. After 3o-9o seconds,
the broil burner will ignite.
Electric ignition require electrical power to operate. In case of
a power outage, the oven burners on these models cannot be
lit manually with a match. Gas will not flow unless the glow
bar ishot.
If the oven is in use when a power outage occurs, the burner
will shut off and cannot be re-lit until power is restored.
If burner flames look like (A), call for service. Normal burner
flames should look like (B) or (C), depending on the type of
gas you use.
With LP gas, some yellow tipping on outer cones is normal.
- 48 -
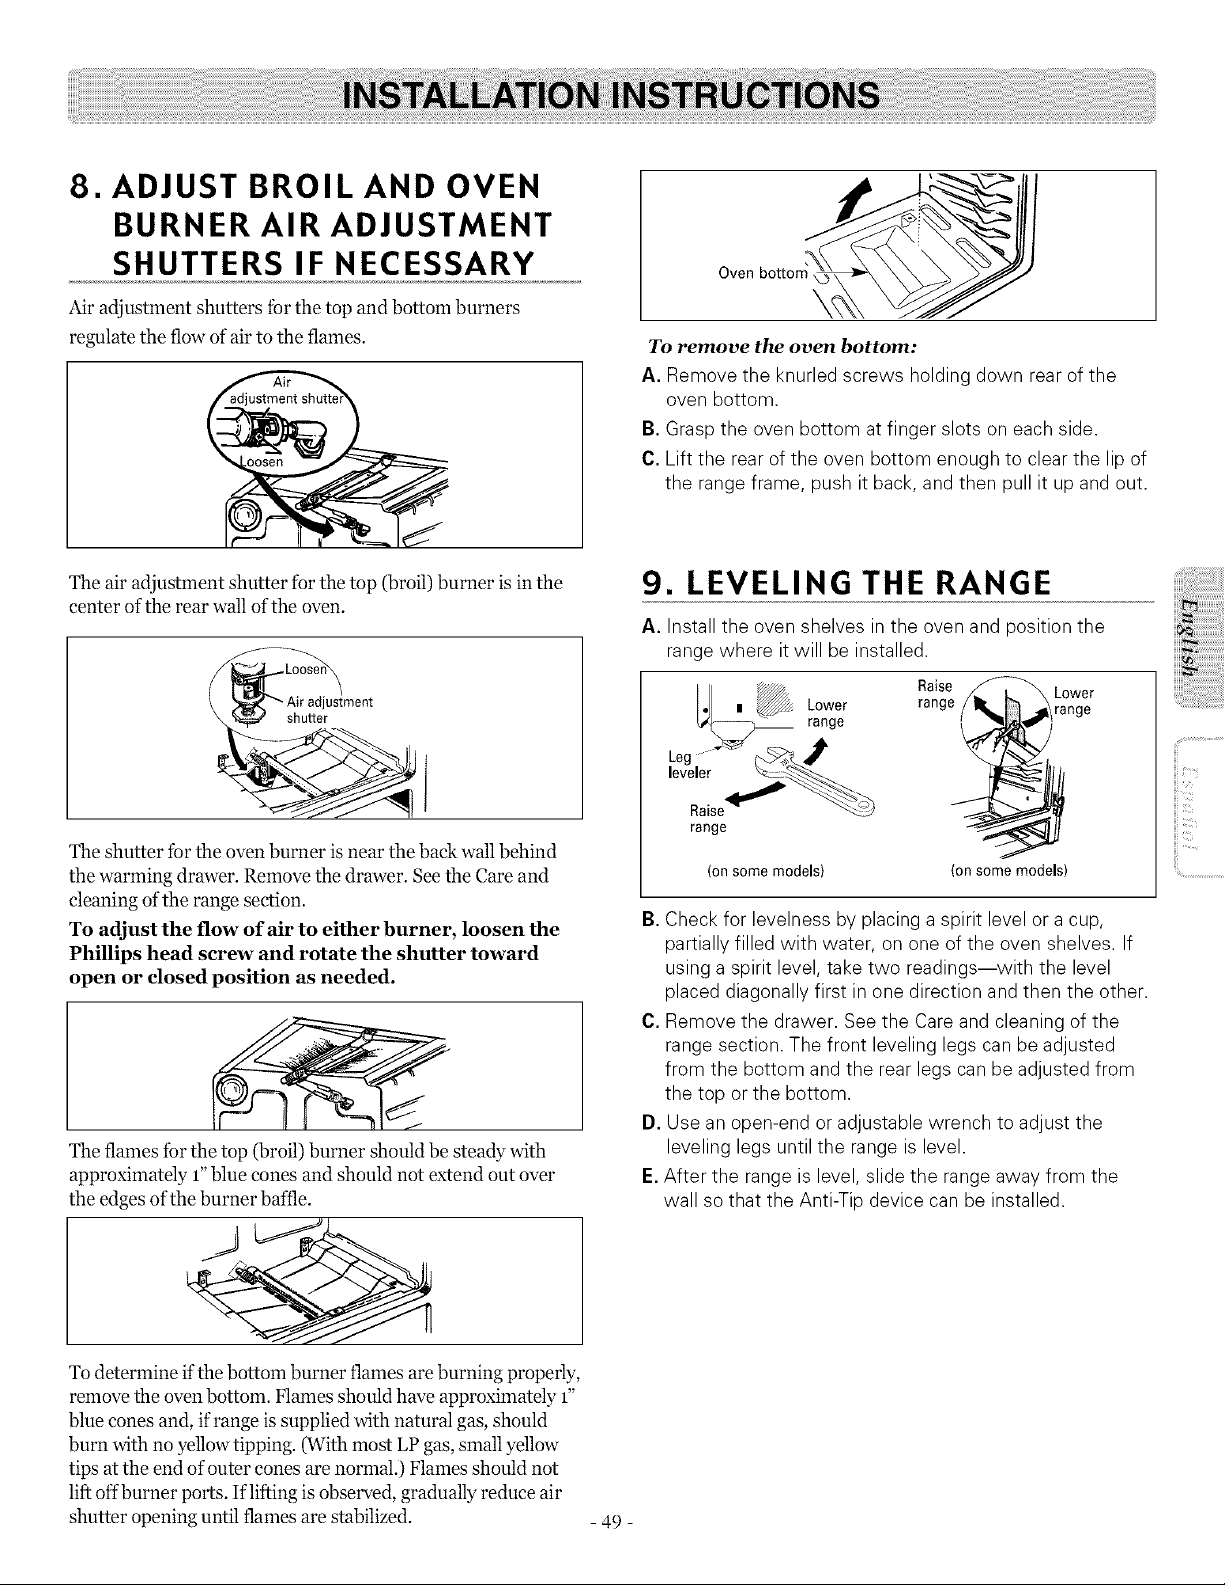
8. ADJUST BROIL AND OVEN
BURNER AIR ADJUSTMENT
SHUTTERS IF NECESSARY
Air adjustment shutters for the top and bottom burners
regulate the flow of air to the flames.
To remove the oven bottom:
A. Remove the knurled screws holding down rear of the
oven bottom.
B.Grasp the oven bottom at finger slots on each side.
C. Lift the rear of the oven bottom enough to clear the lip of
the range frame, push itback, and then pull it up and out.
The air adjustment shutter for the top (broil) burner is inthe
center of the rear wall of the oven.
shu_er
The shutter for the oven burner isnear the back wall behind
the warming drawer. Remove the drawer. See the Care and
cleaning of the range section.
To adjust the flow of air to either burner, loosen the
Phillips head screw and rotate the shutter toward
open or dosed position as needed.
The flames for the top (broil) burner should be steady with
approximately 1"blue cones and should not extend out over
the edges of the burner bane.
To determine if the bottom burner flames are burning properly,
remove the oven bottom. Flames should have approximately 1"
blue cones and, if range is supplied with natural gas, should
burn with no yellow tipping. (With most LP gas, small yellow
tips at the end of outer cones are normal.) Flames should not
liftoffburner ports. Iflifting is observed, gradually reduce air
shutter opening until flames are stabilized.
- 49 -
9. LEVELING THE RANGE
A. Install the oven shelves in the oven and position the
range where itwill be installed.
Io] , _, Lower Raa_S_ _ L°Wge
,eve,e
range
(onsomemodels) (onsomemodels)
B.Check for levelness byplacing a spirit level or a cup,
partially filled with water, on one of the oven shelves. If
using a spirit level, take two readings--with the level
placed diagonally first in one direction and then the other.
C. Remove the drawer. See the Careand cleaning of the
range section. The front leveling legs canbe adjusted
from the bottom and the rear legs canbe adjusted from
the top or the bottom.
D. Use an open-end or adjustable wrench to adjust the
leveling legs until the range is level.
E. After the range is level, slide the range away from the
wall so that the Anti-Tip device can be installed.
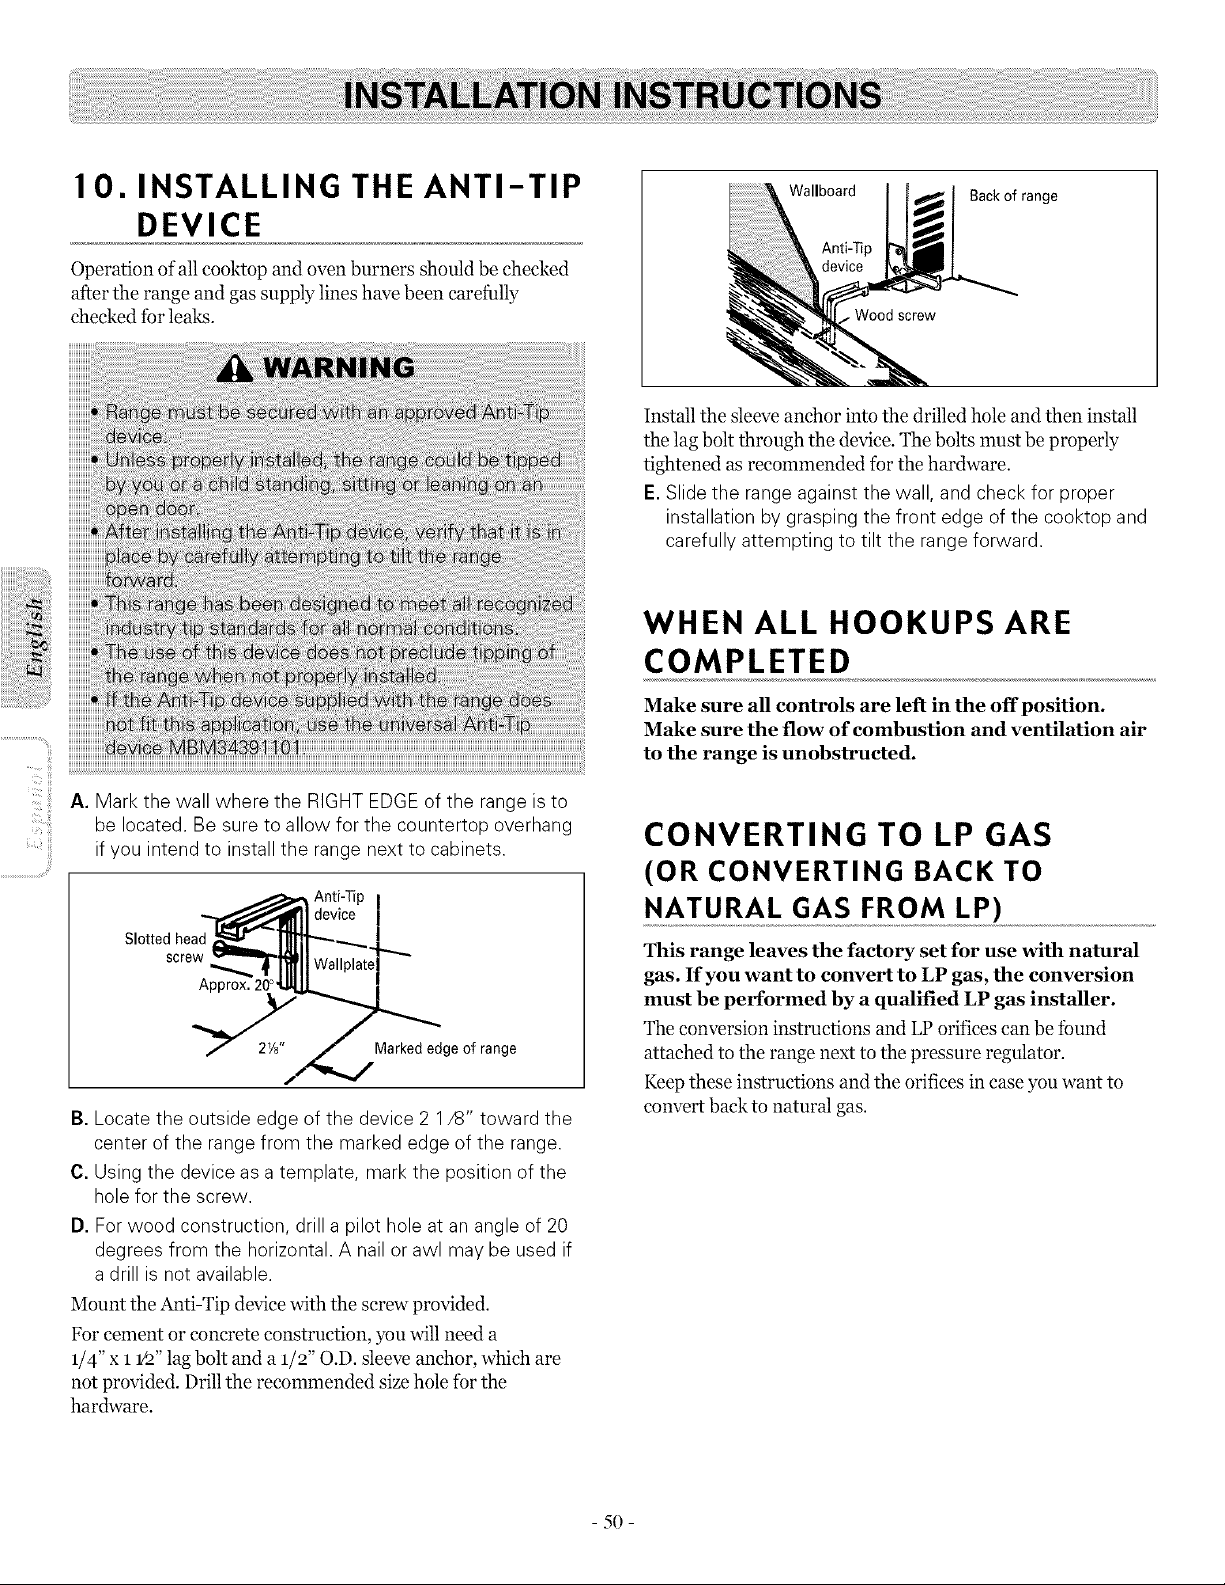
10. INSTALLING THE ANTI-TIP
DEVICE
Operation of all cooktop and oven burners should be checked
after the range and gas supply lines have been carefully
checked for leaks.
Wallboard
Anti-Tip
Back of range
Install the sleeve anchor into the drilled hole and then install
the lag bolt through the device. The bolts must be properly
tightened as recommended for the hardware.
E.Slide the range against the wall, and check for proper
installation by grasping the front edge of the cooktop and
carefully attempting to tilt the range forward.
ii_'_,,ii!!!i
A. Mark the wall where the RIGHT EDGEof the range isto
be located. Be sureto allow for the countertop overhang
ifyou intend to install the range next to cabinets.
Slotted head
screw
!
Marked edge of range
B. Locate the outside edge of the device 2 1/8" toward the
center of the range from the marked edge of the range.
C. Using the device asa template, mark the position of the
hole for the screw.
D. For wood construction, drill a pilot hole at an angle of 20
degrees from the horizontal. A nail or awl may be used if
a drill is not available.
Mount the Anti-Tip device with the screw provided.
For cement or concrete construction, you will need a
1/4" X 1 1/2"lag bolt and a 1/2" O.D. sleeve anchor, which are
not provided. Drill the recommended size hole for the
hardware.
WHEN ALL HOOKUPS ARE
COMPLETED
Make sure all controls are left in the off position.
Make sure the flow of combustion and ventilation air
to the range is unobstructed.
CONVERTING TO LP GAS
(OR CONVERTING BACK TO
NATURAL GAS FROM LP)
This range leaves the factory set for use with natural
gas. If you want to convert to LP gas, the conversion
must be performed by a qualified LP gas installer.
The conversion instructions and LPorifices can be found
attached to the range next to the pressure regulator.
Keep these instructions and the orifices in case you want to
convert back to natural gas.
5O
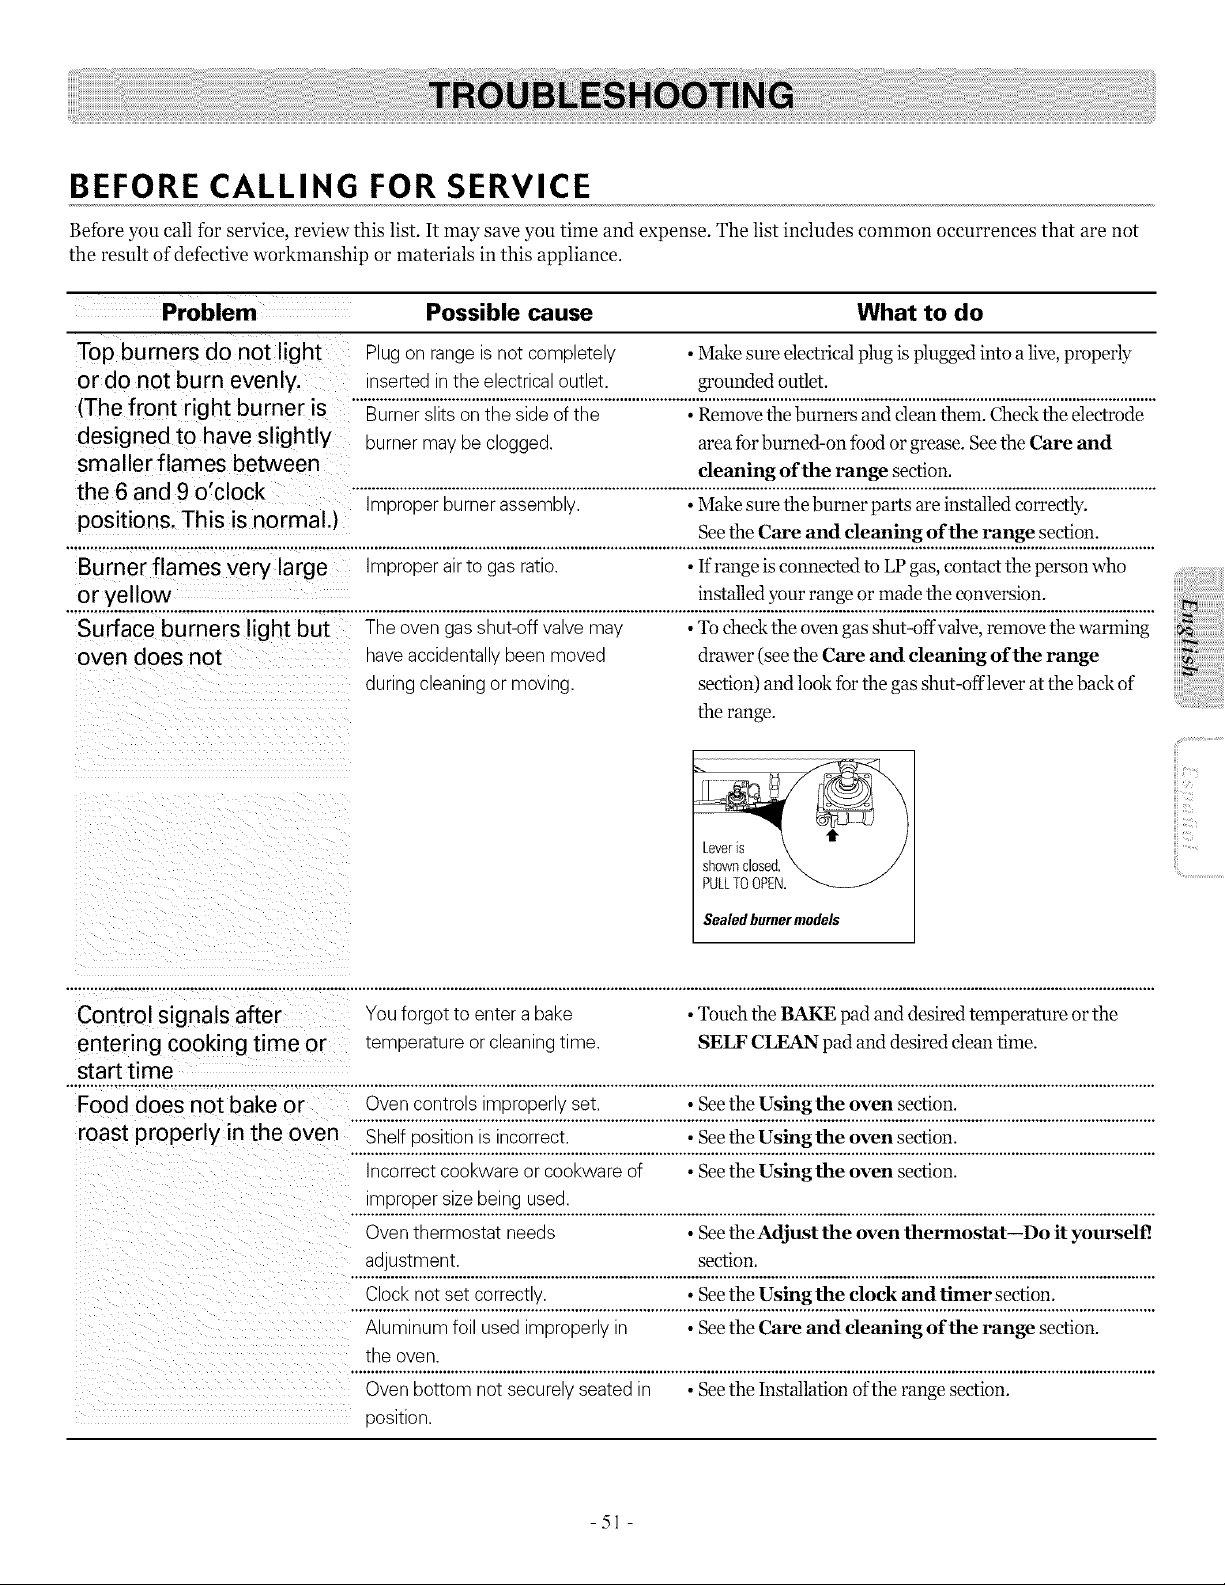
BEFORE CALLING FOR SERVICE
Before you call for service, review this list. It may save you time and expense. The list includes common occurrences that are not
the result of defective workmanship or materials in this appliance.
Problem Possible cause What to do
Top burners do not light
or do not burn evenly.
(The front right burner is
designed to have slig htly
smaller flames between
the 6 and 9 o'clock
positions. This is normal.)
Plugon range isnot completely •Make sure electrical plug isplugged into alive,properly
inserted in theelectricaloutlet, grounded outlet.
......................
burner may be clogged, area fbr burned-on _bodorgrease. Seethe Care and
cleaning of the range section.
Improper burner assembly. • Make sure the burner parts are installed correctly.
Seethe Care and cleaning of the range section.
Burner flames very large Improper air to gas ratio. • Ifrange isconnected to LP gas, contact the person who
O r yellow installed your range or made the conversion.
Surface burners light but The oven gas shut-off valve may • To checkthe oven gas shut-offvalve, remove the warming
oven does not have accidentally been moved drawer (see the Care and cleaning of the range _"
during cleaningor moving, section) and look for the gas shut-offlever at the back of
the range.
Leveris
shownclosed.
PULLTOOPEN.
Sealedburnermodels
ii!i..............................
Control signals after You forgot to entera bake • Touch the BAKE pad and desired temperature orthe
entering cooking time or temperature orcleaning time. SELF CLEAN pad and desired clean time.
start time
Food does not bake or Ovencontrols improperly set. • SeetheUsing the oven section.
roast properly in the oven Shelfposition isincorrect. • See the Usingthe oven section.
Incorrect cookware or cookware of • Seethe Using the oven section.
impropersizebeing used.
Oven thermostat needs • See the Adjust the oven thermostat--Do it yourself!.
adjustment, section.
Clock not set correctly. • See the Using the clock and tinier section.
Aluminum foil used improperly in • Seethe Care and cleaning of the range section.
the oven.
.........................................................................................................................................................................................................
Ovenbottom notsecurelyseated in °SeetheInstallation oftherangesection.
position.
- 51 -
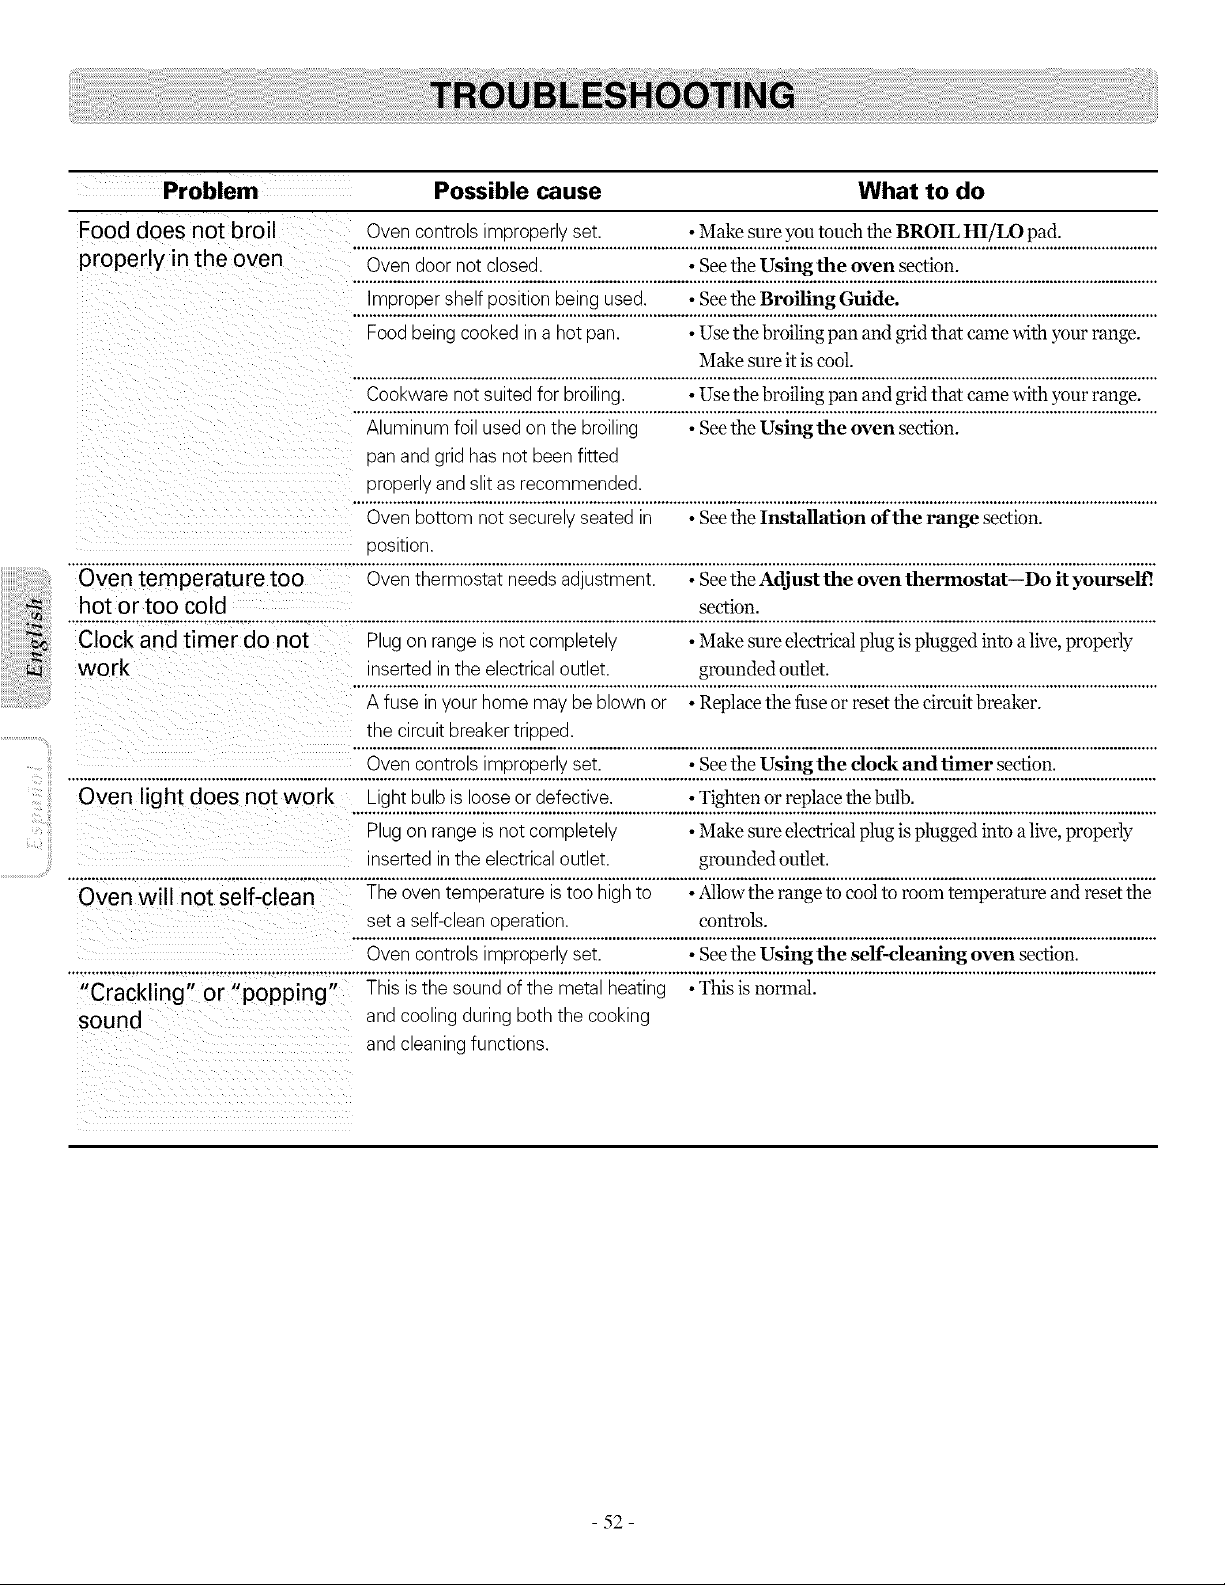
Problem Possible cause What to do
Food does not broil Ovencontrolsimproperly set. • Make sure you touch theBROIL HI/LO pad.
properly in the oven ....O.v...en..d..o...o.r.n..o..!..c.l.o.sed:.....................................:..S..e.e...t.h..e...U.s..!.n.g.t..b.e....o.ve...n..s.e.c.t.!o.u.:..................................................
.... ........... .................................................................
Food being cooked ina hotpan. • Use the broiling pan and grid that cronewith yourrange.
Make sure itis cool.
Cookware not suited for broiling. • Use the broiling pan and grid that came with your range.
Aluminum foil used on thebroiling • Seethe Using the oven section.
pan and grid hasnotbeen fitted
properlyand slit asrecommended.
Ovenbottom notsecurelyseated in • SeetheInstallation of the range section.
position.
Oven temperature too Oventhermostat needs adjustment. • SeetheAdjust the oven thermostat--I)o it yourself!
_ hot or too cold •section.
Clock and timer do not Plug on range isnot completely Make sure electrical plug is plugged into alive,properly
work inserted in theelectrical outlet. • grounded outlet.
A fuse in your homemay be blown or Replacethefuseor resetthecircuitbreaker.
the circuit breaker tripped.
Ovencontrolsimproperly set. •See the Using the clock and timer section.
Oven light does not work Lightbulb isloose or defective. • Tighten or replacethe bulb.
Plug on range isnot completely Make sure electrical plug is plugged into alive,properly
inserted in theelectrical outlet, grounded outlet.
............ ..........
set a self-clean operation, controls.
Ovencontrolsimproperly set. • SeetheUsing the self-cleaning oven section.
.......................... , .............................. ,÷÷,...................................................................................................................................................................................................................
"Crackling" or "popping" This is the soundofthe metal heating • This isnormal.
sound and coolingduring boththe cooking
and cleaning functions.
- 52 -
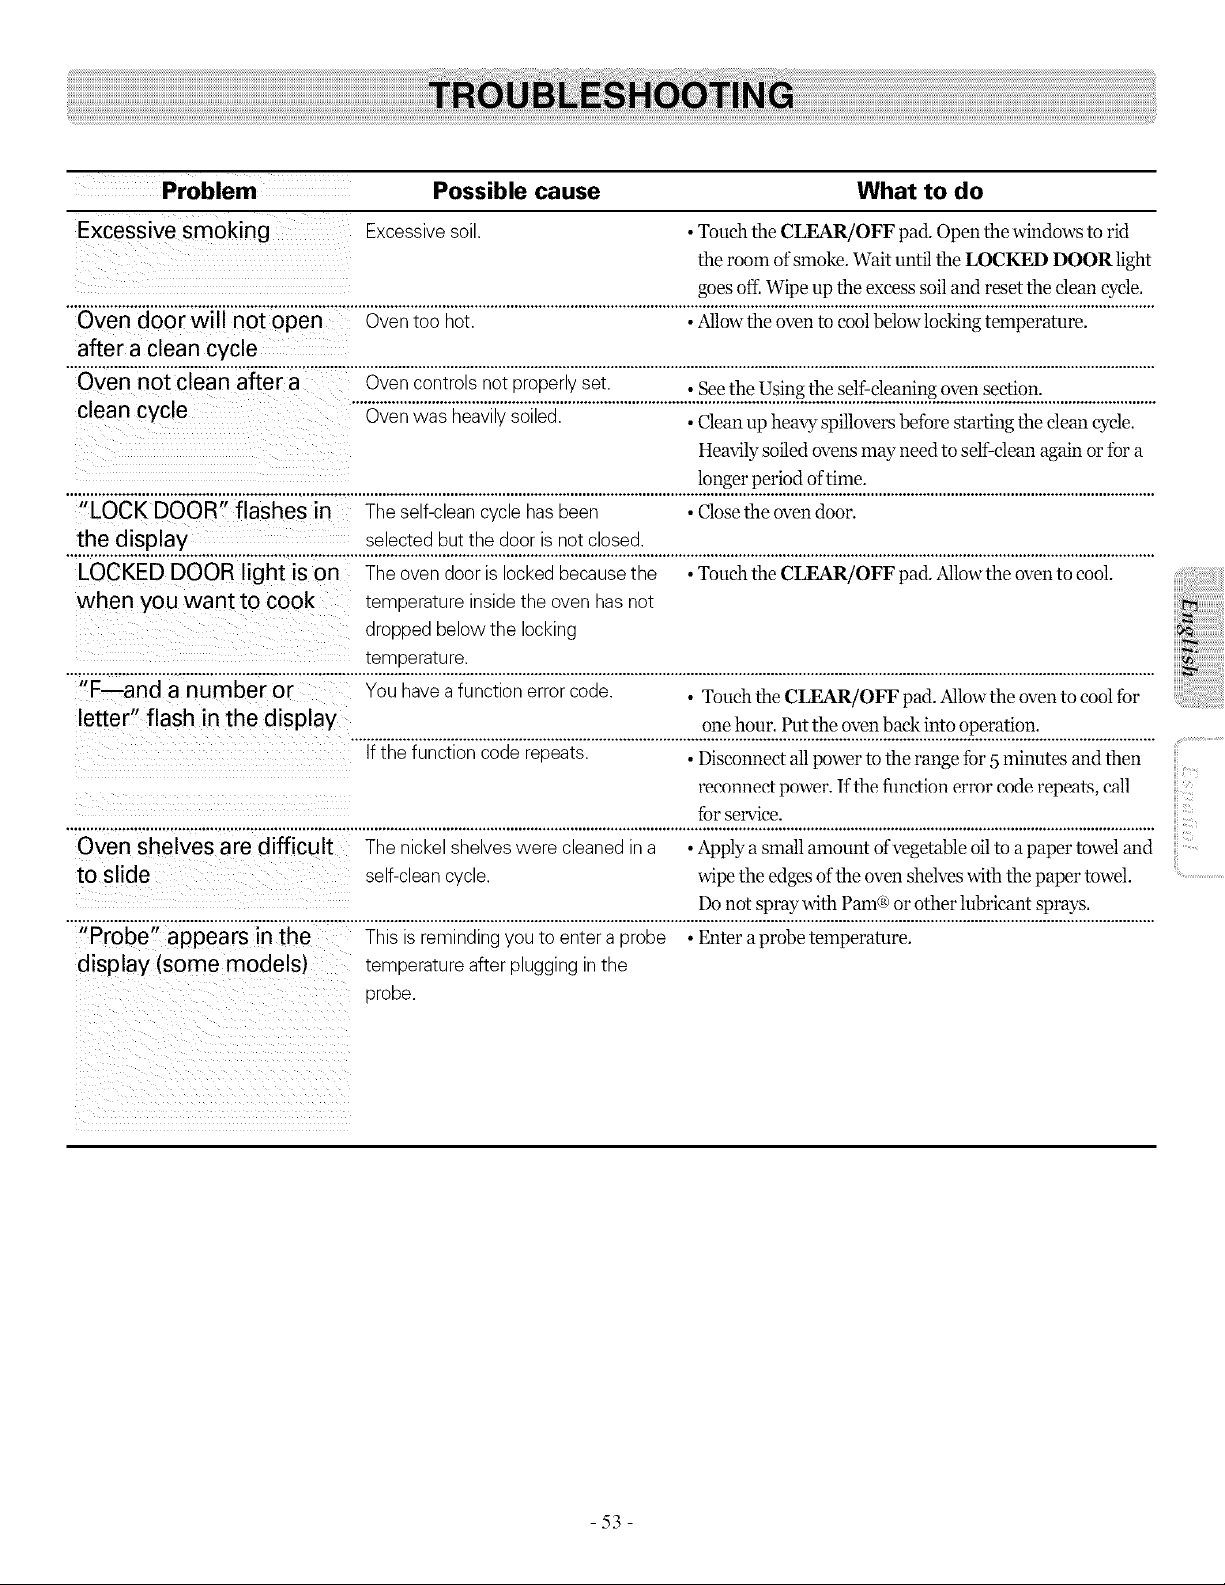
Problem Possible cause What to do
Excessive smoking Excessive soil. • Touch the CLEAR/OFF pad. Open the windowsto rid
theroomofsmoke.Wait until theLOCKED DOOR light
goesof£ Wipeup theexcesssoil and resettheclean eyeD.
................................................................................................................................................................................................................................................................................
Oven door will not open Oventoo hot. • Allowtheoven tocool below]ocking temperature.
after a clean cycle
"iSvennoicieanaf}era.............Ovencontrolsnotproperlyset. •SeetheUsingtheself-cleaningovensection.
.........................................................................................................................................................................................................
clean cycle Oven was heavily soiled. • Clean up heavy spillovers before starting the clean cycle.
Heavily soiled overLsmay need to self-clean again or fora
longer period of time.
"LOCK DOOR" flashes in Theself-clean cyclehas been • Closetheoven door.
the display selected butthedoor isnotclosed.
................................................................................................................................................................................................................................................................................
LOCKED DOOR light ison Theovendoor islocked becausethe ,Touch the CLEAR/OFF pad. Al]ow theoventocooL
when you want to cook temperature inside theovenhasnot
dropped belowthe locking
...........................................................................!._2!2t_.!_.:...........................................................................................................................................................................
II
F--and a number or You have afunction error code. • Touch the CLEAR/OFF pad Allowthe oven to cool for
letter" flash in the display one hour. Put the oven back into operation.
If thefunction coderepeats. •Disconnect all power to the range tbr 5 minutes and then
reconnect power. If the flmction error code repeats, e_ll
Ibr service.
Oven shelves are difficult Thenickel shelves were cleaned in a • Applya small amount ofvegetable oil toapaper towel and
to slide self-clean cycle, wipe theedgesofthe ovenshelveswith thepaper towel
®
Donot spray with Pare or other lubricant sprays.
"Probe" appears in the This isremindingyoutoentera probe • Enter a probe temperature.
display (some models) temperature after plugging in the
probe.
,iiii_i_ii:iii!i!iiiil;!i!iiiilililili!!iii)iiiiiiii
ii_iii:ii:ii:ii:ii:ii:ii:ii:ii:ii:ii:ii:ii:iii!ili_i_ii
iii.................................
iii
iii
iii
iii.....
-53-

iiiiiiiii_i_i_iiii!_i!;!i_i!;!!i!
i iiiiiiiiiii_iii_i:i:
iiiiiiii_i_iiiii!iiiiiiiiiii!_iiiiii!iil
;_i!_i!i!i:i
Problem Possible cause What to do
Display goes blank A fuse in your home may be blown or • Replace the fuseor reset the circuit breaker.
the circuit breaker tripped.
The clock isin the black-out mode. • Seethe Special features of your oven control
section.
Display flashes Powerfailure. • Resettheclock.
Unable to get the display Ovencontrol pads were notpressed • The BAKE and BROIL HI/LO pads mustbetouched at
tO show "SF" properly, thesametime and held Ibr3 seconds.
Powe routag e, clock Poweroutageor surge. * Resettheclock. If theoven was in use,youmustreset itby
flashes touching the CLEAR/OFF pad, setting the clock and
resetting any cooking function.
"Burning" or "oily" odor This isnormalin a new oven and will • To speedthe process,set a self-cleancyclefura minimum
emitting from the vent disappear in time. of3hours. See the Usingthe self-cleaning oven
• section.
Strong odor An odor from the insulationaround This is temporary.
the inside ofthe ovenisnormal for
thefirstfew times the ovenisused.
Fan noise The convection fan may turn on and • This isnormal. The convection fan will run until the
(convection models) off automatically, function isover orthe door isopened.
Convection fan not Preheat temperature not reached. • Fan will startautomaticallyonce the preheat temperature
workin g is reached.
(convection models)
Drawer does not slide The drawerisoutofalignment. • Fully extend the drawer and push itall the way in.
smoothly or drags Seethe Care and cleaning of the range section.
Drawer is over-loaded or load is •Reduce weight. Redistribute drawer contents.
unbalanced.
Warming drawer will not A fuse inyour homemay be blown or • Replacethefuseor reset thecircuitbreaker.
work the circuit breakertripped.
The ovenis self-cleaning. • Wait fortheself-cleancycletofinish and the oven tocool.
Controlsimproperly set. • SeetheElectric warming drawer.
................................................................................................................................................................................................................................................................................
Excessive condensation Liquid indrawer. • Remove liquid.
in the d rawer Uncovered foods. • Cover food with lid or aluminum foil.
Temperature settingtoo high. • Reducetemperaturesetting.
Food dries out in the Moisture escaping. • Cover food with lid or aluminum foil.
warming drawer Drawer notfully closed. • Push drawerin until latch engages.
- 54-

LG Electronics Inc. will repair or replace your product, at LG's option, if it proves to be defective in material or
workmanship under normal use, during the warranty period set forth below, effective from the date of original consumer
purchase of the product. This limited warranty is good only to the original purchaser of the product and effective only
when used in U.S.A.
WARRANTY PERIOD: HOW SERVICE IS HANDLED:
One Year Any part of the range which fails due to a defect in materials or workmanship. During this
From the date of the full one-year warranty, LG will also provide, free of charge, all labor and in-home service
original purchase to replace the defective part.
THIS WARRANTY IS IN LIEU OF ANY OTHER WARRANTIES, EXPRESS OR IMPLIED, INCLUDING
WITHOUT LIMITATION, ANY WARRANTY OF MERCHANTABILITY OR FITNESS FOR A PARTICULAR
PURPOSE. TO THE EXTENT ANY IMPLIED WARRANTY IS REQUIRED BY LAW, IT IS LIMITED IN
DURATION TO THE EXPRESS WARRANTY PERIOD ABOVE. LG WILL NOT BE LIABLE FOR ANY
CONSEQUENTIAL, INDIRECT, OR INCIDENTAL DAMAGES OF ANY KIND, INCLUDING LOST
REVENUES OR PROFITS, IN CONNECTION WITH THE PRODUCT. SOME STATES DO NOT ALLOW
LIMITATION ON HOW LONG AN IMPLIED WARRANTY LASTS OR THE EXCLUSION OF INCIDENTAL
OR CONSEQUENTIAL DAMAGES, SO THE ABOVE LIMITATIONS OR EXCLUSIONS MAY NOT APPLY TO
YOU.
THIS LIMITED WARRANTY DOES NOTAPPLY TO:
1.Service calls to correct the installation of your appliance, to instruct you how to use your appliance, to replace house
fuses or correct house wiring, or to replace owner-accessible light bulbs.
2. Repairs when your appliance is used in other than normal, single-family household use.
3. Pickup and delivery. Your appliance is designed to be repairable in the home.
4. Damage resulting from accident, alteration, misuse, abuse, fire, flood, improper installation, acts of God, or use of
products not approved by LG Corporation.
5. Repairs to parts or systems resulting from unauthorized modifications made to the appliance.
6. Replacement parts or repair labor costs for units operated outside the united states.
7. Any labor costs during the limited warranty period.
This warranty is extended to the original purchaser and any subsequent owner for products purchased for home use within
the USA. In Alaska, the warranty exetudes the cost of shipping or service calls to your home.
Some states do not allow the exclusion or limitation of incidental or consequential damages, so this exclusion or limitation
may not apply to you. This warranty gives you specific legal rights, and you may also have other rights which vary from
states to states. To know what your legal rights are, consult your local or state consumer affairs or your state's Attorney
General.
CUSTOMER ASSISTANCE INFORMATION:
ii!i..............................
To Prove Warranty Coverage
To Obtain Nearest Authorized
Service Center or Sales Dealer, or to
Obtain Product, Customer, or
Service Assistance
Retain your Sales Receipt to prove date of purchase.
A copy of your Sales Receipt must be submitted at the time warranty
service is provided.
Call 1-800-243-0000 (Phone answered 24 hours - 365 days a year) and
choose the appropriate prompt from the menu; or visit our website at:
http://us.lgservice.com.
- 55 -