Arlo VMB4000-100NAS HD Security Camera System
Product's Documents
Below are documents related to this product, you can read online or download:
- User Manual - (English) Read Online | Download pdf
User Manual Camera
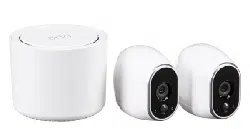
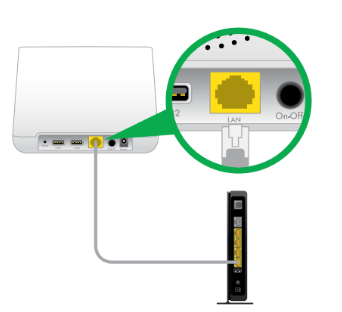
The base station connects to your home network and allows you to view your
camera streams from anywhere.
To connect your base station to the Internet:
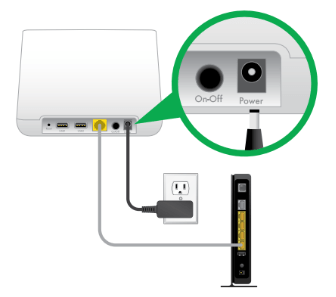
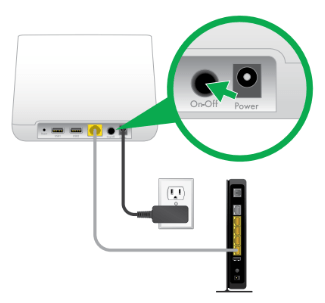 The Power LED and Internet LED on the front of the base station light green in about two minutes.
 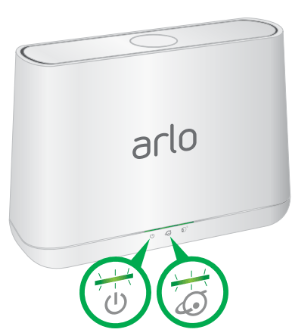 Your base station is set up.
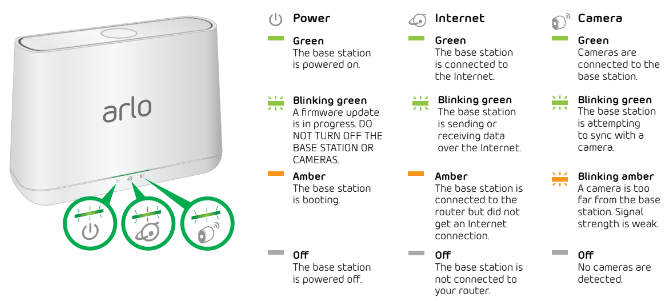
 See the following list for explanations for green, amber, and blinking LEDs:
You can use the Arlo app with IFTTT (If This Then That), a free cloud-based service that connects smart home devices and applications.
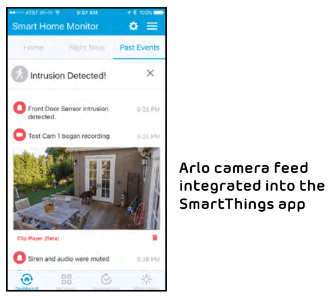
You can integrate your Arlo cameras into the SmartThings app, so all your smart devices work together. For example, if your Arlo camera detects motion, SmartThings can tell your Aeon Labs Siren to trigger your alarm.
Stringify is an iOS app that transforms the way you connect your life by bringing your physical and digital things together. Integrating your Arlo cameras into the Stringify app allows them to connect and interact with more than 600 smart home products and digital services. Stringify connects your smart products and services using flows that you can download, modify, or create using the Stringify app on your iOS device.
Motion, audio, or low battery notifications from Arlo cameras can be triggers for Stringify flows, or Stringify flows can instruct Arlo cameras to arm, disarm, and record video clips.
Add Arlo Cameras to the Stringify App
Stringify is compatible with Arlo Wire-Free, Arlo Pro Wire-Free, Arlo Q, and Arlo Q Plus cameras. Your camera must be in Armed mode or in a custom mode to detect motion or audio and report it to Stringify.
You can also create custom modes to detect motion or audio or both, but not record a video clip. This can be useful for advanced flows where you want to use the Arlo camera as a detection device, but not capture video unless other conditions in the flow are met.
In advanced Stringify flows, you can use the same Arlo camera twice in the same flow. For example, if your Arlo front door camera detects motion, it’s after 5 p.m., and you’re away from home, you can tell Stringify to trigger a 20-second recording from your Arlo front door camera and a 40-second recording from your Arlo driveway camera.
To add Arlo cameras to the Stringify app and use them in a flow:
With Samsung SmartThings, you can integrate your Arlo cameras into the SmartThings app, so all your smart devices can work together. For example, if your Arlo camera detects motion, SmartThings tells your Aeon Labs Siren to trigger your alarm.
After you integrate your Arlo Wire-Free Cameras into the SmartThings app, you must use the SmartThings app to configure your modes and rules. If you try to edit your modes and rules in the Arlo app, you will disarm the SmartThings mode. You can continue to use the Arlo app to view the library.
Note: After syncing your Arlo cameras with the SmartThings app, a SmartThings mode
displays in your Arlo app. Your Arlo system must remain in the SmartThings mode for your system to work correctly with the SmartThings app. All mode configurations must be done in the SmartThings app. If you choose to no longer use the SmartThings app, delete the SmartThings mode in your Arlo app, and delete the Arlo cameras from the things menu in the SmartThings mobile app.
Use Arlo Camera Names That Are Easy to Recognize
Before integrating your cameras with the SmartThings app, make sure that the names of your cameras are easy to understand. If you choose not to rename your cameras, the camera’s serial number becomes the camera’s name in the SmartThings app.
Disarm Your Cameras
When you integrate your Arlo Wire-Free cameras with SmartThings, a new SmartThings mode is created in the Arlo app. Because SmartThings manages your Arlo cameras, they must be in Disarmed mode before you can begin the integration setup. You cannot use Schedule mode or Geofencing mode at the same time as SmartThings mode. You must also disable any IFTTT recipes that change the Arlo system mode.
To disarm your cameras:
 on your mobile device. The Cameras page displays.
To integrate your Arlo cameras into the SmartThings app:
Note: Repeat this step for each camera that you synced with your SmartThings app.
Your Arlo Wire-Free Cameras are in the SmartThings  mode in your Arlo app.
When you integrate Arlo into the SmartThings app, the motion sensitivity for each camera is set to a default of 80. If your camera works more effectively in a different setting, you can use the Arlo app to change it.
To adjust the motion sensitivity level:
on your mobile device. The Cameras page displays. next to Armed mode. The Edit Rule page displays. next to the rule that you want to edit. next to Motion is detected. The Motion detection settings page displays. next to SmartThings mode. The Edit Rule page displays. next to the rule that you want to edit. next to Motion is detected. The Motion detection settings page displays.
When you integrate Arlo with SmartThings, the Arlo app sends push notifications to the SmartThings app. Then the SmartThings app sends you notifications about Arlo and your other smart things. If you still receive push notifications from Arlo, on your smartphone, use your smartphone settings to turn off the Arlo notifications. Email notifications are not needed.
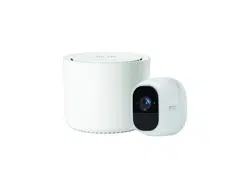
How can I recharge the Arlo Pro battery?
Your Arlo Pro battery is fully charged when it leaves the factory. You can use the power adapter cable to plug the camera into an electrical outlet to charge the battery. You can also use the Arlo Pro Charging Station (sold separately) to charge the battery. For uninterrupted Arlo Pro camera use, you can purchase a spare battery and a charging station. Then you can put the fully charged spare battery into the Arlo Pro camera while you recharge the battery. The charging station can recharge two batteries simultaneously.
What do I need to know about using Arlo cameras in cold weather?
Cold temperatures can affect any battery’s capacity, due to the chemistry of the batteries. This means that if you install your Arlo camera outside in cold temperatures, you might notice a shorter battery duration for the camera or a faster-than-expected drop in the displayed battery capacity.
Why does one Arlo camera battery drain faster than another Arlo camera battery?
Your Arlo camera is flexible and you can use it in a wide range of environments.
Your environment might include elements that affect battery life. Some of the places that you might place your Arlo camera use more battery power than others. Note the following examples.
Arlo cameras work well in the dark. They use infrared sensors to monitor motion in the dark. These use more battery power than cameras monitoring motion in a well-lit room.
Arlo cameras work well when they are as far away as 300 feet from the base station. Cameras positioned farther away from the base station use more battery power than cameras positioned close to the base station.
Arlo cameras let you choose the quality level of the videos that they record. Cameras set to high-quality video recording use more battery power than cameras set to low-quality video recording.
Will my WiFi environment affect my Arlo camera battery?
Yes. If you are in a noisy WiFi environment, your Arlo camera battery might drain
faster. Use a WiFi analyzer to test the WiFi noise in your environment.
What is the battery life for NETGEAR Arlo Pro rechargeable batteries?
The NETGEAR Arlo Pro camera's rechargeable battery life is 4 to 6 months with normal usage and can be extended for optimal usage if you use key settings and follow certain tips. The Arlo Pro cameras offer the best battery life when set up to record when they detect motion.
How long does it take to charge the Arlo Pro rechargeable battery?
Charging an Arlo Pro rechargeable battery inserted into the camera from 0 to fully charged takes about 2.5 hours. One Arlo Pro rechargeable battery inserted into the Arlo Pro Charging Station takes about 2.74 hours to charge. Two Arlo Pro rechargeable batteries inserted into the Arlo Pro Charging Station take about 5.43 hours to charge.
How can I extend the NETGEAR Arlo Pro camera’s battery life?
To extend the battery life, follow these tips:
Depending on the Power Management setting, the bitrate and upstream bandwidth requirement adjusts. The frame rate depends on whether you are in night-vision mode or not. The default behavior for each power management setting is as follows. Each power management setting starts with a particular bit rate and frame rate.
Day Mode
Night Mode
Depending on the available bandwidth and how much of the buffer is full, the Arlo Pro Wire-Free system either increases the bit rate or decreases the bit rate and frame rate.
The Arlo web client uses the Adobe Flash plug-in to display your camera streams in a browser. Make sure that your browser is not blocking the plug-in and that you are using the latest version of Adobe Flash.
Your router might be blocking the ports to which Arlo sends data. To ensure that
Arlo can stay connected, you must keep ports 443 and 80 open on your router.
To troubleshoot problems with the video stream, check for the conditions in the following sections.
WiFi Signal Interference
Environments with multiple WiFi networks, WiFi devices, or frequencies can cause signal interference with your Arlo system. Minimize the number of networks, WiFi devices, and transmitted frequencies in the area where you place your base station and cameras.
Also, place your camera at least one to three feet (30 –100 centimeters) from the base station, and allow at least 61⁄2 feet (2 meters) between cameras. Follow these guidelines to prevent WiFi signals between the devices from interfering with each other.
Out of Range
Make sure that your wire-free camera is no farther than 300 feet (90 meters) from the base station. The range might be less if metal objects or thick walls and ceilings are between a camera and the base station.
Make sure that your cameras display three or four bars of signal strength in the area where you intend to install them. The cameras can work when signal strength is at one or two bars, but they might go out of range intermittently due to fluctuations in the environment.
Low Battery
Recharge or change the battery in the Arlo Pro camera to make sure that the battery level is no less than two bars. A low battery can cause the camera to stream intermittently.
You must be logged in to the Arlo app to receive Arlo alerts on your smartphone or mobile device. Arlo registers your device for push notifications when you log in. If you used the logout option instead of simply exiting the app, you must log back into the app. You receive Arlo alerts even if your device is sleeping.
If you did all of the following and are still not getting Arlo alerts, contact NETGEAR support.
Check the Rules Settings for Armed Modes
Check the rules in your modes. Make sure that Push Notification is enabled in the Armed mode or in a custom mode if you created one.
To check push notifications in the Armed mode setting:
on your mobile device. next to Armed. The Edit Rule page displays.Check the Arlo App Settings on an iOS Device
Make sure that you allow the Arlo app to receive push notifications. The Arlo app push notifications can be disabled on iOS and Android devices.
To allow Arlo push notifications on iOS devices:
Check the Arlo App Settings on an Android Device
To allow Arlo push notifications on Android devices:
If You Said No to Push Notifications at Installation
When you install the Arlo app for the first time, to receive alerts, you must select Allow when asked if you want Arlo to send you to push notifications. For iOS apps, after you respond to this alert, it is not presented again unless the device is restored or the app is uninstalled for at least a day.
If you said no on an iOS device, uninstall the app, wait for a day, and then reinstall it, and allow notifications. If you do not want to wait a day before you reinstall the app, you can use the system clock on your device to simulate a day. Set the system clock forward a day or more, turn your device off, and then turn the device back on. After you reinstall the app, return the system clock to the correct setting.
To determine whether your base station is online, check the Internet LED on the front of the base station:
If you are not at the same location as your Arlo base station, log in to your Arlo account:
To troubleshoot the base station Internet connection:
Power cycle your base station. Unplug the power adapter from the outlet, wait one minute, and reconnect the power adapter to the outlet. The base station takes one to two minutes to start. When the Power LED and Internet LED lights are solid green, your base station is connected to the Internet. If the Internet LED is amber, continue troubleshooting.
Check your router’s DHCP settings and client list. Ensure that DHCP is enabled and that router’s DCHP client list supplied an IP address to the base station. (If it did, the base station appears in the client list.) For more information, see your router documentation.
If you were previously able to connect your base station to the Internet but now cannot connect, check the router’s security settings and firmware to ensure that no changes were made since the last time it successfully connected. You might want to temporarily lower the security settings on the router or temporarily place the base station in the DMZ to rule out any firewall restrictions. If you make these changes, power cycle your base station as described in Step 4.
Check to make sure that ports 443 and 80 are open on your router. Note: If you do not manage your Internet environment, contact your IT department for assistance with any firewall or router configurations. The Arlo base station cannot connect through most proxy servers. Check with your IT team and Internet service provider (ISP) about ways to bypass any proxy servers. Ask your IT team to ensure that ports 443 and 80 are open.
Perform a factory reset on your base station. For more information, see Reset the Arlo Base Station to Factory Settings.
If you are still unable to get your base station to connect, submit a support case describing the steps you took and provide the following information:
Base station serial number
User name (email address used to register Arlo account)
Internet service provider (ISP) name
Internet connection type (DSL, cable, and so on) and speed (Arlo requires at least 1 Mbps upstream)
Internet router model
List of other devices connected directly to your router
The last time and place that your base station successfully connected to the Internet
If an Arlo Pro Wire-Free camera’s signal to the base station is weak, recording delays might occur when motion is detected.
To test whether the camera signal is strong enough, check the camera LED on the base station; if it’s blinking amber, the base station detects a low data rate, which means that the camera is too far from the base station.
Follow these tips to increase signal strength:
The maximum line-of-sight range of 300 feet is reduced by each wall, ceiling, or other large obstruction between the camera and the base station. The following materials reduce signal strength the most:
Performing a factory reset returns your base station values to the default settings. It also removes the serial number from your Arlo account.
To perform a factory reset on your base station:
If your Arlo cameras were synced to the base station, you might need to sync the
cameras to the base station again.