Loading ...
Loading ...
Loading ...
Page 11Page 22
Using Your Dishwasher Installation
AquaStop Anti-Flood Protection
Your dishwasher is fitted with an AquaStop anti-
Ÿ
flood protection system. This system consists of a
solenoid safety shut off valve which in the unlikely
event of a leak, a float switch will signal the Solenoid
to cut off the water supply. Therefore avoiding any
flooding.
Do not immerse the water inlet hose or the safety
Ÿ
valve in water. There is an electrical cable for the
safety valve in the double-walled water inlet hose.
If water inlet hose or the safety valve is damaged,
Ÿ
remove the main plug immediately.
Do not enlarge or shorten the inlet hose because it
Ÿ
contains electric parts.
Cold Water Connection
How to Connect the safety supply hose
The appliance must be connected to the water mains
using new hose-sets. The old hose-sets should not be
reused.
Water pressure must be between 0.04 MPa and 1
MPa. If the pressure is below the minimum, consult
our Service Department for advice.
If the water pipes are new or have not been used for an
extended period of time, let the water run to make sure
that the water is clear. This precaution is needed to
avoid the risk of the water inlet getting blocked and
damaging the appliance.
1. Pull the safety supply hose completely out from the
storage compartment located at the rear of
dishwasher.
2. Connect the cold water supply hose to a threaded
3/4(inch) connector and make sure that it is
fastened tightly in place.
3. Turn water fully on before starting the dishwasher.
WARNING! A hose that attaches to a sink spray
can burst if it is installed on the same water line
as the dishwasher. If your sink has one, it is
recommended that the hose be disconnected
and the hole plugged.
How to disconnect the safety supply hose
1. Turn off the water.
2. Unscrew the safety supply hose from the faucet.
WARNING! In order to avoid water staying in the inlet
hose, please close the hydrant after using.
STARTING A WASHING PROGRAM
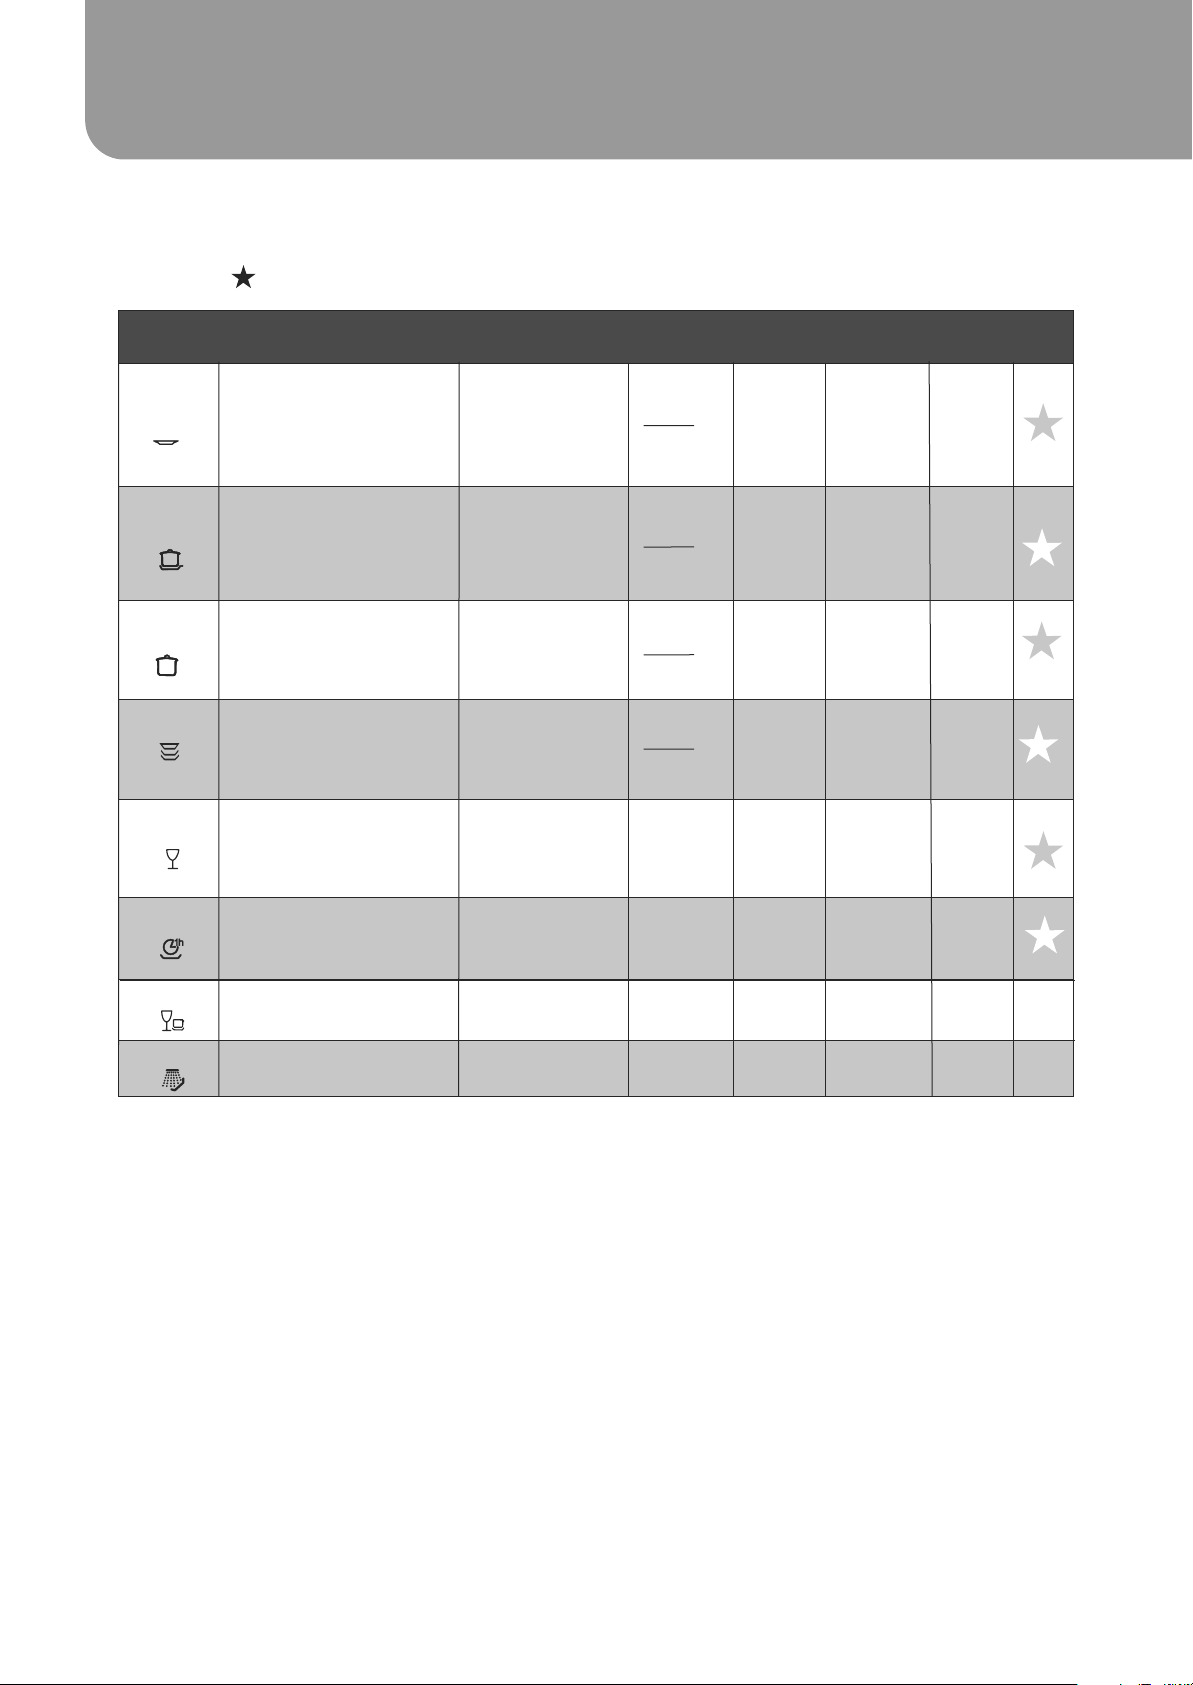
Wash Cycle Table
NOTE: Star ( ) means the need to fill rinse aid into the Rinse Aid Dispenser.
NOTE:
* AS/NZS 2007.1: This program is the test cycle.
The information for comparability test in accordance with AS/NZS 2007.1, as follows:
Capacity: 14 setting
Ÿ
Position Upper basket: Upper wheels on rails
Ÿ
Rinse aid setting: 6
Ÿ
Open the door slightly 50mm to assist in drying of the dishes after every wash
Ÿ
(Or All )in1
5/27.5g
Detergent
pre/main
Cycle Selection
Information
Program
Running
time(min)
Water
(L)
Energy
(Kwh)
Rinse
Aid
For heavily soiled loads,
such as pots, plates,
glasses and lightly
soiled pans.
Standard daily cycle for
normally soiled loads,
such as pots, plates,
glasses.
For heaviest soiled crockery,
and normally soiled pots,
pans, dishes etc with dried
on soiling.
A shorter wash for lightly
soiled loads and quick wash.
Pre-wash(50 °C)
Wash (65 °C)
Rinse
Rinse
Rinse (65°C)
Drying
Pre-wash(45°C)
Wash (55 °C)
Rinse
Rinse (60 °C)
Drying
Pre-wash
Wash (45 °C)
Rinse
Rinse(50°C)
Drying
Wash (40 )
Rinse
Rinse (45 °C)
°C
180
165
150
40
1.15
0.74
1.4
0.5
16.5
13
12.6
10
Description
of Cycle
Pre-wash(50°C)
Wash(60°C)
Rinse (50°C)
Drying
60 90.8
20g
For lightly soiled loads that
do not need excellent
drying efficiency.
To rinse dishes that you plan
to wash later that day.
Pre-wash
8
0.01
3.5
For lightly soiled crockery
and glass.
120 0.85
13
Pre-wash
Wash (40 °C)
Rinse
Rinse(60°C)
Drying
10~13.5
1.1~1.4
120~170
Pre-wash (45 °C)
Autowash(50-60 °C)
Rinse
Rinse (60 °C)
Drying
Auto sensing wash, lightly,
normally or heavily soiled
crockery, with or with out
dried-on food
(Or All )in1
5/27.5g
(Or All )in1
5/27.5g
(Or All )in1
5/27.5g
5/27.5g
5/27.5g
Intensive
Normal
Rapid
1Hour
Glass
Soak
Heavy
(*AS/NZS 2007.1)
Auto
AUTO
Loading ...
Loading ...
Loading ...