Loading ...
Loading ...
Loading ...
Using Your Dishwasher
Page 10 Page 23
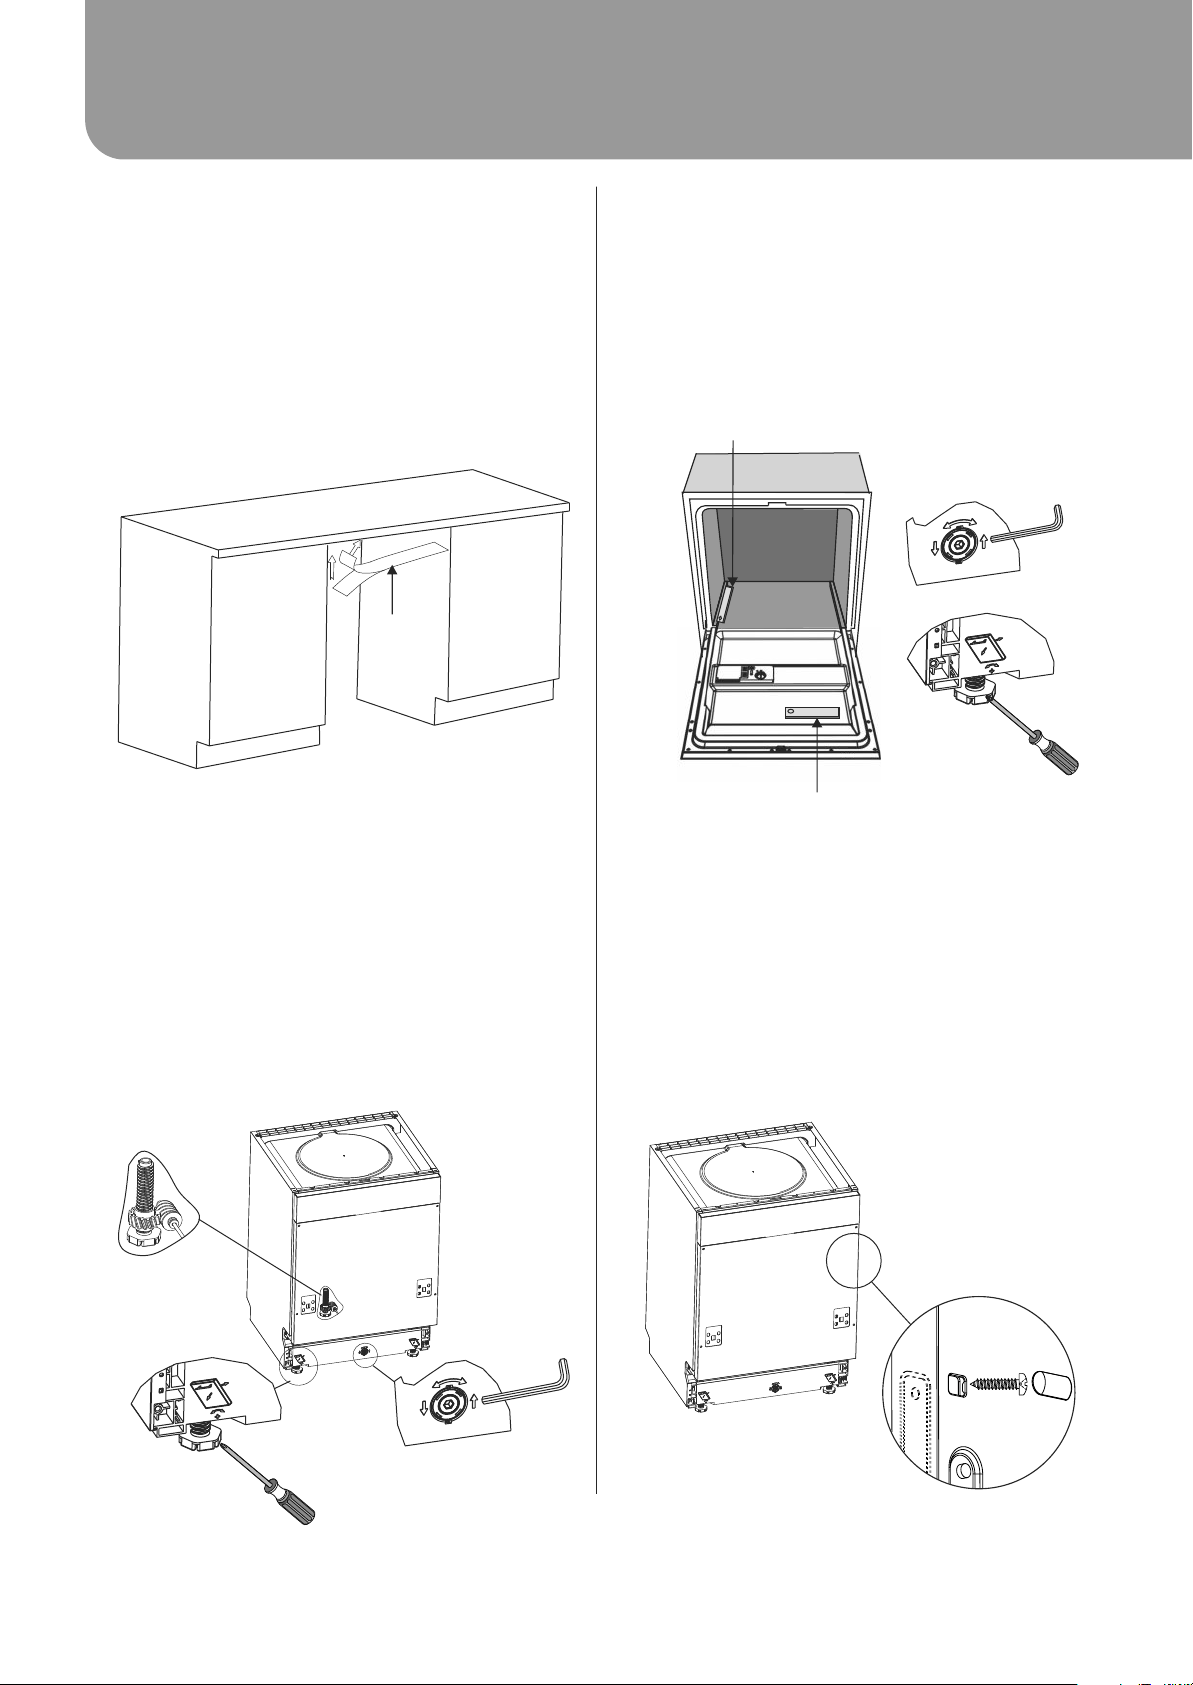
Installation
Place a level on the door and rack track inside the
Ÿ
tub as shown to check that the dishwasher is level.
If necessary, level the dishwasher by adjusting the
Ÿ
three levelling legs individually.
When levelling the dishwasher, please pay
Ÿ
attention not to let the dishwasher tip over.
The maximum adjustment height of the feet is
Ÿ
50mm.
Securing the Dishwasher
The dishwasher must be secured in place using either
of the following methods:
Normal work surface - secure to the work surface
Ÿ
by using two woodscrews ensuring the
dishwasher weight is not being hit by the surface.
Marble or granite work top - secure the bracket to
Ÿ
the side panel of the dishwasher and secure the
dishwasher to the furniture housing. Put the rubber
cap over the screw.
Levelling the Dishwasher
Once the appliance is positioned for levelling, the
Ÿ
height of the dishwasher may be altered via
adjustment of the screwing level of the feet. In any
case, the appliance should not be inclined more
than 2 °.
The rear feet can be adjusted from the front of the
Ÿ
dishwasher by turning the Allen screw in the middle
of the base of the dishwasher using an Allen key.
To adjust the front feet, use a flat screw driver and
Ÿ
turn the front feet until the dishwasher is level.
Positioning the Appliance
Position the appliance in the desired location. The
Ÿ
back should rest against the wall behind it, and the
sides, along the adjacent cabinets or walls. The
dishwasher is equipped with water supply and
drain hoses that can be positioned either to the
right or the left sides to facilitate proper installation.
Affix the condensation strip under the work surface
Ÿ
of the cabinet. Ensure the condensation strip is
flush with edge of the work surface.
CONTROL PANEL
4
3
2
1
Power button: To turn on/off the power supply.
Display screen: to show the remaining
time and the state (running state, delay
time,error codes etc )
Alt function indicator:
Program indicators:
5
Other indicators:
TURNING ON THE APPLIANCE
Starting a wash cycle:
1. Draw out the lower and upper basket, load the
dishes and push them back. It is recommended to
load the lower basket first, then the upper one (see
the section entitled “Loading the Dishwasher”).
2. Pour in the detergent (see Page 17).
3. Insert the plug into the socket. The power supply is
220-240 VAC /50 HZ, the specification of the
socket is 10A 250VAC. Make sure that the water
supply is turned on to full pressure.
4. Close the door, press the ON/OFF button to switch
on the machine.
5. Press the program button to select your desired
program, when the program is selected, the
response icon will light, then press the Start/Pause
button, the dishwasher begins to start.
NOTE: When you press the Start/Pause button to
pause during washing, the running indicator will stop
blinking and the dishwasher will sound every minute
unless you press the Start/Pause button to start.
CHANGE THE PROGRAM
Premise:
1. A cycle that is underway can only be modified if it
has only been running for a short time. Otherwise,
the detergent may have already been released, and
the appliance may have already drained the wash
water.
2. Press the Start/Pause button, the machine will be in
standby mode, then press the program button
more than 3 seconds then you can change the
program to the desired cycle setting (see the
section entitled " Starting a wash cycle. . .").
NOTE:
If this is the case, the detergent dispenser must be
refilled (see the section entitled "Adding
Detergent").
If you open the door during a wash cycle ,
the machine will pause. The program light will
stop blinking and the buzzer will sound every
minute until you close the door. After
you close the door, the machine will keep on
working after 10 seconds.
10
Start /Pause button: To start the selected
washing program or pause the washing
program when the machine is working.
Delay Button: Press to delay the wash
6
Rinse Aid indicator:
Indicates when the dispenser needs to be refilled.
Delay time ,Remain time ,or error codes indicator:
Auto
Intensive
Glass
Heavy
1 Hour
Normal
Rapid
Soak
Start/PausePrograms
Option
2
3
1
6
7
4 5
8 9 10
AUTO
Rinse Aid indicator:
Indicates when the dispenser needs to be refilled.
Water faucet indicator:
Express indicator:
This function can reduce the running time, water and
energy consumption are slight increased.
(This function can only be used with programmes
Intensive, Heavy, Normal and Glass ).
Extra drying: An increased temperature during the final rinse
to improve drying. Slight increase in energy consumption.
(This function can only be used with programmes Intensive,
Heavy, Normal, Glass and 1 Hour).
Alt Button: Dual zone wash function,
press the button to select either upper
basket or lower basket loaded, and the
response indicator.
7
Program Button: Press to select the
appropriate program.
8
Express and Extra drying function
button: Press to select the express and
extra drying function.
9
Attention:
Child lock function: press two buttons( + )
simultaneously to lock the program.
Child lock indicator:
Condensation
Strip
B
A
Spirit level
Spirit level
Check level side to side.
Check level Front to Back.
Loading ...
Loading ...
Loading ...