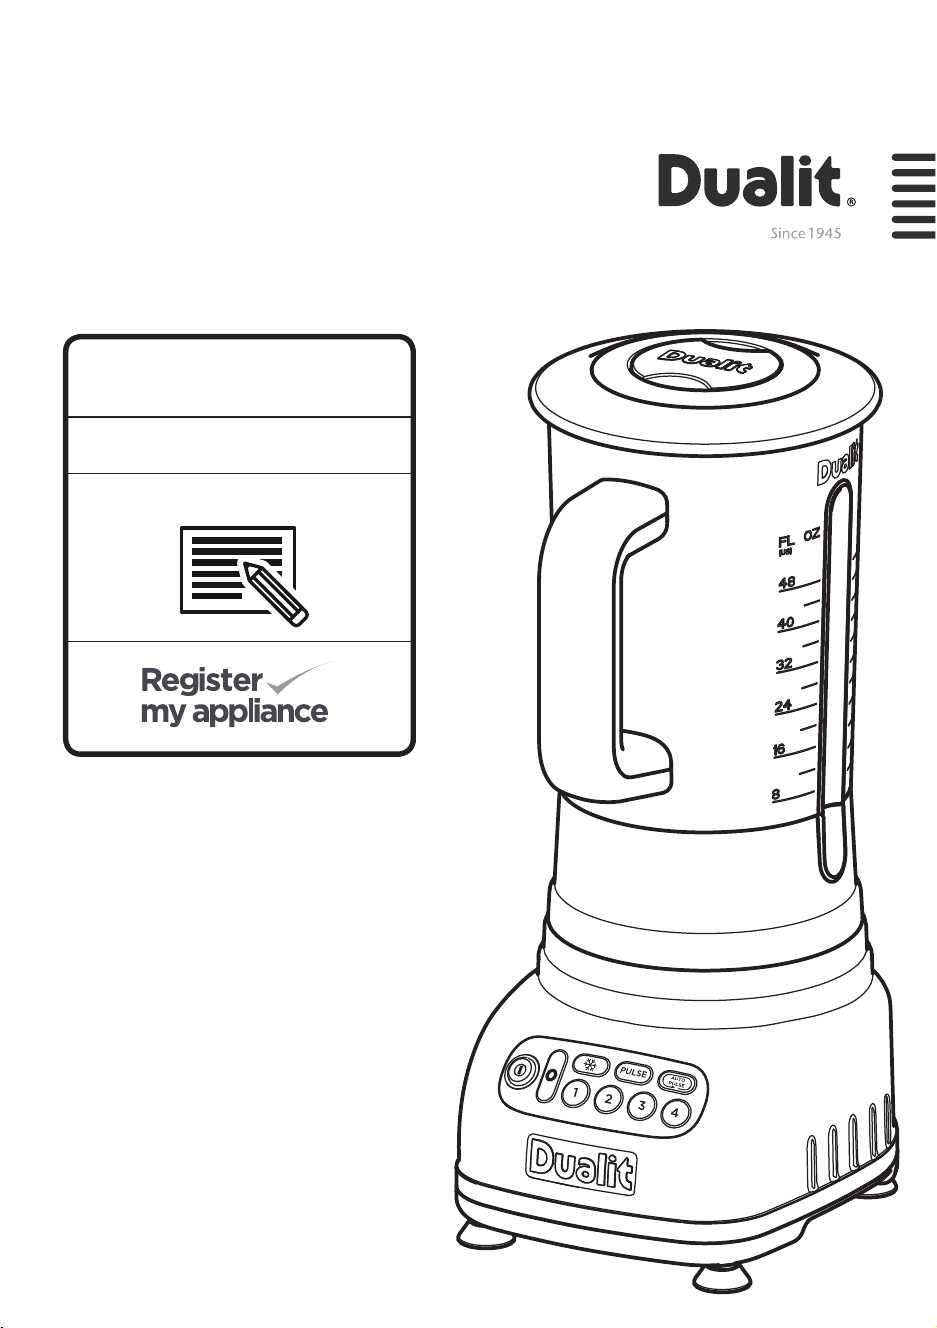
The Blender
Instruction Manual & Guarantee
DON’T FORGET TO
R E G I S T E R Y O U R B L E N D E R
WWW.DUALIT.COM/REGISTER
OR BY POST

3
SAFETY PRECAUTIONS
READ ALL THE
INSTRUCTIONS
CAREFULLY BEFORE USING
YOUR DUALIT BLENDER
KEEP THESE
INSTRUCTIONS SAFE FOR
FUTURE REFERENCE.
Always follow these safety precautions
when using your blender for your own
safety and to avoid damaging the appliance.
•
This is an attended appliance.
Do not leave appliance unattended during
use. Always disconnect the appliance from
the supply if it is left unattended and
before assembling, disassembling or
cleaning.
• This appliance must not be used by
children and people with very extensive
and complex disabilities. People with
reduced physical, sensory or mental
capabilities or lack of experience and
knowledge shall not use this appliance,
unless they are supervised and have been
given instruction concerning the use of
the appliance in a safe way and
understand the hazards involved. Children
shall not play with the appliance. Cleaning
and user maintenance shall not be made
by children.
• Keep the appliance and its cord out of
reach of children.
• This appliance is intended for indoor
household use only. If the appliance is
used improperly or for professional or
semi-professional purposes or if it is not
used according to these instructions the
guarantee becomes invalid and Dualit
refuses any liability for damage caused.
• The use of attachments, not
recommended or sold by the
manufacturer may cause fire, electric
shock or injury.
Electrical safety
• Make sure the electrical outlet is rated at
the same voltage as that stated on the
bottom of the power base.
• Use this product with rated voltage A.C.
outlet only.
• NOTE: any plug cut from the power
supply cord should be disposed of
immediately. Inserting any cut off plug into
a 13A socket-outlet is hazardous.
• Never use the plug without the fuse
cover fitted. Ensure replacement fuse is
the same current value as the original.
Replacement fuses are available and
should be ASTA approved to BS1362.
• Be sure to unplug the A.C. cord when
blender is not being used.
• Switch off the appliance and disconnect
from supply before changing acessories or
approaching parts that move in use.
• Do not operate the appliance with a
damaged cord or plug or after appliance
malfunctions, or is dropped or damaged
in any manner. Return appliance to the
nearest Authorized Service Centre for
examination, repair or ele ctrical or
mechanical adjustment.
2
CONTENTS
Safety precautions
Know your blender
The controls
Blade assembly & removal tool
Setting up
Removable blades
Assembling
Starting & stopping
Auto pulse and pulse
Ice crushing
Settings and their uses
Hot liquids
Notes for blending
Daily cleaning
Maintenance and storage
Do’s & Dont’s
Troubleshooting
Recipe ideas
Guarantee
3
6
7
7
8
8
9
9
10
10
11
12
12
13
13
14
14
18
23

3
SAFETY PRECAUTIONS
READ ALL THE
INSTRUCTIONS
CAREFULLY BEFORE USING
YOUR DUALIT BLENDER
KEEP THESE
INSTRUCTIONS SAFE FOR
FUTURE REFERENCE.
Always follow these safety precautions
when using your blender for your own
safety and to avoid damaging the appliance.
•
This is an attended appliance.
Do not leave appliance unattended during
use. Always disconnect the appliance from
the supply if it is left unattended and
before assembling, disassembling or
cleaning.
• This appliance must not be used by
children and people with very extensive
and complex disabilities. People with
reduced physical, sensory or mental
capabilities or lack of experience and
knowledge shall not use this appliance,
unless they are supervised and have been
given instruction concerning the use of
the appliance in a safe way and
understand the hazards involved. Children
shall not play with the appliance. Cleaning
and user maintenance shall not be made
by children.
• Keep the appliance and its cord out of
reach of children.
• This appliance is intended for indoor
household use only. If the appliance is
used improperly or for professional or
semi-professional purposes or if it is not
used according to these instructions the
guarantee becomes invalid and Dualit
refuses any liability for damage caused.
• The use of attachments, not
recommended or sold by the
manufacturer may cause fire, electric
shock or injury.
Electrical safety
• Make sure the electrical outlet is rated at
the same voltage as that stated on the
bottom of the power base.
• Use this product with rated voltage A.C.
outlet only.
• NOTE: any plug cut from the power
supply cord should be disposed of
immediately. Inserting any cut off plug into
a 13A socket-outlet is hazardous.
• Never use the plug without the fuse
cover fitted. Ensure replacement fuse is
the same current value as the original.
Replacement fuses are available and
should be ASTA approved to BS1362.
• Be sure to unplug the A.C. cord when
blender is not being used.
• Switch off the appliance and disconnect
from supply before changing acessories or
approaching parts that move in use.
• Do not operate the appliance with a
damaged cord or plug or after appliance
malfunctions, or is dropped or damaged
in any manner. Return appliance to the
nearest Authorized Service Centre for
examination, repair or ele ctrical or
mechanical adjustment.
2
CONTENTS
Safety precautions
Know your blender
The controls
Blade assembly & removal tool
Setting up
Removable blades
Assembling
Starting & stopping
Auto pulse and pulse
Ice crushing
Settings and their uses
Hot liquids
Notes for blending
Daily cleaning
Maintenance and storage
Do’s & Dont’s
Troubleshooting
Recipe ideas
Guarantee
3
6
7
7
8
8
9
9
10
10
11
12
12
13
13
14
14
18
23

4 5
Unpack the box with care, keeping all the packaging materials until you are satisfied
everything is present and in working order. Once satisfied remove any tags from the
appliance and recycle the packaging appropriately. Do not remove tags from the cord
where appropriate. You may wish to keep the box to store your appliance.
All illustrations are for representation only, your model may vary from illustrations shown.
Patent pending, registered design and protected under the U.K. Copyright Designs and
Patent Act and Community Design Regulation.
• To protect against risk of electrical shock,
do not submerge the motor housing,
cord or plug in water or any other liquids.
• Do not let cord hang over edge of table
or counter.
General safety
• This appliance should only be operated
in a dry well ventilated area.
• Never tamper with the safety systems.
They are included for your personal
safety.
• Do not operate the appliance empty.
• Unplug from outlet when not in use,
before putting on or taking off parts, and
before cleaning.
• For safety reasons keep hands and
utensils out of jug while blending to
reduce the risk of severe injury to persons
or damage to the blender. A spatula may
be used but must be used only when the
blender is not running and jar is off the
base or the appliance is unplugged.
•
Risk of injury never place the blades on
the base without jug properly attached.
•
Do not attempt to defeat the safety
interlock mechanisms.
•
Avoid contact with moving parts, never
reach into the jar with your fingers or an
object (e.g. a spatula) while the appliance
is running.
•
Be certain the jar is firmly on the base
and the lid and blade assembly is correctly
in position before operating appliance.
• Do not blend dough, pastry or mashed
potato.
• Blades are sharp. Handle carefully.
• If the blade is jammed, switch off
immediately and unplug the appliance
before removing the lid.
• Always operate appliance with lid in
place, spillage may occur if the lid is
damaged or incorrectly fitted.
• Do not lift the jar up while the motor is
running.
• Keep jug empty when not in use.
• Caution, after extended periods of use
the metal drive coupling on the blade
assembly may become hot.
• When blending heavy loads pulse for 30
seconds and allow cooling until room
temperature between each pulse. Please
note that no recipe contained within the
manual is considered a heavy load.
When Blending warm/cold
ingredients
•
Never blend more than 1L when
crushing ice.
•
When blending warm ingredients do not
blend over 1L and only use setting 1.
•
When processing warm ingredients,
secure the lid by hand using a heatproof
glove or suitable protection.
•
When blending warm ingredients, loosen
the filler cap to allow steam to escape, be
cautious of steam venting and possible
spilage.
SAFETY PRECAUTIONS
• Do not add boiling liquids or foods to
the jar. Always cool liquids or food items
to below 60°C before adding to the jar.
• Frozen foods with the exception of small
pieces of fruit or ice cubes should not be
placed in the jug.
• Do not insert frozen items into jug taken
directly from a hot dishwasher.
• Do not immerse or wash jug in boiling
or very hot water.
SAvE THESE
INSTRUCTIONS
BEFORE FIRST USE
When you turn the blender on for the first
time, a “new” smell may be given off, this
will dissipate after a few uses.
Clean all parts in contact with food before
using for the first time.
INSTRUCTIONS ON
ENVIRONMENT PROTECTION
Do not dispose this product in the
usual household garbage at the end of its
life cycle. Please hand it over to a collection
point for the recycling of electrical and
electronic appliances. The symbol on the
product, the instruction of use or the
packaging will inform you about the
methods of disposal. The materials are
recyclable as mentioned on its marking. By
recycling, material recycling or other forms
of re-utilization of old appliances you are
making an important contribution to
protect our environment. Please enquire at
the community administration for the
authorised disposal location.
dishwasher safe
7
6
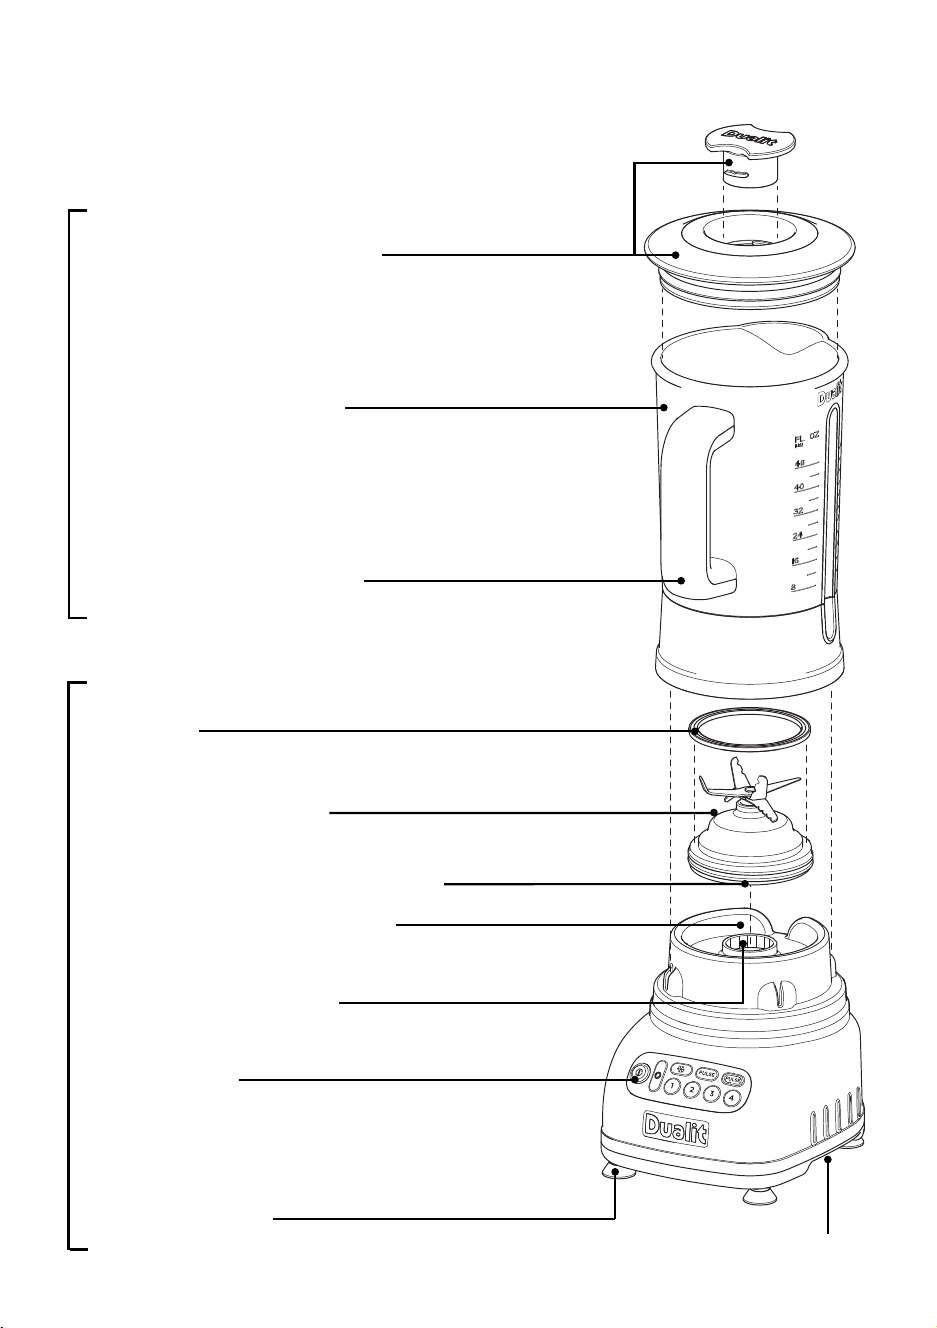
KNOW YOUR BLENDER
LID WITH FILLER CAP
2.0L TRITAN jAR
(WHEN USING AUTO PULSE)
6 PRONG BLADE
GASKET
CORD STORAGE
CONTROL
PANEL
SUCKER FEET
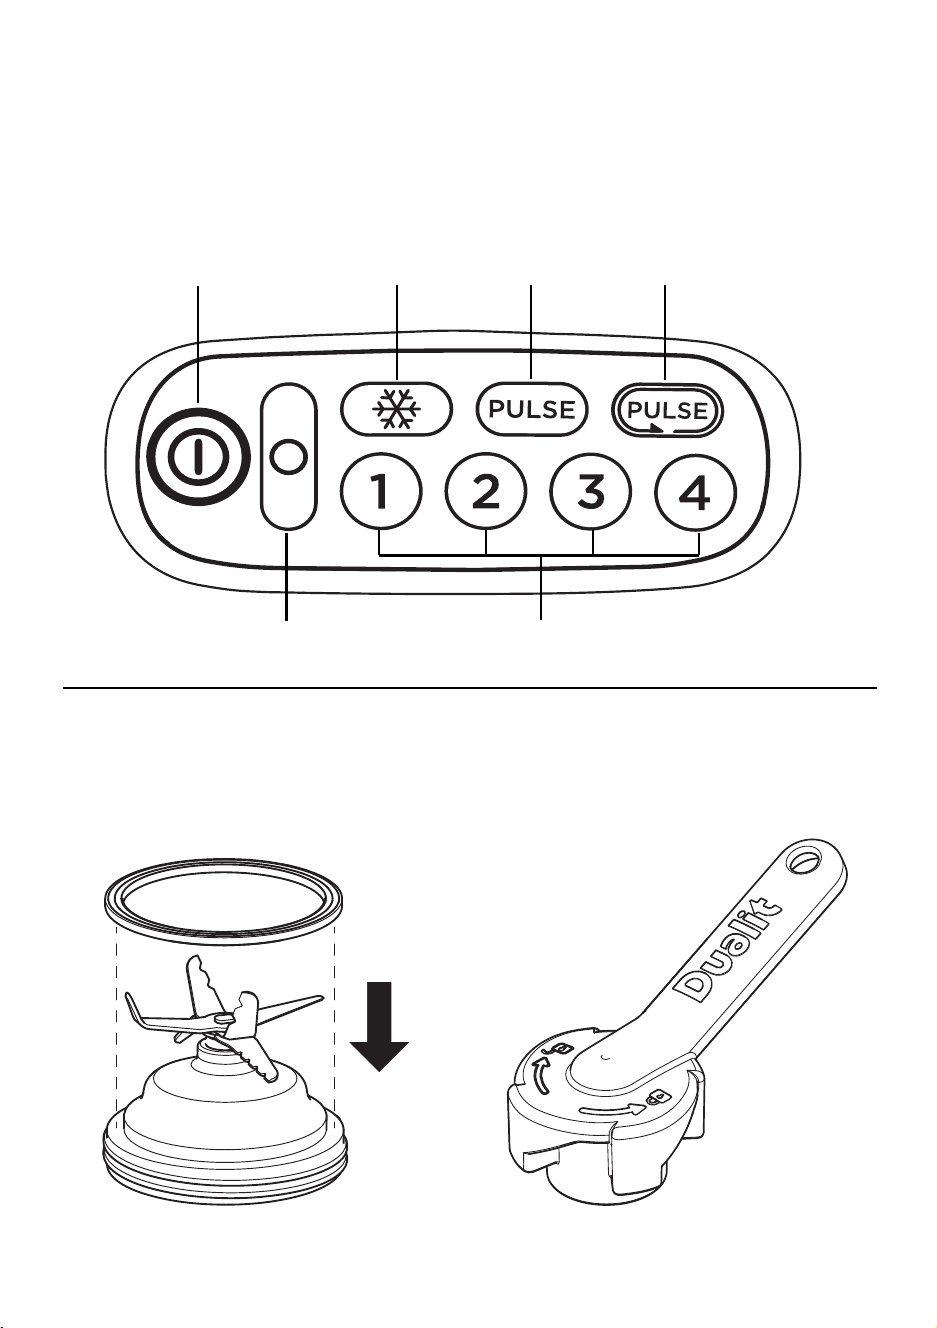
CONTROLS
INTERLOCK FEATURE
(HIDDEN DETAIL)
MAIN
ON/OFF
ICE
CRUSH
STOP
BLADE & GASKET
SPEED SETTING
PULSE
AUTO
PULSE
SURE GRIP HANDLE
BLADE REMOVAL TOOL
BLADE ASSEMBLY
& BLADE REMOVAL TOOL
do not dishwasher
METAL DRIVE COUPLING
DRIVE COUPLING
dishwasher safe
7
6
KNOW YOUR BLENDER
LID WITH FILLER CAP
2.0L TRITAN jAR
(WHEN USING AUTO PULSE)
6 PRONG BLADE
GASKET
CORD STORAGE
CONTROL
PANEL
SUCKER FEET
CONTROLS
INTERLOCK FEATURE
(HIDDEN DETAIL)
MAIN
ON/OFF
ICE
CRUSH
STOP
BLADE & GASKET
SPEED SETTING
PULSE
AUTO
PULSE
SURE GRIP HANDLE
BLADE REMOVAL TOOL
BLADE ASSEMBLY
& BLADE REMOVAL TOOL
do not dishwasher
METAL DRIVE COUPLING
DRIVE COUPLING
TOP RACK
ONLY
40 C
Cycle
TOP RACK
ONLY
40 C
Cycle
TOP RACK
ONLY
40 C
Cycle
98
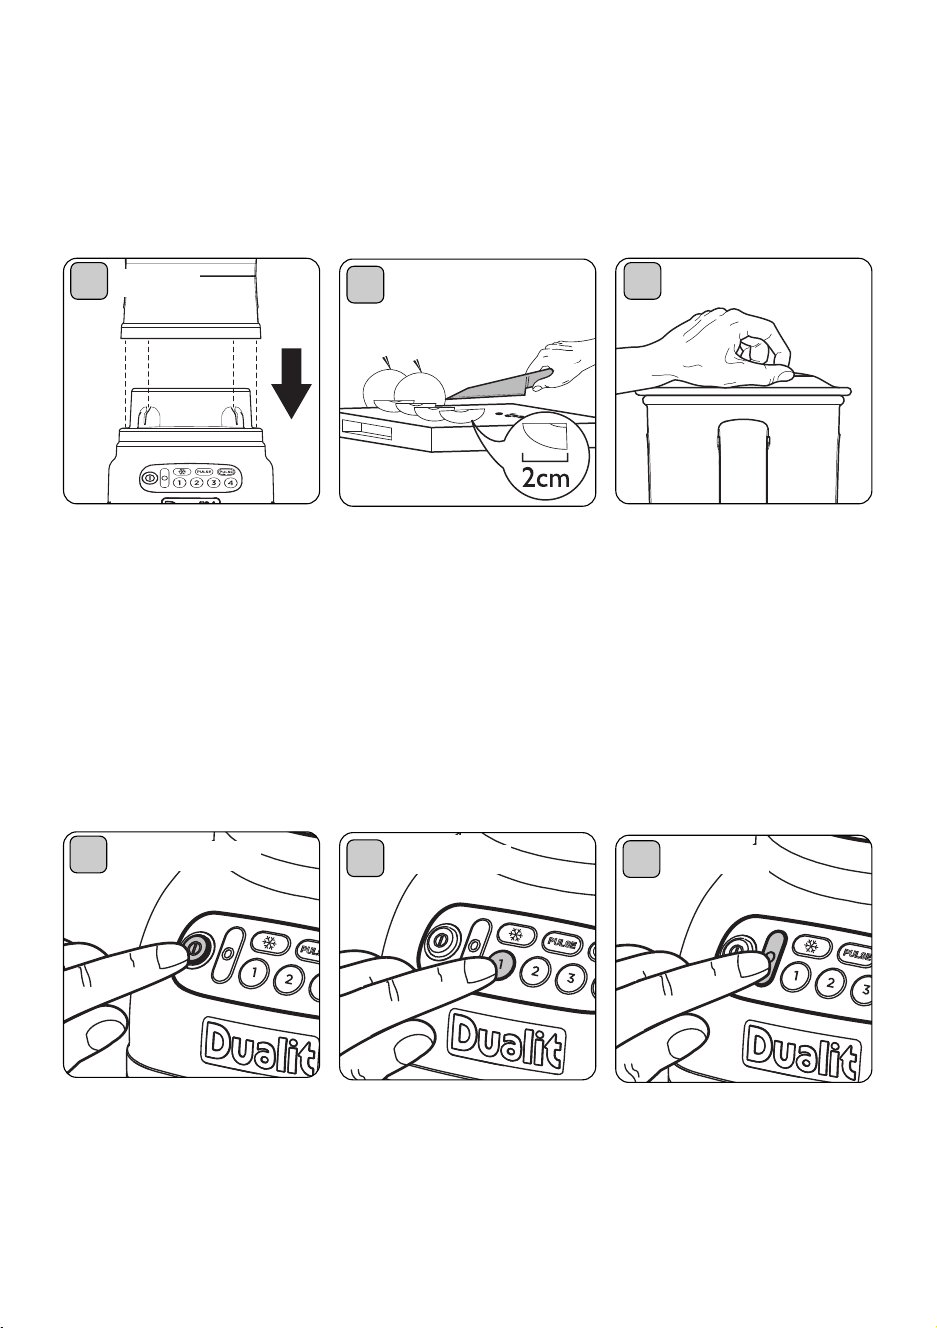
ASSEMBLING
CAUTION: NEvER USE THE BLENDER wITHOUT THE BLADES AND LID
CORRECTLY IN PLACE. NEvER RUN THE BLENDER EmPTY.
Add your ingredients to the
jar. Cut large items in to
evenly sized 2cm chunks.
Do not fill above 2.0L. For
ice, warm or solid items do
not fill above 0.75L - 1L.
Position the jar with blade
on the main body. It can be
located in 8 positions. If not
correctly positioned the
function lights on the control
panel will not illuminate.
Attach the lid by pushing
down while applying a slight
twisting action.
Place your hand on the lid to
hold the blender steady. Use a
heat proof gloved hand when
blending hot items.
2
1
3
3
TO STOP
To stop blending, press the
stop button at any time, this
will be illuminated red. Always
turn main power off & unplug
after each use.
STARTING & STOPPING
NOTE: TO PREvENT OvER PROCESSING THE BLENDER wILL AUTOmATICALLY
STOP AFTER 1 AND A HALF mINUTES. ALL OF THE LIGHTS wILL FLASH 3 TImES.
THE LID
ADD INGREDIENTS
2
1
MAIN POWER
TO START
Plug in the blender then
press the main on/off button.
All the lights will illuminate
solid if the jar is in place and
the blender is ready to go.
To start blending, press one
of the blending cycles as
described on the next pages.
Only the button selected will
illuminate.
TOP RACK
ONLY
40 C
Cycle
TOP RACK
ONLY
40 C
Cycle
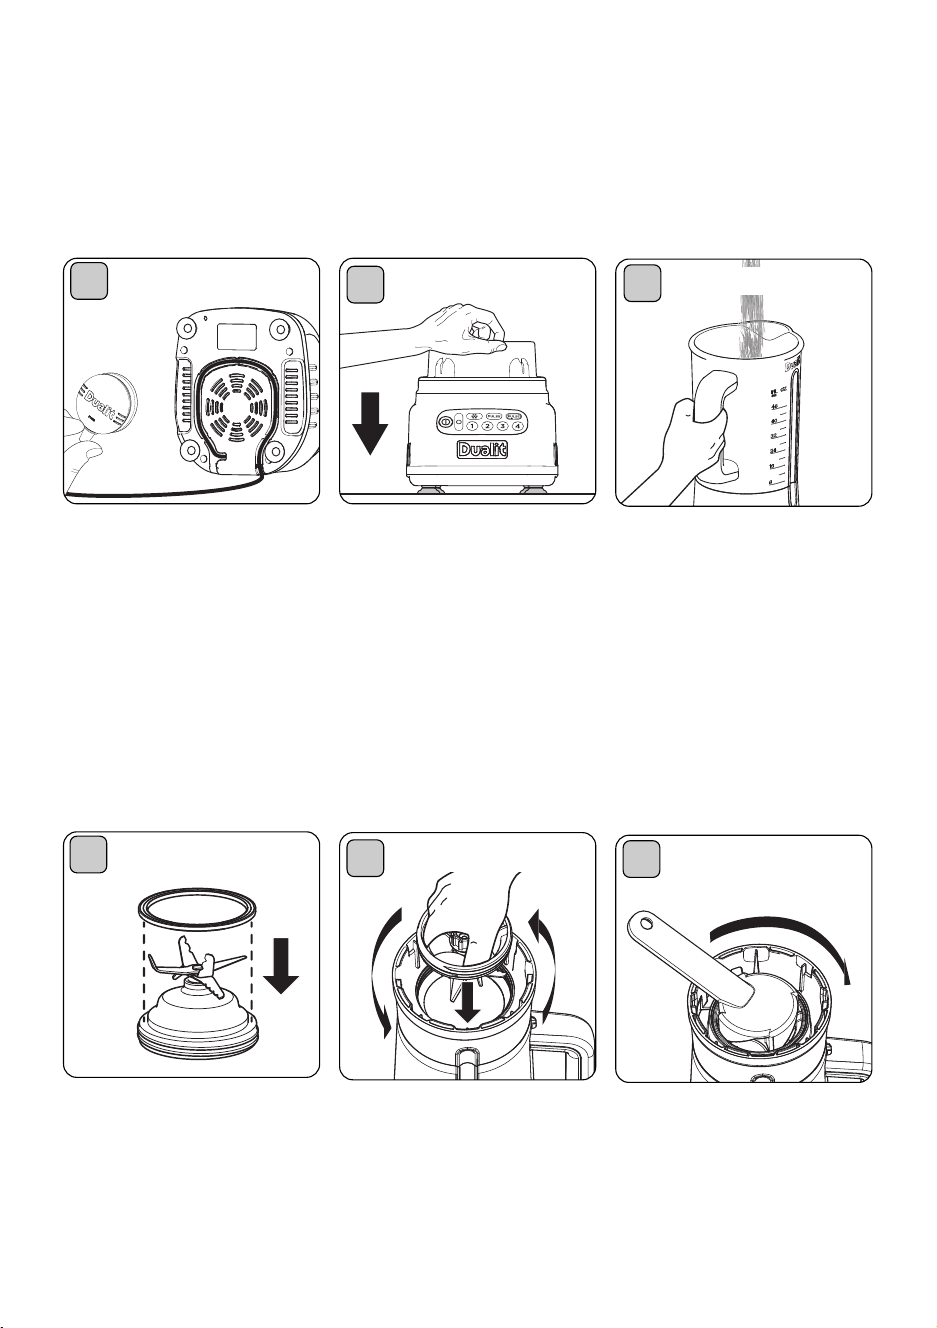
SETTING UP
DO NOT LET CORD HANG OvER EDGE OF TABLE OR COUNTERTOP
AND POSITION AwAY FORm THE EDGE
Rinse and dry the jar, lid and
blades before every use.
TOP RACK
ONLY
40 C
Cycle
Unwind the required length
of cord. It is important to
keep the cord short. Wrap
the excess cord length
round the cord tidy.
Place the blender on a level
surface and push down so
the sucker feet stick to the
surface.
2
1
3
CORD TIDY
3
REMOVING BLADE
To remove the blades use
the tool provided. Insert and
rotate the blades
CLOCKwISE TO
LOOSEN. Continue to
unscrew and lift to remove.
REMOVABLE BLADES
CAUTION: THE BLADES ARE vERY SHARP! ENSURE THE GASKET IS IN
PLACE BEFORE USING.
SECURE TO SURFACE
RINSE AND DRY
TOP RACK
ONLY
40 C
Cycle
2
1
THE GASKET
LOCKING BLADE
Ensure the gasket is seated
on the collar of the blade
correctly before inserting
into the jar. It can be placed
on either way round.
Align the blade assembly to
base of the jar. Using your
fingers, ROTATE
ANTI-CLOCKwISE TO
TIGHTEN then use the
tool to lock in to place.
THE jAR
TOP RACK
ONLY
40 C
Cycle
TOP RACK
ONLY
40 C
Cycle
TOP RACK
ONLY
40 C
Cycle
98
ASSEMBLING
CAUTION: NEvER USE THE BLENDER wITHOUT THE BLADES AND LID
CORRECTLY IN PLACE. NEvER RUN THE BLENDER EmPTY.
Add your ingredients to the
jar. Cut large items in to
evenly sized 2cm chunks.
Do not fill above 2.0L. For
ice, warm or solid items do
not fill above 0.75L - 1L.
Position the jar with blade
on the main body. It can be
located in 8 positions. If not
correctly positioned the
function lights on the control
panel will not illuminate.
Attach the lid by pushing
down while applying a slight
twisting action.
Place your hand on the lid to
hold the blender steady. Use a
heat proof gloved hand when
blending hot items.
2
1
3
3
TO STOP
To stop blending, press the
stop button at any time, this
will be illuminated red. Always
turn main power off & unplug
after each use.
STARTING & STOPPING
NOTE: TO PREvENT OvER PROCESSING THE BLENDER wILL AUTOmATICALLY
STOP AFTER 1 AND A HALF mINUTES. ALL OF THE LIGHTS wILL FLASH 3 TImES.
THE LID
ADD INGREDIENTS
2
1
MAIN POWER
TO START
Plug in the blender then
press the main on/off button.
All the lights will illuminate
solid if the jar is in place and
the blender is ready to go.
To start blending, press one
of the blending cycles as
described on the next pages.
Only the button selected will
illuminate.
TOP RACK
ONLY
40 C
Cycle
TOP RACK
ONLY
40 C
Cycle
SETTING UP
DO NOT LET CORD HANG OvER EDGE OF TABLE OR COUNTERTOP
AND POSITION AwAY FORm THE EDGE
Rinse and dry the jar, lid and
blades before every use.
TOP RACK
ONLY
40 C
Cycle
Unwind the required length
of cord. It is important to
keep the cord short. Wrap
the excess cord length
round the cord tidy.
Place the blender on a level
surface and push down so
the sucker feet stick to the
surface.
2
1
3
CORD TIDY
3
REMOVING BLADE
To remove the blades use
the tool provided. Insert and
rotate the blades
CLOCKwISE TO
LOOSEN. Continue to
unscrew and lift to remove.
REMOVABLE BLADES
CAUTION: THE BLADES ARE vERY SHARP! ENSURE THE GASKET IS IN
PLACE BEFORE USING.
SECURE TO SURFACE
RINSE AND DRY
TOP RACK
ONLY
40 C
Cycle
2
1
THE GASKET
LOCKING BLADE
Ensure the gasket is seated
on the collar of the blade
correctly before inserting
into the jar. It can be placed
on either way round.
Align the blade assembly to
base of the jar. Using your
fingers, ROTATE
ANTI-CLOCKwISE TO
TIGHTEN then use the
tool to lock in to place.
THE jAR
SETTING
1110
TOP RACK
ONLY
40 C
Cycle
TOP RACK
ONLY
40 C
Cycle
TOP RACK
ONLY
40 C
Cycle
TOP RACK
ONLY
40 C
Cycle
TOP RACK
ONLY
40 C
Cycle
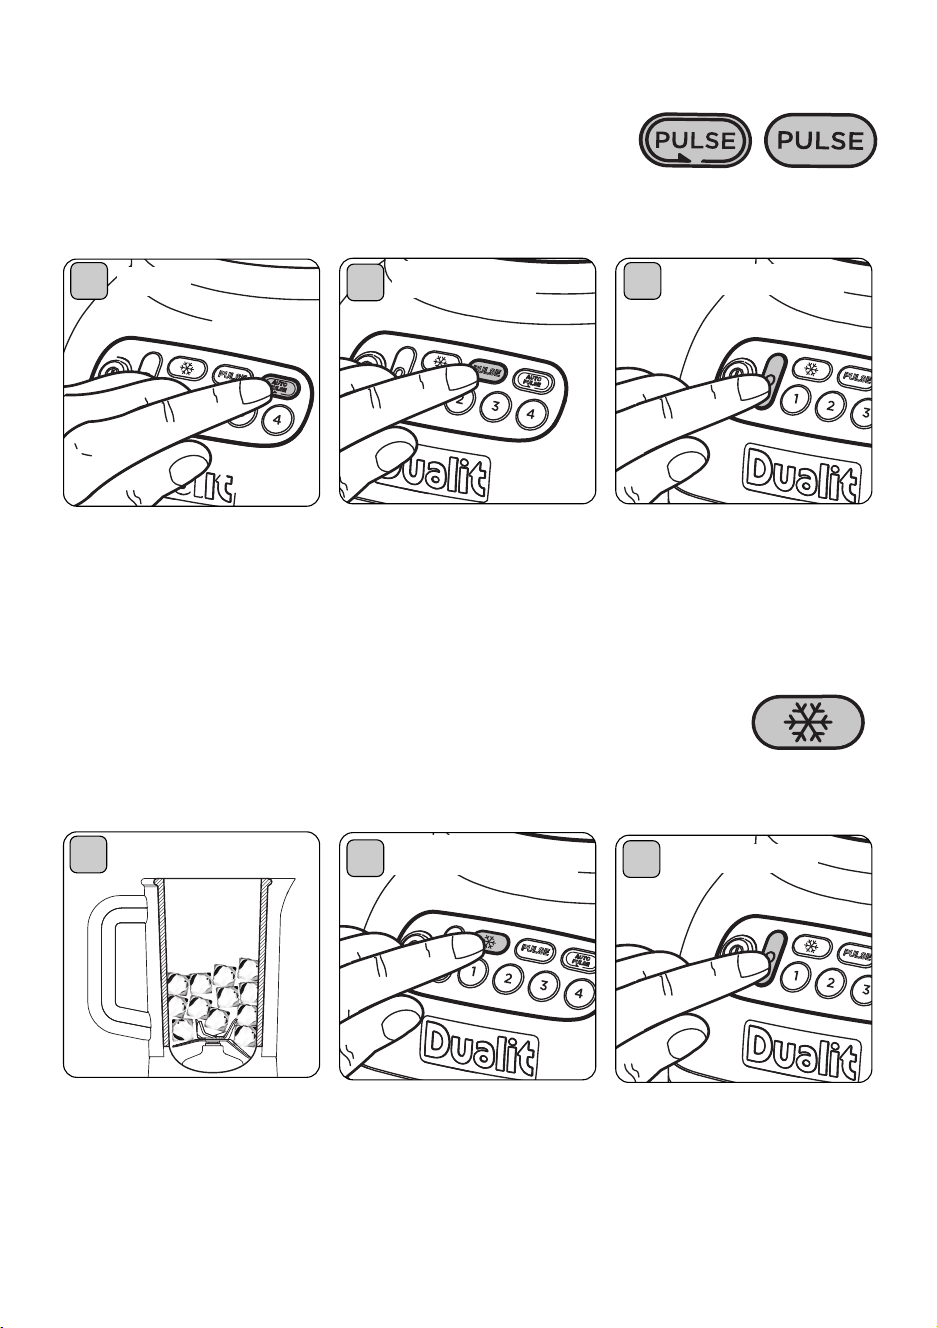
AUTO PULSE & PULSE
USE AUTO PULSE FOR THICK SmOOTHIES OR BLENDING TOUGH
mIXTURES AND PULSE FOR CHOPPING AND THAT EXTRA wHIZZ.
The auto pulse blending
cycle will pulse 10 times
then automatically stop.
ONLY USE AUTOPULSE
wITH INGREDIENTS
BELOw 60
O
C.
Press and hold the pulse
button, the blades will rotate
at full speed until the button
is released. The button will
illuminate while in use.
T
o
s
t
o
p
t
h
e
A
u
t
o
p
u
l
s
e
f
u
n
c
t
i
o
n
m
i
d
c
y
c
l
e
p
r
e
s
s
t
h
e
s
t
o
p
b
u
t
t
o
n
a
t
a
n
y
t
i
m
e
.
2
1
3
PULSE
2
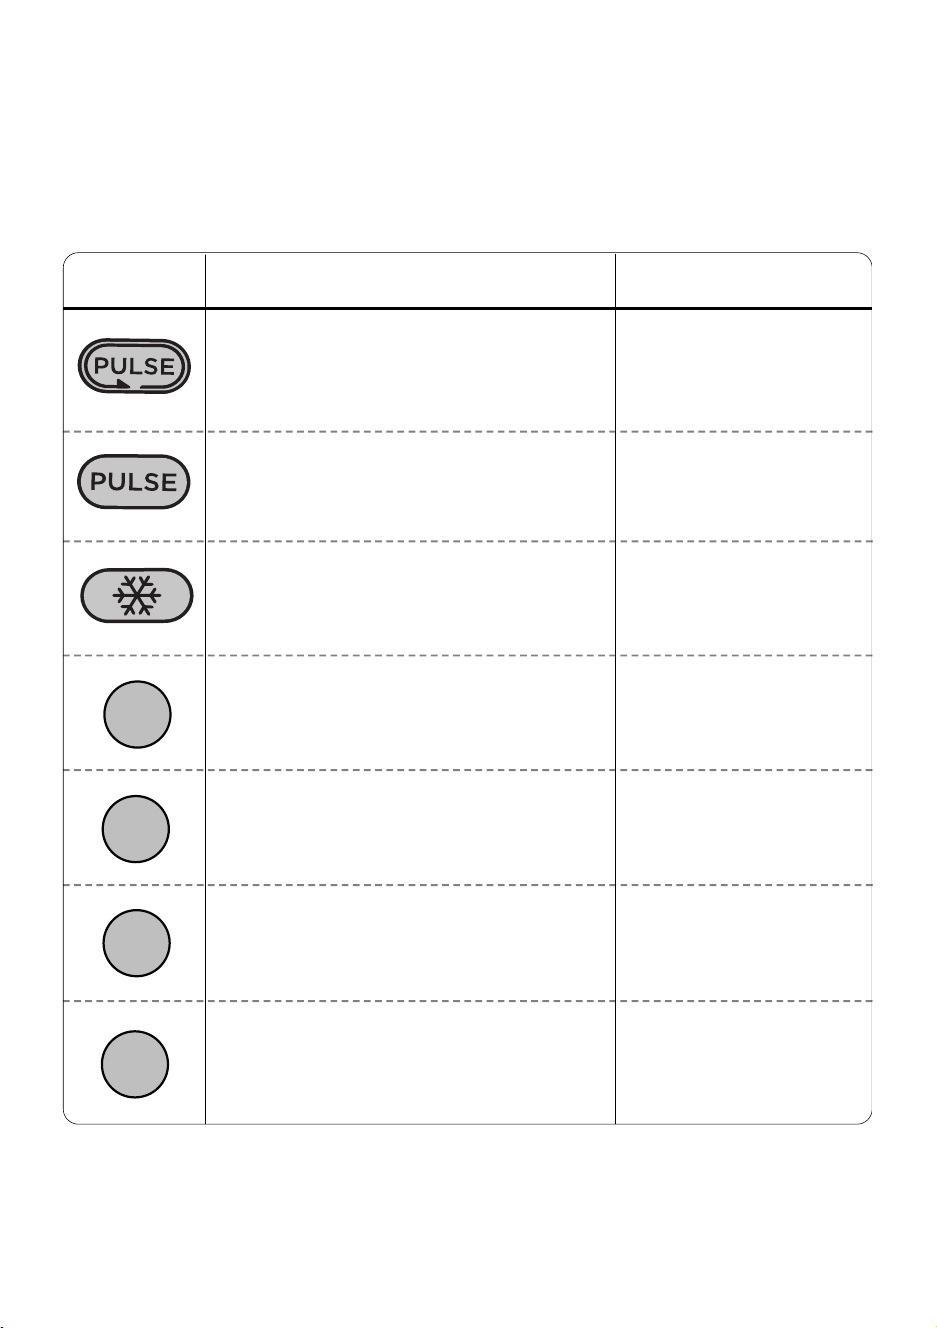
CRUSHED ICE
For course ice, stop cycle
early.
NB. The maximum volume
might vary dependant on
size and shape of the ice
cube.
ICE CRUSHING
CREATE CRUSHED ICE IN LESS THAN 10 SECONDS wITH THE
AUTOmATED ICE CRUSHING FEATURE.
MANUAL STOP
AUTO PULSE
2
1
INSERT ICE - MAX 1L
FINE CRUSHED ICE
Add ice cubes into the jar.
Seperate cubes if stuck
together and
do not fill
obove the 1L mark. Once
added blend immediately.
For finely crushed ice, press
the Ice crush button.The
blade will pulse once at full
speed then automatically
reduce speed and run for a
further 9 pulses.
SETTINGS & THEIR USES
This chart is only to be used as a guide. Auto Pulse is suitable for most ingredients, use this
setting first then use the other settings as required.
1
2
3
4
BLENDING TImE
FOOD
Press once
Press once
As required
2 - 6 pulses
Press once
Press & stop
10 - 30 secs
10 - 20 secs
20 -30 secs
20 / 20 secs*
10 - 15 secs
20 / 20 secs*
10 - 15 secs
20 / 20 secs*
Thick smoothies
Any tough ingredients (below 60
o
C)
Chopping nuts / onions
Additional pulses after auto pulsing
Fine crushed ice / iced snow
Chopped ice (press stop after 2-3 pulses)
Warm soups (below 60
o
C)
Coarse chopping
Thin fruit drinks
Batters
Ice based fruit drink
Lean meats
Purees / baby food
Sauces (thick)
NB: Times are a guide and may vary depending on volumes and ingredient types.
* After 20 seconds turn off the blender, stir the ingredients, and then continue blending.
SETTING
1110
TOP RACK
ONLY
40 C
Cycle
TOP RACK
ONLY
40 C
Cycle
TOP RACK
ONLY
40 C
Cycle
TOP RACK
ONLY
40 C
Cycle
TOP RACK
ONLY
40 C
Cycle
AUTO PULSE & PULSE
USE AUTO PULSE FOR THICK SmOOTHIES OR BLENDING TOUGH
mIXTURES AND PULSE FOR CHOPPING AND THAT EXTRA wHIZZ.
The auto pulse blending
cycle will pulse 10 times
then automatically stop.
ONLY USE AUTOPULSE
wITH INGREDIENTS
BELOw 60
O
C.
Press and hold the pulse
button, the blades will rotate
at full speed until the button
is released. The button will
illuminate while in use.
T
o
s
t
o
p
t
h
e
A
u
t
o
p
u
l
s
e
f
u
n
c
t
i
o
n
m
i
d
c
y
c
l
e
p
r
e
s
s
t
h
e
s
t
o
p
b
u
t
t
o
n
a
t
a
n
y
t
i
m
e
.
2
1
3
PULSE
2
CRUSHED ICE
For course ice, stop cycle
early.
NB. The maximum volume
might vary dependant on
size and shape of the ice
cube.
ICE CRUSHING
CREATE CRUSHED ICE IN LESS THAN 10 SECONDS wITH THE
AUTOmATED ICE CRUSHING FEATURE.
MANUAL STOP
AUTO PULSE
2
1
INSERT ICE - MAX 1L
FINE CRUSHED ICE
Add ice cubes into the jar.
Seperate cubes if stuck
together and
do not fill
obove the 1L mark. Once
added blend immediately.
For finely crushed ice, press
the Ice crush button.The
blade will pulse once at full
speed then automatically
reduce speed and run for a
further 9 pulses.
SETTINGS & THEIR USES
This chart is only to be used as a guide. Auto Pulse is suitable for most ingredients, use this
setting first then use the other settings as required.
1
2
3
4
BLENDING TImE
FOOD
Press once
Press once
As required
2 - 6 pulses
Press once
Press & stop
10 - 30 secs
10 - 20 secs
20 -30 secs
20 / 20 secs*
10 - 15 secs
20 / 20 secs*
10 - 15 secs
20 / 20 secs*
Thick smoothies
Any tough ingredients (below 60
o
C)
Chopping nuts / onions
Additional pulses after auto pulsing
Fine crushed ice / iced snow
Chopped ice (press stop after 2-3 pulses)
Warm soups (below 60
o
C)
Coarse chopping
Thin fruit drinks
Batters
Ice based fruit drink
Lean meats
Purees / baby food
Sauces (thick)
NB: Times are a guide and may vary depending on volumes and ingredient types.
* After 20 seconds turn off the blender, stir the ingredients, and then continue blending.
TOP RACK
ONLY
40 C
Cycle
TOP RACK
ONLY
40 C
Cycle
1312
TOP RACK
ONLY
40 C
Cycle
TOP RACK
ONLY
40 C
Cycle
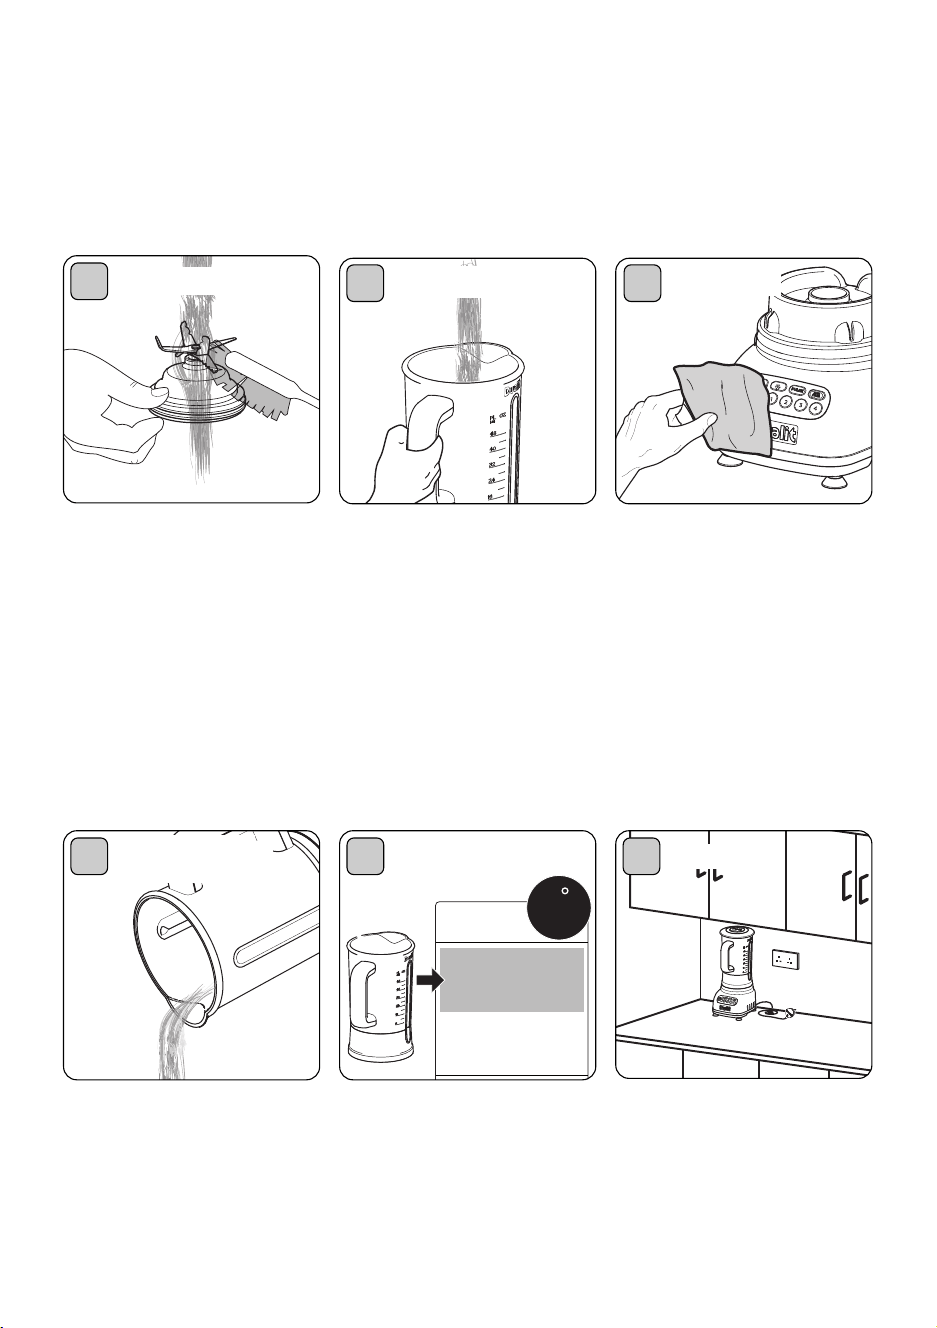
DAILY CLEANING
CAUTION: THE BLADES ARE vERY SHARP - HANDLE wITH CARE
SwITCH OFF, UNPLUG AND DISASSEmBLE BEFORE CLEANING.
To remove the blade for
cleaning, follow the
procedure on page 8. Brush
clean under a tap. Hold
using the black base only, the
blade is very sharp.
TOP RACK
ONLY
40 C
Cycle
Clean the jar and lid with
warm soapy water.
The jar can be dishwashed
as described below (remove
blade and seal).
Wipe the main base with a
damp cloth, then dry. Do
not use an abrasive cleaner
or submerge the power
base, cord or plug in water.
1
2
3
1
Decant the blended items
after every use and rinse
immediately. Clean
thoroughly and leave to dry.
The blades are sharp so
leave to dry out of reach of
children.
TOP RACK
ONLY
40 C
Cycle
2
Remove blades, gasket and
lid. Only dishwasher the jar
on a wash cycle below
40
o
C. Put on the top rack
only and remove prior to
the drying cycle.
3
STORAGE
Store unplugged with the
blender jar, blade, gasket and
lid assembled.
Do not store the jar in a
fridge or freezer or with
items in the jar.
MAINTENANCE & STORAGE
ALwAYS DISCONNECT FROm THE mAINS SUPPLY BEFORE CLEANING.
ONLY THE jAR IS SUITABLE FOR A DISHwASHER.
DISHWASHER
jAR ONLY
THE jAR
THE BODY
CLEAN AFTER
EVERY USE
THE BLADES
60 C
TOP RACK
ONLY
40 C
Cycle
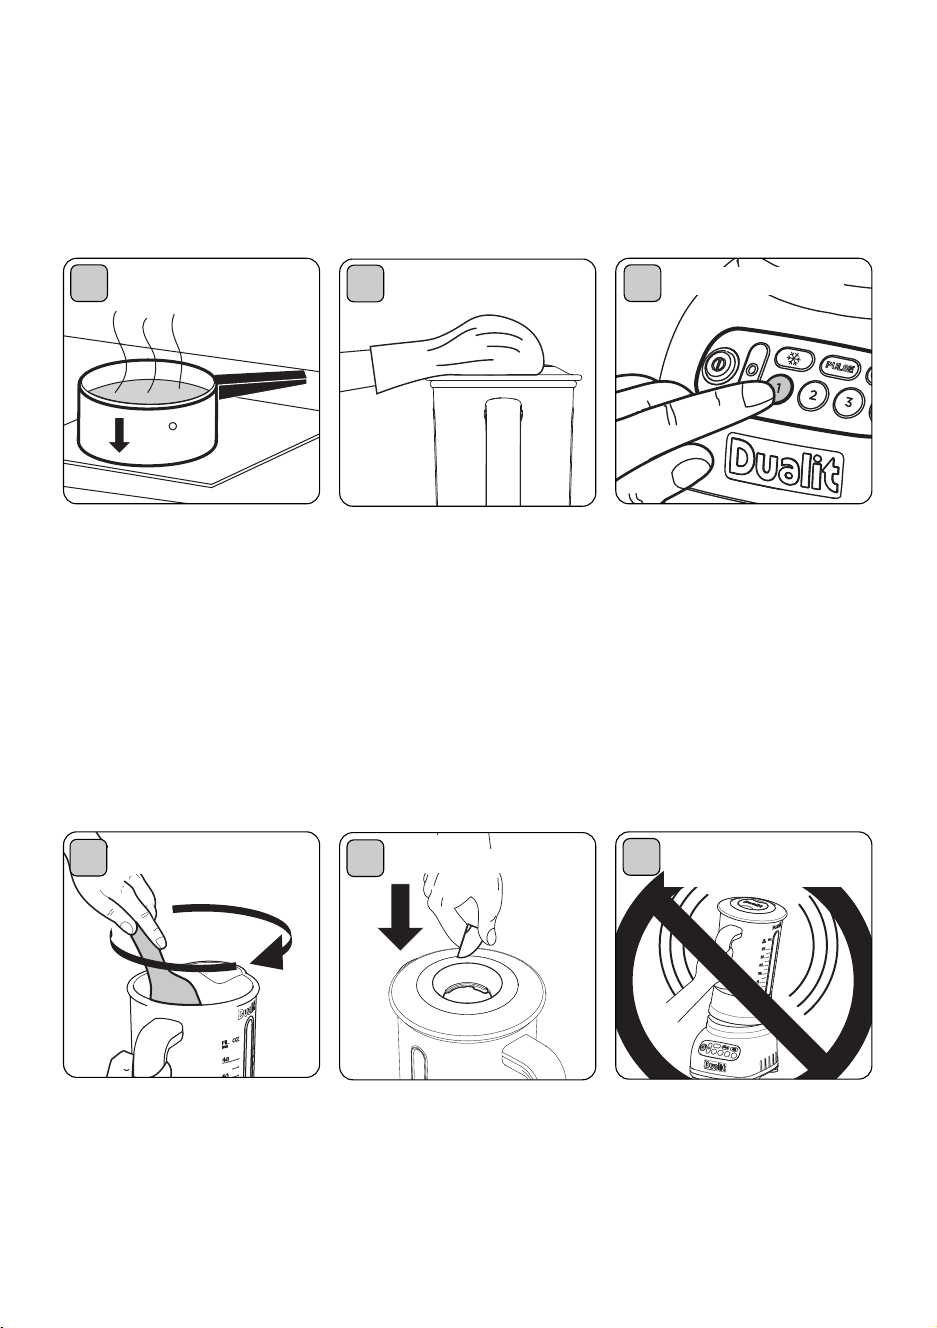
BLENDING WARM LIQUIDS
CAUTION: DO NOT BLEND HOT OR BOILING LIQUIDS.
ALwAYS COOL TO BELOw 60
O
C AND BLEND ONLY 1L AT A TImE.
Place a hand wearing a heat
proof glove on the lid. Do
not fully cover the filler hole,
to allow the steam to
escape.
Allow hot items to cool
below 60
o
C before
blending.
Do not fill above the 1L
mark to avoid spillages.
Use speed 1 for blending
warm items.
Do not use Auto Pulse
function when blending
warm liquids.
2
1
3
COOL BELOW 60
o
C
3
Whilst blending do not
shake or lift off the jar. If the
motor is running this will
permanently damage the
drive coupling.
NOTES FOR BLENDING
ALwAYS PLACE ONE HAND ON TOP OF THE LID wHEN THE mOTOR IS
RUNNING. DO NOT SHAKE OR LIFT THE jAR wHILST BLENDING
SPEED 1 ONLY
R
EM
OVE FILLER
CA
P
2
1
REDISTRIBUTING
ADDING
STOP AND REmOvE
THE jAR OFF THE
BASE. Use a spatula to
redistribute the ingredients.
Never use metal utensils, as
you may damage the jar or
blade.
Add additional ingredients in
to the blender through the
filler cap aperture. Do not
do this when blending warm
items.
DO NOT
SHAKE OR LIFT
TOP RACK
ONLY
40 C
Cycle
TOP RACK
ONLY
40 C
Cycle
1312
TOP RACK
ONLY
40 C
Cycle
TOP RACK
ONLY
40 C
Cycle
DAILY CLEANING
CAUTION: THE BLADES ARE vERY SHARP - HANDLE wITH CARE
SwITCH OFF, UNPLUG AND DISASSEmBLE BEFORE CLEANING.
To remove the blade for
cleaning, follow the
procedure on page 8. Brush
clean under a tap. Hold
using the black base only, the
blade is very sharp.
TOP RACK
ONLY
40 C
Cycle
Clean the jar and lid with
warm soapy water.
The jar can be dishwashed
as described below (remove
blade and seal).
Wipe the main base with a
damp cloth, then dry. Do
not use an abrasive cleaner
or submerge the power
base, cord or plug in water.
1
2
3
1
Decant the blended items
after every use and rinse
immediately. Clean
thoroughly and leave to dry.
The blades are sharp so
leave to dry out of reach of
children.
TOP RACK
ONLY
40 C
Cycle
2
Remove blades, gasket and
lid. Only dishwasher the jar
on a wash cycle below
40
o
C. Put on the top rack
only and remove prior to
the drying cycle.
3
STORAGE
Store unplugged with the
blender jar, blade, gasket and
lid assembled.
Do not store the jar in a
fridge or freezer or with
items in the jar.
MAINTENANCE & STORAGE
ALwAYS DISCONNECT FROm THE mAINS SUPPLY BEFORE CLEANING.
ONLY THE jAR IS SUITABLE FOR A DISHwASHER.
DISHWASHER
jAR ONLY
THE jAR
THE BODY
CLEAN AFTER
EVERY USE
THE BLADES
60 C
TOP RACK
ONLY
40 C
Cycle
BLENDING WARM LIQUIDS
CAUTION: DO NOT BLEND HOT OR BOILING LIQUIDS.
ALwAYS COOL TO BELOw 60
O
C AND BLEND ONLY 1L AT A TImE.
Place a hand wearing a heat
proof glove on the lid. Do
not fully cover the filler hole,
to allow the steam to
escape.
Allow hot items to cool
below 60
o
C before
blending.
Do not fill above the 1L
mark to avoid spillages.
Use speed 1 for blending
warm items.
Do not use Auto Pulse
function when blending
warm liquids.
2
1
3
COOL BELOW 60
o
C
3
Whilst blending do not
shake or lift off the jar. If the
motor is running this will
permanently damage the
drive coupling.
NOTES FOR BLENDING
ALwAYS PLACE ONE HAND ON TOP OF THE LID wHEN THE mOTOR IS
RUNNING. DO NOT SHAKE OR LIFT THE jAR wHILST BLENDING
SPEED 1 ONLY
R
EM
OVE FILLER
CA
P
2
1
REDISTRIBUTING
ADDING
STOP AND REmOvE
THE jAR OFF THE
BASE. Use a spatula to
redistribute the ingredients.
Never use metal utensils, as
you may damage the jar or
blade.
Add additional ingredients in
to the blender through the
filler cap aperture. Do not
do this when blending warm
items.
DO NOT
SHAKE OR LIFT

Problem Cause(s) Solution(s)
Odour on first use
1.
When new, the blender may emit a ‘new’
smell, this is normal.
1.
Continue to use the blender as normal, the smell will disappear after a few uses.
The blade is
not turning
1.
Drive coupling may be damaged.
2.
The blade may be jammed. The stop light
will continuously flash red.
1.
Never lift or shake the jar while in use. If the drive coupling is sheared then contact the
Dualit repairs department for servicing advise.
2. Switch off and unplug the blender
, remove the ingredients that block the blades. You
will need to process the food in smaller batches. Ensure chunks are no larger than 2cm.
DO’S & DON’TS
Here’s a few simple rules to help you get the most out of your blender.
Do’s Don’ts
1.
Add liquid items in the jar first then add solid food items on top.
2.
Use a combination of blend settings and Auto Pulse to suit the items being blended.
Auto Pulse is ideal for solid items, chopping nuts and for smoothies.
3.
Redistribute the items in the jar as required. When blending, thick mixtures may stick
to the side of the jar. Always turn off and unplug before redistributing.
4.
Cut ingredients into evenly sized 2cm chunks for a more consistent blend.
5.
Take extra caution when handling and storing the blades.
6.
Hold the lid down with one hand (gloved if blending warm items) whilst blending.
7.
Blend ice immediately once added to the jar.
1.
Do not use the blender jar to store food and do not store jar in the fridge.
2.
Do not over process, the blender works fast and most food will blend in seconds.
3.
Do not use with dough, mashed potato or glutinous mixtures.
4.
Do not shake or remove the jar while the blender is operating. Always turn off the
main power, unplug and wait for the blades to fully stop before taking the jar off the base.
5.
Do not overfill the jar as this may cause the jar to leak or stall the motor.
Max capacity, warm liquids 1.0L (see pg12), frozen ingredients 1.0L (see pg10),
blending liquid or semi liquid at ambient temperature 2.0L (using Auto Pulse only).
For best results, blend meats and heavy solids in small quantities.
6.
Do not blend hot or boiling items, allow to cool below 60
o
C before adding to the jar &
do not blend over 1L at a time. Use speed setting 1 and do not use Auto Pulse function.
7.
Do not fill above the 2.0L.
8.
Never run the blender empty.
14 15
TROUBLESHOOTING

Problem Cause(s) Solution(s)
My blender stops
turning whilst
processing
1.
jar may not be correctly seated on the main
body. It may have jumped up while blending.
2.
To prevent over processing, the blender will
switch off automatically after 1 minute 30 seconds.
3.
The ingredients you are processing are too
thick.
4.
The blender features a motor overload
protection feature. If the motor is being
overloaded, the control panel will remain lit and
the motor will stop.
1.
Check the jar has not lifted up during blending, always blend with a gloved hand
holding the jar down.
2.
This safety feature will stop the motor. The control panel will flash 3 times and the
blender will revert back to standby.
3.
Stop immediately, remove jar from base and unplug. Thin down the mixture or this
may not be suitable for blending
4.
To restart it again, unplug from the mains and let it cool down for a minimum of 30
minutes. The blender will not be ready to use again untill it has cooled down.
My jar is
looking cloudy
1.
Over time, blending hard items may scratch
the inside of the jar.
2.
You may have used the wrong dishwasher
setting.
1.
Over time blending very hard items may cloud the jar. Consider buying a spare jar
if you intend to blend hard items on a regular basis.
2.
Only dishwasher on a cycle below
4
0
o
C
and place on the top shelf.
My mixture is not
blending evenly
1.
The wrong setting may be selected.
2.
Food is sticking to the sides of the jar and not
blending.
1.
Use the chart on page 11 as a guide. As a general rule for dry ingredents start by
using Auto pulse and for liquid mixtures add the liquid first then the solid items on top.
2.
Stop the blender, remove the jar off the blender base and use a spatula to
redistribute the food items in to the centre of the jar.
The jar is leaking
1.
Blade not correctly threaded into the jar.
2
. Gasket may be missing, damaged or not
correctly seated on the blade.
3
. Blade assembly not tight enough in the jar.
1. Switch off and unplug the blender
, Remove the blade and reattach taking care the
blade is securely attached to the base of the jar.
2.
Examine the gasket for damages, ensure it is seated securely in place and reassemble.
3.
Hand tighten the blade by turning anti-clockwise. Go as far as you can so it does not
move. Only use the tool provided to undo the blade assembly.
The lid is loosening
off whilst blending
1.
The rim of the jar may have food items
stuck and the lid is not seated correctly.
2.
The lid is not pushed down enough.
1.
Wipe the rim of the jar after every use.
2
. Always check the lid is securely pushed down. Attach the lid by applying a slight
twisting action whilst pushing down.
TROUBLESHOOTING
16 17
19
SMOOTHIES AND MILKSHAKES
This blender has the edge over any other kitchen appliance when making smoothies
and milkshakes. The dimensions of the Dualit blades and the construction of the jar
ensure the smoothest, most inviting and velvety textures.
1 / BASIC FRESH FRUIT MILKSHAKE (serves two)
You can’t go wrong with this simple formula: use your imagination and change the fruit –
the fruits in season are usually the ripest. Have your glasses ready before you start.
• 200g (7 oz) fresh soft fruit e.g. raspberries,
• blueberries, peaches, bananas
• 200ml (7 fl oz) cold milk
If using larger fruits such as bananas or peaches, peel, stone if necessary, and cut into
small pieces. Berries can be added whole. Place the fruit, milk and syrup (if using) in the
blender and whizz until you have a smooth, well-blended cream. Finally add the ice-cream
and blend until all is bubbly, frothy and creamy. Serve immediately.
2 / PASSION FRUIT SMOOTHIE (serves two)
This is a sweet drink, given extra kick by spicy nutmeg.
• 2 large, ripe bananas, peeled, cut into chunks
• 4 ripe and wizened passion fruit, cut in half
• 300ml (10 fl oz) plain natural fat-free yoghurt
Spoon out the contents of the passion fruit into the blender and pulse until the seeds are
slightly loosened from their thick juice. Remove from the blender and set in a sieve over a
bowl. Place this juice and all the other ingredients, except the nutmeg, in the blender and
whizz on speed 3 until smooth. Serve in a tall glass, with a dusting of nutmeg on top.
3 / RIPE PEACH AND BANANA (serves two adults or four toddlers)
This is also suitable for babies and toddlers 9-12 months’ old and upwards. For babies and
toddlers, dilute the smoothie with filtered water.
• 500ml (17 fl oz) natural yogurt
• 2 ripe bananas, peeled & cut into small rounds
• 1 big ripe peach, peeled, halved and stoned
Place all the ingredients in a blender, and whizz until well-mixed and frothy. Serve straight
from the blender or, for babies and toddlers, add up to 500ml (17 fl oz) filtered water and
blend again. Alternatively, freeze, undiluted, in an ice-cube tray.
• 1-2 tbsp flavoured syrup e.g. grenadine,
• raspberry (optional)
• 1-3 scoops vanilla ice-cream
• 200ml (6 fl oz) sparkling mineral water
• freshly grated nutmeg
• 1/2 tsp vanilla extract
• small pinch cinnamon
18
FRESH FRUIT & VEGETABLE jUICES
Fresh fruit and vegetable juices offer some of the most effective methods of cleansing
and healing your body. A combination of fresh fruit and vegetables will supply all you
need to ward off ill health and give a cleansing boost to your vital organs.
1 / CARROT AND BEETROOT DETOX (serves four)
Drink this every day during a short detox, or make it at least once a week. It is wonderfully
cleansing for the liver. Choose organic fruit and vegetables and wash them well before
chopping them into chunks. If you cannot get all the ingredients, make it with just carrots,
apples and grapes.
• 2 (350g [12 oz]) organic carrots, washed
but not peeled, chopped
• 1 green apple, peeled and chopped
Place all the ingredients in your blender and add 250ml (9fl oz) water. Blend on speed 4
until thick and smooth. Do not store; finish within the day.
• 12 grapes
• 1 small raw beetroot, peeled and chopped
• 1 small handful baby spinach or parsley
join Club Dualit for more recipe ideas
www.dualit.com/recipes
Access a comprehensive
database of recipes, giving
you lots of ideas for
everyday meals and
entertaining.

21
COCKTAILS
Homemade cocktails are far, far more delicious than anything you can buy in a mixer
bottle in an off-license. The shock of the first freezing sip is followed by a subtle change
as the drink mellows on the palate, filling your mouth with flavour.
1 / IN THE PINK (serves four)
Serve this at a barbecue, on the beach or on the terrace instead of a dessert - in a martini
glass for girly glamour.
• 225g (8 oz) strawberries, hulled
• 1 tsp caster or icing sugar
• 120ml (4 fl oz) white rum
Place all the ingredients in the blender and whizz until the mixture becomes luscious, pink
and creamy in texture. This is a cocktail you can pour into a jug and serve later, as it keeps
its consistency.
2 / FROZEN MARGARITA (serves two)
If you happen to have a golden, mellow, more complex tequila in your drinks cupboard,
this is the time to use it.
• 3 tbsp lime juice
• 2 tbsp triple sec
• 6 tbsp tequila
Frost the glasses with the lime juice and some salt. Measure all ingredients, except for the
crushed ice, into the blender jar. Whizz until slushy. Taste for sweetness before serving.
Pour into small tumblers or margarita glasses, and serve with a spoonful of ice in each glass.
3 / RASPBERRY DAIQUIRI (serves two)
A frozen daiquiri should have the smooth, slithery icy texture of a lightly-frozen sorbet.
• 2 tbsp lemon juice
• 4 tbsp light rum
• 125ml (4 fl oz) fresh raspberries
• 250ml (8 1/2 fl oz) cracked ice
Measure everything into the blender jar, and press the Auto Pulse button. Serve in a
highball glass.
• 2 tbsp lime juice, freshly squeezed
• 4 scoops of strawberry ice-cream
• 150ml (5 fl oz) sparkling water
• 250ml (8 1/2 fl oz) cracked ice
• 3 tsp icing sugar, to taste
• 2 large tbsp crushed ice
• a good splash crème de cassis
(blackcurrant liqueur)
• 2 tbsp icing sugar
20
SOUP
Soups are easy to make. The Dualit blender holds the magic of wonderful soups and gives
a sensationally smooth, satiny finish. Soups are also a good way of increasing your fluid
intake.
1 / DUALIT CUP-A-SOUP (makes four cups)
A quick and easy way to make a fresh cup a soup with a few ingredients and a microwave!
• 250g vegetable stock
• 1/2 potato sliced
• 500g peas (frozen or fresh)
• 3 spring onions
Add the stock to the jar first, then add all the other ingredients and press Auto Pulse, add
water if you want to thin the soup and pulse to mix through. Pour the mixture into a cup
and microwave for one and a half minutes or until piping hot. Season to taste and serve.
2 / CLASSIC VEGETABLE SOUP RECIPE (serves four to six)
Be adventurous, make up your own soups with favourite ingredients and seasonings. If you
don’t like using measurements use up to double of the amount of liquid to vegetables - less
for leafy vegetables, or the soup will be thin and watery.
• 1 tsp extra virgin olive oil
• 1 medium onion, peeled and chopped
• a clove of garlic
• 500g (1lb 2oz) washed, and chopped
vegetables, peeled as necessary
eg carrots, parsnips, Jerusalem
artichokes, swedes, turnips, broccoli,
cauliflower, asparagus, leeks, tomatoes
In a large saucepan heat the olive oil and cook the onion and garlic, stirring. After ten
minutes, they should be sweet, soft, fragrant and lightly coloured. Add the chopped
vegetables and stock. Bubble & simmer for about 20-30 minutes. The soup is cooked when
the vegetables can be crushed against the side of the pan easily with the back of a spoon.
Now add the softer ingredients, like canned pulses or tomatoes. Taste for salt and pepper,
adding a little if necessary. Allow the contents of the pan to cool to lukewarm (below
60
o
C), then ladle it into the blender. If you like your soup chunky, use the Pulse Pad until
you are happy with the consistency, or blend on speed 1 until you have a smooth, satiny
cream. Add extra water at this stage if you want to thin the soup. Reheat, taste for season-
ing, add salt sparinglyand serve immediately.
• 1.5 litres (2 3/4 pints) vegetable stock, made
from a bouillon powder and filtered water,
following the instructions on the side of the
pack, or fresh chicken or vegetable stock
• Canned tomatoes, lentils or cannelloni
beans
(optional)
• sea salt and freshly milled pepper
• 1 onion
• 1 leek slice in to three pieces
• salt and pepper to season
• a microwavable cup and Microwave

23
This Guarantee covers both parts and
labour. Carriage is not included.
Your Guarantee period is as follows:
• 1 year
This Guarantee provides benefits which are
additional to, and do not affect, your
statutory rights. This Guarantee does not
cover the cost of returning the product to
the dealer from whom it was purchased or
to ourselves. This Guarantee applies only to
products sold and located in mainland
Great Britain. It does not cover liability in
respect of or replacement of plugs, cables
or fuses and also does not cover defects
due to:
• Failure to use or maintain product in
accordance with Dualit's instructions.
• The product being connected to an
unsuitable electricity supply.
• Accidental damage to or abuse or
misuse of the product.
• The product has not been modified
except by Dualit or approved agent.
• Dismantling of or interference with the
product.
• Theft or attempted theft of the
product.
Before returning any product under this
Guarantee, please check that:
• You have followed the product
instructions correctly.
• Your mains electricity supply is
functional.
• The defect is not due to a blown fuse.
If you wish to claim under this guarantee
you should:
• Send the product, postage or carriage
paid, to the dealer from whom it was
purchased or to Dualit direct.
• Ensure that the product is clean and
packed carefully (preferably in its
original carton).
• Enclose details of your name, address
and telephone number and when and
where the product was purchased,
together with proof of purchase (e.g. a
till receipt).
• Give exact details of the nature of the
defect.
This Guarantee does not cover any other
claims whatsoever, including, without
limitation, any liability for incidental, indirect
or consequential damage, nor does it cover
any claims for conversion or modification or
for the costs of repair carried out by any
third party without the prior consent of
Dualit. If replacement parts are fitted to the
product this will not extend the period of
the Guarantee.
For further advise contact the Dualit
customer helpline on +44 (0)1293 652 500
(09:00 to 17:00 Monday to Friday).
Alternatively, email Dualit at
info@dualit.com or visit www.dualit.com
GUARANTEE
This appliance is of excellent quality and construction. However, if any defects in materials
or workmanship do appear during the relevant guarantee period, we will, at our discretion,
either repair or replace the defective parts, free of charge, subject to the terms and
conditions of our Guarantee shown below.
22
1 / LUMPY GRAVY
Cool the gravy to lukewarm, then whizz on speed 3-4 until it becomes smooth. Reheat,
stirring, then serve immediately. If lumps reoccur, repeat the procedure, this time
adding more liquid (stock or water). Serve when piping hot.
2/ CURDLED CUSTARD
Custard will become lumpy and curdle into scrambled egg if allowed to boil. If this has
happened, allow the sauce to cool for a minute or two and remove the
vanilla pod (if using). Pour the sauce into the blender jar. With the filler cap fitted loosely
and using speed 1, press the Pulse pad slowly three or four times, to allow the hot
steam to escape. Then whizz on speed 1 and, in less than a minute, you will have a foamy,
perfect sauce to serve with a dessert. If not serving immediately, stir or whisk well as the
sauce cools and before serving.
3/ CURDLED HOLLANDAISE
If you have made hollandaise, the sauce can sometimes separate or curdle. If faced with this
problem, pour 140ml (1/4 pint) of whipping or double cream into a saucepan, and boil until
reduced by half. Pour in the lukewarm curdled sauce and whizz on speed 1. Now gradually
pour in the cream, whizz for a few seconds more, and taste for seasoning and lemon juice
(you may need to add more as the cream will have softened the taste). Serve immediately.
4 / CHOPPING NUTS AND BREADCRUMBS
Although only a few tablespoons may be required, make crumbs from half a loaf, then
store in a plastic bag in the freezer. Crumbs freeze perfectly, and thaw in minutes if left in
a warm place. To use just a little out of a frozen bag, merely crumble the crumbs
inside the bag with your fingers before removing the required amount. When grinding
crumbs and nuts, never fill the blender jar over the 500ml mark.
5 / BREADCRUMBS (WHITE OR BROWN)
Remove crusts and tear slices of bread into six pieces for best results. Start with the
blender on speed 1, remove the filler cap and, with one hand, drop the bread onto the
whizzing blades; keep the other hand over the hole in the lid to minimise mess. When the
blender is half-full tip all the crumbs into a plastic bag and start again.
DUALIT TO THE RESCUE
Lumpy gravies and curdled sauces have an uncanny ability to occur just minutes before
you have to serve guests. But now you can just pour the misbehaving sauce into the
Dualit blender jug, whizz for less than a minute, and proudly present a perfect
version. So you never have to worry about making hollandaise or custard again.

23
This Guarantee covers both parts and
labour. Carriage is not included.
Your Guarantee period is as follows:
• 1 year
This Guarantee provides benefits which are
additional to, and do not affect, your
statutory rights. This Guarantee does not
cover the cost of returning the product to
the dealer from whom it was purchased or
to ourselves. This Guarantee applies only to
products sold and located in mainland
Great Britain. It does not cover liability in
respect of or replacement of plugs, cables
or fuses and also does not cover defects
due to:
• Failure to use or maintain product in
accordance with Dualit's instructions.
• The product being connected to an
unsuitable electricity supply.
• Accidental damage to or abuse or
misuse of the product.
• The product has not been modified
except by Dualit or approved agent.
• Dismantling of or interference with the
product.
• Theft or attempted theft of the
product.
Before returning any product under this
Guarantee, please check that:
• You have followed the product
instructions correctly.
• Your mains electricity supply is
functional.
• The defect is not due to a blown fuse.
If you wish to claim under this guarantee
you should:
• Send the product, postage or carriage
paid, to the dealer from whom it was
purchased or to Dualit direct.
• Ensure that the product is clean and
packed carefully (preferably in its
original carton).
• Enclose details of your name, address
and telephone number and when and
where the product was purchased,
together with proof of purchase (e.g. a
till receipt).
• Give exact details of the nature of the
defect.
This Guarantee does not cover any other
claims whatsoever, including, without
limitation, any liability for incidental, indirect
or consequential damage, nor does it cover
any claims for conversion or modification or
for the costs of repair carried out by any
third party without the prior consent of
Dualit. If replacement parts are fitted to the
product this will not extend the period of
the Guarantee.
For further advise contact the Dualit
customer helpline on +44 (0)1293 652 500
(09:00 to 17:00 Monday to Friday).
Alternatively, email Dualit at
[email protected] or visit www.dualit.com
GUARANTEE
This appliance is of excellent quality and construction. However, if any defects in materials
or workmanship do appear during the relevant guarantee period, we will, at our discretion,
either repair or replace the defective parts, free of charge, subject to the terms and
conditions of our Guarantee shown below.
22
1 / LUMPY GRAVY
Cool the gravy to lukewarm, then whizz on speed 3-4 until it becomes smooth. Reheat,
stirring, then serve immediately. If lumps reoccur, repeat the procedure, this time
adding more liquid (stock or water). Serve when piping hot.
2/ CURDLED CUSTARD
Custard will become lumpy and curdle into scrambled egg if allowed to boil. If this has
happened, allow the sauce to cool for a minute or two and remove the
vanilla pod (if using). Pour the sauce into the blender jar. With the filler cap fitted loosely
and using speed 1, press the Pulse pad slowly three or four times, to allow the hot
steam to escape. Then whizz on speed 1 and, in less than a minute, you will have a foamy,
perfect sauce to serve with a dessert. If not serving immediately, stir or whisk well as the
sauce cools and before serving.
3/ CURDLED HOLLANDAISE
If you have made hollandaise, the sauce can sometimes separate or curdle. If faced with this
problem, pour 140ml (1/4 pint) of whipping or double cream into a saucepan, and boil until
reduced by half. Pour in the lukewarm curdled sauce and whizz on speed 1. Now gradually
pour in the cream, whizz for a few seconds more, and taste for seasoning and lemon juice
(you may need to add more as the cream will have softened the taste). Serve immediately.
4 / CHOPPING NUTS AND BREADCRUMBS
Although only a few tablespoons may be required, make crumbs from half a loaf, then
store in a plastic bag in the freezer. Crumbs freeze perfectly, and thaw in minutes if left in
a warm place. To use just a little out of a frozen bag, merely crumble the crumbs
inside the bag with your fingers before removing the required amount. When grinding
crumbs and nuts, never fill the blender jar over the 500ml mark.
5 / BREADCRUMBS (WHITE OR BROWN)
Remove crusts and tear slices of bread into six pieces for best results. Start with the
blender on speed 1, remove the filler cap and, with one hand, drop the bread onto the
whizzing blades; keep the other hand over the hole in the lid to minimise mess. When the
blender is half-full tip all the crumbs into a plastic bag and start again.
DUALIT TO THE RESCUE
Lumpy gravies and curdled sauces have an uncanny ability to occur just minutes before
you have to serve guests. But now you can just pour the misbehaving sauce into the
Dualit blender jug, whizz for less than a minute, and proudly present a perfect
version. So you never have to worry about making hollandaise or custard again.