User Manual
THE QUEST FOR THE PERFECT CUP OF COFFEE
Element 1: Water
Coffee is 98% water. The quality of that water is as important as the quality of your coffee. If water doesn’t taste good from the tap, it won’t taste good in your coffee. Cuisinart includes a charcoal water filter to remove chlorine, bad tastes and odors, for the purest coffee flavor, every time you brew.
Element 2: Coffee
While coffee is 98% water, all of the flavor comes from the beans. To achieve the same great taste you enjoy at a coffee bar, you need to use the same quality of coffee. If you choose to grind your own beans, buy them fresh and whole. Buy only about a two-week supply at a time, because once the bean is broken, its flavor degrades quickly.
Element 3: Grind
The grind is critical for proper flavor extraction. If the grind is too fine, over-extraction and bitterness will result.
Too fine a grind may also clog the filter. If grind is too coarse, the water will pass through too quickly and the maximum flavor will not be extracted. When grinding your own beans, we recommend a medium-fine grind.
Element 4: Proportion
Coffee that is too strong or too weak is always a disappointment. Follow the recommended portions of ground coffee in the instructions under Brewing Coffee, and later adjust the amount to suit your taste.
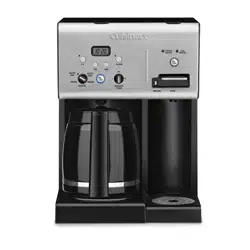
FEATURES AND BENEFITS
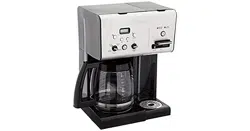
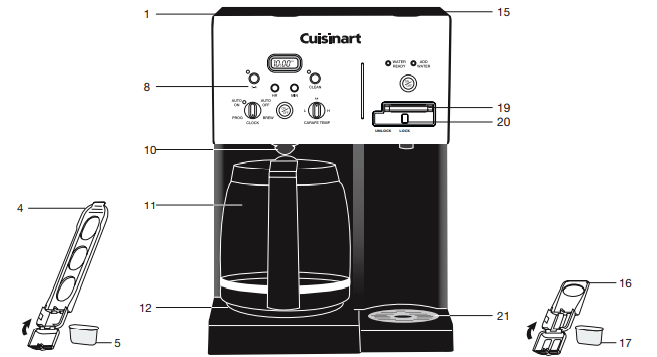
Coffeemaker
1. Coffeemaker Reservoir Cover
Flips back for easy filling.
2. Coffeemaker Water
Reservoir (not shown)With water level indicator window.
3. Showerhead (not shown)
Distributes water evenly over coffee, reducing temperature loss as water passes through grounds.
4. Coffeemaker Charcoal Water Filter Holder
Holds filter firmly in place.
5. Charcoal Water Filter
Eliminates chlorine, calcium and bad tastes and odors from tap water.
6. Filter Basket (not shown)
Holds a #4 paper filter or a permanent filter.
7. Filter Basket Holder (not shown)
8. Coffeemaker Control Panel
See detailed illustration
9. Cord Storage (not shown)
10. Brew Pause™
Stops flow of coffee from basket when carafe is removed from the heater plate, so a cup can be poured in mid-brew.
11. Carafe
The easy-pour, no-drip 12-cup carafe has an ergonomic handle and brewed coffee markings.
12. Adjustable Heater Plate
Keeps brewed coffee at desired temperature. Scratch-resistant with nonstick coating.
13. Ready Tone (not shown)
Signals the end of the brew cycle with five beeps.
14. Power Loss Back-up System
(not shown)
One-minute protection if a breaker trips, unit is unplugged, or power fails. Holds all programmed information, including time of day, Auto On time and Auto Off time.
HOT WATER system
15. Hot Water Reservoir Cover
Flips back for easy filling.
16. Hot Water Charcoal Water Filter Holder
Holds filter firmly in place.
17. Charcoal Water Filter
Eliminates chlorine, calcium and bad tastes and odors from tap water.
18. Hot Water Reservoir (not shown)
With Max fill line
19. Dispensing Lever
For dispensing hot water.
20. Safety Lock
Prevents hot water from being dispensed when in the locked position.
21. Drip Tray
Removable tray with grate.
22. Hot Water Release Tab (not shown)
Located underneath the unit.
Getting to know your Control Panel
Coffeemaker Controls
1. On/Off Button
Use to turn your Coffeemaker on and off. Works in tandem with the Function knob.
2. Clock Display
Displays time of day, Auto On, and Auto Off times.
3. Hour and Minute Buttons
Use to set hours and minutes for time of day, Auto On, and Auto Off times.
4. 1–4 Cup Setting with Indicator
Improves extraction, flavor and temperature when brewing fewer than 5 cups.
5. Clean Indicator
Indicates time to clean Coffeemaker to remove calcium buildup.
6. Carafe Temperature Knob
Set the heater plate to Low (L), Medium (M), or High (H) to keep coffee in the carafe at the temperature you prefer.
7. Function Knob
a. PROG
Select to program Auto On time. Coffeemaker can be programmed to automatically start brewing up to 24 hours in advance.
b. AUTO ON
Select to automatically start brewing coffee at the time you’ve programmed.
c. AUTO OFF
Select to program your Coffeemaker to automatically shut off up to 4 hours after brewing.
d. BREW
Select to begin brew cycle when On button is pressed.
e. CLOCK
Select to program time of day.
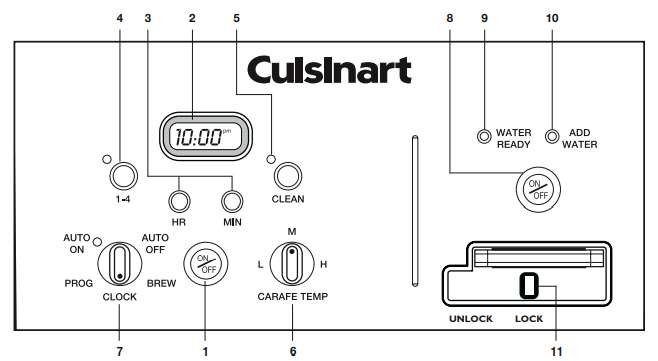
HOT WATER System Controls
8. On/Off Button
Use to turn your Hot Water System on and off.
9. Water Ready Indicator
Indicates when water is heated.
10. Add Water Indicator
Indicates when water should be added.
11. Safety Feature
(Shown in the locked position)
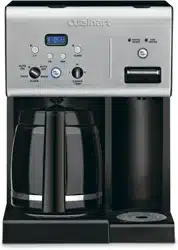
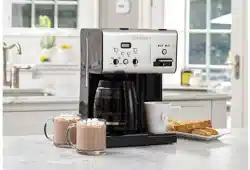
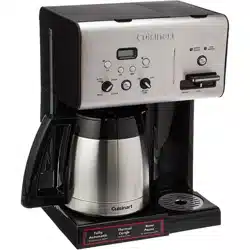
Enjoy the 2-in-1 coffee plus™
Your Coffee PLUS™ system is designed to let you use the Coffeemaker and Hot Water System separately, or at the same time. Perfect for every occasion.
PROGRAMMING YOUR CoffeeMaker
SETTING THE CLOCK
When the Coffeemaker is plugged in, 12:00 will appear.
Turn the Function knob to CLOCK
Hold down the Hour or Minute button until the clock begins flashing. Press either button to select the desired time. Hold buttons down to scroll through the digits, or press and release to advance one digit at a time. When scrolling, the numbers will advance slowly and then speed up. When the number displayed approaches the desired time, press and release to advance one digit at a time. Be sure the PM indicator is on if a PM time is desired. To finish setting the clock, turn the Function knob to any other setting or simply wait until the numbers stop blinking.
SETTING THE AUTO ON TIME
When you turn the Function knob to PROG, it displays a previously selected Auto On time, or the default time (12:00pm).
1. Turn the Function knob to PROG
Use the Hour and Minute buttons as above to program your start-brew time.
2. Turn the Function knob to AUTO ON
LCD will display the current time.
3. Press and release On/Off button
A blue light indicates that the Coffeemaker is in AUTO ON mode. The blue light around On/ Off will come on when brew cycle begins. Both lights will turn off when the Keep Warm cycle ends.
NOTE: To start brew time at the same time the next day, simply make sure the Function knob is on AUTO ON and press and release On/Off button once more. The blue Auto On light will turn on.
SETTING THE AUTO OFF TIME
Turn the Function knob to AUTO OFF
Use the Hour and Minute buttons as above to program your Coffeemaker to shut off from 0 to 4 hours after brew cycle is finished.
Brewing COFFEE
Follow instructions in Before First Use on previous page.
1. Insert charcoal water filter
Follow directions for the preparation and insertion of the filter
2. Fill the water reservoir
Open the Coffeemaker reservoir cover by lifting it up. Pour in the desired amount of water using the water level indicator located at the side of the coffeemaker.
3. Set preferences
a. Push the 1–4 cup button if you are brewing fewer than 5 cups.
b. Turn the Carafe Temperature dial to Low (L), Medium (M), or High (H) and heater plate will keep coffee at the temperature you select.
4. Add the ground coffee
Remove the filter basket by grasping the handle and lifting straight up. Insert a #4 paper filter or permanent filter. Be sure that a paper filter is completely open and fully inserted in the basket. It may help to fold and flatten the seams of a paper filter beforehand. Add 1 level scoop of ground coffee per cup. Adjust the amount according to taste.
NOTE: The maximum capacity for ground coffee is 15 tablespoons for this coffeemaker. Exceeding this amount may cause overflow if the coffee is too finely ground. Replace the filter basket in the filter basket holder and press firmly on cover to be sure it closes securely.
5. Before brewing coffee
Make sure the glass carafe is in position on the heater plate and the top cover is closed. Plug the cord into an electrical outlet.
6. Power unit
Turn the Function knob to brew, press the On/Off button, and the blue indicator light will turn on. Or, set the Auto On function and the Auto On indicator will light.
7. After brewing
When the brewing cycle has been completed, five beeps will sound. Coffee will continue to stream from the filter for several seconds.
Note: Reservoir cover may be hot during and directly after brewing. Wait at least 10 minutes before opening
Using the hot water system
Follow instructions in Before First Use on previous page.
1. Insert charcoal water filter
Follow directions for the preparation and insertion of the filter
. 2. Fill the water reservoir
Open the Hot Water reservoir cover by lifting it up. Fill the reservoir with water, making sure not to fill above the Max fill line.
3. Heating
Press the On/Off button on the Hot Water side of your unit. The blue On indicator around the On/Off button will light. The Water Ready indicator will flash while the unit is heating. Once the unit has heated, the Water Ready indicator will become solid.
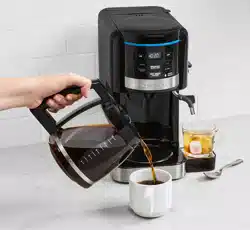
4. Dispensing water
To dispense water, be sure the safety switch, which is located below the lever, is in the unlocked position. Simply slide the safety switch to the left to unlock. Then place a cup on the drip tray and press the lever down – the unit dispenses up to 13 ounces of hot water at a time. If desired, return the safety lock to the locked position (to the right) after dispensing water.
NOTE: You can remove the drip tray to accommodate tall mugs.
5. After dispensing
The heater will immediately begin heating more water. The Water Ready indicator will again flash until water reaches serving temperature.
NOTE: The red Add Water indicator will light if more water is needed
6. Turning off Hot Water System
To turn off your Hot Water System at any time, press the On/Off button. The On indicator will turn off, but the Water Ready indicator will remain lit until water has cooled below serving temperature.
CLEANING AND MAINTENANCE
Always turn unit off and remove the plug from the electrical outlet before cleaning.
Lift up the Coffeemaker reservoir cover. Remove and discard the paper filter and ground coffee. The filter basket can be washed in warm, soapy water and rinsed thoroughly, or cleaned in the upper rack of the dishwasher. Dry all parts after use.
Do not put any water in the unit once the filter basket has been removed. Wipe the area under the filter basket with a damp cloth.
Remove the carafe from the heating plate. Discard any remaining coffee. The carafe and lid can be washed in warm, soapy water and rinsed thoroughly, or placed in a dishwasher. The carafe and carafe lid should be placed on the upper rack only.
Do not use any scouring agents or harsh cleansers on any part of the Coffeemaker.
Never immerse base unit in water or other liquids. To clean base, simply wipe with a clean, damp cloth and dry before storing. Fingerprints and other blemishes on the housing can be washed off with soap and water or a nonabrasive cleaning solution. Wipe heater plate with a clean, damp cloth. Never use rough, abrasive materials or cleansers to clean the heater plate. Do not dry the inside of the water reservoir with a cloth, as lint may remain.
EMPTYING THE HOT WATER RESERVOIR
If your Hot Water System has not been used for more than one week, or if you plan to store your Coffee PLUS™ unit, we suggest emptying the reservoir completely. Place it over the sink, and pull the water release tab from the bottom of the unit to drain the Hot Water System reservoir. Once empty, replace the release tab.
NOTE: Hot water reservoir should be emptied only when the unit is cool. To avoid injury, do not empty the reservoir when there is hot water in the unit.
Decalcification
Decalcification refers to the removal of calcium deposits that form over time on the metal parts of the coffeemaker.
To Decalcify Your Coffeemaker
For best performance from your Coffeemaker, decalcify the unit from time to time. The frequency depends upon the hardness of your tap water and how often you use the Coffeemaker. The flashing Clean light will indicate when unit should be cleaned.
If the Clean light begins to flash when the Coffeemaker is turned on, it is telling you that the calcium buildup is interfering with the functioning of your Coffeemaker and the flavor of your coffee. To clean, fill the water reservoir to capacity with a mixture of ¹⁄³ white vinegar and ²⁄³ water. Press the Clean button. When the Clean light glows, turn the Coffeemaker on by pressing the On/Off button. The Clean light will shine steadily. The Coffeemaker is now in clean mode. One cycle should be sufficient to adequately clean the Coffeemaker. When the cycle is completed and the five beeps sound, the Coffeemaker will shut off. Turn the Coffeemaker on to see if the Clean light continues to flash. If it does, turn it off and then repeat the cleaning procedure with a fresh solution of vinegar and water.
If the Clean light no longer flashes, turn the Coffeemaker off and then run one cycle of fresh cold water through the unit before using the unit again to brew coffee.
Notes on the Clean Function
Pressing the Clean button cancels all other settings. If it is pressed accidentally, press it again to return the Coffeemaker to all its previous settings. Pressing On/Off will also exit the clean mode and turn the Coffeemaker off.
To Decalcify Your Hot Water System
We recommend you clean your Hot Water System twice a year to remove any calcium scale residue from the heating element.
- Dispense and dispose of any water in the reservoir until the Add Water light flashes.
- Add 32 oz. of white vinegar to the Hot Water reservoir. Turn the unit on to heat the vinegar.
- Dispense 16 oz. of vinegar and dispose. This will fill the inner tank.
- Let the vinegar solution sit in the unit for 20 minutes. Do not dispense during this time.
- After 20 minutes, turn the unit off and allow hot vinegar to cool. Then drain the internal reservoir over a sink by removing the water release tab from the bottom of unit.
- When vinegar has completely drained, replace tab.
- Refill reservoir with water and drain the internal reservoir again (by removing tab at the bottom of the unit) to flush thoroughly. Replace tab.
NOTE: If water has a vinegar taste or smell, continue to dispense water until taste or smell is gone.