Loading ...
Loading ...
Loading ...
English — 7
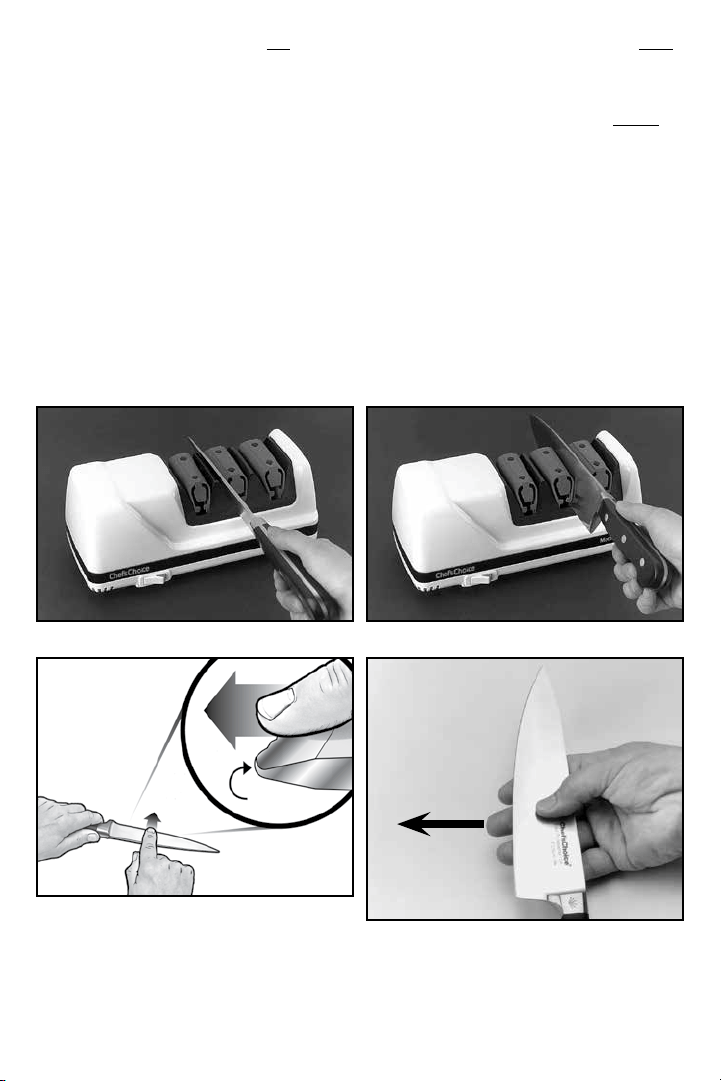
Pull the blade once through the left slot of Stage 2 (Figure 4) and once through the right
slot (Figure 5). For an eight (8) inch blade, take about four (4) seconds for each pull. For
longer knives, take about 6 seconds per pull and about 2-3 seconds for shorter blades.
Before moving to Stage 3, you will find it helpful to confirm that a burr (Figure 6) exists
along one side of the edge. To check for the burr, move your forefinger carefully across
the edge as shown in the Figure 7 (below).
(Do not move your finger along the edge - to avoid cutting your finger). If the last pull
was in the right slot, the burr will appear only on the right side of the blade (as you hold
it) and vice versa. The burr, when present, feels like a rough and bent extension of the
edge; the opposite side of the edge feels very smooth by comparison. If a burr exists,
proceed to Stage 3.
If no burr exists, make one (1) additional pull in the left and right slots of Stage 2 before
proceeding to Stage 3. Slower pulls will help develop the burr. Confirm the presence of
the burr and proceed to Stage 3. (Incidentally, a burr is commonly developed whenever
the knife is pulled through Stage 1. It is not essential to develop a burr in Stage 1 unless, as
discussed later, you intend to bypass Stage 2 and go directly to Stage 3. It is always
desirable to have a burr on the edge before stropping in Stage 3.)
If the knife is extremely dull, additional pulls in Stage 2 may be needed or, alternately,
make one pair of pulls in Stage 1, then repeat in Stage 2 before proceeding to Stage 3.
Figure 4. Inserting blade in left slot of Stage 2. Figure 5. Inserting blade in right slot of Stage 2.
Burr
Figure 6. Develop a distinct burr along knife edge
before stropping in Stage 3.
Figure 7. Burr can be detected by sliding fingers
across and away from the edge. Caution! See text.
Move fingers
across and
away from
edge
Loading ...
Loading ...
Loading ...