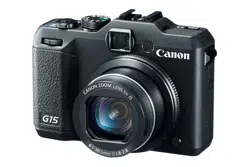

Camera User Guide
• Makesureyoureadthisguide,includingthe“Safety
Precautions”section,beforeusingthecamera.
• Readingthisguidewillhelpyoulearntousethecamera
properly.
• Storethisguidesafelysothatyoucanuseitinthefuture.
ENGLISH
COPY
2
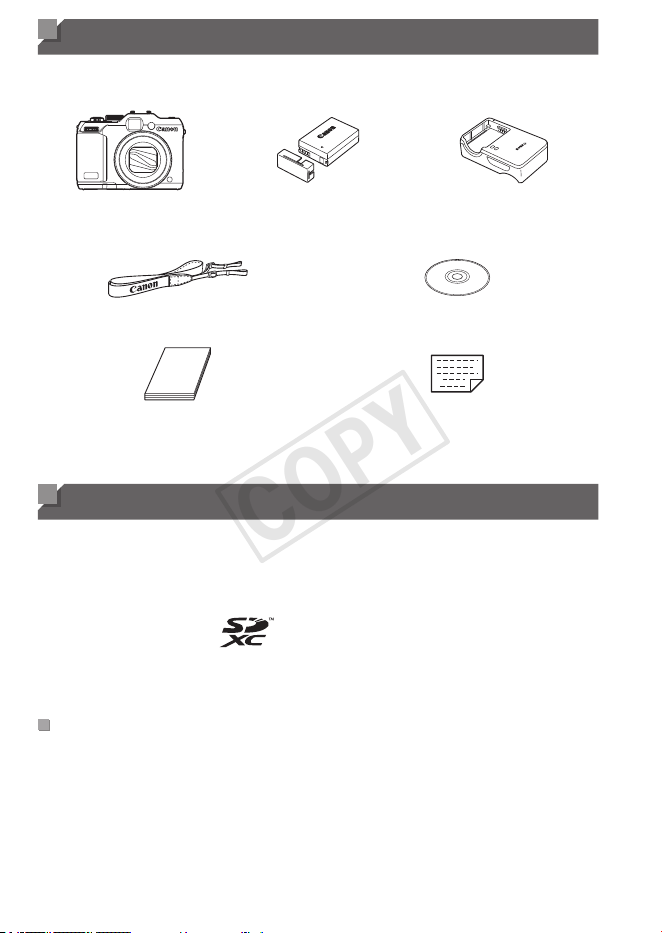
Package Contents
Beforeuse,makesurethefollowingitemsareincludedinthepackage.
Ifanythingismissing,contactyourcameradealer.
Camera BatteryPack
NB‑10L
(withterminalcover)
BatteryCharger
CB‑2LC/CB‑2LCE
NeckStrap
NS-DC11
DIGITALCAMERASolutionDisk*
(CD-ROM)
GettingStarted WarrantyCard
*ContainssoftwareandPDFmanuals(=
30).
• Amemorycardisnotincluded.
Compatible Memory Cards
Thefollowingmemorycards(soldseparately)canbeused,regardlessof
capacity.
• SDmemorycards*
• SDHCmemorycards*
• SDXCmemorycards*
• Eye-Ficards
*ConformstoSDspecications.However,notallmemorycardshavebeenveriedto
workwiththecamera.
AboutEye-FiCards
ThisproductisnotguaranteedtosupportEye-Ficardfunctions(including
wirelesstransfer).IncaseofanissuewithanEye-Ficard,pleasecheck
withthecardmanufacturer.
AlsonotethatanapprovalisrequiredtouseEye-Ficardsinmanycountries
orregions.Withoutapproval,useofthecardisnotpermitted.Ifitisunclear
whetherthecardhasbeenapprovedforuseinthearea,pleasecheckwith
thecardmanufacturer.
COPY

3
Preliminary Notes and Legal
Information
• Takeandreviewsometestshotsinitiallytomakesuretheimageswere
recordedcorrectly.PleasenotethatCanonInc.,itssubsidiariesand
afliates,anditsdistributorsarenotliableforanyconsequentialdamages
arisingfromanymalfunctionofacameraoraccessory,includingmemory
cards,thatresultsinthefailureofanimagetoberecordedortobe
recordedinawaythatismachinereadable.
• Imagesrecordedbythecameraareintendedforpersonaluse.Refrain
fromunauthorizedrecordingthatinfringesoncopyrightlaw,andnotethat
evenforpersonaluse,photographymaycontravenecopyrightorother
legalrightsatsomeperformancesorexhibitions,orinsomecommercial
settings.
• Thecamerawarrantyisvalidonlyintheareaofpurchase.Incaseof
cameraproblemswhileabroad,returntotheareaofpurchasebefore
contactingaCanonCustomerSupportHelpDesk.
• AlthoughtheLCDmonitorisproducedunderextremelyhigh-precision
manufacturingconditionsandmorethan99.99%ofthepixelsmeet
designspecications,inrarecasessomepixelsmaybedefectiveormay
appearasredorblackdots.Thisdoesnotindicatecameradamageor
affectrecordedimages.
• TheLCDmonitormaybecoveredwithathinplasticlmforprotection
againstscratchesduringshipment.Ifcovered,removethelmbefore
usingthecamera.
• Whenthecameraisusedoveranextendedperiod,itmaybecomewarm.
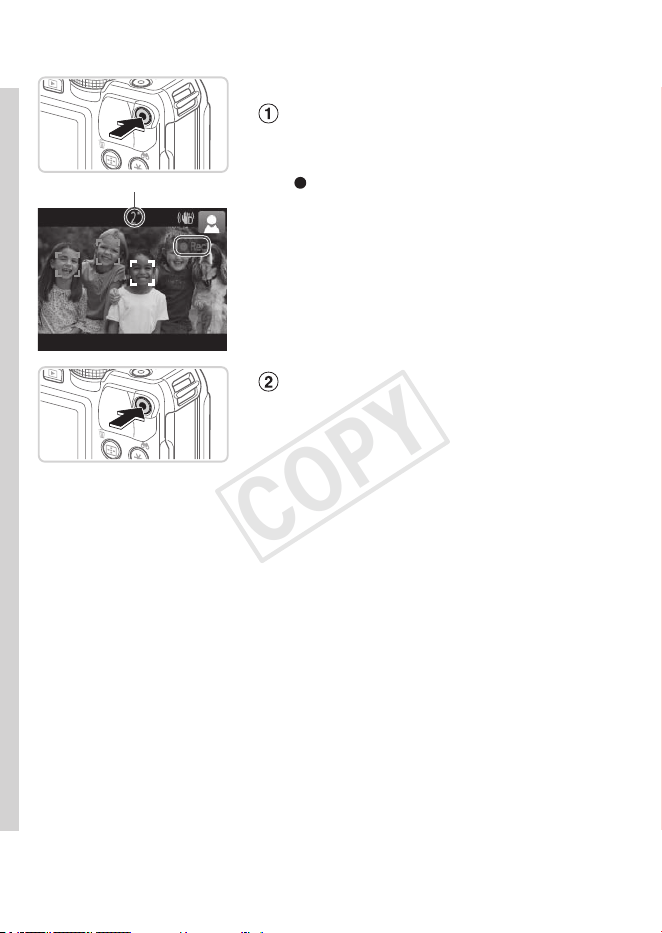
Thisdoesnotindicatedamage.
Organization of Camera User Guide
Thefollowingguidesareincluded,eachusedfordifferentpurposes.
BasicGuide(=
15)
• Givesbasicinstructions,frominitialpreparationstoshooting,playback,
andsavingonacomputer
AdvancedGuide(=
41)
• Practicalguidethatintroducesothercamerabasicsanddescribes
shootingandplaybackoptions
COPY
4
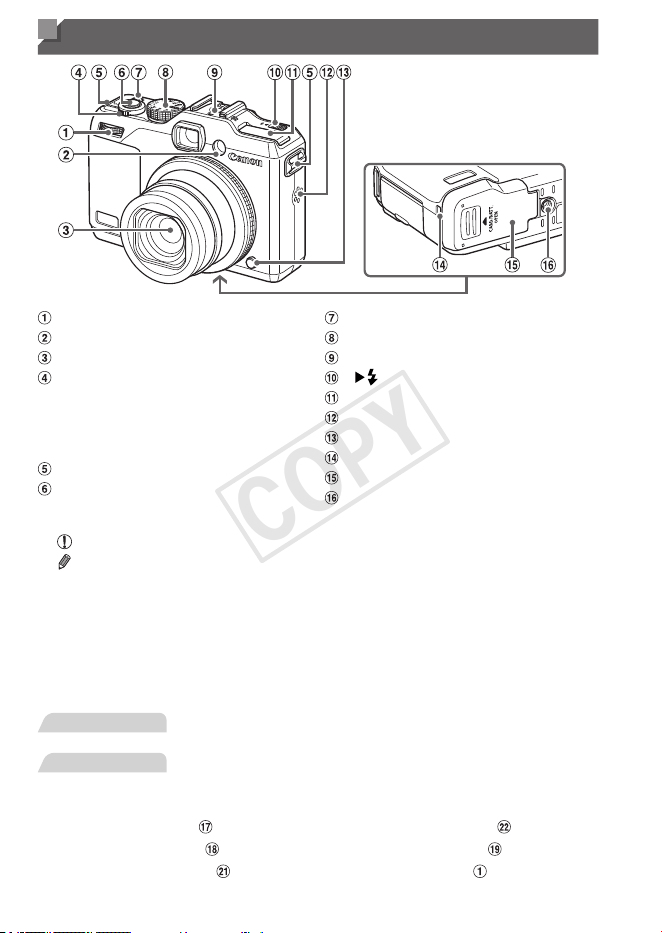
Part Names and Conventions in This Guide
Frontdial
Lamp
Lens
Zoomlever
Shooting:<i(telephoto)>/
<j(wideangle)>
Playback:<k(magnify)>/
<g(index)>
Strapmount
Shutterbutton
Powerbutton/lamp
Modedial
Hotshoe
< (Flashup)>switch
Flash
Speaker
Ringreleasebutton
DCcouplercableport
Memorycard/batterycover
Tripodsocket
• Shootingmodesandon-screeniconsandtextareindicatedinbrackets.
•
:Importantinformationyoushouldknow
•
:Notesandtipsforexpertcamerause
• =xx:Pageswithrelatedinformation(inthisexample,“xx”representsa
pagenumber)
• Instructionsinthisguideapplytothecameraunderdefaultsettings.
• Forconvenience,allsupportedmemorycardsaresimplyreferredtoas
“thememorycard”.
• Thetabsshownabovetitlesindicatewhetherthefunctionisusedforstill
images,movies,orboth.
StillImages
: Indicatesthatthefunctionisusedwhenshootingor
viewingstillimages.
Movies
: Indicatesthatthefunctionisusedwhenshootingor
viewingmovies.
• Thefollowingcamerabuttonsandcontrolsarerepresentedbyicons.
<o> Upbutton
onback <p> Downbutton onback
<q> Leftbutton
onback <7> Controldial onback
<r> Rightbutton
onback < z> Frontdial onfront
COPY
5
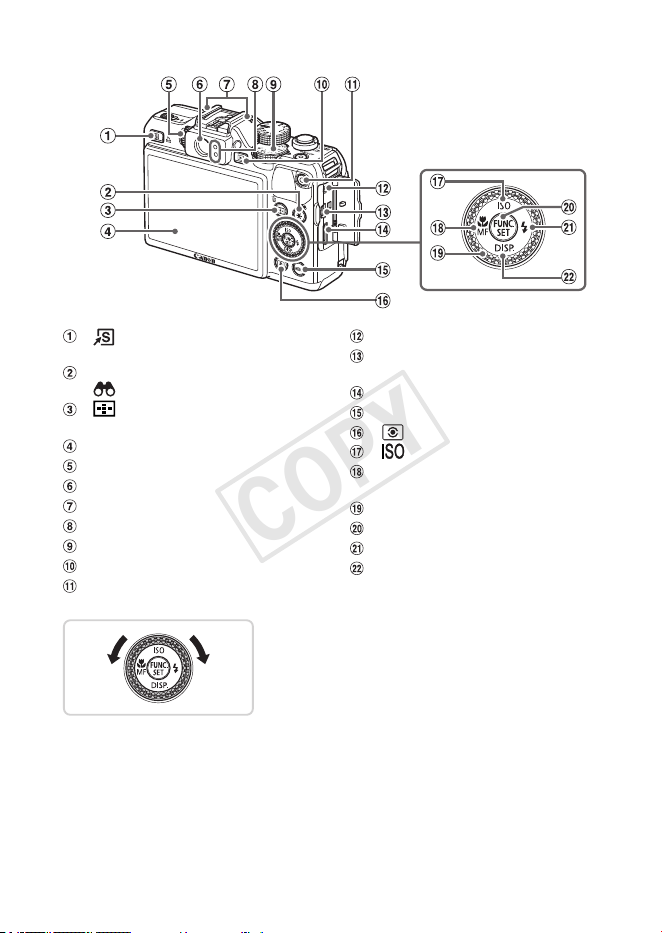
PartNamesandConventionsinThisGuide
<
(Shortcut)>/<c(Directprint)>
button
<+(AElock/FElock)>/
<
(Filteringimagedisplay)>button
< (AFFrameSelector)>/
<a(Singleimageerase)>button
Screen(LCDmonitor)
Diopteradjustmentdial
Viewnder
Microphone
Indicator
Exposurecompensationdial
<1(Playback)>button
Moviebutton
Remoteterminal
AVOUT(Audio/videooutput)/
DIGITALterminal
HDMI
TM
terminal
<n>button
< (Metering)>button
< (ISOspeed)>/Upbutton
<e(Macro)>/<f(Manualfocus)>/
Leftbutton
Controldial
FUNC./SETbutton
<h(Flash)>/Rightbutton
<l(Display)>/Downbutton
zz Turningthecontroldialisonewayto
choosesettingitems,switchimages,and
performotheroperations.Mostofthese
operationsarealsopossiblewiththe
<o><p><q><r>buttons.
• Inthisguide,iconsareusedtorepresentthecorrespondingcamera
buttonsanddialsonwhichtheyappearorwhichtheyresemble.
COPY

6
Table of Contents
PackageContents.........................2
CompatibleMemoryCards............2
PreliminaryNotesandLegal
Information.....................................3
OrganizationofCamera
UserGuide.....................................3
PartNamesandConventionsin
ThisGuide......................................4
TableofContents...........................6
Contents:BasicOperations...........8
SafetyPrecautions.......................10
Basic Guide .................... 15
InitialPreparations.......................16
TryingtheCameraOut................24
IncludedSoftware,PDF
Manuals.......................................30
Accessories..................................38
Advanced Guide ............. 41
1 CameraBasics.....................41
On/Off..........................................42
ShutterButton..............................43
OpticalViewnder........................44
ShootingModes...........................45
ShootingDisplayOptions............46
FUNC.Menu................................47
MENUMenu................................48
IndicatorDisplay..........................50
Clock............................................51
2 SmartAutoMode.................53
Shooting(SmartAuto).................54
Common,ConvenientFeatures...63
UsingFaceID..............................69
ImageCustomizationFeatures....80
HelpfulShootingFeatures...........86
CustomizingCameraOperation..89
3 OtherShootingModes........93
AutoClipRecording
(MovieDigest)..............................94
SpecicScenes...........................95
ImageEffects
(CreativeFilters)..........................99
SpecialModesforOther
Purposes.................................... 112
ShootingVariousMovies........... 119
4 PMode................................123
ShootinginProgramAEMode
(<P>Mode)................................124
ImageBrightness
(ExposureCompensation).........125
ColorandContinuous
Shooting.....................................134
ShootingRangeand
Focusing....................................141
Flash..........................................154
ShootingRAWImages...............159
OtherSettings............................160
5 Tv,Av,M,C1,and
C2Mode.............................161
SpecicShutterSpeeds
(<Tv>Mode)..............................162
SpecicApertureValues
(<Av>Mode)..............................163
SpecicShutterSpeedsand
ApertureValues(<M>Mode).....164
COPY

7
TableofContents
CustomizationforShooting
Styles.........................................166
6 PlaybackMode..................173
Viewing......................................174
BrowsingandFilteringImages..180
EditingFaceIDInformation.......187
ImageViewingOptions..............189
ProtectingImages......................192
ErasingImages..........................196
RotatingImages.........................200
ImageCategories......................202
EditingStillImages....................206
EditingMovies............................213
7 SettingMenu......................217
AdjustingBasicCamera
Functions...................................218
8 Accessories.......................233
TipsonUsingIncluded
Accessories................................234
OptionalAccessories.................235
UsingOptionalAccessories.......239
PrintingImages..........................259
UsinganEye-FiCard.................274
9 Appendix............................277
Troubleshooting.........................278
On-ScreenMessages................283
On-ScreenInformation..............286
FunctionsandMenuTables.......290
HandlingPrecautions.................302
Specications.............................303
Index..........................................309
COPY
8
Contents: Basic Operations
4 Shoot
zz Usecamera-determinedsettings(AutoMode).................................... 54
Shootingpeoplewell
I
Portraits
(=
95)
P
AgainstSnow
(=
96)
SmoothSkin
(=
98)
Matchingspecicscenes
NightScenes
(=
95)
S
UnderWater
(=
96)
t
Fireworks
(=
96)
Applyingspecialeffects
VividColors
(=
99)
PosterEffect
(=
99)
“Aged”Photos
(=
102)
Fish-EyeEffect
(=
103)
MiniatureEffect
(=
104)
ToyCameraEffect
(=
106)
SoftFocus
(=
107)
Monochrome
(=
108)
COPY

9
Contents:BasicOperations
zz Focusonfaces............................................................... 54,95,145,151
zz Withoutusingtheash(FlashOff)................................................. 25,55
zz Withmyselfintheshot(Self-Timer)..............................................64,114
zz Addadatestamp................................................................................. 67
zz UseFaceID................................................................................. 69,177
zz Movieclipsandphotostogether(MovieDigest).................................. 94
1 View
zz Viewimages(PlaybackMode)........................................................... 174
zz Automaticplayback(Slideshow)........................................................ 190
zz OnaTV.............................................................................................. 239
zz Onacomputer..................................................................................... 31
zz Browsethroughimagesquickly......................................................... 180
zz Eraseimages..................................................................................... 196
E Shoot/ViewMovies
zz Shootmovies................................................................................54,119
zz Viewmovies(PlaybackMode)........................................................... 174
zz Fast-movingsubjects,slow-motionplayback..................................... 121
c Print
zz Printpictures...................................................................................... 259
Save
zz Saveimagestoacomputer................................................................. 35
COPY

10
Safety Precautions
• Beforeusingtheproduct,pleaseensurethatyoureadthesafety
precautionsdescribedbelow.Alwaysensurethattheproductisused
correctly.
• Thesafetyprecautionsnotedonthefollowingpagesareintended
topreventinjuriestoyourselfandotherpersons,ordamagetothe
equipment.
• Besuretoalsochecktheguidesincludedwithanyseparatelysold
accessoriesyouuse.
Warning
Denotesthepossibilityofseriousinjuryordeath.
• Donottriggertheashincloseproximitytopeople’seyes.
Exposuretotheintenselightproducedbytheashcoulddamageeyesight.
Inparticular,remainatleast1meter(39inches)awayfrominfantswhen
usingtheash.
• Storethisequipmentoutofthereachofchildrenandinfants.
Strap:Puttingthestraparoundachild’sneckcouldresultinasphyxiation.
• Useonlyrecommendedpowersources.
• Donotattempttodisassemble,alterorapplyheattotheproduct.
• Avoiddroppingorsubjectingtheproducttosevereimpacts.
• Toavoidtheriskofinjury,donottouchtheinterioroftheproductif
ithasbeendroppedorotherwisedamaged.
• Stopusingtheproductimmediatelyifitemitssmoke,astrange
smell,orotherwisebehavesabnormally.
• Donotuseorganicsolventssuchasalcohol,benzine,orthinnerto
cleantheproduct.
• Donotlettheproductcomeintocontactwithwater(e.g.seawater)
orotherliquids.
• Donotallowliquidsorforeignobjectstoenterthecamera.
Thiscouldresultinelectricalshockorre.
Ifliquidsorforeignobjectscomeintocontactwiththecamerainterior,
immediatelyturnthecameraoffandremovethebattery.
Ifthebatterychargerbecomeswet,unplugitfromtheoutletandconsult
yourcameradistributororaCanonCustomerSupportHelpDesk.
• Donotlookthroughtheviewnderatbrightlightsources(suchas
thesunonaclearday).
Thiscoulddamageyoureyesight.
COPY

11
SafetyPrecautions
• Useonlytherecommendedbattery.
• Donotplacethebatterynearorindirectame.
• Unplugthepowercordperiodically,andusingadrycloth,wipeaway
anydustanddirtthathascollectedontheplug,theexteriorofthe
poweroutlet,andthesurroundingarea.
• Donothandlethepowercordwithwethands.
• Donotusetheequipmentinamannerthatexceedstherated
capacityoftheelectricaloutletorwiringaccessories.Donotuseif
thepowercordorplugaredamaged,ornotfullypluggedintothe
outlet.
• Donotallowdirtormetalobjects(suchaspinsorkeys)tocontact
theterminalsorplug.
Thebatterymayexplodeorleak,resultinginelectricalshockorre.This
couldcauseinjuryanddamagethesurroundings.Intheeventthatabattery
leaksandthebatteryelectrolytecontactseyes,mouth,skinorclothing,
immediatelyushwithwater.
• Turnthecameraoffinplaceswherecamerauseisprohibited.
Theelectromagneticwavesemittedbythecameramayinterferewiththe
operationofelectronicinstrumentsandotherdevices.Exerciseadequate
cautionwhenusingthecamerainplaceswhereuseofelectronicdevicesis
restricted,suchasinsideairplanesandmedicalfacilities.
• DonotplaythesuppliedCD-ROM(s)inanyCDplayerthatdoesnot
supportdataCD-ROMs.
Itispossibletosufferhearinglossfromlisteningwithheadphonestothe
loudsoundsofaCD-ROMplayedonanaudioCDplayer(musicplayer).
Additionally,thiscoulddamagethespeakers.
Caution
Denotesthepossibilityofinjury.
• Whenholdingthecamerabythestrap,becarefulnottobangit,
subjectittostrongimpactsorshocks,orletitgetcaughtonother
objects.
• Becarefulnottobumporpushstronglyonthelens.
Thiscouldleadtoinjuryordamagethecamera.
• Becarefulnottosubjectthescreentostrongimpacts.
Ifthescreencracks,injurymayresultfromthebrokenfragments.
COPY

12
SafetyPrecautions
• Whenusingtheash,becarefulnottocoveritwithyourngersor
clothing.
Thiscouldresultinburnsordamagetotheash.
• Avoidusing,placingorstoringtheproductinthefollowingplaces:
-Placessubjecttostrongsunlight
-Placessubjecttotemperaturesabove40°C(104°F)
-Humidordustyareas
Thesecouldcauseleakage,overheatingoranexplosionofthebattery,
resultinginelectricalshock,re,burnsorotherinjuries.
Hightemperaturesmaycausedeformationofthecameraorbatterycharger
casing.
• Theslideshowtransitioneffectsmaycausediscomfortwhenviewed
forprolongedperiods.
• Whenusingtheseparatelysoldoptionallenses,besuretoattach
themrmly.
Ifthelensbecomeslooseandfallsoff,itmaycrack,andtheshardsofglass
mayleadtocuts.
Caution
Denotesthepossibilityofdamagetotheequipment.
• Donotaimthecameraatbrightlightsources(suchasthesunona
clearday).
Doingsomaydamagetheimagesensor.
• Whenusingthecameraonabeachoratawindylocation,becareful
nottoallowdustorsandtoenterthecamera.
• Donotpushdownontheash,orpryitopen.
Thismaycausetheproducttomalfunction.
• Inregularuse,smallamountsofsmokemaybeemittedfromthe
ash.
Thisisduetothehighintensityoftheashburningdustandforeign
materialsstucktothefrontoftheunit.Pleaseuseacottonswabtoremove
dirt,dustorotherforeignmatterfromtheashtopreventheatbuild-upand
damagetotheunit.
• Removeandstorethebatterywhenyouarenotusingthecamera.
Ifthebatteryisleftinsidethecamera,damagecausedbyleakagemay
occur.
COPY

13
SafetyPrecautions
• Beforeyoudiscardthebattery,covertheterminalswithtapeorother
insulators.
Contactingothermetalmaterialsmayleadtoreorexplosions.
• Unplugthebatterychargerfromthepoweroutletafterchargingis
complete,orwhenyouarenotusingit.
• Donotplaceanything,suchascloth,ontopofthebatterycharger
whileitischarging.
Leavingtheunitpluggedinforalongperiodoftimemaycauseitto
overheatanddistort,resultinginre.
• Donotplacethebatterynearpets.
Petsbitingthebatterycouldcauseleakage,overheatingorexplosion,
resultinginreordamage.
• Whenputtingthecamerainyourbag,ensurethathardobjectsdo
notcomeintocontactwiththescreen.
• Donotattachanyhardobjectstothecamera.
Doingsomaycausemalfunctionsordamagethescreen.
COPY

14
COPY

15
Basic Guide
Givesbasicinstructions,frominitial
preparationstoshooting,playback,and
savingonacomputer
COPY

16
Initial Preparations
Prepareforshootingasfollows.
Attaching the Strap
Attachthestrap.
zz Attachtheincludedstraptothecamera
asshown.
zz Ontheothersideofthecamera,attach
thestrapthesameway.
Holding the Camera
zz Placethestraparoundyourneck.
zz Whenshooting,keepyourarmscloseto
yourbodyandholdthecamerasecurely
topreventitfrommoving.Ifyouhave
raisedtheash,donotrestyourngers
onit.
COPY
17
InitialPreparations
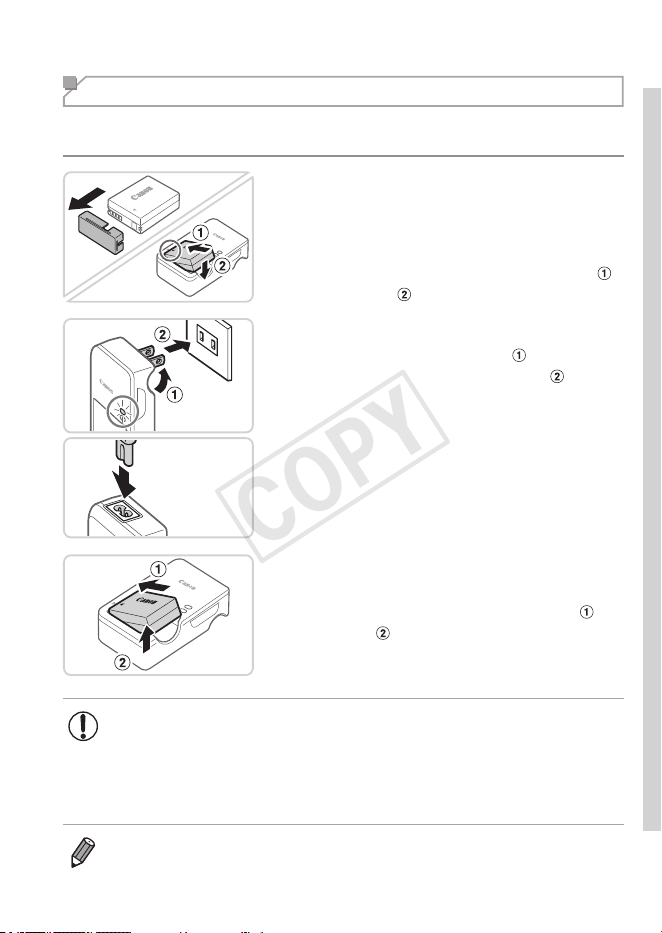
Charging the Battery
Beforeuse,chargethebatterywiththeincludedcharger.Besuretocharge
thebatteryinitially,becausethecameraisnotsoldwiththebatterycharged.
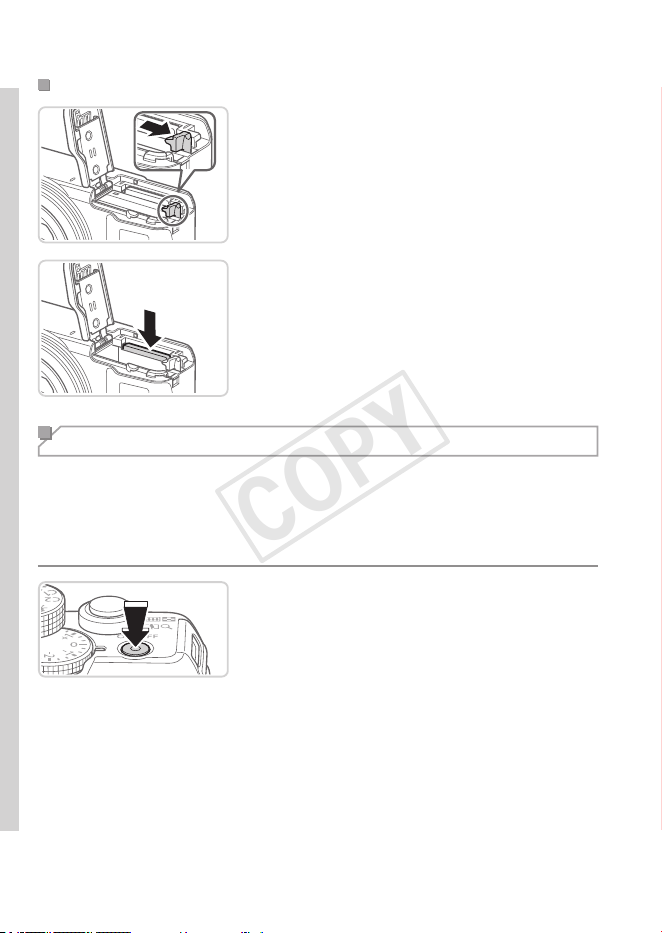
1 Removethebatterycoverand
insertthebatteryinthecharger.
zz Removethecoverfromthebattery,align
themarksonthebatteryandcharger,
andinsertthebatterybypushingitin(
)
anddown(
).
CB‑2LC
CB‑2LCE
2 Chargethebattery.
zz CB-2LC:Flipouttheplug( )andplug
thechargerintoapoweroutlet(
).
zz CB-2LCE:Plugthepowercordintothe
charger,thenplugtheotherendintoa
poweroutlet.
XX Thecharginglampturnsorangeand
chargingbegins.
XX Whenthechargingisnished,thelamp
turnsgreen.
3 Removethebattery.
zz Afterunpluggingthebatterycharger,
removethebatterybypushingitin(
)
andup(
).
• Toprotectthebatteryandkeepitinoptimalcondition,donot
chargeitcontinuouslyformorethan24hours.
• Forbatterychargersthatuseapowercord,donotattach
thechargerorcordtootherobjects.Doingsocouldresultin
malfunctionordamagetotheproduct.
• Fordetailsonchargingtimeandthenumberofshotsandrecordingtime
possiblewithafullychargedbattery,see“Specications”(=
303).
COPY
18
InitialPreparations
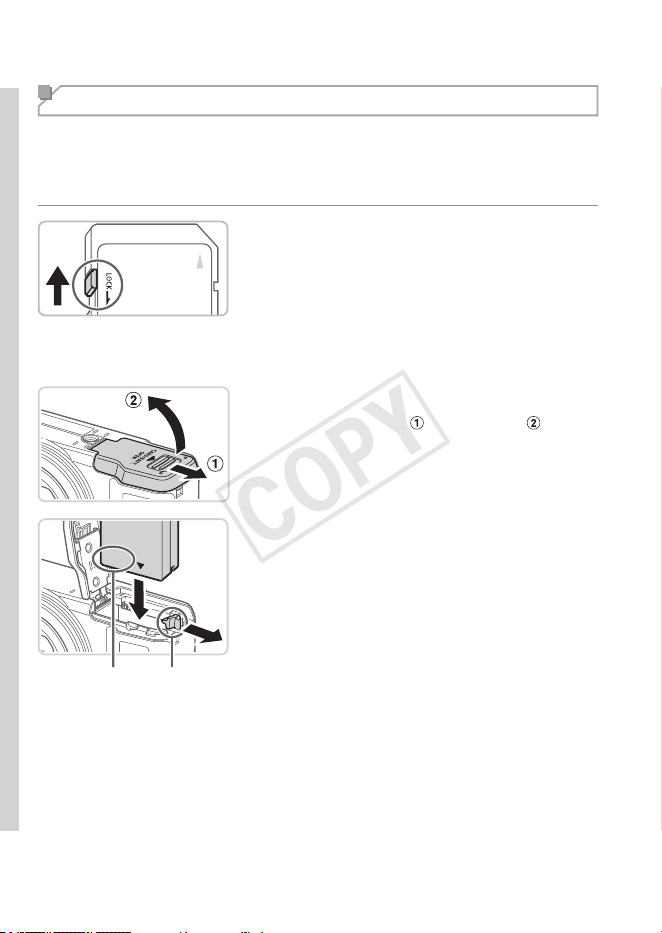
Inserting the Battery and Memory Card
Inserttheincludedbatteryandamemorycard(soldseparately).
Notethatbeforeusinganewmemorycard(oramemorycardformatted
inanotherdevice),youshouldformatthememorycardwiththiscamera
(=
223).
1 Checkthecard’swrite-protect
tab.
zz Recordingisnotpossibleonmemory
cardswithawrite-protecttabwhenthe
tabisinthelocked(downward)position.
Slidethetabupuntilitclicksintothe
unlockedposition.
2 Openthecover.
zz Slidethecover( )andopenit( ).
Terminals
Battery
Lock
3 Insertthebattery.
zz Whilepressingthebatterylockinthe
directionofthearrow,insertthebattery
asshownandpushitinuntilitclicksinto
thelockedposition.
zz Ifyouinsertthebatteryfacingthewrong
way,itcannotbelockedintothecorrect
position.Alwaysconrmthatthebattery
isfacingtherightwayandlockswhen
inserted.
COPY
19
InitialPreparations
Label
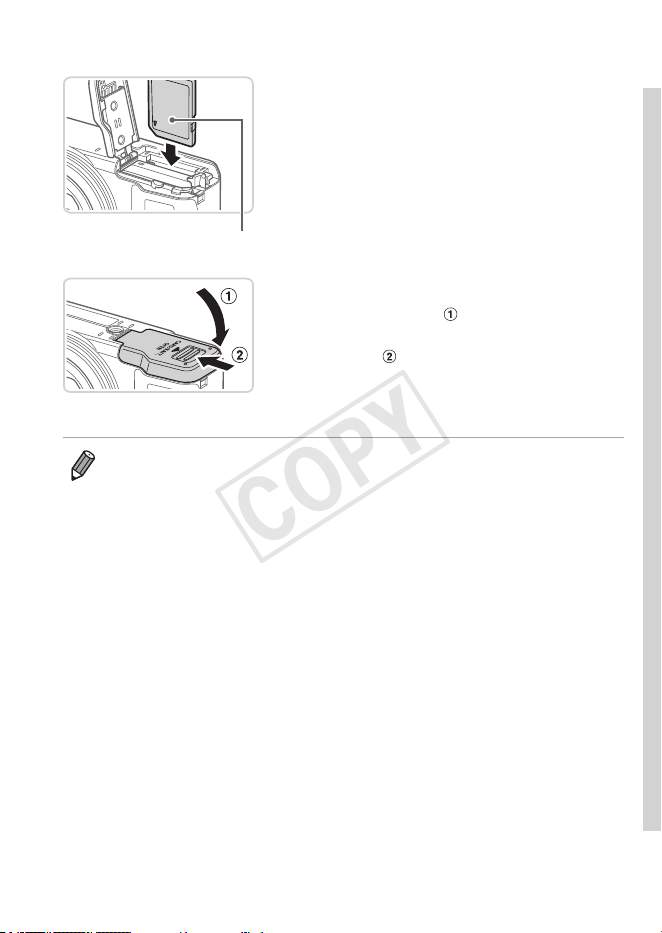
4 Insertthememorycard.
zz Insertthememorycardfacingasshown
untilitclicksintothelockedposition.
zz Makesurethememorycardisfacingthe
rightwaywhenyouinsertit.Inserting
memorycardsfacingthewrongwaymay
damagethecamera.
5 Closethecover.
zz Lowerthecover( )andholditdownas
youslideit,untilitclicksintotheclosed
position(
).
• Forguidelinesonhowmanyshotsorhoursofrecordingcanbesavedon
onememorycard,see“Specications”(=
303).
COPY
20
InitialPreparations
RemovingtheBatteryandMemoryCard
Removethebattery.
zz Openthecoverandpressthebattery
lockinthedirectionofthearrow.
XX Thebatterywillpopup.
Removethememorycard.
zz Pushthememorycardinuntilitclicks,
andthenslowlyreleaseit.
XX Thememorycardwillpopup.
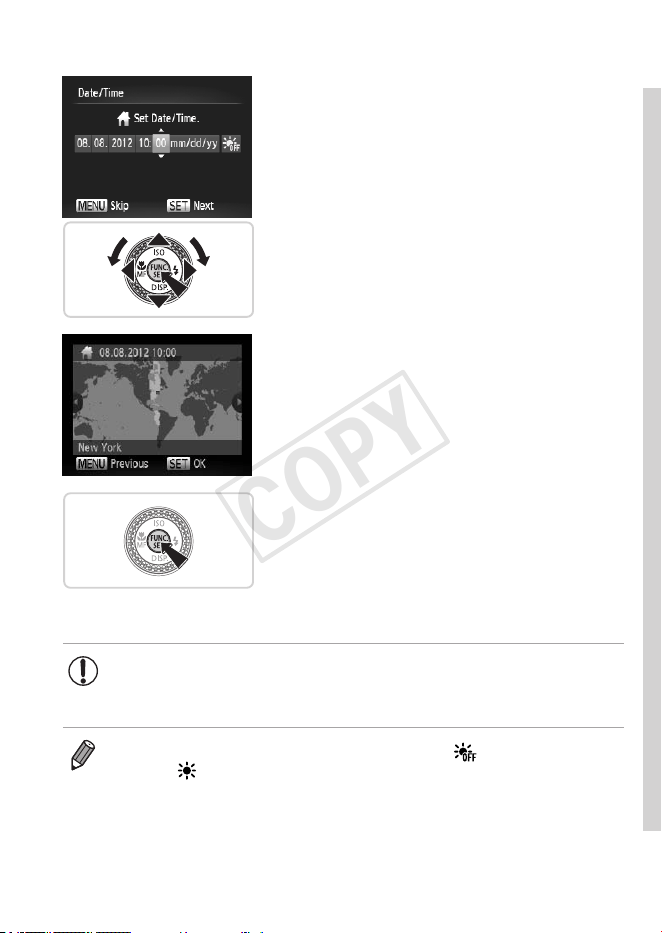
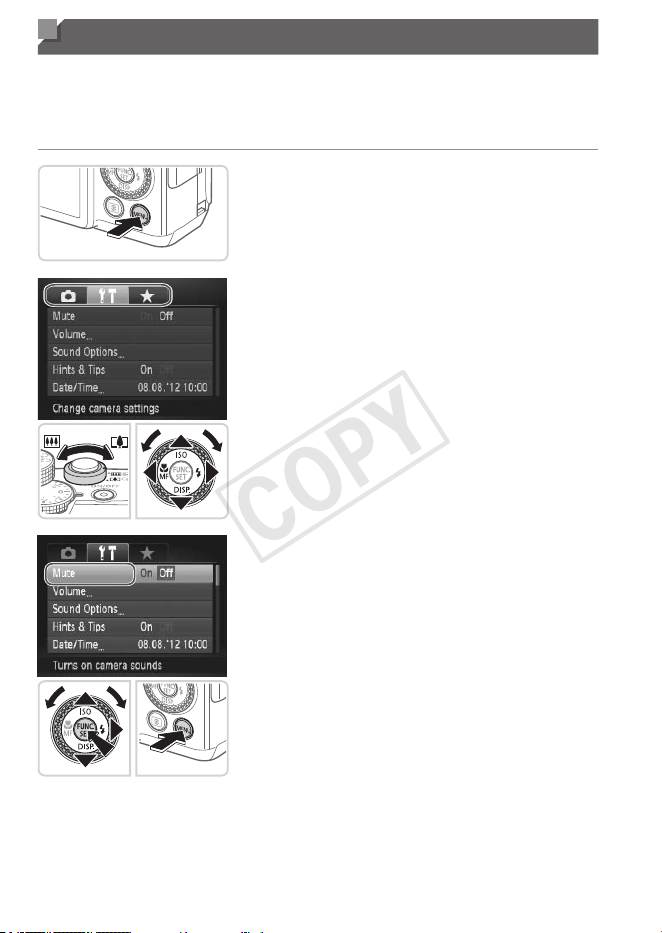
Setting the Date and Time
Setthecurrentdateandtimecorrectlyasfollowsifthe[Date/Time]screen
isdisplayedwhenyouturnthecameraon.Informationyouspecifythisway
isrecordedinimagepropertieswhenyoushoot,anditisusedwhenyou
manageimagesbyshootingdateorprintimagesshowingthedate.
Youcanalsoaddadatestamptoshots,ifyouwish(=
67).
1 Turnthecameraon.
zz Pressthepowerbutton.
XX The[Date/Time]screenisdisplayed.
COPY
21
InitialPreparations
2 Setthedateandtime.
zz Pressthe<q><r>buttonstochoosean
option.
zz Pressthe<o><p>buttonsorturnthe
<7>dialtospecifythedateandtime.
zz Whennished,pressthe<m>button.
3 Setthehometimezone.
zz Pressthe<q><r>buttonsorturnthe
<7>dialtochooseyourhometimezone.
4 Finishthesetupprocess.
zz Pressthe<m>buttonwhennished.
Afteraconrmationmessage,thesetting
screenisnolongerdisplayed.
zz Toturnoffthecamera,pressthepower
button.
• Unlessyousetthedate,time,andhometimezone,the[Date/
Time]screenwillbedisplayedeachtimeyouturnthecameraon.
Specifythecorrectinformation.
• Tosetdaylightsavingtime(1hourahead),choose[ ]instep2andthen
choose[
]bypressingthe<o><p>buttonsorturningthe<7>dial.
COPY
22
InitialPreparations
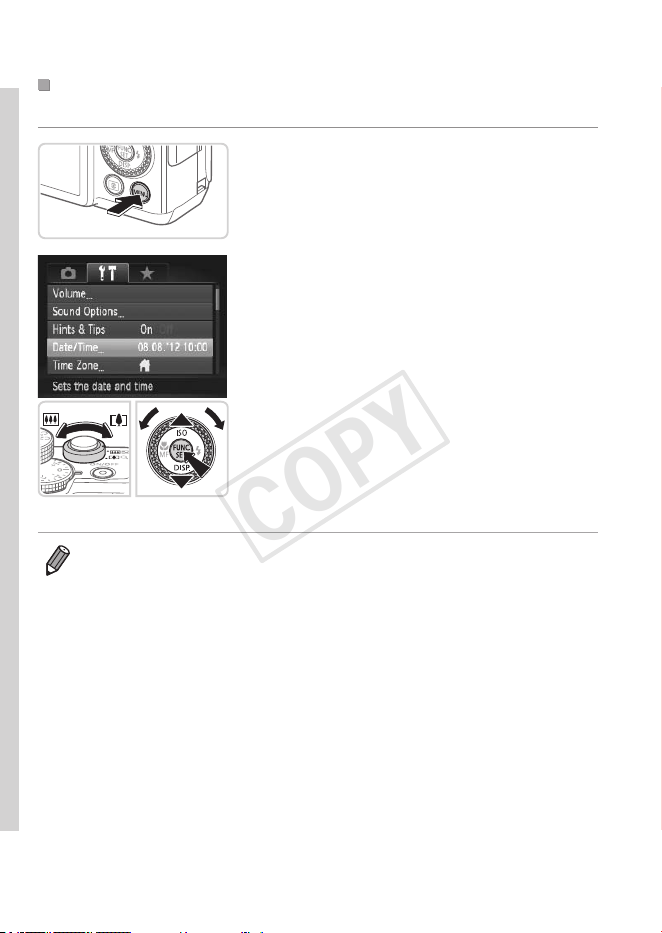
ChangingtheDateandTime
Adjustthedateandtimeasfollows.
1 Accessthecameramenu.
zz Pressthe<n>button.
2 Choose[Date/Time].
zz Movethezoomlevertochoosethe[3]
tab.
zz Pressthe<o><p>buttonsorturnthe
<7>dialtochoose[Date/Time],andthen
pressthe<m>button.
3 Changethedateandtime.
zz Followstep2on=
21toadjustthe
settings.
zz Pressthe<n>buttontoclosethe
menu.
• Date/timesettingscanberetainedforabout3weeksbythecamera’sbuilt-in
date/timebattery(backupbattery)afterthebatterypackisremoved.
• Thedate/timebatterywillbechargedinabout4hoursonceyouinserta
chargedbatteryorconnectthecameratoanACadapterkit(soldseparately,
=
235),evenifthecameraisleftoff.
• Oncethedate/timebatteryisdepleted,the[Date/Time]screenwillbe
displayedwhenyouturnthecameraon.Followthestepson=
20toset
thedateandtime.
COPY

23
InitialPreparations
Display Language
Changethedisplaylanguageasneeded.
1 EnterPlaybackmode.
zz Pressthe<1>button.
2 Accessthesettingscreen.
zz Pressandholdthe<m>button,and
thenimmediatelypressthe<n>
button.
3 Setthedisplaylanguage.
zz Pressthe<o><p><q><r>buttonsor
turnthe<7>dialtochoosealanguage,
andthenpressthe<m>button.
XX Oncethedisplaylanguagehasbeenset,
thesettingscreenisnolongerdisplayed.
• Thecurrenttimeisdisplayedifyouwaittoolonginstep2afterpressingthe
<
m
>buttonbeforeyoupressthe<n>button.Inthiscase,pressthe
<
m
>buttontodismissthetimedisplayandrepeatstep2.
• Youcanalsochangethedisplaylanguagebypressingthe<n>button
andchoosing[Language
]onthe[3]tab.
COPY
24
StillImages Movies
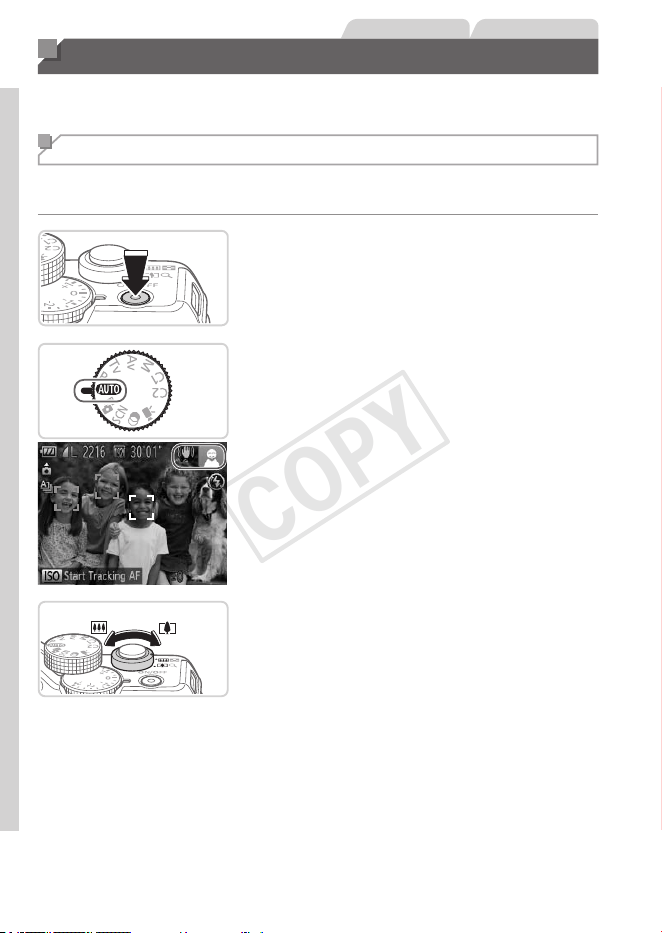
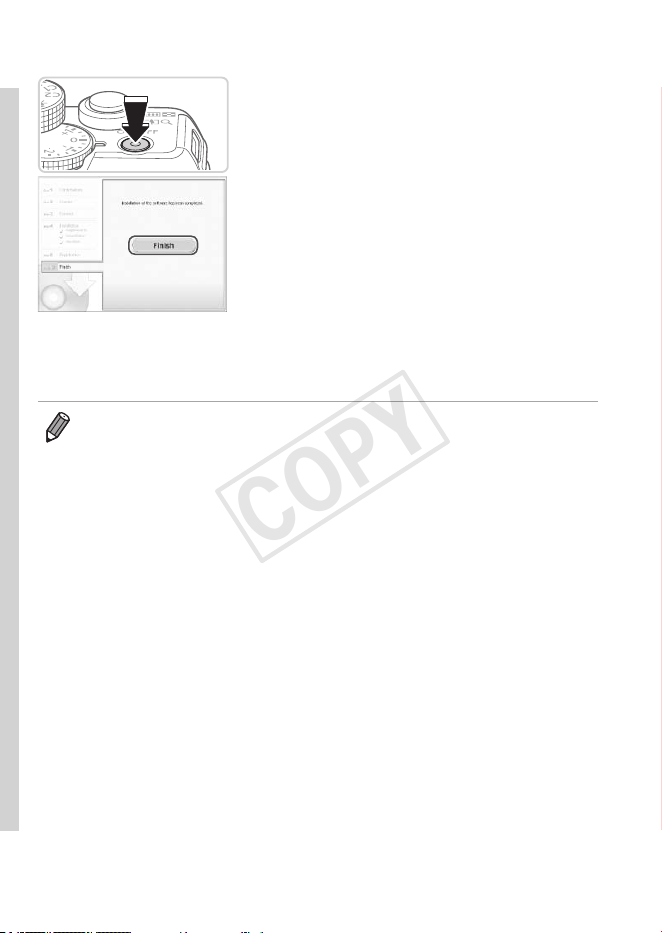
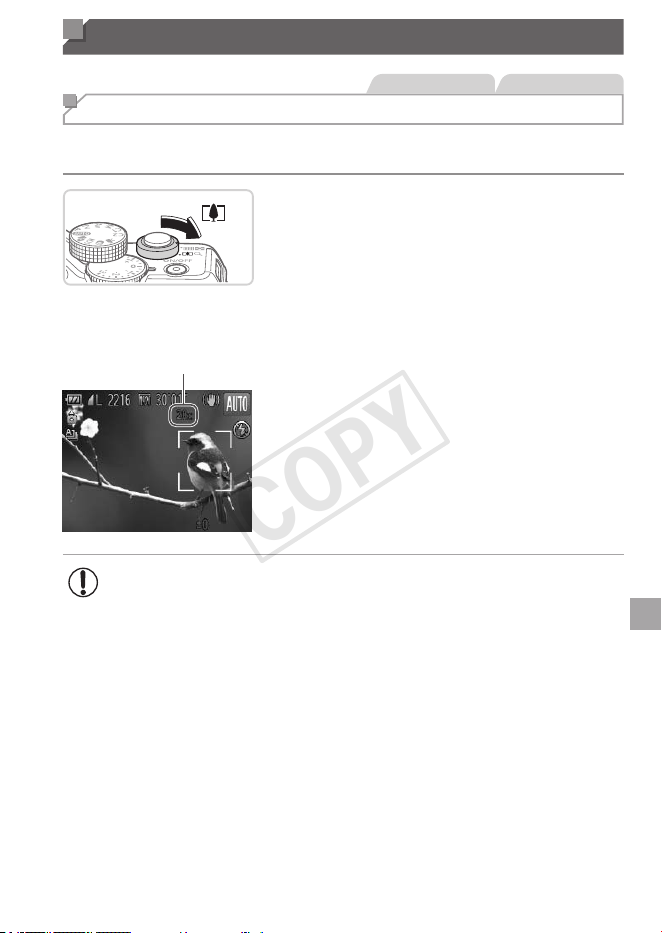
Trying the Camera Out
Followtheseinstructionstoturnthecameraon,shootstillimagesor
movies,andthenviewthem.
Shooting (Smart Auto)
Forfullyautomaticselectionoftheoptimalsettingsforspecicscenes,
simplyletthecameradeterminethesubjectandshootingconditions.
1 Turnthecameraon.
zz Pressthepowerbutton.
XX Thestartupscreenisdisplayed.
2 Enter<A>mode.
zz Setthemodedialto<A>.
zz Aimthecameraatthesubject.The
camerawillmakeaslightclickingnoise
asitdeterminesthescene.
XX Iconsrepresentingthesceneandimage
stabilizationmodearedisplayedinthe
upperrightofthescreen.
XX Framesdisplayedaroundanydetected
subjectsindicatethattheyareinfocus.
3 Composetheshot.
zz Tozoominandenlargethesubject,move
thezoomlevertoward<i>(telephoto),
andtozoomawayfromthesubject,move
ittoward<j>(wideangle).
COPY

25
TryingtheCameraOut
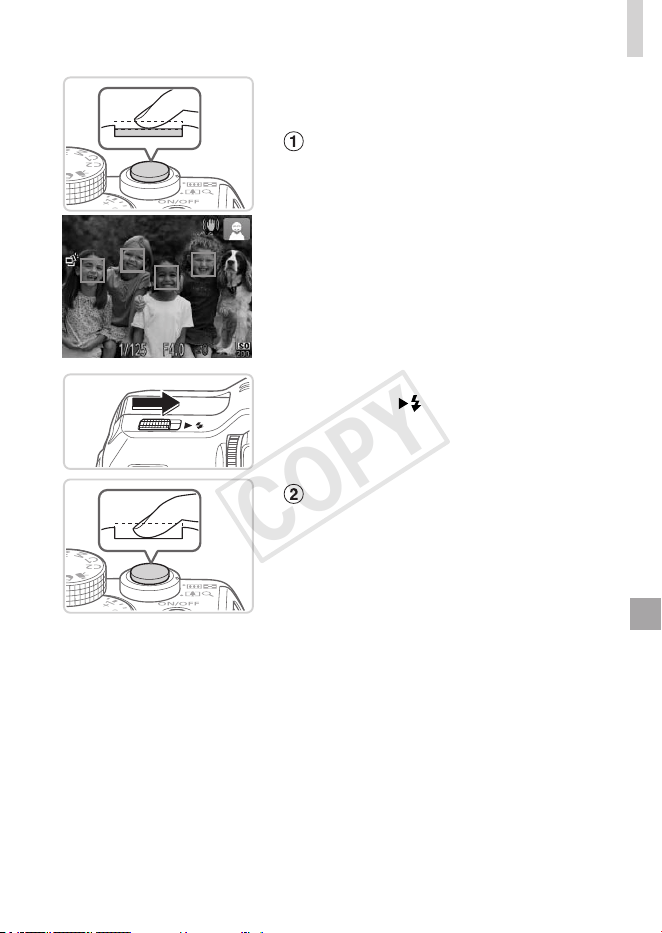
4 Shoot.
ShootingStillImages
Focus.
zz Presstheshutterbuttonlightly,halfway
down.Thecamerabeepstwiceafter
focusing,andAFframesaredisplayedto
indicateimageareasinfocus.
zz If[Raisetheash]appearsonthescreen,
movethe<
>switchtoraisetheash.
Itwillrewhenshooting.Ifyouprefernot
tousetheash,pushitdownwithyour
nger,intothecamera.
Shoot.
zz Presstheshutterbuttonalltheway
down.
XX Asthecamerashoots,ashuttersound
isplayed,andinlow-lightconditions
whenyouhaveraisedtheash,itres
automatically.
zz Keepthecamerastilluntiltheshutter
soundends.
XX Yourshotisonlydisplayeduntilthe
cameraisreadytoshootagain.
COPY
26
TryingtheCameraOut
ElapsedTime
ShootingMovies
Startshooting.
zz Pressthemoviebutton.Thecamera
beepsonceasrecordingbegins,and
[
Rec]isdisplayedwiththeelapsedtime.
XX Blackbarsdisplayedonthetopand
bottomedgesofthescreenindicate
imageareasnotrecorded.
XX Framesdisplayedaroundanydetected
facesindicatethattheyareinfocus.
zz Oncerecordingbegins,youcantakeyour
ngeroffthemoviebutton.
Finishshooting.
zz Pressthemoviebuttonagaintostop
shooting.Thecamerabeepstwiceas
recordingstops.
COPY
27
TryingtheCameraOut
Viewing
Aftershootingimagesormovies,youcanviewthemonthescreenas
follows.
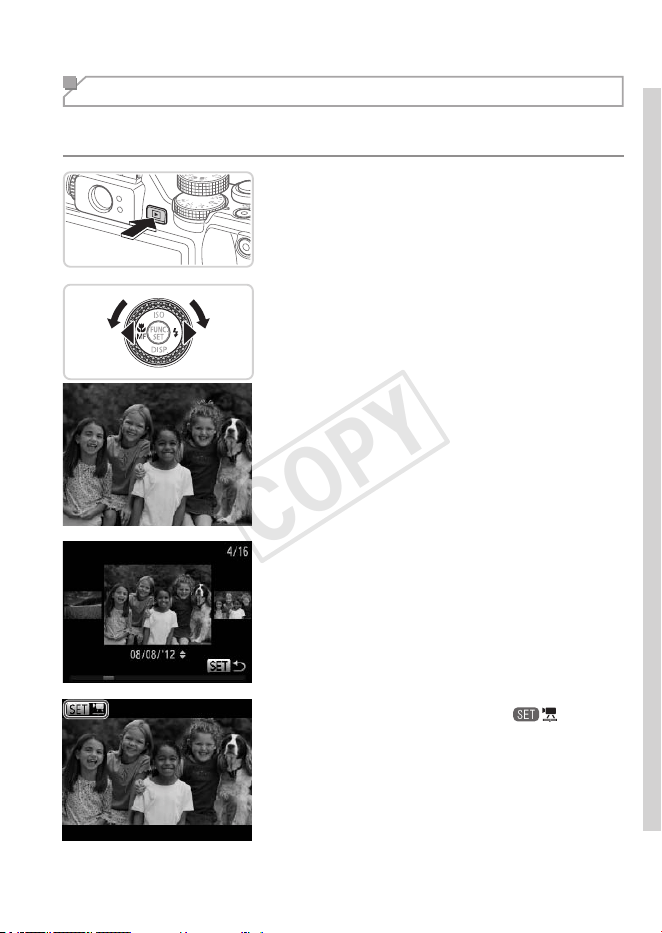
1 EnterPlaybackmode.
zz Pressthe<1>button.
XX Yourlastshotisdisplayed.
2 Browsethroughyourimages.
zz Toviewthepreviousimage,press
the<q>buttonorturnthe<7>dial
counterclockwise.Toviewthenext
image,pressthe<r>buttonorturnthe
<7>dialclockwise.
zz Pressandholdthe<q><r>buttonsto
browsethroughimagesquickly.
zz ToaccessScrollDisplaymode,turnthe
<7>dialrapidly.Inthismode,turnthe
<7>dialtobrowsethroughimages.
zz Toreturntosingle-imagedisplay,press
the<m>button.
zz Moviesareidentiedbya[ ]icon.To
playmovies,gotostep3.
COPY

28
TryingtheCameraOut
Volume
3 Playmovies.
zz Pressthe<m>buttontoaccessthe
moviecontrolpanel,choose[
](either
pressthe<q><r>buttonsorturnthe
<7>dial),andthenpressthe<m>
buttonagain.
XX Playbacknowbegins,andafterthemovie
isnished,[
]isdisplayed.
zz Toadjustthevolume,pressthe<o><p>
buttons.
• ToswitchtoShootingmodefromPlaybackmode,presstheshutterbutton
halfway.
COPY
29
TryingtheCameraOut
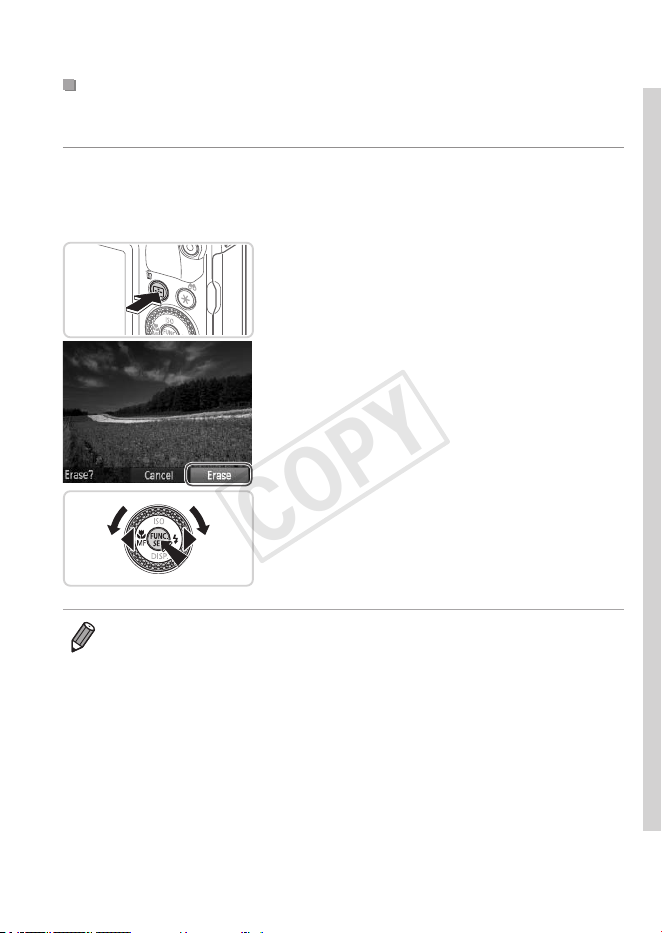
ErasingtheImages
Youcanchooseanderaseunneededimagesonebyone.Becarefulwhen
erasingimages,becausetheycannotberecovered.
1 Chooseanimagetoerase.
zz Pressthe<q><r>buttonsorturnthe
<7>dialtochooseanimage.
2 Erasetheimage.
zz Pressthe<a>button.
zz After[Erase?]isdisplayed,pressthe
<q><r>buttonsorturnthe<7>dialto
choose[Erase],andthenpressthe<m>
button.
XX Thecurrentimageisnowerased.
zz Tocancelerasure,pressthe<q><r>
buttonsorturnthe<7>dialtochoose
[Cancel],andthenpressthe<m>
button.
• Youcanalsoeraseallimagesatonce(=
197).
COPY

30
Included Software, PDF Manuals
ThesoftwareandPDFmanualsontheincludedDIGITALCAMERASolution
Disk(CD-ROM)(=
2)areintroducedbelow,withinstructionsfor
installation,andsavingimagestoacomputer.
Software
AfterinstallingthesoftwareontheCD-ROM,youcandothefollowing
thingsonyourcomputer.
CameraWindow
zz Importimagesandchangecamerasettings
ImageBrowserEX
zz Manageimages:view,search,andorganize
zz Printandeditimages
DigitalPhotoProfessional
zz Browse,processandeditRAWimages
AutoUpdateFunction
Usingtheincludedsoftware,youcanupdatetothelatestversion,and
downloadnewfunctionsviatheInternet(somesoftwareexcluded).Besure
toinstallthesoftwareonacomputerwithanInternetconnectionsoyoucan
usethisfunction.
• Internetaccessisrequiredtousethisfunction,andanyISP
accountchargesandaccessfeesmustbepaidseparately.
PDF Manuals
CameraUserGuide
zz Refertothisguideforamorein-depthunderstandingofcamera
operation.
SoftwareGuide
zz Refertothisguidewhenusingtheincludedsoftware.Theguidecanbe
accessedfromthehelpsystemofincludedsoftware(somesoftware
excluded).
COPY

31
IncludedSoftware,PDFManuals
System Requirements
Theincludedsoftwarecanbeusedonthefollowingcomputers.Adobe
ReaderisrequiredtoviewthePDFmanuals.
Operating
System
Windows Macintosh
Windows7SP1
WindowsVistaSP2
WindowsXPSP3
MacOSX10.6–10.7
Computer
Computersrunningoneoftheaboveoperatingsystems
(preinstalled),withanincludedUSBportandInternetconnection*
Processor
Stillimages
1.6GHzorhigher
Movies
Core2Duo2.6GHzorhigher
Stillimages
CoreDuo1.83GHzorhigher
Movies
Core2Duo2.6GHzorhigher
RAM
Stillimages
Windows7(64bit):
2GBormore
Windows7(32bit),Vista,XP:
1GBormore
Movies
2GBormore
Stillimages
MacOSX10.7:2GBormore
MacOSX10.6:1GBormore
Movies
2GBormore
Interfaces USB
FreeHardDisk
Space
640MBormore* 750MBormore
Display 1024x768resolutionorhigher
*Silverlight4orlater(max.100MB)mustbeinstalled,andinWindowsXP,Microsoft
.NETFramework3.0orlater(max.500MB)mustbeinstalled.Installationmaytake
sometime,dependingoncomputerperformance.
• ChecktheCanonwebsiteforthelatestsystemrequirements,including
supportedOSversions.
COPY

32
IncludedSoftware,PDFManuals
Installing the Software
Windows7andMacOSX10.6areusedhereforthesakeofillustration.
Usingthesoftwareautoupdatefunction,youcanupdatetothelatest
versionanddownloadnewfunctionsviatheInternet(somesoftware
excluded),sobesuretoinstallthesoftwareonacomputerwithanInternet
connection.
Whatyouwillneed:
zz Computer
zz USBcable(cameraend:Mini-B)
zz IncludedCD-ROM(DIGITALCAMERASolutionDisk)(=
2 )
1 InserttheCD-ROMinthe
computer’sCD-ROMdrive.
zz InserttheincludedCD-ROM(DIGITAL
CAMERASolutionDisk)(=
2)inthe
computer’sCD-ROMdrive.
zz OnaMacintoshcomputer,afterinserting
thedisc,double-clickthedesktopdisc
icontoopenit,andthendouble-clickthe
[
]icondisplayed.
2 Begintheinstallation.
zz Click[EasyInstallation]andfollowthe
on-screeninstructionstocompletethe
installationprocess.
COPY
33
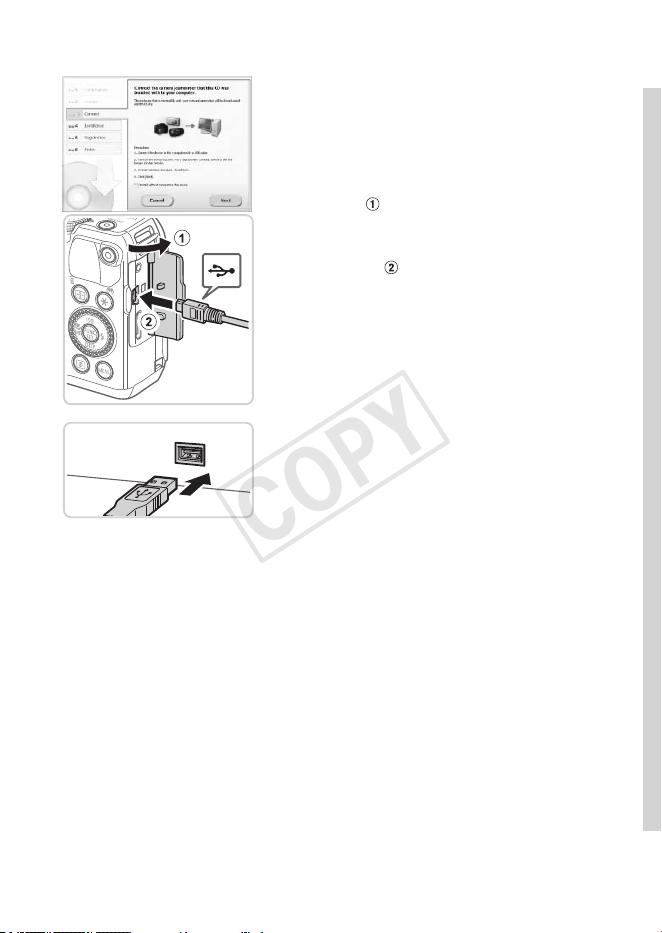
IncludedSoftware,PDFManuals
3 Whenamessageisdisplayed
promptingyoutoconnect
thecamera,connectittoa
computer.
zz Withthecameraturnedoff,openthe
cover(
).Withthesmallerplugofthe
USBcableintheorientationshown,
inserttheplugfullyintothecamera
terminal(
).
zz InsertthelargerplugoftheUSBcable
inthecomputer’sUSBport.Fordetails
aboutUSBconnectionsonthecomputer,
refertothecomputerusermanual.
COPY
34
IncludedSoftware,PDFManuals
4 Installtheles.
zz Turnthecameraon,andfollowthe
on-screeninstructionstocompletethe
installationprocess.
XX ThesoftwarewillconnecttotheInternet
toupdatetothelatestversionand
downloadnewfunctions.Installationmay
takesometime,dependingoncomputer
performanceandtheInternetconnection.
zz Click[Finish]or[Restart]onthescreen
afterinstallationandremovethe
CD-ROMwhenthedesktopisdisplayed.
zz Turnthecameraoffanddisconnectthe
cable.
• WhennotconnectedtotheInternet,therearethefollowinglimitations.
-Thescreeninstep3willnotbedisplayed.
-Somefunctionsmaynotbeinstalled.
• Thersttimeyouconnectthecameratothecomputer,driverswillbe
installed,soitmaytakeafewminutesuntilcameraimagesareaccessible.
• IfyouhaveseveralcamerasthatwerebundledwithImageBrowserEXon
theincludedCD-ROMs,besuretouseeachcamerawiththeirincluded
CD-ROMandfollowtheon-screeninstallationinstructionsforeach.Doing
sowillensurethateachcamerawillreceivethecorrectupdatesandnew
functionsviatheautoupdatefunction.
COPY
35
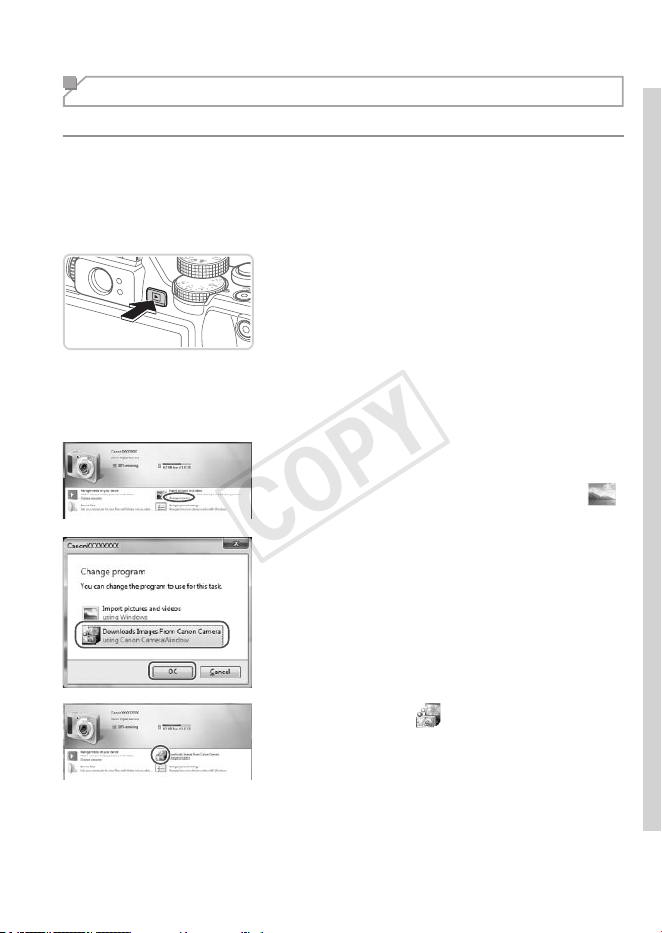
IncludedSoftware,PDFManuals
Saving Images to a Computer
Windows7andMacOSX10.6areusedhereforthesakeofillustration.
1 Connectthecameratothe
computer.
zz Followstep3on=
33toconnectthe
cameratoacomputer.
2 Turnthecameraontoaccess
CameraWindow.
zz Pressthe<1>buttontoturnthecamera
on.
zz OnaMacintoshcomputer,
CameraWindowisdisplayedwhena
connectionisestablishedbetweenthe
cameraandcomputer.
zz ForWindows,followthestepsintroduced
below.
zz Inthescreenthatdisplays,clickthe[ ]
linktomodifytheprogram.
zz Choose[DownloadsImagesFromCanon
CamerausingCanonCameraWindow]
andthenclick[OK].
zz Doubleclick[ ].
COPY

36
IncludedSoftware,PDFManuals
CameraWindow
3 Savetheimagestothe
computer.
zz Click[ImportImagesfromCamera],and
thenclick[ImportUntransferredImages].
XX ImagesarenowsavedtothePictures
folderonthecomputer,inseparate
foldersnamedbydate.
zz Afterimagesaresaved,close
CameraWindow,pressthe<1>button
toturnthecameraoff,andunplugthe
cable.
zz Forinstructionsonviewingimageson
acomputer,refertotheSoftware Guide
(=
30).
COPY

37
IncludedSoftware,PDFManuals
• InWindows7,ifthescreeninstep2isnotdisplayed,clickthe[ ]iconin
thetaskbar.
• TostartCameraWindowinWindowsVistaorXP,click[DownloadsImages
FromCanonCamerausingCanonCameraWindow]onthescreendisplayed
whenyouturnthecameraoninstep2.IfCameraWindowisnotdisplayed,
clickthe[Start]menuandchoose[AllPrograms]X[CanonUtilities]X
[CameraWindow]X[CameraWindow].
• OnaMacintoshcomputer,ifCameraWindowisnotdisplayedafterstep2,
clickthe[CameraWindow]iconintheDock(thebaratthebottomofthe
desktop).
• Althoughyoucansaveimagestoacomputersimplybyconnectingyour
cameratothecomputerwithoutusingtheincludedsoftware,thefollowing
limitationsapply.
-Itmaytakeafewminutesafteryouconnectthecameratothecomputer
untilcameraimagesareaccessible.
-Imagesshotinverticalorientationmaybesavedinhorizontalorientation.
-RAWimages(orJPEGimagesrecordedwithRAWimages)maynotbe
saved.
-Imageprotectionsettingsmaybeclearedfromimagessavedtoa
computer.
-Someproblemsmayoccurwhensavingimagesorimageinformation,
dependingontheoperatingsystemversion,thesoftwareinuse,orimage
lesizes.
-Somefunctionsprovidedbytheincludedsoftwaremaynotbeavailable,
suchaseditingmoviesorreturningimagestothecamera.
Using the PDF Manuals
CameraUserGuide
zz Accessthisguidebydouble-clickingthedesktopshortcuticon.
SoftwareGuide
zz Theguidecanbeaccessedfromthehelpsystemofincludedsoftware
(somesoftwareexcluded).
• ItmaynotbepossibletoinstallthePDFmanualsoncomputersthatdo
notmeetthesystemrequirements(=
31).However,youcanviewthe
manualsonacomputerthatsupportsAdobeReaderbycopyingthePDF
lesintheReadmefolderontheCD-ROMdirectlytoaconvenientlocation
onthecomputer.
COPY

38
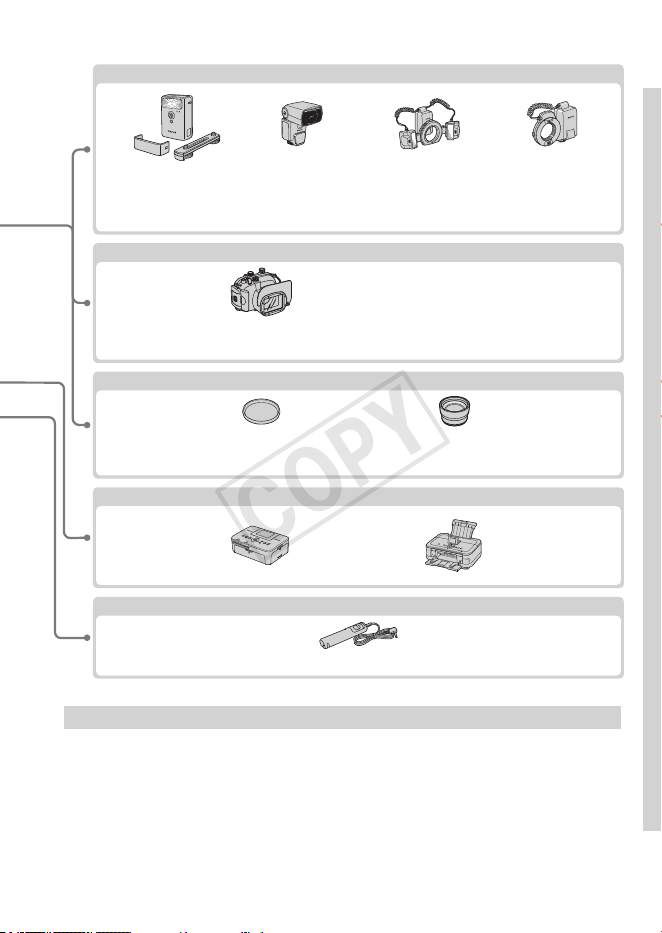
Accessories
SoftCase
SC-DC85
NeckStrap
NS-DC11
BatteryPack
NB-10L*
1
(withterminalcover)
BatteryCharger
CB-2LC/CB-2LCE*
1
DIGITAL
CAMERA
SolutionDisk
USBCable(cameraend:Mini-B)*
2
MemoryCard CardReader
Windows/
Macintosh
Computer
TV/Video
System
ACAdapterKit
ACK-DC80
IncludedAccessories
Power
Cables
HDMICableHTC-100
StereoAVCableAVC-DC400ST
FlashUnits
LensAccessories
CanonPictBridge-CompatiblePrinters
Speedlite*
4
600EX-RT,600EX,
580EXII,430EXII,
320EX,270EXII
MacroTwinLite
MT-24EX*
5
*
6
High-PowerFlash
HF-DC2*
3
MacroRingLite
MR-14EX*
6
Canon-brandLensFilter
(58mmdia.)*
7
Tele-converter
TC-DC58E*
6
RemoteSwitchRS-60E3
OtherAccessories
Case
WaterproofCase
WP-DC48
*1Alsoavailableforpurchaseseparately.
*2AgenuineCanonaccessoryisalsoavailable(InterfaceCableIFC-400PCU).
*3High-PowerFlashHF-DC1alsosupported.
*4Theseaccessoriesarealsosupported:Speedlite580EX,430EX,270EX,and
220EX,SpeedliteTransmitterST-E2,SpeedliteBracketSB-E2,andOff-Camera
ShoeCordOC-E3.
*5RequiresBracketBKT-DC1andOff-CameraShoeCordOC-E3.
*6RequiresConversionLensAdapterLA-DC58L.
*7RequiresFilterAdapterFA-DC58D.
UseofgenuineCanonaccessoriesisrecommended.
Thisproductisdesignedtoachieveexcellentperformancewhenusedwithgenuine
Canonaccessories.
Canonshallnotbeliableforanydamagetothisproductand/oraccidentssuchasre,
etc.,causedbythemalfunctionofnon-genuineCanonaccessories(e.g.,aleakage
and/orexplosionofabatterypack).Pleasenotethatthiswarrantydoesnotapplyto
repairsarisingoutofthemalfunctionofnon-genuineCanonaccessories,althoughyou
mayrequestsuchrepairsonachargeablebasis.
COPY
39
Accessories
Accessories
SoftCase
SC-DC85
NeckStrap
NS-DC11
BatteryPack
NB-10L*
1
(withterminalcover)
BatteryCharger
CB-2LC/CB-2LCE*
1
DIGITAL
CAMERA
SolutionDisk
USBCable(cameraend:Mini-B)*
2
MemoryCard CardReader
Windows/
Macintosh
Computer
TV/Video
System
ACAdapterKit
ACK-DC80
IncludedAccessories
Power
Cables
HDMICableHTC-100
StereoAVCableAVC-DC400ST
FlashUnits
LensAccessories
CanonPictBridge-CompatiblePrinters
Speedlite*
4
600EX-RT,600EX,
580EXII,430EXII,
320EX,270EXII
MacroTwinLite
MT-24EX*
5
*
6
High-PowerFlash
HF-DC2*
3
MacroRingLite
MR-14EX*
6
Canon-brandLensFilter
(58mmdia.)*
7
Tele-converter
TC-DC58E*
6
RemoteSwitchRS-60E3
OtherAccessories
Case
WaterproofCase
WP-DC48
*1Alsoavailableforpurchaseseparately.
*2AgenuineCanonaccessoryisalsoavailable(InterfaceCableIFC-400PCU).
*3High-PowerFlashHF-DC1alsosupported.
*4Theseaccessoriesarealsosupported:Speedlite580EX,430EX,270EX,and
220EX,SpeedliteTransmitterST-E2,SpeedliteBracketSB-E2,andOff-Camera
ShoeCordOC-E3.
*5RequiresBracketBKT-DC1andOff-CameraShoeCordOC-E3.
*6RequiresConversionLensAdapterLA-DC58L.
*7RequiresFilterAdapterFA-DC58D.
UseofgenuineCanonaccessoriesisrecommended.
Thisproductisdesignedtoachieveexcellentperformancewhenusedwithgenuine
Canonaccessories.
Canonshallnotbeliableforanydamagetothisproductand/oraccidentssuchasre,
etc.,causedbythemalfunctionofnon-genuineCanonaccessories(e.g.,aleakage
and/orexplosionofabatterypack).Pleasenotethatthiswarrantydoesnotapplyto
repairsarisingoutofthemalfunctionofnon-genuineCanonaccessories,althoughyou
mayrequestsuchrepairsonachargeablebasis.
COPY

40
COPY

41
Camera Basics
Practicalguidethatintroducesothercamerabasicsand
describesshootingandplaybackoptions
1
Advanced
Guide
COPY
42
On/Off
ShootingMode
zz Pressthepowerbuttontoturnthe
cameraonandprepareforshooting.
zz Toturnthecameraoff,pressthepower
buttonagain.
PlaybackMode
zz Pressthe<1>buttontoturnthecamera
onandviewyourshots.
zz Toturnthecameraoff,pressthe<1>
buttonagain.
• ToswitchtoPlaybackmodefromShootingmode,pressthe<1>button.
• ToswitchtoShootingmodefromPlaybackmode,presstheshutterbutton
halfway(=
43).
• Thelenswillberetractedafteraboutoneminuteoncethecameraisin
Playbackmode.Youcanturnthecameraoffwhenthelensisretractedby
pressingthe<1>button.
Power-Saving Features (Auto Power Down)
Asawaytoconservebatterypower,thecameraautomaticallydeactivates
thescreen(DisplayOff)andthenturnsitselfoffafteraspecicperiodof
inactivity.
PowerSavinginShootingMode
Thescreenisautomaticallydeactivatedafteraboutoneminuteofinactivity.
Inabouttwomoreminutes,thelensisretractedandthecameraturnsitself
off.Toactivatethescreenandprepareforshootingwhenthescreenisoff
butthelensisstillout,presstheshutterbuttonhalfway(=
43).
PowerSavinginPlaybackMode
Thecameraturnsitselfoffautomaticallyafteraboutveminutesof
inactivity.
• Adjustthetimingofautomaticcameraandscreendeactivationasneeded
(=
226).
• Powersavingisnotactivewhilethecameraisconnectedtoacomputer
(=
33).
COPY

43
Shutter Button
Toensureyourshotsareinfocus,alwayspresstheshutterbuttonlightly
(halfway)initially.Oncethesubjectisinfocus,pressthebuttonalltheway
downtoshoot.
Inthismanual,shutterbuttonoperationsaredescribedaspressingthe
buttonhalfwayorall the way down.
1 Presshalfway.(Presslightlyto
focus.)
zz Presstheshutterbuttonhalfway.The
camerabeepstwice,andAFframesare
displayedaroundimageareasinfocus.
2 Pressallthewaydown.(From
thehalfwayposition,pressfully
toshoot.)
XX Thecamerashoots,asashuttersound
isplayed.
zz Keepthecamerastilluntiltheshutter
soundends.
• Imagesmaybeoutoffocusifyoushootwithoutinitiallypressing
theshutterbuttonhalfway.
• Lengthofshuttersoundplaybackvariesdependingonthetime
requiredfortheshot.Itmaytakelongerinsomeshootingscenes,
andimageswillbeblurryifyoumovethecamera(orthesubject
moves)beforetheshuttersoundends.
COPY
44
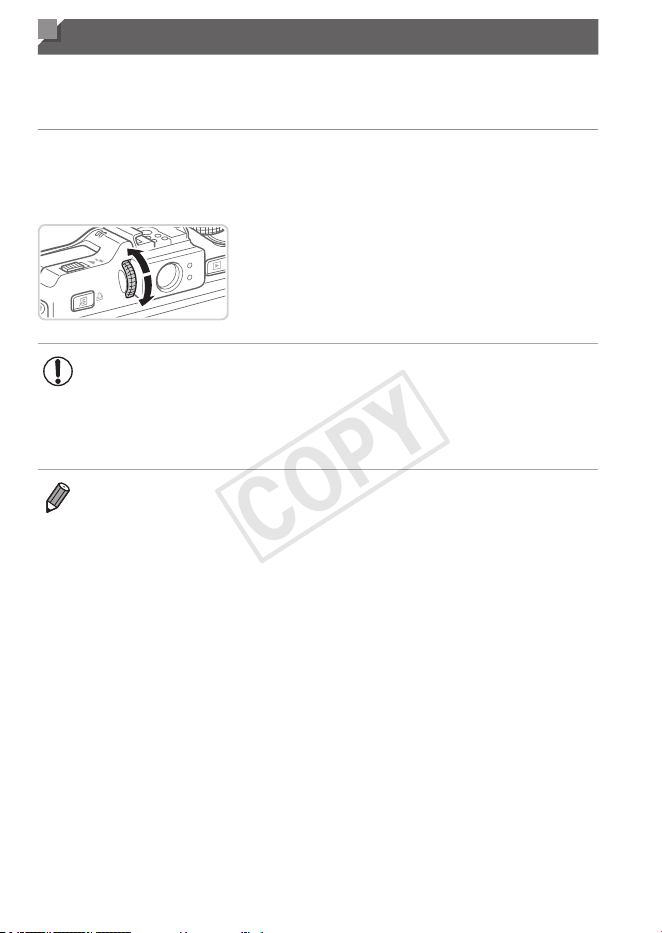
Optical Viewnder
Toconservebatterypowerwhenshooting,youcanusetheoptical
viewnderinsteadofthescreen.Shootthesamewayaswhenusingthe
screen.
1 Deactivatethescreen.
zz Pressthe<p>buttontoturnthescreen
off(=
46).
2 Adjustthediopter.
zz Asyoulookthroughtheoptical
viewnder,turnthedialonewayorthe
othersothatimageslooksharp.
• Theareavisibleintheopticalviewndermaydifferslightlyfrom
theimageareainyourshots.
• Ataspectratiosotherthan4:3,theareavisibleintheoptical
viewnderdiffersfromtheimageareainyourshots.Checkthe
settingsbeforeshooting.
• Thelensmaybepartiallyvisiblethroughtheopticalviewnderatsomezoom
positions.
• Althoughthecameraautomaticallyfocusesonsubjects,facedetectionand
focusingisnotpossible.
• Continuousshootingisnotsupportedin<A>mode,becausethecamera
willnotdeterminetheshootingscene.
COPY
45
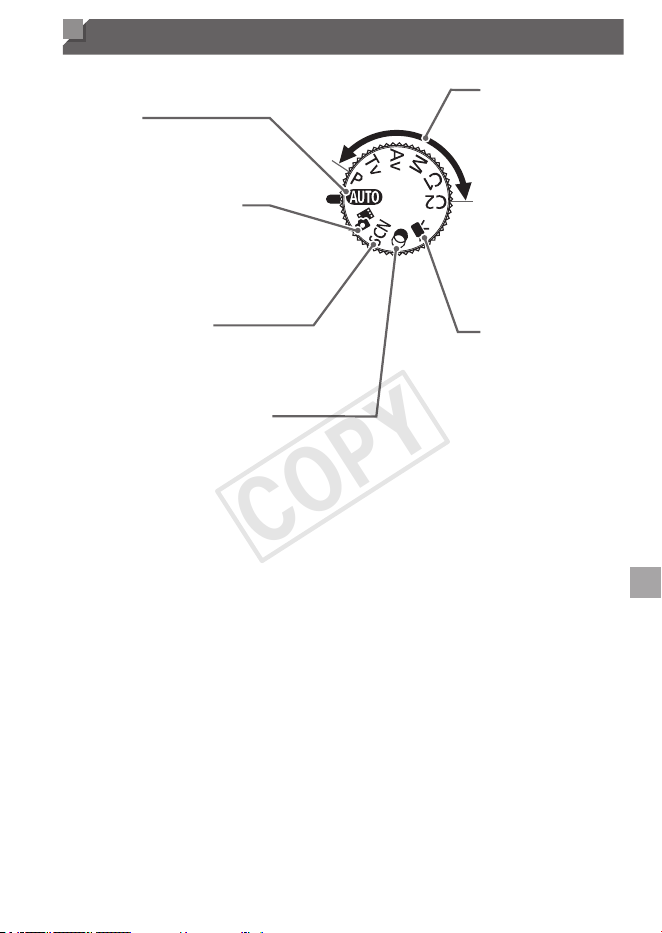
Shooting Modes
Usethemodedialtoaccesseachshootingmode.
P,Tv,Av,M,C1,
andC2Modes
Takeavarietyof
shotsusingyour
preferredsettings
(=
123,161).
MovieMode
Forshootingmovies
(=
119).
Youcanalsoshoot
movieswhenthe
modedialisnot
settoMoviemode,
simplybypressing
themoviebutton.
AutoMode
Fullyautomaticshooting,with
camera-determinedsettings
(=
24,54).
SpecialSceneMode
Shootwithoptimalsettingsfor
specicscenes(=
95).
CreativeFiltersMode
Addavarietyofeffectstoimages
whenshooting(=
99).
MovieDigestMode
Youcanmakeashortmovie
ofadayjustbyshootingstill
images(=
94).
COPY
46
Shooting Display Options
Pressthe<p>buttontoviewotherinformationonthescreen,ortohide
theinformation.Fordetailsontheinformationdisplayed,see=
286.
Display1 Display2 DisplayOff
• Evenifthescreenisoff,itwillturnonwhenyoustartshootinga
movie.
• Screenbrightnessisautomaticallyincreasedbythenightdisplayfunction
whenyouareshootingunderlowlight,makingiteasiertocheckhowshots
arecomposed.However,on-screenimagebrightnessmaynotmatchthe
brightnessofyourshots.Notethatanyon-screenimagedistortionorjerky
subjectmotionwillnotaffectrecordedimages.
• Forplaybackdisplayoptions,see=
176.
COPY
47
FUNC. Menu
CongurecommonlyusedshootingfunctionsthroughtheFUNC.menuas
follows.
Notethatmenuitemsandoptionsvarydependingontheshootingmode
(=
292–295).
1 AccesstheFUNC.menu.
zz Pressthe<m>button.
MenuItems
Options
2 Chooseamenuitem.
zz Pressthe<o><p>buttonstochoosea
menuitem.
XX Availableoptionsareshownatthebottom
ofthescreen.
3 Chooseanoption.
zz Pressthe<q><r>buttonsorturnthe
<7>dialtochooseanoption.
zz Optionslabeledwitha[ ]iconcanbe
conguredbypressingthe<n>
button.
4 Finishthesetupprocess.
zz Pressthe<m>button.
XX Thescreenbeforeyoupressedthe
<m>buttoninstep1isdisplayedagain,
showingtheoptionyoucongured.
• Toundoanyaccidentalsettingchanges,youcanrestorethecamera’s
defaultsettings(=
231).
COPY
48
MENU Menu
Congureavarietyofcamerafunctionsthroughothermenusasfollows.
Menuitemsaregroupedbypurposeontabs,suchasshooting[4],
playback[1],andsoon.Notethatavailablesettingsvarydependingon
theselectedshootingorplaybackmode(=
296–301).
1 Accessthemenu.
zz Pressthe<n>button.
2 Chooseatab.
zz Movethezoomlevertochooseatab.
zz Afteryouhavepressedthe<o><p>
buttonsorturnedthe<7>dialtochoose
atabinitially,youcanswitchbetween
tabsbypressingthe<q><r>buttons.
Youcanalsochooseatabbypressing
the<+>button.
3 Chooseasetting.
zz Pressthe<o><p>buttonsorturnthe
<7>dialtochooseasetting.
zz Tochoosesettingswithoptionsnot
shown,rstpressthe<m>or<r>
buttontoswitchscreens,andtheneither
pressthe<o><p>buttonsorturnthe
<7>dialtoselectthesetting.
zz Toreturntothepreviousscreen,press
the<n>button.
COPY

49
MENUMenu
4 Chooseanoption.
zz Pressthe<q><r>buttonstochoosean
option.
5 Finishthesetupprocess.
zz Pressthe<n>buttontoreturntothe
screendisplayedbeforeyoupressedthe
<n>buttoninstep1.
• Toundoanyaccidentalsettingchanges,youcanrestorethecamera’s
defaultsettings(=
231).
COPY

50
Indicator Display
Thepowerlampandindicatoronthebackofthecamera(=
5)willlight
orblinkdependingonthecamerastatus.
Indicator Color
Indicator
Status
CameraStatus
PowerLamp Green
On Cameraon
Blinking Lowbattery
Indicator
Green
On Readytoshoot(whentheashisdeactivated)
Blinking
Recording/reading/transmittingimages
Distancewarning(=
279),orcannotfocus
(whentheashisdeactivated)(=
279)
Orange
On Readytoshoot(whentheashisactivated)
Blinking
Distancewarning(=
279),orcannotfocus
(whentheashisactivated)(=
279)
• Whentheindicatorblinksgreen,neverturnthecameraoff,open
thememorycard/batterycover,orshakeorjoltthecamera,which
maycorruptimagesordamagethecameraormemorycard.
COPY

51
Clock
Youcancheckthecurrenttime.
zz Pressandholdthe<m>button.
XX Thecurrenttimeappears.
zz Ifyouholdthecameraverticallywhile
usingtheclockfunction,itwillswitch
toverticaldisplay.Pressthe<q><r>
buttonsorturnthe<7>dialtochange
thedisplaycolor.
zz Pressthe<m>buttonagaintocancel
theclockdisplay.
• Whenthecameraisoff,pressandholdthe<m>button,thenpressthe
powerbuttontodisplaytheclock.
COPY

52
COPY

53
Smart Auto Mode
Convenientmodeforeasyshotswithgreatercontrol
overshooting
2
COPY

54
StillImages Movies
Shooting (Smart Auto)
Forfullyautomaticselectionatoptimalsettingsforspecicscenes,simply
letthecameradeterminethesubjectandshootingconditions.
1 Turnthecameraon.
zz Pressthepowerbutton.
XX Thestartupscreenisdisplayed.
2 Enter<A>mode.
zz Setthemodedialto<A>.
zz Aimthecameraatthesubject.The
camerawillmakeaslightclickingnoise
asitdeterminesthescene.
XX Iconsrepresentingthesceneandimage
stabilizationmodearedisplayedinthe
upperrightofthescreen(=
61).
XX Framesdisplayedaroundanydetected
subjectsindicatethattheyareinfocus.
ZoomBar
FocusRange(approx.)
3 Composetheshot.
zz Tozoominandenlargethesubject,move
thezoomlevertoward<i>(telephoto),
andtozoomawayfromthesubject,move
ittoward<j>(wideangle).(Azoombar
showingthezoompositionisdisplayed.)
COPY
55
Shooting(SmartAuto)
4 Shoot.
ShootingStillImages
Focus.
zz Presstheshutterbuttonhalfway.The
camerabeepstwiceafterfocusing,and
AFframesaredisplayedtoindicate
imageareasinfocus.
XX SeveralAFframesaredisplayedwhen
multipleareasareinfocus.
zz If[Raisetheash]appearsonthescreen,
movethe<
>switchtoraisetheash.
Itwillrewhenshooting.Ifyouprefernot
tousetheash,pushitdownwithyour
nger,intothecamera.
Shoot.
zz Presstheshutterbuttonalltheway
down.
XX Asthecamerashoots,ashuttersound
isplayed,andinlow-lightconditions
whenyouhaveraisedtheash,itres
automatically.
zz Keepthecamerastilluntiltheshutter
soundends.
XX Yourshotisonlydisplayeduntilthe
cameraisreadytoshootagain.
COPY

56
Shooting(SmartAuto)
ElapsedTime
ShootingMovies
Startshooting.
zz Pressthemoviebutton.Thecamera
beepsonceasrecordingbegins,and
[
Rec]isdisplayedwiththeelapsed
time.
XX Blackbarsdisplayedonthetopand
bottomedgesofthescreenindicate
imageareasnotrecorded.
XX Framesdisplayedaroundanydetected
facesindicatethattheyareinfocus.
zz Oncerecordingbegins,youcantakeyour
ngeroffthemoviebutton.
Resizethesubjectand
recomposetheshotasneeded.
zz Toresizethesubject,dothesamething
asinstep3on=
54.
However,notethatthesoundofcamera
operationswillberecorded.
zz Whenyourecomposeshots,the
focus,brightness,andcolorswillbe
automaticallyadjusted.
Finishshooting.
zz Pressthemoviebuttonagaintostop
shooting.Thecamerabeepstwiceas
recordingstops.
zz Recordingwillstopautomaticallywhen
thememorycardbecomesfull.
COPY

57
Shooting(SmartAuto)
StillImages/Movies
• Toactivatethescreenwhenthecameraisonbutthescreenis
blank,pressthe<p>button.
• Torestorecamerasoundifyouhaveaccidentallydeactivatedit(by
holdingthe<p>buttondownwhileturningthecameraon),press
the<n>buttonandchoose[Mute]onthe[3]tab,andthen
pressthe<q><r>buttonstochoose[Off].
StillImages
• Aashing[ ]iconwarnsthatimagesaremorelikelytobeblurred
bycamerashake.Inthiscase,mountthecameraonatripodor
takeothermeasurestokeepitstill.
• Ifyourshotsaredarkdespitetheashring,movecloserto
thesubject.Fordetailsontheashrange,see“Specications”
(=
303).
• Thesubjectmaybetoocloseifthecameraonlybeepsoncewhen
youpresstheshutterbuttonhalfway.Fordetailsonthefocusing
range(shootingrange),see“Specications”(=
303).
• Toreducered-eyeandtoassistinfocusing,thelampmaybe
activatedwhenshootinginlow-lightconditions.
• Ablinking[h]icondisplayedwhenyouattempttoshootindicates
thatshootingisnotpossibleuntiltheashhasnishedrecharging.
Shootingcanresumeassoonastheashisready,soeitherpress
theshutterbuttonallthewaydownandwait,orreleaseitand
pressitagain.
• TheshuttersoundwillnotbeplayedwhentheSleepingand
Babies(Sleeping)icons(=
59)aredisplayed.
• Theashringduringshotsindicatesthatthecamerahasautomatically
attemptedtoensureoptimalcolorsinthemainsubjectandbackground
(Multi-areaWhiteBalance).
COPY

58
Shooting(SmartAuto)
Movies
Microphone
• Keepyourngersawayfromthe
microphonewhileshootingmovies.
Blockingthemicrophonemayprevent
audiofrombeingrecordedormay
causetherecordingtosoundmufed.
• Avoidtouchingcameracontrolsotherthanthemoviebuttonwhen
shootingmovies,becausesoundsmadebythecamerawillbe
recorded.
• Tocorrectsuboptimalimagecolorthatmayoccurin[
]movie
shooting(=
84)afteryourecomposeshots,pressthemovie
buttontostoprecording,andthenpressitagaintoresume
recording.
• Audioisrecordedinstereo.
COPY
59
Shooting(SmartAuto)
StillImages Movies
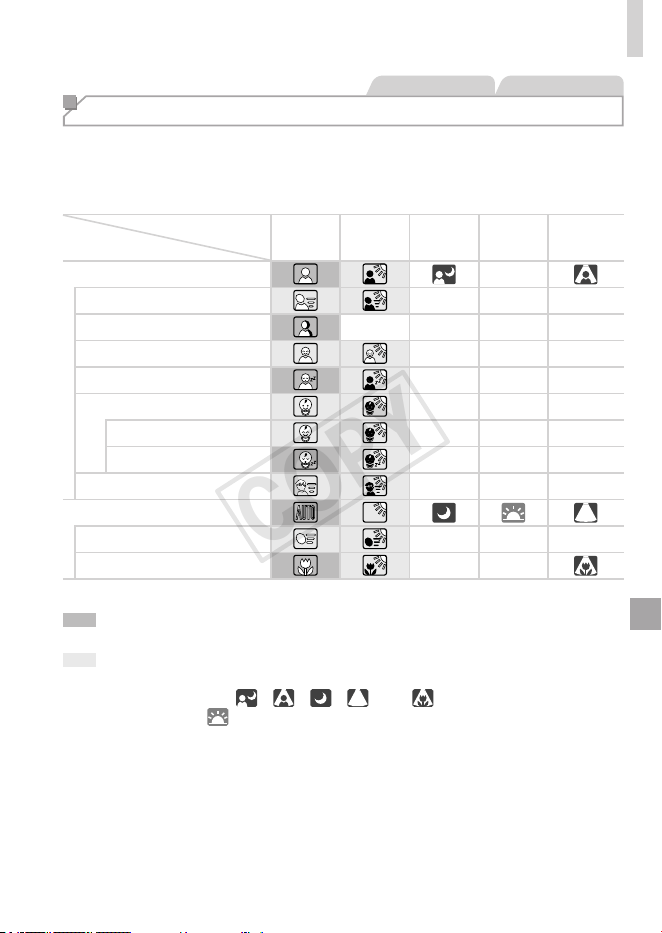
Scene Icons
In<A>mode,shootingscenesdeterminedbythecameraareindicated
bytheicondisplayed,andcorrespondingsettingsareautomatically
selectedforoptimalfocusing,subjectbrightness,andcolor.Dependingon
thescene,continuousimagesmaybeshot(=
60).
Background
Subject
Normal Backlit Dark* Sunsets Spotlights
People
–
InMotion
– – –
ShadowsonFace
– – – –
Smiling
– – –
Sleeping
– – –
Babies
– – –
Smiling
– – –
Sleeping
– – –
Children(InMotion)
– – –
OtherSubjects
InMotion
– – –
AtCloseRange
– –
*TripodUsed
Thebackgroundcoloroficonsislightbluewhenthebackgroundisabluesky,
darkbluewhenthebackgroundisdark,andgrayforallotherbackgrounds.
Thebackgroundcoloroficonsislightbluewhenthebackgroundisabluesky,
andgrayforallotherbackgrounds.
•Thebackgroundcolorof[
],[ ],[ ],[ ],and[ ]isdarkblue,andthe
backgroundcolorof[
]isorange.
•Whenshootingmovies,onlyPeople,OtherSubjects,andAtCloseRangeiconswill
bedisplayed.
•Whenshootingwiththeself-timer,People(InMotion),Smiling,Sleeping,Babies
(Smiling),Babies(Sleeping),Children,OtherSubjects(InMotion)iconswillnotbe
displayed.
COPY

60
Shooting(SmartAuto)
•Whenthedrivemodeissetto[ ](=
139),andwhen[HgLampCorr.]issetto
[On]andscenesareautomaticallycorrected(=
83),Smiling,Sleeping,Babies
(Smiling),Babies(Sleeping),andChildreniconswillnotbedisplayed.
•Iftheashissetto[
],theBackliticonsforSmilingandChildrenwillnotbe
displayed.
•Babies,Babies(Smiling),Babies(Sleeping),andChildreniconswillbedisplayed
when[FaceID]issetto[On],andthefaceofaregisteredbaby(undertwoyearsold)
orchild(fromtwototwelveyearsold)isdetected(=
69).Conrmbeforehandthat
thedateandtimearecorrect(=
20).
• Tryshootingin<G>mode(=
123)ifthesceneicondoesnot
matchactualshootingconditions,orifitisnotpossibletoshoot
withyourexpectedeffect,color,orbrightness.
ContinuousShootingScenes
Ifyoushootastillimagewhenthefollowingsceneiconsaredisplayed,
thecamerawillshootcontinuously.Ifyoupresstheshutterbuttonhalfway
whenoneoftheiconsinthetablebelowisdisplayed,oneofthefollowing
iconswillbedisplayedtoinformyouthatthecamerawillshootcontinuous
images:[ ],[ ],or[W].
Smiling(includingBabies)
: Consecutiveimagesarecaptured,andthecamera
analyzesdetailssuchasfacialexpressionstosave
theimagedeterminedtobethebest.
Sleeping(includingBabies)
: Beautifulshotsofsleepingfaces,createdby
combiningconsecutiveshotstoreducecamera
shakeandimagenoise.
TheAFassistbeamwillnotlightup,theashwill
notre,andtheshuttersoundwillnotbeplayed.
Children
W: Soyoudon’tmissaphotoopportunityofchildren
whomovearound,thecamerawillcapturethree
consecutiveimagesforeachshot.
• Insomescenes,expectedimagesmaynotbesaved,andimages
maynotlookasexpected.
• Focus,imagebrightness,andcoloraredeterminedbytherst
shot.
• Whenyouwanttoshootsingleimagesonly,pressthe<m>button,choose
[
]inthemenu,andthenchoose[ ].
COPY
61
Shooting(SmartAuto)
StillImages Movies
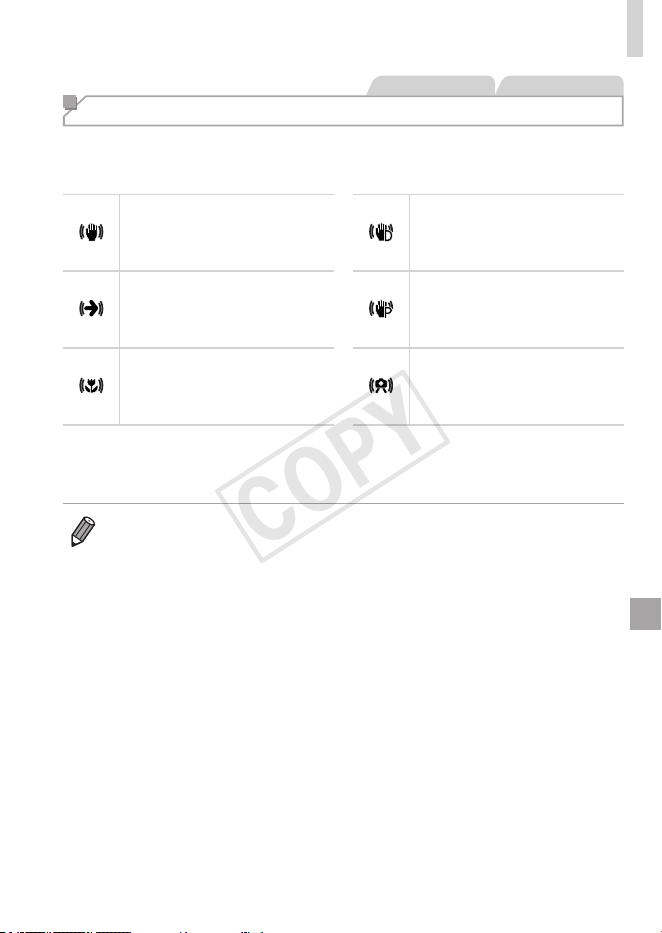
Image Stabilization Icons
Optimalimagestabilizationfortheshootingconditionsisautomatically
applied(IntelligentIS).Additionally,thefollowingiconsaredisplayedin
<A>mode.
Imagestabilizationforstill
images
Imagestabilizationformovies,
reducingstrongcamerashake,
aswhenshootingwhilewalking
(DynamicIS)
Imagestabilizationforstill
images,whenpanning*
Imagestabilizationforslow
camerashake,suchaswhen
shootingmoviesattelephoto
(PoweredIS)
Imagestabilizationformacro
shots(HybridIS)
Noimagestabilization,because
thecameraismountedon
atripodorheldstillbyother
means
*Displayedwhenyoupan,followingmovingsubjectswiththecamera.Whenyoufollow
subjectsmovinghorizontally,imagestabilizationonlycounteractsverticalcamera
shake,andhorizontalstabilizationstops.Similarly,whenyoufollowsubjectsmoving
vertically,imagestabilizationonlycounteractshorizontalcamerashake.
• Tocancelimagestabilization,set[ISMode]to[Off](=
160).Inthiscase,
anISiconisnotdisplayed.
COPY

62
Shooting(SmartAuto)
StillImages Movies
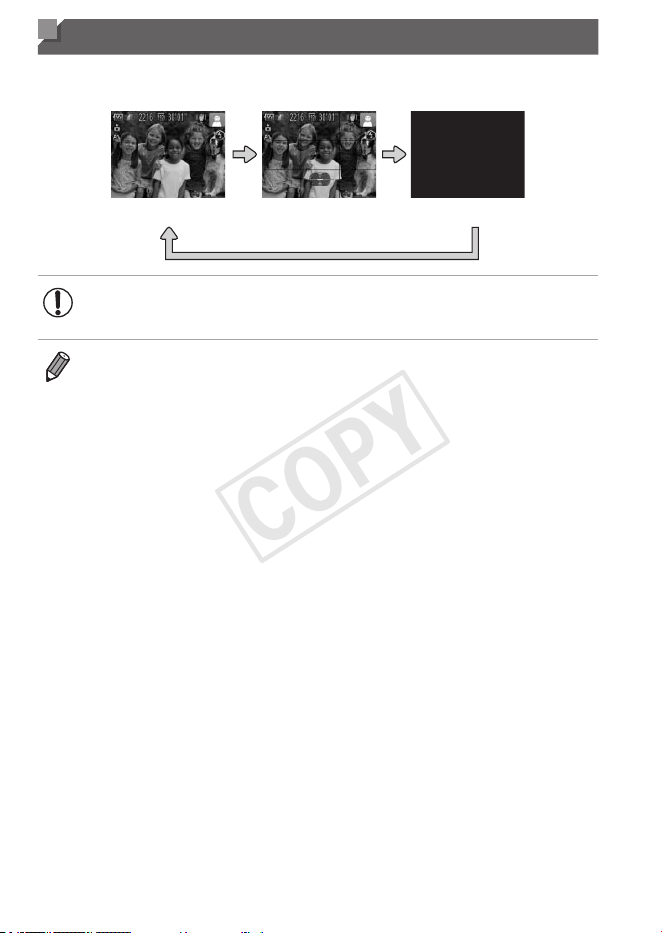
On-Screen Frames
Avarietyofframesaredisplayedoncethecameradetectssubjectsyouare
aimingthecameraat.
• Awhiteframeisdisplayedaroundthesubject(orperson’sface)
determinedbythecameratobethemainsubject,andgrayframesare
displayedaroundotherdetectedfaces.Framesfollowmovingsubjects
withinacertainrangetokeeptheminfocus.
However,ifthecameradetectssubjectmovement,onlythewhiteframe
willremainonthescreen.
• Whenyouarepressingtheshutterbuttonhalfwayandthecamera
detectssubjectmovement,ablueframeisdisplayed,andthefocusand
imagebrightnessareconstantlyadjusted(ServoAF).
• Tryshootingin<G>mode(=
123)ifnoframesaredisplayed,if
framesarenotdisplayedarounddesiredsubjects,orifframesare
displayedonthebackgroundorsimilarareas.
COPY
63
Common, Convenient Features
StillImages Movies
Zooming In Closer on Subjects (Digital Zoom)
Whendistantsubjectsaretoofarawaytoenlargeusingtheopticalzoom,
usedigitalzoomforuptoabout20xenlargement.
1 Movethezoomlevertoward
<i>.
zz Holdtheleveruntilzoomingstops.
XX Zoomingstopsatthelargestpossible
zoomfactor(beforetheimagebecomes
noticeablygrainy),whichisthenindicated
onthescreen.
ZoomFactor
2 Movethezoomlevertoward
<i>again.
XX Thecamerazoomsinevencloseronthe
subject.
• Movingthezoomleverwilldisplaythezoombar(whichindicates
thezoomposition).Thecolorofthezoombarwillchange
dependingonthezoomrange.
-Whiterange:opticalzoomrangewheretheimagewillnotappear
grainy.
-Yellowrange:digitalzoomrangewheretheimageisnot
noticeablygrainy(ZoomPlus).
-Bluerange:digitalzoomrangewheretheimagewillappear
grainy.
Becausethebluerangewillnotbeavailableatsomeresolution
settings(=
81),themaximumzoomfactorcanbeachievedby
followingstep1.
COPY

64
Common,ConvenientFeatures
• Focallengthwhenopticalanddigitalzoomarecombinedisasfollows
(35mmlmequivalent).
28–560mm(28–140mmwithopticalzoomalone)
• Todeactivatedigitalzoom,pressthe<n>button,choose[DigitalZoom]
onthe[4]tab,andthenchoose[Off].
StillImages Movies
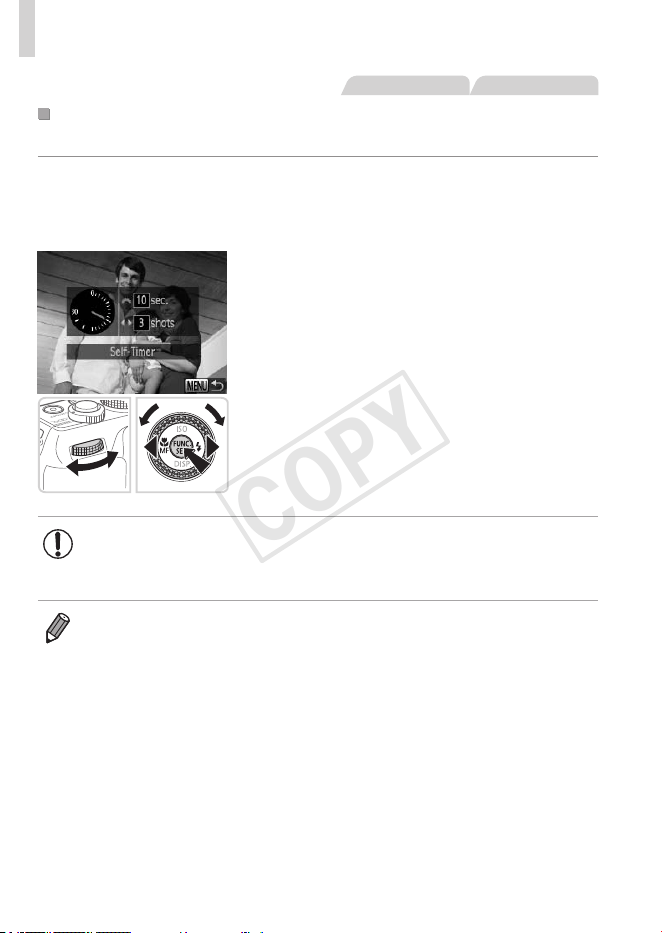
Using the Self-Timer
Withtheself-timer,youcanincludeyourselfingroupphotosorothertimed
shots.Thecamerawillshootabout10secondsafteryoupresstheshutter
button.
1 Congurethesetting.
zz Pressthe<m>button,choose[ ]in
themenu,andthenchoosethe[]]option
(=
47).
XX Oncethesettingiscomplete,[]]is
displayed.
2 Shoot.
zz ForStillImages:Presstheshutterbutton
halfwaytofocusonthesubject,andthen
pressitallthewaydown.
zz ForMovies:Pressthemoviebutton.
COPY

65
Common,ConvenientFeatures
XX Onceyoustarttheself-timer,thelamp
willblinkandthecamerawillplayaself-
timersound.
XX Twosecondsbeforetheshot,theblinking
andsoundwillspeedup.(Thelampwill
remainlitincasetheashres.)
zz Tocancelshootingafteryouhave
triggeredtheself-timer,pressthe
<n>button.
zz Torestoretheoriginalsetting,choose[ ]
instep1.
StillImages Movies
UsingtheSelf-TimertoAvoidCameraShake
Thisoptiondelaysshutterreleaseuntilabouttwosecondsafteryouhave
pressedtheshutterbutton.Ifthecameraisunsteadywhileyouarepressing
theshutterbutton,itwillnotaffectyourshot.
Congurethesetting.
zz Followstep1on=
64andchoose
[[].
XX Oncethesettingiscomplete,[[]is
displayed.
zz Followstep2on=
64toshoot.
COPY
66
Common,ConvenientFeatures
StillImages Movies
CustomizingtheSelf-Timer
Youcanspecifythedelay(0–30seconds)andnumberofshots(1–10).
1 Choose[$].
zz Followingstep1on=
64,choose[$]
andpressthe<n>button.
2 Congurethesetting.
zz Turnthe<z>dialtosetthedelay.
Pressthe<q><r>buttonsorturnthe
<7>dialtospecifythenumberofshots,
andthenpressthe<m>button.
XX Oncethesettingiscomplete,[$]is
displayed.
zz Followstep2on=
64toshoot.
• Formoviesshotusingtheself-timer,thedelayrepresentsthe
delaybeforerecordingbegins,butthesettingforthenumberof
shotshasnoeffect.
• Whenyouspecifymultipleshots,imagebrightnessandwhitebalanceare
determinedbytherstshot.Moretimeisrequiredbetweenshotswhenthe
ashresorwhenyouhavespeciedtotakemanyshots.Shootingwillstop
automaticallywhenthememorycardbecomesfull.
• Whenadelaylongerthantwosecondsisspecied,twosecondsbeforethe
shot,thelampblinkingandself-timersoundwillspeedup.(Thelampwill
remainlitincasetheashres.)
COPY
67
Common,ConvenientFeatures
StillImages
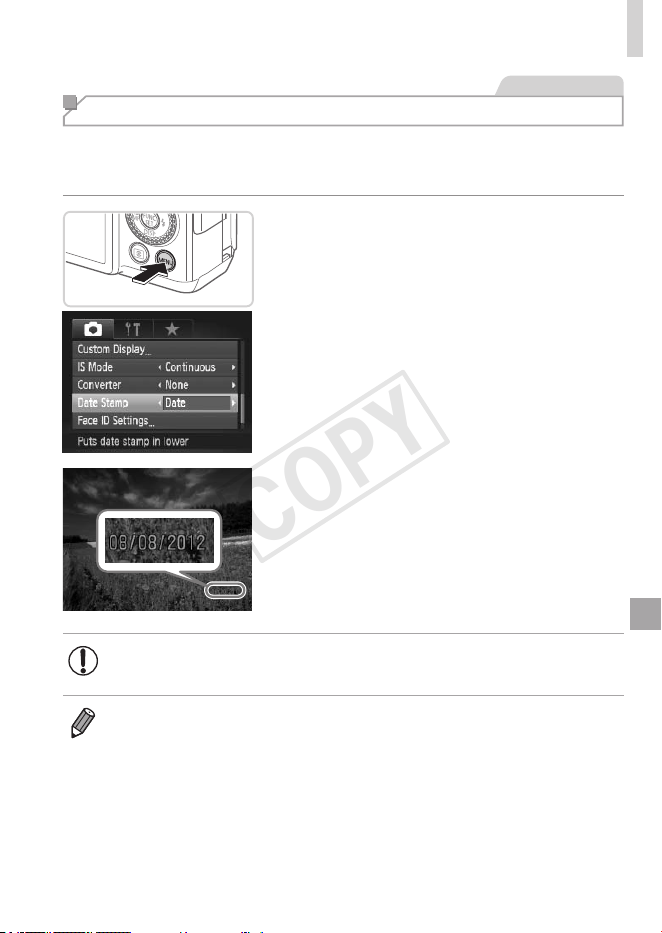
Adding a Date Stamp
Thecameracanaddtheshootingdatetoimages,inthelower-rightcorner.
However,notethatdatestampscannotbeeditedorremoved,soconrm
beforehandthatthedateandtimearecorrect(=
20).
1 Congurethesetting.
zz Pressthe<n>button,choose[Date
Stamp]onthe[4]tab,andthenchoose
thedesiredoption(=
48).
XX Oncethesettingiscomplete,[DATE]is
displayed.
2 Shoot.
XX Asyoutakeshots,thecameraaddsthe
shootingdateortimetothelower-right
cornerofimages.
zz Torestoretheoriginalsetting,choose
[Off]instep1.
• Datestampscannotbeeditedorremoved.
• Shotstakenwithoutaddingadatestampcanbeprintedwithoneasfollows.
However,addingadatestampthiswaytoimagesthatalreadyhaveonemay
causeittobeprintedtwice.
-Usetheincludedsoftwaretoprint
Fordetails,refertotheSoftware Guide(=
30).
-Printusingprinterfunctions(=
259)
-UsecameraDPOFprintsettings(=
266)toprint
COPY

68
Common,ConvenientFeatures
StillImages
Choosing Subjects to Focus On (Tracking AF)
Shootafterchoosingasubjecttofocusonasfollows.
1 SpecifyTrackingAF.
zz Pressthe<o>button.
XX [ ]isdisplayedinthecenterofthe
screen.
2 Chooseasubjecttofocuson.
zz Aimthecamerasothat[ ]isonthe
desiredsubject,andthenpressthe
shutterbuttonhalfway.
XX Ablueframeisdisplayed,andthe
camerawillkeepthesubjectinfocusand
imagebrightnessadjusted(ServoAF).
3 Shoot.
zz Presstheshutterbuttonallthewaydown
toshoot.
zz Pressthe<o>buttontocancelTracking
AF.
• Trackingmaynotbepossiblewhensubjectsaretoosmallormovetoo
rapidly,orwhensubjectcolororbrightnessmatchesthatofthebackground
tooclosely.
COPY
69
Using Face ID
Ifyouregisterapersonaheadoftime,thecamerawilldetectthatperson’s
face,andprioritizefocus,brightness,andcolorforthatpersonwhen
shooting.In<A>mode,thecameracandetectbabiesandchildren
basedonregisteredbirthdaysandoptimizesettingsforthemwhen
shooting.
Thisfunctionisalsousefulwhensearchingforaspecicregisteredperson
amongalargenumberofimages(=
181).
PersonalInformation
• Informationsuchasimagesofaface(faceinfo)registeredwithFaceID,
andpersonalinformation(name,birthday)willbesavedonthecamera.
Additionally,whenregisteredpeoplearedetected,theirnameswillbe
recordedinstillimages.WhenusingtheFaceIDfunction,becareful
whensharingthecameraorimageswithothers,andwhenposting
imagesonlinewheremanyotherscanviewthem.
• Whendisposingofacameraortransferringittoanotherpersonafter
usingFaceID,besuretoeraseallinformation(registeredfaces,names,
andbirthdays)fromthecamera(=
79).
Registering Face ID Information
Youcanregisterinformation(faceinfo,name,birthday)forupto12people
tousewithFaceID.
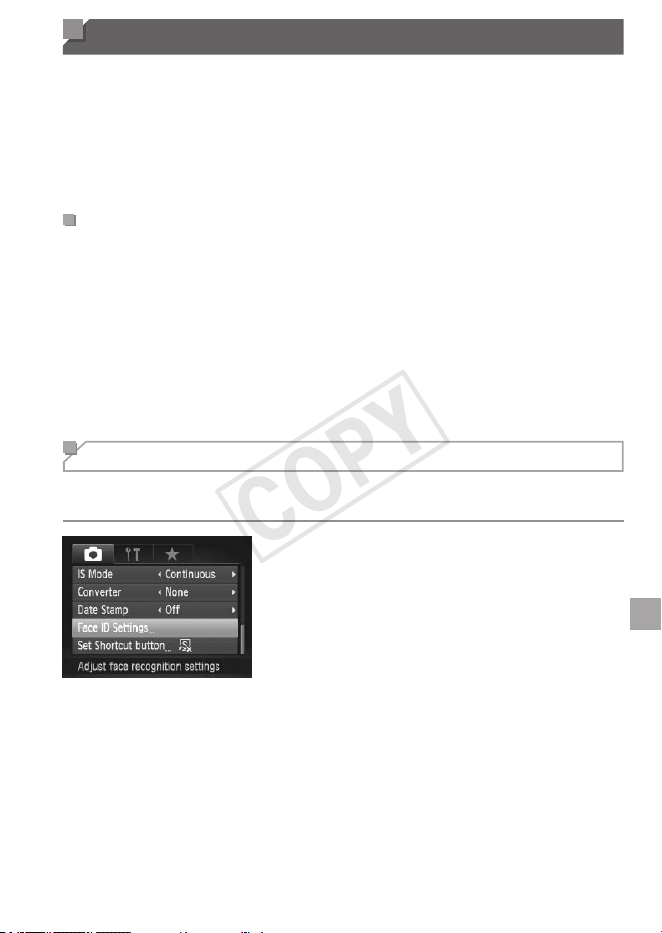
1 Accessthesettingscreen.
zz Pressthe<n>button,choose[Face
IDSettings]onthe[4]tab,andthen
pressthe<m>button(=
48).
COPY
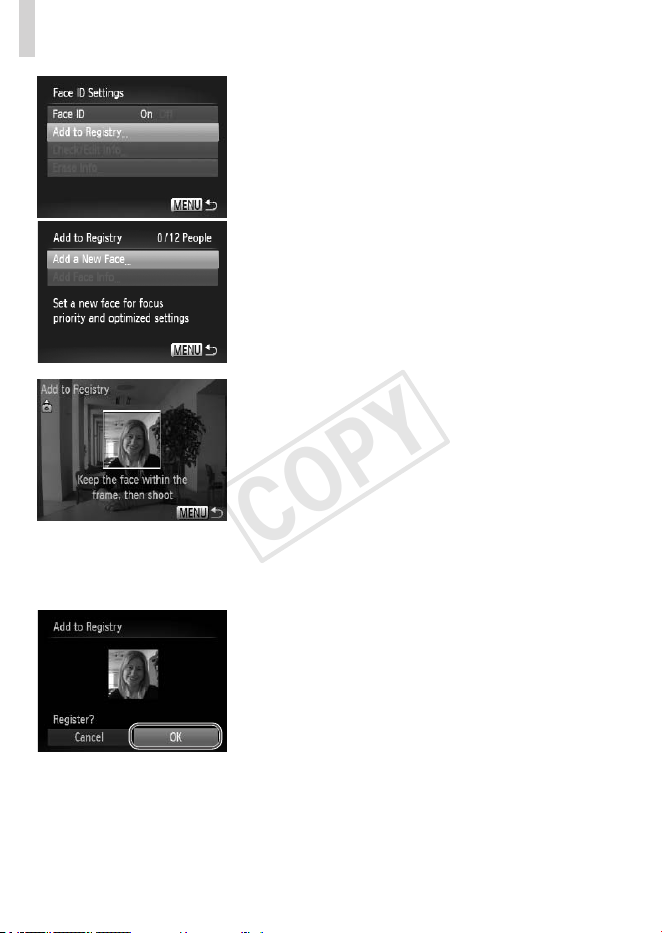
70
UsingFaceID
zz Pressthe<o><p>buttonsorturnthe
<7>dialtochoose[AddtoRegistry],
andthenchoose[AddaNewFace].
2 Registerfaceinformation.
zz Aimthecamerasothatthefaceofthe
personyouwanttoregisterisinsidethe
grayframeatthecenterofthescreen.
zz Awhiteframeontheperson’sface
indicatesthatthefaceisrecognized.
Makesureawhiteframeisdisplayedon
theface,andthenshoot.
zz Ifthefaceisnotrecognized,youcannot
registerfaceinformation.
3 Savethesettings.
zz After[Register?]isdisplayed,pressthe
<q><r>buttonsorturnthe<7>dialto
choose[OK],andthenpressthe<m>
button.
COPY
71
UsingFaceID
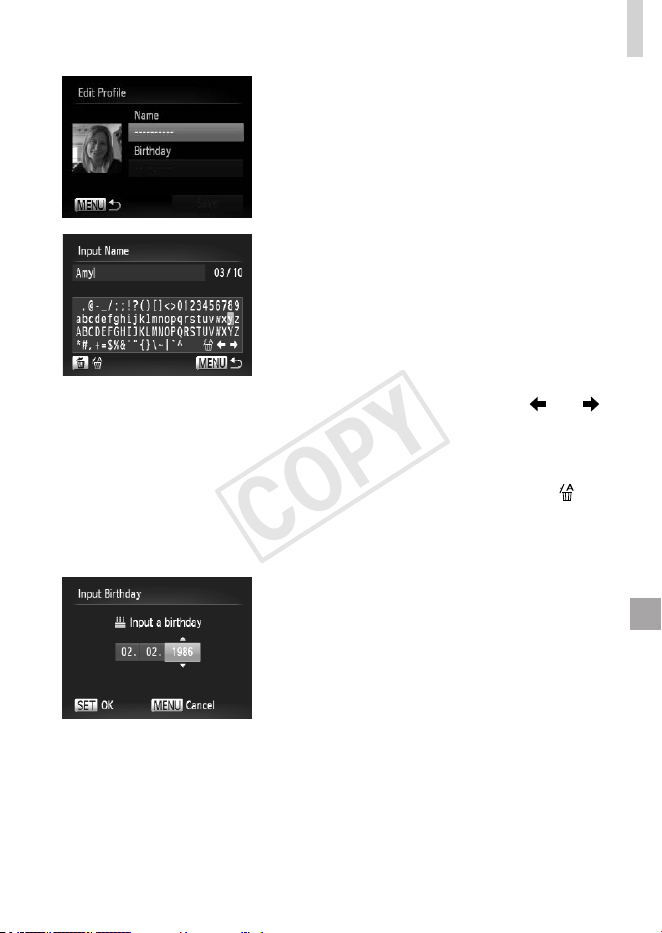
XX The[EditProle]screenisdisplayed.
4 Enteraname.
zz Pressthe<m>button.
zz Pressthe<o><p><q><r>buttonsor
turnthe<7>dialtochooseacharacter,
andthenpressthe<m>buttontoenter
it.
zz Upto10characterscanbeused.
zz Tomovethecursor,choose[ ]or[ ]
andpressthe<m>button,orturnthe
<z>dial.
zz Todeletethepreviouscharacter,either
pressthe<a>buttonorchoose[
]and
pressthe<m>button.
zz Pressthe<n>buttontoreturntothe
editprolescreen.
5 Enterabirthday.
zz Pressthe<o><p>buttonsorturnthe
<7>dialtochoose[Birthday],andthen
pressthe<m>button.
zz Pressthe<q><r>buttonstochoosea
setting.
zz Pressthe<o><p>buttonsorturnthe
<7>dialtospecifythedate.
zz Whennished,pressthe<m>button.
COPY

72
UsingFaceID
6 Savethesettings.
zz Pressthe<o><p>buttonsorturnthe
<7>dialtochoose[Save],andthen
pressthe<m>button.
zz Afteramessageisdisplayed,pressthe
<q><r>buttonsorturnthe<7>dialto
choose[Yes],andthenpressthe<m>
button.
7 Continueregisteringface
information.
zz Toregisterupto4morepointsofface
information(expressionsorangles),
repeatsteps2–3.
zz Registeredfacesaremoreeasily
recognizedifyouaddavarietyofface
information.Inadditiontoahead-on
angle,addaslightsideangle,ashot
whensmiling,andshotsinsideand
outside.
• Theashwillnotrewhenfollowingstep2.
• Ifyoudonotregisterabirthdayinstep5,BabiesorChildrenicons
(=
59)willnotdisplayin<A>mode.
• Youcanoverwriteregisteredfaceinfo,andaddfaceinfolaterifyouhavenot
lledall5faceinfoslots(=
76).
COPY
73
UsingFaceID
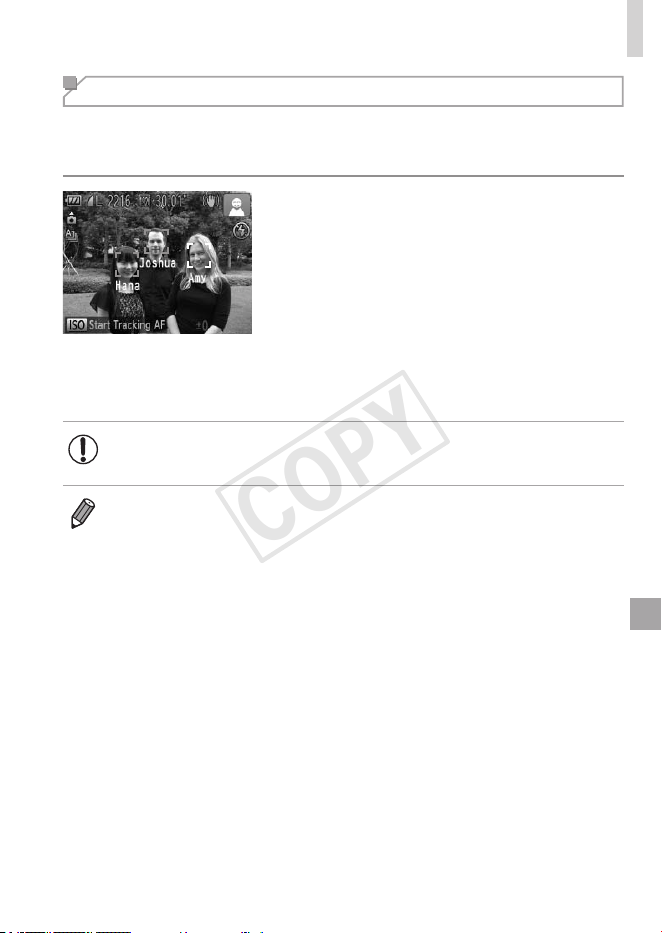
Shooting
Ifyouregisterapersonaheadoftime,thecamerawillprioritizethatperson
asthemainsubject,andoptimizefocus,brightness,andcolorforthat
personwhenshooting.
XX Whenyoupointthecameratowarda
subject,thenamesofupto3registered
peoplewillbedisplayedwhentheyare
detected.
zz Shoot.
XX Displayednameswillberecordedinstill
images.Evenifpeoplearedetected,but
theirnamesarenotdisplayed,thenames
(upto5people)willberecordedinthe
image.
• Peopleotherthanthoseregisteredmaybemistakenlydetectedas
theregisteredpersoniftheysharesimilarfacialfeatures.
• Registeredpeoplemaynotbecorrectlydetectedifthecapturedimageor
scenediffersdrasticallyfromtheregisteredfaceinformation.
• Ifaregisteredfaceisnotdetected,ornoteasilydetected,overwrite
registeredinformationwithnewfaceinfo.Registeringfaceinforightbefore
shootingwillallowforeasierdetectionofregisteredfaces.
• Ifapersonismistakenlydetectedasanotherpersonandyoucontinue
shooting,youcaneditorerasethenamerecordedintheimageduring
playback(=
187).
• Becausefacesofbabiesandchildrenchangequicklyastheygrow,you
shouldupdatetheirfaceinforegularly(=
76).
• Wheninformationdisplayissettooff(=
46),nameswillnotdisplay,but
willberecordedintheimage.
• Ifyoudon’twantnamestoberecordedinstillimages,choose[FaceID
Settings]onthe[4]tab,choose[FaceID],andthenchoose[Off].
• Youcanchecknamesrecordedinimagesintheplaybackscreen(simple
informationdisplay)(=
174).
COPY
74
UsingFaceID
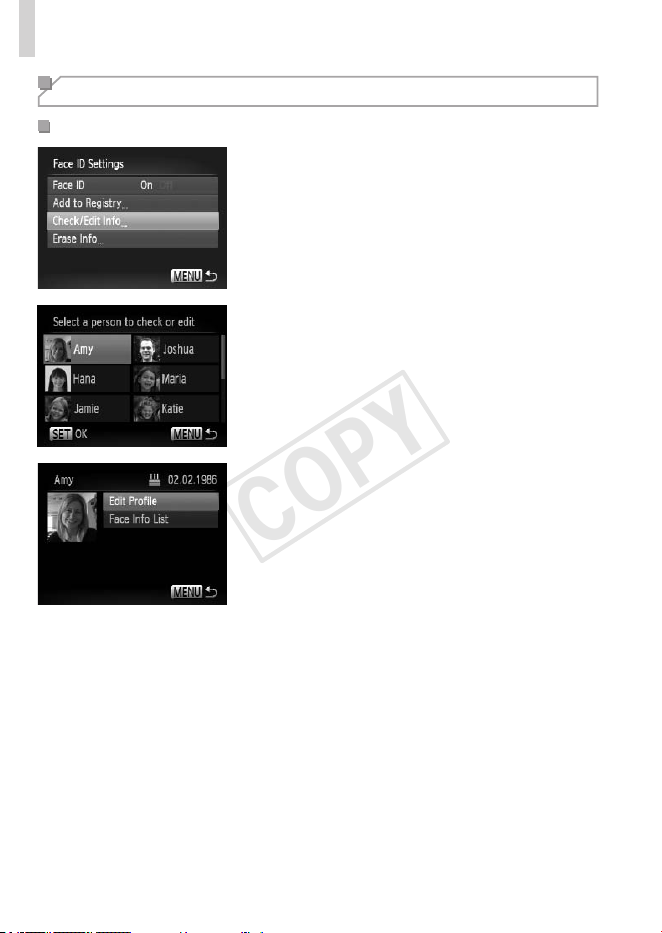
Checking and Editing Registered Information
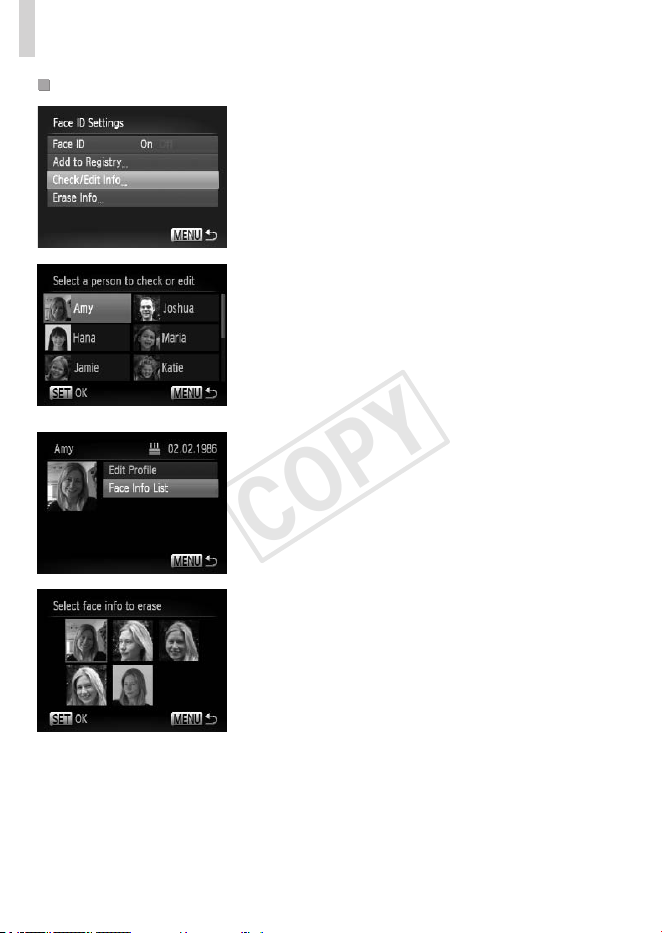
CheckingRegisteredFaceIDInformation
1 Accessthe[Check/EditInfo]
screen.
zz Followingstep1on=
69,choose
[Check/EditInfo]andpressthe<m>
button.
2 Chooseapersontocheck.
zz Pressthe<o><p><q><r>buttonsor
turnthe<7>dialtochooseaperson,
andthenpressthe<m>button.
3 Checktheregistered
information.
zz Pressthe<o><p>buttonsorturnthe
<7>dialtochooseanitem,andthen
pressthe<m>button.
zz Checktheregisteredinformation.
COPY

75
UsingFaceID
ChangingtheNameorBirthday
1 Accessthe[EditProle]screen.
zz Followingsteps1–3on=
74,choose
[EditProle]andpressthe<m>button.
2 Inputchanges.
zz Pressthe<o><p>buttonsorturnthe
<7>dialtochooseanitem,andfollow
steps4–5on=
71toinputchanges.
• Evenifyouchangenamesin[EditProle],thenamesrecordedin
previouslyshotimageswillremainthesame.
• Youcanusetheincludedsoftwaretoeditregisterednames.Some
charactersenteredwiththeincludedsoftwaremaynotdisplayonthe
camera,butwillbecorrectlyrecordedinimages.
COPY

76
UsingFaceID
OverwritingandAddingFaceInformation
Youcanoverwriteexistingfaceinformationwithnewfaceinfo.Youshould
updatefaceinformationregularly,especiallywithbabiesandchildren,as
theirfaceschangequicklyastheygrow.
Youcanalsoaddfaceinformationwhenall5faceinfoslotshavenotbeen
lled.
1 Accessthe[AddFaceInfo]
screen.
zz Onthescreeninstep1on=
69,
choose[AddFaceInfo]andpressthe
<m>button.
2 Choosethenameoftheperson
tooverwrite.
zz Pressthe<o><p><q><r>buttonsor
turnthe<7>dialtochoosethenameof
apersontooverwrite,andthenpressthe
<m>button.
zz If4orlessfaceinformationslotsare
registered,followstep5on=
77to
addmorefaceinfo.
3 Accessthefaceinfoscreen.
zz Readthemessagethatdisplays,press
the<q><r>buttonsorturnthe<7>dial
tochoose[OK],andthenpressthe<m>
button.
XX Thefaceinfoscreenisdisplayed.
COPY

77
UsingFaceID
4 Choosethefaceinfoto
overwrite.
zz Pressthe<o><p><q><r>buttonsor
turnthe<7>dialtochoosethefaceinfo
tooverwrite,andthenpressthe<m>
button.
5 Registerfaceinformation.
zz Followsteps2–3on=
70to
shoot,andthenregisterthenewface
information.
zz Registeredfacesaremoreeasily
recognizedifyouaddavarietyofface
information.Inadditiontoahead-on
angle,addaslightsideangle,ashot
whensmiling,andshotsinsideand
outside.
• Youcannotaddfaceinformationifall5informationslotsarelled.Followthe
stepsabovetooverwritefaceinformation.
• Youcanfollowtheabovestepstoregisternewfaceinfowhenthereisat
leastoneslotopen,howeveryoucannotoverwriteanyfaceinformation.
Insteadofoverwritingfaceinfo,rsteraseunwantedexistinginfo(=
78),
andthenregisternewfaceinformation(=
69)asneeded.
COPY
78
UsingFaceID
ErasingFaceInformation
1 Accessthe[Check/EditInfo]
screen.
zz Followingstep1on=
69,choose
[Check/EditInfo]andpressthe<m>
button.
2 Choosethenameoftheperson
whosefaceinfoyouwantto
erase.
zz Pressthe<o><p><q><r>buttonsor
turnthe<7>dialtochoosethenameof
thepersonwhosefaceinfoyouwantto
erase,andthenpressthe<m>button.
3 Accessthe[FaceInfoList]
screen.
zz Pressthe<o><p>buttonsorturnthe
<7>dialtochoose[FaceInfoList],and
thenpressthe<m>button.
4 Choosethefaceinfotoerase.
zz Pressthe<m>button,pressthe
<o><p><q><r>buttonsorturnthe
<7>dialtochoosethefaceinfoyou
wanttoerase,andthenpressthe<m>
button.
zz After[Erase?]isdisplayed,pressthe
<q><r>buttonsorturnthe<7>dialto
choose[OK],andthenpressthe<m>
button.
XX Theselectedfaceinfowillbeerased.
COPY
79
UsingFaceID
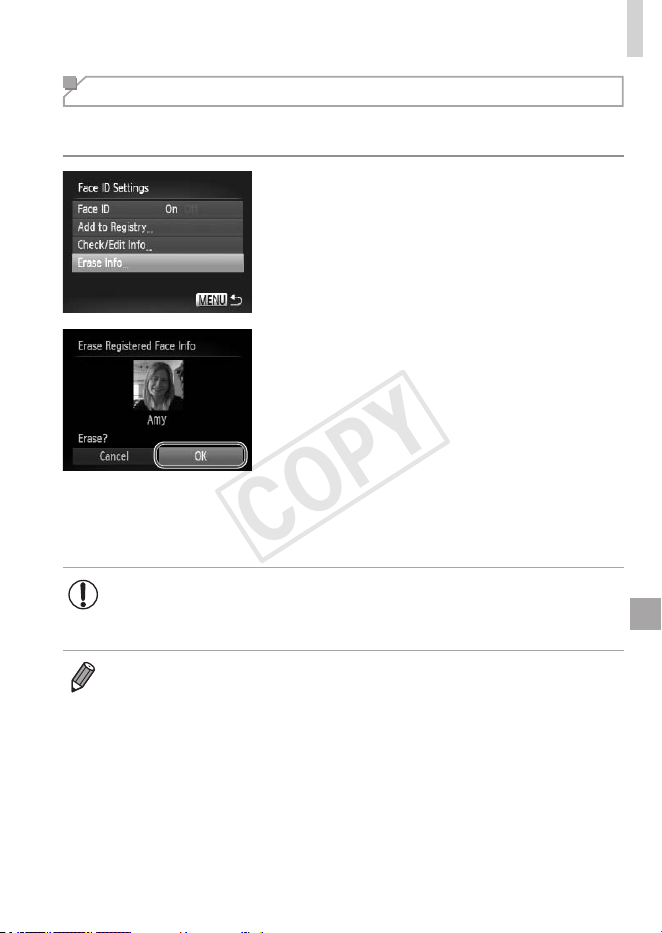
Erasing Registered Information
Youcaneraseinformation(faceinfo,name,birthday)registeredtoFaceID.
However,namesrecordedinpreviouslyshotimageswillnotbeerased.
1 Accessthe[EraseInfo]screen.
zz Followstep1on=
69andchoose
[EraseInfo].
2 Choosethenameoftheperson
whoseinfoyouwanttoerase.
zz Pressthe<o><p><q><r>buttonsor
turnthe<7>dialtochoosethename
ofapersontoerase,andthenpressthe
<m>button.
zz After[Erase?]isdisplayed,pressthe
<q><r>buttonsorturnthe<7>dialto
choose[OK],andthenpressthe<m>
button.
• Ifyouerasearegisteredperson’sinfo,youwillnotbeableto
displaytheirname(=
46),overwritetheirinfo(=
187),or
searchimagesforthem(=
181).
• Youcanalsoeraseaperson’snameonlyfromimages(=
188).
COPY
80
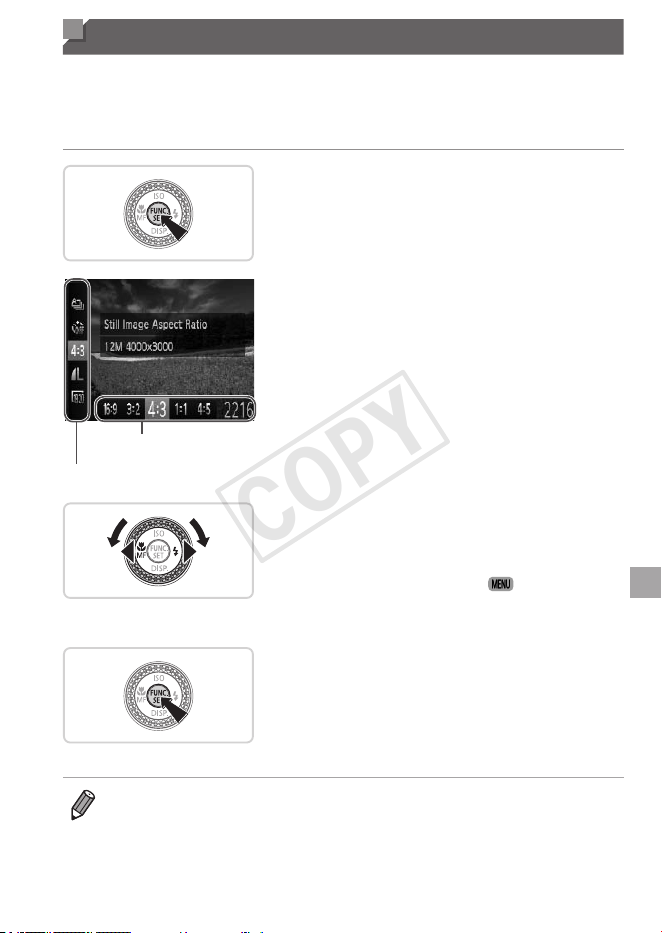
Image Customization Features
StillImages
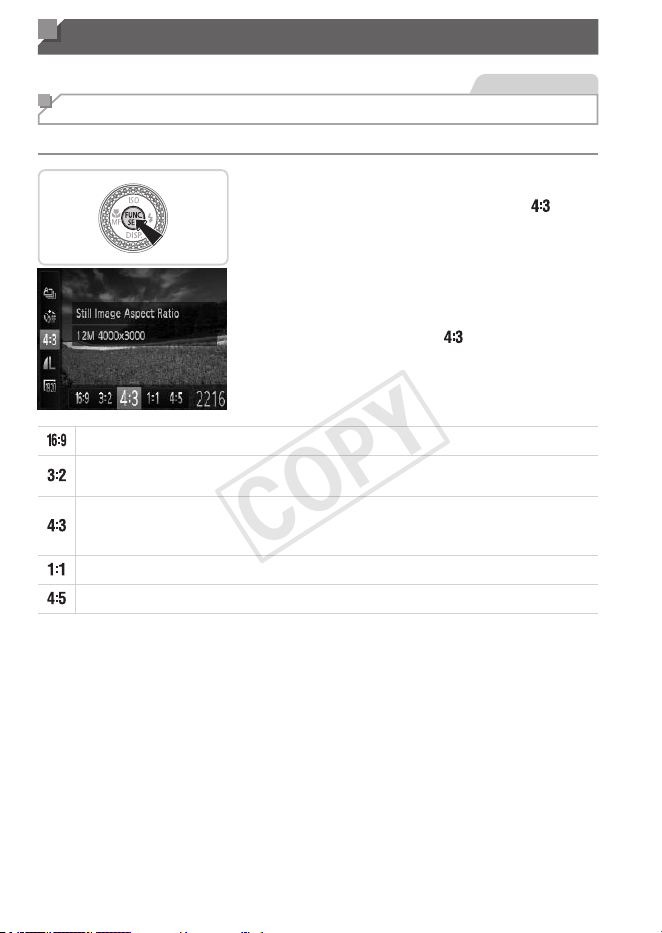
Changing the Aspect Ratio
Changetheimageaspectratio(ratioofwidthtoheight)asfollows.
Congurethesetting.
zz Pressthe<m>button,choose[ ]in
themenu,andchoosethedesiredoption
(=
47).
XX Oncethesettingiscomplete,thescreen
aspectratiowillbeupdated.
zz Torestoretheoriginalsetting,repeatthis
processbutchoose[
].
UsedfordisplayonwidescreenHDTVsorsimilardisplaydevices.
Sameaspectratioas35mmlm,usedforprintingimagesat5x7-inchor
postcardsizes.
Nativeaspectratioofthecamerascreen,alsousedfordisplayonstandard-
denitiontelevisionsorsimilardisplaydevices,orforprintingimagesat
3.5x5-inchorA-seriessizes.
Squareaspectratio.
Aspectratiocommonlyusedforportraits.
COPY
81
ImageCustomizationFeatures
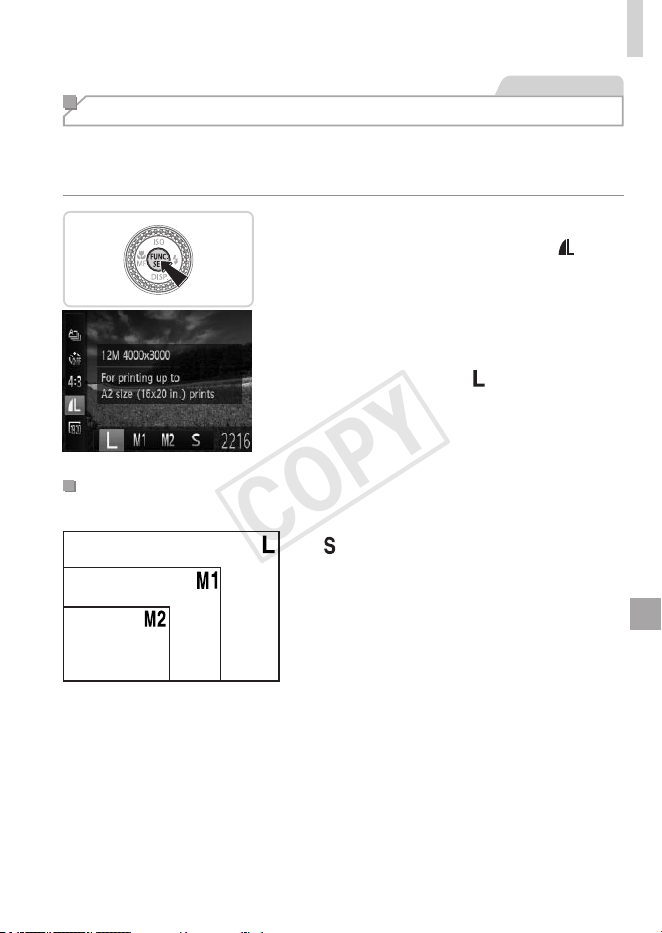
StillImages
Changing Image Resolution (Size)
Choosefrom4levelsofimageresolution,asfollows.Forguidelineson
howmanyshotsateachresolutionsettingcantonamemorycard,see
“Specications”(=
303).
Congurethesetting.
zz Pressthe<m>button,choose[ ]in
themenu,andchoosethedesiredoption
(=
47).
XX Theoptionyouconguredisnow
displayed.
zz Torestoretheoriginalsetting,repeatthis
processbutchoose[
].
GuidelinesforChoosingResolutionBasedonPaper
Size(for4:3Images)
A2(16.5x23.4in.)
A3–A5(11.7x
16.5–5.8x8.3in.)
5x7in.
Postcard
3.5x5in.
zz [ ]:Fore-mailingimages.
COPY
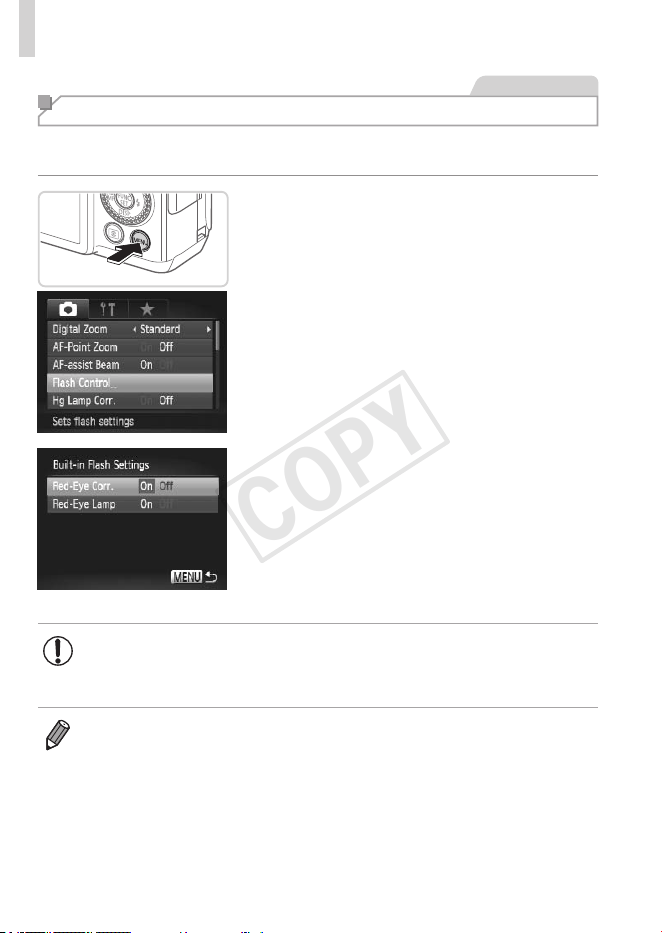
82
ImageCustomizationFeatures
StillImages
Red-Eye Correction
Red-eyethatoccursintheashphotographycanbeautomatically
correctedasfollows.
1 Accessthe[Built-inFlash
Settings]screen.
zz Pressthe<n>button,choose[Flash
Control]onthe[4]tab,andthenpress
the<m>button(=
48).
2 Congurethesetting.
zz Choose[Red-EyeCorr.],andthen
choose[On](=
48).
XX Oncethesettingiscomplete,[R]is
displayed.
zz Torestoretheoriginalsetting,repeatthis
processbutchoose[Off].
• Red-eyecorrectionmaybeappliedtoimageareasotherthan
eyes(ifthecameramisinterpretsredeyemakeupasredpupils,
forexample).
• Youcanalsocorrectexistingimages(=
211).
• Youcanalsoaccessthescreeninstep2byholdingdownthe<r>buttonfor
atleastonesecond.
• Youcanalsoaccessthescreeninstep2whentheashisupbypressing
the<r>buttonandimmediatelypressingthe<n>button.
COPY
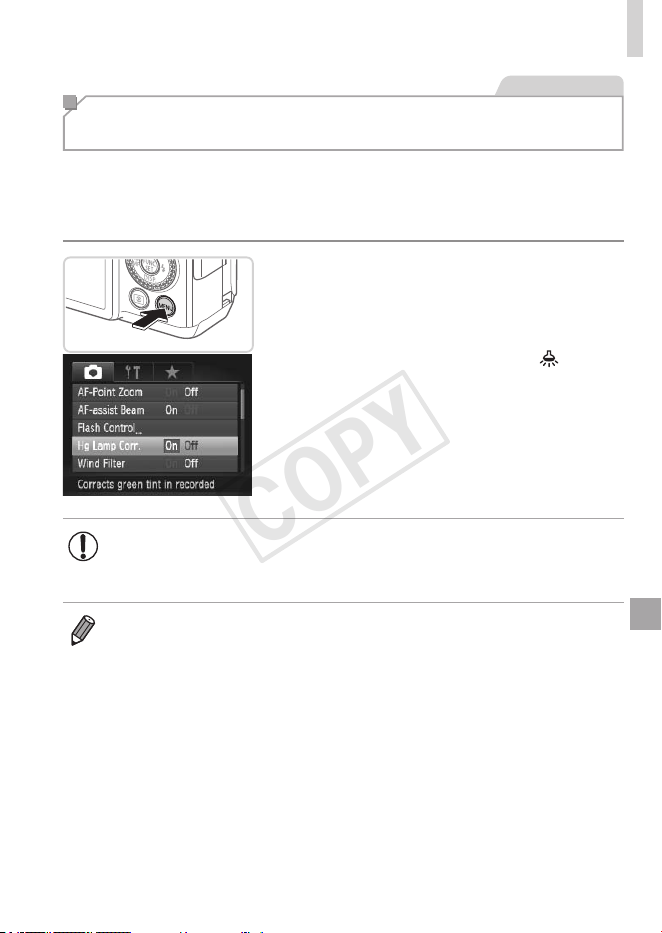
83
ImageCustomizationFeatures
StillImages
Correcting Greenish Image Areas from
Mercury Lamps
Inshotsofeveningsceneswithsubjectsilluminatedbymercurylamps,the
subjectsorbackgroundmayappeartohaveagreenishtinge.Thisgreenish
tingecanbecorrectedautomaticallywhenshooting,usingMulti-areaWhite
Balance.
Congurethesetting.
zz Pressthe<n>button,choose[Hg
LampCorr.]onthe[4]tab,andthen
choose[On](=
48).
XX Oncethesettingiscomplete,[ ]is
displayed.
zz Torestoretheoriginalsetting,repeatthis
processbutchoose[Off].
• Afteryouarenishedshootingundermercurylamps,youshould
set[HgLampCorr.]backto[Off].Otherwise,greenhuesnot
causedbymercurylampsmaybecorrectedbymistake.
• Trytakingsometestshotsrsttomakesureyouobtainthedesiredresults.
COPY
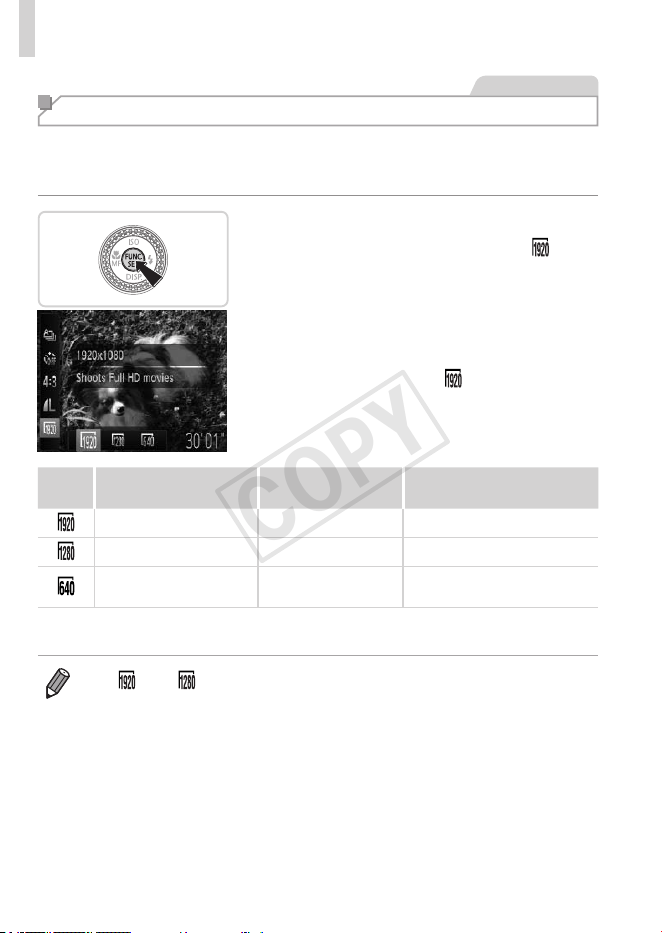
84
ImageCustomizationFeatures
Movies
Changing Movie Image Quality
3imagequalitysettingsareavailable.Forguidelinesonthemaximum
movielengthateachlevelofimagequalitythatwilltonamemorycard,
see“Specications”(=
303).
Congurethesetting.
zz Pressthe<m>button,choose[ ]in
themenu,andchoosethedesiredoption
(=
47).
XX Theoptionyouconguredisnow
displayed.
zz Torestoretheoriginalsetting,repeatthis
processbutchoose[
].
Image
Quality
Resolution FrameRate Details
1920x1080* 24fps ForshootinginFullHD
1280x720 30fps ForshootinginHD
640x480 30fps
Forshootinginstandard
denition
*FineDetailMovieProcessing(Thisfunctionquicklyprocessesalargeamountof
information,makingitpossibletorecordevennerdetailsinmovies.)
• In[ ]and[ ]modes,blackbarsdisplayedonthetopandbottomedges
ofthescreenindicateimageareasnotrecorded.
COPY
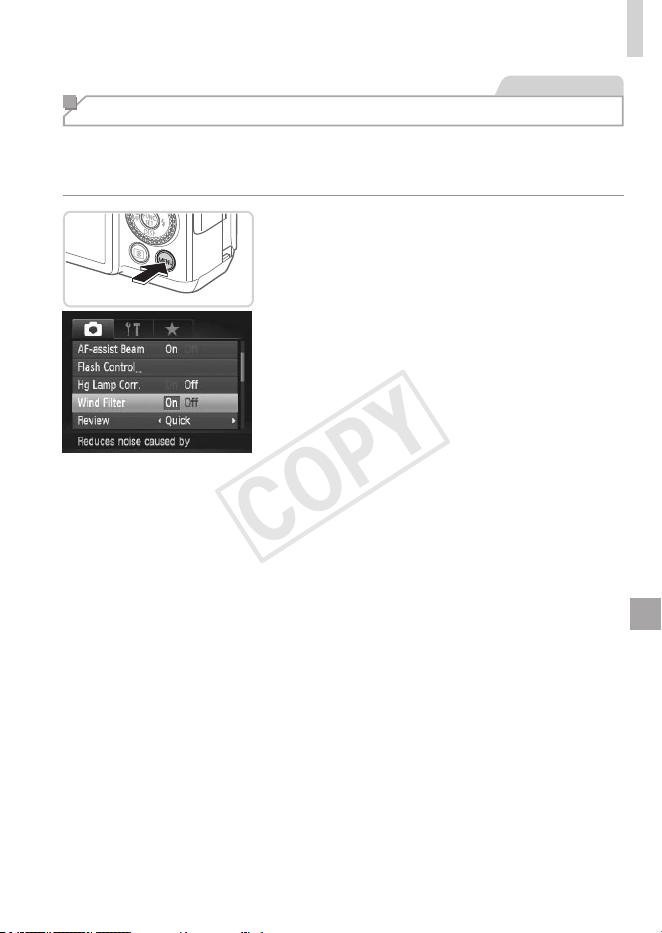
85
ImageCustomizationFeatures
Movies
Using the Wind Filter
Distortedaudiocausedbyrecordingwhenthewindisstrongcanbe
reduced.However,therecordingmaysoundunnaturalwhenthisoptionis
usedwhenthereisnowind.
Congurethesetting.
zz Pressthe<n>button,choose[Wind
Filter]onthe[4]tab,andthenchoose
[On](=
48).
zz Torestoretheoriginalsetting,repeatthis
processbutchoose[Off].
COPY
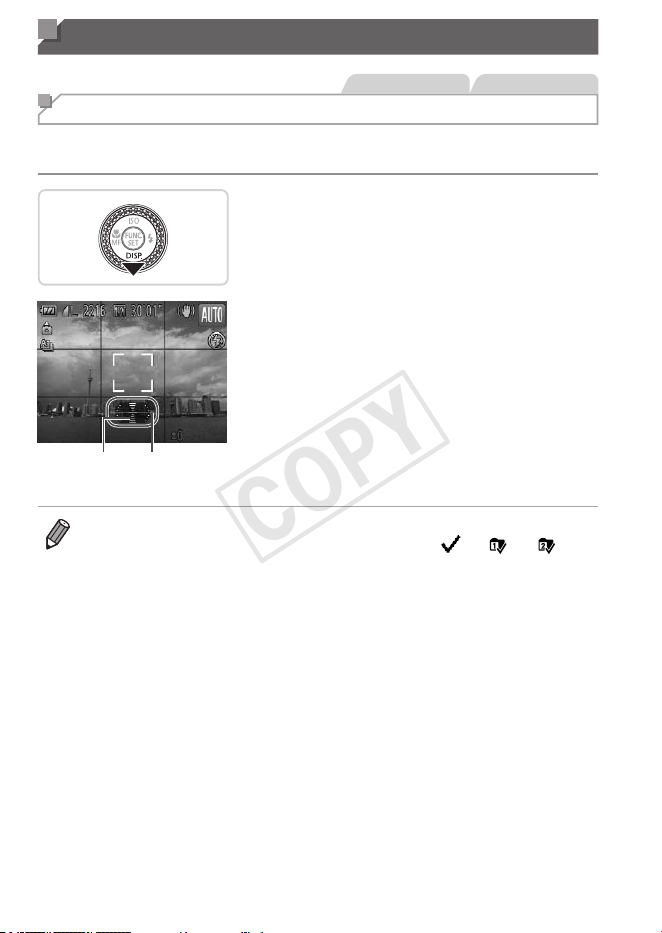
86
Helpful Shooting Features
StillImages Movies
Using the Dual Axis Electronic Level
Anelectroniclevelcanbedisplayedasaguidelinetoensurethecamerais
levelfromfronttobackandlefttoright.
1 Displaytheelectroniclevel.
zz Pressthe<p>buttonseveraltimesto
displaytheelectroniclevel.
Backor
Forward
LeftorRight
2 Straightenthecamera.
zz Ifthecameraistilted,moveitsothatthe
redlinechangestogreen.
• Iftheelectroniclevelisnotdisplayedinstep1,pressthe<n>button,
andonthe[4]tab,choose[CustomDisplay].Adda[
]to[ ]or[ ]to
choosetheelectroniclevel.
• Theelectroniclevelisnotdisplayedduringmovierecording.
• Ifyouholdthecameravertically,theorientationoftheelectroniclevelwillbe
updatedautomaticallytomatchthecameraorientation.
• Calibratetheelectroniclevelifitseemsineffectiveinhelpingyoulevelthe
camera(=
228).
COPY
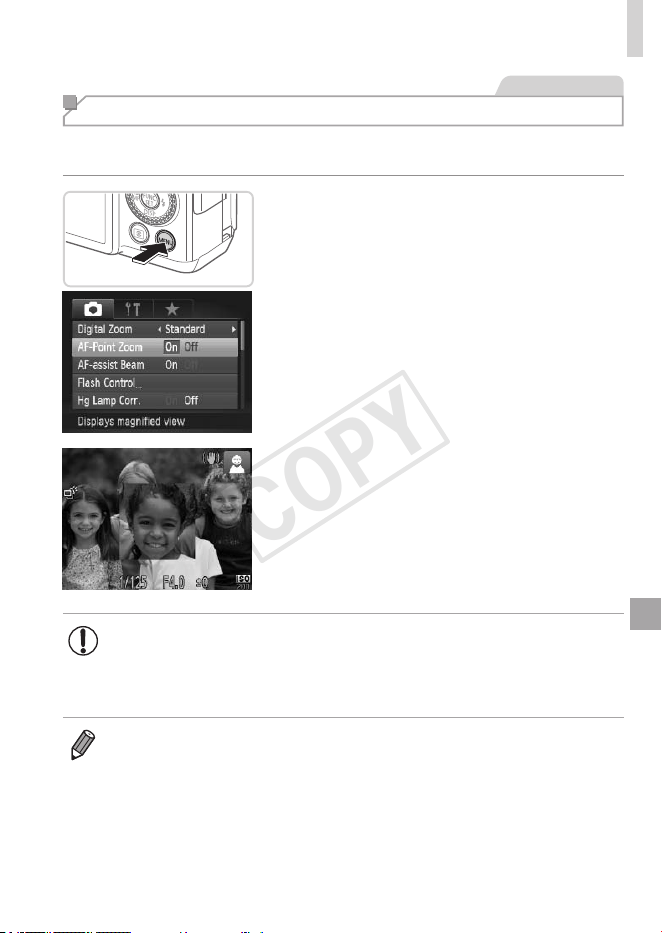
87
HelpfulShootingFeatures
StillImages
Magnifying the Area in Focus
Youcancheckthefocusbypressingtheshutterbuttonhalfway,whichwill
enlargetheportionoftheimageinfocusintheAFframe.
1 Congurethesetting.
zz Pressthe<n>button,choose
[AF-PointZoom]onthe[4]tab,and
thenchoose[On](=
48).
2 Checkthefocus.
zz Presstheshutterbuttonhalfway.The
facedetectedasthemainsubjectisnow
magnied.
zz Torestoretheoriginalsetting,choose
[Off]instep1.
• Theareainfocuswillnotbemagniedwhenyoupresstheshutter
buttonhalfwayifafacewasnotdetected,ifthepersonistooclose
tothecameraandtheirfaceistoolargeforthescreen,orifthe
cameradetectssubjectmovement.
• Thedisplaywillnotmagnifywhenusingthedigitalzoom(=
63)or
TrackingAF(=
148).
COPY

88
HelpfulShootingFeatures
StillImages
Checking for Closed Eyes
[ ]isdisplayedwhenthecameradetectsthatpeoplemayhaveclosed
theireyes.
1 Congurethesetting.
zz Pressthe<n>button,choose[Blink
Detection]onthe[4]tab,andthen
choose[On](=
48).
2 Shoot.
XX [ ]isdisplayedwhenthecamera
detectsapersonwhoseeyesareclosed.
zz Torestoretheoriginalsetting,choose
[Off]instep1.
• Whenyouhavespeciedmultipleshotsin[$]mode,thisfunctionisonly
availableforthenalshot.
• Thisfeatureisnotavailableduringcontinuousshootingin[
]mode
(=
139).
• Aframeisdisplayedaroundpeoplewhoseeyesareclosedwhenyou
haveselected2–10secondsin[Review],orifyouhaveselected[Hold]
(=
90).
COPY
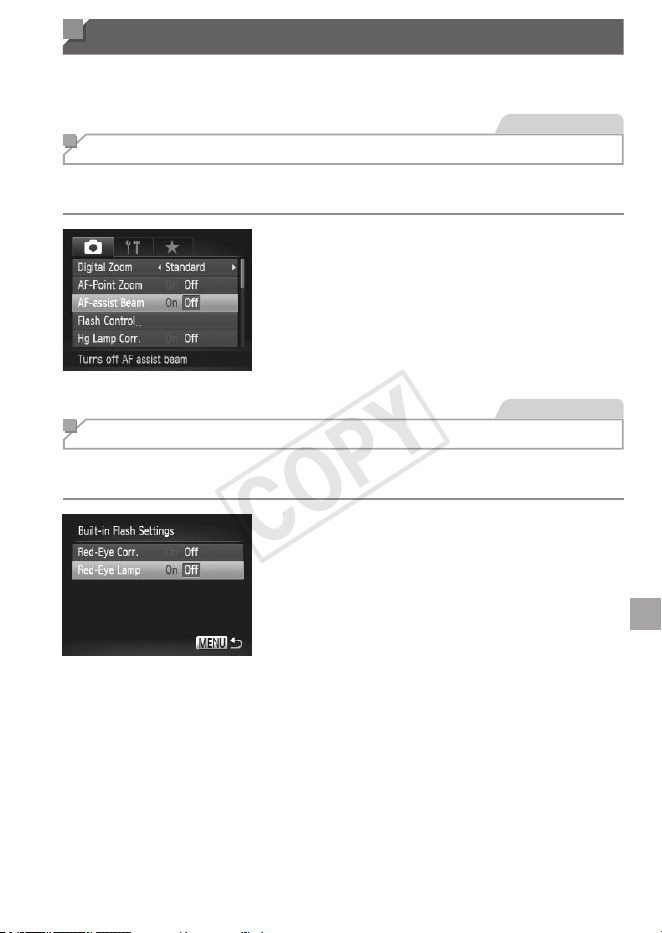
89
Customizing Camera Operation
Customizeshootingfunctionsonthe[4]tabofthemenuasfollows.
Forinstructionsonmenufunctions,see“nMenu”(=
48).
StillImages
Deactivating the AF Assist Beam
Youcandeactivatethelampthatnormallylightsuptohelpyoufocuswhen
youpresstheshutterbuttonhalfwayinlow-lightconditions.
Congurethesetting.
zz Pressthe<n>button,choose
[AF-assistBeam]onthe[4]tab,and
thenchoose[Off](=
48).
zz Torestoretheoriginalsetting,repeatthis
processbutchoose[On].
StillImages
Deactivating the Red-Eye Reduction Lamp
Youcandeactivatethered-eyereductionlampthatlightsuptoreducered-
eyewhentheashisusedinlow-lightshots.
1 Accessthe[Built-inFlash
Settings]screen.
zz Pressthe<n>button,choose[Flash
Control]onthe[4]tab,andthenpress
the<m>button(=
48).
2 Congurethesetting.
zz Choose[Red-EyeLamp],andthen
choose[Off](=
48).
zz Torestoretheoriginalsetting,repeatthis
processbutchoose[On].
COPY
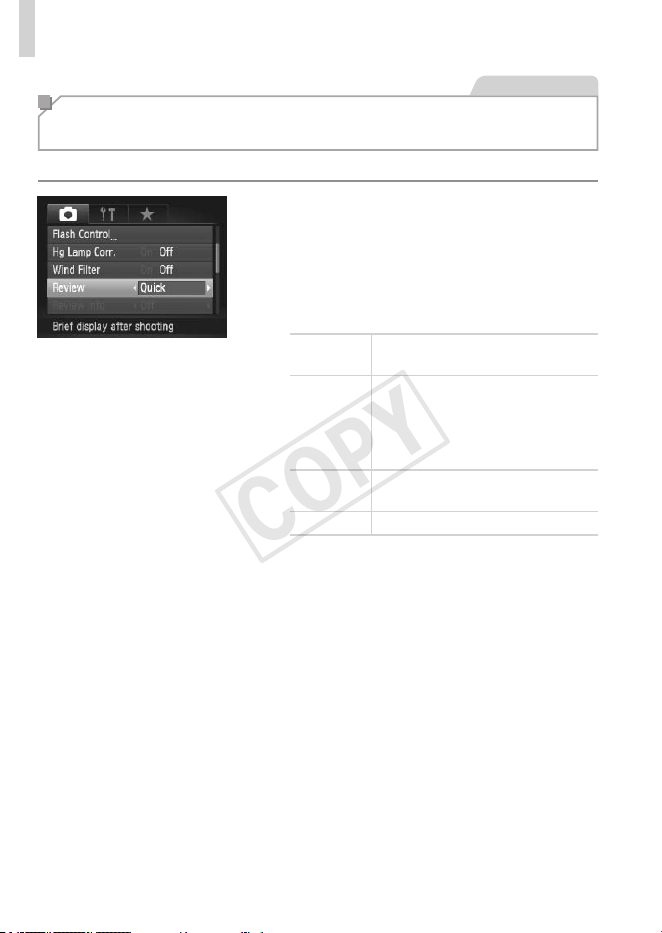
90
CustomizingCameraOperation
StillImages
Changing the Image Display Period After
Shots
Changehowlongimagesaredisplayedaftershotsasfollows.
Congurethesetting.
zz Pressthe<n>button,choose
[Review]onthe[4]tab,andthen
choosethedesiredoption(=
48).
zz Torestoretheoriginalsetting,repeatthis
processbutchoose[Quick].
Quick
Displaysimagesonlyuntilyoucan
shootagain.
2–10sec.
Displaysimagesforthespecied
time.Evenwhiletheshotis
displayed,youcantakeanother
shotbypressingtheshutterbutton
halfwayagain.
Hold
Displaysimagesuntilyoupress
theshutterbuttonhalfway.
Off Noimagedisplayaftershots.
COPY
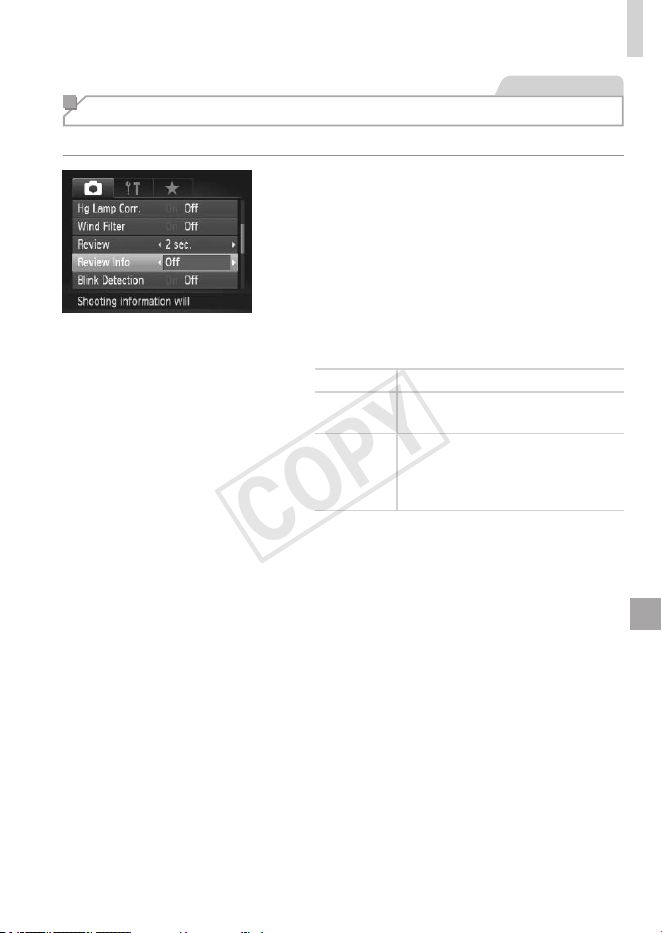
91
CustomizingCameraOperation
StillImages
Changing the Image Display Style After Shots
Changethewayimagesaredisplayedaftershotsasfollows.
1 In[Review],chooseeither2–10
secondsor[Hold](=
90).
2 Congurethesetting.
zz Pressthe<n>button,choose
[ReviewInfo]onthe[4]tab,andthen
choosethedesiredoption(=
48).
zz Torestoretheoriginalsetting,repeatthis
processbutchoose[Off].
Off Displaysonlytheimage.
Detailed
Displaysshootingdetails
(=
288).
Focus
Check
ShowstheareaintheAFframe
magnied,enablingyoutocheck
thefocus.Followthestepsin
“CheckingtheFocus”(=
179).
COPY

92
COPY

93
Other Shooting Modes
Shootmoreeffectivelyinvariousscenes,andtakeshots
enhancedwithuniqueimageeffectsorcapturedusing
specialfunctions
3
COPY
94
StillImages Movies
Auto Clip Recording (Movie Digest)
Youcanmakeashortmovieofadayjustbyshootingstillimages.
Beforeeachshot,thecamerawillautomaticallyrecordamovieclipofthe
scene.Eachcliprecordedthatdayiscombinedintoasinglele.
1 Enter< >mode.
zz Setthemodedialto< >.
2 Shoot.
zz Toshootastillimage,presstheshutter
buttonallthewaydown.
XX Beforeshooting,thecamerawill
automaticallyrecordaclipabout2–4
secondslong.
• Clipsmaynotberecordedifyoushootastillimageimmediately
afterturningthecameraon,choosing< >mode,oroperatingthe
camerainotherways.
• Batterylifeisshorterinthismodethanin<A>mode,because
clipsarerecordedforeachshot.
• Anysoundsfromcameraoperationsduringmovierecordingwill
beincludedinthemovie.
• Moviescreatedin< >modecanbeviewedbydate(=
185).
• Moviescreatedin<
>modearesavedasiFramemovies(=
120).
• Althoughtheclipsrecordedonaparticulardayarecombinedintoasingle
le,individualclips(chapters)canbeedited(=
215).
• Clipsaresavedasseparatemovielesinthefollowingcasesevenifthey
wererecordedonthesamedayin<
>mode.
-Ifthemovielesizereachesabout4GBorthetotalrecordingtimereaches
approx.29minutesand59seconds
-Ifamovieisprotected(=
192)
-Ifthedaylightsavingtime(=
21)ortimezone(=
220)settingshave
beenchanged
-Ifanewfolderiscreated(=
225)
• Somecamerasoundswillbemuted.Soundsarenotplayedwhenyoupress
theshutterbuttonhalfway,usecameracontrols,ortriggertheself-timer
(=
219).
COPY
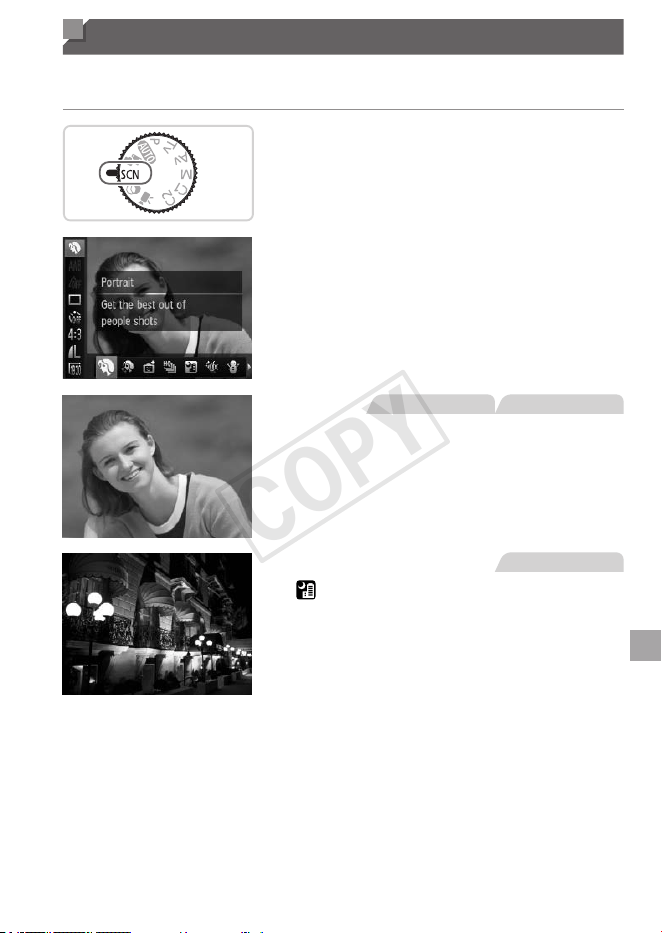
95
Specic Scenes
Chooseamodematchingtheshootingscene,andthecamerawill
automaticallycongurethesettingsforoptimalshots.
1 Enter<K>mode.
zz Setthemodedialto<K>.
2 Chooseashootingmode.
zz Pressthe<m>button,choose[I]inthe
menu,andthenchooseashootingmode
(=
47).
3 Shoot.
StillImages Movies
IShootportraits(Portrait)
zz Takeshotsofpeoplewithasoftening
effect.
StillImages
Shooteveningsceneswithout
usingatripod(Handheld
NightScene)
zz Beautifulshotsofeveningscenesor
portraitswitheveningsceneryinthe
background,withouttheneedtoholdthe
cameraverystill(aswithatripod).
zz Asingleimageiscreatedbycombining
consecutiveshots,reducingcamera
shakeandimagenoise.
COPY
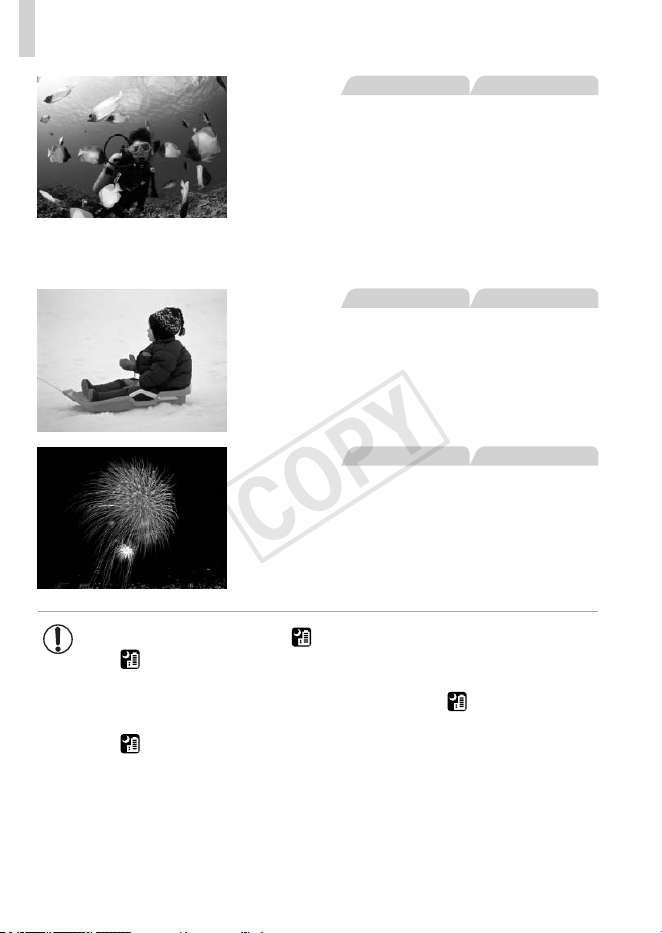
96
SpecicScenes
StillImages Movies
SShootunderwater(Underwater)
zz Natural-coloredshotsofsealifeand
underwaterscenery,whenyouusean
optionalwaterproofcase(=
237).
zz Thismodecancorrectwhitebalanceand
matchtheeffectofusingacommercially
availablecolor-compensatinglter
(=
135).
StillImages Movies
PShootwithsnowybackgrounds
(Snow)
zz Bright,natural-coloredshotsofpeople
againstsnowybackgrounds.
StillImages Movies
tShootreworks(Fireworks)
zz Vividshotsofreworks.
• Subjectsappearlargerin[ ]modecomparedtoothermodes.
• In[
]and[S]modes,shotsmaylookgrainybecausetheISO
speed(=
129)isincreasedtosuittheshootingconditions.
• Becausethecamerawillshootcontinuouslyin[
]mode,holdit
steadywhileshooting.
• In[
]mode,excessivecamerashakeorcertainshooting
conditionsmaypreventyoufromobtainingthedesiredresults.
• In[t]mode,mountthecameraonatripodortakeother
measurestokeepitstillandpreventcamerashake.Additionally,
youshouldset[ISMode]to[Off]whenusingatripodorother
meanstoholdthecamerastill(=
160).
COPY
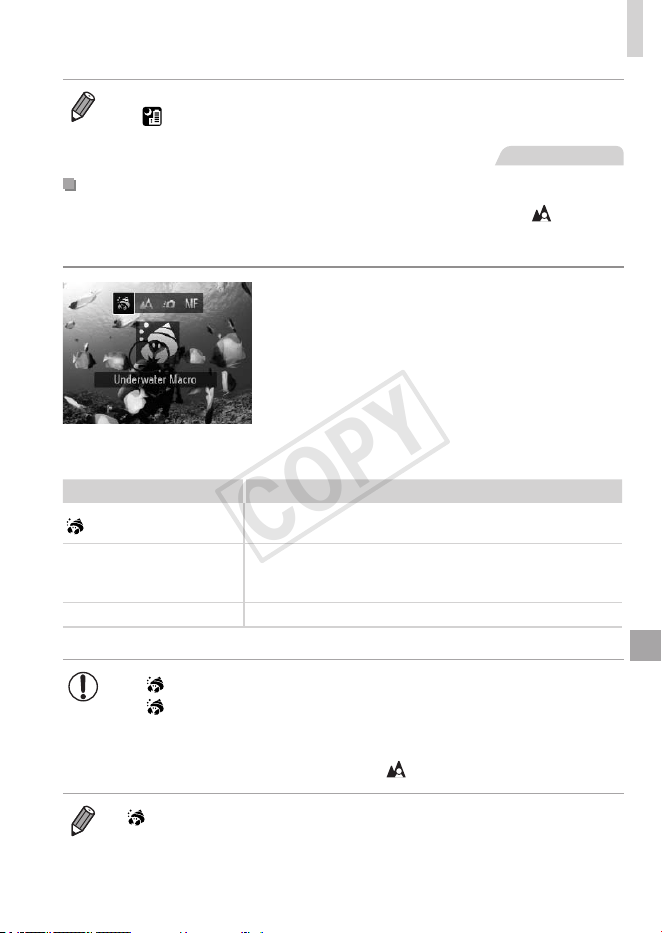
97
SpecicScenes
• Whenyouuseatripodforeveningscenes,shootingin[
A
]modeinstead
of[
]modewillgivebetterresults(=
54).
StillImages
ShootingWithanUnderwaterFocusingRange
Iffocusingisdifcultin[S]mode(=
96)withafocusrangeof[ ],
usingafocusrangedesignedforunderwatershootingcanensureoptimal
underwatershots.
1 Congurethesetting.
zz Followsteps1–2on=
95and
choose[S].
zz Pressthe<q>button,choosethedesired
focusrange(eitherpressthe<q><r>
buttonsorturnthe<7>dial),andthen
pressthe<m>button.
2 Shoot.
FocusingRange Description
UnderwaterMacro
Takeclose-upsofsealife,usingthedigitalzoomforeven
closershots.
8Quick
Avoidmissingunexpectedunderwatershooting
opportunitieswhenshootingsubjectssomedistance
away.Especiallyeffectiveformovingsubjects.
f ManualFocus Focusonsubjectsmanually(=
142).
Referto“Specications”(=
303)fordetailsontherangeofeachfocusrange.
• In[ ]mode,opticalzoomissettomaximumwideangle.
• In[
]mode,useofdigitalzoommaycauseimagestoappear
grainyatsomeresolutions(=
81).
• In[8]mode,subjectsatcloserangemaynotbeinfocus.Inthis
case,trysettingthefocusrangeto[
].
• [ ]and[8]arenotavailablein[TrackingAF]AFframemode(=
148).
COPY
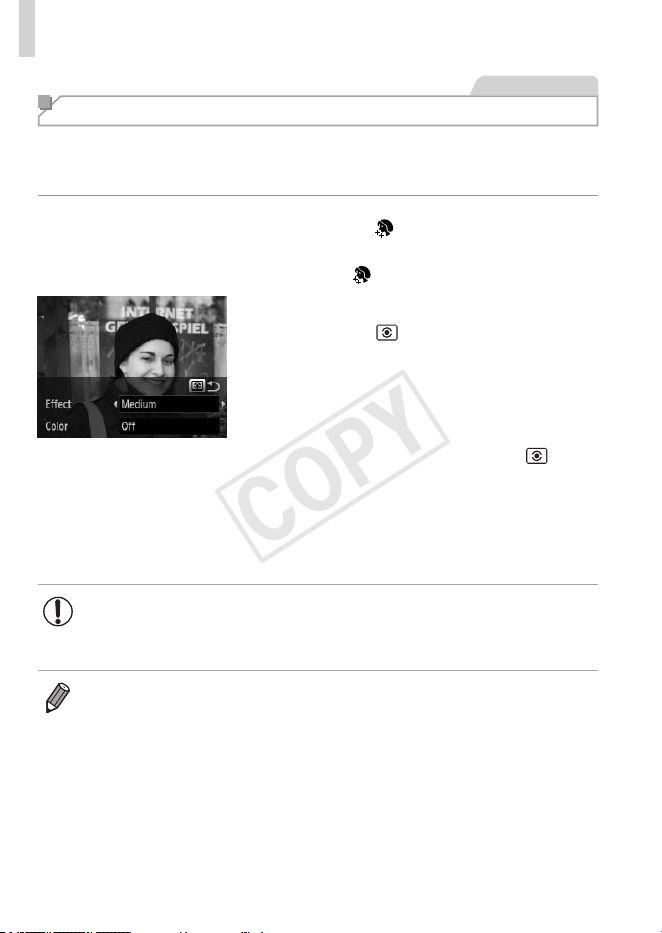
98
SpecicScenes
StillImages
Making Skin Look Smoother (Smooth Skin)
Youcanapplyasmootheningeffectwhenshootingimagesofpeople.
Theeffectlevelandcolor([LighterSkinTone],[DarkerSkinTone])canbe
chosenasfollows.
1 Choose[ ].
zz Followsteps1–2on=
95and
choose[
].
2 Accessthesettingscreen.
zz Pressthe< >button.
3 Congurethesetting.
zz Pressthe<o><p>buttonstochoose
anoption.Choosetheeffectlevel(either
pressthe<q><r>buttonsorturnthe
<7>dial),andthenpressthe<
>
button.
XX Apreviewisshownofhowyourshotwill
lookwiththeeffectapplied.
4 Shoot.
• Areasotherthanpeople’sskinmaybemodied.
• Trytakingsometestshotsrsttomakesureyouobtainthe
desiredresults.
• Theeffectwillbestrongerforthefaceofthepersondetectedasthemain
subject.
COPY
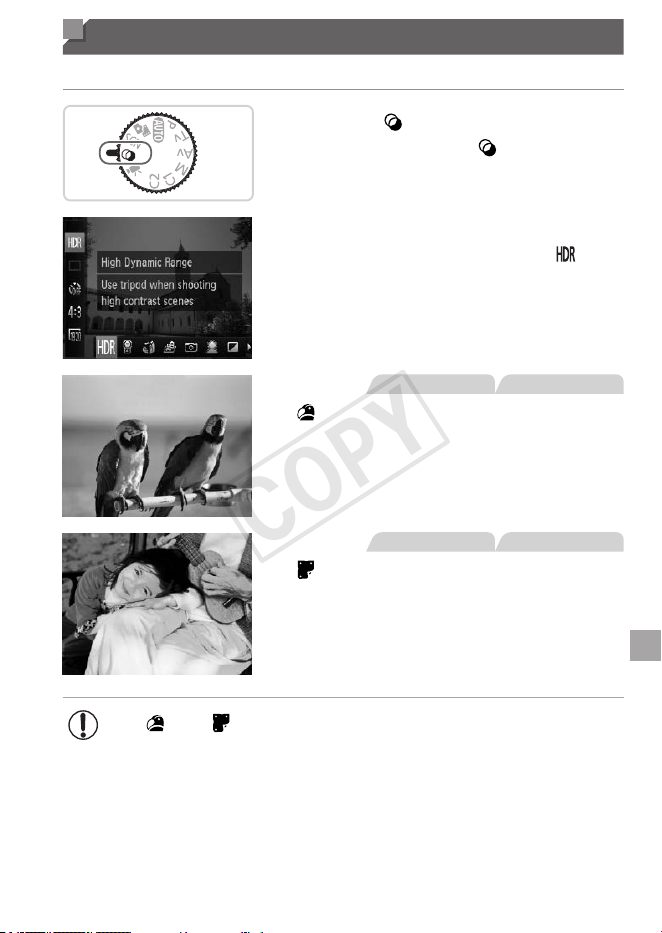
99
Image Effects (Creative Filters)
Addavarietyofeffectstoimageswhenshooting.
1 Enter< >mode.
zz Setthemodedialto< >.
2 Chooseashootingmode.
zz Pressthe<m>button,choose[ ]in
themenu,andthenchooseashooting
mode(=
47).
3 Shoot.
StillImages Movies
Shootinvividcolors(Super
Vivid)
zz Shotsinrich,vividcolors.
StillImages Movies
Posterizedshots(PosterEffect)
zz Shotsthatresembleanoldposteror
illustration.
• In[ ]and[ ]modes,trytakingsometestshotsrst,tomake
sureyouobtainthedesiredresults.
COPY
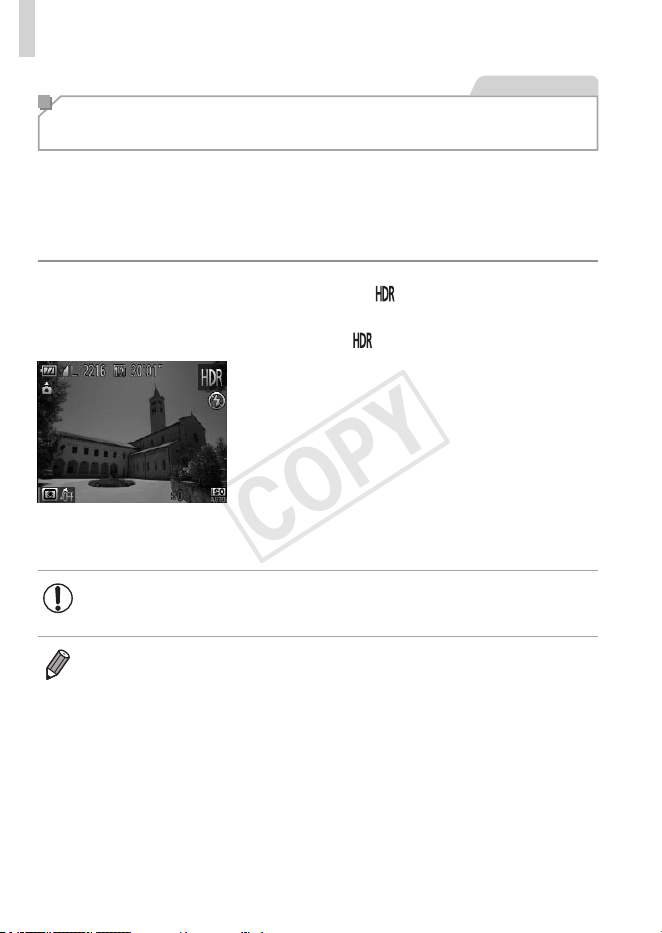
100
ImageEffects(CreativeFilters)
StillImages
Shooting High-Contrast Scenes
(High Dynamic Range)
Threeconsecutiveimagesarecapturedatdifferentbrightnesslevels
eachtimeyoushoot,andthecameracombinesimageareaswithoptimal
brightnesstocreateasingleimage.Thismodecanreducethewashed-out
highlightsandlossofdetailinshadowsthattendstooccurinhigh-contrast
shots.
1 Choose[ ].
zz Followsteps1–2on=
99and
choose[
].
2 Holdthecamerastill.
zz Mountthecameraonatripodortake
othermeasurestokeepitstilland
preventcamerashake.
3 Shoot.
zz Whenyoupresstheshutterbuttonall
thewaydown,thecamerawilltakethree
shotsandcombinethem.
• Set[ISMode]to[Off](=
160)inthismode.
• Anysubjectmovementwillcauseimagestolookblurry.
• Therewillbeadelaybeforeyoucanshootagain,asthecameraprocesses
andcombinestheimages.
COPY
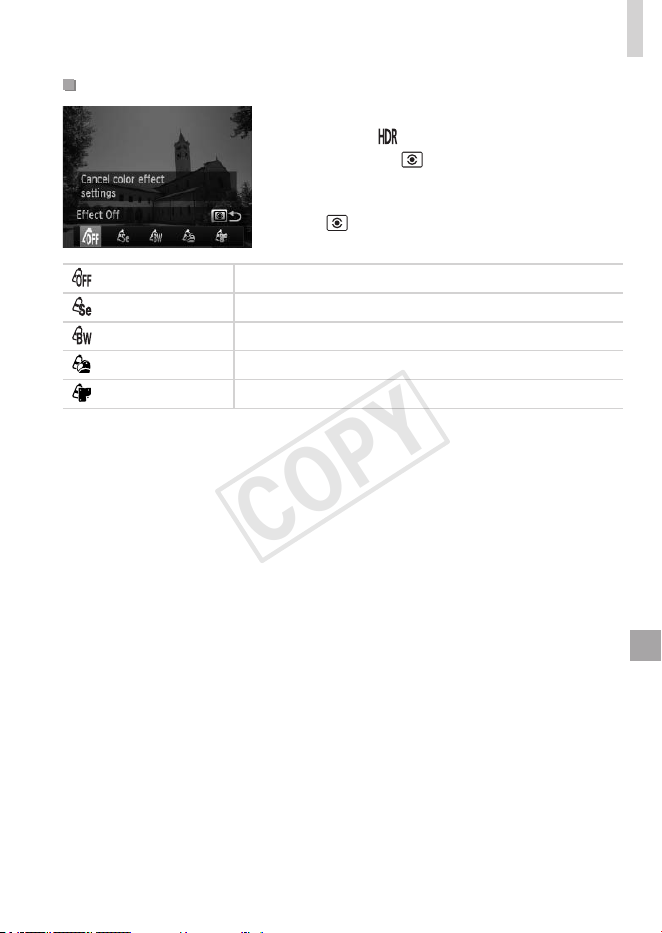
101
ImageEffects(CreativeFilters)
AddingColorEffects
zz Followsteps1–2on=
99and
choose[
].
zz Pressthe< >button,chooseacolor
effect(eitherpressthe<q><r>buttons
orturnthe<7>dial),andthenpressthe
<
>buttonagain.
EffectOff
–
Sepia Sepiatoneshots.
B/W Blackandwhiteshots.
SuperVivid Shotsinrich,vividcolors.
PosterEffect Shotsthatresembleanoldposterorillustration.
COPY

102
ImageEffects(CreativeFilters)
StillImages Movies
Shooting with Faded Colors (Nostalgic)
Thiseffectmakescolorslookfadedandimageslookweathered,asinold
photographs.Choosefromveeffectlevels.
1 Choose[ ].
zz Followsteps1–2on=
99and
choose[
].
2 Chooseaneffectlevel.
zz Turnthe<z>dialtochooseaneffect
level.
XX Apreviewisshownofhowyourshotwill
lookwiththeeffectapplied.
3 Shoot.
• Trytakingsometestshotsrst,tomakesureyouobtainthe
desiredresults.
• Colorswilllookfadedontheshootingscreen,buttheimageagingeffectis
notshown.ReviewtheimageinPlaybackmodetoseetheeffect(=
174).
• Theimageagingeffectisnotshowninmovies.
COPY

103
ImageEffects(CreativeFilters)
StillImages
Shooting with a Fish-Eye Lens Effect
(Fish-eye Effect)
Shootwiththedistortingeffectofash-eyelens.
1 Choose[ ].
zz Followsteps1–2on=
99and
choose[
].
2 Chooseaneffectlevel.
zz Turnthe<z>dialtochooseaneffect
level.
XX Apreviewisshownofhowyourshotwill
lookwiththeeffectapplied.
3 Shoot.
• Trytakingsometestshotsrst,tomakesureyouobtainthe
desiredresults.
COPY

104
ImageEffects(CreativeFilters)
StillImages Movies
Shots Resembling Miniature Models
(Miniature Effect)
Createstheeffectofaminiaturemodel,byblurringimageareasaboveand
belowyourselectedarea.
Youcanalsomakemoviesthatlooklikescenesinminiaturemodelsby
choosingtheplaybackspeedbeforethemovieisrecorded.Peopleand
objectsinthescenewillmovequicklyduringplayback.Notethatsoundis
notrecorded.
1 Choose[ ].
zz Followsteps1–2on=
99and
choose[
].
XX Awhiteframeisdisplayed,indicatingthe
imageareathatwillnotbeblurred.
2 Choosetheareatokeepin
focus.
zz Pressthe< >button.
zz Movethezoomlevertoresizetheframe,
andturnthe<7>dialtomoveit.
3 Formovies,choosethemovie
playbackspeed.
zz Turnthe<z>dialtochoosethespeed.
4 Returntotheshootingscreen
andshoot.
zz Pressthe< >buttontoreturntothe
shootingscreen,andthenshoot.
COPY

105
ImageEffects(CreativeFilters)
PlaybackSpeedandEstimatedPlaybackTime
(forOne-MinuteClips)
Speed PlaybackTime
Approx.12sec.
Approx.6sec.
Approx.3sec.
• Thezoomisnotavailablewhenshootingmovies.Besuretoset
thezoombeforeshooting.
• Trytakingsometestshotsrst,tomakesureyouobtainthe
desiredresults.
• Toswitchtheorientationoftheframetovertical,pressthe<q><r>buttons
instep2.Tomovetheframe,pressthe<q><r>buttonsagain.Toreturnthe
frametohorizontalorientation,pressthe<o><p>buttons.
• Holdingthecameraverticallywillchangetheorientationoftheframe.
• Movieimagequalityis[
]atanaspectratioof[ ]and[ ]atanaspect
ratioof[
](=
80).Thesequalitysettingscannotbechanged.
COPY
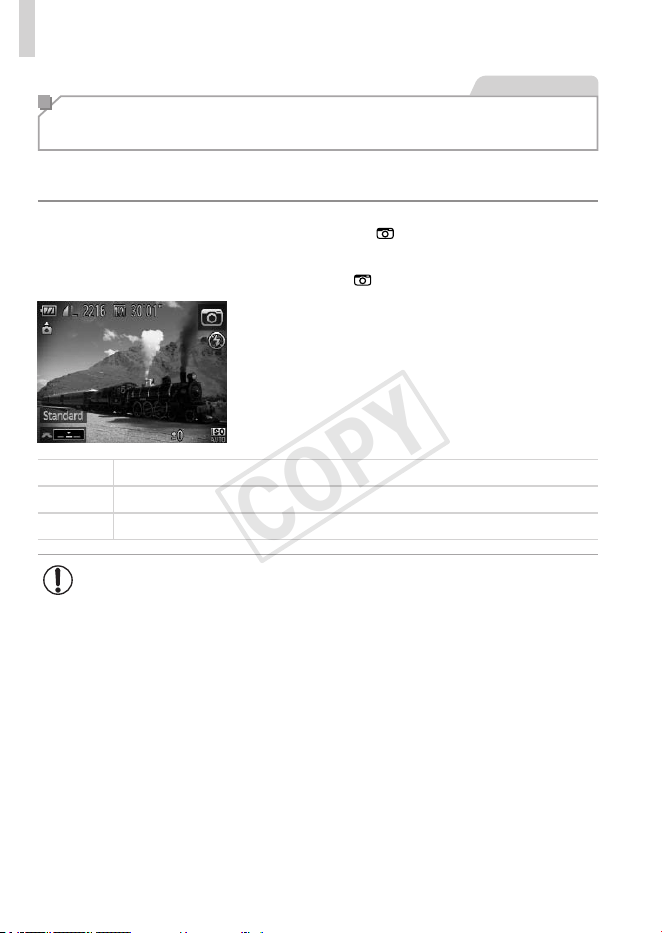
106
ImageEffects(CreativeFilters)
StillImages
Shooting with a Toy Camera Effect
(Toy Camera Effect)
Thiseffectmakesimagesresembleshotsfromatoycamerabyvignetting
(darker,blurredimagecorners)andchangingtheoverallcolor.
1 Choose[ ].
zz Followsteps1–2on=
99and
choose[
].
2 Chooseacolortone.
zz Turnthe<z>dialtochooseacolor
tone.
XX Apreviewisshownofhowyourshotwill
lookwiththeeffectapplied.
3 Shoot.
Standard Shotsresembletoycameraimages.
Warm Imageshaveawarmertonethanwith[Standard].
Cool Imageshaveacoolertonethanwith[Standard].
• Trytakingsometestshotsrst,tomakesureyouobtainthe
desiredresults.
COPY

107
ImageEffects(CreativeFilters)
StillImages
Shooting With a Soft Focus Effect
Thisfunctionallowsyoutoshootimagesasifasoftfocuslterisattached
tothecamera.Youcanadjusttheeffectlevelasdesired.
1 Choose[ ].
zz Followsteps1–2on=
99and
choose[
].
2 Chooseaneffectlevel.
zz Turnthe<z>dialtochooseaneffect
level.
XX Apreviewisshownofhowyourshotwill
lookwiththeeffectapplied.
3 Shoot.
• Trytakingsometestshotsrst,tomakesureyouobtainthe
desiredresults.
COPY
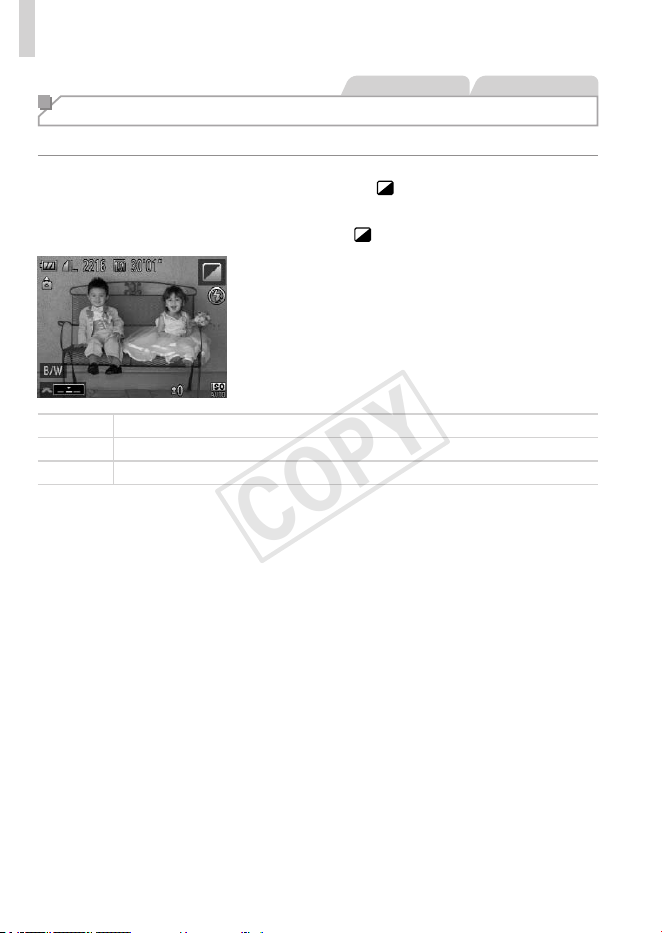
108
ImageEffects(CreativeFilters)
StillImages Movies
Shooting in Monochrome
Shootimagesinblackandwhite,sepia,orblueandwhite.
1 Choose[ ].
zz Followsteps1–2on=
99and
choose[
].
2 Chooseacolortone.
zz Turnthe<z>dialtochooseacolor
tone.
XX Apreviewisshownofhowyourshotwill
lookwiththeeffectapplied.
3 Shoot.
B/W Blackandwhiteshots.
Sepia Sepiatoneshots.
Blue Blueandwhiteshots.
COPY
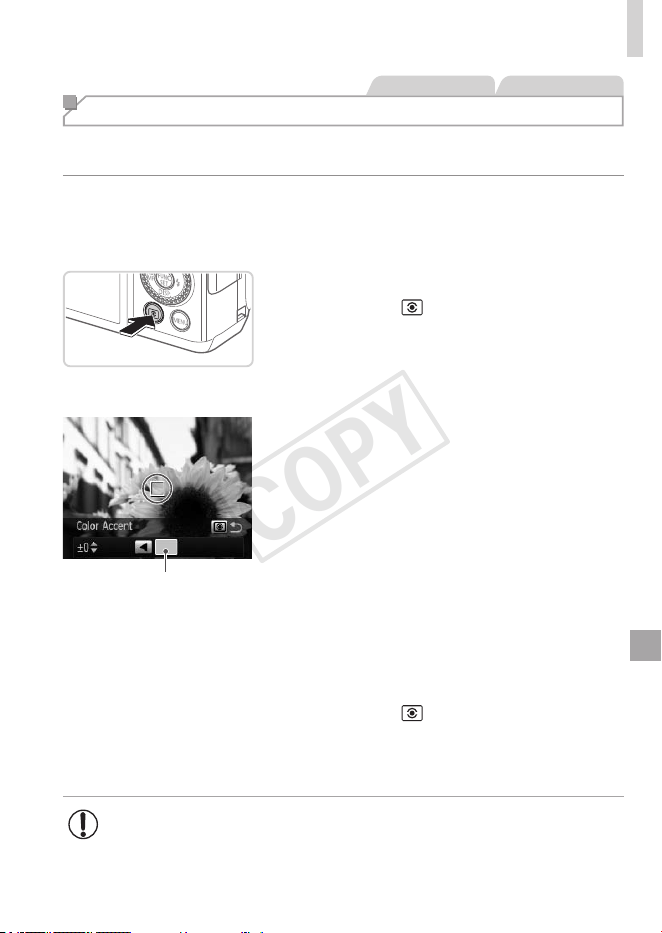
109
ImageEffects(CreativeFilters)
StillImages Movies
Shooting with Color Accent
Chooseasingleimagecolortokeepandchangeothercolorstoblackand
white.
1 Choose[T].
zz Followsteps1–2on=
99and
choose[T].
2 Accessthesettingscreen.
zz Pressthe< >button.
XX TheoriginalimageandtheColorAccent
imagearedisplayedoneafteranother.
XX Bydefault,greenisthecolorthatwillbe
kept.
RecordedColor
3 Specifythecolor.
zz Positionthecenterframeoverthecolor
tokeep,andthenpressthe<q>button.
XX Thespeciedcolorisrecorded.
4 Specifytherangeofcolorsto
keep.
zz Pressthe<o><p>buttonsorturnthe
<7>dialtoadjusttherange.
zz Tokeeponlyyourspeciedcolor,choose
alargenegativevalue.Tokeepcolors
similartoyourspeciedcoloraswell,
choosealargepositivevalue.
zz Pressthe< >buttontoreturntothe
shootingscreen.
5 Shoot.
• Usingtheashinthismodemaycauseunexpectedresults.
• Insomeshootingscenes,imagesmaylookgrainyandcolorsmay
notlookasexpected.
COPY
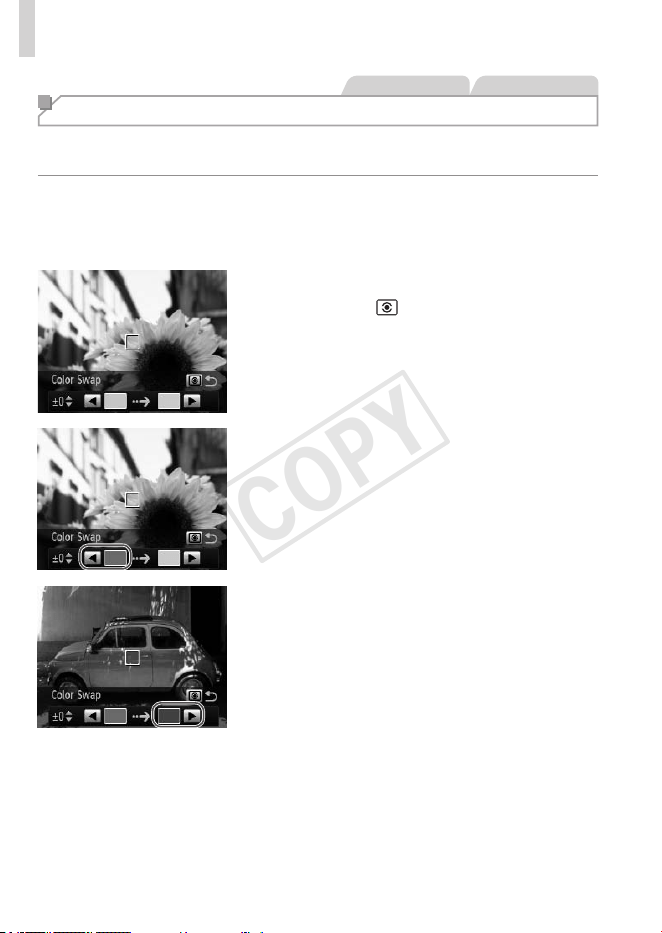
110
ImageEffects(CreativeFilters)
StillImages Movies
Shooting with Color Swap
Youcanreplaceoneimagecolorwithanotherbeforeshooting.Notethat
onlyonecolorcanbereplaced.
1 Choose[Y].
zz Followsteps1–2on=
99and
choose[Y].
2 Accessthesettingscreen.
zz Pressthe< >button.
XX TheoriginalimageandtheColorSwap
imagearedisplayedoneafteranother.
XX Bydefault,greenwillbereplacedwith
gray.
3 Specifythecolortoreplace.
zz Positionthecenterframeoverthecolor
toreplace,andthenpressthe<q>
button.
XX Thespeciedcolorisrecorded.
4 Specifythenewcolor.
zz Positionthecenterframeoverthenew
color,andthenpressthe<r>button.
XX Thespeciedcolorisrecorded.
COPY

111
ImageEffects(CreativeFilters)
5 Specifytherangeofcolorsto
replace.
zz Pressthe<o><p>buttonsorturnthe
<7>dialtoadjusttherange.
zz Toreplaceonlyyourspeciedcolor,
choosealargenegativevalue.Toreplace
colorssimilartoyourspeciedcoloras
well,choosealargepositivevalue.
zz Pressthe< >buttontoreturntothe
shootingscreen.
6 Shoot.
• Usingtheashinthismodemaycauseunexpectedresults.
• Insomeshootingscenes,imagesmaylookgrainyandcolorsmay
notlookasexpected.
COPY
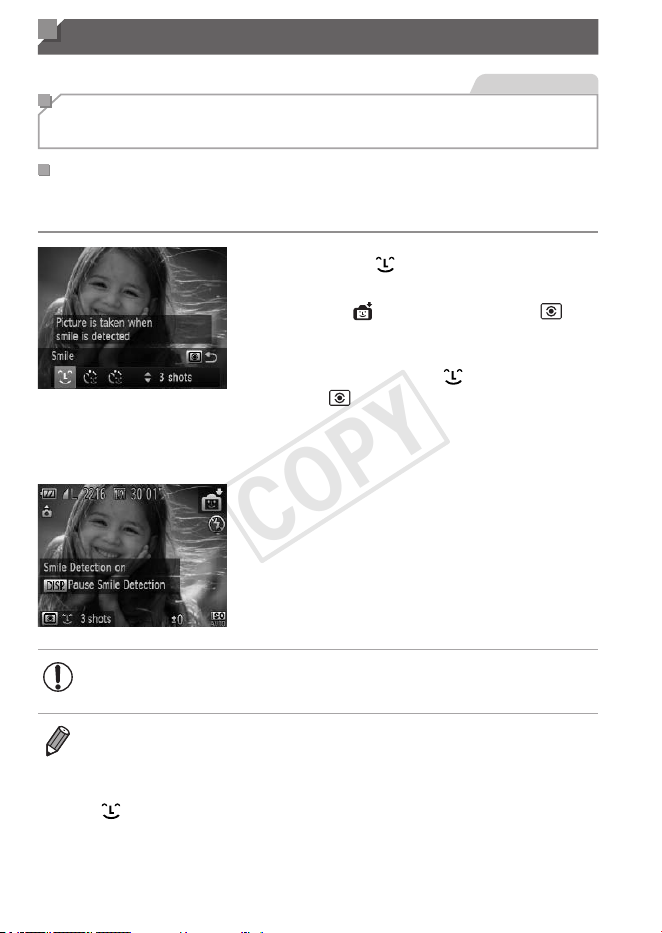
112
Special Modes for Other Purposes
StillImages
Auto Shooting After Face Detection
(Smart Shutter)
AutoShootingAfterSmileDetection
Thecamerashootsautomaticallyafterdetectingasmile,evenwithoutyou
pressingtheshutterbutton.
1 Choose[ ].
zz Followsteps1–2on=
95and
choose[
],andthenpressthe< >
button.
zz Pressthe<q><r>buttonsorturnthe
<7>dialtochoose[
],andthenpress
the<
>button.
XX Thecameranowentersshootingstandby
mode,and[SmileDetectionon]is
displayed.
2 Aimthecameraataperson.
zz Eachtimethecameradetectsasmile,it
willshootafterthelamplightsup.
zz Topausesmiledetection,pressthe<p>
button.Pressthe<p>buttonagainto
resumedetection.
• Switchtoanothermodewhenyounishshooting,orthecamera
willcontinueshootingeachtimeasmileisdetected.
• Youcanalsoshootasusualbypressingtheshutterbutton.
• Thecameracandetectsmilesmoreeasilywhensubjectsfacethecamera
andopentheirmouthwideenoughsothatteetharevisible.
• Tochangethenumberofshots,pressthe<o><p>buttonsafterchoosing
[
]instep1.[BlinkDetection](=
88)isonlyavailableforthenalshot.
COPY
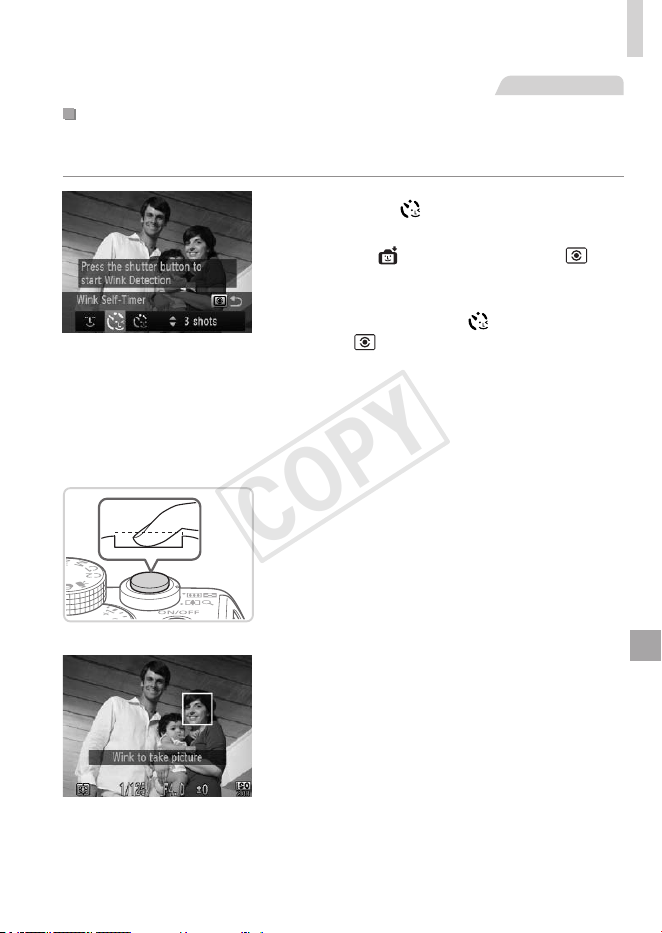
113
SpecialModesforOtherPurposes
StillImages
UsingtheWinkSelf-Timer
Aimthecameraatapersonandpresstheshutterbuttonallthewaydown.
Thecamerawillshootabouttwosecondsafterawinkisdetected.
1 Choose[ ].
zz Followsteps1–2on=
95and
choose[
],andthenpressthe< >
button.
zz Pressthe<q><r>buttonsorturnthe
<7>dialtochoose[
],andthenpress
the<
>button.
2 Composetheshotandpress
theshutterbuttonhalfway.
zz Makesureagreenframeisdisplayed
aroundthefaceofthepersonwhowill
wink.
3 Presstheshutterbuttonallthe
waydown.
XX Thecameranowentersshootingstandby
mode,and[Winktotakepicture]is
displayed.
XX Thelampblinksandtheself-timersound
isplayed.
4 Facethecameraandwink.
XX Thecamerawillshootabouttwoseconds
afterdetectingawinkbytheperson
whosefaceisinsidetheframe.
zz Tocancelshootingafteryouhave
triggeredtheself-timer,pressthe
<n>button.
COPY

114
SpecialModesforOtherPurposes
• Ifthewinkisnotdetected,winkagainslowlyanddeliberately.
• Winkingmaynotbedetectedifeyesareobscuredbyhair,ahat,orglasses.
• Closingandopeningbotheyesatoncewillalsobedetectedasawink.
• Ifwinkingisnotdetected,thecamerawillshootabout15secondslater.
• Tochangethenumberofshots,pressthe<o><p>buttonsafterchoosing
[
]instep1.[BlinkDetection](=
88)isonlyavailableforthenalshot.
• Ifnooneisintheshootingareawhentheshutterbuttonispressedallthe
waydown,thecamerawillshootafterapersonenterstheshootingareaand
winks.
StillImages
UsingtheFaceSelf-Timer
Thecamerawillshootabouttwosecondsafterdetectingthatthefaceof
anotherperson(suchasthephotographer)hasenteredtheshootingarea
(=
145).Thisisusefulwhenincludingyourselfingroupphotosorsimilar
shots.
1 Choose[ ].
zz Followsteps1–2on=
95and
choose[
],andthenpressthe< >
button.
zz Pressthe<q><r>buttonsorturnthe
<7>dialtochoose[
],andthenpress
the<
>button.
2 Composetheshotandpress
theshutterbuttonhalfway.
zz Makesureagreenframeisdisplayed
aroundthefaceyoufocusonandwhite
framesaroundotherfaces.
COPY
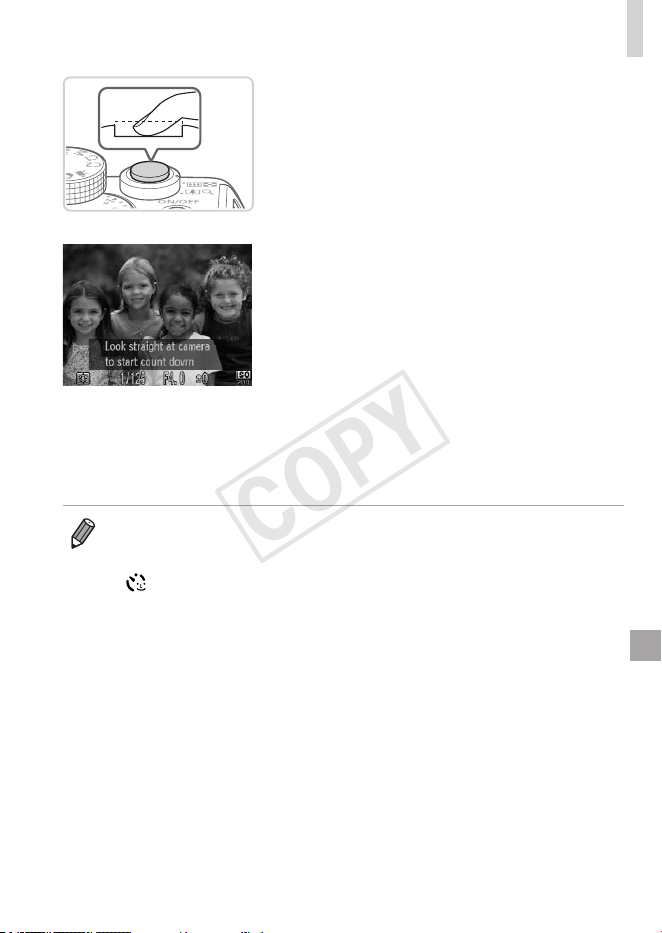
115
SpecialModesforOtherPurposes
3 Presstheshutterbuttonallthe
waydown.
XX Thecameranowentersshootingstandby
mode,and[Lookstraightatcamerato
startcountdown]isdisplayed.
XX Thelampblinksandtheself-timersound
isplayed.
4 Jointhesubjectsinthe
shootingareaandlookatthe
camera.
XX Afterthecameradetectsanewface,the
lampblinkingandself-timersoundwill
speedup.(Whentheashres,thelamp
willremainlit.)Abouttwosecondslater,
thecamerawillshoot.
zz Tocancelshootingafteryouhave
triggeredtheself-timer,pressthe
<n>button.
• Evenifyourfaceisnotdetectedafteryoujointheothersintheshooting
area,thecamerawillshootabout15secondslater.
• Tochangethenumberofshots,pressthe<o><p>buttonsafterchoosing
[
]instep1.[BlinkDetection](=
88)isonlyavailableforthenalshot.
COPY
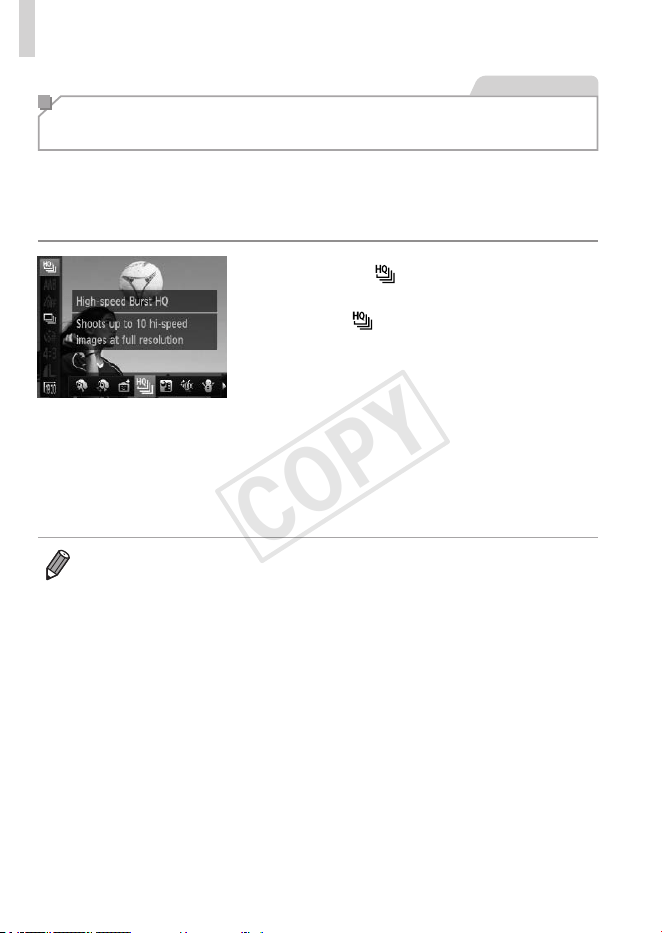
116
SpecialModesforOtherPurposes
StillImages
High-Speed Continuous Shooting
(High-speed Burst HQ)
Youcanshootaseriesofshotsinrapidsuccessionbyholdingtheshutter
buttonallthewaydown.Fordetailsonthecontinuousshootingspeed,see
“Specications”(=
303).
HQ:HighQuality
1 Choose[ ].
zz Followsteps1–2on=
95and
choose[
].
2 Shoot.
XX Holdtheshutterbuttonallthewaydown
toshootcontinuously.
zz Shootingstopswhenyoureleasethe
shutterbuttonorreachthemaximum
numberofshots,afterwhich[Busy]is
displayedandtheshotsareshowninthe
orderyoutookthem.
• Focus,imagebrightness,andcoloraredeterminedbytherstshot.
• Thescreenisblankwhileyouareshooting.
• Theremaybeadelayaftercontinuousshootingbeforeyoucanshootagain.
Notethatsometypesofmemorycardsmaydelayyournextshoteven
longer.SDSpeedClass6orhighermemorycardsarerecommended.
• Shootingmayslowdowndependingonshootingconditions,camerasettings,
andthezoomposition.
COPY

117
SpecialModesforOtherPurposes
ImagesDisplayedDuringPlayback
Eachsetofimagesshotcontinuouslyismanagedasasinglegroup,and
onlytherstimageinthatgroupwillbedisplayed.Toindicatethatthe
imageispartofagroup,[ ]isdisplayedintheupperleftofthescreen.
• Ifyoueraseagroupedimage(=
197),allimagesinthegroup
arealsoerased.Becarefulwhenerasingimages.
• Groupedimagescanbeplayedbackindividually(=
185)andungrouped
(=
186).
• Protecting(=
192)agroupedimagewillprotectallimagesinthegroup.
• GroupedimagescanbeviewedindividuallywhenplayedbackusingImage
Search(=
181)orSmartShufe(=
191).Inthiscase,imagesare
temporarilyungrouped.
• Groupedimagescannotbetaggedasfavorites(=
202),edited(=
200–
211),categorized(=
203),printed(=
259),setforprintingindividually
(=
268),addedtoaPhotobook(=
271),FaceIDinformationcannot
beedited(=
187),andtheycannotbeassignedasastart-upimage
(=
222).Todothesethings,eitherviewgroupedimagesindividually
(=
185)orcancelgrouping(=
186)rst.
COPY
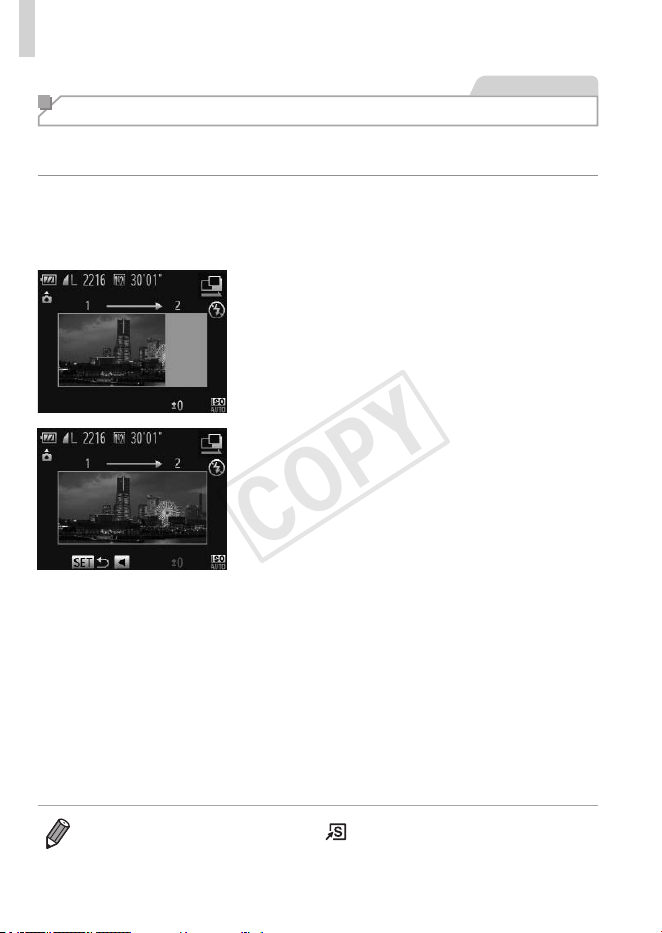
118
SpecialModesforOtherPurposes
StillImages
Shooting Stitch Assist Images
Shootalargesubjectbytakingmultipleshotsatvariouspositions,andthen
usetheincludedsoftware(=
30)tocombinethemintoapanorama.
1 Choose[x]or[v].
zz Followsteps1–2on=
95and
choose[x]or[v].
2 Taketherstshot.
XX Therstshotwilldeterminetheexposure
andwhitebalance.
3 Takeadditionalshots.
zz Composethesecondshotsothatit
partiallyoverlapstheimageareaofthe
rstshot.
zz Minormisalignmentofoverlapping
portionswillbecorrectedautomatically
whentheimagesarecombined.
zz Youcantakeupto26shots,thesame
wayyoutookthesecondshot.
4 Finishshooting.
zz Pressthe<m>button.
5 Usethesoftwaretocombinethe
images.
zz Forinstructionsonmergingimages,refer
totheSoftware Guide(=
30).
• TouseAFlock,assign[%]tothe< >button(=
169).
COPY
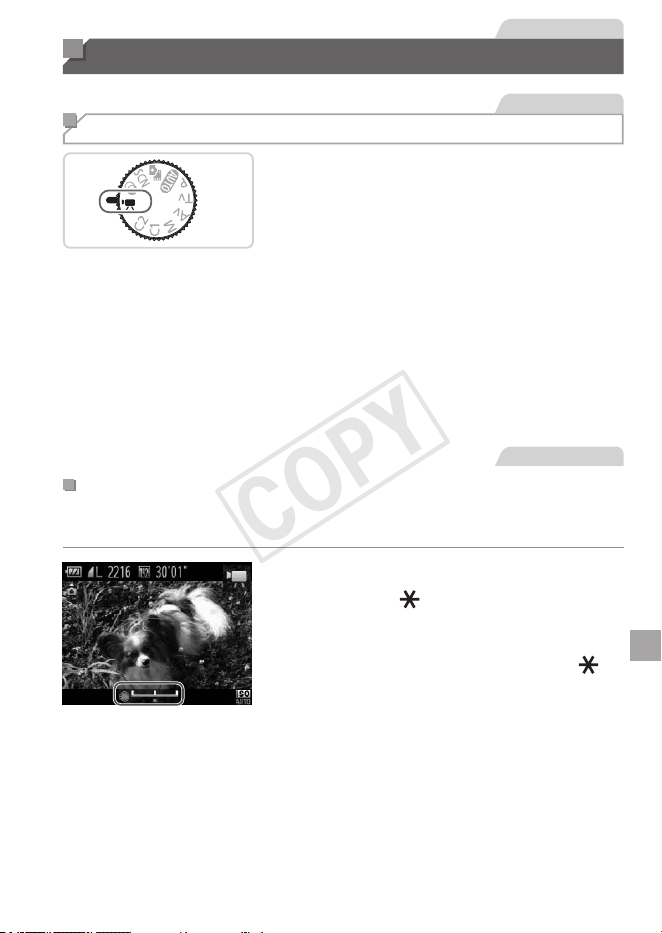
119
Movies
Shooting Various Movies
Movies
Shooting Movies in <E> Mode
1 Enter<E>mode.
zz Setthemodedialto<E>.
XX Blackbarsdisplayedonthetopand
bottomedgesofthescreenindicate
imageareasnotrecorded.
2 Congurethesettingstosuit
themovie(=
290–299).
3 Shoot.
zz Pressthemoviebutton.
zz Tostopmovierecording,pressthemovie
buttonagain.
Movies
LockingorChangingImageBrightnessBeforeShooting
Beforeshooting,youcanlocktheexposureorchangeitin1/3-stop
incrementswithinarangeof–3to+3.
1 Locktheexposure.
zz Pressthe< >buttontolockthe
exposure.Theexposureshiftbaris
displayed.
zz Tounlocktheexposure,pressthe< >
buttonagain.
2 Adjusttheexposure.
zz Turnthe<7>dialtoadjusttheexposure,
asyouwatchthescreen.
3 Shoot(=
119).
COPY
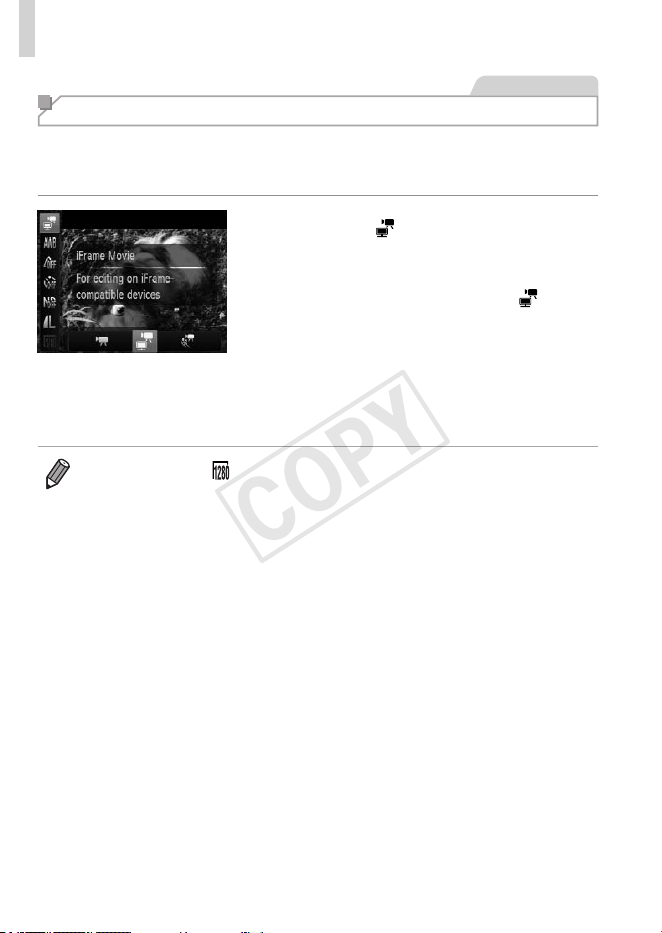
120
ShootingVariousMovies
Movies
Shooting iFrame Movies
ShootmoviesthatcanbeeditedwithiFrame-compatiblesoftwareor
devices.Youcanquicklyedit,save,andmanageiFramemoviesusingthe
includedsoftware(=
30).
1 Choose[ ].
zz Setthemodedialto<E>.
zz Pressthe<m>button,choose[E]
inthemenu,andthenchoose[
]
(=
47).
XX Blackbarsdisplayedonthetopand
bottomedgesofthescreenindicate
imageareasnotrecorded.
2 Shoot(=
119).
• Theresolutionis[ ](=
84)andcannotbechanged.
• iFrameisavideoformatdevelopedbyApple.
COPY
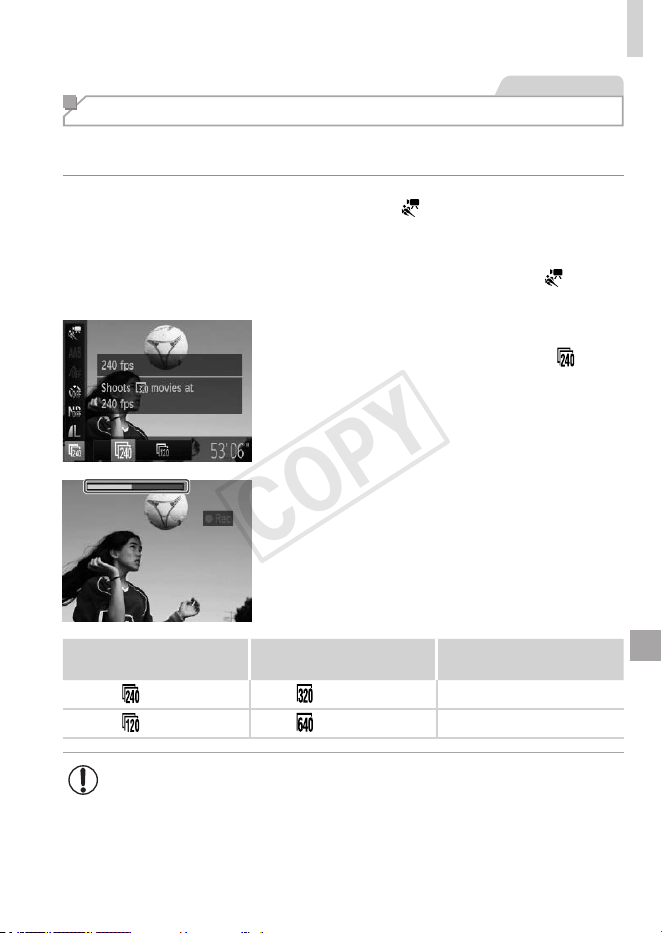
121
ShootingVariousMovies
Movies
Shooting Super Slow Motion Movies
Youcanshootfast-movingsubjectsforplaybacklaterinslowmotion.Note
thatsoundisnotrecorded.
1 Choose[ ].
zz Setthemodedialto<E>.
zz Pressthe<m>button,choose[E]
inthemenu,andthenchoose[
]
(=
47).
2 Chooseaframerate.
zz Pressthe<m>button,choose[ ]in
themenu,andchoosethedesiredframe
rate(=47).
XX Theoptionyouconguredisnow
displayed.
3 Shoot(=
119).
XX Abarshowingtheelapsedtimeis
displayed.Maximumcliplengthisapprox.
30sec.
FrameRate ImageQuality
PlaybackTime
(Fora30-sec.Clip)
240fps
(320x240)
Approx.4min.
120fps
(640x480)
Approx.2min.
• Zoomingisnotavailableduringrecording,evenifyoumovethe
zoomlever.
• Focus,exposure,andcoloraredeterminedwhenyoupressthe
moviebutton.
COPY


123
P Mode
Morediscerningshots,inyourpreferredshootingstyle
• Instructionsinthischapterapplytothecamerawiththemodedialsetto
<G>mode.
• <G>:ProgramAE;AE:AutoExposure
• Beforeusingafunctionintroducedinthischapterinmodesotherthan
<G>,makesurethefunctionisavailableinthatmode(=
290–299).
4
COPY

124
StillImages Movies
Shooting in Program AE Mode
(<P> Mode)
Youcancustomizemanyfunctionsettingstosuityourpreferredshooting
style.
1 Enter<G>mode.
zz Setthemodedialto<G>.
2 Customizethesettingsas
desired(=
125–160),and
thenshoot.
• Ifadequateexposurecannotbeobtainedwhenyoupresstheshutterbutton
halfway,shutterspeedsandaperturevaluesaredisplayedinorange.To
obtainadequateexposure,tryadjustingthefollowingsettings.
-Activatetheash(=
154)
-ChangetheISOspeed(=
129)
• Moviescanberecordedin<G>modeaswell,bypressingthemoviebutton.
However,someH(=
47)andMenu(=
48)settingsmaybe
automaticallyadjustedformovierecording.
• Fordetailsontheshootingrangein<G>mode,see“Specications”
(=
303).
COPY
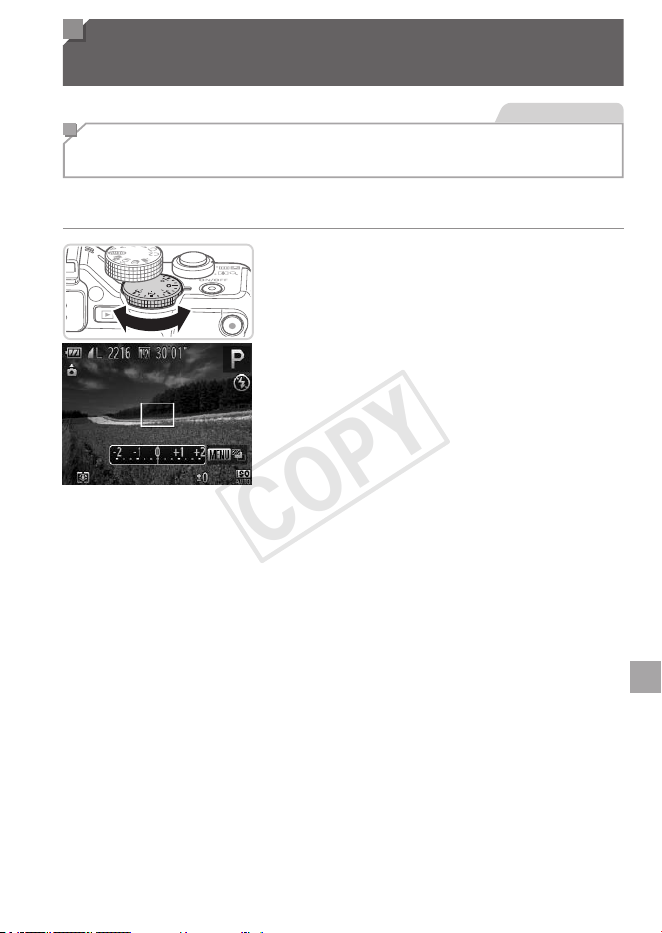
125
Image Brightness
(Exposure Compensation)
StillImages
Adjusting Image Brightness
(Exposure Compensation)
Thestandardexposuresetbythecameracanbeadjustedin1/3-stop
increments,inarangeof–3to+3.
zz Asyouwatchthescreen,turnthe
exposurecompensationdialtoadjust
brightness.
XX Thecorrectionlevelyouspeciedisnow
displayed.
COPY
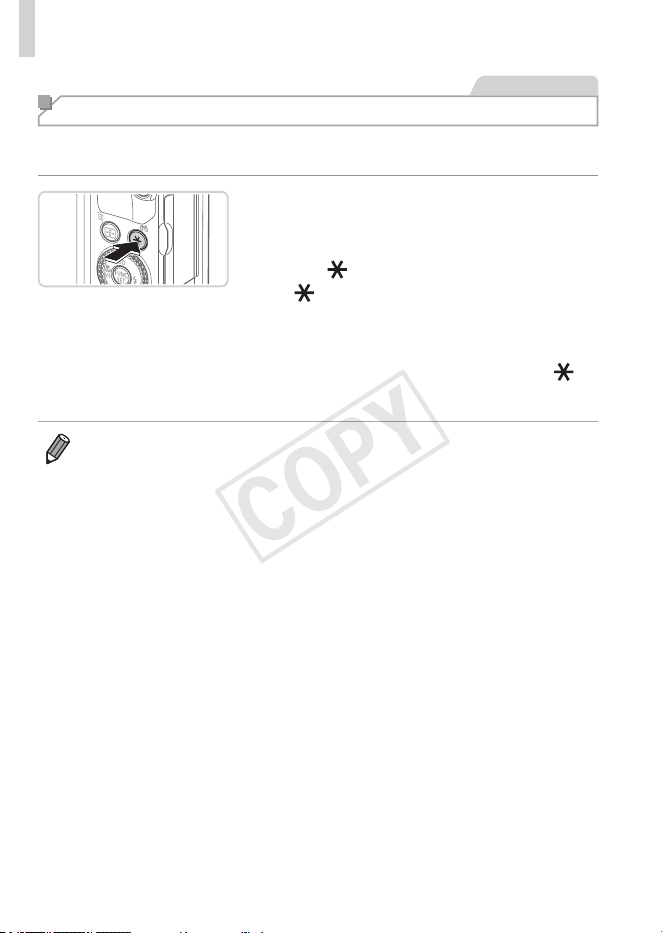
126
ImageBrightness(ExposureCompensation)
StillImages
Locking Image Brightness/Exposure (AE Lock)
Beforeshooting,youcanlocktheexposure,oryoucanspecifyfocusand
exposureseparately.
1 Locktheexposure.
zz Aimthecameraatthesubjecttoshoot
withtheexposurelocked,andthenpress
the<
>button.
XX [ ]isdisplayed,andtheexposureis
locked.
2 Composetheshotandshoot.
zz Afteroneshot,AEisunlockedand[ ]is
nolongerdisplayed.
• AE:AutoExposure
• Aftertheexposureislocked,youcanadjustthecombinationofshutter
speedandaperturevaluebyturningthe<7>dial(ProgramShift).
COPY
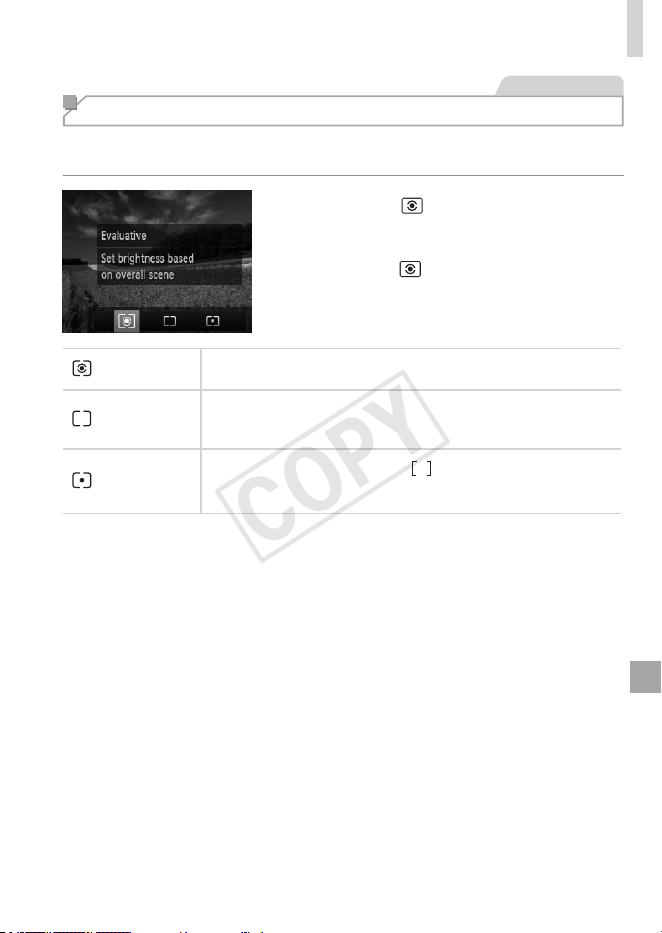
127
ImageBrightness(ExposureCompensation)
StillImages
Changing the Metering Method
Adjustthemeteringmethod(howbrightnessismeasured)tosuitshooting
conditionsasfollows.
zz Pressthe< >button,choosethe
desiredoption(eitherpressthe<q><r>
buttonsorturnthe<7>dial),andthen
pressthe<
>buttonagain.
XX Theoptionyouconguredisnow
displayed.
Evaluative
Fortypicalshootingconditions,includingbacklitshots.
Automaticallyadjustsexposuretomatchtheshootingconditions.
Center
WeightedAvg.
Determinestheaveragebrightnessoflightacrosstheentire
imagearea,calculatedbytreatingbrightnessinthecentralarea
asmoreimportant.
Spot
Meteringrestrictedtowithinthe[
](SpotAEPointframe).
YoucanalsolinktheSpotAEPointframetotheAFframe(see
below).
COPY

128
ImageBrightness(ExposureCompensation)
StillImages
LinkingtheSpotAEPointFrametotheAFFrame
1 Setthemeteringmethodto[ ].
zz Followthestepson
=
127tochoose[ ].
2 Congurethesetting.
zz Pressthe<n>button,choose
[SpotAEPoint]onthe[4]tab,andthen
choose[AFPoint](=
48).
XX TheSpotAEPointframewillnowbe
linkedtothemovementoftheAFframe
(=
147).
• Notavailablewhen[AFFrame]issetto[FaceAiAF](=
145)or
[TrackingAF](=
148).
COPY
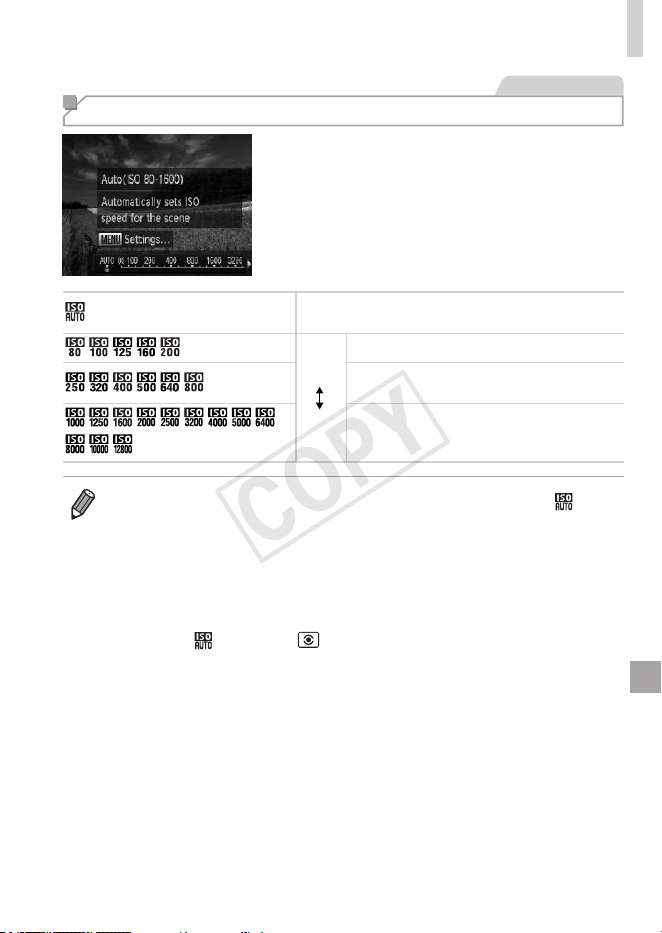
129
ImageBrightness(ExposureCompensation)
StillImages
Changing the ISO Speed
zz Pressthe<o>button,chooseanoption
(eitherpressthe<q><r>buttonsorturn
the<7>dial),andthenpressthe<m>
button.
XX Theoptionyouconguredisnow
displayed.
AutomaticallyadjuststheISOspeedtosuitthe
shootingmodeandconditions.
Low
High
Forshootingoutdoorsinfairweather.
Forshootingincloudyconditions,orat
twilight.
Forshootingnightscenes,orindark
rooms.
• ToviewtheautomaticallysetISOspeedwhenthecameraissetto[ ],
presstheshutterbuttonhalfway.
• AlthoughchoosingalowerISOspeedmayreduceimagegraininess,there
maybeagreaterriskofsubjectblurrinessinsomeshootingconditions.
• ChoosingahigherISOspeedwillincreaseshutterspeed,whichmayreduce
subjectblurrinessandincreasetheashrange.However,shotsmaylook
grainy.
• Tospecify[
],pressthe< >buttononthesettingscreen.
COPY
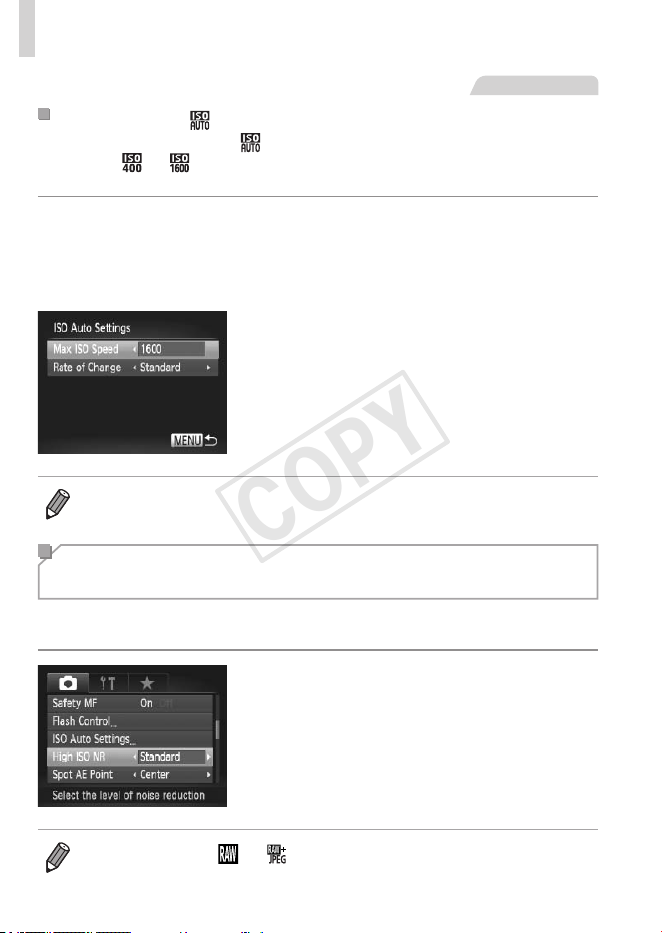
130
ImageBrightness(ExposureCompensation)
StillImages
Adjustingthe Setting
Whenthecameraissetto[ ],maximumISOspeedcanbespeciedin
arangeof[ ]–[ ],andsensitivitycanbespeciedinarangeofthree
levels.
1 Accessthesettingscreen.
zz Pressthe<n>button,choose[ISO
AutoSettings]onthe[4]tab,andthen
pressthe<m>button(=
48).
2 Congurethesetting.
zz Chooseamenuitemtocongure,and
thenchoosethedesiredoption(=
48).
• Youcanalsoaccessthe[ISOAutoSettings]screenwhentheISOspeed
settingscreen(=
129)isdisplayed,bypressingthe<n>button.
Changing the Noise Reduction Level
(High ISO NR)
Youcanchoosefrom3levelsofnoisereduction:[Standard],[High],[Low].
ThisfunctionisespeciallyeffectivewhenshootingathighISOspeeds.
Chooseanoisereductionlevel.
zz Pressthe<n>button,choose[High
ISONR]onthe[4]tab,andthenchoose
thedesiredoption(=
48).
• Notavailablewith[ ]or[ ](=
159).
COPY
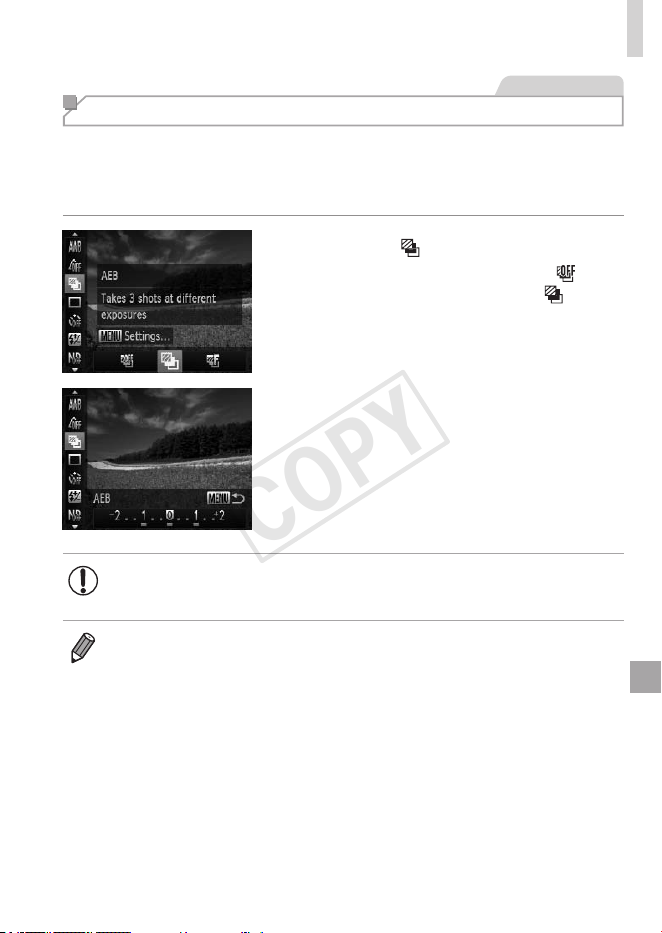
131
ImageBrightness(ExposureCompensation)
StillImages
Auto Exposure Bracketing (AEB Mode)
Threeconsecutiveimagesarecapturedatdifferentexposurelevels
(standardexposure,underexposure,andthenoverexposure)eachtime
youshoot.Youcanadjusttheamountofunderexposureandoverexposure
(relativetostandardexposure)from–2to+2stopsin1/3-stopincrements.
1 Choose[ ].
zz Pressthe<m>button,choose[ ]
inthemenu,andthenchoose[
]
(=
47).
2 Congurethesetting.
zz Pressthe<n>button,andthen
adjustthesettingbypressingthe
<q><r>buttonsorturningthe<7>dial.
• AEBisonlyavailablein[!]mode(=
25,55).
• Continuousshooting(=
139)isnotavailableinthismode.
• Ifexposurecompensationisalreadyinuse(=
125),thevaluespeciedfor
thatfunctionistreatedasthestandardexposurelevelforthisfunction.
• Youcanalsoaccessthesettingscreenofstep2bypressingthe<n>
buttonwhentheexposurecompensationscreen(=
125)isdisplayed.
• Threeshotsaretaken,regardlessofanyquantityspeciedin[$](=
66).
• In[BlinkDetection]mode(=
88),thisfunctionisonlyavailableforthenal
shot.
COPY
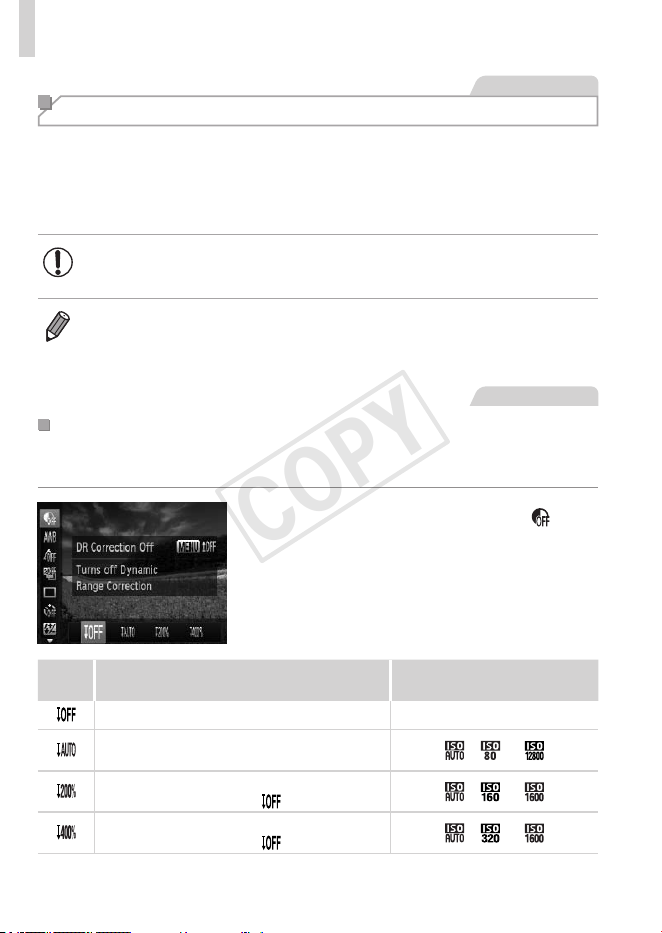
132
ImageBrightness(ExposureCompensation)
StillImages
Correcting Image Brightness (i-Contrast)
Beforeshooting,excessivelybrightordarkimageareas(suchasfacesor
backgrounds)canbedetectedandautomaticallyadjustedtotheoptimal
brightness.
Toavoidwashed-outhighlights,specifyDynamicRangeCorrection.To
preserveimagedetailinshadows,specifyShadowCorrect.
• Undersomeshootingconditions,correctionmaybeinaccurateor
maycauseimagestoappeargrainy.
• Youcanalsocorrectexistingimages(=
210).
• Youcancustomizecameraoperationsothatturningthe<z>or<7>dial
adjustsDRCorrectionorShadowCorrectsettings(=
168).
StillImages
DynamicRangeCorrection(DRCorrection)
Tonedownbrightimageareas,whichmightotherwiselookwashedout,as
follows.
zz Pressthe<m>button,choose[ ]in
themenu,andchoosethedesiredoption
(
=47
).
XX Oncethesettingiscomplete,[@]is
displayed.
Item Details
AvailableISOSpeed
(=
129)
– –
Automaticadjustmenttopreventwashed-out
highlights
[ ],[ ]–[ ]
Tonedownhighlightsbyabout200%relative
tothebrightnesslevelof[
].
[
],[ ]–[ ]
Tonedownhighlightsbyabout400%relative
tothebrightnesslevelof[
].
[
],[ ]–[ ]
COPY
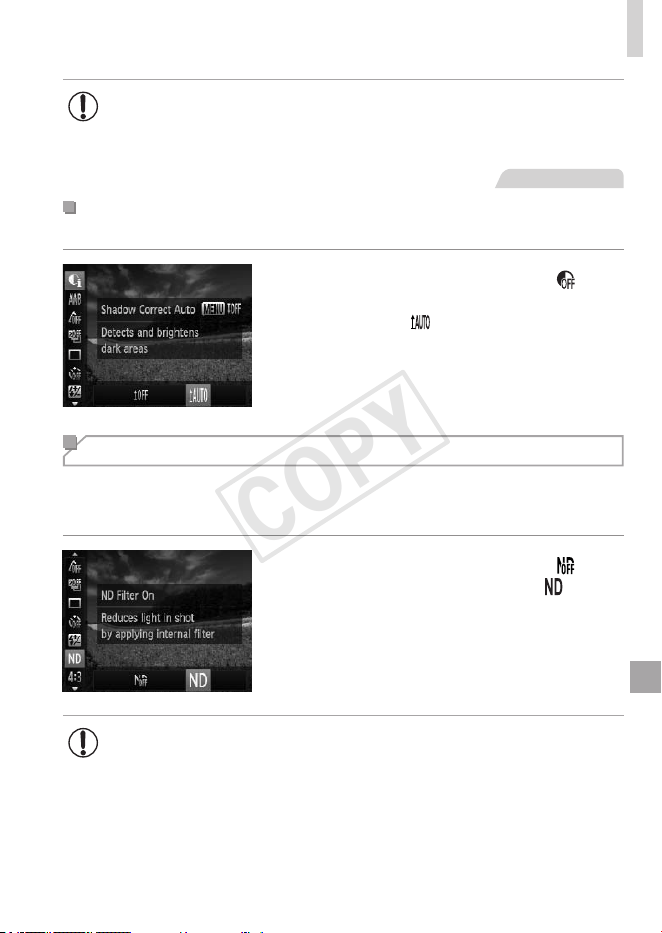
133
ImageBrightness(ExposureCompensation)
• ISOspeed(=
129)willbeadjustedtoaspeedwithinthe
supportedrangeifyouhavespeciedavalueoutsidethe
supportedrangeindicatedhere.
StillImages
ShadowCorrect
Automaticallypreserveimagedetailinshadowsasfollows.
zz Pressthe<m>button,choose[ ]in
themenu,pressthe<n>button,
andchoose[
](=
47).
XX Oncethesettingiscomplete,[@]is
displayed.
Using the ND Filter
Toshootatslowershutterspeedsandsmalleraperturevalues,usetheND
lter,whichreduceslightintensityto1/8theactuallevel(equivalentto3
stops).
zz Pressthe<m>button,choose[ ]
inthemenu,andthenchoose[
]
(=
47).
• Mountthecameraonatripodortakeothermeasurestokeepit
stillandpreventcamerashake.Additionally,youshouldset[IS
Mode]to[Off]whenusingatripodorothermeanstoholdthe
camerastill(=
160).
COPY
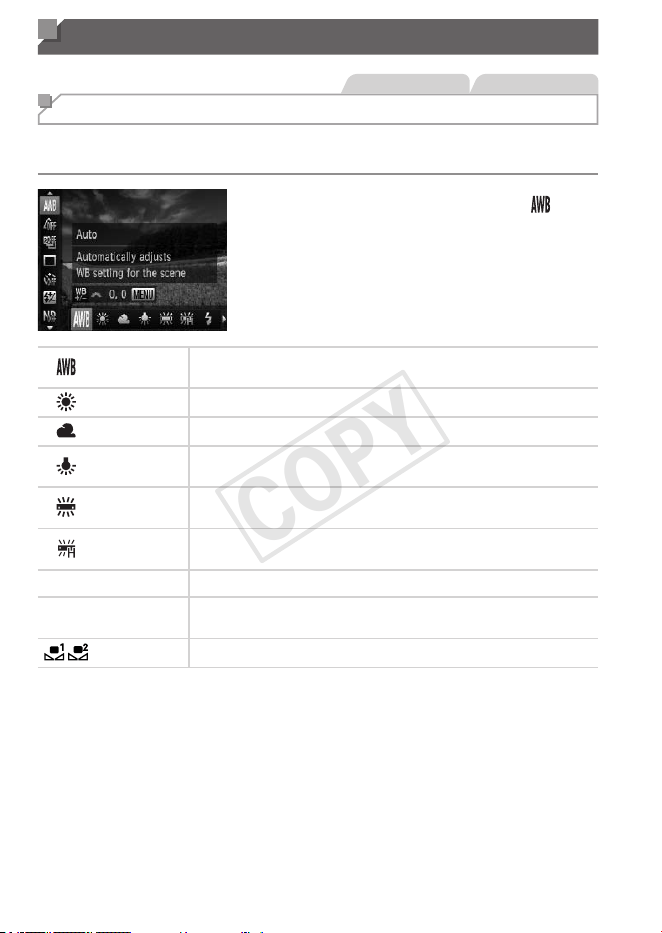
134
Color and Continuous Shooting
StillImages Movies
Adjusting White Balance
Byadjustingwhitebalance(WB),youcanmakeimagecolorslookmore
naturalforthesceneyouareshooting.
zz Pressthe<m>button,choose[ ]in
themenu,andchoosethedesiredoption
(=
47).
XX Theoptionyouconguredisnow
displayed.
Auto
Automaticallysetstheoptimalwhitebalancefortheshooting
conditions.
DayLight Forshootingoutdoorsinfairweather.
Cloudy Forshootingincloudyconditions,intheshade,orattwilight.
Tungsten
Forshootingunderordinaryincandescent(tungsten)lighting
andsimilarlycoloreduorescentlighting.
Fluorescent
Forshootingunderwarm-white(orsimilarlycolored)orcool-
whiteuorescentlighting.
FluorescentH
Forshootingunderdaylightuorescentandsimilarlycolored
uorescentlighting.
h
Flash Forshootingwiththeash.
S
Underwater
Setstheoptimalwhitebalanceforshootingunderwater.Tones
downbluestoproducenatural-lookingcolorsoverall.
Custom
Formanuallysettingacustomwhitebalance(=
135).
COPY
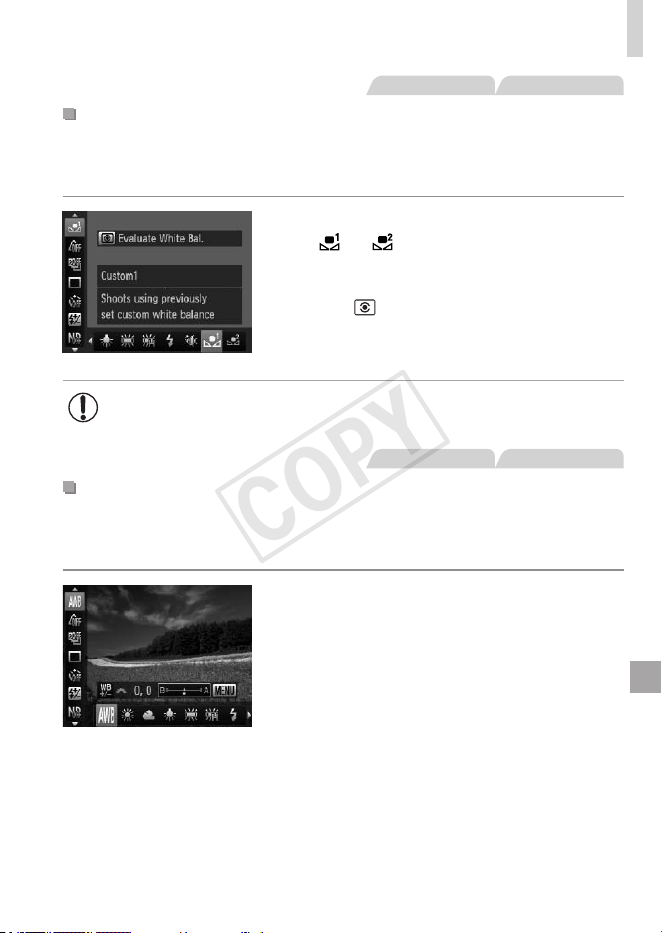
135
Color and Continuous Shooting
Still Images Movies
Custom White Balance
For image colors that look natural under the light in your shot, adjust white
balance to suit the light source where you are shooting. Set the white
balance under the same light source that will illuminate your shot.
zz Follow the steps on =
134 and choose
[
] or [ ].
zz Aim the camera at a plain white subject,
so that the entire screen is white. Press
the <
> button.
XX The tint of the screen changes once the
white balance data has been recorded.
• Colors may look unnatural if you change camera settings after
recording white balance data.
Still Images Movies
Manually Correcting White Balance
You can manually correct white balance. This adjustment can match the
effect of using a commercially available color temperature conversion lter
or color-compensating lter.
1 Congurethesetting.
zz Follow the steps on =
134 to choose
the white balance option.
zz Turn the <z> dial to adjust the
correction level for B and A.
COPY
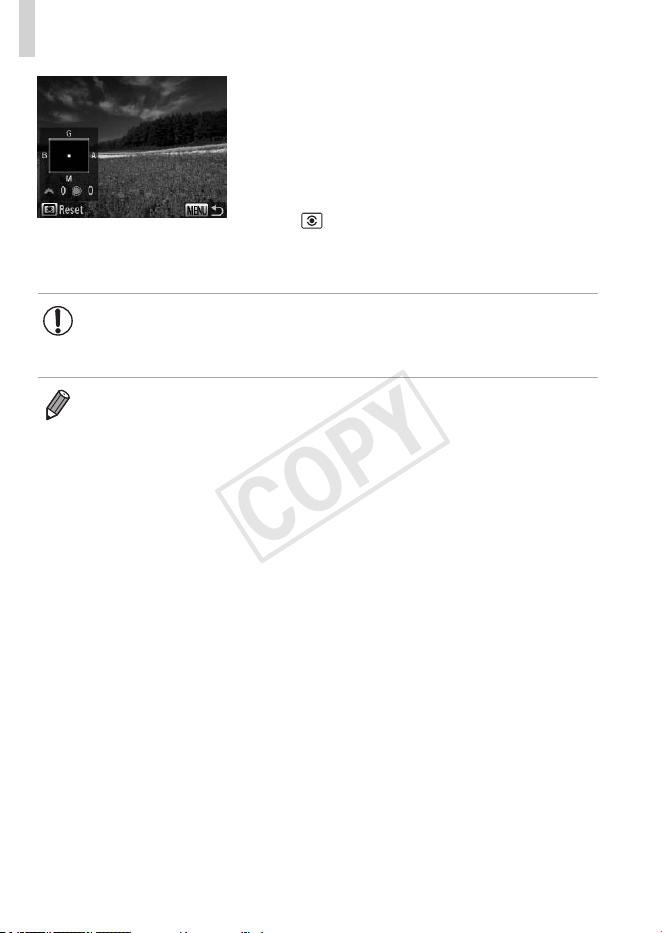
136
ColorandContinuousShooting
2 Congureadvancedsettings.
zz Toconguremoreadvancedsettings,
pressthe<n>buttonandturn
the<z>or<7>dialtoadjustthe
correctionlevel.
zz Toresetthecorrectionlevel,pressthe
<
>button.
zz Pressthe<n>buttontocomplete
thesetting.
• Thecamerawillretainwhitebalancecorrectionlevelsevenifyou
switchtoanotherwhitebalanceoptioninstep1,butcorrection
levelswillberesetifyourecordcustomwhitebalancedata.
• B:blue;A:amber;M:magenta;G:green
• Onelevelofblue/ambercorrectionisequivalenttoabout7miredsonacolor
temperatureconversionlter.(Mired:Colortemperatureunitrepresenting
colortemperatureconversionlterdensity)
• YoucancustomizecameraoperationsothattheBandAadjustmentscreen
canbeaccessedsimplybyturningthe<z>dial(=
168).
COPY
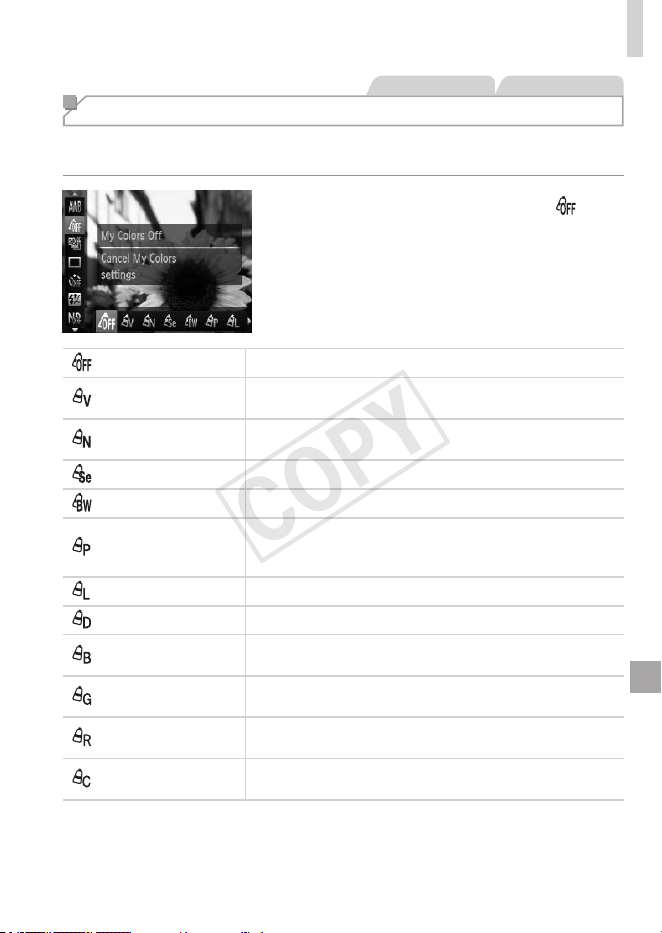
137
ColorandContinuousShooting
StillImages Movies
Changing Image Color Tones (My Colors)
Changeimagecolortonesasdesired,suchasconvertingimagestosepia
orblackandwhite.
zz Pressthe<m>button,choose[ ]in
themenu,andchoosethedesiredoption
(=
47).
XX Theoptionyouconguredisnow
displayed.
MyColorsOff
–
Vivid
Emphasizescontrastandcolorsaturation,makingimages
sharper.
Neutral
Tonesdowncontrastandcolorsaturationforsubdued
images.
Sepia Createssepiatoneimages.
B/W Createsblackandwhiteimages.
PositiveFilm
CombinestheeffectsofVividBlue,VividGreen,and
VividRedtoproduceintenseyetnatural-lookingcolors
resemblingimagesonpositivelm.
LighterSkinTone Lightensskintones.
DarkerSkinTone Darkensskintones.
VividBlue
Emphasizesbluesinimages.Makesthesky,ocean,and
otherbluesubjectsmorevivid.
VividGreen
Emphasizesgreensinimages.Makesmountains,foliage,
andothergreensubjectsmorevivid.
VividRed
Emphasizesredsinimages.Makesredsubjectsmore
vivid.
CustomColor
Adjustcontrast,sharpness,colorsaturation,andother
qualitiesasdesired(=
138).
COPY
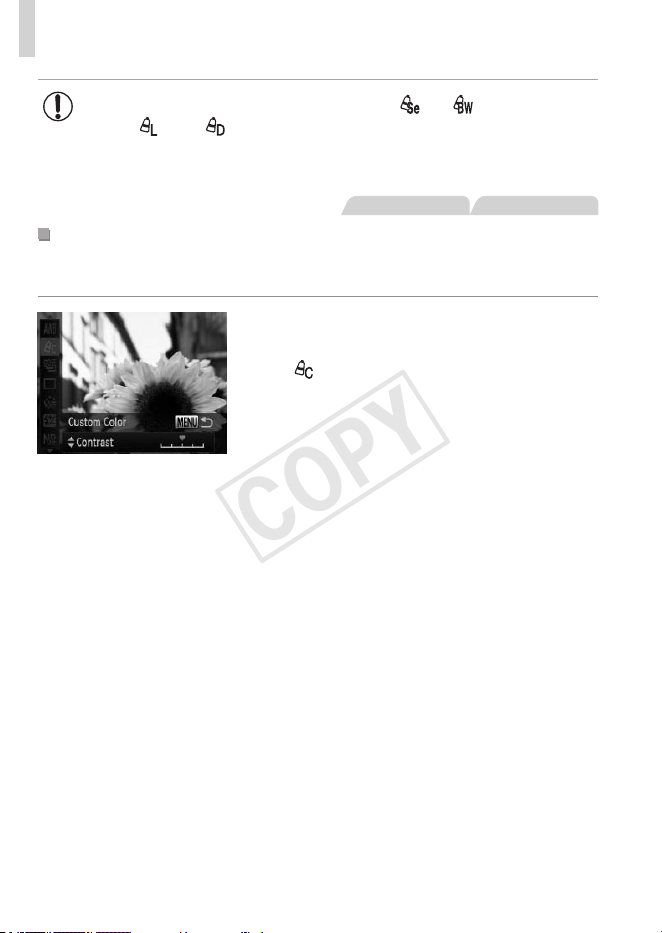
138
ColorandContinuousShooting
• Whitebalance(=
134)cannotbesetin[ ]or[ ]modes.
• With[
]and[ ]modes,colorsotherthanpeople’sskintone
maybemodied.Thesesettingsmaynotproducetheexpected
resultswithsomeskintones.
StillImages Movies
CustomColor
Choosethedesiredlevelofimagecontrast,sharpness,colorsaturation,
red,green,blue,andskintonesinarangeof1–5.
1 Accessthesettingscreen.
zz Followthestepson=
137tochoose
[
],andthenpressthe<n>button.
2 Congurethesetting.
zz Pressthe<o><p>buttonstochoose
anoption,andthenspecifythevalueby
pressingthe<q><r>buttonsorturning
the<7>dial.
zz Forstronger/moreintenseeffects(or
darkerskintones),adjustthevalueto
theright,andforweaker/lightereffects
(orlighterskintones),adjustthevalueto
theleft.
zz Pressthe<n>buttontocomplete
thesetting.
COPY
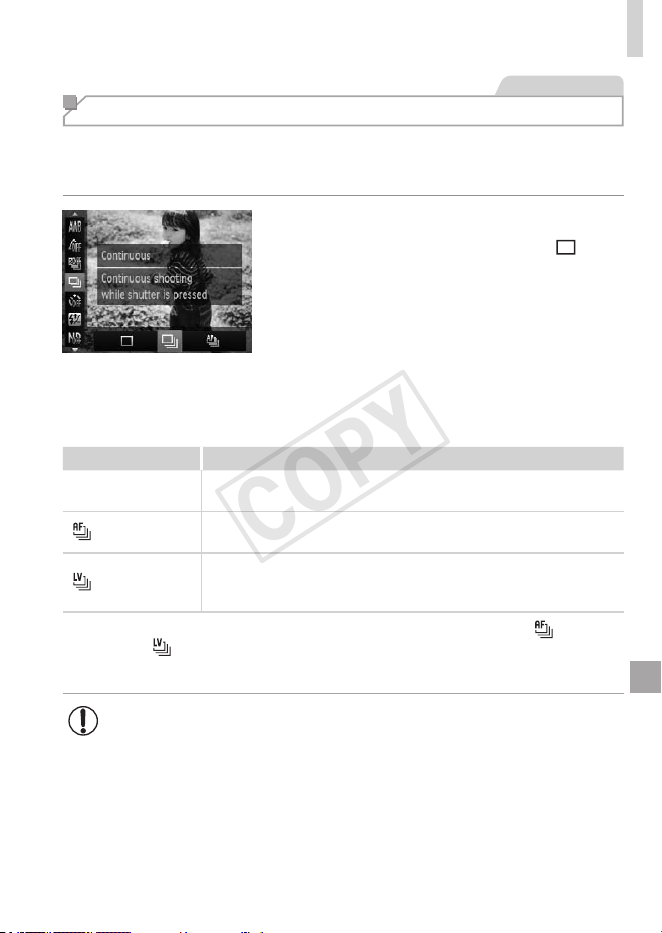
139
ColorandContinuousShooting
StillImages
Continuous Shooting
Holdtheshutterbuttonallthewaydowntoshootcontinuously.
Fordetailsonthecontinuousshootingspeed,see“Specications”
(=
303).
1 Congurethesetting.
zz Pressthe<m>button,choose[ ]in
themenu,andchoosethedesiredoption
(=
47).
XX Theoptionyouconguredisnow
displayed.
2 Shoot.
XX Holdtheshutterbuttonallthewaydown
toshootcontinuously.
Mode Description
W
Continuous
Continuousshooting,withthefocusandexposuredetermined
whenyoupresstheshutterbuttonhalfway.
Continuous
ShootingAF
Continuousshootingandfocusing.
[AFFrame]issetto[Center]andcannotbechanged.
Continuous
ShootingLV*
Continuousshooting,withthefocusxedattheposition
determinedinmanualfocusing.In[t]mode,focusisdetermined
bytherstshot.
*In[t]mode(=
96),AFlock(=
152),ormanualfocusmode(=
142),[ ]is
changedto[
].
*Fordetailsonthecontinuousshootingspeedineachmode,see“Specications”
(=
303).
• Cannotbeusedwiththeself-timer(=
64)or[BlinkDetection]
(=
88).
• Shootingmaystopmomentarilyorcontinuousshootingmayslow
downdependingonshootingconditions,camerasettings,andthe
zoomposition.
• Asmoreshotsaretaken,shootingmayslowdown.
• Shootingmayslowdowniftheashres.
COPY

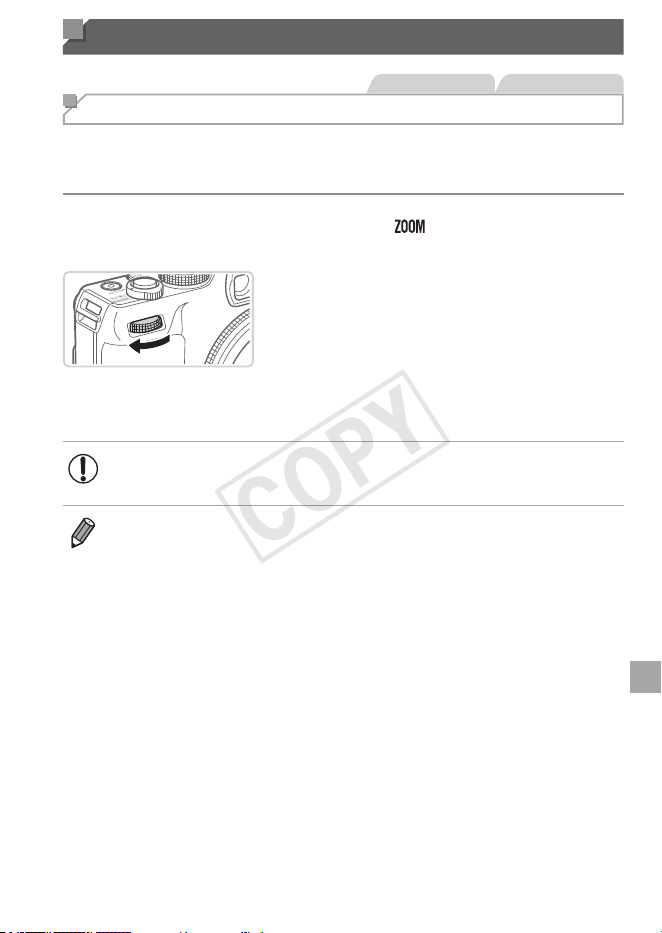
141
Shooting Range and Focusing
StillImages Movies
Shooting at Preset Focal Lengths (Step Zoom)
Youcanshootatpresetfocallengthsof28,35,50,85,100or140mm
(35mmlmequivalent).Thisisconvenientwhenyouwanttoshootatthe
angleofviewofthosefocallengths.
1 Assign[ ]tothe<z>dial
(=
168).
2 Chooseafocallength.
zz Turnthe<z>dialclockwiseuntilit
clickstochangethefocallengthfrom
28mmto35mm.Keepturningthe<z>
dialtoincreasethefocallength,which
changesto50,85,100,and140mmat
eachclick.
• Stepzoomisnotavailablewhenshootingmoviesevenifyouturn
the<z>dial.
• Whenusingthedigitalzoom(=
63),turningthe<z>dialclockwise
willnotchangethezoomfactor.However,turningthe<z>dial
counterclockwisewillsetthefocallengthto140mm.
COPY
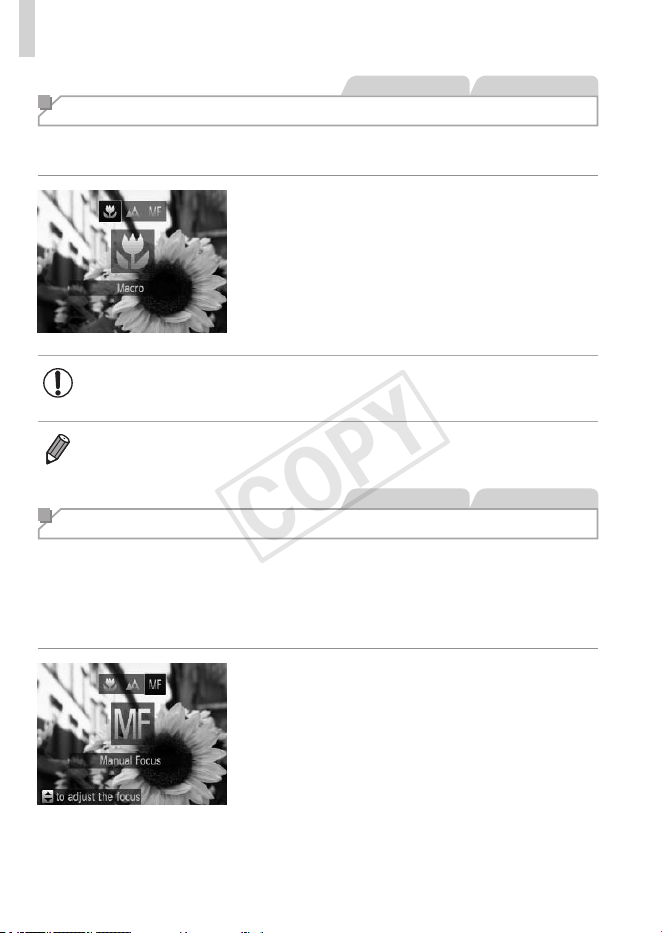
142
ShootingRangeandFocusing
StillImages Movies
Shooting Close-ups (Macro)
Torestrictthefocustosubjectsatcloserange,setthecamerato[e].For
detailsonthefocusingrange,see“Specications”(=
303).
zz Pressthe<q>button,choose[e](either
pressthe<q><r>buttonsorturnthe
<7>dial),andthenpressthe<m>
button.
XX Oncethesettingiscomplete,[e]is
displayed.
• Iftheashres,vignettingmayoccur.
• Becarefultoavoiddamagingthelens.
• Topreventcamerashake,trymountingthecameraonatripodandshooting
withthecamerasetto[[](=
65).
StillImages Movies
Shooting in Manual Focus Mode
WhenfocusingisnotpossibleinAFmode,usemanualfocus.Youcan
specifythegeneralfocalpositionandthenpresstheshutterbuttonhalfway
tohavethecameradeterminetheoptimalfocalpositionneartheposition
youspecied.Fordetailsonthefocusingrange,see“Specications”
(=
303).
1 Choose[f].
zz Pressthe<q>buttonandchoose[f],
eitherbypressingthe<q><r>buttonsor
turningthe<7>dial.Immediatelypress
the<m>button.
XX [f]andtheMFindicatoraredisplayed.
COPY
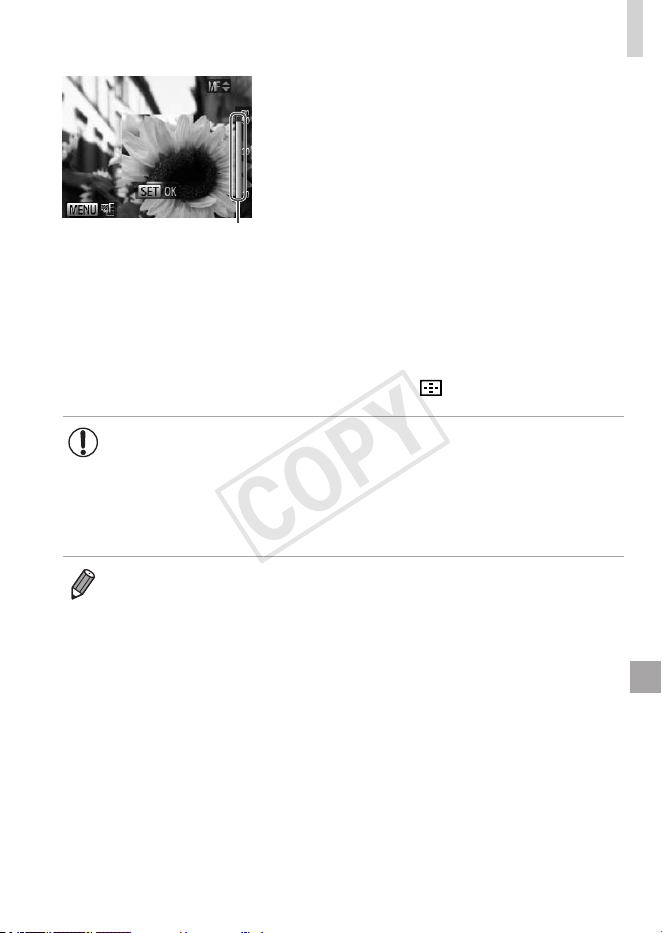
143
ShootingRangeandFocusing
MFIndicator
2 Specifythegeneralfocal
position.
zz Referringtotheon-screenMFindicator
bar(whichshowsthedistanceandfocal
position)andthemagnieddisplayarea,
pressthe<o><p>buttonsorturnthe
<7>dialtospecifythegeneralfocal
position,andthenpressthe<m>button.
3 Fine-tunethefocus.
zz Presstheshutterbuttonhalfwaytohave
thecamerane-tunethefocalposition
(SafetyMF).
zz Youcanalsone-tunethefocusby
pressingthe<
>button.
• AFframemodeorsizecannotbechangedwhilefocusing
manually(=
145).IfyouwanttochangetheAFframemodeor
size,cancelmanualfocusmoderst.
• Focusingispossiblewhenusingthedigitalzoom(=
63)or
digitaltele-converter(=
144),orwhenusingaTVasadisplay
(=
243),butthemagnieddisplaywillnotappear.
• Tofocusmoreaccurately,tryattachingthecameratoatripodtostabilizeit.
• Tohidethemagnieddisplayarea,pressthe<n>buttonandset
[MF-PointZoom]onthe[4]tabto[Off](=
48).
• Todeactivateautomaticfocusne-tuningwhentheshutterbuttonispressed
halfway,pressthe<n>buttonandset[SafetyMF]onthe[4]tabto
[Off](=
4 8 ).
COPY
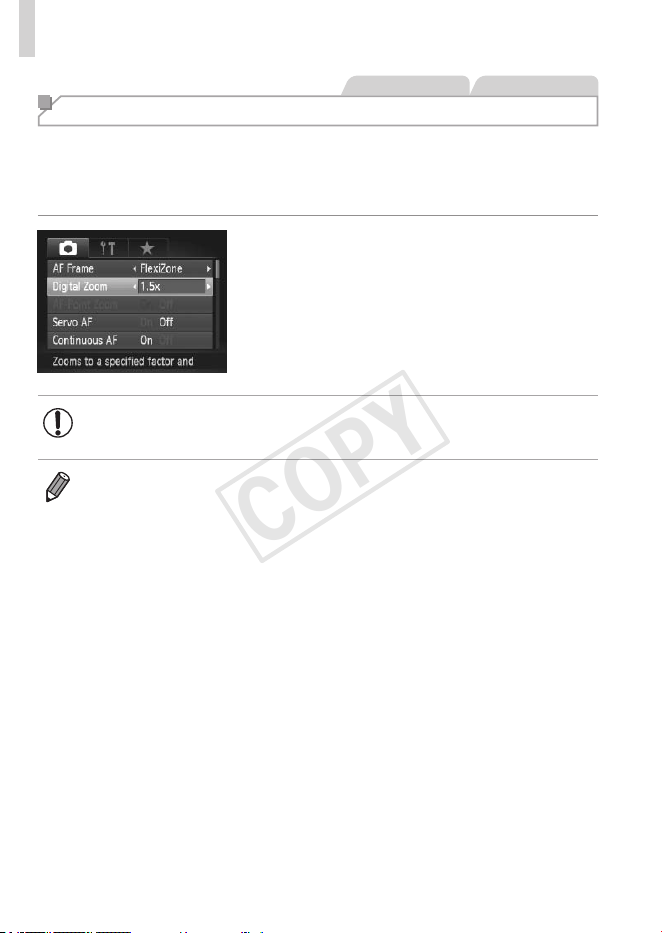
144
ShootingRangeandFocusing
StillImages Movies
Digital Tele-Converter
Thefocallengthofthelenscanbeincreasedbyapproximately1.5xor2.0x.
Thiscanreducecamerashakebecausetheshutterspeedisfasterthanit
wouldbeifyouzoomed(includingusingdigitalzoom)intothesamezoom
factor.
zz Pressthe<n>button,choose
[DigitalZoom]onthe[4]tab,andthen
choosethedesiredoption(=
48).
XX Theviewisenlargedandthezoomfactor
isdisplayedonthescreen.
• Thedigitaltele-convertercannotbeusedwithdigitalzoom
(=
63)andAF-pointzoom(=
87).
• Therespectivefocallengthswhenusing[1.5x]and[2.0x]are42.0–
210.0mmand56.0–280.0mm(35mmlmequivalent).
• Theshutterspeedmaybeequivalentwhenyoumovethezoomleverallthe
waytoward<i>formaximumtelephoto,andwhenyouzoomintoenlarge
thesubjecttothesamesizefollowingstep2on=
63.
COPY
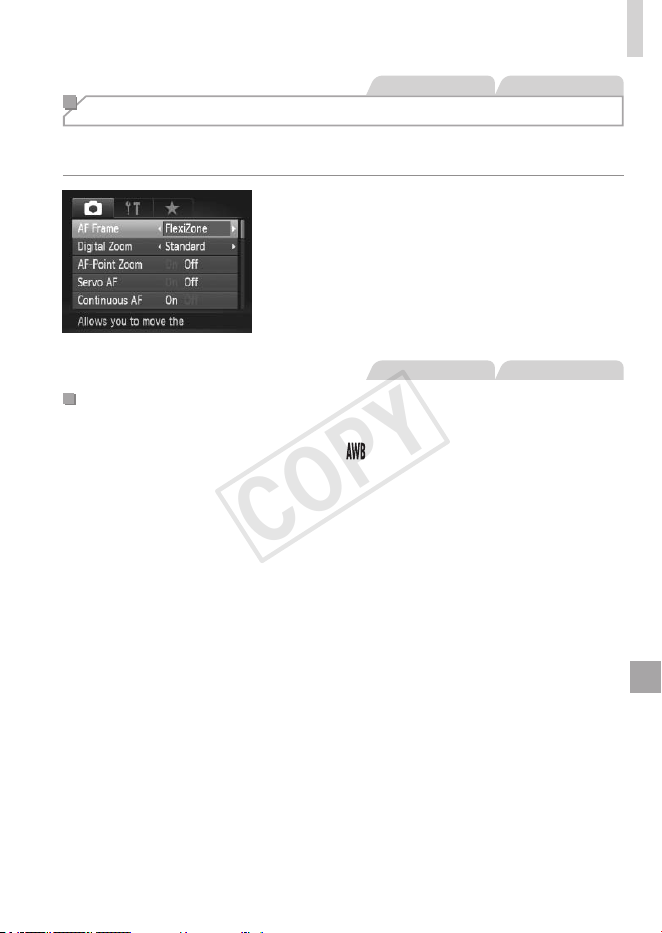
145
ShootingRangeandFocusing
StillImages Movies
Changing the AF Frame Mode
ChangetheAF(autofocus)framemodetosuittheshootingconditionsas
follows.
zz Pressthe<n>button,choose[AF
Frame]onthe[4]tab,andthenchoose
thedesiredoption(=
48).
StillImages Movies
FaceAiAF
• Detectspeople’sfaces,andthensetsthefocus,exposure(evaluative
meteringonly),andwhitebalance([ ]only).
• Afteryouaimthecameraatthesubject,awhiteframeisdisplayed
aroundtheperson’sfacedeterminedbythecameratobethemain
subject,anduptotwograyframesaredisplayedaroundotherdetected
faces.
• Whenthecameradetectsmovement,frameswillfollowmovingsubjects,
withinacertainrange.
• Afteryoupresstheshutterbuttonhalfway,uptoninegreenframesare
displayedaroundfacesinfocus.
COPY

146
ShootingRangeandFocusing
• Iffacesarenotdetected,orwhenonlygrayframesaredisplayed
(withoutawhiteframe),uptoninegreenframesaredisplayedin
theareasinfocuswhenyoupresstheshutterbuttonhalfway.
• IffacesarenotdetectedwhenServoAF(=
150)issetto[On],
theAFframeisdisplayedinthecenterofthescreenwhenyou
presstheshutterbuttonhalfway.
• Examplesoffacesthatcannotbedetected:
-Subjectsthataredistantorextremelyclose
-Subjectsthataredarkorlight
-Facesinprole,atanangle,orpartlyhidden
• Thecameramaymisinterpretnon-humansubjectsasfaces.
• NoAFframesaredisplayedifthecameracannotfocuswhenyou
presstheshutterbuttonhalfway.
StillImages
FlexiZone/Center
OneAFframeisdisplayed.Effectiveforreliablefocusing.
With[FlexiZone],youcanmoveandresizetheAFframe(=
147).
• AyellowAFframeisdisplayedwith[ ]ifthecameracannot
focuswhenyoupresstheshutterbuttonhalfway.NotethatAF-
pointzooming(=
87)isnotpossible.
• Tocomposeshotssothatsubjectsarepositionedattheedgeorinacorner,
rstaimthecameratocapturethesubjectinanAFframe,andthenhold
theshutterbuttonhalfwaydown.Asyoucontinuetoholdtheshutterbutton
halfway,recomposetheshotasdesired,andthenpresstheshutterbuttonall
thewaydown(FocusLock).
COPY
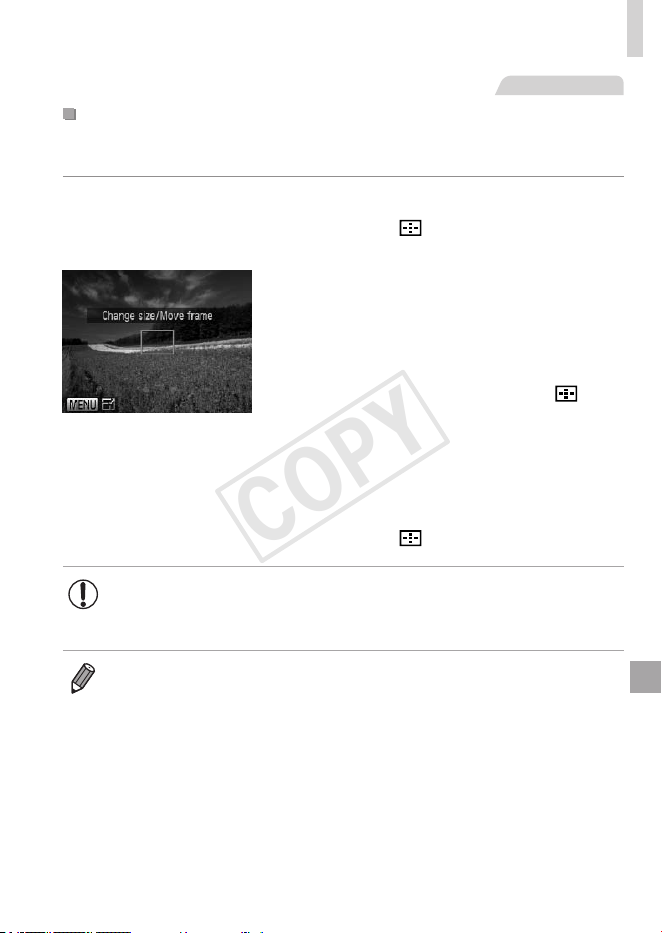
147
ShootingRangeandFocusing
StillImages
MovingandResizingAFFrames(FlexiZone)
WhenyouwanttochangethepositionorsizeoftheAFframe,settheAF
framemodeto[FlexiZone](=
146).
1 PreparetomovetheAFframe.
zz Pressthe< >button.TheAFframe
turnsorange.
2 MoveandresizetheAFframe.
zz Turnthe<7>dialtomovetheAFframe,
orpressthe<o><p><q><r>buttons
tomoveitbyasmalleramount.
zz ToreturntheAFframetotheoriginal
positioninthecenter,keepthe<
>
buttonhelddown.
zz ToreducetheAFframesize,pressthe
<n>button.Pressitagaintorestore
ittotheoriginalsize.
3 Finishthesetupprocess.
zz Pressthe< >button.
• AFframesaredisplayedatnormalsizewhenyouusethedigital
zoom(=
63)ordigitaltele-converter(=
144),andinmanual
focusmode(=
142).
• YoucanalsolinktheSpotAEPointframetotheAFframe(=
128).
COPY
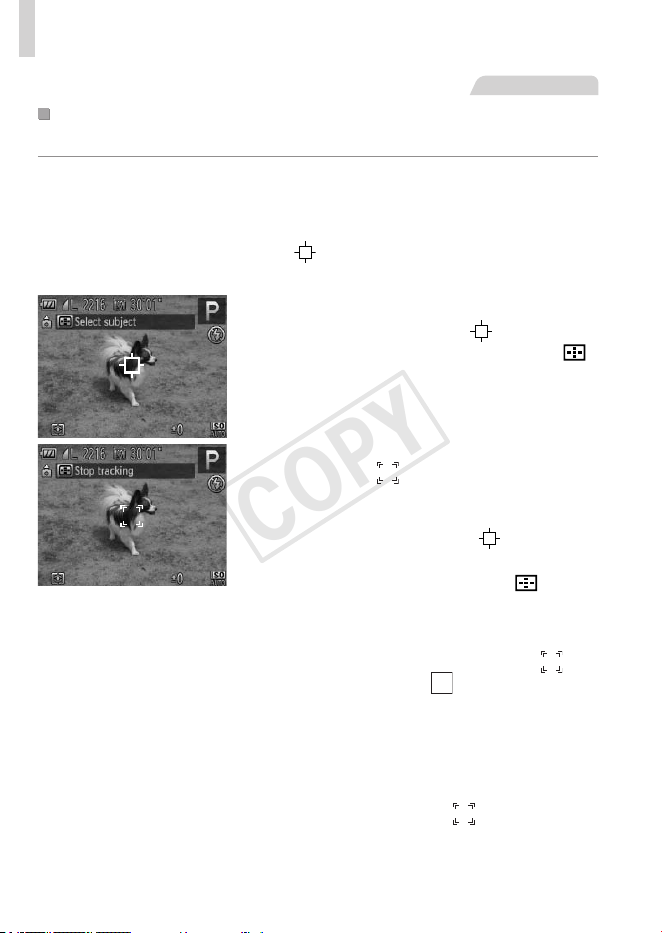
148
ShootingRangeandFocusing
StillImages
ChoosingSubjectstoFocusOn(TrackingAF)
Shootafterchoosingasubjecttofocusonasfollows.
1 Choose[TrackingAF].
zz Followthestepson=
145tochoose
[TrackingAF].
XX [ ]isdisplayedinthecenterofthe
screen.
2 Chooseasubjecttofocuson.
zz Aimthecamerasothat[ ]isonthe
desiredsubject,andthenpressthe<
>
button.
XX Whenthesubjectisdetected,thecamera
beepsand[
]isdisplayed.Evenifthe
subjectmoves,thecamerawillcontinue
totrackthesubjectwithinacertainrange.
XX Ifnosubjectisdetected,[ ]is
displayed.
zz Tocanceltracking,pressthe< >button
again.
3 Shoot.
zz Presstheshutterbuttonhalfway.[ ]
changestoablue[
],whichfollows
thesubjectasthecameracontinuesto
adjustthefocusandexposure(ServoAF)
(=
150).
zz Presstheshutterbuttonallthewaydown
toshoot.
XX Evenafteryourshot,[ ]isstill
displayedandthecameracontinuesto
trackthesubject.
COPY

149
ShootingRangeandFocusing
• [ServoAF](=
150)issetto[On]andcannotbechanged.
• Trackingmaynotbepossiblewhensubjectsaretoosmallormove
toorapidly,orwhensubjectcolororbrightnessmatchesthatofthe
backgroundtooclosely.
• [AF-PointZoom]onthe[4]tabisnotavailable.
• [e]isnotavailable.
• Thecameracandetectsubjectsevenifyoupresstheshutterbuttonhalfway
withoutpressingthe<
>button.Afteryourshot,[ ]isdisplayedinthe
centerofthescreen.
COPY
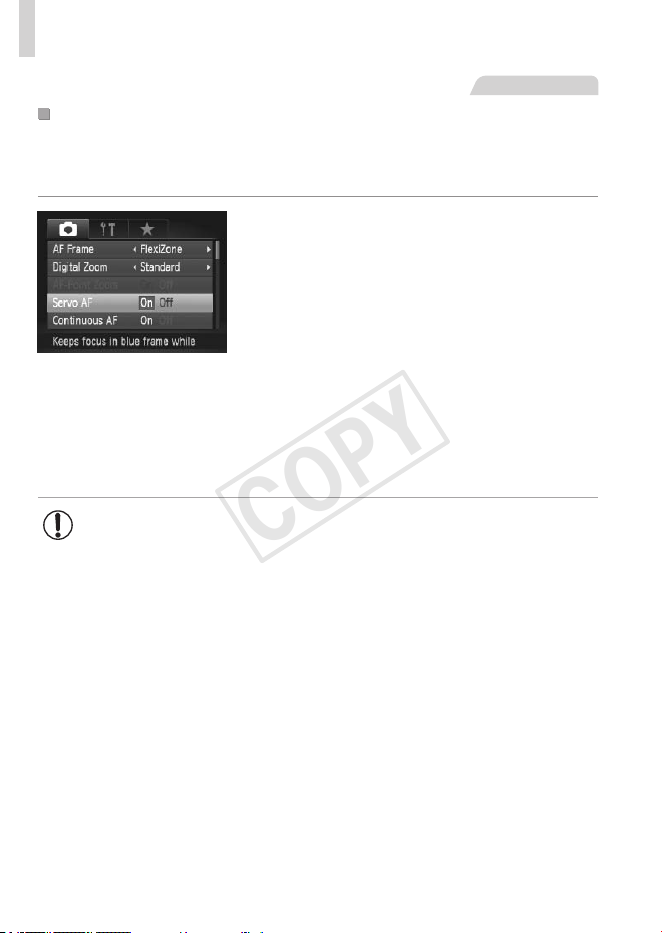
150
ShootingRangeandFocusing
StillImages
ShootingwithServoAF
Thismodehelpsavoidmissingshotsofsubjectsinmotion,becausethe
cameracontinuestofocusonthesubjectandadjusttheexposureaslong
asyoupresstheshutterbuttonhalfway.
1 Congurethesetting.
zz Pressthe<n>button,choose
[ServoAF]onthe[4]tab,andthen
choose[On](=
48).
2 Focus.
zz Thefocusandexposurearemaintained
wheretheblueAFframeisdisplayed
whileyouarepressingtheshutterbutton
halfway.
• Focusingmaynotbepossibleinsomeshootingconditions.
• Inlow-lightconditions,ServoAFmaynotbeactivated(AFframes
maynotturnblue)whenyoupresstheshutterbuttonhalfway.
Inthiscase,thefocusandexposurearesetaccordingtothe
speciedAFframemode.
• Ifadequateexposurecannotbeobtained,shutterspeedsand
aperturevaluesaredisplayedinorange.Releasetheshutter
button,andthenpressithalfwayagain.
• AFlockshootingisnotavailable.
• [AF-PointZoom]onthe[4]tabisnotavailable.
• Notavailablewhenusingtheself-timer(=
64).
COPY
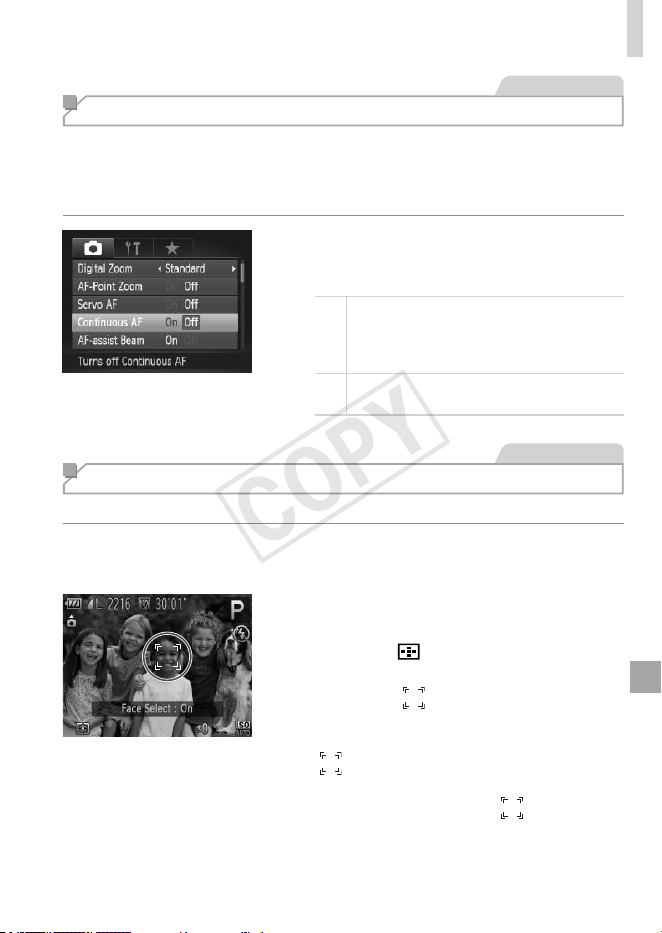
151
ShootingRangeandFocusing
StillImages
Changing the Focus Setting
Youcanchangedefaultcameraoperationofconstantlyfocusingon
subjectsitisaimedat,evenwhentheshutterbuttonisnotpressed.Instead,
youcanlimitcamerafocusingtothemomentyoupresstheshutterbutton
halfway.
zz Pressthe<n>button,choose
[ContinuousAF]onthe[4]tab,andthen
choose[Off](=
48).
On
Helpsavoidmissingsuddenphoto
opportunities,becausethecamera
constantlyfocusesonsubjectsuntilyou
presstheshutterbuttonhalfway.
Off
Conservesbatterypower,becausethe
cameradoesnotfocusconstantly.
StillImages
Choosing a Person to Focus On (Face Select)
Youcanshootafterchoosingaspecicperson’sfacetofocuson.
1 SettheAFframeto[FaceAiAF]
(=
145).
2 EnterFaceSelectmode.
zz Aimthecameraattheperson’sfaceand
pressthe<
>button.
XX After[FaceSelect:On]isdisplayed,a
faceframe[
]isdisplayedaroundthe
facedetectedasthemainsubject.
zz Evenifthesubjectmoves,thefaceframe
[
]followsthesubjectwithinacertain
range.
zz Ifafaceisnotdetected,[ ]isnot
displayed.
COPY
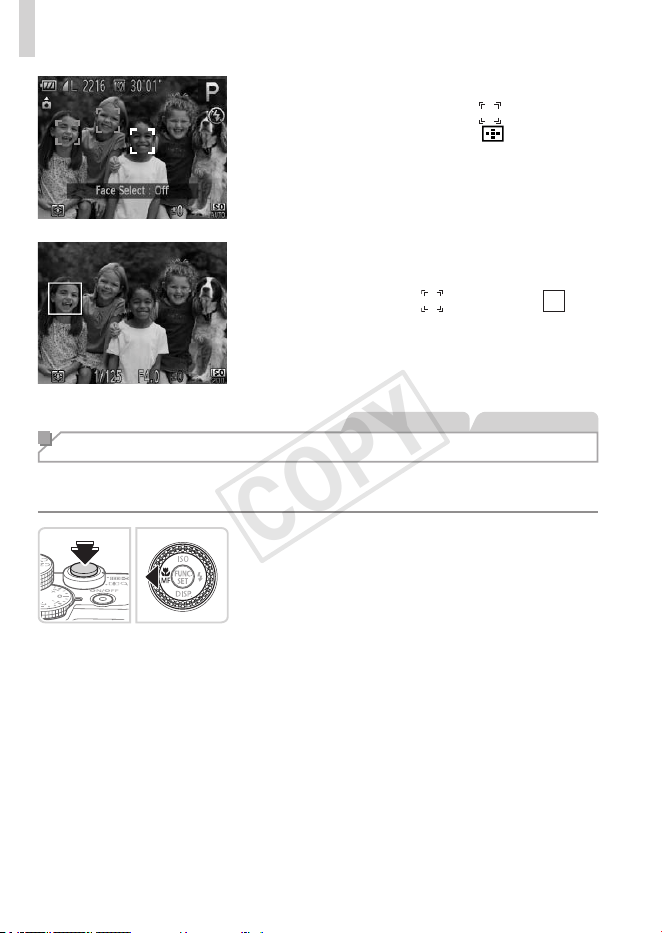
152
ShootingRangeandFocusing
3 Choosethefacetofocuson.
zz Toswitchthefaceframe[ ]toanother
detectedface,pressthe<
>button.
zz Afteryouhaveswitchedthefaceframe
toalldetectedfaces,[FaceSelect:Off]
isdisplayed,andthespeciedAFframe
modescreenisdisplayedagain.
4 Shoot.
zz Presstheshutterbuttonhalfway.Afterthe
camerafocuses,[
]changesto[ ].
zz Presstheshutterbuttonallthewaydown
toshoot.
StillImages Movies
Shooting with the AF Lock
Thefocuscanbelocked.Afteryoulockthefocus,thefocalpositionwillnot
changeevenwhenyoureleaseyourngerfromtheshutterbutton.
1 Lockthefocus.
zz Withtheshutterbuttonpressedhalfway,
pressthe<q>button.
XX Thefocusisnowlocked,and[f]and
theMFindicatoraredisplayed.
zz Tounlockthefocus,onceagainholdthe
shutterbuttonhalfwaydownandpress
the<q>button.
2 Composetheshotandshoot.
COPY
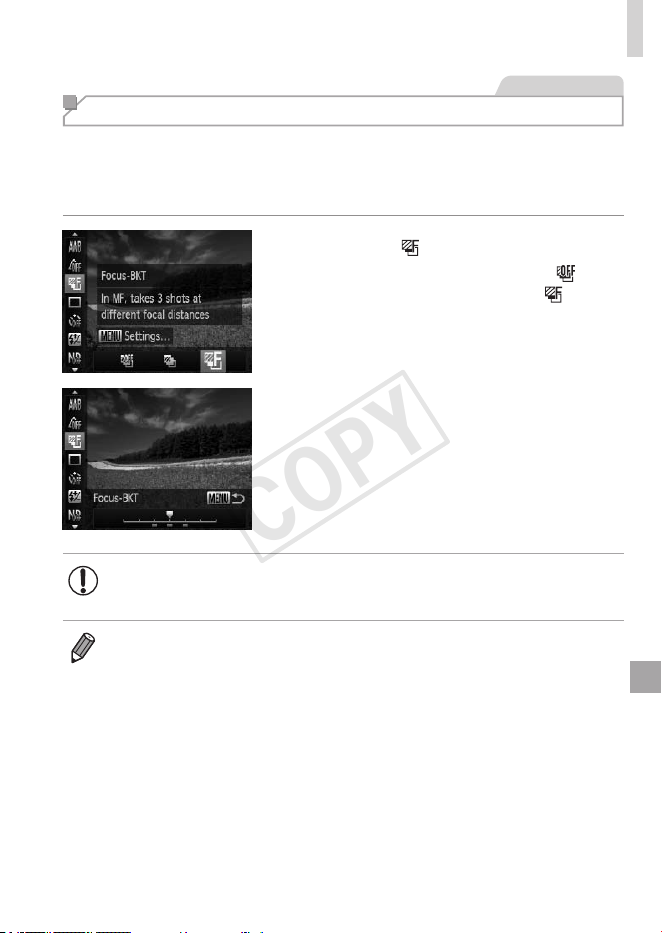
153
ShootingRangeandFocusing
StillImages
Focus Bracketing (Focus-BKT Mode)
Threeconsecutiveimagesarecapturedeachtimeyoushoot,withthe
rstoneatthefocaldistanceyousetmanuallyandtheothersatfarther
andnearerfocalpositionsdeterminedbypresets.Thedistancefromyour
speciedfocuscanbesetinthreelevels.
1 Choose[ ].
zz Pressthe<m>button,choose[ ]
inthemenu,andthenchoose[
]
(=
47).
2 Congurethesetting.
zz Pressthe<n>button,andthen
adjustthesettingbypressingthe
<q><r>buttonsorturningthe<7>dial.
• Focusbracketingisonlyavailablein[!]mode(=
25,55).
• Continuousshooting(=
139)isnotavailableinthismode.
• Youcanalsoaccessthesettingscreeninstep2bychoosing[f]instep1
on=
142andpressingthe<n>button.
• Threeshotsaretaken,regardlessofanyquantityspeciedin[$](=
66).
• In[BlinkDetection]mode(=
88),thisfunctionisonlyavailableforthenal
shot.
COPY

154
Flash
StillImages
Activating Flash
Youcanhavetheashreforeachshot.Fordetailsontheashrange,see
“Specications”(=
303).
1 Raisetheash.
zz Movethe< >switch.
2 Congurethesetting.
zz Pressthe<r>button,choose[h](either
pressthe<q><r>buttonsorturnthe
<7>dial),andthenpressthe<m>
button.
XX Oncethesettingiscomplete,[h]is
displayed.
• Thesettingscreencannotbeaccessedbypressingthe<r>
buttonwhentheashislowered.Movethe< >switchtoraise
theash,thencongurethesetting.
COPY
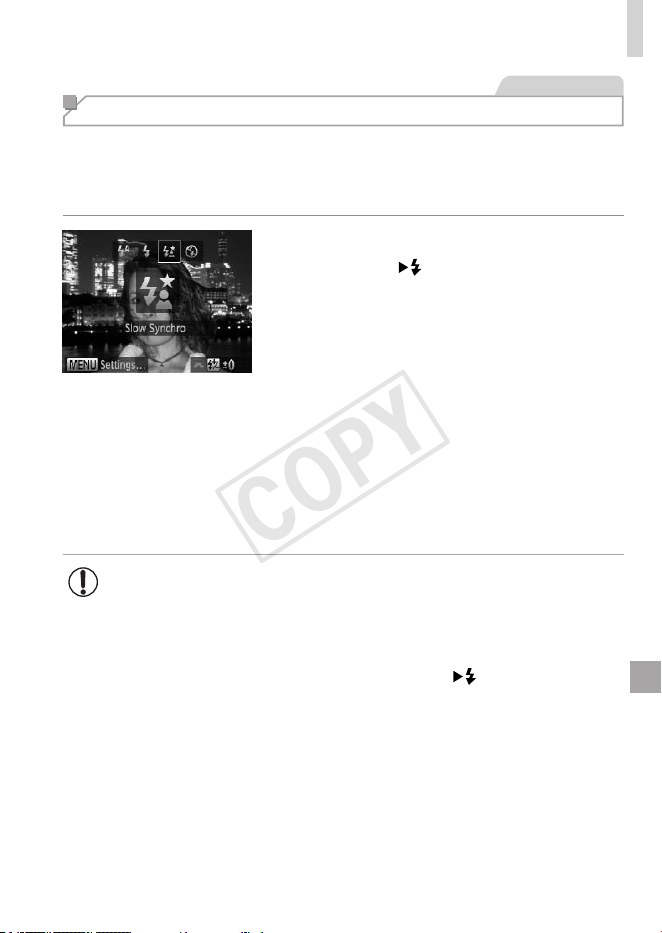
155
Flash
StillImages
Shooting with Slow Synchro
Withthisoption,theashrestoincreasethebrightnessofthemain
subject(suchaspeople)whilethecamerashootsataslowshutterspeedto
increasethebrightnessofthebackgroundthatisoutoftheashrange.
Fordetailsontheashrange,see“Specications”(=
303).
1 Raisetheash.
zz Movethe< >switch.
2 Congurethesetting.
zz Pressthe<r>button,choose[Z](either
pressthe<q><r>buttonsorturnthe
<7>dial),andthenpressthe<m>
button.
XX Oncethesettingiscomplete,[Z]is
displayed.
3 Shoot.
zz Evenaftertheashres,ensurethat
themainsubjectdoesnotmoveuntilthe
shuttersoundisnishedplaying.
• Mountthecameraonatripodortakeothermeasurestokeepit
stillandpreventcamerashake.Additionally,youshouldset[IS
Mode]to[Off]whenusingatripodorothermeanstoholdthe
camerastill(=
160).
• Thesettingscreencannotbeaccessedbypressingthe<r>
buttonwhentheashislowered.Movethe<
>switchtoraise
theash,thencongurethesetting.
COPY
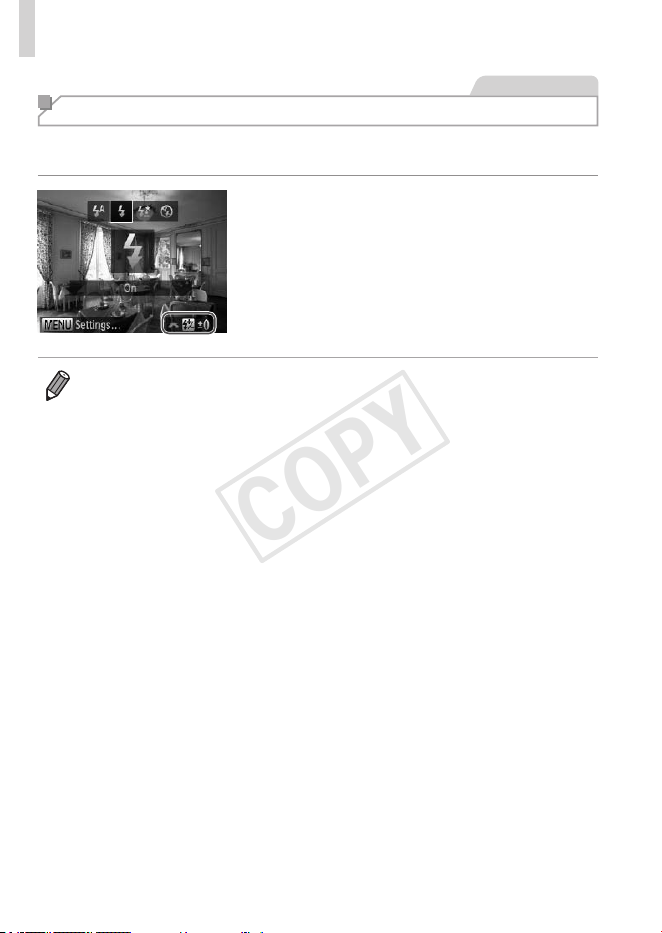
156
Flash
StillImages
Adjusting the Flash Exposure Compensation
Justaswithregularexposurecompensation(=
125),youcanadjustthe
ashexposurefrom–2to+2stops,in1/3-stopincrements.
zz Raisetheash,pressthe<r>buttonand
immediatelyturnthe<z>dialtochoose
thecompensationlevel,andthenpress
the<m>button.
XX Oncethesettingiscomplete,[X]is
displayed.
• Whenthereisariskofoverexposure,thecameraautomaticallyadjuststhe
shutterspeedoraperturevalueduringtheashshotstoreducewashed-
outhighlightsandshootatoptimalexposure.However,youcandeactivate
automaticadjustmentoftheshutterspeedandaperturevaluebyaccessing
<n>(=
48)andsetting[SafetyFE]in[FlashControl]onthe[4]tab
to[Off].
• Youcanalsoconguretheashexposurecompensationbychoosing[X]
intheFUNC.menu(=
47),orbyaccessing<n>(=
48)and
choosing[FlashExp.Comp]in[FlashControl]onthe[4]tab.
• Youcanalsoaccessthe[Built-inFlashSettings]<n>screenasfollows
(exceptwhenanoptionalexternalashismounted).
-Pressandholdthe<r>buttonforatleastonesecond.
-Whentheashisup,pressthe<r>buttonandimmediatelypressthe
<n>button.
COPY
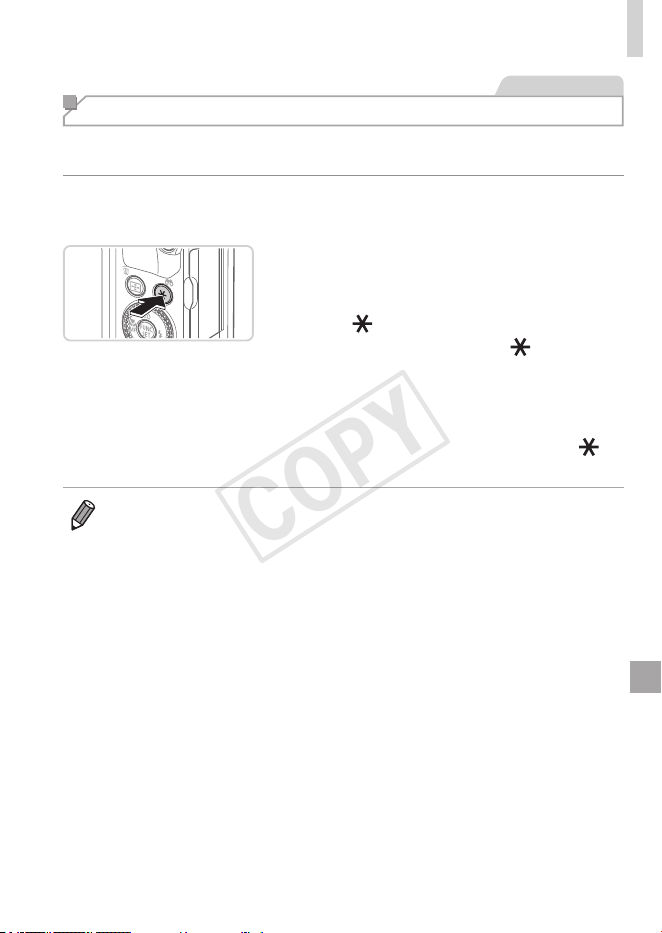
157
Flash
StillImages
Shooting with the FE Lock
JustaswiththeAElock(=126),youcanlocktheexposurefortheash
shots.
1 Raisetheashandsetitto[h]
(=
154).
2 Locktheashexposure.
zz Aimthecameraatthesubjecttoshoot
withtheexposurelocked,andthenpress
the<
>button.
XX Theashres,andwhen[ ]is
displayed,theashoutputlevelis
retained.
3 Composetheshotandshoot.
zz Afteroneshot,FEisunlockedand[ ]is
nolongerdisplayed.
• FE:FlashExposure
COPY
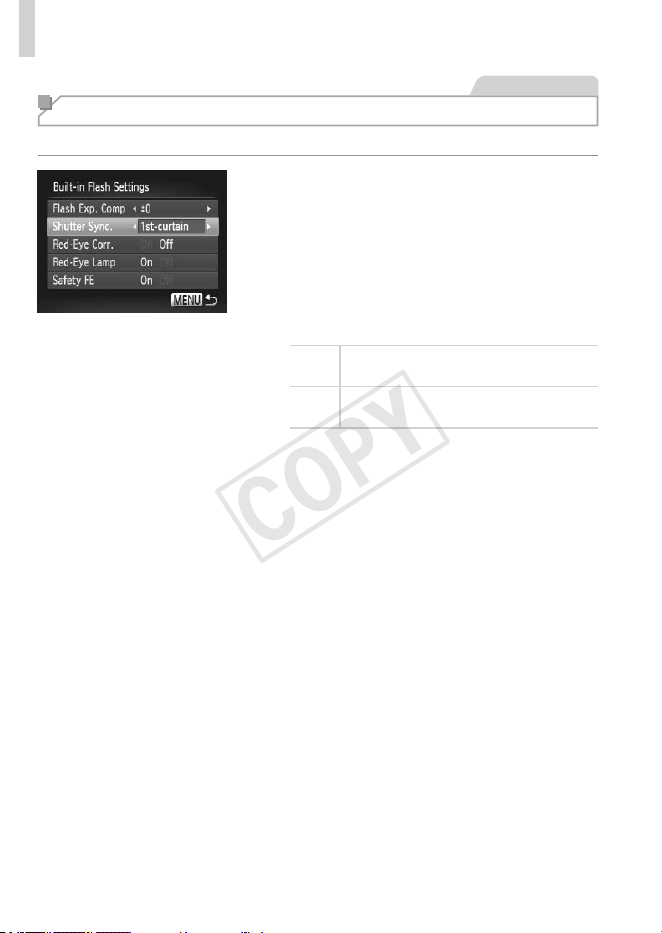
158
Flash
StillImages
Changing the Flash Timing
Changethetimingoftheashandshutterreleaseasfollows.
1 Accessthesettingscreen.
zz Pressthe<n>button,choose[Flash
Control]onthe[4]tab,andthenpress
the<m>button(=
4 8 ).
2 Congurethesetting.
zz Choose[ShutterSync.],andthenchoose
thedesiredoption(=
48).
1st-
curtain
Theashresimmediatelyafterthe
shutteropens.
2nd-
curtain
Theashresimmediatelybeforethe
shuttercloses.
COPY

159
StillImages
Shooting RAW Images
RAWimagesare“raw”(unprocessed)data,recordedwithessentiallyno
lossofimagequalityfromthecamera’sinternalimageprocessing.Use
DigitalPhotoProfessional(=
30)toadjustRAWimagesasdesiredwith
minimallossofimagequality.
zz Pressthe<m>button,choose[ ]in
themenu,andchoosethedesiredoption
(=
47).
RecordsJPEGimages.JPEGimagesareprocessedinthecameraforoptimal
imagequalityandcompressedtoreducelesize.However,thecompression
processisirreversible,andimagescannotberestoredtotheiroriginal,
unprocessedstate.Imageprocessingmayalsocausesomelossofimage
quality.
RecordsRAWimages.RAWimagesare“raw”(unprocessed)data,recordedwith
essentiallynolossofimagequalityfromthecamera’simageprocessing.The
datacannotbeusedinthisstateforviewingorprintingonacomputer.Youmust
rstusetheincludedsoftware(DigitalPhotoProfessional)toconvertimagesto
ordinaryJPEGorTIFFles.Imagescanbeadjustedwithminimallossofimage
quality.
Fordetailsonresolutionandthenumberofshotsthatwilltonacard,see
“Specications”(=
303).
Recordstwoimages,bothaRAWimageandaJPEGimage,foreachshot.
TheJPEGimagecanbeprintedorviewedonacomputerwithoutusingthe
includedsoftware.
• WhentransferringRAWimages(orRAWandJPEGimages
recordedtogether)toacomputer,alwaysusetheincluded
software(=
30).
• Digitalzoom(=
63),datestamps(=
67),andred-eye
reduction(=
82)aresetto[Off]in[ ]and[ ]modes.
Additionally,i-Contrast(=
132),MyColors(=
137)andnoise
reductionlevel(=
130)cannotbecongured.
• TheleextensionforJPEGimagesis.JPG,andtheextensionforRAW
imagesis.CR2.
COPY

160
Other Settings
StillImages
Changing the Compression Ratio
(Image Quality)
Choosefromtwocompressionratios,asfollows:[ ](SuperFine),
[ ](Fine).Forguidelinesonhowmanyshotsateachcompressionratio
cantonamemorycard,see“Specications”(=
303).
Congurethesetting.
zz Pressthe<m>button,choose[ ]in
themenu,pressthe<n>button,
andchoosethedesiredoption(=
47).
StillImages Movies
Changing the IS Mode Settings
zz Pressthe<n>button,choose[IS
Mode]onthe[4]tab,andthenpressthe
<q><r>buttonstochoosethedesired
option(=
48).
Continuous
Optimalimagestabilization
fortheshootingconditionsis
automaticallyapplied(Intelligent
IS)(=
61).
ShootOnly*
Imagestabilizationisactiveonlyat
themomentofshooting.
Off Deactivatesimagestabilization.
*Thesettingischangedto[Continuous]formovie
recording.
• Ifimagestabilizationcannotpreventcamerashake,mountthe
cameraonatripodortakeothermeasurestoholditstill.Inthis
case,set[ISMode]to[Off].
COPY

161
Tv, Av, M, C1, and C2 Mode
Takesmarter,moresophisticatedshots,andcustomize
thecameraforyourshootingstyle
• Instructionsinthischapterapplytothecameraassettotherespective
mode.
5
COPY
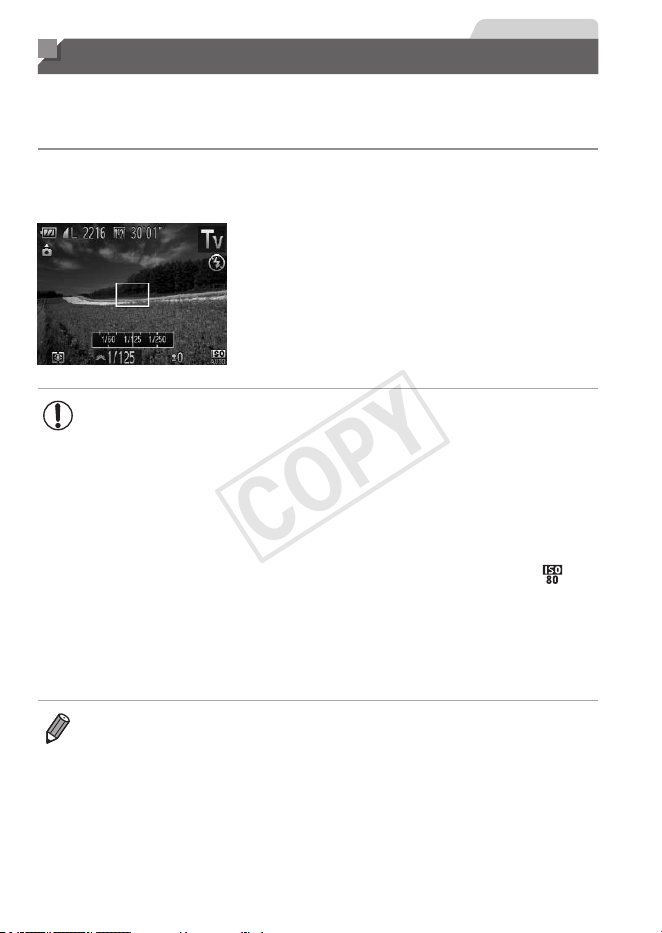
162
StillImages
Specic Shutter Speeds (<Tv> Mode)
Setyourpreferredshutterspeedbeforeshootingasfollows.Thecamera
automaticallyadjuststheaperturevaluetosuityourshutterspeed.
Fordetailsonavailableshutterspeeds,see“Specications”(=
303).
1 Enter<M>mode.
zz Setthemodedialto<M>.
2 Settheshutterspeed.
zz Turnthe<z>dialtosettheshutter
speed.
• Withshutterspeedsof1.3secondsorslower,therewillbeadelay
beforeyoucanshootagain,asimagesareprocessedtoremove
noise.
• Whenshootingatlowshutterspeedsonatripod,youshouldset
[ISMode]to[Off](=
160).
• Maximumshutterspeedwiththeashis1/2000second.Ifyou
specifyafasterspeed,thecamerawillautomaticallyresetthe
speedto1/2000secondbeforeshooting.
• Withshutterspeedsof1.3secondsorslower,ISOspeedis[
]
andcannotbechanged.
• Orangedisplayofaperturevalueswhenyoupresstheshutter
buttonhalfwayindicatesthatthesettingsdeviatefromstandard
exposure.Adjusttheshutterspeeduntiltheaperturevalueis
displayedinwhite,orusesafetyshift(=
163).
• <M>:Timevalue
• Youcancustomizecameraoperationsothatturningthe<7>dialchanges
theshutterspeed(=
168).
COPY

163
StillImages
Specic Aperture Values (<Av> Mode)
Setyourpreferredaperturevaluebeforeshootingasfollows.Thecamera
automaticallyadjuststheshutterspeedtosuityouraperturevalue.
Fordetailsonavailableaperturevalues,see“Specications”(=
303).
1 Enter<B>mode.
zz Setthemodedialto<B>.
2 Settheaperturevalue.
zz Turnthe<z>dialtosettheaperture
value.
• Orangedisplayofshutterspeedswhenyoupresstheshutter
buttonhalfwayindicatesthatthesettingsdeviatefromstandard
exposure.Adjusttheaperturevalueuntiltheshutterspeedis
displayedinwhite,orusesafetyshift(seebelow).
• <B>:Aperturevalue(sizeoftheopeningmadebytheirisinthelens)
• Toavoidexposureproblemsin<M>and<B>modes,youcanhavethe
cameraautomaticallyadjusttheshutterspeedoraperturevalue,evenwhen
standardexposurecannototherwisebeobtained.Pressthe<n>button
andset[SafetyShift]onthe[4]tabto[On](=
48).
However,safetyshiftisdisabledwhentheashres.
• Youcancustomizecameraoperationsothatturningthe<7>dialchanges
theaperturevalue(=
168).
COPY
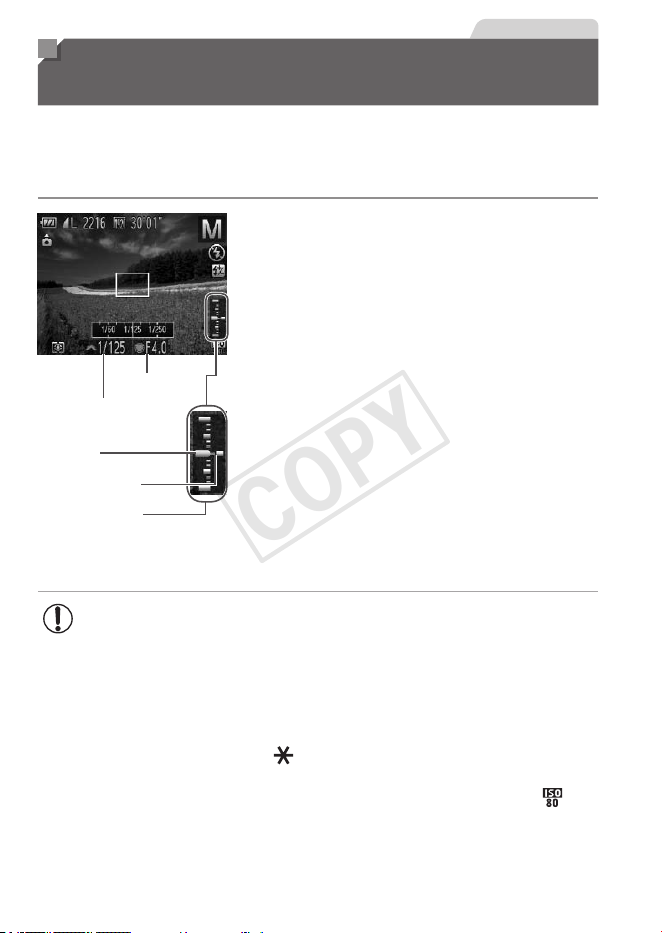
164
StillImages
Specic Shutter Speeds and Aperture
Values (<M> Mode)
Followthesestepsbeforeshootingtosetyourpreferredshutterspeedand
aperturevaluetoobtainthedesiredexposure.
Fordetailsonavailableshutterspeedsandaperturevalues,see
“Specications”(=
303).
ApertureValue
ShutterSpeed
Standard
ExposureLevel
ExposureLevel
Mark
ExposureLevel
Indicator
1 Enter<D>mode.
zz Setthemodedialto<D>.
2 Congurethesetting.
zz Turnthe<z>dialtosettheshutter
speed,andturnthe<7>dialtosetthe
aperturevalue.
XX Anexposurelevelmarkbasedonyour
speciedvalueisshownontheexposure
levelindicatorforcomparisontothe
standardexposurelevel.
XX Theexposurelevelmarkisshown
inorangewhenthedifferencefrom
standardexposureexceeds2stops.“–2”
or“+2”isdisplayedinorangeinthelower
rightwhenyoupresstheshutterbutton
halfway.
• Afteryousettheshutterspeedoraperturevalue,theexposure
levelmaychangeifyouadjustthezoomorrecomposetheshot.
• Screenbrightnessmaychangedependingonyourspecied
shutterspeedoraperturevalue.However,screenbrightness
remainsthesamewhentheashisupandthemodeissetto[h].
• Tohaveboththeshutterspeedandaperturevalueautomatically
adjustedtoobtainstandardexposure,holdtheshutterbutton
halfwayandpressthe<
>button.Notethatstandardexposure
maynotbepossiblewithsomesettings.
• Withshutterspeedsof1.3secondsorslower,ISOspeedis[
]
andcannotbechanged.
COPY

165
SpecicShutterSpeedsandApertureValues(<M>Mode)
• <D>:Manual
• Calculationofstandardexposureisbasedonthespeciedmeteringmethod
(=
127).
• Youcancustomizecameraoperationsothatturningthe<7>dialadjusts
theshutterspeedandturningthe<z>dialadjuststheaperturevalue
(=
168).
StillImages
Adjusting the Flash Output
Choosefromthethreeashlevelsin<D>mode.
1 Enter<D>mode.
zz Setthemodedialto<D>.
2 Congurethesetting.
zz Raisetheash,pressthe<r>buttonand
immediatelyturnthe<z>dialtochoose
theashlevel,andthenpressthe<m>
button.
XX Oncethesettingiscomplete,[X]is
displayed.
• Youcanalsosettheashlevelbychoosing[X]intheFUNC.menu
(=
47),orbyaccessing<n>(=
48)andchoosing[FlashOutput]
in[FlashControl]onthe[4]tab.
• Youcansettheashlevelin<M>or<B>modebyaccessing<n>
(=
48),choosing[FlashControl]onthe[4]tab,andthensetting[Flash
Mode]to[Manual].
• Youcanalsoaccessthe[Built-inFlashSettings]<n>screenasfollows
(exceptwhenanexternalash(soldseparately)isattachedtothecamera).
-Pressandholdthe<r>buttonforatleastonesecond.
-Whentheashisup,pressthe<r>buttonandimmediatelypressthe
<n>button.
COPY
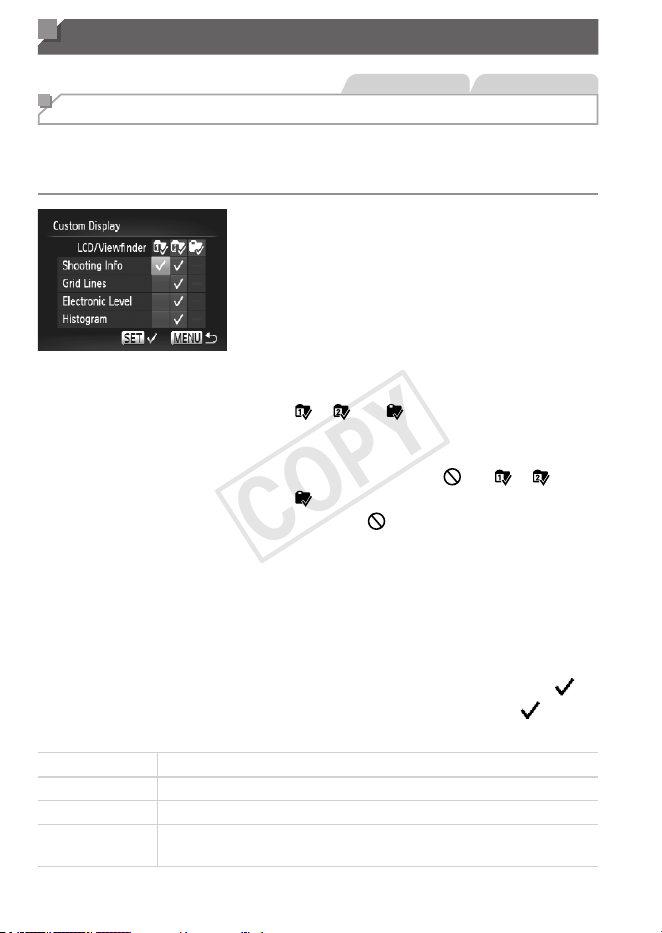
166
Customization for Shooting Styles
StillImages Movies
Customizing Display Information
Setthenumberofcustomdisplays(=
46)andwhatinformationis
displayedineachdisplaywhenthe<p>buttonispushedinshooting
display.
1 Accessthesettingscreen.
zz Pressthe<n>button,choose
[CustomDisplay]onthe[4]tab,and
thenpressthe<m>button(=
48).
2 Choose[LCD/Viewnder].
zz Pressthe<o><p><q><r>buttonsor
turnthe<7>dial,andthenpressthe
<m>buttontocongurecustomdisplays
[
],[ ]or[ ]whicharedisplayed
whenthe<p>buttonispressed.
zz Todeactivateacustomdisplay,pressthe
<m>buttontoadd[
]to[ ],[ ]or
[
].
zz Notethat[ ]cannotbeappliedto[LCD/
Viewnder]customdisplaycurrentlyin
use.
3 Congurethesetting.
zz Pressthe<o><p><q><r>buttonsor
turnthe<7>dialtochooseanitem,and
thenpressthe<m>button.Itemsyou
choosefordisplayarelabeledwith[
].
XX Selecteditems(labeledwitha[ ])will
beincludedindisplay.
ShootingInfo
Displaysshootinginformation(=
286).
GridLines Displaysareferencegrid.
ElectronicLevel
Displaystheelectroniclevel(=
86).
Histogram
Displaysahistogram(=
176),in<G>,<M>,<B>,and<D>
modes.
COPY

167
CustomizationforShootingStyles
• Settingswillnotbesavedifyoupresstheshutterbuttonhalfway
andreturntotheshootingscreenfromthecustomdisplaysettings
screen.
• Grayed-outitemscanalsobespecied,buttheymaynotbe
displayedinsomeshootingmodes.
• Gridlinesarenotrecordedinyourshots.
COPY
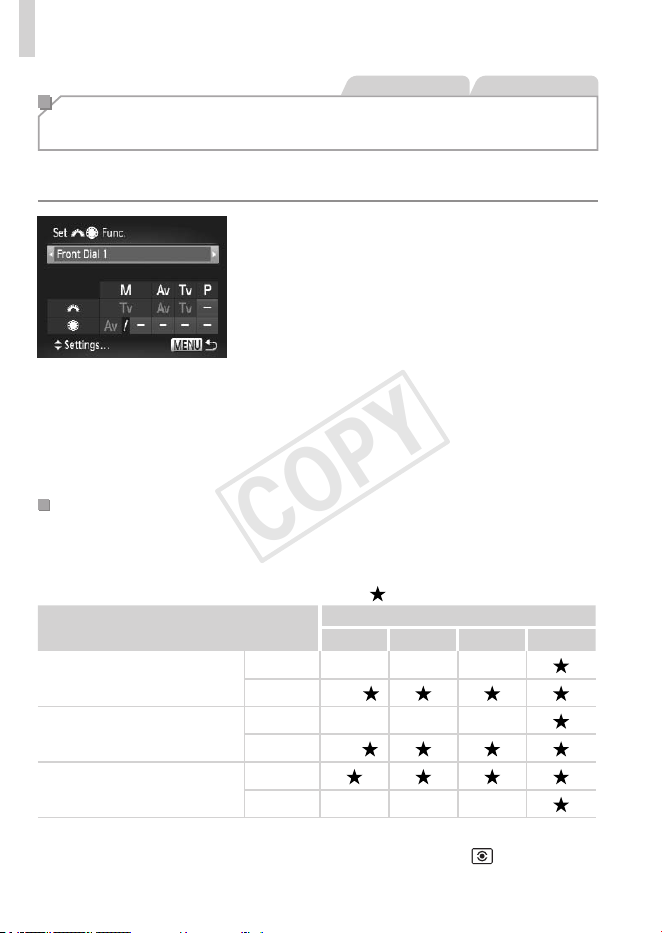
168
CustomizationforShootingStyles
StillImages Movies
Assigning Functions to the Front Dial and
Control Dial
Assigncommonlyusedfunctionstothefrontdialandcontroldial,by
shootingmode.
1 Accessthesettingscreen.
zz Pressthe<n>button,choose[Set
z7Func.]onthe[4]tab,andthen
pressthe<m>button(=
48).
2 Congurethesetting.
zz Pressthe<q><r>buttonstochoosean
item.
zz Tocongurethesettings,pressthe
<o><p>buttons,chooseanitem(either
pressthe<o><p><q><r>buttons
orturnthe<7>dial),andthenturnthe
<z>dialtochangethefunction.
AssignableFunctions
Functionsyoucanassigntothefrontdialandcontroldialvarydepending
onshootingmode.Onthesettingscreen,youcanassignaspectratio
switching(=
80),i-Contrast(=
132),whitebalancecorrection(=
135),
orstepzoom(=
141)tomodesindicatedby inthefollowingtable.
Item
ShootingMode
D B M G
FrontDial1
z M B M
7
B,
FrontDial2
z B B M
7
M,
ControlDial
z
7 B,M B M
•<B>:aperturevalue(=
163);<M>:shutterspeed(=
162)
•Whenmultiplefunctionsareassignedtothe<7>dial,pressthe<
>buttonto
switchbetweenthem.
COPY
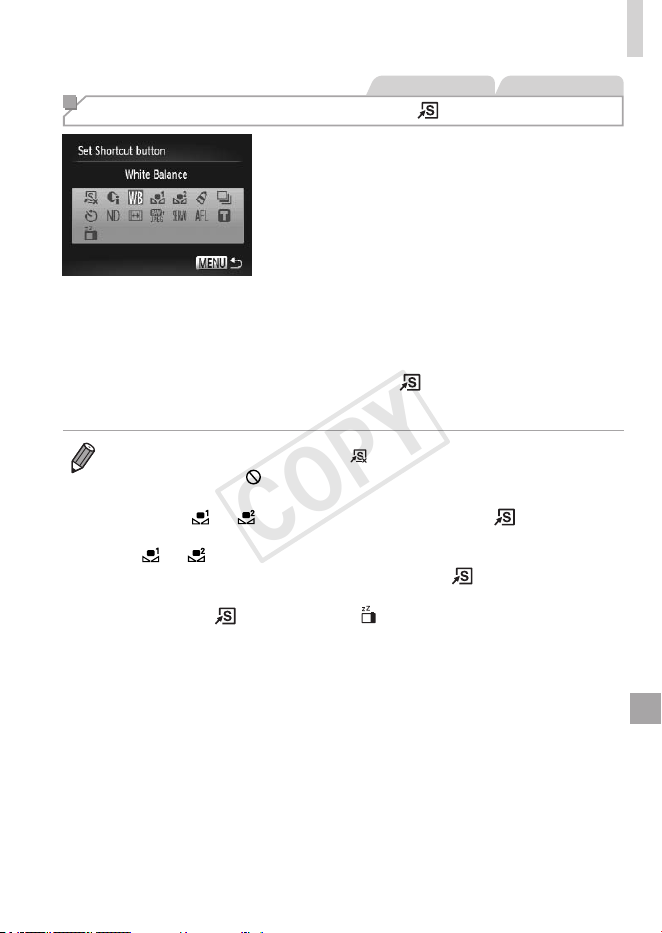
169
CustomizationforShootingStyles
StillImages Movies
Assigning Functions to the < > Button
1 Accessthesettingscreen.
zz Pressthe<n>button,choose[Set
Shortcutbutton]onthe[4]tab,andthen
pressthe<m>button(=
48).
2 Congurethesetting.
zz Pressthe<o><p><q><r>buttonsor
turnthe<7>dialtochooseafunctionto
assign,andthenpressthe<m>button.
3 Usetheassignedfunctionas
needed.
zz Pressthe< >buttontoactivatethe
assignedfunction.
• Torestoredefaultsettings,choose[ ].
• Iconslabeledwith[
]indicatethatthefunctionisnotavailableinthecurrent
shootingmodeorundercurrentfunctionconditions.
• Whenthe[
]or[ ]functionisused,eachpressofthe< >button
recordswhitebalancedata(=
135),andthewhitebalancesettingschange
to[
]or[ ].
• Whenthe[%]functionisused,eachpressofthe<
>buttonadjustsand
locksthefocus,and[%]isdisplayedonthescreen.
• Pressingthe<
>buttonwhenthe[ ]functionisuseddeactivatesscreen
display.Torestorethedisplay,doanyofthefollowing.
-Pressanybutton(otherthanthepowerbutton)
-Holdthecamerainanotherorientation
-Raiseandlowertheash
COPY
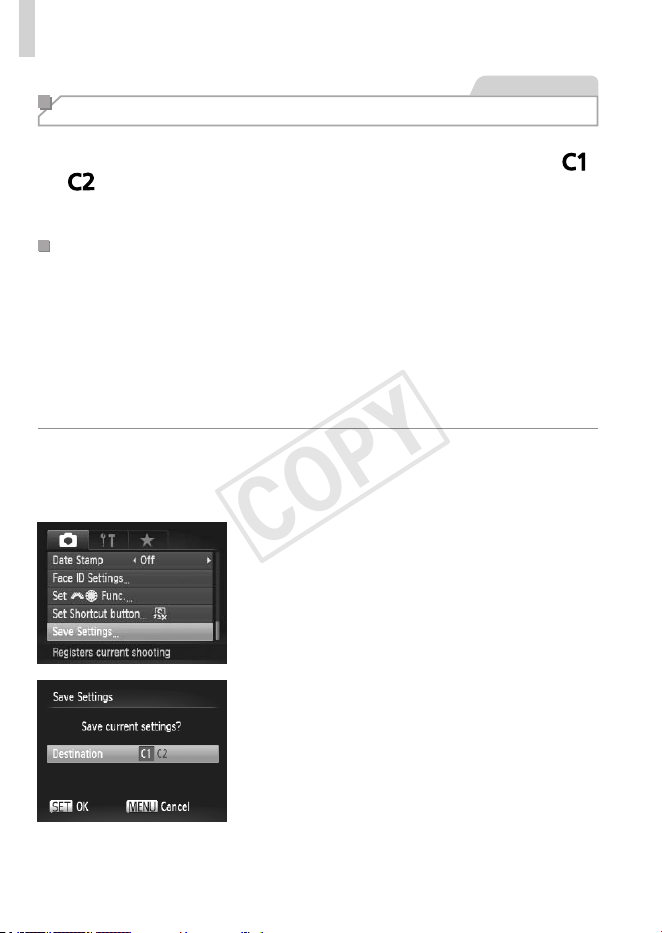
170
CustomizationforShootingStyles
StillImages
Saving Shooting Settings
Savecommonlyusedshootingmodesandyourconguredfunctionsettings
forreuse.Toaccesssavedsettingslater,simplyturnthemodedialto< >
or< >.Evensettingsthatareusuallyclearedwhenyouswitchshooting
modesorturnthecameraoff(suchasself-timersettings)canberetained
thisway.
Settingsthatcanbesaved
• Shootingmodes(<G>,<M>,<B>,and<D>)
• Itemssetin<G>,<M>,<B>,or<D>modes(=
125–164)
• Shootingmenusettings
• Zoompositions
• Manualfocuspositions(=
142)
• MyMenusettings(=
171)
1 Enterashootingmodewith
settingsyouwanttosave,and
changethesettingsasdesired.
2 Congurethesetting.
zz Pressthe<n>button,choose[Save
Settings]onthe[4]tab,andthenpress
the<m>button.
3 Savethesettings.
zz Pressthe<q><r>buttonsorturnthe
<7>dialtochoosethedestination,and
thenpressthe<m>button.
COPY
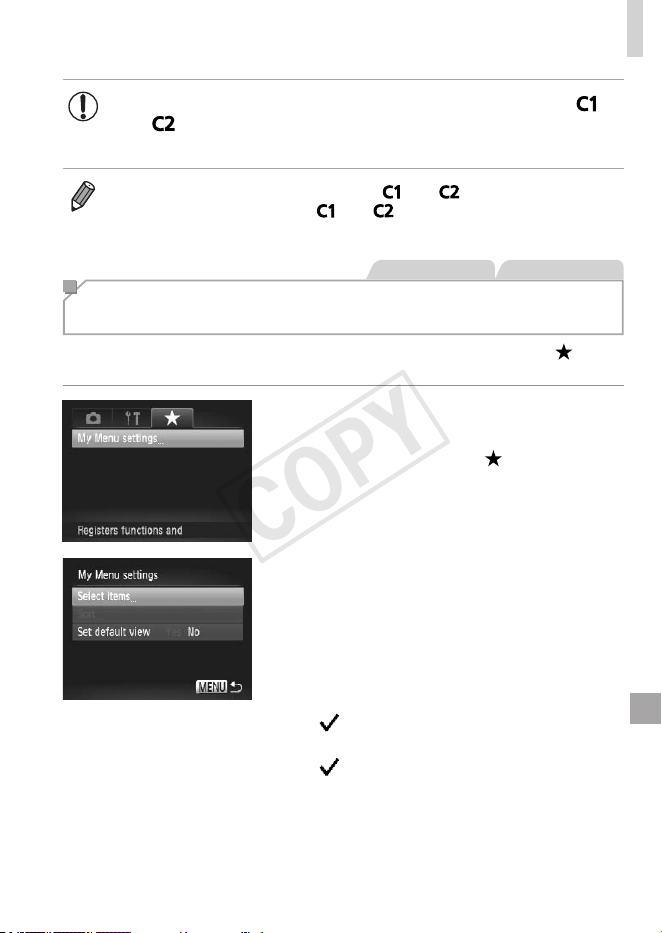
171
CustomizationforShootingStyles
• Toeditsavedsettings(excepttheirshootingmode),choose< >
or< >,changethesettings,andthenrepeatsteps2–3.These
settingdetailsarenotappliedinothershootingmodes.
• Toclearinformationyouhavesavedto< >or< >andrestoredefault
values,turnthemodedialto<
>or< >andchoose[ResetAll]
(=
231).
StillImages Movies
Saving Commonly Used Shooting Menus
(My Menu)
Saveuptovecommonlyusedshootingmenusasmenusonthe[ ]tab,
forinstantaccesstoalloftheseitemsfromasinglescreen.
1 Accessthesettingscreen.
zz Pressthe<n>button,choose[My
Menusettings]onthe[
]tab,andthen
pressthe<m>button(=
48).
2 Congurethesetting.
zz Pressthe<o><p>buttonsorturnthe
<7>dialtochoose[Selectitems],and
thenpressthe<m>button.
zz Pressthe<o><p>buttonsorturnthe
<7>dialtochoosemenustosave(upto
ve),andthenpressthe<m>button.
XX [ ]isdisplayed.
zz Tocancelsaving,pressthe<m>button.
[
]isnolongerdisplayed.
zz Pressthe<n>button.
COPY

172
CustomizationforShootingStyles
3 Rearrangethemenulistorder,
asneeded.
zz Pressthe<o><p>buttonsorturnthe
<7>dialtochoose[Sort],andthenpress
the<m>button.
zz Pressthe<o><p>buttonsorturnthe
<7>dialtochooseamenutomove,and
thenpressthe<m>button.
zz Pressthe<o><p>buttonsorturnthe
<7>dialtochangetheorder,andthen
pressthe<m>button.
zz Pressthe<n>button.
• Grayed-outitemsinstep2canalsobespecied,buttheymaynot
beavailableinsomeshootingmodes.
• TomakeMyMenuimmediatelyaccessiblebypressingthe<n>button
inShootingmode,choose[Setdefaultview]andpressthe<q><r>buttons
tochoose[Yes].
COPY

173
Playback Mode
Havefunreviewingyourshots,andbrowseoreditthem
inmanyways
• Topreparethecamerafortheseoperations,pressthe<1>buttonto
enterPlaybackmode.
• Itmaynotbepossibletoplaybackoreditimagesthatwere
renamedoralreadyeditedonacomputer,orimagesfromother
cameras.
6
COPY
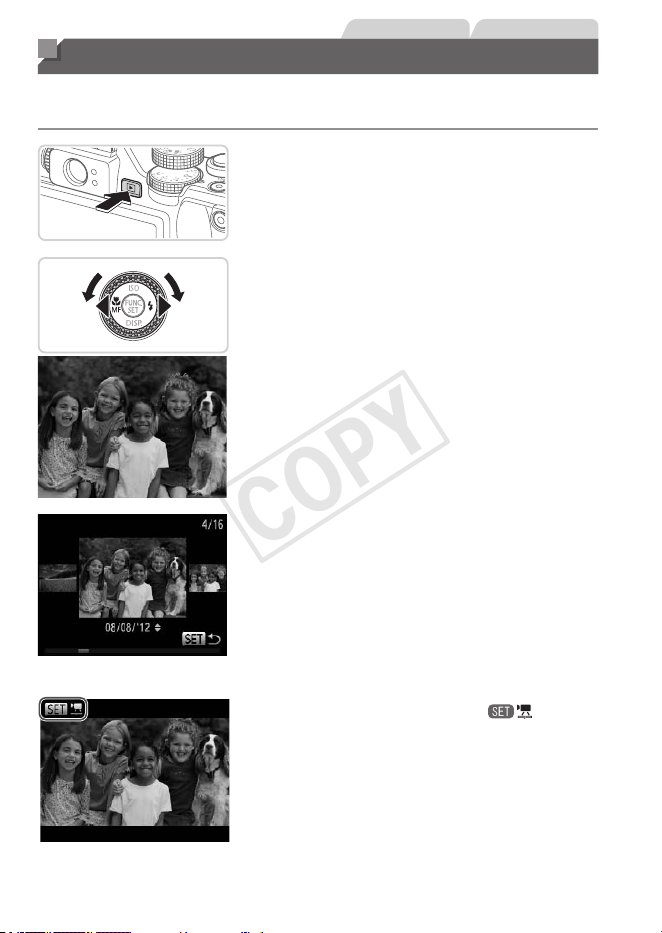
174
StillImages Movies
Viewing
Aftershootingimagesormovies,youcanviewthemonthescreenas
follows.
1 EnterPlaybackmode.
zz Pressthe<1>button.
XX Yourlastshotisdisplayed.
2 Browsethroughyourimages.
zz Toviewthepreviousimage,press
the<q>buttonorturnthe<7>dial
counterclockwise.Toviewthenext
image,pressthe<r>buttonorturnthe
<7>dialclockwise.
zz Pressandholdthe<q><r>buttonsto
browsethroughimagesquickly.
zz ToaccessScrollDisplaymode,turnthe
<7>dialrapidly.Inthismode,turnthe
<7>dialtobrowsethroughimages.
zz Toreturntosingle-imagedisplay,press
the<m>button.
zz Tobrowseimagesgroupedbyshooting
date,pressthe<o><p>buttonsin
ScrollDisplaymode.
zz Moviesareidentiedbya[ ]icon.To
playmovies,gotostep3.
COPY

175
Viewing
Volume
3 Playmovies.
zz Tostartplayback,pressthe<m>button
toaccessthemoviecontrolpanel,
choose[
](eitherpressthe<q><r>
buttonsorturnthe<7>dial),andthen
pressthe<m>buttonagain.
4 Adjustthevolume.
zz Pressthe<o><p>buttonstoadjustthe
volume.
5 Pauseplayback.
zz Topauseorresumeplayback,pressthe
<m>button.
XX Afterthemovieisnished,[ ]is
displayed.
• ToswitchtoShootingmodefromPlaybackmode,presstheshutterbutton
halfway.
• TodeactivateScrollDisplay,pressthe<n>button,choose[Scroll
Display]onthe[1]tab,andthenchoose[Off].
• Ifyouprefertohavethemostrecentshotdisplayedwhenyouenter
Playbackmode,pressthe<n>button,andonthe[1]tab,choose
[Resume]andthen[Lastshot].
• Tochangethetransitionshownbetweenimages,pressthe<n>button,
choose[Transition]onthe[1]tab,andthenpressthe<q><r>buttonsto
choosetheeffect.
COPY

176
Viewing
StillImages Movies
Switching Display Modes
Pressthe<p>buttontoviewotherinformationonthescreen,ortohide
theinformation.Fordetailsontheinformationdisplayed,see=
288.
NoInformation
Display
Simple
Information
Display
Detailed
Information
Display
Enablesyouto
checkthefocus
(=
179)*
*Notshownformovies.
• Switchingdisplaymodesbypressingthe<p>buttonisalsopossible
immediatelyafteryoushoot,whileyourshotisdisplayed.However,simple
informationdisplayisnotavailable.Tochangetheinitialdisplaymode,press
the<n>buttonandchoose[ReviewInfo]onthe[4]tab(=
91).
StillImages Movies
OverexposureWarning(forImageHighlights)
Washed-outhighlightsintheimageashonthescreenindetailed
informationdisplay.
StillImages Movies
Histogram
High
Dark
Low
Bright
zz Thegraphindetailedinformationdisplay
(seeabove)isahistogramshowingthe
distributionofbrightnessintheimage.
Thehorizontalaxisrepresentsthedegree
ofbrightness,andtheverticalaxis,how
muchoftheimageisateachlevelof
brightness.Viewingthehistogramisa
waytocheckexposure.
zz Thehistogramcanalsobeaccessed
whileshooting(=
166,286).
COPY

177
Viewing
StillImages Movies
RGBHistogram
RGBHistogram
zz ToviewanRGBhistogram,pressthe
<o>buttonindetailedinformation
display.TheRGBhistogramshowsthe
distributionofshadesofred,green,and
blueinanimage.Thehorizontalaxis
representsR,G,orBbrightness,andthe
verticalaxis,howmuchoftheimageis
atthatlevelofbrightness.Viewingthis
histogramenablesyoutocheckimage
colorcharacteristics.
zz Pressthe<o>buttonagaintoreturnto
detailedinformationdisplay.
StillImages
Checking People Detected in Face ID
Ifyouswitchthecameratosimpleinformationdisplaymode(=
176),the
namesofuptovedetectedpeopleregisteredinFaceID(=
69)willbe
displayed.
Switchtosimpleinformation
displaymodeandcheck.
zz Pressthe<p>buttonrepeatedlyuntil
simpleinformationdisplayisactivated,
andthenpressthe<q><r>buttonsto
chooseanimage.
zz Nameswillbedisplayedondetected
people.
• IfyoudonotwantnamestodisplayonimagesshotusingFaceID,pressthe
<n>button,choose[FaceIDInfo]onthe[1]tab,andthenset[Name
Display]to[Off].
COPY
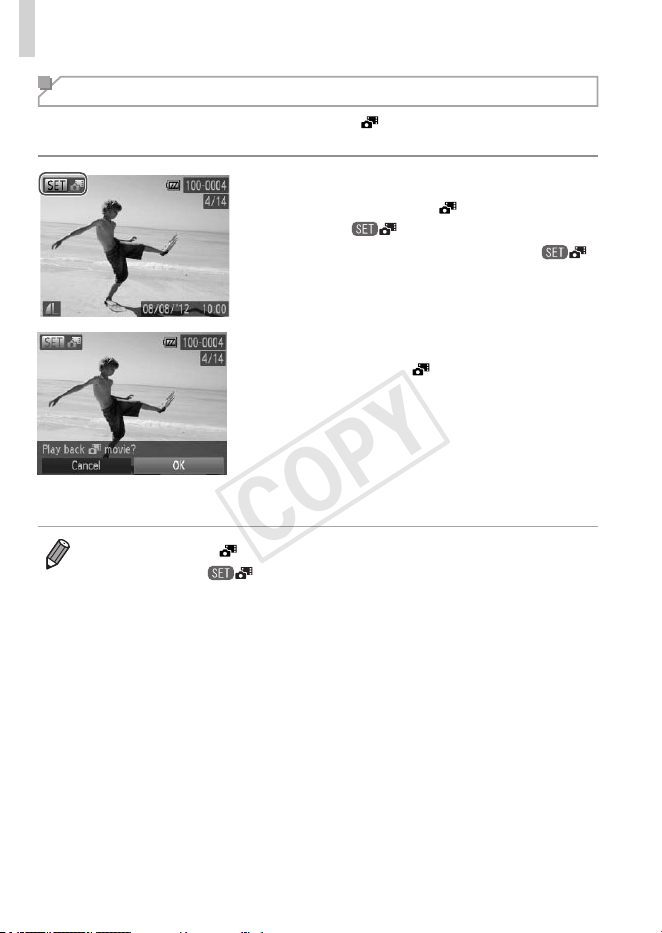
178
Viewing
Viewing Movie Digest Clips
Viewmovieclipsrecordedautomaticallyin[ ]mode(=
94)onadayof
stillimageshootingasfollows.
1 Chooseanimage.
zz Stillimagesshotin[ ]modearelabeled
withan[
]icon.
zz Chooseastillimagelabeledwith[ ]
andpressthe<m>button.
2 Playtheclip.
zz After[Playback movie?]isdisplayed,
pressthe<q><r>buttonsorturnthe
<7>dialtochoose[OK],andthenpress
the<m>button.
XX Themoviecliprecordedautomaticallyon
thedayofstillimageshootingisplayed
back,fromthebeginning.
• Moviescreatedin[ ]modecanalsobeviewedbydate(=
185).
• Afteramoment,[
]willnolongerbedisplayedwhenyouareusingthe
camerawithinformationdisplaydeactivated(=
176).
COPY

179
Viewing
StillImages
Checking the Focus
Tocheckthefocusofyourshots,youcanmagnifytheareaoftheimage
thatwasintheAFframeatthetimeofshooting.
1 AccessFocusCheck.
zz Pressthe<p>button(=
176).
XX AwhiteframeisdisplayedwheretheAF
framewaswhenthefocuswasset.
XX Grayframesaredisplayedoverfaces
detectedlater,inPlaybackmode.
XX Theportionoftheimageintheorange
frameismagnied.
2 Switchframes.
zz Movethezoomlevertoward<k>once.
XX Thescreenatleftisdisplayed.
zz Toswitchtoadifferentframewhenthere
aremultipleframes,pressthe<m>
button.
3 Zoominorout,orviewother
imageareas.
zz Asyouexaminethefocus,usethe
zoomlevertozoominorout.Pressthe
<o><p><q><r>buttonstoadjustthe
displayposition.
zz Pressthe<n>buttontorestorethe
originaldisplayinstep1.
COPY
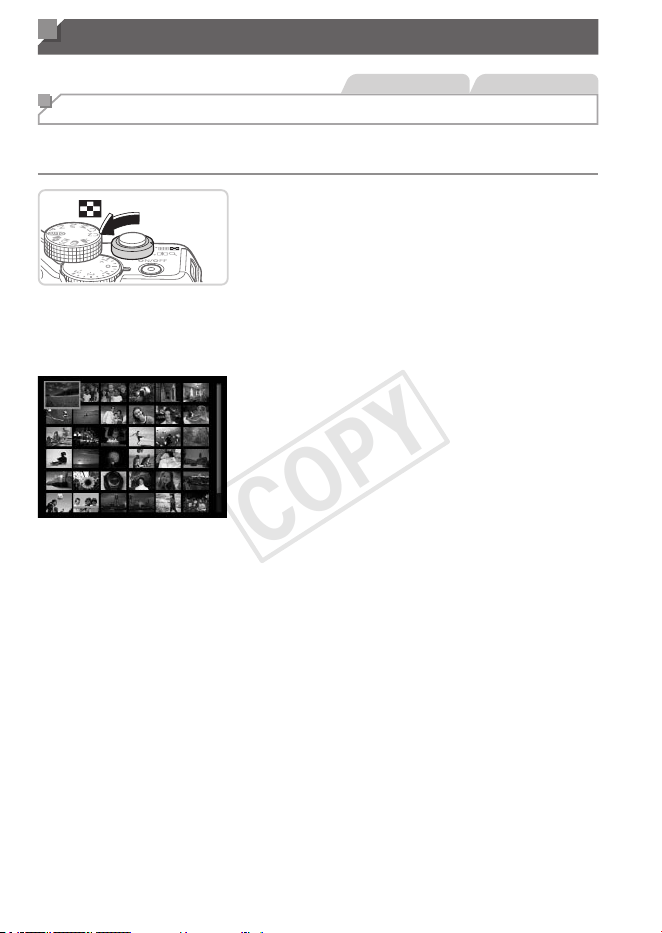
180
Browsing and Filtering Images
StillImages Movies
Navigating Through Images in an Index
Bydisplayingmultipleimagesinanindex,youcanquicklyndtheimages
youarelookingfor.
1 Displayimagesinanindex.
zz Movethezoomlevertoward<g>to
displayimagesinanindex.Movingthe
leveragainwillincreasethenumberof
imagesshown.
zz Todisplayfewerimages,movethezoom
levertoward<k>.Fewerimagesare
showneachtimeyoumovethelever.
2 Chooseanimage.
zz Turnthe<7>dialtoscrollthroughthe
images.
zz Pressthe<o><p><q><r>buttonsto
chooseanimage.
XX Anorangeframeisdisplayedaroundthe
selectedimage.
zz Pressthe<m>buttontoviewthe
selectedimageinsingle-imagedisplay.
COPY

181
BrowsingandFilteringImages
StillImages Movies
Finding Images Matching Specied Conditions
Finddesiredimagesquicklyonamemorycardfullofimagesbyltering
imagedisplayaccordingtoyourspeciedconditions.Youcanalsoprotect
(=
192)ordelete(=
196)theseimagesallatonce.
Favorites
Displaysimagestaggedasfavorites(=
202).
ShotDate Displaystheimagesshotonaspecicdate.
;
MyCategory
Displaystheimagesofaspeciccategory
(=
203).
Stillimage/Movie
Displaysstillimages,movies,ormoviesshotin
[
]mode(=
94).
Name
Displaysimagesofaregisteredperson(=
69).
StillImages Movies
FilteringDisplayby[ ],[ ],[
;
],or[ ]
1 Choosetherstconditionfor
imagedisplayornavigation.
zz Insingle-imagedisplay,pressthe< >
button,andthenpressthe<o><p>
buttonstochooseadisplaylter.
zz When[ ]isselected,youcanview
onlyimagesmatchingthisconditionby
pressingthe<q><r>buttons.Toperform
anactionforalloftheseimagestogether,
pressthe<m>buttonandgotostep3.
COPY
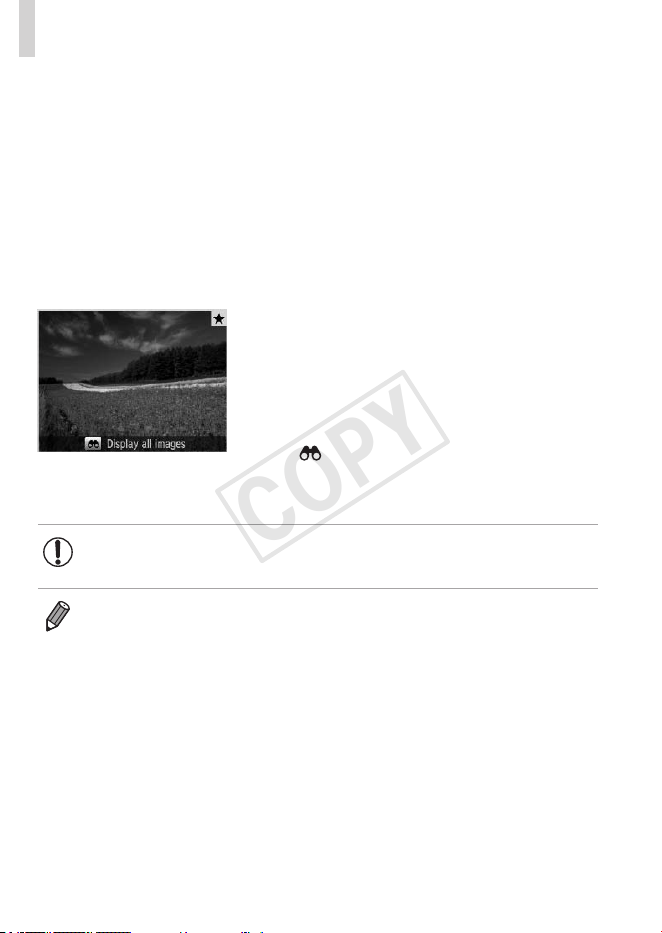
182
BrowsingandFilteringImages
2 Choosethesecondcondition
andchecktheimagesfound.
zz Pressthe<q><r>buttonstochoose
anothercondition.Onceyouturnthe
<7>dial,youcanviewtheimages
narroweddownbyyourconditions.
zz Tocancelthismode,pressthe<n>
button.
zz Toswitchtolteredimagedisplay,press
the<m>buttonandgotostep3.
3 Viewthelteredimages.
zz Imagesmatchingyourconditionsare
displayedinyellowframes.Toview
onlytheseimages,pressthe<q><r>
buttons,orturnthe<7>dial.
zz Toexitlteredimagedisplay,pressthe
<
>button,andafter[Imagesearch
canceled]isdisplayed,pressthe<m>
button.
• Whenthecamerahasfoundnocorrespondingimagesforsome
conditions,thoseconditionswillnotbeavailable.
• Optionsforviewingtheimagesfound(instep3)include“Navigating
ThroughImagesinanIndex”(=
180),“ViewingSlideshows”(=
190),
and“MagnifyingImages”(=
189).Youcanprotect,erase,orprintall
imagesfoundoraddthemtoaphotobookbychoosing[SelectAllImages
inSearch]in“ProtectingImages”(=
192),“ErasingAllImages”(=
197),
“AddingImagestothePrintList(DPOF)”(=
266),or“AddingImagestoa
Photobook”(=
271).
• However,ifyourecategorizeimages(=
203)oreditthemandsavethem
asnewimages(=
206–214),amessageisdisplayedandlteredimage
displayends.
COPY
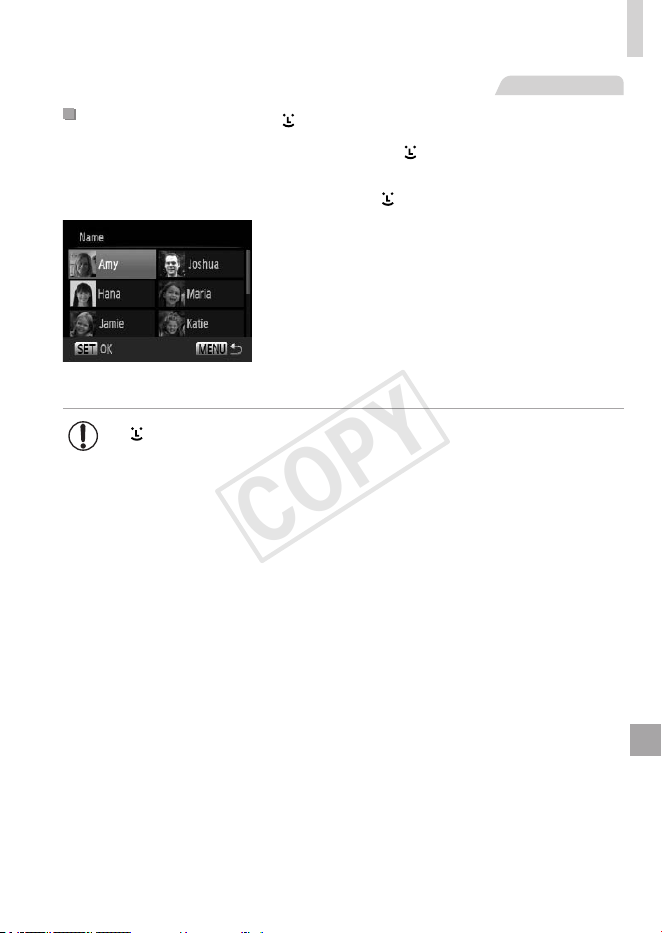
183
BrowsingandFilteringImages
StillImages
FilteringDisplayby[ ]
1 Choose[ ].
zz Followingsteps1–2on=
181–182,
choose[
]andpressthe<m>button.
2 Chooseaperson.
zz Pressthe<o><p><q><r>buttons
tochooseaperson,andthenpressthe
<m>button.
3 Viewthelteredimages.
zz Followstep3on=
182toviewthe
images.
• [ ]isnotavailableunlesspeopleareregistered(=
69).
COPY
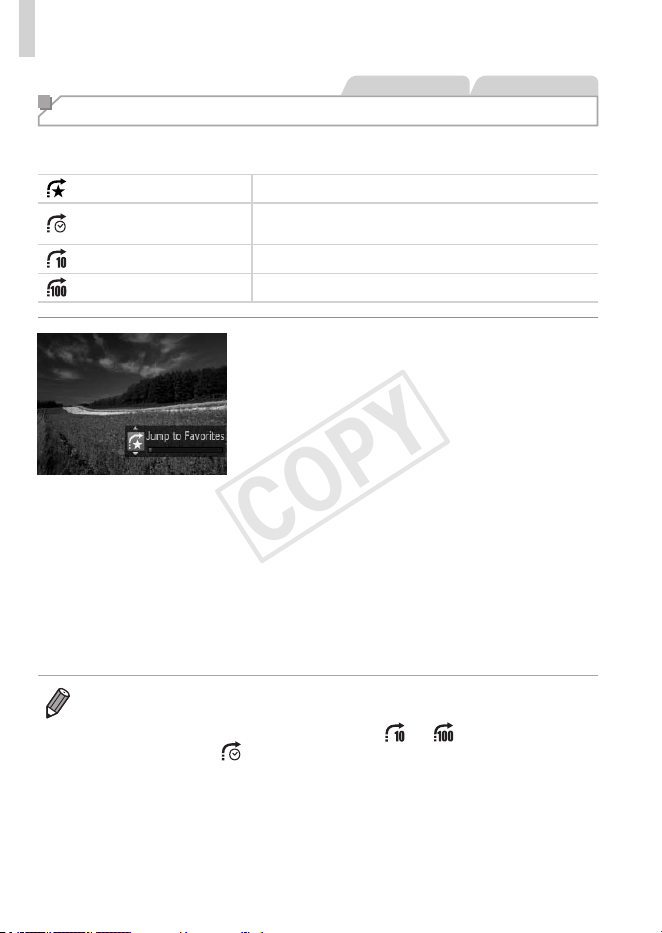
184
BrowsingandFilteringImages
StillImages Movies
Using the Front Dial to Jump
Usethefrontdialtondandjumpbetweendesiredimagesquicklyby
lteringimagedisplayaccordingtoyourspeciedconditions.
JumptoFavorites
Displaysimagestaggedasfavorites(=
202).
JumpShotDate
Jumpstotherstimageineachgroupofimagesthat
wereshotonthesamedate.
Jump10Images Jumpsby10imagesatatime.
Jump100Images Jumpsby100imagesatatime.
1 Chooseacondition.
zz Chooseacondition(orjumpmethod)in
single-imagedisplaybyturningthe<z>
dialandthenpressingthe<o><p>
buttons.
2 Viewimagesmatchingyour
speciedcondition,orjumpby
thespeciedamount.
zz Turnthe<z>dialtoviewonlyimages
matchingtheconditionorjumpbythe
speciednumberofimagesforwardor
back.
zz Tocancelthismode,pressthe<n>
button.
• Turningthe<z>dialwhenbrowsingimagesinindexdisplaywilljumpto
thepreviousornextimageaccordingtothejumpmethodchoseninsingle-
imagedisplay.However,ifyouhavechosen[
]or[ ],thejumpmethod
willbeswitchedto[
].
COPY
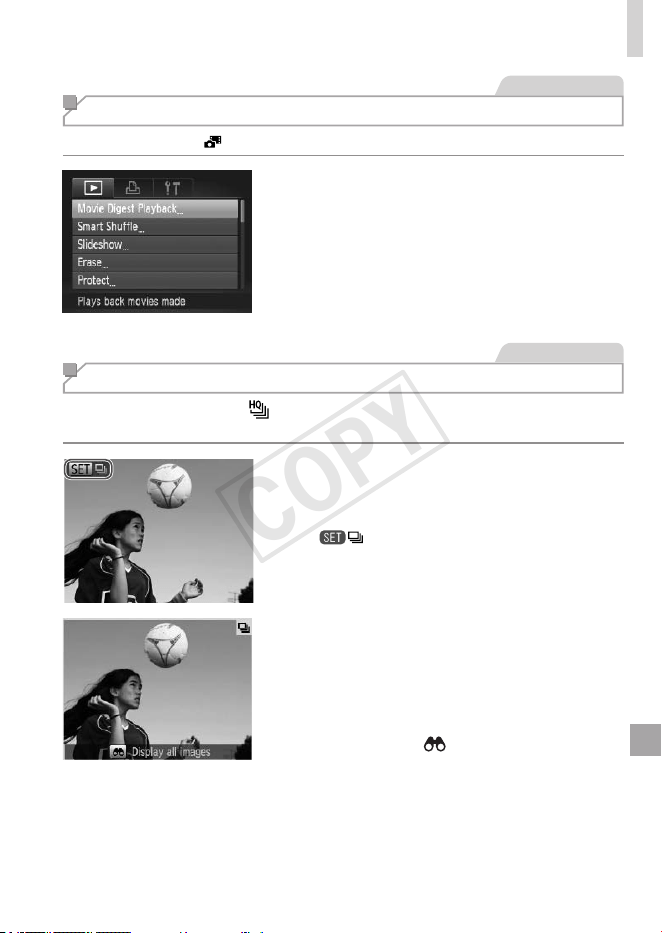
185
BrowsingandFilteringImages
Movies
Viewing Movie Digest Movies
Moviescreatedin[ ]mode(=
94)canbeviewedbydate.
1 Chooseamovie.
zz Pressthe<n>button,choose
[MovieDigestPlayback]onthe[1]tab,
andthenchoosethedate.
2 Playthemovie.
zz Pressthe<m>buttontostartplayback.
StillImages
Viewing Individual Images in a Group
Groupedimagesshotin[ ]mode(=
116)aregenerallydisplayed
together,buttheycanalsobeviewedindividually.
1 Chooseanimagegroup.
zz Pressthe<q><r>buttonsorturnthe
<7>dialtochooseanimagelabeled
[
],andthenpressthe<m>button.
2 Viewindividualimagesinthe
group.
zz Pressingthe<q><r>buttonsorturning
the<7>dialwilldisplayonlyimagesin
thegroup.
zz Pressingthe< >buttonwilldisplay
[Displayallimages].Press<m>to
cancelgroupplayback.
COPY

186
BrowsingandFilteringImages
• Duringgroupplayback(step2),youcanbrowsethroughimagesquickly
“NavigatingThroughImagesinanIndex”(=
180)andmagnifythem
“MagnifyingImages”(=
189).Youcanprotect,erase,orprintallimages
inagroupatonceoraddthemtoaphotobookbychoosing[AllImagesin
Group]in“ProtectingImages”(=
192),“ErasingAllImages”(=
197),
“AddingImagestothePrintList(DPOF)”(=
266),or“AddingImagestoa
Photobook”(=
271).
• Toungroupimagessothatyoucanviewthemindividually,pressthe
<n>button,choose[GroupImages]onthe[1]tab,andthenchoose
[Off](=
48).However,groupedimagescannotbeungroupedduring
individualplayback.
COPY

187
Editing Face ID Information
Ifyounoticethatanameisincorrectduringplayback,youcanchangeitor
eraseit.
However,youcannotaddnamesforpeoplewhoarenotdetectedbyFace
ID(namesarenotdisplayed),andforpeoplewhosenameshavebeen
erased.
ChangingNames
1 Accessthesettingscreen.
zz Pressthe<n>buttonandchoose
[FaceIDInfo]onthe[1]tab(=
48).
zz Pressthe<o><p>buttonsorturnthe
<7>dialtochoose[EditIDInfo],and
thenpressthe<m>button.
2 Chooseanimage.
zz Followingtheprocedureon=
177,
chooseanimageandpressthe<m>
button.
zz Anorangeframeisdisplayedaroundthe
selectedface.Whenmultiplenamesare
displayedinanimage,pressthe<q><r>
buttonsorturnthe<7>dialtochoose
thenametochange,andthenpressthe
<m>button.
3 Choosetheitemtoedit.
zz Pressthe<o><p><q><r>buttonsor
turnthe<7>dialtochoose[Overwrite],
andthenpressthe<m>button.
COPY

188
EditingFaceIDInformation
4 Choosethenameoftheperson
tooverwrite.
zz Followstep2on=
76tochoose
thenameofthepersonyouwantto
overwrite.
ErasingNames
zz Followingstep3on=
187,choose
[Erase]andpressthe<m>button.
zz After[Erase?]isdisplayed,pressthe
<q><r>buttonsorturnthe<7>dialto
choose[OK],andthenpressthe<m>
button.
COPY
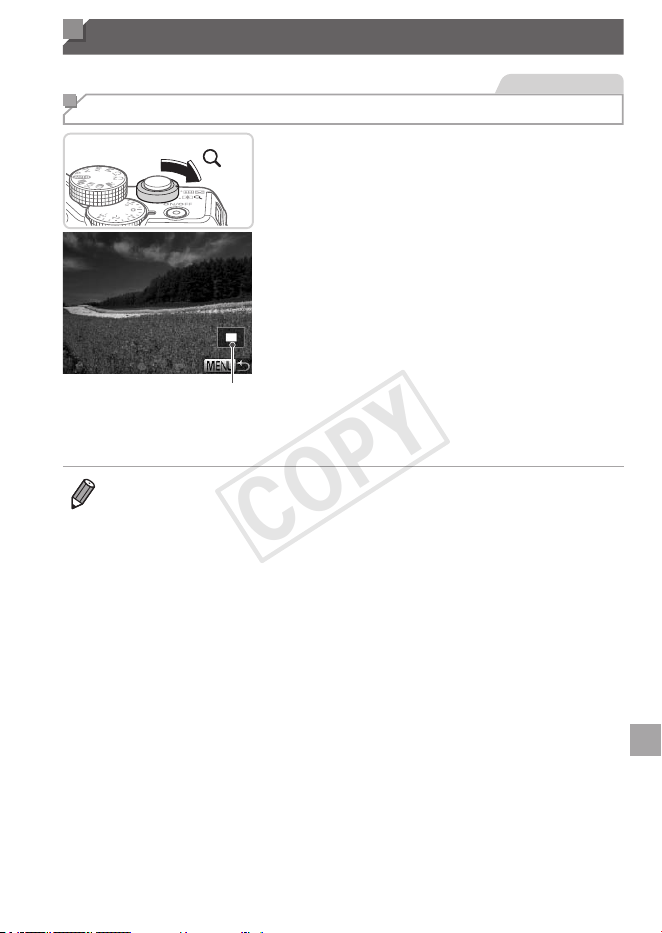
189
Image Viewing Options
StillImages
Magnifying Images
ApproximatePositionof
DisplayedArea
1 Magnifyanimage.
zz Movingthezoomlevertoward<k>will
zoominandmagnifytheimage.You
canmagnifyimagesuptoabout10xby
continuingtoholdthezoomlever.
zz Tozoomout,movethezoomlever
toward<g>.Youcanreturntosingle-
imagedisplaybycontinuingtoholdit.
2 Movethedisplaypositionand
switchimagesasneeded.
zz Tomovethedisplayposition,pressthe
<o><p><q><r>buttons.
zz Toswitchtootherimageswhilezoomed,
turnthe<7>dial.
• Youcanreturntosingle-imagedisplayfrommagnieddisplaybypressing
the<n>button.
COPY

190
ImageViewingOptions
StillImages Movies
Viewing Slideshows
Automaticallyplaybackimagesfromamemorycardasfollows.
1 Accessthesettingscreen.
zz Pressthe<n>button,andthen
choose[Slideshow]onthe[1]tab
(=
48).
2 Congurethesetting.
zz Chooseamenuitemtocongure,and
thenchoosethedesiredoption(=
48).
3 Startautomaticplayback.
zz Pressthe<o><p>buttonsorturnthe
<7>dialtochoose[Start],andthen
pressthe<m>button.
XX Theslideshowwillstartafewseconds
after[Loadingimage...]isdisplayed.
zz Pressthe<n>buttontostopthe
slideshow.
• Thecamera’spower-savingfunctions(=
42)aredeactivated
duringslideshows.
• Topauseorresumeslideshows,pressthe<m>button.
• Youcanswitchtootherimagesduringplaybackbypressingthe<q><r>
buttonsorturningthe<7>dial.Forfast-forwardorfast-rewind,holdthe
<q><r>buttonsdown.
• [PlayTime]cannotbemodiedwhen[Bubble]ischosenin[Effect].
• Youcanalsostartslideshowsfromsingle-imagedisplaybypressingand
holdingthe<m>buttonandimmediatelypressingthe<
>button.
COPY

191
ImageViewingOptions
StillImages
Auto Playback of Similar Images
(Smart Shufe)
Basedonthecurrentimage,thecameraoffersfourimagessimilartoit
thatyoumaywishtoview.Afteryouchoosetoviewoneofthoseimages,
thecameraoffersfourmoreimages.Thisisanenjoyablewaytoplayback
imagesinanunexpectedorder.Trythisfeatureafteryouhavetakenmany
shots,inmanykindsofscenes.
1 ChooseSmartShufe.
zz Pressthe<n>button,choose
[SmartShufe]onthe[1]tab,andthen
pressthe<m>button(=
48).
XX Fourcandidateimagesaredisplayed.
2 Chooseanimage.
zz Pressthe<o><p><q><r>buttonsto
choosetheimageyouwanttoviewnext.
XX Yourchosenimageisdisplayedinthe
center,surroundedbythenextfour
candidateimages.
zz Forfull-screendisplayofthecenter
image,pressthe<m>button.Torestore
theoriginaldisplay,pressthe<m>
buttonagain.
zz Pressthe<n>buttontorestore
single-imagedisplay.
• Onlystillimagesshotwiththiscameraareplayedbackusing
SmartShufe.
• SmartShufeisnotavailableinthefollowingcases:
-Therearelessthan50shotstakenwiththiscamera
-Anunsupportedimageiscurrentlydisplayed
-Imagesareshowninltereddisplay(=
181)
-Duringgroupplayback(=
185)
COPY

192
StillImages Movies
Protecting Images
Protectimportantimagestopreventaccidentalerasurebythecamera
(=
196,197).
Choosing a Selection Method
1 Accessthesettingscreen.
zz Pressthe<n>buttonandchoose
[Protect]onthe[1]tab(=
48).
2 Chooseaselectionmethod.
zz Chooseamenuitemandasettingas
desired(=
48).
zz Toreturntothemenuscreen,pressthe
<n>button.
• Protectedimagesonamemorycardwillbeerasedifyouformat
thecard(=
223,224).
• Protectedimagescannotbeerasedusingthecamera’serasurefunction.To
erasethemthisway,rstcancelprotection.
COPY
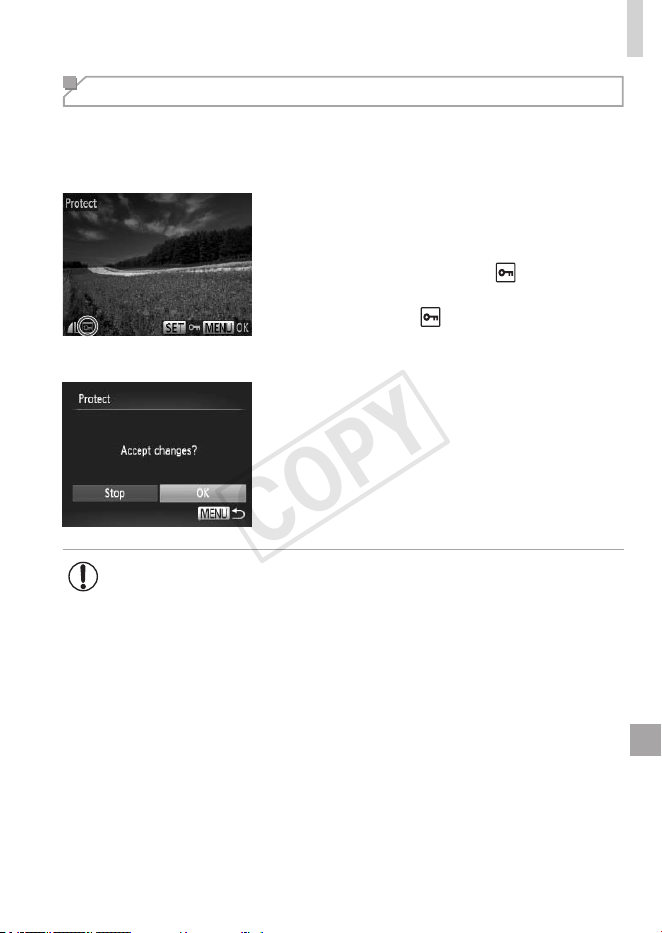
193
ProtectingImages
Choosing Images Individually
1 Choose[Select].
zz Followingstep2above,choose[Select]
andpressthe<m>button.
2 Chooseanimage.
zz Pressthe<q><r>buttonsorturnthe
<7>dialtochooseanimage,andthen
pressthe<m>button.[
]isdisplayed.
zz Tocancelselection,pressthe<m>
buttonagain.[
]isnolongerdisplayed.
zz Repeatthisprocesstospecifyother
images.
3 Protecttheimage.
zz Pressthe<n>button.A
conrmationmessageisdisplayed.
zz Pressthe<q><r>buttonsorturnthe
<7>dialtochoose[OK],andthenpress
the<m>button.
• ImageswillnotbeprotectedifyouswitchtoShootingmodeorturn
thecameraoffbeforenishingthesetupprocessinstep3.
COPY
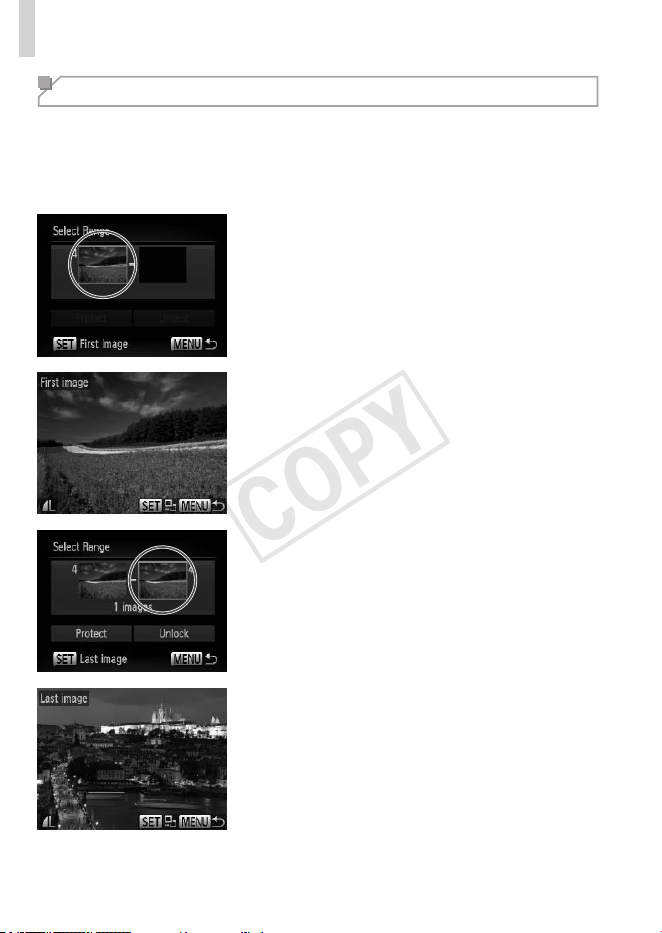
194
ProtectingImages
Selecting a Range
1 Choose[SelectRange].
zz Followingstep2on=
192,choose
[SelectRange]andpressthe<m>
button.
2 Chooseastartingimage.
zz Pressthe<m>button.
zz Pressthe<q><r>buttonsorturnthe
<7>dialtochooseanimage,andthen
pressthe<m>button.
3 Chooseanendingimage.
zz Pressthe<r>buttontochoose[Last
image],andthenpressthe<m>button.
zz Pressthe<q><r>buttonsorturnthe
<7>dialtochooseanimage,andthen
pressthe<m>button.
zz Imagesbeforetherstimagecannotbe
selectedasthelastimage.
COPY
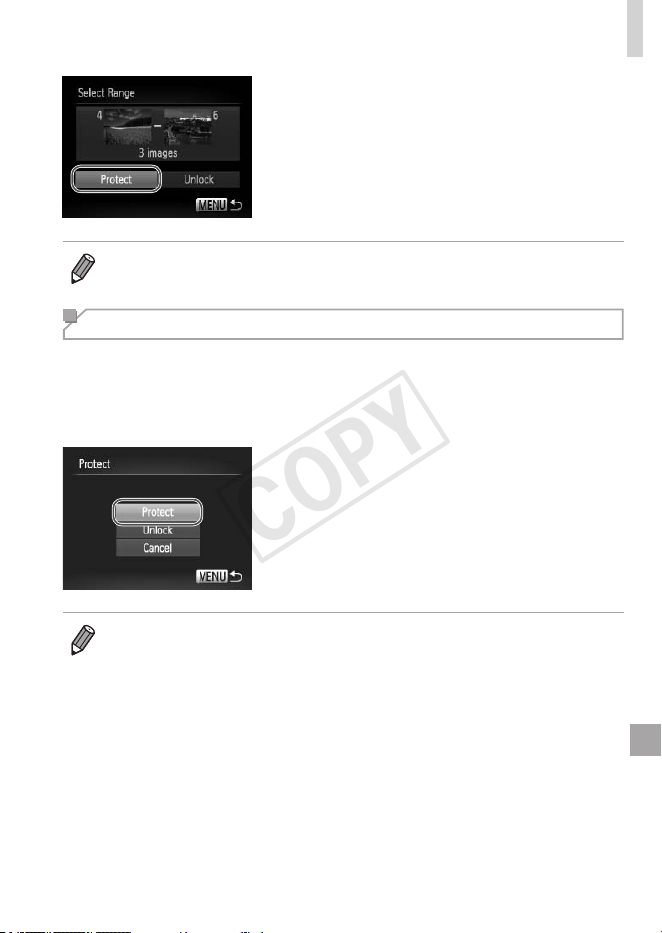
195
ProtectingImages
4 Protecttheimages.
zz Pressthe<p>buttontochoose
[Protect],andthenpressthe<m>
button.
• Youcanalsochoosetherstorlastimagebyturningthe<7>dialwhenthe
topscreeninsteps2and3isdisplayed.
Specifying All Images at Once
1 Choose[SelectAllImages].
zz Followingstep2on=
192,choose
[SelectAllImages]andpressthe<m>
button.
2 Protecttheimages.
zz Pressthe<o><p>buttonsorturnthe
<7>dialtochoose[Protect],andthen
pressthe<m>button.
• Tocancelprotectionforgroupsofimages,choose[Unlock]instep4of
“SelectingaRange”orinstep2of“SpecifyingAllImagesatOnce”.
COPY
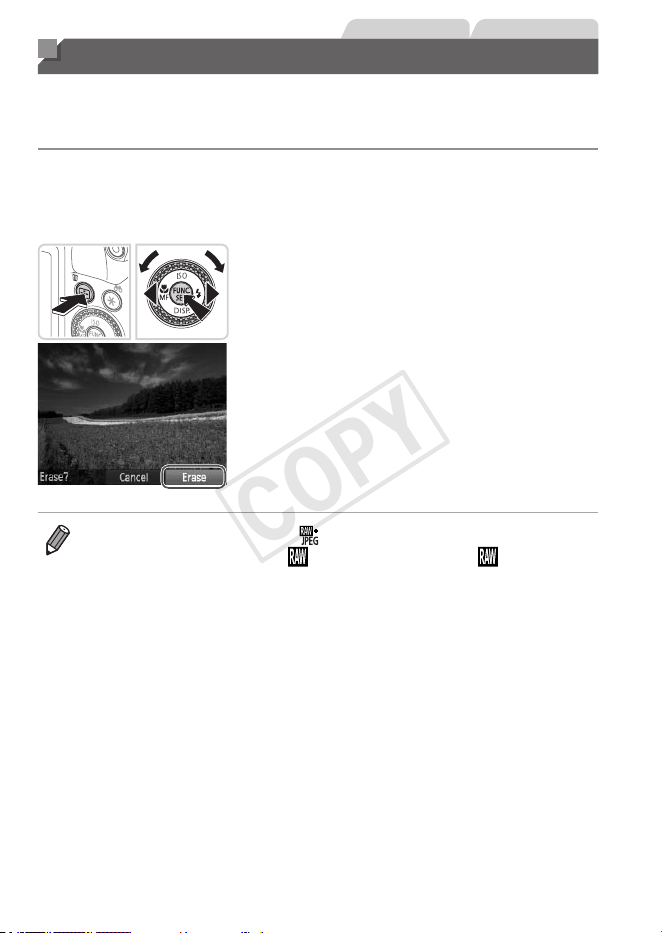
196
StillImages Movies
Erasing Images
Youcanchooseanderaseunneededimagesonebyone.Becarefulwhen
erasingimages,becausetheycannotberecovered.However,protected
images(=
192)cannotbeerased.
1 Chooseanimagetoerase.
zz Pressthe<q><r>buttonsorturnthe
<7>dialtochooseanimage.
2 Erasetheimage.
zz Pressthe<a>button.
zz After[Erase?]isdisplayed,pressthe
<q><r>buttonsorturnthe<7>dialto
choose[Erase],andthenpressthe<m>
button.
XX Thecurrentimageisnowerased.
zz Tocancelerasure,pressthe<q><r>
buttonsorturnthe<7>dialtochoose
[Cancel],andthenpressthe<m>
button.
• Pressingthe<a>buttonwhile[ ]imagesaredisplayedwillgiveyou
theoptionofchoosing[Erase
],[EraseJPEG],or[Erase +JPEG]for
deletion.
COPY

197
ErasingImages
Erasing All Images
Youcaneraseallimagesatonce.Becarefulwhenerasingimages,
becausetheycannotberecovered.However,protectedimages(=
192)
cannotbeerased.
ChoosingaSelectionMethod
1 Accessthesettingscreen.
zz Pressthe<n>button,andthen
choose[Erase]onthe[1]tab(=
48).
2 Chooseaselectionmethod.
zz Chooseamenuitemandasettingas
desired(=
48).
zz Toreturntothemenuscreen,pressthe
<n>button.
ChoosingImagesIndividually
1 Choose[Select].
zz Followingstep2above,choose[Select]
andpressthe<m>button.
2 Chooseanimage.
zz Onceyoufollowstep2on=
193to
chooseanimage,[
]isdisplayed.
zz Tocancelselection,pressthe<m>
buttonagain.[
]isnolongerdisplayed.
zz Repeatthisprocesstospecifyother
images.
COPY
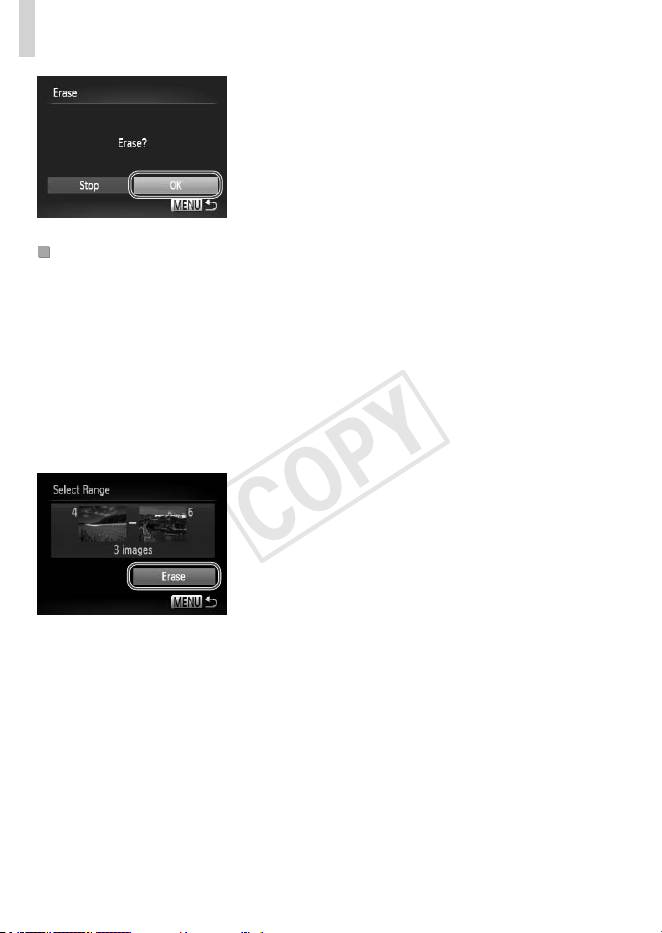
198
ErasingImages
3 Erasetheimage.
zz Pressthe<n>button.A
conrmationmessageisdisplayed.
zz Pressthe<q><r>buttonsorturnthe
<7>dialtochoose[OK],andthenpress
the<m>button.
SelectingaRange
1 Choose[SelectRange].
zz Followingstep2on“Choosinga
SelectionMethod”(=
197),choose
[SelectRange]andpressthe<m>
button.
2 Chooseimages.
zz Followsteps2–3on=
194tospecify
images.
3 Erasetheimages.
zz Pressthe<p>buttontochoose[Erase],
andthenpressthe<m>button.
COPY

199
ErasingImages
SpecifyingAllImagesatOnce
1 Choose[SelectAllImages].
zz Followingstep2on“Choosinga
SelectionMethod”(=
197),choose
[SelectAllImages]andpressthe<m>
button.
2 Erasetheimages.
zz Pressthe<q><r>buttonsorturnthe
<7>dialtochoose[OK],andthenpress
the<m>button.
COPY

200
StillImages Movies
Rotating Images
Changetheorientationofimagesandsavethemasfollows.
1 Choose[Rotate].
zz Pressthe<n>buttonandchoose
[Rotate]onthe[1]tab(=
48).
2 Rotatetheimage.
zz Pressthe<q><r>buttonsorturnthe
<7>dialtochooseanimage.
zz Theimageisrotated90°eachtimeyou
pressthe<m>button.
zz Toreturntothemenuscreen,pressthe
<n>button.
• Movieswithanimagequalityof[ ]or[ ]cannotberotated.
• Rotationisnotpossiblewhen[AutoRotate]issetto[Off]
(=
201).
COPY
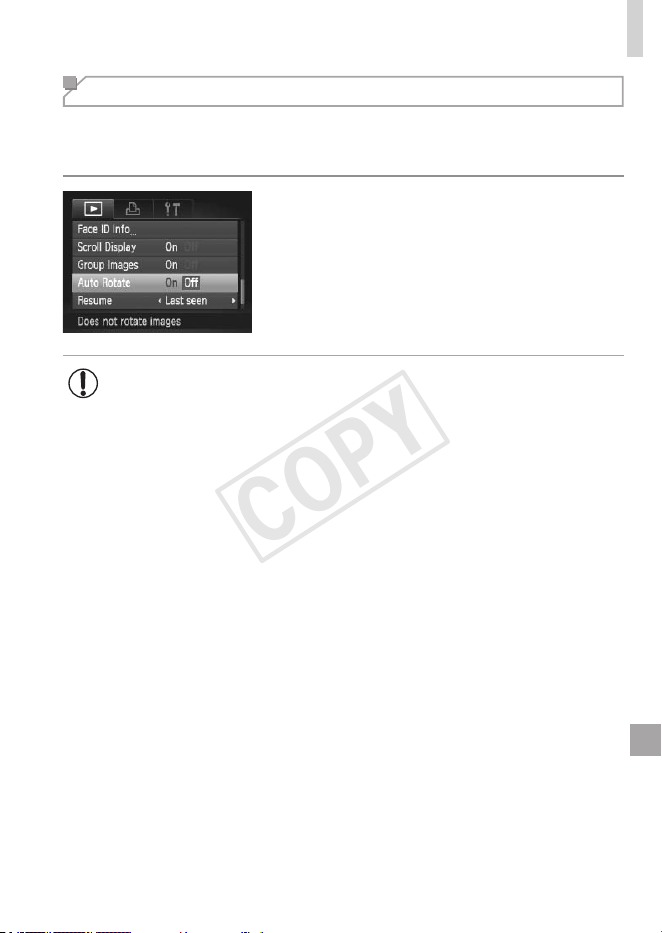
201
RotatingImages
Deactivating Auto Rotation
Followthesestepstodeactivateautomaticrotationbythecamera,which
rotatesimagesshotinverticalorientationsotheyaredisplayedverticallyon
thecamera.
zz Pressthe<n>button,choose[Auto
Rotate]onthe[1]tab,andthenchoose
[Off](=
48).
• Imagescannotberotated(=
200)whenyouset[AutoRotate]to
[Off].Additionally,imagesalreadyrotatedwillbedisplayedinthe
originalorientation.
• InSmartShufe(=
191)mode,evenif[AutoRotate]issetto
[Off],imagesshotverticallywillbedisplayedvertically,androtated
imageswillbedisplayedintherotatedorientation.
COPY
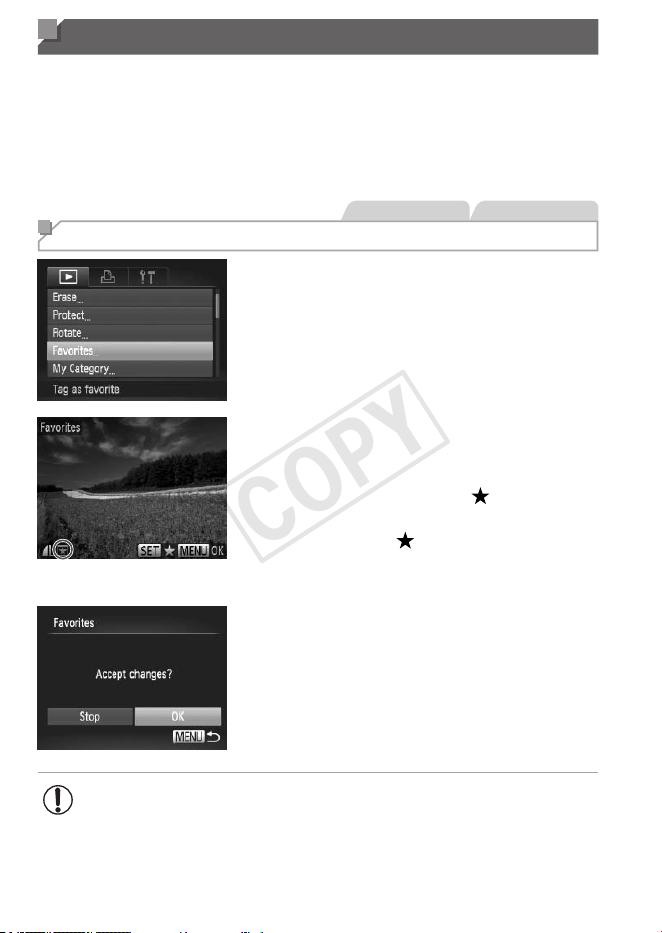
202
Image Categories
YoucantagimagesasfavoritesorassignthemtoMyCategory(=
203)
groups.Bychoosingacategoryinlteredplayback,youcanrestrictthe
followingoperationstoallofthoseimages.
• Viewing(=
174),ViewingSlideshows(=
190),ProtectingImages
(=
192),ErasingImages(=
196),AddingImagestothePrintList
(DPOF)(=
266),AddingImagestoaPhotobook(=
271)
StillImages Movies
Tagging Images as Favorites
1 Choose[Favorites].
zz Pressthe<n>buttonandchoose
[Favorites]onthe[1]tab(=
48).
2 Chooseanimage.
zz Pressthe<q><r>buttonsorturnthe
<7>dialtochooseanimage,andthen
pressthe<m>button.[
]isdisplayed.
zz Tountagtheimage,pressthe<m>
buttonagain.[
]isnolongerdisplayed.
zz Repeatthisprocesstochooseadditional
images.
3 Finishthesetupprocess.
zz Pressthe<n>button.A
conrmationmessageisdisplayed.
zz Pressthe<q><r>buttonsorturnthe
<7>dialtochoose[OK],andthenpress
the<m>button.
• ImageswillnotbetaggedasfavoritesifyouswitchtoShooting
modeorturnthecameraoffbeforenishingthesetupprocessin
step3.
COPY
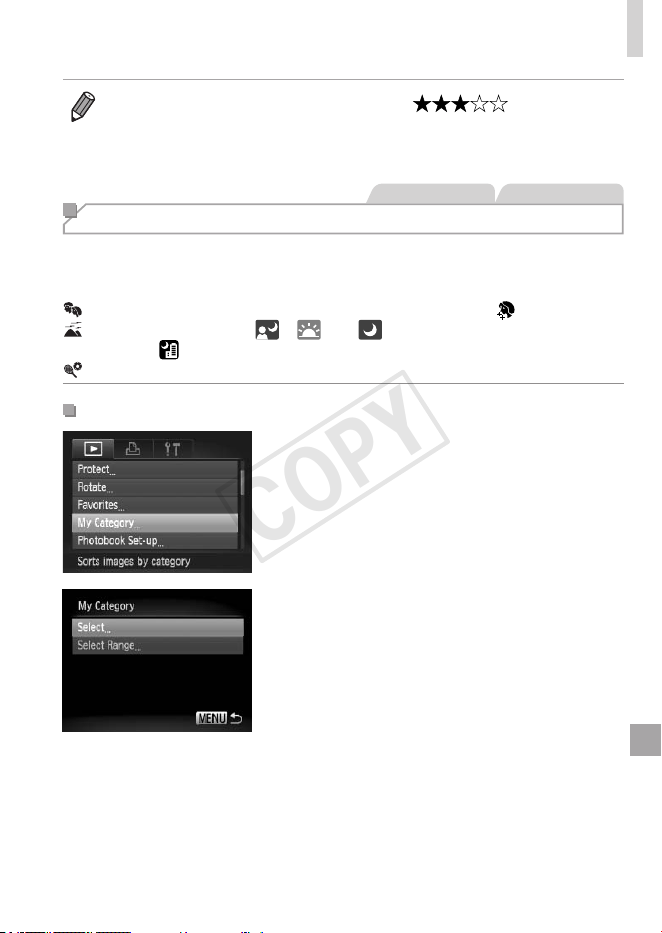
203
ImageCategories
• Favoriteimageswillhaveathree-starrating( )when
transferredtocomputersrunningWindows7orWindowsVista.(Doesnot
applytomoviesorRAWimages.)
StillImages Movies
Organizing Images by Category (My Category)
Youcanorganizeimagesintocategories.Notethatimagesare
automaticallycategorizedatthetimeofshooting,accordingtoshooting
conditions.
: Imageswithdetectedfaces,orimagesshotin[I]or[ ]mode.
: Imagesdetectedas[ ],[ ],or[ ]in<A>mode,orimages
shotin[ ]mode.
: Imagesshotin[S],[P],or[t]mode.
ChoosingaSelectionMethod
1 Accessthesettingscreen.
zz Pressthe<n>button,andthen
choose[MyCategory]onthe[1]tab
(=
48).
2 Chooseaselectionmethod.
zz Chooseamenuitemandasettingas
desired(=
48).
zz Toreturntothemenuscreen,pressthe
<n>button.
COPY
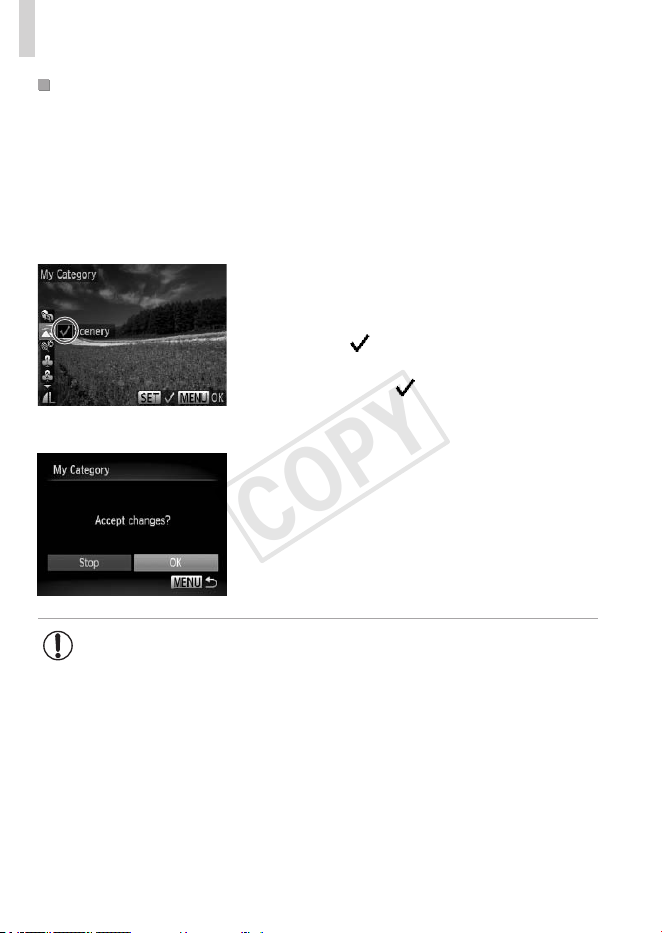
204
ImageCategories
ChoosingImagesIndividually
1 Choose[Select].
zz Followingstep2on=
203,choose
[Select]andpressthe<m>button.
2 Chooseanimage.
zz Pressthe<q><r>buttonsorturnthe
<7>dialtochooseanimage.
3 Chooseacategory.
zz Pressthe<o><p>buttonstochoose
acategoryandthenpressthe<m>
button.[
]isdisplayed.
zz Tocancelselection,pressthe<m>
buttonagain.[
]isnolongerdisplayed.
zz Repeatthisprocesstochooseadditional
images.
4 Finishthesetupprocess.
zz Pressthe<n>button.A
conrmationmessageisdisplayed.Press
the<q><r>buttonsorturnthe<7>dial
tochoose[OK],andthenpressthe<m>
button.
• ImageswillnotbeassignedtoacategoryifyouswitchtoShooting
modeorturnthecameraoffbeforenishingthesetupprocessin
step4.
COPY

205
ImageCategories
SelectingaRange
1 Choose[SelectRange].
zz Followingstep2on=
203,choose
[SelectRange]andpressthe<m>
button.
2 Chooseimages.
zz Followsteps2–3on=
194tospecify
images.
3 Chooseacategory.
zz Pressthe<p>buttontochoosethetype
ofimage,andthenpressthe<q><r>
buttonsorturnthe<7>dialtochoosea
category.
4 Finishthesetupprocess.
zz Pressthe<p>buttontochoose[Select],
andthenpressthe<m>button.
• Youcancleartheselectionofallimagesinthe[SelectRange]categoryby
choosing[Deselect]instep4.
COPY
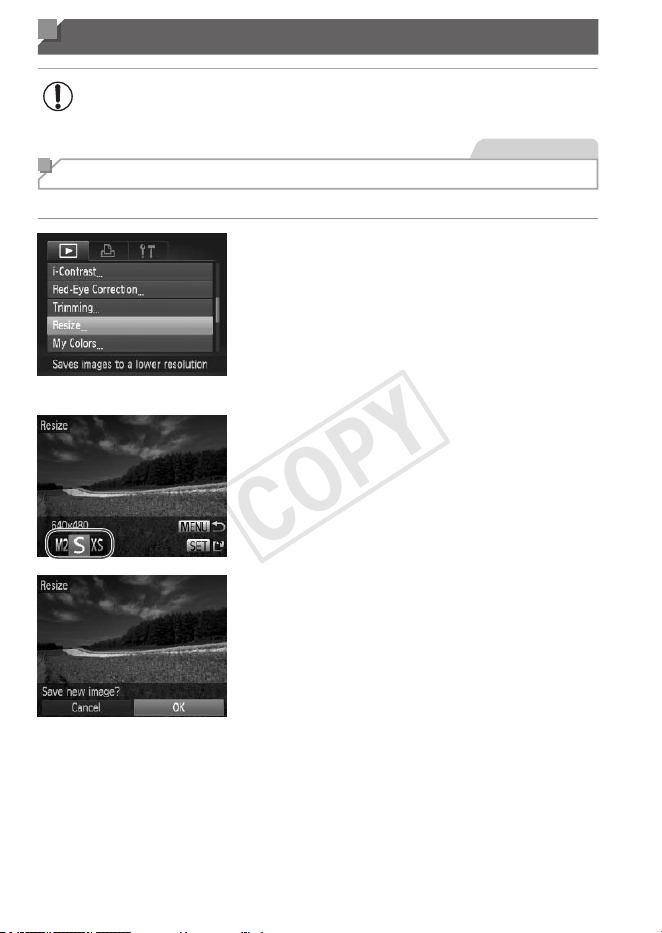
206
Editing Still Images
• Imageediting(=
206–211)isonlyavailablewhenthememory
cardhassufcientfreespace.
StillImages
Resizing Images
Saveacopyofimagesatalowerresolution.
1 Choose[Resize].
zz Pressthe<n>buttonandchoose
[Resize]onthe[1]tab(=
48).
2 Chooseanimage.
zz Pressthe<q><r>buttonsorturnthe
<7>dialtochooseanimage,andthen
pressthe<m>button.
3 Chooseanimagesize.
zz Pressthe<q><r>buttonsorturnthe
<7>dialtochoosethesize,andthen
pressthe<m>button.
XX [Savenewimage?]isdisplayed.
4 Savethenewimage.
zz Pressthe<q><r>buttonsorturnthe
<7>dialtochoose[OK],andthenpress
the<m>button.
XX Theimageisnowsavedasanewle.
COPY
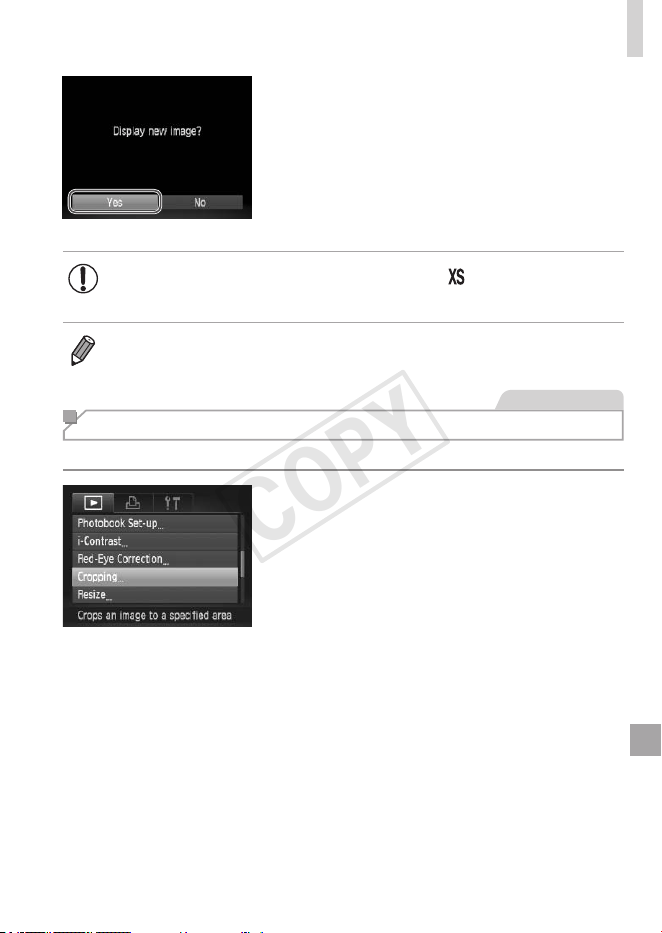
207
EditingStillImages
5 Reviewthenewimage.
zz Pressthe<n>button.[Displaynew
image?]isdisplayed.
zz Pressthe<q><r>buttonsorturnthe
<7>dialtochoose[Yes],andthenpress
the<m>button.
XX Thesavedimageisnowdisplayed.
• Editingisnotpossibleforimagessavedas[ ]instep3.
• RAWimagescannotbeedited.
• Imagescannotberesizedtoahigherresolution.
StillImages
Cropping
Youcanspecifyaportionofanimagetosaveasaseparateimagele.
1 Choose[Cropping].
zz Pressthe<n>button,andthen
choose[Cropping]onthe[1]tab
(=
48).
2 Chooseanimage.
zz Pressthe<q><r>buttonsorturnthe
<7>dialtochooseanimage,andthen
pressthe<m>button.
COPY
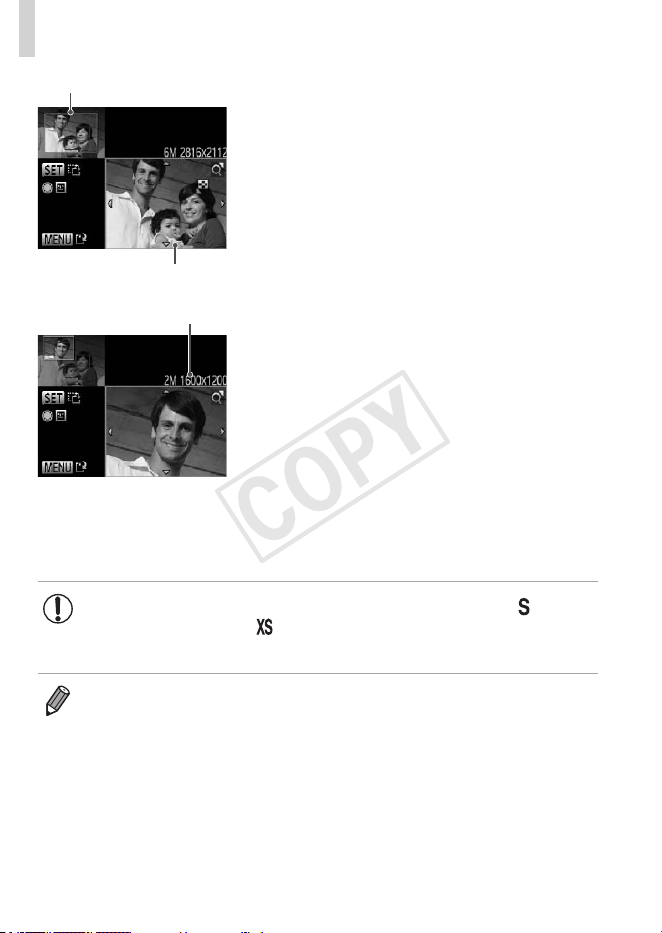
208
EditingStillImages
PreviewofImageAfter
Cropping
CroppingArea
ResolutionAfterCropping
3 Adjustthecroppingarea.
XX Aframeisdisplayedaroundtheportionof
theimagetobecropped.
XX Theoriginalimageisshownintheupper
left,andapreviewoftheimageas
croppedisshowninthelowerright.
zz Toresizetheframe,movethezoom
lever.
zz Tomovetheframe,pressthe
<o><p><q><r>buttons.
zz Tochangetheframeorientation,press
the<m>button.
zz Facesdetectedintheimageare
enclosedingrayframesintheupper-left
image.Tocroptheimagebasedonthis
frame,turnthe<7>dialtoswitchtothe
otherframe.
zz Pressthe<n>button.
4 Saveasanewimageand
review.
zz Followsteps4–5on=
206–207.
• Editingisnotpossibleforimagesshotataresolutionof[ ]
(=
81)orresizedto[ ](=
206).
• RAWimagescannotbeedited.
• Imagessupportedforcroppingwillhavethesameaspectratioafter
cropping.
• Croppedimageswillhaveasmallerresolutionthanuncroppedimages.
COPY

209
EditingStillImages
StillImages
Changing Image Color Tones (My Colors)
Youcanadjustimagecolorsandthensavetheeditedimageasaseparate
le.Fordetailsoneachoption,see=
137.
1 Choose[MyColors].
zz Pressthe<n>button,andthen
choose[MyColors]onthe[1]tab
(=
48).
2 Chooseanimage.
zz Pressthe<q><r>buttonsorturnthe
<7>dialtochooseanimage,andthen
pressthe<m>button.
3 Chooseanoption.
zz Pressthe<q><r>buttonsorturnthe
<7>dialtochooseanoption,andthen
pressthe<m>button.
4 Saveasanewimageand
review.
zz Followsteps4–5on=
206–207.
• Imagequalityofpicturesyourepeatedlyeditthiswaywillbealittle
lowereachtime,andyoumaynotbeabletoobtainthedesired
color.
• ColorsofRAWimagescannotbeedited.
• Thecolorofimageseditedusingthisfunctionmayvaryslightlyfromthe
colorofimagesshotusingMyColors(=
137).
COPY
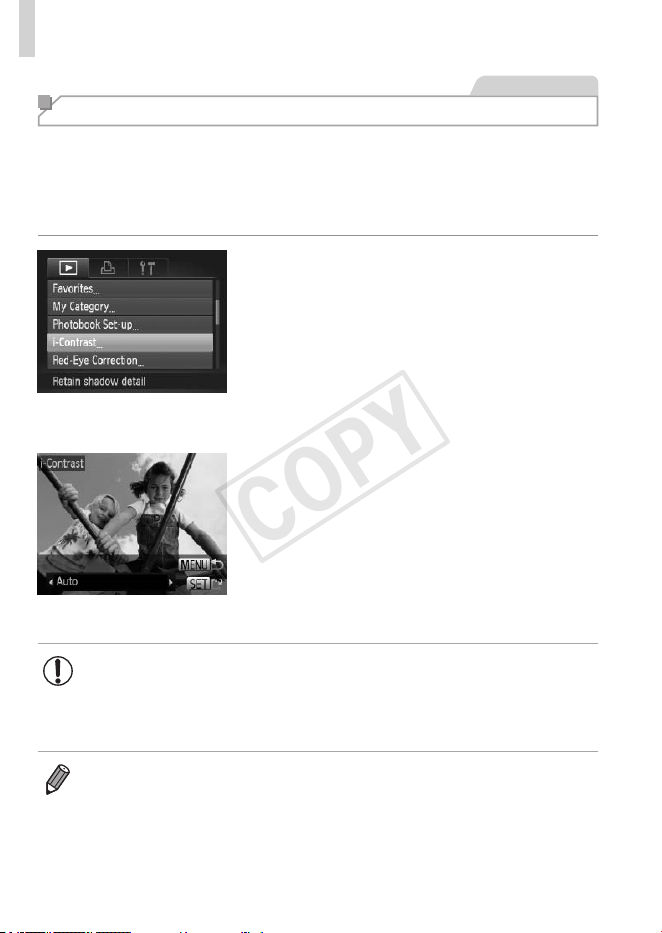
210
EditingStillImages
StillImages
Correcting Image Brightness (i-Contrast)
Excessivelydarkimageareas(suchasfacesorbackgrounds)canbe
detectedandautomaticallyadjustedtotheoptimalbrightness.Insufcient
overallimagecontrastisalsoautomaticallycorrected,tomakesubjects
standoutbetter.Choosefromfourcorrectionlevels,andthensavethe
imageasaseparatele.
1 Choose[i-Contrast].
zz Pressthe<n>button,andthen
choose[i-Contrast]onthe[1]tab
(=
48).
2 Chooseanimage.
zz Pressthe<q><r>buttonsorturnthe
<7>dialtochooseanimage,andthen
pressthe<m>button.
3 Chooseanoption.
zz Pressthe<q><r>buttonsorturnthe
<7>dialtochooseanoption,andthen
pressthe<m>button.
4 Saveasanewimageand
review.
zz Followsteps4–5on=
206–207.
• Forsomeimages,correctionmaybeinaccurateormaycause
imagestoappeargrainy.
• Imagesmaylookgrainyafterrepeatededitingusingthisfunction.
• RAWimagescannotbeeditedthisway.
• If[Auto]doesnotproducetheexpectedresults,trycorrectingimagesusing
[Low],[Medium],or[High].
COPY
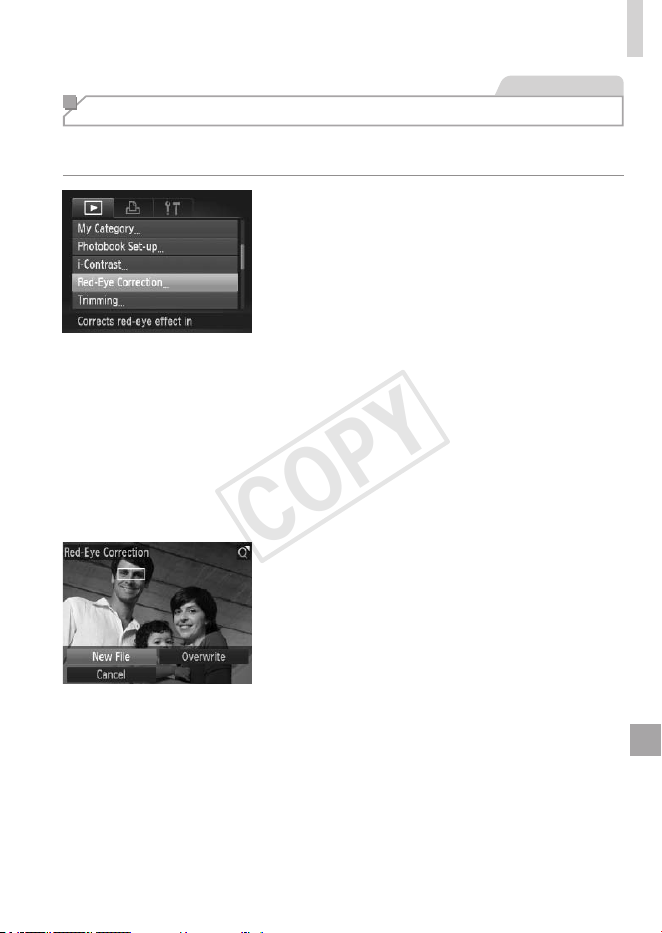
211
EditingStillImages
StillImages
Correcting Red-Eye
Automaticallycorrectsimagesaffectedbyred-eye.Youcansavethe
correctedimageasaseparatele.
1 Choose[Red-EyeCorrection].
zz Pressthe<n>button,andthen
choose[Red-EyeCorrection]onthe[
1
]
tab(=
48).
2 Chooseanimage.
zz Pressthe<q><r>buttonsorturnthe
<7>dialtochooseanimage.
3 Correcttheimage.
zz Pressthe<m>button.
XX Red-eyedetectedbythecameraisnow
corrected,andframesaredisplayed
aroundcorrectedimageareas.
zz Enlargeorreduceimagesasneeded.
Followthestepsin=
189.
4 Saveasanewimageand
review.
zz Pressthe<o><p><q><r>buttonsor
turnthe<7>dialtochoose[NewFile],
andthenpressthe<m>button.
XX Theimageisnowsavedasanewle.
zz Followstep5on=
207.
COPY

212
EditingStillImages
• Someimagesmaynotbecorrectedaccurately.
• Tooverwritetheoriginalimagewiththecorrectedimage,choose
[Overwrite]instep4.Inthiscase,theoriginalimagewillbe
erased.
• Protectedimagescannotbeoverwritten.
• RAWimagescannotbeeditedthisway.
• Red-eyecorrectioncanbeappliedtoJPEGimagesshotin[
],
buttheoriginalimagecannotbeoverwritten.
COPY
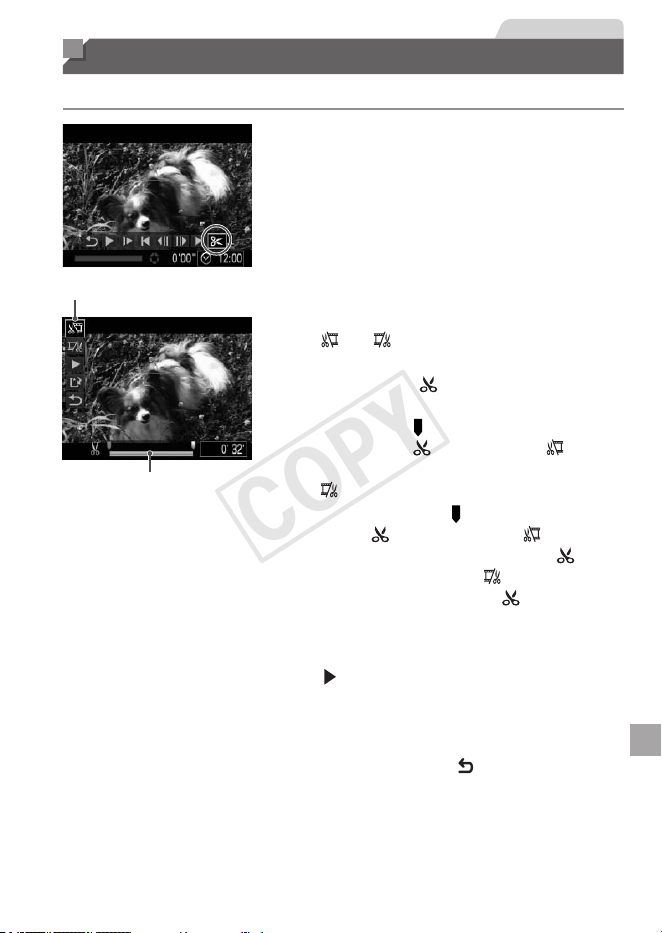
213
Movies
Editing Movies
Youcancutmoviestoremoveunneededportionsatthebeginningorend.
1 Choose[*].
zz Followingsteps1–5on=
174–175,
choose[*]andpressthe<m>button.
XX Themovieeditingpanelandeditingbar
arenowdisplayed.
MovieEditingPanel
MovieEditingBar
2 Specifyportionstocut.
zz Pressthe<o><p>buttonstochoose
[
]or[ ].
zz Toviewtheportionsyoucancut
(identiedby[
]onthescreen),press
the<q><r>buttonsorturnthe<7>
dialtomove[
].Cutthebeginningofthe
movie(from[
])bychoosing[ ],and
cuttheendofthemoviebychoosing
[
].
zz Evenifyoumove[ ]toapositionother
thana[
]mark,choosing[ ]willonly
cuttheportionfromthenearest[
]to
theleft,andchoosing[
]willcutthe
portionfromthenearest[
]totheright.
3 Reviewtheeditedmovie.
zz Pressthe<o><p>buttonstochoose
[
],andthenpressthe<m>button.
Theeditedmovieisnowplayed.
zz Toeditthemovieagain,repeatstep2.
zz Tocancelediting,pressthe<o><p>
buttonstochoose[
].Pressthe<m>
button,choose[OK](eitherpressthe
<q><r>buttonsorturnthe<7>dial),
andthenpressthe<m>buttonagain.
COPY

214
EditingMovies
4 Savetheeditedmovie.
zz Pressthe<o><p>buttonstochoose
[
],andthenpressthe<m>button.
zz Pressthe<o><p><q><r>buttonsor
turnthe<7>dialtochoose[NewFile],
andthenpressthe<m>button.
XX Themovieisnowsavedasanewle.
• Tooverwritetheoriginalmoviewiththecutone,choose
[Overwrite]instep4.Inthiscase,theoriginalmoviewillbeerased.
• [Overwrite]isonlyavailablewhenmemorycardslacksufcient
freespace.
• Moviesmaynotbesavedifthebatteryrunsoutwhilesavingisin
progress.
• Wheneditingmovies,youshoulduseafullychargedbatteryoran
ACadapterkit(soldseparately,=
235).
COPY
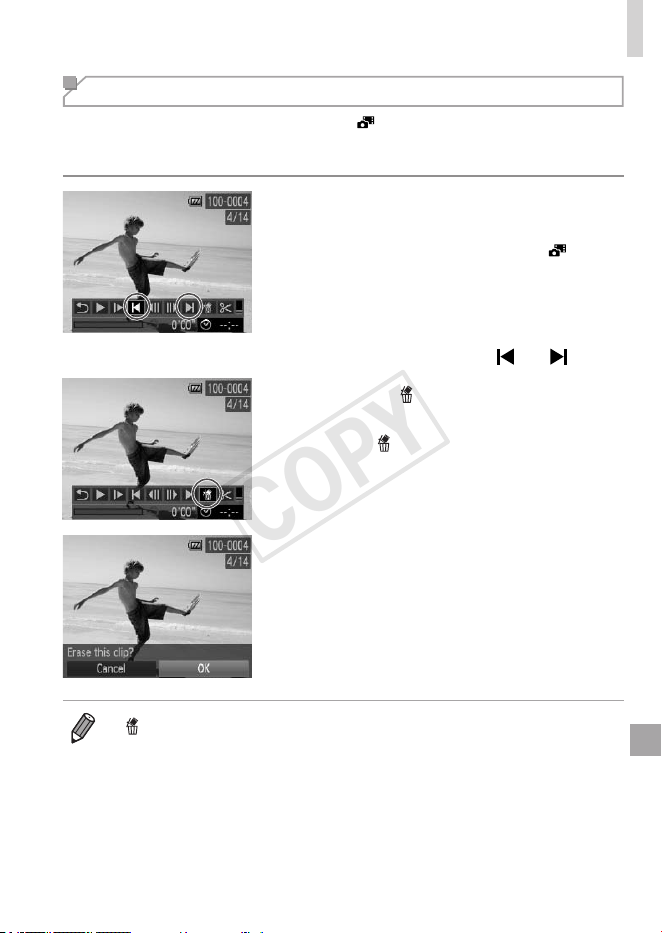
215
EditingMovies
Editing Movie Digest Clips
Individualchapters(=
94)recordedin[ ]modecanbeerased,as
needed.Becarefulwhenerasingchapters,becausetheycannotbe
recovered.
1 Selectthechaptertoerase.
zz Followsteps1–5on=
174–175
tochooseamovierecordedin[
]
mode,andthenpressthe<m>button
repeatedlytoaccessthescreenatleft.
zz Choosethechaptertoerasebypressing
the<q><r>buttonsorturningthe<7>
dial,andthenchoosing[
]or[ ].
2 Choose[ ].
zz Followingsteps1–3on=
174–175,
choose[
]andpressthe<m>button.
XX Theselectedchapterisplayedback
repeatedly.
3 Conrmerasure.
zz Pressthe<q><r>buttonsorturnthe
<7>dialtochoose[OK],andthenpress
the<m>button.
XX Thechapteriserased,andtheclipis
overwritten.
• [ ]isnotdisplayedifyouselectachapterwhenthecameraisconnectedto
aprinter.
COPY

216
COPY

217
Setting Menu
Customizeoradjustbasiccamerafunctionsforgreater
convenience
7
COPY

218
Adjusting Basic Camera Functions
Functionscanbeconguredonthe[3]tab.Customizecommonlyused
functionsasdesired,forgreaterconvenience(=
48).
Silencing Camera Operations
Silencecamerasoundsandmoviesasfollows.
zz Choose[Mute],andthenchoose[On].
• Operationcanalsobesilencedbyholdingdownthe<p>buttonasyouturn
thecameraon.
• Soundisnotplayedduringmoviesifyoumutecamerasounds(=
174).To
restoresoundduringmovies,pressthe<o>button.Adjustvolumewiththe
<o><p>buttons,asneeded.
Adjusting the Volume
Adjustthevolumeofindividualcamerasoundsasfollows.
zz Choose[Volume],andthenpressthe
<m>button.
zz Chooseanitem,andthenpressthe
<q><r>buttonstoadjustthevolume.
COPY
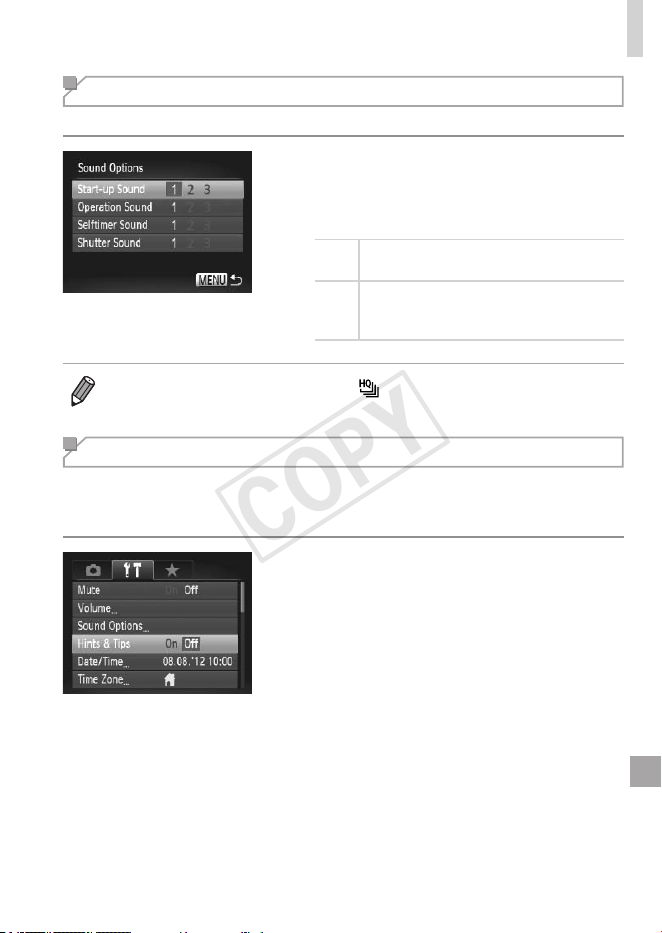
219
AdjustingBasicCameraFunctions
Customizing Sounds
Customizecameraoperatingsoundsasfollows.
zz Choose[SoundOptions],andthenpress
the<m>button.
zz Chooseanitem,andthenpressthe
<q><r>buttonstochooseanoption.
1,2
Presetsounds
(cannotbemodied)
3
Presetsounds
Canbechangedbyusingtheincluded
software.
• Thedefaultshuttersoundisusedin[ ]mode(=
116),regardlessofany
changesto[ShutterSound].
Hiding Hints and Tips
HintsandtipsarenormallyshownwhenyouchooseFUNC.menu
(=
47)orMenu(=
48)items.Ifyouprefer,youcandeactivatethis
information.
zz Choose[Hints&Tips],andthenchoose
[Off].
COPY
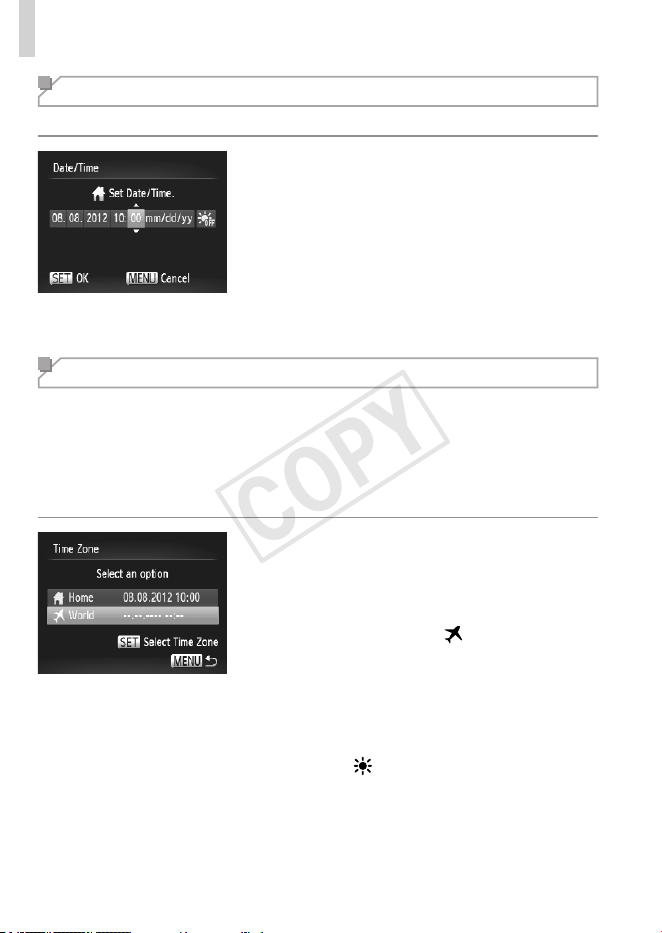
220
AdjustingBasicCameraFunctions
Date and Time
Adjustthedateandtimeasfollows.
1 Accessthe[Date/Time]screen.
zz Choose[Date/Time],andthenpressthe
<m>button.
2 Congurethesetting.
zz Pressthe<q><r>buttonstochoosean
option,andthenadjustthesetting,either
bypressingthe<o><p>buttonsor
turningthe<7>dial.
World Clock
Toensurethatyourshotswillhavethecorrectlocaldateandtimewhenyou
travelabroad,simplyregisterthedestinationinadvanceandswitchtothat
timezone.ThisconvenientfeatureeliminatestheneedtochangetheDate/
Timesettingmanually.
Beforeusingtheworldclock,besuretosetthedateandtimeandyour
hometimezone(“SettingtheDateandTime”(=
20)).
1 Specifyyourdestination.
zz Choose[TimeZone],andthenpressthe
<m>button.
zz Pressthe<o><p>buttonsorturnthe
<7>dialtochoose[
World],andthen
pressthe<m>button.
zz Pressthe<q><r>buttonsorturnthe
<7>dialtochoosethedestination.
zz Tosetdaylightsavingtime(1hour
ahead),pressthe<o><p>buttonsto
choose[
].
zz Pressthe<m>button.
COPY
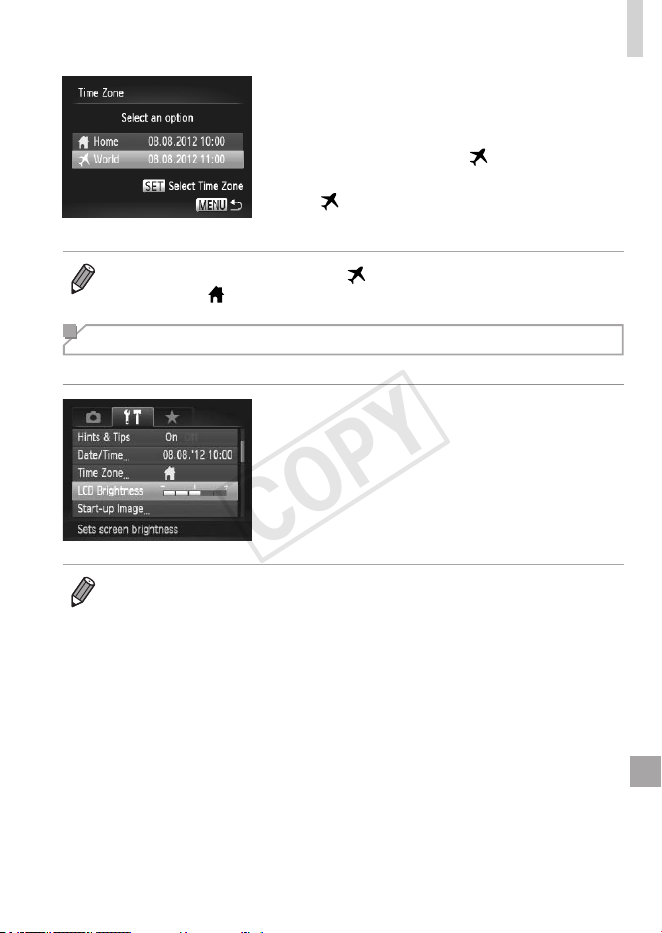
221
AdjustingBasicCameraFunctions
2 Switchtothedestinationtime
zone.
zz Pressthe<o><p>buttonsorturnthe
<7>dialtochoose[
World],andthen
pressthe<n>button.
XX [ ]isnowshownontheshootingscreen
(“On-ScreenInformation”(=
286)).
• Adjustingthedateortimewhilein[ ]mode(=
22)willautomatically
updateyour[
Home]timeanddate.
Screen Brightness
Adjustscreenbrightnessasfollows.
zz Choose[LCDBrightness],andthen
pressthe<q><r>buttonstoadjustthe
brightness.
• Formaximumbrightness,pressandholdthe<p>buttonforatleastone
secondwhentheshootingscreenisdisplayedorwheninsingle-image
display.(Thiswilloverridethe[LCDBrightness]settingonthe[3]tab.)To
restoretheoriginalbrightness,pressandholdthe<p>buttonagainforat
leastonesecondorrestartthecamera.
COPY

222
AdjustingBasicCameraFunctions
Start-up Screen
Customizethestart-upscreenshownafteryouturnthecameraonas
follows.
zz Choose[Start-upImage],andthenpress
the<m>button.
zz Pressthe<q><r>buttonsorturnthe
<7>dialtochooseanoption.
Nostart-upimage
1,2
Presetimage
(cannotbemodied)
3
Presetimage
Assignadesiredshot,orusethe
includedsoftwaretochangetheimage.
CustomizingtheStart-upScreen
1 Accessthe[Start-upImage]
screeninPlaybackmode.
zz Pressthe<1>button.
zz Followingthepreviousprocedure,choose
[3]andpressthe<m>button.
2 Chooseoneofyourshots.
zz Chooseanimageandpressthe<m>
button.After[Register?]isdisplayed,
choose[OK](eitherpressthe<q><r>
buttonsorturnthe<7>dial),andthen
pressthe<m>button.
• Thepreviousstart-upsettingisoverwrittenwhenyouassignanew
start-upimage.
COPY
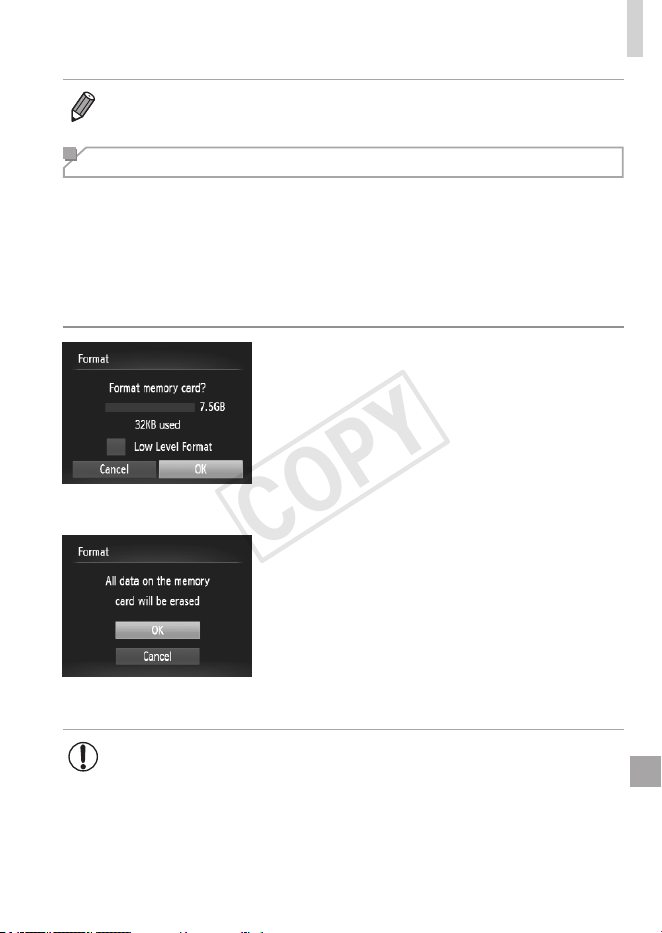
223
AdjustingBasicCameraFunctions
• Youcanassigntheoperatingsoundsandstart-upimageforyourcamera
fromtheincludedsoftware.RefertotheSoftware Guide(=
30)fordetails.
Formatting Memory Cards
Beforeusinganewmemorycardoracardformattedinanotherdevice,you
shouldformatthecardwiththiscamera.
Formattingerasesalldataonamemorycard.Beforeformatting,copy
imagesonthememorycardtoacomputer,ortakeotherstepstobackthem
up.
AnEye-Ficard(=
274)containssoftwareonthecarditself.Before
formattinganEye-Ficard,installthesoftwareonacomputer.
1 Accessthe[Format]screen.
zz Choose[Format],andthenpressthe
<m>button.
2 Choose[OK].
zz Pressthe<o><p>buttonstochoose
[Cancel],choose[OK](eitherpressthe
<q><r>buttonsorturnthe<7>dial),
andthenpressthe<m>button.
3 Formatthememorycard.
zz Tobegintheformattingprocess,press
the<o><p>buttonsorturnthe<7>
dialtochoose[OK],andthenpressthe
<m>button.
zz Whenformattingisnished,[Memory
cardformattingcomplete]isdisplayed.
Pressthe<m>button.
• Formattingorerasingdataonamemorycardonlychangesle
managementinformationonthecardanddoesnoterasethedata
completely.Whentransferringordisposingofmemorycards,take
stepstoprotectpersonalinformationifnecessary,asbyphysically
destroyingcards.
COPY
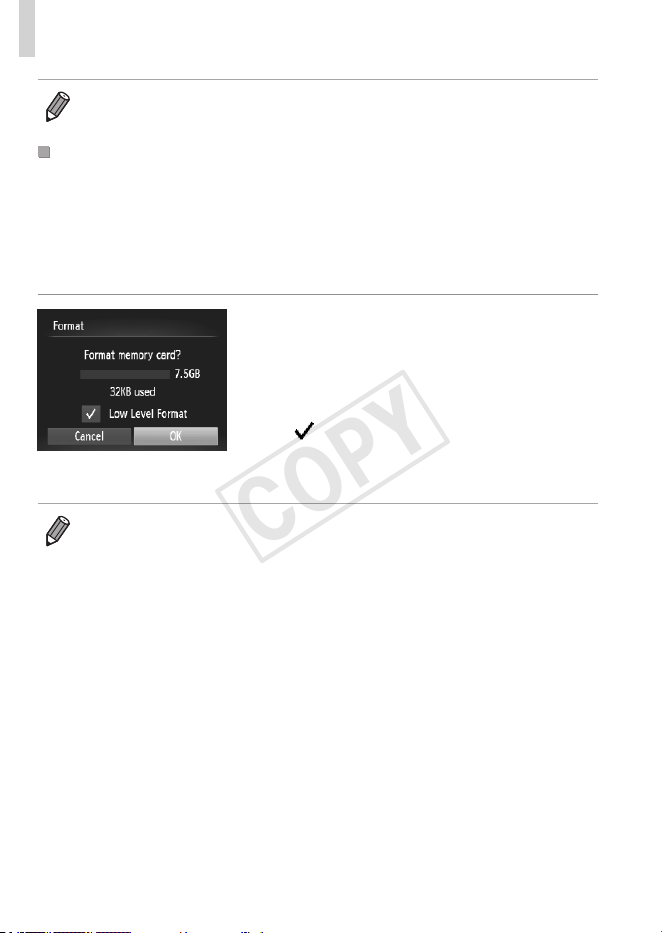
224
AdjustingBasicCameraFunctions
• Thetotalcardcapacityindicatedontheformattingscreenmaybelessthan
theadvertisedcapacity.
Low-LevelFormatting
Performlow-levelformattinginthesecases:[Memorycarderror]is
displayed,thecameraisnotworkingcorrectly,cardimagereading/writingis
slower,continuousshootingisslower,ormovierecordingsuddenlystops.
Low-levelformattingerasesalldataonamemorycard.Beforelow-level
formatting,copyimagesonthememorycardtoacomputer,ortakeother
stepstobackthemup.
Performlow-levelformatting.
zz Onthescreeninstep2on=
223,
pressthe<o><p>buttonsorturnthe
<7>dialtochoose[LowLevelFormat],
andthenselectthisoption(markwitha
[
])bypressingthe<q><r>buttons.
zz Followsteps2–3on=
223tocontinue
withtheformattingprocess.
• Low-levelformattingtakeslongerthan“FormattingMemoryCards”
(=
223),becausedataiserasedfromallstorageregionsofthememory
card.
• Youcancancellow-levelformattinginprogressbychoosing[Stop].Inthis
case,alldatawillbeerased,butthememorycardcanbeusednormally.
COPY
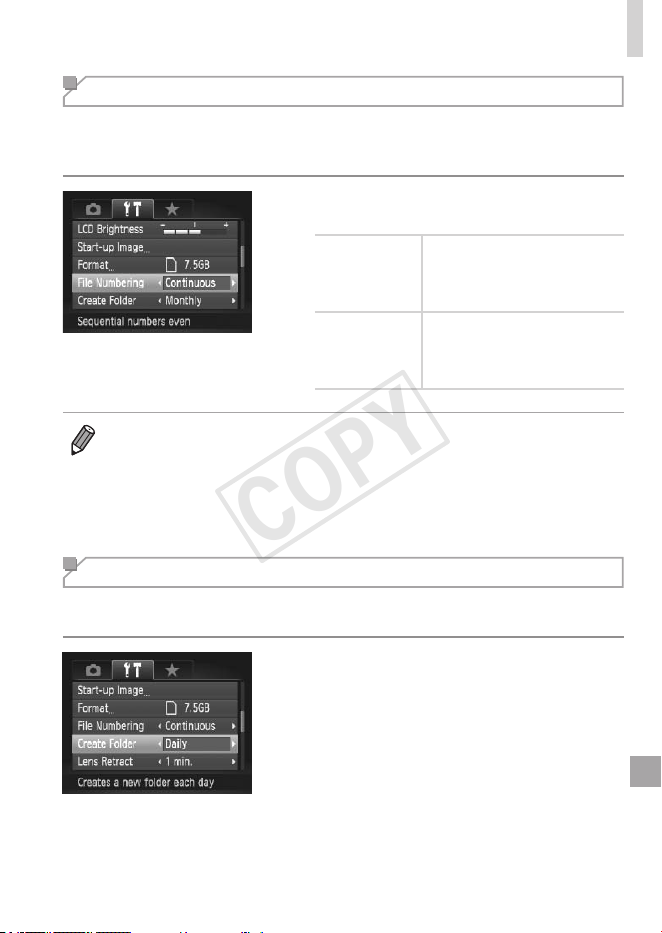
225
AdjustingBasicCameraFunctions
File Numbering
Yourshotsareautomaticallynumberedinsequentialorder(0001–9999)
andsavedinfoldersthatstoreupto2,000imageseach.Youcanchange
howthecameraassignslenumbers.
zz Choose[FileNumbering],andthen
chooseanoption.
Continuous
Imagesarenumbered
consecutively(untilthe9999th
shotistaken/saved)evenif
youswitchmemorycards.
AutoReset
Imagenumberingisresetto
0001ifyouswitchmemory
cards,orwhenanewfolderis
created.
• Regardlessoftheoptionselectedinthissetting,shotsmaybenumbered
consecutivelyafterthelastnumberofexistingimagesonnewlyinserted
memorycards.Tostartsavingshotsfrom0001,useanempty(orformatted
(=
223))memorycard.
• RefertotheSoftware Guide(=
30)forinformationonthecardfolder
structureandimageformats.
Date-Based Image Storage
Insteadofsavingimagesinfolderscreatedeachmonth,youcanhavethe
cameracreatefolderseachdayyoushoottostoreshotstakenthatday.
zz Choose[CreateFolder],andthenchoose
[Daily].
XX Imageswillnowbesavedinfolders
createdontheshootingdate.
COPY
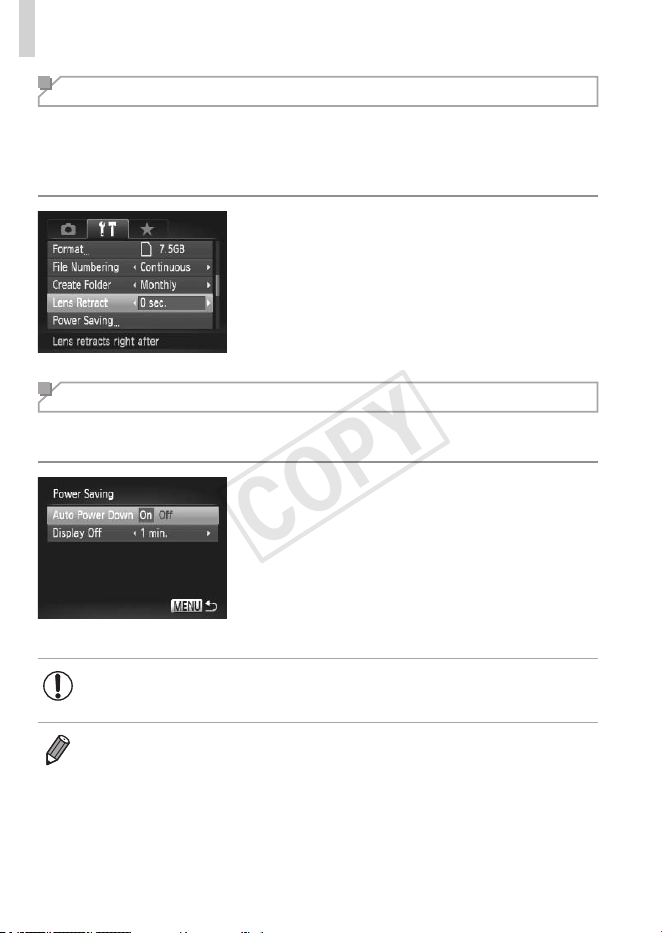
226
AdjustingBasicCameraFunctions
Lens Retraction Timing
Thelensisnormallyretractedforsafetyaboutoneminuteafteryoupress
the<1>buttoninShootingmode(=
42).Tohavethelensretracted
immediatelyafteryoupressthe<1>button,settheretractiontimingto
[0sec.].
zz Choose[LensRetract],andthenchoose
[0sec.].
Power-Saving Adjustment
Adjustthetimingofautomaticcameraandscreendeactivation(AutoPower
DownandDisplayOff,respectively)asneeded(=
42).
1 Accessthe[PowerSaving]
screen.
zz Choose[PowerSaving],andthenpress
the<m>button.
2 Congurethesettings.
zz Afterchoosinganitem,pressthe
<q><r>buttonstoadjustitasneeded.
• Toconservebatterypower,youshouldnormallychoose[On]for
[AutoPowerDown]and[1min.]orlessfor[DisplayOff].
• The[DisplayOff]settingisappliedevenifyouset[AutoPowerDown]to
[Off].
COPY

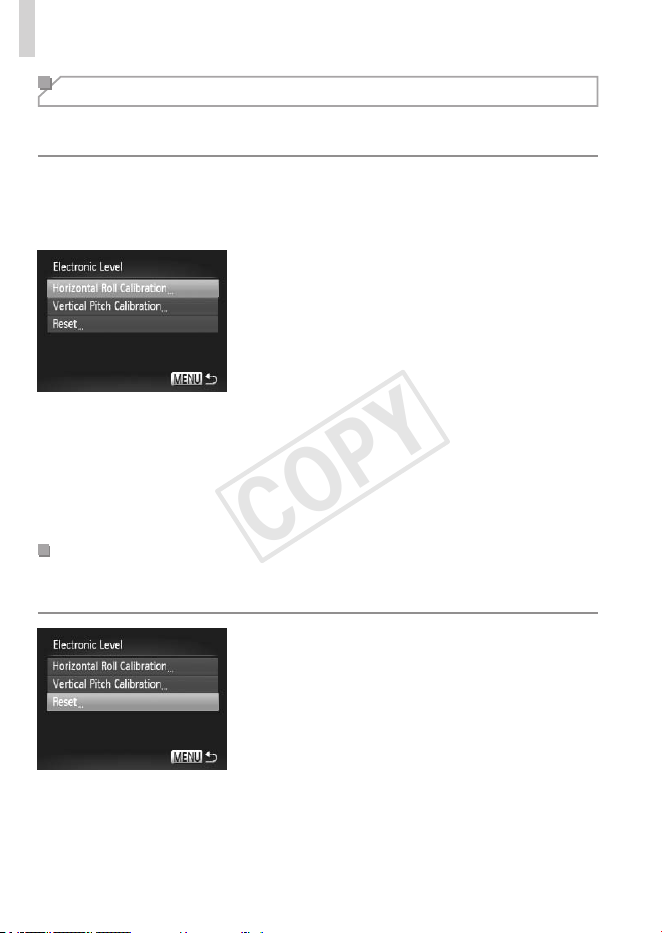
228
AdjustingBasicCameraFunctions
Electronic Level Calibration
Calibratetheelectroniclevelifitseemsineffectiveinhelpingyoulevelthe
camera.
1 Makesurethecameraislevel.
zz Placethecameraonaatsurface,such
asatable.
2 Accessthe[ElectronicLevel]
screen.
zz Choose[ElectronicLevel],andthenpress
the<m>button.
3 Calibratetheelectroniclevel.
zz Toadjustleft/righttilt,choose[Horizontal
RollCalibration],andtoadjustforward/
backwardtilt,choose[VerticalPitch
Calibration],followedbythe<m>button.
Aconrmationmessageisdisplayed.
zz Choose[OK],andthenpressthe<m>
button.
ResettingtheElectronicLevel
Restoretheelectronicleveltoitsoriginalstateasfollows.Notethatthisis
notpossibleunlessyouhavecalibratedtheelectroniclevel.
zz Choose[ElectronicLevel],andthenpress
the<m>button.
zz Choose[Reset],andthenpressthe
<m>button.
XX Oncetheelectroniclevelhasbeenreset,
themenuscreenisdisplayedagain.
COPY
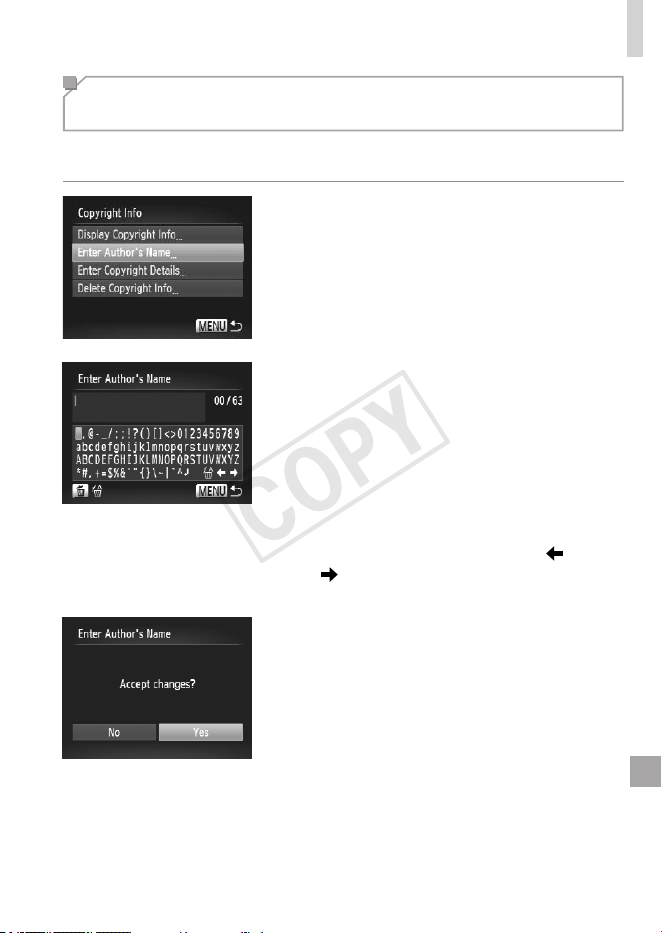
229
AdjustingBasicCameraFunctions
Setting Copyright Information to Record in
Images
Torecordtheauthor’snameandcopyrightdetailsinimages,setthis
informationbeforehandasfollows.
1 Accessthesettingscreen.
zz Choose[CopyrightInfo],andthenpress
the<m>button.
zz Pressthe<o><p>buttonsorturn
the<7>dialtochoose[EnterAuthor’s
Name]or[EnterCopyrightDetails],and
thenpressthe<m>button.
2 Enteraname.
zz Pressthe<o><p><q><r>buttonsor
turnthe<7>dialtochooseacharacter,
andthenpressthe<m>buttontoenter
it.
zz Upto63characterscanbeused.
zz Pressthe<a>buttontodeletesingle
characters.
zz Turnthe<z>dialorchoose[ ]or
[
]andpressthe<m>buttontomove
thecursor.
3 Savethesettings.
zz Pressthe<n>button.[Accept
changes?]isdisplayed.
zz Pressthe<q><r>buttonsorturnthe
<7>dialtochoose[Yes],andthenpress
the<m>button.
XX Theinformationsetherewillnowbe
recordedinimages.
COPY
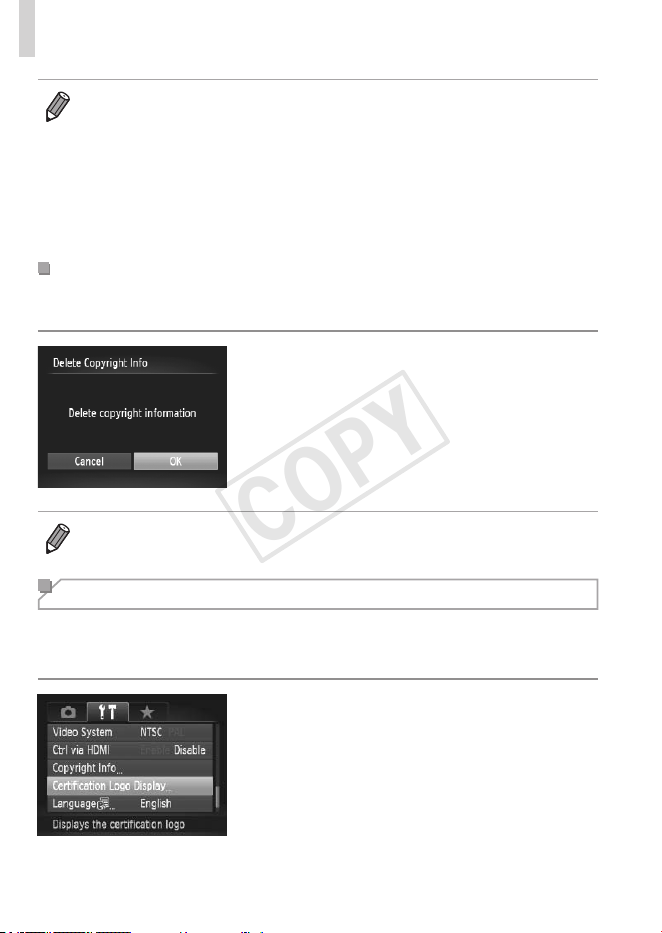
230
Adjusting Basic Camera Functions
• To check the information entered, choose [Display Copyright Info] on the
screen in step 1, and then press the <m> button.
• You can also use the included software (=
30) to enter, change, and
delete copyright information. Some characters entered with the included
software may not display on the camera, but will be correctly recorded in
images.
• After saving images to a computer, you can use the software to review
copyright information recorded in the images.
DeletingAllCopyrightInformation
You can delete both the author’s name and copyright details at the same
time as follows.
zz Follow step 1 on =
229 and choose
[Delete Copyright Info].
zz Press the <q><r> buttons or turn the
<7> dial to choose [OK], and then press
the <m> button.
• The copyright info already recorded in images will not be deleted.
Checking Certication Logos
Some logos for certication requirements met by the camera can be viewed
on the screen. Other certication logos are printed in this guide, on the
camera packaging, or on the camera body.
zz Choose [Certication Logo Display], and
then press the <m> button.
COPY
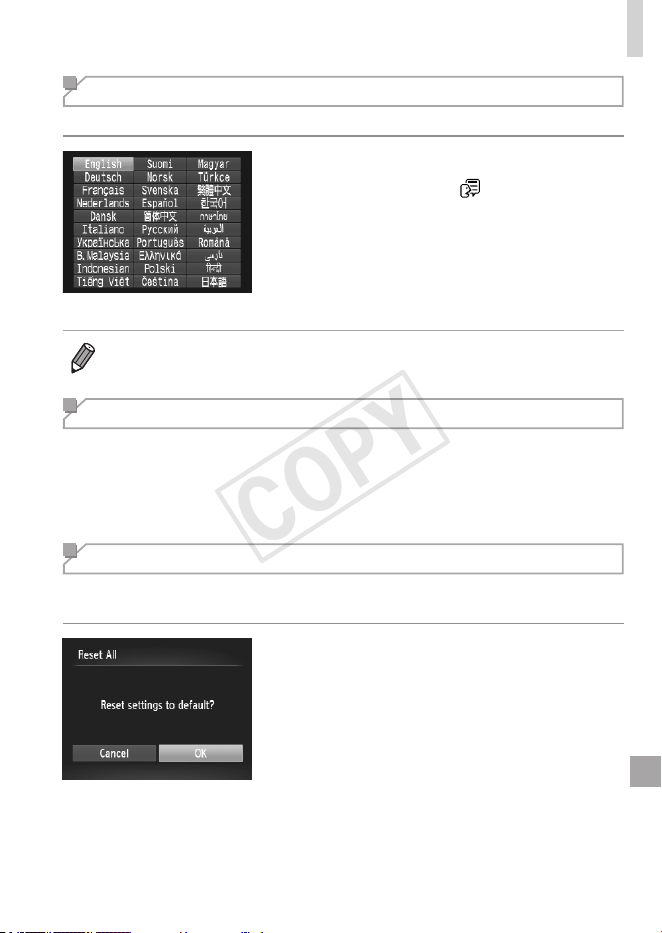
231
AdjustingBasicCameraFunctions
Display Language
Changethedisplaylanguageasneeded.
1 Accessthe[Language]screen.
zz Choose[Language ],andthenpress
the<m>button.
2 Congurethesetting.
zz Pressthe<o><p><q><r>buttonsor
turnthe<7>dialtochoosealanguage,
andthenpressthe<m>button.
• Youcanalsoaccessthe[Language]screeninPlaybackmodebypressing
andholdingthe<m>buttonandimmediatelypressingthe<n>button.
Adjusting Other Settings
Thefollowingsettingscanalsobeadjustedonthe[3]tab.
• [VideoSystem](=
243)
• [CtrlviaHDMI](=
241)
• [Eye-FiSettings](=
274)
Restoring Defaults
Ifyouaccidentallychangeasetting,youcanrestoredefaultcamera
settings.
1 Accessthe[ResetAll]screen.
zz Choose[ResetAll],andthenpressthe
<m>button.
2 Restoredefaultsettings.
zz Pressthe<q><r>buttonsorturnthe
<7>dialtochoose[OK],andthenpress
the<m>button.
XX Defaultsettingsarenowrestored.
COPY

232
AdjustingBasicCameraFunctions
• Thefollowingfunctionsarenotrestoredtodefaultsettings.
-[3]tabsettings[Date/Time](=
20),[Language ](=
23),[Time
Zone](=
220),[VideoSystem](=
243),andtheimageassignedto
[Start-upImage](=
222)
-InformationregisteredusingFaceID(=
69)
-Customwhitebalancedatayouhaverecorded(=
135)
-ColorschoseninColorAccent(=
109)orColorSwap(=
110)
-Shootingmodechosenin<K>(=
95)or< >(=
99)mode
-Exposurecompensation(=
125)setting
-Themoviemode(=
119)
-Calibratedvaluefortheelectroniclevel(=
228)
-Copyrightinformation(=
229)
COPY

233
Accessories
Useincludedaccessorieseffectivelyandenjoythe
camerainmorewayswithoptionalCanonaccessories
andothercompatibleaccessoriessoldseparately
8
COPY

234
Tips on Using Included Accessories
Effective Battery and Charger Use
• Chargethebatteryon(orimmediatelybefore)the
dayofuse
Chargedbatteriesgraduallylosetheircharge,evenwhen
theyarenotused.
Youcaneasilycheckthechargestateofthebatteryby
attachingthecoversothatisvisibleonacharged
battery,andattachingitsothatisnotvisibleonan
unchargedbattery.
• Long-termbatterystorage
Afterusingupallremainingbatterypower,removethebatteryfromthecamera.Store
thebatterywiththecoverattached.Storingapartiallychargedbatteryoverextended
periods(aboutayear)mayshortenitslifeoraffectperformance.
• Usingthebatterychargerabroad
Thechargercanbeusedinareaswith100–240VACpower(50/60Hz).Forpower
outletsinadifferentformat,useacommerciallyavailableadapterfortheplug.Never
useanelectricaltransformerdesignedfortraveling,whichmaydamagethebattery.
COPY
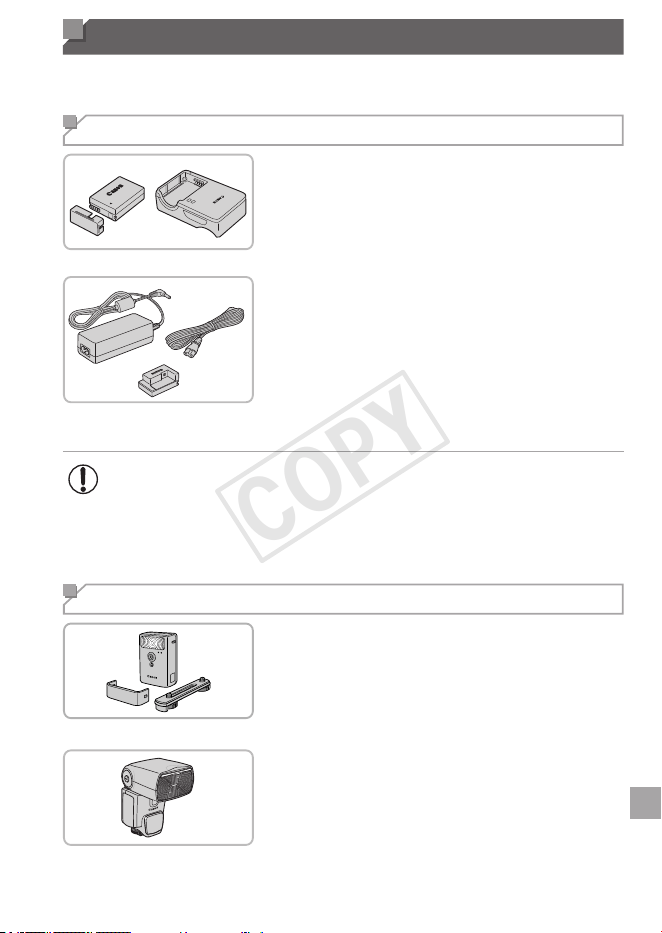
235
Optional Accessories
Thefollowingcameraaccessoriesaresoldseparately.Notethatavailability
variesbyarea,andsomeaccessoriesmaynolongerbeavailable.
Power Supplies
BatteryPackNB-10L
zz Rechargeablelithium-ionbattery
BatteryChargerCB-2LC/CB-2LCE
zz ChargerforBatteryPackNB-10L
ACAdapterKitACK-DC80
zz Forpoweringthecamerausing
householdpower.Recommendedwhen
usingthecameraoverextendedperiods,
orwhenconnectingthecameratoa
printerorcomputer.Cannotbeusedto
chargethecamerabattery.
• ThebatterychargerandACadapterkitcanbeusedinareaswith
100–240VACpower(50/60Hz).
• Forpoweroutletsinadifferentformat,useacommercially
availableadapterfortheplug.Neveruseanelectricaltransformer
designedfortraveling,whichmaydamagethebattery.
Flash Units
High-PowerFlashHF-DC2
zz Externalashforilluminatingsubjects
thatareoutofrangeofthebuilt-inash.
High-PowerFlashHF-DC1canalsobe
used.
Speedlite600EX-RT,600EX,
580EXII,430EXII,320EX,270EXII
zz Shoe-mountedashunitthatenables
manystylesofashphotography.
Speedlite580EX,430EX,270EX,and
220EXarealsosupported.
COPY
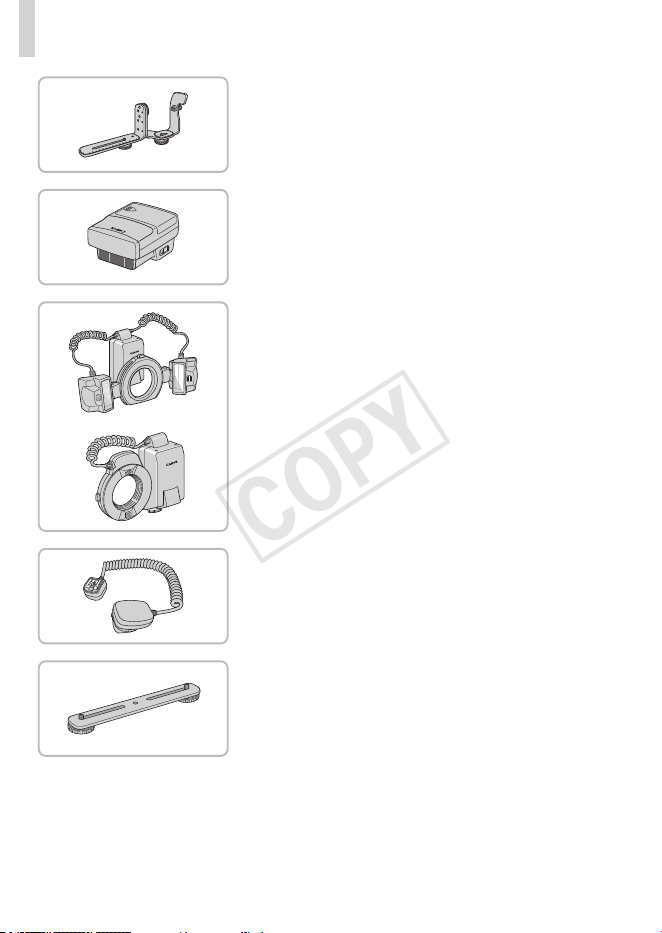
236
OptionalAccessories
SpeedliteBracketSB-E2
zz Preventsunnaturalshadowsnextto
subjectsduringverticalshooting.Includes
Off-CameraShoeCordOC-E3.
SpeedliteTransmitterST-E2
zz Enableswirelesscontrolofslave
Speedliteashunits(exceptSpeedlite
270EX/220EX).
MacroTwinLiteMT-24EX
MacroRingLiteMR-14EX
zz RequiresConversionLensAdapter
LA-DC58L,Off-CameraShoeCord
OC-E3,andBracketBKT-DC1(allsold
separately)forattachmenttothecamera.
RequiresConversionLensAdapter
LA-DC58L(soldseparately)for
attachmenttothecamera.
Off-CameraShoeCordOC-E3
zz UsedtoattachaMacroTwinLiteashto
thecamera.
BracketBKT-DC1
zz UsedtoattachaMacroTwinLiteashto
thecamera.
COPY

237
OptionalAccessories
Other Accessories
SoftCaseSC-DC85
zz Protectsthecamerafromdustand
scratches.
Handlewithcaretopreventleather
discoloration.
WaterproofCaseWP-DC48
zz Forunderwaterphotographyatdepthsof
upto40meters(130ft.).Alsousefulfor
shootingintherain,atthebeach,oron
skislopes.
InterfaceCableIFC-400PCU
zz Forconnectingthecameratoacomputer
orprinter.
StereoAVCableAVC-DC400ST
zz ConnectthecameratoaTVtoenjoy
playbackonthelargerTVscreen.
HDMICableHTC-100
zz ForconnectingthecameratoanHDMI
inputofahigh-denitionTV.
Tele-converterTC-DC58E
zz Optionallensattachedtothecamerato
increasethefocallengthbyafactorof
approximately1.4x.(Includeslenshood.)
COPY
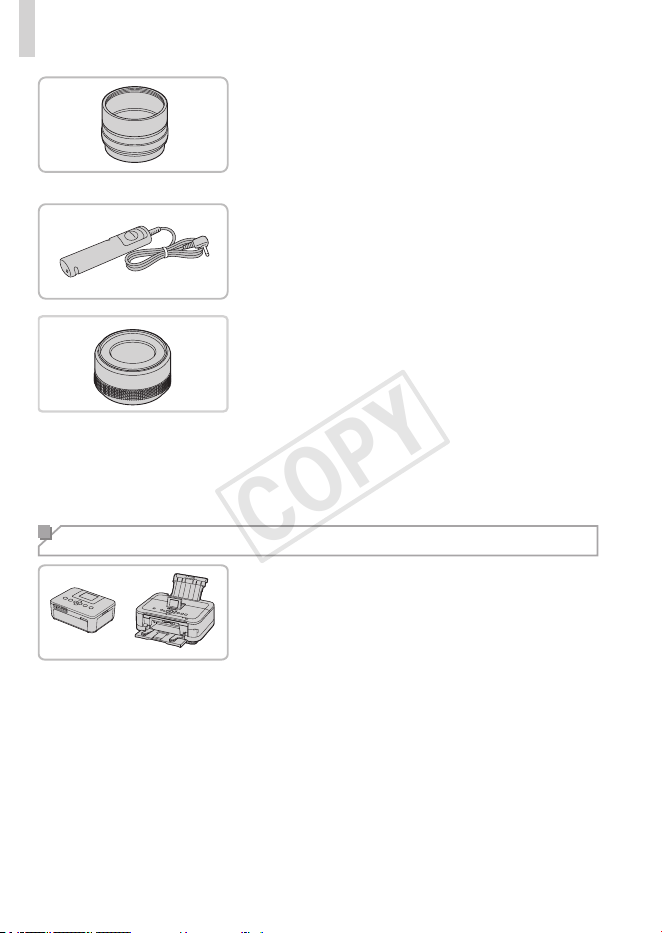
238
OptionalAccessories
ConversionLensAdapter
LA-DC58L
zz AdapterrequiredtoattachtheTele-
converterorMacroRingLite/MacroTwin
Liteashtothecamera.
RemoteSwitchRS-60E3
zz Enablesremoteshutterbuttonoperation
(pressingthebuttonhalfwayorallthe
waydown).
FilterAdapterFA-DC58D
zz Adapterrequiredwhenmountinga58
mmlter.
CanonLensFilter(58mmdia.)
zz Protectsthelensandenablesavarietyof
shootingeffects.
Printers
CanonPictBridge-Compatible
Printers
zz Printingimageswithoutacomputeris
possiblebyconnectingthecameratoa
CanonPictBridge-compatibleprinter.
Fordetails,visityournearestCanon
dealer.
COPY
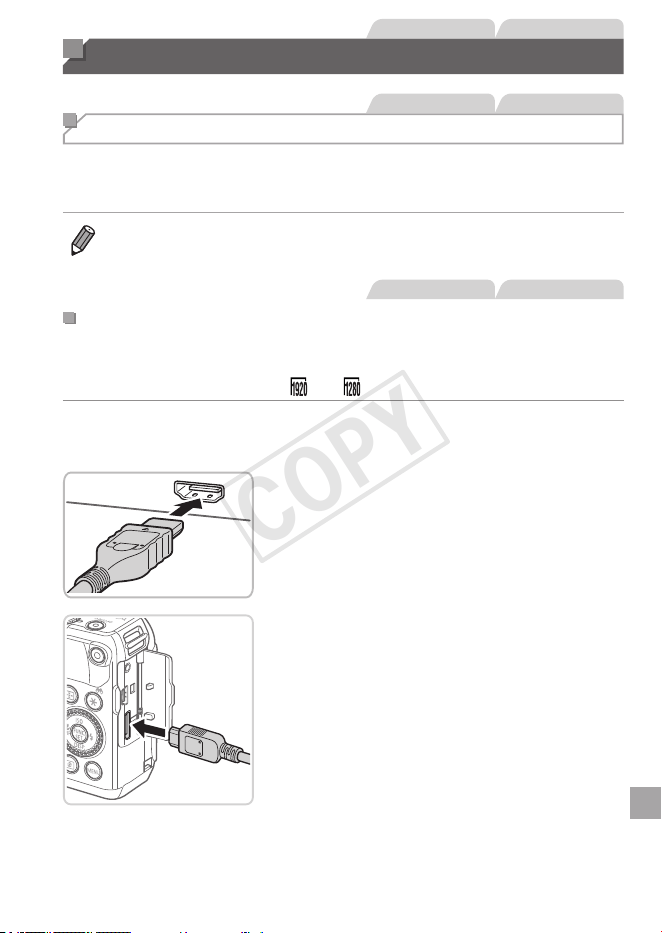
239
StillImages Movies
Using Optional Accessories
StillImages Movies
Playback on a TV
ByconnectingthecameratoaTV,youcanviewyourshotsonthelarger
screenoftheTV.
Fordetailsonconnectionorhowtoswitchinputs,refertotheTVmanual.
• SomeinformationmaynotbedisplayedontheTV(=
288).
StillImages Movies
PlaybackonaHigh-DenitionTV
ConnectingthecameratoanHDTVwiththeHDMICableHTC-100(sold
separately)enablesyoutoviewyourshotsonthelargerscreenoftheTV.
Moviesshotataresolutionof[ ]or[ ]canbeviewedinhigh-denition.
1 MakesurethecameraandTV
areoff.
2 ConnectthecameratotheTV.
zz OntheTV,insertthecableplugfullyinto
theHDMIinputasshown.
zz Onthecamera,opentheterminalcover
andinsertthecableplugfullyintothe
cameraterminal.
COPY

240
UsingOptionalAccessories
3 TurntheTVonandswitchto
videoinput.
zz SwitchtheTVinputtothevideoinputyou
connectedthecabletoinstep2.
4 Turnthecameraon.
zz Pressthe<1>buttontoturnthecamera
on.
XX Imagesfromthecameraarenow
displayedontheTV.(Nothingis
displayedonthecamerascreen.)
zz Whennished,turnoffthecameraand
TVbeforedisconnectingthecable.
• ItisnotpossibletoconnecttheUSBcableoranoptionalstereo
AVcableatthesametimeasanHDMICableHTC-100.Forcing
thecablesintothecameraatthesametimemaydamagethe
cameraorcables.
• Cameraoperatingsoundsarenotplayedwhilethecameraisconnectedto
anHDTV.
COPY
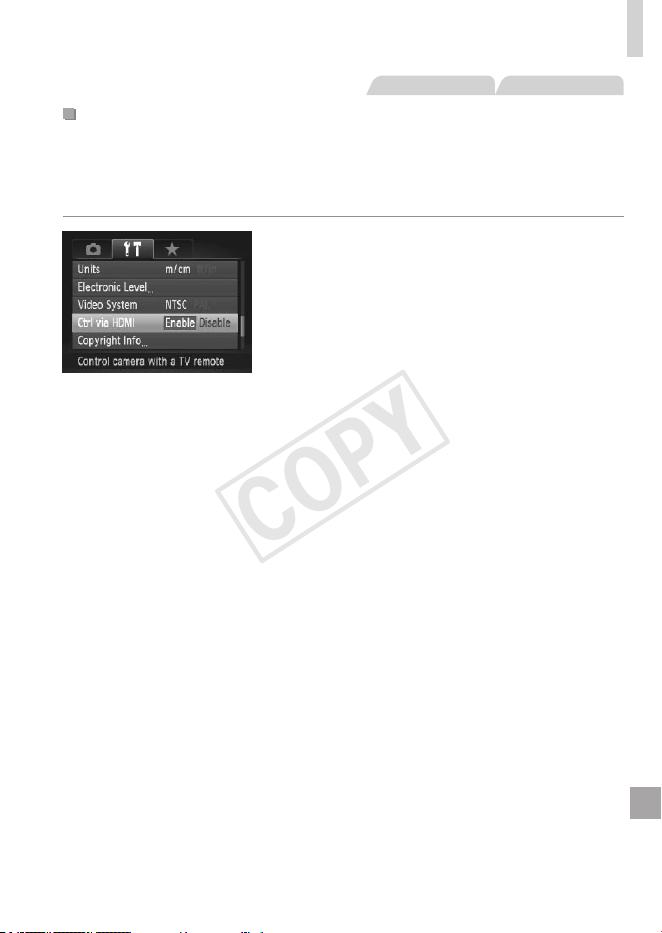
241
UsingOptionalAccessories
StillImages Movies
ControllingtheCamerawithaTVRemote
ConnectingthecameratoanHDMICEC-compatibleTVenablesplayback
(includingslideshowplayback)usingtheTVremotecontrol.
Inthiscase,youwillneedtoadjustsomeTVsettings.Fordetails,referto
theTVusermanual.
1 Congurethesetting.
zz Pressthe<n>button,choose
[CtrlviaHDMI]onthe[3]tab,andthen
choose[Enable](=
48).
2 ConnectthecameratotheTV.
zz Followsteps1–2on=
239toconnect
thecameratotheTV.
3 Displayimages.
zz TurnontheTV.Onthecamera,pressthe
<1>button.
XX Imagesfromthecameraarenow
displayedontheTV.(Nothingis
displayedonthecamerascreen.)
4 ControlthecamerawiththeTV
remote.
zz Pressthe<q><r>buttonsontheremote
tobrowseimages.
zz Todisplaythecameracontrolpanel,
presstheOK/Selectbutton.Select
controlpanelitemsbypressingthe
<q><r>buttonstochooseanitem,and
thenpressingtheOK/Selectbuttonagain.
COPY

242
UsingOptionalAccessories
CameraControlPanelOptionsShownontheTV
Return Closesthemenu.
GroupPlayback
Displayssetsofimagesshotin[
]mode(=
116).
(Onlydisplayedwhenagroupedimageisselected.)
PlayMovie
Startsmovieplayback.(Onlydisplayedwhenamovie
isselected.)
.
Slideshow
Startsslideshowplayback.Toswitchimagesduring
playback,pressthe<q><r>buttonsontheremote
control.
IndexPlayback Displaysmultipleimagesinanindex.
l
ChangeDisplay
Switchesdisplaymodes(=
46).
• Pressingthe<n>buttononthecamerawillswitchcontroltothe
cameraitself,whichwillpreventremotecontroluntilyoureturntosingle-
imagedisplay.
• Thecameramaynotalwaysrespondcorrectlyeveniftheremoteisforan
HDMICEC-compatibleTV.
COPY
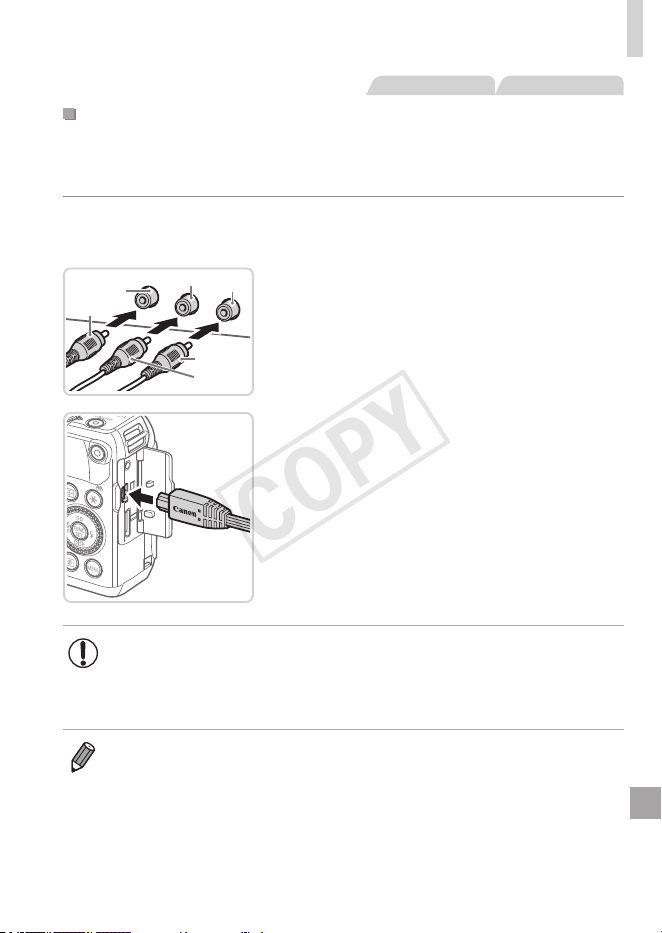
243
UsingOptionalAccessories
StillImages Movies
PlaybackonaStandard-DenitionTV
ConnectingthecameratoaTVwiththeStereoAVCableAVC-DC400ST
(soldseparately)enablesyoutoviewyourshotsonthelargerscreenofthe
TVasyoucontrolthecamera.
1 MakesurethecameraandTV
areoff.
Red
Red
White
Yellow
Yellow
White
2 ConnectthecameratotheTV.
zz OntheTV,insertthecableplugsfullyinto
thevideoinputsasshown.
zz Onthecamera,opentheterminalcover
andinsertthecableplugfullyintothe
cameraterminal.
3 Displayimages.
zz Followsteps3–4on=
240todisplay
images.
• Correctdisplayisnotpossibleunlessthecameravideooutput
format(NTSCorPAL)matchestheTVformat.Tochangethe
videooutputformat,pressthe<n>buttonandchoose[Video
System]onthe[3]tab.
• WhenthecameraandTVareconnected,youcanalsoshootwhile
previewingshotsonthelargerscreenoftheTV.Toshoot,followthesame
stepsaswhenusingthecamerascreen.However,AF-PointZoom(=
87),
StitchAssist(=
118)andMF-PointZoom(=
143)arenotavailable.
COPY

244
UsingOptionalAccessories
StillImages Movies
Powering the Camera with Household Power
PoweringthecamerawithACAdapterKitACK-DC80(soldseparately)
eliminatestheneedtomonitortheremainingbatterylevel.
1 Makesurethecameraisoff.
2 Connecttheadaptertothe
coupler.
zz Inserttheadapterplugfullyintothe
coupler.
3 Insertthecoupler.
zz Followstep2on=
18toopenthe
cover,andtheninsertthecoupleras
shownuntilitlocksintoplace.
CouplerCablePort
zz Lowerthecover( ),keepingthecoupler
cableinthecouplercableport(
).
zz Slidethecover( )untilitclicksinto
place.

245
UsingOptionalAccessories
4 Connectthepowercord.
zz Insertoneendofthepowercordintothe
compactpoweradapter,andthenplug
theotherendintoapoweroutlet.
zz Turnthecameraonanduseitasdesired.
zz Whennished,turnthecameraoffand
unplugthepowercordfromtheoutlet.
• Donotdisconnecttheadapterorunplugthepowercordwhile
thecameraisstillon.Thismayeraseyourshotsordamagethe
camera.
• Donotattachtheadapteroradaptercordtootherobjects.Doing
socouldresultinmalfunctionordamagetotheproduct.
StillImages Movies
Using a Tele-converter (Sold Separately)
AttachingTele-converterTC-DC58EandConversionLensAdapter
LA-DC58L(bothsoldseparately)enablesyoutouseafocallengthof1.4x.
1 Removethering.
zz Makesurethecameraisoff.
zz Holddowntheringreleasebutton( )
andturntheringinthedirectionofthe
arrow(
).
zz Alignthe
○
markontheringwiththe
●
markonthecamera,andthenliftthe
ringoff.
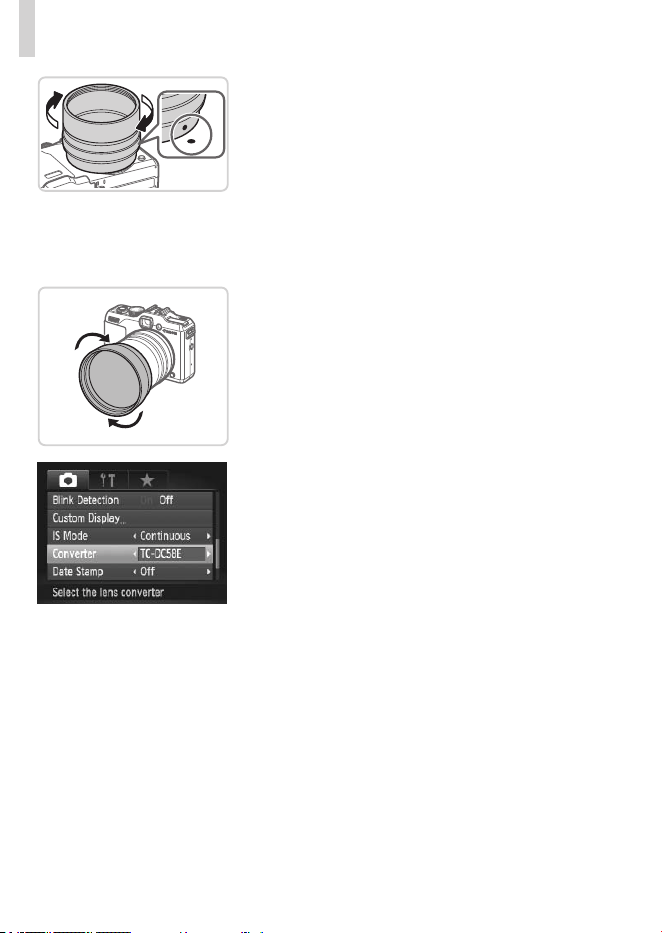
246
UsingOptionalAccessories
2 Attachtheconversionlens
adapter.
zz Alignthe
●
markontheconversionlens
adapterwiththe
●
markonthecamera,
andthenturntheadapterinthedirection
ofthearrowsuntilitlocks.
zz Toremovetheadapter,holddownthe
ringreleasebuttonandturntheadapter
intheoppositedirection.
3 Attachthetele-converterlens.
zz Turnthelensinthedirectionofthearrow
toattachitsecurelytothecamera.
4 Specifytheconverterinthe
camerasettings.
zz Turnthecameraon.
zz Pressthe<n>buttonandchoose
[Converter]onthe[4]tab.Pressthe
<q><r>buttonstochoose[TC-DC58E].
zz Thereisnoneedtoadjusttheconverter
settingwhen[ISMode]issetto[Off].
zz Afterremovingtheconverter,always
returntheconvertersettingto[None].
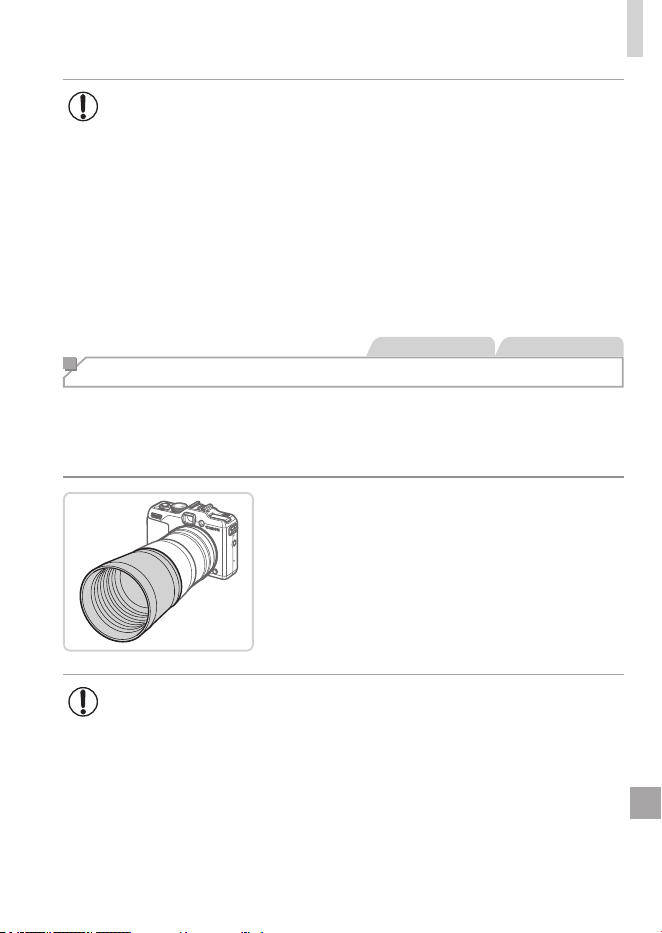
247
UsingOptionalAccessories
• Vignettingmayoccur(especiallyinthelowerright)whenthebuilt-
inashisused.
• Setthecameratomaximumtelephotowhenusingthetele-
converter.Atotherzoompositions,vignettingmayoccur.
• UsetheLCDmonitortocomposeshots.Theviewthroughthe
viewndermaybepartiallyobstructedbyvignetting.
• Beforeuse,removealldustordebrisfromtheconversionlens
withalensblowerbrush.
• Stitchingmultipleimagestogetheraccuratelywiththeincluded
softwareisnotpossiblewhenshootingin[x]or[v]mode
(=
118)whileusingtheselensattachments.
StillImages Movies
Using a Lens Hood
AttachingthelenshoodincludedwithTele-converterTC-DC58E(sold
separately)canreducetheeffectofextraneouslightoutsidetheangleof
viewwhenshootingbacklitsubjects,orwhenthecameraisaimedtowarda
brightlightsource.
Attachthelenshood.
zz Fitthelenshoodoverthetele-converter
asshownandattachitsecurely.
zz Whenthelenshoodwillnotbeused,
attachitinverted.
• Vignettingmayoccurifyouusethebuilt-inashwhenthelens
hoodisattached.
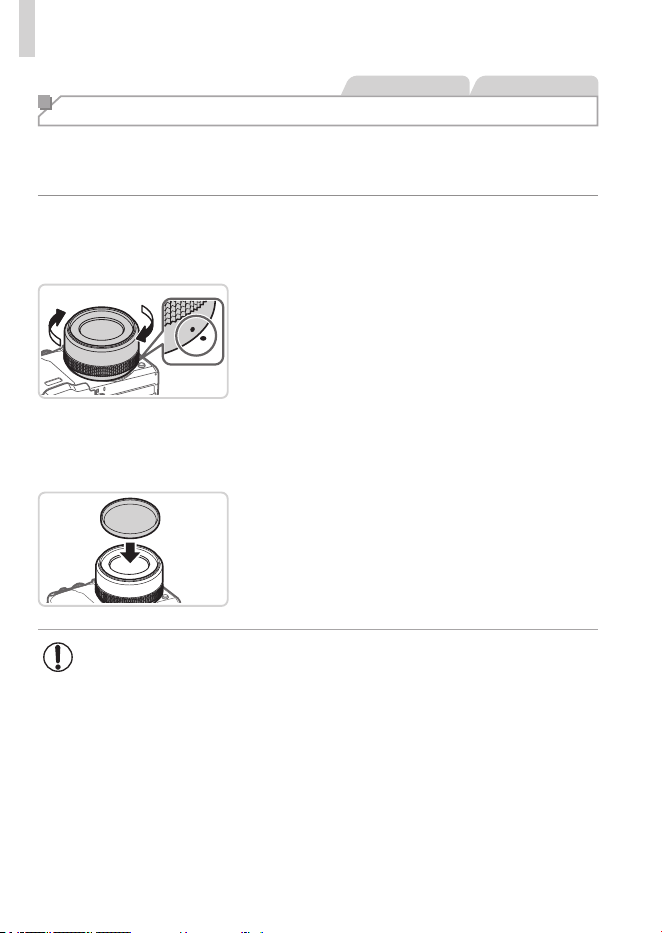
248
UsingOptionalAccessories
StillImages Movies
Using Lens Filters (Sold Separately)
Attachingalensltertothecameraprotectsthelensandallowsyouto
shootwithvariouseffects.Toattachalenslter,youwillneedFilterAdapter
FA-DC58D(soldseparately).
1 Removethering.
zz Followstep1on=
245toremovethe
ring.
2 Attachthelteradapter.
zz Alignthe
●
markonthelteradapterwith
the
●
markonthecamera,andthenturn
theadapterinthedirectionofthearrows
untilitlocksinplace.
zz Toremovetheadapter,turnoffthe
camera,holddowntheringrelease
button,andturntheadapterinthe
oppositedirection.
3 Attachalter.
zz Attachtheltertothecamerainthe
directionofthearrow.
• WerecommendtheuseofgenuineCanonlters(58mmdia.).
• Whennotusingautofocustoshoot,setthemanualfocusoption
[SafetyMF]to[On].
• Ifyouusethebuilt-inashwiththelteradapterattached,portions
oftheimagemayappeardarker.
• Whenusingthelteradapter,besuretouseonlyonelterata
time.Attachingmultiplelters,oraccessoriessuchasaheavy
lens,maycausetheattachmentstofalloffandbecomedamaged.
• Donotgripthelteradaptertightly.
• Removethelteradapterwhennotusingalter.
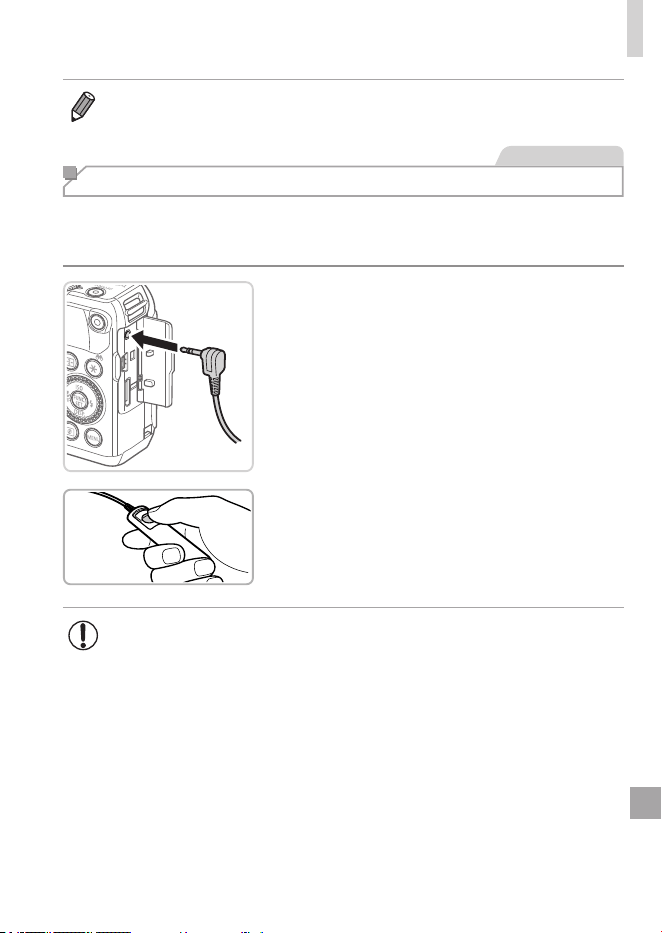
249
UsingOptionalAccessories
• Thelteradapterandalenshoodcannotbeattachedtothecameraatthe
sametime.
StillImages
Using a Remote Switch (Sold Separately)
AnoptionalRemoteSwitchRS-60E3canbeusedtoavoidcamerashake
thatmayotherwiseoccurwhenpressingtheshutterbuttondirectly.This
optionalaccessoryisconvenientwhenshootingatslowshutterspeeds.
1 Connecttheremoteswitch.
zz Makesurethecameraisoff.
zz Opentheterminalcoverandinsertthe
remoteswitchplug.
2 Shoot.
zz Toshoot,pressthereleasebuttononthe
remoteswitch.
• Bulbphotography(longexposures)isnotsupported.
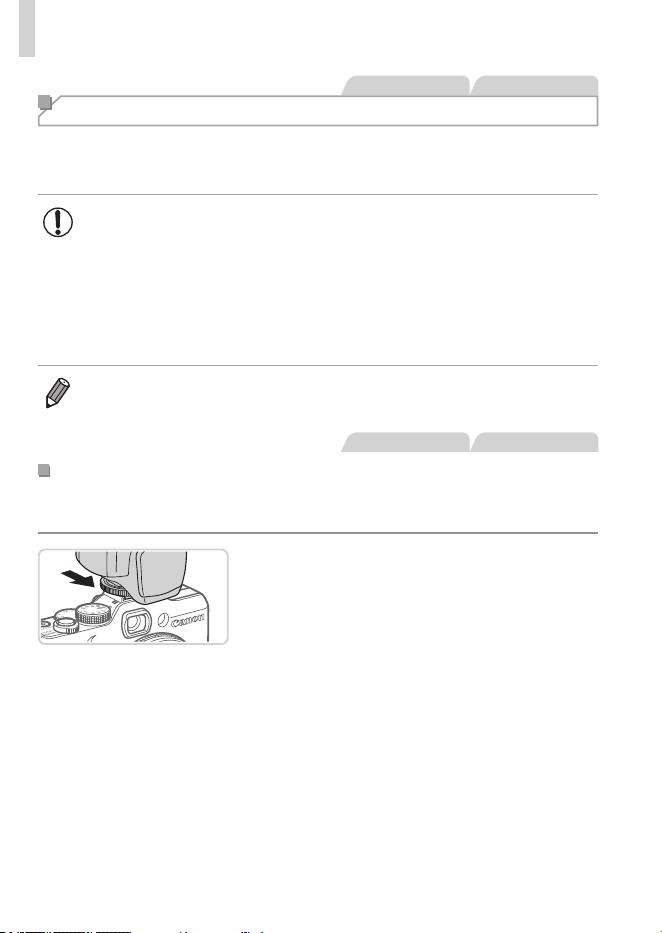
250
UsingOptionalAccessories
StillImages Movies
Using an External Flash (Sold Separately)
MoresophisticatedashphotographyispossiblewithanoptionalSpeedlite
EXseriesash.FormovieshootingusinganLEDlight,theoptional
Speedlite320EXashisavailable.
• ThiscameradoesnotsupportsomeSpeedliteEXseriesfunctions.
• WirelessoperationoftheSpeedlite600EX-RTisnotsupported.
• Non-EXseriesCanonashunitsmaynotrecorrectlyormaynot
reatall,insomecases.
• Useofnon-Canonashunits(especiallyhigh-voltageashunits)
orashaccessoriesmaypreventnormalcameraoperationand
maydamagethecamera.
• AlsorefertotheSpeedliteEXseriesmanualforadditionalinformation.
StillImages Movies
SpeedliteEXSeries
Theseoptionalashunitscanprovidebrightlightingandmeetavarietyof
ashphotographyneeds.
1 Attachtheashunittothehot
shoe.
2 Turntheashon,andthenturn
thecameraon.
XX Ared[h]iconisnowdisplayed.
XX Theashpilotlampwilllightupwhenthe
ashisready.

251
UsingOptionalAccessories
3 Chooseshootingmode<G>,
<M>,<B>,or<D>.
zz Flashsettingscanonlybeconguredin
thesemodes.Inothermodes,theash
isadjustedandredautomatically,as
needed.
4 Setthewhitebalanceto[h]
(=
134).
5 Conguretheexternalash.
zz Pressthe<n>button,choose[Flash
Control]onthe[4]tab,andthenpress
the<m>button.
XX Optionsalreadysetontheashitselfare
displayed.
zz Pressthe<o><p>buttonsorturn
the<7>dialtochooseanitem,and
thenadjustthesettingbypressingthe
<q><r>buttons.
zz Availablesettingsvarydependingonthe
shootingmodeandtheashattached
(=
257).
• Settingsforthebuilt-inashcannotbeconguredwhileaSpeedliteEX
seriesashisattached,becausethatsettingscreenisnolongeraccessible.
• Youcanalsoaccessthesettingscreenbypressingthe<r>buttonforat
leastonesecond.
• Flashsettingsin[
]shootingmodecanbeconguredjustastheyarein
<G>mode.
• 600EX-RT/580EXIIonly:[FlashControl]isnotavailableiftheexternalash
hasbeensetupforstroboscopicash.
• 320EXonly:AutoLEDlightingisonlyavailableinlow-lightmovierecording
orinMoviemode.Inthiscase,the[
]iconisshown.
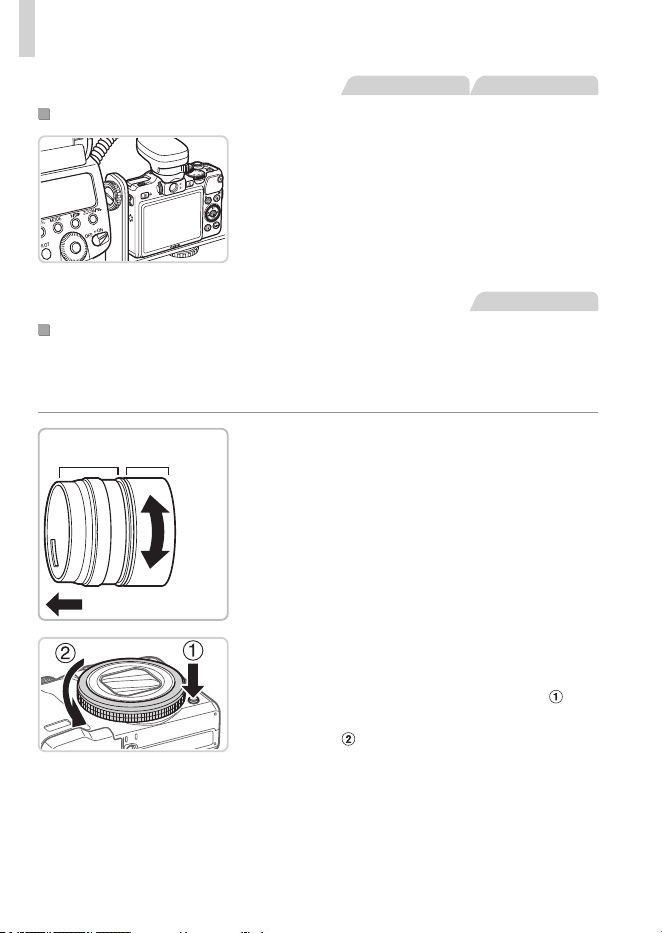
252
UsingOptionalAccessories
StillImages Movies
UsingSpeedliteBracketSB-E2(SoldSeparately)
zz UsingtheoptionalSpeedliteBracket
SB-E2canhelppreventunnatural
shadowsnexttosubjectsduringvertical
shooting.
StillImages
MacroRingLiteMR-14EX
Theseoptionalashunitsenablemanystylesofmacroashphotography.
RequiresConversionLensAdapterLA-DC58L(soldseparately)for
attachmenttothecamera.
Attachtocamera
Attach
Detach
Back
Section
Front
Section
1 Preparetheconversionlens
adapter.
zz Rotatetheconversionlensadapterin
thedirectionindicatedbythearrowto
separatethefrontandbacksections.
zz Onlythebacksectionisusedtoattach
theMacroRingLiteMR-14EXorMacro
TwinLiteMT-24EX.
2 Removethering.
zz Makesurethecameraisoff.
zz Holddowntheringreleasebutton( )
andturntheringinthedirectionofthe
arrow(
).

253
UsingOptionalAccessories
zz Alignthe
○
markontheringwiththe
●
markonthecamera,andthenliftthe
ringoff.
3 Attachthebacksectionofthe
conversionlensadapter.
zz Alignthe
●
markonthebacksectionwith
the
●
markonthecamera,andthenturn
theadapterinthedirectionofthearrows
untilitlocksinplace.
zz Toremovetheadapter,holddownthe
ringreleasebuttonandturntheadapter
intheoppositedirection.
4 Attachthecontrollertothe
camera.
zz Attachthecontrolcomponentofthe
macroringlitetothehotshoeontopof
thecamera.
5 Attachtheashunittothe
conversionlensadapter.
zz Pressthereleasebuttonsonbothsides
ofthemacroringliteinandattachthe
macroringlitetotheconversionlens
adapter.
6 Chooseshootingmode<G>,
<M>,<B>,or<D>.
zz Flashsettingscanonlybeconguredin
thesemodes.Inothermodes,theash
isadjustedandredautomatically,as
needed.

254
Using Optional Accessories
7 Set the white balance to [h]
(=
134).
8 Enter <e> mode (=
142).
9 Set [ND Filter] to [On] (=
133).
10
Conguretheexternalash.
z Follow step 5 on =
251 to adjust the
settings.
• Keep the macro ring lite cord away from ash heads.
• When using a tripod, adjust the position of the legs to prevent
them from coming into contact with the ash heads or the bracket.
• Use the screen to compose shots, because the viewnder cannot
be used with these accessories attached.
Macro Twin Lite MT‑24EX
These optional ash units enable many styles of macro ash photography.
Requires the Conversion Lens Adapter LA-DC58L, Off-Camera Shoe Cord
OC-E3, and Bracket BKT-DC1 (all sold separately) for attachment to the
camera.
1 Removetheringandattachthe
backsectionoftheconversion
lensadapter.
z Follow steps 1 – 3 on =
252 – 253 to
remove the ring, and then attach the back
section of the conversion lens adapter.
2 Attachtheoff-camerashoecord
to the bracket.
z Slide the bracket screw to the outer end
of the bracket. Align the bracket screw
with the tripod socket of the off-camera
shoe cord, and then tighten the screw to
secure it.

255
UsingOptionalAccessories
3 Attachthebrackettothe
camera.
zz Slidetheotherbracketscrewtotheouter
endofthebracket.Alignthebracket
screwwiththetripodsocketonthe
bottomofthecamera,andthentighten
thescrewtosecureit.
4 Attachtheoff-camerashoecord
tothecamera.
zz Attachthecameraconnectioncomponent
oftheoff-camerashoecordtothehot
shoeontopofthecamera.
5 Attachthecontrollertotheoff-
camerashoecord.
zz Attachthecontrollerforthemacrotwin
litetotheashconnectioncomponentof
theoff-camerashoecord.
6 Attachtheashunittothe
conversionlensadapter.
zz Attacheachashheadtotherespective
mount(
).Pressthereleasebuttonon
thetopoftheringinandattachtheringto
theconversionlensadapter(
).

256
UsingOptionalAccessories
7 Conguretheexternalashand
settingsonthecamera.
zz Followsteps6–10on=
253–254to
congurethesetting.
• Keepcords(fromthemacrotwinliteortheoff-camerashoecord)
awayfromashheads.
• Whenusingatripod,adjustthepositionofthelegstoprevent
themfromcomingintocontactwiththeashheadsorthebracket.
• Usethescreentocomposeshots,becausetheviewndercannot
beusedwiththeseaccessoriesattached.

257
UsingOptionalAccessories
StillImages
CameraSettingsAvailablewithanExternalFlash
(SoldSeparately)
Thefollowingsettingsareavailablein<G>,<M>,<B>,or<D>mode.
Inothershootingmodes,only[Red-EyeCorr.]and[Red-EyeLamp]can
becongured.(Withautoashcontrol,theashalwaysres.)However,
externalashunitsdonotreinmodesthatthebuilt-inashdoesnotre
(=
290).
Item Options
ShootingMode
G M B D
FlashMode
Auto*
1
O O O
–
Manual*
2
O O O O
FlashExp.Comp*
3
–3to+3
O O O
–
FlashOutput*
4
1/128*
5
to1/1(in1/3-stopincrements)
O O O O
ShutterSync. 1st-curtain/2nd-curtain/Hi-speed
O O O O
SlowSynchro
On
O O O O
Off
O
–
O
–
WirelessFunc.*
6
On/Off
O O O O
Red-EyeCorr. On/Off
O O O O
Red-EyeLamp On/Off
O O O O
SafetyFE*
7
On
O O O
–
Off
O O O O
ClearFlashSettings*
8
O O O O
*1E-TTLmodeisusedfortheash.
*2Mmodeisusedfortheash.
In[D]shootingmode,E-TTLmodeisalsoavailablefortheash.Inthiscase,when
theashres,ashexposurecompensationsetontheashisappliedtotheash
outputlevelsetonthecamera.
*3Canbeconguredonlywhen[FlashMode]is[Auto]andashexposure
compensationsetontheashis[+0].Whenyouadjustashexposurecompensation
on600EX-RT,600EX,580EXII,or430EXIISpeedlites,thecameradisplaywillbe
updatedaccordingly.
*4Canbeconguredwhen[FlashMode]is[Manual].Linkedtosettingsontheash
unit.
*51/64forSpeedlite430EXII/430EX/320EX/270EXII/270EX,MacroRingLite
MR-14EX,andMacroTwinLiteMT-24EX.

258
UsingOptionalAccessories
*6ForoptionsotherthanOn/Off,congurethesettingontheashunititself.Not
availablewithSpeedlite430EXII/320EX/270EXII/270EX,MacroRingLiteMR-14EX,
orMacroTwinLiteMT-24EX.Whenthissettingissetto[On],[ShutterSync.]cannot
besetto[2nd-curtain].(If[ShutterSync.]issetto[2nd-curtain],itwillbechangedto
[1st-curtain].)
*7Canonlybeconguredwhen[FlashMode]is[Auto].
*8Restoresalldefaultsettings.Youcanalsorestoredefaultsfor[SlowSynchro],[Safety
FE],[Red-EyeCorr.],and[Red-EyeLamp]byusing[ResetAll]inthe[3]menuon
thecamera(=
231).
• Flashsettingsin[ ]shootingmodecanbeconguredjustastheyarein
<G>mode.
• In<A>shootingmode,iconsrepresentingSmiling,Sleeping,Babies
(Smiling),Babies(Sleeping),andChildrenshootingscenesdeterminedby
thecameraarenotdisplayed,andthecameradoesnotshootcontinuously
(=
59).
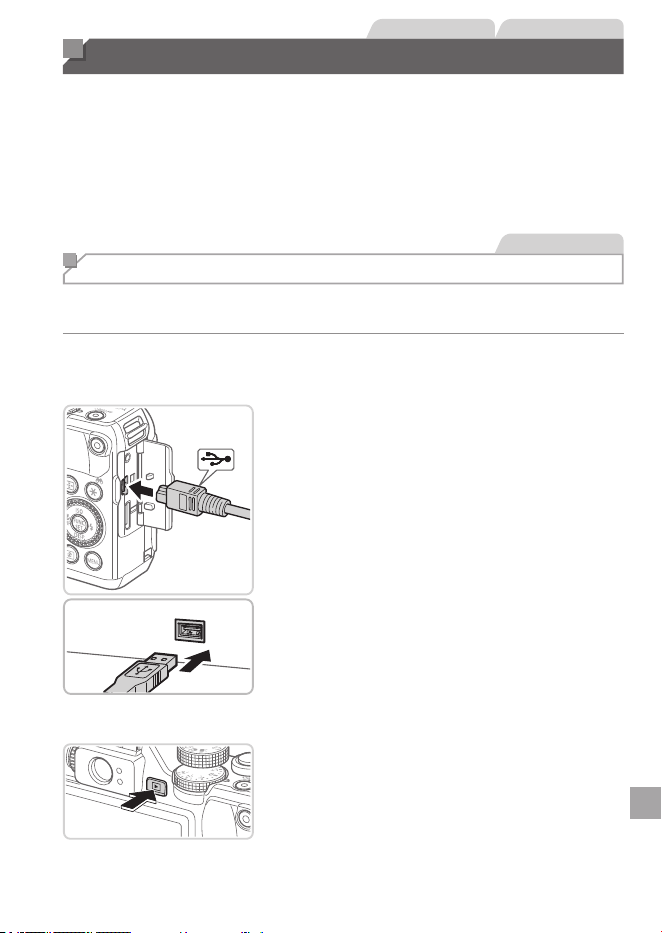
259
StillImages Movies
Printing Images
Yourshotscaneasilybeprintedbyconnectingthecameratoaprinter.On
thecamera,youcanspecifyimagestosetupbatchprinting,prepareorders
forphotodevelopmentservices,andprepareordersorprintimagesfor
photobooks.
ACanonSELPHYCPseriescompactphotoprinterisusedhereforthe
sakeofillustration.Screensdisplayedandavailablefunctionsvaryby
printer.Alsorefertotheprintermanualforadditionalinformation.
StillImages
Easy Print
EasilyprintyourshotsbyconnectingthecameratoaPictBridge-compatible
printer(soldseparately)withtheUSBcable.
1 Makesurethecameraand
printerareoff.
2 Connectthecameratothe
printer.
zz Openthecover.Holdingthesmaller
cableplugintheorientationshown,insert
theplugfullyintothecameraterminal.
zz Connectthelargercableplugtothe
printer.Forotherconnectiondetails,refer
totheprintermanual.
3 Turntheprinteron.
4 Turnthecameraon.
zz Pressthe<1>buttontoturnthecamera
on.

260
PrintingImages
XX [ ]isdisplayed.
5 Chooseanimage.
zz Pressthe<q><r>buttonsorturnthe
<7>dialtochooseanimage.
6 Printtheimage.
zz Pressthe<c>button.
XX Printingnowbegins.
zz Toprintotherimages,repeatsteps5–6
afterprintingisnished.
zz Whenyouarenishedprinting,turnthe
cameraandprinteroffanddisconnectthe
interfacecable.
• ForCanonPictBridge-compatibleprinters(soldseparately),see=
238.
• RAWimagescannotbeprinted.
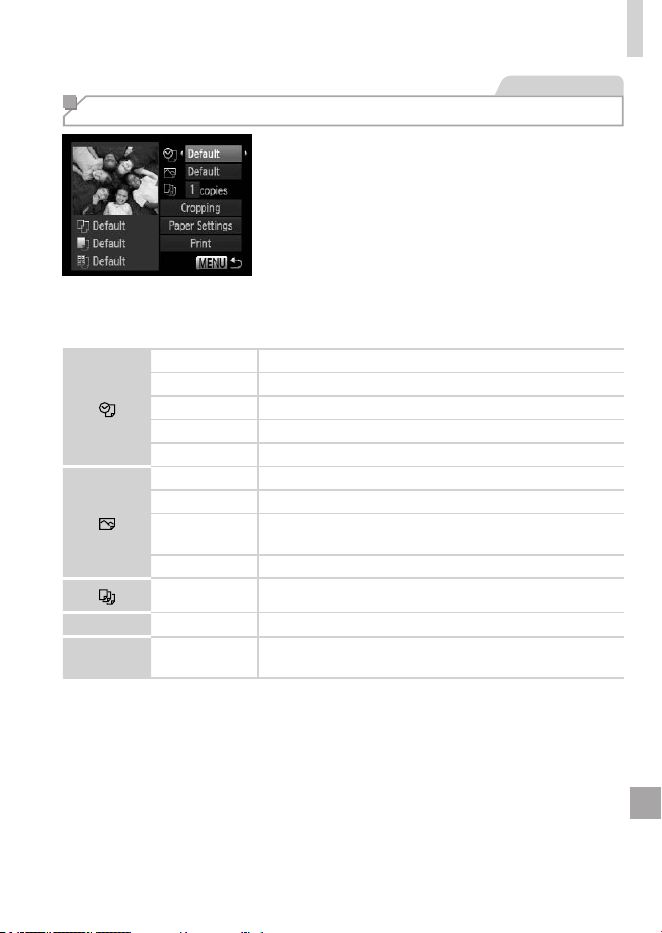
261
PrintingImages
StillImages
Conguring Print Settings
1 Accesstheprintingscreen.
zz Afterfollowingsteps1–5on=
259
–260tochooseanimage,pressthe
<m>buttontoaccessthescreenatleft.
2 Congurethesettings.
zz Pressthe<o><p>buttonsorturn
the<7>dialtochooseanitem,and
thenchooseanoptionbypressingthe
<q><r>buttons.
Default Matchescurrentprintersettings.
Date Printsimageswiththedateadded.
FileNo. Printsimageswiththelenumberadded.
Both Printsimageswithboththedateandlenumberadded.
Off
–
Default Matchescurrentprintersettings.
Off
–
On
Usesinformationfromthetimeofshootingtoprintunder
optimalsettings.
Red-Eye1 Correctsred-eye.
No.ofCopies Choosethenumberofcopiestoprint.
Cropping
–
Specifyadesiredimageareatoprint(=
262).
Paper
Settings
–
Specifythepapersize,layout,andotherdetails
(=
263).

262
PrintingImages
StillImages
CroppingImagesBeforePrinting(Cropping)
Bycroppingimagesbeforeprinting,youcanprintadesiredimagearea
insteadoftheentireimage.
1 Choose[Cropping].
zz Afterfollowingstep1on=
261to
accesstheprintingscreen,choose
[Cropping]andpressthe<m>button.
XX Acroppingframeisnowdisplayed,
indicatingtheimageareatoprint.
2 Adjustthecroppingframeas
needed.
zz Toresizetheframe,movethezoom
lever.
zz Tomovetheframe,pressthe
<o><p><q><r>buttons.
zz Torotatetheframe,turnthe<7>dial.
zz Whennished,pressthe<m>button.
3 Printtheimage.
zz Onthescreeninstep1,pressthe
<o><p>buttonsorturnthe<7>dialto
choose[Print],andthenpressthe<m>
button.
• Croppingmaynotbepossibleatsmallimagesizes,oratsome
aspectratios.
• Datesmaynotbeprintedcorrectlyifyoucropimagesshotwith
[DateStamp]selected.
263
PrintingImages
StillImages
ChoosingPaperSizeandLayoutBeforePrinting
1 Choose[PaperSettings].
zz Afterfollowingstep1on=
261to
accesstheprintingscreen,choose
[PaperSettings]andpressthe<m>
button.
2 Chooseapapersize.
zz Pressthe<o><p>buttonsorturnthe
<7>dialtochooseanoption,andthen
pressthe<m>button.
3 Chooseatypeofpaper.
zz Pressthe<o><p>buttonsorturnthe
<7>dialtochooseanoption,andthen
pressthe<m>button.
4 Choosealayout.
zz Pressthe<o><p>buttonsorturnthe
<7>dialtochooseanoption.
zz Whenchoosing[N-up],pressthe
<q><r>buttonstospecifythenumberof
imagespersheet.
zz Pressthe<m>button.
5 Printtheimage.
264
PrintingImages
AvailableLayoutOptions
Default Matchescurrentprintersettings.
Bordered Printswithblankspacearoundtheimage.
Borderless Borderless,edge-to-edgeprinting.
N-up Choosehowmanyimagestoprintpersheet.
IDPhoto
Printsimagesforidenticationpurposes.
OnlyavailableforimageswitharesolutionofLandanaspectratioof
4:3.
FixedSize
Choosetheprintsize.
Choosefrom3.5x5in.,postcard,orwide-formatprints.
StillImages
PrintingIDPhotos
1 Choose[IDPhoto].
zz Followingsteps1–4on=
263,choose
[IDPhoto]andpressthe<m>button.
2 Choosethelongandshortside
length.
zz Pressthe<o><p>buttonsorturnthe
<7>dialtochooseanitem.Choosethe
lengthbypressingthe<q><r>buttons,
andthenpressthe<m>button.
3 Choosetheprintingarea.
zz Followstep2on=
262tochoosethe
printingarea.
4 Printtheimage.

265
PrintingImages
Movies
Printing Movie Scenes
1 Accesstheprintingscreen.
zz Followsteps1–5on=
259–260
tochooseamovie,andthenpressthe
<m>button.
zz Pressthe<q><r>buttonsorturnthe
<7>dialtochoose[c],andthenpress
the<m>button.Thescreenatleftis
displayed.
2 Chooseaprintingmethod.
zz Pressthe<o><p>buttonsorturn
the<7>dialtochoose[
],andthen
pressthe<q><r>buttonstochoosethe
printingmethod.
3 Printtheimage.
MoviePrintingOptions
Single Printsthecurrentsceneasastillimage.
Sequence
Printsaseriesofscenes,acertainintervalapart,onasinglesheetof
paper.Youcanalsoprintthefoldernumber,lenumber,andelapsed
timefortheframebysetting[Caption]to[On].
• Tocancelprintinginprogress,pressthe<m>button.
• [IDPhoto]and[Sequence]cannotbechosenonCanonPictBridge-
compatibleprintersfromCP720/CP730andearliermodels.
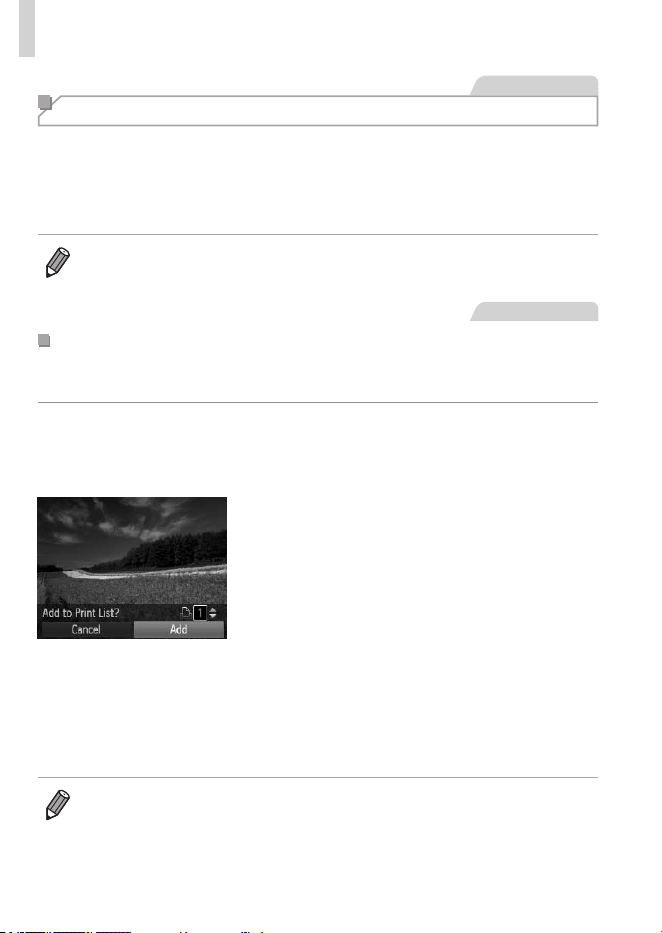
266
PrintingImages
StillImages
Adding Images to the Print List (DPOF)
Batchprinting(=
270)andorderingprintsfromaphotodevelopment
servicecanbesetuponthecamera.Chooseupto998imagesona
memorycardandcongurerelevantsettings,suchasthenumberofcopies,
asfollows.Theprintinginformationyoupreparethiswaywillconformto
DPOF(DigitalPrintOrderFormat)standards.
• RAWimagescannotbeincludedinprintlist.
StillImages
AddingImagestothePrintListviathe<c>Button
Youcanaddimagestotheprintlist(DPOF)duringplaybacksimplyby
pressingthe<c>button.
1 Chooseanimage.
zz Pressthe<q><r>buttonsorturnthe
<7>dialtochooseanimage.
2 Addtheimagetotheprintlist.
zz Pressthe<c>button.
zz Pressthe<o><p>buttonstospecify
thenumberofprints.Choose[Add]by
pressingthe<q><r>buttonsorturning
the<7>dial,andthenpressthe<m>
button.
zz Toremovetheimagefromtheprintlist,
repeatsteps1–2butchoose[Remove]
bypressingthe<q><r>buttonsor
turningthe<7>dial,andthenpressthe
<m>button.
• Printlistcannotbesetupwhilethecameraisconnectedtoaprinter.

267
PrintingImages
StillImages
ConguringPrintSettings
Specifytheprintingformat,whethertoaddthedateorlenumber,and
othersettingsasfollows.Thesesettingsapplytoallimagesintheprintlist.
zz Pressthe<n>button,andthen
choose[PrintSettings]onthe[2]tab.
Chooseandconguresettingsasdesired
(=
48).
PrintType
Standard Oneimageisprintedpersheet.
Index
Smallerversionsofmultipleimagesareprinted
persheet.
Both Bothstandardandindexformatsareprinted.
Date
On Imagesareprintedwiththeshootingdate.
Off
–
FileNo.
On Imagesareprintedwiththelenumber.
Off
–
ClearDPOF
data
On
Allimageprintlistsettingsareclearedafter
printing.
Off
–
• NotallofyourDPOFsettingsmaybeappliedinprintingbythe
printerorphotodevelopmentservice,insomecases.
• [
]maybedisplayedonthecameratowarnyouthatthememory
cardhasprintsettingsthatwereconguredonanothercamera.
Changingtheprintsettingsusingthiscameramayoverwriteall
previoussettings.
• Setting[Date]to[On]maycausesomeprinterstoprintthedate
twice.
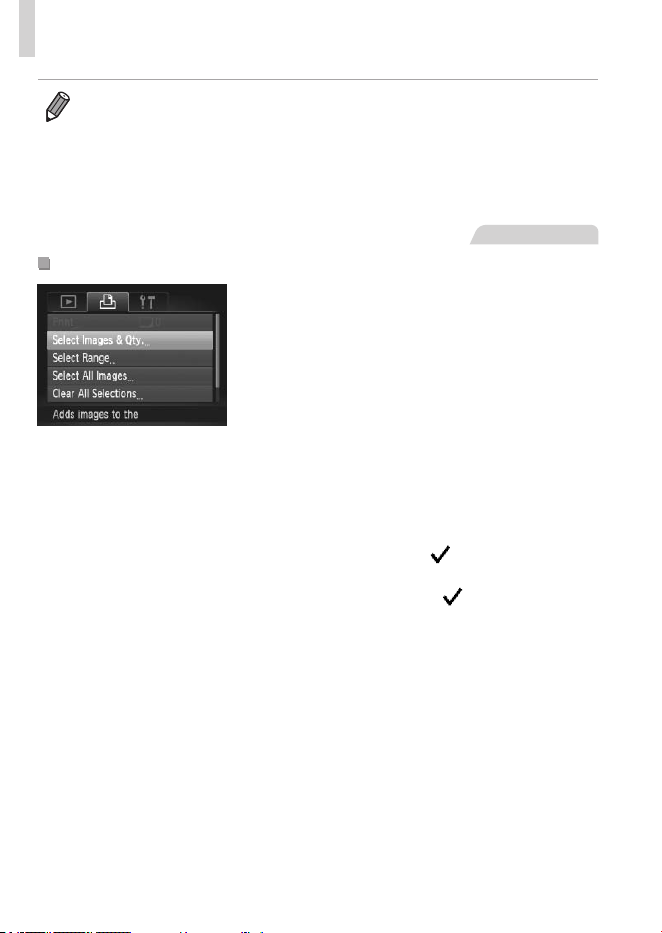
268
PrintingImages
• Specifying[Index]willpreventyoufromchoosing[On]forboth[Date]and
[FileNo.]atthesametime.
• IndexprintingisnotavailableonsomeCanonPictBridge-compatibleprinters
(soldseparately).
• Thedateisprintedinaformatmatchingsettingdetailsin[Date/Time]onthe
[3]tab(=
20).
StillImages
SettingUpPrintingforIndividualImages
1 Choose[SelectImages&Qty.].
zz Pressthe<n>button,choose
[SelectImages&Qty.]onthe[2]tab,
andthenpressthe<m>button.
2 Chooseanimage.
zz Pressthe<q><r>buttonsorturnthe
<7>dialtochooseanimage,andthen
pressthe<m>button.
XX Youcannowspecifythenumberof
copies.
zz Ifyouspecifyindexprintingfortheimage,
itislabeledwitha[
]icon.Tocancel
indexprintingfortheimage,pressthe
<m>buttonagain.[
]isnolonger
displayed.

269
PrintingImages
3 Specifythenumberofprints.
zz Pressthe<o><p>buttonsorturnthe
<7>dialtospecifythenumberofprints
(upto99).
zz Tosetupprintingforotherimagesand
specifythenumberofprints,repeatsteps
2–3.
zz Printingquantitycannotbespeciedfor
indexprints.Youcanonlychoosewhich
imagestoprint,byfollowingstep2.
zz Whennished,pressthe<n>button
toreturntothemenuscreen.
StillImages
SettingUpPrintingforaRangeofImages
1 Choose[SelectRange].
zz Followingstep1on=
268,choose
[SelectRange]andpressthe<m>
button.
2 Chooseimages.
zz Followsteps2–3on=
194tospecify
images.
3 Conguretheprintsettings.
zz Pressthe<o><p>buttonstochoose
[Order],andthenpressthe<m>button.

270
PrintingImages
StillImages
SettingUpPrintingforAllImages
1 Choose[SelectAllImages].
zz Followingstep1on=
268,choose
[SelectAllImages]andpressthe<m>
button.
2 Conguretheprintsettings.
zz Pressthe<q><r>buttonsorturnthe
<7>dialtochoose[OK],andthenpress
the<m>button.
StillImages
ClearingAllImagesfromthePrintList
1 Choose[ClearAllSelections].
zz Followingstep1on=
268,choose
[ClearAllSelections]andpressthe<m>
button.
2 Conrmclearingtheprintlist.
zz Pressthe<q><r>buttonsorturnthe
<7>dialtochoose[OK],andthenpress
the<m>button.
StillImages
PrintingImagesAddedtothePrintList(DPOF)
zz Whenimageshavebeenaddedtothe
printlist(=
266–270),thescreen
atleftisdisplayedafteryouconnect
thecameratoaPictBridge-compatible
printer.Pressthe<o><p>buttonsto
choose[Printnow],andthensimplypress
the<m>buttontoprinttheimagesinthe
printlist.
zz AnyDPOFprintjobthatyoutemporarily
stopwillberesumedfromthenextimage.
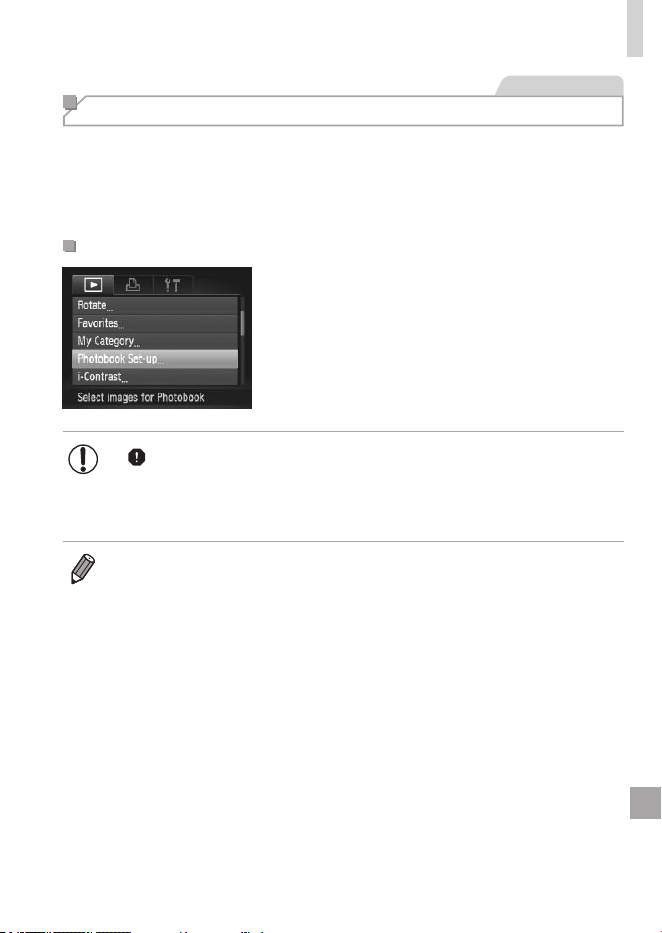
271
PrintingImages
StillImages
Adding Images to a Photobook
Photobookscanbesetuponthecamerabychoosingupto998images
onamemorycardandimportingthemintotheincludedsoftwareonyour
computer,wheretheyarestoredintheirownfolder.Thisisconvenient
whenorderingprintedphotobooksonlineorprintingphotobookswithyour
ownprinter.
ChoosingaSelectionMethod
zz Pressthe<n>button,choose
[PhotobookSet-up]onthe[1]tab,and
thenchoosehowyouwillselectimages.
• [ ]maybedisplayedonthecameratowarnyouthatthememory
cardhasprintsettingsthatwereconguredonanothercamera.
Changingtheprintsettingsusingthiscameramayoverwriteall
previoussettings.
• Afterimportingimagestoyourcomputer,alsorefertotheSoftware Guide
(=
30)andtheprintermanualforfurtherinformation.
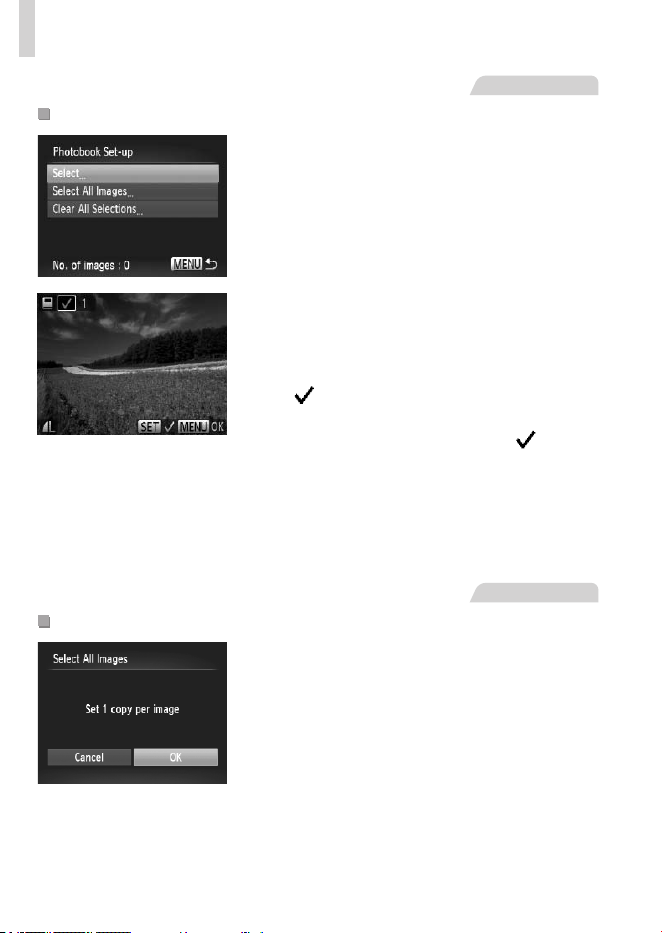
272
PrintingImages
StillImages
AddingImagesIndividually
1 Choose[Select].
zz Followingthepreviousprocedure,choose
[Select]andpressthe<m>button.
2 Chooseanimage.
zz Pressthe<q><r>buttonsorturnthe
<7>dialtochooseanimage,andthen
pressthe<m>button.
XX [ ]isdisplayed.
zz Toremovetheimagefromthephotobook,
pressthe<m>buttonagain.[
]isno
longerdisplayed.
zz Repeatthisprocesstospecifyother
images.
zz Whennished,pressthe<n>button
toreturntothemenuscreen.
StillImages
AddingAllImagestoaPhotobook
1 Choose[SelectAllImages].
zz Followingtheprocedureon=
272,
choose[SelectAllImages]andpressthe
<m>button.
2 Conguretheprintsettings.
zz Pressthe<q><r>buttonsorturnthe
<7>dialtochoose[OK],andthenpress
the<m>button.

273
PrintingImages
StillImages
RemovingAllImagesfromaPhotobook
1 Choose[ClearAllSelections].
zz Followingtheprocedureon=
272,
choose[ClearAllSelections]andpress
the<m>button.
2 Conrmclearingthephotobook.
zz Pressthe<q><r>buttonsorturnthe
<7>dialtochoose[OK],andthenpress
the<m>button.

274
StillImages Movies
Using an Eye-Fi Card
BeforeusinganEye-Ficard,alwaysconrmthatlocaluseispermitted
(=
2).
InsertingapreparedEye-Ficardenablesautomaticwirelesstransferof
imagestoacomputeroruploadingtoaphoto-sharingwebsite.
ImagesaretransferredbytheEye-Ficard.Refertothecard’susermanual
orcontactthemanufacturerforinstructionsonpreparingandusingcardsor
resolvingtransferproblems.
• WhenusinganEye-Ficard,keepthefollowingpointsinmind.
-Cardsmaycontinuetotransmitradiowavesevenwhen
[Eye-Fitrans.]issetto[Disable](=
276).RemovetheEye-Fi
cardbeforeenteringhospitals,aircraft,orotherareaswhere
transmissionisprohibited.
-Whentroubleshootingimagetransferissues,checkthecardand
computersettings.Fordetails,refertothecard’susermanual.
-PoorEye-Ficonnectionsmaycauseimagetransfertotakealong
time,andtransfermaybeinterruptedinsomecases.
-Eye-Ficardsmaybecomehot,duetotheirtransferfunctions.
-Batterypowerwillbeconsumedfasterthaninnormaluse.
-Cameraoperationmaybecomesluggish.Toresolvethis,try
setting[Eye-Fitrans.]to[Disable].

275
UsinganEye-FiCard
ConnectionstatusofEye-Ficardsinthecameracanbecheckedonthe
shootingscreen(inregularinformationdisplaymode)orplaybackscreen(in
simpleinformationdisplaymode).
(Gray) Notconnected Interrupted
(Blinkingwhite) Connecting Notcommunicating
(White) Connected
ErroracquiringEye-Ficard
information*
2
(Animated)
Transferin
progress*
1
*1Powersaving(=
42)onthecameraistemporarilydisabledduringimage
transfer.
*2Restartthecamera.Repeateddisplayofthisiconmayindicateaproblemwiththe
card.
Imageslabeledwitha[ ]iconhavebeentransferred.
• Choosing[ ]modewillinterrupttheEye-Ficonnection.AlthoughtheEye-Fi
connectionwillberestoredafteryouchooseanothershootingmodeorenter
Playbackmode,thecameramaytransferanymoviesmadein[
]mode
again.
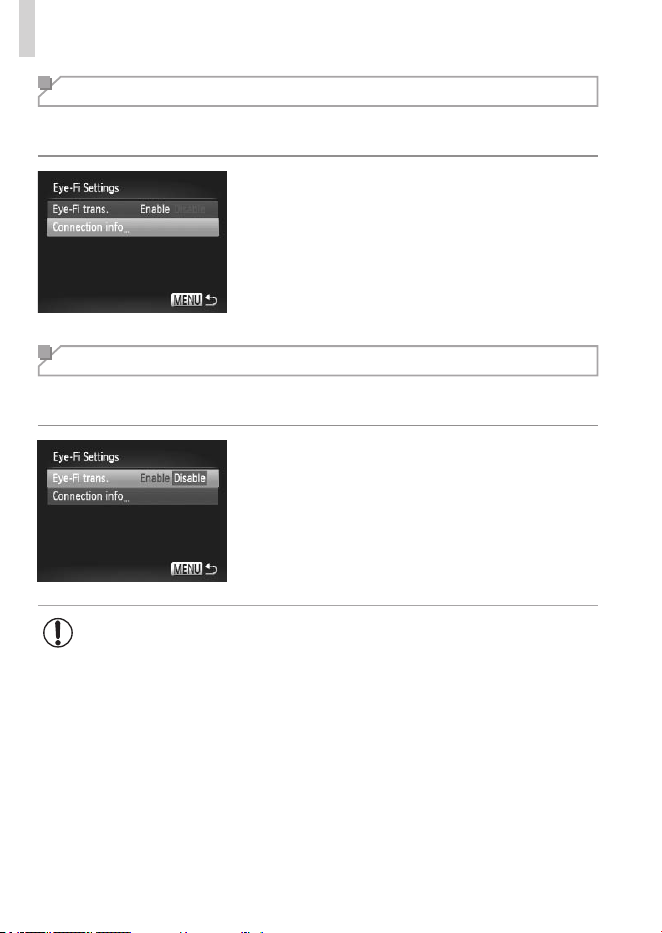
276
UsinganEye-FiCard
Checking Connection Information
ChecktheaccesspointSSIDusedbytheEye-Ficardortheconnection
status,asneeded.
zz Pressthe<n>button,choose
[Eye-FiSettings]onthe[3]tab,andthen
pressthe<m>button.
zz Choose[Connectioninfo],andthenpress
the<m>button.
XX Theconnectioninformationscreenis
displayed.
Disabling Eye-Fi Transfer
CongurethesettingasfollowstodisableEye-Fitransferbythecard,if
necessary.
Choose[Disable]in[Eye-Fitrans.].
zz Pressthe<n>button,choose
[Eye-FiSettings]onthe[3]tab,andthen
pressthe<m>button.
zz Choose[Eye-Fitrans.],andthenchoose
[Disable].
• [Eye-FiSettings]isnotshownunlessanEye-Ficardisinthe
camerawithitswrite-protecttabintheunlockedposition.Forthis
reason,youcannotchangesettingsforaninsertedEye-Ficardif
thewrite-protecttabisinthelockedposition.

277
Appendix
Helpfulinformationwhenusingthecamera
9

278
Troubleshooting
Ifyouthinkthereisaproblemwiththecamera,rstcheckthefollowing.
Iftheitemsbelowdonotsolveyourproblem,contactaCanonCustomer
SupportHelpDesk.
Power
Nothinghappenswhenthepowerbuttonispressed.
• Conrmthatthebatteryischarged(=
17).
• Conrmthatthebatteryisinsertedfacingthecorrectway(=
18).
• Conrmthatthememorycard/batterycoverisfullyclosed(=
19).
• Dirtybatteryterminalsreducebatteryperformance.Trycleaningtheterminalswitha
cottonswabandreinsertingthebatteryafewtimes.
Thebatteryisdepletedquickly.
• Batteryperformancedecreasesatlowtemperatures.Trywarmingthebatteryalittle
byputtingitinyourpocket,forexample,withtheterminalcoveron.
• Ifthesemeasuresdonothelpandthebatteryisstilldepletedsoonaftercharging,it
hasreachedtheendofitslife.Purchaseanewbattery.
Thelensisnotretracted.
• Donotopenthememorycard/batterycoverwhilethecameraison.Closethecover,
turnthecameraon,andthenturnitoffagain(=
19).
Thebatteryisswollen.
• Batteryswellingisnormalanddoesnotposeanysafetyconcerns.However,ifbattery
swellingpreventsthebatteryfromttinginthecamera,contactaCanonCustomer
SupportHelpDesk.
Display on a TV
CameraimageslookdistortedornotdisplayedonaTV(=
243).
Shooting
Cannotshoot.
• InPlaybackmode(=
23),presstheshutterbuttonhalfway(=
43).
Nothingisdisplayed(=
46,57).
Strangedisplayonthescreenunderlowlight(=
46).
Strangedisplayonthescreenwhenshooting.
Notethatthefollowingdisplayproblemsarenotrecordedinstillimagesbutare
recordedinmovies.
• ThescreenmayickerandhorizontalbandingmayappearunderuorescentorLED
lighting.

279
Troubleshooting
Nodatestampisaddedtoimages.
• Congurethe[DateStamp]setting(=
67).Notethatdatestampsarenotadded
toimagesautomatically,merelybecauseyouhaveconguredthe[Date/Time]setting
(=
20).
• Datestampsarenotaddedinshootingmodes(=
298–299)inwhichthissetting
cannotbecongured(=
67).
[h]ashesonthescreenwhentheshutterbuttonispressed,and
shootingisnotpossible(=
57).
[ ]isdisplayedwhentheshutterbuttonispressedhalfway(=
57).
• Set[ISMode]to[Continuous](=
160).
• Raisetheashandsettheashmodeto[h](=
154).
• IncreasetheISOspeed(=
129).
• Mountthecameraonatripodortakeothermeasurestokeepitstill.Inthiscase,you
shouldset[ISMode]to[Off](=
160).
Shotsareoutoffocus.
• Presstheshutterbuttonhalfwaytofocusonsubjectsbeforepressingitalltheway
downtoshoot(=
43).
• Makesuresubjectsarewithinfocusingrange(=
306).
• Set[AF-assistBeam]to[On](=
89).
• Conrmthatunneededfunctionssuchasmacroaredeactivated.
• TryshootingwithfocuslockorAFlock(=
146,152).
NoAFframesaredisplayedandthecameradoesnotfocuswhenthe
shutterbuttonispressedhalfway.
• TohaveAFframesdisplayedandthecamerafocuscorrectly,trycomposingthe
shotwithhigher-contrastsubjectareascenteredbeforeyoupresstheshutterbutton
halfway.Otherwise,trypressingtheshutterbuttonhalfwayrepeatedly.
Subjectsinshotslooktoodark.
• Raisetheashandsettheashmodeto[h](=
154).
• Adjustbrightnessbyusingexposurecompensation(=
125).
• Adjustcontrastbyusingi-Contrast(=
132,210).
• UseAElockorspotmetering(=
126,127).
Subjectslooktoobright,highlightsarewashed-out.
• Lowertheashandsettheashmodeto[!](=
25,55).
• Adjustbrightnessbyusingexposurecompensation(=
125).
• UseAElockorspotmetering(=
126,127).
• Reducethelightingonsubjects.

280
Troubleshooting
Shotslooktoodarkdespitetheashring(=
57).
• Shootwithinashrange(=
306).
• Adjustbrightnessbyusingashexposurecompensationorchangingtheashoutput
level(=
156,165).
• IncreasetheISOspeed(=
129).
Subjectsinashshotslooktoobright,highlightsarewashed-out.
• Shootwithinashrange(=
306).
• Lowertheashandsettheashmodeto[!](=
25,55).
• Adjustbrightnessbyusingashexposurecompensationorchangingtheashoutput
level(=
156,165).
Whitedotsorsimilarimageartifactsappearinashshots.
• Thisiscausedbylightfromtheashreectingoffdustorairborneparticles.
Shotslookgrainy.
• LowertheISOspeed(=
129).
• HighISOspeedsinsomeshootingmodesmaycausegrainyimages(=
96).
Subjectsareaffectedbyred-eye(=
82).
• Set[Red-EyeLamp]to[On](=
89)toactivatethered-eyereductionlamp
(=
4)inashshots.Forbestresults,havesubjectslookatthered-eyereduction
lamp.Alsotryincreasingthelightinginindoorscenesandshootingatcloserrange.
• Editimagesusingred-eyecorrection(=
211).
Recordingtothememorycardtakestoolong,orcontinuousshooting
isslower.
• Usethecameratoperformlow-levelformattingofthememorycard(=
224).
ShootingsettingsorFUNC.menusettingsarenotavailable.
• Availablesettingitemsvarybyshootingmode.Referto“FunctionsAvailableinEach
ShootingMode”,“FUNC.Menu”,and“ShootingMenu”(=
290–299).
TheBabiesorChildrenicondoesnotdisplay.
• TheBabiesandChildreniconswillnotdisplayifthebirthdayisnotsetinface
information(=
69).Iftheiconsstilldonotdisplayevenwhenyousetthebirthday,
re-registerfaceinformation(=
76),ormakesurethatthedate/timeareset
correctly(=
20).

281
Troubleshooting
Shooting Movies
Theelapsedtimeshownisincorrect,orrecordingisinterrupted.
• Usethecameratoformatthememorycard,orswitchtoacardthatsupportshigh-
speedrecording.Notethateveniftheelapsedtimedisplayisincorrect,thelength
ofmoviesonthememorycardcorrespondstotheactualrecordingtime(=
223,
305).
[ ]isdisplayedandshootingstopsautomatically.
Thecamera’sinternalmemorybufferlledupasthecameracouldnotrecordtothe
memorycardquicklyenough.Tryoneofthefollowingmeasures.
• Usethecameratoperformlow-levelformattingofthememorycard(=
224).
• Lowertheimagequality(=
84).
• Switchtoamemorycardthatsupportshigh-speedrecording(=
305).
Zoomingisnotpossible.
• Zoomingisnotpossiblewhenshootingmoviesin[ ](=
104)and[ ](=
121)
modes.
Subjectslookdistorted.
• Subjectsthatpassinfrontofthecameraquicklymaylookdistorted.Thisisnota
malfunction.
Playback
Playbackisnotpossible.
• Imageormovieplaybackmaynotbepossibleifacomputerisusedtorenamelesor
alterthefolderstructure.RefertotheSoftware Guide(=
30)fordetailsonfolder
structureandlenames.
Playbackstops,oraudioskips.
• Switchtoamemorycardthatyouhaveperformedlow-levelformattingonwiththe
camera(=
224).
• Theremaybebriefinterruptionswhenplayingmoviescopiedtomemorycardsthat
haveslowreadspeeds.
• Whenmoviesareplayedonacomputer,framesmaybedroppedandaudiomayskip
ifcomputerperformanceisinadequate.
Soundisnotplayedduringmovies.
• Adjustthevolume(=
28,218)ifyouhaveactivated[Mute](=
218)orthe
soundinthemovieisfaint.
• Nosoundisplayedformoviesshotin[
](=
104)or[ ](=
121)mode
becauseaudioisnotrecordedinthesemodes.

282
Troubleshooting
Computer
Cannottransferimagestoacomputer.
Whenattemptingtotransferimagestothecomputerviaacable,tryreducingthe
transferspeedasfollows.
• Pressthe<1>buttontoenterPlaybackmode.Holdthe<n>buttondownas
youpressthe<o>and<
m
>buttonsatthesametime.Onthenextscreen,press
the<q><r>buttonstochoose[B],andthenpressthe<
m
>button.
Eye-Fi Cards
Cannottransferimages(=
274).

283
On-Screen Messages
Ifanerrormessageisdisplayed,respondasfollows.
Nomemorycard
• Thememorycardmaybeinsertedfacingthewrongway.Reinsertthememorycard
facingthecorrectway(=
19).
Memorycardlocked
• Thewrite-protecttabofthememorycardissettothelockedposition.Switchthe
write-protecttabtotheunlockedposition(=
18).
Cannotrecord!
• Shootingwasattemptedwithoutamemorycardinthecamera.Toshoot,inserta
memorycardfacingthecorrectway(=
19).
Memorycarderror(=
224)
• Ifthesameerrormessageisdisplayedevenwhenyouhaveinsertedaformatted
memorycardfacingthecorrectway,contactaCanonCustomerSupportHelpDesk
(=
19).
Insufcientspaceoncard
• Thereisnotenoughfreespaceonthememorycardtoshoot(=
53,93,123,
161)oreditimages(=
206–211).Eithereraseunneededimages(=
196,197)
orinsertamemorycardwithenoughfreespace(=
18).
Chargethebattery(=
17)
NoImage.
• Thememorycarddoesnotcontainanyimagesthatcanbedisplayed.
Protected!(=
192)
UnidentiedImage/IncompatibleJPEG/Imagetoolarge./Cannotplay
backAVI/RAW
• Unsupportedorcorruptimagescannotbedisplayed.
• Itmaynotbepossibletodisplayimagesthatwereeditedorrenamedonacomputer,
orimagesshotwithanothercamera.
Cannotmagnify!/CannotplaybackthiscontentinSmartShufe/
Cannotrotate/Cannotmodifyimage/Cannotregisterthisimage!/
Cannotmodify/Cannotassigntocategory/Unselectableimage./No
identicationinformation
• Thefollowingfunctionsmaybeunavailableforimagesthatwererenamedoralready
editedonacomputer,orimagesshotwithanothercamera.Notethatstarred(*)
functionsarenotavailableformovies.
Magnify*(=
189),SmartShufe*(=
191),Categorize(=
203),Rotate
(=
200),Edit*(=
206–211),AssignasStart-upImage*(=
222),PrintList*
(=
266),PhotobookSet-up*(=
271),andEditIDInfo*(=
187–188).
• Groupedimagescannotbeprocessed(=
117).

284
On-ScreenMessages
Invalidselectionrange
• Whenspecifyingarangeforimageselection(=
194,198,205,269),you
attemptedtochooseaninitialimagethatwasafterthenalimage,orvice-versa.
Exceededselectionlimit
• Morethan998imageswereselectedforPrintList(=
266)orPhotobookSet-up
(=
271).Choose998imagesorless.
• PrintList(=
266)orPhotobookSet-up(=
271)settingscouldnotbesaved
correctly.Reducethenumberofselectedimagesandtryagain.
• Youattemptedtochoosemorethan500imagesinProtect(=
192),Erase
(=
196),Favorites(=
202),MyCategory(=
203),PrintList(=
266),or
PhotobookSet-up(=
271).
Communicationerror
• Anexcessiveamountofimages(approx.1,000)onthememorycardprevented
printingorimagetransfertoacomputer.Totransfertheimages,useacommercially
availableUSBcardreader.Toprint,insertthememorycarddirectlyintotheprinter
cardslot.
Namingerror!
• Thefoldercouldnotbecreatedorimagescouldnotberecorded,becausethehighest
supportedfoldernumber(999)forstoringimagesonthecardhasbeenreachedand
thehighestsupportedimagenumber(9999)forimagesinfoldershasbeenreached.
Inthe[3]menu,change[FileNumbering]to[AutoReset](=
225),orformatthe
memorycard(=
223).
LensError
• Thiserrormayoccurifthelensisheldwhileitismoving,orwhenthecameraisused
industyorsandylocations.
• Frequentdisplayofthiserrormessagemayindicatecameradamage.Inthiscase,
contactaCanonCustomerSupportHelpDesk.
Acameraerrorwasdetected(error number)
• Ifthiserrormessageisdisplayedimmediatelyafterashot,theimagemaynothave
beensaved.SwitchtoPlaybackmodetocheckfortheimage.
• Frequentdisplayofthiserrormessagemayindicatecameradamage.Inthiscase,
writedowntheerrornumber(Exx)andcontactaCanonCustomerSupportHelp
Desk.
FileError
• Correctprinting(=
259)maynotbepossibleforphotosfromothercamerasor
imagesthathavebeenalteredusingcomputersoftware,evenifthecamerais
connectedtotheprinter.

285
On-ScreenMessages
Printerror
• Checkthepapersizesetting(=
263).Ifthiserrormessageisdisplayedwhenthe
settingiscorrect,restarttheprinterandcompletethesettingonthecameraagain.
Inkabsorberfull
• ContactaCanonCustomerSupportHelpDesktorequestassistancewithink
absorberreplacement.
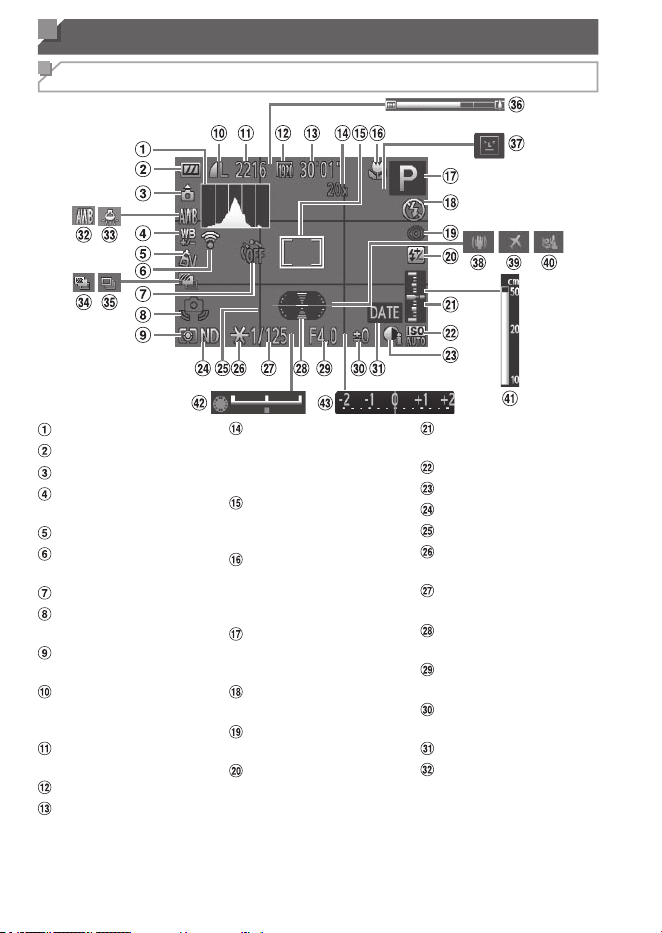
286
On-Screen Information
Shooting (Information Display)
Histogram
(=
176)
Batterylevel(=
287)
Cameraorientation*
Whitebalance
correction(=
135)
MyColors(=
137)
Eye-Ficonnection
status(=
274)
Self-timer(=
64)
Camerashakewarning
(=
57)
Meteringmethod
(=
127)
Stillimagecompression
(=
160),Resolution
(=
81)
Recordableshots
(=
305)
Moviequality(=
84)
Remainingtime
(=
305)
Digitalzoom
magnication(=
63),
Digitaltele-converter
(=
144)
AFframe(=
145),
SpotAEpointframe
(=
127)
Focusingrange
(=
142),AFlock
(=
152),ISmodeicon
(=
61)
Shootingmode
(=
290),Sceneicon
(=
59)
Flashmode(=
154),
LEDlight(=
251)
Red-eyecorrection
(=
82)
Flashexposure
compensation/Flash
outputlevel(=
156,
165)
Exposurelevel
(=
164)
ISOspeed(=
129)
i-Contrast(=
132)
NDlter(=
133)
Gridlines(=
166)
AElock(=
126),FE
lock(=
157)
Shutterspeed(=
162,
164)
Electroniclevel
(=
86)
Aperturevalue
(=
163,164)
Exposurecompensation
level(=
125)
Datestamp(=
67)
Whitebalance
(=
134)

287
On-ScreenInformation
Mercurylampcorrection
(=
83)
AEBshooting(=
131)
/Focusbracketing
(=
153)
Drivemode(=
139)
Zoombar(=
54)
Blinkdetection
(=
88)
Imagestabilization
(=
160)
Timezone(=
220)
Windlter(=
85)
MFindicator(=
143)
Exposureshiftbar
(=
119)
Exposurecompensation
bar(=
125)
*
:Regularorientation, :Heldvertically
Thecameradetectstheshootingorientationandadjustssettingsforoptimalshots.
Orientationisalsodetectedduringplayback,andineitherorientation,thecamera
automaticallyrotatesimagesasneeded.
However,theorientationmaynotbedetectedcorrectlywhenthecameraispointed
straightupordown.
BatteryLevel
Anon-screeniconormessageindicatesthebatterychargelevel.
Display Details
Sufcientcharge
Slightlydepleted,butsufcient
(Blinkingred)
Nearlydepleted–chargethebatterysoon
[Chargethebattery] Depleted–chargethebatteryimmediately
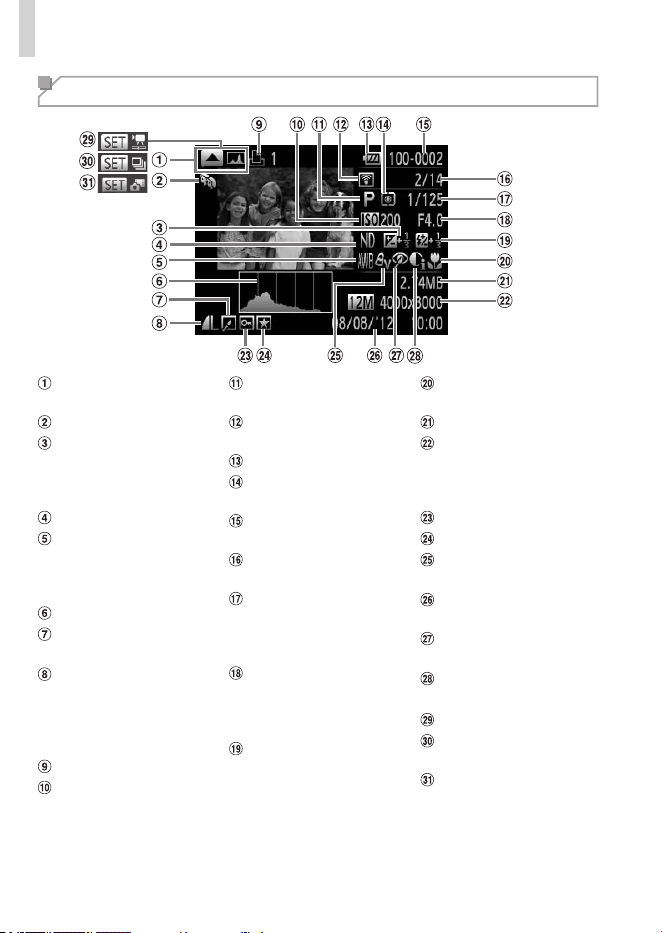
288
On-ScreenInformation
Playback (Detailed Information Display)
Switchdisplay
(histogram)(=
176)
MyCategory(=
203)
Exposurecompensation
level(=
125),
Exposureshiftlevel
(=
119)
NDlter(=
133)
Whitebalance
(=
134),White
balancecorrection
(=
135)
Histogram(=
176)
Imageediting(=
206
–211)
Compression(image
quality)(=
160)/
Resolution(=
81),
RAW(=
159),MOV
(movies)
Printlist(=
266)
ISOspeed(=
129),
Playbackspeed
(=
105,121)
Shootingmode
(=
290)
TransferredviaEye-Fi
(=
274)
Batterylevel(=
287)
Meteringmethod
(=
127)
Foldernumber-File
number(=
225)
Currentimageno./
Totalno.ofimages
Shutterspeed(still
images)(=
162),
Imagequality/Frame
rate(movies)(=
84)
Aperturevalue
(=
163,164),
Imagequality(movies)
(=
84)
Flash(=
154,
155),Flashexposure
compensation(=
156)
Focusingrange
(=
142)
Filesize
Stillimages:Resolution
(=
305)
Movies:Movielength
(=
305)
Protection(=
192)
Favorites(=
202)
MyColors(=
137,
209)
Shootingdate/time
(=
20)
Red-eyecorrection
(=
82,211)
i-Contrast(=
132,
210)
Movies(=
54,174)
Groupplayback
(=
185)
MovieDigestPlayback
(=
185)
289
On-ScreenInformation
• SomeinformationmaynotbedisplayedwhenviewingimagesonaTV
(=
239).
SummaryofMovieControlPanelin“Viewing”(=
174)
Exit
Play
SlowMotion(Toadjusttheplaybackspeed,pressthe<q><r>buttonsorturn
the<7>dial.Nosoundisplayed.)
SkipBackward*(=
28,175)orPreviousClip(=
215)
(Tocontinueskippingbackward,keepholdingdownthe<m>button.)
PreviousFrame(Forfast-rewind,keepholdingdownthe<m>button.)
NextFrame(Forfast-forward,keepholdingdownthe<m>button.)
SkipForward*(=
28,175)orNextClip(=
215)
(Tocontinueskippingforward,keepholdingdownthe<m>button.)
* Edit(=
213)
Shownwhenyouhaveselectedamoviecreatedin[ ]mode(=
215).
c
ShownwhenthecameraisconnectedtoaPictBridge-compatibleprinter
(=
259).
*Displaystheframeapprox.4sec.beforeorafterthecurrentframe.
• Toskipforwardorbackduringmovieplayback,pressthe<q><r>buttons.
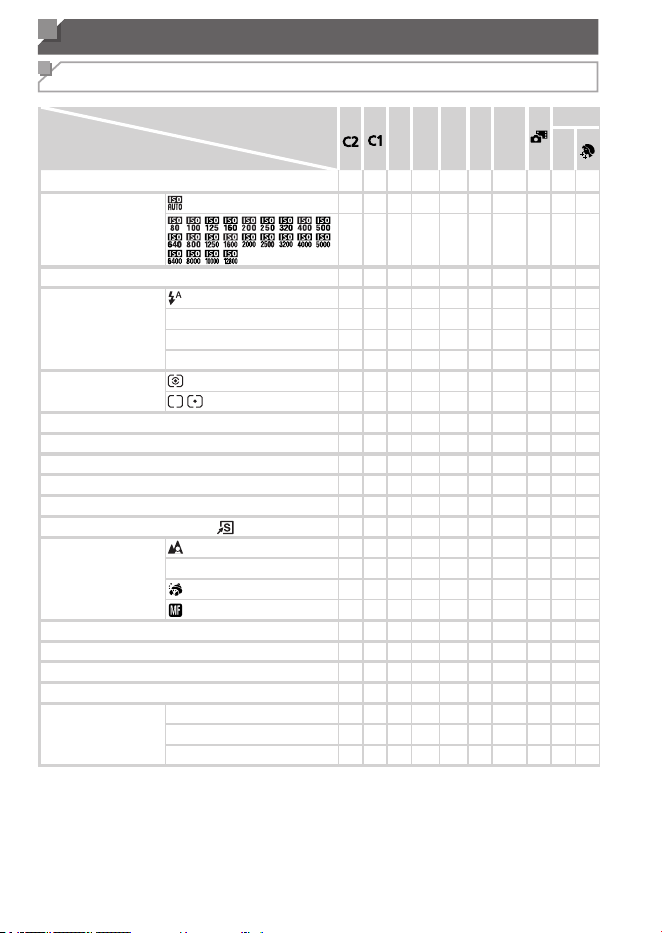
290
ShootingMode
Function
D B M G A
K K E
I S P t
x
v
T
Y
E
ExposureCompensation(=
125)
*
1
*
1
–
O O O
–
O O O O O O O O O O O O
–
O O O O O O O
– – – – –
ISOSpeed
(=
129)
*
1
*
1
–
O O O O O O O O O O O O O O O O O O O O O O O O O O O O O
*
1
*
1
O O O O
–
O
– – – – – – – – – – – – – – – – – – – – – – – –
WhiteBalanceCorrection(=
134)
*
1
*
1
O O O O
– – – – – – – – –
*
2
– – – – – – – – – – – – – – – –
Flash(=
154)*
3
*
1
*
1
– – –
O O O O O O O O
–
O O O
– – –
O O O O O O O O O
– – –
h
*
1
*
1
O O O O
–
O O O O O O
–
O O O
–
O
–
O O O O O O O O O
– – –
Z
*
1
*
1
–
O
–
O
*
4
O
– – – – – –
*
4
– – –
O
– – – – – – – – – – – – –
!
*
1
*
1
O O O O O O O O O O O O O O O O O O O O O O O O O O O O O O
MeteringMethod
(=
127)
*
1
*
1
O O O O O O O O O O O O O O O O O O O O O O O O O O O O O O
*
1
*
1
O O O O
–
O
– – – – – – – – – – – – – – – – – – – – – – – –
ShutterSpeed(=
162,164)
*
1
*
1
O
–
O
– – – – – – – – – – – – – – – – – – – – – – – – – – –
ApertureValue(=
163,164)
*
1
*
1
O O
– – – – – – – – – – – – – – – – – – – – – – – – – – – –
ProgramShift(=
126)
O O
–
O O O
–
O
– – – – – – – – – – – – – – – – – – – – – – – –
AELock/FELock(=
126,157)
O O
–
O O O
–
O
– – – – – – – – – – – – – – – – – – – – – – – –
AELock(Movie)/ExposureShift(=
119)
– – – – – – – – – –
– – – – – – – – – – – – – – – – – – –
O O
–
AFLock(whenassignedtothe< >button)(
=
152)
O O O O O O
–
O O O
– – –
O O O O
–
O O O O O O O O O O O O O O
FocusingRange
(
=
97,142,152)
*
1
*
1
O O O O O O O O O O O O O O O O O O O O O O O O O O O O O O
e
*
1
*
1
O O O O
–
O O O
– – –
O O
–
O
–
O O O O O O O O O O O O O O
/8
– – – – – – – – – –
– – – – –
O
– – – – – – – – – – – – – – – –
/AFLock
*
1
*
1
O O O O
–
O O O
– – –
O O O O
– –
O O O O O O O O O O O O O
MoveAFFrame(=
147)
*
1
*
1
O O O O
– – – – – – – – – – – – – – – – – – – – – – – – – –
ResizeAFFrame(=
147)
*
1
*
1
O O O O
–
O O
– – – –
O
–
O O
– – –
O
– –
O O O O O O O O O
FaceSelect(=
151)
O O O O O O O O O O O O O O
– –
O
– –
O O
– –
O O O O O O O O O
TrackingAF(=
68)
O O O O O O O
–
O
– – – –
O
–
O O
– – –
O
– – – –
O O O O
– – –
ScreenDisplay
(=
46)
Off
*
1
*
1
O O O O O
–
O
– – – –
O
– –
O O
– – – – – – – – – – – – – –
Display1
*
1
*
1
O O O O O O O O O O O O O O O O O O O O O O O O O O O O O O
Display2
*
1
*
1
O O O O O O O O
–
O O O O O O O O O O O O O O O O O O O O O
Functions and Menu Tables
Functions Available in Each Shooting Mode
*1Optionsvarydependingontheassignedshootingmode.
*2Advancedsettingsnotavailable.
*3Setto[
!]whentheashisdown,butotherwiseselectionispossiblewhentheash
isup.
*4Notavailable,butswitchesto[Z]insomecases.

291
FunctionsandMenuTables
O
Availableorsetautomatically.
–
Notavailable.
ShootingMode
Function
D B M G A
K K E
I S P t
x
v
T
Y
E
ExposureCompensation(=
125)
*
1
*
1
–
O O O
–
O O O O O O O O O O O O
–
O O O O O O O
– – – – –
ISOSpeed
(=
129)
*
1
*
1
–
O O O O O O O O O O O O O O O O O O O O O O O O O O O O O
*
1
*
1
O O O O
–
O
– – – – – – – – – – – – – – – – – – – – – – – –
WhiteBalanceCorrection(=
134)
*
1
*
1
O O O O
– – – – – – – – –
*
2
– – – – – – – – – – – – – – – –
Flash(=
154)*
3
*
1
*
1
– – –
O O O O O O O O
–
O O O
– – –
O O O O O O O O O
– – –
h
*
1
*
1
O O O O
–
O O O O O O
–
O O O
–
O
–
O O O O O O O O O
– – –
Z
*
1
*
1
–
O
–
O
*
4
O
– – – – – –
*
4
– – –
O
– – – – – – – – – – – – –
!
*
1
*
1
O O O O O O O O O O O O O O O O O O O O O O O O O O O O O O
MeteringMethod
(=
127)
*
1
*
1
O O O O O O O O O O O O O O O O O O O O O O O O O O O O O O
*
1
*
1
O O O O
–
O
– – – – – – – – – – – – – – – – – – – – – – – –
ShutterSpeed(=
162,164)
*
1
*
1
O
–
O
– – – – – – – – – – – – – – – – – – – – – – – – – – –
ApertureValue(=
163,164)
*
1
*
1
O O
– – – – – – – – – – – – – – – – – – – – – – – – – – – –
ProgramShift(=
126)
O O
–
O O O
–
O
– – – – – – – – – – – – – – – – – – – – – – – –
AELock/FELock(=
126,157)
O O
–
O O O
–
O
– – – – – – – – – – – – – – – – – – – – – – – –
AELock(Movie)/ExposureShift(=
119)
– – – – – – – – – –
– – – – – – – – – – – – – – – – – – –
O O
–
AFLock(whenassignedtothe< >button)(
=
152)
O O O O O O
–
O O O
– – –
O O O O
–
O O O O O O O O O O O O O O
FocusingRange
(
=
97,142,152)
*
1
*
1
O O O O O O O O O O O O O O O O O O O O O O O O O O O O O O
e
*
1
*
1
O O O O
–
O O O
– – –
O O
–
O
–
O O O O O O O O O O O O O O
/8
– – – – – – – – – –
– – – – –
O
– – – – – – – – – – – – – – – –
/AFLock
*
1
*
1
O O O O
–
O O O
– – –
O O O O
– –
O O O O O O O O O O O O O
MoveAFFrame(=
147)
*
1
*
1
O O O O
– – – – – – – – – – – – – – – – – – – – – – – – – –
ResizeAFFrame(=
147)
*
1
*
1
O O O O
–
O O
– – – –
O
–
O O
– – –
O
– –
O O O O O O O O O
FaceSelect(=
151)
O O O O O O O O O O O O O O
– –
O
– –
O O
– –
O O O O O O O O O
TrackingAF(=
68)
O O O O O O O
–
O
– – – –
O
–
O O
– – –
O
– – – –
O O O O
– – –
ScreenDisplay
(=
46)
Off
*
1
*
1
O O O O O
–
O
– – – –
O
– –
O O
– – – – – – – – – – – – – –
Display1
*
1
*
1
O O O O O O O O O O O O O O O O O O O O O O O O O O O O O O
Display2
*
1
*
1
O O O O O O O O
–
O O O O O O O O O O O O O O O O O O O O O
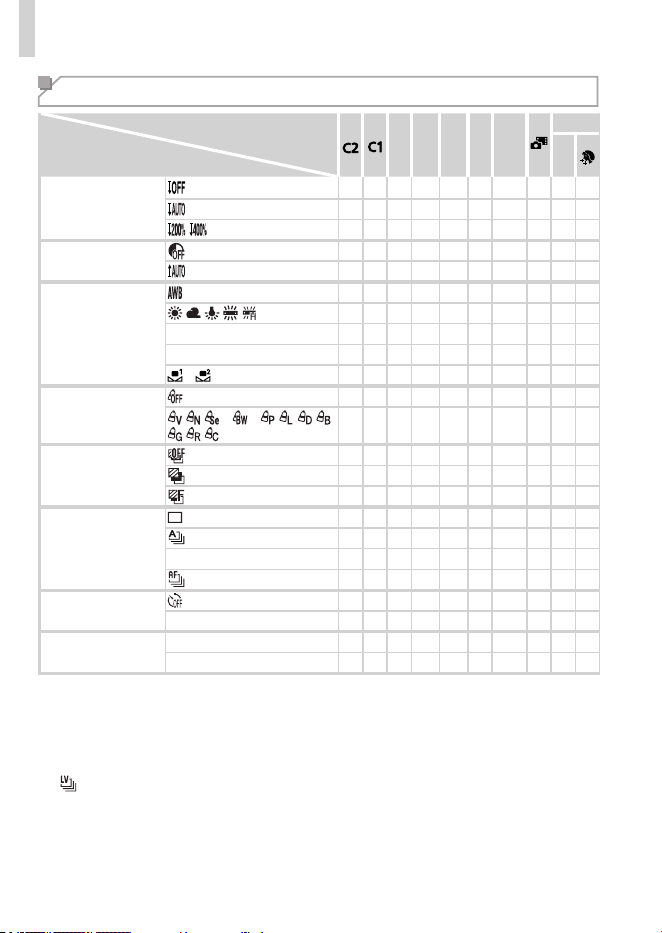
292
FunctionsandMenuTables
FUNC. Menu
ShootingMode
Function
D B M G A
K K E
I S P t
x
v
T
Y
E
DRCorrection
(=
132)
*
1
*
1
O O O O
–
O O O O O O O O
–
O O O O O O O O O O O O O
– – –
*
1
*
1
–
O O O O
– – – – – – – –
O
– – – – – – – – – – – – – – – –
*
1
*
1
O O O O
– – – – – – – – – – – – – – – – – – – – – – – – – –
ShadowCorrect
(=
133)
*
1
*
1
O O O O
–
O O O O O O O O O O O O O O O O O O O O O O
– – –
*
1
*
1
O O O O O O
– – – – – – – – – – – – – – – – – – – – – – – –
WhiteBalance
(=
134)
*
1
*
1
O O O O O O O O O O O O O O O O O O O O O O O O O O O O O O
*
1
*
1
O O O O
–
O
– –
O O O
– – – – –
O
– – – – – – – – – –
O O
–
h
*
1
*
1
O O O O
–
O
– –
O O O
– – – – –
O
– – – – – – – – – – – – –
S
*
1
*
1
O O O O
–
O
– –
O O O
– – – – –
O
– – – – – – – – – –
O O
–
*
2
*
2
*
1
*
1
O O O O
–
O
– –
O O O
– –
O
– –
O
– – – – – – – – – –
O O
–
MyColors(=
137)
*
1
*
1
O O O O O O O O O O O O O O O O O O O O O O O O O O O O O O
*
3
*
3
*
4
*
1
*
1
O O O O
–
O
– –
O O O
– – – – –
O
– – – – – – – – – –
O O
–
Bracketing
(=
153)
*
1
*
1
O O O O O O O O O O O O O O O O O O O O O O O O O O O O O O
*
1
*
1
–
O O O
– – – – – – – – – – – – – – – – – – – – – – – – – –
*
1
*
1
O O O O
– – – – – – – – – – – – – – – – – – – – – – – – – –
DriveMode
(=
139)
*
1
*
1
O O O O O O O O O O O
–
O O O O O O O O O O O O O O O O O O
– – – – – –
O
– – – – – – – – – – – – – – – – – – – – – – – – –
W
*
1
*
1
O O O O
– –
O O
– – –
O
–
O O O
– –
O O O O O O O O O
– – –
*
5
*
1
*
1
O O O O
– – – – – – –
O
–
O O O
– –
O O O O O O O O O
– – –
Self-Timer(=
64)
*
1
*
1
O O O O O O O O O O O O O O O O O O O O O O O O O O O O O O
][$
*
1
*
1
O O O O O O O O
– – – –
O O O O O O O O O O O O O O O O O O
Self-TimerSettings
(=
66)
Delay*
6
*
1
*
1
O O O O O O O O
– – – –
O O O O O O O O O O O O O O O O O O
Shots*
7
*
1
*
1
O O O O O
–
O O
– – – –
O O O O
–
O O O O O O O O O O
– – –
*1Optionsvarydependingontheassignedshootingmode.
*2Notavailablein[x]or[v].
*3Whitebalanceisnotavailable.
*4Setinarangeof1–5:contrast,sharpness,colorsaturation,red,green,blue,and
skintone.
*5[
]issetwith[f],AFlock,or[t].
*6Cannotbesetto0secondsinmodeswithoutselectionofthenumberofshots.
*7Oneshot(cannotbemodied)inmodeswithoutselectionofthenumberofshots.

293
FunctionsandMenuTables
O
Availableorsetautomatically.
–
Notavailable.
ShootingMode
Function
D B M G A
K K E
I S P t
x
v
T
Y
E
DRCorrection
(=
132)
*
1
*
1
O O O O
–
O O O O O O O O
–
O O O O O O O O O O O O O
– – –
*
1
*
1
–
O O O O
– – – – – – – –
O
– – – – – – – – – – – – – – – –
*
1
*
1
O O O O
– – – – – – – – – – – – – – – – – – – – – – – – – –
ShadowCorrect
(=
133)
*
1
*
1
O O O O
–
O O O O O O O O O O O O O O O O O O O O O O
– – –
*
1
*
1
O O O O O O
– – – – – – – – – – – – – – – – – – – – – – – –
WhiteBalance
(=
134)
*
1
*
1
O O O O O O O O O O O O O O O O O O O O O O O O O O O O O O
*
1
*
1
O O O O
–
O
– –
O O O
– – – – –
O
– – – – – – – – – –
O O
–
h
*
1
*
1
O O O O
–
O
– –
O O O
– – – – –
O
– – – – – – – – – – – – –
S
*
1
*
1
O O O O
–
O
– –
O O O
– – – – –
O
– – – – – – – – – –
O O
–
*
2
*
2
*
1
*
1
O O O O
–
O
– –
O O O
– –
O
– –
O
– – – – – – – – – –
O O
–
MyColors(=
137)
*
1
*
1
O O O O O O O O O O O O O O O O O O O O O O O O O O O O O O
*
3
*
3
*
4
*
1
*
1
O O O O
–
O
– –
O O O
– – – – –
O
– – – – – – – – – –
O O
–
Bracketing
(=
153)
*
1
*
1
O O O O O O O O O O O O O O O O O O O O O O O O O O O O O O
*
1
*
1
–
O O O
– – – – – – – – – – – – – – – – – – – – – – – – – –
*
1
*
1
O O O O
– – – – – – – – – – – – – – – – – – – – – – – – – –
DriveMode
(=
139)
*
1
*
1
O O O O O O O O O O O
–
O O O O O O O O O O O O O O O O O O
– – – – – –
O
– – – – – – – – – – – – – – – – – – – – – – – – –
W
*
1
*
1
O O O O
– –
O O
– – –
O
–
O O O
– –
O O O O O O O O O
– – –
*
5
*
1
*
1
O O O O
– – – – – – –
O
–
O O O
– –
O O O O O O O O O
– – –
Self-Timer(=
64)
*
1
*
1
O O O O O O O O O O O O O O O O O O O O O O O O O O O O O O
][$
*
1
*
1
O O O O O O O O
– – – –
O O O O O O O O O O O O O O O O O O
Self-TimerSettings
(=
66)
Delay*
6
*
1
*
1
O O O O O O O O
– – – –
O O O O O O O O O O O O O O O O O O
Shots*
7
*
1
*
1
O O O O O
–
O O
– – – –
O O O O
–
O O O O O O O O O O
– – –
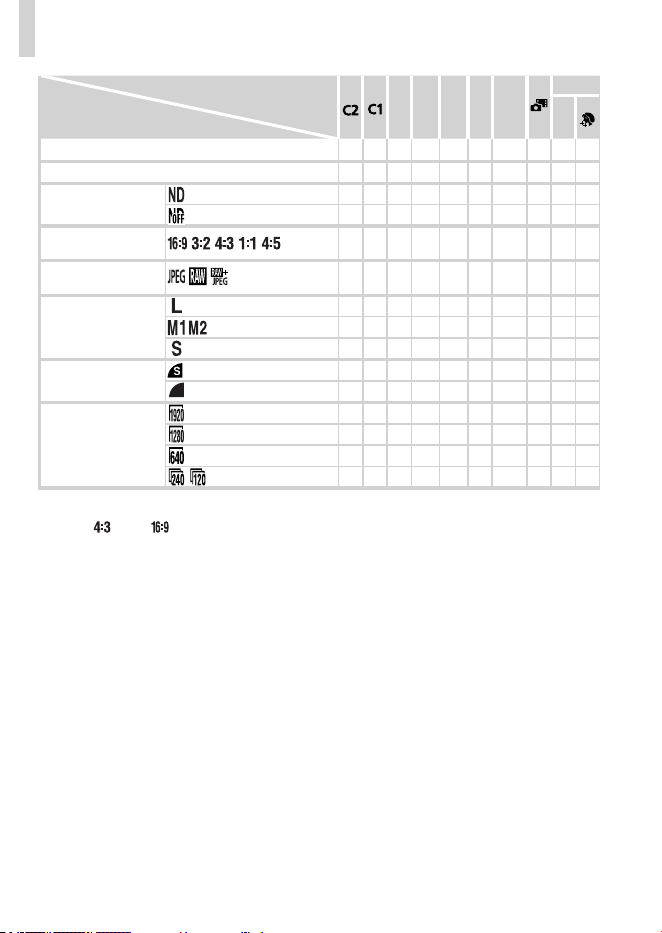
294
FunctionsandMenuTables
ShootingMode
Function
D B M G A
K K E
I S P t
x
v
T
Y
E
FlashExposureCompensation(=
156)
*
1
*
1
–
O O O
–
O
– – – – – – – – – – – – – – – – – – – – – – – –
FlashOutputLevel(=
165)
*
1
*
1
O O O
– – – – – – – – – – – – – – – – – – – – – – – – – – –
NDFilter(=
133)
*
1
*
1
O O O O
–
O
– – – – – – – – – – – – – – – – – – – – –
O O O
*
1
*
1
O O O O O O O O O O O O O O O O O O O O O O O O O O O O O O
StillImageAspect
Ratio(=
80)
*
1
*
1
O O O O O
–
O
–
O O O
– –
O O O
–
O
– –
*
2
– –
O O O O
– – –
ImageType
(=
159)
*
1
*
1
O O O O
– – – – – – – – – – – – – – – – – – – – – – – – – –
Resolution
(=
81)
*
1
*
1
O O O O O O O O O O O O O O O O O O O O O O O O O O O O O O
*
1
*
1
O O O O O O O
–
O O O
– –
O O O O
– – – – – – – – – –
O O O
*
1
*
1
O O O O O O O
–
O O O
– –
O O O O
– – – – – – – – – –
O O O
Compression
(=
160)
*
1
*
1
O O O O
– – – – – – – – – – – – – – – – – – – – – – – – – –
*
1
*
1
O O O O O O O O O O O O O O O O O O O O O O O O O O O O O O
MovieQuality
(=
84)
*
1
*
1
O O O O O O O O O O O O O O O O O O O O
–
O O O O O O O
– –
*
1
*
1
O O O O O O O O O O O O O O O O O O O O
*
3
O O O O O O O O
–
*
1
*
1
O O O O O O O O O O O O O O O O O O O O
*
3
O O O O O O O
– –
– – – – – – – – – – – – – – – – – – – – – – – – – – – – – – –
O
*1Optionsvarydependingontheassignedshootingmode.
*2Only[
]and[ ]areavailable.
*3Synchronizeswiththeaspectratiosettingandisautomaticallyset(=
80).

295
FunctionsandMenuTables
O
Availableorsetautomatically.
–
Notavailable.
ShootingMode
Function
D B M G A
K K E
I S P t
x
v
T
Y
E
FlashExposureCompensation(=
156)
*
1
*
1
–
O O O
–
O
– – – – – – – – – – – – – – – – – – – – – – – –
FlashOutputLevel(=
165)
*
1
*
1
O O O
– – – – – – – – – – – – – – – – – – – – – – – – – – –
NDFilter(=
133)
*
1
*
1
O O O O
–
O
– – – – – – – – – – – – – – – – – – – – –
O O O
*
1
*
1
O O O O O O O O O O O O O O O O O O O O O O O O O O O O O O
StillImageAspect
Ratio(=
80)
*
1
*
1
O O O O O
–
O
–
O O O
– –
O O O
–
O
– –
*
2
– –
O O O O
– – –
ImageType
(=
159)
*
1
*
1
O O O O
– – – – – – – – – – – – – – – – – – – – – – – – – –
Resolution
(=
81)
*
1
*
1
O O O O O O O O O O O O O O O O O O O O O O O O O O O O O O
*
1
*
1
O O O O O O O
–
O O O
– –
O O O O
– – – – – – – – – –
O O O
*
1
*
1
O O O O O O O
–
O O O
– –
O O O O
– – – – – – – – – –
O O O
Compression
(=
160)
*
1
*
1
O O O O
– – – – – – – – – – – – – – – – – – – – – – – – – –
*
1
*
1
O O O O O O O O O O O O O O O O O O O O O O O O O O O O O O
MovieQuality
(=
84)
*
1
*
1
O O O O O O O O O O O O O O O O O O O O
–
O O O O O O O
– –
*
1
*
1
O O O O O O O O O O O O O O O O O O O O
*
3
O O O O O O O O
–
*
1
*
1
O O O O O O O O O O O O O O O O O O O O
*
3
O O O O O O O
– –
– – – – – – – – – – – – – – – – – – – – – – – – – – – – – – –
O

296
FunctionsandMenuTables
4 Shooting Menu
ShootingMode
Function
D B M G A
K K E
I S P t
x
v
T
Y
E
AFFrame(=
145)
FaceAiAF*
1
*
2
*
2
O O O O O O O O O O O O O
–
O
– –
O O
– –
O O O O O O O O O
TrackingAF
*
2
*
2
O O O O
*
3
–
O
– – – –
O
–
O O
– – –
O
– – – –
O O O O
– – –
FlexiZone/Center*
4
*
2
*
2
O O O O
–
O O
– – – –
O
–
O O O O
–
O O
–
O O O O O O O O O
DigitalZoom
(=
63)
Standard
*
2
*
2
O O O O O
–
O
–
O O O
– –
O O O
– – – – – – – – – – –
O O
–
Off
*
2
*
2
O O O O O O O O O O O O O O O O O O O O O O O O O O O O O O
DigitalTele-converter
(1.5x/2.0x)
*
2
*
2
O O O O
– – – – – – – – – – – – – – – – – – – – – – – – – –
AF-PointZoom
(=
87)
On
*
2
*
2
O O O O O
–
O
–
O O O O
–
O O
– –
O O
– – – –
O O O O
– – –
Off
*
2
*
2
O O O O O O O O O O O O O O O O O O O O O O O O O O O O O O
ServoAF(=
150)
On
*
2
*
2
O O O O
– –
O
– – – – – –
O O
– – –
O
– – – –
O O O O
– – –
Off*
5
*
2
*
2
O O O O O O O O O O O O O O O O O O O O O O O O O O O O O O
ContinuousAF
(=
151)
On
*
2
*
2
O O O O O O O O O O O O O O O
–
O O O O O O O O O O O O O O
Off
*
2
*
2
O O O O
– –
O O
– – – –
O O O O O O O O O O O O O O O
– – –
AF-assistBeam
(=
89)
On
*
2
*
2
O O O O O O O O O O O O O
–
O
–
O O O O O O O O O O O O O O
Off
*
2
*
2
O O O O O O O O
–
O O O O O O O O O O O O O O O O O O O O O
MF-PointZoom
(=
142)
On
*
2
*
2
O O O O
– –
O
– – – –
O
–
O O
– –
O O
– – – –
O O O O
– – –
Off
*
2
*
2
O O O O O O O O O O O O O O O O O O O O O O O O O O O O O O
SafetyMF(=
143)
On
*
2
*
2
O O O O
–
O O
– – – –
O O O O
– –
O O O O O O O O O O O O O
Off
*
2
*
2
O O O O O O O O O O O O O O O O O O O O O O O O O O O O O O
FlashControl
(=
82,89,
156,158,165)
FlashMode
Auto
*
2
*
2
–
O O O O O O O O O O
–
O O O
–
O
–
O O O O O O O O O
– – –
Manual
*
2
*
2
O O O
– – – – – – – – – – – – – – – – – – – – – – – – – – –
FlashExp.Comp
*
2
*
2
–
O O O
–
O
– – – – – – – – – – – – – – – – – – – – – – – –
FlashOutput
*
2
*
2
O O O
– – – – – – – – – – – – – – – – – – – – – – – – – – –
ShutterSync.
1st-curtain
*
2
*
2
O O O O O O O O O O O
–
O O O
–
O
–
O O O O O O O O O
– – –
2nd-curtain
*
2
*
2
O O O O
–
O
– – – – – – – – – – – – – – – – – – – – – – – –
Red-EyeCorr.
On
*
2
*
2
O O O O O O O
–
O O O
–
O
–
O
– – – – – – – – – – – – – – –
Off
*
2
*
2
O O O O O O O O O O O
–
O O O
–
O
–
O O O O O O O O O
– – –
Red-EyeLamp
On/Off
*
2
*
2
O O O O O O O O O O O
–
O
–
O
–
O
–
O O O O O O O O O
– – –
SafetyFE
On
*
2
*
2
–
O O O O O O O O O O
–
O O O
–
O
–
O O O O O O O O O
– – –
Off
*
2
*
2
O O O O
–
O
– – – – – – – – – – – – – – – – – – – – – – – –
*1Operationwhennofacesaredetectedvariesbyshootingmode.
*2Optionsvarydependingontheassignedshootingmode.
*3Onlyavailablebypressingthe<o>button(=
68).
*4[FlexiZone]in<
G
>,<
M
>,<
B
>,and<
D
>modes,otherwise[Center].
*5[On]whensubjectmovementisdetectedin<A>mode.

297
FunctionsandMenuTables
O
Availableorsetautomatically.
–
Notavailable.
ShootingMode
Function
D B M G A
K K E
I S P t
x
v
T
Y
E
AFFrame(=
145)
FaceAiAF*
1
*
2
*
2
O O O O O O O O O O O O O
–
O
– –
O O
– –
O O O O O O O O O
TrackingAF
*
2
*
2
O O O O
*
3
–
O
– – – –
O
–
O O
– – –
O
– – – –
O O O O
– – –
FlexiZone/Center*
4
*
2
*
2
O O O O
–
O O
– – – –
O
–
O O O O
–
O O
–
O O O O O O O O O
DigitalZoom
(=
63)
Standard
*
2
*
2
O O O O O
–
O
–
O O O
– –
O O O
– – – – – – – – – – –
O O
–
Off
*
2
*
2
O O O O O O O O O O O O O O O O O O O O O O O O O O O O O O
DigitalTele-converter
(1.5x/2.0x)
*
2
*
2
O O O O
– – – – – – – – – – – – – – – – – – – – – – – – – –
AF-PointZoom
(=
87)
On
*
2
*
2
O O O O O
–
O
–
O O O O
–
O O
– –
O O
– – – –
O O O O
– – –
Off
*
2
*
2
O O O O O O O O O O O O O O O O O O O O O O O O O O O O O O
ServoAF(=
150)
On
*
2
*
2
O O O O
– –
O
– – – – – –
O O
– – –
O
– – – –
O O O O
– – –
Off*
5
*
2
*
2
O O O O O O O O O O O O O O O O O O O O O O O O O O O O O O
ContinuousAF
(=
151)
On
*
2
*
2
O O O O O O O O O O O O O O O
–
O O O O O O O O O O O O O O
Off
*
2
*
2
O O O O
– –
O O
– – – –
O O O O O O O O O O O O O O O
– – –
AF-assistBeam
(=
89)
On
*
2
*
2
O O O O O O O O O O O O O
–
O
–
O O O O O O O O O O O O O O
Off
*
2
*
2
O O O O O O O O
–
O O O O O O O O O O O O O O O O O O O O O
MF-PointZoom
(=
142)
On
*
2
*
2
O O O O
– –
O
– – – –
O
–
O O
– –
O O
– – – –
O O O O
– – –
Off
*
2
*
2
O O O O O O O O O O O O O O O O O O O O O O O O O O O O O O
SafetyMF(=
143)
On
*
2
*
2
O O O O
–
O O
– – – –
O O O O
– –
O O O O O O O O O O O O O
Off
*
2
*
2
O O O O O O O O O O O O O O O O O O O O O O O O O O O O O O
FlashControl
(=
82,89,
156,158,165)
FlashMode
Auto
*
2
*
2
–
O O O O O O O O O O
–
O O O
–
O
–
O O O O O O O O O
– – –
Manual
*
2
*
2
O O O
– – – – – – – – – – – – – – – – – – – – – – – – – – –
FlashExp.Comp
*
2
*
2
–
O O O
–
O
– – – – – – – – – – – – – – – – – – – – – – – –
FlashOutput
*
2
*
2
O O O
– – – – – – – – – – – – – – – – – – – – – – – – – – –
ShutterSync.
1st-curtain
*
2
*
2
O O O O O O O O O O O
–
O O O
–
O
–
O O O O O O O O O
– – –
2nd-curtain
*
2
*
2
O O O O
–
O
– – – – – – – – – – – – – – – – – – – – – – – –
Red-EyeCorr.
On
*
2
*
2
O O O O O O O
–
O O O
–
O
–
O
– – – – – – – – – – – – – – –
Off
*
2
*
2
O O O O O O O O O O O
–
O O O
–
O
–
O O O O O O O O O
– – –
Red-EyeLamp
On/Off
*
2
*
2
O O O O O O O O O O O
–
O
–
O
–
O
–
O O O O O O O O O
– – –
SafetyFE
On
*
2
*
2
–
O O O O O O O O O O
–
O O O
–
O
–
O O O O O O O O O
– – –
Off
*
2
*
2
O O O O
–
O
– – – – – – – – – – – – – – – – – – – – – – – –

298
FunctionsandMenuTables
ShootingMode
Function
D B M G A
K
I
ISOAutoSettings
(=
130)
MaxISOSpeed
*
1
*
1
–
O O O
–
O
– –
RateofChange
*
1
*
1
–
O
–
O
–
O
– –
HighISONR
(=
130)
Low/Standard/High
*
1
*
1
O O O O
– – – –
HgLampCorr.
(=
83)
On/Off
– – – – – –
O
– – –
SpotAEPoint
(=
127)
AFPoint
*
1
*
1
O O O O
–
O
– –
Center
*
1
*
1
O O O O
– – – –
SafetyShift
(=
163)
On
*
1
*
1
–
O O
– – – – –
Off
*
1
*
1
O O O O O O O O
WindFilter
(=
85)
On/Off
*
1
*
1
O O O O O O O O
Review(=
90)
Off/Quick/2–10sec./Hold
*
1
*
1
O O O O O O O O
ReviewInfo
(=
91)
Off
*
1
*
1
O O O O O O O O
Detailed/FocusCheck
*
1
*
1
O O O O O O O O
BlinkDetection
(=
88)
On
*
1
*
1
O O O O O O O O
Off
*
1
*
1
O O O O O O O O
CustomDisplay
(=
166)
ShootingInfo/GridLines/
ElectronicLevel/Histogram
*
1
*
1
O O O O O O O O
ISMode(=
160)
Off
*
1
*
1
O O O O O O O O
Continuous
*
1
*
1
O O O O O O O O
ShootOnly
*
1
*
1
O O O O
– –
O O
Converter(=
245)
None/TC-DC58E
*
1
*
1
O O O O O O O O
DateStamp
(=
67)
Off
*
1
*
1
O O O O O O O O
Date/Date&Time
*
1
*
1
O O O O O O O
–
FaceIDSettings(=
69)
*
1
*
1
O O O O O O O O
Setz7Func.(=
168)
*
1
*
1
O O O O
– – – –
SetShortcutbutton(=
169)
*
1
*
1
O O O O O O O O
SaveSettings(=
170)
O O O O O O
– – – –
*1Optionsvarydependingontheassignedshootingmode.
–Whenusing[FaceID](=
69)toshoot,nameswillnotbedisplayedin[ ],[ ],or
[
],buttheywillberecordedinstillimages.
–Settingavailable,butwhenusing[FaceID](=
69)toshoot,nameswillnotbe
displayedin[E],[
],or[ ],andtheywillnotberecordedinmovies.

299
FunctionsandMenuTables
K E
S P t
x
v
T
Y
E
– – – – – – – – – – – – – – – – – – – – – –
– – – – – – – – – – – – – – – – – – – – – –
– – – – – – – – – – – – – – – – – – – – – –
– – – – – – – – – – – – – – – – – – – – – –
– – – – – – – – – – – – – – – – – – – – – –
– – – – – – – – – – – – – – – – – – – – – –
– – – – – – – – – – – – – – – – – – – – – –
O O O O O O O O O O O O O O O O O O O O O O
O O O O O O O O O O O O
–
O O O O O O O O
–
O O O O O O O O O O O O O O O O O O O
– – –
O O O O O O O O O O O O O O O O O O O
– – –
O O O O O O O O
–
O O O O O O O O O O
– – –
O O O
– – –
O
– – –
O
– – – – –
O O O
– – –
O O O O O O O O O O O O O O O O O O O O O O
O O O O O O O O O O O O O O O O O O O O O O
O O O O
–
O O O O O O O O O O O O O O O O O
O O O O O O O O O O O O O O O O O O O O O O
O O O O
–
O O O O O O O O O O O O O O
– – –
O O O O O O O O O O O O O O O O O O O O O O
O O O O O O O O O O O O O O O O O O O O O O
O O O
– –
O O O
– – – – – – – – – – – – – –
O O O O O O O O O O O O O O O O O O O O O O
– – – – – – – – – – – – – – – – – – – – – –
O O O O O O O O O O O O O O O O O O O O O O
– – – – – – – – – – – – – – – – – – – – – –
O
Availableorsetautomatically.
–
Notavailable.

300
FunctionsandMenuTables
3 Set up Menu
Item Ref.Page
Item Ref.Page
Mute
=
218
LensRetract
=
226
Volume
=
218
PowerSaving
=
42,226
SoundOptions
=
219
Units
=
227
Hints&Tips
=
219
ElectronicLevel
=
8 6
Date/Time
=
2 0
VideoSystem
=
243
TimeZone
=
220
CtrlviaHDMI
=
241
LCDBrightness
=
221
Eye-FiSettings
=
274
Start-upImage
=
222
CopyrightInfo
=
229
Format
=
223,224
CerticationLogoDisplay
=
230
FileNumbering
=
225
Language
=
2 3
CreateFolder
=
225
ResetAll
=
231
My Menu Menu
Item Ref.Page
MyMenusettings
=
171

301
FunctionsandMenuTables
1 Playback Menu
Item Ref.Page Item Ref.Page
MovieDigestPlayback
=
185
Red-EyeCorrection
=
2 1 1
SmartShufe
=
191
Cropping
=
207
Slideshow
=
190
Resize
=
206
Erase
=
196
MyColors
=
209
Protect
=
192
FaceIDInfo
=
187
Rotate
=
200
ScrollDisplay
=
175
Favorites
=
202
GroupImages
=
185
MyCategory
=
203
AutoRotate
=
201
PhotobookSet-up
=
271
Resume
=
175
i-Contrast
=
210
Transition
=
175
2 Print Menu
Item Ref.Page Item Ref.Page
Print
–
SelectAllImages
=
270
SelectImages&Qty.
=
268
ClearAllSelections
=
270
SelectRange
=
269
PrintSettings
=
267

302
Handling Precautions
• Thecameraisahigh-precisionelectronicdevice.Avoiddroppingitor
subjectingittostrongimpact.
• Neverbringthecameranearmagnets,motors,orotherdevicesthat
generatestrongelectromagneticelds,whichmaycausemalfunctionor
eraseimagedata.
• Ifwaterdropletsordirtadherestothecameraorscreen,wipewithadry
softcloth,suchasaneyeglasscloth.Donotrubhardorapplyforce.
• Neverusecleanerscontainingorganicsolventstocleanthecameraor
screen.
• Useablowerbrushtoremovedustfromthelens.Ifcleaningisdifcult,
contactaCanonCustomerSupportHelpDesk.
• Topreventcondensationfromformingonthecameraaftersudden
temperaturechanges(whenthecameraistransferredfromcoldtowarm
environments),putthecamerainanairtight,resealableplasticbagand
letitgraduallyadjusttothetemperaturebeforeremovingitfromthebag.
• Ifcondensationdoesformonthecamera,stopusingitimmediately.
Continuingtousethecamerainthisstatemaydamageit.Removethe
batteryandmemorycard,andwaituntilthemoisturehasevaporated
beforeresuminguse.

303
Specications
CameraEffective
Pixels(Max.)
Approx.12.1millionpixels
LensFocalLength
5xzoom:6.1(W)–30.5(T)mm
(35mmlmequivalent:28(W)–140(T)mm)
Viewnder
Real-imagetypeopticalzoomviewnder
DioptricAdjustmentRange:–3.0to+1.0m
‑1
(dpt)
Coverage:Approx.80%
LCDMonitor
3.0typecolorTFTLCD
EffectivePixels:Approx.922,000dots
FileFormat
DesignruleforCameraFilesystem,DPOF(version1.1)
compliant
DataType
StillImages:Exif2.3(JPEG),RAW(CR2(CanonOriginal))
Movies:MOV(Imagedata:H.264;Audiodata:LinearPCM
(stereo))
Interface
Hi-speedUSB
HDMIoutput
Analogaudiooutput(stereo)
Analogvideooutput(NTSC/PAL)
PowerSource
BatteryPackNB-10L
ACAdapterKitACK-DC80
Dimensions(Based
onCIPAGuidelines)
106.6x75.9x40.1mm(4.20x2.99x1.58in.)
Weight(Basedon
CIPAGuidelines)
Approx.352g(approx.12.4oz.;includingthebatteryand
memorycard)
Approx.310g(approx.10.9oz.;camerabodyonly)

304
Specications
NumberofShots/RecordingTime,PlaybackTime
NumberofShots
ScreenOn Approx.350
ScreenOff Approx.770
MovieRecording
Time*
1
ScreenOn Approx.1hour,10minutes
Continuous
Shooting*
2
ScreenOn Approx.2hours
PlaybackTime Approx.7hours
*1Timeunderdefaultcamerasettings,whennormaloperationsareperformed,suchas
shooting,pausing,turningthecameraonandoff,andzooming.
*2Timeavailablewhenshootingthemaximummovielength(untilrecordingstops
automatically)repeatedly.
•Thenumberofshotsthatcanbetakenisbasedonmeasurementguidelinesofthe
Camera&ImagingProductsAssociation(CIPA).
•Undersomeshootingconditions,thenumberofshotsandrecordingtimemaybeless
thanmentionedabove.
•Numberofshots/timewithafullychargedbattery.
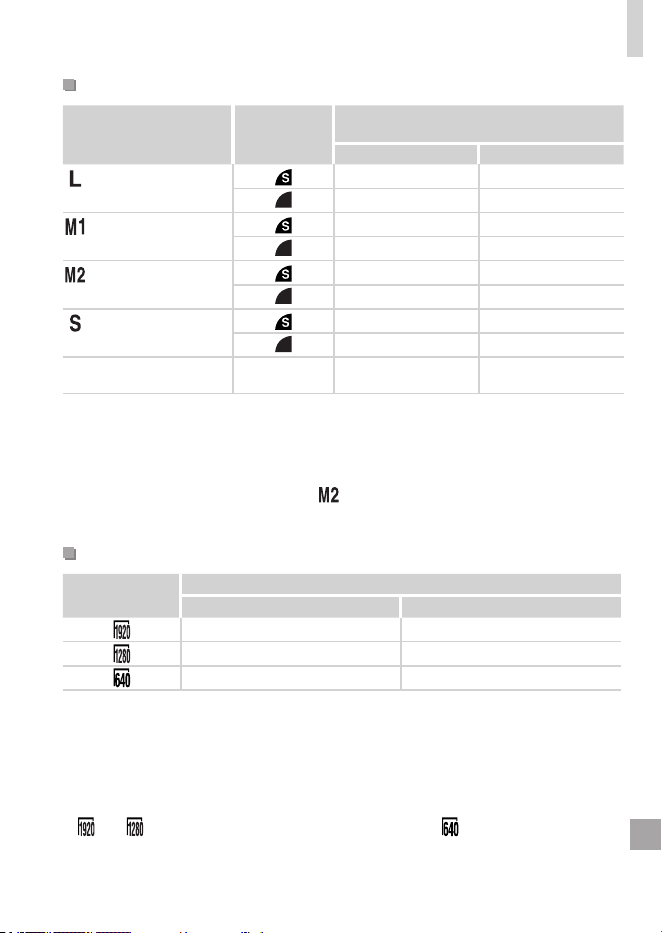
305
Specications
Numberof4:3ShotsperMemoryCard
RecordingPixels
Compression
Ratio
NumberofShotsperMemoryCard
(Approx.shots)
8GB 32GB
(Large)
12M/4000x3000
1379 5568
2192 8850
(Medium1)
6M/2816x2112
2431 9814
3721 15020
(Medium2)
2M/1600x1200
7442 30040
12927 52176
(Small)
0.3M/640x480
27291 110150
40937 165225
RAWImages
4000x3000
– 446 1804
•ThevaluesinthetablearemeasuredaccordingtoCanonstandardsandmaychange
dependingonthesubject,memorycardandcamerasettings.
•Thevaluesinthetablearebasedon4:3aspectratio.Iftheaspectratioischanged
(=
80),moreimagescanbeshotbecausethedatasizeperimagewillbesmaller
thanwith4:3images.However,since[
]16:9imageshaveasettingof1920x1080
pixels,theirdatasizewillbelargerthan4:3images.
RecordingTimeperMemoryCard
ImageQuality
RecordingTimeperMemoryCard
8GB 32GB
29min.39sec. 1hr.59min.43sec.
42min.11sec.*
1
2hr.50min.19sec.*
2
1hr.28min.59sec. 5hr.59min.10sec.
*127min.39sec.foriFramemovies(=
120).
*21hr.51min.37sec.foriFramemovies(=
120).
•ThevaluesinthetablearemeasuredaccordingtoCanonstandardsandmaychange
dependingonthesubject,memorycardandcamerasettings.
•Recordingwillautomaticallystopwhenthecliplesizereaches4GB,orwhenthe
recordingtimereachesapproximately29minutesand59secondswhenshootingin
[
]or[ ],andapproximately1hourwhenshootingin[ ].
•Recordingmaystopevenifthemaximumcliplengthhasnotbeenreachedonsome
memorycards.SDSpeedClass6orhighermemorycardsarerecommended.
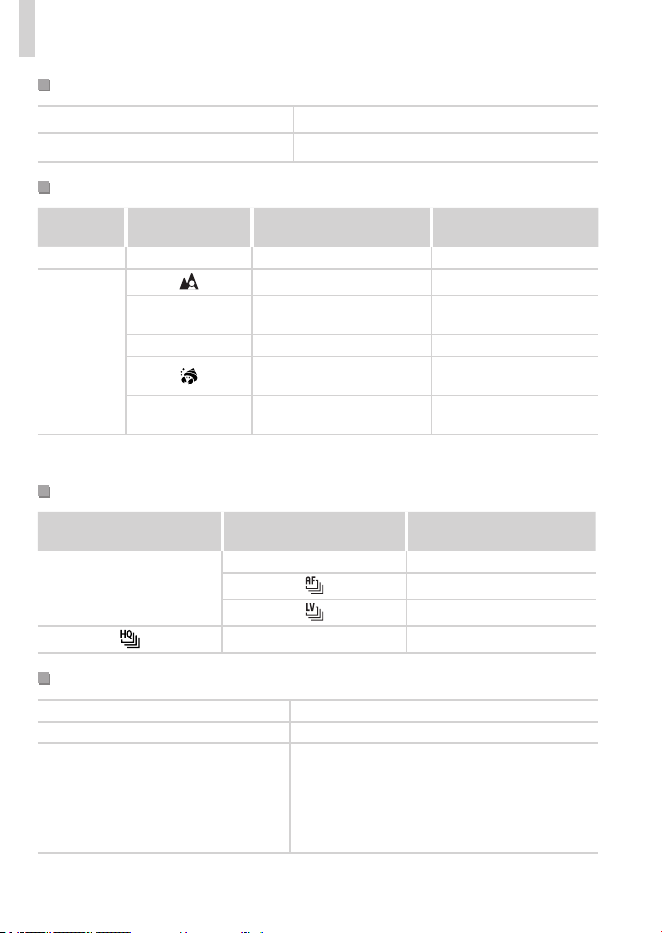
306
Specications
FlashRange
Maximumwideangle(j)
50cm–7.0m(1.6–23ft.)
Maximumtelephoto(i)
50cm–4.5m(1.6–15ft.)
ShootingRange
Shooting
Mode
FocusingRange
MaximumWideAngle
(j)
MaximumTelephoto
(i)
A
–
1cm(0.4in.)–innity 40cm(1.3ft.)–innity
Othermodes
5cm(2.0in.)–innity 40cm(1.3ft.)–innity
e*
1–50cm
(0.4in.–1.6ft.)
–
f*
1cm(0.4in.)–innity 40cm(1.3ft.)–innity
1–50cm
(0.4in.–1.6ft.)
–
8
1.5
–
20m
(4.9
–
66
ft.)
1.5
–
20m
(4.9
–
66
ft.)
*Notavailableinsomeshootingmodes.
ContinuousShootingSpeed
ShootingMode
ContinuousShooting
Mode
Speed
G
W
Approx.2.1shots/sec.
Approx.0.9shots/sec.
Approx.0.9shots/sec.
–
Approx.10shots/sec.
ShutterSpeed
<A>mode,automaticallysetrange
1–1/4000sec.
Rangeinallshootingmodes 15–1/4000sec.
<M>modeavailablevalues(sec.)
15,13,10,8,6,5,4,3.2,2.5,2,1.6,1.3,1,
0.8,0.6,0.5,0.4,0.3,1/4,1/5,1/6,1/8,1/10,
1/13,1/15,1/20,1/25,1/30,1/40,1/50,1/60,
1/80,1/100,1/125,1/160,1/200,1/250,1/320,
1/400,1/500,1/640,1/800,1/1000,1/1250,
1/1600,1/2000,1/2500,1/3200,1/4000

307
Specications
Aperture
f/number f/1.8–f/8.0(W),f/2.8–f/8.0(T)
<B>modeavailablevalues*
f/1.8,f/2.0,f/2.2,f/2.5,f/2.8,f/3.2,f/3.5,f/4.0,
f/4.5,f/5.0,f/5.6,f/6.3,f/7.1,f/8.0
*Dependingonthezoomposition,someaperturevaluesmaynotbeavailable.
BatteryPackNB-10L
Type: Rechargeablelithium-ionbattery
RatedVoltage: 7.4VDC
RatedCapacity: 920mAh
ChargingCycles: Approx.300times
OperatingTemperature:0–40°C(32–104°F)
Dimensions: 32.5x45.4x15.1mm(1.28x1.79x0.59in.)
Weight: Approx.41g(approx.1.45oz.)
BatteryChargerCB-2LC/CB-2LCE
RatedInput: 100–240VAC(50/60Hz)16VA(100V)–22VA(240V),
0.18A(100V)–0.12A(240V)
RatedOutput: 8.4VDC,0.7A
ChargingTime: Approx.1hour50min.(whenusingNB-10L)
ChargeIndicator: Charging:orange/Fullycharged:green
OperatingTemperature:5–40°C(41–104°F)
Dimensions: 92.8x63.0x27.0mm(3.65x2.48x1.06in.)
Weight: CB-2LC: Approx.80g(approx.2.82oz.)
CB-2LCE:Approx.74g(approx.2.61oz.)(excludingpowercord)
Tele-converterTC-DC58E(SoldSeparately)
ZoomFactor: 1.4x
LensConstruction: 5elementsin3groups
ThreadDiameter: 58mm*
Max.DiameterxLength:ɸ69.0x36.5mm(ɸ2.72x1.44in.)
Weight: Approx.165g(approx.5.8oz.)
*RequiresConversionLensAdapterLA-DC58L.

308
Specications
ConversionLensAdapterLA-DC58L(SoldSeparately)
CameraMount: Bayonet
ThreadDiameter: 58mm
Max.DiameterxLength:ɸ63.8x54.8mm(ɸ2.51x2.16in.)
Weight: Approx.36g(approx.1.3oz.)
FilterAdapterFA-DC58D(SoldSeparately)
DiameterxLength: ɸ66.0x46.7mm(ɸ2.60x1.84in.)
Weight: Approx.58g(approx.2.0oz.)
BracketBKT-DC1(SoldSeparately)
Dimensions(Max.):220.0x32.0x19.0mm(8.66x1.26x0.75in.)
Weight: Approx.90g(approx.3.2oz.)
• AlldataisbasedontestsbyCanon.
• Cameraspecicationsorappearancearesubjecttochangewithout
notice

309
Index
A
ACadapterkit............................ 235,244
Accessories....................................... 235
AEBmode......................................... 131
AElock.............................................. 126
AFframes.................................. 145,147
AFlock............................................... 152
Aspectratio.......................................... 80
AUTOmode(shootingmode). . 24,45,54
Av(shootingmode)........................... 163
B
Battery
Charging........................................ 17
Level............................................ 287
Powersaving................................. 42
Batterycharger...................................... 2
Blackandwhiteimages............. 101,137
Blinkdetection..................................... 88
C
C1/C2(shootingmode)..................... 170
Camera
Resetall...................................... 231
Camerashake................................... 160
Clock.................................................... 51
ColorAccent(shootingmode)........... 109
ColorSwap(shootingmode)..............110
Color(whitebalance)......................... 134
Compressionratio(imagequality)..... 160
Continuousshooting.......................... 139
High-speedburstHQ
(shootingmode)...........................116
Creativelters(shootingmode)........... 99
Cropping............................................ 207
Customwhitebalance....................... 135
D
Date/time
Addingdatestamps...................... 67
Changing....................................... 22
Date/timebattery........................... 22
Setting........................................... 20
Worldclock.................................. 220
DefaultsResetall
DIGITALCAMERASolutionDisk........... 2
Digitaltele-converter.......................... 144
Digitalzoom......................................... 63
Displaylanguage................................. 23
DPOF................................................. 266
Drivemode........................................ 139
DynamicRangeCorrection............... 132
E
Editing
Cropping...................................... 207
i-Contrast..................................... 210
MyColors.................................... 209
Red-eyecorrection.......................211
Resizingimages.......................... 206
Electroniclevel.................................... 86
Erasing.............................................. 196
Errormessages................................. 283
Exposure
AElock........................................ 126
Compensation............................. 125
FElock........................................ 157
Eye-Ficards.................................. 2,274
F
FaceID........................................ 69,177
Faceselect........................................ 151
Faceself-timer(shootingmode).........114
Favorites............................................ 202
FElock............................................... 157
Filenumbering................................... 225

310
Index
Fireworks(shootingmode).................. 96
Fish-eyeeffect(shootingmode)........ 103
Flash
Deactivatingash.................... 25,55
Flashexposurecompensation.... 156
On............................................... 154
Slowsynchro............................... 155
FlexiZone(AFframemode)............... 146
Focusbracketing............................... 153
Focuscheck...................................... 179
Focusing
AFframes.................................... 145
AFlock........................................ 152
AF-pointzoom............................... 87
Faceselect.................................. 151
ServoAF..................................... 150
Focusingrange
Macro.......................................... 142
Manualfocus............................... 142
Focuslock......................................... 146
Frontdial.................................... 168,184
FUNC.menu
Basicoperations............................ 47
Table............................................ 292
H
Handheldnightscene
(shootingmode)................................... 95
Highdynamicrange
(shootingmode)................................. 100
High-speedburstHQ
(shootingmode)..................................116
Householdpower............................... 244
I
i-Contrast................................... 132,210
iFramemovies(moviemode)............ 120
ImagequalityCompressionratio
(imagequality)
Images
Displayperiod............................... 90
Erasing........................................ 196
PlaybackViewing
Protecting.................................... 192
Indicator............................................... 50
ISOspeed.......................................... 129
L
Lamp.................................................... 89
M
M(shootingmode)............................. 164
Macro(focusmode)........................... 142
Magnieddisplay............................... 189
Manualfocus(focusmode)............... 142
Memorycards........................................ 2
Recordingtime............................ 305
Menu
Basicoperations............................ 48
Table............................................ 290
Mercurylampcorrection...................... 83
Meteringmethod................................ 127
Miniatureeffect(shootingmode)....... 104
Monochrome(shootingmode)........... 108
MovieDigest(shootingmode)............. 94
Movies
Editing......................................... 213
Imagequality
(resolution/framerate)................... 84
Recordingtime............................ 305
Multi-areaWhiteBalance.................... 83
MyCategory...................................... 203
MyColors.................................. 137,209
N
NDlter.............................................. 133
NeckstrapStrap
Nostalgic(shootingmode)................. 102

311
Index
P
P(shootingmode)............................. 124
Packagecontents.................................. 2
Photobookset-up.............................. 271
PictBridge.................................. 238,259
PlaybackViewing
Portrait(shootingmode)...................... 95
Postereffect(shootingmode)............. 99
PowerACadapterkit
Battery
Batterycharger
Powersaving....................................... 42
Printing.............................................. 259
ProgramAE....................................... 124
Protecting.......................................... 192
R
RAW.................................................. 159
Red-eyecorrection.......................82,211
Resetall............................................. 231
Resizingimages................................ 206
Resolution(imagesize)....................... 81
Rotating............................................. 200
S
Screen
Displaylanguage........................... 23
Icons.................................... 286,288
MenuFUNC.menu,Menu
SD/SDHC/SDXCmemorycards
Memorycards
Searching.......................................... 181
Self-timer............................................. 64
2-secondself-timer........................ 65
Customizingtheself-timer............. 66
Faceself-timer(shootingmode)..114
Winkself-timer(shootingmode)..113
Sepiatoneimages..................... 101,137
ServoAF............................................ 150
ShadowCorrect................................. 133
Shooting
Shootingdate/timeDate/time
Shootinginformation........... 166,286
Slideshow.......................................... 190
SmartShufe..................................... 191
SmartShutter(shootingmode)..........112
Smile(shootingmode)........................112
Snow(shootingmode)......................... 96
Softfocus(shootingmode)................ 107
Software
DIGITALCAMERASolutionDisk.... 2
Installation..................................... 32
Savingimagestoacomputer........ 35
Sounds.............................................. 218
StereoAVcable................................. 243
StitchAssist(shootingmode).............118
Strap................................................ 2,16
Superslowmotionmovie
(moviemode)..................................... 121
Supervivid(shootingmode)................ 99
T
Terminal............... 33,239,243,244,259
Toycameraeffect(shootingmode)... 106
TrackingAF................................. 68,148
Travelingwiththecamera......... 220,234
Troubleshooting................................. 278
TVdisplay.......................................... 239
Tv(shootingmode)............................ 162
U
Underwater(shootingmode)............... 96

312
Index
V
Viewnder............................................ 44
Viewing................................................ 27
Imagesearch.............................. 181
Indexdisplay............................... 180
Magnieddisplay........................ 189
Single-imagedisplay..................... 27
Slideshow.................................... 190
SmartShufe.............................. 191
TVdisplay................................... 239
W
Whitebalance(color)......................... 134
Winkself-timer(shootingmode).........113
Worldclock........................................ 220
Z
Zoom....................................... 24,54,63

313
CAUTION
RISKOFEXPLOSIONIFBATTERYISREPLACEDBYANINCORRECTTYPE.
DISPOSEOFUSEDBATTERIESACCORDINGTOLOCALREGULATION.
BatteryChargerCB-2LC
IMPORTANTSAFETYINSTRUCTIONS-
SAVETHESEINSTRUCTIONS.
DANGER-TOREDUCETHERISKOF
FIREORELECTRICSHOCK,CAREFULLY
FOLLOWTHESEINSTRUCTIONS.
ForconnectiontoasupplynotintheU.S.A.,useanattachmentplugadapterofthe
propercongurationforthepoweroutlet,ifneeded.
BatteryChargerCB-2LCE
Theadaptercanbeusedwithapowersupplybetween100and240VAC.
ContactyourCanondealerforinformationaboutplugadapterforoverseasuse.
ForU.S.A.customersonly:Forareaswhere120VACpowerisnotused,youwill
needaspecialplugadapter.
ForonlyUnitedStates
UseaULlisted,1.8-3m(6-10ft),TypeSPT-2orNTSPT-2,AWGno.18powersupply
cord,ratedfor125V7A,withanon-polarizedNEMA1-15Pplugratedfor125V15A.
USAandCanadaonly:
TheLithiumion/polymerbatterythatpowerstheproductisrecyclable.
Pleasecall1-800-8-BATTERYforinformationonhowtorecyclethis
battery.

314
FCC Notice
(Digital Camera, Model PC1815 systems)
This device complies with Part 15 of the FCC Rules. Operation is subject to the
following two conditions;
(1) this device may not cause harmful interference, and
(2) this device must accept any interference received, including interference that may
cause undesired operation.
Note: This equipment has been tested and found to comply with the limits for Class
B digital devices, pursuant to Part 15 of the FCC rules. These limits are designed
to provide reasonable protection against harmful interference in a residential
installation.
This equipment generates, uses and can radiate radio frequency energy and, if
not installed and used in accordance with the instructions, may cause harmful
interference to radio communications. However, there is no guarantee that
interference will not occur in a particular installation. If this equipment does cause
harmful interference to radio or television reception, which can be determined
by turning the equipment off and on, the user is encouraged to try to correct the
interference by one or more of the following measures:
•Reorient or relocate the receiving antenna.
•Increase the separation between the equipment and receiver.
•Connect the equipment into an outlet on a circuit different from that to which the
receiver is connected.
•Consult the dealer or an experienced radio/TV technician for help.
The cable with the ferrite core provided with the digital camera must be used with this
equipment in order to comply with Class B limits in Subpart B of Part 15 of the FCC
rules.
Donotmakeanychangesormodicationstotheequipmentunlessotherwise
speciedinthemanual.Ifsuchchangesormodicationsshouldbemade,youcould
be required to stop operation of the equipment.
Canon U.S.A., Inc.
One Canon Park, Melville, New York 11747, U.S.A.
Tel No. 1-800-OK-CANON (1-800-652-2666)
Canadian Radio Interference Regulations
This Class B digital apparatus complies with Canadian ICES-003.
To ensure proper operation of this product, use of genuine Canon
accessories is recommended.
For CA, USA only
Included lithium battery contains Perchlorate Material - special handling may apply.
See www.dtsc.ca.gov/hazardouswaste/perchlorate/ for details.

315
TrademarkAcknowledgments
• TheSDXClogoisatrademarkofSD-3C,LLC.
• ThisdeviceincorporatesexFATtechnologylicensedfromMicrosoft.
• HDMI,theHDMIlogoandHigh-DenitionMultimediaInterfaceare
trademarksorregisteredtrademarksofHDMILicensingLLC.
• TheiFramelogoandtheiFramesymbolaretrademarksofAppleInc.
AboutMPEG-4Licensing
ThisproductislicensedunderAT&TpatentsfortheMPEG-4standard
andmaybeusedforencodingMPEG-4compliantvideoand/ordecoding
MPEG-4compliantvideothatwasencodedonly(1)forapersonaland
non-commercialpurposeor(2)byavideoproviderlicensedundertheAT&T
patentstoprovideMPEG-4compliantvideo.
NolicenseisgrantedorimpliedforanyotheruseforMPEG-4standard.
*NoticedisplayedinEnglishasrequired.
Disclaimer
• Reprinting,transmitting,orstoringinaretrievalsystemanypartofthis
guidewithoutthepermissionofCanonisprohibited.
• Canonreservestherighttochangethecontentsofthisguideatanytime
withoutpriornotice.
• Illustrationsandscreenshotsinthisguidemaydifferslightlyfromthe
actualequipment.
• Theaboveitemsnotwithstanding,Canonacceptsnoliabilityfordamages
duetomistakenoperationoftheproducts.

CDD-E490-030 ©CANON INC. 2012