Product Overview
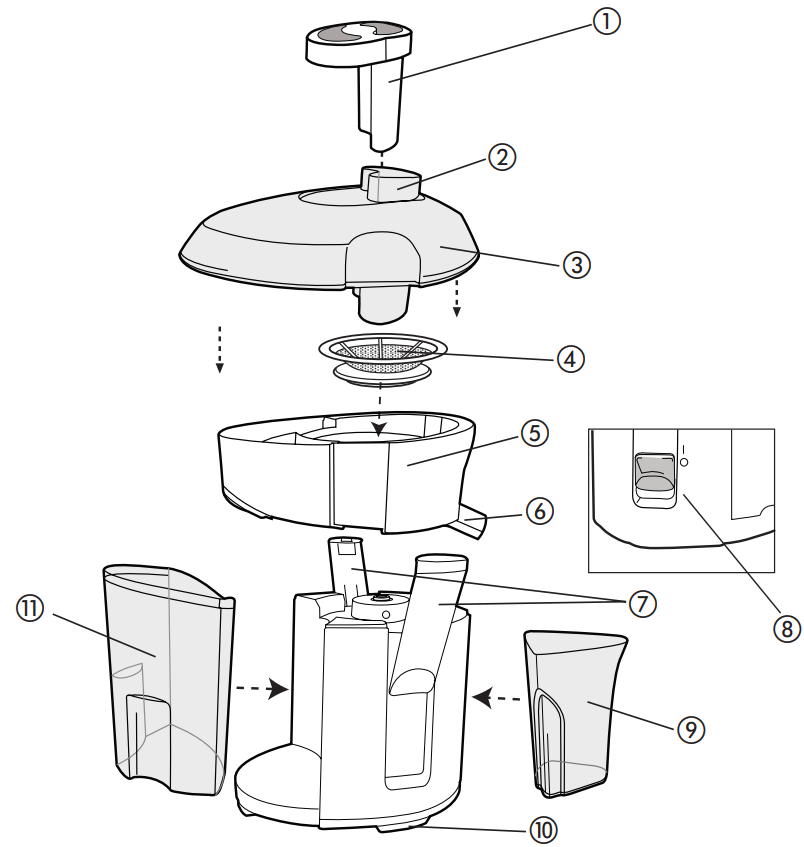
- Fruit and vegetable feeder
- Food chute
- Clear cover
- Stainless steel cutter/strainer
- Pulp separator JE2200B
- Continuous flow juice spout
- Safety locking latch (on each side)
- On/off (I/0) control
- Juice container
- Non-slip rubber feet
- Removable pulp container
Note: indicates consumer replaceable/removable parts
How to Disassemble
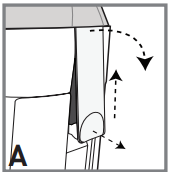
1. To unlock the locking latches, pull open at the bottom of each latch to disengage from the groove on the cover (A)
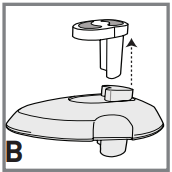
2. To remove the cover, take out the feeder, grasp the chute and pull up the cover (B)
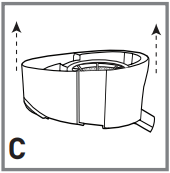
3. To remove the pulp separator, grip the juice spout with one hand and the back edge of the pulp separator with the other hand. Pull it up with the cutter/strainer in place (C)
4. To remove the cutter/strainer, hold the juice spout with one hand and grasp the cutter/strainer rim with the other hand; pull it out (D)
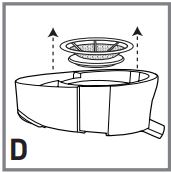
Caution: The cutter/strainer teeth are very sharp. Handle it carefully.
5. To remove the pulp container, grasp the sides firmly and slide it out
How to Use
GETTING STARTED
- Remove all labels, tags and stickers attached to the body or cord.
- Please go to www.prodprotect.com/applica to register your warranty.
- Remove and save literature.
Important: Before you use it for the first time, disassemble the unit.
HOW TO ASSEMBLE AND USE
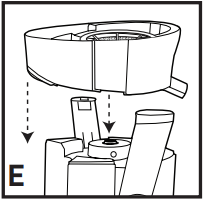
1. Place the pulp separator on the base with the juice spout facing you (E)
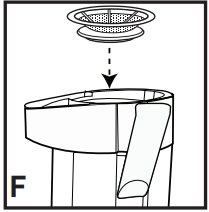
2. Insert the cutter/stainer in the center of the pulp separator. Press it down until it snaps into place (F)
3. Grip the pulp container and slide it in until it snaps into place (G)
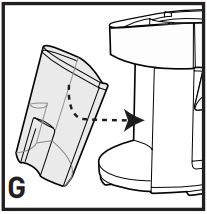
Important: Do not operate juice extractor without pulp container in place.
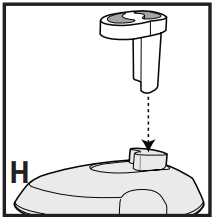
4. Place the cover on top of the pulp separator with feeder in place (H)
5. Lock the locking latches by pressing down the cover as you fit the tab at the top of each latch into the groove on each side of the cover. Press the bottom of each latch until you hear it click into place (J)
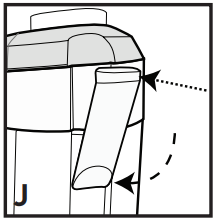
Important: The unit will not operate until the locking latches are locked.
6. .Place the juice cup under the juice spout (K)

7. Cut food into pieces to fit the food chute.
8. .Plug unit into an AC outlet. Press the on/off (I/0) switch to the on (I) position.
9. Place food in the food chute and press lightly with feeder.
10. Every time the pulp container is almost full, turn the unit off (0) and unplug from outlet, empty the pulp container and clean the cutter/strainer before you start juicing again.
Caution: The cutter/strainer teeth are very sharp. Handle carefully.
11. When juicing is completed, turn the unit off (0) and unplug from outlet.
Juicing Tips
 When juicing carrots, do not overfill the food chute. Place carrots one by one and use gentle pressure.
Juicing avocados or bananas will produce a puree rather than a juice.
When juicing large quantities of fruits and vegetables, stop and empty the pulp container as it begins to get full and clean the cutter/strainer before you start juicing again.
Care and Cleaning
TO CLEAN THE UNIT
Always clean all parts after every use to prolong the life of the unit
1. Turn unit off (0) and unplug from electric outlet.
2. Disassemble all parts. See How to Disassemble section.
3. Wash the feeder, food chute, cover, cutter/strainer, pulp separator, juice spout, juice cup and pulp container in warm sudsy water or in the dishwasher (top rack only).
Caution: The cutter/strainer teeth are very sharp. Handle carefully.
4. Wipe the base with a damp cloth or sponge. Never immerse the unit in water.
Note: Over time, parts may change color (especially from juicing carrots or beets).
NEED HELP?
For service, repair or any questions regarding your appliance, call the appropriate 800 number on cover of this book. Please DO NOT return the product to the place of purchase. Also, please DO NOT mail product back to manufacturer, nor bring it to a service center. You may also want to consult the website listed on the cover of this manual.
Two-Year Limited Warranty
What does it cover?
- Any defect in material or workmanship provided; however, Applica’s liability will not exceed the purchase price of product.
For how long?
- Two years from the date of original purchase with proof of such purchase.
What will we do to help you?
- Provide you with a reasonably similar replacement product that is either new or factory refurbished.
How do you get service?
- Save your receipt as proof of date of sale.
What does your warranty not cover?
- Damage from commercial use
- Damage from misuse, abuse or neglect
- Products that have been modified in any way
- Products used or serviced outside the country of purchase
- Glass parts and other accessory items that are packed with the unit
- Shipping and handling costs associated with the replacement of the unit
- Consequential or incidental damages (Please note, however, that some states do not allow the exclusion or limitation of consequential or incidental damages, so this limitation may not apply to you.)
How does state law relate to this warranty?
- This warranty gives you specific legal rights. You may also have other rights that vary from state to state or province to province.
IMPORTANT SAFEGUARDS
When using any electrical appliance, basic safety precautions should always be followed, including the following:
- Read all instructions.
- To protect against risk of electrical shock, do not immerse cord, plug or base unit in water or other liquid.
- Close supervision is necessary when any appliance is used by or near children.
- Unplug from the outlet when not in use, before putting on or taking off parts and before cleaning.
- Avoid contact with moving parts.
- Do not operate any appliance with a damaged cord or plug or after the appliance malfunctions, or has been damaged in any manner. Return the appliance to the nearest authorized service facility for examination, repair or adjustment.
- The use of accessories or attachments not recommended or sold by the manufacturer may cause fire, electric shock or injury.
- Do not use outdoors.
- Do not let cord hang over edge of the table or counter.
- Always make sure juicer cover is clamped securely in place before motor is turned on. Do not unfasten clamps while juicer is in operation.
- Be sure to turn switch to OFF (0) position after each use of your juicer. Make sure the motor stops completely before disassembling.
- Do not put your fingers or other objects into juicer opening while it is in operation. If food becomes lodged in opening, use food pusher or other piece of fruit or vegetable to push it down. When this method is not possible, turn the motor off and disassemble juicer to remove the remaining food.
- Do not use this appliance if the rotating sieve is damaged.
- Do not operatre the juice extractor without pulp container in place.
- This appliance is not intended for use by persons (including children) with reduced physical, sensory or mental capabilities, or lack of experience and knowledge, unless they have been given supervision or instruction concerning use of the appliance by a person responsible for their safety.
- Children should be supervised to ensure that they do not play with the appliance.