Documents: Go to download!
- Owner's manual - (English, Spanish)
- PARTS AND FEATURES
- OPERATION
- CLEANING
- TROUBLESHOOTING
Table of contents
Bowl Lift Stand Mixer User Manual
PARTS AND FEATURES
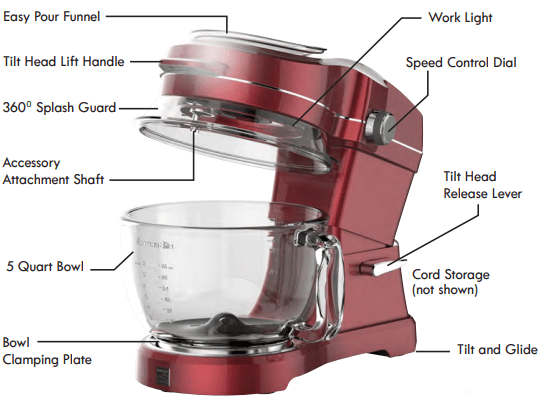
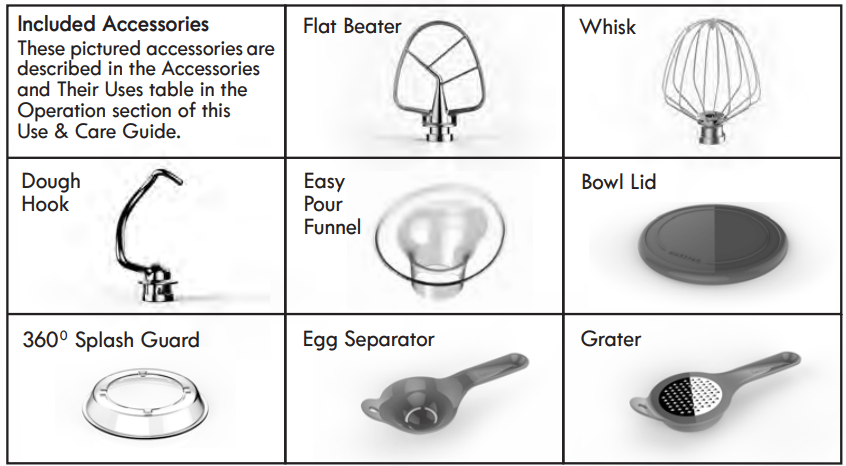
OPERATION
TILT HEAD (See Fig. 1)
• To attach and remove accessories and bowl you must tilt back the Mixer Head by means of the release lever on the right side of the mixer (with the front facing you).
• To unlock the Head from operation position, press lever down with one hand, then with other hand guide spring loaded Head up to lock into raised position.
• To unlock Head from Head down until it locks into operation position.
WARNING: To avoid serious injury, keep fingers and hands away from hinge area when raising or lowering Tilt Head.
TILT AND GLIDE
Glides are built into the bottom of the Mixer to allow easy movement from one location to another across the same surface. To use, first lower Tilt Head into locked position. With one hand lift up on Tilt Head Lift Handle to tilt Mixer back onto glides. With other hand grasp Mixer base at front and push to new location. Lower Mixer back into operation position.
WORK LIGHT
The work light is an LED that shines continuously during mixer operation to help illuminate mixer bowl contents. It also flashes to alert you of operational errors or motor overheating.
| CORD STORAGE The power cord is stored in the base of the mixer. Grasp cord by plug and raise out of slot. Carefully pull the cord out of the mixer and secure it by pressing it down into the slot. The cord is 3-1/2 feet long. Be careful not to overextend the cord. Push the cord all the way back into the base when finished using mixer. | 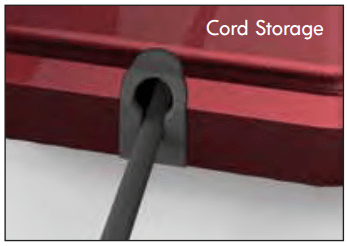 |
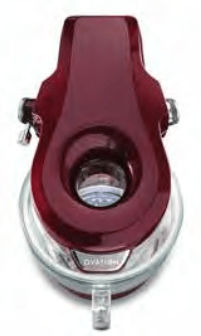
EASY POUR FUNNEL The Easy Pour Funnel allows you to add ingredients directly into the mixing bowl from the top of the mixer.
WARNING: To prevent injury to persons or product damage, NEVER pour boiling water into the glass mixer bowl or use the bowl for heating or cooking purposes. Extreme temperatures can cause the glass bowl to break or shatter.
ATTACHING BOWL TO MIXER (See Fig. 2) 1. Turn speed dial to 0. 2. Unplug mixer from electrical outlet. 3. Press down release lever to tilt head back. 4. Place bowl in Bowl Clamping Plate. 5. Turn bowl clockwise until snug.
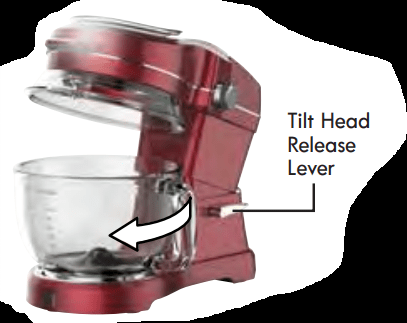
Fig. 2
REMOVING BOWL FROM MIXER (See Fig. 3) 1. Turn speed dial to 0. 2. Unplug mixer from electrical outlet. 3. Press down release lever to tilt head back. 4. Turn bowl counterclockwise until loosened and pull up and out of Bowl Clamping Plate.
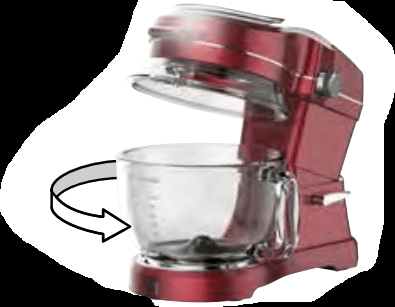
Fig. 3
ATTACHING 3600 SPLASH GUARD (See Fig. 4)
1. Turn speed dial to 0.
2. Unplug mixer from electrical outlet.
3. Press down release lever to tilt head back.
4. Push the splash guard up to fit onto the seating ring on the underside of the Tilt Head.
NOTE: As an optional attachment method, lay the splash guard on top of the bowl and lower the Tilt Head onto it.
| REMOVING 3600 SPLASH GUARD 1. Turn speed dial to 0. 2. Unplug mixer from electrical outlet. 3. Press down release lever to tilt head back. 4. Pull off the splash guard. | 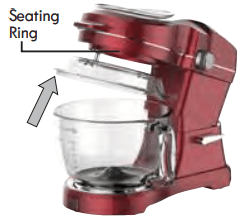 Fig. 4 |
WARNING: Never turn on Mixer with accessories attached unless the Bowl is in place.
ATTACHING MIXING ACCESSORIES (See Fig. 5) 1. Turn speed dial to 0. 2. Unplug mixer from electrical outlet. 3. Press down release lever to tilt head back. 4. Align slot at the top of accessory with pin on Tilt Head shaft. Push accessory up onto shaft and turn counterclockwise until pin moves all the way into the slot | 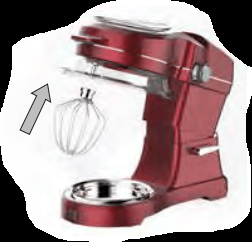 Fig. 5 |
REMOVING MIXING ACCESSORIES
1. Turn speed dial to 0.
2. Unplug mixer from electrical outlet.
3. Press down release lever to tilt head back.
4. Turn Accessory clockwise on shaft until pin on shaft lines up with slot on accessory. Pull accessory off shaft.
SPEED CONTROL DIAL (See Fig. 6)
The Speed Control Dial is located on the right side of the Mixer, and is scaled in digits from 0 to 10 (0 equals OFF). To start the Mixer, turn the Speed Control Dial clockwise from 0. When using the Splash Guard, you may immediately turn the dial to the optimum speed of your recipe. If not using the Splash Guard, start the mixer on the slowest possible speed and gradually raise to optimum speed to avoid splashing ingredients out of the bowl. | 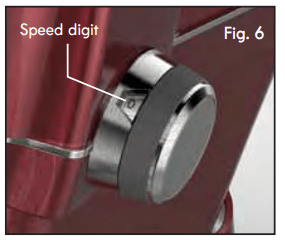 |
OPERATION SAFETY FEATURES
- If the mixer is plugged into an outlet when the speed dial is turned to a speed setting, the mixer will not start and the work light will flash. Unplug the cord and turn the speed dial to 0 before plugging it back in.
- If you attempt to lift the tilt head while the mixer is running, the mixer will shut off and the work light will go out. When you lower the head back into place, the work light will flash. Turn speed dial to 0 and then to a speed setting to restart mixer.
- If the mixer motor becomes overheated, the mixer will shut off and the work light will flash. Turn the speed dial to 0 and allow mixer motor to cool down before restarting.
SPEED SETTINGS
| 1 | Slow Stirring | - Stirring slowly - Combining or mashing - Starting all mixing procedures if Splash Guard is not in place - Adding flour and dry or solid ingredients to batter - Adding liquids to dry ingredients - Combining heavy mixtures |
| 2-3 | Slow Mixing, Faster Stirring | - Slow mixing, mashing, faster stirring - Mix heavy batters and candies - Start mashing potatoes, other vegetables - Cut shortening into flour - Mix thin or splashy batters - Mix and knead yeast dough |
| 4-5 | Medium Mixing, Medium Beating | - Mixing semi-heavy batter (cookies) - Combine sugar and shortening - Add sugar to egg whites for meringues - Medium cake mix speed |
| 6-7 | Creaming (Medium Fast Beating) | - Medium fast beating (creaming) or whipping - Finish mixing cake, doughnut, or other batters - High cake mix speed |
| 8-9 | Whipping (Rapid Beating) | - Whipping cream, egg whites, and broiled frostings |
| 10 | Rapid Whipping | - Whipping small amounts of cream or egg whites |
NOTICE
- Under heavy load the Mixer may not maintain fast speeds.
- Excessive speed when preparing yeast dough may damage Mixer.
WIRE WHISK ADJUSTMENT (See Fig. 7)
- Turn speed dial to 0.
- Unplug Mixer from electrical outlet.
- Press down release lever to tilt head back and lock in place.
- Remove the whisk from the shaft.
- Use a flat blade screwdriver to turn the adjustment set screw in the top of the whisk.
- To raise the whisk in the bowl, lower the set screw by turning clockwise.
- To lower the whisk in the bowl, raise the set screw by turning counterclockwise.
- Reattach the whisk to the mixer shaft.
| CAUTION: Be careful not to turn set screw too far down or up or it may fall out. Also, if turned too far down, the screw may obstruct attaching whisk to shaft. | 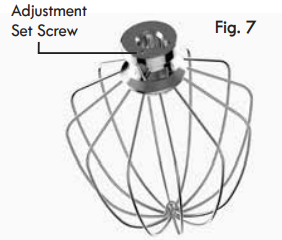 |
MIXING TIPS
- Observe the batter or dough in bowl while mixing. Mix only until contents achieve the appearance called for in recipe, such as “smooth” or “creamy.”
- Follow recipe guidelines when adding nuts, raisins or candied fruits to a mixture.
- Fold such solid ingredients into the bowl in the last few seconds of slow stirring (speed 1), when batter is sufficiently thick to prevent them from sinking to the bottom of baking pan. Dust sticky, candied fruits with flour for equal distribution throughout the batter.
- If not using Splash Guard, mixtures containing large amounts of liquid ingredients should be initially mixed at lower speeds to avoid splashing. Once mixture thickens increase speed.
The Wire Whisk may be adjusted to a lower position to reach a low level of ingredients in the bowl. Adjust as follows:
HOW TO USE THE MIXER FUNNEL
NOTE: Regular use of the Easy Pour Funnel accessory is highly recommended. The accessory inserts into the Mixer Funnel, is removable for convenient cleaning, and using it helps keep Mixer Funnel surfaces free of ingredient residue.
Using one ingredient at a time, slowly add into pour funnel.
Mixer can be operating at low speed when ingredients are being added as long as the Splash Guard is in place.
Gradually continue to add remaining ingredients through the pour funnel.
If you need to scrape down sides of bowl, first turn speed dial to 0 and raise up tilt head.
When pouring liquids through funnel make sure to place speed setting on 0 or low number to keep ingredients from splashing.
Course ingredients such as nuts, dried fruits, or morsels should be folded into the mixture at the final stage of mixing.
Tip: Lightly dust coarse ingredients with all-purpose flour to keep them from retreating to the bottom of the bowl.
Once all ingredients are well-combined, raise up tilt head and twist mixing bowl counterclockwise to remove bowl from clamping plate.
After finished using mixer, clean exterior surfaces by wiping with a damp cloth.
Use dry cloth to wipe thoroughly free of moisture before putting mixer away.
CLEANING
WARNING: Unplug Mixer before touching beaters or other accessories. Failure to do so can result in broken bones, cuts or bruises.
- Always unplug Mixer before cleaning. NEVER immerse Mixer in water. The exterior of the Mixer should only be cleaned with a soft damp cloth.
- Do not use abrasive cleansers or scouring pads when cleaning Mixer.
- Always remove accessories before cleaning Mixer. If washing accessories by hand, rinse and dry completely. Most accessories and the glass bowl are dishwasher safe. Only place the bowl lid in the upper dishwasher rack. Only hand wash the Wire Whisk.
- Wash accessories and bowl as soon as possible after use to keep food from drying on them.
TROUBLESHOOTING
| Mixer will not start | • Make sure mixer is plugged in. • Verify that there is 120V from outlet to mixer. • Verify that Tilt Head is locked into down position. Set speed dial to 0. Then turn dial to a low speed setting. • If Tilt Head is hot to touch, allow 15 minutes for motor to cool, then try starting again. • If above solutions do not work, call Customer Assistance at 1-855-438-7899 |
| Position of wire whisk in bowl is too low or high | • To raise whisk: Remove whisk from mixer shaft. Lower the set screw on top of whisk by turning clockwise. Attach whisk to shaft. Be careful not to turn set screw too far down or it may obstruct attaching whisk to shaft. • To lower whisk: Remove whisk from mixer shaft. Raise the set screw on top of whisk by turning counter- clockwise. Attach whisk to shaft. Do not raise screw too far or it may fall out. • Beater and dough hook are adjusted at factory for optimum efficiency, so there are no further adjustments necessary. |
| Work Light Blinking | • Lock Tilt Head in down position. • Set speed dial to 0 position. • If blinking does not stop, and unit is hot to touch, unplug and wait 15 minutes for motor overheat condition to clear. • If unit cools and still does not operate, call Customer Assistance at 855-438-7899 |
| Surface Area Hot | • Mixer may warm up during use. You may not be able to comfortably touch the top of the Mixer. This is normal. • Under heavy loads with extended period of mixing time the surface area of mixer may become hot. This is normal. • Mixer is equipped with safety thermal shut off to protect motor and user from operating in too hot condition. Allow unit to cool for period no less than 15 minutes before operating again. |
See other models: 51113 00840713 70332 79343 99792
