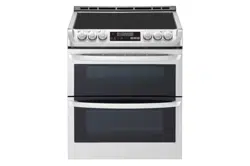
Documents: Go to download!
User Manual
- User Manual - (English, Spanish)
- Specification - (English)
- INSTALLATION
- OPERATION
- MAINTENANCE
- TROUBLESHOOTING
Table of contents
User manual Electric Range
INSTALLATION
Engaging the Anti-tip Device
- Move the range close enough to the opening to plug into the receptacle.
- Slide the range into position ensuring that the back leg slides under the anti-tip bracket. The range should sit flush against the back wall when properly installed.
- Carefully attempt to tip the range forward to ensure that the anti-tip bracket is engaged properly. If properly installed, the anti-tip bracket will prevent the range from being tipped. If the range can be tipped, reinstall the range until the anti-tip bracket is properly installed and the range will not tip forward.
- Turn on electrical power. Check the range for proper operation.
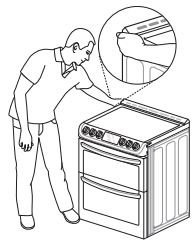
Optional Rear Filler
If the counter does not bridge the opening at the rear wall, use the rear filler kit provided with the slide-in range.
NOTE If the countertop depth is greater than 25" there will be a gap between the filler kit and the back wall.
If the countertop depth is less than 24", the control panel will not sit flush with the countertop.
Installing the Rear Filler
1 Using a screwdriver, remove the three screws holding the rear bracket in place.
2 Attach the rear bracket and filler assembly as shown, using the three screws removed in step 1.
Test Run
Check if the range is properly installed and run a test cycle.
1 Before using the cooktop for the first time, clean it with a ceramic cooktop cleaner. This helps protect the top and makes cleanup easier.
2 Press Upper CLEAR/OFF and Lower CLEAR/ OFF to start test.
3 Turn each knob to the Hi position to check that the surface heating elements are working properly. The elements should glow red and radiate heat, and they should cycle on and off periodically even when the knob is in the Hi position. This cycling prevents the glass-ceramic from being cracked by thermal shock. IMPORTANT : The Warming Zone does not consume enough power to glow red.
4 After checking all the surface heating elements, check the locking system by pressing Lower CLEAR/OFF for three seconds. The oven door should lock and the cooktop should not operate while the Lockout function is turned on. Press Lower CLEAR/OFF for three seconds to disable Lockout.
5 Now check the oven's operation. Turn the oven mode knob to select the Bake mode. 350 °F appears in the display. Press Start.
6 The oven should finish preheating in 15 minutes, and the convection fan should operate while the oven is preheating.
7 After checking the oven's operation, turn the temperature up to 450 °F and leave the oven on for at least an hour to help remove any oil which might cause smoke and odors when first using the oven.
NOTE Smoke may come out of the range when it is first used.
OPERATION
Control Panel Overview
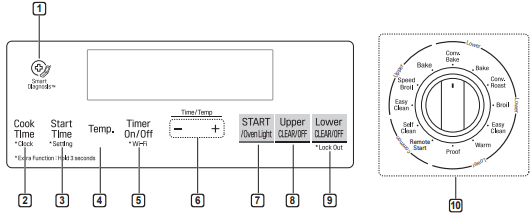
1. Smart DiagnosisTM
- Use during the Smart Diagnosis feature.
2. Cook Time / Clock
- Press the button to set the desired amount of time for food to cook. The oven shuts off when the set cooking time runs out.
- Press and hold button for three seconds to set the time of day.
3. Start Time / Setting
- Press the button to set the delayed timed cook. The oven starts at the set time.
- Press and hold button for three seconds to select and adjust oven settings.
4. Temp.
- Press the button to change the oven or meat probe temperature during cooking.
5. Timer On/Off / Wi-Fi
- Press the button to set or cancel automatic timer.
- Press and hold button for three seconds to connect to Wi-Fi network.
6. -/+
- Press the plus button to increase cooking time or oven temperature.
- Press the minus button to decrease cooking time or oven temperature.
7. START / Oven Light
- Press the button to start all oven features.
- Press the button to manually turn the oven light on/ off.
8. Upper CLEAR/OFF
- Press the button to end all upper oven features.
9. Lower CLEAR/OFF / Lock Out
- Press the button to end all lower oven feature.
- Press and hold button for three seconds to lock the door and control panel.
10. Oven Mode Knob
- Turn the knob to select oven operating mode.
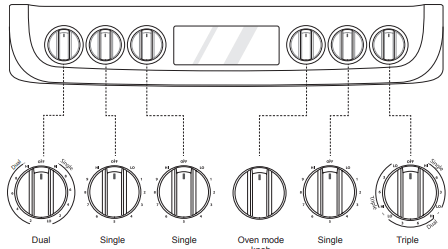
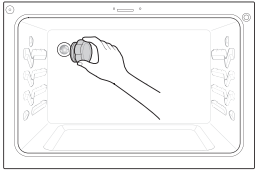
Knob Positions
After cleaning the oven knobs, make sure to replace each knob in the correct position. Failure to do so can result in improper operation of the burners.
Changing Oven Settings
Clock
The clock must be set to the correct time of day in order for the automatic oven timing functions to work properly.
- Press and hold Cook Time for three seconds. CLO shows in the display.
- Press plus(+) or minus(-) to select the desired time. Plus(+) to increase the time and minus(-) to decrease the time.
- Press Start to enter the time and start the clock.
NOTE
- The time of day cannot be changed during a timed baking or self-clean cycle.
- If no other keys are pressed within 25 seconds of pressing Clock, the display reverts to the original setting.
- If the display colon in the clock is blinking, you may have experienced a power failure. Reset the time.
Oven Light
The interior oven light automatically turns on when the door is opened. Press Oven Light to manually turn the oven light on.
NOTE The oven light cannot be turned on if the Self Clean function is active.
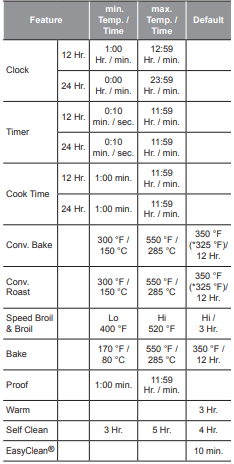
Minimum & Maximum Default Settings
All of the features listed have a minimum and a maximum time or temperature setting that may be entered into the control. An entry acceptance beep sounds each time a control key is pressed.
An entry error tone (two short tones) sounds if the entry of the temperature or time is below the minimum or above the maximum setting for the feature.
Timer On/Off
The Timer On/Off feature serves as an extra timer in the kitchen that beeps when the set time has run out. It does not start or stop cooking.
The Timer On/Off feature can be used during any of the oven control function.
Setting the Timer (for example, to set 5 minutes)
1 Press Timer On/Off. 0:00 with HR inside it appears and Timer flashes in the display.
2 Press plus(+) or minus(-) to select the desired time. Plus(+) increases the time and minus(-) decreases the time.
3 Press Timer On/Off or Start to start the Timer. The remaining time countdown appears in the display.
4 When the set time runs out, End shows in the display. The indicator tones sound every 15 seconds until Timer On/Off is pressed.
NOTE
- If the remaining time is not in the display, recall the remaining time by pressing Timer On/Off.
- Press Timer On/Off twice to set the time in minutes and seconds.
- Press Timer On/Off once to set the time in hours and minutes.
Canceling the Timer
1 Press Timer On/Off once. The display returns to the time of day
Wi-Fi
The Wi-Fi button is used to connect the appliance to a home Wi-Fi network.
1 Press Upper CLEAR/OFF and Lower CLEAR/ OFF.
2 Press and hold Timer On/Off for 3 seconds.
3 The power-on chime sounds, "Set" appears in the display, and the Wi-Fi icon ( ) blinks.
4 Register the appliance on the Wi-Fi network using the smart phone app. (See page 35.)
5 To disconnect the appliance from the network, delete it from the registered appliances in the app.
Settings
Press and hold Start Time for three seconds. Then press the Start Time key repeatedly to toggle through and change oven settings.
The Setting key allows you to:
- set the hour mode on the clock (12 or 24 hours)
- enable/disable convection auto conversion
- adjust the oven temperature
- activate/deactivate the preheating alarm light
- set the beeper volume
- switch the temperature scale between Fahrenheit and Celsius
- adjust cooktop on alert volume
Setting the Hour Mode
The control is set to use a 12-hour clock. To reset the clock to 24-hour mode, follow the steps below.
- 1 Press and hold Start Time for three seconds.
- 2 Press plus(+) or minus(-) to set the desired hour mode on the clock.
- 3 Press Start to accept the desired change.
Setting Convection Auto Conversion
If you are new to convection cooking, LG makes converting standard recipes for convection cooking easy. When Conv. Bake and Conv. Roast are selected, Convection Auto Conversion automatically converts the standard recipe temperature entered to a convection temperature by subtracting 25 °F / 14 °C. This auto-converted temperature shows on the display. For example, select Conv. Bake, enter 350 °F, and 325 °F shows on the display after preheat.
Convection Auto Conversion is enabled by default. To change the setting, follow these instructions.
1 Press and hold Start Time for three seconds. Then press Start Time repeatedly until Auto appears in the display.
2 Press plus(+) or minus(-) to enable or disable the feature.
3 Press Start to accept the change.
Adjusting the Oven Temperature
Your new oven may cook differently from the one it replaced. Use your new oven for a few weeks to become more familiar with it before changing the temperature settings. If after familiarizing yourself with the new oven, you still think that it is too hot or too cold, you can adjust the oven thermostat yourself.
NOTE To begin, either raise or lower the thermostat 15 °F (8 °C). Try the oven with the new setting. If the oven still needs adjustment, raise or lower the thermostat again, using the first adjustment as a gauge. For example, if the adjustment was too much, raise or lower the thermostat 10 °F (5 °C). If the adjustment was not enough, raise or lower the thermostat 20 °F (12 °C). Proceed in this way until the oven is adjusted to your satisfaction.
1 Press and hold Start Time for three seconds. Then press Start Time repeatedly until U_AJ or L_AJ appears in the display. U_AJ adjusts the upper oven and L_AJ adjust the lower oven.
2 To increase the temperature, press plus (+) until the desired amount appears in the display. To decrease the temperature, press minus (-) until the desired amount appears in the display.
3 Press Start to accept the change.
NOTE
- This adjustment does not affect the broiling or Self Clean temperatures. The adjustment is retained in memory after a power failure. The oven temperature can be increased (+) or decreased (-) as much as 35 °F or 19 °C.
- Once the temperature is increased or decreased, the display shows the adjusted temperature until it is readjusted.
Turning the Preheat Alarm Light On/Off
When the oven reaches its set-temperature, the preheating alarm light flashes 5 times or until the oven door is opened.
You can activate or deactivate the preheating alarm light.
1 Press and hold Start Time for three seconds. Then press Start Time repeatedly until PrE appears in the display.
2 Press plus(+) or minus(-) to turn the function on/off.
3 Press Start to accept the change.
Adjusting the Beeper Volume
1 Press and hold Start Time for three seconds. Then press Start Time repeatedly until BEEP appears in the display.
2 Press plus(+) or minus(-) to select Hi, Lo, Off.
3 Press Start to accept the change.
Selecting Fahrenheit or Celsius
Set the oven temperature display to show either Fahrenheit (°F) or Celsius (°C) units. The oven defaults to Fahrenheit unless changed by the user.
1 Press and hold Start Time for three seconds. Then press Start Time repeatedly until Unit appears in the display.
2 Press plus(+) or minus(-) to select F(Fahrenheit) or C(Celsius).
3 Press Start to accept the change.
Adjusting Cooktop On Alert Volume
1 Press and hold Start Time for 3 seconds. Then press Start Time repeatedly until CtOP appears in the display.
2 Press plus (+) or minus (-) to select Hi, Lo, Off.
3 Press Start to accept the change.
Lock Out
The Lock Out feature automatically locks the oven door and prevents most oven controls from being turned on. It does not disable the clock, timer or the interior oven light.
1 Press and hold Lower CLEAR/OFF for three seconds.
2 The lock melody sounds, Loc appears in the display, and the lock icon  blinks in the display.
3 Once the oven door is locked, the lock  indicator stops blinking and remains on.
4 To deactivate the Lock Out feature, press and hold Lower CLEAR/OFF for three seconds. The unlock melody sounds and the door and the controls unlock.
Start Time (Delayed Timed Cook)
The automatic timer of the Delayed Timed Cook function turns the oven on and off at the time you select. This feature can be used with the Bake, Conv. Bake and Conv. Roast modes.
Setting a Delayed Timed Cook
For example, to bake at 300 °F and delay the start of baking until 4:30, first set the clock for the correct time of day.
1 Turn the oven mode knob to select the Bake mode. 350 °F appears in the display.
2 Set the temperature: press minus(-) until 300 °F appears in the display.
3 Press Cook Time and press plus(+) or minus(-) to set the baking time.
4 Press Start Time.
5 Set the start time: press plus(+) until 4:30 appears in the display.
6 Press Start. A short beep sounds and Timed Delay and the start time appear in the display. The oven begins baking at the set start time.
NOTE
- To cancel the Delayed Timed Cook function, Press Clear/Off at any time.
- To change the cooking time, repeat step 3 and press Start.
- If the oven clock is set as a 12-hour clock, you can delay the cook time for 12 hours. If the oven clock is set as a 24-hour clock, you can delay the cook time for 24 hours.
The oven will continue to cook for the set amount of time and then turn off automatically. When the cooking time has elapsed:
- End and the time of day show in the display.
- The cook-end indicator tone sounds every 60 seconds until Clear/Off is pressed.
CAUTION
- Use the automatic timer when cooking cured or frozen meats and most fruits and vegetables. Foods that can easily spoil, such as milk, eggs, fish, meat or poultry, should be chilled in the refrigerator. Even when chilled, they should not stand in the oven for more than 1 hour before cooking begins, and should be removed promptly when cooking is completed.
- Eating spoiled food can result in sickness from food poisoning.
Cook Time (Timed Cook)
Set the oven to cook for a specific length of time using the Timed Cook feature. This feature can only be used with the Bake, Conv. Bake and Conv. Roast modes.
Setting the Cook Time Function
For example, to bake at 300 °F for 30 minutes, first set the clock to the correct time of day.
1 Turn the oven mode knob to select the Bake mode. 350 °F appears in the display.
2 Set the oven temperature. For this example, press minus(-) until 300 °F appears in the display.
3 Press Cook Time. Timed flashes in the display. Bake, 0:00 and 300 °F appear in the display.
4 Set the baking time: press plus(+) until 30:00 appears in the display. The baking time can be set for any amount of time between 1 minute and 11 hours and 59 minutes.
5 Press Start.
The oven will continue to cook for the set amount of time and then turn off automatically. When the cooking time has elapsed:
- End and the time of day show in the display.
- The cook end indicator tone sounds every 60 seconds until Clear/Off is pressed.
Changing the Cook Time during Cooking
For example, to change the cook time from 30 minutes to 1 hour and 30 minutes, do the following.
1 Press Cook Time.
2 Change the baking time: press plus(+) until 1 hour and 30 minutes appears in the display.
3 Press Start to accept the change.
Using the Cooktop
Cooking Areas
The cooking areas on your range are identified by permanent circles on the glass cooktop surface. For the most efficient cooking, fit the pan size to the element size.
Pans should not extend more than 1/2 to 1-inch beyond the cooking area.
When a control is turned on, a glow can be seen through the glass cooktop surface.
NOTE It is normal for the surface elements to cycle on and off during cooking, even on higher settings. This will happen more frequently if cooking on a lower temperature setting.
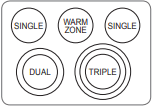
NOTE It is normal to see a very faint red ring around the outer edge of a dual or triple element when using it as a single element at a high heat setting. This is only a reflection from the bright glow of the center element and is not a malfunction.
Hot Surface Indicator
The hot surface indicator light glows as long as any surface cooking area is too hot to touch.
It remains on after the element is turned off and until the surface has cooled to approximately 150 °F.
Using the Cooktop Elements
Turning on a Single element
1 Push the Single element knob in.
2 Turn the knob in either direction to the desired setting. The control knob clicks when it is positioned at both Off and Hi.
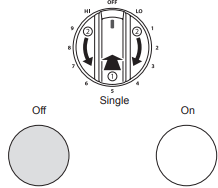
NOTE
- Hi is the highest temperature available.
- Lo is the lowest temperature available.
1 Push in the appropriate knob.
2-A Turn the knob counterclockwise to use it as a Single element.
2-B Turn the knob clockwise to use it as a Dual unit.

Turning on a Triple element (on some models)
There is one triple element that can be used as either a single, dual or triple element.
1 Push in the appropriate knob.
2-A Turn the knob counterclockwise to use the Single element.
2-B Turn the knob clockwise to the Dual position to use as a Dual element.
2-C Turn the knob clockwise to the Triple position to use as a Triple element

Turning on the Warming Zone
The Warming Zone, located in the back center of the glass surface, will keep hot, cooked food at serving temperature. Use the Warming Zone to keep food warm after it has already been cooked. Attempting to cook uncooked or cold food on the Warming Zone could result in a food-borne illness.
Turning on a Warming Zone element
1 Push the Warming Zone element knob in.
2 Turn the knob in either direction to the desired setting. The control knob clicks when it is positioned at both Off and Hi.

NOTE
- For best results, food on the warmer should be kept in its container or covered with a lid or aluminum foil to maintain food quality.
- The warmer will not glow red like the other cooking elements.
The Recommended Surface Cooking Setting
| Setting | Recommended Use |
| 8.5-Hi |
• Bring liquid to a boil • Start cooking |
| 5.5-8.0 |
• Hold a rapid boil, frying, deep fat fry • Quickly brown or sear food |
| 3.5-5.0 |
• Maintain a slow boil • Fry or saute foods • Cook soups, sauces and gravies |
| 2.2-3.0 |
• Stew or steam food • Simmer |
| Lo-2.0 |
• Keep food warm • Melt chocolate or butter • Simmer |
Using the Oven
Before Using the Oven
NOTE
- Because the oven temperature cycles, an oven thermometer placed in the oven cavity may not show the same temperature that is set on the oven.
- It is normal for the convection fan to run while preheating during a regular bake cycle.
- The convection fan motor may run periodically during a regular bake cycle.
- The heat turns off if the door is left open during baking. If the door is left open for longer than 30 seconds during baking, the heat turns off. The heat turns back on automatically once the door is closed.
Oven Vent
Areas near the vent may become hot during operation and may cause burns. Do not block the vent opening. Avoid placing plastics near the vent as heat may distort or melt the plastic.
It is normal for steam to be visible when cooking foods with high moisture content.

Using Oven Racks
The racks have a turned-up back edge that prevents them from being pulled out of the oven cavity.
Removing Racks
1 Pull the rack straight out until it stops.
2 Lift up the front of the rack and pull it out.
Replacing Racks
1 Place the end of the rack on the support. Make sure rack is level and both sides are in the same rack position.
2 Tilt the front end up and push the rack in.
Bake
Bake is used to prepare foods such as pastries, breads and casseroles. The oven can be programmed to bake at any temperature from 170 °F (80 °C) to 550 °F (285 °C). The default temperature is 350 °F (175 °C).
Setting the Bake Function (example: Bake at 375°F)
1 Turn the oven mode knob to select Bake.
2 Set the oven temperature: For example, press plus(+) until 375 °F appears in the display.
3 Press Start. The oven starts to preheat. As the oven preheats, the temperature is displayed and rises in 5 degree increments. Once the oven reaches the set temperature, a tone sounds and the oven light blinks on and off.
4 When cooking is complete, press Clear/Off.
5 Remove food from the oven.
NOTE It is normal for the convection fan to operate periodically throughout a normal bake cycle in the lower oven. This is to ensure even baking results.
Changing the Temperature during Cooking
1 Press Temp.
2 Press plus(+) or minus(-) to increase or decrease the set temperature.
3 Press Start.
Convection Mode
The convection system uses a fan to circulate the heat evenly within the oven. Improved heat distribution allows for even cooking and excellent results while cooking with single or multiple racks.
Setting the Convection Function (example: Conv. Bake/Roast at 350°F)
1 Turn the oven mode knob to select Conv. Bake or Conv. Roast.
2 Set the oven temperature: For example, press plus(+) until 375 °F appears in the display.
3 Press Start. The display shows Conv. Bake or Conv. Roast and the oven temperature starting at 100 °F.
As the oven preheats, the display shows increasing temperatures in 5-degree increments. Once the oven reaches the set adjusted temperature, a tone sounds and the oven light flashes on and off. The display shows the auto-converted oven temperature, 350 °F and the fan icon.
4 When cooking has finished or to cancel, press Clear/Off.
NOTE The oven fan runs while convection baking. The fan stops when the door is open. In some cases, the fan may shut off during a convection bake cycle.
Tips for Convection Baking
- Use Convection Bake for faster and more even multiple-rack cooking of pastries, cookies, muffins, biscuits, and breads of all kinds.
- Bake cookies and biscuits on pans with no sides or very low sides to allow heated air to circulate around the food. Food baked on pans with a dark finish will cook faster.
- When using Convection Bake with a single rack, place the oven rack in position 3. If cooking on multiple racks, place the oven racks in positions 1 and 3 (for two racks).
- Multiple oven rack cooking may slightly increase cook times for some foods.
- Cakes, cookies and muffins have better results when using multiple racks.
The Convection Roast feature is designed to give optimum roasting performance. Convection Roast combines cooking with the convection fan to roast meats and poultry. The heated air circulates around the food from all sides, sealing in juices and flavors. Foods are crispy brown on the outside while staying moist on the inside. Convection roasting is especially good for large tender cuts of meat, uncovered.
Tips for Convection Roasting
Use a broiler pan and grid when preparing meats for convection roasting. The broiler pan catches grease spills and the grid helps prevent grease splatters.
1 Place the oven rack in the bottom rack position.
2 Place the grid in the broiler pan.
3 Place the broiler pan on the oven rack.

Remote Start
If the appliance is registered on a home Wi-Fi network, this function starts preheating and then holds the temperature for up to an hour (including preheating time). If the appliance is not registered on the network, “OFF” appears in the display. Follow the instructions on page 35 to register the appliance on the network.
Set the oven mode knob to the Remote Start position to use the function.
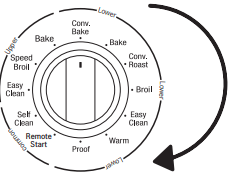
Setting Remote Start
1 Open the oven door to make sure the oven is empty and ready for pre-heating. Close the oven door.
2 Within 30 seconds of closing the door, turn the oven mode knob to Remote Start to use the function. If more than 30 seconds passes before you initiate Remote Start, “door” appears in the display. If this occurs, open and close the door and try again.
3 When ON appears in the display, the Remote Start function is ready to use.
4 Follow the directions in the smart phone application to set the cook mode, temperature, and run time (preheating time plus holding time).
NOTE
Do not place food in oven before or during Remote Start run time.
Remote Start is disconnected in the following situations:
- Remote Start is never set up in the smart phone app.
- The Remote Start status is "OFF" or "door".
- Remote Start function can not be started if either upper or lower oven is in use.
- The Remote Start function cannot be started when the oven door is open. A beep alerts you to shut the door.
MAINTENANCE
Cleaning the Glass-Ceramic Cooktop
Use ceramic cooktop cleaner on the glass cooktop. Other creams may not be as effective or may scratch, damage or stain the cooktop surface.
To maintain and protect the surface of the glass cooktop, follow these steps:
1 Before using the cooktop for the first time, clean it with a ceramic cooktop cleaner. This helps protect the top and makes cleanup easier.
2 Use ceramic cooktop cleaner daily to help keep the cooktop looking new.
3 Shake the cleaning cream well. Apply a few drops of cleaner directly to the cooktop.
4 Use a paper towel to clean the entire cooktop surface.
5 Rinse with clear water and use a dry cloth or paper towel to remove all cleaning residue.
NOTE Do not heat the cooktop until it has been cleaned thoroughly.
IMPORTANT If any sugar or food containing sugar (preserves, ketchup, tomato sauce, jellies, fudge, candy, syrups, chocolate) spills, or plastic or foil melts on the cooktop, remove the molten material IMMEDIATELY with a metal razor scraper (it will not damage the decorated cooking surface) while the cooking surface is still hot to avoid the risk of damage to the glass-ceramic surface. For your safety, please use an oven mitt or pot holder while scraping the hot cooking surface.
NOTE Sugary spillovers(such as preserves, ketchup, tomato sauce, jellies, fudge, candy, syrups, chocolate) or melted plastics can cause pitting of the surface of your cooktop. (Not covered by the warranty)
Burned-On Residue
1 While the cooktop is still hot, remove any burnt on deposits or spilled food from the glass-ceramic cooking surface with a suitable metal razor scraper. (Similar to scraping paint off of a windowpane, it will not damage the decorated cooking surface.) Hold the scraper at an approximate 30° angle to the cooktop.

NOTE
- Do not use a dull or nicked blade.
- To prevent burns, wear an oven mitt or pot holder while using the metal scraper.
2 When the cooking surface has cooled down, apply a few dabs (about the size of a dime) of a ceramic glass cooktop cleaner in each burner area and work the cleaning cream over the cooktop surface with a damp paper towel.
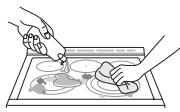
3 Rinse with clean water and wipe the cooktop surface with a clean, dry paper towel.

Maintaining the Cooktop
DO NOT use chlorine bleach, ammonia, or other cleaners not specifically recommended for use on glass-ceramic cooktops.
Let your glass-ceramic cooking surface cool off before cleaning.

Metal Marks and Scratches
1 Be careful not to slide pots and pans across the cooktop. Doing so will leave metal markings on the cooktop surface. To help remove these marks, use a ceramic cooktop cleaner with a cleaning pad for ceramic cooktops.
2 If pots with a thin overlay of aluminum or copper are allowed to boil dry, the overlay may leave black discoloration on the cooktop. This should be removed immediately before heating again or the discoloration may be permanent.
CAUTION Cookware with rough or uneven bottoms can mark or scratch the cooktop surface.
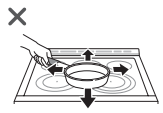
- Do not slide metal or glass across the cooktop surface.
- Do not use cookware with any dirt build-up on the bottom.
Cleaning Tips
- Allow the oven to cool to room temperature before using the EasyClean® cycle. If your oven cavity is above 150 °F (65 °C), Hot will appear in the display, and the EasyClean® cycle will not be activated until the oven cavity cools down.
- A plastic spatula can be used as a scraper to scrape off any chunks or debris before and during oven cleaning.
- Using the rough side of a non-scratch scouring pad may help to take off burnt-on stains better than a soft sponge or towel.
- Certain non-scratch scrubbing sponges, such as those made of melamine foam, available at your local stores, can also help improve cleaning.
- The range should be level to ensure that the bottom surface of the oven cavity is entirely covered by water at the beginning of the EasyClean® cycle.
- For best results, use distilled or filtered water. Tap water may leave mineral deposits on the oven bottom.
- Soil baked on through several cooking cycles will be more difficult to remove with the EasyClean® cycle.
- Do not open the oven door during the EasyClean® cycle. Water will not get hot enough if the door is opened during the cycle.
- For hard to reach areas such as the back surface of the lower oven, it is better to use the Self Clean cycle.
EasyClean® Instruction Guide
1 Remove oven racks and accessories from the oven.
2 Scrape off and remove any burnt-on debris with a plastic scraper.

Suggested plastic scrapers:
- Hard plastic spatula
- Plastic pan scraper
- Plastic paint scraper
- Old credit card
3 Fill a spray bottle (10 oz or 300 ml) with water and use the spray bottle to thoroughly spray the inside surfaces of the oven.
4 Use at least 1/5 (2 oz or 60 ml) of the water in the bottle to completely saturate the soil on both the walls and in the corners of the oven.
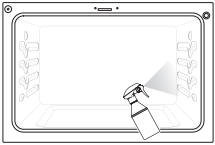
5 Spray or pour the remaining water (8 oz or 240 ml) onto the bottom center of the oven cavity. The indentation on the oven bottom should be fully covered to submerge all soils. Add water if necessary
NOTE If cleaning multiple ovens, use an entire bottle of water to clean each oven. Do not spray water directly on the door. Doing so will result in water dripping to the floor.
6 Close the oven door. Turn the oven mode knob to select EasyClean®. Press Start.
7 A tone will sound at the end of the 10 minute cycle. Press Clear/Off to clear the display and end the tone.
8 After the cleaning cycle and during hand-cleaning, enough water should remain on the oven bottom to completely submerge all soils. Add water if necessary. Place a towel on the floor in front of the oven to capture any water that may spill out during hand-cleaning.
9 Clean the oven cavity immediately after the EasyClean® cycle by scrubbing with a wet, non-scratch scouring sponge or pad. (The scouring side will not scratch the finish.) Some water may spill into the bottom vents while cleaning, but it will be captured in a pan under the oven cavity and will not hurt the burner.

10 Once the oven cavity is cleaned, wipe any excess water with a clean dry towel. Replace racks and any other accessories.
11 If some light soils remain, repeat the above steps, making sure to thoroughly soak the soiled areas. If stubborn soils remain after multiple EasyClean® cycles, run the Self Clean cycle. Be sure that the oven cavity is empty of oven racks and other accessories, and that the oven cavity surface is dry before running the Self Clean cycle. Consult the Self Clean section of your owner’s manual for further details.
Self Clean
The Self Clean cycle uses extremely hot temperatures to clean the oven cavity. While running the Self Clean cycle, you may notice smoking or an odor. This is normal; especially if the oven is heavily soiled.
During Self Clean, the kitchen should be well ventilated to minimize the odors from cleaning.
Before Starting Self Clean
- Remove the oven racks, broiler pan, broiler grid, all cookware, aluminum foil or any other material from the oven.
- The kitchen should be well ventilated to minimize the odors from cleaning.
- Wipe any heavy spillovers on the bottom of the oven.
- Make sure that the oven light bulb cover is in place and the oven light is off.
- The oven light cannot be turned on during a Self Clean cycle. The oven light cannot be turned on until the oven temperature has cooled below 500 ˚F (260 ˚C) after a Self Clean cycle is complete.
Setting Self Clean with a Delayed Start
1 Remove all racks and accessories from the oven.
2 Turn the oven mode knob to select Self Clean. The oven defaults to the recommended four-hour self clean for a moderately soiled oven. Press plus(+) or minus(-) repeatedly to cycle through self-clean times in the upper or lower oven. Both ovens cannot use the self-clean function at the same time.
3 Press Start Time.
4 Press plus(+) or minus(-) to enter the time of day you would like the Self Clean to start.
5 Press Start.
NOTE It may become necessary to cancel or interrupt a Self Clean cycle due to excessive smoke or fire in the oven. To cancel the Self Clean function, press Clear/Off.
During Self Clean
- The Self Clean cycle uses extremely hot temperatures to clean the oven cavity. While running the Self Clean cycle, you may notice smoking or an odor. This is normal, especially if the oven is heavily soiled.
- As the oven heats, you may hear sounds of metal parts expanding and contracting. This is normal and will not damage the oven.
- Do not force the oven door open when the lock
 is displayed. The oven door remains locked until the oven temperature has cooled. Forcing the door open will damage the door.
After the Self Clean Cycle
- The oven door remains locked until the oven temperature has cooled.
- You may notice some white ash in the oven. Wipe it off with a damp cloth or a soap-filled steel wool pad after the oven cools. If the oven is not clean after one self-clean cycle, repeat the cycle.
- If oven racks were left in the oven and do not slide smoothly after a self-clean cycle, wipe racks and rack supports with a small amount of vegetable oil to make them glide more easily.
- Fine lines may appear in the porcelain because it went through heating and cooling. This is normal and will not affect performance.
NOTE
- The Self Clean cycle cannot be started if the Lockout feature is active.
- Once the Self Clean cycle is set, the oven door locks automatically. You will not be able to open the oven door until the oven has cooled. The lock releases automatically.
- Once the door has been locked, the lock indicator light stops flashing and remains on. Allow about 15 seconds for the oven door lock to activate.
- If the clock is set for a 12-hour display (default) the Delayed Self Clean can never be set to start more than 12 hours in advance.
- After the oven is turned off, the convection fan keeps operating until the oven has cooled down.
Changing the Oven Light
The oven light is a standard 40-watt appliance bulb. It turns on when the oven door is open. When the oven door is closed, touch Start to turn it on or off.
- Unplug the range or disconnect power and make sure that the oven and bulb are cool first.
- Turn the glass bulb cover in the back of the oven counterclockwise to remove.
- Turn the bulb counterclockwise to remove it from the socket.
- Insert the new bulb and turn it clockwise.
- Insert the glass bulb cover and turn it clockwise.
- Plug in the range or reconnect the power.
Cleaning the Exterior
Painted and Decorative Trim
For general cleaning, use a cloth with hot soapy water. For more difficult soils and built-up grease, apply a liquid detergent directly onto the soil. Leave it on for 30 to 60 minutes. Rinse with a damp cloth and dry. Do not use abrasive cleaners.
Stainless Steel Surfaces
To avoid scratches, do not use steel wool pads.
1 Place a small amount of stainless steel appliance cleaner or polish on a damp cloth or paper towel.
2 Clean a small area, rubbing with the grain of the stainless steel if applicable.
3 Dry and buff with a clean, dry paper towel or soft cloth.
4 Repeat as necessary.
NOTE
- Do not use a steel wool pad. it will scratch the surface.
- To clean the stainless steel surface, use warm sudsy water or a stainless steel cleaner or polish.
- Always wipe in the direction of the metal surface finish.
- Stainless steel appliance cleaner or polish can be purchased online or from most retailers of appliances or home goods.
Removing and Replacing the Lift-Off Oven Doors
Upper Oven
Removing the Door
1 Fully open the door.
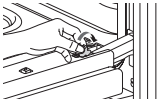
2 Lift up and rotate the hinge locks toward the hinge until they stop.
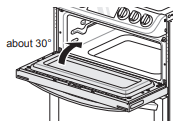
3 Close the door to 30 degrees (you will feel the door stop). The hinge locks will contact the oven frame.
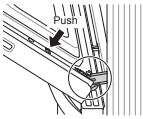
4 Press the hinge release buttons on either side of the door.
5 Lift the door up until it is clear of the hinges.
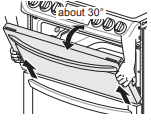
Replacing the Door
1 Be sure both hinges are in a 30 degree position.
2 Slide the door back onto the hinges until you hear a solid click and the release buttons have engaged.

3 Fully open the door.
4 Push the hinge locks down onto the door frame.

5 Close the oven door
TROUBLESHOOTING
FAQs
What types of cookware are recommended for use with the cooktop?
- The pans must have a flat bottom and straight sides.
- Only use heavy-gauge pans.
- The pan size must match the amount of food to be prepared and the size of the surface element.
- Use tight fitting lids.
- Only use flat-bottom woks or 12" to 14" roundbottom woks when using an LG supplied wok grate.
Why do the heating elements appear to be turning ON and OFF during use of the cooktop or oven?
Depending on your cooktop element setting or the temperature selected in your oven, it is NORMAL for the cooking elements to cycle on and off.
My new oven doesn’t cook like my old one. Is there something wrong with the temperature settings?
No, your oven has been factory tested and calibrated. For the first few uses, follow your recipe times and temperatures carefully. If you still think your new oven is too hot or too cold, you can adjust the oven temperature yourself to meet your specific cooking needs. Refer to the Oven Temperature Adjustment section in this manual for easy instructions on how to adjust your thermostat.
Is it normal to hear a clicking noise coming from the back of my oven when I am using it?
Your new range is designed to maintain a tighter control over your oven’s temperature. You may hear your oven’s heating elements click on and off more frequently on your new oven. This is NORMAL.
Why is the time flashing?
This means that the product has just been plugged in, or that it has experienced a power interruption. To clear the flashing time, press any button and reset the clock if needed.
During convection cooking the fan stops when I open the door. Is that normal?
Yes, this is normal. When the door is opened, the convection fan will stop until the door is closed.
Can I use aluminum foil to catch drippings in my oven cavity?
Never use aluminum foil to line the bottom or sides of the oven. The foil will melt and stick to the bottom surface of the oven and will not be removable. Use a sheet pan lined with parchment paper and placed on a lower oven rack to catch drippings instead. (If foil has already melted onto the bottom of the oven, it will not interfere with the oven's performance.)
Can I use aluminum foil on the racks?
Do not cover racks with aluminum foil. Covering entire racks with foil restricts air flow, leading to poor cooking results. Use a sheet pan lined with parchment paper under fruit pies or other acidic or sugary foods to prevent spillovers from damaging the oven finish.
Can I leave my racks in the oven when running a Self Clean cycle?
No. Although it will not damage the racks, it will discolor them and may make them hard to slide in and out during use. Remove all items from the oven before starting a Self Clean cycle.
What should I do if my racks are sticky and have become hard to slide in and out?
Over time, the racks may become hard to slide in and out. Apply a small amount of olive oil to the ends of the racks. This will work as a lubricant for easier gliding.
What should I do for hard to remove stains on my cooktop?
The cooktop should be cleaned after every use to prevent permanent staining. When cooking foods with high sugar content, such as tomato sauce, clean the stain off with a scraper while the cooktop is still warm. Use an oven mitt when scraping to prevent burns. Refer to the MAINTENANCE section of this owner's manual for further instruction.
Why aren't the function buttons working?
Make sure that the range is not in Lock Out mode. The lock  will show in the display if Lock Out is activated. To deactivate Lock Out, press and hold Lower CLEAR/OFF for three seconds. The unlock melody sounds and Loc appears in the display until the controls are unlocked.
My range is still dirty after running the EasyClean® cycle. What else should I do?
The EasyClean® cycle only helps to loosen light soils in your oven range to assist in hand-cleaning of your oven. It does not automatically remove all soils after the cycle. Some scrubbing of your oven range is required after running the EasyClean® cycle.
I tried scrubbing my oven after running EasyClean®, but some soils still remain. What can I do?
The EasyClean® feature works best when the soils are fully soaked and submerged in water before running the cycle and during hand-cleaning. If soils are not sufficiently soaked in water, it can negatively affect the cleaning performance. Repeat the EasyClean® process using sufficient water.
Sugar-based and certain greasy soils are especially hard to clean. If some stubborn soils remain, use the Self Clean feature to thoroughly clean your oven.
Soils on my oven walls are not coming off. How can I get my walls clean?
Soils on the side and rear walls of your oven range may be more difficult to fully soak with water. Try repeating the EasyClean® process with more than the ¼ cup (2 oz or 60 ml) spray recommended.
Will EasyClean® get all of the soils and stains out completely?
It depends on the soil type. Sugar-based and certain grease stains are especially hard to clean. Also, if stains are not sufficiently soaked in water, this can negatively affect cleaning performance.
If stubborn or built-up stains remain, use the Self Clean feature. Refer to the Self Clean section of your owner's manual.
Are there any tricks to getting some of the stubborn soils out?
Scraping the soils with a plastic scraper before and during hand-cleaning is recommended. Fully saturating soils with water is also recommended.
However, certain types of soils are harder to clean than others. For these stubborn soils, the Self Clean cycle is recommended. Consult the Self Clean section of your owner's manual for details.
Is it safe for my convection fan, broil burner or heater element to get wet during EasyClean®?
Yes. The convection fan, broiler burner or heater element may get a little wet during cleaning. However, direct spray onto the broil burner and heater elements is not necessary because these are self-cleaning during regular use.
Do I need to use all 1¼ cups (10 oz or 300 ml) of water for EasyClean®?
Yes. It is highly recommended that 1 cup (8 oz or 240 ml) of water be sprayed or poured on the bottom and an additional ¼ cup (2 oz or 60 ml) of water be sprayed on walls and other soiled areas to fully saturate the soils for better cleaning performance.
I see smoke coming out of my oven range’s cooktop vents during EasyClean®. Is this normal?
This is normal. This is not smoke. It is actually water vapor (steam) from the water in the oven cavity. As the oven heats briefly during EasyClean®, the water in the cavity evaporates and escapes through the oven vents.
How often should I use EasyClean®?
EasyClean® can be performed as often as you wish. EasyClean® works best when your oven is LIGHTLY soiled from such things as LIGHT grease splatter and small drops of cheese. Please refer to the EasyClean® section in your owner's manual for more information.
What is required for EasyClean®?
A spray bottle filled with 1¼ cups (10 oz or 300 ml) of water, a plastic scraper, a non-scratch scrubbing pad and a towel. You should not use abrasive scrubbers such as heavy-duty scouring pads or steel wool. Except for a towel, all of the materials you need are included in a special cleaning kit with your new range.
How can I help keep children safe around the range?
Children should be supervised around the range whenever it is in use, and after use until surfaces have cooled. You can also use the Lockout feature to help prevent children from accidentally turning on the cooktop or oven. The Lockout feature disables most control panel buttons and the cooktop control knobs. On some models, it also locks the oven door.
Consult the Lockout section of your owner’s manual for details.
(In models without a self-clean option, the Lockout feature locks the controls but does not lock the oven door.)
Before Calling for Service
Before you call for service, review this list. It may save you time and expense. The list includes common occurrences that are not the result of defective workmanship or materials in this appliance.
| Symptoms | Possible Causes / Solutions |
| Range is not level. |
• Poor installation. Place oven rack in center of oven. Place a level on the oven rack. Adjust leveling legs at base of range until the oven rack is level. • Be sure floor is level and strong and stable enough to adequately support range. • If floor is sagging or sloping, contact a carpenter to correct the situation. • Kitchen cabinet alignment may make range appear unlevel. Be sure cabinets are square and have sufficient room for range clearance. |
| Cannot move appliance easily. Appliance must be accessible for service. |
• Cabinets not square or are built in too tightly. Contact builder or installer to make appliance accessible. • Carpet interferes with range. Provide sufficient space so range can be lifted over carpet. • Anti-tip device engaged. |
| Oven control beeps and displays any F code error. |
• Electronic control has detected a fault condition. Press Clear/Off to clear the display and stop beeping. Reprogram oven. If fault recurs, record fault number. Press Clear/Off and contact a Service agent.
|
| Surface units will not maintain a rolling boil or cooking is not fast enough |
• Improper cookware being used. - Use pans which are flat and match the diameter of the surface unit selected. • In some areas, the power(voltage) may be low. - Cover pan with a lid until desired heat is obtained. |
| Surface units do not work properly |
• A fuse in your home may be blown or the circuit breaker tripped. - Replace the fuse or reset the circuit breaker. • Cooktop controls improperly set. - Check to see the correct control is set for the surface unit you are using. |
| Surface unit stops glowing when changed to a lower setting | • This is normal. The unit is still on and hot. |
| Areas of discoloration on the cooktop |
• Food spillovers not cleaned before next use. - See Cleaning the Glass-Ceramic Cooktop section. • Hot surface on a model with a light-colored cooktop. - This is normal. The surface may appear discolored when it is hot. This is temporary and will disappear as the glass cools. |
| Frequent cycling on and off of surface units |
• This is normal. - The element will cycle on and off to maintain the heat setting. |
| Oven will not work |
• Plug on range is not completely inserted in the electrical outlet. - Make sure electrical plug is plugged into a live, properly grounded outlet. • A fuse in your home may be blown or the circuit breaker tripped. - Replace the fuse or reset the circuit breaker. • Oven controls improperly set. - See the Using the Oven section. • Oven too hot. - Allow the oven to cool to below locking temperature. |
| Steam is exhausted through the oven vent. | • Cooking foods with high moisture produces steam. This is normal. |
| Appliance does not operate. |
• Make sure cord is plugged correctly into outlet. Check circuit breakers. • Service wiring is not complete. Contact your electrician for assistance. • Power outage. Check house lights to be sure. Call your local electric company for service. |
| Oven light does not work. | • Replace or tighten bulb. See Changing the Oven Light section in this Owner’s Manual. |
| Oven smokes excessively during broiling. |
• Control not set properly. Follow instructions under Setting Oven Controls. • Meat too close to the element. Reposition the rack to provide proper clearance between the meat and the element. Preheat broil element for searing. • Meat not properly prepared. Remove excess fat from meat. Cut remaining fatty edges to prevent curling. • Insert on broiler pan wrong side up and grease not draining. Always place grid on the broiler pan with ribs up and slots down to allow grease to drip into pan. • Grease has built up on oven surfaces. Regular cleaning is necessary when broiling frequently. - Old grease or food spatters cause excessive smoking. |
| Food does not bake or roast properly |
• Oven controls improperly set. - See the Using the Oven section. • Rack position is incorrect or the rack is not level. - See the Using the Oven section. • Incorrect cookware or cookware of improper size being used. - See the Using the Oven section. • Oven sensor needs to be adjusted. - See Oven Temperature Adjustment in the Features section. |
| Food does not broil properly |
• Oven controls improperly set. - Make sure you turn the oven mode knob to select the Broil mode. • Improper rack position being used. - See the Broiling Guide. • Cookware not suited for broiling. - Use broiling pan and grid. |
| Food does not broil properly |
• Aluminum foil used on the broiling pan and grid has not been fitted properly and slit as recommended. - See the Using the Oven section. • In some areas the power voltage may be low. - Preheat the broil element for 5-7 minutes. - See the Broiling Guide. |
| Oven temperature too hot or too cold |
• Oven sensor needs to be adjusted. - See Oven Temperature Adjustment in the Features section. |
| Scratches or abrasions on cooktop surface |
• Coarse particles such as salt or sand between cooktop and utensils can cause scratches. Be sure the cooktop surface and bottoms of utensils are clean before using. Small scratches do not affect cooking and will become less visible with time. • Cleaning materials not recommended for glass-ceramic cooktop have been used. See Cleaning the Glass-Ceramic Cooktop in the MAINTENANCE section. • Cookware with rough bottom has been used. Use smooth, flat-bottomed cookware. |
| Metal marks | • Scraping of metal utensils on cooktop surface. Do not slide metal utensils on cooktop surface. Use a glass-ceramic cooktop cleaning creme to remove the marks. See Cleaning the Glass-Ceramic Cooktop in the MAINTENANCE section. |
| Brown streaks or specks | • Boilovers are cooked onto surface. Use a blade scraper to remove soil. See Cleaning the Glass-Ceramic Cooktop in the MAINTENANCE section. |
| Areas of discoloration on cooktop | • Mineral deposits from water and food. Remove using a glass-ceramic cooktop cleaning creme. Use cookware with clean, dry bottoms. |
| Oven will not Self Clean |
• The oven temperature is too high to set a Self Clean operation. - Allow the range to cool and reset the controls. • Oven controls improperly set. - See the Self Clean section. • A Self Clean cycle cannot be started if the oven lockout feature is active. |
| “Crackling” or “popping” sound |
• This is the sound of the metal heating and cooling during both the cooking and Self Clean functions. - This is normal. |
| Fan noise |
• A convection fan may automatically turn on and off. - This is normal. |
| Convection Fan stops |
• Convection fan stops during a convection bake cycle. - This is normal and is done to allow for more even heating during the cycle. This is not a failure of the range and should be considered normal operation. |
| Displayed colon in the clock is flashing | • This is normal. This means that the product has just been plugged in, or that it has experienced a power interruption. Press Cook Time for three seconds and reset the clock, or press any key to stop the flashing. |
| Excessive smoking during a Self Clean cycle |
• Excessive soil. - Press the Clear/Off button. Open the windows to rid the room of smoke. Wait until the Self Clean mode is cancelled. Wipe up the excess soil and reset the clean. |
| Oven door does not open after a Self Clean cycle |
• Oven is too hot. - Allow the oven to cool below locking temperature. • Allow about one hour for the oven to cool after the completion of a Self Clean cycle. The door can be opened when the lock • The control and door may be locked. |
| The oven does not clean after a Self Clean cycle |
• Oven controls not properly set. - See the Self Clean section. • Oven was heavily soiled. - Clean up heavy spillovers before starting the clean cycle. Heavily soiled ovens may need to Self Clean again or for a longer period of time. |
| CLEAN and door flash in the display |
• The Self Clean cycle has been selected, but the door is not closed. - Close the oven door. |
| LOCKED is on in the display when you want to cook |
• The oven door is locked because the temperature inside the oven has not dropped below the locking temperature. - Press the Clear/Off button. Allow the oven to cool. |
| Burning or oily odor emitting from the vent |
• This is normal in a new oven and will disappear in time. - To speed the process, set a Self Clean cycle for a minimum of 3 hours. See the Self Clean section. |
| Oven racks are difficult to slide |
• The shiny, silver-colored racks were cleaned in a Self Clean cycle. - Apply a small amount of vegetable oil to a paper towel and wipe the edges of the oven racks with the paper towel. |
| Moisture collects on oven window or steam comes from oven vent |
• This is normal when cooking foods high in moisture. • Excessive moisture was used when cleaning the window. |
| A chime sounds when surface elements are turned on. | • When any cooktop burner is activated, a chime sounds to indicate the cooktop is in use. |
| Trouble connecting appliance and smartphone to Wi-Fi network |
• The password for the Wi-Fi network was entered incorrectly. - Delete your home Wi-Fi network and begin the registration process again. • Mobile data for your smartphone is turned on. - Turn off the Mobile data on your smartphone before registering the appliance. • The wireless network name (SSID) is set incorrectly. - The wireless network name (SSID) should be a combination of English letters and numbers. (Do not use special characters.) • The router frequency is not 2.4 GHz. - Only a 2.4 GHz router frequency is supported. Set the wireless router to 2.4 GHz and connect the appliance to the wireless router. To check the router frequency, check with your Internet service provider or the router manufacturer. • The distance between the appliance and the router is too far. - If the appliance is too far from the router, the signal may be weak and the connection may not be configured correctly. Move the router closer to the appliance or purchase and install a Wi-Fi repeater. |
See other models: CM4360 28LH4530 BP50NB40 LGC800VL DLEX8000V

