Loading ...
Loading ...
Loading ...
12
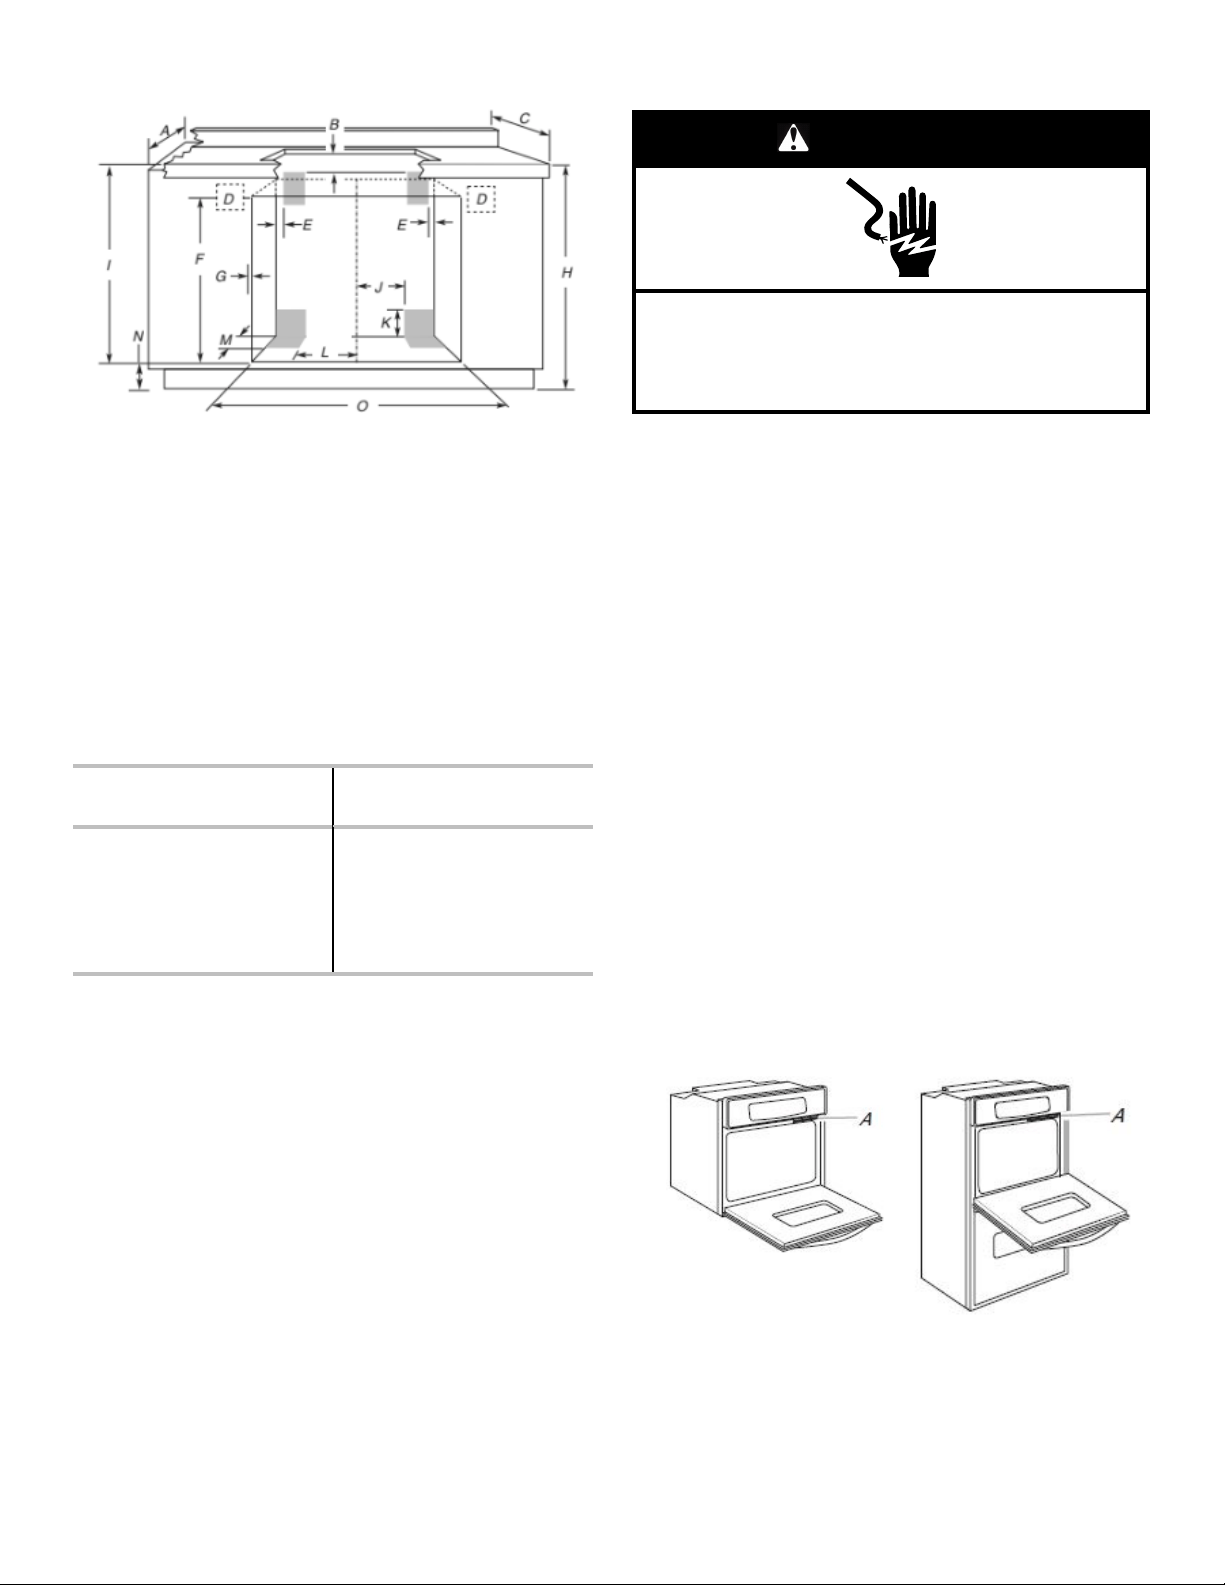
Approved Built-In Oven and Gas Cooktop Combinations
A. 24" (61 cm) cabinet depth
B. 1" (2.5 cm) clearance to
bottom of countertop
C. 25" (63.5 cm) countertop
depth
D. Recommended oven junction
box locations
E. 1" (2.5 cm) clearance to
cabinet
F. 27
3
/
4
" (70.5 cm) minimum
cutout height
G. Allow 5/8" (1.6 cm) for oven
trim to overlap on each side.
H. 36" (91.4 cm) from cabinet
base to countertop
I. 31
3
/
8
" (79.7 cm) from top of
countertop to bottom of cutout
J. Gas line through wall 10
1
/
2
"
(26.7 cm) to center of cutout
K. 3
1
/
4
" (8.3 cm)
L. Gas line through floor 10
1
/
2
"
(26.7 cm) to center of cutout
M. 3
1
/
2
" (8.9 cm)
N. 4
5
/
8
" (11.7 cm) maximum from
cabinet base with feet
installed
O. See Cutout Dimensions chart
CUTOUT DIMENSIONS (O)
Oven Size
Minimum Oven Cutout
Dimension
24" (61 cm) 22
1
/
2
" (57.2 cm)
27" (68.6 cm) 25
1
/
2
" (64.8 cm)
30" (76.2 cm) 28
1
/
2
" (72.4 cm)
36" (91.4 cm) 34
1
/
2
" (87.6 cm)
For the approved model number combinations, refer to the
undercounter label located on top of the oven chassis.
NOTE: For undercounter installation, it is recommended that the
junction box for oven be located in the adjacent right or left
cabinet. A 1" (2.5 cm) minimum diameter hole should have been
drilled in the upper rear right or left corner of the side wall surface
to pass the appliance cable through to the junction box.
The upper shaded areas are recommended locations for recessed
junction box for 120 V grounded outlet for cooktop.
Lower shaded areas are recommended locations for flexible or
rigid gas pipe installation. The gas connection on the cooktop is
on the right (same location as “J” in the above diagram). The gas
pipe can be installed on either side of the cutout, and either
through the floor or through the wall. Refer to local codes
regarding the use of gas lines.
Electrical Requirements
WARNING
Electrical Shock Hazard
Electrically ground appliance.
Failure to do so could result in death, fire, or electrical
shock.
If codes permit and a separate ground wire is used, it is
recommended that a qualified electrical installer determine that
the ground path and the wire gauge are in accordance with local
codes.
Check with a qualified electrical installer if you are not sure the
oven is properly grounded.
This oven must be connected to a grounded metal, permanent
wiring system.
Be sure that the electrical connection and wire size are adequate
and in conformance with the National Electrical Code, ANSI/NFPA
70-latest edition or CSA Standards C22.1-94, Canadian Electrical
Code, Part 1 and C22.2 No. O-M91-latest edition, and all local
codes and ordinances.
A copy of the above code standards can be obtained from:
National Fire Protection Association
1 Batterymarch Park
Quincy, MA 02169-7471
CSA International
8501 East Pleasant Valley Road
Cleveland, OH 44131-5575
Electrical Connection
To properly install your oven, you must determine the type of
electrical connection you will be using and follow the instructions
provided for it here.
� Oven must be connected to the proper electrical voltage and
frequency as specified on the model/serial/rating plate. The
model/serial/rating plate is located under the control panel on
single ovens and under the control panel on the upper oven
cavity on double ovens. See the following illustrations.
Single oven
A. Model/serial/rating plate
Double oven
A. Model/serial/rating plate
� Models rated from 7.3 to 9.6 kW at 240 V (5.4 to 7.4 kW at
208 V) require a separate 40 A circuit. Models rated at 4.8 kW
and below at 240 V (3.6 kW and below at 208 V) require a
separate 20 A circuit.
Loading ...
Loading ...
Loading ...