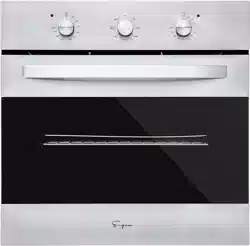
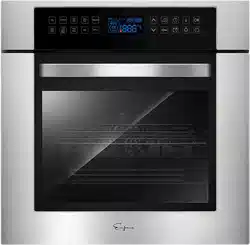
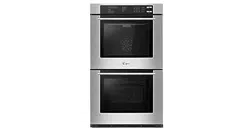
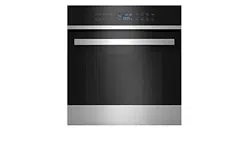
DESCRIPTION OF THE APPLIANCE
INSTALLATION
Important – Save for the local electrical inspector’s use.
- The kitchen area should be dry and aired and equipped with efficient ventilation. When installing the oven, easy access to all control elements should be ensured.
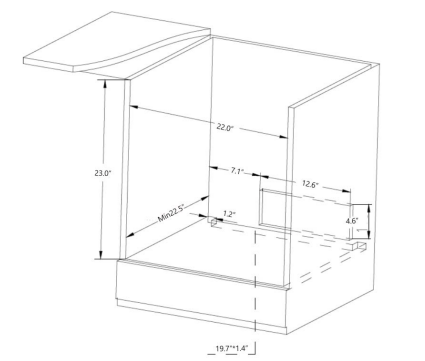
- This is a built-in oven, and its back wall and one side wall can be placed next to a high piece of furniture or a wall. Coating or veneer used on fitted furniture must be applied with a heat-resistant adhesive (215℉). This prevents surface deformation or detachment of the coating.
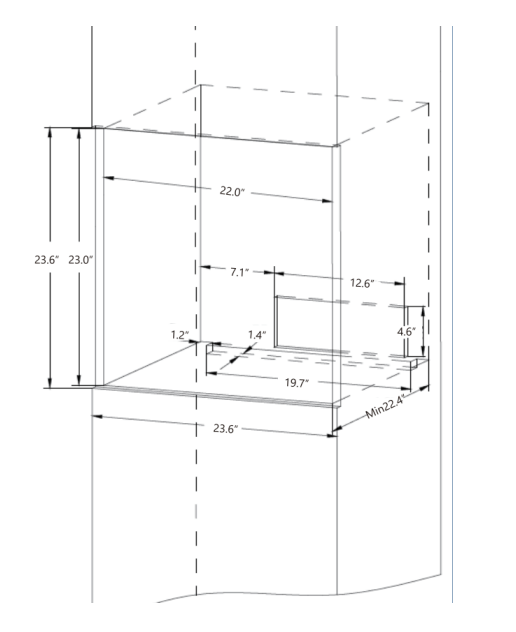
- Make an opening with the dimensions given in the diagram for the oven to be fitted.
- Make sure the mains plug is disconnected and then connect the oven to the mains supply.
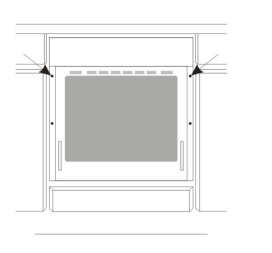
- Insert the oven completely into the opening without allowing the four screws in the places shown in the diagram to fall out.
MAKE ELECTRICAL CONNECTION
1. Disconnect power.
2. Feed the flexible conduit from the through the opening in the cabinet.
3. Remove junction box cover, if it is present.
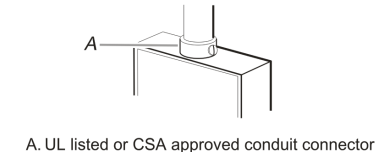
4. Install a UL listed or CSA approved conduit connector to the junction box.
5. Route the flexible conduit from the oven to the junction box through a UL listed or CSA approved conduit connector.
6. Tighten screens on conduit connection.
7. See “Electrical Connection Options” to complete installation for your type of electrical connection.
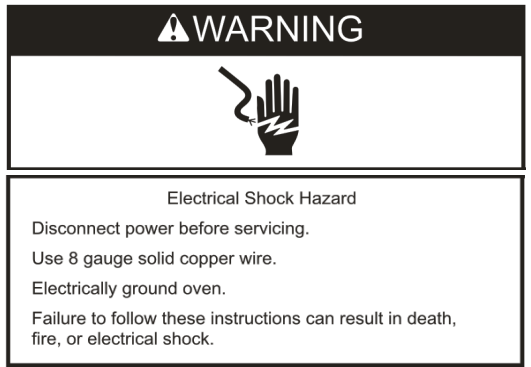
WARNING: Risk of Electric Shock, the neutral conductor is not required for the operation of the appliance, no grounding link provided within oven. The oven is only for use where grounding is provided.
Warning! All electrical work should be carried out by a suitably qualified and authorized electrician. No alterations or willful changes in the electricity supply should be carried out.
Fitting guidelines
- The oven is manufactured to work with signal-phase alternating current (120/240V supply system).
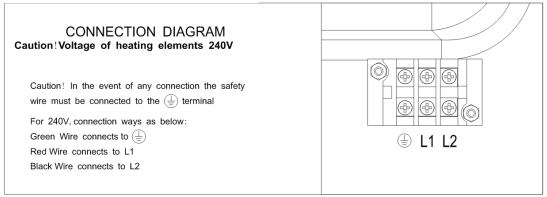
- The connection diagram is also found on the cover of the connection holder. Remember that the connection wire should match the connection type and the power rating of the oven.
- Before connecting the oven to the power supply it is important to read the information on the data plate and the connection diagram.
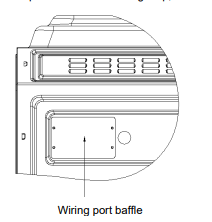
Bellows wiring method:
- Step 1: Remove the wiring strip, as shown below:
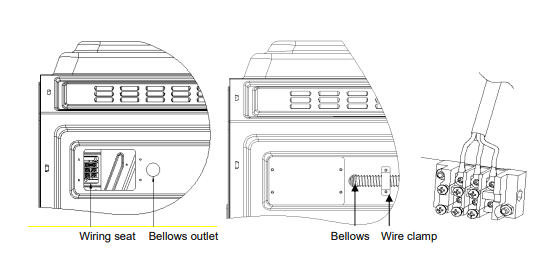
- Step 2: connect the ground wire, red wire L1 and black wire L2 of the bellows to the ground wire, red wire L1 and black wire L2 of the wiring seat respectively. The bellows is stretched out from the outlet of the bellows and pressed on the upper cover by the wire clamp. As shown below::
- Power cord + plug installation: The power cord + plug are installed in the factory.

Rack installation diagram
- Step1: Insert the bracket into the mounting hole of inner tank.
- Step2: Insert the bracket into the slot.
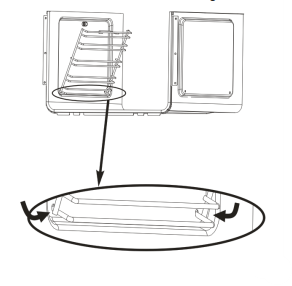
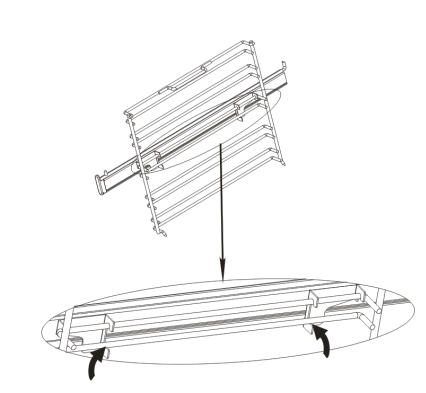
Telescopic runner installation diagram:
- Step 1: Put the four hocks into the side rack:
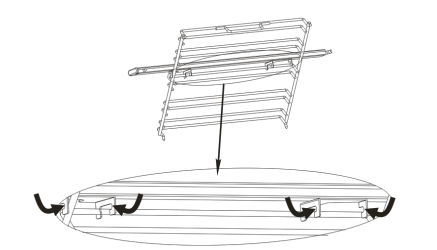
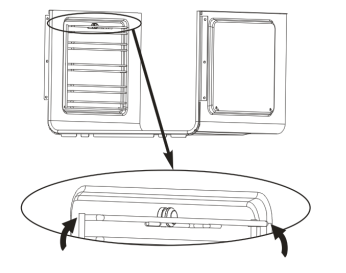
- Step 2: Put the two locks into the side rack:
Before first use
- Remove packaging, clean the interior of the oven.
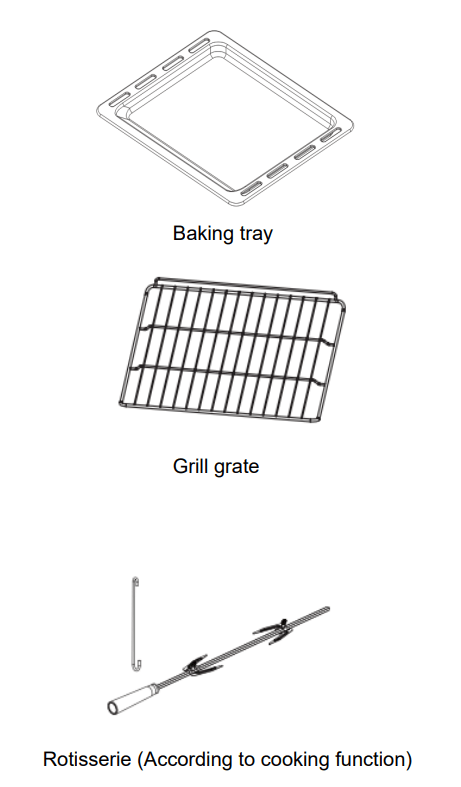
- Take out and wash the oven fittings with warm water and a little washing-up liquid.
- Switch on the ventilation in the room or open a window.
- Heat the oven (to a temperature of 465℉,, for approx,30 min.), remove any stains and wash carefully; Important!
- The inside of the oven should only be washed with warm water and a small amount of washing-up liquid.
OPERATION

1. Turn on and off
Turn on:
- (1) In shutdown status, touch the
 key for more than 3 seconds to enter functions setting status. Touch the key one time to enter standby status.
 - (2) In standby status, touch the key one time to enter functions setting status.
- (3) In working status, touch the key one time to immediately stop the corresponding function and enter standby status.
Turn off:
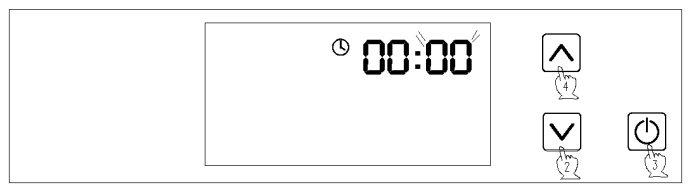
- In standby status, touch the key for more than 3 seconds to enter shutdown status. The LED displays as below when in standby status:

Note: when the product is set up electricity, if the clock is not set up, it will not show time and only shows (0:00)
2. Clock setting (12 hours / 24 hours):
- (1) Touch the
 key one time, the hour setting flickers, reminding to set up the hour. Touch the
  or
or  key, set up hours (0-11/0-23), defaulted “00”

- Touch the key once again, the minute setting flickers, reminding to set up the minutes. Touch the or key, set up minutes (0-59). Defaulted “00”.
- (3) Press and hold the key for more than 4 seconds to switch between 12-hour system and 24-hour system . Default 12-hour system
- (4) Touch the
 key, clock setting finish.

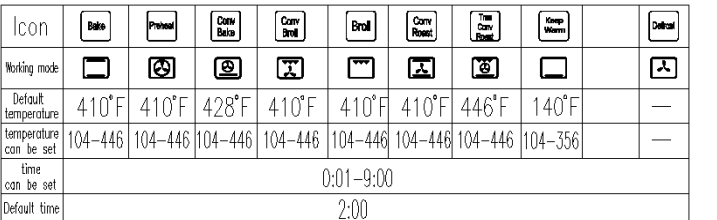
3. Function selection:“Roast”as example (other functions are same way to set)
- (1) In standby condition, touch “ Roast ” continuously, display shows as below diagram(“XX”means flicker, others are bright).

- Note: All above are defaulted under its function condition.
- (2) After function selection, can set up temperature and working time as below:
- Touch the
 key, the temperature setting flickers, Touch or key, the temperature can increase (or decrease) 10℉/5℃, temperature can be set between 104℉ and 482℉.
 - Touch
 once, the hour flicker, touch or keys, can set time between 0 and 8 hours.
 - Touch once again (or touch twice continuously), minute flicker and touch or key, it can set up minutes between 0 and 59 minutes, touch key, it will start to work, other icon will not show. For example: Working time set as 1:30 hours, temperate set as410℉..

- Under condition of item 3-(1) or item 3-(2) , touch key, it will work as system defaulted or current condition.
- Touch the
Table 1(With rotisserie)
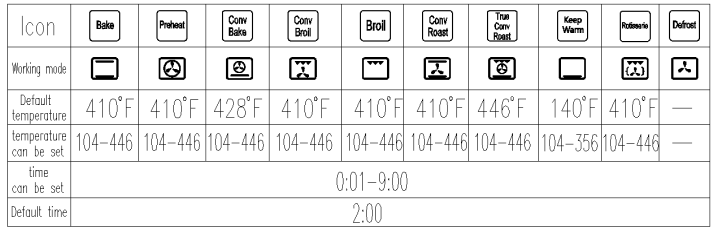
Table 2(Without rotisserie)
4. Degrees Fahrenheit to degrees Celsius
- Under the function of temperature display setting, press the key long for more than 4 seconds, you can switch between degrees Fahrenheit and degrees Celsius. The default unit is Fahrenheit every time you power on. The corresponding temperature value is automatically converted by the controller.
5. Set up child lock
- (1) Lock: Touch
 key more than 4 seconds, icon shows in LED, it is locked, there is no function to touch any other keys.
 - (2) Unlock: Touch key more than 4 seconds again, icon doesn't show, then it is unlocked. Maybe touch more than 4 seconds to turn off all functions.
6. Delay function
- (1)Touch
 once, the hour flicker, touch or keys, can set time. Touch again, minute flicker and touch or key, it can set up minute, touch key, delay setup finish.
CLEANING AND MAINTENANCE
Caution: Before each cleaning and maintenance shall be cut off the power supply! By ensuring proper cleaning and maintenance of your oven you can have a significant influence on the continuing fault-free operation of your appliance.
Before you start cleaning, the oven must be switched off,then cut off the power supply. Do not start cleaning until the oven has completely cooled.
Caution! The sharp blade should always be protected by adjusting the cover (just push it with your thumb). Injuries are possible so be careful when using this instrument-keep out of reach of reach of children
Appropriate light cleaning or washing products are recommended, such as e.g. any kind of liquids or emulsions for fat removal. In particular, special cleaning products such as COLLO Luneta, Sidol Stahlglanz, Stahl-Fix for washing and Cleaning and Cera Fix for maintenance are recommended. If the recommended products are not available, it is advisable to use a solution of warm water with a little washing-up liquid or cleaning products for stainless steel sinks.
Oven
- The oven should be cleaned after every use. When cleaning the oven the lighting should be switched on to enable you to see the surfaces better.
- The oven chamber should only be washed with warm water and small amount of washing-up liquid.
- After cleaning the oven chamber wipe it dry.
Caution! Do not use cleaning products containing abrasive materials for the cleaning and maintenance of the glass front panel
!steam cleaning*:
- pour 250ml of water (1 glass) into a bowl placed in the oven on the first level from the bottom
- close the oven door,
- set the temperature to 125℉, and the function to the Keep Warm position
- heat the oven chamber for approximately 30 minutes
- open the oven door, wipe the chamber inside with a cloth or sponge and wash using warm water with washing-up liquid.
Caution! Possible moisture or water residues under the oven can result from steam cleaning ! After cleaning the oven chamber wipe it dry
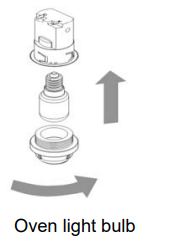
Replacement of the oven light bulb
- In order to avoid the possibility of an electric shock ensure that the appliance is switched off before replacing the bulb.
- Turn off the oven and disconnect the mains plug
- unscrew and wash the lamp cover and then wipe it dry
- unscrew the light bulb from the socket replace the bulb with a new one-a high temperature bulb (575℉) with the following parameters:
- voltage 240 V~
- power 15 W
- thread E14
- Screw the bulb in, making sure it is properly inserted into the ceramic socket
- Screw in the lamp cover.
Disassembly method of inside glass
Method 1: (Handling with pointed tool)
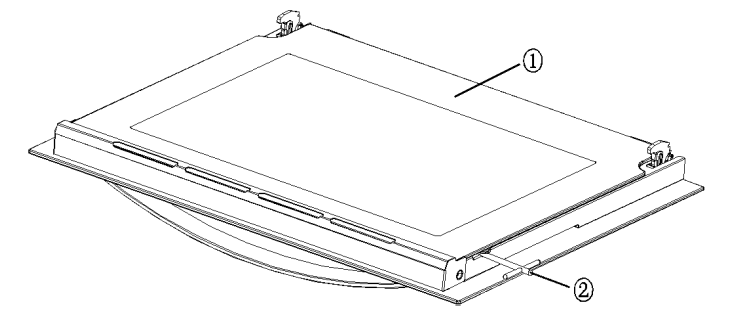
① : Inside glass
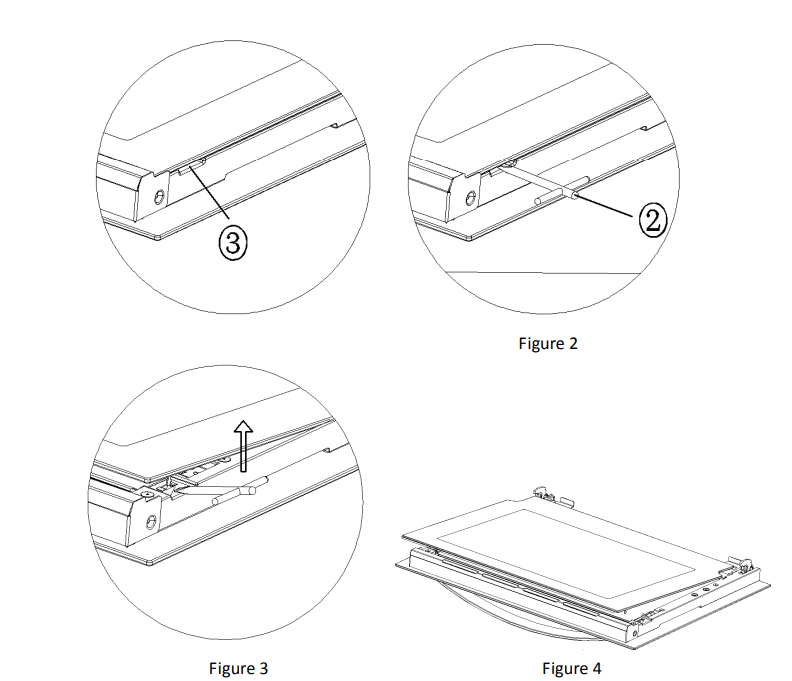
② : Pointed tool (To insert into disassembly groove)
③ : disassembly groove
- To insert ② pointed tool into the disassembly groove, as shown in figure 2
- To drive up ② pointed tool bilaterally so that loosen the inside glass, as shown in figure 3
- To sideling extract the inside glass, as shown in figure 4
Method 2: (Handling with cross screwdriver)
1. To disassemble two screws on the beam with cross screwdriver, as shown in figure 5
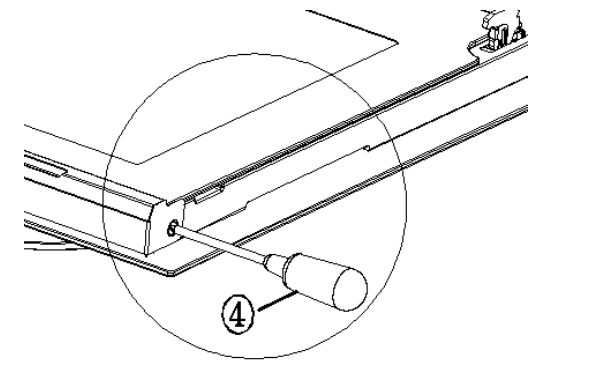
2. To move out the beam, as shown in figure 6

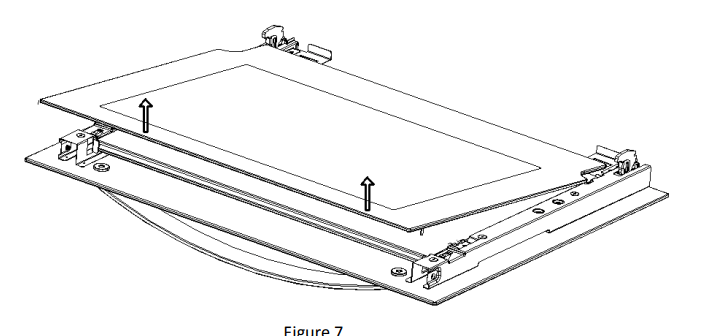
3. To move up the inside glass along with the direction of the arrow, as shown in figure 7
4. To sideling extract the inside glass, as shown in figure 4
Method 3: (Manual operation)
1. To insert index finger into disassembly groove and pry up inside glass, as shown in figure 8
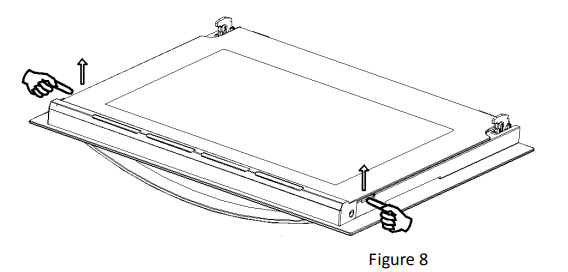
2. To sideling extract the inside glass, as shown in figure 4
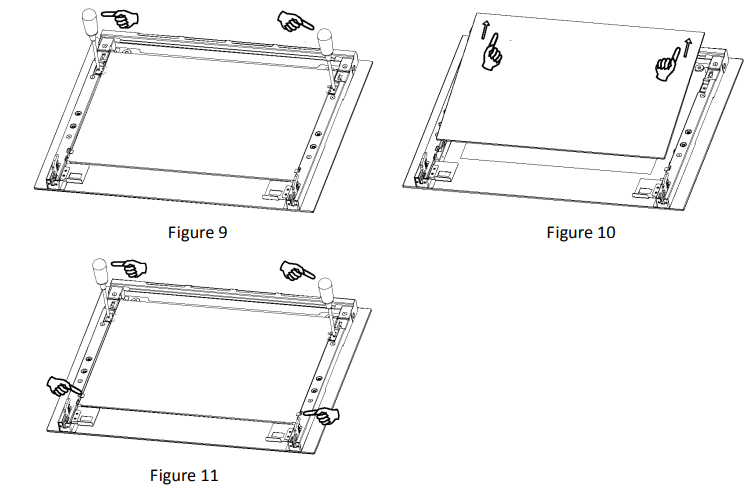
Disassembly and assembly method of middle glass
- To loosen the screws on the bilateral holders, as shown in figure 9
- To sideling extract the middle glass and finish disassembly, as shown in figure 10
- To put the middle glass on the corresponding holders accurately, and tighten the screws, as shown in figure 11
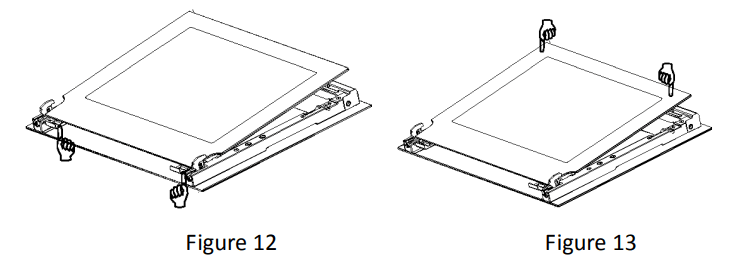
Assembly method of inside glass
- To insert the inside glass into fixed holder and push it to the fixed position, as shown in figure 12
- To press the glass into snap hook, as shown in figure 13
OPERATION IN CASE OF EMERGENCY
In the event of an emergency, you should:
- Switch off all working units of the oven
- Disconnect the mains plug
- Call the service center
- Some minor faults can be fixed by referring to the instructions given in the table below.
Before calling the customer support center or the service center check the following points that are presented in the table.
Troubleshooting
1. The appliance does not work.
- Break in power supply
- Check the household fuse box, if there is a blown fuse replace it with a new one
- Back thermostat power-off protection
- Manual reset the back thermostat of the oven
2. The oven lighting does not work
- The bulb is loose or dama~ ged
- Tighten up or replace the blown bulb (see chapter Cleaning and Maintenance)