1. INTRODUCTION & SAFETY INFORMATION
This manual provides instructions for the AEGTEST HOUND-1085 Radon Detector. Radon is a naturally occurring radioactive gas that can seep into buildings. Prolonged exposure to high levels is a health risk. This device is designed to monitor radon gas concentrations in indoor air to help you assess potential exposure.
Safety Precautions:
- Read all instructions before use.
- This device is for indoor use only.
- Do not disassemble, modify, or expose the device to open flame or extreme heat.
- Keep away from children and pets.
- Use only the provided charging cable.
- For accurate readings, follow the placement guidelines in Section 6.
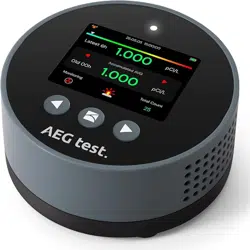
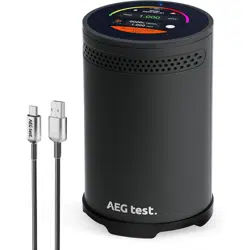
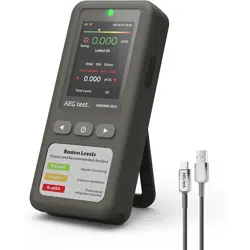
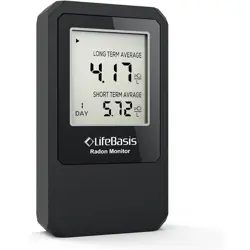
2. PRODUCT OVERVIEW
The HOUND-1085 is a compact, rechargeable radon monitor with a digital display. It uses an advanced semiconductor sensor to provide continuous, long-term monitoring of radon gas levels.

Key Features:
- High-Accuracy Sensor: Semiconductor sensor with a triple-vent design for accelerated radon diffusion.
- Long-Term Data Logging: Stores historical data for up to 504 days with automatic logging every 6 hours.
- Rechargeable Battery: Built-in lithium battery provides up to 45 days of continuous use in ECO mode. Recharges in approximately 3.5 hours.
- Dual Alarms: Visual (color-coded display) and audible alerts for elevated radon levels.
- Flexible Data Review: View short-term (6/24/48/96 hour) and long-term historical data directly on the device.
- Unit Selection: Display readings in pCi/L or Bq/m³.
What's in the Box:
- HOUND-1085 Radon Detector
- Charging/Data Cable
- User Manual
Physical Specifications:
- Dimensions: 3.2" D x 3.2" W x 1.38" H
- Weight: 123 Grams
- Color: Blue
- Operating Humidity: <90% RH
3. GETTING STARTED
- Initial Charge: Connect the device to a power source using the provided cable. A full charge takes approximately 3.5 hours.
- Power On: Press and hold the main button to turn on the device.
- Initial Reading: After startup, place the device in its intended location. The first radon reading will appear on the screen after 6 hours. Subsequent readings update hourly.
- Screen Overview: The display shows the current radon concentration, unit of measurement (pCi/L or Bq/m³), and status indicators for battery and alarms.

4. OPERATION & MEASUREMENT
Understanding the Display
The main screen shows the current radon level. Use the device buttons to navigate menus.
Viewing Historical Data
Use the navigation buttons to cycle through different data timeframes:
- Short-term averages: 6, 24, 48, and 96-hour overviews.
- Long-term history: Access data logged over days, weeks, and months (up to 504 days).
Data is automatically logged every 6 hours and stored locally on the device.
Changing Units
You can switch the measurement unit between pCi/L (common in the US) and Bq/m³ (international standard) via the device settings menu.
Using the Retest Function
The "Retest" function resets the current measurement screen. Historical data is preserved. After initiating a retest, wait 6 hours for the first new reading to appear.

5. ALARM SYSTEM
The device provides alerts when radon levels exceed user-defined thresholds.
Visual Alarm
The display uses color-coded bars or indicators to show the current risk level (e.g., green for safe, yellow for caution, red for high).
Audible Alarm
A sound alert can be enabled or disabled. The alarm triggers promptly when elevated concentrations are detected.
Setting Alarm Thresholds
Navigate to the alarm settings menu to customize the concentration level at which the visual and audible alarms activate. Refer to local health guidelines for recommended action levels.
6. PLACEMENT & OPTIMAL USE
Correct placement is critical for accurate measurements.
Recommended Locations:
- Basements, ground floors, or rooms at soil level.
- Living areas, bedrooms, or nurseries where you spend significant time.
- Near potential entry points like floor cracks or sump pumps.
Placement Guidelines:
- Place on a flat, stable surface away from vibrations.
- Position 0.5 to 2 meters (20 inches to 6.5 feet) above the floor.
- Keep at least 20 cm (8 inches) away from walls, furniture, or other obstructions.
- Avoid areas with direct airflow from vents, windows, doors, fans, or heaters.
- Do not place in direct sunlight, near heat sources, or in areas of high humidity (e.g., bathrooms, kitchens).
Environmental Factors:
- Humidity: High humidity (>90% RH) can affect readings. Use a dehumidifier or place non-powder desiccant packets near the device's air inlets if necessary.
- Light: Strong light (sunlight, camera flash) can affect the sensor. The device has a built-in light-blocking film, but direct exposure should be avoided. If exposed, place it in a dark spot (e.g., a drawer) and wait before restarting measurement.

7. MAINTENANCE & TROUBLESHOOTING
Regular Care and Cleaning
- Power off the device before cleaning.
- Wipe the exterior with a soft, dry cloth.
- Do not use liquids, cleaners, or compressed air on the air inlets or screen.
- Ensure the ventilation slots on the sides and bottom are not blocked by dust or debris.
Recharging Schedule and Battery Life
- The rechargeable lithium battery provides up to 45 days of continuous monitoring in ECO mode under normal conditions.
- A full recharge takes approximately 3.5 hours.
- A battery indicator on the display shows the remaining charge. Recharge the device when the battery level is low.
- For long-term storage, charge the device to at least 50% and power it off.
FAQ Section
- Why is the radon reading high at startup?
The device is exposed to radon during final factory testing, so initial readings may be high. Try blowing on the air inlet with a fan for a few minutes to clear residual radon, then restart the measurement.
- Why is there no reading on the screen?
After restarting the device or using the "Retest" function, the measurement screen will reset (historical data is preserved). Please wait 6 hours for the first reading to appear.
- Can high humidity affect the readings?
Yes. High humidity can affect radon readings. To ensure accuracy, keep humidity below 90% by using a dehumidifier or air conditioner, or place granular (non-powder) desiccants near the air inlets on the sides or bottom of the device.
- Can strong light affect radon detection?
Yes. Strong light (e.g., sunlight or camera flash) can affect the sensor. The device has a built-in light-blocking film, but direct exposure should still be avoided. If exposed, place it in a dark spot (e.g., drawer) and wait before re-testing.
Troubleshooting Guide
| Issue |
Possible Cause |
Solution |
| No power / Screen blank |
Battery depleted. |
Connect to charger. Allow 3.5 hours for a full charge. |
| Inconsistent or fluctuating readings |
Device placed in area with drafts, high humidity, or direct light. |
Relocate device according to placement guidelines in Section 6. Ensure humidity is below 90% RH. |
| Audible alarm not sounding |
Alarm may be disabled or volume set to minimum. |
Check alarm settings in the device menu and ensure audible alerts are enabled. |
| Readings seem unusually high immediately after placement |
Residual radon from factory testing or environmental disturbance during setup. |
Use a fan to gently clear air around the inlets for a few minutes, then allow the device to settle for 6+ hours. |
Resetting the Device
A full reset clears all user settings and historical data, restoring the device to factory defaults. This function is typically found in the system settings menu. Use this option only if necessary.