Overview
This manual provides instructions for the safe and effective use of the RAMJOY 4-Slice Toaster. This appliance is designed for toasting bread, bagels, waffles, and similar food items in a domestic kitchen environment.

Features and Specifications
Key Features
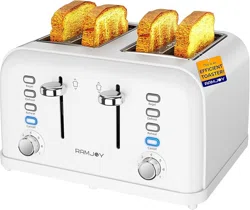
- Four Extra-Wide Slots: Each slot measures 1.45" x 5.43" to accommodate various bread types, bagels, and pastries.
- Dual Independent Controls: Two separate control panels allow you to toast two different items with different settings simultaneously.
- 7 Shade Settings: Adjustable browning control from light to dark.
- 4 Main Functions: Bagel, Defrost, Reheat, and Cancel, each with a blue LED indicator.
- Removable Crumb Tray: Two slide-out trays for easy cleaning.
- Ergonomic Lift Lever: For lowering and raising the bread carriage.
- Cord Storage: Under-base compartment to manage the power cord.
- Non-Slip Base: Provides stability during use.
Technical Specifications
| Specification | Detail |
|---|
| Model Number | RT-140 WHT |
| Color | White |
| Material | Stainless Steel |
| Power | 1500 Watts |
| Voltage | 120 Volts AC |
| Slot Dimensions | 1.45" W x 5.43" L |
| Product Dimensions (D x W x H) | 11.46" x 11.82" x 6.97" |
| Item Weight | 4.2 lbs |
Safety Information
WARNING: To reduce the risk of fire, electric shock, or injury:
- Read all instructions before using the toaster.
- Do not operate the toaster if it has a damaged cord or plug, or if it is malfunctioning.
- This appliance is not intended for use by persons (including children) with reduced physical, sensory, or mental capabilities.
- Close supervision is necessary when any appliance is used near children.
- Do not use the toaster for anything other than its intended purpose.
- Do not immerse the toaster, cord, or plug in water or other liquids.
- Always unplug the toaster from the outlet when not in use and before cleaning.
- Allow the toaster to cool completely before handling or cleaning.
- Do not insert oversized foods, metal foil packages, or utensils into the toaster slots.
- Do not attempt to dislodge food while the toaster is plugged in.
- To avoid risk of electric shock, do not operate the toaster on or near water, such as a sink or wet countertop.
- Ensure the toaster is placed on a stable, flat, heat-resistant surface away from flammable materials like curtains or paper towels.
Parts and Controls

- Bread Slots (4): Extra-wide slots for inserting food.
- Lift Lever (2): Press down to lower the bread carriage and start the toasting cycle. The lever will raise automatically when the cycle is complete.
- Shade Control Dial (2): Rotate to select the desired browning level (1-7, with 1 being the lightest).
- Function Buttons (per side):
- Bagel Button: Press to toast the cut side of bagels more intensely while gently warming the outside.
- Defrost Button: Press to toast frozen bread. The cycle will first defrost, then toast.
- Reheat Button: Press to warm already toasted bread without further browning.
- Cancel Button: Press to stop the toasting cycle immediately and raise the bread.
- Blue LED Indicators: Located next to each function button. Illuminates to show which function is active.
- Removable Crumb Tray: Located at the back and front bottom of the toaster. Pull out to empty crumbs.
- Cord Storage: Located underneath the base.
- Non-Slip Feet: Located on the bottom of the toaster.
Use Guide
Before First Use
- Remove all packaging materials.
- Wipe the exterior with a damp cloth and dry thoroughly. Do not immerse in water.
- Operate the toaster without bread on the highest shade setting to burn off any manufacturing residues. Ensure the room is well-ventilated.
Basic Toasting
- Plug the toaster into a standard 120V electrical outlet.
- Place slices of bread, bagels, or other toasting items into the slots. Ensure food items do not touch the heating elements.
- Select the desired browning level using the Shade Control Dial (1-7).
- Press the Lift Lever down until it locks. The toasting cycle will begin.
- When toasting is complete, the lever will raise automatically. You may also press the Cancel button to stop the cycle early.
- Carefully remove the toasted food, as it will be hot. Unplug the toaster when finished.

Using the Special Functions
- Bagel Function: Insert bagel halves with the cut side facing the center of the toaster. Press the Bagel button (LED will light), then press the lever down.
- Defrost Function: Insert frozen bread. Press the Defrost button (LED will light), select your shade, then press the lever down.
- Reheat Function: Insert already toasted bread. Press the Reheat button (LED will light), then press the lever down. No shade selection is needed.
- Cancel Function: Press the Cancel button at any time during a toasting cycle to stop it immediately.

Dual Independent Controls
The left and right control sets operate independently. You can toast two different types of food (e.g., bread on one side, a bagel on the other) with different shade and function settings at the same time.
Cleaning and Maintenance
- Always unplug the toaster and allow it to cool completely before cleaning.
- Exterior: Wipe the outside with a soft, damp cloth. Do not use abrasive cleaners or scouring pads.
- Crumb Trays:
- Gently pull the crumb trays out from the front and back of the toaster.
- Empty crumbs into a trash bin.
- Wash the trays in warm, soapy water, rinse, and dry thoroughly before reinserting.
- Interior: Do not insert any objects into the slots to clean them. Turn the toaster upside down over a trash bin and gently shake to dislodge loose crumbs. The crumb trays are designed to catch most debris.
- Cord Storage: Wrap the power cord around the base and tuck it into the storage area when not in use.

Troubleshooting
| Problem | Possible Cause & Solution |
|---|
| Toaster does not turn on. | Ensure the power cord is securely plugged into a working outlet. Check your home's circuit breaker. |
| Food is not toasted. | The shade setting may be too low. Adjust to a higher number. Ensure the lift lever is pressed down completely until it locks. |
| Food is too dark or burnt. | The shade setting may be too high. Adjust to a lower number. |
| Toaster smokes during use. | Accumulated crumbs may be burning. Unplug, let cool, and clean the crumb trays thoroughly. |
| Lever does not stay down. | Ensure the toaster is plugged in. The slot may be obstructed; ensure no foreign objects are inside. |
| LED indicators do not light. | The function may not have been selected properly. Press the desired function button until the LED illuminates. |
Compliance and Disposal
This appliance complies with relevant safety standards. This symbol indicates that this product should not be disposed of with your regular household waste. At the end of its life, dispose of it at a designated collection point for the recycling of electrical and electronic equipment.