Overview
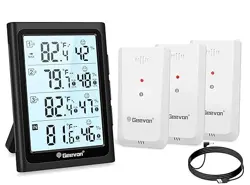
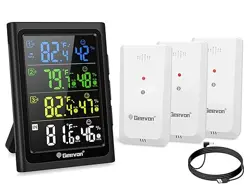
This Geevon Weather Station is a digital thermometer and hygrometer designed to monitor temperature and humidity in up to four locations simultaneously. The system consists of a main display unit and three wireless remote sensors.

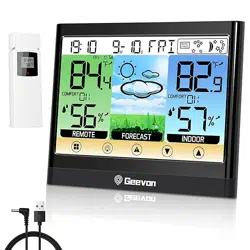
The main unit features a 5-inch LCD with backlight and can be powered via USB or batteries. It receives data from the remote sensors via 433 MHz wireless transmission with a range of up to 200 feet (60 meters).
Features
Display and Readability
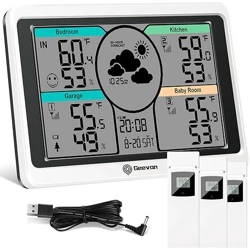
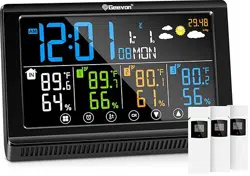
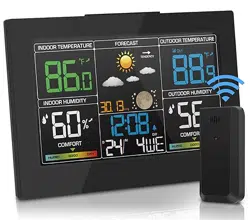
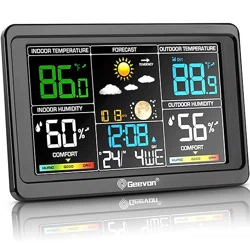
- 5-Inch Large LCD Display: Shows temperature and humidity readings from four channels (one internal, three remote).
- 8-Second Backlight: Activated manually for reading in low light.
- Comfort Indicator: Displays an icon (smiley/frowny face) based on combined temperature and humidity readings to indicate comfort level.
- Trend Arrows: Show if temperature or humidity is rising or falling.

Monitoring and Alerts
- 4-Channel Monitoring: Tracks conditions at the main unit location and three remote sensor locations.
- Max/Min Records: Records and displays the highest and lowest temperature and humidity values over the past 24 hours for each channel.
- Programmable Alarms: Audible alarm can be set to trigger when temperature or humidity for any channel exceeds or falls below user-defined limits.

Connectivity and Power
- Wireless Sensors (3 included): Each sensor transmits data to the main unit. Uses 433 MHz frequency.
- 200 ft / 60 m Range: Maximum wireless transmission range in open space.
- Dual Power for Main Unit: Can be powered by included USB cable or by 3 AAA batteries (not included).
- Sensor Power: Each remote sensor requires 2 AAA batteries (not included).
- USB Charging Port: The main unit includes a USB-A port that can be used to charge mobile devices.

Specifications
- Model: 24281A
- Indoor Temperature Range: 50°F to 140°F (-10°C to 60°C)
- Outdoor (Sensor) Temperature Range: -58°F to 158°F (-50°C to 70°C)
- Temperature Accuracy: ±1.8°F (±1°C)
- Humidity Range: 20% to 95% RH
- Humidity Accuracy: ±5%
- Display Dimensions: Approximately 5.3"H x 3.9"W x 0.6"D
- Material: ABS Plastic
- Included Components: 1 Main Display Unit, 3 Remote Sensors, 1 USB Cable, User Instructions.
Use Guide
Initial Setup
- Install Batteries:
- Open the battery compartment on the back of the main display unit. Insert 3 AAA batteries, observing the correct polarity.
- Open the battery compartment on each of the three remote sensors. Insert 2 AAA batteries into each sensor, observing the correct polarity.
- Power the Main Unit: You can now power the unit using the installed batteries. For permanent placement, connect the included USB cable to the unit and a USB power adapter (not included).
- Sensor Channel Assignment: Each remote sensor has a small switch inside its battery compartment labeled 1, 2, or 3. Ensure each sensor is set to a unique number (1, 2, or 3) as printed on its front.
- Pairing: Place the sensors within range. The main unit should automatically search for and connect to the sensors within a few minutes. The corresponding channel number (CH1, CH2, CH3) will appear on the display when each sensor is connected.

Understanding the Display
The main screen is divided into four sections, one for each monitoring channel:
- Channel Indicators: "IN" for the main unit's internal sensor, and "CH1", "CH2", "CH3" for the remote sensors.
- Temperature: Displayed in large digits, in Fahrenheit (°F) or Celsius (°C).
- Humidity: Displayed as a percentage (%RH).
- Trend Arrows: Located next to the readings, indicating if the value is rising (↑), falling (↓), or steady (→).
- Comfort Icon: A smiley face indicates comfortable conditions (40%–70% RH and 20°C–28°C). A frowny face indicates conditions are too dry (<40% RH), too wet (>70% RH), or outside the comfortable temperature range.
- Max/Min Indicators: The "MAX" and "MIN" labels will illuminate next to a reading when viewing recorded data.
Button Functions
(Refer to the buttons on the top or side of the main unit as indicated in the manual diagrams).
- LIGHT / ON: Press to activate the 8-second backlight. A short press may also wake the display if it is in battery-saving sleep mode.
- CH / VIEW: Press to cycle through different display views (e.g., all channels, individual channel details with MAX/MIN).
- ALARM / SET: Used to enter the alarm setting mode and to confirm selections while programming.
- °F/°C: Press to toggle the temperature display between Fahrenheit and Celsius.
- ▲ (UP) and ▼ (DOWN): Used to adjust values (e.g., alarm thresholds) in setting mode.
Setting Temperature/Humidity Alarms
- Press and hold the ALARM / SET button for 3 seconds to enter alarm setting mode. The display will indicate which channel and parameter (e.g., CH1 High Temp) is being set.
- Use the CH / VIEW button to select the channel (IN, CH1, CH2, CH3) and parameter (High Temp, Low Temp, High Humidity, Low Humidity) you wish to set.
- Use the ▲ and ▼ buttons to adjust the high or low limit value.
- Press the ALARM / SET button to confirm the value and move to the next setting.
- To exit setting mode, press and hold the ALARM / SET button again, or wait for the display to timeout.
- When a reading exceeds a set limit, the audible alarm will sound and the corresponding value on the display will flash.
Viewing Max/Min Records
Press the CH / VIEW button until the "MAX" or "MIN" indicator appears next to a reading. This shows the highest or lowest recorded value for that channel in the past 24 hours. The records reset automatically every 24 hours.
Mounting Options
- Main Unit: Can be placed on a tabletop using the fold-out stand, mounted on a wall using the keyhole slot on the back, or attached to a magnetic surface (like a refrigerator) using the built-in magnets.
- Remote Sensors: Each sensor has a keyhole slot on the back for wall mounting. For accurate readings, place sensors in a shaded, well-ventilated area, protected from direct sunlight and rain.

Troubleshooting
- No Reading from a Sensor:
- Check that the sensor batteries are correctly installed and have sufficient charge.
- Verify the sensor is within the 200 ft wireless range, with minimal obstructions.
- Ensure the sensor's channel switch is set correctly (1, 2, or 3).
- Bring the sensor closer to the main unit to re-establish connection, then return it to its desired location.
- Inaccurate Temperature Reading (Sensor): Ensure the remote sensor is not in direct sunlight, near a heat source, or in an enclosed space without airflow.
- Display is Blank:
- If using batteries, check battery polarity and charge. Press the LIGHT/ON button to wake the display.
- If using USB power, check the cable connection and power source.
- Alarm Not Sounding: Verify the alarm limits are set correctly and the alarm function is enabled in the settings.
Care and Maintenance
- Clean the display and sensors with a soft, dry cloth. Do not use chemicals or abrasive cleaners.
- Replace batteries in the sensors and main unit (if used) when the low battery indicator appears or readings become unreliable.
- For long-term storage, remove all batteries.
Warranty and Support
This product is covered by a one-year warranty from the date of purchase. For support, refer to the contact information provided by the seller, Geevon, at the time of purchase.