1. Overview
The SASWELL Smart Thermostat (Model T18BUTW-7-WIFI(TY)) is a WiFi-enabled, programmable thermostat designed for residential heating and cooling systems. It features a color LED touchscreen for local control and can be managed remotely via a smartphone app or through voice commands with compatible smart home platforms.

2. Features
2.1 System Compatibility
This thermostat is compatible with a wide range of systems:
- Heat Pump Systems: Supports multi-stage heating and cooling (3H/2C configuration).
- Conventional Systems: Compatible with multi-stage furnaces and air conditioners.
Important: All compatible system types require a common wire (C-wire) for power and optimal performance. Verify your existing wiring before installation.
2.2 Control Methods
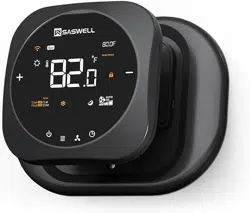
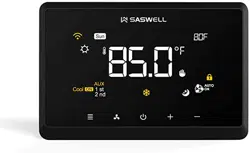
- Local Touchscreen: Bright LED color display with a touch interface for adjusting settings, viewing temperature, and changing modes.
- Smartphone App: Connect to the Tuya Smart or Smart Life app for remote control and scheduling via WiFi.
- Voice Control: Compatible with Amazon Alexa and Google Home for hands-free voice commands.
2.3 Programming
The thermostat allows for a 7-day programmable schedule. You can set different temperature targets for weekdays and weekends to optimize comfort and energy efficiency.

2.4 Display and Interface
The main screen displays current temperature, setpoint, system mode (Heat, Cool, Fan), and other status indicators. Navigation is performed via touch gestures (taps and swipes).
3. Installation Guide
Safety First: Turn off power to your HVAC system at the circuit breaker before beginning any installation work.
3.1 Pre-Installation Check
- Identify your HVAC system type (Heat Pump or Conventional).
- Remove your old thermostat and take a clear photo of the existing wiring for reference.
- Verify the presence of a C-wire. This is a critical power source. The thermostat will not function correctly without it.

3.2 Mounting and Wiring
- Use the included mounting plate as a template to mark screw holes on the wall.
- Secure the mounting plate to the wall.
- Connect the wires from your HVAC system to the corresponding terminals on the thermostat's base. Match the wire labels (R, C, Y, W, G, O/B, etc.) from your old thermostat or refer to the installation manual.
- Once all wires are securely connected, snap the thermostat body onto the mounted base.

3.3 Power On and Initial Setup
- Restore power to your HVAC system at the circuit breaker.
- The thermostat screen will illuminate. Follow the on-screen prompts to select your language, country, and system type.
- Configure basic settings such as temperature format (°F/°C).
4. Use Guide
4.1 Basic Operation
- Adjusting Temperature: Tap the temperature value on the screen and use the up/down arrows to adjust the setpoint.
- Changing Mode: Tap the mode icon (e.g., flame for Heat, snowflake for Cool, fan for Fan) to cycle through available system modes.
- Viewing Status: The main screen shows the current operating mode, indoor temperature, and target setpoint.

4.2 Setting a Schedule
- From the main screen, access the Menu.
- Select Schedule or Program.
- Choose a day (e.g., Monday, Weekend) and set periods (Wake, Leave, Return, Sleep) with desired temperatures.
- Repeat for other days as needed. The thermostat will follow this schedule automatically.
4.3 Using the Smart App
- Download the "Tuya Smart" or "Smart Life" app from your device's app store.
- Create an account and log in.
- Follow the in-app instructions to add a new device. Select the thermostat category.
- The app will guide you through connecting the thermostat to your home WiFi network.
- Once connected, you can adjust temperature, change modes, create schedules, and monitor system status from anywhere.
4.4 Using Voice Control
- Ensure your thermostat is connected to the same WiFi network as your smart speaker (Amazon Echo or Google Nest).
- In the respective voice assistant app (Alexa or Google Home), discover new devices.
- Once the thermostat is discovered, you can use commands like:
- "Alexa, set the temperature to 72 degrees."
- "Hey Google, turn up the heat."
4.5 Child Lock
This feature prevents unintended changes to the settings. When enabled, the touchscreen is locked. You can typically enable or disable the child lock from the settings menu.

5. Specifications
- Model: T18BUTW-7-WIFI(TY)
- Compatibility: Heat Pump (3H/2C), Conventional Multi-Stage Systems
- Power Source: 24VAC, requires C-wire
- Display: LED Color Touchscreen
- Connectivity: Wi-Fi (2.4GHz)
- Control Methods: Touchscreen, Tuya/Smart Life App, Amazon Alexa, Google Home
- Programming: 7-day programmable
- Included Components: Thermostat unit, mounting plate, installation screws, wire labels, user manual.
6. Troubleshooting
- Thermostat screen is blank:
- Check the circuit breaker to ensure power is supplied to the HVAC system.
- Verify the C-wire is properly connected at both the thermostat and the HVAC equipment.
- Wi-Fi will not connect:
- Ensure you are using a 2.4GHz Wi-Fi network (not 5GHz).
- Check that your Wi-Fi password is entered correctly in the app.
- Move the thermostat closer to your router to improve signal strength during setup.
- HVAC system does not turn on:
- Verify all system wires are connected to the correct terminals securely.
- Confirm the correct system type (Heat Pump vs. Conventional) is selected in the thermostat settings.