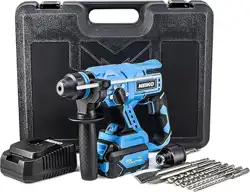
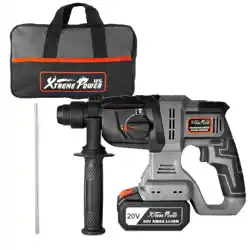
1. Overview
The NEIKO 10882A is a cordless rotary hammer drill powered by a 20-volt lithium-ion battery. It is designed for drilling, hammer drilling, hammering, and chiseling in materials such as concrete, wood, masonry, and metal.


2. Package Contents
- NEIKO 10882A Cordless Rotary Hammer Drill
- One (1) 20V 4.0Ah Li-ion Battery
- One (1) 2.4A ETL Approved Fast Charger
- One (1) 360-degree Auxiliary Handle with Depth Gauge
- One (1) Point Chisel
- One (1) Flat Chisel
- One (1) Drill Chuck
- Five (5) 6-inch SDS Plus Drill Bits (3/16”, ¼”, 5/16”, 3/8”, ½”)
- Storage Case
3. Key Features
3.1 Brushless Motor
Features a brushless motor with a no-load speed of 1,400 RPM and an impact rate of 4,500 blows per minute (BPM).
3.2 Battery and Charging
Powered by a 20V 4.0Ah lithium-ion battery. The included fast charger replenishes the battery. The battery has an energy indicator light showing levels at 100%, 65%, and 25%.
3.3 Four Operating Modes
- Drilling: Standard rotary drilling.
- Hammer Drilling: Rotary drilling with a hammering action for masonry.
- Hammering: Hammer-only action for chiseling.
- Chiseling: For use with chisel accessories.
Select the mode using the side mode selector.
3.4 Ergonomic Design
- 360-degree adjustable auxiliary handle for improved control and leverage.
- Built-in LED work light to illuminate dimly lit work areas.
- Variable speed trigger for precise control.
3.5 SDS Plus Chuck System
Accepts SDS Plus drill bits and chisels. Bits are inserted without tightening; a secure lock is achieved by sliding the bit into the chuck.
4. Technical Specifications
| Specification | Detail |
|---|
| Brand | NEIKO |
| Model Number | 10882A |
| Power Source | 20V Battery Powered |
| Motor Type | Brushless |
| No-Load Speed | 1,400 RPM |
| Impact Rate | 4,500 BPM |
| Battery Capacity | 4.0 Amp Hours |
| Chuck Type | SDS Plus |
| Maximum Chuck Size | 10 mm (SDS Plus) |
| Drilling Capacity (Metal) | 1/2 inch |
| Special Features | Variable Speed, LED Light, Battery Indicator |
| Product Dimensions | 13.25" L x 6" W x 16.75" H |
| Item Weight | 13.35 pounds |
5. Use Guide
5.1 Initial Setup
- Remove all components from the storage case.
- Insert the battery into the base of the drill handle until it clicks into place.
- Attach the auxiliary handle to the front of the drill by sliding it onto the collar and tightening the handle grip.
5.2 Installing a Drill Bit or Chisel
- Ensure the tool is powered off.
- Pull the chuck sleeve forward.
- Insert the SDS Plus shank of the bit or chisel into the chuck.
- Release the chuck sleeve. The bit should lock in place. Gently pull on the bit to confirm it is secure.
5.3 Selecting the Operating Mode
Rotate the mode selector ring located near the chuck to the desired icon:
- Drill Bit Icon: Drilling
- Drill Bit + Hammer Icon: Hammer Drilling
- Hammer Icon: Hammering
- Chisel Icon: Chiseling
5.4 Basic Operation
- Set the mode selector to the correct function.
- Press the trigger to start the tool. Speed is controlled by how far you depress the trigger.
- For hammer drilling or chiseling, apply firm, steady pressure. Let the tool do the work; do not force it.
- Use the auxiliary handle for stability and to control torque.
- Press the LED light button (if separate) or partially press the trigger (if light is trigger-activated) to illuminate the work area.
5.5 Using the Depth Gauge
- Loosen the knob on the depth rod attached to the auxiliary handle.
- Slide the rod so the desired depth aligns with the end of the chuck.
- Tighten the knob to lock the rod in place. The drill will stop when the rod contacts the work surface.
5.6 Battery Charging and Monitoring
- Remove the battery from the tool by pressing the release buttons and sliding it out.
- Insert the battery into the fast charger. The charger indicator will light up.
- When charging is complete, remove the battery. The battery's indicator lights show charge level (100%, 65%, 25%).
6. Safety Instructions
- Read all instructions before use.
- Always wear appropriate personal protective equipment (PPE), including safety glasses, hearing protection, and a dust mask when necessary.
- Ensure the tool is powered off before changing accessories or making adjustments.
- Use the auxiliary handle to maintain control, especially during hammering operations.
- Do not force the tool. Excessive pressure can reduce efficiency and increase wear.
- Keep the tool and battery away from water and other liquids.
- Use only NEIKO 20V lithium-ion batteries and the provided charger. Using incompatible batteries or chargers can cause fire or injury.
- Store the tool and battery in a dry, cool place, out of reach of children.
WARNING: This product can expose you to chemicals which are known to the State of California to cause cancer and reproductive harm. For more information, go to
www.P65Warnings.ca.gov.
7. Maintenance
- Keep the tool clean. Wipe off dust and debris with a dry cloth after each use.
- Periodically check that all screws and handles are tight.
- Keep the chuck clean and free of debris. Do not lubricate the SDS chuck mechanism.
- Store the tool and accessories in the provided case when not in use.
- If the tool requires service, contact NEIKO customer support.
8. Troubleshooting
| Problem | Possible Cause | Solution |
|---|
| Tool does not start | Battery not installed, dead, or not fully seated. | Ensure battery is fully inserted and charged. Check battery indicator. |
| Reduced power or speed | Battery charge low. Bit dull or inappropriate for material. | Recharge battery. Use a sharp, correct bit for the material. |
| Bit slips or does not hold | Bit not fully inserted into SDS chuck. Chuck worn. | Power off, pull chuck sleeve, re-insert bit fully. Inspect chuck for damage. |
| Excessive vibration or noise | Operating in incorrect mode. Loose auxiliary handle. Worn accessory. | Select correct operating mode. Tighten auxiliary handle. Replace worn drill bit or chisel. |
| Battery not charging | Faulty charger, battery, or outlet. | Try a different outlet. Ensure charger contacts are clean. If problem persists, contact support. |