1. Overview
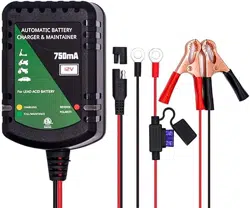
This manual provides instructions for the Unocho 12V 750mA Automatic Battery Charger and Maintainer. This device is a smart, microprocessor-controlled charger designed for the automatic charging and maintenance of 12V lead-acid batteries.

The charger features a fully automatic three-stage charging process, multiple safety protections, and an LED status indicator. It is intended for use with vehicles and equipment such as cars, motorcycles, ATVs, boats, and lawn mowers.
2. Features & Specifications
2.1 Key Features
- 3-Stage Intelligent Charging: Fully automatic CC-CV(H)-CV(F) charging process.
- Safety Protections: Includes reverse polarity, short circuit, over-voltage/current, overcharge/discharge, overload, and overheating protection.
- Intelligent LED Indicator: Tri-color LED displays charging status and diagnostics.
- Wide Compatibility: For use with all 12V lead-acid, SLA, VRLA, GEL, AGM, and WET batteries.
- Compact Design: Lightweight and small for use in confined spaces.
- Dual Connection Cables: Includes output cables with both alligator clips and ring terminals.
2.2 Technical Specifications
| Specification | Detail |
|---|
| Input Voltage | 100-240V AC, 50-60Hz |
| Input Current | 0.1A |
| Output Voltage | 12V DC |
| Charge Current | 750mA (±200mA) |
| Bulk Charge Voltage | 14.7V |
| Back Current Drain | 1.3mA |
| Battery Capacity Range | 3Ah to 18Ah (Maintains up to 36Ah) |
| Operating Temperature | -20℃ to 50℃ |
| Cooling | Natural convection |
| Enclosure Rating | IP64 (Dust protected, water splashing resistance) |
| Dimensions (D x W x H) | 3.23" x 3.23" x 5.55" |
| Weight | 0.21 kg |
| Certifications | ETL, CE, FCC, RoHS |
3. Package Contents
- 1 x Unocho 12V Battery Charger (main unit)
- 1 x DC Output Cable with Alligator Clip Connectors
- 1 x DC Output Cable with Ring Connectors
- 1 x Instruction Manual (this document)

4. Understanding the Charger
4.1 Charger Unit
The main charger unit is a compact, black enclosure. The front or side features a single tri-color LED indicator light.
4.2 LED Indicator Status
The LED provides visual feedback on the charger's operation and battery status.
- Solid YELLOW: The battery is charging (Bulk/Absorption stage).
- Solid GREEN: Charging is complete. The unit is in Float/Maintenance mode, keeping the battery at optimal voltage.
- Flashing GREEN: Battery is fully charged and the charger is in standby/maintenance mode.
- Solid RED: Reverse polarity detected. The output is disabled. Disconnect and correct the connections.
- OFF (No Light): No power, output short circuit protection is active, or the battery is deeply discharged and the charger is in a pre-charge mode. Ensure connections are correct and wait.
4.3 Output Cables
- Alligator Clip Cable: For temporary connection to battery terminals. Red clip is positive (+), black clip is negative (-).
- Ring Terminal Cable: For permanent or semi-permanent installation. Connect ring terminals directly to battery posts.
Both cables feature an SAE quick-disconnect plug that connects to the charger's output port.
5. Use Guide
WARNING: Always read all instructions before use. Failure to follow instructions can result in fire, electric shock, or battery explosion. This charger is for 12V lead-acid batteries only. Do not use with lithium-ion or other non-compatible battery chemistries.
5.1 Safety Precautions
- Work in a well-ventilated area.
- Wear protective eyewear.
- Do not smoke or create sparks near a battery.
- Ensure the charger is not covered during operation to allow for natural convection cooling.
- Do not disassemble the charger.
- Disconnect the AC power before making or breaking DC connections to the battery.
5.2 Connection Instructions
For Temporary Charging (Using Alligator Clips):
- Identify Battery Terminals: Locate the positive (+) and negative (-) terminals on your 12V battery.
- Connect to Battery:
- Connect the RED alligator clip to the POSITIVE (+) battery terminal.
- Connect the BLACK alligator clip to the NEGATIVE (-) battery terminal or a solid, unpainted metal point on the vehicle chassis (a good ground).
- Plug in Charger: Once DC connections are secure, plug the charger's AC power cord into a standard 100-240V wall outlet.
- Observe LED: The LED should light up. A yellow light indicates charging has begun. A red light indicates reverse polarity—disconnect immediately and correct the connections.
For Permanent Installation (Using Ring Terminals):
- Disconnect the vehicle's battery cables (negative first, then positive).
- Attach the ring terminals from the charger's cable directly to the battery posts. Connect RED to positive (+), BLACK to negative (-).
- Reconnect the vehicle's battery cables (positive first, then negative).
- Route the charger's SAE connector to a convenient, dry location.
- When charging is needed, simply plug the charger's output cable into the SAE connector, then plug the charger into AC power.
5.3 Charging Process
The charger automatically manages a three-stage process:
- Bulk Charge (CC - Constant Current): Delivers maximum current (750mA) to quickly charge the battery until it reaches approximately 14.7V. LED is YELLOW.
- Absorption Charge (CV(H) - Constant Voltage High): Holds voltage at 14.7V while current gradually tapers down as the battery reaches full charge. LED remains YELLOW.
- Float/Maintenance (CV(F) - Constant Voltage Float): Reduces voltage to a safe level (around 13.5-13.8V) to maintain a full charge indefinitely without overcharging. LED turns GREEN. The charger can be left connected for long-term maintenance.
The charger will automatically stop charging and enter maintenance mode when the battery is full. It will periodically test and recharge as needed.
5.4 Disconnection
- Unplug the charger from the AC wall outlet.
- Disconnect the alligator clips or SAE connector from the battery.
- When using clips, disconnect the negative (black) clip first, then the positive (red) clip.
6. Troubleshooting
| Symptom | Possible Cause | Solution |
|---|
| LED does not light when plugged in. | No AC power; faulty outlet; internal fault. | Check wall outlet and power cord. Try a different outlet. If problem persists, discontinue use. |
| LED is solid RED. | Reverse polarity connection. | Immediately disconnect from AC and battery. Verify red clip is on positive (+) and black clip is on negative (-). Reconnect correctly. |
| LED is OFF after connection (AC power is on). | Output short circuit protection active; battery voltage is extremely low. | Check cables for short circuits or fraying. Ensure connections are clean and tight. For deeply discharged batteries, the charger may need time to initiate a pre-charge. Wait up to 2 hours. |
| LED stays YELLOW for an excessively long time (multiple days). | Battery may be defective, too large, or have an internal short. | Disconnect charger. Test battery health with a multimeter or load tester. This charger is for batteries 3-18Ah. A very large or faulty battery may not charge properly. |
| Charger feels very hot. | Overheating protection may activate; ventilation blocked. | Ensure the charger is not covered and is in an open area with airflow. Do not place on flammable surfaces. If ambient temperature is very high, move to a cooler location. |
7. Compatibility
This charger is compatible with the following:
- Battery Types: All 12V lead-acid batteries, including Sealed (SLA), Valve Regulated (VRLA), Gel Cell (GEL), Absorbent Glass Mat (AGM), and flooded (WET) batteries.
- Vehicle/Equipment Types: Cars, motorcycles, ATVs, UTVs, lawn mowers, tractors, snowmobiles, golf carts, boats (marine batteries), RVs, scooters, and personal watercraft.
- Battery Capacity: Optimal for charging batteries from 3 Amp-hours (Ah) to 18 Ah. It can maintain (float charge) batteries up to 36 Ah.
NOT COMPATIBLE with 6V batteries, 24V battery systems, or any lithium-ion (Li-ion, LiPo, LiFePO4), nickel-cadmium (NiCd), or nickel-metal hydride (NiMH) batteries.