1. Overview
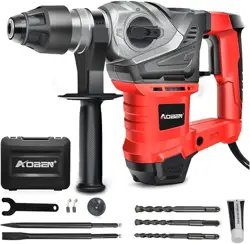
The AOBEN Rotary Hammer Drill is a corded electric power tool designed for heavy-duty drilling and chiseling in concrete, masonry, wood, and metal. It features a 13 Amp motor, three operating modes, and an ergonomic design with vibration control.

2. Specifications
| Brand | AOBEN |
|---|
| Power Source | Corded Electric |
|---|
| Voltage | 120 Volts |
|---|
| Amperage | 13 Amps |
|---|
| Maximum Power | 1500 Watts |
|---|
| Maximum Chuck Size | 13 Millimeters (SDS-Plus) |
|---|
| Drill Type | Hammer Drill |
|---|
| Drilling Capacity (Concrete) | 1-1/4 inch |
|---|
| Drilling Capacity (Metal) | 1/2 inch |
|---|
| Item Weight | 12 Pounds |
|---|
| Package Dimensions | 17.17 x 13.98 x 5.12 inches |
|---|
| Item Model Number | AB2132ZA |
|---|
3. Safety Information
WARNING: Read all safety warnings and instructions before operating the tool. Failure to follow warnings may result in electric shock, fire, or serious injury.
- This tool is designed for 120V outlets. Using it with other voltages may cause damage or injury.
- Always wear appropriate personal protective equipment (PPE), including safety glasses, hearing protection, gloves, and a dust mask.
- Ensure the work area is clean, well-lit, and free of obstructions.
- Do not operate the tool if the power cord is damaged.
- Keep hands away from moving parts and the drill bit/chisel during operation.
- Use the auxiliary handle for better control and to reduce vibration.
- The tool features a safety clutch to help protect the user from sudden jamming.
- Allow the tool to cool down if it becomes hot during extended use.
4. Package Contents
- 1 x AOBEN Rotary Hammer
- 1 x Auxiliary Handle (360-degree adjustable)
- 3 x SDS-Plus Drill Bits (8mm, 10mm, 12mm, 150mm length)
- 1 x SDS-Plus Point Chisel (250mm)
- 1 x SDS-Plus Flat Chisel (250mm)
- 1 x Dirt Proof Boot (Dust Guard)
- 1 x Motor Lubricant
- 2 x Spare Carbon Brushes
- 1 x Portable Carrying Case
- 1 x Warranty Card

5. Features and Controls
5.1 Motor and Power
The tool is equipped with a 13 Amp (1500W) motor designed for heavy-duty applications on concrete, masonry, and metal.
5.2 Function Mode Selector
The tool has three operating modes, selected via a double switch button for increased durability:
- Hammer Only (Chiseling-Only): Provides a hammering action without rotation. Use this mode for demolition, chiseling, or breaking tasks with the flat or point chisel.
- Hammer Drill (Hammering and Rotation): Combines hammering and rotation. This is the primary mode for drilling into concrete, brick, or stone.
- Drill Only (Rotation Only): Provides rotation only, without hammering. Use this mode for drilling into wood, metal, or other materials that do not require impact.
5.3 Ergonomic Design
- Vibration Control: Reduces user fatigue by minimizing transmitted vibration.
- 360-Degree Adjustable Auxiliary Handle: A rubber-coated side handle that can be rotated and locked into various positions for optimal control and comfort.
- Heat Dissipation System: Designed to prevent motor overheating during extended use.
- Double Anti-Dust Bottom Structure: Helps prevent dust and debris from entering the tool's internal mechanism, extending its service life.
5.4 Chuck System
The tool uses an SDS-Plus chuck system. This allows for quick and secure bit changes without the need for a chuck key. To insert a bit, push it into the chuck until it clicks. To remove, pull the chuck sleeve back and pull the bit out.
6. Use Guide
6.1 Before First Use
- Inspect the tool and all accessories for any damage.
- Ensure the power cord is in good condition and the plug is suitable for your outlet (120V).
- Familiarize yourself with all controls and the function mode selector.
- Attach the auxiliary handle to the desired position and tighten it securely.
6.2 Selecting and Installing Accessories
- Select the appropriate accessory (drill bit or chisel) for your material and task.
- Ensure the accessory is clean and the shank is undamaged.
- Pull the chuck sleeve back.
- Insert the SDS-Plus shank of the accessory into the chuck.
- Release the chuck sleeve. You should hear a click, indicating the accessory is locked.
- Gently pull on the accessory to confirm it is secure.
6.3 Operating the Tool
- Set the function mode selector to the correct setting for your task (Hammer Drill, Drill Only, or Hammer Only).
- Firmly grip the main handle and the auxiliary handle.
- Position the tip of the accessory on your work surface.
- Press the trigger to start the tool. Allow it to reach full speed before applying significant pressure.
- For drilling, apply steady, firm pressure. Let the tool do the work; do not force it.
- For chiseling, hold the tool at the appropriate angle and use the hammering action to break material.
- Release the trigger to stop the tool.
6.4 Drilling Capacities
- Concrete/Masonry: Maximum 1-1/4 inch diameter.
- Metal: Maximum 1/2 inch diameter.
For larger or deeper holes, it is recommended to use a smaller pilot bit first.
7. Maintenance
- Disconnect the tool from the power source before performing any maintenance.
- Keep the air vents clean and free of debris to ensure proper cooling.
- Regularly clean the exterior of the tool with a dry cloth. Do not use solvents.
- Apply the provided motor lubricant as needed, following any instructions on the lubricant container.
- The carbon brushes are consumable parts. Inspect them periodically. Use the provided spare brushes when the originals are worn. A professional should replace the brushes if you are unsure of the procedure.
- Store the tool and all accessories in the provided carrying case in a dry, secure location.
8. Troubleshooting
| Problem | Possible Cause | Solution |
|---|
| Tool does not start | Not plugged in; Power cord damaged; Carbon brushes worn out. | Check power connection and cord. Inspect/replace carbon brushes. |
| Tool operates but does not hammer | Function mode incorrectly set. | Ensure selector is set to "Hammer Drill" or "Hammer Only". |
| Accessory slips or falls out | Accessory not fully inserted; Chuck mechanism dirty or worn. | Re-insert accessory until it clicks. Clean chuck. If problem persists, tool may need service. |
| Excessive vibration or noise | Worn accessory; Loose auxiliary handle; Internal damage. | Use a sharp, undamaged accessory. Tighten all handles. If noise continues, discontinue use and contact support. |
| Motor overheats | Blocked air vents; Excessive pressure during use; Extended use without breaks. | Clean air vents. Use less pressure. Allow tool to cool down periodically. |
9. Warranty and Support
AOBEN offers a one-year warranty from the date of purchase for malfunctions caused by quality problems.
For customer service, warranty claims, or technical support:
When contacting support, please have your model number (AB2132ZA) and purchase information available.