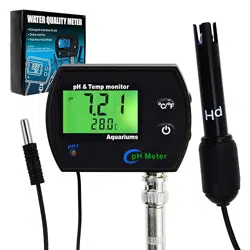
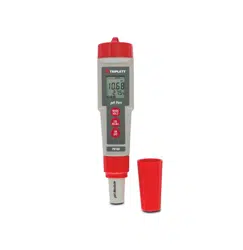
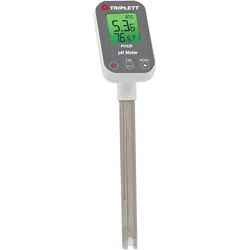
The Digital Combo pH & Temperature Meter is a monitoring device designed to measure the pH level and temperature of water. It is suitable for use in aquariums, fish tanks, hydroponics, aquaculture, laboratories, pools, and spas.
The device consists of a main display unit with a built-in permanent temperature probe and a separate, replaceable pH electrode probe. It features a large LCD screen with a backlight and is powered by AA batteries.
2. Features & Specifications
2.1 Key Features
Dual Measurement: Simultaneously monitors pH and temperature.
Replaceable pH Probe: The BNC-type pH electrode can be replaced separately from the main unit.
Automatic Temperature Compensation (ATC): Adjusts pH readings for changes in water temperature to ensure accuracy.
Automatic Calibration: Features one-touch, up to three-point calibration (pH 4.01, 7.0, 10.01) with automatic buffer recognition.
Large LCD Display: Shows both pH and temperature readings clearly. Includes a green backlight.
Power Saving Mode: The unit conserves battery life.
Flexible Installation: Can be hung, wall-mounted, or used with a tripod (accessories included).
Switchable Temperature Units: Read temperature in °C or °F.
Low Battery Indicator: Alerts you when batteries need replacement.
2.2 Technical Specifications
pH Measurement:
Range: 0.0 to 14.0 pH
Accuracy: ±0.1 pH
Resolution: 0.01 pH
Temperature Measurement:
Range: -5.0 to 60.0°C (23 to 140°F)
Accuracy: ±0.5°C
Resolution: 0.1°
Display: LCD, 26 x 44mm
Operating Environment: 0 to 50°C; 80% RH max
Power Supply: 4 x AA Alkaline Batteries
Dimensions (Main Unit): 90mm x 63mm x 31mm
3. What's in the Box
1 x pH & Temperature Monitor (with built-in temperature probe)
Insert the 4 AA batteries into the compartment on the back of the main unit.
Connect the replaceable pH probe to the BNC connector on the top of the main unit.
4.2 Mounting (Optional)
The device can be positioned in several ways:
Freestanding: Place the unit on a flat, stable surface near the water source.
Hanging: Use the integrated hook on the back of the unit to hang it.
Wall Mounting: Use the provided wall mount hangers and screws to secure the unit to a wall.
Ensure the temperature probe and pH electrode are fully submerged in the water you wish to monitor, but the main display unit itself must remain dry.
5. Calibration
For accurate pH readings, calibrate the meter using the provided buffer solutions. The device is factory pre-calibrated but recalibration is recommended before first use and periodically thereafter.
5.1 Preparing Buffer Solutions
Prepare three clean containers with distilled or deionized water.
Add one packet of each buffer powder (pH 4.01, 7.0, 10.01) to separate containers and stir until fully dissolved.
5.2 Performing Calibration
Power on the device.
Rinse the pH probe with distilled water and gently blot dry with a soft tissue.
Immerse the pH probe into the pH 7.0 buffer solution. Stir gently.
Press the calibration button. The device will automatically recognize the buffer and calibrate to pH 7.0.
Repeat steps 2-4 for the pH 4.01 and pH 10.01 buffers if performing a 3-point calibration. The device guides you through the sequence.
After calibration, rinse the probe with distilled water before taking measurements.
Note: The automatic buffer recognition is designed to prevent calibration errors.
6. Use Guide
6.1 Taking Measurements
Ensure the device is powered on and calibrated.
Submerge both the built-in temperature probe and the pH electrode into the water you wish to test.
Gently stir the pH probe in the water to ensure a stable reading.
Allow a few moments for the readings to stabilize on the LCD display.
The top line of the display shows the pH value. The bottom line shows the temperature.
6.2 Understanding the Display
pH Value: Displayed on the main part of the screen (e.g., "7.45").
Temperature Value: Displayed alongside the pH reading, followed by the unit (°C or °F).
Backlight: The green backlight illuminates the display for easy reading in low light.
Low Battery Icon: A symbol will appear when the batteries need to be replaced.
6.3 Power & Settings
Power On/Off: Use the power button.
Switching Temperature Unit: Access the setting to toggle between °C and °F (refer to the physical button functions on the device).
Power Saving: The device may automatically enter a sleep mode to conserve battery. Press any button to wake it.
7. Care & Maintenance
7.1 Probe Care
Always rinse the pH electrode with distilled or deionized water after use.
Gently blot dry with a soft tissue. Do not rub the glass bulb.
For storage, you may use a pH electrode storage solution or cap the probe with a moist sponge cap. Do not let it dry out.
The temperature probe is permanent and requires no special maintenance beyond keeping it clean.
7.2 General Maintenance
Keep the main display unit dry and free from dust.
Replace the AA batteries when the low battery indicator appears.
If readings become unstable or inaccurate, recalibrate the pH probe.
The pH probe is a consumable part and will eventually need replacement for optimal performance.
8. Troubleshooting
Problem
Possible Cause
Solution
No display / Unit won't turn on
Dead or incorrectly inserted batteries.
Replace or reinsert the 4 AA batteries.
Unstable or erratic pH reading
Probe is dirty, dry, or needs calibration.
Clean and rinse the pH probe. Perform a new calibration.
pH reading is inaccurate
Out-of-calibration probe. Old or contaminated buffer solutions.
Recalibrate using fresh buffer solutions.
Temperature reading is incorrect
Temperature probe damaged or unit set to wrong scale (°C/°F).
Check the temperature unit setting. Ensure the probe is clean and undamaged.