1. Overview
The NEIKO 10878A is a 1/2-inch drive, cordless impact wrench powered by a 20-volt lithium-ion battery. It is designed for automotive and general fastening tasks, providing high torque in a portable, cordless format.

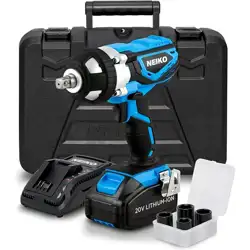
The kit includes the impact wrench, a rechargeable battery, a fast charger, a storage case, and four sockets.
2. Features and Specifications
2.1 Key Features
- High Torque Output: Delivers up to 300 ft-lbs of torque.
- Variable Speed Control: Trigger-controlled speed from 0 to 3,000 RPM.
- Impact Mechanism: Impact frequency of 0 to 3,500 blows per minute (BPM).
- Forward/Reverse Switch: Located on the head for easy direction change.
- Battery Indicator: LED lights show battery charge level (100%, 75%, 50%, 25%).
- Ergonomic Design: Rubberized handle for grip and a belt hook for carrying.
- Cordless Operation: Powered by a 20V 4.0Ah lithium-ion battery.
2.2 Technical Specifications
- Drive Size: 1/2 inch
- Max Torque: 300 ft-lbs
- No-Load Speed: 0-3,000 RPM
- Impact Rate: 0-3,500 BPM
- Battery: 20V, 4.0Ah Lithium-Ion
- Charger: 2.4A Fast Charger (ETL-approved)
- Charge Time: Approximately 1.5 hours for a full charge
- Weight: Tool weight is approximately 4.5 inches in length (see product details for exact weight)
- Materials: ABS shell with rubber handle components
2.3 Included Components
- NEIKO 10878A Impact Wrench
- 20V 4.0Ah Lithium-Ion Battery
- 2.4A Fast Charger
- Storage Case
- Four Sockets: 7/8", 3/4", 21 mm, 17 mm

3. Safety Information
WARNING: Read all instructions before use. Failure to follow warnings can result in electric shock, fire, and/or serious injury.
- Wear appropriate personal protective equipment (PPE), including safety glasses.
- Keep the work area clean and well-lit.
- Do not operate the tool in explosive atmospheres or near flammable materials.
- Use the correct socket size for the fastener. Do not use damaged sockets.
- Ensure the battery is correctly installed and the chuck is secure before operation.
- Do not expose the tool or battery to rain or wet conditions.
- Keep the tool out of reach of children.
- Only use the charger provided by the manufacturer.
California Proposition 65 Warning: This product can expose you to chemicals which are known to the State of California to cause cancer and reproductive harm. For more information, go to
www.P65Warnings.ca.gov.
4. Use Guide
4.1 Initial Setup and Charging
- Unpack: Remove all components from the packaging.
- First Charge: Connect the charger to a standard 120V outlet. Insert the battery into the charger. The charger indicator will show charging status. A full charge takes approximately 1.5 hours.
- Battery Installation: Slide the battery pack into the base of the tool's handle until it clicks into place.

4.2 Basic Operation
- Select Socket: Choose the correct socket from the included set and push it onto the 1/2-inch square drive until it locks.
- Select Direction: Use the forward/reverse switch located above the trigger.
- Push the switch to the left (usually marked with an arrow pointing forward) for tightening fasteners.
- Push the switch to the right (usually marked with an arrow pointing backward) for loosening fasteners.
- Control Speed: Squeeze the variable-speed trigger. Speed increases with greater pressure.
- Using the Impact: Place the socket onto the fastener and apply light pressure. The impact mechanism will engage when resistance is met, delivering concussive blows to loosen or tighten the fastener.
4.3 Battery and Charger
- Battery Indicator: Press the button on the battery to check the charge level. LEDs will illuminate to indicate approximate charge (4 lights = 100%, 3 lights = 75%, etc.).
- Charging: Only charge the battery with the provided charger. Do not charge near heat sources or flammable materials.
- Storage: Store the tool and battery in the provided case in a cool, dry place.
5. Maintenance and Care
- Keep the tool clean and free of dust, oil, and grease. Wipe with a dry cloth.
- Do not use solvents or abrasive cleaners.
- Periodically check for loose screws or damage.
- Store the battery separately if the tool will not be used for an extended period.
- The tool contains no user-serviceable parts. Do not disassemble.
6. Troubleshooting
- Tool does not start: Check that the battery is fully charged and properly inserted. Check the forward/reverse switch is not in the center position.
- Reduced power: Battery may be low. Recharge. Ensure the socket is properly seated on the fastener.
- Battery does not charge: Ensure the charger is plugged in and the battery is correctly seated in the charger. Check the outlet for power.
- Socket won't stay on: Inspect the square drive and socket for damage or debris. Use only 1/2-inch drive sockets.