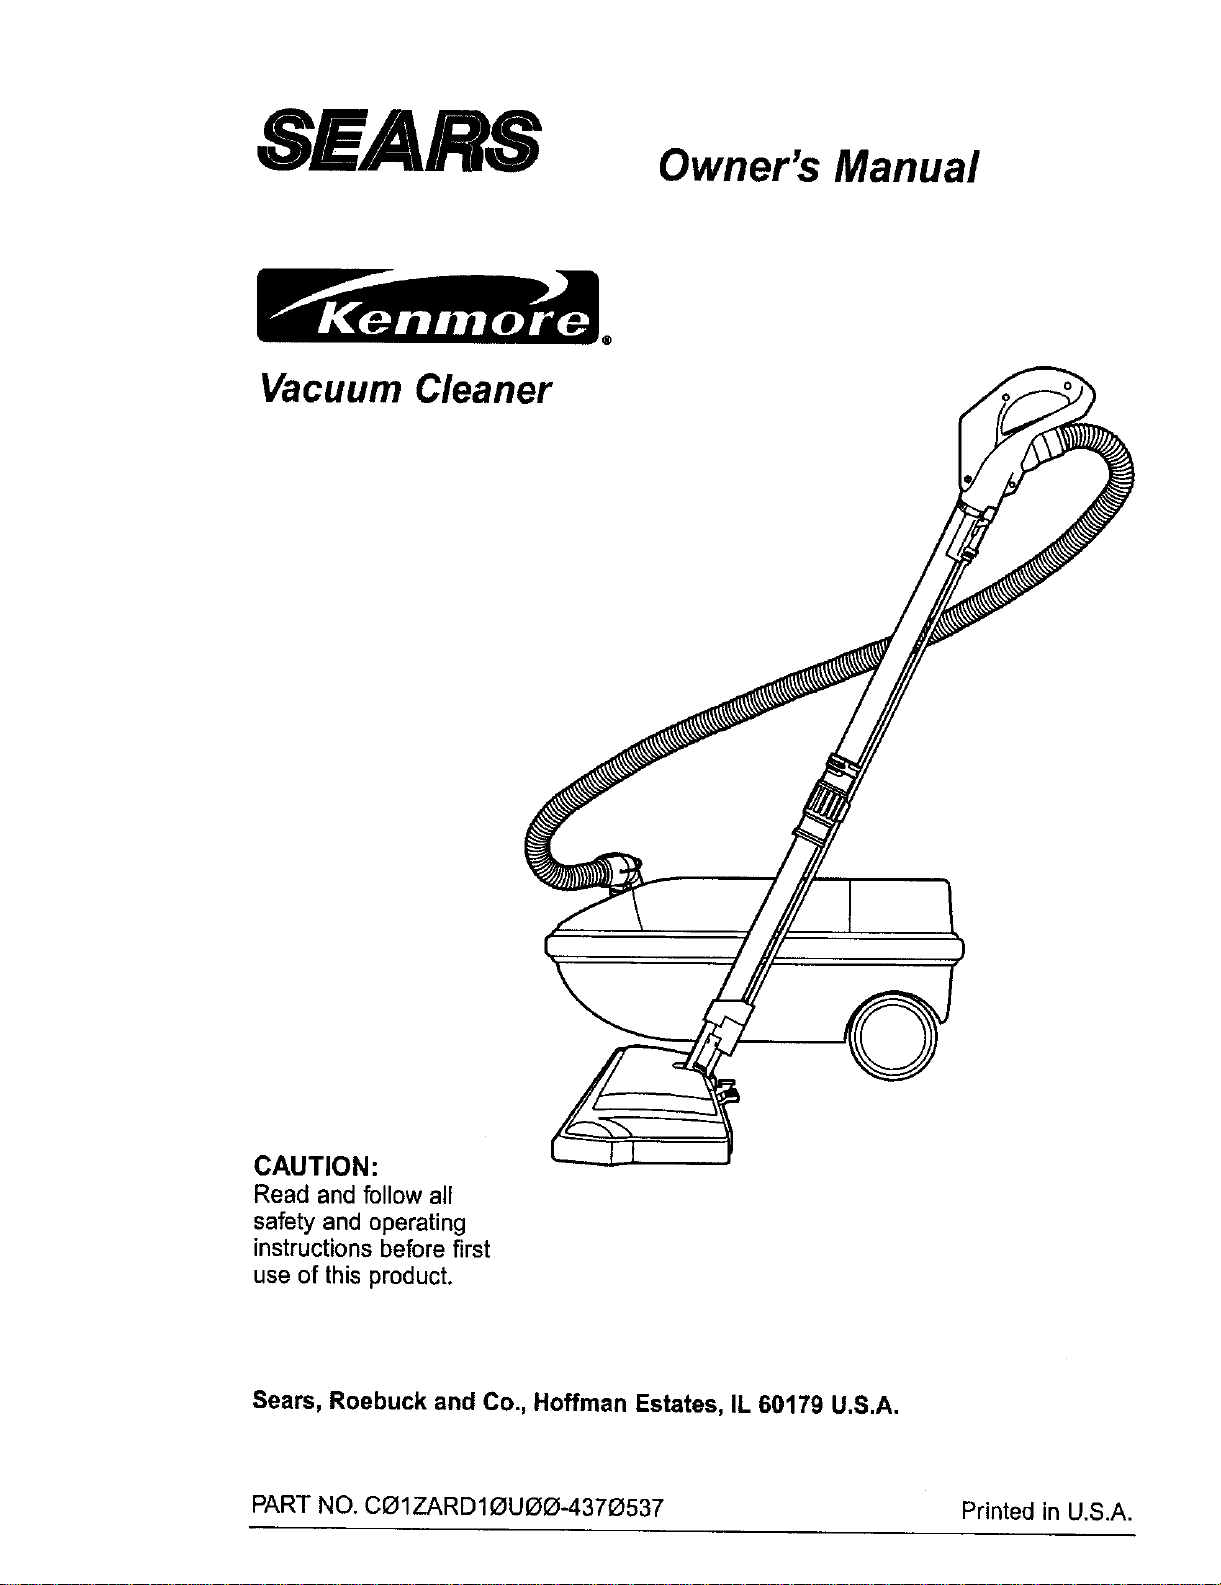
SEARS
Vacuum Cleaner
Owner's Manual
CAUTION:
Read and follow all
safety and operating
instructions before first
use of this product.
Sears, Roebuck and Co., Hoffman Estates, IL 60179 U.S.A.
PART NO. CI31ZARD10UOO°4370537 Printed in U,S.A.
Before Using Your New Vacuum ....... 2
Kenmore Vacuum Cleaner Warranty ... 2
Important Safety Instructions ......... 3
Parts and Features ................. 4-5
Assembly ........................ 6-7
Use ................................ 8
How to Start ........................ 8
Vacuuming Tips ..................... 9
SuggestedPile Height Settings ......... 9
Attaohments ....................... 10
AttachmentUse Chart ............... 10
PerformanceFeatures ............... 11
How Your Vacuum Works ............ 12
Canister Care ...................... 12
Bag Changing ..................... 12
Motor Safety FilterCleaning ........... 13
Cleaning Exteriorand Attachments ..... 13
Power-Mate TM Care .................. 14
LightBulb Changing ................. 14
Belt Changingand BrushCleaning ... 14-15
Brush Servicing .................... 16
BrushAssembly .................... 16
Troubleshooting .................... 17
Requesting Assistance Or Service . .. 18
Please read this guide. It will help you assemble and operate your new Kenmore vacuum in
the safest and most effective way.
For more information about the care and operation, call your nearest Sears store. You will
need the complete model and seria_ numbers when requesting information. Your vacuum's
model and serial numbers are located on the Model and Serial Number Plate.
Use the space below to record the model number and serial number of your new Kenmore
vacuum.
Model No.
Serial No.
Date of Purchase
Keep this book and your sales check (receipt) in a safe place for future reference.
FULL ONE-YEAR WARRANTY
When used for private household purposes, if within one year from the date of purchase, this
vacuum cleaner fails due to a defect in material or workmanship, RETURN IT TO THE NEAR-
EST SEARS SERVICE CENTER/DEPARTMENT IN THE UNITED STATES, and Sears will
repair it free of charge.
This warranty gives you specific legal rights, and you may also have other rights which vary
from state to state.
SEARS, ROEBUCK AND CO., D/817 WA, Hoffman Estates, IL 60179
2
Yoursafetyis important to us.To reduce the risk of fire, electrical shock, injury to
persons or damage when using your vacuum cleaner, follow basic safety precau-
tions including the following:
Read this manual before assemblingor
using yourvacuumcleaner.
Use your cleaner only as described in this
manual. Use only with Sears recommended
attachments.
To reduce the risk of electrical shock - Do
not use outdoors or on wet surfaces.
Disconnect electrical supply before servic-
ing or cleaning out brush area. Faiture to do
so could result in electrical shock or brush
suddenly starting.
Always turn cleaner off before connecting or
disconnecting the hose or POWER-MATE TM.
Always turn cleaner off before unplugging.
Do not unplug by pulling on cord. To unplug,
grasp the plug, not the cord.
Hold plug when rewinding onto cordreel,
Do not allow plugto whipwhenrewinding.
Do not use with damaged cord or plug. If
cleaner is not working as it should, has been
dropped, damaged, Leftoutdoors, or dropped
into water, return it to a Sears Service
Center/Department.
Do not pull or carry by cord, use cord as a
handle, close door on cord, or pull cord
around sharp edges or corners. Do not run
cleaner over cord. Keep cord away from
heated surfaces.
Do not leave cleaner when plugged in.
Unplug from outlet when not in use and
before servicing.
Do not allow to be used as a toy. Close
attention is necessary when used by or near
children.
Do not handle plug or cleaner with wet
hands.
Do not operate the cleaner with a punctured
hose. The hose contains electrical wires.
Replace if cut or worn. Avoid picking up
sharp objects.
Do not put any objects into openings.
Do not use with any opening blocked; keep
free of dust, lint, hair and anything that may
reduce air flow.
Keep hair, loose clothing, fingers, and all
parts of body away from openings and mov-
ing parts.
Do not use cleaner without dust bag and/or
filters in place.
Always change the dust bag after vacuum-
ing carpet cleaners or freshener, powders
and fine dust. These products clog the bag,
reduce airflow and can cause the bag to
burst. Failure to change bag could cause
permanent damage to the cleaner.
Do not use the cleaner to pick up sharp hard
objects, small toys, pins, paper, etc. They
may damage the cleaner or dust bag.
Do not pick up anything that is burning or
smoking, such as cigarettes, matches, or hot
ashes.
Do not use cleaner to pick up flammable or
combustible liquids (gasoline, cleaning fluids,
perfumes, etc.), or use in areas where they
may be present. The fumes from these sub-
stances can create a fire hazard or explo-
sion.
Useextra care when cleaningon stairs.Do
notputonchairs,tables,etc. Keeponfloor.
You are responsible for making sure that
your vacuum cleaner is not used by anyone
unable to operate it properly.
SAVE THESE INSTRUCTIONS
Proper assembly and safe use of your vacuum cleaner are your responsibilities.Your cleaner
is intended only for household use. Read this Owner's Manual carefully for important use and
safety information. This guide contains safety statements under warning and caution symbols.
Please pay special attention to these boxes and follow any instructions given. WARNING
statements alert you to such dangers as fire, electrical shock, burns and personal injury.CAU-
TION statements alert you to such dangers as personal injury and/or property damage.
i
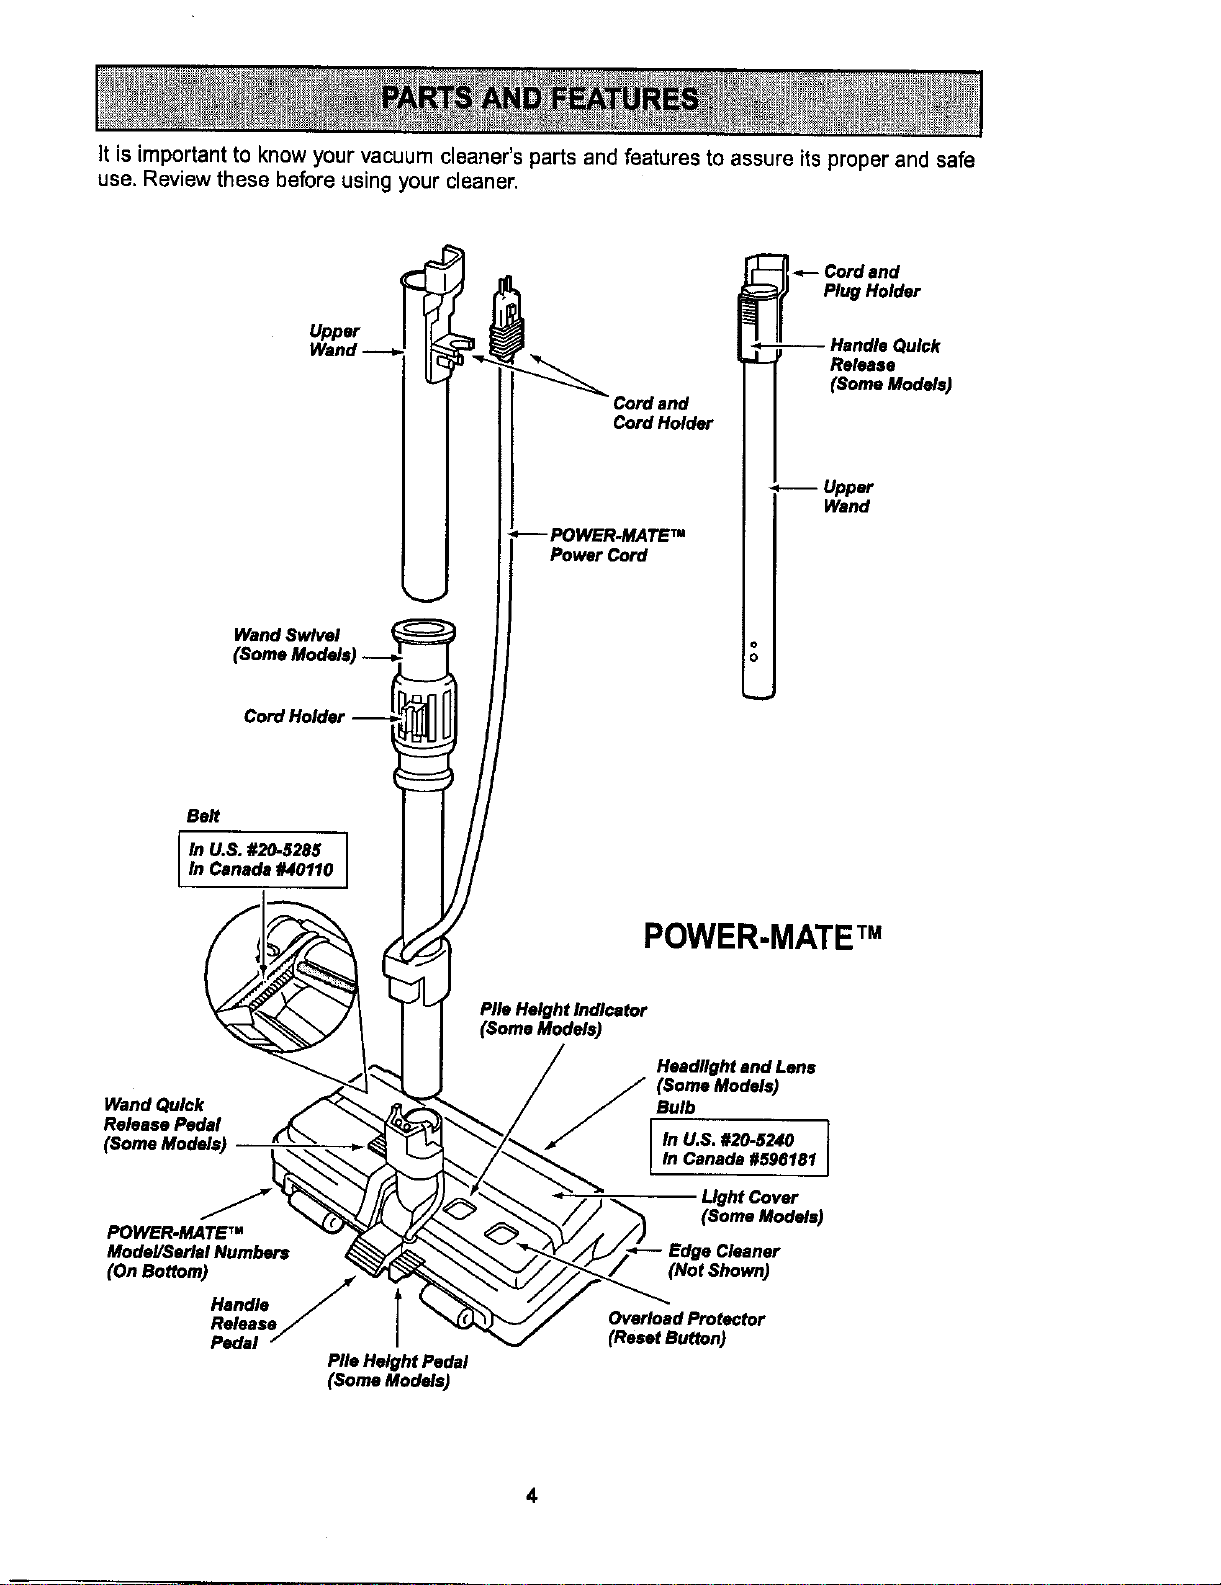
it is important to know your vacuum cleaner's parts and features to assure its proper and safe
use. Review these before using your cleaner.
Upper
WandSwlvel
(Some Models)
Cord Holder
Cordand
CordHolder
PowerCord
_--Cordand
Plug Holder
--HanMe Quick
RePose
(Some Models)
--Upper
Wand
Belt
M U.S. #20-5285
In Canada #40110
POWER-MATE TM
Wand Quick
Release Pedal
POWER.MATE TM
Model/Seriel Numbers
(On Bottom)
Handle
Release
Pedal
Pile HeightPedal
(SomeModels)
PileHeightIndicator
(SomaModels)
Headlight end Lens
(Some Models)
Bulb
In U.S. #20-5240
In Canada #596181
Light Cover
(Some Models)
Edge Cleaner
(Not Shown)
Overload Protector
(Reset Button)
4
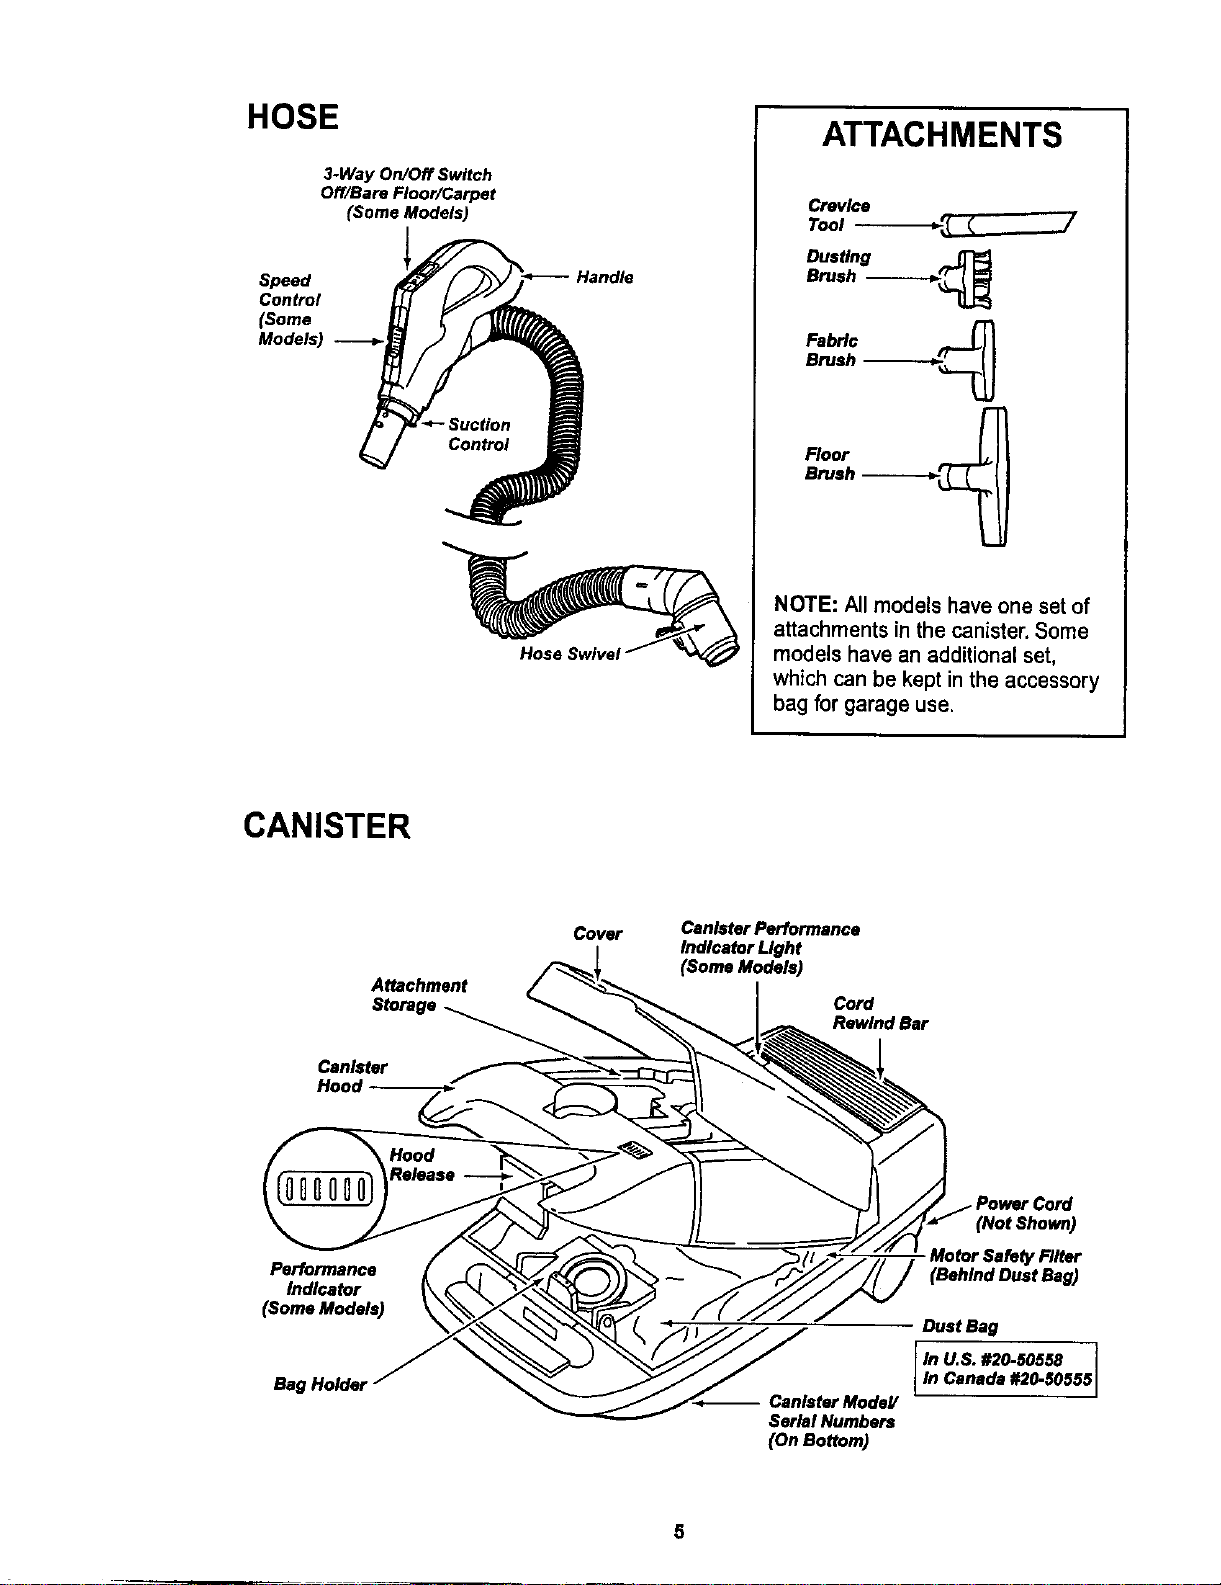
HOSE
3-Way On/Off Switch
Off/Bare Floor/Carpet
(Some Models)
Speed
Control
(Some
Models)
Handle
ATTACHMENTS
Crevice
Tool -_ _ ....)/
Dusting
Brush -_----_._
Fabric
Brush -_--___
Floor
Brush ------.---_
NOTE: All models have one set of
attachments in the canister, Some
models have an additional set,
which can be kept in the accessory
bag for garage use.
CANISTER
Attachment
Storage
Can_ter
Hood
Cover
Canister Performance
Indicator Light
(Soma Models)
Cord
RewindBar
Performance
Indicator
(Some Models)
Bag Holder
-- CanisterModeY
SerialNumbers
(OnBottom)
(Not Shown)
Motor Safety Biter
(Behind Dust Bag)
Dust Bag
M U,S. #20-50550
In Canada #20-50555
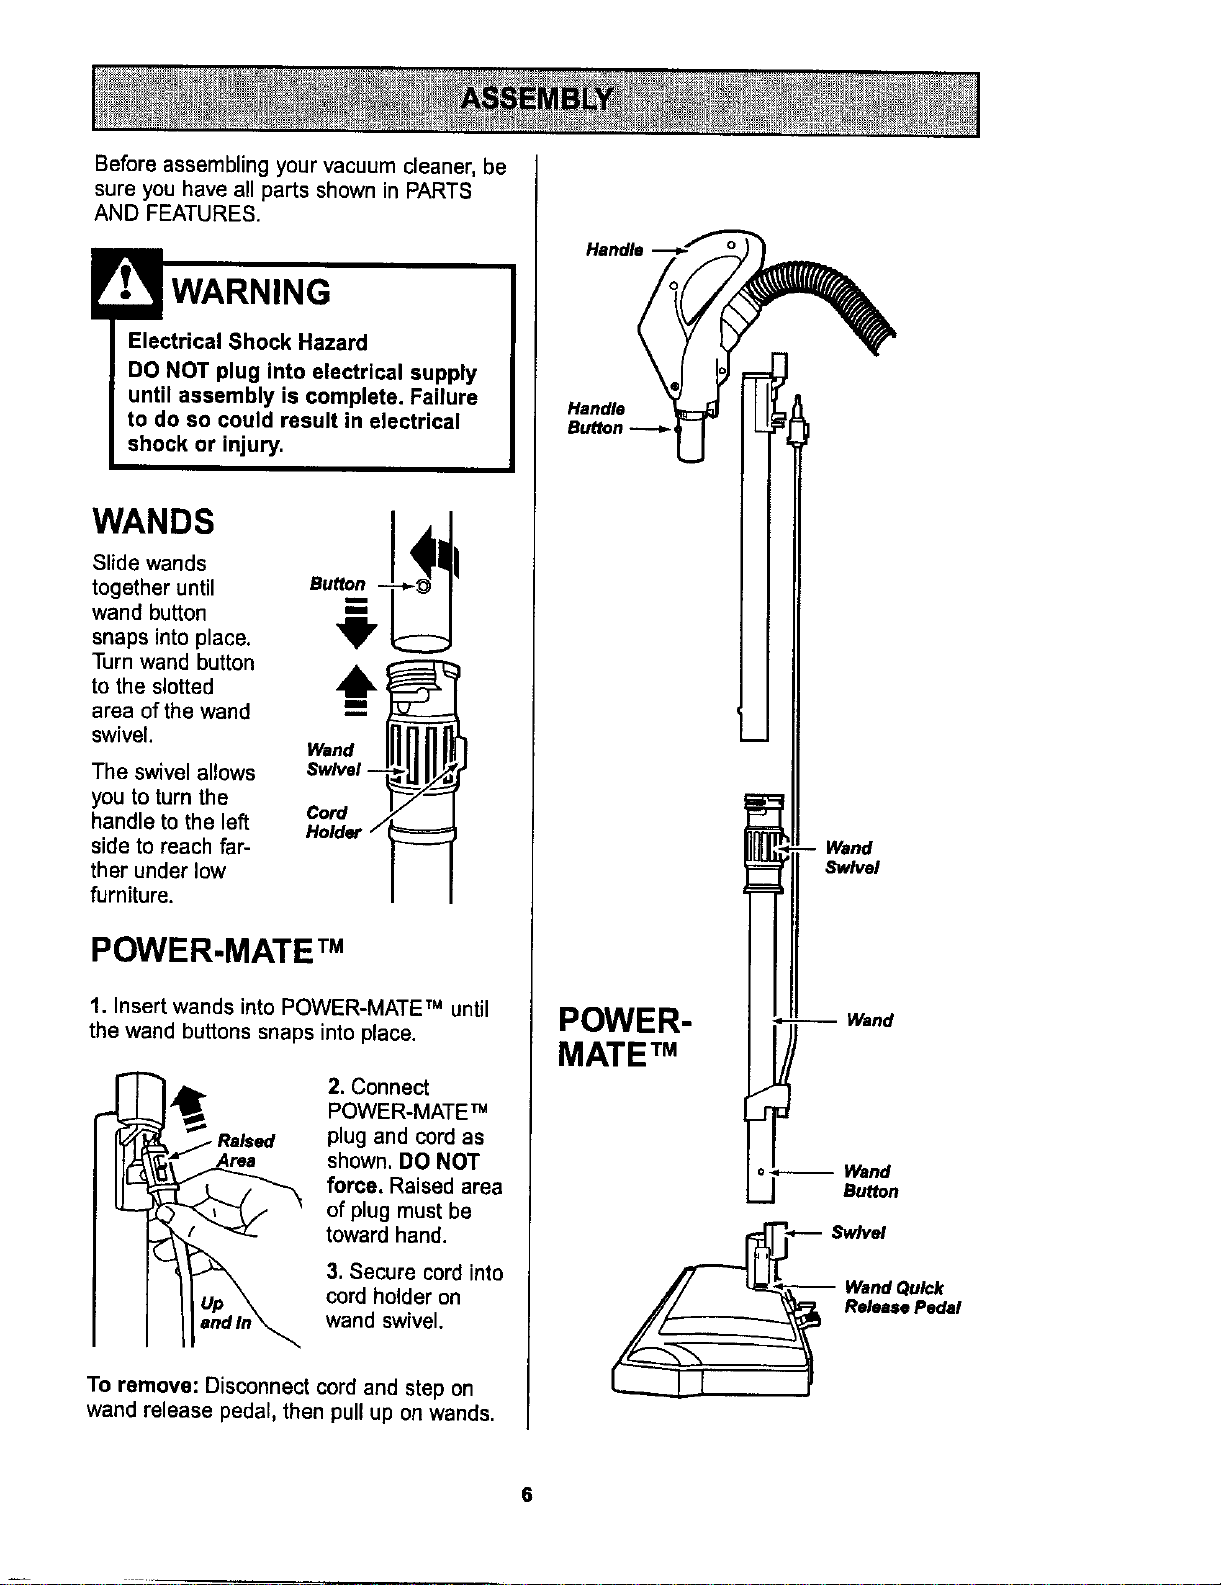
Before assembling your vacuum cleaner, be
sure you have all parts shown in PARTS
AND FEATURES.
WARNING
Electrical Shock Hazard
DO NOT plug into electrical supply
until assembly is complete. Failure
to do so could result in electrical
shock or injury.
w,.os
Slide wands
together until Bu
wand button
snaps into place,
Turn wand button
to the slotted
area of the wand
swivel.
The swivel allows
you to turn the
handle to the left
side to reach far-
ther under low
furniture.
Wand
Swivel --
Cord
Holder
POWER.MATE TM
1. Insert wands into POWER-MATE TM until
the wand buttons snaps into place.
2. Connect
POWER-MATE TM
plug and cord as
shown. DO NOT
force. Raised area
of plug must be
toward hand.
3. Secure cord into
cord holder on
wand swivel.
To remove: Disconnect cord and step on
wand release pedal, then pull up on wands.
Handle -_J_'_
Wand
Swivel
POWER-
MATE TM
Wand
Wand
Bu_on
__ Release Pedal
6
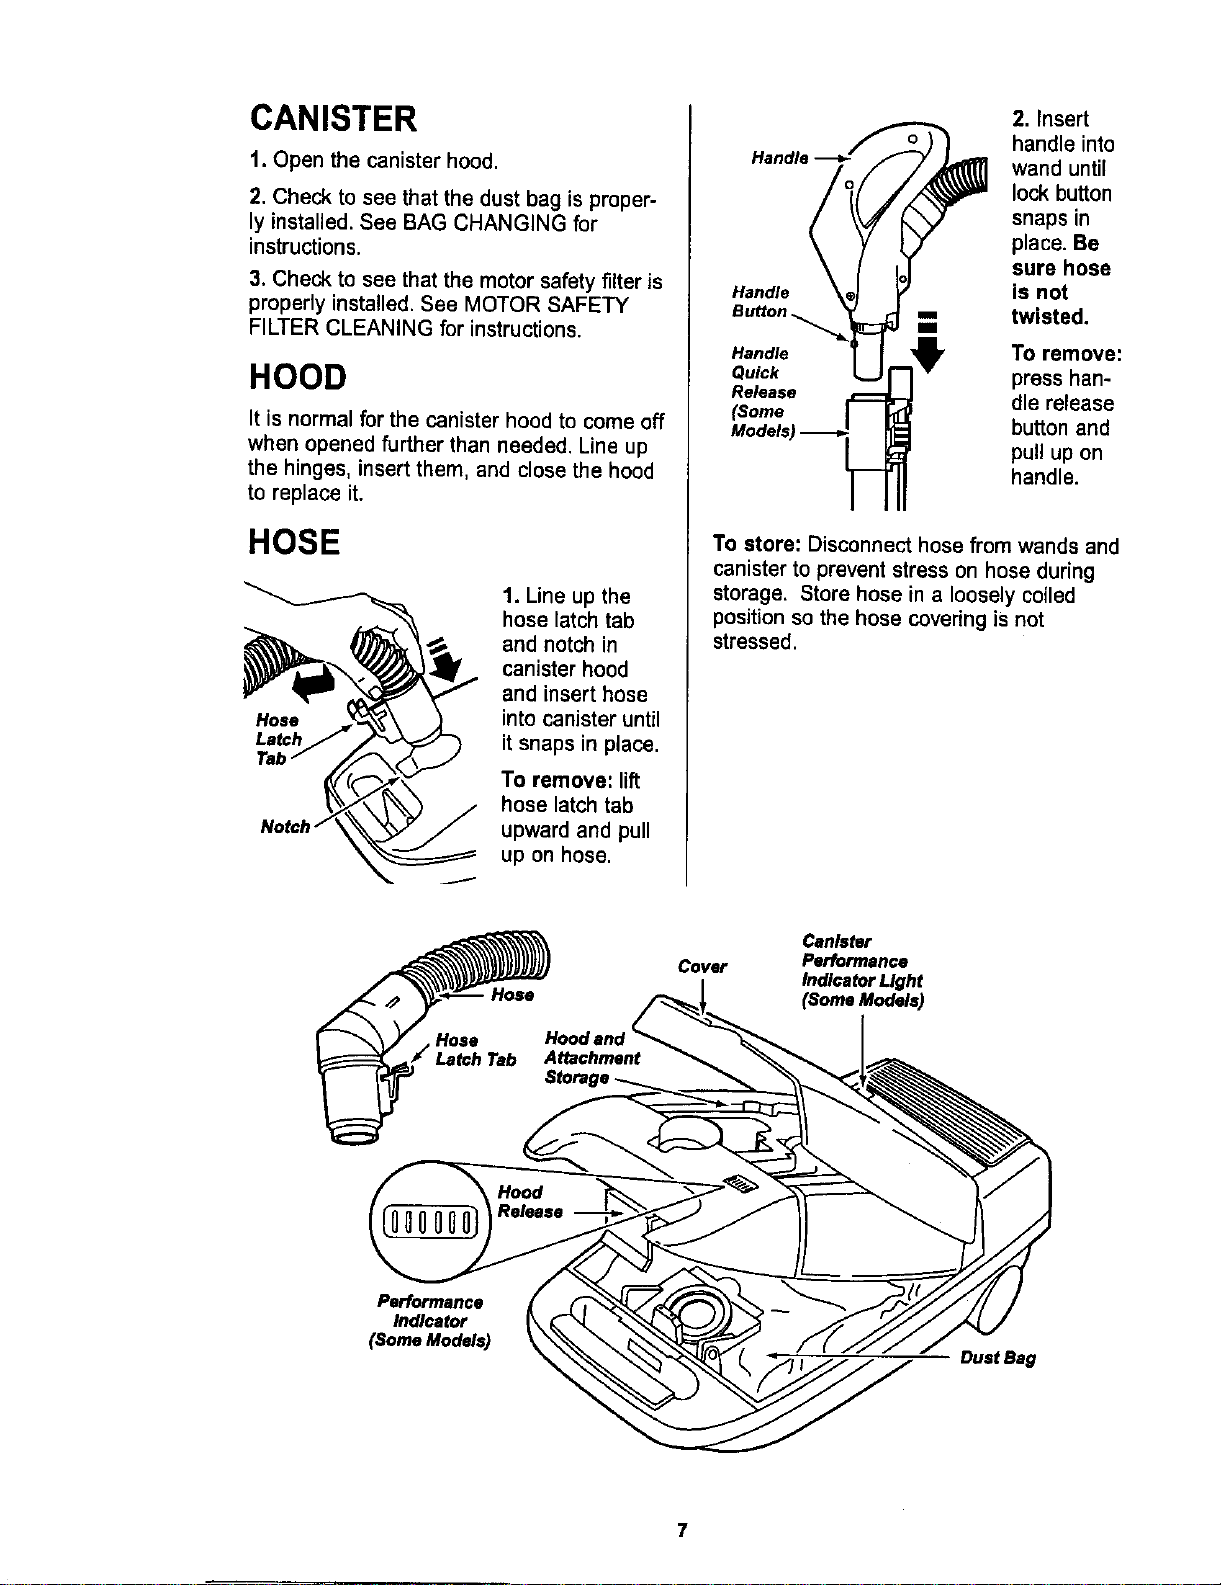
CANISTER
1. Open the canister hood.
2. Check to see that the dust bag isproper-
ly installed.See BAG CHANGING for
instructions.
3. Check to see that the motor safety filter is
properly installed. See MOTOR SAFETY
FILTER CLEANING for instructions.
HOOD
It is normal for the canister hood to come off
when opened further than needed. Line up
the hinges, insert them, and close the hood
to replace it.
HOSE
J
1. Line up the
hose latch tab
and notch in
canister hood
and insert hose
into canister until
it snaps in place.
To remove: lift
hose latch tab
upward and pull
up on hose.
Handle
Handle
Qu_k
Re_ase
_ome
2. Insert
handle into
wand until
lock button
snaps in
place. Be
sure hose
is not
twisted.
To remove:
press han-
dle release
button and
pull up on
handle.
To store: Disconnect hose from wands and
canister to prevent stress on hose during
storage, Store hose in a loosely coiled
position so the hose covering is not
stressed.
Cover
Hoodand_'_,,_
Attachment
Canister
Performance
IndlcetorLIght
(Some Models)
Performance
Indicator
(Some Models)
- DustBag
7

HOW TO START
HP:rso;al Injury and Product Damage
• DO NOT plug in if switch is in ON
position. Personal injury or
damage could result.
• The cord moves rapidly when
rewinding. Keep children away
and provide a clear path when
rewinding the cord to prevent
personal injury.
• DO NOT use outlets above
counters. Damage to items in
surrounding area could occur.
Cord
Rewind
Bar
1. Pull cord out of
canister to desired
length, The cord
will not rewind until
the cord rewind
bar is pushed.
NOTE: To reduce the risk of electric shock,
this vacuum cleaner has a polarized plug,
one blade is wider than the other. This plug
will fit in a polarized outlet only one way. If
the plug does not fit fully in the outlet,
reverse the plug. If it still does not fit, con-
tact a qualified electrician to install the prop-
er outlet. Do not change the plug in any
way.
2. Plug the polarized power cord into a 120
Volt outletlocated near the floor.
To rewind: Unplug the cleaner. Hold the
plug while rewinding to prevent damage or
injury from the moving cord, Push cord
rewind bar.
PIle eight
etor
_ Height
Pedal
Pedal
3. Lower Wand fi'om upright position by
pressing on the handle release pedal.
4. Select a pile height setting by pressing
the small pedal on the rear of the POWER-
MATE TM. The pile height setting shows on
the indicator, See SUGGESTED PILE
HEIGHT SETTINGS.
Select a switch
position on the
handle.
OFF
FLOOR - turns on the canistermotor only.
CARPET - turns on both the canister and
the POWER-MATE TM motors.
8
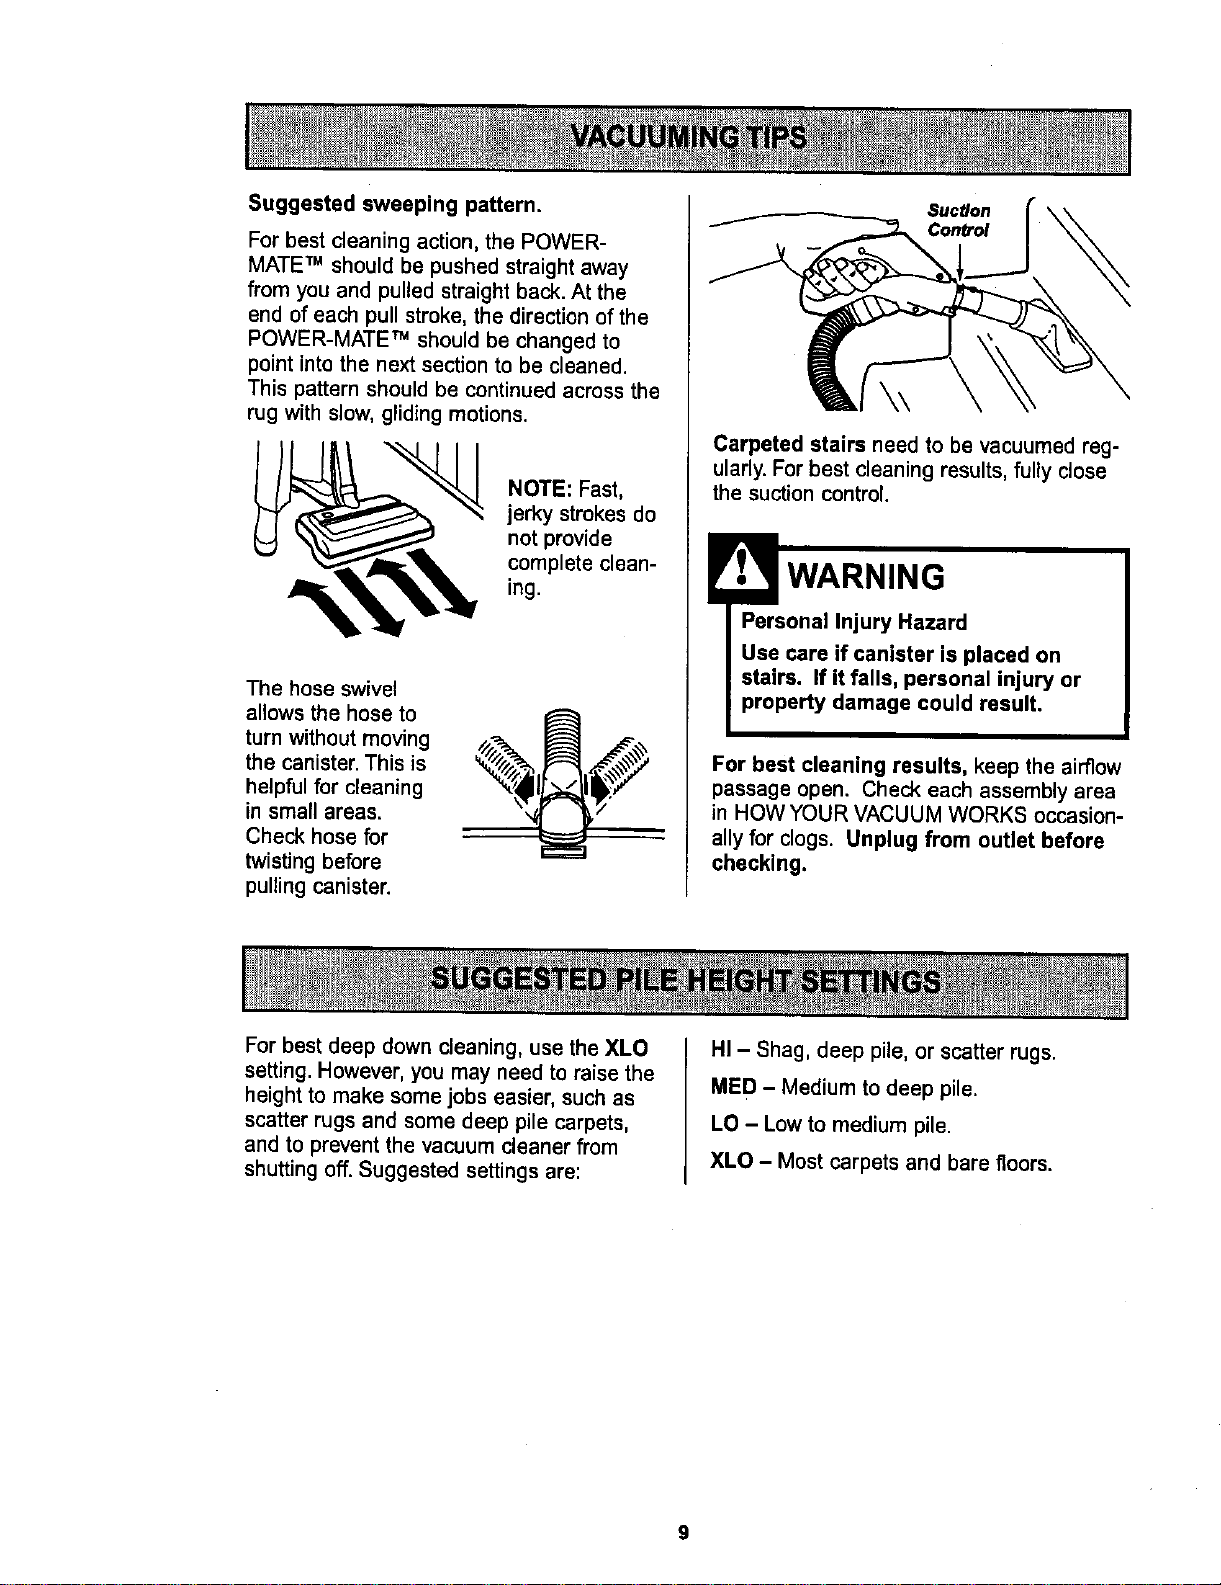
Suggestedsweepingpattern.
For best cleaning action, the POWER-
MATE TM should be pushed straight away
from you and pulled straight back. At the
end of each pull stroke, the direction of the
POWER-MATE TM should be changed to
point into the next section to be cleaned.
This pattern should be continued across the
rug with slow, gliding motions.
NOTE: Fast,
jerky strokesdo
not provide
complete clean-
ing.
The hose swivel
allows the hose to
turn without moving
the canister. This is
helpful for cleaning
in small areas.
Check hose for
twisting before
pulling canister.
Suction
Conb'ol
Carpeted stairs need to be vacuumed reg-
ularly. For best cleaning results, fully close
the suction control.
WARNING
Personal Injury Hazard
Use care if canister is placed on
stairs. If it falls, personal injury or
property damage could result.
For best cleaning results, keep the airflow
passage open, Check each assembly area
in HOW YOUR VACUUM WORKS occasion-
ally for clogs. Unplug from outlet before
checking.
For best deep down cleaning, use the XLO
setting. However, you may need to raise the
height to make some jobs easier, such as
scatter rugs and some deep pile carpets,
and to prevent the vacuum cleaner from
shutting off. Suggested settings are:
HI - Shag, deep pile, or scatter rugs.
MED - Medium to deep pile.
LO - Low to medium pile.
XLO - Most carpets and bare floors.
9

CAUTION
ATTACHMENTS ON HANDLE
Handle
Button --_ =
NOTE: If the
POWER-
MATETM is
attached, turn
cleaneroff
before removing
handle from
wands.
1. Press lock
button, then pull
to remove han-
dle from wand.
If your model has the optional feature of a
handle release, press it in similarly.
2. Slide attach-
ments firmly on
handle as need-
ed. See chart
below.
ATTACHMENTS ON WANDS
1. To remove
wands from
POWER-
MATE TM, lock
wands in
straight-up
position.
1111 " ":;'
fll_l
i /I
,, Ii
r at
• I/
I!
Wand Quick
Release Pedal i!
2. Press wand
release pedal
with foot and
pull the wands
straight up out of
POWER-MATE TM .
The POWER-
MATE TM plug and
cord do not have to
be removed to use
attachments on the
wands.
3. Put attach-
ments on
wands as
needed. See
chart below.
CLEANING AREA
Between
ATTACHMENT Furniture* Cushions* Drapes* Stairs Walls
DUSTING BRUSH _j_
CREVICE TOOL
FABRIC BRUSH
FLOOR BRUSH
POWER'MATET"
X X X
X X
X X
X X X
X**
Sars Carpeted
Floors :loors/Rugs
X
_osition.*Alwayscleanattachmentsbeforeusingonfabrics. ** 3-way On/Off switchshouldbe in FLOOR
NOTE: When separatingwends, depress lock button completelybebre pulling wandsapart. Ifwand lockbutton is diffi-
cult to depress, push the twowands more tightly togetherto line up the lock button with the hole, Depress lock button
and then puffwands apart.
10
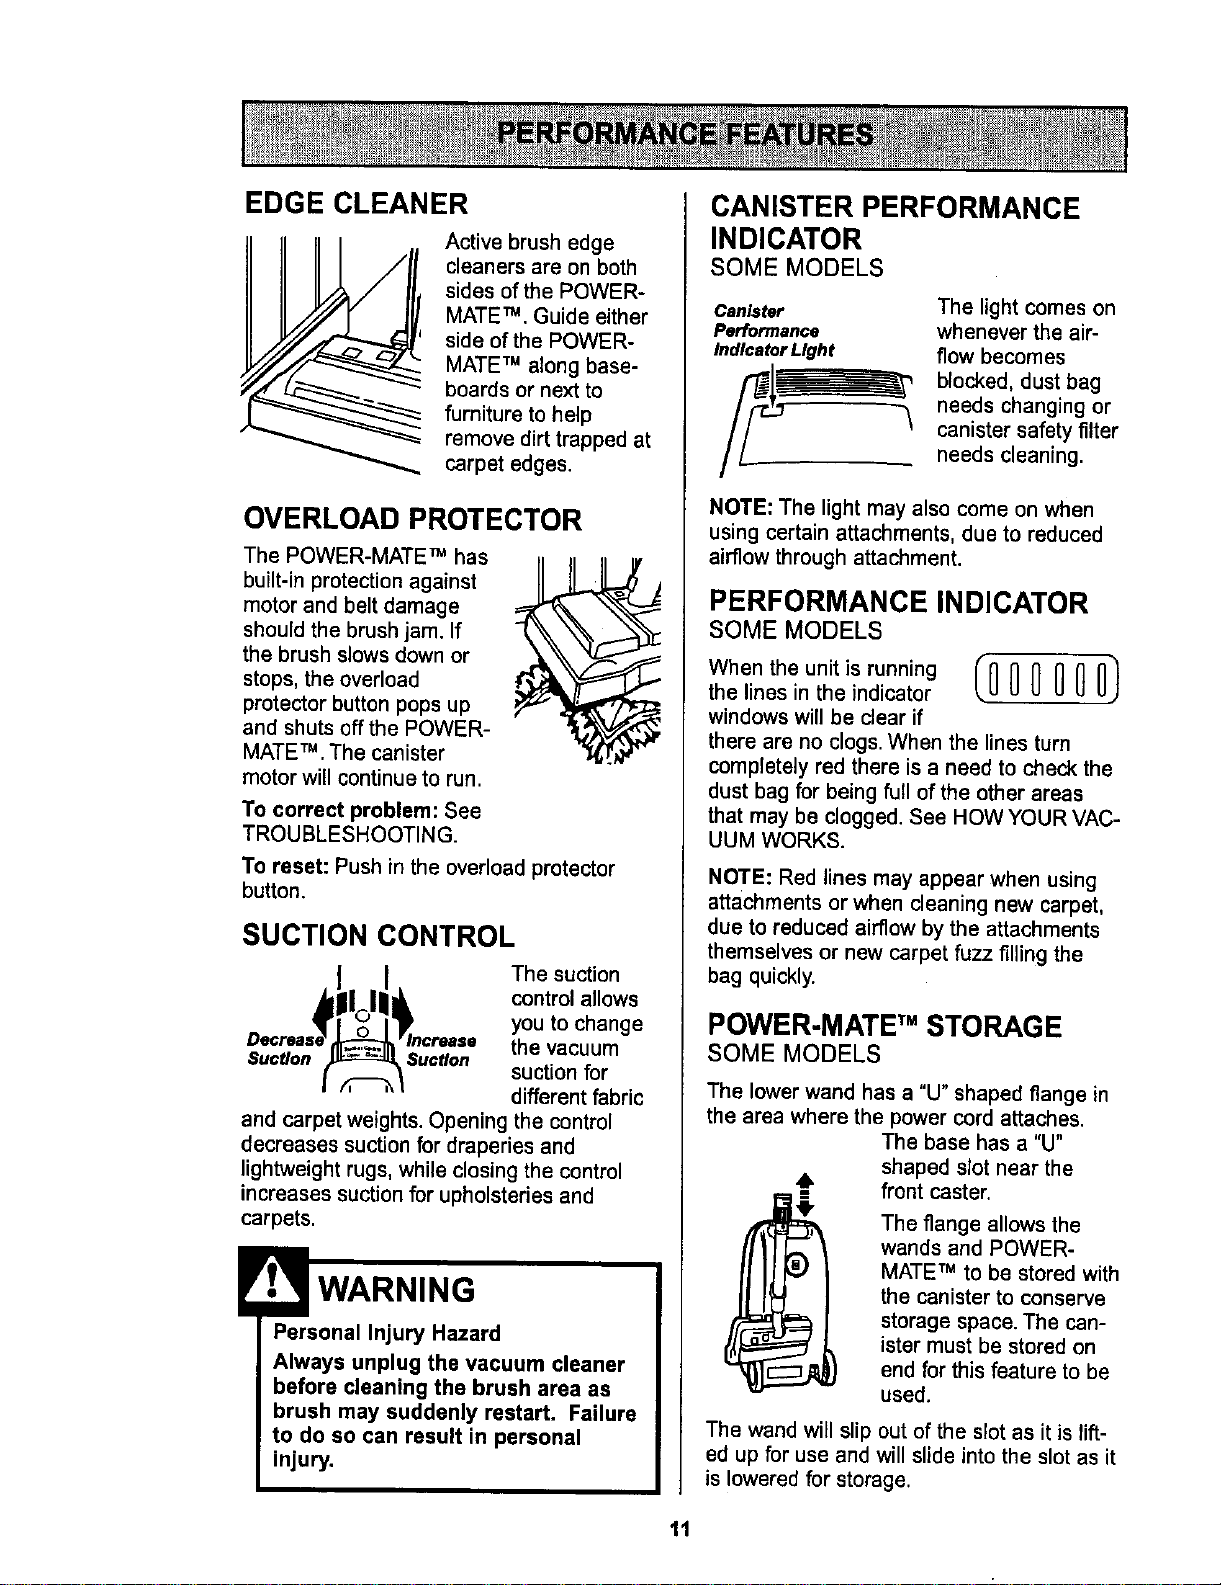
EDGE CLEANER
Active brush edge
cleaners are on both
sides of the POWER-
MATE TM. Guide either
side of the POWER-
MATE TM along base-
boards or next to
furniture to help
remove dirt trapped at
carpet edges.
OVERLOAD PROTECTOR
The POWER-MATE TM has
tl
built-in protection against II
motor and belt damage
should the brush jam. If
the brush slows down or
stops, the overload
protector button pops up
and shuts off the POWER-
MATE TM .The canister
motor will continue to run.
To correct problem: See
TROUBLESHOOTING.
To reset: Push in the overload protector
button.
SUCTION CONTROL
The suction
control allows
you to change
the vacuum
Suction i suctI°n suction for
different fabric
and carpet weights. Opening the control
decreases suction for draperies and
lightweight rugs, while closing the control
increases suction for upholsteries and
carpets.
Personal Injury Hazard
Always unplug the vacuum cleaner
before cleaning the brush area as
brush may suddenly restart. Failure
to do so can result in personal
injury.
CANISTER PERFORMANCE
INDICATOR
SOME MODELS
Canister
Performance
Indicator Light
The light comes on
whenever the air-
flow becomes
blocked, dust bag
needs changing or
canister safety filter
needs cleaning.
NOTE: The light may also come on when
using certain attachments, due to reduced
airflow through attachment.
PERFORMANCE INDICATOR
SOME MODELS
Whentheunitisrunning (_ 0 0 0 O)
the lines in the indicator
windows will be clear if
there are no clogs. When the lines turn
completely red there is a need to check the
dust bag for being full of the other areas
that may be clogged. See HOW YOUR VAC-
UUM WORKS.
NOTE: Red lines may appear when using
attachments or when cleaning new carpet,
due to reduced airflow by the attachments
themselves or new carpet fuzz filling the
bag quickly.
POWER-MATE TM STORAGE
SOME MODELS
The lower wand has a "U" shaped flange in
the area where the power cord attaches.
The base has a "U"
shaped slot near the
6 front caster.
The flange allows the
wands and POWER-
MATE TM to be stored with
the canister to conserve
storage space. The can-
ister must be stored on
end for this feature to be
used.
The wand will slip out of the slot as it is lift-
ed up for use and will slide into the slot as it
is lowered for storage.
11
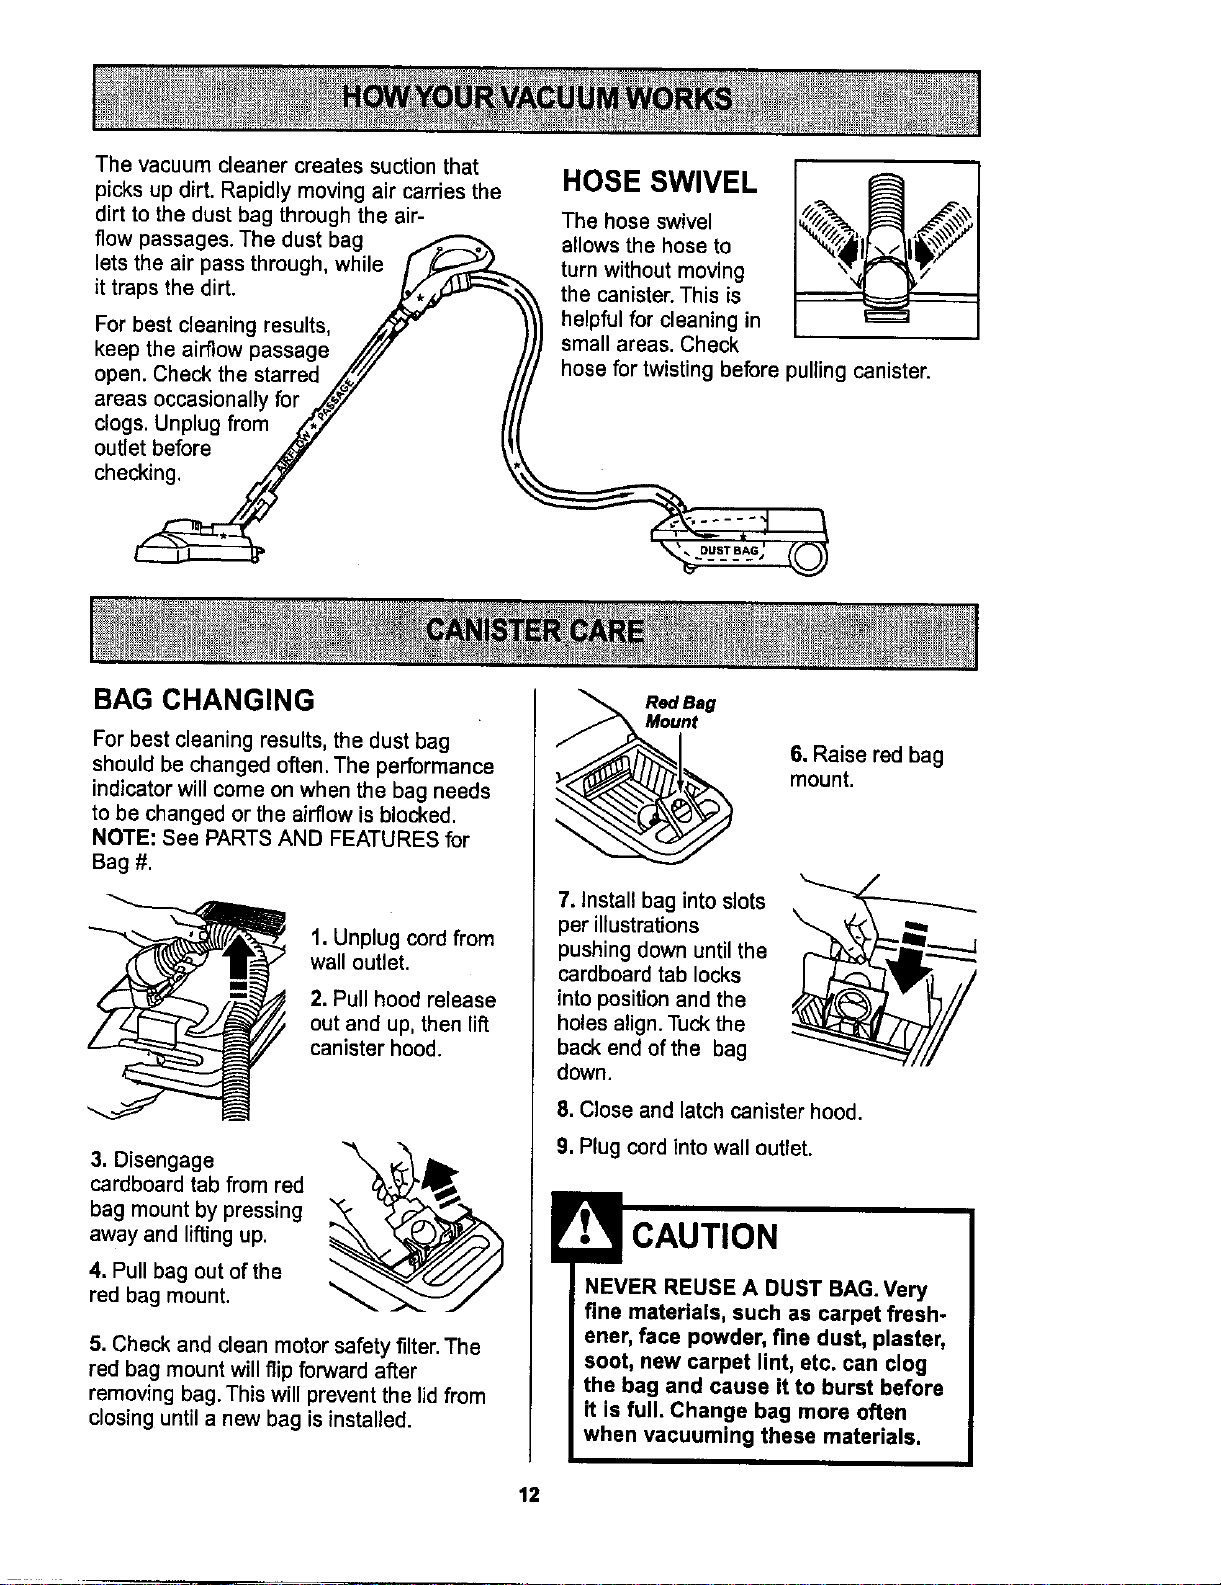
Thevacuum cleaner creates suction that
picks up dirt. Rapidly moving air carries the
dirt to the dust bag through the air-
flow passages. The dust bag
lets the air pass through, while /y_
it traps the dirt. J_,_
For best cleaning results,
keep the airflow passage //'JJ
open. Check the starred .Z_._" /
areas occasionally for .,_@_/ /t
c,o0sUnp,ugfromAY I(I
outlet before _ _,_!
checJ
I jI I_"
BAG CHANGING
HOSE SWIVEL
The hose swivel
allows the hose to
turn without moving
the canister. This is
helpful for cleaning in
small areas. Check
%
hose for twisting before pulling canister.
For best cleaning results, the dust bag
should be changed often. The performance
indicator will come on when the bag needs
to be changed or the airflow is blocked.
NOTE: See PARTS AND FEATURES for
Bag #.
1. Unplug cord from
wall outlet.
2. Pull hood release
out and up, then lift
canister hood.
3. Disengage
cardboard tab from red
bag mount by pressing
away and lifting up.
4. Pull bag out of the
red bag mount.
5. Check and clean motor safety filter. The
red bag mount will flip forward after
removing bag. This will prevent the lid from
closing until a new bag is installed.
Red ag
nt
6. Raise red bag
mount.
7. Install bag into slots
per illustrations
pushing down until the
cardboard tab locks
into position and the
holes align. Tuck the
back end of the bag
down.
8. Close and latch canister hood.
9. Plug cord into wall outlet.
CAUTION
NEVER REUSE A DUST BAG. Very
fine materials, such as carpet fresh-
ener, face powder, fine dust, plaster,
soot, new carpet lint, etc. can clog
the bag and cause it to burst before
it is full. Change bag more often
when vacuuming these materials.
12
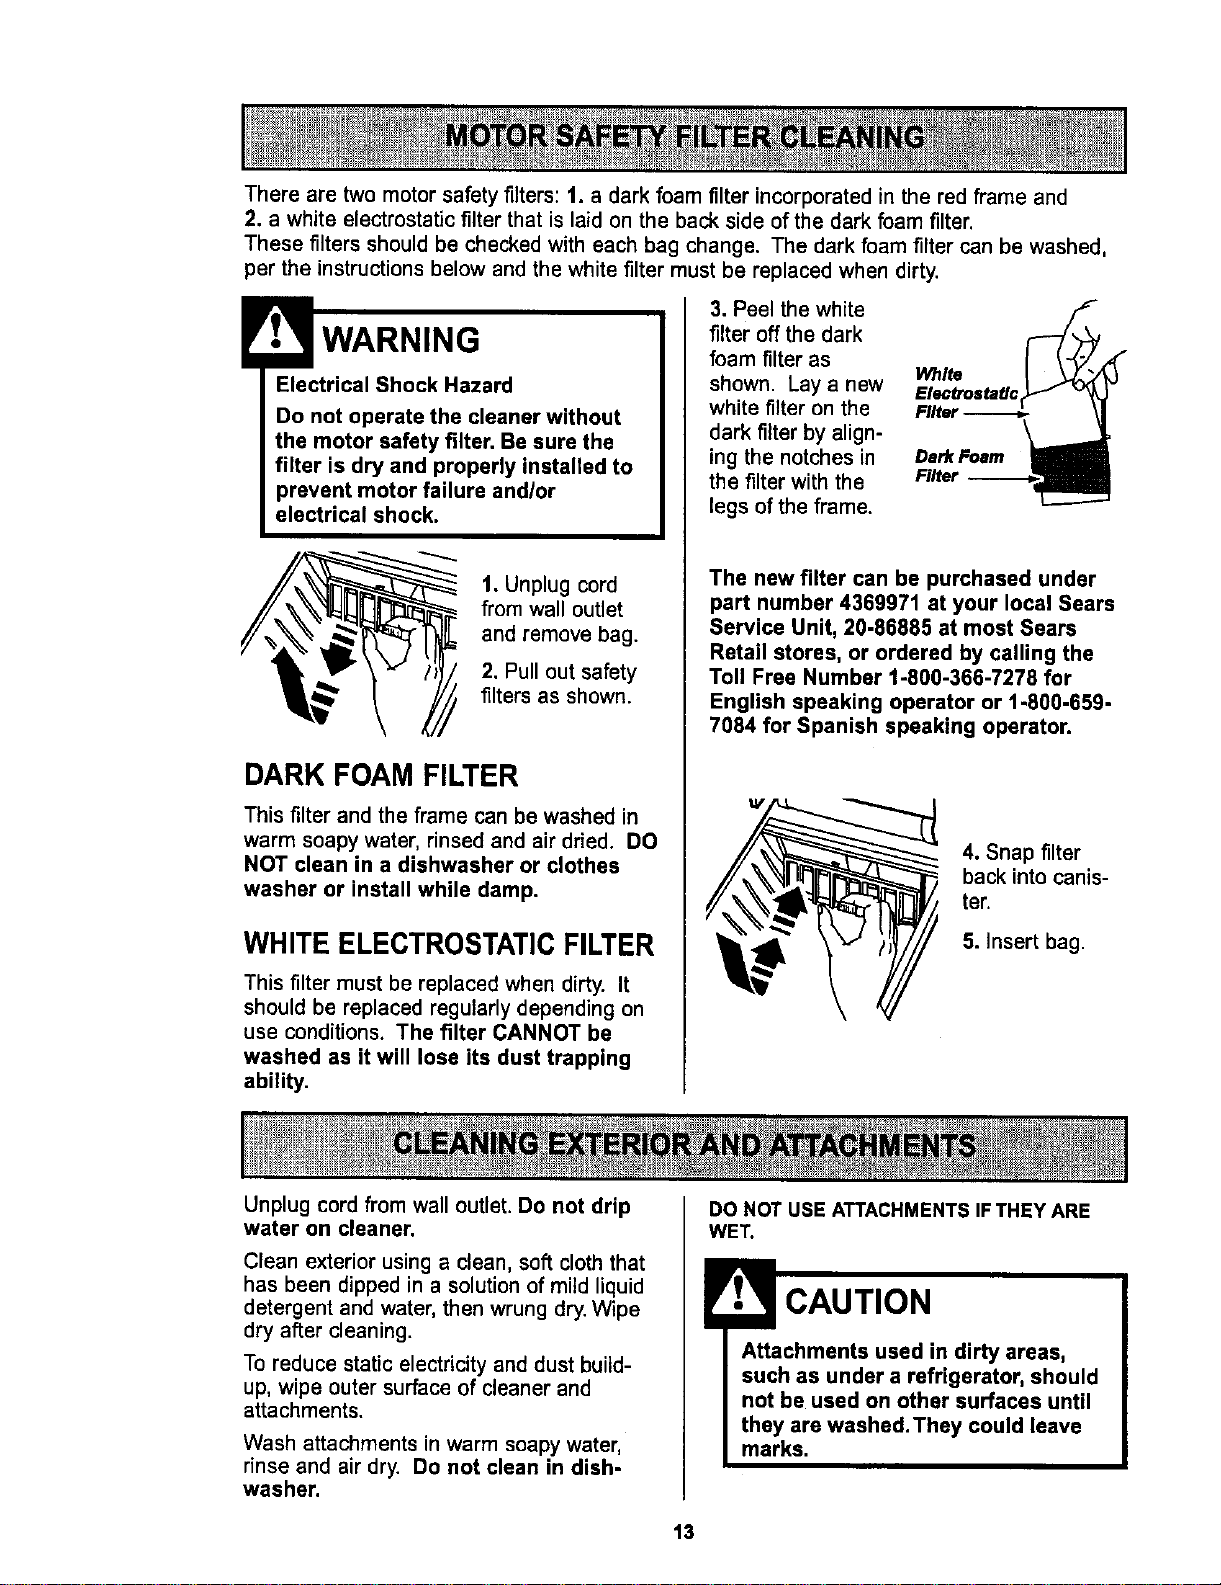
There are two motor safety filters: 1. a dark foam filter incorporated in the red frame and
2. a white electrostatic filter that is laid on the back side of the dark foam filter,
These filters should be checked with each bag change. The dark foam filter can be washed,
per the instructions below and the white filter must be replaced when dirty.
WARNING
Electrical Shock Hazard
Do not operate the cleaner without
the motor safety filter. Be sure the
filter is dry and properly installed to
prevent motor failure and/or
electrical shock.
1. Unplug cord
from wall outlet
and remove bag.
2. Pull out safety
filters as shown.
DARK FOAM FILTER
This filter and the frame can be washed in
warm soapy water, rinsed and air dried. DO
NOT clean in a dishwasher or clothes
washer or install while damp.
WHITE ELECTROSTATIC FILTER
This filter must be replaced when dirty. It
should be replaced regularly depending on
use conditions. The filter CANNOT be
washed as it will lose its dust trapping
ability.
3. Peel the white
filter off the dark
foam filter as
shown. Lay a new White
Etectroste#c
white filter on the Filter
dark filter by align-
ing the notches in DmrkFoam
the filter with the Filter --
legs of the frame.
The new filter can be purchased under
part number 4369971 at your local Sears
Service Unit, 20-86885 at most Sears
Retail stores, or ordered by calling the
Toll Free Number t-800-366-7278 for
English speaking operator or 1-800-659-
7084 for Spanish speaking operator.
4. Snap filter
back into canis-
ter.
5. Insert bag.
Unplug cord from wall outlet.Do not drip
water on cleaner.
Clean exterior using a clean, soft cloth that
has been dipped in a solution of mild liquid
detergent and water, then wrung dry. Wipe
dry after cleaning.
To reduce static electricity and dust build-
up, wipe outer surface of cleaner and
attachments.
Wash attachments in warm soapy water,
rinse and air dry. Do not clean in dish-
washer.
DO NOT USE ATTACHMENTS IFTHEY ARE
WET.
CAUTION
Attachments used in dirty areas,
such as under a refrigerator, should
not be used on other surfaces until
they are washed. They could leave
marks.
13
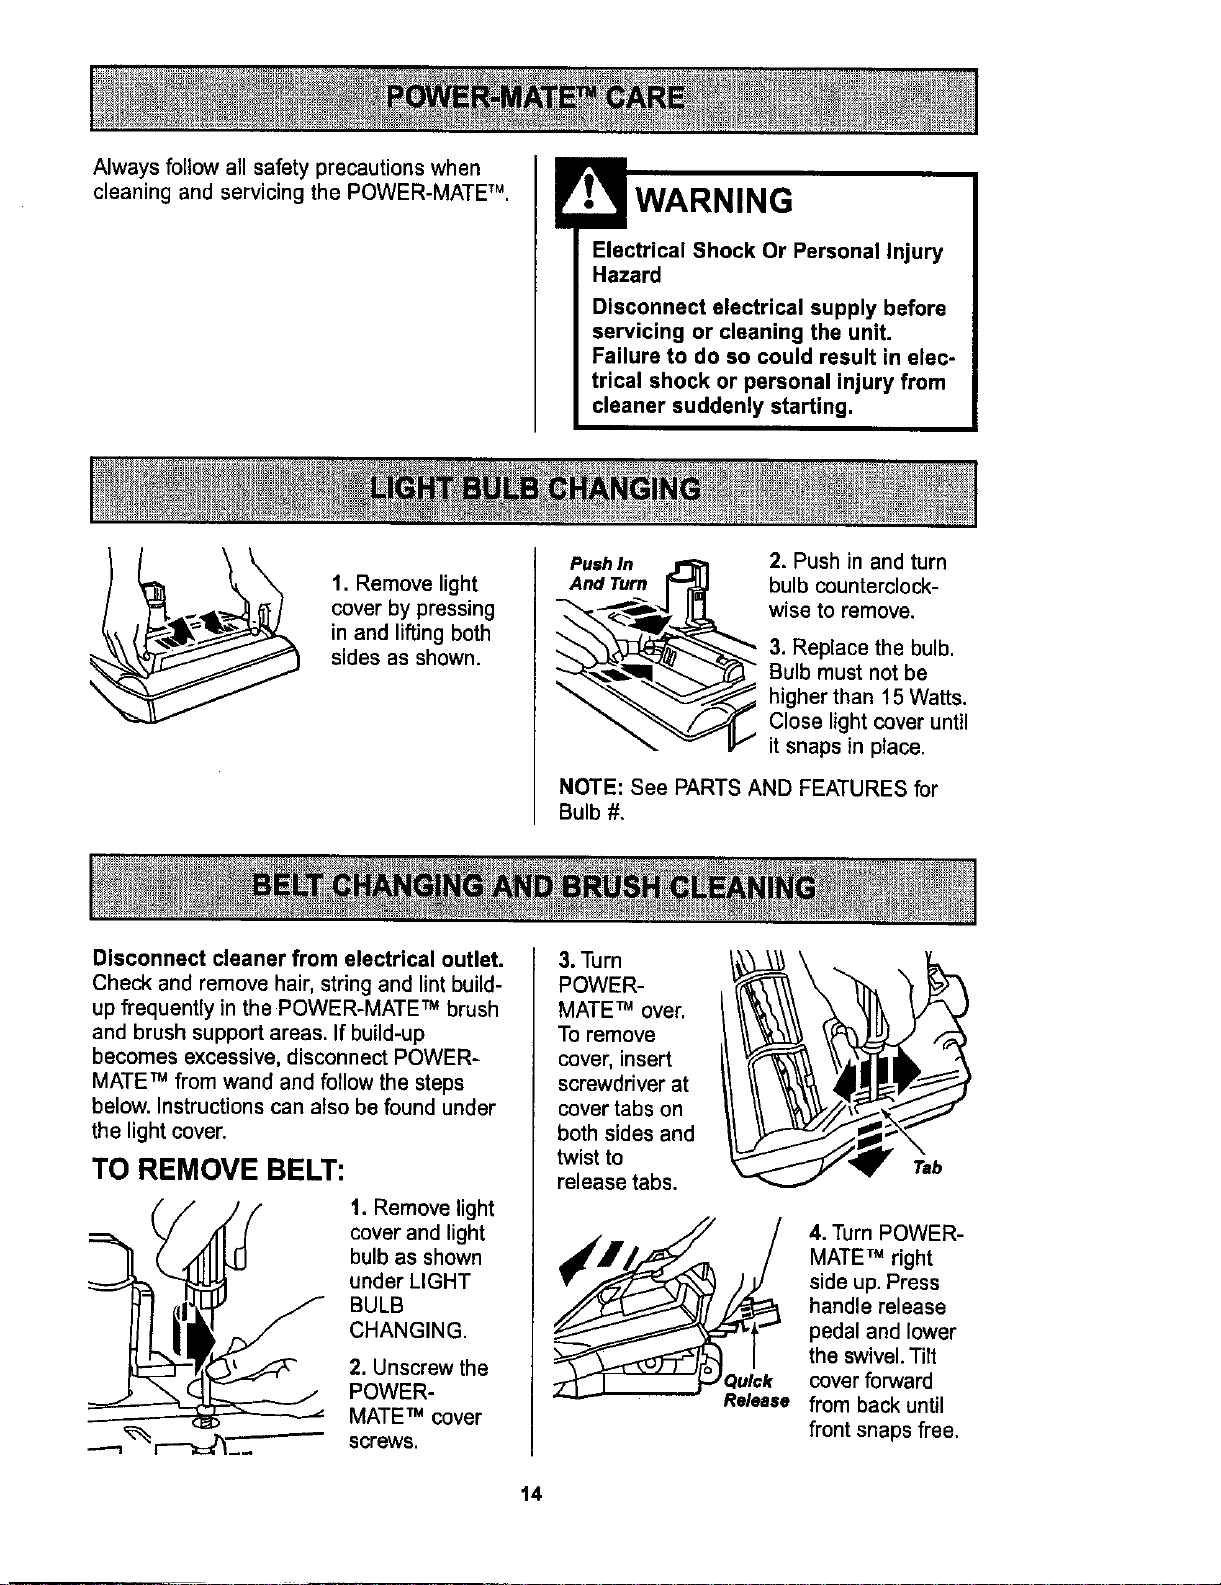
Always follow all safety precautions when
cleaning and servicing the POWER-MATE TM.
Electrical Shock Or Personal Injury
Hazard
Disconnect electrical supply before
servicing or cleaning the unit.
Failure to do so could result in elec-
trical shock or personal injury from
cleaner suddenly starting.
1. Remove light
cover by pressing
in and lifting both
sides as shown.
PushIn _ 2. Push in and turn
And Turn r_ bulb counterclock-
_ wise to remove.
3. Replace the bulb.
_ Bulb must not be
_"% higher than 15 Watts.
_---_'_ Close light cover until
it snaps in place.
NOTE: See PARTS AND FEATURES for
Bulb #.
Disconnect cleaner from electrical outlet.
Check and remove hair, string and lint build-
up frequently in the POWER-MATE TM brush
and brush support areas. If build-up
becomes excessive, disconnect POWER-
MATE TM from wand and follow the steps
below. Instructions can also be found under
the light cover.
TO REMOVE BELT:
1. Remove light
cover and light
bulb as shown
under LIGHT
BULB
CHANGING.
2. Unscrew the
POWER-
MATE TM cover
screws.
3. Turn
POWER-
MATE TM over.
To remove
cover, insert
screwdriver at
cover tabs on
both sides and
twist to
release tabs.
14
4. Turn POWER-
MATE TM right
side up. Press
handle release
pedal and lower
the swivel. Tilt
Q_lck cover forward
Re/ease from back until
front snaps free.
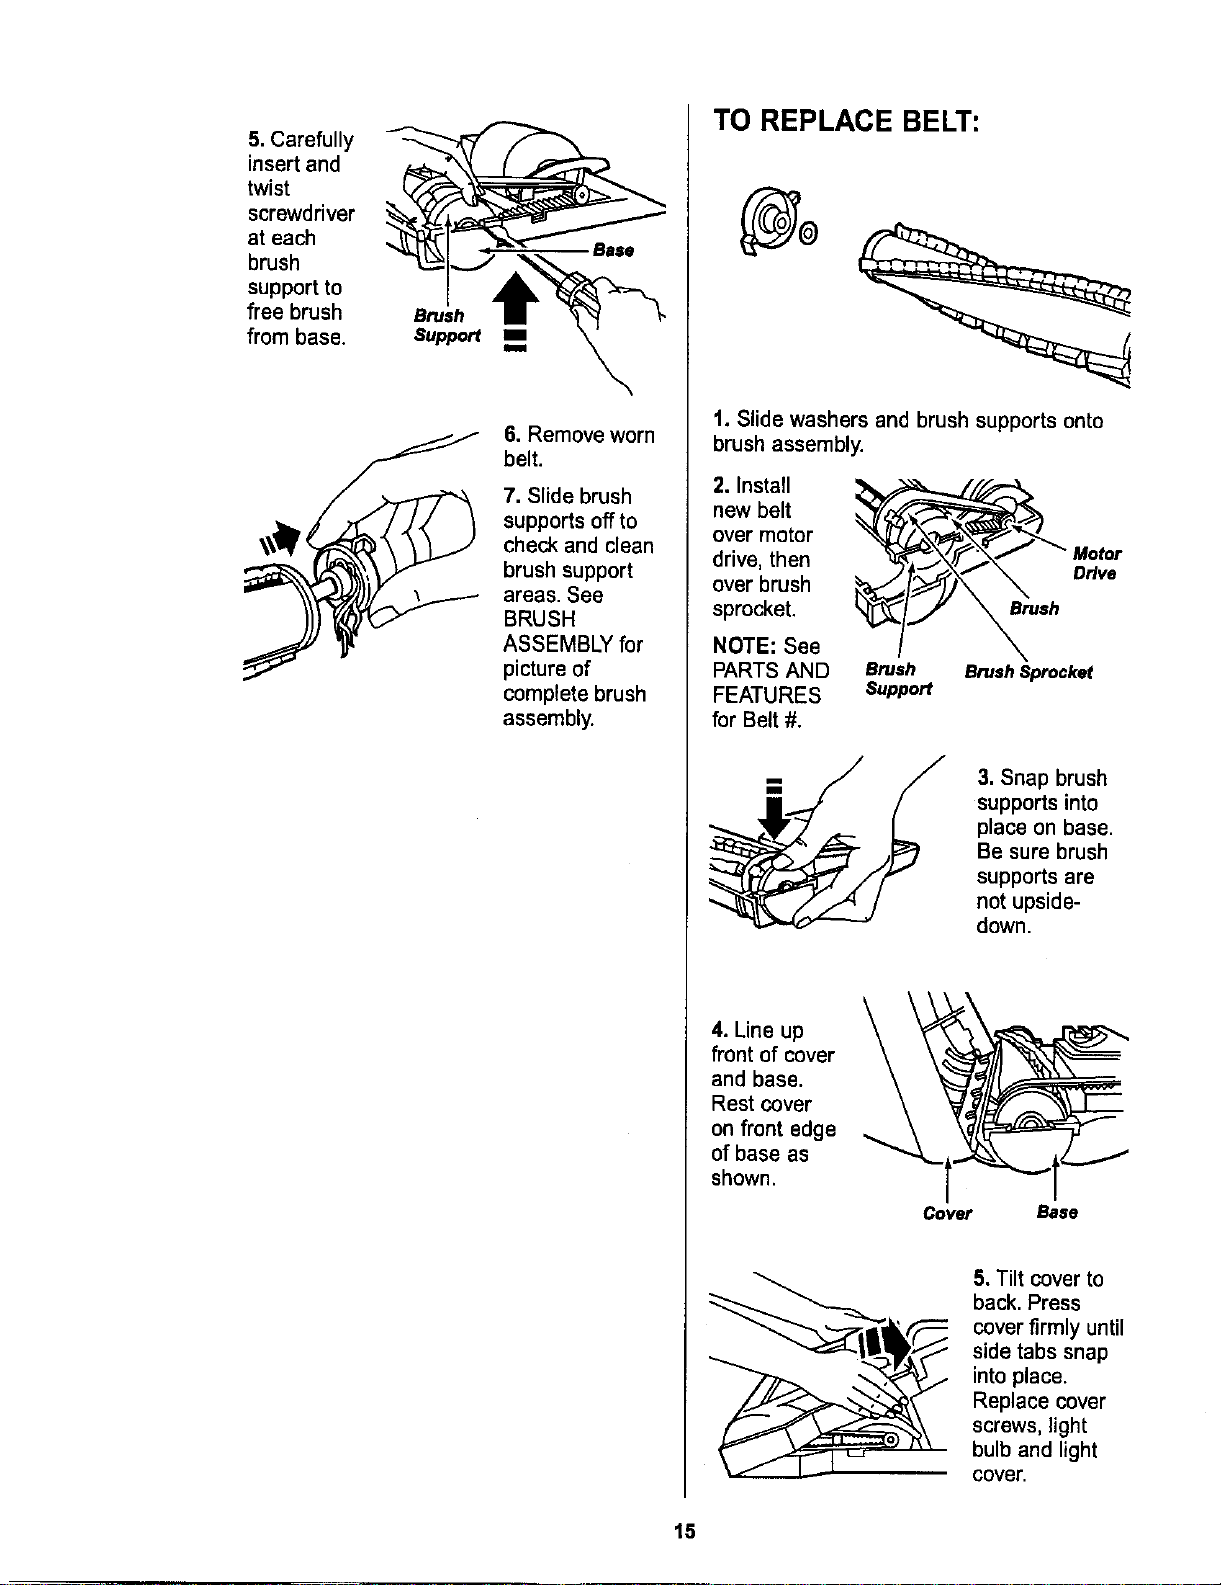
5.Carefully
insertand
twist
screwdriver
ateach
brush
supportto
freebrush
frombase.
Brush
Support
.Base
6. Remove worn
belt.
7. Slide brush
supports off to
check and clean
brush support
areas. See
BRUSH
ASSEMBLY for
picture of
complete brush
assembly.
TO REPLACE BELT:
t. Slide washers and brush supports onto
brush assembly.
2. Install
new belt
over motor
drive, then
over brush
sprocket.
NOTE: See
PARTS AND
FEATURES
for Belt #.
Brush
Brush Brush Sprocket
Support
3. Snap brush
supports into
place on base.
Be sure brush
supports are
not upside-
down.
4. Line up
front of cover
and base.
Rest cover
on front edge
of base as
shown.
Cover Base
5. Tilt cover to
back. Press
cover firmly until
side tabs snap
into place.
Replace cover
screws, light
bulb and light
cover.
15
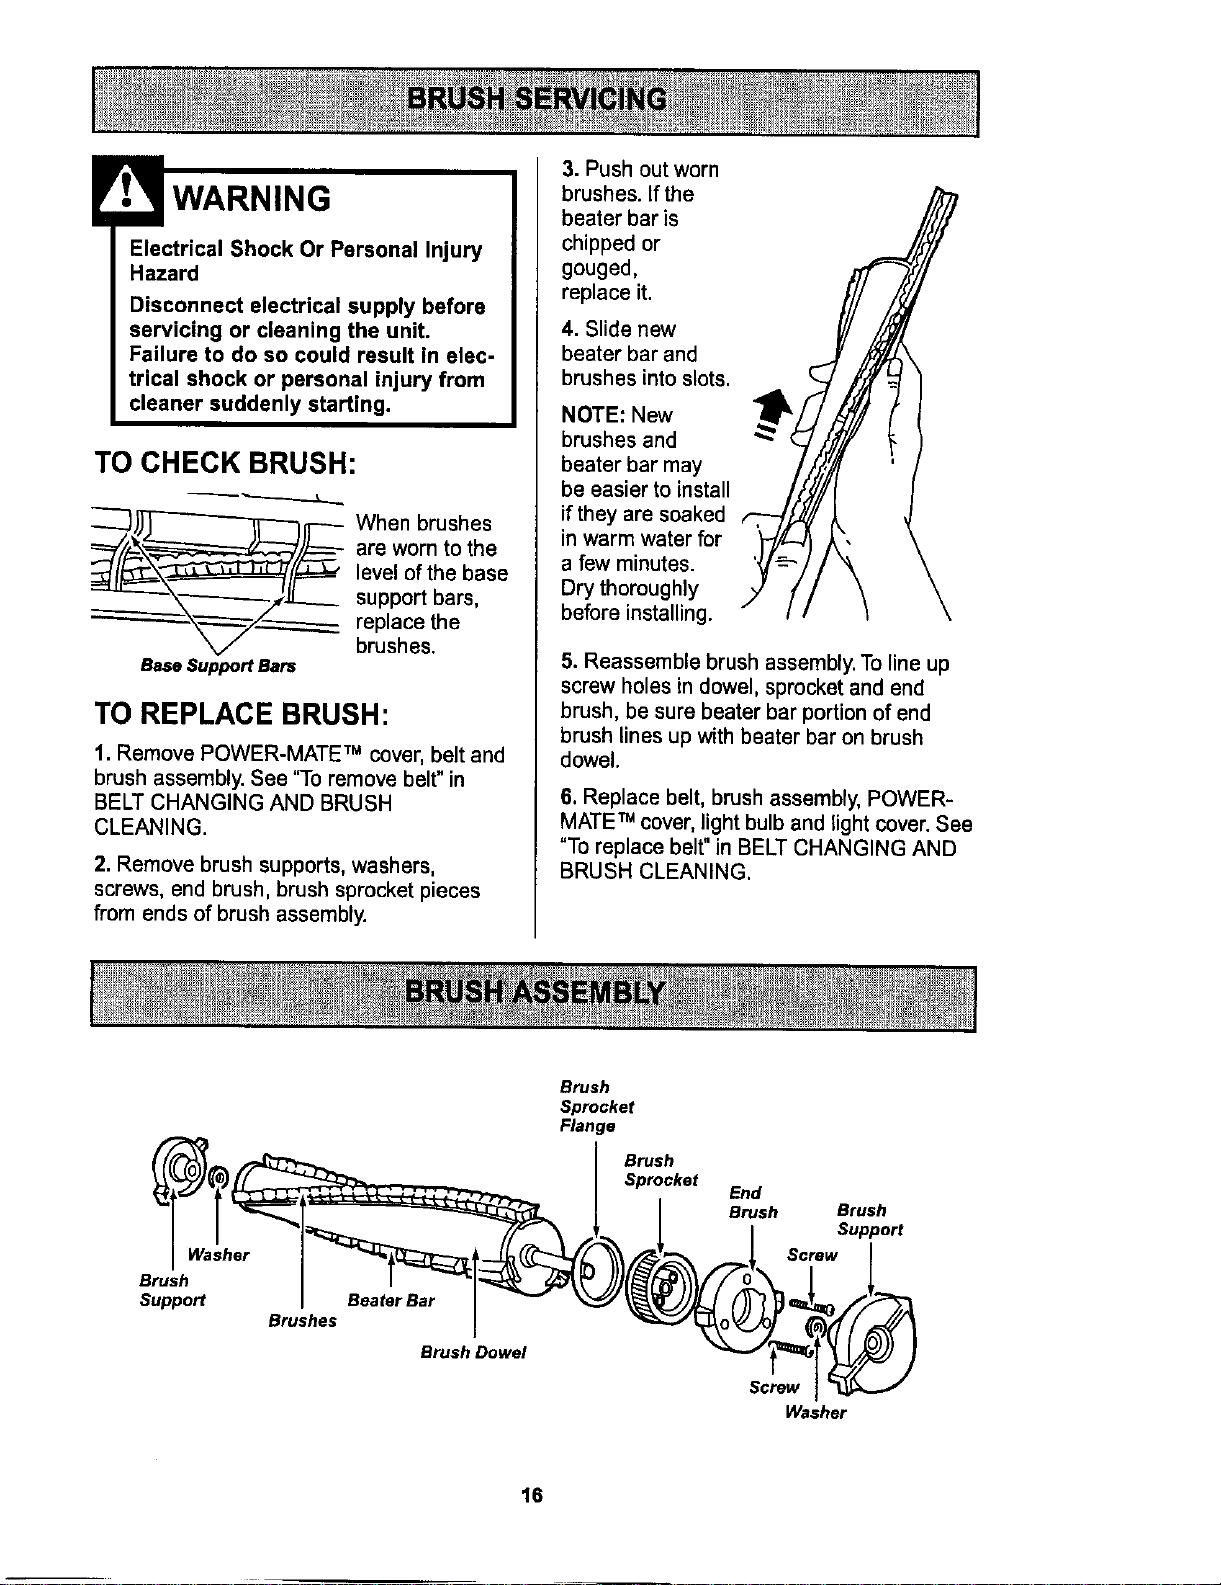
ElectricalShockOrPersonalInjury
Hazard
Disconnectelectricalsupply before
servicing or cleaningthe unit.
Failureto do so couldresult In elec-
trical shock orpersonalinjury from
cleanersuddenlystarting.
TO CHECK BRUSH:
Base Support Bars
When brushes
are worn to the
level of the base
support bars,
replace the
brushes.
TO REPLACE BRUSH:
1. Remove POWER-MATE:" cover, belt and
brush assembly. See 'q-o remove belt" in
BELT CHANGING AND BRUSH
CLEANING.
2. Remove brush supports, washers,
screws, end brush, brush sprocket pieces
from ends of brush assembly.
3. Push out worn
brushes. If the
beater bar is
chipped or
gouged,
replace it.
4. Slide new
beater bar and
brushes into slots.
NOTE: New
brushes and
beater bar may
be easier to install
if they are soaked
in warm water for
a few minutes.
Dry thoroughly
before installing.
5. Reassemble brush assembly. To line up
screw holes in dowel, sprocket and end
brush, be sure beater bar portion of end
brush lines up with beater bar on brush
dowel.
6. Replace belt, brush assembly, POWER-
MATE TM cover, light bulb and light cover. See
"To replace belt" in BELT CHANGING AND
BRUSH CLEANING.
Washer
Brush
Support
Brushes
Beater Bar
Brush Dowel
Brush
Sprocket
Flange
Brush
Sprocket
End
Brush Brush
Support
Screw
Screw
Washer
16
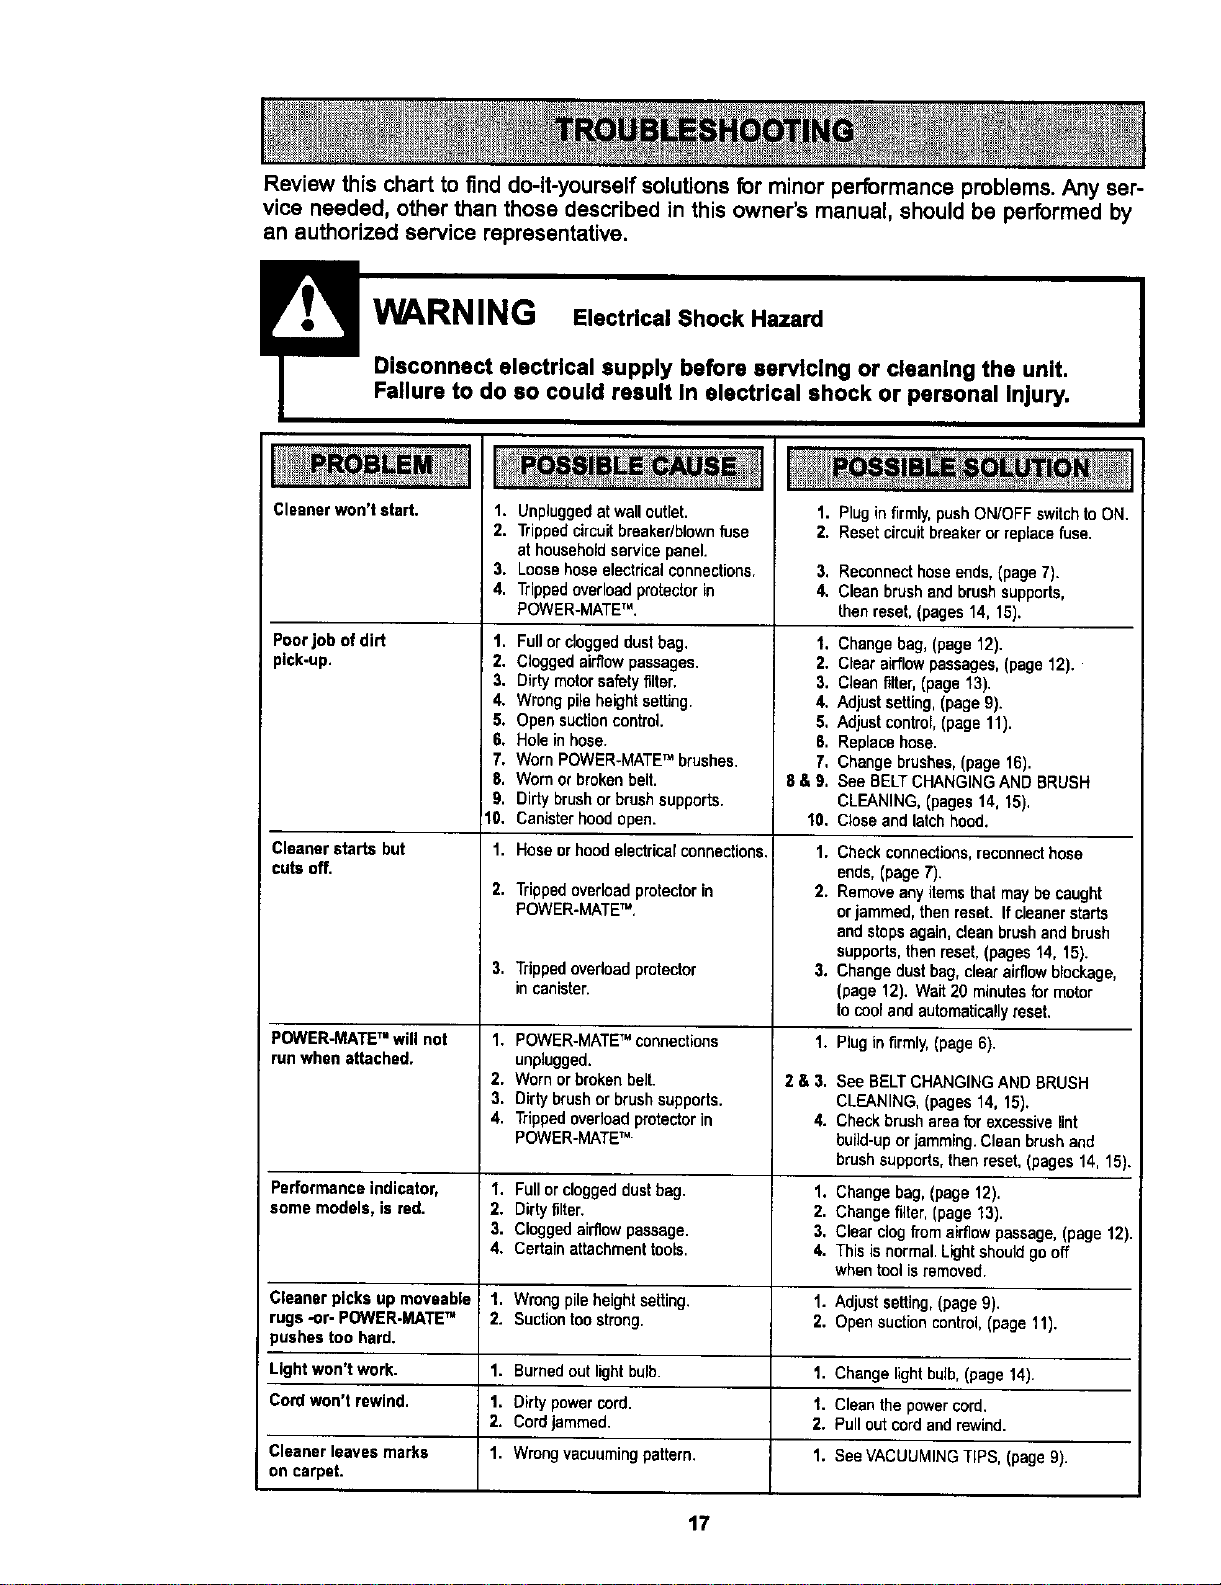
Review this chart to find do-it-yourself solutions for minor performance problems. Any ser-
vice needed, other than those described in this owner's manual, should be performed by
an authorized service representative.
Cleaner won't start,
Poorjob of dirt
pick-up.
Cleanerstarts but
cutsoff.
1. Unpluggedat walloutlet.
2. Trippedcircuitbreaker/blownfuse
at householdservicepanel.
3. Loosehose electricalconnections.
4. Trippedoverloadprotectorin
POWER-MATETM,
1, Fullorcloggeddustbag.
2. Cloggedairflowpassages.
3. Dirtymotorsafetyfilter,
4. Wrongpileheightsetting.
5. Opensuctioncontrol.
6, Holein hose.
7. WornPOWER-MATETM brushes.
8, Wornorbrokenbelt.
9. Dirtybrushorbrushsupports.
10. Canisterhoodopen.
1. Hoseorhoodelectricalconnections.
2,
3,
Trippedoverloadprotectorin
POWER-MATETM,
Trippedoverloadprotector
incanister.
1. Pluginfirmly,pushON/OFFswitchto ON.
2. Resetcircuitbreakeror replacefuse.
3. Reconnecthoseends,(page7).
4. Cleanbrushandbrushsupports,
thenreset,(pages 14, 15).
1. Changebag, (page12).
2. Clear airflowpassages,(page12).
3. Cleanfilter,(page13).
4. Adjust setting,(page9).
5, Adjust control,(page 11).
fi. Replacehose.
7, Changebrushes,(page16).
fi& 9, See BELTCHANGINGANDBRUSH
CLEANING,(pages14, 15).
10. Closeandlatchhood.
1.
Checkconnections,reconnecthose
ends,(page7).
2. Removeanyitemsthatmaybecaught
orjammed,thenreset. Itcleanerstarts
andstopsagain,cleanbrushand brush
supports,thenreset,(pages14, 15).
3. Changedustbag,clearairflowblockage,
(page 12). Wait20 minutesfor motor
tocooland automaticallyreset.
POWER-MATETM will not 1. POWER-MATETM connections 1. Rug in firmly,(page6).
run whenattached, unplugged.
2. Wornor brokenbelt. 2 & 3. See BELTCHANGINGAND BRUSH
3. Dirtybrushor brush supports. CLEANING,(pages14, 15).
4. Trippedoverloadprotectorin 4. Checkbrush areafur excessivelint
POWER-MATETM build-uporjamming.Cleanbrushand
brushsupports,thenreset,(pages14,15).
Performanceindicator, 1. Fullor cloggeddustbag. 1. Changebag,(page12).
some models, isred. 2. Dirtyfilter. 2. Changefilter,(page13).
3. Cloggedairflowpassage. 3, Clearclogfrom airflowpassage,(page 12).
4. Certainattachmenttools. 4. Thisisnormal.Lightshouldgooff
whentool isremoved.
Cleanerpicks up moveable 1. Wrongpileheight setting. 1. Adjustsetting,(page9).
rugs -or- POWER.MATETM 2. Suctiontoostrong. 2. Opensuctioncontrol.(page11).
pushestoo hard.
Light won't work. 1. Burnedoutlightbulb. 1. Changelightbulb,(page14).
Cordwon't rewind. 1. Dirtypowercord. I. Cleanthe powercord.
2. Cordjammed. 2. Pullout cordandrewind.
Cleaner leaves marks 1. Wrongvacuumingpattern. 1. See VACUUMINGTIPS, (page9).
on carpet.
17
For the repair or replacement parts you need
Call 7:00 am - 7:00 pm, 7 days a week
1-800-366-PART
(1-800-366-7278)
For in-home majorbrand repair service:
Call 24 hoursa day, 7 days a week
1-800"4-MY-HOME s=
(1-800469-4663)
For the location of a
Sears Parts and Service Center in your area:
Call 24 hours a day, 7 days a week
1-600-488-1222
For informationon purchasing a
Sears Maintenance Agreement
or to inquire about an existing Agreement:
Call 9:00 am - 5:00 pro, Monday - Saturday
1-800-827-6655
When requesting service or ordering parts, alwaysprovide the following information:
• Product Type • Part Number • Model Number • Part Description
SEL /AtlRS
i ii i i
HomeCentrar
TheServiceSideofSears.'
t8

SEARS
Manuel Del Propietario
Aspiradora
CUIDADO:
Lea y sigue todas las
instrucciones de operaci6n
y seguridad antesdel usode
esteproducto.
Sears, Roebuck and Co., Hoffman Estates, IL 60179 U,S.A.
PIEZA NoCO1ZARD19U_DI3-4370537 Impreso en EUA

Antes de usar su aspiradora nueva ..... 2
Garantia de la aspiradora de Kenmore.., 2
Instrucciones importantes de
seguridad ............................ 3
Piezas y caracteristicas .............. 4-5
Armado ............................. 6-7
USO .................................. 8
Paracomenzar ....................... 8
Sugerenciaspara aspirar ............... 9
Sugerenciassobreel ajustedenivelde
pelode la alfombra .................... 9
Accesorios .......................... 10
Uso de losaccesorios ................. 10
Caracteristicasde rendimiento........... 11
Funcionamiento de su aspiradora ...... 12
Cuidado del recept_culo .............. 12
Cambiode labolsa ................... 12
Lirnpiezadelfiltro deseguridaddelmotor .. 13
Limpiezadelexteriory de losaccesorios... 13
Cuidado de la Power-Mate TM ........... 14
Carnbiode labombUla................. 14
Carnbiode lacorreay lirnpieza
del cepillo ........................ 14-15
Cuidadodel cepillo.................... 16
Ensambledel cepino .................. 16
Reconocimiento de problemas ......... 17
Informaci6n de assistancia
o servicio ............................ 18
Porfavorleaesta guiaque le ayudaraa assemblary operarsuaspiradoranuevade Kenmoreen unarnanera
m_s seguray effectiva.
Paramasinformaci6nacercadelcuidadoy operacibnde estaaspirador,1lamea su tiendaSearsmascercana.
Cuandoprequnteporinformaci6nustednecisitar_el n_merocompletodeseriey modelode laaspiradoraque
est_ Iocadoen la placade losn_merosde modeloy serie.
Useelespaciode abajopara registrarel n_memde modetoy serieparasu nuevaaspiradorade Kenmore.
N0mero de Modelo
N_mero de Serie
Fecha de Compra
Matengaeste libroy sureciboen ulugarseguropara referenciasfuturas.
GARANTIA COMPLETAPOR UN ANO
Mientras su uso se limits a fines dom6sticos particulares, siesta aspiradorafalla dentro de un periodo de un
aho a partir de la fecha de compra,por razones de defectos en materiales o mano de obra, DEMUI_LMALAAL
CENTRO O DEPARTAMENTODE SERVICIO DE SEARS MAS CERCANO y Sears la reparar6 sin ningen
cargo.
Esta garantia le confierederechos legalesespecificosy adem&spuede que tengaotros derechos que difieren
entreestados.
SEARS, ROEBUCKAND CO.,DI817WA, HoffmanEstates, IL 60179
2

Su seguridad es muy importantepara nosotros.Para reducirel riesgo de incendio,choque
el6ctrico,lesi6n corporal o dafios al utilizar su asplradora,act_e de acuerdocon precauclones
b_sicas de seguridad,entre elias:
Leaeste manualantesdearmaroutilizarsuaspi-
radora.
Usesuaspiradora_nicamenteen laforma descrita
en estemanual.Use_nicamenteconaccesorios
recomendadosperSears.
Parareducirel riesgodechoqueeldctrico,no use
suaspiradoraalsire librenisobresuperficies
mojadas.
Desconecteelcord6nel_ctricoantesde
componero limpiarel breadel cepillo.De Io
centrario,elcepillopodriaarrancardeform
imprevistao poddaproducirseun choqueel6ctrico.
Siempre debeapagarlaaspiradoraantesde
conectarodesconectarla mangueradela
POWER-MATETM .
Siempre debeapagarsuaspiradoraantesdedes-
conectarla.
Nodesconecte la aspiradoratirandodelcordbn
el6ctrico.Paradesconectarla,haleel enchufe,no
elcord6n.
Sujete el enchufe con la manoal enrollar elcord6n
el_ctrico.Paradesconectarla,hale enenchufe,no
elcord6n.
No usela aspiradorasielcord6noel enchufeesta
dafiado.Sila aspiradoranoestafuncionando ade-
cuadamenteo sise hadejadocaer,estddafiada,
se hadejadoexpuestaa la intempedeose ha
dejadocaerenagua,devu_tvalaa unCen-
tro/Departamentodeserviciode Sears.
No hale nitransportelaaspiradoraporel cord6n;
no useel cord6ncomomango;nocierrepuertas
sobreel cordbn;nohaleel cord6nsobrerebordes
agudosniesquinas.No paselaaspiradorasobre
elcord6n.Mantengaelcordbnalejadodesuperfi-
ciescalientes.
No abandonela aspiradoracuandoest_ conec-
tada.Descon_ctelacuandonolaest6 usandoy
antesdedarleservicio.
No permits que sea utUizadacomojuguete.Se
requieretenermayorcuidadocuandosea utilizada
enla proximidadde nitroso pornifios.
No toquela aspiradoraniel enchufoconlas
manesmojadas.
No uselaaspiradorasila mangueraest_ rota,La
mangueracontienealambresel_ctricos.C&mbiela
siest_lrotaodesgastada.Eviteaspirarcbjetos
agudos.
No coloqueobjetosen lasaberturas.
No utilicela aspiradorasialgunaaberturaest_ blo-
queada;mant_ngala librede polvo,pelusa,cabe-
Ilosy cualquieracosaque podriadisminuiretflujo
deaire.
Mantenga elcabello,ropasuelta,dedosy todas
laspartesdel cuerpoalejadosdelasaberturasy
piezasmec_nicas.
No uselaaspiradorasintenerinstaladala bolsa
parapolvoy/o losfiltros.
Cambiesiempre labolsaparapolvodespu_sde
aspirarlimpiadoresde alfombraso desodorantes,
talcosy polvosflnos.Estosproductosatascanla
bolsa,reducenel flujode airey puedencausarque
_sta se rompa.Si nocambiala bolsapodriaoca-
sionarda_o permanentea laaspiradora.
Nouselaaspiradoraparalevantarobjetosagudos,
juguetes pequefios,alfileres,papel,etc.Podrian
da_arla aspiradorao labolsa parapolvo.
No levanteninguna cosaquese est_ quemandoo
emitiendohumo,comocigardllos,cerilloso ceni-
zascalientes.
No use laaspiradoraparaasplrarliquidosinflama-
blesocombustibles(gasolina,liquidosparalim-
pieza, perfumes,etc.)ni Isuseenlugaresdonde
6stos podrianestarpresentes.Losvaporesde
estassustanciaspuedencrearunpeligmdeincen-
dieoexplesi6n.
Tenga cuidadoespecialai utiUzarlaaspiradora
en escalones.No lacoloquesobresillas,mesas,
etc.Mant_ngalaen el piso,
Ustedes responsabledeasegurarque suaspira-
dora nosea utilizadaporningunapersonaque no
puedamanejarlacorrectamente.
GUARDE ESTASINSTRUCClONES
El armadoy useseguro de suaspiradorasonsuresponsabilidad.Esta aspiradoraha sidodisefiada
exclusivamente pare uso dom_stico.La aspiradoradeber_almacenarse enun lugarseco yen el interior.
Lea este Manual del propietariodetenidamente, puescontione informaci6n importantesobre seguridady
uso. Esta quia contieneinformaci6nsobre seguridad debajo de simbolosde advertienciacuidado. Por
favor pongaatencibnespecial a estasinstruccionesdadas. Advertencla:Este informaci6n le alertard con
el poligro de fuego, choques electricos,quemadasy lesiones. Cuidado: Este informaci6nle alertara a
peligros como lesiones y dafios de propiedad.
3
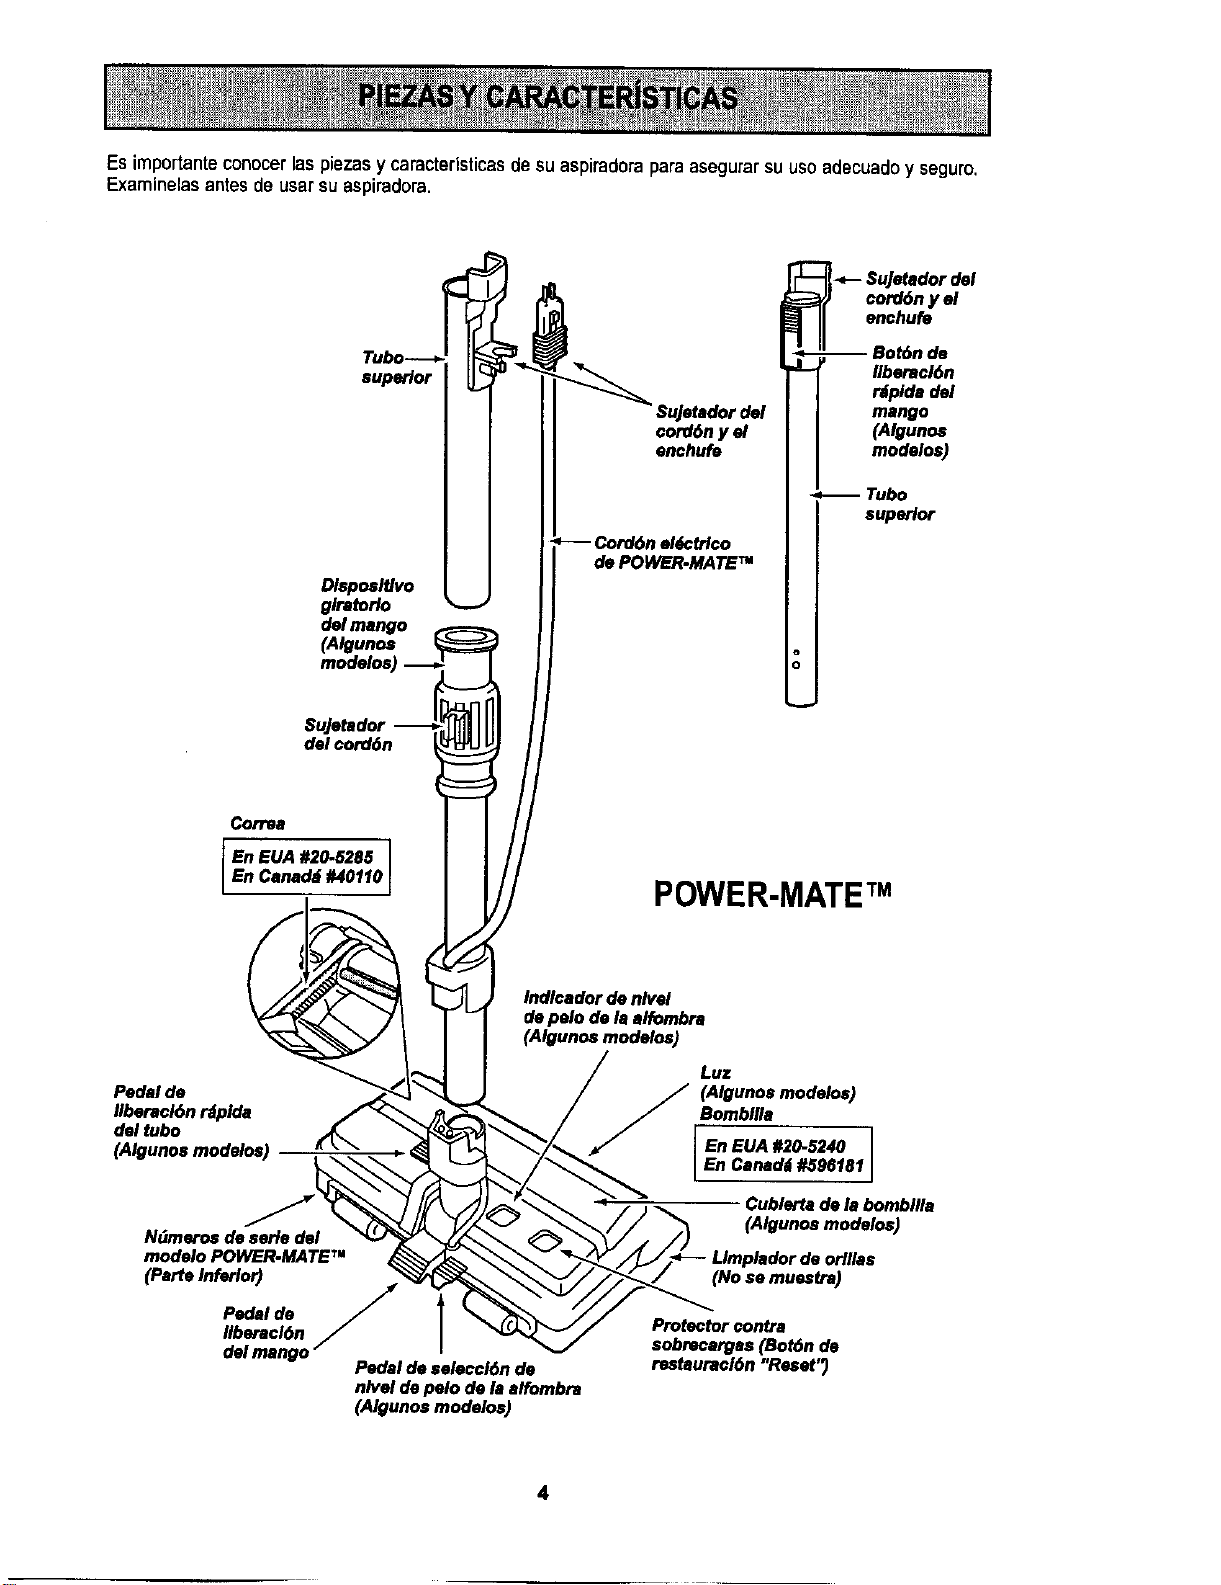
Es importante conocer laspiezas y caracteristicas de su aspiradoraparaasegurarsu uso adecuadoy seguro.
Examinelas antes de usar su aspiradom.
superior
Dlsposltlvo
glretorlo
del mango
(Algunos
modelos)
cord6n y el
enchufe
de POWER-MATE TM
i -.-- $uJelador del
cordon y el
enchufe
-- Bot6n de
Ilberacl6n
r_plda del
mango
(Algunos
modelos)
Tubo
superior
$ujetador
del oord6n
Correa
En EUA #20-5285 ]
En Canad_i #40110
POWER-MATEr"
Indlcador de nlvel
de polo de la alfombra
(Algunos modelos)
Pedal de
Ilberacl6n _plda
del tubo
(Algunos modelos)
N_meros de aerie del
modelo POWER-MATE TM
(ParteInferior)
Pedal de S
Ilberacl6n
del mango --
Pedal de aeleccl6n de
nivel de polo de la alfombra
(Algunos modelos)
Luz
j/_ (Algunosmodelos)
Bombllla
En EUA #20-5240
En Car)add #596181
I
Cublertadela bombllla
(Algunosmodelos)
(No se muestra)
Protector contra
sobrecarges (Bot6n de
restauracl6n "Reset")
4
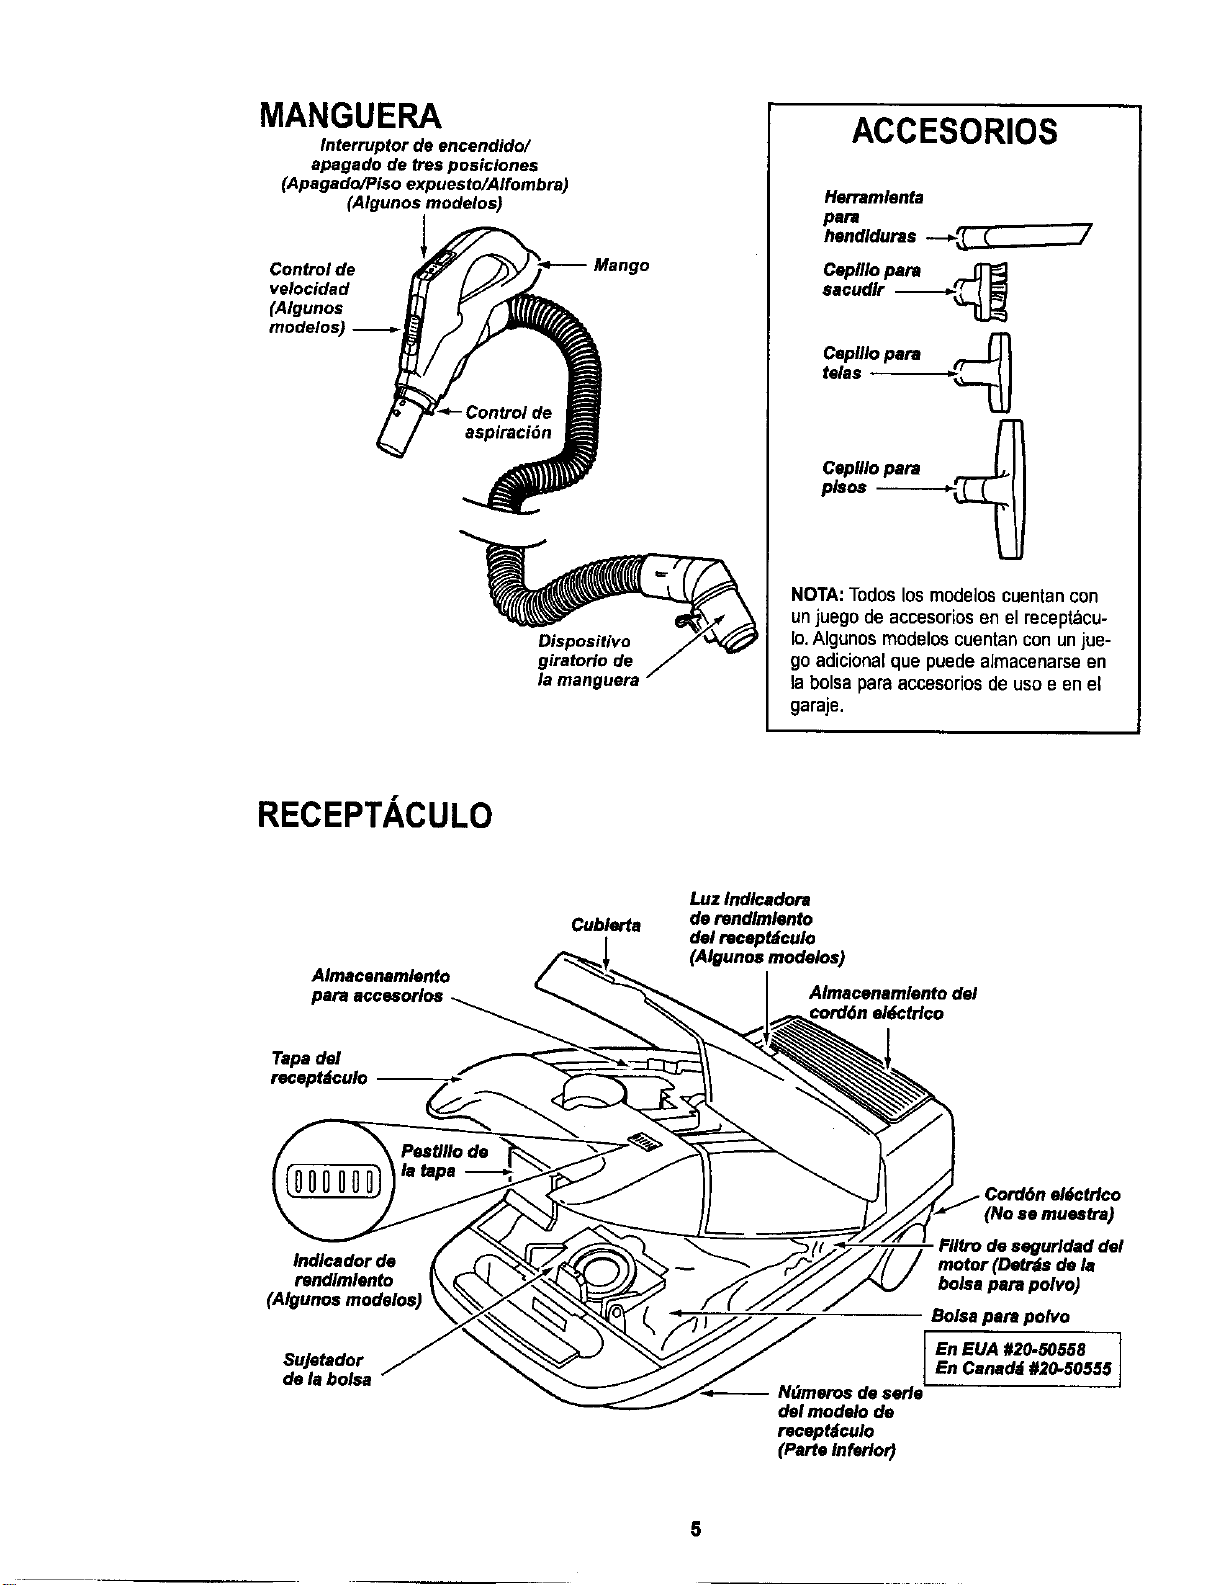
MANGUERA
Interruptor de encendido/
apagado de tres posiclones
(Apagado/Piso expuesto/Alfombra)
(Algunos modelos)
Control de
velocidad
(AIgunos
modelos)
Mango
Dispositivo
giratorio de
la manguera
ACCESORIOS
Herramlonta
para
hendlduras --_ _ _ /
Ceplllopara
sacudlr "--_'_L_
Ceplllopara ..._
telas
CepUlopara ___
pls_ --
NOTA:To(loslosmodeloscuentancon
unjuegodeaccesoriosen el recep_cu-
Io.Algunosmodeloscuentanconunjue-
goadicionalque puedeaJmacenarseen
la bolsaparaaccesofiosdeusoe enel
garaje.
RECEPTACULO
Almacenamlento
para accesorlos
Tapadel
recepMculo
Cublerta
Luz Indlcadora
de rendlmlento
del recept_culo
(Algunos modelos)
Almacenamlonto del
_ord6n e/_ctr/co
Cord6n el_ctrlco
Indlcador de
rendlmlento
SuJetador
de la bolsa
Fllfro de segurldad del
motor (Detr_s do la
bolsa para polvo)
Bolsa para polvo
En EUA #20-50558En Canad_ #20-50555
-- N_meros do serle
del modelo de
receptdculo
(Parte tnferlo_
]
5
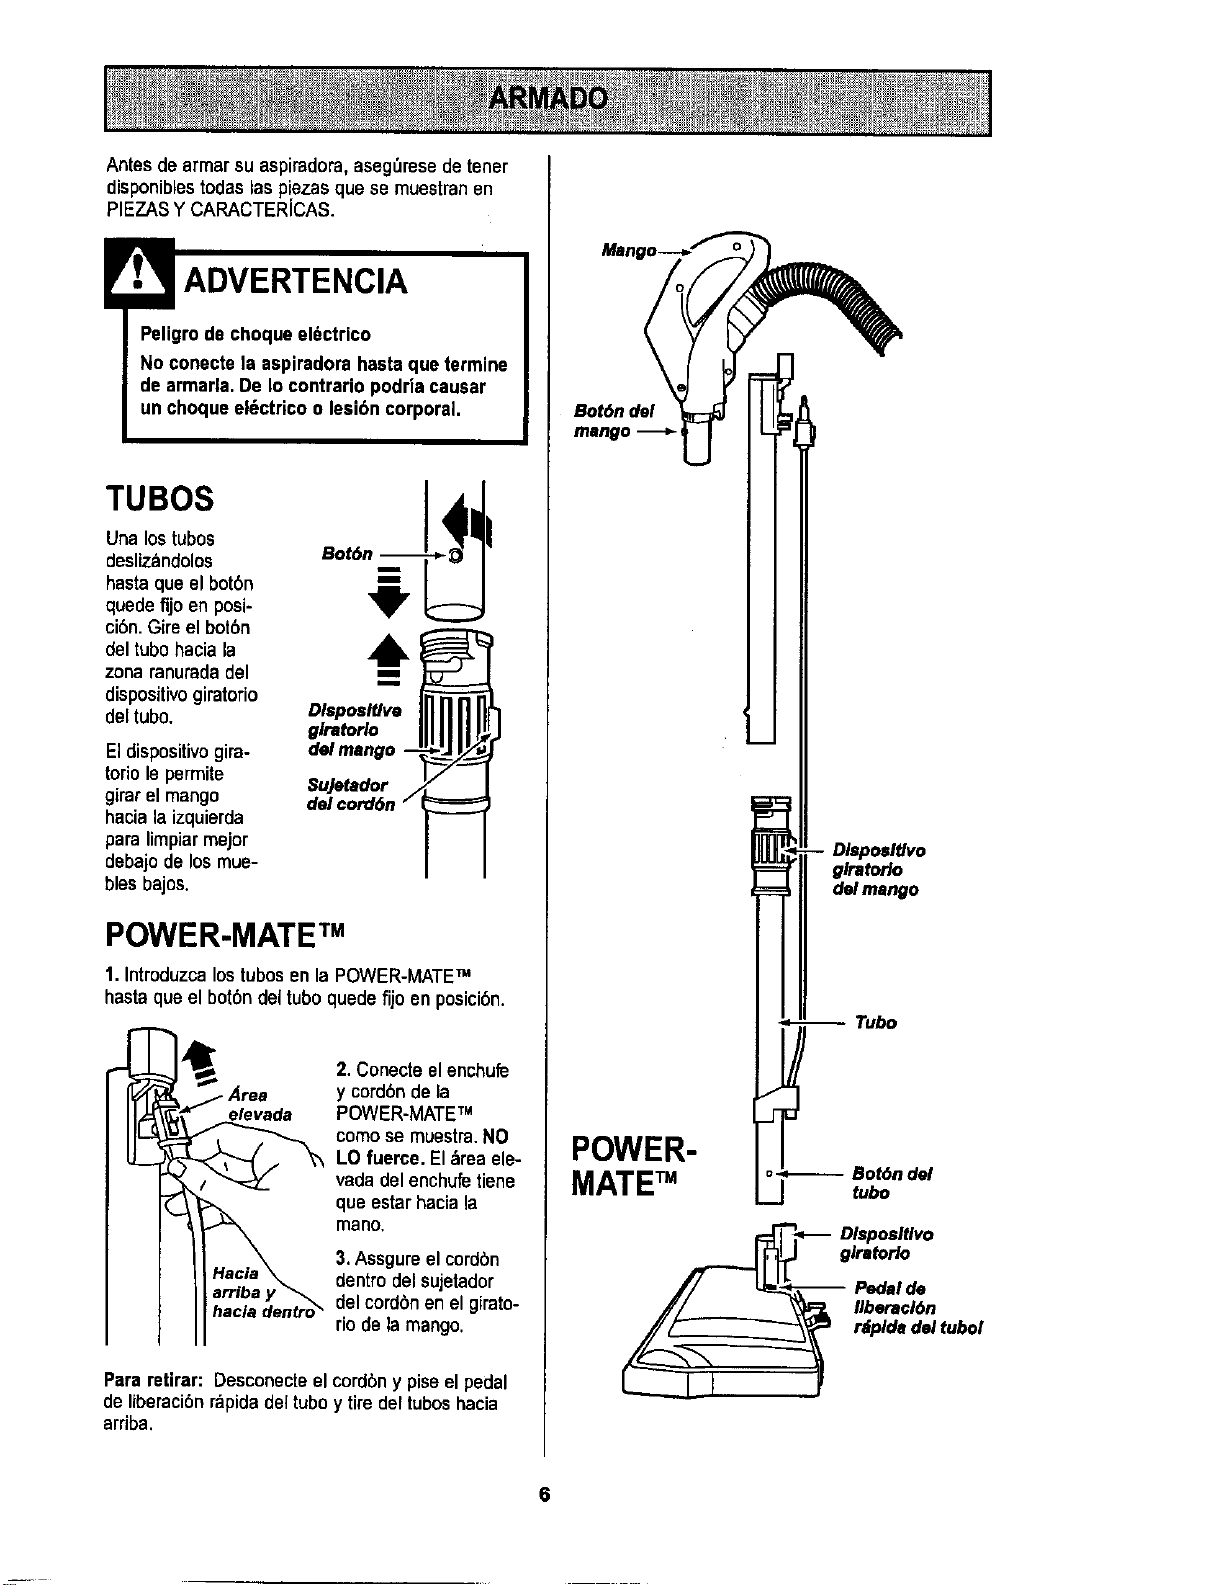
Antes de armarsuaspiradora,aseg_resede tener
disponibles todaslas piezasque se muestranen
PIEZASY CARACTERICAS.
ADVERTENCIA
Peligrode choque el6ctrico
No conecte la aspiradorahasta que termine
de armada.De Io contrario podriacausar
un choque el_ctrico o lesi6n corporal.
TUBOS
Una lostubos
deslizandolos Bot6
hasta que el bot6n
quede fijoen posi-
ci0n.Gireel bot6n
del tubo hacia la
zonaranuradadel
dispositivogiratorio
deltubo.
Eldispositivogira-
toriolepermite
girarelmango
haciala izquierda
para limpiarmejor
debajodelosmue-
bles bajos.
m
m
DlsposlUva
glratorlo
del mango
Sujetador /
del cord6n i
POWER-MATE TM
1. Introduzca los tubosenla POWER-MATETM
hastaque el bot6ndel tubo quede fijo en posici6n.
•Area
elevada
hacia dentro_
2. Conecte el enchufe
y cord6nde la
POWER-MATETM
como se muestra.NO
LO fuerce. El&reaele-
vada del enchufetiene
queestarhaciala
mano,
3.Assgureelcordbn
dentrodelsujetador
delcordbnen elgirato-
riode la mango.
Pararetirar: Desconecteel cordbny piseel pedal
de liberacibnrapidadeltuboy tire dertuboshacia
arriba.
Bot6n del
mango
POWER-
MATETM
Dlsposltlvo
glratorlo
del mango
-- Tubo
o_ Bot6n del
J tubo
_._ _ Dlsposltlvo
glratorlo
-- Pedalde
// _ _ Ilberac/6n
d.ltubo,
L--I f
6
RECEPTACULO
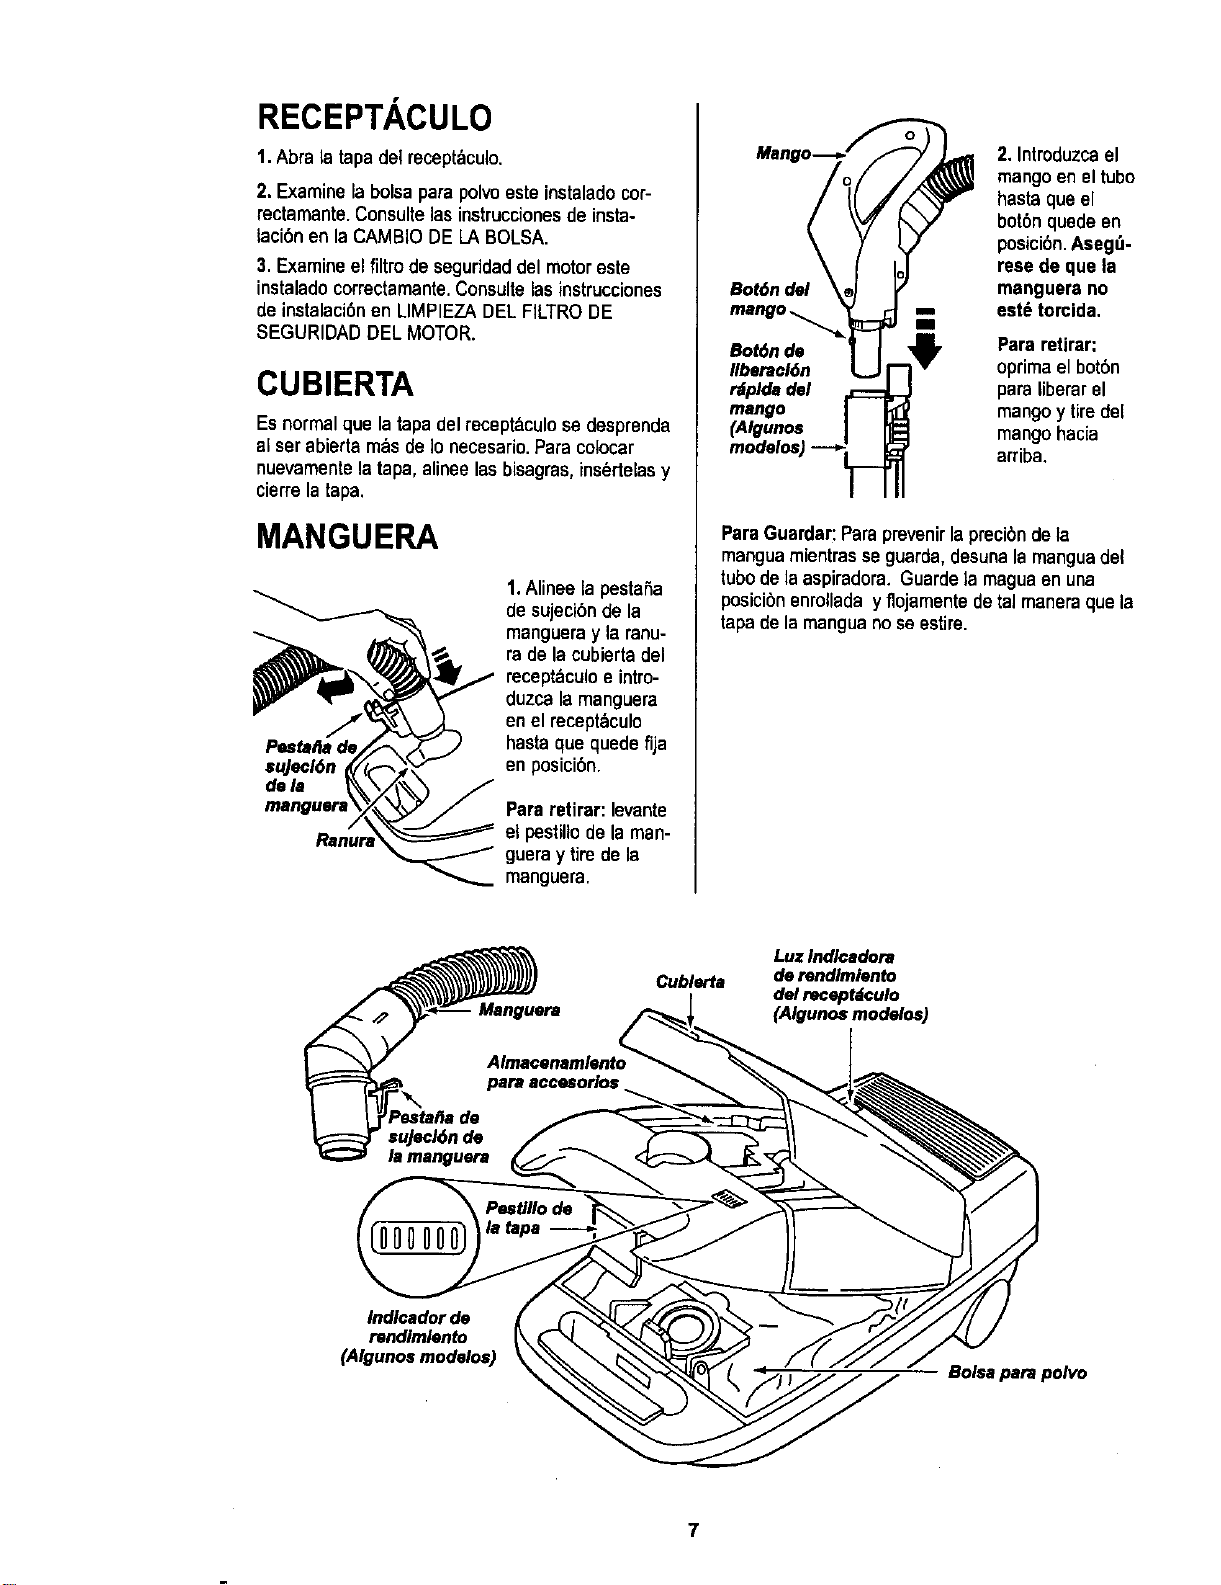
1. Abrala tapa del recepff,culo.
2. Examine la bolsa parapolvoeste instalado cor-
rectamante.Consulte las instruccionesde insta-
laci6n en la CAMBIO DE LA BOLSA.
3. Examine el filtro de seguridaddel motor este
instalado correctamante.Consulte las instrucciones
de instalaci6nen LIMPIEZA DEL FILTRODE
SEGURIDADDEL MOTOR.
CUBIERTA
Es normal que latapa delrecept&culose desprenda
al ser abierta mbs de Io necesario.Para colocar
nuevamentela tapa, alinee las bisagras,ins_rtelasy
cierre la tapa.
MANGUERA
su]ecl6n
dam
1.Alinee la pestaSa
de sujecibn de la
mangueray laranu-
ra de la cubierta del
recept_culoe intro-
duzca la manguera
en el recept_culo
hasta que quede fija
en posicibn.
Pareratirar: levante
et pestillode la man-
guera y tire de la
manguera.
2. Introduzcael
mangoen el tubo
hasta qua el
botbn quede en
posici6n.Aseg_-
rese de qua la
Bot6ndel manguera no
mango.., est_ torcida,
Ill
BobSnde Para retirar:
Ilberacl6n oprimael bot6n
rdpldadel para liberar el
mango mango y tiredel
(Algunos mango hacia
arriba,
ParaGuardar:Para prevenirlaprecibnde la
manguamientrasse guarda, desunala manguadel
tubo de la aspiradora. Guarde la maguaen una
posicibn enrollada y flojamentede tal maneraque la
tapa de la mangua no se estire.
Luz Indlcadora
Cublerta de rendimiento
del receptdculo
(Algunos modelos)
Indlcador de
rendimlento
(Algunos modalos)
Bolsa para polvo
7
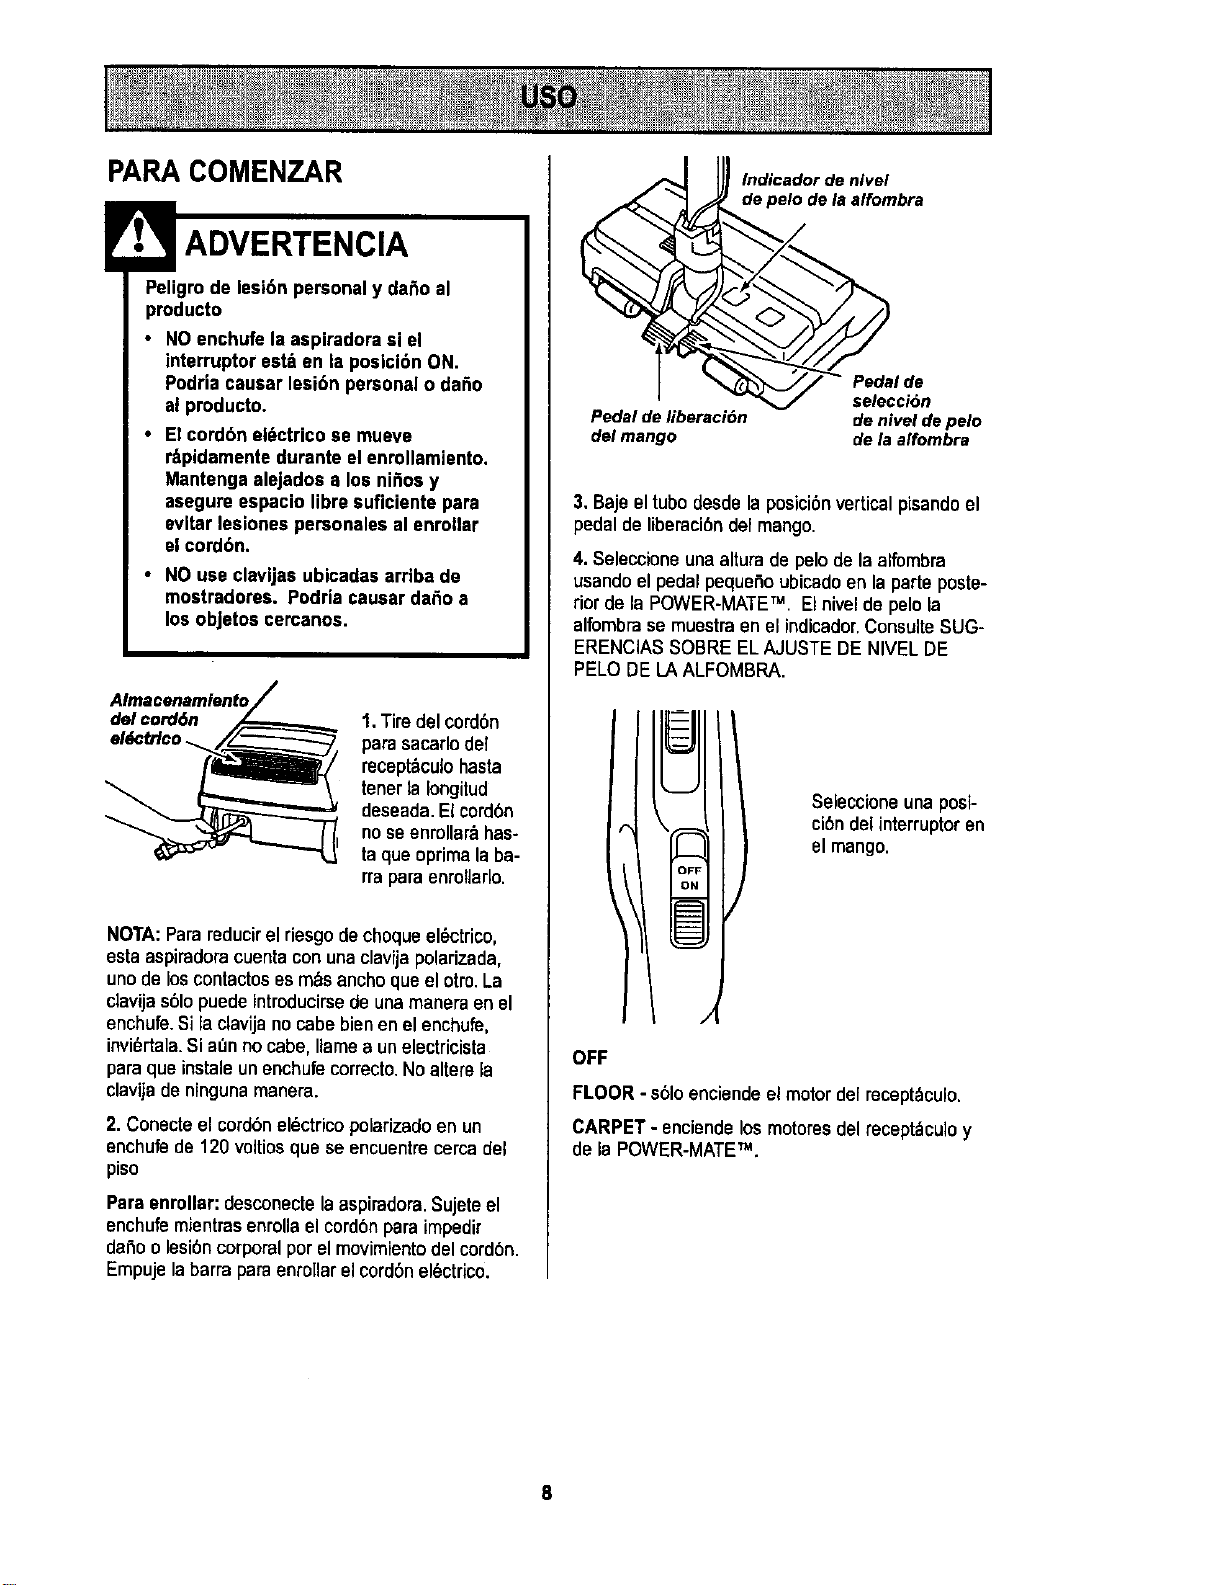
PARA COMENZAR
;reolidgrOtdoelesi6n personal Y dano al
• NOenchufe la aspiradora si el
interruptor est_ en la posicibn ON.
Podria causar lesi6n personal o daSo
al producto.
• El cordbn el_ctrico se mueve
r:_pidamentedurante el enrollamiento.
Mantenga alejados a los ni_os y
asegure espacio libre suficiente para
evitar lesiones personalesal enrollar
el cordbn.
• NO use clavljas ubicadas arriba de
mostradores. Podria causar da_o a
los objetos cercanos.
Almacenamlento
del cord6n
el_ctrlco _.
1.Tiredelcord6n
parasacarlodel
recept_culohasta
tenerla Iongitud
deseada.El cord6n
noseenrollar_has-
ta qua oprimala ba-
rraparaenroflaflo.
NOTA:Parsreducirel riesgodechoqueel_ctrico,
estaaspiradoracuentaconunaclavijapolarizada,
unode loscontactoses m&sanchoquael otroLa
clavijas61opuedeintroducirsede unamaneraen el
enchufe.Si la clavijanocabebienonelenchufe,
invi6rtala.Si at_nno cabe, llamaaun electricista
parsqua instaleunenchufecorrectoNoaltere la
clavijadeningunamanera.
2. Conecte el cord6nel_ctricopolarizadoen un
enchufede 120 voltios que se encuentrecerca del
piso
Paraenrollar: desconecte laaspiradora.Sujeteel
enchufemientrasenrollael cordbnpara impedir
daSoo lesi6ncorporalpor el movimientodel cord6n.
Empujelabarrapara enrollarel cordonel6ctrico.
lndicador de nivel
Io de laalfombra
q -- g selecci6n
Pedalde liberaeibn deniveldepelo
del mango dela alfombra
3. Bajeel tubedesdela posici6nverticalpisandoel
pedal de liberaci6ndel mango.
4. Seleccione una alturade pelo de la alfombra
usando el pedal pequeSoubicadoen la parte poste-
rior de la POWER-MATETM. Elnivelde pelo la
alfombra se muestra en el indicador,Consulte SUG-
ERENClASSOBRE ELAJUSTE DE NIVEL DE
PELO DE LA ALFOMBRA.
Seleccione una posi-
cibndel interruptor en
el mango.
OFF
FLOOR - s61oenciende el motor de[mcept_culo.
CARPET - enciandelosmotoresdel recept_culoy
de la POWER-MATETM.
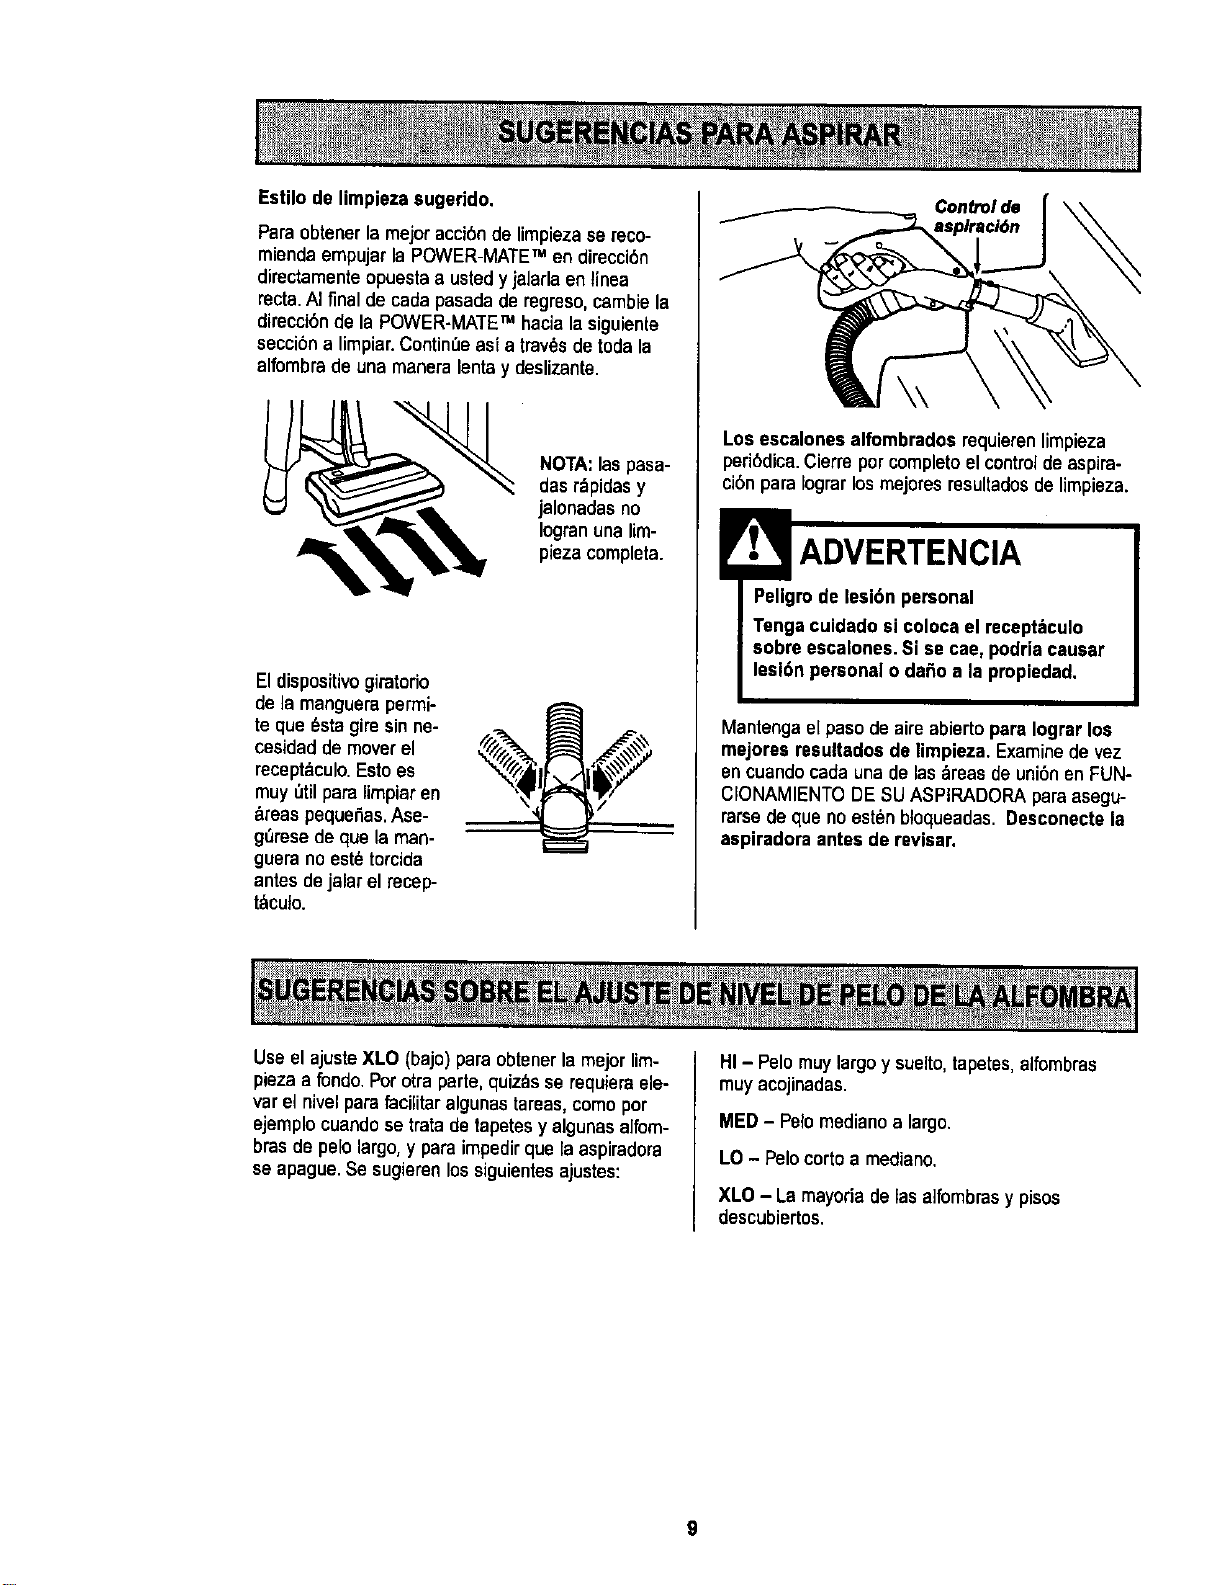
Estilo de limpieza sugeddo,
Paraobtenerla mejor acci6nde limpieza se reco-
miendaempujar la POWER-MATETM en direcci6n
diractamenteopuestaa ustedy jalarlaen tinea
recta.AIfinal de cadapasadade regreso,cambiela
direcci6nde laPOWER-MATETM haciala siguiente
seccibna limpiar.ContinUeasi a trav_sdetoda la
alfombrade una maneralentay deslizante.
NOTA:laspasa-
dasrbpidasy
jalonadasno
Iogranunalim-
piezacompleta.
Eldispositivo giratodo
de la manguerapermi-
te que _sta gire sin ne-
cesidad de mover el
receptaculo. Esto es
muy ,',tilpara limpiar en
_reas pequefias.Ase-
g_resedeque la man-
gueranoest_torcida
antesdejalarel recep-
t_icuto.
Control de
Los escalones alfombrados requierenlimpieza
peri6dica. Cierra porcompletoelcontroldeaspira-
ci6npara Iograrlosmejores resultadosdelimpieza.
ADVERTENClA
Pellgrode lesibn personal
Tenga cuidadosi coloca el recept_culo
sobre escalones. Si se cae, podriacausar
lesl6n personalo dafio a la pmpiedad.
Mantenga elpaso de aireabiertopars Iograrlos
mejores resultadosde limpieza. Examinede vez
encuandocadaunade las:_raasde unibnen FUN-
CIONAMIENTODE SU ASPIRADORAparaasegu-
raraede que noestdnbloqueadas.Desconectela
aspiradora antes de revisar.
Useel ajuste XLO (bajo) para obtener la mejor lim-
piezaa rondo.Porotra parle, quizQsse requiera ele-
var el nivel para facilitaralgunas tareas, comopor
ejemplo cuando se trata de tapetesy algunasalfom-
bras de pelo largo, y para impedirque la aspiradora
se apague.Se sugieren los siguientesajustes:
HI - Pelomuy largo y suelto,tapetes,alfombras
muy acojinadas.
MED- Pelomedianoa largo.
LO- Pelocortoa mediano.
XLO - Lamayoria delas a]fombrasy pisos
descubiertos.
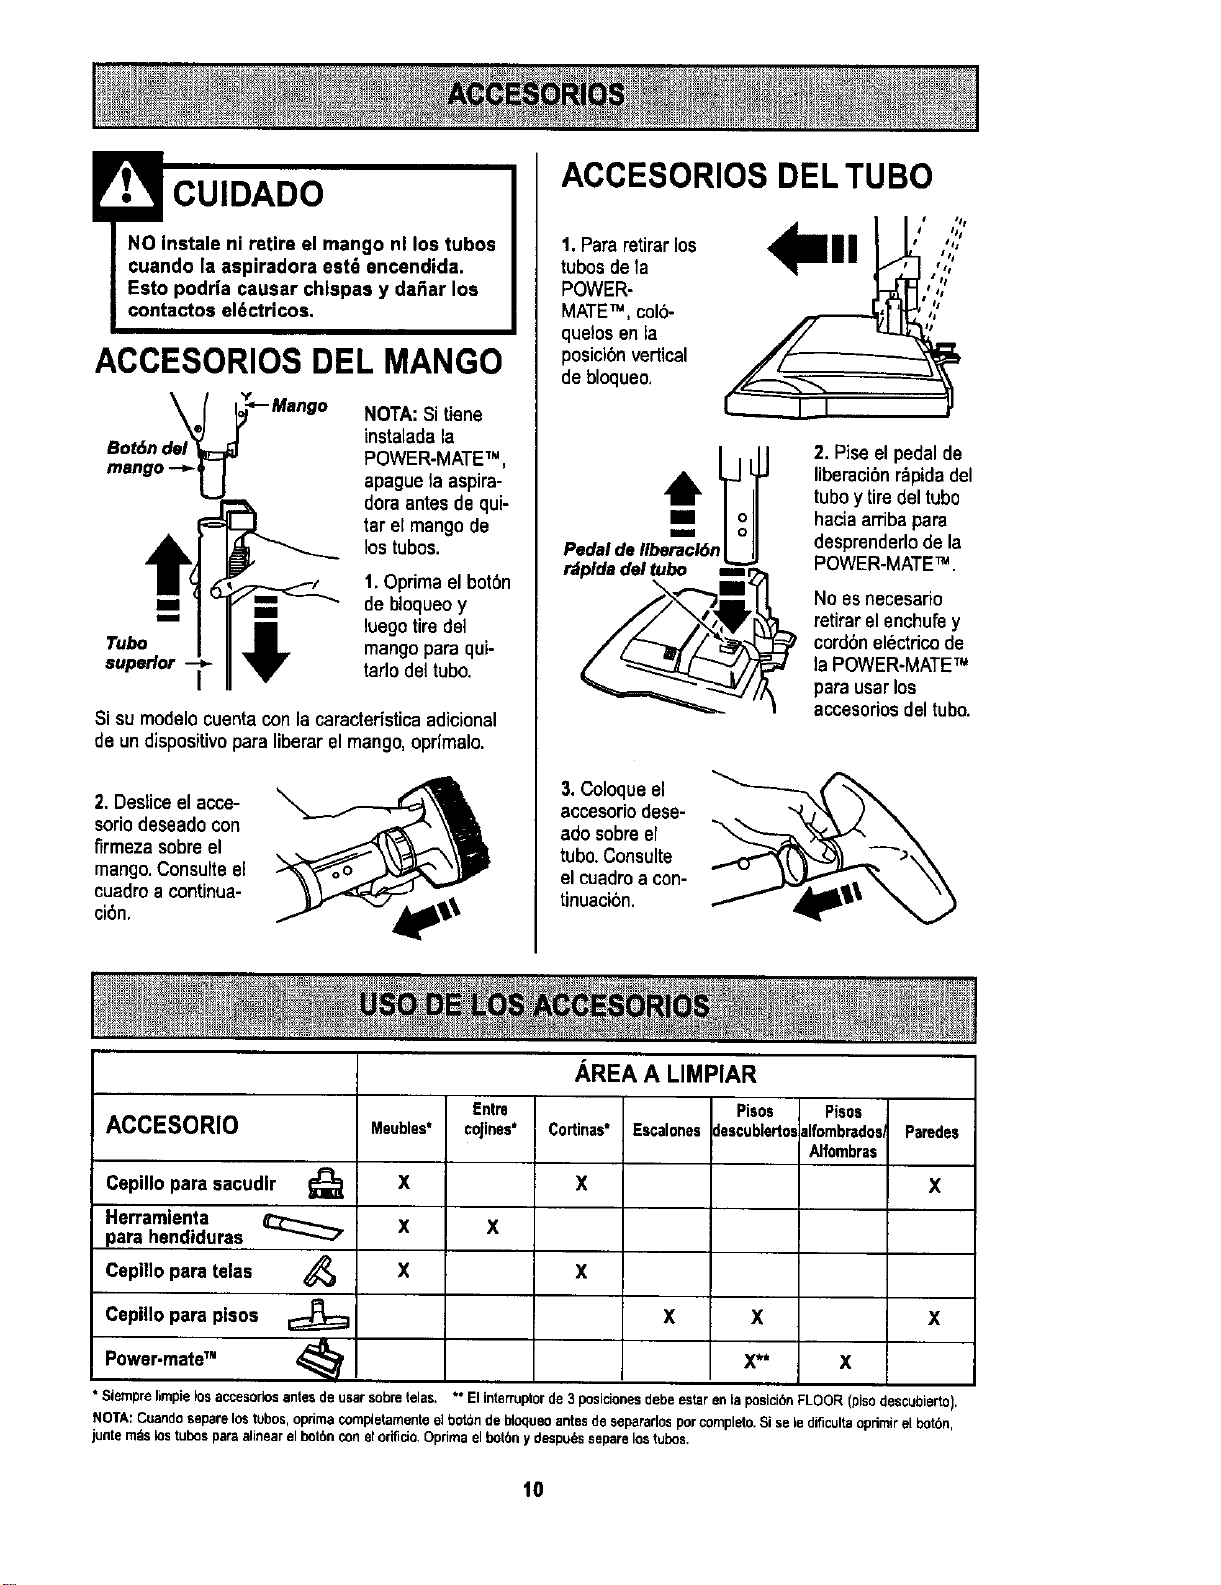
CUIDADO
ACCESORIOS DEL MANGO
NOTA:Si tiene
instaladala
POWER-MATETM,
apague la aspira-
doraantes dequi-
tar el mangode
lostubos.
1.Optimael bot0n
m m,, de bloqueoy
luego tire del
Tubo mango para qui-
superior tarlo del tubo.
Si su modelocuentacon la caracterfsticaadicional
de un dispositivo para liberar el mango, opdmalo.
2. Desiiceel acce-
soriodeseadocon
firmezasobreel
mango.ConsulteeE
cuadroa continua-
ci6n.
ACCESORIOS DEL TUBO
1.Para retirarlos
tubos de la
POWER-
MATETM, colb-
quelos en la
posici0n vertical
de bloqueo.
IIII ,{""',
• SI
Pedal de II_cl6n_
r_plda del tubo Bin,
2. Pise el pedal de
liberacibnr_pidadel
tuboy tire del tubo
haciaarribapara
desprenderlode la
POWER-MATETM .
No esnecesario
retirarel enchufey
cordonelectricode
la POWER-MATETM
parausarlos
accesoriosdeltubo.
3. Coloqueel
accesoriodese-
adosobreel
tubo.Consulte
el cuadroa con-
tinuacibn.
ACCESORIO
Cepillo para sacudlr _;_
Herramlenta
para hendiduras
Cepillo para telas
Cepillo para pisos
Power-mate" <_
Meubles*
X
X
Entre
coJines*
X
AREA A LIMPIAR
Cortinas*
X
Escalones
Pisos
clescublertoe
Pisos
alfombredos
Alfombras
Paredes
X
X X
X X X
X** X
• Siemprelimpielosaccesorlosantesde usarsobretelas. ** Elinterruptorde3 posicionesdebeestareniaposicibnFLOOR (pisodescubierto).
NOTA:Cuandoseparelostubos,optimacornpletarnentee_botchde bloqueoantesde separarlosporcompleto.Si selediflcultaoprimirel botbn,
junterodslostubesparaalinearelbot6nconelorificio+Oprimaelbotbny despu/_sseparelostubes.
1o
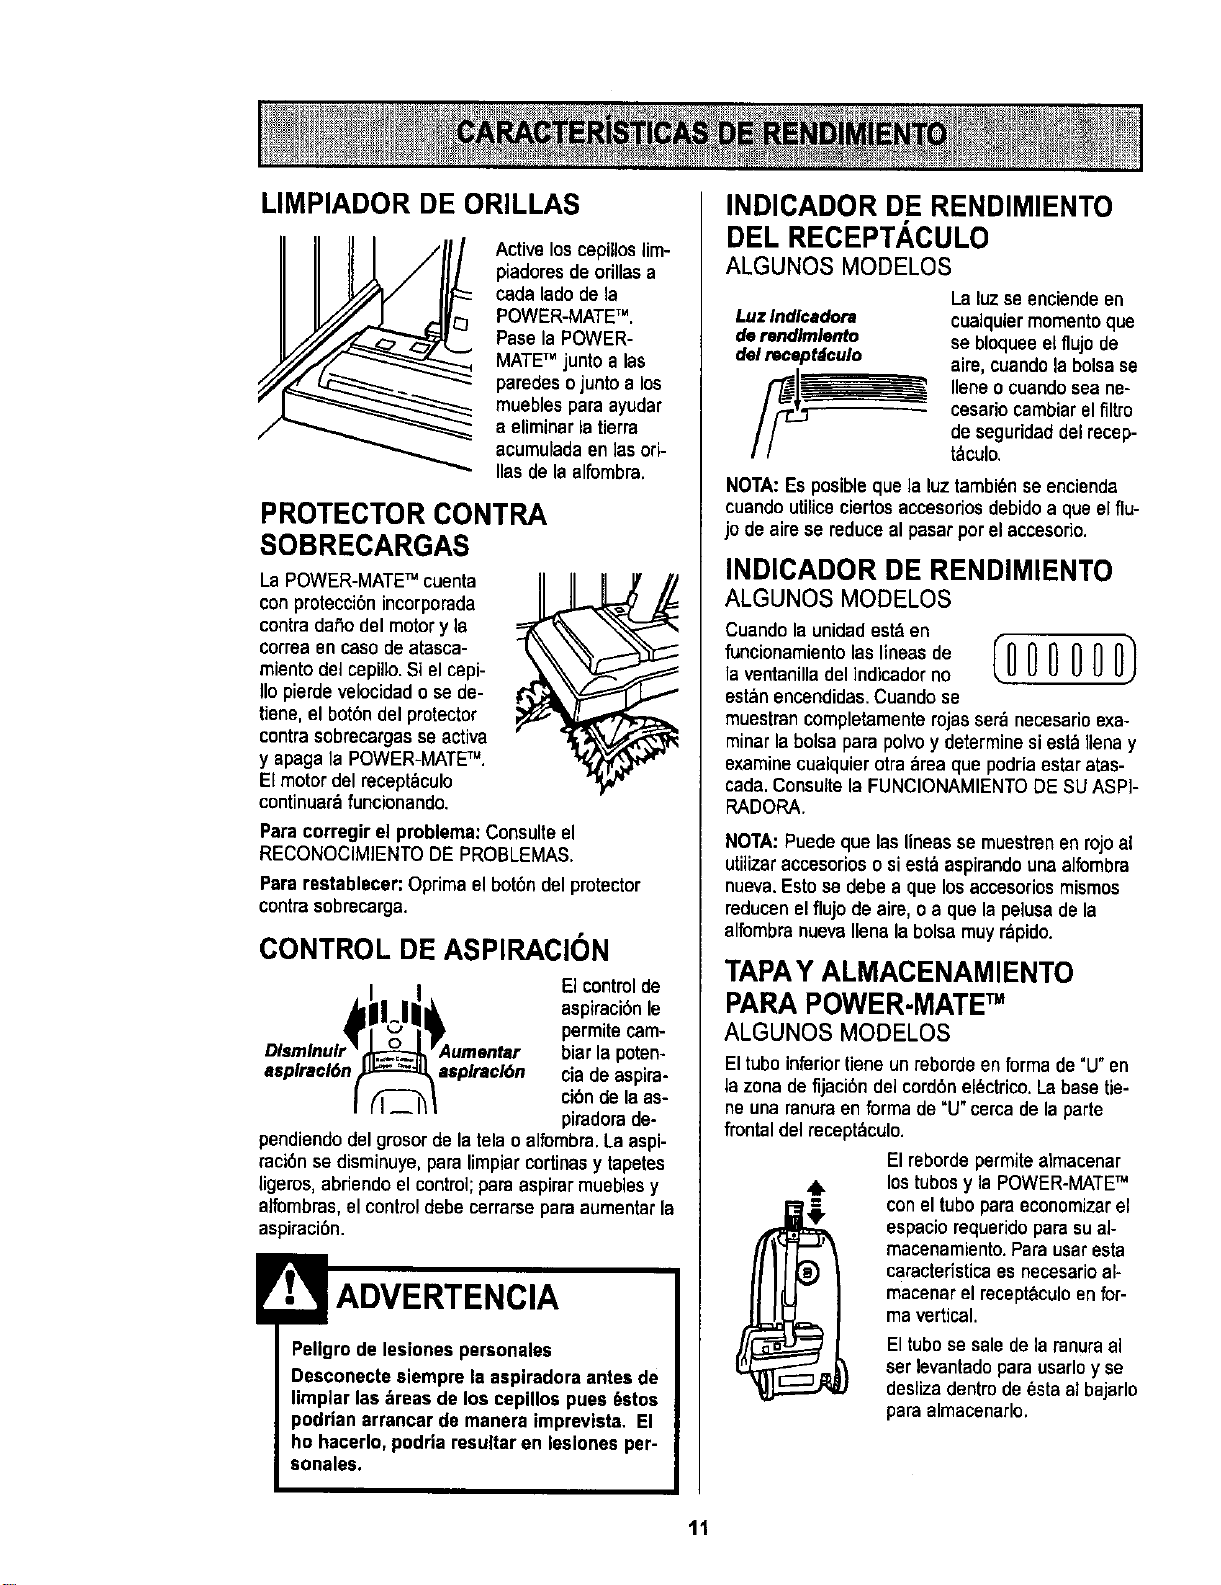
LIMPIADOR DE ORILLAS
Active loscepillos lim-
piadoresde orillas a
cada lade de la
POWER-MATETM.
Pase la POWER-
MATETM junto alas
paredeso junto a los
muebles para ayudar
a eliminarla tierra
acumulada en las ori-
Ilas de la alfembra.
PROTECTOR CONTRA
SOBRECARGAS
La POWER-MATETM cuenta
con protecci6nincorporada
contra dafio del motory la
correa en caso de atasca-
miento del cepillo.Si el cepi-
Iio pierde velocidad o se de-
tiene,el bot6n del protector
contra sobrecargas se activa
y apaga la POWER-MATETM.
El motor del receptbculo
continuarb funcionando.
Paracorregir el problema:Consulteel
RECONOCIMIENTODE PROBLEMAS.
Pararestablecer: Optima elbot6n del protector
contrasobrecarga.
CONTROL DE ASPIRACION
Elcontrolde
aspiraci6nle
permite cam-
biar la poten-
asplracl6n asplracl6n ciade aspira-
cibnde laas-
piradorade-
pendiendodel grosordela telao alfembra.La aspi-
raci6n se disminuye,para limpiarcortinasy tapetes
ligeros, abriendoel control;paraaspirar muebles y
alfombras, el control debe cerrarse para aumentar la
aspiraci6n.
Pellgrode lesiones personales
Desconecte siempre la aspiradora antesde
limplar las _reas de los cepillos pues 6stos
podrian errancar de manera imprevista, El
ho hacerlo,podria resultar en leslones per-
sonales.
INDICADOR DE RENDIMIENTO
DEL RECEPTACULO
ALGUNOS MODELOS
Luz Indlcadora
de rendlmlento
del recept;iculo
La luzse enciendeen
cualquiermomentoque
se bloqueeelflujode
aire,cuandolabolsase
Ileneo cuandoseane-
cesariocambiarel filtro
deseguridaddelrecep-
t_culo.
NOTA:Es posible que la luztambi_n se encienda
cuando utiliceciertosaccesoriosdebido a que elflu-
jo de aire se reduce al pasar por el accesorio.
INDICADOR DE RENDIMIENTO
ALGUNOSMODELOS
Cuando la unidadest& en
funcionamientolasl,neasde IO 0 0 0 0 O)
la ventanilladelindicador no
estanencendidas.Cuandose
muestran completamenterojas serb necesario exa-
minarla bolsa para polvoy determine siesta Ilenay
examine cualquier otra area que podria estar atas-
cada. Consulte la FUNClONAMIENTODE SU ASPi-
RADORA.
NOTA:Puede que las lineas se muestrenen rojoal
utilizaraccesoriososiestb aspirandouna alfombra
nueva.Estose debe a que losaccesoriosmismos
reducenelflujo de aim, oa que lapelusadela
alfombranuevaIlenalabolsa muy rbpido.
TAPAY ALMACENAMIENTO
PARAPOWER-MATETM
ALGUNOS MODELOS
El tube inferiortieneun reborde en forma de "U"en
la zona de fijaci6n del cord6nel_ctrico.La base tie-
ne una ranura en ferma de"U" cerca de la parte
frontal del recept&culo.
El reborde permite aimacenar
los tubos y la POWER-MATETM
con el tubopara economizarel
espacio requeridopara su ai-
macenamiento.Para usar esta
caracteristica es necesario al-
macenar el receptbculoen for-
mavertical.
El tubese salede laranuraa]
serlevantadopara usarloy se
deslizadentrode_sta al bajarlo
paraalmacenarlo.
11
Laaspiradoracrea succi6no aspiraci6n que levanta
la tierra.La tierraes impulsada a trav6sde lasvias
deflujo aire hasta labolsaporuna r_pidacorriente
deaire.La bolsapara polvopermiteel_
flujo de aim, peroatrapa latierra. F,_:_,z___
Para Iograrlos mejores resultados ,L,/,,_.,u.-'_-_,
de lirnpieza,mantenga abiertas
lasvies de aim. Examineperi6- ,_/)k"
dicamente las 6reas indica- /,///
dascon asteriscospara /,_y t
asegurarsedeque no _.,_" /
est6nbloqueadas. _,_./ I i
Desconectedel _ _I
rr;vC;pt6culOde N \
DISPOSITIVO
GIRATORIO DE
LA MANGUERA
El disposiUvogiratorio de
la manguerapermite que
6sta gire sinnecesidad de
mover elrecept_culo, Esto
,asmuy etil para limpiaren
areaspequefias.AsegL_resede quela manguerano
est6 retorcidaantesde jalarel recept_culo.
CAMBIO DE LA BOLSA
La bolsadebe cambiarseseguidopara Iograr los
mejores resultadosde limpieza.El indicadorde ren-
dimientose encender6 cuandosea necesariocam-
biarta bolsao sise bloqueanlasviesdeflujode
aire.NOTA: Consulte la PIEZASY
CARACTERISTICASparadeterminarel N°. de la
bolsa.
1.Desconecteel cordbn
el6ctricode la clavijade
la pared.
2. Tiredel pestillode la
tapa haciafuera y hacia
arriba;luego levantela
tapa delrecept_.culo.
3. Destrabela pestafia de
cart6ndel montaje rojo de
la bolsaempujando hacia
afueray
tirando haciaarriba.
4. Saquela bolsa delmon-
tajeroja.
5. Examiney limpiee[firm de seguridaddel motor.
Elmontaje rojo de la boiseseincliner&haciaadelan-
tedespu6sdeque retirela bolsa.Estoimpedir_qua
la tapase cierreantesdeinstalarunabolsanueva.
Boisedel
mon_e roJo
6. Levanteel montaje
rojo.
7. Instalelabalsaentas
renurascornose muestra
enlasilustraciones,empu-
jandohaciaabajohasta
que lapestafiade cart6n
quede bloqueadaenposi-
cibny los orificiosest6n
aUneados.Dobleelextre-
moposterior dela boise
haciaabajo.
8.Baje la cubierta del recept_culoy cierreel pestillo.
9. Conecteel cord6nel6ctricoen laclavijade la
pared.
NUNCA REUTILICEUNA BOLSAPARA
POLVO.Los materialesmuy finos, tales
como deeodorantae para alfombras,talco
facial, polvo fino, yeso, hollin,pelusa de
alfombras nuevas,etc., pueden ataacar la
bolsa y causar que se rompa antesde que
eat6 Ilena. Cambie laboise m_s seguido
cuando aspireeste tipo de materiales.
12
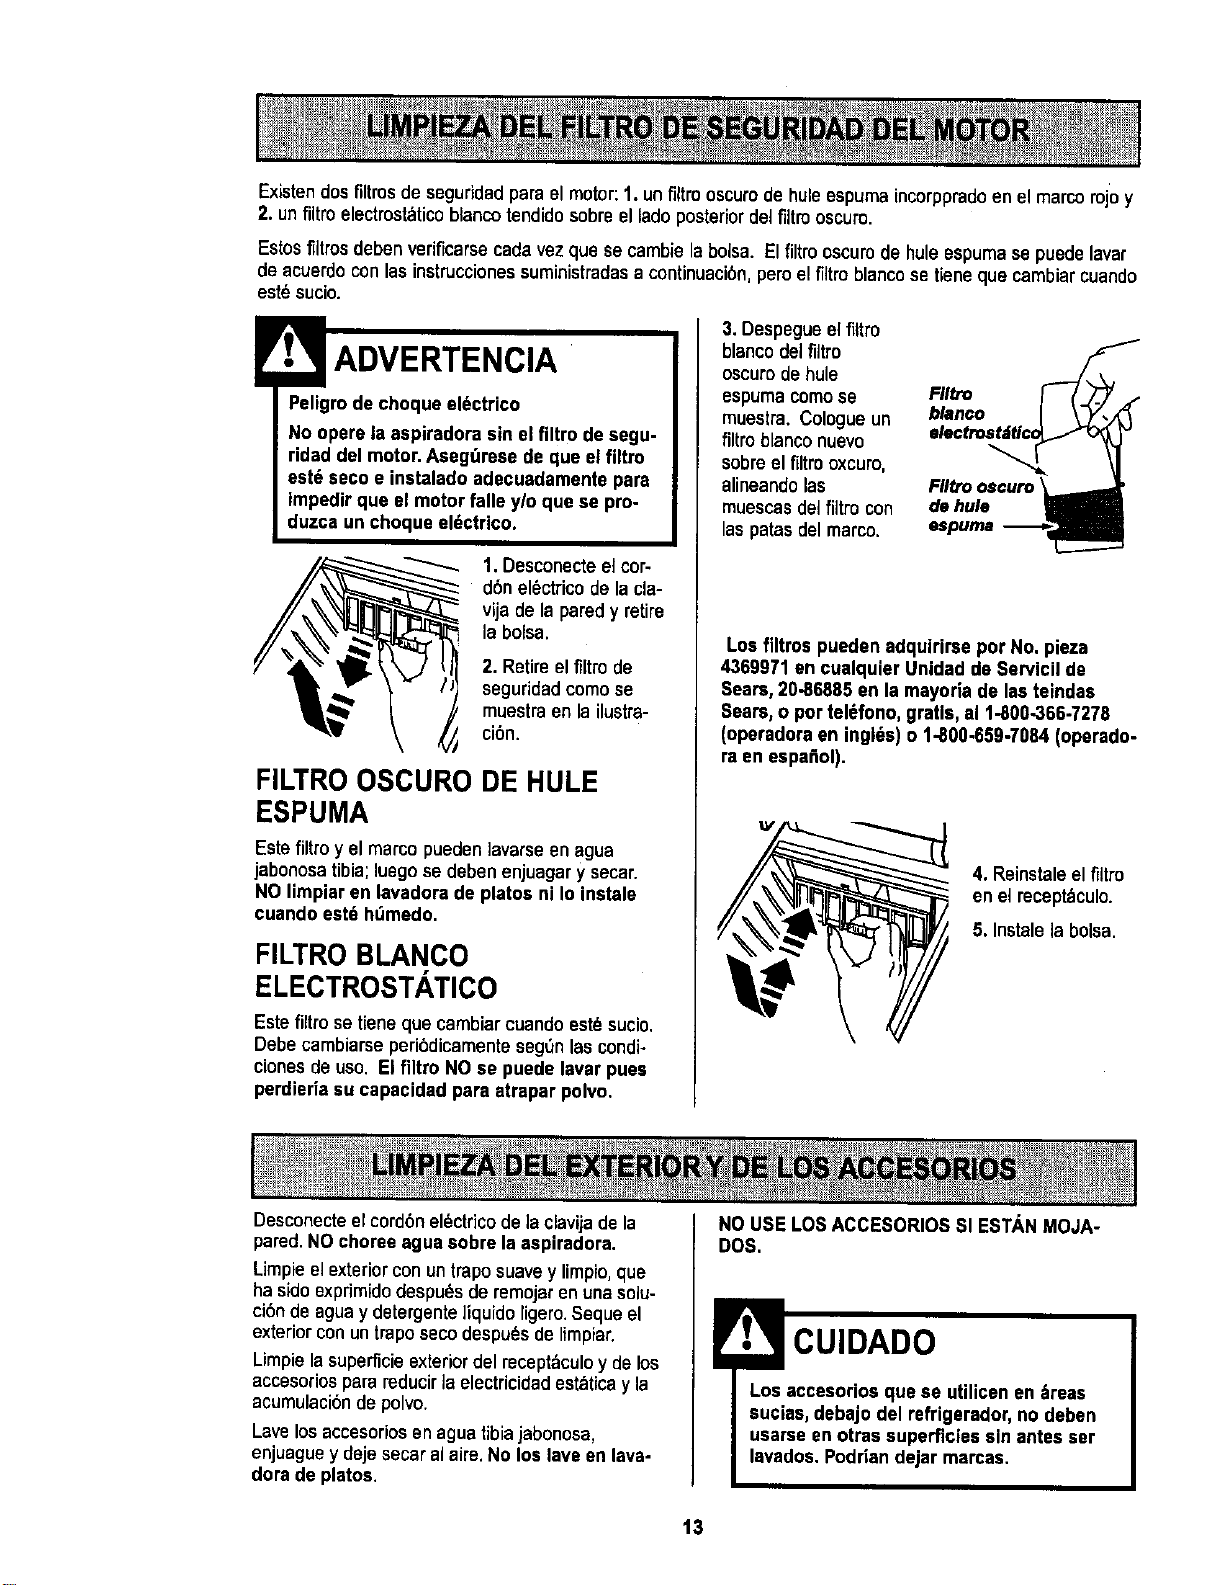
Existendos firms de seguddadpara elmotor: 1.un filtro oscurode hule espumaincorppradoenel marco rojo y
2. unflltroelectmsl_ticoblancotendidosabreel lado posteriordelfiltrooscum.
Estosfiltrosdebenverificarsecadavezque secambielabalsa. Elfiltro oscurode huleespumase puedelavar
de acuerdoconlasinstruccionessuministradasa continuacibn,peroelfiltro blancose tieneque cambiarcuando
est_sucio.
Peligrode choque eldctrico
No opere la aspiradora sin el filtro de segu-
ridad del motor. Aeeg_rese de que elfiltro
est_ seco • inetaladoadecuadamente pare
Impedirqua el motor falle y/o qua se pro-
duzca un choque eldctrico.
/
1. Desconecteel cor-
d6n el_ctrico de la cla-
vija de la paredy retire
_ la bolsa.
2. Retireelfiltro de
seguridadcoma se
muestraen la ilustra-
cibn.
FILTRO OSCURO DE HULE
ESPUMA
Este filtro y el marco pueden lavarseen agua
jabonosatibia; luego se deben enjuagary secar.
NO limpiaren lavadora de platos ni Io instals
cuando estd ht_medo.
FILTROBLANCO
ELECTROSTATICO
Estefiltro setienequa cambiarcuandoest_sucio.
Debecambiarseperi6dicamentesegOnlascondi-
cionesde usa. El filtro NO se puede lavar puee
perdieriaau capacidad pare atrapar polvo.
3. Despegueel fittro
blancodel filtro
oscurade hule
espumacomose
muestra.Cologueun
filtroblanconuevo
sabreel filtrooxcuro,
alineandolas
muescasdelfiltro con
laspatasdelmarco.
bl,.oo I \-?",'(
de hu_ _
I_puma .--------_
Los filtros pueden adquiriroe par No. pieza
4369971 en cualquier Unidad de Sarvicil de
Sears, 20-86885 en la mayoda de lasteindas
Sears, o par tel_fono, gratis, el 1-800-366-7276
(operodoraen inglds)o 1-800-659-7064 (operado-
ra en aspa_ol).
4. Reinstaleel filtm
enel receptbculo.
5. Instalela balsa.
Desconecteel cordbnel_ctricode la clavijade la
pared.NOchoreeagua sabre la aspiradora.
Limpieelexteriorconuntraposuavey limpio,que
ha sidoexprimidodespu_sderemojarenunasolu-
cibndeaguay detergente]iquido [igero.Sequeel
exteriorconuntmposecodespu_sde limpiar.
Limpielasuperficieexteriordel recept_culoy delos
accesoriosparamducir la electricidadestaticay la
acumulacibndepolvo.
Lavelosaccesoriosenaguatibiajabonosa,
enjuaguey daje secaralaire.No los lave en lava-
dorade platos.
NO USE LOSACCESORIOS Sl ESTANMOJA-
DOS.
CUlDADO
Los accesorios que se utilicen en ;_reas
sucias, debajo del refrigerador,no deben
usarse enarras superficiessin antes ser
lavados.Podriandejar marcas.
13

Siempre deberdn seguirse todas las precau-
ciones de seguridad al limpiar y dar servicio a
la POWER-MATE TM.
Peligrode choqueel_ctrico o lesibn corpo-
ral
Desconectela unidadantesde limpiarla o
darleservicio. De Io contrario podria pro-
ducirse un choque el_ctrico ocausar
lesi6n corporal si la aspiradora arranca de
manera imprevlsta.
1. Retirela cubierta
dela bombillaejer-
ciendopmsibnhacia
adentroy levantando
amboscostadoscome
se muestra.
EmpuJehaole
adentroy glre
2. Empujela bombillahacia
adentro y girela en direc-
ci6n opuesta al sentido de
lasmanecillas del reloj
para retirarla.
3. Cambie la bombilla. €:sta
no debeexceder 15 vatios.
Cierre la cubierta de la
bombilla basraque quede
J bien cerrada.
NOTA:CensuRela PIEZASY CARACTERISTICAS
para determinar el N°. de la bombilla.
Desconecte laaspiradora. Examinefrecuente-
mente el cepilloy lasbreasdesoportedel mismo
de laPOWER-MATETM y eliminetodocabello,hitoy
pelusaacumulada.Si la acumulaci6nes excesiva,
separela POWER-MATETM deltuboy realicelos
pasos a continuaci6n.Les instruccionestambi_n
aparecenbajolacubiertade labombilla.
PARA RETIRAR LA CORREA:
1. Retirela cubierta
de la bombUlay la
bombillacomose
indicabajoCAM-
BIO DE LABOM-
BILLA.
2. Retire los tornil-
los de la POWER-
MATETM .
3. Volteela
POWER-MATETM.
Para quitar la
cubierta, inserte
el destornillador
en las pestafias
de la cubierta de
ambos costados
y girelo para lib-
erar laspes-
tafias.
4. Volteela
POWER-MATETM
hacia arriba.
Oprima la guia de
liberaci6ny baje
el dispositivogira-
torio, inclinela
y Gulade cubierta de at#,s
llberacl6n hacia adelante
hastaque se des-
prenda.
14
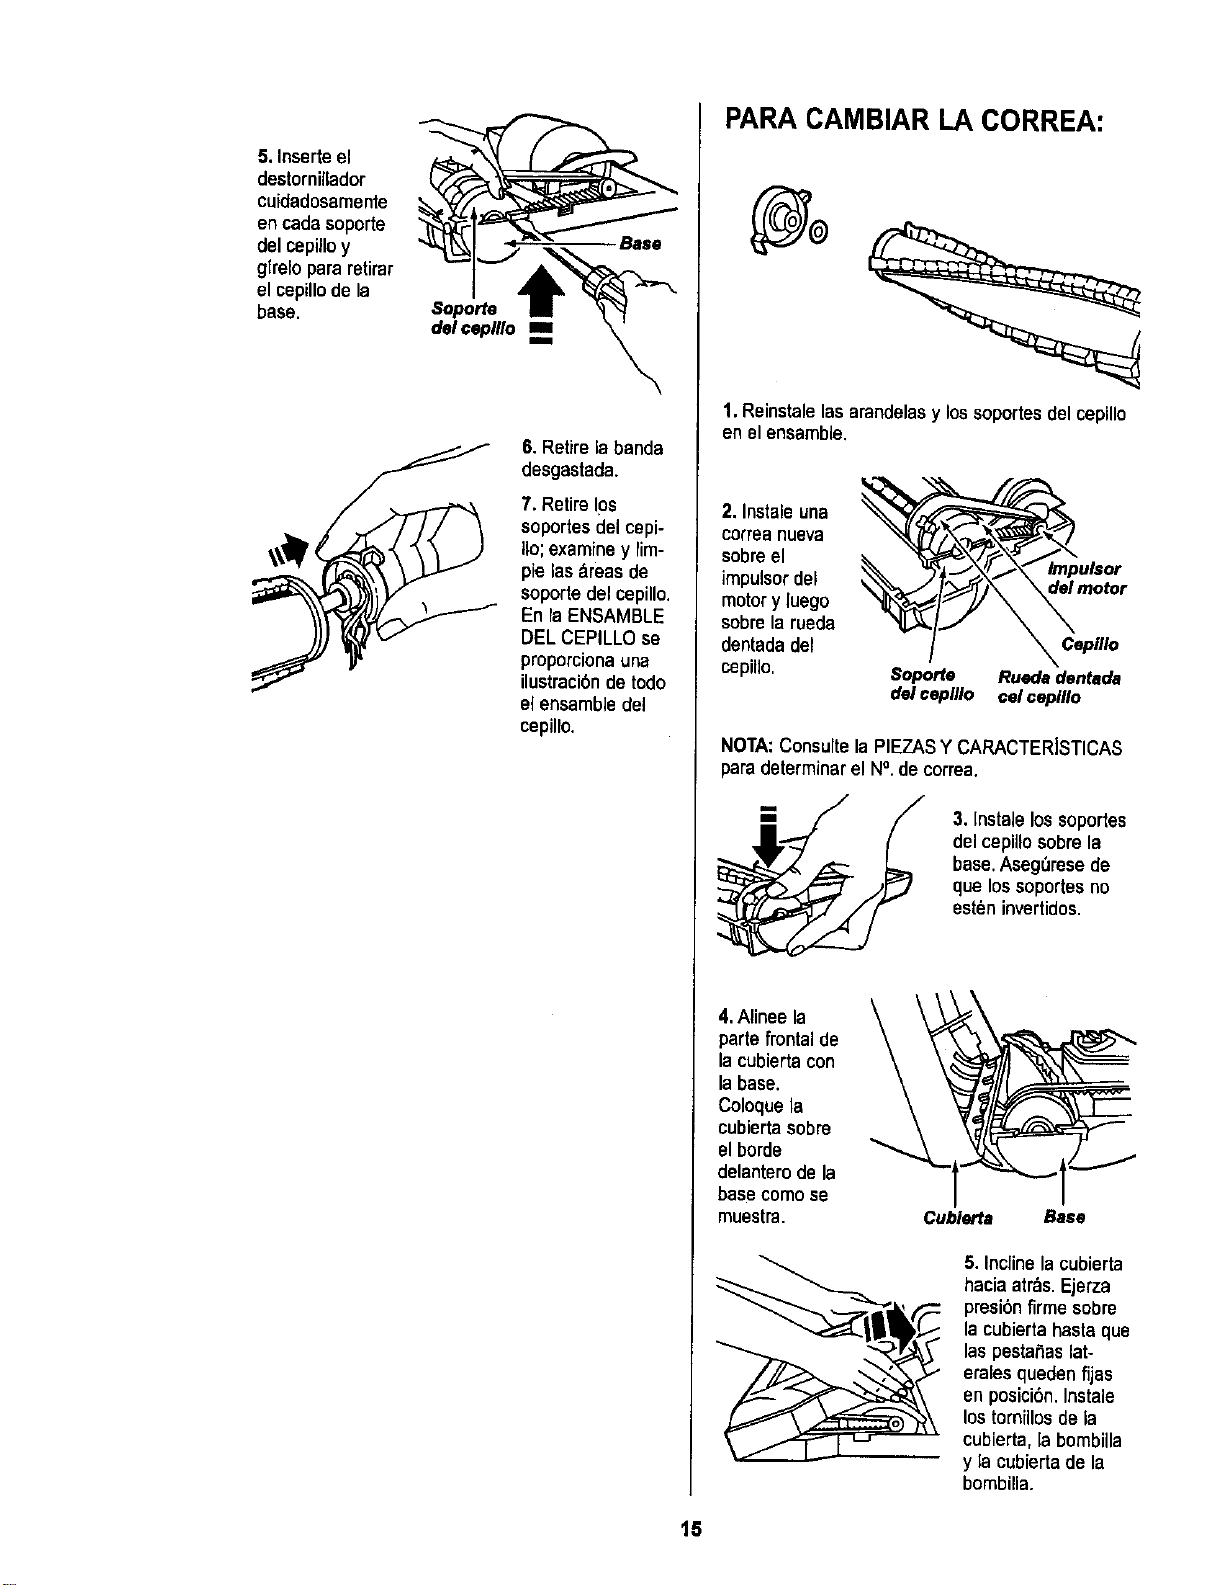
5. Inserte el
destornillador
cuidadosamente
encadasoporte
del cepil_y
glrelopararetirar
elcepillode la
base.
Base
6. Retirela banda
desgastada.
7. Retire10s
soportesdel cepi-
Iio;examiney rim-
pie las _lreasde
soportedel cepillo.
Enla ENSAMBLE
DELCEPILLOse
proporciona una
ilustraci6nde todo
el ensamble del
cepillo.
PARA CAMBIAR LA CORREA:
1, Reinstalelasarendelasy lossoportesdel cepiUo
en elensamble.
2, Instaleuna
carreanueva
sabreel
impulsor del
motory luego
sabre la rueda
dentada del
cepillo.
Capillo
Soporte Ruedadentada
del ceplllo eelceplllo
NOTA:Consulte la PIEZASY CARACTERISTICAS
para determinar el N°. de correa.
3. Instale lossoportes
del cepillosabre la
base. AsegOresede
que lossoportesno
esten invertidos.
4,Alineela
partefrontal de
lacubiertacon
la base.
Coloquela
cubiertasabre
el borde
delanterode la
basecomese
muestra. Cublerta Base
5. Incline la cubierta
hacia atr&s.Ejerza
presiOnfirme sabre
la cubierta hasta que
las pestaSaslat-
eralesqueden fijas
en posici6n.Instale
los tornillos de la
cubierta, la bombilla
y la cubierta de la
bombilla.
15
Peligr0 de cheque el_ctrico o lesi6n corpo-
ral
Desconecte la unidad antes de limpiarla o
darle servicio, De Io contrario podria pro-
ducirse un cheque eldctricoo causer
lesi6n corporal si la aspiradora arranca de
manera imprevista,
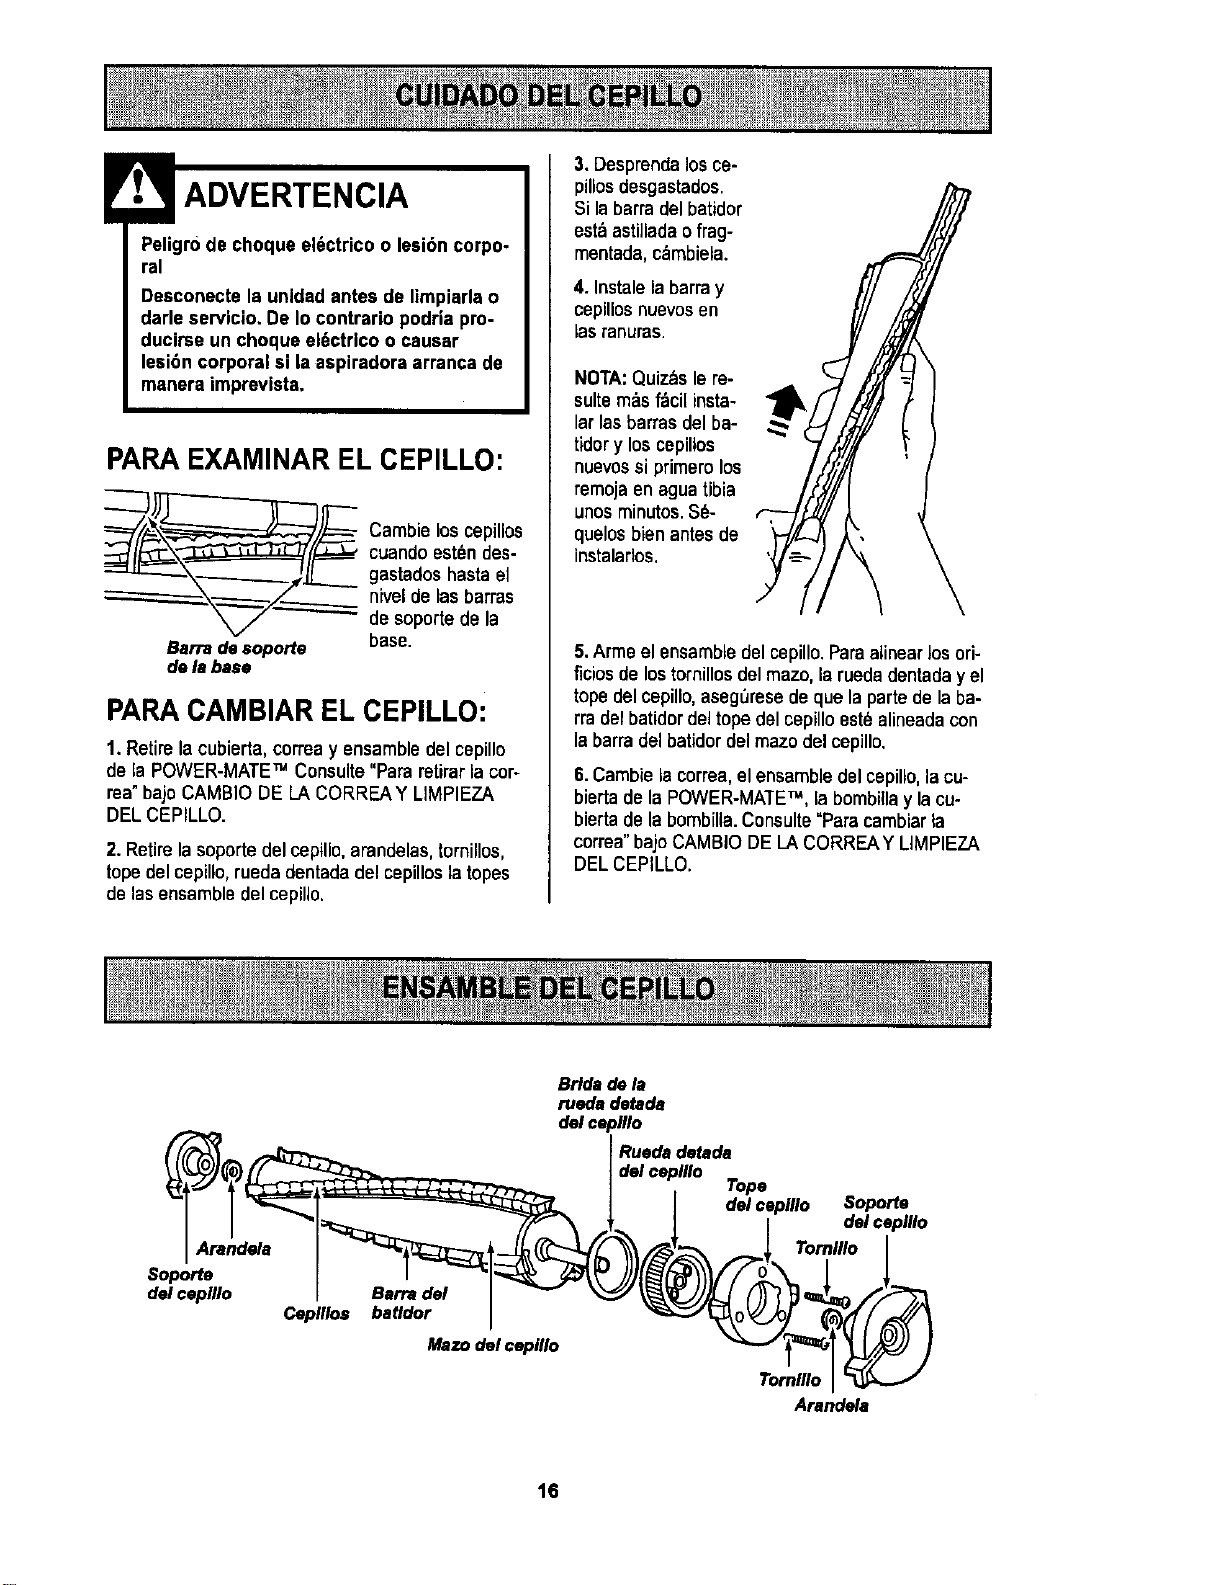
PARA EXAMINAR EL CEPILLO:
__ Cambie los cepillos
cuando est_ndes-
gastados hasta el
niveldo las barras
de soporte de la
Bsrradesoporte base.
dela base
PARACAMBIAR EL CEPILLO:
1. Retire la cubierta,correa y ensambledel cepillo
de la POWER-MATETM Consulte "Para retirar la cor-
rea"bajo CAMBIO DE LA CORREAY LIMPIEZA
DEL CEPILLO.
2. Retirela soporte del cepillo, arandelas,tornillos,
tope del cepillo, rueda dentada del cepillos la topes
de las ensamble del cepillo.
3. Desprendalos ce-
pillosdesgastados.
Si la barra del batidor
esta asti]ladao frag-
mentada,c_mbiela.
4. Instalela barra y
cepillos nuevosen
las rar_uras.
NOTA:Quiz_s le re-
suiterobsfbci[ insta-
lar las barras del ba-
tidory loscepiltos
nuevossiprimero los
rernojaen aguatibia
unosminutos.S_-
quelosbien antesde
instalados.
5.Arme el ensambledel cepillo.Paraalinearlosori-
ficios de lostornillos del mazo,la ruedadentada yel
tope del cepillo, aseg_rese deque la parte de la ba-
rra del batidordel tope del cepillo est_ alineadacon
la barra del batidor del mazo del cepillo.
6.Cambie la correa,el ensamble del cepillo,la cu-
biertade la POWER-MATETM, la bombillay la cu-
biertade la bombilla.Consulte"Paracambiarla
correa" bajoCAMBIO DELACORREAY LIMPIEZA
DELCEPILLO.
Arend_s
Soporte
delceplllo
Barfs del
Cepillos batldor
Mazo del ceplllo
Bride de 1,1
rueds detade
del ceplllo
Ruede detada
del ceplllo
Tope
del cepillo
Soporte
del cepUlo
Tomlllo
Tornlllo
Arandela
16
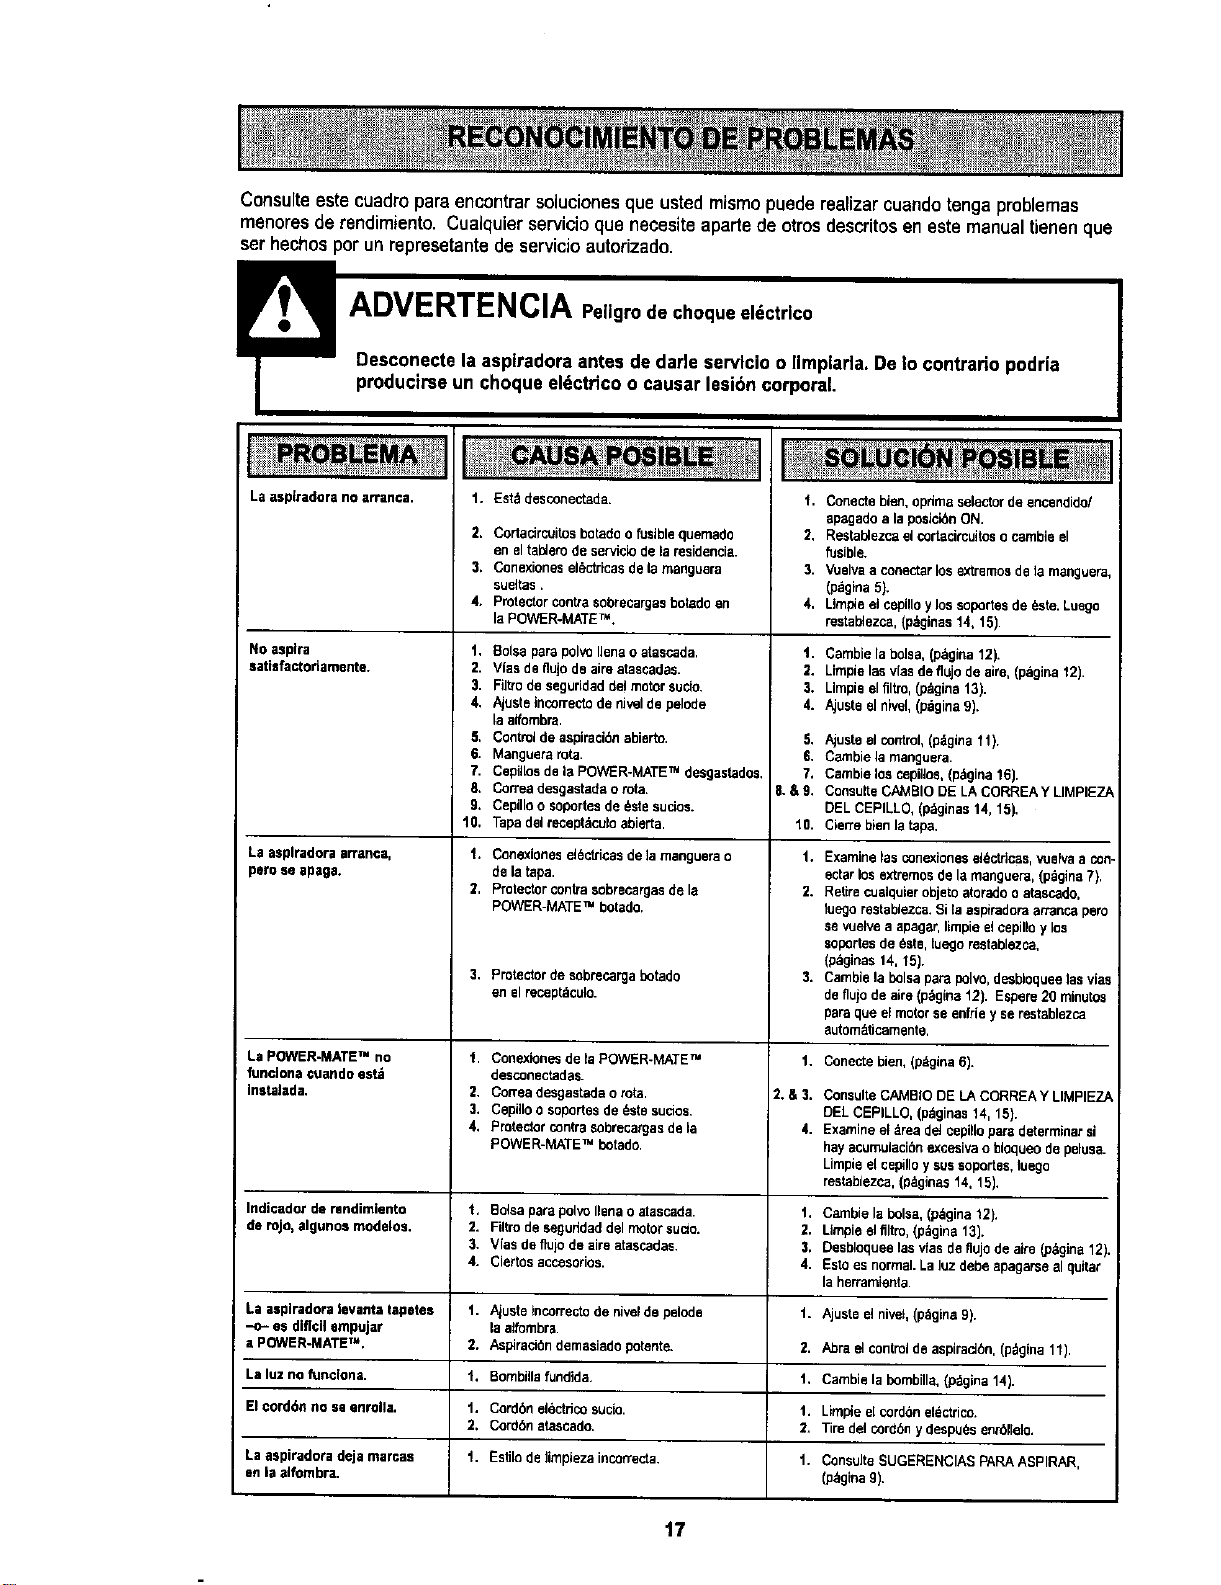
Consulte este cuadropara encontrarsolucionesque ustedmismo puederealizarcuandotenga problemas
menores de rendimiento. Cualquier servicio que necesiteaparte de otros descritos en este manualtienen que
serhechos por un represetante de servicioautorizado.
La asplradora no arranca. t. Estddesconectada.
2. Cortadrcuitos betadoo fusiblequemado
en eltal_emde serviclodelaresidencia.
3. Cenexloneselectricasdela manguera
sueltas.
4. Protector centresobreeargasbotadoen
la POWER-MATETM.
No asplra 1.
satisfactorlamente. 2.
3.
4.
5,
6.
7.
8.
9.
10.
La asplradoraarran©a, 1.
peroseapaga.
2,
3.
La POWER-MATETM no 1.
functonacuandoest_
Instalada, 2.
3.
4.
Indicadorde rendimfunto 1,
do role,algunosmodelos. 2,
3.
4.
La asplradoralevanta tapetos 1.
--c- as difi¢ilempujar
aPOWER-MATETM. 2.
Laluz no funclona, t.
El€ord6nno seenrolla, t.
2.
La aspiradoradejamarcas 1.
an la alfombra.
Boise pare pol_ liana o atascada.
Vias de I]ujo de airs atascadas.
Filtro de seguridad del motor sucio.
Ajusto incorrecfu de nivel de pelode
la alfombra.
Control de aspiraci6n abierto.
Manguera rote.
Cepillos de la POWER-MATE TM desgastados,
Correa desgastada o rota.
Cepillo o soportes de este sucfus.
Tapa del receptdcufu abierta.
Conexlonesel6ctricasdela manguerao
dolat_pa.
Protectorcontrasobrecargasde la
POWER-MATETM botado,
Protectordesobrecargabotado
en elrecept_culo.
1. Conectobien, optimaselectordeencendido/
apagadoala posicibnON.
2. Restablezcael cortacircuitosocambieel
fusible.
3. Vuslvaa conectarlosextremesdela manguera,
(pdgina5).
4. Limpie elcepilloylossoportesde6sto.Luego
restal_ezca,(p_gloas14,15).
1. ¢ambiela belsa,(pdgina12).
2. Limpielasvlas deflujode airs,(pagina12).
3. Llmpiselfiltm,(p_ina 13).
4. Ajustsel nivel,(pagina9).
5. Ajustoelcontrct,(p_Igina11).
5. Cambielamanguera.
7. Cambielos cepiflos,(p&gina15).
8.&9. ConsulteCAMBIODELACORREAY LIMPIEZ_
DELCEPILLO,(p_lginas14, 15).
18. Cierrebienla tape.
1. Examinelasconexionesel_ctricas,vuslvaa con
ectarlosextremesde lamanguera,(pdgina7).
2. Retirecuaiquierobjetoatoradoo atascado.
luegorestablezca.SiEaaspiradoraarrancapete
sevuelvea apagar,limpieelcepilloy los
SOl:Odesde _sts,luego restablezca,
(paginas14, 15).
3. Cambielab01saparepolvo,de_bloqueelasvlae
deflujode airs(pagina12). Espere20 minutes
pareque elmotorseenfrieyse restablezca
automz_Scamento.
Conexionesde laPOWER-MATETM 1. Cenectebien,(pdgina6).
desconectadas.
Correadesgastadao rote, 2.&3. ConsulteCAMBIODELACORREAY LIMPIEZA
Cepilloo sopertesde _stssucios, DELCEPILLO,(pdginas14, 15).
Protectorcontra sobrecargasde la 4. Examineel _readetcepillopare determloarsi
POWER-MATETM botado, hayacumulacibnexcesivaobloqueode pelusa.
Limpieelcepilloysussoportes,loego
restablezca,(pSginas14,15).
BctsaparapolvoIlenao atoscada, t. Cambielabolsa,(p_gina12).
Filtrodeseguddaddelmotorsucre. 2. Umpie elfiltro.(p_gina13).
Vfasde flujode airsatascadas. 3. Desblequeelasvlasdenujo deairs (pdgina12).
Ciertosaccesorios. 4. Estoesnormal.Lalozdebe apagarsealquitar
laherramienta.
Ajustetncorrectodenivctde pefude t. Ajusteel nivet,(p&gina9).
laatfombra.
Aspiract6ndemasiadopotente. 2. Abraelcontroldeaspiradbn,(p_gloa11).
Bombillafundida. 1. Cambiela bombilla,(pdgina14).
Cordbnelectdcosucre. 1. Limpieel cordbnel_ctrico.
Cordbnatascado. 2. Tiredelcordbnydespu/_senrbllelo.
Estilo deJimpiezaincorrecta, t. ConsuJteSUGERENCIASPARAABPIRAR,
(pdgina9).
17
Sears se complace en ofrecer a sus clientes servicio de reparaci6n de aparatos
electrodomdsticos y electr6nicos de todas las marcas.
En Sears, usted puede contar con operadores en espafiol, a los que puede Ilamr
sin cargo alguno.
Para pedir servicio de reparaci6n a domocillio,Llame 24 horas al dia,7 d[as a la semana
1-800-676-5811
Para ordenar piezas con entrega a domocillio, Llame24 horasal dia, 7 d{asa la semana
1-800-659-7084
S , ARS
HomeCentral"
I
TheServiceSideofSears,
18