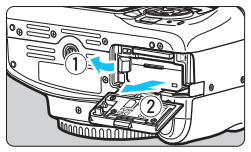
With the card’s label facing toward the back of the camera, insert it into the card slot.
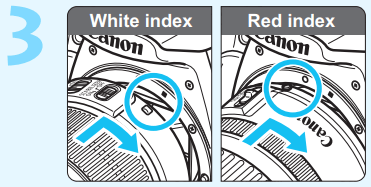
Attach the lens (p.36).
Align the lens’s white or red mount index with the camera’s mount index of the same color to attach the lens.
Set the lens’s focus mode switch to <AF> (p.36)
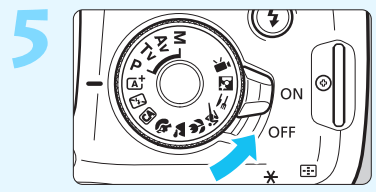
Set the power switch to <1> (p.31).
When the LCD monitor displays the date/time/zone setting screen, see page 33.
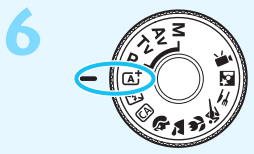
Set the Mode Dial to <A> (Scene Intelligent Auto) (p.50).
All the necessary camera settings will be set automatically.
Focus on the subject (p.39).
Look through the viewfinder and aim the viewfinder center over the subject.
Press the shutter button halfway, and the camera will focus on the subject.
If necessary, the built-in flash will be raised
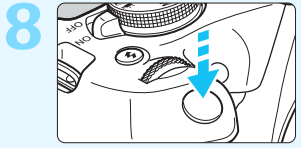
Take the picture (p.39).
Press the shutter button completely to take the picture.
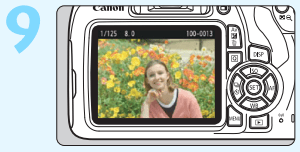
Review the picture.
The captured image will be displayed for approx. 2 sec. on the LCD monitor.
To display the image again, press the <> button (p.68).
To shoot while looking at the LCD monitor, see “Live View Shooting” (p.69).
To view the images captured so far, see “Image Playback” (p.68).
To delete an image, see “Erasing Images” (p.98).
Nomenclature
Shooting Function Settings ( in Creative Zone modes, p.30)
The display will show only the setting currently applied.
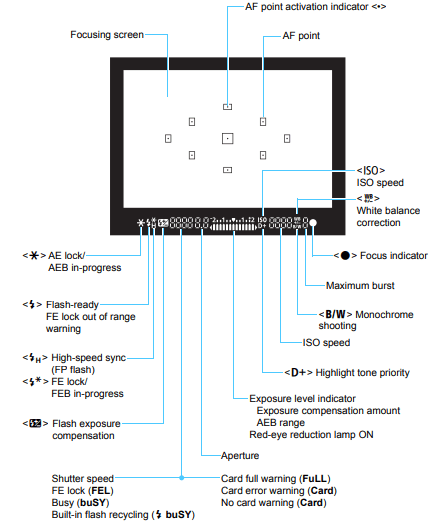
Viewfinder Information
The display will show only the setting currently applied.
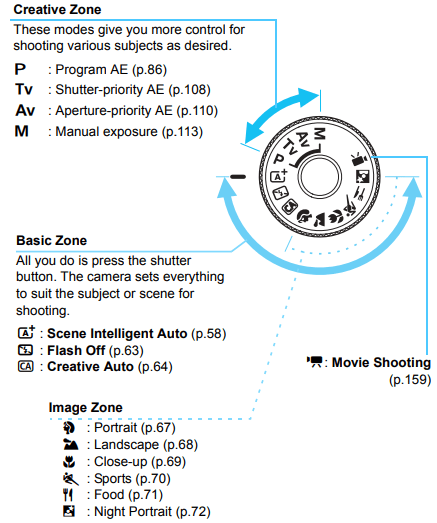
Mode Dial
The Mode Dial includes the Basic modes, Creative Zone modes, and the Movie shooting mode.
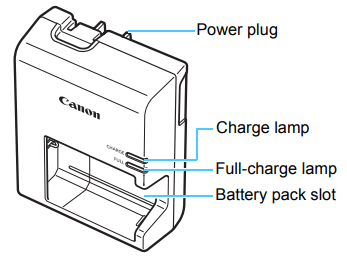
Battery Charger LC-E10
Charger for Battery Pack LP-E10 (p.34).
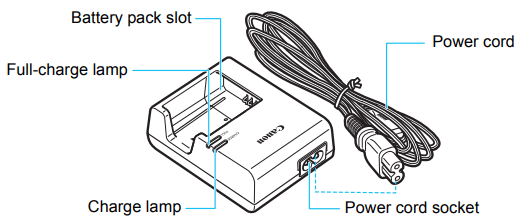
Battery Charger LC-E10E
Charger for Battery Pack LP-E10 (p.34).
Getting Started
This chapter explains preparatory steps before you start shooting and basic camera operations.
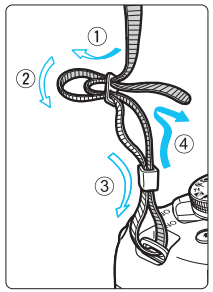
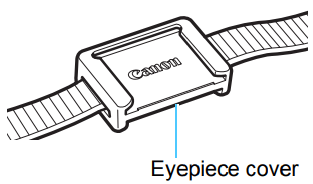
Attaching the Strap
Pass the end of the strap through the camera’s strap mount eyelet from the bottom. Then pass it through the strap’s buckle as shown in the illustration. Pull the strap to take up any slack and make sure the strap will not loosen from the buckle.
The eyepiece cover is attached to the strap.
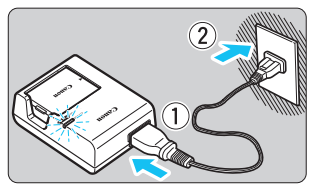
Charging the Battery
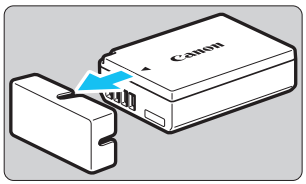
1. Remove the protective cover.
Detach the protective cover provided with the battery.
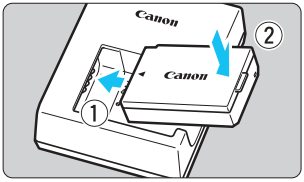
2. Attach the battery.
As shown in the illustration, attach the battery securely to the charger.
To detach the battery, follow the above procedure in reverse.
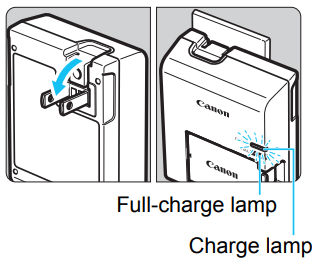
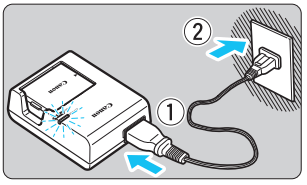
3. Recharge the battery.
For LC-E10
As shown by the arrow, flip out the battery charger’s prongs and insert the prongs into a power outlet.
For LC-E10E
Connect the power cord to the charger and insert the plug into a power outlet.
Recharging starts and the charge lamp lights up in orange.
When the battery is fully recharged, the full-charge lamp will light up in green.
It takes approx. 2 hours to fully recharge a completely exhausted battery at room temperature (23°C / 73°F). The time required to recharge the battery will vary greatly depending on the ambient temperature and the battery’s remaining capacity.
For safety reasons, recharging in low temperatures (6°C - 10°C / 43°F - 50°F) will take longer (up to approx. 4 hours)
Tips for Using the Battery and Charger
Upon purchase, the battery is not fully charged.
Charge the battery before use.
Recharge the battery on the day before or on the day it is to be used.
Even during storage, a charged battery will gradually drain and lose its capacity.
After recharging the battery, detach it and disconnect the charger from the power outlet.
When not using the camera, remove the battery.
If the battery is left in the camera for a prolonged period, a small amount of power current is released, resulting in excess discharge and shorter battery life. Store the battery with the protective cover (provided) attached. Storing the battery when it is fully charged may lower the battery’s performance.
The battery charger can also be used in foreign countries.
The battery charger is compatible with a 100 V AC to 240 V AC 50/60 Hz power source. If necessary, attach a commercially-available plug adapter for the respective country or region. Do not attach any portable voltage transformer to the battery charger. Doing so can damage the battery charger.
If the battery becomes exhausted quickly even after being fully charged, the battery has reached the end of its service life.
Purchase a new battery.
Installing and Removing the Battery and Card
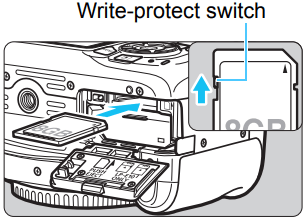
Load a fully charged Battery Pack LP-E10 into the camera. You can use an SD, SDHC, or SDXC memory card (sold separately) with the camera. The captured images are recorded onto the card. Make sure the card’s write-protect switch is set upward to enable writing and erasing.
Installing the Battery and Card
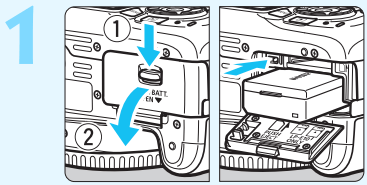
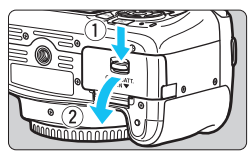
1. Open the cover.
Slide the lever as shown by the arrows and open the cover.
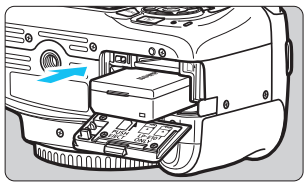
2. Insert the battery.
Insert the end with the electrical contacts.
Insert the battery until it locks in place.
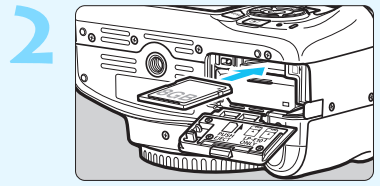
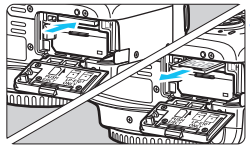
3. Insert the card.
As shown by the illustration, face the card’s label side toward the back of the camera and insert it until it clicks in place.
4. Close the cover.
Press the cover until it snaps shut.
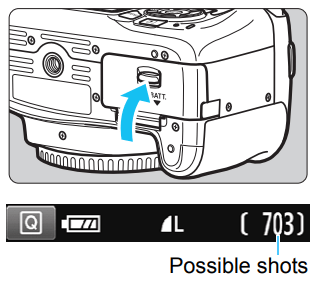
When you set the power switch to <1>, the number of possible shots will be displayed on the LCD monitor.
Removing the Battery and Card
1. Set the power switch to <2> (p.31).
2. Open the cover.
Make sure the access lamp is off, then open the cover.
If [Recording...] is displayed, close the cover.
3. Remove the battery.
Press the battery lock lever as shown by the arrow and remove the battery.
To prevent short circuiting of the electrical contacts, be sure to attach the provided protective cover (p.26) to the battery.
4. Remove the card.
Gently push in the card, then let it go to eject.
Pull the card straight out.
5. Close the cover.
Press the cover until it snaps shut.
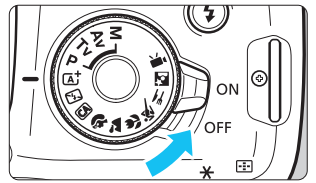
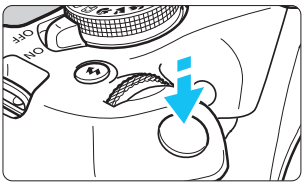
Turning on the Power
If you turn on the power and the date/time/zone setting screen appears, see page 33 to set the date/time/zone.
<ON>: The camera turns on.
<OFF>: The camera is turned off and does not function. Set to this position when not using the camera. Auto Power Off
To save battery power, the camera turns off automatically after approx. 30 seconds of non-operation. To turn on the camera again, just press the shutter button halfway (p.39).
You can change the auto power off time with [: Auto power off]. (p.185)
Setting the Date, Time, and Zone
When you turn on the power for the first time or if the date/time/zone have been reset, the date/time/zone setting screen will appear. Follow the steps below to set the time zone first. Set the camera to the time zone in which you currently live so that, when you travel, you can simply change the setting to the correct time zone for your destination, and the camera will automatically adjust the date/time.
Note that the date/time appended to recorded images will be based on this date/time setting. Be sure to set the correct date/time.
1. Display the menu screen.
Press the <MENU> button to display the menu screen.
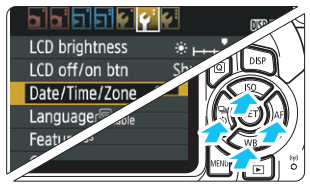
2. Under the [] tab, select [Date/ Time/Zone].
Press the <> <> keys to select the [] tab.
Press the <> <> keys to select [Date/Time/Zone], then press <>.
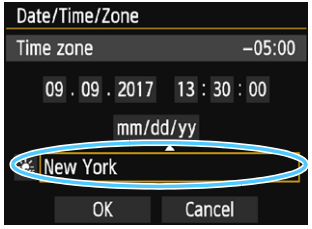
3. Set the time zone.
[London] is set by default.
Press the <> <> keys to select the time zone box.
Press <> so <> is displayed.
Press the <> <> keys to select the time zone, then press <>. (Returns to <>.)
The menu setting procedure is explained on pages 42-43.
In step 3, the time displayed on the upper right of the screen is the time difference compared with Coordinated Universal Time (UTC). If you do not see your time zone, set the time zone while referring to the difference with UTC.
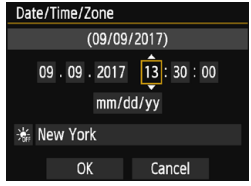
4. Set the date and time.
Press the <> <> keys to select the number.
Press <> so <> is displayed.
Press the <> <> keys to set the number, then press <>. (Returns to <>.)
5. Set the daylight saving time.
Set it if necessary.
Press the <> <> keys to select [].
Press <> so <> is displayed.
Press the <> <> keys to select [], then press <>.
When the daylight saving time is set to [], the time set in step 4 will advance by 1 hour. If [] is set, the daylight saving time will be canceled and the time will go back by 1 hour.
6. Exit the setting.
Press the <> <> keys to select [OK], then press <>.
The date/time/zone and daylight saving time will be set and the menu will reappear.
Basic Shooting and Image Playback
This chapter explains how to use the Basic Zone modes on the Mode Dial for best results and how to play back images.
With Basic Zone modes, all you do is point and shoot while the camera sets everything automatically (p.67). Also, to prevent botched pictures due to mistaken operations, advanced shooting function settings cannot be changed.
Auto Lighting Optimizer
In Basic Zone modes, the Auto Lighting Optimizer will adjust the image automatically to obtain the optimum brightness and contrast. It is also enabled by default in Creative Zone modes.
Fully Automatic Shooting (Scene Intelligent Auto)
< > is a fully automatic mode. The camera analyzes the scene and sets the optimum settings automatically. It also adjusts focus automatically by detecting whether the subject is still or moving (p.53).
1. Set the Mode Dial to <>.
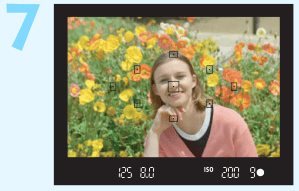
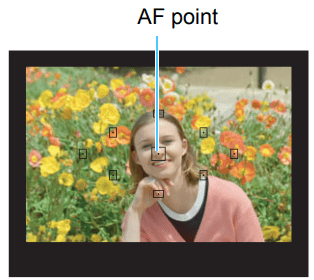
2. Aim any AF point over the subject.
All the AF points will be used to focus, and the camera will normally focus on the closest object.
Aiming the center AF point over the subject will make focusing easier.
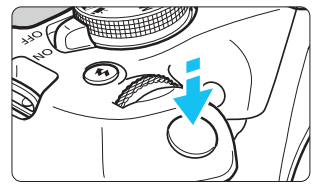
3. Focus on the subject.
Press the shutter button halfway. The lens focusing ring will rotate to focus.
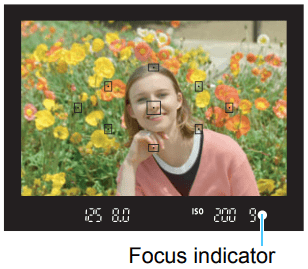
The dot inside the AF point achieving focus flashes briefly in red. At the same time, the beeper will sound and the focus indicator <> in the viewfinder will light up.
If necessary, the built-in flash will be raised automatically.
4. Take the picture.
Press the shutter button completely to take the picture.
The captured image will be displayed for approx. 2 sec. on the LCD monitor.
After you finish shooting, push down the built-in flash with your fingers.
The <> mode makes the colors look more impressive in nature, outdoor, and sunset scenes. If you did not obtain the desired color tones, change the mode to a Creative Zone mode and select a Picture Style other than <>, then shoot again ( p.95).
FAQ
The focus indicator <> blinks and focus is not achieved.
Aim the AF point over an area with good contrast, then press the shutter button halfway (p.39). If you are too close to the subject, move away and try again.
Multiple AF points flash simultaneously.
This indicates that focus is achieved at all those AF points. When the AF point covering the desired subject also flashes, take the picture.
The beeper continues to beep softly. (The focus indicator <> does not light up.)
It indicates that the camera is focusing continuously on a moving subject. (The focus indicator <> does not light up.) You can take sharp pictures of a moving subject.
Note that the focus lock (p.53) will not work in this case.
Pressing the shutter button halfway does not focus on the subject.
If the focus mode switch on the lens is set to <MF> (manual focus), set it to <AF> (autofocus).
The flash fired even though it was daylight.
For a backlit subject, the flash may fire to help lighten the subject’s dark areas. If you do not want the flash to fire, use the Flash off mode (p.55). Other than the flash setting, the camera will shoot with the same settings as with <>.
The flash fired and the picture came out extremely bright.
Move further away from the subject and shoot. When shooting flash photography, if the subject is too close to the camera, the picture may come out extremely bright (overexposure).
In low light, the built-in flash fired a series of flashes.
Pressing the shutter button halfway may trigger the built-in flash to fire a series of flashes to assist autofocusing. This is called the AF-assist beam. Its effective range is approx. 4 meters / 13.1 feet.
When flash was used, the bottom part of the picture came out unnaturally dark.
The shadow of the lens barrel was captured in the picture because the subject was too close to the camera. Move further away from the subject and shoot. If a hood is attached to the lens, remove it before taking the flash picture.
Shooting with the LCD Monitor (Live View Shooting)
You can shoot while viewing the picture on the camera’s LCD monitor. This is called “Live View shooting”.
Live View shooting is effective for still subjects which do not move.
If you handhold the camera and shoot while viewing the LCD monitor, camera shake can cause blurred images. Using a tripod is recommended.
Shooting with the LCD Monitor
1. Display the Live View image.
Press the <> button.
The Live View image will appear on the LCD monitor.
The Live View image will closely reflect the brightness level of the actual image you capture.
2. Focus on the subject.
When you press the shutter button halfway, the camera will focus with the current AF method (p.73).
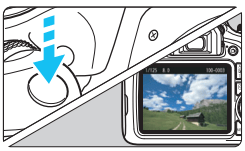
3. Take the picture.
Press the shutter button completely.
The picture is taken and the captured image is displayed on the LCD monitor.
When the playback display ends, the camera will return to Live View shooting automatically.
Press the <> button to exit the Live View shooting.
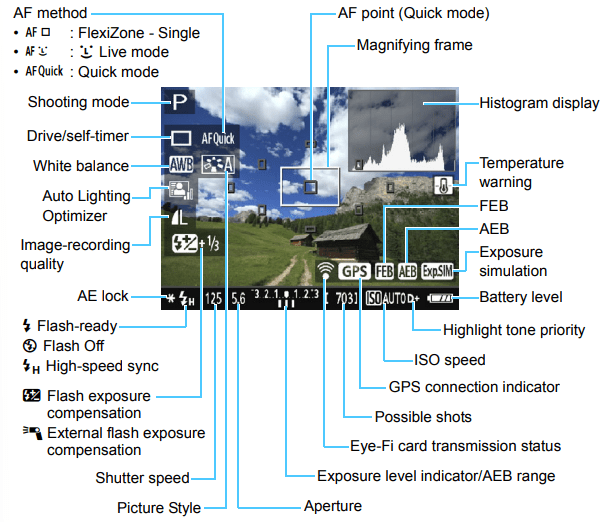
Information Display
Each time you press the <B> button, the information display will change.
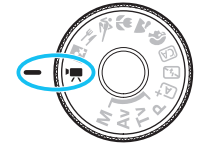
Shooting Movies
Movie shooting is enabled by setting the Mode Dial to <>. The movie recording format will be MOV.
For cards that can record movies, see page 5.
Shooting Movies
Autoexposure Shooting
1. Set the Mode Dial to <>.
The reflex mirror will make a sound, then the image will appear on the LCD monitor.
2. Focus on the subject.
Before shooting a movie, focus with AF or manual focus (p.73-80).
When you press the shutter button halfway, the camera will focus with the current AF method.
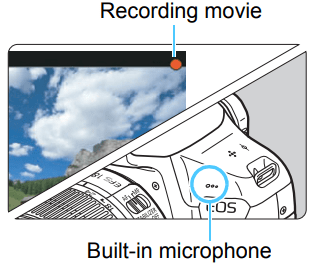
3. Shoot the movie.
Press the <> button to start shooting a movie. To stop movie shooting, press the <> button again.
While the movie is being shot, the [] mark will be displayed on the upper right of the screen.
Sound will be recorded by the built-in microphone.
Q: Was at the beach yesterday taking pix at sunset. Pretty much rapid fire on the shutter. After a bit the T7 would not take a pic until I waited a few seconds. All in full auto mode. No monitor. Is this due to overheating? Too much data too fast? What? Otherwise the T7 is amazing! Great pictures. Reply
Q: In any mode I try I cannot take a picture. I press the shutter 1/2 way, all the way, nothing. Especially when the flash is needed it will say busy. It is a brand new camera. Reply

 > button (p.68).
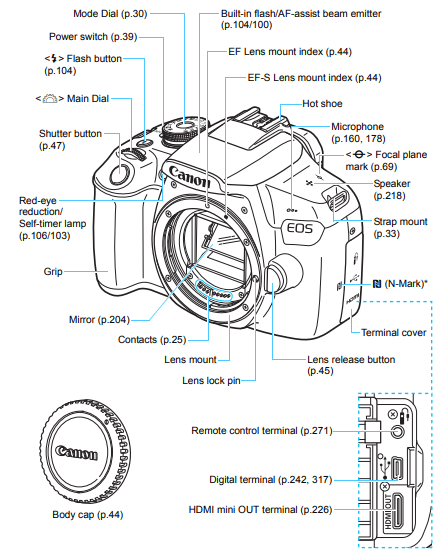


 Make sure the card’s write-protect switch is set upward to enable writing and erasing.
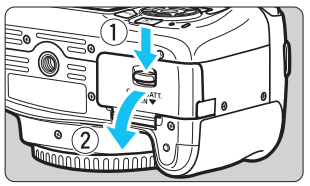
 Auto Power Off
 : Auto power off]. (p.185)
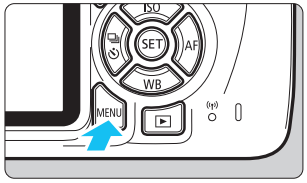
 ] tab, select [Date/ Time/Zone].
 > <
> < > keys to select the [
 > <
> < > keys to select [Date/Time/Zone], then press <
 >.
>.
 > is displayed.
 >.)
>.)
 > is displayed.
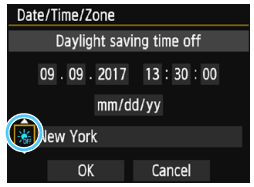
 ].
]. ], then press <
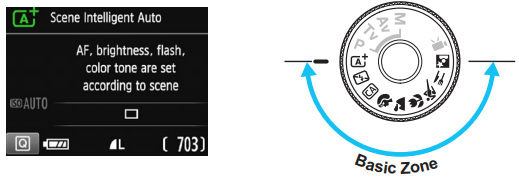
 Fully Automatic Shooting (Scene Intelligent Auto)
 > is a fully automatic mode. The camera analyzes the scene and sets the optimum settings automatically. It also adjusts focus automatically by detecting whether the subject is still or moving (p.53).
 > in the viewfinder will light up.
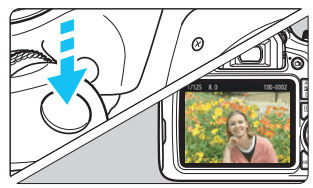
 >, then shoot again ( p.95).
 Shooting with the LCD Monitor
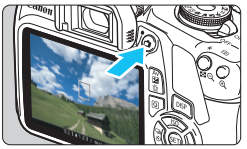
 > button.
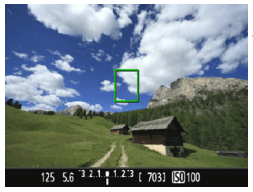
 >. The movie recording format will be MOV.
 Shooting Movies

 > button to start shooting a movie. To stop movie shooting, press the <
 ] mark will be displayed on the upper right of the screen.