Owner 's Manual Robot Vacuum
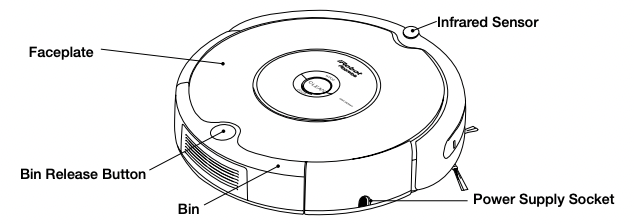
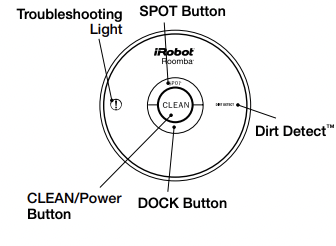
iRobot Roomba Anatomy
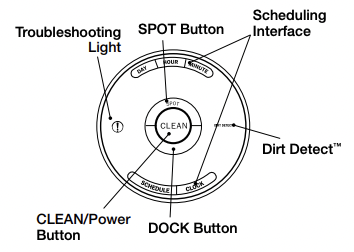
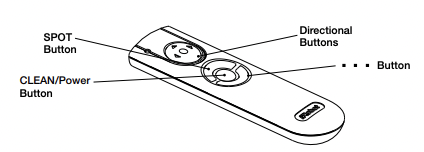
Buttons and Lights
(Models 620 and 630)
(Models 650 and 660)
Bottom View

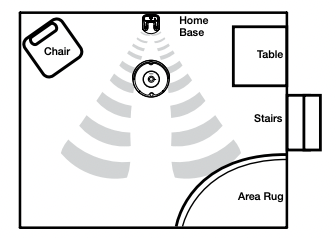
Cleaning Pattern
Roomba is a robot that cleans floors differently than the way most people clean their floors. Roomba uses its robot intelligence to efficiently clean the whole floor, under and around furniture and along walls.
Roomba calculates the optimal cleaning path as it cleans and determines when to use its various cleaning behaviors:
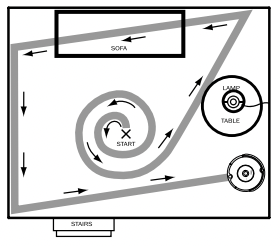
- Spiraling: Roomba uses a spiral motion to clean a concentrated area.
- Wall Following: Roomba uses this technique to clean the full perimeter of the room and navigate around furniture and obstacles.
- Room Crossing: Roomba crisscrosses the room to ensure full cleaning coverage.
- Dirt Detection: When Roomba senses dirt, the blue Dirt Detect™ light is lit and Roomba cleans more intensely in that area.
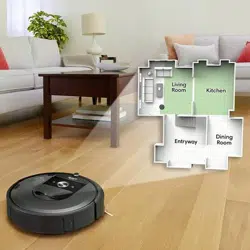
TIP: For most efficient cleaning, clear your floor of clutter and use a Virtual Wall to confine Roomba to one room.
Cleaning Modes
Roomba will clean based on the cleaning mode you select. Roomba has three cleaning modes.
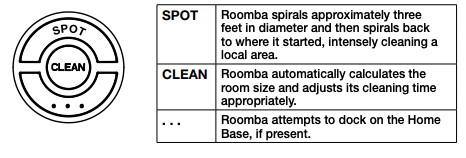
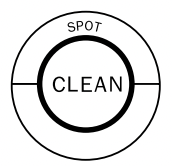
Clean Mode (all models)
Roomba automatically calculates the room size and adjusts its cleaning time appropriately.
Spot Mode (all models)
Roomba will spiral approximately three feet in diameter and then spiral back to where it started, intensely cleaning a localized area.
Scheduled Cleaning Mode (Models 650 and above)
When a future cleaning time is programmed, Roomba enters Scheduled Cleaning Mode. When scheduled to clean, Roomba will occasionally flash its next cleaning time to remind you of its schedule. At the specified time, leaves its Home Base, cleans, and then returns to the Home Base to recharge when it’s done.
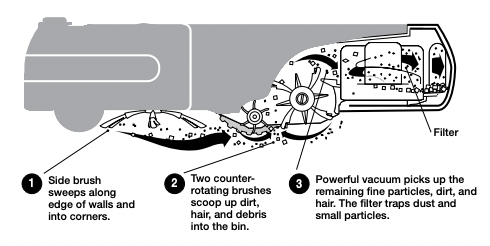
Cleaning System
Roomba features a patented three-stage cleaning system.
Floor Surfaces
Roomba works on wood, carpet, tile, vinyl, and linoleum, and adjusts automatically to different floor types. Roomba automatically senses stairs and other cliffs. Roomba might stall when confronting rounded edges and might slide over particularly slippery surfaces. Extremely dark-colored floors may contribute to Roomba’s cliff sensors working less effectively.
Anti-Tangle system
Roomba won’t get stuck on cords, carpet fringe or tassels. When Roomba senses it has picked up a cord or tassel, it will automatically stop its main brushes or side brush and try to escape. Roomba may make a clicking noise when anti-tangle is activated.
Battery Storage and Charging
Roomba is powered by a rechargeable battery. Roomba’s battery can last for hundreds of cleaning cycles if cared for properly
Battery Life
To extend the battery life, iRobot recommends always storing Roomba plugged in. For more details on how to maintain Roomba’s battery life, visit www.irobot.com/support.
TIP: Recharge Roomba as soon as possible. Waiting several days to recharge Roomba can damage the battery.
TIP: For storage off the power supply, remove the battery from Roomba and store in a cool, dry place.
Cleaning Time
You should fully charge Roomba’s battery before each cleaning cycle. When fully charged, Roomba’s battery will last for at least one full clean cycle.
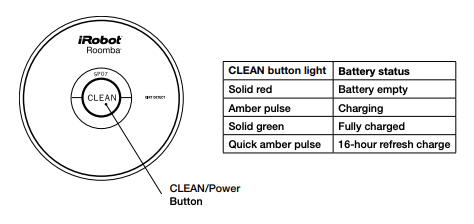
Hour Refresh Charge
If Roomba has been left off the power supply or Home Base for an extended period, Roomba will initiate a special 16-hour charge cycle. This extensive charge refreshes Roomba’s battery and extends the battery life. While charging, Roomba’s “Clean” button will pulse quickly. Note: For best results, do not interrupt this Refresh Charge.
TIP: For best performance, charge Roomba’s battery overnight before using Roomba for the first time.
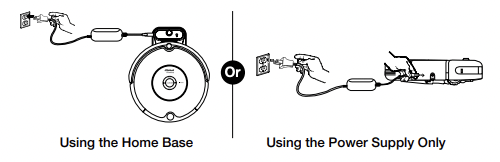
Charging Roomba
Charge Roomba in one of two ways:
TIP: When Roomba is on the Home Base, always make sure that the Home Base power light is on.
Charging Lights
Roomba uses the CLEAN button light to indicate that it is charging. Use this chart to determine the status of the battery.
Virtual Wall® (optional accessory for all models)
Virtual Walls create an invisible barrier that Roomba will not cross. This invisible barrier can be used to confine Roomba to a particular room or area, and prevent it from getting too close to electrical or computer cords, delicate objects on the floor, etc.
The Virtual Walls can be set to block an opening up to seven feet long. Note that the width of the Virtual Wall’s beam also increases as its length increases, creating a cone-shaped area which Roomba cannot pass. The Virtual Wall also creates a halo of protection around itself, preventing Roomba from getting too close.
TIP: Point the arrows on top of the Virtual Wall towards the opening you would like to block.
TIP: For best performance, place the Virtual Wall on the outside of the doorway you wish to block.
Manual Virtual Wall
A Manual Virtual Wall must be turned on by hand at the beginning of the cleaning cycle to activate the barrier. A Manual Virtual Wall (and its power light) will shut off after 135 minutes. When battery levels are low, the Virtual Wall power light will blink slowly to indicate that it needs new batteries.
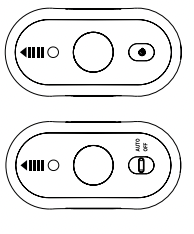
Auto Virtual Wall
When an Auto Virtual Wall is set to “Auto” mode, the power light blinks repeatedly to indicate it is on. When battery levels are low, the Virtual Wall blinks repeatedly twice to indicate that it needs new batteries. To save battery power, switch the Auto Virtual Wall to “Off”. When in “Auto” mode, the batteries should last approximately six months.
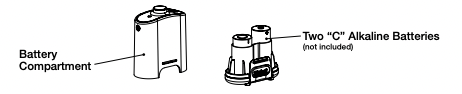
Battery Installation
Virtual Wall® Halo (optional accessory for all models)
The Virtual Wall Halo is perfect for homes with pets. It sets up a protective zone, gently guiding Roomba around your pet’s food and water bowls to keep the contents intact.
To set up the Halo, take the Virtual Wall out of the sleeve. Install batteries as shown on the previous page. Set the Virtual Wall to “Auto” mode and fully insert it into the sleeve. Make sure the Virtual Wall is inserted all the way into the sleeve. The circular lens should be completely visible at the top. Place the Virtual Wall Halo on the floor, level with Roomba, and in close proximity to the bowls as shown below. If you have one bowl, put it beside the Halo, almost touching the wall. For two bowls, place one on either side.
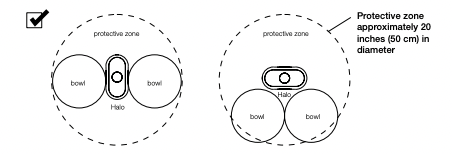
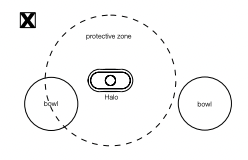
TIP: Virtual Wall Halo works on non-metal bowls less than 10 inches (25 cm) in diameter and up to 3.5 inches (9 cm) tall.
TIP: As Halo’s battery levels get low, the field may not be strong enough to protect your bowls. If that happens, change the batteries in the Virtual Wall Halo.
Home Base®
Roomba returns to the Home Base at the end of a cleaning cycle or when its battery is running low. Roomba needs to find the infrared signal of the Home Base in order to return.
Always keep the Home Base plugged in. When the Home Base is plugged in, the power light will blink to indicate that the Home Base is connected to the power source. When Roomba connects to the Home Base, the power light will be solid to indicate that Roomba has successfully connected to the Home Base. When Roomba is charging, Roomba’s Clean” button will pulse amber as described in the “Battery Storage and Charging” section of this manual. The “Clean” button will be a solid green when Roomba is completely charged.
Home Base Location
You should position the Home Base on a hard level surface and in an area where Roomba has a clear path to return at the end of a cleaning cycle. Locate the Home Base against a wall or other immovable object to prevent it from sliding during docking. If Roomba is unable to dock on its first attempt, it will try again until it docks successfully.
Tip: Do not place the Home Base within 4 feet of a stairwell.
Remote Control
(optional accessory for all models)
The Remote Control lets you conveniently control Roomba’s functions. You can use it to turn Roomba on and off and steer it around your room without bending down. It also gives you remote access to these commands:
Before using your remote for the first time, install 2 AA batteries (not included).
TIP: Check that there is a direct line of sight from the Remote Control to Roomba and that the remote is pointed at Roomba.
 The Remote Control, Virtual Walls and Home Base operate using an invisible infrared beam. If they are all used in the same area, Roomba may see multiple infrared signals and will not operate. The Remote WILL NOT work when Roomba is near Virtual Walls.
Scheduling Roomba
(Models 650 and above)
Setting the Time
You must set the time before scheduling Roomba to clean.
- 1 Press and hold CLOCK.
- 2 While holding CLOCK, use the DAY, HOUR, and MINUTE buttons to set the correct time.
- 3 Release CLOCK. Roomba will beep to indicate that the time has been set.
Setting a Schedule
You can schedule Roomba to clean once per day, up to seven times per week. You must set the time before setting a schedule.
To set a schedule:
- 1 Press and hold SCHEDULE.
- 2 While holding SCHEDULE, use the DAY, HOUR, and MINUTE buttons to set the schedule.
- 3 Release SCHEDULE. Roomba will beep to indicate that the schedule has been set.
Viewing and Deleting Schedules
To view Roomba’s scheduled cleaning times:
1 Press and hold SCHEDULE.
2 While holding SCHEDULE, press the DAY button to cycle through Roomba’s scheduled cleaning times.
3 Release SCHEDULE.
To Delete a Schedule
- 1 Press and hold SCHEDULE.
- 2 While holding SCHEDULE, press the DAY button to cycle through Roomba’s scheduled cleaning times.
- 3 When Roomba is displaying the scheduled cleaning time you’d like to delete, press and hold DAY to delete the scheduled cleaning time.
- 4 Release SCHEDULE.
To Change a Schedule
- 1 Press and hold SCHEDULE.
- 2 While holding SCHEDULE, press the DAY button to cycle through Roomba’s scheduled cleaning times.
- 3 When Roomba is displaying the scheduled cleaning time you’d like to change, press the HOUR and MINUTE buttons to change the scheduled cleaning time.
- 4 Release SCHEDULE. Roomba will beep to confirm that the schedule has been changed.
TIP: Roomba’s clock can be viewed in either the 12-hour (AM/PM) format or the 24-hour format. To toggle between the two views, press and hold the DAY and MINUTE buttons simultaneously for 3 seconds until Roomba beeps and the clock briefly illuminates, indicating the clock format has been switched. Roomba’s clock will switch back to the default 12-hour (AM/PM) format when Roomba’s battery is disconnected or significantly discharged.
Regular Maintenance
To keep Roomba running at peak performance, it is recommended that you perform the following maintenance regularly:
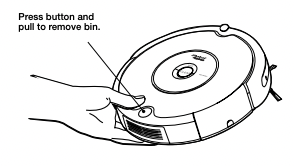
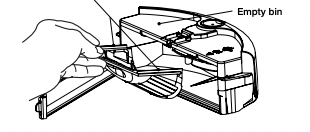
- 1 Remove and empty Roomba’s bin after each use
- 2 Clean Roomba’s filter
*Replace filter every 2 months
Tip: Bin emptying and brush cleaning should be done after every cleaning cycle. Regularly pull out and clean Roomba’s front wheel.
Tip: If you notice Roomba picking up less debris from your floor, empty the bin and clean the brushes.
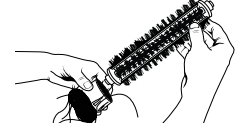
A. Remove brush guard by lifting both yellow tabs. B. Remove and clean Roomba’s brushes.

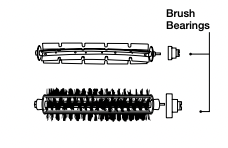
Tip: When maintaining Roomba, look for the yellow parts. These parts are designed to be removed and cleaned every time you empty Roomba’s bin.
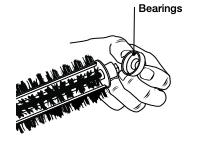
C. Remove and clean hair and dirt from Roomba’s yellow brush bearings.
D. Use the included cleaning tool to easily remove hair from Roomba’s bristle brush by pulling it over the brush.
Excessive build-up of hair can permanently damage Roomba. Remove brushes and inspect brush bearings regularly
Do not attempt to run Roomba without the bearings. If you misplace Roomba’s brush bearings, contact iRobot Customer Care for replacement bearings.
Clean Roomba’s front wheel
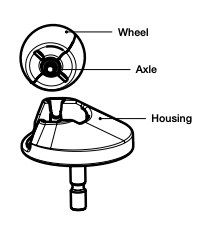
- 1 Pull firmly on Roomba’s front wheel to remove it from the robot.
- 2 Remove debris from inside the front wheel cavity.
- 3 Remove the front wheel from its housing and clear any hair wrapped around the axle. Push firmly on the wheel axle to remove it completely from the wheel.
- 4 Wipe the wheel clean.
- 5 Re-install the wheel into the housing, and the module into the robot.
Front wheels clogged with hair and debris could result in floor damage.
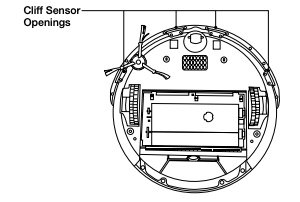
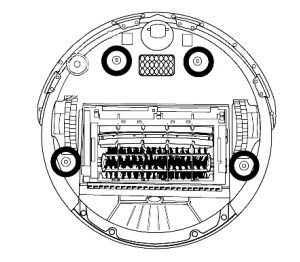
Clean Roomba’s cliff sensors
- 1 Wipe all four cliff sensors with a clean, dry cloth.
Language Selection Mode
Roomba 600 Series can provide troubleshooting messages in English, French, German, Spanish, Italian, Dutch, Danish, Swedish, Norwegian, Finnish, Polish, Russian, Portuguese, Japanese, Korean and Chinese.
Roomba’s default language is English.
Setting the Language
- 1 Turn OFF Roomba. (Press and hold CLEAN until Roomba’s lights turn off.)
- 2 Press and hold CLEAN until Roomba beeps and says the currently selected language.
- 3 Release CLEAN. Roomba is now in Language Selection Mode.
- 4 Press CLEAN repeatedly until you hear the desired language.
- 5 Press and hold CLEAN to turn OFF Roomba and confirm the language choice.
Troubleshooting
Roomba will tell you something is wrong with a two-tone “uh-oh” sound followed by a narrated voice. The troubleshooting light will also blink. Refer to the chart below to resolve Roomba’s problem.
Tip : To repeat Roomba's error message, press the "clean" button.
Runtime Errors
1 blink (every 2 seconds)
Error 1. Move Roomba to a new location then press CLEAN to restart.
Roomba is stuck with a wheel hanging down.
- Ensure Roomba’s wheels are firmly on the floor. Start Roomba in a new location.
Error 2. Open Roomba’s brush cage and clean brushes.
Roomba’s main brushes cannot turn.
- Remove and clean Roomba’s brushes. See page 19.
Error 5. Spin Roomba’s side wheels to clean.
Roomba’s side wheel is stuck.
- Clean hair and debris from Roomba’s side wheels. Push them in and out and confirm that they both turn freely. Start Roomba in a new location.
Error 6. Move Roomba to a new location then press CLEAN to restart.
Roomba’s cliff sensors are dirty or Roomba is stuck hanging over a cliff.
- Wipe Roomba’s cliff sensors with a dry cloth. See page 20. Start Roomba in a new location.
Error 7. Spin Roomba’s side wheels to clean.
Roomba’s side wheel is stuck.
- Clean Roomba’s side wheels of hair and debris. Push them in and out and confirm that they both turn freely. Start Roomba in a new location.
Error 9. Tap Roomba’s bumper to clean.
Roomba’s bumper is compressed or the bumper sensor is dirty.
- Briskly tap Roomba’s bumper 10-20 times to dislodge any debris that may be trapped under the bumper.
Error 10. Spin Roomba’s side wheels to clean.
Roomba’s side wheel is stuck or its bumper is not registering obstacles.
- If Roomba is circling in place, clean Roomba’s side wheels of hair and debris. Push them in and out and confirm that they both turn. If not circling in place, Roomba may be in an extremely large room. Use a Virtual Wall to create a smaller cleaning area.
Please charge Roomba.
Roomba’s battery is discharged.
- Plug Roomba into the power supply (or place Roomba on the Home Base) to charge. See page 11.
Charging Errors (while charging)
1 blink -- Charging Error 1
Roomba’s battery is not connected.
- Confirm that Roomba’s battery pull-tab is removed. Remove the bottom cover of Roomba to remove and re-install Roomba’s battery. See page 27.
2 blinks -- Err2 -- Charging Error 2.
Roomba has a charging error.
- Let Roomba cool down for at least one hour and try charging again.
3 blinks -- Err3 -- Charging Error 3.
Roomba has a charging error.
- Reset Roomba’s software (refer to tip below) and try charging again.
5 blinks -- Err5 -- Charging Error 5.
Roomba has a charging error.
- Reset Roomba’s software (refer to tip below) and try charging again.
6 blinks -- Err6 -- Charging Error 6.
Roomba’s battery is too warm.
- Let Roomba cool down for at least one hour and try charging again.
7 blinks -- Err7 -- Charging Error 7.
Roomba’s battery is not cooling.
- Let Roomba cool down for at least one hour and try charging again.
Tip: To reset Roomba’s software, simultaneously hold down the two buttons above and below CLEAN for 10 seconds. This will clear all scheduled cleaning times, reset the clock and may resolve some software issues.
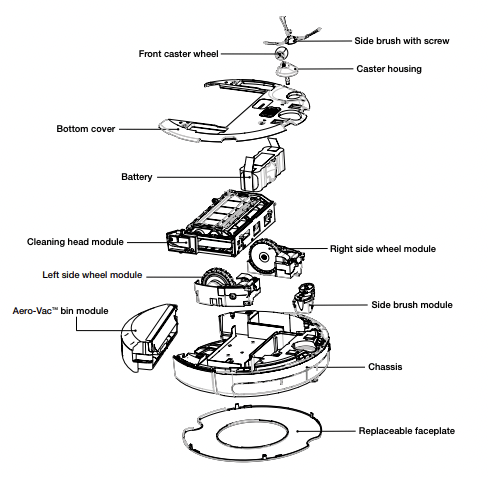
Replaceable Modules
Roomba has a number of modules that can be replaced, including its drive wheels, side brush, main cleaning head, vacuum bin, caster wheel, and battery.
To access Roomba’s replaceable modules, remove the bottom cover of Roomba by removing the four screws that hold down the bottom cover and the screw that holds the spinning side brush.
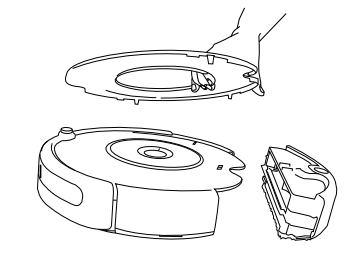
Faceplate Removal
Follow these instructions to remove and install Roomba’s faceplate.
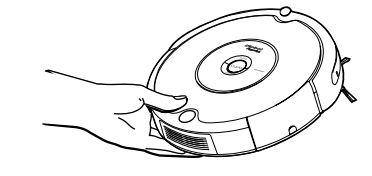
- 2 Remove Roomba’s faceplate by pulling up from the bin. The faceplate is secured in several places.
- 3 Install Roomba’s faceplate by inserting the tabs into the appropriate slots, and then pushing down firmly on the inside and outsides edges of the faceplate.
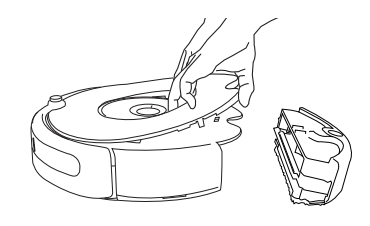
Battery Removal
Follow these instructions to remove and reinstall Roomba’s battery.
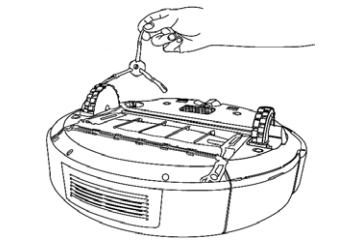
- 1 Remove Roomba’s side brush screw.
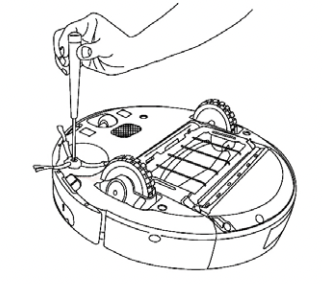
- 2 Remove Roomba’s side brush.
- 3 Unscrew the four screws shown below and remove Roomba’s bottom cover.
- 4 Remove Roomba’s battery.

- 5 Reinstall Roomba’s battery with the iRobot logo facing up.
- 6 Replace Roomba’s bottom cover and the four screws.
- 7 Replace Roomba’s side brush and the side brush screw.
Frequently Asked Questions
Why does Roomba’s Side Brush occasionally spin backwards?
When caught on items such as carpet tassels or wires, the Side Brush may spin slowly or briefly spin backwards to free itself. This may also occur on thick or high-pile carpets. If this behavior should occur on hard floor surfaces or when no tassels or wires are present, the Side Brush should be cleaned. Using a small Philips head screwdriver, first remove the screw from the center of the Side Brush. Next remove the Side Brush and thoroughly clean any hair or debris that is wrapped around the shaft. Then reinstall the Side Brush and Side Brush screw.
Why does Roomba occasionally make a thumping sound?
When Roomba’s brushes encounter items such as carpet tassels or wires, the brushes will briefly reverse direction to get free. This action causes a thumping sound that can be heard approximately once per second until the brushes are free from obstruction. If Roomba makes a thumping sound when no tassels or wires are present, the main brushes should be cleaned as described on page 19.
Why doesn’t Roomba slow down as it approaches certain obstacles?
Roomba uses its Light Touch Bumper technology to identify walls and other obstacles, allowing it to slow down and gently touch the obstacle with its bumper before changing direction. Roomba may be less effective at sensing and slowing down for extremely dark or black surfaces, or for objects that are less than two inches wide.