* Depending on the model, some of the following functions may not be available.
Ice Type
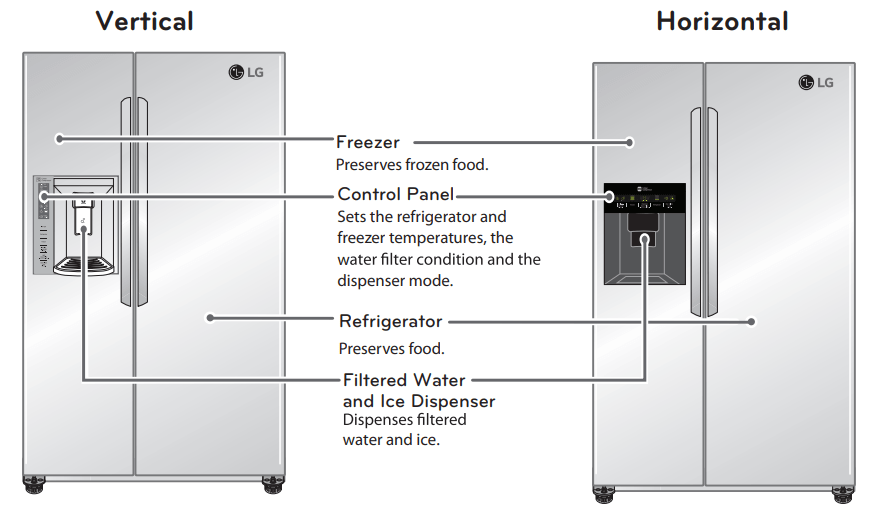
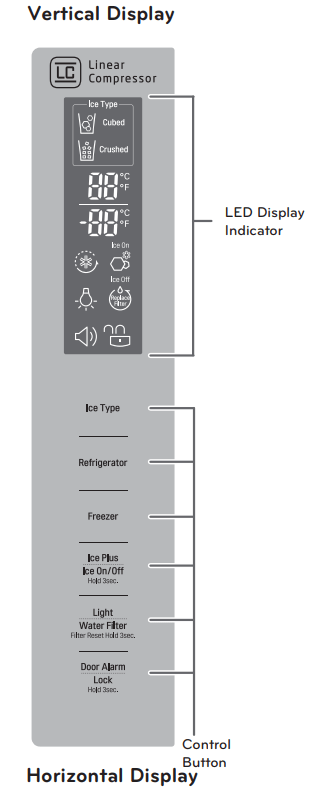
Vertical Display
Select Crushed Ice or Cubed Ice by pressing the Ice Type button repeatedly to choose the selection desired. The Crushed Ice or Cubed Ice icon will light up to indicate your selection.V
Selecting this icon indicates that cubed ice will be dispensed when the dispenser pad is activated.
Selecting this icon indicates that crushed ice will be dispensed when the dispenser pad is activated.
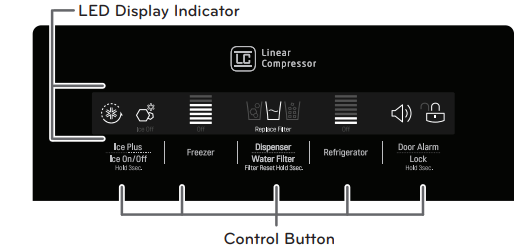
Horizontal Display
Select Crushed Ice, Cubed Ice or Water by pressing the Dispenser button repeatedly to choose the selection desired. The Icon will light up to indicate your selection.
To dispense water or ice, gently push your cup against the dispenser pad (see page 26).
Temperature
The Refrigerator Temp. Control ranges from 33°F to 46°F (1°C to 8°C). Press the Refrigerator button to cycle through the available temperature settings one increment at a time.
The Freezer Temp. Control range is from -6°F to 8°F (-21°C to -13°C). Press the Freezer button to cycle through the available temperature settings one increment at a time.
NOTE: When changing control settings, wait 24 hours before making additional adjustments. The controls are set correctly when milk or juice is as cold as you would like and when ice cream is rm. If the temperature in either compartment is too cold or too warm, change the setting one increment at a time. Wait 24 hours for the change to stabilize before adjusting again.
Temperature Mode Switch Function (°F <->°C)
If you want to convert °F to °C or vice versa, press and hold the Freezer and Refrigerator buttons at the same time for approximately ve seconds. (Type 2 is not available)
Ice Plus
When you press the Ice Plus button, the graphic will illuminate in the display and will continue for 24 hours. The function will automatically shut o after 24 hours.
You can stop this function manually by pressing the button one more time.
This function increases both ice making and freezing capabilities.
Ice ON/OFF
To turn o the automatic icemaker, press and hold the Ice ON/OFF button for three seconds until the Ice O text is illuminated. To turn on the automatic ice maker, press and hold until the Ice On text is illuminated.
Light
This light has two settings: ON and OFF. Press the Light button to turn the dispenser light on and off . (Not available on all models)
Water Filter Reset
When the water Filter indicator turns on, you need to replace the water Filter . After replacing the water Filter , press and hold the Replace Filter button for three seconds to turn the indicator light off . You need to replace the water Filter approximately every six months.
Door Alarm
When power is connected to the refrigerator, the door alarm is initially set to ON. When you press the Door Alarm button, the display will change to OFF and the Door Alarm function will deactivate.
When either the refrigerator or the freezer door is left open for more than 60 seconds, the alarm tone will sound to let you know that the door is open.
When you close the door, the door alarm will stop.
Lock
When power is initially connected to the refrigerator, the Lock function is off .
If you want to activate the Lock function to lock other buttons, press and hold the Door Alarm button for three seconds or more. The Lock icon will display and the Lock function is now enabled.
When the Lock function is activated, no other buttons will work. The dispenser pad is also deactivated.
To disable the Lock function, press and hold the Door Alarm button for approximately three seconds.
Display Off Mode
When the refrigerator is in the Display Off Mode, the display will remain off until a door is opened or a button is pressed. Once on, the display will remain on for 20 seconds.
Demo Mode (For Store Use Only)
The Demo Mode disables all cooling in the refrigerator and freezer sections to conserve energy while on display in a retail store. When activated, OFF will display on the control panel.
To deactivate:
With either refrigerator door opened, press and hold the Refrigerator Temp. and Ice Plus buttons at the same time for five seconds. The control panel will beep and the temperature settings will display to confirm that Demo Mode is deactivated. Use the same procedure to activate the Demo Mode .
Ice and Water Dispenser
* Depending on the model, some of the following functions may not be available.
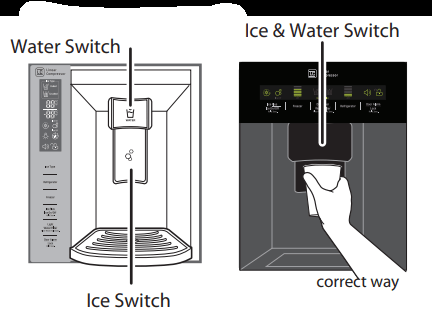
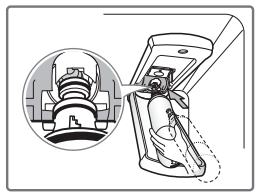
Dispenser structure
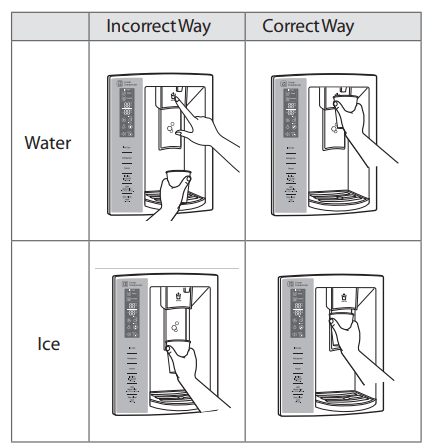
Using the dispenser
To dispense cold water , push on the water switch with a glass.
To dispense ice , push on the ice switch with a glass.
Locking the dispenser
Press and hold the Alarm and Lock button simultaneously for 3 seconds to lock the dispenser and all the control panel functions. Follow the same instructions to unlock.
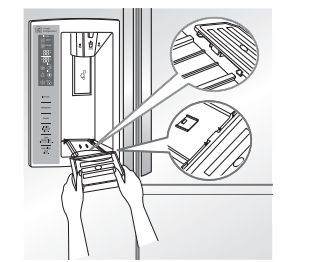
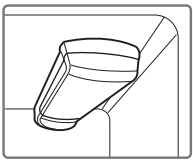
Cleaning the dispenser stand
The dispenser drip tray has no self-draining function. It should be cleaned regularly. (Models with a combined ice and water switch do not have a drip tray).
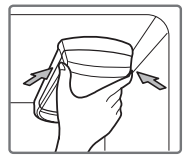
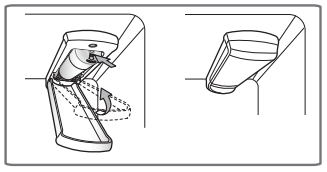
1 To remove, grip the tray with both hands and pull it out.Wipe out dirty areas and dry with a clean cloth.
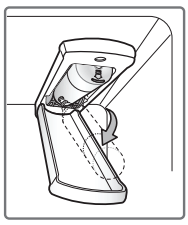
2 To reinstall the tray, slightly tilt the front of the tray and snap the ribs into the holes.
MAINTENANCE
Cleaning
Both the refrigerator and freezer sections defrost automatically; however, clean both sections about once a month to prevent odors.
Wipe up spills immediately.
Always unplug the refrigeration before cleaning.
General Cleaning Tips
Unplug refrigerator or disconnect power.
Remove all removable parts, such as shelves, crispers, etc.
Use a clean sponge or soft cloth and a mild detergent in warm water. Do not use abrasive or harsh cleaners.
Hand wash, rinse and dry all surfaces thoroughly
Exterior
Waxing external painted metal surfaces helps provide rust protection. Do not wax plastic parts. Wax painted metal surfaces at least twice a year using appliance wax (or auto paste wax). Apply wax with a clean, soft cloth.
For products with a stainless steel exterior, use a clean sponge or soft cloth and a mild detergent in warm water. Do not use abrasive or harsh cleaners. Dry thoroughly with a soft cloth.
Inside Walls (allow freezer to warm up so the cloth will not stick)
To help remove odors, you can wash the inside of the refrigerator with a mixture of baking soda and warm water. Mix 2 tablespoons of baking soda to 1 quart of water (26 g soda to 1 liter water.) Be sure the baking soda is completely dissolved so it does not scratch the surfaces of the refrigerator.
Door Liners and Gaskets
Use a clean sponge or soft cloth and a mild detergent in warm water. Do not use cleaning waxes, concentrated detergents, bleaches, or cleaners containing petroleum on plastic refrigerator parts.
Plastic Parts (covers and panels)
Use a clean sponge or soft cloth and a mild detergent in warm water. Do not use window sprays, abrasive cleansers, or flammable fluids. These can scratch or damage the material.
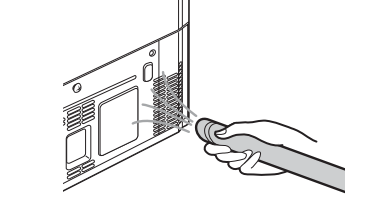
Condenser Coils
Use a vacuum cleaner with an attachment to clean the condenser cover and vents. Do not remove the panel covering the condenser coil area.
Replacing the Water Filter
It is recommended that you replace the water filter:
Approximately every six months.
When the water filter indicator turns on.
When the water dispenser output decreases.
When the ice cubes are smaller than normal.
1 Remove the old water filter.
Lower or remove the top left shelf to allow the water filter to rotate all the way down.
Pinch the sides to open the water filter cover.
NOTE: Replacing the water filter causes a small amount of water (around 1 oz. or 25 cc) to drain. Place a cup under the front end of the water filter cover to collect any leaking water. Hold the water filter upright, once it is removed, to prevent any remaining water from spilling out of the water filter.
Pull the water filter downward and turn it counterclockwise to pull it out. Make sure to rotate the filter down completely before pulling it out of the manifold hole.
2 Replace with a new water filter.
Take the new water filter out of its packing and remove the protective cover from the orings. With water filter tabs in the horizontal position, push the new water filter into the manifold hole until it stops.
Rotate the water filter up into position and close the cover. The cover will click when closed correctly.
3 After the water filter is replaced, dispense 2.5 gallons of water (flush for approximately five minutes) to remove trapped air and contaminants from the system. Do not dispense the entire 2.5 gallon amount continuously. Depress and release the dispenser pad for cycles of 30 seconds ON and 60 seconds OFF
TROUBLESHOOTING
Noises You Might Hear
Noise
Possible Causes
Solutions
Clicking
The defrost control will click when the automatic defrost cycle begins and ends. The thermostat control (or refrigerator control on some models) will also click when cycling on and off.
Normal Operation
Rattling
Rattling noises may come from the flow of refrigerant, the water line on the back of the unit, or items stored on top of or around the refrigerator.
Normal Operation
Refrigerator is not resting solidly on the floor.
Floor is weak or uneven or leveling legs need to be adjusted. See the Door Alignment section.
Refrigerator with linear compressor was jarred while running.
Normal Operation
Whooshing
Evaporator fan motor is circulating air through the refrigerator and freezer compartments.
Normal Operation
Air is being forced over the condenser by the condenser fan.
Normal Operation
Gurgling
Refrigerant flowing through the cooling system.
Normal Operation
Popping
Contraction and expansion of the inside walls due to changes in temperature.
Normal Operation
Sizzling
Water dripping on the defrost heater during a defrost cycle.
Normal Operation
Vibrating
If the side or back of the refrigerator is touching a cabinet or wall, some of the normal vibrations may make an audible sound.
To eliminate the noise, make sure that the sides and back cannot vibrate against any wall or cabinet.
Dripping
Water running into the drain pan during the defrost cycle.
Normal Operation
Pulsating or high-pitched sound
Your refrigerator is designed to run more effi ciently to keep your food items at the desired temperature. The high effi ciency compressor may cause your new refrigerator to run longer than your old one, but it is still more energy effi cient than previous models. While the refrigerator is running, it is normal to hear a pulsating or highpitched sound.
Normal Operation
Before Calling for Service
Review this section before calling for service; doing so will save you both time and money.
Cooling
Problem
Possible Causes
Solutions
Refrigerator and Freezer section are not cooling.
The refrigerator control is set to OFF (some models).
Turn the control ON. Refer to the Setting the Controls section for proper temperature settings.
Refrigerator is set to Demo Mode
Demo Mode allows the lights and control display to work normally while disabling cooling, to save energy while the refrigerator is on the showroom floor. See the FAQs or the Setting the Controls section of this manual for instructions on how to disable Demo Mode.
Refrigerator is in the defrost cycle.
During the defrost cycle, the temperature of each compartment may rise slightly. Wait 30 minutes and confirm the proper temperature has been restored once the defrost cycle has completed.
Refrigerator was recently installed.
It may take up to 24 hours for each compartment to reach the desired temperature.
Refrigerator was recently relocated.
If the refrigerator was stored for a long period of time or moved on its side, it is necessary for the refrigerator to stand upright for 24 hours before connecting it to power.
Cooling System runs too much.
Refrigerator is replacing an older model.
Modern refrigerators require more operating time but use less energy due to more efficient technology.
Refrigerator was recently plugged in or power restored.
The refrigerator will take up to 24 hours to cool completely.
The door is opened often or a large amount of food / hot food was added.
Adding food and opening the door warms the refrigerator, requiring the compressor to run longer in order to cool the refrigerator back down. In order to conserve energy, try to get everything you need out of the refrigerator at once, keep food organized so it is easy to find, and close the door as soon as the food is removed. (Refer to the Food Storage Guide.)
Doors are not closed completely.
Firmly push the doors shut. If they will not shut all the way, see the Doors will not close completely or pop open section in Troubleshooting.
Refrigerator is installed in a hot location.
The compressor will run longer under warm conditions. At normal room temperatures (70°F) expect your compressor to run about 40% to 80% of the time. Under warmer conditions, expect it to run even more often. The refrigerator should not be operated above 110°F.
Condenser / back cover is clogged.
Use a vacuum cleaner with an attachment to clean the condenser cover and vents. Do not remove the panel covering the condenser coil area.
Refrigerator or Freezer section is too warm.
Refrigerator was recently installed.
It may take up to 24 hours for each compartment to reach the desired temperature.
The air vents are blocked. Cold air circulates from the freezer to the fresh food section and back again through air vents in the wall dividing the two sections.
Locate air vents by using your hand to sense airflow and move all packages that block vents and restrict airflow. Rearrange items to allow air to flow throughout the compartment. (Refer to the Airflow diagram in the UsingYour Refrigerator section.)
Doors are opened often or for long periods of time.
When the doors are opened often or for long periods of time, warm, humid air enters the compartment. This raises the temperature and moisture level within the compartment.To lessen the effect, reduce the frequency and duration of door openings.
A large amount of food or hot food was added to either compartment.
Adding food warms the compartment requiring the cooling system to run. Allowing hot food to cool to room temperature before putting it in the refrigerator will reduce this effect.
Doors not closed correctly.
See the Doors will not close correctly or pop open section in Parts & FeaturesTroubleshooting.
Temperature control is not set correctly
If the temperature is too warm, adjust the control one increment at a time and wait for the temperature to stabilize. Refer to the Setting the Controls section for more information
Defrost cycle has recently completed.
During the defrost cycle, the temperature of each compartment may rise slightly and condensation may form on the back wall.Wait 30 minutes and confirm the proper temperature has been restored once the defrost cycle has completed.
Refrigerator or Freezer section is too cold.
Incorrect temperature control settings.
If the temperature istoo cold, adjust the control one increment at a time and wait for the temperature to stabilize. Refer to the Setting the Controls section for more information.
Items in the Cheese & Butter and Condiment bins are not as cool as other items in the refrigerator.
The Cheese & Butter and Condiment bins will be slightly warmer than the refrigerator compartment.
This is normal. Items that you would like to keep cooler should be stored in the refrigerator section.
Interior moisture buildup.
Doors are opened often or for long periods of time.
When the doors are opened often or for long periods of time, warm, humid air enters the compartment. This raises the temperature and moisture level within the compartment. To lessen the effect, reduce the frequency and duration of door openings.
Doors not closed correctly.
See the Doors will not close correctly section in the Troubleshooting section.
Weather is humid.
Humid weather allows additional moisture to enter the compartments when the doors are opened leading to condensation or frost. Maintaining a reasonable level of humidity in the home will help to control the amount of moisture that can enter the compartments.
Defrost cycle recently completed.
During the defrost cycle, the temperature of each compartment may raise slightly and condensation may form on the back wall. Wait 30 minutes and confirm that the proper temperature has been restored once the defrost cycle has completed.
Food is not packaged correctly.
Food stored uncovered or unwrapped, and damp containers can lead to moisture accumulation within each compartment. Wipe all containers dry and store food in sealed packaging to prevent condensation and frost.
Food is freezing in the refrigerator compartment.
Food with high water content was placed near an air vent.
Rearrange items with high water content away from air vents.
Refrigerator temperature control is set incorrectly.
If the temperature is too cold, adjust the control one increment at a time and wait for the temperature to stabilize. Refer to the Setting the Controls section for more information.
Refrigerator is installed in a cold location.
When the refrigerator is operated in temperatures below 41°F (5°C), food can freeze in the refrigerator compartment. The refrigerator should not be operated in temperatures below 55°F (13°C).
Frost or ice crystals form on frozen food (outside of package).
Door is opened frequently or for long periods of time.
When the doors are opened often or for long periods of time, warm, humid air enters the compartment. This raises the temperature and moisture level within the compartment. Increased moisture will lead to frost and condensation. To lessen the effect, reduce the frequency and duration of door openings.
Door is not closing properly.
Refer to the Doors will not close correctly or pop open section in the Troubleshooting section.
Cooling/Ice & Water
Problem
Possible Causes
Solutions
Frost or ice crystals on frozen food (inside of sealed package).
Condensation from food with a high water content has frozen inside of the food package.
This is normal for food items with a high water content.
Food has been left in the freezer for a long period of time.
Do not store food items with high water content in the freezer for a long period of time.
Icemaker is not making enough ice.
Demand exceeds ice storage capacity.
The icemaker will produce approximately 70-120 cubes in a 24 hour period.
House water supply is not connected, valve is not turned on fully, or valve is clogged.
Connect the refrigerator to a cold water supply with adequate pressure and turn the water shutoff valve fully open.
If the problem persists, it may be necessary to contact a plumber
Water filter has been exhausted.
Replacing the water filter is recommended:
Approximately every six months.
When the water filter indicator turns on.
When the water dispenser output decreases.
When the ice cubes are smaller than normal.
Low house water supply pressure
The water pressure must be between 20 and 120 psi (138 - 827 kPa) on models without a water filter and between 40 and 120 psi (276 – 827 kPa) on models with a water filter.
If the problem persists, it may be necessary to contact a plumber.
Reverse Osmosis filtration system is used.
Reverse osmosis filtration systems can reduce the water pressure below the minimum amount and result in icemaker issues. (Refer to water Pressure section.)
Tubing connecting refrigerator to house supply valve is kinked.
The tubing can kink when the refrigerator is moved during installation or cleaning resulting in reduced water flow. Straighten or repair the water supply line and arrange it to prevent future kinks.
Doors are opened often or for long periods of time.
If the doors of the unit are opened often, ambient air will warm the refrigerator which will prevent the unit from maintaining the set temperature. Lowering the refrigerator temperature can help, as well as not opening the doors as frequently.
Doors are not closed completely.
If the doors are not properly closed, ice production will be affected. See the Doors will not close completely or pop open section in Parts & Features Troubleshooting for more information.
The temperature setting for the freezer is too warm.
The recommended temperature for the freezer compartment for normal ice production is 0°F. If the freezer temperature is warmer, ice production will be affected.
Ice & Water
Problem
Possible Causes
Solutions
Icemaker is not making enough ice (continued).
Refrigerator was recently installed or icemaker recently connected.
It may take up to 24 hours for each compartment to reach the desired temperature and for the icemaker to begin making ice.
Icemaker not turned on.
Locate the icemaker ON/OFF button on the display and confirm that it is set to the Ice On mode.
The ice detecting sensor is obstructed.
Foreign substances or frost on the ice-detecting sensor can interrupt ice production. Make sure that the sensor area is clean at all times for proper operation.
The refrigerator is not connected to a water supply or the supply shutoff valve is not turned on
Connect the refrigerator to the water supply and turn the water shutoff valve fully open.
Icemaker shutoff (arm or sensor) obstructed.
If your icemaker is equipped with an ice shutoff arm, make sure that the arm moves freely. If your icemaker is equipped with the electronic ice shutoff sensor, make sure that there is a clear path between the two sensors.
Ice has bad taste or odor.
Water supply contains minerals such as sulfur.
A water filter may need to be installed to eliminate taste and odor problems. NOTE: In some cases, a filter may not help. It may not be possible to remove all minerals/odor/taste in all water supplies.
Icemaker was recently installed.
Ice that has been stored for too long will shrink, become cloudy, and may develop a stale taste. Throw away old ice and make a new supply.
The food has not been stored properly in either compartment.
Rewrap the food. Odors may migrate to the ice if food is not wrapped properly
The interior of the refrigerator needs to be cleaned.
See the Care and Cleaning section for more information.
The ice storage bin needs to be cleaned.
Empty and wash the bin (discard old cubes). Make sure that the bin is completely dry before reinstalling it.
Icemaker is making too much ice.
Icemaker shutoff (arm/sensor) is obstructed
Empty the ice bin. If your icemaker is equipped with an ice shutoff arm, make sure that the arm moves freely. If your icemaker is equipped with the electronic ice shuto sensor, make sure that there is a clear path between the two sensors. Reinstall the ice bin and wait 24 hours to confirm proper operation.
Ice is not dispensing.
Doors are not closed completely.
Ice will not dispense if any of the refrigerator doors are left open.
Infrequent use of the dispenser.
Infrequent use of the ice dispenser will cause the cubes to stick together over time, which will prevent them from properly dispensing. Check the ice bin for ice cubes clumping/sticking together. If they are, break up the ice cubes to allow for proper operation
The delivery chute is clogged with frost or ice fragments.
Eliminate the frost or ice fragments by removing the ice bin and clearing the chute with a plastic utensil. Dispensing cubed ice can also help prevent frost or ice fragment buildup.
The dispenser display is locked.
Press and hold the Lock button for three seconds to unlock the control panel and dispenser.
Ice bin is empty.
It may take up to 24 hours for each compartment to reach the desired temperature and for the icemaker to begin making ice. Make sure that the shutoff (arm/sensor) is not obstructed. Once the ice supply in the bin has been completely exhausted, it may take up to 90 minutes before additional ice is available, and approximately 24 hours to completely refill the bin
Water is dispensing slowly.
Water filter has been exhausted.
Replacing the water filter is recommended:
Approximately every six months.
When the water filter indicator turns on.
When the water dispenser output decreases.
When the ice cubes are smaller than normal.
Reverse osmosis filtration system is used.
Reverse osmosis filtration systems can reduce the water pressure below the minimum amount and result in icemaker issues.
If the problem persists, it may be necessary to contact a plumber or install a booster pump to compensate for the low pressure.
Low house water supply pressure.
The water pressure must be between 20 and 120 psi (138 - 827 kPa) on models without a water filter and between 40 and 120 psi (276 – 827 kPa) on models with a water filter.
If the problem persists, it may be necessary to contact a plumber or install a booster pump to compensate for the low pressure.
Water is not dispensing.
New installation or water line recently connected.
Dispense 2.5 gallons of water (flush for approximately 5 minutes) to remove trapped air and contaminants from the system. Do not dispense the entire 2.5 gallon amount continuously. Depress and release the dispenser pad for cycles of 30 seconds ON and 60 seconds OFF
The dispenser panel is locked.
Press and hold the Lock button for three seconds to unlock the control panel and dispenser.
Refrigerator or freezer doors are not closed properly.
Water will not dispense if any of the refrigerator doors are left open.
Water filter has been recently removed or replaced.
After the water filter is replaced, dispense 2.5 gallons of water (flush for approximately 5 minutes) to remove trapped air and contaminants from the system. Do not dispense the entire 2.5 gallon amount continuously. Depress and release the dispenser pad for cycles of 30 seconds ON and 60 seconds OFF
Tubing connecting refrigerator to house supply valve is kinked.
The tubing can kink when the refrigerator is moved during installation or cleaning resulting in reduced water flow. Straighten or repair the water supply line and arrange it to prevent future kinks.
The house water supply is not connected, the valve is not turned on fully, or the valve is clogged.
Connect the refrigerator to the water supply and turn the water shutoff valve fully open. If the problem persists, it may be necessary to contact a plumber
Dispensing warm water.
Refrigerator was recently installed.
Allow 24 hours after installation for the water storage tank to cool completely.
The water dispenser has been used recently and the storage tank was exhausted.
Depending on your specific model, the water storage capacity will range from approximately 20 to 30 oz.
Dispenser has not been used for several hours.
If the dispenser has not been used for several hours, the first glass dispensed may be warm. Discard the first 10 oz.
Refrigerator is connected to the hot water supply.
Make sure that the refrigerator is connected to a cold water pipe.
WARNING: Connecting the refrigerator to a hot water line may damage the icemaker.
Ice & Water/Parts & Features
Problem
Possible Causes
Solutions
Water has bad taste or odor.
Water supply contains minerals such as sulfur.
A water filter may need to be installed to eliminate taste and odor problems.
Water filter has been exhausted.
Replacing the water filter is recommended:
Approximately every six months
When the water filter indicator turns on.
When the water dispenser output decreases.
When the ice cubes are smaller than normal.
Refrigerator was recently installed.
Dispense 2.5 gallons of water (flush for approximately 5 minutes) to remove trapped air and contaminantsfrom the system. Do not dispense the entire 2.5 gallon amount continuously. Depress and release the dispenser pad for cycles of 30 seconds ON and 60 seconds OFF
Doors will not close correctly or pop open.
Food packages are blocking the door open.
Rearrange food containers to clear the door and door shelves.
Ice bin, crisper cover, pans, shelves, door bins, or baskets are out of position.
Push bins all the way in and put crisper cover, pans, shelves and baskets into their correct positions. See the UsingYour Refrigerator section for more information.
The doors were removed during product installation and not properly replaced.
Remove and replace the doors according to the Removing and Replacing Refrigerator Handles and Doors section.
Refrigerator is not leveled properly.
See Door Alignment in the Refrigeration Installation section to level refrigerator.
Doors are difficult to open.
The gaskets are dirty or sticky.
Clean the gaskets and the surfaces that they touch. Rub a thin coat of appliance polish or kitchen wax on the gaskets after cleaning.
Door was recently closed.
When you open the door, warmer air enters the refrigerator. As the warm air cools, it can create a vacuum. If the door is hard to open, wait one minute to allow the air pressure to equalize, then see if it opens more easily.
Refrigerator wobbles or seems unstable.
Leveling legs are not adjusted properly.
Refer to the Leveling and Door Alignment section.
Floor is not level.
It may be necessary to add shims under the leveling legs or rollers to complete installation.
Lights do not work.
LED interior lighting failure.
The lamps are LED interior lighting, and service should be performed by a qualified technician.
Parts & Features
Problem
Possible Causes
Solutions
The interior of the refrigerator is covered with dust or soot.
The refrigerator is located near a fire source, such as a fireplace, chimney, or candle.
Make sure that the refrigerator is not located near a fire source, such as a fireplace, chimney or candle.
#1 Does this item come with a hose to hook up to the water supply for the ice maker or is it purchased separately?
The water line connection for the LG Electronics' 26.26 cubic foot Side-By-Side Refrigerator, Model # LSXS26326S is not covered under the Refrigerator warranty and the hoses to connect the water line are not a supplied accessory, they will have to be purchased separately!
#3 Does this Refrigerator have wheels on the bottom for moving it?
The ENERGY STAR® Qualified LG 26.16-cu ft Side-by-Side Refrigerator with Single Ice Maker (Stainless Steel), Model # LSXS26326S does not have wheels on the bottom for moving but the leveling legs are made of a material that will not scratch wooden floors
If you scroll down further to 'Specifications' on the product page for the ENERGY STAR® Qualified LG Smart Wi-Fi Enabled 21.9-cu ft Counter-depth Side-by-Side Refrigerator with Ice Maker, Model # LSXC22426S, you will find the heights and width listed for the refrigerator. Actual width is listed as 35.88", Common width is listed as 36", Height to Top of Case (Inches) is listed as 69.34 and Height to Top of Door Hinge (Inches) is listed at 70.31