Loading ...
Loading ...
Loading ...
ADJUSTMENT TO DIFFERENT TYPES OF GAS
If the appliance is intended to operate with a different gas from the gas type stated on the rating plate change the injectors.
Use pressure regulators suitable for the gas pressure indicated in the Product Description Sheet.
• The gas nozzles must be changed by After Sales Service or a qualified technician.
• Nozzles not supplied with the appliance must be ordered from After Sales Service.
• Adjust the minimum setting of the taps.
Note: when liquid petroleum gas is used (ULPG), the minimum gas setting screw must be tightened as far as it
will go.
Should you experience difficulty in turning the burners knobs, please contact the After Sales Service for the
replacement of the burner tap if found to be faulty.
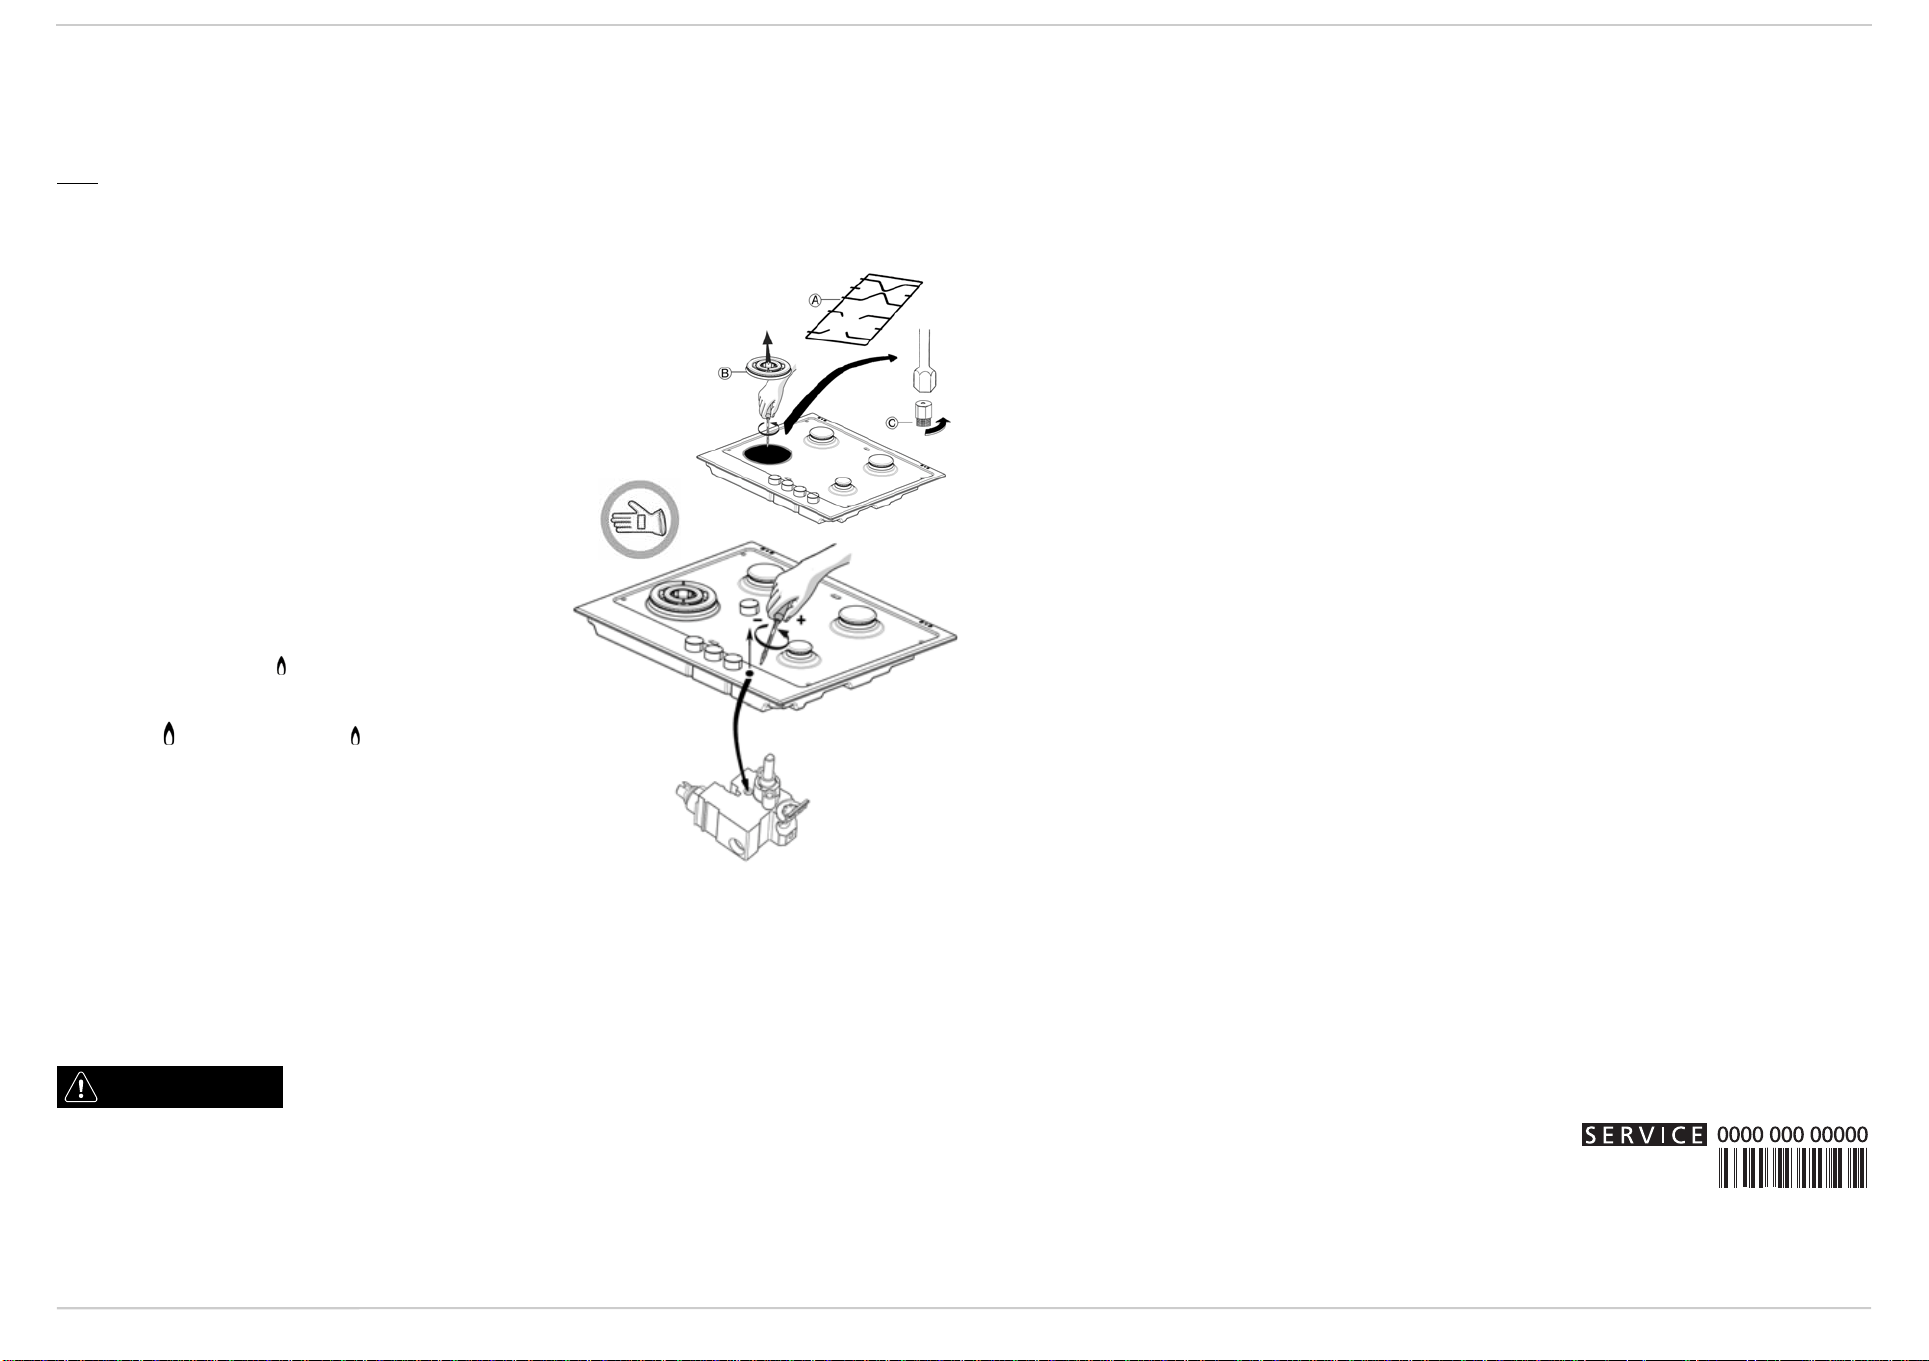
REPLACING THE INJECTORS
(see the injector table in the Product Description Sheet)
• Remove grids (A)
• Extract burners (B)
• Using a socket spanner of the appropriate size unscrew the injector (C)
• Replace it with the injector suitable for the new type of gas.
Before installing the hob, remember to affix the gas calibration plate supplied with the
injectors in such a way that it covers the existing information relating to gas calibration.
ADJUSTING MINIMUM GAS SETTING OF TAPS
To ensure that the minimum setting is correctly adjusted, remove
the knob and proceed as follows:
• tighten the screw to reduce the height of the flame (-)
• loosen the screw to increase the height of the flame (+)
The adjustment must be performed with the tap in minimum gas
setting position (small flame) .
• The primary air of the burners does not need to be adjusted.
• At this stage, light up the burners and turn the knobs from max
position to minimum position to check flame stability.
Upon completion of adjustment, reseal using sealing wax or an
equivalent material.
SERVICE INSTRUCTIONS
Service and maintenance only to be carried out by an authorised
person.
To replace parts such as burners, valve and electric components, the
hotplate must be removed from the bench top by releasing the attachment hooks, loosening the attachment screws of each
burner, unscrewing the hotplate attachments nuts which are visible at the bottom of the surface, removing the hotplate top,
taking care to remove lid taps and screws under them, and finally replacing the defective parts.
Note: If the valves must be replaced, first disassemble the chain of ignition switches.
It is recommended to replace the valve gaskets each time the valve is replaced, thus ensuring a perfect seal between the body
and the gas train.
WARNING: Do not modify this appliance.
CLEANING THE HOB SURFACE
• All the enamelled and glass parts should be cleaned with warm water and neutral solution.
• Stainless steel surfaces may be stained by calcareous water or aggressive detergents if left in contact for too long.
Any food spills (water, sauce, coffee, etc.) should be wiped away before they dry.
• Clean with warm water and neutral detergent, and then dry with a soft cloth or chamois. Remove baked-on dirt with
specific cleaners for stainless steel surfaces.
NOTE: clean stainless steel only with soft cloth or sponge.
• Do not use abrasive or corrosive products, chlorine-based cleaners or pan scourers.
• Do not use steam cleaning appliances.
• Do not use flammable products.
WARNING
Disconnect power before servicing.
• Do not leave acid or alkaline substances, such as vinegar, mustard, salt, sugar or lemon juice on the hob.
• Small scratches on black burners may be present after use, cleaning or as a consequence of the product transportation
and may be due to friction with burner caps. These scratches do not impact product quality or performance. We
recommend to handle and place burner caps without twisting them in order to minimize potential scratches.
• Clean black burners following recommendations indicated in CLEANING THE HOB PARTS section.
If you have a IXELIUM hob, observe the following cleaning recommendations:
• Use a soft cloth (microfibre is best) dampened with water or with everyday glass cleaning detergent.
• Do not use paper kitchen towel, which can leave traces of streaks on the hob.
CLEANING THE HOB PARTS
• Grids, burner caps and burners can be removed to be cleaned.
• Handle black burners carefully. Do not use abrasive sponge neither corrosive detergents when cleaning black burners.
• Clean them by hand with warm water and non-abrasive detergent, removing any food residues and checking that none of
the burner openings is clogged.
•Rinse and dry
• After cleaning black burners, changes in appearance can be noticed in the uncoated bottom surface of the burners or
either, after several cleaning cycles, on the black coated surface. These esthetical changing though do not impact product
quality neither its performances.
• Refit burners and burner caps correctly in the respective housings.
• When replacing the grids, make sure that the panstand area is aligned with the burner.
• Models equipped with electrical ignition plugs and safety device require thorough cleaning of the plug end in order to
ensure correct operation. Check these items frequently, and if necessary, clean them with a damp cloth. Any baked-on
food should be removed with a toothpick or needle.
NOTE: to avoid damaging the electric ignition device, do not use it when the burners are not in their housing.
TROUBLESHOOTING GUIDE
The hob may not work or work incorrectly. Before calling the After-Sales Service, refer to the Troubleshooting Guide to
determine the problem.
1. The burner fails to ignite or the flame is not even. Check that:
• The gas or electrical supplies are not shut off and especially that the gas supply tap is open.
• The gas cylinder (liquid gas) is not empty.
• The burner openings are not clogged.
• The plug end is not dirty.
• All the burner parts have been positioned correctly.
• There are no draughts near the hob.
2. The burner does not stay lit. Check that:
• When lighting the burner, the knob has been pressed for enough time to activate the protection device.
• The burner openings are not clogged near the thermocouple.
• The end of the thermocouple is not dirty.
• The minimum gas setting is correct (see relevant paragraph).
3. The containers are not stable. Check that:
• The bottom of the container is perfectly flat
• The container is centered on the burner.
• The grids have not been exchanged or positioned incorrectly.
If after the above checks the fault still occurs, get in touch with the nearest After Sales Service.
AFTER-SALES SERVICE
Before calling the After-Sales Service, make sure you can give the following information:
- type of fault or problem;
- exact model (written on the Product Description Sheet and Warranty);
- service number that follows the word SERVICE on the rating plate under the hob and on the Warranty;
- your complete address and phone number.
If any repairs are required, please contact an authorised After-Sales Service, as indicated in the warranty.
Note: Failure to comply with these instructions may compromise the safety and quality of the product.
Customer Service: 1300 363 344
Service Call Booking: 1300 361 166
Manufacturer:
Whirlpool Europe S.r.l.
Viale G. Borghi, 27
21025 Comerio (VA)
ITALY