
Read this owner’s manual thoroughly before operating the appliance and keep
it handy for reference at all times.
OWNER'S MANUAL
EN ENGLISH
GK-B405PL
www.lg.com
Copyright © 2019 LG Electronics Inc. All Rights Reserved.
REFRIGERATOR
FREEZER
MFL67704811
Rev.01_030519

TABLE OF CONTENTS
This manual may contain images or
content different from the model you
purchased.
This manual is subject to revision by the
manufacturer.
SAFETY INSTRUCTIONS ..................................................................3
IMPORTANT SAFETY INSTRUCTIONS ................................................................3
PRODUCT FEATURES ..................................................................... 10
INSTALLATION .................................................................................11
Compartments ......................................................................................................11
Notes for Movement and Transport ......................................................................12
Notes for Installation .............................................................................................12
Dimensions and Clearances ................................................................................13
Ambient Temperature ...........................................................................................13
Leveling ................................................................................................................14
OPERATION .....................................................................................15
Before use ............................................................................................................15
Parts and Functions (Applicable to some models only) ........................................16
Control Panel (Applicable to some models only) ..................................................18
Notes for Operation ..............................................................................................21
Storing Food .........................................................................................................22
Recycling the Fresh Air Filter of the top compartments ........................................25
Adjusting the Refrigerator Shelves .......................................................................26
CustomChill Drawer .............................................................................................27
SMART FUNCTIONS ........................................................................ 28
Using LG SmartThinQ Application ........................................................................28
Using Smart Diagnosis™ .....................................................................................30
MAINTENANCE ................................................................................31
Cleaning ...............................................................................................................31
TROUBLESHOOTING ......................................................................33
3
EN
SAFETY INSTRUCTIONS
The following safety guidelines are intended to prevent
unforeseen risks or damage from unsafe or incorrect operation
of the appliance.
The guidelines are separated into ‘WARNING’ and ‘CAUTION’ as
described below.
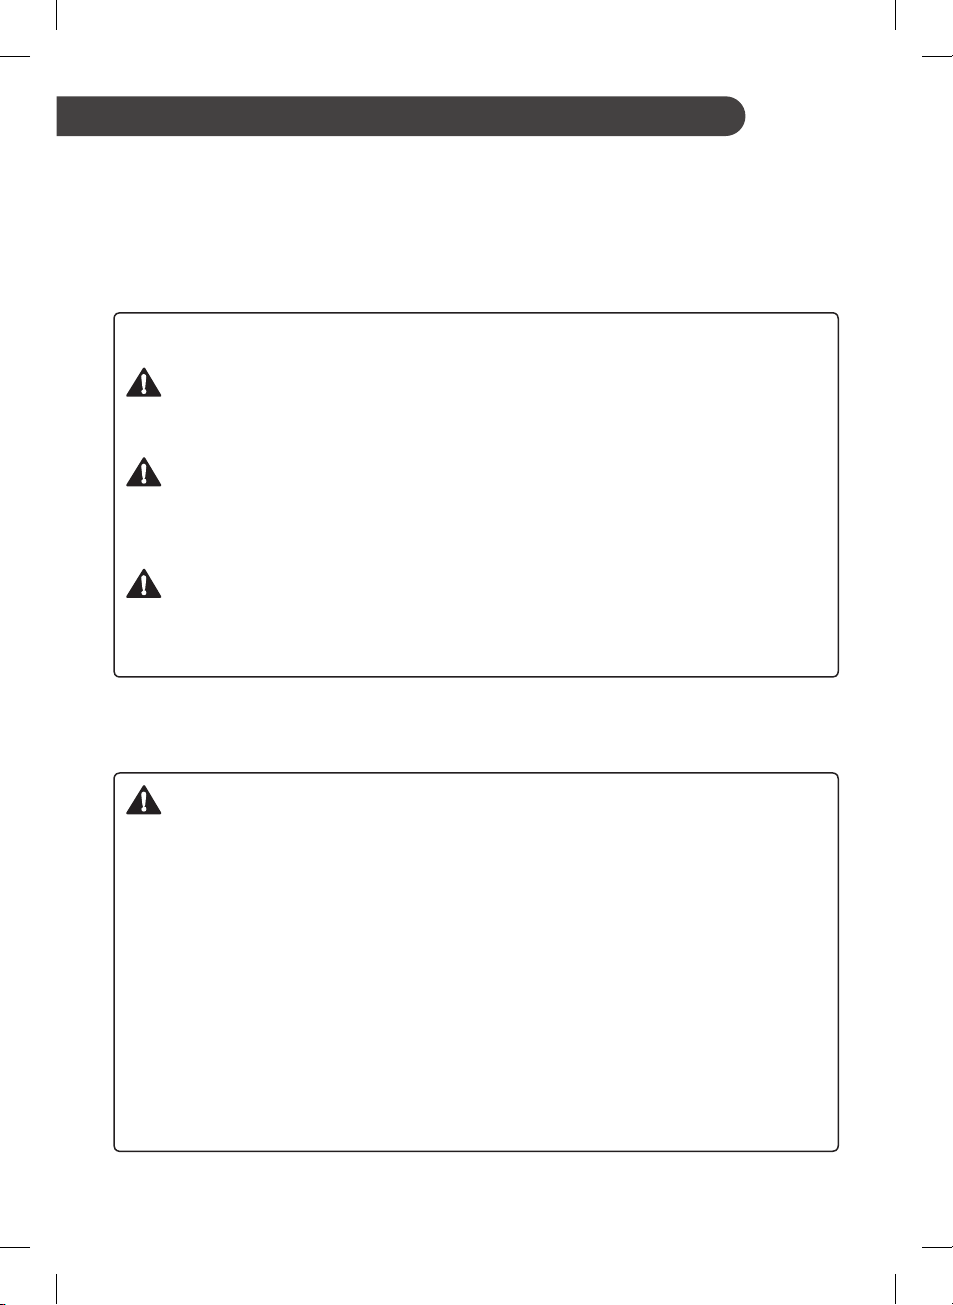
This symbol is displayed to indicate matters and
operations that can cause risk. Read the part with this
symbol carefully and follow the instructions in order to
avoid risk.
WARNING
This indicates that the failure to follow the instructions can
cause serious injury or death.
CAUTION
This indicates that the failure to follow the instructions can
cause the minor injury or damage to the product.
IMPORTANT SAFETY INSTRUCTIONS
WARNING
To reduce the risk of explosion, re, death, electric shock,
injury or scalding to persons when using this product, follow
basic precautions, including the following:
Technical Safety
•
This appliance is not intended for use by persons (including
children) with reduced physical, sensory or mental capabilities, or
lack of experience and knowledge, unless they have been given
supervision or instruction concerning use of the appliance by a
person responsible for their safety. Children should be supervised
to ensure that they do not play with the appliance.
4
EN
4
•
This appliance should only be transported by two or more people
holding the appliance securely.
•
If the power cord is damaged or the hole of the socket outlet is
loose, do not use the power cord and contact an authorized service
centre.
•
Do not modify or extend the power cable.
•
Ensure that the socket outlet is properly grounded, and that the
earth pin on the power cord is not damaged or removed from the
power plug. For more details on grounding, inquire at an LG
Electronics customer information centre.
•
This appliance is equipped with a power cord having an equipment-
grounding conductor and a grounding power plug. The power plug
must be plugged into an appropriate socket outlet that is installed
and grounded in accordance with all local codes and ordinances.
•
Do not plug the appliance into a multi socket adapter which does
not have a power cable (mounted).
•
The appliance should be connected to a dedicated power line
which is separately fused.
•
Do not use a multi outlet power board when connecting this
appliance. it should be plugged into a single outlet wall socket.
•
Install the appliance in a place where is easy to unplug the power
plug of the appliance.
•
Be careful not to point the power plug up or let the appliance lean
against the power plug.
•
Install the appliance on a rm and level oor.
•
Do not install the appliance in a damp and dusty place. Do not
install or store the appliance in any outdoor area, or any area that
is subject to weathering conditions such as direct sunlight, wind,
rain, or temperatures below freezing.
•
Do not place the appliance in direct sunlight or expose it to the heat
from heating appliances such as stoves or heaters.
•
Be careful not to expose the rear of the appliance when installing.

5
EN
5
•
Be careful not to let the appliance door fall during assembly or
disassembly.
•
Be careful not to pinch, crush, or damage the power cable during
assembly or disassembly of the appliance door.
•
Do not connect a plug adapter or other accessories to the power
plug.
•
Do not damage the refrigerant circuit.
•
Do not use mechanical devices or other means to accelerate the
defrosting process.
•
When discarding the appliance, remove the door gasket while
leaving the shelves and baskets in place and keep children away
from the appliance.
•
Dispose of all packaging materials (such as plastic bags and
styrofoam) away from children. The packaging materials can cause
suffocation.
•
Keep ventilation openings, in the appliance enclosure or in the
built-in structure, clear of obstruction.
•
Do not use electrical appliances inside the refrigerator.
•
The refrigerant and insulation blowing gas used in the appliance
require special disposal procedures. Consult with service agent or
a similarly qualied person before disposing of them.
•
This appliance is intended to be used in household and similar
applications only. It should not be used for commercial, or catering
purposes, or in any mobile application such as a caravan or boat.
•
Do not store explosive substances such as aerosol cans with a
ammable propellant in this appliance.
•
Refrigerant leaking out of the pipes could ignite or cause an
explosion.
•
The amount of refrigerant in your particular appliance is shown on
the identication plate inside the appliance.
•
Never start up an appliance showing any signs of damage. If in
doubt, consult your dealer.
6
EN
6
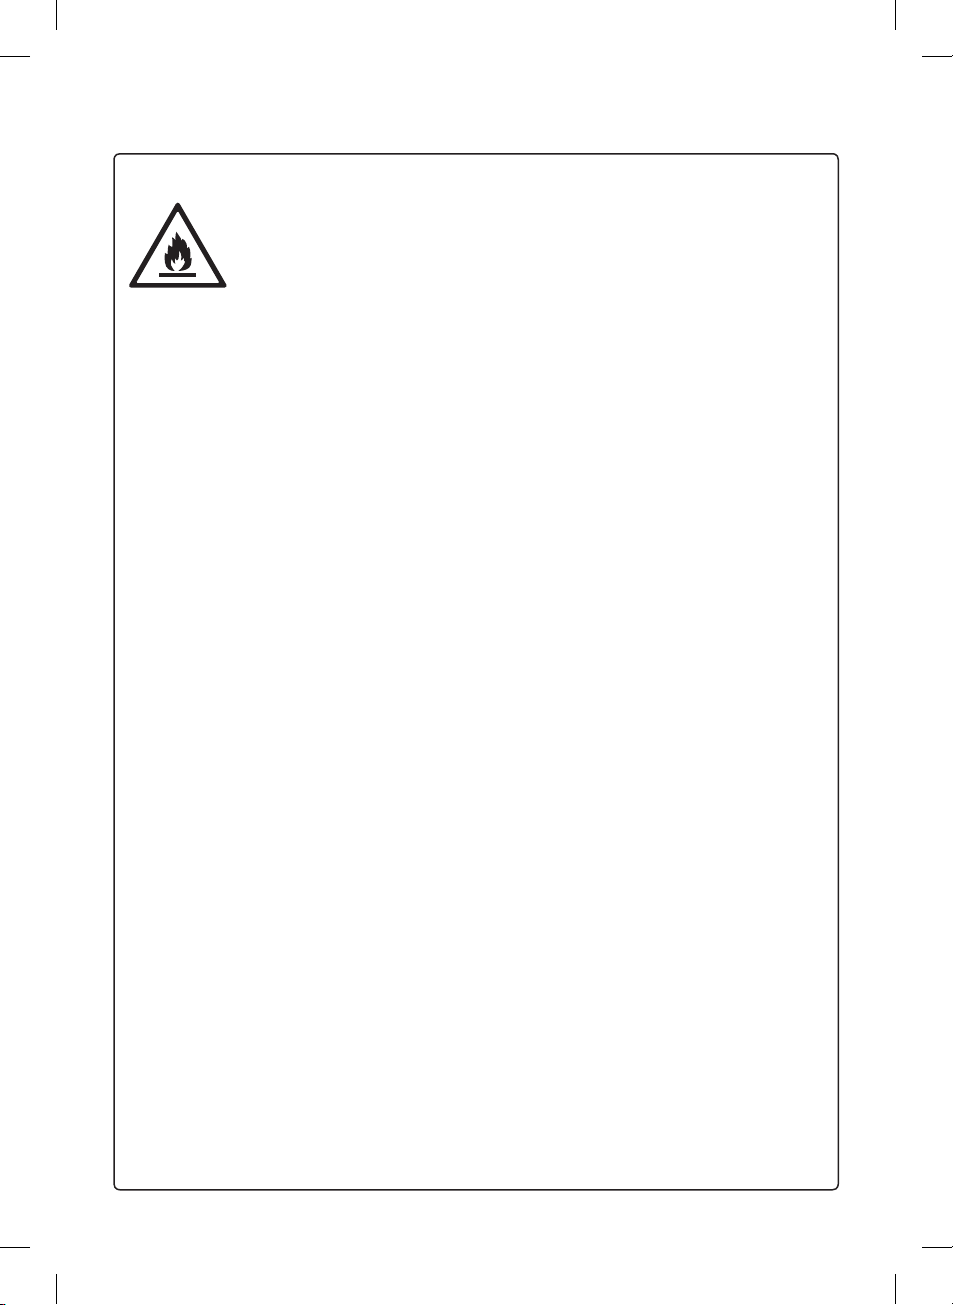
Risk of Fire and Flammable Materials
This symbol alerts you to ammable materials that can
ignite and cause a re if you do not take care.
•
This appliance contains a small amount of isobutane refrigerant
(R600a), but it is also combustible. When transporting and installing
the appliance, care should be taken to ensure that no parts of the
refrigerating circuit are damaged.
•
If a leak is detected, avoid any naked ames or potential sources of
ignition and air the room in which the appliance is standing for
several minutes. In order to avoid the creation of a ammable gas
air mixture if a leak in the refrigerating circuit occurs, the size of the
room in which the appliance is used should correspond to the
amount of refrigerant used. The room must be 1 m² in size for every
8 g of R600a refrigerant inside the appliance.
•
When positioning the appliance, ensure the supply cord is not
trapped or damaged.
•
Do not locate multiple portable socket-outlets or portable power
supplies at the rear of the appliance.
Children in the Household
•
If the appliance is equipped with a lock (some models only), keep
the key out of reach of children.
Operation
•
Do not use the appliance for any purpose (storage of medical or
experimental materials or medication that requires strict
temperature control) other than any domestic household food
storage use.
•
Unplug the power plug during a severe thunderstorm or lightening
or when not in use for a long period of time.
•
Do not touch the power plug or the appliance controls with wet
hands.

7
EN
7
•
Do not bend the power cable excessively or place a heavy object
on it.
•
If water penetrates electrical parts of the appliance, disconnect
power plug and contact an LG Electronics customer information
centre.
•
Do not place hands or metallic objects inside the area emitting the
cold air, cover or heat releasing grille on the back.
•
Do not apply excessive force or impact to the back cover of the
appliance.
•
Do not put animals, such as pets into the appliance.
•
Be careful of nearby children when you open or close the appliance
door. The door may bump the child and cause injury.
•
Avoid the danger of children getting trapped inside the appliance. A
child trapped inside the appliance can cause suffocation.
•
Do not place heavy or fragile objects, containers lled with liquid,
combustible substances, ammable objects (such candles, lamps,
etc.), or heating devices (such as stoves, heaters, etc.) on the
appliance.
•
If there is a gas leakage (isobutane, propane, natural gas, etc.), do
not touch the appliance or power plug and ventilate the area
immediately. This appliance uses a refrigerant gas (isobutane,
R600a). Although it uses a small amount of the gas, it is still
combustible gas. Gas leakage during appliance transport, installation
or operation can cause re, explosion or injury if sparks are caused.
•
Do not use or store ammable or combustible substances (ether,
benzene, alcohol, chemical, LPG, combustible spray, insecticide,
air freshener, cosmetics, etc.) near the appliance.
•
Immediately unplug the power plug and contact an LG Electronics
customer information centre if you detect a strange sound, odour,
or smoke coming from the appliance.
•
Fill with potable water only into icemaker or dispenser water tank.
•
Do not place any electronic appliance (such as heater and mobile
phone) inside the appliance.
8
EN
8
Maintenance
•
Disconnect the power cord before cleaning the appliance or
replacing the inside lamp (where tted).
•
Securely plug the power plug in the socket outlet after completely
removing any moisture and dust.
•
Never unplug the appliance by pulling on the power cable. Always
grip the power plug rmly and pull straight out from the socket
outlet.
•
Do not spray water or inammable substances (toothpaste, alcohol,
thinner, benzene, ammable liquid, abrasive, etc.) over the interior
or exterior of the appliance to clean it.
•
Do not clean the appliance with brushes, cloths or sponges with
rough surfaces or which are made of metallic material.
•
Only qualied service personnel from LG Electronics service centre
should disassemble, repair, or modify the appliance. Contact an LG
Electronics customer information centre if you move and install the
appliance in a different location.
•
Do not use a hair drier to dry the inside of the appliance or place a
candle inside to remove the odours.
CAUTION
To reduce the risk of minor injury to persons, malfunction, or
damage to the product or property when using this product,
follow basic precautions, including the following:
Installation
•
Do not tilt the appliance to pull or push it when transporting.
•
Make sure not to get a body part such as a hand or foot stuck while
moving the appliance.

9
EN
9
Operation
•
Do not touch frozen food or the metal parts in the freezer
compartment with wet or damp hands. It may cause frostbite.
•
Do not place glass containers, bottles or cans (especially those
containing carbonated drinks) in the freezer compartment, shelves
or ice bin that will be exposed to temperatures below freezing.
•
The tempered glass on the front side of the appliance door or the
shelves can be damaged by an impact. If it is broken, do not touch
it with hands.
•
Do not hang from the appliance doors, storage room, shelf or climb
up into it.
•
Do not store an excessive amount of water bottles or containers for
side dishes on the door baskets.
•
Prevent animals from nibbling on the power cable or water hose.
•
Do not open or close the appliance door with excessive force.
•
If the hinge of the appliance door is damaged or operates
improperly, stop using the appliance and contact an authorized
service centre.
•
Do not clean glass shelves or covers with warm water when they are
cold. They may break if exposed to sudden temperature changes.
•
Never eat frozen foods immediately after they have been taken out
in the freezer compartment.
•
Do not use a thin crystal cup or chinaware when dispensing.
•
Make sure not to get a hand or foot stuck upon opening or closing
the appliance door or door in door.
Maintenance
•
Do not insert the shelves upside down. The shelves may fall.
•
To remove frost from the appliance, contact an LG Electronics
customer information centre.
•
Dispose of the ice inside the ice bin in the freezer compartment
during an extended power outage.
10
EN
PRODUCT FEATURES
•
Depending on the model, some of the following functions may not be available.
DOOR ALARM
The Door Alarm function is designed to prevent refrigerator malfunctioning that
could occur if a refrigerator door or freezer door remains open. If a refrigerator
door or freezer door is left open for more than 60 seconds, a warning alarm
sounds in 30 second intervals until it is closed.
AUTO CLOSING HINGE
The refrigerator doors close automatically with a slight push. (The door only
closes automatically when it is open at an angle less than 30°.)
11
EN
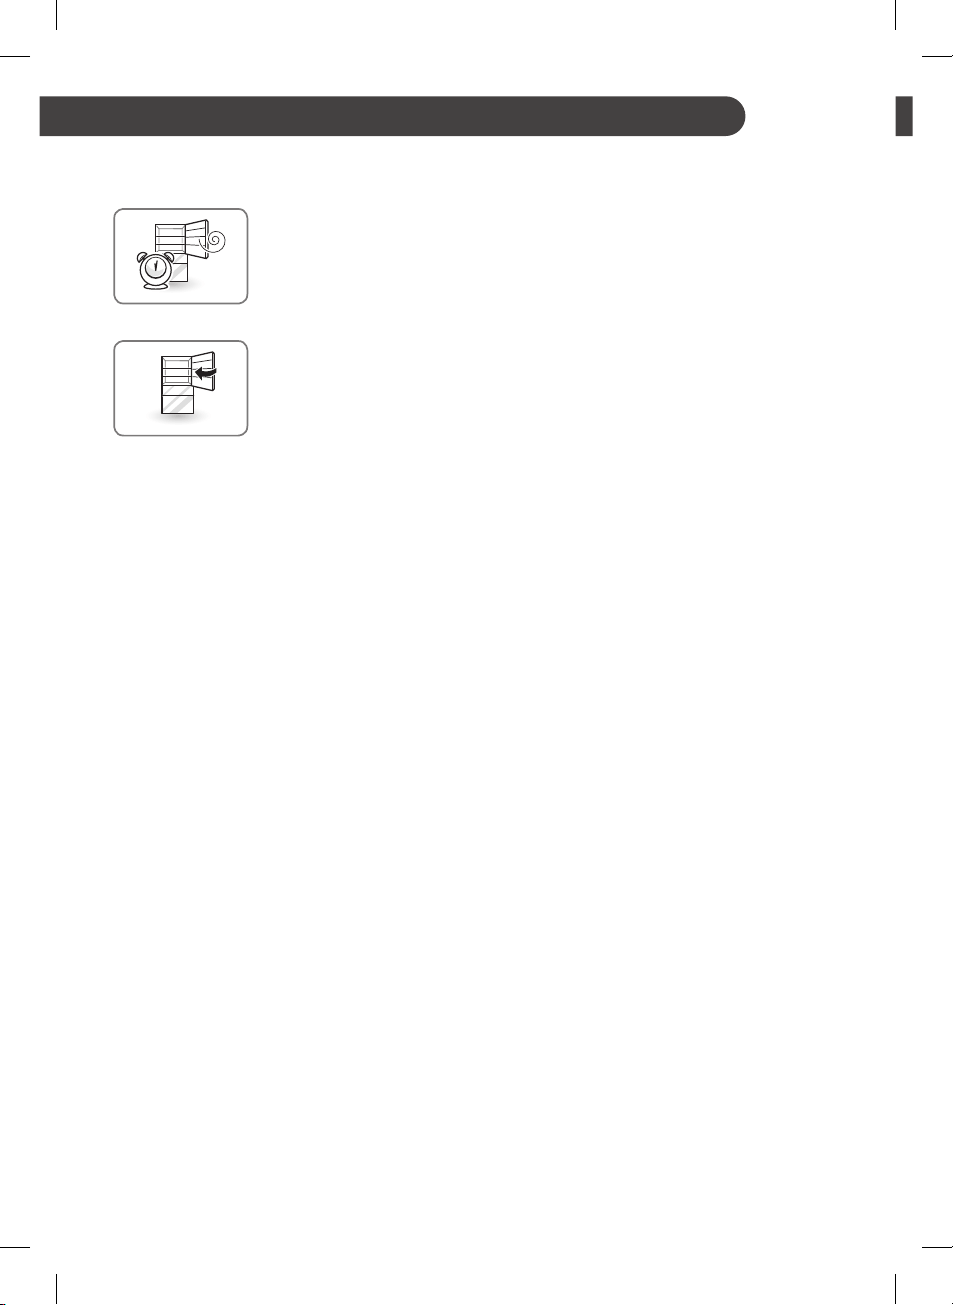
Compartments
Owner’s Manual
Kimchi storage contaner 1
(AKC67523415, 11.7L)
Kimchi storage contaner 2
(AKC67523721, 11.3L)
Kimchi storage contaner 3
(AKC67523722, 17.1L)
•
The appearance or components of the appliance may differ from model to model.
INSTALLATION

12
EN
Notes for Movement and
Transport
•
Remove all food from inside the appliance.
Then, transport the appliance only after xing
fragile parts such as shelves and the door
handle with tape. Failure to do so may cause
appliance damage.
•
Pull the power plug out, insert and x it into the
power plug hook at the rear or on top of the
appliance. Failure to do so may cause damage
to the power plug or oor scratch.
•
When transporting the appliance, more than
two people should transport the appliance
carefully. Dropping the appliance, which is
extremely heavy, may cause personal injury or
appliance failure.
•
When transporting the appliance over a long
distance, keep the appliance upright. The
appliance may fall over, causing malfunctions.
Never transport the appliance laying down as it
can cause a refrigerant circulation malfunction
when it is turned back on again.
Notes for Installation
•
Install the appliance on a solid and at area.
−
If the appliance is installed on an uneven
oor, it can cause vibration and noise causing
the appliance to fall resulting in injury. It could
also cause the doors not to close correctly
and introduce moisture inside the unit during
operation.
−
If the appliance front or rear is not level,
adjust the front feet so that it can be
corrected. Severe cases may need the oor
to be packed out with strips of thin timber.
•
Avoid placing the unit near heat sources, direct
sunlight or moisture.
•
Connect the power supply cord (or plug) to the
outlet. Don’t double up with other appliances
on the same outlet.
•
After connecting the power supply cord (or
plug) to the outlet, Wait two or three hours
before you put food into the appliance. If you
add food before the appliance has cooled
completely, your food may spoil.
•
After installing the appliance, connect the
power plug into a socket outlet. Before moving
and discarding the appliance, disconnect the
plug from the socket outlet.
13
EN
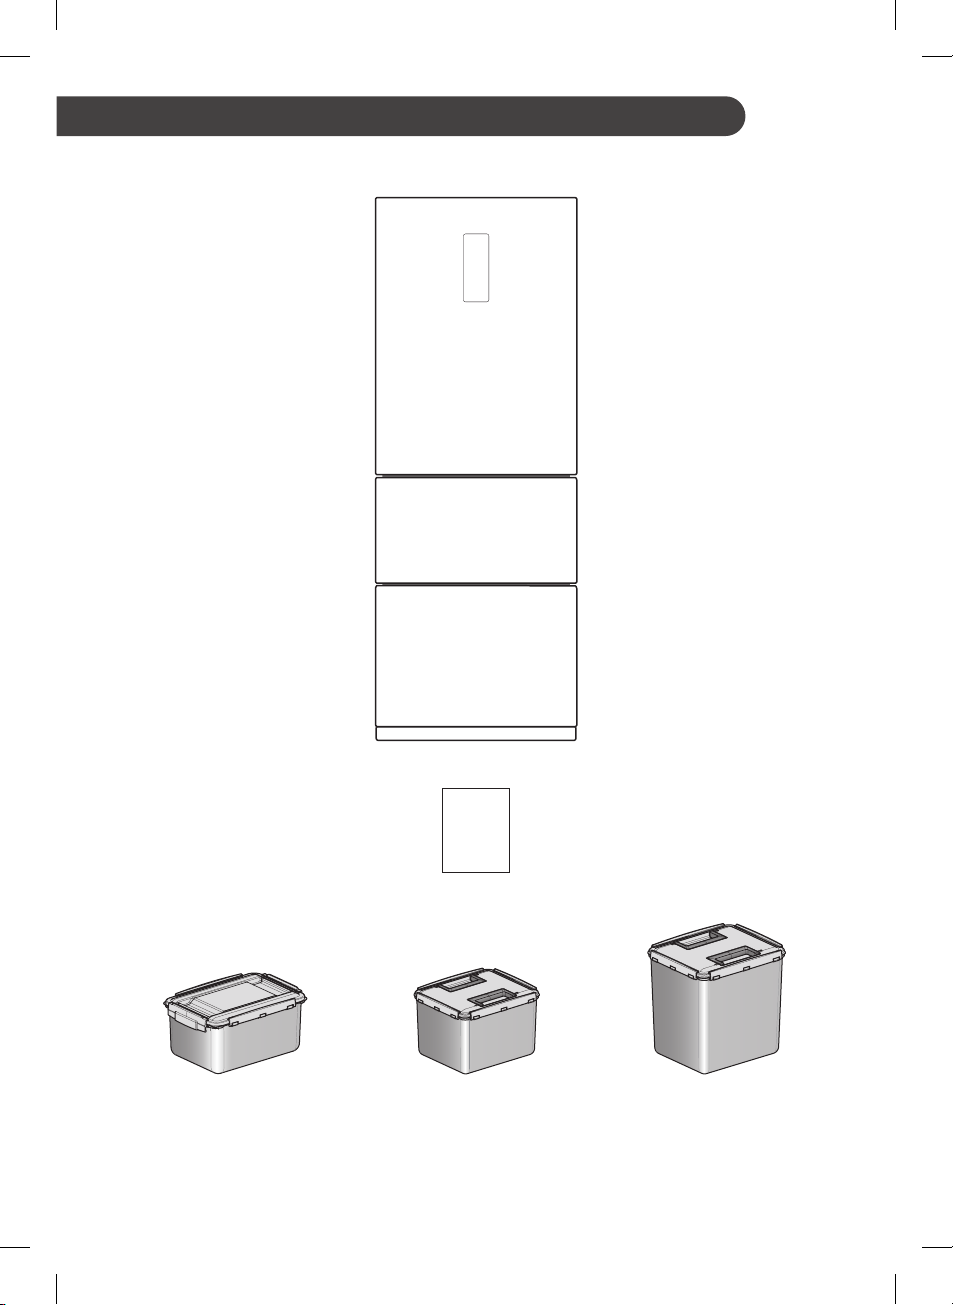
Dimensions and Clearances
•
Too small of a distance from adjacent items
may result in degradation of freezing capability
and increased electricity costs. Allow over
50mm clearance from each adjacent wall when
installing the appliance.
A
C
E
G
F
B
D
- Size
A 666 mm
B 1802 mm
C 737 mm
D 27 mm
E 710 mm
F 1292 mm
G 920 mm
NOTE
•
You can determine what type of appliance it is
by looking at the label inside the fridge
compartment.
Ambient Temperature
•
The appliance is designed to operate within a
limited range of ambient temperatures,
depending on the climate zone. Do not use the
appliance at a temperature exceeding the limit.
•
The internal temperatures could be affected by
the location of the appliance, the ambient
temperature, the frequency of door opening
and so on.
•
The climate class can be found on the rating
label.
Climate Class Ambient Temperature
Range °C
SN (Extended
Temperate)
+10 - +32
N (Temperate) +16 - +32
ST (Subtropical) +16 - +38
T (Tropical) +16 - +43 / +10 - +43*
*Australia, India, Kenya
NOTE
•
The appliances rated from SN to T are intended
to be used at an ambient temperature between
10 °C and 43 °C.
14
EN
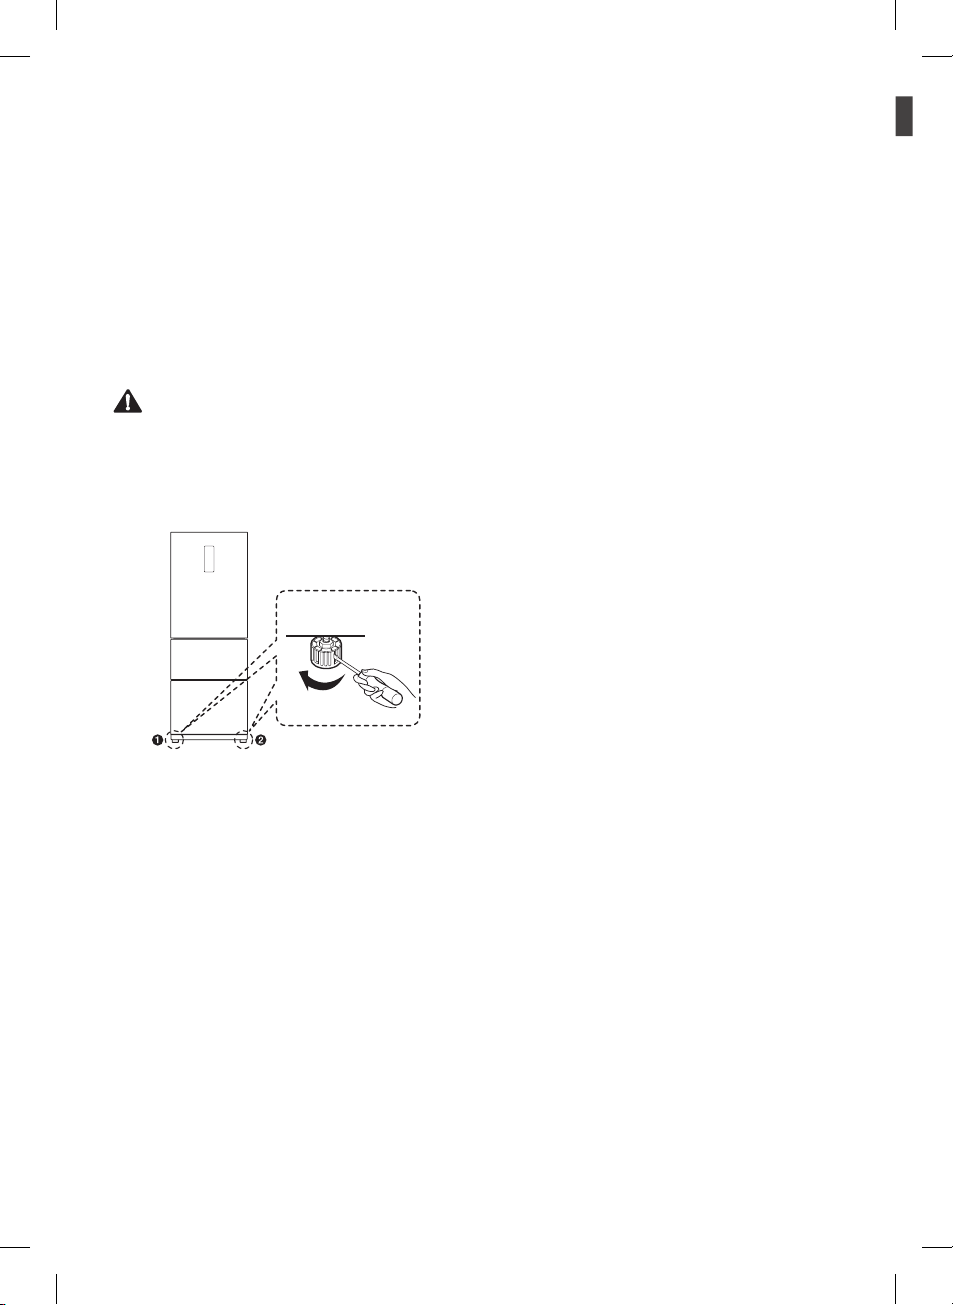
Leveling
•
Aligning the doors may not be possible if the
oor is not level, or is of weak or poor
construction.
The refrigerator is heavy and should be
installed on a rigid and solid surface. Wood
ooring may cause leveling difculties if it
exes excessively.
•
If the oor is uneven, level the refrigerator to
avoid noise and vibration.
CAUTION
•
Adjust the front leveling feet so they are lower
than the wheels. The weight of the refrigerator
must rest on the feet, not the wheels, to avoid
risk of movement of tipover.
Using
Screwdriver
To level the refrigerator, use a screwdriver to turn
the leveling feet until they are in firm contact with
the floor. The front of the refrigerator can be
slightly higher than the rear to make shutting the
doors easier.
15
EN
OPERATION
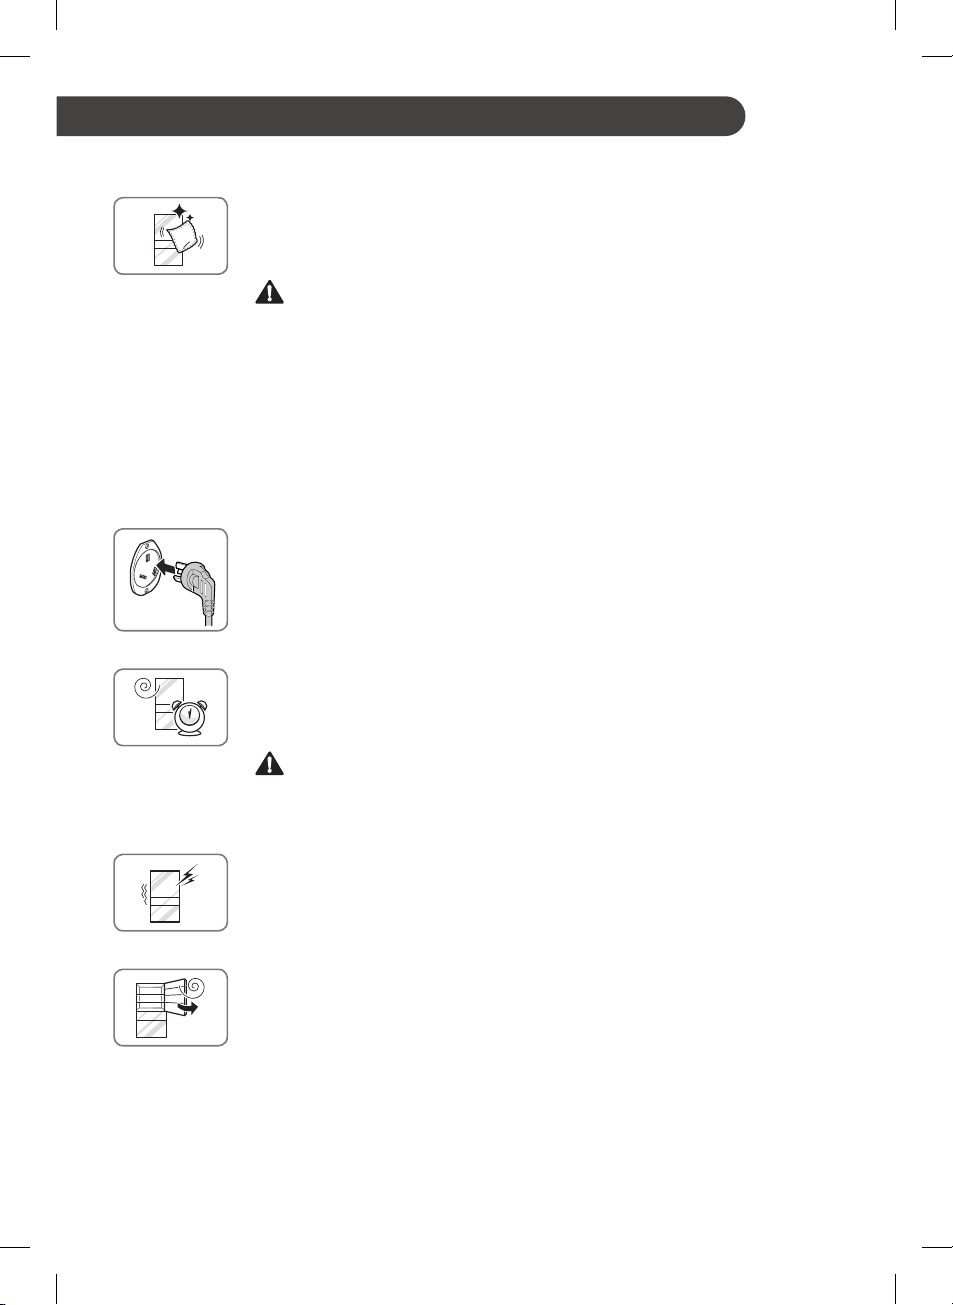
Before use
Clean the refrigerator.
Clean your refrigerator thoroughly and wipe off all dust that may have accumulated
during shipping.
CAUTION
•
Do not scratch the refrigerator with a sharp object or use a detergent that
contains alcohol, a ammable liquid or an abrasive when removing any tape or
adhesive from the refrigerator,.
•
Do not peel off the model or serial number label or the technical information on
the rear surface of the refrigerator.
NOTE
•
Remove adhesive residue by wiping it off with your thumb or dishwashing
detergent.
Connect the power supply.
Check if the power supply is connected before use.
Read the “Turning On The Power” section. (Your plug type might be different from
the picture.)
Wait for the refrigerator to cool.
Allow your refrigerator to run for at least three to four hours before putting food in
it. Check the flow of cold air in the freezer compartment to ensure proper cooling.
CAUTION
•
Putting food in the refrigerator before it has cooled could cause the food to spoil,
or a bad odor could remain inside the refrigerator.
The refrigerator makes a loud noise after initial operation.
This is normal. The loudness will decrease as the temperature lowers.
Before Plugging in, open the refrigerator doors to ventilate the
interior.
The inside of the refrigerator may smell like plastic at first. Remove any adhesive
tape from inside the refrigerator and open the refrigerator doors for ventilation until
any odors have subsided.
16
EN
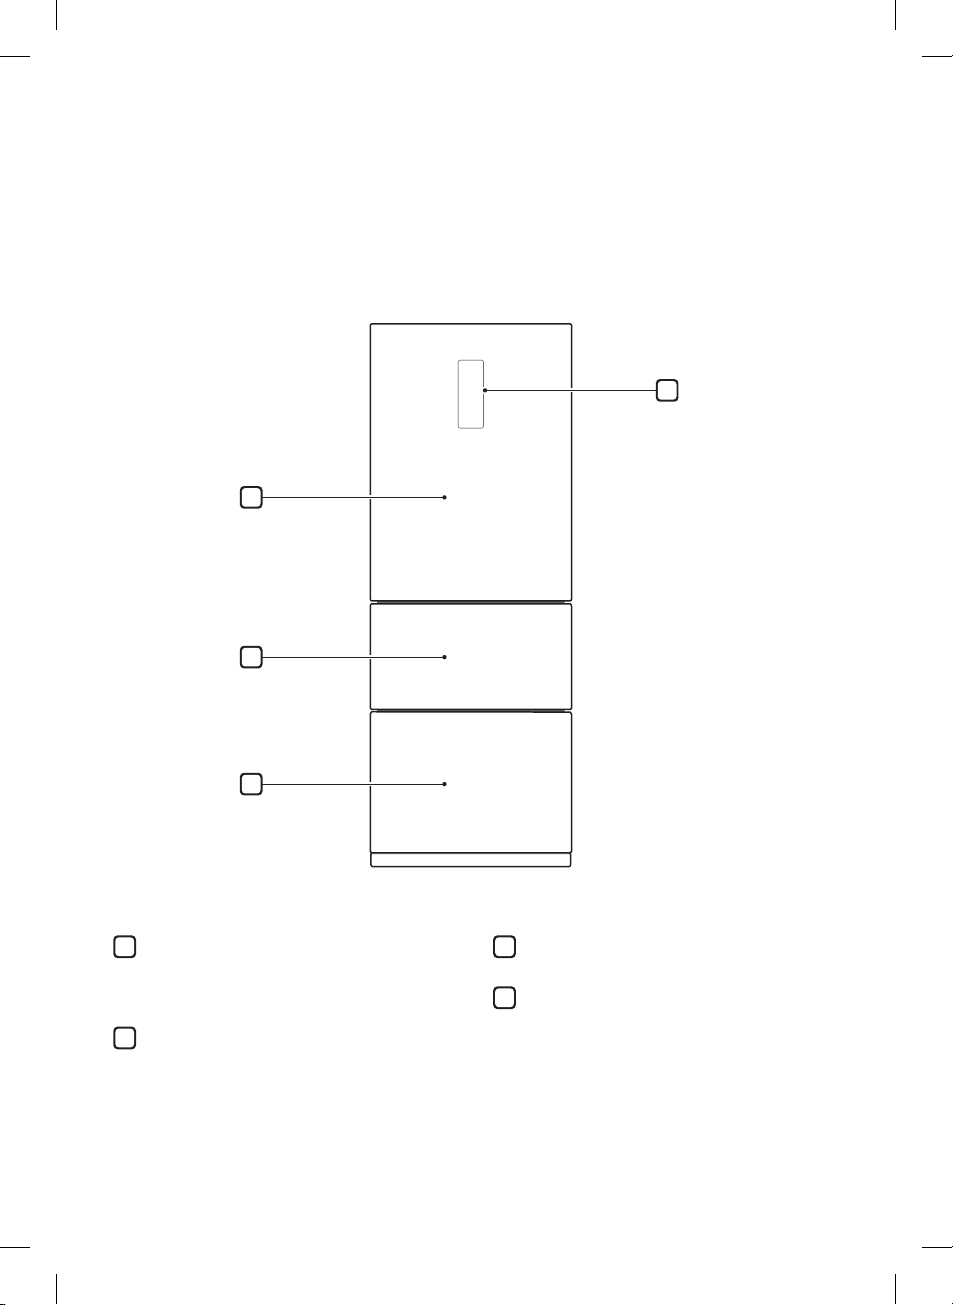
Use this page to become more familiar with the parts and features of your refrigerator.
Page references are included for your convenience.
*The appearance and specifications of the actual product may differ depending on the model.
Parts and Functions (Applicable to some models only)
1
LED Display
Displays the refrigerator and freezer’s target
temperature and CustomChill settings.
2
Top
3
Middle
4
Bottom
1
2
3
4
17
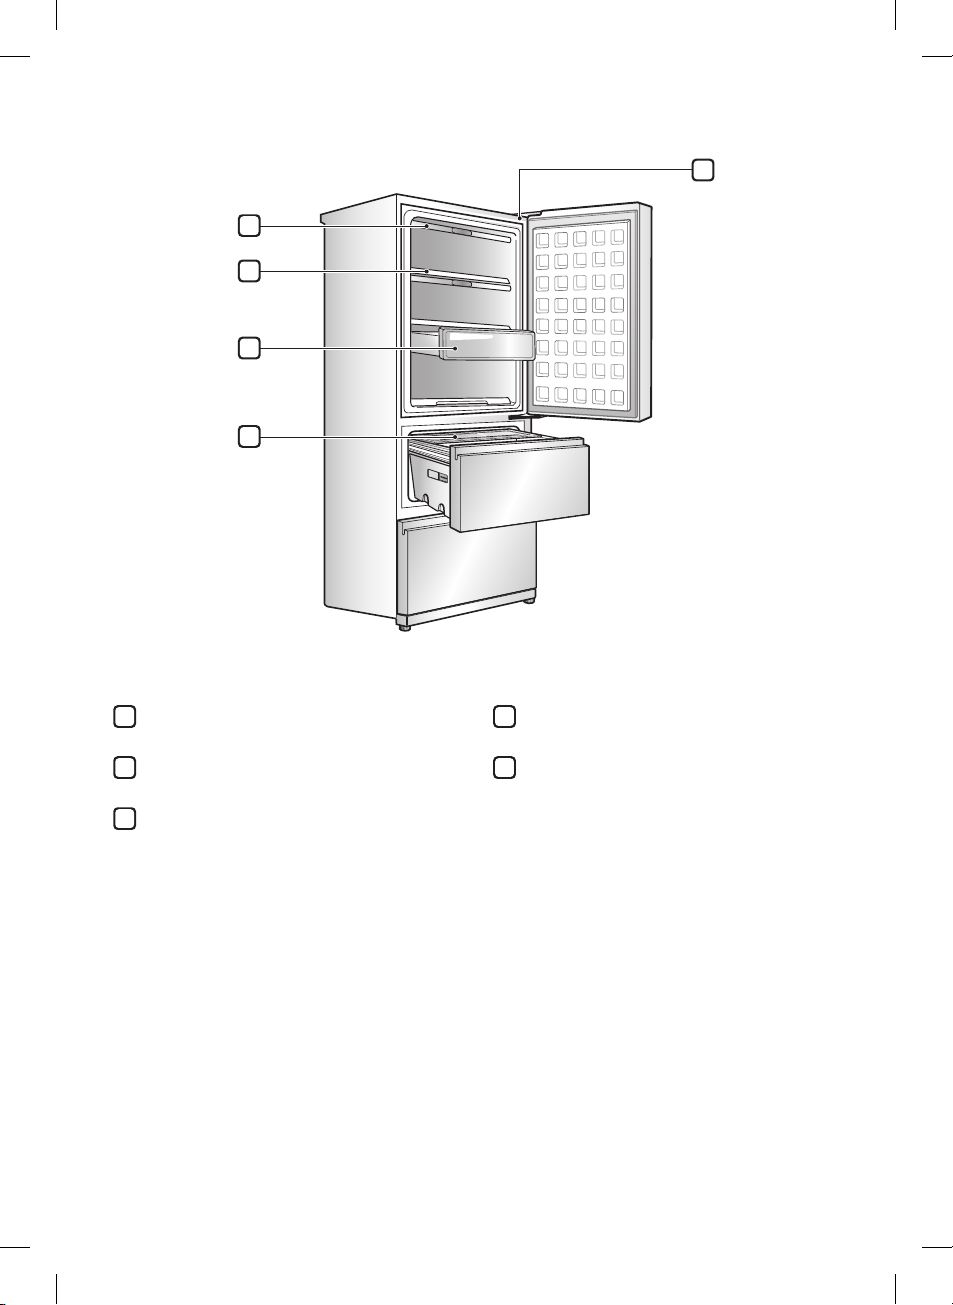
EN
1
Flap-up Cover
2
Shelf
3
Shelf Basket
4
Multi Basket
5
Smart Diagnosis
1
2
3
4
5
18
EN
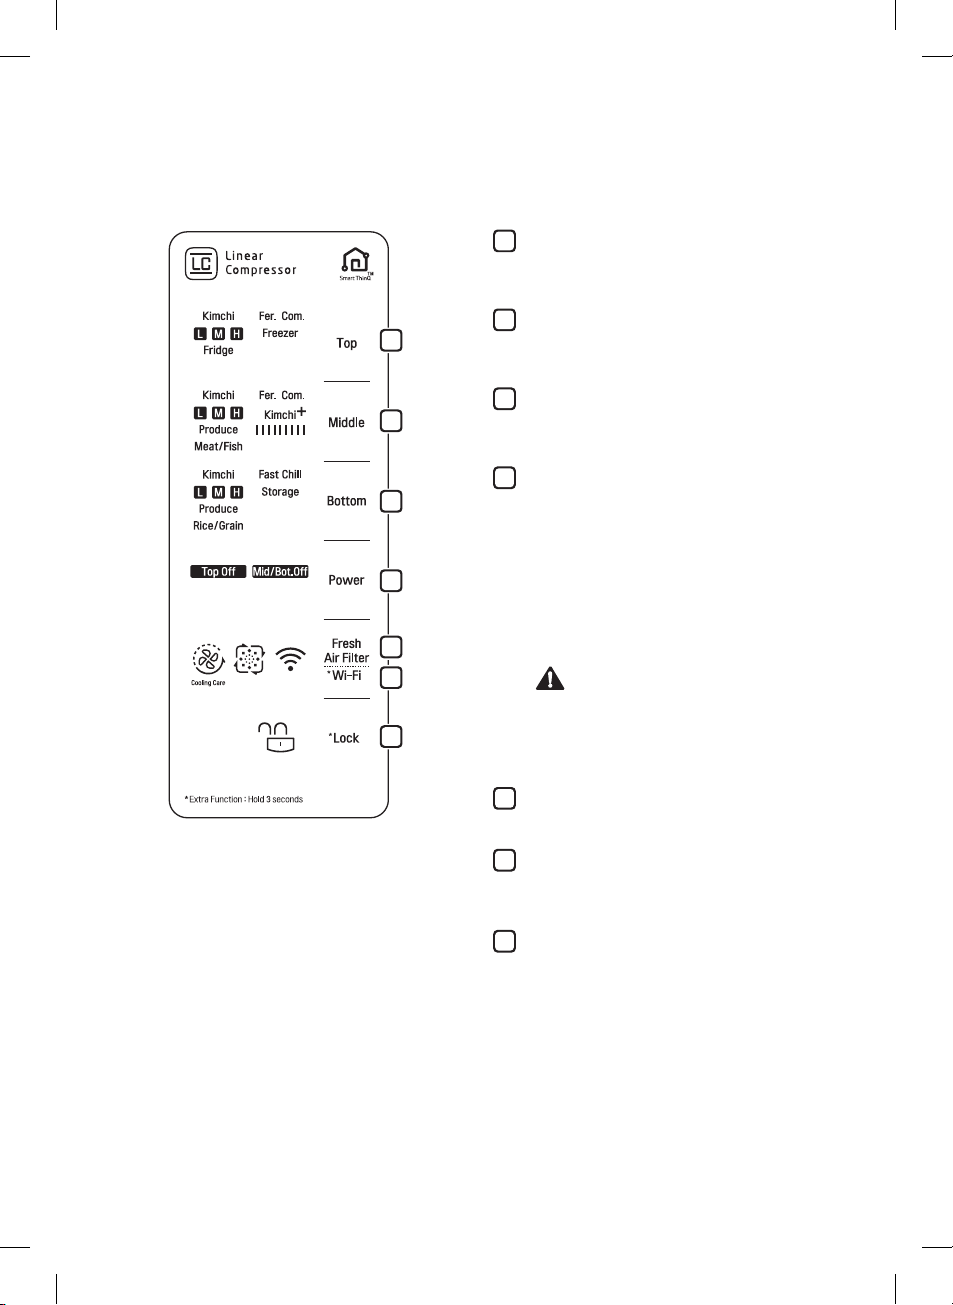
Control Panel (Applicable to some models only)
Control Panel Features
1
2
3
4
5
6
7
1
Top
•
This sets Kimchi, Fridge, Fer. Com. and
Freezer.
2
Middle
•
This sets Kimchi, Produce, Meat/Fish, Fer.
Com. And Kimchi+.
3
Bottom
•
This sets Kimchi, Produce, Rice/Grain,
Fast Chill And Storage.
4
Power
•
This sets power off setting button. You can
save electricity by turning off the unused
refrigerator compartment(Top, Middle/
Bottom)
If you press the power off button, The Top
turns off → The Middle / Bottom turns off
→ The Top / Middle / Bottom turns off →
The Top / Middle / Bottom turns on.
CAUTION
Please note that the Middle / Bottom are
turned off at the same time. Any food left in
a turned-off compartment may be
damaged.
5
Fresh Air Filter
•
This sets the Fresh Air Filter.
6
Wi-Fi
•
This sets the refrigerator to connect to
your home’s Wi-Fi network.
7
Lock
•
This locks the buttons on the control panel.
NOTE
•
Temperature Information
Top Compartment
Low Freezer – Kimchi H – Kimchi M – Kimchi L - Fridge High
Middle Compartment
Low Meat/Fish – Kimchi H – Kimchi M – Kimchi L - Produce High
Bottom Compartment
Low Kimchi H – Kimchi M – Kimchi L - Produce – Rice/Grain High

19
EN
Notes for Use of the Control Panel
•
The control panel will turn on in any of the
following cases.
−
When the power is turned on
−
When a button is pressed
−
When the appliance door is opened
•
The control panel will turn off automatically for
energy saving in any of the following cases.
−
When one minute has passed after turning
on the power
−
When no button operation is carried out for
60 seconds after a desired button is pressed
−
When 60 seconds has passed after the
appliance door is opened and closed
•
When the power-saving function is operational,
the control panel window will turn off except the
Lock lamp.
Setting Functions
•
Select the button for your desired function.
•
Each time you press the button, the following
functions will show up sequentially:
[Top]
Kimchi : M → H → L
Fridge : M → H → L → Freezer
Fer. Com.
[Middle]
Kimchi : M → H → L
Produce : M → H → L
Meat/Fish
Kimchi+
Fer. Com.
[Bottom]
Kimchi : M → H → L
Vege/Fruit : M → H → L
Rice/Grain
Storage
Fast Chill
Fer. Com(Fermentation)
•
This function detects the external temperature
and then ripens Kimchi.
•
Select another function if you wish to cancel
“Fer.”.
•
If you set the Ripen function, “Fer.” will be
turned on.
•
Once Ripen has been completed, “Fer. Com.”
will be turned on and Kimchi M will be set.
•
If you press the Lock button when Ripen has
been completed, “Fer. Com.” will be turned off.
NOTE
•
The completion time is subject to change
depending on seasonality, surrounding
temperature and Kimchi temperature.
Fridge
•
Stores refrigerated foods.
NOTE
•
If you store Kimchi after setting the Fridge, the
Kimchi will get sour in taste fast.
Freezer
•
Stores frozen foods.
NOTE
•
If you store Kimchi after setting the Freezer,
the Kimchi will get frozen.
Produce
•
You can store vegetables and fruits and keep
them fresh for a long time.

20
EN
Meat/Fish
•
You can store meat and sh and keep them
fresh.
NOTE
•
If you store Kimchi after setting Meat/Fish, the
Kimchi will get frozen.
Kimchi+
•
Implement a temperature at which Leuconostoc
grows well and then cool rapidly so that Kimchi
can be stored preserving good taste for a long
time.
•
The gauge displays the degree of ripeness.
Once the gauge gets lled up, help yourself to
Kimchi. (About 6 days are required.)
•
Apply to freshly prepared Kimchi only.
NOTE
•
Apply once only. If you apply twice or more
times, Kimchi may get sour in taste.
•
Notice) Apply to cabbage Kimchi. Lightly-salted
Kimchi can get frozen.
Storage
•
Minimizes changes in taste in order to store
Kimchi for a long time.
Fast Chill
•
Use this setting to store commercially prepared
kimchi. Kimchi purchased in a store has
already been fermented, so it is best to cool it
as rapidly as possible.
Fresh Air Filter
•
This is the function to quickly circulate the air
inside the refrigerator for deodorization inside
the refrigerator.
Wi-Fi
•
The Wi-Fi button, when used with the LG
Smart ThinQ application, allows the refrigerator
to connect to a home Wi-Fi network.
•
The Wi-Fi icon shows the status of the
refrigerator’s network connection. The icon
illuminates when the refrigerator is connected
to the Wi-Fi network.
•
Press and hold the Wi-Fi button for 3 seconds
to connect to the network. The icon blinks while
the connection is being made, then turns on
once the connection is successfully made.
21
EN
Notes for Operation
•
Do not use the ice water dispenser tank for
beverages other than drinking water.
•
Users should keep in mind that frost can form.
If the door is not closed completely, if the
humidity is high during the summer, or if the
freezer door is opened frequently.
•
Ensure there is sufcient space between food
stored on the shelf or door basket to allow the
door to close completely.
•
Opening the door lets warm air enter the
appliance, and may cause the internal
temperature to rise.
•
Do not open or close the appliance door
excessively.
•
The LED lamp is only intended for use in
domestic appliances and is not suitable for
household room illumination.
•
If you are leaving the appliance turned off for
an extended period of time, remove all food
and unplug the power cord. Clean the interior,
and leave the doors slightly ajar to prevent
mold from growing in the appliance.
NOTE
•
The 2-star section ( ) basket or drawer
can be used to store ice and food from -12 °C
to -18 °C for short periods.
•
When using the top compartment as a freezer
setting, that compartment becomes a 2-star
section. (optional)
Suggestion for Energy Saving
•
Ensure there is sufcient space between stored
foods. This allows cold air to be circulated
evenly and lowers electricity bills.
•
Store hot food only after it has cooled in order
to prevent dew or frost.
•
Do not put food near the temperature sensor of
the fridge compartment. Keep a distance of at
least 3 cm from the sensor.
•
Please note that a temperature rise after
defrosting has a permissible range in the
appliance specications. If you wish to
minimise the impact this may have on the food
storage due to a temperature rise, seal or wrap
the stored food in several layers.
•
The automatic defrosting system in the
appliance ensures that the compartment
remains free of ice buildup under normal
operating conditions.

22
EN
Storing Food
Storing Foods Effectively
•
Store frozen food or refrigerated food inside
sealed containers.
•
Check the expiration date and label (storage
instructions) before storing food in the
appliance.
•
Do not store food for a long period of time
(more than four weeks) if it spoils easily at a
low temperature.
•
Place the refrigerated food or frozen food in
each fridge or freezer compartment
immediately after purchasing.
•
Avoid refreezing any food which has been
completely thawed. Freezing any food which
has been completely thawed again will lower
its taste and nutrition.
•
Do not wrap and store vegetables with
newspaper. Printing material of newspaper or
other foreign substances may smear and
contaminate food.
•
Do not overll the appliance. Fill less than 70%
of the space. Cold air can not circulate properly
if the appliance is overlled.
•
Cool hot food before storing. If too much hot
food is placed inside, the internal temperature
of the appliance can increase and negatively
affect other foods stored in the appliance.
•
If you set an excessively low temperature for
food, it may become frozen. Do not set a
temperature lower than the required
temperature for the food to be stored correctly.
•
Always keep the appliance clean.
•
If there are chill compartments in the appliance,
do not store vegetables and fruits with higher
moisture content in the chill compartments as
they may freeze due to the lower temperature.
•
In the event of a blackout, call the electricity
company and ask how long it is going to last.
−
You should avoid door openings while the
power is off.
−
When the power supply gets back to normal,
check the condition of the food.
Maximum Storage
•
To get better air circulation, insert all Kimchi
Storage Containers.
•
If large quantities of food are to be stored, all
the Kimchi storage containers and Flip-up
covers shall be taken out of the appliance and
the food shall be stacked directly on the freezer
shelves in the freezer compartment.
NOTE
•
The shape of each container may be different,
insert in the right position.
Food Storage Tips
•
Storing Vegetables and Fruit
The moisture left on vegetables after washing
can make them spoil faster. Wait to wash
vegetables until just before use. Leafy greens
like kale or lettuce have a limited storage life.
Wrap them in newspaper or in sealed
containers to help them stay fresh longer.
•
Do not store tropical fruits in the refrigerator.
Bananas or uncut pineapples are damaged by
cold temperatures.
•
To store dried seafood, select “Produce” for the
middle compartment and adjust the storage
temperature to “low”.
•
Store vegetables or fruit in the designated
containers to prevent them from freezing in the
middle or lower compartment.
•
Store rice or grain in the bottom compartment
using the Rice/Grain setting.
•
To avoid freezing vegetables, do not store them
using the Storage setting on the bottom
compartment.
•
To avoid freezing kimchi, do not store it using
the Meat/Fish setting on the middle
compartment.

23
EN
Tips for Storing Kimchi
•
Do not overll the kimchi containers.
Allow space for the kimchi to expand as it
ferments or the contents may overow the
container. Close the container lids completely
to prevent the kimchi from fermenting too
quickly or developing yeast mold.
Fill the container with kimchi up to the ll line
and make sure the lid is tightly closed before
storing. Cover the surface of the kimchi with
plastic wrap to extend the storage time.
•
Do not place kimchi directly into the
refrigerator compartment or store it in a
plastic bag.
Use the kimchi container provided to store
kimchi. Kimchi placed directly into the
refrigerator compartment may freeze and taste
off. Do not block the air outlet inside the
refrigerator with food. Doing so could cause the
food to freeze, affect product performance, or
result in electric shock or injury.
•
For best results, check on kimchi within 3
to 4 days of storing it.
If the kimchi has overowed from the container,
it may ferment too quickly and not store well.
•
Do not place foods that require different
storage conditions in the same
compartment.
Select the appropriate settings for the food
being stored.
•
Be sure to use enough salt when preparing
kimchi for longer storage.
The rate of fermentation is mostly determined
by the amount of salt in the kimchi.
Small batches of mild kimchi can be
successfully stored for short periods, but add
more salt if storing large amounts for use over
an extended period.
•
Use care when placing kimchi containers in
the refrigerator.
Lift the container by the handles and avoid
impacts to the bottom of the container.
(The appearance of kimchi containers may
vary by model.)
A Guide to Kimchi
•
The rst step in fermenting kimchi is salt
pickling.
The salt reacts with enzymes in the cabbage to
break down proteins and begin fermentation
immediately. This process continues even at
cold temperatures. Traditionally, kimchi was
allowed to ferment slowly during the cold winter
weather.
•
The taste of kimchi also depends on the
seasonings used.
Typical seasonings include green onion, garlic,
ginger, salted sh, and chili powder. The
combination of spices chosen determines the
overall taste of the kimchi.
•
Fermentation Rates for Kimchi
Adding a lot of garlic, seafood, onions, chili
powder, cucumber or green onions makes
kimchi ferment more quickly. Adding salted
oysters, salted shrimp or persimmon sauce
really speeds up fermentation. On the other
hand, adding leeks, mustard or ginseng slows
down fermentation.
•
Kimchi begins fermenting as soon as it is
prepared.
Contact with air will make kimchi sour. If the
kimchi is not covered in sauce or has too little
salt, a thin skin of yeast will form on its surface.
Keep air away from the vegetables by covering
them in sauce or placing the kimchi in a plastic
bag or covering it with plastic wrap.
•
How Temperature Affects Kimchi
Temperature affects the fermentation rate of
kimchi. When preparing kimchi for long-term
storage, keep the temperature below 10 °C.
•
Long-Term Storage of Kimchi
Like cheese, kimchi is a living organism and
will change over time. To keep kimchi fresh for
long periods, increase the salt content and
store at a low temperature, near 0°C.
Press vegetables down so they are covered
with sauce and cover the container with plastic
wrap or a layer of cabbage leaves to keep air
out and keep kimchi fresh longer.

24
EN
•
Choosing the Right Cabbage for Kimchi
There are many different kinds of cabbage
available. For kimchi, choose a medium sized
cabbage which is rounded rather than long and
thin. The inner leaves should be sweet and
paler than the outer leaves. Outer leaves
should be thin and light green.
•
Selecting Radishes for Kimchi
There are many types of radish kimchi, and
different radishes are used for different types of
kimchi.
For radish kimchi, use Korean radishes that
have pale green tops and well-spread leaves.
For chonggak (young radish) kimchi, use Seoul
radishes that have round, thick bottoms. For
kkakdugi (cubed radish kimchi), try to nd
radishes with white rather than green tops. For
dongchimi, use radishes with soft leaves and
white rather than green tops.
Proper Food Storage Techniques
•
Store kimchi in the kimchi container.
Fill the container with kimchi only up to the ll
line and make sure the lid is tightly closed
before storing.
If the lid is not closed properly, a thin lm of
yeast can form on the surface of the kimchi or
the kimchi may ferment too quickly. Cover the
surface of the kimchi with plastic wrap or a
layer of cabbage leaves before storing it to
prevent yeast from forming.
•
Store vegetables or fruits in the designated
container.
Some vegetables and fruits are damaged by
cold air. For best results, don’t wash vegetables
before storing them.
Do not refrigerate tropical fruits like bananas or
pineapples, which are damaged by cold
temperatures.
•
Allow hot food to cool to room temperature
before refrigerating it.
Placing hot food directly into the refrigerator
can raise the temperature of surrounding food
items, leading to spoilage and higher utility
bills.
•
Long-Term Storage of Kimchi
Place newly prepared kimchi into the
refrigerator and select the Kimchi setting.
Depending on the type and saltiness of the
kimchi, select the Low, Medium, or High
setting. For best long-term storage, make sure
the vegetables are completely submerged in
the sauce and cover the kimchi with plastic
wrap.
•
Storing Purchased Kimchi
If kimchi will be consumed within a short time,
select the Fast Chill setting. If kimchi will be
stored for a long time, select the Storage
setting.
•
Before storing vegetable oils in the
refrigerator, read the storage instructions
on the container.
Vegetable oil bottles can become messy with
use. Place oil bottles in disposable or left over
plastic containers to avoid having to clean
refrigerator shelves.
25
EN
•
Select the appropriate temperature for the
Food being stored.
Storing kimchi at the Fermentation setting may
cause it to spoil.
Some types of kimchi may freeze if stored at
the High setting. Check on kimchi often when
using the High setting. Storing other food along
with kimchi in a storage container may result in
the other food freezing.
•
Using the Different Containers
For best results when using the Fridge setting,
store containers which are similar in size,
smaller containers, or bottles.
−
Storing kimchi in the provided kimchi
container in the designated position makes
the most delicious kimchi.
−
Do not store kimchi in glass bottles. The
kimchi will expand when frozen and the bottle
may break, causing a risk of injury.
−
Do not place containers near the air outlet in
the refrigerator. The food may freeze.
•
Fermenting Kimchi
Avoid opening the compartment door while
kimchi is fermenting. Allowing the warmer
outside air in during fermentation can affect the
taste of the kimchi.
•
Getting Rid of Food Odors
Cover open food containers with plastic wrap
before storing to prevent transfer of odors
inside the refrigerator.
•
After installation, allow the refrigerator to
cool completely before storing food.
Food may spoil and cause odors to linger if it is
stored before the refrigerator has been allowed
to reach the set temperature.
※
If the proper basket is not used, the
performance of the refrigerator may be
degraded.
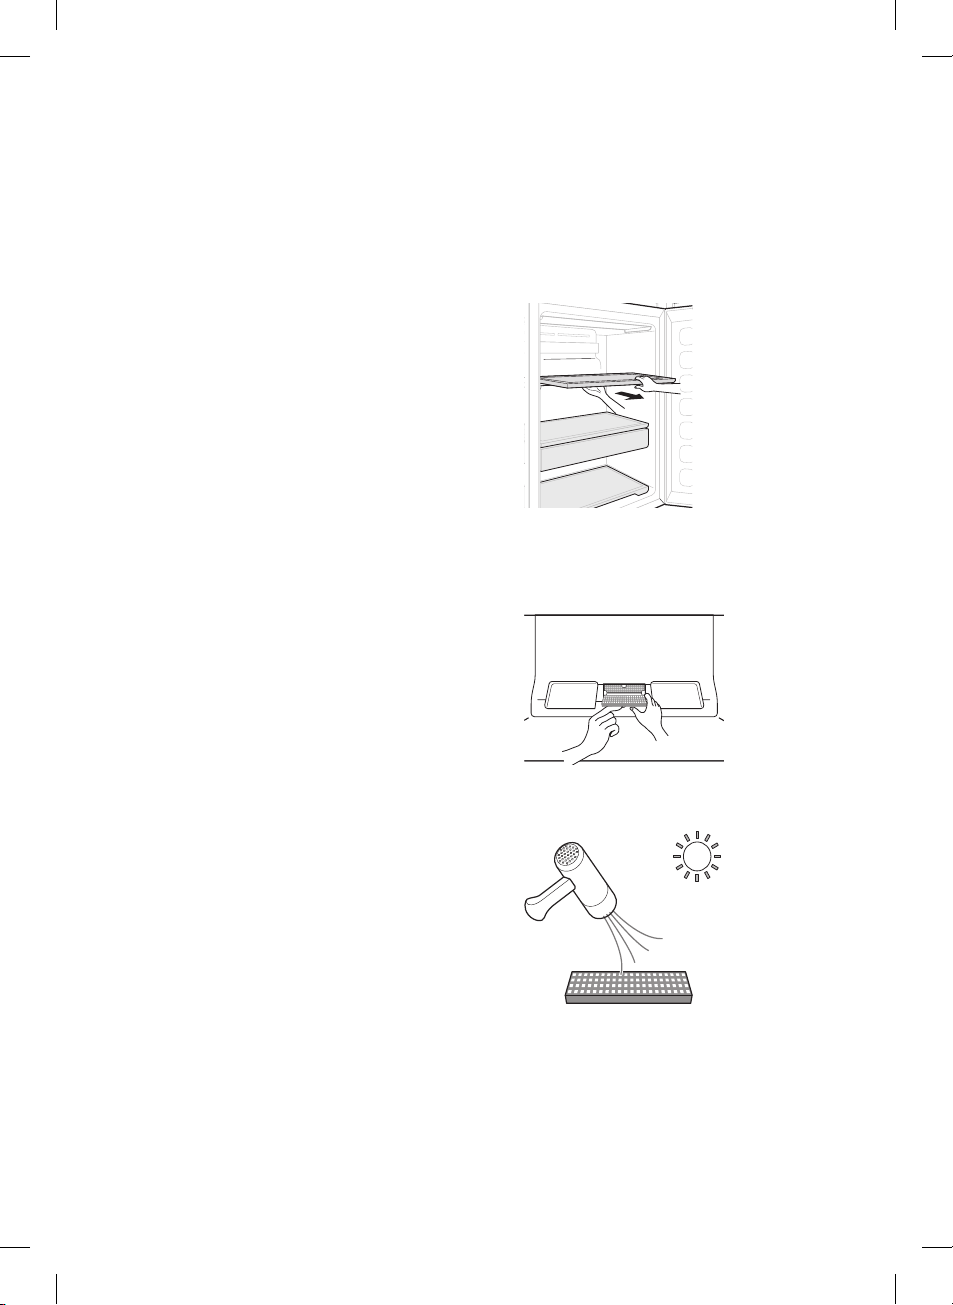
Recycling the Fresh Air Filter
of the top compartments
You can remove the odors absorbed by the
Fresh Air Filter and reuse it.
1
Pull out the shelf in top compartments
2
Press on the hook inside the upper
compartment, then take out the Fresh Air
Filter.
3
Dry it by using a hair dryer or exposing it to
sunlight. The filter is reusable.
•
To increase deodorizing performance, a natural
palm wood material is attached to the lter. If
residue falls off, it will not harm you and can be
wiped off easily with a towel or cloth.

26
EN
Adjusting the Refrigerator
Shelves
The shelves in your refrigerator are adjustable to
meet your individual storage needs. Your model
may have either glass or wire shelves.
Adjusting the shelves to fit different heights of
items will make finding the exact item you want
easier. Doing so will also reduce the amount of
time the refrigerator door is open which will save
energy.
Detaching the Shelf
•
Hold one side of the shelf and pull it out while
squeezing it to the other side.
•
Lift the rear part slightly and pull it out.
•
When removing the upper 3rd-layer basket, lift
the basket up slightly and pull it out. When
reinserting the basket, align it with the grooves
at both ends and push it inside.(Remove all
content inside the baskets before removing it
from the refrigerator.)
•
When removing the shelf, remove all content
on it, pull the basket all the way out, hold the
front of th e shelf with both hands, lift it up at an
angle and pull it out.
•
After removing the 4th-layer shelf at the left/
right compartments, hold the deodorizer with
the hand and remove it from the back wall of
the refrigerator. The deodorizer is reusable.
※
Gently lift and pull out the shelf.
※
Depending on the model, the shelves and cold
insulation cover may not be present or differ
from the figures in their shapes.
27
EN
CustomChill Drawer
The CustomChill Drawer provides storage space
with a variable temperature control that can be
adjusted to keep the compartment either colder
or warmer than the refrigerator.
Use it to store meat and seafood, cold drinks,
deli snacks, or chilled wine.
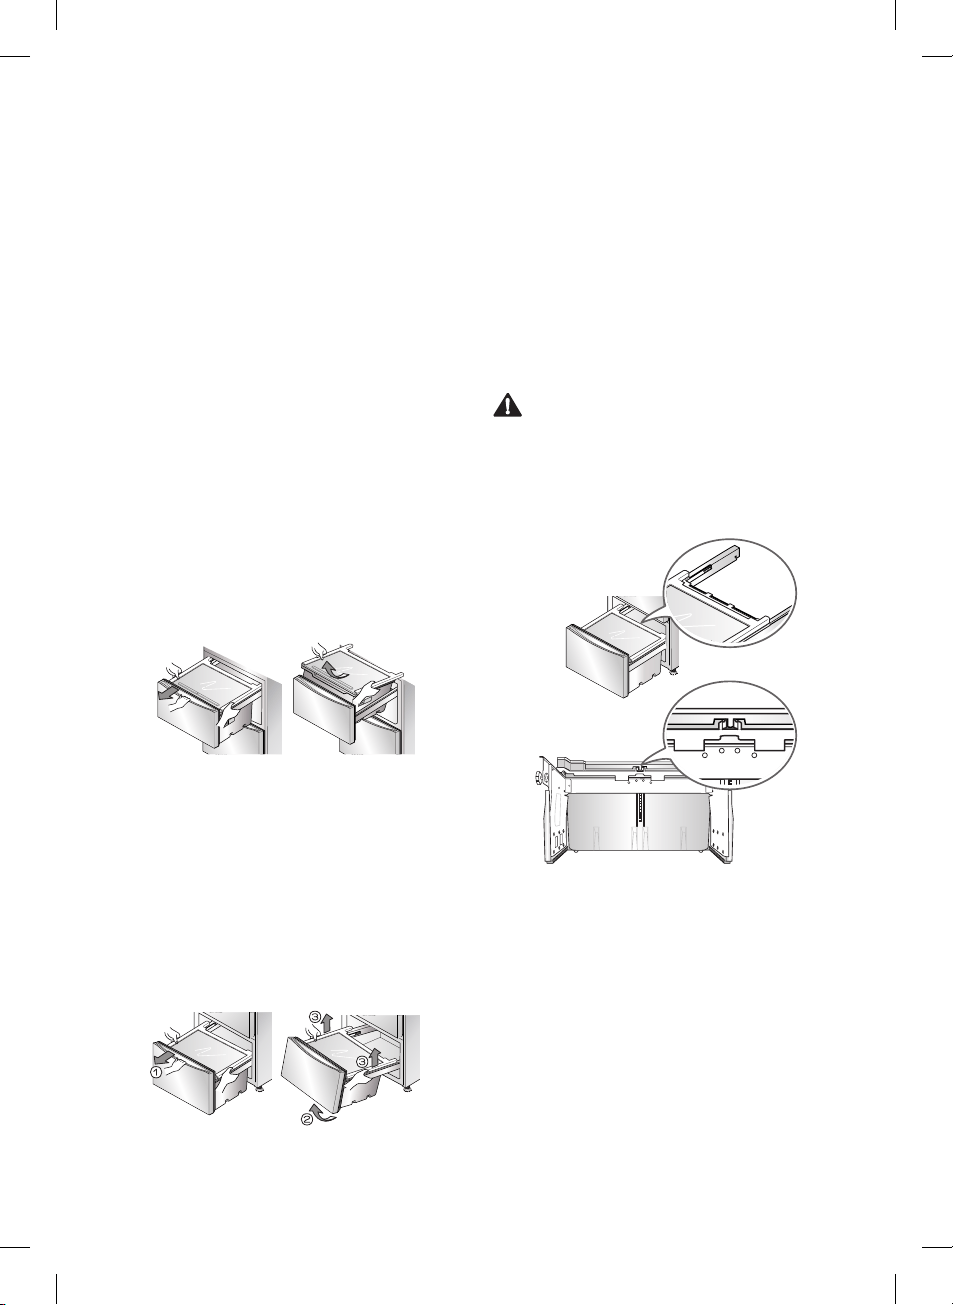
CustomChill Drawer Disassembly
The Mid Drawer
Raise the Mid drawer slightly, lift the basket up
and remove it while the roller is pulled out
halfway. (The basket is released when the upper
door is open.)
When reinserting the basket, put the basket in
while the roller is pulled out halfway, lift the
drawer up slightly, align it with the roller, and
push it in.
※
When removing or mounting the middle
drawer, be sure to open the door at the upper
compartment.
The Bottom Drawer
1
Open the drawer completely.
2
Pull up the drawer slightly and pull it out.
(When you hear the knocking sound, the
drawer will no longer be pulled or pushed.)
3
Remove the Bottom drawer by lifting it with
full power as shown in the figure.
When reinserting the basket, insert the drawer to
the refrig erator and lift the left roller of the
drawer to align and push it in. If you hear a
knocking sound, lift it up slightly and keep
pushing it in.
※
When removing or mounting the middle
drawer, be sure to open the doors at the left/
right compartments.
※
You need to remove the baskets together with
the middle/lower drawers. Removing only the
baskets is impossible.
CAUTION
•
When removing the lower drawer, be careful as
you may hurt your foot.
•
The lower doors may be heavy, and your back
may be hurt when removing them. Be sure to
remove the content before removing them.
28
EN
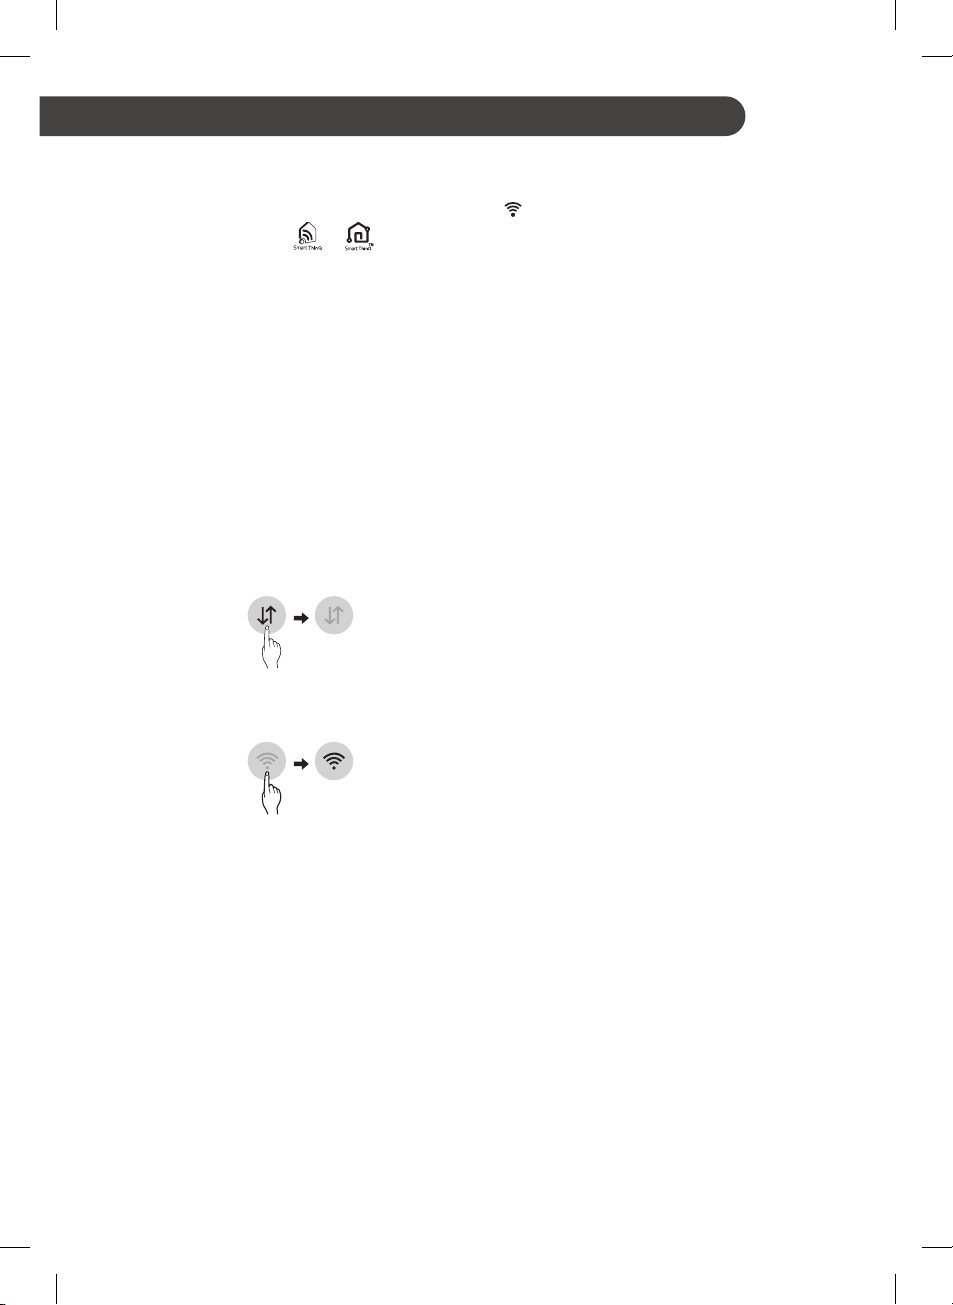
Using LG SmartThinQ
Application
•
For appliances with the or logo
Things to check before using LG
SmartThinQ
1
Check the distance between the appliance
and the wireless router (Wi-Fi network).
•
If the distance between the appliance and
the wireless router is too far, the signal
strength becomes weak.
It may take a long time to register or
installation may fail.
2
Turn off the Mobile data or Cellular Data
on your smartphone.
•
For iPhones, turn data off by going to
Settings → Cellular → Cellular Data.
3
Connect your smartphone to the wireless
router.
NOTE
•
To verify the Wi-Fi connection, check that Wi-Fi
icon on the control panel is lit.
•
The appliance supports 2.4 GHz Wi-Fi
networks only. To check your network
frequency, contact your Internet service
provider or refer to your wireless router manual.
•
LG SmartThinQ is not responsible for any
network connection problems or any faults,
malfunctions, or errors caused by network
connection.
•
If the appliance is having trouble connecting to
the Wi-Fi network, it may be too far from the
router. Purchase a Wi-Fi repeater (range
extender) to improve the Wi-Fi signal strength.
•
The Wi-Fi connection may not connect or may
be interrupted because of the home network
environment.
•
The network connection may not work properly
depending on the Internet service provider.
•
The surrounding wireless environment can
make the wireless network service run slowly.
•
The appliance cannot be registered due to
problems with the wireless signal transmission.
Unplug the appliance and wait about a minute
before trying again.
•
If the rewall on your wireless router is
enabled, disable the rewall or add an
exception to it.
•
The wireless network name (SSID) should be a
combination of English letters and numbers.
(Do not use special characters.)
•
Smartphone user interface (UI) may vary
depending on the mobile operating system
(OS) and the manufacturer.
•
If the security protocol of the router is set to
WEP, you may fail to set up the network.
Please change it to other security protocols
(WPA2 is recommended) and register the
product again.
SMART FUNCTIONS

29
EN
Installing LG SmartThinQ
Search for the LG SmartThinQ application from
the Google Play Store or Apple App Store on a
smart phone. Follow instructions to download
and install the application.
Wi-Fi Function
Communicate with the appliance from a smart
phone using the convenient smart features.
Firmware Update
Keep the appliance performance updated.
Smart Diagnosis™
If you use the Smart Diagnosis function, you will
be provided with the useful information such as
a correct way of using the appliance based on
the pattern of use.
Settings
Allows you to set various options on the
refrigerator and in the application.
NOTE
•
If you change your wireless router, Internet
service provider, or password, delete the
registered appliance from the LG SmartThinQ
application and register it again.
•
The application is subject to change for
appliance improvement purposes without
notice to users.
•
Functions may vary by model.
Connecting to Wi-Fi
The Wi-Fi button, when used with the LG
SmartThinQ application, allows the refrigerator
to connect to a home Wi-Fi network. The Wi-Fi
icon shows the status of the refrigerator’s
network connection. The icon illuminates when
the refrigerator is connected to the Wi-Fi
network.
Initial Appliance Registration
Run the LG SmartThinQ application and follow
the instructions in the application to register the
appliance.
Re-registering the Appliance or
Registering Another User
Press and hold the Wi-Fi button for 3 seconds to
temporarily turn it off. Run the LG SmartThinQ
application and follow the instructions in the
application to register the appliance.
Open Source Software Notice
Information
To obtain the source code under GPL, LGPL,
MPL, and other open source licenses, that is
contained in this product, please visit
http://opensource.lge.com.
In addition to the source code, all referred
license terms, warranty disclaimers and
copyright notices are available for download.
LG Electronics will also provide open source
code to you on CD-ROM for a charge covering
the cost of performing such distribution (such as
the cost of media, shipping, and handling) upon
email request to [email protected].
This offer is valid for a period of three years after
our last shipment of this product. This offer is
valid to anyone in receipt of this information.
RF Radiation Exposure Statement
This equipment shall be installed and used at a
minimum distance of 20 cm from the human
body.
30
EN
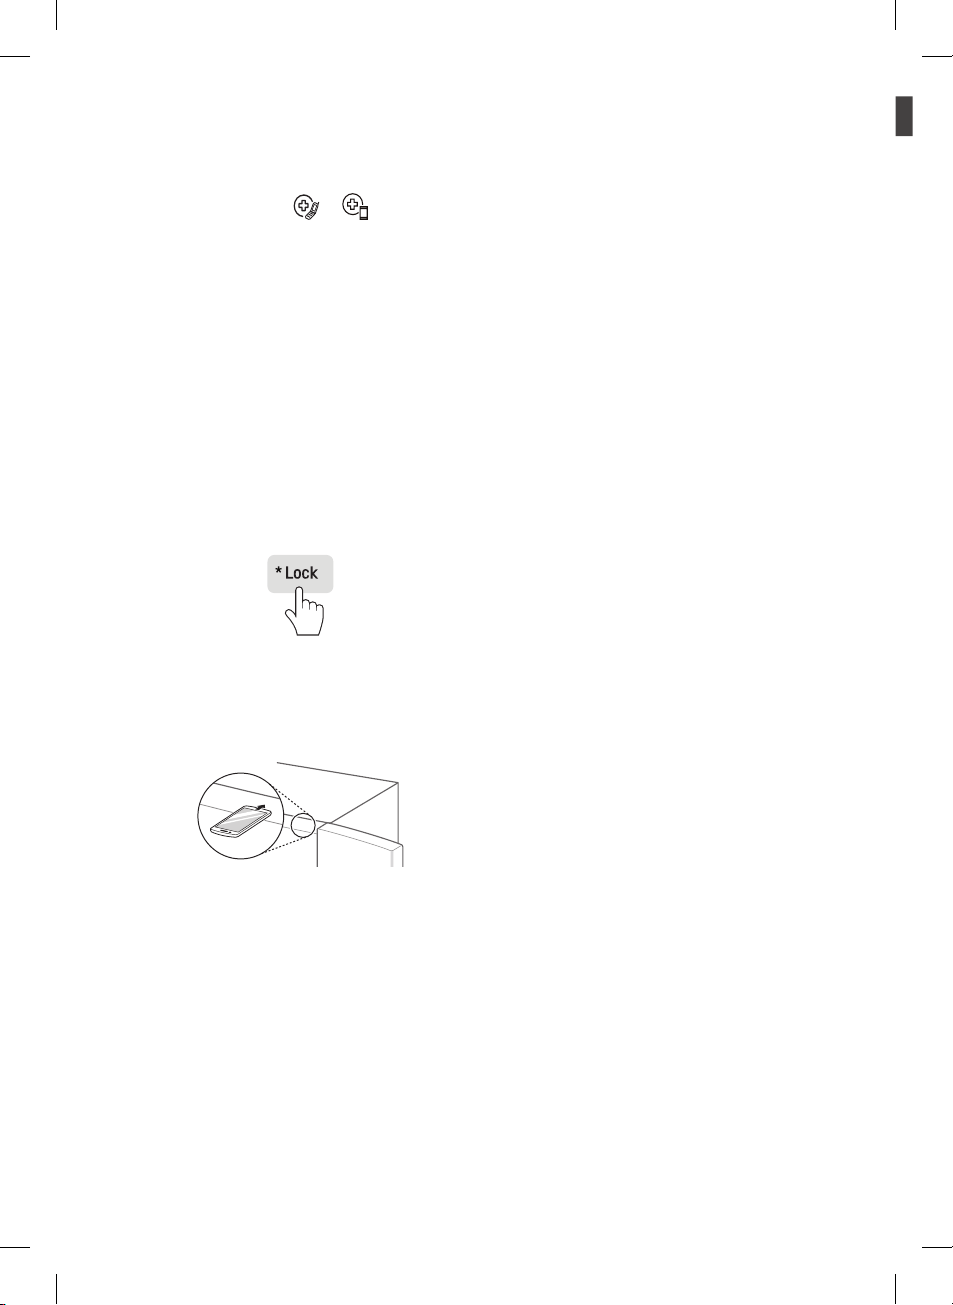
Using Smart Diagnosis™
•
For appliances with the or logo
Smart Diagnosis™ Through the
Customer Information Centre
Use this function if you need an accurate
diagnosis by an LG Electronics customer
information center when the appliance
malfunctions or fails. Use this function only to
contact the service representative, not during
normal operation.
1
Press the Lock button to activate the lock
function.
•
If the display has been locked for over 5
minutes, you must deactivate the lock and
then reactivate it.
2
Open the top door and then hold the phone
on the upper right speaker hole.
•
Position the phone so that its microphone
is aligned with the speaker hole.
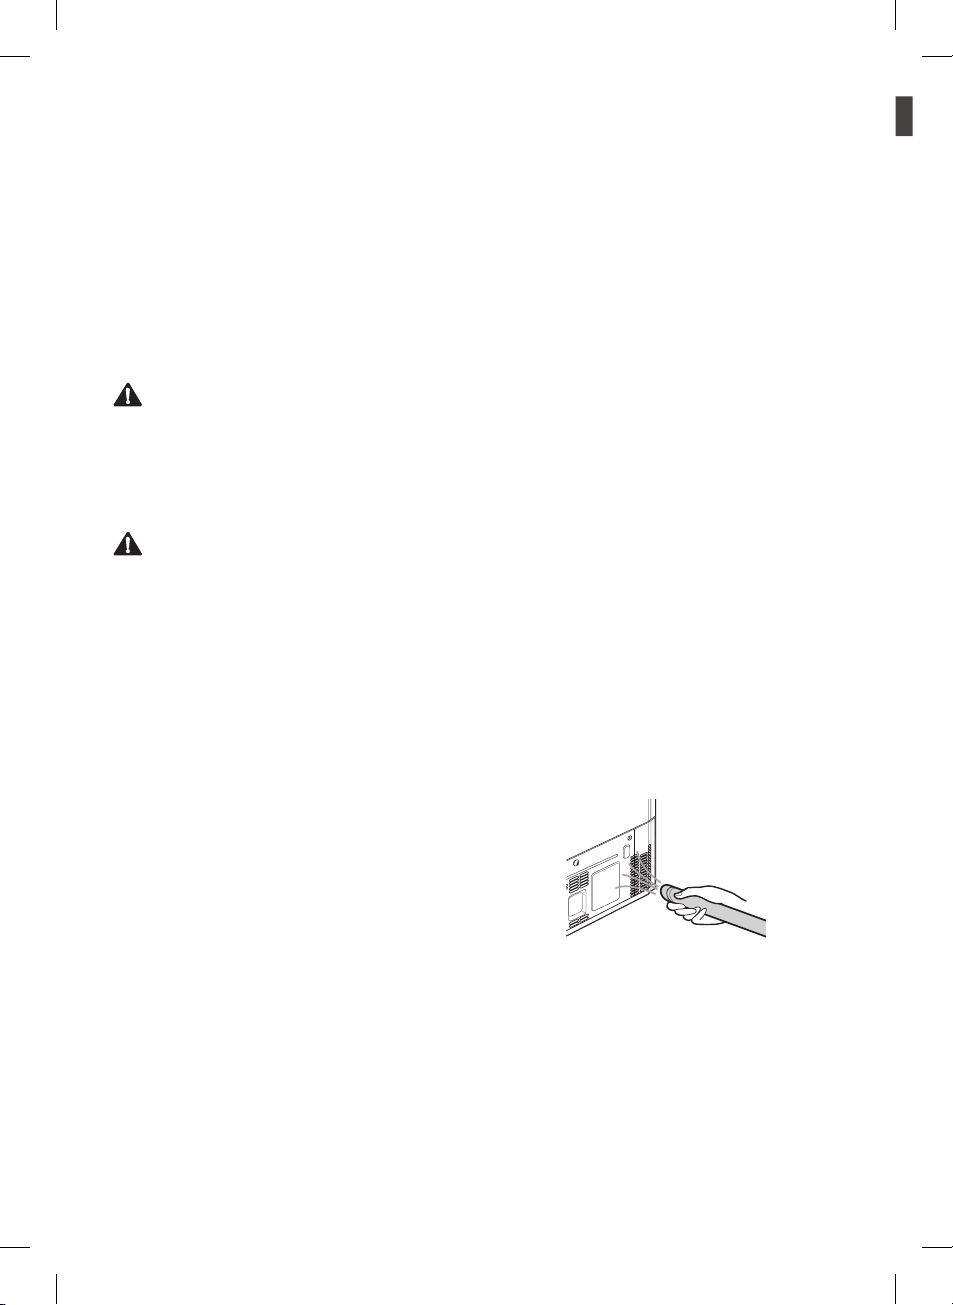
3
Press and hold the Bottom button for three
seconds or longer while continuing to hold
your phone to the speaker.
4
After the data transfer is complete, the
service agent will explain the result of the
Smart Diagnosis™.
NOTE
•
Position the phone so that its microphone is
aligned with the speaker hole.
•
The Smart Diagnosis™ sound is generated
after around three seconds.
•
Do not take the phone off the speaker hole
while the data is transmitted.
•
Hold the phone to the upper right speaker hole
and wait while the data is transmitted.
•
The data transfer sound may be harsh to the
ear while the Smart Diagnosis™ data is being
transmitted, but do not take the phone off the
speaker hole for accurate diagnosis until the
data transfer sound has stopped.
•
When the data transfer is complete, the
transfer completion message is displayed and
the control panel is automatically turned off and
then on again after a few seconds. After the
customer information centre explains the
diagnosis result.
•
The Smart Diagnosis™ function depends on
the local call quality.
•
The communication performance will improve
and you can transmit a better signal if you use
a land line home phone.
•
If the Smart Diagnosis™ data transfer is poor
due to poor call quality, you may not receive
the best Smart Diagnosis™ service.

31
EN
MAINTENANCE
Cleaning
•
Both the refrigerator and freezer sections
defrost automatically; however, clean both
sections about once a month to prevent odors.
•
Wipe up spills immediately.
•
Always unplug the refrigeration before
cleaning.
General Cleaning Tips
•
Unplug refrigerator or disconnect power.
•
Remove all removable parts, such as shelves,
crispers, etc.
•
Use a clean sponge or soft cloth and a mild
detergent in only warm water. Do not use
abrasive or harsh cleaners.
•
Hand wash, rinse and dry all surfaces
thoroughly.
Notes for Cleaning
•
When removing a shelf or drawer from inside
the appliance, remove all stored foods from the
shelf or drawer to prevent injury or damage to
the appliance. Otherwise, injury may occur due
to the weight of stored foods.
•
If cleaning the outside air vents of the
appliance by means of vacuuming, then the
power cord should be unplugged from the
outlet to avoid any static discharge that can
damage the electronics or cause an electric
shock.
•
Detach the shelves and drawers and clean
them with water, and then dry them sufciently,
before replacing them.
•
Regularly wipe the door gaskets with a wet soft
towel.
•
Door basket spills and stains should be
cleaned as they can compromise storage
ability of the basket and could even be
damaged.
•
After cleaning, check if the power cable is
damaged, warm or improperly plugged.
•
Keep the air vents on the exterior of the
appliance clean.
Blocked air vents can cause re or appliance
damage.
•
Waxing external painted metal surfaces helps
provide rust protection. Do not wax plastic
parts. Wax painted metal surfaces at least
twice a year using appliance wax (or auto
paste wax). Apply wax with a clean, soft cloth.
•
When cleaning the inside or outside of the
appliance, do not wipe it with a rough brush,
toothpaste, or ammable materials. Do not use
cleaning agents containing ammable
substances.
This may cause discoloration or damage to the
appliance.
Flammable substances: alcohol (ethanol,
methanol, isopropyl alcohol, isobutyl alcohol,
etc.), thinner, bleach, benzene, ammable
liquid, abrasive, etc.
•
For the appliance exterior, use a clean sponge
or soft cloth and a mild detergent in warm
water. Do not use abrasive or harsh cleaners.
Dry thoroughly with a soft cloth.
•
Never clean the shelves or containers in the
dishwasher.
The parts may become deformed due to the
heat.
•
If the appliance is equipped with an LED lamp,
do not remove lamp cover and LED lamp in
any attempt to repair or service it.
Please, contact the LG Electronics customer
information centre.
32
EN
Exterior
Waxing external painted metal surfaces helps
provide rust protection. Do not wax plastic parts.
Wax painted metal surfaces at least twice a year
using appliance wax (or auto paste wax). Apply
wax with a clean, soft cloth.
For products with a stainless steel exterior, use a
clean sponge or soft cloth and a mild detergent
in warm water. Do not use abrasive or harsh
cleaners. Dry thoroughly with a soft cloth.
CAUTION
•
Do not use a rough cloth or sponge when
cleaning the interior and exterior of the
refrigerator.
•
Do not place your hand on the bottom surface
of the refrigerator when opening and closing.
WARNING
Use non-flammable cleaner. Failure to do so can
result in fire, explosion, or death. Always remove
power cord from the wall outlet prior to cleaning
in the vicinity of electrical parts (lamps, switches,
covers, controls, etc.).
Wipe up excess moisture with a sponge or cloth
to prevent water or Liquid from getting into any
electrical part and causing an electric shock.
Never use metallic scouring pads, brushes,
coarse abrasive cleaners, Strong alkaline
solutions, industrial detergent (bleach containing
detergent) Flammable or toxic cleaning liquids
on any surface. Do not use Hot water to clean
the interior or any interior parts of the unit when
they are cold.
Inside Walls (allow freezer to warm
up so the cloth will not stick)
To help remove odors, you can wash the inside
of the refrigerator with a mixture of baking soda
and warm water. Mix 2 tablespoons of baking
soda to 1 litre of warm water. Be sure the baking
soda is completely dissolved so it does not
scratch the surfaces of the refrigerator.
Door Liners and Gaskets
Use a clean sponge or soft cloth and a mild
detergent in warm water. Do not use cleaning
waxes, concentrated detergents, bleaches, or
cleaners containing petroleum on plastic
refrigerator parts.
Plastic Parts (covers and panels)
Use a clean sponge or soft cloth and a mild
detergent in warm water. Do not use window
sprays, abrasive cleansers, or flammable fluids.
These can scratch or damage the material.
Condenser Coil Cover
Use a vacuum cleaner with an attachment to
clean the condenser cover and vents located at
the rear of the appliance. Do not remove the
panel covering the condenser coil area. Always
disconnect the main power before cleaning.
33
EN
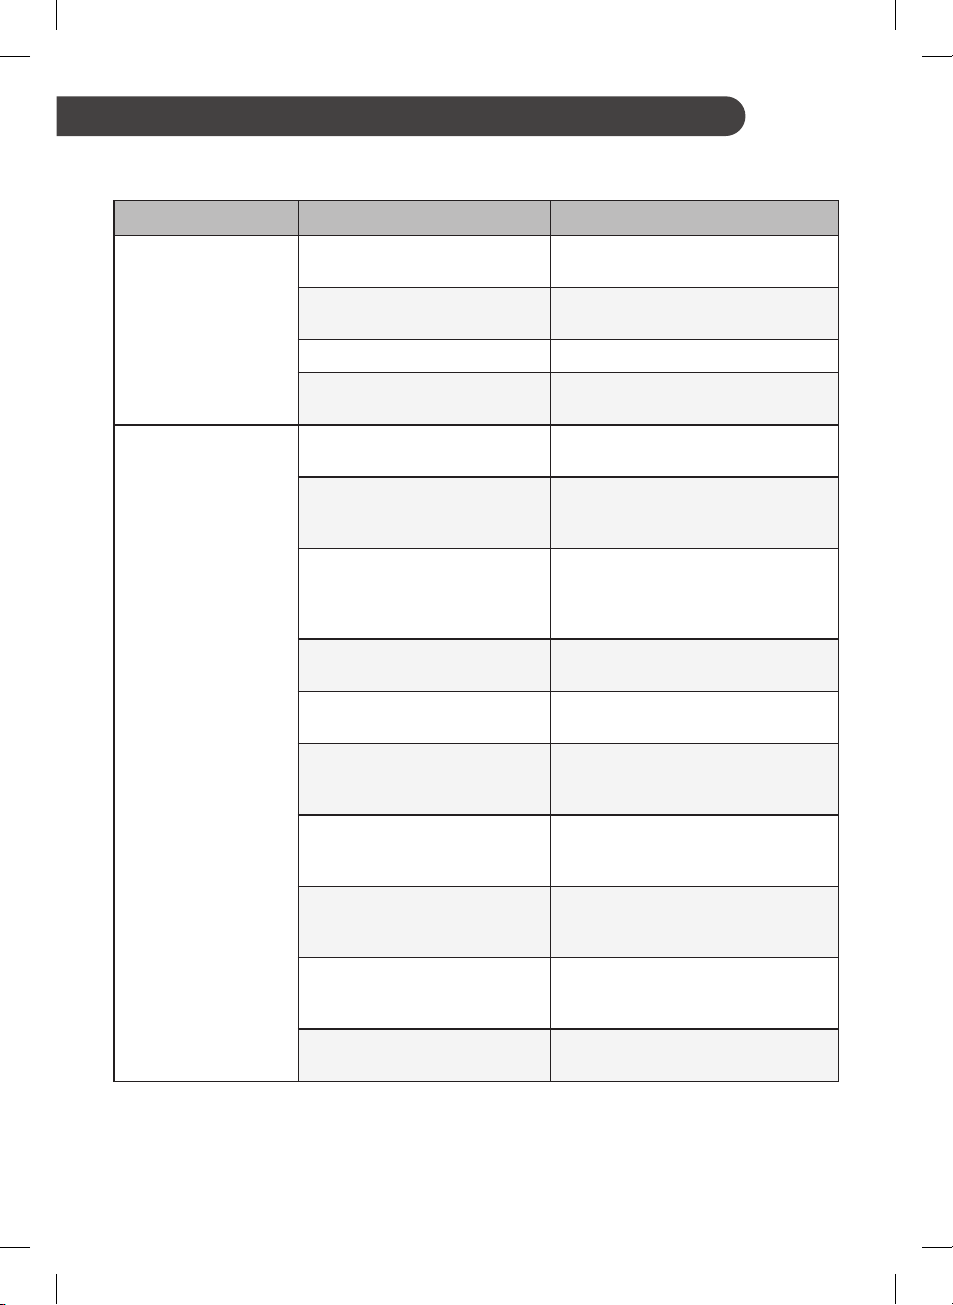
TROUBLESHOOTING
Review the Troubleshooting section before calling for service; doing so will save you both time and
money.
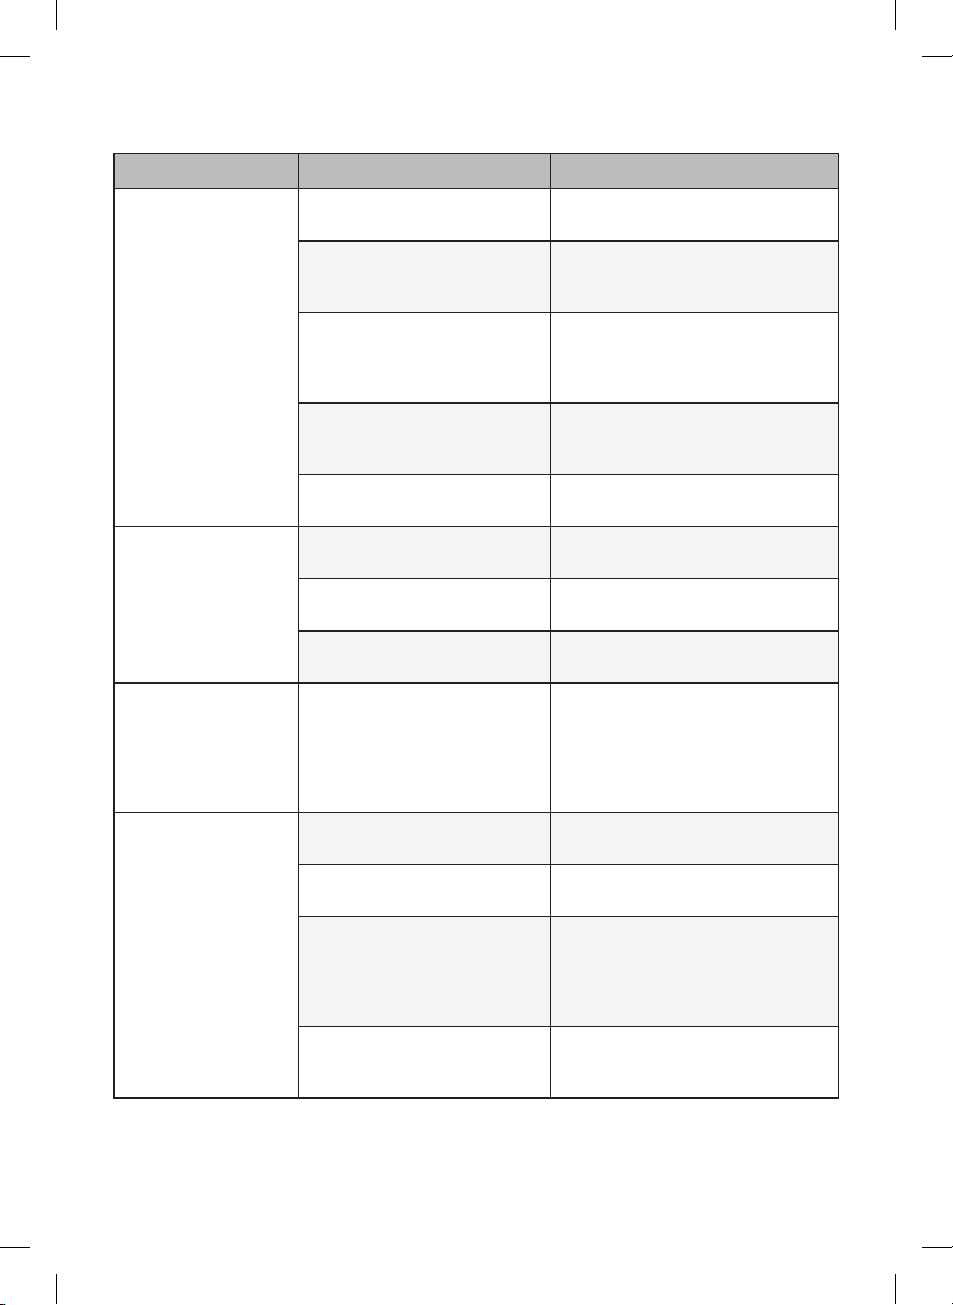
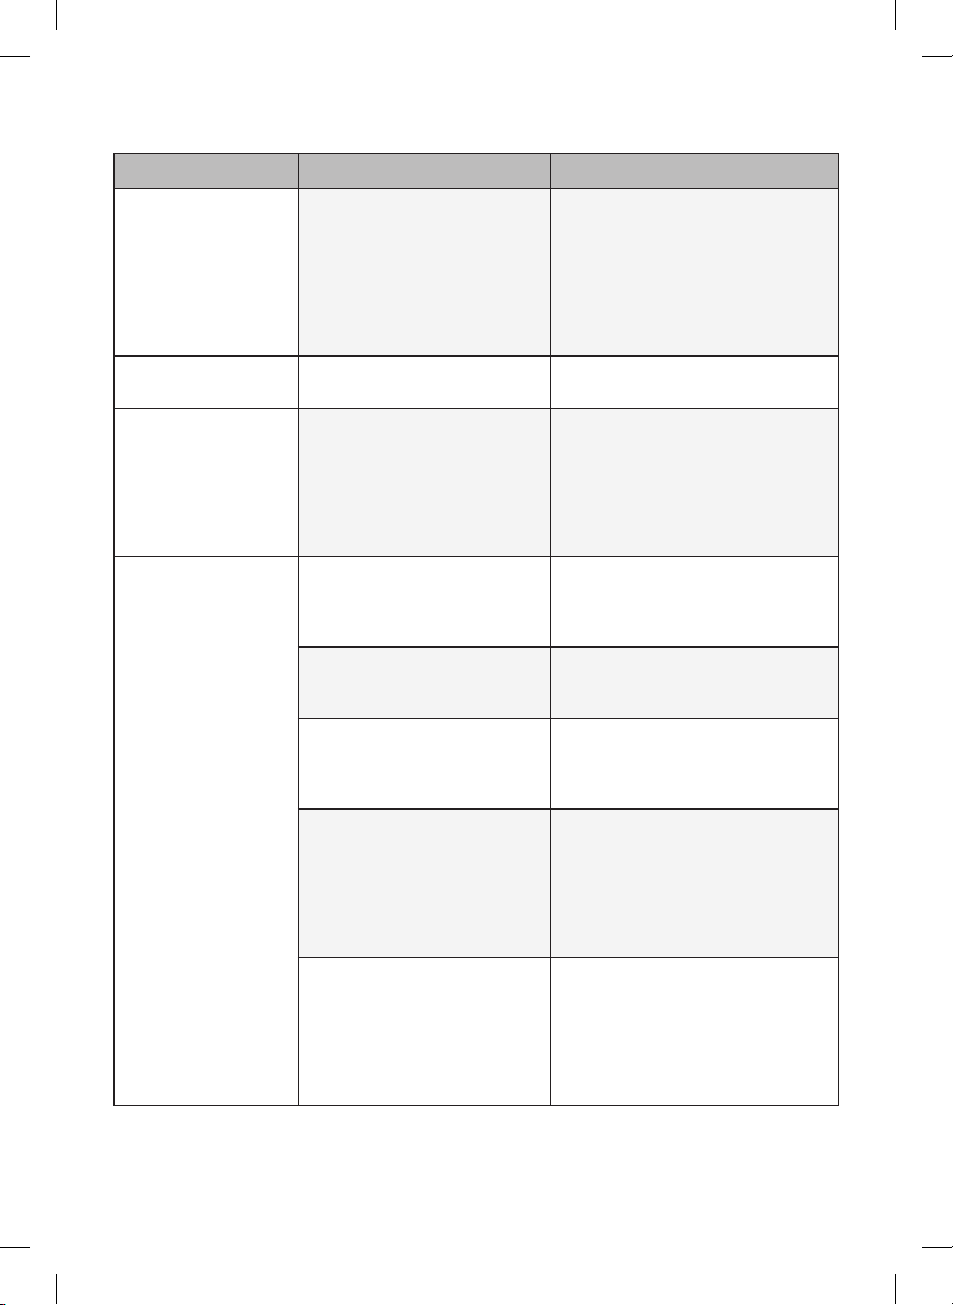
Problem Possible Causes Solutions
There is no
refrigeration or
freezing.
Is there a power interruption?
•
Check the power of other
appliances.
If the power plug unplugged
from the outlet?
•
Plug the power plug in the outlet
properly.
Is the power supply 220 V?
•
If it is 110 V, then use a transformer.
If you are using a transformer,
is the power lamp off?
•
Turn on the power lamp for the
transformer.
There is poor
refrigeration or
freezing.
Is the storage temperature set
to ‘L’?
•
Set it to ‘M’.
Is the fridge or freezer
temperature set to its warmest
setting?
•
Set the fridge or freezer temperature
to ‘M’.
Is the appliance in direct
sunlight, or is it near a heat
generating object such as
cooking oven or heater?
•
Check the installation area and
reinstall it away from heat generating
objects.
Did you store hot food without
cooling it first?
•
Cool the hot food rst before putting
it inside the fridge or freezer.
Did you put in too much food?
•
Maintain an appropriate space
between food.
Are the appliance doors
completely closed?
•
Completely close the door and make
sure that stored food is not
obstructing in the door.
Is there enough space around
the appliance?
•
Adjust the installation position to
make enough space around the
appliance.
Did you install the product
where the ambient temperature
is between 5°C and 43°C?
•
Install the product where the ambient
temperature is between 5°C and
43°C.
Is the control panel set to
Produce or Rice/Grain?
•
In the Control panel, select the
proper function for the type of foods
stored.
Is the middle or bottom shelf
incorrectly assembled?
•
Assemble the middle or bottom shelf
correctly.
34
EN
34
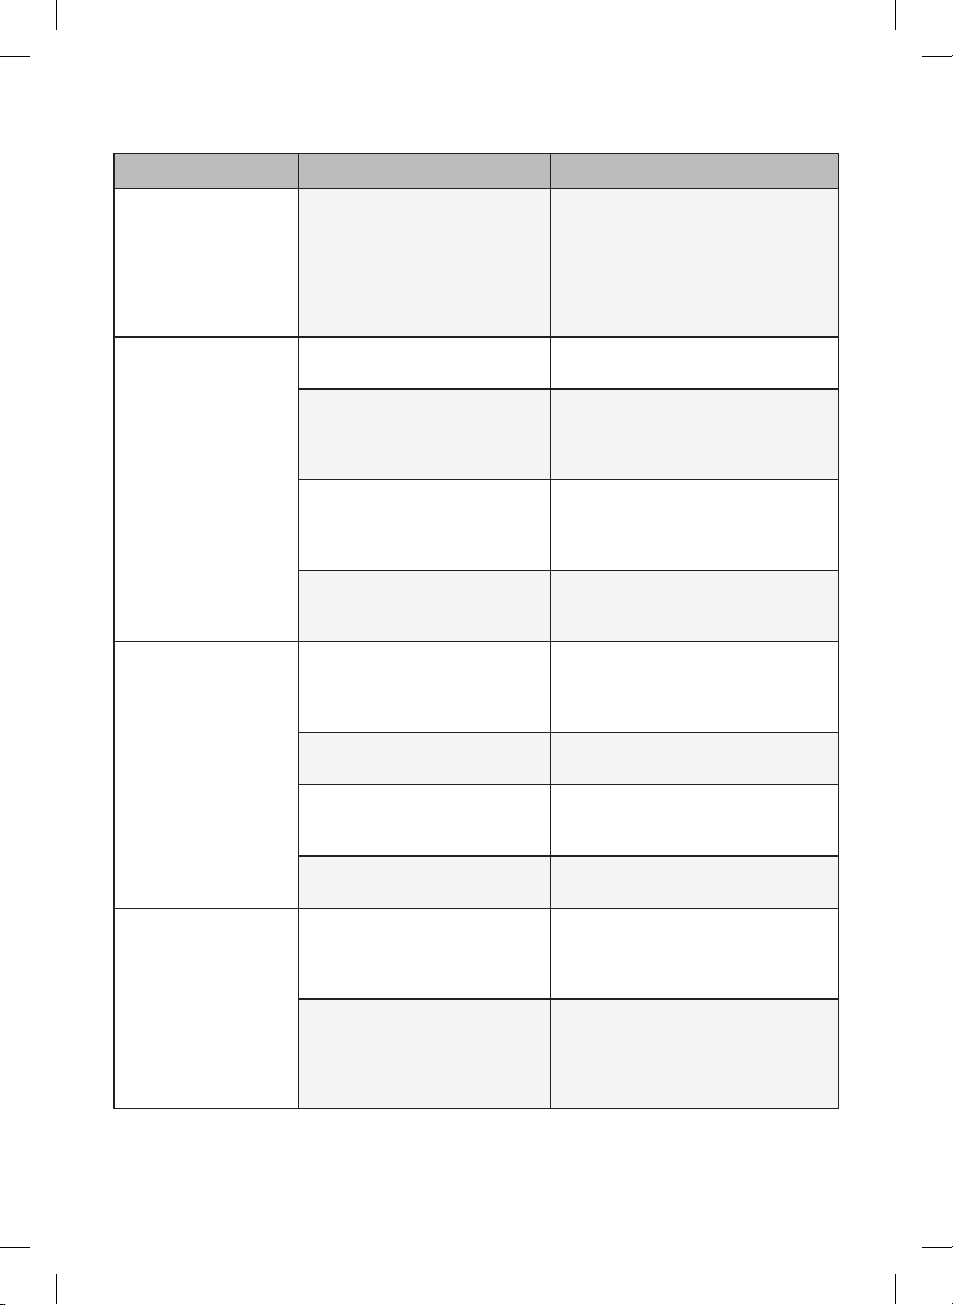
Problem Possible Causes Solutions
Refrigerated foods
are frozen.
Is the storage temperature set
to ‘H’?
•
Set it to ‘M’ or lower.
Did you put moist and easy-
tofreeze foods near the cold
air exit?
•
Put them on the outer edge of the
shelf.
Did you put moist and easy-
tofreeze foods on the upper
shelf of the refrigeration
compartment?
•
Put them on the bottom shelf.
Is the control panel set to
Meat/Fish, Kimchi or Long
term?
•
In the Control panel, select the
proper function for the type of foods
stored.
Did you put foods in the
container provided?
•
Put foods in the container provided.
The appliance
contains a bad smell.
Is the storage temperature set
to ‘L’?
•
Set it to ‘M’.
Did you put in food with a
strong smell?
•
Store foods with strong smells in
sealed containers.
Is the Kimchi container cover
open?
•
Completely close the Kimchi
container cover.
The inside lamp in the
appliance does not
turn on.
Does the inside lamp in the
appliance turn off?
•
It is hard for customers to replace
the inside lamp in the appliance as
they are not serviceable. If the inside
lamp does not turn on, please
contact the LG Electronics customer
information center.
The appliance door is
not closed tightly.
Is the appliance leaning
forward?
•
Adjust the front feet to raise the front
side slightly.
Were the shelves properly
assembled?
•
Ret the shelves if needed.
Did you close the door with
excessive force?
•
If you apply too much force or speed
when closing the door, it may remain
briey open before closing. Make
sure that you do not slam the door
closed. Close without force.
Are the foods stored on the
shelf touching the ceiling of
the product?
•
Do not let the foods touch the
ceiling.
35
EN
35
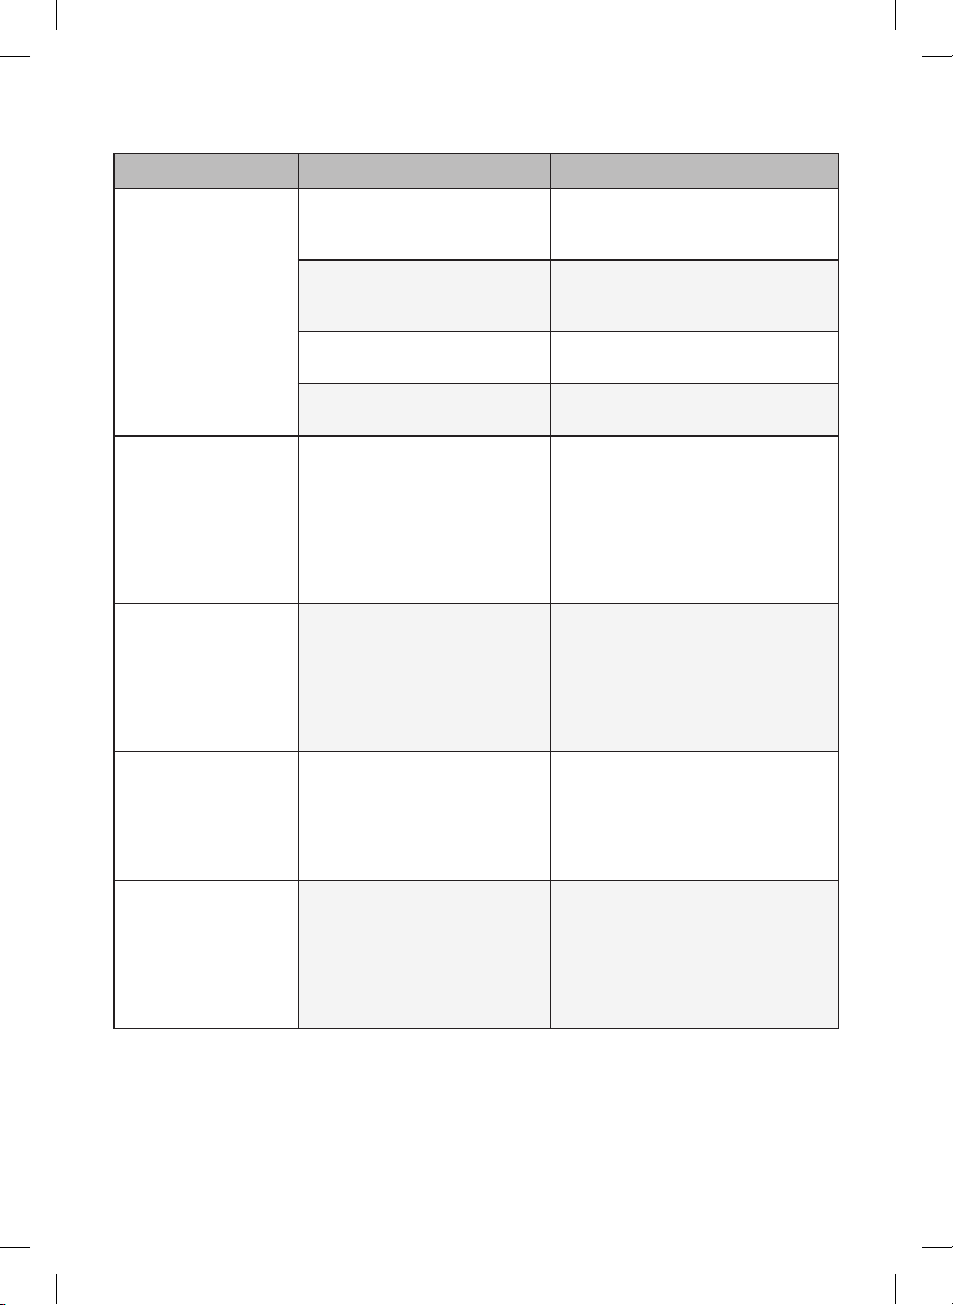
Problem Possible Causes Solutions
It is difficult to open
the appliance door.
Did you open the door right
after you closed it?
•
If you try to open the appliance door
within 1 minute after you closed it,
you may have difculties because of
the pressure inside the appliance.
Try to open the appliance door again
in a few minutes so that the internal
pressure stabilizes.
There is condensation
inside the appliance
or on the bottom of
the vegetable drawer
cover.
Did you store hot food without
cooling it first?
•
Cool the hot food rst before putting
it inside the fridge or freezer.
Did you leave the appliance
door open?
•
Although the condensation will
disappear soon after you close the
appliance door, you can wipe it with
a dry cloth.
Do you open and close the
appliance door frequently?
•
Condensation can form due to the
temperature difference from the
outside. Wipe out the dampness
with a dry cloth.
Did you put warm or moist
food inside without sealing it
in a container?
•
Store food in a covered or sealed
container.
Frost is formed in the
compartment set to
Freeze.
Doors may not be closed
properly?
•
Check if the food item inside the
appliance is blocking the door and
make sure that the door is tightly
closed.
Did you store hot food without
cooling it first?
•
Cool the hot food rst before putting
it inside the fridge or freezer.
Is the air entry or exit of the
freezer blocked?
•
Make sure that air entry or exit is not
blocked so that the air can circulate
inside.
Is the freezer overfilled?
•
Maintain an appropriate space
between items.
Frost or condensation
has formed inside or
outside the appliance.
Did you open and close the
appliance door frequently or is
the appliance door improperly
closed?
•
Frosts or condensation can form if
the outside air penetrates inside the
appliance.
Is the installation environment
humid?
•
Condensation can appear on the
exterior of the appliance if the
installation area is too humid or on a
humid day such as a rainy day. Wipe
off any moisture with a dry cloth.
36
EN
36
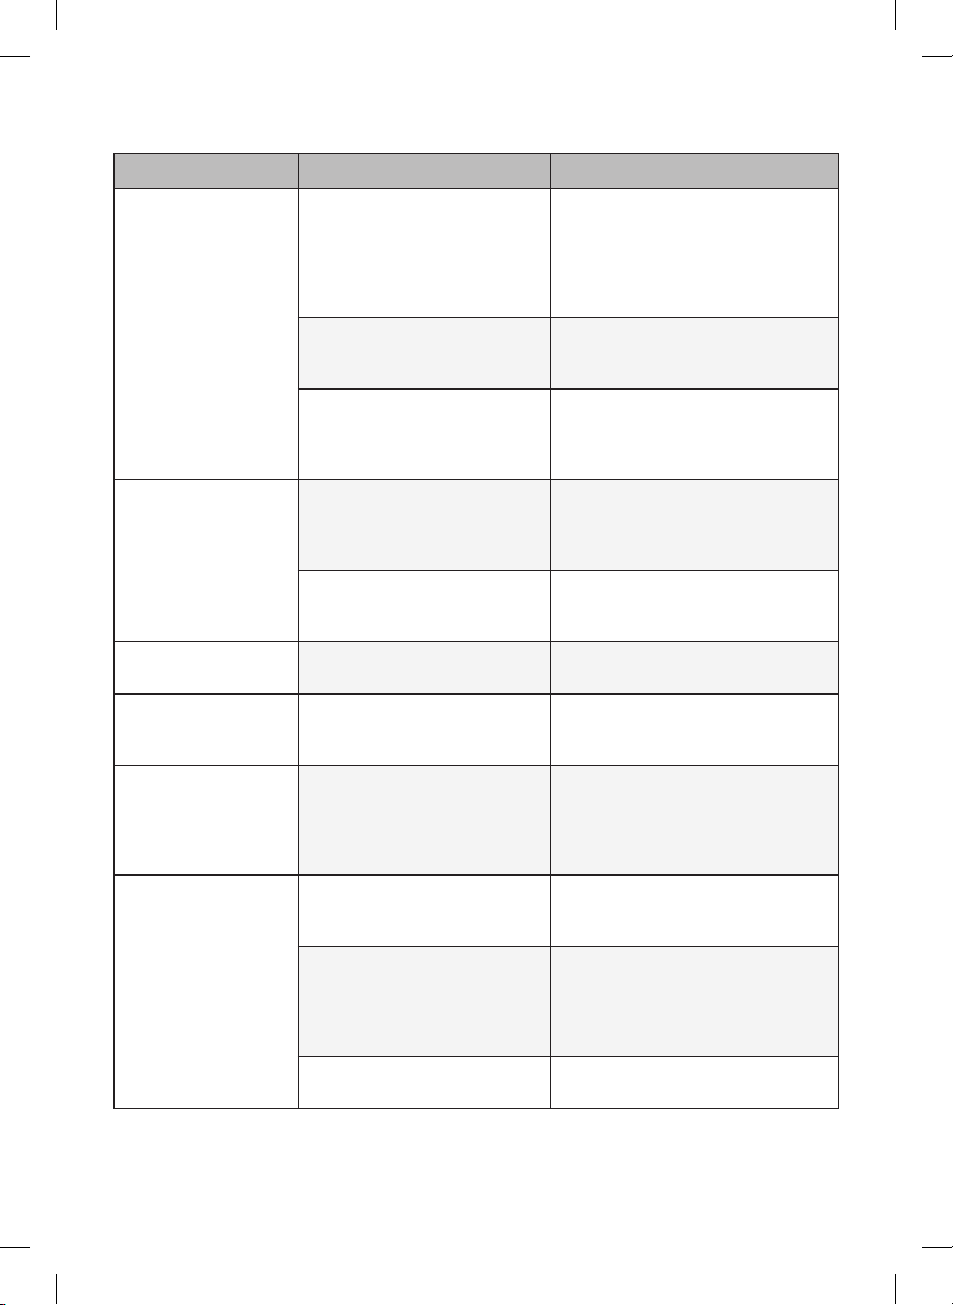
Problem Possible Causes Solutions
The appliance is
noisy and generates
abnormal sounds.
Is the appliance installed on a
weak floor or improperly
leveled?
•
Install the appliance on a solid and
at area.
Does the rear of the appliance
touch the wall?
•
Adjust the installation position to
allow enough clearance around the
appliance.
Are objects scattered behind
the appliance?
•
Remove the scattered objects from
behind the appliance.
Is there an object on top of the
appliance?
•
Remove the object on top of the
appliance.
The side or front of
the appliance is
warm.
There are anti condensation
pipes fitted to these areas of
the appliance to reduce
condensation forming from
around the door area.
•
The heat releasing pipe to prevent
condensation is installed on the front
and side of the appliance. You may
feel it particularly hot right after the
appliance is installed or during the
summer. You can be assured that
this is not a problem and is quite
normal.
The bottom side of
the product is warm
or there is warm air
coming from the
back.
Did you install the product not
too long ago?
•
Right after installation, the
compressor will operate very hard to
cool it down quickly. So, you can
expect warmth or warm air at the
bottom right.
After cooling down, the warm air will
be gone. So do not worry.
The internal wall of
the product is warm.
Did you touch it when the
product is operating?
•
To maintain the optimal temperature,
the cold air and the hot air will take
turns to control the temperatures,
causing the inner wall to be warm. It
is not a malfunction, so keep using
the product as usual.
Clicking noises The defrost control will click
when the automatic defrost
cycle begins and ends. The
thermostat control (or
appliance control on some
models) will also click when
cycling on and off.
•
Normal Operation
37
EN
37
Problem Possible Causes Solutions
Rattling nosies Rattling noises may come
from the flow of refrigerant,
the water line on the back of
the unit (for plumbed models
only), or items stored on top of
or around the appliance.
•
Normal Operation
Appliance is not resting evenly
on the floor.
•
Floor is weak or uneven or leveling
legs need to be adjusted. See the
door alignment section.
Appliance with linear
compressor was moved while
operating.
•
Normal operation. If the compressor
does not stop rattling after 3
minutes, turn the power to the
appliance off and then on again.
Whooshing nosies Evaporator fan motor is
circulating air through the
fridge and freezer
compartments.
•
Normal Operation
Air is being forced over the
condenser by the condenser
fan.
•
Normal Operation
Gurgling nosies Refrigerant flowing through
the cooling system
•
Normal Operation
Popping nosies Contraction and expansion of
the inside walls due to
changes in temperature.
•
Normal Operation
Vibrating If the side or back of the
appliance is touching a cabinet
or wall, some of the normal
vibrations may make an
audible sound.
•
To eliminate the noise, make sure
that the sides and back do not make
any contact with any wall or cabinet.
Kimchi gets sour too
quickly.
Is the control panel set to
“Fer.”, “Kimchi” or “Fridge”?
•
In the control panel, select the
proper function for the type of foods
stored.
Is the control panel set to
Fresh Kimchi (MIN)?
•
Set it to Fresh Kimchi (MID) or
higher.
Please note that if you select Fresh
Kimchi (MAX), Kimchi may get
frozen.
Is the door or shelf closed
properly?
•
Close the door or shelf properly.
38
EN
38
Problem Possible Causes Solutions
There are white
fungus on the surface
of Kimchi.
Is the Kimchi container cover
open?
•
Close the cover completely. If the
cover does not close completely, the
Kimchi may contact with air to
generate oxidation yeasts (white
fungus).
Cover up the surface of Kimchi with
wraps or hygienic vinyl to store it for
a longer time.
The power is off for
some compartments.
Is the control panel set to “Top
Off” or “Mid/Bot. Off”?
•
Change to other settings.
Kimchi is soggy and
less chewy.
Did you add an adequate
amount of salt or seafood
seasoning when you made
Kimchi?
•
If you add too little salt then it will
look good but the enzyme contained
in the Kimchi will make it less chewy
and soggy.
Also, seafood seasoning can affect
Kimchi in terms of ripening it quickly
or making it soggy.
Your home appliance
and smartphone is
not connected to the
Wi-Fi network.
The password for the Wi-Fi
that you are trying to connect
to is incorrect.
•
Find the Wi-Fi network connected to
your smartphone and remove it,
then register your appliance on LG
SmartThinQ.
Mobile data for your
smartphone is turned on.
•
Turn off the Mobile data of your
smartphone and register the
appliance using the Wi-Fi network.
The wireless network name
(SSID) is set incorrectly.
•
The wireless network name (SSID)
should be a combination of English
letters and numbers. (Do not use
special characters.)
The router frequency is not 2.4
GHz.
•
Only a 2.4 GHz router frequency is
supported. Set the wireless router to
2.4 GHz and connect the appliance
to the wireless router. To check the
router frequency, check with your
Internet service provider or the
router manufacturer.
The distance between the
appliance and the router is too
far.
•
If the distance between the
appliance and the router is too far,
the signal may be weak and the
connection may not be congured
correctly. Move the location of the
router so that it is closer to the
appliance.
Memo