User manual Washer
Installation instructions
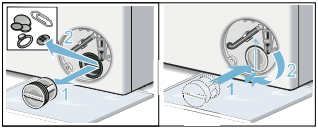
Remove the transport bolts
1. Remove drain hose from all brackets.
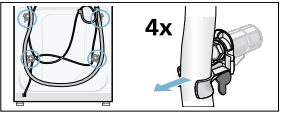
2. Loosen and remove all 4 transport bolts. Remove the sleeves. Take the power cable out of the brackets.
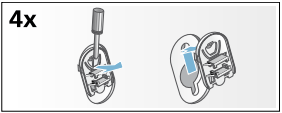
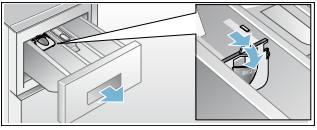
3. Place covers over the transport bolt holes.
Four plastic covers are provided in the small parts bag included with your washer. Separate these covers and install one in each hole where the transport bolts were removed.
Lock covers firmly by pressing on the snap hook.

NOTICE: Keep the assemblies together and store them for later use such as when moving the washer.
Water connections
Water supply hose connections
NOTICES
- The washing machine must only be operated with cold and hot (max. 140 °F/60 °C) tap water. Do not connect the appliance to the mixer tap of a pressurized hot-water boiler.
- To prevent water damage, the hot and cold water valves should be accessible when the washing machine is in place and should always be turned off when the washing machine is not in use.
- If installing the washing machine in a new building or a building in which the plumbing system was recently installed or upgraded, flush the lines before installing the washing machine to remove any sand, dirt or residue.
- To prevent leakage or water damage, follow the instructions in this chapter.
- If in doubt, have the appliance installed by an authorized technician.
Connect your washer to the wall faucets. Observe each of the following:
- Only use the new water supply hose shipped with your washer. Never use old used hoses.
- The water supply hoses must not be kinked, bent, or pinched causing hose damage or restricting water flow.
- The water supply pressure must be between 14,5 to 145 psi (1 - 10 bar) with a minimum of 2.2 U.S. gallons (8 liters) of flow per minute. A pressure regulator valve must be installed if the maximum water pressure is exceeded.
- Make sure the water supply faucet is easily accessible when the washer is in use. The faucet should be turned off if the washer is going to be unused for extended periods of time.
- Make sure rubber washers are in place at both ends of the water supply hose. Missing washers could cause leaks.
- The connection points are under full water pressure. Turn on the water tap and check for leaks.
- Periodically inspect the water supply hose and replace with a new hose if cuts, kinks or leaks are observed.
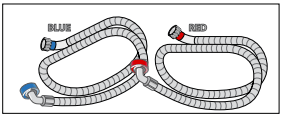
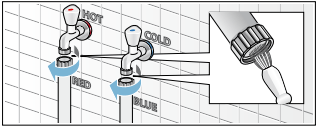
Water connection hoses
- red - Hot water-hose
- blue - Cold water-hose
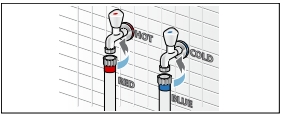
Attach this end to water tap. Hand tighten only.
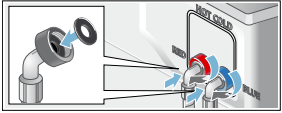
Attach this end of the hose to the back of the washing machine. Hand tighten only.
Water drain hose connection
NOTICES
- Do not reuse an old drain hose. Only use the drain hose and parts included with your washer.
- Do not kink or modify the water drain hose.
Height of drain point
Height difference between the floor and drainage point: max. 39 in. (100 cm).
Types of drainage hookups
Standpipe
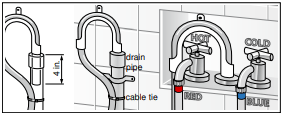
Attach the drain hose to the elbow included with your washer.
Position the elbow on the drain hose 4" from end of hose as shown. Insert this section of the drain hose into the drain pipe. Secure the elbow and hose with a nylon tie strap or the equivalent to keep the hose from coming out of the drain pipe during use.
Sink siphon
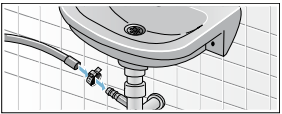
Secure the drain hose to the sink siphon using a Ø 0.9 - 1.6 in. (20-44 mm) hose clip (available from a hardware store).
Wash Basin
Note: APPLIANCE DAMAGE/DAMAGE TO TEXTILES If the end of the drain hose touches the discharge water (water drained from washer) it (the discharge water) can be sucked back into the appliance and may damage the appliance or textiles.
Make sure that:
- There is no stopper in the sink drain.
- The end of the hose does not touch the discharge water.
- The sink drain is free flowing and not partially clogged.
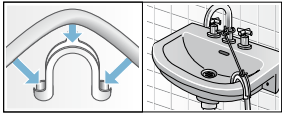
Attach the drain hose securely to the wash basin.
NOTICE: In any multi-story installation, the washer should be installed on a drained floor to prevent water damage to rooms below in the event of a leak.
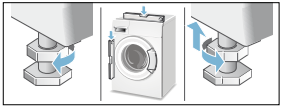
Leveling the washer
Importance of leveling the washer
Your new washer uses high spin speeds to remove water at the end of the wash cycle. It is important that your washer is level and that all four washer feet press with equal pressure against the floor. This will help assure the quietest, most vibration-free use of your washer.
Follow these steps:
1. Install the washer on a level and solid surface, preferably in a corner of a room.
2. If the floor is uneven (or unlevel) adjust the washer feet as required to level the washer. Do not place anything under the washer feet to help level the washer.
3. Extend the washer feet no more than is necessary. The more the feet are extended, the more vibration the washer will experience. Start with the washer feet turned all the way in and adjust each foot as necessary.
4. Use a bubble level to check the top of the washer to make sure it is level side to side and front to rear. 5. Press down on each corner of the washer top to make sure the washer doesn’t “wobble“. There should be no "give" or movement. All four washer feet should press equally against the floor. This is just as important as the washer being level to prevent vibration.
6. When the washer is level and does not wobble, lock the washer feet in place by tightening the locknuts against the washer bottom. Be sure to do this without changing the height of the foot (hold the foot while tightening the locknut).
Procedure for adjusting the washer feet:
1. After determining which washer feet need to be extended, have someone lift up on the washer slightly to take pressure off the foot to be adjusted.
2. Turn the grey plastic foot to extend it downward as far as necessary to raise the corner of the washer the correct amount to level the washer.
3. When the height of the foot is correct, use a 17 mm open end wrench to tighten the locknut against the washer bottom. The locknut should be tight against the bottom of the washer to lock the foot in place.
Transporting the washer
Before transporting the washer
1. Disconnect the washer power cord from the wall outlet.
2. Turn off the water supply to the washer.
3. Disconnect water supply lines from the tap.
4. Disconnect the drain hose from the drain location.
5. Install the transport bolt assemblies as shown in the following images.
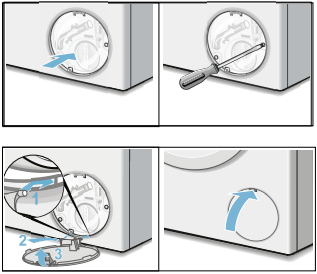
Remove the transport bolt hole covers
1. Remove all four transport bolt hole covers.
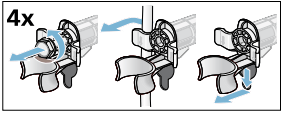
2. Pull the tip of the arrow on the cover out slightly to disengage the locking tab.
3. Rotate the cover counterclockwise to remove. Repeat for all 4 transport bolt hole covers.
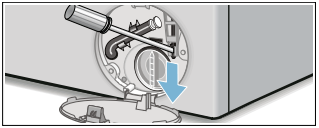
Insert the transport bolt assemblies
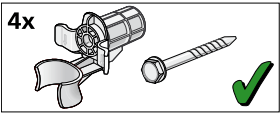
1. Each assembly consists of a plastic bushing and a bolt that extends through the bushings. Unscrew the bolt until the threaded end is flush with the end of the plastic bushing.
2. Insert the transport bolt and bushing assembly as shown. The metal housing slides around the bolt through the slot in the plastic bushing as the bushing is slid into place. The open part of the bushing slot should be facing the direction shown to allow the assembly to slide fully into place.
3. When the bolt is in place screw it in until the bolt threads engage the drum. Double check and ensure bolts are screwed into threaded holes and not into cracks or crevices. Repeat the process for all 4 transport bolt assemblies before tightening any all the way. Complete tightening all 4 bolt assemblies until they are each snug in place.

Getting to know your appliance
Control panel
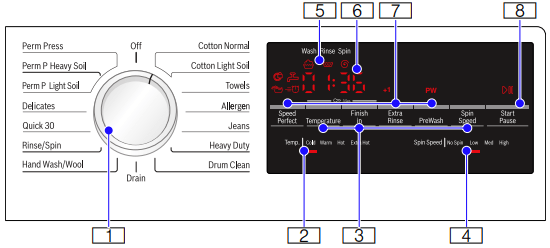
1. Program Selector
for selecting a cycle and on/off switch; turns in both directions.
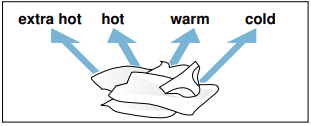
2. Selectable temperature ranges
Cold, Warm, Hot, Extra Hot
3. Temperature, Finish in, Spin Speed
To change the default cycle settings. Indicator lamp lights up if the setting is active.
4. Selectable Spin Speed ranges
No Spin, Low, Med, High
5. Cycle status sequence
6. 4 Digit Display
for settings and information
- Finish time: adjustable in 1h (hour) steps to 24 hours
- Cycle duration: e.g. 2:40 (hours:minutes)
7. SpeedPerfect  , Prewash PW, Extra Rinse +1, +2
Additional program settings.
Indicator on = setting is active.
8. Start/Pause 
- starts or pauses the selected cycle
- lit steady - cycle running, can be paused (if Child Lock is not activated)
- blinking - Options can be changed; cycle can be started; door is locked (water may be hot); cycle is in Pause mode
Operating Instructions
Before doing any laundry with your washing machine
Check to make sure your washer has been installed properly by following the installation instructions in this manual. -> Installation instructions; Page 12
Check the machine. Never connect the utilities (power or water) to or start a damaged machine! Contact customer service!
Check to be sure your household electrical system voltage and the voltage specifications on the washing machine rating plate correspond.
Check to be sure the washer hot and cold water supply taps are turned on.
Turning the washing machine on and off
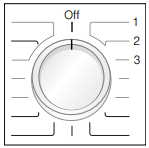
The rotating Cycle Selector turns the washer on as wash cycles are selected and off when the selector is later turned to the vertical Off position.
Before loading your first load of laundry
Your new washing machine was tested before leaving the factory. This process involves running various wash cycles. As a result, a small amount of water may remain in the tub and drainage system. Run a Drum Clean cycle with no laundry to clean the system before your first load of laundry.
First add 1 to 2 tablespoons of detergent to the mainwash chamber II. Then run the Drum Clean cycle.
Wait for the cycle to finish.
Using the cycle selector to choose a wash cycle
NOTICE: If the child lock feature is activated, you must deactivate it before you can set a cycle. -> Child lock; Page 23
Use the cycle selector to select the desired cycle. Turns in both directions.
The machine is switched on.
In the display field, the cycle duration for the selected cycle appears and the indicator lamps for the pre-set temperature and spin speed options light up.
Changing default cycle settings
You can use the default settings or change them to your desired settings.
Touch the appropriate button until the desired setting is displayed.
The settings or options are active when the related indicator is lit. There is no need for additional confirmation on your part. The settings or options are not retained after the appliance is switched off (all are set back to default automatically).
-> Program selection table; Page 27
-> Default Program and Option settings; Page 29
Selecting additional cycle settings
By selecting additional settings, you can adjust the washing process to better suit the items you are washing.
The settings can be selected and deselected depending on the cycle progress.
The indicator lamps of the buttons light up if the setting is active.
The settings are not retained after the appliance is switched off.
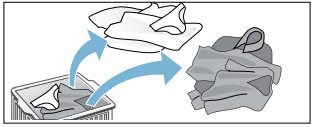
Loading the laundry
Loosen the laundry being loaded and mix small and large items
Unfold the sorted items and place them loosely in the drum. Mix small and large items to help them better distribute in the drum during the spin cycle.
Tip: Do not exceed the maximum load recommended for the type of wash. Overloading will cause poor wash results and will cause wrinkles.
Recommended Load Size
Recommended maximum load size can be found:
->Standard features and helpful information; Page 9
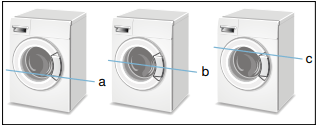
a 1/3 Load - woolens, delicates, silk
b 1/2 Load - cotton, synthetic fabrics, or knitted textiles
c Full Load - cotton and linen
Tips
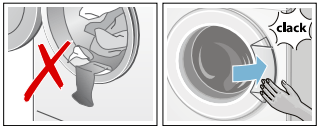
- After loading, close the door carefully so as not to trap any items between the door and the rubber seal. The door should close easily and should not be forced to close.
- Foreign objects left in the drum may damage laundry. Before inserting any laundry, check to make sure no foreign objects are in the drum.
Filling the detergent and additives compartments
NOTICE: Damage to the appliance
Detergent and laundry pre-treatment aids (e.g. spot remover, pre-wash sprays, etc.) can cause damage if they come into contact with the surfaces of the washer. Do not let these substances touch the surfaces of the washer. If necessary, wipe off spray traces and other traces/drops immediately with a soft cloth.
Measuring
Measure out the detergent and laundry care products according to:
- the water hardness; consult your water utility company for details
- the manufacturer's instructions on the packaging
- quantity of laundry
- amount of soiling (heavy, normal, light)
Filling
NOTICE: To prevent build up and possible clogging of water ways, dilute thick fabric softener or other laundry care products with water.
Pour the detergent and laundry care product into the appropriate chambers:
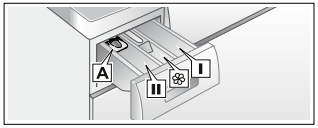
Liquid detergent insert A: for liquid detergent
Pre-wash chamber I: Detergent for pre-wash
Softener chamber  :
:
Fabric softener, starch
Do not exceed max
Tips
- Do not pour fabric softener directly into the wash load.
- Fabric softener is automatically dispensed during the last rinse cycle.
- Dilute concentrated or thick fabric softener or fabric conditioner with water (2/3’s water) before pouring it into the dispenser (prevents blockage of overflow).
Main-wash chamber II
Detergent for main wash, water softener, spot remover,
NOTICE: . Do not use Chlorine based or color safe bleaches as these could damage the washer. Detergents and/or solid bleaching agents based on Oxygen (like Sodium Percarbonate) are safe to use.
1. Open the detergent dispenser tray.
2. Add detergent or additive.
3. Avoid overfilling the compartment to prevent early dispensing.
4. Close the detergent dispenser tray completely before starting the wash cycle.
Tip: DO NOT operate the washer without the detergent compartment in place and fully closed.
Liquid detergent insert
To measure liquid detergent:
1. Pull out the detergent dispenser tray. Press down on the insert and remove the drawer completely.
2. Push the liquid detergent insert forward and down as shown.
3. Reinsert the tray into its compartment.
NOTICE: Do not use the liquid detergent insert with geltype detergents and powdered detergents or for cycles with pre-wash and selected "Finish in" time.
Starting the cycle
Touch the Start/Pause button. Indicator lamp lights up and the cycle starts.
NOTICE: If you want to protect the cycle against inadvertent adjustment, select the child lock.
-> Child lock; Page 23
During the cycle, the display field indicates the "Finish at" time and, after starting the washing cycle, the cycle duration and the symbols for the cycle progress.
Child lock
You can secure the washer against inadvertent changing of the set functions. To do this, activate the child lock after cycle start.
To Activate/Deactivate, touch and hold Temperature and Finish in buttons for approximately 3 seconds. The D symbol appears in the display.
 lit steady: The child lock is active.
- blinking: The child lock is active and the cycle selector has been adjusted. To prevent a cycle interruption, set the cycle selector back to the initial cycle. The symbol lights up again.
NOTICE: The child lock can remain activated until the next cycle start even after switching the machine off. Then you must deactivate the child lock before cycle start and if necessary activate it again after cycle start.
Selecting a different cycle
If you have inadvertently started the wrong cycle, you can change this as follows:
1. Touch Start/Pause.
2. Select another cycle.
3. Touch Start/Pause. The new cycle starts from the beginning.
Pausing/Adding a garment to the cycle
Pausing the wash cycle can be useful for several purposes.
e.g. for soaking -> Soaking; Page 28
Touch Start/Pause.  appears on the display. Wash load will soak in water until continued by touching Start/Pause.
For adding a garment after the cycle begins.
1. Touch Start/Pause.
2. Open door carefully and add or remove laundry item. Note: You can do this as long as the Start/Pause indicator flashes and it is safe to do so.
3. Close door.
4. Touch Start/Pause. The cycle continues.
NOTICE: If the cycle is paused but the door will not unlock it could be for safety reasons (high water level, water temperature or drum speed).
Cancel cycle
For cycles with a high temperature:
1. Touch Start/Pause.
2. Cool the laundry off: Select Rinse.
3. Touch Start/Pause.
For cycles with a low temperature:
1. Touch Start/Pause.
2. Select Drain.
3. Touch Start/Pause.
Cycle end
End appears in the display field and the Start/Pause button indicator lamp is off.
If this symbol  appears in the display, the washer has detected too much foam and it automatically adds an additional rinse to remove the foam.
NOTICE: Use less detergent the next time you run the washer with the same load.
Removing laundry/switching the appliance off
1. Open the front door of the washer and remove the laundry.
2. Turn the cycle selector to the Off position. Appliance is switched off.
3. Turn off the water tap.
NOTICES
- Do not leave any laundry in the drum. It can shrink or become discolored by the next laundry.
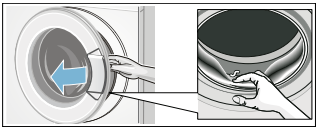
- Remove any remaining items from the drum and rubber gasket.
- Leave the front door and detergent drawer open so that any remaining water can dry.
- Always wait for the end of the cycle; otherwise the appliance may still be locked. If locked, switch the appliance on and wait until it unlocks.
- If at the end of the cycle the display is not lit up, the energy saving mode is active. To see display, Touch any button.
Signal
You can change the following settings:
- volume for button signals
- volume for indicator signals
To change these settings always activate adjustment mode first.
Activate adjustment mode
1. Select Cotton Normal on Position 1. The appliance is on.
2. Hold down Start/Pause and turn the Program Selector to the right (Position 2). Release Start/Pause button.
Adjustment mode is now activated and the default volume for indicator signals appears in the display.
Changing the volume
You can set the volume by touching the Finish in button with the program selector in one of the following positions:
- Position 2: for indicator volume
- Position 3: for button signals volume

0 = off, 1 = soft,
2 = mid, 3 = loud,
4 = very loud
Quit adjustment mode
Turn the Cycle Selector to Off position. The settings were saved.
Laundry
LaundryPreparing the laundry
NOTICE: Damage to the appliance/fabrics
Foreign objects (e.g. coins, paper-clips, needles, nails) may damage the laundry or components in the washing machine.
Therefore, note the following tips when preparing your laundry:
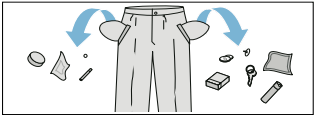
- Empty all pockets to ensure no loose debris (coins, keys, other hard objects) are placed in the washer drum.
- Close any fasteners (such as zippers and hooks) that could cause laundry to catch or become entangled.
- Remove any foreign objects or non-washable parts.
- Turn trousers and knitted wear inside out prior to washing.
- Place small items (such as socks and handkerchiefs) and underwired bras into a mesh bag prior to washing.
Sorting the laundry
Sort laundry items according to color, degree of soiling and recommended wash temperature range.
Wash white items separately from colored items.
Otherwise, white items may tend to become grey.
Observe laundry care labels
Check the care labels on each laundry item prior to washing. They provide valuable information as well as limitations about the laundry process (temperature etc.) to help you choose an appropriate cycle.
Determining degree of soiling
Light soiling
No visible soiling or stains, but may have absorbed some odor. This could include light weight summer clothing such as T-shirts, shirts, or blouses worn only once. Also to freshen bed linen or guest towels.
Normal soiling
Visible soiling and/or a few light stains. This could include clothing such as T-shirts, shirts, or blouses that have been sweated in or worn several times. Also tea towels, hand towels or bed linen used for up to one week or more. Curtains without stains that have not been washed for up to a half year.
Heavy soiling
Visible soiling and stains. This could include kitchen towels, fabric napkins, baby bibs, children’s outer clothing or football jerseys and shorts stained with grass or dirt. It could also include working clothes such as overalls and jeans and other clothing worn for outside work and activities.
Identifying and treating stains
 Oils and grease: normal body skin oil, cooking oils/fats, sauces, mineral oil, or wax (containing fat/oil). Treatment: scrape residue from fabric. Pretreat. Wash using hottest water safe for the fabric. For heavy stains, apply non-flammable dry cleaning fluid to back of stain, replacing towels under stain frequently. Rinse thoroughly and wash using hottest water safe for the fabric.
 Beverages and juices: tea, coffee, red wine, fruit, vegetables. Treatment: Pretreat stain. Wash using cold water.
 Proteins and carbohydrates: blood, egg, milk, starch. Treatment: Rinse immediately in cold water. If stain remains, soak in cold water with an enzyme prewash.
 Soot, earth, sand (pigments), red clay (such as soiling of tennis clothing). Brush off residue if present. Pretreat or soak with a laundry product containing enzymes.
Removing stains
- Remove/pretreat stains as soon as possible after they have occurred.
- Dab with a soapy solution. Do not rub.
- Select an appropriate wash cycle and wash the item. Several washing cycles may be required in order to remove stubborn or dried-in stains.
Starching
NOTICE: Laundry must not be treated with fabric softener.
Starching is possible in all wash programs if liquid starch is used. Measure starch into compartment in accordance with the manufacturer's instructions (clean first if necessary).
Dyeing/bleaching
Dye should only be used in normal household quantities. Salt may damage stainless steel. Always follow the dye manufacturer's instructions.
Do not use the washing machine to bleach clothes.
Soaking
1. Pour soaking agent/detergent into compartment  in accordance with the manufacturer's instructions.
2. Turn the program selector to Cotton Normal Cold program.
3. Touch Start/Pause.
4. After approximately. ten minutes, touch Start/Pause.
5. After the required soaking time, touch Start/Pause again to continue or change the program.
NOTICES
- Load laundry of the same color.
- No additional detergent is required; the soaking solution is used for washing.
Default Program and Option settings
At the factory, temperature and spin speed options, and cycle duration ("Finish in" time) are pre-set for all cycles.
After selection of the cycle, these values are displayed in the display field.
You can change the default settings as follows.
Changing the temperature range
Before and during the cycle, you can change the default temperature range depending on the cycle progress.
Press the appropriate button until the desired setting is displayed.
The maximum temperature range that can be set depends on the cycle selected.
Changing the spin speed range
Before and during the cycle, you can change the spin speed range depending on the cycle progress.
Touch the appropriate button until the desired setting is displayed.
No Spin: This option eliminates the final spin and the load remains saturated with the final rinse water. The pump is activated to remove all residual water. -> Program selection table; Page 27
Finish in
The program end (Finished in) time can be set in one hour increments to a maximum of 24 h (hours). After selecting the desired washing program (at the dial) but before touching the Start button, touch the Finish in button until the desired time is displayed, e.g. 8 h, then touch the Start button to start the washer.
NOTICE: The cycle duration is included in the set Finish in time.
Here is an example of a 2hr:30min cycle time and an 8 h Finish in time.
8 h is displayed (until the Energy-Saving mode activates) and counts down (approximately 5hr:30min) until the washing cycle begins (at 2hr:30min) then the cycle duration 2:30 is displayed and began. Total time approximately 8 hours.
Additional Program Option settings
Extra Rinse +1, +2
This feature is helpful for locations with very soft water or to generally improve rinsing results. It allows up to 2 additional rinse cycles to be added to selected programs and will increase program time.
Prewash PW
For heavily soiled washing. Pour 1/3 of normal detergent amount into pre-wash chamber I and remaining 2/3 into main wash chamber II.
SpeedPerfect 
For washing in a shorter time with a washing result comparable to that of the standard program.
Note: Do not exceed the maximum load. -> Program selection table; Page 27
Cleaning and maintenance
Your washer is designed to give you years of service. Observe the following instructions to maintain and protect your washer and keep it in top operating condition.
Cleaning the housing and control panel
As required, you may clean the washer housing and control panel.
- Use hot soapy water or a mild (non-abrasive) cleansing agent.
- Dry with a soft towel.
- Remove residue immediately.
- Do not use high pressure spray.
Cleaning the drum
Metallic debris left in the drum can produce rust spots on the drum. Never use steel wool to try to remove these. Use a chlorine-free cleaning agent and follow the manufacturer’s instructions.
Descaling the washer
Provided that you use correct amounts of detergent with your wash loads, descaling is not necessary. If descaling the washer drum does become necessary, please follow the descaling product manufacturer’s instructions.
Small amounts of descaling agent can be used to remove white spots on the washer drum caused by lime or mineral deposits or small amounts of rust caused by metal objects left in the drum.
NOTICE: Descaling agents contain acids which may attack parts of the washing machine and may discolor the laundry
Cleaning the detergent dispenser tray
If there is a buildup of residual detergent or additives, or if the softener compartment is not rinsed out well enough, it may be helpful to clean the dispenser.

1. Open the detergent dispenser tray fully. Press down on the drawer catch (1) and pull the tray (2) from the washer housing.
2. Remove the insert (3) by grasping it and pulling it upwards from the detergent dispenser tray.
3. Clean the insert and the detergent dispenser tray by holding it under warm running water. Lightly wipe away any remaining detergent residue.
4. Attach the insert and slide the detergent dispenser tray back into place and close the tray securely.
Tip: Do not operate the washer without the detergent dispenser tray in place. Always keep the tray completely closed.
Cleaning the water inlet strainers
If the washer water supply slows or stops completely, the water inlet strainer may be blocked. Cleaning is recommended every 6 months in any event to reduce chances of valve blockage in areas using hard water.
Release the water under pressure in the supply hoses
Normal water pressure in your home will cause some water to leak when you remove the water supply hose from the back of the washer. You can minimize this by first de-pressurizing the hoses.
- Turn off the water tap.
- Turn the cycle selector to any wash cycle (not to Drain or Spin).
- Touch Start/Pause and allow 30 seconds to pass.
- Turn the cycle selector to the Off position.
This should reduce the water pressure on the water supply hose.
Clean the strainers at the water tap end of the hose
1. Remove the hose from the tap.
2. Rinse the strainer under running water. Look at the strainer to see if any visible debris is still present. Rinse again if necessary to remove the debris.
3. Reconnect the hose to the tap.
Clean the strainers at the washer end of the hose
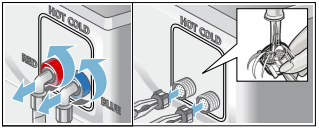
1. Remove the hose from the inlet on the back of the washer.
2. Using narrow pliers, grasp and pull the strainer from the inlet port.
3. Rinse the strainer under running water.
4. Reconnect the hose to the back of the washer and turn on the water tap. Check to see if water flows by starting a warm water wash cycle.
NOTICE: Check for leaks to be sure the rubber washers are seated at both ends of the water supply hose and the connections are properly tightened.
Cleaning the drain pump
It may be necessary to clean the washer drain pump if the washer fails to drain (sound of water being pumped from the washer cannot be heard when the washer should be draining and other nearby drains, such as a sink, are draining properly).
The washer pump can become blocked by loose debris (a good reason to check the drum and remove any visible debris after each load.) Fabrics that give off large amounts of fluff may also cause blockage.
To access the washer drain pump, the service cover must first be removed (see steps below). With the service cover removed, proceed as follows:
1. If the washer has not been drained, try to drain it now. Turn the program selector to the Drain and touch the Start/Pause button. Wait a few moments to let the cycle drain the water from the drum. If the pump is totally blocked, the water will be unable to drain and the cycle will end.
2. Shut off the tap so that no more water flows in and has to be drained. Switch the appliance off. Unplug the power plug.

3. Open and remove the service cover.

4. Loosen the screws and remove the protective film.

5. Use the pull-out drain hose located in the pump access opening to drain the remaining water into a suitable container (up to 5.3 U.S. gallons/20 liters of water may be drained). Pull the sealing cap from the hose and lay the hose over the side of the container and allow the water to finish draining from the drum. When finished, replace the sealing cap into the end of the hose and restore the hose to its storage location.
6. Turn the pump cover counterclockwise to remove it. A small amount of residual water may flow out when the cover is removed.
Clean the interior of the pump housing, removing any debris or foreign objects. Check to be sure the impeller wheel at the back of the pump housing can now turn freely.
Remove any lint, debris or detergent residue from the threads of the pump cover and the pump cover housing.
Replace the pump cover by screwing tightly into position. Handle must be vertical.
7. Reinstall the protective film over the pump access using both screws.
8. Snap the service cover in place at the hinges and close it.Wipe up any spilled water.
NOTICE: In order to prevent detergent from flowing unused into the drain during the next wash cycles: pour 0.26 U.S. gallons/1 liter water into the chamber II. Turn the cycle selector to the Drain and touch the Start/Pause button.
Troubleshooting
In the event of a power interruption the program will continue running when the power supply has been restored.
If the washer door must be opened and the normal door unlock procedures do not work, the emergency door lock release rod can be actuated to open the door.
1. Turn the washer off by rotating the cycle selector to the Off position. Any running program will then be cancelled. Disconnect the mains plug.
2. Allow the water in the drum to cool off.
3. Allow the washer drum to come to a stand still (no longer spinning).
4. Before opening the washer door, perform the drain procedure included in the pump maintenance section. -> Cleaning the drain pump; Page 31
5. Loosen screws and remove the protective foil.
6. The washing machine door can then be opened. Pull the emergency release downwards with a tool and release.
7. The door can now be opened.
General Troubleshooting
If you encounter a problem, consider the suggestions and instructions below before you call customer service.
If repairs are necessary and you cannot eliminate the fault with the aid of the table below, follow these steps:
- Turn the cycle selector to Off.
- Disconnect the washer from the power outlet.
- Turn off the water taps.
- Call Customer Service.
-> Customer Service; Page 4
NOTICE: The troubleshooting items listed below can help you resolve minor issues with your washer quickly and without the necessity of waiting for a service call.
Service calls for issues that could have been solved by using this table may not be covered under the warranty. Please rule out any of these issues before calling customer service.
Determing the Problem
Washer door cannot be opened.
Deactivated Child lock (touch and hold Temperature and Finish in for approximately 3 seconds).
If a cycle is interrupted by a power failure, it will resume when the power is restored.
- Cycle is running, or water level is too high and/or too hot.
Wait until the cycle ends.
- Electric power cord has become loose or unplugged.
Make sure the electric cord is securely plugged in.
- Program selector turned to Off before end of cycle.
Turn the program selector to a cycle.
- Emergency door lock released is activated.
-> Emergency door lock release; Page 33
Door still cannot be opened, even after turning the washer Off and back on again.
Deactivated Child lock (touch and hold Temperature and Finish in for approximately 3 seconds).
- Door is locked for safety reasons (high water level, temperature of water hot, or high drum speed (drum is turning).
Wash cycle time is increased.
- Your washer utilizes sensors to monitor certain characteristics of the wash load. Increases in wash cycle time could be due to:
Solutions are based on the specific reason the wash time has been extended.
- Excess suds.
 displays at end of cycle
Use less detergent.
- The automatic unbalanced load detection system spins the laundry several times to ensure even distribution.
Always load the washer with a mixture of large and small wash items (easier to distribute in the drum).
Cycle does not start - Start/Pause flashes.
- Start/Pause button not touched / selected?
Touch the Start/Pause button to start the cycle.
- Washer door is not closed properly.
Check if laundry is caught in the door. Close the door until a click is heard, the cycle should start.
Cycle does not start - Finish in-Time is displayed.
- Cycle ending time has been selected and activated.
Wash cycle will begin at proper time to complete at the selected finish time.
Cycle does not start - symbol flashes.
Deactivate Child lock (touch and hold Temperature and Finish in for approximately 3 seconds).
Detergent residue remains in the detergent dispenser.
- Dry detergent may have been damp or lumpy.
Clean and dry the detergent dispenser.
- Excess liquid detergent may have been added.
See Adding the correct amount of HE detergent to determine proper detergent usage.
- Use the dosing cup for liquid detergent when dosing powder detergent. Powder detergent may have been damp or lumpy.
Clean and dry the detergent dispenser.
Water does not appear to be coming into the washer, or detergent is not washed away
Select Start/Pause.
- Water taps not turned on.
Turn on water taps.
- Supply hose kinked or pinched (reduce flow).
Eliminate the cause.
- Water supply hose strainers clogged.
Clean the water inlet strainers.
Eliminate the cause.
Water cannot be seen in the drum.
- The water level in your high efficiencey front load washer is below the visible part of the drum, this is normal.
No action needed.
Water has not drained completely.
- Suds may be excessive (usually due to too much detergent or nonHE detergent being used).
Use less detergent for future loads. Be sure to use only high efficiency HE-detergents.
Check and clean the drain pump, water drain hose and/or the drain pipe.
- Drain hose or drain pipe is blocked.
Clean drainage pipe and/or drainage hose.
Water is coming out from underneath the washer.
- Water supply hose is leaking: is not screwed on tight at both ends, or rubber washer not placed in hose.
Eliminate the cause: tighten the hose (by hand at the washer end), check for rubber washer in place.
Check the drain hose, be sure that it is on the washer securely with the clamp in place; may need to replace the drain hose if leaking continues.
Foam comes out of the detergent dispenser drawer.
The cyle status sequence Washflashes in the display.
- Too much detergent was used, or a non-HE detergent was used; pump was not able to pump out the increased suds. displays at end of cycle.
Immediate fix: mix 1 tablespoon of fabric softener with 1/2 liter (1 pint) of water and pour this mixture into the detergent compartment (not with waterproof fabrics).
To prevent: use less detergent for future wash loads.
Repeated spinning.
- The Unbalanced Load Detection system is attempting to balance the load through repeated spins.
To prevent: always load the washer with a mixture of large and small wash items (easier to distribute in the drum).
No spin took place (laundry is still wet).
Add more laundry.
- Large items may have become entangled in the drum and could not be distributed by the Unbalanced Load Detection system; spin cycle therefore canceled for safety reasons.
To prevent: always load the washer with a mixture of large and small wash items (easier to distribute in the drum).
- Excessive suds: too much detergent was used, or a non-HE detergent was used. displays at end of cycle.
Immediate fix: mix 1 tablespoon of fabric softener with 1/2 liter (1 pint) of water and pour this mixture into the detergent compartment (not with waterproof fabrics). To prevent: use less detergent for future wash loads.
Detergent residue on the laundry
- Some phosphate free detergents contain water insoluble ingredients that may appear as light spots on the laundry.
Brush off when laundry is dry or execute the program Rinse.
System shakes or shudders when spin speed increases.
- The washer drum suspension system shifts during spinning as the speed increases. This may result in a slight shaking of the washer during the spin speed transition.
Mix small and large laundry items together in the load to minimize this effect. Check to be sure the washer is level and all four feet press equally against the floor. Transport bolts removed? -> Remove the transport bolts; Page 15
 flashes
- Door not closed properly.
Check to be sure no laundry is caught in the washer door. Close the door securely.

- Cold water tap not turned on.
Turn on the cold water tap.
- Supply hose for cold water kinked or pinched closed.
Eliminate the cause, replace the hose if damaged.
- Strainer in water supply hose clogged.
Clean the water inlet strainer.
-> Cleaning the water inlet strainers; Page 30
- Cold water pressure too low.
Eliminate the cause.
E:93 (Displayed at end of first cycle without hot water. Not displayed in subsequent cycles if hot water is not available. Reset after second cycle with hot water)
- Hot water tap not turned on.
Turn on the hot water tap.
- Supply hose for hot water kinked or pinched closed.
Eliminate the cause, replace the hose if damaged.
- Hot water pressure too low.
Eliminate the cause.
- Strainer in water supply hose clogged.
Connect both supply hoses (hot and cold water) for hot water appliances. -> Water connections; Page 16
E:32 (alternating display with END when program is finished)
- Not a fault – the unbalanced load detection system has interrupted the spin cycle because the laundry is unevenly distributed.
Distribute small and large items of laundry evenly in the drum. If necessary, start an additional spin program.
E:18
- Too much detergent used or nonHE detergent used. displays at end of cycle.
Use less detergent for future loads. Only use HE detergents. -> Your washing machine is intended for; Page 5
- Pump is blocked (obstructed).
Clean the washer drain hose and/or the drain pipe. May need to perform pump maintenance to clear blockage. -> Cleaning the drain pump; Page 31
Others
Turn off machine, wait 5 seconds and turn on again. If the display shows again, call customer service.