ANT751
Outdoor Antenna
User’s Guide
Step 1: Unpack
Remove the antenna and the hardware bag from package. Make sure the
following parts are in the package:
• Antenna
• Mountingpipeandfoot
• Hardwarebag
U-Bolt (2)10/32”Hexnuts
Mast Clamp Insert (5)1/4”HexNuts
(2) Black Plastic Plugs (2) 5/8” Bolts
Matching Transformer 2 1/2” Screw
(4) 7/16” Washers
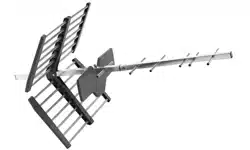
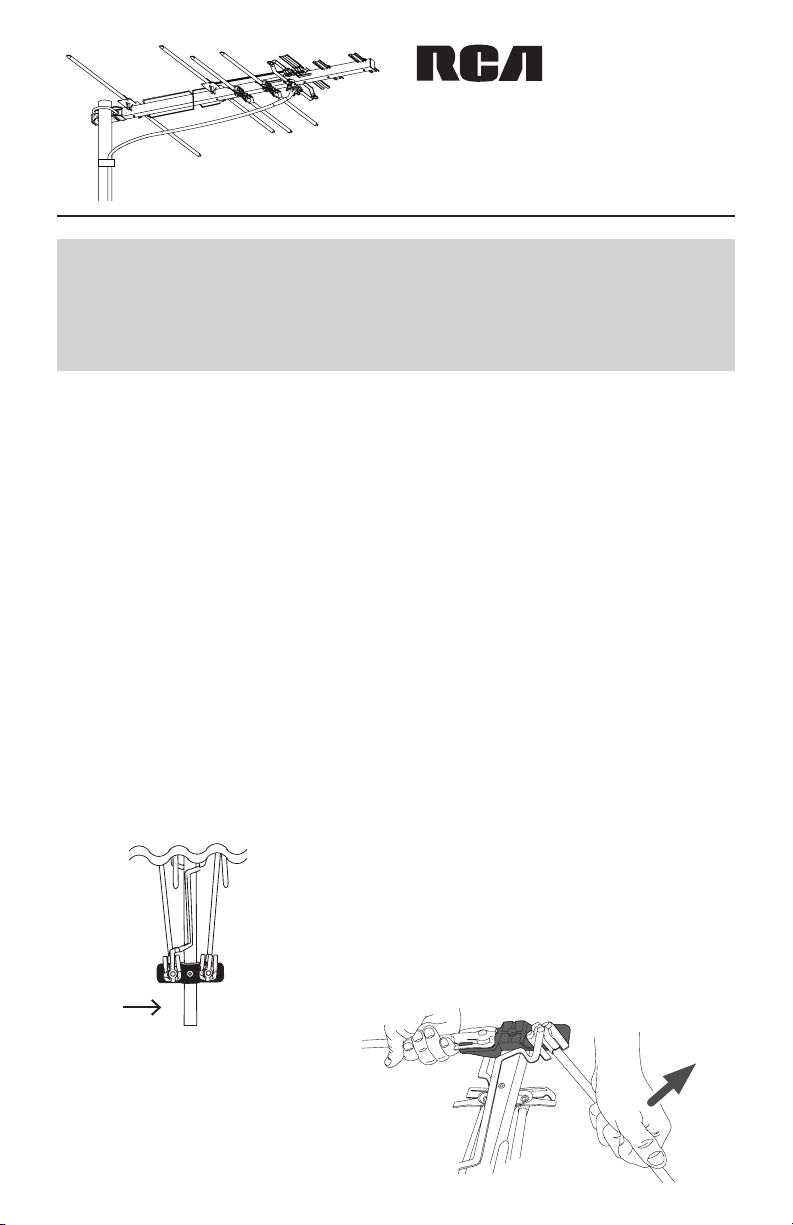
Starting from the rear of the antenna, unfold
the elements on both the top and bottom of the
antenna until they lock into place (as illustrated
below). Make sure the elements are flat and
parallel to each other when you’ve finished.
BEFORE YOU START!!!
PleasereadtheIMPORTANTSAFETYINFORMATIONsheet
included in this package.
Step 2: Unfold the antenna’s elements
Rear
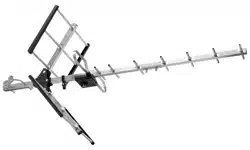
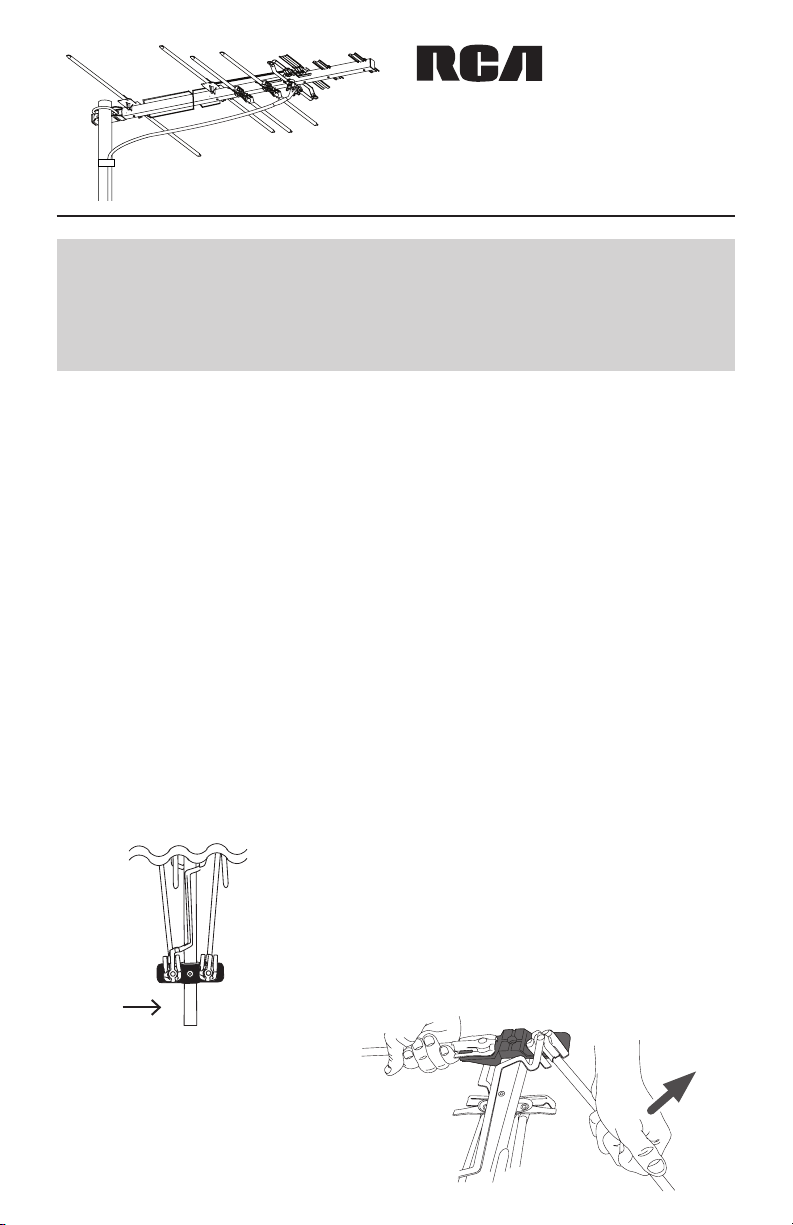
Step 3: Unfold the tetrapole
Make sure the tetrapole locks into place. Do
not attach the downlead yet!
Note: VHF elements have been removed from this
illustration to show the tetrapoles more clearly.
Tetrapole
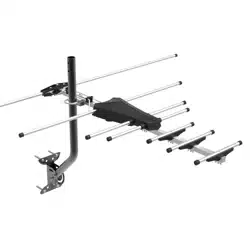
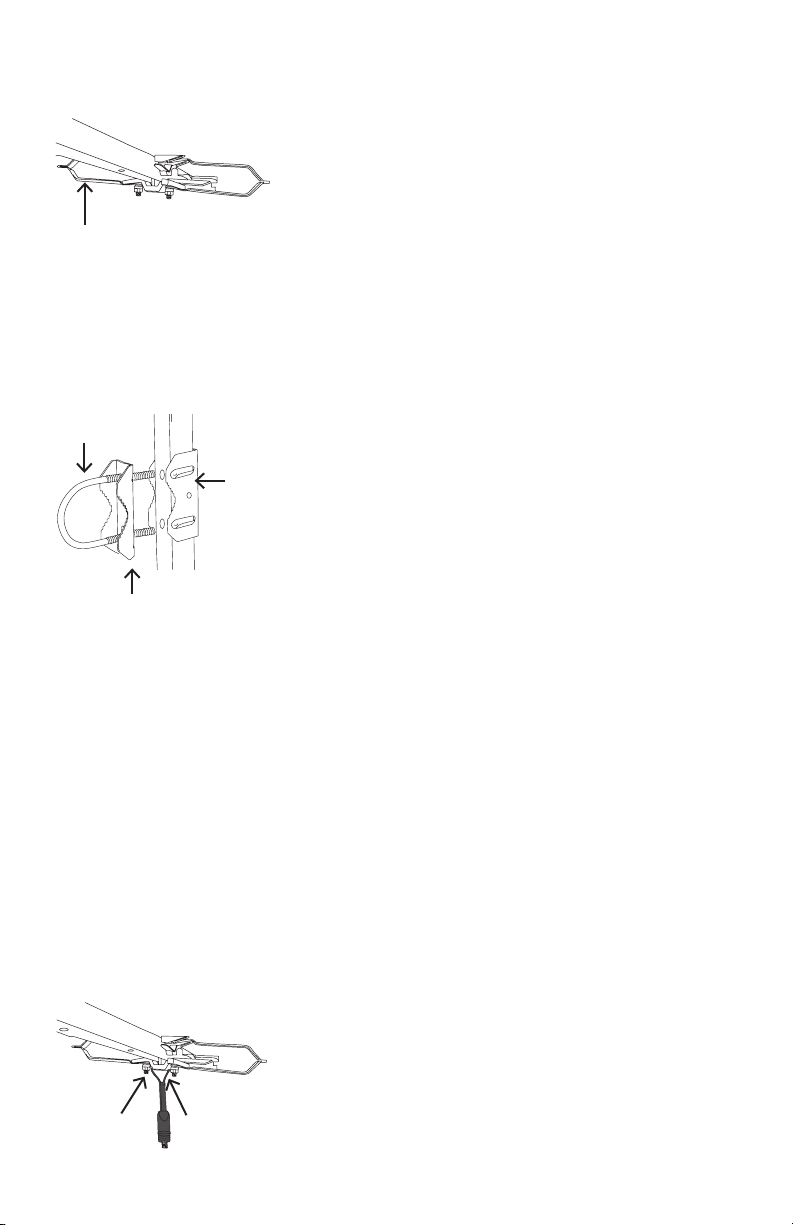
Step 4: Attach the mast clamp insert
FindtheU-boltandmastclampinsert(see
the illustration to the left). Put the U-bolt
into the mast clamp insert with the teeth of
the mast clamp insert facing the closed end
of the U-bolt.
Insert the U-bolt into the mast clamp on
the antenna and loosely thread the 1/4”
hexnutsontotheU-bolt.Theteethon
the mast clamp and the teeth on the insert
should be facing the same direction.
Donottightenthehexnutsyet.
Mast
clamp
U-bolt
Mast clamp insert
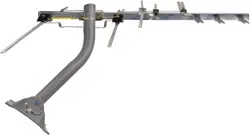
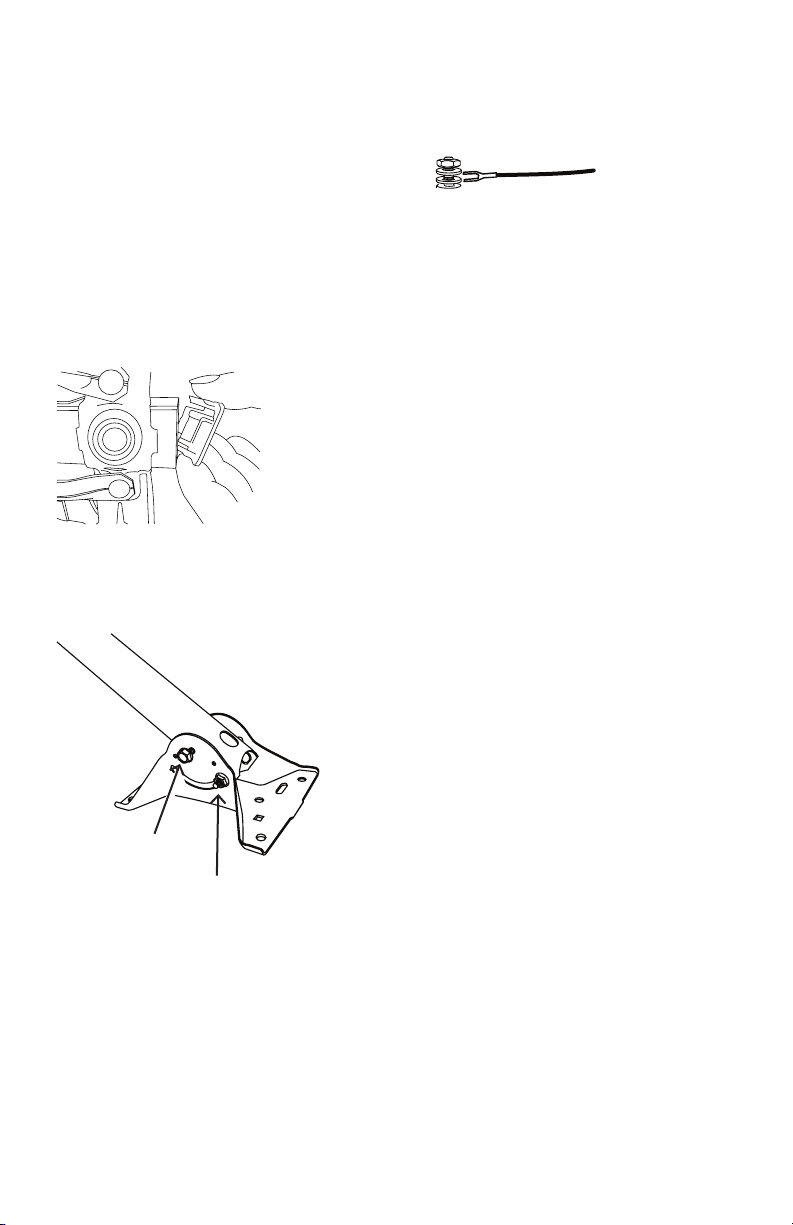
Step 5: Install the transformer and coaxial
downlead
Attachthetransformertothecoaxialdownlead(notincluded).
Findthe10/32”hexnutsandwashersinyourhardwarebag.
Transformer
lead
Tetrapole
stud
Use them to attach the transformer to the
bottom of the antenna at the studs on
tetrapole.
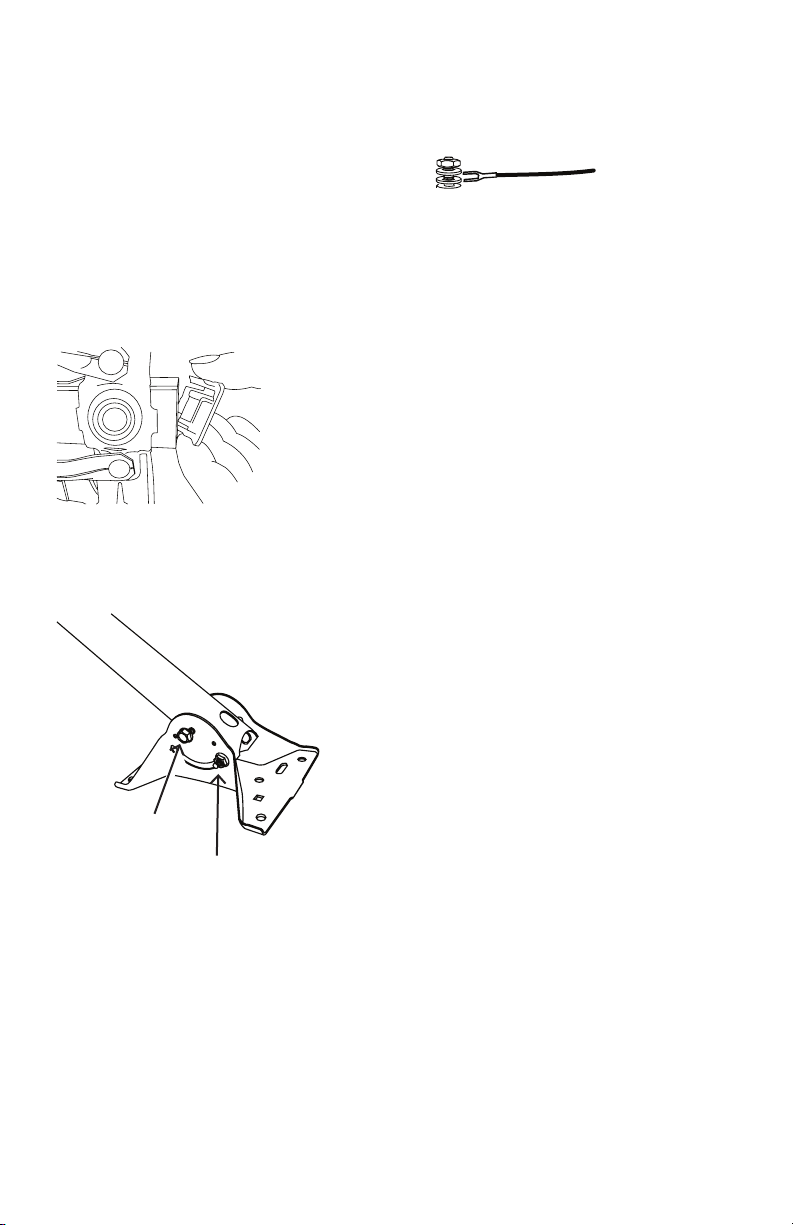
Make sure to place the leads of the matching
transformer between the two washers on
each post as shown here.
Finally,tightenthehexnutstosecuretheleads.
Step 6: Insert end caps
Insert the plastic end caps in the ends of the
booms as shown here. Use a rubber mallet to
gently tap them into the antenna booms to
secure them.
Step 7: Attach the mounting pipe to the foot
Findtheendofthemountingpipewith
holes on the sides for screws. Insert
this end into the middle of the foot as
illustrated here. Then insert the 2-1/2”
screw through the foot and pipe as shown.
Screwthe1/4”hexnutontotheendofthe
screw to hold the pipe and foot together.
Don’t tighten the nut completely yet.
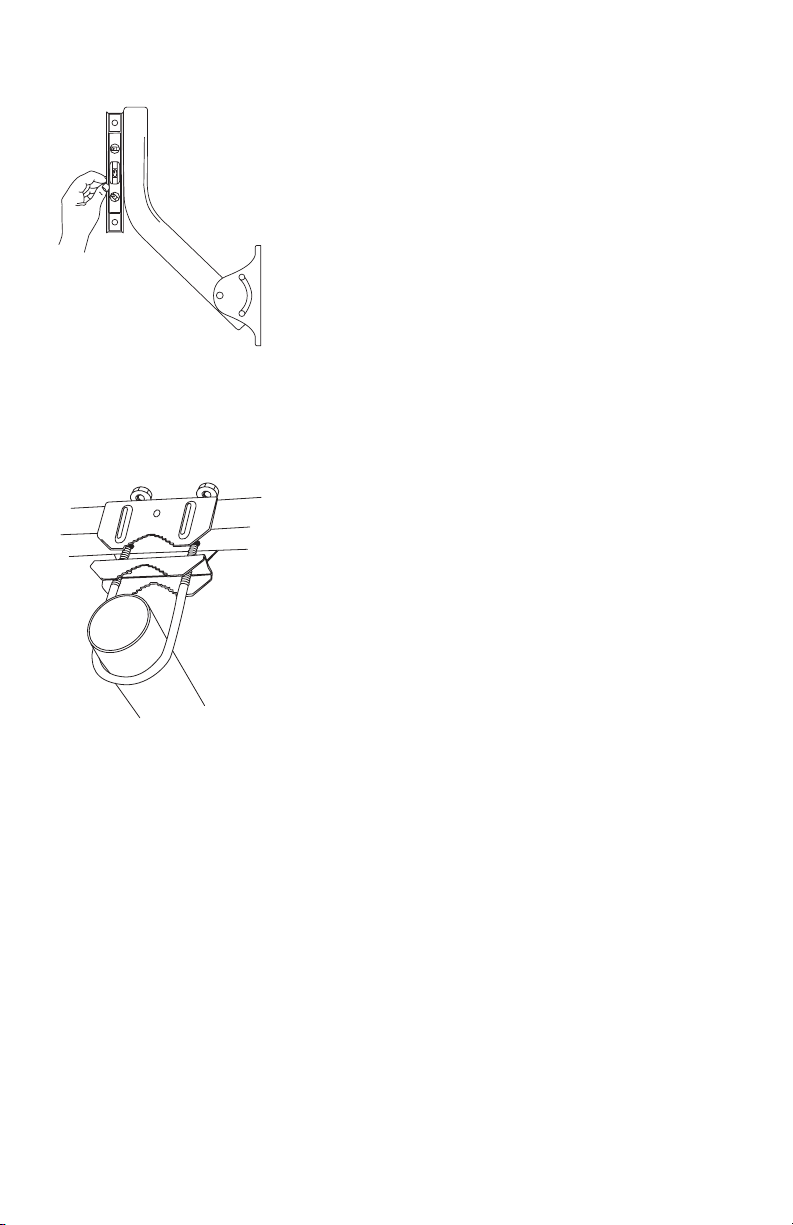
Findthesquareholesoneithersideof
the bottom of the pipe. Raise the pipe
slightly and insert a 5/8” bolt through
these holes and out of the side of the
foot. Install the nuts on the outside
of the foot on the 5/8” bolts to hold
the pipe in place. Don’t tighten the nuts
completely yet.
2 1/2”
screw
Hex nut on
5/8” bolt
Step 9: Attach the antenna to the mast
IMPORTANT: Before you attach the antenna
to your mast, visit www.antennaweb.org to see
the locations of your local broadcast towers. This
information is crucial in pointing your antenna
correctly.
Loosen the nuts on the mounting clamp
U-bolt.
Point the small end of the antenna toward the
stations you want to receive.
Slide the U-bolt over the mast.
Point small end of antenna toward your local
broadcast towers. Tighten the mast clamp and
nuts securely.
Step 8: Mount the foot and pipe
Secure the foot to its permanent location.
Adjusttheendofthepipesothatitis
perpendicular to the ground. Tighten the
hexnutstoholdthepipeinplace.
End of the
pipe should be
perpendicular
to the ground
(plumb)

12 Month Limited Warranty
AudiovoxElectronicsCorporation(the“Company”)warrantstotheoriginalretailpurchaser
of this product that should this product or any part thereof, under normal use and conditions,
be proven defective in material or workmanship within 12 months from the date of original
purchase, such defect(s) will be repaired or replaced (at the Company’s option) without charge
for parts and repair labor. To obtain repair or replacement within the terms of this Warranty,
the product along with any accessories included in the original packaging is to be delivered
with proof of warranty coverage (e.g. dated bill of sale), specification of defect(s), transportation
prepaid, to the Company at the address shown below. Do not return this product to the
Retailer.
This Warranty is not transferable and does not cover product purchased, serviced or used
outsidetheUnitedStatesorCanada.Thewarrantydoesnotextendtotheelimination
ofexternallygeneratedstaticornoise.ThisWarrantydoesnotapplytocostsincurred
for installation, removal or reinstallation of the product, or, if in the Company’s opinion,
the product has been damaged through acts of nature, alteration, improper installation,
mishandling, misuse, neglect, or accident. This warranty does not cover damage caused by an
ACadapternotprovidedwiththeproduct.
THEEXTENTOFTHECOMPANY’SLIABILITYUNDERTHISWARRANTYIS
LIMITEDTOTHEREPAIRORREPLACEMENTPROVIDEDABOVEAND,INNO
EVENT,SHALLTHECOMPANY’SLIABILITYEXCEEDTHEPURCHASEPRICE
PAIDBYPURCHASERFORTHEPRODUCT.ThisWarrantyisinlieuofallotherexpress
warrantiesorliabilities.ANYIMPLIEDWARRANTIES,INCLUDINGANYIMPLIED
WARRANTYOFMERCHANTABILITYORFITNESSFORAPARTICULAR
PURPOSE,SHALLBELIMITEDTODURATIONOFTHISWARRANTY.ANY
ACTIONFORBREACHOFANYWARRANTYHEREUNDER,INCLUDING
ANYIMPLIEDWARRANTY,MUSTBEBROUGHTWITHINAPERIODOF24
MONTHSFROMTHEDATEOFORIGINALPURCHASE.INNOCASESHALL
THECOMPANYBELIABLEFORANYCONSEQUENTIALORINCIDENTAL
DAMAGESWHATSOEVER.Nopersonorrepresentativeisauthorizedtoassumeforthe
Companyanyliabilityotherthanexpressedhereininconnectionwiththesaleofthisproduct.
Some states/provinces do not allow limitations on how long an implied warranty lasts or
theexclusionorlimitationofincidentalorconsequentialdamagesotheabovelimitationsor
exclusionsmaynotapplytoyou.ThisWarrantygivesyouspeciclegalrightsandyoumayalso
have other rights which vary from state/province to state/province.
U.S.A.:AudiovoxElectronicsCorporation,150MarcusBlvd.,Hauppauge,NY11788
CANADA:AudiovoxReturnCenter,c/oGenco,6685KennedyRoad,Unit#3Door16,
MississaugaOntarioL5T3A5
©2008AEC,150MarcusBlvd.Hauppauge,NY11788
ANT751
Antena exterior
Guía del Usuario
Paso 1: Desempaque
Extraigalaantenaylabolsadeherrajesdelempaque.Asegúresequetodaslas
piezasseencuentrenincluidasenelempaque:
• Antena
• Tuboypiedemontaje
• Bolsadeherrajes
Perno en U (2)tuercashexagonalesde
10/32 pulg.
Insertodelaabrazaderadelmástil(5)tuercashexagonalesde¼pulg.
(2)taponesplásticosnegros (2) pernos de 5/8 pulg.
Transformadoranálogo Tornillo de 2-1/2 pulg.
(4) arandelas de 7/16 pulg.
Comience por la parte posterior de la antena,
desdoble los elementos de la parte superior e inferior
delaantenahastaquequedenjosensuposición
(segúnseilustraacontinuación).Cuandohaya
nalizado,asegúresequeloselementosqueden
planos y paralelos entre sí.
¡¡¡ANTES DE COMENZAR!!!
LealahojadeINFORMACIÓNIMPORTANTEDESEGURIDAD
incluidaenesteempaque.
Paso 2: Desdoble los elementos de la antena
Parte
posterior

Paso 3: Desdoble el tetrapolo
Asegúresequeeltetrapoloquedejoensuposición.
¡Noacopletodavíaelconductordeconexión!
Aviso: A fin de mostrar los tetrapolos con mayor
claridad, en esta ilustración no se incluyen los
elementos VHF.
Tetrapolo
Paso 4: Fije el inserto de la
abrazadera del mástil
EncuentreelpernoenUyelinsertodela
abrazaderadelmástil(vealailustraciónala
izquierda).InstaleelpernoenUenelinserto
delaabrazaderadelmástildemaneraquelos
dientesdelinsertodelaabrazaderaqueden
orientados hacia el lado cerrado del perno en U.
InserteelpernoenUenlaabrazaderadel
mástilenlaantenayenrosquesinapretarlas
tuercashexagonalesde1/4pulg.enelpernoen
U.Losdientesdelaabrazaderadelmástilylos
dientes del inserto deben estar orientados hacia
lamismadirección.
Noaprietetodavíalastuercashexagonales.
Abrazadera
del mástil
Perno en U
Inserto de la abrazadera del mástil
Paso 5: Instale el transformador y el
conductor de conexión coaxial
Fijeeltransformadoralconductordeconexióncoaxial(nosuministrado).
Encuentrelasarandelasytuercashexagonalesde10/32pulg.enlabolsadeherrajes.
Conector del
transformador
Pernos de
tetrapolo
Utilícelasparajareltransformadoralaparteinferior
de la antena y a los pernos del tetrapolo.
Asegúresedecolocarlosconectoresdel
transformadoranálogoentredosarandelasencada
postesegúnsemuestraaquí.
Porúltimo,aprietelastuercashexagonalespara
asegurar los conectores.
Paso 6: Inserte las tapas de los extremos
Insertelastapasplásticasdelosextremosenlos
extremosdelosbrazossegúnsemuestraaquí.
Utilice un martillo de goma para golpearlos
suavemente de manera de introducirlos y asegurarlos
enlosbrazosdelaantena.
Paso 7: Fije el tubo de montaje al pie
Encuentreelextremodeltubodemontaje
con los orificios en los lados de los tornillos.
Inserteesteextremoenelcentrodelpie
segúnseilustraaquí.Luegoinserteel
tornillo de 2-1/2 pulg. a través del pie y del
tubosegúnseilustra.Atornillelatuerca
hexagonalde¼pulg.enelextremodel
tornilloparasujetareltuboyelpieentresí.
No apriete la tuerca completamente todavía.
Encuentrelosoricioscuadradosenuno
de los lados de la parte inferior del tubo.
Eleveunpocoeltuboeinserteelpernode
5/8 pulg. a través de estos orificios hasta
quesalganporelextremodelpie.Instale
lastuercasenelladoexteriordelpieen
lospernosde5/8pulg.parasujetarel
tuboensuposición.No apriete las tuercas
completamente todavía.
Tornillo de
2-1/2 pulg.
Tuerca
hexagonal en
perno de 5/8
pulg.

Paso 9: Fije la antena al mástil
IMPORTANTE: Antes de fijar la antena al mástil,
visite www. antennaweb.org para informarse sobre
las ubicaciones de las torres de difusión locales. Esta
información es sumamente importante para la lograr
la orientación correcta de la antena.
AojelastuercasenelpernoenUdelaabrazadera
demontaje.
Orienteelextremopequeñodelaantenahacialas
emisorasquedesearecibir.
DesliceelpernoenUenelmástil.
Orienteelextremopequeñodelaantenahacialas
torresdedifusiónlocales.Aprietebienlastuercasy
laabrazaderadelmástil.
Paso 8: Monte el pie y el tubo
Asegureelpieensuubicaciónpermanente.
Ajusteelextremodeltubodemaneraque
quedeperpendicularalsuelo.Aprietelastuercas
hexagonalesparasujetareltuboensuposición.
El extremo
del tubo
debe quedar
perpendicular
al suelo (a
plomo)

Garantía Limitada de 12 Meses
AudiovoxElectronicsCorporation(la“Compañia”)legarantizaausted,elcompradororiginal
deesteproductoquesi,bajocondicionesyusonormales,seencontraraqueesteproductoo
algunapiezapresentadefectosmaterialesodemanodeobradentrodelosprimeros12messes
apartirdelafechadecompraoriginal,talesdefectosseránreparadosoreemplazados(aopción
delaCompañia)sincargoalgunoporlaspiezasylaboresdereparación.Paraobtenerlos
serviciosdereparaciónoreemplazodentrodelostérminosdeestaGarantia,elproductojunto
concualquieraccesorioincluidoenelempaqueoriginalseentregaránconpruebadegarantia.
NodevuelvaesteproductoalDistribuidor.
EstaGarantíanoestransferibleynocubreunproductoadquirido,mantenidooutilizado
fueradelosEstadosUnidosoCanadá.Estagarantíanoincluyelaeliminacióndeestáticao
ruidogeneradosexternamente.Estagarantíanoincluyeloscostosincurridosenlainstalación
remociónoreinstalacióndeesteproducto,o,siesopinióndelaCompañia,queesteproducto
hasufridodañosdebidoacausasdefuerzamayor,alteraciones,instalacióninadecuada,abuso,
usoindebido,negligenciaoaccidente.Estagarantianoincluyedañosocasionadosporun
adapadordeCAquenohayasidosuministradoconelproducto.
ELALCANCEDELARESPONSABILIDADDELACOMPAÑIABAJOESTA
GARANTÍAESTÁLIMITADOALAREPARACIÓNOELREEMPLAZO
PROVISTOARRIBAY,ENNINGÚNCASO,DEBERÁLARESPONSABILIDAD
DELACOMPAÑIAEXCEDERELPRECIODECOMPRAPAGADOPOREL
COMPRADORDEESTEPRODUCTO.EstaGarantíareemplazacualesquieraotras
responsabilidadesogarantíasexpresas.CUALESQUIERAGARANTÍASIMPLÍCITAS,
INCLUYENDOCUALQUIERGARANTÍAIMPLÍCITADECOMERCIABILIDAD
OADAPTABILIDADPARAUNPROPÓSITOENPARTICULARESTARÁN
LIMITADASALADURACIÓNDEESTAGARANTÍA.CUALQUIERACCIÓN
PARAELINCUMPLIMIENTODECUALQUIERGARANTÍAENELPRESENTE,
INCLUYENDOCUALQUIERGARANTÍAIMPLÍCITA,DEBERÁPRESENTARSE
DENTRODEUNPERÍODODE24MESESAPARTIRDELAFECHADECOMPRA
ORIGINAL.ENNINGÚNCASOLACOMPAÑÍASERÁRESPONSABLEPOR
DAÑOSEMERGENTESOINCIDENTALES.Ningunapersonanirepresentanteestá
autorizadoaasumir,anombredelaCompañía,ningunaresponsabilidadsalvolaexpresada
aquíenconexiónconlaventadeesteproducto.
Algunosestados/provinciasnopermitenlimitacionessobreladuracióndeunagarantía
implícitaolaexclusiónolalimitacióndedañosincidentalesoemergentes,demodoquees
posiblequelaslimitacionesoexclusionesanterioresnoseapliquenensucaso.EstaGarantíale
conerederechoslegalesespecícos;segúnelestado/provincia,puededisfrutarademásdeotros
derechos.
U.S.A.:AudiovoxElectronicsCorporation,150MarcusBlvd.,Hauppauge,NY11788
CANADÁ:AudiovoxReturnCenter,c/oGenco,6685KennedyRoad,Unit#3Door16,
MississaugaOntarioL5T3A5
©2009AudiovoxAccessoriesCorporation,111CongressionalBlvd.,Suite350,Carmel,IN46032
ANT751USIB01