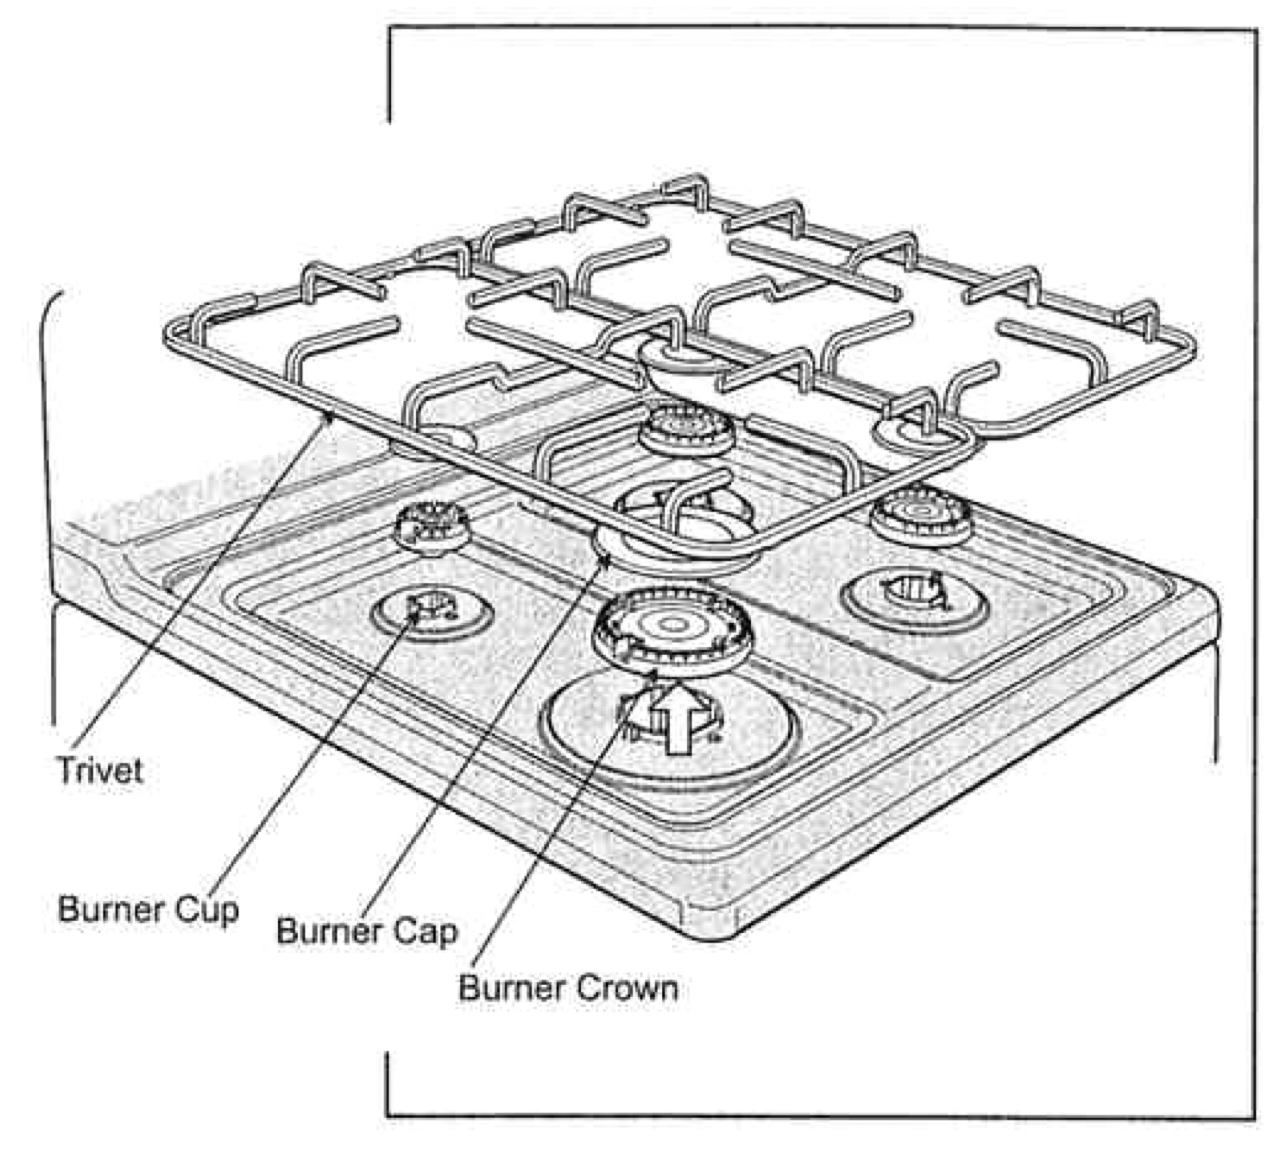
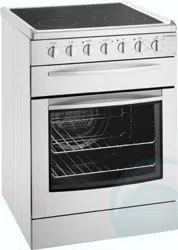
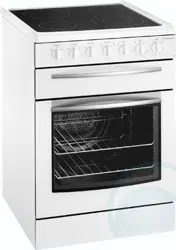
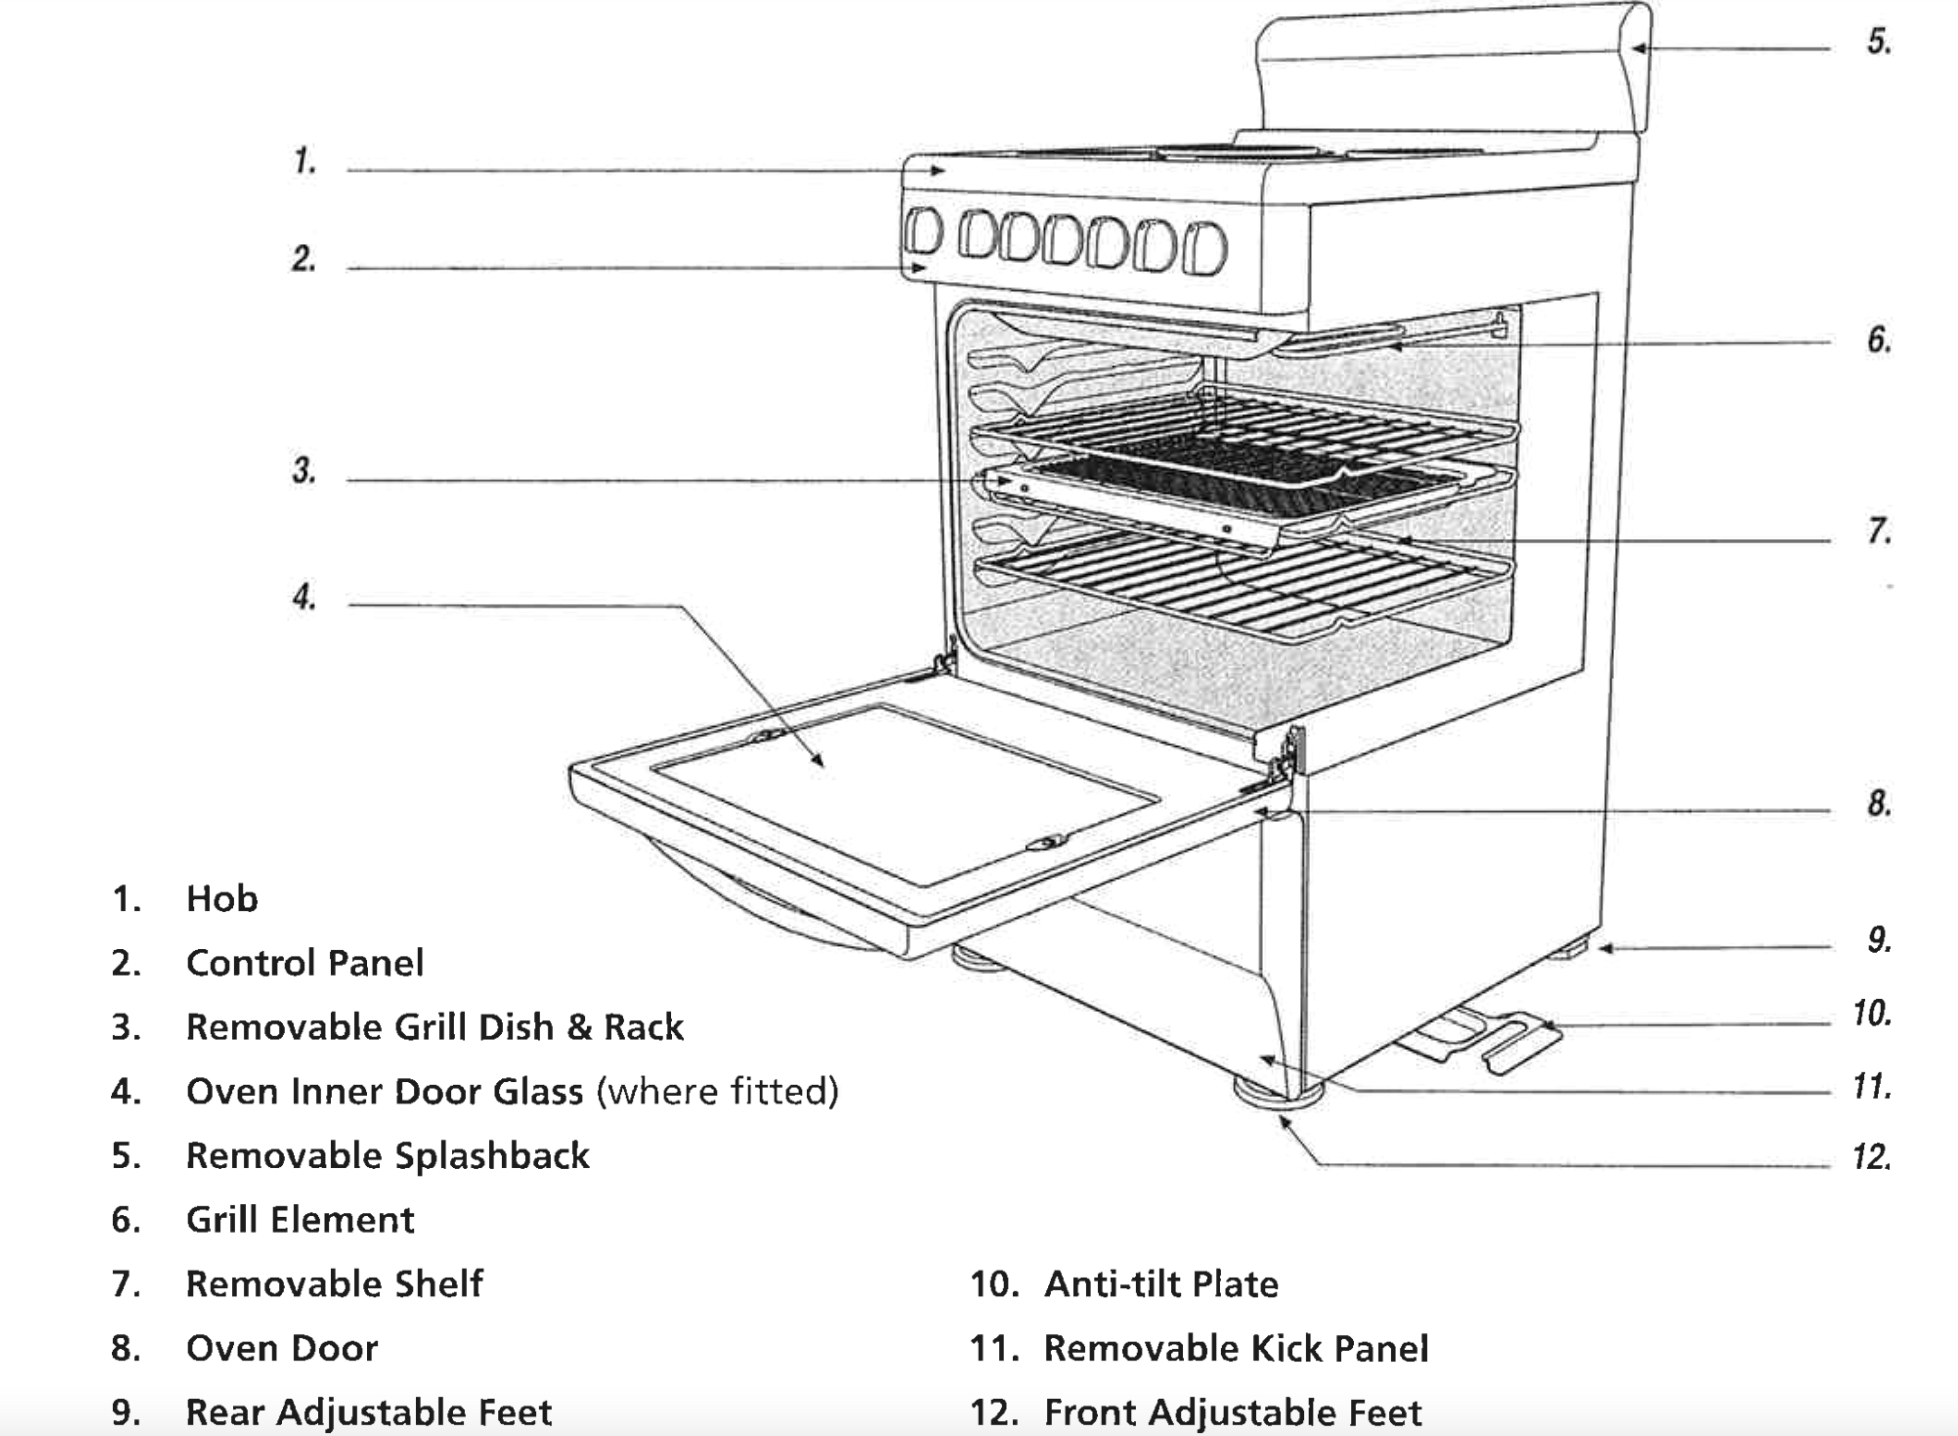
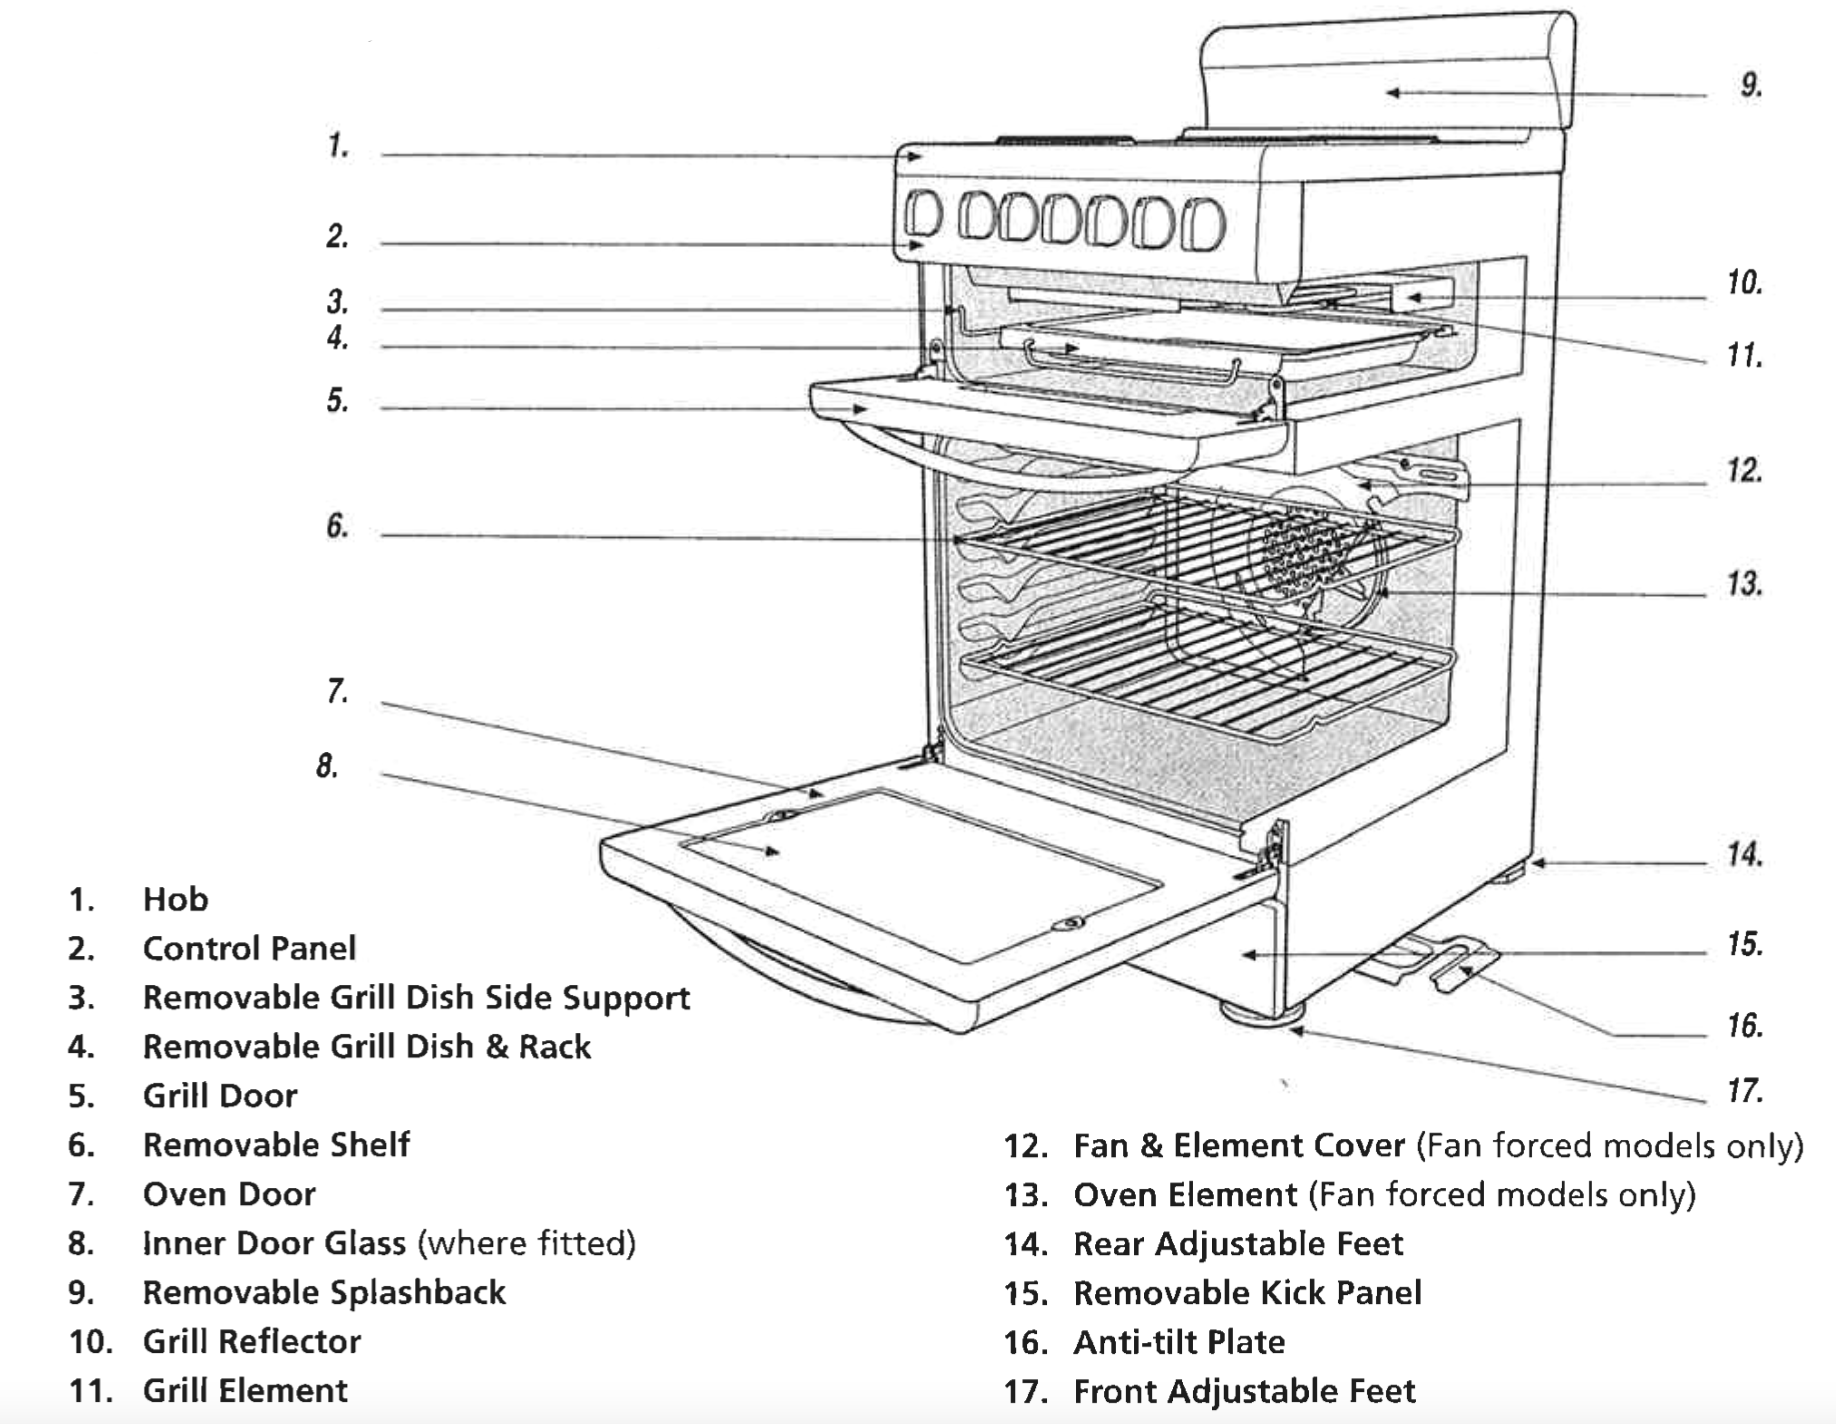
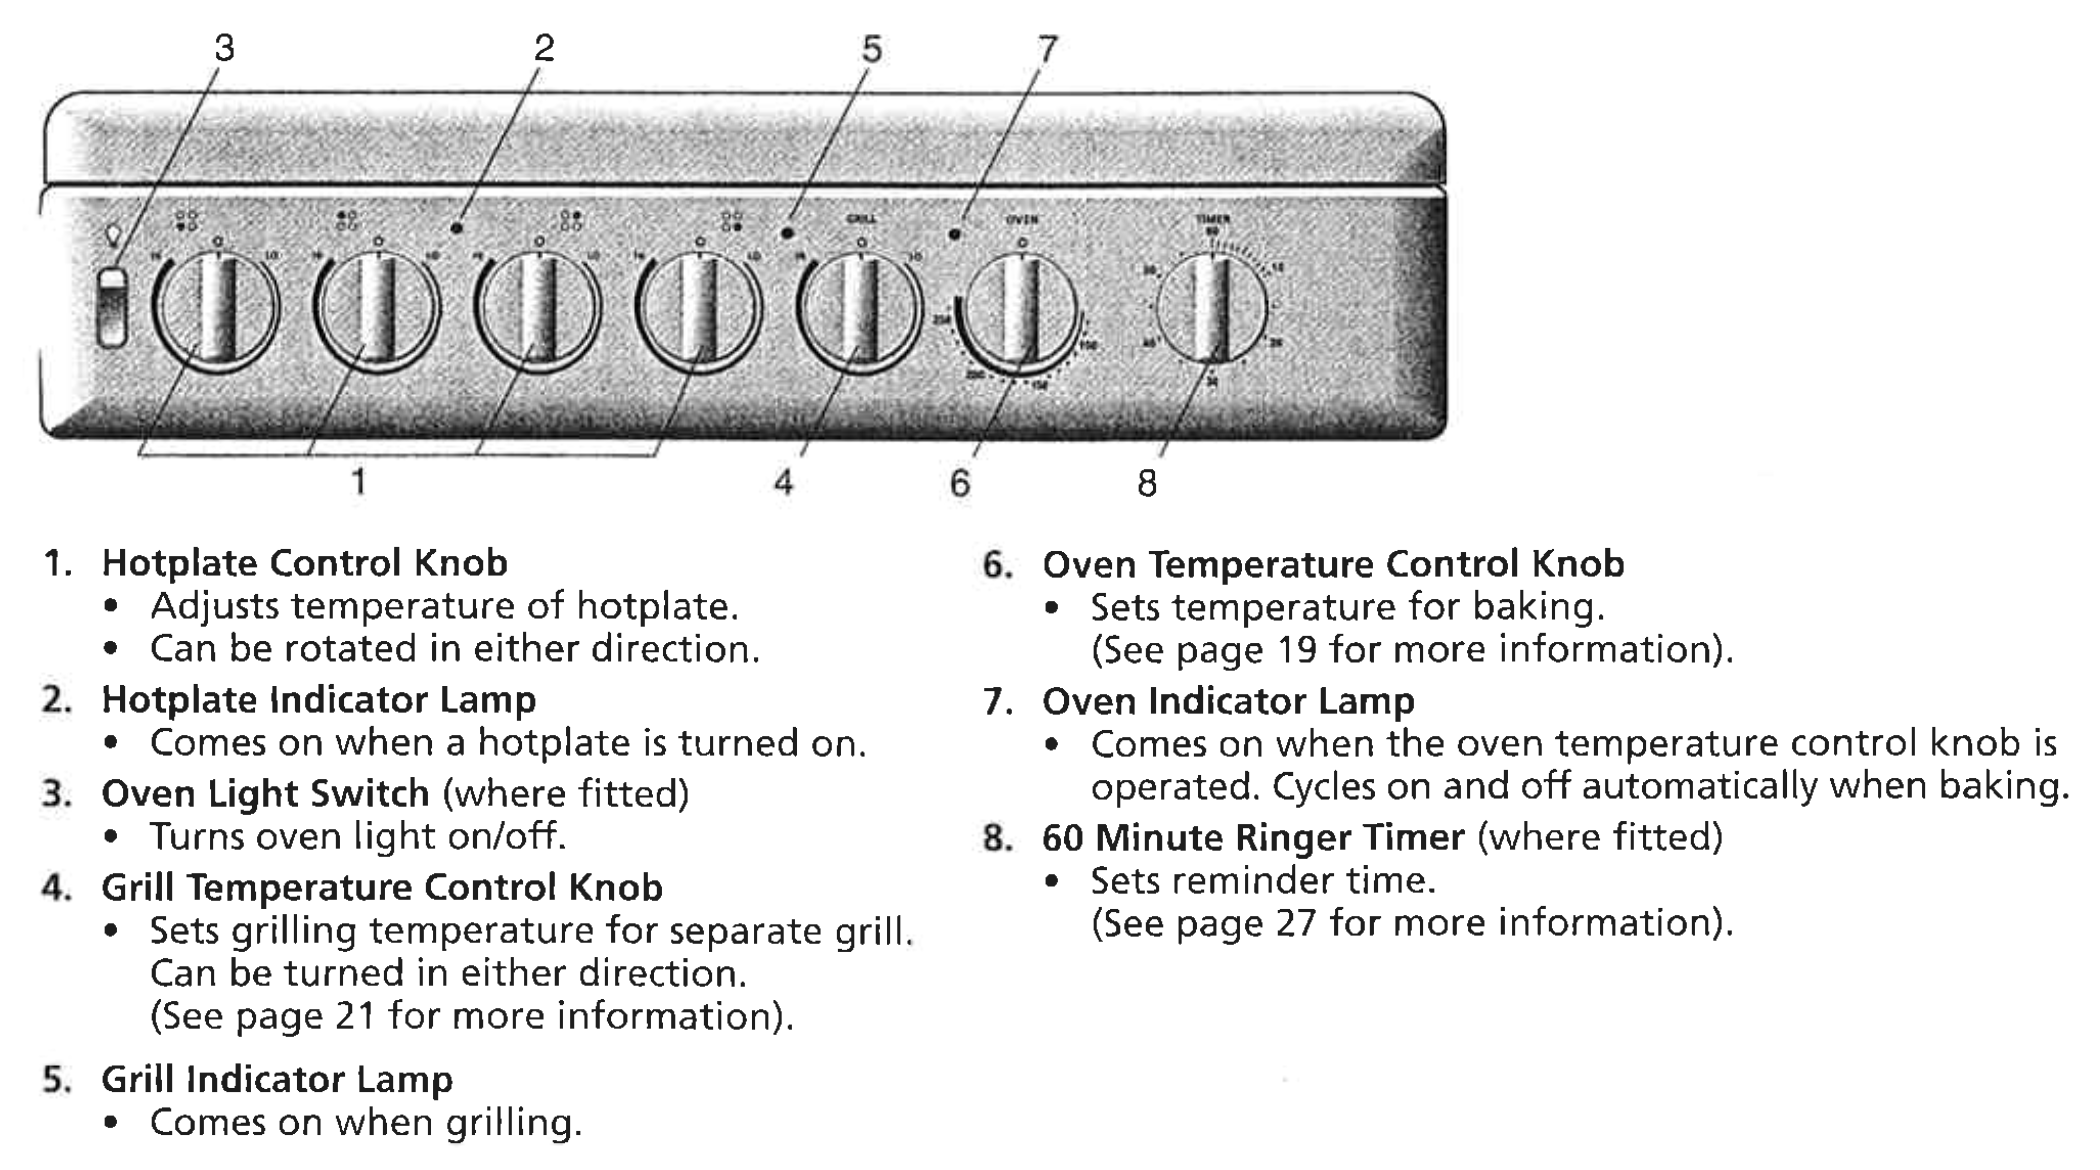
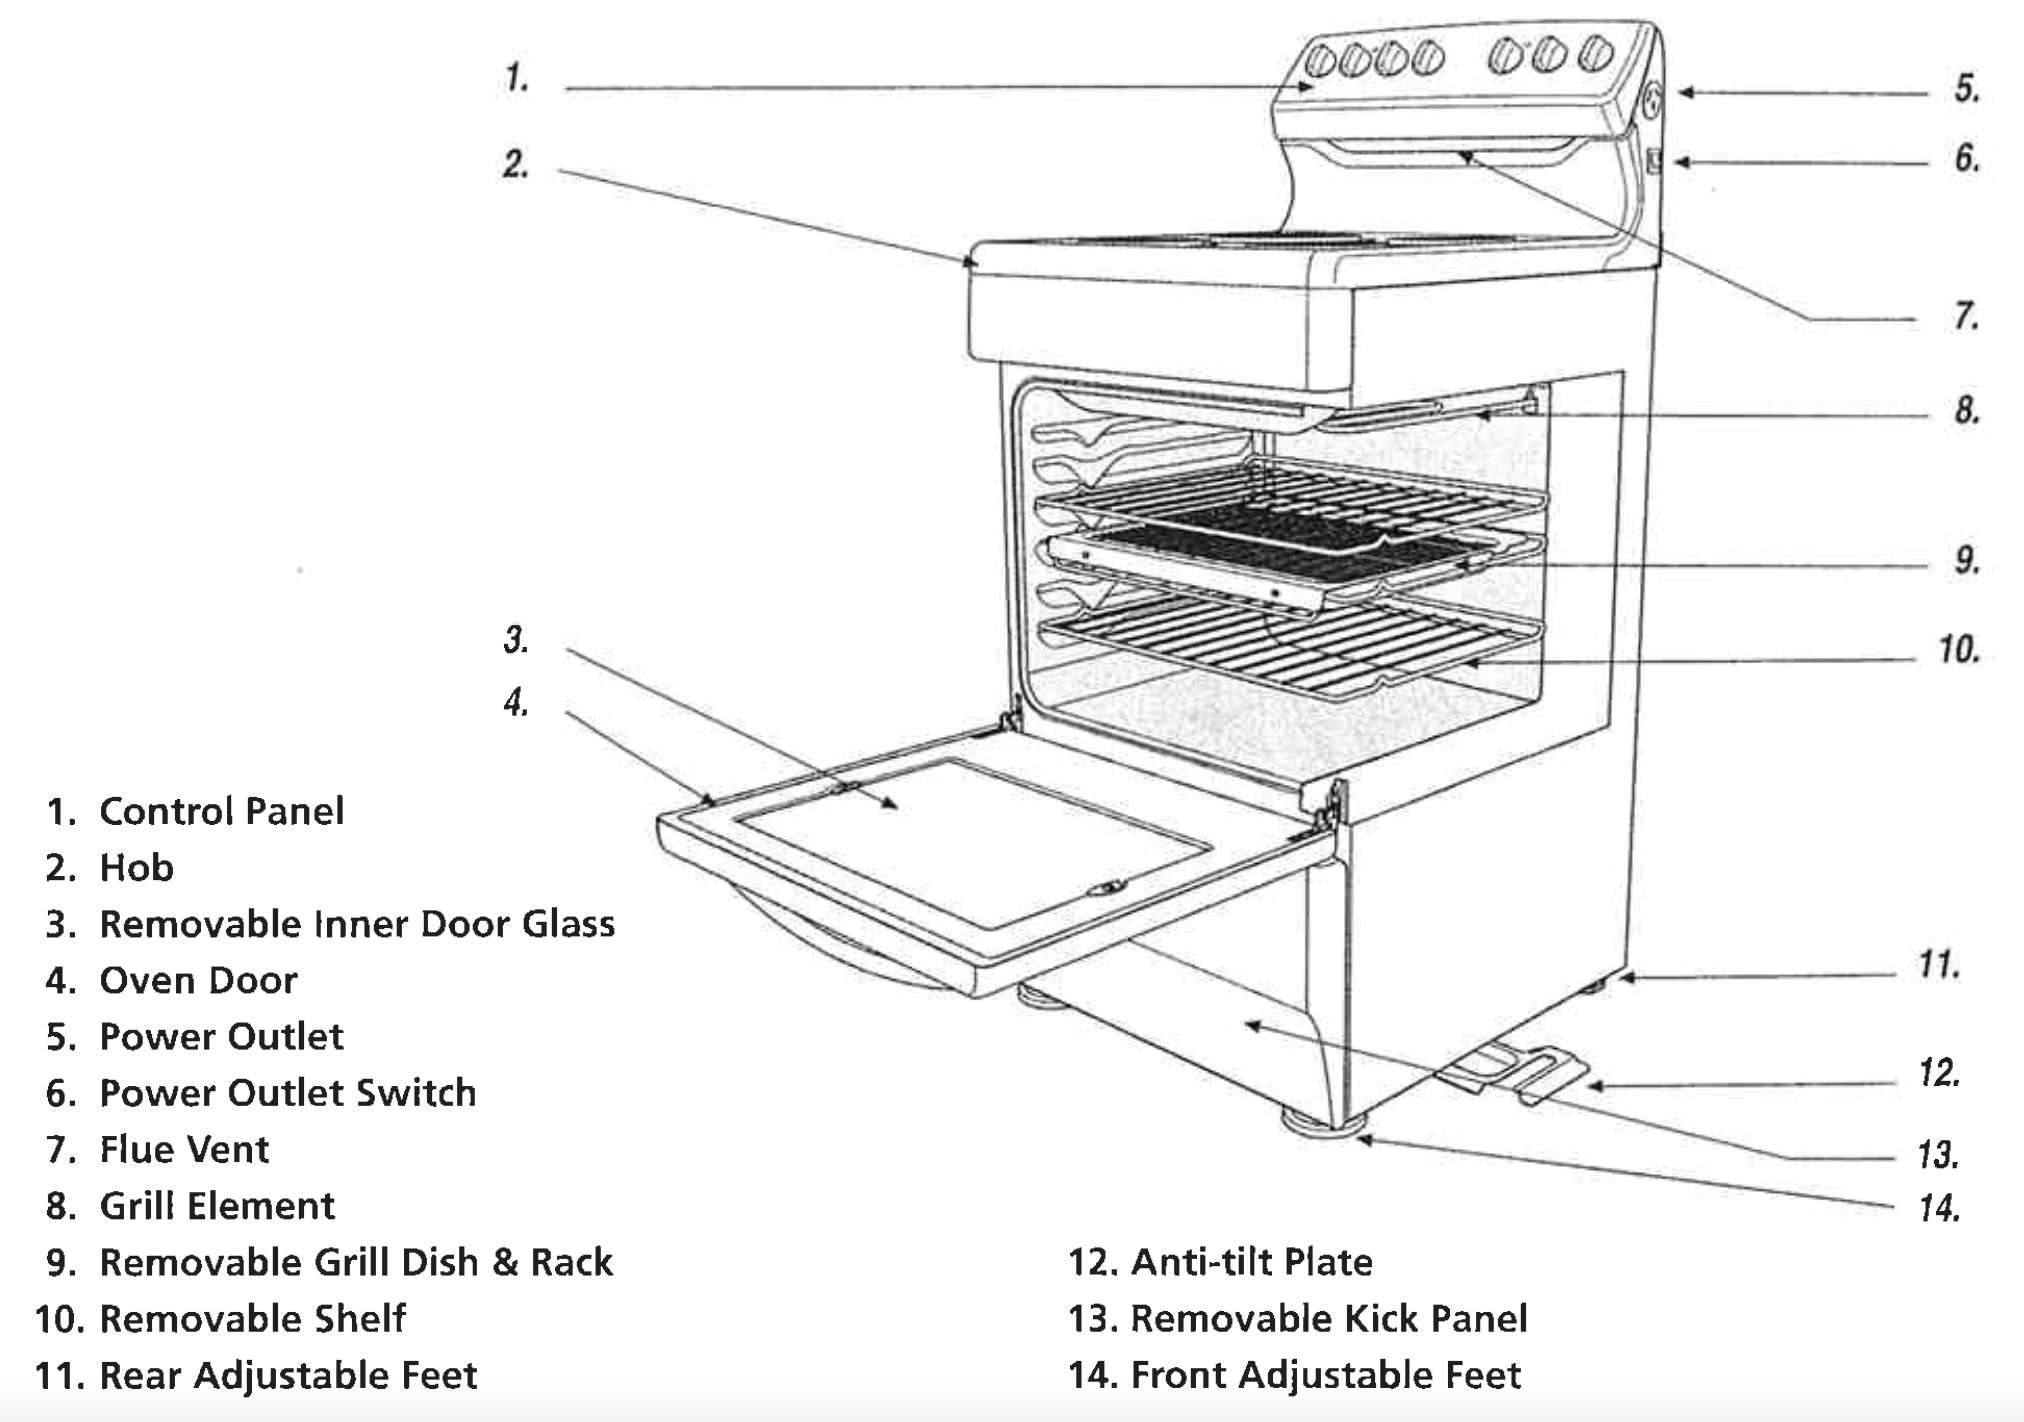
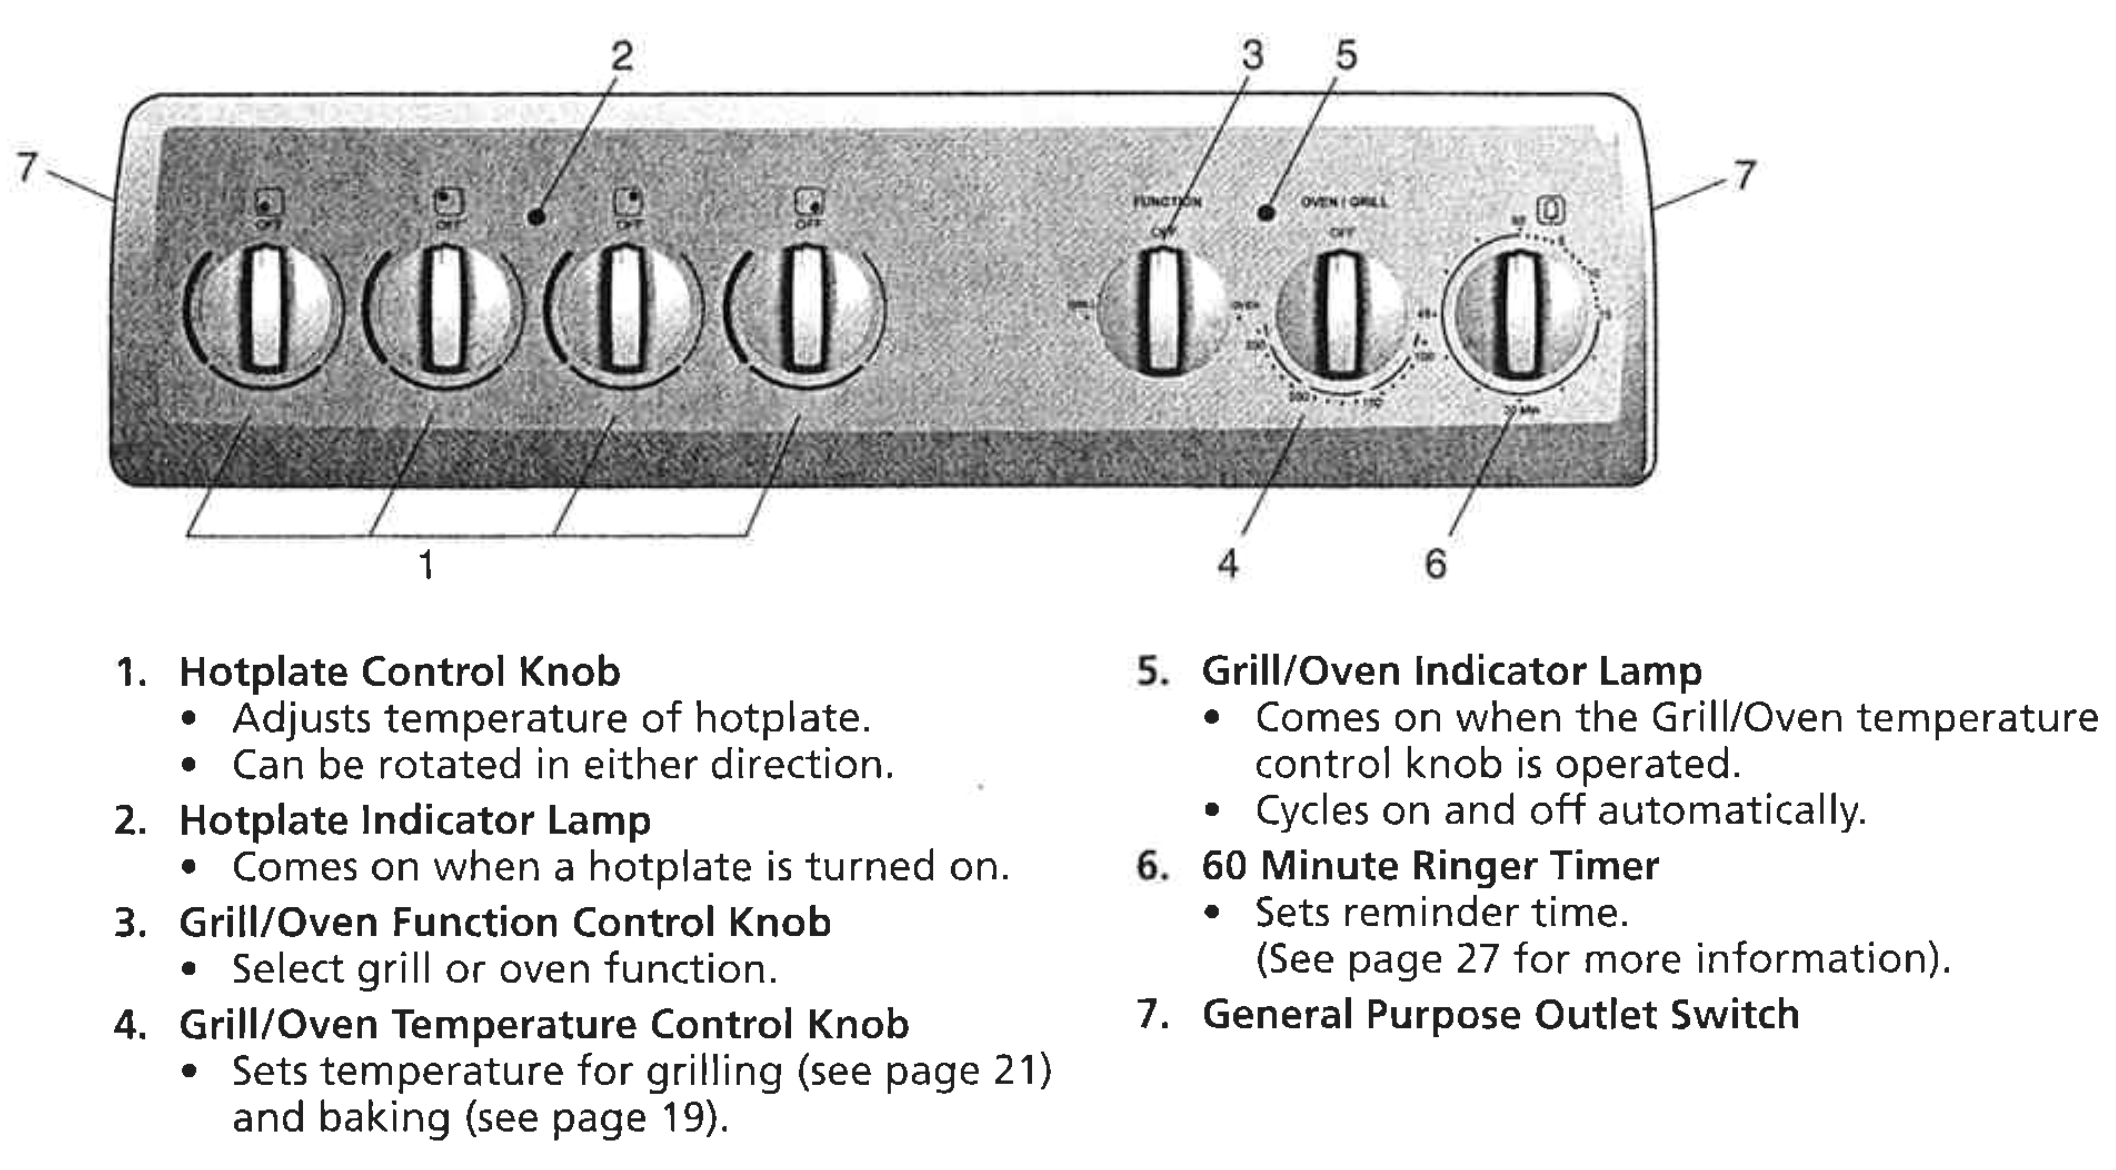
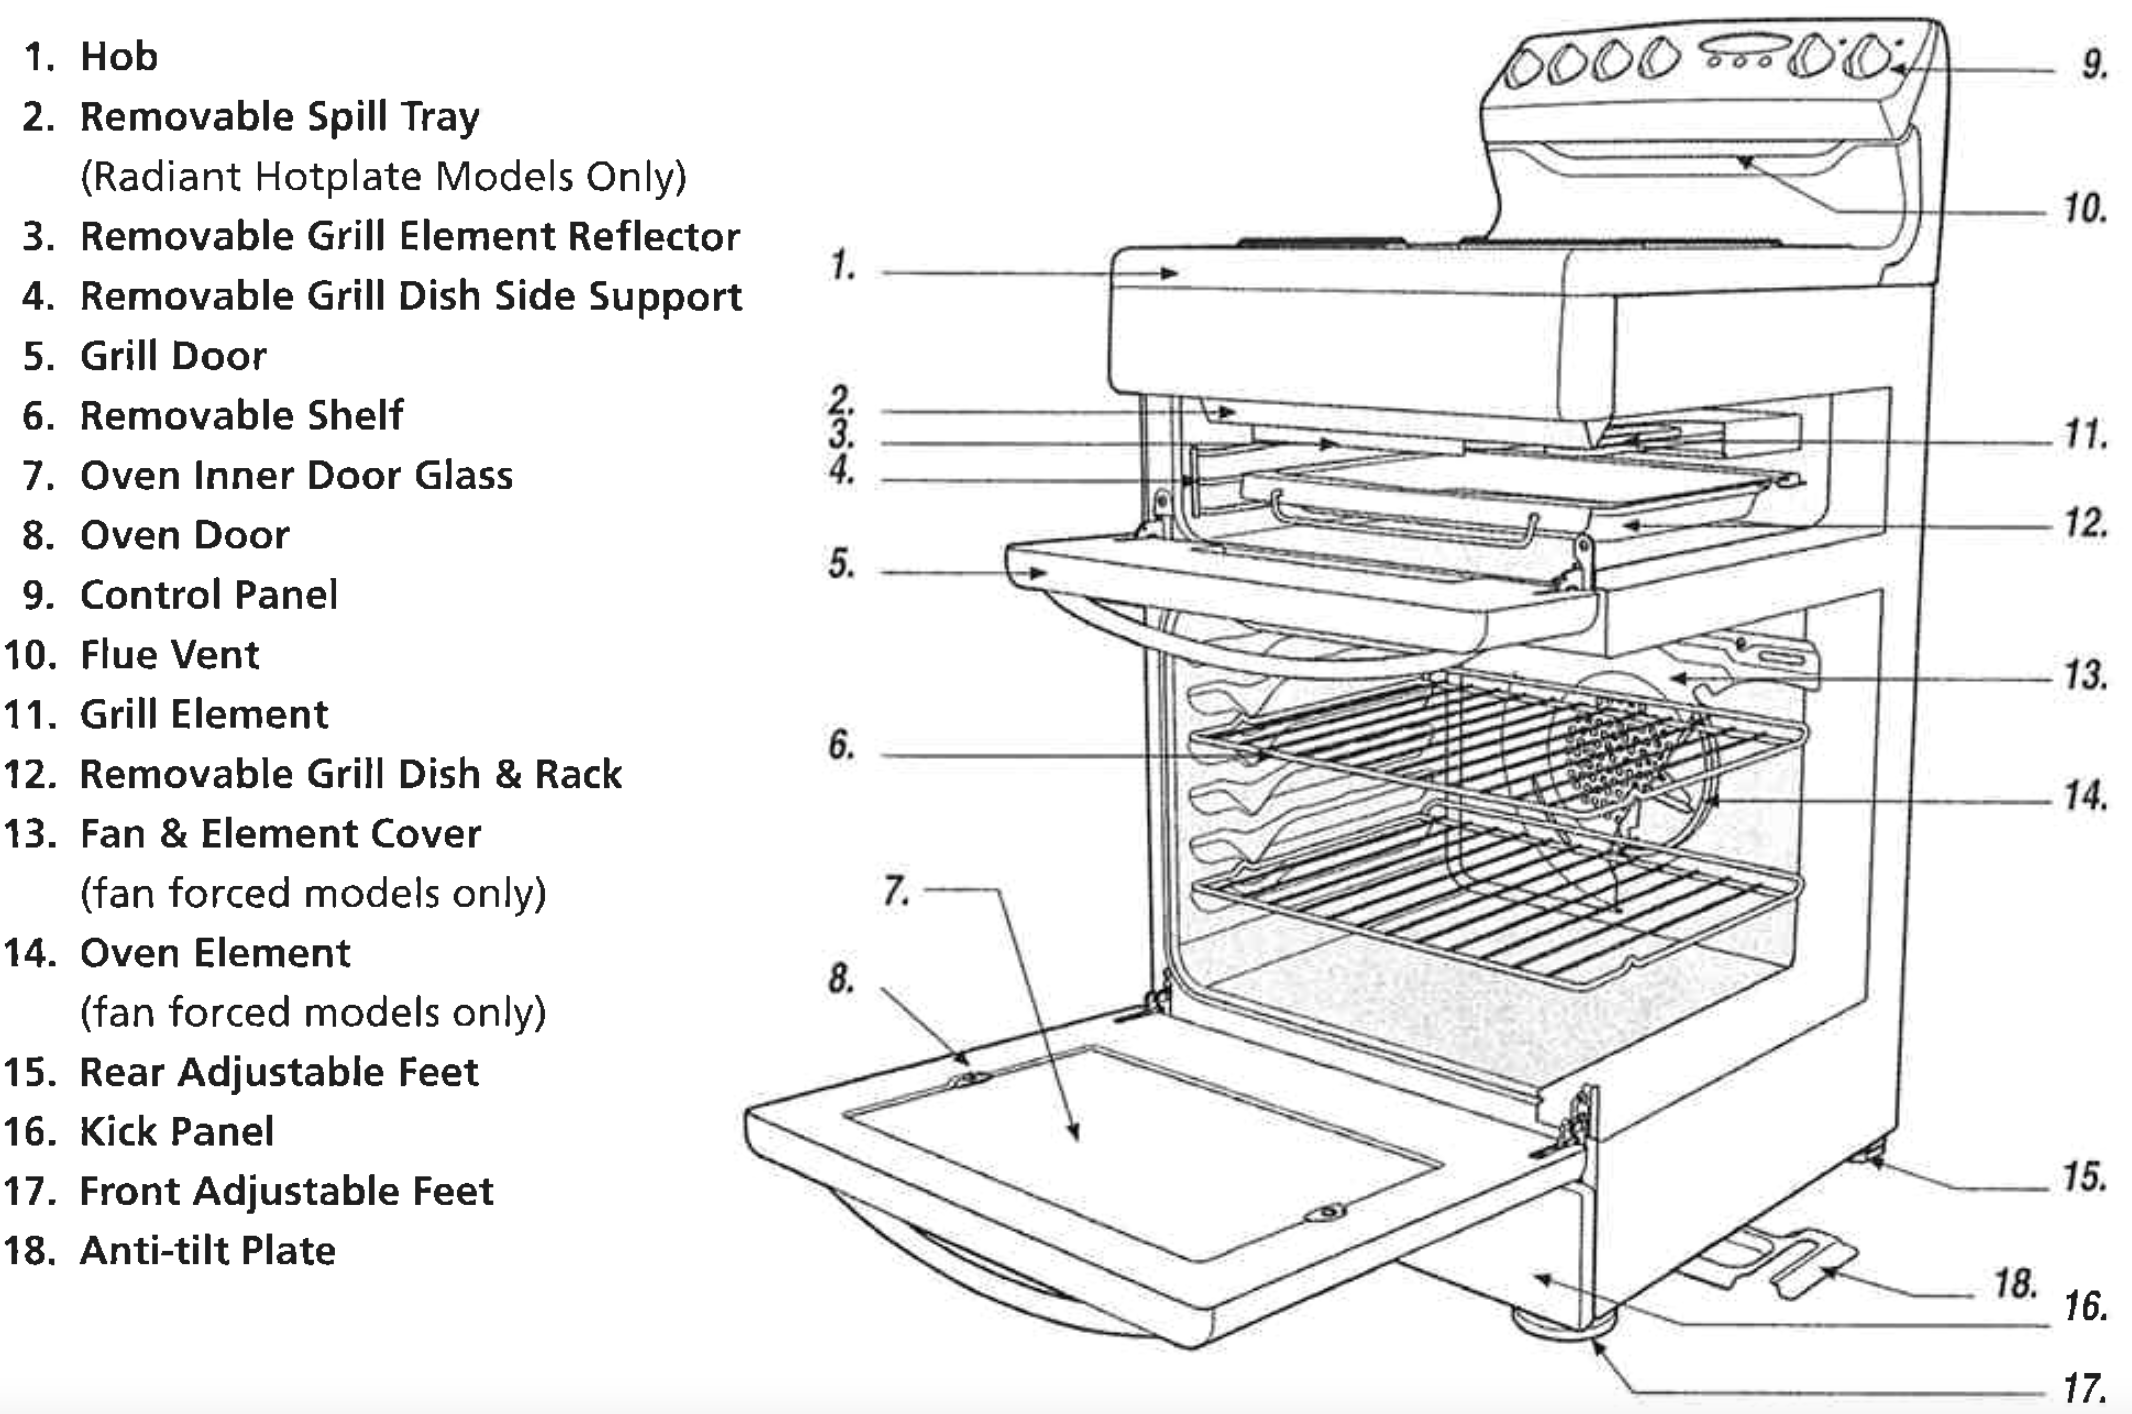
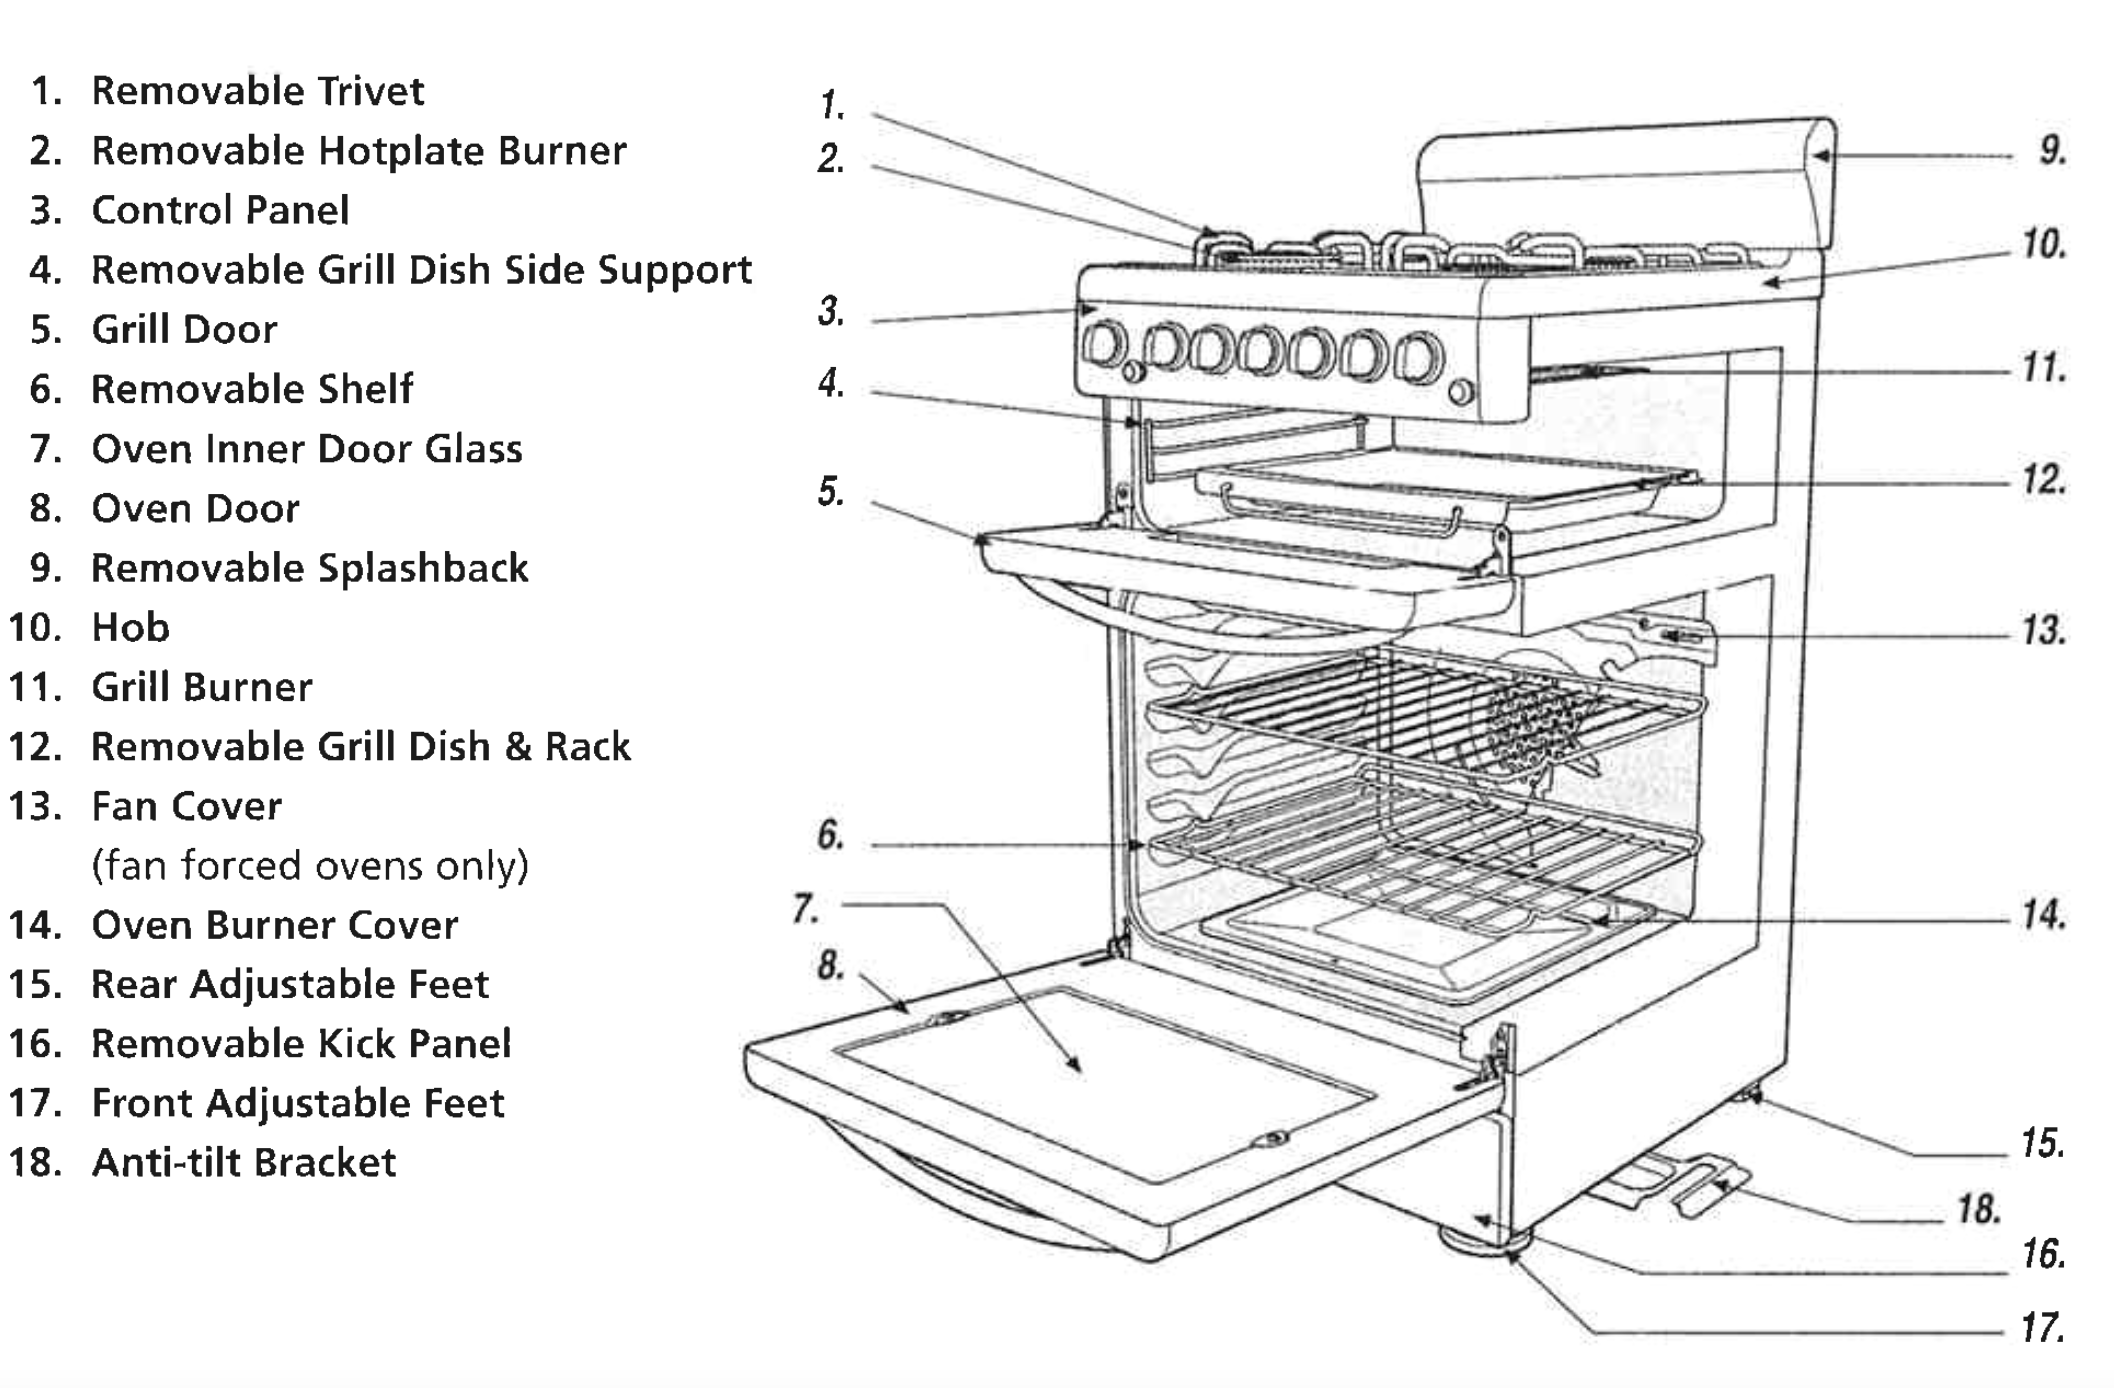
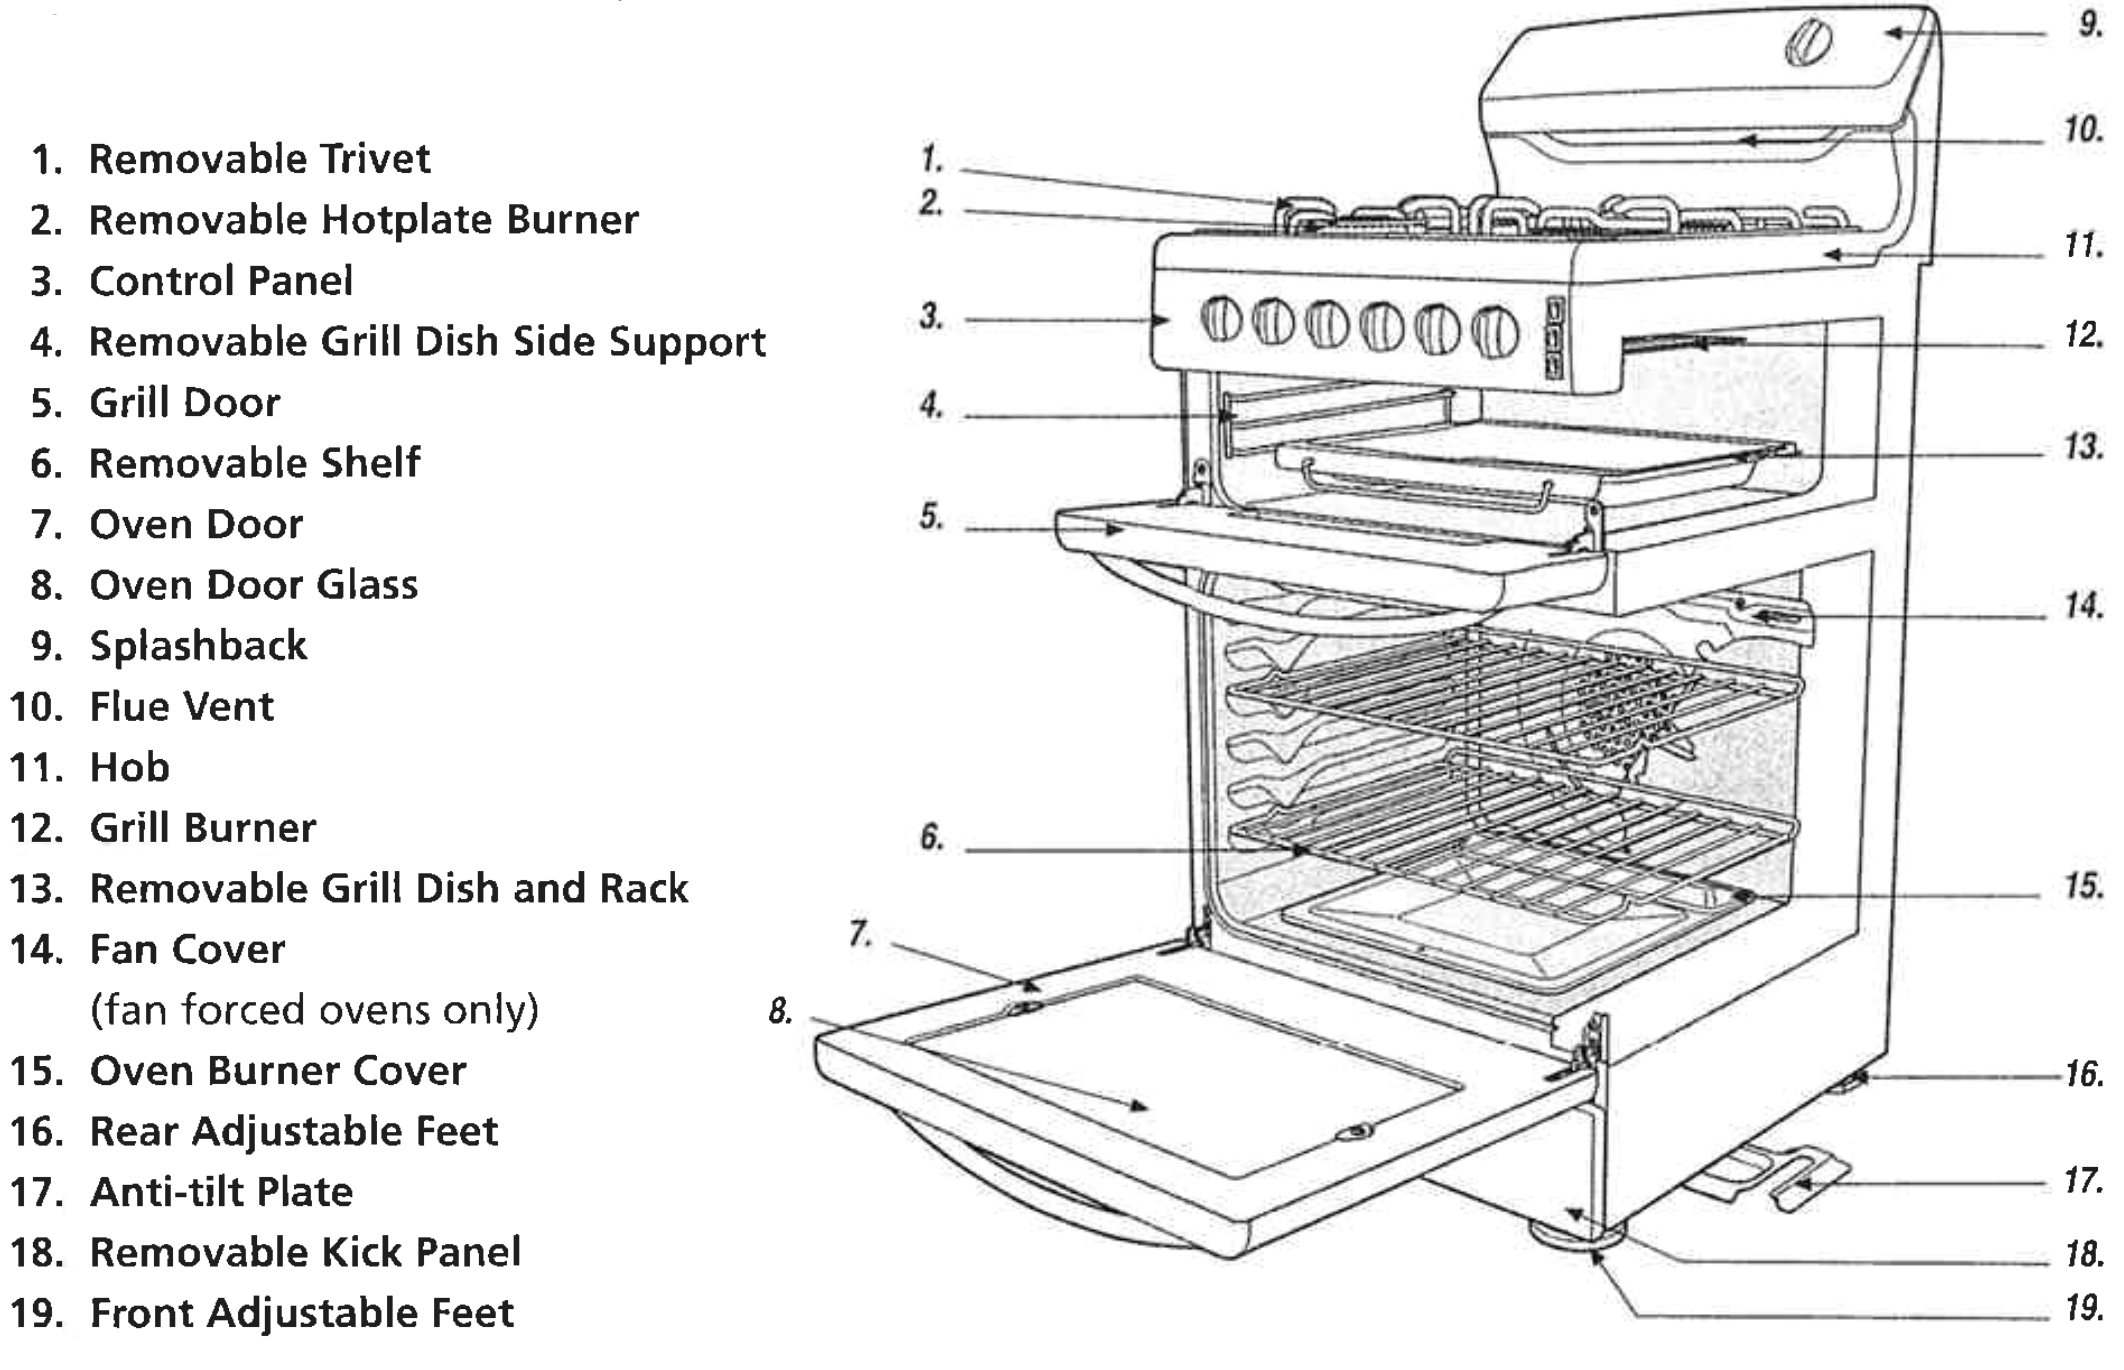
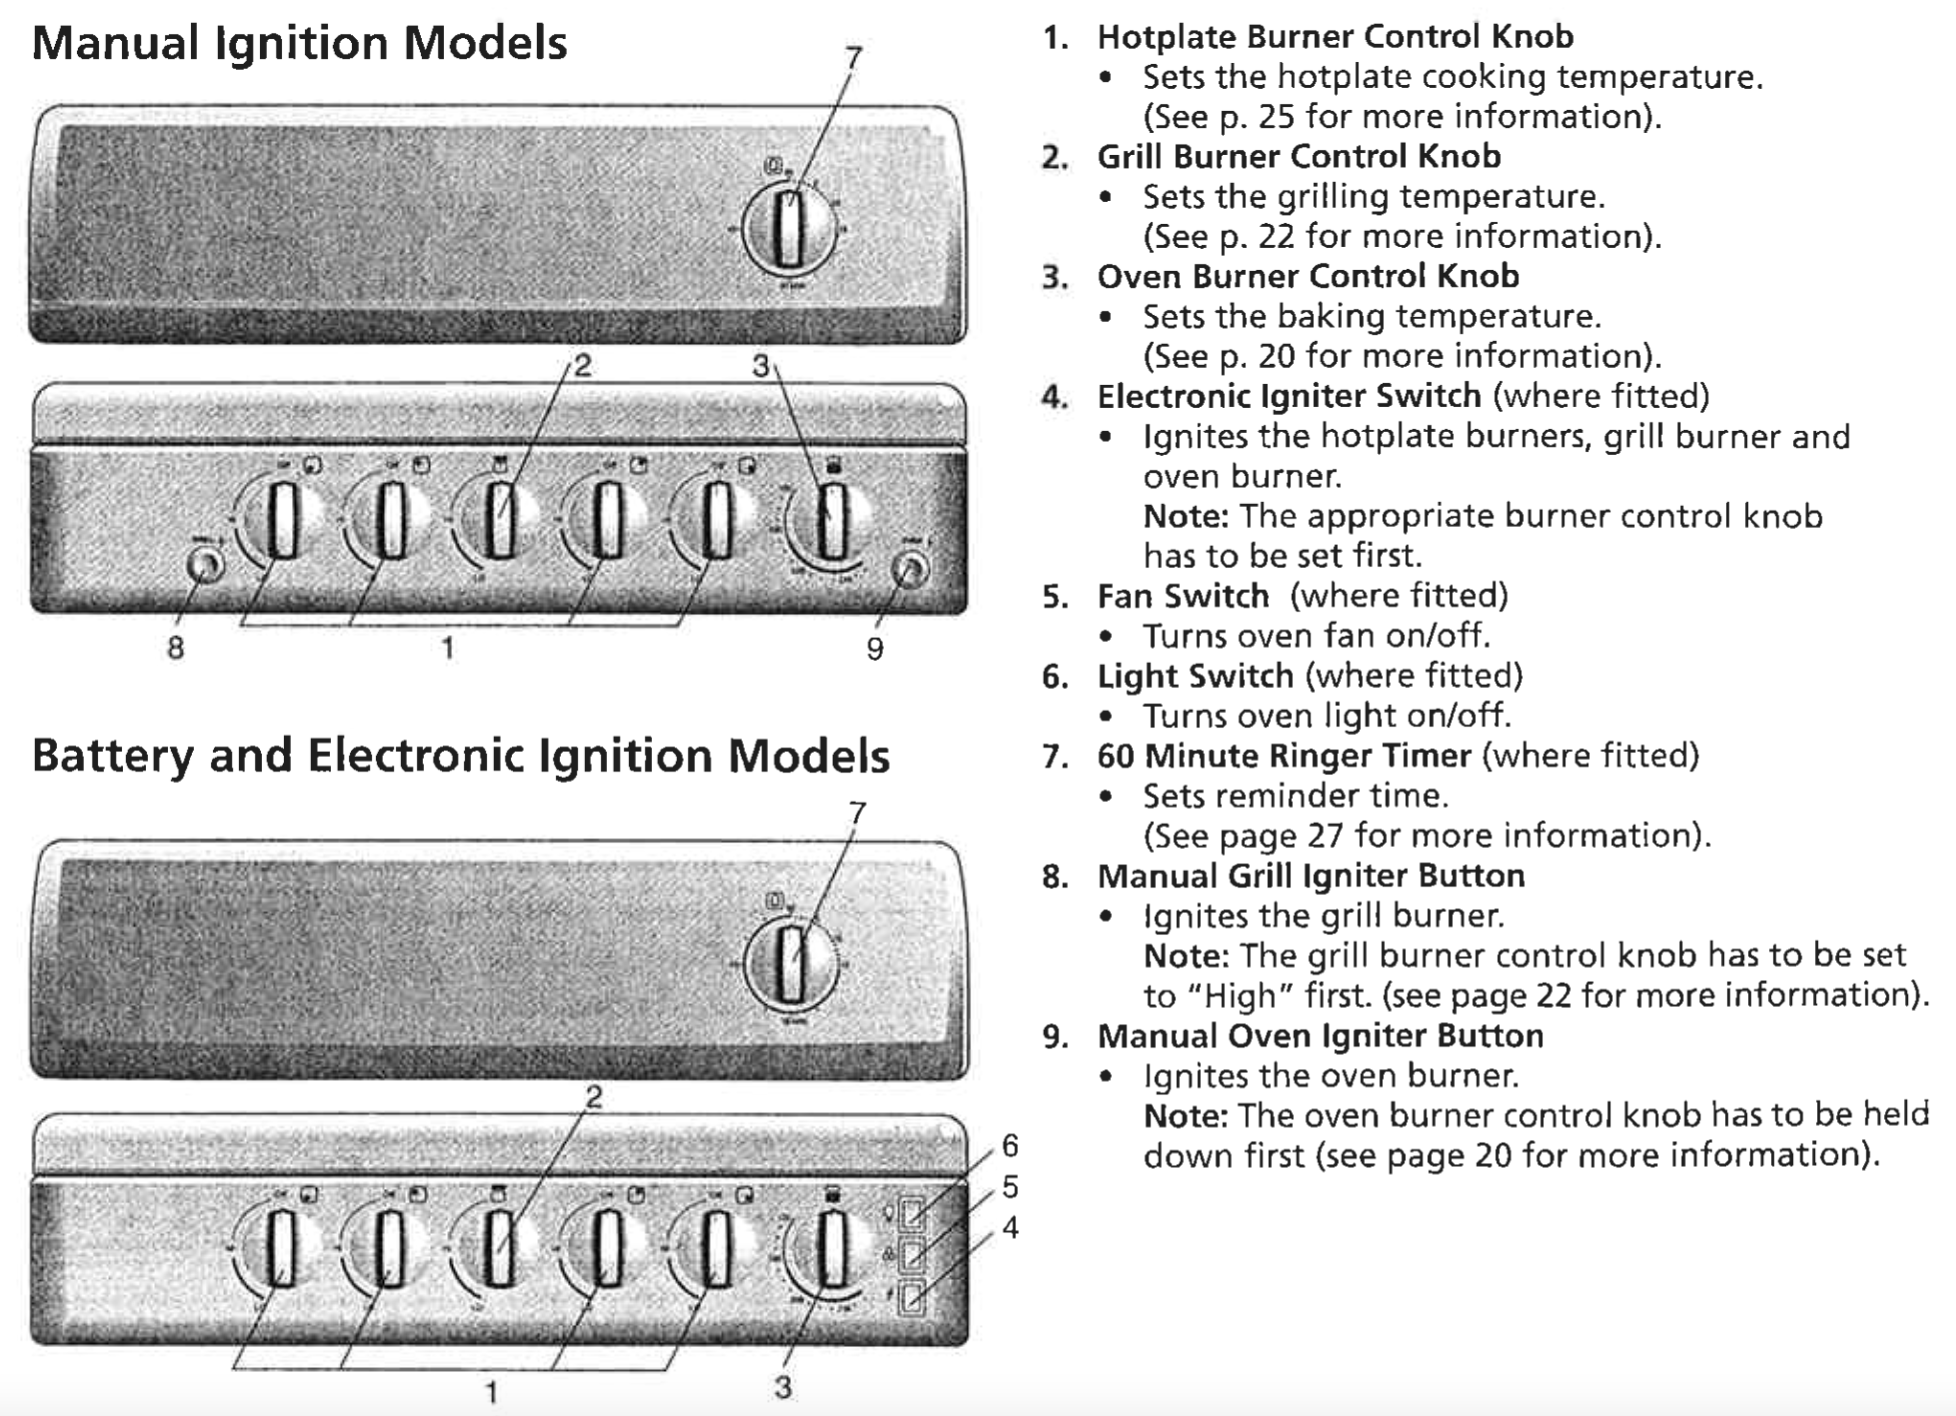
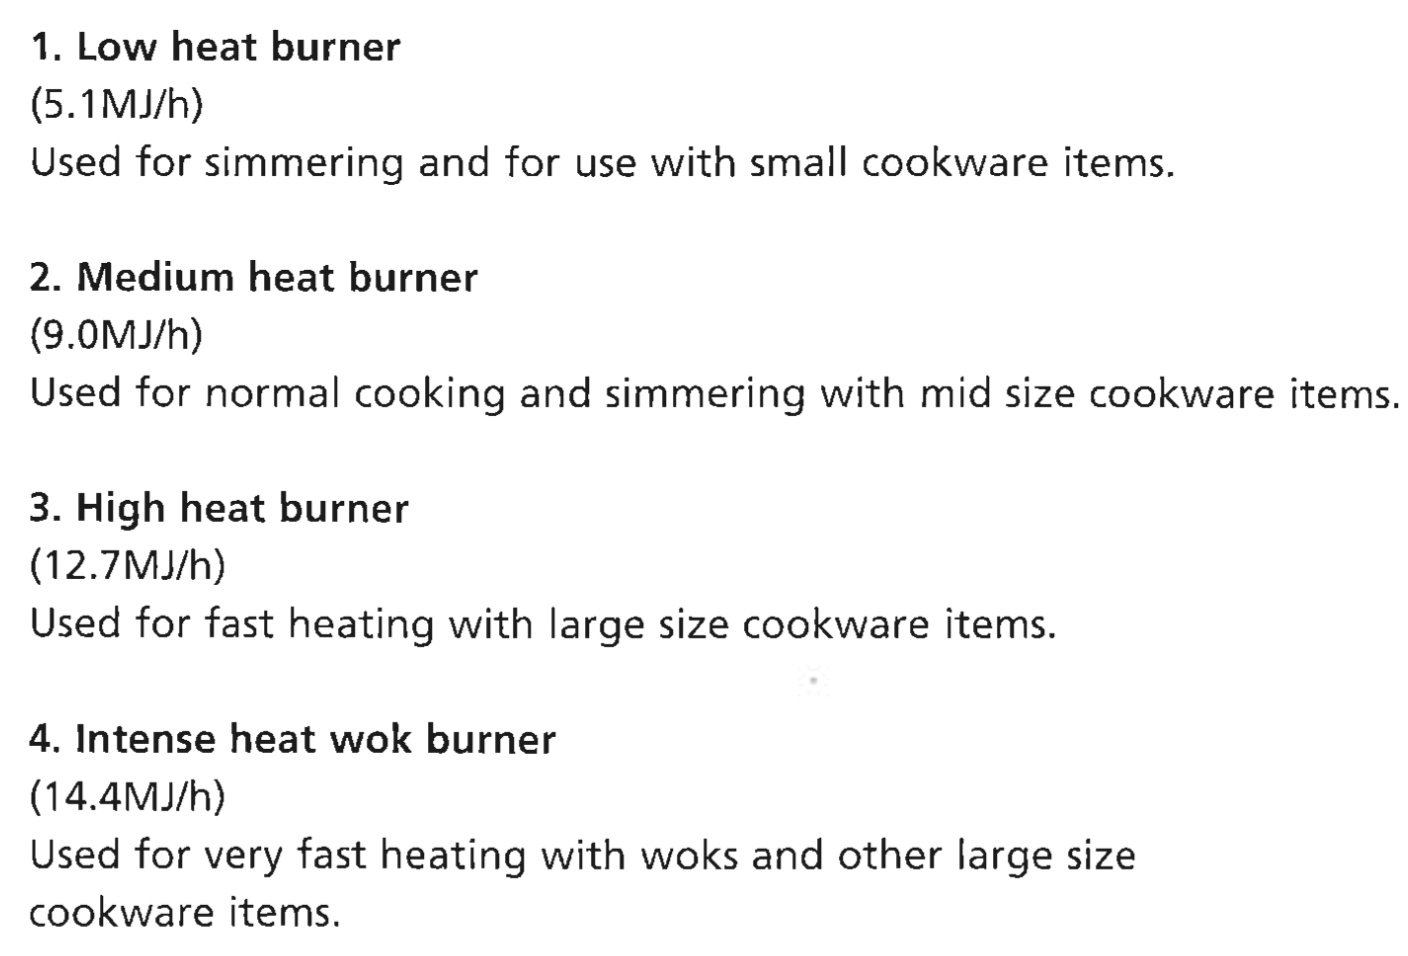
Check the parts of your cooker against the diagram below before you use your cooker for the first time.
UPSWEPT HOB COOKER
Fan Forced & Conventional Oven
Manual Ignition Models & Battery and Electronic Ignition Models
USING THE OVEN
USING THE OVEN OF YOUR ELECTRIC COOKER
Baking (conventional oven models)
In the oven, heat comes from the element hidden below the oven cavity (see diagram opposite).
The element is controlled by the thermostat which sets the oven temperature. During baking the thermostat turns on and off to keep the set temperature.
For grill in oven models det Function switch knob to OVEN and set thermostat knob to required temperature.
Note: If you are only baking on one shelf, then cook in the lower half of the oven.
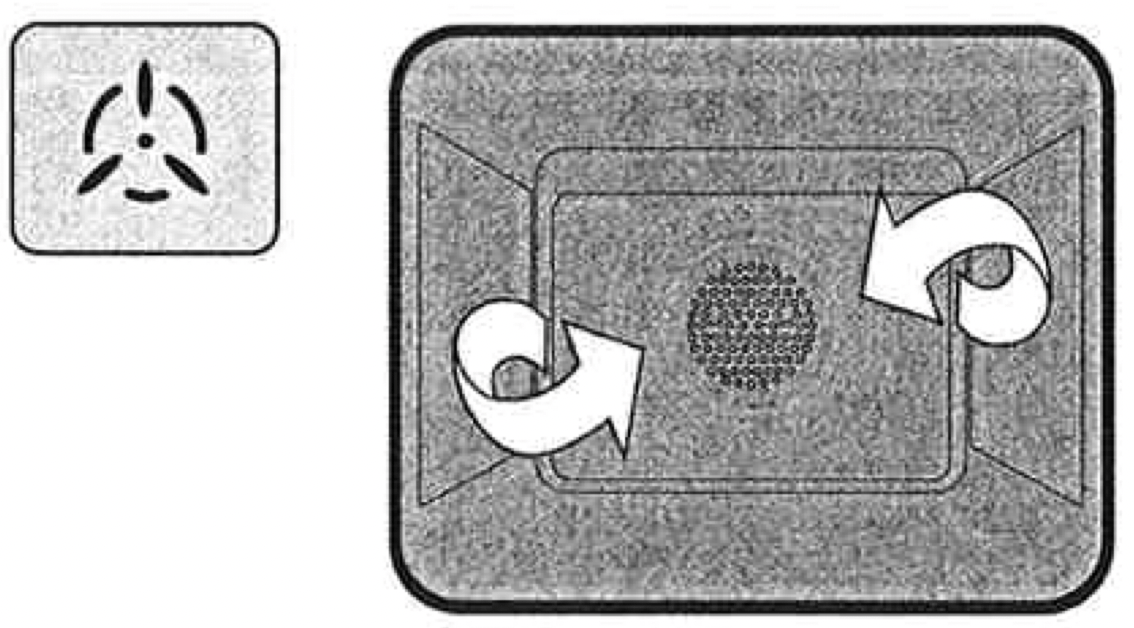
Fan baking (Fan forced oven models)
With fan forced ovens, heat comes from the element surrounding the fan (see diagram opposite).
The fan circulates the hot air and so the temperature is more even throughout the oven.
Fan baking:
cooks faster and at lower temperatures than conventional baking
is good when you are cooking food on different shelves at the same time
Note: Some variation in browning is normal with a fan forced oven.
Preheating the oven
We recommended that you preheat your oven before you put the food in to be cooked.
Set the required temperature.
When the indicator light goes out, put the food in the oven, close the door and set the timer.
USING THE OVEN OF YOUR GAS COOKER
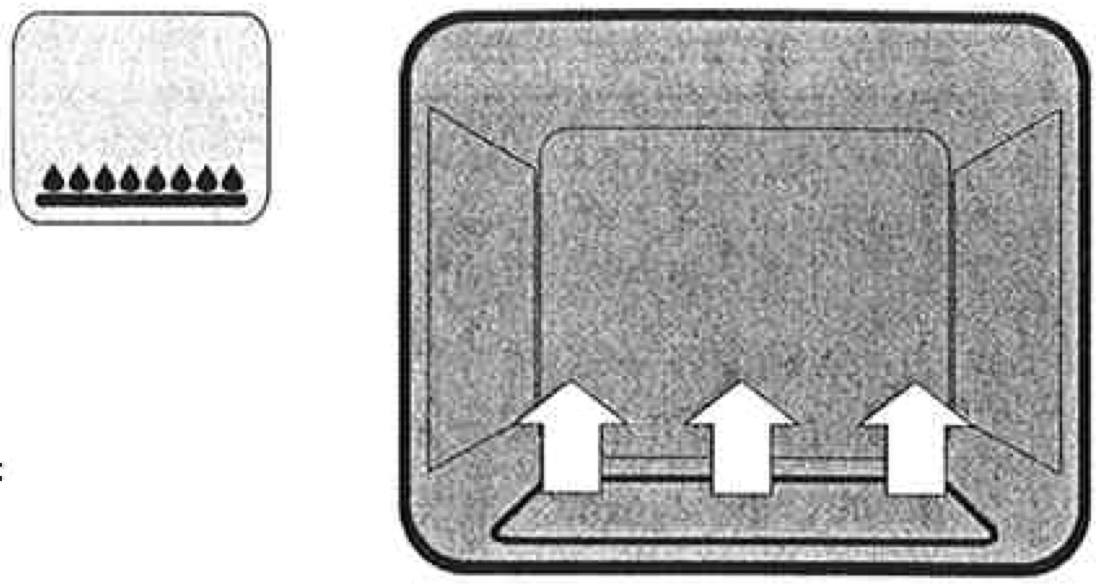
Baking
With conventional oven models heat comes from the burner below the food at rear of oven.
The burner is controlled by the thermostat which sets the oven temperature.
There is a variation in temperature between the bottom and the top of shelf is the hottest.
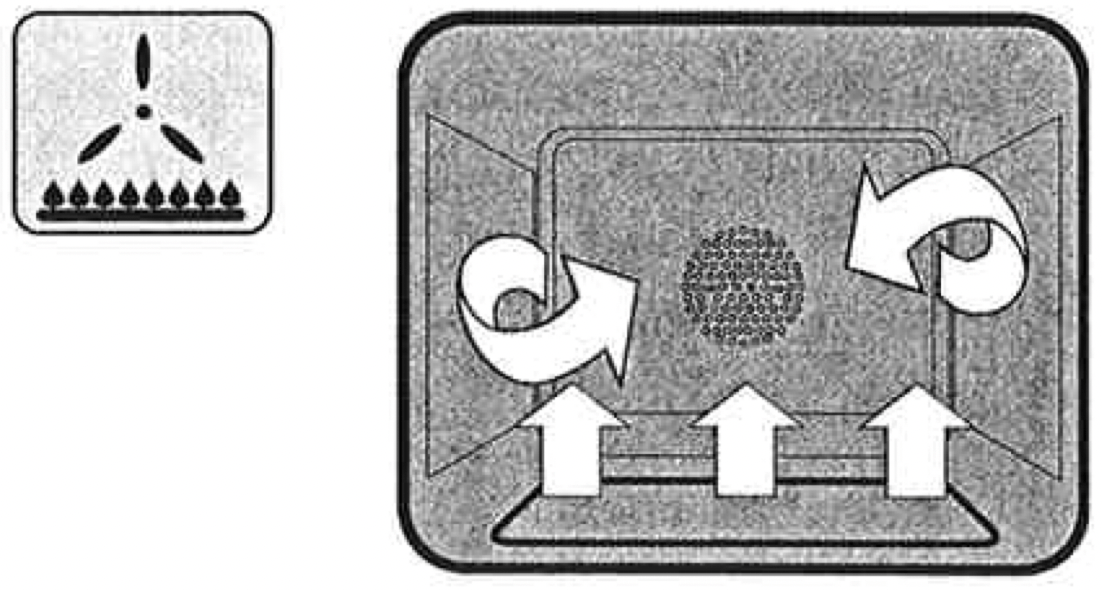
Fan baking (Fan forced oven models)
With fan forced ovens, heat comes from the burner below the food at rear of oven.
The fan circulates the hot air and so the temperature is more even throughout the oven.
Fan baking:
cooks faster and at lower temperatures than conventional baking
is good when you are cooking food on different shelves at the same time
Note: We recommended that you preheat your oven before you turn the fan on.
Lighting the oven
Press the oven burner control knob and turn it a quarter of the way.
For manual ignition models: Keep the oven burner control knob pushed in and at the same time press the oven igniter button on the right hand side of the control panel. For battery and electronic ignition models: Keep the oven burner control knob pushed in and at the same time press the electronic igniter switch on the right hand side of the control panel.
Hold the control knob for about 20 seconds when the burner lights, before releasing it.
Note: If the oven does not light within 10 seconds, or the flame goes out after you release the oven burner control knob, follow these steps:
Turn the oven burner control knob back to the start position and let go.
Open the oven door to stop gas building up.
Wait one minute and repeat the steps to light the oven.
Preheating the oven
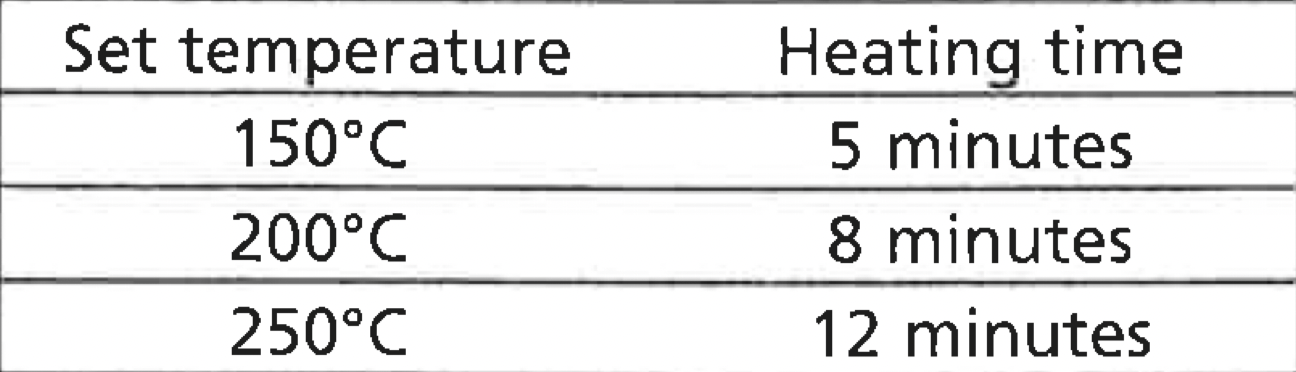
We recommended that you preheat your oven before you put the food in to be cooked.
The following table tells you how long it takes to preheat a cold oven to different temperatures.
Cookware
For best cooking results with gas oven, dark coloured trays and baking dishes are recommended.
USING THE GRILL
USING THR GRILL OF YOUR ELECTRIC COOKER
Separate Grill Models
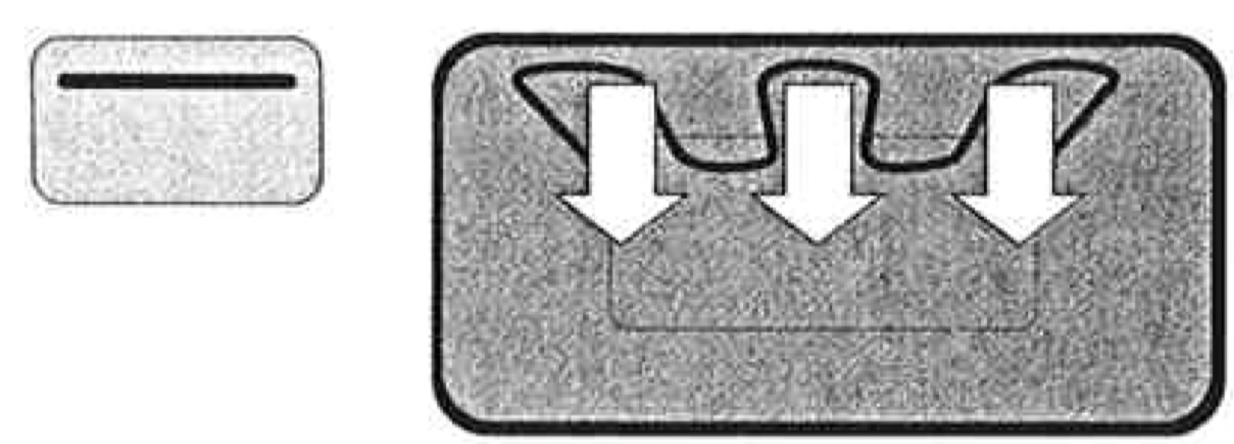
The grill directs heat onto food from the powerful upper element (see diagram opposite).
The grill is suitable for tender cuts of meat, steak, chops, sausages, fish, toasted cheese and other foods which cook quickly.
Note: The grill should be preheated for 3 minutes before cooking to seal natural juices of meat.
Caution: The grill door MUST be left open during grilling.
Grill in Oven Models
Set Function switch knob to GRILL and set thermostat knob to required temperature.
The grill directs heat onto food from the powerful upper element (see diagram opposite).
The grill is suitable for tender cuts of meat, steak, chops, sausages, fish, toasted cheese and other foods which cook quickly.
Note: The grill should be preheated for 3 minutes before cooking to seal natural juices of meat
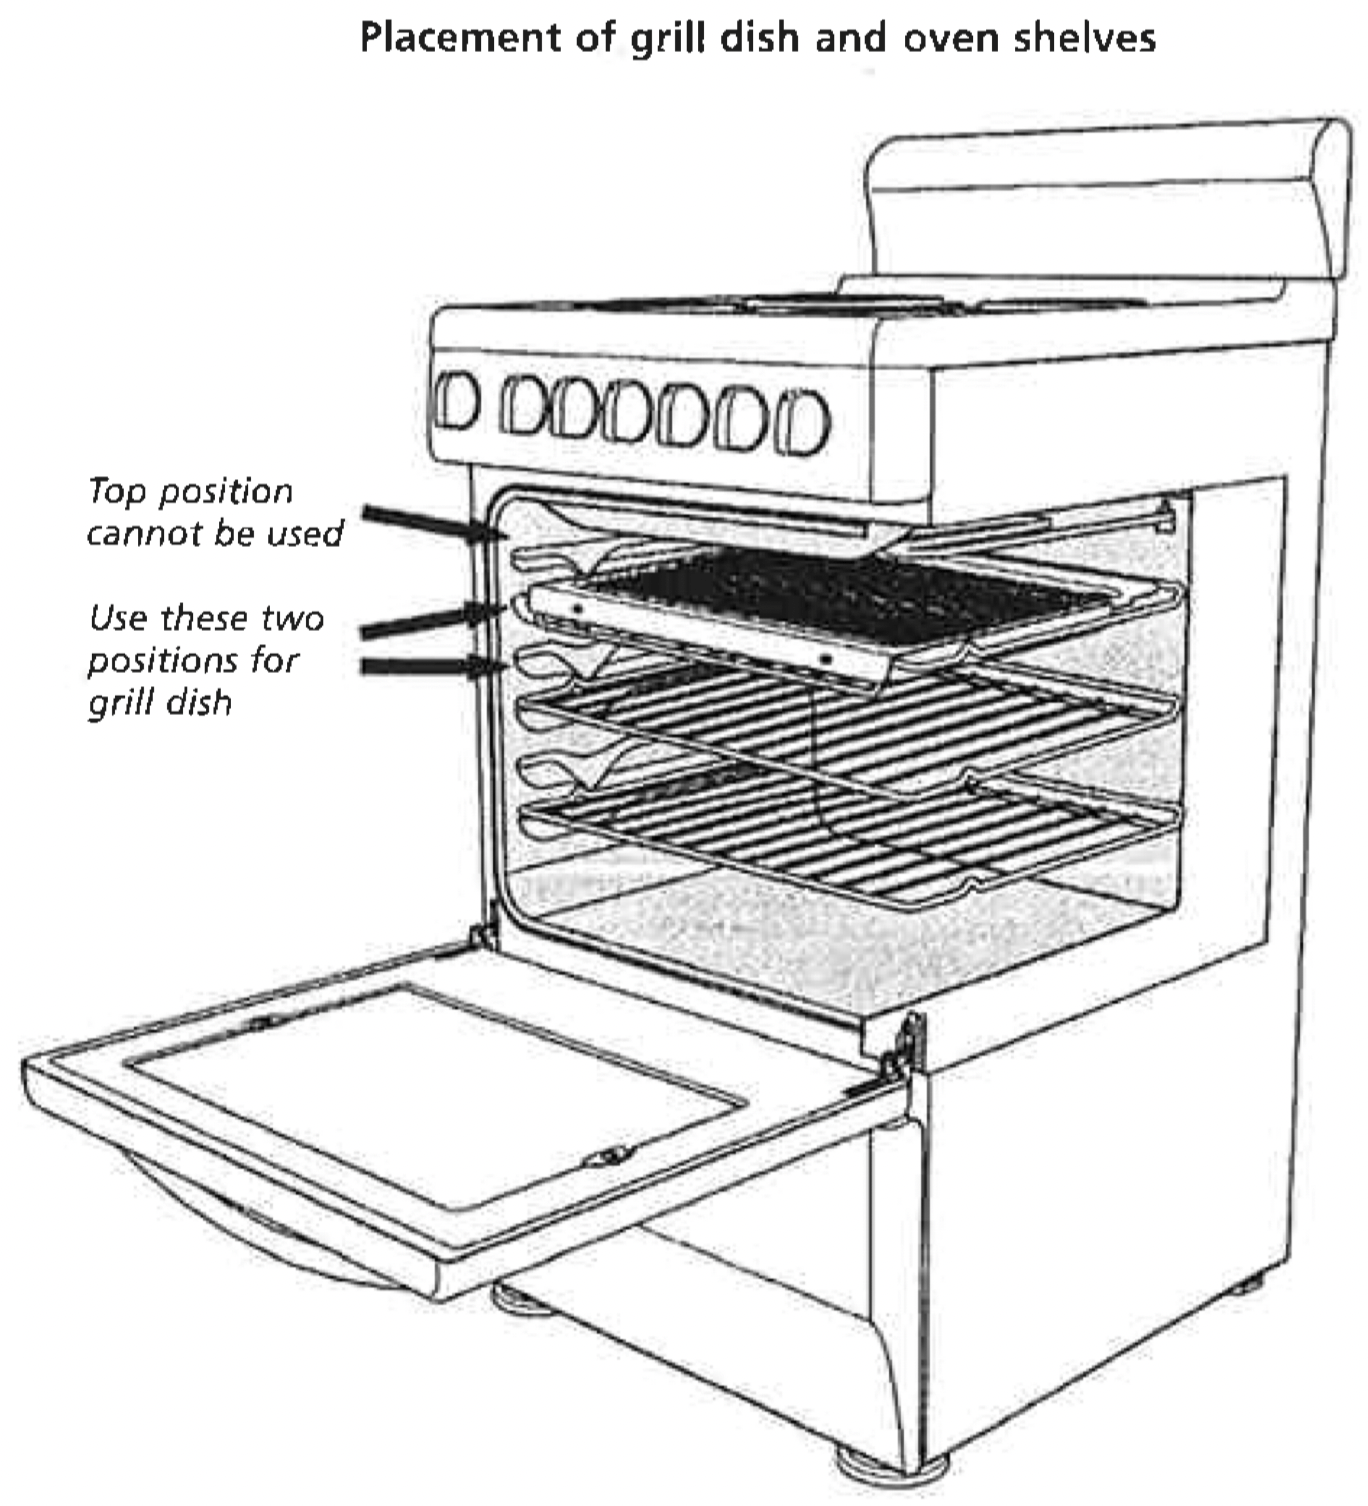
IMPORTANT: The oven door MUST be left closed. The full width grill dish can be used in any of the two upper height positions between the runners. Do not place grill dish on top of upper most runner as there are no stops for shelf withdrawal.
USING THR GRILL OF YOUR GAS COOKER
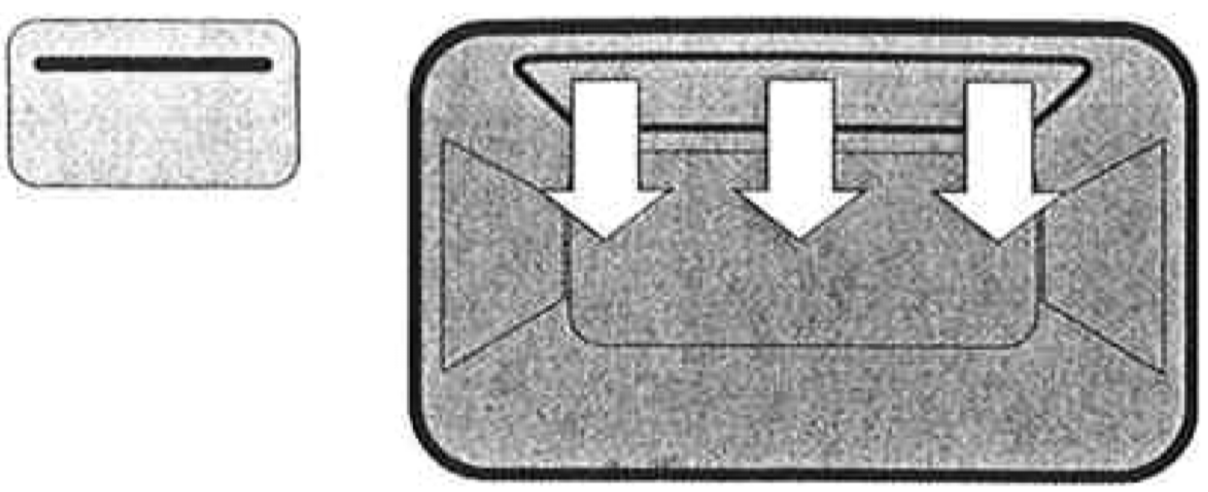
The "Grill" works by directing heat from the burner onto the food.
The grill function is suitable for tender cuts of meat, steak, chops, sausages, fish, cheese toasties and other quick cooking foods.
Igniting the Griller.
First press and turn the grill burner control knob to max.
Ignite the grill burner by pressing either the electric igniter switch (electronic ignition models) on the right hand side of control panel or manual igniter button (manual igniter models) on the left hand side of the control panel.
If the burnrt is not alight after about 8 seconds, turn the control knob to off and allow about 15 seconds for the gas to clear.
Then repeat the ignition procedure.
IMPORTANT: The grill door must be left open during grilling.
Best results are obtained after 3 minutes preheat. This will help seal in the natural juices of steak, chops etc. for a better flavour.
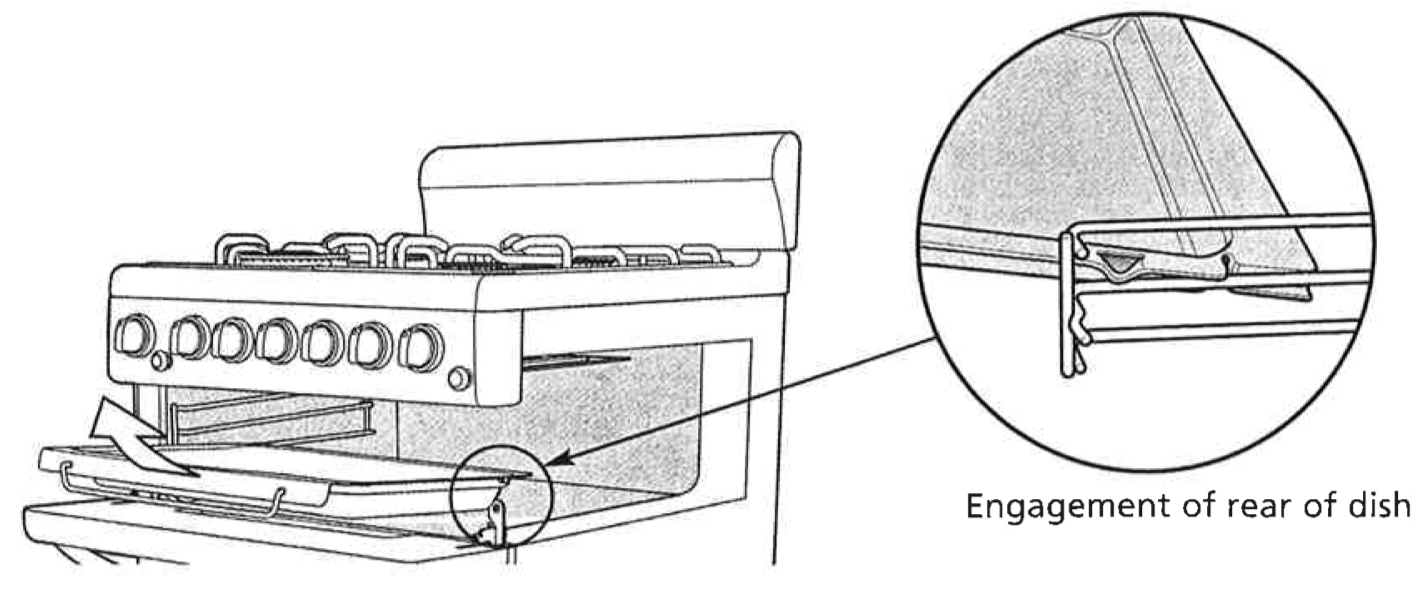
Removing the grill dish
To remove the Grill Dish simply pull forwards and upwards.
To replace the Grill Dish ensure that the rear of the dish is engaged with the side support before sliding backwards.
Note: Before you use your grill for the first time, run the frill for 15 minutes with 10mm of water in the bottom of the grill dish. This will remove any residual oils left on the burner.
USING THE HOTPLATES OF YOUR COOKER
Hotplate Safety Warnings
DO NOT leave the hotplace on with no pot or pan on top.
DO NOT use pots and pans which are unsteady, as these could overbalance.
DO NOT use asbestos mats, heat diffusers or wok stands. These will cause a temperature build-up which can damage the cooktop.
DO NOT allow pots or pans to boil dry. This could damage the hotplate and/or the cooktop.
DO NOT let cooking untensils get too close to the hotplate control knobs.
DO NOT use the cooktop as a kitchen bench.
DO NOT let children on or near the cooktop.
Ceramic hotplates
ALWAYS switch the cooker off if the ceramic glass top is cracked or broken.
DO NOT use aluminium foil on the ceramic hotplates.
Note: Stored heat in the hotplate can be used for the last few minutes of cooking. Simply turn off the control.
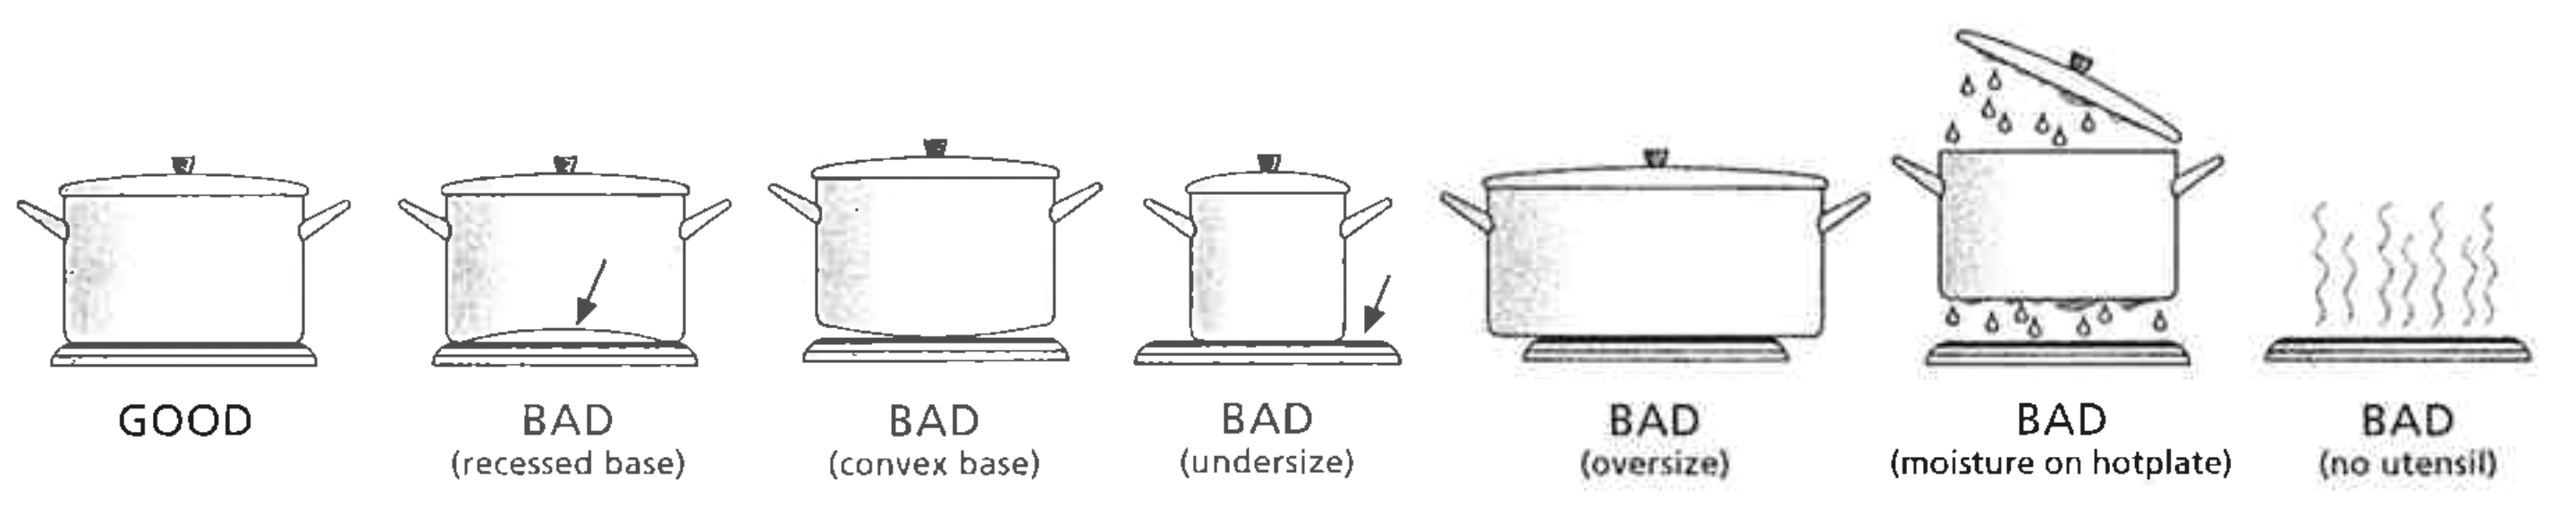
Choosing Untensils
Look at this diagram below which shows you which utensils to use on the hotplates and which utensils should not be used.
ALWAYS use pots and pans with flat bottoms. Uneven or thin bottoms will waste electricity and cook slowly.
ALWAYS use pots and pans which are slightly larger than the hotplate. Small pans waste electricity.
ALWAYS put pots and pans which are dry on the hotplates.
DO NOT use pots and pans which are too large. Pans which overhang the hotplate more than 50mm can damage enamel cooktops.
USING THE HOTPLATES OF YOUR ELECTRIC COOKER
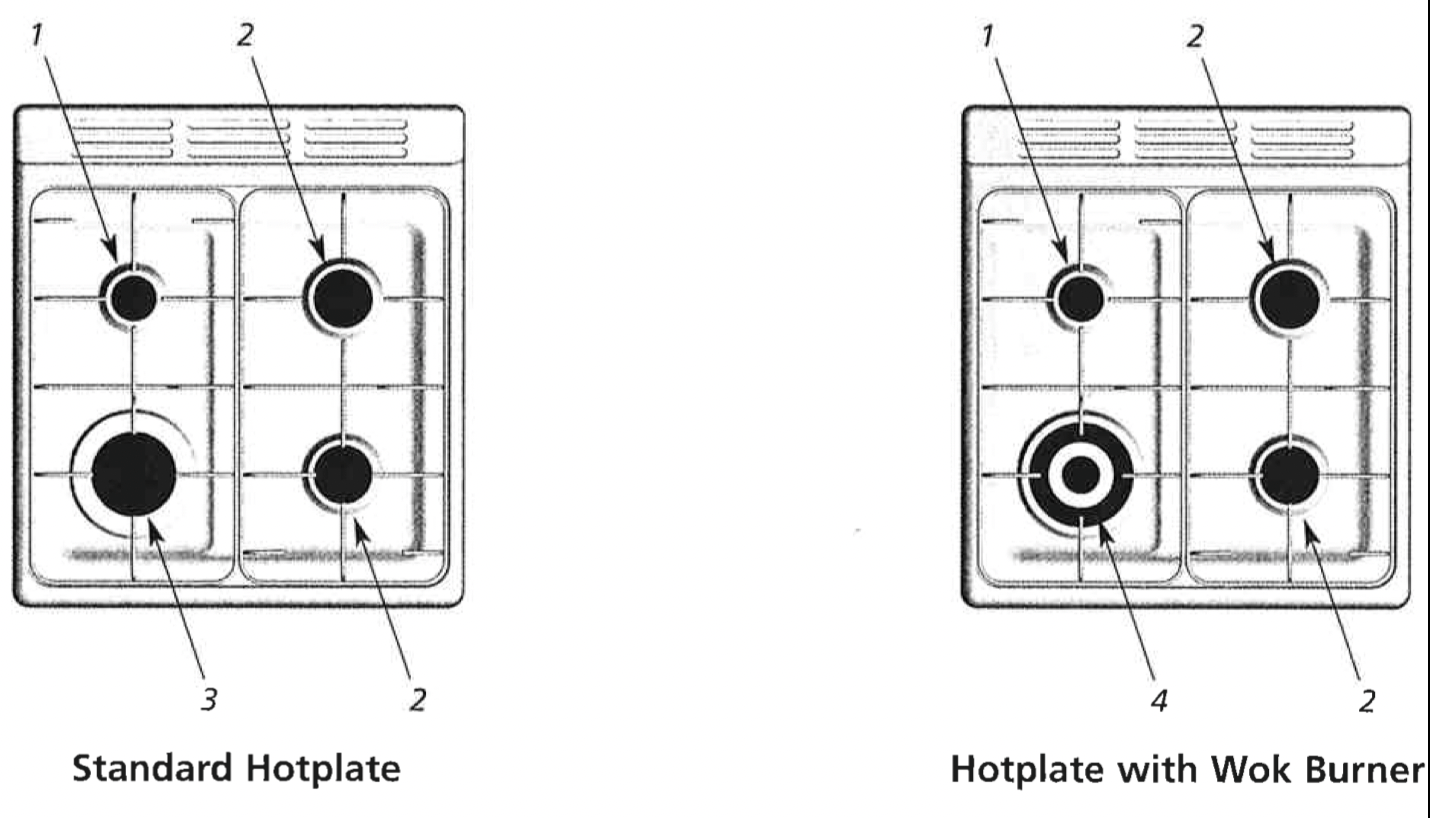
Check the hotplates on your cooker against the diagrams below before you use your cooker for the first time.
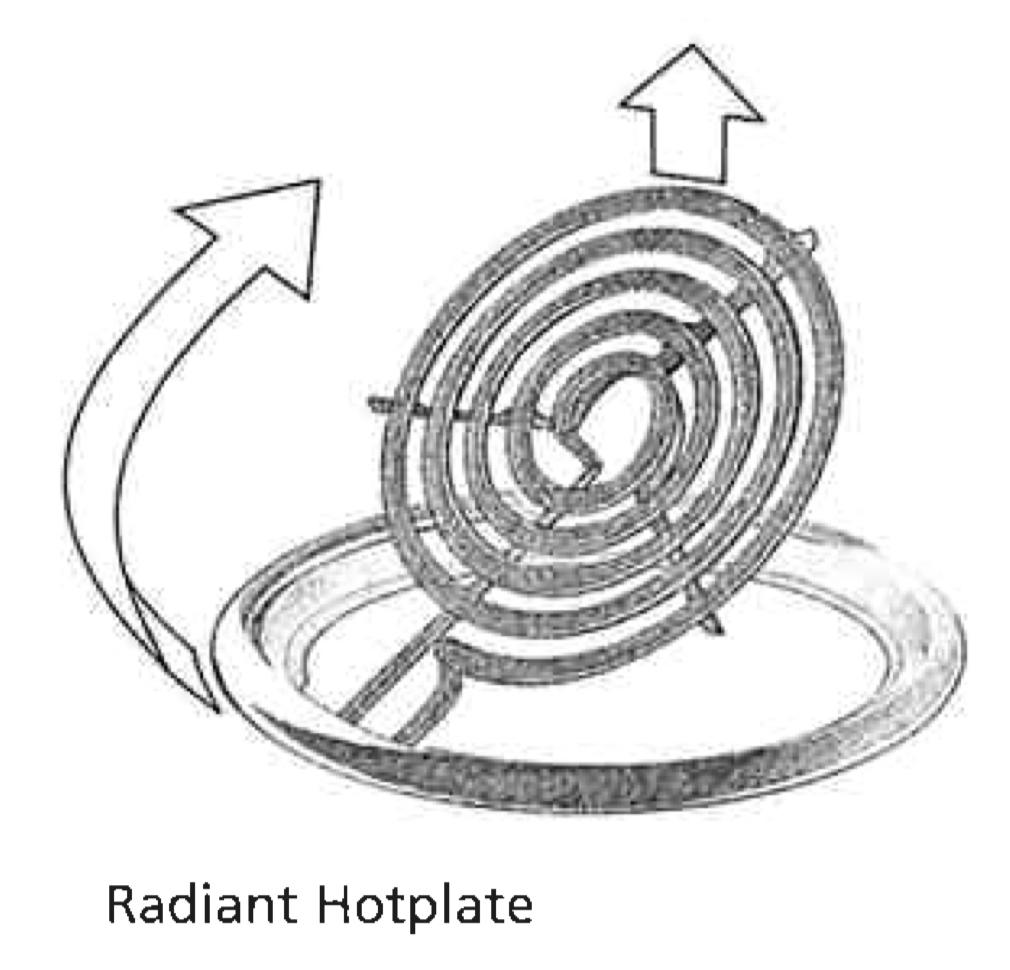
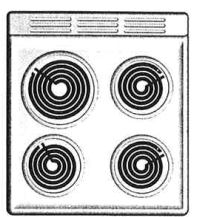
Radian hotplates
The high-speed radiant hotplates (see diagram opposite) heat rapidly from a cold start. This saves power.
Front control models
The hotplates have a tray underneath the hob which collects spilt liquids. The radiant elements can swivel and the trim rings can be removed for cleaning of this tray.
Rear control models
The hotplates have a tray under the hob which collects split liquids. This tray can be removed by sliding it out through the open grill door.
The radiant elements also swivel for easy cleaning.
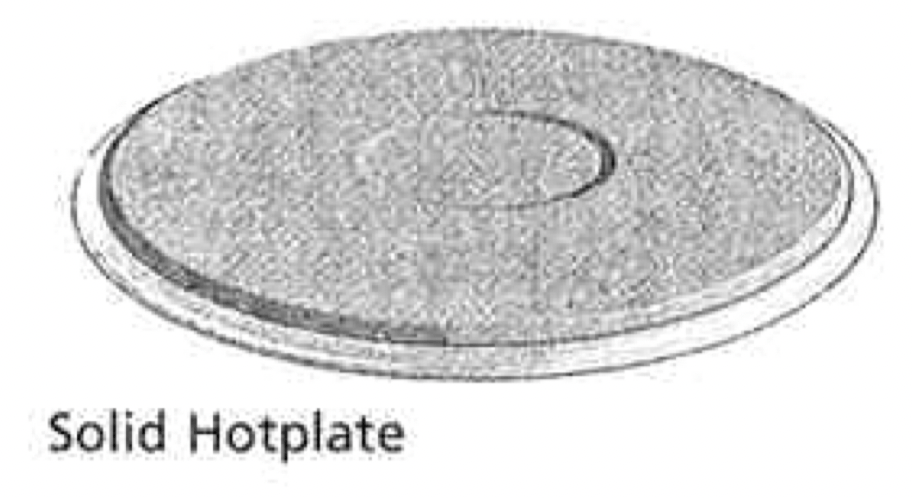
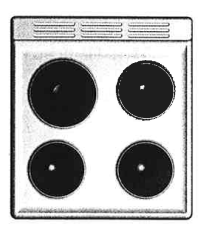
Solid hotplates
The strong solid-cast hotplates (see diagram opposite) give wide contact for fast, efficent cooking.
The hotplates are sealed all around which means that spilt liquids do not go under the hotplates.
The 2000W and 1500W hotplates include a red dot in the centre to indicate the hotplate temperature, the red dot changes colour when the hotplate is heated.
Before first use:
The top surface of the hotplates are sealed with a heat resistant coating. Before using for the first time the hotplates should be heated for a short period without a pan to harden the protective coating.
Turn the heat setting to high for approx 3 minutes to fully harden the coating. When the hotplates have cooled apply a thin coating of cooking oil to the hotplate to seal and protect the surface.
Ceramic hotplates
Do not use the cooktop if the glass is cracked.
The ceramic cooktop is made from ceramic glass, a tough, durable material that withstands heating and cooling without breaking. However, it must be remembered that as it is GLASS, it may break. Treat it accordingly! Should you have any questions about the glass in your new appliance, please contact the service centre by dialling 13 13 49.
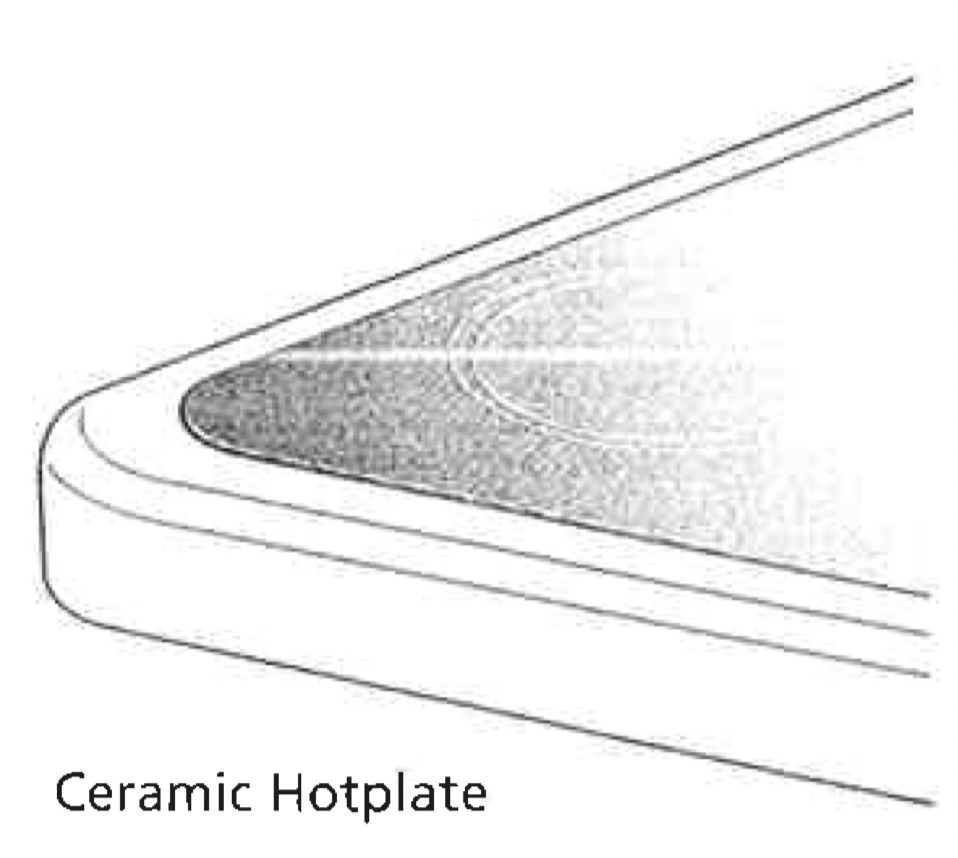
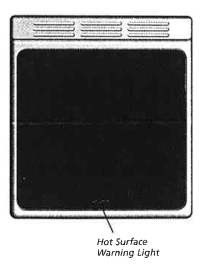
The smooth glass surface has a pattern to show where the elements under the glass are located (see diagram opposite).
When a hotplate is on, the hot surface warning light (see diagram opposite), will come on. After switching off, this light will continue to glow until the temperature of the hotplate drops below 60°C.
USING THE HOTPLATE BURNERS OF YOUR GAS COOKER
Manual Ignition Burners
After setting the appropriate hotplate burner control knob to max, these burners are ignited by a hand held igniter. (Not supplied).
Battery and Electronic Ignition Burners
After setting the appropriate hotplate burner control knob to max, the burner is ignited by pressing the igniter switch. Sparks are released to all burners.
To conserve gas, place the pan centrally over the burner and adjust the flame so that it does not go past the edges of the cookware.
BEFORE OPERATING YOUR APPLIANCE FOR THE FIRST TIME
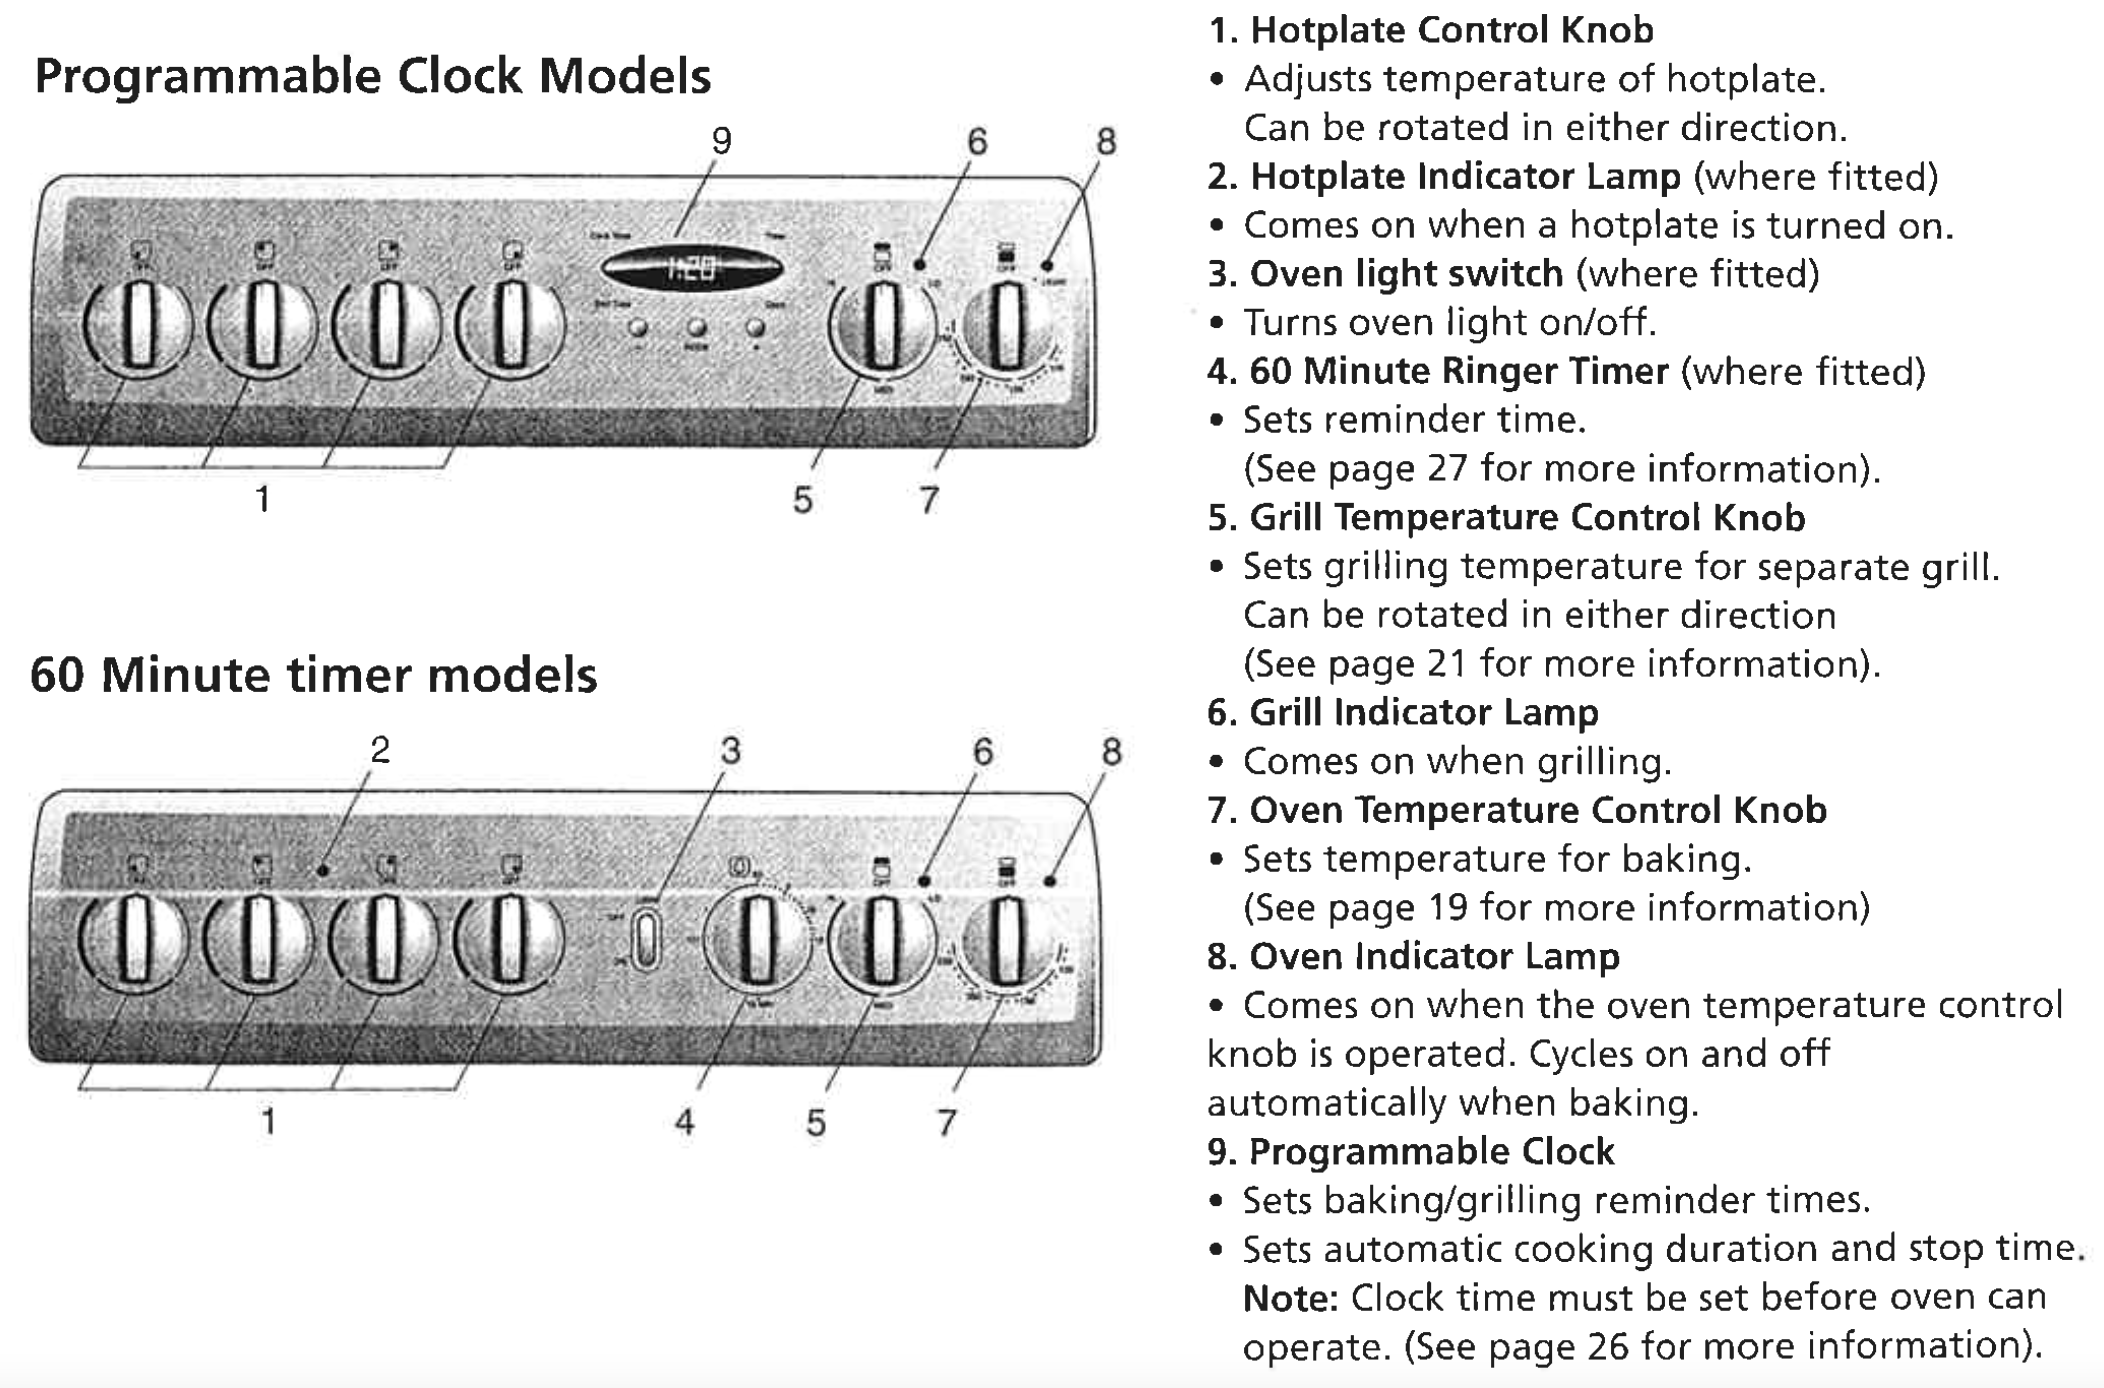
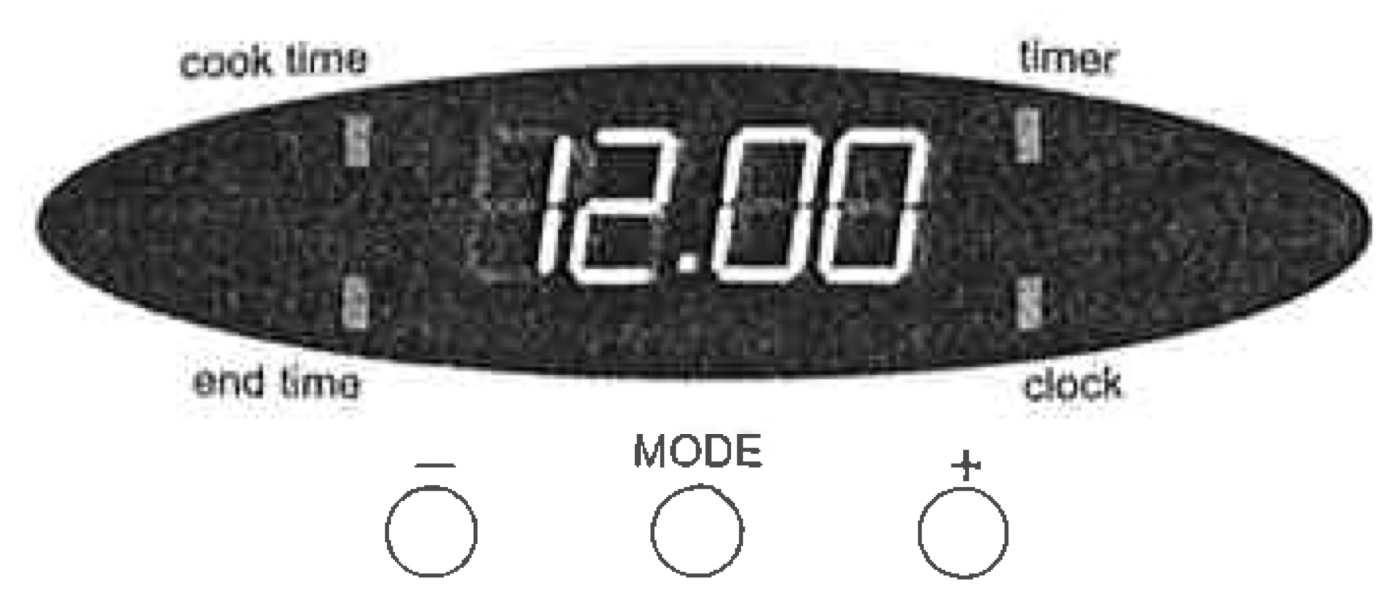
Electronic Clock
After the appliance has been switched on "12.00" will be displayed and the "clock" indicator will flash. To set the time of day in hours and minutes, press the - or + buttons. 5 seconds after the last change, the "clock" indicator will disapear, confirming the time has been set. Once the time has been entered, the clock advances minute by minute.
Note: The clock has 24-hour display. The clock must be set to operate oven.
OPERATING THE PROGRAMMABLE CLOCK
General feature
Your 3 button programmable timer has the following features:
Timer - your 3 button programmable timer allows you to set a countdown time that will beep when the set time has elapsed.
Cooking duration - You can set a cooking duration. A timer will count down the preset cooking time, beep when the time has elapsed and turn the oven off.
End cooking time - you can set a cooking finish time. A timer will count down the preset cooking time, beep when the finish time has been reached and turn the oven off.
Delayed start cooking time - you can combine the cooking duration and cooking end time to switch the oven on and off at a specific time during the day.
Note: Your 3 button programmable timer only operates with your oven.
Change the time of day (Daylight saving)
Press the "mode" button until the "clock" indicator begins flashing.
Press the - or + buttons to change the time. 5 seconds after the last change, the "clock" indicator will disappear, confirming the time has been set.
Setting the timer
Press the "mode" button until the "timer" indicator begins flashing.
Set the countdown time you want by using the - or + buttons. 5 seconds after the last change the "timer" indicator will stop flashing, confirming the timer has been set.
To stop the beeper, press any button.
Setting the cooking duration
Check the clock displays the correct time of day.
Set the oven to the desired temperature. The oven indicator light will glow and the oven will come on.
Press the "mode" button until the "cook time" indicator begins flashing.
Set the cooking duration you want by using the - or + buttons. 5 seconds after the last change, the "timer" indicator will stop flashing, and the time of day will be displayed.
Note: Do not forget to add preheating time if necessary.
Setting the cooking end time
Check the clock displays the correct time of day.
Select the desired oven temperature. The oven indicator light will glow and the heating source will come on.
Press the "mode" button until the "end time" indicator begins flashing.
Enter the time of day you want to finish cooking by pressing the - or + buttons. 5 seconds after the last change, the "timer" indicator will stop flashing, and the current time of day will be displayed.
Setting the delayed start cooking time
Program the "cook time" and "end time" as decribed in the relevant sections. Once both the "cook time" and "end time" have been set, the "cook time" and "end time" indicators will stop flashing and the current time of day will be displayed.
To check or cancel settings
To check your settings, press the mode button until the setting you want is displayed. A red light will flash next to the mode (cook time, end time etc) that is currently on display.
To cancel "delayed start" press the mode button until a light flashes next to "end time". Press and hold the - button until the clock no longer reverses (you will hear a beep). If your have left the temperature knob at a setting the oven will start once the "end time" light stops flashing.
To cancel "auto shut off" press the mode button until a light flashes next to "cook time". Press and hold the - button until the clock no longer reverses at ("0:00" and you will hear a beep). This automatically cancels "delayed start". If you have left the temperature knob at a setting, the oven will start once the "cook time" light stops flashing. Because you have cancelled "auto off" the oven will continue to heat until you manually turn it off.
On completion of cooking
The heat source will turn off, the timer will beep and the "end time" and/or "cook/time" indicators will flash.
Turn the temperature control to the off position.
Press any button to stop the timer from beeping.
Switching the clock display ON and OFF
Press any two buttons together for 2 seconds to switch 'off' the display.
Press any button to switch the clock display 'on' again.
Note: If a timer mode is set, then it is not possible to switch thw display off.
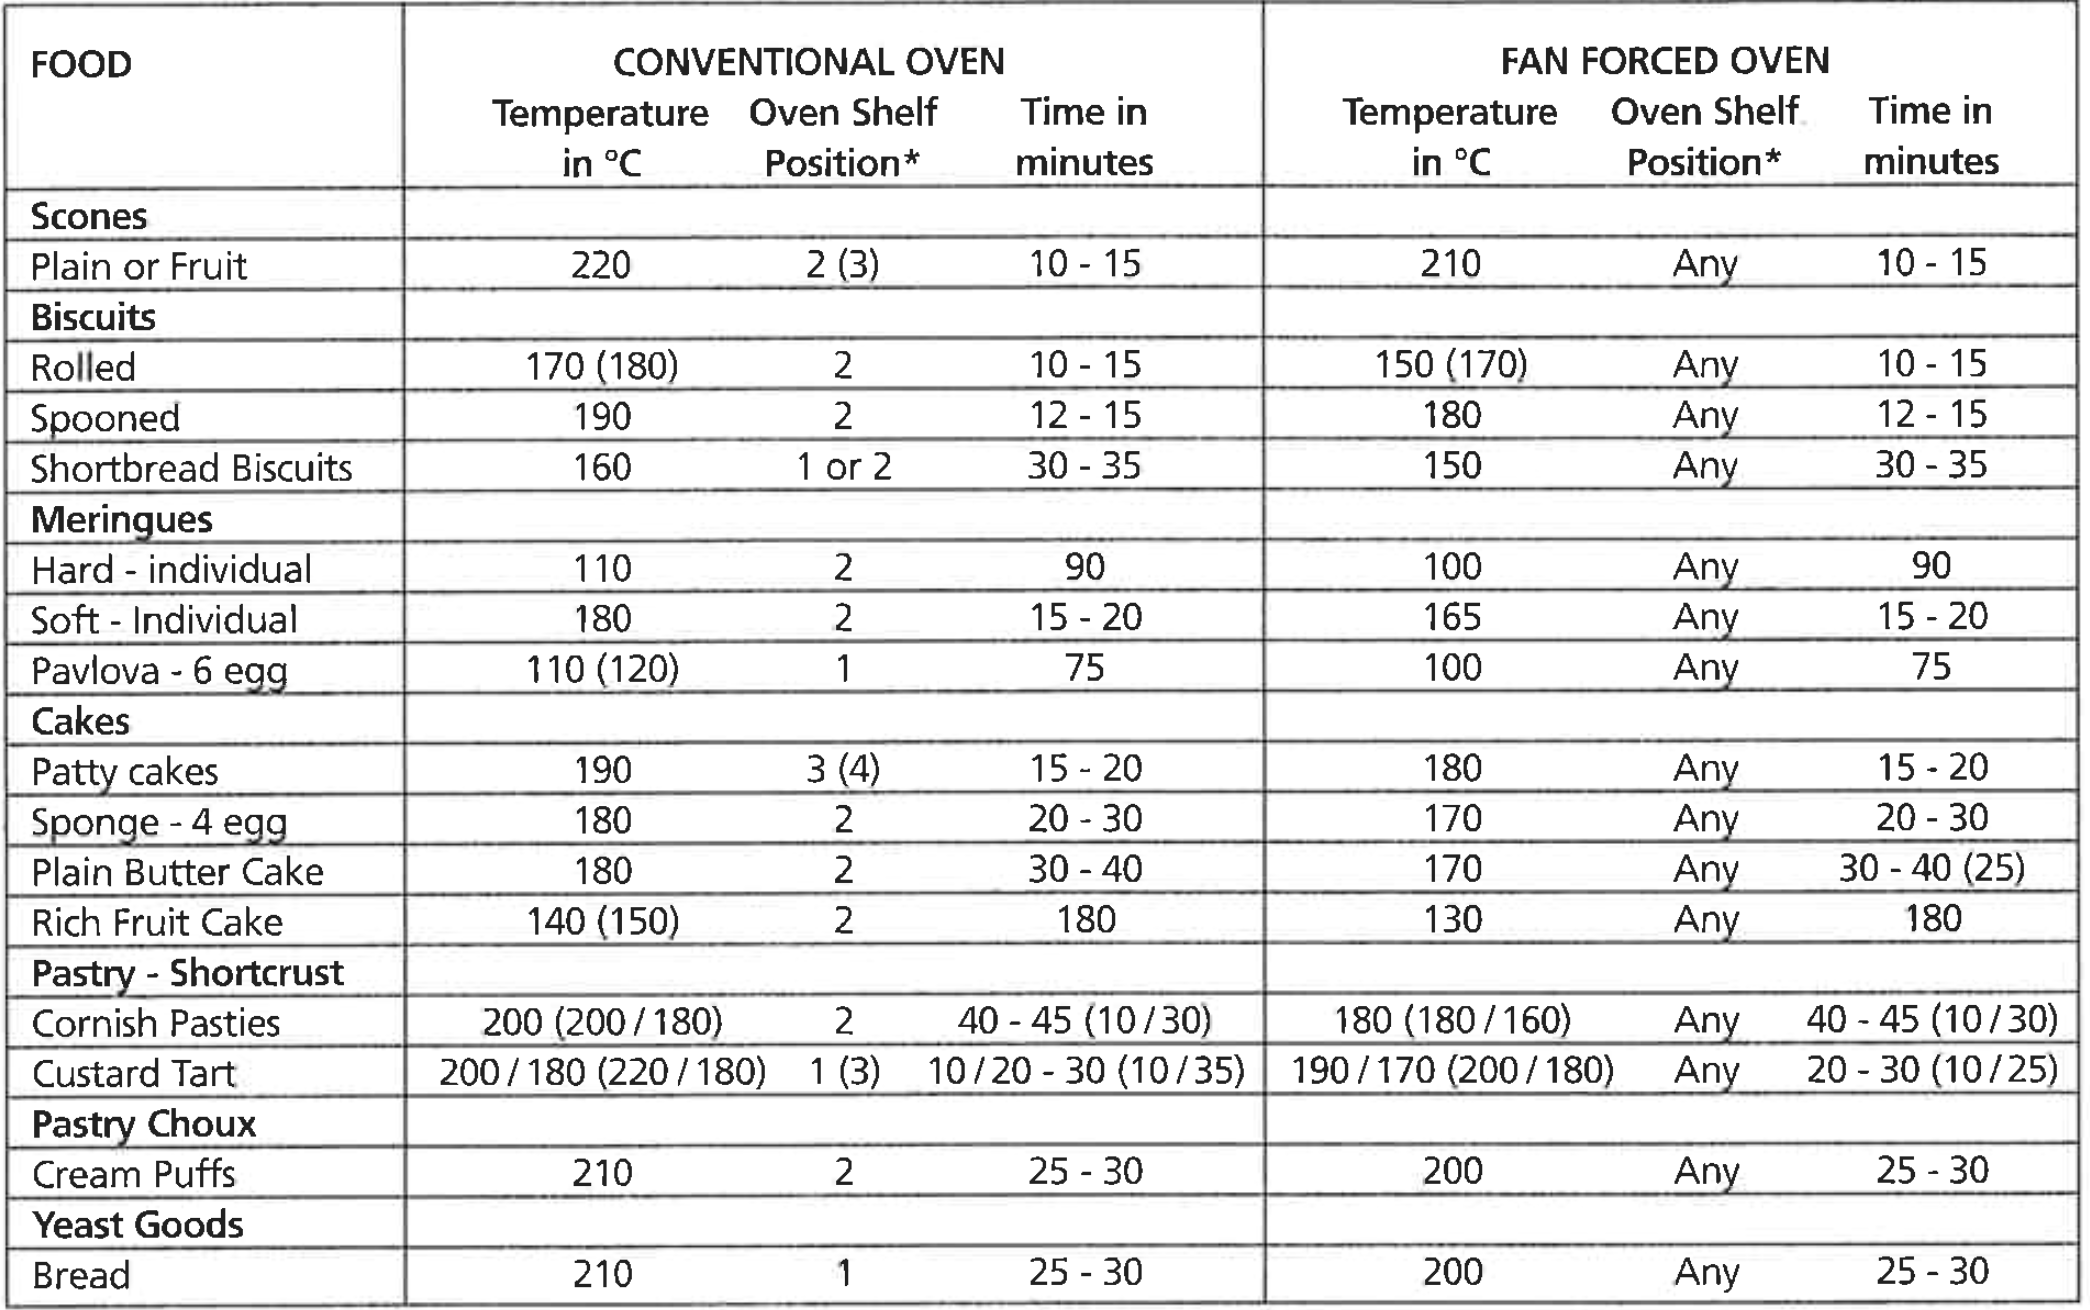
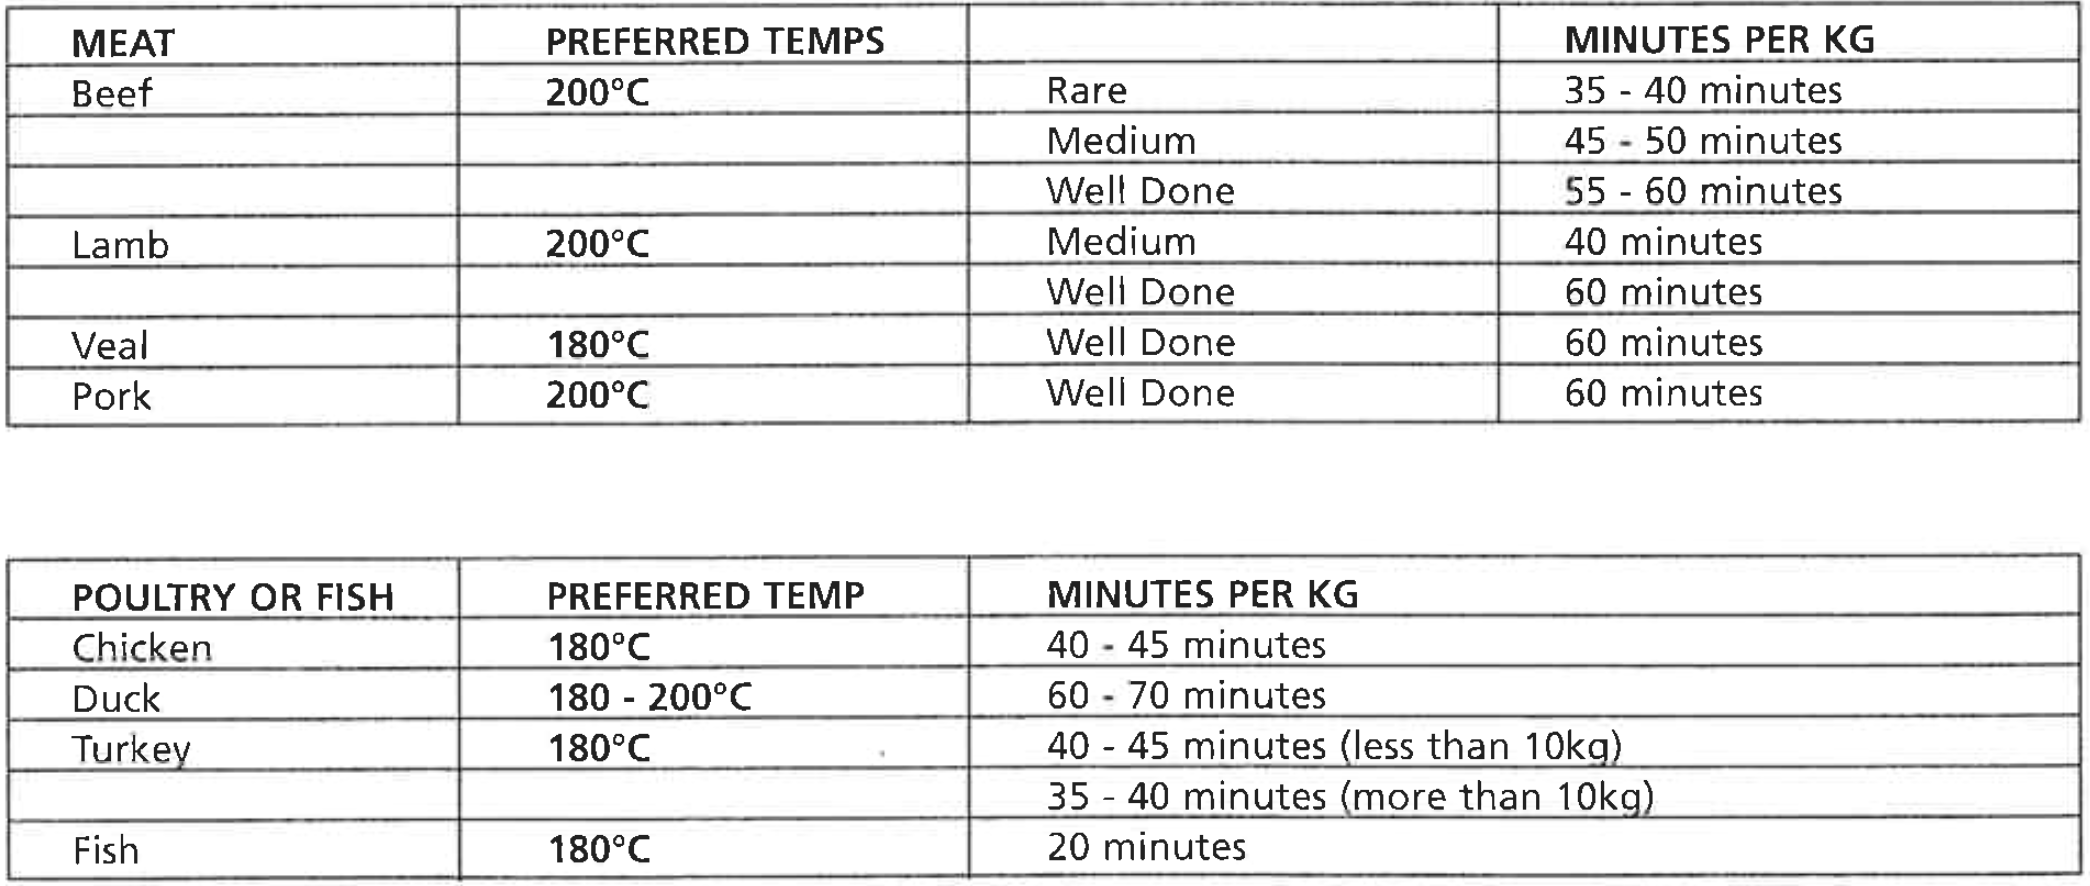
OVEN COOKING GUIDE
The following is intended as a guide and experience may show some slight variation to be necessary to meet individual requirements.
* Shelf position is counted from the bottom shelf ip ie. Bottom shelf position is 1
Where the gas models vary from electric, details for gas cooking is shown in brackets
HANDLING BAKING & GRILLING PROBLEMS
PROBLEM
CAUSES
WHAT TO DO
Uneven cooking
Incorrect shelf position.
Oven tray too large.
Trays not in centre of oven.
Air flow in oven uneven
Select shelf which puts food in centre of oven.
Try other trays or dishes.
Put trays in centre of oven.
Turn food during cooking.
Baked products too brown on top
Oven not preheated.
Aluminium foil in oven.
Baking tins too large for recipe.
Baking tins not evenly spaced.
Food not evenly sized or placed on trays.
Food placed too close to top of oven.
Preheat oven (refer p.19 or 20)
Remove foil.
Use correct size tins.
Place baking tins so that there is at least 3cms between tins and oven walls.
Make food same size and shape and spread evenly on trays.
Place food in middle or on a lower shelf.
Baked products too brown on bottom
Baking temperature too high.
Baking tins too large for recipe.
Baking tins are dark metal or glass.
Food too low in oven.
Oven door opened too frequently during cooking.
Lower temperature
Use correct sized tins
Change to shiny, light tins or lower temperature by 10°C.
Cook one shelf higher.
Do not open door until half way through cooking time.
Cakes have craked thick crust
Baking temperature too high
Food too high in oven.
Cake batter overmixed.
Pan too deep.
Baking tins too dark.
Lower temperature
Cook one shelf lower
Mix just long enough to combine ingredients.
Check size of pan and use recommended size.
Change to shiny tins
Baking products are pale flat and undercooked
Baking temperature too low
Food too low in oven
Baking time too short
Incorrect tin size
Raise temperature
Cook one shelf higher.
Increase cooking time.
Use correct tin size.
Cakes fallen in centre
Baking temperature too low
Baking time too short
Measurement of ingredients is wrong
Door opened too early
Raise temperature
Increase cooking time.
Check recipe.
Do not open door until three quarters (3/4) of way through cooking time.
Meat and potatoes not browning in fan oven
Poor circulation
Put food onto a rack in baking dish to allow air to circulate
Condensation on oven door.
Use less water with cooking.
Place food into oven bag.
Leave oven door open after cooking if food is to be left in the oven for a long time.
Grilled meats overcooked on outside and raw in centre
Meat too close to grill
Grill at lower shelf position.
Excess grill smoke
Build-up of fats in grill
Clean grill
Juices running out of meat
Do not pierce meat with fork but turn with tongs
Grilled steaks and chops buckling
Cut fat with knife towards meat
Note: Condensation on oven door and in grill compartment is normal.
CLEANING AND CARING FOR THE COOKER
Cleaning the enamel:
Keep enamel clean by wiping it with a soft cloth dipped in warm soapy water.
Rub difficult stains with a nylon scourer or creamed powder cleanser.
DO NOT use abrasive cleansers, powder cleansers, steel wool or wax polishes.
If you use an oven cleaner, then follow the instructions on the product carefully.
Cleaning the control panel:
Make sure control knobs are in OFF position.
Remove knobs from control panel by pulling forwards.
Clean the control panel by wiping it with a soft cloth dipped in warm soapy water.
DO NOT use too much water when cleaning control panel.
Cleaning the electric cooktop
Radiant hotplates
These plates are self cleaning. Any liquid which boils over will burn to ash and can be wiped off when the hotplate has cooled. To clean the trim rings, lift front of element and remove (see diagram opposite). Then wash in warm, soapy water. To clean the spillage that falls through the element either remove spillage tray (rear control models) and wash in warm soapy water or lift element and wipe out (front control models).
Solid hotplates
For normal cleaning use a moist cloth.
For very dirty hotplates use any commercial cleanser.
After cleaning, remove any cleanser remaining and dry the hotplate completely by running the element for a short period.
Oil the hotplate after cleaning with a thin coating of cooking oil to prevent rust or corrosion.
Some discolouration of the trim ring is normal during use.
Ceramic hotplates
Remove all split food with the razor blade scraper supplied while the hotplates is still warm - NOT HOT.
If aluminium foil, plastic items or foods with a high sugar content melt onto glass, use the razor blade scraper to remove immediately before the hotplate has cooled, otherwise pitting of the surface may occur. High sugar content foods include jam, fruit, carrots, tomatoes and peas.
When the ceramoic hotplate has cooled, wipe clean with dishwashing detergent on a damp cloth.
Note: DO NOT use abrasive sponges or scourers, oven sprays or stain removers on ceramic hotplates. These may damage, scratch or stain the ceramic cooktop. Any pitting, staining or scratching WILL NOT be covered by warranty.
Cleaning the Gas Hob
Removing the trivets
The trivets locate in the recessed area of the hob.
They can be removed for cleaning by carefully lifting them from the hob.
Clean by washing in warm soapy water.
Take care when replacing the trivets as dropping them onto the hob may damage the enamelled surface.
For wok burners only use the trivet suited to the wok burner.
Removing the burners
The burner caps and crowns are removable for cleaning.
Flame port blockage should be removed by means of a match stick or brush.
If the caps, crowns and cups are heavily soiled, use a non-abrasive cleaning compound.
Do not clean them with abrasive or caustic type cleaners, or clean in a dishwasher as they will be damaged.
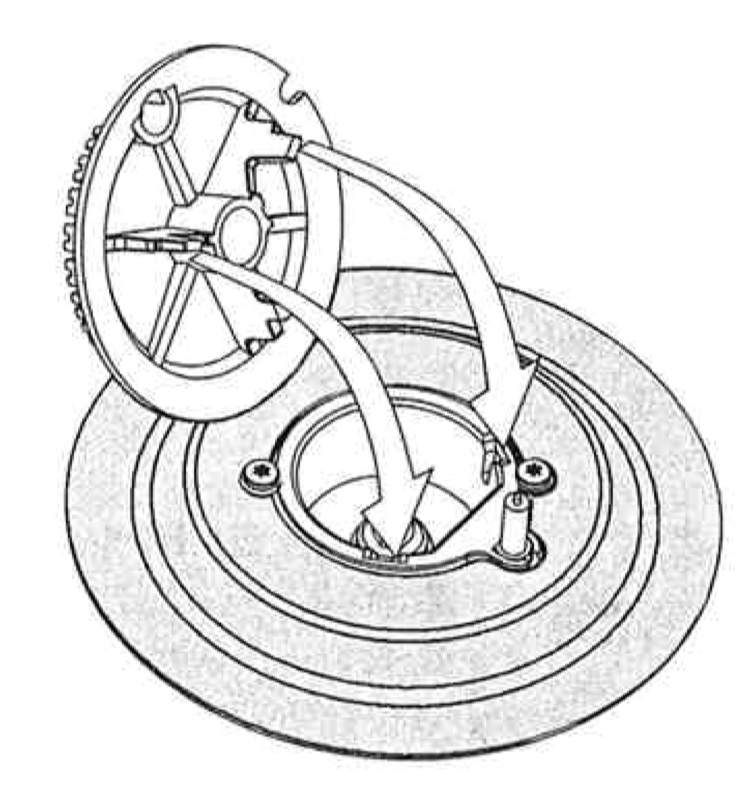
Refitting the burner crowns and caps
The burner crown must be fitted correctly into the burner cup or damage will occur during operation.
To do this, ensure that the 2 ribs on either side of the spark plug hole are positioned into the 2 slots on the burner cup. (See diagram opposite)
The burner cap is simply positioned over the top of the burner crown.
Note: When the burner is correctly fitted it will sit level on the hob.
Removing the splashback
(Flat hob models only)
The splashback can be removed to aid in cleaning.
To remove the splashback, simply pull upwards.
Clean the splashback in hot soapy water.
To replace the splashback, align the 2 tabs of the splashback with the corresponding holes in the hob and push downwards.
Cleaning the grill
Removing the Grill Dish Supports
The grill dish supports can be removed to aid in the cleaning of the Grill Compartment.
To remove them, simply grasp the supports at the front and pull them inwards.
To install the grill dish supports, first insert the rear hook to the rear hole.
Then locate the front peg into the front hole and push in firmly.
Cleaning the Grill Compartment
Clean the Grill Compartment with hot soapy water. If stronger action is needed use a non-abrasive oven cleaner applied with a nylon scourer.
NOTE: You can also use household oven enamel cleaners but follow the manufacturer's instructions carefully. Do not use harsh abrasive, powder cleaners, steel wool or wax polishes.
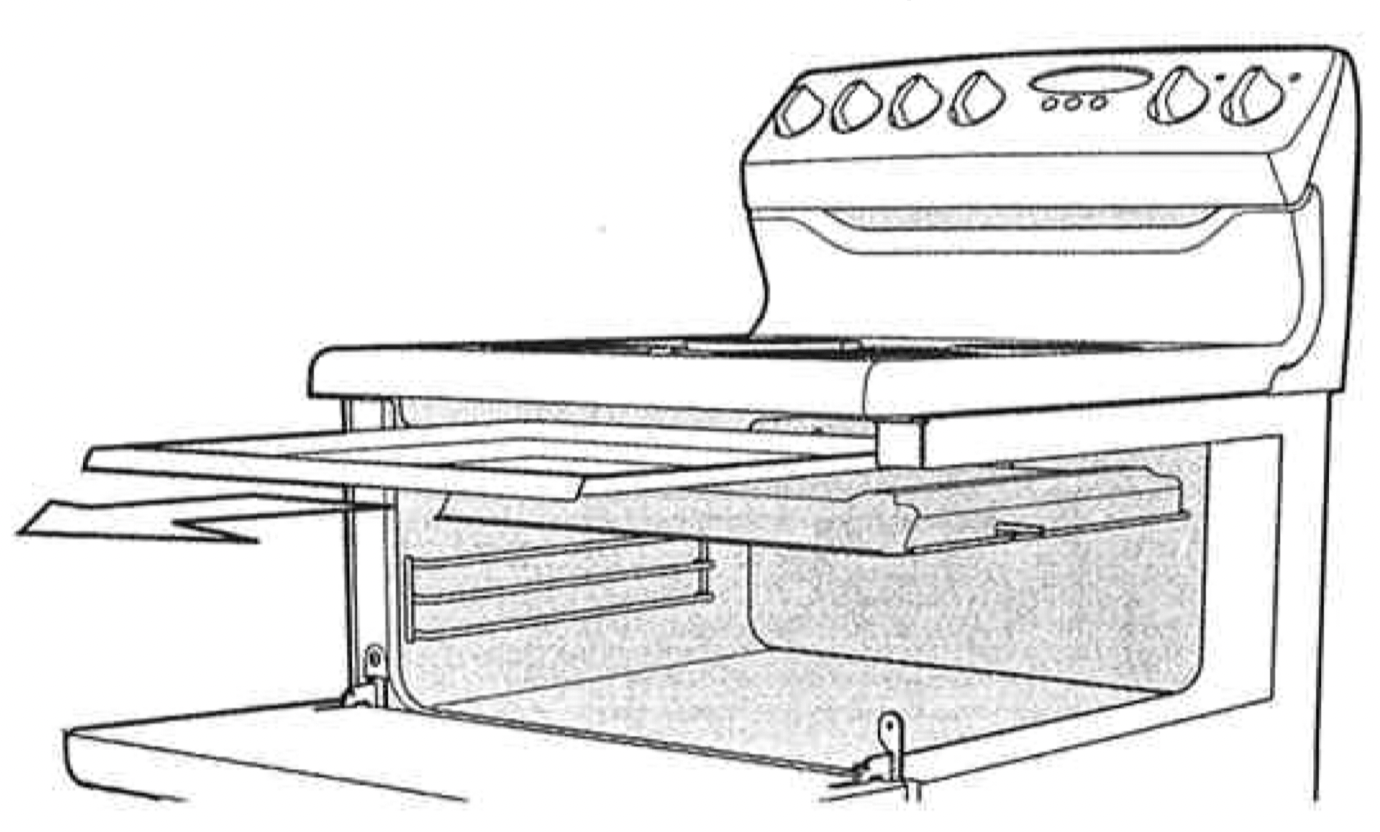
Hotplate Spillage Tray (Electric rear control cookers with radiant elements only).
Pull out the spillage tray (radiant models only) and clean in hot soapy water (see diagram opposite).
Cleaning the Oven
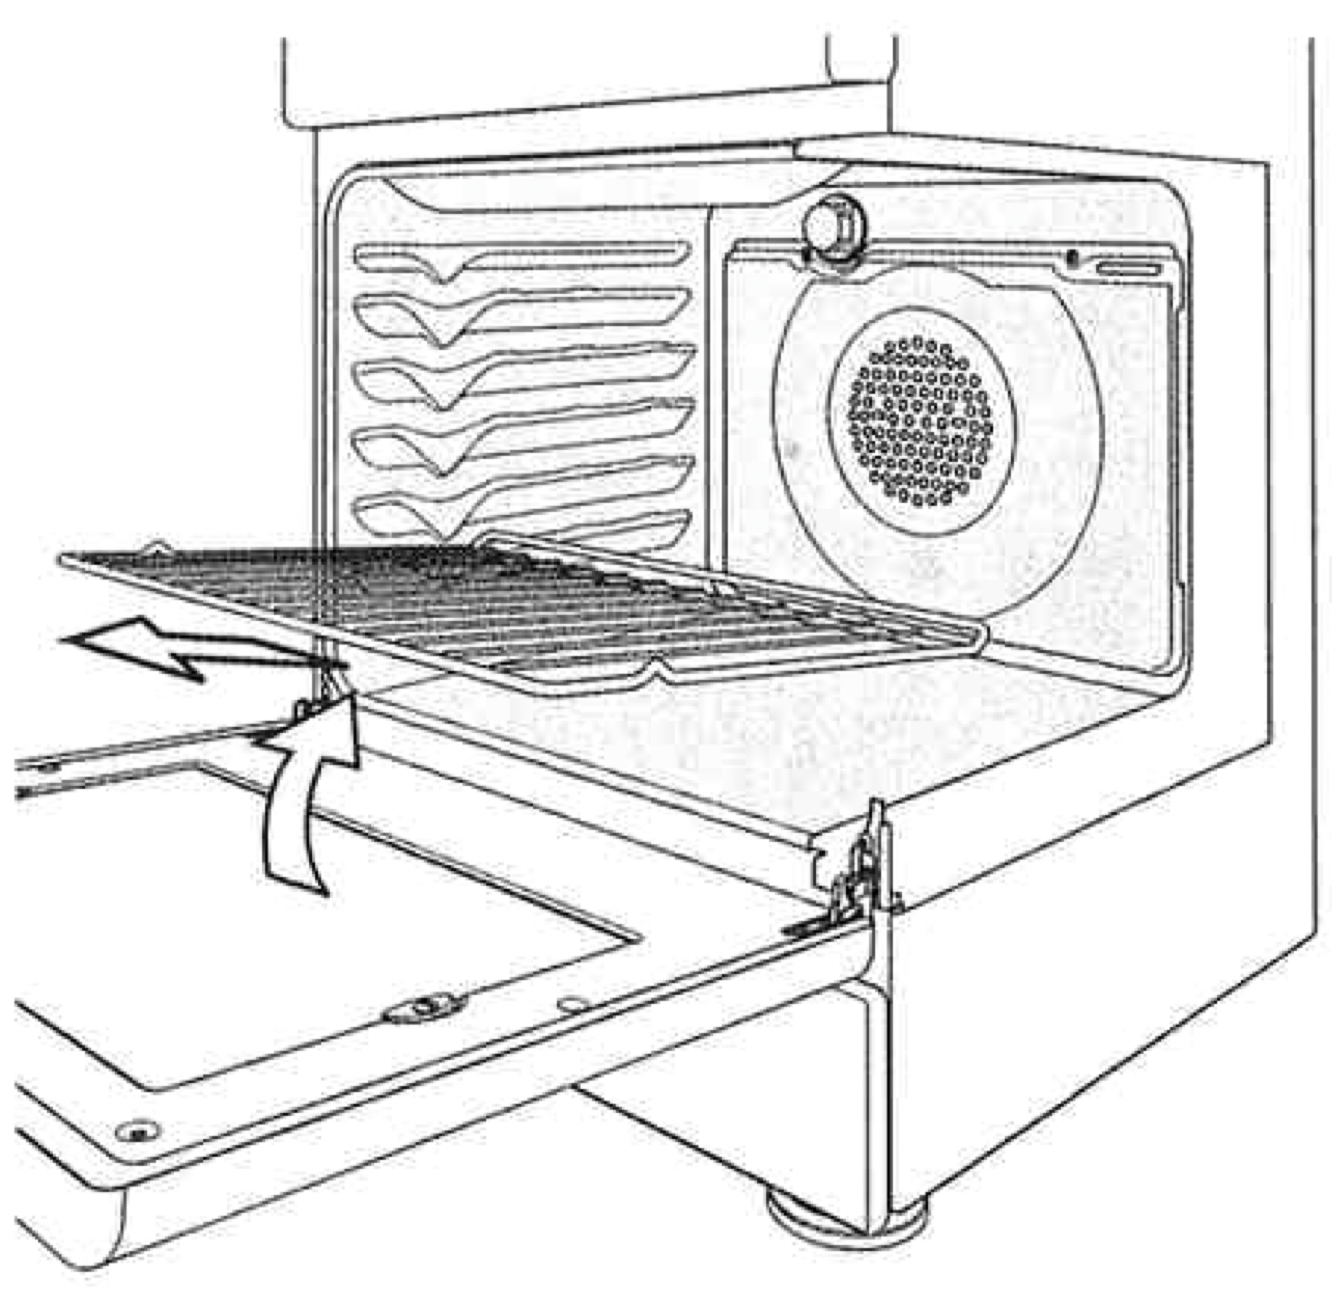
Removal of Oven Shelves
Open the door fully.
Pull and lift shelf to remove (see diagram).
Clean in hot soapy water.
Insertion of Oven Shelves.
Ensure that the shelf rack is orientated correctly (refer diagram).
Insert shelves between forms (formed side runners) ensuring the bottom tag is engaged.
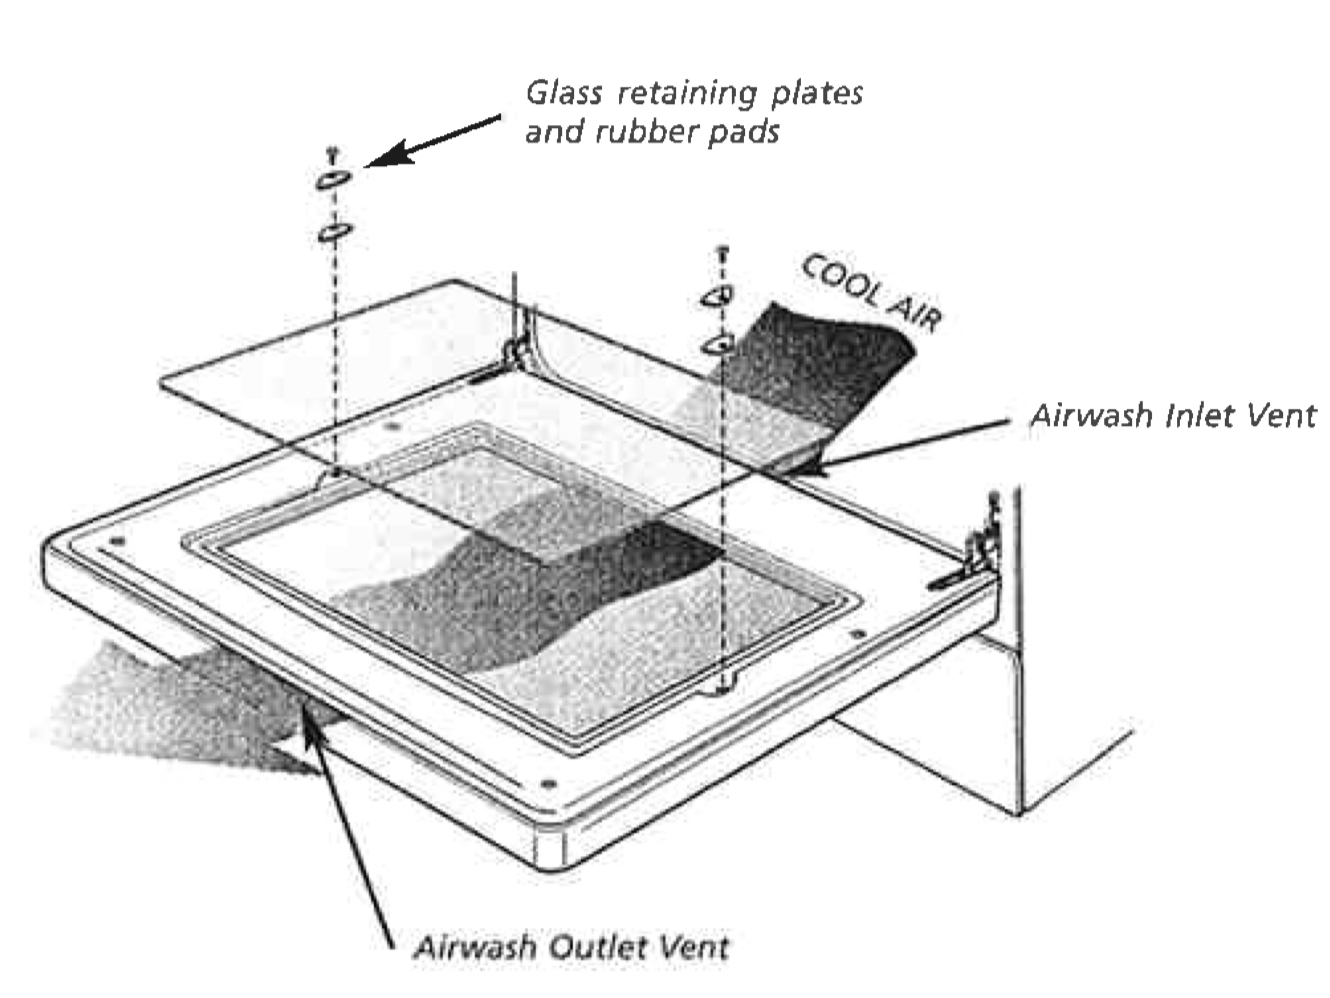
AIRWASH DOOR
The door on your cooker is designed to allow cool air to pass up through the middle and out through the vent in the top of the door. (see diagram opposite).
This feature results in lower surface temperatures on the outside of the door.
Cleaning the door glass
To help with cleaning the door your cooker has a removable inner door glass.
First open the oven door to access inner door glass screws.
Undo the screws on either side of the door ans remove the 2 glass retaining plates and rubber pads.
Remove the inner glass and clean in hot soapy water.
The inside of the outer glass can also be wiped clean.
When ressembling do not overtighten the retaining plate screw.
Warning:
DO NOT use the oven without the inner door glass fitted.
DO NOT use harsh abrasive cleaners or sharp metal scrapers to clean the oven door glass since they can scratch the surface, which may result in shattering of the glass.
SOLVING PROBLEMS
PROBLEM
POSSIBLE CAUSES
WHAT TO DO
No spark obtained when electronic igniter is pressed (gas cooker only)
Power not turned on
Hosehold fuse blown
Circuit breaker tripped
Spark plug is wet or dirty
AA battery depleted (battery models only)
Switch on electricity
Check fuses
Check circuit breaker
Dry or ckean spark plug
Replace battery
No spark obtained when manual igniter is pressed (gas cooker only)
Saprk plug is wet or dirty
Dry or clean spark plug.
Burner will not light even though igniter is working (gas cooker only)
Gas supply valve is turned off
Port blockage in ignition area
Turn on gas supply.
Make sure that ports and ignition area are clean and dry.
Oven or grill not working (electric cooker only)
Clock not set
Power not turned on
Household fuse blown
Controls incorrectly set
Circuit breaker tripped
Refer to clock instruction
Switch on electricity
Check fuses
Reset controls
Check circuit breaker
Oven not working (electric cooker only)
Clock program set
Household fuse blown
Cancel program
Check fuses
Oven light not working
Power not turned on
Household fuse blown
Circuit breaker tripped
Lamp blown or loose in socket
Switch on electricity
Check fuses
Check circuit breaker
Replace or tighten globe.
Oven not heating enough
Foil or trays on bottom of oven
Heat escaping through incorrectly sealed door
The set oven temperature is incorrect
Remove foil or trays
Check door is properly closed.
Change set oven temperature
Electronic clock flashing on display (electronic cooker only)
Power failure or interruption
Household fuse blown or power supply id off.
Reset time of day
Check fuses, power supply
Unit smoking when first used
Protective oils being removed
Turn grill on high for 10 mins
Turn oven on high for 10 mins
Condensation building up
Too much water used when cooking
Reduce amount of water
Leave door open after cooking, if food is top be left in oven to keep warm
Odours on first use of oven
This is normal
Power points not working (NZ model electric cooker only)
Fuse at rear has blown
Check fuse
60 minute timer not audible
Timer not wound sufficiently
Turn timer knob past 15 minute mark then to the required number of minutes.
Oven shelf tight
Oven shelf not inserted correctly, may be upside down or back to front

 will flash. To set the time of day in hours and minutes, press the - or + buttons. 5 seconds after the last change, the "clock" indicator