BOWL LIFT STAND MIXER
INSTRUCTIONS AND RECIPES
1-800-541-6390
Details Inside
9708307C

We’re so confident
the quality of our
products meets the
exacting standards of
KitchenAid that, if
your stand mixer
should fail within the
first year of ownership, KitchenAid
will arrange to deliver an identical
or comparable replacement to your
door free of charge and arrange to
have your “failed” stand mixer
returned to us. Your replacement
stand mixer will also be covered by
our one year full warranty. Please
follow these instructions to receive
this quality service.
If you reside in the 50 United
States and your KitchenAid
®
stand
mixer should fail within the first
year of ownership, simply call our
toll-free Customer Satisfaction
Center at 1-800-541-6390, 8 a.m.
to 8 p.m., Monday through Friday,
10 a.m. to 5 p.m., Saturday, Eastern
Time. Give the consultant your
complete shipping address. (No P.O.
Box Numbers, please.)
When you receive your
replacement stand mixer, use the
carton and packing materials to
pack up your “failed” stand mixer.
In the carton, include your name
and address on a sheet of paper
along with a copy of the proof of
purchase (register receipt, credit
card charge slip, etc.).
For a detailed explanation of
warranty terms and conditions,
including how to arrange for service
outside the United States, see the
Warranty section.
Hassle-Free Replacement Warranty
Proof of Purchase and Product Registration
Always keep a copy of the sales
receipt showing the date of
purchase of your stand mixer. Proof
of purchase will assure you of in-
warranty service.
Before you use your stand mixer,
please fill out and mail your
product registration card packed
with the stand mixer. This card will
enable us to contact you in the
unlikely event of a product safety
notification and assist us in
complying with the provisions of
the Consumer Product Safety Act.
This card does not verify your
warranty.
Please complete the following for
your personal records:
Model Number_______________________________________________________
Serial Number _______________________________________________________
Date Purchased ______________________________________________________
Store Name__________________________________________________________
2

3
Table of Contents
Hassle-Free Replacement Warranty.....................................Inside Front Cover
Product Registration Card...................................................Inside Front Cover
Stand Mixer Safety ........................................................................................4
Important Safeguards....................................................................................4
Warranty........................................................................................................5
For the 50 United States and District of Columbia .................................5
For Puerto Rico........................................................................................6
Arranging for Service after the Warranty Expires....................................6
Arranging for Service Outside the 50 United States and Puerto Rico .....6
Ordering Accessories and Replacement Parts................................................6
Electrical Requirements..................................................................................7
Troubleshooting Problems.............................................................................7
About Your Mixer
Bowl Lift Stand Mixer Features......................................................................8
Assembling Your Bowl Lift Mixer...................................................................9
Using the Pouring Shield .............................................................................10
Using Your KitchenAid
®
Attachments..........................................................11
Mixing Time.................................................................................................11
Mixer Use.....................................................................................................11
Care and Cleaning .......................................................................................12
Beater to Bowl Clearance ............................................................................12
Speed Control Guide - 10 Speed Mixers......................................................13
Mixing Tips ..................................................................................................14
Egg Whites............................................................................................15
Whipped Cream ....................................................................................15
Attachments and Accessories - General Instructions...................................16
Appetizers, Entrees, and Vegetables ...........................................................17
Cakes and Frostings.....................................................................................27
Cookies, Bars, and Candies..........................................................................40
Pies and Desserts .........................................................................................50
Yeast Breads and Quick Breads ...................................................................55
General Instructions for Mixing and Kneading Yeast Dough ................55
Bread Making Tips.................................................................................56
KitchenAid
®
Attachments and Accessories ..................................................80

4
IMPORTANT SAFEGUARDS
When using electrical appliances, basic safety precautions should always be
followed including the following:
1. Read all instructions.
2. To avoid risk of electrical shock, do not put stand mixer in water or
other liquid.
3. Close supervision is necessary when any appliance is used by or near
children.
4. Unplug stand mixer from outlet when not in use, before putting on or
taking off parts and before cleaning.
5. Avoid contacting moving parts. Keep hands, hair, clothing, as well as
spatulas and other utensils away from beater during operation to
reduce the risk of injury to persons and/or damage to the stand mixer.
6. Do not operate stand mixer with a damaged cord or plug or after the
stand mixer malfunctions, or is dropped or damaged in any manner.
Return appliance to the nearest authorized service center for
examination, repair or electrical or mechanical adjustment. Call the
KitchenAid Customer Satisfaction Center at 1-800-541-6390 for more
information.
7. The use of attachments not recommended or sold by KitchenAid may
cause fire, electrical shock or injury.
8. Do not use the stand mixer outdoors.
9. Do not let the cord hang over edge of table or counter.
10. Remove flat beater, wire whip or dough hook from stand mixer before
washing.
SAVE THESE INSTRUCTIONS
THIS PRODUCT IS DESIGNED FOR HOUSEHOLD
USE ONLY.
Your safety and the safety of others are very important.
We have provided many important safety messages in this manual and on your
appliance. Always read and obey all safety messages.
This is the safety alert symbol.
This symbol alerts you to potential hazards that can kill or hurt
you and others.
All safety messages will follow the safety alert symbol and either
the word “DANGER” or “WARNING.” These words mean:
You can be killed or seriously
injured if you don’t immediately
follow instructions.
You can be killed or seriously
injured if you don’t follow
instructions.
All safety messages will tell you what the potential hazard is, tell you how to
reduce the chance of injury, and tell you what can happen if the instructions are
not followed.not followed.
Stand Mixer Safety

5
Length of
Warranty:
One Year Full
Warranty from date of
purchase.
KitchenAid Will Pay
For Your Choice of:
Hassle-Free
Replacement of your
stand mixer. See
inside front cover for
details on how to
arrange for service, or
call the Customer
Satisfaction Center
toll-free at
1-800-541-6390.
OR
The replacement parts
and repair labor costs
to correct defects in
materials and
workmanship. Service
must be provided by
an Authorized
KitchenAid Service
Center. See the
KitchenAid
®
Stand
Mixer Warranty for
Puerto Rico on the
following page on
how to arrange for
service.
KitchenAid Will Not
Pay For:
A. Repairs when stand
mixer is used in
other than normal
single family home
use.
B. Damage resulting
from accident,
alteration, misuse
or abuse.
C. Any shipping or
handling costs to
deliver your stand
mixer to an
Authorized Service
Center.
D. Replacement parts
or repair labor
costs for stand
mixers operated
outside the 50
United States and
District of
Columbia.
KITCHENAID DOES NOT ASSUME ANY RESPONSIBILITY FOR INCIDENTAL
OR CONSEQUENTIAL DAMAGES. Some states do not allow the exclusion
or limitation of incidental or consequential damages, so this exclusion may
not apply to you. This warranty gives you specific legal rights and you may
also have other rights which vary from state to state.
This warranty extends to the purchaser and any succeeding owner for
stand mixers operated in the 50 United States and District of Columbia.
KitchenAid
®
Stand Mixer Warranty for
the 50 United States and District of Columbia

6
KitchenAid
®
Stand Mixer Warranty
for Puerto Rico
A limited one year warranty extends
to the purchaser and any
succeeding owner for stand mixers
operated in Puerto Rico. During the
warranty period, all service must be
handled by an Authorized
KitchenAid Service Center. Please
bring the stand mixer, or ship it
prepaid and insured, to the nearest
Authorized Service Center. Call toll-
free 1-800-541-6390 to learn the
location of a Service Center near
you. Your repaired stand mixer will
be returned to you prepaid and
insured.
For service information, call toll-free
1-800-541-6390 or write to:
Customer Satisfaction Center,
KitchenAid Portable Appliances, P.O.
Box 218, St. Joseph, MI 49085-
0218.
Arranging for Service
after the Warranty Expires
Consult your local KitchenAid dealer
or the store where you purchased
the stand mixer for information on
how to obtain service.
Arranging for Service Outside
the 50 United States and Puerto Rico
To order accessories or replacement
parts for your stand mixer, call toll-
free 1-800-541-6390 or write to:
Customer Satisfaction Center,
KitchenAid Portable Appliances, P.O.
Box 218, St. Joseph, MI 49085-
0218.
Ordering Accessories and Replacement Parts

7
Please read the following before
calling your service center.
1. The stand mixer may warm up
during use. Under heavy loads
with extended mixing time
periods, you may not be able to
comfortably touch the top of the
stand mixer. This is normal.
2. The stand mixer may emit a
pungent odor, especially when
new. This is common with
electric motors.
3. If the flat beater hits the bowl,
stop the stand mixer. See the
“Beater to Bowl Clearance”
section.
Keep a copy of the sales receipt
showing the date of purchase.
Proof of purchase will assure you of
in-warranty service.
If your stand mixer should
malfunction or fail to operate,
please check the following:
- Is the stand mixer plugged in?
- Is the fuse in the circuit to the
stand mixer in working order? If
you have a circuit breaker box, be
sure the circuit is closed.
- Turn the stand mixer off for
10-15 seconds, then turn it back
on. If the mixer still does not start,
allow it to cool for 30 minutes
before turning it back on.
- If the problem is not due to one
of the above items, see the
“Arranging for Service” section.
- Do not return the stand mixer to
the retailer as they do not provide
service.
Electrical Requirements
Volts: 120 A.C. only. Hertz: 60
The wattage rating for your stand
mixer is printed on the serial plate.
Do not use an extension cord. If the
power supply cord is too short,
have a qualified electrician or
serviceman install an outlet near the
appliance.
The maximum rating is based on
the attachment that draws the
greatest load (power). Other
recommended attachments may
draw significantly less power.
Troubleshooting Problems
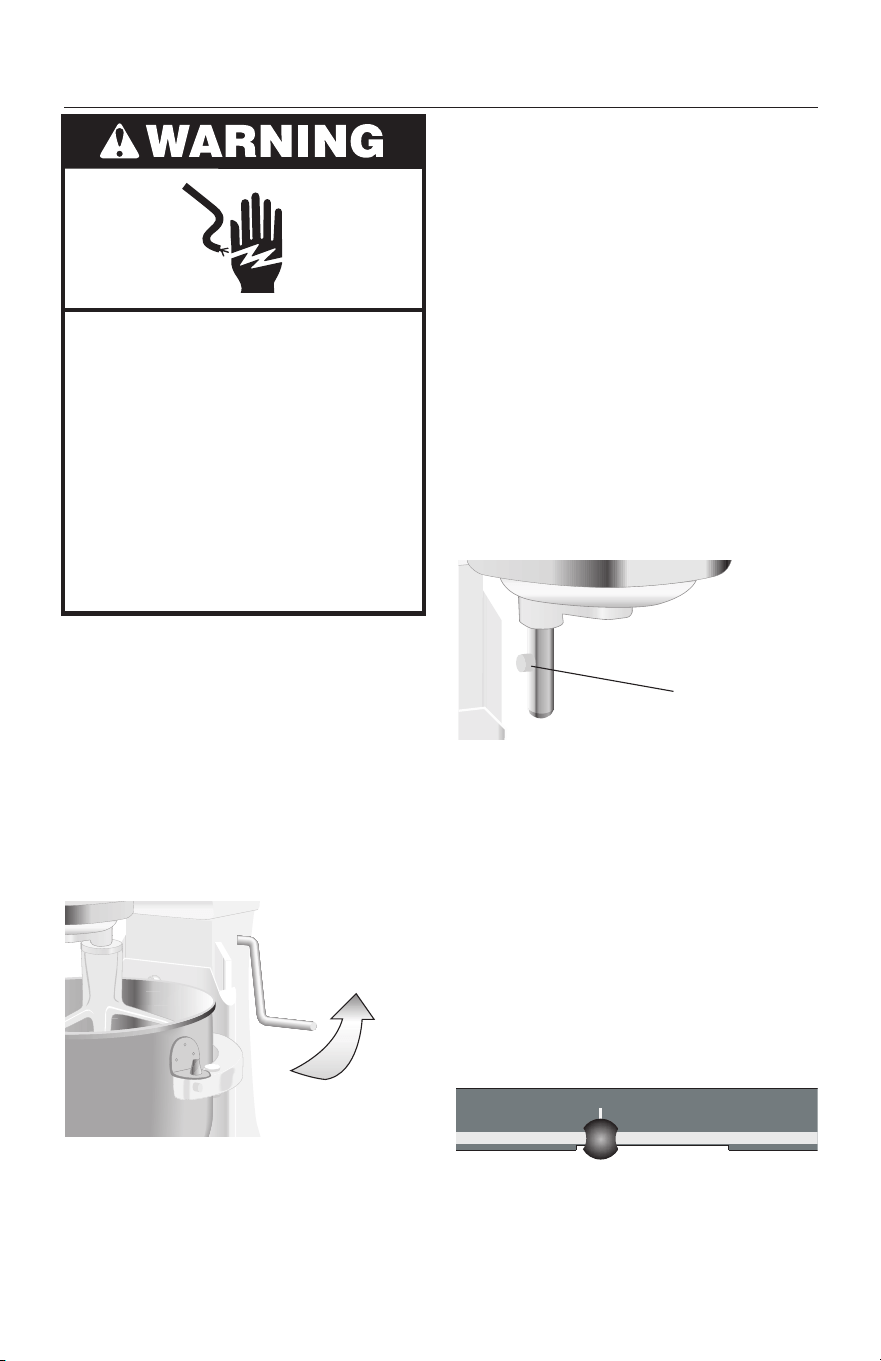
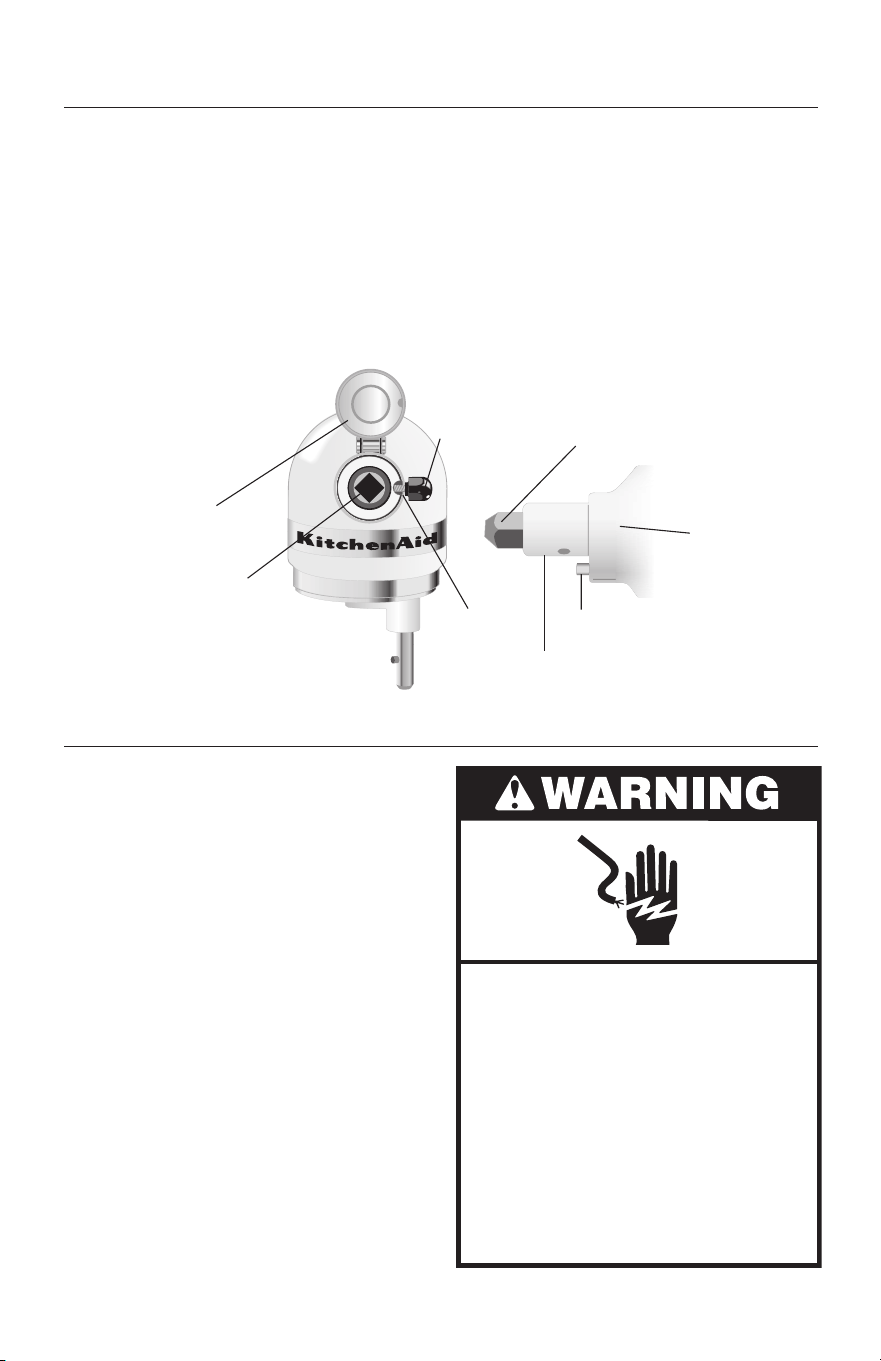
Electrical Shock Hazard
Plug into a grounded 3 prong
outlet.
Do not remove ground prong.
Do not use an adapter.
Do not use an extension cord.
Failure to follow these
instructions can result in
death, fire, or electrical shock.
8
O
F
F
/0
S
TIR
R
E
S
E
T
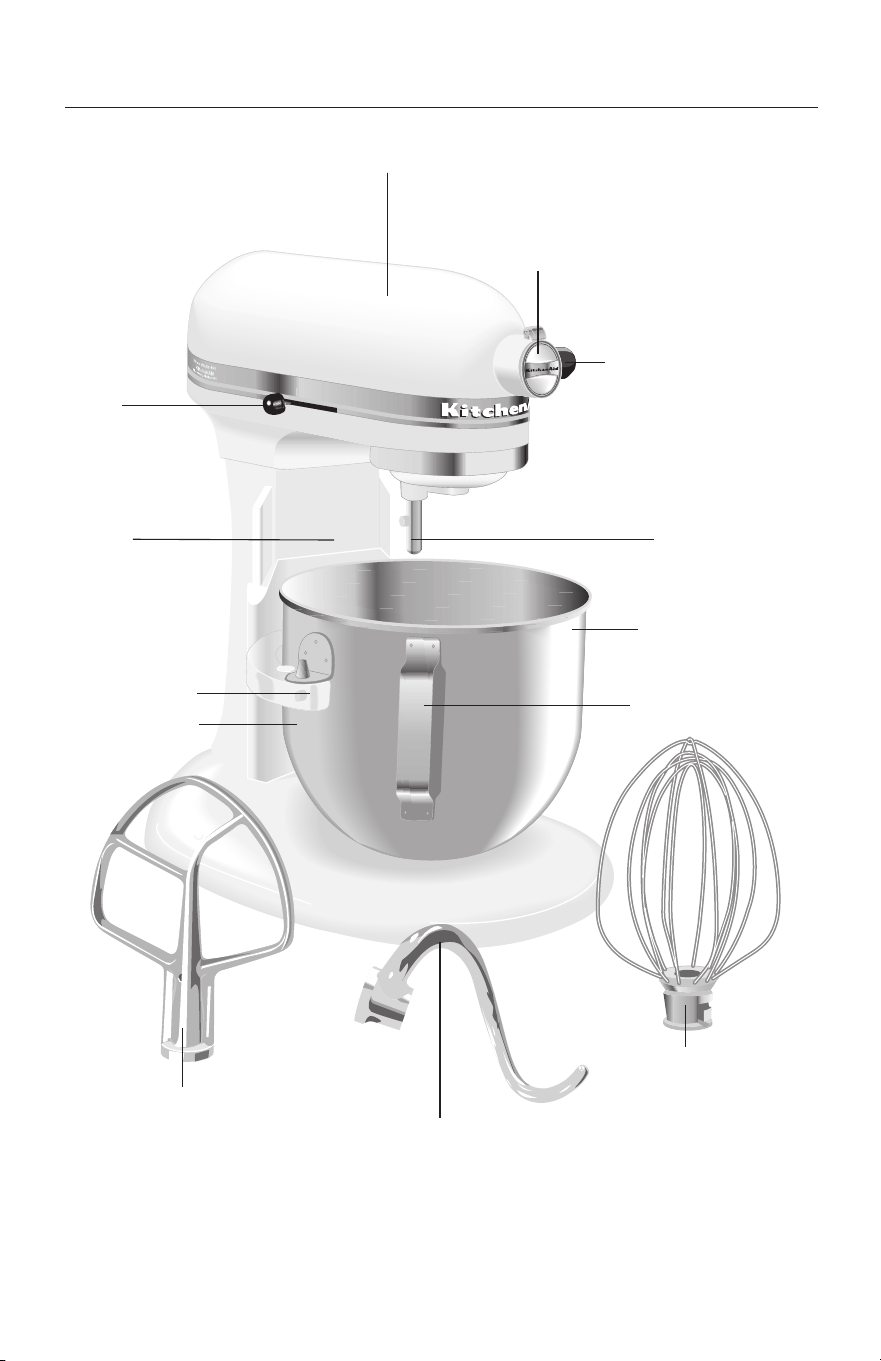
Bowl Lift Stand Mixer Features
Motor Head
Bowl Height
Adjustment
Screw
Bowl Lift Handle
(not shown)
Attachment
Knob
Attachment Hub
(See the “Attachments and
Accessories” section.)
Locating Pins
Wire Whip
Flat Beater
PowerKnead™
Spiral Dough Hook
Speed
Control
Knob
Bowl Support
Beater
Shaft
Stainless Steel
Bowl
Bowl Handle
9
Assembling Your Bowl Lift Mixer
To Attach Bowl
1. Be sure speed control is OFF and
stand mixer is unplugged.
2. Place bowl lift handle in down
position.
3. Fit bowl supports over locating
pins.
4. Press down on back of bowl
until bowl pin snaps into spring
latch.
5. Raise bowl before mixing.
6. Plug into a grounded 3 prong
outlet.
To Raise Bowl
1. Rotate handle to straight-up
position.
2. Bowl must always be in raised,
locked position when mixing.
3. Turn beater to right, hooking
beater over the pin on shaft.
4. Plug into a grounded 3 prong
outlet.
To Remove Flat Beater,
Wire Whip, or PowerKnead™
Spiral Dough Hook
1. Slide speed control to OFF and
unplug.
2. Press beater upward and turn to
the left.
3. Pull beater from beater shaft.
Household Stand Mixer
Speed Control
Plug into a grounded 3 prong
outlet. Speed control lever should
always be set on lowest speed for
starting, then gradually moved to
desired higher speed to avoid
splashing ingredients out of bowl.
See the “Speed Control Guide”
section.
Pin
Raise
Electrical Shock Hazard
Plug into a grounded 3 prong
outlet.
Do not remove ground prong.
Do not use an adapter.
Do not use an extension cord.
Failure to follow these
instructions can result in
death, fire, or electrical shock.
To Lower Bowl
1. Rotate handle back and down.
To Remove Bowl
1. Be sure speed control is OFF and
stand mixer is unplugged.
2. Place bowl lift handle in down
position
3. Remove flat beater, wire whip,
or spiral dough hook.
4. Grasp bowl handle and lift
straight up and off locating pins.
To Attach Flat Beater,
Wire Whip, or PowerKnead™
Spiral Dough Hook
1. Slide speed control to OFF and
unplug.
2. Slip flat beater on beater shaft.
OFF/0
STIR
RESET
10
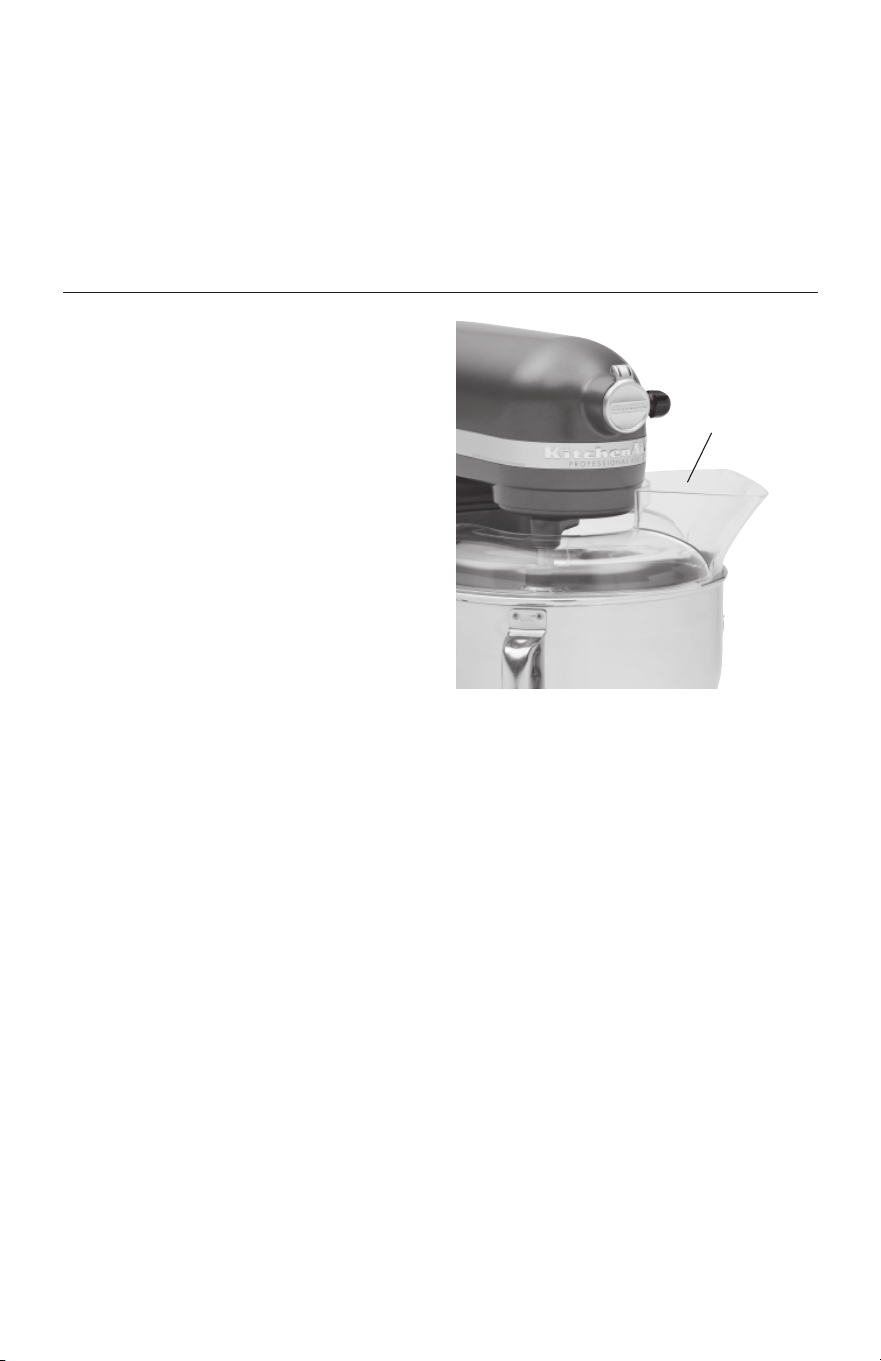
Attaching the Pouring Shield*
1. Make sure the speed control lever
is set to the OFF/0 position.
2. Unplug the stand mixer.
3. Attach desired accessory and raise
the mixing bowl.
4. Slide pouring shield collar around
beater shaft, centering collar over
rim of bowl.
Using the Pouring Shield
Pour ingredients into the mixing
bowl through the chute portion of
shield.
IMPORTANT: Make sure the guides
on the bottom of the chute rest on
the rim of the bowl to keep
ingredients from falling outside the
bowl as they are added.
Using the Pouring Shield*
Removing the Pouring Shield
1. Make sure the speed control lever
is set to the OFF/0 position.
2. Unplug the stand mixer.
3. Remove pouring chute from collar.
4. Slide pouring shield collar off
bowl.
5. Lower the bowl support by
turning the bowl-lift lever
clockwise.
6. Remove accessory and the mixing
bowl.
Cleaning the Pouring Shield
Wash in warm sudsy water. If you
wish, you may place on the top rack
of your dishwasher.
*If Pouring Shield is included.
Auto-Reset Motor Protection
If the stand mixer stops due to
overload, slide the speed control
lever to OFF. After a few minutes,
the stand mixer will automatically
reset. Slide the Speed Control Lever
to the desired speed and continue
mixing.
If the stand mixer does not restart,
see the “Troubleshooting Problems”
section.
Pouring
Chute

11
Using Your KitchenAid
®
Attachments
Flat Beater for normal to heavy mixtures:
cakes biscuits
creamed frostings quick breads
candies meat loaf
cookies mashed potatoes
pie pastry
Wire Whip for mixtures that need air incorporated:
eggs sponge cakes
egg whites angel food cakes
heavy cream mayonnaise
boiled frostings some candies
PowerKnead™ Spiral Dough Hook for mixing and kneading
yeast doughs:
breads coffee cakes
rolls buns
pizza dough
Mixing Time
Your KitchenAid
®
stand mixer will
mix faster and more thoroughly
than most other electric stand
mixers. Therefore, the mixing time
in most recipes must be adjusted to
avoid overbeating. With cakes, for
example, beating time may be half
as long as with other stand mixers.
Mixer Use
NOTE: Do not scrape bowl while
stand mixer is operating.
The bowl and beater are designed
to provide thorough mixing
without frequent scraping. Scraping
the bowl once or twice during
mixing is usually sufficient. Turn
stand mixer off before scraping.
The stand mixer may warm up
during use. Under heavy loads with
extended mixing time, you may not
be able to comfortably touch the
top of the stand mixer. This is
normal.
Injury Hazard
Unplug mixer before touching
beaters.
Failure to do so can result in
broken bones, cuts or bruises.
12
Bowl, white flat beater and white
spiral dough hook may be washed
in an automatic dishwasher. Or,
clean them thoroughly in hot sudsy
water and rinse completely before
drying. Wire whip, burnished spiral
dough hook and burnished flat
beater should be hand washed and
dried immediately. Do not wash
wire whip, burnished spiral dough
hook and burnished flat beater in a
dishwasher. Do not store beaters
on shaft.
Care and Cleaning
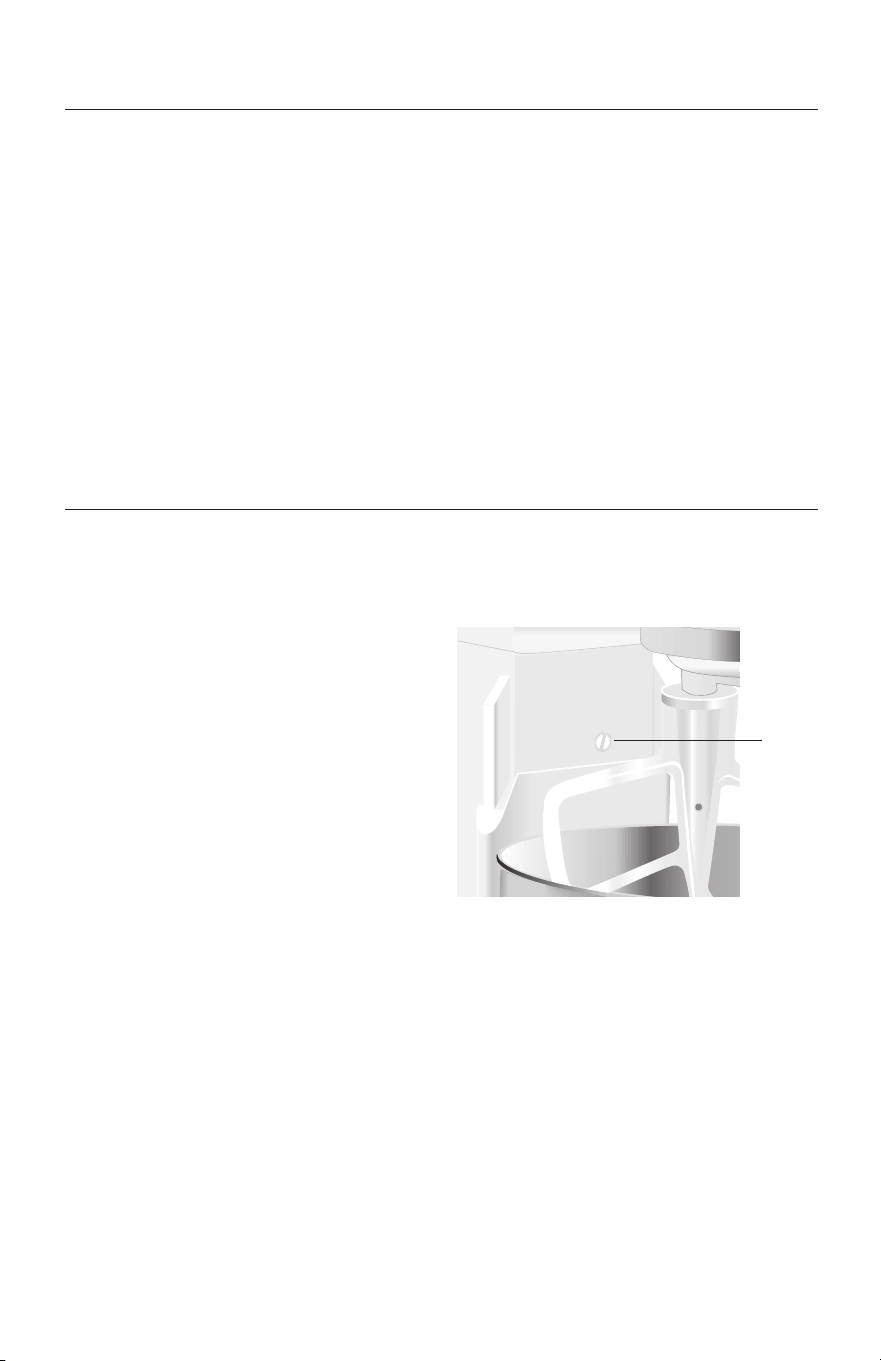
1. Unplug stand mixer.
2. Place bowl lift handle in down
position.
3. Attach flat beater.
4. Adjust so flat beater just clears
bottom surface of bowl when in
lifted position by turning screw
(A) counterclockwise to raise the
bowl and clockwise to lower the
bowl. Just a slight turn is all that
is required: the screw will not
rotate more than
1
⁄4 turn
(90 degrees) in either direction.
(The full range of adjustment is
1
⁄2 turn, or 180 degrees.)
5. Place bowl lift handle in up
position to check clearance.
6. Repeat steps 4 and 5 if
necessary.
NOTE: When properly adjusted, the
flat beater will not strike on the
bottom or side of the bowl. If the
flat beater or the wire whip is so
close that it strikes the bottom of
the bowl, coating may wear off the
beater or wires on whip may wear.
Beater to Bowl Clearance
Your stand mixer is adjusted at the factory so the flat beater just clears the
bottom of the bowl. If, for any reason, the flat beater hits the bottom of
the bowl or is too far away from the bowl, you can correct the clearance
easily.
NOTE: Always be sure to unplug
stand mixer before cleaning. Wipe
stand mixer with a soft, damp cloth.
Do not use household/commercial
cleaners. Do not immerse in water.
Wipe off beater shaft frequently,
removing any residue that may
accumulate.
A

13
Speed Control Guide
All speeds have the Soft Start
®
feature which automatically starts the stand
mixer at a lower speed to help avoid ingredient splash-out and “flour puff”
at start-up then quickly increases to the selected speed for optimal
performance.
Number of Speed
Stir
Speed STIR For slow stirring, combining, mashing,
starting all mixing procedures. Use to
add flour and dry ingredients to batter,
and add liquids to dry ingredients. Do
not use STIR speed to mix or knead
yeast doughs.
2 SLOW MIXING For slow mixing, mashing, faster
stirring. Use to mix and knead yeast
doughs, heavy batters and candies;
start mashing potatoes or other
vegetables; cut shortening into flour;
mix thin or splashy batters. Use with
Can Opener attachment.
4 MIXING, For mixing semi-heavy batters, such as
BEATING cookies. Use to combine sugar and
shortening and to add sugar to egg
whites for meringues. Medium speed
for cake mixes. Use with: Food Grinder,
Rotor Slicer/Shredder, Pasta Roller, and
Fruit/Vegetable Strainer.
6 BEATING, For medium-fast beating (creaming) or
CREAMING whipping. Use to finish mixing cake,
doughnut, and other batters. High
speed for cake mixes. Use with Citrus
Juicer attachment.
8 FAST BEATING, For whipping cream, egg whites, and
WHIPPING boiled frostings.
10 FAST WHIPPING For whipping small amounts of cream,
egg whites or for final whipping of
mashed potatoes. Use with Pasta
Maker and Grain Mill attachments.
NOTE: Will not maintain fast speeds
under heavy loads, such as when using
Pasta Maker or Grain Mill attachments.
Use Speed 2 to mix or knead yeast doughs. Use of any other speed creates
high potential for stand mixer failure. The PowerKnead™ Spiral Dough
Hook efficiently kneads most yeast dough within 4 minutes.

14
Mixing Tips
Converting Your Recipe
for the Mixer
The mixing instructions for recipes
in this book can guide you in
converting your own favorite
recipes for preparation with your
KitchenAid
®
stand mixer. Look for
recipes similar to yours and then
adapt your recipes to use the
procedures in the similar
KitchenAid
®
recipes.
For example, the “quick mix”
method (sometimes referred to as
the “dump” method) is ideal for
simple cakes, such as the Quick
Yellow Cake and Easy White Cake
included in this book. This method
calls for combining dry ingredients
with most or all liquid ingredients
in one step.
More elaborate cakes, such as
Caramel Walnut Banana Torte,
should be prepared using the
traditional cake mixing method.
With this method, sugar and the
shortening, butter or margarine are
thoroughly mixed (creamed) before
other ingredients are added.
For all cakes, mixing times may
change because your KitchenAid
®
stand mixer works more quickly
than other mixers. In general,
mixing a cake with the KitchenAid
®
stand mixer will take about half the
time called for in most cake
recipes.
To help determine the ideal
mixing time, observe the batter or
dough and mix only until it has the
desired appearance described in
your recipe, such as “smooth and
creamy.”
To select the best mixing speeds,
use the “Speed Control Guide”
section.
Adding Ingredients
Always add ingredients as close to
side of bowl as possible, not
directly into moving beater. The
Pouring Shield can be used to
simplify adding ingredients.
NOTE: If ingredients in very bottom
of bowl are not thoroughly mixed,
then the beater is not far enough
into the bowl. See the “Beater to
Bowl Clearance” section.
Cake Mixes
When preparing packaged cake
mixes, use Speed 2 for low speed,
Speed 4 for medium speed, and
Speed 6 for high speed. For best
results, mix for the time stated on
the package directions.
Adding Nuts, Raisins, or
Candied Fruits
Follow individual recipes for
guidelines on including these
ingredients. In general, solid
materials should be folded in the
last few seconds of mixing on STIR
Speed. The batter should be thick
enough to keep the fruit or nuts
from sinking to the bottom of the
pan during baking. Sticky fruits
should be dusted with flour for
better distribution in the batter.
Liquid Mixtures
Mixtures containing large amounts
of liquid ingredients should be
mixed at lower speeds to avoid
splashing. Increase speed only after
mixture has thickened.

15
Egg Whites
Place room temperature egg whites
in clean, dry bowl. Attach bowl and
wire whip. To avoid splashing,
gradually turn to designated speed
and whip to desired stage. See chart
below.
AMOUNT SPEED
1 egg white .....GRADUALLY to 10
2-4 egg whites......GRADUALLY to 8
6 or more
egg whites......GRADUALLY to 8
Whipping Stages
With your KitchenAid
®
stand mixer,
egg whites whip quickly. So, watch
to avoid overwhipping. This list tells
you what to expect.
Frothy
Large, uneven air bubbles.
Begins to Hold Shape
Air bubbles are fine and compact;
product is white.
Soft Peak
Tips of peaks fall over when wire
whip is removed.
Almost Stiff
Sharp peaks form when wire whip
is removed, but whites are actually
soft.
Stiff but not Dry
Sharp, stiff peaks form when wire
whip is removed. Whites are
uniform in color and glisten.
Stiff and Dry
Sharp, stiff peaks form when wire
whip is removed. Whites are
speckled and dull in appearance.
Whipped Cream
Pour cold whipping cream into
chilled bowl. Attach bowl and wire
whip. To avoid splashing, gradually
turn to designated speed and whip
to desired stage. See chart below.
AMOUNT SPEED
1
⁄4 cup (50 mL) .....GRADUALLY to 10
1
⁄2 cup (125 mL) ...GRADUALLY to 10
1 cup (250 mL) .....GRADUALLY to 8
1 pint (500 mL).....GRADUALLY to 8
Whipping Stages
Watch cream closely during
whipping. Because your
KitchenAid
®
stand mixer whips so
quickly, there are just a few
seconds between whipping stages.
Look for these characteristics:
Begins to Thicken
Cream is thick and custard-like.
Holds its Shape
Cream forms soft peaks when wire
whip is removed. Can be folded
into other ingredients when making
desserts and sauces.
Stiff
Cream stands in stiff, sharp peaks
when wire whip is removed. Use
for topping on cakes or desserts, or
filling for cream puffs.
16
®
Attachments and Accessories
To Attach
1. Turn stand mixer off and
unplug.
2. Loosen attachment knob by
turning it counterclockwise.
3. Flip up hinged hub cover.
4. Insert attachment shaft housing
into attachment hub, making
certain that attachment power
shaft fits into square attachment
hub socket. It may be necessary
to rotate attachment back and
forth. When attachment is in
proper position, the pin on the
attachment will fit into the
notch on the hub rim.
5. Tighten attachment knob by
turning clockwise until
attachment is completely
secured to stand mixer.
6. Plug into a grounded 3 prong
outlet.
General Information
KitchenAid
®
Attachments are designed to assure long life. The attachment
power shaft and hub socket are of a square design, to eliminate any
possibility of slipping during the transmission of power to the attachment.
The hub and shaft housing are tapered to assure a snug fit, even after
prolonged use and wear. KitchenAid
®
Attachments require no extra power
unit to operate them; the power unit is built-in.
See the Use and Care Guide that came with your stand mixer attachments
for speed settings and operating time.
‡Not part of mixer.
General Instructions
Attachment
Hub Socket
Attachment
Knob
Notch
Pin
Attachment Shaft
Housing
Attachment
Power Shaft‡
Hinged
Hub Cover
Attachment
Housing
Electrical Shock Hazard
Plug into a grounded 3 prong
outlet.
Do not remove ground prong.
Do not use an adapter.
Do not use an extension cord.
Failure to follow these
instructions can result in
death, fire, or electrical shock.

17
Crabmeat Dip
1 package (8 oz) light
cream cheese
1 cup reduced-fat
cottage cheese
1
⁄4 cup reduced-calorie
mayonnaise
1 can (6
1
⁄2 oz)
crabmeat, flaked
1 tablespoon lemon
juice
3 tablespoons
chopped green
onions
1
⁄2 teaspoon garlic salt
3 drops hot pepper
sauce
Place cream cheese, cottage cheese, and
mayonnaise in mixer bowl. Attach bowl and flat
beater to mixer. Turn to Speed 6 and beat about
1 minute, or until well blended. Stop and scrape
bowl. Add all remaining ingredients. Turn to
Speed 6 and beat about 1 minute, or until all
ingredients are combined.
Refrigerate until well chilled. Serve with assorted
crackers or raw vegetables.
Yield: 24 servings (2 tablespoons per serving).
Per serving: About 42 cal, 4 g protein, 1 g carb,
3 g fat, 12 mg chol, 180 mg sodium.
4 ounces light cream
cheese
1
⁄2 cup marshmallow
cream
1 can (8 oz) crushed
pineapple, well
drained
2 teaspoons grated
orange peel
Place cream cheese in mixer bowl. Attach bowl
and flat beater to mixer. Turn to Speed 2 and mix
about 30 seconds. Stop and scrape bowl. Add
marshmallow cream, pineapple, and orange peel.
Turn to Speed 4 and beat about 30 seconds.
Stop and scrape bowl. Turn to Speed 4 and beat
about 30 seconds. Refrigerate at least 2 hours.
Serve with sliced fresh fruit, if desired.
Yield: 12 servings (2 tablespoons per serving).
Per serving: About 61 cal, 1 g protein, 11 g carb,
2 g fat, 3 mg chol, 58 mg sodium.
Creamy Pineapple Fruit Dip
APPETIZERS, ENTREES, AND VEGETABLES
To Remove
1. Turn stand mixer off and
unplug.
2. Loosen attachment knob by
turning it counterclockwise.
Rotate attachment slightly back
and forth while pulling out.
3. Replace attachment hub cover.
Tighten attachment knob by
turning it clockwise.

18
1 package (8 oz) light
cream cheese
1
⁄2 cup shredded hot
pepper Monterey
Jack cheese
1
⁄4 cup bean or black
bean dip
1
⁄2 cup thick and
chunky salsa
1
⁄2 cup chopped green
onions
1
⁄4 cup sliced pitted
ripe olives
Place cream cheese in mixer bowl. Attach bowl
and flat beater to mixer. Turn to Speed 2 and
mix about 30 seconds. Stop and scrape bowl.
Add Monterey Jack cheese. Turn to Speed 2 and
mix about 30 seconds.
Spread cheese mixture on 10" serving plate to
within 1 or 2" of edge. Spread bean dip over
cheese. Spread salsa over bean dip. Top with
onions and olives. Refrigerate until ready to
serve. Serve with tortilla chips, if desired.
Yield: 12 servings (
1
⁄4 cup per serving).
Per serving: About 70 cal, 4 g protein, 3 g carb,
5 g fat, 12 mg chol, 265 mg sodium.
Layered Mexican Dip
2 packages (8 oz
each) light cream
cheese, softened
1 package (1.25 oz)
taco seasoning mix
3 eggs
2 cups shredded
Marble-Jack cheese
1 can (4 oz) green
chilies
1 cup light sour
cream
1 cup salsa
Place cream cheese and taco seasoning mix in
mixer bowl. Attach bowl and flat beater to
mixer. Turn to Speed 6 and beat about
1
1
⁄2 minutes, or until fluffy. Stop and scrape bowl.
Turn to Speed 4 and add eggs, one at a time,
beating about 15 seconds after each addition.
Stop and scrape bowl. Add cheese and green
chilies. Turn to STIR Speed and mix 15 seconds.
Pour mixture into greased 9" springform pan.
Bake at 350ºF for 40 minutes, or until knife
inserted near center comes out clean. Remove
from oven and spread with sour cream. Return
to oven and bake 5 minutes longer. Cool
15 minutes. Refrigerate 3 to 8 hours. Before
serving, remove outer ring and spread top of
cheesecake with salsa. Serve with taco chips, if
desired.
Yield: 20 servings (1 wedge per serving).
Per serving: About 136 cal, 7 g protein, 5 g carb,
9 g fat, 59 mg chol, 421 mg sodium.
Fiesta Cheesecake Appetizer

19
1 cup shredded sharp
Cheddar cheese
1 cup shredded Swiss
cheese
1 package (8 oz) light
cream cheese
2 tablespoons
chopped fresh
chives
2 teaspoons
Worcestershire
sauce
1
⁄4 teaspoon paprika
1
⁄2 teaspoon garlic
powder
1
⁄4 cup finely chopped
pecans
Nutty Cheese Ball
Place all ingredients, except pecans, in mixer
bowl. Attach bowl and flat beater to mixer. Turn
to Speed 4 and beat about 1 minute, or until
well blended.
On waxed paper, shape mixture into a ball. Roll
ball in chopped pecans. Wrap in waxed paper.
Refrigerate until serving time. Serve with
assorted crackers or raw vegetables.
Yield: 24 servings (2 tablespoons per serving).
Per serving: About 65 cal, 4 g protein, 1 g carb,
5 g fat, 13 mg chol, 109 mg sodium.
1 baguette loaf, cut
into
1
⁄2" slices
2 teaspoons butter or
margarine
1
⁄2 cup finely chopped
onion
1 clove garlic, minced
1 package (9 oz)
frozen chopped
spinach, thawed
and squeezed dry
1 package (8 oz) light
cream cheese
1
⁄4 cup roasted red
peppers
1
⁄2 cup shredded
Cheddar cheese
Place baguette slices on baking sheet. Bake at
375°F for 4 to 6 minutes, or until toasted. Set
aside.
Melt butter in 10" skillet over medium heat. Add
onion and garlic. Cook and stir 2 to
3 minutes, or until softened. Add spinach. Cook
and stir 30 to 60 seconds, or until warm. Cool
slightly.
Place cream cheese in mixer bowl. Attach bowl
and flat beater to mixer. Turn to Speed 2, mix
about 30 seconds. Add spinach mixture.
Continuing on Speed 2, mix about 30 seconds.
Add red peppers. Continuing on Speed 2, mix
about 30 seconds. Spread spinach mixture on
toasted baguette slices. Top each slice with
about 1 teaspoon Cheddar cheese. Bake at 375°F
for 5 to 8 minutes, or until thoroughly heated
and cheese is melted. Serve warm.
Yield: 12 servings (2 crostini per serving).
Per serving: About 141 cal, 6 g protein, 16 g
carb, 6 g fat, 12 mg chol, 324 mg sodium.
Spinach and Cheese Crostini

20
Mushroom-Onion Tartlets
Pastry Crusts
4 oz light cream
cheese
3 tablespoons butter
or margarine,
divided
3
⁄4 cup plus 1 teaspoon
all-purpose flour
8 oz fresh
mushrooms,
coarsely chopped
1
⁄2 cup chopped green
onions
Filling
1egg
1
⁄4 teaspoon dried
thyme leaves
1
⁄2 cup shredded Swiss
cheese
To Make Pastry Crusts:
Place cream cheese and 2 tablespoons butter in
mixer bowl. Attach bowl and flat beater to
mixer. Turn to Speed 4 and beat about 1 minute.
Stop and scrape bowl. Add
3
⁄4 cup flour. Turn to
Speed 2 and mix about 1 minute, or until well
blended. Form mixture into a ball. Wrap in
waxed paper and chill 1 hour. Clean mixer bowl
and beater.
To Make Filling:
Melt remaining 1 tablespoon butter in 10" skillet
over medium heat. Add mushrooms and onions.
Cook and stir until tender. Remove from heat.
Cool slightly.
Divide chilled dough into 24 pieces. Press each
piece into miniature muffin cup (greased, if
desired).
For filling, place egg, remaining 1 teaspoon
flour, and thyme in mixer bowl. Attach bowl and
flat beater to mixer. Turn to Speed 6 and beat
about 30 seconds. Stir in cheese and cooled
mushroom mixture. Spoon into pastry-lined
muffin cups. Bake at 375°F for 15 to 20 minutes,
or until egg mixture is puffed and golden brown.
Serve warm.
Yield: 12 servings (2 tartlets per serving).
Per serving: About 98 cal, 4 g protein, 8 g carb,
6 g fat, 33 mg chol, 83 mg sodium.

21
Herbed Whipped Squash
1 large butternut
squash, baked
(about 3 cups
cooked)
1
⁄4 cup butter or
margarine, melted
1
⁄2 teaspoon dried
tarragon leaves
1
⁄8 teaspoon salt
1
⁄8 teaspoon black
pepper
Scoop cooked squash out of shell and place in
mixer bowl. Attach bowl and wire whip to
mixer. Turn to Speed 4 and beat about
30 seconds. Add all remaining ingredients.
Turn to Speed 2 and mix about 30 seconds.
Turn to Speed 4 and beat about 2 minutes.
Yield: 6 servings (
1
⁄2 cup per serving).
Per serving: About 107 cal, 1 g protein, 11 g
carb, 7 g fat, 0 mg chol, 137 mg sodium.
2 medium sweet
potatoes, cooked
and peeled
1
⁄2 cup low-fat milk
1
⁄3 cup sugar
2 eggs
2 tablespoons butter
or margarine
1
⁄2 teaspoon nutmeg
1
⁄2 teaspoon cinnamon
Crunchy Praline
Topping
2 tablespoons butter
or margarine,
melted
3
⁄4 cup corn flakes
1
⁄4 cup chopped
walnuts or pecans
1
⁄4 cup firmly packed
brown sugar
Place potatoes in mixer bowl. Attach bowl and
flat beater to mixer. Turn to Speed 2 and mix
about 30 seconds. Add milk, sugar, eggs,
2 tablespoons butter, nutmeg, and cinnamon.
Turn to Speed 4 and beat about 1 minute.
Spread mixture in greased 9" pie plate. Bake at
400°F for 20 minutes, or until set. Clean bowl
and beater.
Place all topping ingredients in mixer bowl.
Attach bowl and flat beater to mixer. Turn to
STIR Speed and mix about 15 seconds. Spread
on hot puff. Bake 10 minutes longer.
Yield: 6 servings (
1
⁄2 cup per serving).
Per serving: About 268 cal, 6 g protein, 35 g
carb, 12 g fat, 2 mg chol, 176 mg sodium.
Sweet Potato Puff

22
Appetizer Cream Puffs
with Creamy Feta Olive Filling
Cream Puffs
1 cup water
1
⁄2 cup butter or
margarine
1
⁄4 teaspoon salt
1 cup all-purpose
flour
4 eggs
Filling
1 package (8 oz) light
cream cheese
4 oz crumbled
tomato-basil feta
cheese
1
⁄2 cup light sour
cream
1
⁄3 cup finely chopped
kalamata or ripe
olives
1
⁄2 teaspoon lemon
pepper seasoning
To Make Cream Puffs:
Heat water, butter, and salt in a medium
saucepan over high heat to a full rolling boil.
Reduce heat and quickly stir in flour, mixing
vigorously until mixture leaves sides of pan in a
ball.
Place flour mixture in mixer bowl. Attach bowl
and flat beater. Turn to Speed 2 and add eggs,
one at a time, beating about 30 seconds after
each addition. Stop and scrape bowl. Turn to
Speed 4 and beat about 15 seconds.
Drop dough onto greased baking sheets forming
36 mounds, 2" apart. Bake at 400ºF for
10 minutes. Reduce heat to 350ºF and bake
25 minutes longer. Turn off oven. Remove pans
from oven. Cut a small slit in side of each puff.
Return pans to oven (turned off) for 10 minutes,
leaving oven door ajar. Cool completely on rack.
To Make Filling:
Combine all ingredients in mixer bowl. Attach
bowl and flat beater. Turn to Speed 2 and mix
about 30 seconds, or until blended. Pipe or
spoon about 1 tablespoon filling into each cream
puff.
Yield: 36 servings (1 filled cream puff per
serving).
Per serving: About 72 cal, 2 g protein, 4 g carb,
5 g fat, 37 mg chol, 132 mg sodium.

23
Mashed Potatoes
5 large potatoes
(about 2
1
⁄2 lbs),
peeled, quartered,
and boiled
1
⁄2 cup low-fat milk,
heated
2 tablespoons butter
or margarine
1 teaspoon salt
1
⁄8 teaspoon black
pepper
Warm mixer bowl and flat beater with hot water;
dry. Place hot potatoes in bowl. Attach bowl and
flat beater to mixer. Gradually turn to Speed 2
and mix about 1 minute, or until smooth.
Add all remaining ingredients. Turn to Speed 4
and beat about 30 seconds, or until milk is
absorbed. Gradually turn to Speed 6 and beat
about 1 minute, or until fluffy. Stop and scrape
bowl. Exchange flat beater for wire whip. Turn to
Speed 10 and whip 2 to 3 minutes.
Yield: 9 servings (
3
⁄4 cup per serving).
Per serving: About 111 cal, 2 g protein, 19 g
carb, 3 g fat, 8 mg chol, 296 mg sodium.
VARIATIONS
Garlic Mashed Potatoes
Substitute 1 teaspoon garlic salt for salt.
Per serving: About 111 cal, 2 g protein, 19 g
carb, 3 g fat, 8 mg chol, 239 mg sodium.
Mashed Potatoes for a Crowd
Prepare as directed above, using 6 qt mixer bowl.
Yield: 18 servings (
3
⁄4 cup per serving).
9 large potatoes
(about
5 lbs), peeled,
quartered, and
boiled
2
⁄3 cups low-fat milk,
heated
3 tablespoons butter
or margarine
1
1
⁄2 teaspoons salt
1
⁄4 teaspoon black
pepper

24
Baked Pastry Shell
(see the “Pie Pastry”
section)
1 tablespoon oil
1 small onion,
chopped
1 medium green bell
pepper, chopped
8 oz sliced fresh
mushrooms
6 eggs
1
⁄3 cup low-fat milk
1 tablespoon
chopped fresh
parsley
1 teaspoon salt
5 drops hot pepper
sauce
1 cup (4 oz) reduced-
fat shredded Swiss
cheese
Follow procedure for Baked Pastry Shell. Cool
10 minutes.
Meanwhile, heat oil in large non-stick skillet over
medium-high heat. Add onion and bell pepper.
Cook about 1 minute, stirring frequently. Add
mushrooms. Cook and stir about 2 minutes, or
until vegetables are tender. Set aside.
Place eggs, milk, parsley, salt, and hot pepper
sauce in mixer bowl. Attach bowl and wire whip
to mixer. Turn to Speed 2 and mix 1 to
2 minutes.
Sprinkle half of cheese in pastry shell. Top with
vegetables. Pour egg mixture over vegetables.
Top with remaining cheese. Bake at 350°F for
30 to 35 minutes, or until knife inserted in center
comes out clean. Let stand about 5 minutes
before serving.
Yield: 8 servings.
Per serving (filling and crust): About 264 cal,
12 g protein, 17 g carb, 16 g fat, 172 mg chol,
561 mg sodium.
Garden Quiche

25
1 cup salsa, divided
2 cups soft bread
crumbs
1 small onion,
chopped
1 egg
1 tablespoon
Worcestershire
sauce
1 teaspoon dried
thyme
1
⁄2 teaspoon garlic salt
1
⁄4 teaspoon pepper
1 pound lean ground
beef
1
⁄2 pound ground
turkey
Place
3
⁄4 cup salsa, bread crumbs, onion, egg,
Worcestershire sauce, thyme, garlic salt, and
pepper in mixer bowl. Attach bowl and flat
beater to mixer. Turn to STIR Speed, mix about
30 seconds. Add beef and turkey. Continuing on
STIR Speed, mix about 45 seconds, or until
blended.
Divide mixture into 3 equal parts. Shape each
part into a loaf about 6 x 3 x 12". Place loaves on
rack in shallow baking pan. Spoon remaining
salsa on tops of loaves. Bake at 350°F for 40 to
45 minutes, or until no longer pink in center.
Yield: 6 servings (2 servings per loaf).
Per serving: About 167 cal, 11 g protein, 16 g
carb, 6 g fat, 47 mg chol, 426 mg sodium.
VARIATION
Mexican Appetizer Meatballs
Form meat mixture into 1" balls. Place in 13 x 9 x
2" rectangular baking pan. Bake at 400°F for 20
to 25 minutes, or until no longer pink inside.
Serve with salsa, if desired.
Yield: 18 servings (2 meatballs per serving).
Per serving: About 124 cal, 9 g protein, 11 g
carb, 5 g fat, 36 mg chol, 287 mg sodium.
Meat Loaf for a Crowd
Double the ingredients and mix in the 6 qt mixer
bowl.
Yield: 12 servings (
1
⁄2 loaf per serving).
Mexican Meat Loaf

26
Filling
2 tablespoons butter
or margarine
3 boneless, skinless
chicken breast
halves, cut into
1
⁄2" pieces
1 medium onion or 3
shallots, sliced
8 ounces button or
crimini mushrooms,
halved or quartered
1 can (14
1
⁄2 oz) diced
tomatoes,
undrained
2 tablespoons flour
1
⁄2 teaspoon dried
thyme leaves
Pastry Topping
1
⁄2 cup water
1
⁄4 cup butter or
margarine, cut up
1
⁄4 teaspoon salt
1
⁄2 cup all-purpose
flour
2 eggs
2 oz sharp Cheddar
cheese, diced
To Make Filling:
Melt butter in large skillet over medium heat.
Add chicken and onion. Cook and stir 3 minutes.
Add mushrooms. Cook and stir 5 minutes. Add
tomatoes, flour, and thyme. Cook and stir until
thickened and bubbly. Cover and keep warm on
low heat.
To Make Pastry Topping:
Heat water, butter, and salt in small saucepan
over high heat to a full rolling boil. Reduce heat
and quickly stir in flour, mixing vigorously until
mixture leaves sides of pan in a ball.
Place flour mixture in mixer bowl. Attach bowl
and flat beater to mixer. Turn to Speed 2 and
add eggs, one at a time, mixing about
30 seconds after each addition. Stop and scrape
bowl. Turn to Speed 4 and beat about
15 seconds. Add cheese. Turn to STIR Speed and
mix about 10 seconds.
Pour hot filling into 2-qt casserole dish sprayed
with no-stick cooking spray. Spoon pastry into
4 mounds on top of chicken mixture. Bake at
400°F for 35 to 45 minutes, or until pastry is
puffed and browned and filling is bubbly.
Yield: 4 servings.
Per serving: About 507 cal, 39 g protein, 24 g
carb, 28 g fat, 240 mg chol, 706 mg sodium.
Chicken and Mushroom Casserole
with Cheese Puff Topping

27
2
1
⁄4 cups all-purpose
flour
1
1
⁄3 cups sugar
3 teaspoons baking
powder
1
⁄2 teaspoon salt
1
⁄2 cup shortening
1 cup low-fat milk
1 teaspoon vanilla
2 eggs
Combine dry ingredients in mixer bowl. Add
shortening, milk, and vanilla. Attach bowl and
flat beater to mixer. Turn to Speed 2 and mix
about 1 minute. Stop and scrape bowl. Add
eggs. Continuing on Speed 2, mix about
30 seconds. Stop and scrape bowl. Turn to
Speed 6 and beat about 1 minute.
Pour batter into two greased and floured 8- or
9" round baking pans. Bake at 350°F for
30 to 35 minutes, or until toothpick inserted in
center comes out clean. Cool 10 minutes.
Remove from pans. Cool completely on wire
rack. Frost if desired.
Yield: 12 to 16 servings.
Per serving: About 272 cal, 4 g protein, 42 g
carb, 10 g fat, 37 mg chol, 175 mg sodium.
Quick Yellow Cake
2 cups all-purpose
flour
1
1
⁄2 cups sugar
3 teaspoons baking
powder
1
⁄2 teaspoon salt
1
⁄2 cup shortening
1 cup low-fat milk
1 teaspoon vanilla
4 egg whites
Combine dry ingredients in mixer bowl. Add
shortening, milk, and vanilla. Attach bowl and
flat beater to mixer. Turn to Speed 2 and mix
about 1 minute. Stop and scrape bowl. Add egg
whites. Turn to Speed 6 and beat about
1 minute, or until smooth and fluffy.
Pour batter into two greased and floured 8- or
9" round baking pans. Bake at 350°F for
30 to 35 minutes, or until toothpick inserted in
center comes out clean. Cool 10 minutes.
Remove from pans. Cool completely on wire rack.
Frost if desired.
Yield: 12 to 16 servings.
Per serving: About 267 cal, 4 g protein, 42 g
carb, 9 g fat, 2 mg chol, 183 mg sodium.
Easy White Cake
CAKES AND FROSTINGS

28
Topping
1 cup firmly packed
brown sugar
1
⁄2 cup butter or
margarine
1
⁄4 cup whipping
cream
1 cup chopped
walnuts
Cake
1
1
⁄2 cups sugar
1
⁄2 cup butter or
margarine, softened
1 cup (2 medium)
mashed ripe
banana
1 teaspoon vanilla
3 eggs
2
1
⁄2 cups all-purpose
flour
1
1
⁄4 teaspoons baking
powder
1 teaspoon baking
soda
1
⁄2 teaspoon salt
3
⁄4 cup buttermilk
Filling
1
⁄2 cup sugar
3 tablespoons all-
purpose flour
1
⁄4 teaspoon salt
1 cup low-fat milk
1 egg, beaten
1 teaspoon vanilla
1 tablespoons butter
or margarine
2 medium bananas,
thinly sliced
1
⁄2 cup whipping
cream, whipped
To Make Topping:
Place brown sugar, butter, and cream in small
saucepan. Heat over low heat just until butter
melts, stirring constantly. Pour over bottoms of
three 8- or 9" round baking pans. Sprinkle with
walnuts.
To Make Cake:
Place sugar and butter in mixer bowl. Attach
bowl and flat beater to mixer. Turn to Speed 2
and mix about 30 seconds. Stop and scrape
bowl. Add banana and vanilla. Continuing on
Speed 2, mix about 30 seconds. Continuing on
Speed 2, add eggs, one at a time, mixing about
15 seconds after each addition. Stop and scrape
bowl.
Combine flour, baking powder, baking soda, and
salt in small bowl. Add half of flour mixture to
sugar mixture in mixer bowl. Turn to Speed 2
and mix about 30 seconds. Add buttermilk and
remaining flour mixture. Gradually turn to Speed
6 and beat about 30 seconds. Spread batter
evenly over nut mixture in pans. Bake at 350°F
for 25 to 30 minutes, or until toothpick inserted
in center comes out clean. Cool in pans about
3 minutes. Remove from pans and cool
completely on wire racks.
Meanwhile, to make filling, combine sugar, flour,
and salt in medium saucepan. Gradually stir in
milk. Heat to boiling over medium heat, stirring
constantly. Stir about
1
⁄4 cup hot mixture into
beaten egg in separate bowl. Pour egg mixture
into saucepan. Cook until mixture is bubbly,
stirring constantly. Remove from heat. Stir in
vanilla and butter. Cool slightly. Refrigerate
1 hour while cake is cooling.
To assemble torte, place one cake layer, nut side
up, on large plate. Spread with half of filling.
Arrange half of banana slices over filling. Top
with second layer, nut side up. Spread with
remaining filling and banana slices. Top with
remaining cake layer, nut side up. Top torte with
whipped cream. Store in refrigerator.
Yield: 16 to 20 servings.
Per serving: About 451 cal, 7 g protein, 65 g
carb, 19 g fat, 58 mg chol, 384 mg sodium.
Caramel Walnut Banana Torte

29
1
1
⁄4 cups all-purpose
flour
1
1
⁄2 cups sugar, divided
1
1
⁄2 cups egg whites
(about 12 to 15 egg
whites)
1
1
⁄2 teaspoons cream of
tartar
1
⁄4 teaspoon salt
1
1
⁄2 teaspoons vanilla or
1
⁄2 teaspoon almond
extract
Mix flour and
1
⁄2 cup sugar in small bowl.
Set aside.
Place egg whites in mixer bowl. Attach bowl and
wire whip to mixer. Gradually turn to Speed 6
and whip 30 to 60 seconds, or until egg whites
are frothy.
Add cream of tartar, salt, and vanilla. Turn to
Speed 8 and whip 2 to 2
1
⁄2 minutes, or until
whites are almost stiff but not dry. Turn to
Speed 2. Gradually add remaining 1 cup sugar
and mix about 1 minute. Stop and scrape bowl.
Remove bowl from mixer. Spoon flour-sugar
mixture, one-fourth at a time, over egg whites.
Fold in gently with spatula, just until blended.
Pour batter into ungreased 10" tube pan. With
knife, gently cut through batter to remove large
air bubbles. Bake at 375°F for 35 minutes, or
until crust is golden brown and cracks are very
dry. Immediately invert cake onto funnel or soft
drink bottle. Cool completely. Remove from pan.
Yield: 16 servings.
Per serving: About 124 cal, 4 g protein, 27 g
carb, 0 g fat, 0 mg chol, 79 mg sodium.
Angel Food Cake

30
3 cups all-purpose
flour
2 cups sugar
3 teaspoons baking
powder
1
⁄2 teaspoon salt
2 cups butter,
softened
1
⁄2 cup low-fat milk
1 teaspoon vanilla
1 teaspoon almond
extract
6 eggs
Combine dry ingredients in mixer bowl. Add
butter, milk, vanilla, and almond extract. Attach
bowl and flat beater to mixer. Turn to STIR Speed
and mix about 1 minute. Stop and scrape bowl.
Turn to Speed 6 and beat about 2 minutes. Stop
and scrape bowl.
Turn to Speed 2 and add eggs, one at a time,
mixing about 15 seconds after each addition.
Turn to Speed 4 and beat about 30 seconds.
Pour batter into greased and floured 10" tube
pan. Bake at 350°F for 1 hour 15 minutes, or
until toothpick inserted in center comes out
clean. Cool completely on wire rack. Remove
cake from pan.
Yield: 16 servings.
Per serving: About 419 cal, 5 g protein, 44 g
carb, 25 g fat, 143 mg chol, 378 mg sodium.
VARIATION
Double Chocolate Pound Cake
Add
1
⁄2 cup unsweetened Dutch-processed cocoa
powder to dry ingredients. Reduce butter to
1 cup. Increase milk to 1 cup. Omit almond
extract. Prepare as directed above. Bake at 325°F
for 1 hour 20 minutes.
Chocolate Glaze
Melt 1 square (1 oz) semisweet chocolate and
1 teaspoon shortening in small saucepan over
low heat, stirring to blend. Drizzle over cake.
Yield: 16 servings.
Per serving (cake and glaze): About 390 cal, 6 g
protein, 55 g carb, 18 g fat, 99 mg chol, 289 mg
sodium.
Old-Fashioned Pound Cake

31
Italian Cream Cake
5 eggs, separated
1
⁄2 cup butter or
margarine
1
⁄2 cup shortening
1
3
⁄4 cup sugar
2 cups all-purpose
flour
1 teaspoon baking
soda
1 cup buttermilk
1 teaspoon vanilla
2 cups coconut
1 cup chopped
pecans
Place egg whites in mixer bowl. Attach bowl and
wire whip to mixer. Turn to Speed 8 and whip
2
1
⁄2 to 3 minutes, or until egg whites are stiff but
not dry. Place egg whites in another bowl.
Place butter, shortening, and sugar in mixer
bowl. Attach bowl and flat beater to mixer. Turn
to Speed 4 and mix about 2
1
⁄2 minutes, or until
light and fluffy. Continuing on Speed 4, add egg
yolks, one at a time, mixing about 15 seconds
after each addition. Stop and scrape bowl.
Mix flour and baking soda. Add half to sugar
mixture in mixer bowl. Turn to Speed 2 and mix
about 30 seconds. Add buttermilk, vanilla, and
remaining flour mixture. Gradually turn to Speed
4 and beat about 1 minute.
Add coconut and pecans. Turn to STIR Speed and
mix just until blended. Remove bowl from mixer.
Gently fold in beaten egg whites with spatula
just until blended. Pour batter into greased and
floured 13 x 9 x 2" baking pan. Bake at 350°F for
40 to 50 minutes, or until toothpick inserted in
center comes out clean. Cool completely on wire
rack. Spread with Cream Cheese Frosting.
Yield: 15 servings.
NOTE: For best flavor, chill cake in refrigerator
several hours or overnight.
Place all ingredients in mixer bowl. Attach bowl
and flat beater to mixer. Turn to Speed 2 and
mix about 30 seconds, or until blended. Stop and
scrape bowl. Turn to Speed 4 and beat about
2 minutes, or until smooth and creamy. Spread
on cooled cake.
Per serving: About 626 cal, 7 g protein, 77 g
carb, 33 g fat, 112 mg chol, 351 mg sodium.
Cream Cheese Frosting
4 cups powdered
sugar
1 package (8 oz) light
cream cheese,
softened
1
⁄2 cup butter or
margarine, softened
1 teaspoon vanilla

32
Chocolate Cake
2 cups all-purpose
flour
1
1
⁄3 cups sugar
1 teaspoon baking
powder
1
⁄2 teaspoon baking
soda
1
⁄2 teaspoon salt
1
⁄2 cup shortening
1 cup low-fat milk
1 teaspoon vanilla
2 eggs
2 squares (1 oz each)
unsweetened
chocolate, melted
Combine dry ingredients in mixer bowl. Add
shortening, milk, and vanilla. Attach bowl and
flat beater to mixer. Turn to Speed 2 and mix
about 1 minute. Stop and scrape bowl. Add eggs
and chocolate. Continuing on Speed 2, mix
about 30 seconds. Stop and scrape bowl. Turn to
Speed 6 and beat about 1 minute.
Pour batter into two greased and floured
8- or 9" round baking pans. Bake at 350°F for 30
to 35 minutes, or until toothpick inserted in
center comes out clean. Cool 10 minutes.
Remove from pans. Cool completely on wire
rack. Frost if desired.
Yield: 12 to 16 servings.
Per serving: About 285 cal, 4 g protein, 41 g
carb, 12 g fat, 37 mg chol, 185 mg sodium.
Apple Cake
1
1
⁄2 cups all-purpose
flour
1 cup whole-wheat
flour
1
1
⁄2 cups sugar
1 teaspoon baking
powder
1 teaspoon baking
soda
1
⁄2 teaspoon salt
1
1
⁄2 teaspoons
cinnamon
1
⁄2 teaspoon nutmeg
1
1
⁄2 cups applesauce
1
⁄2 cup butter or
margarine, melted
2 eggs
1 cup chopped,
peeled apple
1
⁄2 cup chopped
walnuts
Caramel Creme
Frosting, if desired
(see the “Caramel
Creme Frosting”
section)
Combine dry ingredients in mixer bowl. Add
applesauce, butter, and eggs. Attach bowl and
flat beater to mixer. Turn to Speed 2 and mix
about 1 minute. Stop and scrape bowl. Turn to
Speed 4 and beat about 30 seconds. Add apple
and walnuts. Turn to STIR Speed and mix just
until blended.
Pour batter into greased and floured 13 x 9 x
2" baking pan. Bake at 350°F for 35 to
40 minutes, or until toothpick inserted in center
comes out clean. Cool completely on wire rack.
Frost with Caramel Creme Frosting, if desired.
Yield: 12 to 16 servings.
Per serving: About 318 cal, 5 g protein, 51 g
carb,
11 g fat, 36 mg chol, 315 mg sodium.
VARIATION
Apple Cake Made Ahead
Double all ingredients and prepare in 6 qt mixer
bowl. Bake in two pans. Enjoy one cake now;
freeze the second and frost when ready to serve.
Yield: 24 to 32 servings.

33
Sunshine Chiffon Cake
2 cups all-purpose
flour
1
1
⁄2 cups sugar
1 tablespoon baking
powder
1
⁄2 teaspoon salt
3
⁄4 cup cold water
1
⁄2 cup oil
7 egg yolks, beaten
1 teaspoon vanilla
2 teaspoons grated
lemon rind
7 egg whites
1
⁄2 teaspoon cream of
tartar
Combine flour, sugar, baking powder, and salt in
mixer bowl. Add water, oil, egg yolks, vanilla,
and lemon rind. Attach bowl and wire whip to
mixer. Turn to Speed 4 and beat about 1 minute.
Stop and scrape bowl. Continuing on Speed 4,
beat about 15 seconds. Pour mixture into
another bowl. Clean mixer bowl and wire whip.
Place egg whites and cream of tartar in mixer
bowl. Attach bowl and wire whip to mixer. Turn
to Speed 8 and whip 2 to 2
1
⁄2 minutes, or until
whites are stiff but not dry.
Remove bowl from mixer. Gradually add flour
mixture to egg whites. Fold in gently with
spatula, just until blended.
Pour batter into ungreased 10" tube pan. Bake at
325°F for 60 to 75 minutes, or until top springs
back when lightly touched. Immediately invert
cake onto funnel or soft drink bottle. Cool
completely. Remove from pan. Drizzle with
Lemon Glaze.
Lemon Glaze
1 cup powdered
sugar
1 tablespoon butter
or margarine,
softened
2-3 tablespoons lemon
juice
Combine powdered sugar and butter in small
bowl. Stir in lemon juice, 1 tablespoon at a time,
until glaze is of desired consistency.
Yield: 16 servings.
Per serving: About 256 cal, 4 g protein, 38 g
carb, 10 g fat, 93 mg chol, 152 mg sodium.

34
Chocolate Almond Brownie Cake
Cake
7 squares (1 oz each)
semisweet
chocolate
1
⁄2 cup butter or
margarine
3 eggs, separated
1
⁄2 cup sugar
1
⁄2 teaspoon almond
extract
2 tablespoons all-
purpose flour
Glaze
1 square (1 oz)
semisweet
chocolate
1 teaspoon
shortening
Topping
1
⁄2 cup whipping
cream
1 tablespoon
powdered sugar
1
⁄4 teaspoon almond
extract
2 tablespoons sliced
almonds
To Make Cake:
Melt chocolate and butter in medium saucepan
over low heat, stirring constantly. Remove from
heat; cool slightly.
Place egg whites in mixer bowl. Attach bowl and
wire whip to mixer. Turn to Speed 8 and whip
1 to 2 minutes, or until stiff peaks form. Place
egg whites in another bowl. Clean mixer bowl
and wire whip.
Place chocolate mixture, sugar, and almond
extract in mixer bowl. Attach bowl and flat
beater to mixer. Turn to Speed 4 and beat about
1 minute. Stop and scrape bowl. Continuing on
Speed 4, add egg yolks, one at a time, beating
about 30 seconds after each addition.
Continuing on Speed 4, add flour and beat
about 15 seconds. Gently fold in egg whites with
spatula.
Spoon batter into 8" springform pan that has
been greased and floured on the bottom only.
Bake at 375°F for 20 to 25 minutes, or until set
in center. Cool completely on wire rack before
glazing. Clean mixer bowl.
To Make Glaze:
Melt chocolate and shortening in small saucepan
over low heat, stirring to blend. Drizzle over
cake.
To Make Topping:
Place cream, powdered sugar, and almond
extract in mixer bowl. Attach wire whip and
bowl to mixer. Turn to Speed 10 and whip 30 to
60 seconds, or until stiff peaks form. Pipe or
spoon whipped cream in ring over top of cake.
Sprinkle with almonds. Store in refrigerator.
Yield: 16 servings.
Per serving: About 180 cal, 3 g protein, 17 g
carb, 13 g fat, 58 mg chol, 74 mg sodium.

35
Double Lemon Cake Roll
To Make Cake:
Place eggs in mixer bowl. Attach bowl and wire
whip to mixer. Turn to Speed 8 and whip eggs
about 3 minutes, or until very thick and lemon
colored. Continuing on Speed 8, gradually add
sugar, beating about 1 minute. Stop and scrape
bowl.
Add water, vanilla, and lemon extract. Turn to
Speed 4 and beat about 30 seconds. Continuing
on Speed 4, gradually add flour, baking powder,
and salt. Beat about 30 seconds, or until batter is
smooth.
Line a 15
1
⁄2 x10
1
⁄2 x1" baking pan with waxed
paper, aluminum foil, or parchment paper.
Grease well. Pour batter into pan, spreading to
corners. Bake at 375°F for 11 to 13 minutes, or
until toothpick inserted in center comes out
clean. Remove from oven and immediately turn
onto a towel sprinkled with powdered sugar.
Remove paper or foil. Roll cake and towel
together. Cool completely on wire rack.
To Make Lemon Filling:
Place ingredients in mixer bowl. Attach bowl and
flat beater to mixer. Turn to Speed 4 and beat
about 1
1
⁄2 minutes, or until well mixed. Spread on
cooled cake roll.
When cool, unroll cake and spread with Lemon
Filling. Reroll and sprinkle with powdered sugar.
Yield: 10 servings (1" slice per serving).
Per serving: About 217 cal, 6 g protein, 35 g
carb, 6 g fat, 96 mg chol, 213 mg sodium.
Cake
4 eggs
3
⁄4 cup granulated
sugar
1
⁄4 cup water
1
⁄2 teaspoon vanilla
1
⁄2 teaspoon lemon
extract
2
⁄3 cup all-purpose
flour
1 teaspoon baking
powder
1
⁄4 teaspoon salt
Lemon Filling
1 package (8 oz) light
cream cheese,
softened
1 cup powdered
sugar
1 tablespoon lemon
juice
2 teaspoons grated
lemon peel

36
Gingered Pear Upside-Down Cake
Topping
1
⁄2 cup packed brown
sugar
1
⁄4 cup butter or
margarine
1 tablespoon light
corn syrup
1 tablespoon finely
chopped
crystallized ginger
1 large ripe pear
Cake
1 cup granulated
sugar
1
⁄2 cup shortening
1 teaspoon vanilla
2 eggs
1
1
⁄2 cups all-purpose
flour
1
⁄2 cup low-fat milk
1 tablespoon finely
chopped
crystallized ginger
1
1
⁄2 teaspoons baking
powder
1
⁄2 teaspoon nutmeg
1
⁄4 teaspoon salt
To Make Topping:
Combine brown sugar, butter, and corn syrup in
small saucepan. Cook and stir over medium-low
heat for 3 to 5 minutes, or until smooth. Pour
evenly into 9" round or square cake pan that has
been sprayed with no-stick cooking spray.
Sprinkle evenly with chopped ginger. Set aside.
To Make Cake:
Place granulated sugar, shortening, and vanilla in
mixer bowl. Attach bowl and flat beater to
mixer. Turn to Speed 2 and mix about
45 seconds. Continuing on Speed 2, add eggs
and mix about 45 seconds longer. Continuing on
Speed 2, add remaining cake ingredients and mix
about 30 seconds. Stop and scrape bowl. Turn to
Speed 6 and beat about 1 minute.
Peel, core, and slice pear. Arrange pear slices
evenly over sugar mixture in pan. Spread batter
evenly over pear slices.
Bake at 350ºF for 45 to 55 minutes, or until
center springs back when touched lightly. Let
stand in pan about 3 minutes. Invert onto
serving plate. Serve warm or at room
temperature.
Yield: 8 servings.
Per serving: About 462 cal, 5 g protein, 66 g
carb, 21 g fat, 70 mg chol, 210 mg sodium.

37
Cappuccino Fudge Cupcakes
Cupcakes
1
⁄2 cup butter or
margarine,
softened
1
1
⁄2 cups sugar
3 eggs
3
⁄4 cup milk
1 tablespoon plus
2 teaspoons instant
espresso or coffee
granules
1
3
⁄4 cups all-purpose
flour
1
1
⁄2 teaspoons baking
powder
1
⁄4 teaspoon salt
Coffee Cream
1
1
⁄2 cups heavy cream
1
⁄4 cup sugar
1
1
⁄2 teaspoons instant
espresso or coffee
granules (optional)
Fudge Sauce
4 squares (1 oz each)
semisweet
chocolate
1
⁄2 cup whipping
cream
1
⁄4 teaspoon cinnamon
To Make Cupcakes:
Place butter in bowl. Attach bowl and flat beater
to mixer. Turn to Speed 6 and gradually add
sugar, beating about 3 minutes, or until light
and fluffy. Turn to Speed 4 and add eggs, one at
a time, beating for 30 seconds after each
addition. Stop and scrape bowl. Dissolve instant
espresso in milk. Set aside.
Combine flour, baking powder, and salt. Turn to
STIR Speed and add
1
⁄3 of the flour mixture
alternately with
1
⁄2 of the milk mixture, mixing
15 seconds after each addition.
Spoon batter into 8 greased and floured custard
cups. Place cups on baking sheet. Bake at 350°F
for 30 to 35 minutes, or until toothpick inserted
into cupcake comes out clean. Remove from
custard cups and cool on wire rack. Top with
Coffee Cream and serve with Fudge Sauce.
To Make Coffee Cream:
Combine cream, sugar, and espresso in bowl.
Attach bowl and wire whip to mixer. Turn to
Speed 8 and whip cream until stiff.
To Make Fudge Sauce:
Place chocolate, cream, and cinnamon in small
saucepan. Cook and stir over low heat until
chocolate is melted and mixture is combined.
Yield: 8 servings (8 cupcakes).
Per serving: About 690 cal, 8 g protein, 76 g
carb, 40 g fat, 187 mg chol, 291 mg sodium.
VARIATION
Cupcakes for a Party
Double all ingredients and prepare in 6 qt mixer
bowl. Fill paper-lined standard-size muffin pans
two-thirds full. Bake at 350°F for 18 to
22 minutes, or until toothpick inserted into
cupcake comes out clean.
Yield: 48 cupcakes (48 servings).
Per serving: About 227 cal, 3 g protein, 25g carb,
14 g fat, 64 mg chol, 59 mg sodium.

38
Caramel Creme Frosting
1
⁄2 cup butter or
margarine
1 cup firmly packed
brown sugar
1
⁄4 cup low-fat milk
1 cup miniature
marshmallows
2 cups powdered
sugar
1
⁄2 teaspoon vanilla
Melt butter in medium saucepan. Add brown
sugar and milk, stirring to blend. Heat to boiling.
Cook about 1 minute, stirring constantly.
Remove from heat. Add marshmallows. Stir until
marshmallows melt and mixture is smooth.
Place powdered sugar in mixer bowl. Add brown
sugar mixture and vanilla. Attach bowl and flat
beater to mixer. Turn to STIR Speed and mix
about 30 seconds. Turn to Speed 4 and beat
about 1 minute, or until smooth and creamy.
Spread on cake while warm.
Yield: 12 to 16 servings (frosting for 2-layer or
13 x 9 x 2" cake).
Per serving: About 228 cal, 0 g protein, 41 g
carb, 7 g fat, 0 mg chol, 98 mg sodium.
Fluffy Frosting
1
1
⁄2 cups sugar
1
⁄2 teaspoon cream of
tartar
1
⁄2 teaspoon salt
1
⁄2 cup water
1
1
⁄2 tablespoons light
corn syrup
2 egg whites
1
1
⁄2 teaspoons vanilla
Place sugar, cream of tartar, salt, water, and corn
syrup in saucepan. Cook and stir over medium
heat until sugar is completely dissolved, forming
a syrup.
Place egg whites in mixer bowl. Attach bowl and
wire whip to mixer. Turn to Speed 10 and whip
about 45 seconds, or until whites begin to hold
shape. Continuing on Speed 10, slowly pour hot
syrup into egg whites in a fine stream and whip
1 to 1
1
⁄2 minutes. Add vanilla and whip about
5 minutes longer, or until frosting loses its gloss
and stands in stiff peaks. Frost cake immediately.
Yield: 12 to 16 servings (frosting for 2-layer or
13 x 9 x 2" cake).
Per serving: About 109 cal, 1 g protein, 27 g
carb, 0 g fat, 0 mg chol, 101 mg sodium.

39
Buttercream Frosting
1
⁄3 cup butter or
margarine,
softened
1
⁄4 cup whipping
cream or
evaporated milk
1 teaspoon vanilla
1
⁄4 teaspoon salt
4 cups powdered
sugar, divided
Low-fat milk, if
necessary
Place butter in mixer bowl. Attach bowl and flat
beater to mixer. Turn to Speed 4 and beat about
1 minute, or until creamy. Stop and scrape bowl.
Add cream, vanilla, salt, and 1 cup powdered
sugar. Turn to STIR Speed and mix about
30 seconds. Stop and scrape bowl. Turn to Speed
2 and mix about 1
1
⁄2 minutes, or until well
blended. Stop and scrape bowl.
Turn to STIR Speed. Gradually add remaining
3 cups powdered sugar and mix until blended.
Stop and scrape bowl, if necessary. Add milk,
1 teaspoon at a time, if necessary. Turn to
Speed 4 and beat about 1 minute, or until
smooth.
Yield: 12 to 16 servings (frosting for 2-layer or
13 x 9 x 2" cake).
Per serving: About 219 cal, 0 g protein, 40 g
carb, 7 g fat, 21 mg chol, 103 mg sodium.
VARIATION
Chocolate Buttercream Frosting
Mix
1
⁄3 cup cocoa with powdered sugar in small
bowl. Add to softened butter, cream, vanilla, and
salt. Continue as directed above.
Yield 12 to 16 servings (frosting for 2-layer or
13 x 9 x 2" cake)
Per serving: About 224 cal, 1 g protein, 41 g
carb, 7 g fat, 21 mg chol, 103 mg sodium.
Orange Cream Cheese Frosting
4 cups powdered
sugar
1 package (8 oz) light
cream cheese
1 teaspoon orange
juice
1
⁄2 teaspoon grated
orange peel
Place all ingredients in mixer bowl. Attach bowl
and flat beater to mixer. Turn to STIR Speed and
mix about 30 seconds, or until blended. Turn to
Speed 4 and beat about 2 minutes, or until
smooth and creamy.
Yield: 12 to 16 servings (frosting for 2-layer or
13 x 9 x 2" cake).
Per serving: About 196 cal, 2 g protein, 41 g
carb, 3 g fat, 7 mg chol, 107 mg sodium.

40
COOKIES, BARS, AND CANDIES
Creamy No-Cook Mints
3 ounces light cream
cheese
1
⁄4 teaspoon mint
flavoring
2 drops green food
color or color of
choice
4
1
⁄4-4
1
⁄2 cups powdered
sugar
Superfine sugar
Place cream cheese, flavoring, and food color in
mixer bowl. Attach bowl and flat beater to
mixer. Turn to Speed 2 and mix about
30 seconds, or until smooth. Continuing on
Speed 2, gradually add powdered sugar and mix
about 1
1
⁄2 minutes, or until mixture becomes very
stiff.
To make mints, dip individual flexible candy
molds in superfine sugar. Press in mint mixture.
Turn out onto waxed paper covered with
superfine sugar. Repeat until all mixture is used.
OR: Shape mixture into
3
⁄4" balls, using about
1 teaspoon for each ball. Roll in superfine sugar.
Place on waxed paper covered with superfine
sugar. Flatten slightly with thumb to form
1
⁄4"
thick patties. If desired, press back of fork lightly
on patties to form ridges.
Store mints, tightly covered, in refrigerator. Mints
also freeze well.
Yield: 42 servings (2 candies per serving).
Per serving: About 54 cal, 0 g protein, 13 g carb,
0 g fat, 1 mg chol, 12 mg sodium.

41
Chocolate Fudge
Butter
2 cups sugar
1
⁄8 teaspoon salt
3
⁄4 cup evaporated
milk
1 teaspoon light corn
syrup
2 squares (1 oz each)
unsweetened
chocolate
2 tablespoons butter
or margarine
1 teaspoon vanilla
2 cup chopped
walnuts or pecans
Butter sides of heavy 2-qt saucepan. Combine
sugar, salt, evaporated milk, corn syrup, and
chocolate in pan. Cook and stir over medium
heat until chocolate melts and sugar dissolves.
Cook to soft ball stage (236°F) without stirring.
Remove immediately from heat. Add butter
without stirring. Cool to lukewarm (110°F). Stir in
vanilla.
Pour mixture into mixer bowl. Attach bowl and
flat beater to mixer. Turn to Speed 2 and mix
about 8 minutes, or until fudge stiffens and loses
its gloss. Quickly turn to STIR Speed and add
walnuts, mixing just until blended. Spread in
buttered 9 x 9 x 2" baking pan. Cool at room
temperature. Cut into 1" squares when firm.
Yield: 64 servings (1 square per serving).
Per serving: About 59 cal, 1 g protein, 7 g carb,
3 g fat, 1 mg chol, 12 mg sodium.
VARIATION
Chocolate Fudge for a Crowd
Triple all ingredients and prepare in the 6 qt
mixer bowl. Increase mixing time at Speed 2 to
9 minutes. Spread in buttered 15 x 10 x 1"
baking pan. Cut into 1" squares when firm.
Yield: 150 servings (1 square per serving).
Per serving: About 75 cal, 2 g protein, 9 g carb,
4 g fat, 1 mg chol, 15 mg chol.

42
Divinity
3 cups sugar
3
⁄4 cup light corn syrup
1
⁄2 cup water
2 egg whites
1 teaspoon almond
extract
1 cup chopped
walnuts or pecans
Place sugar, corn syrup, and water in heavy
saucepan. Cook and stir over medium heat to
hard ball stage (248°F). Remove from heat and
let stand until temperature drops to 220°F,
without stirring.
Place egg whites in mixer bowl. Attach bowl and
wire whip to mixer. Turn to Speed 8 and whip
about 1 minute, or until soft peaks form.
Gradually add syrup in a fine stream and whip
about 2
1
⁄2 minutes longer.
Turn to Speed 4. Add almond extract and whip
20 to 25 minutes, or until mixture starts to
become dry. Turn to STIR Speed and add
walnuts, mixing just until blended.
Drop mixture from measuring tablespoon onto
waxed paper or greased baking sheet to form
patties.
Yield: 20 servings (2 pieces per serving).
Per serving: About 192 cal, 2 g protein, 40 g
carb, 4 g fat, 0 mg chol, 15 mg sodium.

43
Chocolate Chip Cookies
1 cup granulated
sugar
1 cup brown sugar
1 cup butter or
margarine,
softened
2 eggs
1
1
⁄2 teaspoons vanilla
1 teaspoon baking
soda
1 teaspoon salt
3 cups all-purpose
flour
12 ounces semisweet
chocolate chips
Place sugars, butter, eggs, and vanilla in mixer
bowl. Attach bowl and flat beater to mixer. Turn
to Speed 2 and mix about 30 seconds. Stop and
scrape bowl. Turn to Speed 4 and beat about
30 seconds. Stop and scrape bowl.
Turn to STIR Speed. Gradually add baking soda,
salt, and flour to sugar mixture and mix about
2 minutes. Turn to Speed 2 and mix about
30 seconds. Stop mixer and scrape bowl. Add
chocolate chips. Turn to STIR Speed and mix
about 15 seconds.
Drop by rounded teaspoonfuls onto greased
baking sheets, about 2" apart. Bake at 375°F for
10 to 12 minutes. Remove from baking sheets
immediately and cool on wire racks.
Yield: 54 servings (1 cookie per serving).
Per serving: About 117 cal, 1 g protein, 17 g
carb, 5 g fat, 8 mg chol, 106 mg sodium.
VARIATIONS
Macadamia Chocolate Chunk Cookies
Decrease granulated sugar to
3
⁄4 cup. Decrease
flour to 2
1
⁄4 cups. Add
1
⁄2 cup unsweetened cocoa
powder with the flour. Follow mixing directions
above. Omit chocolate chips. Turn to STIR Speed.
Add 1 package (8 oz) semisweet baking
chocolate, cut into small chunks, and 1 jar
(3
1
⁄2 oz) macadamia nuts, coarsely chopped. Mix
just until blended. Bake at 325°F for 12 to
13 minutes, or until edges are set. Do not
overbake. Cool on baking sheet about 1 minute.
Cool completely on wire racks.
Yield: 48 servings (1 cookie per serving.)
Per serving: About 125 cal, 2 g protein, 16 g
carb, 7 g fat, 9 mg chol, 107 mg sodium.
Cookies for the Freezer
Double the ingredients and prepare in 6 qt mixer
bowl. Enjoy some now and freeze the rest.
Yield: 108 servings for Chocolate Chip cookies or
96 servings for Macadamia Chocolate Chunk
Cookies (1 cookie per serving).

44
Peanut Butter Cookies
1
⁄2 cup peanut butter
1
⁄2 cup butter or
margarine,
softened
1
⁄2 cup granulated
sugar
1
⁄2 cup brown sugar
1 egg
1
⁄2 teaspoon vanilla
1
⁄2 teaspoon baking
soda
1
⁄4 teaspoon salt
1
1
⁄4 cups all-purpose
flour
Place peanut butter and butter in mixer bowl.
Attach bowl and flat beater to mixer. Turn to
Speed 6 and beat about 1 minute, or until
mixture is smooth. Stop and scrape bowl. Add
sugars, egg, and vanilla. Turn to Speed 4 and
beat about 1 minute. Stop and scrape bowl.
Turn to STIR Speed. Gradually add all remaining
ingredients to sugar mixture and mix about
30 seconds. Turn to Speed 2 and mix about
30 seconds.
Roll dough into 1" balls. Place about 2" apart on
ungreased baking sheets. Press flat with fork in a
criss-cross pattern to
1
⁄4" thickness.
Bake at 375°F for 10 to 12 minutes, or until
golden brown. Remove from baking sheets
immediately and cool on wire racks.
Yield: 36 servings (1 cookie per serving).
Per serving: About 83 cal, 2 g protein, 10 g carb,
4 g fat, 6 mg chol, 81 mg sodium.
Nutty Shortbread Bars
1 cup butter or
margarine,
softened
1 cup firmly packed
brown sugar
2 cups all-purpose
flour
1 teaspoon baking
powder
1
⁄2 teaspoon salt
2 egg whites
1 cup chopped
walnuts or pecans
Place butter and brown sugar in mixer bowl.
Attach bowl and flat beater to mixer. Turn to
Speed 2 and mix about 1 minute. Stop and
scrape bowl. Add flour, baking powder, and salt.
Turn to Speed 2 and mix about 1
1
⁄2 minutes, or
until soft dough forms.
Press dough into greased 15
1
⁄2 x 10
1
⁄2 x 1" baking
pan. Beat egg whites with fork until slightly
foamy. Brush dough with egg whites, using only
as much as needed to cover lightly. Sprinkle with
chopped walnuts.
Bake at 375°F for 20 to 25 minutes. Cut into bars
while warm. Cool on wire rack.
Yield: 30 servings (1 bar per serving).
Per serving: About 139 cal, 2 g protein, 14 g
carb, 8 g fat, 17 mg chol, 114 mg sodium.

45
Lemon Cream Cheese Bars
Crust
2 cups all-purpose
flour
1
⁄2 cup powdered
sugar
1 cup (2 sticks) chilled
butter, cut into
chunks
Cream Cheese Filling
1 package (8 oz) light
cream cheese
1
⁄2 cup powdered
sugar
2 tablespoons flour
2 eggs
1 teaspoon vanilla
Lemon Filling
4 eggs
2 cups granulated
sugar
1
⁄4 cup all-purpose
flour
1 teaspoon grated
lemon peel
1
⁄4 cup lemon juice
Powdered sugar, if
desired
Place Crust ingredients in mixer bowl. Attach
bowl and flat beater to mixer. Turn to STIR Speed
and mix about 1 minute, or until well blended
and mixture starts to stick together. Press into
ungreased 15
1
⁄2 x 10
1
⁄2 x 1" baking pan. Bake at
350°F for 14 to 16 minutes, or until set.
(NOTE: Check crust after 10 minutes and prick
with fork if it puffs up during baking.) Remove
from oven.
Meanwhile, clean mixer bowl and beater. Place
Cream Cheese Filling ingredients in mixer bowl.
Attach bowl and flat beater to mixer. Turn to
STIR Speed and mix about 30 seconds. Turn to
Speed 4 and beat about 2 minutes, or until
smooth and creamy. Pour over partially baked
Crust. Bake at 350°F for 6 to 7 minutes, or until
filling is slightly set. Remove from oven.
Meanwhile, clean mixer bowl and beater. Place
all Lemon Filling ingredients, except lemon juice,
in mixer bowl. Attach bowl and flat beater to
mixer. Turn to STIR Speed and mix about
30 seconds. Turn to Speed 2. Gradually add
lemon juice and mix about 30 seconds, or until
well blended. Pour over Cream Cheese Filling.
Bake at 350°F for 14 to 16 minutes, or until
filling is set.
(NOTE: Filling may puff up during baking but will
fall when removed from oven.) Sprinkle with
powdered sugar, if desired. Cool completely in
pan.
Yield: 48 servings (1 bar per serving).
Per serving: About 115 cal, 2 g protein, 16 g
carb, 5 g fat, 39 mg chol, 65 mg sodium.

46
Sugar Cookies
1
⁄2 cup butter or
margarine,
softened
3
⁄4 cup sugar
1 egg
1 teaspoon vanilla
2 cups all-purpose
flour
1
⁄2 teaspoon baking
soda
1
⁄4 teaspoon salt
Place butter and sugar in mixer bowl. Attach
bowl and flat beater to mixer. Turn to Speed 2
and mix 30 seconds. Turn to speed 4 and beat
about 1
1
⁄2 minutes. Stop and scrape bowl. Add
egg and vanilla. Turn to Speed 6 and beat about
1 minute.
Combine flour, soda and salt. Add to mixer bowl.
Turn to STIR Speed and beat about 30 seconds.
Stop and scrape bowl. Turn to Speed 2 and mix
about 45 seconds. Shape dough into a flat ball.
Wrap in plastic wrap. Chill in refrigerator 2 to
3 hours.
Divide dough into thirds. Roll each portion
1
⁄8"
thick on lightly floured waxed paper. Cut with
cookie cutters and place on lightly greased
baking sheets. Bake at 375°F for 7 to 10 minutes,
or until edges are light brown. Remove from
baking sheets immediately and cool on wire
racks.
Yield: 48 servings (1 cookie per serving).
Per serving: About 50 cal, 1 g protein, 7 g carb,
2 g fat, 10 mg chol, 46 mg sodium.
VARIATION
Sugar Cookies for a Crowd
Double the ingredients and prepare in the 6 qt
mixer bowl.
Yield: 96 servings (1 cookie per serving).

47
Raisin-Apricot Oatmeal Cookies
1
⁄2 cup butter or
margarine
1
⁄2 cup shortening
3
⁄4 cup granulated
sugar
1
⁄4 cup packed brown
sugar
2 teaspoons vanilla
2 eggs
2 cups quick cooking
oats
1
1
⁄2 cups all-purpose
flour
1 teaspoon baking
soda
1
⁄2 teaspoon salt
3
⁄4 cup raisins
1
⁄2 cup chopped dried
apricots
Place butter, shortening, vanilla, sugars, and
eggs in mixer bowl. Attach bowl and flat beater
to mixer. Turn to Speed 2 and mix about
30 seconds. Stop mixer and scrape bowl. Turn to
Speed 4 and beat about 30 seconds. Stop and
scrape bowl. Add oats, flour, baking soda, salt,
raisins, and apricots. Turn to Speed 2 and mix
about 30 seconds.
Drop by rounded teaspoonfuls onto greased
baking sheets. Bake at 375°F for 8 to 10 minutes,
or until light golden brown.
Yield: 48 servings (1 cookie per serving)
Per serving: About 91 cal, 1 g protein, 12 g carb,
5 g fat, 14 mg chol, 74 mg sodium.
VARIATION
Cookies for the Freezer
Double the ingredients and prepare in 6 qt mixer
bowl. Enjoy cookies now and freeze some for
later.
Yield: 96 servings (1 cookie per serving).

48
Almond Kisses
3 egg whites
1
1
⁄2 cups sugar
1 teaspoon almond
extract
2 cups sliced almonds
Place egg whites in mixer bowl. Attach bowl and
wire whip to mixer. Gradually turn to Speed 10
and whip about 2 minutes, or until soft peaks
form.
Reduce to Speed 4 and gradually add sugar,
beating about 1 minute. Stop and scrape bowl.
Add almond extract. Turn to Speed 10 and whip
1
1
⁄2 minutes, or until very stiff. Fold in almonds
with rubber spatula.
Drop by tablespoonfuls onto greased and floured
or parchment paper-covered baking sheets. Bake
at 325°F for 15 minutes. Cool on wire racks.
Yield: 36 servings (1 cookie per serving).
Per serving: About 66 cal, 1 g protein, 9 g carb,
3 g fat, 0 mg chol, 5 mg sodium.
VARIATION
Almond Kisses for Gift Giving
Prepare as directed above, using 6 qt mixer bowl.
Yield: 144 servings (1 cookie per serving).
Tip: After cookies are completely cooled, pack in
layers in covered container. Freeze up to
1 month.
12 egg whites
6 cups sugar
1 tablespoon almond
extract
6 cups sliced almonds

49
Crispy Cheese Wafers
3 cups (12 oz)
shredded extra
sharp Cheddar
cheese
3
⁄4 cup butter or
margarine,
softened and cut
up
1
1
⁄2 cups all-purpose
flour
1
⁄2 teaspoon cayenne
Place cheese and butter in mixer bowl. Attach
bowl and flat beater to mixer. Turn to Speed 2
and mix about 45 seconds. Turn to Speed 4 and
beat about 30 seconds, or until well blended.
Add flour and cayenne. Turn to STIR Speed and
mix about 45 seconds, or until mixture forms a
ball.
Divide dough in half. Wrap half of dough in
plastic wrap and refrigerate. On floured surface
with floured rolling pin, roll remaining half of
dough to
1
⁄4" thick (about 12 x 9" rectangle). Cut
into 1 x 3" strips. With floured spatula, place on
large lightly greased baking sheets. Bake at 375°F
for 10 to 12 minutes, or until set. Let stand 1
minute. Remove from pans and cool on wire
rack. Repeat with remaining dough. Serve warm
or at room temperature.
Yield: 30 servings (2 wafers per serving).
Per serving: About 108 cal, 4 g protein, 5 g carb,
8 g fat, 12 mg chol, 126 mg sodium.

50
Pie Pastry
2
1
⁄4 cups
all-purpose flour
3
⁄4 teaspoon salt
1
⁄2 cup shortening,
well chilled
2 tablespoons butter
or margarine,
well chilled
5-6 tablespoons
cold water
Place flour and salt in mixer bowl. Attach bowl
and flat beater to mixer. Turn to STIR Speed and
mix about 15 seconds. Cut shortening and butter
into pieces and add to flour mixture. Turn to STIR
Speed and mix 30 to 45 seconds, or until
shortening particles are size of small peas.
Continuing on STIR Speed, add water,
1 tablespoon at a time, mixing until all particles
are moistened and dough begins to hold
together.
Divide dough in half. Pat each half into a smooth
ball and flatten slightly. Wrap in plastic wrap.
Chill in refrigerator 15 minutes.
Roll one half of dough to
1
⁄8" thickness between
waxed paper. Fold pastry into quarters. Ease into
8- or 9" pie plate and unfold, pressing firmly
against bottom and sides. Continue with one of
the procedures that follow.
For One-crust Pie: Fold edge under. Crimp, as
desired. Add desired pie filling. Bake as directed.
For Two-crust Pie: Trim pastry even with edge of
pie plate. Using second half of dough, roll out
another pastry crust. Add desired pie filling. Top
with second pastry crust. Seal edge. Crimp, as
desired. Cut slits for steam to escape. Bake as
directed.
For Baked Pastry Shell: Fold edge under. Crimp,
as desired. Prick sides and bottom with fork.
Bake at 450°F for 8 to 10 minutes, or until lightly
browned. Cool completely on wire rack and fill.
Alternate Method for Baked Pastry Shell: Fold
edge under. Crimp, as desired. Line shell with
foil. Fill with pie weights or dried beans. Bake at
450°F for 10 to 12 minutes, or until edges are
lightly browned. Remove pie weights and foil.
Cool completely on wire rack and fill.
Yield: 8 servings (two 8- or 9" crusts).
Per serving (one crust): About 134 cal, 2 g
protein, 13 g carb, 8 g fat, 0 mg chol, 118 mg
sodium.
Per serving (two crusts): About 267 cal, 4 g
protein, 27 g carb, 16 g fat, 0 mg chol, 236 mg
sodium.
VARIATION
Pastry for Four Pie Crusts
Double the ingredients and prepare in the 6 qt
mixer bowl.
Yield: 16 servings (four 8- or 9" crusts).
PIES AND DESSERTS

51
Lemony Light Cheesecake
Crust
15 reduced-fat creme-
filled chocolate
sandwich cookies,
finely crushed
(about 1
1
⁄2 cups
crumbs)
2 tablespoons butter
or margarine,
melted
Filling
3 packages (8 oz
each) light cream
cheese
1 cup sugar
1 tablespoon all-
purpose flour
4 eggs
1
⁄4 cup lemon juice
1 teaspoon grated
lemon peel
Spray bottom and sides of 9" springform pan
with no-stick cooking spray.
To Make Crust:
Combine cookie crumbs and butter in medium
bowl; mix well. Press mixture firmly into bottom
of springform pan. Chill while making Filling.
To Make Filling:
Place cream cheese, sugar, and flour in mixer
bowl. Attach bowl and flat beater to mixer. Turn
to Speed 2 and mix about 30 seconds. Stop and
scrape bowl. Turn to Speed 2 and mix about
30 seconds longer. Stop and scrape bowl.
Add eggs, lemon juice, and lemon peel. Turn to
STIR Speed and mix about 30 seconds. Stop and
scrape bowl. Turn to Speed 2 and mix 15 to
30 seconds longer, just until blended. Do not
overbeat. Pour Filling into Crust.
Place top oven rack in center of oven. Place pan
of hot water on bottom rack of oven. Place
cheesecake on rack in center of oven. Bake at
325°F for 50 to 60 minutes, or until cheesecake is
set when pan is jiggled slightly. Do not overbake.
Turn off oven; open oven door. Let cheesecake
stand in oven 30 minutes. Remove from oven.
Cool completely on wire rack away from drafts.
Cover and refrigerate 6 to 8 hours before
serving.
Yield: 16 servings.
Per serving: About 169 cal, 6 g protein, 20 g
carb, 7 g fat, 68 mg chol, 214 mg sodium.

52
Tawny Pumpkin Pie
1 can (16 oz)
pumpkin
3
⁄4 cup firmly packed
brown sugar
3 eggs
1 teaspoon cinnamon
1
⁄2 teaspoon ginger
1
⁄2 teaspoon salt
1
⁄4 teaspoon cloves
1
1
⁄4 cups low-fat milk
Pie Pastry for One-
crust Pie (see
the “Pie Pastry”
section)
Place pumpkin, brown sugar, eggs, cinnamon,
ginger, salt, and cloves in mixer bowl. Attach
bowl and flat beater to mixer. Turn to Speed 2
and mix about 30 seconds. Stop and scrap bowl.
Continuing on Speed 2, slowly add milk and mix
about 1
1
⁄2 minutes.
Follow procedure for One-crust Pie. Fill with
pumpkin mixture. Bake at 400°F for 40 to
50 minutes, or until knife inserted near center
comes out clean.
Yield: 8 servings.
Per serving (filling and crust): About 280 cal,
6 g protein, 41 g carb, 11 g fat, 87 mg chol,
325 mg sodium.
Cookies and Cream Sundae Pie
1 pie crust (9") baked
and cooled
completely
3 cups (1
1
⁄2 pints) light
cherry nut ice
cream
1 cup (10) reduced-
fat cream filled
chocolate wafer
cookies, cut up
1 cup prepared hot
fudge topping,
warmed slightly
4 cups (1 qt) light
French silk
chocolate or
chocolate ice cream
Place cherry nut ice cream and half the cookies
(
1
⁄2 cup) in mixer bowl. Attach bowl and flat
beater to mixer. Turn to Speed 2 and mix about
20 seconds. Spoon quickly into pie crust. Top
evenly with
3
⁄4 cup hot fudge topping. Freeze at
least 1 hour.
Place French silk chocolate ice cream in mixer
bowl with remaining
1
⁄2 cup cookies. Turn to
Speed 2 and mix about 20 seconds. Spoon into
pie crust. Drizzle with remaining
1
⁄4 cup hot fudge
topping. Freeze at least 4 hours.
Yield: 8 servings.
Per serving: About 553 cal, 10 g protein, 91 g
carb, 16 g fat, 10 mg chol, 445 mg sodium.

53
Double Chocolate Mousse
with Raspberry Sauce
Mousse
6 oz bittersweet
chocolate, chopped
in
3
⁄4" chunks
6 oz white chocolate,
chopped in
3
⁄4"
chunks
2 cups whipping
cream, divided
Raspberry Sauce
1 package (14-16 oz)
frozen
unsweetened
raspberries, thawed
1
⁄4 cup water
1
⁄4 cup sugar
1 tablespoon
cornstarch
To Make Mousse:
Place bittersweet chocolate in one 3- to 4-cup
microwave-safe bowl. Place white chocolate in a
second microwave-safe bowl. Cover each with
waxed paper. Place one bowl at a time into
microwave oven and heat on HIGH for
1
1
⁄2 minutes. Stop and stir. If chocolate is not
melted, repeat process for 30 seconds at a time,
or until melted. Stop and stir.
Heat cream in a heavy saucepan over medium
heat until very hot, but do not boil. Remove from
heat. Pour one cup of cream into each of the
chocolate bowls. Stir each until completely
mixed. Cover bowls and refrigerate about
2 hours.
Pour white chocolate mixture into mixer bowl.
Attach bowl and wire whip to mixer. Gradually
turn to Speed 6 and beat 4 to 4
1
⁄2 minutes, or
until soft peaks form. Spoon about
1
⁄3 cup
mixture into each of 6 stemmed dessert dishes.
Set aside.
Pour bittersweet chocolate mixture into mixer
bowl. Gradually turn to Speed 6, and beat about
3 minutes, or until soft peaks form. Spoon about
1
⁄3 cup mixture over white chocolate layer. Cover
dishes with plastic wrap or foil. Refrigerate
8 hours, or overnight.
To Make Raspberry Sauce:
Place raspberries in blender container. Cover and
blend until smooth. Pour mixture into a wire
mesh strainer over a small saucepan; press with
back of spoon to squeeze out liquid. Discard
seeds and pulp in strainer.
Place remaining ingredients in saucepan. Cook
over medium heat, stirring constantly, until
thickened and bubbly. Remove from heat and
cool. Store sauce in covered container in
refrigerator. Stir before using.
Spoon Raspberry Sauce over chocolate in dessert
dishes before serving.
Yield: 6 servings (
2
⁄3 cup mousse and
1
⁄4 cup
raspberry sauce per serving).
Per serving: About 664 cal, 6 g protein, 53 g
carb, 48 g fat, 115 mg chol, 57 mg sodium.

54
Raspberry Filled
Almond Meringue Dessert
Meringue
2 cups toasted
slivered almonds,
finely chopped
8 egg whites, room
temperature
1 tablespoon vanilla
1 teaspoon white
vinegar
2 cups powdered
sugar
Filling
2 cups frozen
raspberries (from
16 oz bag)
1
⁄2 cup granulated
sugar
2 tablespoons
cornstarch
1
⁄4 cup water or
orange juice
1 cup whipping
cream
3 tablespoons
powdered sugar
To Make Meringue:
Place egg whites in mixer bowl. Attach bowl and
wire whip to mixer. Turn to Speed 8 and whip
about 1
1
⁄2 minutes, or until foamy. Continuing on
Speed 8, add vanilla and vinegar. Whip about
5 seconds. Add powdered sugar. Turn to
Speed 4 and beat about 5 seconds. Stop and
scrape bowl. Turn to Speed 8 and whip about
2
1
⁄2 minutes, or until stiff but not dry. Stop and
scrape bowl. Add nuts. Turn to STIR and mix
about 10 seconds, or until well blended.
Divide egg white mixture equally between two
9" round baking pans lined with waxed paper
cut to fit the pan bottoms, greased, and floured.
Bake at 350°F for 25 to 35 minutes, or until
golden brown. Cool in pans about
15 minutes. Remove from pans and cool
completely on wire racks.
To Make Filling:
Place raspberries, granulated sugar, cornstarch,
and water in medium saucepan. Cook and stir
over medium heat until bubbly. Cook about
1 minute longer, or until thick and translucent,
stirring constantly. Remove from heat. Strain
seeds if desired. Cool completely.
Place whipping cream and powdered sugar in
mixer bowl. Attach bowl and wire whip to
mixer. Gradually turn to Speed 8 and whip
about 1
1
⁄2 minutes, or until cream holds soft
peaks. Stop mixer. Add cooled raspberry
mixture. Turn to Speed 8 and whip about
15 seconds, or until thick and blended.
Place 1 meringue layer on serving plate. Top
with half the filling. Top with remaining
meringue layer and remaining filling. Freeze or
refrigerate until serving. Garnish with fresh
raspberries or almonds, if desired.
Yield: 8 servings.
Tip: To toast almonds, place in baking pan and
bake at 375°F for 6 to 8 minutes.
Per serving: About 528 cal, 11 g protein, 58 g
carb, 28 g fat, 41 mg chol, 71 mg sodium.
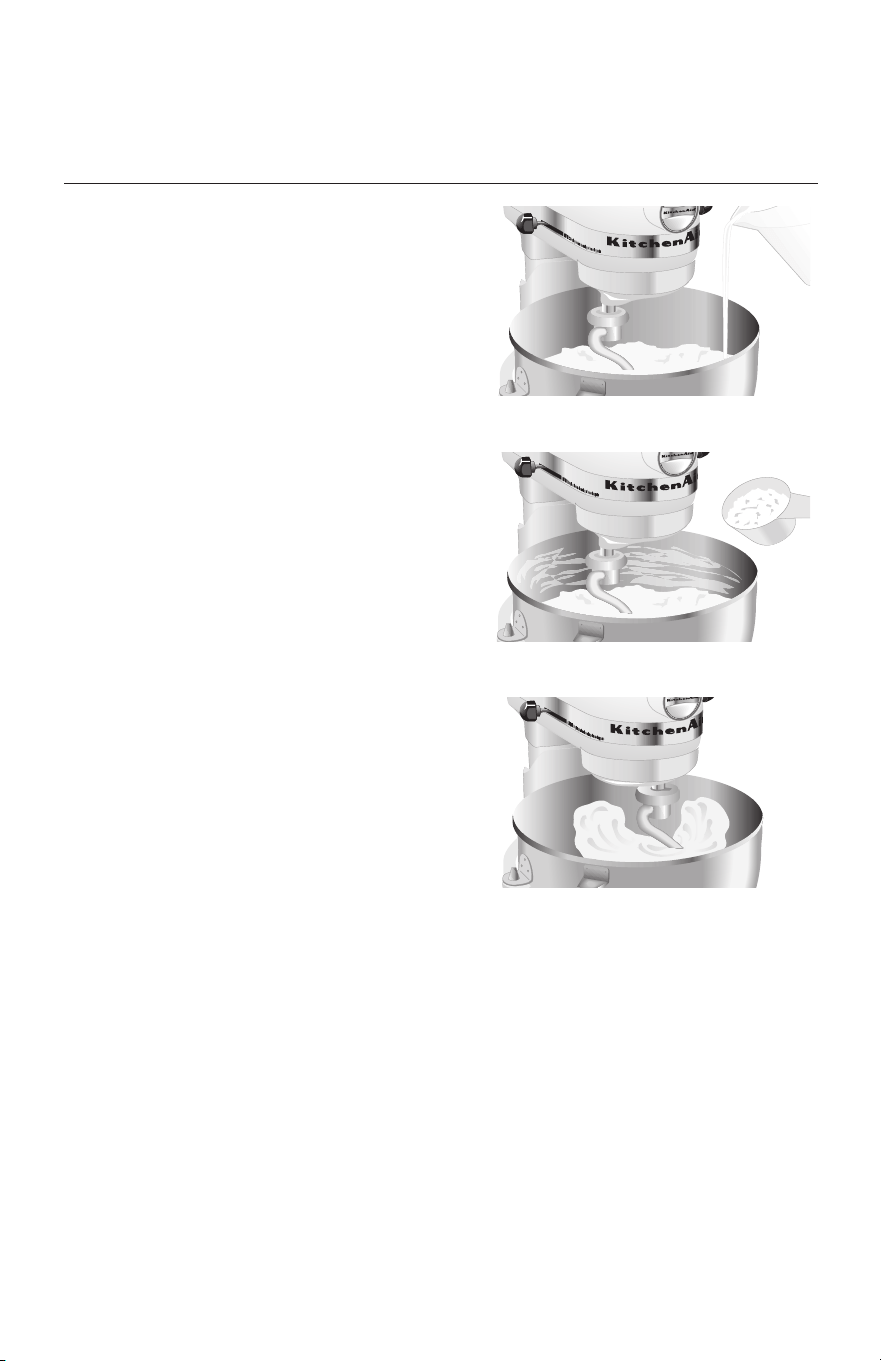
55
“Rapid Mix” describes a bread
baking method that calls for dry
yeast to be mixed with other dry
ingredients before liquid is added.
In contrast, the traditional method
is to dissolve yeast in warm water.
1. Place all dry ingredients
including yeast into bowl, except
last 1 to 2 cups flour.
2. Attach bowl and PowerKnead™
Spiral Dough Hook. Raise mixer
bowl. Turn to Speed 2 and mix
about 15 seconds, or until
ingredients are combined.
3. Continuing on Speed 2,
gradually add liquid ingredients
to flour mixture and mix 1 to
2 minutes longer. See
Illustration A.
NOTE: If liquid ingredients are
added too quickly, they will form a
pool around the PowerKnead™
Spiral Dough Hook and slow down
mixing process.
4. Continuing on Speed 2, gently
add remaining flour,
1
⁄2 cup at a
time. See Illustration B. Mix until
dough starts to clean sides of
bowl, about 2 minutes.
5. Knead on Speed 2 for 2 more
minutes, or until dough is
smooth and elastic. See
Illustration C.
6. Lower bowl on mixer and
remove dough from the bowl
and PowerKnead™ Spiral Dough
Hook. Follow directions in recipe
for rising, shaping and baking.
When using the traditional method
to prepare a favorite recipe,
dissolve yeast in warm water in
warmed bowl. Add remaining
liquids and dry ingredients, except
last 1 to 2 cups flour. Turn to
Speed 2 and mix about 1 minute,
or until ingredients are thoroughly
mixed. Proceed with steps 4
through 6.
Both methods work equally well for
bread preparation. However, the
“Rapid Mix” method may be a bit
faster and easier for new bread
bakers. It is slightly more
temperature tolerant because the
yeast is mixed with dry ingredients
rather than with warm liquid.
General Instructions
for Making and Kneading Yeast Dough
with the Rapid Mix Method
ILLUSTRATION C
Of
f
/
0
1
2
4
6
8
1
0
R
e
s
e
t S
t
ir
ILLUSTRATION A
Of
f
/0
1
2
4
6
8
1
0
R
e
s
e
t
S
t
ir
ILLUSTRATION B
Of
f
/
0
1
2
4
6
8
1
0
R
e
s
e
t S
t
ir
YEAST BREADS AND QUICK BREADS

56
Bread Making Tips
Making bread with a mixer is quite
different from making bread by
hand. Therefore, it will take some
practice before you are completely
comfortable with the new process.
For your convenience, we offer
these tips to help you become
accustomed to bread making the
KitchenAid
®
brand way.
• Start out with an easy recipe,
such as the “Basic White Bread”
recipe, until you are familiar with
using the PowerKnead™ Spiral
Dough Hook.
• Always use the PowerKnead™
Spiral Dough Hook to mix and
knead yeast doughs.
• Use Speed 2 to mix or knead
yeast doughs. Use of any other
speed creates high potential for
stand mixer failure.
• Do not use recipes calling for
more than 14 cups all-purpose
flour or 8 cups whole-wheat flour
when making dough with a 6 qt
mixer.
• Do not use recipes calling for
more than 12 cups all-purpose
flour or 6 cups whole-wheat flour
when making dough with a 5 qt
mixer.
• Use a candy or other kitchen
thermometer to assure that
liquids are at temperature
specified in the recipe. Liquids at
higher temperature can kill yeast,
while liquids at lower
temperatures will retard yeast
growth.
• Warm all ingredients to room
temperature to ensure proper
rising of dough. If yeast is to be
dissolved in bowl, always warm
bowl first by rinsing with warm
water to avoid cooling of liquids.
• Allow bread to rise in a warm
place, 80°F to 85°F, free from
draft, unless otherwise specified
in recipe.
• Here are some alternative rising
methods to use: (1) The bowl
containing the dough can be
placed on a wire rack over a pan
of hot water. (2) The bowl can be
placed on the top rack of an
unheated oven; put a pan of hot
water on the rack below. (3) Turn
the oven to 400°F for 1 minute;
then turn it off; place the bowl
on the center rack of the oven
and close the door.
Cover bowl with waxed paper, if
desired. Always cover with towel
to retain warmth in the bowl and
protect the dough from drafts.
• Recipe rising times may vary due
to temperature and humidity in
your kitchen. Dough has doubled
in bulk when indentation remains
after tips of fingers are pressed
lightly and quickly into dough.
• Most bread recipes give a range
for the amount of flour to be
used. Enough flour has been
added when the dough starts to
clean sides of bowl. If dough is
sticky or humidity is high, slowly
add more flour, about
1
⁄2 cup at a
time but do not exceed
recommended flour capacity.
Knead after each addition until
flour is completely worked into
dough. If too much flour is
added, a dry loaf will result.
• When done, yeast breads and
rolls should be deep golden
brown in color. Other tests for
doneness of breads are: Bread
pulls away from the sides of pan,
and tapping on the top of the
loaf produces a hollow sound.
Turn loaves and rolls onto racks
immediately after baking to avoid
sogginess.
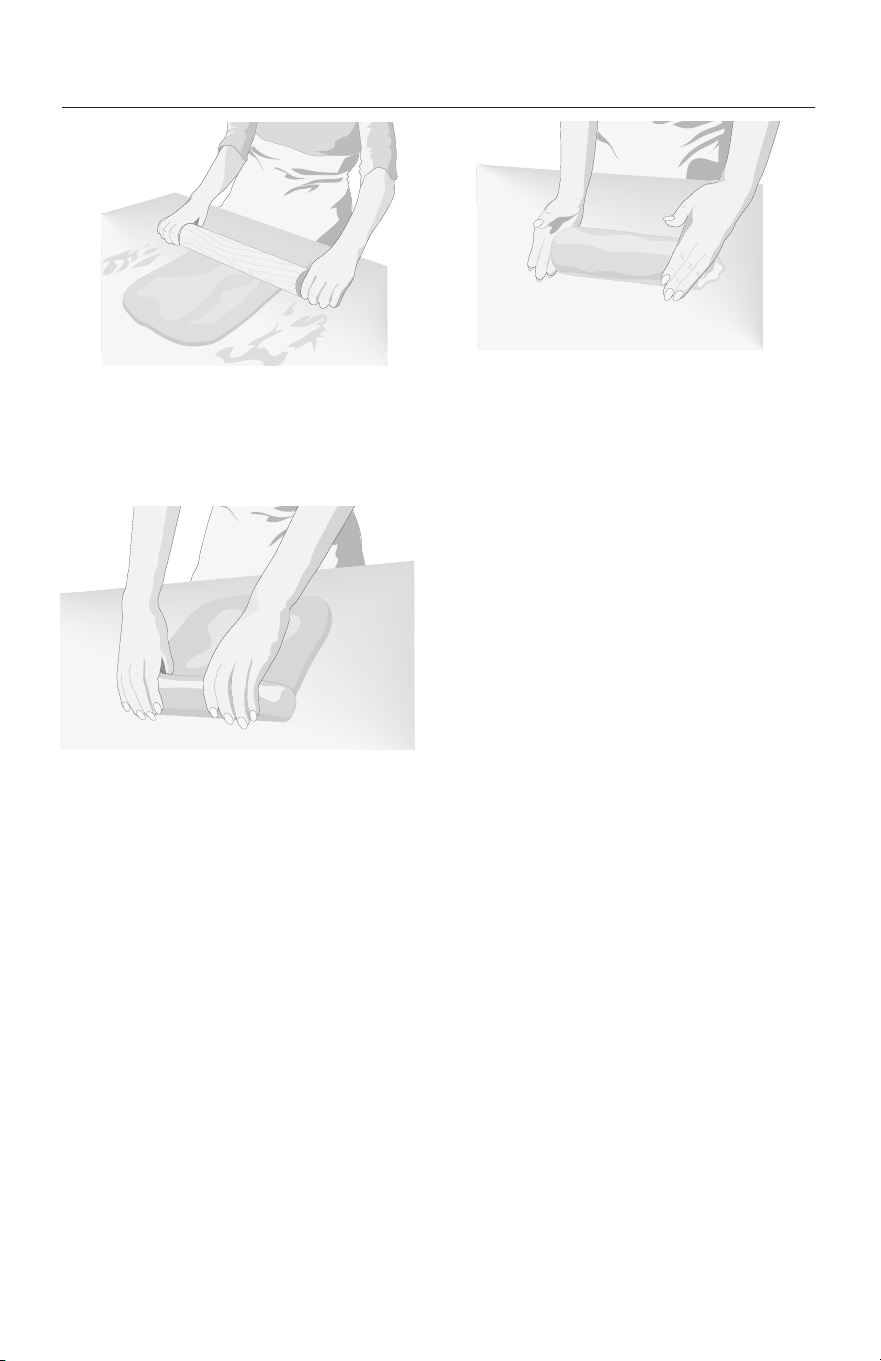
57
Divide dough in half. On lightly
floured surface, roll each half into a
rectangle, approximately
9 x 14". A rolling pin will smooth
dough and remove gas bubbles.
Starting at a short end, roll dough
tightly. Pinch dough to seal seam.
Pinch ends and turn under. Place,
seam side down, in loaf pan.
Follow directions in recipe for rising
and baking.
Shaping a Loaf

58
Basic White Bread
1
⁄2 cup low-fat milk
3 tablespoons sugar
2 teaspoons salt
3 tablespoons butter
or margarine
2 packages active dry
yeast
1
1
⁄2 cups warm water
(105°F to 115°F)
5-6 cups all-purpose
flour
Place milk, sugar, salt, and butter in small
saucepan. Heat over low heat until butter melts
and sugar dissolves. Cool to lukewarm.
Dissolve yeast in warm water in warmed mixer
bowl. Add lukewarm milk mixture and 4
1
⁄2 cups
flour. Attach bowl and PowerKnead™ Spiral
Dough Hook to mixer. Turn to Speed 2 and mix
about 1 minute.
Continuing on Speed 2, add remaining flour,
1
⁄2 cup at a time, and mix about 1
1
⁄2 minutes, or
until dough starts to clean sides of bowl. Knead
on Speed 2 about 2 minutes longer, or until
dough is smooth and elastic. Dough will be
slightly sticky to the touch.
Place dough in greased bowl, turning to grease
top. Cover. Let rise in warm place, free from
draft, about 1 hour, or until doubled in bulk.
Punch dough down and divide in half. Shape
each half into a loaf, as directed in the “Bread
Making Tips” section, and place in greased
8
1
⁄2 x 4
1
⁄2 x 2
1
⁄2" baking pans. Cover. Let rise in
warm place, free from draft, about 1 hour, or
until doubled in bulk.
Bake at 400°F for 30 minutes, or until golden
brown. Remove from pans immediately and cool
on wire racks.
Yield: 32 servings (16 slices per loaf).
Per serving: About 95 cal, 3 g protein, 18 g carb,
1 g fat, 0 mg chol, 148 mg sodium.
VARIATION
Extra Bread for the Freezer
Increase ingredient quantities by 50 percent and
prepare in 6 qt mixer bowl. In second paragraph,
change 4
1
⁄2 cups flour to 7 cups. Divide dough
into 3 pieces.
Yield: 48 servings (16 slices per loaf).
Variations continued on next page.

59
Basic White Bread CONTINUED
VARIATIONS
Cinnamon Bread
Prepare dough, divide, and roll out each half to a
rectangle, as directed in the “Shaping a Loaf”
section. Mix together
1
⁄2 cup sugar and
2 teaspoons cinnamon in small bowl. Spread
each rectangle with 1 tablespoon softened butter
or margarine. Sprinkle with half of sugar mixture.
Finish rolling and shaping loaves. Place in well-
greased 8
1
⁄2 x 4
1
⁄2 x 2
1
⁄2" baking pans. Cover. Let rise
in warm place, free from draft, about 1 hour, or
until doubled in bulk. If desired, brush tops with
beaten egg white. Bake at 375°F for 40 to
45 minutes, or until golden brown. Remove from
pans immediately and cool on wire racks.
Yield: 32 servings (16 slices per loaf).
Per serving: About 111 cal, 3 g protein, 21 g
carb, 2 g fat, 0 mg chol, 152 mg sodium.
Sixty-Minute Rolls
Increase yeast to 3 packages and sugar to
1
⁄4 cup.
Mix and knead dough as directed in the “Basic
White Bread” section. Place in greased bowl,
turning to grease top. Cover. Let rise in warm
place, free from draft, about 15 minutes. Turn
dough onto lightly floured surface. Shape as
desired (see following suggestions). Cover. Let
rise in slightly warm oven (90°F) about
15 minutes. Bake at 425°F for 12 minutes, or
until golden brown. Remove from pans
immediately and cool on wire racks.
Curlicues: Divide dough in half and roll each half
to 12 x 9" rectangle. Cut 12 equal strips about 1"
wide. Roll each strip tightly to form a coil,
tucking ends underneath. Place on greased
baking sheets about 2" apart.
Cloverleafs: Divide dough into 24 equal pieces.
Form each piece into a ball and place in greased
muffin pan. With scissors, cut each ball in half,
then quarters.
Yield: 24 servings (1 roll per serving).
Per serving: About 130 cal, 4 g protein, 25 g
carb, 2 g fat, 0 mg chol, 198 mg sodium.

60
Whole Grain Wheat Bread
1
⁄3 cup plus
1 tablespoon
brown sugar
2 cups warm water
(105°F to 115°F)
2 packages active
dry yeast
5-6 cups whole-wheat
flour
3
⁄4 cup powdered milk
2 teaspoons salt
1
⁄3 cup oil
Dissolve 1 tablespoon brown sugar in warm
water in small bowl. Add yeast and let mixture
stand.
Place 4 cups flour, powdered milk,
1
⁄3 cup brown
sugar, and salt in mixer bowl. Attach bowl and
PowerKnead™ Spiral Dough Hook to mixer. Turn
to Speed 2 and mix about 15 seconds.
Continuing on Speed 2, gradually add yeast
mixture and oil to flour mixture and mix about
1
1
⁄2 minutes longer. Stop and scrape bowl, if
necessary.
Continuing on Speed 2, add remaining flour,
1
⁄2 cup at a time, and mix about 2 minutes, or
until dough starts to clean sides of bowl. Knead
on Speed 2 about 2 minutes longer.
NOTE: Dough may not form a ball on hook.
However, as long as hook comes in contact with
dough, kneading will be accomplished. Do not
add more than the maximum amount of flour
specified or a dry loaf will result.
Place dough in greased bowl, turning to grease
top. Cover. Let rise in warm place, free from
draft, about 1 hour, or until doubled in bulk.
Punch dough down and divide in half. Shape
each half into a loaf as directed in the “Shaping
a Loaf” section. Place in greased 8
1
⁄2 x 4
1
⁄2 x
2
1
⁄2" baking pan. Cover. Let rise in warm place,
free from draft, about 1 hour, or until doubled in
bulk.
Bake at 400°F for 15 minutes. Reduce oven
temperature to 350°F and bake 20 to 30 minutes
longer. Remove from pans immediately and cool
on wire racks.
Yield: 32 servings (16 slices per loaf).
Per serving: About 112 cal, 4 g protein, 19 g
carb, 3 g fat, 2 mg chol, 146 mg sodium.

61
French Bread
2 packages active dry
yeast
2
1
⁄2 cups warm water
(105°F to 115°F)
1 tablespoon salt
1 tablespoon butter
or margarine,
melted
7 cups all-purpose
flour
2 tablespoons
cornmeal
1 egg white
1 tablespoon cold
water
Dissolve yeast in warm water in warmed mixer
bowl. Add salt, butter, and flour. Attach bowl
and PowerKnead™ Spiral Dough Hook to mixer.
Turn to Speed 2 and mix about 1 minute, or until
well blended. Knead on Speed 2 about 2 minutes
longer. Dough will be sticky.
Place dough in greased bowl, turning to grease
top. Cover. Let rise in warm place, free from
draft, about 1 hour, or until doubled in bulk.
Punch dough down and divide in half. Roll each
half into 12 x 15" rectangle. Roll dough tightly,
from longest side, tapering ends if desired. Place
loaves on greased baking sheets that have been
dusted with cornmeal. Cover. Let rise in warm
place, free from draft, about 1 hour, or until
doubled in bulk.
With sharp knife, make 4 diagonal cuts on top of
each loaf. Bake at 450°F for 25 minutes. Remove
from oven. Beat egg white and water together
with a fork. Brush each loaf with egg mixture.
Return to oven and bake 5 to 10 minutes longer.
Remove from baking sheets immediately and
cool on wire racks.
Yield: 30 servings (15 slices per loaf).
Per serving: About 114 cal, 3 g protein, 23 g
carb, 1 g fat, 0 mg chol, 221 mg sodium.

62
Honey Oatmeal Bread
1
1
⁄2 cups water
1
⁄2 cup honey
1
⁄3 cup butter or
margarine
5
1
⁄2-6
1
⁄2 cups all-purpose
flour
1 cup quick cooking
oats
2 teaspoons salt
2 packages active dry
yeast
2 eggs
1 egg white
1 tablespoon water
Oatmeal
Place water, honey, and butter in small
saucepan. Heat over low heat until mixture is
very warm (120°F to 130°F).
First place oats, then 5 cups flour, salt, and yeast
in mixer bowl. Attach bowl and PowerKnead™
Spiral Dough Hook to mixer. Turn to Speed 2 and
mix about 15 seconds. Continuing on Speed 2,
gradually add warm mixture to flour mixture and
mix about 1 minute. Add eggs and mix about
1 minute longer.
Continuing on Speed 2, add remaining flour,
1
⁄2 cup at a time, and mix about 2 minutes, or
until dough starts to clean sides of bowl. Knead
on Speed 2 about 2 minutes longer.
Place dough in greased bowl, turning to grease
top. Cover. Let rise in warm place, free from
draft, about 1 hour, or until doubled in bulk.
Punch dough down and divide in half. See the
”Shaping a Loaf” section. Place in greased 8
1
⁄2 x
4
1
⁄2 x 2
1
⁄2" baking pans. Cover. Let rise in warm
place, free from draft, about 1 hour, or until
doubled in bulk.
Beat egg white and water together with a fork.
Brush tops of loaves with mixture. Sprinkle with
oatmeal. Bake at 375°F for 30 to 40 minutes.
Remove from pans immediately and cool on
wire racks.
Yield: 32 servings (16 slices per loaf).
Per serving: About 134 cal, 4 g protein, 24 g
carb, 3 g fat, 13 mg chol, 162 mg sodium.

63
Light Rye Bread
1
⁄4 cup honey
1
⁄4 cup light molasses
2 teaspoons salt
2 tablespoons butter
or margarine
2 tablespoons
caraway seed
1 cup boiling water
2 packages active dry
yeast
3
⁄4 cup warm water
(105°F to 115°F)
2 cups rye flour
3
1
⁄2-4 cups all-purpose
flour
Place honey, molasses, salt, butter, caraway seed,
and boiling water in small bowl. Stir until honey
dissolves. Cool to lukewarm.
Dissolve yeast in warm water in warmed mixer
bowl. Add lukewarm honey mixture, rye flour,
and 1 cup all-purpose flour. Attach bowl and
PowerKnead™ Spiral Dough Hook to mixer. Turn
to Speed 2 and mix about 1 minute, or until well
mixed. Stop and scrape bowl if necessary.
Continuing on Speed 2, add remaining all-
purpose flour,
1
⁄2 cup at a time, and mix about
2 minutes, or until dough starts to clean sides of
bowl. Knead on Speed 2 about 2 minutes longer.
Place dough in greased bowl, turning to grease
top. Cover. Let rise in warm place, free from
draft, about 1 hour, or until doubled in bulk.
Punch dough down and divide in half. Shape
each half into a round loaf. Place on two greased
baking sheets. Cover. Let rise in warm place, free
from draft, 45 to 60 minutes, or until doubled in
bulk.
Bake at 350°F for 30 to 45 minutes. Cover loaves
with aluminum foil for last 15 minutes if tops
brown too quickly. Remove from baking sheets
immediately and cool on wire racks.
Yield: 32 servings (16 slices per loaf).
Per serving: About 96 cal, 2 g protein, 20 g carb,
1 g fat, 0 mg chol, 143 mg sodium.

64
Dill Batter Bread
2 packages active dry
yeast
1
⁄2 cup warm water
(105°F to 115°F)
4 tablespoons honey,
divided
2 cups large curd
cottage cheese
2 tablespoons grated
fresh onion
4 tablespoons butter
or margarine,
softened
3 tablespoons dill
seed
3 teaspoons salt
1
⁄2 teaspoon baking
soda
2 eggs
1 cup whole-wheat
flour
3-3
1
⁄2 cups all-purpose
flour
Dissolve yeast in warm water in warmed mixer
bowl. Add 1 tablespoon honey and let stand
5 minutes.
Add cottage cheese, remaining 3 tablespoons
honey, onion, butter, dill seed, salt, and soda.
Attach bowl and flat beater to mixer. Turn to
STIR Speed and mix about 30 seconds. Add eggs.
Continuing on STIR Speed, mix about
15 seconds.
Add whole-wheat flour and 2 cups all-purpose
flour. Turn to Speed 2 and mix about 2 minutes,
or until combined. Continuing on Speed 2, add
remaining flour, a little at a time, and mix until
dough forms a stiff batter. Stop and scrape
bowl, if necessary. Continuing on Speed 2, mix
about 2 minutes longer.
Cover. Let rise in warm place, free from draft,
about 1 hour, or until doubled in bulk.
Stir dough down. Place in two well-greased
8
1
⁄2 x 4
1
⁄2 x 2
1
⁄2" baking pans or two well-greased
1
1
⁄2- to 2-qt casseroles. Cover. Let rise in warm
place, free from draft, about 45 minutes, or until
doubled in bulk.
Bake at 350°F for 40 to 50 minutes. Remove
from pans immediately and cool on wire racks.
Yield: 32 servings (16 slices per loaf).
Per serving: About 98 cal, 4 g protein, 15 g carb,
3 g fat, 15 mg chol, 298 mg sodium.
VARIATION
Dill Batter Bread for a Crowd
Double all ingredients and prepare in 6 qt mixer
bowl.
Yield: 64 servings (16 slices per loaf).

65
Vegetable Cheese Bread
2 packages active dry
yeast
1 cup warm water
(105°F to 115°F)
2 cups whole-wheat
flour
3-3
1
⁄2 cups all-purpose
flour
2 tablespoons sugar
2 teaspoons salt
2 tablespoons
softened butter or
margarine
1 cup warm low-fat
milk (105°F to
115°F)
1
⁄4 cup chopped sun-
dried tomatoes
2 teaspoons instant
minced onion
2 teaspoons dried
parsley leaves
1
⁄2 cup shredded sharp
Cheddar cheese
Dissolve yeast in warm water in small bowl.
Set aside.
Combine whole-wheat flour, 2 cups all-purpose
flour, sugar, and salt in mixer bowl. Attach bowl
and PowerKnead™ Spiral Dough Hook to mixer.
Turn to Speed 2 and mix about 30 seconds.
Continuing on Speed 2, gradually add yeast
mixture, softened butter, and warm milk to flour
mixture and mix about 1
1
⁄2 minutes. Stop and
scrape bowl. Add tomatoes, onion, parsley, and
cheese. Turn to Speed 2 and mix about
30 seconds.
Continuing on Speed 2, add remaining flour,
1
⁄2 cup at a time and mix about 2 minutes, or
until dough starts to clean sides of bowl. Knead
on Speed 2 about 2 minutes longer.
Place dough in greased bowl, turning to grease
top. Cover. Let rise in warm place, free from
draft, about 1 hour, or until doubled in bulk.
Punch dough down and divide in half. Shape
each half into a loaf as directed in the “Shaping
a Loaf” section. Place in well-greased 8
1
⁄2 x 4
1
⁄2 x
2
1
⁄2" baking pans. Cover. Let rise in warm place,
free from draft, 45 to 60 minutes, or until
doubled in bulk.
Bake at 375°F for 40 minutes. Remove from pans
immediately and cool on wire rack.
(NOTE: Loaves may need to be released by
running a knife around edges of pans.)
Yield: 32 servings (16 slices per loaf).
Per serving: About 99 cal, 3 g protein, 18 g carb,
2 g fat, 2 mg chol, 160 mg sodium.

66
Blueberry Oat Bread
2 cups all-purpose
flour
1 cup rolled oats
1 cup sugar
1
1
⁄2 teaspoons baking
powder
1
⁄2 teaspoon baking
soda
1
⁄4 teaspoon salt
1
⁄4 teaspoon allspice
3
⁄4 cup low-fat milk
1
⁄2 cup butter or
margarine, melted
1 tablespoon grated
orange peel
2 eggs
1
1
⁄4 cups fresh or
frozen blueberries
(not thawed)
Combine dry ingredients in mixer bowl. Add
milk, butter, orange peel, and eggs. Attach bowl
and flat beater to mixer. Turn to STIR Speed and
mix about 30 seconds. With spoon, gently stir in
blueberries.
Spoon batter into 9 x 5 x 3" baking pan that has
been greased on the bottom only. Bake at 350°F
for 55 to 65 minutes, or until toothpick inserted
in center comes out clean. Cool in pan
10 minutes. Remove from pan and cool
completely on wire rack.
Yield: 16 servings (16 slices per loaf).
Per serving: About 196 cal, 3 g protein, 31 g
carb, 7 g fat, 27 mg chol, 177 mg sodium.
Baking Powder Biscuits
2 cups all-purpose
flour
4 teaspoons baking
powder
1
⁄2 teaspoon salt
1
⁄3 cup shortening
2
⁄3 cup low-fat milk
Melted butter or
margarine, if
desired
Place flour, baking powder, salt, and shortening
in mixer bowl. Attach bowl and flat beater to
mixer. Turn to STIR Speed and mix about
1 minute. Stop and scrape bowl. Add milk.
Continuing on STIR Speed, mix until dough starts
to cling to beater. Avoid overbeating.
Turn dough onto lightly floured surface and
knead about 20 seconds, or until smooth. Pat or
roll to
1
⁄2" thickness. Cut with floured 2" biscuit
cutter.
Place on greased baking sheets and brush with
melted butter, if desired. Bake at 450°F for
12 to 15 minutes. Serve immediately.
Yield: 12 servings (1 biscuit per serving).
Per serving: About 135 cal, 3 g protein, 17 g
carb, 6 g fat, 1 mg chol, 183 mg sodium.

67
Basic Sweet Dough
3
⁄4 cup low-fat milk
1
⁄2 cup sugar
1
1
⁄4 teaspoons salt
1
⁄2 cup butter or
margarine
2 packages active dry
yeast
1
⁄3 cup warm water
(105°F to 115°F)
3 eggs, room
temperature
5
1
⁄2-6
1
⁄2 cups all-purpose
flour
Place milk, sugar, salt, and butter in small
saucepan. Heat over low heat until butter melts
and sugar dissolves. Cool to lukewarm.
Dissolve yeast in warm water in warmed mixer
bowl. Add lukewarm milk mixture, eggs, and
5 cups flour. Attach bowl and PowerKnead™
Spiral Dough Hook to mixer. Turn to Speed 2 and
mix about 2 minutes.
Continuing on Speed 2, add remaining flour,
1
⁄2 cup at a time, and mix about 1
1
⁄2 minutes, or
until dough starts to clean sides of bowl. Knead
on Speed 2 about 2 minutes longer.
Place dough in greased bowl, turning to grease
top. Cover. Let rise in warm place, free from
draft, about 1 hour, or until doubled in bulk.
Punch dough down and shape as desired for
rolls or coffee cakes.
VARIATION
Basic Sweet Dough for a Crowd
Double all ingredients and prepare in 6 qt mixer
bowl. In first paragraph, change small saucepan
to medium saucepan. In second paragraph,
change 5 cups flour to 10 cups flour.

68
Cinnamon Swirl Rounds
1 cup firmly packed
brown sugar
1 cup sugar
1
⁄2 cup butter or
margarine,
softened
1
⁄4 cup all-purpose
flour
1
1
⁄2 tablespoons
cinnamon
1
⁄2 cup chopped
walnuts or pecans
1 recipe “Basic Sweet
Dough”
Place brown sugar, sugar, butter, flour,
cinnamon, and walnuts in mixer bowl. Attach
bowl and flat beater to mixer. Turn to Speed 2
and mix about 1 minute.
Turn dough onto lightly floured surface. Roll
dough to 10 x 24" rectangle. Spread sugar-
cinnamon mixture evenly on dough. Roll dough
tightly from long side to form 24" roll, pinching
seam together. Cut into 24 slices, 1" each.
Place 12 rolls each in two greased 13 x 9 x 2"
baking pans. Cover. Let rise in warm place, free
from draft, 45 to 60 minutes, or until doubled
in bulk.
Bake at 350°F for 20 to 25 minutes. Remove
from pans immediately. Spoon Caramel Glaze
over warm rolls.
Caramel Glaze
1
⁄3 cup evaporated
milk
2 tablespoons brown
sugar
1
1
⁄2 cups powdered
sugar
1 teaspoon vanilla
Place evaporated milk and brown sugar in small
saucepan. Cook over medium heat until mixture
begins to boil, stirring constantly.
Place milk mixture, powdered sugar, and vanilla
in mixer bowl. Attach bowl and flat beater to
mixer. Turn to Speed 4 and beat about
2 minutes, or until creamy.
Yield: 24 servings (1 roll per serving)
Per serving: About 338 cal, 6 g protein, 57 g
carb, 10 g fat, 28 mg chol, 219 mg sodium.

69
Rapid Mix Cool Rise White Bread
6-7 cups all-purpose
flour
2 tablespoons sugar
3
1
⁄2 teaspoons salt
3 packages active dry
yeast
1
⁄4 cup butter or
margarine,
softened
2 cups very warm
water (120°F to
130°F)
vegetable oil
Place 5
1
⁄2 cups flour, sugar, salt, yeast, and butter
in mixer bowl. Attach bowl and PowerKnead™
Spiral Dough Hook to mixer. Turn to Speed 2 and
mix about 20 seconds. Gradually add warm
water and mix about 1
1
⁄2 minutes longer.
Continuing on Speed 2, add remaining flour,
1
⁄2 cup at a time, and mix about 2 minutes, or
until dough starts to clean sides of bowl. Knead
on Speed 2 about 2 minutes longer.
Cover dough with plastic wrap and a towel. Let
rest 20 minutes.
Divide dough in half. Shape each half into a loaf
as directed in the “Shaping a Loaf” section. Place
in greased 8
1
⁄2 x 4
1
⁄2 x 2
1
⁄2" baking pans. Brush each
loaf with vegetable oil and cover loosely with
plastic wrap. Refrigerate 2 to 12 hours.
When ready to bake, uncover dough slowly. Let
stand at room temperature 10 minutes. Puncture
any gas bubbles which may have formed.
Bake at 400°F for 35 to 40 minutes. Remove
from pans immediately and cool on wire racks.
Yield: 32 servings (16 slices per loaf).
Per serving: About 110 cal, 3 g protein, 21 g
carb, 2 g fat, 0 mg chol, 251 mg sodium.

70
Crusty Pizza Dough
1 package active dry
yeast
1 cup warm water
(105°F to 115°F)
1
⁄2 teaspoon salt
2 teaspoons olive oil
2
1
⁄2-3
1
⁄2 cups all-purpose
flour
1 tablespoon
cornmeal
Dissolve yeast in warm water in warmed mixer
bowl. Add salt, olive oil, and 2
1
⁄2 cups flour.
Attach bowl and PowerKnead™ Spiral Dough
Hook to mixer. Turn to Speed 2 and mix about
1 minute.
Continuing on Speed 2, add remaining flour,
1
⁄2 cup at a time, and mix about 1
1
⁄2 minutes, or
until dough starts to clean sides of bowl. Knead
on Speed 2 about 2 minutes longer.
Place dough in greased bowl, turning to grease
top. Cover. Let rise in warm place, free from
draft, about 1 hour, or until doubled in bulk.
Punch dough down.
Brush 14" pizza pan with oil. Sprinkle with
cornmeal. Press dough across bottom of pan,
forming a collar around edge to hold toppings.
Add toppings, as desired. Bake at 450°F for 15 to
20 minutes.
Yield: 4 servings (
1
⁄4 pizza per serving).
Per serving: About 373 cal, 11 g protein, 74 g
carb, 3 g fat, 0 mg chol, 271 mg sodium.
VARIATION
Pizza for a Crowd
Double the ingredients and prepare in the 6 qt
mixer bowl.
Yield: 8 servings (
1
⁄4 pizza per serving).

71
Herb Garlic Baguettes
1 package active dry
yeast
1 teaspoon sugar
1
⁄4 cup warm water
(105°F to 115°F)
3
1
⁄4-3
1
⁄2 cups all-purpose
flour
1 tablespoon
chopped fresh basil
or 1 teaspoon dried
basil
2 teaspoons chopped
fresh oregano or
1
⁄2 teaspoon dried
leaf oregano
2 teaspoons chopped
fresh thyme or
1
⁄2 teaspoon dried
leaf thyme
1 teaspoon fresh
minced garlic
1 teaspoon salt
3
⁄4 cup cold water
1 egg
1 teaspoon water
Dissolve yeast and sugar in warm water.
Place 3
1
⁄4 cups flour, basil, oregano, thyme, garlic,
and salt in bowl. Attach bowl and PowerKnead™
Spiral Dough Hook to mixer. Turn to Speed 2 and
mix 30 seconds. Stop and scrape bowl.
Continuing on Speed 2, slowly add yeast mixture
and cold water, mixing about 30 seconds. If
dough is sticky, add remaining
1
⁄4 cup flour.
Knead on Speed 2 about 3 minutes, or until
dough is smooth and elastic.
Place dough in greased bowl, turning to grease
top. Cover. Let rise in warm place, free from
draft, 1
1
⁄2 to 2 hours, or until doubled in size.
On lightly floured surface, punch dough down
several times to remove all air bubbles. Divide
dough in half. Shape each half into a 12" long
loaf. Place each loaf on greased baking sheet or
in greased baguette pans. With sharp knife,
make 3 to 4 shallow diagonal slices in top of
dough. Beat egg and 1 teaspoon water together
with a fork. Brush each baguette with egg
mixture. Cover with greased plastic wrap. Let rise
in warm place, free from draft, about 1 to
1
1
⁄2 hours, or until doubled in bulk.
Brush top of each baguette again with egg
mixture. Bake at 450°F for 15 to 18 minutes, or
until deep golden brown. Remove from pans and
cool on wire racks.
Yield: 36 servings (18 slices per loaf).
Tip: Freeze up to 2 weeks. Thaw at room
temperature. Wrap loosely with foil. Heat at
375°F for 10 to 15 minutes.
Per serving: About 45 cal, 1 g protein, 9 g carb,
0 g fat, 6 mg chol, 62 mg sodium.

72
Herb Pull-Apart Rolls
1 package active dry
yeast
1 cup warm water
(105°F to 115°F)
1
⁄2 cup butter or
margarine, melted
3-3
1
⁄2 cups all-purpose
flour
2 tablespoons sugar
1
1
⁄2 teaspoons salt
1
⁄4 teaspoon thyme
1
⁄4 teaspoon oregano
1
⁄4 teaspoon dill
Dissolve yeast in warm water in warmed mixer
bowl. Add
1
⁄4 cup butter, 2 cups flour, sugar, salt,
thyme, oregano, and dill. Attach bowl and
PowerKnead™ Spiral Dough Hook to mixer. Turn
to Speed 2 and mix for 1 minute, or until well
blended.
Continuing on Speed 2, add remaining flour,
1
⁄2 cup at a time, and mix about 2 minutes, or
until dough starts to clean sides of bowl. Knead
on Speed 2 about 2 minutes longer, or until
dough is smooth and elastic.
Place dough in greased bowl, turning to grease
top. Cover. Let rise in warm place, free from
draft, about 1 hour, or until doubled in bulk.
Punch dough down. Roll dough into a 12 x 9 x
1
⁄4"
rectangle. Brush with remaining butter. Slice
dough into six 1
1
⁄2 x 12" strips. Stack strips; then
cut into twelve 1" pieces. Place pieces, cut side
up, in greased muffin pans. Cover. Let rise in
warm place, free from draft, about 45 minutes,
or until doubled in bulk. Bake at 400°F for 15 to
20 minutes. Remove from pans immediately and
cool on wire racks.
Yield: 12 servings (12 rolls).
Per serving: About 149 cal, 3 g protein, 17 g
carb, 8 g fat, 20 mg chol, 292 mg sodium.

73
Banana Nut Bread
1
⁄3 cup shortening
1
⁄2 cup sugar
2 eggs
1
3
⁄4 cups all-purpose
flour
1 teaspoon baking
powder
1
⁄2 teaspoon baking
soda
1
⁄2 teaspoon salt
1 cup (2 medium)
mashed ripe
banana
1
⁄2 cup chopped
walnuts or pecans
Place shortening and sugar in mixer bowl. Attach
bowl and flat beater to mixer. Turn to Speed 6
and beat about 1 minute. Stop and scrape bowl.
Continuing on Speed 6, beat about 1 minute
longer. Add eggs. Turn to Speed 4 and beat
about 30 seconds. Stop and scrape bowl. Turn to
Speed 6 and beat about 1
1
⁄2 minutes.
Combine flour, baking powder, baking soda, and
salt in separate bowl. Add half of flour mixture
and half of mashed banana to mixer bowl. Turn
to STIR Speed and mix about 30 seconds. Add
remaining flour and banana. Continuing on STIR
Speed, mix about 30 seconds. Stop and scrape
bowl. Add walnuts. Continuing on STIR Speed,
mix about 15 seconds.
Pour mixture into greased and floured 9 x 5 x
3" baking pan. Bake at 350°F for 40 to
45 minutes. Cool 5 minutes in pan. Remove from
pan and cool completely on wire rack.
Yield: 16 servings (16 slices).
Per serving: About 157 cal, 3 g protein, 21 g
carb, 7 g fat, 27 mg chol, 131 mg sodium.
VARIATION
Bread for Gifts
Triple the ingredients to prepare 3 loaves for gift-
giving.
Yield: 48 servings (16 slices per loaf).

74
Lemony Raisin Bread
1 package active dry
yeast
1 cup warm milk
(105°F to 115°F)
4-4¹⁄₂ cups all-purpose
flour
1 cup raisins
1
⁄4 cup sugar
1 teaspoon salt
1 teaspoon grated
lemon peel
1
⁄2 cup vegetable oil
1
⁄2 cup butter or
margarine, melted
4 egg yolks, beaten
1 egg white
1 tablespoon water
Dissolve yeast in warm milk. Set aside.
Place 3 cups flour, raisins, sugar, salt, and lemon
peel in mixing bowl. Attach bowl and
PowerKnead™ Spiral Dough Hook to mixer. Turn
to Speed 2 and mix about 15 seconds.
Continuing on Speed 2, gradually add milk
mixture, oil, butter, and egg yolks to flour
mixture and mix about 1 minute.
Continuing on Speed 2, add remaining flour,
1
⁄2 cup at a time, until dough starts to clean sides
of bowl. Knead on Speed 2 about 2 minutes
longer.
(NOTE: Dough may not form a ball on the hook.
However, as long as there is contact between
dough and hook, kneading will be accomplished.
Do not add more than the maximum amount of
flour specified or loaf will be dry.)
Place dough in a greased bowl, turning to grease
top. Cover. Let rise in warm place, free from
draft, about 1 hour, or until doubled in bulk.
Punch dough down and shape into a ball. Place
in a greased and floured 1
1
⁄2-qt baking dish. Let
rise in warm place, free from draft, about 1 hour,
or until doubled in bulk.
Cut 2 slashes with a sharp knife in a cross
pattern on top of loaf. Beat egg white and water
in small bowl and brush lightly on top of loaf.
Bake at 350°F for 55 to 60 minutes. Remove
from baking dish immediately and cool on wire
rack.
Yield: 12 servings (12 slices per loaf).
Per serving: About 351 cal, 7 g protein, 47 g
carb, 15 g fat, 83 mg chol, 253 mg sodium.
VARIATION
Lemony Raisin Focaccia
Prepare dough as directed above. After shaping
into a ball, place dough on lightly greased
baking sheet and flatten to 2" thick. Let rise and
bake as directed above.

75
Raisin Bran Muffins
1 cup boiling water
1 cup wheat bran
1 cup raisins
1 cup brown sugar
1
⁄2 cup sugar
1
⁄2 cup shortening
2 eggs
2 cups buttermilk
1
1
⁄2 teaspoons vanilla
2
1
⁄2 cups all-purpose
flour
2
1
⁄2 teaspoons baking
soda
1 teaspoon baking
powder
1
⁄2 teaspoon salt
2 cups bran cereal
flakes
Pour boiling water over bran in medium bowl.
Add raisins. Set aside.
Place brown sugar, sugar, and shortening in
mixer bowl. Attach bowl and flat beater to
mixer. Turn to Speed 4 and beat about 1 minute.
Add eggs. Turn to Speed 4 and beat about
30 seconds. Add buttermilk and vanilla. Turn to
STIR Speed and mix about 30 seconds. Stop and
scrape bowl.
Add flour, baking soda, baking powder, and salt.
Continuing on STIR Speed, mix about
30 seconds. Stop and scrape bowl. Continuing
on STIR Speed, mix about 30 seconds longer.
Gradually turn to Speed 4 and beat about
1 minute. Add bran-raisin mixture and bran
cereal flakes. Turn to STIR Speed and mix about
30 seconds, or until ingredients are combined.
Spoon batter into greased or paper-lined muffin
pans. Bake at 400°F for 20 minutes, or until
toothpick inserted in center comes out clean.
Remove from pans immediately. Serve warm.
Yield: 24 servings (1 muffin per serving).
Per servings; About 185 cal, 3 g protein, 33 g
carb, 5 g fat, 18 mg chol, 261 mg sodium.
Tip: Batter can be refrigerated in tightly covered
container up to 1 week.

76
Pepper Cheese Muffins
1 cup buttermilk
1
⁄3 cup butter or
margarine, melted
2 eggs
2 cups all-purpose
flour
4 oz (1 cup) shredded
pepper cheese
1 tablespoon sugar
2 teaspoons baking
powder
1 teaspoon chopped
parsley
1
⁄2 teaspoon baking
soda
1
⁄4 teaspoon salt
1
⁄4 teaspoon coarsely
ground black
pepper
Place buttermilk, butter, and eggs in bowl.
Attach bowl and flat beater to mixer. Turn to
Speed 4 and beat 1 minute. Stop and scrape
bowl. Combine flour, cheese, sugar, baking
powder, parsley, baking soda, salt, and pepper.
Turn to STIR Speed and add flour mixture, mixing
just until moistened, about 30 seconds. Do not
overbeat.
Fill greased regular muffin pans two-thirds full.
Bake at 400°F for 15 to 20 minutes. Serve warm.
Yield: 12 servings (12 muffins).
Tip: Recipe will make 24 miniature muffins to
serve as an appetizer.
Per serving: About 90 cal, 3 g protein, 9 g carb,
5 g fat, 29 mg chol, 145 mg sodium.
VARIATION
Muffins for a Party
Double all ingredients and prepare in 6 qt mixer
bowl. In first paragraph, change Speed 4 to
Speed 2.
Yield: 24 servings (24 muffins).

77
Sour Cream Coffee Cake
1
⁄2 cup firmly packed
brown sugar
1
1
⁄2 teaspoons
cinnamon
1 cup chopped
walnuts or pecans
3 cups all-purpose
flour
1
1
⁄2 cups granulated
sugar
3 teaspoons baking
powder
1 teaspoon baking
soda
1
⁄2 teaspoon salt
1 cup butter or
margarine,
softened
1 cup reduced-fat
sour cream
1 teaspoon vanilla
3 eggs
Combine brown sugar, cinnamon, and walnuts in
small bowl. Set aside.
Combine flour, granulated sugar, baking powder,
baking soda, and salt in mixer bowl. Add butter,
sour cream, and vanilla. Attach bowl and flat
beater to mixer. Turn to Speed 2 and mix about
45 seconds, or until ingredients are combined.
Stop and scrape bowl. Turn to Speed 4 and beat
about 1
1
⁄2 minutes. Stop and scrape bowl.
Turn to STIR Speed and add eggs, one at a time,
mixing about 15 seconds after each addition.
Turn to Speed 2 and mix about 30 seconds.
Spread half of batter in greased and floured
13 x 9 x 2" baking pan or 10" tube pan. Sprinkle
with half of cinnamon-sugar mixture. Spread
remaining batter in pan and top with remaining
cinnamon-sugar mixture. Bake at 350°F for 40 to
50 minutes (13 x 9 x 2" pan) or 50 to 60 minutes
(10" tube pan). Serve warm.
Yield: 16 servings.
Per serving: About 362 cal, 6 g protein, 47 g
carb, 17 g fat, 44 mg chol, 349 mg sodium.
VARIATION
Coffee Cake for a Crowd
Double the ingredients and prepare in 6 qt mixer
bowl.
Yield: 32 servings (16 servings per cake).

78
Caramel Apple Kuchen
1 recipe “Basic Sweet
Dough”
2 cups firmly packed
brown sugar
6 tablespoons all-
purpose flour
2 teaspoons
cinnamon
6 tablespoons butter
or margarine,
softened
6-8 apples (8 cups),
peeled and thinly
sliced
Divide dough in half. Press each half into greased
13 x 9 x 2" baking pan. Gently press edges
1
⁄2" up
sides.
Cover. Let rise in warm place, free from draft,
45 to 60 minutes, or until doubled in bulk.
Meanwhile, place brown sugar, flour, cinnamon,
and butter in mixer bowl. Attach bowl and flat
beater to mixer. Turn to Speed 2 and mix about
1 minute.
Arrange apple slices over dough in each of two
pans. Sprinkle evenly with brown sugar mixture.
Bake at 350°F for 35 to 45 minutes, or until
golden brown and apples are tender. Serve
warm.
Yield: 24 servings (12 pieces per kuchen).
Per serving: About 301 cal, 5 g protein, 54 g
carb, 8 g fat, 27 mg chol, 207 mg sodium.
Crispy Waffles
2 cups all-purpose
flour
3 teaspoons baking
powder
2 tablespoons sugar
1
⁄2 teaspoon salt
2 eggs, separated
1
1
⁄4 cups low-fat milk
1
⁄4 cup butter or
margarine, melted
Combine flour, baking powder, sugar, and salt in
mixer bowl. Add egg yolks, milk, and butter.
Attach bowl and flat beater to mixer. Turn to
Speed 4 and mix about 30 seconds, or until
ingredients are combined. Stop and scrape bowl.
Continuing on Speed 4, mix about 15 seconds,
or until smooth. Pour mixture into another bowl.
Clean mixer bowl.
Place egg whites in mixer bowl. Attach bowl and
wire whip to mixer. Turn to Speed 8 and whip
until whites are stiff but not dry. Gently fold egg
whites into flour mixture.
Spray waffle iron with no-stick cooking spray.
Heat waffle iron. Pour about
1
⁄3 cup batter for
each waffle onto iron. Bake 3 to 5 minutes, or
until golden brown.
Yield: 6 servings (1 waffle per serving).
Per serving: About 287 cal, 8 g protein, 39 g
carb, 10 g fat, 75 mg chol, 441 mg sodium.

79
Light and Fluffy Pancakes
4 eggs, separated
1 cup cottage cheese
1
⁄3 cup all-purpose
flour
1
⁄4 teaspoon salt
Place egg whites in mixer bowl. Attach bowl and
wire whip to mixer. Turn to Speed 8 and beat
2 to 2
1
⁄2 minutes, or until egg whites are stiff but
not dry. Place egg whites in another bowl.
Place yolks in mixer bowl. Turn to Speed 2 and
mix about 1 minute. Continuing on Speed 2, add
cottage cheese, flour, and salt. Mix about
1 minute. Stop and scrape bowl. Remove bowl
from mixer and fold in beaten egg whites with a
rubber spatula.
For each pancake, drop a heaping tablespoonful
of batter on hot, greased griddle. Cook pancakes
1 to 2 minutes, or until puffed and dry around
edges. Turn and cook 1 to 2 minutes longer, or
until golden brown on underside.
Yield: 6 servings (3, 3" pancakes per serving).
Per serving: About 108 cal, 10 g protein, 7 g
carb, 4 g fat, 147 mg chol, 272 mg sodium.
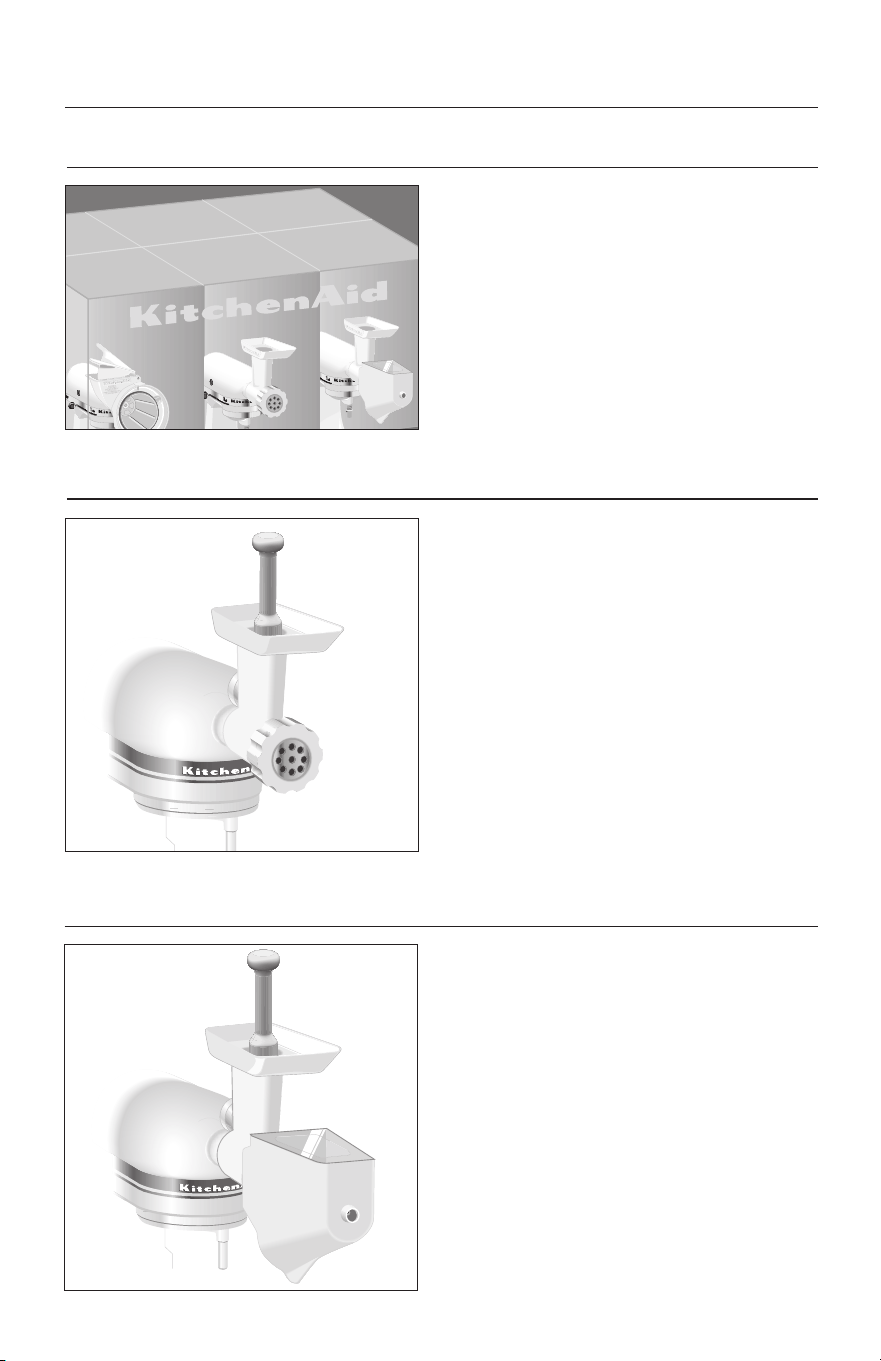
80
Model FPPA
Three popular KitchenAid
®
attachments have been packaged in
one carton. It includes a Rotor
Slicer/Shredder (RVSA), Food
Grinder (FGA), and Fruit/Vegetable
Strainer Parts (FVSP).
Multifunction Attachment Pack
K
i
t
c
h
e
n
A
i
d
S
t
.
J
o
s
e
p
h
,
M
i
c
h
i
g
a
n
U
S
A
O
f
f
S
t
i
r
2
4
6
8
1
0
S
o
l
i
d
S
t
a
t
e
S
p
e
e
d
C
o
n
t
r
o
l
®
K
i
t
c
h
e
n
A
i
d
S
t
.
J
o
s
e
p
h
,
M
i
c
h
i
g
a
n
U
S
A
O
f
f
S
t
i
r
2
4
6
8
1
0
S
o
l
i
d
S
t
a
t
e
S
p
e
e
d
C
o
n
t
r
o
l
®
K
i
t
c
h
e
n
A
i
d
S
t
.
J
o
s
e
p
h
,
M
i
c
h
ig
a
n
U
S
A
O
f
f
S
t
i
r
2
4
6
8
1
0
S
o
l
i
d
S
t
a
t
e
S
p
e
e
d
C
o
n
t
r
o
l
Slicer &
Shredder
Attachment Pack
Food
Grinder
Fruit &
Vegetabl
e
Strainer
Food Grinder
Model FGA
Grinds meat, firm fruits and
vegetables, and dry bread.
C
u
s
to
m
Attachments – For More Information, call 1-800-541-6390
Fruit/Vegetable Strainer
Model FVSFGA
Makes preparing jams, purées,
sauces and baby foods quick and
easy. Comes with Food Grinder.
C
u
s
to
m
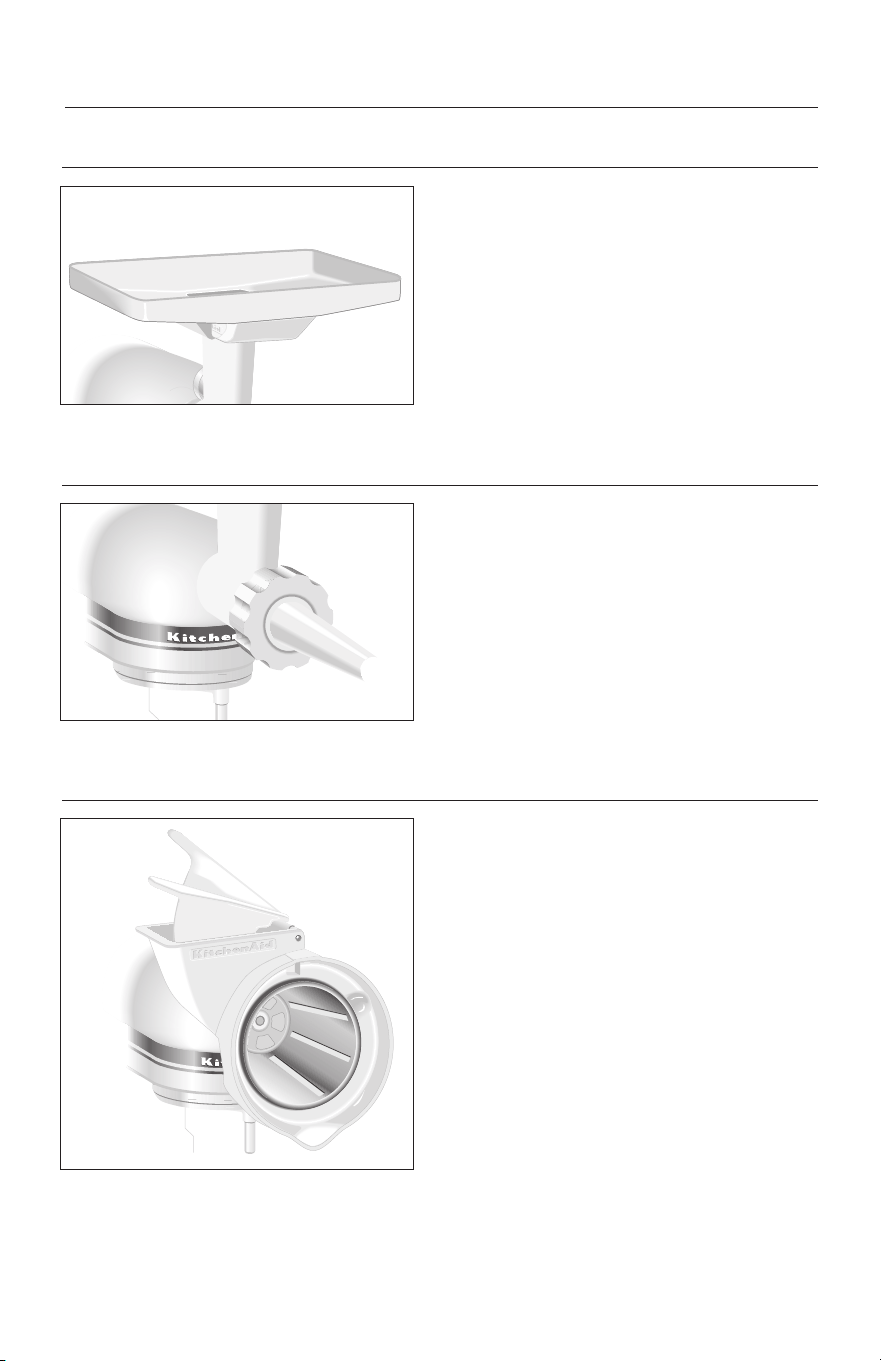
81
Attachments – For More Information, call 1-800-541-6390
Food Tray
®
Model FT
Holds large quantities of food for
quicker and easier juicing, puréeing
and grinding. For use with FGA.
Sausage Stuffer
Custom
Model SSA
3
⁄8" and
5
⁄8" stuffing tubes make
Bratwurst, Kielbasa, Italian or Polish
Sausage and breakfast links. For use
with FGA.
Rotor Slicer/Shredder
C
u
s
to
m
Model RVSA
Includes 4 cones: thin and thick
slicer, fine and coarse shredder.
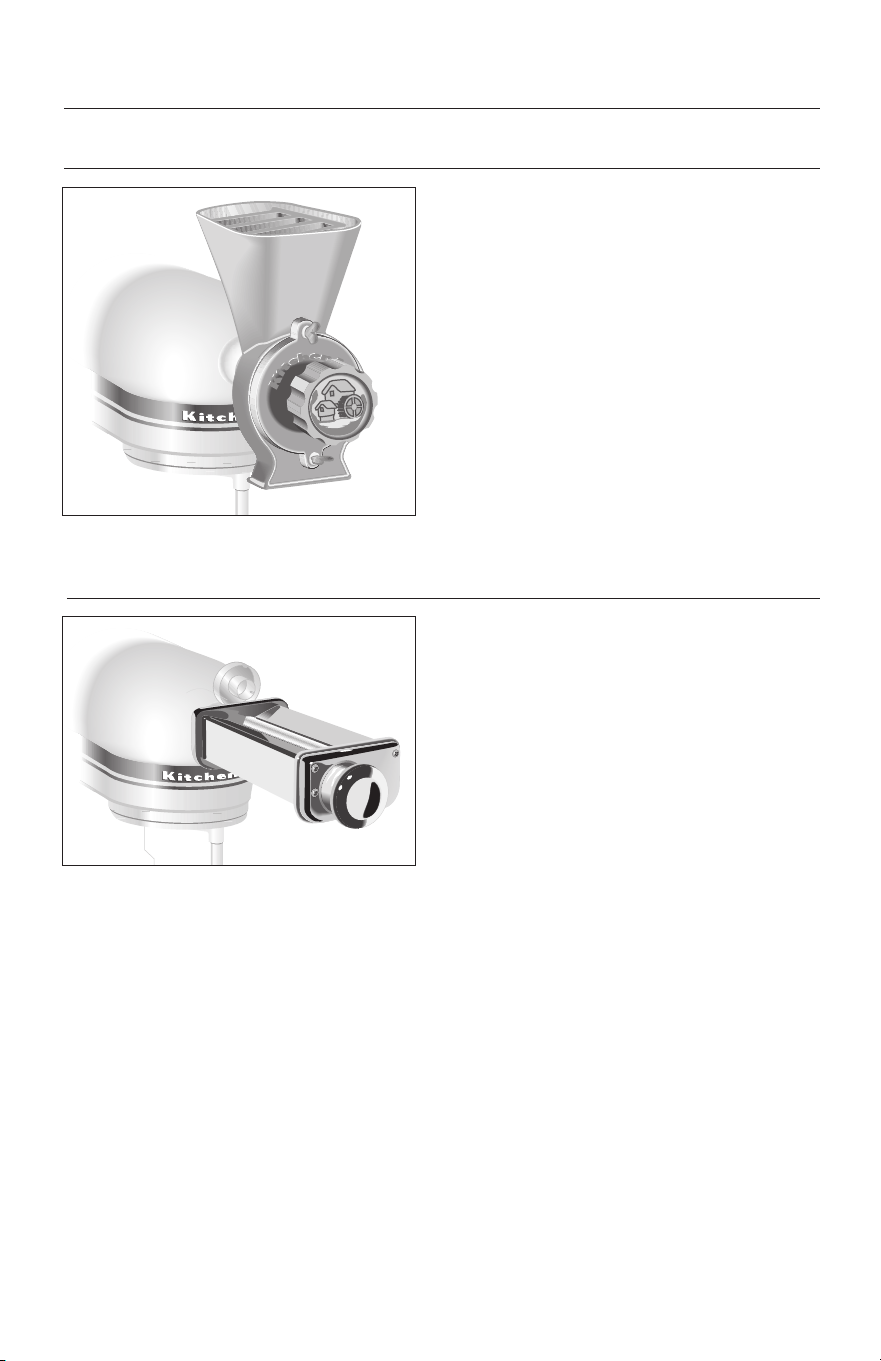
82
Grain Mill
C
u
s
to
m
Model GMA
Grinds low-moisture grains from very
fine to extra coarse textures.
Attachments – For More Information, call 1-800-541-6390
Custom
Pasta Roller Set
Model KPRA
Makes lasagna noodles, fettuccini
and linguine fini. 3 piece set includes
Roller, Fettuccine Cutter and Linguine
Fini Cutter.

83
Citrus Juicer
Custom
Model JE
Juices citrus fruits quickly and
thoroughly, strains out pulp.
Attachments – For More Information, call 1-800-541-6390
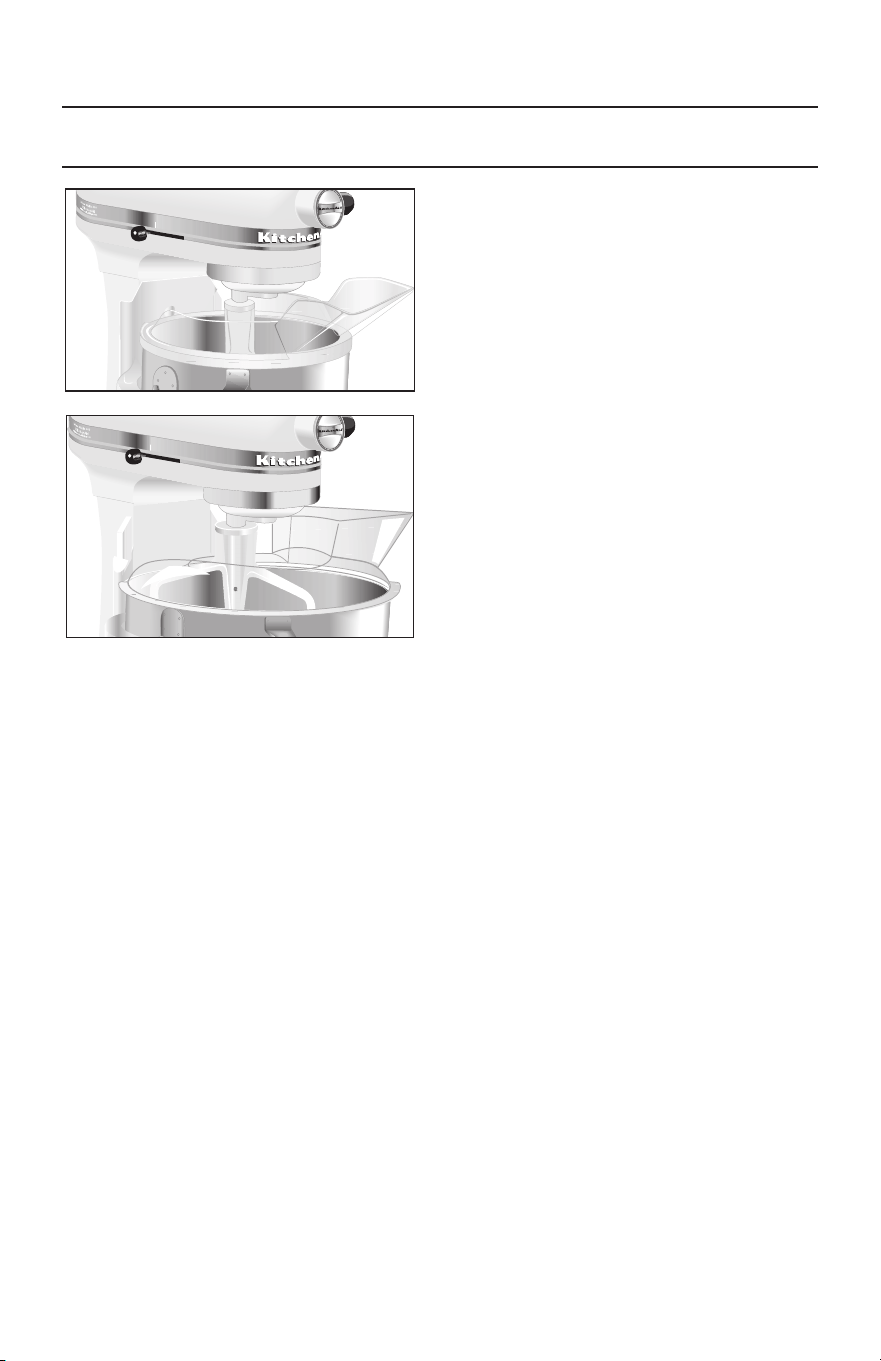
OFF/0
S
T
IR
R
E
S
E
T
Profess
i
o
n
a
l
H
D
OFF/0
S
TIR
R
E
S
E
T
84
Pouring Shields
Model KN1PS
(fits all 5-qt bowl-lift models except
the 5-qt KV models)
Minimizes splash-out when adding
ingredients.
Model KN256PS
(fits all 6-qt and KV 5-qt
bowl-lift models)
Minimizes splash-out when adding
ingredients.
Attachments – For More Information, call 1-800-541-6390


® Registered trademark/™ Trademark/
the shape of the mixer is a registered trademark of KitchenAid, U.S.A.
9708307C
© 2010. All rights reserved.
Printed in U.S.A.
2/10