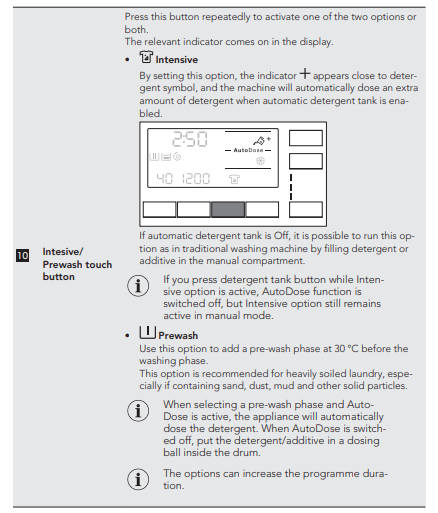
User Manual
INSTALLATION
Unpacking
WARNING! Remove all the packaging and the transit bolts before installing the appliance.
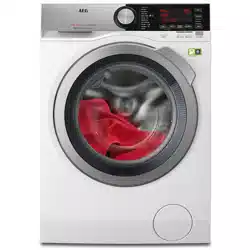
WARNING! Use the gloves.
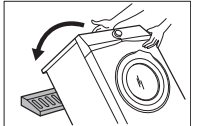
1. Remove the external film. If necessary, use a cutter.
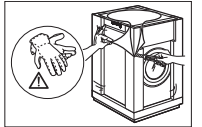
2. Remove the cardboard top and the polystyrene packaging materials.
3. Remove the internal film.

4. Open the door and remove the polystyrene piece from the door seal and all the items from the drum.
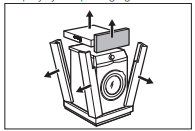
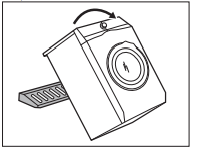
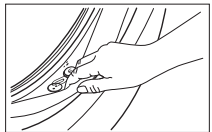
5. Carefully put the appliance down on its rear side.
6. Put the front polystyrene packaging element on the floor under the appliance
7. Remove the polystyrene protection from the bottom.
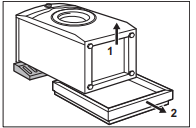
8. Fully clean and dry the bottom of the appliance.
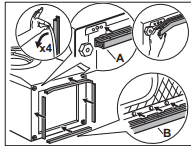
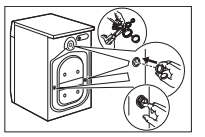
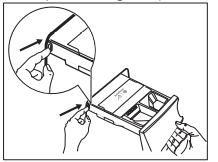
9. Make sure to identify the different sizes and the positions of the sound barriers. Refer to the illustration:
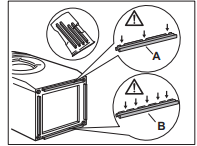
- A (FRONT) = Front of the appliance
- B (BACK) = Rear of the appliance
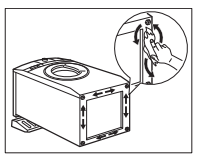
10. Remove the adhesive strip from the silent barriers.
11. Attach the four barriers to bottom of the appliance.
12. Refer to the illustration. Make sure that the barriers are securely attached.
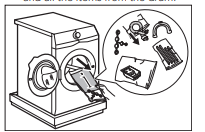
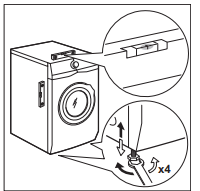
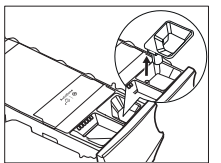
13. Pull up the appliance in vertical position.
14. Remove the power supply cable and the drain hose from the hose holders.
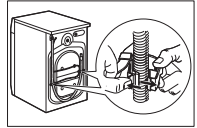
15. Remove the three bolts by using the spanner supplied with the appliance.
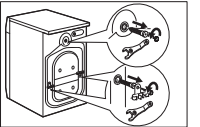
16. Pull out the plastic spacers.
17. Put the plastic caps, that you find in the user manual bag, in the holes.
Installation on suspended flooring
Suspended wooden floors are particularly susceptible to vibration.
To limit vibration we recommend placing a waterproof wooden panel, at least 15 mm thick, under the appliance. It should be screwed to at least 2 floor beams and should extend beyond the front feet. If possible, install the appliance where the floor is more stable.
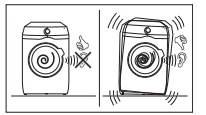
Positioning and levelling
1. Install the appliance on a flat hard floor.
Make sure that the appliance does not touch the wall or other units.
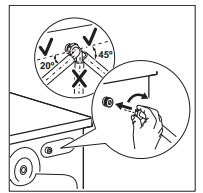
2. Loosen or tighten the feet to adjust the level.
The appliance must be level and stable.
A correct adjustment of the appliance level prevents the vibration, noise and the movement of the appliance when in operation.
When the machine is installed on a plinth or if a washer dryer is stacked on the washing machine, use the accessories described in chapter 'Accessories'. Read carefully the instructions supplied with the appliance and with the accessory.
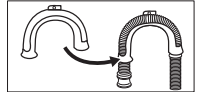
The inlet hose
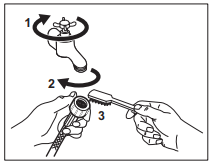
1. Connect the water inlet hose to the back of the appliance.
2. Position it toward left or right depending on the position of the water tap
3. If necessary, loose the ring nut to set it in the correct position.
4. Connect the water inlet hose to the cold water tap with 3/4" thread.

Water drainage
The drain hose should be positioned at a height of not less than 60 cm and not more than 100 cm from the floor
It is possible to connect the drain hose in different ways:
1. Make a U shape with the drain hose and put it around the plastic hose guide.
2. On the edge of a sink - Fasten the guide to the water tap or to the wall.
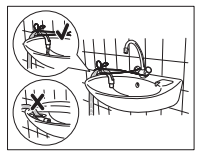
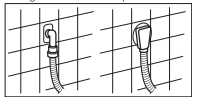
3. To a stand pipe with vent-hole - Insert the drain hose directly into a drain pipe. Refer to the illustration.
4. If the end of the drain hose looks like this (see the picture), you can push it directly into the stand pipe.
5. Without the plastic hose guide, to a sink spigot - Put the drain hose in the spigot and tighten it with a clamp. Refer to the illustration.
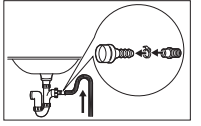
6. Position the hose directly to a built�in drain pipe in the room wall and tighten it with a clamp
PRODUCT DESCRIPTION
Special features
Your new washing machine meets all modern requirements for an effective treatment of laundry with low water, energy and detergent consumption and proper care of fabric.
- The AutoDose technology automatically dispenses the right amount of detergent according to the load; the drawer has two integrated tanks (detergent + softener) and two additional compartments for detergent and additives manual load.
- It gives the highest use flexibility.
- The Wi-Fi connection and Remote
- Start enable you to start a cycle, to interact with your washing machine and to check the washing cycle status in remote control.
- The Oko-Mix technology has been designed to protect the fabric fibres thanks to different pre-mixing phases that dissolves first the detergent and then fabric softener in the water before they are distributed in the laundry. So every fibre is reached and cared for.
- The ProSense technology detects the laundry load size defining the programme duration in 30 seconds. The washing programme is tailored to the laundry load and the type of fabric without consuming more time, energy and water than necessary.
- The steam has a quick and easy way to refresh the clothes. The gentle steam programmes remove odours and reduce creases in dry fabrics so they need little ironing. The Plus Steam option, finishes every cycle with gentle steam that relaxes the fibres and reduces fabric creasing. Ironing will be easier!
- The Intensive option pre-treats stubborn stains optimizing the effectiveness of washing performance.
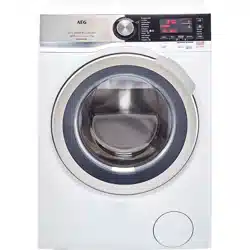
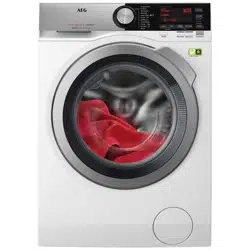
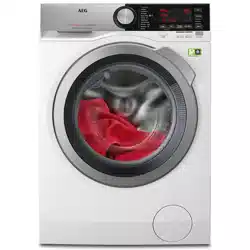
Appliance overview

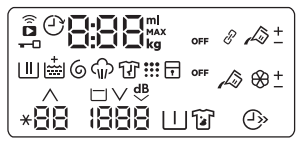
CONTROL PANEL
Control panel description
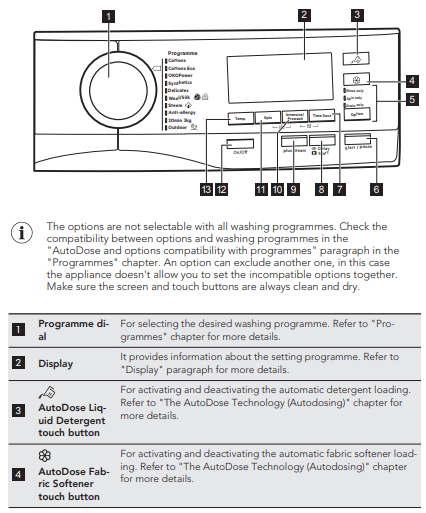

Display
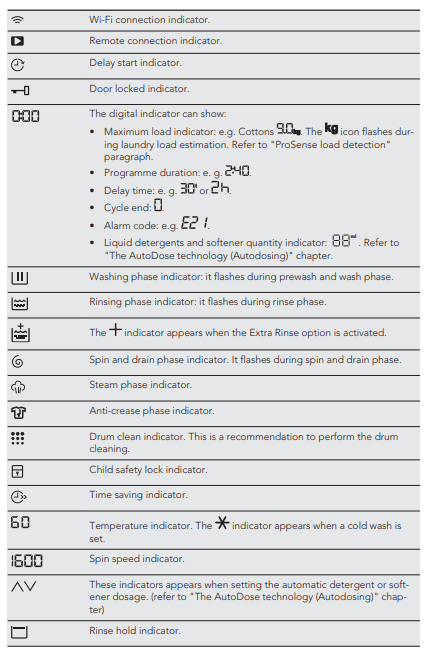
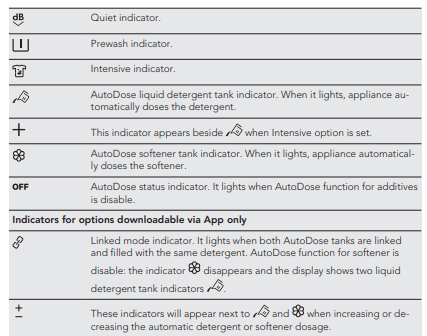
THE AUTODOSE TECHNOLOGY (AUTODOSING)
Introduction
Right detergent and fabric softener dosage takes better care of the laundry and ensuring good wash performances
Too much detergent damages your clothes and too little doesn’t ensure good wash performances. This appliance is equipped with an auto dosing system able to automatically provide the right detergent and fabric softener dosage to preserve the fabric integrity and colour brightness.
The appliance is pre-set by the factory to suit most users habits. Once started the programme, the appliance will automatically release the right amount of detergent and softener according to the real fabric load, if the indicators  and/or
  are on in the display.
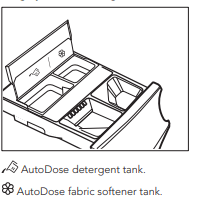
Detergent dispenser with AutoDose tanks and manual compartments
If both AutoDose tanks are enabled in the set programme, liquid detergent and fabric softener are automatically loaded.
If one of the AutoDose tank or both are disabled (OFF ) in the set programme, proceed by manually filling the product in the proper compartment.
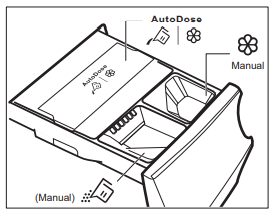
 AutoDose tanks for liquid detergent and fabric softener .
 Manual compartment for washing phase: powder or liquid detergent.
 Manual Manual compartment for liquid additives (fabric softener, fabric conditioner, starch).
- MAX Maximum level for detergent/ additives quantity
AutoDose basic setting
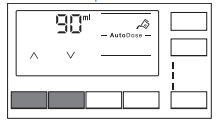
The factory pre-set doses for a large load are 90 ml for detergent tank and 25 ml for fabric softener tank: the optimal configuration to meet majority of use condition. Based on this setting, the appliance will calculate the precise dosage for each wash.
However, under extreme conditions (very soft or very hard water) and particular type of detergent (such as super compact), we recommend to adjust the pre-set dosage by following the indication given on detergent and fabric softener container: e.g when using super compact detergent you may need to reduce the pre-set dosage considerably. If the washing results are not satisfying or there is too much foam during washing, you may need to change the factory setting. Read in the paragraph 'AutoDose configuration mode' how to change the basic setting, but before:
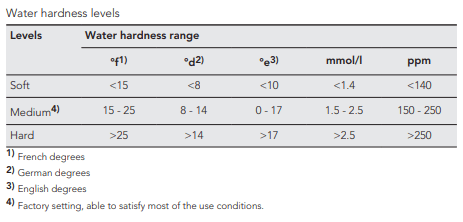
1. Identify the water hardness level.
Check the water hardness level in your area. The levels are generally indicated as: soft, medium and hard. If necessary, please contact your local water authority to check the water hardness in your area.
2. Identify the customized detergent dosage.
Check the label in the detergent/ fabric softener container suggesting the quantity to use. This suggestion is measured combining three different factors:
- Water hardness level (see the following table);
- Normal soil level;
- Rated capacity of the appliance (e.g. maximum load capacity 9 kg). If the rated capacity on the product container refers to lower capacity appliances, the customized dosage should be increased.
AutoDose configuration mode
Enter the AutoDose configuration mode before proceeding with any programme setting. The configuration mode may cancel temporary settings .
1. Press the On/Off button for a few seconds to activate the appliance.
2. Wait about 10 seconds for appliance internal check.
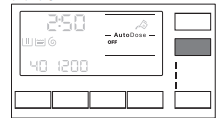
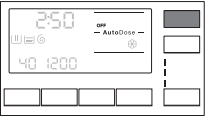
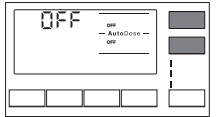
3. To enter in configuration mode, hold pressed the Temperature and the Spin buttons simultaneously for a few seconds until the display shows the  on the left in the display and blinking detergent tank and softener tank indicators on the right in the display.
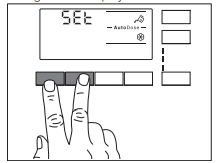
4. Touch related tank buttons to toggle function off and on. The display shows OFF when a tank is disabled or shows tank indicator when it is enabled.
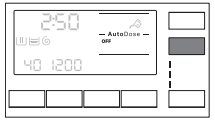
5. To set basic dosage touch related tank buttons until default dosage laundry product and two arrows on bottom of display appear. Touch the Temperature button repeatedly to adjust the dosage upwards and the Spin button to adjusts it downwards. Minimum step is 1 ml.
6. After about 10 seconds the display returns to the programme information screen or hold pressed the Temperature and the Spin buttons again to exit immediately.
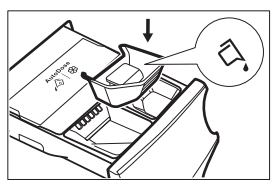
Filling the detergent and additives on AutoDose system
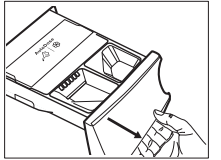
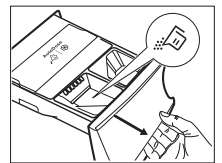
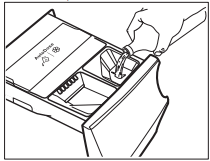
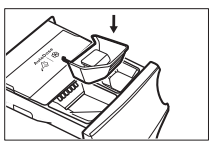
1. Open the detergent dispenser.
2. Lift up the AutoDose cover lid.
3. Gently pour only liquid detergent in the AutoDose detergent tank  . Fill up to the maximum indicated level MAX
4. Gently pour only liquid softener in the AutoDose fabric softener tank . Fill up to the maximum indicated level MAX.
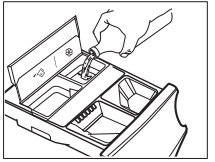
5. Lift down the AutoDose cover lid.

6. Gently close the detergent dispenser, till click engagement.
AutoDose low level indication
Do not refill the AutoDose tanks unless appliances indicates that one or both tanks are empty.
When the activated tank reaches a low level of detergent, related indicator blinks slowly and continuously on the display.
It will stop blinking when the compartment is refilled. If tank is not refilled, once a programme has started, the indicator will stop blinking and stay steadily lit. Once the programme is finished, it will start blinking again.
Unless AutoDose is turned OFF, if a compartment has reached low level, the set dosage for that compartment will be shown by the display for a few seconds each time the drawer is opened, to remind refill is needed.
If in both tanks detergent level is low, both indicators blink, but only the set dosage for detergent will be displayed.
Switching from AutoDose to manual dosing
It is possible to disable AutoDose function for one or both tanks by pressing related button symbol.
Example:
- To switch Fabric Softener tank off, press the button until the display shows OFF.
- If you need to use different detergent than ones present in AutoDose tanks, you could switch Detergent tank off by pressing button until the display shows OFF.
Deactivating the AutoDose
If you prefer to use the compartments for manual filling as default choice, you can deactivated the AutoDose tanks completely. Once you have entered the AutoDose configuration mode by pressing Temperature and the Spin buttons:
1. Tap on the button or button until display shows OFF: the AutoDose is excluded completely for related tank or both.
2. After about 10 seconds the display returns to the programme information screen.
Manual filling the detergent and additives
You may need to use a different detergent or fabric softener than the ones used in the AutoDose tanks. First, make sure that the AutoDose tanks are disabled and then pour the detergent and/or other treatments in the manual compartments.
1. Open the detergent dispenser.
2. Put the powder detergent in the compartment  . When using liquid detergent, refer to "Manual filling the liquid detergent".
3. If desired, pour the fabric softener in the compartment
4. Gently close the detergent dispenser, till click engagement.

Manual filling the liquid detergent
1. Insert the container for liquid detergent.
2. Pour the liquid detergent in the compartment .
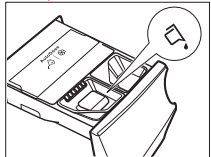
3. Gently close the detergent dispenser, till click engagement.
Drawer open indication
When a programme is running, the detergent drawer must always be closed. A sensor in the drawer detects if the drawer is open (or not properly closed) while the programme is running. In such case, the appliance will immediately be paused.
If you press the Start/Pause button, an error sound is generated and everything in the display will turn off except the AutoDose indicators remain lit for a few seconds. Then the display returns to the previous paused state.
This will happen even if the user turned AutoDose off. To restart the programme, ensure the drawer is properly closed and press Start/Pause button.
PROGRAMMES
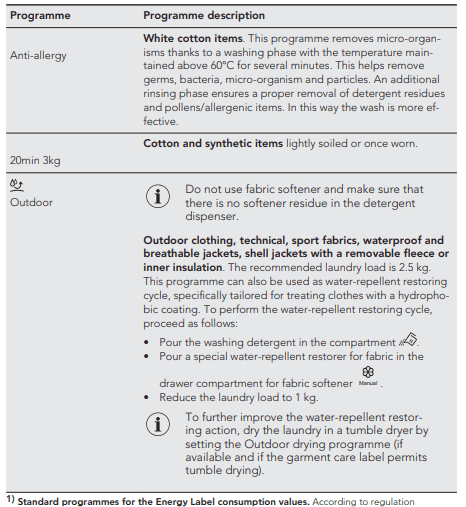
Programme Chart
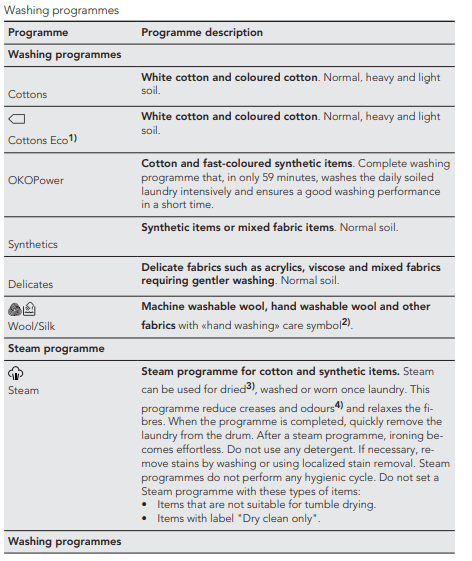
1061/2010, the programmes Cottons Eco  at 60 °C and the programme Cottons Eco at 40 °C are respectively the «Standard 60°C cotton programme» and the «Standard 40°C cotton programme». They are the most efficient programmes in terms of combined energy and water consumption for washing normally soiled cotton laundry. Powder detergent and fabric softener have to be filled in the proper manual compartment. Make sure that the AutoDose tanks are disabled.
The water temperature of the washing phase may differ from the temperature declared for the selected programme.
2) During this cycle the drum rotates slowly to ensure a gentle wash. It can seem that the drum doesn't rotate or doesn't rotate properly, but this is normal for this programme.
3) If you set a Steam programme with dried laundry, at the end of the cycle the laundry can be humid. Line dry the items for about 10 minutes.
4) Steam programme doesn't remove particularly intense odour.
Programme temperature, maximum spin speed and maximum load 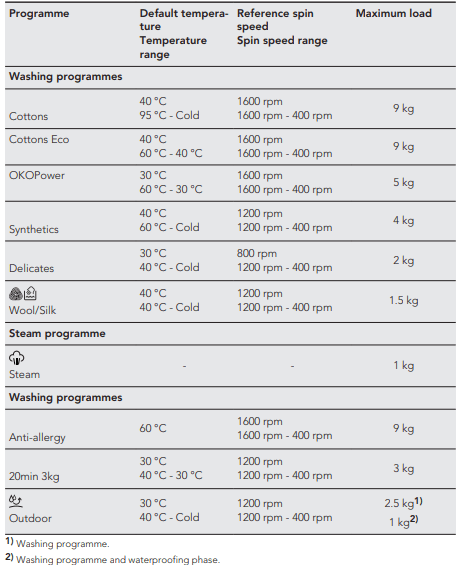
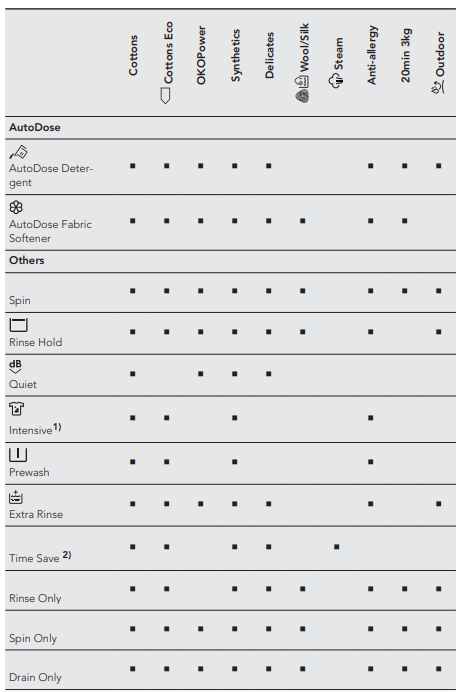
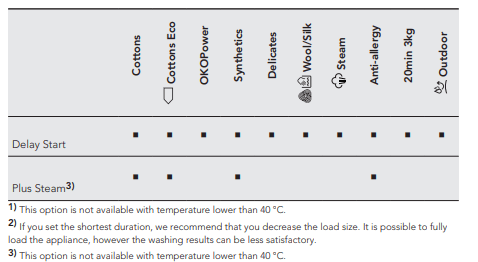
AutoDose and options compatibility with programmes
 WI-FI - CONNECTIVITY SETUP
This chapter describes how to connect the smart appliance to the Wi-Fi network and to link it to mobile devices. By this functionality you can receive notifications, control and monitor your washing machine from your mobile devices.
To connect the appliance to enjoy the full range of features and services you need:
- Wireless network at home with internet connection enabled.
- Mobile device connected to wireless network.
Configuring the washing machine wireless connection
1. Press and hold the On/Off button for a few seconds to activate the appliance. Wait about 10 seconds before proceeding with wireless configuration.
2. Press and hold the  and the
  buttons for a few seconds simultaneously until a 'click' sounds.
Release the buttons. appears on the display for 5 seconds and the indicator
 starts blinking.
The wireless module begins starting up.
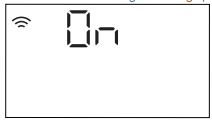
3. After about 45 seconds,  (Access Point) appears on the display.

The access point will be open for about 3 minutes.
4. Configure the "My AEG" app on your smart device and follow the instructions to connect the appliance to your Wi-Fi network.
5. If the connectivity is configured, when the programme information screen returns, the indicator is on the display.

 Remote Start
The Remote Start enables you to start a cycle in remote control.
When the App is installed and the wireless connection is complete, you can activate the Remote Start:
1. Touch the Remote button and the indicator APP blinks on the display for a few seconds.

2. Touch the Start/Pause button to activate the Remote Start before the indicator APP stops blinking.
The indicators and  appear on the programme summary screen and the door is locked. Now it is possible to start the programme remotely.
To remove the Remote Start, tap on the Remote button and confirm by pressing the Start/Pause button.
DAILY USE
Activating the appliance
1. Connect the mains plug to the mains socket.
2. Open the water tap.
3. Press the On/Off button for a few seconds to activate the appliance.
A short tune sounds (if activated). The programme dial is automatically set on Cottons programme.
The display shows the programme duration, the maximum load (for a few seconds only), the default temperature, the default spin speed and the indicators of the phases making up the programme.
Loading the laundry
1. Open the appliance door.
2. Shake the items before you put them in the appliance.
3. Put the laundry in the drum, one item at a time.
Make sure not to put too much laundry in the drum.
4. Close the door firmly.

Setting a programme
1. Turn the programme dial to select the desired washing programme. The related programme indicator comes on.
The indicator of the Start/Pause button flashes.
The display shows an indicative programme duration, the maximum declared load for the set programme (only for a few seconds), the default temperature, the default spin speed and the washing phase indicators (when available).
2. To change the temperature and/or the spin speed, touch the related buttons.
3. If desired, set one or more options by touching the related buttons. The related indicators come on in the display and the given information changes accordingly.
Starting a programme
Touch the Start/Pause button to start the programme.
The related indicator stops flashing and stays on.
In the display, the indicator of the operating phase starts flashing. The programme starts, the door is locked. The display shows the indicator .
Starting a programme with the delay start
1. Touch this repeatedly until the display shows the desired delay time. The indicator  comes on.
2. Touch the Start/Pause button.
The appliance starts the countdown of the delay start. When the countdown is completed, the programme starts.
Cancelling the delay start after the countdown has started
To cancel the delay start:
1. Touch the Start/Pause button to pause the appliance. The related indicator flashes.
2. Touch the Delay Start button repeatedly until the display shows  .
.
3. Touch the Start/Pause button again to start the programme immediately.
Changing the delay start after the countdown has started
To change the delay start:
1. Touch the Start/Pause button to pause the appliance. The related indicator flashes.
2. Touch the Delay Start button repeatedly until the display shows the desired delay time.
3. Touch the Start/Pause button again to start the new countdown.
The ProSense load detection
After touching the Start/Pause button, the maximum declared load indicator goes off, the indicator  flashes, the ProSense starts the laundry load detection:
1. The appliance detects the load in the first 30 seconds: the indicator  comes on and the indicator
 flashes, the drum rotates shortly.
2. The appliance adjusts automatically the programme duration to the load to achieve perfect washing results in the minimum possible time. The programme duration could increase or decrease.
At the end of the load detection, if laundry load is below the maximum declared weight for selected programme, the display shows the new programme duration. After further 30 seconds, the water filling starts.
At the end of the load detection, in case of drum overload, the indicator is steady on and the indicator MAX is flashing in the display. In this case, for 30 seconds, it is possible to pause the appliance and remove the exceeding garments.
Once removed the exceeding garments, touch the Start/Pause button to start the programme again. The ProSense phase can be repeated up to three times (see point 1).
Programme phase indicators
When the programme starts the indicator of the running phase flashes and the other phase indicators are steady on.
E.g. the washing or pre wash phase is running:
When the phase ends the relevant indicator stops flashing and is steady on. The next phase indicator starts flashing.
E.g. the rinse phase is running:
If you select the Plus Steam the steam phase indicators come on. The steam phase is running:
The anti-crease phase is running:
CARE AND CLEANING
External cleaning
Clean the appliance with mild soap and warm water only. Fully dry all the surfaces.
Descaling
If the water hardness in your area is high or moderate, we recommend that you use a water descaling product for washing machines.
Regularly examine the drum to check for limescale.
The regular detergents already contain water softening agents, but we recommend to run a cycle with empty drum and a descaling product occasionally.
Maintenance wash
The repeated and prolonged use of low temperature and short programmes can cause detergent deposits, fluff residues, bacterial growth and biofilm formation inside the drum and the tub. This could generate bad odours and mildew.
To eliminate these deposits and hygienize the inner part of the appliance, run a maintenance wash at least once a month:
1. Remove all laundry from the drum.
2. Deactivate AutoDose function for detergent and softener.
3. Add manually small quantity of powder detergent or a specific product and run a cotton programme with the highest temperature.
Door seal
Regularly examine the seal and remove all objects from the inner part.
Cleaning the drum
Regularly examine the drum to prevent unwanted deposits.
Rust deposits in the drum may occur due to rusting foreign body in the washing or tap water containing iron
Clean the drum with special products for stainless steel.
For a thorough clean:
1. Remove all laundry from the drum.
2. Deactivate AutoDose function for detergent and softener.
3. Run a Cottons programme with the highest temperature.
4. Add a manually small quantity of powder detergent or a specific product into the empty drum, in order to rinse out any left residues.
Occasionally, at the end of a cycle the display may show the icon : this is a recommendation to perform the “drum cleaning”. Once the drum cleaning has been performed, the icon disappears.
Cleaning the detergent dispenser and the AutoDose tanks
To prevent possible deposits of dried detergent, clotted fabric softener, formation of mould in the detergent dispenser and/or clotted liquid additives in the AutoDose tanks, once in a while carry out the following cleaning procedure:
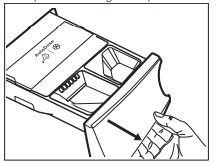
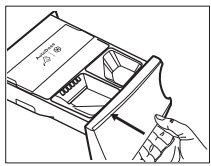
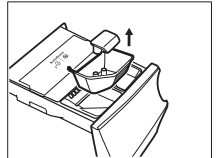
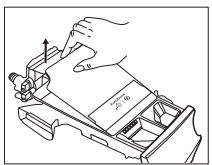
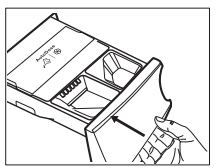
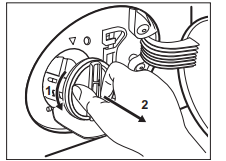
1. Open the detergent dispenser. Press the catch as indicated in the picture and pull the detergent dispenser out.
2. Remove the insert for the softener and, if inserted, the container for liquid detergent.
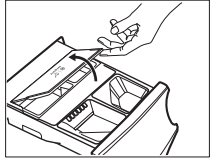
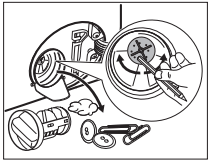
3. Open the drain plugs of each tank and empty them into a sink.
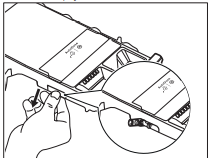
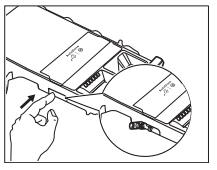
4. Press the catch on the back as indicated in the picture and lift up the top cover to remove it.
5. Wash the drawer and all inserts under running water.

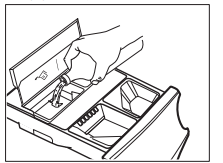
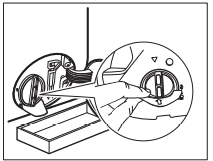
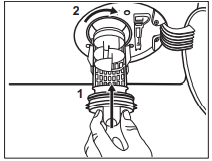
6. Turn the dispenser up side down and open the bottom cover as indicated in the picture.
7. Make sure that all detergent residue is removed from the conveyor. Use only soft damp clothes.
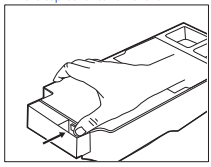
8. Put bottom cover back to its position by aligning its holes on drawer hooks as indicated in the picture. Close it till "click" sound.
WARNING! Do not clean with any sharp and metal brushes ora any tools, pumps or sensors allocated on the back of the detergent drawer. If necessary, use only soft damp clothes.

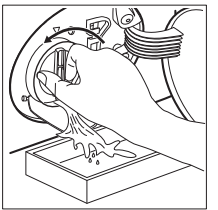
WARNING! If some residues remain on the back area of tanks, soak detergent drawer in a warm water. Do not use tools to clean it. Before soaking, remove the handle by pressing red button and slide the handle as indicated in the picture
9. Make sure that all detergent residue is removed from the upper and lower part of the recess. Use a small brush to clean the recess.
10. Reassembly the drawer as follows:
a. Place the handle if was disassembled.
b. Place the bottom cover and press till "click" sound.
c. Place the top cover on the tanks compartment and press till "click" sound.
d. Replace components on manual compartment.
11. Insert the detergent dispenser into the guide rails and gently close it till "click" sound. Run the rinsing programme without any clothes in the drum.
To restore the functionality, refill tanks with detergent and softener. If you place a wrong additives in the tanks, you can easily recover it by using the drain plug on both side of the drawer. Before opening drain plugs ensure to place below the drawer a basin or suitable containers to collect the liquid. Ensure to properly close the plugs before refilling.
Cleaning the drain pump
Clean the drain pump if:
- The appliance does not drain the water.
- The drum does not turn.
- The appliance makes an unusual noise because of the blockage of the drain pump.
- The display shows the alarm code E21
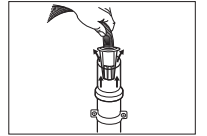
Proceed as follows to clean the pump:
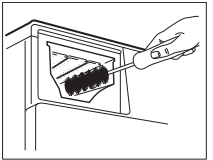
1. Open the pump cover.

2. Place a suitable bowl below the drain pump access to collect the water that flows out.
3. Open the chute downwards. Always keep a rag nearby to dry up any water spillages when removing the filter.
4. Turn the filter 180 degrees in anti�clockwise direction to open it, without removing. Let the water flow out.
5. When the bowl is full of water, turn the filter back and empty the container.
6. Repeat the steps 4 and 5 until the water stops to flow out.
7. Turn the filter anti-clockwise to remove it.
8. If it is necessary, remove fluff and objects from the filter recess.
9. Make sure that the impeller of the pump can rotate. If it does not rotate, contact the Authorised Service Centre.
10. Clean the filter under the water tap.

11. Put the filter back into the special guides by turning it clockwise. Make sure that you tighten the filter correctly to prevent leakages
12. Close the pump cover.
When you drain the water with the emergency drain procedure, you must activate the drain system again:
a. Put 2 litres of water in the main wash compartment of the detergent dispenser.
b. Start the programme to drain the water.
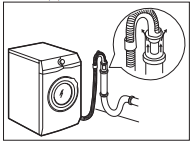
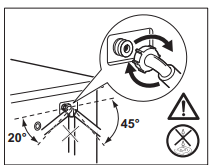
Cleaning the inlet hose and the valve filter
It is recommended to clean both the filters of the inlet hose and valve occasionally to remove any deposit, collected over the time:
1. Remove the inlet hose from the tap and clean the filter.
2. Remove the inlet hose from the appliance by loosening the ring nut.
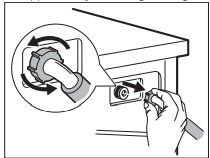
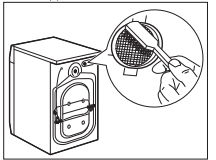
3. Clean the valve filter on the back of the appliance with a toothbrush.
4. When you reconnect the hose to the back of the appliance, turn it left or right (not in vertical position) depending on the position of your water tap.
TROUBLESHOOTING
Introduction
The appliance does not start or it stops during operation.
First try to find a solution to the problem (refer to the table). If the problem persists, contact the Authorised Service Centre.
In case of major problems, the acoustic signals operate, the display shows an alarm code and the Start/Pause button may flash continuously:
- E11 - The appliance does not fill with water properly. Start the appliance again by pressing Start/Pause button. After 5 seconds the door will be unlocked.
- E21- The appliance does not drain the water.
- E41 - The appliance door is open or not closed correctly. Please check the door!
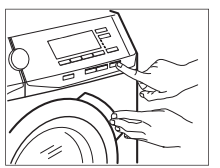
If the appliance is overloaded, remove some items from the drum and/or keep pressed the door while touching the Start/Pause button until the indicator  stops flashing (see the picture below).
- EH1 - Frequency of power supply out of range.
- EH2 - Supply voltage too high.
- EH3 - Supply voltage too low.
- E91 - Internal fail. Switch the appliance off and switch it on again. The programme was not finished properly or the appliance stopped too early. If the alarm code appears again, contact the Authorized Service Center and communicate it.
- EF3 - The anti-flood device is on. Disconnect the appliance and close the water tap. Contact the Authorised Service Centre.
Possible failures
The programme does not start.
- Make sure that the mains plug is connected to the mains socket.
- Make sure that the appliance door is closed.
- Make sure that there is no damaged fuse in the fuse box.
- Make sure that the Start/Pause has been touched.
- Make sure that the detergent dispenser is firmly closed.
- If the delay start is set, cancel the setting or wait for the end of countdown.
- Deactivate the Child Lock function if it is on.
The appliance does not fill with water properly.
- Make sure that the water tap is open.
- Make sure that the pressure of the water supply is not too low. For this information, contact your local water authority.
- Make sure that the water tap is not clogged.
- Make sure that the inlet hose has no kinks, damages or bends.
- Make sure that the connection of the water inlet hose is correct.
- Make sure that the filter of the inlet hose and the filter of the valve are not clogged. Refer to "Care and cleaning".
The appliance fills with water and drains immediately
- Make sure that the drain hose is in the correct position. The hose may be positioned too low. Refer to "Installation instruction".
The appliance does not drain the water.
- Make sure that the sink spigot is not clogged.
- Make sure that the drain hose has no kinks or bends.
- Make sure that the drain filter is not clogged. Clean the filter, if necessary. Refer to "Care and cleaning".
- Make sure that the connection of the drain hose is correct.
- Set the drain programme if you set a programme without drain phase.
- Set the drain programme if you set an option which ends with water in the tub.
The spin phase does not operate or the washing cycle lasts longer than usual.
- Set the spin programme.
- Make sure that the drain filter is not clogged. Clean the filter, if necessary. Refer to "Care and cleaning".
- Adjust manually the items in the tub and start the spin phase again. This problem may be caused by balance problems.
There is water on the floor.
- Make sure that the couplings of the water hoses are tight and there is not water leakages.
- Make sure that the water inlet hose and the drain hose have no damages.
- Make sure you use the correct detergent and the correct quantity of it.
You cannot open the appliance door.
- Make sure that a washing programme that ends with water in tub, has been selected.
- Make sure that the washing programme is finished.
- Set the drain or the spin programme if there is water in the drum.
- Make sure that the appliance receives electrical power.
- This problem may be caused by a failure of the appliance. Contact the Authorised Service Centre. If you need to open the door, please read carefully "Emergency door opening".
- Make sure that the Remote Start is not activated. Deactivate it.
The display does not show the wireless indicator .
.
- Check the wireless signal.
- Make sure that the wireless connection is on.
- Check your home network and router.
- Restart the router.
- Contact your wireless service provider if there are further problems with the wireless network
The App cannot connect to the appliance.
- Check the wireless signal.
- Check if your smart device is connected to the wireless network.
- Check your home network and router.
- Restart the router.
- Contact your wireless service provider if there are problems with the wireless network.
- The appliance, the smart device, or both, need to be configured again because a new router has been installed or the router configuration has been changed.
The App cannot frequently connect to the appliance.
- Make sure that the wireless signal reaches the appliance. Try to move the home router as near the appliance as possible or consider purchasing a wireless range extender.
- Make sure the wireless signal is not disrupted by microwave. Turn the microwave off. Avoid using the microwave and the remote control at the same time.
The appliance makes an unusual noise and vibrates.
- Make sure the levelling of the appliance is correct. Refer to Installation instruction".
- Make sure that the packaging and/or the transit bolts are removed. Refer to "Installation instruction".
- Add more laundry in the drum. The load may be too small.
The programme duration increases or decreases during programme execution.
- The ProSense function is able to adjust the programme duration according to the type and the laundry load size. Refer to "The ProSense load detection" in "Daily Use" chapter.
The washing results are not satisfactory.
- Increase the detergent quantity or use a different detergent.
- Use special products to remove the stubborn stains before you wash the laundry.
- Make sure that you set the correct temperature.
- Decrease the laundry load.
- When using AutoDose tanks, make sure that they are not empty.
- When using AutoDose tanks, verify the pre-set detergent/ fabric softener dose. Refer to "AutoDose basic setting" paragraph in "The AutoDose Technology (Autodosing)" chapter.
- Make sure that you have cleaned the AutoDose tanks before using different brand and type of detergent, fabric softener or other additives.
Too much foam in the drum during the washing cycle.
- Reduce the quantity of detergent.
- When using AutoDose tanks, verify the pre-set detergent/ fabric softener dosage. Refer to "AutoDose basic setting" paragraph in "The AutoDose Technology (Autodosing)" chapter.
The detergent/fabric softener level does not decrease in the AutoDose tanks after washing.
- This is normal: tanks are quite large and detergent consumption may be not so evident.
After the check, activate the appliance. The programme continues from the point of interruption.
If the problem occurs again, contact the Authorised Service Centre.
If the display shows other alarm codes. Deactivate and activate the appliance. If the problem continues, contact the Authorised Service Centre.
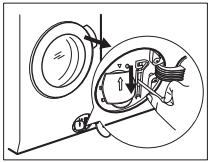
Emergency door opening
In case of power failure or functioning failure the appliance door remains locked. The washing programme continues when the power is restored. If the door remains locked in case of failure, it is possible to open it using the emergency unlock function.
Before opening the door:
To open the door, proceed as follows:
- Press the On/Off button to switch the appliance off.
- Disconnect the mains plug from the mains socket.
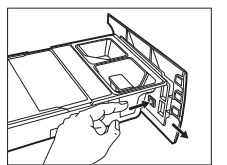
- Open the filter flap.
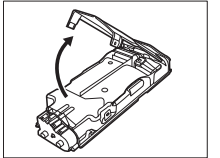
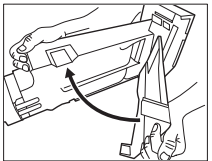
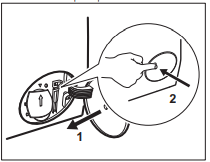
- Pull the emergency unlock trigger downward once. Pull it downward once again, keep it tensed and, in the meanwhile, open the appliance door.
- Take out the laundry and then close the appliance door.
- Close the filter flap.