
On-line owner's handbook
Referring to the owner's handbook on-line also gives you
access to the latest information available, easily identifi ed by
the bookmarks, associated with this pictogram:
If the heading "MyCitroën" is not available on the public website for
your country, you can fi nd your handbook at the following address:
http://service.citroen.com
Select:
You can fi nd your handbook on the CITROËN website, under the
heading "MyCitroën".
This personal space provides you with information on your products
and services, a direct and special contact with CITROËN and
becomes a space tailored for you.
the link in "Private customer access",
the language,
the model,
the edition date appropriate for the date of registration of your vehicle.
You will fi nd your handbook, presented in the same way as the paper
version.

We draw
y
our attention to the followin
g
...
Ke
y
sa
f
et
y
warnin
g
add
iti
o
n
a
l inf
o
rm
a
ti
o
n
contributes to the protection of the environment
refer to the pa
g
e indicated
Your vehicle is fitted with onl
y
some of the
e
quipment described in this document,
dependin
g
on the trim level, version and the
s
peci
f
ications
f
or the countr
y
in which it is sold.
The fittin
g
of electrical equipment or
accesso
ri
es
whi
c
h
a
r
e
n
o
t r
eco
mm
e
n
ded
by
C
ITR
OËN
ma
y
result in a
f
ailure o
f
y
our
ve
hi
c
l
e
'
s e
l
ectron
i
c s
y
stem.
Pl
ease note t
hi
s
s
peci
f
ic warnin
g
and contact a
C
ITR
OËN
dea
l
e
r t
o
be
s
h
o
wn th
e
r
eco
mm
e
n
ded
e
quipment and accessories.
C
ITR
O
Ë
N
has a presence on ever
y
continent,
a complete product ran
g
e,
brin
g
in
g
to
g
ether technolo
gy
and a permanent spirit o
f
innovation,
f
or a modern and creative approach to mobilit
y
.
We thank
y
ou and con
g
ratulate
y
ou on
y
our choice.
H
app
y
motor
i
n
g!
A
t the wheel o
f
y
our new vehicle,
g
ettin
g
to know each s
y
stem,
each control, each settin
g
,
makes
y
our trips,
y
our
j
ourne
y
s
more com
f
ortable and more en
j
o
y
able.

Contents
Instrument panel 2
4
Warnin
g
and indicator lamps
2
5
Instrument panel screen 3
1
Trip computer 4
3
Di
s
t
a
n
ce
r
eco
r
de
r 4
3
Tri
p
distance recorder 4
3
Se
rvi
ce
in
d
i
ca
t
o
r
4
4
Adj
ust
i
n
g
ve
hi
c
l
e sett
i
n
g
s
4
8
A
UDIO-CD s
y
stem screen 5
4
C
olour screen
5
6
L
i
g
htin
g
dimmer 5
9
Monitoring
Familiarisation
R
emote control ke
y
6
0
"
Ke
y
less Entr
y
and Startin
g
" s
y
stem 64
Doo
r
s
7
0
B
oo
t
7
1
Al
a
rm
7
3
Elec
tr
ic
w
i
n
do
w
s
7
6
Pa
n
o
r
a
mi
c
su
nr
oof
7
8
Access
F
r
o
nt
sea
t
s
7
9
Rea
r
sea
t
s
8
3
M
irrors
8
5
S
teerin
g
wheel ad
j
ustment 8
7
Ventilation
8
8
M
anual heatin
g
/ air conditionin
g
9
0
Automatic air conditioning
9
2
Rea
r
sc
r
ee
n
de
mi
s
t -
def
r
os
t
9
7
Interior
fi
ttin
g
s
9
8
Boot
fi
ttin
g
s 1
0
4
Comfort
S
tartin
g
- stoppin
g
the en
g
ine with the ke
y
1
0
6
S
tartin
g
- stoppin
g
the en
g
ine with
the Ke
y
less Entr
y
and Startin
g
s
y
stem 10
7
Parkin
g
brake
11
0
M
anual gearbox 1
1
1
Gea
r
s
hi
f
t in
d
i
ca
t
o
r 1
1
2
C
VT
g
earbox 1
1
3
H
ill
s
t
a
rt
ass
i
s
t 1
1
8
S
top & Start
(
Auto Stop & Go
)
function 1
1
9
Four wheel drive s
y
stem
12
2
C
ruise control 1
2
4
Parking sensors 12
7
R
eversin
g
camera 1
3
0
Driving
Li
g
htin
g
controls 1
3
1
Da
y
time runnin
g
lamps 13
4
A
utomatic illumination o
f
headlamps 13
4
M
anual
g
uide-me-home li
g
htin
g
1
3
5
Welcome li
g
htin
g
13
6
H
eadlamp ad
j
ustment
13
7
Wi
p
er controls 1
3
8
A
utomatic rain sensitive wi
p
ers 14
0
C
ourtes
y
lamps 14
2
Boot lamp 14
4
Panoramic roof li
g
htin
g
144
Visibility
Eco-driving

Contents
Dir
ec
ti
o
n in
d
i
ca
t
o
r
s
14
5
H
azard warnin
g
lamps
1
4
5
Ho
rn
14
5
Brakin
g
assistance s
y
stems 14
6
Tra
j
ector
y
control s
y
stems 1
4
8
Fr
o
nt
sea
t
be
lt
s
1
5
0
A
irba
g
s 15
4
C
hild seats 1
5
9
I
SO
FIX child seats 1
6
4
C
hild lock 16
9
Safety
Temporar
y
puncture repair kit 1
7
0
C
han
g
in
g
a wheel 1
7
4
C
han
g
in
g
a bulb 18
0
C
han
g
in
g
a fuse 1
8
6
12
V batter
y
19
2
A
utomatic power cut-off to accessories 19
5
C
hanging a wiper blade 19
5
R
ecoverin
g
the vehicle 1
9
6
Towin
g
a trailer 19
9
Fittin
g
roo
f
bars 2
0
1
A
ccessories 2
0
2
Practical information
Bonnet 2
0
5
P
etrol en
g
ines
20
6
D
iesel en
g
ines
20
7
F
uel tank 2
0
8
Runnin
g
out o
f
f
uel
(
Diesel
)
2
1
0
C
heckin
g
levels 2
1
1
C
hecks 21
4
Checks
P
etrol en
g
ines 2
1
7
P
etrol wei
g
hts 21
8
D
iesel en
g
ines 2
1
9
D
iesel wei
g
hts 2
2
0
D
im
e
n
s
i
o
n
s
22
1
Identifi cation markin
g
s 22
2
Technical data
A
UDI
O
-TELEMATIC s
y
stem 2
2
3
A
UDI
O
-CD s
y
stem 28
3
Audio and telematics
Alphabetical index
Visual search
4
Familiarisation
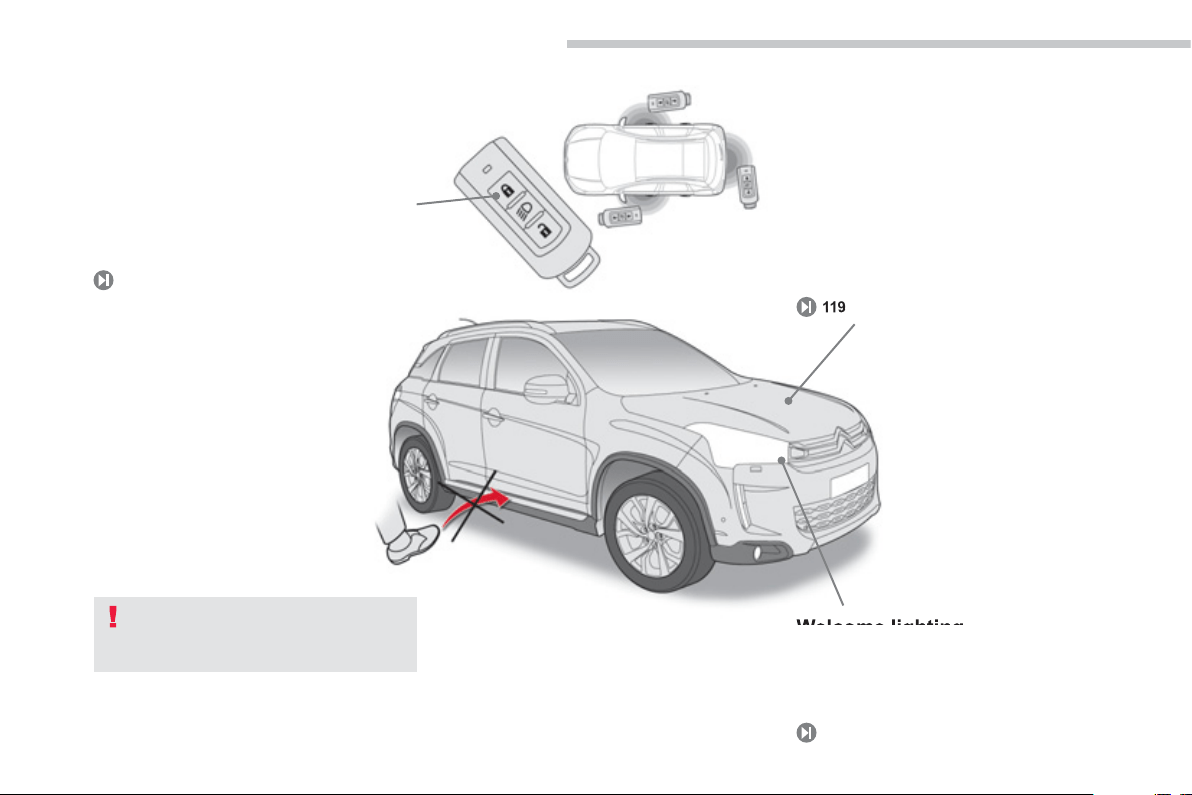
Electronic ke
y
: Ke
y
less Entr
y
a
nd Startin
g
This s
y
stem allows
y
ou to lock, unlock and
s
tart t
h
e ve
hi
c
l
e w
hil
e
k
eep
i
n
g
t
h
e
k
e
y
on
y
our
p
erson and in the de
f
ined zone.
6
4
Welcome lighting
Thi
s a
ddi
t
i
ona
l
exter
i
or an
d
i
nter
i
or
ligh
t
i
n
g
,
c
ontrolled remotely, makes your approach to
the vehicle easier when the li
g
ht is poor.
13
6
Exterior
Sto
p
& Start function
(
Auto Stop & Go
)
Thi
s system puts t
h
e eng
i
ne temporar
il
y
i
nto
s
tandby during stops in the tra
ff
ic
(
tra
ff
ic
li
g
hts, traffic
j
ams, etc...
)
. The en
g
ine restarts
automaticall
y
as soon as
y
ou want to move
off. The Stop & Start s
y
stem reduces fuel
c
onsumption and exhaust emissions, as well as
n
o
i
se
l
eve
l
s w
h
en stat
i
onar
y
.
119
Th
e
doo
r
s
ill fini
s
h
e
r
s
h
ou
l
d
n
o
t
be
used
as a step.

.
5
Familiarisation
Temporar
y
puncture repair kit
This kit is a complete s
y
stem, consistin
g
of a
c
ompressor and a sealant cartrid
g
e, for the
temporar
y
repair o
f
a t
y
re.
170
Panoramic sunroof
This large glazed area provides incomparable
visibilit
y
and li
g
ht in the passen
g
er
c
ompartment.
7
8
Reversin
g
camera
This system is activated automatically on
e
n
g
a
g
in
g
reverse and provides an ima
g
e in the
co
l
ou
r
sc
r
ee
n.
13
0
Exterior
F
ront an
d
rear par
ki
n
g
sensors
This s
y
stem warns
y
ou o
f
the presence o
f
obs
t
ac
l
es
in
f
r
o
nt
of
o
r
be
hin
d
th
e
v
e
hi
c
l
e
wh
e
n
m
anoeuvring
f
orwards or backwards.
1
27
6
Familiarisation
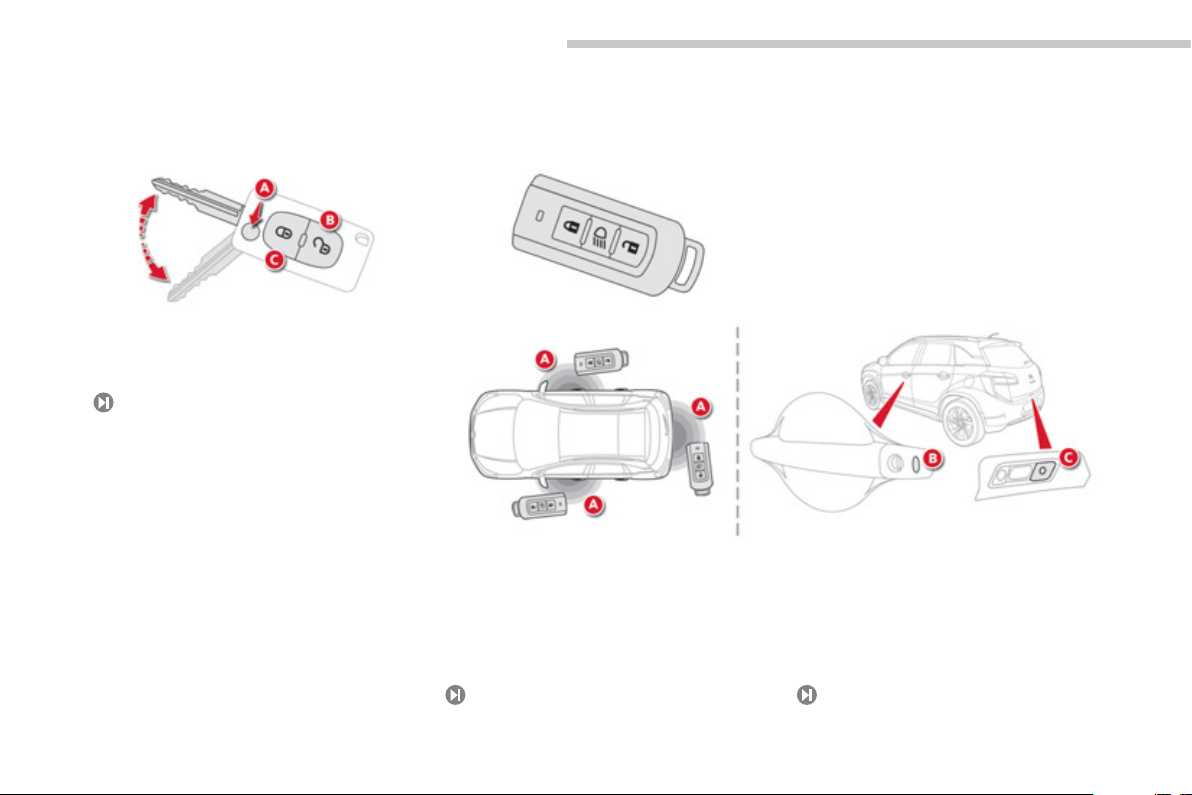
Opening
A.
Foldin
g/
un
f
oldin
g
the ke
y
.
B.
Unlocking the vehicle.
C
.
Lockin
g
the vehicle.
Remote control
65
Unlockin
g
With the electronic ke
y
on
y
our person and in
o
n
e
o
f th
e
de
fin
ed
z
o
n
es
A
, press one of the
bu
tt
o
n
s
B
or
C
to unlock the vehicle, then pull
o
n the handle to open the door.
Lockin
g
With the electronic ke
y
on
y
our person and in
o
n
e
o
f th
e
de
fin
ed
z
o
n
es
A
, press one of the
bu
tt
o
n
s
B
or
C
t
o
l
oc
k th
e
v
e
hi
c
l
e
.
Ke
y
less Entr
y
and Startin
g
s
y
stem
60
64
.
7
Familiarisation
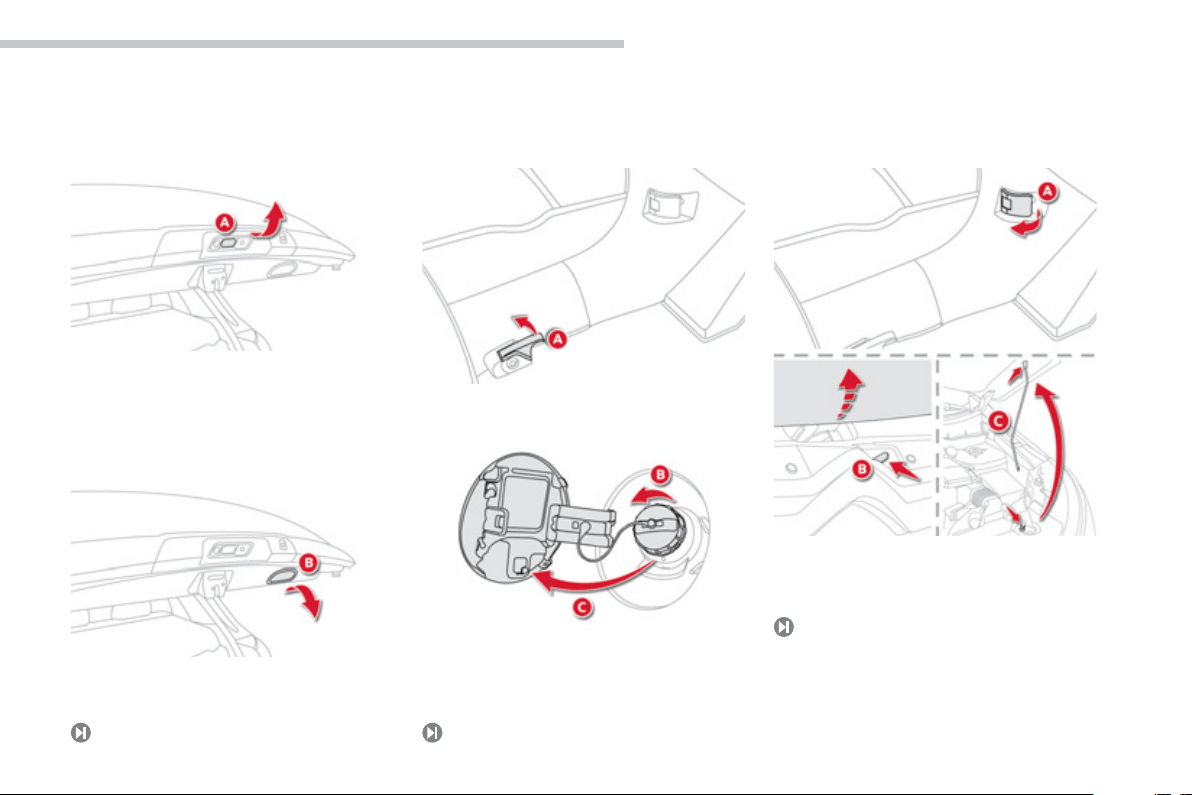
Opening
Boot
Openin
g
A
fter unlockin
g
the vehicle with the remote
c
ontrol or the Ke
y
less Entr
y
and Startin
g
sy
stem, press t
h
e
h
an
dl
e
A
.
Closin
g
P
u
ll th
e
h
a
n
d
l
e
B
do
wnw
a
r
ds
.
Fuel tank
A.
O
penin
g
the
f
iller
f
lap.
7
1
2
0
8
B
.
Removin
g
the
f
iller cap.
C
.
Hookin
g
the filler cap.
Capacit
y
of the fuel tank: approximatel
y
60 litres.
Bonnet
A
.
Int
e
ri
o
r r
e
l
ease
l
e
v
e
r.
B
.
Exterior safet
y
catch.
C.
Bonnet sta
y
.
205
8
Familiarisation
Interior
4-wheel drive s
y
stem with
electronic control
*
This s
y
stem allows the selection of a
transmission mode, accordin
g
to the drivin
g
co
n
di
t
io
n
s
.
CVT
g
earbox
This s
y
stem offers drivin
g
combinin
g
a full
y
au
t
o
m
a
ti
c
m
ode
a
n
d
a
m
a
n
ua
l m
ode
.
Di
g
ital air conditionin
g
This automatic air conditionin
g
s
y
stem maintains
the desired comfort level and adequate ai
r
c
irculation in the passen
g
er compartment.
Audio and communication
s
y
stems
These s
y
stems benefit from the followin
g
technolo
g
ies: radio,
C
D pla
y
er, U
S
B pla
y
er,
Bl
uetoot
h
s
y
stem, sate
lli
te nav
ig
at
i
on s
y
stem
w
i
t
h
co
l
our screen, aux
ili
ar
y
soc
k
ets.
AUDIO-TELEMATIC system
122
113
9
2
28
3
22
3
AUDIO-CD s
y
stem
*
Dependin
g
on version.
.
9
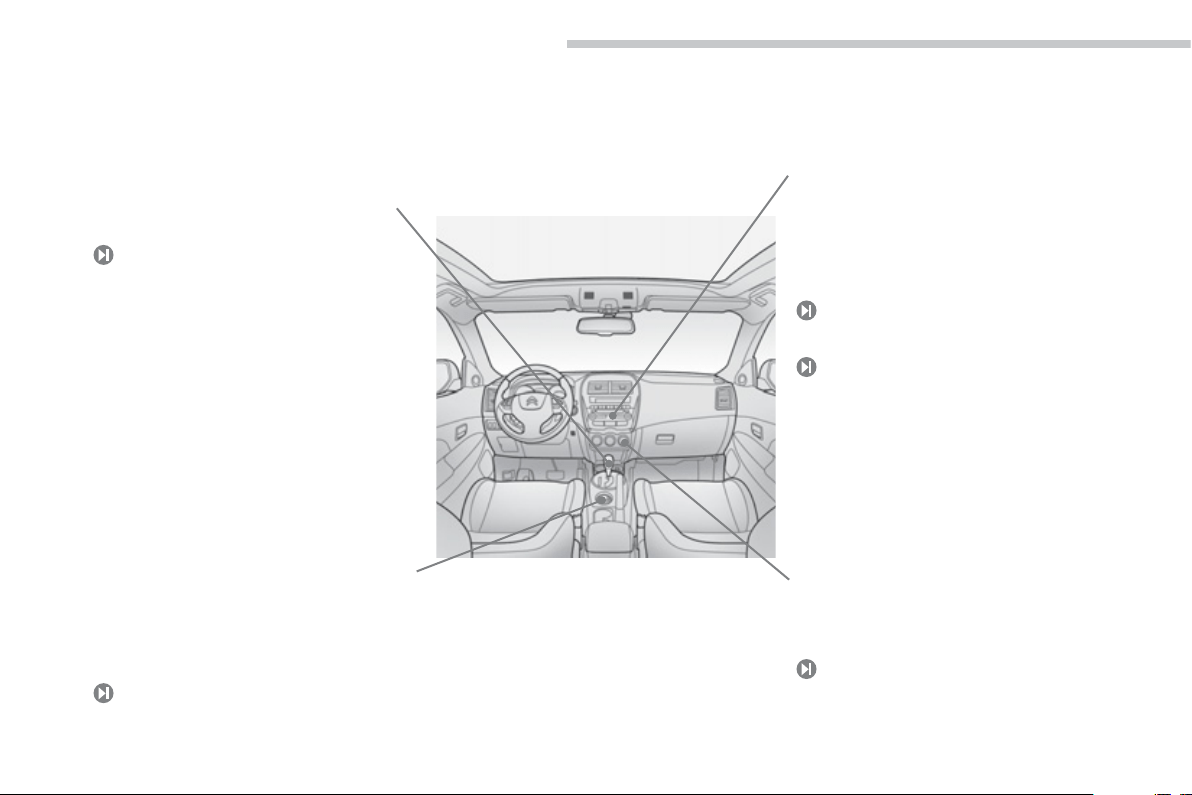
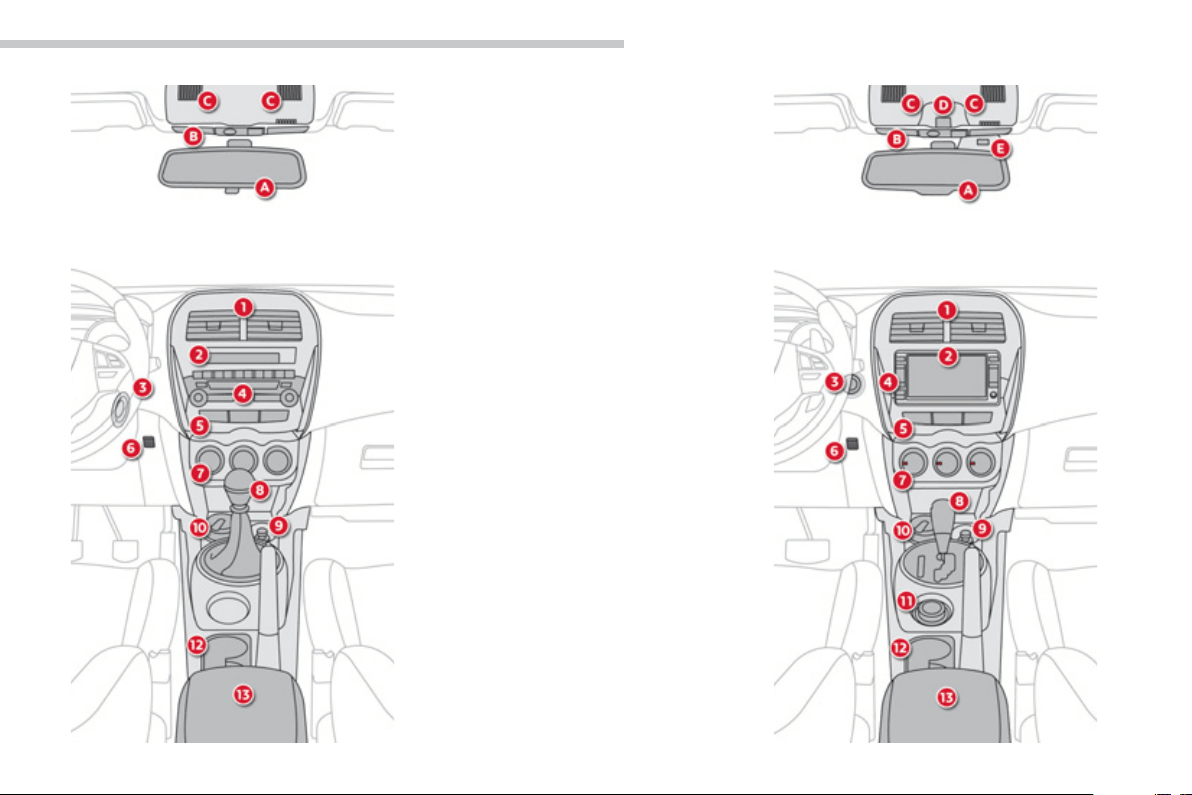
Familiarisation
Instruments and controls
D
oo
r mirr
o
r
co
ntr
o
l
s
.
El
ec
tri
c
win
do
w
co
ntr
o
l
s
.
2.
B
o
nn
e
t r
e
l
ease
.
3.
F
usebo
x.
4.
M
anua
l
h
ea
dl
amp
h
e
igh
t a
dj
ustment.
S
ide switch panel.
5
.
S
ide ad
j
ustable air vent.
6
.
Instrument
p
anel.
7
.
Li
g
htin
g
and direction indicator control
s
t
a
lk.
8.
Steerin
g
wheel ad
j
ustment control.
9.
Controls for Bluetooth s
y
stem or telephone.
1
0
.
C
ontrols for Audio-
C
D and Audio-telematic
sy
stems.
11.
D
r
i
ver
'
s a
i
r
b
a
g
.
Ho
rn.
1
2
.
C
ruise control switches.
1
3
.
Parkin
g
brake.

10
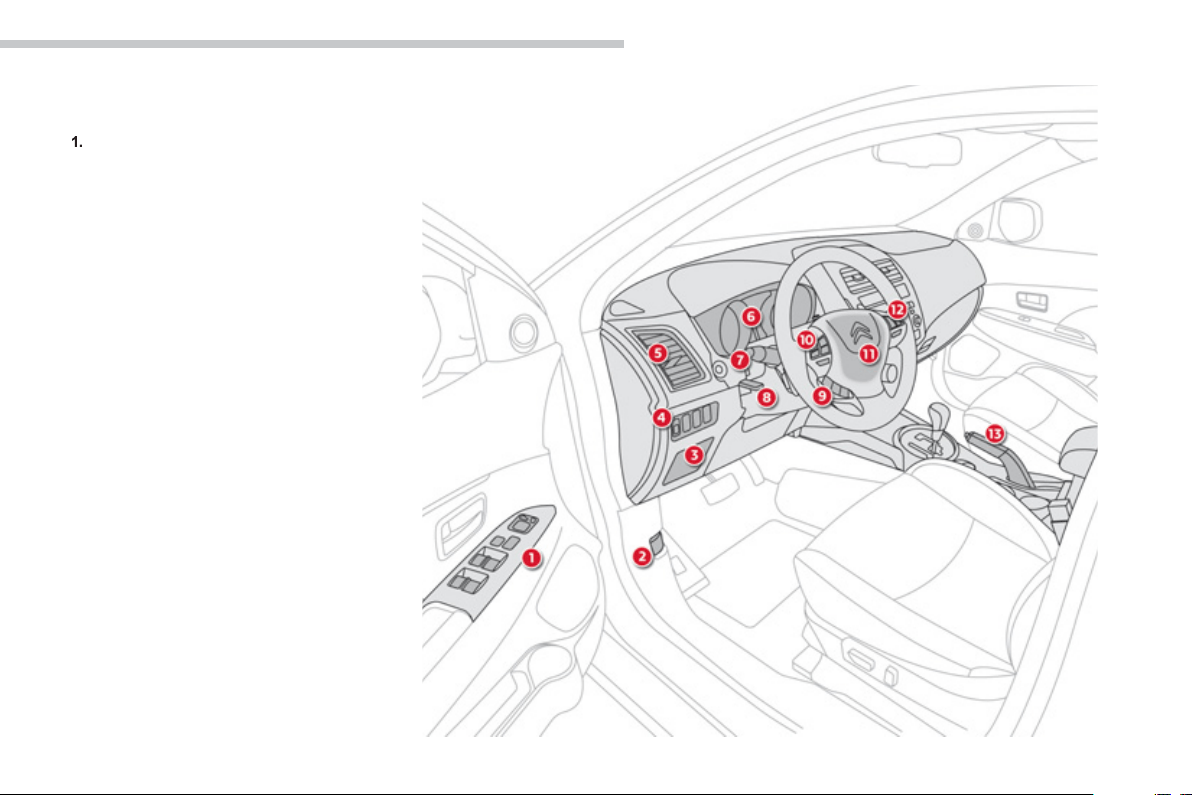
Familiarisation
Instruments and controls
1.
H
ea
t
ed
sea
t
co
ntr
o
l.
2.
Gear lever, CVT
g
earbox.
3.
Steerin
g
lock and i
g
nition.
4.
Wiper / screenwash control stalk.
5.
S
teerin
g
mounted control paddles
f
or the
C
VT
g
earbox.
6
.
Wi
n
d
screen
d
em
i
st
i
n
g
vent.
7
.
Passenger's airbag.
8.
G
love box.
Passen
g
er's airba
g
deactivation switch.
Back-up startin
g
unit
(
with the "Ke
y
less
Entr
y
and Startin
g
" s
y
stem
)
.
9.
Front door
g
lass demistin
g
vent.
.
11
Familiarisation
Centre console
A.
Rear view mirror
,
manual or automatic.
B.
Courtes
y
lamp / Map readin
g
lamps.
C.
Microphone
f
or Audio-
C
D et Audio-
te
l
emat
i
c s
y
stems.
D.
C
ontrol
f
or
p
anoramic sunroo
f
blind.
E
.
S
unshine
/
rain sensor.
1.
C
entral ad
j
ustable air vents.
2.
S
creen
f
or the Audio-
C
D s
y
stem or colou
r
s
creen
f
or the Audio-telematic s
y
stem.
3.
Ignition switch.
S
TART/
S
TOP button
(
with "Ke
y
less Entr
y
and Startin
g
" s
y
stem
)
.
4.
Audio-CD s
y
stem or Audio-telematic
sy
s
t
em.
5
.
Central switch panel.
6.
T
emperature sensor.
7.
Manual or di
g
ital heatin
g
/
air conditionin
g
co
ntr
ols
.
8.
G
ear lever, manual or
C
VT gearbox.
9.
C
i
g
arette li
g
hter
/
12 V accessor
y
socket.
10
.
Portable ashtra
y
.
11
.
Control for 4 wheel drive s
y
stem.
12
.
Cup holder.
13
.
Fr
o
nt
a
rmr
es
t.
12
Familiarisation
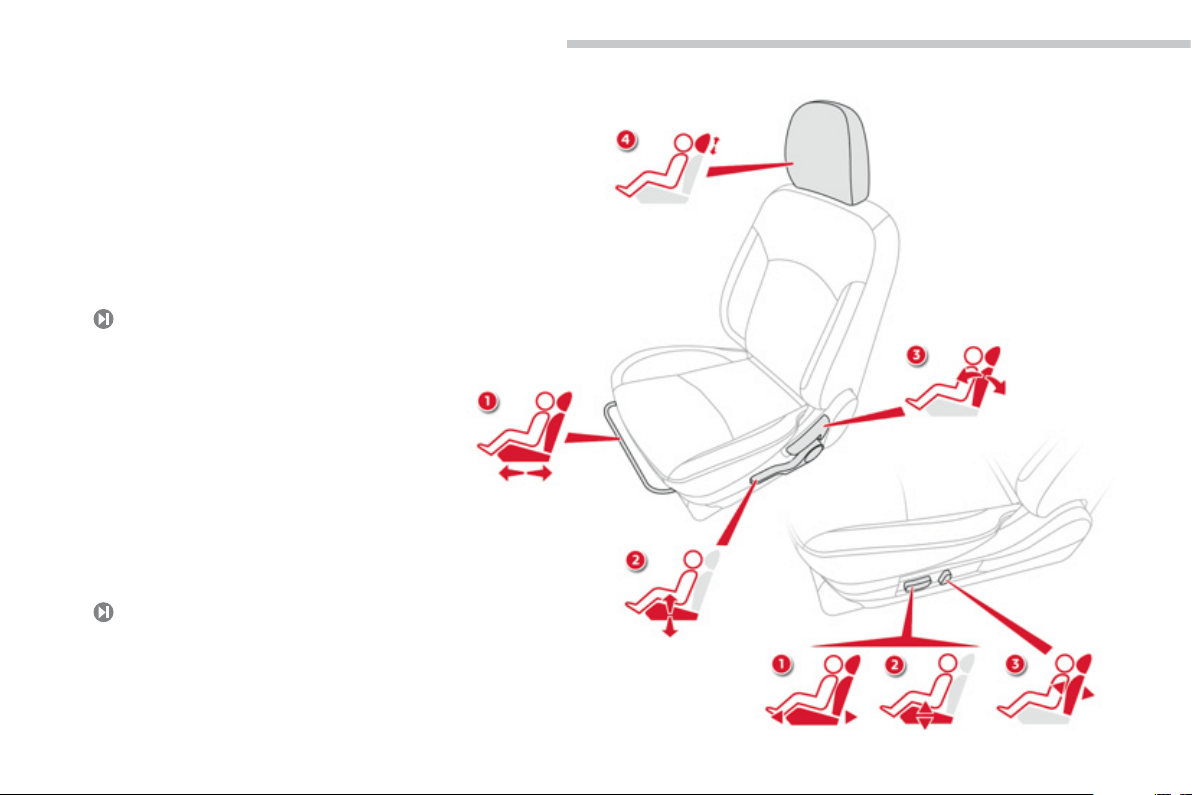
Sitting comfortably
Front seat
7
9
Manual ad
j
ustments
1.
Seat forwards-backwards ad
j
ustment.
2.
Driver's seat cushion hei
g
ht ad
j
ustment.
3.
Seat backrest an
g
le ad
j
ustment.
4.
H
ea
d
restra
i
nt a
dj
ustment.
Electric ad
j
ustments
1.
Seat forwards-backwards ad
j
ustment.
2.
Driver's seat cushion hei
g
ht and an
g
le
a
d
j
ustment.
3.
Seat backrest an
g
le ad
j
ustment.
80
.
13
Familiarisation
Sitting comfortably
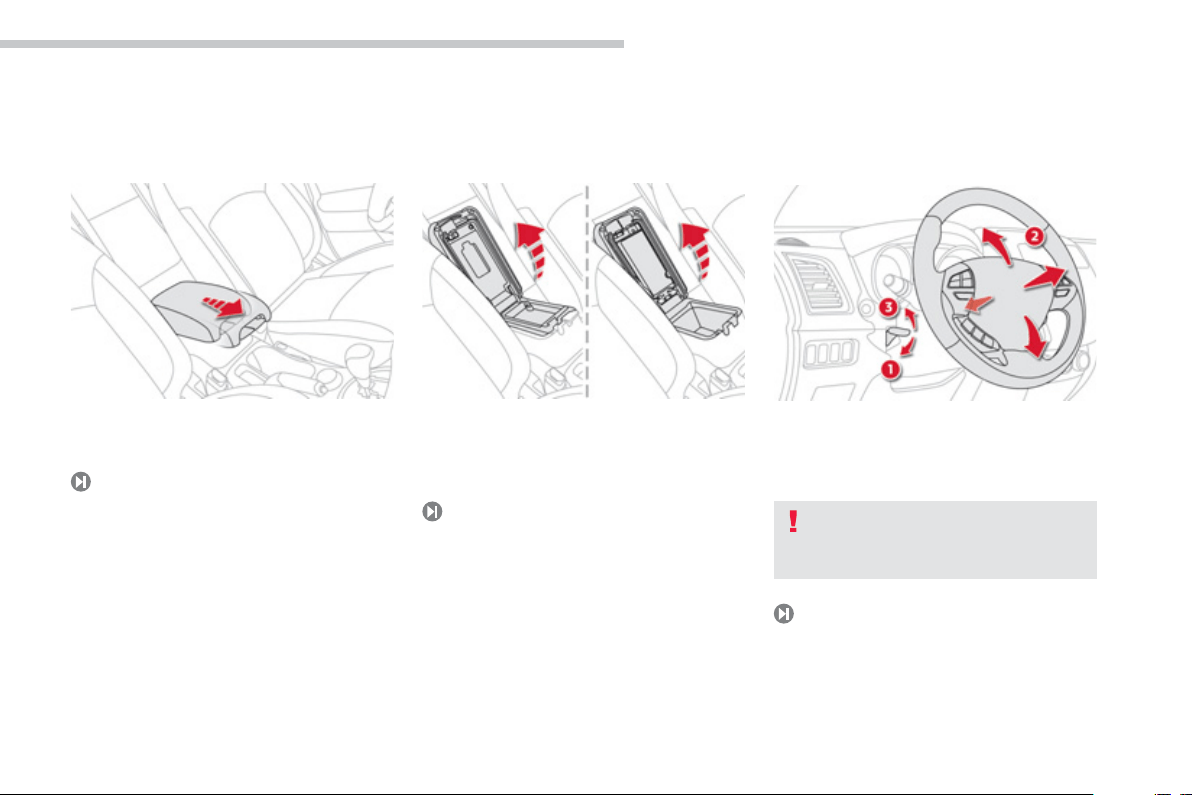
Front armrest
8
2
Steerin
g
wheel ad
j
ustment
1
.
R
e
l
ease
.
2.
Ad
j
ust for hei
g
ht and reach.
3.
L
oc
k.
For
y
our comfort, the front armrest is ad
j
ustable
lon
g
itudinall
y
.
8
7
It also has two stora
g
e spaces; these can be
fitted with accessor
y
sockets.
1
0
1
As a safet
y
precaution, these
operations must onl
y
be carried out
when stationar
y
.
14
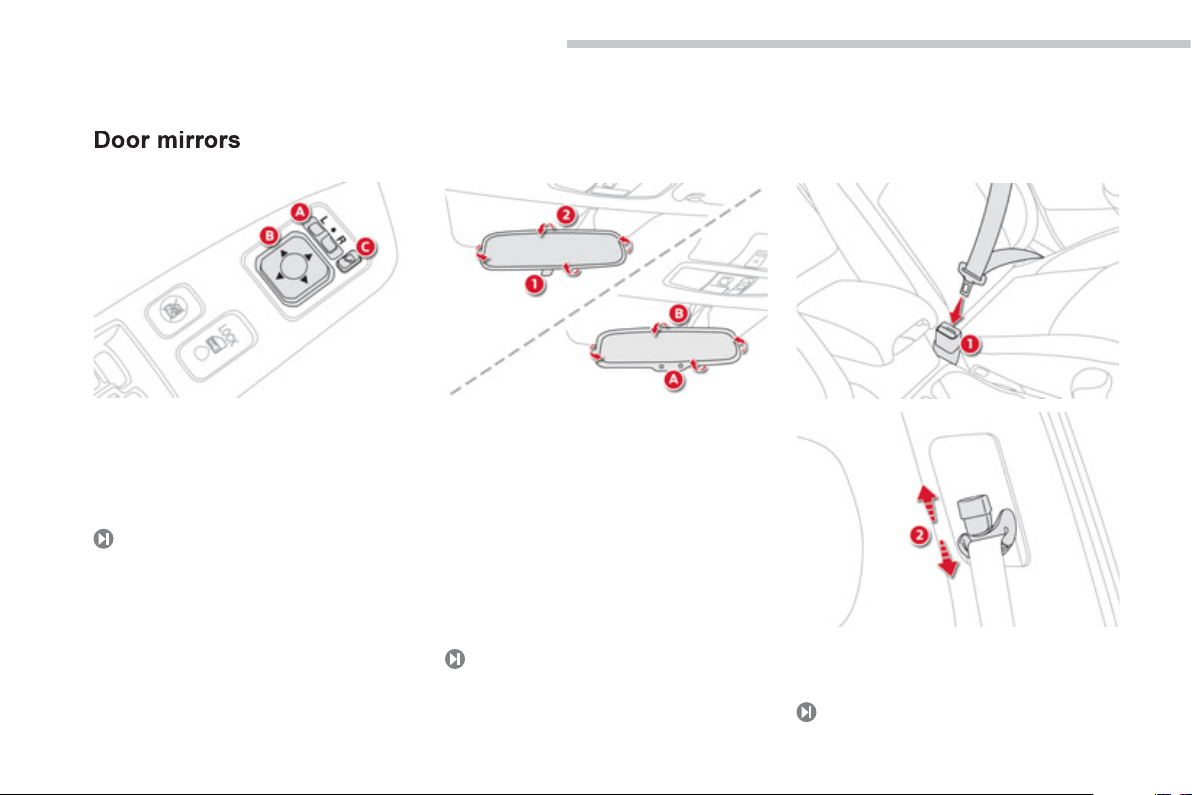
Familiarisation
Sitting comfortably
A.
Selection of the mirror to ad
j
ust.
B.
Ad
j
ustin
g
the position of the mirror
g
lass in
f
ou
r
d
ir
ec
ti
o
n
s
.
C.
Foldin
g
/ Unfoldin
g
.
8
5-8
6
Rear view mirror
Manual da
y
/ni
g
ht model
1
.
S
election o
f
the "da
y
" position o
f
the mirror.
2
.
Ad
j
ustment of the mirror.
Automatic da
y/
ni
g
ht model
8
7
A
.
Bri
g
htness detection in automatic da
y
/ni
g
ht
m
ode
.
B.
Ad
j
ustment o
f
the mirror.
1.
Fastenin
g
the buckle.
2.
Hei
g
ht ad
j
ustment.
Front seat belts
15
0
.
15
Familiarisation
Seeing clearly
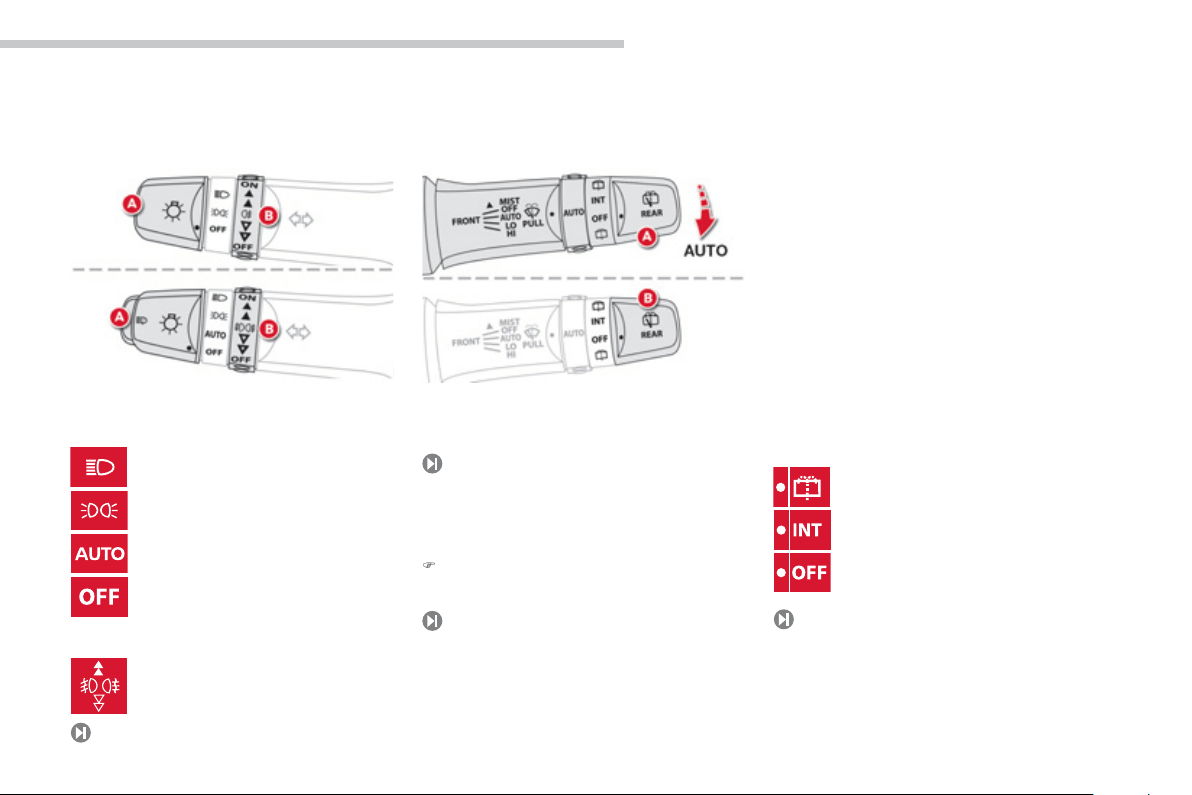
Li
g
htin
g
Rin
g
A
Rin
g
B
Wi
p
ers
13
1
Control A: windscreen wi
p
ers
1
38
Control B: rear wi
p
e
r
14
1
Dipped
/
main beam headlamps.
S
idelam
p
s.
Automatic illumination of headlamps.
Li
g
htin
g
off.
Front and rear fo
g
lamps.
Wash-wipe.
I
nterm
i
ttent w
i
pe.
Pa
r
k
.
Switchin
g
On / Off "AUTO"
)
Push
t
he
s
t
alk
do
wnw
a
r
ds
a
n
d
r
elease
i
t.
1
40

16
Familiarisation
Ventilation
we recommend use of automatic operation b
y
pressin
g
the
"
AUTO"
bu
tt
o
n.
R
ecommen
d
e
d
i
nter
i
or sett
i
n
g
s
I re
q
uire..
.
Manual Air Conditionin
g
Ai
r
di
str
ib
ut
i
on
A
ir flo
w
Air recirculation
/
I
ntake of outside air
T
emperatur
e
Manual A/C
H
O
T
COLD
D
EMISTING
D
EFROSTIN
G
.
17
Familiarisation
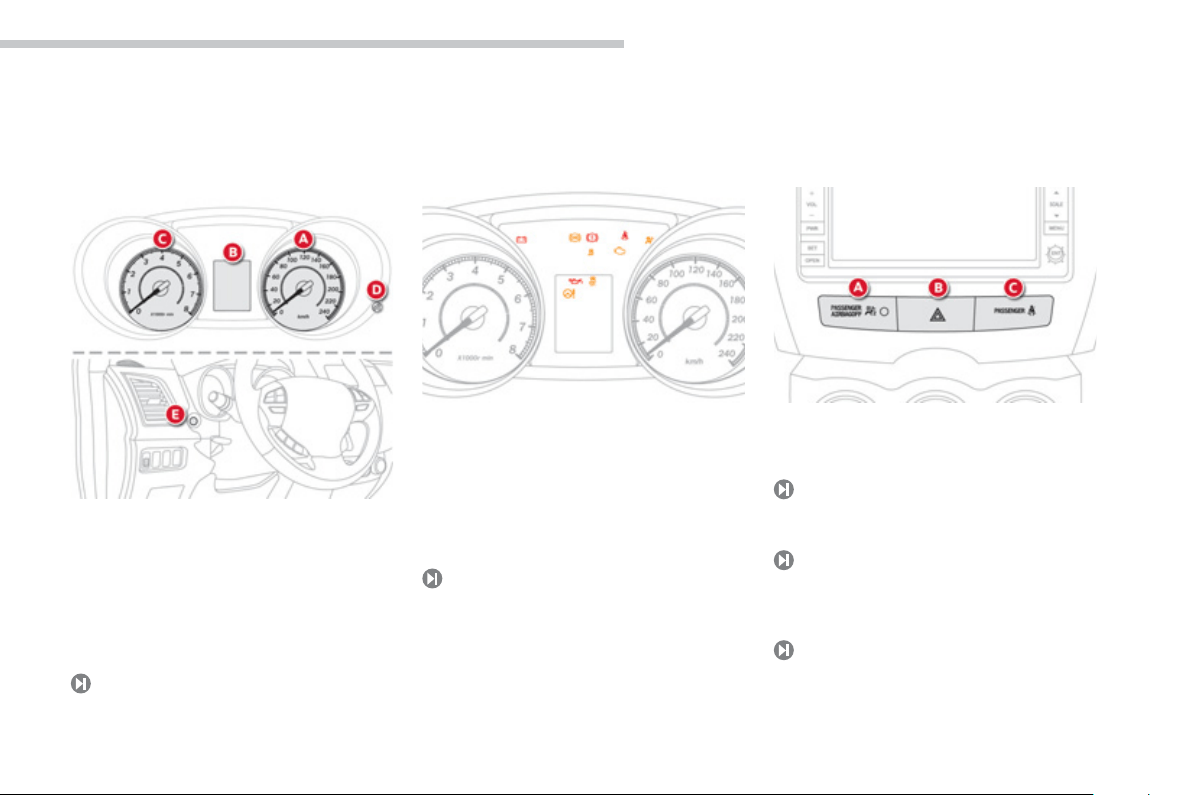
Monitoring
A.
Speedometer dial.
B.
I
nstrument pane
l
screen.
C.
Re
v
cou
nt
e
r
dial
.
D.
Ligh
t
i
n
g
di
mmer.
E.
INF
O
button.
Used to c
y
cle throu
g
h the di
ff
erent
information in the instrument panel screen.
Instrument
p
anel
A
.
Passen
g
er's airba
g
deactivation warnin
g
lamp.
Central switch
p
anel
1
55
1
.
With the i
g
nition on, the oran
g
e and red
warnin
g
lamps come on.
2
.
With the en
g
ine runnin
g
, these warnin
g
l
amps should
g
o off.
If warnin
g
lamps remain on, refer to the pa
g
e
co
n
ce
rn
ed
.
25
2
4
Warnin
g
lamps
1
45
1
5
1
B.
Hazard warnin
g
lamps.
C.
Front passen
g
er's seat belt not
f
astened or
u
n
fas
t
e
n
ed
.
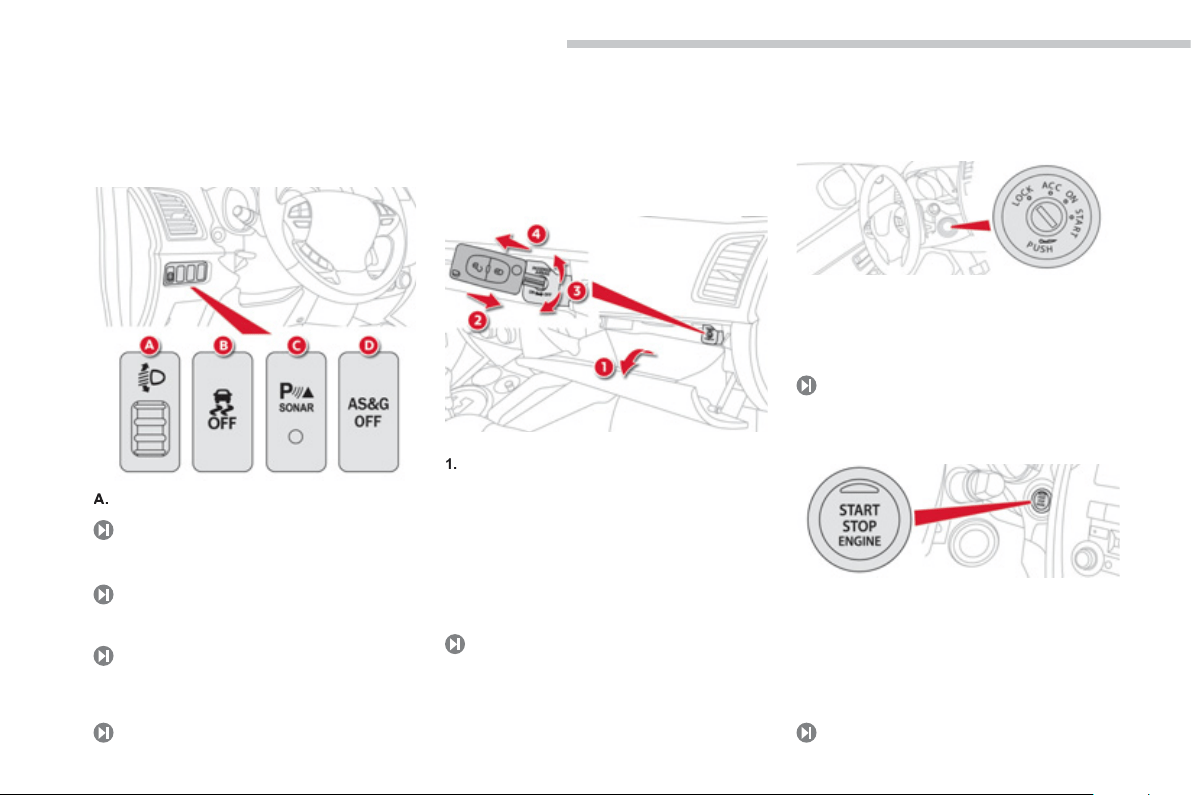
18
Familiarisation
Monitoring
M
anua
l
h
ea
dl
amp a
dj
ustment.
Side switch
p
anel
1
3
7
1
.
O
pen the
g
love box.
2
.
Insert the ke
y
.
3.
S
elect the position:
"
OFF"
(
deactivation
)
, with "rear facin
g
"
child
seat,
"
ON"
(
activation
)
, with front passen
g
er o
r
"f
orwards
f
acing" child seat.
4.
Remove the ke
y
keepin
g
the switch in the
new pos
i
t
i
on
.
Passen
g
er's front airba
g
1
5
5
B.
Deactivation of the ASC/TCL s
y
stem.
1
27
C
.
Deactivation o
f
the parkin
g
sensors.
1
48
Passenger safety
1
20
D.
Deactivation of the Stop & Start
(
Auto
S
top
&
G
o
)
f
unction.
Starting
- P
os
iti
o
n 1:
L
OCK
- P
os
iti
o
n 2: A
CC
- P
os
iti
o
n
3
: O
N
- P
os
iti
o
n 4:
S
TAR
T
Each press on the START/STO
P
button,
without action on the pedals, chan
g
es the
mode
o
f th
e
v
e
hi
c
l
e
.
-
Fi
rst press: ACC mod
e
-
S
econd press: O
N
m
o
de
-
Thi
r
d
press:
O
FF mod
e
10
6
10
7
I
g
nition switch
START/STOP button
.
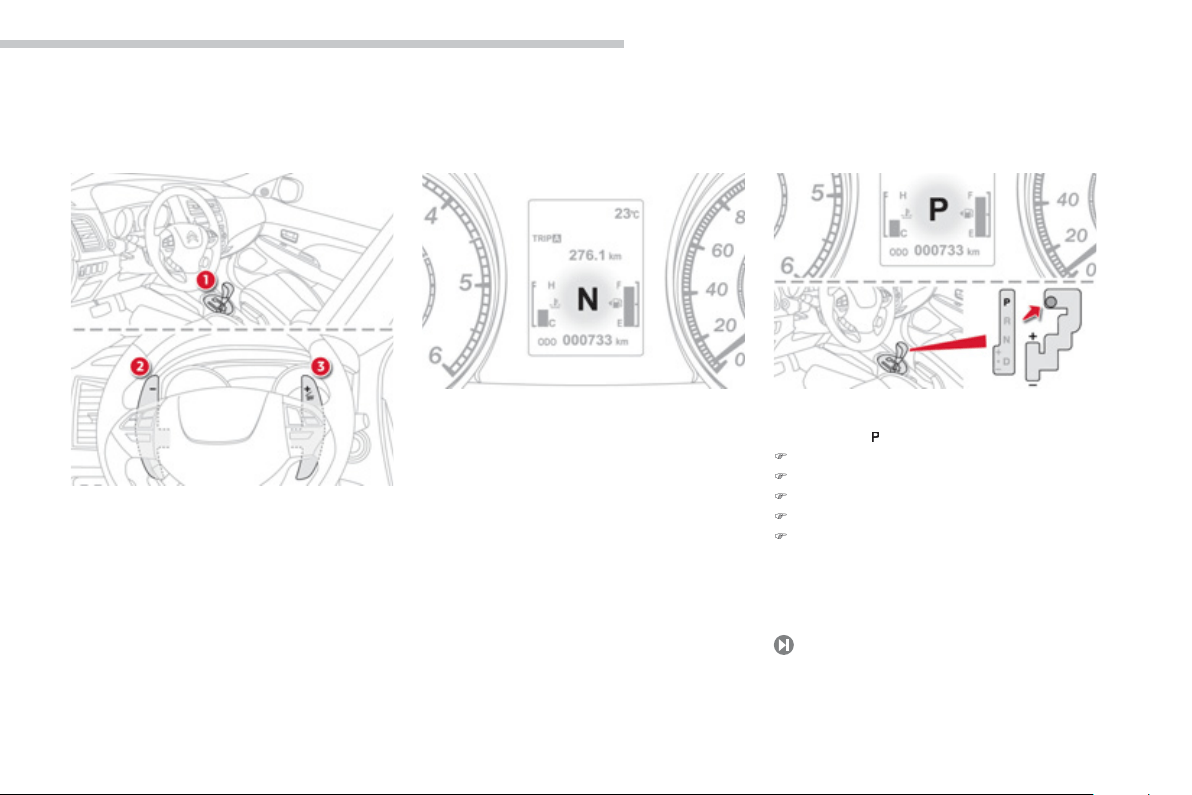
19
Familiarisation
Driving safely
This six-speed
g
earbox o
ff
ers the choice o
f
the
e
ase o
f
automatic operation or the pleasure o
f
m
anua
l
g
ear c
h
an
gi
n
g
.
1.
G
ear lever.
2.
"-" steerin
g
mounted control paddle.
3.
"+" steerin
g
mounted control paddle.
CVT
g
earbox
Di
sp
l
a
y
i
n t
h
e
i
nstrument pane
l
The drivin
g
mode selected and
/
or the
g
ea
r
en
g
a
g
e
d
appear
i
n t
h
e
i
nstrument pane
l
screen
.
P
.
P
a
rk.
R
.
R
e
v
e
r
se
.
N
.
N
eu
tr
a
l.
D.
Drive
(
Automated mode
)
.
+
/
-
.
Manual mode with sequential
g
ear
c
han
g
es.
Movin
g
off
From position
P
, with the parking brake applied:
P
)
Press the brake pedal
f
irml
y
.
)
S
tart the en
g
ine.
)
Th
en se
l
ect
p
os
i
t
i
on
R
,
D
or
+
/
-
.
)
Release the parking brake.
)
Pro
g
ressivel
y
take
y
our
f
oot o
ff
the brake
p
edal, the vehicle moves off on its own.
11
3
20
Familiarisation
Driving safely
Stop & Start
(
Auto Stop &
G
o
)
function
En
g
ine
g
oin
g
into STOP mode
11
9
Th
e
"
AS&G" warnin
g
lamp comes on in
the instrument panel or the instrument
panel screen and the en
g
ine is put into
standb
y
a
f
ter a
f
ew seconds:
En
g
ine
g
oin
g
into START mode
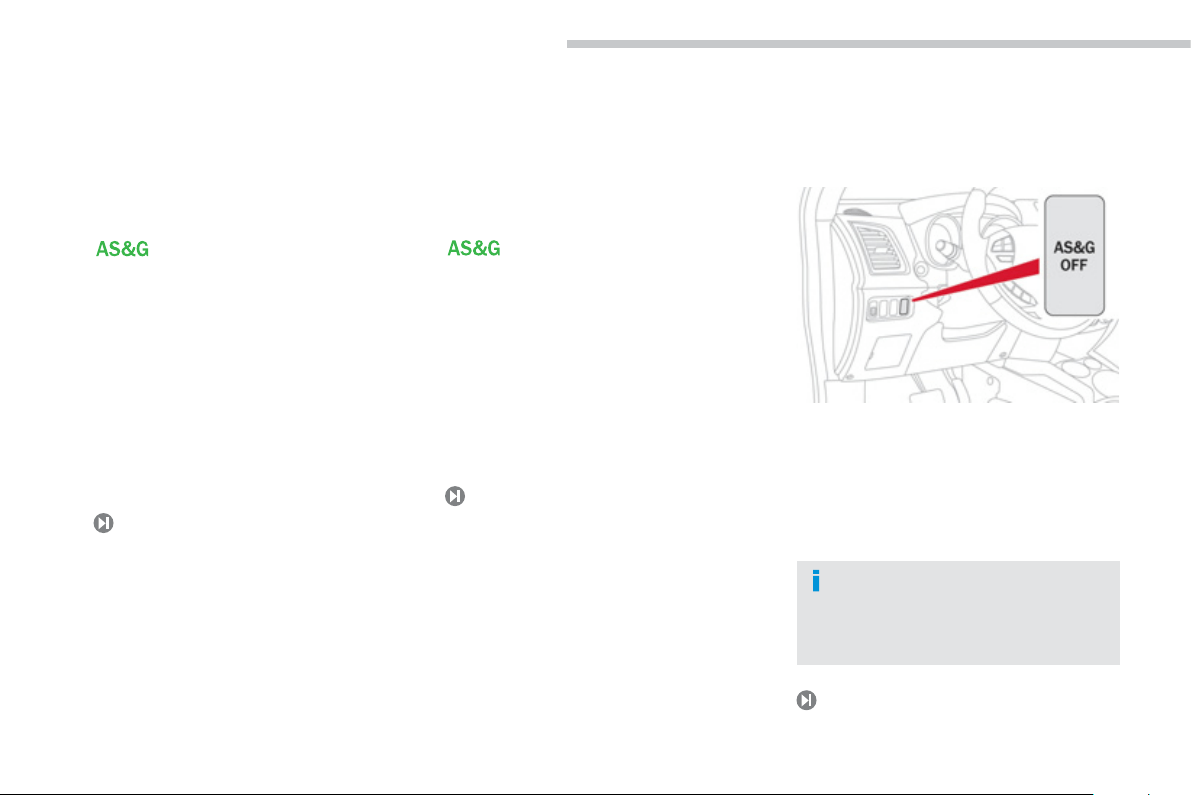
Deactivation
/
Reactivation
You can deactivate the system at any time
b
y
pressin
g
the
"
AS&G OFF" button; the
c
orrespondin
g
warnin
g
lamp comes on in the
instrument panel or the instrument panel screen.
1
20
120
Th
e s
y
stem
i
s react
i
vate
d
automat
i
ca
lly
e
ver
y
t
i
me
y
ou start t
h
e en
gi
ne w
i
t
h
t
h
e
k
e
y
or w
i
t
h
t
h
e
S
TART/
S
TO
P
bu
tt
o
n.
Th
e
"AS&G" warnin
g
lamp
g
oes off
and the en
g
ine restarts automaticall
y
:
-
w
ith a manual
g
earbox
;
when
y
ou
f
ull
y
depress the clutch pedal.
-
w
i
t
h
a manua
l
g
ear
b
ox
;
w
i
t
h
t
he
v
ehicle
stationar
y
and
y
our
f
oot on the brake pedal,
w
h
en
y
ou put t
h
e
g
ear
l
ever
i
nto neutra
l
a
n
d
re
l
ease t
h
e c
l
utc
h
p
e
d
a
l
.
In certain condition, START mode ma
y
en
g
a
g
e
automaticall
y
; the
"
AS&G" warnin
g
lamp
flashes then
g
oes off.
In certain circumstances the ST
O
P mode ma
y
n
ot be available; the
"
AS&G" warnin
g
lamp
flashes for a few seconds then
g
oes off.
.
21
Familiarisation
Driving safely
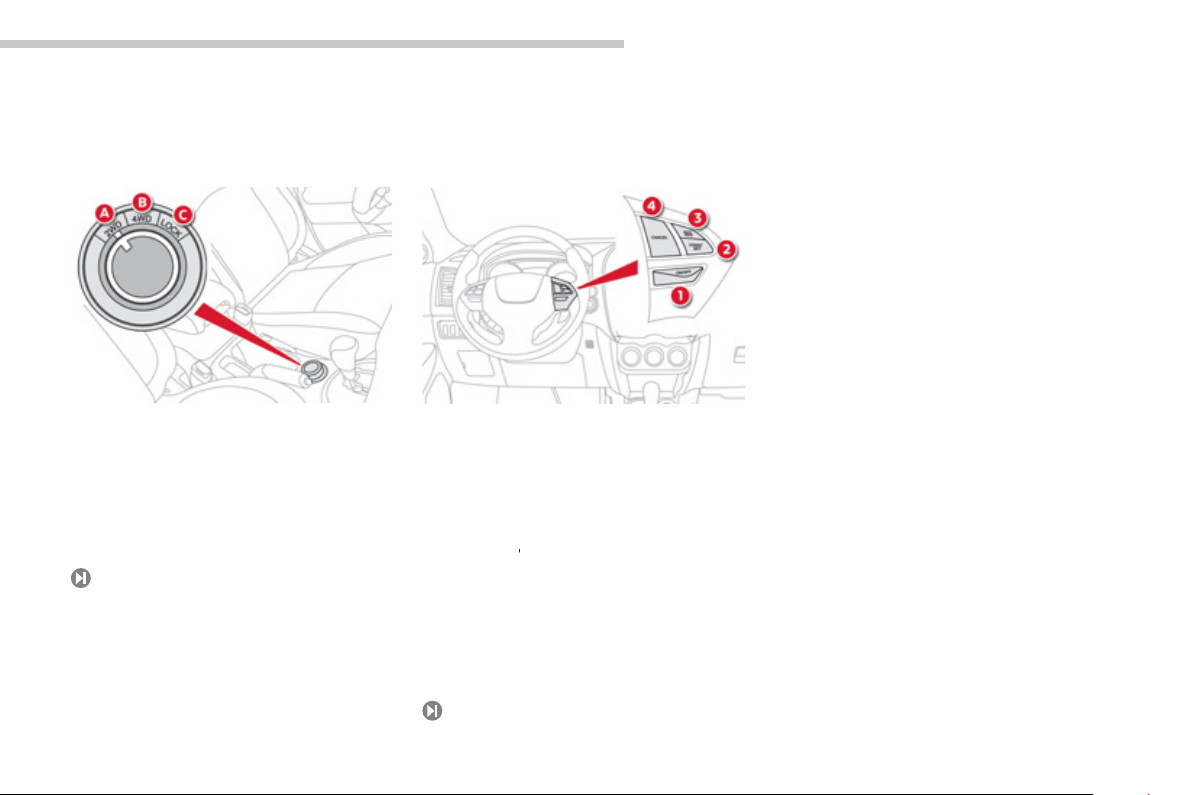
Thr
ee
tr
a
n
s
mi
ss
i
o
n m
odes
a
r
e
a
v
a
il
ab
l
e
a
n
d
s
electable manuall
y
b
y
the driver accordin
g
to
requirements:
A
.
Two wheel drive
(
2WD
)
,
B.
Four wheel drive
(
4WD AUTO
)
,
C.
Four wheel drive
(
4WD L
OC
K
)
.
Four wheel drive s
y
stem
1
.
"ON / OFF"
bu
tt
o
n:
s
wit
c
h
es
c
r
u
i
se
co
ntr
o
l
o
n
a
n
d
o
ff.
2
.
" COAST SE
T
" button: pro
g
ramme a drivin
g
s
peed then decrease the cruise speed.
3.
"
A
CC RE
S
"
:
i
ncrease t
h
e cru
i
se spee
d
,
an
d
reca
ll
t
h
e pro
g
ramme
d
spee
d
.
4.
"
CANCEL
" button: cruise control off.
L
L
Cruise control "CRUISE"
1
2
4
I
n or
d
er to
b
e pro
g
ramme
d
or act
i
vate
d
, t
h
e
vehicle speed must be hi
g
her than 25 mph
(
40 km
/
h
)
, with at least second
g
ear en
g
a
g
ed.
122

22
Familiarisation
Eco-driving
Eco-drivin
g
is a ran
g
e o
f
ever
y
da
y
practices that allow the motorist to optimise their
f
uel consumption and
CO
2
e
m
issio
n
s
.
Optimise the use of
y
ou
r
g
earbox
With a manual
g
earbox, move off
g
entl
y
,
c
han
g
e up without waitin
g
and drive b
y
c
han
g
in
g
up quite soon. If
y
our vehicle has
the s
y
stem, the
g
ear shift indicator invites
y
ou
to c
h
an
g
e up;
i
t
i
s
di
sp
l
a
y
e
d
i
n t
h
e
i
nstrument
p
anel,
f
ollow its instructions.
With an automatic or electronic
g
earbox,
s
ta
y
i
n
D
r
i
ve
"D"
o
r
Au
t
o
"A"
, accor
di
n
g
to
the t
y
pe o
f
g
earbox, without pressin
g
the
a
cce
l
erator pe
d
a
l
h
eav
ily
or su
dd
en
ly
.
D
r
i
ve smoot
hly
Maintain a sa
f
e distance between vehicles, use
e
n
g
ine brakin
g
rather than the brake pedal,
a
nd press the accelerator pro
g
ressivel
y
. These
p
ractices contribute towards a reduction in fuel
c
onsumption and C
O
2
emissions and also helps
r
educe the back
g
round tra
ff
ic noise.
I
f
your vehicle has cruise control, make use o
f
the s
y
stem at speeds above 25 mph
(
40 km
/
h
)
when the traffic is flowin
g
well.
Control the use of
y
our
e
lectrical e
q
ui
p
ment
Before movin
g
off, if the passen
g
er
c
ompartment is too warm, ventilate it b
y
openin
g
the windows and air vents before usin
g
t
h
e a
i
r con
di
t
i
on
i
n
g
.
Above 30 mph
(
50 km
/
h
)
, close the windows
an
d
l
eave t
h
e a
i
r vents o
p
en.
Remember to make use o
f
e
q
ui
p
ment that can
help keep the temperature in the passen
g
e
r
c
ompartment down
(
sunroof and window
b
linds...
)
.
Switch off the air conditionin
g
, unless it has
automatic di
g
ital re
g
ulation, as soon as the
d
es
i
re
d
temperature
i
s atta
i
ne
d
.
S
witch o
ff
the demistin
g
and de
f
rostin
g
c
ontrols, i
f
not automatic.
S
witch o
ff
the heated seat as soon as
p
ossible.
S
witch o
ff
the headlamps and
f
ront
f
o
g
lamps
when the level o
f
li
g
ht does not require thei
r
use
.
A
void runnin
g
the en
g
ine before movin
g
off,
p
articularl
y
in winter;
y
our vehicle will warm
up much faster while drivin
g
.
A
s a passen
g
er, i
f
y
ou avoid connectin
g
y
our multimedia devices
(f
ilm, music, video
game...
)
, you will contribute towards limiting
the consumption o
f
electrical ener
gy
, and so
o
f f
ue
l.
Disconnect
y
our portable devices before
leavin
g
the vehicle.

.
23
Familiarisation
Limit the causes of excess
c
onsum
p
tion
Spread loads throu
g
hout the vehicle; place
the heaviest items in the bottom of the boot,
as close as possible to the rear seats.
Limit th
e
l
oads
ca
rri
ed
in th
e
v
e
hi
c
l
e
a
n
d
reduce wind resistance
(
roo
f
bars, roo
f
rack,
bic
y
cle carrier, trailer...
)
. Use a roo
f
box in
p
re
f
erence.
R
e
m
o
v
e
r
oof
ba
r
s
a
n
d
r
oof
r
ac
k
s
af
t
e
r
use
.
A
t the end of winter, remove snow t
y
res and
refit
y
our summer t
y
res.
Observe the recommendations
on maintenance
Check the t
y
re pressures re
g
ularl
y
, when cold,
r
eferrin
g
to the label in the door aperture,
d
riv
e
r'
s
s
i
de
.
C
arr
y
out this check in particular:
- be
f
ore a lon
g
j
ourne
y
,
- at each chan
g
e o
f
season,
- a
f
ter a long period out o
f
use.
Don't
f
or
g
et the spare wheel and the t
y
res on
a
n
y
trailer or caravan.
Have
y
our vehicle serviced re
g
ularl
y
(
en
g
ine
oil, oil
f
ilter, air
f
ilter...
)
and observe the
schedule o
f
operations recommended by the
m
a
n
ufac
t
u
r
e
r.
When refuellin
g
, do not continue after the
3
r
d
cut-off of the nozzle to avoid an
y
overflow.
A
t the wheel of
y
our new vehicle, it is onl
y
a
f
ter the
f
irst 1 800 miles
(
3 000 kilometres
)
that
y
ou will see the
f
uel consumption settle
d
own to a cons
i
stent avera
g
e.
24
Monitoring
Instrument panel
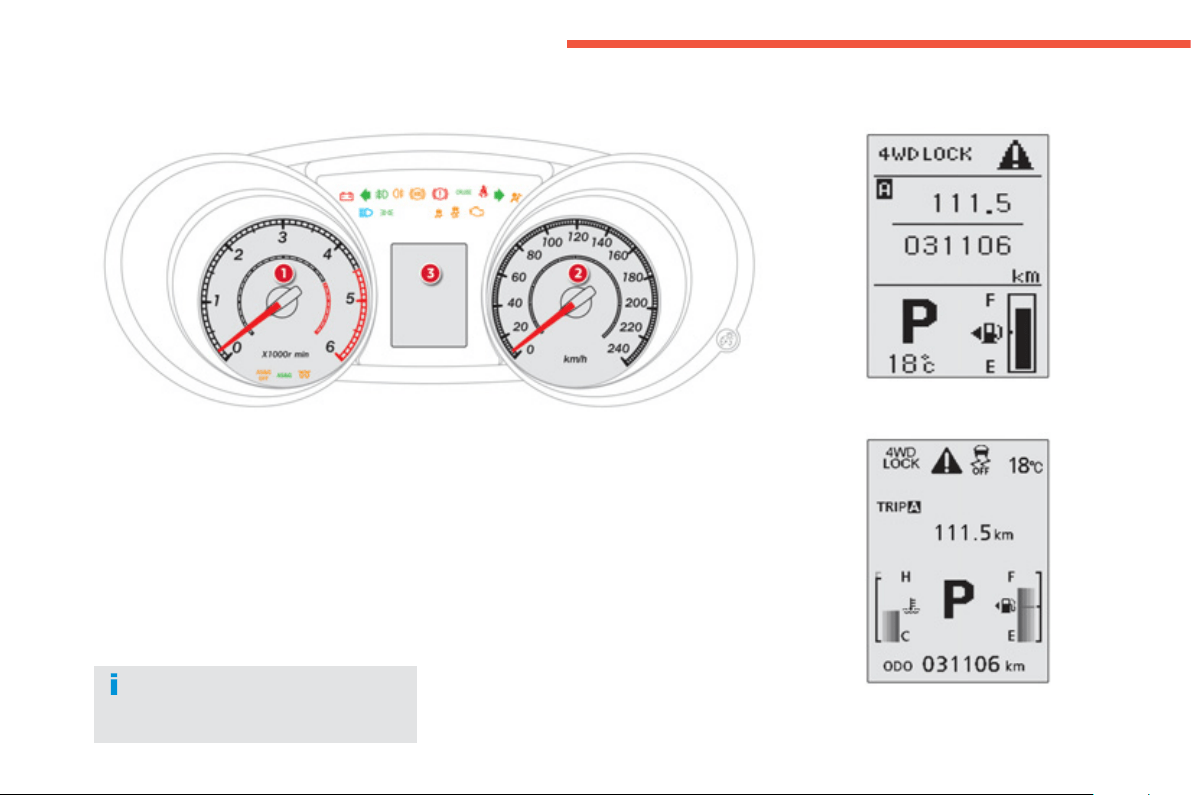
1.
Re
v
cou
nt
e
r.
2.
Sp
eedometer.
Screen t
y
pe 2
3.
I
nstrument pane
l
di
sp
l
a
y
screen:
- Warning and status displays.
- Total and tri
p
distance recorders.
- Service indicator.
- Coolant temperature.
- Trip computer information.
- Cruise control settin
g
.
-
G
ear shi
f
t indicator recommendations.
-
S
ettin
g
s menu
(
displa
y
, sound...
)
.
-
Fuel
le
v
el
.
- Ambient tem
p
erature.
- Tr
a
n
s
mi
ss
i
o
n m
ode
.
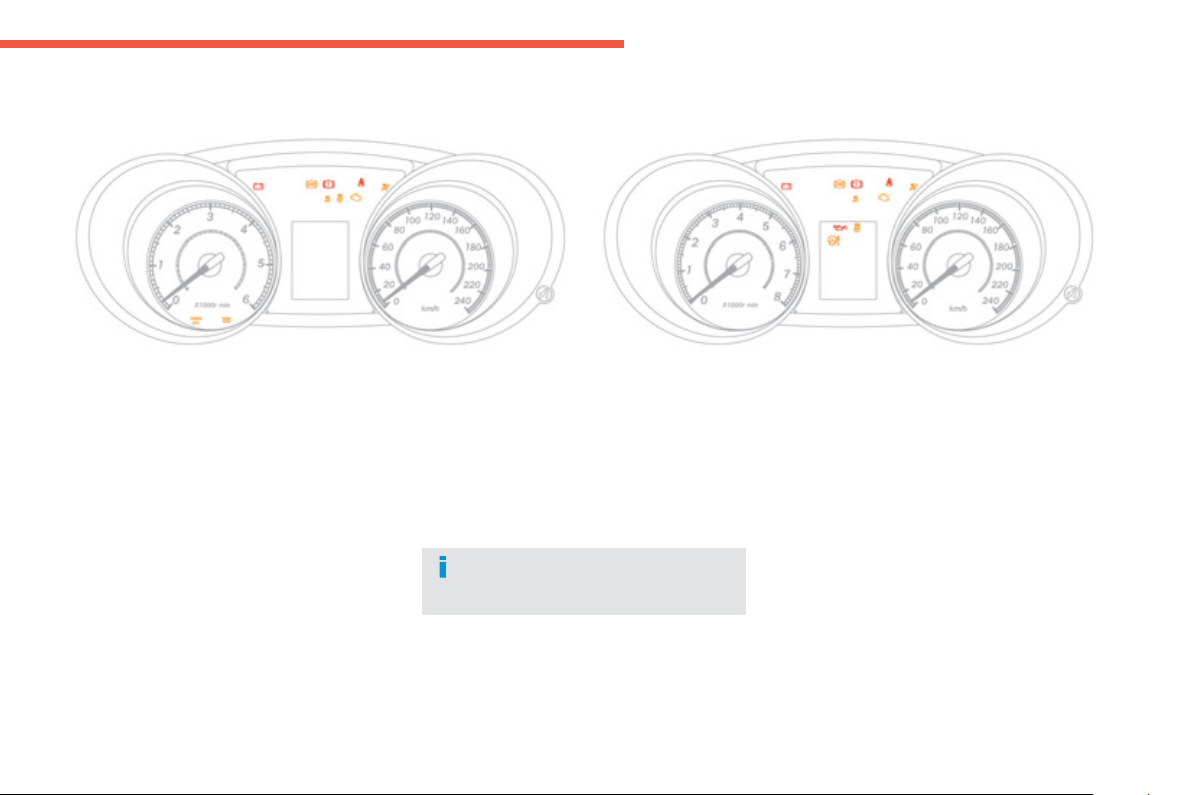
Panel
g
roupin
g
to
g
ether the dials and warnin
g/
indicator lam
p
s. These in
f
orm the driver o
f
the
a
ctivation
/
deactivation o
f
a s
y
stem or o
f
the
occu
rr
e
n
ce
o
f
a
f
au
lt.
Screen t
y
pe 1
Mana
g
ement o
f
the displa
y
is done usin
g
t
he
INF
O
bu
tt
o
n
loca
t
ed
o
n t
he
dashboa
r
d
to the le
f
t o
f
the instrument
p
anel.
1
25
Monitoring
Vi
sua
l in
d
i
ca
t
o
r
s
whi
c
h inf
o
rm th
e
d
riv
e
r
o
f th
e
occurrence of a malfunction
(
warnin
g
lamp
)
or o
f
the operation o
f
a s
y
stem
(
operation or
deactivation indicator lamp
)
.
Wh
en t
h
e
ig
n
i
t
i
on
i
s sw
i
tc
h
e
d
on
C
ertain warnin
g
lamps come on
f
or a
f
ew
secon
d
s w
h
en t
h
e
ig
n
i
t
i
on
i
s sw
i
tc
h
e
d
on.
Wh
en t
h
e en
gi
ne
i
s starte
d
, t
h
ese warn
i
n
g
l
amps should go o
ff
.
A
ssoc
i
ate
d
warn
i
n
g
s
The illumination,
f
ixed or
f
lashin
g
, o
f
certain
warn
i
n
g
l
amps ma
y
b
e accompan
i
e
d
by
an
au
dibl
e s
ig
na
l
an
d
a messa
g
e.
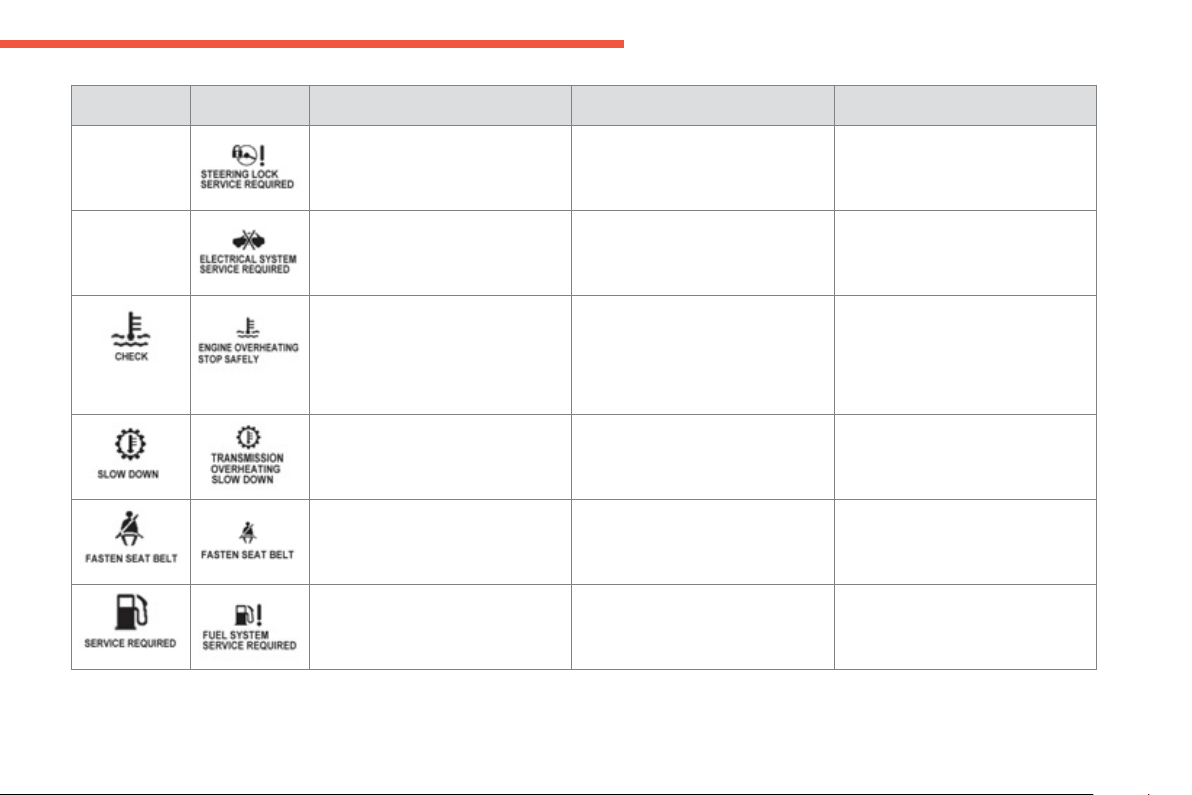
Warnin
g
and indicator lamps
I
f
they remain on, be
f
ore moving o
ff
,
r
e
f
er to the in
f
ormation on the warning
lam
p
in
q
uestion.
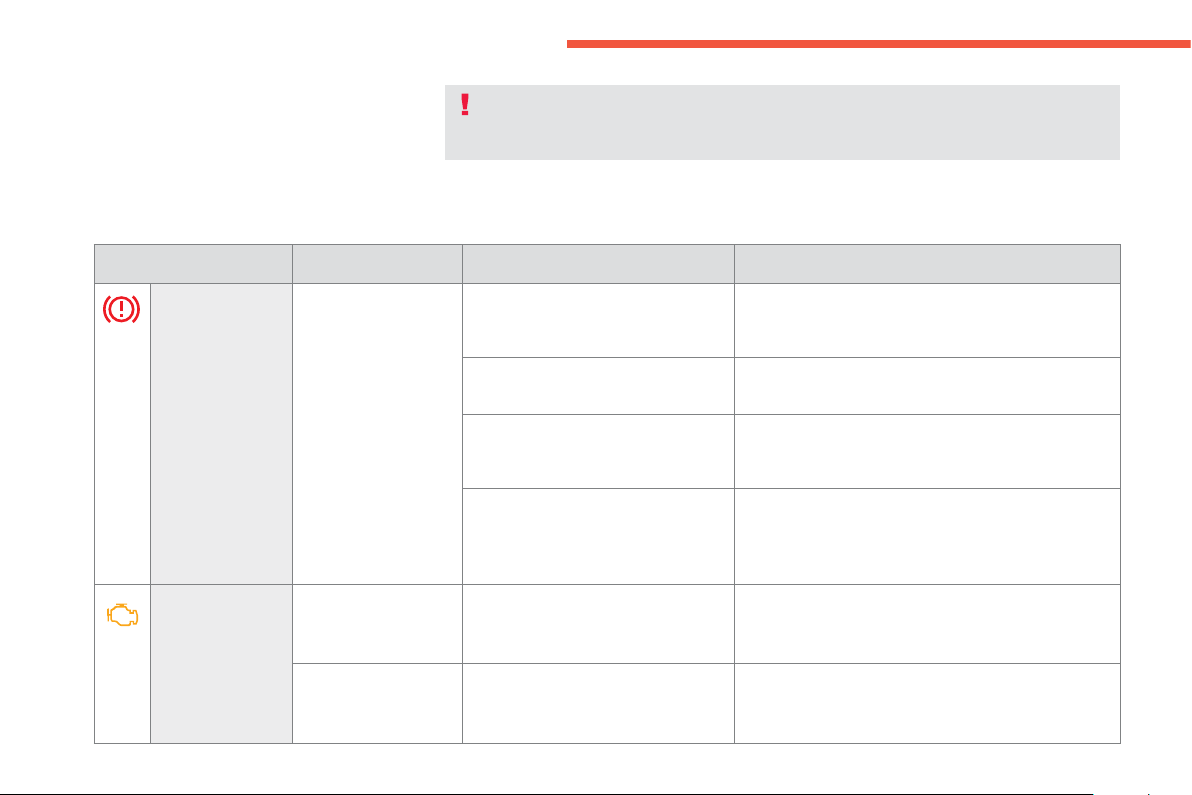
26
Monitoring
W
arn
i
n
g
l
amps
Wh
en t
h
e en
gi
ne
i
s runn
i
n
g
or t
h
e ve
hi
c
l
e
i
s
being driven, the illumination o
f
one o
f
the
f
ollowing warning lamps indicates a mal
f
unction
which requires action on the part of the driver.
The warnin
g
comes on in the instrument panel
or appears in the instrument panel screen.
Warnin
g
lam
p
i
s on Caus
e
A
ction / Observations
P
arkin
g
brake
/
B
rake fluid
l
evel
/
Electronic
b
rake force
distribution
fix
ed
. It comes on for a few seconds
,
then
g
oes o
ff
when the i
g
nition is switched
t
o
"
O
N".
The parkin
g
brake is on or not
f
ull
y
re
l
eased
.
It is accompanied b
y
a messa
g
e. Release the parkin
g
brake to make the warnin
g
lamp
g
o off.
Th
e
b
r
a
k
e
f
l
u
i
d
l
e
v
e
l i
s
t
oo
l
o
w.
I
t
i
s accompan
i
e
d
by
a messa
g
e.
T
op up w
i
t
h
b
ra
k
e
fluid and contact a CITRO
Ë
N dealer or a qualified
wor
k
s
h
o
p
.
Th
e
e
l
ec
tr
o
ni
c
b
r
a
k
e
f
o
r
ce
d
i
s
tri
bu
ti
o
n
(
EBFD
)
is fault
y
.
You must stop as soon as it is safe to do so.
Have it checked b
y
a CITROËN dealer or a qualified
workshop.
E
ngine
a
utodia
g
nosis
s
y
ste
m
f
lashing. The engine management system has
a
fau
lt.
Risk o
f
destruction o
f
the catalytic converter.
Have it checked b
y
a CITROËN dealer or a qualified
workshop.
fix
ed
. The emission control s
y
stem has a
f
au
lt.
The warnin
g
lamp should
g
o off when the en
g
ine is started.
If it does not
g
o off, contact a CITROËN dealer o
r
quali
f
ied workshop without dela
y
.
The illumination o
f
a warning lamp may be accompanied by the display o
f
an additional
m
essa
g
e, to assist
y
ou in identi
fy
in
g
the problem.
If
y
ou encounter an
y
problems,
y
ou should contact a CITROËN dealer or a qualified workshop.
1
27
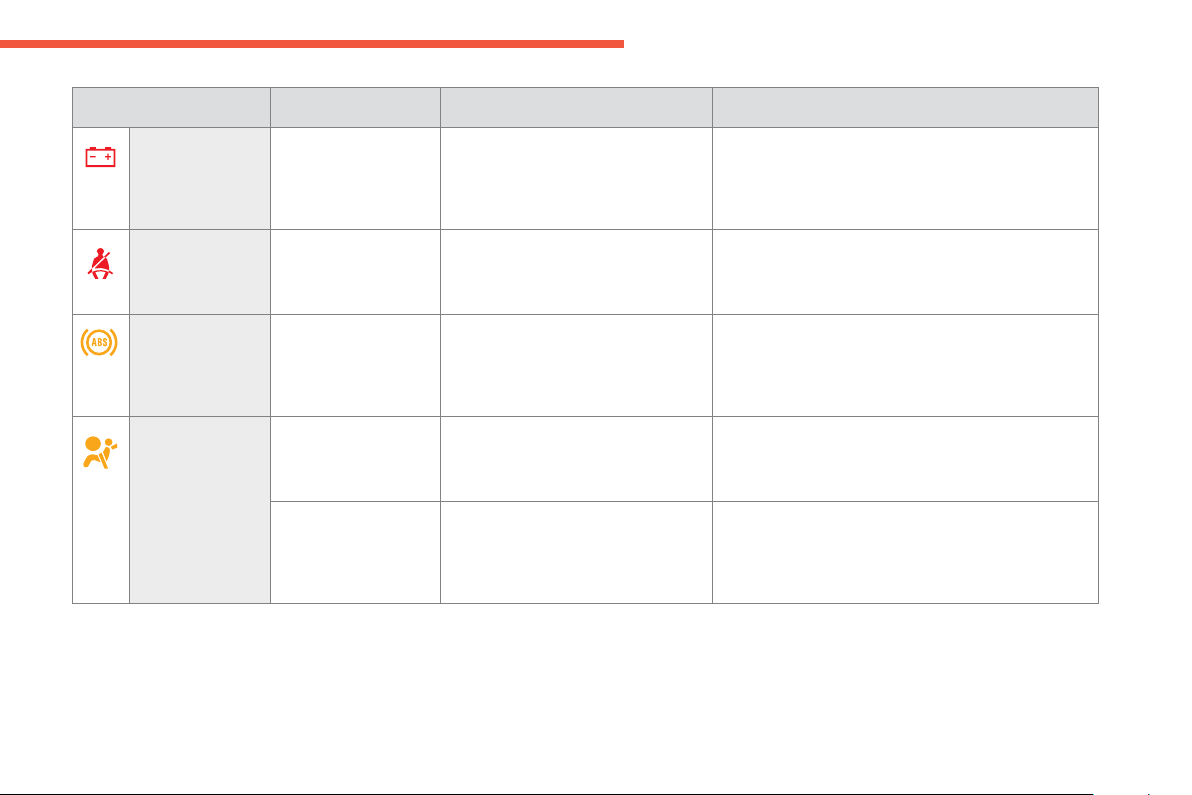
Monitoring
Warnin
g
lamp
i
s on Caus
e
A
ction / Observations
B
atter
y
c
h
ar
ge
*
f
ix
ed
.
Th
e
b
atter
y
c
h
ar
gi
n
g
c
i
rcu
i
t
h
as a
f
ault
(
dirty or loose terminals, slack o
r
c
ut alternator belt, ...
)
.
The warnin
g
lamp should
g
o o
ff
when the en
g
ine is
s
t
a
rt
ed
.
If it does not
g
o off, contact a CITROËN dealer or a
qualified workshop.
A
nt
i
-
l
oc
k
B
raking System
(
ABS
)
f
ix
ed
.
Th
e ant
i
-
l
oc
k
b
ra
ki
n
g
s
y
stem
h
as a
fau
lt.
Th
e ve
hi
c
l
e reta
i
ns convent
i
ona
l
b
ra
ki
n
g
.
Drive care
f
ully at reduced speed and contact a
CITROËN dealer or a
q
ualified worksho
p
without
dela
y
.
Front seat belt
not fastened /
u
nfastened
fixed, then flashin
g
,
a
ccompanied b
y
an
a
u
dibl
e s
ig
na
l
.
Th
e
d
riv
e
r h
as
n
o
t f
as
t
e
n
ed
o
r h
as
u
nf
as
t
e
n
ed
th
e
ir
sea
t
be
lt.
Pull the strap, then insert the ton
g
ue in the buckle.
*
Accordin
g
to destination countr
y
.
Ai
r
b
a
g
s an
d
p
retens
i
oner
s
temporar
ily
.
Wh
en
y
ou sw
i
tc
h
on t
h
e
ig
n
i
t
i
on, t
hi
s
warnin
g
lamp comes on
f
or a
f
ew
seconds, then
g
oes o
ff
.
If it does not
g
o off, contact a CITRO
Ë
N dealer or a
quali
f
ied workshop.
f
ix
ed
.Fault with one o
f
the airba
g
or seat
belt pretensioner s
y
stems.
Have it checked b
y
a CITROËN dealer or a qualified
workshop.

28
Monitoring
O
p
eration indicator lam
p
s
I
f
one o
f
the
f
ollowin
g
indicator lamps comes on, this con
f
irms that the correspondin
g
s
y
stem has come into operation.
I
t may
b
e accompan
i
e
d
b
y an au
dibl
e s
i
gna
l
an
d
a message
i
n t
h
e
i
nstrument pane
l
screen.
Warnin
g
lam
p
i
s on Caus
e
A
ction / Observations
L
eft-hand
direction
i
ndicato
r
f
lashin
g
with audible
warning.
Th
e
ligh
t
i
n
g
sta
lk
h
as
b
een presse
d
do
wnw
a
r
ds
.
I
f
this indicator lamp
f
lashes abnormall
y
quickl
y
, this
cou
l
d
in
d
i
ca
t
e
th
a
t th
e
bu
l
b
of
o
n
e
of
th
e
d
ir
ec
ti
o
n
indicators has blown.
C
han
g
e the bulb or contact a
CITROËN dealer or a qualified workshop.
R
i
g
ht-hand
direction
i
ndicato
r
f
lashin
g
with audible
warnin
g
.
The li
g
htin
g
stalk has been pushed
upwards.
I
f
this indicator lamp
f
lashes abnormall
y
quickl
y
, this
cou
l
d
in
d
i
ca
t
e
th
a
t th
e
bu
l
b
o
f
o
n
e
o
f th
e
d
ir
ec
ti
o
n
indicators has blown. Chan
g
e the bulb or contact a
CITROËN dealer or a qualified workshop.
Sidelam
ps
or
di
pp
ed beam
headlam
p
s
fix
ed
. The sidelamps or dipped beam
h
eadlamps are on.
M
ain beam
h
ea
dl
am
p
s
fix
ed
.The li
g
htin
g
stalk is pulled towards
yo
u.
Pull the stalk to return to dipped beam headlamps.
Front fo
g
lamp
s
f
ix
ed
.The
f
ront
f
o
g
lamps are switched on. Turn the rin
g
on the stalk rearwards twice to switch o
ff
the front fo
g
lamps.
R
ear fo
g
lamp fix
ed
.The rear fo
g
lamp is switched on. Turn the rin
g
on the stalk rearwards to switch off the
rear
f
o
g
lamp.

1
29
Monitoring
Warnin
g
lam
p
i
s on Caus
e
Action / Observations
Cruise contro
l
fix
ed
Thi
s
co
m
es
o
n wh
e
n th
e
c
r
u
i
se
co
ntr
o
l h
as
bee
n
ac
tiv
a
t
ed
.
Press the "
O
N/
O
FF" button to activate/deactivate the
c
r
u
i
se
co
ntr
o
l.
Active stabilit
y
c
ontrol and
t
ract
i
on contro
l
(
ASC/TCL
)
flashin
g
.
O
peration of the ASC/TCL s
y
stems. The s
y
stems optimise traction and improve the
directional stabilit
y
of the vehicle.
Ad
apt
y
our
d
r
i
v
i
n
g
an
d
mo
d
erate
y
our spee
d
.
f
ix
ed
. Fault in the A
SC/
T
C
L s
y
stems. Have it checked b
y
a CITRO
Ë
N dealer or a qualified
wor
k
s
h
o
p
.
Sto
p
& Start
(
Auto Stop & Go
)
f
unction
fix
ed
. When the vehicle stops
(
red li
g
hts,
traffic
j
ams, ...
)
the Stop & Start
(
A
S&G)
f
unction has put the en
g
ine
int
o
S
T
O
P m
ode
.
The warnin
g
lamp
g
oes off and the en
g
ine restarts
automaticall
y
in START mode, as soon as
y
ou want to
mo
v
e
off
.
f
l
as
h
es
fo
r
a
fe
w
s
econ
d
s, t
h
en
g
oes
off
.
S
T
O
P mode is temporaril
y
u
n
a
v
ailable
.
or
S
TART mode is invoked
automaticall
y
.
S
ee "
S
top
&
S
tart
(
A
S&G)
f
unction"
f
or special cases
with
S
T
O
P m
ode
a
n
d
S
TART m
ode
.
Di
ese
l
en
gi
ne
p
re-
h
eat
i
n
g
f
ix
ed
.
Th
e en
gi
ne
i
s co
ld
an
d
:
- t
h
e
ig
n
i
t
i
on sw
i
tc
h
i
s at t
h
e O
N
p
osition
(
ignition on
)
, o
r
- th
e
S
TART/
S
TOP startin
g
button
h
as been pressed
(
i
g
nition on
)
.
Wi
t
h
k
e
y
start
i
n
g
, wa
i
t unt
il
t
h
e warn
i
n
g
l
amp
h
as
g
one
o
ff
be
f
ore startin
g
.
With the Ke
y
less Entr
y
and
S
tartin
g
s
y
stem, the en
g
ine
will onl
y
start a
f
ter the warnin
g
lamp has
g
one o
ff
.
The duration
f
or which the warnin
g
lamp is on is
determined b
y
the climatic conditions
(
up to 30 seconds
in severe weather
)
.
I
f
the en
g
ine does not start, switch the i
g
nition o
ff
and
t
h
en on a
g
a
i
n an
d
wa
i
t a
g
a
i
n unt
il
t
h
e warn
i
n
g
l
amp
g
oes o
ff
, then start the en
g
ine.

30
Monitoring
D
eact
i
vat
i
on
i
n
di
cator
l
am
p
s
I
f
one o
f
the
f
ollowin
g
indicator lamps comes on, this con
f
irms that the correspondin
g
s
y
stem has been switched o
ff
intentionall
y
.
Thi
s
i
s ma
y
b
e accompan
i
e
d
by
an au
dibl
e s
ig
na
l
an
d
a messa
g
e
i
n t
h
e screen.
W
arn
i
n
g
l
am
p
i
s on Caus
e
A
ction / Observations
A
SC/TC
L
fix
ed
. The ASC/TCL off switch
,
located at
the bottom o
f
the dashboard
(
driver's
s
ide
)
has been pressed.
A
SC/
T
C
L i
s
deac
tiv
a
t
ed
.
A
SC
: active stability control .
T
C
L: traction control.
Press the button to activate the A
SC/
T
C
L.
The A
SC/
T
C
L s
y
stem is automaticall
y
activated on
s
tart
i
n
g
t
h
e ve
hi
c
l
e.
Sto
p
& Start
s
y
stem
(
Auto
Stop & Go
)
fix
ed
. The off switch for the Stop & Start
(
AS&G
)
s
y
stem, located at the bottom
o
f
the dashboard
(
driver's side
)
has
b
een presse
d
.
The
S
top
&
S
tart
(
A
S&G)
s
y
stem is
deaac
t
i
v
a
t
ed
.
Press the switch a
g
ain to activate the Stop & Start
(
AS&G
)
s
y
stem.
1
31
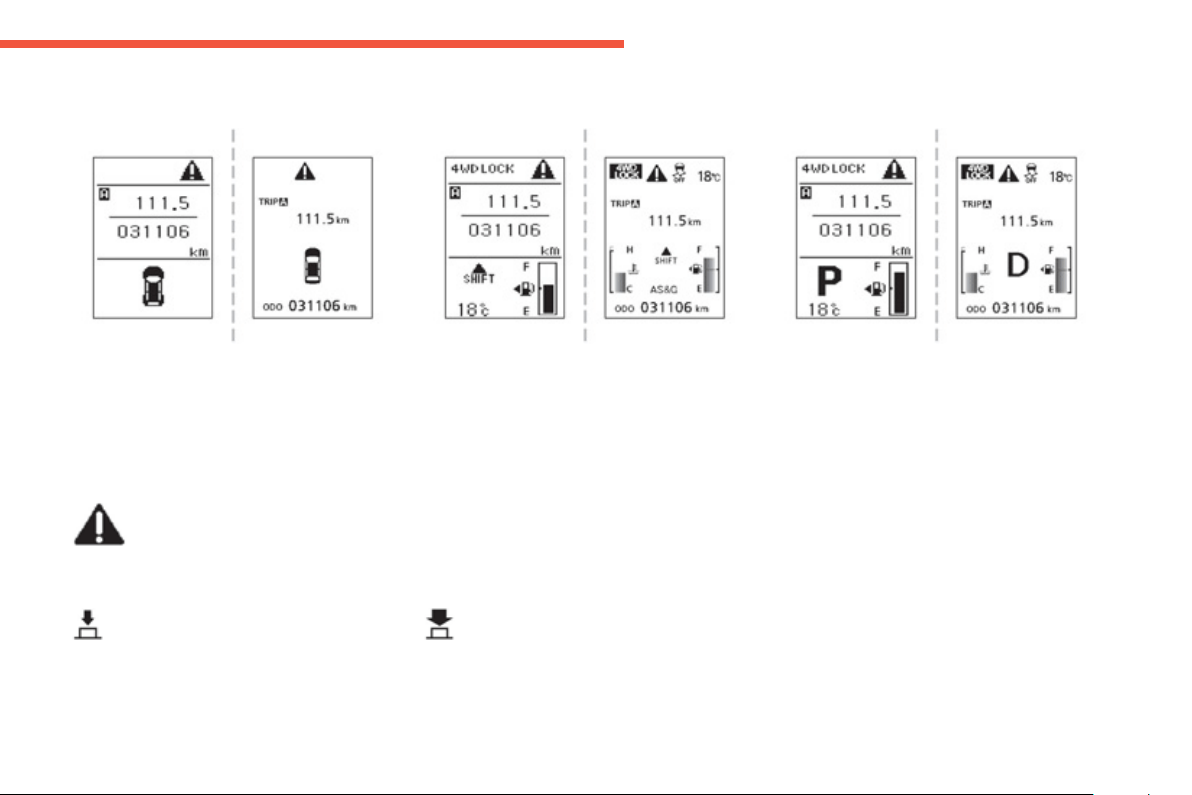
Monitoring
Instrument panel screen
Each time the en
g
ine is started: warnin
g
lamps and/or messa
g
es come on, appl
y
in
g
a checkin
g
self test. The
y
g
o off after a few seconds.
When
y
ou want to see the trip computer in
f
ormation,
y
ou can choose to i
g
nore the alerts, b
y
pressin
g
the INFO
bu
tt
o
n
o
n t
he
dashboa
r
d
.
The messa
g
es displa
y
ed ma
y
var
y
accordin
g
to the t
y
pe o
f
displa
y
screen
(
t
y
pe 1 or t
y
pe 2
)
in the instrument panel.
Certain messa
g
es are onl
y
displa
y
ed in the t
y
pe 2 screen
.
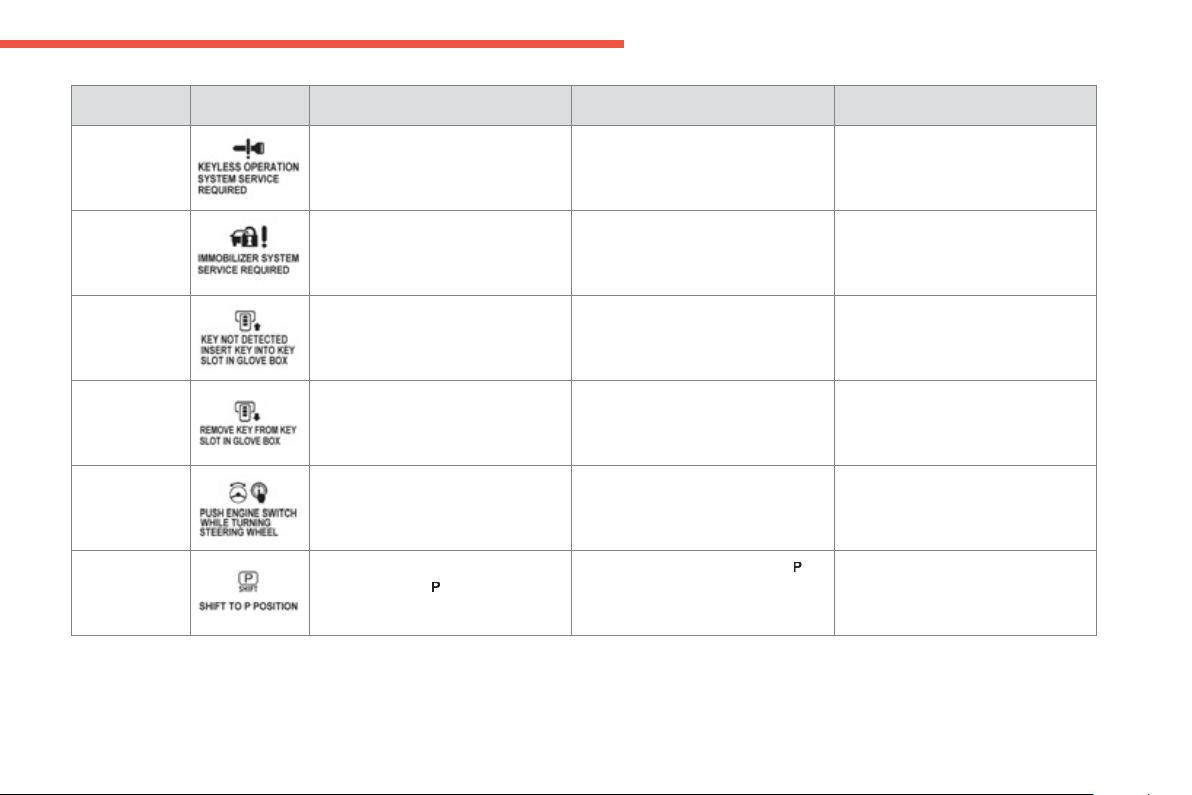
Wh
en t
hi
s s
y
m
b
o
l
appears: ma
k
e a
s
h
ort
p
ress
.
Wh
en t
hi
s s
y
m
b
o
l
appears: ma
k
e a
l
on
g
press
.
I
g
nition off
.
Ig
nition on
(
with a manual
g
earbox
).
Ig
nition on
(
with a CVT
g
earbox
).
Warnin
g
s and alerts
When an alert occurs, the displa
y
ed information then disappears. the warnin
g
lamp and its associated messa
g
e appear, accompanied if appropriate b
y
an audible si
g
nal.
When there are several alerts, they are displayed in turn and this symbol appears. It remains displayed while there are still alerts.
You will then be able to displa
y
the alerts a
g
ain b
y
pressin
g
the
I
NFO button several times to c
y
cle throu
g
h the trip computer information and return to
th
e
a
l
e
rt
s
.
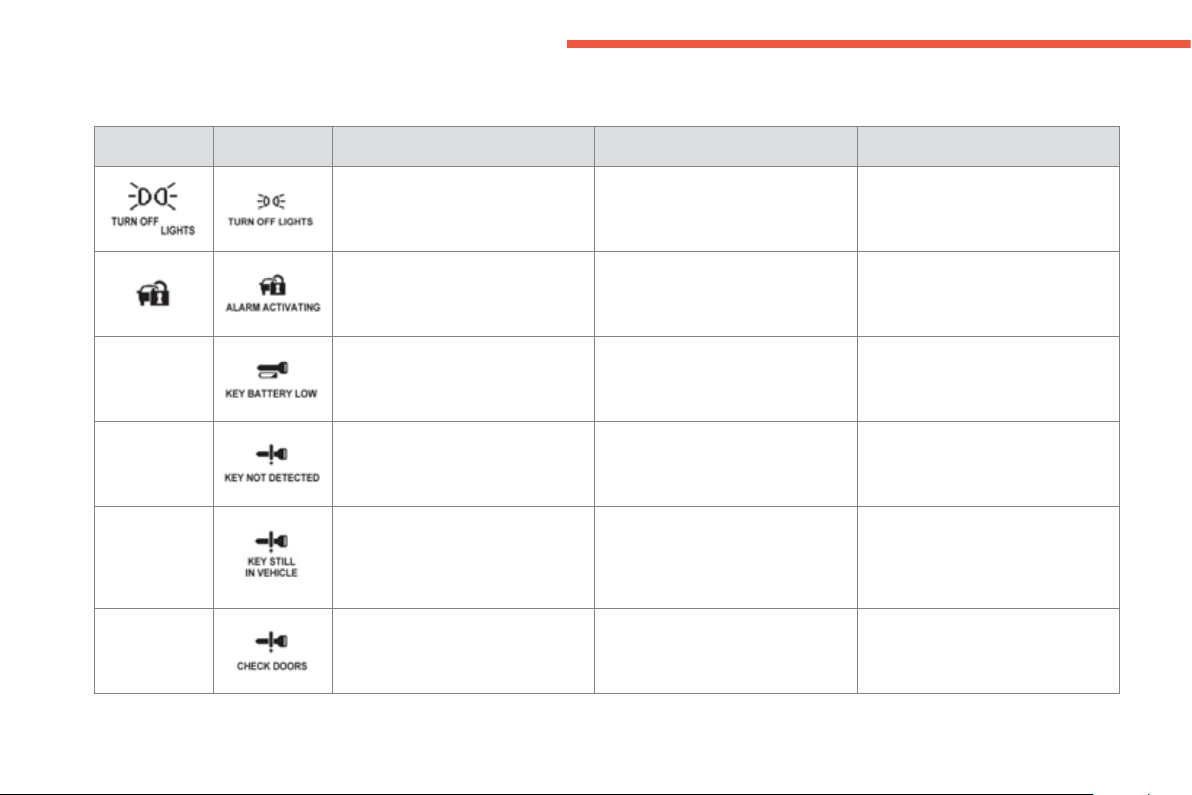
32
Monitoring
S
creen
1
S
creen 2 Caus
e
S
olution - Action Observations
Warnin
g
messa
g
es
(
i
g
nition at "OFF"
)
You have
f
or
g
otten to switch o
ff
the
ve
hi
c
l
e
ligh
t
i
n
g
.
S
witch o
ff
the vehicle li
g
htin
g
b
y
placin
g
the control at
O
FF.
The
r
e
is
a
n
i
nt
e
rm
i
tt
e
nt
audible
sig
na
l
.
The alarm has been tri
gg
ered.
The batter
y
f
or the Ke
y
less Entr
y
a
nd
S
tartin
g
s
y
stem is
f
lat.
Replace the batter
y
(
see "
C
han
g
in
g
the batteries"
)
.
Th
e e
l
ectron
i
c
k
e
y
t
h
at
y
ou
h
ave on
your person is not recognised.
C
heck that
y
ou have the correct
e
lectronic key.
I
f
the messa
g
e persists, contact a
C
ITROËN dealer.
The electronic ke
y
is still in the
vehicle and
y
ou have tried to lock
th
e
doo
r
s
o
r
boo
t fr
o
m th
e
ou
t
s
i
de
.
Ensure that
y
ou have the electronic
k
e
y
on
y
our person before lockin
g
th
e
v
e
hi
c
l
e
.
O
n
e
of
th
e
doo
r
s
o
r th
e
boo
t i
s
n
o
t
p
roper
ly
c
l
ose
d
w
h
en
l
oc
ki
n
g
t
h
e
v
e
hi
c
l
e
f
r
o
m th
e
ou
t
s
i
de
.
C
lose the door or the boot, then lock
t
he
v
ehicle
.
1
33
Monitoring
Screen
1
Screen 2 Caus
e
Solution - Action Observations
Fault with the "Ke
y
less Entr
y
and
S
tartin
g
" s
y
stem.
Contact a CITROËN dealer.
F
au
lt with th
e
e
l
ec
tr
o
ni
c
a
nti-th
e
ft
sy
stem.
Switch off the i
g
nition, then start the
e
n
gi
ne.
If the problem persists, contact a
C
ITR
OË
N dealer.
The electronic key is not detected. Insert the electronic key into the
housin
g
located in the
g
love box.
R
e
m
e
m
be
r t
o
r
e
m
o
v
e
th
e
e
l
ec
tr
o
ni
c
ke
y
f
rom the housin
g
a
f
ter startin
g
th
e
v
e
hi
c
l
e
.
The electronic ke
y
has not been
r
emoved from the housin
g
in the
gl
ove
b
ox.
Remove the electronic ke
y
from the
housin
g
in the
g
love box.
Th
e steer
i
n
g
co
l
umn
i
s
l
oc
k
e
d
.
S
witch the i
g
nition on and turn the
steer
i
n
g
w
h
ee
l
s
ligh
t
ly
to un
l
oc
k
t
h
e
steering column.
The en
g
ine is off but the
g
ear lever
is not in position
P
.
P
Place the
g
ear lever in position
P
.
P
O
nl
y
for vehicles fitted with a "CVT"
g
earbox.
34
Monitoring
Screen
1
Screen 2 Caus
e
Solution - Action Observations
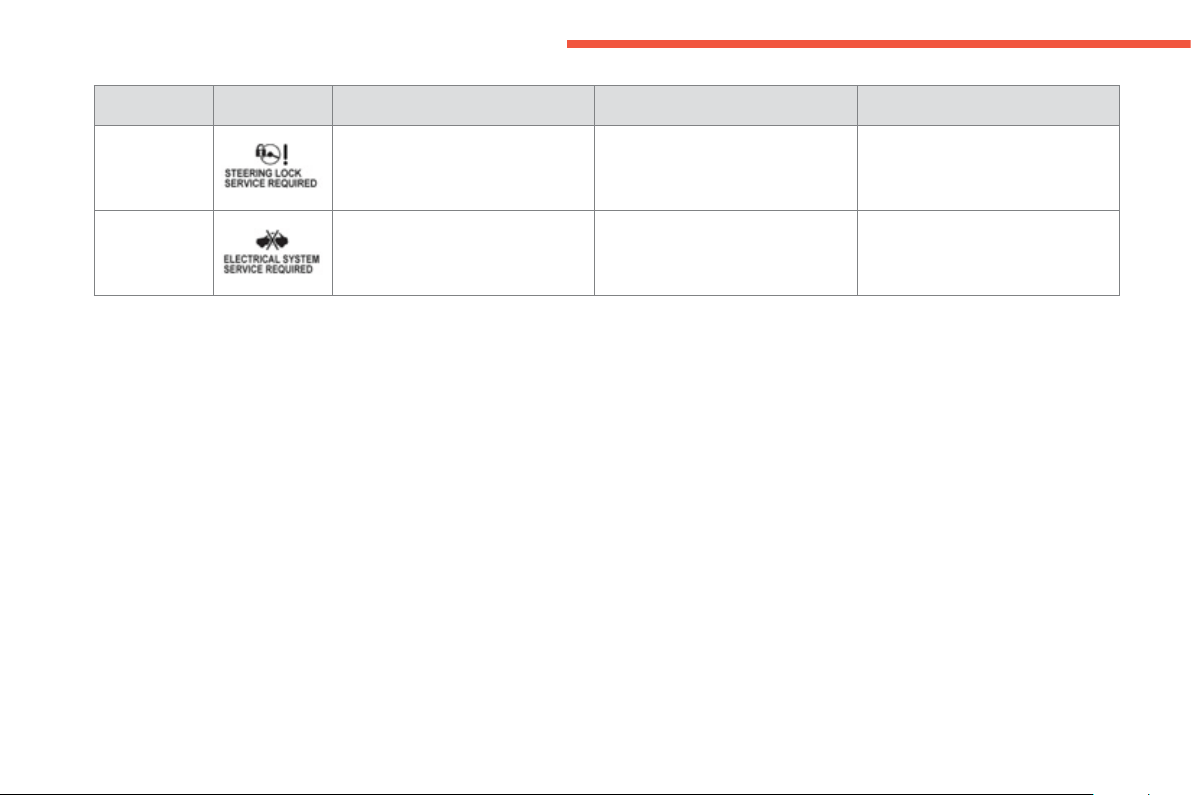
The steerin
g
column has not locked
a
fter openin
g
the driver's door.
Lock the steerin
g
column b
y
turnin
g
the steerin
g
wheel sli
g
htl
y
before
l
eavin
g
the vehicle.
F
au
l
t w
i
t
h
t
h
e e
l
ectr
i
ca
l
s
y
stem.
C
ontact a
C
ITR
OË
N dealer or a
q
uali
f
ied workshop.
1
35
Monitoring
Screen
1
Screen 2 Caus
e
Solution - Action Observations
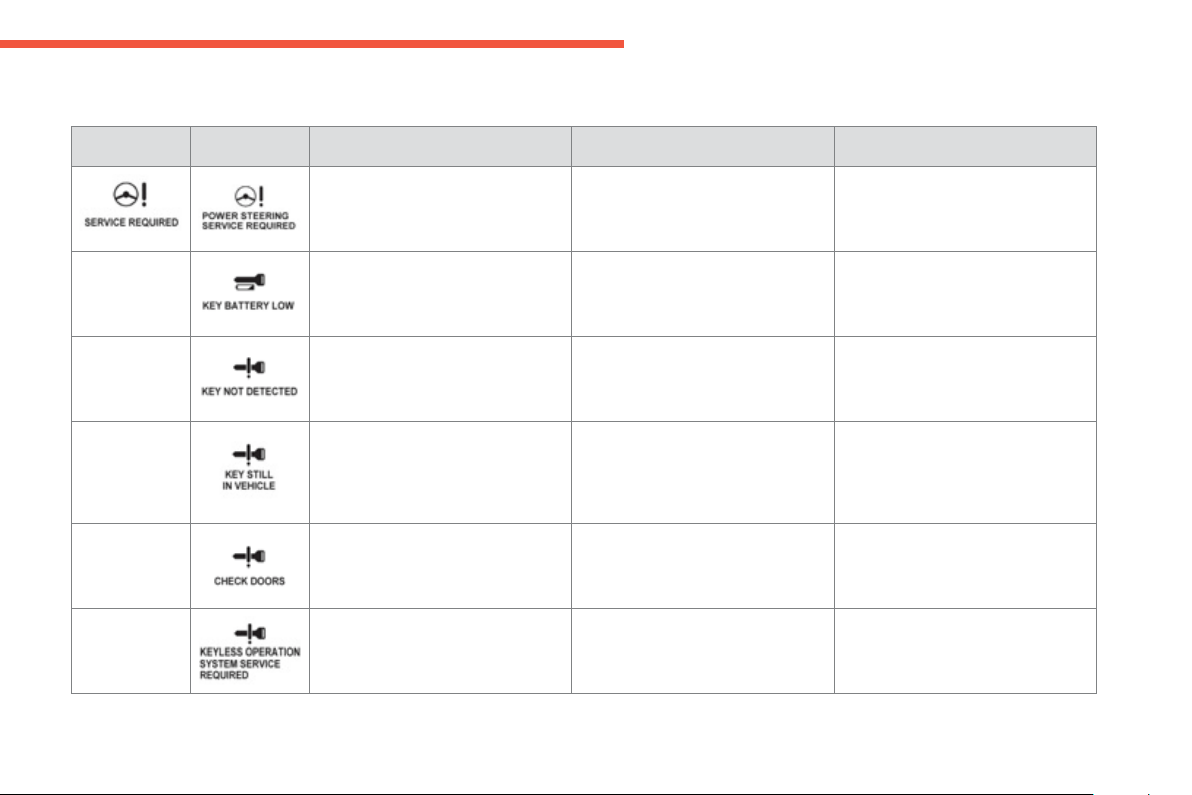
Warnin
g
messa
g
es
(
i
g
nition at "ON"
)
F
au
l
t w
i
t
h
t
h
e e
l
ectr
i
c
p
ower
s
teering.
S
to
p
the vehicle, wait
f
ew moments
then start the engine again.
I
f
the messa
g
e remains a
f
te
r
restarting, contact a CITROËN
dealer or a quali
f
ied workshop.
The batter
y
f
or the "Ke
y
less Entr
y
a
nd Startin
g
" s
y
stem is flat.
Replace the batter
y
(
see "
C
han
g
in
g
the batteries"
)
.
The electronic ke
y
that
y
ou have on
y
our person is not reco
g
nised.
Check that
y
ou have the correct
e
lectronic ke
y
.
If the messa
g
e persists, contact a
C
ITR
O
ËN dealer.
The electronic ke
y
is still in the
vehicle and
y
ou have tried to lock
th
e
doo
r
s
o
r
boo
t fr
o
m th
e
ou
t
s
i
de
.
Ensure that
y
ou have the electronic
k
e
y
on
y
our person before lockin
g
th
e
v
e
hi
c
l
e
.
O
ne of the doors or the boot is not
p
roperl
y
closed when lockin
g
the
v
e
hi
c
l
e
fr
o
m th
e
ou
t
s
i
de
.
Close the door or the boot, then lock
th
e
v
e
hi
c
l
e
.
Fault with the "Ke
y
less Entr
y
and
S
tartin
g
" s
y
stem.
C
ontact a
C
ITR
O
ËN dealer.
36
Monitoring
Screen
1
Screen 2 Caus
e
Solution - Action Observations
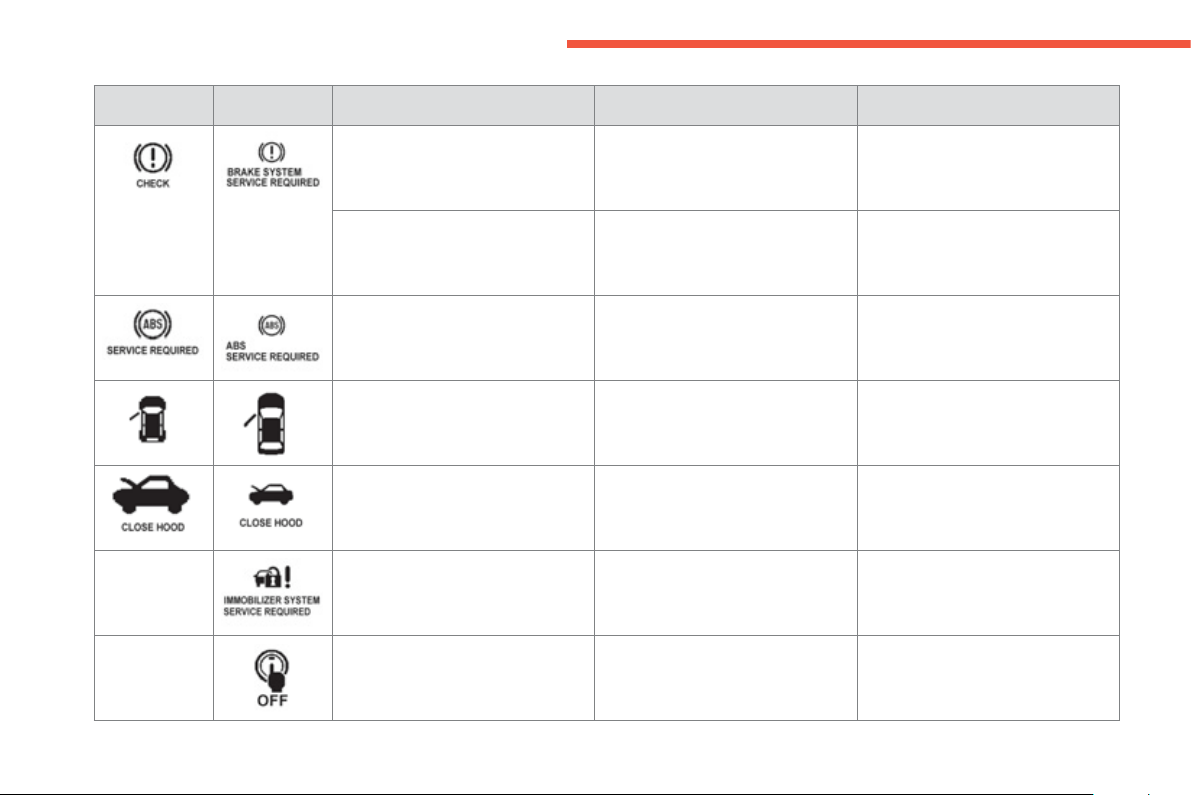
Th
e
b
r
a
k
e
fl
u
i
d
l
e
v
e
l i
s
t
oo
l
o
w. Top up usin
g
a brake fluid listed b
y
C
ITR
O
ËN.
If the problem persists, contact
a CITROËN dealer or a qualified
w
orkshop.
Fault with the brakin
g
s
y
stem. You must stop as soon as it is safe
t
o
do
so
.
Have the s
y
stem checked b
y
a
C
ITRO
Ë
N dealer or a qualified
w
or
k
s
h
op.
Fault with the anti-lock braking
s
y
stem
(
AB
S)
.
Contact a CITROËN dealer or a
q
uali
f
ied workshop.
Th
e
v
e
hi
c
l
e
r
e
t
a
in
s
co
nv
e
nti
o
n
a
l
brakin
g
without assistance but
y
ou
are advised to stop.
O
ne of the doors or the boot is not
p
roperl
y
closed.
C
lose the door or the boot. The openin
g
in question is identified
in th
e
sc
r
ee
n.
Th
e
b
onnet
i
s not proper
ly
c
l
ose
d
.
C
l
ose
th
e
bo
nn
e
t.
F
au
lt with th
e
e
l
ec
tr
o
ni
c
a
nti-th
e
ft
s
y
stem.
Switch off the i
g
nition then start the
e
n
g
ine a
g
ain.
If the problem persists, contact a
C
ITR
O
ËN dealer.
Th
e
d
r
i
ver
'
s
d
oor
i
s open an
d
t
h
e
ig
n
i
t
i
on
i
s st
ill
on.
S
witch o
ff
the i
g
nition be
f
ore leavin
g
t
he
v
ehicle
.
1
37
Monitoring
Screen
1
Screen 2 Caus
e
Solution - Action Observations
Fault in the steerin
g
column. You must stop as soon as it is safe
t
o
do
so
.
Contact a CITROËN dealer or a
q
ualified workshop.
Fault with the electrical s
y
stem. Stop the vehicle and contact a
C
ITRO
Ë
N dealer or a qualified
w
or
k
s
h
op.
The cooling system temperature is
too hi
g
h.
Wait
f
or the engine to cool down
b
e
f
ore toppin
g
up, i
f
necessar
y
.
If the problem persists, contact
a CITROËN dealer or a qualified
w
orkshop.
You must sto
p
as soon as it is sa
f
e
t
o
do
so
.
The temperature o
f
the
C
VT
transmission fluid is too hi
g
h.
S
top the vehicle and contact a
C
ITROËN dealer or a qualified
w
orkshop.
Th
e
d
riv
e
r h
as
n
o
t f
as
t
e
n
ed
o
r h
as
u
n
fas
t
e
n
ed
th
e
ir
sea
t
be
lt.
Fasten
y
our seat belt. There is a continuous audible si
g
nal
i
f
y
ou drive without
f
astenin
g
y
our
sea
t
bel
t.
Mal
f
unction o
f
the
f
uel system. Contact a CITROËN dealer or a
q
uali
f
ied worksho
p
.
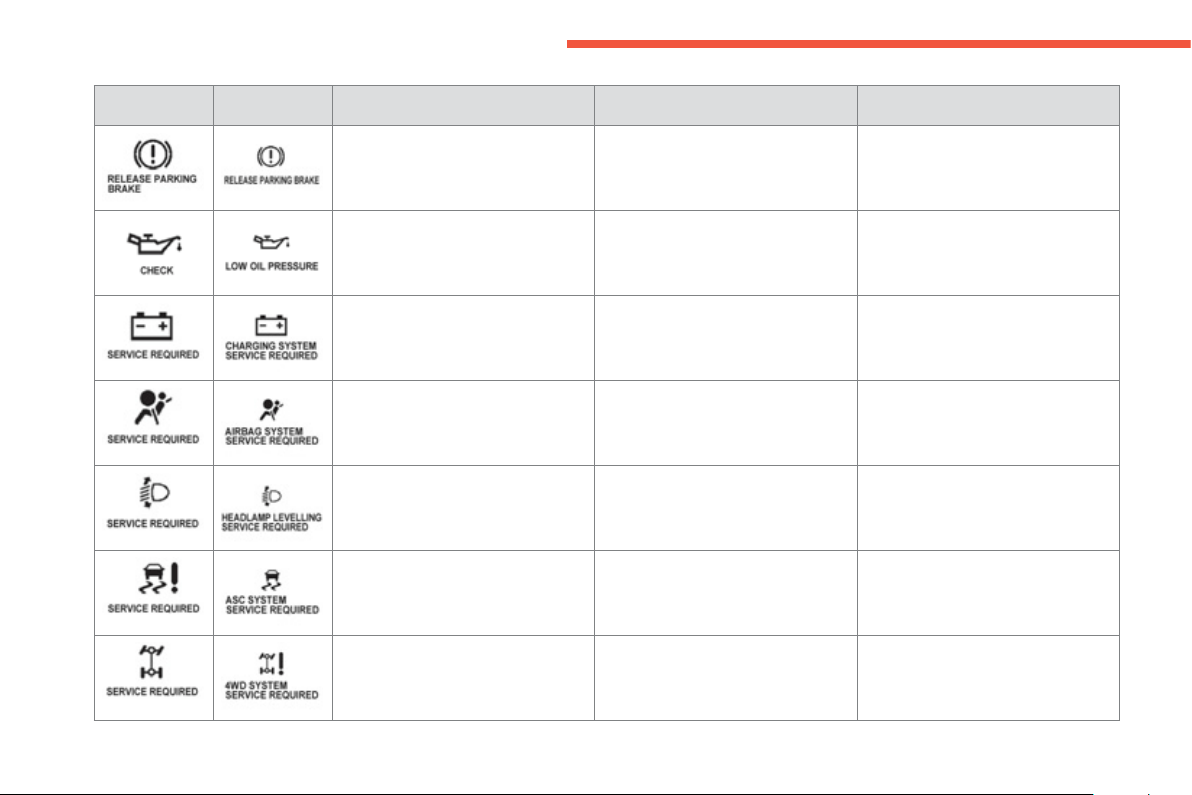
38
Monitoring
Screen
1
Screen 2 Caus
e
Solution - Action Observations
You have moved off with the parkin
g
brake not full
y
released.
Release the parkin
g
brake.
The oil pressure is too low or there
is a
f
ault with the en
g
ine lubrication
s
y
stem.
Stop the vehicle and contact a
C
ITRO
Ë
N dealer or a qualified
wor
k
s
h
op.
Battery charge
f
ault.
S
to
p
the vehicle and contact a
C
ITROËN dealer or a qualified
workshop.
Airba
g
or pretensioner fault.
C
ontact a
C
ITR
O
ËN dealer or a
q
ualified workshop to have the
sy
stems c
h
ec
k
e
d
.
F
au
l
t w
i
t
h
automat
i
c
h
ea
dl
amp
adj
ustment s
y
stem.
Co
nt
ac
t
a
C
ITR
OË
N
dea
l
e
r
o
r
a
q
uali
f
ied worksho
p
.
O
nl
y
on vehicles
f
itted with xenon
h
ea
dl
am
p
s.
Fault with the stabilit
y
control
s
y
stem
(
ASC
)
.
Contact a CITROËN dealer or a
q
ualified workshop.
F
au
lt with th
e
fou
r wh
ee
l
d
riv
e
transm
i
ss
i
on s
y
stem.
C
ontact a
C
ITR
OË
N dealer or a
q
uali
f
ied workshop.
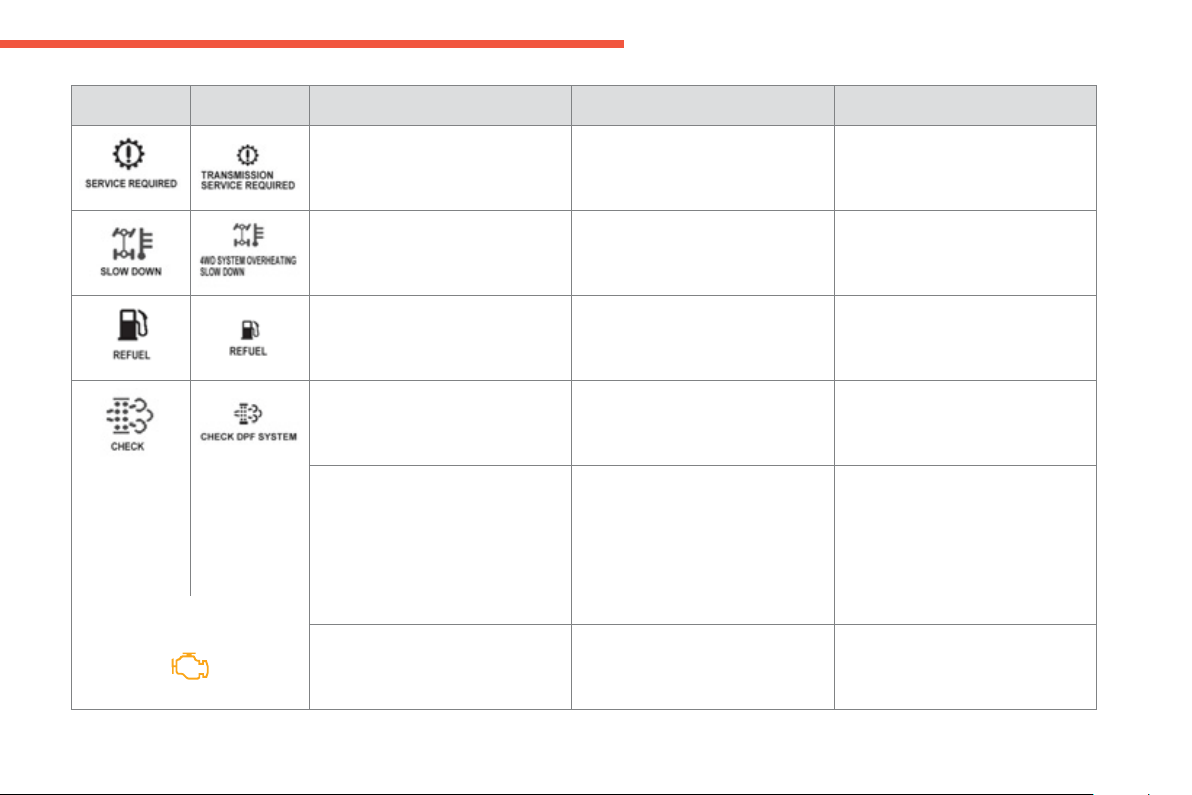
1
39
Monitoring
Screen
1
Screen 2 Caus
e
Solution - Action Observations
Fault with the CVT
g
earbox. Contact a CITROËN dealer or a
q
ualified workshop.
The temperature of the four wheel
d
r
i
ve transm
i
ss
i
on s
y
stem
i
s too
high
.
Stop the vehicle and contact a
C
ITRO
Ë
N dealer or a qualified
w
or
k
s
h
op.
The vehicle chan
g
es automaticall
y
to two wheel drive
(
2WD
)
.
Th
e
fue
l l
e
v
e
l i
s
l
o
w. Re
f
uel as soon as
p
ossible.
The low level o
f
the
p
article
e
mi
ss
i
o
n
s
f
ilt
e
r
add
itiv
e
r
ese
rv
o
ir
has
bee
n r
eac
h
ed
.
H
ave t
h
e reservo
i
r to
pp
e
d
u
p
as
soon as possible by a CITROËN
dealer or a quali
f
ied workshop.
O
nl
y
f
or the 1.6 litre HDi en
g
ine.
+
Start of saturation of the particle
e
mi
ss
i
o
n
s
filt
e
r.
As soon as the drivin
g
conditions
allow, re
g
enerate the filter b
y
drivin
g
at a speed of at least 25 mph
(
40 km
/
h
)
f
or around 20 minutes
(
with
the 1.6 litre HDi en
g
ine the minimum
speed is 36 mph
(
60 km
/
h
))
.
If the messa
g
e remains on, contact
a CITROËN or a qualified workshop.
The particle emissions filter is fault
y
. Stop as soon as it is safe to do so. Contact a CITROËN dealer or a
q
ualified workshop as soon as
possible.
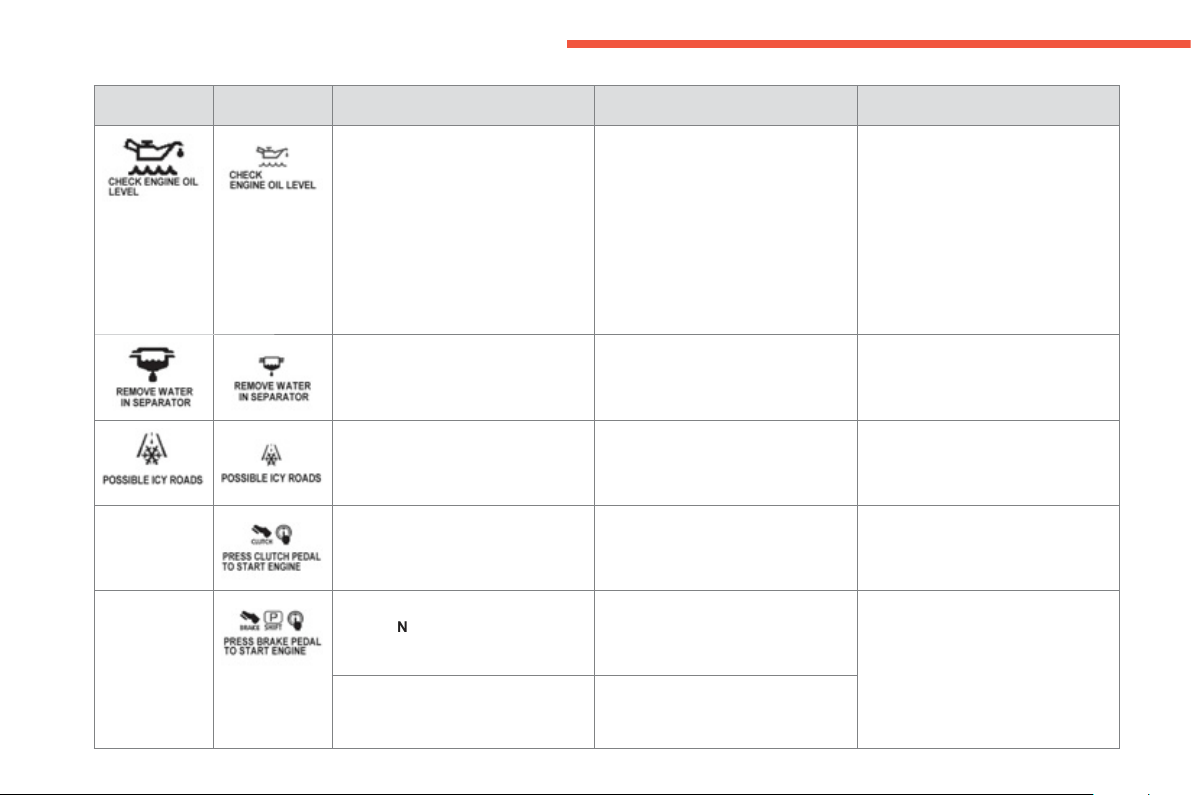
40
Monitoring
Screen
1
Screen 2 Caus
e
Solution - Action Observations
En
g
ine oil level not correct
(
below
m
inim
u
m l
e
v
e
l
o
r
abo
v
e
m
a
xim
u
m
l
evel
)
.
Stop the vehicle as soon as it is safe
t
o
do
so
.
Check the level with the dipstick and
top-up if the level low.
I
f
th
e
l
e
v
e
l i
s
abo
v
e
th
e
m
a
xim
u
m
mar
k
,
d
o not restart t
h
e en
gi
ne an
d
co
nt
ac
t
a
C
ITR
OË
N
dea
l
e
r
o
r
a
q
uali
f
ied worksho
p
.
Never drive with an incorrect oil
l
evel
.
Pr
ese
n
ce
of
w
a
t
e
r in th
e
Di
ese
l
fue
l
f
ilt
e
r.
Risk o
f
dama
g
e to the in
j
ection
sy
stem on
Di
ese
l
en
gi
nes.
Co
nt
ac
t
a
C
ITR
OË
N
dea
l
e
r
o
r
a
q
uali
f
ied worksho
p
as soon as
p
ossible.
The ambient temperature is at or
below 3 °C
(
37 °F
)
.
There ma
y
be black ice on the road.
Take care and drive
g
entl
y
.
The clutch pedal is not depressed
while startin
g
the en
g
ine.
Depress the clutch pedal to start the
e
n
g
ine.
F
o
r v
e
hi
c
l
es
fitt
ed
with
a
m
a
n
ua
l
g
earbox.
Th
e
g
ear
l
ever
i
s not
i
n pos
i
t
i
on
P
or
p
os
i
t
i
on
N
w
h
en start
i
n
g
t
h
e en
gi
ne.
Pl
ace t
h
e
g
ear
l
ever at pos
i
t
i
on
P
t
o
s
tart t
h
e en
gi
ne.
For vehicles
f
itted with a
C
VT
g
ear
b
ox.
The brake
p
edal is not
p
ressed
while startin
g
the en
g
ine.
Press the brake
p
edal to start the
e
n
g
ine.
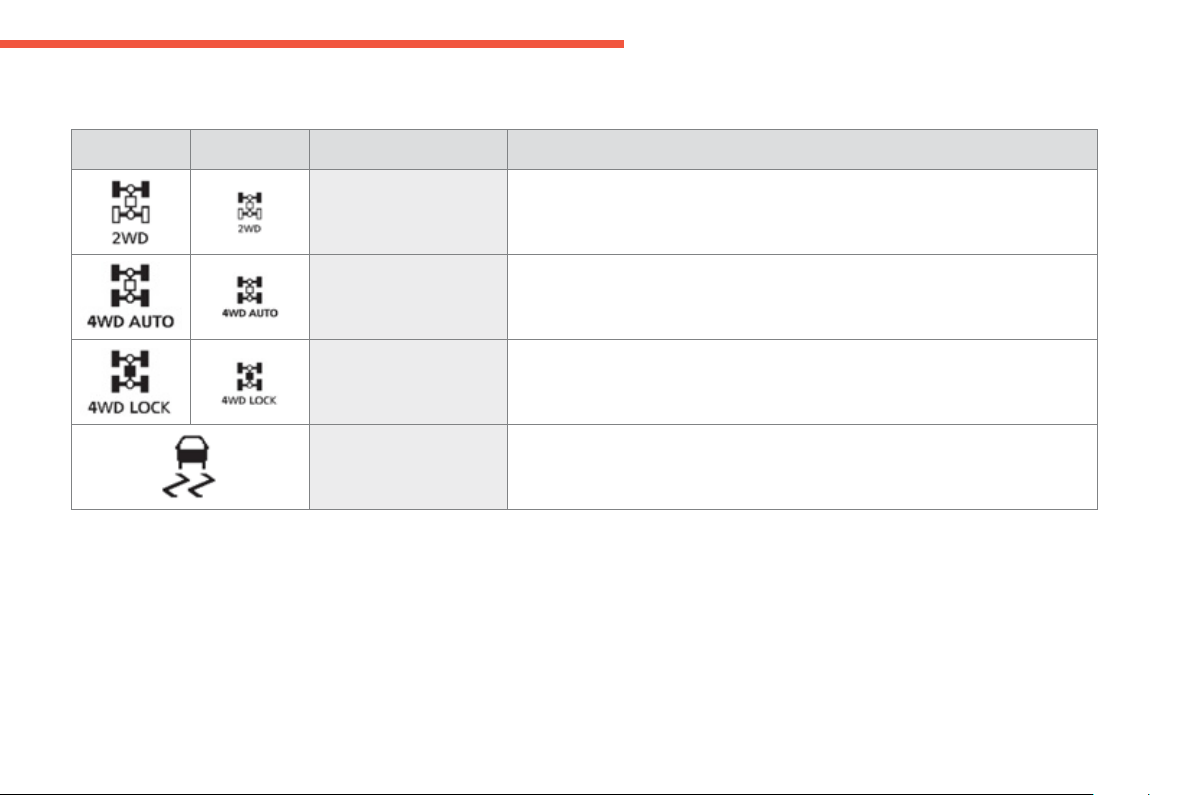
1
41
Monitoring
Screen
1
Screen 2 S
y
ste
m
Observations
Information messa
g
es
(
i
g
nition at "ON"
)
2
WD two wheel drive
syste
m
Flashes
f
or a
f
ew moments when the "2WD"
(
2 wheel drive
)
mode is selected usin
g
the transmission mode selector,
f
or 4 wheel drive versions.
4
WD four wheel drive
s
y
ste
m
Flashes for a few moments when the "4WD"
(
4 wheel drive
)
mode is selected usin
g
the transmission mode selector, for 4 wheel drive versions.
4
WD LOCK four wheel
d
r
i
ve s
y
stem
Flashes
f
or a
f
ew moments when the "L
OC
K"
(
4 wheel drive
)
mode is selected usin
g
the transmission mode selector,
f
or 4 wheel drive versions.
A
ct
i
ve sta
bili
t
y
contro
l
(
ASC
)
Flashes when the stabilit
y
control s
y
stem
(
A
SC)
is operatin
g
.
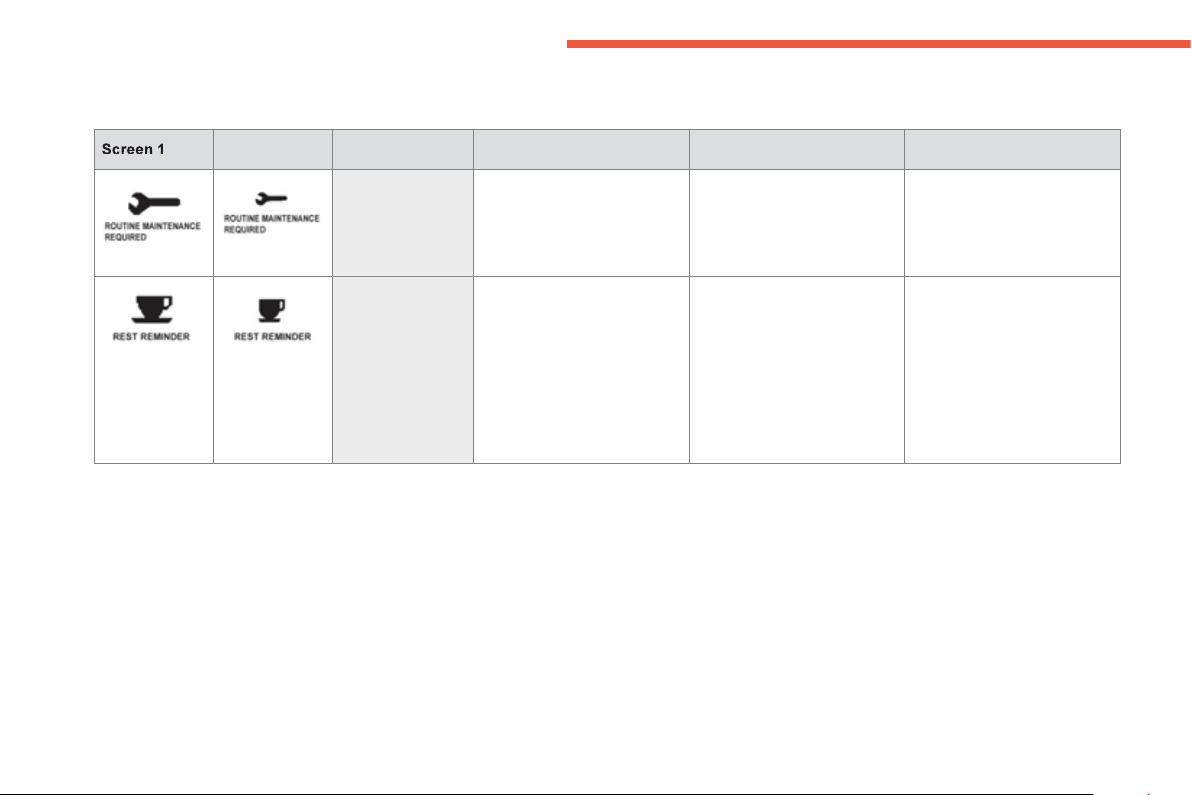
42
Monitoring
Screen 2 S
y
ste
m
Caus
e
Observations Solution - Action
Prevention messa
g
es
Service indicator In
fo
rm
s
th
e
d
riv
e
r th
a
t th
e
ne
xt
se
rv
ice
is
o
v
e
r
due
.
This is displa
y
ed
f
or a
f
ew
s
econ
d
s w
h
en t
h
e
ig
n
i
t
i
on
i
s
s
w
i
t
ched
o
n.
C
ontact a
C
ITR
OË
N dealer
or a quali
f
ied workshop.
R
est rem
i
n
d
e
r
In
f
orms the driver that the
y
should sto
p
to take a break.
Thi
s
i
s
di
sp
l
a
y
e
d
w
h
en t
h
e
driving time that you set
previousl
y
is reached.
A
n audible si
g
nal sounds
3
times and then ever
y
5
minutes until the vehicle
s
tops.
You
a
r
e
ad
v
ised
t
o
t
ake
a
break approximately every
tw
o
h
ou
r
s
.
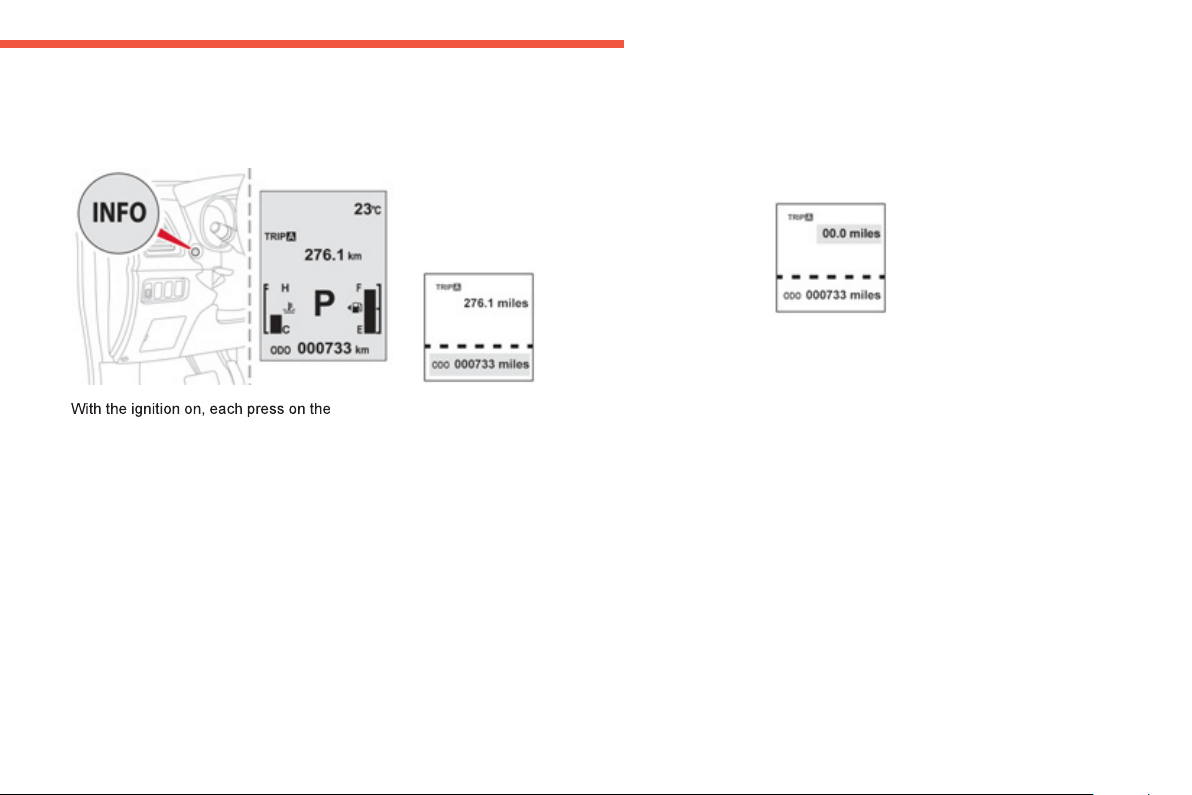
1
43
Monitoring
Trip computer
I
NFO
button displa
y
s the followin
g
screens in
success
i
o
n:
-
di
stance recor
d
er an
d
tr
i
p recor
d
er
A
,
-
di
stance recor
d
er an
d
tr
i
p recor
d
er
B
,
- serv
i
ce
i
n
di
cator,
- coolant tem
p
erature,
-
range
,
- avera
g
e fuel consumption,
- avera
g
e speed,
- current fuel consumption,
- settin
g
menu,
- an
y
a
l
ert messa
g
es.
Information displa
y
D
istance recorder
S
y
stem for measurin
g
the total distance
travelled b
y
the vehicle durin
g
its life.
Th
e
t
o
t
a
l
d
i
s
t
a
n
ce
i
s
displa
y
ed in the lower part o
f
t
he
sc
r
ee
n.
T
ri
p
distance recorde
r
(
Trip A or B
)
Reset to zero
With the ignition on and either trip
A
or
B
displa
y
ed, press the INF
O
bu
tt
o
n
fo
r m
o
r
e
th
a
n
2 seconds.
O
nl
y
the trip displa
y
ed will be reset.
Each of these trip recorders
i
n
d
i
ca
t
es
th
e
d
i
s
t
a
n
ce
tr
a
v
e
ll
ed
s
in
ce
th
e
l
as
t r
ese
t.
Pr
ess
th
e
INFO
bu
tt
o
n t
o
di
sp
l
a
y
t
h
e
d
es
i
re
d
tr
i
p.
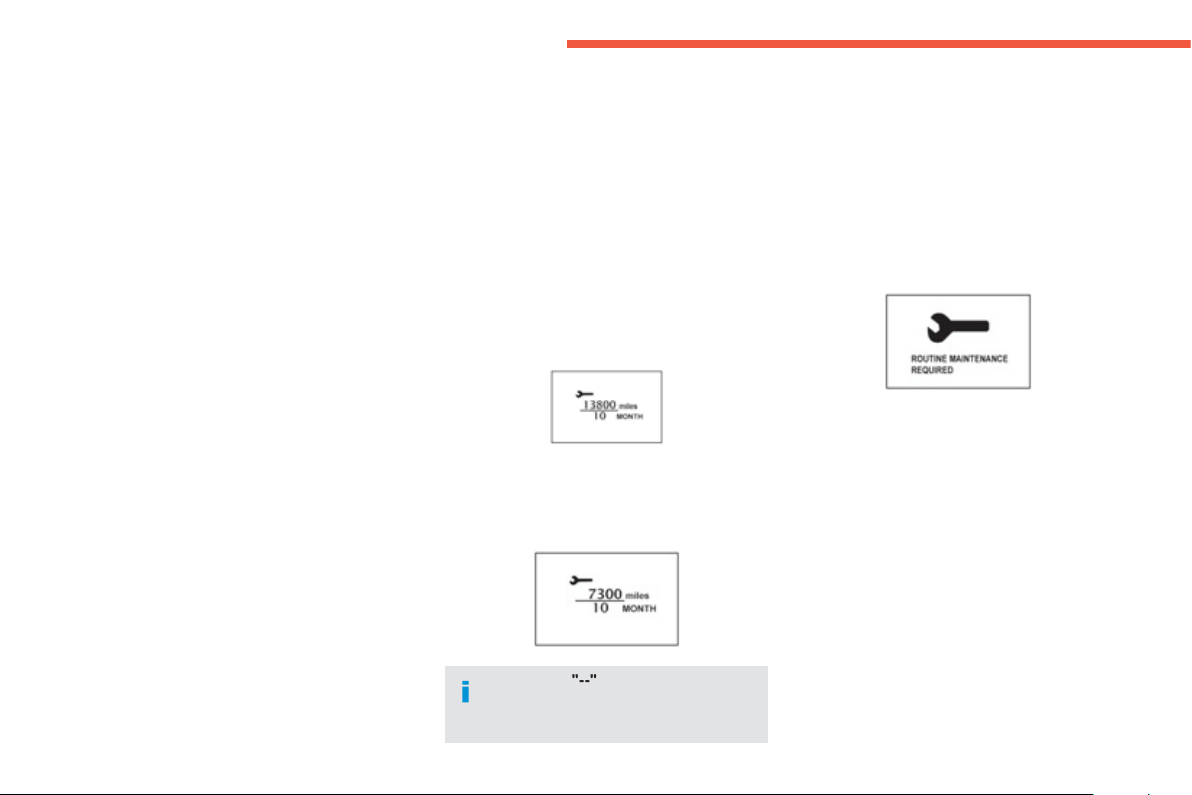
44
Monitoring
Service indicator
Sy
stem which in
f
orms the driver when the
ne
xt
se
rvi
ce
i
s
due
in
acco
r
da
n
ce
with th
e
m
anu
f
acturer's servicin
g
schedule.
The point at which the next service is due is
ca
l
cu
l
a
t
ed
fr
o
m th
e
l
as
t
se
rvi
ce
in
d
i
ca
t
o
r z
e
r
o
reset
.
It is determined b
y
two parameters:
- the distance travelled
(
in miles
(
km
))
,
- t
h
e t
i
me e
l
apse
d
s
i
nce t
h
e
l
ast serv
i
c
e
(
in months
)
.
The distance remaining to be travelled may be
wei
g
hted b
y
the time
f
actor, dependin
g
on the
use
m
ade
o
f th
e
v
e
hi
c
l
e
.
Exam
p
le
:
the screen indicates that 7
3
00 miles
(
kilometres
)
remain before the next service is
due
.
Service overdue
E
xam
p
le
:
th
e
sc
r
ee
n in
d
i
ca
t
es
th
a
t th
e
se
rvi
ce
i
s over
d
ue.
Thi
s serv
i
ce must
b
e carr
i
e
d
out
by
a CITRO
Ë
N dealer or a qualified workshop.
Operation
Th
e s
y
m
b
o
l
"--
"
rema
i
ns
di
sp
l
a
y
e
d
unt
il
th
e
f
ir
s
t
se
rvi
ce
of
a
n
e
w v
e
hi
c
l
e
h
as
bee
n
ca
rr
ied
ou
t.
Each time the i
g
nition is switched on, the
"
ROUTINE MAINTENANCE REQUIRED"
sy
mbol is displa
y
ed
f
or a
f
ew seconds to
i
n
dica
t
e
t
ha
t t
he
se
rv
ice
m
us
t
be
ca
rr
ied
ou
t
without dela
y
.
When the i
g
nition is switched on,
y
ou must press
th
e
INFO
bu
tt
o
n
se
v
e
r
a
l tim
es
in
success
i
o
n
u
ntil the service indicator is displa
y
ed. The
distance recorder displa
y
line indicates the
number of miles or kilometres remainin
g
and
the time elapsed line indicates the number o
f
months remainin
g
be
f
ore the next service is due.
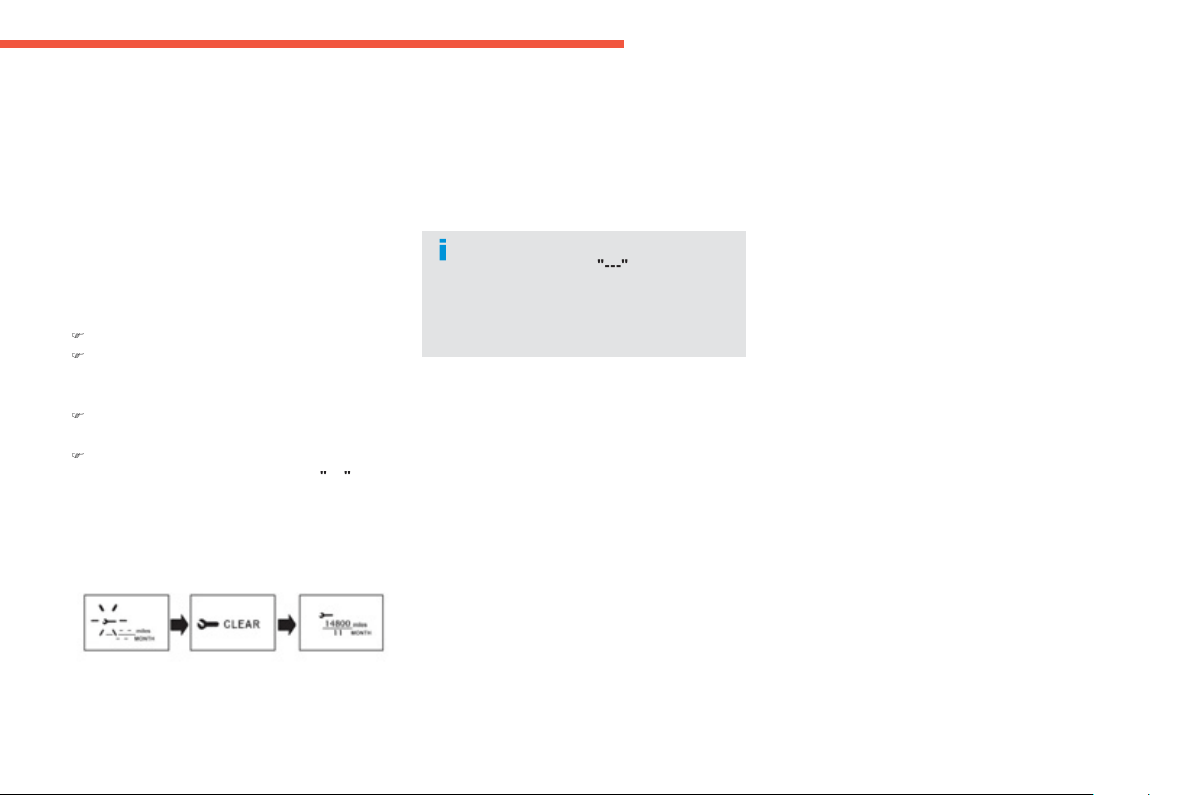
1
45
Monitoring
Resettin
g
the service indicato
r
t
o zero
A
f
t
e
r
a
ce
rt
a
in
d
i
s
t
a
n
ce
a
n
d
a
ce
rt
a
in
time, the displa
y
o
f
"---
"
i
s
r
ese
t
a
utomaticall
y
and the displa
y
indicates
the time remainin
g
before the next
se
rvi
ce
i
s
due
.
Your CITRO
Ë
N dealer or a qualified workshop
c
arries out this o
p
eration a
f
ter each service.
I
f
you have carried out your vehicle's service
y
oursel
f
, the zero reset procedure is the
followin
g
:
)
switch off the i
g
nition,
)
press the INF
O
bu
tt
o
n
se
v
e
r
a
l tim
es
in
success
i
o
n
u
ntil th
e
se
rvi
ce
in
d
i
ca
t
o
r i
s
di
sp
l
a
y
e
d
,
)
press an
d
h
o
ld
t
h
e INFO
bu
tt
o
n
fo
r
a
fe
w
seco
n
ds
u
nt
il
t
he
spanner flashe
s
,
)
p
ress the INF
O
button while the s
p
anne
r
is
f
lashin
g
to chan
g
e the displa
y
"
---
"
t
o
"
CLEAR" then the time remainin
g
before
the next service is due is displa
y
ed.
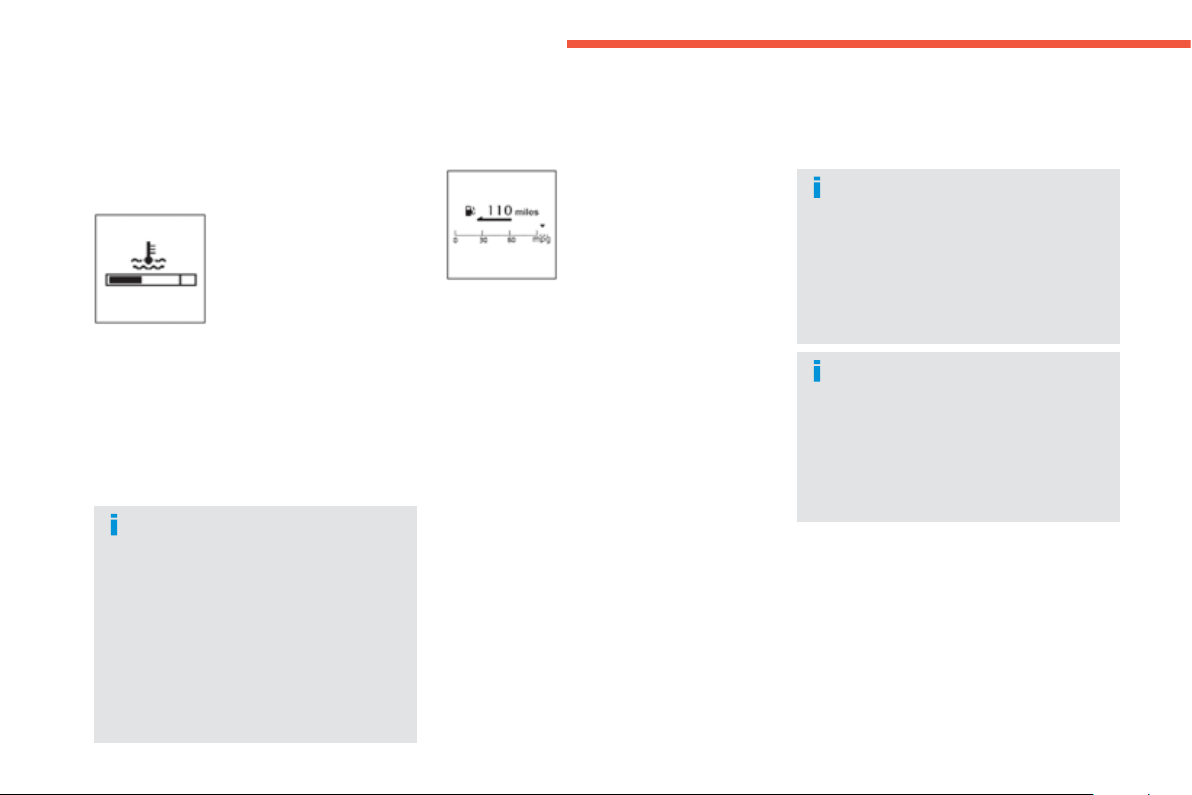
46
Monitoring
When the en
g
ine is
runnin
g
, this indicates the
temperature of the coolant.
Ran
g
e
When the en
g
ine is
r
unnin
g
, this indicates
th
e
d
i
s
t
a
n
ce
whi
c
h
ca
n
s
till
be
tr
a
v
e
ll
ed
with th
e
f
uel remainin
g
in the tank
b
ase
d
on t
h
e avera
g
e
f
uel consum
p
tion over the
last
f
ew miles
/
kilometres
tr
a
v
e
ll
ed
.
This value ma
y
var
y
followin
g
a chan
g
e
in the st
y
le of drivin
g
or the relief,
resu
l
t
i
n
g
i
n a
l
ar
g
e var
i
at
i
on
i
n t
h
e
c
urrent
f
uel consumption.
I
f
y
ou onl
y
add a
f
ew litres, the value
displayed will be incorrect. There
f
ore,
y
ou must
f
ill the tank whenever
possible.
C
oolant tem
p
erature
g
au
g
e
I
f
th
e
ba
r i
s
c
l
ose
t
o
th
e
c
r
i
t
i
ca
l
pos
i
t
i
on
l
ocate
d
on t
h
e r
igh
t, t
h
e temperature
i
s too
high
.
The symbol
f
lashes when your engine is
overheatin
g
.
Y
ou must stop your vehicle as soon as it is
safe to do so
.
Wait a few minutes before switchin
g
off the
e
n
g
ine
.
When the ran
g
e is less than
3
0 miles
(
50 km
)
,
dashes are displa
y
ed.
Refuel as soon as possible. The displa
y
of the
r
an
g
e is updated.
Wait
f
or the en
g
ine to cool be
f
ore
toppin
g
up the level. The coolin
g
s
y
stem
is pressurised.
To avoid an
y
risk of scaldin
g
, unscrew
the cap b
y
two turns to allow the
p
ressure to
d
rop.
Wh
en t
h
e pressure
h
as
d
roppe
d
,
remove t
h
e ca
p
an
d
to
p
u
p
t
h
e
l
eve
l
,
i
f
necessary.
Contact a CITROËN dealer or a
q
ualified workshop.
Wh
en
y
ou
di
sconnect t
h
e
b
atter
y
,
the previous
f
uel consumption data
i
s
l
ost an
d
t
h
e va
l
ue
di
sp
l
a
y
e
d
w
ill
b
e
di
ff
erent
f
rom that displayed be
f
ore the
batter
y
was disconnected. The distance
displa
y
ed must be considered an
approximate indication.
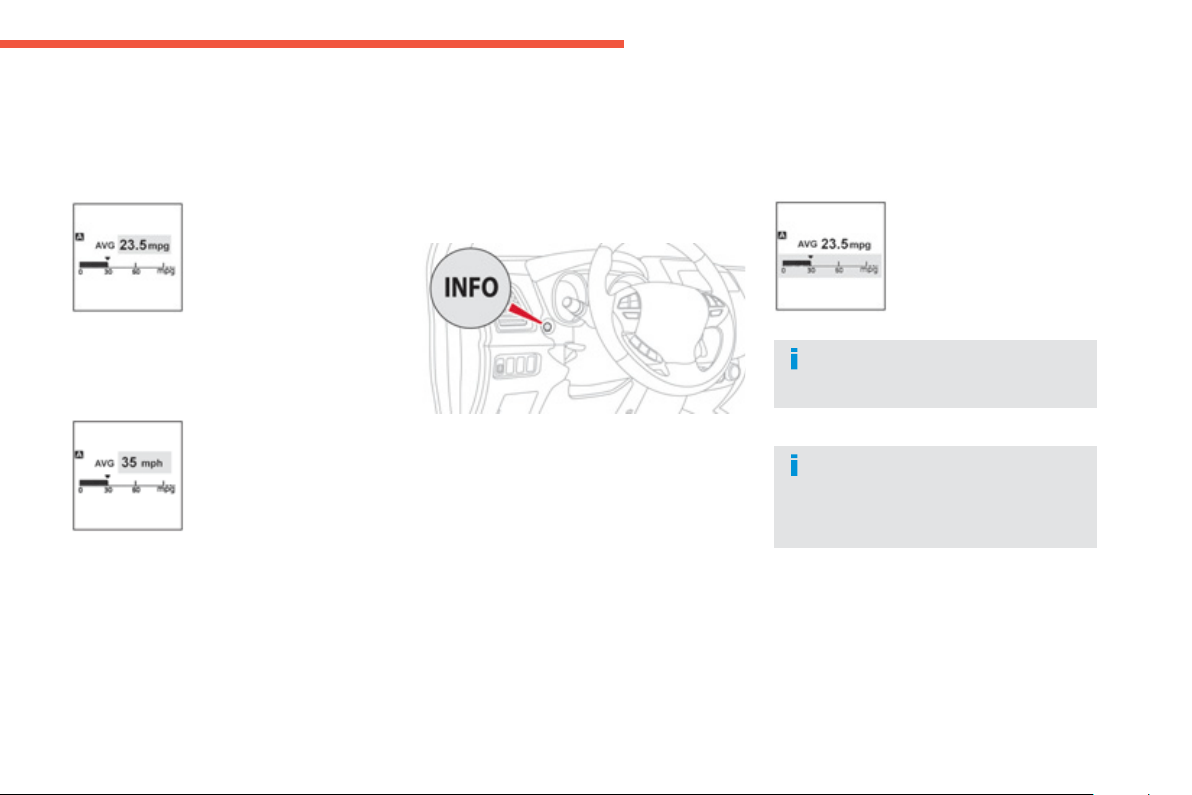
1
47
Monitoring
Avera
g
e fuel consumption
(
l/100 km or km/l or mp
g)
This is the avera
g
e
f
uel
c
onsum
p
t
i
on ca
l
cu
l
ate
d
s
ince the tri
p
com
p
uter was
l
as
t r
ese
t.
A
vera
g
e spee
d
(
km
/
h or mph
)
This is the avera
g
e speed
c
alculated since the trip
c
omputer was last reset.
Current fuel consum
p
tion
(
l/100 km or km/l or mp
g)
This is the avera
g
e fuel
c
onsumpt
i
on ca
l
cu
l
ate
d
over
th
e
l
as
t
fe
w
seco
n
ds
.
This value ma
y
chan
g
e
f
ollowin
g
a
c
han
g
e in the st
y
le o
f
drivin
g
or the relie
f
.
If dashes "---" are displa
y
ed for lon
g
periods in place of the di
g
its while
drivin
g
, contact a CITRO
Ë
N dealer or a
q
uali
f
ied workshop.
Resettin
g
the information to zero
When the required information is displa
y
ed,
p
ress t
h
e
I
NFO
bu
tt
o
n
fo
r m
o
r
e
th
a
n
tw
o
seco
n
ds
t
o
r
ese
t
a
ll
of
th
e
in
fo
rm
a
ti
o
n t
o
zero
.
When the ignition is switched on, the zero reset
switches automaticall
y
f
rom manual mode to
au
t
o
m
a
ti
c
m
ode
.
A
utomatic
If the i
g
nition ke
y
remains in the
O
FF position
for more than 4 hours, the information is reset
to zero automaticall
y
.
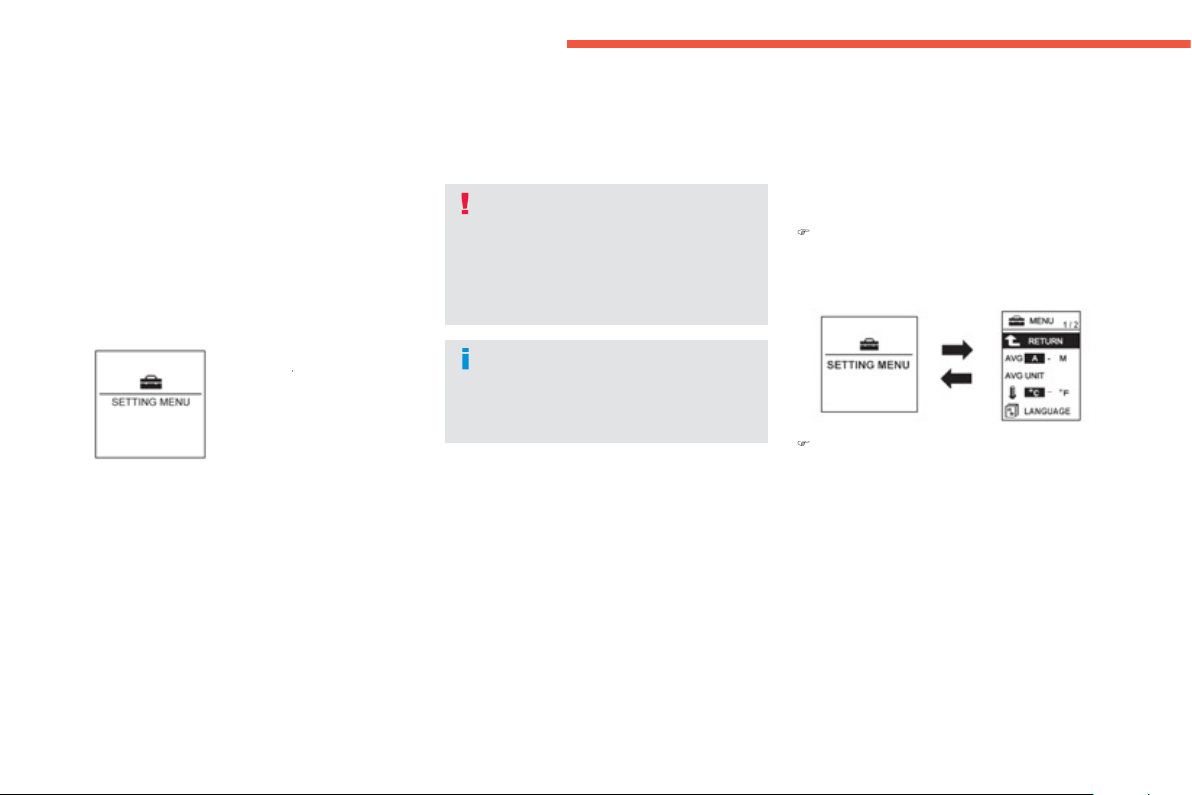
48
Monitoring
The various menus ma
y
chan
g
e between
the t
y
pe 1 instrument panel and the t
y
pe 2
instrument panel.
A
d
j
ustin
g
vehicle settin
g
s
When the vehicle is
stationary
, it allows the
y
user to chan
g
e the followin
g
s
ettin
g
s:
- th
e
r
e
initi
a
li
sa
ti
o
n
m
ode for avera
g
e
f
uel consumption and
a
vera
g
e spee
d
,
)
Pr
ess
a
n
d
h
o
l
d
th
e
INFO
bu
tt
o
n f
o
r
a
f
e
w
s
econds to displa
y
the menu screen.
)
In the menu screen, press the INF
O
bu
tt
o
n
t
o
se
l
ec
t
a
f
u
n
c
ti
o
n fr
o
m th
e
li
s
t:
- the
f
uel consum
p
tion units,
- the temperature displa
y
unit,
- the displa
y
lan
g
ua
g
e,
- activation
/
deactivation of the sound when
p
ressin
g
the INFO button
,
- the break
(
rest
)
reminder displa
y
interval,
- restore the
f
actor
y
settin
g
s.
T
o c
h
an
g
e t
h
e sett
i
n
g
s,
y
ou must stop
t
h
e ve
hi
c
l
e an
d
sw
i
tc
h
on t
h
e
ig
n
i
t
i
on.
Apply the parking brake and place the
g
ear lever in neutral.
Wi
t
h
t
h
e
ig
n
i
t
i
on on ,
p
ress t
h
e INF
O
bu
tt
o
n
on the dashboard, to the le
f
t o
f
the instrument
p
anel, several times in succession until the
"SETTINGS MENU" screen is displa
y
ed.
O
p
eration
MENU
1
/3
:
-
1
- 2, A - M, A -
P
*
(
choice o
f
the t
y
pe o
f
r
eset o
f
average
f
uel consumption and
a
vera
g
e speed
)
,
-
A
VG UNI
T
(
choice of the fuel consumption
units
)
,
-
c
h
o
i
ce
o
f th
e
temperature displa
y
uni
t
,
-
L
ANGUAG
E
(
option of the displa
y
lan
g
ua
g
e
)
,
* Accordin
g
to displa
y
lan
g
ua
g
e.
For your sa
f
ety, when the vehicle is
m
ovin
g
, the
f
unction settin
g
s are not
displa
y
ed when
y
ou press the
I
NFO
bu
tt
o
n.
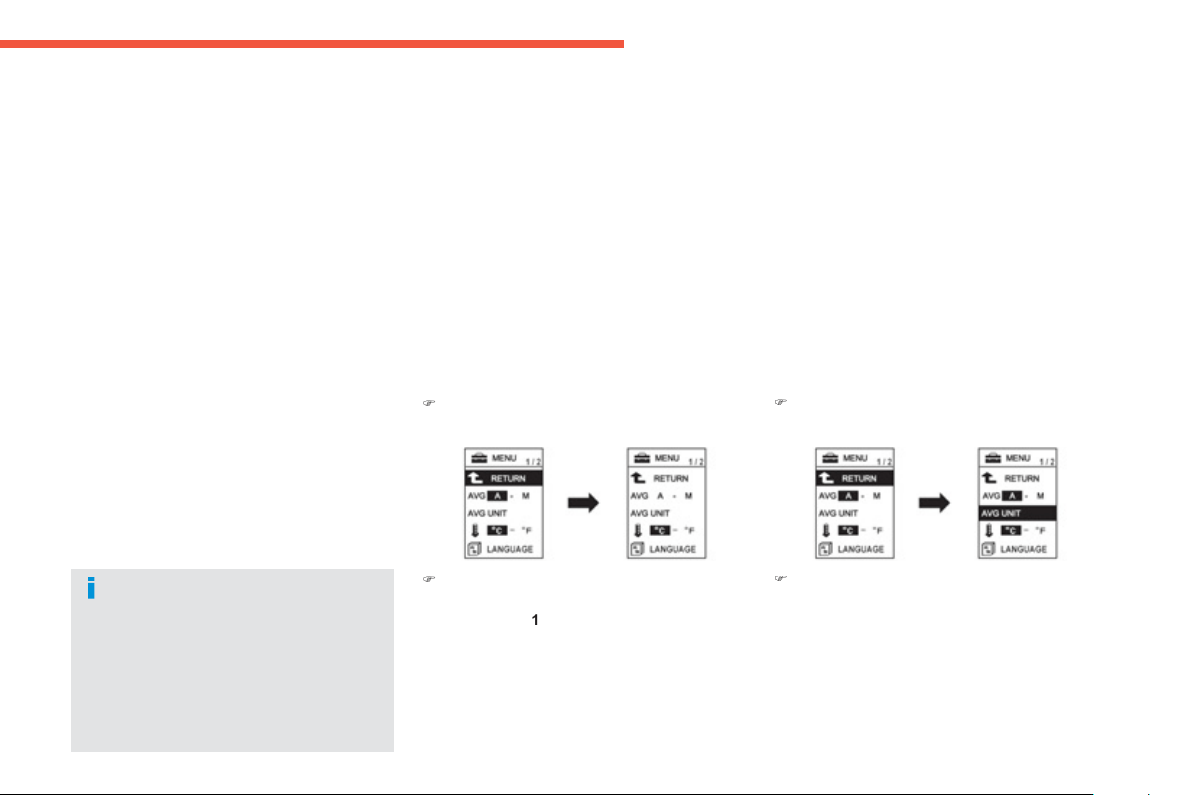
1
49
Monitoring
MEN
U
2/3
:
-
a/b
(
option o
f
displa
y
in
g
a di
ff
erent
l
an
g
ua
g
e
i
n t
h
e
i
nstrument pane
l
screen
a
nd the navi
g
ation screen
)
,
-
a
ctivation / deactivation of the INF
O
bu
tt
o
n sound ,
-
A
LERT
(
chan
g
in
g
of the "REST
R
EMINDER" displa
y
interval
)
,
-
selection of the sound
o
f th
e
d
ir
ec
ti
o
n
indicators
,
-
a
ctivation / deactivation of the current
f
uel consumption
,
Pr
ess
a
n
d
h
o
l
d
th
e
INFO
bu
tt
o
n f
o
r
a
f
ew seconds to return to the previous
sc
r
ee
n.
Wh
en t
h
e menu screen
i
s
di
sp
l
a
y
e
d
,
i
f
no operation is carried out within
15 seconds, the
S
ettin
g
s Menu screen
is displayed.
MENU 3
/
3
:
-
R
E
S
ET
(
restore
f
actor
y
settin
g
s
)
.
Choice of the reset mode for
a
vera
g
e fuel consumption and
a
vera
g
e spee
d
You can choose between two avera
g
e fuel
c
onsumption and avera
g
e speed reset modes:
- automatic reset
,
- m
a
n
ual
r
ese
t.
In th
e
m
e
n
u
sc
r
ee
n:
)
press the INFO
bu
tt
o
n t
o
se
l
ec
t:
)
p
ress an
d
h
o
ld
t
h
e INFO
bu
tt
o
n
fo
r
a
fe
w
seco
n
ds
t
o
s
wit
c
h in
success
i
o
n
f
r
o
m
rese
t m
ode
1
-
A
(
automatic
)
*
t
o
r
ese
t
m
ode
2 - M - P (manual) *
.
Th
e
m
ode
se
l
ec
t
ed
i
s
co
nfirm
ed
.
Choice of the fuel consum
p
tion
u
n
i
t
The distance, speed and quantit
y
of fuel units
will also be chan
g
ed in accordance with
y
our
c
hoice of fuel consumption unit.
In th
e
m
e
n
us
sc
r
ee
n:
)
press t
h
e INF
O
bu
tt
o
n t
o
selec
t
"UNIT"
.
)
p
ress and hold the INF
O
bu
tt
o
n
fo
r
a
f
ew seconds to displa
y
the
"
AVG UNIT"
screen
.
* Accordin
g
to displa
y
lan
g
ua
g
e.
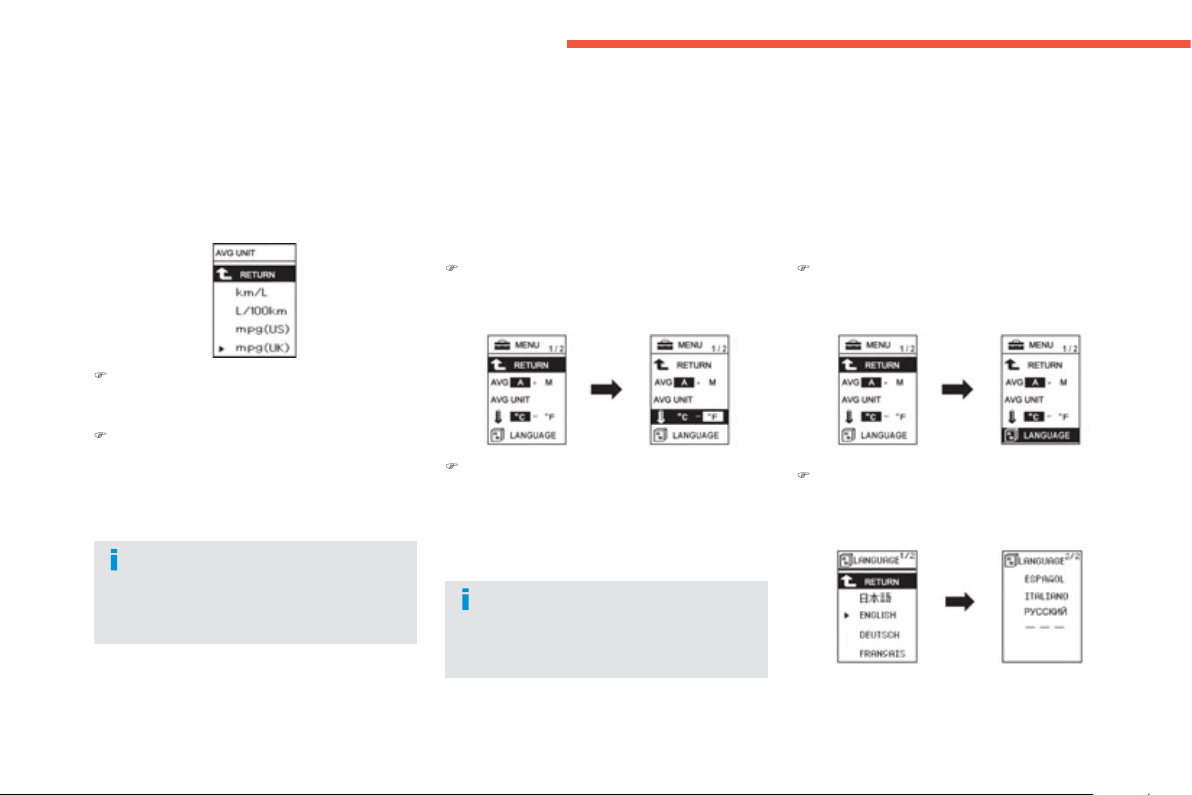
50
Monitoring
If the batter
y
is disconnected, the
s
ettin
g
s memor
y
is cleared and
the default unit
(
km/L
)
is restored
automat
i
ca
lly
.
I
f
the batter
y
is disconnected, the
sett
i
n
g
s memor
y
i
s c
l
eare
d
an
d
the de
f
ault unit
(°C)
is restored
a
utomatically.
)
press t
h
e INFO
bu
tt
o
n t
o
sc
r
oll
t
he
u
n
i
t
s
(
km
/
L, L
/
100km, mp
g
(
U
S)
, mp
g
(
UK
)
and
RETURN
)
in succession,
)
p
ress and hold the
I
NFO
bu
tt
o
n
fo
r
a
fe
w
seconds to con
f
irm
y
our selection.
Choice of the tem
p
erature
di
sp
l
a
y
un
i
t
)
p
ress an
d
h
o
ld
t
h
e INFO
bu
tt
o
n
fo
r
a
fe
w
s
econds to scroll the units
(°C
and
°
F
)
in
success
i
o
n.
Th
e
m
ode
se
l
ec
t
ed
i
s
co
nfirm
ed
.
In th
e
m
e
n
u
sc
r
ee
n:
)
press the INFO
bu
tt
o
n t
o
se
l
ec
t th
e
temperature un
i
t sett
i
n
g
s
y
m
b
o
l
(
thermometer
)
:
Choice of the displa
y
LANGUAGE
In th
e
m
e
n
u
sc
r
ee
n:
)
press the INFO
bu
tt
o
n t
o
se
l
ec
t
"
LANGUAGE"
:
)
p
ress and hold the INFO
bu
tt
o
n
fo
r
a
fe
w
s
econds to displa
y
the "LANGUAGE"
screen
:
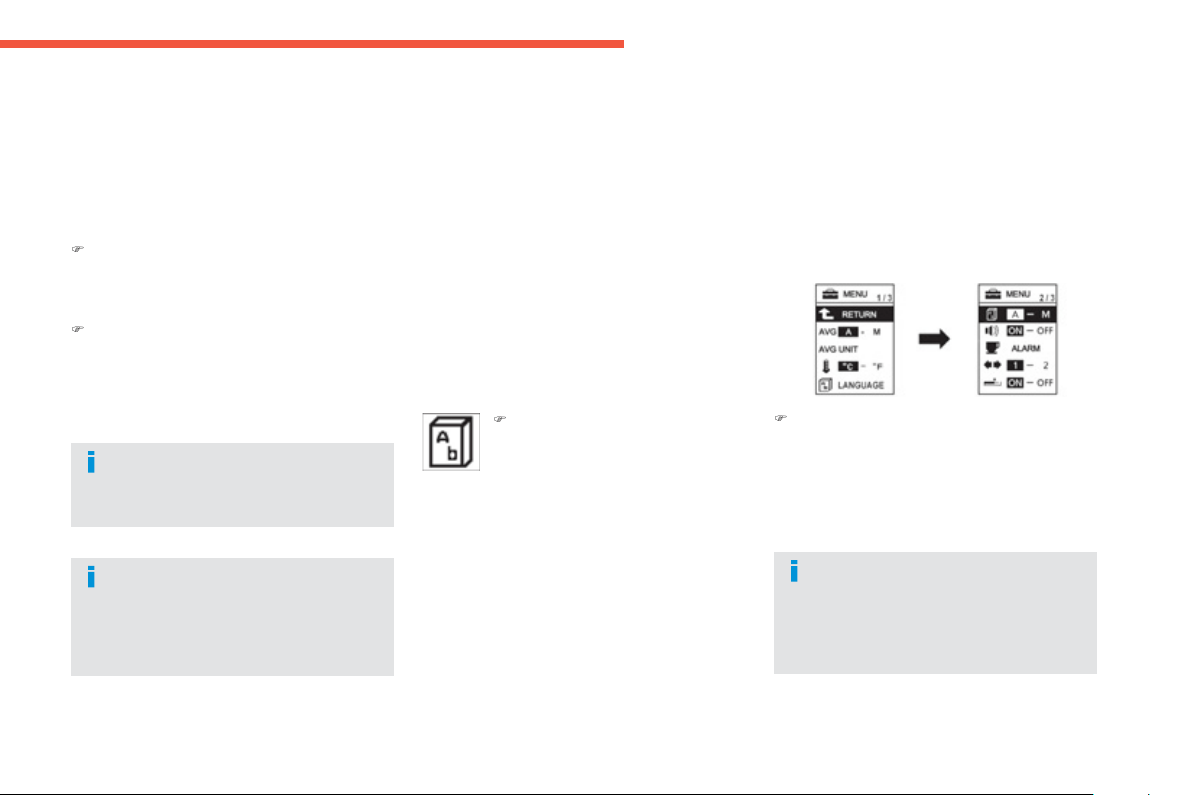
1
51
Monitoring
If
y
ou select the "---" settin
g
, no
messa
g
e will be displa
y
ed in messa
g
e
displa
y
situations.
If the batter
y
is disconnected, the
s
ettin
g
s memor
y
is cleared and the
default lan
g
ua
g
e
(
ENGLISH
)
is restored
automaticall
y
.
)
press the INF
O
bu
tt
o
n t
o
sc
r
o
ll th
e
lan
g
ua
g
es
(
Japonais, En
g
lish, Deutsch,
Français, Espanol, Italiano, Russe "---" and
R
ETURN
)
in succession,
)
press an
d
h
o
ld
t
h
e INFO
bu
tt
o
n
fo
r
a
fe
w
s
econds to con
f
irm
y
our selection.
A
ctivation / deactivation of
l
an
g
ua
g
e cooperat
i
on
b
etween
t
h
e
i
nstrument
p
ane
l
screen an
d
the navi
g
ation screen
*
You can choose to have the lan
g
ua
g
e used b
y
the instrument panel screen linked to that of the
n
avi
g
ation screen.
In th
e
m
e
n
us
sc
r
ee
n:
)
press and hold the INF
O
f
o
r
a
f
e
w
s
econds to run throu
g
h the choices
(
A
-
1
"cooperation activated"
**
and
M
-
2
-
P
"cooperation deactivated"
**
)
.
Th
e
se
l
ec
t
ed
m
ode
i
s
co
n
f
irm
ed
.
I
f
the battery is disconnected, the
s
ettin
g
s memor
y
is cleared and
the default unit
(
A -
1
"cooperation
activated"
)
is restored automaticall
y
.
)
p
ress the INFO
bu
tt
o
n t
o
se
l
ec
t
the s
y
mbol
f
or activation
/
deactivation of lan
g
ua
g
e
c
ooperation.
** Accordin
g
to displa
y
lan
g
ua
g
e.
* Dependin
g
on equipment.
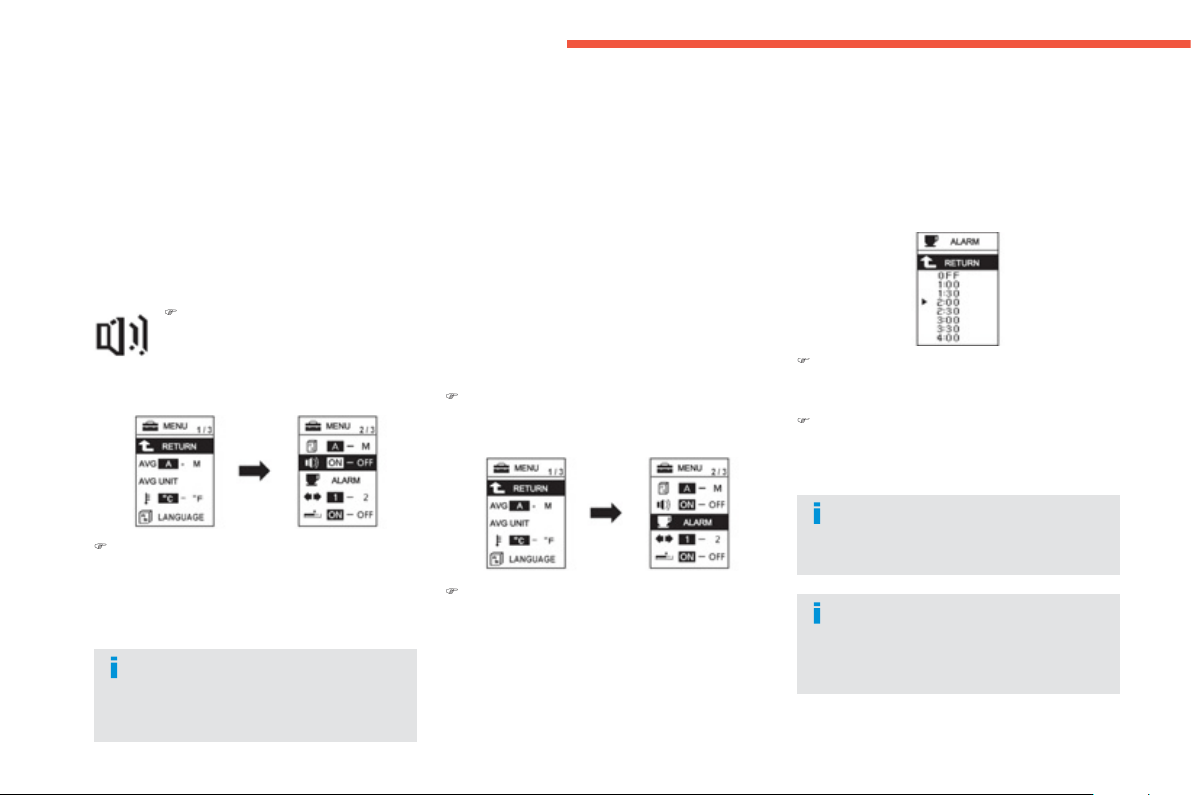
52
Monitoring
If the batter
y
is disconnected, the
s
ettin
g
s memor
y
is cleared and
the default choice
(O
N
)
is restored
automat
i
ca
lly
.
As a safet
y
measure, it is recommended
that
y
ou stop
f
or a break ever
y
tw
o
hou
r
s
.
Y
ou
ca
n
ac
tiv
a
t
e
o
r
deac
tiv
a
t
e
th
e
sou
n
d
assoc
i
a
t
ed
with th
e
INFO
bu
tt
o
n.
A
ctivation / deactivation of the
"
INFO" button sound
In th
e
m
e
n
u
sc
r
ee
n:
)
p
ress the INFO
bu
tt
o
n t
o
se
l
ec
t
th
e
INFO button sound activation
/
deactivation s
y
mbol
(
located in
m
enu 2/3
)
:
)
press and hold the
I
NFO
bu
tt
o
n f
o
r
a
f
e
w
seconds to scroll the choices
(
ON, OFF
)
in
successio
n.
Th
e
m
ode
se
l
ec
t
ed
i
s
co
n
f
irm
ed
.
Chan
g
in
g
the displa
y
interval of
the "REST REMINDER" messa
g
e
The "REST REMINDER" function allows
y
ou to
pro
g
ramme an alert messa
g
e remindin
g
y
ou to
t
a
k
e
a
b
r
ea
k.
Th
e
"
REST REMINDER" messa
g
e appears
accompanied b
y
an audible si
g
nal.
You can chan
g
e the displa
y
interval of the
"REST REMINDER" messa
g
e.
In th
e
m
e
n
u
sc
r
ee
n:
)
press the INFO
bu
tt
o
n t
o
se
l
ec
t
"
ALARM"
(
located in menu 2/3
)
:
)
p
ress and hold the INFO
bu
tt
o
n
fo
r
a
fe
w
s
econds to displa
y
the
"
ALARM"
screen
,
)
press t
h
e INFO
b
utton to se
l
ect t
h
e
di
sp
l
a
y
int
e
rv
a
l
of
th
e
"REST REMINDER"
message
,
)
p
ress and hold the INFO
bu
tt
o
n
fo
r
a
fe
w
seco
n
ds
t
o
co
n
f
irm.
I
f
the batter
y
is disconnected, the
s
ettings memory is cleared and
the de
f
ault value
(O
FF
)
is restored
automaticall
y
.
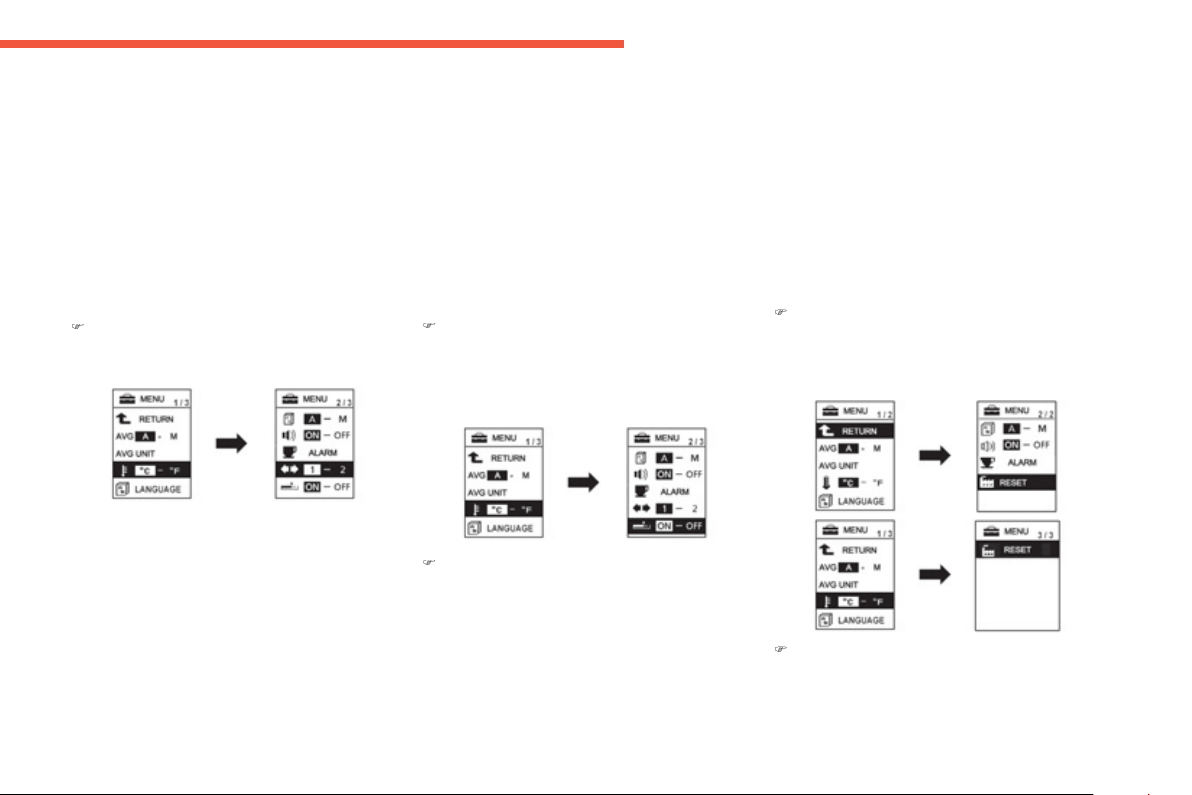
1
53
Monitoring
O
n the menu screen:
)
press t
h
e INF
O
bu
tt
o
n t
o
selec
t
"
RESET"
(
located in menu 2
/
2 or 3
/
3 dependin
g
on the instrument panel
)
:
Restorin
g
factor
y
settin
g
s
(
RESET
)
You can restore all of the factor
y
settin
g
s for all
fu
n
c
ti
o
n
s
.
)
p
ress an
d
h
o
ld
t
h
e INF
O
bu
tt
o
n
fo
r
a
t
l
east
5
seconds .
There is an audible signal and all o
f
the
f
actory
s
ettin
g
s are restored
f
or all
f
unctions.
In th
e
m
e
n
u
sc
r
ee
n:
)
press t
h
e INFO
bu
tt
o
n t
o
selec
t t
he
cu
rr
e
nt
f
uel consumption activation
/
deactivation
sy
m
b
o
l
(
located in menu 2
/
3
)
:
A
ctivation / deactivation of the
c
urrent fuel consum
p
tion *
You can activate or deactivate the displa
y
o
f
the current fuel consumption, with the t
y
pe
2
instrument panel onl
y
.
)
press and hold the INFO
bu
tt
o
n f
o
r
a
f
e
w
s
econ
d
s to scro
ll
t
h
rou
gh
t
h
e c
h
o
i
ces
i
n
s
uccession
(O
N,
O
FF
)
.
*
Dependin
g
on equipment.
In th
e
m
e
n
u
sc
r
ee
n:
)
press t
h
e
I
NFO
bu
tt
o
n t
o
se
l
ec
t
sou
n
d
1
o
r 2
(
located in menu 2
/
3
)
:
Selection of the sound
for the direction indicators
Y
ou
ca
n
se
l
ec
t th
e
sou
n
d
f
o
r th
e
d
ir
ec
ti
o
n
indicators, with the t
y
pe 2 instrument panel onl
y
.
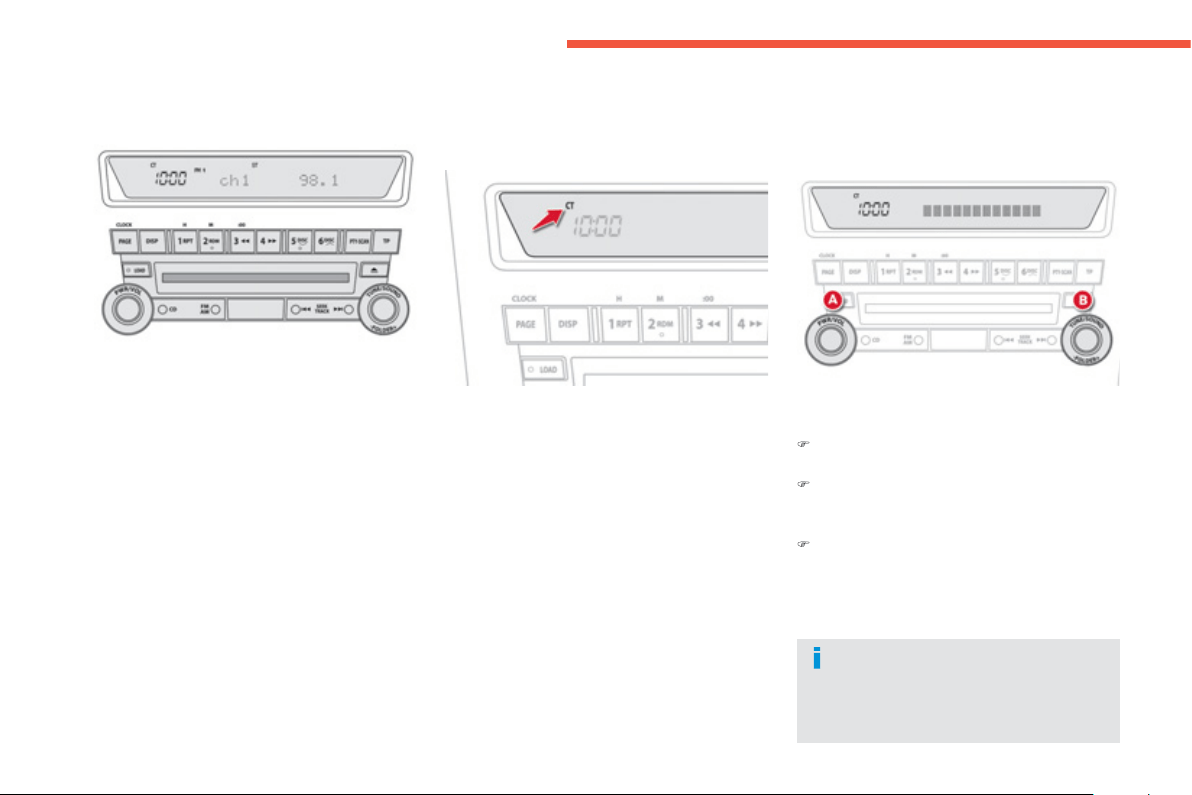
54
Monitoring
AUDIO-CD system screen
A
ssociated with the audio s
y
stem, this provides
the
f
ollowin
g
in
f
ormation:
- t
h
e t
i
me,
- audio s
y
stem in
f
ormation
(
see "Audio and
Telematics"
)
.
Settin
g
the time
Selectin
g
the ad
j
ustment mode
The di
g
ital clock can be set in automatic mod
e
o
r in
m
anual mod
e
.
Se
l
ec
t
a
utomat
i
c mo
de
or
m
anua
l
mo
de
as
fo
ll
o
w
s
:
)
Pr
ess
bu
tt
o
n
A
"PWR" t
o
s
wit
c
h
o
n th
e
a
udio s
y
stem.
)
Access the settin
g
mode b
y
pressin
g
bu
tt
o
n
B
"TUNE" for approximatel
y
2
seco
n
ds
.
)
Pr
ess
bu
tt
o
n
B
"T
U
NE" several times to
s
cro
ll
t
h
rou
gh
t
h
e var
i
ous menus an
d
se
l
ect
t
he
CT menu
(
clock time
)
.
The order o
f
the menus is the
f
ollowin
g
:
AF / CT / REG / TP-S / PTY displa
y
lan
g
ua
g
e / SCV / PH
O
NE / Functions
s
ettin
g
mode
O
FF.
M
anual mod
e
This mode permits manual settin
g
of the time
u
sin
g
the audio s
y
stem buttons.
It
ca
n
a
l
so
be
used
wh
e
n th
e
"A
u
t
o
m
a
ti
c
m
ode
"
displa
y
s an inaccurate time, when the local
R
D
S
stations are broadcastin
g
f
rom a di
ff
erent
t
i
m
e
z
o
n
e
.
Automatic mod
e
This mode permits automatic settin
g
o
f
the
l
ocal time usin
g
the si
g
nal
f
rom RD
S
stations.
Th
e s
y
m
b
o
l
"C
T" a
pp
ears
i
n t
h
e screen.
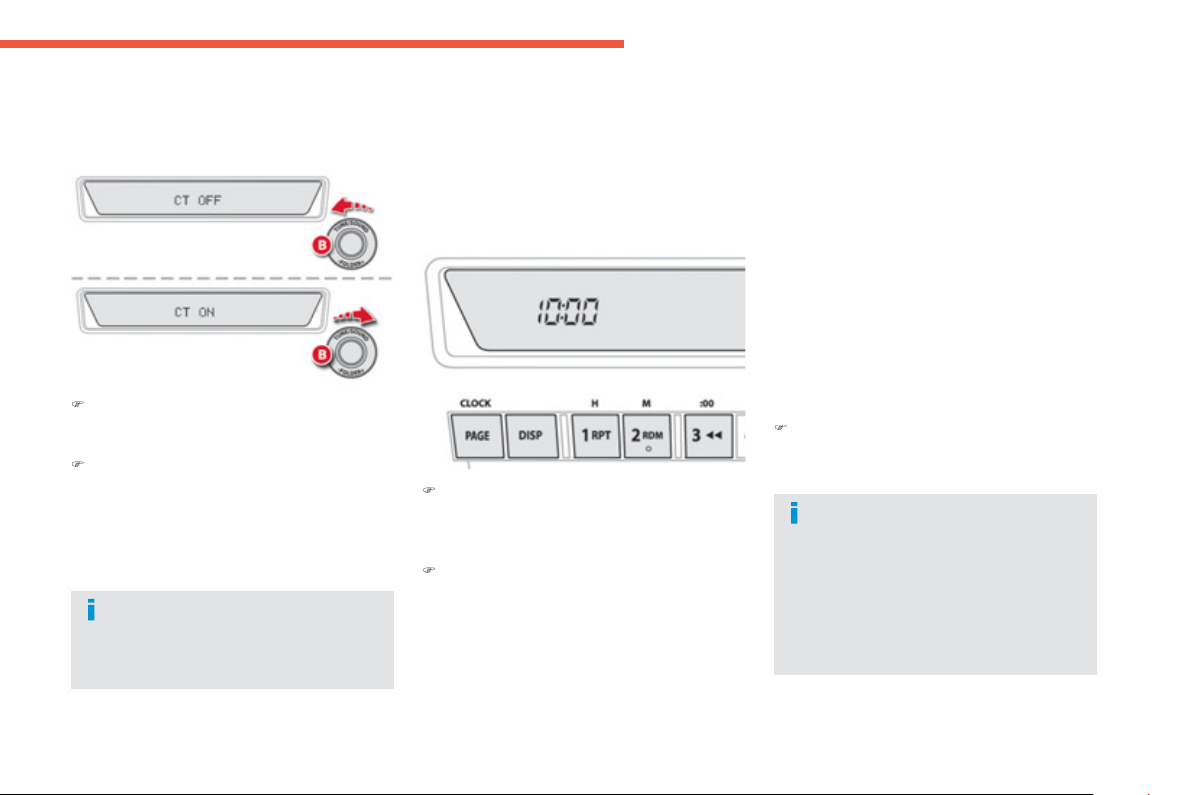
1
55
Monitoring
I
f
n
o
ac
ti
o
n i
s
ca
rri
ed
ou
t within
10 seconds, the system will exit
the "Functions settin
g
mode" menu
automaticall
y
.
)
T
u
rn
bu
tt
o
n
B
"T
U
NE" to the left or to the
r
i
g
ht to select
"
CT ON"
(
automatic mode
)
or
"
CT OFF"
(
manual mode
)
.
)
A
f
ter selectin
g
the mode,
y
ou can exit the
"F
unct
i
ons sett
i
n
g
mo
d
e
"
menu
by
press
i
n
g
bu
tt
o
n
B
"TUNE"
f
or approximately
2
seco
n
ds
.
Th
e
digi
ta
l
c
l
oc
k
d
oes not
di
sp
l
a
y
seco
n
ds
.
When the "minutes" displa
y
is set or
reset to zero, the clock starts at the zero
seco
n
d
o
f th
e
min
u
t
e
se
l
ec
t
ed
.
The time settin
g
is lost if the batter
y
is
d
i
sco
nn
ec
t
ed
.
Manual ad
j
ustment
)
With the ignition on or in the A
CC
(
Accessories
)
position, press and hold
th
e
CLOCK button until the time displa
y
fl
as
h
es
.
)
Press the appropriate button to set the
tim
e
:
B
utton
H:
t
o
se
t t
he
hou
r
s
Th
e
h
ours
digi
ts scro
ll
w
h
en
y
ou press t
hi
s
bu
tt
o
n.
Button M: t
o
se
t th
e
min
u
t
es
The minutes di
g
its scroll when
y
ou press this
bu
tt
o
n.
Button 00
:
t
o
r
ese
t th
e
min
u
t
es
t
o
z
e
r
o
.
- fr
o
m
1
to 29 min: r
ou
n
ded
do
wn t
o
th
e
p
revious hour,
-
f
r
o
m 30 to 59 min
:
roun
d
e
d
up to t
h
e next
hou
r.
)
A
f
ter settin
g
the time, press the
D
I
SP
button; the time display stops
f
lashing.
S
et the time usin
g
the buttons as indicated
belo
w:

56
Monitoring
AUDIO-TELEMATIC system screen
I
f
y
our vehicle is
f
itted with the navi
g
ation s
y
stem,
y
ou have this colour touch screen.
General o
p
eration
Use the buttons on either side o
f
the screen,
or touc
h
t
h
e v
i
rtua
l
b
uttons appear
i
n
g
i
n t
h
e
s
creen to operate the system.
Uses
a
sof
t
c
l
ea
n
c
l
o
th t
o
c
l
ea
n th
e
screen
.
Do not use pointed ob
j
ects on the touch
screen
.
D
o
n
o
t t
ouc
h th
e
sc
r
ee
n with w
e
t h
a
n
ds
.
For reasons of safet
y
, the driver
should onl
y
carr
y
out operations
t
hat re
q
uire close attention, with the
v
ehicle stationar
y.
In addition
,
some functions are not
access
ibl
e w
h
en
d
r
i
v
i
n
g
.
1.
M
ODE :
access
t
o
th
e
"A
ud
i
o
-vi
deo
" m
e
n
u
.
2.
A
UDIO :
se
l
ec
ti
o
n
o
f th
e
A
ud
i
o
-vi
deo
o
r
Navi
g
ation displa
y
.
3.
V
OL : volume ad
j
ustment.
4.
PWR
: on
/
o
ff
.
5
.
SET
: access to the "Settings" menu.
T
6
.
O
PEN: access to the
C
D
/
DVD pla
y
er.
7
.
INFO:
access
t
o
th
e
"In
fo
" m
e
n
u
.
8.
NAVI : displa
y
the map with the location o
f
th
e
v
e
hi
c
l
e
.
9.
SCALE : map scale.
1
0
.
M
EN
U
: access to the "Navi
g
ation-
g
uidance" menu.
11.
ENT
: scroll through a list or select an item.
T
For more in
f
ormation on these menus,
r
e
f
e
r t
o
th
e
"A
ud
i
o
a
n
d
t
e
l
e
m
a
ti
cs
"
sec
ti
o
n.
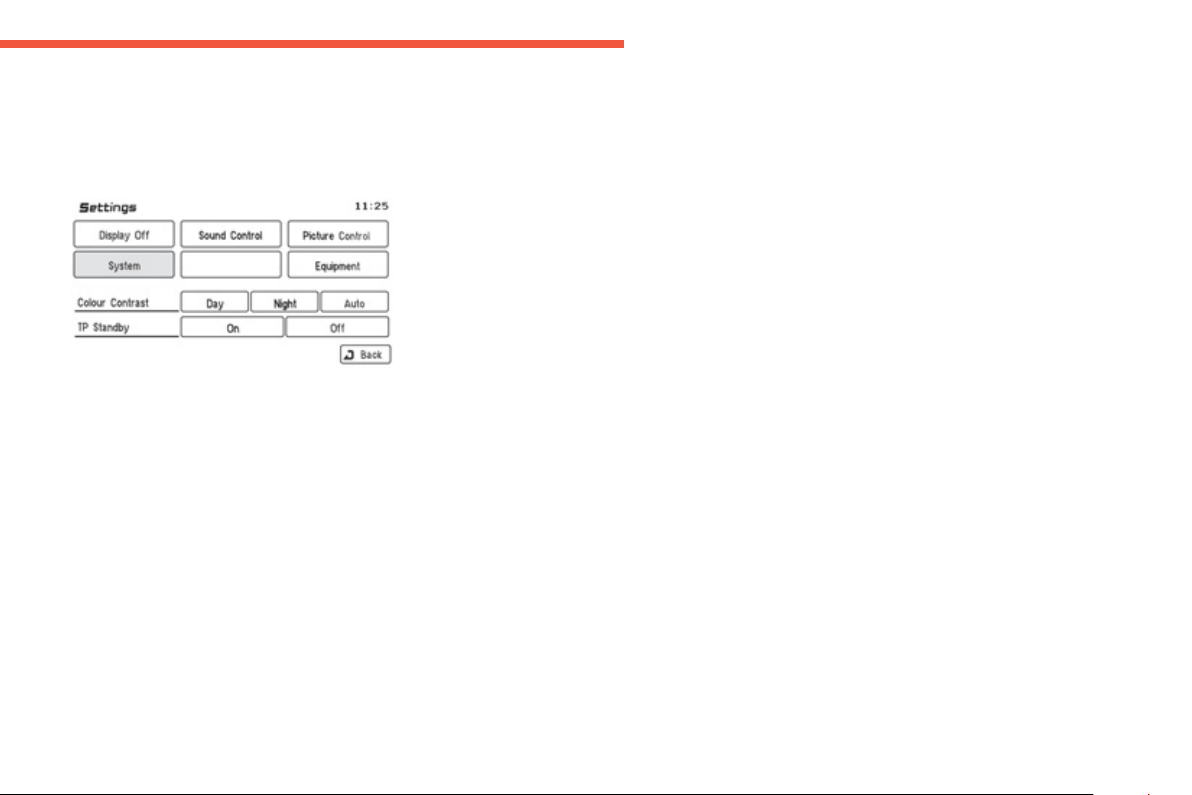
1
57
Monitoring
S
y
stem screen
O
nce in the "Settin
g
s" menu, select "S
y
stem" to
m
odif
y
the time zone, the units, or the displa
y
lan
g
ua
g
e
(
En
g
lish, Dutch, Swedish, French,
Portu
g
uese, Italian, German, Spanish or
Danish
)
and ad
j
ust other settin
g
s.
E
q
ui
p
ment screen
O
nce in the "
S
ettings" menu, select
"Equipment" to activate or deactivate certain
drivin
g
and comfort s
y
stems, or to ad
j
ust
s
ettin
g
s.
"Settin
g
s" menu
O
n the control
p
anel,
p
ress the
S
ET
bu
tt
o
n t
o
o
p
en the menu.
R
emot
e
c
ontro
l
:
- o
p
eration o
f
the direction indicators when
l
ocking and unlocking the vehicle.
K
e
y
less Entr
y
and Startin
g
s
y
ste
m
:
- o
p
eration o
f
the direction indicators when
l
ocking and unlocking the vehicle,
- operation o
f
the Ke
y
less Entr
y
and
S
tartin
g
sy
stem
(
onl
y
for unlockin
g
, onl
y
for startin
g
,
or both
)
.
Wi
p
ers:
- intermittent operation of the windscreen
wipers,
- operation of the front screenwash
associated with the wipers,
- ad
j
ust the
f
requenc
y
o
f
rear wiper
operat
i
on,
- continuous o
p
eration o
f
the rear wi
p
er,
- wiper linked to reverse gear.
Interior
/
exterior li
g
htin
g
:
- sensitivit
y
o
f
the sensor
f
or automatic
illumination o
f
headlam
p
s,
- guide-me-home lighting
(
activation
/
deactivation
)
,
- welcome li
g
htin
g
(
activation/deactivation
)
,
E
lectric windows :
- operatin
g
period after switchin
g
off the
i
g
nition.
Di
rect
i
on
i
n
di
cator
s
:
- motorwa
y
f
unction.
Central lockin
g
:
- selective unlockin
g
.
- automatic door unlockin
g
,
- timin
g
of the automatic re-lockin
g
of the
vehicle a
f
ter unlockin
g
,
- deadlockin
g
(
activation
/
deactivation
)
.
Other
s
:
- automatic
f
olding o
f
the door mirrors,
- automatic cut o
f
power suppl
y
to
accesso
ri
es
.
- alarm
(
ad
j
ustment of sensor sensitivit
y
,
activation/deactivation
)
.
- operatin
g
period
f
or courtes
y
lamps a
f
ter
cl
os
i
n
g
a
d
oor,
- automatic headlamp dipping
(
activation
/
deactivation
)
,
- timin
g
before automatic courtes
y
lamps
g
o off,
- automatic li
g
htin
g
linked to the wipers.
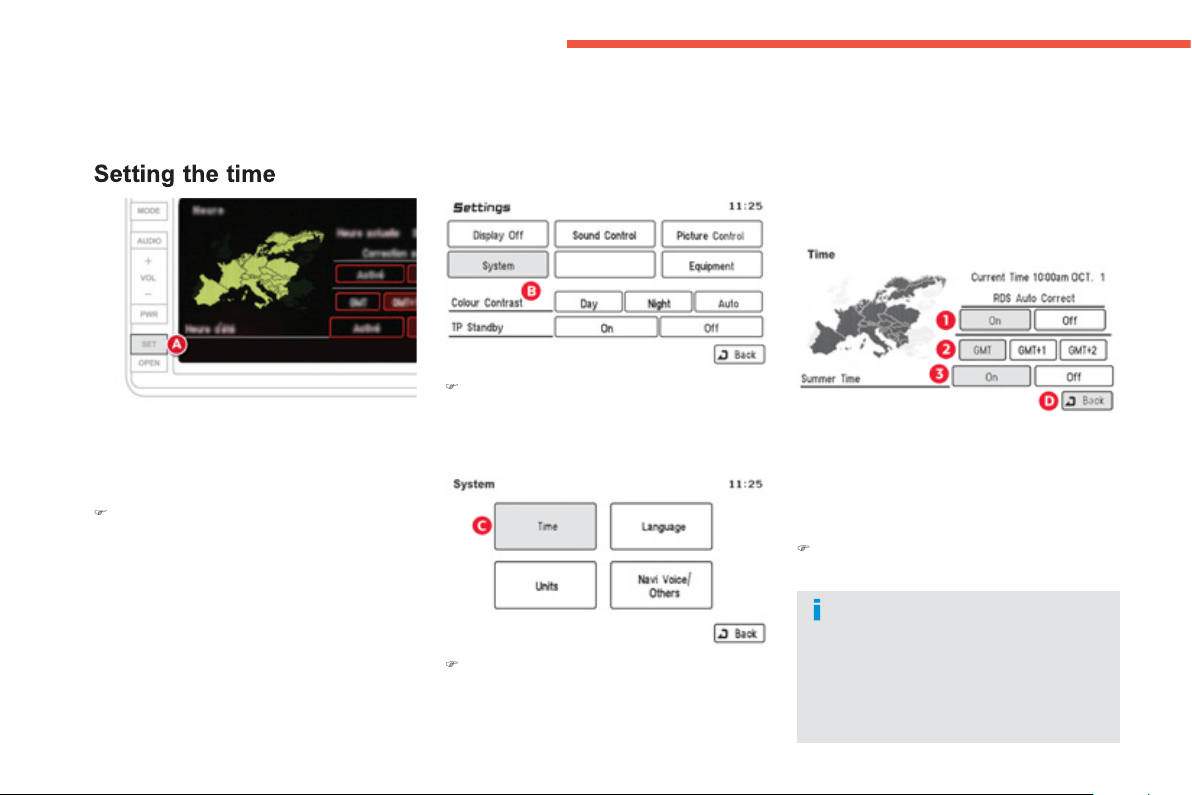
58
Monitoring
Th
e
digi
ta
l
c
l
oc
k
i
s set
automatically
.
y
Thi
s mo
d
e ena
bl
es t
h
e s
y
stem to set t
h
e
l
oca
l
time automaticall
y
usin
g
the si
g
nal
f
rom the
R
D
S
stations.
)
O
n the control panel, press button
A
(
SET
)
t
o
access
th
e
"
Settin
g
s"
menu
.
)
O
n the touch screen,
p
ress button
B
t
o
access
th
e
"
S
y
stem"
menu
.
The s
y
stem settin
g
s screen is displa
y
ed.
Y
ou
m
us
t
deac
tiv
a
t
e
au
t
o
m
a
ti
c
ad
j
ustment
(
RD
S
Auto
C
orrect
)
to
c
han
g
e the time zone and summer time
s
ettin
g
s.
O
n each screen,
y
ou can return to the
previous screen b
y
pressin
g
button
D
"B
ac
k"
.
)
Pr
ess
bu
tt
o
n
C
t
o
access
th
e
"
Time"
m
e
n
u
.
1.
R
DS Auto Correct
:
Activate
/
deactivate automatic ad
j
ustment.
2.
G
MT / GMT+1 / GMT+2
Se
l
ec
t th
e
tim
e
z
o
n
e
.
3.
S
ummer Time
:
S
ummer time
O
n
/
Off
.
)
Pr
ess
bu
tt
o
n
D
t
o
co
nfirm
a
n
d
r
e
t
u
rn t
o
th
e
p
revious menu.
O
nce this menu has been selected,
y
ou can
access the
f
ollowin
g
f
unctions:
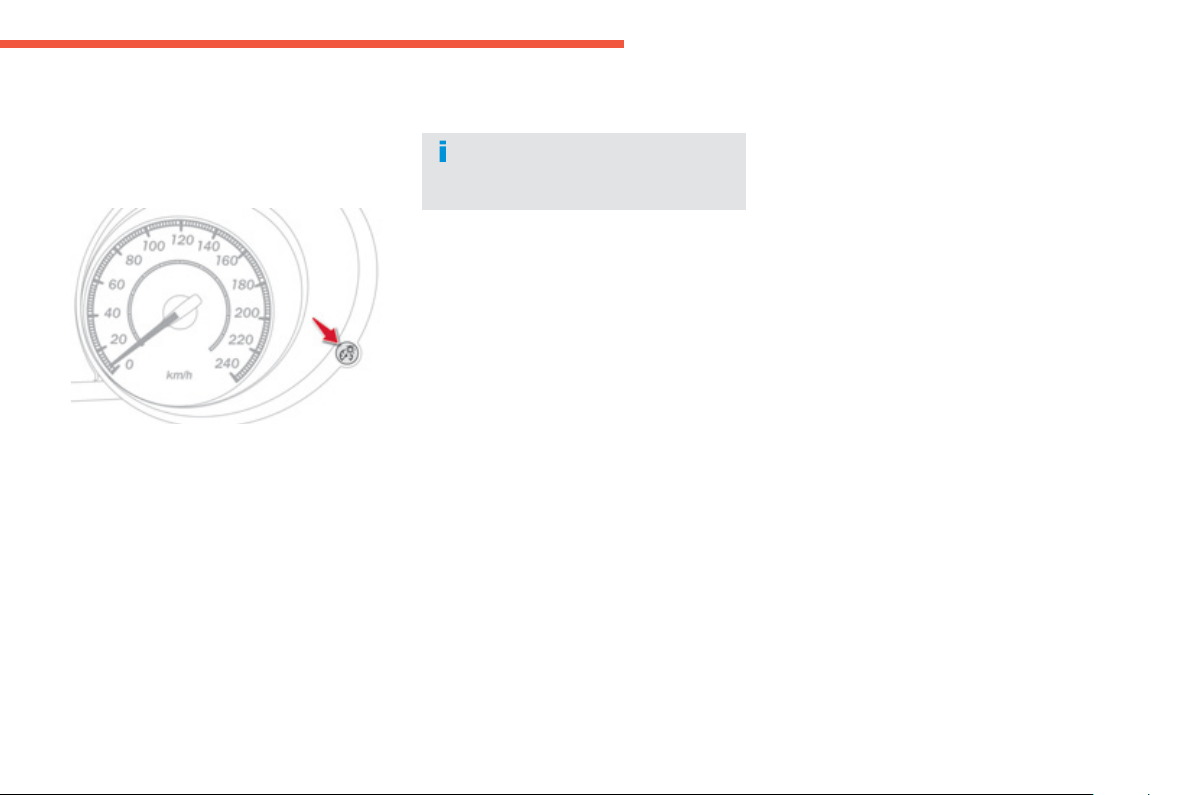
1
59
Monitoring
Lighting dimmer
Sy
stem
f
or manual ad
j
ustment o
f
the bri
g
htness
of
th
e
in
s
tr
u
m
e
nt
s
a
n
d
co
ntr
o
l
s
in r
e
l
a
ti
o
n t
o
th
e
e
xterior brightness.
There is an audible si
g
nal and the
intensit
y
of the li
g
htin
g
increases each
t
i
me t
h
e
b
utton
i
s presse
d
.
With the li
g
htin
g
on or off, press the button
to chan
g
e the intensit
y
of the li
g
htin
g
of the
i
nstruments an
d
contro
l
s
i
n
"d
a
y"
or
"
n
igh
t
"
mode
.
Wh
en t
h
e
ligh
t
i
n
g
reac
h
es t
h
e max
i
mum
setting, press again to change to the minimum
settin
g
.
When the li
g
htin
g
reaches the required
i
ntensit
y
, release the button.
With the vehicle's li
g
htin
g
o
ff
, onl
y
the
bri
g
htness o
f
the instrument panel is modi
f
ied.
Th
e sett
i
n
g
i
s save
d
w
h
en t
h
e
ig
n
i
t
i
on sw
i
tc
h
i
s
t
u
rn
ed
t
o
O
FF.
Wit the vehicle's li
g
htin
g
on, the bri
g
htness o
f
the entire dashboard
(
instrument panel, screen,
air conditionin
g
control panel...
)
is modi
f
ied.

60
Access
S
y
stem which permits central unlockin
g
or lockin
g
of the vehicle usin
g
the door lock or remotel
y
. It is also used for the
g
uide-me-home li
g
htin
g
and
s
tartin
g
the en
g
ine, as well as providin
g
protection a
g
ainst theft.
Remote control key
Unfoldin
g
the ke
y
)
First press this button to unfold the ke
y
.
Unlockin
g
the vehicle
Complete unlockin
g
usin
g
the
r
emote control
)
Press the open padlock to unlock
th
e
v
e
hi
c
l
e
.
Unlockin
g
usin
g
the ke
y
Unlockin
g
is con
f
irmed b
y
the interio
r
lighting which comes on
f
or around
1
5 seconds and the direction indicators
whi
c
h fl
as
h
t
wic
e
.
Accordin
g
to version, the door mirrors
u
nf
o
l
d
a
t th
e
sa
m
e
tim
e
.
)
Turn the ke
y
to the front in the driver's door
l
oc
k t
o
u
nl
oc
k it.

61
2
Access
The complete or selective unlockin
g
parameter is set via the colour
s
creen "Equipment" menu.
C
omplete unlockin
g
is activated b
y
defau
lt.
Selective unlockin
g
usin
g
the
remote control
Selective unlockin
g
is onl
y
available on
versions not
f
itted with deadlockin
g
.
S
elective unlockin
g
is not available
us
i
n
g
t
h
e
k
e
y
.
)
Press the open padlock once to unlock the
driver's door onl
y
.
)
Press the open padlock a
g
ain to unlock the
o
t
he
r
doo
r
s
a
n
d
t
he
boo
t.
Unlockin
g
is confirmed b
y
illumination
o
f
the interior li
g
htin
g
f
or about
15 seconds and the direction indicators,
whi
c
h
f
l
as
h tw
i
c
e
.
According to version, the door mirrors
u
n
fo
l
d
a
t th
e
sa
m
e
tim
e
as
th
e
f
ir
s
t
unlockin
g
action.
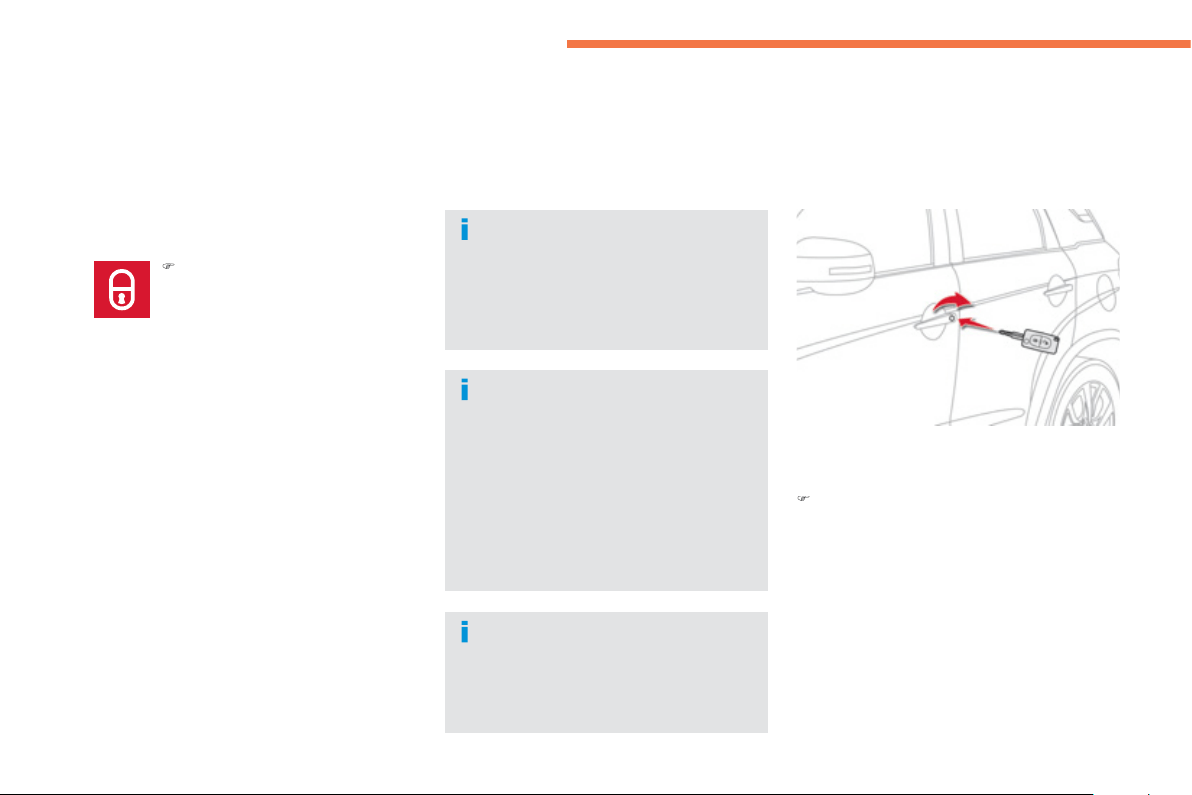
62
Access
L
ockin
g
the vehicle
)
Turn the ke
y
to the rear in the driver's door
lock
t
o
lock
i
t.
Normal lockin
g
usin
g
the remote
c
ontrol
)
Press the closed padlock to lock
the vehicle completel
y
.
I
f
o
n
e
of
th
e
doo
r
s
o
r th
e
boo
t i
s
s
till
open, the central lockin
g
does not take
p
lace.
When the vehicle is locked, if it is
u
nlocked inadvertentl
y
, it will re-lock
a
utomaticall
y
a
f
ter a certain time
(
which can be set in the colour screen
"
Equipment" menu
)
, except i
f
a door is
open
.
Normal lockin
g
usin
g
the ke
y
The
f
oldin
g
and un
f
oldin
g
o
f
the door
mi
rrors us
i
n
g
t
h
e remote contro
l
can
b
e
set
i
n t
h
e co
l
our screen
"Eq
u
ip
ment
"
menu
.
Lockin
g
is con
f
irmed b
y
the direction
i
n
d
i
ca
t
o
r
s
whi
c
h
f
l
as
h
once
.
Accordin
g
to version, the door mirrors
f
o
l
d
a
t th
e
sa
m
e
tim
e
.
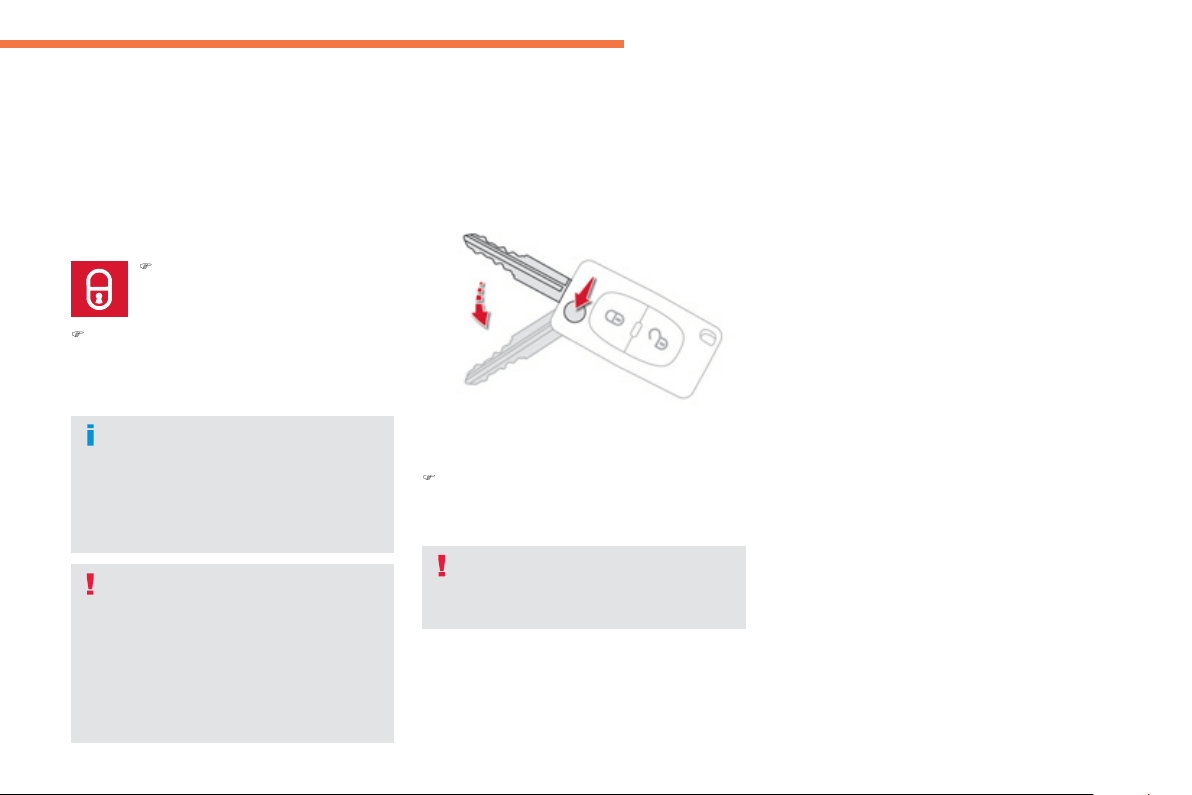
63
2
Access
If
y
ou do not press the button when
f
oldin
g
the ke
y
, there is a risk o
f
dama
g
e
t
o
t
he
m
echa
n
is
m.
D
eadlockin
g
usin
g
the remote
c
ontrol
)
Press the closed padlock to lock
the vehicle completel
y
.
)
Press the closed padlock a
g
ain within
f
ive
seco
n
ds
t
o
deadlock
t
he
v
ehicle
.
Foldin
g
the ke
y
)
First press this button to
f
old the ke
y
.
Deadlockin
g
renders the exterior and
interior door controls inoperative.
It
a
l
so
deac
tiv
a
t
es
th
e
m
a
n
ua
l
ce
ntr
a
l
co
ntr
o
l
bu
tt
o
n.
Therefore,
y
ou should never leave
an
y
one
i
ns
id
e t
h
e ve
hi
c
l
e w
h
en
i
t
i
s
deadlocked
.
Deadlockin
g
is con
f
irmed b
y
the
direction indicators, which
f
lash three
t
imes.
A
ccordin
g
to version, the door mirrors
fo
l
d
a
t th
e
sa
m
e
tim
e
.
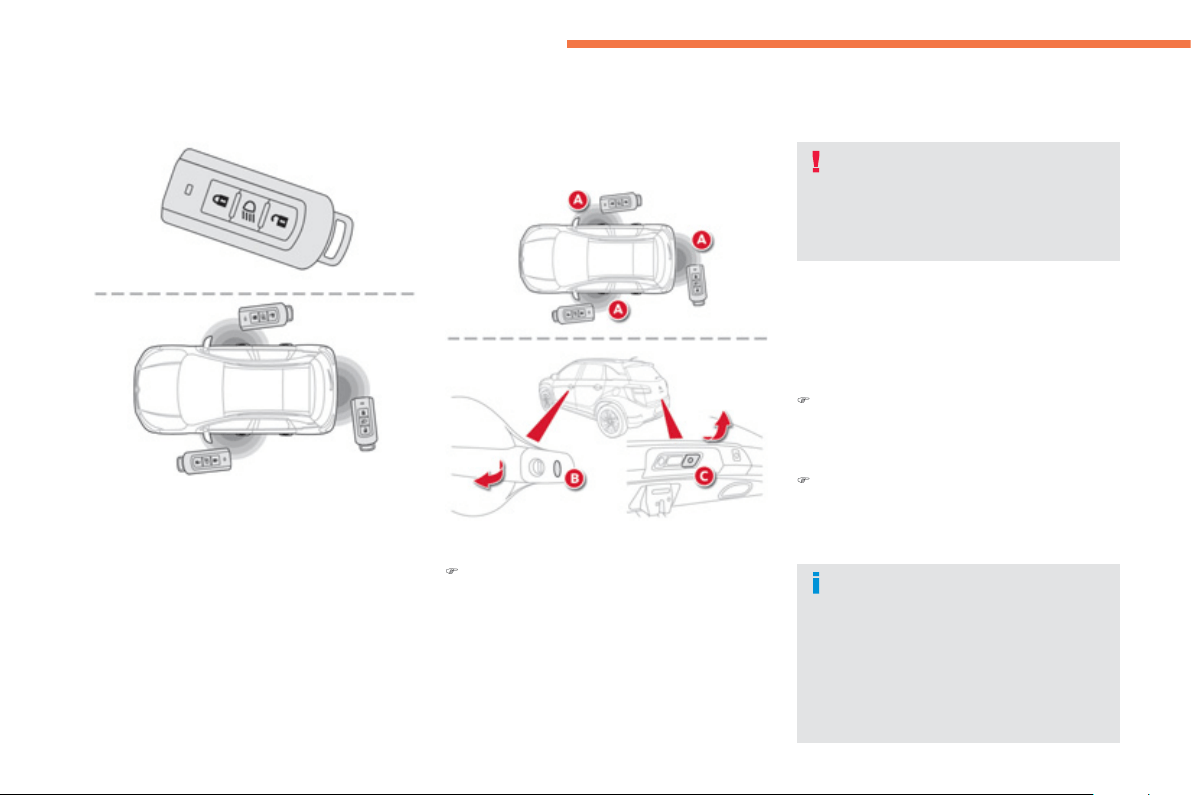
64
Access
"Keyless Entry and Starting" system
Selective unlockin
g
Thi
s sett
i
n
g
i
s
d
one v
i
a t
h
e
"E
qu
i
pment
"
menu
of
th
e
co
l
ou
r
sc
r
ee
n.
B
y
de
f
ault, complete unlockin
g
is activated.
Sy
stem that allows the lockin
g
, unlockin
g
a
nd startin
g
o
f
the vehicle while keepin
g
the
el
ectron
i
c
k
e
y
on
y
our person.
It can also be used as a remote control; see the
"R
e
m
o
t
e
co
ntr
o
l"
sec
ti
o
n.
Unlockin
g
the vehicle
Complete unlockin
g
)
Wi
t
h
t
h
e e
l
ectron
i
c
k
e
y
on
y
our person an
d
in
o
n
e
of
th
e
def
in
ed
z
o
n
es
A
,
press
one
of
th
e
bu
tt
o
n
s
B
or
C
to un
l
oc
k
t
h
e ve
hi
c
l
e,
then
p
ull on the handle to o
p
en the door.
Your passen
g
ers can also open their doors,
as soon as the electronic ke
y
is in one o
f
th
e
de
fin
ed
z
o
n
es
.
Unlockin
g
is confirmed b
y
an audible
s
i
g
nal and the direction indicators which
f
l
as
h tw
i
c
e
.
Th
e
doo
r mirr
o
r
s
u
n
fo
l
d
a
t th
e
sa
m
e
t
i
m
e
.
S
elective unlocking is only available on
versions not
f
itted with deadlockin
g
.
)
Wi
t
h
t
h
e e
l
ectron
i
c
k
e
y
on
y
our person,
p
ress
b
utton
B
once to un
l
oc
k
on
ly
t
h
e
d
r
i
ver
'
s
d
oor, t
h
en
p
u
ll
on t
h
e
d
oor
h
an
dl
e
to o
p
en.
)
Pr
ess
bu
tt
o
n B a
g
ain to unlock the vehicle
c
ompletel
y
.
For securit
y
, the detection zones in
w
hi
c
h
t
h
e e
l
ectron
i
c
k
e
y
i
s operat
i
ona
l
h
a
v
e
a
r
ad
i
us
of
abou
t 7
0
c
m
a
r
ou
n
d
e
ac
h
open
i
n
g
b
utton.
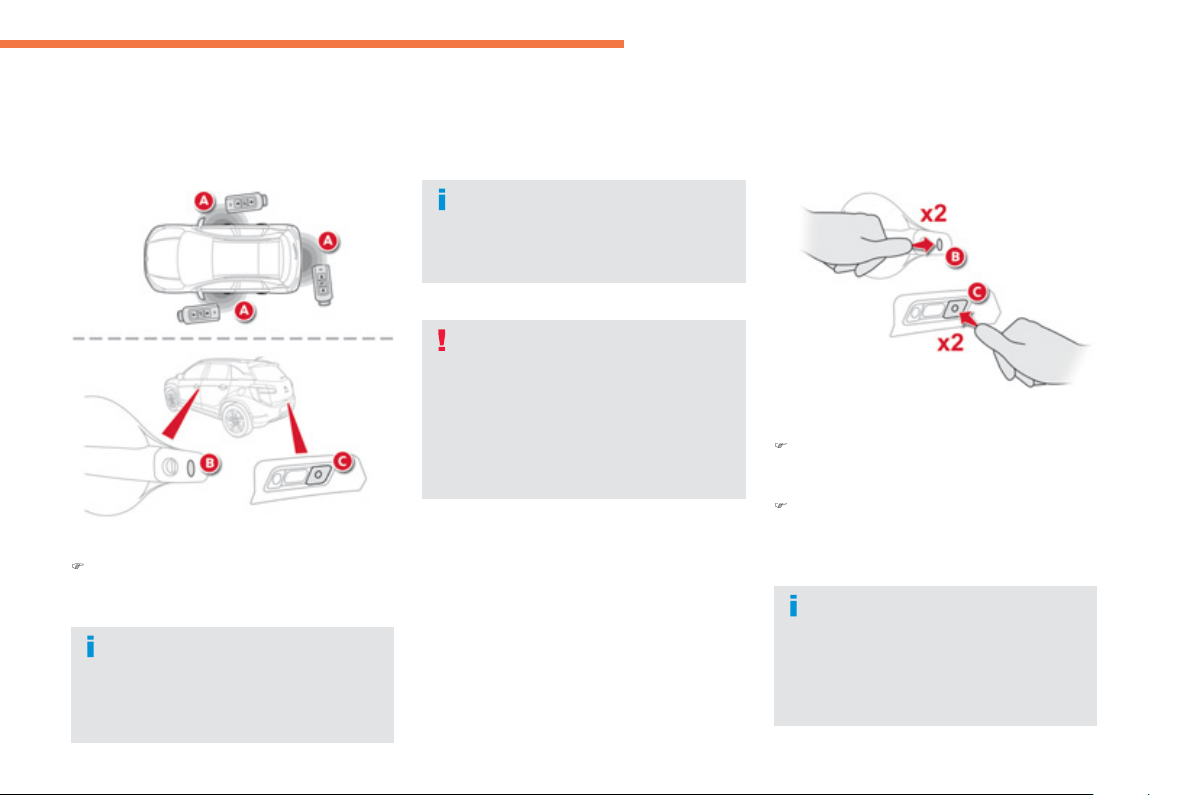
65
2
Access
L
ockin
g
the vehicle
Loc
ki
n
g
)
With the ke
y
in one o
f
the de
f
ined zones
A
,
p
ress one o
f
the buttons
B
or
C
.
D
ea
dl
oc
ki
n
g
)
With the electronic ke
y
in one o
f
the
def
in
ed
z
o
n
es
A
, press
b
utton
B
or
C
t
o
lock
t
he
v
ehicle
.
)
Within
f
ive seconds,
p
ress button B
or
C
a
g
ain to deadlock the vehicle.
Al
wa
y
s ensure t
h
at
y
ou
h
ave t
h
e
e
lectronic key on your person
be
f
ore lockin
g
the vehicle: in some
c
ircumstances, it is possible to lock
the vehicle without the presence of the
e
lectronic ke
y
havin
g
been detected
in
s
i
de
th
e
v
e
hi
c
l
e
.
Locking is con
f
irmed by an audible
s
i
g
nal and the direction indicators,
whi
c
h fl
as
h
once
.
Th
e
doo
r mirr
o
r
s
f
o
l
d
a
t th
e
sa
m
e
tim
e
.
Lockin
g
is confirmed b
y
two audible
s
i
g
nals and b
y
the direction indicators
whi
c
h fl
as
h
t
hree time
s
.
Th
e
doo
r mirr
o
r
s
u
nf
o
l
d
a
t th
e
sa
m
e
t
i
m
e
.
The operatin
g
mode must be "
O
FF".
W
ith Stop & Start, if the en
g
ine is in
S
top mode, the vehicle cannot be
locked
.
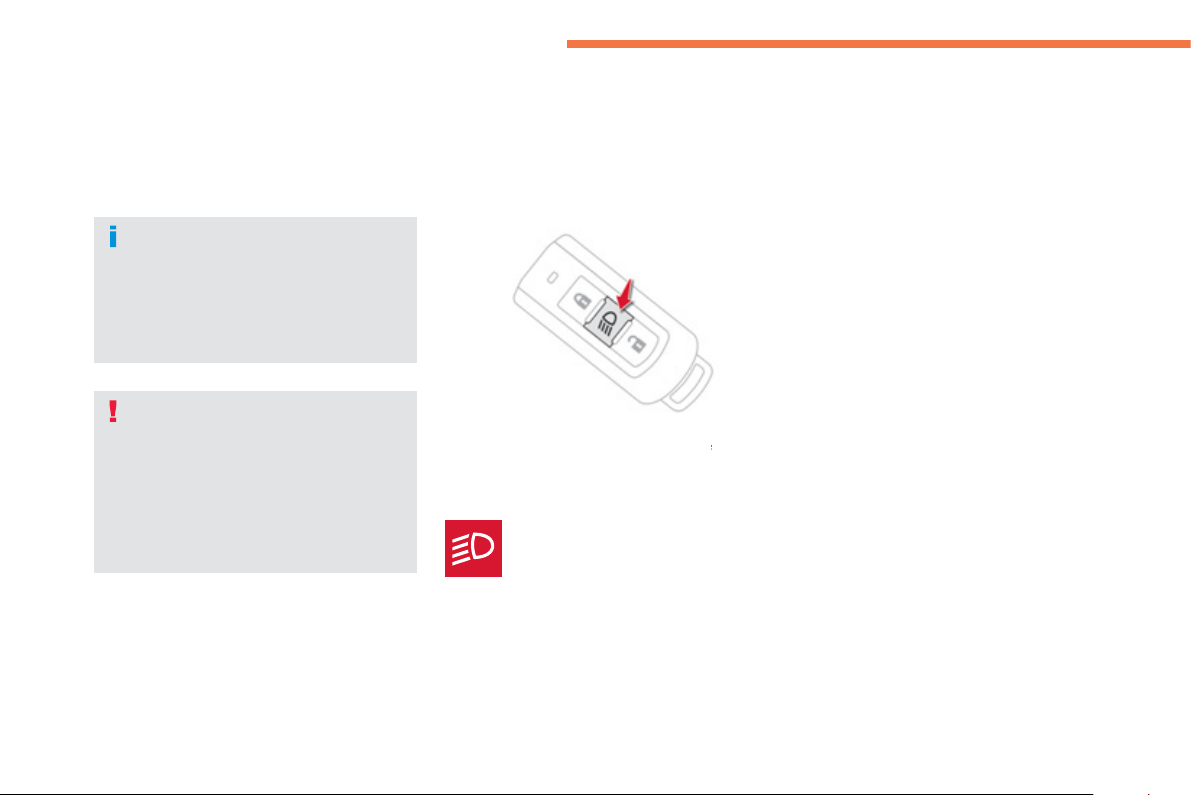
66
Access
Switchin
g
on the li
g
htin
g
remote
ly
This only operates with the
ignition off
a
n
d
th
e
f
l
i
g
htin
g
control in the "OFF"
o
r "AUTO " position.
Remote operation of the li
g
htin
g
will be
s
wit
c
h
ed
off
:
- on sw
i
tc
hi
n
g
on t
h
e
ig
n
i
t
i
on,
- i
f
the li
g
htin
g
control is not in the " OFF
"
o
r
"AUTO "
p
osition,
- when activatin
g
manual
g
uide-me-home
li
g
htin
g
.
Pr
ess
thi
s
bu
tt
o
n t
o
s
wit
c
h
o
n
the li
g
htin
g
remotel
y
(
illumination
of the sidelamps and dipped
b
eam headlamps
)
for a period o
f
30
seconds.
A
second press switches o
ff
the
ligh
t
i
n
g
.
D
ea
dl
oc
ki
n
g
ren
d
ers t
h
e exter
i
or an
d
interior door controls ino
p
erative.
It
a
l
so
deac
tiv
a
t
es
th
e
m
a
n
ua
l
ce
ntr
a
l
co
ntr
o
l
bu
tt
o
n.
Therefore, never leave an
y
one inside
th
e
v
e
hi
c
l
e
wh
e
n it i
s
dead
l
oc
k
ed
.
The means b
y
which lockin
g
/unlockin
g
the vehicle and automatic
f
oldin
g/
un
f
oldin
g
o
f
the mirrors is con
f
irmed
c
an be con
f
i
g
ured in the colour screen
"E
q
ui
p
ment" menu.
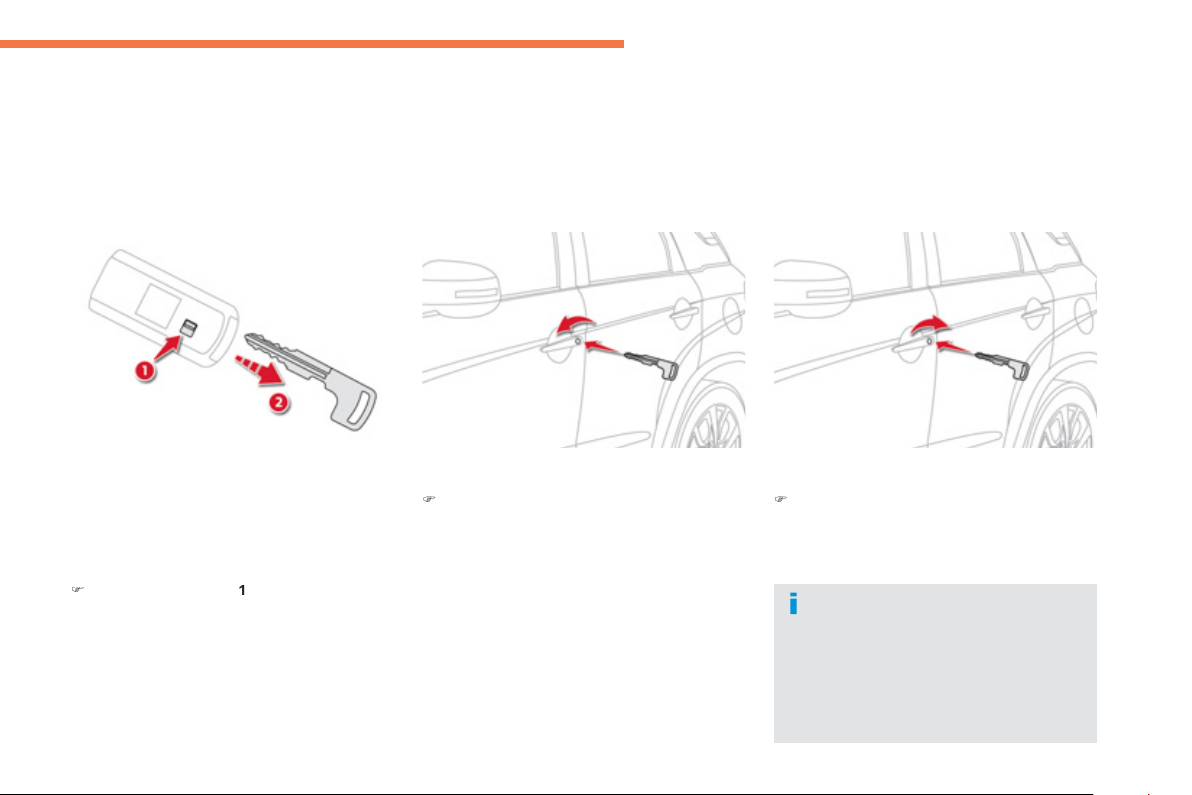
67
2
Access
Emergency procedure with the Keyless Entry and Starting
system
Unlockin
g
)
Turn the ke
y
towards the front in the
d
riv
e
r'
s
doo
r l
oc
k t
o
u
nl
oc
k th
e
v
e
hi
c
l
e
.
Emer
g
enc
y
unlockin
g/
lockin
g
u
sin
g
the inte
g
ral ke
y
Th
e
i
nte
g
ra
l
k
e
y
i
s use
d
to
l
oc
k
an
d
un
l
oc
k
t
h
e
vehicle when the electronic key cannot operate:
- cell batter
y
f
lat, vehicle batter
y
dischar
g
ed
or disconnected, ...
- vehicle located in an area with stron
g
e
lectro-ma
g
netic si
g
nals.
)
P
u
ll
a
n
d
h
o
l
d
bu
tt
o
n
1
,
to extract the
i
nte
g
ra
l
k
e
y
2
.
Lockin
g
)
Turn the ke
y
towards the rear in the driver's
doo
r l
oc
k t
o
l
oc
k th
e
v
e
hi
c
l
e
.
The emer
g
enc
y
ke
y
allows
y
ou to lock
o
r un
l
oc
k
t
h
e
d
r
i
ver
'
s
d
oor on
ly
.
T
o
l
oc
k
or un
l
oc
k
t
h
e ot
h
er
d
oors, use
the interior controls
(
see "Lockin
g
/
unlockin
g
f
rom inside"
)
.
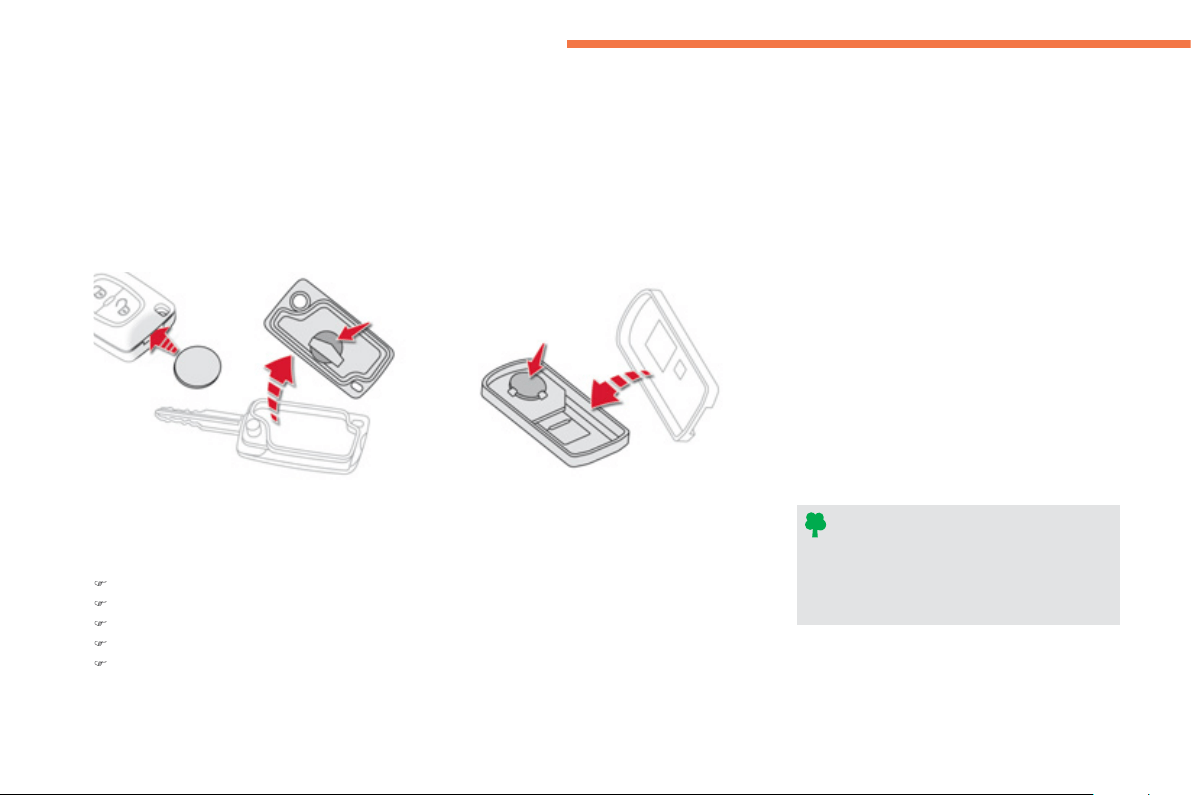
68
Access
With the Ke
y
less Entr
y
and
S
tartin
g
s
y
stem,
m
essage appears in the instrument panel when
r
eplacement o
f
the batter
y
is needed.
C
han
g
in
g
the batteries
D
o
n
o
t thr
o
w th
e
r
e
m
o
t
e
co
ntr
o
l
batteries awa
y
, the
y
contain metals
whi
c
h
a
r
e
h
a
rmf
u
l t
o
th
e
e
nvir
o
nm
e
nt.
Take them to an approved collection
point.
Remote control ke
y
Batter
y
re
f
.:
C
R1620
/
3 volts.
Electronic ke
y
Batter
y
re
f
.:
C
R2032
/
3 volt.
)
Unclip the cover usin
g
a small screwdriver at the cutout.
)
Li
f
t
off
th
e
co
v
e
r.
)
Remove the flat batter
y
from its location.
)
Fit the new batter
y
into its location observin
g
the ori
g
inal direction of fitment.
)
Clip the cover onto the casin
g
.
69
2
Access
Visit a CITROËN dealer with the vehicle's re
g
istration document and
y
our personal identification documents and if possible the ke
y
code label.
The CITROËN dealer will be able to retrieve the ke
y
code and the transponder code required to order a new ke
y
.
Electronic ke
y
The electronic ke
y
is a sensitive s
y
stem; do not operate it while it is in
y
our pocket as there is a possibilit
y
that it ma
y
unlock the vehicle, without
y
ou bein
g
aware of it.
Do not repeatedl
y
press the buttons of
y
our electronic ke
y
out of ran
g
e and out of si
g
ht of
y
our vehicle. You run the risk of stoppin
g
it from
wor
ki
n
g
an
d
t
h
e remote contro
l
wou
ld
h
ave to
b
e re
i
n
i
t
i
a
li
se
d
.
Th
e e
l
ectron
i
c
k
e
y
cannot operate as a remote contro
l
w
h
en
i
t
i
s
i
n t
h
e rea
d
er or even w
h
en t
h
e
ig
n
i
t
i
on
i
s sw
i
tc
h
e
d
on.
Lockin
g
the vehicle
Drivin
g
with the doors locked ma
y
make access to the passen
g
er compartment b
y
the emer
g
enc
y
services more di
ff
icult in an emer
g
enc
y
.
As a safet
y
precaution
(
with children on board
)
, take the Ke
y
less Entr
y
and Startin
g
electronic ke
y
when
y
ou leave the vehicle, even for a short
tim
e
.
Electrical interference
The Ke
y
less Entr
y
and
S
tartin
g
electronic ke
y
ma
y
not operate i
f
close to certain electronic devices: telephone, laptop computer, stron
g
m
a
g
netic
f
ields, ...
A
nti-theft
p
rotection
Do not make an
y
modi
f
ications to the electronic en
g
ine immobiliser s
y
stem; this could cause mal
f
unctions.
Don't
f
or
g
et to turn the steerin
g
to en
g
a
g
e the steerin
g
lock.
Wh
en purc
h
as
i
n
g
a secon
d
-
h
an
d
ve
hi
c
l
e
Have all of the ke
y
s in
y
our possession paired b
y
a CITRO
Ë
N dealer, to ensure that onl
y
y
our ke
y
s allow
y
our vehicle to be unlocked and started.
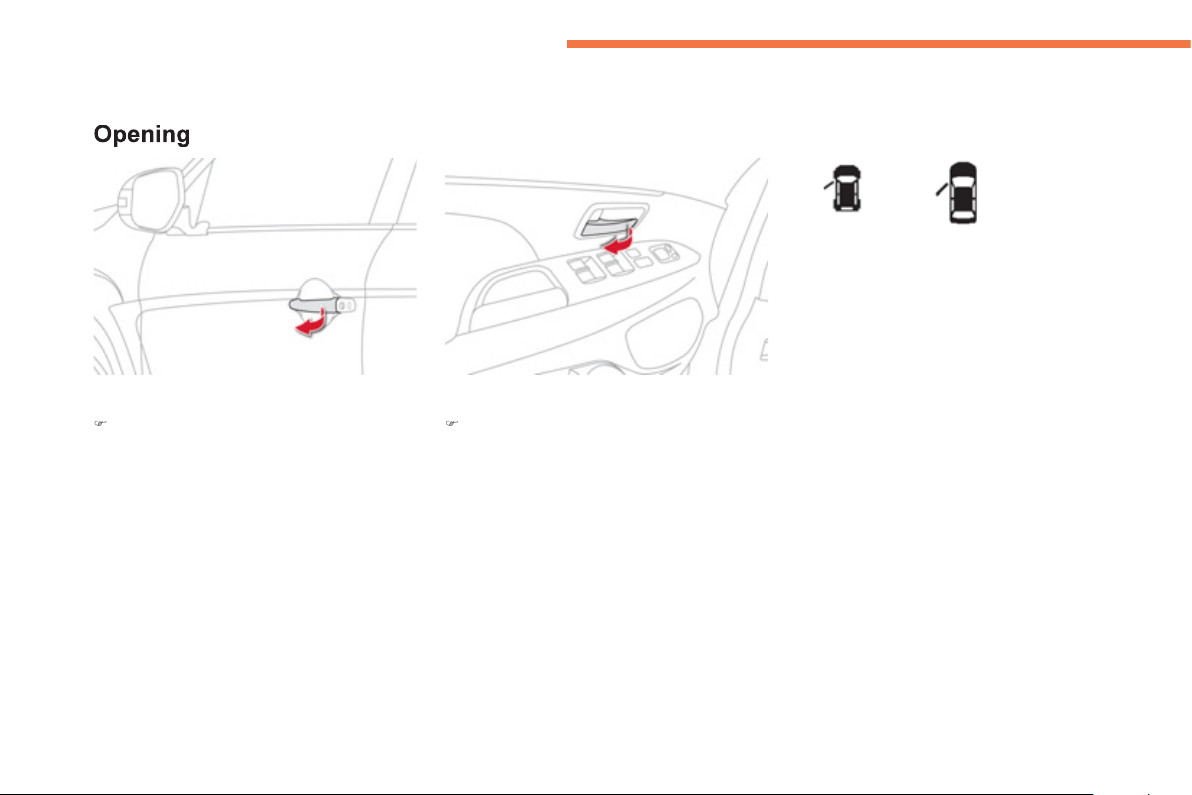
70
Access
Doors
From outside
)
A
f
ter unlocking the vehicle using the
r
emote control or the ke
y
, pull the door
ha
n
d
l
e
.
Closin
g
From inside
)
Pull the
f
ront or rear door lever to o
p
en the
doo
r.
If a door is not closed correctl
y
, this warnin
g
lamp comes on in the instrument panel screen
u
ntil th
e
doo
r
co
n
ce
rn
ed
i
s
c
l
osed
.
O
n the driver's side, this action on the door
le
v
e
r
u
nl
oc
k
s
th
e
doo
r i
f
it w
as
l
oc
k
ed
.
O
n the passen
g
er's side or
f
or the rear doors,
the door must
f
irst be unlocked manually
(
see
"
Individual controls"
)
i
f
it was locked.
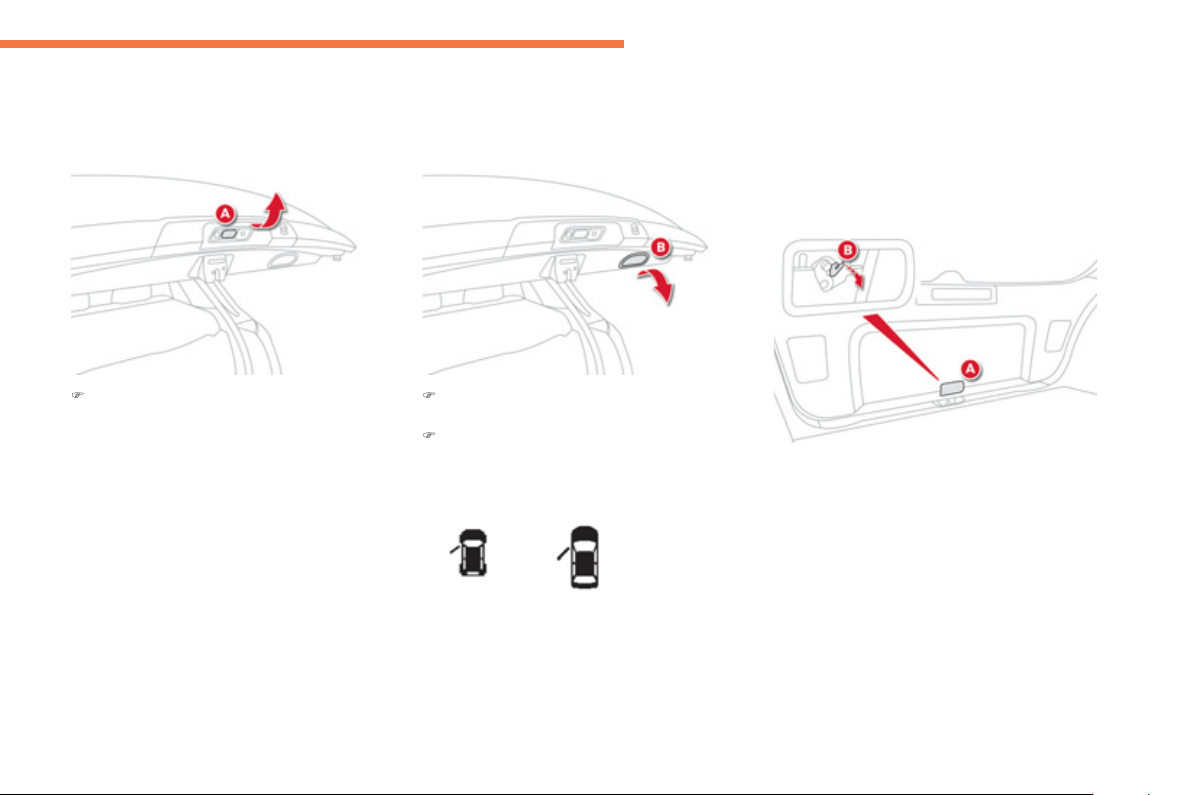
71
2
Access
Boot
Openin
g
)
After unlockin
g
the vehicle, press the
ha
n
dle
A
an
d
ra
i
se t
h
e ta
ilg
ate.
)
P
u
ll th
e
h
a
n
d
l
e
B
downwards to
g
uide the
ta
ilg
ate.
)
R
e
l
ease t
h
e
h
an
dl
e an
d
press
g
ent
ly
on t
h
e
e
xterior sur
f
ace o
f
the tail
g
ate to close it.
Closin
g
M
anual release
Thi
s
e
n
ab
l
es
th
e
boo
t t
o
be
u
nl
oc
k
ed
in th
e
e
vent of a central lockin
g
fault.
- Fold back the rear seats to
g
ain access to
the tail
g
ate release from inside the boot.
- Remove the plastic cover
f
rom the
open
i
n
g
A
i
n t
h
e ta
ilg
ate
i
nter
i
or p
ill
ar.
-
Mo
v
e
t
he
co
ntr
ol
B
to t
h
e r
igh
t to un
l
oc
k
and o
p
en the boot.
If the tail
g
ate is not full
y
closed, this warnin
g
l
amp comes on in the instrument panel screen
u
ntil it i
s
c
l
osed
.
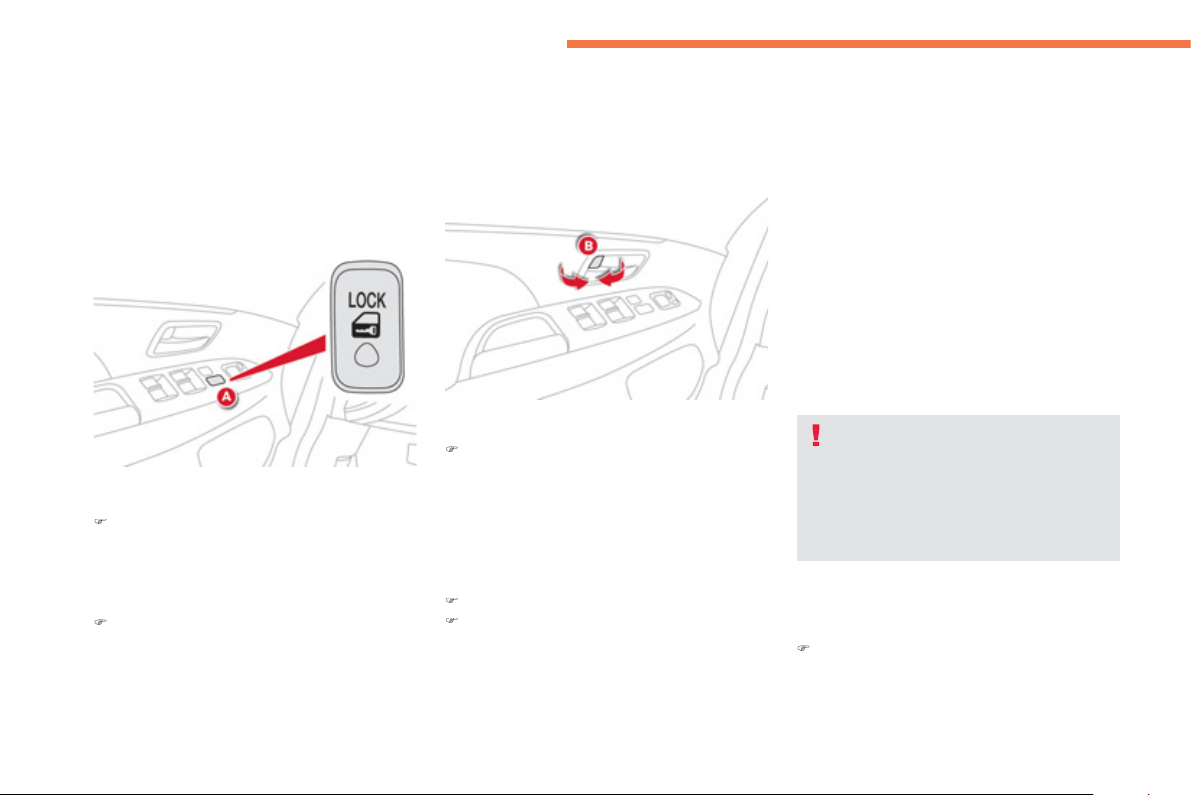
72
Access
Locking / unlocking from inside
Central lockin
g
control
Lockin
g
)
Pr
ess
th
e
f
r
o
nt
of
bu
tt
o
n
A
t
o
l
oc
k th
e
v
e
hi
c
l
e
.
Unlockin
g
)
Pr
ess
th
e
r
ea
r
of
bu
tt
o
n
A
t
o
u
nl
oc
k th
e
v
e
hi
c
l
e
.
Individual controls
Thi
s
co
ntr
o
l
ca
n
a
l
so
be
used
t
o
l
oc
k th
e
fr
o
nt
passen
g
er
'
s
d
oor an
d
t
h
e rear
d
oors
i
n t
h
e
e
vent o
f
a
f
ailure with the central lockin
g
. To
do
t
his
:
)
Op
en the door in
q
uestion.
)
Piv
o
t th
e
int
e
ri
o
r
co
ntr
o
l B t
o
w
a
r
ds
th
e
f
ront, then close the door.
Lockin
g
the front and rear doors
)
Piv
o
t th
e
int
e
ri
o
r
co
ntr
o
l
B
t
o
w
a
r
ds
th
e
f
r
o
nt.
Sy
stem which provides
f
ull manual lockin
g
or
unlockin
g
o
f
the doors and boot
f
rom the inside.
It is possible to lock the vehicle with a
passen
g
er door open, usin
g
usin
g
the
i
n
di
v
id
ua
l
l
oc
ki
n
g
contro
l
s: ensure t
h
at
y
ou have the ke
y
be
f
ore closin
g
the
passen
g
er
d
oor.
Unlockin
g
the front and rear
d
oors
)
Piv
o
t th
e
int
e
ri
o
r
co
ntr
o
l
B
t
o
w
a
r
ds
th
e
r
ea
r.
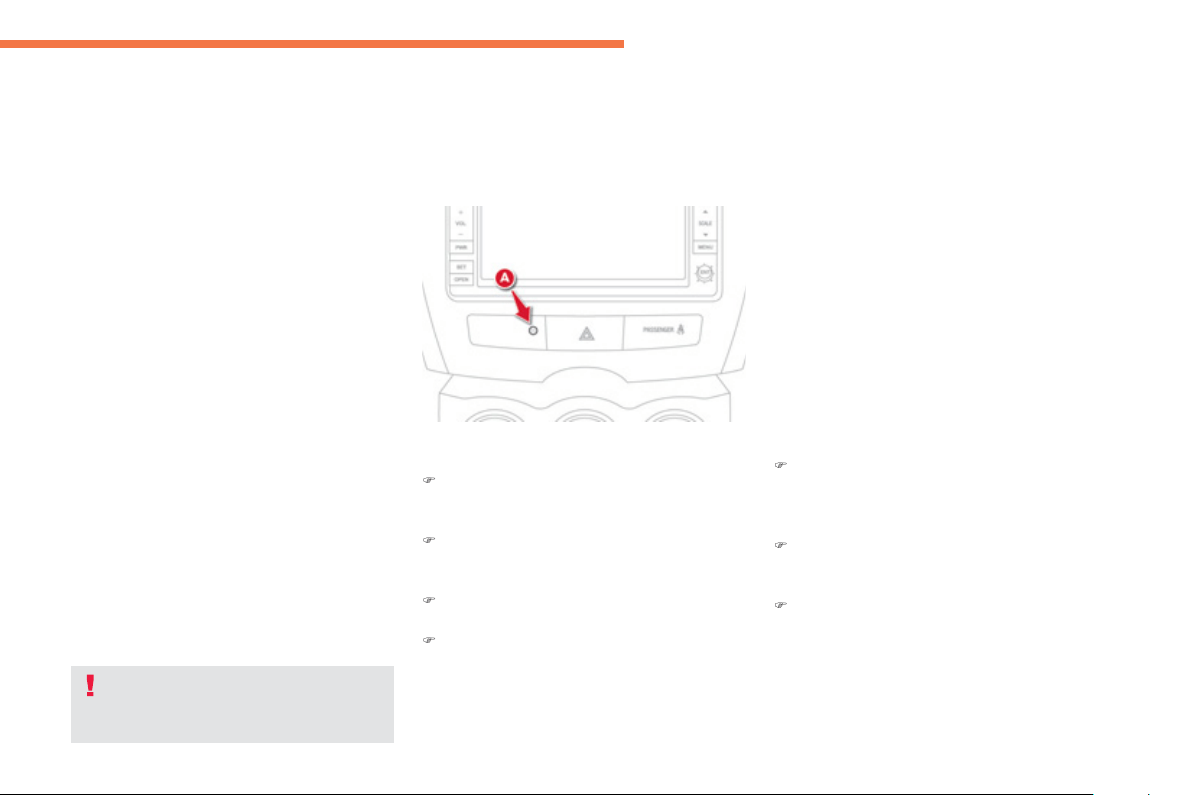
73
2
Access
For all work on the alarm s
y
stem,
c
ontact a
C
ITR
O
ËN dealer or a
q
ualified workshop.
Alarm *
S
ystem which protects and provides a deterrent against the
f
t and break-ins. It provides the
f
ollowing types o
f
monitoring:
-
p
erimeter
The s
y
stem checks for an
y
openin
g
of the vehicle.
The alarm is tri
gg
ered if an
y
one tries to open a
d
oor
,
t
h
e
b
oot
,
t
h
e
b
onnet....
- volumetric
The s
y
stem checks for an
y
variation in the
volume in the passen
g
er compartment.
The alarm is tri
gg
ered if an
y
one breaks a
window, enters the passen
g
er compartment o
r
mo
v
es
i
n
side
t
he
v
ehicle
.
- tilt
The s
y
stem checks for an
y
chan
g
e in the
a
ttit
ude
o
f th
e
v
e
hi
c
l
e
.
The alarm is tri
gg
ered if the vehicle is lifted,
mo
v
ed
o
r kn
oc
k
ed
.
Self-
p
rotection function
The s
y
stem checks
f
or the puttin
g
out o
f
s
ervice o
f
its com
p
onents.
The alarm is triggered i
f
the battery, the central
c
ontrol or the siren wirin
g
are put out o
f
service
or dama
g
ed.
Lockin
g
the vehicle with full
a
larm s
y
stem
A
ctivation
)
S
witch o
ff
the i
g
nition
(O
FF mode i
f
y
our
vehicle has the Ke
y
less Entr
y
and Startin
g
sy
stem
)
.
)
Remove the ke
y
from the i
g
nition switch,
if
y
our vehicle does not have the "Ke
y
less
Entr
y
and
S
tartin
g
" s
y
stem.
)
L
eave t
h
e ve
hi
c
l
e, an
d
c
l
ose a
ll
t
h
e
d
oors
a
n
d
t
he
bo
nn
e
t.
)
Press the locking button on the remote
co
ntr
o
l
o
r
o
n
e
of
th
e
doo
r
o
r
boo
t
bu
tt
o
n
s
if
y
our vehicle has the "Ke
y
less Entr
y
and
S
tartin
g
" s
y
stem.
D
eact
i
vat
i
on
Do one o
f
the the
f
ollowin
g
to deactivate the
ala
rm:
)
P
ress t
h
e un
l
oc
ki
n
g
b
utton on t
h
e remote
co
ntr
o
l
o
r
o
n
e
of
th
e
doo
r
o
r
boo
t
bu
tt
o
n
s
i
f
y
our vehicle has the "Ke
y
less Entr
y
and
S
tartin
g
" s
y
stem.
)
Switch on the i
g
nition
(O
N mode if
y
our
vehicle has the "Ke
y
less Entr
y
and
S
tartin
g
" s
y
stem
)
.
)
O
pen a door or the boot while the s
y
stem is
b
e
i
n
g
act
i
vate
d
.
Th
e a
l
arm s
y
stem
i
s
d
eact
i
vate
d
: t
h
e
i
n
di
cator
lam
p
A goes o
ff
.
The alarm is bein
g
activated: the indicator
lamp
A
flashes rapidl
y
accompanied b
y
an intermittent audible si
g
nal
f
or about
2
0
seco
n
ds
.
O
nce the 20 seconds have ex
p
ired, t
h
e
system is activ
e
. The audible signal stops and
the indicator lamp in the button
f
lashes slowl
y
.
*
Accordin
g
to equipment.

74
Access
Lockin
g
the vehicle with
p
erimeter monitorin
g
onl
y
D
eac
tiv
a
t
e
th
e
int
e
ri
o
r v
o
l
u
m
e
tri
c
a
n
d
tilt
m
onitorin
g
to avoid unwanted tri
gg
erin
g
of the
al
arm
i
n certa
i
n cases, suc
h
as:
- an animal le
f
t in the vehicle,
- a window le
f
t partl
y
open,
- washing your vehicle.
Deactivation of the interior
v
o
l
umetr
i
c an
d
t
il
t mon
i
tor
i
n
g
Raise and hold the wiper control stalk in the
"
M
IS
T
" position for about three seconds to
activate them a
g
ain, the audible si
g
nal sounds
tw
i
c
e
.
)
Switch off the i
g
nition and remove the
k
e
y
from the i
g
nition switch
(O
FF mode i
f
y
our vehicle has the "Ke
y
less Entr
y
and
S
tartin
g
" s
y
stem
)
.
)
R
a
i
se an
d
h
o
ld
t
h
e w
i
per contro
l
sta
lk
i
n
t
he
"
MIST" position
f
or about 3 seconds.
)
Th
e au
dibl
e s
ig
na
l
soun
d
s
once
a
n
d
t
he
interior volumetric and tilt monitoring are
deac
tiv
a
t
ed
.

75
2
Access
Tri
gg
erin
g
of the alarm
This is indicated b
y
soundin
g
o
f
the siren and
f
lashin
g
o
f
the direction indicators
f
or thirt
y
seco
n
ds
.
A
messa
g
e then appears in the instrument
p
anel screen while the siren is operatin
g
.
When the i
g
nition is next switched on
(O
N
m
ode if
y
our vehicle has the "Ke
y
less Entr
y
and
S
tartin
g
" s
y
stem
)
, an audible si
g
nal sounds four
times to in
f
orm
y
ou that the alarm was tri
gg
ered
d
ur
i
n
g
y
our a
b
sence.
Com
p
lete deactivation of
t
he alarm
)
S
witch o
ff
the ignition
(O
FF mode i
f
y
our vehicle has the "Ke
y
less Entr
y
and
S
tartin
g
" s
y
stem
)
.
)
Remove the ke
y
from the i
g
nition switch,
if
y
our vehicle does not have the "Ke
y
less
Entr
y
and Startin
g
" s
y
stem.
)
O
pen the driver's door.
)
Pl
ace t
h
e
ligh
t
i
n
g
contro
l
sta
lk
i
n t
h
e
"
OFF
"
p
os
i
t
i
on.
)
Pull the wiper control stalk towards you and
h
o
l
d
.
Aft
e
r
abou
t t
e
n
seco
n
ds
th
e
r
e
i
s
a
n
aud
i
b
l
e
s
i
g
nal.
)
When the audible si
g
nal stops, continue to
hold the wiper stalk pulled towards
y
ou and
press t
h
e remote contro
l
l
oc
ki
n
g
b
utton.
Y
ou can comp
l
ete
ly
d
eact
i
vate t
h
e a
l
arm
s
y
stem. To do this, proceed as
f
ollows:
)
The state o
f
the system is then signalled to
y
ou b
y
the number o
f
beeps:
O
ne beep: the alarm s
y
stem is completel
y
deac
tiv
a
t
ed
.
Two beeps: the alarm s
y
stem is activated.
Each new press of the remote control
lockin
g
button chan
g
es the state o
f
the
sy
stem.
I
t
i
s poss
ibl
e to a
dj
ust t
h
e sens
i
t
i
v
i
t
y
of
th
e
a
l
a
rm
se
n
so
r
a
n
d
t
o
deac
tiv
a
t
e
th
e
fu
n
c
ti
o
n vi
a
th
e
co
l
ou
r
sc
r
ee
n
"
Equipment" menu.
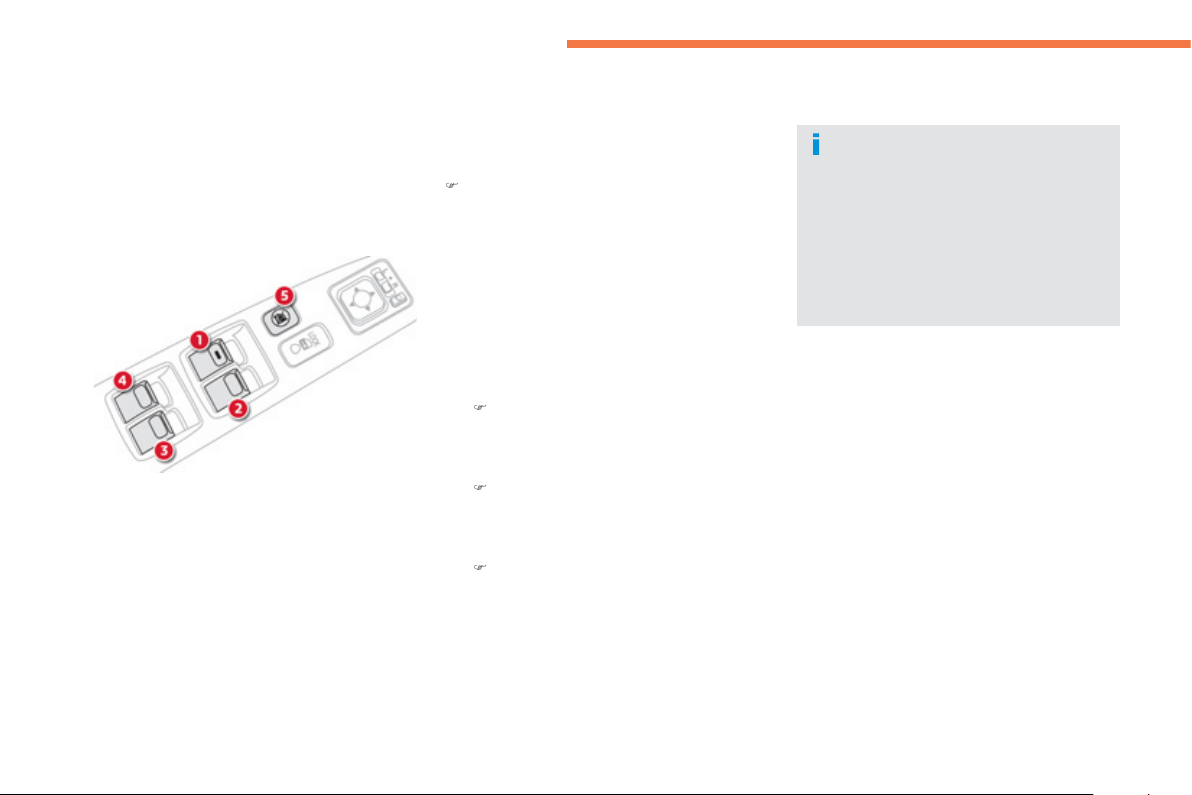
76
Access
Electric windows
S
y
stem which opens or closes a window
m
anuall
y
or automaticall
y
. It is fitted with
a
s
y
stem which provides protection if an
obs
t
acle
is
de
t
ec
t
ed
o
n
o
n
e
-t
ouch
m
odels
a
n
d
a
deactivation s
y
stem to prevent misuse o
f
the
rea
r
co
ntr
ols
.
Front and rear passen
g
ers'
el
ectr
i
c w
i
n
d
ows
)
Wi
t
h
t
h
e
ig
n
i
t
i
on on, press or pu
ll
t
h
e
s
w
i
tc
h
.
Th
e w
i
n
d
ow stops w
h
en
y
ou
r
elease
t
he
s
w
i
t
ch
.
Safet
y
anti-pinch
(
driver's side
)
I
n automat
i
c mo
d
e, w
h
en t
h
e w
i
n
d
ow r
i
ses an
d
m
eets an obstacle, it stops and lowers again.
Th
e
e
l
ec
tri
c
win
do
w
s
wit
c
h
es
remain operational for approximatel
y
30 seconds a
f
ter the i
g
nition is switched
off
.
Th
e w
i
n
d
ows can no
l
on
g
er
b
e opene
d
o
r closed once a
f
ront door is o
p
ened.
The rear windows do not lower
f
ull
y
.
1.
D
r
i
ver
'
s e
l
ectr
i
c w
i
n
d
ow
.
2.
P
assen
g
er
'
s e
l
ectr
i
c w
i
n
d
ow
.
3.
Rear right electric window
.
4.
Rear left electric window
.
5.
D
eactivatin
g
the passen
g
er and rea
r
electric window switches
.
Driver's one-touch electric
w
i
n
d
ow
Wi
t
h
t
h
e
ig
n
i
t
i
on on,
y
ou
h
ave two opt
i
ons:
-
m
anual mod
e
)
Press the switch
g
entl
y
to open or pull
it
g
entl
y
to close. The window stops as
soo
n
as
th
e
s
wit
c
h i
s
r
e
l
eased
.
-
a
utomatic mod
e
)
Press the switch full
y
to open or pull
it
f
ull
y
to close. The window opens o
r
cl
oses comp
l
ete
ly
w
h
en t
h
e sw
i
tc
h
i
s
r
eleased
.
)
Pressing the switch again stops the
m
o
v
e
m
e
nt
of
th
e
win
do
w.
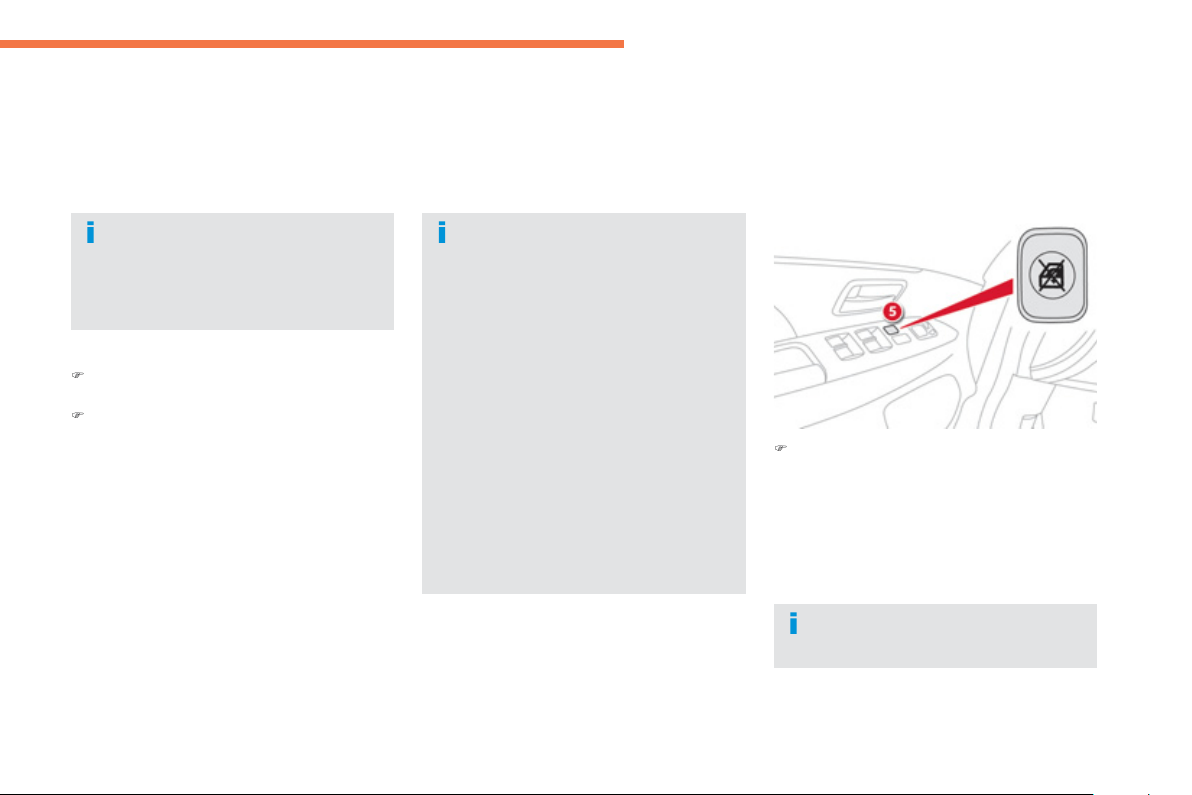
77
2
Access
Deactivatin
g
the passen
g
er
a
n
d
rear e
l
ectr
i
c w
i
n
d
ow
switches
Reinitialisin
g
the electric
w
i
n
d
ows
Wh
en t
h
e
b
utton
i
s presse
d
d
own, on
ly
t
h
e w
i
n
d
ow
i
n t
h
e
d
r
i
ver
'
s
d
oor operates.
Alwa
y
s remove the ke
y
from the i
g
nition
when leavin
g
the vehicle, even for a
s
h
o
rt tim
e
.
In the event o
f
contact durin
g
operation
o
f
the windows,
y
ou must reverse the
m
ovement o
f
the window. To do this,
p
ress the switch concerned.
When the driver operates the passen
g
er
e
lectric window switches, the
y
must
e
nsure that no one is preventin
g
correct
c
losin
g
of the windows.
The driver must ensure that passen
g
ers
use t
h
e e
l
ectr
i
c w
i
n
d
ows correct
ly
.
Be aware o
f
children when operatin
g
t
he
w
i
n
do
w
s
.
)
For the safet
y
of
y
our children, press switch
5
to prevent operation of the passen
g
er
and rear electric windows irrespective o
f
t
h
e
i
r pos
i
t
i
on.
Fr
o
m th
e
s
wit
c
h in th
e
d
riv
e
r'
s
doo
r:
)
pull the switch until the window is
f
ull
y
c
losed, then release it,
)
pull the switch a
g
ain for at least one
s
econd after reachin
g
the window closed
p
osition.
T
he safet
y
anti-pinch function is not active
d
ur
i
n
g
t
h
ese operat
i
ons
.
When the button is pressed down, the switches
a
r
e
deac
tiv
a
t
ed
.
When the button is up, the switches are activated.
S
hould there be no automatic
movement of a window when risin
g
or
after the safet
y
anti-pinch has been
tr
igg
ere
d
t
h
ree t
i
mes
i
n success
i
on, t
h
e
elec
tr
ic
w
i
n
do
w
s
m
us
t
be
r
ei
n
i
t
ialised
.
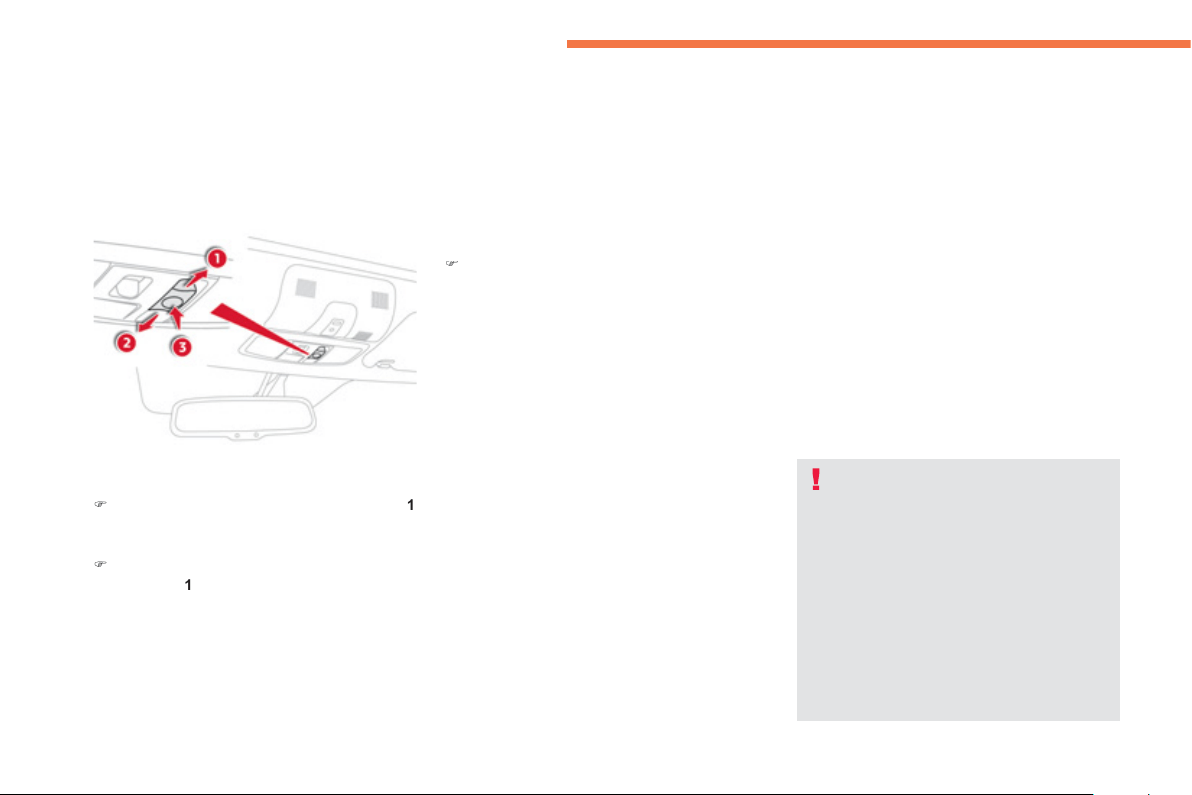
78
Access
Panoramic sunroof
It h
as
a
m
o
t
o
ri
sed
b
lin
d
.
Motorised blind
With the i
g
nition on, there are two wa
y
s o
f
opening or closing the blind:
)
Brie
f
l
y
pull or push the control in direction
1
or
2
, the blind stops when
y
ou release the
co
ntr
o
l.
)
Maintain pressure on the control in
d
ir
ec
ti
o
n
1
o
r
2
until movement starts
,
the
blind then opens or closes
f
ull
y
.
Stoppin
g
temporaril
y
)
To stop the openin
g
or closin
g
of the blind,
press par
t
3
o
f th
e
co
ntr
o
l
o
r r
e
v
e
r
se
th
e
m
o
v
e
m
e
nt
o
f th
e
co
ntr
o
l.
Safet
y
anti-pinch
At the end of its travel, if the blind encounters
an obstacle to closin
g
, it stops and moves back
sli
g
htl
y
.
Remember to alwa
y
s switch off the
ig
n
i
t
i
on w
h
en
l
eav
i
n
g
t
h
e ve
hi
c
l
e, even
fo
r
a
s
h
o
rt tim
e
.
Wh
en operat
i
n
g
t
h
e contro
l
, t
h
e
d
r
i
ver
s
hould ensure that there is nothing
preventin
g
movement o
f
the blind.
The driver must ensure that passen
g
ers
u
se the blind correctl
y
.
Be aware of children when operatin
g
th
e
b
lin
d
.
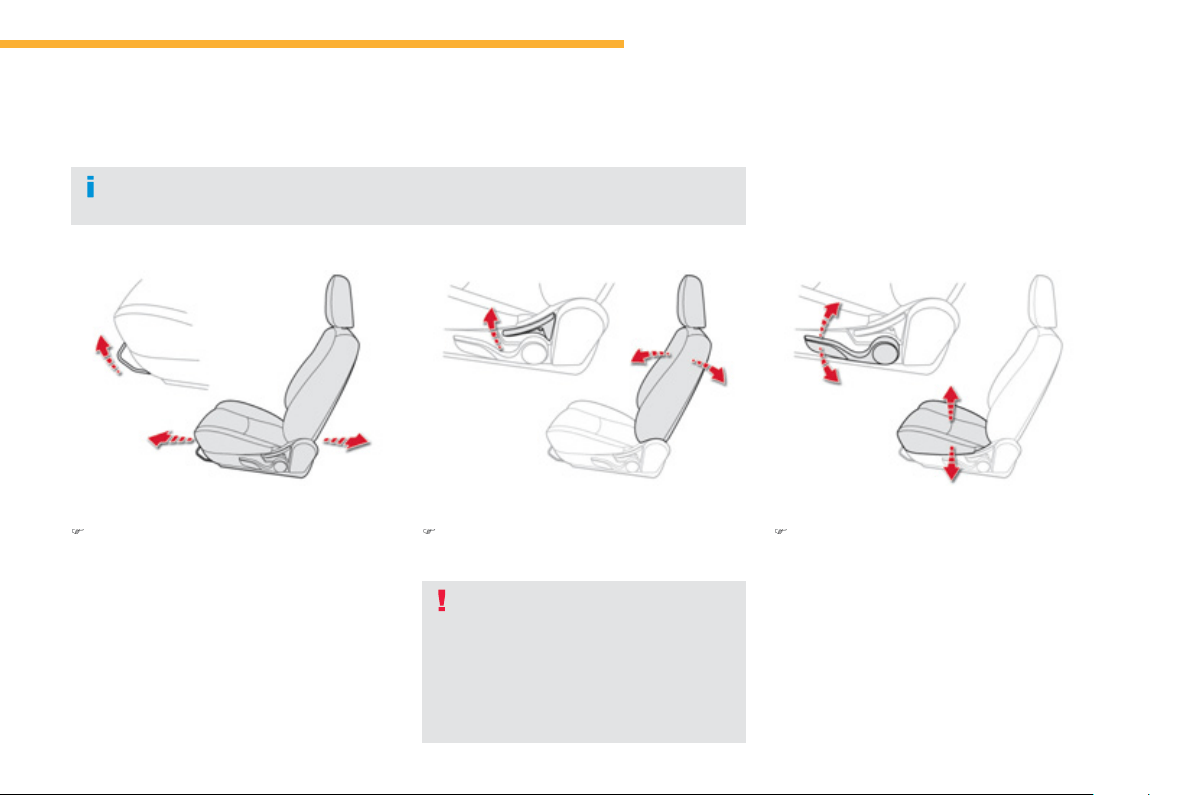
79
3
Comfort
Front seats
Manual ad
j
ustments
Forwards-backwards
)
R
a
i
se
th
e
co
ntr
o
l
ba
r
a
n
d
s
li
de
th
e
sea
t
fo
rw
a
r
ds
o
r
bac
kw
a
r
ds
.
When the seat is in the correct position, push
it forwards and backwards without raisin
g
the
co
ntr
o
l
ba
r t
o
c
h
ec
k th
a
t th
e
it h
as
l
a
t
c
h
ed
.
Seat backrest an
g
le
)
Pull the control lever up to adjust the seat
bac
kr
es
t.
Wh
e
n th
e
bac
kr
es
t i
s
a
t th
e
des
ir
ed
a
n
gl
e, re
l
ease t
h
e contro
l
.
A
s a sa
f
et
y
measure, seat ad
j
ustments should onl
y
be done when stationar
y
.
Driver's seat hei
g
ht
)
Pull the control u
p
wards to raise or
p
ush
it downwards to lower, as man
y
times as
n
ecessar
y
, to obtain the position required.
Seat consistin
g
of a seat cushion, a seat back and a head restraint which can all be ad
j
usted to
adapt
y
our position for ease of drivin
g
and comfort.
When the backrest is at the correct an
g
le,
re
l
ease
th
e
co
ntr
o
l l
e
v
e
r. T
o
e
n
su
r
e
th
a
t th
e
backrest does not suddenl
y
f
old
f
orwards
a
n
d
h
urt
y
ou, restra
i
n
i
t w
i
t
h
y
our
b
ac
k
or
y
our
h
an
d
w
hil
e operat
i
n
g
t
h
e contro
l
.
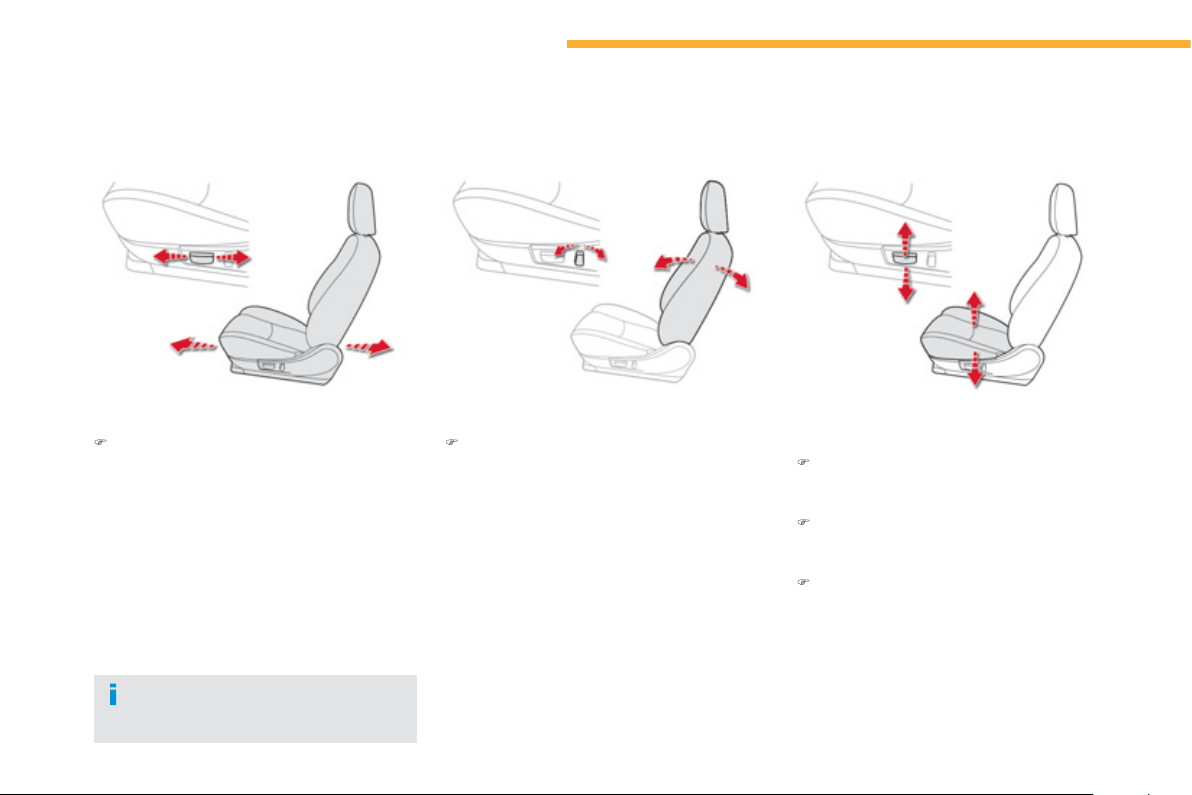
80
Comfort
Front seats
Electric ad
j
ustments
F
orwar
d
s-
b
ac
k
war
d
s
)
P
us
h th
e
co
ntr
o
l f
o
rw
a
r
ds
o
r r
ea
rw
a
r
ds
t
o
slide
t
he
sea
t.
Seat backrest an
g
le
)
Tilt th
e
co
ntr
o
l f
o
rw
a
r
ds
o
r r
ea
rw
a
r
ds
t
o
ad
j
ust the an
g
le o
f
the seat backrest.
D
r
i
ver
'
s seat cus
hi
on
h
e
igh
t
a
n
d
an
gl
e
)
Pull or push the
f
ront part o
f
the control
upwar
d
s or
d
ownwar
d
s to ra
i
se or
l
ower t
h
e
f
r
o
nt
of
th
e
sea
t
cus
hi
o
n.
)
Pull or
p
ush the rear
p
art o
f
the control
upwards or downwards to raise or lower the
rea
r
o
f th
e
sea
t
cus
hi
o
n.
)
Pull or push all of the control upwards or
do
wnw
a
r
ds
t
o
r
a
i
se
o
r l
o
w
e
r th
e
wh
o
l
e
sea
t
cus
hi
o
n
.
To avoid dischar
g
in
g
the batter
y
, carr
y
out
these ad
j
ustments with the en
g
ine runnin
g
.
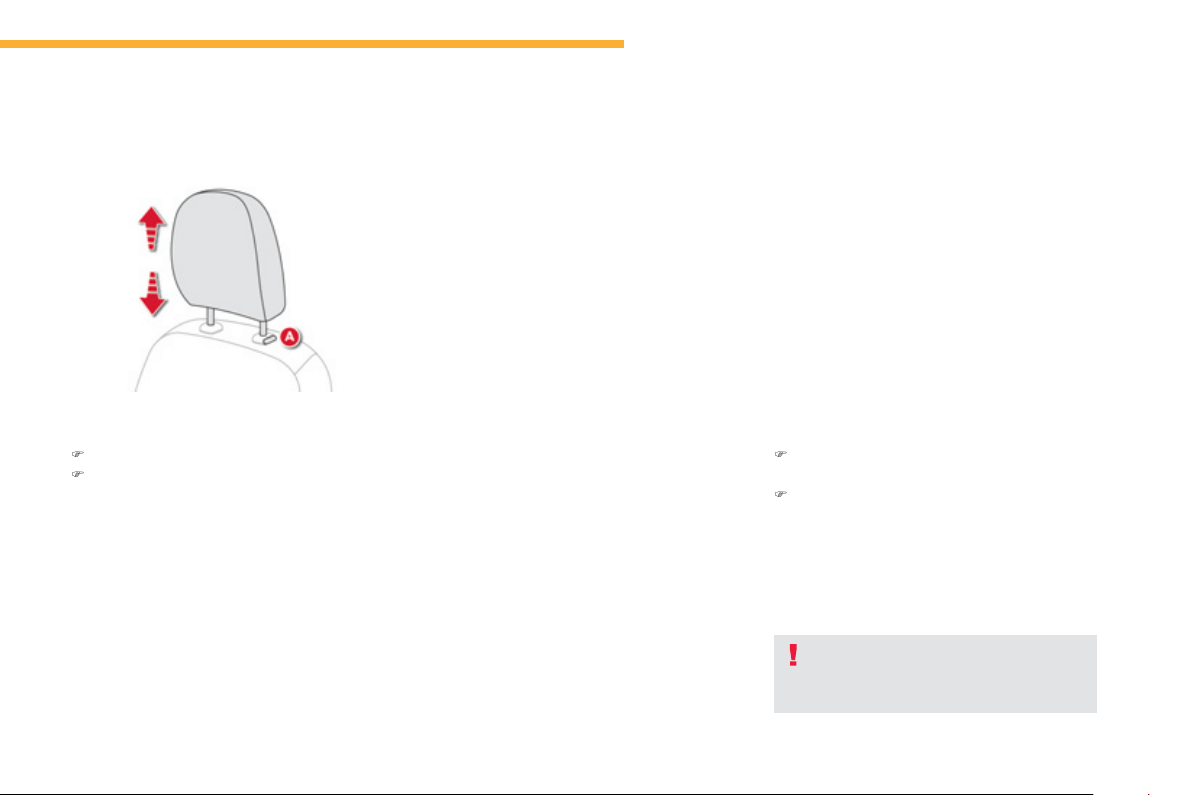
81
3
Comfort
Additional ad
j
ustments
H
ea
d
restra
i
nt
h
e
igh
t
Th
e
h
ead
r
es
tr
a
int i
s
f
itt
ed
with
a
f
r
a
m
e
with
n
otches which prevents it
f
rom lowerin
g
; this is
a
safet
y
device in case of impact.
T
he ad
j
ustment is correct when the uppe
r
ed
g
e of the head restraint is level with the
to
p
of the head
.
N
e
v
e
r
d
riv
e
with th
e
h
ead
r
es
tr
a
int
s
removed; the
y
must be in place and
ad
j
usted correctl
y
.
)
T
o ra
i
se a
h
ea
d
restra
i
nt,
p
u
ll
i
t u
p
war
d
s.
)
To lower the head restraint, press the lug
A
a
n
d
th
e
h
ead
r
es
tr
a
int
a
t th
e
sa
m
e
tim
e
.
)
T
o remove a
h
ea
d
restra
i
nt, press t
h
e
l
u
g
A
and
p
ull the head restraint u
p
wards.
)
To
p
ut the head restraint back in
p
lace,
e
n
g
a
g
e the head restraint stems in the
openin
g
s keepin
g
them in line with the seat
back and press the lu
g
A
a
t th
e
sa
m
e
tim
e
.
R
emov
i
n
g
a
h
ea
d
restra
i
nt
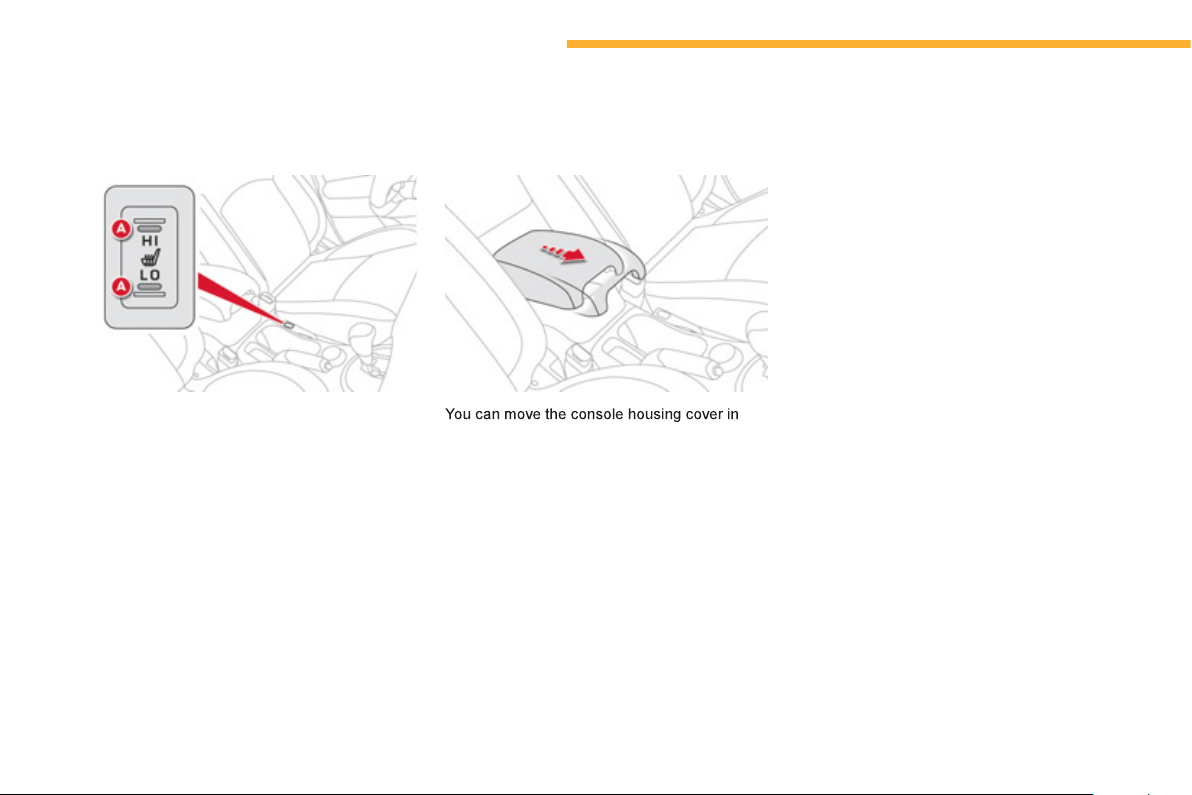
82
Comfort
o
r
de
r t
o
use
it
as
a
n
a
rmr
es
t.
Front armrest
H
eate
d
seats a
dj
ustment
Wi
t
h
t
h
e en
gi
ne runn
i
n
g
,
t
il
t t
h
e
b
utton to t
h
e
p
os
i
t
i
on requ
i
re
d
.
The temperature o
f
the seat is re
g
ulated
a
utomat
i
ca
lly
.
There are two setting positions:
- "HI": Hi
g
h heatin
g
- "L
O
": Low heatin
g
When the button is in the intermediate position,
the heatin
g
is switched off.
Th
e
i
n
di
cator
l
amps
A
co
m
e
o
n w
he
n t
he
sy
stem
i
s act
i
vate
d
.
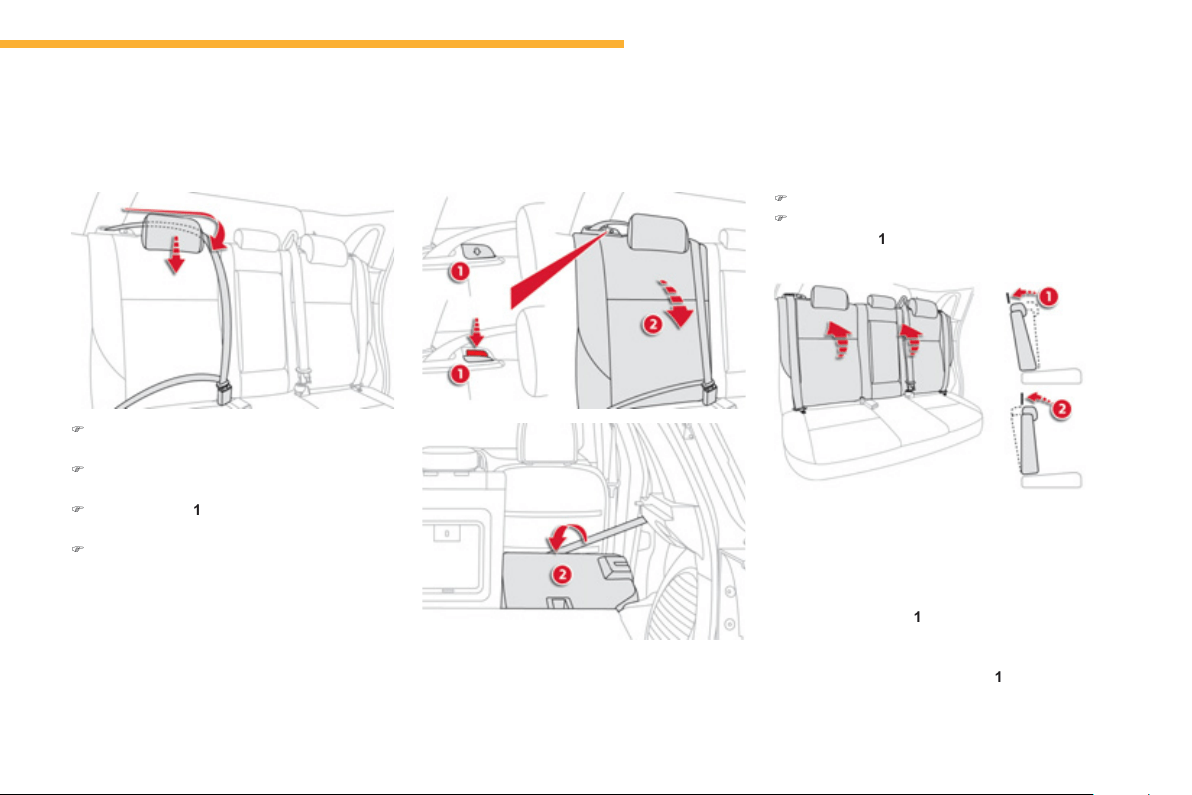
83
3
Comfort
Rear seats
Bench seat with
f
ixed one-piece cushion and split backrest
(
le
f
t hand 2
/
3, right hand 1
/
3
)
which can be
f
olded individually to adapt the load space in the boot.
Foldin
g
the backrest
Repositionin
g
the seat backrest
)
Move the correspondin
g
front seat forward
if necessar
y
.
)
Place the head restraints in the low position
(
see "Rear head restraints"
)
.
)
P
r
ess
co
ntr
ol
1
fo
rw
a
r
ds
t
o
r
e
l
ease
th
e
sea
t
back
r
es
t
2
.
)
Fold
t
he
sea
t
back
2
o
n t
o
t
he
cushio
n.
)
Strai
g
hten the seat backrest
2
a
n
d
secu
r
e
i
t.
)
C
heck that the red indicator, located next to
t
he
co
ntr
ol
1
,
i
s no
l
on
g
er v
i
s
ibl
e.
When repositionin
g
the seat backrests, the
y
c
an be locked in one of two different positions,
dependin
g
on the speed in which the operation
is
ca
rr
ied
ou
t:
- i
f
done quickl
y
, the backrest returns to its
or
igi
na
l
pos
i
t
i
on
1
,
- i
f
done slowly, the backrest goes into the
vertical
p
osition 2 .
To
g
o from position
2
to position
1
, simpl
y
release the backrest and push it until it locks
in place.
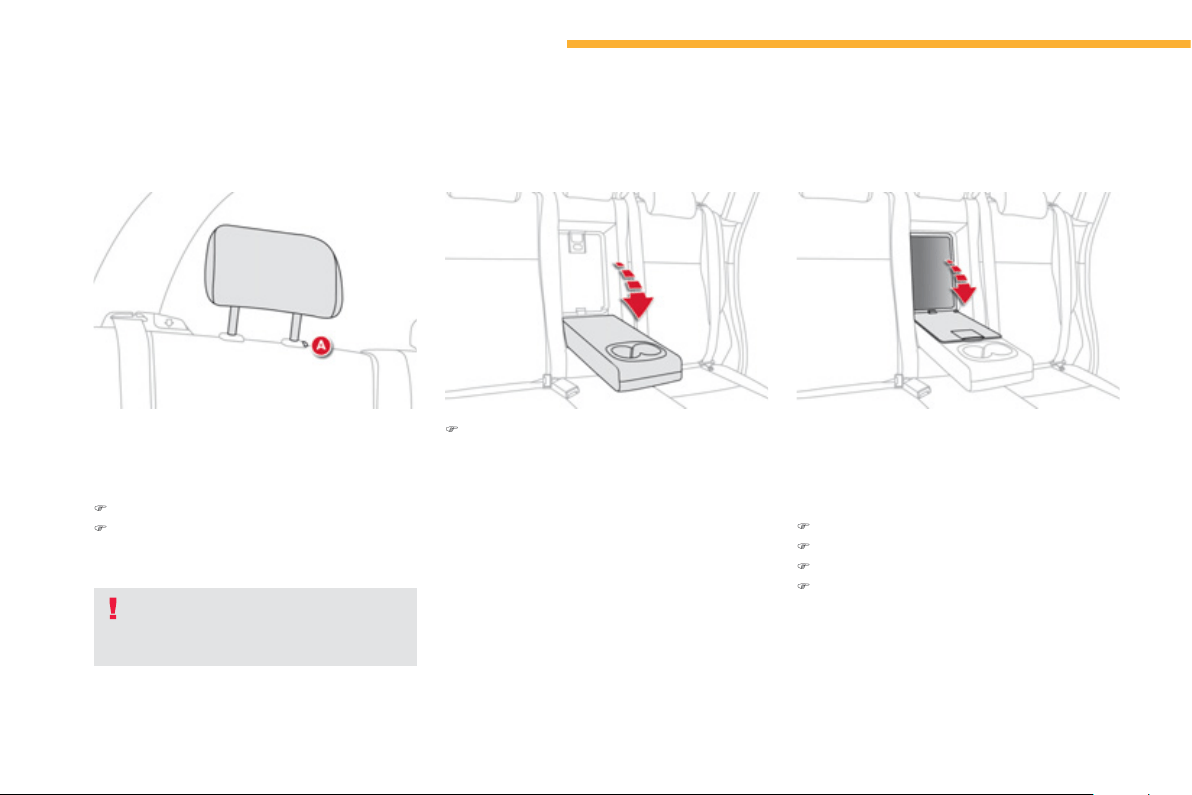
84
Comfort
)
L
o
w
e
r th
e
r
ea
r
a
rmr
es
t f
o
r
a
m
o
r
e
c
omfortable position.
It ma
y
be fitted with cup holders and also
g
ives
access to the ski
f
lap.
Device for storin
g
and transportin
g
lon
g
ob
j
ects.
Openin
g
)
L
o
w
e
r th
e
a
rmr
es
t.
)
Lower the flap openin
g
control.
)
Lower the flap.
)
Load the ob
j
ects from inside the boot.
These have one position for use
(
up
)
and a
s
towed position
(
down
)
.
Th
e
y
can a
l
so
b
e remove
d
.
To
r
e
m
o
v
e
a
head
r
es
tr
ai
nt:
)
p
u
ll
t
h
e
h
ea
d
restra
i
nt u
p
war
d
s to t
h
e sto
p
,
)
then, press the lug
A
.
Rear head restraints Rear armrest Ski fla
p
N
e
v
e
r
d
riv
e
with th
e
h
ead
r
es
tr
a
int
s
removed; the
y
must be in place and
c
orrect
ly
a
dj
uste
d
.
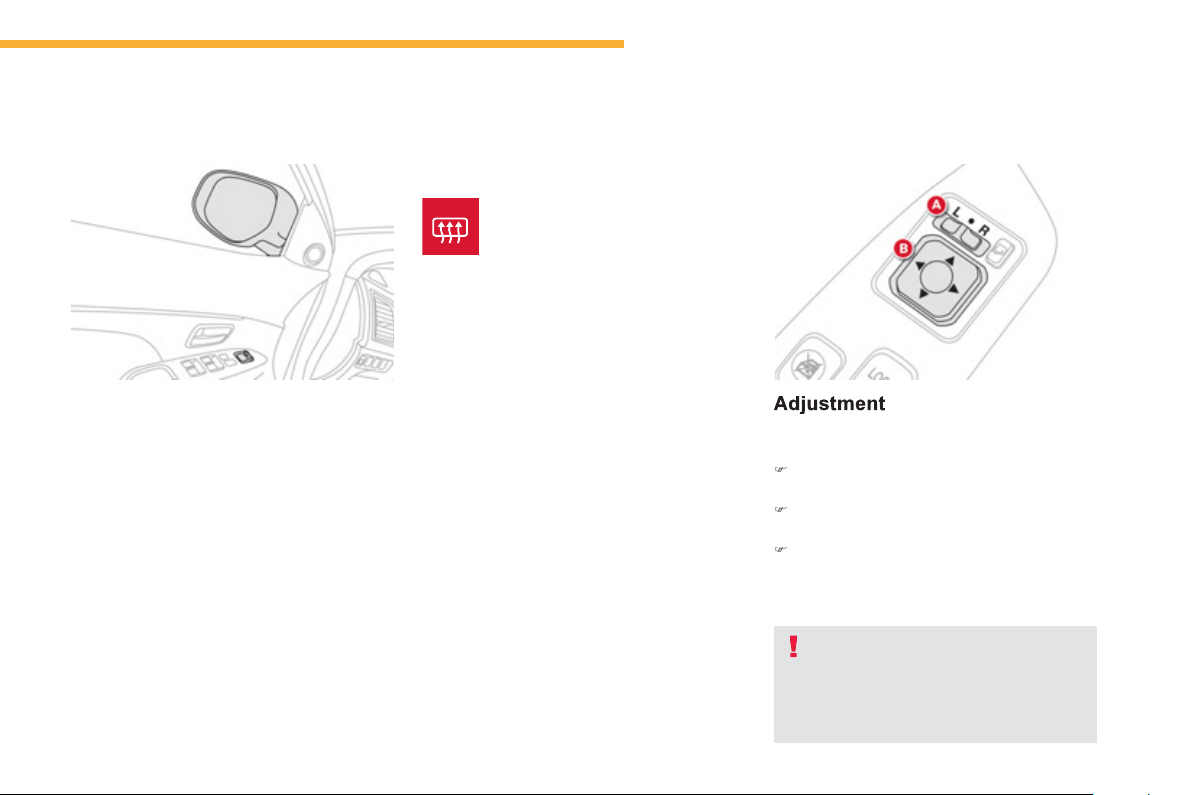
85
3
Comfort
Mirrors
A
djustment is possible when the ignition switch
is in the "
O
N" or "A
CC
"
p
osition.
)
M
o
v
e
co
ntr
o
l
A
to the ri
g
ht or to the left to
s
elect the correspondin
g
mirror.
)
M
o
v
e
co
ntr
o
l
B
in
a
ll f
ou
r
d
ir
ec
ti
o
n
s
t
o
ad
j
ust.
)
Re
t
u
rn
co
ntr
ol
A
to t
h
e centra
l
pos
i
t
i
on.
Each
f
itted with an ad
j
ustable mirror
g
lass
p
erm
i
tt
i
n
g
t
h
e
l
atera
l
rearwar
d
v
i
s
i
on necessar
y
f
or overtakin
g
or parkin
g
. The
y
can also be
f
olded
f
or parking in con
f
ined spaces.
Demistin
g
- Defrostin
g
Door mirrors
I
f
y
our vehicle is
f
itted with heated
mirrors, the demistin
g
-de
f
rostin
g
o
perates with the engine running, by
s
witchin
g
on the heated rear screen
(
see "Rear screen demist-defrost"
)
.
Th
e o
bj
ects o
b
serve
d
are,
i
n rea
li
t
y
,
cl
oser t
h
an t
h
e
y
appear.
Take
t
his
i
nt
o
accou
nt
i
n
o
r
de
r t
o
c
orrectly judge the distance o
f
vehicles
approachin
g
f
rom behind.
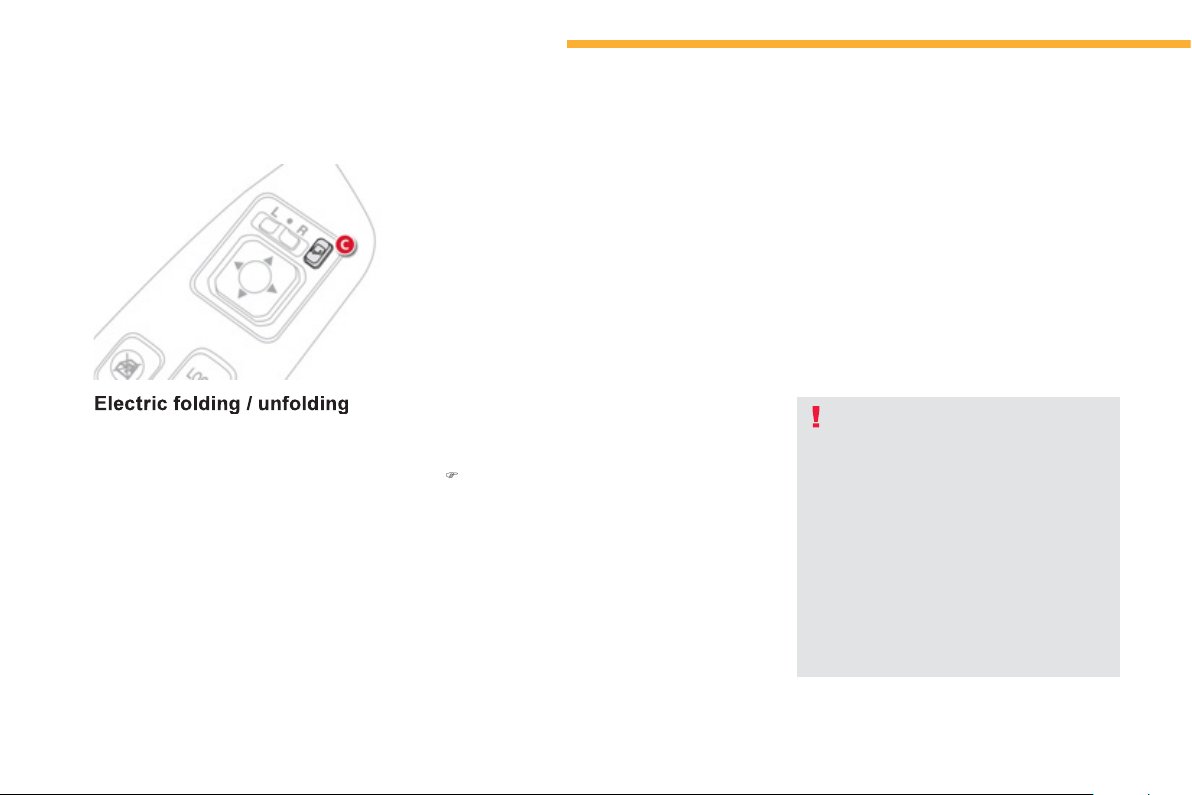
86
Comfort
From the outside
:
)
by
l
oc
ki
n
g
or un
l
oc
ki
n
g
t
h
e ve
hi
c
l
e,
u
sin
g
the remote control or the lockin
g
/
u
nlockin
g
buttons
(f
or vehicles
f
itted with
the "Keyless Entry and
S
tarting" system
)
.
I
f
y
ou have
f
olded the mirrors usin
g
the
co
ntr
ol
C
,
y
ou must use t
hi
s contro
l
to
un
f
old them, otherwise the mirrors will
not be lock in place correctl
y
.
Some mirror functions
(
in particular the
automatic foldin
g
and unfoldin
g
of the
door mirrors
)
can be confi
g
ured via the
c
o
l
our screen
"E
qu
i
pment
"
menu.
Th
e
mirr
o
r
s
ca
n
a
l
so
be
fo
l
ded
manua
lly
.
From inside:
- with the i
g
nition switch in the "
O
N" or
"
ACC" position, b
y
pressin
g
the control
C
,
- with the i
g
nition switch in the "L
O
CK"
p
osition, b
y
pressin
g
control C
,
within
3
0 seconds
.
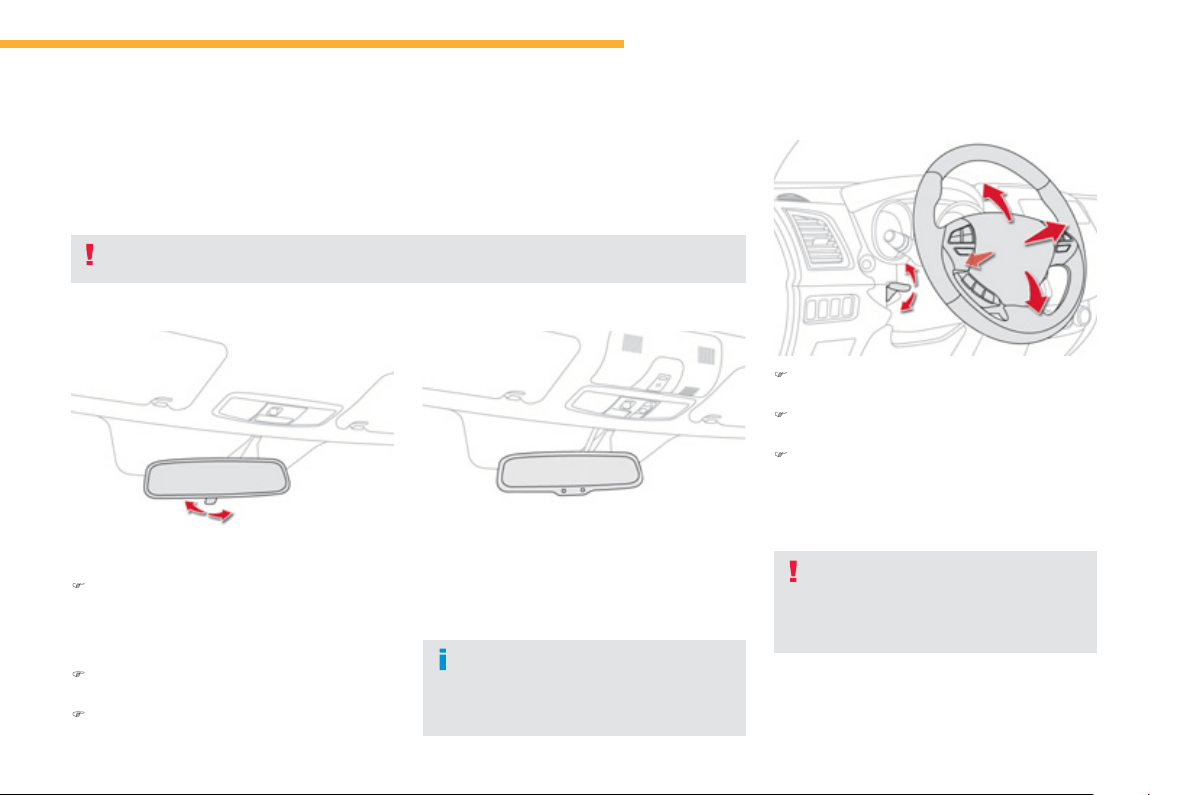
87
3
Comfort
Rear view mirror
A
djustable mirror providing a central rearward view.
Equipped with an anti-dazzle s
y
stem, which darkens the mirror
g
lass and reduces the nuisance to
the driver caused b
y
the sun, headlamps from other vehicles...
Manual da
y/
ni
g
ht model
Ad
j
ustment
)
Ad
j
ust the mirror so that the
g
lass is
di
recte
d
correct
ly
i
n t
h
e
"d
a
y"
pos
i
t
i
on.
A
s a safet
y
measure, the mirrors should be ad
j
usted to reduce the "blind spot".
In order to ensure optimum visibilit
y
d
ur
i
n
g
y
our manoeuvres, t
h
e m
i
rror
ligh
tens automat
i
ca
lly
w
h
en reverse
g
ear
i
s en
g
a
g
e
d
.
Da
y
/ ni
g
ht position
)
P
u
ll
t
h
e
l
ever to c
h
an
g
e to t
h
e
"
n
igh
t
"
ant
i
-
d
azz
l
e pos
i
t
i
on.
)
P
us
h
t
h
e
l
ever to c
h
an
g
e to t
h
e norma
l
"day" position.
A
utomatic da
y/
ni
g
ht model
B
y
means o
f
a sensor, which measures the
li
g
ht
f
rom the rear o
f
the vehicle, this s
y
stem
a
utomatically and progressively changes
between the da
y
and ni
g
ht uses.
Steering wheel adjustment
)
When stationary
,
l
ower t
h
e contro
l
l
ever to
y
r
e
l
ease t
h
e steer
i
n
g
w
h
ee
l
a
dj
ustment mec
h
an
i
sm.
)
Adjust the height and reach to suit your
drivin
g
position.
)
Pull the control lever to lock the steerin
g
wheel ad
j
ustment mechanism.
As a safet
y
precaution, these
operat
i
ons s
h
ou
ld
on
ly
b
e carr
i
e
d
out
w
hil
e t
h
e ve
hi
c
l
e
i
s stat
i
onar
y
.
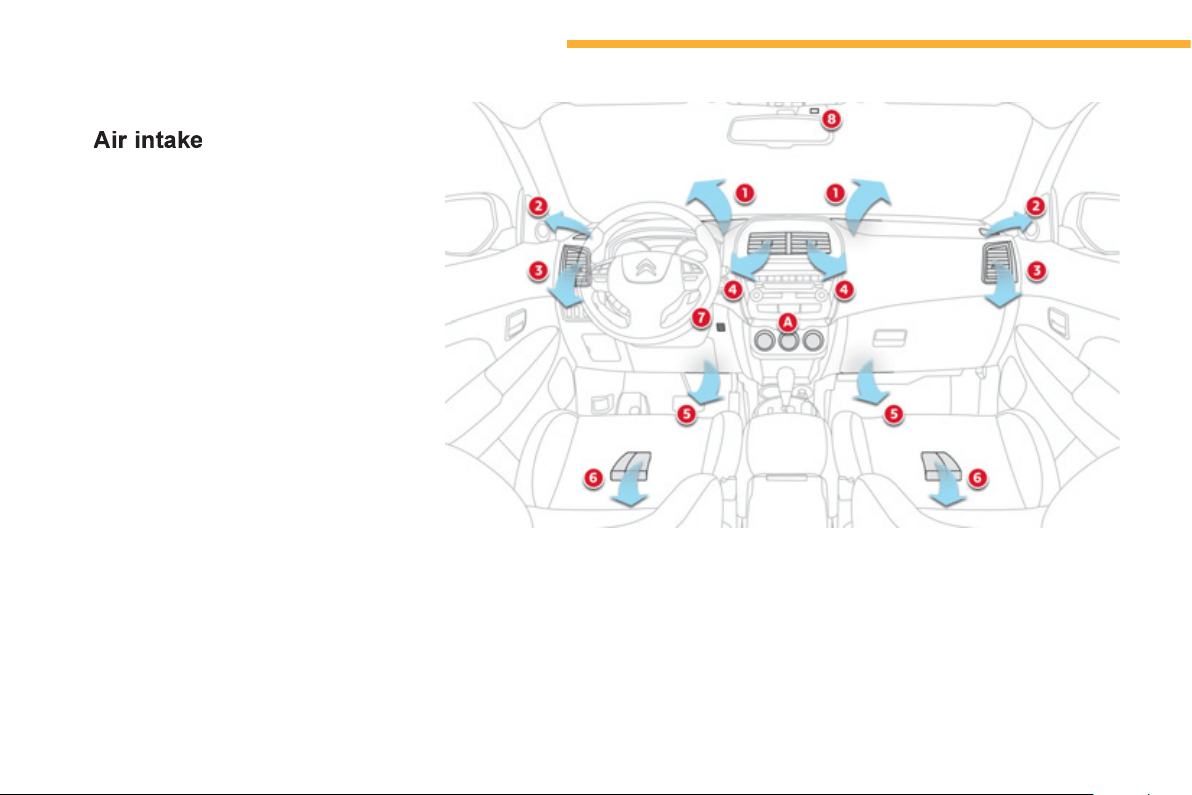
88
Comfort
Ventilation
The air circulatin
g
in the passen
g
er compartment
is filtered and ori
g
inates either from the outside via
the
g
rille located at the base of the windscreen or
f
r
o
m th
e
in
s
i
de
in
a
ir r
ec
ir
cu
l
a
ti
o
n m
ode
.
A
ir treatment
The incoming air
f
ollows various routes
dependin
g
on the controls selected b
y
the
d
riv
e
r:
- direct arrival in the passen
g
er compartment
(
air intake
)
,
- passa
g
e throu
g
h a heatin
g
circuit
(
heatin
g)
,
- passa
g
e throu
g
h a coolin
g
circuit
(
air
c
onditionin
g)
.
Control
p
anel
The controls of this s
y
stem are
g
rouped
to
g
ether on control panel
A
o
n th
e
ce
ntr
e
co
n
so
l
e
.
1.
Windscreen demistin
g
-de
f
rostin
g
vents.
2.
Front side window demistin
g
-de
f
rostin
g
v
e
nt
s
.
3.
S
ide adjustable air vents.
4.
C
entral ad
j
ustable air vents.
5
.
Air
ou
tl
e
t
s
t
o
th
e
f
r
o
nt
foo
tw
e
ll
s
.
6
.
Air
ou
tl
e
t
s
t
o
th
e
r
ea
r
foo
tw
e
ll
s
.
7.
T
em
p
erature sensor.
8.
S
unshine
/
rain sensor.
Air distribution

89
3
Comfort
In order for these s
y
stems to be full
y
effective, follow the operation and maintenance
g
uidelines below:
)
T
o o
b
ta
i
n an even a
i
r
di
str
ib
ut
i
on, ta
k
e care not to o
b
struct t
h
e exter
i
or a
i
r
i
nta
k
e
g
r
ill
es
located at the base o
f
the windscreen, the nozzles, the vents and the air outlets, as well
as
t
he
ai
r
e
xtr
ac
t
o
r
loca
t
ed
i
n t
he
boo
t.
)
Do not cover the sunshine sensor, located on the dashboard; this is used
f
or regulation
of
the di
g
ital air conditionin
g
s
y
stem.
)
O
perate the air conditionin
g
s
y
stem for at least 5 to 10 minutes, once or twice a month
to keep it in perfect workin
g
order.
)
Ensure that the passen
g
er compartment filter is in
g
ood condition and have the filte
r
e
lements replaced re
g
ularl
y
.
We recommend the use o
f
a combined passen
g
er compartment
f
ilter. Thanks to its
s
pecial active additive, it contributes to the puri
f
ication o
f
the air breathed b
y
the
o
ccupants and the cleanliness o
f
the passen
g
er compartment
(
reduction o
f
aller
g
ic
s
ymptoms, bad odours and greasy deposits
)
.
)
To ensure correct operation o
f
the air conditionin
g
s
y
stem,
y
ou are also advised to have
it checked re
g
ularl
y
as recommended in the servicin
g
booklet.
)
If the s
y
stem does not produce cold air, switch it off and contact a CITROËN dealer or a
q
ualified workshop.
Recommendations for ventilation and air conditioning
If after an extended stop in sunshine,
the interior temperature is ver
y
hi
g
h, first
ventilate the passen
g
er compartment fo
r
a
f
e
w m
o
m
e
nt
s
.
P
ut the air
f
low control at a settin
g
hi
g
h
e
nou
gh
to qu
i
c
kly
c
h
an
g
e t
h
e a
i
r
i
n t
h
e
passen
g
er compartment.
The air conditioning system does not
c
ontain chlorine and does not
p
resent
an
y
dan
g
er to the ozone la
y
er.
Th
e con
d
ensat
i
on create
d
by
t
h
e a
ir
c
on
di
t
i
on
i
n
g
resu
l
ts
i
n a
di
sc
h
ar
g
e
of
w
a
t
e
r
u
n
de
r th
e
v
e
hi
c
l
e
whi
c
h i
s
per
f
ectly normal.
When towin
g
the maximum load on a steep
g
radient in hi
g
h temperatures, switchin
g
off the
a
i
r con
di
t
i
on
i
n
g
i
ncreases t
h
e ava
il
a
bl
e en
gi
ne power an
d
so
i
mproves t
h
e tow
i
n
g
a
bili
t
y
.
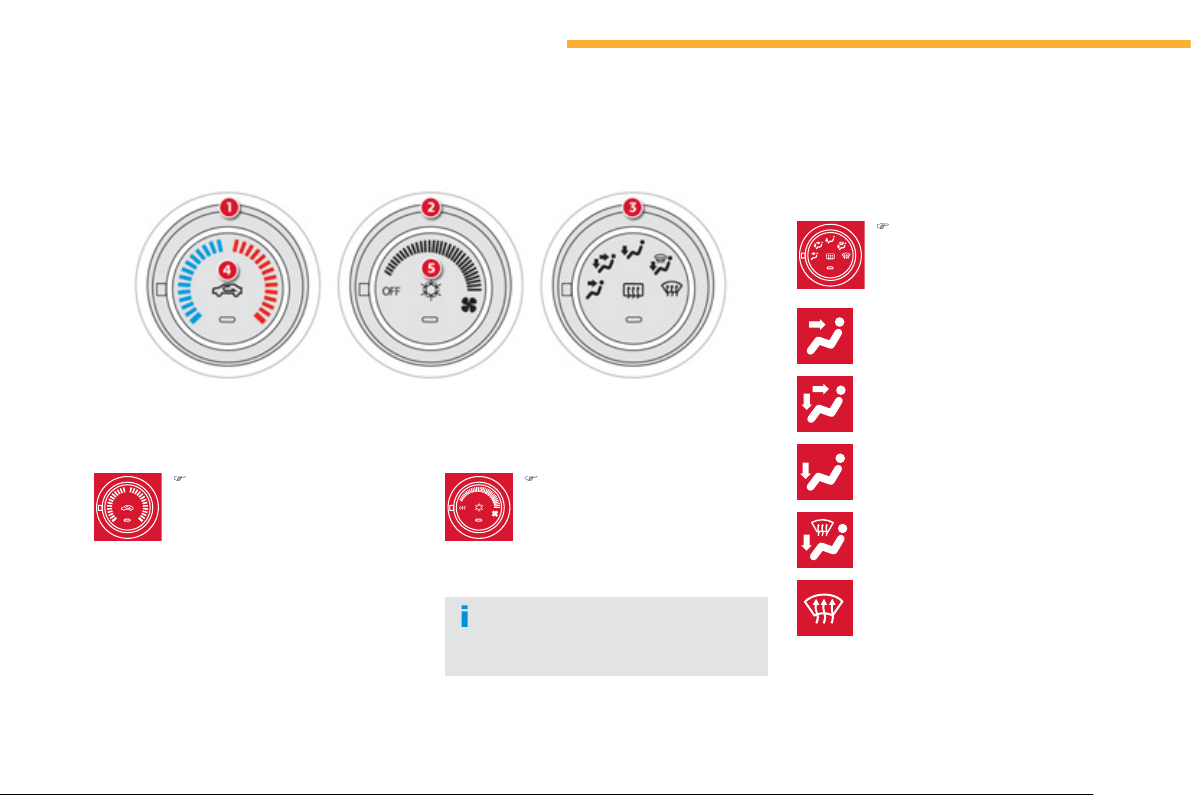
90
Comfort
Manual heating / air conditioning
The s
y
stem operates with the en
g
ine runnin
g
.
1. Temperature settin
g
)
Turn the temperature control
dial to the ri
g
ht to raise the
temperature, and to the left to
l
o
w
e
r it.
To avoid mistin
g
and deterioration o
f
the air
quality in the passenger compartment, ensure
that an adequate air
f
low is maintained.
3. Air distribution settin
g
)
Pl
ace
th
e
d
i
a
l in th
e
des
ir
ed
position, to direct air towards:
t
h
e centre an
d
s
id
e vents,
Th
e a
i
r
di
str
ib
ut
i
on can
b
e mo
d
u
l
ate
d
by
pl
ac
i
n
g
t
h
e
di
a
l
i
n
i
nterme
di
ate pos
i
t
i
ons.
2. Air fl ow settin
g
)
Turn the dial to the ri
g
ht to
in
c
r
ease
a
n
d
t
o
th
e
l
e
ft t
o
reduce
th
e
a
ir fl
o
w.
the centre, side and footwell
vents,
the
f
ootwells,
the windscreen, side windows
and footwells,
t
he
w
i
n
dsc
r
ee
n
a
n
d
side
win
do
w
s
.
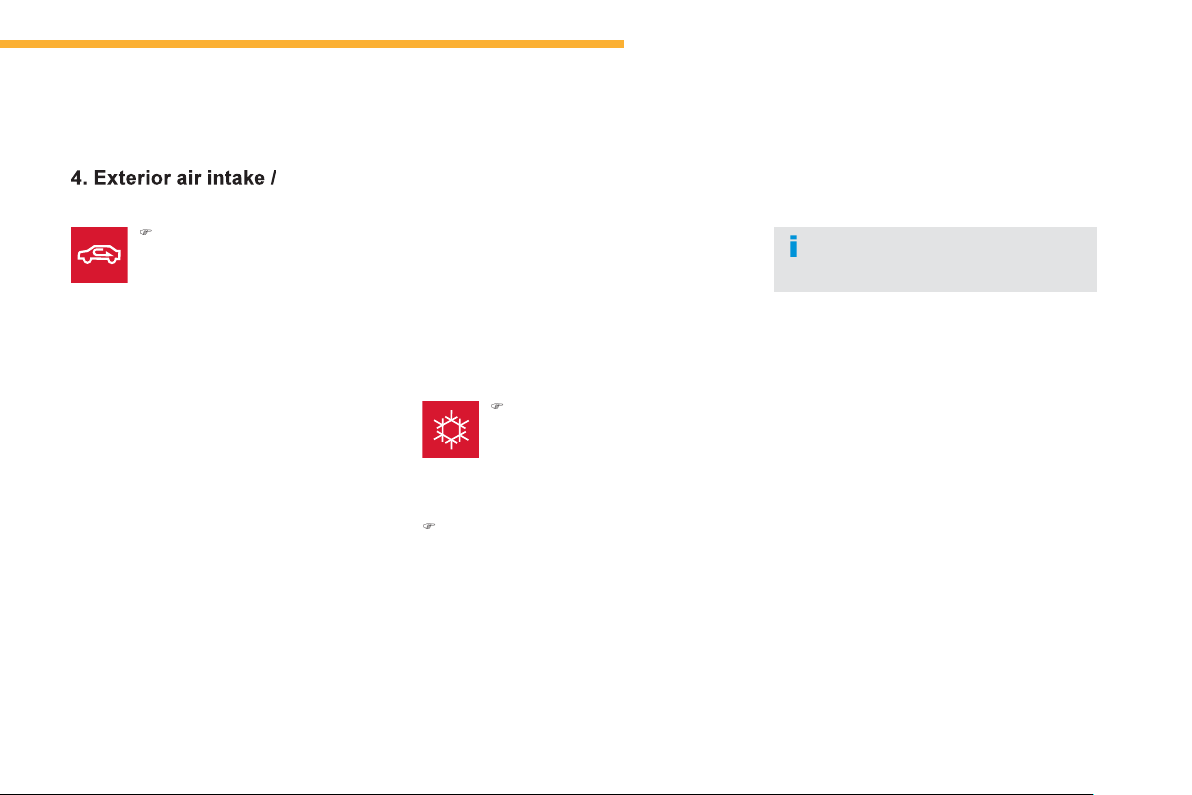
91
3
Comfort
Recirculation of interior ai
r
)
Pr
ess
bu
tt
o
n
4
t
o
se
l
ec
t th
e
a
ir
e
ntr
y
mode.
This
f
unction allows the passen
g
er
c
om
p
artment to be isolated
f
rom exterio
r
odou
r
s
a
n
d
s
m
o
k
e
.
When the warnin
g
lamp in button 4 is o
ff
, the
int
a
k
e
o
f
e
xt
e
ri
o
r
a
ir i
s
ac
tiv
e
.
When the warnin
g
lamp in button
4
is on, the
intake of exterior air is deactivated, and
y
ou are
in
a
ir r
ec
ir
cu
l
a
ti
o
n.
Do not drive
f
or lon
g
with interior air
rec
i
rcu
l
at
i
on, except
i
n tru
ly
except
i
ona
l
atmos
ph
er
i
c con
di
t
i
ons.
The air conditionin
g
is desi
g
ned to operate
e
ff
ectivel
y
in all seasons, with the windows closed.
I
t ena
bl
es
y
ou to:
-
l
ower t
h
e tem
p
erature,
i
n summer,
- increase the e
ff
ectiveness o
f
the demisting
in winter, above 3
°C
.
5. Air conditionin
g
On / Off
Switchin
g
on
Switchin
g
off
)
P
r
ess
bu
tt
o
n 5 a
g
a
i
n, t
h
e
l
amp
i
n t
h
e
b
utton
g
oes o
ff
.
S
witching o
ff
may a
ff
ect com
f
ort levels
(
humidit
y
, condensation
)
.
If
y
our vehicle is not fitted with air
c
onditionin
g
, the button is not active.
)
P
r
ess
bu
tt
o
n
5
, t
h
e
l
am
p
i
n t
h
e
bu
tt
o
n
co
m
es
o
n.
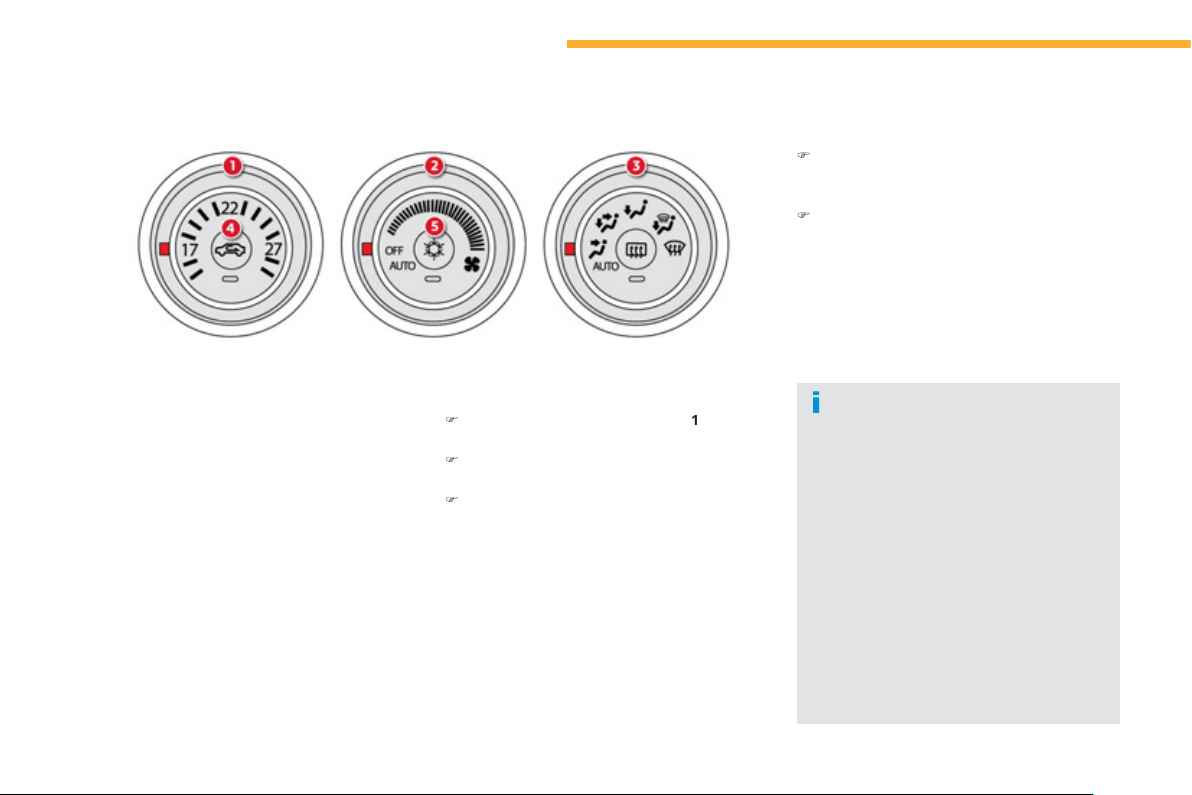
92
Comfort
Automatic air conditioning
1.
Temperature ad
j
ustment
2.
Air flow ad
j
ustment
3.
Ai
r
di
str
ib
ut
i
on a
dj
ustment
4.
Int
a
k
e
of
e
xt
e
ri
o
r
a
ir
/
R
ec
ir
cu
l
a
ti
o
n
of
i
nt
e
r
io
r
air
5.
Air conditioning
O
n
/
Off
Automatic o
p
eration
)
S
et the tem
p
erature control dial
1
t
o
th
e
temperature required.
)
Pl
ace
th
e
a
ir fl
o
w
co
ntr
o
l
d
i
a
l
2
in th
e
"
AUTO" position.
)
Place the air distribution ad
j
ustment dial
3
i
n t
he
"
AUTO" pos
i
t
i
on.
When the en
g
ine is cold, to avoid an
e
xcessive distribution of cold air, the
ventilation will reach its optimum level
g
raduall
y
.
On enterin
g
the vehicle, the interio
r
temperature ma
y
b
e muc
h
co
ld
e
r
(
or warmer
)
than the temperature
s
ett
i
n
g
.
Th
ere
i
s no nee
d
to c
h
an
g
e t
h
e
temperature setting in order to reach
the com
f
ort required rapidl
y
.
The automatic re
g
ulation of the air
c
onditionin
g
will operate to correct the
temperature difference as quickl
y
as
possible.
In
au
t
o
m
a
ti
c
m
ode
:
)
when the temperature is set to maximum
(
Rapid heatin
g)
, the intake of exterior air is
a
ctivated and the air conditionin
g
stops.
)
w
h
en t
h
e temperature
i
s set to m
i
n
i
mum
(
Rapid coolin
g)
, air recirculation is
a
ct
i
vate
d
an
d
t
h
e a
i
r con
di
t
i
on
i
n
g
operates.
Th
e s
y
stem contro
l
s t
h
e a
i
r
di
str
ib
ut
i
on, t
h
e
f
low, the tem
p
erature and the air intake to
e
n
su
r
e
th
e
l
e
v
e
l
of
co
m
fo
rt
se
l
ec
t
ed
a
n
d
adequate air circulation in the passen
g
er
c
ompartment. No further action on
y
our part is
r
equired.
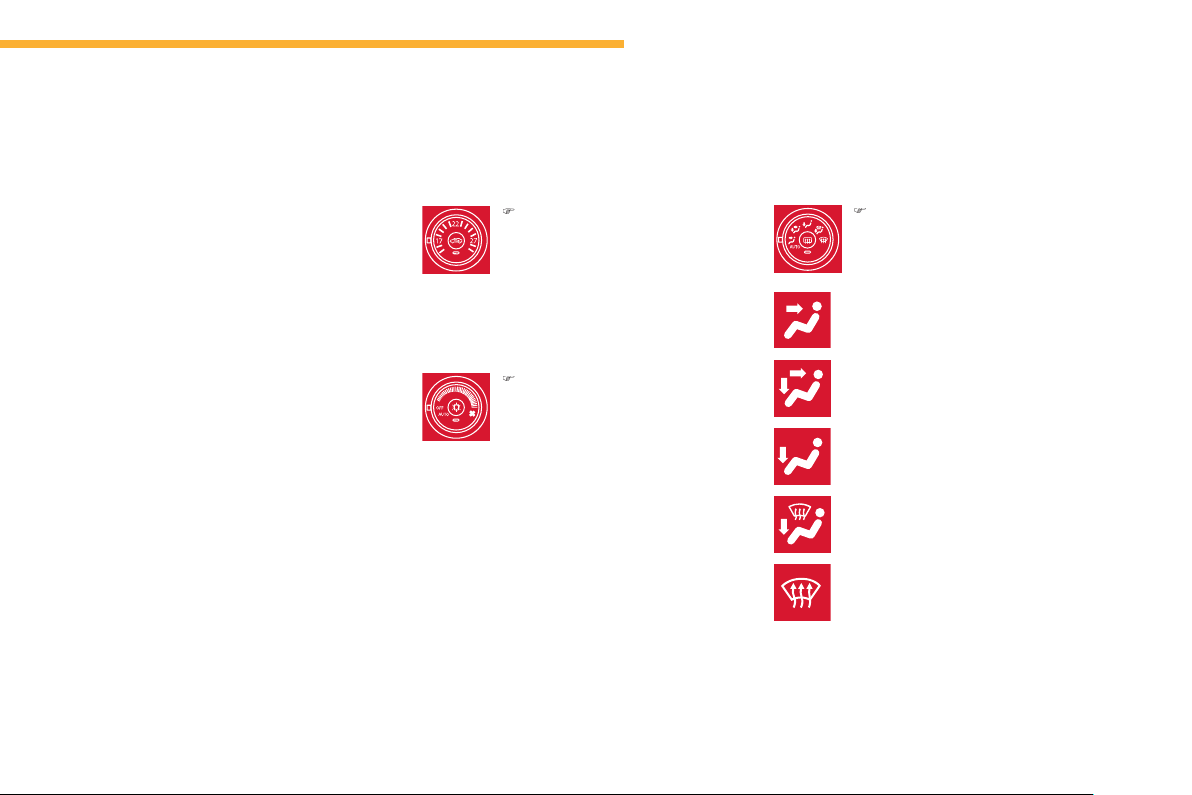
93
3
Comfort
Manual settin
g
s
1. Temperature settin
g
2. Air fl ow settin
g
th
e
ce
ntr
a
l
a
n
d
s
i
de
v
e
nt
s
a
n
d
the footwells
,
)
Turn the tem
p
erature control
dial to the ri
g
ht to increase the
temperature and to the left to
dec
r
ease
it.
)
Turn the dial to the ri
g
ht to
in
c
r
ease
th
e
a
ir fl
o
w
o
r t
o
th
e
l
e
ft t
o
dec
r
ease
it.
T
o
a
v
o
i
d
co
n
de
n
sa
ti
o
n
a
n
d
de
t
e
ri
o
r
a
ti
o
n
of
th
e
q
ualit
y
o
f
the air in the passen
g
er compartment,
e
n
su
r
e
th
a
t
a
suff
i
c
i
e
nt
f
l
o
w
of
a
ir i
s
m
a
int
a
in
ed
.
3. Air distribution settin
g
)
Place the dial in the position
r
equ
i
re
d
to
di
rect t
h
e a
ir
t
o
w
a
r
ds
:
t
h
e centra
l
an
d
s
id
e vents,
the
f
ootwells,
the windscreen
,
the side
windows and the footwells
,
th
e
win
dsc
r
ee
n
a
n
d
th
e
s
i
de
win
do
w
s
.
The air distribution can be adapted b
y
placin
g
the ad
j
ustment dial in the intermediate
positions.
It is
p
ossible to set one or more
f
unctions
m
anually while leaving the other
f
unctions in
au
t
o
m
a
ti
c
m
ode
.
Switchin
g
to manual mode ma
y
result in
discomfort
(
temperature, humidit
y
, odour,
c
ondensation
)
and does not offer optimum
co
mf
o
rt.

94
Comfort
Personalisation of the
E
xterior air intake
/
Interior air
r
ecirculation function
This
f
unction is controlled automatically.
H
owever,
y
ou can deactivate its automatic
c
ontrol if
y
ou wish to chan
g
e the air intake
mode at an
y
time.
Chan
g
in
g
the status
Press the Air intake / Interior air recirculation
b
utton for at least 1
0
seconds.
When the status chan
g
es from active to
inactive, three bleeps are heard and the
indicator lamp
f
lashes three times.
When the status chan
g
es
f
rom inactive to
act
i
ve, two
bl
ee
p
s are
h
ear
d
an
d
t
h
e
i
n
di
cator
l
am
p
f
lashes three times.
A
utomat
i
c contro
l
act
i
ve
I
f
the air distribution ad
j
ustment dial and the air
f
low adjustment dial are placed in the "AUT
O
"
p
osition, the Air intake
/
Interior air recirculation
function is also controlled automaticall
y
.
Automatic control inactive
Even if the air distribution ad
j
ustment dial and
the air flow ad
j
ustment dial are placed in the
"AUT
O
" position, the Air intake / Interior ai
r
recirculation function is no lon
g
er controlled
automat
i
ca
lly
.
The settin
g
s are retained, even a
f
ter switchin
g
o
ff
the i
g
nition.
4. Intake of exterior air /
Recirculation of interior air
This function insulates the passen
g
er
c
ompartment
f
rom exterior odours and smoke.
)
Pr
ess
bu
tt
o
n
4
t
o
se
l
ec
t th
e
a
ir
i
nt
ake
m
ode
.
Wh
en t
h
e
i
n
di
cator
l
amp on
b
utton
4
is o
ff
, the
e
xt
e
ri
o
r
a
ir int
a
k
e
fu
n
c
ti
o
n i
s
o
n.
When the indicator lam
p
on button
4
is on, the
intake o
f
exterior air is o
ff
and the s
y
stem is in
a
ir r
ec
ir
cu
l
a
ti
o
n m
ode
.
Do not drive for lon
g
periods in interior
air recirculation mode, except in trul
y
e
xcept
i
ona
l
atmosp
h
er
i
c con
di
t
i
ons.

95
3
Comfort
5. Air conditionin
g
On / Off
)
Pr
ess
bu
tt
o
n 5 t
o
ac
tiv
a
t
e
th
e
a
ir
c
onditionin
g
.
The indicator lamp comes on.
Personalisation of the Ai
r
Conditionin
g
On / Off function
This
f
unction is controlled automaticall
y
.
H
owever, you can deactivate its automatic
c
ontrol i
f
y
ou wish to activate or deactivate the
a
ir conditionin
g
at an
y
time.
Chan
g
in
g
the status
Press the Air Conditionin
g
O
n /
O
ff button for at
l
east
10
seconds.
When the status chan
g
es from active to
i
nactive, three bleeps are heard and the
i
ndicator lamp
f
lashes three times.
When the status chan
g
es
f
rom inactive to
a
ct
i
ve, two
bl
ee
p
s are
h
ear
d
an
d
t
h
e
i
n
di
cato
r
l
am
p
f
lashes three times.
A
utomat
i
c contro
l
act
i
ve
I
f
the air distribution ad
j
ustment dial and the
air
f
low adjustment dial are placed in the
"AUT
O
"
p
osition, or i
f
the tem
p
erature control
dial is set to the minimum temperature, the air
c
onditionin
g
s
y
stem is controlled automaticall
y
.
Automatic control inactive
The air conditionin
g
s
y
stem is no lon
g
er
c
ontrolled automaticall
y
.
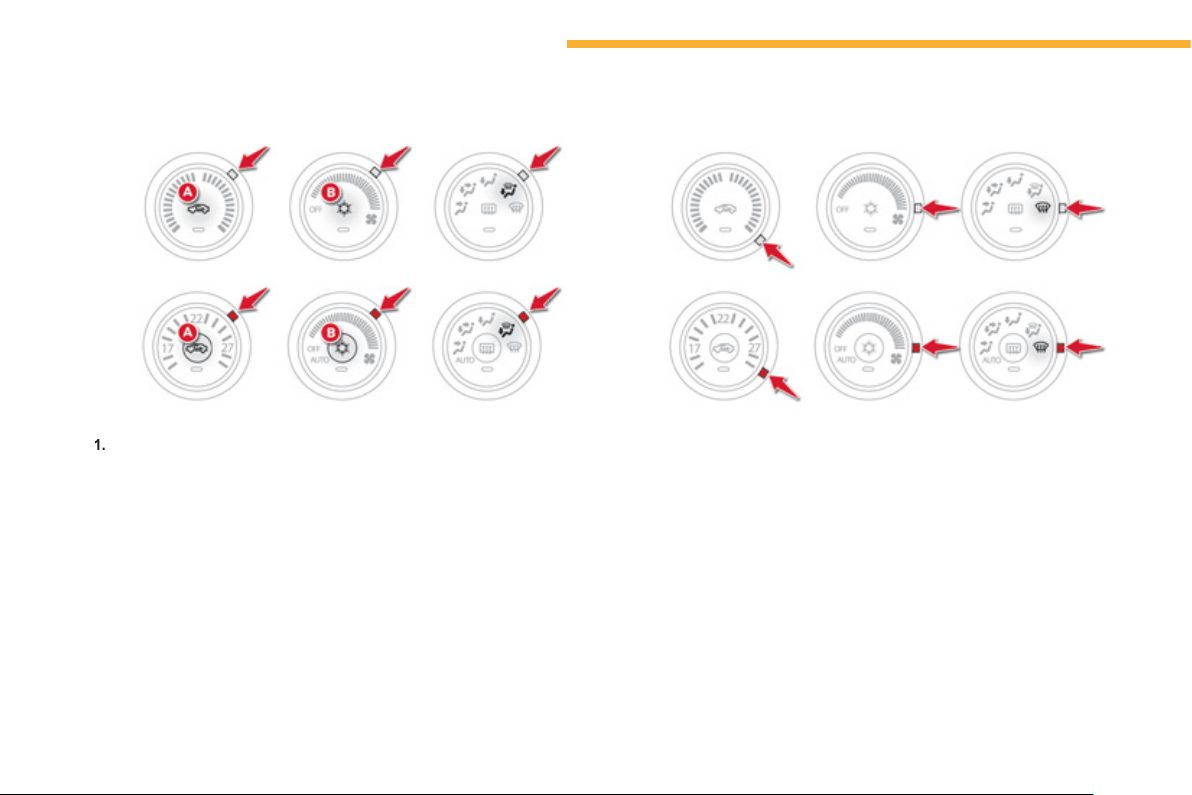
96
Comfort
Front Demist - Defrost
Pr
ess
bu
tt
o
n
A
, to select "exterior air intake". The lam
p
in the button
is
off
.
2.
Place the air distribution dial in the "windscreen, side windows and
footwells" position.
3.
S
elect the desired level of air flow.
4.
Select the desired temperature.
5.
I
f
y
our vehicle has air conditionin
g
, switch it on b
y
pressin
g
button
B
.
Th
e
l
amp
i
n t
hi
s
b
utton comes on.
Rapid demistin
g
1
.
Pl
ace
th
e
d
i
s
tri
bu
ti
o
n
co
ntr
o
l
o
n th
e
"win
dsc
r
ee
n
a
n
d
s
i
de
win
do
w"
p
osition.
2.
S
elect maximum air flow.
3.
Select maximum temperature.

97
3
Comfort
Rear screen demist - defrost
Switchin
g
on
The rear screen demistin
g/
de
f
rostin
g
can onl
y
operate when the engine is running.
Switchin
g
off
The demisting
/
de
f
rosting switches o
ff
a
utomaticall
y
to prevent an excessive
c
onsumption of current.
)
It is possible to stop the demistin
g
/
defrostin
g
operation before it is switched
off automaticall
y
b
y
pressin
g
the button
a
g
a
i
n.
Th
e
i
n
di
cator
l
amp assoc
i
ate
d
w
i
t
h
the button
g
oes o
ff
.
)
S
witch o
ff
the demistin
g/
de
f
rostin
g
o
f
the
rea
r
sc
r
ee
n
a
n
d
doo
r mirr
o
r
s
as
soo
n
as
a
pp
ro
p
riate, as lower current consum
p
tion
r
esults in reduced fuel consumption.
Th
e contro
l
b
utton
i
s
l
ocate
d
on t
h
e a
i
r con
di
t
i
on
i
n
g
s
y
stem contro
l
pane
l
.
)
Press this button to demist
/
def
r
os
t th
e
r
ea
r
sc
r
ee
n
a
n
d
(
dependin
g
on version
)
the
doo
r mirr
o
r
s
. Th
e
in
d
i
ca
t
or
l
am
p
associated with the button
comes
on
.
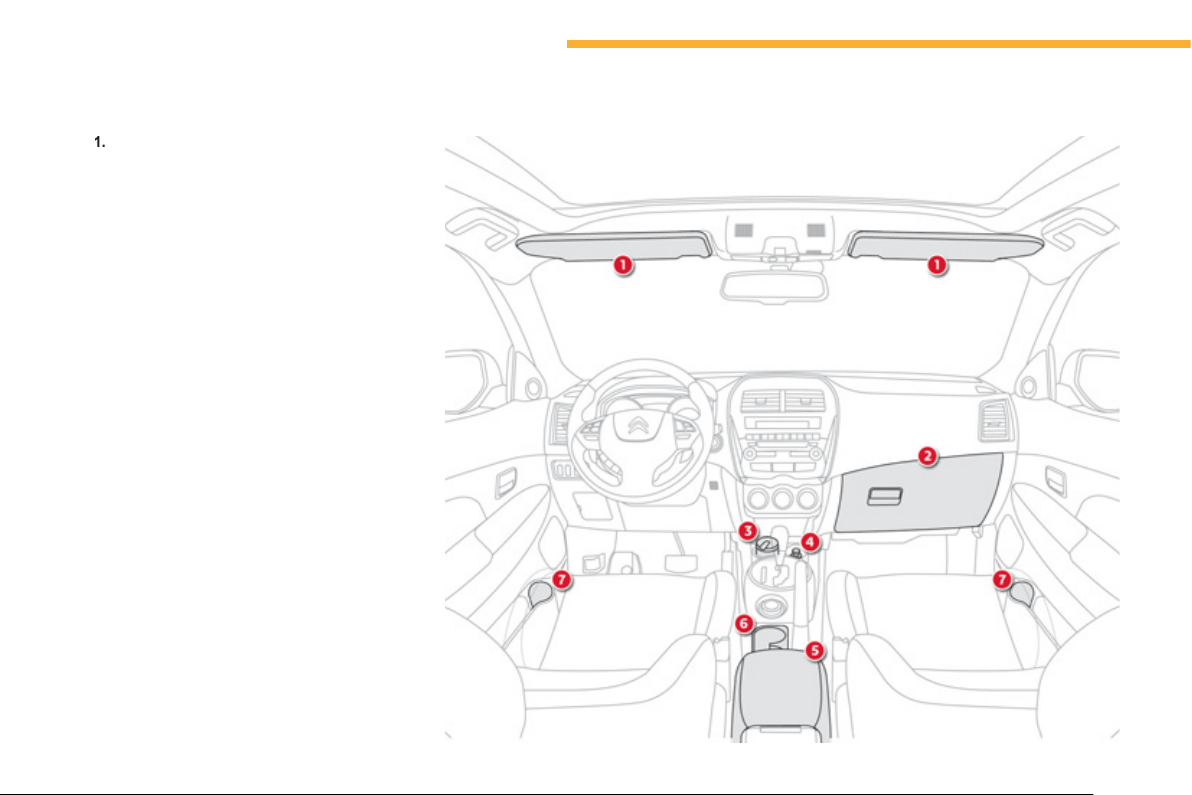
98
Comfort
Front fi ttings
Sun visor.
2.
G
love box.
3.
Portable ashtra
y
.
4.
Ci
g
arette li
g
hter
12 V socket
(
120 W max
)
.
5.
A
rmrest w
i
t
h
stora
g
e compartments.
6
.
C
u
p
holder.
7
.
B
o
ttl
e
h
o
l
de
r.
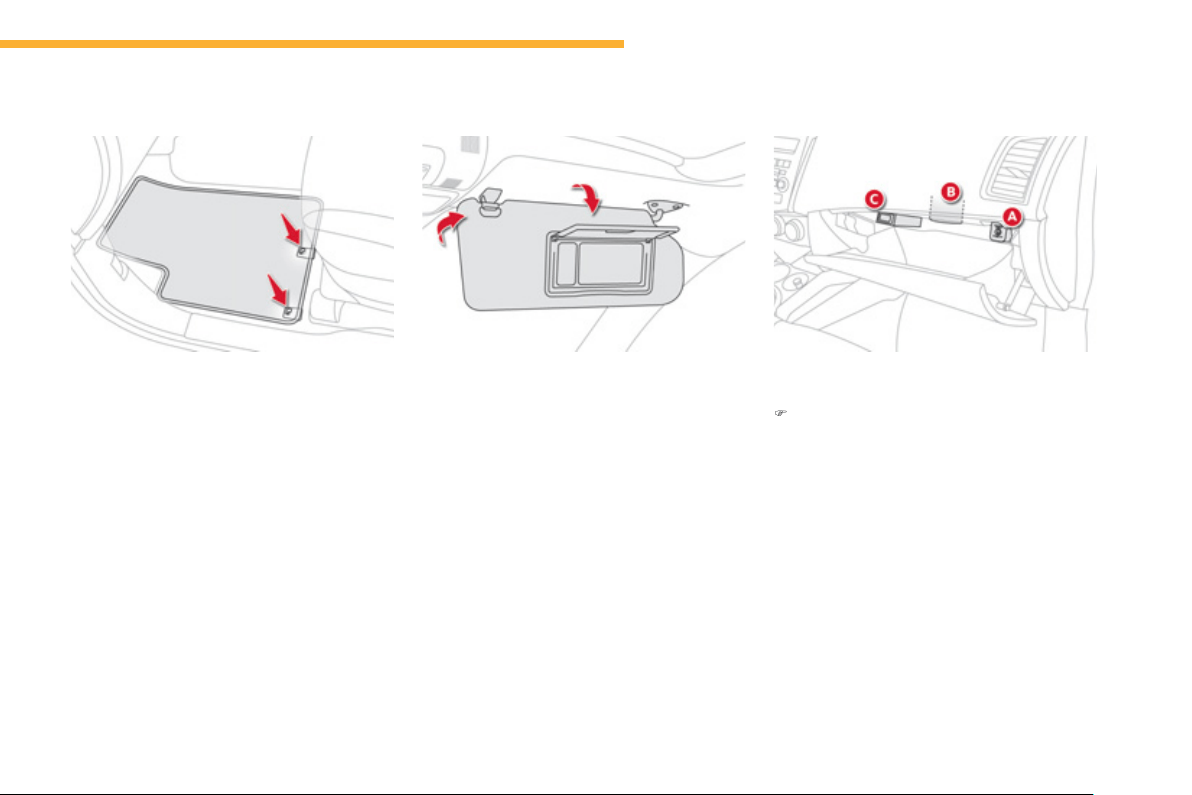
99
3
Comfort
Mat
Wh
en remov
i
n
g
t
h
e mat on t
h
e
d
r
i
ver
'
s s
id
e,
m
ove back the seat as
f
ar as possible and
remove the
f
ixin
g
s.
When re
f
ittin
g
, position the mat correctl
y
on the
p
ins and clip the
f
ixings.
C
heck that the mat is
s
ecured
f
irml
y
.
To prevent an
y
risk of
j
ammin
g
under the
p
edals:
- onl
y
use mats suited to the fixin
g
s alread
y
p
resent
i
n t
h
e ve
hi
c
l
e;
i
t
i
s
i
mperat
i
ve t
h
at
these
f
ixin
g
s are used.
- never
f
it one mat on top o
f
another.
Sun visor Glove box
It has dedicated locations for storin
g
a water
b
ott
l
e, t
h
e ve
hi
c
l
e
'
s
h
an
db
oo
k
pac
k
...
)
T
o open t
h
e
gl
ove
b
ox, ra
i
se t
h
e
h
an
dl
e.
I
t
i
s
ill
um
i
nate
d
w
h
en t
h
e
lid
i
s o
p
ene
d
.
It houses the
f
ront passenger airbag
deac
tiv
a
ti
o
n
s
wit
c
h
A
.
If the vehicle is fitted with air conditionin
g
, it has
a
v
e
ntil
a
ti
o
n n
o
zzl
e
B
, distributin
g
the same
c
onditioned air as the vents in the passen
g
e
r
c
ompartment.
I
f
y
our vehicle is
f
itted with the "Ke
y
less Entr
y
and
S
tartin
g
" s
y
stem, it contains the back-up
s
tart
i
n
g
un
i
t
C
.
The sun visors fold forwards
,
and to the side
wh
en t
h
e
y
are un
h
oo
k
e
d
.
The
y
are
f
itted with a courtes
y
mirror and a
t
icke
t
holde
r.
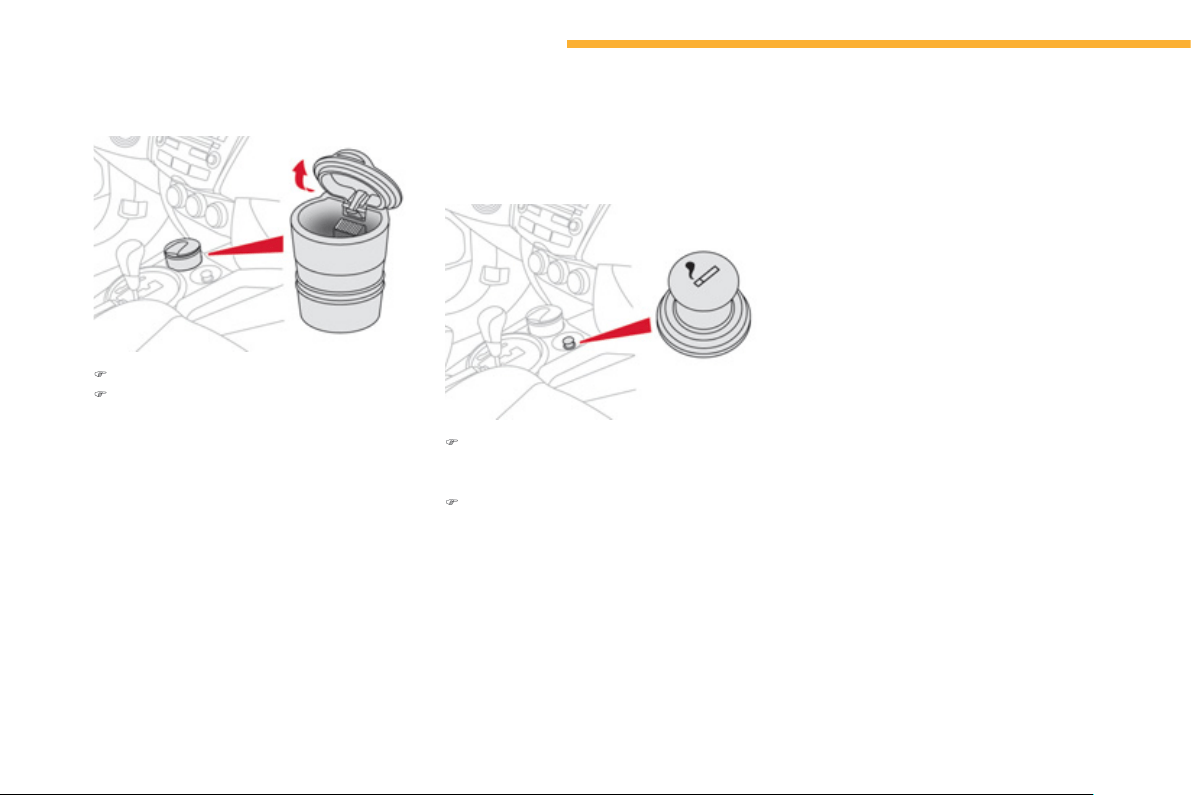
100
Comfort
Portable ashtray
)
Pull the cover to open the ashtra
y
.
)
To empt
y
it, remove the ashtra
y
b
y
pullin
g
it
u
pwar
d
s.
Cigarette lighter /
12 V accessory
socket
)
T
o use t
h
e c
ig
arette
ligh
ter, press
i
t
i
n
and wait a
f
ew seconds until it
p
o
p
s out
automaticall
y
.
)
To connect a 12 V accessor
y
(
max power:
120 W
)
, remove the ci
g
arette li
g
hter and
c
onnect a suitable adaptor.
You can use this socket to connect a telephone
ch
ar
g
er, a
b
ott
l
e warmer...
A
f
ter use, put the ci
g
arette li
g
hter back into
p
l
ace stra
igh
t awa
y
.
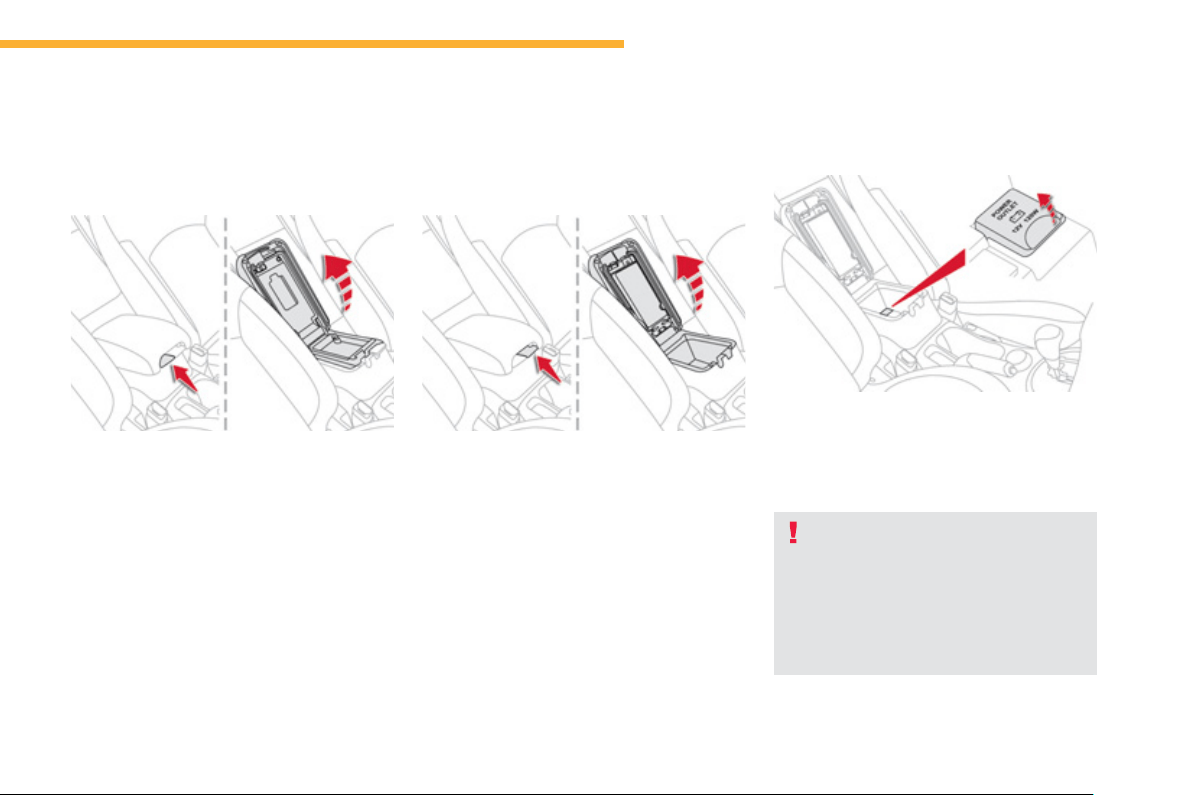
101
3
Comfort
Front armrest
Pull the right-hand lever to open the storage
c
ompartment lid, which serves as an armrest.
To close, fold down the lid until it locks.
Pull the le
f
t-hand lever to o
p
en the lid.
To close,
f
old down the lid until it locks.
This stora
g
e compartment ma
y
contain up
to
3
accessor
y
sockets.
This operates when the i
g
nition switch is in the
"L
O
CK", "ACC" or "
O
N" position.
Open the cover of the front armrest to
g
ain
access
t
o
t
he
socke
t.
Upper stora
g
e compartment
L
ower stora
g
e compartment
C
heck that the electrical e
q
ui
p
ment
operates on
12
V and that its maximum
e
lectrical power is
120
W.
The prolon
g
ed use of electrical
e
quipment without runnin
g
the en
g
ine
ma
y
dischar
g
e the batter
y
.
12 V socket
(120 W max)
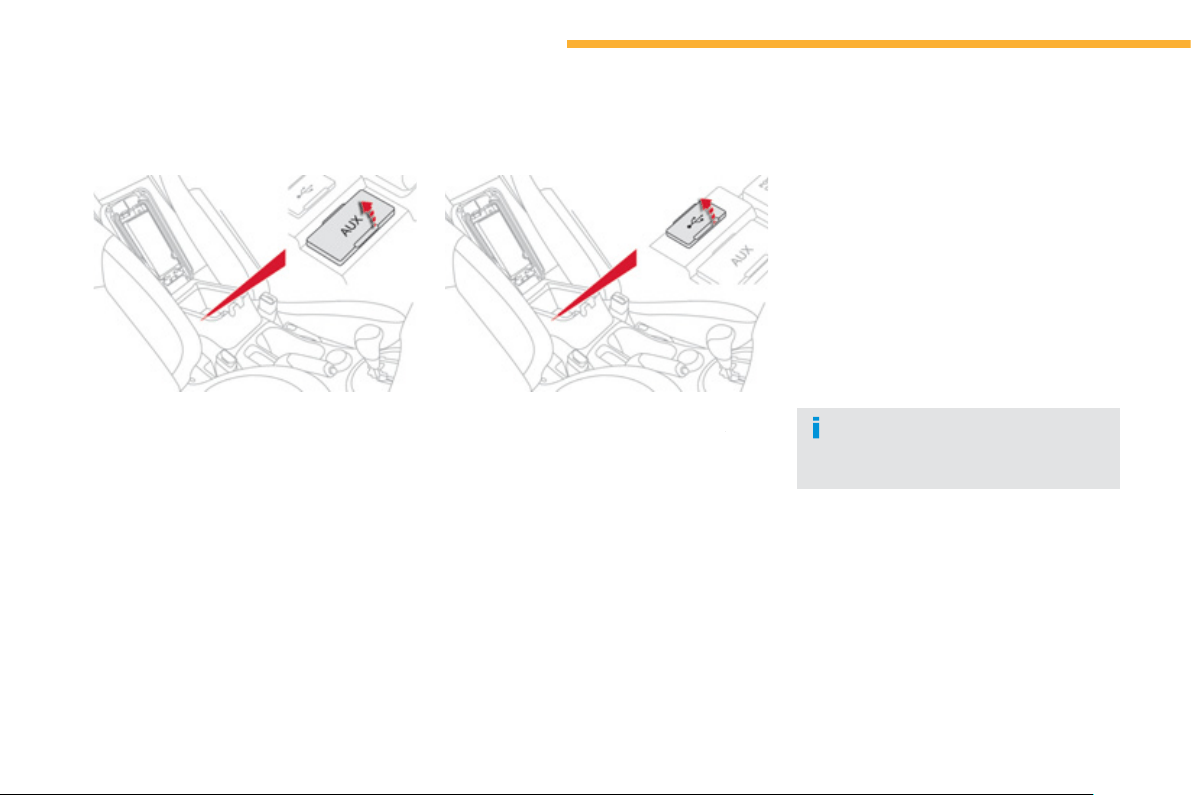
102
Comfort
It permits the connection of a portable device,
such as a di
g
ital audio pla
y
er of the iPod
®
or
®
U
SB memor
y
stick t
y
pe.
O
pen the
f
ront armrest cover
f
or access to the
port.
It reads certain audio
f
ile
f
ormats allowin
g
them
to be heard via the vehicle's s
p
eakers.
You can mana
g
e these
f
iles usin
g
the steerin
g
mounted controls or the audio s
y
stem control
panel.
F
o
r m
o
r
e
in
fo
rm
a
ti
o
n
o
n th
e
use
of
thi
s
eq
ui
p
ment, see "Audio and Telematics".
USB port
Connected to the USB port, the
porta
bl
e
d
ev
i
ce c
h
ar
g
es automat
i
ca
lly
w
hile
i
n
use
.
Auxiliary socket
(AUX)
It is used to connect a portable device
(
MP3 pla
y
er...
)
.
Open the front armrest cover for access to the
socke
t.
For more in
f
ormation on usin
g
this equipment,
see
"Audio
a
n
d
Tele
m
a
t
ics"
.
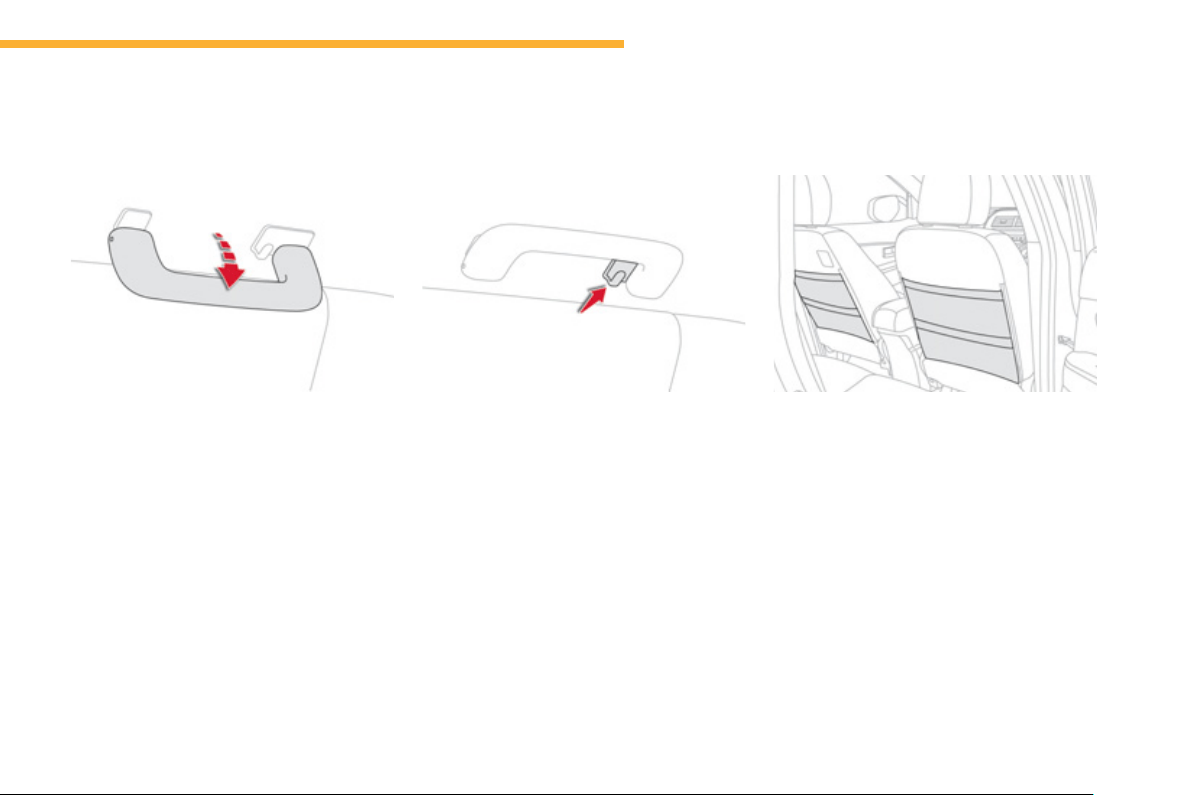
103
3
Comfort
Rear fi ttings
P
u
ll th
e
h
a
n
d
l
e
do
wnw
a
r
ds
t
o
l
o
w
e
r it.
Grab handle
The rear left
g
rab handle is fitted with a coat
hoo
k.
Coat hook Seat
p
ockets
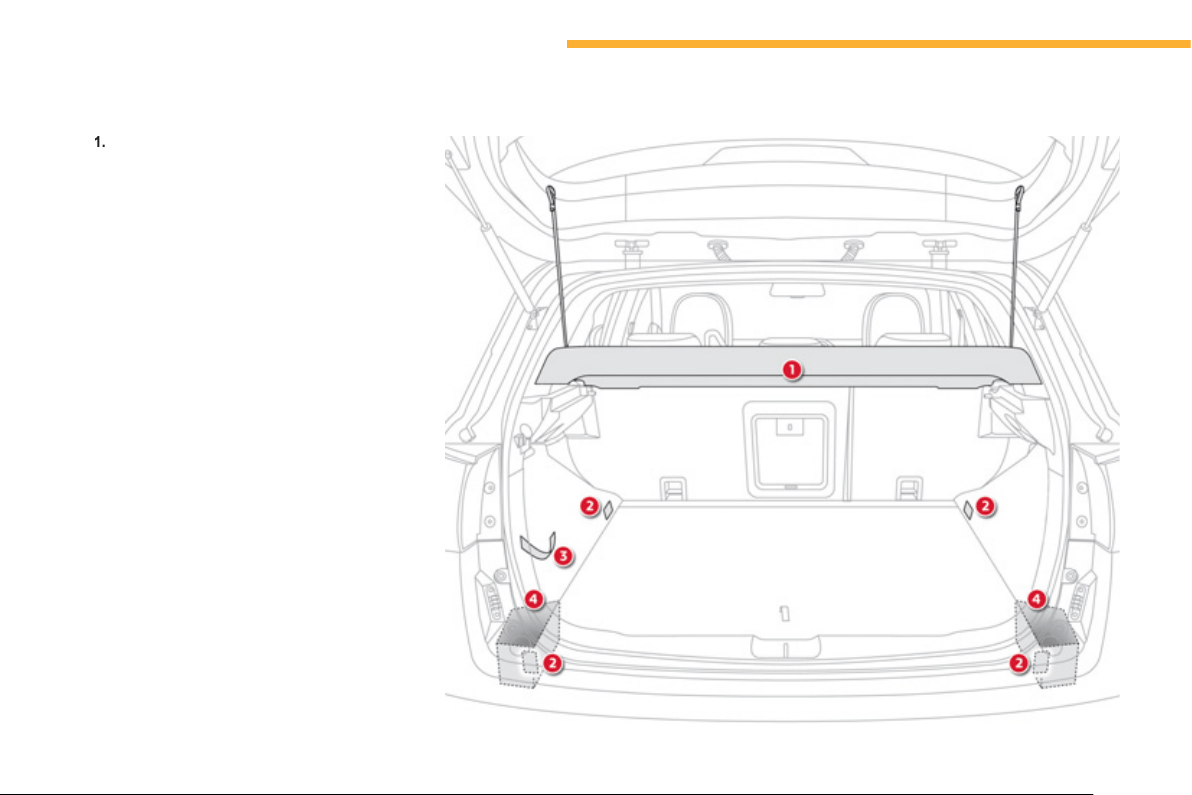
104
Comfort
Boot fi ttings
Rear parcel shelf
(
see details on a followin
g
pa
g
e
)
2.
L
ashin
g
rin
gs
3.
Retainin
g
stra
p
4.
Side stora
ge
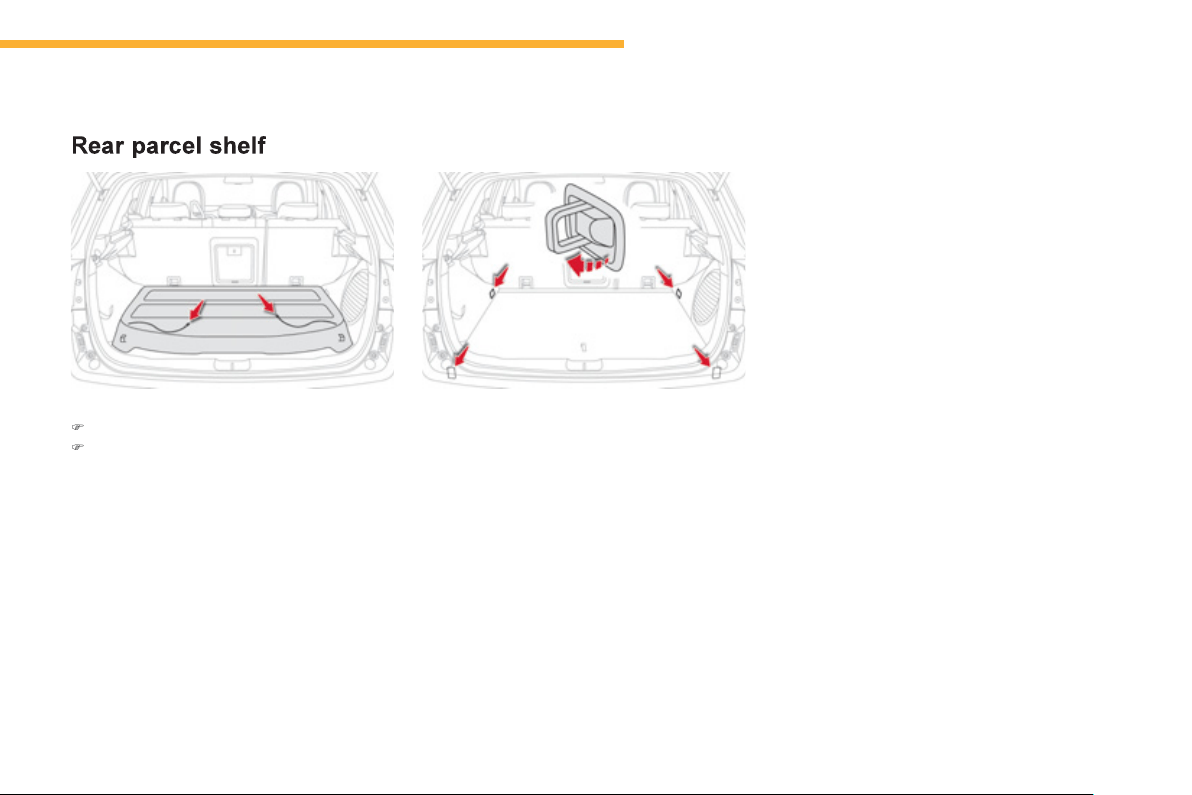
105
3
Comfort
Stowin
g
rin
g
s
There are four stowin
g
rin
g
s in the boot for
securin
g
lu
gg
a
g
e:
- two rin
g
s are located on the boot floor,
- two r
i
n
g
s are
l
ocate
d
on t
h
e rear s
id
e
p
ill
ars.
T
o
r
e
m
o
v
e
th
e
s
h
e
lf:
)
unhook the two cords
,
)
raise the shelf sli
g
htl
y
, then remove it.
There are several options
f
or storin
g
the shel
f
:
- either upri
g
ht behind the
f
ront seats,
-
o
r
f
l
a
t
a
t th
e
base
of
th
e
boo
t.
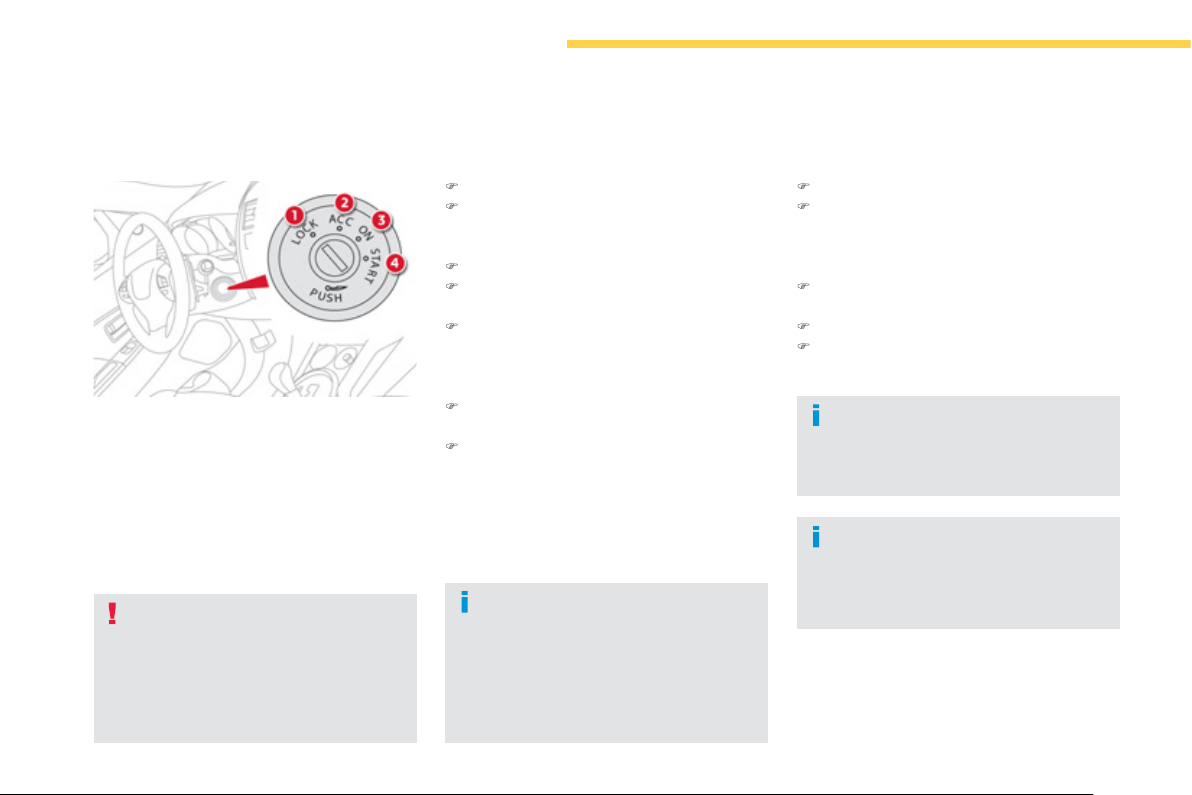
106
Driving
Starting - stopping the engine with the key
- P
os
iti
o
n 1:
L
OCK
Th
e steer
i
n
g
i
s
l
oc
k
e
d
.
- P
os
iti
o
n 2:
ACC
The accessories
(
radio, 12 V socket...
)
can
be
used
.
- Position
3
: O
N
I
g
nition on.
- P
os
iti
o
n 4: STAR
T
Startin
g
the en
g
ine.
I
g
nition switch
If
y
ou use the accessories for a
p
rolon
g
ed period
(
with the ke
y
in
p
osition
2
(
ACC
)
)
,
y
ou risk dischar
g
in
g
the batter
y
. Startin
g
y
our vehicle will
t
h
en no
l
on
g
er
b
e poss
ibl
e.
B
e awar
e
.
S
ee the "Automatic power cut-o
ff
to
accesso
r
ies"
sec
t
io
n.
K
e
y
in i
g
nition
A buzzer sounds on openin
g
the driver's
door, i
f
the ke
y
has been le
f
t in the
ig
n
i
t
i
on.
)
I
nsert t
h
e
k
e
y
i
n t
h
e
ig
n
i
t
i
on sw
i
tc
h
.
)
Turn the key to position
2
(ACC)
a
n
d
u
nl
oc
k
the steerin
g
column, b
y
turnin
g
wheel
s
li
g
htl
y
.
)
Press and hold the brake pedal.
)
Full
y
depress the clutch pedal
(
vehicles
f
itted with a manual
g
earbox
)
.
)
Put the
g
ear lever into neutral
(
vehicles
f
itted with a manual
g
earbox
)
, or in
p
os
i
t
i
on
P
(
vehicles
f
itted with a
C
VT
gearbox
)
.
)
O
perate the starter b
y
turnin
g
the ke
y
to
position
4
(
START
)
.
)
O
nce the en
g
ine is runnin
g
, release the
k
e
y
.
The ke
y
returns automaticall
y
to
pos
i
t
i
on
3
(
ON
)
.
Startin
g
usin
g
the ke
y
Stoppin
g
)
I
mm
obilise
t
he
v
ehicle
.
)
Put the gear lever into neutral
(
vehicles
f
itted with a manual
g
earbox
)
, or in
p
osition
P
(
vehicles fitted with a CVT
g
earbox
)
.
)
While pressin
g
the ke
y
, turn it to
p
osition 1
(
LOCK
)
.
)
Remove the ke
y
f
rom the i
g
nition switch.
)
L
oc
k
t
h
e steer
i
n
g
.
Do not attach an
y
heav
y
ob
j
ects to the
k
e
y
as t
hi
s cou
ld
we
igh
d
own on
i
t w
h
en
in the i
g
nition switch and cause a
f
ault.
For Diesel vehicles, when the en
g
ine
i
s co
ld
wa
i
t w
i
t
h
t
h
e
ig
n
i
t
i
on sw
i
tc
h
i
n pos
i
t
i
on
3
(
ON
)
unt
il
t
h
e pre
h
eate
r
w
arnin
g
lamp
g
oes o
ff
, be
f
ore turnin
g
the key to position 4 (START
)
.
The warnin
g
lamp does not come on
w
hen the en
g
ine is hot.
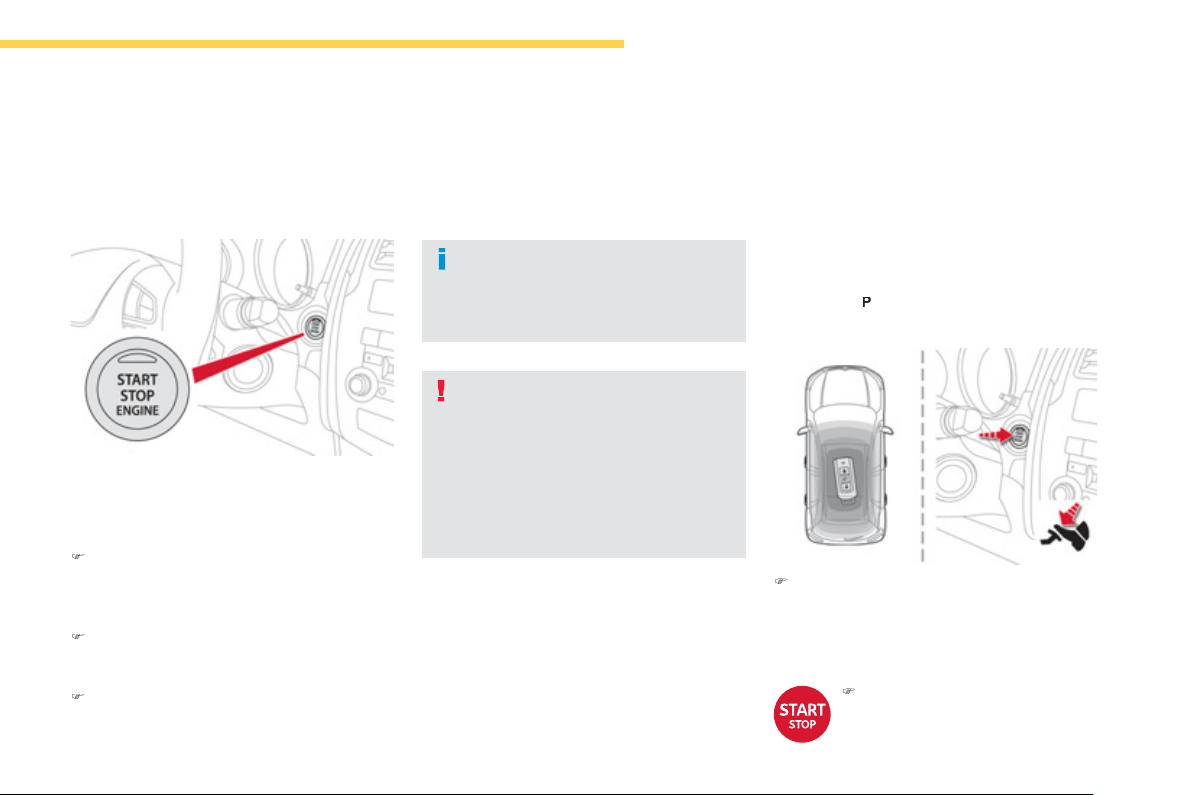
107
4
Driving
Starting - stopping the engine with the Keyless Entry and
Starting system
Wi
t
h
t
h
e e
l
ectron
i
c
k
e
y
i
ns
id
e t
h
e ve
hi
c
l
e; eac
h
p
ress on t
h
e
"
START/STO
P
"
b
utton, w
i
t
h
no
act
i
on on t
h
e pe
d
a
l
s, c
h
an
g
es t
h
e ve
hi
c
l
e
'
s
mode
:
)
First press
(
A
CC
mode
)
, the button's
warnin
g
lamp comes on in oran
g
e.
The accessories
(
radio, 12V socket...
)
can
be
used
.
)
Second press
(O
N mode
)
, the button's
warn
i
n
g
l
amp comes on
i
n
g
reen.
S
witchin
g
on the i
g
nition.
)
Third press
(O
FF mode
)
, the warnin
g
lamp
in the button
g
oes o
ff
.
If
y
ou use the accessories for a
p
rolon
g
ed period with the i
g
nition switch
in position 2
(
ACC
)
,
y
ou risk dischar
g
in
g
the batter
y
. Startin
g
y
our vehicle will
t
h
en no
l
on
g
er
b
e poss
ibl
e.
T
a
k
e car
e
.
S
ee the "Automatic power cut-o
ff
to
accesso
r
ies"
sec
t
io
n.
Chan
g
in
g
the mode of
the vehicle
If the warnin
g
lamp flashes oran
g
e,
c
ontact a
C
ITR
O
ËN dealer or a
quali
f
ied workshop as soon as possible.
)
Pr
ess
a
n
d
r
e
l
ease
th
e
" START
/
STOP"
bu
tt
o
n.
)
Wi
t
h
t
h
e e
l
ectron
i
c
k
e
y
i
ns
id
e t
h
e ve
hi
c
l
e,
depress the clutch pedal
f
ully on vehicles
with a manual
g
earbox or press the brake
p
edal on vehicles with a CVT
g
earbox.
Startin
g
usin
g
the
e
lectronic ke
y
For vehicles
f
itted with a manual
g
earbox , put
t
h
e
g
ear
l
ever
i
n neutra
l
.
For vehicles
f
itted with a
C
VT gearbox , put the
g
ear lever in
P
.
P

108
Driving
For Diesel vehicles, when
the en
g
ine is cold startin
g
does not take place until the
pre-
h
eater warn
i
n
g
l
amp
h
as
g
one o
ff
.
I
f
one o
f
the startin
g
conditions is not
m
et, a reminder messa
g
e appears in
the instrument panel screen. In some
c
ircumstances, it is necessar
y
to
turn t
h
e steer
i
n
g
w
h
ee
l
s
ligh
t
ly
w
hil
e
p
ress
i
n
g
t
h
e
"
START/STOP
"
bu
tt
o
n
to assist unlockin
g
o
f
the steerin
g
;
a messa
g
e warns
y
ou w
h
en t
hi
s
i
s
needed
.
The presence o
f
the electronic ke
y
in th
e
de
fin
ed
z
o
n
e
i
s
esse
nti
a
l. F
or
reasons of safet
y
, do not leave this area
when the en
g
ine is runnin
g
.
Switchin
g
off usin
g
the
e
lectronic ke
y
If the vehicle is not immobilised, the
e
n
g
ine will not stop.
Thi
s messa
g
e
i
s
di
sp
l
a
y
e
d
w
he
n t
he
d
r
i
v
e
r
's
doo
r
is
o
p
ene
d
an
d
t
h
e ve
hi
c
l
e
i
s not
in "
O
FF" mode.
)
Pr
ess
th
e
"
S
TART/
S
TO
P
" button a
g
ain to
c
han
g
e to "
O
FF" mode.
)
I
mm
obilise
t
he
v
ehicle
.
)
Place the
g
ear lever in neutral
f
or vehicles
f
itted with a manual
g
earbox , or on
P
for
vehicles
f
itted with a
C
VT gearbox .
)
With the electronic ke
y
inside the vehicle,
p
ress the " START/STO
P
"
bu
tt
o
n.
The en
g
ine stops.
The steerin
g
locks when a door is opened or on
lockin
g
the vehicle.
Each attempt at startin
g
takes around
15 seconds. If the en
g
ine does not start, press
th
e
"START/STOP " button once more to tr
y
ag
ain.
The presence of the electronic ke
y
in
the vehicle is essential for switchin
g
on the i
g
nition and startin
g
onl
y
. Once
t
h
e en
gi
ne
h
as starte
d
, ma
k
e sure
t
h
at t
h
e e
l
ectron
i
c
k
e
y
rema
i
ns w
i
t
h
the vehicle until the end o
f
the
j
ourne
y
:
otherwise you would not be able to lock
th
e
v
e
hi
c
l
e
.
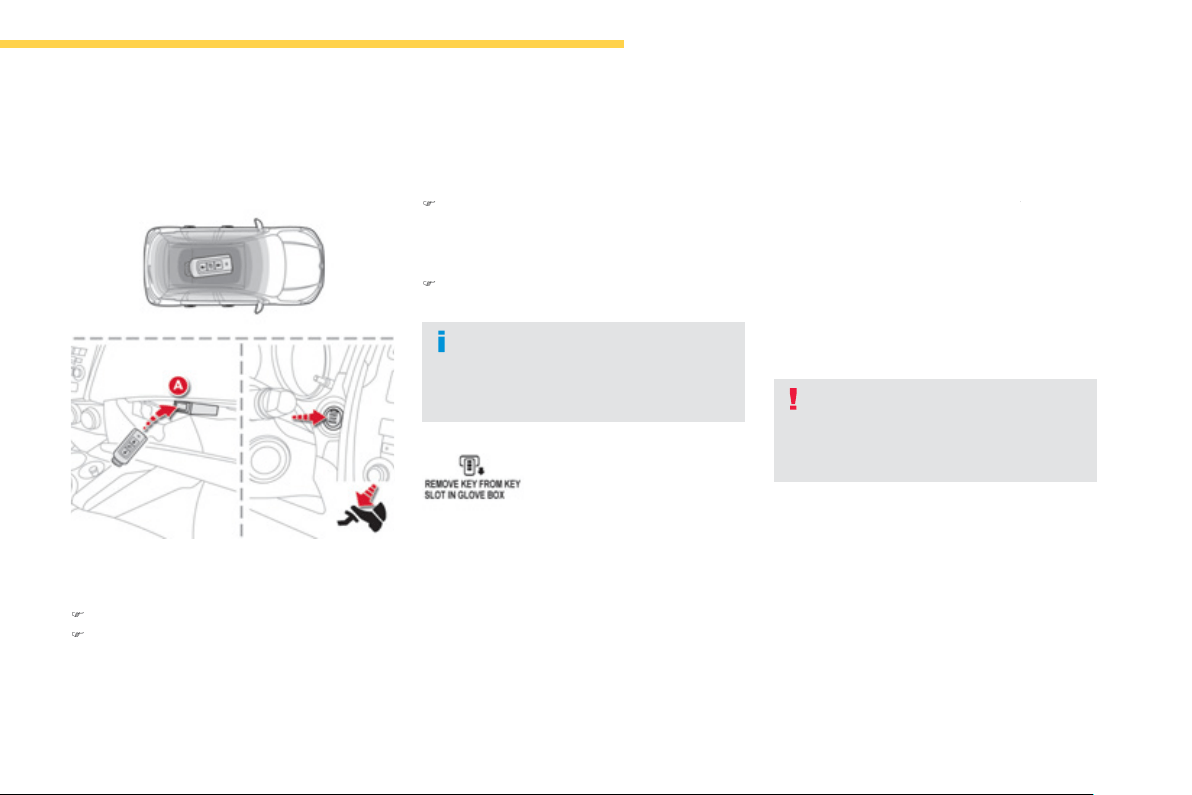
109
4
Driving
O
nce the en
g
ine has started,
y
ou can
remove the electronic ke
y
from its
housin
g
A
and close the
g
love box.
Back-up startin
g
with the
e
lectronic ke
y
The messa
g
e is displa
y
ed
when
y
ou open the driver's
door and the electronic ke
y
has
n
o
t
bee
n r
e
m
o
v
ed
fr
o
m
i
t
s
l
oca
ti
o
n
A
. R
e
m
e
m
be
r t
o
t
a
k
e
th
e
e
l
ec
tr
o
ni
c
k
e
y
w
i
t
h
y
ou w
h
en
y
ou
l
eave t
h
e ve
hi
c
l
e.
)
Press the brake pedal on vehicles fitted
with a
C
VT
g
earbox or depress the clutch
pedal
f
ull
y
on vehicles with a manual
g
ear
b
ox.
)
Pr
ess
th
e
"
S
TART/
S
TOP "
bu
tt
o
n.
When the electronic ke
y
is in the defined zone
and
y
our vehicle does not start after pressin
g
th
e
"START/STOP"
bu
tt
o
n:
)
O
pen the
g
love box.
)
I
nsert t
h
e e
l
ectron
i
c
k
e
y
i
n t
h
e
l
ocat
i
on
A
.
Emer
g
enc
y
stop with the
e
lectronic ke
y
D
ur
i
n
g
an emer
g
enc
y
stop, t
h
e
b
ra
ki
n
g
s
ervo ass
i
stance an
d
steer
i
n
g
power
assistance
f
unctions are no lon
g
e
r
provided. Take great care.
In the event of an emergency only
, t
h
e
y
e
n
gi
ne can
b
e stoppe
d
w
i
t
h
out an
y
con
di
t
i
ons.
To do this,
p
ress and hold the "
S
TART/
S
TO
P
" button
f
or about
3
seconds or make
3
s
uccessive presses on the button.
The en
g
ine stops and the vehicle
g
oes into
"A
CC
" mode.
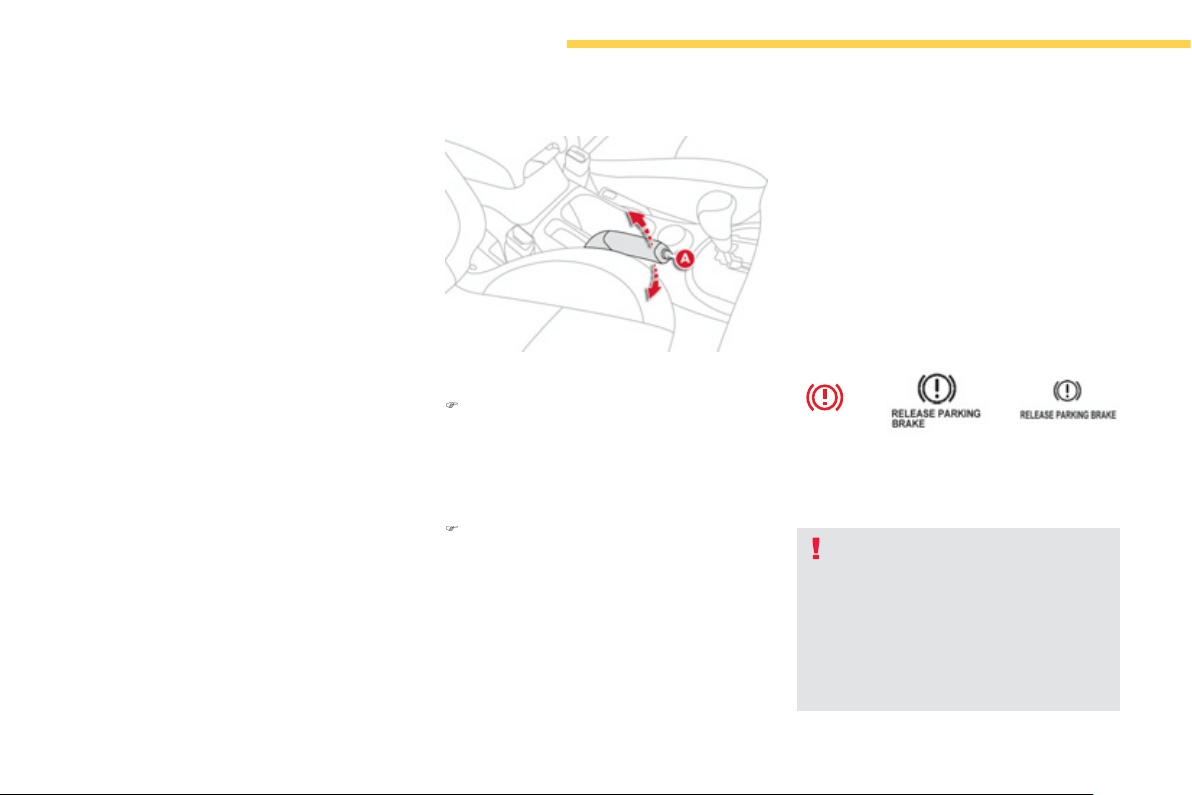
110
Driving
Anti-theft protection
Electronic en
g
ine immobiliser
The ke
y
s contain an electronic chip which has
a
secret co
d
e.
Wh
en t
h
e
ig
n
i
t
i
on
i
s sw
i
tc
h
e
d
on, this code must be reco
g
nised in order
f
or
s
tart
i
n
g
to
b
e poss
ibl
e.
Thi
s e
l
ectron
i
c en
gi
ne
i
mmo
bili
ser
l
oc
k
s t
h
e
e
ngine management system a
f
ew minutes
af
ter the i
g
nition is switched o
ff
and prevents
s
tartin
g
of the en
g
ine b
y
an
y
one who does not
h
ave the ke
y
.
In the event of a malfunction,
y
ou are informed
by
a messa
g
e
i
n t
h
e
i
nstrument pane
l
screen.
I
n t
hi
s case,
y
our ve
hi
c
l
e
d
oes not start; contact
a
CITRO
Ë
N dealer as soon as possible.
Appl
y
in
g
)
Pull the parkin
g
brake lever
f
ull
y
up to
immobilise
y
our vehicle.
Parking brake
Releasin
g
)
Pull the parkin
g
brake lever up
g
entl
y
,
press the release button
A
th
e
n l
o
w
e
r th
e
l
ever full
y
.
When the vehicle is bein
g
driven, i
f
the parkin
g
brake is still on or has not been
f
ull
y
released, a
m
essage appears in the screen.
Wh
en par
ki
n
g
on a s
l
ope,
di
rect
y
our
wheels against the kerb, apply the
parkin
g
brake, en
g
a
g
e a
g
ear or place
the
g
ear lever in position
P
f
o
r v
e
hi
c
l
es
f
itted with a CVT
g
earbox, and switch
o
ff the i
g
nition
(
"
O
FF" mode
)
.
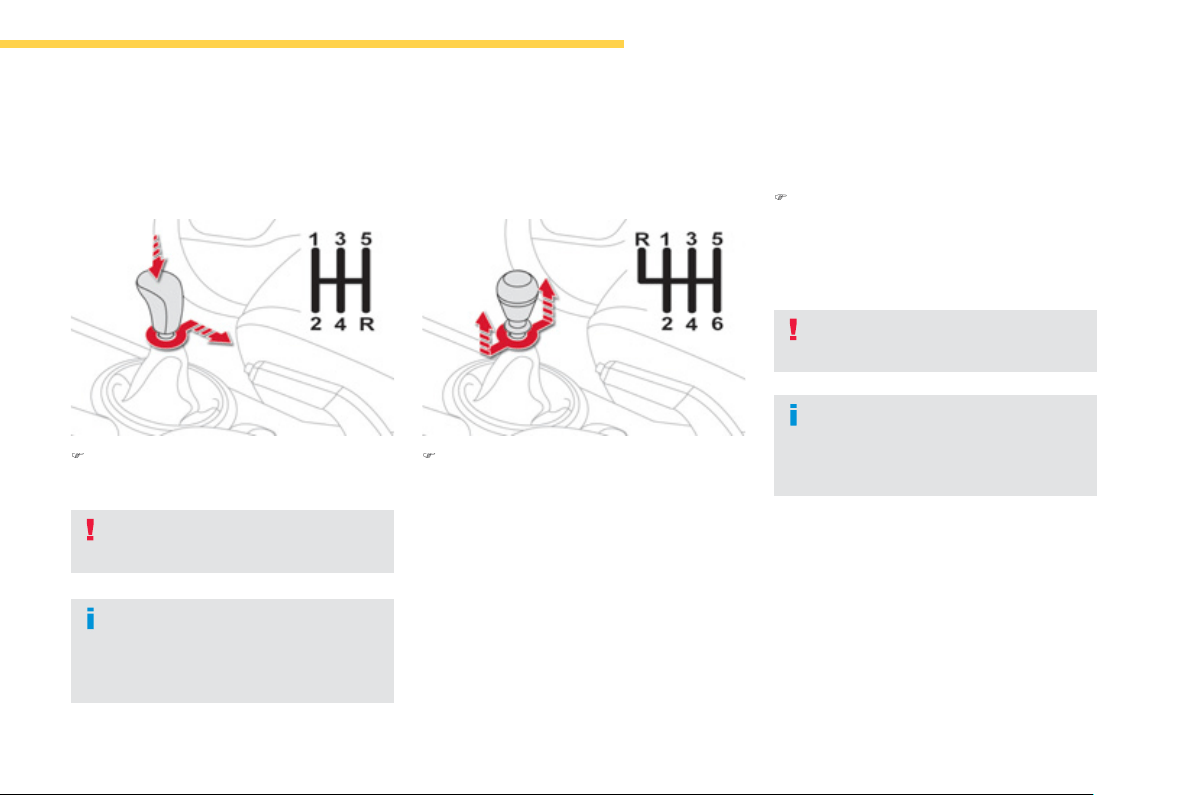
111
4
Driving
5-speed manual
gearbox
)
Push the
g
ear lever to the ri
g
ht then
back
w
a
r
ds
.
E
n
g
a
gi
n
g
reverse
g
ear
6-speed manual
gearbox
)
Move the lever full
y
to the ri
g
ht to en
g
a
g
e
5
t
h
or
6
t
h
gear
.
E
n
g
a
gi
n
g
reverse
g
ear
)
R
a
i
se t
h
e r
i
n
g
un
d
er t
h
e
k
no
b
an
d
move
the gear lever to the le
f
t then
f
orwards.
E
n
g
a
gi
n
g
5
t
h
or 6
t
h
gear
Onl
y
en
g
a
g
e reverse
g
ear when the
ve
hi
c
l
e
i
s stat
i
onar
y
w
i
t
h
t
h
e en
gi
ne at
idl
e.
A
s a sa
f
et
y
precaution and to
f
acilitate
s
tarting o
f
the engine:
- alwa
y
s select neutral,
- press the clutch pedal.
O
nl
y
en
g
a
g
e reverse
g
ear when the
vehicle is stationar
y
with the en
g
ine at idle.
As a sa
f
et
y
precaution and to
f
acilitate
s
tartin
g
o
f
the en
g
ine:
- always select neutral,
- press the clutch pedal.
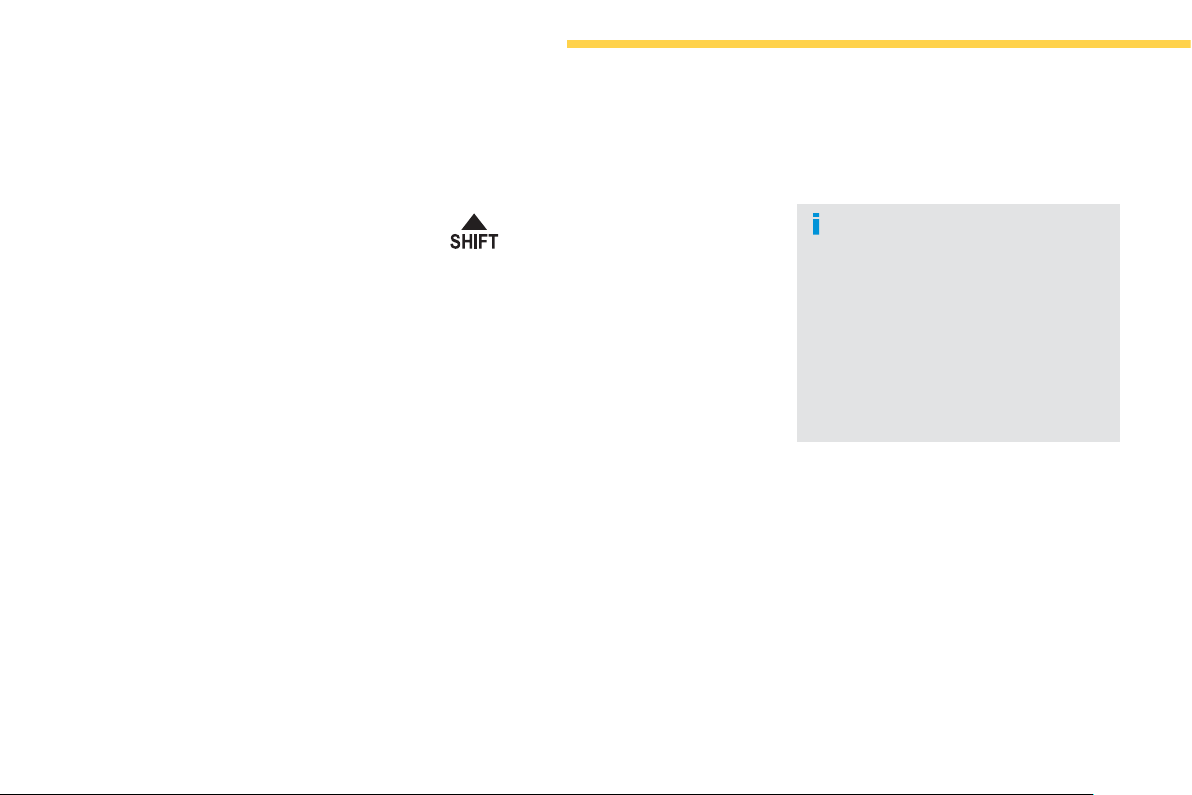
112
Driving
Gear shift indicator *
S
ystem which reduces
f
uel consumption by advising the driver to change up on vehicles
f
itted with a manual gearbox.
O
p
eration
*
Accordin
g
to en
g
ine.
Th
e s
y
m
b
o
l
appears
i
n t
h
e
i
nstrument
p
ane
l
su
gg
est
i
n
g
t
h
at
y
ou c
h
an
g
e up.
In the case o
f
drivin
g
which makes
p
articular demands on the
p
er
f
ormance
o
f
the engine
(f
irm pressure on the
accelerator pedal,
f
or example, when
overtakin
g
...
)
, the s
y
stem will not
recommend a
g
ear chan
g
e.
The s
y
stem never su
gg
ests:
- en
g
a
g
in
g
reverse
g
ear,
- en
g
a
gi
n
g
a
l
ower
g
ear.
Th
e s
y
stem
i
ntervenes on
ly
w
h
en
d
r
i
v
i
n
g
e
conom
i
ca
lly
.
D
epen
di
n
g
on t
h
e
d
r
i
v
i
n
g
s
i
tuat
i
on an
d
y
our
vehicle's equipment, the system may advise
y
ou to skip one or more
g
ears. You can
follow this instruction without en
g
a
g
in
g
the
intermediate
g
ears.
The
g
ear recommendations should not
be considered compulsor
y
. In fact, the
c
on
f
i
g
uration o
f
the road, the amount o
f
tra
ff
ic
a
nd sa
f
et
y
remain determinin
g
f
actors when
c
hoosin
g
the best
g
ear. There
f
ore, the driver
r
emains responsible
f
or deciding whether or not
to
f
ollow the advice
g
iven b
y
the s
y
stem.
Thi
s
f
u
n
c
ti
o
n
ca
nn
o
t
be
deac
tiv
a
t
ed
.
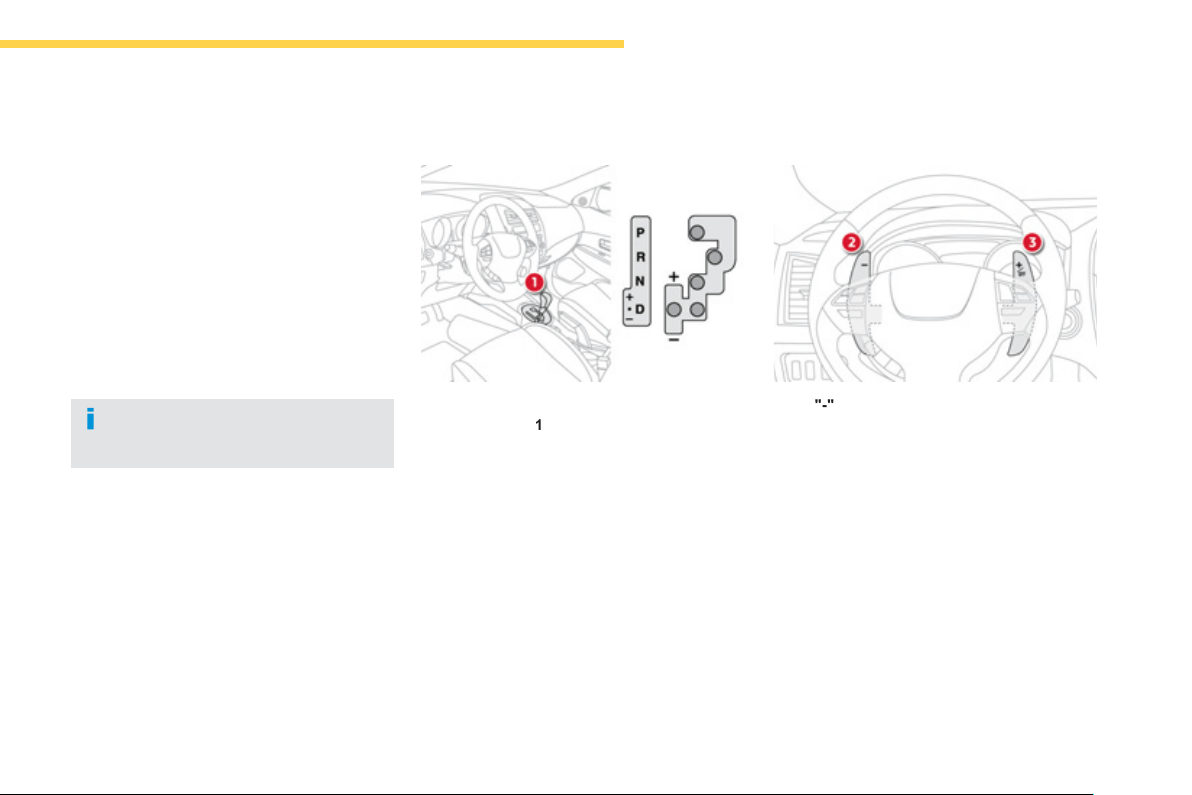
113
4
Driving
Thi
s
g
ear
b
ox
h
as two
d
r
i
v
i
n
g
mo
d
es:
-
a
n
au
t
o
m
a
t
ed
m
ode
fo
r
au
t
o
m
a
ti
c
co
ntr
o
l
o
f
the
g
ears b
y
the
g
earbox and there
f
ore
without any action on the part o
f
the driver,
- a manual mode
f
or sequential chan
g
in
g
o
f
the
g
ears b
y
the driver usin
g
the steerin
g
m
ounted controls or the
g
ear lever.
CVT gearbox
It includes the
f
ollowin
g
controls:
- a gear lever
1
o
n th
e
ce
ntr
e
co
n
so
l
e
fo
r
s
electin
g
the drivin
g
mode, reverse
g
ear
and neutral or for chan
g
in
g
g
ear in manual
mode,
-
a
"-"
steer
i
n
g
mounte
d
contro
l
pa
ddl
e
2
fo
r
m
anual downward gear changes,
-
a
"
+/OFF" steerin
g
mounted control
p
addle
3
for manual upward
g
ear chan
g
es.
The six-speed automatic
g
earbox offers a choice between the comfort of automatic re
g
ulation or the pleasure of manual
g
ear chan
g
in
g
.
The mode can be chan
g
ed at an
y
time.
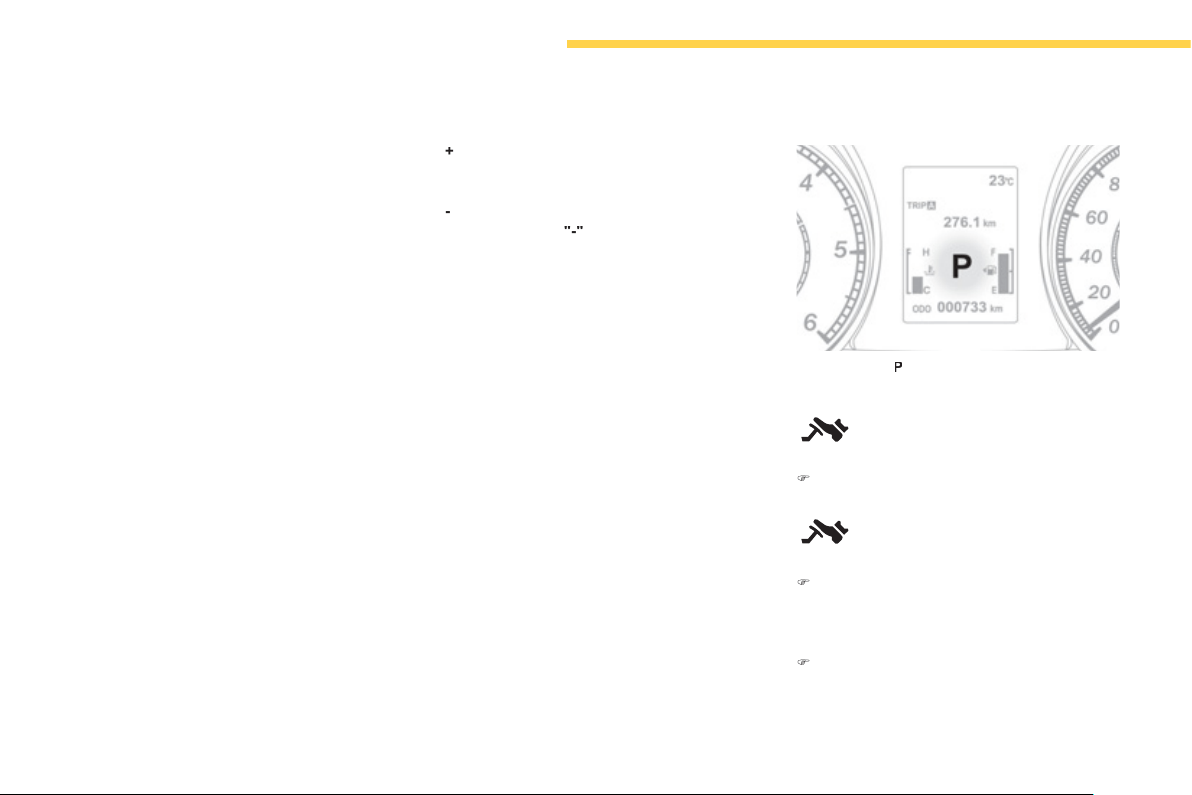
114
Driving
Gear lever
p
ositions
P
: park.
Immobilisation of the vehicle, parkin
g
brake
a
pp
li
e
d
or not.
R
:
re
v
erse
gear
.
With the vehicle stationar
y
, keep
y
our
f
oot
on t
h
e
b
ra
k
e pe
d
a
l
an
d
pus
h
t
h
e
g
ear
l
eve
r
fo
rw
a
r
ds
.
N: n
eu
tr
a
l.
D
: drivin
g
in automated mode.
M
o
v
e
th
e
l
e
v
e
r
bac
kw
a
r
ds
t
o
se
l
ec
t thi
s
m
ode
.
+
/
-: manual mode with sequential
g
ear
ch
an
gi
n
g
.
Move the lever backwards, then to the le
f
t to
s
e
l
ect t
hi
s mo
d
e, t
h
en:
- push
f
orward to chan
g
e up,
- pull backward to change down.
+
:
g
ear chan
g
in
g
in manual mode.
Pr
ess
be
hin
d
th
e
"
+/OFF" steerin
g
mounted
c
ontrol paddle to chan
g
e up.
-
:
g
ear c
h
an
gi
n
g
i
n manua
l
mo
d
e.
P
r
ess
behi
n
d
t
he
"-"
steer
i
n
g
mounte
d
contro
l
pa
ddl
e to c
h
an
g
e
d
own.
Functions of the steerin
g
m
ounted control
p
addles
Press the brake pedal firml
y
while
s
tartin
g
the en
g
ine
.
Movin
g
off
)
Start the en
g
ine.
From position
P
, parking brake applied:
P
Press the brake pedal firml
y
to
re
l
ease t
h
e
g
ear
l
ever
.
)
S
elect
f
irst
g
ear
(
position
D
or
+/-
) or
r
everse
(
position
R
).
R
"
D"
or
"
1"
or
"
R" appear in the instrument
p
anel screen.
)
Release the parkin
g
brake, the vehicle
mo
v
es
o
ff
o
n it
s
o
wn.
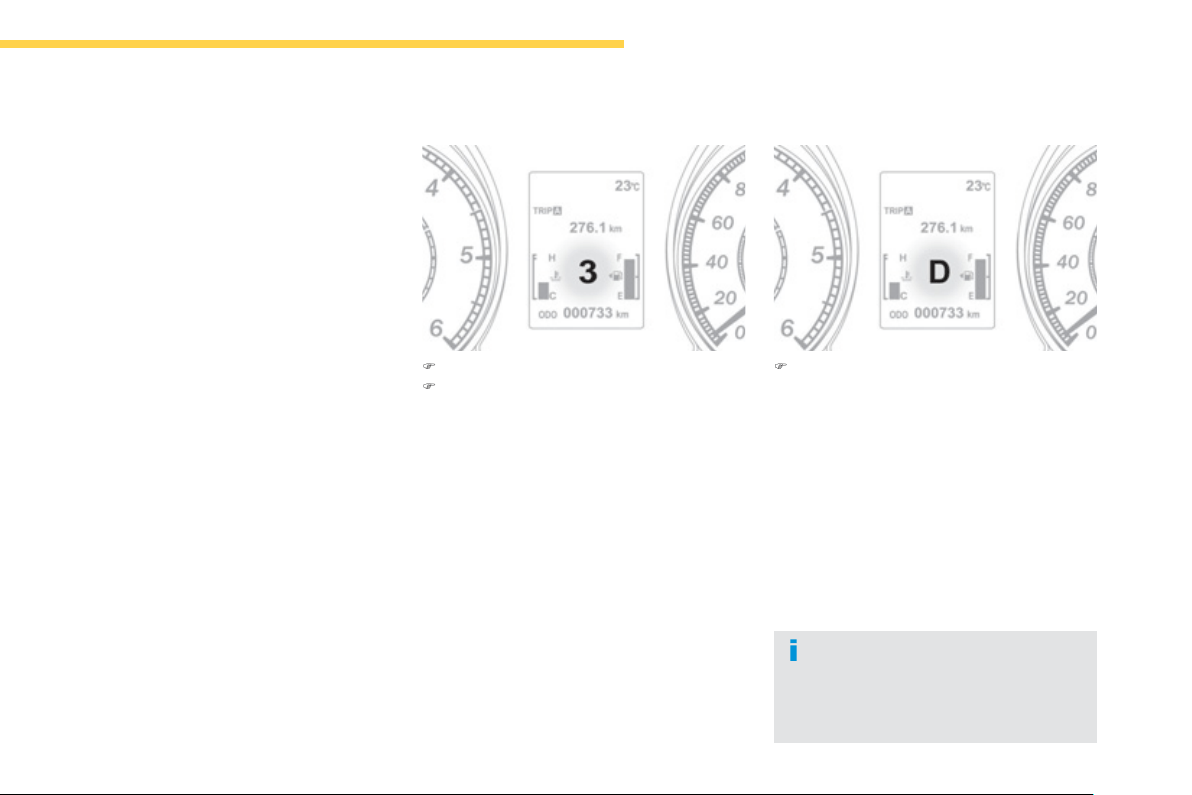
115
4
Driving
Stoppin
g
- Startin
g
on a slope
I
t is essential to use the parkin
g
brake to
hold the vehicle on a slo
p
e and not the
a
cce
l
erator
p
e
d
a
l.
Wh
en start
i
n
g
on a s
l
ope, acce
l
erate
g
ra
d
ua
lly
w
hil
e re
l
eas
i
n
g
t
h
e par
ki
n
g
b
ra
k
e.
Manual mode
)
Select position +
/
-
.
)
Use the steerin
g
mounted controls or the
g
ear lever to chan
g
e
g
ear.
Th
e
g
ears en
g
a
g
e
d
appear
i
n success
i
on
i
n t
h
e
i
nstrument pane
l
screen.
Th
e
g
ear c
h
an
g
e
i
nstruct
i
ons are on
ly
carr
i
e
d
out i
f
the engine speed permits it.
You can chan
g
e
g
ear without takin
g
y
our
f
oot
off the accelerator pedal.
When deceleratin
g
, the
g
earbox chan
g
es down
a
utomaticall
y
.
With the vehicle stationar
y
, first
g
ear is
en
g
a
g
e
d
.
Automated mode
)
Select position
D
.
"
D" appears in the instrument panel screen.
The
g
earbox operates in auto-active mode,
without an
y
action on the part o
f
the driver.
I
t cont
i
nuous
ly
se
l
ects t
h
e
g
ear most su
i
te
d
to
th
e
co
n
d
iti
o
n
s
of
:
- driving style,
- road characteristics,
- v
e
hi
c
l
e
l
oad
.
To optimise drivin
g
comfort and obtain the most
s
uitable
g
ear, avoid sharp variations in the
pressure on the accelerator pedal.
F
or t
h
e
b
est acce
l
erat
i
on, w
h
en
overtakin
g
another vehicle,
f
or example,
press
f
irml
y
on the accelerator
g
oin
g
beyond the point o
f
resistance.

116
Driving
M
anua
l
g
ear c
h
an
gi
n
g
I
n t
h
e automate
d
mo
d
e,
y
ou can ta
k
e ove
r
c
ontro
l
temporar
ily
at an
y
t
i
me us
i
n
g
t
h
e
s
teer
i
n
g
mounte
d
contro
l
s.
The use o
f
these controls
p
ermits manual
s
election o
f
the
g
ears in situations which
r
equire a faster chan
g
e down than that offered
in automated mode
(
arrival at a roundabout,
e
xit from a car park with a steep
g
radient,
overtakin
g
...
)
.
The
g
earbox en
g
a
g
es the
g
ear requested i
f
t
h
e en
gi
ne spee
d
perm
i
ts
i
t.
Th
e
g
ear en
g
a
g
e
d
appears
.
To return to the automated mode, do one o
f
the
f
ollowin
g
:
- press the back of the
"
+/OFF" steerin
g
mou
nt
ed
co
ntr
o
l
3
for approximatel
y
2 seconds,
- move the
g
ear lever quickl
y
towards
p
os
i
t
i
on
+/
- an
d
t
h
en return
i
t to pos
i
t
i
on
D
,
- stop t
h
e ve
hi
c
l
e.
Stoppin
g
the vehicle Operatin
g
fault
With the i
g
nition on, if the messa
g
e "Slow
down"
o
r
"
Service re
q
uired" appears in
the instrument panel screen, this indicates a
g
earbox mal
f
unction.
Wh
en a messa
g
e
i
s
di
sp
l
a
y
e
d
, carr
y
out t
h
e
f
ollowin
g
operations:
- slow down and stop
y
our vehicle in a sa
f
e
p
lace,
- place the lever in position
P
a
n
d
l
e
t th
e
e
n
g
ine run,
- open the bonnet to allow the en
g
ine to cool.
If the messa
g
e disappears for a lon
g
period,
y
ou can set o
ff
a
g
ain.
I
f
the messa
g
e remains displa
y
ed or appears
frequentl
y
, contact a CITRO
Ë
N dealer or a
q
uali
f
ied workshop without dela
y
.
Before switchin
g
off the en
g
ine,
y
ou must place
the
g
ear lever in position
P
.
P
Y
ou must app
ly
t
h
e par
ki
n
g
b
ra
k
e to
i
mmo
bili
se
t
he
v
ehicle
.
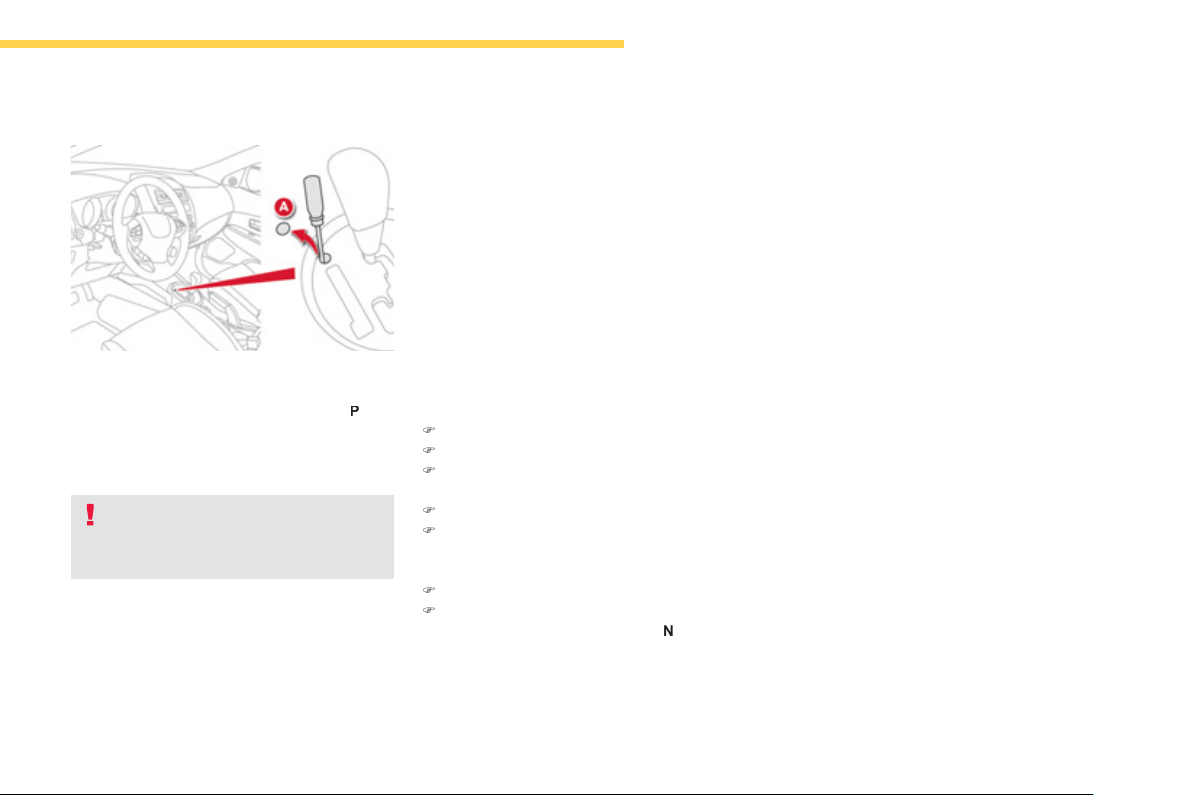
117
4
Driving
Emer
g
enc
y
release
I
f
the batter
y
is dischar
g
ed or i
f
the
g
ear lever
lockin
g
mechanism is dama
g
ed, it is possible
for the
g
ear lever to be locked in position
P
,
P
e
ven when
y
ou press the brake pedal firml
y
.
However, i
f
y
ou have to move the vehicle,
r
elease the
g
ear lever usin
g
the followin
g
p
rocedure:
)
Appl
y
the parkin
g
brake.
)
Switch off the en
g
ine if necessar
y
.
)
R
emove t
h
e cap
A
, usin
g
a
f
lat screwdriver
co
v
e
r
ed
w
i
t
h
a
clo
t
h
.
)
Press the brake pedal
f
irml
y
.
)
Put the ignition switch into position A
CC
(
A
CC
mode, i
f
y
ou vehicle has the Ke
y
less
Entr
y
and Startin
g
s
y
stem
)
.
)
Insert the screwdriver into the aperture.
)
While pushin
g
the screwdriver downwards,
move the
g
ear lever to position
N
.
Y
ou must contact a CITROËN dealer
o
r a qualified workshop to have the
s
y
stem checked .
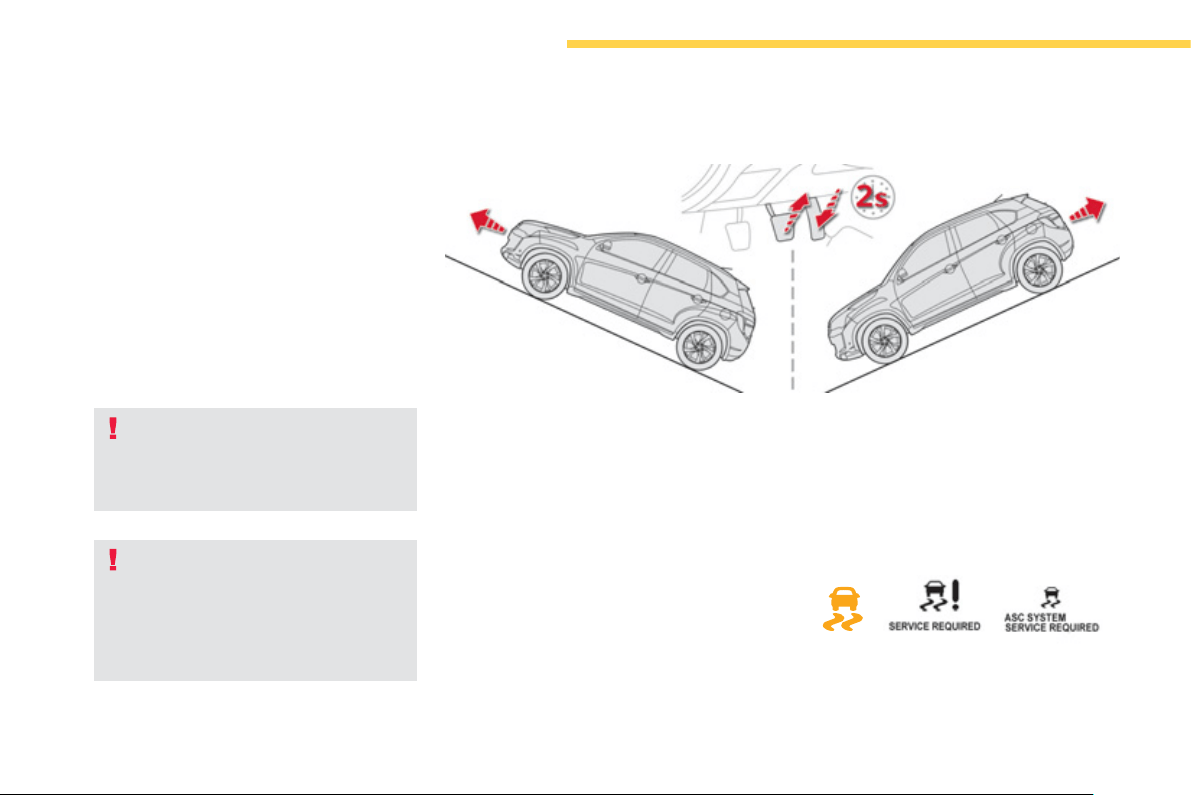
118
Driving
Hill start assist
S
y
stem which keeps
y
our vehicle immobilised
temporaril
y
(
approximatel
y
2 seconds
)
when
s
tartin
g
on a
g
radient, the time it takes to
m
ove
y
our foot from the brake pedal to the
a
cce
l
erator pe
d
a
l
.
This
f
unction is onl
y
active when:
- t
h
e ve
hi
c
l
e
i
s comp
l
ete
ly
stat
i
onar
y
, w
i
t
h
your
f
oot on the brake pedal,
- when certain conditions o
f
g
radient are
m
et,
- with th
e
d
riv
e
r’
s
doo
r
c
l
osed
.
Th
e
hill
s
t
a
rt
ass
i
s
t f
u
n
c
ti
o
n
ca
nn
o
t
be
deac
tiv
a
t
ed
.
On an ascendin
g
slope, with the vehicle
s
tationar
y
, the vehicle is held for a brief
m
oment when
y
ou release the brake pedal
:
- if
y
ou are in first
g
ear or neutral with a
manua
l
g
ear
b
ox,
- i
f
y
ou are in position
D
with th
e
C
VT
g
ear
b
ox.
O
p
eration
On a descendin
g
slope, with the vehicle
stationar
y
and reverse
g
ear en
g
a
g
ed, the
v
ehicle is held for a brief moment when
y
ou
r
e
l
ease t
h
e
b
ra
k
e
p
e
d
a
l.
D
o not
l
eave t
h
e ve
hi
c
l
e w
hil
e
i
t
i
s
b
e
i
n
g
h
e
ld
i
n t
h
e
hill
start ass
i
st
ph
ase.
I
f
you need to leave the vehicle while
the en
g
ine is runnin
g
, appl
y
the parkin
g
b
r
a
k
e
.
Operatin
g
fault
If a fault occurs with the s
y
stem, this warnin
g
l
amp comes on, accompan
i
e
d
by
a messa
g
e
in the instrument panel screen.
C
ontact a
C
ITRO
Ë
N dealer or a
q
ualified worksho
p
to
h
ave the system checked.
Wh
en t
h
e en
gi
ne
i
s not runn
i
n
g
,
i
nc
l
u
di
n
g
per
i
o
d
s on stan
dby
w
i
t
h
the
S
top
&
S
tart
(
A
S&G)
s
y
stem, the
f
unction is not o
p
erative.
119
4
Driving
Stop & Start (Auto Stop & Go) function
O
p
eration
Goin
g
into en
g
ine STOP mode
The
"
AS&G" warn
i
n
g
l
amp comes on
i
n
t
h
e
i
nstrument pane
l
or t
h
e
i
nstrument
p
ane
l
screen an
d
t
h
e en
gi
ne
g
oes
i
nto
s
tandby a
f
ter a
f
ew seconds:
- with a manual
g
earbo
x
, with the vehicle
s
tationar
y
and
y
our foot on the brake, when
y
ou put the
g
ear lever into neutral and
r
e
l
ease t
h
e c
l
utc
h
pe
d
a
l
.
Never re
f
uel with the en
g
ine in
S
T
O
P
m
ode;
y
ou must switch off the i
g
nition
with the ke
y
or the START/ST
O
P button.
Wh
en t
h
e en
gi
ne
i
s stoppe
d
a
utomatically, the operation o
f
certain
vehicle s
y
stems, such as
f
or example,
brakin
g
, power steerin
g
... are modified.
T
ake car
e
.
S
p
ecial cases: STOP mode not
a
va
il
a
bl
e
S
T
O
P mode is not invoked when:
- the driver's seat belt is not
f
astened,
- t
h
e
b
onnet
i
s o
p
en,
- the vehicle has not exceeded 3 m
p
h
(
5 km
/
h
)
since the last en
g
ine start,
- th
e
v
e
hi
c
l
e
h
as
r
es
t
a
rt
ed
l
ess
th
a
n
10
seconds a
g
o,
- the en
g
ine is needed to maintain a
c
omfortable temperature in the passen
g
er
c
ompartment,
-
d
em
i
st
i
n
g
i
s act
i
ve,
- some special conditions
(
batter
y
char
g
e,
e
ngine temperature, braking assistance,
ambient temperature...
)
where the en
g
ine is
n
eeded to assure control of a s
y
stem.
- th
e
"AS
&
G" warnin
g
lamp is
flashin
g
in the instrument panel.
This operation is perfectl
y
normal
.
The Stop & Start
(
Auto Stop & Go
)
function puts the en
g
ine temporaril
y
into standb
y
durin
g
stops in the traffic
(
red li
g
hts, traffic
j
ams, or other...
)
. The
e
n
g
ine restarts automaticall
y
as soon as
y
ou want to move off. The restart takes place instantl
y
, quickl
y
and silentl
y
.
Perfect for urban use, the Stop & Start
(
Auto Stop & Go
)
function reduces fuel consumption and exhaust emissions as well as the noise level when
s
tationar
y
.
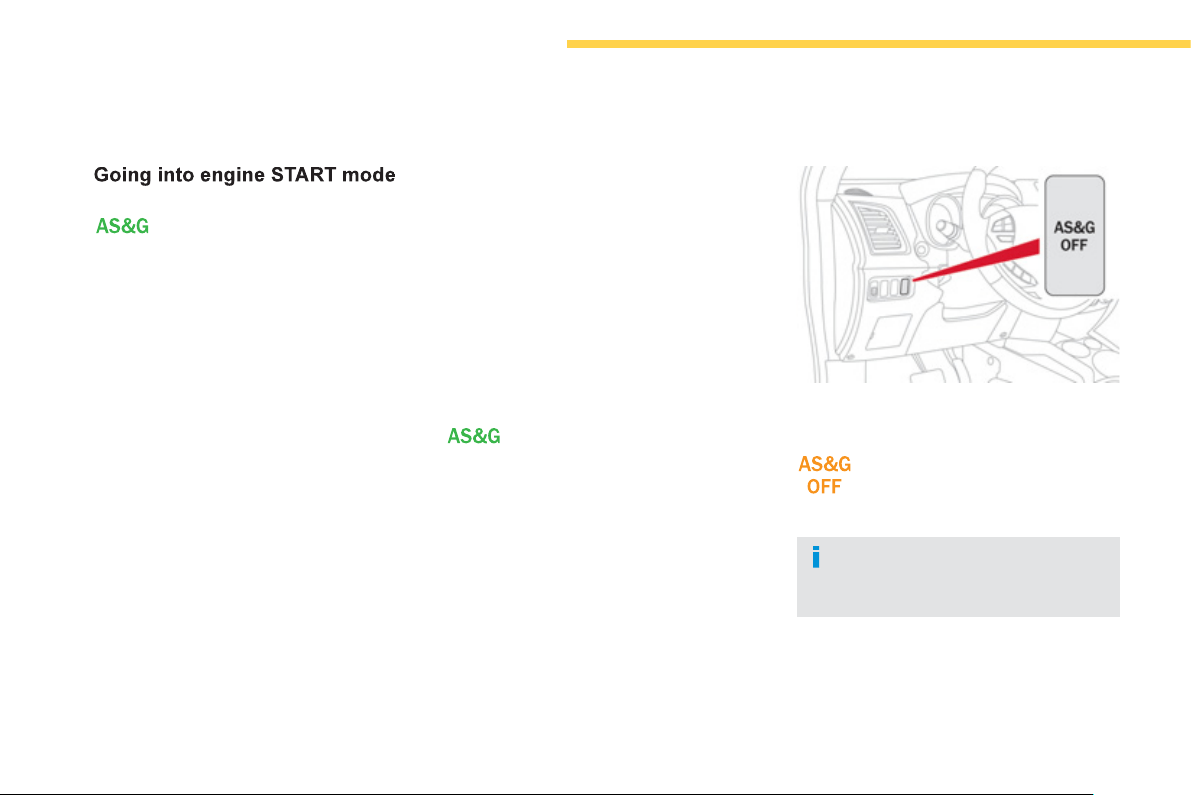
120
Driving
Th
e
"
AS&G" warnin
g
lamp
g
oes of
f
an
d
t
h
e en
gi
ne starts automat
i
ca
lly
:
-
with a manual
g
earbo
x
, when
y
ou
f
ull
y
depress the clutch pedal.
For safet
y
reasons or to ensure smooth
operation,
S
TART mode is invoked
automat
i
ca
lly
w
h
en:
Special cases: START invoked
automaticall
y
- the speed o
f
the vehicle exceeds 2 mph
(
3 km
/
h
)
,
- some special conditions
(
batter
y
char
g
e,
e
ngine temperature, braking assistance,
ambient temperature...
)
where the en
g
ine is
needed to assure control of a s
y
stem.
If the s
y
stem has been deactivated in
S
T
O
P mode, the en
g
ine will not start.
A
t an
y
time, press the "AS&G OFF"
s
wit
c
h t
o
deactivate the s
y
stem.
Deactivation
I
n t
his
case
t
he
"
AS&G" warn
i
n
g
l
amp
f
lashes
f
or
f
ew seconds, then goes o
ff
.
T
his operation is perfectl
y
normal
.
This is con
f
irmed b
y
the
"
AS&G OFF"
w
arn
i
n
g
l
amp com
i
n
g
on
i
n t
h
e
i
nstrument
p
ane
l
or
i
nstrument
p
ane
l
screen.
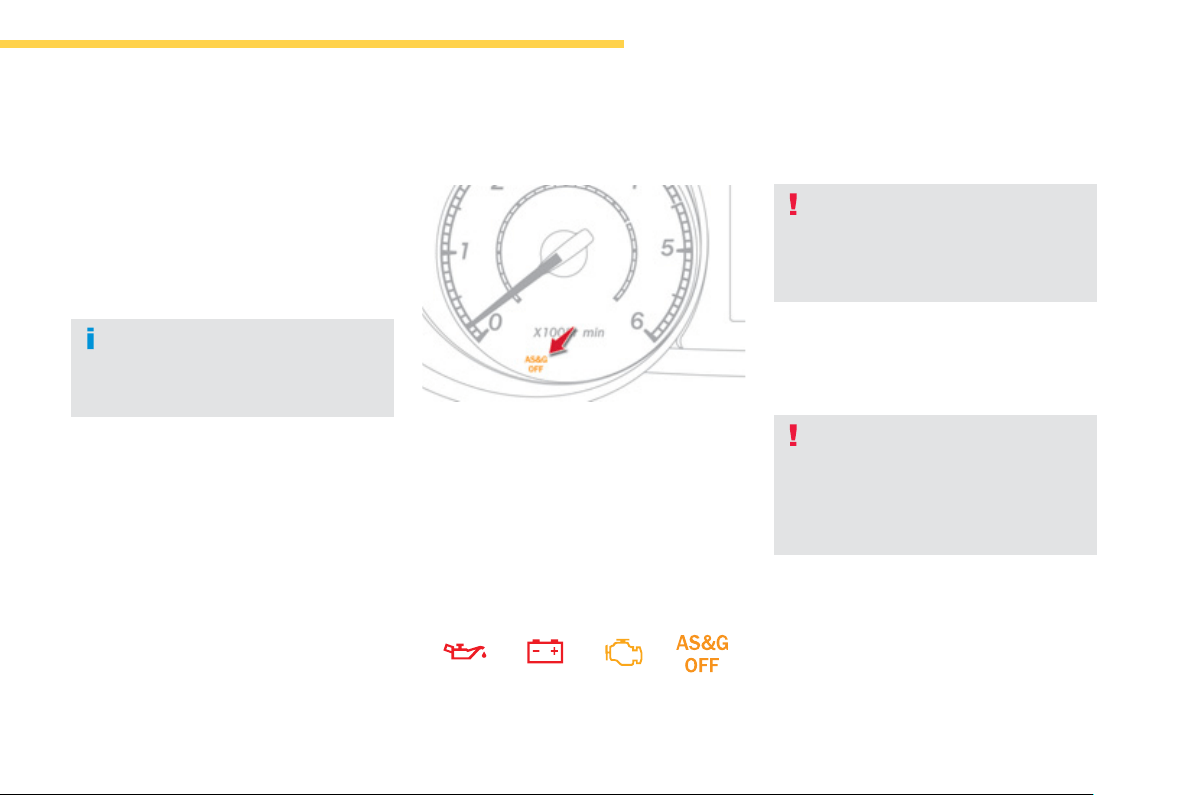
121
4
Driving
Th
e s
y
stem
i
s react
i
vate
d
automat
i
ca
lly
at every new start using the key or the
S
TART
/S
T
O
P button.
Reactivation
Pr
ess
th
e
"
AS
&
G OFF" switch a
g
ain.
The s
y
stem is active a
g
ain; this is confirmed b
y
th
e
"AS&G OFF" warnin
g
lamp
g
oin
g
off in the
instrument panel or instrument panel screen.
Operatin
g
fault
In the event o
f
a mal
f
unction with the system,
th
e
"
AS
&
G OFF" warnin
g
lamp
f
lashes in the
i
nstrument panel or instrument panel screen,
a
nd the s
y
stem no lon
g
er operates.
have it checked b
y
a CITROËN dealer or a
q
ualified workshop.
This s
y
stem requires a speci
f
ic
batter
y
with a special speci
f
ication
and technology
(
re
f
erence numbers
available from a CITROËN dealer or
a qualified workshop
)
.
Fitting a battery not listed by CITROËN
introduces the risk o
f
mal
f
unction o
f
the s
y
stem.
Maintenance
The "Auto Stop & Go" s
y
stem makes
u
se of advanced technolo
gy
. All work
on this t
y
pe o
f
batter
y
must be done
onl
y
b
y
a CITRO
Ë
N dealer or a qualified
wor
k
s
h
o
p
.
In the event o
f
a
f
ault in
S
T
O
P mode, the
vehicle may stall. The
f
ollowing warning lamps
c
ome on in the instrument panel or instrument
p
anel screen:
It is then necessar
y
to switch o
ff
the i
g
nition,
then restart the en
g
ine usin
g
the ke
y
or the
S
TART
/S
T
O
P button.
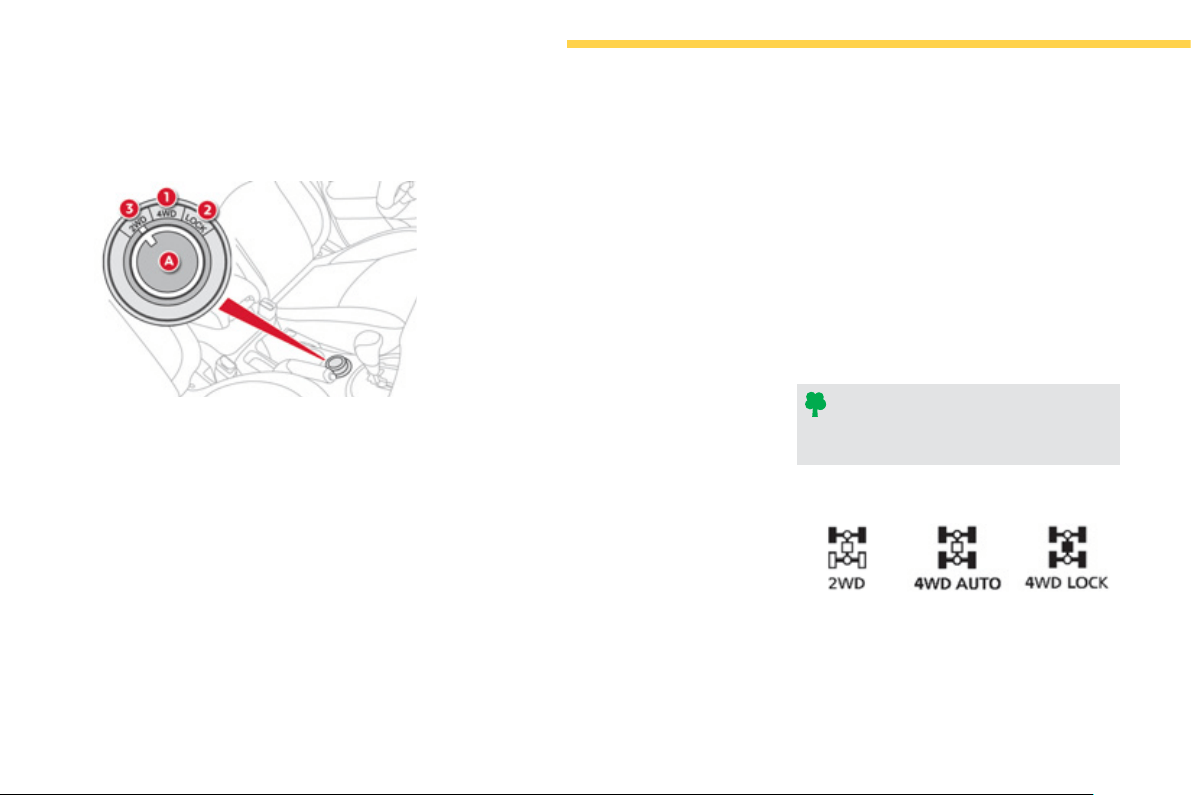
122
Driving
Four wheel drive system
S
y
stem which permits the selection of a transmission mode in relation to the drivin
g
conditions.
Three transmission modes are available and can be selected manuall
y
b
y
the driver in accordance with his requirements.
You can chan
g
e transmission mode when
s
tationar
y
or while drivin
g
.
The transmission mode can be selected b
y
turnin
g
the control
A
.
Selectin
g
the transmission
m
ode
4WD AUTO
(
position 1
)
The vehicle operates with four wheel drive and
provides optimum traction
f
or all levels o
f
g
rip.
Thi
s
i
s t
h
e ve
hi
c
l
e
'
s norma
l
an
d
re
g
u
l
ar
operatin
g
mode, the distribution o
f
the torque
be
tw
ee
n th
e
f
r
o
nt
a
n
d
r
ea
r
a
xl
es
i
s
co
ntr
o
ll
ed
automaticall
y
.
The distribution favours the front wheels,
the transfer of torque to the rear wheels is
mana
g
ed electronicall
y
b
y
the control unit
in relation to the level of
g
rip, so providin
g
opt
i
mum roa
d
h
o
ldi
n
g
.
4WD LOCK
(
position 2
)
The vehicle operates with
f
our wheel drive in
t
his
m
ode
also
.
It is recommended when grip is particularly
poor or di
ff
icult
(
sand, mud, slopes, ...
)
.
2WD
(
position 3
)
The vehicle operates with front two wheel drive.
Thi
s
i
s
su
it
ab
l
e
fo
r
use
o
n
a
t
a
rm
ac
r
oads
or
w
he
r
e
t
he
d
r
i
v
e
r
co
n
side
r
s
t
ha
t t
he
r
e
is
n
o
r
isk
o
f
loss o
f
g
rip
(
dr
y
road
)
.
D
ispla
y
in the instrument panel
The transmission mode is displa
y
ed in the
form of an intermittent displa
y
in the instrument
p
ane
l
screen w
h
en t
h
e transm
i
ss
i
on mo
d
e
i
s
selec
t
ed
.
Th
e
se
l
ec
ti
o
n
of
thi
s
m
ode
i
s
recommended when the level of
g
rip
permits.
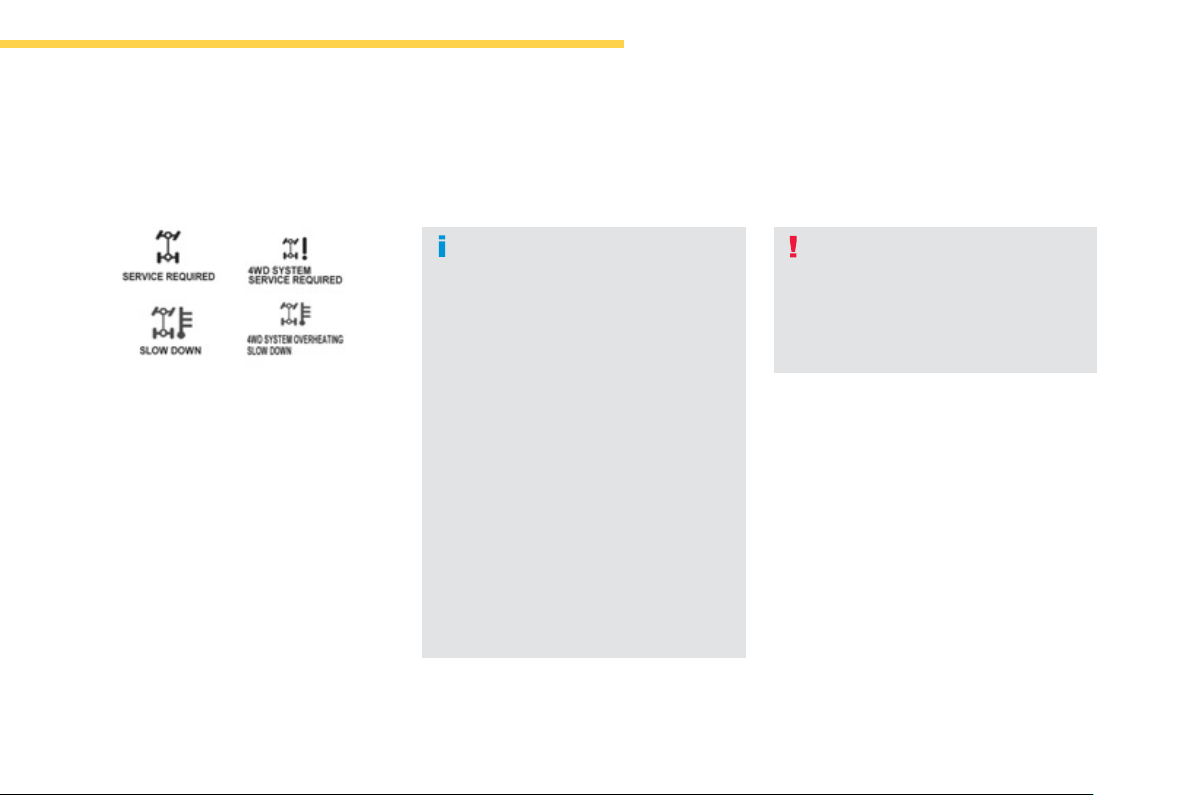
123
4
Driving
A
s the en
g
ine torque is applied to all
f
our wheels, the condition o
f
the t
y
res
h
as a cons
id
era
bl
e
i
mpact on t
h
e
p
er
f
ormance o
f
the vehicle.
Ensure that all
f
our tyres are in good
co
n
d
iti
o
n.
A
void drivin
g
the vehicle in sand
y
or
m
udd
y
areas or in other areas in which
the wheels could spin.
Spinnin
g
the wheels places the
transm
i
ss
i
on components un
d
e
r
p
ressure an
d
cou
ld
cause a ser
i
ous
ma
l
fu
n
c
ti
o
n.
Do not drive the vehicle through deep
w
a
t
e
r.
A
void drivin
g
over excessivel
y
uneven
terrain
(
risk of scrapin
g
under the bod
y
or of
g
roundin
g
on crossin
g
a brid
g
e
)
.
Operatin
g
faults
I
f
the selected transmission mode displa
y
f
lashes, the vehicle switches automaticall
y
to
f
r
o
nt
"
2WD" tr
a
n
s
mi
ss
i
o
n m
ode
.
It is then no lon
g
er possible to select the
transmission mode usin
g
the control A .
If the messa
g
e "SL
O
W D
O
WN" is displa
y
ed on
the instrument panel, let the transmission cool
down then wait for the displa
y
to clear before
s
ettin
g
o
ff
a
g
ain.
I
f
"4WD" and "L
OC
K" are displa
y
ed alternatel
y
and i
f
"
S
ERVI
C
E RE
Q
UIRED" is displa
y
ed in
the instrument panel, the system has
f
ailed and
the sa
f
et
y
s
y
stem has been activated.
Contact a CITROËN dealer or a qualified
workshop without dela
y
.
Have your vehicle towed on a
flatbed
.
Th
e
v
e
hi
c
l
e
m
us
t n
o
t
be
t
o
w
ed
with th
e
front or rear wheels on the
g
round even
if it is in front "2WD"
(
2 wheel drive
)
m
ode
.
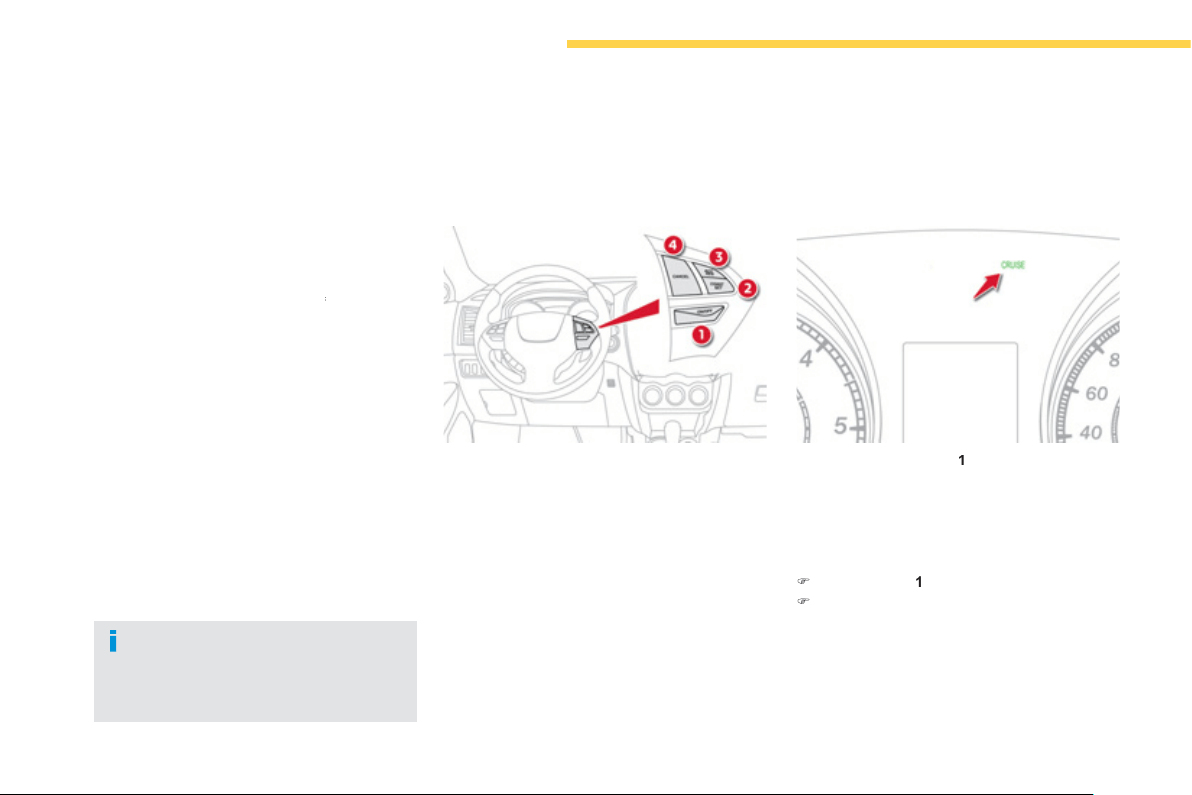
124
Driving
Cruise control
S
y
stem which automaticall
y
maintains the vehicle speed at the value pro
g
rammed b
y
the driver, without an
y
action on the accelerator pedal.
The
c
r
uise
co
ntr
ol
is
sw
i
tc
h
e
d
on manua
lly
:
the vehicle s
p
eed must be at least 25 m
p
h
(
40 km
/
h
)
and second gear or higher must be
e
n
g
a
g
ed in the case o
f
a manual
g
earbox.
Th
e
c
r
u
i
se
co
ntr
o
l i
s
switched off
manually, by
f
a
n action on the brake or clutch pedal or i
f
the
A
SC s
y
stem is tri
gg
ered.
The pro
g
rammed speed can be exceeded
temporaril
y
b
y
pressin
g
the accelerator pedal.
The cruise control cannot, in any
c
ircumstances, take the
p
lace o
f
the
n
eed to compl
y
with speed limits or of the
vi
g
ilance and responsibilit
y
of the driver.
The controls o
f
this s
y
stem are
g
rouped
to
g
et
h
er on t
h
e steer
i
n
g
w
h
ee
l
.
1.
"
ON/OFF"
bu
tt
o
n:
ac
tiv
a
ti
o
n
/
deac
tiv
a
ti
o
n
of
th
e
c
r
u
i
se
co
ntr
o
l m
ode
.
2
.
"
COA
S
T
S
ET" button: store a drivin
g
s
peed and decrease the cruisin
g
speed.
3.
"
ACC RES" button: increase the cruisin
g
s
peed and recall the stored speed.
4.
"C
AN
C
EL" button: stop control of the
ve
hi
c
l
e
'
s spee
d
.
Steerin
g
mounted controls
Wh
en
y
ou press
b
utton
1
, t
h
e "CRUISE"
i
n
di
cator comes on
i
n t
h
e
i
nstrument pane
l
.
Di
sp
l
a
y
i
n t
h
e
i
nstrument pane
l
Pro
g
rammin
g
)
Pr
ess
bu
tt
o
n
1
.
)
S
et the pro
g
rammed speed b
y
acceleratin
g
to
the required speed, then press button
2
"COAST
SET"
.
To return to the pro
g
rammed speed, simpl
y
r
elease the accelerator pedal.
Switchin
g
off the i
g
nition cancels an
y
p
ro
g
rammed speed value.

125
4
Driving
I
ncreas
i
n
g
t
h
e pro
g
ramme
d
s
p
eed
D
ecreas
i
n
g
t
h
e
pro
g
rammed speed
Temporar
y
acceleration
/
d
eceleration
Temporar
y
acceleration
Press the accelerator pedal as normal. When
the pedal is released,
y
ou return to the stored
s
pee
d
.
)
U
s
i
n
g
b
utton 2 "COA
S
T
S
ET"
:
- successive
p
resses decrease the s
p
eed in
s
teps o
f
approximatel
y
1 mph
(
1.6 km
/
h
)
.
- a maintained press of this button
decreases the speed pro
g
ressivel
y
.
O
nce the speed required has been reached,
r
elease the button, the new speed is stored.
)
U
s
i
n
g
t
h
e
b
ra
k
e pe
d
a
l
:
-
b
ra
k
e to
d
eact
i
vate t
h
e cru
i
se contro
l
, t
h
en
p
ress
b
utton
2
"COA
S
T
S
ET" .
Release
t
o
s
tore the new s
p
eed.
)
U
s
i
n
g
b
utton
3
"ACC RE
S
"
:
- successive
p
resses increase the s
p
eed in
s
teps o
f
approximatel
y
1 mph
(
1.6 km
/
h
)
.
- a maintained press of this button increases
the pro
g
rammed speed pro
g
ressivel
y
.
O
nce the speed required has been reached,
release the button, the new speed is stored.
)
U
s
i
n
g
t
h
e acce
l
erator pe
d
a
l
:
- acce
l
erate to reac
h
t
h
e spee
d
requ
i
re
d
,
t
h
en
p
ress
b
utton
2
"COA
S
T
S
ET"
.
R
elease the button to store the new s
p
eed.
T
emporar
y
d
ece
l
erat
i
on
P
ress t
h
e
b
ra
k
e pe
d
a
l
to re
d
uce t
h
e spee
d
.
T
o
return to t
h
e store
d
spee
d
, press
b
utton
3
"ACC
RE
S
"
.

126
Driving
When the cruise control is in operation,
pa
y
attention i
f
y
ou press and hold one
of
the pro
g
rammed speed ad
j
ustment
b
uttons: t
hi
s can resu
l
t
i
n a ver
y
rap
id
c
hange in the speed o
f
your vehicle.
D
o
n
o
t
use
th
e
c
r
u
i
se
co
ntr
o
l
o
n
s
lipper
y
roads or in heav
y
traffic.
O
n a steep descent, the cruise control
will not be able to prevent the vehicle
f
rom exceedin
g
the pro
g
rammed speed.
To prevent the mat
f
rom becomin
g
c
au
gh
t un
d
er t
h
e pe
d
a
l
s:
- ensure t
h
at t
h
e mat
i
s
p
os
i
t
i
one
d
c
orrectly,
- never
f
it one mat on top o
f
another.
T
o
deac
tiv
a
t
e
th
e
c
r
u
i
se
co
ntr
o
l:
)
press the brak
e
or
c
lutch pedal, or
)
press button 1 "ON OFF"
,
or
)
press button
4
"
C
AN
C
EL"
.
Deactivatin
g
the function Reactivatin
g
the function
Wh
e
n th
e
c
r
u
i
se
co
ntr
o
l h
as
bee
n
deac
tiv
a
t
ed
u
sin
g
the button
4
"CANCEL" ,
y
ou can return
to the stored speed b
y
pressin
g
button
3
"ACC
RES" when
y
ou reach a minimum speed o
f
2
5 mph
(
40 km/h
)
.
The cruise control ma
y
be deactivated
a
utomaticall
y
:
)
when the vehicle reaches a speed below
20 mph
(
35 km/h
)
,
)
w
h
en t
h
e act
i
ve sta
bili
t
y
contro
l
s
y
stem
(
A
SC)
comes into operation.
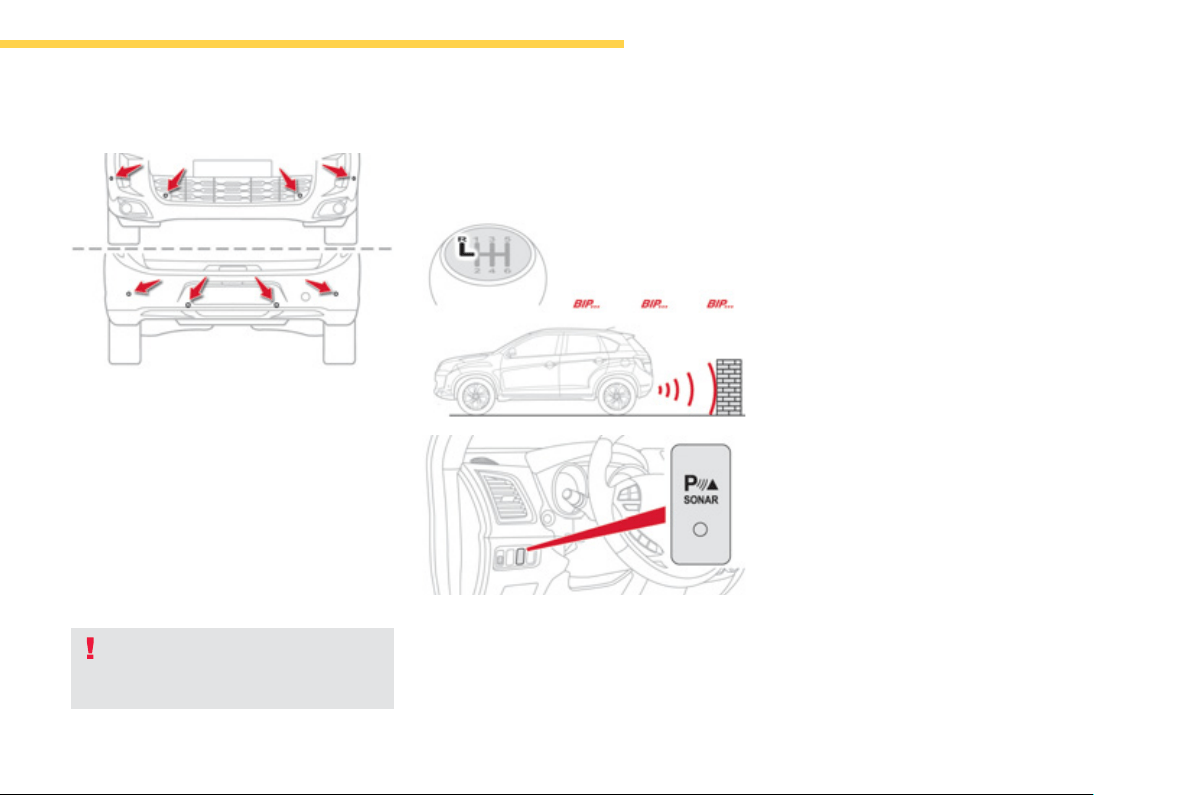
127
4
Driving
Parking sensors
This function cannot, in an
y
c
ircumstances, take the place of the
vi
g
ilance and responsibilit
y
of the driver.
Rear parkin
g
sensors
This s
y
stem indicates the proximit
y
of an
obstacle
(
person, vehicle, tree,
g
ate, etc.
)
which
co
m
es
within th
e
f
i
e
l
d
of
de
t
ec
ti
o
n
of
se
n
so
r
s
l
ocate
d
i
n t
h
e
b
um
p
er.
C
ertain types o
f
obstacle
(
stake, roadworks
c
one, etc.
)
detected initiall
y
will no lon
g
er be
de
t
ec
t
ed
a
t th
e
e
n
d
o
f th
e
m
a
n
oeu
vr
e
due
t
o
the presence of blind spots.
Audible assistance
The proximity in
f
ormation is given by an
intermittent audible si
g
nal, the
f
requenc
y
o
f
which increases as the vehicle approaches the
obs
t
ac
l
e
.
Wh
e
n th
e
d
i
s
t
a
n
ce
be
tw
ee
n th
e
v
e
hi
c
l
e
a
n
d
the obstacle becomes less than approximatel
y
t
hi
rt
y
cent
i
metres, t
h
e au
dibl
e s
ig
na
l
b
ecomes
co
nt
i
n
uous
.
The s
y
stem is switched on b
y
en
g
a
g
in
g
reverse
g
ear. This is accompanied b
y
an audible si
g
nal.
The indicator lamp in the button comes on to
c
onfirm that the s
y
stem is active.
Th
e s
y
stem
i
s
d
eact
i
vate
d
w
h
en
y
ou come out
o
f
reverse
g
ear.
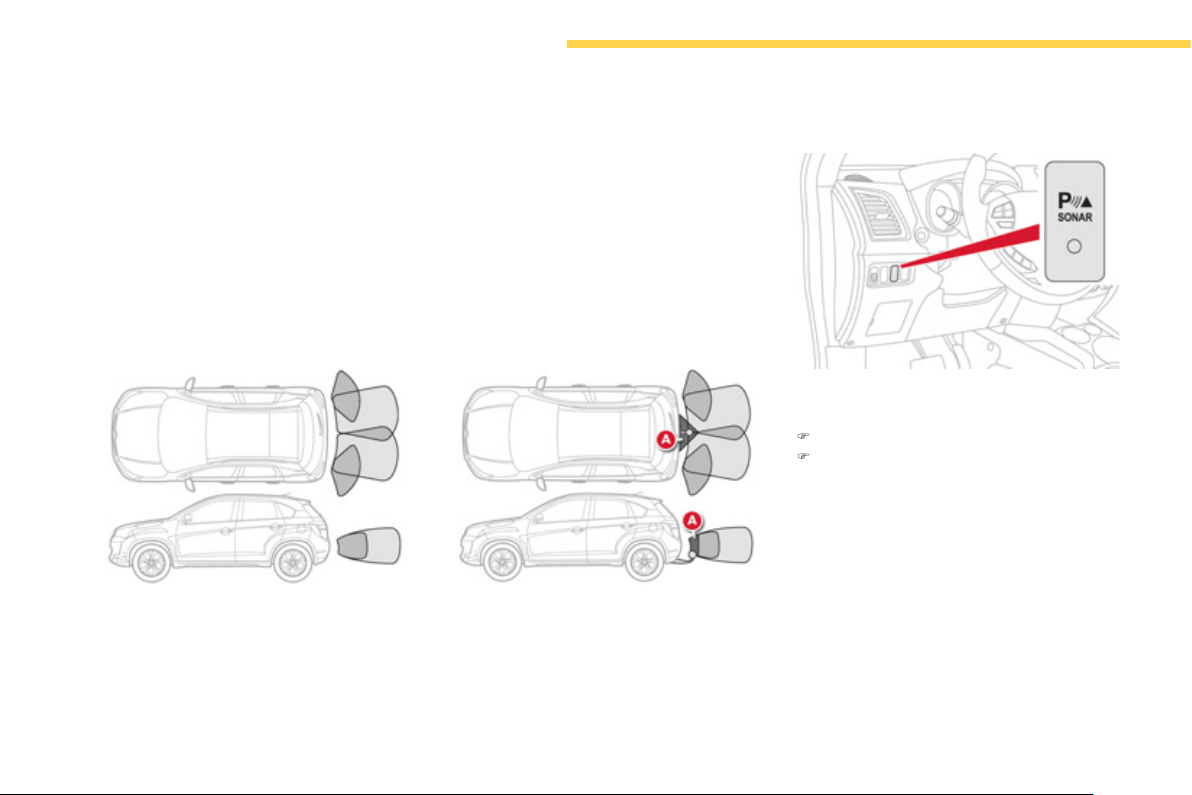
128
Driving
V
ehicle onl
y
Vehicle fitted with a towbar
Modifi cation of the detection
zones
)
P
ress t
hi
s
b
utton to
d
eact
i
vate t
h
e s
y
stem.
)
Press this button again
f
or a
f
ew seconds
a
n
d
r
e
l
ease
it.
Th
e
de
t
ec
ti
o
n z
o
n
e
m
od
ifi
ca
ti
o
n inf
o
rm
a
ti
o
n i
s
indicated b
y
an audible si
g
nal:
-
d
oubl
e
si
g
nal on vehicles fitted with a
towbar
,
-
s
i
n
gle
s
ig
na
l
on ve
hi
c
l
es w
hi
c
h
are not
f
itt
ed
with
a
t
o
w
ba
r.
D
etection zones
The detection zones di
ff
er depending on whether the vehicle is
f
itted with a towbar.
I
f
y
ou select towbar mode, the towbar zone A i
s
e
x
c
l
uded
f
r
o
m th
e
de
t
ec
ti
o
n z
o
n
es
.
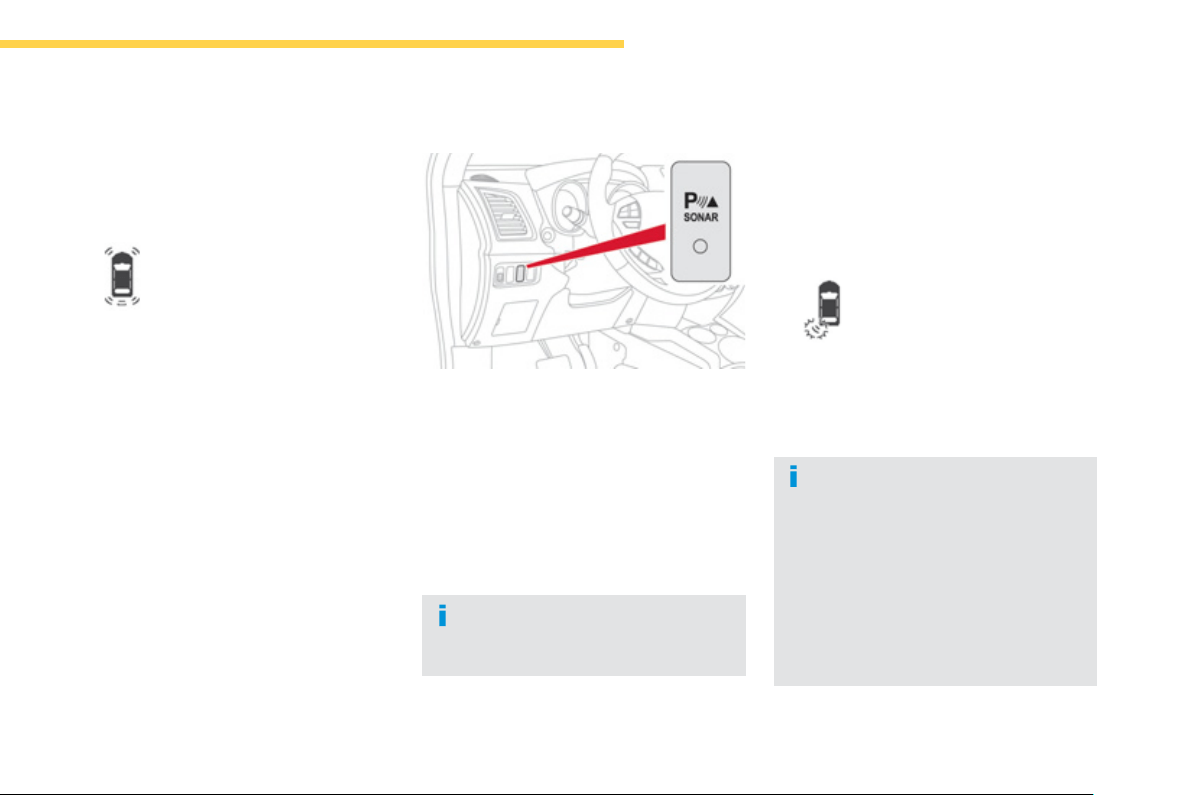
129
4
Driving
V
isual assistance
Front parkin
g
sensors
Deactivation / Activation of the
f
ront and rear parkin
g
sensors
The
f
unction is deactivated b
y
pressin
g
this
button. The indicator lamp in the button goes
off
.
Pressin
g
this button a
g
ain reactivates the
function. The indicator lamp in the button
co
m
es
o
n.
Operatin
g
fault
The
f
ront parkin
g
sensors are tri
gg
ered when
an obstacle is detected in
f
ront, a
g
ear is
e
ngaged
(
position
D
f
or vehicles with a
C
VT
g
earbox
)
and the speed o
f
the vehicle remains
below 6 mph
(
10 km/h
)
.
The front parkin
g
sensors are interrupted i
f
the vehicle stops for more than five seconds
in forward
g
ear, if no further obstacles are
detected or when the speed o
f
the vehicle
e
xceeds 6 mph
(
10 km
/
h
)
.
Remember to deactivate the s
y
stem i
f
towin
g
a trailer or caravan.
In bad weather or in winter
,
ensure that
the sensors are not covered with mud
,
ice
o
r
s
n
o
w.
Wh
en t
h
e ve
hi
c
l
e
i
s mov
i
n
g
at a spee
d
below 6 mph
(
10 km
/
h
)
, certain sound
s
ources
(
motorcycle, lorry, pneumatic
drill, etc.
)
ma
y
tri
gg
er the audible
s
i
g
nals of the parkin
g
sensor s
y
stem.
In the event o
f
an problem, when reverse
g
ea
r
is en
g
a
g
ed this lamp in the button
f
lashes,
accompan
i
e
d
by
an au
dibl
e s
ig
na
l
.
Thi
s supp
l
ements t
h
e au
dibl
e
sig
na
l
by
di
sp
l
a
yi
n
g
b
ars
i
n t
h
e
s
creen, in
f
ront o
f
or behind the
v
e
hi
c
l
e
.
If one of the sensors is fault
y
, it
flashes in the instrument panel
sc
r
ee
n.
Contact a CITROËN dealer or a
q
ualified
workshop.
Th
ese
ba
r
s
fl
as
h
a
t th
e
s
t
a
rt
o
f th
e
m
a
n
oeu
vr
e
th
e
n
beco
m
e
fix
ed
fr
o
m
a
ce
rt
a
in
d
i
s
t
a
n
ce
be
tw
ee
n th
e
v
e
hi
c
l
e
a
n
d
th
e
obs
t
ac
l
e
.
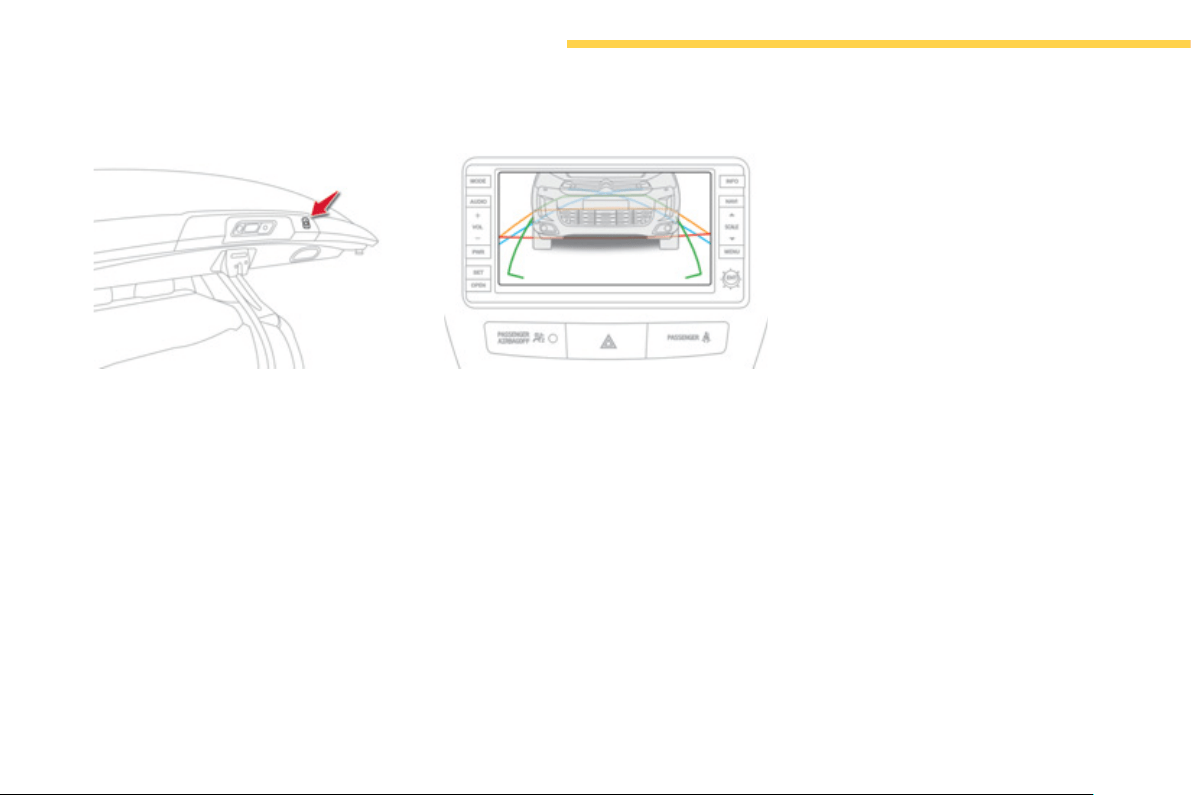
130
Driving
Reversing camera
Linked with the navi
g
ation option, the reversin
g
c
amera comp
l
ements t
h
e par
ki
n
g
sensor
sy
stem an
d
i
s act
i
vate
d
automat
i
ca
lly
w
h
en
r
everse
g
ear
i
s en
g
a
g
e
d
.
The colour ima
g
e is provided on the navi
g
ation
sc
r
ee
n with in
d
i
ca
ti
o
n
o
f th
e
limit
o
f th
e
r
ea
r
bumper and o
f
the
g
eneral direction o
f
the
v
ehicle
.

131
5
Visibility
Lighting controls
S
talk
f
or selecting and switching the vehicle's
front and rear exterior lamps.
Main li
g
htin
g
The various
f
ront and rear lam
p
s o
f
the vehicle
a
re desi
g
ned to adapt the li
g
htin
g
pro
g
ressivel
y
i
n r
e
l
a
ti
o
n t
o
th
e
c
lim
a
ti
c
co
n
d
iti
o
n
s
a
n
d
so
ensure the best visibilit
y
for the driver:
- sidelamps, to be seen,
-
di
ppe
d
b
eam
h
ea
dl
amps to see w
i
t
h
out
d
azz
li
n
g
ot
h
er
d
r
i
vers,
- ma
i
n
b
eam
h
ea
dl
amps to see c
l
ear
ly
w
h
en
th
e
r
oad
i
s
c
l
ea
r.
Additional li
g
htin
g
O
ther lam
p
s are
p
rovided to
f
ul
f
il the
requirements of particular drivin
g
conditions:
- a rear fo
g
lamp to be seen from a distance,
- front fo
g
lamps for even better visibilit
y
,
- da
y
time runnin
g
lamps to be seen durin
g
t
h
e
d
a
y
.
In some weather conditions
(
e.
g
. low
temperature or humidit
y)
, the presence
o
f mistin
g
on the internal surface of the
g
lass o
f
the headlamps and rear lamps
is normal; it disappears a
f
ter the lamps
h
a
v
e
bee
n
o
n
fo
r
a
fe
w min
u
t
es
.
O
ther li
g
htin
g
functions are also available:
-
au
t
o
m
a
ti
c
ill
u
min
a
ti
o
n
of
h
eadlamps,
-
g
u
id
e-me-
h
ome
ligh
t
i
n
g
,
- we
l
come
ligh
t
i
n
g
.
When usin
g
y
our vehicle in a countr
y
th
a
t
d
riv
es
o
n th
e
o
th
e
r
s
i
de
o
f th
e
road, the headlamps must be ad
j
usted
to avo
id
d
azz
li
n
g
on-com
i
n
g
d
r
i
vers.
Co
nt
ac
t
a
C
ITR
OË
N
dea
l
e
r
o
r
a
q
uali
f
ied worksho
p
.
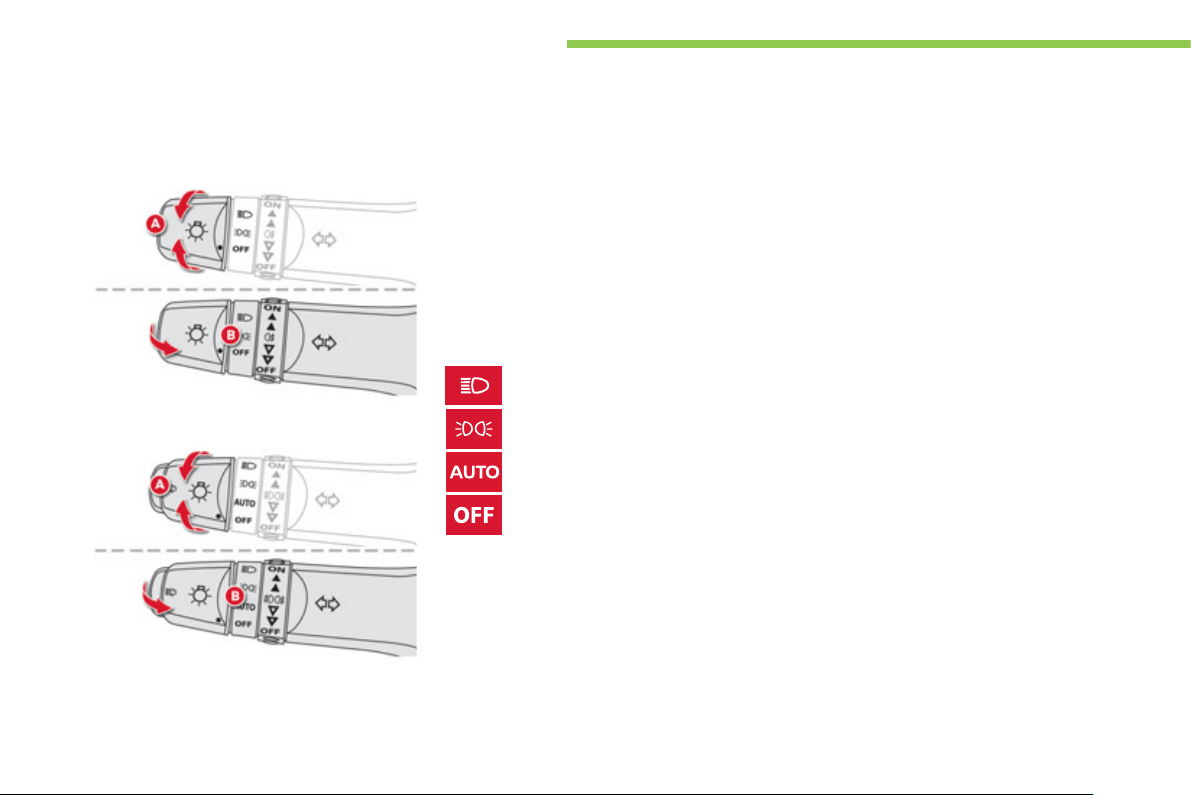
132
Visibility
Model without AUTO li
g
htin
g
Model with AUTO li
g
htin
g
Manual controls
Th
e
ligh
t
i
n
g
i
s contro
ll
e
d
di
rect
ly
by
t
h
e
d
r
i
ve
r
b
y means o
f
the ring
A
a
n
d
th
e
s
t
a
lk B .
Lamps o
ff
.
A
utomatic illumination o
f
headlamps.
S
idelamps.
Di
ppe
d
h
ea
dl
amps or ma
i
n
b
eam
h
ea
dl
amps.
Displa
y
s
Illumination o
f
the correspondin
g
indicato
r
lam
p
in the instrument
p
anel con
f
irms that the
li
g
htin
g
selected is on.
A.
M
a
i
n
ligh
t
i
n
g
mo
d
e se
l
ect
i
on r
i
n
g
: turn
i
t
to position the symbol required
f
acing the
m
a
rk.
B.
S
talk
f
or switchin
g
headlamps: pull the stalk
towar
d
s
y
ou to sw
i
tc
h
t
h
e
ligh
t
i
n
g
b
etween
di
ppe
d
an
d
ma
i
n
b
eam
h
ea
dl
amps.
In the lamps o
ff
and sidelamps modes, the
d
r
i
ver can sw
i
tc
h
on t
h
e ma
i
n
b
eam
h
ea
dl
am
p
s
temporarily
(
"headlamp
f
lash"
)
by maintaining a
p
ull on the stalk.
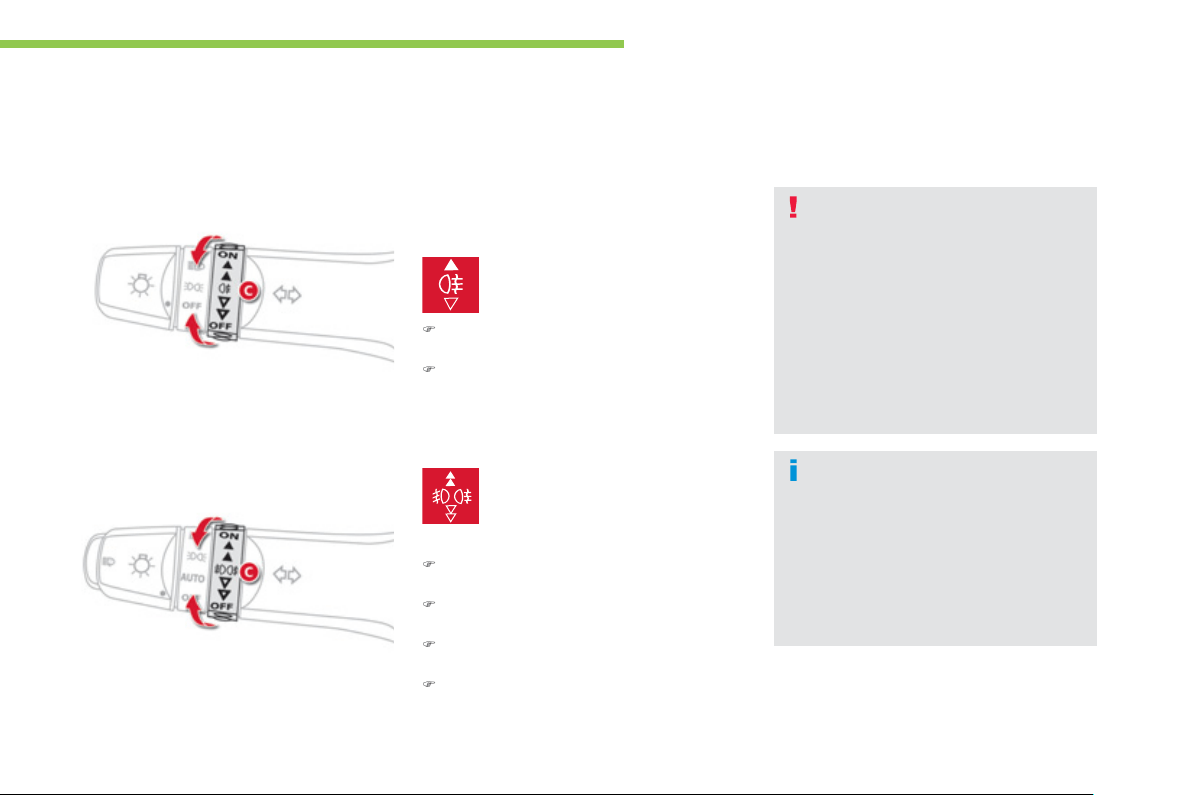
133
5
Visibility
Model with a rear fo
g
lamp onl
y
rear
f
o
g
lamp
Rotate and release the rin
g
C
:
)
f
o
rw
a
r
ds
a
fir
s
t tim
e
t
o
s
wit
c
h
o
n th
e
fr
o
nt
f
o
g
lamps,
)
fo
rw
a
r
ds
a
seco
n
d
tim
e
t
o
s
wit
c
h
o
n th
e
r
ear
f
o
g
lamp,
)
r
ea
rw
a
r
ds
a
f
ir
s
t tim
e
t
o
s
wit
c
h
off
th
e
r
ea
r
f
o
g
lamp,
)
r
ea
rw
a
r
ds
a
seco
n
d
tim
e
t
o
s
wit
c
h
o
f th
e
front fo
g
lamps.
In
g
ood or rain
y
weather, both da
y
and ni
g
ht, the front fo
g
lamps and the
rear fo
g
lamps are prohibited. In these
s
ituations, the power o
f
their beams
ma
y
d
azz
l
e ot
h
er
d
r
i
vers.
Do not
f
or
g
et to switch o
ff
the
f
ront
f
o
g
lamps and the rear
f
o
g
lamps when
they are no longer necessary.
M
odel with front fo
g
lamps and
a
rear fo
g
lamp
Fo
g
lamp selection rin
g
.
The
y
operate if at least the sidelamps are on.
)
To switch on the rear fo
g
lamp, turn the
r
in
g
C
f
o
rw
a
r
ds
.
)
To switch off the rear fo
g
lamp, turn the
ri
n
g
C
r
ea
rw
a
r
ds
.
front and rear fo
g
lamps
Li
g
htin
g
on reminder
An audible signal when the driver's door
is o
p
ened warns the driver i
f
the vehicle
l
i
g
htin
g
is on, with the i
g
nition off.
Switchin
g
off the li
g
htin
g
stops the
audible si
g
nal.

134
Visibility
The sensitivit
y
o
f
the automatic illumination
o
f
headlamps can be con
f
i
g
ured via the
c
olour screen "E
q
ui
p
ment" menu.
In
f
oggy weather or in snow, the
sunshine sensor ma
y
detect su
ff
icient
l
i
g
ht. The li
g
htin
g
will not come on
a
utomaticall
y
.
Do not cover the sunshine sensor, the
a
ssociated functions will no lon
g
er be
co
ntr
olled
.
Automatic switchin
g
off
Wh
en t
h
e
ligh
t
i
n
g
contro
l
sta
lk
i
s at
"di
ppe
d
o
r
m
ain beam headlamps", i
f
the ignition switch
is at "L
OC
K" or "A
CC
" or i
f
the ke
y
has been
removed from the i
g
nition switch, the lamps
s
witch off automaticall
y
w
hen the driver's
door is o
p
ened
.
D
a
y
time runnin
g
lamps
D
a
y
t
i
me
ligh
t
i
n
g
w
hi
c
h
comes on automat
i
ca
lly
when the engine is started making the vehicle
mo
r
e
vi
s
i
b
l
e
t
o
o
th
e
r
use
r
s
.
This
f
unction is assured b
y
special lamps.
The lighting control stalk must be placed in
p
osition "0"
or
"AUTO"
(
da
y
mode
)
.
Automatic illumination of headlam
p
s
Th
e s
id
e
l
am
p
s an
d
t
h
e
dipp
e
d
b
eam
h
ea
dl
am
p
s come
on automatically, without any action on the part o
f
the
driver, i
f
a low level o
f
exterior li
g
ht is detected or i
f
the
wipers are switched on.
When the li
g
ht returns to a sufficient level or the wipers
are switched off, the li
g
htin
g
is switched off automaticall
y
.
Th
e
se
n
so
r i
s
l
oca
t
ed
a
t th
e
base
o
f th
e
win
dsc
r
ee
n.
Contact a CITRO
Ë
N dealer or a qualified workshop to
ad
j
ust the sensitivit
y
o
f
the sensor.
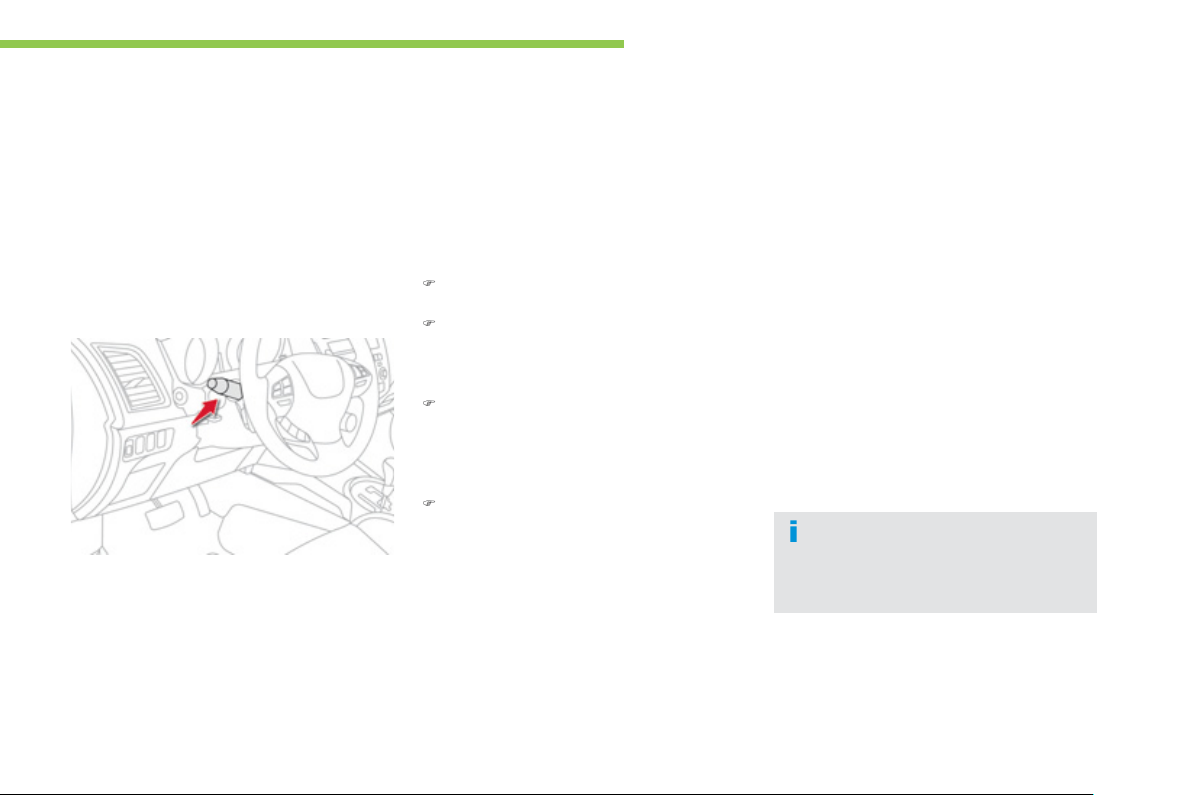
135
5
Visibility
Switchin
g
off
Th
e manua
l
g
u
id
e-me-
h
ome
ligh
t
i
n
g
sw
i
tc
h
es
off
immediatel
y
i
f
y
ou.
-
f
lash the headlamps a
g
ain,
- place the lighting control stalk in another
p
osition,
- switch the i
g
nition on
(
or select "
O
N" mode
for vehicle with the "Ke
y
less Entr
y
and
S
tartin
g
" s
y
stem
)
.
M
anual
g
uide-me-home
l
i
g
htin
g
Switchin
g
on
)
Place the li
g
htin
g
control stalk in the "
O
FF"
position, or "AUT
O
"
f
or vehicles that have it.
)
Place the i
g
nition switch on "L
OC
K" and
r
emove the key
(
or select "
O
FF" mode
f
or
vehicles that have the "Ke
y
less Entr
y
and
S
tartin
g
" s
y
stem
)
.
)
Within one minute after switchin
g
off the
i
g
nition, "flash" the headlamps usin
g
the
l
i
g
htin
g
control stalk.
The headlamps come on
f
or around
30
seco
n
ds
.
)
A
f
urther "headlam
p
f
lash" within
6
0 seconds o
f
switching the ignition to
O
FF
(
or selection o
f
"
O
FF" mode
f
or vehicles
with the "Ke
y
less Entr
y
and Startin
g
"
sy
stem
)
reactivates the function for a
further
30
seconds.
Temporaril
y
keepin
g
the dipped beam headlamps
on after the vehicle's i
g
nition has been switched
o
ff
makes the exit o
f
the vehicle's occupants easier
w
h
en t
h
e
ligh
t
i
s poor.
The duration of the
g
uide-me-home
ligh
t
i
n
g
can
b
e set
i
n t
h
e co
l
our screen
"E
qu
i
pment
"
menu.

136
Visibility
Exterior welcome lighting
Remote switching on o
f
the lighting makes your approach to the vehicle easier in poor light.
It comes on when the vehicle is unlocked remotel
y
.
Switchin
g
on
)
Place the li
g
htin
g
control in
position "
O
FF" or "AUT
O
".
)
P
ress t
h
e open pa
dl
oc
k
on t
h
e
r
e
m
o
t
e
co
ntr
ol
o
r t
he
elec
tr
o
n
ic
k
e
y
.
The sidelam
p
s come on
f
or about
3
0 seconds. For vehicles
f
itted
with
au
t
o
m
a
ti
c
ill
u
min
a
ti
o
n
of
headlamps, the welcome li
g
htin
g
o
nl
y
comes on under conditions
o
f low ambient li
g
ht.
Switchin
g
off
The welcome li
g
htin
g
g
oes off immediatel
y
if:
-
y
ou press t
h
e open pa
dl
oc
k
on t
h
e remote
c
ontro
l
,
-
y
ou p
l
ace t
h
e
ligh
t
i
n
g
contro
l
i
n anot
h
er
p
osition,
-
y
ou switch on the i
g
nition
(
or select "
O
N"
mode for vehicles fitted with the "Ke
y
less
Entr
y
and Startin
g
" s
y
stem
)
.
It is possible to choose the t
y
pe o
f
l
am
p
s sw
i
tc
h
e
d
on or to
d
eact
i
vate
th
e
fu
n
c
ti
o
n vi
a
th
e
co
l
ou
r
sc
r
ee
n
"E
q
ui
p
ment" menu.
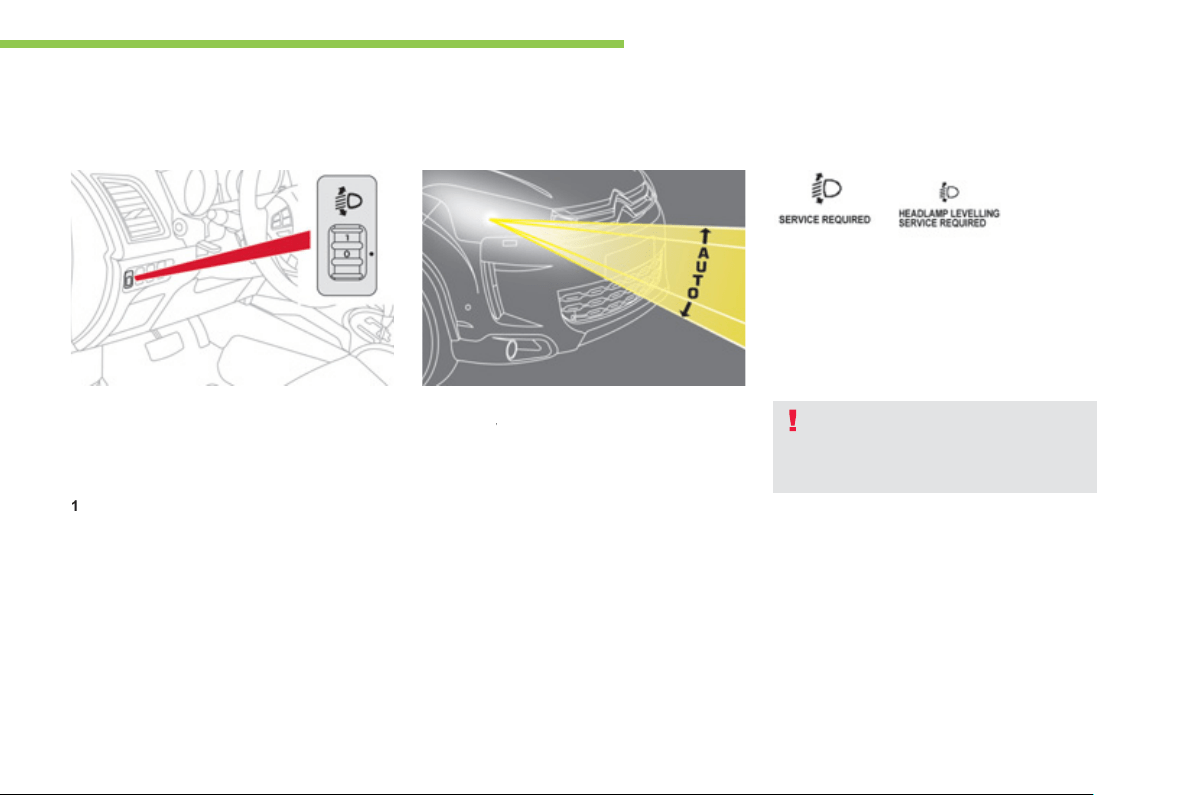
137
5
Visibility
To avoid causin
g
a nuisance to other road
users, the hei
g
ht of the halo
g
en headlamp
beams should be ad
j
usted accordin
g
to the
load
i
n t
he
v
ehicle
.
0
1 or 2 people in the
f
ront seats.
1
5 passen
g
ers
(
includin
g
the driver
)
.
2
5 passengers
(
including the driver
)
+
ma
xim
u
m
au
th
o
ri
sed
l
oad
.
3
Driv
e
r + m
a
xim
u
m
au
th
o
ri
sed
l
oad
.
Manual adjustment of
the headlamp beams
Automatic headlamp adjustment
In cases of malfunction, this messa
g
e
appears in the multifunction screen.
Do not touch the xenon bulbs.
C
ontact
a CITRO
Ë
N dealer or a qualified
wor
k
s
h
op.
O
n vehicles with xenon bulbs: when
stationary
, the system automatically corrects
y
the hei
g
ht of the beam, whatever the load of the
vehicle. The driver is then assured o
f
havin
g
opt
i
mum
ligh
t
i
n
g
an
d
not caus
i
n
g
a nu
i
sance to
o
t
he
r r
oad
use
r
s
.
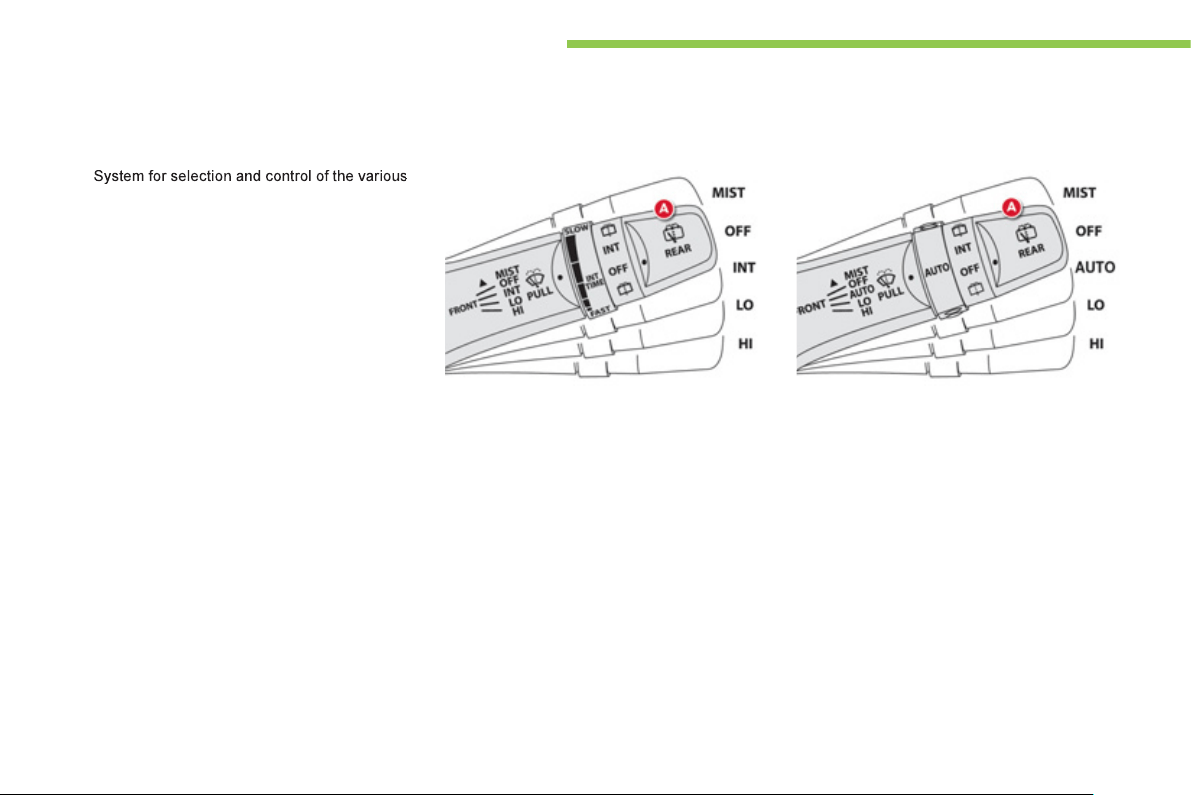
138
Visibility
f
ront and rear wipin
g
modes
f
or removin
g
rain
a
nd cleanin
g
the screens.
The vehicle's front and rear wipers are
desi
g
ned to improve the driver's visibilit
y
a
ccordin
g
to the climatic conditions.
Wiper controls
Settin
g
s
V
ar
i
ous automat
i
c w
ip
er contro
l
mo
d
es are a
l
so
a
vailable depending on whether the
f
ollowing
options are
f
itted:
- automatic rain sensitive windscreen wipers,
- rear wipin
g
on en
g
a
g
in
g
reverse
g
ear.
Model with intermittent wipin
g
Model with AUTO wipin
g
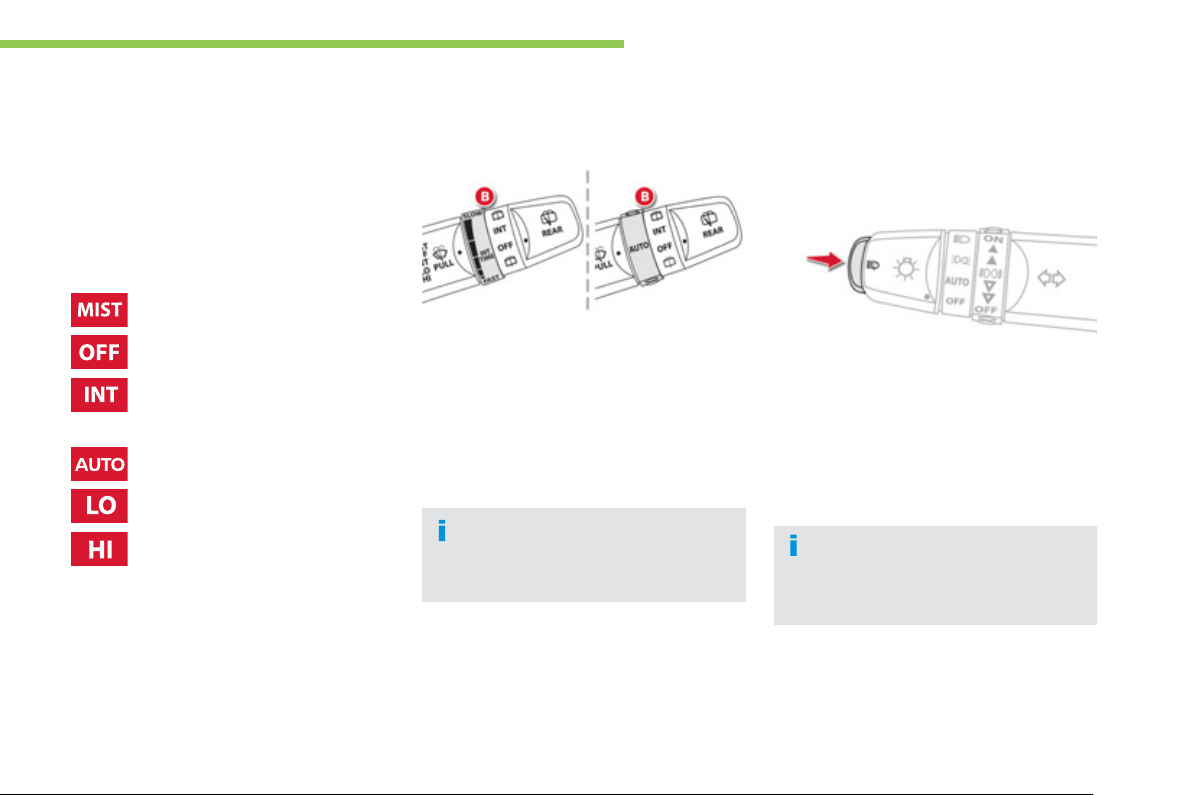
139
5
Visibility
C
ertain windscreen wi
p
er
f
unctions
(
intermittent operation, ...
)
can be
c
onfi
g
ured via the colour screen
"Equipment" menu.
Manual controls
Windscreen wi
p
ers
B. intermittent operation or rain sensor
s
ensitivit
y
ad
j
ustment rin
g
.
Windscreen wash
Pull the wiper stalk towards
y
ou. The
w
indscreen wash then the wipers operate for a
se
t t
i
m
e
.
Th
e
h
ea
dl
amp was
h
i
s a
l
so act
i
vate
d
i
f the
di
ppe
d
b
eam
h
ea
dl
amps are on
.
Headlam
p
wash
Press the end of the li
g
htin
g
stalk to activate
the headlamp wash, when the dipped beam
h
ea
dl
amps are on.
sin
g
le wipe.
park.
intermittent
(
the speed can be set
manuall
y)
.
or
automat
i
c ra
i
n sens
i
t
i
ve w
ip
ers
(
the speed can be set manually
)
.
s
l
o
w.
f
as
t.
A
.
wipin
g
speed selection stalk:
Y
ou
ca
n in
c
r
ease
o
r
dec
r
ease
:
- the wipin
g
f
requenc
y
when the intermittent
mode is active
,
- the sensitivity o
f
the rain sensor when the
au
t
o
m
a
ti
c
m
ode
i
s
ac
tiv
e
.
- "+": hi
g
h sensitivit
y
.
- "-": low sensitivit
y
.
To reduce the consum
p
tion o
f
s
creenwash
f
luid, the headlam
p
washers onl
y
operate with the
f
irst
operation of the screenwash.
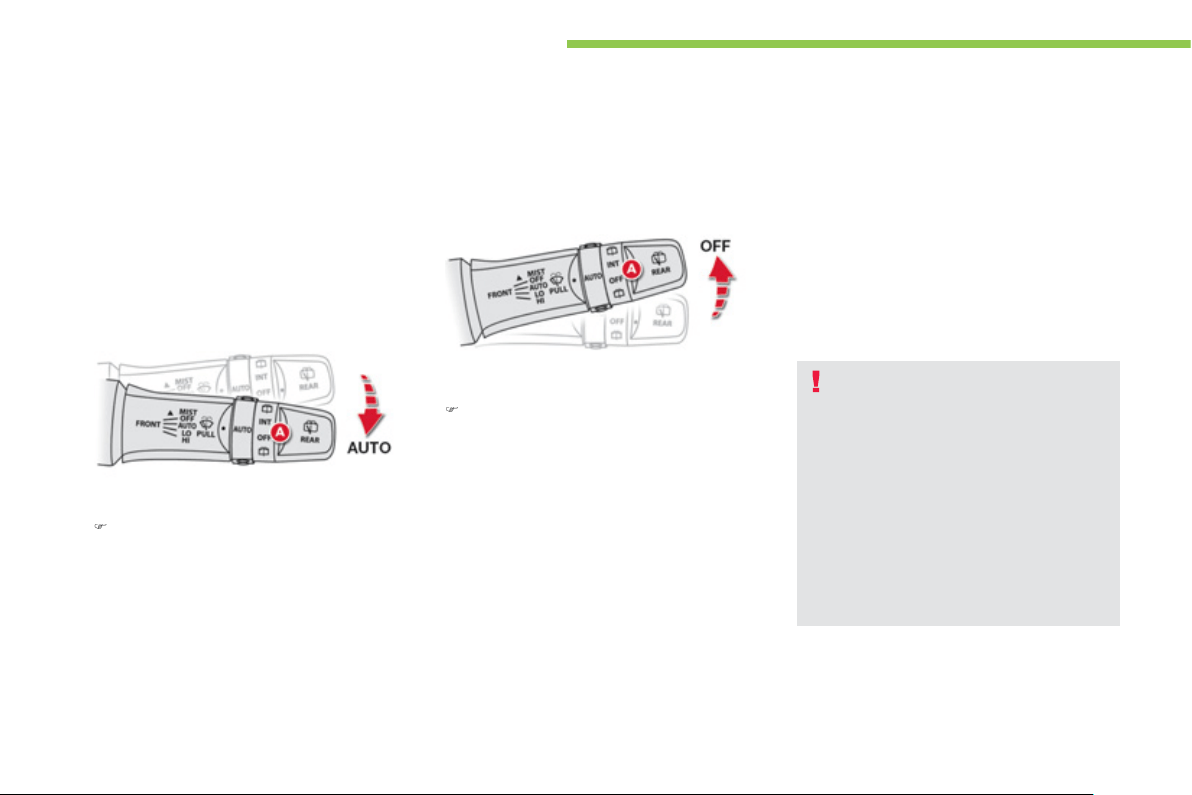
140
Visibility
A
utomatic rain sensitive
wipers
The windscreen wipers operate automaticall
y
,
without an
y
action on the part of the driver, if
r
ain is detected
(
sensor behind the rear view
m
irror
)
, adaptin
g
their speed to the intensit
y
o
f
th
e
r
a
in
fa
ll.
Operatin
g
fault
Do not cover the rain sensor, linked with the
su
n
s
hin
e
se
n
so
r
a
n
d
l
oca
t
ed
in th
e
ce
ntr
e
o
f
t
he
w
i
n
dsc
r
ee
n
behi
n
d
t
he
r
ea
r v
ie
w m
i
rr
o
r.
A
ctivation
)
M
o
v
e
th
e
s
t
a
lk
A
t
o
th
e
"
AUTO" position.
S
witch off the automatic rain sensitive
wipers when usin
g
an automatic ca
r
w
as
h.
To protect the rubber o
f
the wiper, it is
ad
v
isable
t
o
deac
t
i
v
a
t
e
t
he
au
t
o
m
a
t
ic
mo
d
e w
h
en t
h
e ve
hi
c
l
e
i
s
p
ar
k
e
d
an
d
when the ambient tem
p
erature is
below 0
°
C
.
In winter, it is advisable to wait until
the windscreen is completel
y
clear o
f
ice before activatin
g
the automatic rain
s
ensitive wipers.
Deactivation
)
M
o
v
e
th
e
s
t
a
lk
A
t
o
th
e
"
OFF" position.
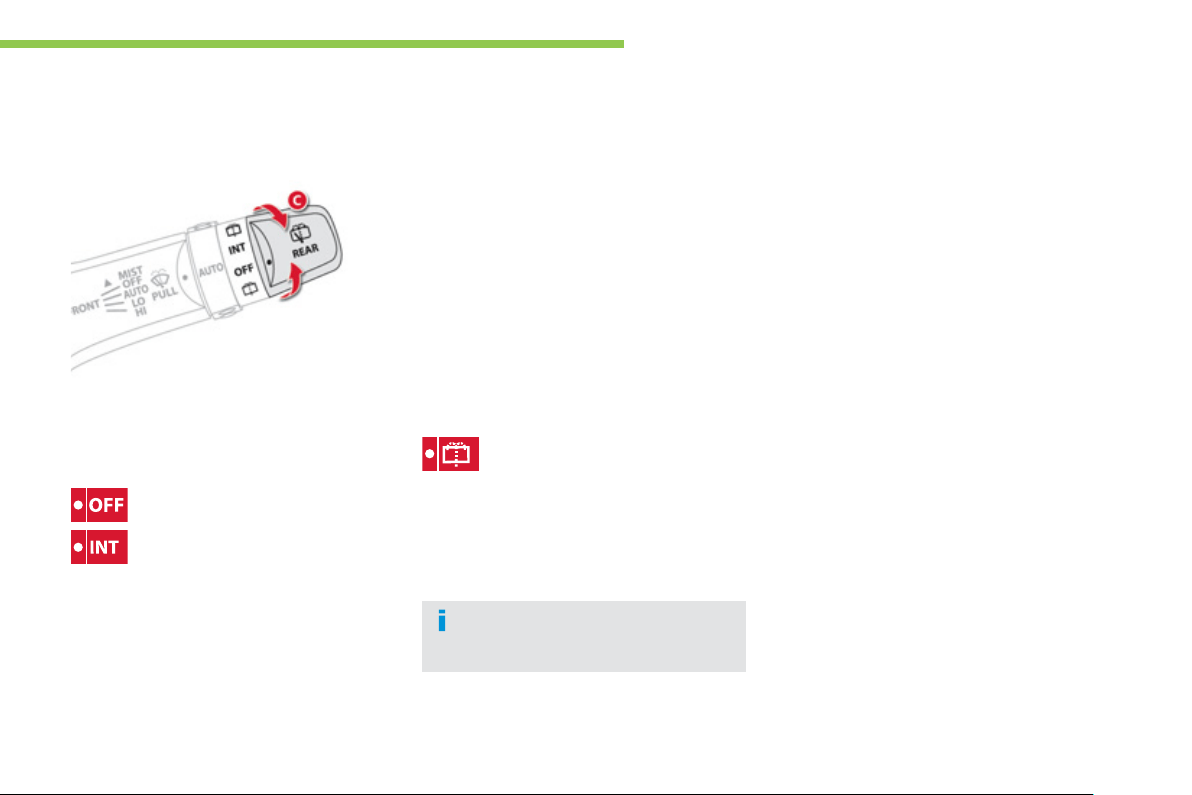
141
5
Visibility
Rear wiper
par
k
.
intermittent wi
p
e.
The wi
p
er wi
p
es twice then switches to
int
e
rmitt
e
nt m
ode
.
wi
p
e with screen wash.
Keep the rin
g
in this position to operate the
screen wash with several wipes o
f
the wiper.
The intermittence o
f
the rear wiper can
be confi
g
ured via the colour screen
"Equipment" menu.
C
.
rear wiper selection rin
g
:

142
Visibility
Courtesy lamps
Front courtes
y
lamp
Position 1
The courtesy lamp comes on when a door or
the tail
g
ate is opened.
When the door or the tail
g
ate is closed a
g
ain,
the li
g
htin
g
g
raduall
y
dims for a few seconds
before switchin
g
off.
However, the courtes
y
lamp is switched of
f
a
utomaticall
y
in the
f
ollowin
g
cases:
-
Wh
en t
h
e
d
oors an
d
t
h
e ta
ilg
ate are c
l
ose
d
a
n
d
t
h
e
ig
n
i
t
i
on sw
i
tc
h
i
s p
l
ace
d
i
n t
h
e
"ON"
p
osition.
- When the doors and the tail
g
ate are closed
a
nd
y
ou lock the vehicle.
Position 2
The courtesy lamp is permanently o
ff
.
Th
ere are two map rea
di
n
g
l
amps, one on eac
h
s
ide o
f
the courtes
y
lamp.
Press the correspondin
g
lamp lens
A
.
Map readin
g
lamps
The durations of li
g
htin
g
of the front
c
ourtes
y
lamps can be confi
g
ured via
t
h
e co
l
our screen
"E
qu
i
pment
"
menu.
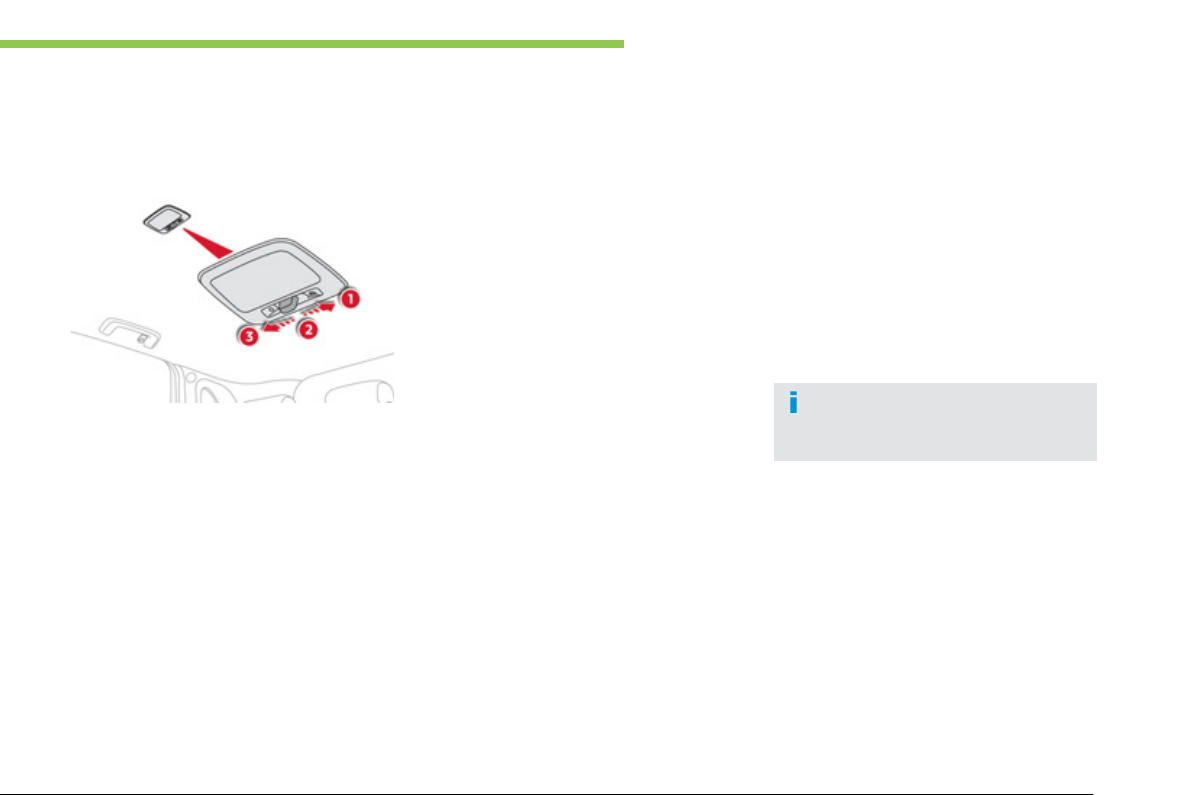
143
5
Visibility
Rear courtes
y
lamp
Position 1 "ON"
The courtes
y
lamp is permanentl
y
on.
Position 2 "●"
The courtes
y
lamp comes on when a door or
the tail
g
ate is opened. When the door or the
tail
g
ate is closed a
g
ain, the li
g
htin
g
g
raduall
y
dims for a few seconds before switchin
g
off.
However, the courtes
y
lamp is switched off
i
mmediatel
y
in the
f
ollowin
g
cases:
-
Wh
en t
h
e
d
oors an
d
t
h
e ta
ilg
ate are c
l
ose
d
an
d
t
h
e
ig
n
i
t
i
on sw
i
tc
h
i
s p
l
ace
d
i
n t
h
e
"
ON"
p
osition.
- When the doors and the tail
g
ate are closed
and
y
ou lock the vehicle.
Position 3 "OFF"
The courtes
y
lamp is permanentl
y
off.
Courtes
y
lamps automatic
switch off
The duration o
f
li
g
htin
g
o
f
the rear
c
ourtes
y
lamps can be confi
g
ured via
the colour screen "Equipment" menu.
With the en
g
ine o
ff
, the courtes
y
lamps,
map rea
di
n
g
l
amps an
d
b
oot
l
amp sw
i
tc
h
off
automatically a
f
ter 30 minutes to prevent
dischar
g
in
g
o
f
the batter
y
.
The courtes
y
lamps are switched on a
g
ain i
f
the i
g
nition switch is placed in the "ON"
or
"
A
CC
" position, if
y
ou open then close a doo
r
o
r the tail
g
ate or if
y
ou use the remote control.
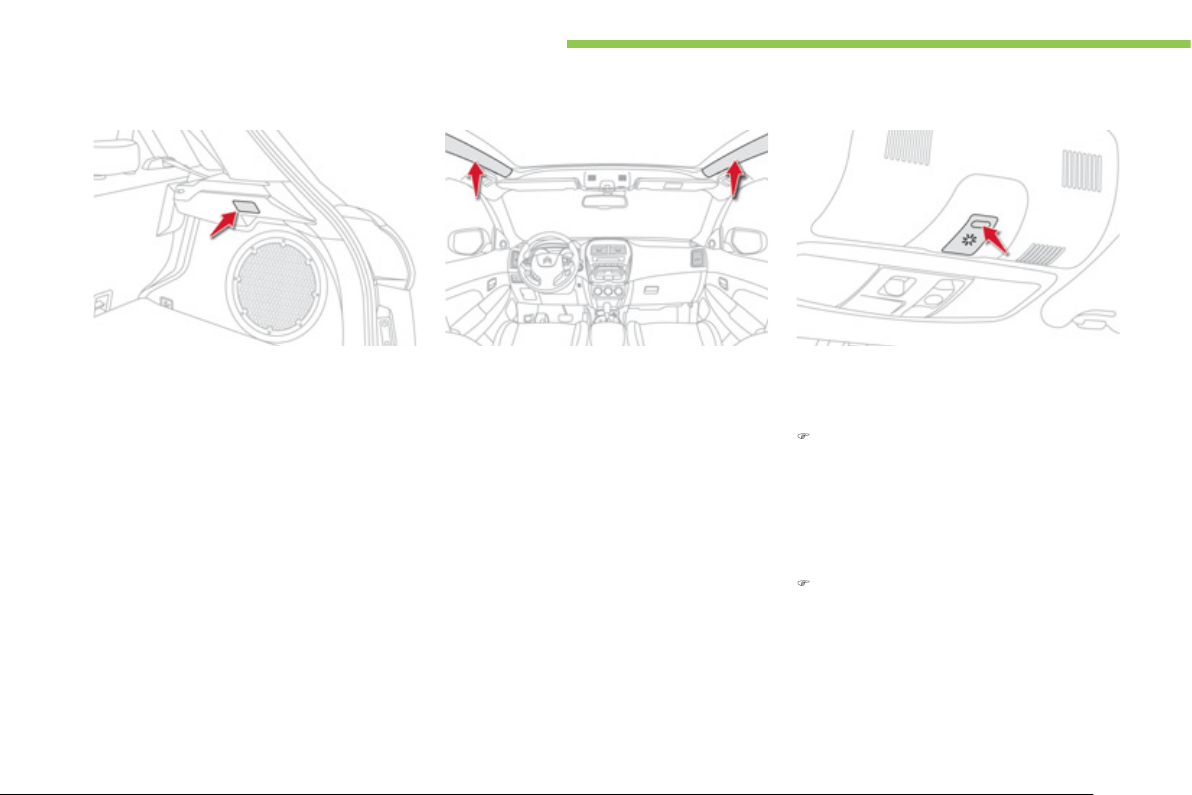
144
Visibility
Boot lamp
This comes on automaticall
y
when the boot is
opened and
g
oes o
ff
automaticall
y
when the
boo
t
is
closed
.
Panoramic roof lighting
When active, the panoramic roof li
g
htin
g
comes
on i
f
the i
g
nition switch is placed in the
"
ON"
or
"A
CC
" pos
i
t
i
on.
D
eact
i
vat
i
on
Wh
en t
h
e
ig
n
i
t
i
on sw
i
tc
h
i
s p
l
ace
d
i
n
p
osition
"
ON"
or
"
ACC":
)
Press this button repeatedl
y
until the
li
g
htin
g
g
oes off.
Settin
g
s
When the i
g
nition switch is placed in
p
osition
"
ON"
or
"
ACC":
)
Press this button repeatedl
y
to obtain the
desired li
g
htin
g
level
(
hi
g
h, medium, low
)
.
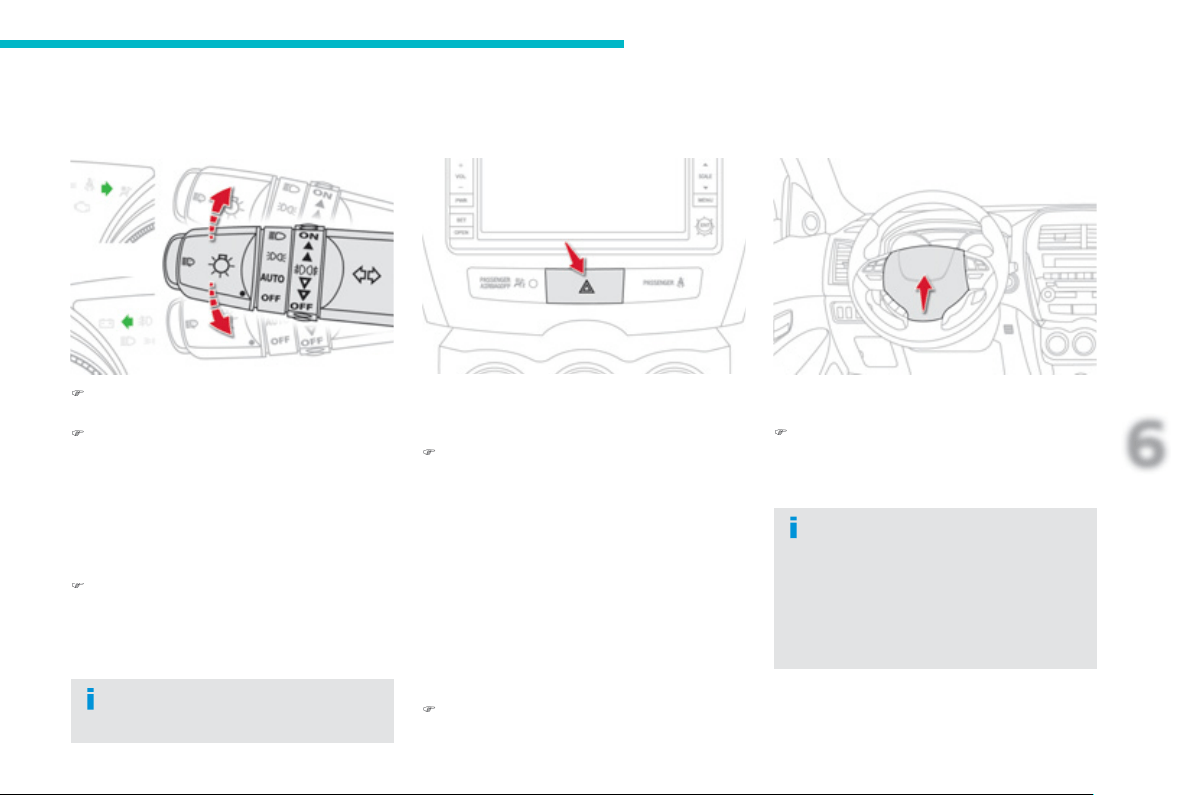
145
6
Safety
Direction indicators
)
Left: lower the li
g
htin
g
stalk passin
g
the
p
oint o
f
resistance.
)
Righ
t: ra
i
se t
h
e
ligh
t
i
n
g
sta
lk
pass
i
n
g
t
h
e
p
oint o
f
resistance.
"
Motorwa
y
" function
)
Press briefl
y
upwards or downwards,
without
g
oin
g
be
y
ond the point o
f
r
esistance; the direction indicators will
f
lash
3
tim
es
.
Th
e
f
u
n
c
ti
o
n
ca
n
be
deac
tiv
a
t
ed
vi
a
th
e
c
olour screen "Equipment" menu.
Hazard warning
lamps
A visual warnin
g
b
y
means o
f
the direction
i
n
dica
t
o
r
s
t
o
ale
rt
o
t
he
r r
oad
use
r
s
t
o
a
v
ehicle
b
rea
kd
own, tow
i
n
g
or acc
id
ent.
)
Press this button, the direction indicators
f
l
as
h.
The
y
can operate with the i
g
nition off.
A
utomatic o
p
eration of
hazard warnin
g
lamps
When braking in an emergency, depending on
the deceleration, the hazard warnin
g
lamps
c
ome on automaticall
y
.
The
y
switch off automaticall
y
the first time
y
ou
acce
l
e
r
a
t
e
.
)
You can also switch them off b
y
pressin
g
t
he
bu
tt
o
n.
Horn
A
u
dibl
e warn
i
n
g
s
y
stem to a
l
ert ot
h
er roa
d
users to an
i
mm
i
nent
d
an
g
er.
)
Press the central part o
f
the steerin
g
wh
ee
l.
U
se t
h
e
h
orn mo
d
erate
ly
an
d
on
ly
i
n t
h
e
f
ollowin
g
circumstances:
- immediate danger,
- approachin
g
a location lackin
g
visibilit
y
.
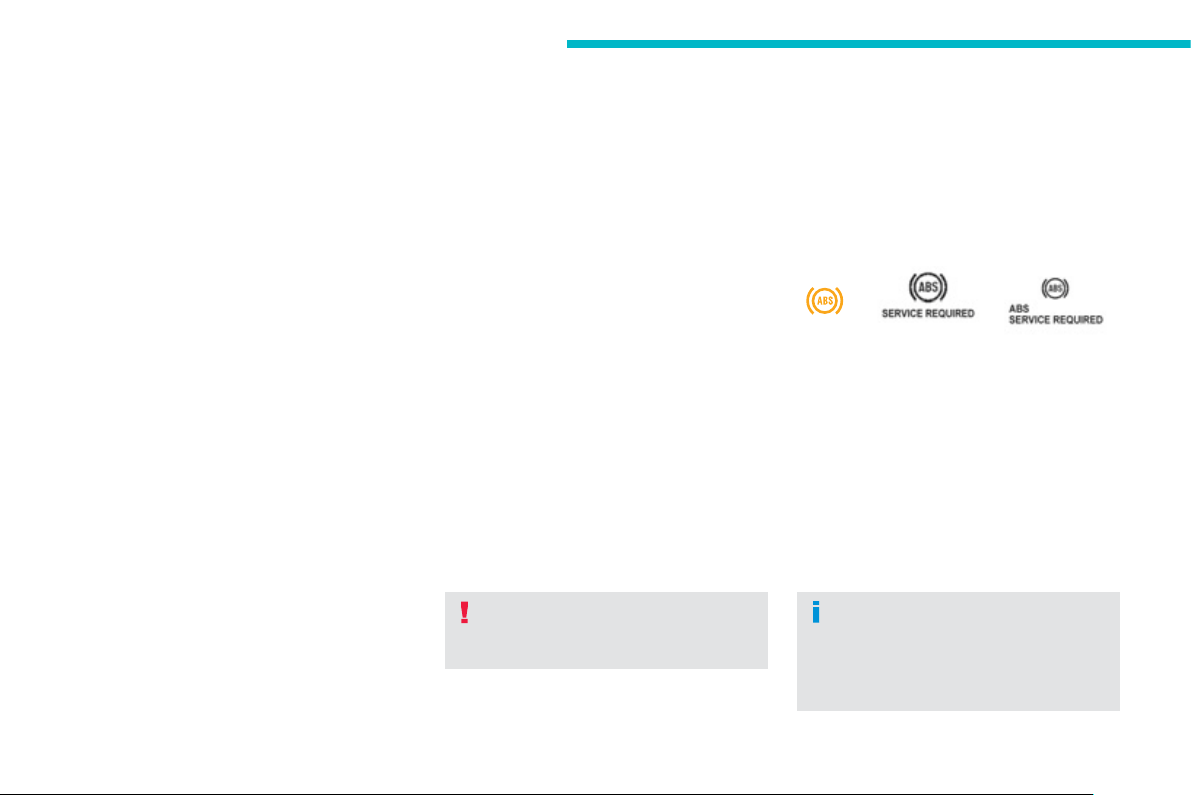
146
Safety
G
roup o
f
supplementar
y
s
y
stems which help
y
ou to obtain optimum brakin
g
in complete
s
afet
y
in emer
g
enc
y
situations:
- anti-lock brakin
g
s
y
stem
(
ABS
)
,
- electronic brake force distribution
(
EBFD
)
.
Braking assistance systems
Anti-lock brakin
g
s
y
stem
a
nd electronic brake force
di
str
ib
ut
i
on
Linked s
y
stems which improve the stabilit
y
and
manoeuvrabilit
y
o
f
y
our vehicle when brakin
g
,
in particular on poor or slipper
y
sur
f
aces.
Activation
The anti-lock braking system is active i
f
the
vehicle speed is hi
g
her than 6 mph
(
10 km
/
h
)
.
It is deactivated when the vehicle speed falls
b
elow 3 mph
(
5 km/h
)
.
The anti-lock brakin
g
s
y
stem comes into
operation automaticall
y
when there is a risk o
f
w
heel
lock
.
Normal operation o
f
the AB
S
ma
y
make itsel
f
f
elt b
y
sli
g
ht vibration o
f
the brake pedal.
Operatin
g
fault
When the vehicle is stationar
y
I
f
this warning lamp comes on, accompanied by
the indication on the instrument panel screen, it
indicates a malfunction of the anti-lock brakin
g
sy
stem which could result in a loss of control o
f
the vehicle when brakin
g
.
The vehicle retains normal brakin
g
.
Drive care
f
ull
y
at moderate speed and contact
a CITRO
Ë
N dealer or a qualified workshop as
s
oon as
p
oss
ibl
e.
When braking in an emergency, press
ver
y
f
irml
y
without releasin
g
the
press
u
re
.
The warnin
g
lamp comes on
f
or a
f
ew
s
econ
d
s w
h
en t
h
e
ig
n
i
t
i
on
i
s sw
i
tc
h
e
d
on
(O
N position
)
. I
f
it does not switch o
ff
or
does not come on, contact a CITROËN
dealer or a quali
f
ied workshop.
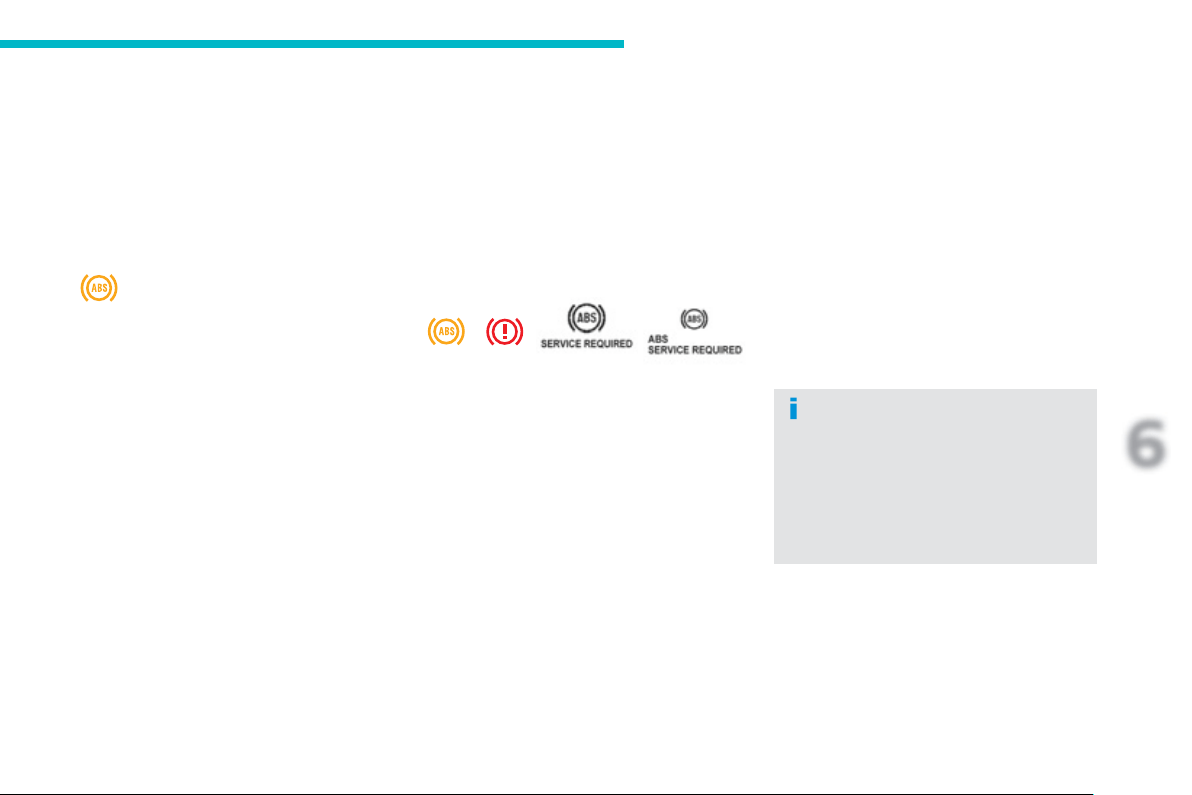
147
6
Safety
Wh
en t
h
e ve
hi
c
l
e
i
s mov
i
n
g
If this warnin
g
lamp comes
on continuousl
y
it indicates a
malfunction of the anti-lock brakin
g
sy
stem which could result in a loss o
f
c
ontrol o
f
the vehicle on brakin
g
.
Th
e two warn
i
n
g
l
amps comes on at t
h
e
s
ame t
i
me an
d
t
h
e two warn
i
n
g
s are
di
sp
l
a
y
e
d
a
l
ternate
ly
i
n t
h
e
i
nstrument
p
anel screen.
When replacin
g
wheels
(
t
y
res and
rims
)
, ensure that the
y
conform to the
m
a
n
u
f
ac
t
u
r
e
r'
s
r
eco
mm
e
n
da
ti
o
n
s
.
Th
e ve
hi
c
l
e reta
i
ns norma
l
b
ra
ki
n
g
.
Drive care
f
ully at moderate speed and contact
a CITROËN dealer or qualified workshop as
s
oon as possible.
I
f
these two warnin
g
lamps come on, linked with
the warnings on the instrument panel screen,
the
y
indicate a mal
f
unction o
f
the electronic
b
r
a
k
e
f
o
r
ce
d
i
s
tri
bu
ti
o
n whi
c
h
cou
l
d
r
esu
lt in
a
l
oss of control of the vehicle on brakin
g
.
You must sto
p
as soon as it is safe to do so
.
Contact a CITROËN dealer or a qualified
w
or
k
s
h
op.
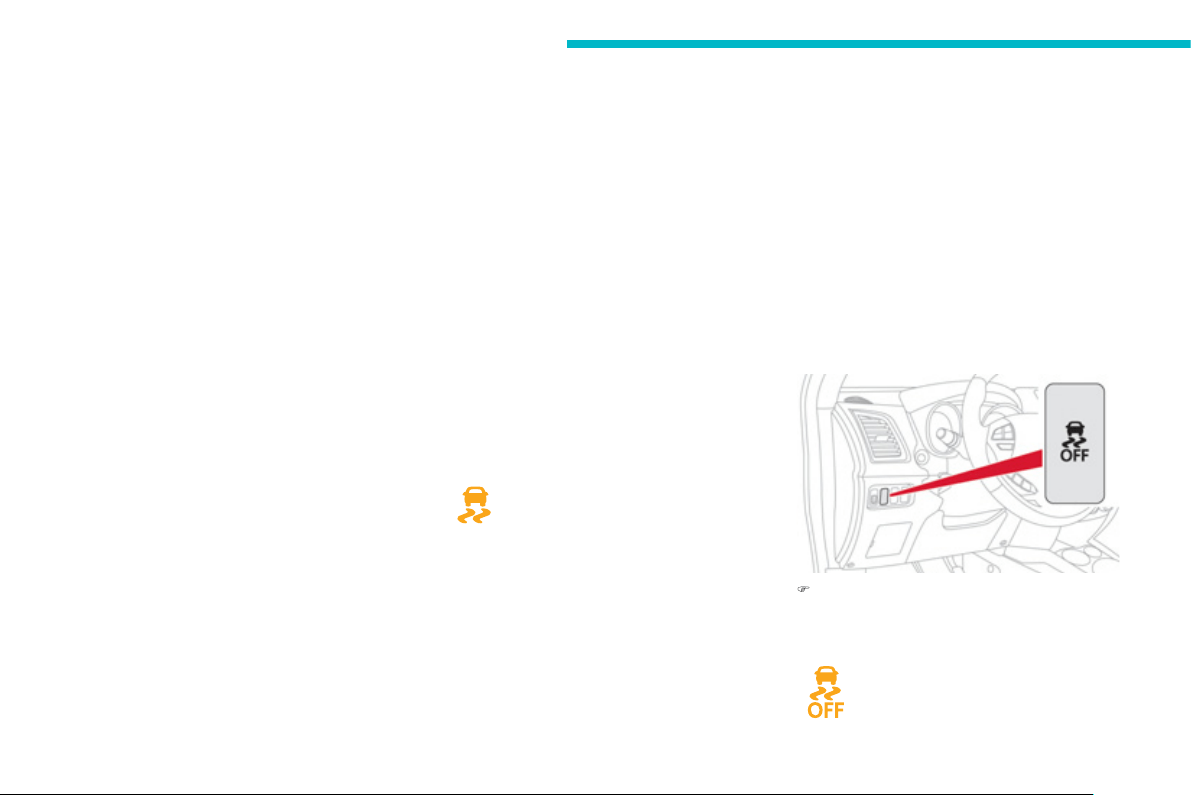
148
Safety
A
ssociated s
y
stems which
g
uarantee the directional stabilit
y
o
f
the vehicle within the limits o
f
the laws o
f
ph
y
sics:
- traction control
(
T
C
L
)
,
- active stability control
(
A
SC)
.
Traction control and active stabilit
y
control
Traction control optimises traction to prevent
wheel spin, b
y
actin
g
on the brakes of the
drivin
g
wheels and on the en
g
ine.
A
ctive stabilit
y
control acts on the brake of one
or more w
h
ee
l
s an
d
on t
h
e en
gi
ne to
k
eep t
h
e
ve
hi
c
l
e on t
h
e tra
j
ector
y
requ
i
re
d
by
t
h
e
d
r
i
ver.
Activation
These s
y
stems are activated automaticall
y
each
t
i
m
e
t
he
v
ehicle
is
s
t
a
rt
ed
.
The illumination o
f
this warnin
g
lamp
in the instrument
p
anel indicates
that the A
SC
and T
C
L s
y
stems are
deac
tiv
a
t
ed
.
D
eact
i
vat
i
on
In exceptional conditions
(
startin
g
a vehicle
which is bo
gg
ed down, stuck in snow, on so
f
t
g
round, ...
)
, it ma
y
be advisable to deactivate
the A
SC
s
y
stem, so that the wheels can move
f
reely and regain grip.
This is indicated b
y
f
lashin
g
o
f
this
sy
mbol on the instrument panel
screen
.
Trajectory control systems
)
Press this button, located to the le
f
t o
f
the
s
teering wheel, until the symbol appears in
the instrument
p
anel screen.
O
p
eration
The
y
operate when the vehicle speed is hi
g
he
r
than 10 mph
(
15 km/h
)
.
The
y
come into operation in the event of a
g
rip
or tra
j
ector
y
problem.
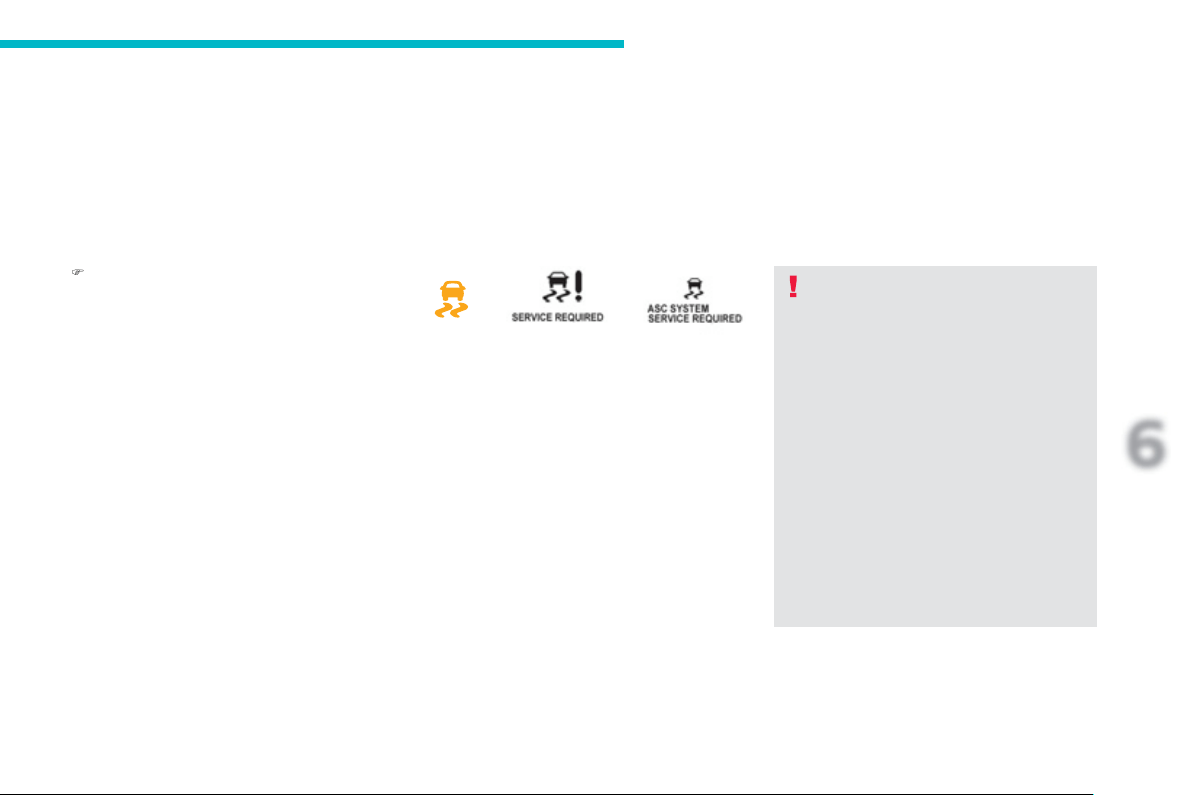
149
6
Safety
R
eact
i
vat
i
on Operatin
g
fault
The illumination o
f
one o
f
these warning lamps
a
ccompanied b
y
a messa
g
e in the instrument
p
anel screen indicates a malfunction of these
s
y
stems.
Contact a CITROËN dealer or a qualified
w
orkshop to have the ASC/TCL s
y
stems
checked
.
The A
SC/
T
C
L s
y
stems o
ff
er exceptional
s
a
f
et
y
in normal drivin
g
, but this should
not encoura
g
e the driver to take extra
risks or drive at hi
g
h speed.
The correct functionin
g
of these
sy
stems depends on observation of the
m
a
n
u
f
ac
t
u
r
e
r'
s
r
eco
mm
e
n
da
ti
o
n
s
o
n:
- wheels
(
t
y
res and rims
)
,
-
b
ra
ki
n
g
components,
- e
l
ectron
i
c components,
- assem
bly
an
d
repa
i
r proce
d
ures.
A
f
ter an impact, have these s
y
stems
c
hecked b
y
a CITROËN dealer or a
q
ualified workshop.
)
Press this button a
g
ain to reactivate the
A
SC and TCL s
y
stems.
When the warnin
g
lamp
g
oes off, this indicates
the reactivation of the ASC and TCL s
y
stems.
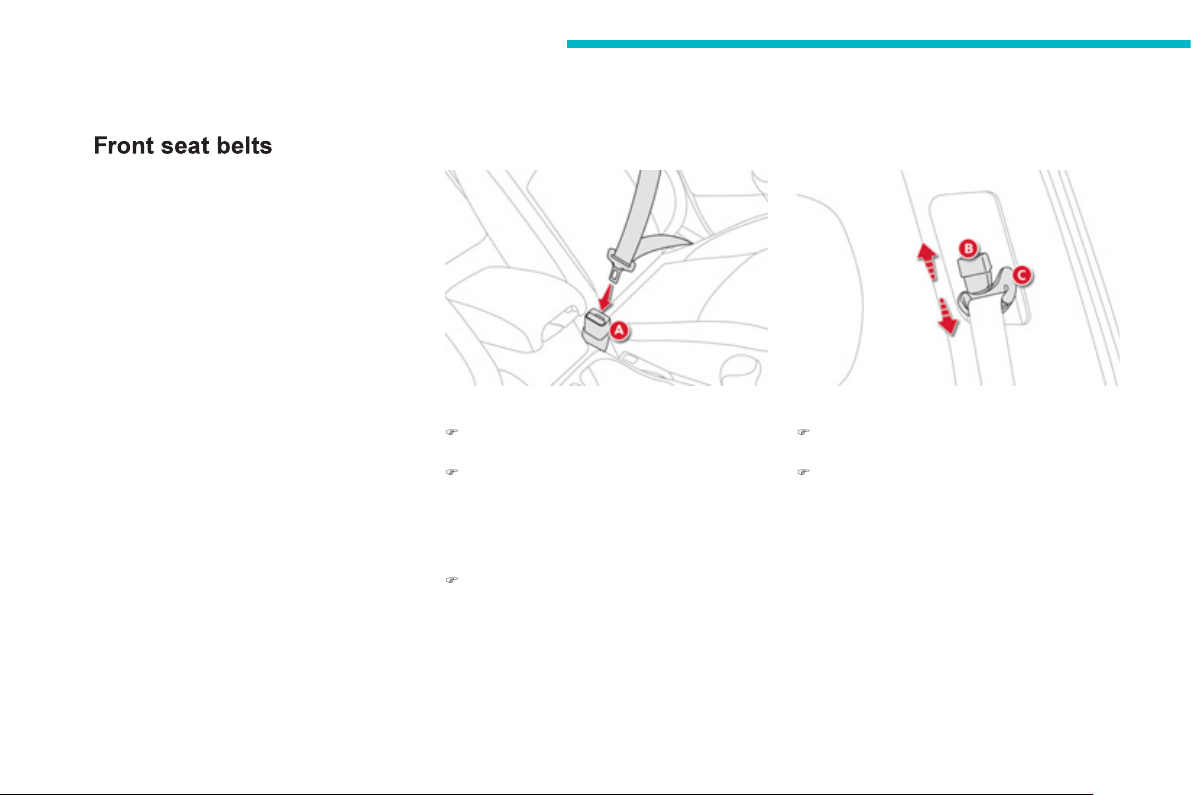
150
Safety
Seat belts
Th
e
f
r
o
nt
sea
t
be
lt
s
a
r
e
f
itt
ed
with
a
p
retensionin
g
and
f
orce limitin
g
s
y
stem.
This s
y
stem improves safet
y
in the front
s
eats in the event of a front or side impact.
Dependin
g
on the severit
y
of the impact, the
p
retensionin
g
s
y
stem instantl
y
ti
g
htens the seat
belts a
g
ainst the bod
y
o
f
the occupants.
Th
e pretens
i
on
i
n
g
seat
b
e
l
ts are act
i
ve w
h
en
t
h
e
ig
n
i
t
i
on
i
s on.
The
f
orce limiter reduces the
p
ressure o
f
the
s
eat belt on the chest o
f
the occu
p
ant, so
improvin
g
their protection.
Fastenin
g
)
Pull the strap, then insert the ton
g
ue in the
buc
kl
e
A
.
)
C
heck that the seat belt is
f
astened
c
orrect
ly
by
pu
lli
n
g
t
h
e strap.
Unfastenin
g
)
Pr
ess
th
e
r
ed
bu
tt
o
n
o
n th
e
buc
kl
e
A
.
Hei
g
ht ad
j
ustment
)
To lower the attachment point, press the
co
ntr
o
l
B
and slide the fixin
g
C
do
wn.
)
T
o ra
i
se t
h
e attac
h
ment po
i
nt, press t
h
e
co
ntr
ol
B
and slide the
f
ixin
g
C
u
p
.
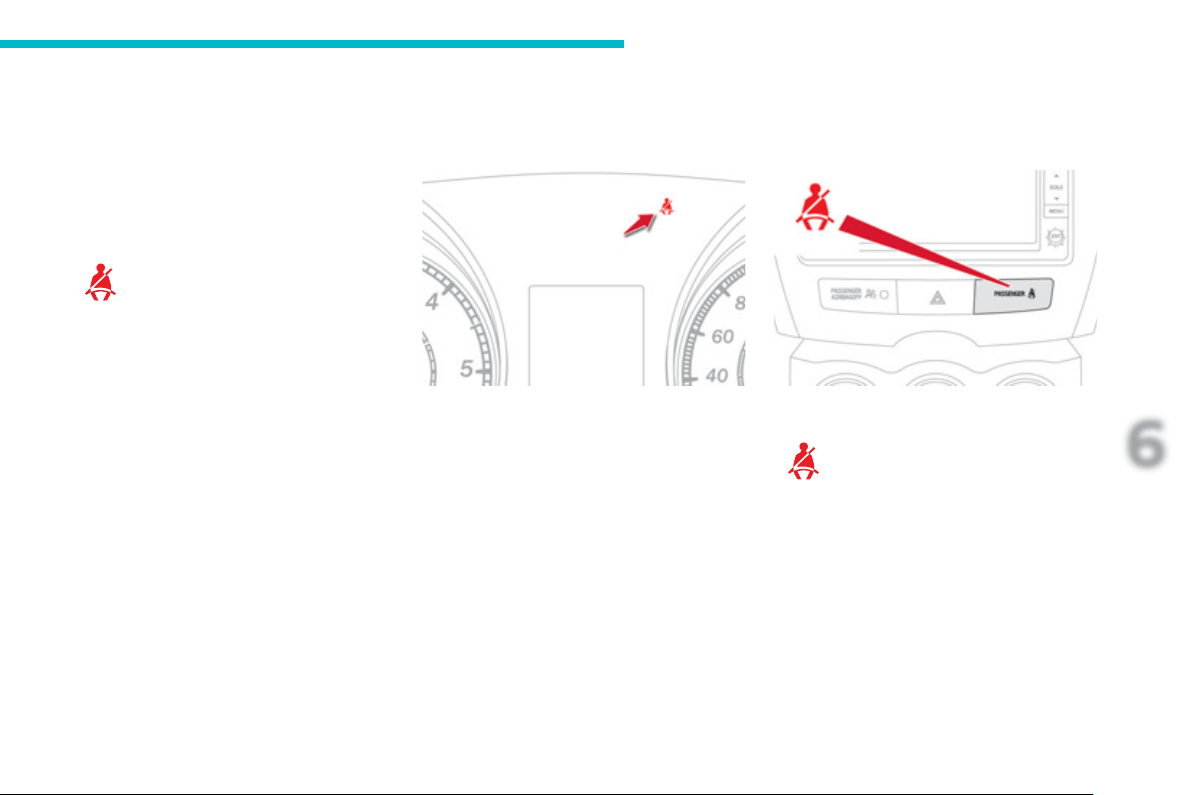
151
6
Safety
If th
e
d
riv
e
r
does
n
o
t f
as
t
e
n th
e
ir
sea
t
be
lt
w
ithin one minute after switchin
g
on the
ig
nition, the warnin
g
lamp flashes accompanied
by
an
i
nterm
i
ttent au
dibl
e s
ig
na
l
an
d
a
di
sp
l
a
y
on t
h
e
i
nstrument pane
l
screen.
Th
e warn
i
n
g
l
amp, t
h
e au
dibl
e s
ig
na
l
an
d
t
h
e
display stop a
f
ter approximately 90 seconds
a
n
d
r
e
t
u
rn
u
ntil th
e
d
riv
e
r
fas
t
e
n
s
th
e
ir
sea
t
be
lt.
If th
e
sea
t
be
lt i
s
u
nf
as
t
e
n
ed
while the vehicle
i
s movin
g
,
y
ou are alerted b
y
the same
w
arnin
g
s.
Wh
en t
h
e
ig
n
i
t
i
on
i
s sw
i
tc
h
e
d
on, t
hi
s warn
i
n
g
l
amp comes on
a
ccompanied by an audible signal
f
or
a
fe
w
seco
n
ds
i
f
th
e
d
riv
e
r h
as
n
o
t
f
as
t
e
n
ed
th
e
ir
sea
t
be
lt.
Front seat belt not fastened /
u
nfastened warnin
g
lamp
F
ront passen
g
er
'
s seat
b
e
l
t
D
r
i
ver
'
s seat
b
e
l
t
When the i
g
nition is switched on, this
warnin
g
lamp comes on the centre
c
onsole panel.
It is accompanied b
y
an audible si
g
nal
f
or a
f
ew
s
econds if the passen
g
er has not fastened their
sea
t
be
lt.
If th
e
sea
t
be
lt i
s
u
nf
as
t
e
n
ed
w
hile the vehicle
i
s movin
g
,
y
ou are alerted b
y
the same
warn
i
n
g
s.
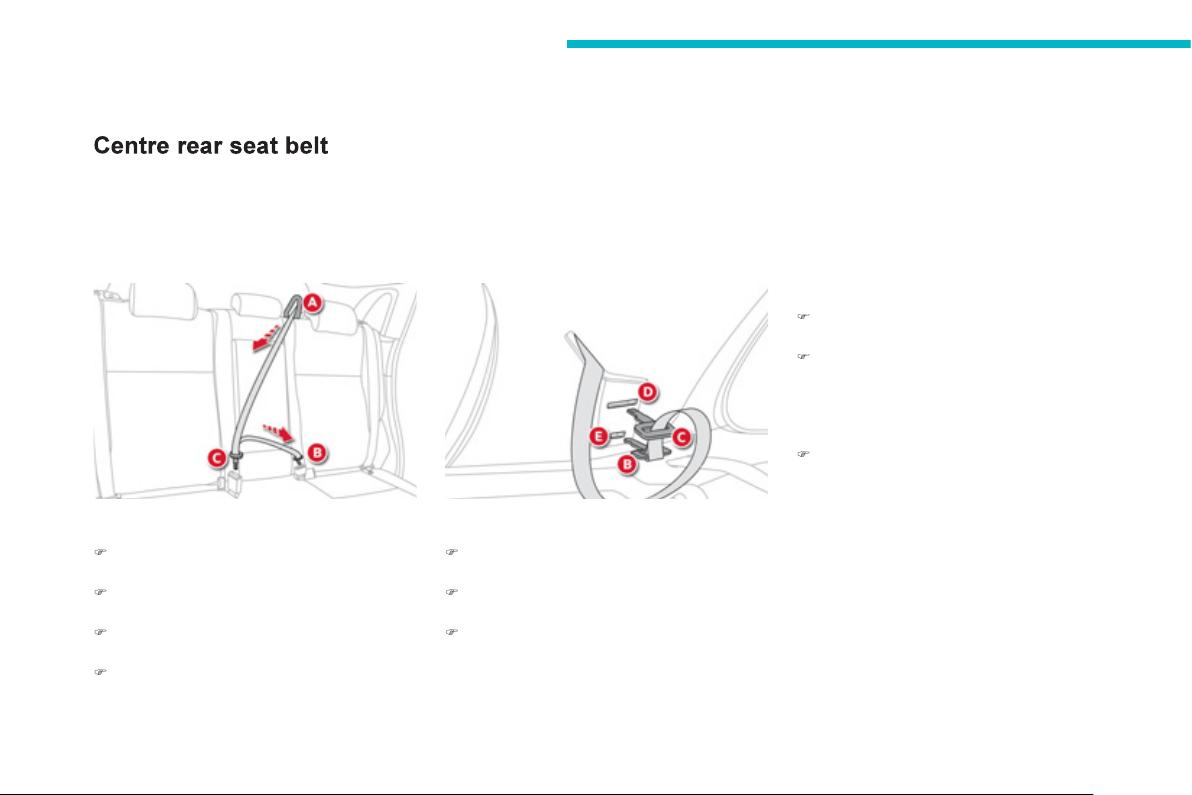
152
Safety
Th
e
sea
t
be
lt f
o
r th
e
ce
ntr
e
r
ea
r
sea
t i
s
fitt
ed
in
th
e
r
oo
f.
It has three anchora
g
e points and a reel.
Fittin
g
the belt
)
Pull out the belt and pass it throu
g
h the belt
g
uide A
.
)
Pull on the strap and insert the ton
g
ue B
i
nt
o
th
e
l
e
ft h
a
n
d
buc
kl
e
.
)
I
nsert t
h
e ton
g
ue
C
i
nto t
h
e r
igh
t-
h
an
d
buckle
.
)
C
heck that each buckle has en
g
a
g
ed b
y
p
ullin
g
on the strap.
Removin
g
and stowin
g
the belt
)
Pr
ess
th
e
r
ed
bu
tt
o
n
o
n
buc
kl
e
C , and then
o
n th
e
r
ed
bu
tt
o
n
o
n
buc
kl
e
B
.
)
Guide the belt as it reels in, passin
g
it
throu
g
h the belt
g
uide
A
.
)
S
tow the ton
g
ue
C
i
n t
h
e upper s
l
ot
D
a
n
d
t
h
e ton
g
ue
B
i
n t
he
lo
w
e
r
slo
t
E
.
Outer rear seat belts
Each outer rear seat is fitted with a three-point
in
e
rti
a
r
ee
l
sea
t
be
lt.
Fastenin
g
)
Pull the strap, then insert the ton
g
ue in the
buc
kl
e
.
)
C
heck that the seat belt is fastened
c
orrectl
y
b
y
pullin
g
the strap.
Unfastenin
g
)
P
r
ess
t
he
r
ed
bu
tt
o
n
o
n t
he
buckle
.

153
6
Safety
The driver must ensure that passen
g
ers use
the seat belts correctl
y
and that the
y
are all
restrained securel
y
be
f
ore settin
g
o
ff
.
Wh
erever
y
ou are seate
d
i
n t
h
e ve
hi
c
l
e,
alwa
y
s
f
asten
y
our seat belt, even
f
or short
j
ourneys.
Do not interchan
g
e the seat belt buckles as
the
y
will not fulfil their role full
y
.
Th
e
sea
t
be
lt
s
a
r
e
fitt
ed
with
a
n in
e
rti
a
r
ee
l
permittin
g
automatic ad
j
ustment of the len
g
th
o
f the strap to
y
our size. The seat belt is
s
towe
d
automat
i
ca
lly
w
h
en not
i
n use.
Be
f
ore and a
f
ter use, ensure that the seat
b
e
l
t
i
s ree
l
e
d
i
n correct
ly
.
The lower
p
art o
f
the stra
p
must be
p
ositioned as low as
p
ossible on the
p
elvis.
The upper part must be positioned in the
h
o
ll
o
w
o
f th
e
s
h
ou
l
de
r.
Th
e
in
e
rti
a
r
ee
l
s
a
r
e
fitt
ed
with
a
n
au
t
o
m
a
ti
c
l
ockin
g
device which comes into operation in
the event o
f
a collision, emer
g
enc
y
brakin
g
o
r i
f
th
e
v
e
hi
c
l
e
r
o
ll
s
o
v
e
r. Y
ou
ca
n r
e
l
ease
the device b
y
pullin
g
f
irml
y
on the strap and
releasing it so that it reels in slightly.
Recommendations for children
Use a suitable child seat i
f
the passen
g
er is
l
ess than 12
y
ears old or shorter than one
a
n
d
a
h
a
l
f
m
e
tr
es
.
N
e
v
e
r
use
th
e
sa
m
e
sea
t
be
lt t
o
secu
r
e
m
o
r
e
than one person.
Never allow a child to travel on
y
our lap.
In order to be effective, a seat belt must:
- be ti
g
htened as close to the bod
y
as
poss
ibl
e,
- be pulled in
f
ront o
f
y
ou with a smooth
movement, c
h
ec
ki
n
g
t
h
at
i
t
d
oes not
twist,
- be used to restrain onl
y
one person,
- not bear an
y
trace of cuts or fra
y
in
g
,
- n
o
t
be
co
nv
e
rt
ed
o
r m
od
ifi
ed
t
o
a
v
o
i
d
affectin
g
its performance.
In the event of an im
p
act
D
epen
di
n
g
on t
h
e nature an
d
seriousness of the impac
t
, t
h
e
p
retensioning device may be deployed
be
f
ore and independentl
y
o
f
the airba
g
s.
D
eplo
y
ment of the pretensioners is
a
ccompanied b
y
a sli
g
ht dischar
g
e of
h
armless smoke and a noise, due to the
a
ctivation of the p
y
rotechnic cartrid
g
e
i
ncorporate
d
i
n t
h
e s
y
stem.
I
n a
ll
cases, t
h
e a
i
r
b
a
g
warn
i
n
g
l
amp
comes
on
.
Following an impact, have the seat belts
s
y
stem checked, and i
f
necessar
y
replaced,
b
y
a CITROËN dealer or a qualified
workshop.
In accordance with current sa
f
et
y
r
e
g
ulations,
f
or all repairs on
y
our vehicle,
g
o to a quali
f
ied workshop with the skills and
e
q
ui
p
ment needed, which a CITROËN deale
r
is able to provide.
Have
y
our seat belts checked re
g
ularl
y
b
y
a
CITROËN dealer or a qualified workshop,
p
articularl
y
if the straps show si
g
ns o
f
d
ama
g
e.
C
lean the seat belt straps with soap
y
water or a text
il
e c
l
ean
i
n
g
pro
d
uct, so
ld
by
C
ITR
OË
N
dea
l
e
r
s
.
A
f
ter
f
olding or moving a seat or rear bench
seat, ensure that the seat belt is positioned
a
nd reeled in correctl
y
.
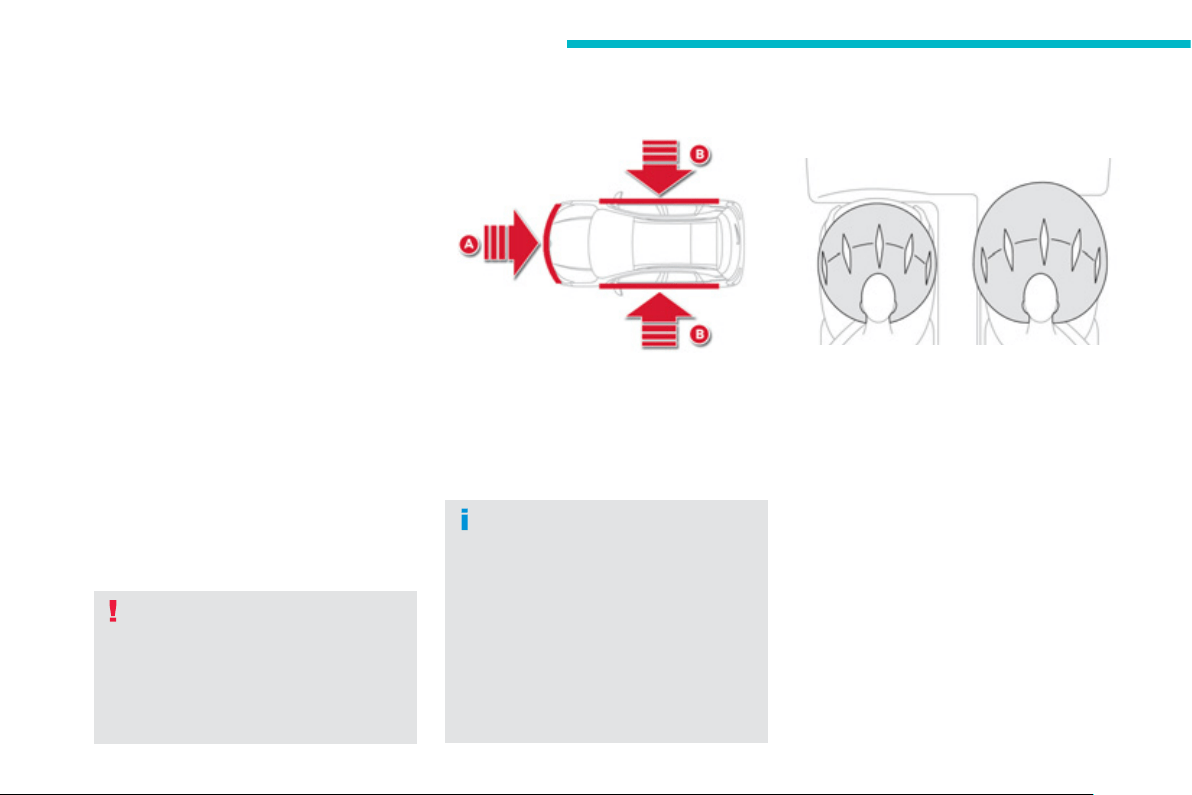
154
Safety
Airbags
S
y
stem desi
g
ned to maximise the safet
y
of the
occupants
(
with the exception of the rear centre
p
assen
g
er
)
in the event of violent collisions.
It supplements the action of the force-limitin
g
s
eat belts
(
with the exception o
f
the rear centre
p
assen
g
er
)
.
I
f
a collision occurs, the electronic detectors
r
ecord and analyse the
f
ront and side impacts
s
ustained in the impact detection zones:
- in the case of a serious impact, the airba
g
s
a
re deplo
y
ed instantl
y
and protect the
occupants of the vehicle
(
with the exception
of the rear centre passen
g
er
)
; immediatel
y
af
ter the impact, the airba
g
s de
f
late rapidl
y
so t
h
at t
h
e
y
d
o not
hi
n
d
er v
i
s
ibili
t
y
or t
h
e
exit o
f
the occu
p
ants,
- in the case o
f
a minor or rear im
p
act or in
c
ertain roll-over conditions, the airba
g
s
will not be deplo
y
ed; the seat belt alone is
sufficient to provide optimum protection in
th
ese
s
it
ua
ti
o
n
s
.
T
he airba
g
s do not operate when the
ig
nition is switched off
.
This equipment will onl
y
deplo
y
once.
I
f a second impact occurs
(
durin
g
the
s
ame or a subsequent accident
)
, the
a
i
r
b
a
g
w
ill
not
b
e
d
ep
l
o
y
e
d
a
g
a
i
n.
Deplo
y
ment o
f
the airba
g(
s
)
is
a
ccompanied by a slight emission o
f
h
armless smoke and a noise, due to the
a
ctivation of the p
y
rotechnic cartrid
g
e
i
ncorporated in the s
y
stem.
This smoke is not harmful, but sensitive
i
ndividuals ma
y
experience sli
g
ht
i
rr
i
t
a
t
io
n.
The noise o
f
the detonation ma
y
result
i
n a sli
g
ht loss o
f
hearin
g
f
or a short
tim
e
.
I
m
p
act
d
etect
i
on zones
A.
F
ront
i
mpact zone.
B.
S
ide im
p
act zone.
Front airba
g
s
Deplo
y
ment
The airba
g
s are deplo
y
ed simultaneousl
y
,
unless the passen
g
er's front airba
g
is
deactivated
,
in the event of a serious front
impact applied to all or part o
f
the
f
ront impact
z
one
A
, in the lon
g
itudinal centreline o
f
the
vehicle on a horizontal
p
lane and directed
f
rom
th
e
f
r
o
nt t
o
th
e
r
ea
r
of
th
e
v
e
hi
c
l
e
.
The
f
ront airba
g
in
f
lates between the
f
ront
occupant of the vehicle and the dashboard to
cus
hi
o
n th
e
ir f
o
rw
a
r
d
m
o
v
e
m
e
nt.
S
ystem which protects the head and chest o
f
the driver and
f
ront passen
g
er in the event o
f
a
front impact.
The driver's airba
g
is fitted in the centre of the
s
teerin
g
wheel; the front passen
g
er's airba
g
is
fitted in the dashboard above the
g
love box.
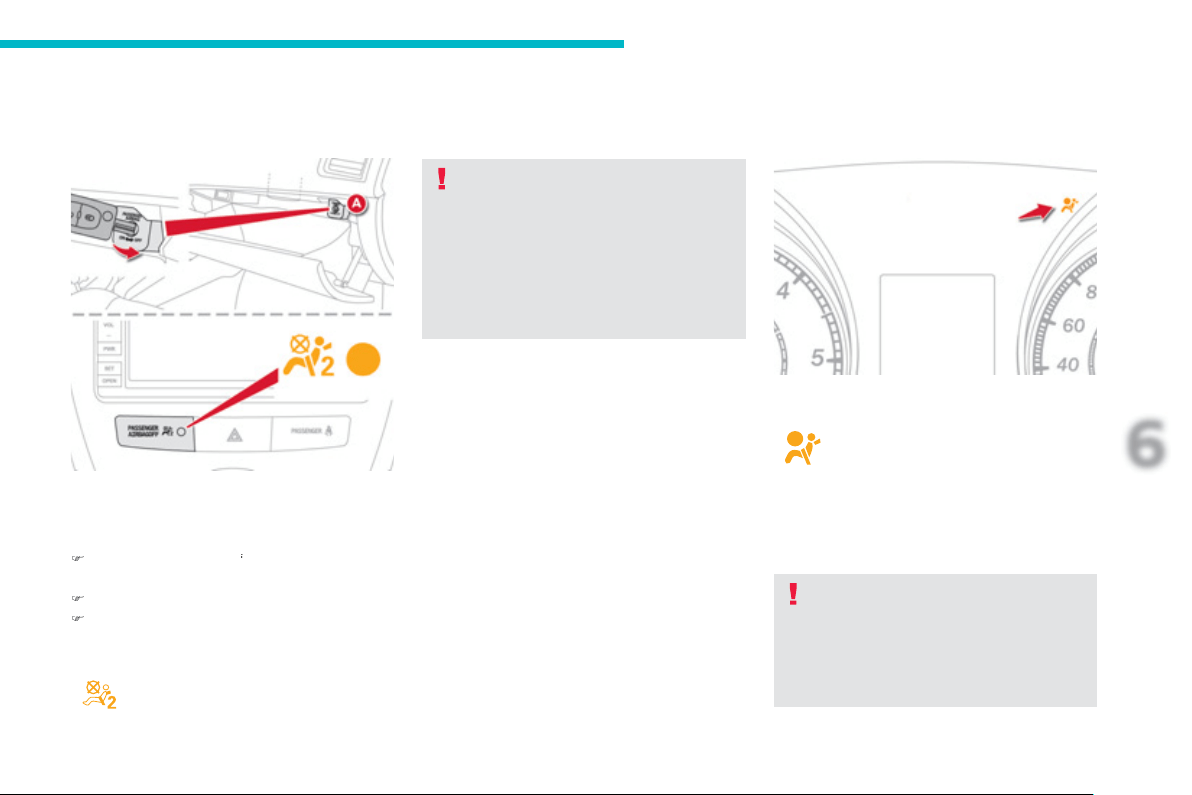
155
6
Safety
D
eact
i
vat
i
on
Onl
y
the front passen
g
er's airba
g
can be
deac
t
i
v
a
t
ed
:
)
with the ignition off
, insert the key in the
f
p
assen
g
er a
i
r
b
a
g
d
eact
i
vat
i
on sw
i
tc
h
A
,
)
t
u
rn it t
o
th
e
"OFF"
p
osition,
)
remove the ke
y
.
This warning lamp comes on in
the centre console panel when the
ig
nition is on and until the airba
g
is
r
eac
tiv
a
t
ed
.
To ensure the safet
y
of
y
our child, the
p
assen
g
er's airba
g
must be deactivated
when
y
ou install a "rear
f
acin
g
" child
s
eat on the
f
ront passen
g
er seat.
O
therwise, the child would risk bein
g
s
eriously injured or killed i
f
the airbag
were tri
gg
ered.
If the airba
g
warnin
g
lamp and the
displa
y
come on continuousl
y
, do not
install a "rear facin
g
" child seat on the
f
ront passen
g
er seat.
Co
nt
ac
t
a
C
ITR
OË
N
dea
l
e
r
o
r
a
q
uali
f
ied worksho
p
.
R
eact
i
vat
i
on
Wh
en
y
ou remove t
h
e c
hild
seat, turn
s
w
i
t
ch
A
t
o
t
he
"
ON"
p
os
i
t
i
on to react
i
vate t
h
e
a
irbag and so ensure the sa
f
ety o
f
your
f
ront
p
assen
g
er in the event o
f
an impact.
The associated warnin
g
lamp
g
oes off.
Operatin
g
fault
I
f
this warning lamp comes on in the
instrument panel and this displa
y
appears
on the instrument panel screen, contact a
C
ITROËN dealer or a qualified workshop
to have the s
y
stem checked. The airba
g
s ma
y
no
l
on
g
er be deplo
y
ed in the event of a serious impact.
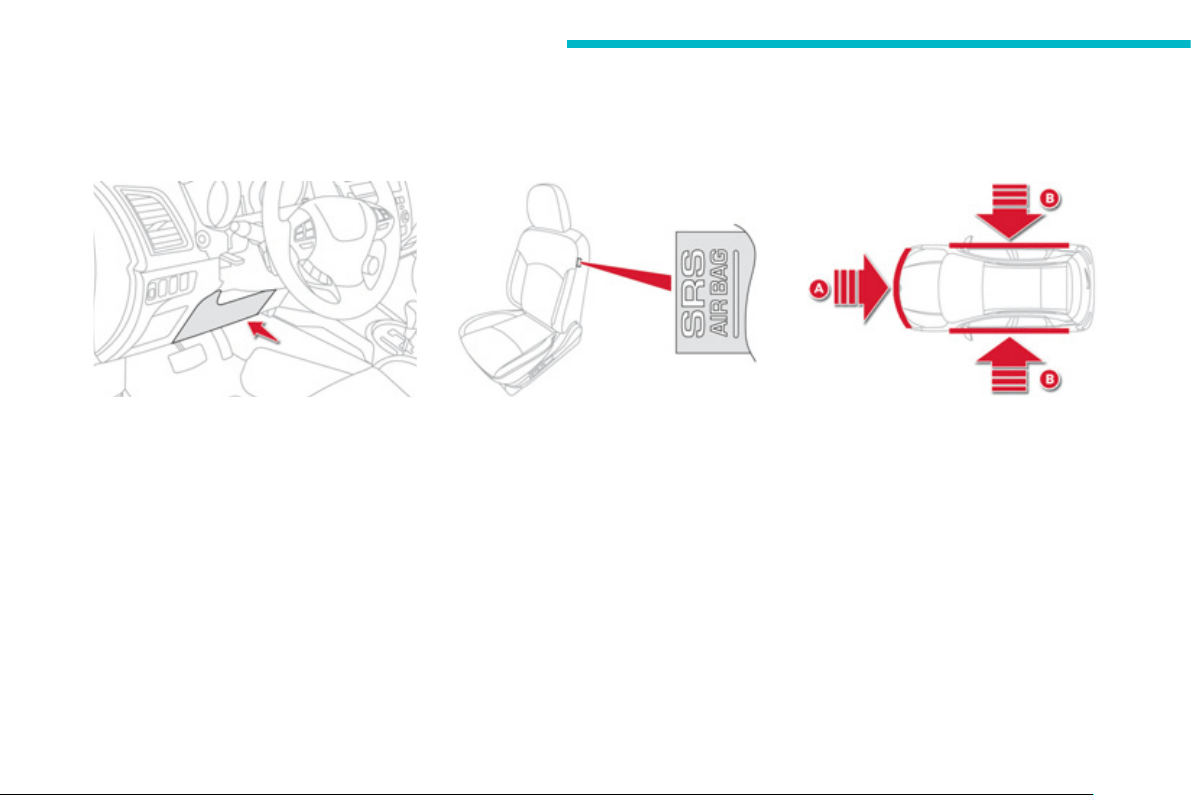
156
Safety
K
nee airba
g
*
Deplo
y
ment
It is deplo
y
ed at the same time as the
f
ront
a
irbags.
S
ystem which protects the driver's knees in the
e
vent o
f
a serious
f
ront impact.
This airba
g
is fitted in the dashboard below the
s
teerin
g
column.
S
ystem which protects the driver and
passen
g
er in the event o
f
a serious side impact
in order to limit the risk of in
j
ur
y
to the chest.
Each lateral airba
g
is fitted in the front seat
b
ack frame, on the door side.
Deplo
y
ment
Th
e
l
atera
l
a
i
r
b
a
g
i
s
d
ep
l
o
y
e
d
un
il
atera
lly
i
n t
h
e
e
vent o
f
a serious side im
p
act a
pp
lied to all or
p
art o
f
the side im
p
act zone B ,
p
er
p
endicula
r
to the lon
g
itudinal centreline of the vehicle on a
horizontal plane and directed from the outside
t
o
w
a
r
ds
th
e
in
s
i
de
o
f th
e
v
e
hi
c
l
e
.
The lateral airba
g
inflates between the front
occupant o
f
the vehicle and the correspondin
g
d
oor tr
i
m pane
l
.
Impact detection zones
A
.
Front impact zone.
B
.
Side impact zone.
*
According to country.
L
ateral airba
g
s
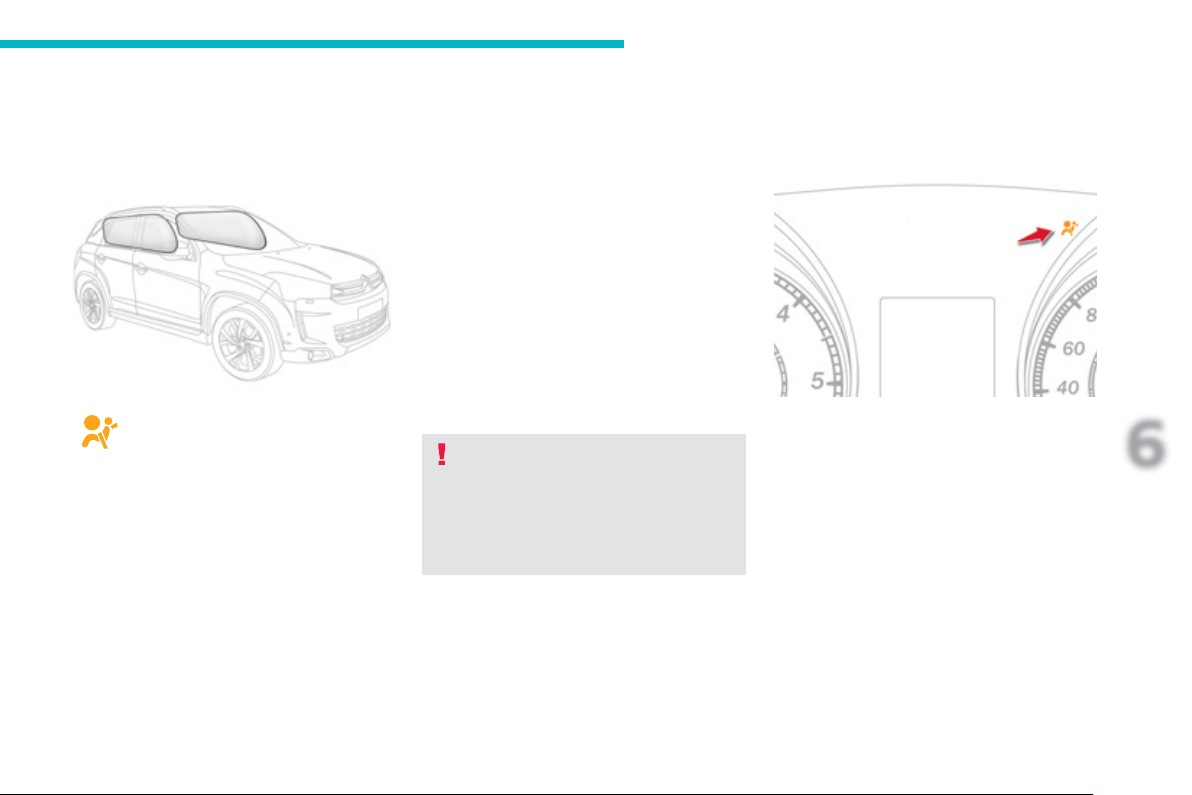
157
6
Safety
In the event of a minor impact or bump
o
n th
e
s
i
de
of
th
e
v
e
hi
c
l
e
o
r i
f
th
e
ve
hi
c
l
e ro
ll
s over, t
h
e a
i
r
b
a
g
ma
y
not
b
e
d
ep
l
o
y
e
d
.
In the event o
f
a rear or
f
ront collision,
the airba
g
is not deplo
y
ed.
S
ystem which protects the driver and
p
assen
g
ers
(
with the exception o
f
the
r
ear centre passen
g
er
)
in the event o
f
a serious side impact in order to limit the risk of
in
j
ur
y
to the head.
Each curtain airba
g
is fitted in the pillars
and the upper section o
f
the passen
g
er
c
ompartment.
Curtain airba
g
s
Deplo
y
ment
The curtain airba
g
is deplo
y
ed at the same
time as the correspondin
g
lateral airba
g
in the
event of a serious side impact applied to all or
p
art of the side impact zone
B
, perpendicular
to the lon
g
itudinal centreline of the vehicle on a
h
orizontal plane and directed
f
rom the outside
t
o
w
a
r
ds
th
e
in
s
i
de
of
th
e
v
e
hi
c
l
e
.
The curtain airba
g
in
f
lates between the
f
ront or
r
ear occu
p
ant o
f
the vehicle and the windows.
Operatin
g
fault
If this warnin
g
lamp comes on in the instrument
panel and this displa
y
appears in the instrument
panel screen, contact a CITROËN dealer or a
q
uali
f
ied workshop to have the s
y
stem checked.
Th
e a
i
r
b
a
g
s ma
y
no
l
on
g
er
b
e
d
ep
l
o
y
e
d
i
n t
h
e
e
vent o
f
a serious im
p
act.

158
Safety
S
it in a normal upri
g
ht position.
Wear a correctly adjusted seat belt.
Do not leave an
y
thin
g
between the
o
ccupants and the airba
g
s
(
a child, pet,
o
b
j
ect...
)
. This could hamper the operation o
f
the airba
g
s or in
j
ure the occupants.
A
ft
e
r
a
n
acc
i
de
nt
o
r if th
e
v
e
hi
c
l
e
h
as
bee
n
s
to
l
en or
b
ro
k
en
i
nto,
h
ave t
h
e a
i
r
b
a
g
sy
stems c
h
ec
k
e
d
.
All
wor
k
on t
h
e a
i
r
b
a
g
s
y
stem must
b
e
c
arried out by a CITROËN dealer or a
q
uali
f
ied worksho
p
.
Even if all of the precautions mentioned
are observed, a risk of in
j
ur
y
or of minor
burns to the head
,
chest or arms when an
airba
g
is deplo
y
ed cannot be ruled out. The
ba
g
in
f
lates almost instantl
y
(
within a
f
ew
m
illiseconds
)
then de
f
lates within the same
t
i
me
di
sc
h
ar
gi
n
g
t
h
e
h
ot
g
as v
i
a open
i
n
g
s
p
rovided
f
or this
p
ur
p
ose.
K
nee airba
g
*
D
o not s
i
t w
i
t
h
y
our
k
nees an
y
nearer to t
h
e
steering wheel than necessary.
Front airba
g
s
Do not drive holdin
g
the steerin
g
wheel b
y
its
s
pokes or restin
g
y
our hands on the centre
part of the wheel.
Passen
g
ers must not place their feet on the
dashboa
r
d
.
I
f
possible, do not smoke as deplo
y
ment o
f
the airba
g
s can cause burns or the risk o
f
in
j
ur
y
f
rom a ci
g
arette or pipe.
Never remove or pierce the steering wheel or
hit it violentl
y
.
For the airba
g
s to be full
y
effective, observe the followin
g
safet
y
rules:
Lateral airba
g
s
Use onl
y
approved covers on the seats,
c
ompatible with the deplo
y
ment the lateral
a
irba
g
s. For information on the ran
g
e of seat
c
overs suitable for
y
our vehicle,
y
ou can
c
ontact a
C
ITR
OË
N dealer.
R
efe
r t
o
th
e
"A
ccesso
ri
es
"
sec
ti
o
n.
Do not
f
ix or attach an
y
thin
g
to the seat
backs
(
clothin
g
...
)
. This could cause in
j
ur
y
to the chest or arms i
f
the lateral airbag is
deplo
y
ed.
Do not sit with the upper part of the bod
y
an
y
n
earer to the door than necessar
y
.
*
Accordin
g
to countr
y
.
A
vo
id
attac
hi
n
g
a
h
eav
y
o
bj
ect to t
h
e
k
e
y
as
it could become a dan
g
erous pro
j
ectile i
f
the
a
i
r
b
a
g
were
d
ep
l
o
y
e
d
.
Curtain airba
g
s
Do not
f
ix or attach an
y
thin
g
to the roo
f
. This
c
ould cause injury to the head i
f
the curtain
airba
g
is deplo
y
ed.
If fitted on
y
our vehicle, do not remove the
g
rab handles installed on the roof, the
y
pla
y
a part in securin
g
the curtain airba
g
s.

159
6
Safety
General points relating to child seats
For maximum sa
f
et
y
, please observe the
f
ollowin
g
recommendations:
- in accordance with European regulations,
a
ll children under the a
g
e of 12 or less
than one and a half metres tall must
travel in a
pp
roved child seats suited to
their wei
g
h
t
,
on seats fitted with a seat
belt or ISOFIX mountin
g
s * ,
-
statisticall
y
, the safest seats in
y
ou
r
vehicle for carr
y
in
g
children are the
r
ear seats
,
-
a
child weighing less than 9 kg must
travel in the "rearwards-facin
g
" position
b
oth in the front and in the rear
.
CITROËN recommend
s
th
a
t
c
hil
d
r
e
n
s
h
ou
l
d
tr
a
v
e
l in th
e
r
ear seat
s
o
f
y
our
v
e
hi
c
l
e
:
-
"rearwards-facin
g
" up to the a
g
e of 2,
-
"forwards-facin
g
" over the a
g
e of 2.
A
lthou
g
h one of CITROËN's main criteria when desi
g
nin
g
y
our vehicle, the safet
y
of
y
our children
also depends on
y
ou.
*
The rules
f
or carrying children are speci
f
ic to
e
ach countr
y
. Re
f
er to the current le
g
islation
in
y
our countr
y
.
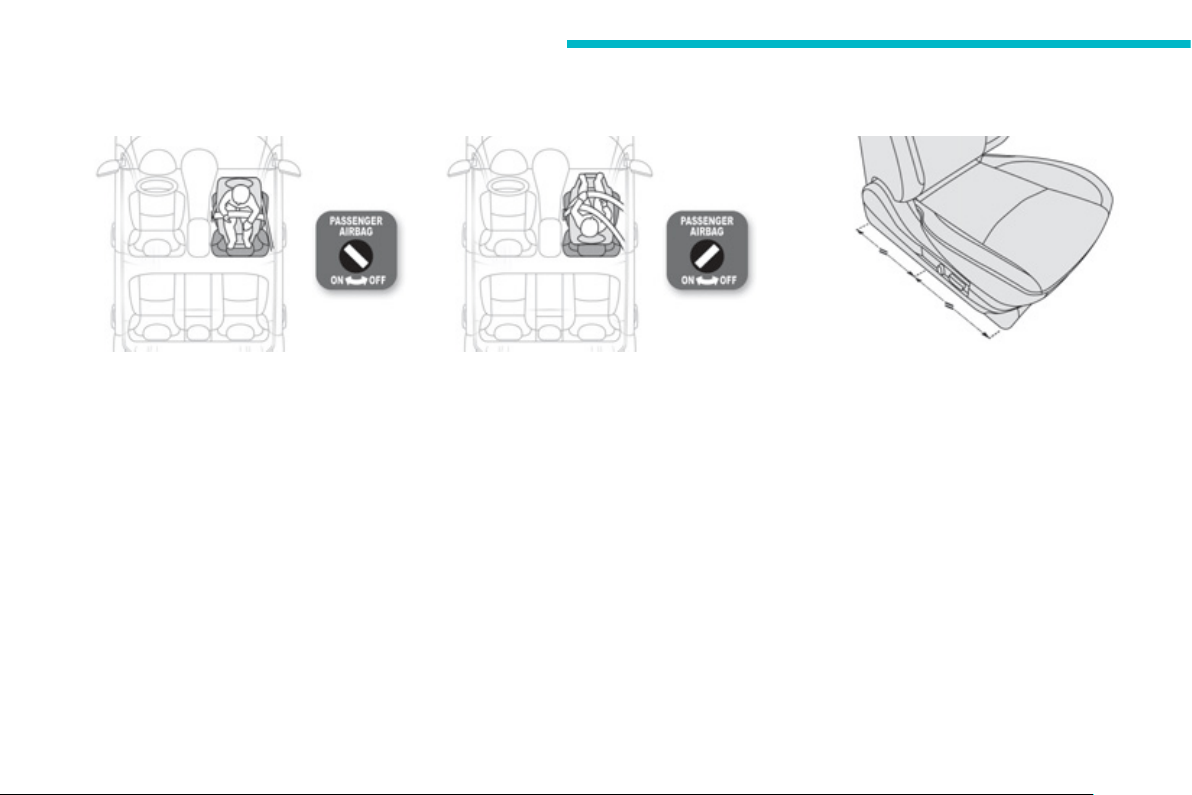
160
Safety
Child seat in the front
"Rearwards-facin
g
"
When a "rearwards-facin
g
" child seat is
i
n
s
t
alled
o
n t
he
f
ront passen
g
er sea
t
,
i
t
i
s essent
i
a
l
t
h
at t
h
e passen
g
er a
i
r
b
a
g
i
s
deactivated.
O
therwise,
th
e c
hild
wou
ld
r
isk being seriously injured or killed if the
a
irba
g
were to inflat
e
.
"Forwards-facin
g
"
When a "forwards-facin
g
" child seat is installed
o
n t
he
f
ront passen
g
er sea
t
, a
dj
ust t
h
e
ve
hi
c
l
e
'
s seat to t
h
e
i
nterme
di
ate
l
on
gi
tu
di
na
l
pos
i
t
i
on w
i
t
h
t
h
e seat
b
ac
k
upr
igh
t an
d
l
eave
the passenger airbag activated.
Intermediate lon
g
itudinal
p
os
i
t
i
on
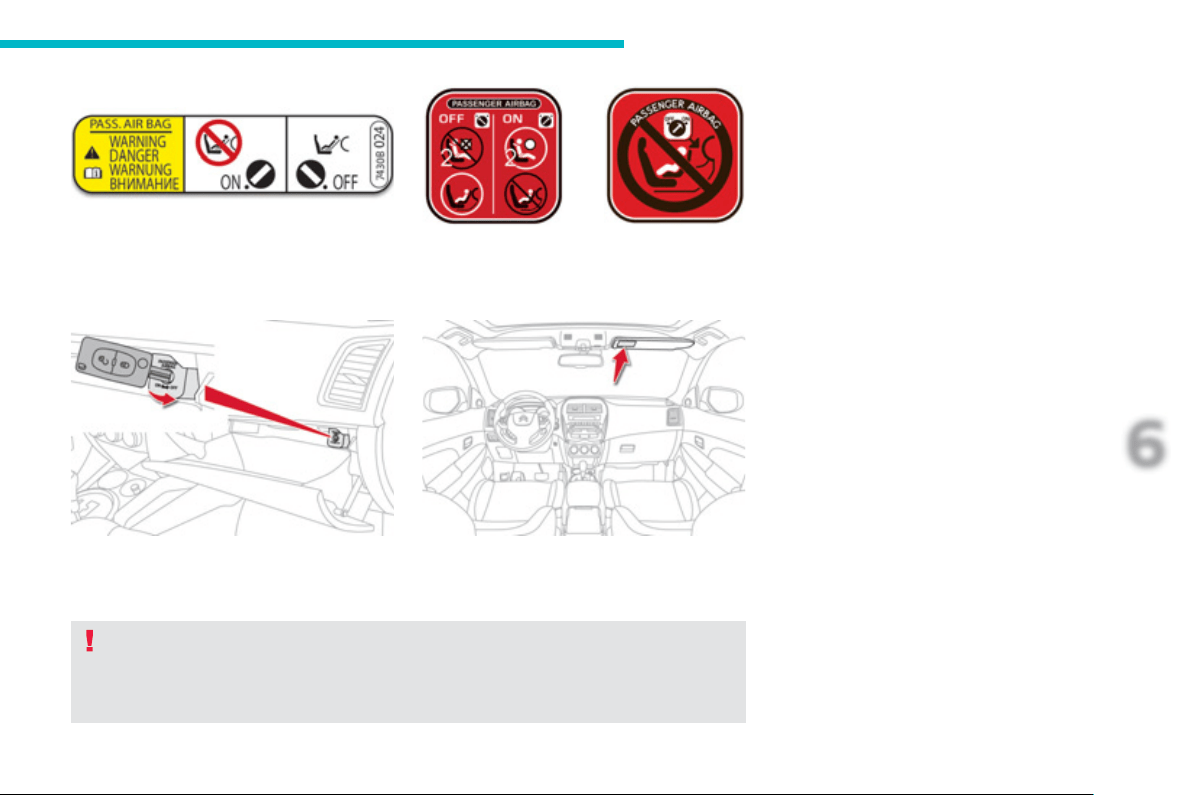
161
6
Safety
Passen
g
er airba
g
OFF
Refer to the advice
g
iven on the label present
on both sides of the passen
g
er's sun visor.
To assure the sa
f
ety o
f
your child, you must deactivate the passenger's
f
ront airbag when
y
ou install a child seat in the rearwards
f
acin
g
position on the
f
ront passen
g
er's seat.
O
therwise, there is a risk that the child could be seriousl
y
in
j
ured or killed if the airba
g
were
deplo
y
ed.

162
Safety
Child seats recommended by CITROËN
Group 0+: from birth to 13 k
g
L1
"
R
Ö
MER Bab
y
-Safe Plus"
Installed in the rearwards-
f
acin
g
position.
G
roup 1: from 9 to 18 k
g
L2
"FAIR
G
0/
1
S
I
SO
FIX"
Installed
f
orwards-
f
acing, without the I
SO
FIX base.
6
positions o
f
inclination o
f
the shell.
L
3
"
R
Ö
MER Duo Plus I
SO
FIX"
Installed forwards-facin
g
.
C
an be secured with the seat belt.
3 positions o
f
inclination o
f
the shell.
CITRO
Ë
N offers a range of recommended child seats which are secured using a three point seat
b
el
t
:
Th
ese seats can a
l
so
b
e
i
nsta
ll
e
d
us
i
n
g
the I
SO
FIX mountin
g
s
(
see
f
ollowin
g
pa
g
es
)
.
Follow the instructions for fitting
t
he child seat
g
iven in the seat
m
anufacturer's installation
g
uide
.
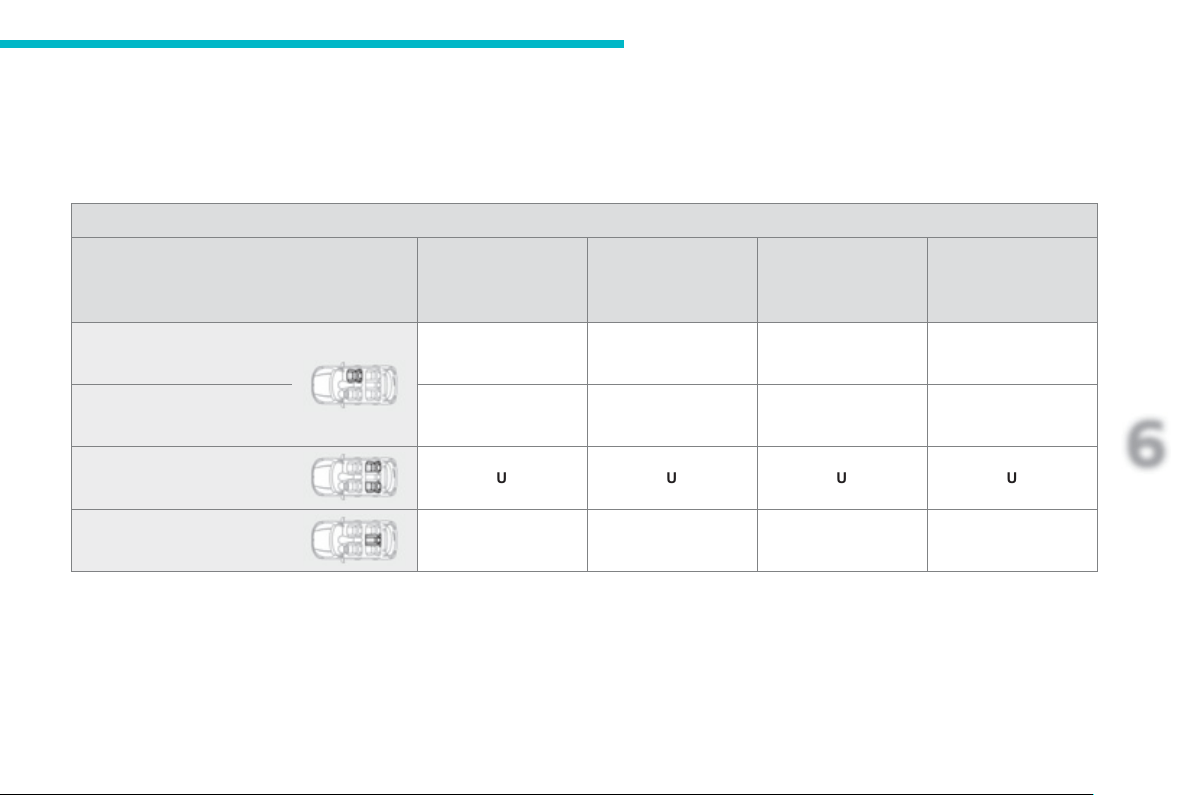
163
6
Safety
Locations for child seats secured using the seat belt
In accordance with European regulations, this table indicates the options
f
or installing child seats secured using a seat belt and universally approved
(
a
)
in relation to the wei
g
ht o
f
the child and the seat in the vehicle.
Sea
t
Wei
g
ht of the child and indicative a
ge
L
ess than 13 k
g
(g
roups 0
(
b
)
and 0+
)
Up to ≈ 1
y
ear
From 9 to 18 k
g
(g
roup 1
)
F
rom 1 to ≈ 3
y
ears
From 15 to 25 k
g
(g
roup 2
)
From 3 to ≈ 6
y
ears
From 22 to 36 k
g
(g
roup 3
)
F
rom 6 to ≈ 10
y
ears
Front passen
g
er seat
(
c
)
with
passen
g
er a
i
r
b
a
g
act
i
vate
d
X
X
X
X
Front passen
g
er seat
(
c
)
with
passen
g
er airba
g
deactivated
L1
L
2
,
L
3
X
X
O
uter rear seats
(
row 2
)
U
U
U
U
C
entre rear seat
(
row 2
)
L1
L
2, L
3
X
X
(
a
)
Universal child seat: child seat which can be installed in all vehicles usin
g
the seat belt.
(
b
)
G
roup 0:
f
rom birth to 10 kg. In
f
ant car seats and "car cots" cannot be installed on the
f
ront passenger seat.
(
c
)
C
onsult the le
g
islation in
f
orce in
y
our countr
y
be
f
ore installin
g
y
our child on this seat.
U:
seat suitable for the installation of a child seat secured usin
g
the seat belt and universall
y
approved, "rear facin
g
" and/or "forward facin
g
".
X
:
seat not suitable for the installation of a child seat of the wei
g
ht
g
roup indicated.
L
-: onl
y
the child seats indicated can be installed on the seat concerned
(
accordin
g
to countr
y)
.
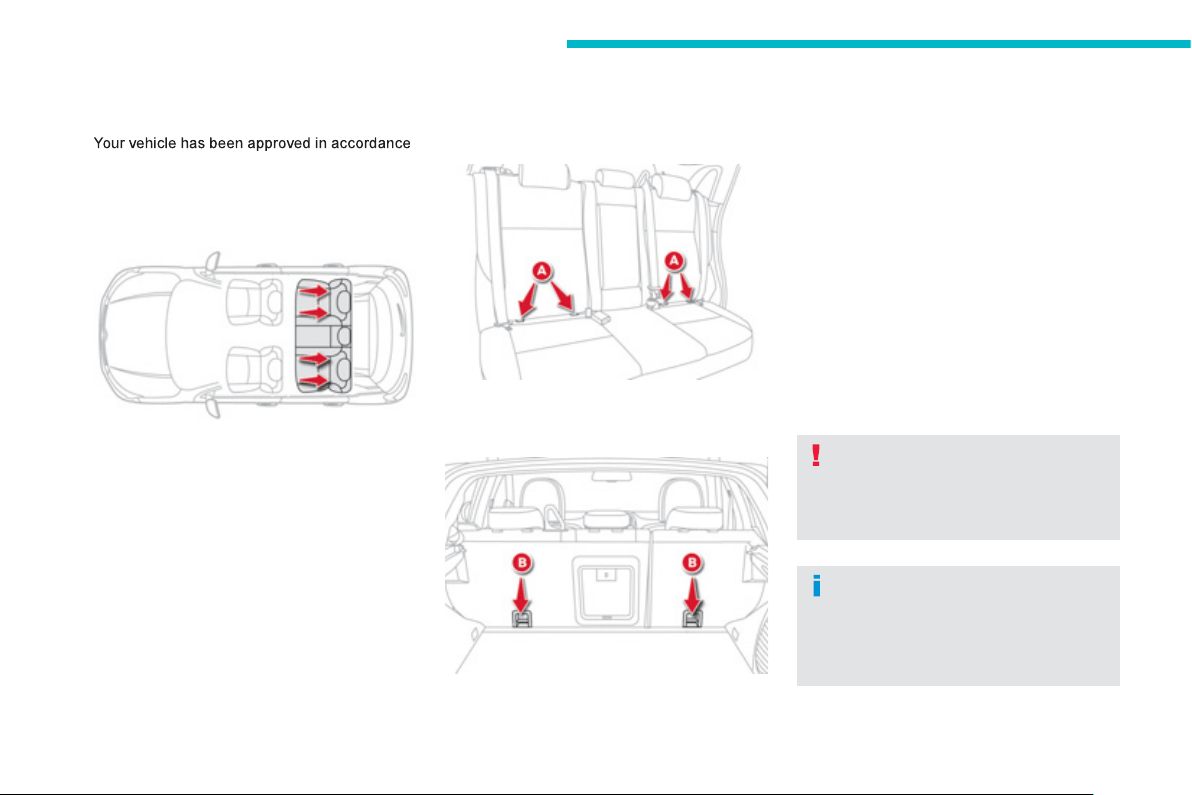
164
Safety
"ISOFIX" mountings
with th
e
l
ates
t
I
SO
FIX
r
e
g
ulation
s
.
The seats, represented below, are
f
itted with
r
e
g
ulation I
SO
FIX mountin
g
s:
- two rings
A
, located between the vehicle
s
eat back and cushion, indicated b
y
a label,
- a rin
g
B
,
behind the seat
,
referred to as the
T
OP TETHER
f
or
f
ixin
g
the upper strap.
This IS
O
FIX mountin
g
s
y
stem provides fast,
reliable and safe fittin
g
of the child seat in
y
our
v
ehicle
.
The
ISOFIX child seats
a
r
e
f
itt
ed
with tw
o
l
atc
h
es w
hi
c
h
are eas
ily
secure
d
on t
h
e two
rings
A
.
S
ome also have an
upp
er stra
p
whi
c
h i
s
attached to rin
g
B
.
To attach this strap, raise the vehicle seat's
h
ead restraint then pass the hook between its
rods. Then fix the hook on rin
g
B
and ti
g
hten
t
h
e upper strap.
Th
e
in
co
rr
ec
t in
s
t
a
ll
a
ti
o
n
of
a
c
hil
d
sea
t
i
n a ve
hi
c
l
e com
p
rom
i
ses t
h
e c
hild'
s
p
rotection in the event o
f
an accident.
For in
f
ormation re
g
ardin
g
the I
SO
FIX
c
hil
d
sea
t
s
whi
c
h
ca
n
be
in
s
t
a
ll
ed
in
y
our vehicle, re
f
er to the table showin
g
the locations for installin
g
IS
O
FIX child
sea
t
s
.
There are three rin
g
s for each seat:
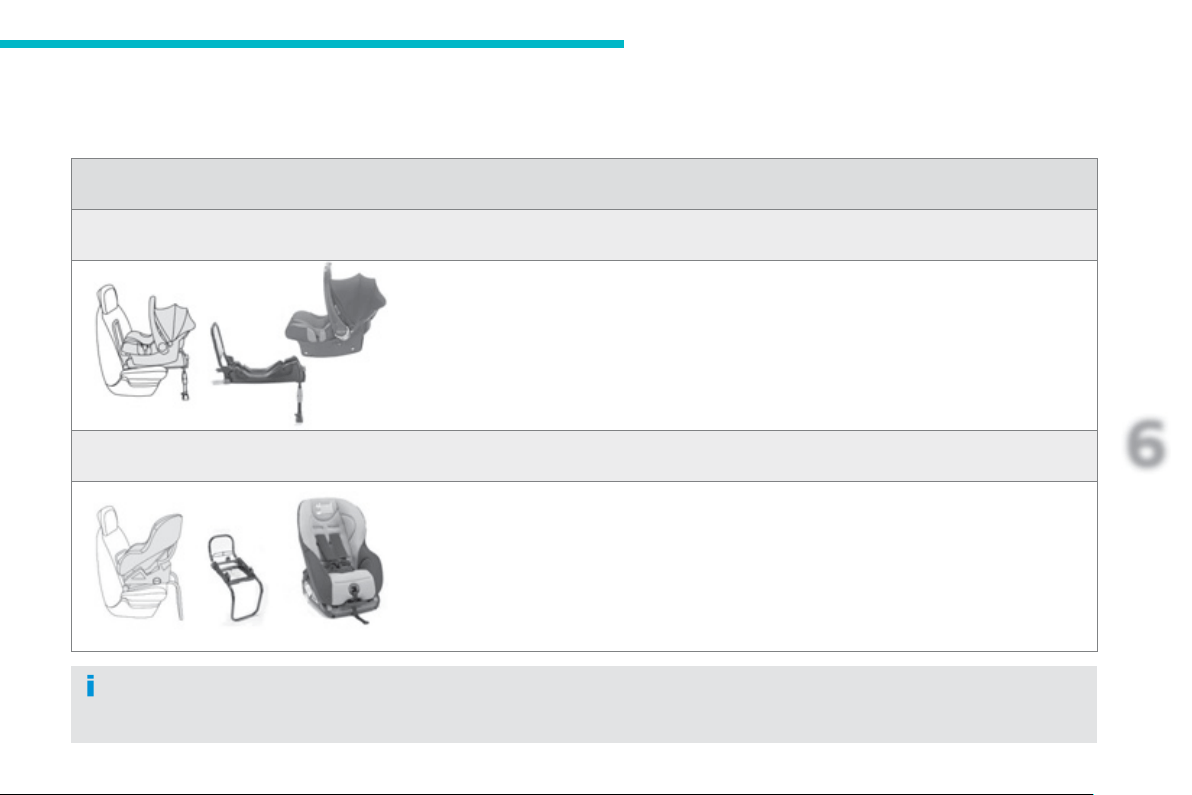
165
6
Safety
ISOFIX child seat recommended by CITROËN and approved for your vehicle
These child seats can also be used on seats which are not fitted with IS
O
FIX mountin
g
s.
In this case, the
y
must be attached to the vehicle seat usin
g
the three point seat belt.
Follow the instructions for fittin
g
the child seat
g
iven in the seat manufacturer's installation
g
uide
.
CITROËN offers a ran
g
e of child seats secured usin
g
the ISOFIX mountin
g
s.
G
roup 0+: up to 13 k
g
IL
1
RÖMER Bab
y
-Safe Plus and its Bab
y
-Safe plus ISOFIX bas
e
Installed in the rearwards-
f
acin
g
position usin
g
its I
SO
FIX base, which is attached to the rin
g
s
A
.
The base has a height-adjustable stay.
IL2
FAIR G 0/1 S and its RWF ISOFIX bas
e
Installed in the rearwards-facin
g
position usin
g
its IS
O
FIX base, which is attached to the rin
g
s A .
The base has a sta
y
.
6
positions of inclination for the shell.
This confi
g
uration is reserved for children wei
g
hin
g
up to 13 k
g
.
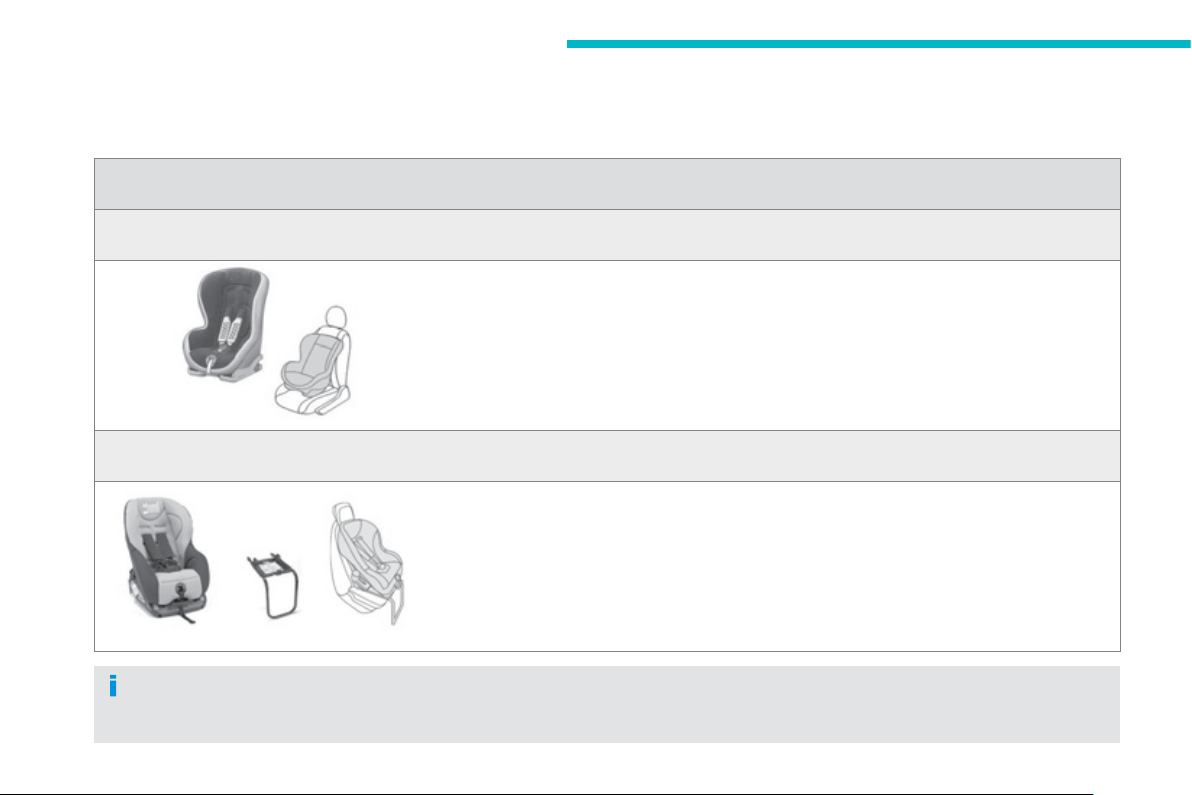
166
Safety
G
roup 1: from 9 to 18 kg
I
L3
RÖMER Duo Plus ISOFIX
Installed
f
orwards-
f
acin
g
.
A
ttac
h
e
d
to t
h
e r
i
n
g
s
A
, as we
ll
as r
i
n
g
B
, known as the T
O
P TETHER,
u
sing an upper strap.
3
p
ositions o
f
inclination o
f
the shell.
IL4
FAIR G 0/1 S and its FWF ISOFIX
b
as
e
Installed in the rearwards-facin
g
position usin
g
its IS
O
FIX base, which is attached to the rin
g
s
A
.
the base has a sta
y
.
6
positions of inclination of the shell.
This confi
g
uration is suitable for children wei
g
hin
g
more than 13 k
g
.
These child seats can also be used on seats which are not
f
itted with I
SO
FIX mountin
g
s.
I
n t
hi
s case, t
h
e
y
must
b
e attac
h
e
d
to t
h
e ve
hi
c
l
e seat us
i
n
g
t
h
e t
h
ree po
i
nt seat
b
e
l
t.
Follow the instructions for fittin
g
the child seat
g
iven in the seat manufacturer's installation
g
uide
.

167
6
Safety
Locations for ISOFIX child seats
m
ountin
g
s.
In the case of universal and semi-universal IS
O
FIX child seats, the IS
O
FIX size cate
g
or
y
, determined b
y
a letter between
A
a
n
d
G
, is indicated on the
c
hild seat next to the IS
O
FIX lo
g
o.
Wei
g
ht of the child
/
indicative a
g
e
L
ess than 10 kg
(g
roup 0
)
U
p to approx.
6
months
L
ess than 10 k
g
(g
roup 0
)
L
ess t
h
an 13 k
g
(g
roup 0+
)
Up to approx. 1
y
ear
From 9 to 18 k
g
(g
roup 1
)
F
rom approx.
1
to
3
y
ears
Ty
pe of ISOFIX child sea
t
i
nfant car sea
t
"rear facin
g
""rear facin
g
" "forward facin
g
"
ISOFIX size cate
g
or
y
F
G
C
D
E
C
D
A
B
B1
U
niversal and semi-universal ISOFIX child
s
eats which can be installed on the outer
rear sea
t
s
X
X
IL1
IL2
X
IUF
I
UF
:
sea
t
su
it
ab
l
e
fo
r th
e
in
s
t
a
ll
a
ti
o
n
of
a
n
I
sof
ix
U
niversal seat, "F orward
f
acin
g
" secured usin
g
the "Top Tether" upper strap.
For advice on securin
g
of the "Top Tether" upper strap, refer to the "IS
O
FIX mountin
g
s" section.
I
L-
:
onl
y
the child seats indicated can be installed usin
g
the IS
O
FIX mountin
g
s.
X
:
seat not suitable for the installation of an IS
O
FIX seat of the size cate
g
or
y
indicated.
If in the wa
y
, the head restraint of the vehicle's ISOFIX seat must be removed and stowed safel
y
.

168
Safety
Th
e
in
co
rr
ec
t in
s
t
a
ll
a
ti
o
n
o
f
a
c
hil
d
sea
t in
a
ve
hi
c
l
e comprom
i
ses t
h
e c
hild'
s protect
i
on
i
n
th
e
e
v
e
nt
of
a
n
acc
i
de
nt.
R
e
m
e
m
be
r t
o
fas
t
e
n th
e
sea
t
be
lt
s
o
r th
e
c
hil
d
sea
t h
a
rn
esses
k
eeping the slac
k
in
relation to the child's bod
y
t
o a minimu
m
,
e
ven for short
j
ourne
y
s.
For optimum installation of the "forward
facin
g
" child seat, ensure that the back o
f
th
e
c
hil
d
sea
t i
s
in
co
nt
ac
t with th
e
bac
k
of
t
he
v
ehicle's
sea
t
a
n
d
t
ha
t t
he
head
r
es
tr
ai
nt
does not cause an
y
discom
f
ort.
I
f
the head restraint has to be removed,
e
nsure that it is stored or attached securely
to prevent it
f
rom bein
g
thrown around the
vehicle in the event of sharp brakin
g
.
Advice on child seats
Installin
g
a booster seat
The chest
p
art o
f
the seat belt must be
p
ositioned on the child's shoulder without
touchin
g
the neck.
Ensure that the lap part of the seat belt
p
asses correctl
y
over the child's thi
g
hs.
C
ITR
O
ËN recommends the use of a booste
r
seat which has a back
,
fitted with a seat belt
g
u
id
e at s
h
ou
ld
er
l
eve
l
.
As a sa
f
et
y
precaution, do not leave:
-
o
n
e
o
r m
o
r
e
child
r
e
n
alo
n
e
a
n
d
u
nsu
p
ervised in a vehicle,
-
a
c
hil
d
o
r
a
n
a
nim
a
l in
a
v
e
hi
c
l
e
whi
c
h
is exposed to the sun, with the windows
c
losed,
- the ke
y
s within reach of children inside
th
e
v
e
hi
c
l
e
.
To prevent accidental openin
g
o
f
the doors,
use
th
e
"
C
hil
d
l
oc
k".
T
a
k
e care not to open t
h
e rear w
i
n
d
ows
by
m
o
r
e
th
a
n
o
n
e
thir
d
.
To protect
y
oun
g
children
f
rom the ra
y
s o
f
the sun, fit side blinds on the rear windows.
Children under the a
g
e of 10 must not travel
in the "
f
orward
f
acin
g
" position on the
f
ront
passen
g
er seat, un
l
ess t
h
e rear seats are
a
l
rea
dy
occup
i
e
d
by
ot
h
er c
hild
ren, cannot
be
used
o
r
a
r
e
abse
nt.
Deactivate the passen
g
er's airba
g
when a
"
rear facin
g
" child seat is installed on the
f
ront seat.
O
therwise, the child would risk
bein
g
seriousl
y
in
j
ured or killed if the airba
g
w
e
r
e
t
o
infl
a
t
e
.
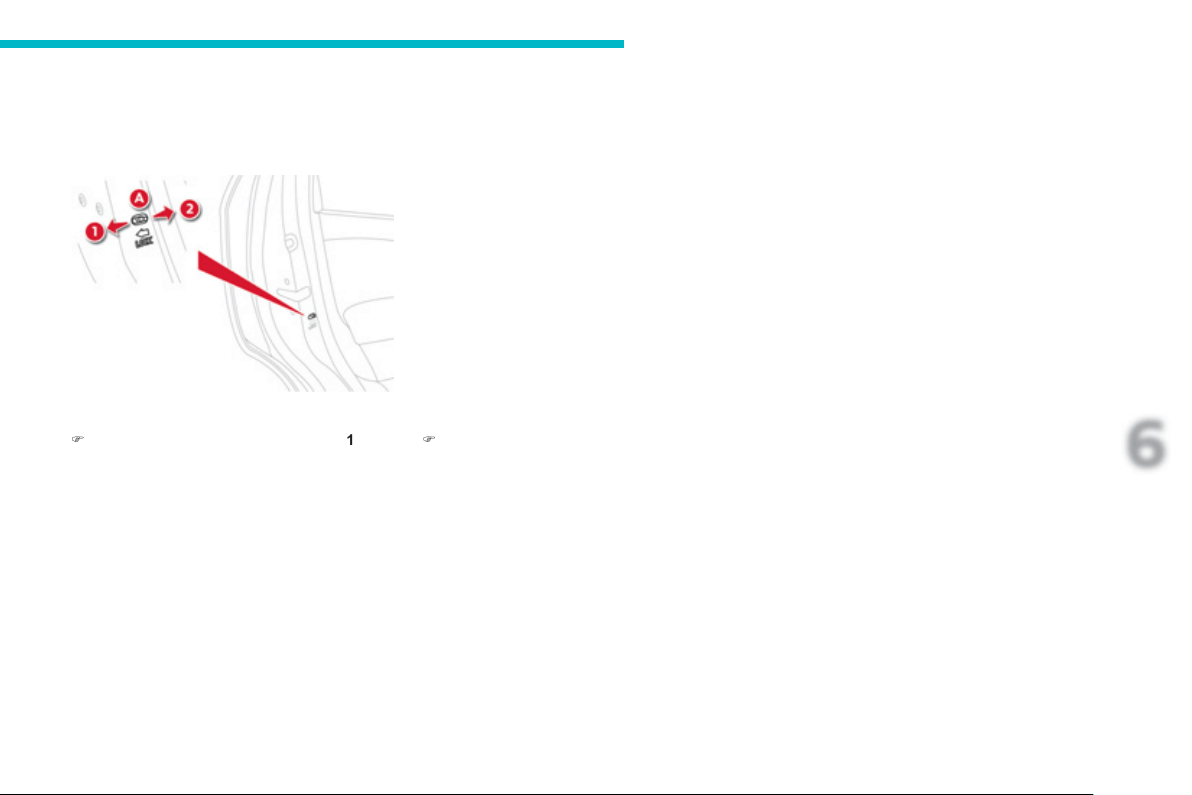
169
6
Safety
Child lock
Mechanical s
y
stem to prevent openin
g
of the rear doors usin
g
their interior controls.
The control is located on the ed
g
e of each rear door.
Child lock on
)
M
o
v
e
th
e
co
ntr
o
l
A
towards position
1
.
Child lock off
)
M
o
v
e
th
e
co
ntr
o
l
A
towards position
2
.
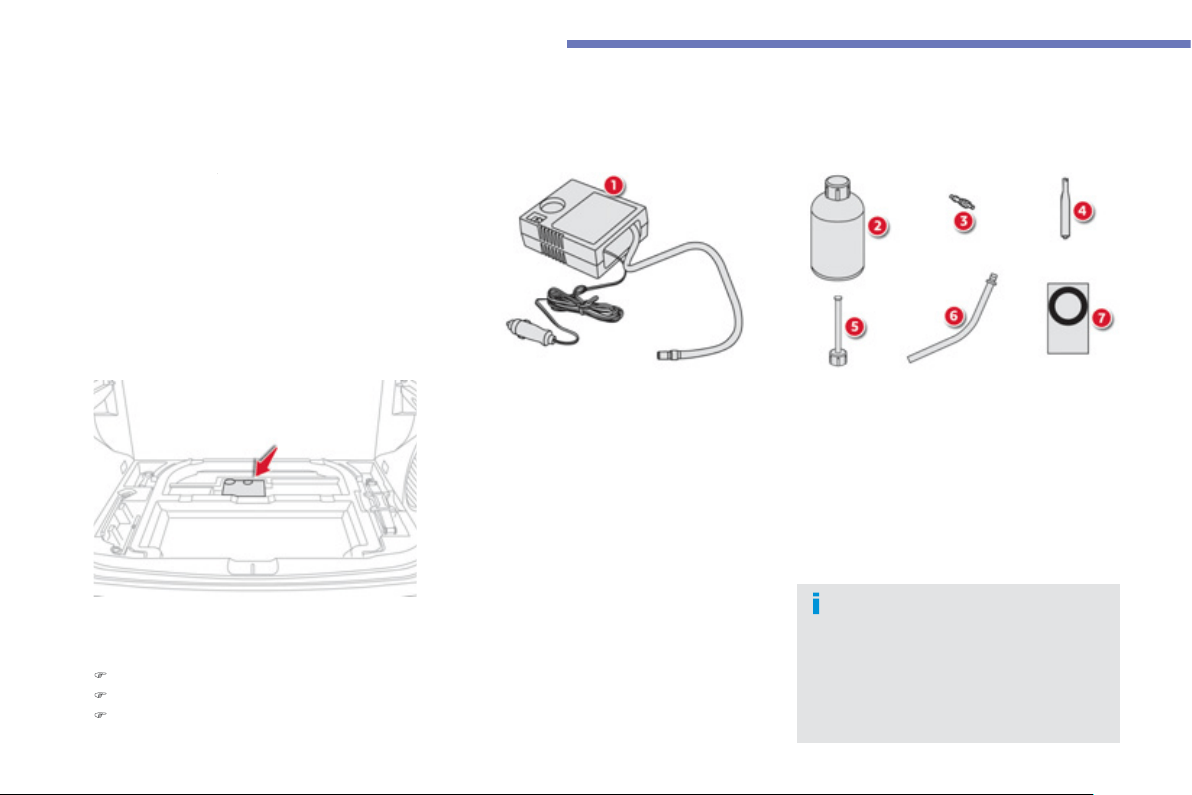
170
Practical information
Thi
s
kit i
s
in
s
t
a
ll
ed
in th
e
boo
t
u
n
de
r th
e
fl
oo
r.
Complete s
y
stem consistin
g
of a compressor
a
nd a sealant cartrid
g
e which permits the
temporar
y
repai
r
of a tyre so that you can
r
drive to the nearest
g
ara
g
e.
I
t
i
s
d
es
ig
ne
d
to repa
i
r most punctures w
hi
c
h
c
ould a
ff
ect the t
y
re, located on the t
y
re tread
o
r
shoulde
r.
Temporary puncture repair kit
A
ccess to t
h
e
ki
t
1
.
12 V compressor with inte
g
ral pressure
g
au
g
e, to measure and ad
j
ust the t
y
re
press
u
re
.
F
o
r
access
t
o
it:
)
O
pen the boot.
)
Lift
a
n
d
r
e
m
o
v
e
th
e
fl
oo
r.
)
Take
ou
t t
he
ki
t.
Com
p
osition of the kit
The speed restriction sticker must be
affixed to the vehicle's steerin
g
wheel to
remind
y
ou that a wheel is in temporar
y
use
.
Do not exceed a speed o
f
50 mph
(
80 km
/
h
)
when drivin
g
with a t
y
re
repaired usin
g
this t
y
pe o
f
kit.
2.
Sealant cartrid
g
e for the temporar
y
repair
of a t
y
re.
3.
R
ep
l
acement va
l
ve core.
4.
Valve core removal
/f
ittin
g
tool.
5
.
I
n
j
ect
i
on p
i
pe.
6
.
S
uction
p
i
p
e, to remove the sealant
p
roduct
i
f
necessar
y
.
7
.
Speed limit sticker.
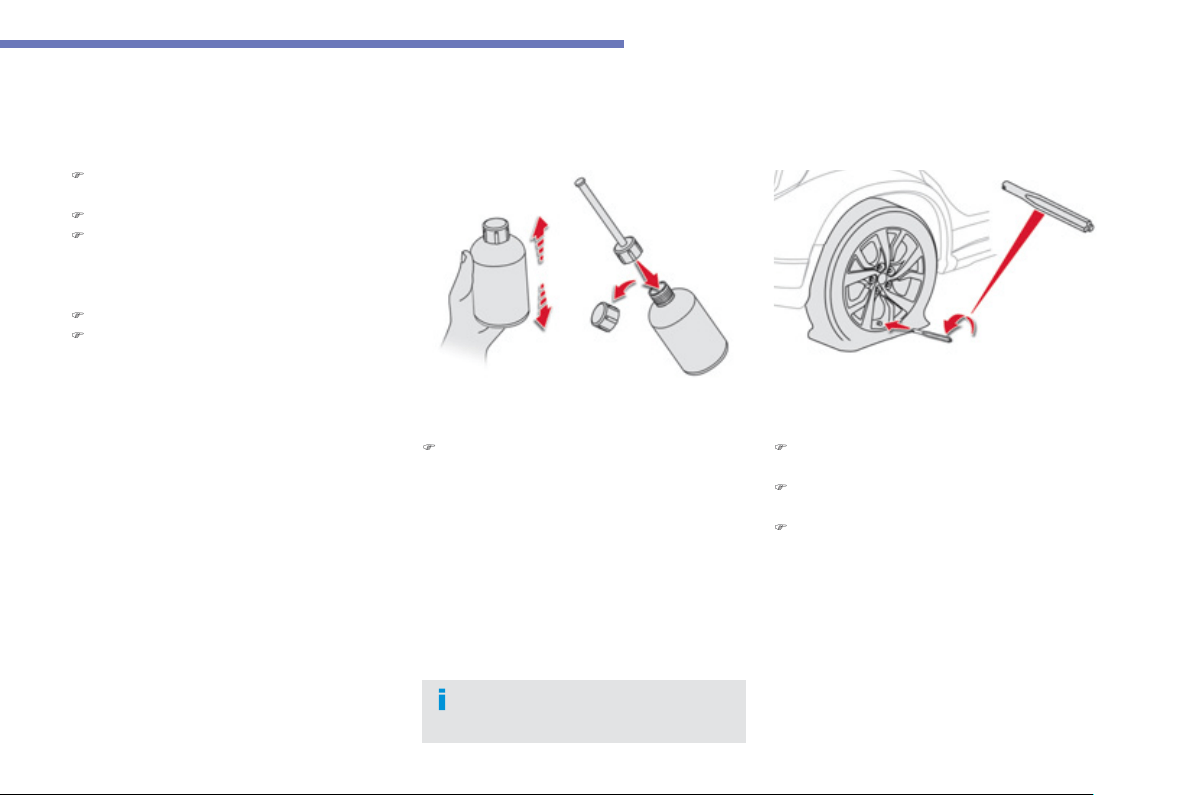
171
7
Practical information
1. Sealin
g
Re
p
air
p
rocedure
Avoid removin
g
an
y
f
orei
g
n bodies
which have penetrated into the tyre.
)
S
top the vehicle in as sa
f
e a location as
p
ossible and on a level and stable sur
f
ace.
)
Apply the parking brake.
)
Place the
g
ear lever in position R
fo
r
vehicle with a manual
g
earbox, or in
p
osition
P
for vehicles fitted with a
C
VT
g
earbox.
)
Switch off the i
g
nition.
)
I
n
di
cate on t
h
e spee
d
restr
i
ct
i
on st
i
c
k
er
p
rovided, the wheel to be repaired, then
f
ix
i
t to t
h
e steer
i
n
g
w
h
ee
l
as a rem
i
n
d
er t
h
at a
wheel is in temporary use.
)
Remove the valve cap
f
or the t
y
re to be
re
p
aired.
)
Remove the valve core usin
g
the tool
p
rovided, and store in in a clean place.
)
Connect the in
j
ection pipe to the valve o
f
the t
y
re to be repaired.
)
S
hake the sealant cartrid
g
e, remove the
c
ap and screw on the injection pipe.
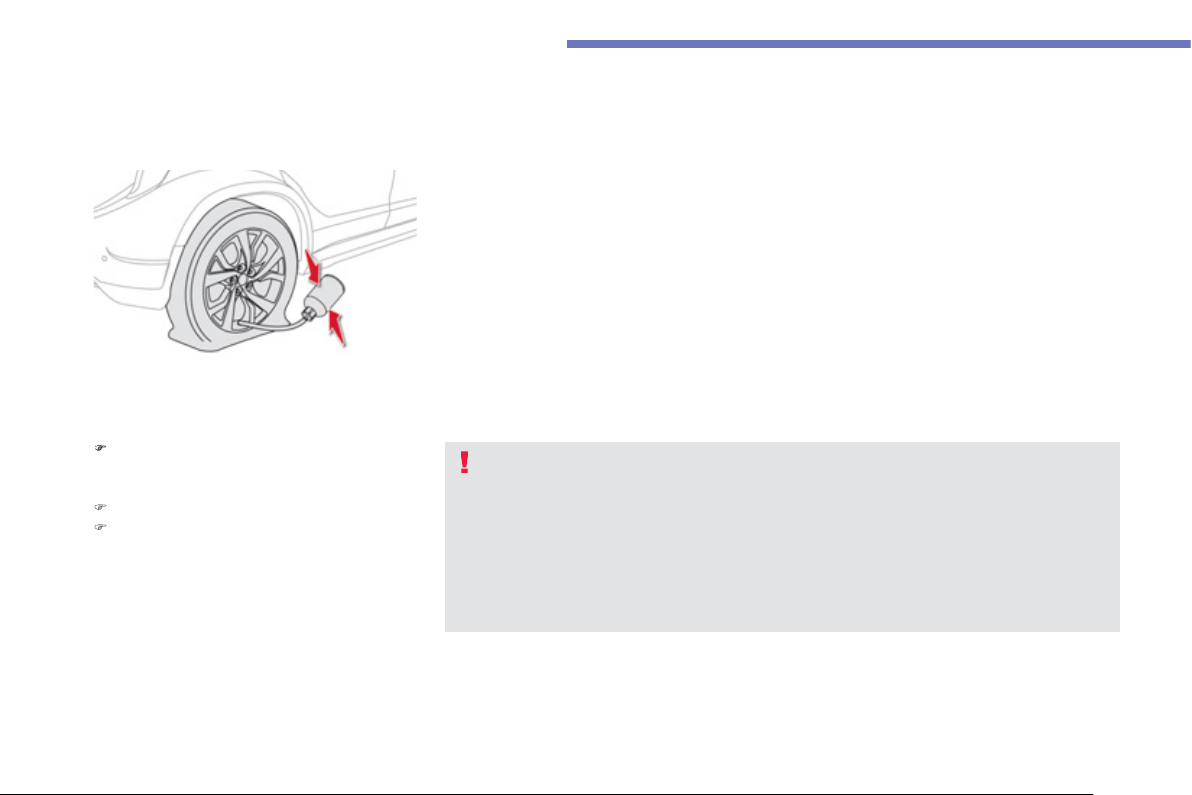
172
Practical information
Tap the sealant cartrid
g
e
(
top down
)
several times with your hand, so as to inject
a
ll of the
p
roduc
t
into the t
y
re.
)
Remove the in
j
ection pipe.
)
Refit the valve core and ti
g
hten it usin
g
the
tool provided.
Take care, this product is harmful
(
e.
g
. eth
y
lene-
g
l
y
col, colophon
y
...
)
if swallowed and
c
auses
i
rr
i
tat
i
on to t
h
e e
y
es.
Keep it out o
f
reach o
f
children.
The use-b
y
date o
f
the sealant is marked on the cartrid
g
e.
After use, do not discard the empt
y
cartrid
g
e but take it to a CITROËN dealer
(
France
)
or an
a
uthorised waste dis
p
osal site.
Don't for
g
et to obtain a replacement cartrid
g
e; the
y
are available from a CITROËN dealer or
a
qualified workshop.
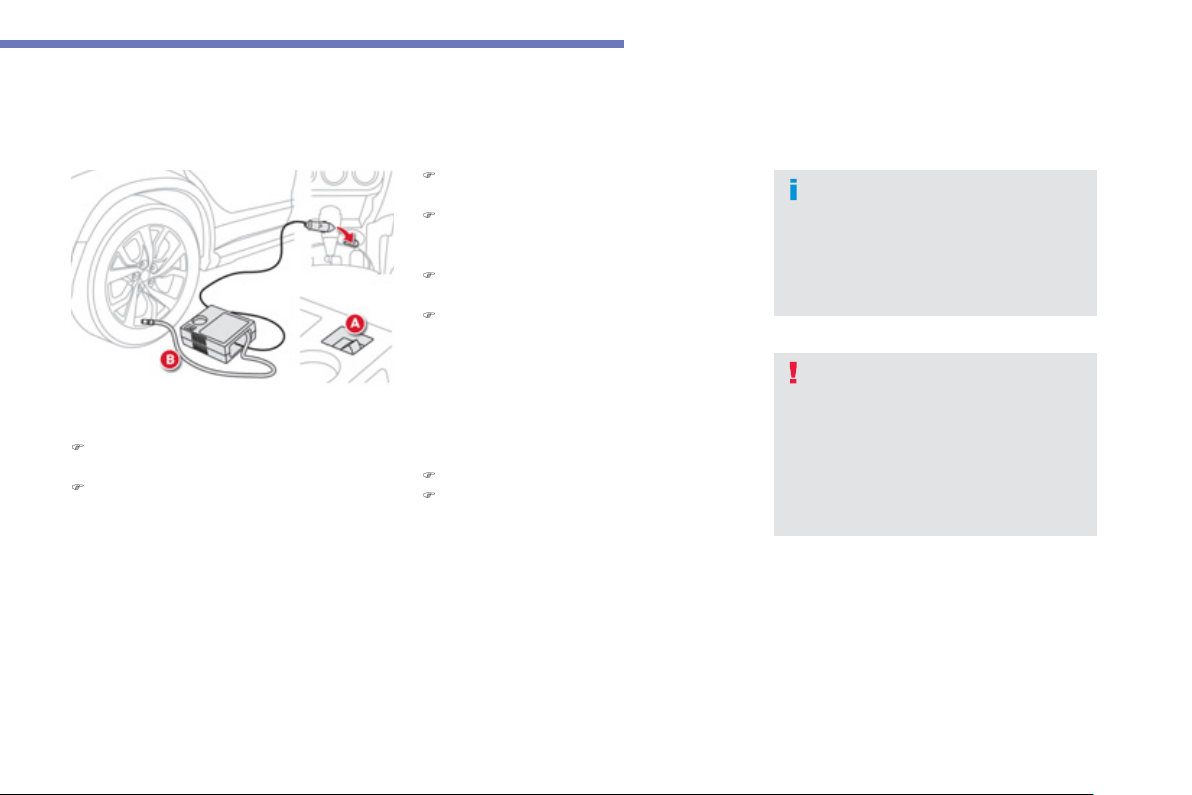
173
7
Practical information
2. Infl ation
)
C
heck that the com
p
ressor switch
A
is
i
n
th
e
"OFF"
p
osition.
)
Uncoil the com
p
ressor
p
i
p
e
B
.
)
C
onnect this pipe to the valve o
f
the
r
e
p
a
i
re
d
w
h
ee
l
.
)
C
onnect the compressor's electric plug to
the vehicle's 12 V socket
(
i
g
nition switch in
position "ACC" or ACC mode
)
.
)
Start the compressor b
y
turnin
g
the
s
wit
c
h A t
o
th
e
"ON" position.
)
Usin
g
the compressor, ad
j
ust the pressure
i
n accor
d
ance w
i
t
h
t
h
e ve
hi
c
l
e
'
s t
y
re
pressure label
(
located in the driver's doo
r
aperture
)
.
A loss o
f
p
ressure indicates that the
puncture has not been
f
ull
y
plu
gg
ed;
c
ontact a CITROËN dealer or a qualified
workshop for assistance.
)
Remove the compressor and stow the kit.
)
Drive off strai
g
ht awa
y
at reduced speed
(
50 mph [80 km
/
h] max
)
f
or around 3 miles
(
5 km
)
or 10 minutes.
As soon as possible,
g
o to a CITROËN
dealer or a qualified workshop.
Tell the technician that
y
ou have used
the kit. After checkin
g
, the technician
will advise
y
ou whether the t
y
re can be
repa
i
re
d
or must
b
e rep
l
ace
d
.
If after around 10 minutes the pressure
is not attained, this indicates that
the t
y
re is not repairable; contact
a CITROËN dealer or a qualified
workshop for assistance.
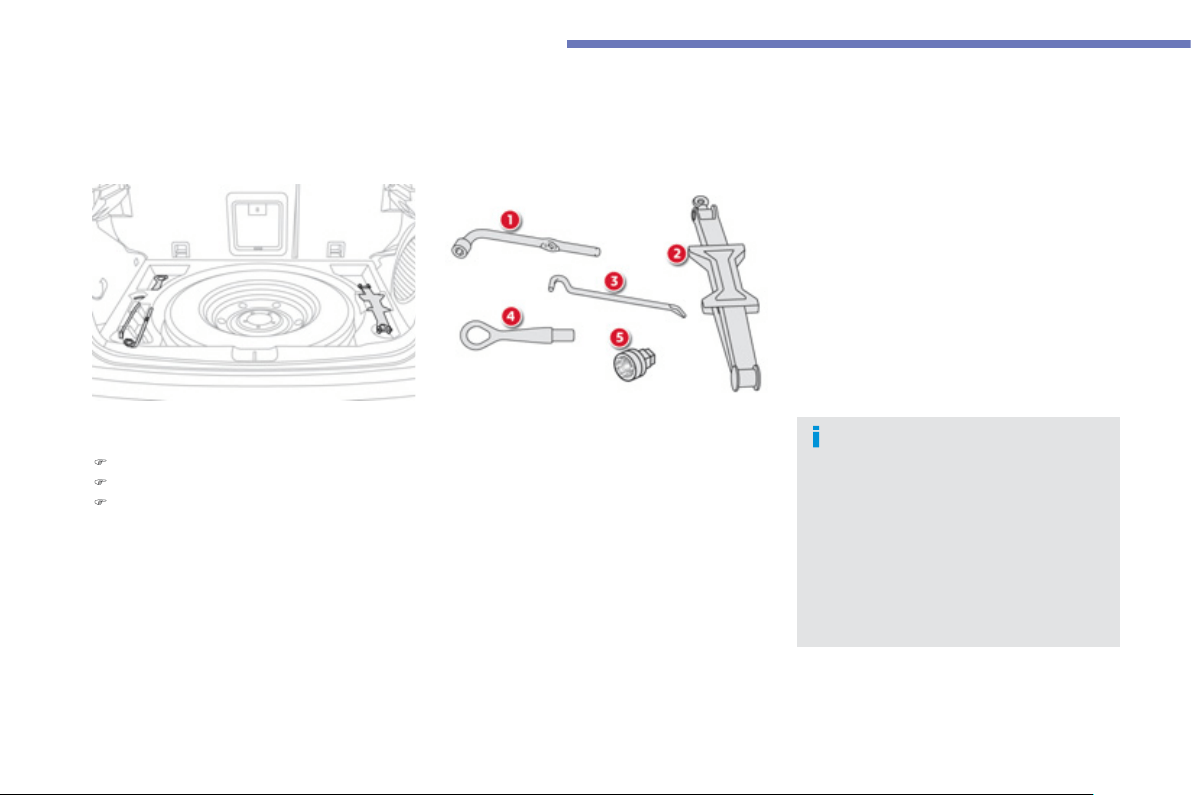
174
Practical information
Changing a wheel
Th
e
t
oo
l
s
a
r
e
s
t
o
r
ed
in th
e
boo
t
u
n
de
r th
e
fl
oo
r.
To
g
ain access to them:
)
O
pen the boot.
)
Lift
a
n
d
r
e
m
o
v
e
th
e
boo
t fl
oo
r.
)
Take
ou
t t
he
t
ools
.
A
ccess to the tools
List of tools
All of these tools are specific to
y
our vehicle.
D
o not use them
f
or an
y
thin
g
else.
1.
Wheelb
r
ace
.
Used
t
o
r
e
m
o
v
e
t
he
w
heel
tr
i
m
a
n
d
t
he
wheel
f
ixing bolts.
2
.
Jack.
Used to raise the vehicle.
3.
H
a
n
d
l
e
.
Used to operate the
j
ack.
4.
Removable towin
g
e
y
e.
S
ee "Recoverin
g
the vehicle".
5
.
S
ecurit
y
wheel bolt socket
(
available as an
accessor
y)
.
Used to ada
p
t the wheelbrace to the
s
pecial "securit
y
" wheel bolts.
Procedure for replacin
g
a fault
y
wheel with the spare wheel usin
g
the tools supplied with the vehicle.
Wheel with trim
When removin
g
the whee
l
,
remove the
trim first usin
g
the handle
3
, pullin
g
at
t
he
cu
t
ou
t.
When refittin
g
the whee
l
, re
f
it the trim
s
tart
i
n
g
by
p
l
ac
i
n
g
i
ts cutout oppos
i
te
the valve and press on its outer edge
with the palm o
f
y
our hand.
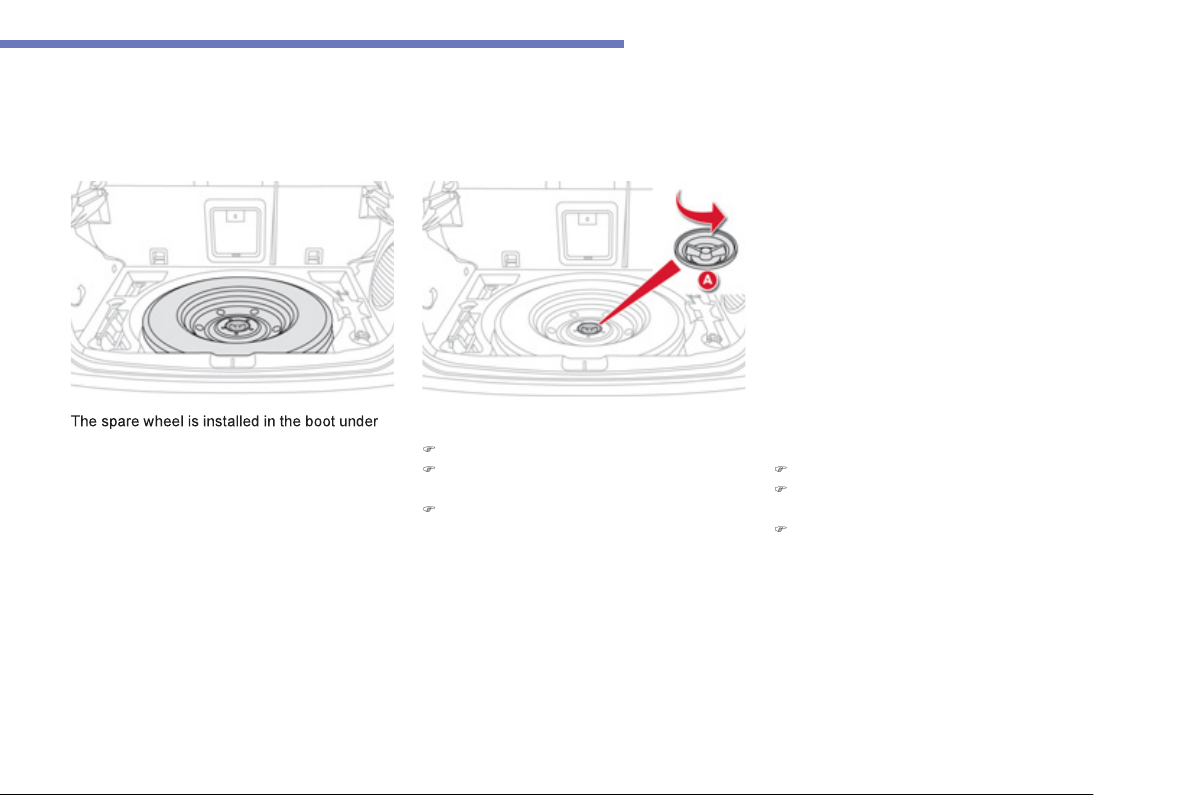
175
7
Practical information
th
e
f
l
oo
r.
Dependin
g
on version, the spare wheel ma
y
be
a standard size steel or allo
y
wheel, or for some
c
ountries it is the "space saver" t
y
pe.
For access to the spare wheel, see "Access to
t
he
t
ools"
.
Access to the s
p
are wheel
Takin
g
out the standard wheel
)
U
nscrew the central bolt A
.
)
Raise the spare wheel towards
y
ou from
th
e
r
ea
r.
)
T
a
k
e
th
e
wh
ee
l
ou
t
of
th
e
boo
t.
Puttin
g
the standard wheel back
i
n
p
lace
)
Put the wheel back in its housin
g
.
)
P
u
t th
e
ce
ntr
a
l
bo
lt
A
in place in the centre
of
th
e
wh
ee
l.
)
Ti
g
hten
f
ull
y
to retain the wheel correctl
y
.
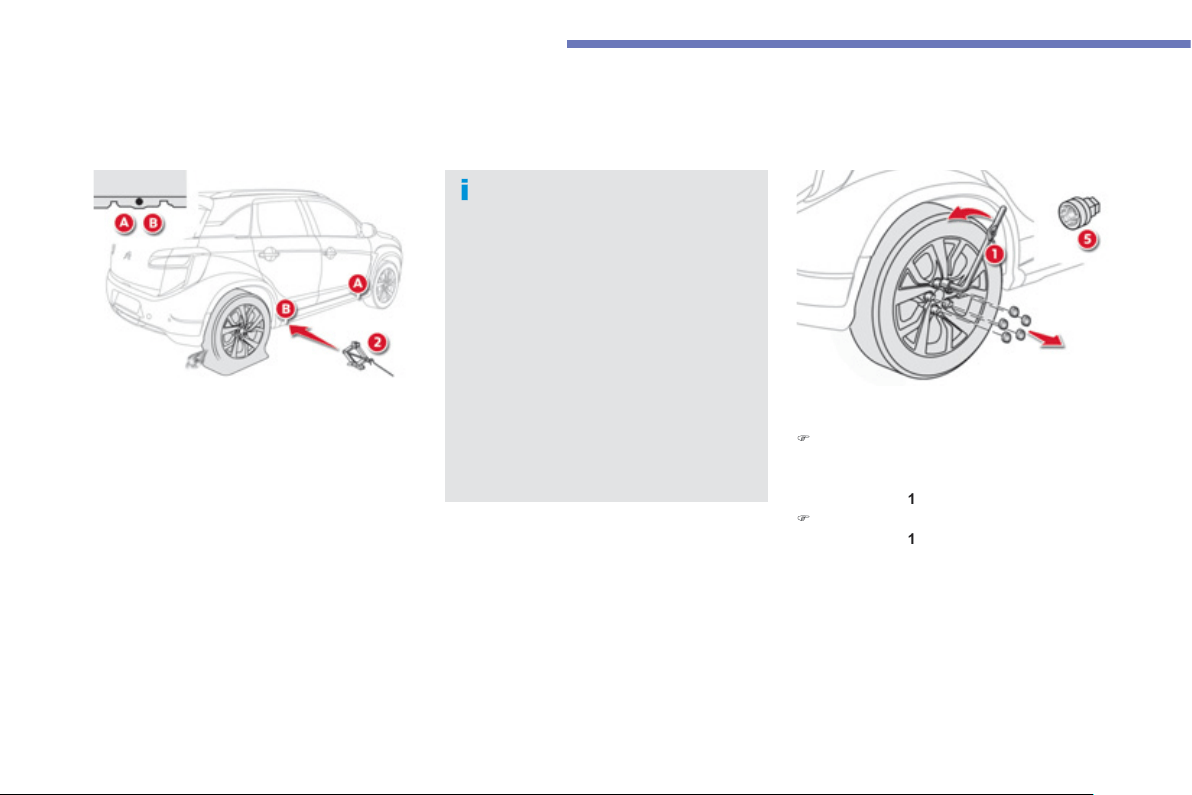
176
Practical information
Removin
g
a wheel
Parkin
g
the vehicle
Imm
ob
ili
se
th
e
v
e
hi
c
l
e
wh
e
r
e
it
does
n
ot block traffic: if possible, park the
ve
hi
c
l
e on
l
eve
l
, sta
bl
e an
d
non-s
li
pper
y
g
roun
d
.
Appl
y
the parkin
g
brake, switch o
ff
the
i
gnition and engage
f
irst gear to lock the
w
h
ee
l
s
.
If necessar
y
, place a chock under the
w
heel dia
g
onall
y
opposite the wheel to
be chan
g
ed.
Never
g
o underneath a vehicle raised
u
s
i
n
g
a
j
ac
k
; use a stan
d
.
List of o
p
erations
)
If
y
our vehicle is equipped with securit
y
wheel bolts
(
equipment available as an
a
ccessor
y)
fit the securit
y
socket 5
o
n th
e
w
heelb
r
ace
1
to s
l
ac
k
en t
h
e secur
i
t
y
b
o
l
t.
)
S
lacken the other bolts usin
g
the
w
heelb
r
ace
1
on
ly
.
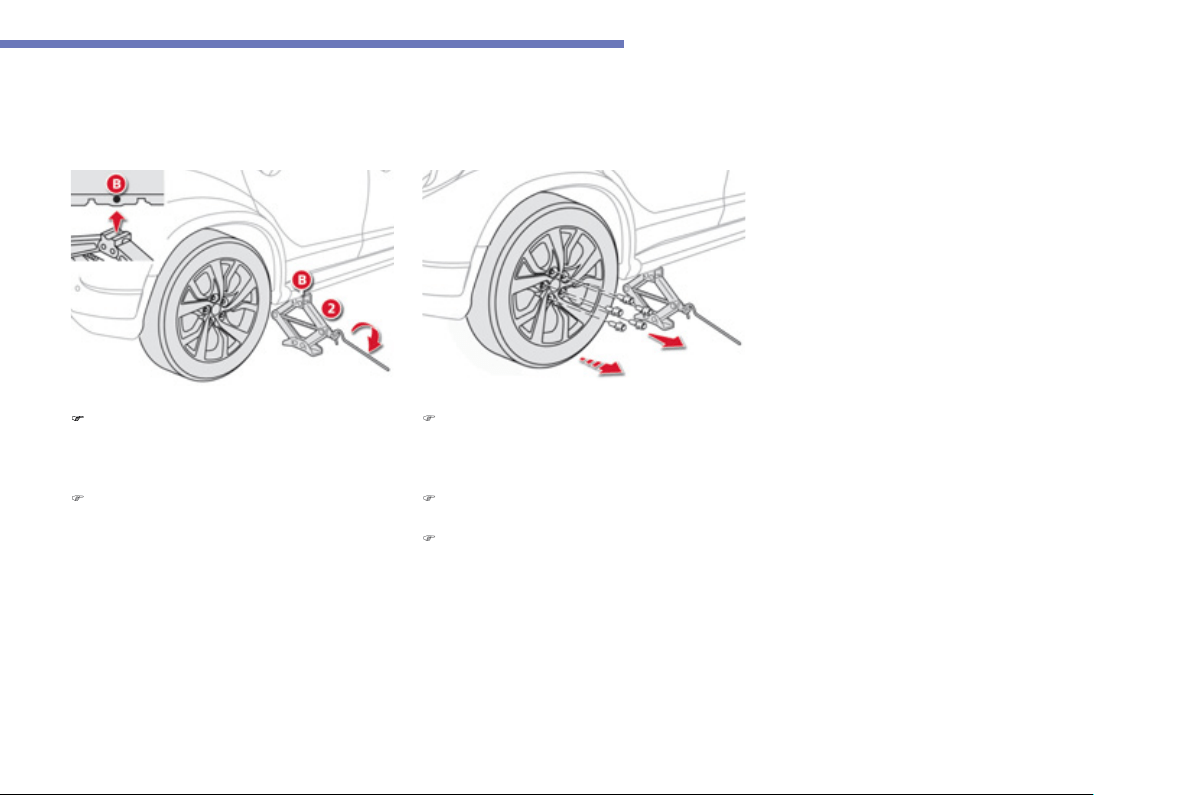
177
7
Practical information
Place the
j
ack
2
in
co
nt
ac
t with
o
n
e
of
th
e
tw
o
fr
o
nt
A
or
rear
B locations provided on
the underbod
y
, whichever is closest to the
wheel to be chan
g
ed.
)
Extend the
j
ack
2
until its base plate is in
c
ontact w
i
t
h
t
h
e
g
roun
d
.
E
nsure t
h
at t
h
e
c
entreline o
f
the
j
ack base plate is directl
y
belo
w t
he
loca
t
io
n
A
or
B
used
.
)
R
a
i
se
th
e
v
e
hi
c
l
e
u
ntil th
e
r
e
i
s
suff
i
c
i
e
nt
s
pace between the wheel and the
g
round
to admit the spare
(
not punctured
)
wheel
e
asil
y
.
)
R
e
m
o
v
e
th
e
bo
lt
s
a
n
d
s
t
o
r
e
th
e
m in
a
c
l
ea
n
p
l
ace.
)
Re
m
o
v
e
t
he
w
heel
.

178
Practical information
Fittin
g
a wheel
A
fter chan
g
in
g
a wheel
When usin
g
the "space-saver" spare
w
heel, do not exceed a speed o
f
5
0 mph
(
80 km
/
h
)
.
Have the ti
g
htenin
g
o
f
the bolts and the
p
ressure o
f
the s
p
are wheel checked
by a CITROËN dealer or a qualified
w
orkshop without dela
y
.
Have the punctured wheel repaired and
r
eplace it on the vehicle as soon as
p
ossible.
List of o
p
erations
)
P
ut t
h
e w
h
ee
l
i
n p
l
ace on t
h
e
h
u
b
.
)
S
crew in the bolts
f
ull
y
b
y
hand.
)
P
re-t
igh
ten t
h
e secur
i
t
y
b
o
l
t us
i
n
g
t
h
e
wh
ee
l
b
r
ace
1
f
itted with the security
soc
k
e
t 5
(
i
f
y
our vehicle is equipped with
s
ecurit
y
wheel bolts
)
.
)
Pre-ti
g
hten the other bolts usin
g
the
wh
ee
l
b
r
ace
1
onl
y
.
Fi
tt
i
n
g
snow t
y
res
If
y
ou equip
y
our vehicle with snow
t
y
res
f
itted on steel wheel rims, special
bolts available from
y
our CITRO
Ë
N
dealer or a
q
uali
f
ied worksho
p
mus
t
be
used
.

179
7
Practical information
Lower the vehicle full
y
.
)
Fold the
j
ack
2
a
n
d
de
t
ac
h it.
)
Ti
g
hten the securit
y
bolt usin
g
the
wh
ee
l
b
r
ace
1
fitted with the securit
y
socke
t 5
(
i
f
y
our vehicle is equipped with
s
ecurit
y
wheel bolts
)
.
)
Tigh
ten t
h
e ot
h
er
b
o
l
ts us
i
n
g
t
h
e
wh
ee
l
b
r
ace
1
only.
)
S
tore the tools
(
re
f
er to the para
g
raph
"
Access to the tools"
)
.
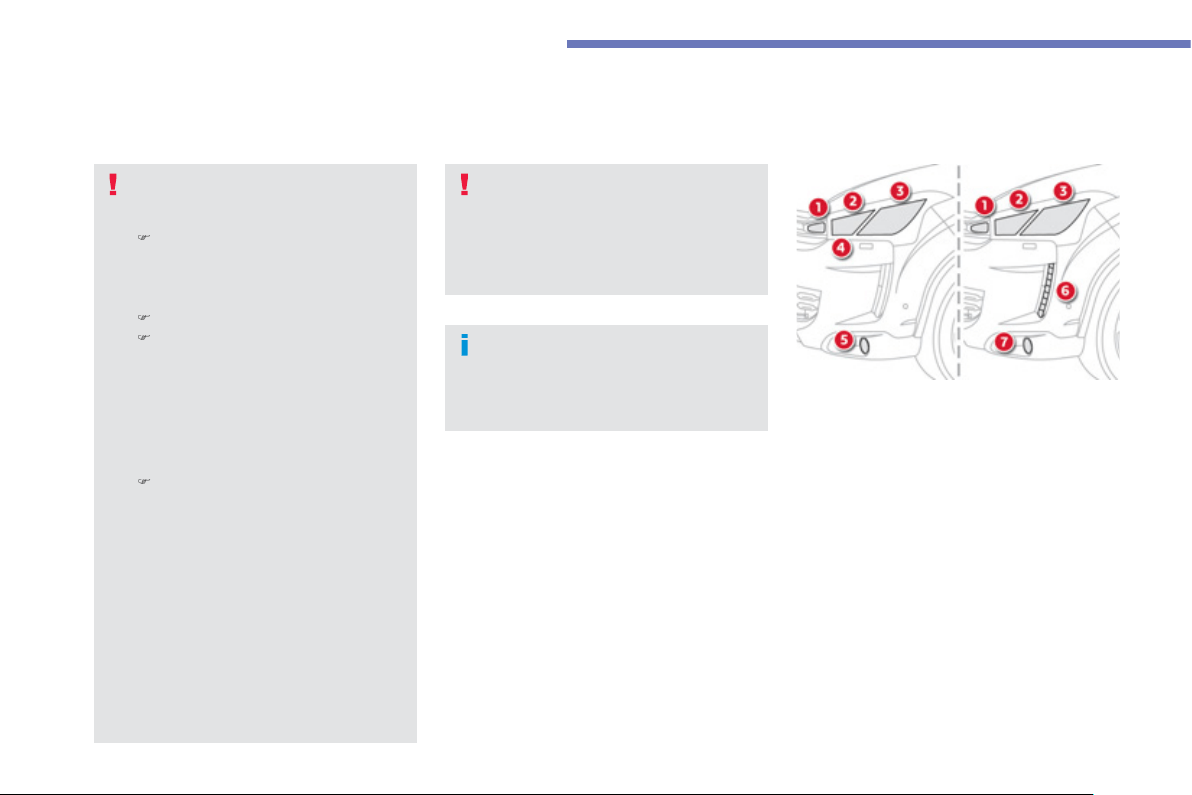
180
Practical information
Changing a bulb
For bulbs that have ali
g
nment lu
g
s
(
H1, H7...
)
ensure that the
y
are
fitted correctl
y
for the best li
g
htin
g
p
erformance.
The headlamps have
p
ol
y
carbonate lenses with
a protect
i
ve coat
i
n
g
:
)
d
o not c
l
ean t
h
em us
i
n
g
a
d
r
y
or a
b
ras
i
ve c
l
ot
h
,
nor with a detergent or
solvent
p
roduct
,
)
use a spon
g
e and soap
y
water,
)
when usin
g
a hi
g
h pressure
washer on persistent marks,
do not keep the lance directed
towar
d
s t
h
e
l
amps or t
h
e
i
r
e
d
g
es
f
or too lon
g
, so as
n
ot to
d
ama
g
e t
h
e
i
r protect
i
ve
c
oating and seals.
)
D
o not touc
h
t
h
e
b
u
lb
di
rect
ly
w
i
t
h
y
our
f
in
g
ers, use lint-
f
ree cloths.
C
han
g
in
g
a bulb should onl
y
be done
af
ter the headlam
p
has been switched
o
ff
f
or a
f
ew minutes
(
risk o
f
serious
burns
)
.
It is imperative to use onl
y
anti-
ultraviolet
(
UV
)
t
y
pe bulbs in order not
to dama
g
e the headlamp.
A
lwa
y
s replace a
f
ailed bulb with a
n
ew
b
u
lb
w
i
t
h
t
h
e same t
y
pe an
d
sp
eci
f
ication.
Risk of electrocution
Replacement of the xenon bulbs
(
D1
S
-35W
)
must be carried out b
y
a
CITRO
Ë
N dealer or a qualified
w
or
k
s
h
o
p
.
Front lam
p
s
1.
Di
rect
i
on
i
n
di
cators
(
WY21W-21W
).
2.
M
ain beam headlamps
(
H1-55W
).
3.
D
ipped beam headlamps
(
H11-55W
)
or
Xenon bulb
(
D1S-35W
).
4.
Sidelamps
(
W5W-5W
).
5
.
D
a
y
time runnin
g
lamps
(
P13W-13W
).
6
.
D
a
y
time runnin
g
lamps / sidelamps
(
li
g
ht emittin
g
doides-LEDs
).
7.
Front fo
g
lamps
(
H11-55W
).
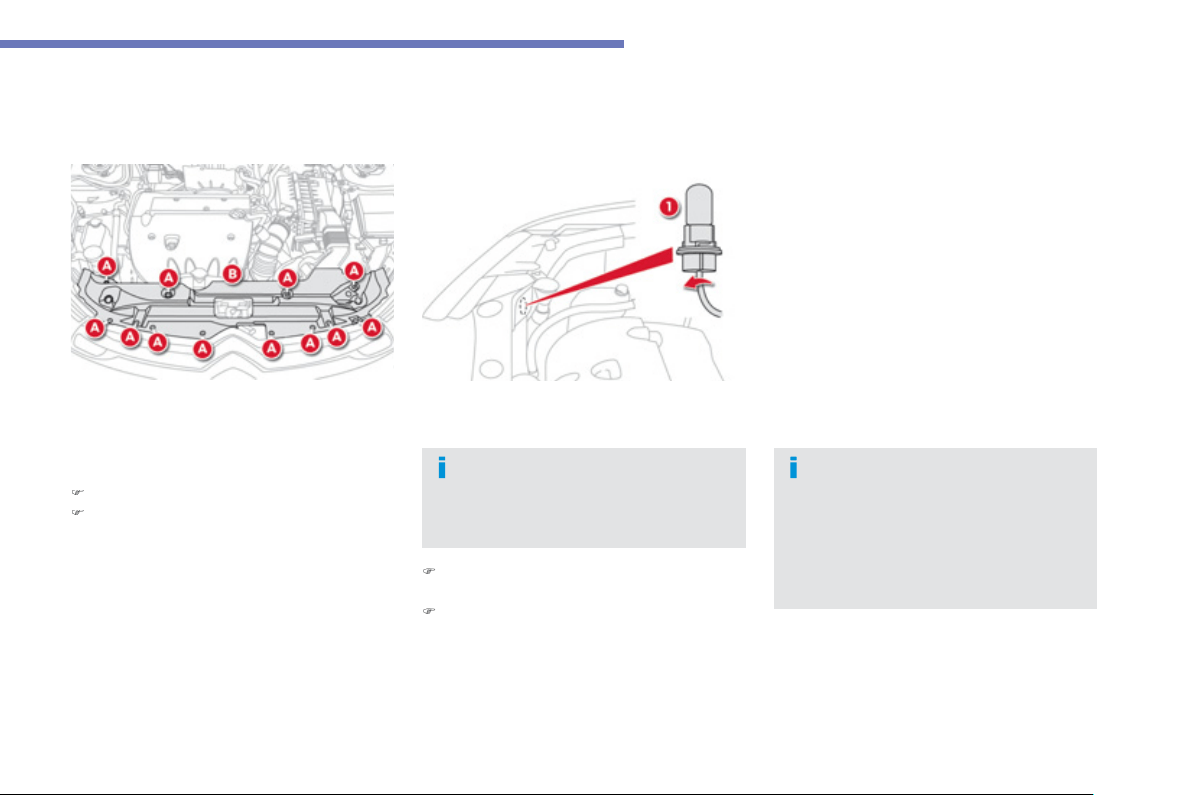
181
7
Practical information
C
arry out the
f
ollowing operations
f
or access
the bulb protective covers:
)
Remove the retainin
g
pins
A
.
)
Remove the protective cover B
.
Access to bulbs Chan
g
in
g
direction indicator
b
ulbs
(
1
)
)
Turn the bulb holder a quarter of a turn to
the left and pull it out.
)
Pull out the bulb and chan
g
e it.
Rapid flashin
g
of the direction indicator
warnin
g
lamp
(
ri
g
ht or left
)
indicates the
f
a
il
u
r
e
o
f
a
bu
l
b
o
n th
a
t
s
i
de
.
To reassemble, carr
y
out these
operations in reverse order.
Amber coloured bulbs, such as the
direction indicators, must be replaced
with bulbs o
f
identical speci
f
ications
a
n
d
colou
r.
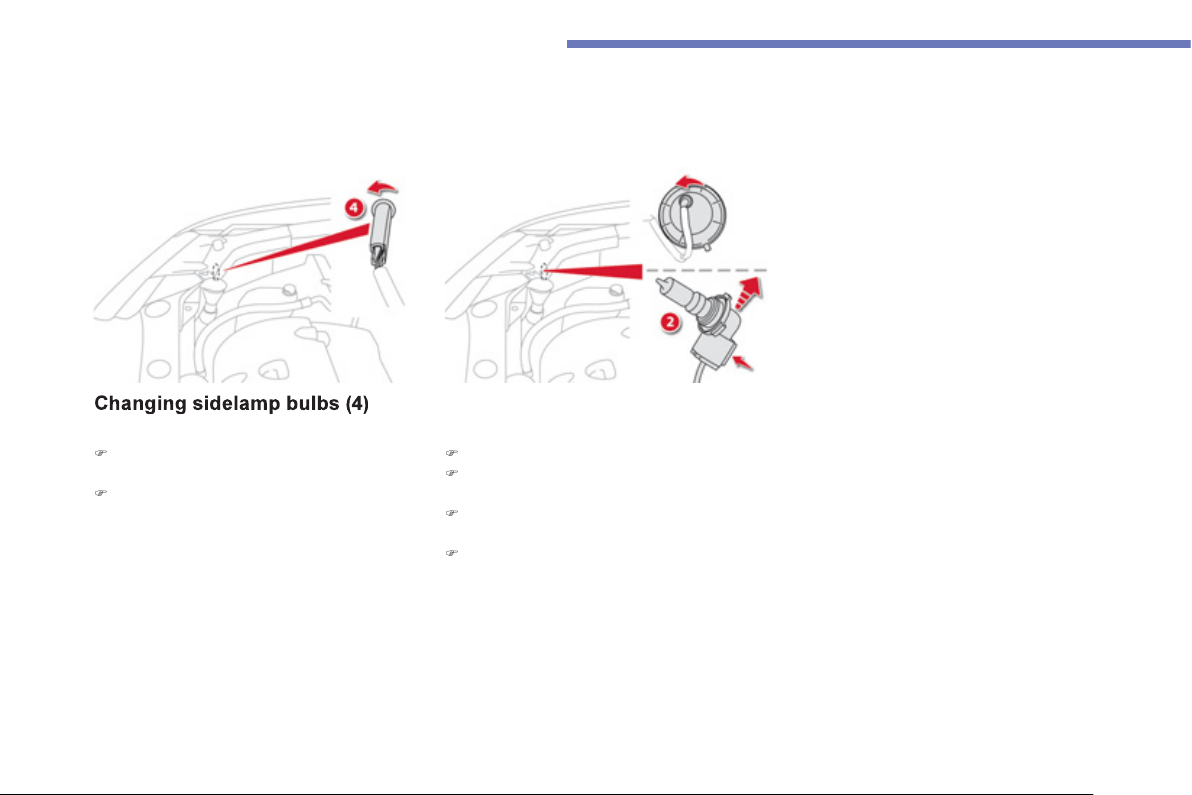
182
Practical information
)
R
emove t
h
e protect
i
ve p
l
ast
i
c cover.
)
Turn the bulb holder to the le
f
t and
p
ull it
ou
t.
)
Remove the bulb and its base b
y
pressin
g
o
n the lu
g
at the bottom.
)
Chan
g
e the bulb.
For reassembl
y
, carr
y
out these operations in
re
v
e
r
se
o
r
de
r.
Chan
g
in
g
main beam headlamp
b
ulbs
(
2
)
)
T
urn t
h
e
b
u
lb
h
o
ld
er a quarter turn to t
h
e
le
f
t and
p
ull it out.
)
Pull out the bulb and re
p
lace it.
To reassemble, carr
y
out these operations in
re
v
e
r
se
o
r
de
r.
Chan
g
in
g
the da
y
time runnin
g
l
amps
/
sidelamps
(
li
g
ht-emittin
g
diodes - LEDs
)
(
6
)
For the replacement of this t
y
pe of LED lamp,
c
ontact a CITRO
Ë
N dealer or a qualified
wor
k
s
h
op.
Chan
g
in
g
dipped headlamp
bulbs
(
3
)
For the re
p
lacement o
f
these bulbs, contact a
C
ITROËN dealer or a qualified workshop.
To replace these bulbs contact a CITROËN
dealer or a qualified workshop.
Chan
g
in
g
front fo
g
lamp
bulbs
(
7
)
/ da
y
time runnin
g
l
amp bulbs
(
5
)
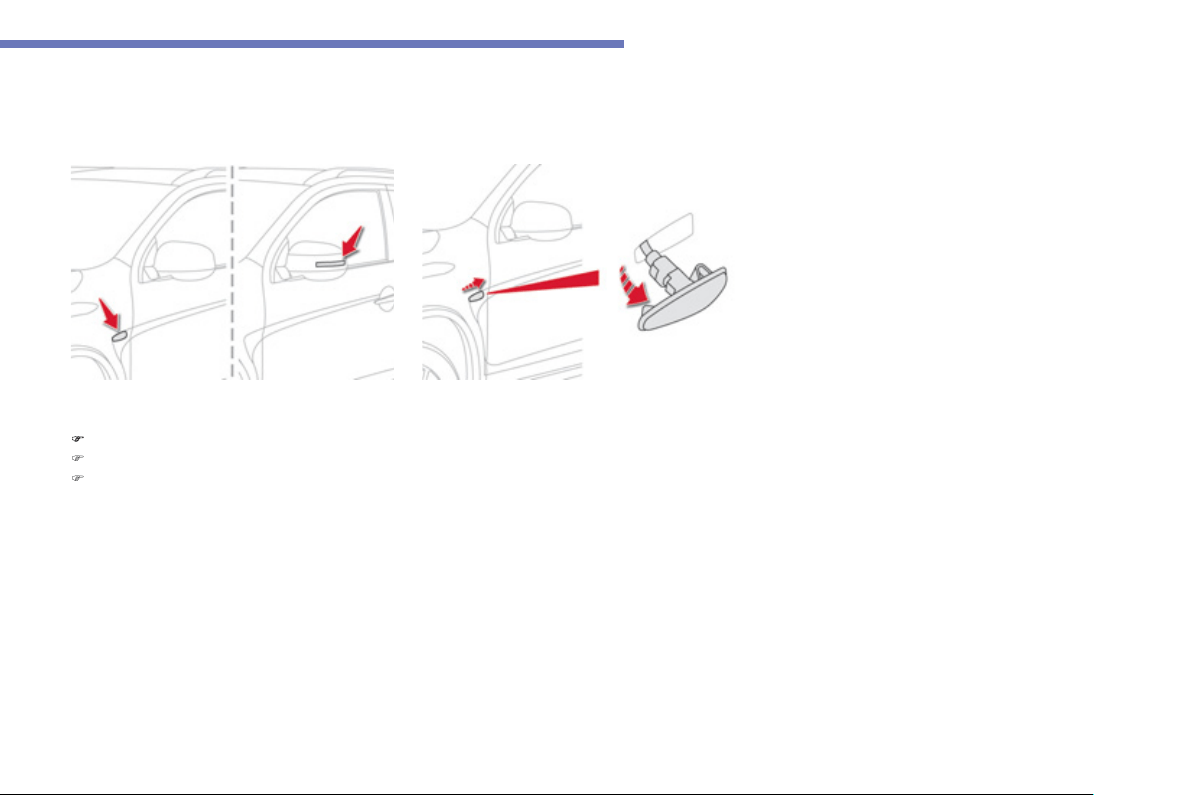
183
7
Practical information
P
us
h
t
h
e repeater towar
d
s t
h
e rear to
di
sen
g
a
g
e
i
t.
)
Disconnect the re
p
eater connector.
)
Chan
g
e the repeater unit.
To reassemble, carr
y
out these operations in reverse order.
Contact a CITROËN dealer or a qualified workshop to obtain replacement repeaters.
Chan
g
in
g
direction indicator side repeaters
D
oor mirror spotlamps
You should contact a CITRO
Ë
N dealer or a qualified workshop for the replacement of the li
g
ht
e
m
i
tt
i
n
g
di
o
d
e -
LED
.
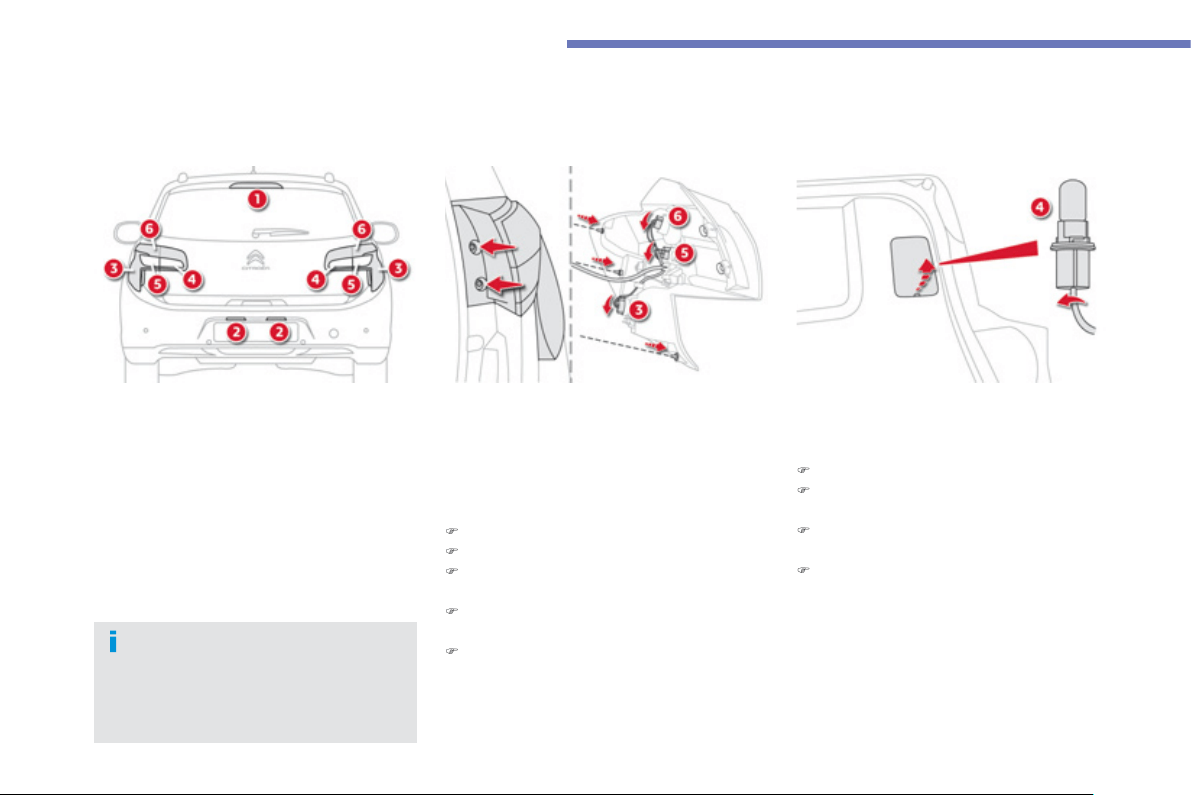
184
Practical information
1.
T
hird brake lamp
(
LEDs
).
2.
Number plate lamps
(
W5W-5W
).
3.
Rear fo
g
lamp
(
W21W-21W
)
.
4.
Reversin
g
lamp
(
W16W-16W
).
5.
D
irection indicators
(
WY21W-21W
).
6
.
Sidelamps / brake lamps
(
W21-5W
).
Rear lam
p
s
A
mber coloured bulbs, such as the
direction indicators, must be replaced
with bulbs o
f
identical speci
f
ication and
colou
r.
These bulbs are chan
g
ed
f
rom outside the
boo
t.
)
Op
en the boot.
)
Remove the two
f
ixin
g
screws.
)
Unclip the lamp unit carefull
y
extract it
pullin
g
it towards the rear.
)
Turn the bulb holder a quarter of a turn to
the left and pull it out.
)
P
u
ll
t
h
e
b
u
lb
out an
d
c
h
an
g
e
i
t.
T
o reassem
bl
e, carr
y
out t
h
ese operat
i
ons
i
n
re
v
e
r
se
o
r
de
r.
Take care to align the pins on the lamp unit with
the locations on the bod
y
work.
Chan
g
in
g
sidelamp / brake
lamp
(
6
)
, direction indicator
(
5
)
,
and fo
g
lamp
(
3
)
bulbs
)
O
pen the boot.
)
Insert a screwdriver into the aperture o
f
the
c
over an
d
l
ever
i
t o
p
en.
)
Turn the bulb holder a
q
uarter o
f
a turn to
th
e
l
ef
t.
)
Pull the bulb out and chan
g
e it.
To reassemble, carr
y
out these operations in
r
e
v
e
r
se
o
r
de
r.
You can also contact a
C
ITR
OË
N dealer or a
q
uali
f
ied workshop
f
or the replacement o
f
these
bulbs
.
Chan
g
in
g
reversin
g
lamp
bulbs
(
4
)
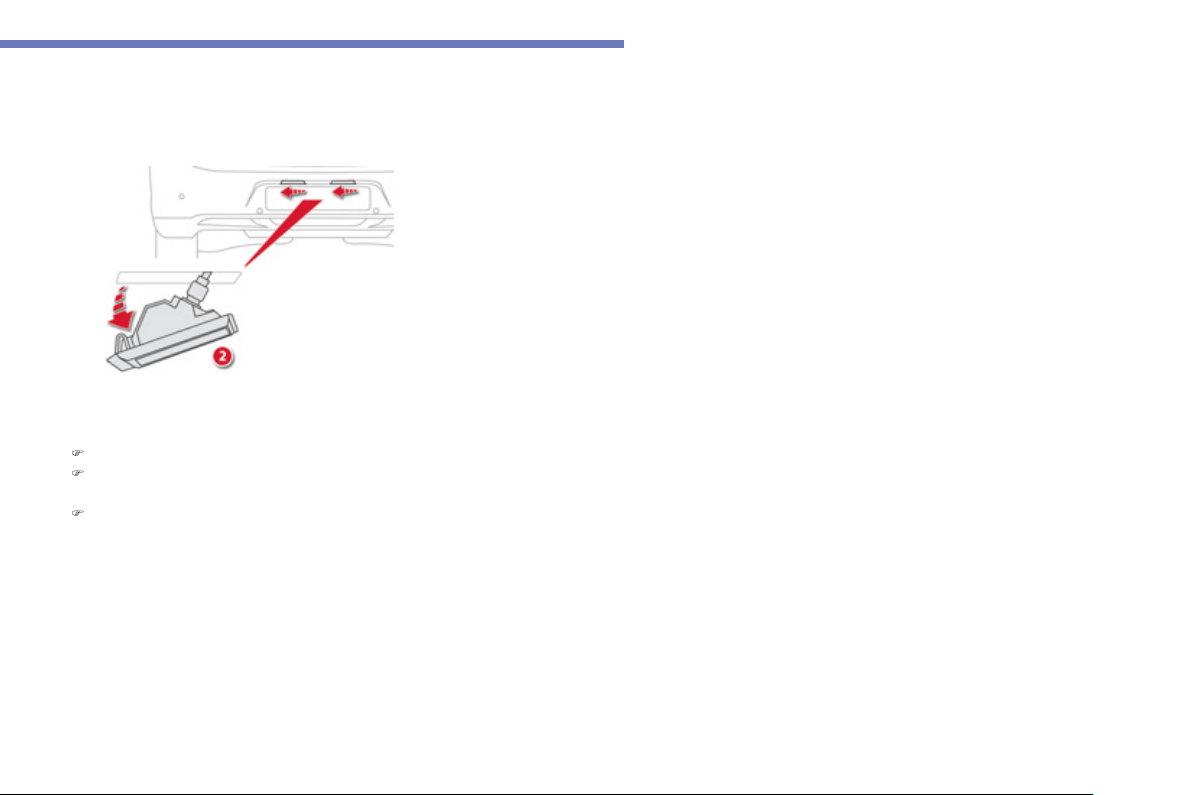
185
7
Practical information
Chan
g
in
g
number plate lamps
(
2
)
)
P
us
h th
e
l
e
n
s
t
o
th
e
l
ef
t
a
n
d
th
e
n
do
wn.
)
Turn the bulb holder a
q
uarter turn to the
le
f
t and
p
ull it out.
)
Remove the bulb and chan
g
e it.
To refit, carr
y
out these operations in reverse
order and press on the lens to clip it in place.
T
hird brake lamp
(
li
g
ht emittin
g
diodes - LEDs
)
(
1
)
Contact a CITROËN dealer or
q
ualified
w
orkshop
f
or the replacement o
f
this t
y
pe o
f
l
amp.
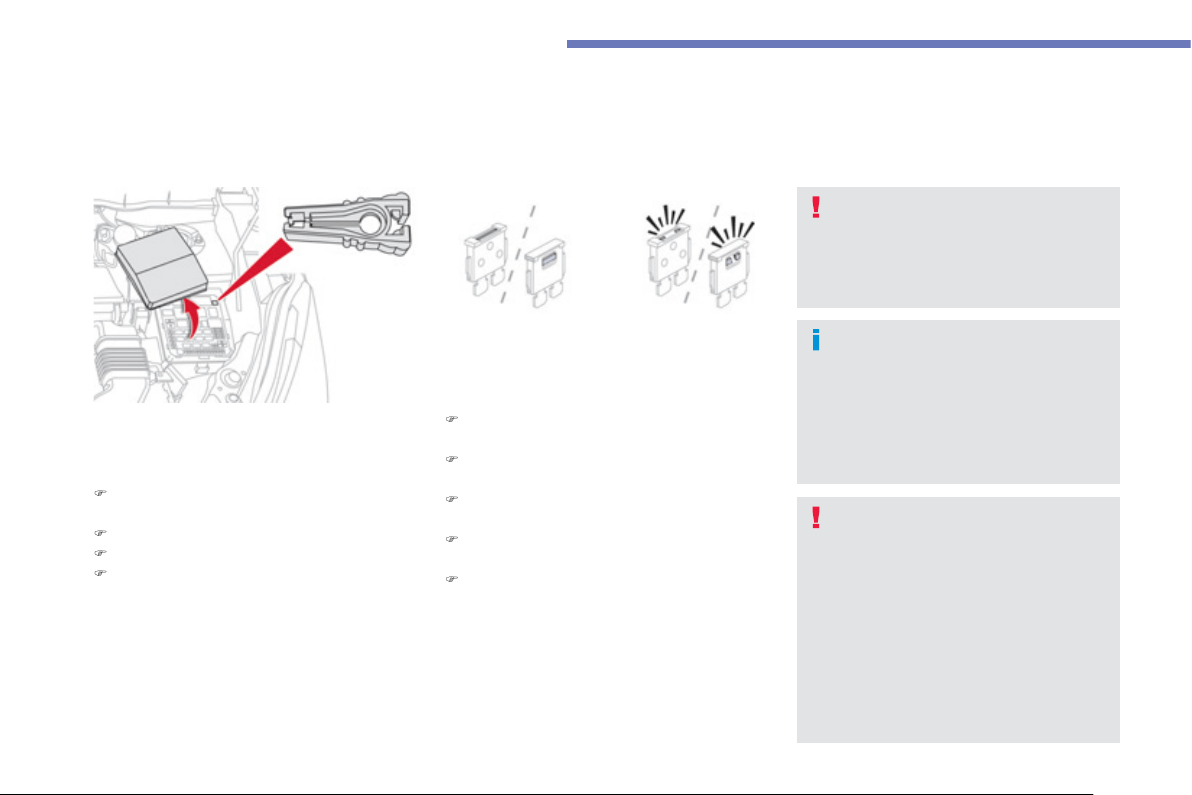
186
Practical information
Changing a fuse
The extraction tweezer and spare
f
uses are
fitted in the en
g
ine compartment fusebox.
To
g
ain access to them:
)
O
pen the bonnet
(
refer to the "Checks"
section
)
.
)
U
nc
li
p t
h
e an
d
remove t
h
e cover.
)
Re
m
o
v
e
t
he
tw
ee
z
e
r.
)
C
are
f
ull
y
close the cover to ensure correct
sealing o
f
the
f
usebox.
A
ccess to the tools
Before chan
g
in
g
a fuse, the cause of the failure
m
us
t
be
i
de
nti
f
i
ed
a
n
d
r
ec
ti
f
i
ed
.
)
C
h
ec
k th
a
t th
e
s
wit
c
h i
s
in th
e
"
L
OCK
"
p
os
i
t
i
on or t
h
at t
h
e ve
hi
c
l
e mo
d
e
i
s
"
OFF
".
)
Identi
f
y the
f
aulty
f
use by checking the
co
n
d
iti
o
n
of
it
s
f
il
a
m
e
nt.
)
Use the special tweezer to extract the fuse
f
r
o
m it
s
l
oca
ti
o
n.
)
Alwa
y
s replace the fault
y
fuse with a fuse
o
f the same ratin
g
.
)
C
heck that the number etched on the box,
t
h
e rat
i
n
g
etc
h
e
d
on t
h
e top an
d
t
h
e ta
bl
es
b
e
l
ow a
ll
a
g
ree.
Chan
g
in
g
a fuse
Good Failed
CITROËN will not accept responsibilit
y
f
or the cost incurred in repairin
g
y
ou
r
vehicle or for rectif
y
in
g
the malfunctions
resultin
g
f
rom the installation o
f
accessor
i
es not supp
li
e
d
an
d
not
recommended b
y
CITRO
Ë
N and
n
o
t in
s
t
a
ll
ed
in
acco
r
da
n
ce
with it
s
instructions, in particular when the
c
onsumption of all of the additional
e
quipment connected exceeds
10 milliamperes.
Y
our ve
hi
c
l
e
'
s e
l
ectr
i
ca
l
s
y
stem
i
s
d
es
ig
ne
d
to operate w
i
t
h
stan
d
ar
d
or
o
pt
i
ona
l
equ
i
pment.
Be
f
ore installin
g
other electrical
e
quipment or accessories in your
vehicle, contact a CITROËN dealer or a
q
ualified workshop.
The replacement of a fuse not
mentioned in the followin
g
tables ma
y
c
ause a serious fault on
y
our vehicle.
C
ontact a
C
ITR
O
ËN dealer or a
q
uali
f
ied workshop.
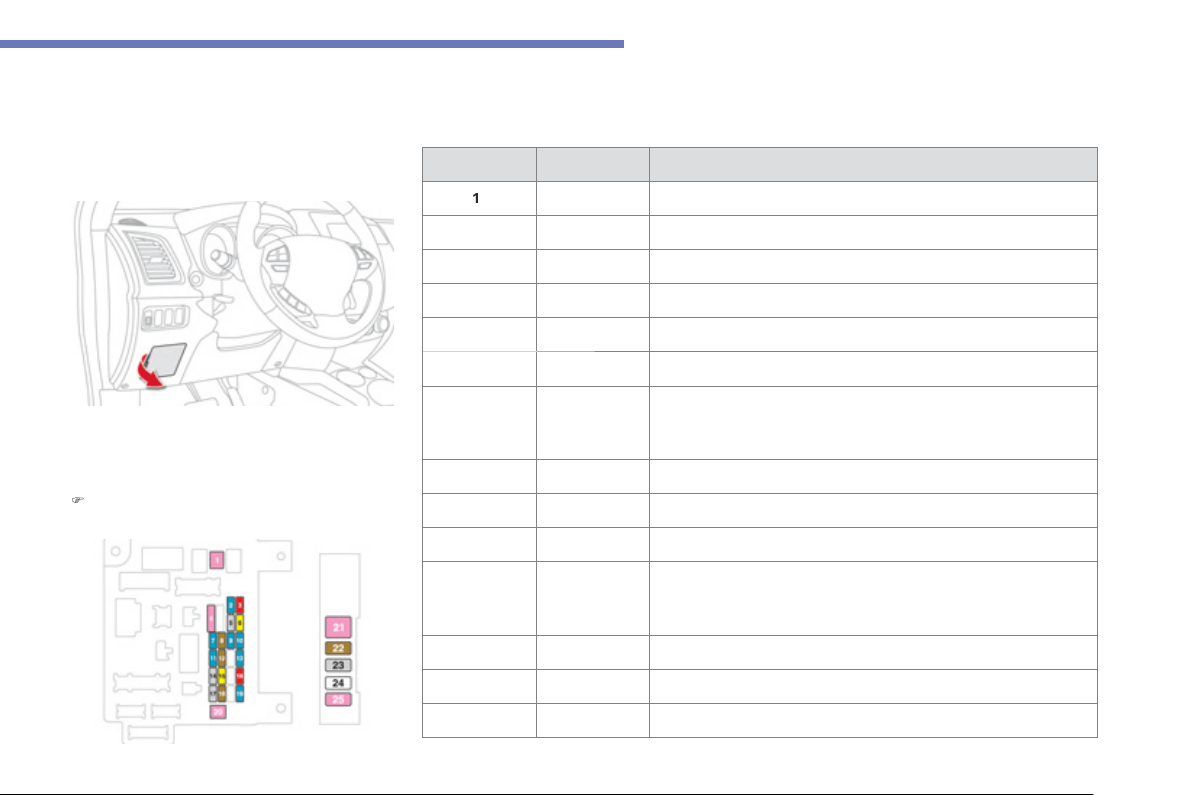
187
7
Practical information
Dashboard fuses
Th
e
f
usebo
x i
s
l
oca
t
ed
in th
e
l
o
w
e
r
das
h
boa
r
d
(
left-hand side
)
.
Access to the fuses
)
O
pen the cover and remove it completely
b
y
pullin
g
it towards
y
ou.
Fuse N
°
Ratin
g
Functions
1
*
3
0
A
C
abin fan.
2 15 A Brake lam
p
s, third brake lam
p
.
3
10 A Rear
f
o
g
lamps.
4
3
0
A
Wi
n
d
screen w
i
per, screenwas
h
.
6
2
0
A
Central lockin
g
, electric door mirrors.
7 15 A Audio equipment, telematics, USB unit, Bluetooth s
y
stem.
8
7.5
A
Remote control ke
y
, air conditionin
g
control unit, instrument
panel, electric windows, rain and sunshine sensors, alarm,
s
witch panel, steerin
g
mounted controls.
9
15 A Instrument panel and interior li
g
htin
g
.
10
15 A Hazard warnin
g
lamps
11
15 A
R
ear w
ip
er.
12 7.5
A
Instrument panel, multi
f
unction screen, parking sensors, heated
s
eats, heated rear screen, electric blind, automatic headlam
p
ad
j
ustment.
1
3
15 A Ci
g
arette li
g
hter, accessor
y
socket.
15
2
0
A
El
ec
tri
c
b
lin
d
.
1
6
10 A
D
oor m
i
rrors, au
di
o equ
i
pment.
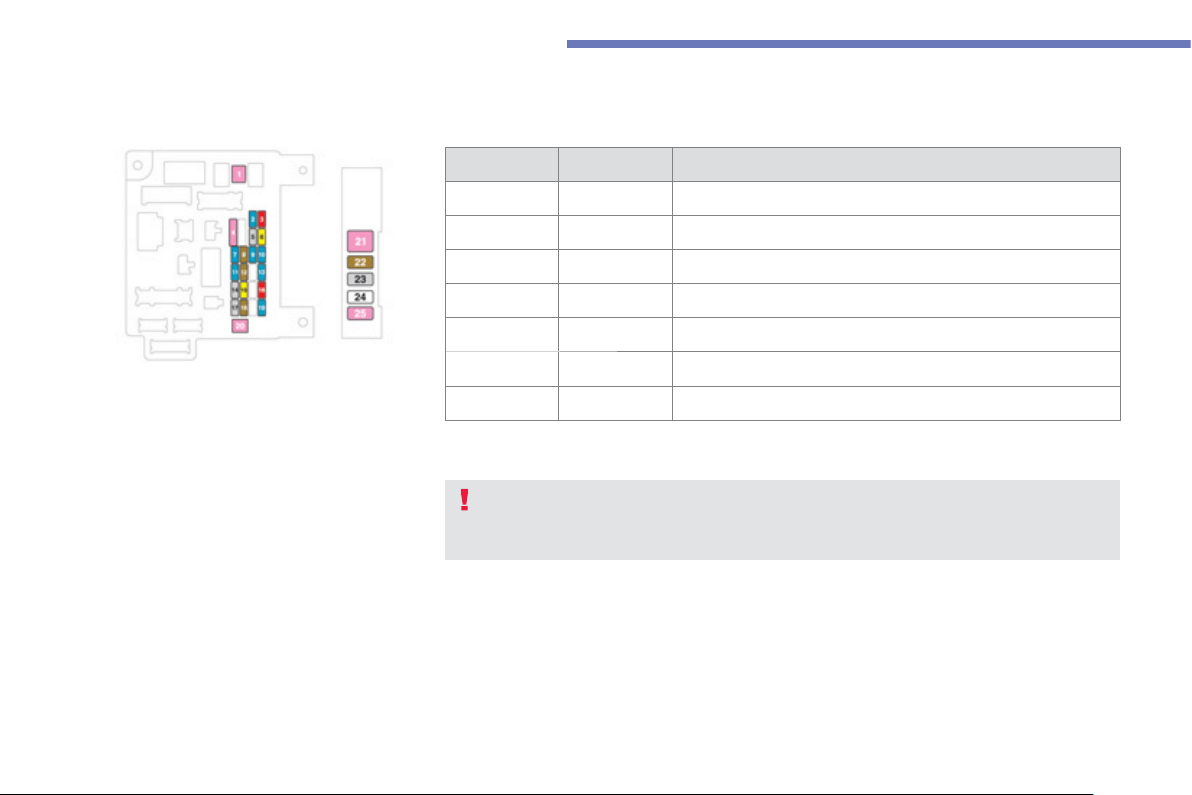
188
Practical information
* The maxi-fuses provide additional protection for the electrical s
y
stems. All work on the
maxi-fuses must be carried out b
y
a CITROËN dealer or a qualified workshop.
Fuse N
°
Ratin
g
Functions
1
87.5 A Reversin
g
lamps.
1
9
15 A Accessor
y
socket.
2
0
*
3
0
A
Elec
tr
ic
w
i
n
do
w
co
ntr
ols
.
21
*
3
0
A
Hea
t
ed
r
ea
r
sc
r
ee
n.
22
7.5 A H
ea
t
ed
doo
r mirr
o
r
s
.
2
4
2
5 A Driver's and passen
g
er's electric seat.
2
5
3
0 A
Hea
t
ed
sea
t
s
.
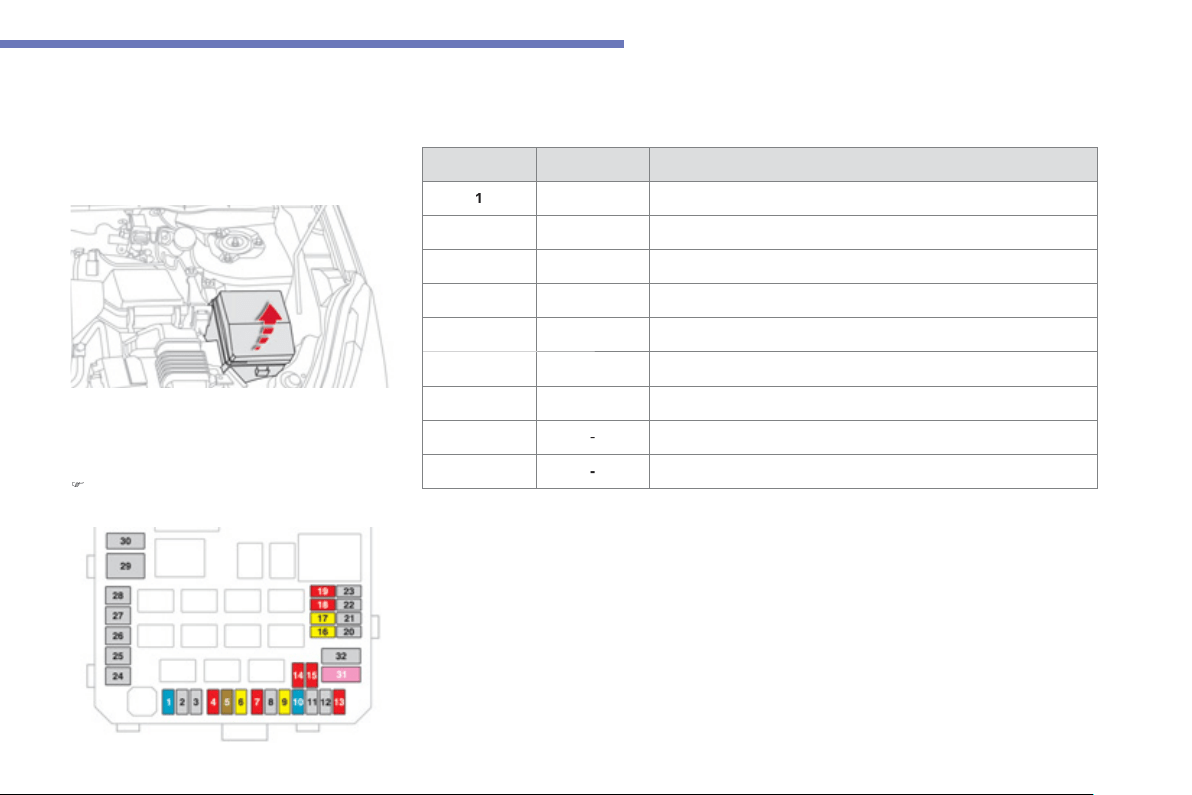
189
7
Practical information
En
g
ine compartment fuses
Access to the fuses
)
U
nc
li
p t
h
e cover an
d
remove
i
t comp
l
ete
ly
.
Fuse N
°
R
at
i
n
g
F
unct
i
ons
1
15 A Front fo
g
lamps.
4
10 A H
o
rn.
57.5
A
Al
t
e
rn
a
t
o
r.
6
2
0
A
H
ea
dl
amp was
h
.
7 10 A Air conditionin
g
.
9
2
0
A
Al
a
rm.
10
15 A Demisting, wipers.
11
-
No
t
used
.
12
-
N
o
t
used
.
The fusebox is placed in the en
g
ine
c
ompartment
(
left-hand side
)
.
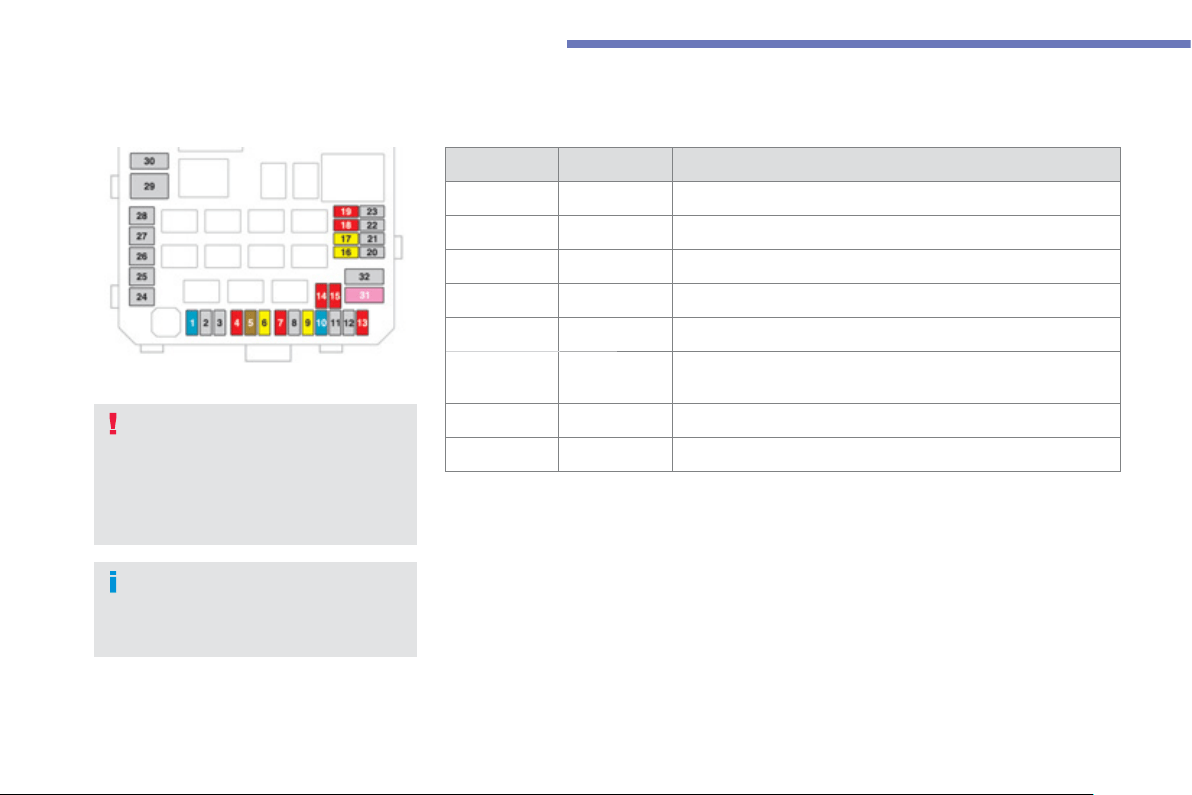
190
Practical information
Fuse N
°
R
at
i
n
g
F
unct
i
ons
1
3
10 A Da
y
time runnin
g
lamps.
1
4 10 A Le
f
t-hand main beam headlamp.
15
10 A
Righ
t-
h
an
d
ma
i
n
b
eam
h
ea
dl
amp.
1
6
20
A
Le
f
t-hand dipped beam headlamp
(
xenon
)
.
1
7
20
A
Ri
g
ht-hand dipped beam headlamp
(
xenon
)
.
18
10 A
Le
f
t-hand dipped beam headlamp
(
halo
g
en
)
, manual and
automatic headlamp ad
j
ustment.
1
9
10 A Ri
g
ht-hand dipped beam headlamp
(
halo
g
en
)
.
31
3
0 A Audio ampli
f
ier.
The maxi-
f
uses provide additional
p
rotection
f
or the electrical s
y
stems. All
w
o
rk
o
n th
e
m
a
xi-
fuses
m
us
t
be
ca
rri
ed
o
ut b
y
a CITROËN dealer or a qualified
workshop.
Carefull
y
close the cover after replacin
g
a
f
use
so
as
t
o
e
n
su
r
e
th
e
co
rr
ec
t
s
ealin
g
o
f
the
f
usebox.
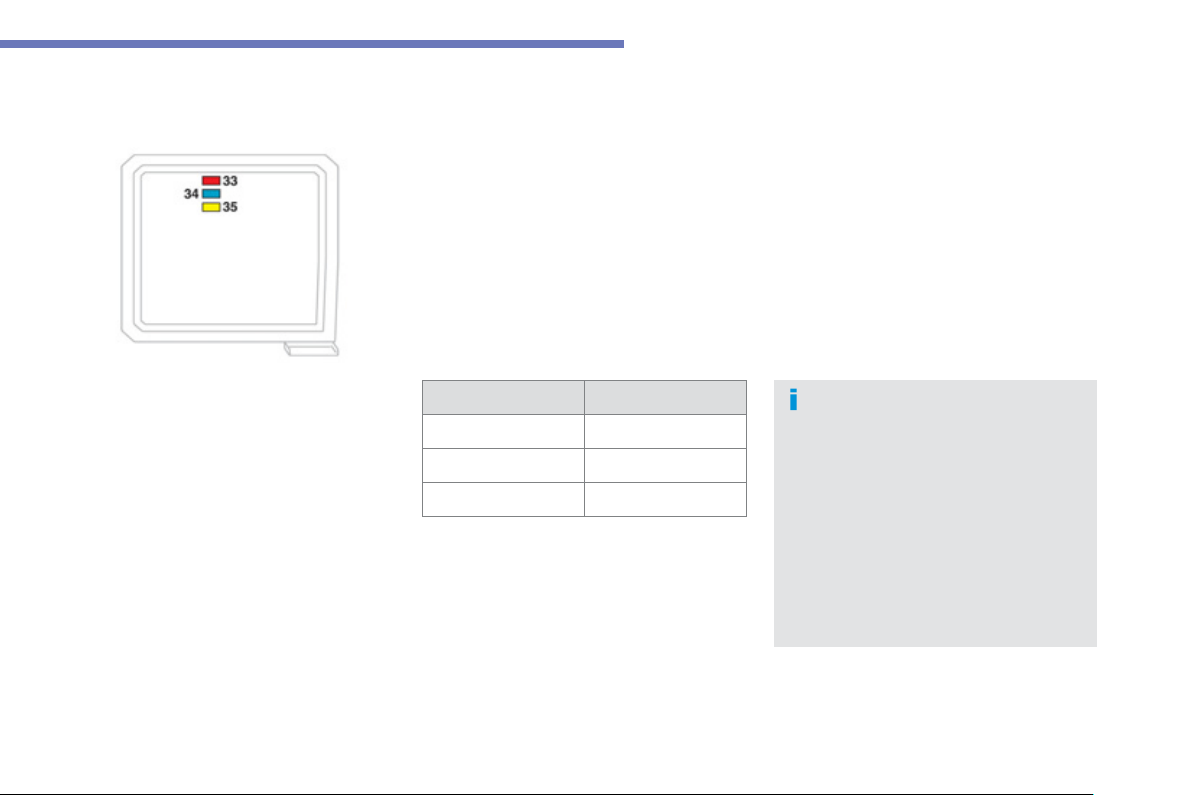
191
7
Practical information
S
p
are fuses
The spare
f
uses are located under the en
g
ine
c
om
p
artment
f
usebox cover.
Th
e cover
d
oes not conta
i
n spare
f
uses with an ampera
g
e o
f
7.5 A, 25 A
o
r
30
A. I
f
o
n
e
of
th
e
fuses
with th
ese
amperages develops a
f
ault, replace it
with the
f
ollowin
g
f
use:
A 7.5 A fus
e
must be replaced with the
10 A s
p
are fus
e
,
a
2
5 A fus
e
with
a
20 A s
p
are fus
e
a
n
d
a
3
0 A fus
e
with
th
e
a
udio s
y
stem fuse
(
N° 31
)
.
Fuse N
°
Rating
33 10 A
34
15 A
35
20
A
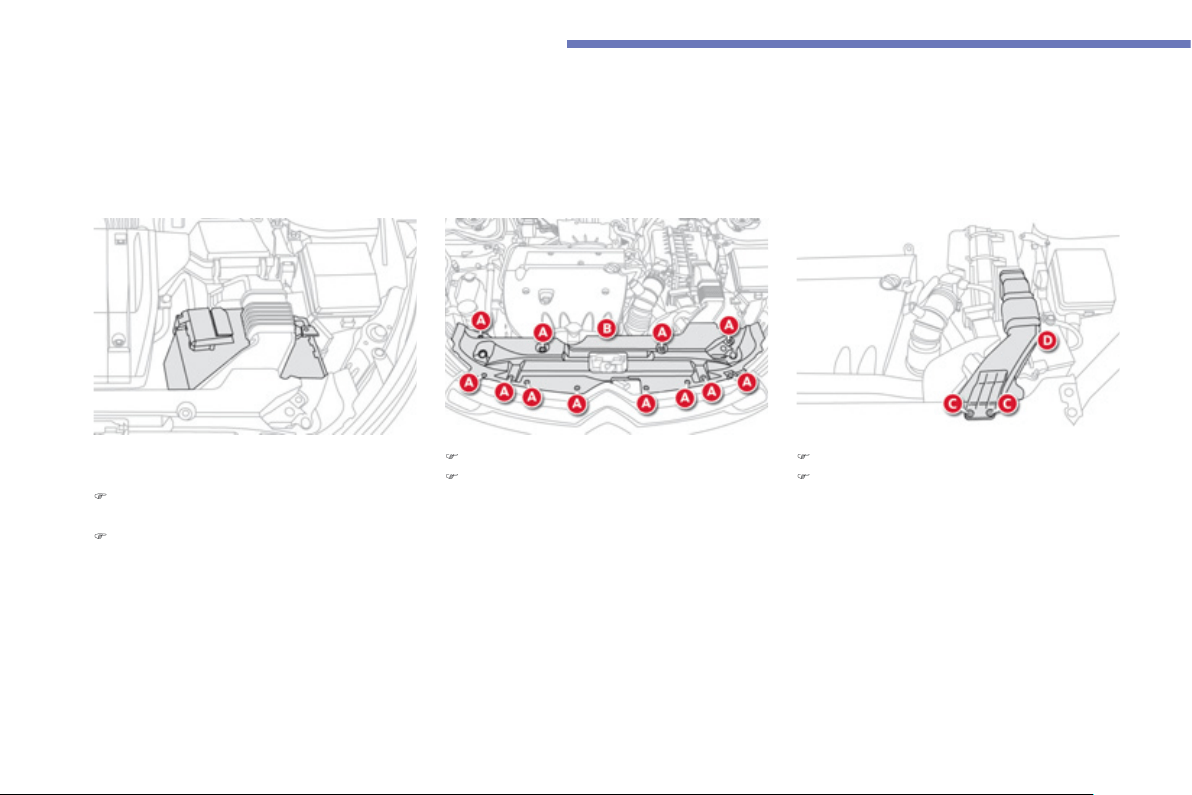
192
Practical information
12 V battery
The battery is located under the bonnet.
To
g
ain access to it:
)
open the bonnet usin
g
the interior release
l
ever, then the exterior safet
y
catch,
)
secure the bonnet sta
y
,
A
ccess to the batter
y
Procedure for char
g
in
g
y
our batter
y
when it is flat or for startin
g
the en
g
ine usin
g
another batter
y
and
j
ump leads.
)
remove t
h
e reta
i
n
i
n
g
p
i
ns
A
,
)
remove t
h
e
p
rotect
i
ve cover
B
,
)
remove t
h
e reta
i
n
i
n
g
p
i
ns
C
,
)
r
e
m
o
v
e
t
he
ai
r
duc
t
D
.
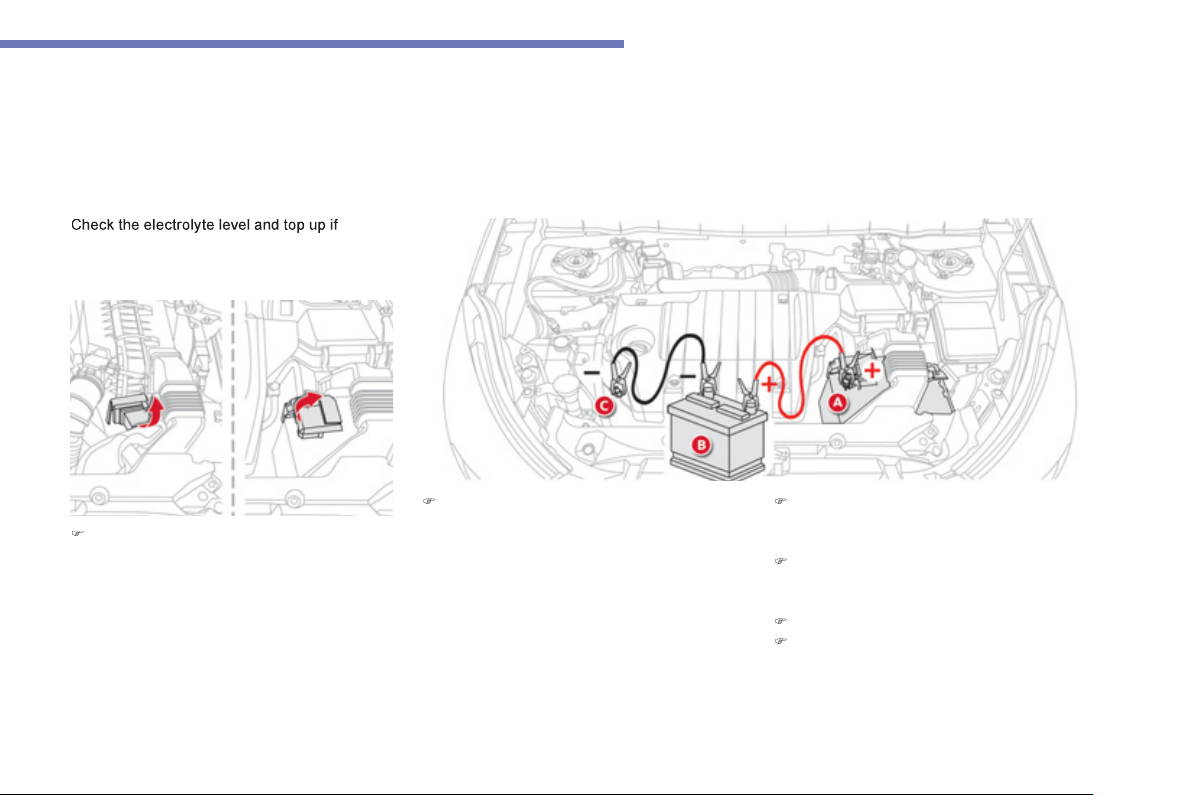
193
7
Practical information
n
ecessar
y
(
see "
C
heckin
g
levels"
)
.
Startin
g
usin
g
another
b
atter
y
)
Connect the red cable to the positive
terminal
(
+
)
of the flat batter
y
A , then to the
positive terminal
(
+
)
of the slave batter
y
B
.
)
Connect one end of the
g
reen or black
c
able to the ne
g
ative terminal
(
-
)
of the
s
lave batter
y
B
.
)
C
onnect the other end o
f
the
g
reen or black
c
a
bl
e to t
h
e eart
h
po
i
nt
C
on
y
our ve
hi
c
l
e
(
en
g
ine mountin
g)
.
)
O
perate the starter, let the engine run.
)
Wait until the en
g
ine returns to idle and
d
i
sco
nn
ec
t th
e
cab
l
es
.
)
Raise the protective cover on the
(
+
)
t
e
rmin
a
l.

194
Practical information
Th
e
ba
tt
e
ri
es
co
nt
a
in h
a
rmf
u
l
s
ubstances such as sul
p
huric acid
and lead. The
y
must be disposed of in
accordance with re
g
ulations and must
n
ot,
i
n an
y
c
i
rcumstances,
b
e
di
scar
d
e
d
with h
ouse
h
o
l
d
w
as
t
e
.
Take
used
r
e
m
o
t
e
co
ntr
ol
ba
tt
e
r
ies
a
n
d
vehicle batteries to a special collection
p
o
i
nt.
Do not reverse the polarit
y
and use onl
y
a 12 V char
g
er.
Do not disconnect the terminals while the en
g
ine is runnin
g
.
Do not char
g
e the batteries without disconnectin
g
the terminals
f
irst.
Do not push the vehicle to start the en
g
ine i
f
it is
f
itted with a
C
VT
g
earbox.
I
t
i
s a
d
v
i
sa
bl
e to
di
sconnect t
h
e
b
atter
y
i
f
th
e
v
e
hi
c
l
e
i
s
t
o
be
l
ef
t
u
n
used
fo
r
mo
r
e
th
a
n
o
n
e
m
o
nth.
Before disconnectin
g
the batter
y
Wait 2 minutes after switchin
g
off the
ig
nition before disconnectin
g
the batter
y
.
C
lose the windows and the doors before
disconnectin
g
the batter
y
.
Followin
g
reconnection
of the batter
y
Followin
g
reconnection of the batter
y
,
s
witch on the i
g
nition and wait
1
minute
before startin
g
to permit initialisation of the
e
lectronic s
y
stems. However, if problems
remain
f
ollowin
g
this operation, contact a
C
ITRO
Ë
N dealer or a qualified workshop.
)
Disconnect the batter
y
from the vehicle,
if
necessar
y
.
)
Follow the instructions
f
or use provided b
y
the manu
f
acturer o
f
the char
g
er.
)
Reconnect starting with the negative
terminal
(
-
)
.
)
Check that the terminals and connectors
a
re clean. If the
y
are covered with sulphate
(
whitish or
g
reenish deposit
)
, remove them
a
n
d
c
l
ea
n th
e
m.
Char
g
in
g
the batter
y
usin
g
a
batter
y
char
g
er

195
7
Practical information
Removin
g
a front or rea
r
wiper blade
)
Raise the correspondin
g
wiper arm.
)
Remove the wiper blade, slidin
g
it towards
th
e
ou
t
s
i
de
.
Changing a wiper
blade
Fittin
g
a front or rear wiper
blade
)
At the front, check the size of the wiper
b
l
ade
as
th
e
s
h
o
rt
e
r
b
l
ade
i
s
fitt
ed
o
n th
e
ri
g
ht-hand side of the vehicle.
)
P
ut t
h
e correspon
di
n
g
new w
i
per
bl
a
d
e
i
n
p
lace and
f
ix it.
)
Fold down the wiper arm care
f
ully.
Automatic power cut-off to accessories
Af
ter the engine has stopped, when the
ig
nition switch is in the "ACC" position
(
or the vehicle in "ACC" mode
)
yo
u
ca
n
s
till
use
f
u
n
c
ti
o
n
s
suc
h
as
th
e
aud
i
o
e
quipment, windscreen wipers, dipped beam
h
eadlamps, courtes
y
lamps, etc. for about
t
hi
rt
y
m
i
nutes.
Cuttin
g
off
O
nce the thirty minutes have expired, the
p
ower suppl
y
to the accessories will be
a
utomaticall
y
cut off.
Restorin
g
power
The power supply will be restored the next time
the i
g
nition is switched on.
The
p
eriod be
f
ore cut-o
ff
can be
e
xtended up to about sixt
y
minutes
or deactivated, via the colour screen
"Equipment" menu.
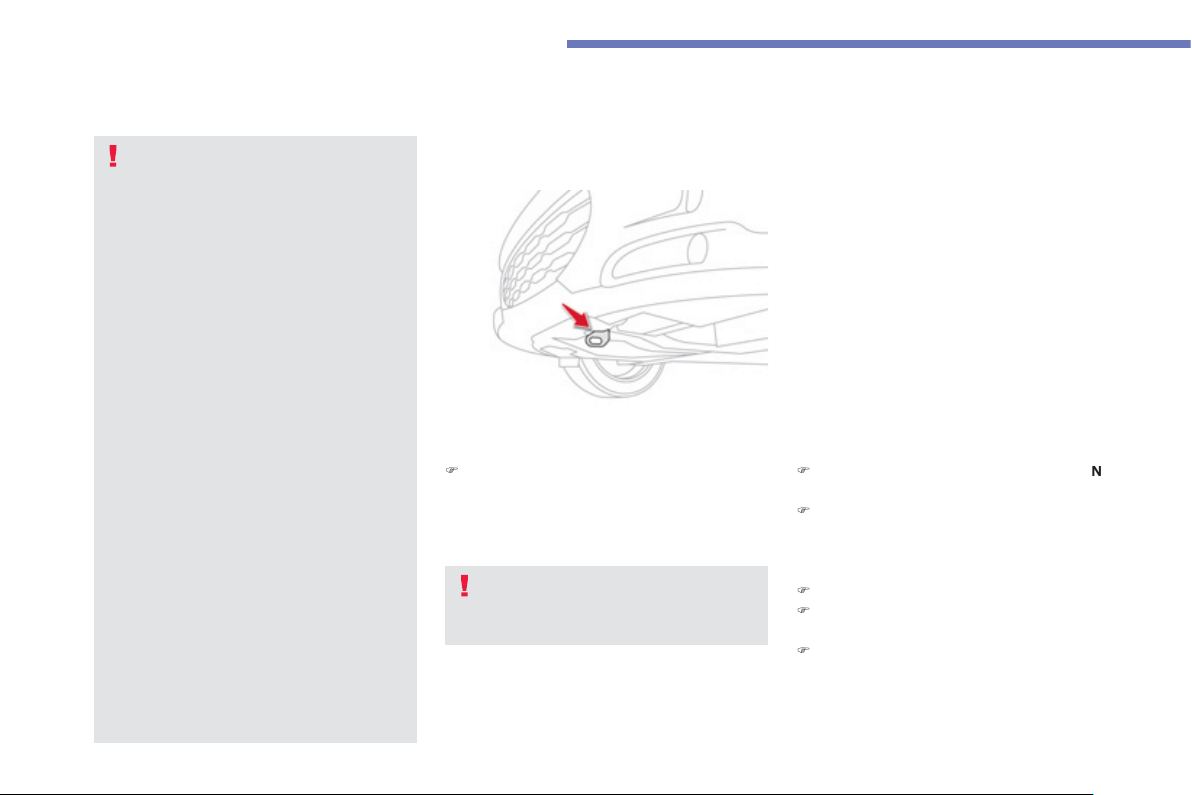
196
Practical information
Recovering the vehicle
General
r
ecommendations
Observe the le
g
islation in force in
y
our
c
ountr
y
.
Ensure that the wei
g
ht o
f
the towin
g
vehicle is hi
g
her than that of the towed
v
ehicle
.
The person at the wheel of the towed
ve
hi
c
l
e must
h
ave a va
lid
d
r
i
v
i
n
g
li
ce
n
ce
.
When towin
g
a vehicle with all
f
our
wheels on the
g
round, alwa
y
s use an
approved towin
g
bar; rope and straps
are pro
hibi
te
d
.
When towin
g
a vehicle with the en
g
ine
off
, there is no lon
g
er an
y
power
assistance for brakin
g
or steerin
g
.
In the
f
ollowin
g
cases,
y
ou must alwa
y
s
c
all on a professional recover
y
service:
- vehicle broken down on a motorwa
y
or fast road
,
- 4 wheel drive vehicle,
- w
h
en
i
t
i
s not poss
ibl
e to put t
h
e
g
earbox into neutral, unlock the
s
teer
i
n
g
, or re
l
ease t
h
e par
ki
n
g
brake,
- tow
i
n
g
w
i
t
h
on
ly
two w
h
ee
l
s on t
h
e
g
round,
- where there is no approved towin
g
ba
r
a
v
a
il
ab
l
e
...
T
ow
i
n
g
w
i
t
h
t
h
e w
h
ee
l
s on t
h
e
g
roun
d
i
s onl
y
possible on 2 wheel drive
(
2WD
)
v
e
r
sio
n
s
.
Recover
y
of
y
our vehicle
2 wheel drive
(
2WD
)
versions: towin
g
w
i
t
h
t
h
e w
h
ee
l
s on t
h
e
g
roun
d
)
Put the
g
ear lever into neutral
(
position
N
f
or the
C
VT gearbox
)
.
)
Unlock the steerin
g
b
y
b
y
turnin
g
the
i
g
nition switch to the " O
N
" position
(
o
r
t
o
"
ON
" m
ode
f
o
r v
e
hi
c
l
e
fitt
ed
with th
e
"Ke
y
less Entr
y
and Startin
g
" s
y
stem
)
.
)
Release the parkin
g
brake.
)
S
witch on the hazard warnin
g
lamps on
bo
t
h
v
ehicles
.
)
Move o
ff
g
entl
y
and travel slowl
y
f
or a short
distance only.
)
Fi
t t
h
e tow
i
n
g
b
ar to t
h
e tow
i
n
g
e
y
e on t
h
e
c
hassis, located under the
f
ront bum
p
er.
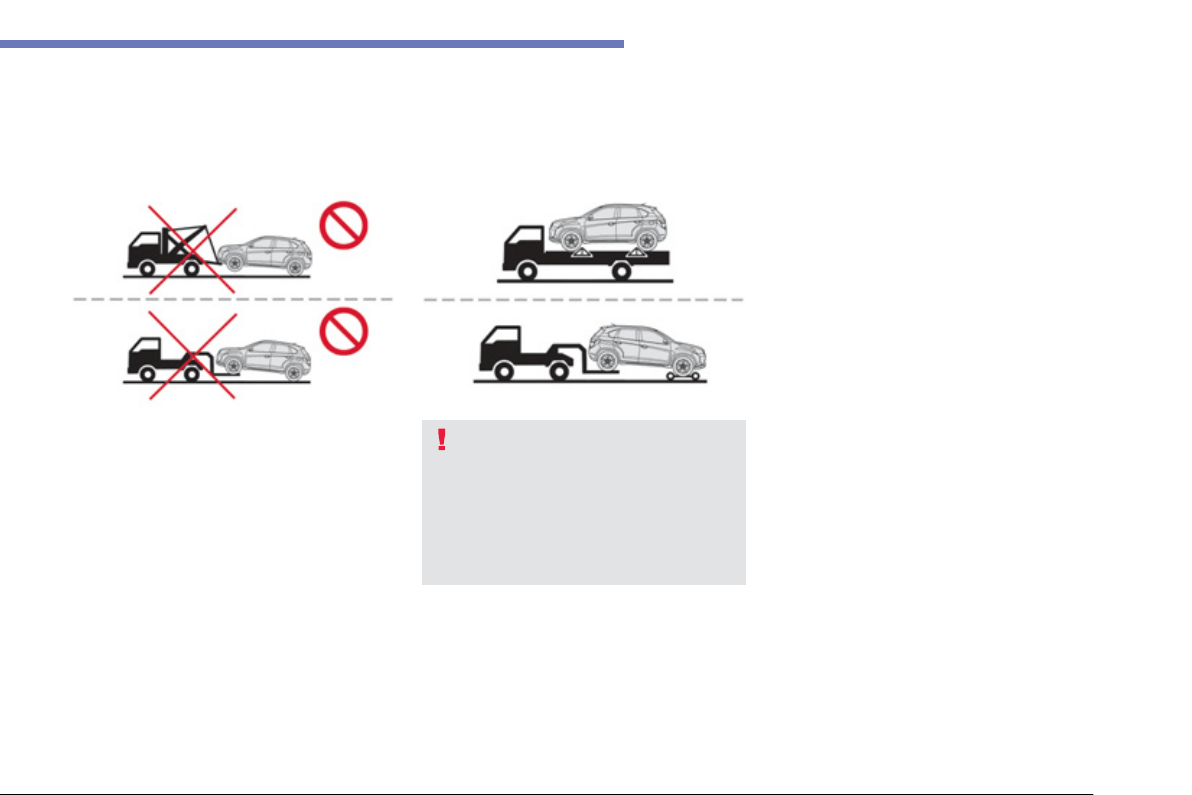
197
7
Practical information
V
ehicles fitted with the 4 wheel drive
s
y
stem must alwa
y
s be recovered on a
f
latbed
.
Ne
v
e
r
ha
v
e
t
he
v
ehicle
t
o
w
ed
w
i
t
h
t
he
f
our wheels on the
g
round, this could
d
ama
g
e t
h
e transm
i
ss
i
on.
Th
e
v
e
hi
c
l
e
m
us
t n
o
t
be
t
o
w
ed
with th
e
f
ront or rear wheels on the
g
round even
if it is in front "2WD"
(
2 wheel drive
)
mode
.
4 wheel drive
(
4WD
)
versions: recover
y
on a fl atbed
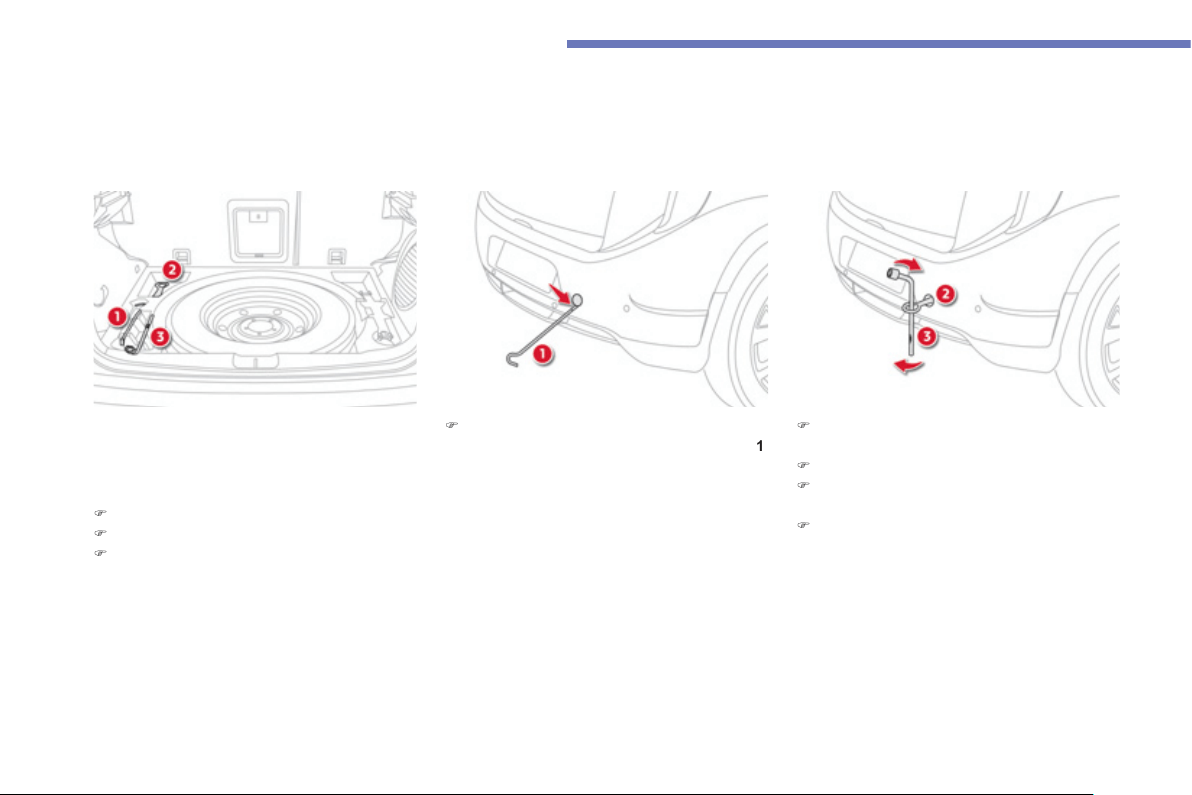
198
Practical information
)
O
n the rear bumper, remove the cover by
pullin
g
at the bottom usin
g
the
j
ack handle
1
.
)
S
crew in the towing eye 2
f
ully using the
wh
ee
l
b
r
ace
3
.
)
Install the towin
g
bar.
)
Switch on the hazard warnin
g
lamps on
bo
th v
e
hi
c
l
es
.
)
Move off
g
entl
y
and travel slowl
y
for a short
di
stance on
ly
.
Towin
g
another vehicle
A
ccess to the toolin
g
The towin
g
e
y
e and the tools are stored under
th
e
boo
t fl
oo
r.
T
o
g
a
i
n access to t
h
em:
)
open t
h
e
b
oot,
)
li
f
t and remove the boot
f
loor,
)
take the towing eye and the tools required.
L
ist of tools
1.
Jac
k h
a
n
d
l
e
.
2.
Towin
g
e
y
e.
3.
Wh
ee
l
b
r
ace
.
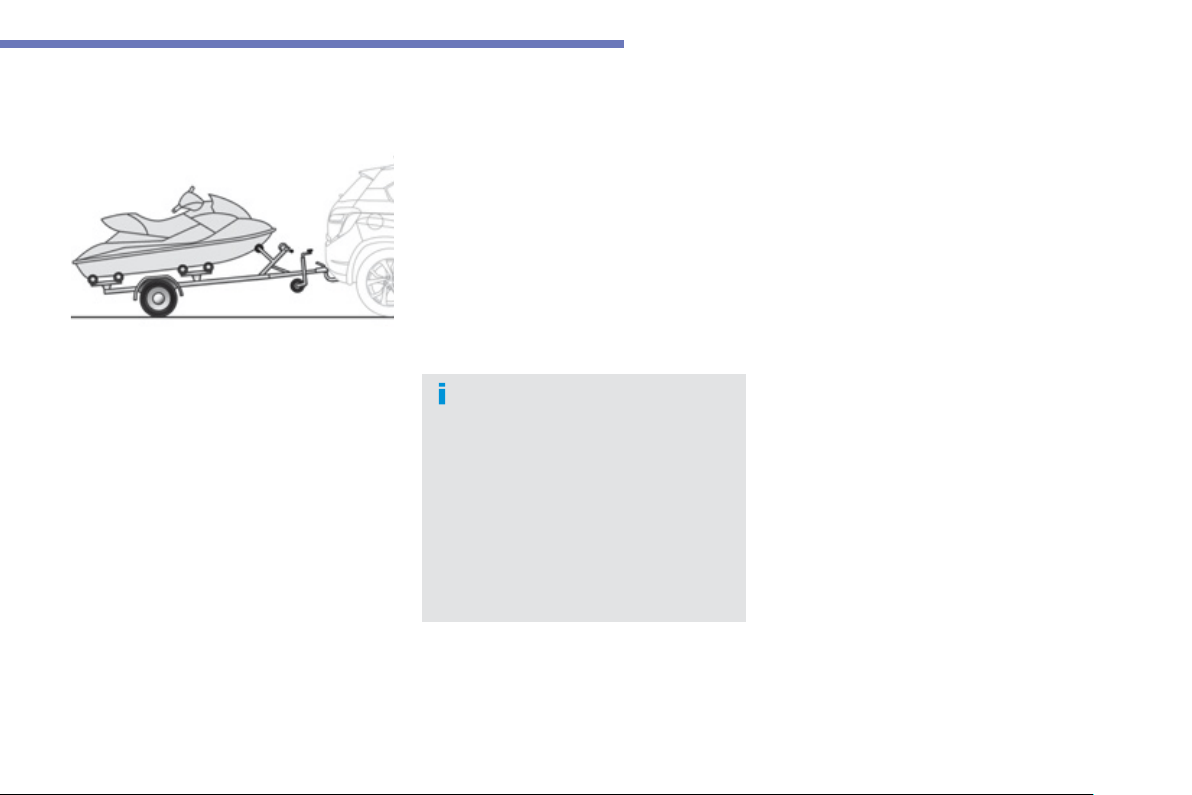
199
7
Practical information
Towing a trailer, a caravan...
We recommend the use o
f
g
enuine
C
ITR
OË
N t
o
w
ba
r
s
a
n
d
th
e
ir h
a
rn
esses
t
h
at
h
ave
b
een teste
d
an
d
a
pp
rove
d
f
rom the design stage o
f
your vehicle
a
nd that the
f
ittin
g
o
f
the towbar is
e
ntrusted to a CITROËN dealer or a
qualified workshop.
If the towbar is not fitted b
y
a
CITROËN dealer, it is imperative that
it is
f
itted
f
ollowin
g
the manu
f
acturer's
i
n
s
tr
uc
t
io
n
s
.
Your vehicle is primaril
y
desi
g
ned for
transport
i
n
g
peop
l
e an
d
l
u
gg
a
g
e,
b
ut
i
t ma
y
also be used
f
or towin
g
a trailer.
Drivin
g
with a trailer sub
j
ects the towin
g
vehicle
to more si
g
nificant stress and its driver must be
particularl
y
care
f
ul.
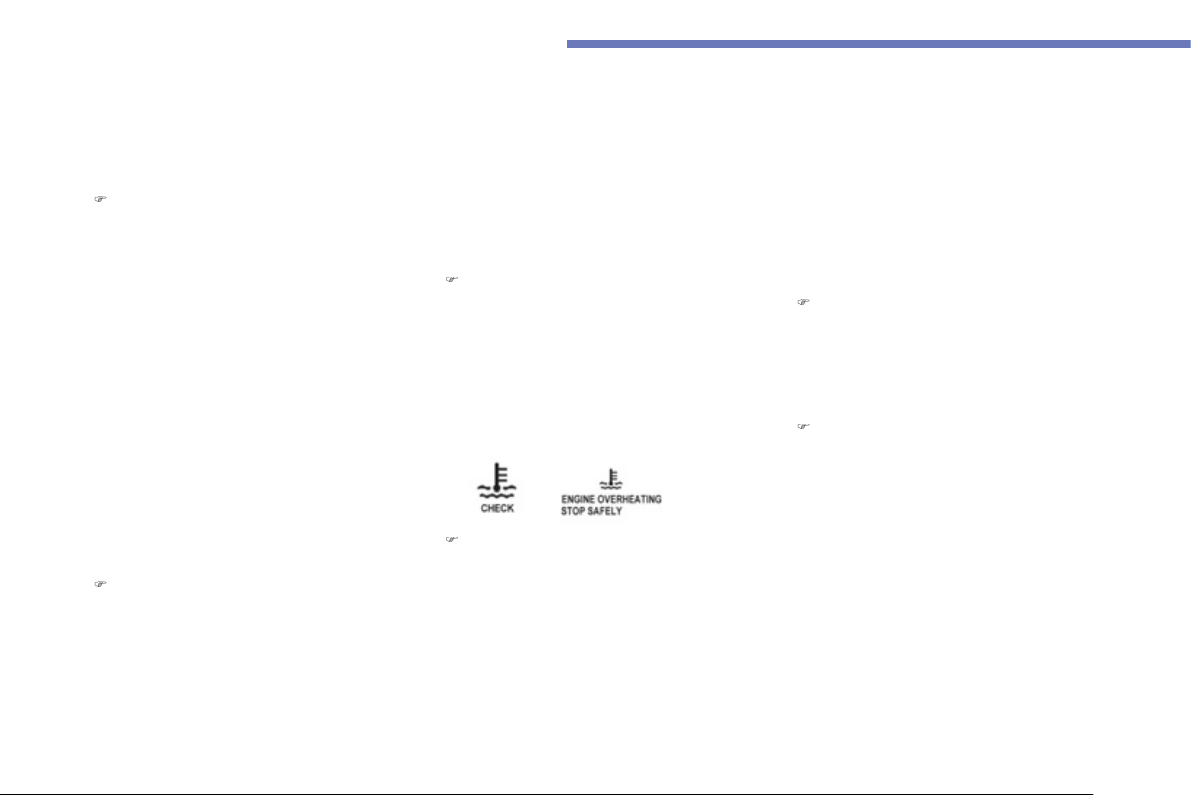
200
Practical information
Drivin
g
advice
Distribution of loads
)
Di
s
tri
bu
t
e
th
e
l
oad
in th
e
tr
a
il
e
r
so
th
a
t th
e
h
eaviest items are as close as possible to
the axle and the nose wei
g
ht approaches the
m
aximum permitted without exceedin
g
it.
Ai
r
d
ens
i
t
y
d
ecreases w
i
t
h
a
l
t
i
tu
d
e, t
h
us
r
educin
g
en
g
ine per
f
ormance. Above
1 000 metres, the maximum towin
g
load must
be reduced by 10
%
o
f
the
G
TW and so on
f
or
e
ver
y
1 000 metres o
f
altitude.
R
e
f
e
r t
o
th
e
"T
ec
hni
ca
l D
a
t
a
"
sec
ti
o
n f
o
r
de
t
a
il
s
of the wei
g
hts and towin
g
loads which appl
y
to
y
our vehicle.
Side wind
)
Take into account the increased sensitivit
y
t
o
side
w
i
n
d
.
Coolin
g
Towin
g
a trailer on a slope increases the
temperature of the coolant.
As the fan is electricall
y
controlled, its coolin
g
c
apacit
y
is not dependent on the en
g
ine speed.
)
T
o
l
ower t
h
e en
gi
ne spee
d
, re
d
uce
y
our
s
pee
d
.
Th
e max
i
mum tow
i
n
g
l
oa
d
on a
l
on
g
s
l
ope
depends on the gradient and the outside
tem
p
erature.
In all cases, pa
y
attention to the coolant
temperature.
)
I
f
this messa
g
e is displa
y
ed, stop
y
our
v
ehicle as soon as it is safe to do so
.
Brakin
g
Towin
g
a trailer increases the brakin
g
distance.
T
y
res
)
Check the t
y
re pressures of the towin
g
vehicle and of the trailer, observin
g
the
r
ecommended pressures.
Li
g
htin
g
)
Check the li
g
htin
g
and si
g
nallin
g
on the
tr
a
il
e
r.
I
f
the messa
g
e
f
lashes slowl
y
, wait
f
or the
e
ngine to cool be
f
ore topping up the level, i
f
necessary
.
If the messa
g
e flashes rapidl
y
, contact a
C
ITROËN dealer or a qualified workshop
without dela
y
.
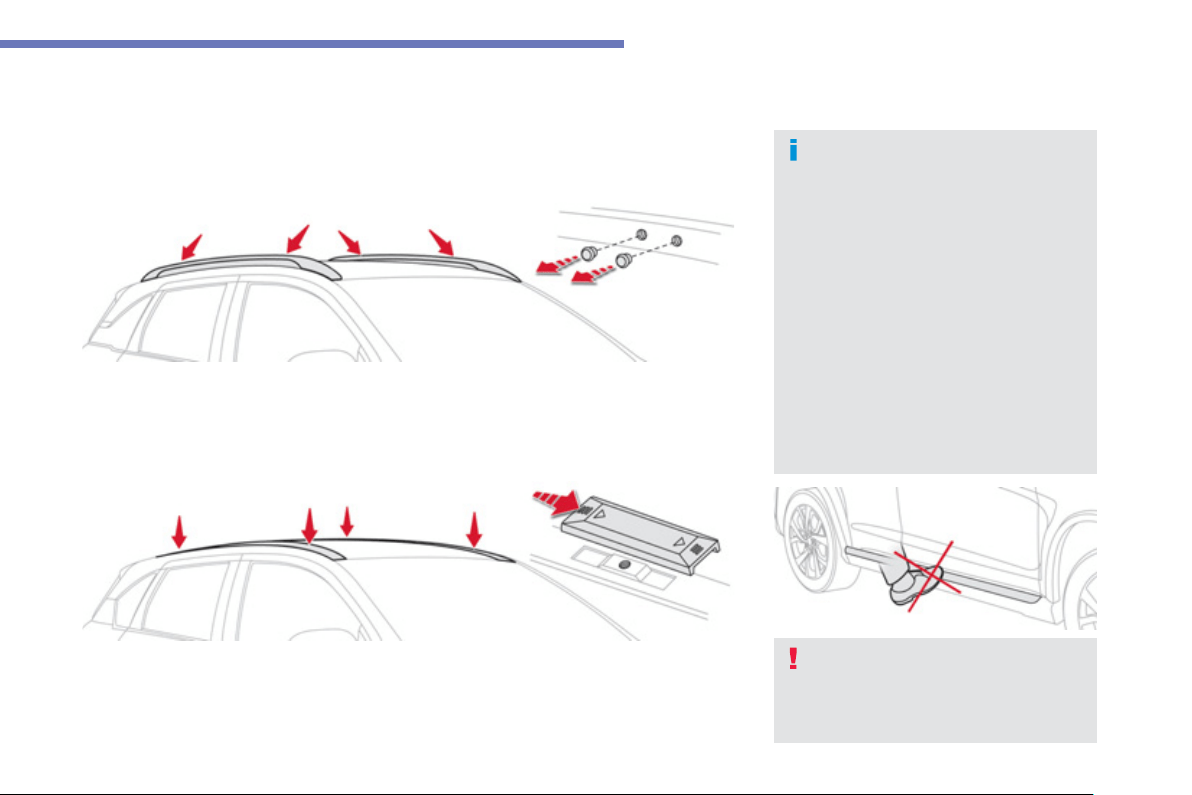
201
7
Practical information
Fitting roof bars
The bod
y
sill
f
inishers should not be
u
sed as a step when fittin
g
roof bars.
U
se accessor
i
es recommen
d
e
d
by
C
ITRO
Ë
N and follow the accessory
manu
f
acturer's
f
ittin
g
instructions.
Maximum authorised wei
g
ht on the roo
f
bars, for a loadin
g
hei
g
ht not exceedin
g
40 cm
(
except bic
y
cle carriers
)
: 80 k
g
.
If the hei
g
ht exceeds 40 cm, adapt the
s
peed o
f
the vehicle to the condition o
f
the road, to avoid dama
g
in
g
the roo
f
bars and the
f
ixin
g
s on the roo
f
.
Please re
f
er to national legislation to
c
ompl
y
with the re
g
ulations re
g
ardin
g
the transportation of ob
j
ects which are
lon
g
er than the vehicle.
The transverse roof bars are fitted to the lon
g
itudinal bars at the 8 fixin
g
points masked b
y
covers.
Usin
g
a small screwdriver, remove the 8 covers on the inner faces of the lon
g
itudinal bars.
The transverse bars are fitted directl
y
to the roof of the vehicle, at the 4 anchora
g
e points masked
b
y
covers.
S
lide the covers towards the front of the vehicle to remove them.
Retain the protective covers
f
or re
f
ittin
g
a
f
ter removal o
f
the roo
f
bars.
V
ehicles fitted with lon
g
itudinal bars
V
ehicles not fitted with lon
g
itudinal bars
For reasons of safet
y
and to avoid dama
g
in
g
the roof, it is essential to use transverse bars that are
approved for
y
our vehicle.

202
Practical information
Accessories
A
wide ran
g
e of accessories and
g
enuine parts is available from the CITROËN dealer network.
These accessories and parts have been tested and approved for reliabilit
y
and safet
y
.
The
y
are all adapted to
y
our vehicle and benefit from CITROËN's recommendation and warrant
y
.
"
Comfort":
f
ront and rear parkin
g
sensors, smoker's
ki
t, coat
h
an
g
er on
h
ea
d
restra
i
nt,
i
nsu
l
ate
d
m
odule, aluminium
f
ootrest, reading lamp, air
de
f
lectors, sun blinds...
"Trans
p
ort solutions":
towbar with quickl
y
detachable ball, rear
c
arr
y
in
g
platform
(
eas
y
base
)
, roof bars, boot
liner, boot spacers, bic
y
cle carrier for roof bars,
s
ki carrier, canoe carrier, ri
g
id roo
f
boxes,
f
lexible roo
f
boxes, boot net...
"St
y
le":
16 inch allo
y
wheels, 18 inch allo
y
wheels,
ch
rome
d
d
oor
h
an
dl
e s
h
e
ll
s, c
h
rome
d
m
i
rror
shells,
f
ront s
p
oiler, brushed aluminium interior
trim kit,
g
loss black interior trim kit, parkin
g
b
rake lever trim, aluminium
g
ear knob, leather
steerin
g
wheel...
"Securit
y
and safet
y
":
anti-intrusion alarm, warnin
g
trian
g
le, hi
g
h
visibilit
y
vest, breathal
y
ser, first aid kit, snow
c
hains, anti-slip covers, wheel securit
y
bolts,
c
hild seats,
f
ire extin
g
uisher,
f
o
g
lamp kit,
d
o
g
g
uar
d
, sto
l
en ve
hi
c
l
e trac
ki
n
g
s
y
stem,
accessories
f
or pets
(
seat belts, seat and boot
protectors, cage
)
...
"P
rotect
i
on
"
:
mat
*
, boot carpet, side protective mouldin
g
s,
d
oor s
ill
p
rotectors,
b
oot s
ill
p
rotector, ve
hi
c
l
e
c
over,
f
ront and rear bum
p
er
p
rotective
m
ouldin
g
s...
Conversion kits
You can obtain an "Enterprise" kit to convert a
trade vehicle to a private car and vice-versa.
I
f
a
t
o
w
ba
r
a
n
d
it
s
h
a
rn
ess
i
s
f
itt
ed
o
utside the CITROËN dealer network,
thi
s
m
us
t
be
do
n
e
in lin
e
with th
e
ma
n
u
f
ac
t
u
r
e
r'
s
in
s
tr
uc
ti
o
n
s
.
*
To prevent an
y
risk o
f
j
ammin
g
o
f
the
p
e
d
a
l
s:
- ensure that the mat is
p
ositioned and
secured correctl
y
,
- never fit one mat on top of another.

203
7
Practical information
The
f
ittin
g
o
f
electrical equipment
o
r
accesso
ri
es
whi
c
h
a
r
e
n
o
t
recommended b
y
CITROËN ma
y
result
in a failure of
y
our vehicle's electronic
sy
stem and excessive electrical
c
onsumption.
Please note this precaution. You
are advised to contact a
C
ITR
OË
N
representat
i
ve to
b
e s
h
own t
h
e ran
g
e
o
f
recommended e
q
ui
p
ment and
accesso
ri
es
.
Installation of radio
c
ommunication
transmitters
Before installin
g
an
y
after-market radio
c
ommunication transmitter,
y
ou can
c
ontact a
C
ITR
OË
N dealer for the
s
peci
f
ication o
f
transmitters which can
be
f
itted
(f
requenc
y
, maximum power,
a
erial
p
osition, s
p
eci
f
ic installation
r
equirements
)
, in line with the Vehicle
E
lectroma
g
netic Compatibilit
y
Directive
(
2004/104/EC
)
.
Dependin
g
on the le
g
islation in
f
orce
in the country, it may be compulsory
to have a hi
g
h visibilit
y
sa
f
et
y
vest,
warnin
g
trian
g
le and spare bulbs and
f
uses
a
v
a
il
ab
l
e
in th
e
v
e
hi
c
l
e
.
"M
u
l
t
i
me
di
a
"
:
sem
i
-
i
nte
g
ra
l
sate
lli
te nav
ig
at
i
on s
y
stems,
p
orta
bl
e sate
lli
te nav
ig
at
i
on s
y
stems, au
di
o
s
ystems, speakers, rear shel
f
with speakers,
h
ands-
f
ree kit, DVD pla
y
er, mappin
g
update
DVD, speed camera detector, Wi-Fi on board,
230
V socket, head-up displa
y
, iPhone char
g
er,
r
ea
r m
u
ltim
ed
i
a
ca
rri
e
r...

204
Checks
TOTAL & CITROËN
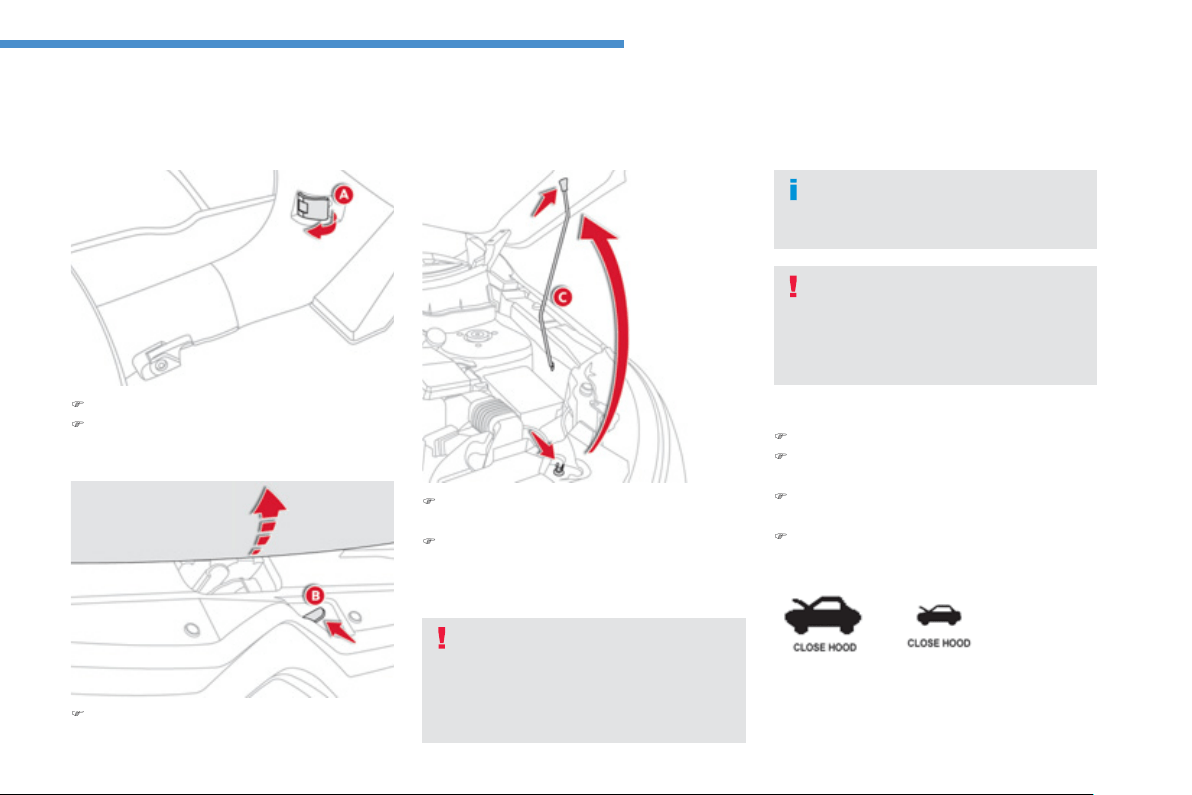
205
8
Checks
Bonnet
)
O
pen the left-hand front door.
)
P
u
ll th
e
int
e
ri
o
r
bo
nn
e
t r
e
l
ease
l
e
v
e
r
A
,
located at the bottom o
f
the door aperture.
D
o not open t
h
e
b
onnet
i
n
high
w
i
n
d
s.
Wh
en t
h
e en
gi
ne
i
s
h
ot,
h
an
dl
e t
h
e
e
xterior sa
f
et
y
catch and the bonnet
s
ta
y
with care
(
risk o
f
burns
)
.
)
Unclip the stay
C
f
rom its housing on the
bac
k
of
th
e
bo
nn
e
t.
)
Fix the sta
y
in the notch to hold the bonnet
open
.
Closin
g
)
Take the sta
y
out of the support notch.
)
Clip the sta
y
in its housin
g
on the back o
f
t
he
bo
nn
e
t.
)
Lo
w
e
r t
he
bo
nn
e
t
a
n
d
r
elease
i
t
a
t t
he
e
n
d
of
it
s
tr
a
v
e
l.
)
P
u
ll
o
n th
e
bo
nn
e
t t
o
c
h
ec
k th
a
t it i
s
s
ecured correctl
y
.
Th
e
l
oca
ti
o
n
o
f th
e
int
e
ri
o
r
bo
nn
e
t r
e
l
ease
l
ever prevents openin
g
of the bonnet while
th
e
fr
o
nt l
e
ft
doo
r i
s
c
l
osed
.
Openin
g
)
Push the exterior safet
y
catch B t
o
th
e
l
e
ft
a
n
d
r
a
i
se
th
e
bo
nn
e
t.
This messa
g
e appears in the instrument panel
s
creen if the bonnet is not full
y
closed.
T
he coolin
g
fan ma
y
start after
switchin
g
off the en
g
ine: take care
with articles and clothin
g
that mi
g
ht
b
ecome cau
g
ht b
y
the fan blades
.

206
Checks
fluids and the replacement of certain
c
omponen
t
s.
Petrol engines
1.
Screenwash and headlamp wash fluid
rese
rv
oi
r.
2.
Coo
l
a
nt h
eade
r t
a
nk.
3.
Br
a
k
e
f
l
u
i
d
r
ese
rv
o
ir.
4.
Battery.
5.
F
usebo
x.
6
.
Air filt
e
r.
7
.
En
g
ine oil dipstick.
8.
En
g
ine oil filler cap.
1.6 litre 115
2
.0 litre 150
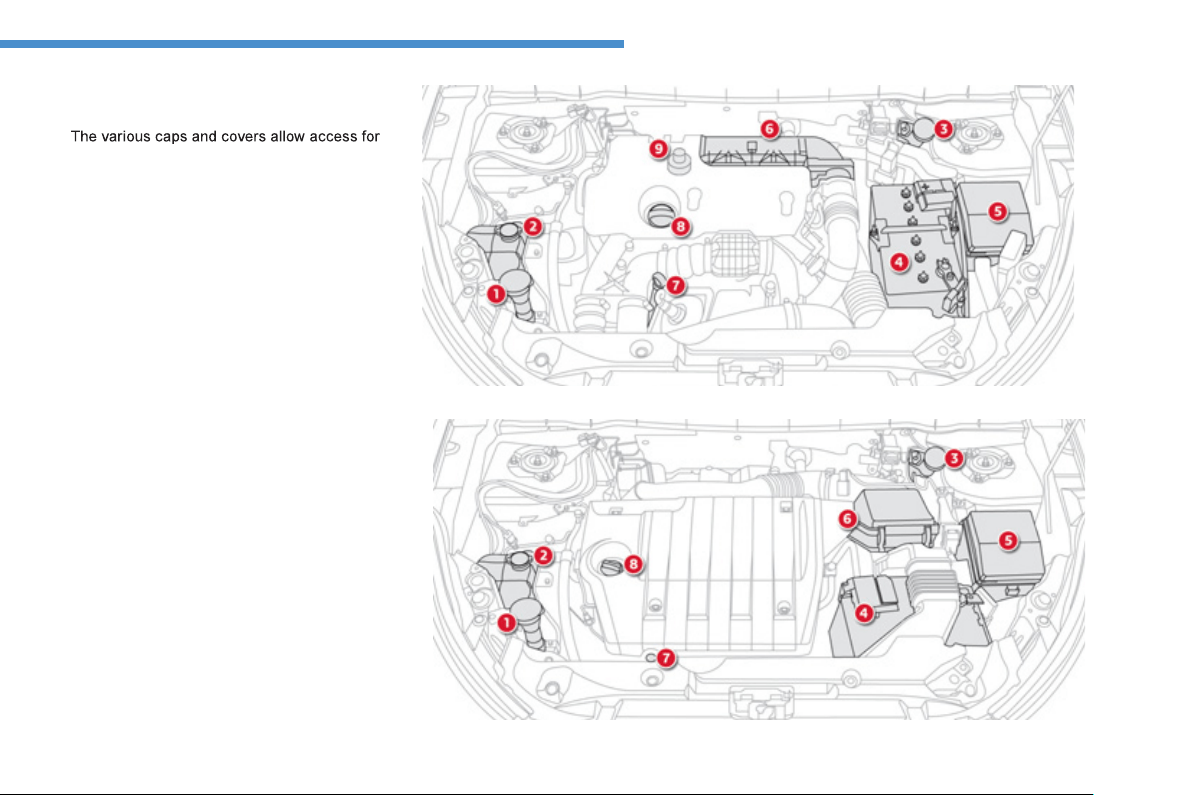
207
8
Checks
c
heckin
g
the levels of the various fluids, for
replacin
g
certain components and for primin
g
the fuel s
y
stem.
Diesel engines
1.
Screenwash and headlamp wash fluid
rese
rv
oi
r.
2.
Coo
l
a
nt r
ese
rv
o
ir.
3.
Br
a
k
e
f
l
u
i
d
r
ese
rv
o
ir.
4.
Battery.
5
.
F
usebo
x.
6
.
Air filt
e
r.
7
.
En
g
ine oil dipstick.
8.
En
g
ine oil filler cap.
9.
Primin
g
pump * .
1
.
6
H
Di 110
1
.
8
HDi 150
*
Accordin
g
to en
g
ine.
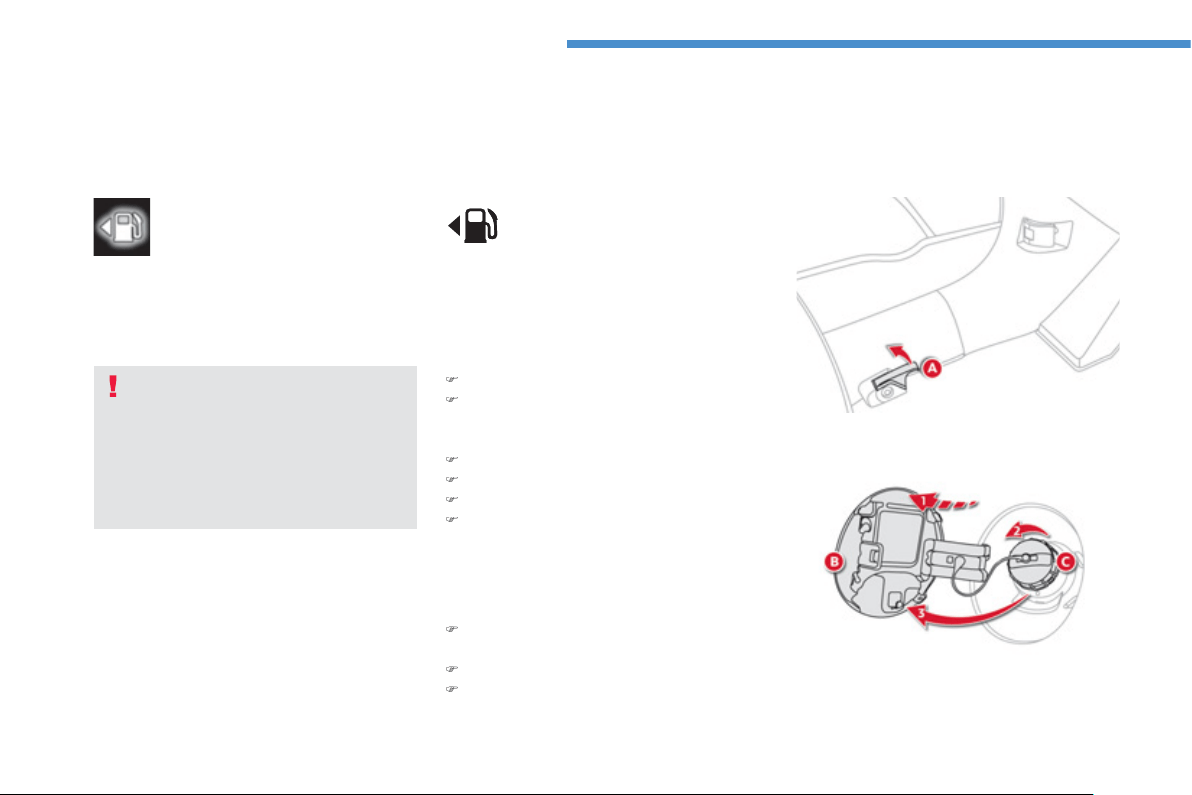
208
Checks
When the symbol begins to flash
r
apidl
y
(
approximatel
y
twice per
s
econd
)
, there is not much fuel
remainin
g
in
y
our tank
(
approximatel
y
5
litres
)
.
You must fill the tank to avoid runnin
g
ou
t
of
fue
l.
Fuel tank
Capacit
y
of the tank: approximatel
y
60 litres
.
Low fuel level
Filli
n
g
A
label, a
ff
ixed on the inside o
f
the
f
la
p
,
r
eminds you o
f
the type o
f
f
uel to be used
a
ccordin
g
to
y
our en
g
ine.
More than 5 litres of fuel must be added in
order to be re
g
istered b
y
the fuel
g
au
g
e.
Location of the ca
p
When the low fuel level is reached
,
t
hi
s
i
n
di
cat
i
on appears
i
n t
h
e
instrument panel screen. When it
f
irst
c
omes on,
y
ou
h
ave approx
i
mate
ly
10 litres o
f
f
uel remaining.
The s
y
mbol
f
lashes slowl
y
(
approximatel
y
once per second
)
.
1.
O
penin
g
the filler flap.
2.
Removin
g
the filler cap.
3.
Hookin
g
the filler cap.
To
f
ill the tank sa
f
el
y
:
)
t
he en
g
ine must be switched off
,
)
pull the control A l
oca
t
ed
a
t th
e
bo
tt
o
m l
e
ft
o
f th
e
d
riv
e
r'
s
sea
t t
o
r
e
l
ease
th
e
f
ue
l fill
e
r
f
lap,
)
open the
f
uel
f
iller
f
lap
B
,
)
turn the
f
iller cap
C
to the le
f
t,
)
remove the
f
iller ca
p
C
,
)
f
ill the tank, but do not continue after the
3
r
d
cut-off of the nozzl
e
; this could cause
m
a
lf
u
n
c
ti
o
n
s
.
When
y
ou have filled the tank:
)
refit the filler cap, insertin
g
the upper part
f
irst
,
)
screw in the
f
iller cap to the ri
g
ht,
)
close the
f
lap.
Ensure that the
f
uel
f
iller
f
la
p
is closed
c
orrectly.
This symbol indicates that the
f
uel
tank cap is located on the le
f
t-hand
s
i
de
o
f th
e
v
e
hi
c
l
e
.
Openin
g
the cap ma
y
cause an inrush of air.
Thi
s vacuum, w
hi
c
h
i
s comp
l
ete
ly
norma
l
,
i
s
c
aused b
y
the sealin
g
o
f
the
f
uel s
y
stem.
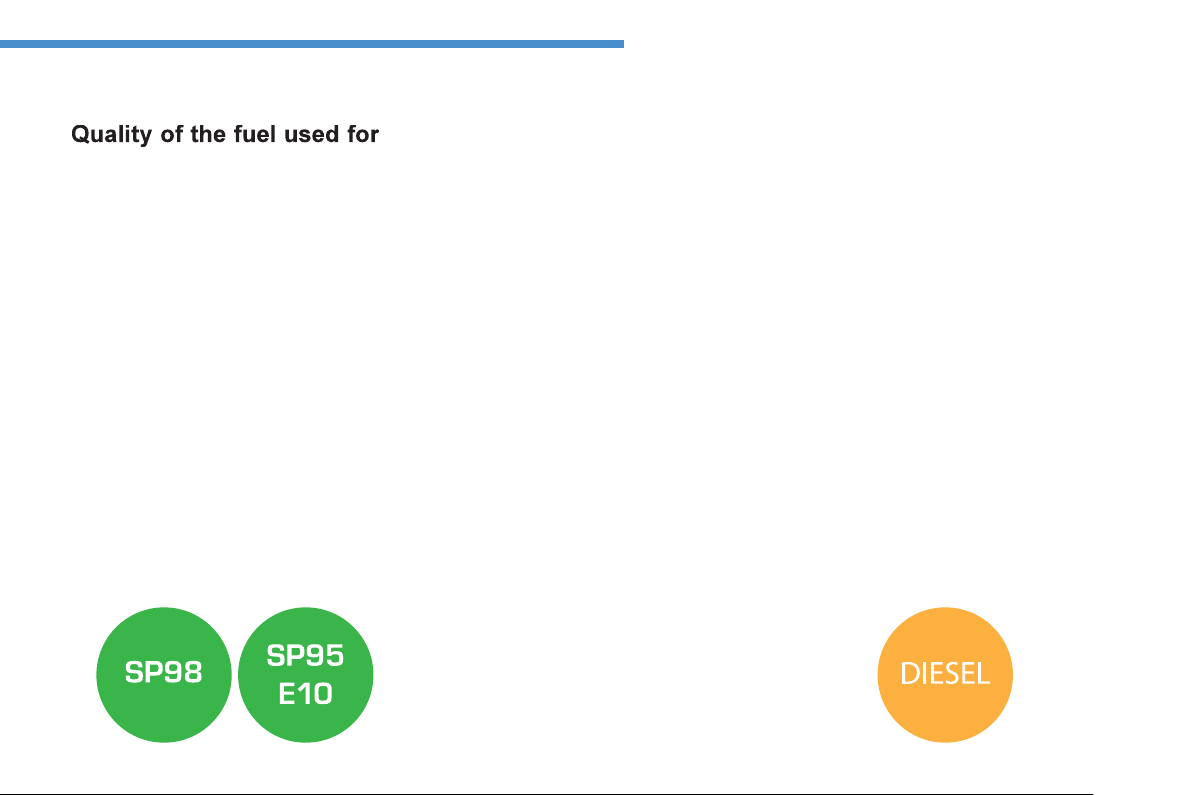
209
8
Checks
p
etro
l
en
gi
nes
The petrol en
g
ines are perfectl
y
compatible
with E10 or E24 t
y
pe petrol bio
f
uels
(
containin
g
10
%
or 24
%
ethanol
)
, con
f
ormin
g
to European
s
t
a
n
da
r
ds
EN 22
8
a
n
d
EN 1
53
7
6
.
E85 type
f
uels
(
containing up to 85
%
ethanol
)
are reserved exclusivel
y
f
or vehicles marketed
for the use of this t
y
pe of fuel
(
BioFlex
vehicles
)
. The qualit
y
of the ethanol must
c
ompl
y
with European standard EN 15293.
For Brazil onl
y
, special vehicles are marketed
to run on
f
uels containin
g
up to 100
%
ethanol
(
E100 t
y
pe
)
.
Qualit
y
of the fuel used for
Di
ese
l
en
gi
nes
The Diesel en
g
ines are perfectl
y
compatible
with
b
i
ofue
l
s
whi
c
h
co
n
fo
rm t
o
cu
rr
e
nt
a
n
d
f
uture European standards
(
Diesel
f
uel which
c
om
p
lies with standard EN 590 mixed with a
bio
f
uel which complies with standard EN 14214
)
available at the pumps
(
containin
g
up to 7
%
Fatt
y
Acid Meth
y
l Ester
)
.
The B
30
biofuel can be used in certain Diesel
e
n
g
ines; however, this use is sub
j
ect to strict
application of the special servicin
g
conditions.
C
ontact a CITRO
Ë
N dealer or a qualified
wor
k
s
h
op.
The use o
f
an
y
other t
y
pe o
f
(
bio
)f
uel
(
vegetable or animal oils, pure or diluted,
domestic
f
uel...
)
is strictl
y
prohibited
(
risk o
f
dama
g
e to the en
g
ine and fuel s
y
stem
)
.
1.6 litre petrol en
g
ines, even thou
g
h the
y
have
been desi
g
ned to operate on 95 R
O
N petrol,
c
an accept 90 R
O
N petrol without en
g
ine
adj
ustments,
b
ut w
i
t
h
a s
ligh
t
d
eter
i
orat
i
on
i
n
p
er
f
ormance.
2.0 litre petrol en
g
ines can accept 90 R
O
N or
h
i
g
her petrol.
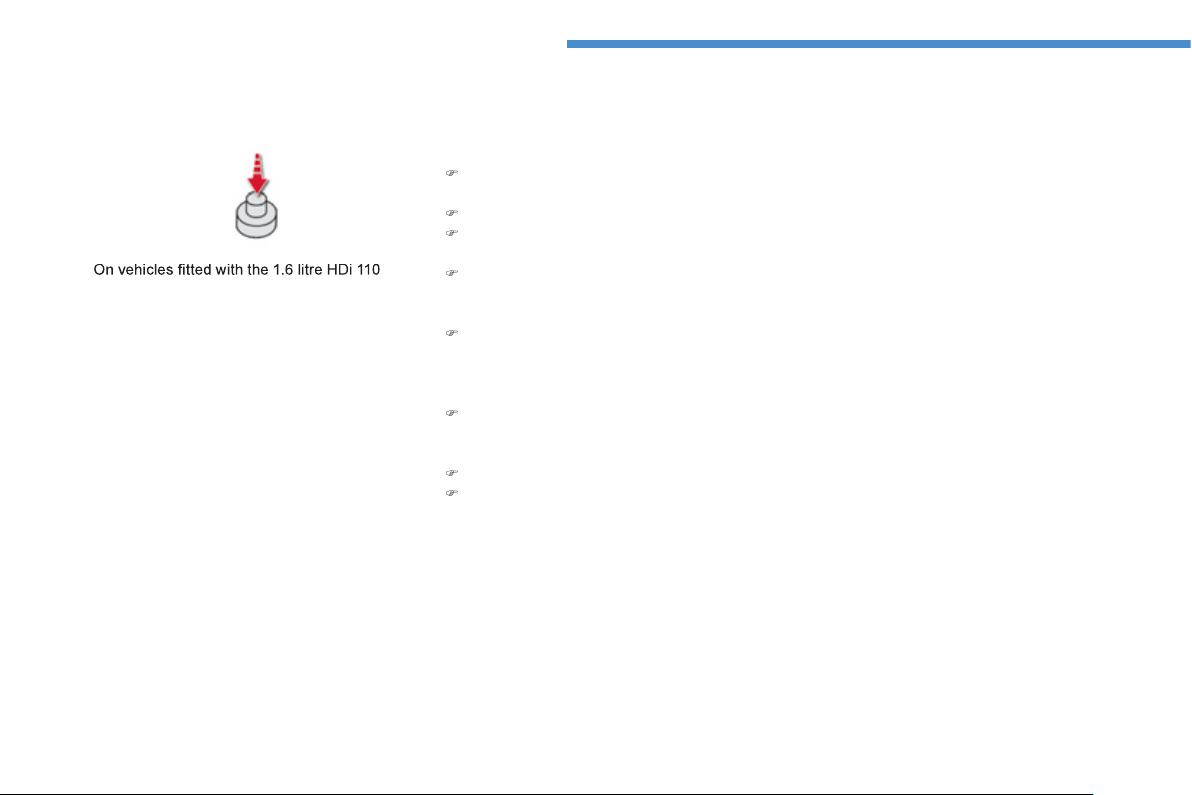
210
Checks
Running out of fuel (Diesel)
e
n
g
ine, the
f
uel s
y
stem must be manuall
y
p
rimed i
f
you run out o
f
f
uel; re
f
er to the
c
orrespondin
g
Diesel en
g
ine compartment
vi
e
w.
1.6 litre HDi en
g
ine
)
Fill th
e
f
ue
l t
a
nk with
a
t l
eas
t fiv
e
litr
es
of
d
i
ese
l.
)
O
pen the bonnet.
)
If necessar
y
, unclip the st
y
lin
g
cover for
access to t
h
e pr
i
m
i
n
g
pump.
)
S
queeze and release the primin
g
pump
repeatedl
y
until resistance is
f
elt
(
there ma
y
be resistance at the
f
irst press
)
.
)
O
perate the starter until the en
g
ine starts
(
if the en
g
ine does not start at the first
attempt, wait around 15 seconds before
tr
y
in
g
a
g
ain
)
.
)
If the en
g
ine does not start after a few
attempts, operate t
h
e pr
i
m
i
n
g
pump a
g
a
i
n
t
h
en start t
h
e en
gi
ne.
)
C
lip the st
y
lin
g
cover back in place.
)
C
lose the bonnet.
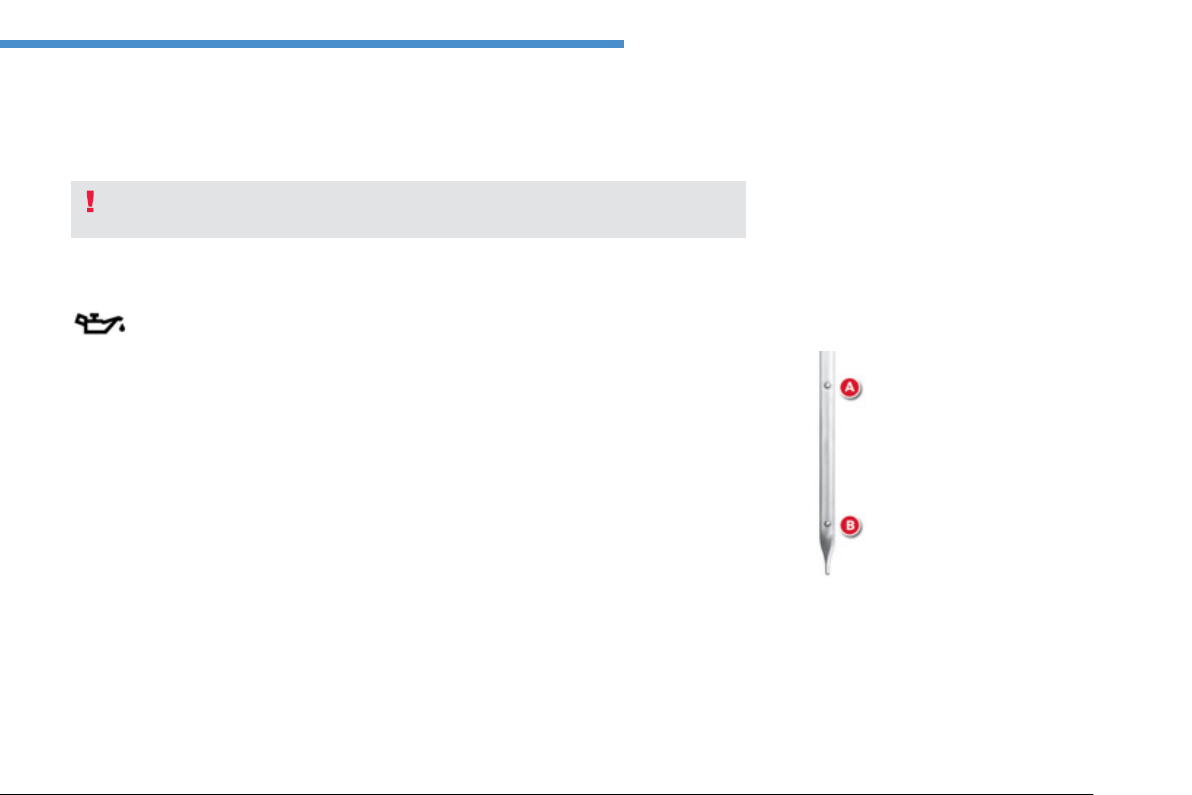
211
8
Checks
Checking levels
Take care when workin
g
under the bonnet, as certain areas of the en
g
ine ma
y
be extremel
y
hot
(
risk of burns
)
.
Oil level
Th
e
c
h
ec
k i
s
ca
rri
ed
ou
t with th
e
di
pst
i
c
k
.
This check will onl
y
be correct i
f
the
ve
hi
c
l
e
i
s on
l
eve
l
g
roun
d
an
d
t
h
e
e
ngine has been o
ff
f
or more than 30 minutes.
It is normal to top up the oil level between
two services
(
or oil chan
g
es
)
. CITROËN
recommends that
y
ou check the level, and top
up if necessar
y
, ever
y
3 000 miles
(
5 000 km
)
.
A
fter toppin
g
up the oil, the check when
s
w
i
tc
hi
n
g
on t
h
e
ig
n
i
t
i
on w
i
t
h
t
h
e o
il
l
eve
l
i
n
di
cator
i
n t
h
e
i
nstrument pane
l
i
s not va
lid
durin
g
the 30 minutes a
f
ter toppin
g
up.
E
n
gi
ne o
il
c
h
an
g
e
Re
f
er to the servicin
g
booklet
f
or details o
f
the
i
nterval
f
or this o
p
eration.
In order to maintain the reliabilit
y
o
f
the en
g
ine
a
nd emission control s
y
stem, the use o
f
a
dditives in the en
g
ine oil is prohibited.
Oil s
p
ecifi cation
The oil must be the correct
g
rade for
y
our
en
g
ine and con
f
orm to the manu
f
acturer's
reco
mm
e
n
da
t
io
n
s
.
If a level drops si
g
nificantl
y
, have the correspondin
g
s
y
stem checked b
y
a CITROËN dealer or a qualified workshop.
Check all of these levels re
g
ularl
y
, in line with the servicin
g
booklet and the requirements of the warrant
y
. Top them up if necessar
y
, unless otherwise indicated.
D
i
p
stick
There are two marks on the dipstick:
A = m
a
xim
u
m
If
y
ou fill past this mark,
c
ontact a
C
ITR
OË
N dealer
o
r a quali
f
ied workshop.
B
= m
i
n
i
m
u
m
N
e
v
e
r
a
ll
o
w th
e
l
e
v
e
l t
o
fa
ll
be
l
o
w thi
s
m
a
rk.
212
Checks
Th
e
coo
l
a
nt l
e
v
e
l
s
h
ou
l
d
be
c
l
ose
t
o
th
e
"MAX" m
a
rk
bu
t
s
h
ou
l
d
n
e
v
e
r
e
x
ceed
i
t.
I
n a
ddi
t
i
on, as t
h
e coo
li
n
g
s
y
stem
i
s pressur
i
se
d
,
wait at least one hour a
f
ter switchin
g
o
ff
the
e
ngine be
f
ore carrying out any work.
To avoid an
y
risk o
f
scaldin
g
, unscrew the cap
by
two turns to allow the pressure to drop.
When the pressure has dropped, remove the
c
ap and top up the level.
Chan
g
in
g
the coolant
Th
e coo
l
ant
d
oes not
h
ave to
b
e c
h
an
g
e
d
.
Fluid s
p
ecifi cation
Th
e
coo
l
a
nt m
us
t
co
n
fo
rm t
o
th
e
ma
n
ufac
t
u
r
e
r'
s
r
eco
mm
e
n
da
ti
o
n
s
.
Th
e
b
r
a
k
e
fl
u
i
d
l
e
v
e
l
s
h
ou
l
d
be
c
l
ose
to the "MAX" mark. I
f
it is not, check
t
h
e
b
ra
k
e pa
d
wear.
Brake fluid level
Chan
g
in
g
the fl uid
Re
f
er to the servicing booklet
f
or details o
f
the
interval
f
or this o
p
eration.
Fluid s
p
ecifi cation
Th
e
b
r
a
k
e
f
l
u
i
d
m
us
t
co
n
fo
rm t
o
th
e
ma
n
ufac
t
u
r
e
r'
s
r
eco
mm
e
n
da
ti
o
n
s
a
n
d
m
ee
t th
e
D
O
T
3
or D
O
T4 standard.
T
he coolin
g
fan ma
y
start after switchin
g
o
ff the en
g
ine: take care with articles and
c
l
ot
hi
n
g
t
h
at m
igh
t
b
ecome cau
gh
t
by
t
h
e
fan blades
.
When the en
g
ine is warm, the temperature o
f
the coolant is re
g
ulated b
y
the
f
an.
213
8
Checks
Avoid prolon
g
ed contact o
f
used oil or
f
l
u
i
ds
with th
e
s
kin.
M
os
t
of
th
ese
f
l
u
i
ds
a
r
e
h
a
rm
fu
l t
o
health or indeed ver
y
corrosive.
D
o
n
o
t
d
i
sca
r
d
used
o
il
o
r fl
u
i
ds
int
o
s
ewers or onto t
h
e
g
roun
d
.
T
a
k
e
used
o
il t
o
a
C
ITR
OË
N
dea
l
e
r
o
r
a quali
f
ied workshop
(
France
)
or to an
authorised waste dis
p
osal site.
Used
p
roducts
Toppin
g
up
The reservoir must be topped up without dela
y
b
y
a CITROËN dealer or a qualified workshop.
A
dditive level
(
1.6 HDi 110 Diesel versions
with particle emissions filter
)
The additive reservoir low level is indicated b
y
the displa
y
o
f
this messa
g
e.
Fluid specifi cation
For optimum cleanin
g
and to avoid freezin
g
,
this fluid must not be topped up with or
replaced with plain water.
Screenwash and headlam
p
wash fluid
In th
e
case
of
v
e
hi
c
l
es
f
itt
ed
with
h
eadlam
p
washers, the low
f
luid level
is indicated by an audible signal and
a messa
g
e in the instrument panel
screen
.
Top up the reservoir when
y
ou next stop the
v
e
hi
c
l
e
.
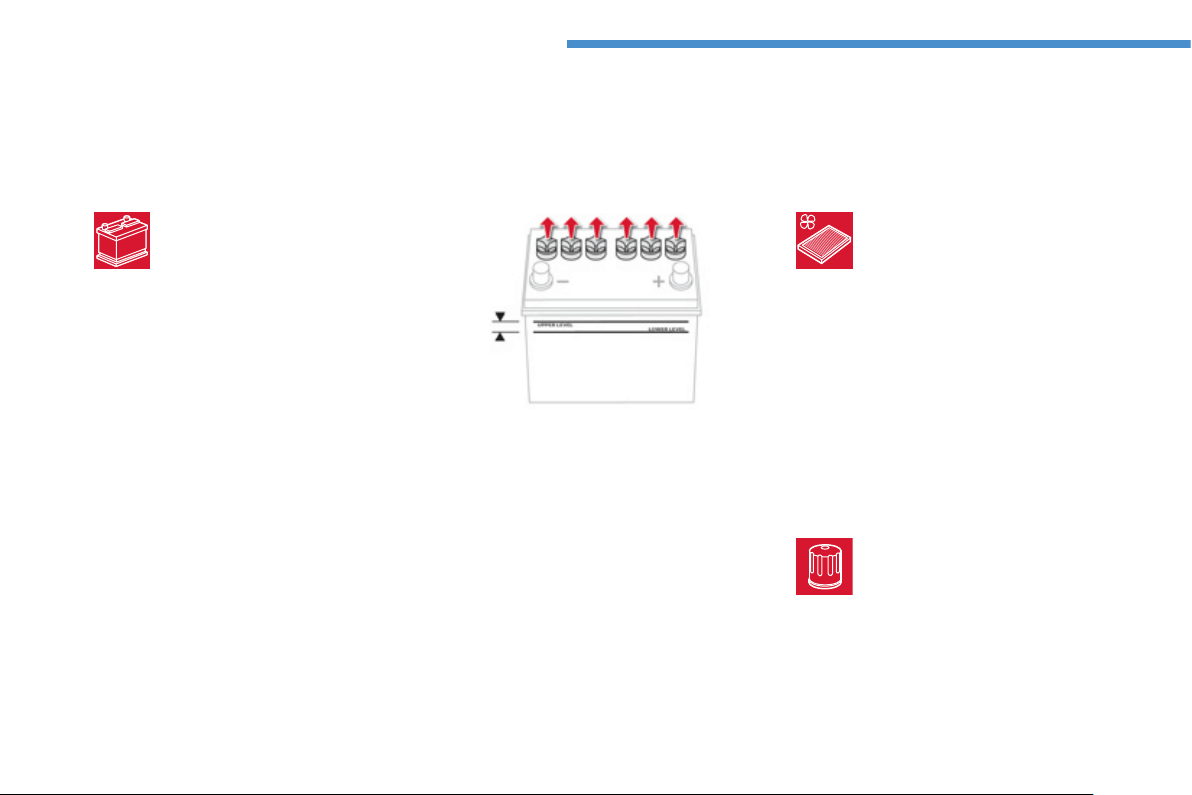
214
Checks
Checks
12 V batter
y
Electrol
y
te level
For access to the batter
y
, refer to the
"
12V batter
y
" section.
Th
e e
l
ectro
ly
te
l
eve
l
must
b
e
be
tw
ee
n th
e
"L
O
WER LEVEL"
a
n
d
"
U
PPER
LEVEL"
m
a
r
ks
.
Refer to the servicin
g
booklet for
details of the replacement intervals
for these components.
Air filter and passen
g
er compartment filter
Replace the oil filter each time the
e
n
g
ine oil is chan
g
ed.
Refer to the servicin
g
booklet for
details of the replacement interval fo
r
t
hi
s component.
Oil filter
If necessar
y
, top up usin
g
distilled water,
removin
g
the batter
y
cap from each cell.
Check the electrol
y
te level at least once
a
m
o
nth.
When carr
y
in
g
out work on the batter
y
, re
f
e
r
to "12V batter
y
" section
f
or details o
f
the
precautions to be taken be
f
ore disconnectin
g
the battery and
f
ollowing its reconnection.
Unless otherwise indicated, check these components in accordance with the servicin
g
booklet and accordin
g
to
y
our en
g
ine.
Otherwise, have them checked b
y
a CITROËN dealer or a qualified workshop.
Dependin
g
on the environment
(
e.
g
. dust
y
atmosphere
)
and the use of the vehicle
(
e.
g
.
c
it
y
drivin
g)
, re
p
lace them twice as often if
necessary
.
y
A
clo
gg
ed passen
g
er compartment
f
ilter ma
y
h
ave an adverse e
ff
ect on the per
f
ormance
o
f
the air conditionin
g
s
y
stem and
g
enerate
u
n
des
ir
ab
l
e
odou
r
s
.
215
8
Checks
M
anual
g
earbox
Refer to the servicin
g
booklet for
m
aintenance of the
g
earbox.
"CVT"
g
earbox
Refer to the servicin
g
booklet for
m
aintenance of the "CVT"
g
earbox.
Particle emissions filter
(
Diesel
)
The start o
f
saturation o
f
the particle
f
ilter is
indicated b
y
the temporar
y
illumination o
f
this
warning lamp accompanied by a message in
the instrument panel screen.
As soon as the traffic conditions permit,
r
e
g
enerate the filter b
y
drivin
g
at a
s
peed of at least 25 mph
(
40 km/h
)
for
a
bout 20 minutes
(
with the 1.6 litre HDi
e
n
g
ine the minimum speed is 36 mph
(
60 km
/
h
))
.
I
f
the warning lamp stays on, this
in
d
i
ca
t
es
a
l
o
w
add
itiv
e
l
e
v
e
l.
O
n a new vehicle, the
f
irst
p
article
f
ilter re
g
eneration operations ma
y
be
a
ccompanied b
y
a "burnin
g
" smell,
which is perfectl
y
normal.
Followin
g
prolon
g
ed operation of the
vehicle at ver
y
low speed or at idle,
y
ou ma
y
,
i
n except
i
ona
l
c
i
rcumstances,
n
otice the emission o
f
water vapour at
t
he
e
x
haus
t
o
n
accele
r
a
t
io
n.
This
does
no
t
affec
t th
e
be
h
a
vi
ou
r
of
th
e
v
e
hi
c
l
e
o
r
th
e
e
nvir
o
nm
e
nt.
216
Checks
Brake wear depends on the st
y
le
of drivin
g
, particularl
y
in the case
of vehicles used in town
,
over short
di
stances.
I
t ma
y
b
e necessar
y
to
h
ave the condition o
f
the brakes checked, even
be
tw
ee
n v
ehicle
se
rv
ices
.
Unless there is a leak in the circuit, a dro
p
in
th
e
b
r
a
k
e
f
l
u
i
d
l
e
v
e
l in
d
i
ca
t
es
th
a
t th
e
b
r
a
k
e
p
ads are worn.
B
ra
k
e
p
a
d
s
For information on checkin
g
brake
disc wear, contact a CITRO
Ë
N deale
r
or a quali
f
ied workshop.
Brake disc wear
P
arkin
g
brake
If
e
x
cess
iv
e
tr
a
v
e
l
o
r
a
l
oss
of
e
ffectiveness of this s
y
stem is
n
oticed, the parkin
g
brake must be
ch
ec
k
e
d
, even
b
etween two serv
i
ces.
O
nl
y
use products recommended b
y
CITROËN or products of equivalent
q
ualit
y
and specification.
I
n or
d
er to opt
i
m
i
se t
h
e operat
i
on
o
f
units as important as the brakin
g
s
y
stem, CITRO
Ë
N selects and offers
very speci
f
ic products.
To avoid dama
g
in
g
the electrical units,
the use of a hi
g
h pressure washe
r
i
n the en
g
ine compartment is strictl
y
p
rohibited
.
C
hecking this system must be done by a
C
ITROËN dealer or a
q
ualified worksho
p
.

9
217
Technical data
PETROL ENGINE
S
1
.6 litre 11
5
2.0 litre 15
0
M
odel codes:
BU
...
NKZ7
NKZ7/
S
NKZ0
NKZ0/
S
AFYR
AFZ7
AFYV
AFZM
AFYT
AFZH
AFYW
AFZP
T
ransm
i
ss
i
on mo
de
2WD
2WD
4WD
2WD
4WD
C
ubic capacit
y
(
cc
)
1
590
1
998
Bore x stroke
(
mm
)
7
5
x
90
86
x
86
Max power: EU standard
(
kW
)
86
113
Max power engine speed
(
rpm
)
6 000 6 000
Max torque: EU standard
(
Nm
)
1
5
4 1
99
Max torque en
g
ine speed
(
rpm
)
4
000
4 2
00
F
ue
l
U
nleaded
U
nleaded
C
atalytic converte
r
Y
es
Y
es
GEARBOXE
S
Ma
n
ual
(
5-speed
)
Ma
n
ual
(
5-speed
)
C
VT
(
6-speed
)
OIL CAPACITY
(
in litres
)
En
g
ine
(
with filter replacement
)
4.
2
4.
3
.../
S
: model
f
itted with the
S
top
&
S
tart
(
A
S&G)
f
unction.
Engines and gearboxes

218
Technical data
Caution, towin
g
with a li
g
htl
y
loaded towin
g
vehicle can have an adverse affect on its roadholdin
g
.
The GTW and towed load values indicated are valid up to a maximum altitude of 1 000 metres; the towed load mentioned must be reduced b
y
10 % fo
r
e
ach additional 1
000
metres of altitude.
The speed of a towin
g
vehicle must not exceed 60 mph
(
100 km/h
)
(
compl
y
with the le
g
islation in force in
y
our countr
y)
.
Hi
g
h ambient temperatures ma
y
result in a reduction in the per
f
ormance o
f
the vehicle to protect the en
g
ine; i
f
the ambient temperature is above 37
°C
,
li
m
i
t t
he
t
o
w
ed
load
.
P
ETROL ENGINE
S
1.6 litre 115
2
.0 litre 150
Gearboxe
s
M
anual
(
5-speed
)
Manual
(
5-speed
)
C
VT
(
6-speed
)
Model codes
:
B
U..
.
NKZ7
NKZ7/
S
NKZ0
NKZ0/
S
AFYR
AFZ7
AFYV
A
FZ
M
AFYT
A
FZ
H
AFYW
A
FZ
P
T
ransm
i
ss
i
on mo
de
2WD
2WD
4WD
2WD
4WD
- Unladen wei
g
ht
1
320
1
30
5
1
36
5
1
4
30
1
39
5
1
4
60
- Kerb weight 1
3
95 1
3
80 1 440 1 505 1 470 1 5
3
5
-
G
ross vehicle wei
g
ht
(G
VW
)
1
8
7
0
1
8
7
0
1
9
7
0
1
9
7
0
1
9
7
0
1
9
7
0
-
G
ross vehicle wei
g
ht
(G
VW
)
when towin
g
1
9
2
5
1
9
2
5
2
035
2
035
2
035
2
035
-
G
ross train wei
g
ht
(G
TW
)
on a 12
%
g
radient
3
0
2
5
3
0
2
5
3
335
3
335
3
335
3
335
- Braked trailer
(
within GTW limit
)
on a 10% or 12%
g
radient
1 1
00
1 1
00
1
300
1
300
1
300
1
300
-
U
nbraked traile
r
685
685
7
20
7
50
7
20
7
50
- Recommended nose wei
g
ht 55 55 65 65 65 65
Weights and towed loads (kg)

9
219
Technical data
D
IESEL ENGINE
S
1.6 HDi 11
0
1.8 HDi 150
M
odel codes:
B
U..
.
9
HD
8
/
S
9
HDB/
S
6HZ
8
/
S
6HZB
6HZB/
S
T
ransmission mod
e
2
W
D
4
W
D
2
WD
4
W
D
C
ubic capacity
(
cc
)
1 560 1 798
Bore x stroke
(
mm
)
77 x
88
.
3
83
x
83
.1
Max power: EU standard
(
kW
)
8
4 11
0
Max power en
g
ine speed
(
rpm
)
3
600
4
000
Max torque: EU standard
(
Nm
)
270
3
00
Max torque en
g
ine speed
(
rpm
)
1 7
50
2
000
t
o
3
000
F
ue
l Di
ese
l Di
ese
l
Catal
y
tic converte
r
Y
es
Y
es
Particle emission
f
ilter
(
PEF
)
Y
es
Y
es
GEARBOXE
S
Ma
n
ual
(
6-speed
)
Ma
n
ual
(
6-speed
)
OIL CAPACITY
(
in litres
)
En
g
ine
(
with
f
ilter replacement
)
3
.7
5
5
.
3
.../
S
: model fitted with the Stop & Start
(
AS&G
)
function.
Engines and gearboxes

220
Technical data
The
G
TW and towed load values indicated are valid up to a maximum altitude o
f
1 000 metres; the towed load mentioned must be reduced by 10
%
f
o
r
e
ach additional 1 000 metres o
f
altitude.
The speed of a towin
g
vehicle must not exceed 60 mph
(
100 km/h
)
(
compl
y
with the le
g
islation in force in
y
our countr
y)
.
Hi
g
h ambient temperatures ma
y
result in a reduction in the performance of the vehicle to protect the en
g
ine; if the ambient temperature is above 37 °C,
limit th
e
t
o
w
ed
l
oad
.
D
IESEL ENGINE
S
1.6 HDi 11
0
1
.8 HDi 150
Gearboxe
s
Manual
(
6-speed
)
M
anual
(
6-speed
)
Model codes
:
B
U..
.
9HD8/
S
9HDB/
S
6HZ8/
S
6HZB
6HZB/
S
T
ransm
i
ss
i
on
m
o
de
2WD
4WD
2WD
4WD
- Unladen wei
g
ht 1
3
1
5
1 42
5
1 4
30
1 4
95
- Kerb wei
g
ht
1
390
1
5
00
1
5
0
5
1
57
0
- Gross vehicle wei
g
ht
(
GVW
)
2
060
2
060
2
060
- Gross vehicle wei
g
ht
(
GVW
)
when towin
g
2 1
30
2 1
30
2 1
30
-
G
ross train wei
g
ht
(G
TW
)
on a 12
%
g
radient
3
2
60
3
2
60
3
530
- Braked trailer
(
within
G
TW limit
)
o
n a 10
%
or 12
%
gradient
1 1
30
1 1
30
1 4
00
- Braked trailer
*
(
with trans
f
er o
f
load within
the
G
TW limit
)
1
3
00 1
3
00
-
U
nbraked traile
r
695
7
50
7
50
- Recommended nose wei
g
ht 7
0
7
0
7
0
Weights and towed loads (kg)
* The wei
g
ht of the braked trailer can be increased within the GTW limit provided that the wei
g
ht of the towin
g
vehicle is reduced b
y
the same amount.
Caution, towin
g
with a li
g
htl
y
loaded vehicle ma
y
adversel
y
affect roadholdin
g
.
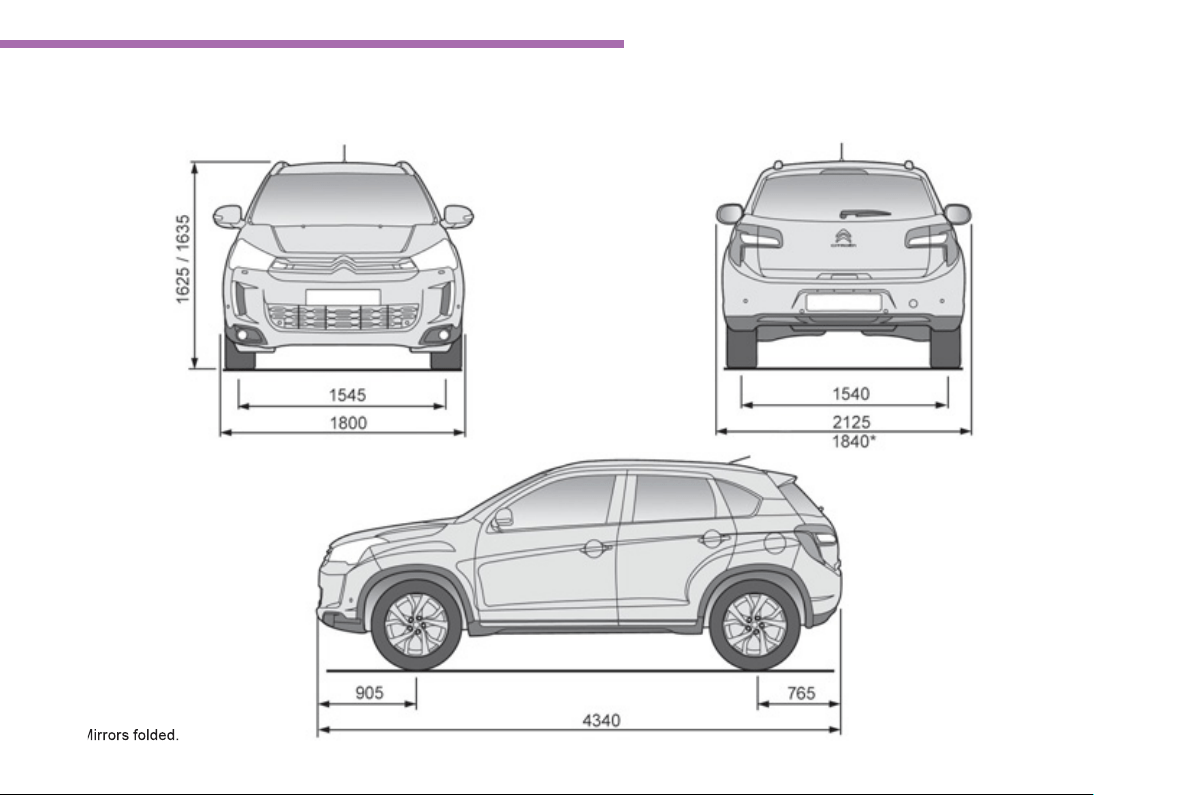
9
221
Technical data
Dimensions (in mm)
Th
ese
d
im
e
n
s
i
o
n
s
h
a
v
e
bee
n m
easu
r
ed
o
n
a
v
e
hi
c
l
e
th
a
t i
s
n
o
t l
oaded
.
*
M
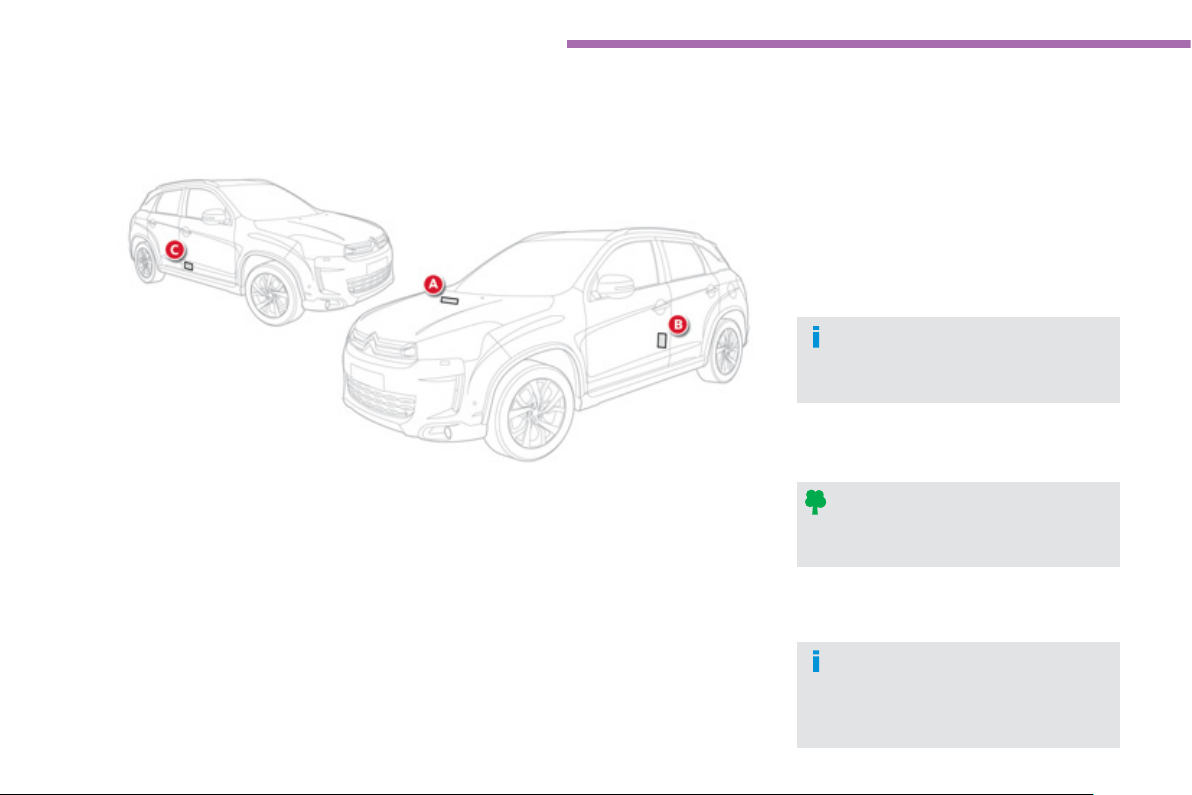
222
Technical data
Identifi cation markings
Various visible markings
f
or the identi
f
ication and tracing o
f
your vehicle.
A.
M
anufacturer's plate
.
It is riveted to the right hand middle pilla
r
a
nd carries the
f
ollowin
g
in
f
ormation:
- manufacturer,
- EU t
y
pe approval number,
- vehicle identification number
(
VIN
)
,
-
g
ross vehicle wei
g
ht,
-
g
ross tra
i
n we
igh
t,
- maximum
f
ront axle wei
g
ht,
- max
i
mum rear ax
l
e we
igh
t.
The t
y
re pressures must be checked
when the t
y
res are cold, at least once
a
m
o
nth.
If the t
y
re pressures are too low, this
increases fuel consumption.
B.
Ty
re
l
a
b
e
l.
Thi
s
l
abe
l i
s
aff
ix
ed
t
o
th
e
th
e
d
riv
e
r'
s
s
ide middle pillar and carries the
f
ollowin
g
inf
o
rm
a
ti
o
n:
- t
y
re sizes,
-
ty
re pressures.
C.
V
ehicle Identification Number
(
VIN
)
u
n
d
er t
h
e
b
onnet
.
Thi
s num
b
er
i
s en
g
rave
d
on t
h
e
b
o
dy
wor
k
n
ear the dam
p
er su
pp
ort.
O
ri
g
inal equipment t
y
res can be
c
hained using 9 mm chains.
C
ontact
a CITROËN dealer or a
q
ualified
workshop.

22
3
A
UDIO-TELEMATIC s
y
stem
The s
y
stem is protected in such a wa
y
that it will onl
y
operate in
y
our vehicle.
01 First steps - Control panel
For safet
y
reasons, the driver must carr
y
out operations
which require prolon
g
ed attention while the vehicle is
s
tationar
y
.
When the en
g
ine is switched off and to prevent
dischar
g
in
g
o
f
the batter
y
, the s
y
stem switches o
ff
f
ollowin
g
the activation o
f
the ener
gy
econom
y
mode.
CONTENTS
02 General operation
03 Navigation - Guidance
04 Audio / Video
05 Settings
06 Information
07 USB player
p.
p.
p.
p.
p.
p.
p.
224
225
226
236
258
261
264
08 BLUETOOTH
®
streaming - telephone
09 BLUETOOTH
®
telephone
p.
p.
269
271
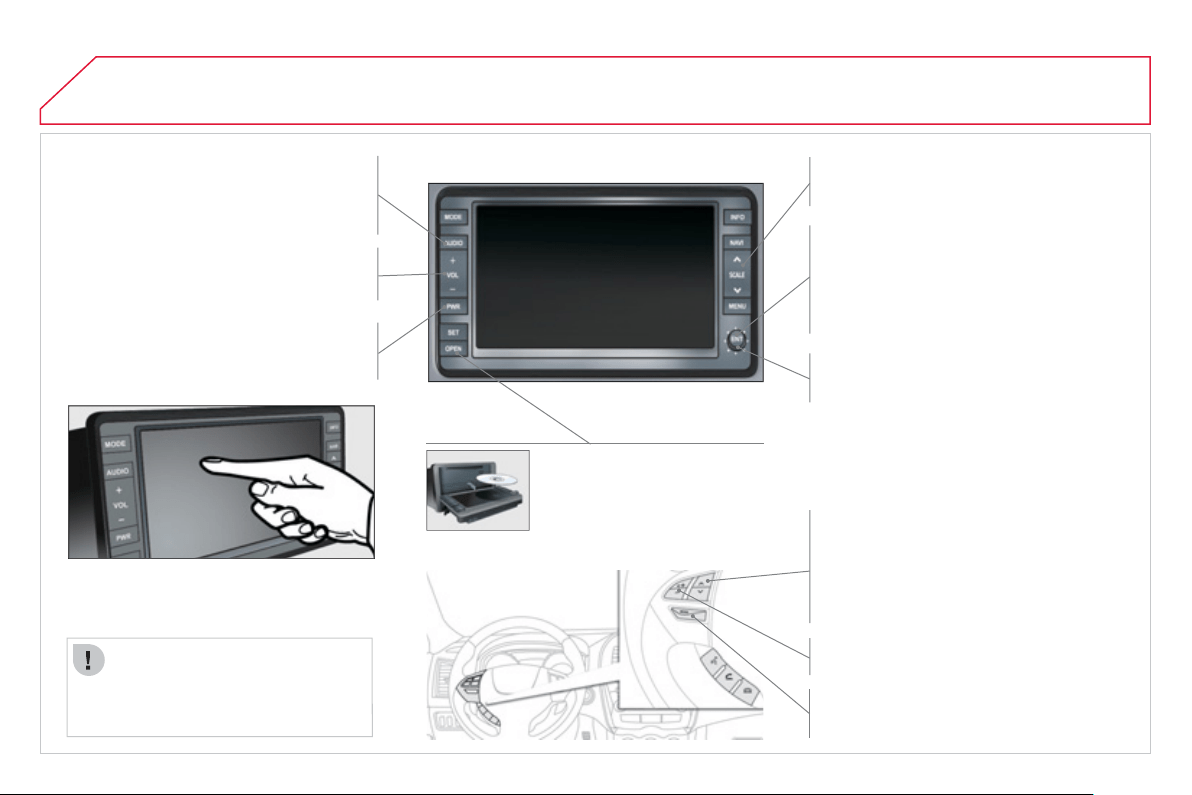
224
01
FIRST STEPS
AUDI
O
: select Audio-video
(
FM, CD, music
s
erver, ...
)
or Navi
g
ation
(
map
)
displa
y
.
V
O
L: ad
j
ust audio-video volume.
SC
ALE: chan
g
e the scale o
f
the map.
P
O
WER: audio system on
/
o
ff
(
only
)
.
O
PEN: opens the screen and
g
ives access to
C
D
/
DVD.
A second press closes the
screen
.
ENT:
co
nfi rm
s
th
e
c
h
o
i
ce
o
f th
e
it
e
m
selec
t
ed
i
n t
he
sc
r
ee
n.
For certain operations, con
fi
rmation is
g
iven b
y
pressin
g
the touch screen.
Scroll the map displa
y
ed or selection of an
it
e
m.
Move a fi n
g
er over the screen to operate
the s
y
stem.
Use the buttons o
ff
ered on the screen.
For safet
y
reasons, the driver
must onl
y
carr
y
out operations
which require prolon
g
ed
attent
i
on w
i
t
h
t
h
e ve
hi
c
l
e
stat
i
onar
y.
Mute on
/
off.
Next or
p
revious selection for:
- a radio station,
- an audio track
(
CD
)
,
- a chapter
(
DVD
)
.
S
et the audio volume.
Chan
g
e the audio-video source
(
FM, CD,
m
usic server, ...
)
.
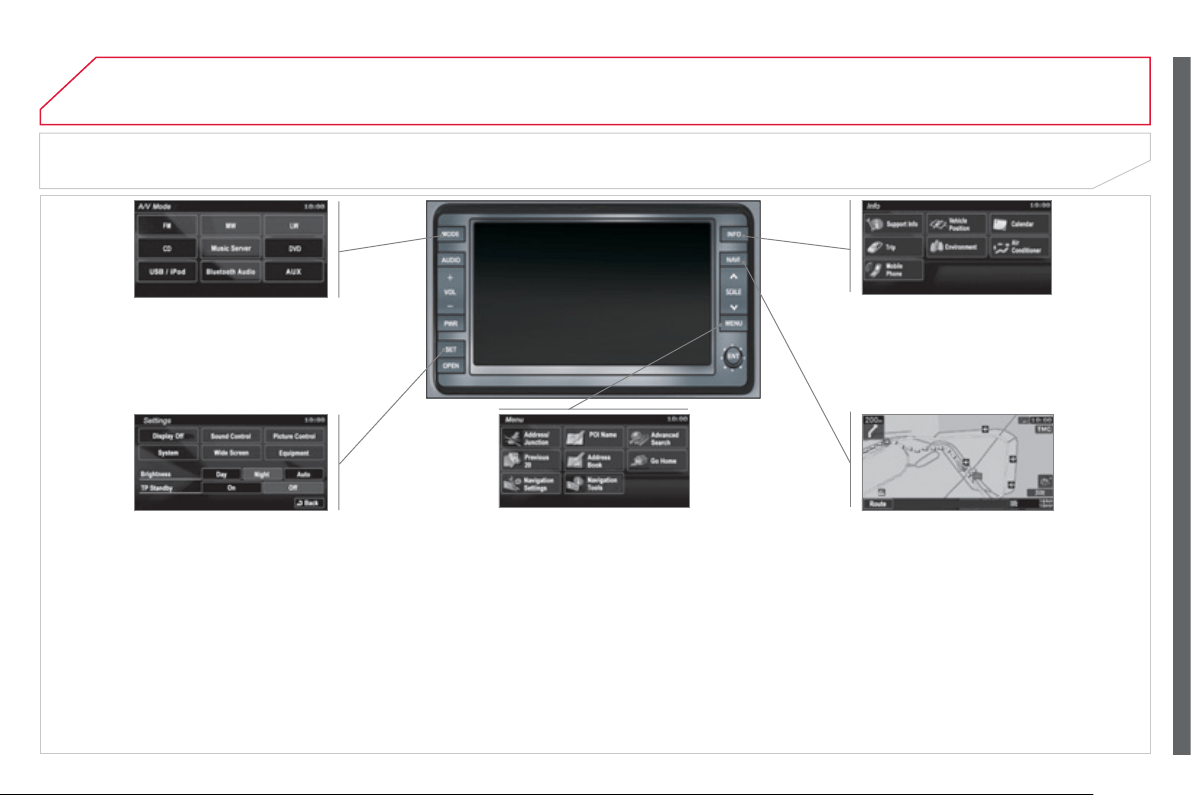
22
5
02
GENERAL OPERATION
M
O
DE: Audio-video m
e
n
u
fo
r:
- radio,
- audio, MP3 or WMA
C
D,
- music server,
-
DVD.
MEN
U
: Navi
g
ation-
g
uidanc
e
m
e
n
u
f
o
r
selectin
g
:
- a
d
est
i
nat
i
on
,
- a point o
f
interest
(
P
O
I
)
,
- an advanced search by P
O
I,
- one o
f
the 20 previous destinations,
- an address stored in the address book,
- the return home,
- certain navi
g
ation settin
g
s,
-
a
r
ou
t
e
de
m
o
n
s
tr
a
t
io
n.
NAVI: displa
y
of the current location on
th
e
map
.
S
ET: Settin
gs
m
e
n
u
f
o
r:
- switchin
g
off the screen,
- se
l
ect
i
n
g
t
h
e soun
d
sett
i
n
g
,
- se
l
ect
i
n
g
t
h
e p
i
cture qua
li
t
y
,
- selecting the language, the time zone
o
r the units,
- selectin
g
the size of the DVD picture,
- selectin
g
the
g
uidance voice, the
s
creen colour schemes or displa
y
o
f
t
h
e au
di
o-v
id
eo
i
con
,
- sett
i
n
g
certa
i
n equ
i
pment ava
il
a
bl
e
i
n
y
our ve
hi
c
l
e.
INF
O
:
I
nformation m
e
n
u
fo
r th
e
c
onsultation or adjustment o
f
certain
s
ettin
g
s
f
or
y
our vehicle.
DESCRIPTION OF THE CONTROLS - MENUS
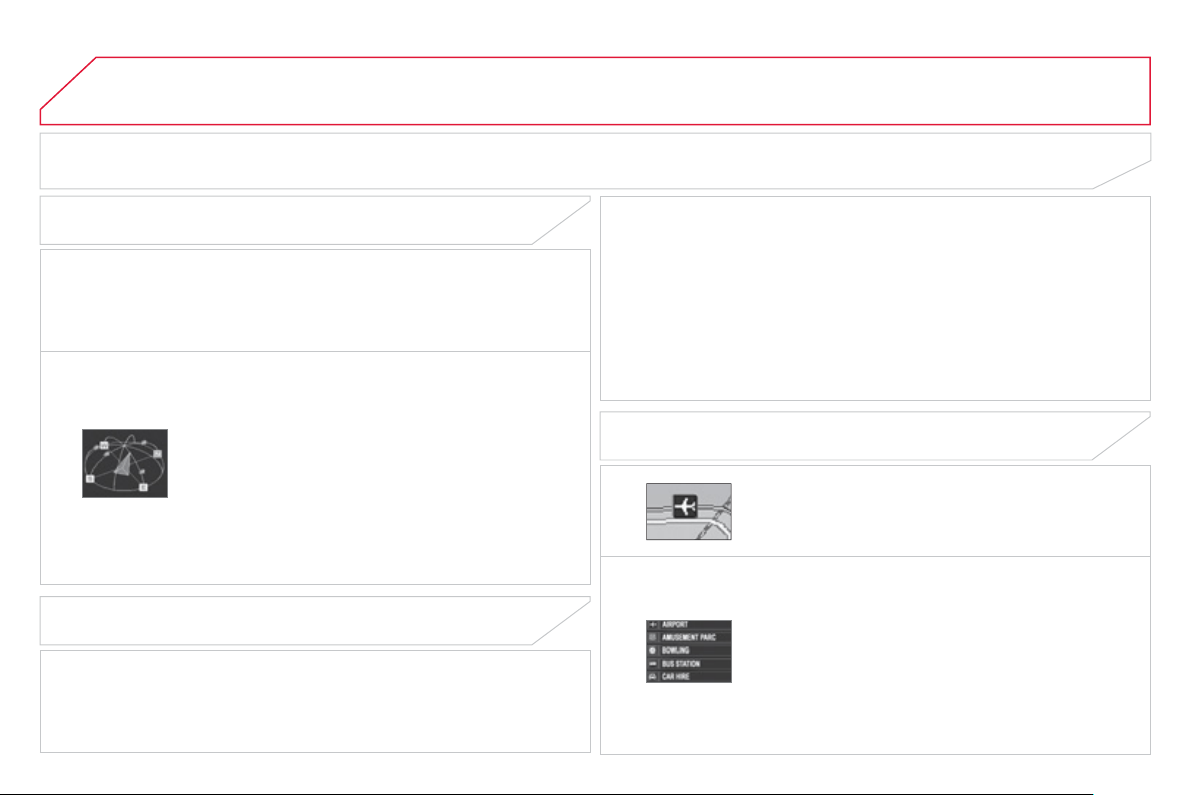
22
6
03
NAVIGATION - GUIDANCE
The satellite navi
g
ation s
y
stem
g
uides the driver to the destination
th
a
t h
e
h
as
se
t in
acco
r
da
n
ce
with
a
c
h
ose
n r
ou
t
e
.
Initiall
y
, it searches for the destination required b
y
the user, then
i
t calculates the route and fi nall
y
it provides the visual and vocal
g
u
id
ance
i
nstruct
i
ons.
A
point o
f
interest
(
P
O
I
)
is represented by an icon on
the map, it represents an airport, a station, a town
h
all, ...
WHAT IS A POINT OF INTEREST
(
POI
)
?
Up to 40 different icons ma
y
be displa
y
ed
(
refer to the
section "Points of interest icon"
)
.
The
y
are classifi ed in 5
g
roups and identifi ed b
y
one
c
olour
f
or each
g
roup:
-
S
hops,
fi
nance and businesses
(G
reen
)
,
- Vehicles and travel
(
Dark blue
)
,
- Restaurants
(O
ran
g
e
)
,
- Public places and emer
g
enc
y
services
(
Brown
)
,
- Entertainment and attractions
(
Blue
)
.
GPS
(
Global Positionin
g
S
y
stem
)
consists of several
s
atellites arran
g
ed around the earth. The
y
continuousl
y
transmit di
g
ital si
g
nals which travel at the speed o
f
li
g
ht, on 2 different frequencies.
A
t an
y
gi
ven t
i
me, t
h
e s
y
stem rece
i
ves
i
ts pos
i
t
i
on
in r
e
l
a
ti
o
n t
o
th
e
sa
t
e
llit
es
de
t
ec
t
ed
a
n
d
th
e
tim
e
of
transmission o
f
the si
g
nal.
This enables the telematic unit to calculate its position
a
n
d
th
e
r
e
f
o
r
e
th
a
t
o
f th
e
v
e
hi
c
l
e
.
A
repositionin
g
process usin
g
the map database stored
o
n the hard disk allows the vehicle to be positioned
o
n the road network, so improvin
g
the accurac
y
of the
v
e
hi
c
l
e
l
oca
ti
o
n
fu
n
c
ti
o
n.
GPS SYSTEM
WHAT I
S
THE NAVIGATION
S
Y
S
TEM AND GP
S
?
The s
y
stem's measurements ma
y
be inaccurate if the vehicle is:
- in a tunnel or under
g
round car park,
- underneath a two-level motorwa
y
,
-
i
n an area w
i
t
h
severa
l
ver
y
high
b
u
ildi
n
g
s,
- surroun
d
e
d
by
c
l
ose
ly
p
l
ante
d
trees.
Depending on the vehicle's situation and the reception o
f
the
G
P
S
in
f
ormation, the displa
y
ed in
f
ormation ma
y
disappear
f
rom the
screen temporaril
y
.
WHAT PRECAUTIONS SHOULD BE OBSERVED IN
ORDER TO MAKE BEST USE OF THE SYSTEM?
Do not place anything on or near the
G
P
S
aerial.
Do not use an
y
di
g
ital communication equipment
(
personal
c
omputers, etc.
)
near the
G
P
S
aerial.
Do not affi x an
y
refl ective fi lms or fi lms containin
g
carbon to the
win
do
w
s
.
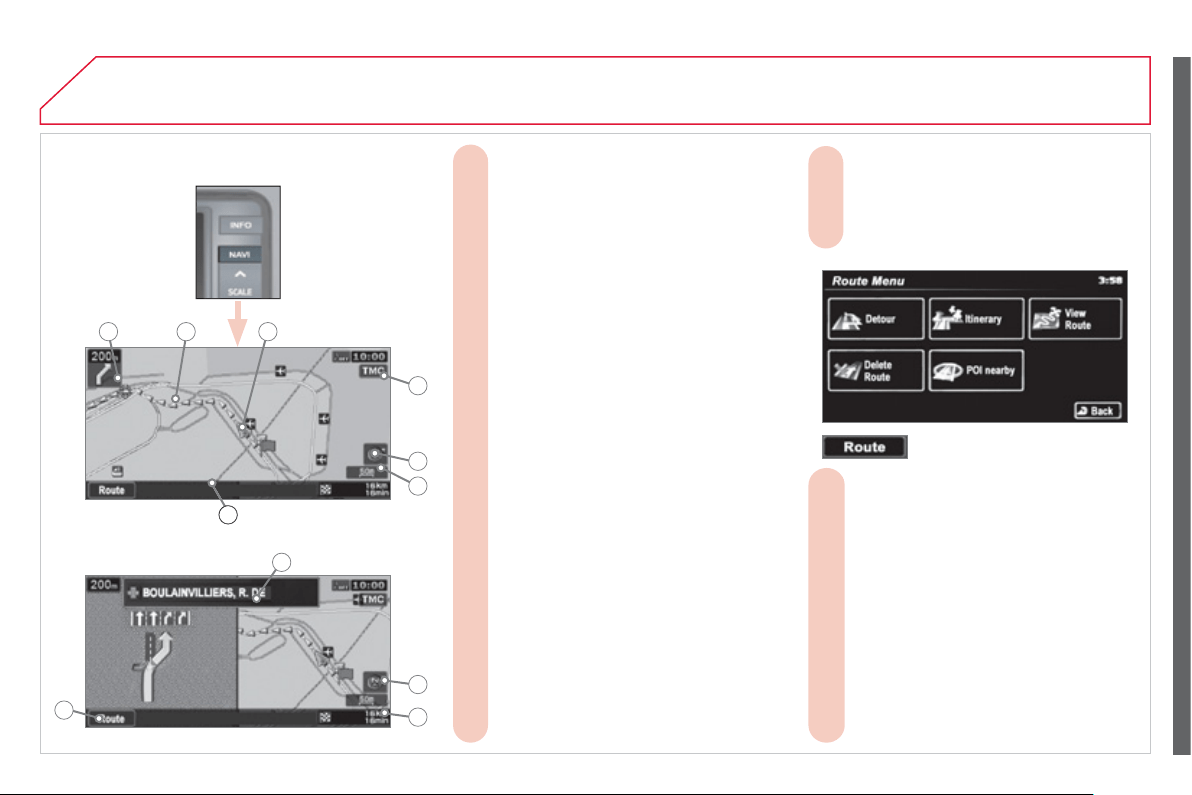
227
03 NAVIGATION - GUIDANCE
Manoeuvre icon: indicates whether the
A.
driver should turn left or ri
g
ht at the next
j
unction indicated b
y
the
g
uidance and the
di
stance to t
hi
s
j
unct
i
on.
Guidance route: indicates the route to the
B.
des
t
i
n
a
t
io
n.
Vehicle marker: indicates the position of
C.
the vehicle while drivin
g
.
TMC icon: displays traffi c information
D.
s
uch as traffi c
j
ams, road works, etc.
When the icon is touched, detailed TMC
inf
o
rm
a
ti
o
n
ca
n
be
vi
e
w
ed
.
Orientation mark: indicates the orientation
E.
o
f
the map displa
y
ed.
Map scale: indicates the scale of the map
F.
displa
y
ed.
Name of the street: indicates the name of
G.
th
e
cu
rr
e
nt
s
tr
ee
t.
Direction frame: displays the number of
H.
th
e
n
e
xt r
oad
o
r th
e
n
a
m
e
o
f th
e
n
e
xt
s
tr
ee
t w
hich
t
he
d
r
i
v
e
r
should
t
u
rn
i
nt
o
.
Destination/intermediate destination icon:
I.
in
d
i
ca
t
es
th
e
d
ir
ec
ti
o
n
of
th
e
des
tin
a
ti
o
n
o
r int
e
rm
ed
i
a
t
e
des
tin
a
ti
o
n.
Two-map displa
y
.
S
in
g
le map displa
y
.
INFORMATION DISPLAYED ON THE MAP
D
URING NAVIGATION
Destination/intermediate destination
J.
in
fo
rm
a
ti
o
n: in
d
i
ca
t
es
th
e
d
i
s
t
a
n
ce
a
n
d
the time remaining until the destination o
r
int
e
rm
ed
i
a
t
e
des
tin
a
ti
o
n i
s
r
eac
h
ed
.
Press for access to the
K.
R
oute Menu
in
o
r
de
r t
o
:
- change the route in favour of another
K1
m
akin
g
a detour throu
g
h a speci
fi
ed
r
e
gi
on,
- change the position of the destination,
K2
add
a
n int
e
rm
ed
i
a
t
e
des
tin
a
ti
o
n
a
n
d
c
han
g
e the route calculation conditions,
- display a route by various methods,
K3
- delete a route created,
K4
- search for points of interest (POI)
K5
a
r
ou
n
d
t
he
cu
rr
e
nt
loca
t
io
n.
K
H
E
F
B CA
D
G
I
J
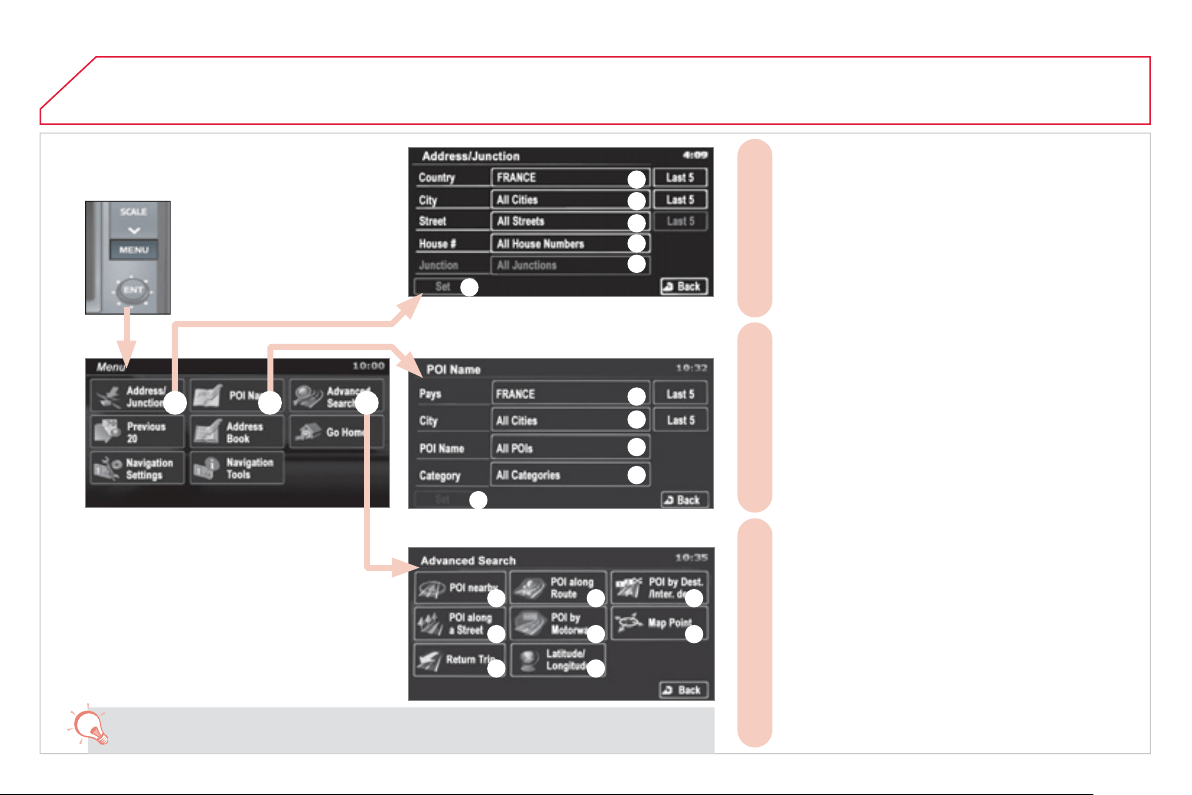
22
8
03
- Select a location using the name of a point of
B
interest
(
P
O
I
)
.
Select:
- the country,
B1
- the city,
B2
- the name of a stored POI,
B3
- a POI category (airport, bowling alley, bus station,
B4
c
ar park, service station, hotel, cinema, ...
)
,
- a detailed POI list.
B5
- Select a location using an advanced search based
C
on a P
O
I:
- around the current location,
C1
- on the current route,
C2
- in the vicinity of the destination,
C3
- on a chosen street,
C4
- along a motorway or in the vicinity of the exit,
C5
- by scrolling the map,
C6
- taking the point of departure of the current route,
C7
- specifying the latitude/longitude coordinates.
C8
- Select a location using the address or street name
A
of the destination.
S
elect:
- the country,
A1
- the city,
A2
- the street,
A3
- the house number,
A4
- the name of a junction,
A5
- to select the search using either a number or a
A6
j
unction.
You have a maximum of 100 points of interest
(
P
O
I
)
within a radius o
f
approximatel
y
60 miles
(
100 km
)
.
SEARCHING FOR A DESTINATION USING
AN ADDRESS OR POINTS OF INTEREST
(
POI
)
NAVIGATION - GUIDANCE
C3
C6
A
B C
A4
A3
A2
A1
A6
A5
B1
B2
B3
B4
B5
C1 C2
C4 C5
C7 C8
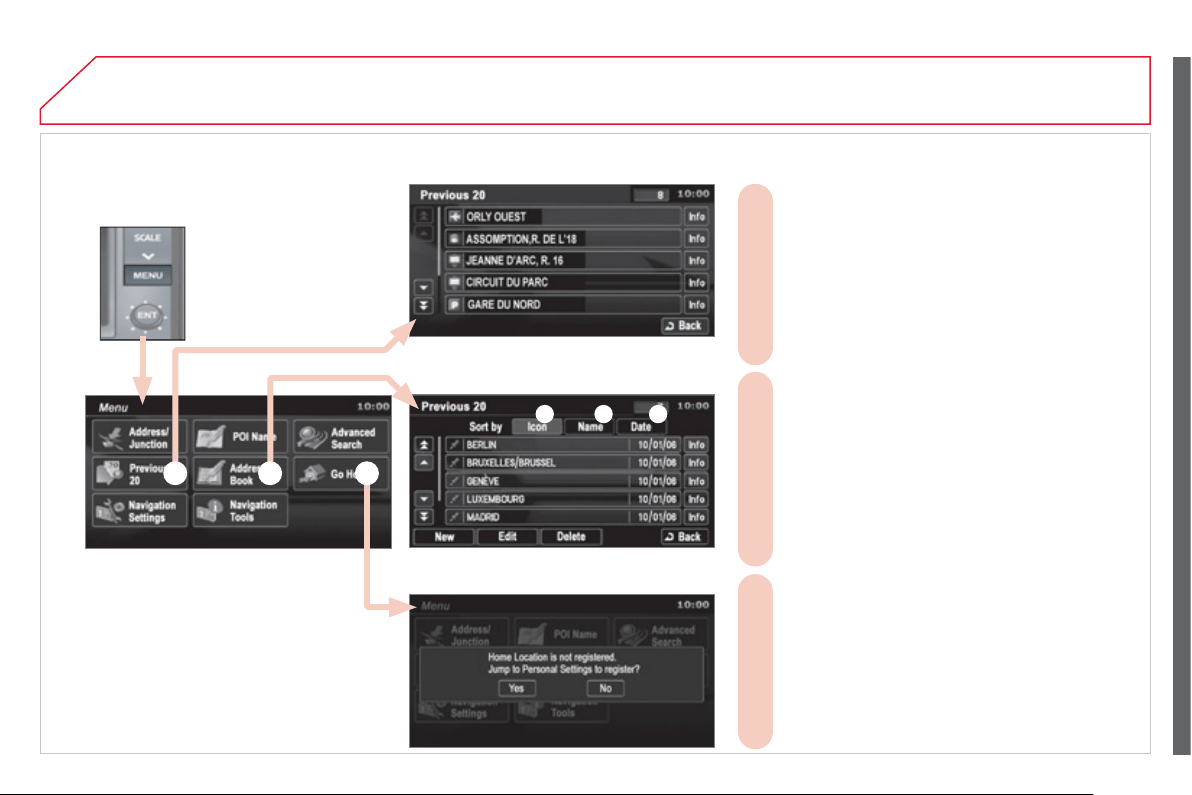
22
9
03
SEARCHING USING PREVIOUS
D
ESTINATIONS
,
A STORED ADDRESS OR
A
RETURN HOME
- Select a location using an address stored in the
E
address book.
S
ort b
y
:
- Icon,
E1
- Name,
E2
- Date.
E3
- Select a location using one of the 20 previous
D
des
tin
a
ti
o
n
s
.
- Select a return home directly.
F
Press YES to store your home address
(
the fi rst time
)
.
NAVIGATION - GUIDANCE
E2E1 E3
D E F
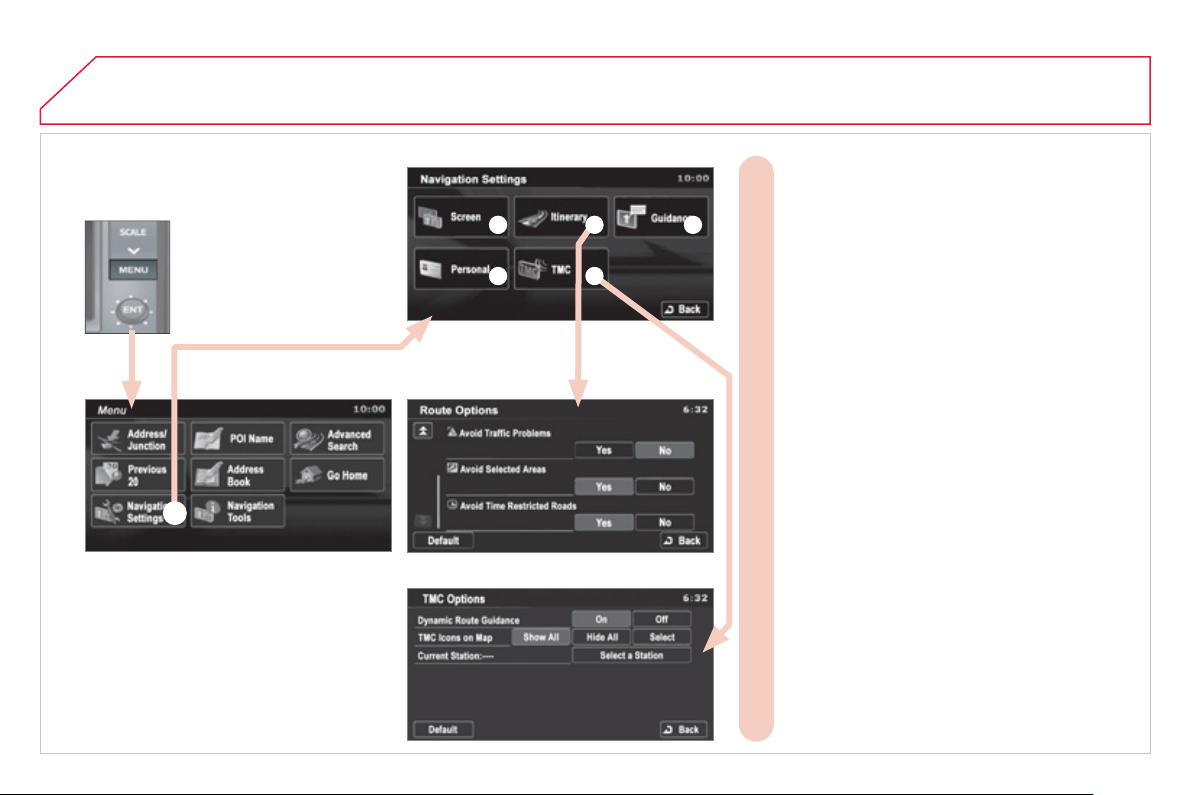
2
30
03
NAVIGATION SETTINGS AND
INFORMATION
(
1/2
)
- Select the settings of functions linked with the
G
navi
g
ation to:
- set the screen display parameters such as:
G1
- display 1 or 2 maps,
- display or do not display the POIs on the map,
displa
y
selected icons,
- change the colours of the map,
- display or do not display the name of the current
st
r
eet
.
- display or do not display the address of the
cu
rr
e
nt
s
tr
ee
t.
- set route conditions, such as:
G2
- avoiding traffi c problems,
- avoiding selected areas,
- avoiding roads at a certain time.
- set the route guidance mode and the displaying
G3
of
th
e
r
esu
lt
s
of
th
e
r
ou
t
e
sea
r
c
h.
- save, change or delete a location in the address
G4
book,
- display and select the traffi c information such as
G5
traffi c
j
ams or road works b
y
selectin
g
d
y
namic
g
u
id
ance.
NAVIGATION - GUIDANCE
G1 G2 G3
G4 G5
G
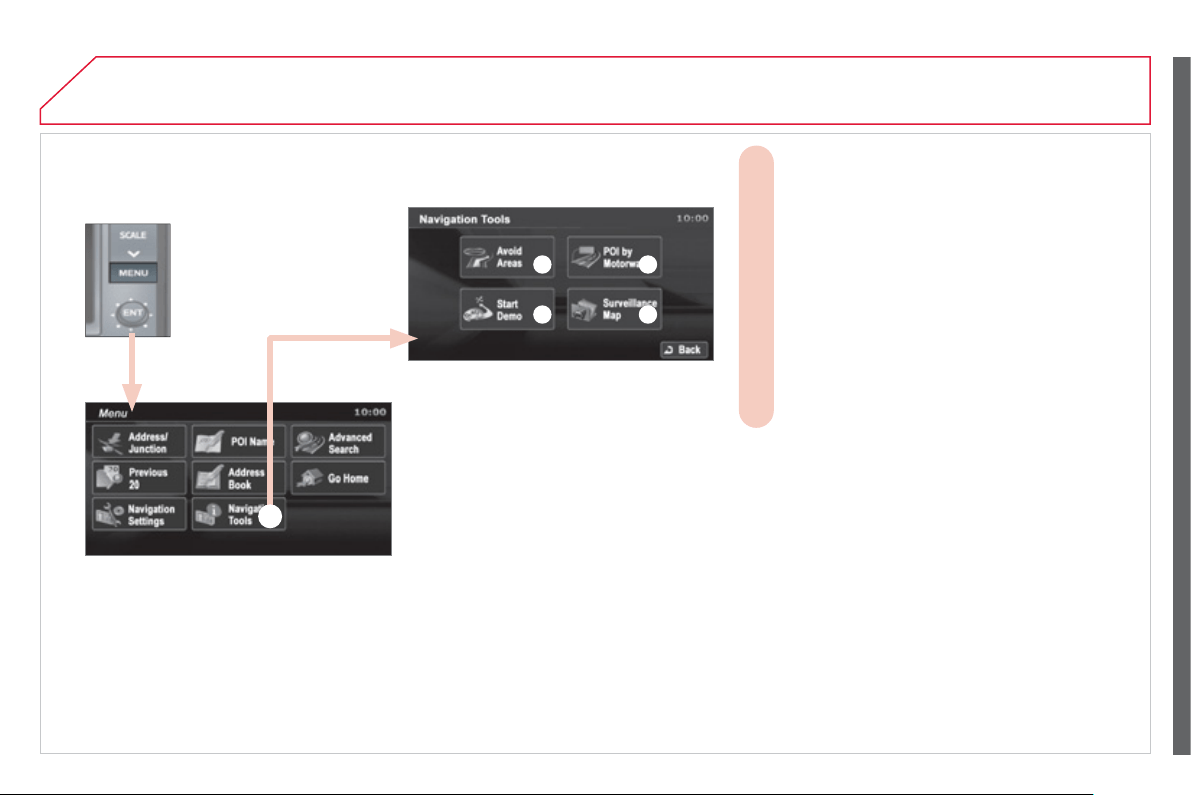
2
31
03
- Select basic information relating to the
H
navi
g
ation as well as a pre-set route
de
m
o
n
s
tr
a
ti
o
n t
o
:
- choose to divert your route to avoid certain
H1
areas
,
- select a location using an advanced search
H2
based on a P
O
I alon
g
a motorwa
y
or in the
vicinit
y
o
f
the motorwa
y
exit,
- start/stop the demonstration,
H3
- recall a stored map screen.
H4
NAVIGATION SETTINGS AND
INFORMATION
(
2/2
)
NAVIGATION - GUIDANCE
H1 H2
H3 H4
H
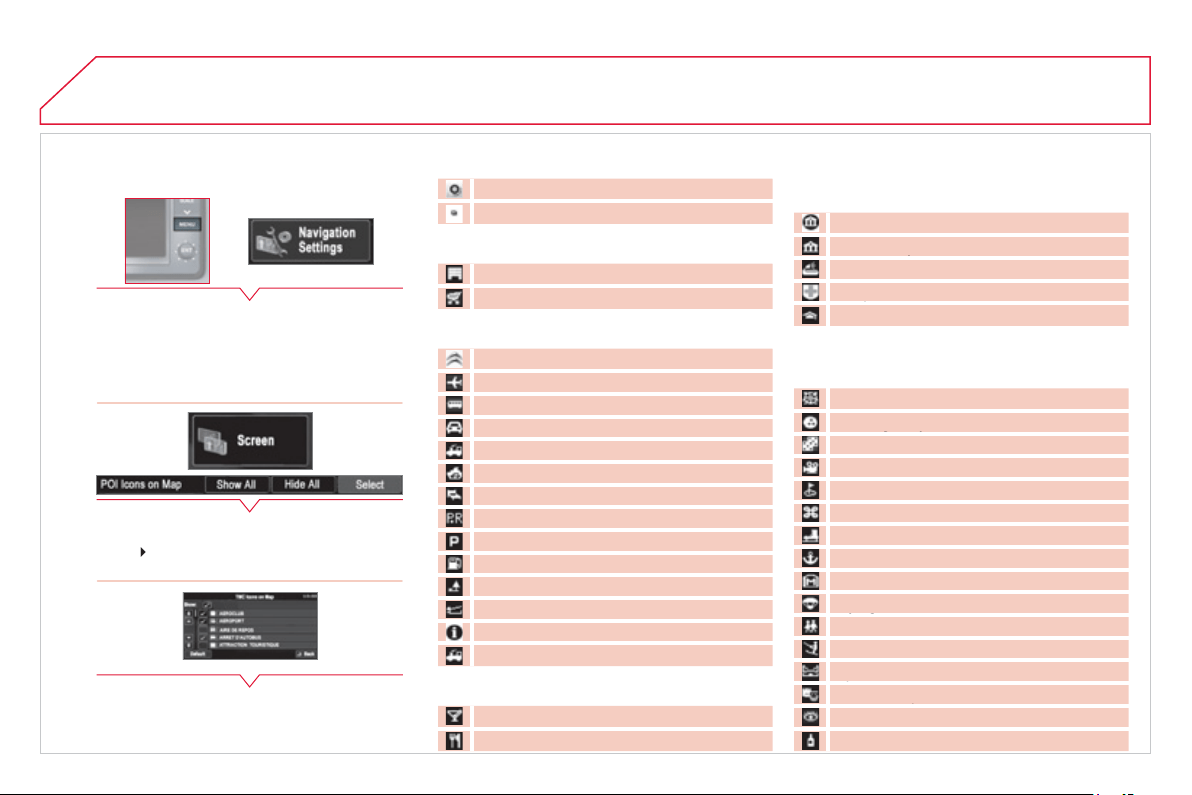
2
32
03
SELECTING POINTS OF INTEREST
(
POI
)
I
CONS DISPLAYED ON THE MAP
You can select up to 40 t
y
pes o
f
point o
f
i
nterest
i
con w
hi
c
h
are
di
sp
l
a
y
e
d
on
y
our map
screen
.
Press the MENU button then [Navi
g
ation
S
ettin
g
s].
Press [
S
creen] then [
S
elect] on the P
O
I line.
P
ress
[
]
w
hi
c
h
i
s
di
sp
l
a
y
e
d
.
Press each P
O
I re
q
uired.
At each contact with a P
O
I, the displa
y
of [α] chan
g
es
(
α = the P
O
I will be displa
y
ed on the screen
)
.
G
eneral
T
o
wn
ce
ntr
e
Localit
y
S
hops,
fi
nance and businesses
(G
reen
)
M
a
j
or compan
i
es
S
hoppin
g
centre
Vehicles and travel
(
Dark blue
)
C
ITR
O
ËN
Air
p
ort
B
us stop
Vehicle
hi
r
e
S
uburban
/
main line station
Ferr
y
terminal
H
o
t
e
l
P
a
rk
a
n
d
ri
de
Car park
(
press +
)
S
ervice station
Res
t
a
r
ea
T
o
ll
boo
th
T
ou
ri
s
t in
fo
rm
a
ti
o
n
Railwa
y
station
Restaurant
(O
ran
g
e
)
Ni
g
ht li
f
e
/
ni
g
ht club
Res
t
au
r
a
nt
Public places and emergency services
(
Brown
)
To
wn
Hall
C
ommunit
y
centre
y
Co
nv
e
nti
o
n
/
e
xhi
b
iti
o
n
ce
ntr
e
Hos
p
ital
p
Universit
y
/ colle
g
e
Entertainment and attractions
(
Blue
)
Theme
p
ark
p
Bowlin
g
alle
y
gy
C
asino
C
inema
G
olf course
His
t
o
r
ical
m
o
n
u
m
e
nt
S
katin
g
rink
g
M
a
rin
a
M
useu
m
Fl
y
in
g
club
yg
Leisu
r
e
a
r
ea
S
ki station
Sp
orts centre
p
Theatre
/
o
p
era
p
T
ou
ri
s
t
a
ttr
ac
ti
o
n
Vine
y
ard / wine and spirit store
NAVIGATION - GUIDANCE
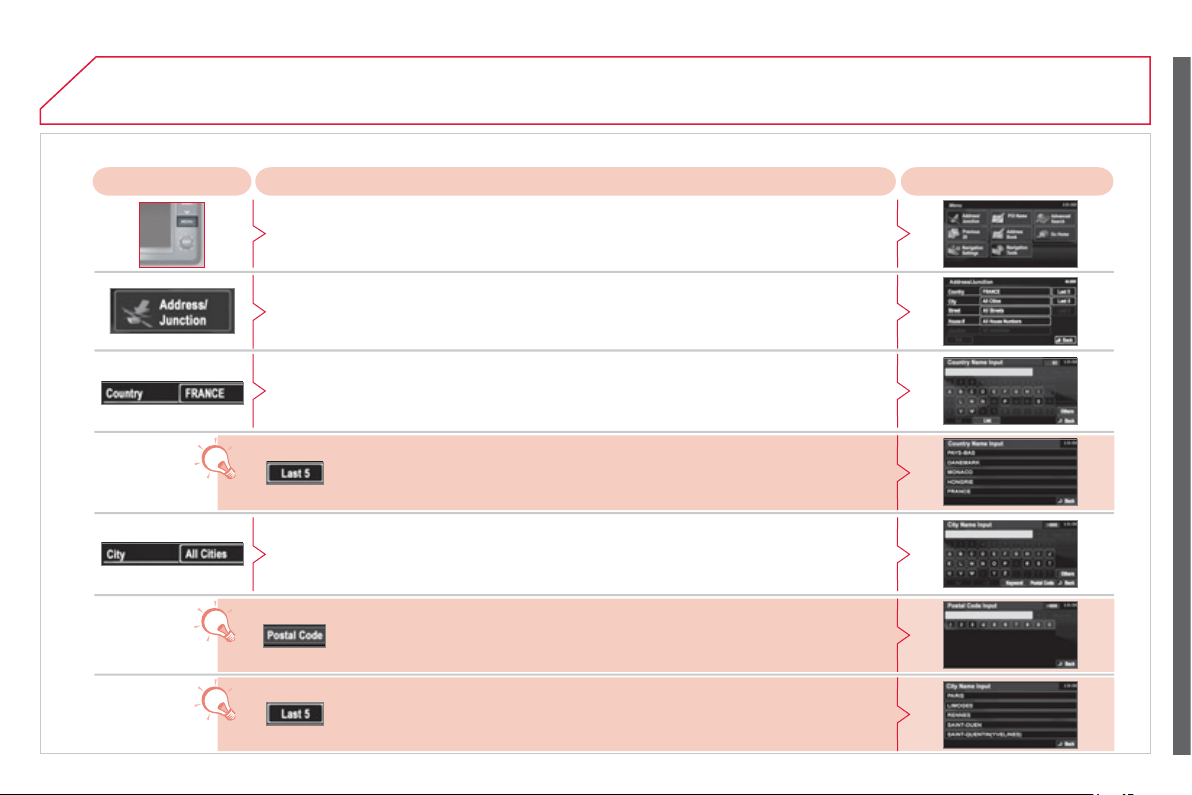
2
33
03
Enterin
g
an address and startin
g
g
uidance
(
1
/
2
)
Pr
ess
Ex
p
lanation
R
esu
lt
Pr
ess
th
e
MEN
U
bu
tt
o
n.
Press [Address
/
Junction].
Press [Countr
y
] and enter the name of the countr
y
usin
g
the touch ke
y
pad.
When a character of the name of the countr
y
is entered, if 5 countries or fewer are
reco
g
nised,
y
ou can select a countr
y
from a list which is displa
y
ed or press [List].
You can select one o
f
the 5 most recentl
y
selected countries b
y
pressin
g
[Last 5]
on the "
C
ountry" line.
Press [
C
ity] then [Keyword] and enter the name o
f
the city using the touch keypad.
When a character o
f
the name o
f
the cit
y
is entered, i
f
5 cities or
f
ewer are reco
g
nised,
y
ou can select a cit
y
f
rom a list which is displa
y
ed or press [List].
Y
ou can se
l
ect a c
i
t
y
us
i
n
g
t
h
e post co
d
e.
Press
[
Post Code
]
and enter the number.
NAVIGATION - GUIDANCE
You can select one of the 5 most recentl
y
selected cities b
y
pressin
g
[Last 5]
on the "
C
it
y
" line.
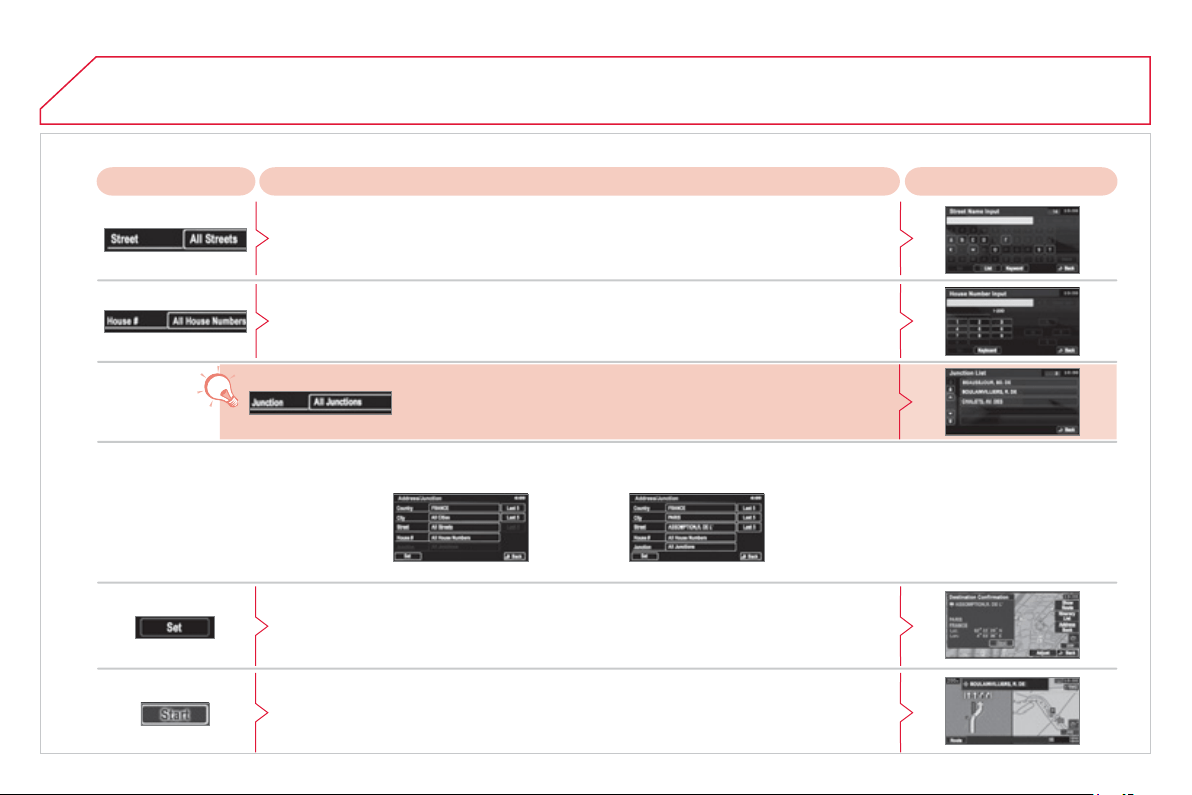
2
3
4
03
Enterin
g
an address and startin
g
g
uidance
(
2
/
2
)
Pr
ess
Explanation
Resul
t
Press [Street] and enter the name of a street usin
g
the touch ke
y
pad.
When a character of the name of the street is entered, if 5 streets or fewer are
reco
g
nised,
y
ou can select a street from a list which is displa
y
ed or press [List].
Press [House
#
] and enter the number o
f
the house usin
g
the touch ke
y
pad.
You can enter the name o
f
a
j
unction instead o
f
the number o
f
the
street. Press [Junction] and select the name
f
rom a list which is
displa
y
ed.
Thi
s
i
s
th
e
r
esu
lt
o
n
ce
a
ll
o
f th
e
inf
o
rm
a
ti
o
n h
as
bee
n
e
nt
e
r
ed
:
If
y
ou a
g
ree with the information press [Set], otherwise press one of the buttons to
co
rr
ec
t.
Press [Start] to start the navi
g
ation.
/
NAVIGATION - GUIDANCE
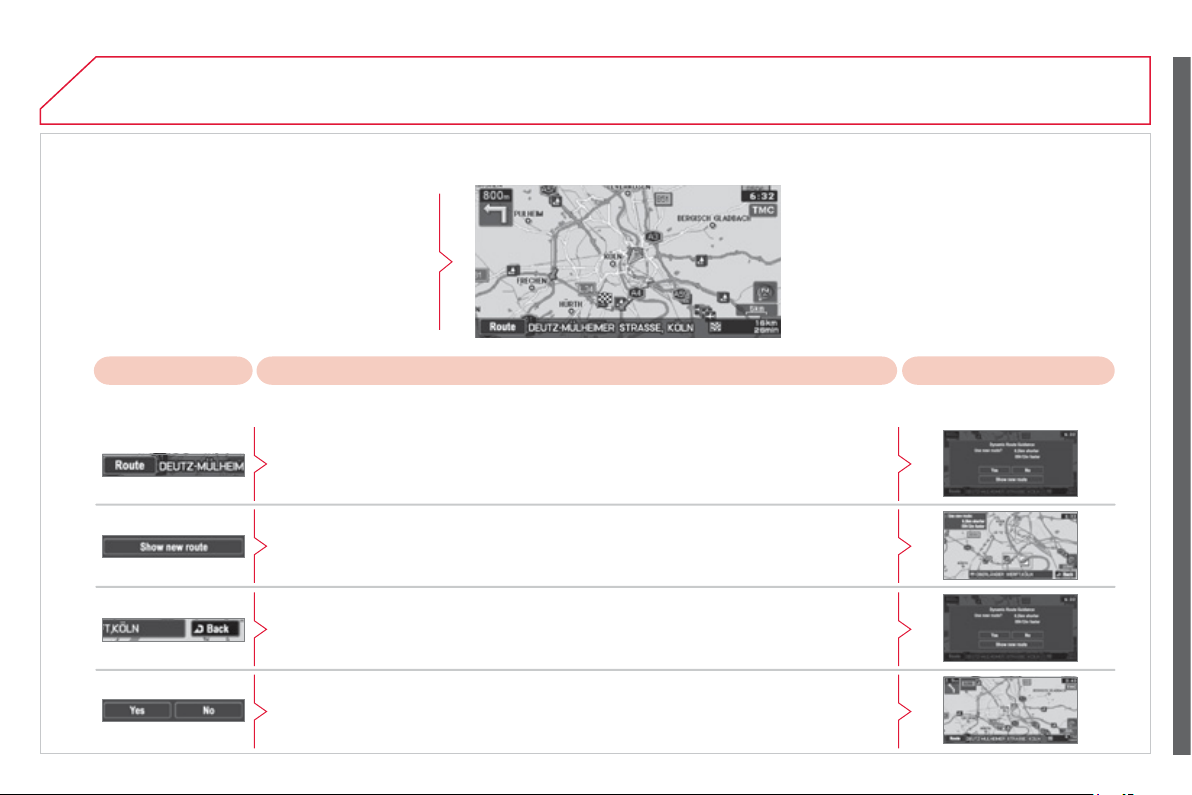
2
35
03
TRAFFIC INFORMATION
Pr
ess
Explanation
R
esu
lt
P
ress
[R
oute
]
.
Press [Displa
y
new route].
The s
y
stem offers a detour route
(
d
y
namic
g
uidance
)
.
Press [Back] and enter to return to the previous screen.
The s
y
stem asks
y
ou to con
fi
rm or not the new route.
Press [Yes] to confi rm
y
our choice. The s
y
stem displa
y
s the name of the new route.
P
ress
[N
o
]
to not re
gi
ster t
h
e route.
Durin
g
navi
g
ation, the s
y
stem
g
ives
y
ou traffi c
inf
o
rm
a
ti
o
n r
ece
iv
ed
in r
ea
l tim
e
.
The s
y
stem can then su
gg
est a detour route, i
f
dy
nam
i
c
g
u
id
ance
h
as
b
een act
i
vate
d
by
press
i
n
g
M
ENU, [Navi
g
ation settin
g
s] then [TM
C
].
NAVIGATION - GUIDANCE
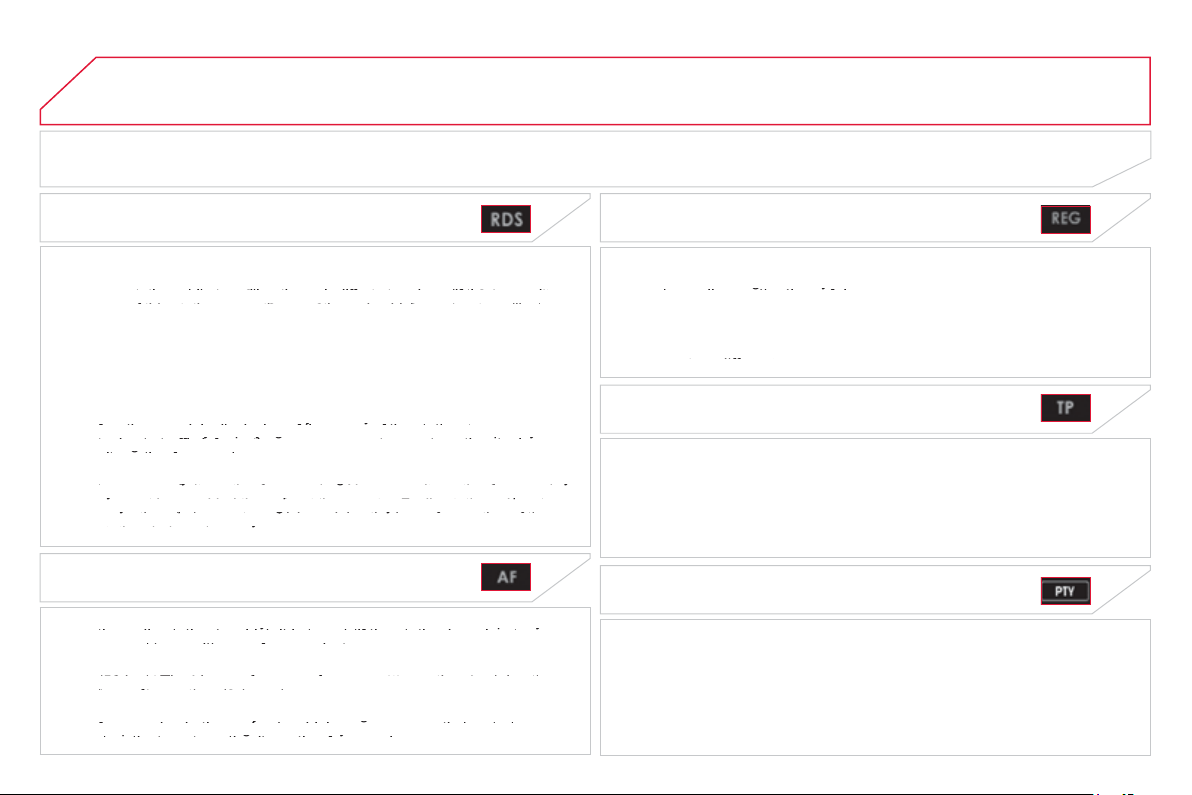
2
36
04
WHAT IS RDS?
The Radio Data
Sy
stem
(
RD
S)
f
unction on the FM waveband permits:
- automatic retuning to alternative frequencies carrying the same
station while travelling through different regions (if the transmitters
gqyg
gqyg
of
thi
s s
t
a
ti
on cover
th
e area
th
rou
gh
w
hi
c
h
y
ou are
t
rave
lli
n
g)
,
gg g(
gg g(
- temporar
y
tunin
g
to tra
ffi
c in
f
ormation announcements,
- displa
y
o
f
the name o
f
the station, etc...
Most FM stations use RD
S
.
Th
ese
s
t
a
ti
o
n
s
tr
a
n
s
mit n
o
n-
aud
i
b
l
e
da
t
a
in
add
iti
o
n t
o
th
e
ir
programmes
.
The data transmitted in this way allows you access to various
functions, mainly displaying of the name of the station, temporary
yy
yy
tuning to traffi c information announcements or automatic retuning to
y pyg p y
y pyg p
alt
erna
ti
ve
f
requenc
i
es.
g
g
RDS allows you to continue listening to the same station automatically
by means of alternative frequencies. However, alternative frequencies
yg y
yg
ma
y
no
t
b
e
p
rov
id
e
d
th
rou
gh
ou
t
th
e coun
t
r
y
.
R
a
di
o s
t
a
ti
ons
d
o no
t
yq q
qq
cover the whole country, which explains the loss of reception of the
yp g ypg y
station during a journey.
y
REGIONAL MODE
S
ome stations are or
g
anised in a network.
In different regions, they broadcast different or shared programmes
d
epen
di
n
g
on
th
e
ti
me o
f
d
a
y
.
gy
g,y
Y
ou
ca
n
fo
ll
o
w:
- a re
g
ional station onl
y
,
- the entire network, with the possibility that you will be listening
t
o a
diff
eren
t
pro
g
ramme.
RADIO, RDS, AF, REG, TP, PTY
AUDIO / VIDEO
RDS ALTERNATIVE FREQUENCIES
Your radio automatically checks and selects the best frequency for
the radio station to which it is tuned (if the station broadcasts on
yqy
yq
s
evera
l
t
ransm
itt
ers or
f
requenc
i
es
)
.
The frequency of a radio station covers approximately 30 miles
(50 km). The change from one frequency to another explains the
q y pp y
q y pp y
l
oss o
f
recep
ti
on
d
ur
i
n
g
a
j
ourne
y
.
() g q
() g
If the station to which you are listening does not have several
frequencies in the region in which you are currently located, you can
yg
yg
d
eac
ti
va
t
e au
t
oma
ti
c a
lt
erna
ti
ve
f
requenc
i
es.
qgy
qgy
TRAFFIC INFORMATION FUNCTION
The Tra
ffi
c Programme
(
TP
)
f
unction permits automatic and
temporar
y
switchin
g
to an FM station broadcastin
g
tra
ffi
c in
f
ormation.
The radio station or the source that
y
ou are listenin
g
to at this point is
p
aused.
O
nce the traffi c information has ended, the s
y
stem switches back to
the radio station or the source that
y
ou were listenin
g
to initiall
y
.
PROGRAMME TYPES
S
ome stations o
ff
er the option o
f
listenin
g
to a themed t
y
pe o
f
pro
g
ramme as a priorit
y
, selected from the list available below:
NEWS, AFFAIRS, INF
O
S, SP
O
RT, EDUCATE, DRAMA, CULTURE,
S
CIENCE
,
VARIED
,
P
O
P M
,
R
O
CK M
,
EASY M
,
LIGHT M
,
C
LA
SS
I
CS
,
O
THER M, WEATHER, FINAN
C
E,
C
HILDREN,
SOC
IAL, RELI
G
I
O
N, PH
O
NE IN, TRAVEL, LEI
S
URE, JAZZ,
CO
UNTRY, NATI
O
N M,
O
LDIE
S
, F
O
LK M, D
OC
UMENT.
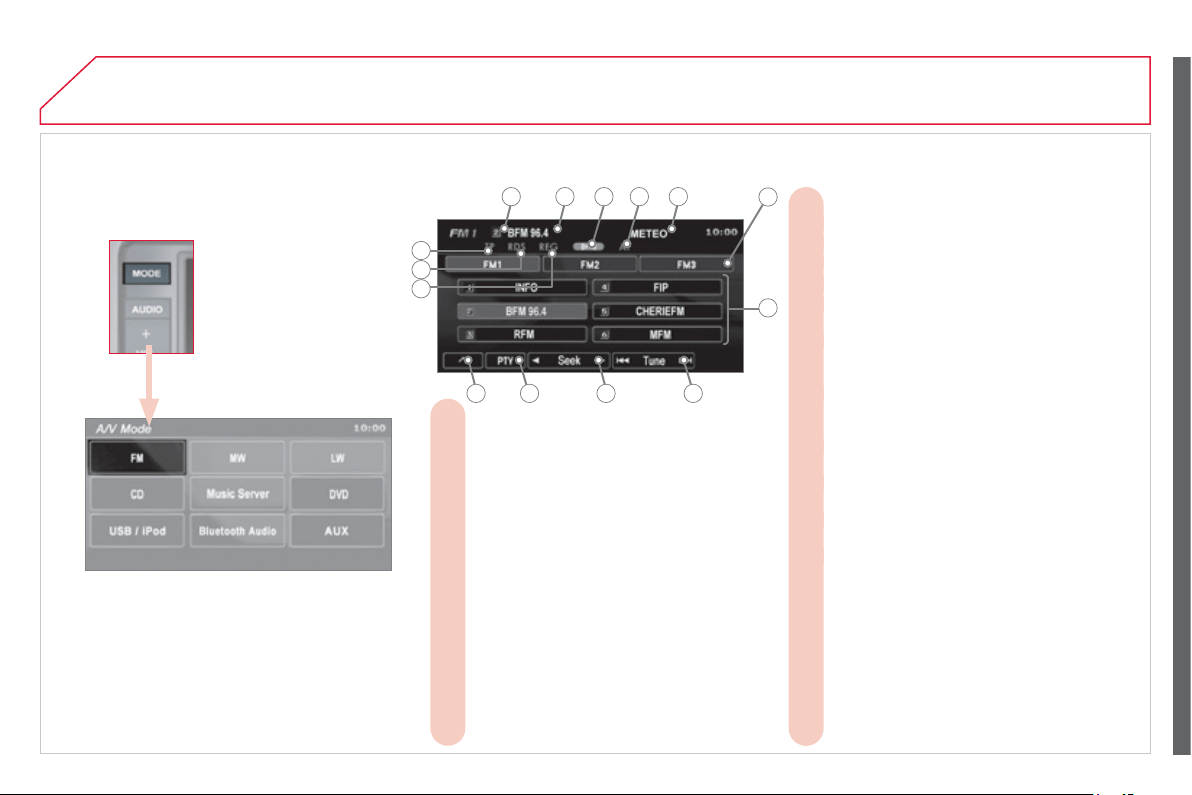
2
37
04
A
UDIO / VIDEO
INFORMATION DISPLAYED IN RADIO MODE
A preset number is displayed when a
A.
p
reset station has been selected.
The name of the station is displayed
B.
durin
g
the reception of RDS information. I
f
t
h
e stat
i
on name
h
as not
b
een transm
i
tte
d
,
the
f
requenc
y
is displa
y
ed.
Stereo is displayed when a stereo
C.
tr
a
n
s
mi
ss
i
o
n i
s
r
ece
iv
ed
.
AF is displayed when the AF function is on.
D.
PTY (programme type) is displayed if the
E.
R
DS information received is displa
y
ed.
TRAFINF is displayed, during an
interruption,
f
or tra
ffi
c in
f
ormation.
ALARM is displayed, during an
interruption,
f
or urgent in
f
ormation.
Display of 6 preset stations.
F.
To receive the preset station.
G.
Press and hold to store a station.
To change the frequency step by step.
H.
Press and hold for continuous frequency
c
han
g
in
g
.
To search for currently broadcasting
I.
s
t
a
t
io
n
s
w
hich
ca
n
be
r
ecei
v
ed
i
n t
he
c
urrent location, until a station is
f
ound.
To display the programme type setting
J.
screen, e.
g
.: sport, rock, classical, news, ...
Press PTY a
g
ain to exit.
Press this button to display the secondary
K.
m
e
n
u
.
REG is displayed during the reception of
L.
re
g
ional frequencies information.
RDS is displayed during the reception of
M.
R
D
S
in
f
ormation.
TP is displayed when the traffi c
N.
in
f
ormation is in standb
y
mode.
A B C D E
G
HIJK
L
M
N
F
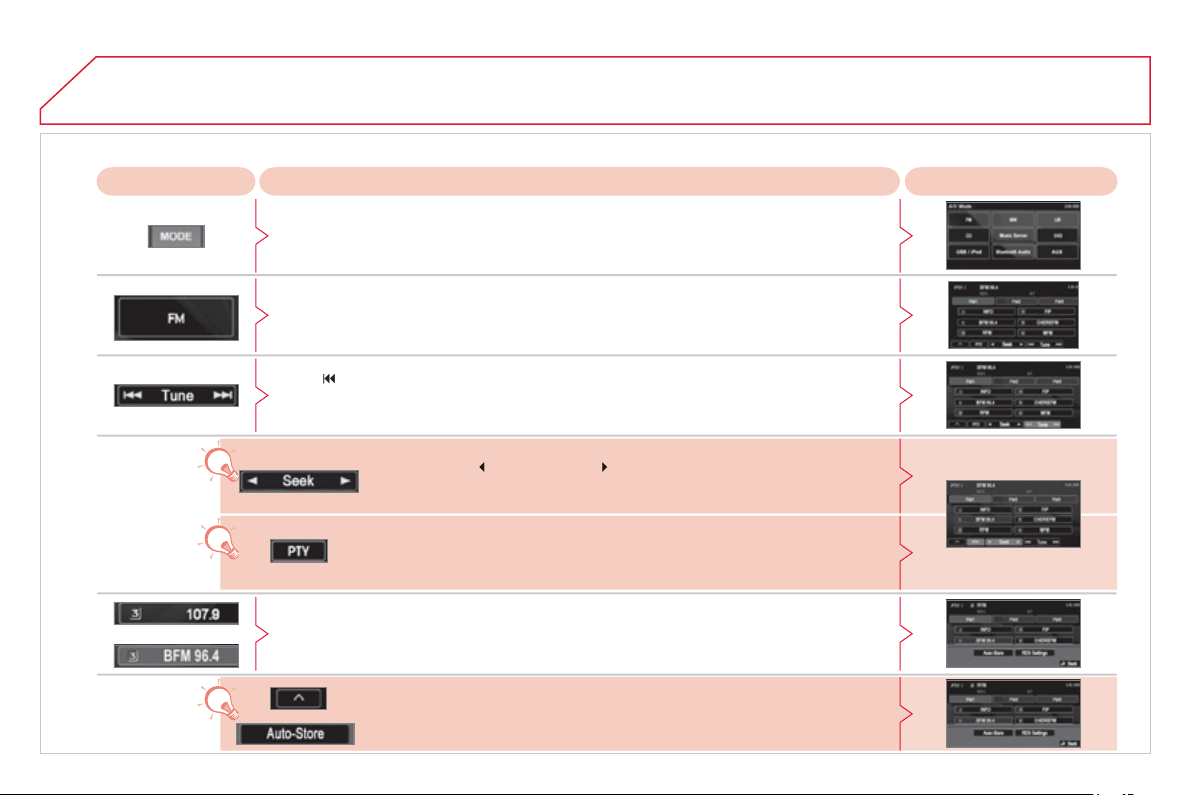
2
38
04
AUDIO / VIDEO
RADIO
,
SELECTING AN FM STATION AND PRESETTING
Pr
ess
th
e
M
O
DE
bu
tt
o
n.
Pr
ess
Explanation R
esu
lt
Y
ou can se
l
ect
[
S
eek] or [
S
eek
]
to start a cont
i
nuous searc
h
unt
il
t
h
e
s
t
a
t
io
n
s
w
hich
ca
n
be
r
ecei
v
ed
i
n t
he
cu
rr
e
nt
loca
t
io
n
a
r
e
de
t
ec
t
ed
.
Press FM. B
y
de
f
ault the screen shows the FM1 stations.
Press [
Tune] to decrease the frequenc
y
or [Tune
] to increase the frequenc
y
. The
frequenc
y
is chan
g
ed in steps of 0.1 MHz.
C
ontinue to press to tune to a station automaticall
y
.
O
nce the
f
requenc
y
has been selected, a lon
g
press on the station
(
e.
g
. 3
)
will preset it.
The name of the station is displa
y
ed if it is available.
You can start automatic presettin
g
on FM3 for 6 stations, which can be
r
eceived in the current location, b
y
pressin
g
[^] then [Auto-Store].
You can also start a search b
y
t
y
pe o
f
pro
g
ramme b
y
pressin
g
[PTY].
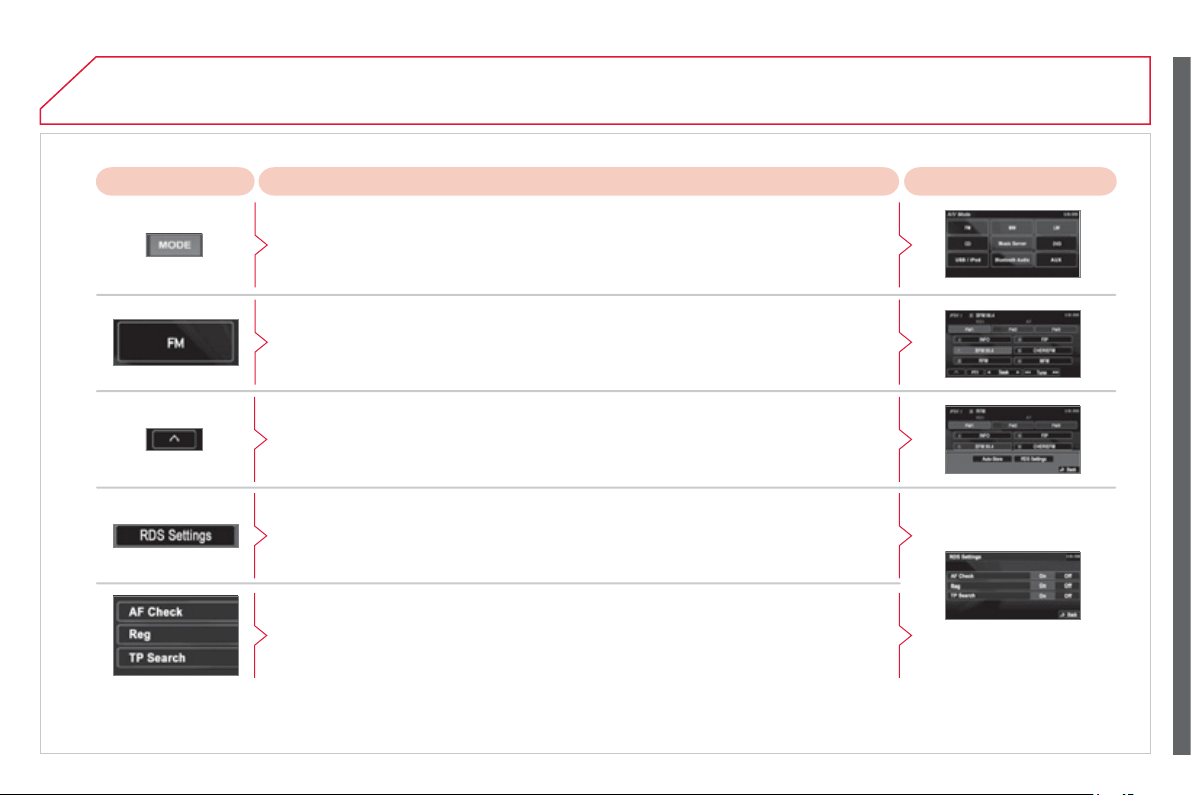
2
39
04
A
UDIO / VIDEO
RADIO
,
RDS SETTINGS
Pr
ess
Explanation R
esu
lt
Press the M
O
DE button.
Press FM. B
y
default the screen shows the stations on FM1.
Press [
^
].
Press [RDS Settin
g
s].
Press
[O
n
]
or
[O
ff
]
to activate or deactivate the functions:
- AF: automatic search for the best frequenc
y
,
- REG: switch to the re
g
ional frequencies,
- TP: automatic selection o
f
stations broadcastin
g
tra
ffi
c in
f
ormation.
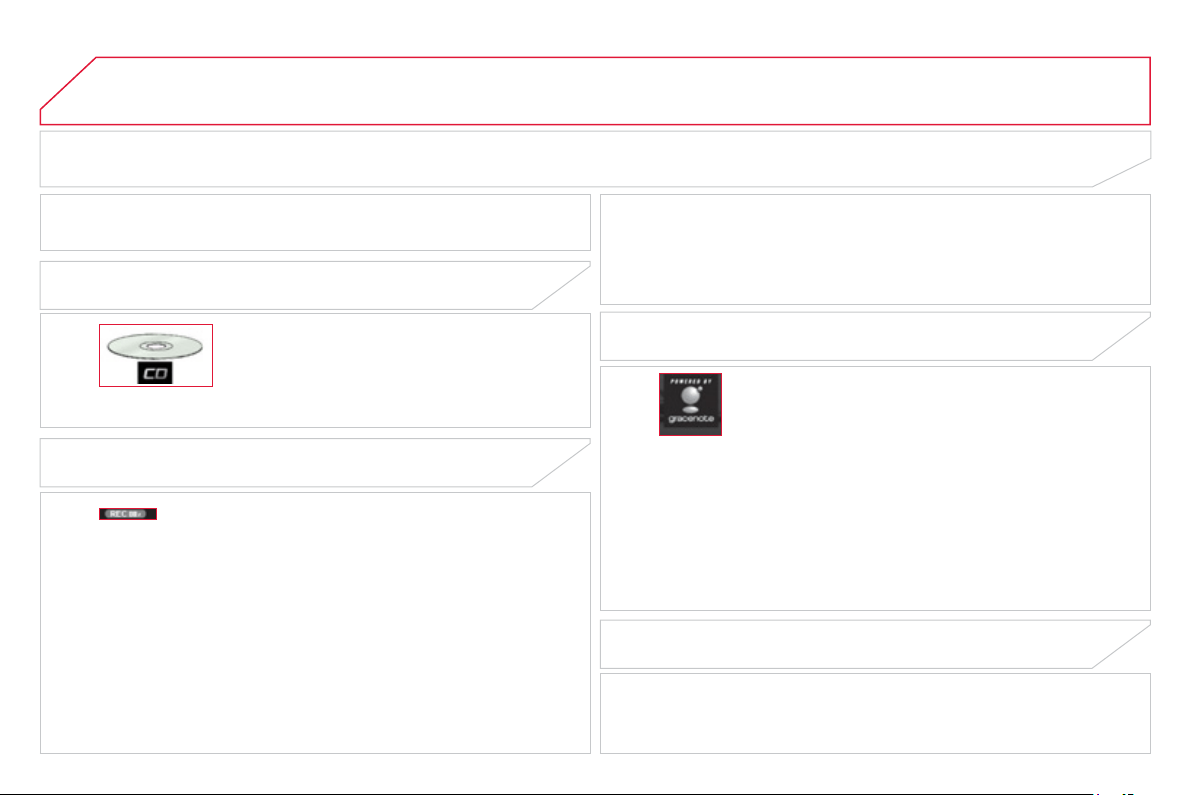
24
0
04
PLAYING AN AUDIO CD
When the audio
C
D is inserted in the player,
p
la
y
in
g
o
f
the tracks is automatic and the
y
can be
reco
r
ded
o
nt
o
th
e
h
a
r
d
d
i
s
k.
Simultaneous access to the music reco
g
nition
s
ervice "Gracenote CDDB" on the hard disk permits displa
y
of the
titl
e
inf
o
rm
a
ti
o
n.
The recording speed may be slower than 4x due to the processing
load on the equipment or the condition o
f
the audio
C
D.
I
f
j
umps or other errors occur, return to the be
g
innin
g
o
f
the track
and start the recordin
g
a
g
ain.
Even if there is no
g
ap between the tracks on the CD, a brief silence
be
tw
ee
n tr
acks
is
s
t
o
r
ed
o
n t
he
ha
r
d
disk
.
CD PLAYER
AUDIO / VIDEO
RECORDING ONTO THE MUSIC SERVER
The tracks o
f
audio
C
Ds
(
not MP3
/
WMA
)
can be
r
ecor
d
e
d
onto t
h
e
h
ar
d
di
s
k
at approx
i
mate
ly
4
x spee
d
(
e.g.: 60 minutes converted to 15 minutes
)
and stored on the music
ser
v
er
.
The sounds recorded ma
y
be altered b
y
the noise present and the
q
ualit
y
of the sound ma
y
differ from the ori
g
inal.
The tracks recorded on the music server cannot be re
p
roduced on
a
nother medium
(
CD-R/RW, HDD, etc ...
)
.
Previousl
y
recorded tracks cannot be recorded a
g
ain
f
rom
the same
C
D.
S
witching o
ff
the engine or removing the
C
D during recording will
result in the tracks bein
g
f
ault
y
.
The operation o
f
the navi
g
ation s
y
stem ma
y
slow down durin
g
recordin
g
.
WHAT IS THE GRACENOTE CDDB?
The title information for the track currentl
y
bein
g
pla
y
ed
c
an be obtained from the "
G
racenote
C
DDB" database
s
t
o
r
ed
o
n th
e
h
a
r
d
d
i
s
k.
The
G
racenote compan
y
uses this standard to identi
fy
th
e
m
us
i
c
a
n
d
th
e
assoc
i
a
t
ed
in
fo
rm
a
ti
o
n
suc
h
as
:
- the title o
f
the album,
- the name o
f
the artist,
- the title o
f
the tracks,
- the
g
enre, ...
For further details, consult the site: www.
g
racenote.com.
The Gracenote CDDB database incorporated in this equipment
c
annot
g
uarantee the content o
f
the data 100
%
. You can update this
d
ata
b
ase us
i
n
g
a
DVD
so
ld
separate
ly
.
COPYRIGH
T
Your Audio equipment ma
y
allow
y
ou to listen to music which is
usuall
y
protected b
y
cop
y
ri
g
ht in accordance with current national
a
n
d
i
nt
e
rn
a
t
io
n
al
s
t
a
n
da
r
ds
.
Please
co
n
sul
t t
hese
s
t
a
n
da
r
ds
a
n
d
c
omp
ly
w
i
t
h
t
h
em.
Your Audio-Telematic s
y
stem allows
y
ou to listen to audio CDs
(
CDDA, CD-Text, CD-R/RW
)
or MP3 and WMA CDs.
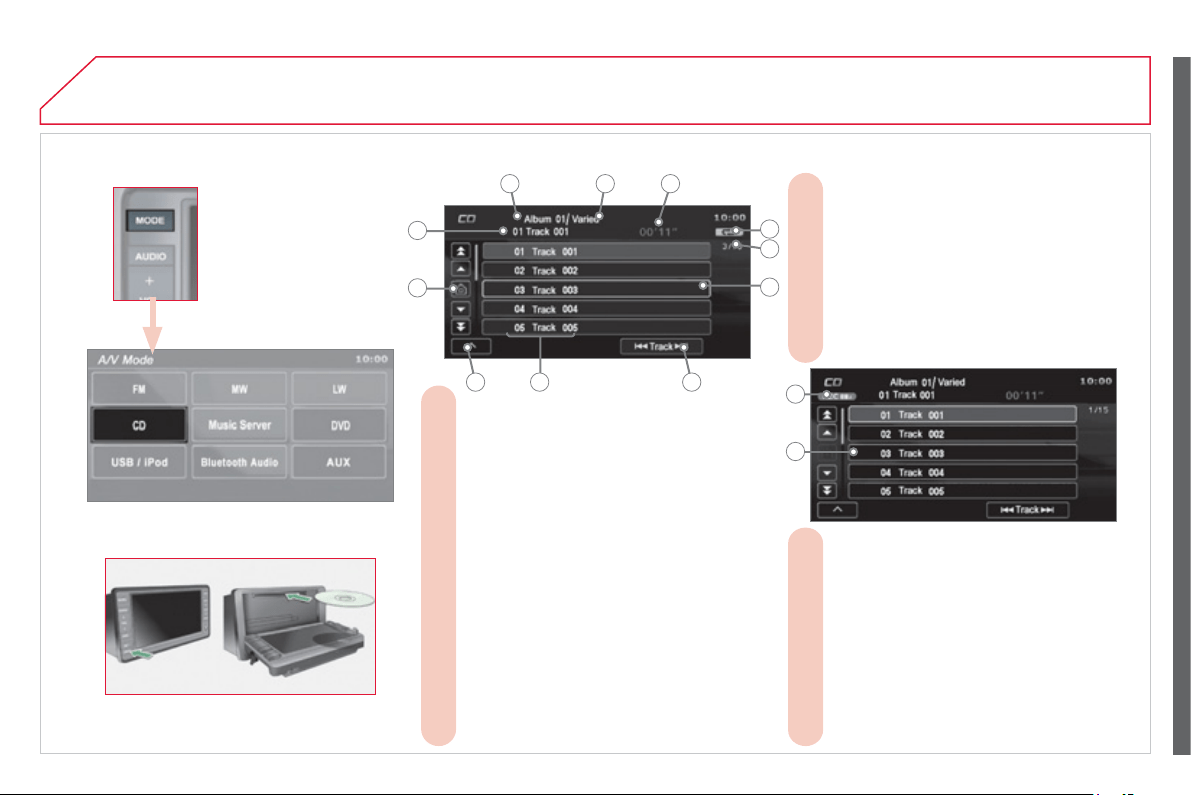
241
04
A
UDIO / VIDEO
INFORMATION DISPLAYED IN CD MODE AND COPYING A CD
The name of the album is displayed for the
A.
trac
k
current
ly
b
e
i
n
g
p
l
a
y
e
d
.
The name of the artist is displayed for the
B.
album currentl
y
bein
g
pla
y
ed.
The playing time of the track currently
C.
bein
g
pla
y
ed is displa
y
ed.
The playing mode currently selected is
D.
displa
y
ed.
Position of the cursor and total number of
E.
tr
acks
o
n t
he
albu
m.
Displays the item currently selected.
F.
To scroll up or down through the tracks.
G.
Press and hold for fast backwards or
forwards pla
y
in
g
of a track.
Displays the number and the name of the
H.
track. While drivin
g
, the
y
are not available
a
n
d
ca
nn
o
t
be
se
l
ec
t
ed
.
To display the secondary menu.
I.
Move the cursor onto the track currently
J.
b
e
i
n
g
p
l
a
y
e
d
.
The number and the name of the track
K.
c
urrently being played are displayed.
During copying, this symbol is displayed
L.
in red and it
g
oes off when all cop
y
in
g
operations are complete. The number
indicates the percenta
g
e of the total
number o
f
tracks on the
C
D alread
y
c
opied onto the hard disk. 00
%
when onl
y
one track has been copied.
The tracks which have not been copied
M.
a
re displa
y
ed in blue.
No symbol is displayed for tracks for
which cop
y
in
g
has fi nished.
The CD button is onl
y
active if the pla
y
er
c
ontains a
C
D.
Press
Op
en to return the screen to the vertical
p
osition.
A B C
D
E
F
GHI
J
K
L
M
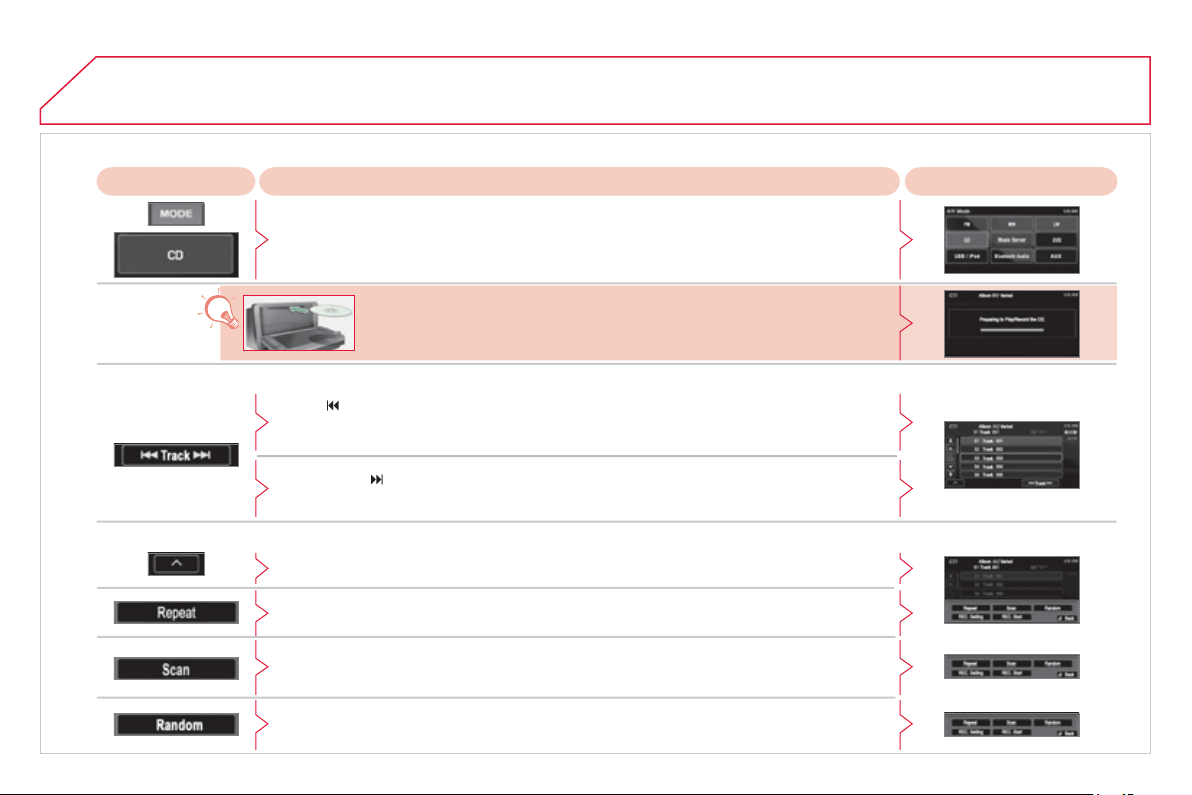
242
04
AUDIO / VIDEO
P
LAYING A CD
Press the M
O
DE button then
C
D, i
f
the pla
y
er alread
y
contains a
C
D.
Pr
ess
Explanation
Resul
t
O
therwise, insert a
C
D in the pla
y
er, pla
y
be
g
ins automaticall
y
.
P
ress
[
Track] to select the previous track or return to the be
g
innin
g
of the track
c
urrent
ly
b
e
i
n
g
p
l
a
y
e
d
.
Press and hold
f
or
f
ast backwards play.
P
ress
[T
rac
k
]
to se
l
ect t
h
e next trac
k
.
Press and hold
f
or
f
ast
f
orwards pla
y
.
Press [
^
] to access the secondar
y
menu.
Press [Repeat] to play the track in a loop
(
repetition
)
.
Press [
^
] then [Repeat] to stop.
Press [
S
can] to play the beginning o
f
each track
f
or approximately 9 seconds
(
scan
)
.
Press [
^
] then [
S
can] to stop or press the current track
(
durin
g
the 9 seconds
)
and pla
y
be
g
ins.
Press [Random] to pla
y
the tracks in random order. Press [
^
] then [Random] to stop.
Selectin
g
a track
Chan
g
in
g
the pla
y
mod
e
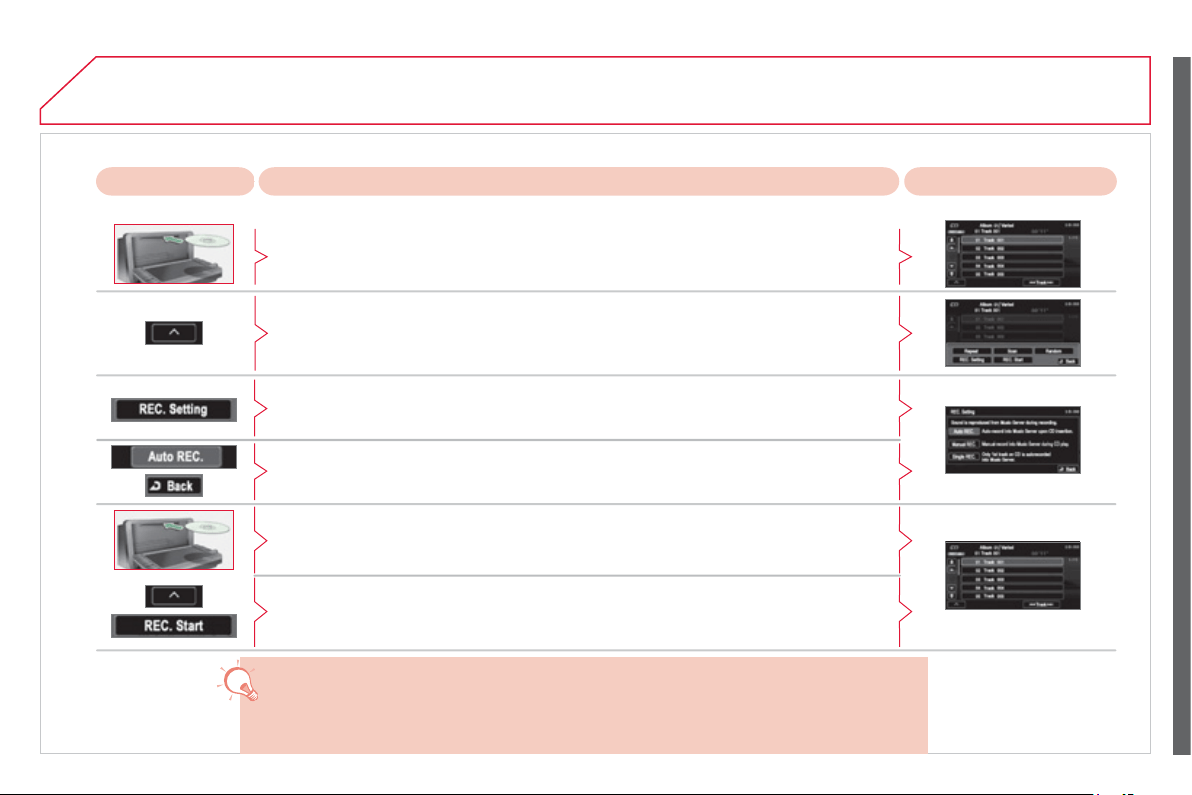
24
3
04
A
UDIO / VIDEO
Cop
y
in
g
a CD onto the music server
(
1/3
)
Pr
ess
Explanation R
esu
lt
A
ll of the tracks are copied automaticall
y
when a CD is inserted.
This automatic cop
y
is pro
g
rammed b
y
default on leavin
g
the factor
y
.
Automatic copying of all of the tracks
I
f
y
ou have chan
g
ed the cop
y
mode
(
manual or
fi
rst track
)
, while a
C
D is bein
g
pla
y
ed
p
ress [
^
]
f
or access to the secondar
y
menu.
Press [REC. Settin
g
].
Press [Auto RE
C
.] and con
fi
rm by pressing [Back].
Next, e
j
ect the CD currentl
y
bein
g
pla
y
ed then insert a CD and cop
y
in
g
of all of the
tracks be
g
ins.
If
y
ou wish to cop
y
the CD which is currentl
y
bein
g
pla
y
ed, press [^] for access to the
s
econdar
y
menu and press [RE
C
.
S
tart].
I
f
another track
(
alread
y
copied
)
is selected durin
g
cop
y
in
g
, the cop
y
in
g
continues and
t
h
e new trac
k
se
l
ecte
d
i
s p
l
a
y
e
d
.
I
f
another track
(
not copied
)
is selected, the copying which is in progress stops and the
c
op
y
in
g
o
f
the new track selected be
g
ins. This track is pla
y
ed durin
g
cop
y
in
g
.
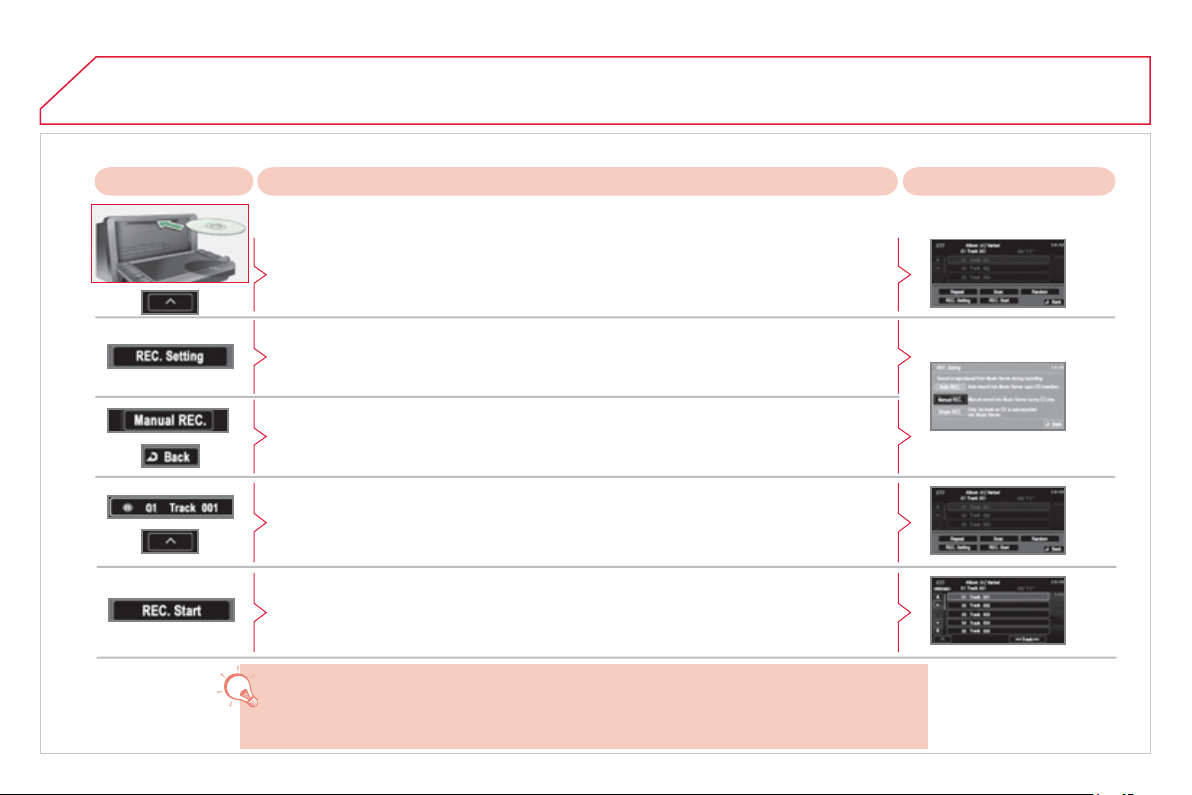
244
04
AUDIO / VIDEO
Cop
y
in
g
a CD onto the music server
(
2/3
)
Pr
ess
Explanation R
esu
lt
Manual cop
y
in
g
of individual tracks
You can cop
y
the tracks manuall
y
, one b
y
one.
Af
ter insertin
g
a
C
D and while it is bein
g
pla
y
ed, press [
^
]
f
or access to the secondar
y
me
n
u
.
Press [RE
C
.
S
ettin
g
].
Press [Manual RE
C
.] and con
fi
rm b
y
pressin
g
[Back].
O
nce the manual pro
g
rammin
g
has been carried out, select the track to be copied then
p
ress [
^
].
Press [REC. Start], the cop
y
in
g
of the track selected be
g
ins.
I
f
another track is selected durin
g
cop
y
in
g
, the cop
y
in
g
stops and the new track selected is
p
la
y
ed.
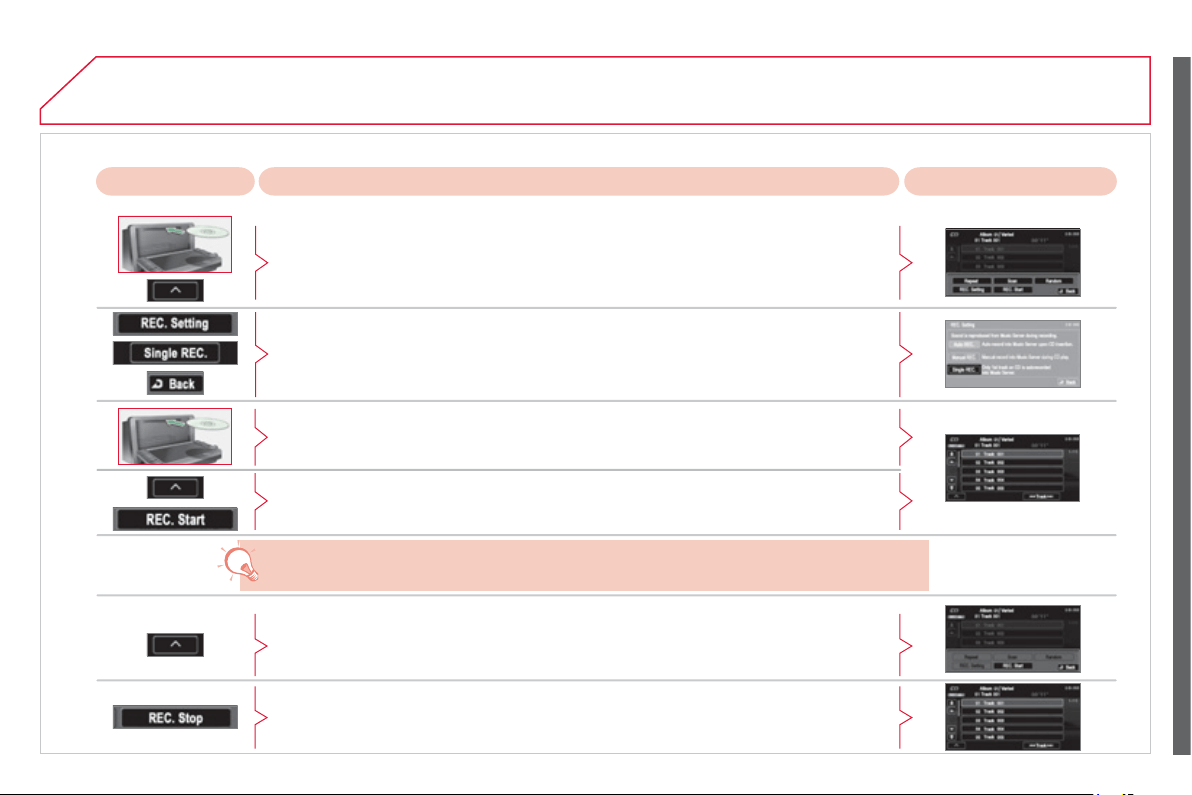
24
5
04
A
UDIO / VIDEO
Cop
y
in
g
a CD onto the music server
(
3/3
)
Pr
ess
Explanation R
esu
lt
Automatic cop
y
in
g
of the fi rst track
You can pro
g
ramme the automatic cop
y
in
g
of the fi rst track when a CD is inserted.
Af
ter insertin
g
a
C
D and while it is bein
g
pla
y
ed, press [
^
]
f
or access to the secondar
y
menu
.
Press [REC. Settin
g
] then [Sin
g
le REC.] and confi rm b
y
pressin
g
[Back].
Next, e
j
ect the
C
D which is currentl
y
bein
g
pla
y
ed then insert a
C
D and the cop
y
in
g
o
f
the
fi
rst track be
g
ins.
I
f
y
ou wish to cop
y
the
fi
rst track o
f
the
C
D which is currentl
y
bein
g
pla
y
ed, press [
^
]
f
o
r
a
ccess to the secondar
y
menu and press [RE
C
.
S
tart].
I
f
another track is selected durin
g
cop
y
in
g
, the cop
y
in
g
stops and the track selected is
p
layed.
Stoppin
g
automatic or manual cop
y
in
g
During the copying o
f
a
C
D or o
f
a track on a
C
D, press [
^
]
f
or access to the secondary
menu
.
Press [REC. Stop], the cop
y
in
g
stops.
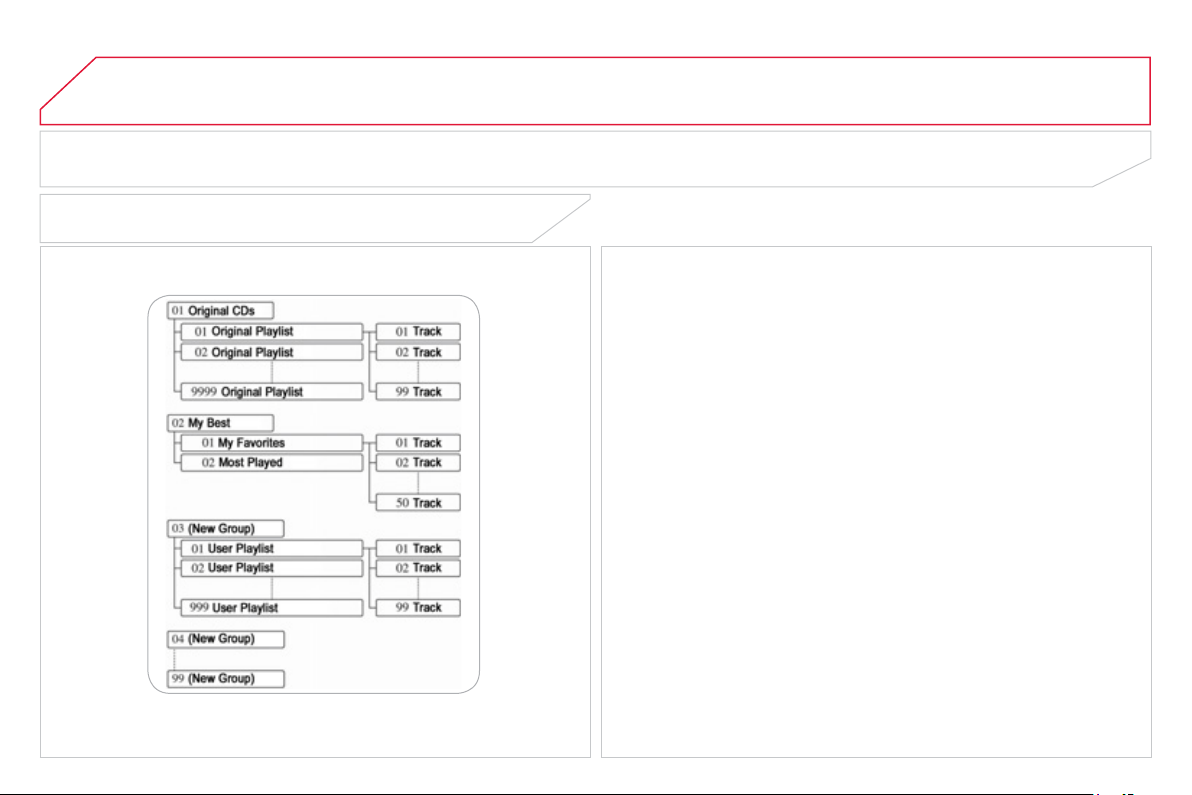
24
6
04
WHAT IS THE MUSIC SERVER?
GENERAL NOTES ON THE MUSIC SERVER
AUDIO / VIDEO
Your Audio-Telematic s
y
stem allows
y
ou to cop
y
audio
C
Ds onto a
music server, up to 2,500 songs on a 10
G
b hard disk.
The tracks on audio
C
Ds
(
not MP3 or WMA
)
can be recorded onto
the hard disk at approximatel
y
4x speed and stored in the music
se
rv
e
r.
Refer to the "Recordin
g
a CD" section.
The music server then allows
y
ou to mana
g
e
g
roups and lists o
f
tr
acks
.
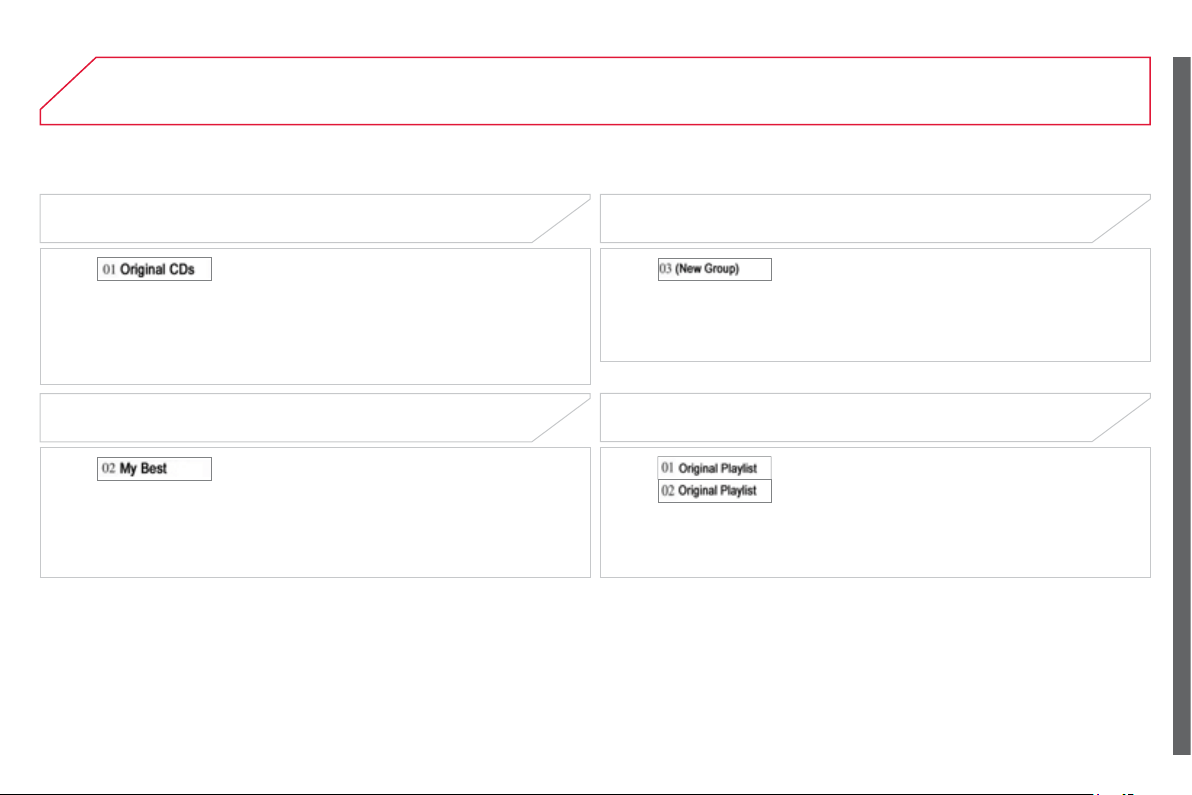
247
04
"ORIGINAL" GROUP, NUMBER 01:
This is the location of the ori
g
inal pla
y
list created
automaticall
y
(
not manual
)
when a track of an
audio
C
D is recorded.
I
t
i
s not poss
ibl
e to c
h
an
g
e
i
ts name or
d
e
l
ete
i
t.
You can record up to 9999 pla
y
lists in this
g
roup.
"MY BEST" GROUP, NUMBER 02:
This is the location o
f
the pla
y
lists, etc ... created
automatically
f
rom the in
f
ormation read in the
m
us
i
c
se
rv
e
r.
It is not possible to chan
g
e its name or delete it.
The
g
roups "M
y
Favorites" and "M
y
Frequenc
y
" are stored here.
"NEW GROUP" GROUP FOR THE USER,
NUMBER
S
03 TO
99
:
This is the location of the user's pla
y
lists.
You can record up to 9999 pla
y
lists in this
g
roup.
Th
e
g
roup can
b
e create
d
, rename
d
or
d
e
l
ete
d
.
A
UDIO / VIDEO
"ORIGINAL PLAYLIST" LISTS:
These are ori
g
inal pla
y
lists created automaticall
y
(
not manual
)
when an audio
C
D is copied.
Th
e
li
s
t
s
a
n
d
th
e
a
rti
s
t
s
ca
n
be
r
e
n
a
m
ed
o
r
deleted. The
g
enres can also be set.
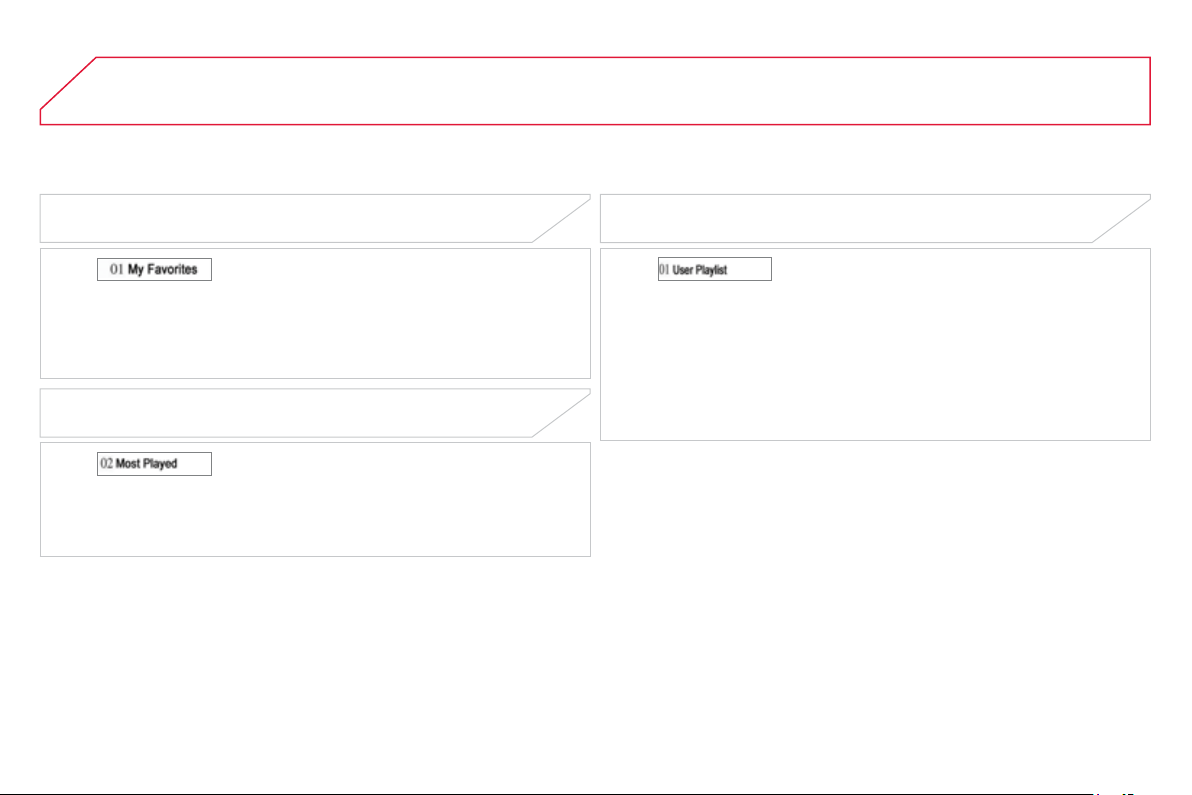
24
8
04
A
UDIO / VIDEO
"MY FAVORITES" LIST:
This is the location
f
or storin
g
y
our
f
avourite
tr
acks
.
They can be deleted
f
rom the list and the order in which they are
pla
y
ed can be chan
g
ed.
"MY MO
S
T PLAYED" LI
S
T:
This is the location o
f
the pla
y
lists used most
f
requentl
y
f
rom the ori
g
ina
l
li
s
t.
It is not possible to add tracks or chan
g
e their order.
"USER PLAYLIST" LIST:
This is the location of a pla
y
list of tracks selected
b
y
the user from the
o
ri
g
ina
l
li
s
t.
If
y
ou delete a track from the ori
g
inal list, it will be deleted from the
use
r
lis
t.
The
lis
t
a
n
d
t
he
a
rt
is
t
ca
n
be
r
e
n
a
m
ed
o
r
dele
t
ed
.
It is possible to add tracks or change their order.
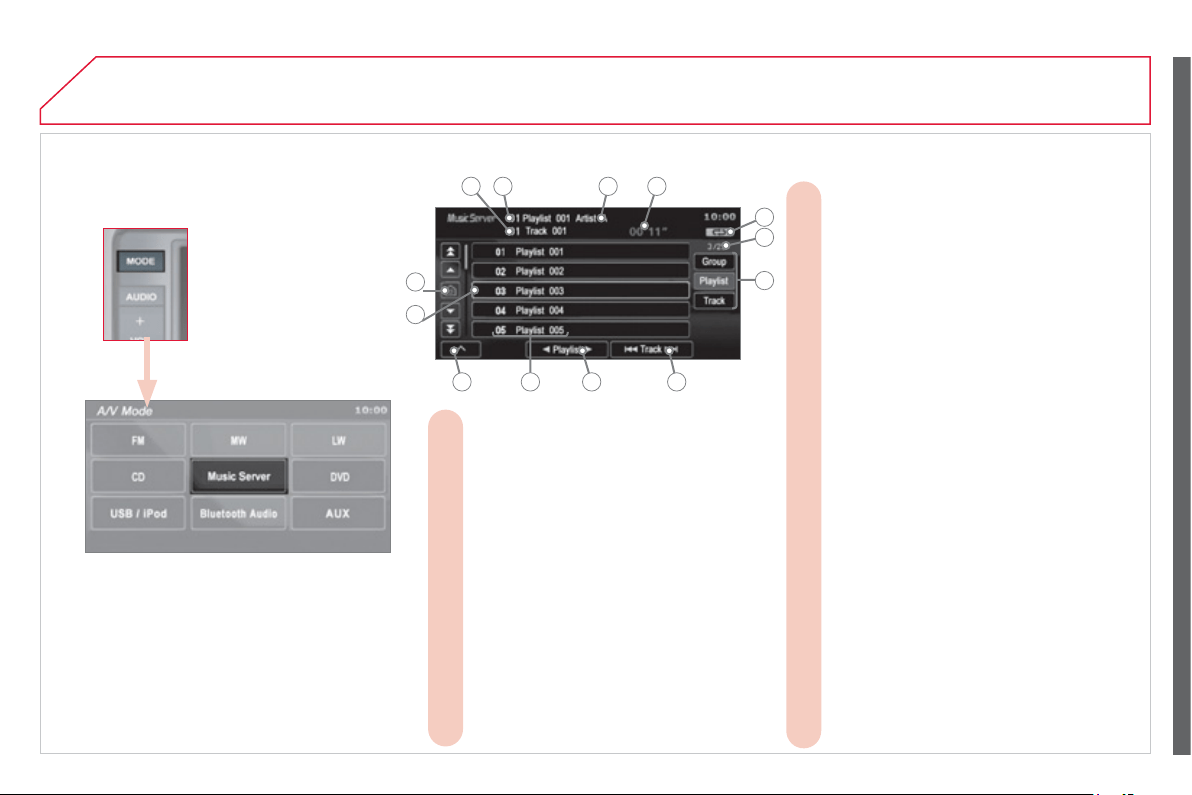
24
9
04
A
UDIO / VIDEO
INFORMATION DISPLAYED IN MUSIC SERVER MODE
The number and the name of the track
A.
c
urrentl
y
bein
g
pla
y
ed are displa
y
ed.
The number and the name of the playlist
B.
c
urrentl
y
bein
g
pla
y
ed are displa
y
ed.
The name of the artist is displayed for the
C.
pl
a
yli
st current
ly
b
e
i
n
g
p
l
a
y
e
d
.
The playing time of the track currently
D.
being played is displayed.
The playing mode currently selected is
E.
displa
y
ed.
Group lists: position of the cursor and total
F.
n
umber of
g
roups.
Playlists: position of the cursor and total
n
umber o
f
pla
y
lists.
Track lists: position of the cursor and total
nu
m
be
r
of
tr
ac
k
s
.
To display the list of groups, the playlist
G.
a
n
d
th
e
li
s
t
of
tr
ac
k
s
.
To scroll up or down through the tracks.
H.
Press and hold for fast backwards or
forwards pla
y
in
g
of a track.
To scroll up or down through the playlists.
I.
Group lists: number and name of the
J.
gro
u
p
.
Playlists: number and name of the playlist.
Track lists: number and name of the track.
To display the secondary menu.
K.
Displays the item currently selected.
L.
Move the cursor onto the track currently
M.
b
e
i
n
g
p
l
a
y
e
d
.
A B C D
E
F
G
HIJK
L
M
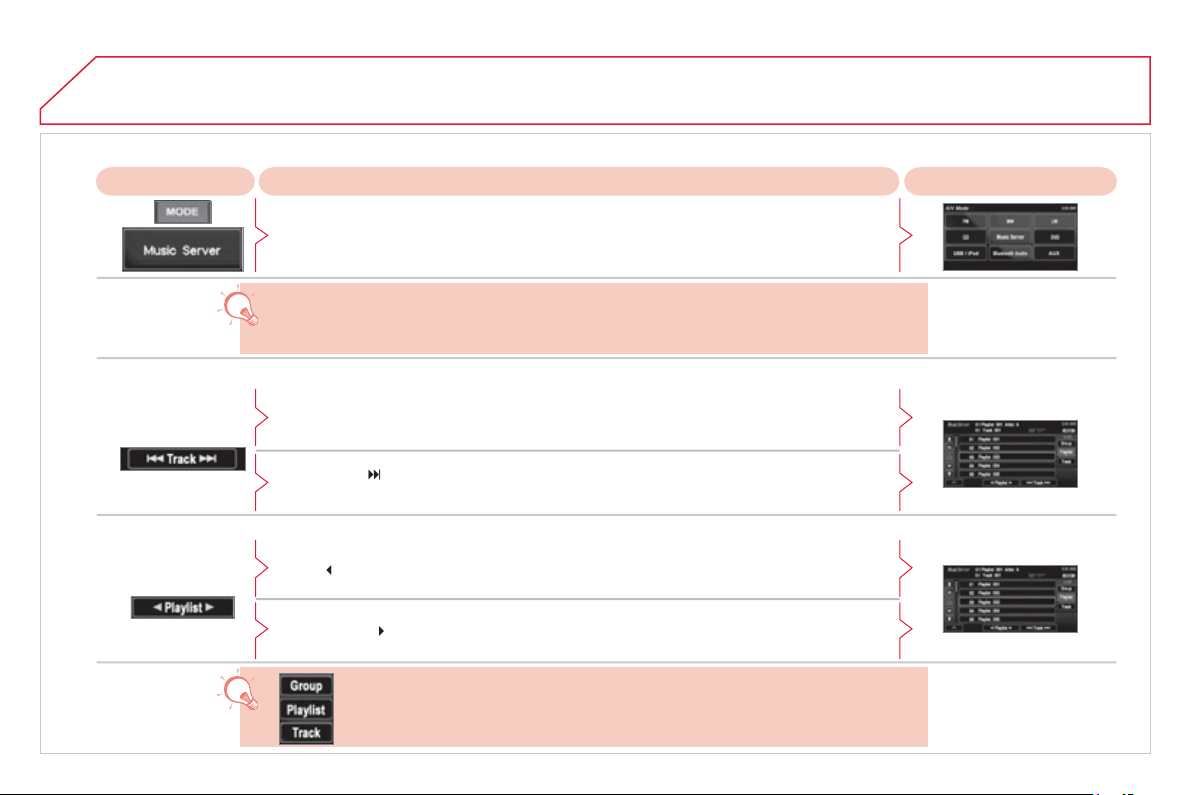
2
50
04
A
UDIO / VIDEO
P
LAYING A TRACK OR A PLAYLIST IN THE MUSIC SERVER
E
xp
l
anat
i
on
Resul
t
P
r
ess
Press the M
O
DE button then Music
S
erver.
The pla
y
lists are pla
y
ed in a loop.
The server can pla
y
a track while recordin
g
another track from a CD. You must wait
u
ntil recordin
g
is complete before pla
y
in
g
the recorded track.
Selectin
g
a track
Press these buttons to switch between
g
roups, pla
y
lists and tracks.
You cannot switch directl
y
from
g
roups to tracks.
P
ress
[
Track] to select the previous track or return to the be
g
innin
g
o
f
the track
c
urrently being played.
Pr
ess
a
n
d
h
o
l
d
fo
r
fas
t
bac
kw
a
r
ds
.
Press [Track
]
to select the next track.
Pr
ess
a
n
d
h
o
l
d
f
o
r f
as
t f
o
rw
a
r
ds
.
Selectin
g
a pla
y
list
Press
[
Pla
y
list] to select the previous pla
y
list.
Press [Pla
y
list
] to select the next pla
y
list.
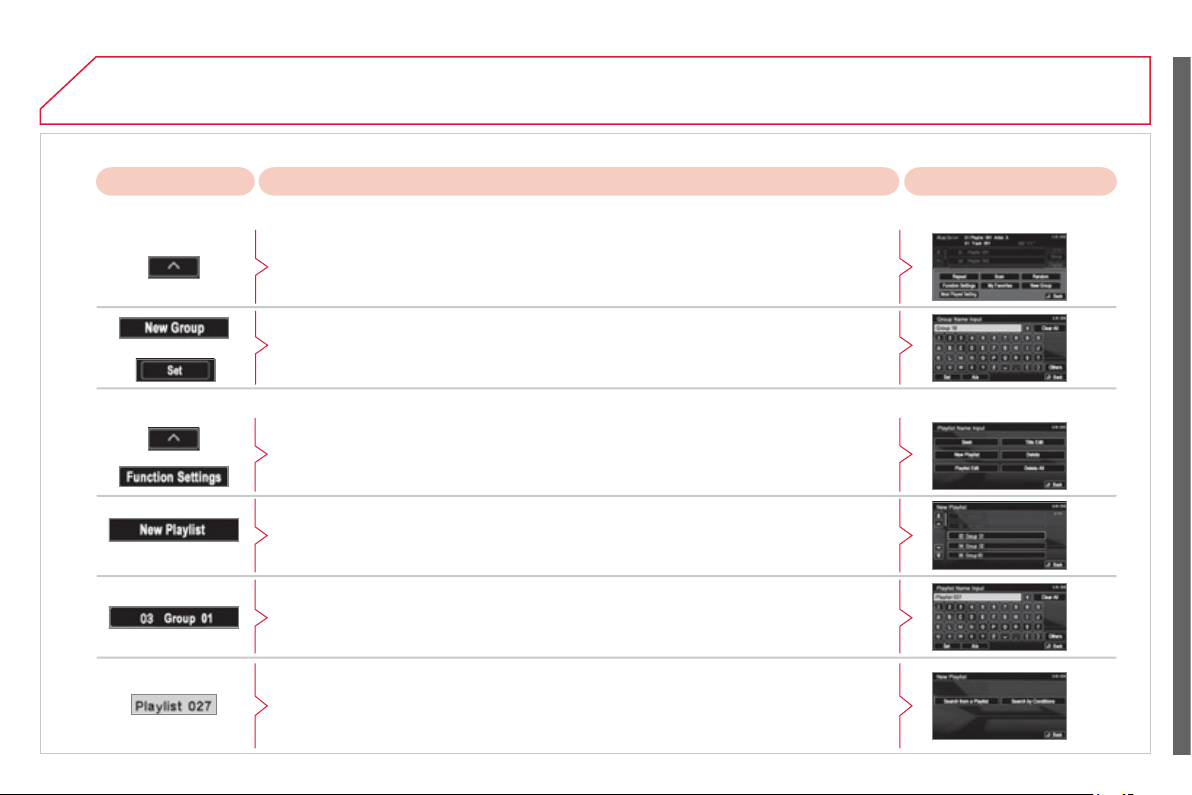
2
51
04
A
UDIO / VIDEO
CREATING A GROUP AND A PLAYLIST IN THE MUSIC SERVER
E
xp
l
anat
i
on
Resul
t
Press [
^
] to access the secondar
y
menu.
Creatin
g
a
g
roup
Press [New Group], enter the name of the
g
roup and press [SET].
Th
e
g
roup
i
s store
d
on t
h
e server.
Creatin
g
a pla
y
list
Press [
^
] to access the secondary menu then press [Function
S
ettings].
Press [New Pla
y
list].
S
elect the
g
roup to which the pla
y
list is to be attached. The
g
roup must be created
fi
rst.
Enter the name of the pla
y
list and confi rm b
y
pressin
g
[SET].
Then select the search method attached to this new list
(
either from the list or b
y
c
onditions
)
.
Th
e
li
s
t i
s
s
t
o
r
ed
o
n th
e
se
rv
e
r.
P
r
ess
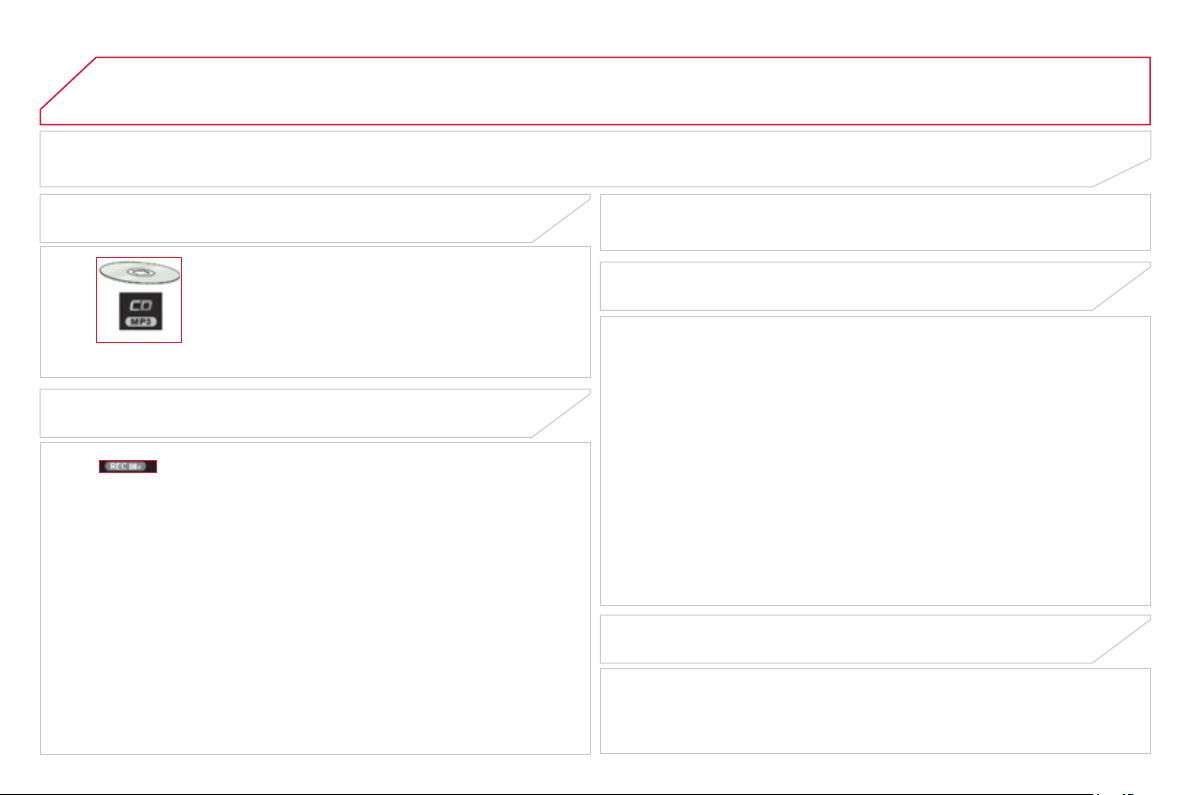
2
52
04
PLAYING AN MP3/WMA CD
When the MP3/WMA CD is inserted in the pla
y
er,
p
la
y
in
g
of the tracks is automatic.
The
tr
acks
ca
nn
o
t
be
r
eco
r
ded
o
nt
o
t
he
m
usic
se
rv
e
r.
You can pla
y
C
Ds with up to 8 levels, 255
f
olders and
400
fi
les maximum.
Windows Media and Microsoft Cor
p
oration are trademarks
re
g
istered in the United States and/or other countries.
GENERAL NOTES ON MP3/WMA CDs
AUDIO / VIDEO
WHAT IS THE MP3/WMA FILE FORMAT?
MP3 is the abbreviation of MPEG-1 Audio La
y
er 3 and
M
P
G
is the abbreviation o
f
Motion Pictures Experts
G
roup, a di
g
ital video data compression standard used on media
s
uch as video
C
Ds.
The MP3 compression reduces the number o
f
b
y
tes in a son
g
b
y
eliminatin
g
the lon
g
sound waves in the ran
g
e o
f
f
requencies which
a
re imperceptible to the human ear, so producin
g
hi
g
h qualit
y
audio
fi l
es
with
a
l
o
w v
o
l
u
m
e
o
f
da
t
a
.
This compression divides the size of the content of a conventional
a
udio
C
D b
y
approximatel
y
10, which means that the content o
f
10 audio
C
Ds can be recorded onto a sin
g
le
C
D-R or
C
D-RW.
WMA is the abbreviation o
f
Windows Media Audio, another audio
data compression standard o
ff
ered b
y
Microso
f
t.
It can be used to create and save audio
fi
les at a compression rate
hi
g
her than that of the MP3 format.
ACCEPTANCE OF THE FILES
Some blank CDs ma
y
not be pla
y
ed b
y
y
our equipment
(
qualit
y
,
recordin
g
speed...
)
.
When
y
ou burn a CD-R or CD-RW, select the IS
O
9660 level 1.2 o
r
J
o
li
et
b
urn
i
n
g
stan
d
ar
d
.
T
o o
b
ta
i
n t
h
e
b
est acoust
i
c qua
li
t
y
poss
ibl
e, se
l
ect t
h
e
l
owest
burning speed.
The MPE
G
1 and MPE
G
2 standards are accepted.
Transmission s
p
eeds between 32 and 320 kbits/s and scans
between 16 kHz and 48 kHz are acce
p
ted.
To displa
y
the title information
(
the name of the artist, the title of the
album, etc...
)
, the information contained in the ID3 Ta
g
s or the WMA
Ta
g
s must be included in the MP3
/
WMA
fi
les burned onto the disc.
COPYRIGH
T
Your audio s
y
stem ma
y
allow
y
ou to listen to music which is usuall
y
protecte
d
by
cop
y
r
igh
t
i
n accor
d
ance w
i
t
h
current nat
i
ona
l
an
d
i
nternat
i
ona
l
stan
d
ar
d
s.
Pl
ease consu
l
t t
h
ese stan
d
ar
d
s an
d
comp
ly
w
i
t
h
t
he
m.
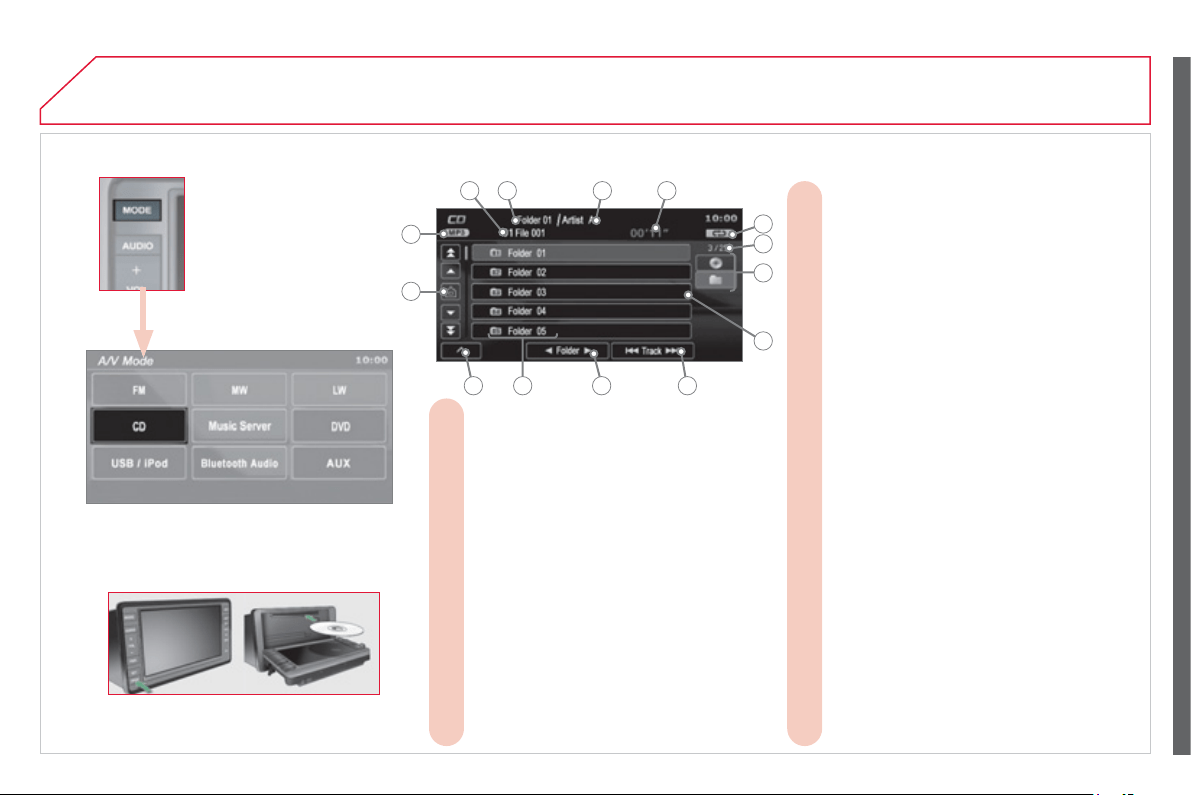
2
53
04
A
UDIO / VIDEO
INFORMATION DISPLAYED IN MP3/WMA CD MODE
The number and the name of the track
A.
c
urrentl
y
bein
g
pla
y
ed are displa
y
ed.
The name of the album/folder is displayed
B.
for the track currentl
y
bein
g
pla
y
ed.
The name of the artist is displayed for the
C.
track currentl
y
bein
g
pla
y
ed.
The playing time of the current track is
D.
di
sp
l
a
y
e
d
.
The playing mode currently selected is
E.
displa
y
ed.
Position of the cursor and total number of
F.
f
o
l
de
r
s
o
r tr
ac
k
s
o
n th
e
cu
rr
e
nt l
e
v
e
l.
To display the list of folders of a higher
G.
l
e
v
e
l.
Displays the item currently selected.
H.
To scroll up or down through the tracks.
I.
Press and hold for fast backwards or
forwards pla
y
in
g
of a track.
To scroll up or down through the folders.
J.
Displays the folder number and the folder
K.
na
m
e
. Pl
us
th
e
li
s
t
s
a
n
d
n
u
m
be
r
s
of
tracks and the name o
f
the
fi
le
(
without
e
xtension
)
.
To display the secondary menu.
L.
Move the cursor onto the track currently
M.
b
e
i
n
g
p
l
a
y
e
d
.
Displays the type of medium, MP3 or
N.
WMA
.
The
C
D button is onl
y
active i
f
the pla
y
e
r
co
nt
a
in
s
a
C
D.
Press
O
pen to return the screen to the vertical
p
osition.
A B C
E
F
G
IKL
M
N
D
H
J
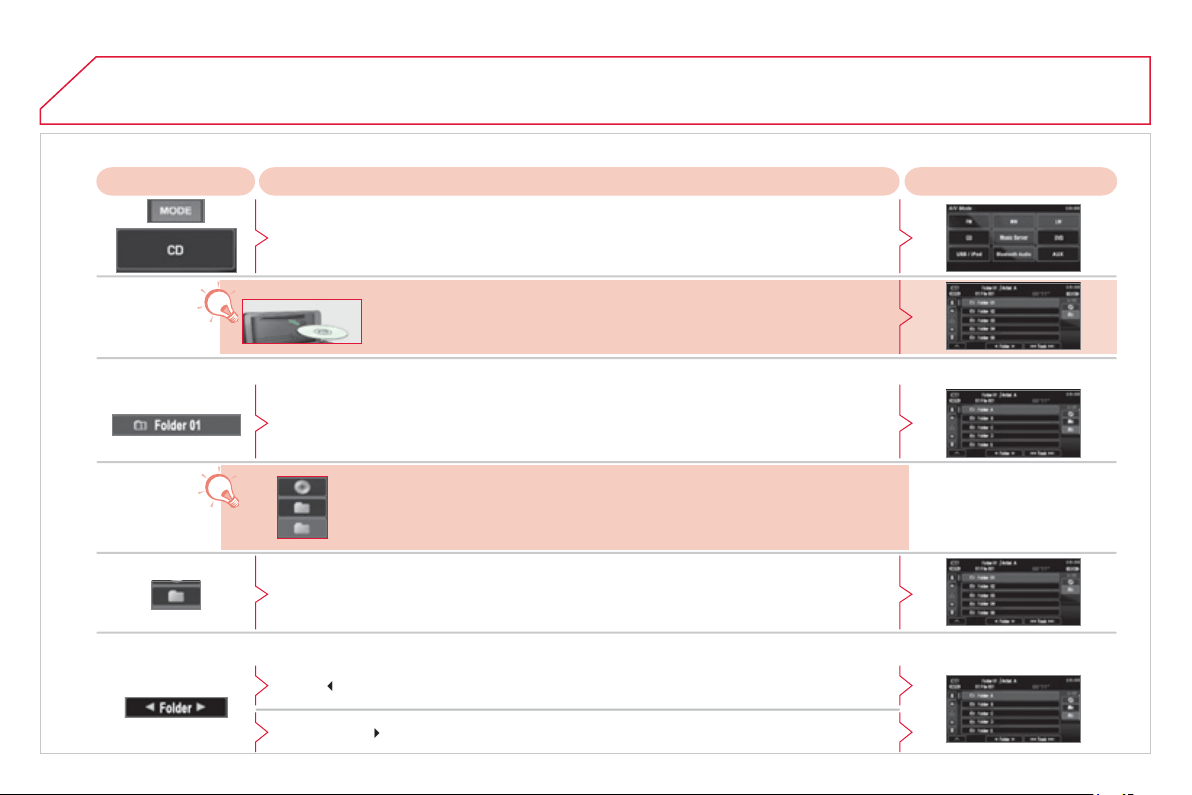
2
5
4
04
A
UDIO / VIDEO
PLAYING AN MP3/WMA CD
(
1/2
)
Pr
ess
Ex
p
lanation R
esu
lt
Press the M
O
DE button then CD, if the pla
y
er alread
y
contains a CD.
Movin
g
around the folders
Selectin
g
a folder
O
therwise, insert a CD in the pla
y
er, pla
y
be
g
ins automaticall
y
.
You can move b
y
one level at a time.
Press on the name o
f
a
f
older and at each press the list o
f
f
olders o
f
the level below is
displa
y
ed.
Press on the folder above to move up and/or select a level.
Press [
Folder] to select the previous folder.
Press [Folder
] to select the next
f
older.
Th
ese
di
sp
l
a
y
s
i
n
di
cate t
h
e current
l
eve
l
:
C
D: level 0,
f
older below: level,
f
older below that, level 2, etc ...
Up to 8 levels.
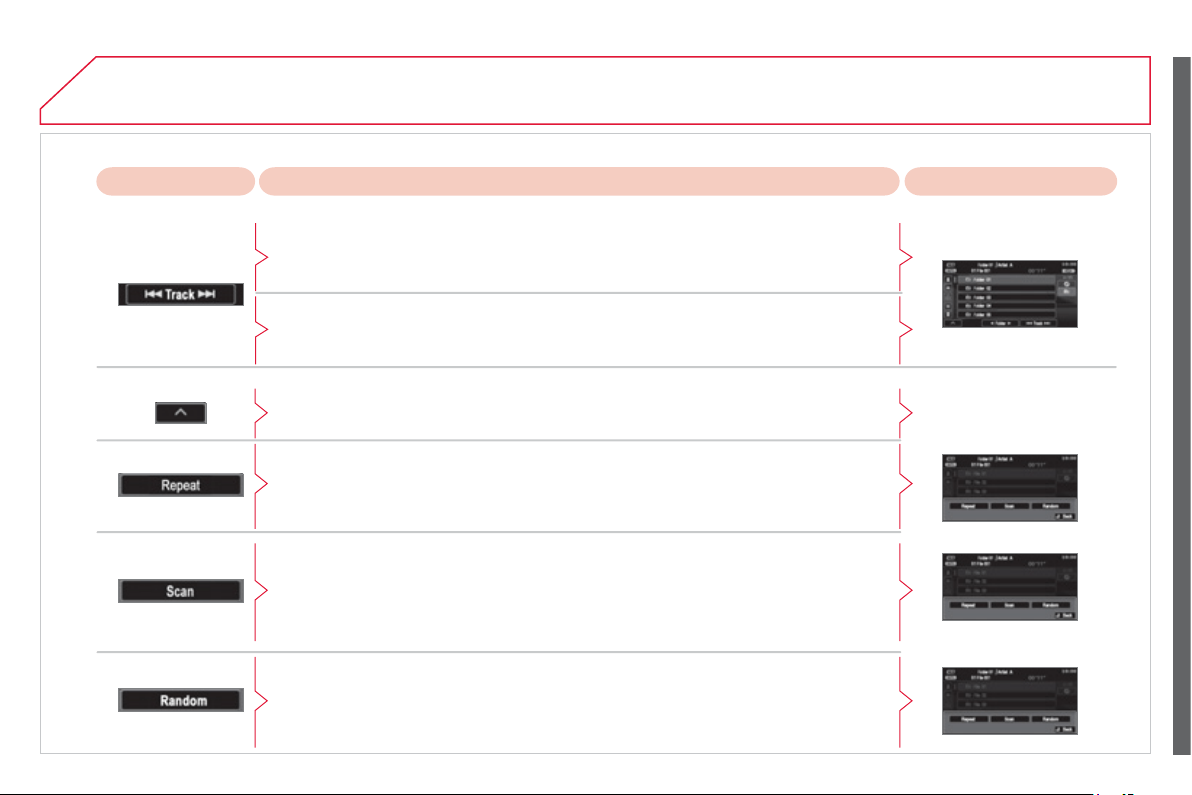
2
55
04
A
UDIO / VIDEO
PLAYING AN MP3/WMA CD
(
2/2
)
Chan
g
in
g
the pla
y
in
g
mode
P
ress
[
Track] to select the previous track or return to the be
g
innin
g
o
f
the track
c
urrent
ly
b
e
i
n
g
p
l
a
y
e
d
.
Press and hold
f
or
f
ast backwards play.
Selectin
g
a track
Press [Track
] to select the next track.
Press and hold
f
or
f
ast
f
orwards pla
y
.
Press [Repeat] to play the track selected in a loop
(
repetition
)
.
Press [Repeat] a
g
ain to pla
y
all o
f
the tracks in the selected
f
older in a loop.
Press a
g
ain to stop.
Press [
S
can] to pla
y
the be
g
innin
g
o
f
each track in each
f
older
f
or approximatel
y
10 seconds
(
scannin
g)
.
Press [Scan] a
g
ain the pla
y
the be
g
innin
g
of each track in the selected folder in a loop.
Press a
g
ain to stop or press on the current track
(
durin
g
the 10 seconds
)
and pla
y
b
e
gi
ns.
Press [Random] to pla
y
all of the tracks in the selected folder in random order.
Press [Random] a
g
ain to pla
y
all of the tracks on the CD in random order.
P
ress a
g
a
i
n to stop.
Press [
^
] to access the secondary menu.
Pr
ess
Ex
p
lanation R
esu
lt
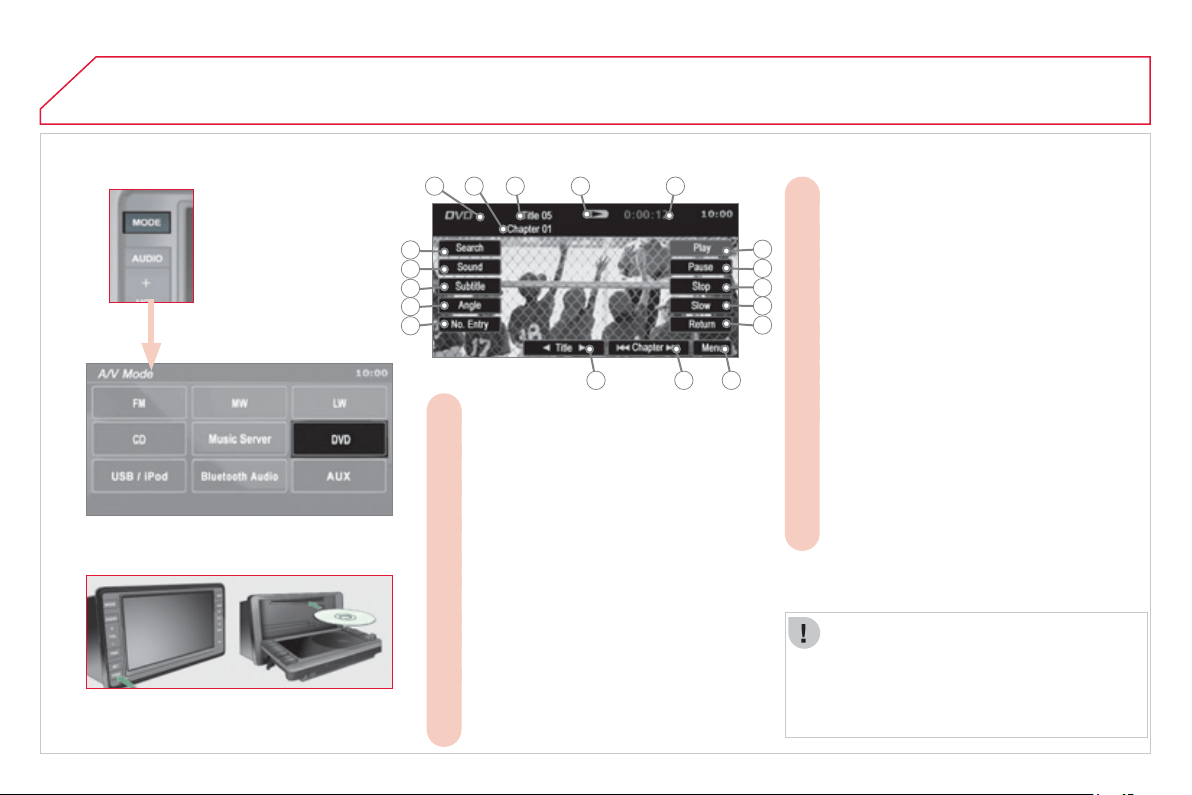
2
56
04
INFORMATION DISPLAYED IN DVD MODE
A
UDIO / VIDEO
The DVD button is onl
y
active if the pla
y
er
co
nt
a
in
s
a
DVD.
Press
Op
en to return the screen to the vertical
p
osition.
For safet
y
reasons, the video is not
di
sp
l
a
y
e
d
w
hil
e
d
r
i
v
i
n
g
,
h
owever t
h
e au
di
o
c
an
b
e p
l
a
y
e
d
.
To displa
y
the picture and watch a DVD,
p
ark the vehicle in a sa
f
e place.
To play the previously selected zone on
J.
t
he
disc
.
To display the DVD title menu.
K.
To scroll up or down through the chapters.
L.
Press and hold for fast backwards or
forwards pla
y
.
To scroll up or down through the titles.
M.
To enter a title or chapter number.
N.
To change the angle.
O.
To change the language of the subtitles.
P.
To change the language.
Q.
To select a chapter or title or specify a
R.
nu
m
be
r.
This icon is displayed when the operation
A.
requested cannot be carried out.
The number of the chapter currently being
B.
pla
y
ed is displa
y
ed.
The number of the title currently being
C.
p
l
a
y
e
d
i
s
di
sp
l
a
y
e
d
.
Symbols display the current status of the
D.
p
l
a
y
er.
The playing time is displayed.
E.
To resume normal play when play is
F.
paused or durin
g
slow-motion pla
y
.
To stop play temporarily.
G.
To stop play. Press the screen to access
H.
t
he
m
e
n
u
.
For slow-motion play.
I.
A B C D E
F
G
H
I
J
KLM
R
Q
P
O
N
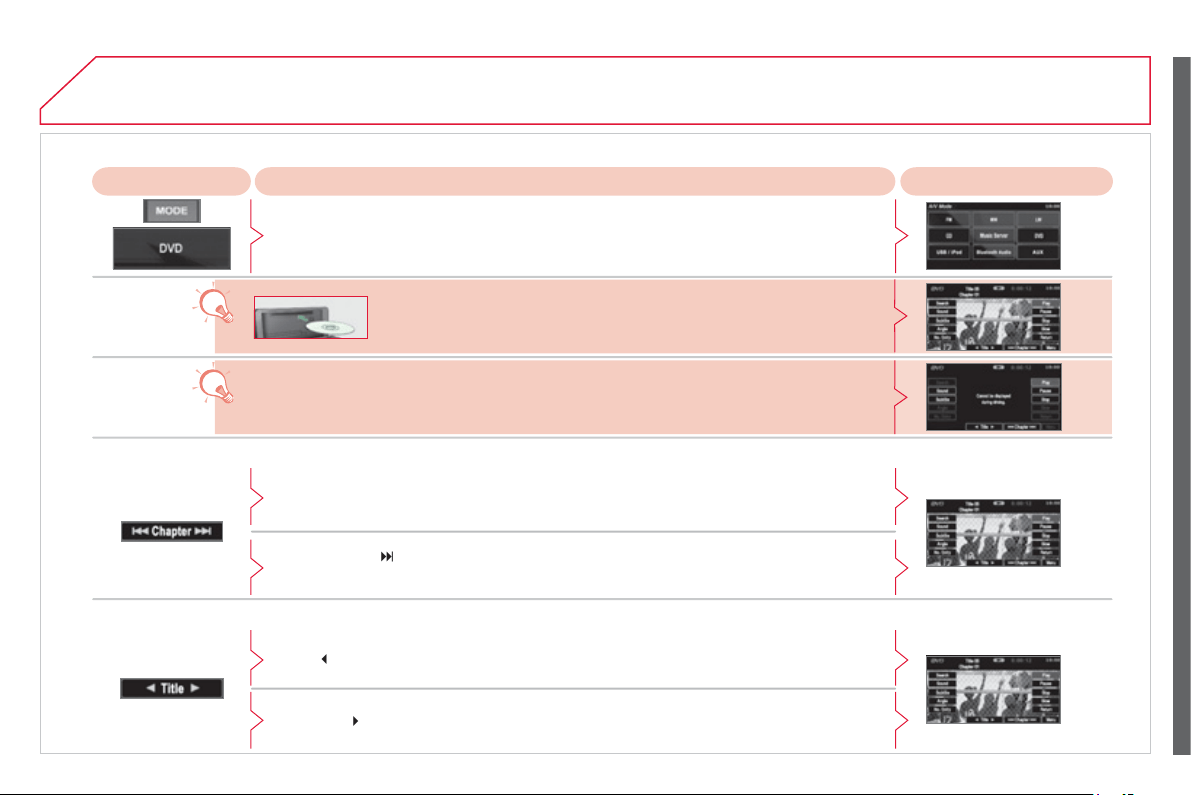
2
57
04
A
UDIO / VIDEO
R
esu
lt Ex
p
lanation
Selectin
g
a chapte
r
Press the M
O
DE button then DVD, if the pla
y
er alread
y
contains a DVD.
O
therwise, insert a DVD in the pla
y
er, the picture is displa
y
ed
a
utomat
i
ca
lly
.
P
ress t
h
e screen to access t
h
e menus.
Whil
e
d
r
i
v
i
n
g
, on
ly
t
h
e soun
d
trac
k
i
s p
l
a
y
e
d
an
d
no p
i
cture
i
s
di
sp
l
a
y
e
d
.
P
ress
[
C
hapter] to select the previous chapter or return to the be
g
innin
g
o
f
the
ch
apter current
ly
b
e
i
n
g
p
l
a
y
e
d
.
Press and hold
f
or
f
ast backwards play.
Press [
C
hapter
]
to se
l
ect t
h
e next c
h
apter.
Press and hold
f
or
f
ast
f
orwards pla
y
.
Selectin
g
a title
P
ress
[
Ti
t
l
e
]
to se
l
ect t
h
e prev
i
ous t
i
t
l
e.
P
ress
[Ti
t
l
e
]
to se
l
ect t
h
e next t
i
t
l
e.
Pr
ess
P
LAYING A DVD
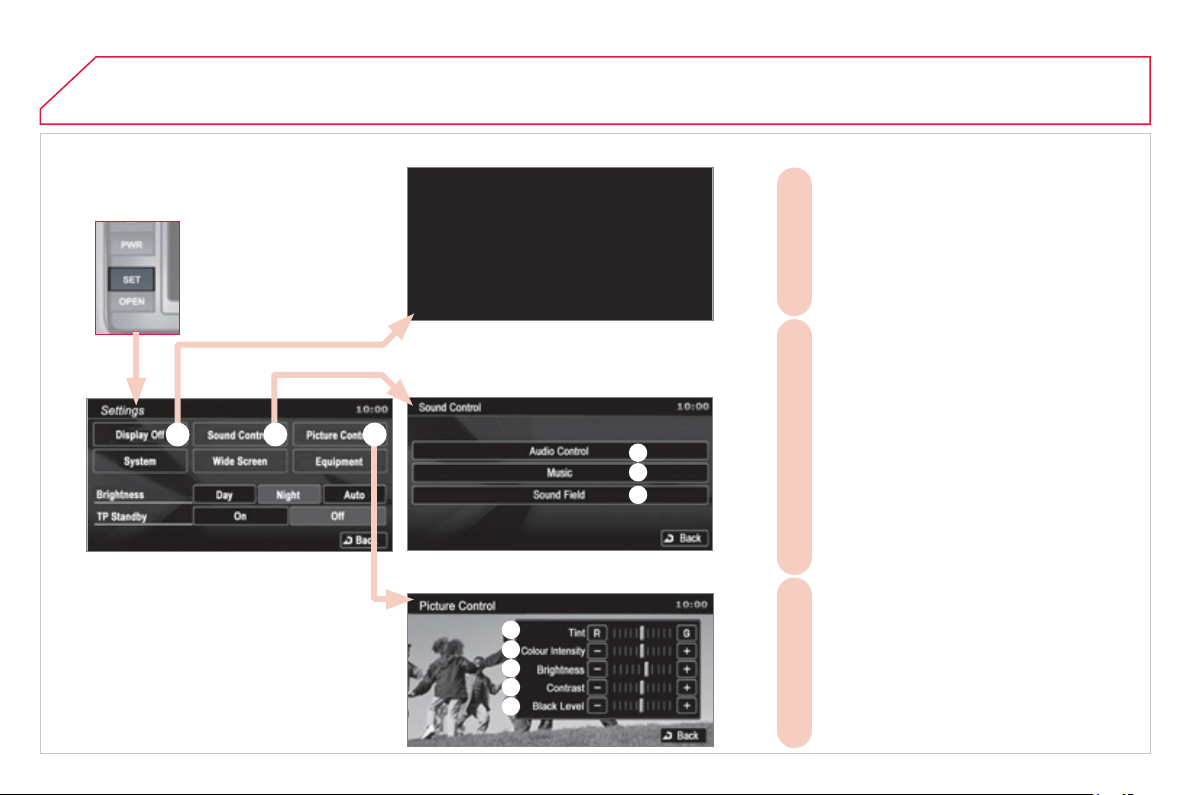
2
58
05
D
ISPLAY SCREEN, SOUND, PICTURE
SETTINGS
- Choose to switch off the screen.
A
To switch it back on, touch the screen or
press an
y
button.
- Choose the settings of the sound in the
B
vehicle, i
f
an audio source is selected
(
FM,
C
D, ...
)
,
f
or:
- the sound distribution or the volume
B1
such as the front-rear balance, the bass,
the medium, the treble, the volume
a
d
j
ustment in relation to the vehicle
spee
d
,
- the type of music (with surround option)
B2
suc
h
as c
l
ass
i
c,
j
azz, pop, roc
k
,
hi
p
h
op,
c
ountry, normal, ...
- the sound fi eld (with surround option)
B3
such as sta
g
e, live, hall, normal, ...
- Choose the quality of the picture for:
C
- the colour (when playing DVDs),
C1
- the intensity of the colours (when playing
C2
DVDs
)
,
- the brightness,
C3
- the contrast,
C4
- the level of black.
C5
B1
B2
B3
C1
C2
C3
C4
C5
A B C
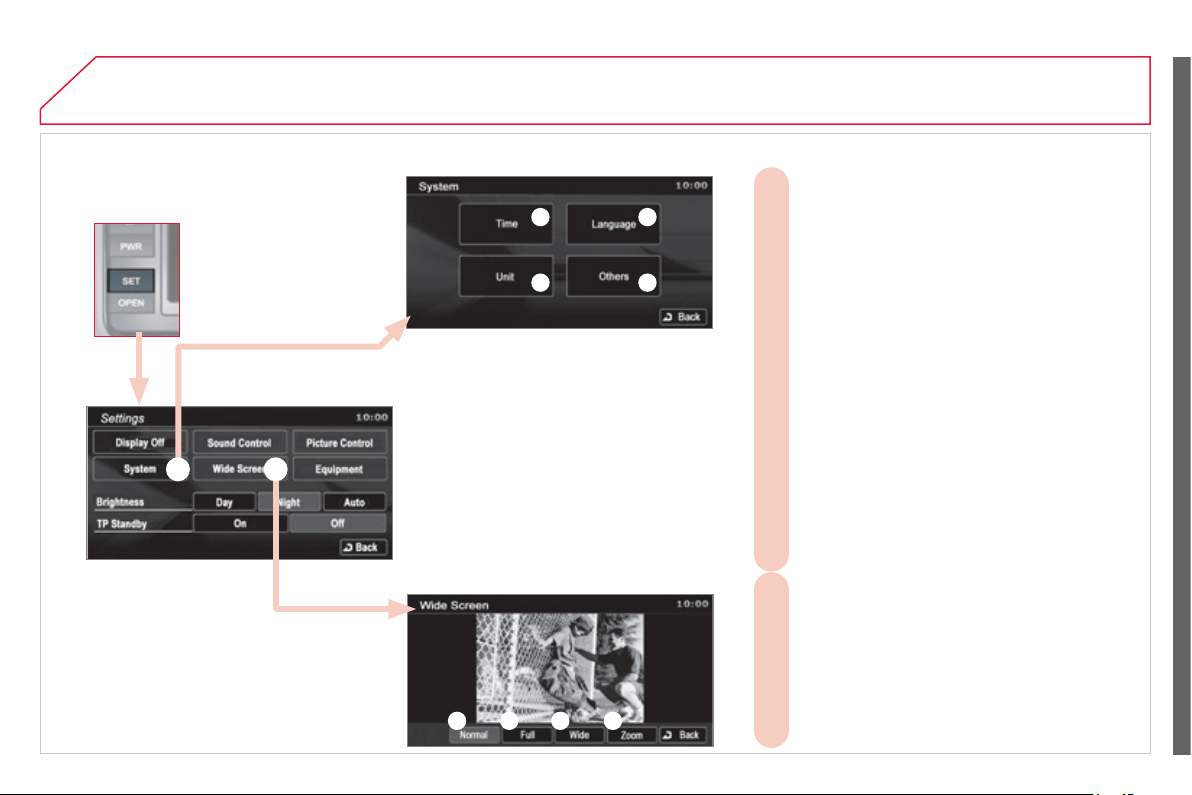
2
59
05 SETTINGS
TIME AND DATE, LANGUAGE, UNIT, PICTURE SIZE
- Choose the size of the DVD picture for:
E
- normal 4/3,
E1
- extends the picture evenly to the right and to
E2
the le
f
t in wide screen mode,
- extends the right and left parts only leaving
E3
the centre as it stands in wide screen mode,
- enlarges the picture in 4/3 format. The top
E4
a
n
d
th
e
bo
tt
o
m
a
r
e
ou
t
s
i
de
th
e
f
r
a
m
e
.
- Choose the base settings of the system for:
D
- setting of the time by the RDS signal, time
D1
zone, summer time,
- the language (English, Français, Deutsch,
D2
N
ederlands, Portu
g
uese, Español, Svenska,
I
taliano, Dansk
)
,
- the units for calculation of the distances (km
D3
or miles and
°C
or
°
F
)
,
- other settings such as:
D4
- the voice
g
uidance volume,
- the t
y
pe o
f
voice
g
uidance voice
(f
emale or
m
ale
)
,
- the volume of the operation bleeps
(
1 to
3 and 0=no bleep
)
,
- the t
y
pe o
f
ke
y
pad
(
alphabet or P
C)
,
- the ran
g
e o
f
menu colours
(
red or blue
)
,
- the displa
y
or not o
f
the audio pla
y
icons in
the map screen,
- the reinitialisation of the vehicle sensor,
- the interruption or not of the displa
y
when
the air conditionin
g
is used.
E1 E2 E3 E4
D1 D2
D3 D4
D E
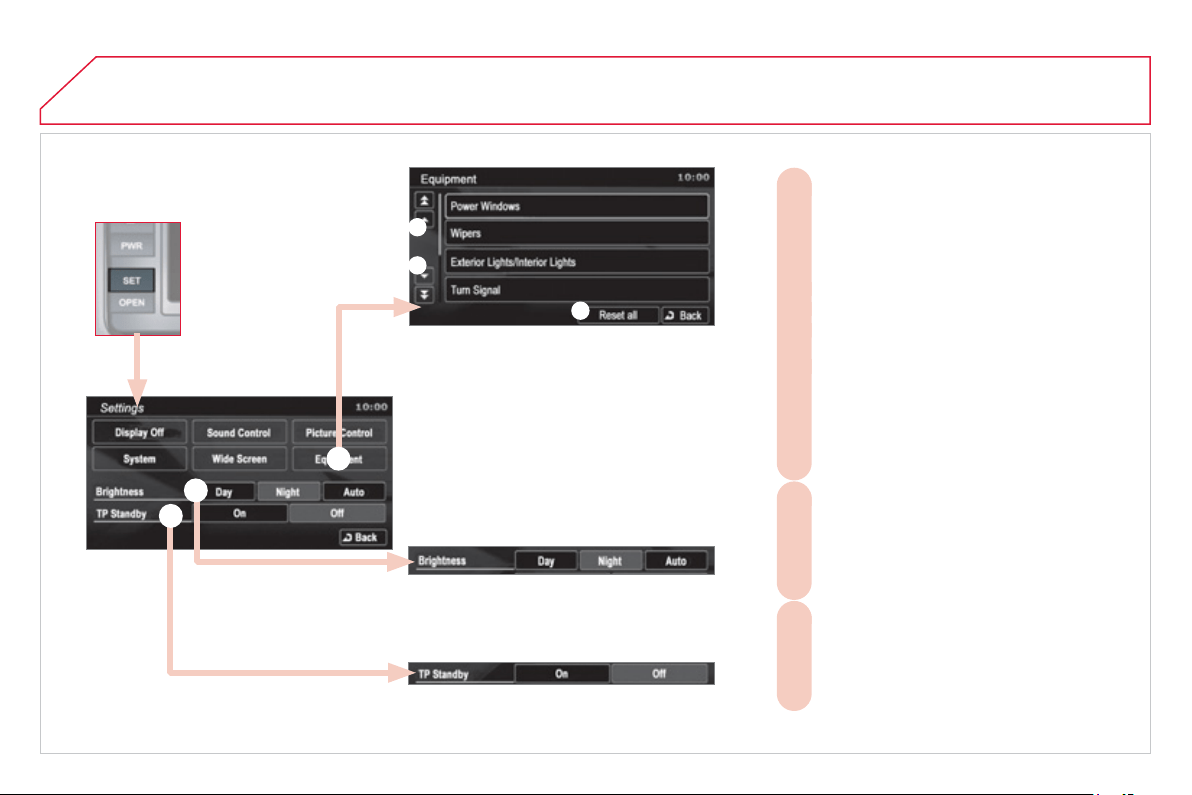
2
60
05
EQUIPMENT, CONTRAST, TRAFFIC INFORMATION
(
TP
)
SETTINGS
- Choose to adjust or set the parameters of
F
c
ertain equipment o
ff
ered in your vehicle
(
e.
g
.: un
f
oldin
g/f
oldin
g
o
f
the mirrors,
c
losin
g
the windows on lockin
g
, timin
g
and sensitivit
y
o
f
the automatic li
g
htin
g
,
direction indicators motorwa
y
function, ...
)
:
- to scroll up the list,
F1
- to scroll down the list,
F2
- to reinitialise all of the settings
F3
(
manu
f
acturer's settin
g
s
)
.
Press each setting to select or change
the parameters.
- Choose to adjust the contrast of the
G
di
sp
l
a
y
i
n re
l
at
i
on to t
h
e am
bi
ent
ligh
t
l
eve
l
(
day, night or automatic
)
.
- Choose to activate or deactivate the
H
traffi c information
(
TP
)
.
H
G
F
F1
F2
F3
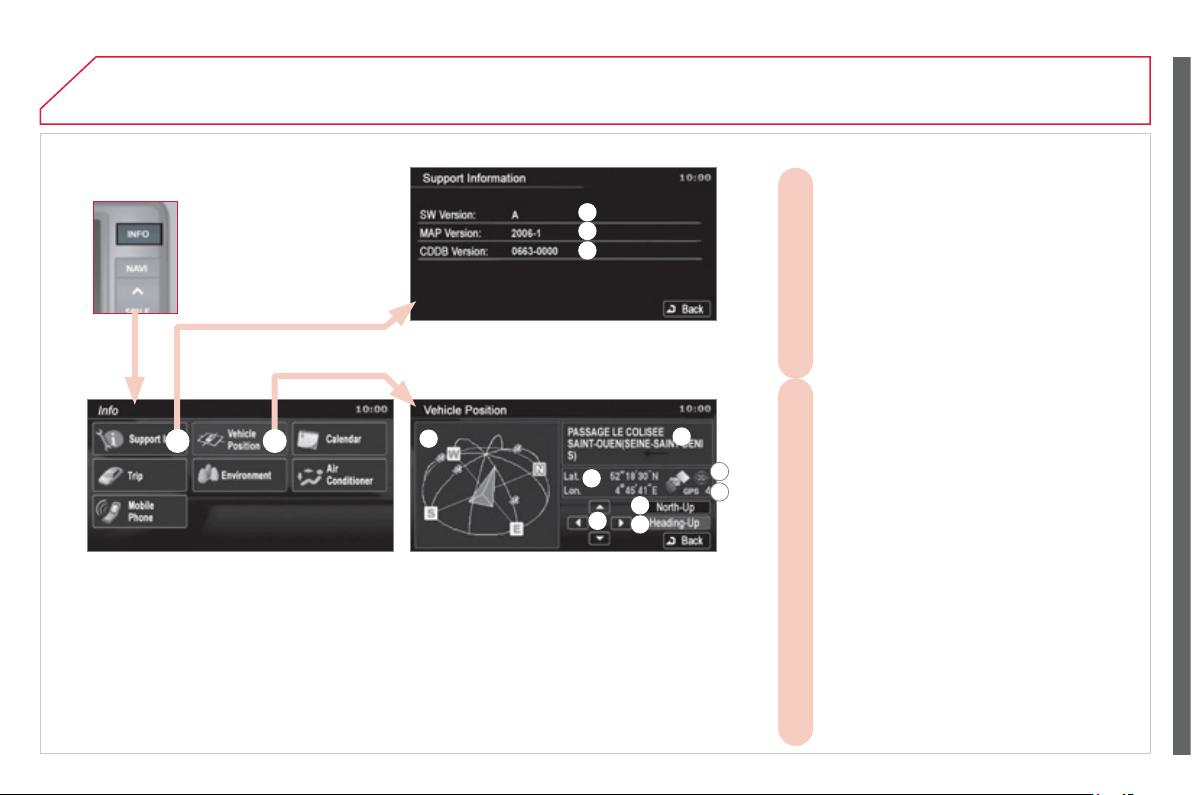
2
61
06 INFORMATION
SYSTEM VERSION, SATELLITE
- View the system information:
A
- the software version,
A1
- the map data version,
A2
- the system information database version.
A3
To update the versions, insert the DVD
c
ontainin
g
the new data and
f
ollow the
i
n
s
tr
uc
t
io
n
s
o
n t
he
sc
r
ee
n.
- View the GPS information:
B
- the satellite positions diagram with the
B1
d
ir
ec
ti
o
n
o
f m
o
v
e
m
e
nt
o
f th
e
v
e
hi
c
l
e
. Pl
us
the position of the satellite si
g
nal receivers,
- the name of the current location,
B2
- the longitude and latitude of the current
B3
location,
- the position measurement status
B4
(
2D=3 satellites or
f
ewer, 3D=4 satellites or
more
)
,
- the number of receiving satellites,
B5
- to have north at the top of the map,
B6
- to have the direction of the vehicle at the
B7
top o
f
the map,
- to pivot the map from overhead or change
B8
the an
g
le o
f
the map.
A2
A1
A3
B1
B2
B3
B4
B5
B6
B7
B8
A B
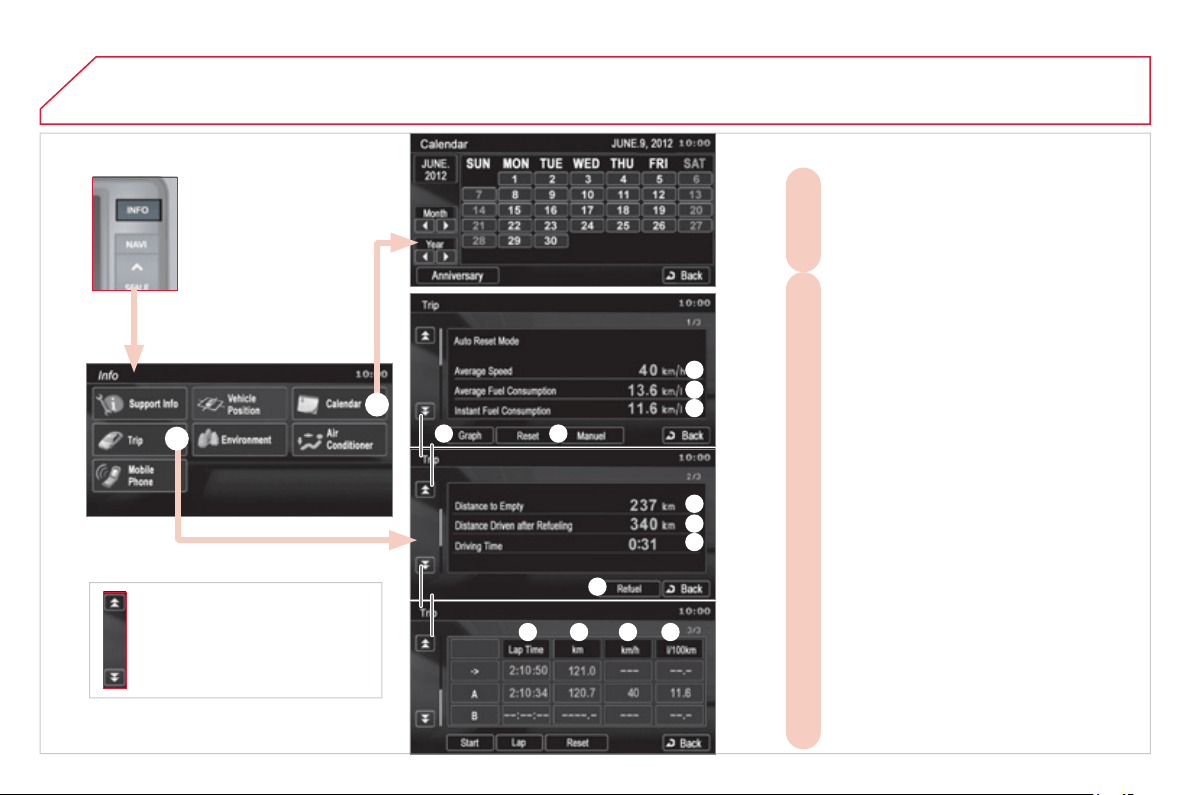
2
62
06
CALENDAR, TRIP
INFORMATION
These double arrows permit
access to the drivin
g
information
s
creen, prev
i
ous or next.
- View the driving information:
D
- the average speed,
D1
- the average fuel consumption,
D2
- the current fuel consumption,
D3
- for speed and fuel consumption graphs in
D4
5 m
i
nute
i
nterva
l
s,
- choose an automatic reset (key at off for
D5
m
ore than 4 hours
)
or manual reset
(
press
[
Reset]
)
,
- the distance which can still be travelled
D6
(
based on the fuel remainin
g
and the
r
ecent avera
g
e consumption
)
,
- the distance travelled since the fuel
D7
tank was last
fi
lled
(
press [Re
f
uel] to
r
einitialise
)
,
- the driving time (duration between the key
D8
bein
g
turned to on then to off
)
.
- press [Start] to measure intermediate
tim
es
with:
- the duration,
D9
D1
0
- the distance,
- the speed,
D11
D12
- the fuel consumption.
- Make a note on the calendar of special
C
da
y
s, birthda
y
s, ...
Use the arrows to fi nd a date and press
directl
y
on the da
y
required to enter the
e
v
e
nt.
D1
D2
D3
D4 D5
D6
D7
D8
D7
D9
D10 D11 D12
D
C
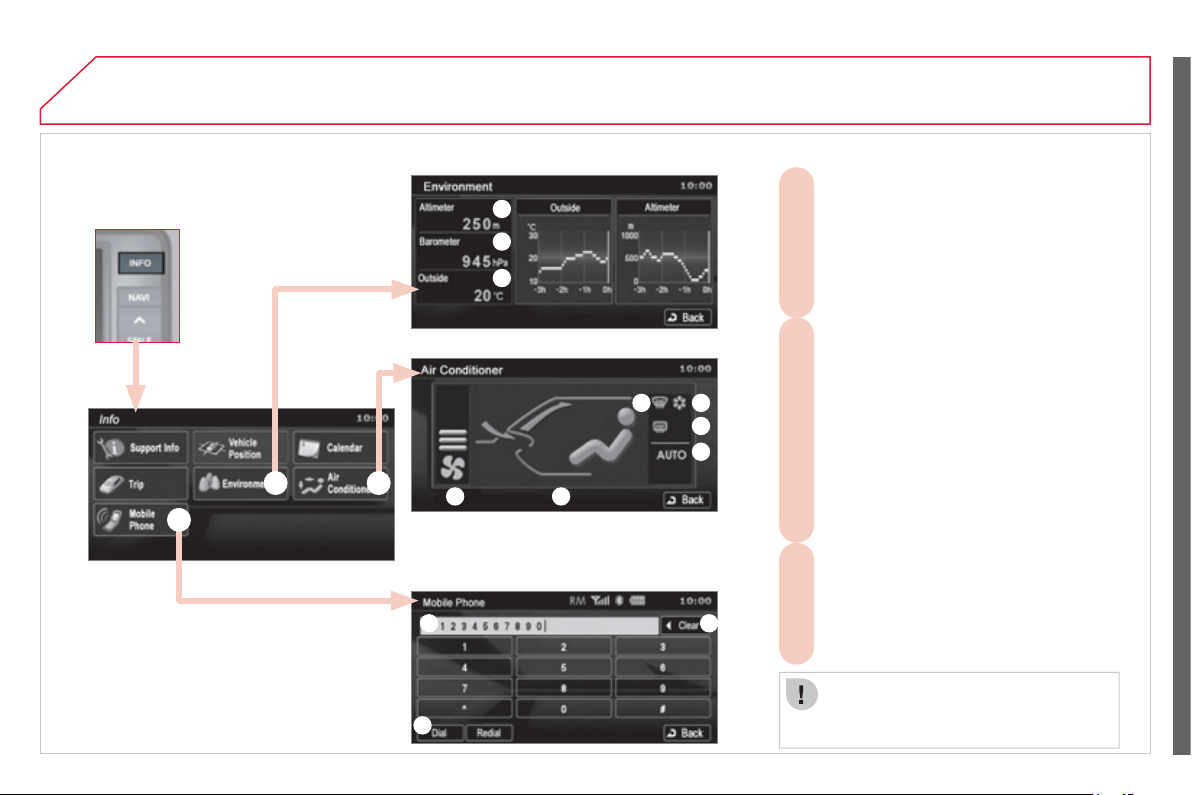
2
63
06 INFORMATION
ENVIRONMENT, AIR CONDITIONING, TELEPHONE
- View the air conditioning settings:
F
- the fan speed indicator,
F1
- the air selection indicator,
F2
- the windscreen demisting indicator,
F3
- the air conditioning indicator,
F4
- the rear screen demisting indicator,
F5
- the AUTO mode indicator.
F6
- View the environment information:
E
- the altitude,
E1
- the atmospheric pressure,
E2
- the ambient temperature. The ice
E3
sy
mbol fl ashes if there is a risk of ice.
- Make and receive telephone calls:
G
- enter the telephone number,
G1
- delete a character,
G2
- make the call.
G3
Refer to the hands-free telephone
s
ect
i
on to connect
y
our
Bl
uetoot
h
®
m
o
bil
e te
l
ep
h
one.
F1 F2
F3
F4
F5
F6
E1
E2
E3
G1 G2
G3
G
E F
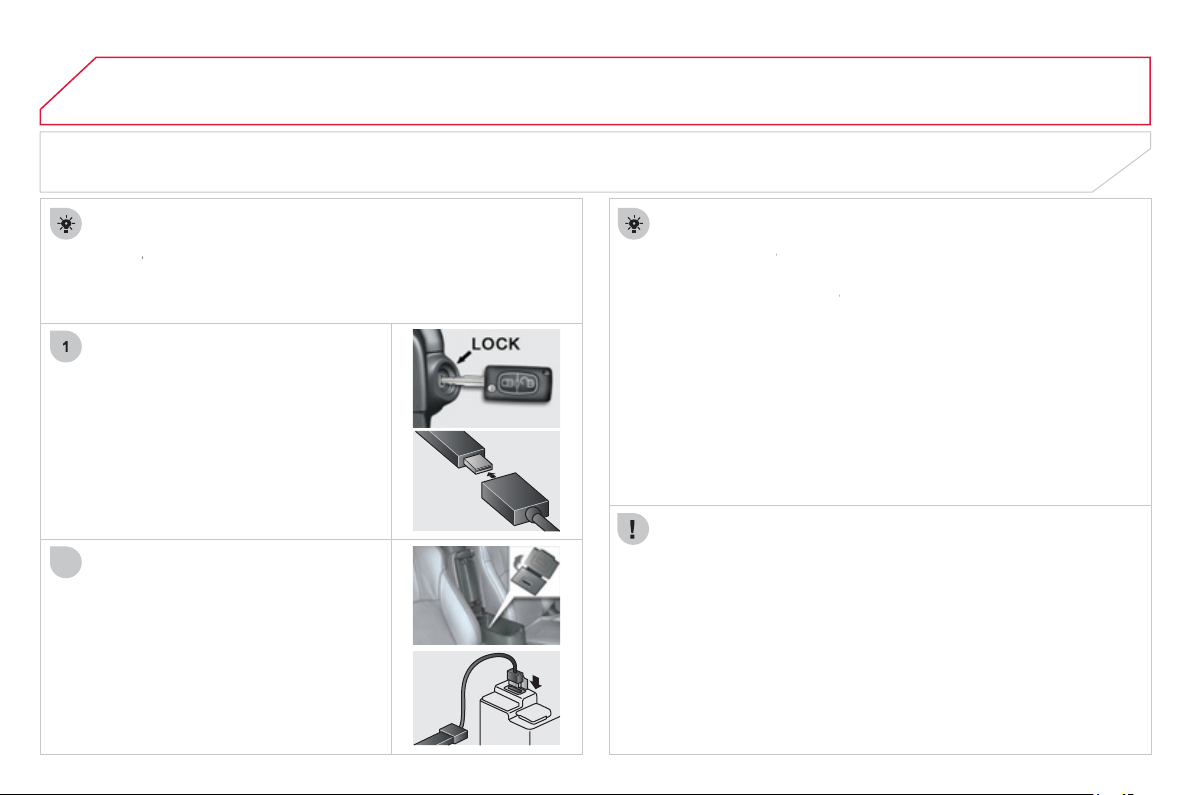
2
6
4
07
2
USB PLAYER
USING THE USB PORT
With the vehicle stationar
y
, i
g
nition
s
wit
c
h in th
e
L
OCK position, connect a
s
u
i
ta
bl
e ca
bl
e to t
h
e porta
bl
e p
l
a
y
er.
The USB port is used to connect a portable device
(
MP3 pla
y
er,
A
pp
l
e
®
player, ...). The fi les are sent from the player to your audio
®
sy
stem an
d
h
ear
d
t
h
rou
gh
t
h
e ve
hi
c
l
e
'
s spea
k
ers.
Th
e
n
co
nn
ec
t th
e
cab
l
e
t
o
th
e
v
e
hi
c
l
e
'
s
USB port.
Models supported:
- iP
od
t
ouc
h
®
: FW version 1.1.1 or later.
®
- iP
od
c
l
ass
i
c
®
: FW version 1.
0
or later.
- iPod
5
t
h
g
eneration
®
: FW version 1.2.2 or later.
®
-
iP
o
d
nano 5
th
g
enerat
i
on
®
: FW v
e
r
s
i
o
n 1.2
o
r l
a
t
e
r.
- iP
od
n
a
n
o
2 n
d
g
enerat
i
on
®
: FW version 1.1.2 or later.
®
-
C
ompatible U
S
B mass storage device: 256 Mb capacity or
g
reater.
File
f
ormats: MP3, WMA, AA
C
, WAV.
M
aximum number o
f
levels
(
includin
g
root
)
: 8.
N
umber of folders: 7
00
.
N
umber of fi les:
65
535
.
Do not connect the portable device directly to the U
S
B port, use a
cab
l
e
.
To disconnect the cable, the i
g
nition switch must be in the
L
OCK
p
osition.
N
avi
g
ation in the fi le base is done via the portable device / iPod
®
.
T
a
k
e care not to trap t
h
e ca
bl
e w
h
en c
l
os
i
n
g
t
h
e armrest.
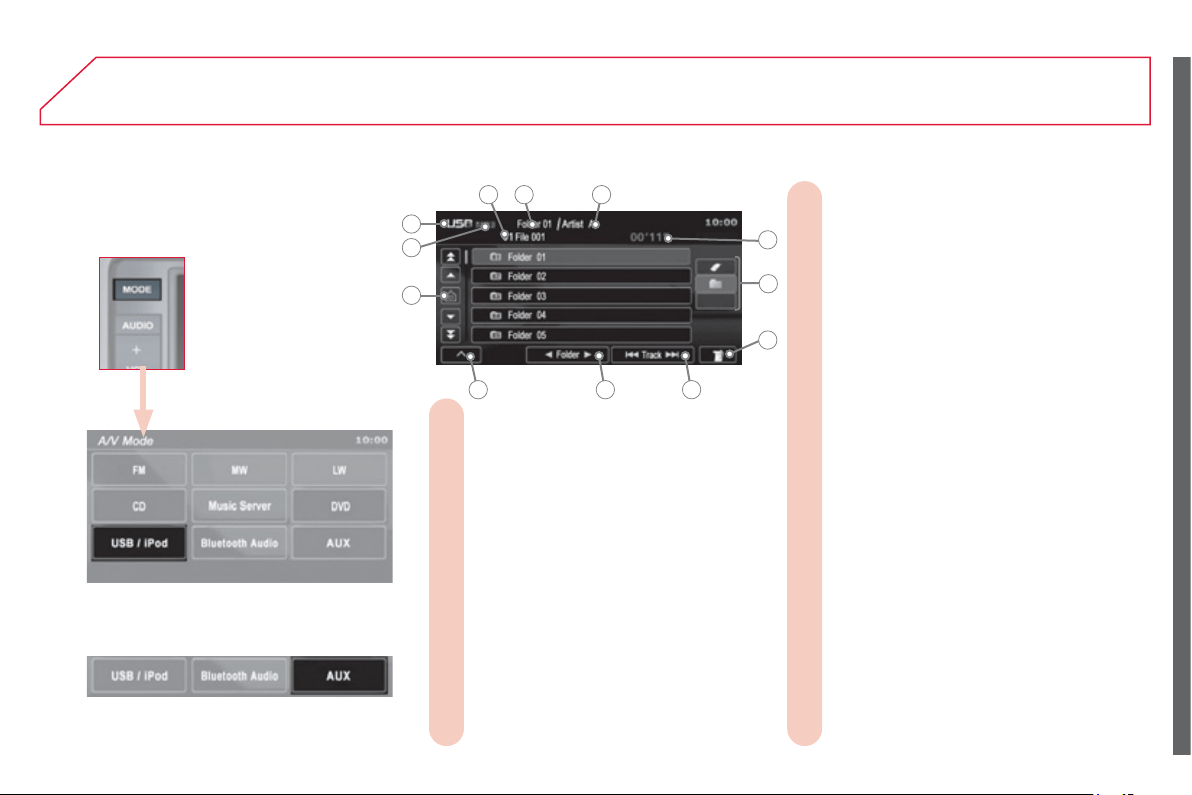
2
65
07 USB PLAYER
The number and the name of the track
A.
c
urrentl
y
bein
g
pla
y
ed are displa
y
ed.
The name of the album/folder is displayed
B.
for the track currentl
y
bein
g
pla
y
ed.
The name of the artist is displayed for the
C.
trac
k
current
ly
b
e
i
n
g
p
l
a
y
e
d
.
The playing time of the current track is
D.
di
sp
l
aye
d
.
To display the list of folders of higher
E.
l
e
v
e
l
s
.
To display in list mode.
F.
To scroll up or down through the tracks.
G.
Press and hold for fast backwards or
f
orwards pla
y
in
g
o
f
a track.
To scroll up or down through the folders.
H.
To display the secondary menu.
I.
Move the cursor to the track being played.
J.
Display the format of the current fi le: MP3,
K.
WMA, AAC, WAV.
Displays the type of medium: USB or iPod.
L.
INFORMATION DI
S
PLAYED IN U
S
B OR AUX MODE
or
A B C
D
E
GI
J
K
F
L
H
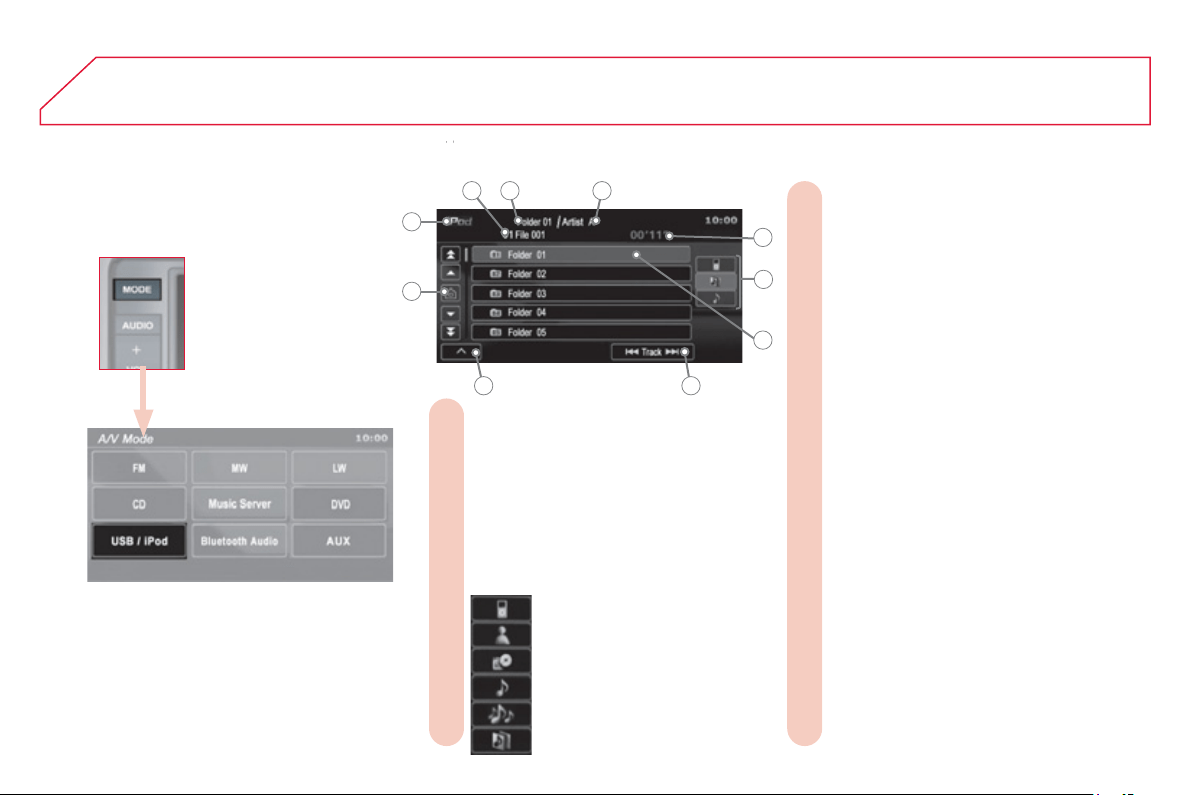
2
66
07 USB PLAYER
The number and the name of the track
A.
c
urrent
ly
b
e
i
n
g
p
l
a
y
e
d
are
di
sp
l
a
y
e
d
.
The name of the album/folder is displayed
B.
f
or the track currentl
y
bein
g
pla
y
ed.
The name of the artist is displayed for the
C.
track currentl
y
bein
g
pla
y
ed.
The playing time of the current track is
D.
displa
y
ed.
To display/sort each category:
E.
The item currently selected and being
F.
p
la
y
ed is hi
g
hli
g
hted.
To scroll up or down through the tracks.
G.
Press and hold for fast backwards or
forwards pla
y
in
g
of a track.
To display the secondary menu.
H.
Move the cursor onto the track currently
I.
being played.
Displays the type of medium: USB or iPod.
J.
INFORMATION DISPLAYED IN IPOD (OR APPLE
®
PLAYER) MODE
®
G
o to the root
A
rt
is
t
s
A
l
bu
m
s
S
ongs
Ge
nr
es
Pla
y
lists
A B C
D
E
GH
I
J
F
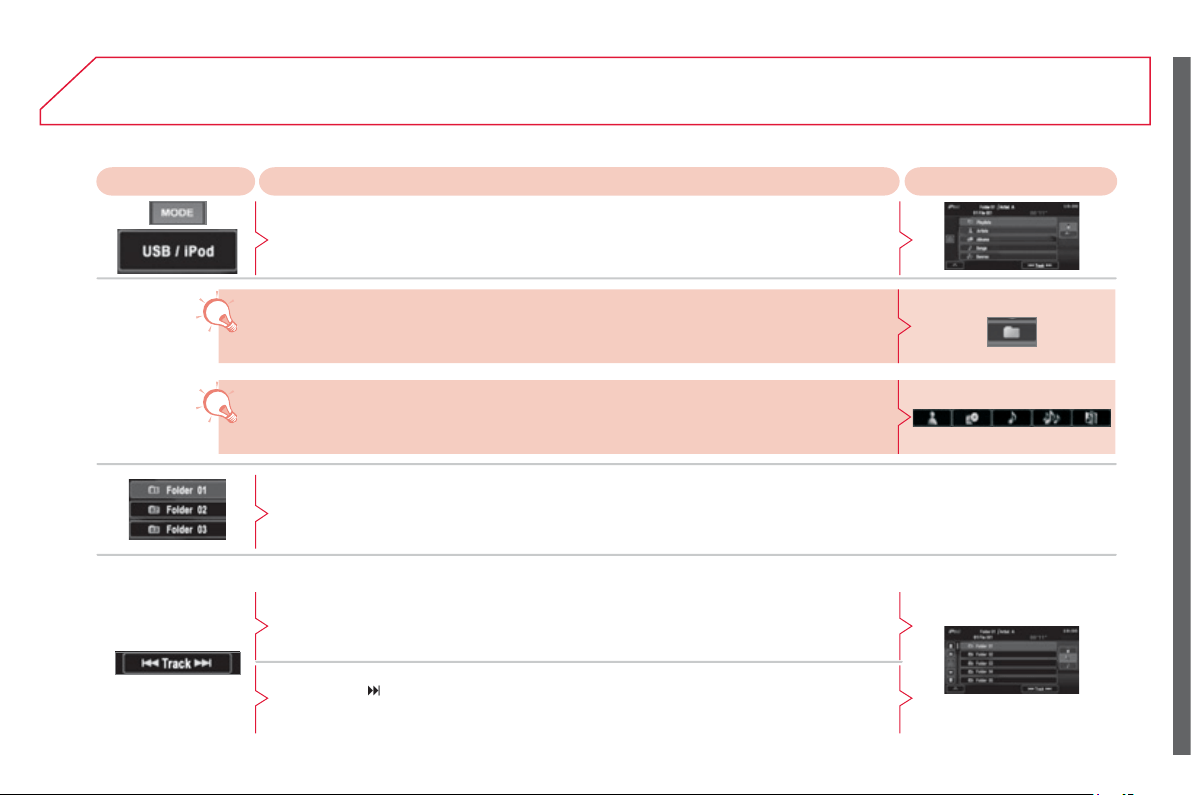
2
67
07
P
LAYING A TRACK
(
1/2
)
Pr
ess
Ex
p
lanation R
esu
lt
Pr
ess
th
e
M
O
DE
bu
tt
o
n th
e
n
o
n
US
B
/
iP
od
.
USB PLAYER
Press on a track to play it.
In iPod mode:
y
ou can displa
y
/
sort b
y
cate
g
or
y
at an
y
time.
In USB or AUX mode:
y
ou can press the next folder up at an
y
time, to
g
o up one level/
o
r
selec
t
a
le
v
el
.
Press [
Track] to select the previous track or return to the be
g
innin
g
o
f
the track
c
urrentl
y
bein
g
pla
y
ed.
Pr
ess
a
n
d
h
o
l
d
f
o
r f
as
t
bac
kw
a
r
ds
.
Selectin
g
a previous / next track
Press
[
Track
]
to select the next track.
Pr
ess
a
n
d
h
o
l
d
f
o
r f
as
t f
o
rw
a
r
ds
.
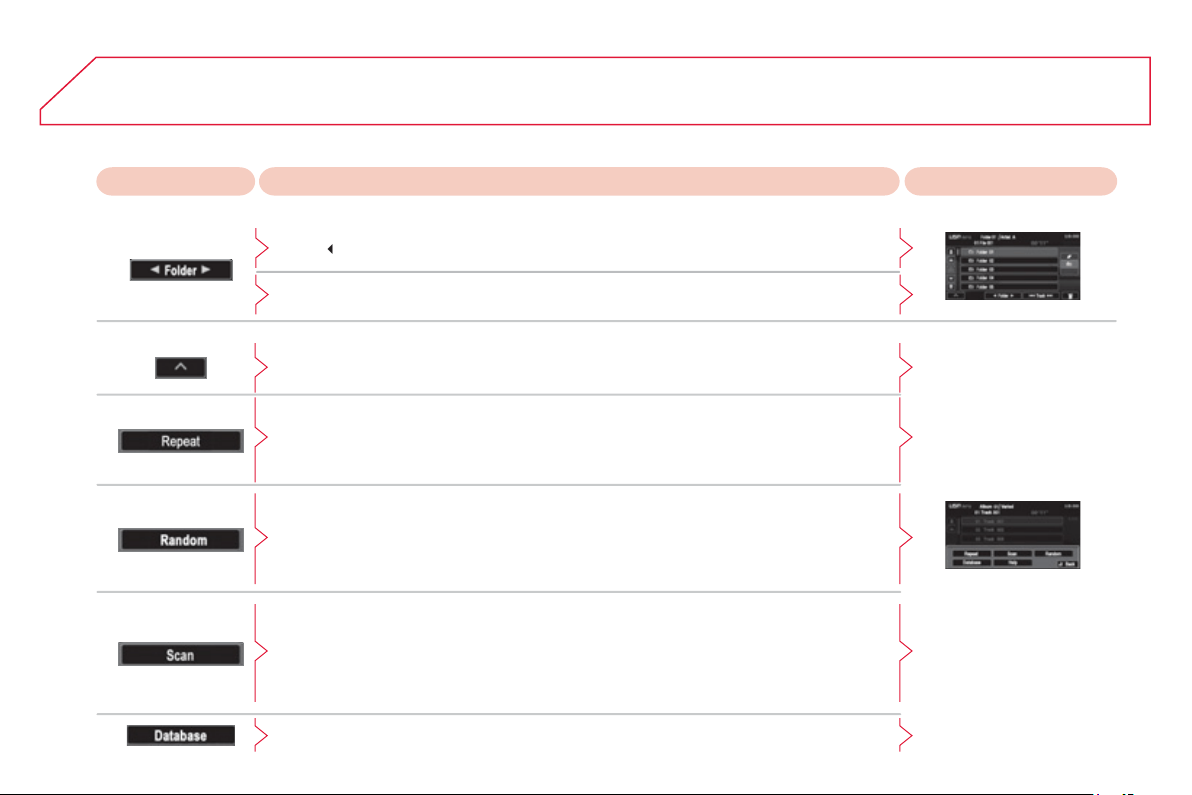
2
68
07
P
LAYING A TRACK
(
2/2
)
Chan
g
in
g
the pla
y
in
g
mode
(
in USB, AUX or iPod mode
)
Press [Repeat] to play the track selected in a loop
(
repetition
)
.
Press [Repeat] a
g
ain to pla
y
all o
f
the tracks in the selected
f
older in a loop.
Press a
g
ain to stop.
Press [
S
can] to pla
y
the be
g
innin
g
o
f
each track in each
f
older
f
or approximatel
y
10 seconds
(
scanning
)
.
Press [
S
can] a
g
ain the pla
y
the be
g
innin
g
o
f
each track in the selected
f
older in a loop.
Press a
g
ain to stop or press on the current track
(
durin
g
the 10 seconds
)
and pla
y
be
g
ins.
Press [Random] to pla
y
all of the tracks in the selected folder in random order.
Press [Random] a
g
ain to pla
y
all of the tracks on the pla
y
er in random order.
P
ress a
g
a
i
n to stop.
Press [
^
] to access the secondary menu.
P
r
ess
E
xp
l
anat
i
on
Resul
t
USB PLAYER
Selectin
g
a folder
(
in USB or AUX mode
)
P
ress
[
Folder] to select the previous folder.
Press
[
Folder
]
to select the next folder.
Press on [Database] to displa
y
the Gracenote
®
version
(
Compact Disc Database:
database of music CDs
)
.
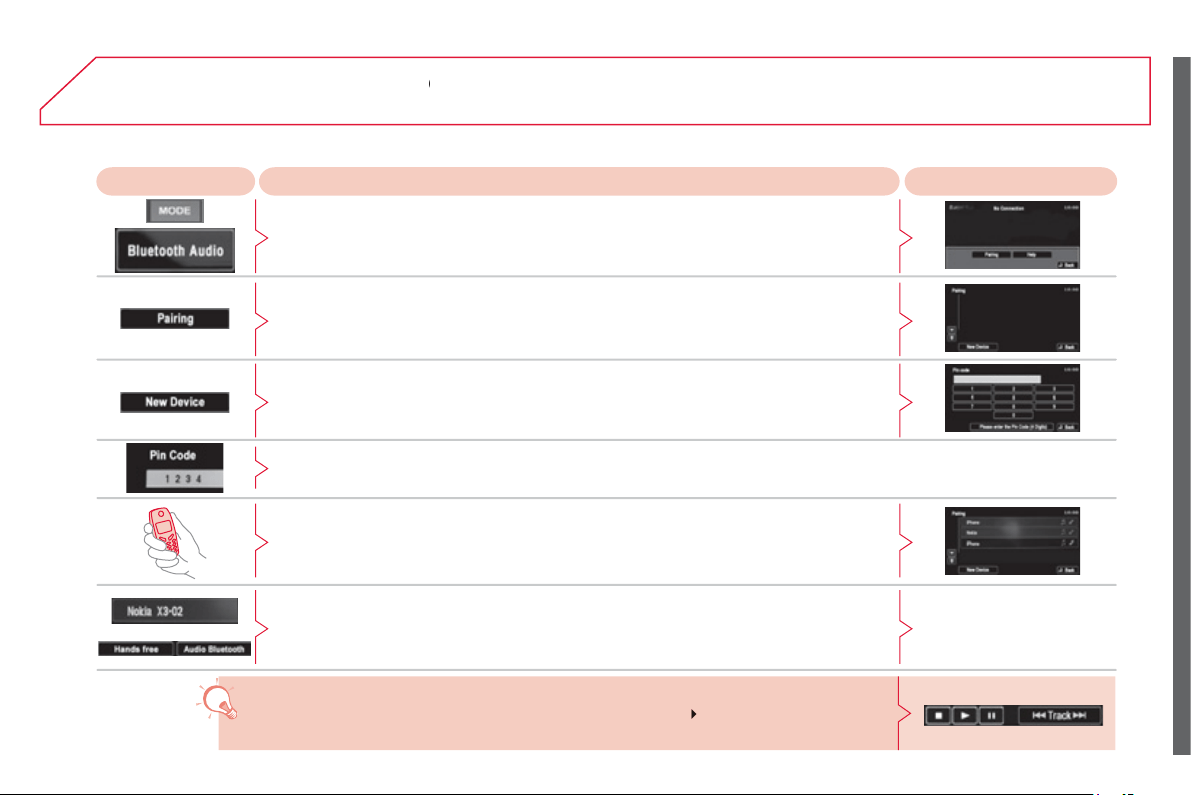
2
69
08
MATCHING A TELEPHONE, PLAYING A TRACK
P
r
ess
o
n
E
xp
l
anat
i
on
Resul
t
s
Press the M
O
DE button then Bluetooth Audio.
BLUETOOTH
®
STREAMING - TELEPHONE
®
Press on [Matchin
g
] to start matchin
g
.
Press on [New device] to detect a telephone.
Enter the PIN in the audio s
y
stem.
Refer to the instructions for
y
our telephone to authorise the matchin
g
.
Enter the PIN in the telephone then a
f
ter a short time it appears in the list.
Select the telephone in the list, then choose [Hands free] for telephone and/or [Audio
B
luetooth] for streamin
g
(
an iPhone is reco
g
nised automaticall
y)
.
Then con
fi
rm with [Yes].
O
nce the telephone is matched, select a track then press [
] to pla
y
it.
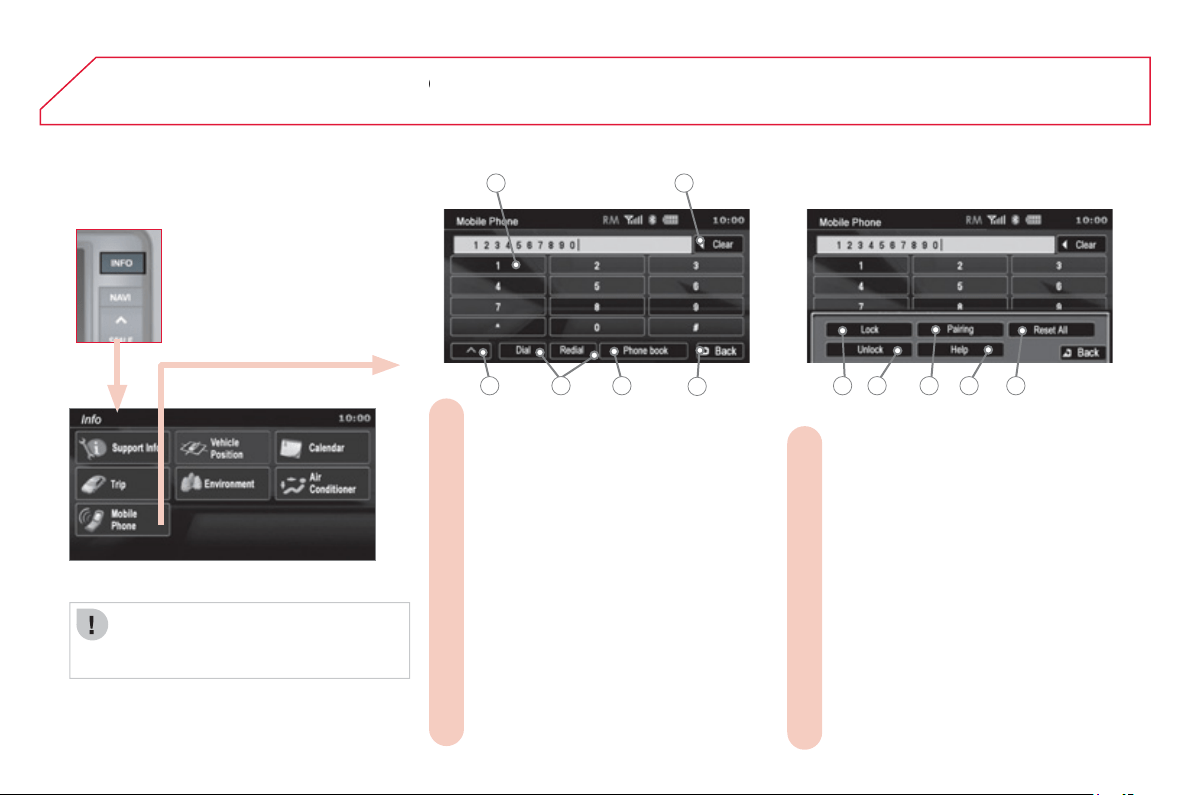
27
0
08
BLUETOOTH
®
STREAMING - TELEPHONE
®
Enter the number using the keypad.
A.
Erasing a number one at a time.
B.
Return to the previous screen.
C.
To display the list of contacts (in the
D.
Bluetooth telephone or the vehicle
)
.
Select a contact in the list.
To start [Dial] or start again [Redial] a
E.
telephone call
To display the secondary menu:
F.
Is displayed if the personal identifi cation
F1.
nu
m
be
r h
as
n
o
t
bee
n
defi
n
ed
.
Press to enter it.
Is displayed if the personal identifi cation
F2.
nu
m
be
r h
as
bee
n
de
fi n
ed
.
To display the list of matched telephones.
F3.
To display the list of voice commands.
F4.
To reset all settings.
F5.
INFORMATION DISPLAYED IN TELEPHONE MODE
Re
f
er to the section "matchin
g
a
telephone" to connect
y
our telephone
b
y
Bluetooth
®
.
A B
F
C
DE F1 F2 F4F3 F5
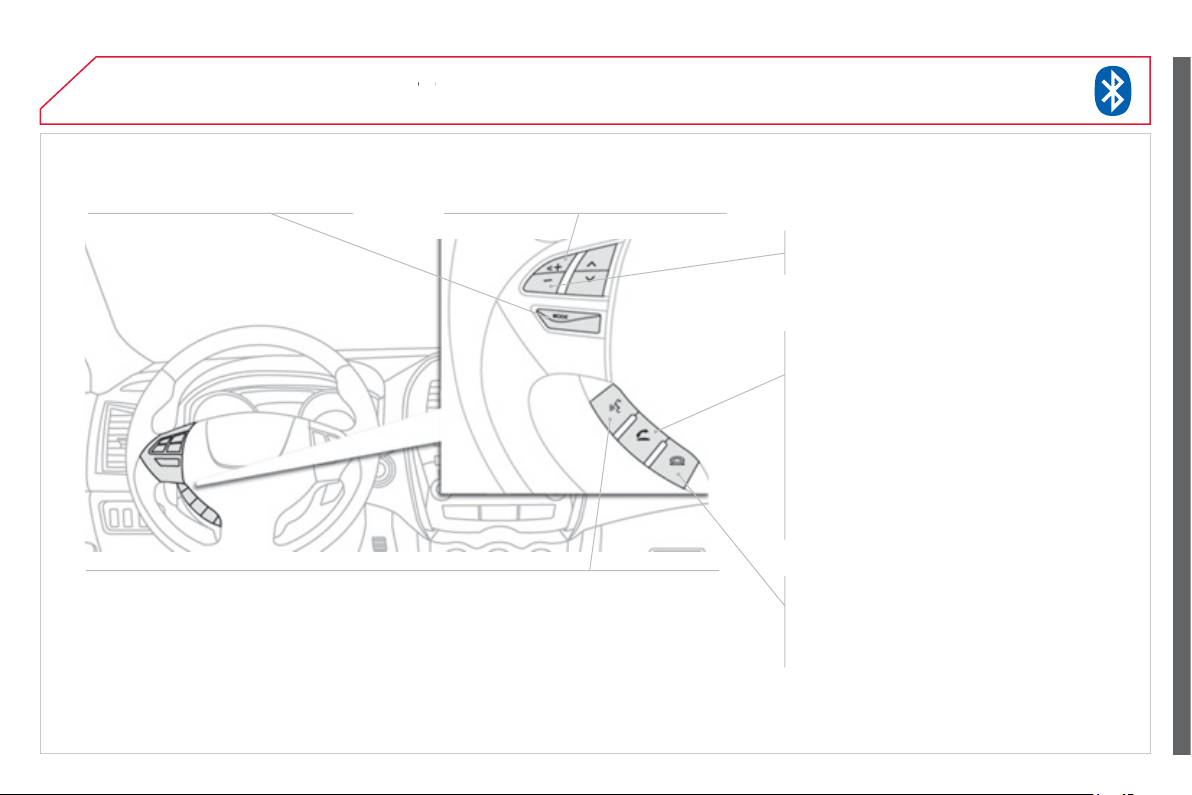
271
09
BLUETOOTH
®
TELEPHONE
®
S
PEAK
Press this button to activate voice recognition
(
"
L
istenin
g
" is displayed
)
.
Durin
g
a voice reco
g
nition, press this button brie
fl
y
to put this voice reco
g
nition on hold.
Make a lon
g
press on this button to deactivate voice reco
g
nition.
Press this button briefl
y
to activate voice reco
g
nition, even durin
g
a call.
A
udio s
y
stem on/off.
AN
S
WER A
C
AL
L
Press this button to accept an incoming
ca
ll.
In th
e
e
v
e
nt
of
a
2 n
d
incomin
g
call, press
to
p
ut the 1
st
call on hold and s
p
eak to the
seco
n
d
ca
ll
e
r.
In this case, press briefl
y
to switch from
o
n
e
call
t
o
t
he
o
t
he
r.
T
o esta
bli
s
h
a t
h
ree-wa
y
conversat
i
on,
p
ress on
S
PEAK to change
f
rom voice
reco
g
nition and sa
y
" Incor
p
orate the cal
l
".
END
C
AL
L
Press this button to re
j
ect an incomin
g
call.
D
ur
i
n
g
a conversat
i
on, press t
hi
s
b
utton to
e
n
d
t
he
call
.
In
c
r
ease
th
e
aud
i
o
v
o
l
u
m
e
.
D
ec
r
ease
th
e
aud
i
o
v
o
l
u
m
e
.
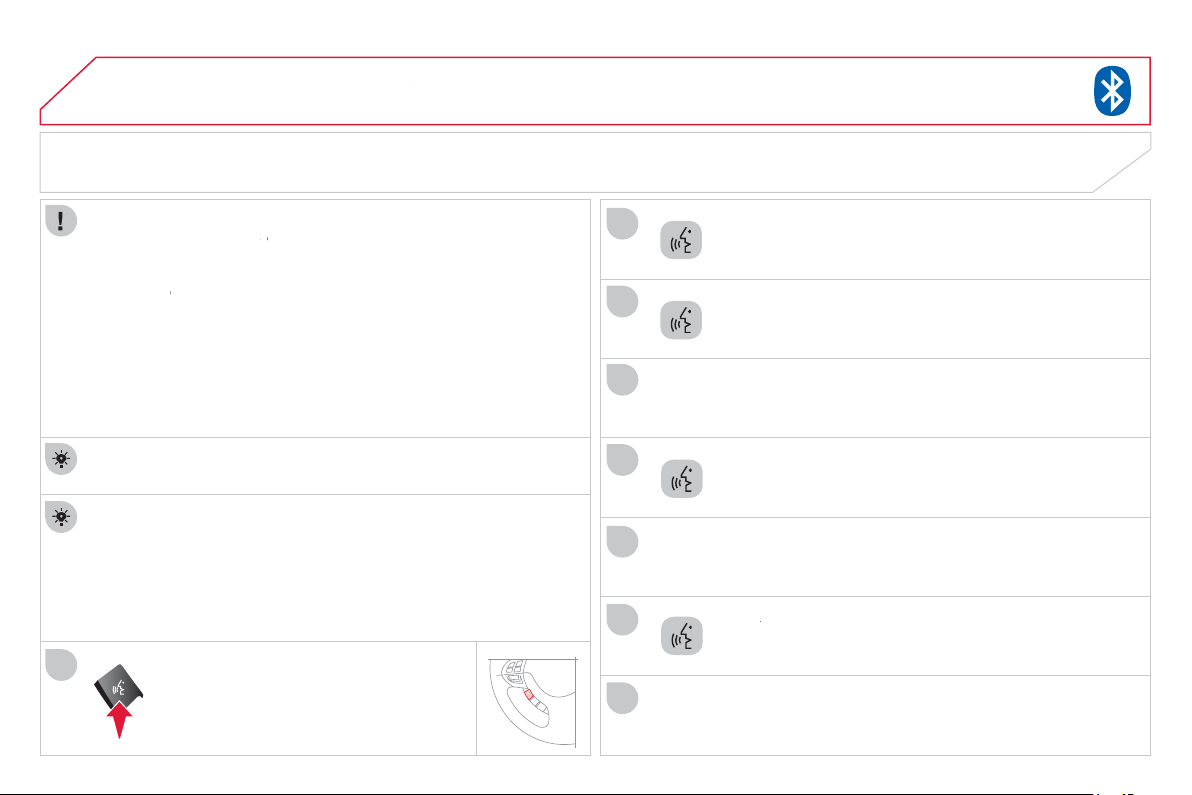
272
1
2
3
09
4
5
6
7
8
CHANGING THE VOICE COMMAND LANGUAGE
BLUETOOTH
®
TELEPHONE
®
B
y
de
f
ault, the voice reco
g
nition s
y
stem is in En
g
lish.
Pr
ess
thi
s
bu
tt
o
n.
Sa
y
"Setu
p
"
.
S
a
y
"
L
an
g
ua
ge
".
S
a
y
the lan
g
ua
g
e o
f
y
our choice in En
g
lish, example: sa
y
"
French "
fo
r Fr
e
n
c
h.
Say "
Y
es" to start the chan
g
e of lan
g
ua
g
e process
S
a
y
"
No
"
to return to steps
4
to 7.
Th
e s
y
stem sa
y
s
"
Select a lan
g
ua
g
e: En
g
lish, Spanish, French,
German or Italian
"
.
The system then says " French selected. Is this correct? "
The system repeats the language chosen and completes the
c
han
g
e o
f
lan
g
ua
g
e process.
I
f
y
ou do not start the trainin
g
procedure within around 3 minutes o
f
p
ressing
S
PEAK, the process is cancelled.
I
f
y
ou press
S
PEAK within 5 seconds
f
ollowin
g
the pla
y
o
f
a voice
c
ommand, this command is saved a
g
ain.
What is the Bluetooth
®
hands-free telephone with voice
®
r
eco
g
nition
?
The s
y
stem uses wireless communication technolo
gy
known as
Blue
t
oo
t
h
®
which allows you to make hands-free telephone calls in
®
y
our ve
hi
c
l
e v
i
a
y
our
Bl
uetoot
h
®
compat
ibl
e mo
bil
e te
l
ep
h
one.
Y
ou can ma
k
e te
l
ep
h
one ca
ll
s us
i
n
g
a m
i
crop
h
one
l
ocate
d
i
n t
h
e
c
ourtesy lamp, making use o
f
the simple steering mounted controls
o
r b
y
the voice reco
g
nition
f
unction with voice commands. Five
lan
g
ua
g
es are available: En
g
lish
(
the de
f
ault
)
,
S
panish, French,
G
erman and Italian.
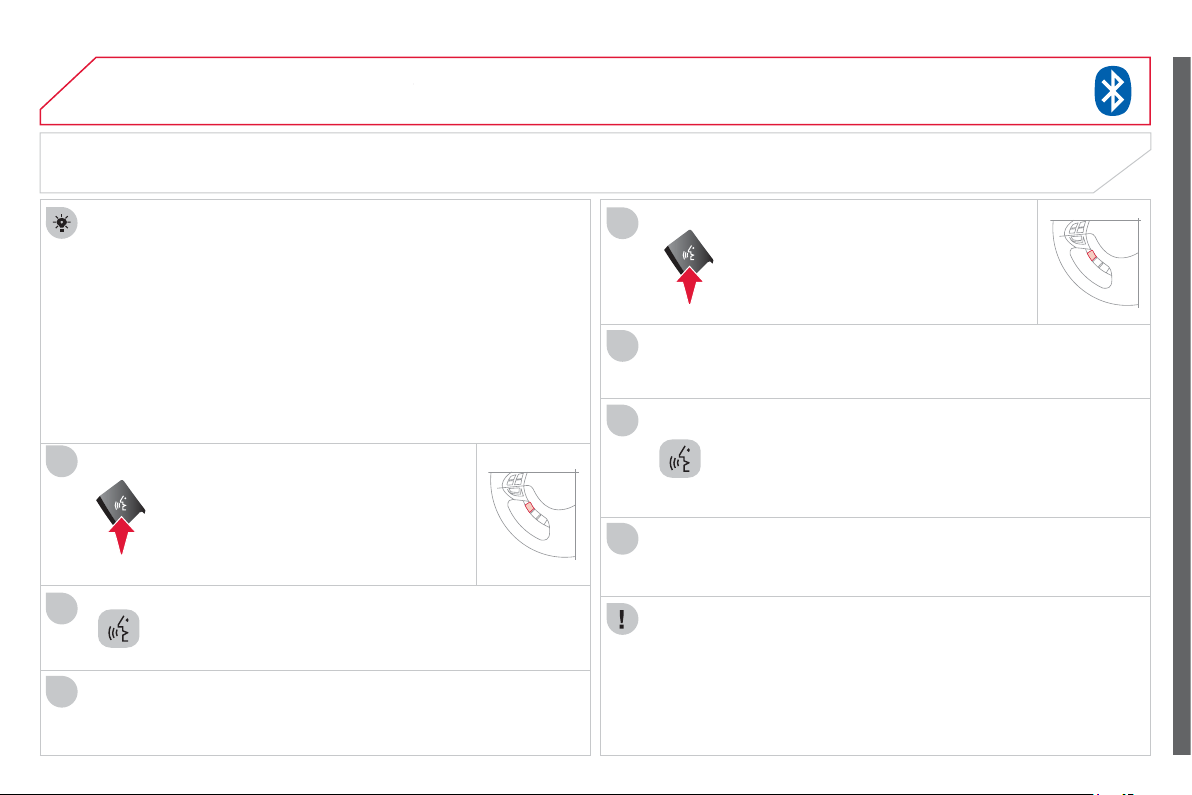
27
3
09
2
3
1
4
5
6
7
BLUETOOTH
®
TELEPHONE
®
TRAINING THE USER'S VOICE
You can use the user voice trainin
g
function to create a voice model
for one person per lan
g
ua
g
e.
The characteristics o
f
y
our voice and
y
our pronunciation are saved
i
n t
hi
s mo
d
e
l
to prov
id
e t
h
e
b
est vo
i
ce recogn
i
t
i
on.
The vehicle must be stationar
y
with the parkin
g
brake applied.
S
witch o
ff
y
our telephone durin
g
the operation to avoid an
y
interru
p
tion.
Pr
ess
thi
s
bu
tt
o
n.
The s
y
stem sa
y
s the
fi
rst o
f
45 standard phrases.
Sa
y
" Word trainin
g
"
.
When you are ready to start, press and
ho
l
d
thi
s
bu
tt
o
n.
Repeat each o
f
the phrases in the table on the
f
ollowin
g
page
.
The s
y
stem saves
y
our voice and moves on to the next
co
mm
a
n
d
.
Continue the process until all of the phrases have been
sa
v
ed
.
An explanation messa
g
e is
g
iven.
After pla
y
in
g
all the voice commands, the s
y
stem sa
y
s "
T
he word
e
nrolment is complet
e
" and ends the
p
rocess.
I
f
y
ou do not start the pro
g
rammin
g
process within approximatel
y
3
minutes a
f
ter pressin
g
the
S
PEAK button, the process is
ca
n
ce
ll
ed
.
I
f
y
ou press the
S
PEAK button within 5 seconds o
f
the pla
y
o
f
a
voice command, this command is saved a
g
ain.

274
09
BLUETOOTH
®
TELEPHONE
®
VOICE TRAINING COMMANDS
1
#
790
(f
or
#
= "Hash"
)
2
* 671
(
for * = "Star"
)
3
212 - 4
903
4
235
-
3
4
9
4
5
3
15- 5 657
6
4
56
- 7
930
7
7
93
-
5
4
6
2
8
7
9
4 -
1
826
9 826 -
3
145
1
0
96
2 - 7
305
11
(
531
)
742 - 9 860
12
(
632
)
807 - 4 591
13
(
800
)
222 - 5 015
14
(
888
)
555 - 1 212
1
5
0
12
3
4
56
7
89
16 55 66 77 88 99
17
44
33
22 11
00
1
8
C
all 2
93
-
580
4
19
Ca
ll
*
350
20
C
all 1
(
234
)
567 - 8 901
21
Dial
639
- 1
5
42
22
Dial
#
7
80
23
Dial
(
987
)
654 - 3210
24 1058
#
3
794
#
S
end
2
5
27
6
4
3#
4
3
21
#
S
end
2
6
C
ancel
2
7
Co
ntin
ue
28
Emergency number
29
C
lear all
30
Hel
p
3
1
H
ome,
W
or
k
,
M
o
bil
e,
P
a
g
er
3
2 Li
s
t
o
f n
a
m
es
33
N
o
3
4 Ph
o
n
e
boo
k: D
e
l
e
t
e
3
5
Ph
one
b
oo
k
:
N
ew entr
y
36
P
r
e
v
ious
3
7 Phone book:
C
lear all
38
R
ed
i
a
l
3
9
R
epeat t
h
e tra
i
n
i
n
g
4
0
Confi
g
ure the confi rmation requests
41
Confi
g
ure the lan
g
ua
g
e
4
2
C
on
fi
g
ure the matchin
g
options
4
3
Match a telephone
44
Tr
a
n
sfe
r th
e
ca
ll
4
5
Y
es
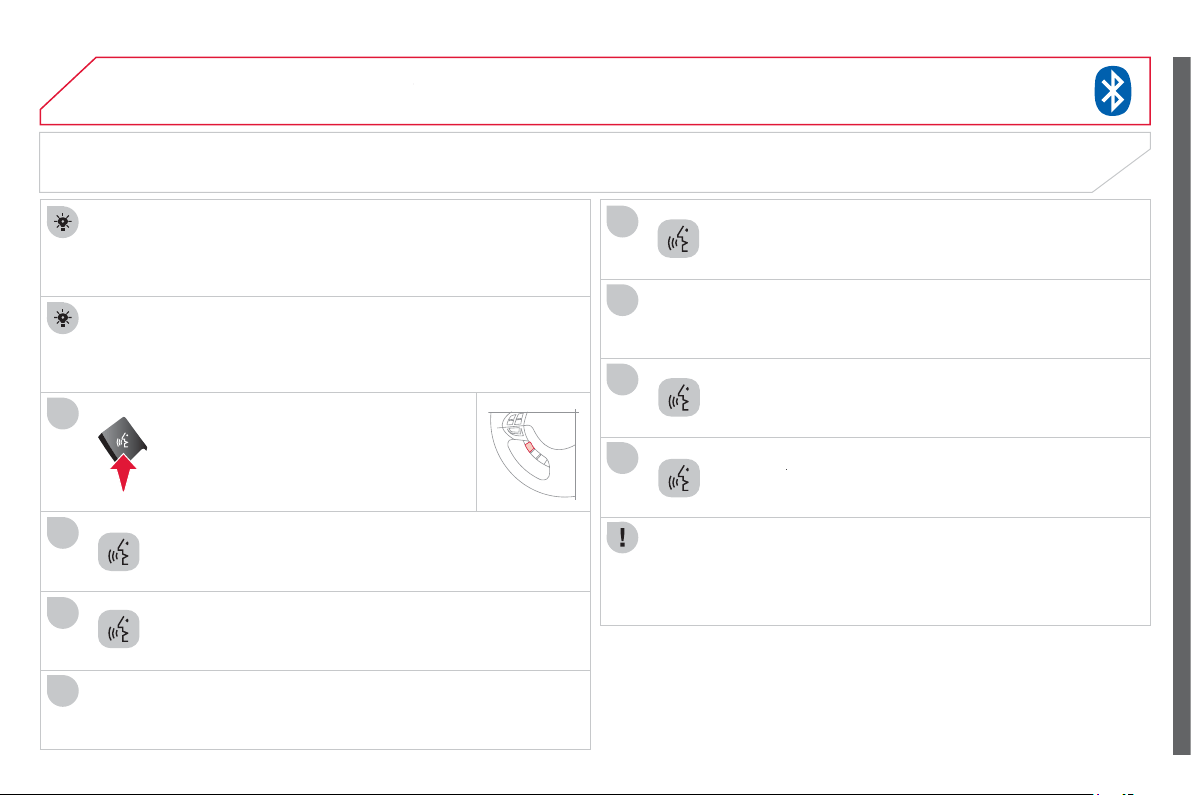
27
5
09
1
3
6
8
2
5
7
4
BLUETOOTH
®
TELEPHONE
®
For reasons o
f
sa
f
et
y
and because the sustained attention o
f
the
driver is needed, operations o
f
matchin
g
a Bluetooth
®
mobile phone
with the audio s
y
stem's hands-free function must be done with the
v
ehicle stationar
y
.
The s
y
stems sa
y
s "
P
lease sa
y
the 4 di
g
its of a matchin
g
cod
e
"
.
Pr
ess
thi
s
bu
tt
o
n.
The s
y
stem con
fi
rms the validit
y
o
f
the number spoken,
answer "
Yes
".
S
a
y
" No" to return to step 7.
S
a
y
"
M
atchin
g
option
s
".
MATCHING A BLUETOOTH
®
TELEPHONE
FIRST CONNECTION
S
a
y
"
M
atc
h
a te
l
e
ph
on
e
"
.
S
ay "Confi gur
e
".
The system can register up to 7 Bluetooth
®
compatible mobile
telephones.
The telephone which has the hi
g
hest level o
f
priorit
y
is connected
a
utomaticall
y
.
The s
y
stem sa
y
s "
D
o
y
ou wish to match a telephone, delete a
t
ele
p
hone or obtain the list of matched tele
p
hones? ".
Sa
y
a 4-di
g
it number which will be recorded as the
matc
hi
n
g
co
d
e.
R
emem
b
er t
hi
s matc
hi
n
g
co
d
e as
y
ou must enter
i
t
i
n t
h
e te
l
ep
h
one
in one o
f
the
f
ollowing steps o
f
the matching procedure.
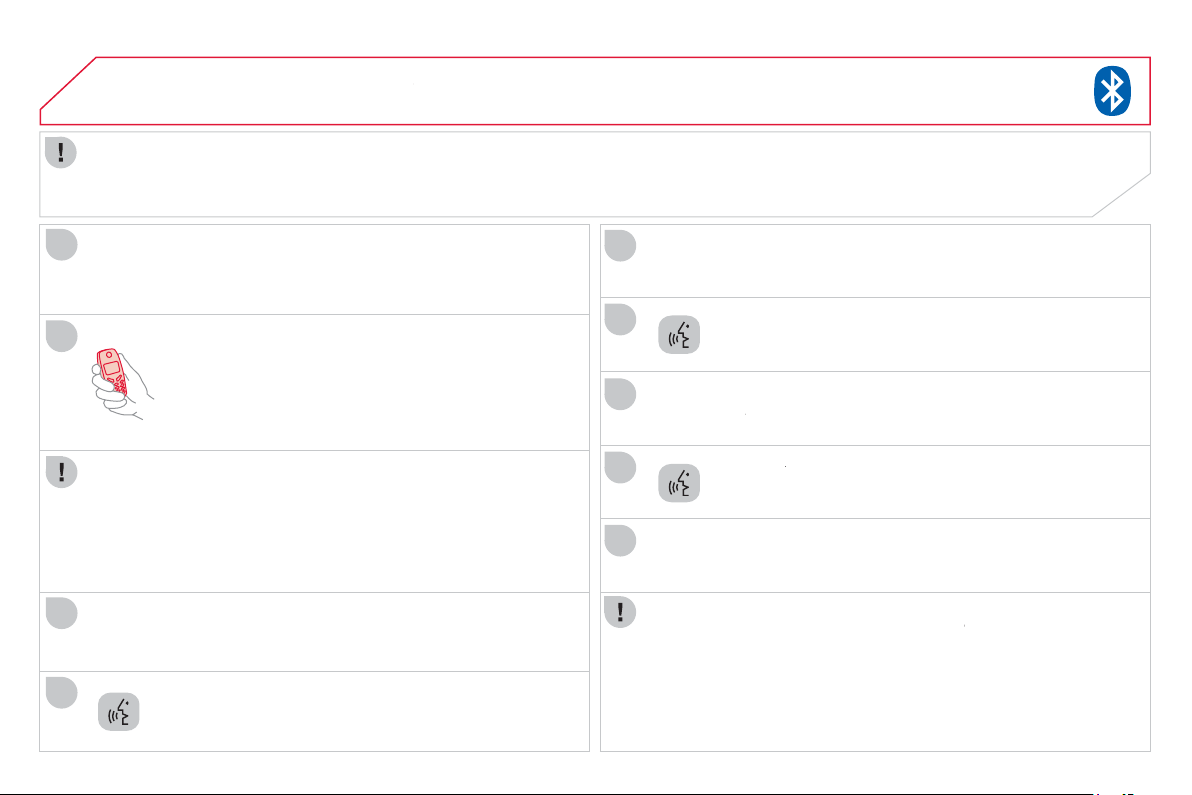
27
6
10
09
9
11
12
13
14
15
16
17
Consult
y
our mobile telephone's user manual and enter
t
h
e matc
hi
n
g
co
d
e recor
d
e
d
i
n step 7
i
n t
h
e te
l
ep
h
one.
BLUETOOTH
®
TELEPHONE
®
Th
e s
y
stem sa
y
s
"
Start the matchin
g
procedure on the
tele
p
hone. Consult the instructions in the tele
p
hone manual
"
.
If the code is incorrect, the s
y
stem locks. To clear the code:
- check that the telephone's voice reco
g
nition is not activated,
- w
i
t
h
t
h
e
ig
n
i
t
i
on on an
d
t
h
e au
di
o s
y
stem act
i
ve, press t
h
e
END
C
ALL button
f
or 2 seconds, 3 times in succession.
Wh
e
n it
de
t
ec
t
s
a
Bl
ue
t
oo
th
®
compatible mobile telephone,
the s
y
stem sa
y
s "
P
lease sa
y
the name of the telephone after
the beep"
.
Af
ter the audible si
g
nal, allocate a name to the telephone
b
y
sa
y
in
g
the name o
f
y
our choice.
The s
y
stem sa
y
s "Allocate an order of priorit
y
between 1 and 7.
One is the hi
g
hest level of priorit
y
".
G
iv
e
a
n
u
m
be
r
be
tw
ee
n 1
a
n
d
7 t
o
es
t
ab
li
s
h th
e
l
e
v
e
l
of
priorit
y
of the mobile telephone.
The system says and con
fi
rms the " name of the tele
p
hon
e
"
a
n
d
th
e
" numbe
r
" of its priority.
r
Answer "
Yes
"
S
a
y
"
N
o" to return to step 13.
Th
e s
y
stems sa
y
s
"
M
atc
hi
n
g
comp
l
et
e
"
t
he
n
e
m
i
t
s
a
n
audible
sig
na
l
an
d
d
eact
i
vates t
h
e vo
i
ce reco
g
n
i
t
i
on.
The services available depend on the network, the
S
IM card and the compatibilit
y
o
f
the Bluetooth
®
telephone used.
C
heck in
y
our telephone user
manual and with
y
our service provider
f
or the services
y
ou have access to.
I
f
the system does not detect the Bluetooth
®
compatible mobile
®
telephone, the matchin
g
process stops ands is accompanied b
y
an
a
udible si
g
nal.
If
y
ou select a level of priorit
y
which has alread
y
been allocated to
a
nother telephone, the s
y
stem asks
y
ou if
y
ou wish to replace this
level of priorit
y
.
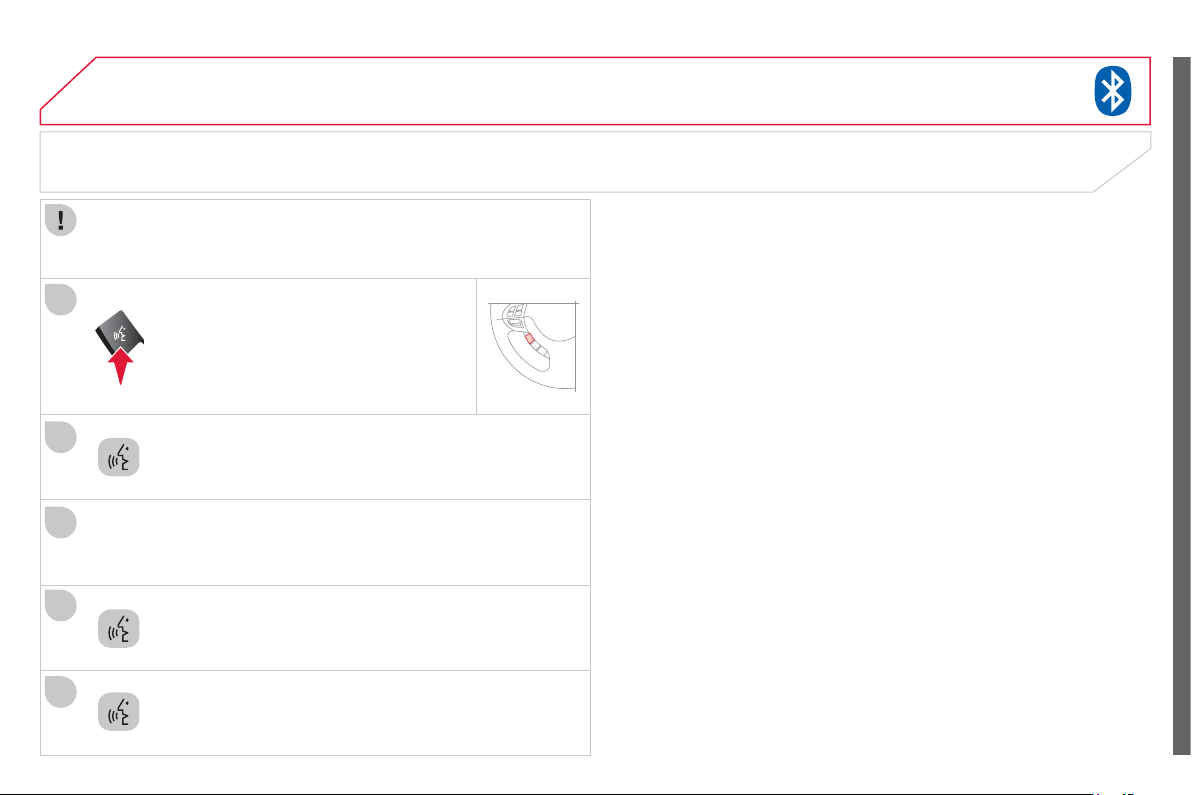
277
09
2
3
1
4
5
BLUETOOTH
®
TELEPHONE
®
S
a
y
"
Di
a
l
"
.
The system says "Number
p
leas
e
".
USING A TELEPHONE NUMBER
Call out the telephone number.
P
r
ess
t
his
bu
tt
o
n.
The system asks you to confi rm this number, answer "
Y
e
s
".
S
a
y
"
No
"
to return to t
h
e prev
i
ous step.
Y
ou
m
us
t h
a
v
e
fi
r
s
t m
a
t
c
h
ed
a
Bl
ue
t
oo
th
®
compatible mobile
telephone with the s
y
stem.
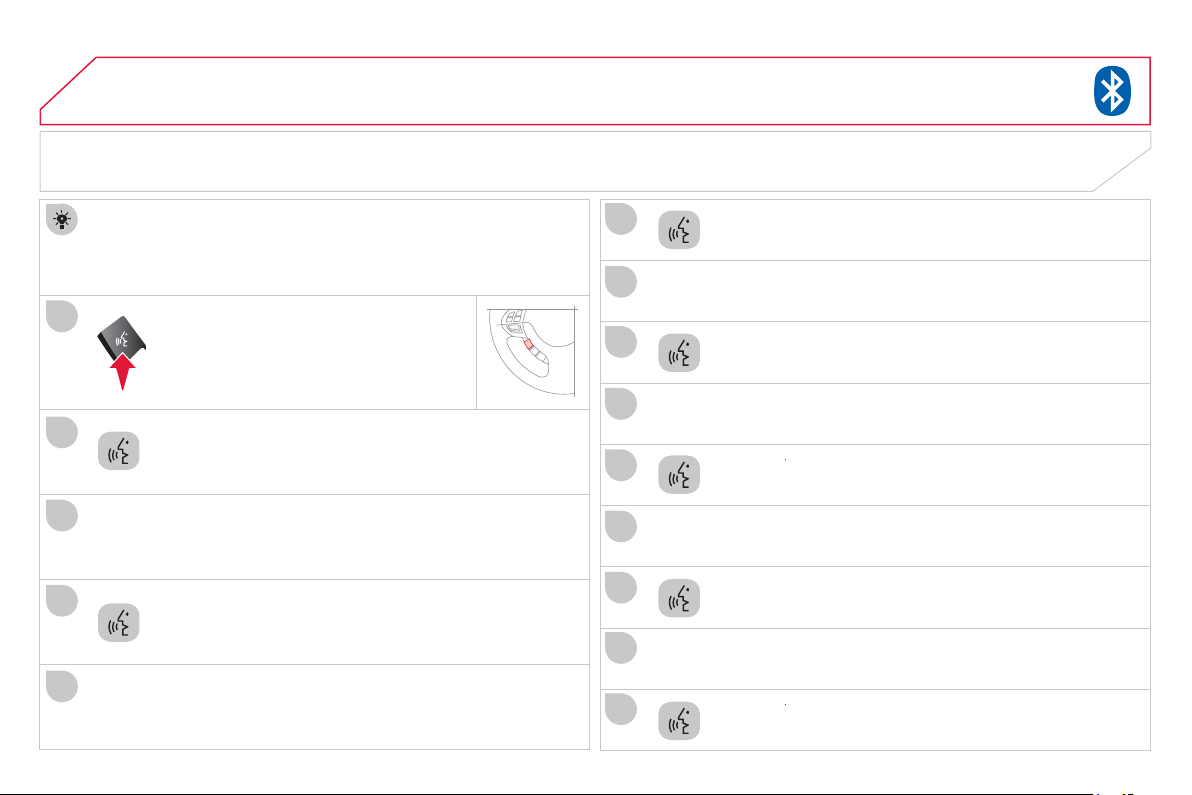
27
8
09
3
4
7
8
9
10
11
1
2
5
6
12
14
13
BLUETOOTH
®
TELEPHONE
®
The system has its own phone book, independent o
f
that o
f
the
m
obile telephone.
It can contain up to 32 names for each lan
g
ua
g
e.
Each name in the
p
hone book is associated with 4 locations:
HO
ME, W
O
RK, M
O
BILE and PAGER.
The s
y
stem sa
y
s " Select one of the followin
g
items: New Entr
y
,
Chan
g
e, List of names, Delete or Clear all, or sa
y
Cancel to
r
eturn to t
h
e ma
i
n menu
".
Sa
y
"
N
ew entr
y
".
Th
e s
y
stem sa
y
s
"
HOME
,
WORK
,
MOBILE OR PAGER
".
G
ive the location which corresponds to the number that
y
ou wish to record.
The s
y
stem asks
y
ou to con
fi
rm the location.
Answer "
Yes
"
.
S
ay " No" to return to step 7.
If a telephone number has alread
y
been recorded for this location, the
sy
stem sa
y
s "
T
he current number is -number-, number pleas
e
"
.
SAVING A NAME IN THE SYSTEM PHONE BOOK
Pr
ess
thi
s
bu
tt
o
n.
Sa
y
"
P
hone book"
.
The system says " Name
p
leas
e
".
G
ive the name o
f
your choice.
If
y
ou do not wish to chan
g
e the telephone number, repeat the
or
igi
na
l
num
b
er to reta
i
n
i
t, ot
h
erw
i
se sa
y
t
h
e new num
b
er.
Answer "
Yes
"
S
a
y
"
N
o" to return to step 11.
The s
y
stem asks
y
ou to con
fi
rm the number.
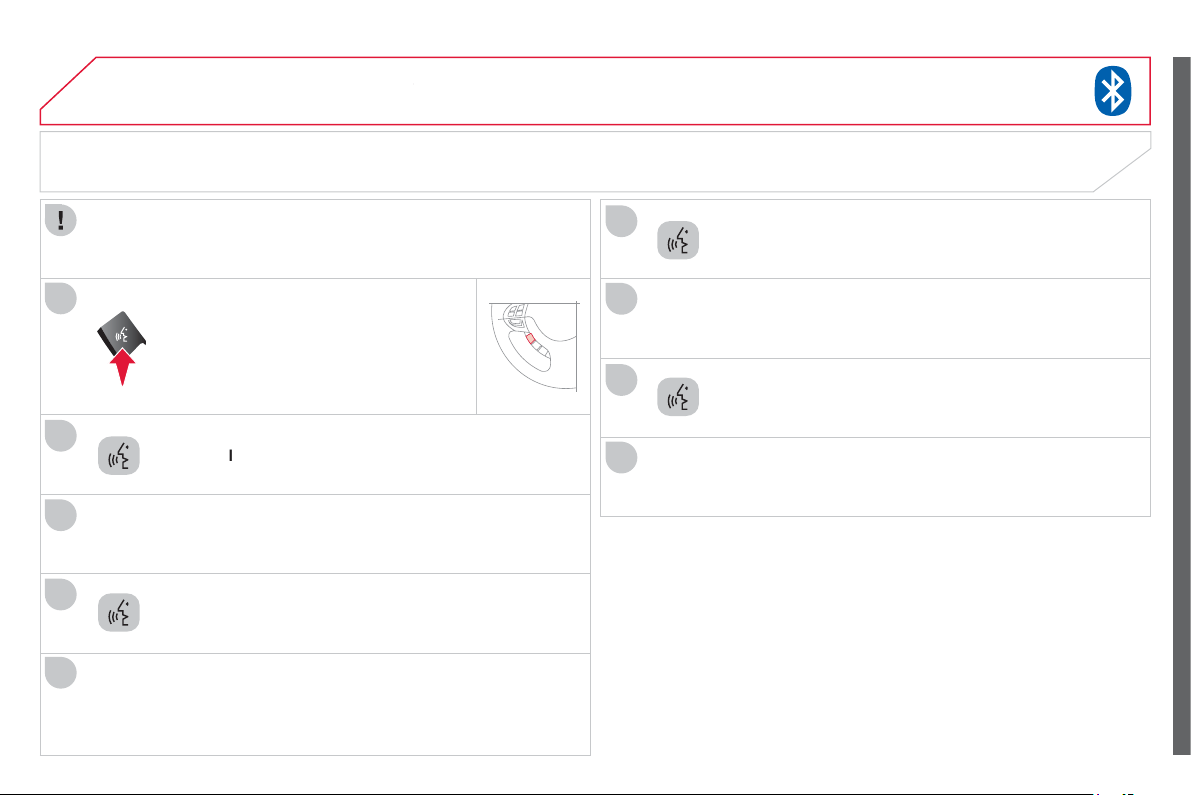
27
9
09
2
3
1
4
6
5
7
8
9
BLUETOOTH
®
TELEPHONE
®
S
a
y
"Ca
l
l
".
The s
y
stem sa
y
s "Name
p
leas
e
".
USING A NAME IN THE PHONE BOOK
Give the name of the person that
y
ou wish to call.
Pr
ess
thi
s
bu
tt
o
n.
G
ive the location corresponding to the number that you
wi
s
h t
o
ca
ll.
You must have fi rst matched a com
p
atible Bluetooth
®
m
ob
il
e
telephone with the s
y
stem.
If several telephone numbers have been recorded for this person,
t
h
e s
y
stem sa
y
s
"
D
o
y
ou wish to call <name>
{
home
}
,
{
work
}
,
{
mobile
}
or
{
pa
g
er
}
?
"
The s
y
stem request con
fi
rmation o
f
the name.
Answer "
Yes
".
S
a
y
"N
o
" to return to step 4.
The s
y
stem sa
y
s "Call to <name> at <location
>
"
a
n
d
m
a
k
es
th
e
ca
ll.
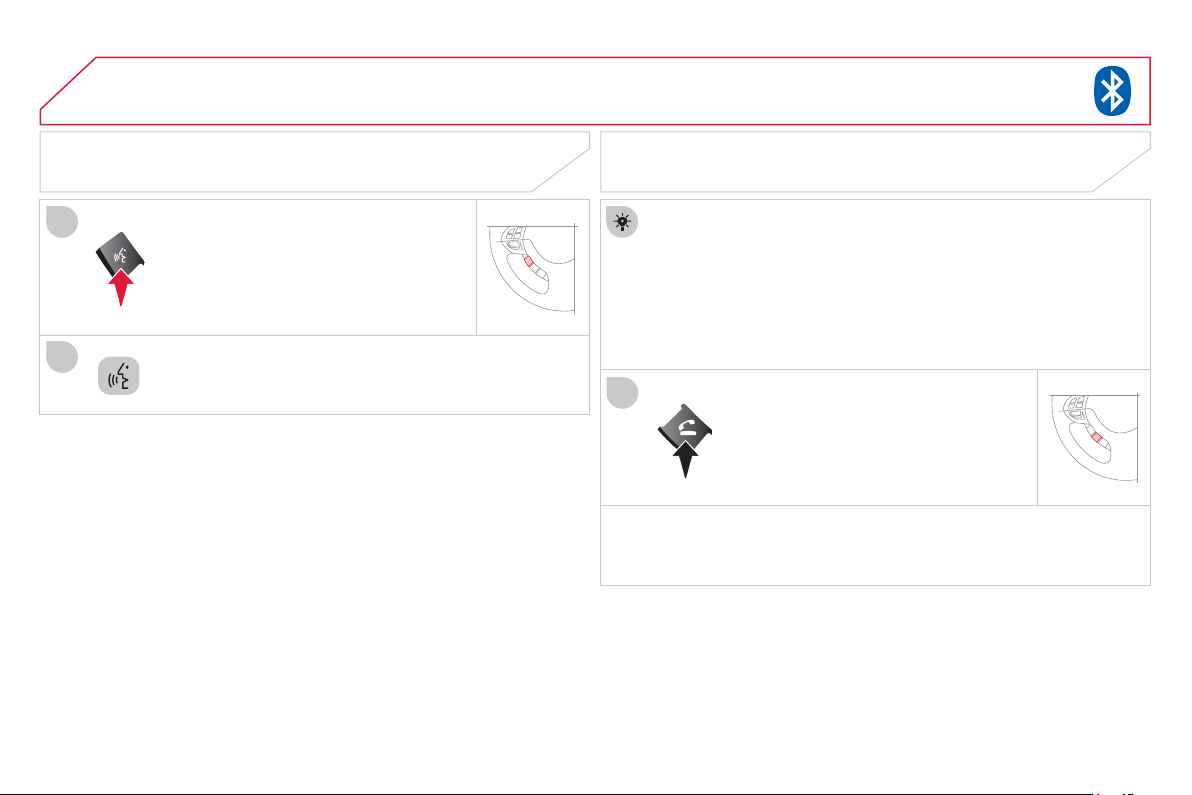
2
80
09
1
2
1
BLUETOOTH
®
TELEPHONE
®
The telephone rin
g
is sent to the speaker b
y
the front passen
g
er's
sea
t.
I
f
an audio source
(C
D, radio, ...
)
is in operation when the call is
r
eceived, it is placed on MUTE and only the incoming call is heard.
When the i
g
nition switch is in the A
CC
or
O
N position, the audio
sy
stem is activated automaticall
y
i
f
an incomin
g
call is received,
e
ven if it was ori
g
inall
y
off.
At the end o
f
the call, the audio s
y
stem returns to its previous state.
REDIAL THE LAST NUMBER CALLED
P
r
ess
t
his
bu
tt
o
n.
Sa
y
"
R
e
di
a
l
".
RECEIVING A CALL
Pr
ess
thi
s
bu
tt
o
n.
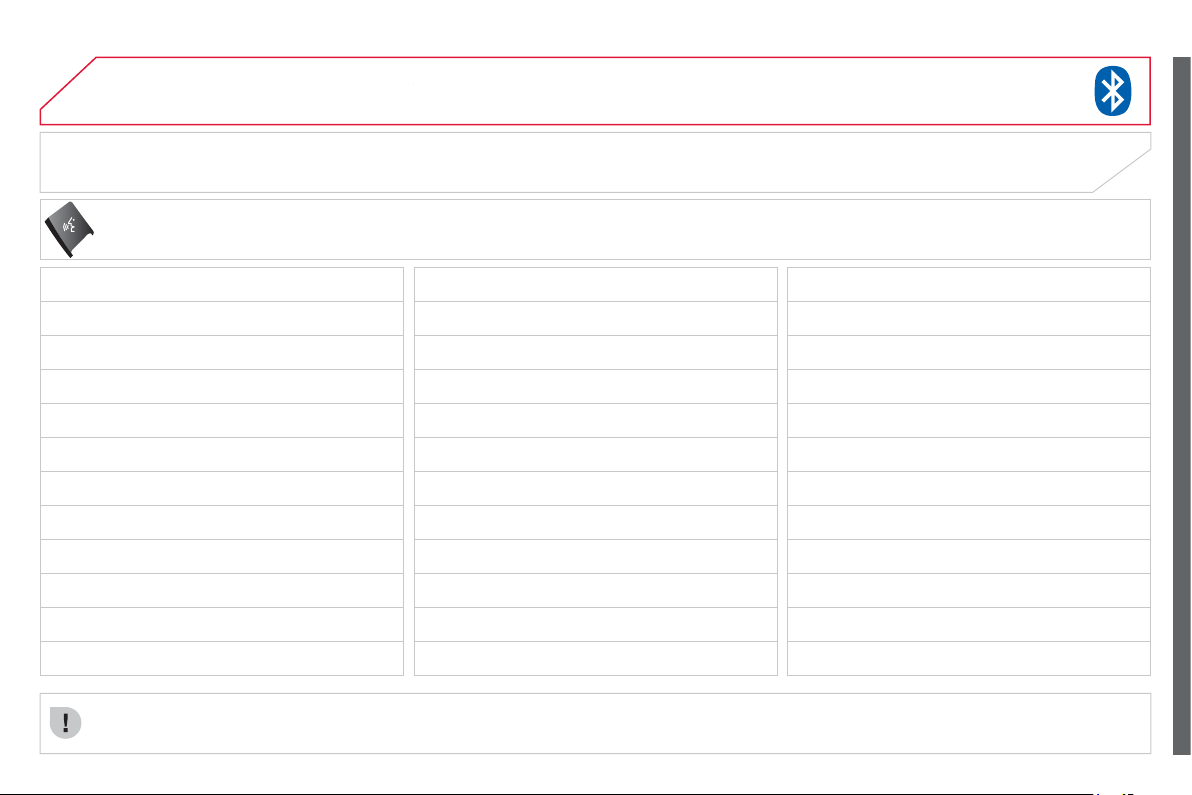
2
81
09
BLUETOOTH
®
TELEPHONE
®
VOICE COMMANDS (1/2)
C
on
fi
g
ure
Ph
o
n
e
boo
k
Dial
C
all
R
ed
i
a
l
Emer
g
enc
y
number
Matchin
g
options
M
atc
h
a te
l
ep
h
one
Delete a telephone
List o
f
matched telephones
Select a telephone
P
r
e
v
ious
Press this button to start the voice recognition.
When the s
y
stem is waitin
g
for a voice command, sa
y
"Help" t
o
ob
t
a
in
a
li
s
t
o
f
co
mm
a
n
ds
whi
c
h
ca
n
be
used
in th
e
cu
rr
e
nt
s
it
ua
ti
o
n.
Div
e
rt th
e
ca
ll
A
dd
a
l
oca
ti
o
n
Confi
g
ure the confi rmation requests
L
an
g
ua
g
e
New entr
y
D
e
l
e
t
e
Chan
g
e
C
all this number
C
hange another entry
Tr
y
a
g
ain
C
lear all
Li
s
t
of
n
a
m
es
Home, at home
Work, at work
Mobile, on mobile
P
a
g
er, on pa
g
er
Help
C
ontinue
All
C
ancel
M
u
t
e
D
eac
tiv
a
t
e
m
u
t
e
Y
es
No
2
82
09
BLUETOOTH
®
TELEPHONE
®
VOICE COMMANDS (2/2)
Press this button to start the voice recognition.
When the s
y
stem is waitin
g
f
or a voice command, sa
y
"
H
e
lp
" t
o
ob
t
a
in
a
li
s
t
of
co
mm
a
n
ds
whi
c
h
ca
n
be
used
in th
e
cu
rr
e
nt
s
it
ua
ti
o
n.
Z
e
r
o
O
ne
T
w
o
Th
r
ee
F
ou
r
Fiv
e
S
ix
S
even
Eight
Nin
e
Star
(
*
)
Hash
(#)
Word trainin
g
PIN
R
epeat tra
i
n
i
n
g
Ac
t
i
v
a
t
e
D
eac
tiv
a
t
e
Incor
p
orate the call
<di
g
its> Send
En
g
lish
Phone book New entr
y
Phone book Chan
g
e
Pho
n
e
book
Dele
t
e
Ph
o
n
e
boo
k
C
l
ea
r All
Ph
o
n
e
boo
k Li
s
t
o
f n
a
m
es
Confi
g
ure the confi rmation requests
C
on
fi
g
ure
S
elect a telephone
C
on
fi
gure the matching options
D
e
l
e
t
e
a
n
a
m
e
Confi
g
ure the lan
g
ua
g
e
C
on
fi
g
ure the PIN
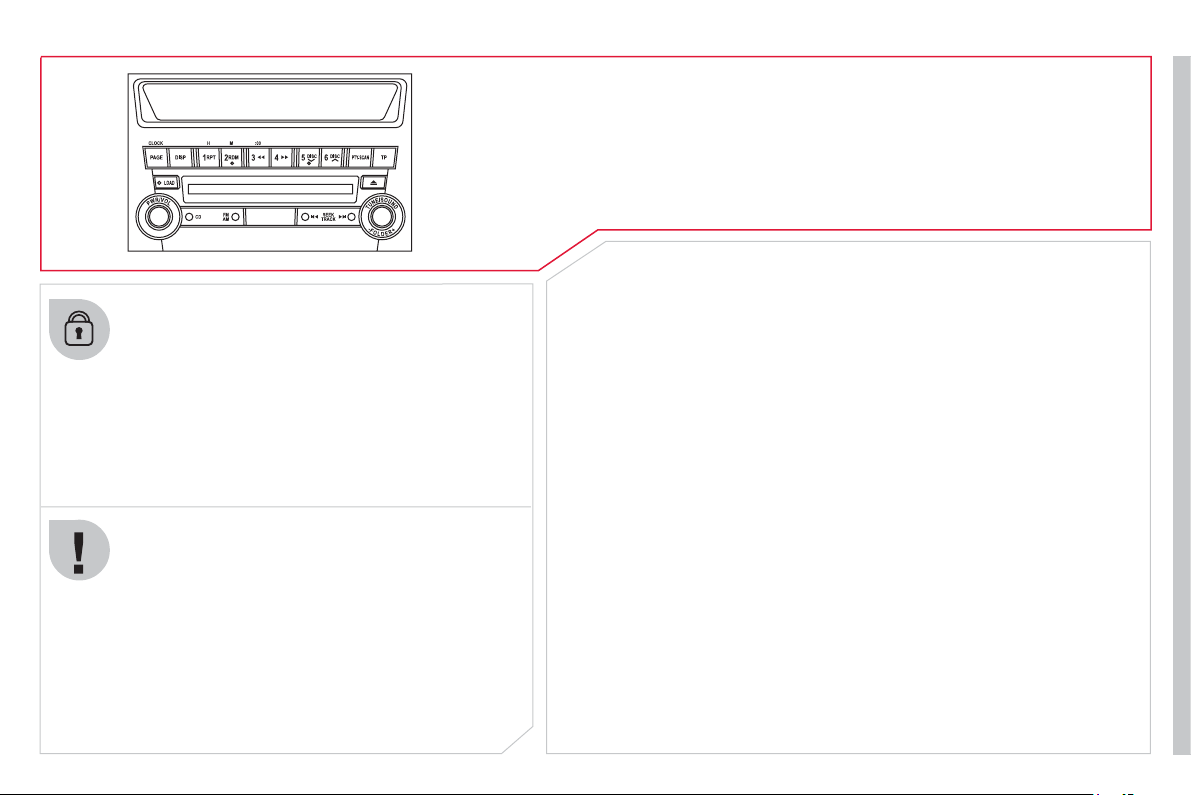
2
83
A
UDIO-CD s
y
stem
The s
y
stem is protected in such a wa
y
that it will onl
y
operate in
y
our vehicle.
01 First steps - Control panel
For safet
y
reasons, the driver must carr
y
out operations
which require prolon
g
ed attention while the vehicle is
s
tationar
y
.
When the en
g
ine is switched off and to prevent
dischar
g
in
g
o
f
the batter
y
, the s
y
stem switches o
ff
f
ollowin
g
the activation o
f
the ener
gy
econom
y
mode.
CONTENTS
02 Steering mounted controls
03 General operation
04 Radio
05 Music media players
06 USB player
07 BLUETOOTH
®
streaming
08 BLUETOOTH
®
telephone
Error messages
p.
p.
p.
p.
p.
p.
p.
p.
p.
284
286
287
291
297
305
307
309
320
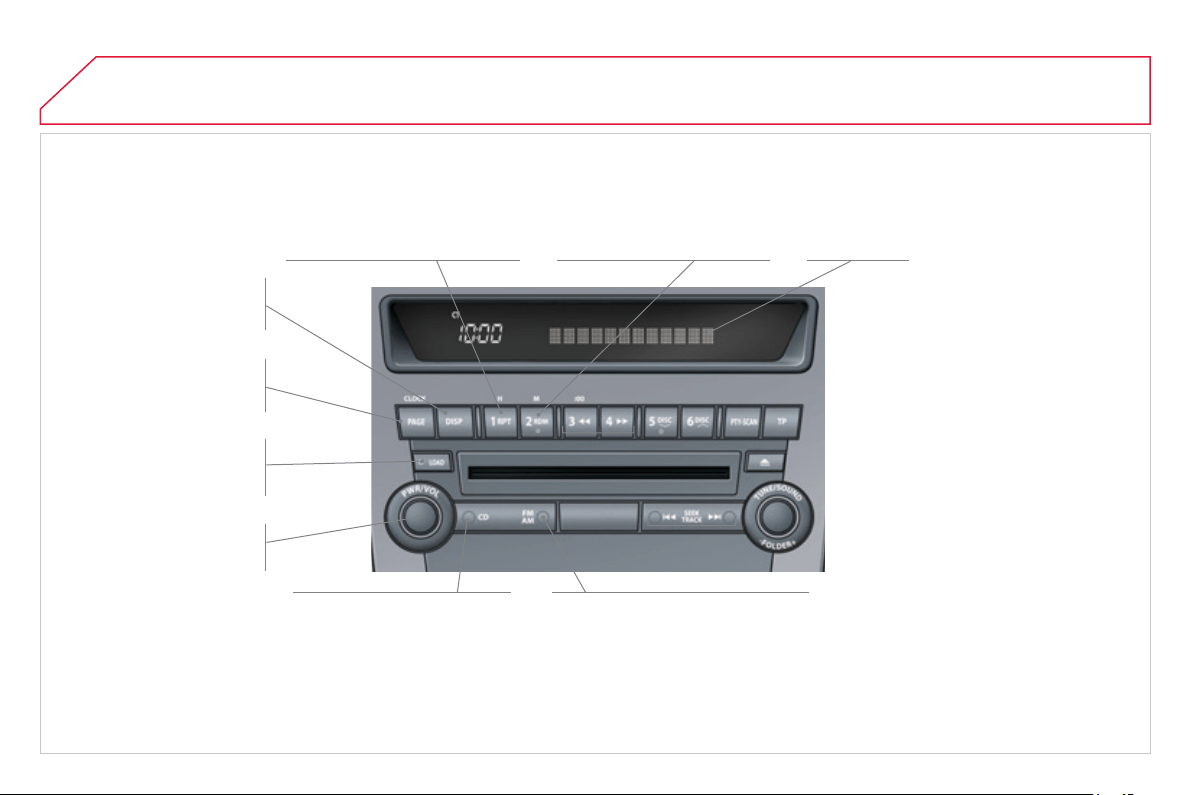
2
8
4
01
FIRST STEPS
Displa
y
the track.
S
croll through tracks.
S
y
mbols:
i
:
iPod
®
.
U: U
S
B.
B: Bl
ue
t
oo
th
®
.
R
an
d
om p
l
a
y
i
n t
h
e current
fo
l
de
r.
Press and hold
(
audible
beep
)
: random play in all
fo
l
de
r
s
.
Loadin
g
one or more
C
Ds.
S
witch audio mode:
->
C
D ->
portable pla
y
er
(
U
S
B
)
/
iPod
®
-> Bl
ue
t
oo
th * ->
R
epeat t
h
e current trac
k
.
Press and hold
(
audible beep
)
:
r
epeat all o
f
the tracks in the
cu
rr
e
nt
fo
l
de
r.
*
Available accordin
g
to version.
A
udio s
y
stem on
/
o
ff
.
S
elect radio source.
S
elect waveband
(
FW, MW, LW
)
.
Automatic presettin
g
o
f
radio stations
(
autostore
)
.

2
85
01
FIRST STEPS
Fast back
/
forwards.
PTY
O
n
/
Off
.
Pla
y
the start of each track in the current folder.
Press and hold
(
audible beep
)
: pla
y
the start o
f
eac
h tr
ac
k in
a
ll f
o
l
de
r
s
.
Pr
e
vi
ous
/
n
e
xt tr
ac
k.
Successive presses: pla
y
re
t
u
rn
s
t
o
th
e
s
t
a
rt
o
f th
e
cu
rr
e
nt tr
ac
k.
S
elect previous
/
next
f
older
(
or track
)
.
Ad
j
ust audio settin
g
s
(
BASS, TREBLE, ...
)
.
Manual search u
p
and down for a radio station / PTY.
Function settin
g
mode
(
AF, REG, TP, SCV, ...
)
.
E
j
ect one or more
C
Ds.
Press: select folder
(
or track
)
.
Sea
r
c
h
fo
r TP tr
affi
c
in
fo
rm
a
ti
o
n.
Select previous / next CD.
Pause / stop and restart pla
y
.
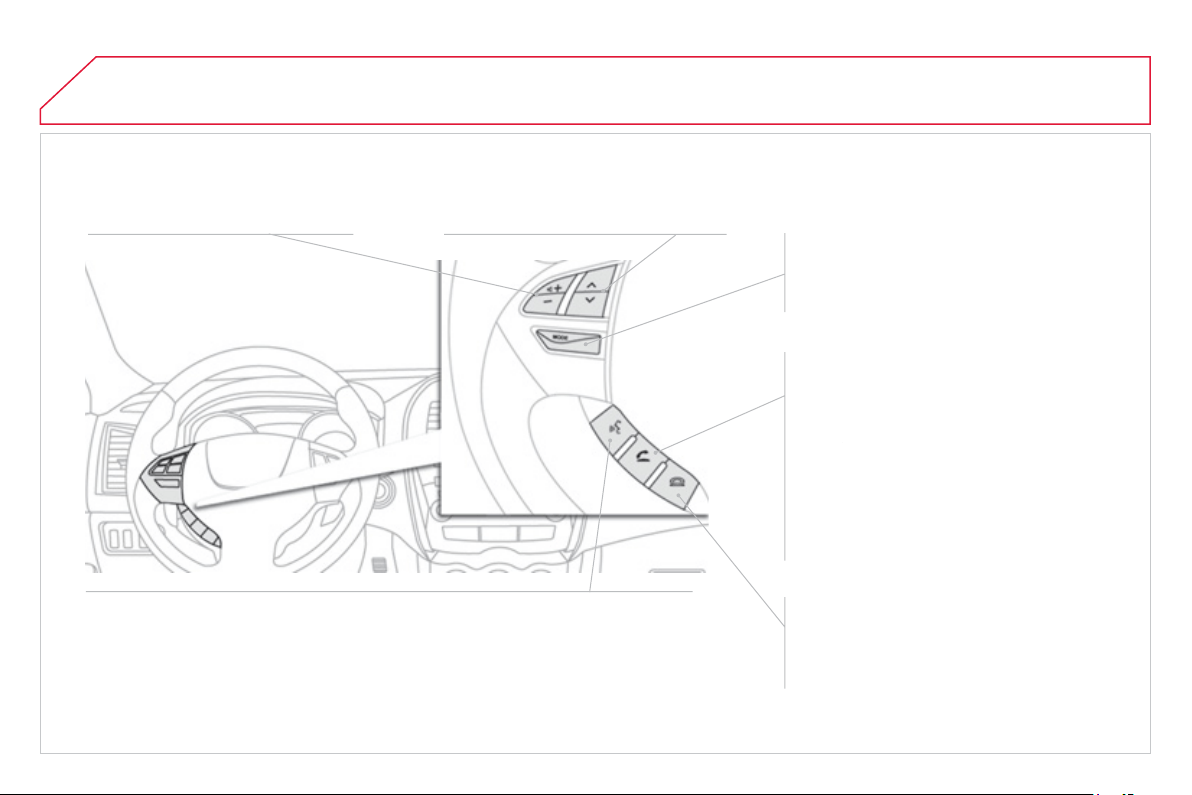
2
86
02
STEERING MOUNTED CONTROLS
S
PEAK
Press this button to activate voice reco
g
nition
(
"
L
istenin
g
" is displa
y
ed
)
.
Durin
g
voice reco
g
nition, press this button brie
fl
y
to pause voice reco
g
nition.
Make a lon
g
press on this button to end voice reco
g
nition.
Press this button briefl
y
to activate voice reco
g
nition, even durin
g
a call.
I
ncrease
/
reduce audio volume.
S
TART
C
AL
L
Press this button to answer an incomin
g
ca
ll.
If th
e
r
e
i
s
a
2n
d
incomin
g
call, press to put
th
e
1
st
call on hold and speak to the 2
t
nd
ca
ll
e
r.
In this case, press brie
fl
y
to switch
f
rom one
calle
r t
o
t
he
o
t
he
r.
To start a three-way conversation, press
S
PEAK to chan
g
e to voice reco
g
nition
m
ode and sa
y
" Incor
p
orate the cal
l
".
END
C
AL
L
Press this button to re
j
ect an incomin
g
call.
D
ur
i
n
g
a conversat
i
on, press t
hi
s
b
utton to
e
n
d
a
call
.
S
earch
f
or a hi
g
her
/
lower radio
f
requenc
y
.
Next /
p
revious CD track.
C
D fast forwards
/
backwards.
Lon
g
press: audio s
y
stem on / off.
S
hort press: selection o
f
the source in the
f
ollowin
g
order: FM1
/
FM2
/
FM3
/
MW
/
LW
/
C
D.
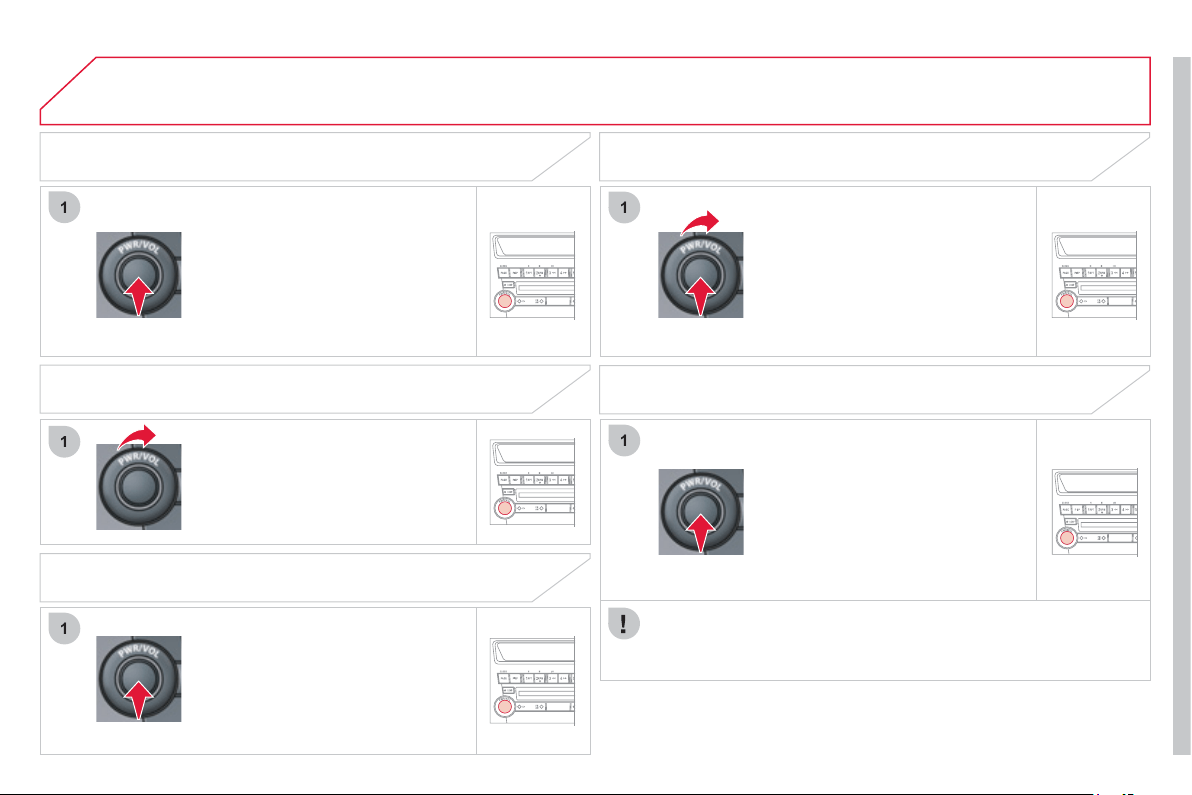
2
87
1
1
1
1
1
03 GENERAL OPERATION
Pr
ess
th
e
"PWR"
bu
tt
o
n.
Th
e
l
as
t
sou
r
ce
se
l
ec
t
ed
be
f
o
r
e
s
witchin
g
off resumes operation.
The audio equipment functions can be
u
se
d
w
h
en t
h
e
ig
n
i
t
i
on sw
i
tc
h
i
s
i
n t
h
e
"O
N" or "A
CC
" position.
To switch o
ff
, press the "PWR" button
again.
ADJU
S
TING THE VOLUME
SETTING THE AUDIO MODES
Press the "
SOU
ND" button several
t
i
mes; t
h
e au
di
o mo
d
es c
h
an
g
e
i
n t
h
e
f
ollowin
g
order:
S
UB PUN
C
H
/
TYPE
/
FIELD
/
BA
SS
/
MID
/
TREBLE
/
FADER
/
BALAN
C
E
/
O
FF.
Turn the "V
O
L" dial respectivel
y
to the
l
e
ft t
o
dec
r
ease
th
e
v
o
l
u
m
e
o
r t
o
th
e
righ
t to
i
ncrease
i
t.
To access the personalised sound
functions quickl
y
, press and hold
t
hi
s
b
utton, t
h
en turn
i
t to reac
h
t
h
e
personalised sound settin
g
o
f
y
our
c
h
o
i
ce
.
Re
l
ease
th
e
bu
tt
o
n t
o
s
t
o
r
e
th
e
settin
g
.
QUICK ACCESS MODE SWITCHING ON / OFF
The audio settin
g
mode is deactivated when the radio is operated
o
r a
C
D is pla
y
ed or a
f
ter approximatel
y
10 seconds without an
y
ac
ti
o
n.
I
f
you press this button
f
or more than
2
seconds in the audio settin
g
mode,
the s
y
stem switches to "Hold" mode.
Th
e
aud
i
o
m
ode
se
l
ec
t
ed
will
be
retained until
y
ou press this button
ag
ain for more than 2 seconds.
"HOLD" MODE
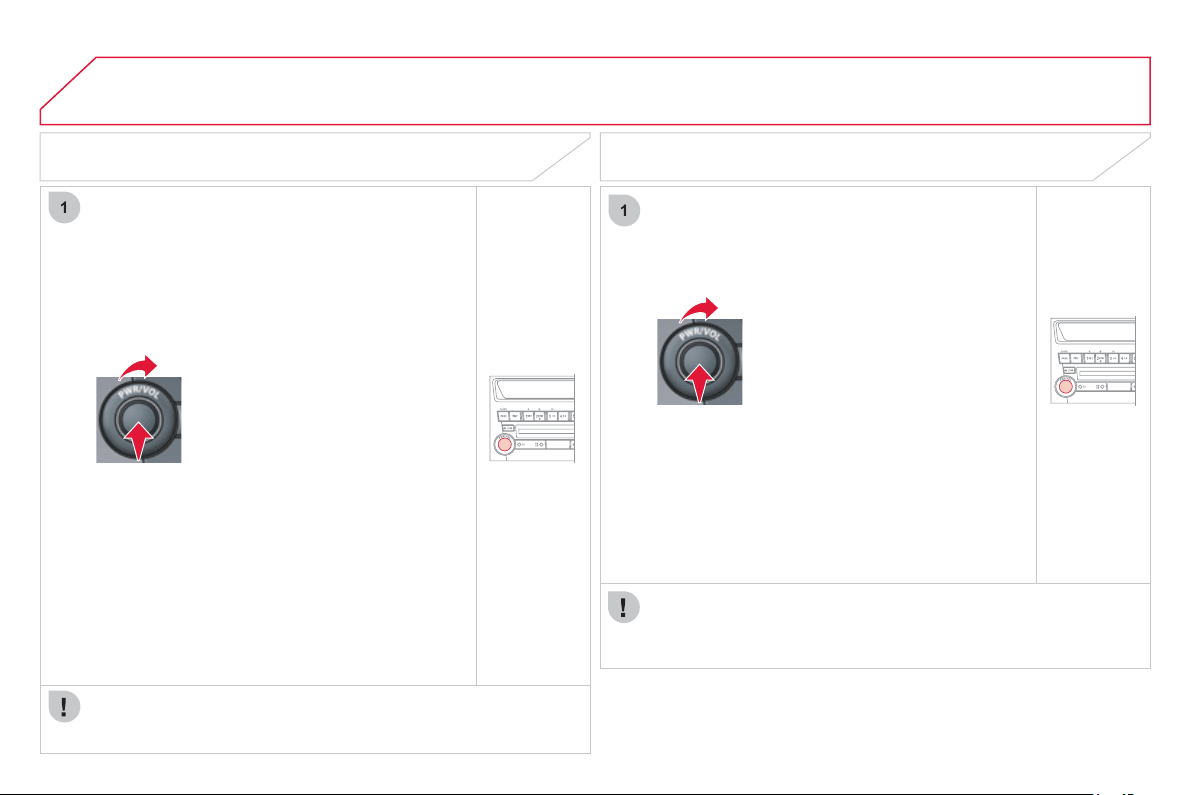
2
88
03
1
1
GENERAL OPERATION
Turn the "S
O
UND" dial; the musical
ambiences chan
g
e in the followin
g
o
r
de
r:
C
LA
SS
I
C
/
JAZZ
/
P
O
P
/
R
OC
K
/
H
IP-H
O
P.
O
n
ce
th
e
a
m
b
i
e
n
ce
h
as
bee
n
s
elected, press the "
SO
UND" button
t
o
co
nfi rm.
"CLASSIC": o
p
timises the acoustics
to obtain perfect equalisation of the
sou
n
d
f
o
r
c
l
ass
i
ca
l m
us
i
c
.
"JAZZ"
: opt
i
m
i
ses t
h
e acoust
i
cs to
obtain an ambient sound with speci
fi
c
m
odulations in the bass, mid tone and
treble
f
or
j
azz.
"P
O
P": o
p
timises the acoustics to
ob
t
a
in
c
l
ea
r v
oca
l
s
a
n
d
m
odu
l
a
ti
o
n
of
the bass and treble for pop music.
"R
O
CK": optimises the acoustics to
o
b
ta
i
n a soun
d
i
n
h
armon
y
w
i
t
h
t
h
e
rhy
t
h
m w
hi
c
h
p
l
aces t
h
e emp
h
as
i
s on
th
e
mi
d
t
o
n
e
fo
r r
oc
k m
us
i
c
.
"HIP-H
O
P": optimises the acoustics
to obtain a power
f
ul sound and
accentuation of the bass for hi
p
-ho
p
mus
i
c
.
SELECTING THE "TYPE" MUSICAL AMBIENCE
If the "TYPE" is chan
g
ed, the sound cuts out briefl
y
.
SELECTING "FIELD" SURROUND EFFECT
Turn the "
SO
UND" dial; the surround
e
ffects chan
g
e in the followin
g
order:
N
O
RMAL
/
S
TA
G
E
/
LIVE
/
HALL.
O
nce the surround effect has been
s
elected, press the "S
O
UND" button
t
o
co
n
fi
rm.
"N
O
RMAL": produces a sound in
whi
c
h th
e
v
o
i
ces
a
r
e
a
t th
e
f
r
o
nt
a
n
d
th
e
in
s
tr
u
m
e
nt
s
su
rr
ou
n
d
th
e
li
s
t
e
n
e
r.
"STAGE":
p
roduces a sound in which
the voices are immediatel
y
facin
g
the
l
istener, as on a sta
g
e.
"LIVE"
: pro
d
uces a soun
d
s
i
m
il
ar to
that o
f
a live show, in which the sound
reac
h
es
th
e
li
s
t
e
n
e
r
f
r
o
m
a
ll
d
ir
ec
ti
o
n
s
.
"HALL": produces a sound similar to
th
a
t
of
a
co
n
ce
rt h
a
ll with
defl
ec
ti
o
n
of
th
e
sou
n
d
.
I
f
the "FIELD" is chan
g
ed, the sound cuts out brie
fl
y
.
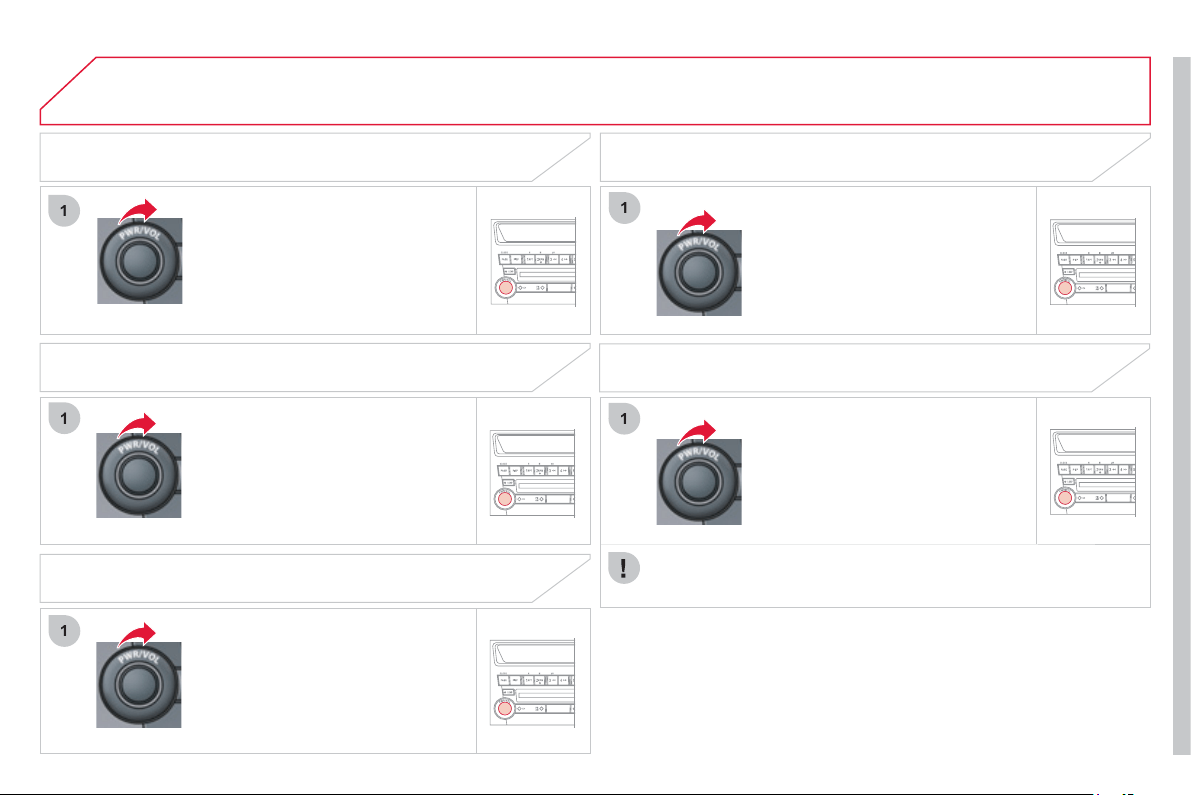
2
89
1
03
1
1
1
1
"BA
SS
"
S
ETTING
T
u
rn th
e
"
SOU
ND"
d
i
a
l t
o
se
t th
e
r
e
q
uired bass value.
GENERAL OPERATION
Turn the "
SO
UND" dial to set the
r
equ
i
re
d
m
id
tone va
l
ue.
"TREBLE" SETTING
"FADER" FRONT/REAR SOUND DISTRIBUTION SETTING
Turn the "
SOU
ND" dial to set the
ba
l
a
n
ce
o
f th
e
v
o
l
u
m
e
o
f th
e
fr
o
nt
a
n
d
r
ear speakers.
Turn the "
SOU
ND" dial to set the
r
equ
i
re
d
tre
bl
e va
l
ue.
Turn the "
SOU
ND" dial to set the
balance of the volume of the ri
g
ht and
l
eft speakers.
"BALANCE" LEFT/RIGHT SOUND DISTRIBUTION SETTING
"MID" MID-RANGE
S
ETTING
If the value "0" is set, an audible si
g
nal will be heard.
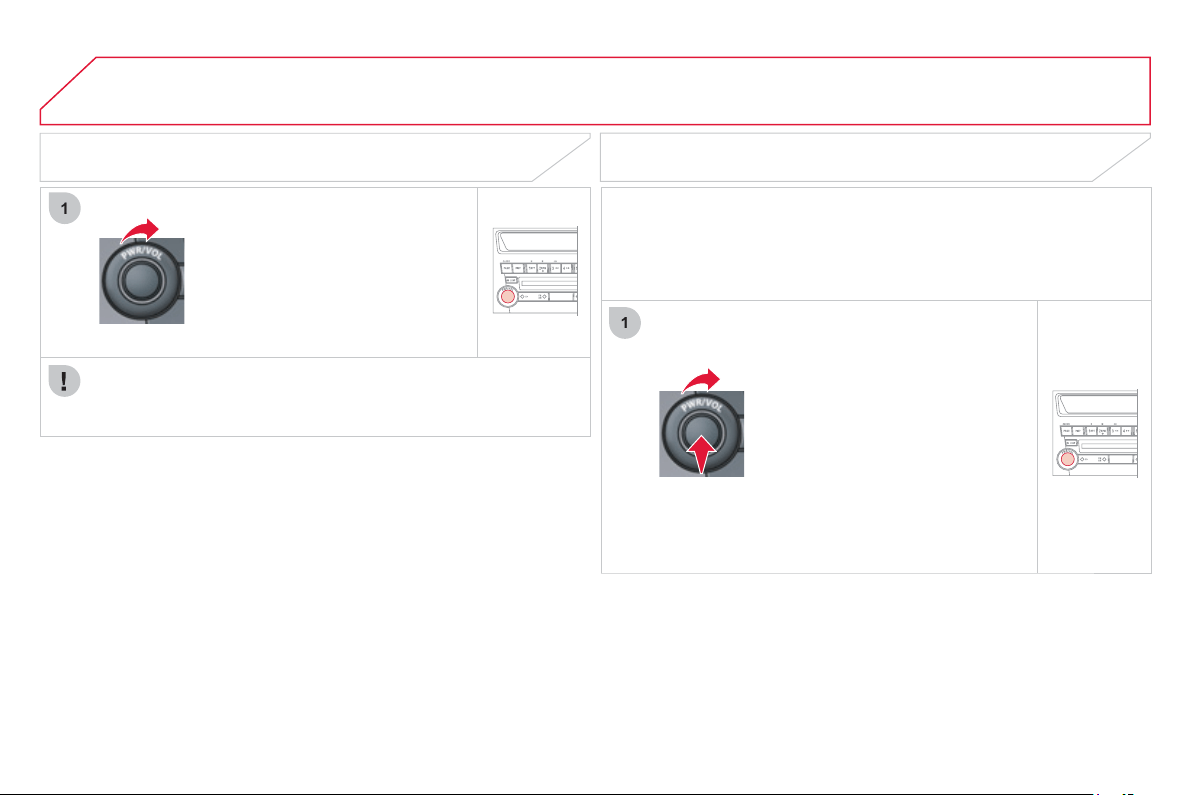
2
90
03
1
1
GENERAL OPERATION
This permits automatic ad
j
ustment of the "V
O
LUME", "BASS",
"MID"
an
d
"TREBLE"
sett
i
n
g
s
i
n re
l
at
i
on to t
h
e ve
hi
c
l
e spee
d
.
"
S
CV" AUTOMATIC VOLUME ADJU
S
TMENT
Turn the "
SOU
ND" dial to set the
v
o
l
u
m
e
o
f th
e
bass
u
nit.
O
nl
y
vehicles fi tted with the "Premium
S
ound" s
y
stem can o
ff
er the "
S
UB
PUN
C
H" settin
g
.
"SUB PUNCH" BASE UNIT VOLUME SETTING
If the "SUB PUNCH" is chan
g
ed, the sound cuts out briefl
y
.
Pr
ess
th
e
"
SOU
ND"
bu
tt
o
n
fo
r m
o
r
e
than two seconds to
g
ain access to
the functions settin
g
mode.
Then,
p
ress this same button several
times; the functions settin
g
mode
c
han
g
es in the followin
g
order:
AF
/
C
T
/
RE
G
/
TP-
S
/
PTY
(
languages
)
/
SC
V
/
PH
O
NE
/
O
FF.
Turn the "
SO
UND" dial respectivel
y
to
th
e
l
ef
t t
o
deac
tiv
a
t
e
th
e
fu
n
c
ti
o
n
o
r t
o
the ri
g
ht to activate it.
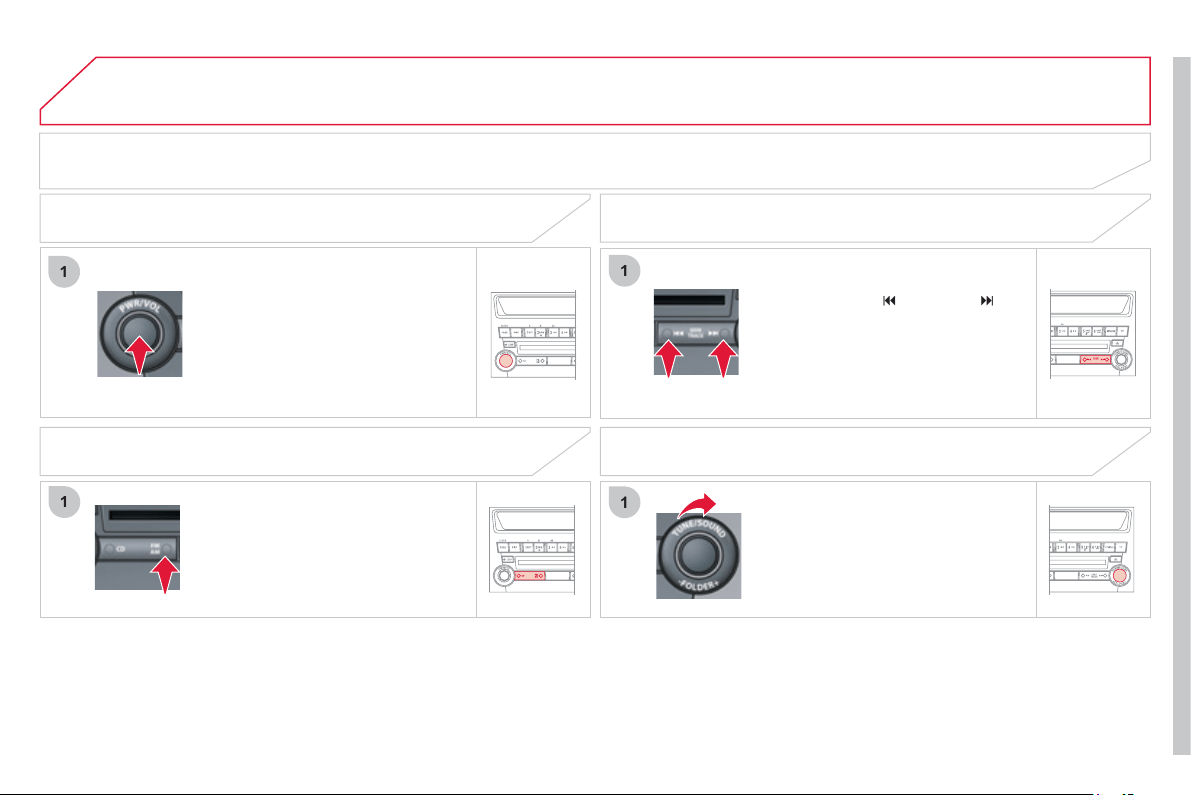
2
91
04
1
1
1
1
RADIO
SELECTING RADIO SOURCE
Press the "PWR" button or the "AM
/
FM"
bu
tt
o
n t
o
s
w
i
t
ch
o
n t
he
r
adio
.
Pr
ess
th
e
"AM
/
FM"
bu
tt
o
n
se
v
e
r
a
l
tim
es
in
success
i
o
n t
o
se
l
ec
t th
e
waveband; it chan
g
es in the followin
g
order: FM1
/
FM2
/
FM
3
/
MW
/
LW
/
FM1...
A
UTOMATIC STATION SEARCH
MANUAL STATION SEARCH
Turn the "TUNE" dial respectivel
y
to
the left to search the lower frequencies
or to t
h
e r
igh
t to searc
h
t
h
e
high
er
f
requencies.
Press the "
S
EEK
" or "
S
EEK
"
button to search the lower frequencies
or the hi
g
her
f
requencies respectivel
y
.
Th
e searc
h
b
e
gi
ns automat
i
ca
lly
an
d
s
tops at the
fi
rst station
f
ound.
SELECTING THE WAVEBAND
SELECTION / PRESETTING
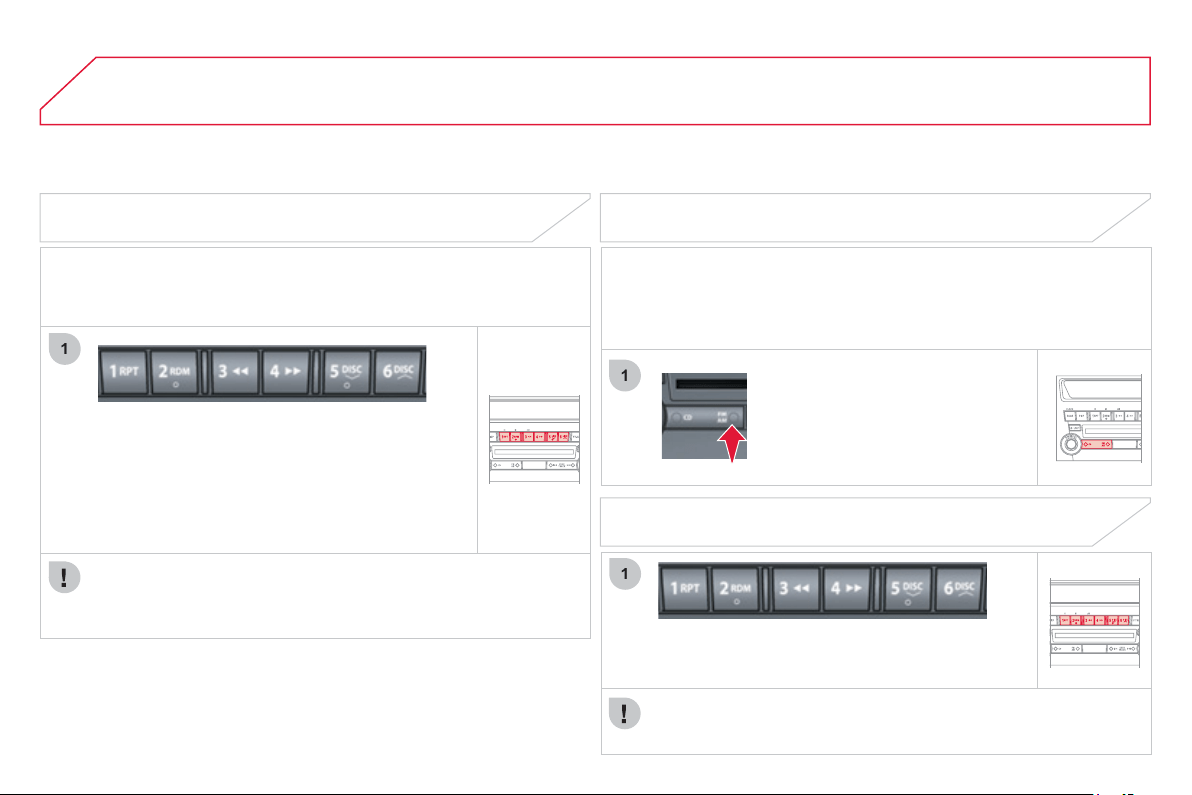
2
92
1
04
1
1
Press one of the six buttons "1" to "
6
" until an
a
u
dibl
e s
ig
na
l
i
s
h
ear
d
.
Th
e soun
d
cuts out t
h
en
b
ecomes au
dibl
e a
g
a
i
n
when the station has been preset.
Th
e
n
u
m
be
r
of
th
e
bu
tt
o
n
a
n
d
th
e
assoc
i
a
t
ed
r
ad
i
o
f
requenc
y
appear on the screen.
MANUAL STATION PRESETTING
To recall the pre-set stored settin
g
, press the button and release it
within tw
o
seco
n
ds
.
RADIO
Y
ou can preset up to s
i
x stat
i
ons on eac
h
wave
b
an
d
.
Presetting a new station replaces the previous station.
AUTOMATIC STATION PRESETTING
Di
sconnect
i
n
g
t
h
e
b
atter
y
term
i
na
l
s c
l
ears t
h
e preset ra
di
o stat
i
ons.
S
tations can onl
y
be preset automaticall
y
on wavebands FM3, MW
a
n
d
LW.
Presettin
g
new stations replaces the previous stations.
This presettin
g
can be activated automaticall
y
irrespective of the
w
a
v
eba
n
d
selec
t
ed
.
Pr
ess
th
e
"AM
/
FM"
bu
tt
o
n
fo
r m
o
r
e
th
a
n tw
o
seco
n
ds
.
The six stations offerin
g
the best
reception are preset and classifi ed
f
rom the weakest to the stron
g
est on
t
h
e s
i
x correspon
di
n
g
b
uttons.
RECALLING PRESET STATIONS
Press one o
f
the six buttons "1" to "6". The station
c
orresponding to the waveband selected appears on
th
e
sc
r
ee
n.
2
93
04
1
RADIO
The "Radio Data
Sy
stem"
(
RD
S)
f
unction on the FM waveband
p
ermits:
- access to the displa
y
of information, such as the name of the
s
tation, ...
- listenin
g
to the same station while travellin
g
throu
g
h different
r
e
gi
ons,
- temporar
y
tunin
g
to tra
ffi
c in
f
ormation announcements.
Most FM stations use RD
S
. These stations transmit non-audible
data in addition to their pro
g
rammes.
The data transmitted in this wa
y
allows
y
ou access to various
functions, mainl
y
displa
y
in
g
of the name of the station, automatic
retunin
g
to alternative frequencies or temporar
y
retunin
g
to traffi c
inf
o
rm
a
ti
o
n
a
nn
ou
n
ce
m
e
nt
s
.
RD
S
allows
y
ou to continue listenin
g
to the same station b
y
means
of
alternative
f
requencies that carr
y
the same station. However,
in certain conditions, RD
S
alternative
f
requencies may not be
p
rovided throu
g
hout the countr
y
. Radio stations do not cover the
w
hole countr
y
, which explains the loss o
f
reception o
f
the station
durin
g
a
j
ourne
y
.
"AF" ALTERNATIVE FREQUENCIES
Your radio automaticall
y
checks and selects the best
f
requenc
y
f
or
the radio station to which it is tuned
(
i
f
the station broadcasts on
s
everal transmitters or
f
requencies
)
.
The frequenc
y
of a radio station covers approximatel
y
30 miles
(
50 km
)
. The chan
g
e from one frequenc
y
to another explains the
temporar
y
loss of reception durin
g
a
j
ourne
y
.
If the station to which
y
ou are listenin
g
does not have several
f
requencies in the re
g
ion in which
y
ou are currentl
y
located,
y
ou can
deactivate alternative
f
requencies.
Some stations are or
g
anised in a network.
In different re
g
ions, the
y
broadcast different or shared pro
g
rammes
dependin
g
on the time o
f
da
y
.
Y
ou
ca
n
fo
ll
o
w:
- a regional station only,
- the entire network, with the possibilit
y
that
y
ou will be listenin
g
to a di
ff
erent pro
g
ramme.
REG REGIONAL MODE
O
n lon
g
distance
j
ourne
y
s, when the stored station becomes weak,
the radio searches
fi
rst
f
or another
f
requency
f
or the same station
(
AF
)
. Then, i
f
this
f
ails, it searches
f
or a
f
requenc
y
broadcastin
g
the
r
e
g
ional pro
g
ramme
(
RE
G)
. I
f
this also
f
ails, the radio returns to the
s
t
o
r
ed
s
t
a
ti
o
n.
The "AF", "REG" and "TP" functions
ca
n
be
deac
tiv
a
t
ed
o
r
ac
tiv
a
t
ed
vi
a
th
e
"TUNE" button functions settin
g
mode.
RDS
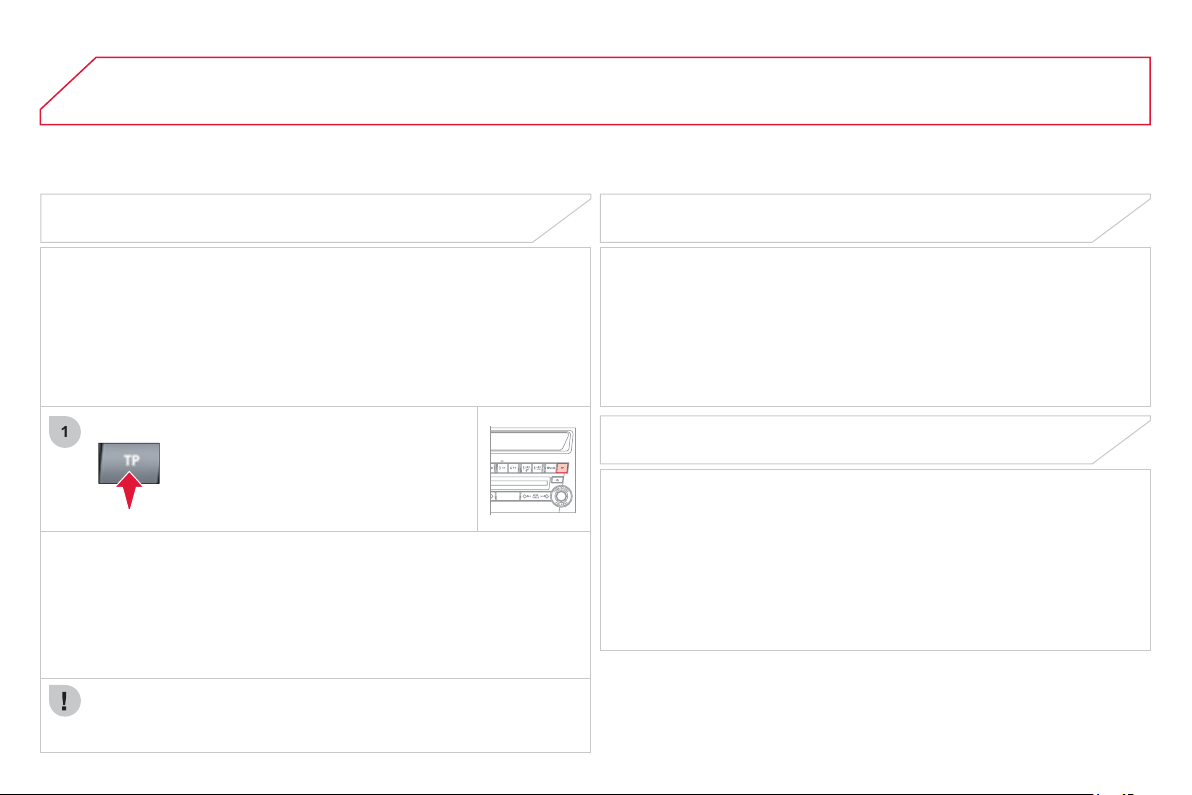
2
9
4
04
1
RADIO
"TP" TRAFFIC INFORMATION
The "Traffi c Pro
g
ramme"
(
TP
)
function permits automatic
and temporar
y
switchin
g
to an FM station broadcastin
g
traffi c
inf
o
rm
a
ti
o
n.
Th
e ra
di
o stat
i
on or t
h
e source t
h
at
y
ou are
li
sten
i
n
g
to at t
hi
s po
i
nt
i
s pause
d
.
O
nce the tra
ffi
c in
f
ormation has ended, the system switches back to
the radio station or the source that
y
ou were listenin
g
to initiall
y
.
P
r
ess
t
he
"TP"
bu
tt
o
n.
"TP" appears in the screen. I
f
the
s
tation is compatible, "RD
S
" also
appears
.
If the radio detects traffi c information, "TRAF INF" a
pp
ears on the
displa
y
, followed b
y
the frequenc
y
of the broadcastin
g
station, then
i
t
s
n
a
m
e
.
The volume is di
ff
erent
f
rom that o
f
the previous source.
Following the broadcasting o
f
the tra
ffi
c in
f
ormation, the volume
returns to that o
f
the source prior to the interruption.
When "TP" appears in the screen, the radio stops onl
y
at RD
S
s
tations broadcastin
g
tra
ffi
c in
f
ormation.
"ALERT" EMERGENCY BROADCA
S
T
S
A
n emer
g
enc
y
b
roa
d
cast automat
i
ca
lly
an
d
temporar
ily
i
nterrupts
the FM station or the source that you are listening to.
The messa
g
e "ALERT" appears in the screen and the volume is
different from that of the
p
revious source.
Followin
g
the emer
g
enc
y
broadcast, the messa
g
e disappears and
the volume returns to that of the source prior to the interruption.
"PTY" THEMED TYPE OF PROGRAMME
S
ome stations o
ff
er the option o
f
listenin
g
to a themed t
y
pe o
f
programme as a priority, selected
f
rom the list available below:
NEW
S
, AFFAIR
S
, INF
O
,
S
P
O
RT, EDU
C
ATE, DRAMA,
C
ULTURE,
SC
IEN
C
E, VARIED, P
O
P M, R
OC
K M, EA
S
Y M, LI
G
HT M,
C
LASSICS,
O
THER M, WEATHER, FINANCE, CHILDREN,
SO
CIAL, RELIGI
O
N, PH
O
NE IN, TRAVEL, LEISURE, JAZZ,
CO
UNTRY, NATI
O
N M,
O
LDIES, F
O
LK M, D
O
CUMENT.
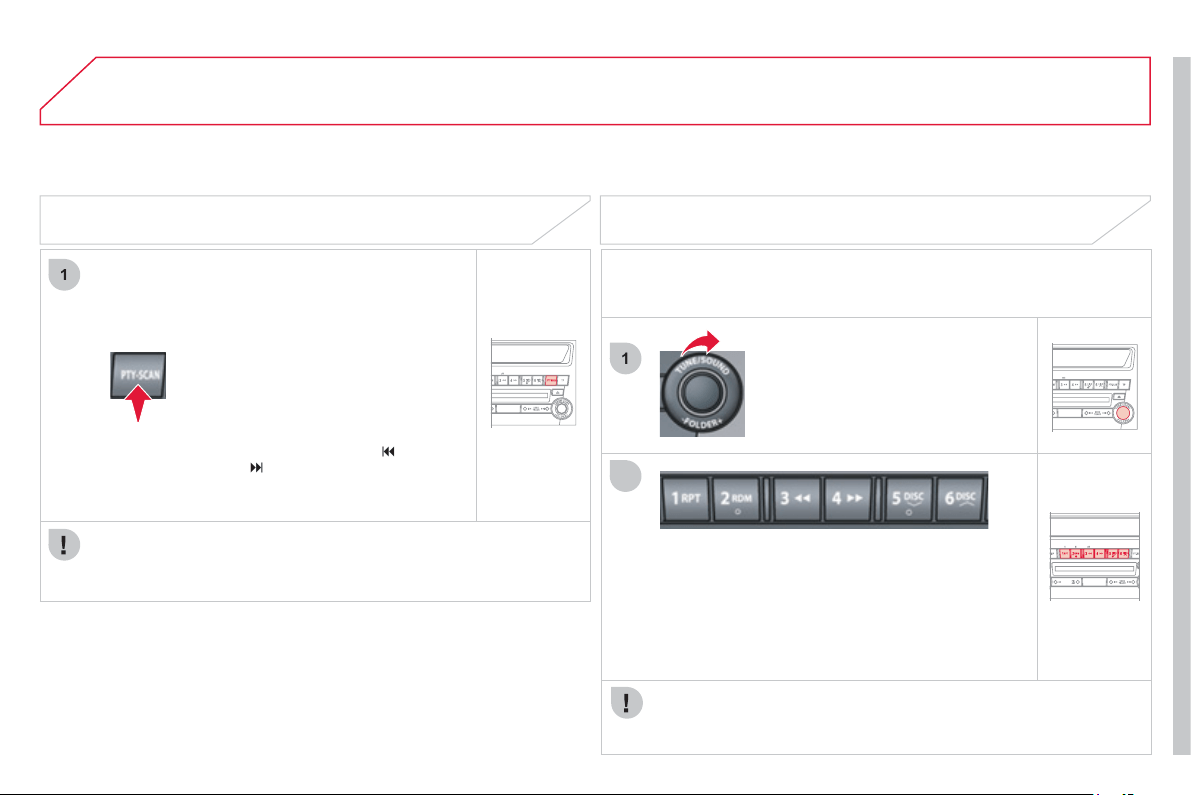
2
95
04
1
1
2
RADIO
SEARCH FOR A "PTY" BROADCAST
Pr
ess
th
e
"PTY"
bu
tt
o
n.
Turn the "TUNE" dial to select the t
y
pe
o
f
pro
g
ramme required.
Two seconds later, the radio searches
for a broadcast which corres
p
onds
to
y
our selection; the t
y
pe of PTY
se
l
ec
t
ed
fl
as
h
es
in th
e
sc
r
ee
n.
O
nce the station has been
f
ound, its
name appears
i
n t
h
e screen.
You can press the "
S
EEK
"
o
r
"
S
EEK
"
bu
tt
o
n
s
t
o
fi
n
d
a
n
o
th
er
s
t
a
ti
o
n.
I
f
no station is
f
ound correspondin
g
to
y
our selected t
y
pe o
f
pro
g
ramme, "N
O
NE" appears in the screen
f
or
fi
ve seconds and the
radio returns to the
p
revious station.
T
u
rn th
e
"T
U
NE"
d
i
a
l t
o
se
t th
e
PTY
pro
g
ramme to be stored.
Pr
ess
o
n
e
of
th
e
s
ix
bu
tt
o
n
s
"1" t
o
"
6
"
fo
r m
o
r
e
th
a
n
tw
o
seco
n
ds
.
The sound cuts out then becomes audible a
g
ain
when the pro
g
ramme has been stored.
Th
e
n
u
m
be
r
o
f th
e
bu
tt
o
n
a
n
d
th
e
assoc
i
a
t
ed
PTY
p
ro
g
ramme appear
i
n t
h
e screen.
To recall the preset memor
y
settin
g
, press the button and release it
within tw
o
seco
n
ds
.
PRESETTING A "PTY" PROGRAMME
You can preset up to six PTY programmes.
Each new pro
g
ramme stored replaces the previous one.
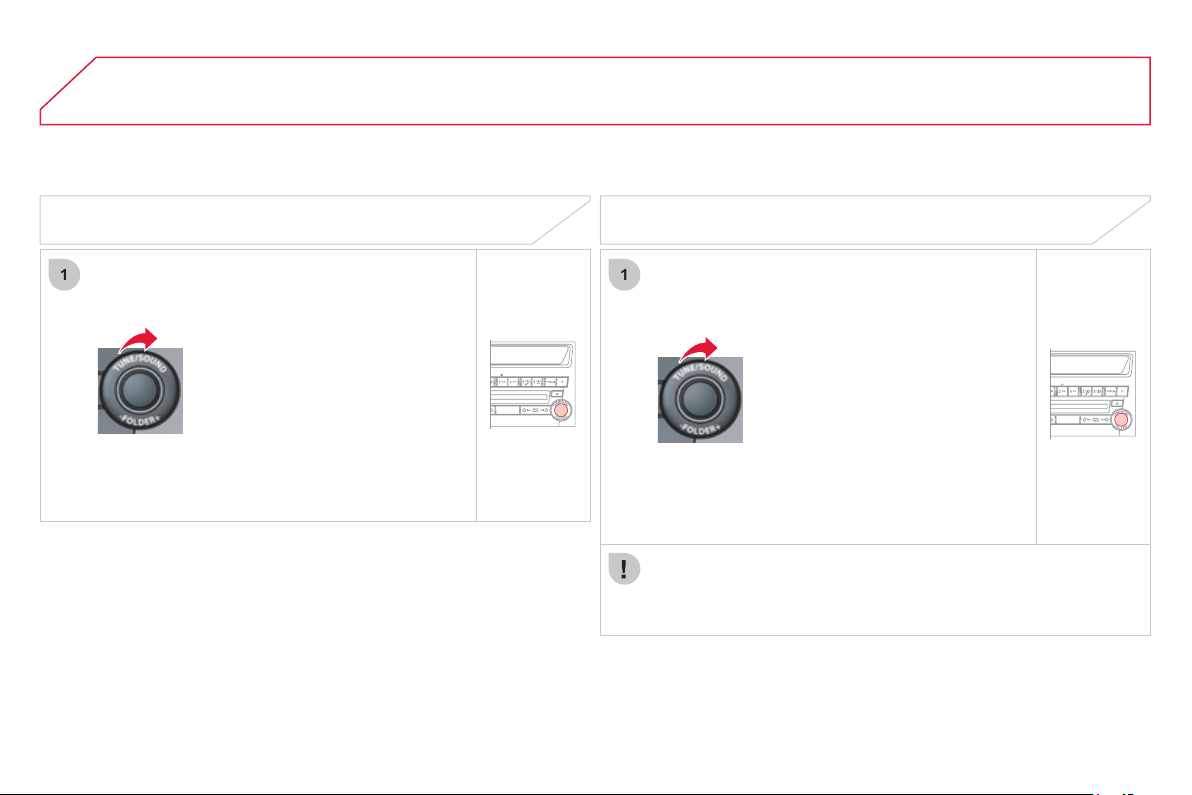
2
96
04
1
1
RADIO
CHANGING THE DISPLAY LANGUAGE OF THE "PTY"
P
ROGRAMME
Press the "TUNE" button
f
or more than
tw
o
seco
n
ds
t
o
access
th
e
fu
n
c
ti
o
n
s
s
ettin
g
mode.
Then,
p
ress this button several times
in succession; the functions settin
g
mode chan
g
es in the followin
g
order:
AF
/
C
T
/
RE
G
/
TP-
S
/
PTY
(
lan
g
ua
g
es
)
/
SC
V
/
PH
O
NE
/
O
FF.
Turn the "TUNE" dial to the le
f
t or
to the ri
g
ht to select the lan
g
ua
g
e
(
EN
G
LI
S
H, FRAN
C
AI
S
, DEUT
SC
H,
S
VENSK, ESPAGN
O
L, ITALIAN
O)
.
FUNCTIONS SETTING MODE
This
p
ermits activation or deactivation
o
f th
e
f
u
n
c
ti
o
n
s
be
l
o
w.
Press the "T
U
NE" button for more than
tw
o
seco
n
ds
t
o
access
th
e
fu
n
c
ti
o
n
s
s
ett
i
n
g
mo
d
e.
Then, press this button several times
in succession; the
f
unctions settin
g
mode chan
g
es in the
f
ollowin
g
order:
AF
/
C
T
/
RE
G
/
T
O
-
S
/
PTY
(
lan
g
ua
g
es
)
/ SCV / PH
O
NE /
O
FF.
T
urn t
h
e
"TUNE"
di
a
l
respect
i
ve
ly
t
o
th
e
l
ef
t t
o
deac
tiv
a
t
e
th
e
fu
n
c
ti
o
n
(
"
O
FF"
)
or to the ri
g
ht to activate it
(
"
O
N"
)
.
The "PH
O
NE" is not operational at present.
The
f
unctions settin
g
mode is deactivated a
f
ter approximatel
y
10 seconds without an
y
action.
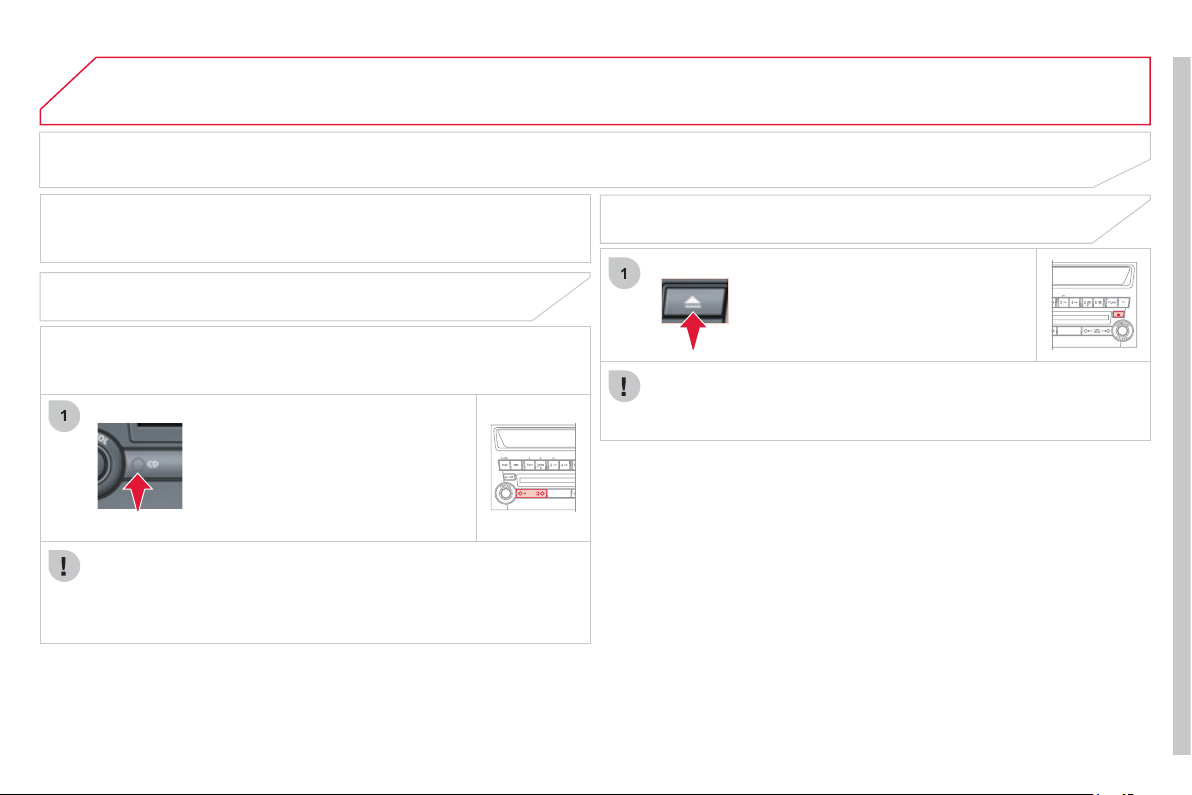
2
97
05
1
MUSIC MEDIA PLAYERS
This can pla
y
audio CDs
(
CD-DA, CD-Text, CD-R/RW
)
or MP3 CDs.
EJECTING A DISC
CD PLAYER
SELECTING CD MODE
I
f
the pla
y
er alread
y
contains a disc,
press the "
C
D" button.
"
C
D", the track number and the pla
y
in
g
time a
pp
ear in the screen.
Insert circular compact discs onl
y
.
8 cm compact discs must be inserted in the centre of the pla
y
er slot.
Af
ter inserting a disc, printed
f
ace upwards, the player starts
automaticall
y
.
Pr
ess
thi
s
bu
tt
o
n t
o
r
e
m
o
v
e
th
e
disc from the pla
y
er. The s
y
stem
automat
i
ca
lly
sw
i
tc
h
es to ra
di
o mo
d
e.
O
nce e
j
ected, i
f
the compact disc is not removed within
fi
f
teen
s
econds, it is reloaded into the pla
y
er.
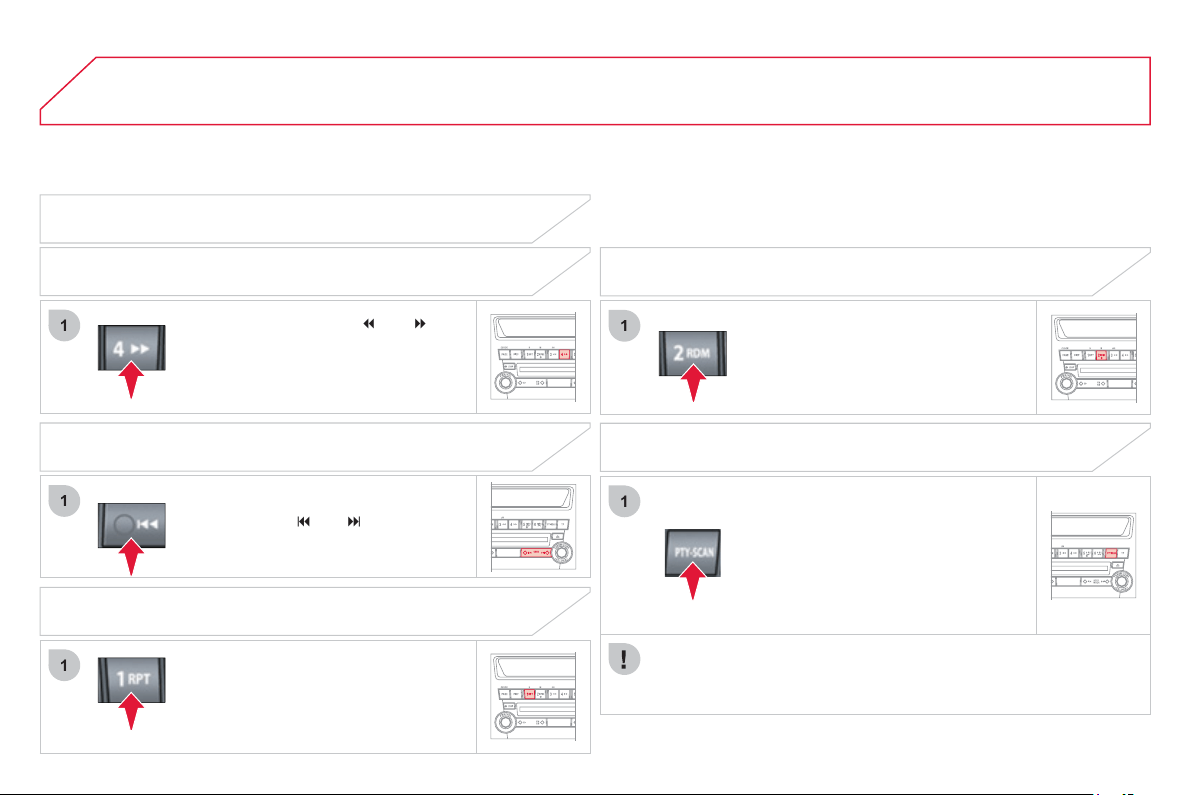
2
98
05
1
1
1
1
1
MUSIC MEDIA PLAYERS
Random pla
y
in
g
of a disc
Pr
ess
th
e
"RDM"
bu
tt
o
n t
o
s
t
a
rt
r
andom pla
y
of the tracks on the disc.
"
RDM" appears in the screen.
T
o ex
i
t t
hi
s mo
d
e, press t
hi
s
b
utton
a
g
a
i
n.
AUDIO CD
P
r
ess
a
n
d
hold
bu
tt
o
n
"
"
o
r
"
"
t
o
c
arr
y
out a
f
ast backwards or
f
orwards
s
earch respectivel
y
.
Pla
y
be
g
ins when the button is
r
e
l
eased
.
Fast search
P
r
ess
bu
tt
o
n
"
"
o
r
"
"
t
o
selec
t t
he
previous or next track respectively.
Selectin
g
a track
P
ress t
h
e
"RPT"
b
utton to repeat
the play o
f
the current track. "RPT"
a
ppears in the screen.
To exit this mode, press this button
ag
ain.
Repeatin
g
a track
Pla
y
in
g
the be
g
innin
g
of each track
Press the "
SC
AN" button to start
p
layback o
f
the
fi
rst ten seconds
of
eac
h tr
ac
k
o
n th
e
d
i
sc
. "
SC
AN"
appears in the screen and the
c
orrespondin
g
track number fl ashes.
To exit this mode,
p
ress this button
a
g
ain.
O
n CD-R/RWs, the qualit
y
of the pla
y
back sound depends on the
e
ncodin
g
software, the burnin
g
device and the burnin
g
speed used.
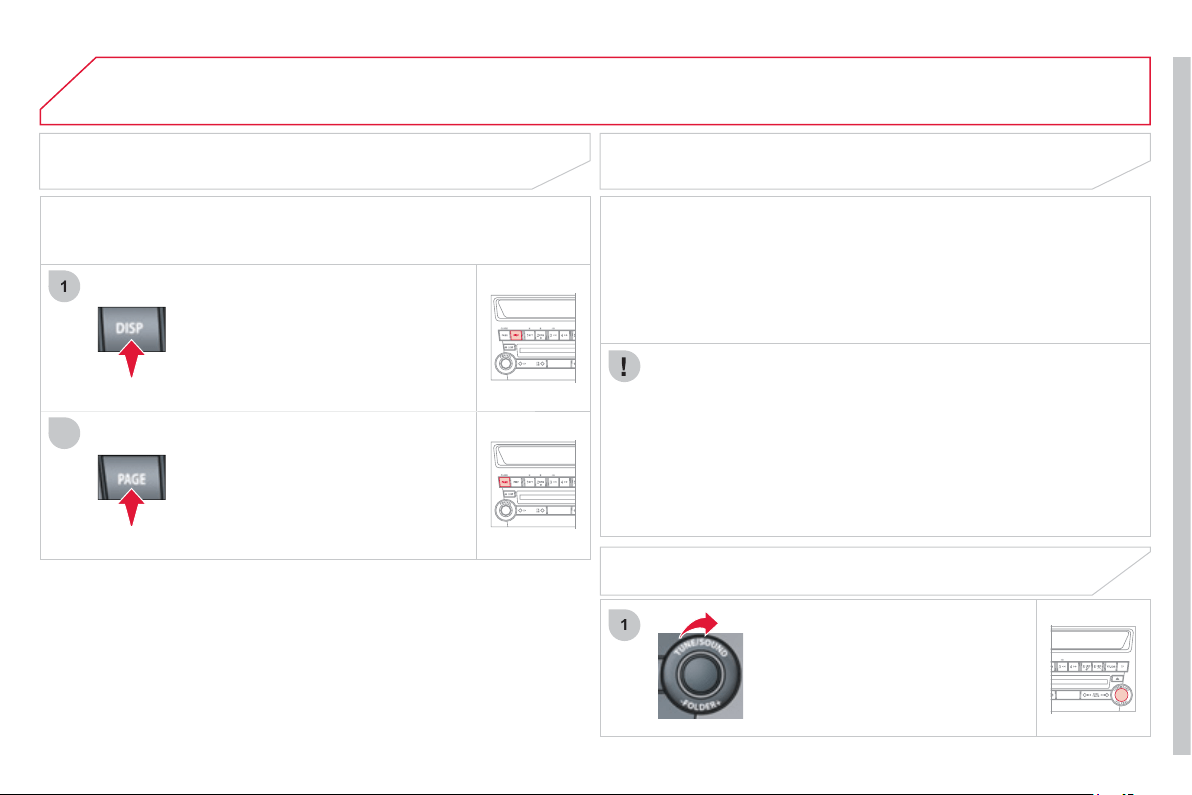
2
99
1
2
1
05
CD-TEXT DISPLAY
Press the "DI
S
P" button several times
in succession; the
C
D-Text in
f
ormation
a
ppears in the
f
ollowin
g
order:
DI
SC
NAME
/
TRA
C
K NAME
/
N
O
RMAL DI
S
PLAY M
O
DE.
The CD pla
y
er and the CD chan
g
er are compatible with the displa
y
of
C
D-Text information.
In the case o
f
compact discs containin
g
both
C
D-DA and MP3
fi
les,
p
la
y
automaticall
y
be
g
ins with the
C
D-DA
fi
les.
To switch play between the two types o
f
fi
le, press the "
C
D" button
f
or more than two seconds until an audible si
g
nal is heard.
While usin
g
these compact discs, the "Repeat", Random pla
y
" and
"Pla
y
in
g
of the be
g
innin
g
of the tracks" functions are onl
y
applied to
fi l
es
o
f th
e
sa
m
e
f
o
rm
a
t.
I
f
th
e
in
fo
rm
a
ti
o
n
e
x
ceeds
12 characters, press the "PA
G
E"
bu
tt
o
n t
o
see
th
e
r
es
t.
In th
e
abse
n
ce
of
C
D-T
e
xt in
fo
rm
a
ti
o
n
to be displa
y
ed, "N
O
TITLE" appears
o
n th
e
sc
r
ee
n.
MP3 / ID3 TAG CD
SELECTING AN MP3 FOLDER
Turn the "F
O
LDER" dial respectivel
y
to
the right to select a
f
older in ascending
o
r
de
r
o
r t
o
th
e
l
ef
t t
o
se
l
ec
t
a
fo
l
de
r in
descendin
g
order.
The
C
D pla
y
er and the
C
D chan
g
er are compatible with the pla
y
in
g
of
MP
3
fi
les.
These must be recorded in I
SO
9660 Level 1
/
Level 2, Joliet or
R
omeo
f
ormat on
C
D R
O
Ms,
C
D-Rs or
C
D-RWs. The
C
Ds can
co
nt
a
in
a
m
a
xim
u
m
of
2
55
fi
l
es
a
n
d
1
00
fo
l
de
r
s
o
n 1
6
l
e
v
e
l
s
.
The ID3 version 1 Ta
g
can be displa
y
ed while pla
y
in
g
MP3 fi les.
MUSIC MEDIA PLAYERS
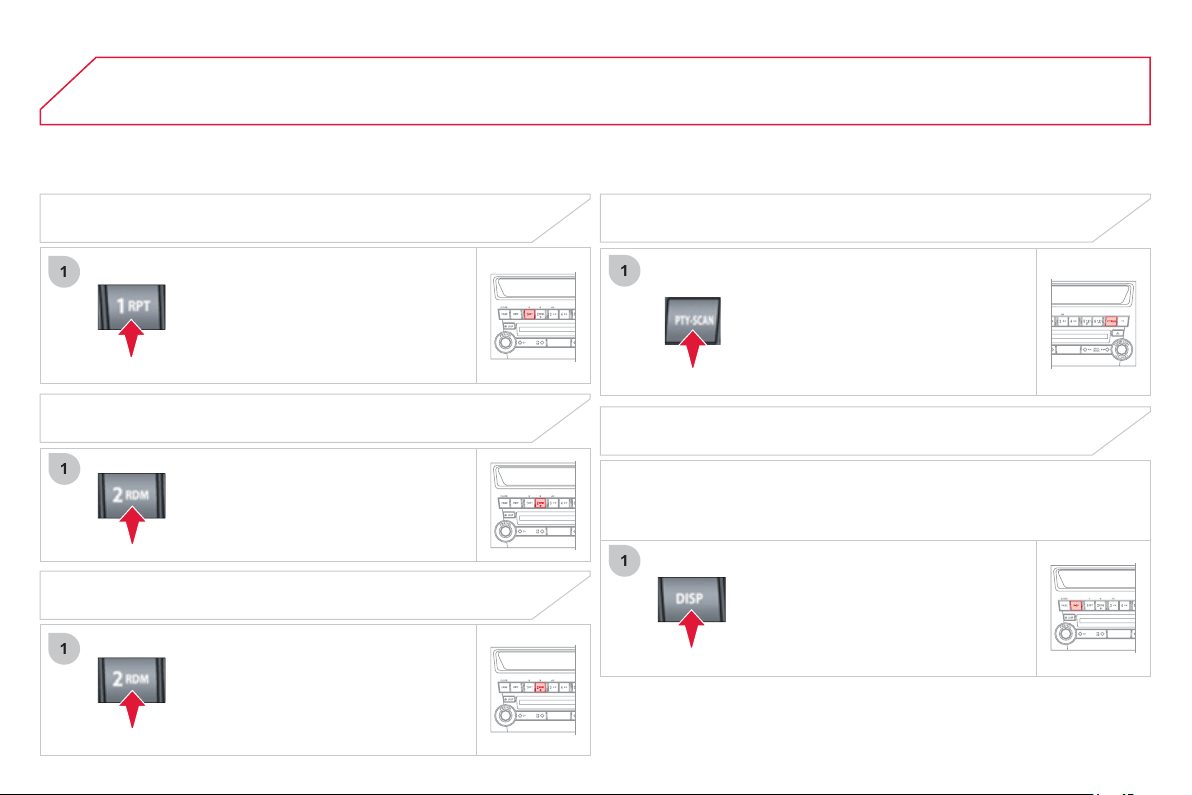
300
05
1
1
1
1
1
MUSIC MEDIA PLAYERS
REPEATING THE TRACKS IN A FOLDER
Pr
ess
th
e
"RPT"
bu
tt
o
n f
o
r m
o
r
e
th
a
n
two seconds to repeat the pla
y
in
g
o
f
t
he
tr
acks
co
nt
ai
n
ed
i
n t
he
cu
rr
e
nt
f
older. "D-RPT" appears in the screen.
To exit this mode, press this button
a
g
ain.
Pr
ess
th
e
"RDM"
bu
tt
o
n t
o
s
t
a
rt
r
andom pla
y
in
g
of the tracks in the
c
urrent folder. "RDM" a
pp
ears in the
screen
.
T
o ex
i
t t
hi
s mo
d
e, press t
hi
s
b
utton
a
g
a
i
n.
PLAYING THE BEGINNING OF EACH TRACK
MP3 / ID3 TAG DISPLAY
Press the "DI
S
P" button several times
in succession; the MP3 information
appears in the followin
g
order:
F
O
LDER NAME
/
TRA
C
K NAME
/
NO
RMAL DI
S
PLAY M
O
DE.
Press the "
SC
AN" button to start
p
la
y
in
g
the
fi
rst ten seconds o
f
each
tr
ac
k in
a
ll
of
th
e
fo
l
de
r
s
. "
SC
AN"
a
pp
ears in the screen and the
c
orrespondin
g
track number fl ashes.
To exit this mode, press this button
a
g
a
i
n.
RANDOM PLAYING OF A FOLDER
RANDOM PLAYING OF A DI
S
C
Pr
ess
th
e
"RDM"
bu
tt
o
n
fo
r m
o
r
e
th
a
n
two seconds to start random pla
y
in
g
o
f
th
e
tr
ac
k
s
in
a
ll
of
th
e
fo
l
de
r
s
. "D-RDM"
a
pp
ears in the screen.
To exit this mode,
p
ress this button
a
g
ain.
When pla
y
be
g
ins, "READIN
G
" appears in the screen then
disappears to make wa
y
f
or the
f
older number, the track number,
the playing time and "MP3".
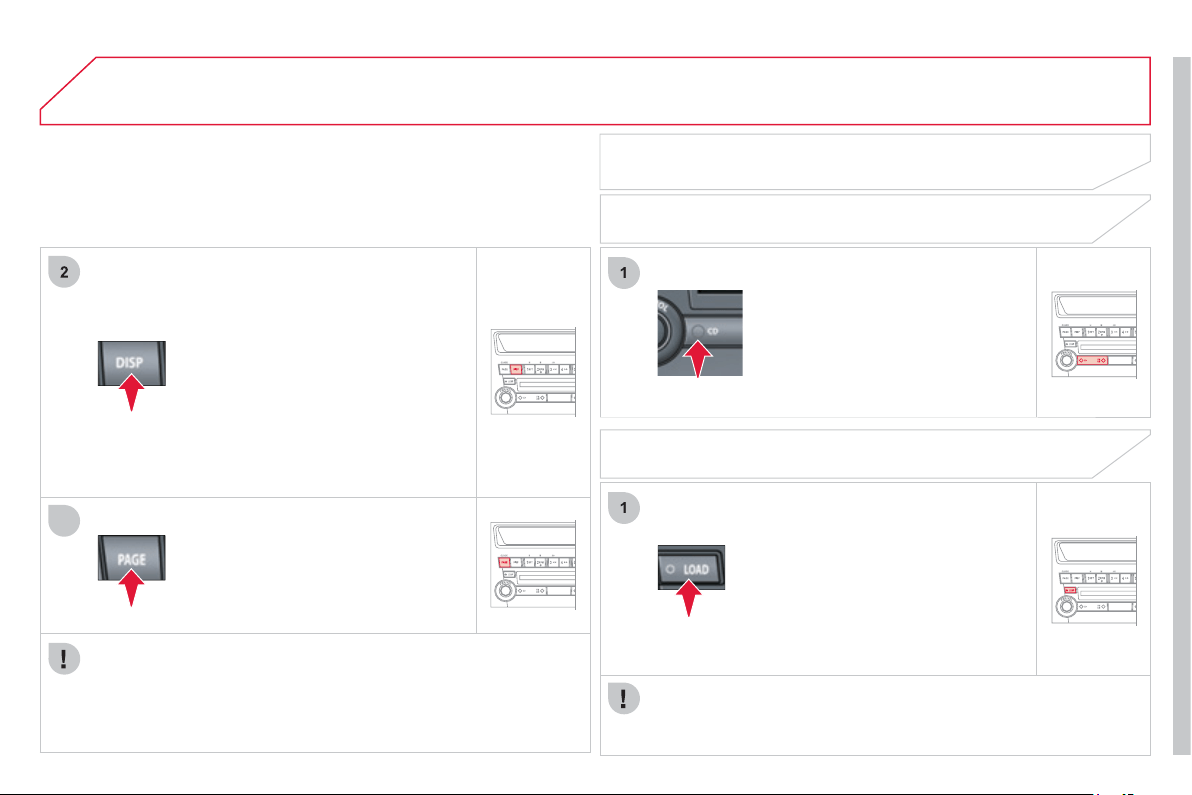
301
05
3
1
1
Pr
ess
th
e
"DI
S
P"
bu
tt
o
n
fo
r m
o
r
e
th
a
n
two seconds to activate the ID
3
Ta
g
information. "TAG" a
pp
ears in the
sc
r
ee
n.
Press the "DI
S
P" button several times
in succession; the Ta
g
ID3 information
appears in the
f
ollowin
g
order:
A
LBUM NAME
/
TRA
C
K NAME
/
A
RTI
S
T NAME
/
N
O
RMAL DI
S
PLAY
MO
DE.
To deactivate this information,
p
ress
the "DISP" button a
g
ain for more than
tw
o
seco
n
ds
.
If th
e
inf
o
rm
a
ti
o
n
e
x
ceeds
12 characters, press the "PAGE"
bu
tt
o
n t
o
see
t
he
r
es
t.
In the absence o
f
MP3 or ID3 Ta
g
in
f
ormation to be displayed,
"N
O
TITLE" appears in the screen.
O
n
C
D-R
/
RWs, the qualit
y
o
f
the pla
y
in
g
sound depends on the
e
ncodin
g
software, the burnin
g
device and the burnin
g
speed used.
Dependin
g
on the fl ow chart of the MP3 folders and fi les on the
di
sc, p
l
a
y
ma
y
not
b
e
gi
n
i
mme
di
ate
ly
.
CD CHANGER
SELECTING CHANGER MODE
A
fter insertin
g
at least one disc, printed
f
ace upwards, the chan
g
er starts
automat
i
ca
lly
.
I
f
the changer already contains a disc,
p
ress the "
C
D" button.
"CD", the disc and track numbers and
the pla
y
in
g
time appear in the screen.
MUSIC MEDIA PLAYERS
See also "CD-Text displa
y
" and "MP3 / ID3 Ta
g
CD".
LOADING A DISC
The CD chan
g
er can hold up to 6 CDs.
Press the "L
O
AD" button briefl
y
.
"WAIT"
appears on t
h
e
di
sp
l
a
y
.
Wh
en t
h
e c
h
an
g
er
i
s rea
dy
, t
h
e
indicator lamp on the "L
O
AD" button
c
omes on and "L
O
AD DI
SC
N
°
(
1-6
)
"
appears in the screen.
If several slots are empt
y
, select one
u
sin
g
one of the "DISC" buttons.
I
nsert c
i
rcu
l
ar compact
di
scs on
ly
.
8 cm compact discs cannot be pla
y
ed b
y
the chan
g
er.
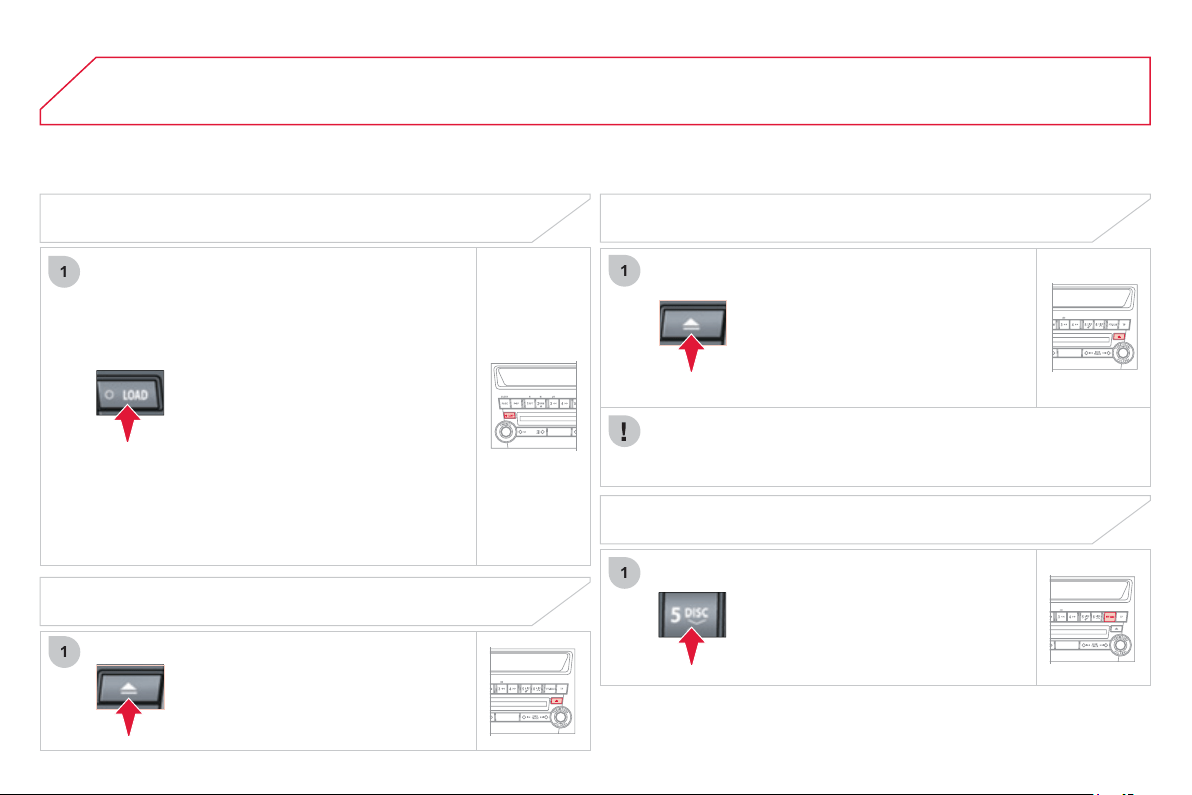
302
05
1
1
1
1
MUSIC MEDIA PLAYERS
LOADING ALL OF THE DISCS
Pr
ess
th
e
"L
O
AD"
bu
tt
o
n
fo
r m
o
r
e
th
a
n
tw
o
seco
n
ds
.
The chan
g
er selects an empt
y
slot
n
umber from the lowest to the hi
g
hest
and switches to waitin
g
for loadin
g
mode
.
"L
O
AD DI
SC
N
°
(
1-6
)
" appears on
the display; insert the disc in the
c
orrespondin
g
slot.
The chan
g
er automaticall
y
selects the
n
ext empt
y
slot number and returns to
waitin
g
for loadin
g
mode.
R
epeat t
h
ese steps unt
il
l
oa
di
n
g
i
s
c
omp
l
ete.
Pl
a
y
b
e
gi
ns w
i
t
h
t
h
e
l
ast
disc
i
n
se
rt
ed
.
Press this button brie
fl
y
to remove the
c
urrent disc
f
rom the chan
g
er.
EJECTING ALL OF THE DISCS
S
ELECTING A DI
S
C
Press one of the "DI
SC
" buttons
s
everal times in succession until
y
ou
r
each the disc required. The s
y
mbol
of the disc selected appears in the
screen
.
Pr
ess
thi
s
bu
tt
o
n
fo
r m
o
r
e
th
a
n tw
o
s
econ
d
s.
Th
e current
di
sc
i
s e
j
ecte
d
.
O
nce this disc has been removed, the
n
ext disc is e
j
ected automaticall
y
in
it
s
t
u
rn.
Repeat these steps until unloadin
g
is
c
omplete.
EJECTING A DISC
O
nce e
j
ected, if the compact disc is not removed within fi fteen
s
econds it is re-loaded into the chan
g
er.
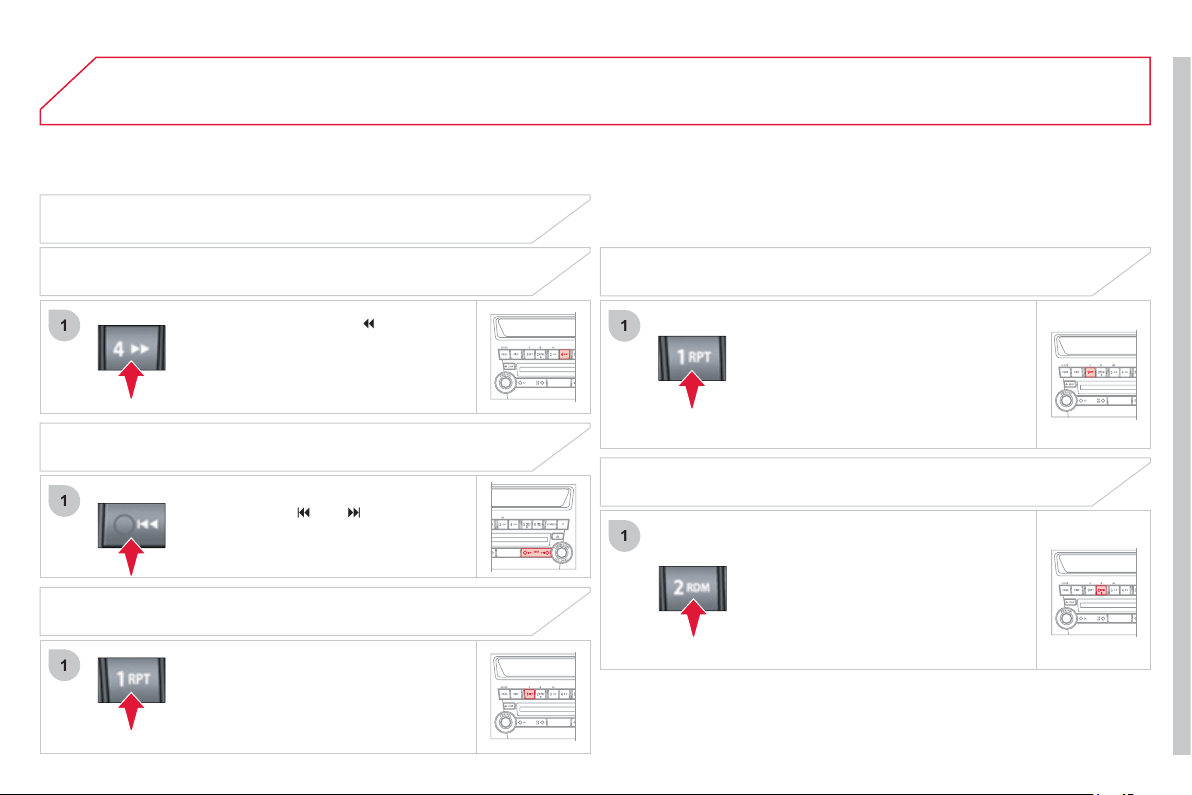
303
05
1
1
1
1
1
MUSIC MEDIA PLAYERS
R
epeat
i
n
g
a
di
sc
Pr
ess
th
e
"RPT"
bu
tt
o
n
fo
r m
o
r
e
th
a
n
two seconds to repeat the playing o
f
th
e
tr
ac
k
s
of
th
e
cu
rr
e
nt
d
i
sc
. "D-RPT"
appears in the screen.
To exit this mode,
p
ress this button
a
g
ain.
AUDIO CD
P
r
ess
a
n
d
hold
bu
tt
o
n
"
"
o
r
"
"
t
o
c
arr
y
out a
f
ast backwards or
f
orwards
s
earch respectivel
y
.
Pla
y
be
g
ins when the button is
r
e
l
eased
.
Fast search
P
r
ess
bu
tt
o
n
"
"
o
r
"
"
t
o
selec
t
t
h
e prev
i
ous trac
k
or next trac
k
respectivel
y
.
Selectin
g
a track
Press the "RPT" button to repeat the
pla
y
in
g
of the current track. "RPT"
a
ppears
i
n t
h
e screen.
To exit this mode, press this button
ag
ain.
Repeatin
g
a track
Random pla
y
in
g
of a disc
Pr
ess
th
e
"RDM"
bu
tt
o
n t
o
s
t
a
rt
r
andom pla
y
in
g
of the tracks on the
di
sc.
"RDM"
appears
i
n t
h
e screen.
T
o ex
i
t t
hi
s mo
d
e, press t
hi
s
b
utton
again.
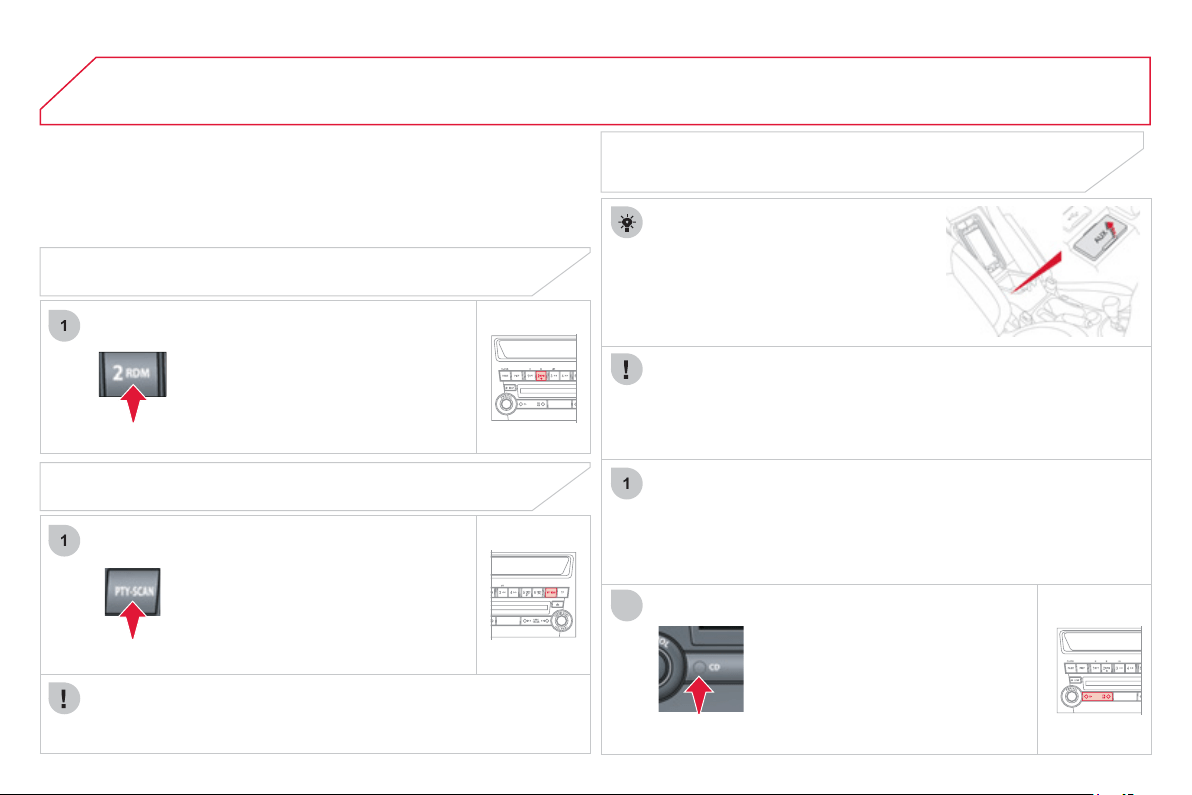
30
4
05
1
1
1
2
MUSIC MEDIA PLAYERS
Random pla
y
in
g
on all of the discs
Pr
ess
th
e
"RDM"
bu
tt
o
n
fo
r m
o
r
e
th
a
n
two seconds to start random pla
y
in
g
o
f
th
e
tr
ac
k
s
o
n
a
ll
of
th
e
d
i
scs
. "D-RDM"
a
ppears in the screen.
To exit this mode, press this button
ag
ain.
Pla
y
in
g
of the be
g
innin
g
of each track
Press the "
SC
AN" button to start play
of
th
e
fi
r
s
t t
e
n
seco
n
ds
of
eac
h tr
ac
k
on the disc. "
SC
AN" appears in the
s
creen and the correspondin
g
track
n
u
m
be
r fl
as
h
es
.
To exit this mode, press this button
ag
a
i
n.
O
n CD-R/RWs, the pla
y
back sound qualit
y
depends on the
e
ncodin
g
software, the burnin
g
device and the burnin
g
speed used.
USING THE AUXILIARY SOCKET (AUX)
The auxiliar
y
socket, JACK or RCA,
p
ermits the connection of
p
ortable
equipment
(
MP3 pla
y
er...
)
.
Do not connect a sin
g
le piece o
f
equipment via the U
S
B port and
the JA
C
K socket at the same time.
Connect the portable equipment
(
MP3 pla
y
er…
)
to the JACK
s
ocket or to the R
C
A-t
y
pe audio sockets
(
white and red
)
usin
g
a
s
u
i
ta
bl
e ca
bl
e, not supp
li
e
d
.
Pr
ess
th
e
"
C
D"
bu
tt
o
n
fo
r m
o
r
e
th
a
n
tw
o
seco
n
ds
.
"AUX" a
pp
ears in the screen and the
e
xt
e
rn
a
l m
ode
i
s
ac
tiv
a
t
ed
.
Press "CD" a
g
ain to deactivate the
mode or on "AM/FM" to
g
o to anothe
r
m
ode
.
JACK / RCA cable not su
pp
lied
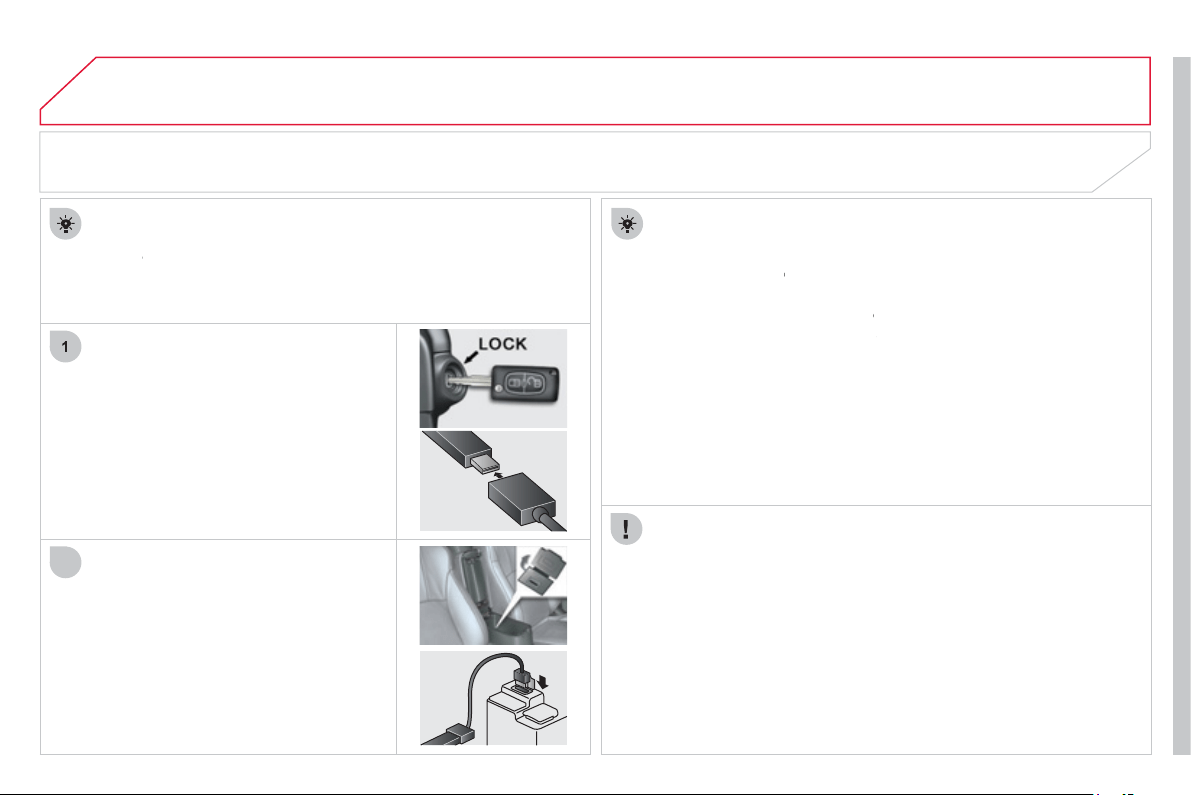
305
06
2
USB PLAYER
USING THE USB PORT
With the vehicle stationar
y
, i
g
nition
s
w
i
t
ch
i
n t
he
LOCK pos
i
t
i
on, connect a
su
i
ta
bl
e ca
bl
e to t
h
e porta
bl
e p
l
a
y
er.
The U
S
B port is used to connect a portable device
(
MP3 pla
y
er,
A
pp
l
e
®
player, ...). The fi les are sent from the player to your audio
®
system and heard through the vehicle's speakers.
Th
e
n
co
nn
ec
t th
e
cab
l
e
t
o
th
e
v
e
hi
c
l
e
'
s
U
SB port.
Models supported:
- iP
od
t
ouc
h
®
: FW v
e
r
s
i
o
n 1.1.1
o
r l
a
t
e
r.
- iP
od
c
l
ass
i
c
®
: FW version 1.0 or later.
®
-
iP
o
d
5
t
h
g
enerat
i
on
®
: FW v
e
r
s
i
o
n 1.2.2
o
r l
a
t
e
r.
-
iP
o
d
nano 5
th
g
enerat
i
on
®
: FW version 1.2 or later.
®
- iP
od
n
a
n
o
2
n
d
g
enerat
i
on
®
: FW version 1.1.2 or later.
®
-
C
ompatible U
S
B mass stora
g
e device: 256 Mb capacit
y
o
r
g
reater.
File
f
ormats: MP3, WMA, AA
C
, WAV.
M
aximum number of levels
(
includin
g
root
)
: 8.
Number of folders: 7
00
.
Number of fi les:
65
535
.
Do not connect the portable device directl
y
to the U
S
B port, use a
cab
l
e
.
To disconnect the cable, the i
g
nition switch must be in the LOCK
p
osition.
Navi
g
ation in the fi le base is done via the portable device / iPod
®
.
T
a
k
e care not to trap t
h
e ca
bl
e w
h
en c
l
os
i
n
g
t
h
e armrest.
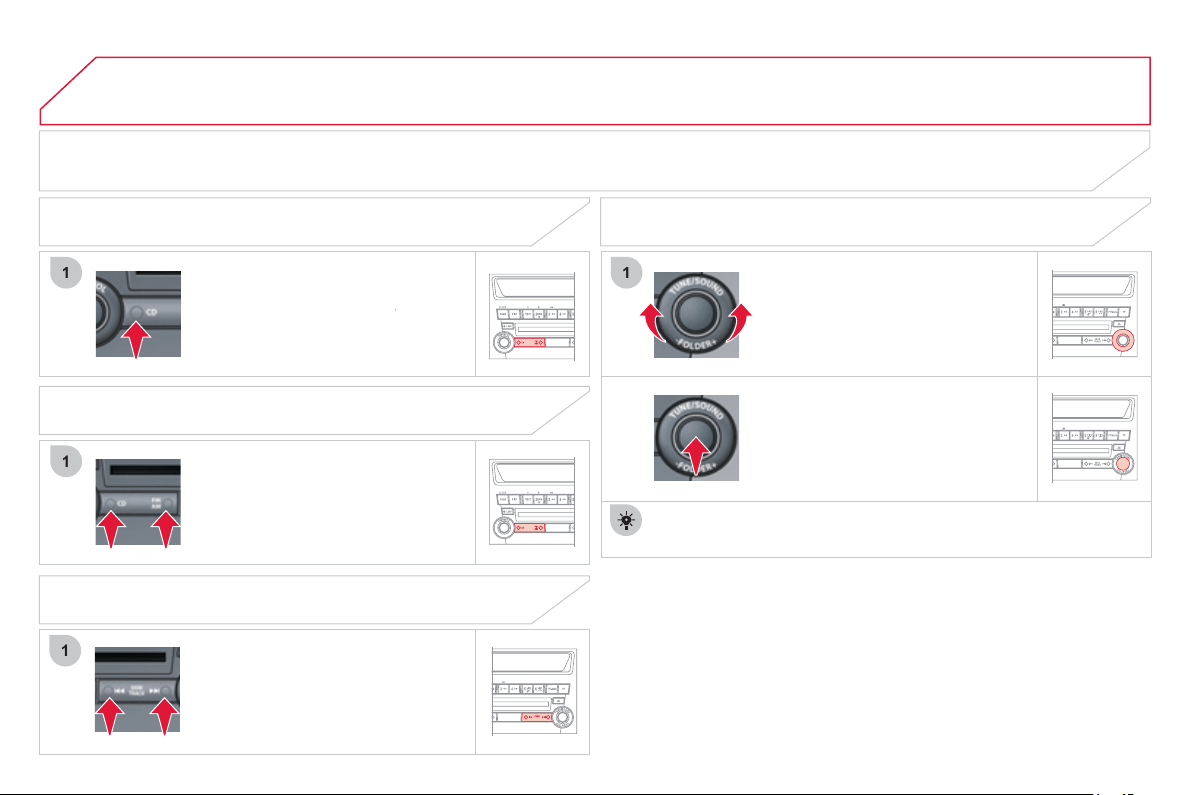
306
06
1
1
1
1
O
nce the portable player
/
iPod
®
i
s
c
onnected, make several successive
p
resses on the
C
D button and select
USB
(
U is displa
y
ed
)
/ iPod
®
(i is
®
displa
y
ed
)
.
O
nce the pla
y
er is selected, pla
y
s
t
a
rt
s
.
PLAY
MANAGING A TRACK (OR FOLDER)
S
TOP
Press AM/FM or CD to chan
g
e mode.
T
urn t
h
e
di
a
l
to se
l
ect a prev
i
ous or
n
e
xt tr
ack
.
SELECT A FOLDER
(
OR TRACK
)
SELECT A TRACK
Press
S
EEK-TRA
C
K to select a
p
revious or next track; the track
n
umber
g
oes down or up.
P
ress and hold to
g
o faster.
Pr
ess
th
e
bu
tt
o
n t
o
se
l
ec
t th
e
f
o
l
de
r
a
n
d
g
o
d
own or up one
l
eve
l
.
Th
e
d
i
a
l
ca
n
a
l
so
be
used
fo
r tr
ac
k
s
.
USB PLAYER
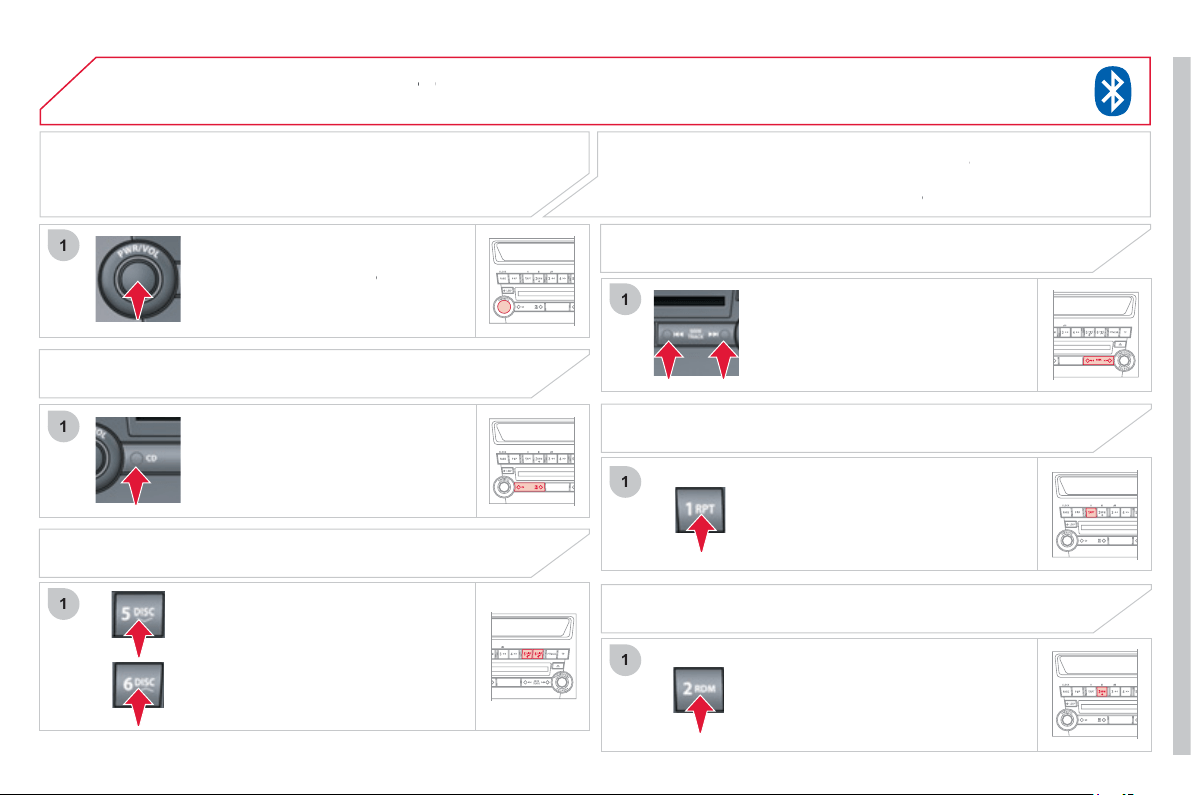
307
07
1
1
1
1
1
1
To listen to tracks on a telephone
co
nn
ec
t
ed
v
ia
Blue
t
oo
t
h
®
, press the
®
audio s
y
stem
O
N
/O
FF button.
PLAY
MANAGING A TRACK
PAUSE / STOP / RESUME *
BLUETOOTH
®
STREAMING
®
Press the 5 DISC button to
p
ause or
s
top pla
y
.
P
ress the
6
DI
SC
button to resume
pl
a
y
.
Make several successive presses on
th
e
C
D
bu
tt
o
n
a
n
d
se
l
ec
t Bl
ue
t
oo
th
®
(
B is displa
y
ed
)
.
O
nce the pla
y
er is selected, pla
y
co
mm
e
n
ces
.
Pr
ess
S
EEK-TRA
C
K t
o
se
l
ec
t
a
p
revious or next track, the track
number
g
oes down or up.
A
cont
i
nuous press a
ll
ows
y
ou to
g
o
fas
t
e
r.
S
ELECT A TRACK *
REPEAT PLAY
*
Press this button durin
g
pla
y
.
P
ress a
g
a
i
n to ex
i
t t
hi
s mo
d
e.
P
ress t
hi
s
b
utton
d
ur
i
n
g
p
l
a
y
.
P
ress a
g
a
i
n to ex
i
t t
hi
s mo
d
e.
*
I
f
the
f
unction is supported b
y
the device.
RANDOM PLAY *
S
treamin
g
allows music fi les on a telephone to be heard via the vehicle's speakers.
The telephone must support the appropriate Bluetooth
®
profi les (profi les A2DP /
®
A
VR
C
P
)
.
C
onnect the telephone: see the "BLUET
OO
TH
®
TELEPHONE" section.
®
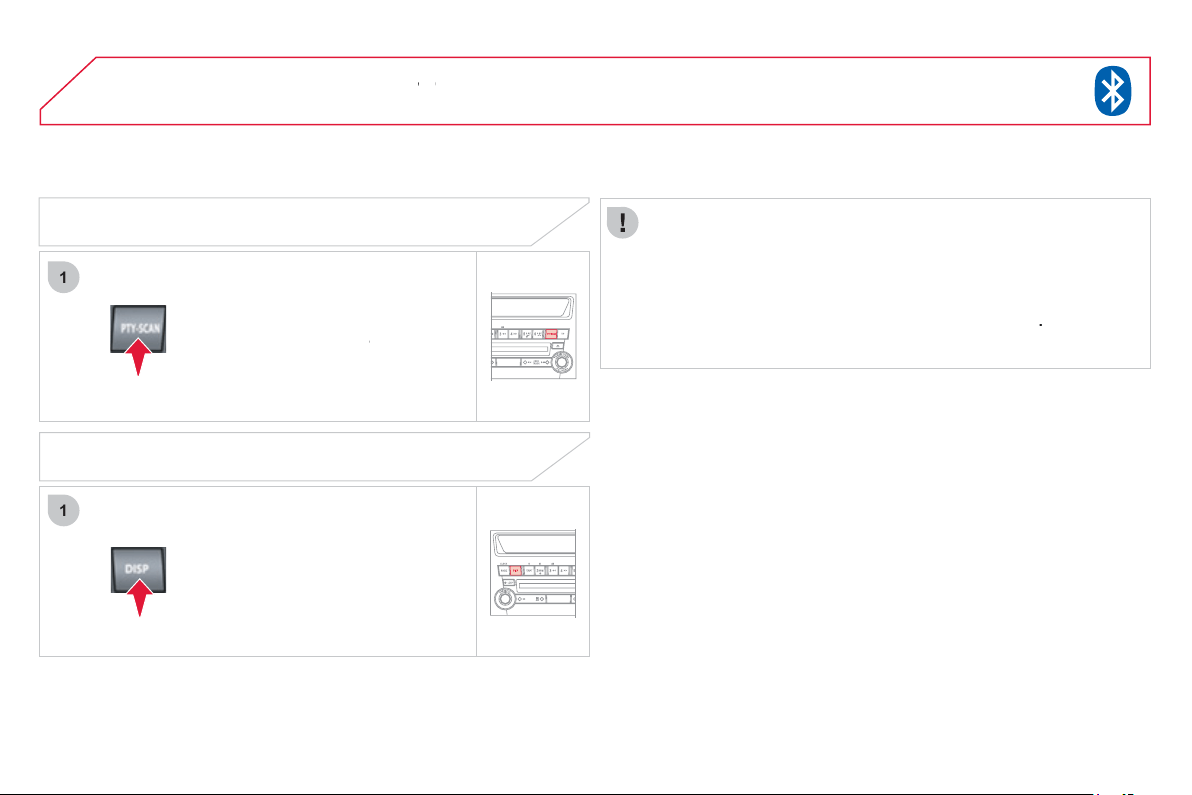
308
07
1
1
Pr
ess
thi
s
bu
tt
o
n.
"SCA
N
" appears in the screen and the
s
tart of each track on the telephone
co
nn
ec
t
ed
v
ia
Blue
t
oo
t
h
®
is played for
®
around 10 seconds.
P
ress a
g
ain to exit this mode.
PLAY THE START OF EACH TRACK *
CHANGING THE DISPLAY *
Pr
ess
a
n
d
h
o
l
d
thi
s
bu
tt
o
n
u
ntil
a
n
audible si
g
nal is heard and "
T
AG" i
s
displa
y
ed.
P
ress this button to chan
g
e the
displa
y
.
M
a
k
e a new
l
on
g
press to ex
i
t t
hi
s
mode
.
The screen displa
y
s a maximum o
f
10 characters at a times. I
f
the end o
f
the title is cut o
ff
, press the PA
G
E button. The next
c
haracters are displa
y
ed each time the button is pressed.
If n
o
titl
e
i
s
s
t
o
r
ed
: " NO TITL
E
" a
pp
ears in the screen.
C
haracters that cannot be displa
y
ed are replaced b
y
"
.
"
.
*
I
f
the
f
unction is supported b
y
the device
.
BLUETOOTH
®
STREAMING
®
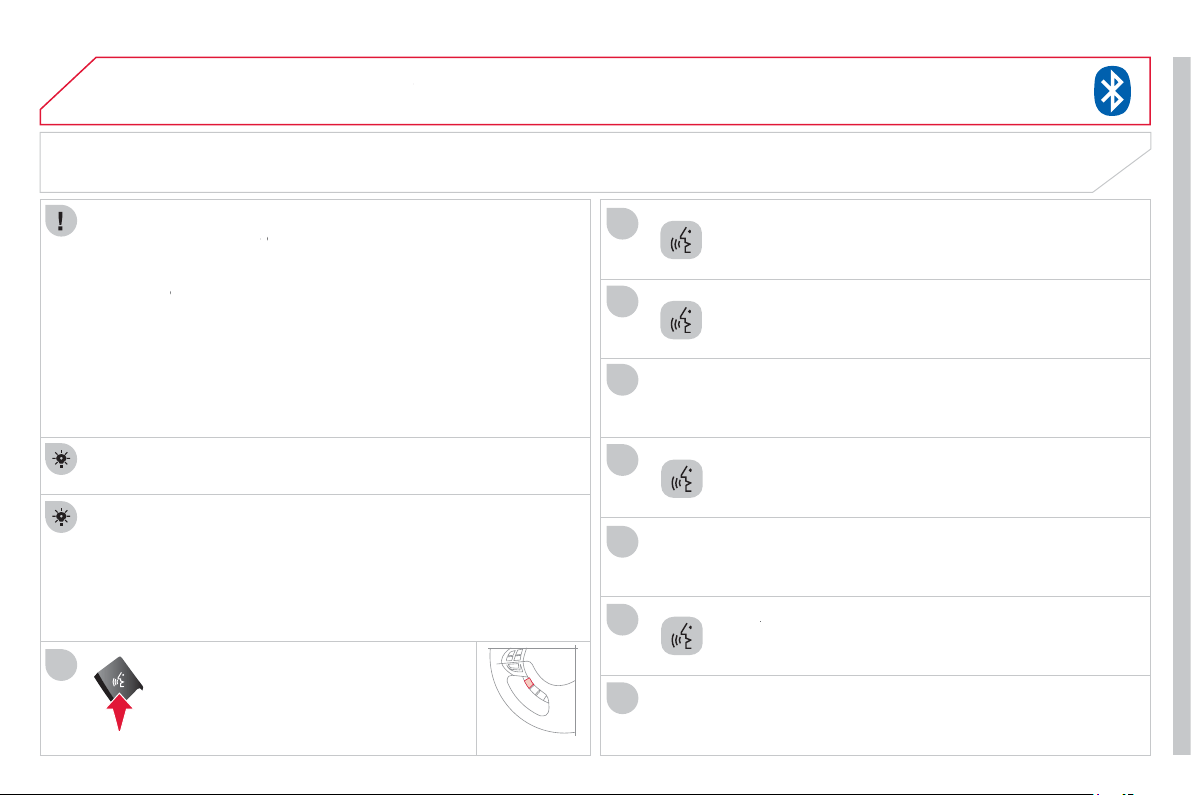
309
1
2
3
08
4
5
6
7
8
CHANGING THE VOICE COMMAND LANGUAGE
BLUETOOTH
®
TELEPHONE
®
By de
f
ault, the voice recognition system is in English.
Pr
ess
thi
s
bu
tt
o
n.
Sa
y
" Setup"
.
S
a
y
"
L
an
g
ua
ge
".
S
a
y
the lan
g
ua
g
e o
f
y
our choice in En
g
lish, example: sa
y
"
French "
fo
r Fr
e
n
c
h.
Say "
Y
es" to start the chan
g
e of lan
g
ua
g
e process
S
a
y
"
No
"
to return to steps
4
to 7.
Th
e s
y
stem sa
y
s
"
Select a lan
g
ua
g
e: En
g
lish, Spanish, French,
German or Italian
".
Th
e s
y
stem t
h
en sa
y
s
"
French selected. Is this correct?
"
The system repeats the language chosen and completes the
c
han
g
e o
f
lan
g
ua
g
e process.
I
f
y
ou do not start the trainin
g
procedure within around 3 minutes o
f
p
ressin
g
S
PEAK, the process is cancelled.
I
f
y
ou press
S
PEAK within 5 seconds
f
ollowin
g
the pla
y
o
f
a voice
c
ommand, this command is saved a
g
ain.
What is the Bluetooth
®
hands-free telephone with voice
®
r
eco
g
nition
?
The s
y
stem uses wireless communication technolo
gy
known as
Bl
ue
t
oo
th
®
which allows you to make hands-free telephone calls in
®
y
our ve
hi
c
l
e v
i
a
y
our
Bl
uetoot
h
®
compat
ibl
e mo
bil
e te
l
ep
h
one.
Y
ou can ma
k
e te
l
ep
h
one ca
ll
s us
i
n
g
a m
i
crop
h
one
l
ocate
d
i
n t
h
e
c
ourtesy lamp, making use o
f
the simple steering mounted controls
o
r b
y
the voice reco
g
nition
f
unction with voice commands. Five
lan
g
ua
g
es are available: En
g
lish
(
the de
f
ault
)
,
S
panish, French,
G
erman and Italian.
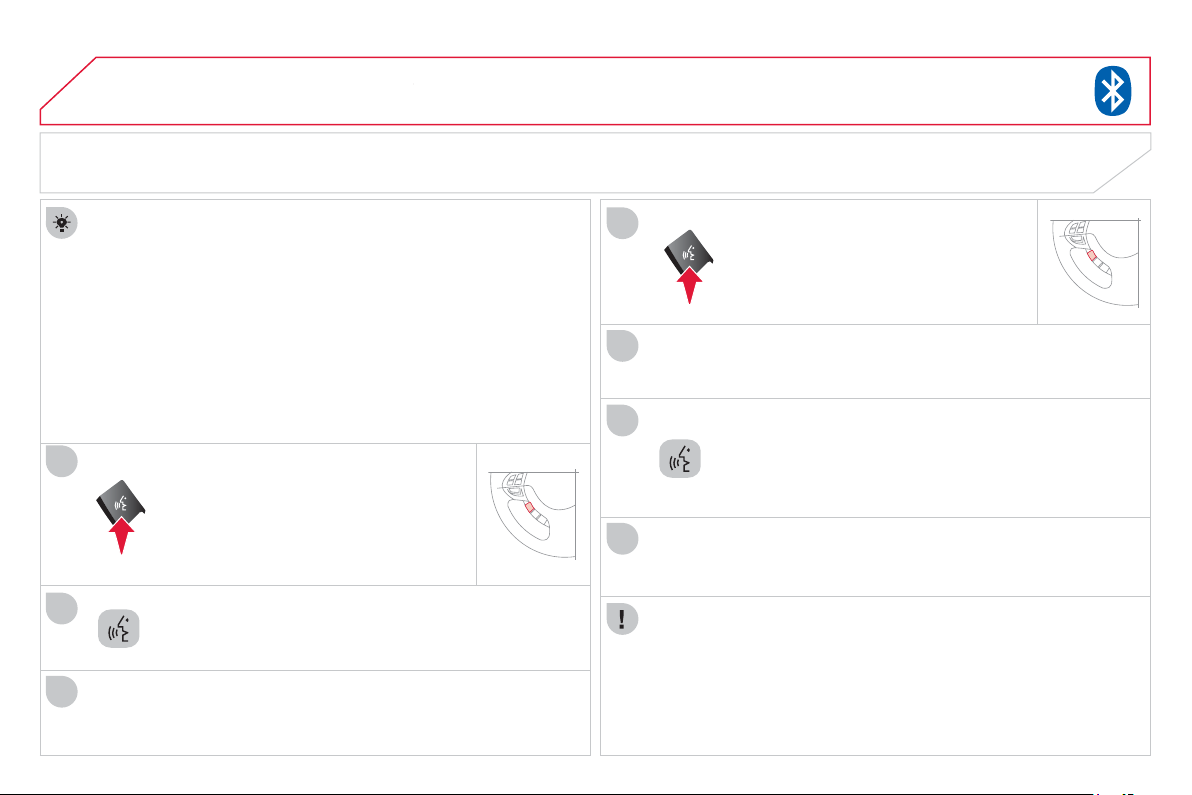
3
1
0
08
2
3
1
4
5
6
7
BLUETOOTH
®
TELEPHONE
®
TRAINING THE USER'S VOICE
You can use the user voice trainin
g
function to create a voice model
for one person per lan
g
ua
g
e.
The characteristics o
f
y
our voice and
y
our pronunciation are saved
i
n t
hi
s mo
d
e
l
to prov
id
e t
h
e
b
est vo
i
ce recogn
i
t
i
on.
The vehicle must be stationar
y
with the parkin
g
brake applied.
S
witch o
ff
y
our telephone durin
g
the operation to avoid an
y
interru
p
tion.
Pr
ess
thi
s
bu
tt
o
n.
The s
y
stem sa
y
s the
fi
rst o
f
45 standard phrases.
Sa
y
" Word trainin
g
"
.
When you are ready to start, press and
ho
l
d
thi
s
bu
tt
o
n.
Repeat each o
f
the phrases in the table on the
f
ollowin
g
page
.
The s
y
stem saves
y
our voice and moves on to the next
co
mm
a
n
d
.
Continue the process until all of the phrases have been
sa
v
ed
.
An explanation messa
g
e is
g
iven.
After pla
y
in
g
all the voice commands, the s
y
stem sa
y
s "
T
he word
e
nrolment is complet
e
" and ends the
p
rocess.
I
f
y
ou do not start the pro
g
rammin
g
process within approximatel
y
3
minutes a
f
ter pressin
g
the
S
PEAK button, the process is
ca
n
ce
ll
ed
.
I
f
y
ou press the
S
PEAK button within 5 seconds o
f
the pla
y
o
f
a
voice command, this command is saved a
g
ain.

3
1
1
08
BLUETOOTH
®
TELEPHONE
®
VOICE TRAINING COMMANDS
1
#
790
(f
or
#
= "Hash"
)
2
*
671
(f
or
*
= "
S
tar"
)
3
212 - 4
903
4
235
-
3
4
9
4
5
31
5- 5
6
57
6 456 - 7 9
3
0
7
7
93
-
5
4
6
2
8
7
9
4 - 1
8
2
6
9 826 -
3
145
10 962 - 7
3
05
11
(
531
)
742 - 9 860
12
(
632
)
807 - 4 591
13
(
800
)
222 - 5 015
14
(
888
)
555 - 1 212
1
5
0
12
3
4
56
7
89
16
55
66
77
88
99
17
44
33
22 11 00
1
8
C
all 2
93
-
580
4
19
Ca
ll
*
350
20
C
all 1
(
234
)
567 - 8 901
21
Dial 6
3
9 - 1542
22
Dial
#
7
80
2
3
Dial
(
987
)
654 - 3210
24 1058
#
3
794
#
S
end
25 2764
3#
4
3
21
#
S
end
2
6
C
ancel
27
C
ontinue
28
Emer
g
enc
y
number
29
C
lear all
30
Help
31
Home, Work, Mobile, Pager
3
2 Li
s
t
of
n
a
m
es
33
N
o
3
4 Ph
o
n
e
boo
k: D
e
l
e
t
e
3
5 Phone book: New entry
3
6
P
r
e
v
ious
3
7 Phone book:
C
lear all
38
R
ed
i
a
l
3
9 Repeat the trainin
g
40
C
on
fi
g
ure the con
fi
rmation requests
41
Confi
g
ure the lan
g
ua
g
e
42 Confi
g
ure the matchin
g
options
4
3
Match a telephone
44
Tr
a
n
sfe
r th
e
ca
ll
4
5
Y
es
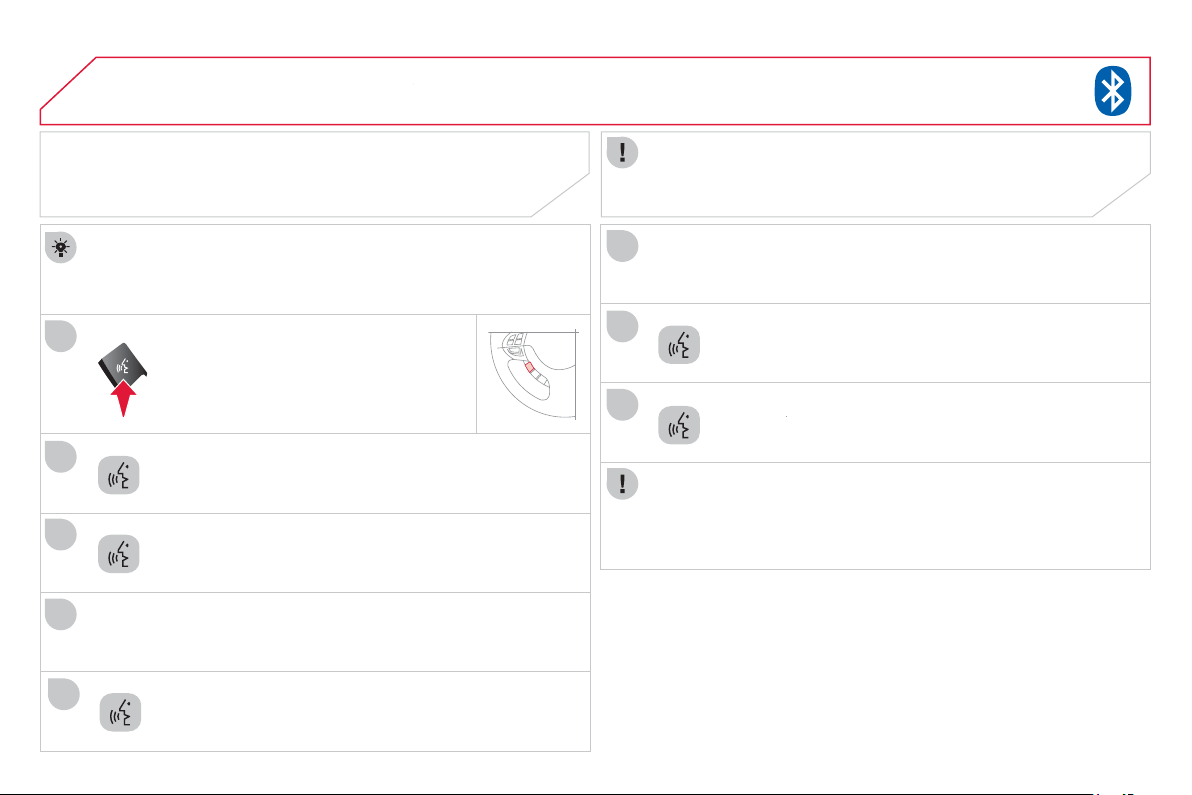
3
1
2
08
2
4
1
6
8
3
5
7
BLUETOOTH
®
TELEPHONE
®
The s
y
stem can re
g
ister up to 7 Bluetooth
®
compatible mobile
tele
p
hones.
The telephone which has the hi
g
hest level of priorit
y
is connected
a
utomaticall
y
.
Th
e s
y
stems sa
y
s
"
P
lease sa
y
the 4 di
g
its of a matchin
g
cod
e
".
S
a
y
"Confi
g
ur
e
".
The s
y
stem con
fi
rms the validit
y
o
f
the number spoken,
answer "
Yes
".
S
a
y
" No" to return to ste
p
7.
The s
y
stem sa
y
s "
D
o
y
ou wish to match a telephone, delete a
t
ele
p
hone or obtain the list of matched tele
p
hones?
".
MATCHING A BLUETOOTH
®
TELEPHONE
FIRST CONNECTION
For reasons o
f
sa
f
et
y
and because the sustained attention o
f
the driver is needed, operations o
f
matchin
g
a Bluetooth
®
mobile
®
phone with the audio system's hands-
f
ree
f
unction must be done
with th
e
v
ehicle stationar
y
.
S
a
y
"
M
atchin
g
option
s
".
Pr
ess
thi
s
bu
tt
o
n.
S
a
y
"
M
atch a tele
p
hon
e
".
S
a
y
a 4-di
g
it number which will be recorded as the
matc
hi
n
g
co
d
e.
Remember this matchin
g
code as
y
ou must enter it in the telephone
in one of the followin
g
steps of the matchin
g
procedure.
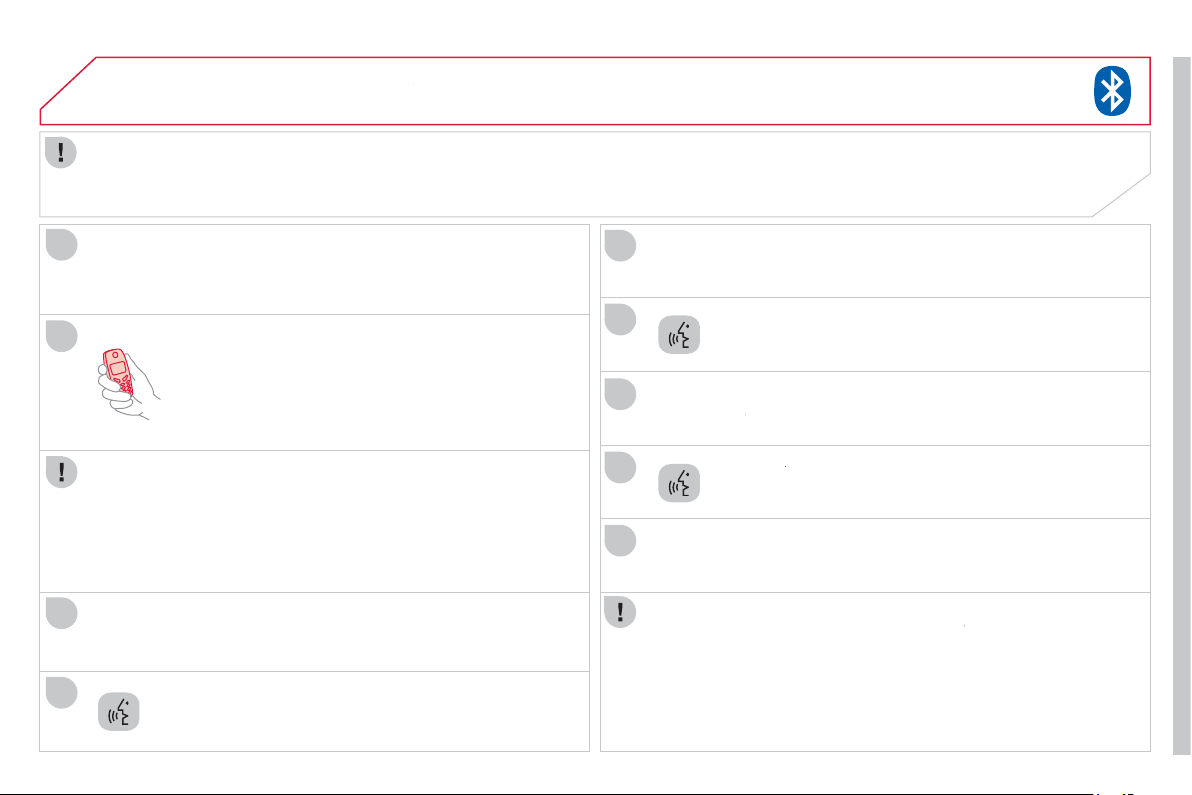
3
1
3
10
08
9
11
12
13
14
15
16
17
Consult
y
our mobile telephone's user manual and enter
t
h
e matc
hi
n
g
co
d
e recor
d
e
d
i
n step 7
i
n t
h
e te
l
ep
h
one.
BLUETOOTH
®
TELEPHONE
®
Th
e s
y
stem sa
y
s
"
Start the matchin
g
procedure on the
tele
p
hone. Consult the instructions in the tele
p
hone manual
"
.
If the code is incorrect, the s
y
stem locks. To clear the code:
- check that the telephone's voice reco
g
nition is not activated,
- w
i
t
h
t
h
e
ig
n
i
t
i
on on an
d
t
h
e au
di
o s
y
stem act
i
ve, press
the END
C
ALL button
f
or 2 seconds, 3 times in succession.
Wh
e
n it
de
t
ec
t
s
a
Bl
ue
t
oo
th
®
com
p
atible mobile tele
p
hone, the
sy
stem sa
y
s "
P
lease sa
y
the name of the telephone after the
b
ee
p
"
.
Af
ter the audible si
g
nal, allocate a name to the telephone
b
y
sa
y
in
g
the name of
y
our choice.
The s
y
stem sa
y
s "Allocate an order of priorit
y
between 1 and 7.
One is the hi
g
hest level of priorit
y
"
.
G
ive a number between 1 and 7 to establish the level o
f
priorit
y
of the mobile telephone.
The s
y
stem sa
y
s and con
fi
rms the " name of the tele
p
hon
e
"
a
n
d
th
e
" numbe
r
" of its priority.
r
Answer "
Yes
"
S
ay "
N
o" to return to step 13.
Th
e s
y
stems sa
y
s
"
M
atc
hi
n
g
comp
l
et
e
"
t
he
n
e
m
i
t
s
a
n
audible
si
gna
l
an
d
d
eact
i
vates t
h
e vo
i
ce recogn
i
t
i
on.
The services available depend on the network, the
S
IM card and the compatibilit
y
o
f
the Bluetooth
®
telephone used.
C
heck in
y
our telephone user
manual and with your service provider
f
or the services you have access to.
I
f
the s
y
stem does not detect the Bluetooth
®
compatible mobile
®
telephone, the matchin
g
process stops ands is accompanied b
y
an
a
udible si
g
nal.
If
y
ou select a level of priorit
y
which has alread
y
been allocated to
a
nother telephone, the s
y
stem asks
y
ou if
y
ou wish to replace this
level of priorit
y
.
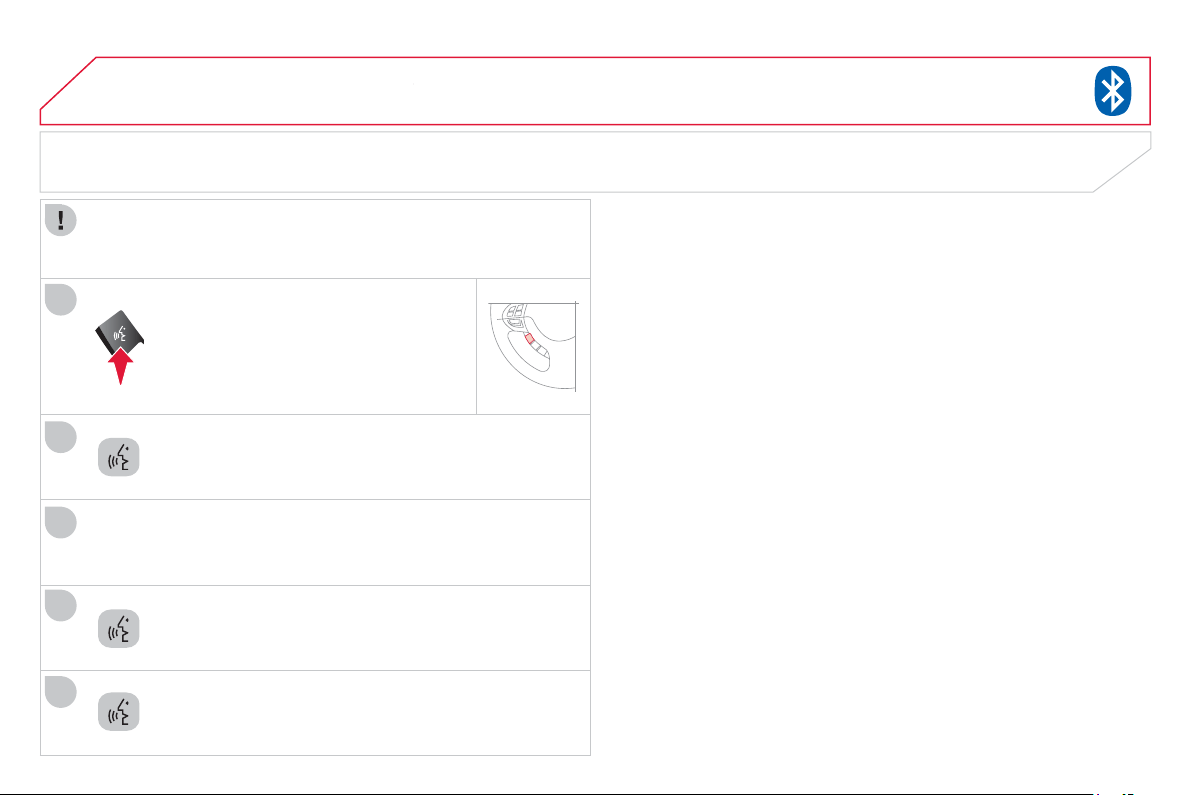
3
14
08
2
3
1
4
5
BLUETOOTH
®
TELEPHONE
®
S
a
y
"
Di
a
l
"
.
The system says "Number
p
leas
e
".
USING A TELEPHONE NUMBER
Call out the telephone number.
P
r
ess
t
his
bu
tt
o
n.
The system asks you to confi rm this number, answer "
Y
e
s
".
S
a
y
"
No
"
to return to t
h
e prev
i
ous step.
Y
ou
m
us
t h
a
v
e
fi
r
s
t m
a
t
c
h
ed
a
Bl
ue
t
oo
th
®
compatible mobile
telephone with the s
y
stem.
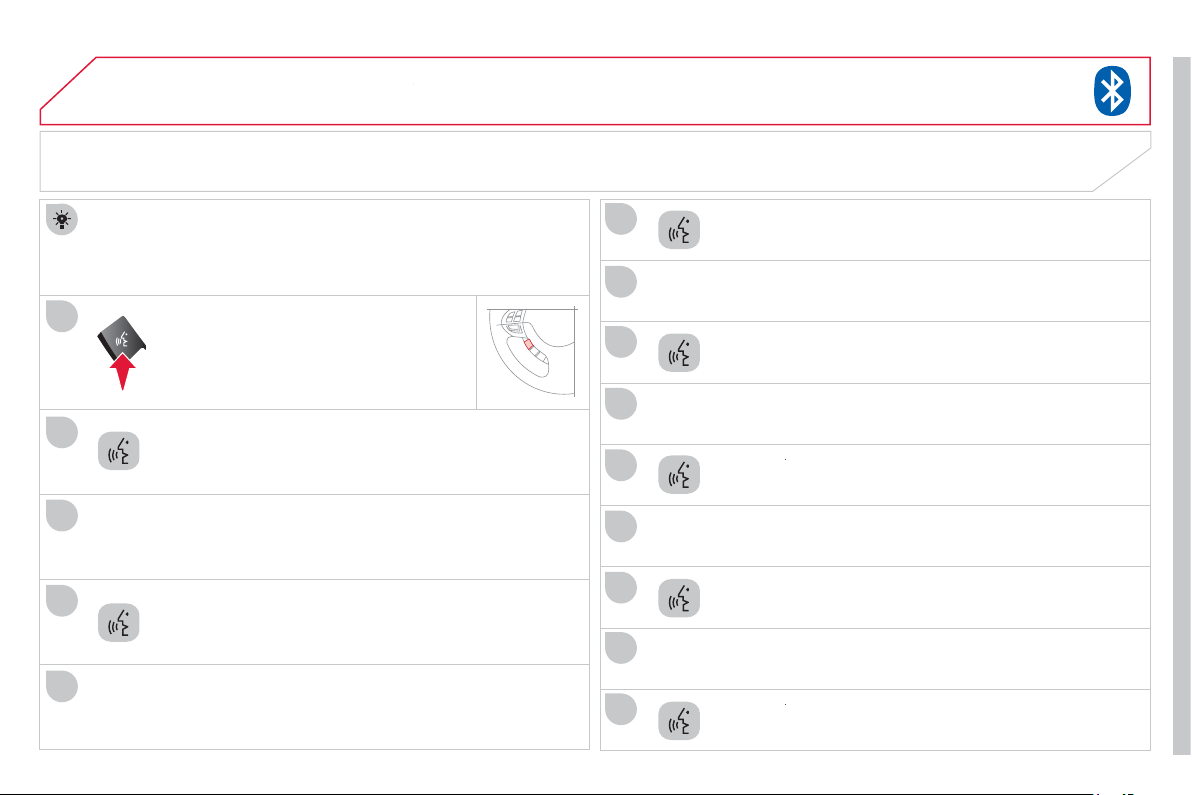
3
1
5
08
3
4
7
8
9
10
11
1
2
5
6
12
14
13
BLUETOOTH
®
TELEPHONE
®
The s
y
stem has its own phone book, independent of that of the
m
obile telephone.
It can contain up to 32 names
f
or each lan
g
ua
g
e.
E
ac
h
name
i
n t
h
e p
h
one
b
oo
k
i
s assoc
i
ate
d
w
i
t
h
4
l
ocat
i
ons:
HO
ME, W
O
RK, M
O
BILE and PA
G
ER.
The s
y
stem sa
y
s " Select one of the followin
g
items: New Entr
y
,
Chan
g
e, List of names, Delete or Clear all, or sa
y
Cancel to
r
eturn to the main menu"
.
Sa
y
"New entr
y
"
.
The s
y
stem sa
y
s "HOME, WORK, MOBILE OR PAGER"
.
G
ive the location which corresponds to the number that
y
ou wish to record.
The s
y
stem asks
y
ou to confi rm the location.
Answer "
Yes
".
S
a
y
"
N
o
"
to return to step 7.
If a telephone number has alread
y
been recorded for this location,
t
h
e s
y
stem sa
y
s
"
Th
e current num
b
er
i
s -num
b
er-
,
num
b
e
r
pl
eas
e
"
.
SAVING A NAME IN THE SYSTEM PHONE BOOK
Pr
ess
thi
s
bu
tt
o
n.
Sa
y
"
P
hone book"
.
Th
e s
y
stem sa
y
s
"
N
ame
pl
eas
e
"
.
G
ive the name o
f
y
our choice.
I
f
you do not wish to change the telephone number, repeat
the ori
g
inal number to retain it, otherwise sa
y
the new
n
u
m
be
r.
Answer "
Yes
".
S
a
y
"
N
o" to return to step 11.
The s
y
stem asks
y
ou to con
fi
rm the number.
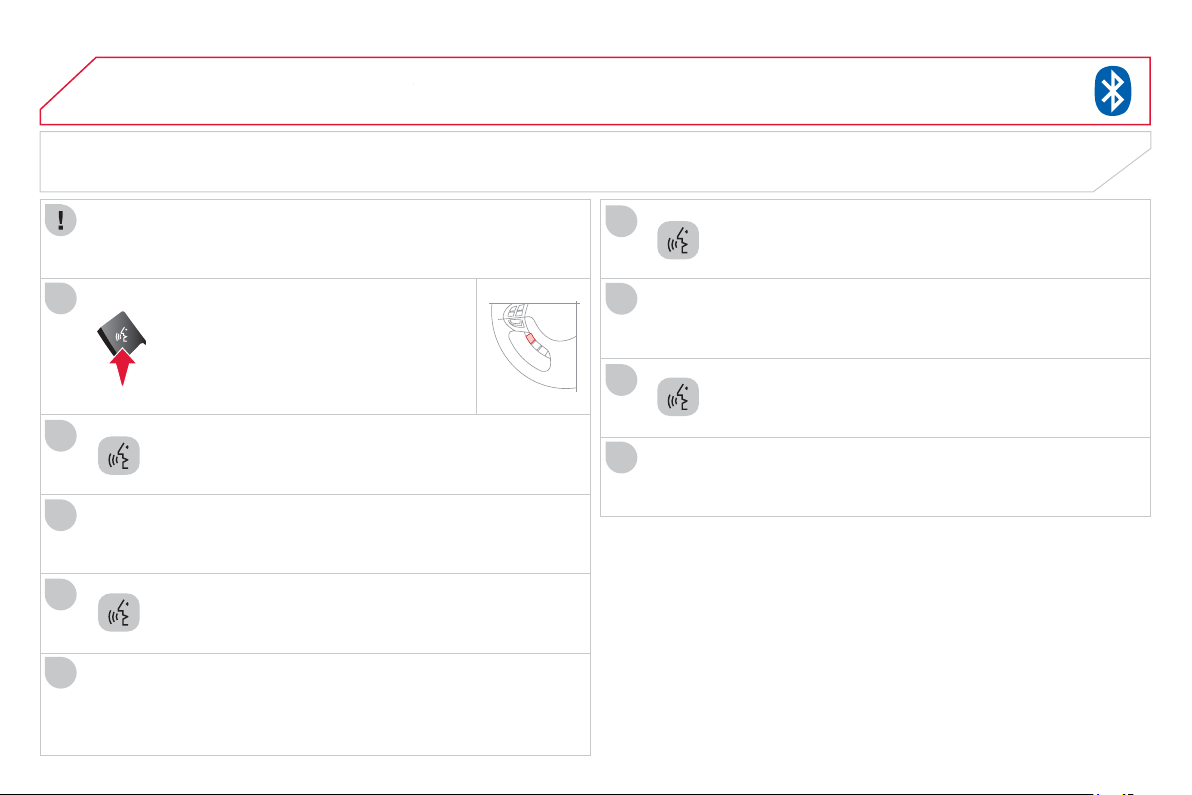
3
1
6
08
2
3
1
4
6
5
7
8
9
BLUETOOTH
®
TELEPHONE
®
S
a
y
"Ca
l
l ".
The system says "Name
p
leas
e
".
USING A NAME IN THE PHONE BOOK
Give the name of the person that
y
ou wish to call.
Pr
ess
thi
s
bu
tt
o
n.
G
ive the location correspondin
g
to the number that
y
ou
wi
s
h t
o
ca
ll.
You must have
fi
rst matched a compatible Bluetooth
®
m
ob
il
e
telephone with the s
y
stem.
If several tele
p
hone numbers have been recorded for this
p
erson,
the s
y
stem sa
y
s "
D
o
y
ou wish to call <name>
{
home
}
,
{
work
}
,
{
mobile
}
or
{
pa
g
er
}
?
"
The system request con
fi
rmation o
f
the name.
Answer "
Yes
"
.
S
a
y
"N
o
" to return to step 4.
The s
y
stem sa
y
s "Call to <name> at <location
>
"
a
n
d
m
a
k
es
th
e
call
.
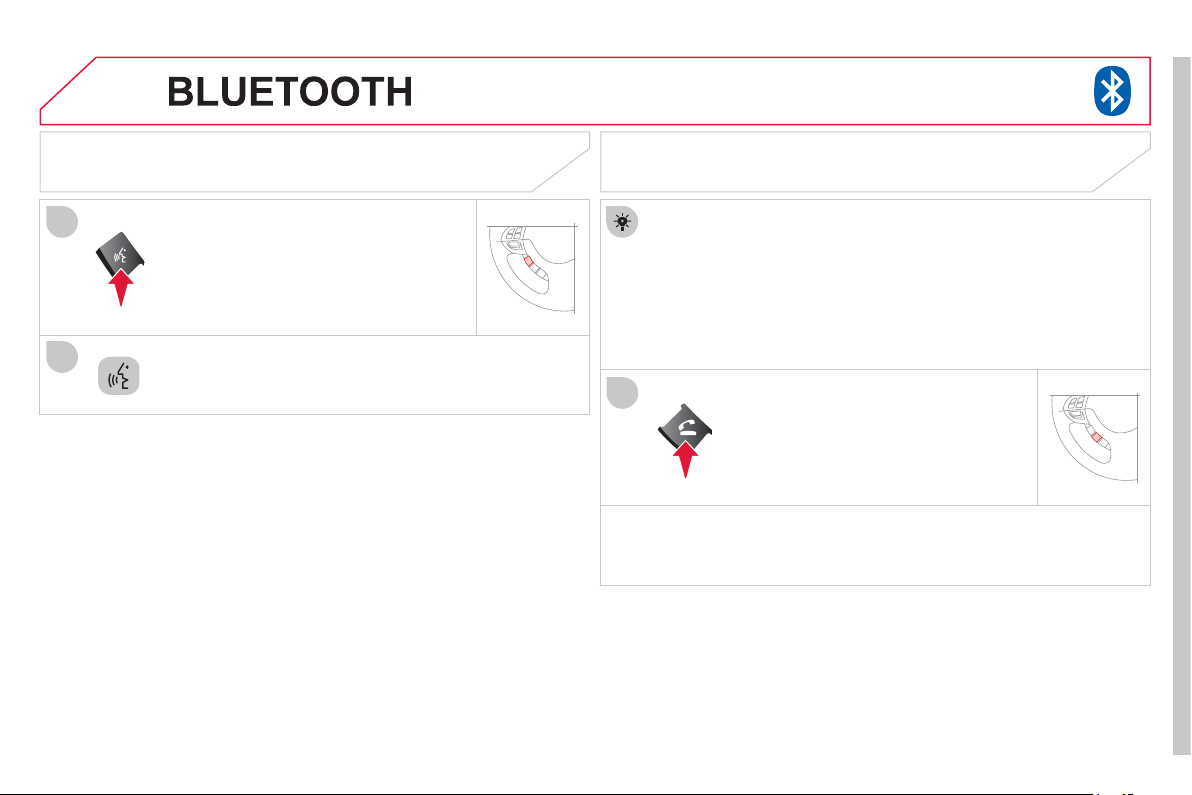
3
1
7
08
1
2
1
®
TELEPHONE
®
The telephone rin
g
is sent to the speaker b
y
the front passen
g
er's
sea
t.
I
f
an audio source
(C
D, radio, ...
)
is in operation when the call is
r
eceived, it is placed on MUTE and only the incoming call is heard.
When the i
g
nition switch is in the A
CC
or
O
N position, the audio
sy
stem is activated automaticall
y
i
f
an incomin
g
call is received,
e
ven if it was ori
g
inall
y
off.
At the end o
f
the call, the audio s
y
stem returns to its previous state.
REDIAL THE LAST NUMBER CALLED
P
r
ess
t
his
bu
tt
o
n.
Sa
y
"
R
e
di
a
l
".
RECEIVING A CALL
Pr
ess
thi
s
bu
tt
o
n.

3
1
8
08
BLUETOOTH
®
TELEPHONE
®
VOICE COMMANDS (1/2)
C
on
fi
gure
Ph
o
n
e
boo
k
Di
a
l
C
all
Redial
Emer
g
enc
y
number
Matchin
g
options
M
atc
h
a te
l
ep
h
one
D
e
l
ete a te
l
ep
h
one
List o
f
matched telephones
Select a tele
p
hone
Pr
e
vi
ous
Press this button to start the voice reco
g
nition.
When the s
y
stem is waitin
g
for a voice command, sa
y
"Help" t
o
ob
t
a
in
a
li
s
t
o
f
co
mm
a
n
ds
whi
c
h
ca
n
be
used
in th
e
cu
rr
e
nt
s
it
ua
ti
o
n.
Div
e
rt th
e
ca
ll
A
dd
a
l
oca
ti
o
n
Confi
g
ure the confi rmation requests
L
an
g
ua
g
e
N
ew entry
D
e
l
e
t
e
Chan
g
e
C
all this number
C
han
g
e another entr
y
Tr
y
a
g
ain
C
lear all
Li
s
t
o
f n
a
m
es
Home, at home
Work, at work
Mobile, on mobile
P
a
g
er, on pa
g
er
H
e
l
p
Co
ntin
ue
All
C
ancel
Mu
t
e
D
eac
tiv
a
t
e
m
u
t
e
Y
es
N
o
3
1
9
08
BLUETOOTH
®
TELEPHONE
®
VOICE COMMANDS (2/2)
Press this button to start the voice reco
g
nition.
When the system is waiting
f
or a voice command, say "Hel
p
" t
o
ob
t
a
in
a
li
s
t
of
co
mm
a
n
ds
whi
c
h
ca
n
be
used
in th
e
cu
rr
e
nt
s
it
ua
ti
o
n.
Z
e
r
o
O
ne
Tw
o
Thr
ee
F
ou
r
Fi
v
e
S
ix
Se
v
e
n
Ei
g
ht
Ni
n
e
S
tar
(*)
Hash
(#)
Word trainin
g
PIN
Repeat training
Ac
tiv
a
t
e
D
eac
tiv
a
t
e
I
ncorporate t
h
e ca
ll
<di
g
its>
S
end
En
g
lish
Ph
one
b
oo
k
N
ew entr
y
Phone book
C
hange
Ph
o
n
e
boo
k D
e
l
e
t
e
Phone book
C
lear All
Ph
o
n
e
boo
k Li
s
t
o
f n
a
m
es
C
on
fi
g
ure the con
fi
rmation requests
C
on
fi
g
ure
S
elect a telephone
Confi
g
ure the matchin
g
options
Dele
t
e
a
n
a
m
e
C
on
fi
g
ure the lan
g
ua
g
e
C
on
fi
g
ure the PIN

3
2
0
ERROR MESSAGES
If
an error messa
g
e appears on the screen, re
f
er to the table below to
fi
nd out what it means and the solution to be applied in order to
r
ecti
f
y it.
TEXT
D
ESCRIPTIO
N
SOLUTION
N
O
DI
SC
No disc present.
D
isc not compatible.
In
se
rt
a
d
i
sc
.
ERR
O
R
0
1
Di
sc
i
nserte
d
i
ncorrect
ly
.
Disc
w
i
t
h
co
n
de
n
sa
t
io
n.
Insert the disc with the printed face upwards.
C
lean the dampness o
ff
the disc.
ERR
O
R
0
2 Disc dirt
y
, scratched or distorted.
Ex
cess
iv
e
v
e
hi
c
l
e
vi
b
r
a
ti
o
n.
C
lean or replace the disc.
Tr
y
a
g
ain when the vibration has stopped.
ERR
O
R 0
3
E
rror on
i
nsert
i
on or e
j
ect
i
on.
Pl
ay
i
ng
h
ea
d
m
i
sa
li
gne
d
.
E
j
ect the disc and insert it a
g
ain. I
f
it is not e
j
ected, have the audio
e
qu
i
pment c
h
ec
k
e
d
.
ERR
O
R H
O
T Tri
gg
erin
g
of the internal protection a
g
ainst hi
g
h temperatures. Wait approximatel
y
30 minutes to allow the audio s
y
stem to cool.
ERR
O
R
C
ommunication error between the audio system and the external
sy
stem.
External s
y
stem suppl
y
error.
Consult a CITROËN dealer.

.
321
Alphabetical index
A
BS and EBFD s
y
stems...............................
1
4
6
Accesso
r
ies
..................................................
2
0
2
A
ccessor
y
socket,
12V
...................
9
8
,
10
0
,
10
1
Access
t
o
bulbs
.............................................
1
8
1
A
ctive stabilit
y
control
(
ASC
)
........................
14
8
Adj
ust
i
n
g
h
ea
dl
amps
....................................
1
3
7
A
d
j
ustin
g
head restraints ................................
8
1
Adj
ust
i
n
g
seat
b
e
l
t
h
e
ight
..............................
1
5
0
A
d
j
ustin
g
the steerin
g
wheel ..........................
.
8
7
Ai
r
b
a
g
,
k
ne
e
..........................................
1
5
6
,
1
5
8
A
irba
g
s, curtai
n
.....................................
1
5
7
,
15
8
A
irba
g
s,
f
ron
t
.........................................
1
5
4
,
1
5
8
A
irba
g
s, latera
l
......................................
1
5
6
,
15
8
Ai
r con
di
t
i
on
i
n
g
...............................................
2
2
A
ir conditionin
g
, automatic .......................
8
9
,
9
2
Ai
r con
di
t
i
on
i
n
g
, manua
l
...........................
8
9
,
9
0
Air filter
..........................................................
r
21
4
A
ir
f
l
ow
............................................................
2
2
A
ir int
a
k
e
.........................................................
9
2
Ai
r v
e
nt
s
..........................................................
8
8
A
l
a
rm
...............................................................
7
3
A
nt
i
-
l
oc
k
b
ra
ki
n
g
s
y
stem
(
ABS
)
..........................................................
1
4
6
A
nti-th
eft
........................................................
11
0
A
ppl
e
®
player
®
.........................................
26
6
-
26
8
A
rmrest,
f
ron
t
....................................
8
2
,
9
8
,
1
0
1
Armrest, rear
...................................................
r
8
4
ASC
...............................................................
14
8
A
shtra
y
, portabl
e
.....................................
9
8
,
10
0
A
u
dibl
e warn
i
n
g
............................................
14
5
A
udio-CD s
y
stem
..................................
283
-
320
A
u
di
o-te
l
emat
i
c s
y
stem
........................
2
2
3
-2
8
2
Aud
i
o
-vi
deo
...................................................
23
6
A
udio streamin
g
(
Bluetooth
)
.................
269,
30
7
A
udio s
y
stem functions
.........................
22
4
,
28
5
A
utomatic illumination of headlamps....
13
2
,
13
4
A
utomatic operation o
f
hazard warning
l
amps
..........................................................
14
5
A
utomatic rain sensitive windscreen wipers
...
14
0
A
utomatic switchin
g
off of li
g
htin
g
................
13
4
A
uxiliar
y
sockets..................
102
,
26
4
,
30
4,
30
5
C
apacit
y
, fuel tank
........................................
20
8
CD changer
...................................................
r
30
1
C
D MP
3
.................................................
2
4
0
,
2
99
C
entral lockin
g
..........................................
6
2
,
6
5
C
han
g
in
g
a bulb
.....................................
1
8
0
-
1
8
5
C
han
g
in
g
a fus
e
.....................................
18
6
-
191
A
C
C
han
g
in
g
a wheel .................................
.
17
4
-
1
7
9
C
hanging a wiper blad
e
...............................
.
19
5
C
han
g
in
g
the remote control batter
y
..............
6
8
C
han
g
in
g
the tim
e
.....................................
5
4
,
5
8
C
heckin
g
levels
......................................
21
1
-
21
3
C
heckin
g
the en
g
ine oil level .......................
.
21
1
C
h
ec
k
s
..................................................
2
0
5
-
21
6
C
hild seats
............................................
1
5
9
-
1
6
8
C
hild loc
k
.......................................................
1
6
9
Cigarette lighter
............................................
.
r
10
0
C
losing the boo
t
.......................................
.
6
2
,
7
1
C
losin
g
the doors
................................
6
2
,
6
5
, 7
0
C
olour screen
.................................
5
6
,
22
4
,
22
5
C
onnectors, audio
................
10
2
,
26
4
,
30
4
,
30
5
C
ontrols
f
or air conditionin
g
.....................
.
9
0,
9
2
Coo
l
a
n
t
............................................................
4
6
C
oolant level
.................................................
21
2
C
ourtes
y
lamp, fron
t
.....................................
14
2
Courtesy lamp, rear
.....................................
.
r
1
4
3
C
opying a
C
D ...............................................
.
24
1
C
r
u
i
se
co
ntr
ol
................................................
12
4
Cup holder
.......................................................
r
9
8
C
VT
g
earbo
x
.........................................
11
3
,
21
5
B
atter
y
...................................................
1
9
2
,
21
4
Batter
y
, char
g
in
g
...........................................
1
9
4
Batter
y
, remote control .............................
6
8
,
6
9
Bluetooth
(
telephone
)
.............26 9 -2 82, 3 0 9 - 31
9
Bo
nn
et
...........................................................
20
5
Bonnet sta
y
...................................................
20
5
B
oot
.................................................................
7
1
Boot lam
p
.....................................................
.
1
44
Bottle holder
....................................................
r
9
8
B
r
ake
discs
....................................................
21
6
Brake lamps
..................................................
1
8
4
Brake pads ...................................................
.
21
6
Br
a
k
es
...........................................................2
1
6
B
ra
ki
n
g
ass
i
stance s
y
stem
...........................
14
6
Bulbs
(
chan
g
in
g
, t
y
pe
)
..........................
1
8
0
,
1
8
4
B
D
a
y
t
i
me runn
i
n
g
l
amps
.........................
1
3
4
,
1
8
2
D
eactivatin
g
A
SC
..........................................
14
8
D
eactivatin
g
the passen
g
er airba
g
...............
15
5
D
eactivation of the passen
g
er and
r
ea
r w
i
n
do
w
co
ntr
ol
s
w
i
t
ches
.......................
7
7
D
eadlockin
g
..............................................
6
3
,
6
5
D
efrostin
g
..................................................
9
6
,
9
7
D
em
i
st
i
n
g
..................................................
9
6
,
9
7
D
i
a
l
s
................................................................
2
4
D
i
ese
l
add
itiv
e
l
e
v
e
l
......................................
21
3
D

322
Alphabetical index
Dim
e
n
s
i
o
n
s
...................................................
22
1
Di
pp
ed beam................................
.
132, 1
8
0
,
1
8
2
Di
pst
i
c
k
..........................................................
21
1
Dir
ec
ti
o
n in
d
i
ca
t
o
r
s
...............
14
5
,
1
8
0
,
1
8
1
,
1
8
4
Drivin
g
economicall
y
......................................
2
2
D
oo
r
s
............................................
.
6
0, 64, 67,
7
0
DVD
(
mode
)
...........................................
2
5
6
, 2
5
7
E
BFD
.............................................................
1
4
6
E
co-drivin
g
.....................................................
2
2
E
lectronic brake
f
orce distribution
(
EBFD
)
....
14
6
Electronic engine immobiliser
.................
r
6
9
,
11
0
E
mer
g
enc
y
boot releas
e
.................................
7
1
E
mer
g
enc
y
warnin
g
lamps ...........................
1
4
5
E
ngine, Diesel ............... 2
0
7
, 20
9
, 21
0
,
21
9
,
22
0
E
n
gi
ne, petro
l
........................
2
0
6
,
2
0
9
,
21
7
,
21
8
E
n
g
ine compartmen
t
.............................
2
0
6
,
2
0
7
E
n
g
ine compartment fusebo
x
.......................
1
8
9
E
n
g
ine oil ......................................................
21
1
E
n
gi
ne o
il
l
eve
l
.............................
206, 207,
21
1
E
n
gi
nes
.................................................
21
7
,
21
9
E
nvir
o
nm
e
n
t
.............................
2
2
,
6
8
,
194
,
213
E
quipment settin
g
s .........................................
57
E
rror messages
(
audio equipment
)
..............
32
0
G
.P.
S.
....................................................
2
2
6
-2
35
G
earbox, manua
l
..................
.
11
1
,
11
2
,
11
9
,
21
5
G
ear shi
f
t indicato
r
.
......................................
.
1
1
2
G
ear lever, manual
g
earbo
x
.........................
11
1
G
love bo
x
..................................................
9
8
,
9
9
G
rab handles
.................................................
10
3
G
uidanc
e
..............................................
.
22
6
-
23
5
H
e
igh
t an
d
reac
h
a
dj
ustment,
steerin
g
wheel
..............................................
8
7
H
ill
s
t
a
rt
ass
i
st
...............................................
11
8
Identification plates
.......................................
22
2
Indicators, directio
n
......................
14
5
,
181
,
1
8
4
In
f
latin
g
t
y
res ........................................
.
2
2
, 222
Inputs
f
or audio s
y
stem
........
102,
26
4
,
30
4
,
30
5
I
nstrument pane
l
.............................................
2
4
Instrument panel scree
n
...........................
2
4
,
3
1
Interior fittin
g
s ...........................................
9
8
,
9
9
iPh
o
n
e
...........................................................
2
6
9
iPod
.......................................................
2
6
6
-
2
6
8
I
SO
FIX child seats
................................
1
6
5
,
1
6
7
IS
O
FIX mountin
g
s
.................................
16
4
,
16
7
Jack
...............................................................
17
4
J
A
C
K socke
t
.................................
26
4
,
30
4
,
30
5
G
I
J
F
lashin
g
indicators ........
1
4
5
,
18
0
,
18
1
,
18
3
,
18
4
F
olding
/
un
f
olding the door mirrors.................
.
8
6
F
our-w
h
ee
l
d
r
i
ve s
y
stem
...............................
12
2
F
ront fo
g
lamps
..............................
1
3
3
,
1
8
0
,
1
8
2
F
r
o
nt
sea
t
s
..........................................
7
9
,
8
0
,
8
2
Fuel
.
................................................
2
2
, 2
0
8
,2
0
9
F
ue
l
consum
p
t
i
o
n
............................................
2
2
F
uel
f
iller cap
.................................................
2
0
8
F
uel filler flap
.................................................
2
0
8
F
uel
g
au
ge
...................................................
.
20
8
Fue
l t
a
n
k
.......................................................
.
2
0
8
F
use
b
ox,
d
as
hb
oar
d
.....................................
1
8
7
Fuses
.............................................................
1
8
6
E
Filling with
f
uel ....................................
.
2
0
8
, 2
0
9
Fi
tt
i
n
g
a w
h
ee
l
...............................................
1
7
8
Fittin
g
s, boo
t
.................................................
1
0
4
Fittings, rear
..................................................
r
10
3
Fittin
g
the ma
t
.................................................
9
9
F
H
azar
d
warn
i
n
g
l
amps
..................................
14
5
H
eadlamp ad
j
ustmen
t
...................................
1
3
7
H
eadlamp was
h
...........................................
.
13
9
Headlamp wash reservoir
............................
.
r
2
1
3
H
ead restraints,
f
ron
t
......................................
8
1
Head restraints, rear
.......................................
r
8
3
Hea
t
ed
sea
t
s
...................................................
8
4
H
eatin
g
...............................................
2
2,
9
0
,
9
2
H
Keepin
g
children saf
e
...................
1
55,
1
5
9
-
169
Ke
y
......................................................
6
0-63, 6
8
K
e
y
, e
l
ectron
i
c
....................................
6
4
, 68, 6
9
Ke
y
in i
g
nition warnin
g
..................................
1
0
6
Ke
y
less Entr
y
and Startin
g
...............
6
4
-
6
7,
10
7
Ke
y
with remote control ....................
6
0
,
6
2
,
11
0
K

.
323
Alphabetical index
Labels, identification
.....................................
2
2
2
Lamps, fron
t
..................................................
18
0
Lamps, rear
...................................................
r
1
8
4
Lamps, warning and indicator
...................
r
2
5
-
42
LED da
y
time runnin
g
lamps
..........................
1
8
2
Level, brake flui
d
...........................................
21
2
Level, headlam
p
was
h
.................................
.
2
1
3
Le
v
els
a
n
d
checks
.................................
2
05
-21
6
Ligh
t
i
n
g
,
g
u
id
e-me
h
om
e
..............................
1
3
5
Lighting, interior
.....................................
r
142-144
Li
g
htin
g
bulbs
(
replacement
)
................
.
18
0
-
18
5
Lighting control stal
k
.....................................1
3
1
Lighting dimmer
..............................................
r
5
9
Lighting on reminder
.....................................
r
1
3
3
Loadin
g
............................................................
2
2
Lon
g
ob
j
ects, transportin
g
.............................
.
8
4
L
o
w
fue
l l
e
v
el
................................................
20
8
L
u
gg
a
g
e reta
i
n
i
n
g
strap
................................
1
0
4
Ma
in
bea
m
....................................
136
,
1
8
0
,
1
8
2
Ma
int
e
n
a
n
ce
....................................................
2
2
M
ap
(
colour screen
)
.....................................
.
2
27
M
ap rea
di
n
g
l
amps
.......................................
14
2
M
arkin
g
s, identi
f
ication
.................................
22
2
Mat
..................................................................
9
9
M
atch telephon
e
...................................
269
,
312
M
enus
(
audio
)
...............................................22
5
Mi
rror, rear v
i
e
w
..............................................
8
7
Mirrors, door
....................................................
r
8
5
M
otorwa
y
function
(
direction indicators
)
.......
14
5
M
ountin
g
s
f
or I
SO
FIX seats .................
16
4
,
16
7
M
P
3
C
D
.................................................
2
40, 29
9
Music server
..........................................
r
24
0
-
2
5
1
Navi
g
atio
n
.............................................
2
2
6
-2
35
Number plate lamps .............................
.
18
4
,
18
5
Oil filter
..........................................................
r
21
4
O
il leve
l
..........................................................
21
1
O
penin
g
the bonne
t
......................................
20
5
O
penin
g
the boo
t
................................
6
0
,
6
4
,
7
1
O
penin
g
the doors
..............................
6
0
,
6
4
,
7
0
O
penin
g
the fuel filler flap
.............................
2
0
8
O
peration indicator lamps........................
.
2
5-4
2
Radio
.....................................................
2
3
6
,
2
9
1
R
an
ge
..............................................................
4
6
RC
A sockets
.................................................
30
4
R
ear
f
o
g
lam
p
.........................................
133
,
18
4
R
ear screen
(
demistin
g)
..................................
9
7
R
ec
h
ar
gi
n
g
t
h
e
b
atter
y
.................................
1
9
4
R
ecirculation
/
exterior air intak
e
..............
9
1
,
94
R
e
g
eneration o
f
the
p
article emissions
f
ilter........................
.
2
1
5
Re
m
o
t
e
co
ntr
ol
..........................................
6
0
-
6
9
R
emovin
g
a wheel
........................................
17
6
R
emovin
g
the ma
t
...........................................
9
9
R
e
p
air kit,
p
unctur
e
......................................
.
17
0
R
ep
l
ac
i
n
g
b
u
lb
s
.....................................
1
8
0
-
1
8
5
R
eplacin
g
f
uses
.....................................
1
8
6
-1
91
Replacing the air filter
...................................
r
2
1
4
Replacing the oil filter
..................................
.
r
21
4
R
eplacing the passenge
r
compartment filter
......................................
r
21
4
R
eplacin
g
wiper blades
.................................
1
9
5
Rev counter
.....................................................
r
2
4
R
eversin
g
camer
a
........................................
.
13
0
R
evers
i
n
g
l
amps
...........................................
1
8
4
Roof
ba
r
s
.......................................................
2
0
1
Roo
f
b
lin
d
........................................................
7
8
Rou
tin
e
c
h
ec
k
s
.....................................
.
21
4-
21
6
R
unning out o
f
f
uel
(
Diesel
)
.........................
.
2
1
0
L
M
N
O
R
Panoramic glass sunroof
................................
f
7
8
Parcel shelf, rear
...........................................
r
1
0
5
P
ar
ki
n
g
b
ra
ke
........................................
11
0
,
21
6
P
arkin
g
sensors, fron
t
...................................
12
9
Parking sensors, rear
............................
r
12
7
,
12
8
Particle emission filter
..........
r
20
5
,
2
1
2
,
2
1
3
, 21
5
Passenger compartment filter
......................
r
21
4
P
la
y
er,
C
D MP3
.....................................
240, 299
P
ort, USB
.............................
1
0
2
,
2
6
4
, 304,
30
5
P
rimin
g
the fuel s
y
stem ................................
21
0
P
rotecting childre
n
.......................
.
155, 159-169
Pu
n
c
t
u
r
e
........................................................
17
0
P
S
creen
(
audio equipment
)
...............................
5
4
S
creen, instrument pane
l
..........................
3
1
,
4
3
Sc
r
ee
n-w
as
h r
ese
rv
o
ir
..................................
21
3
S
creenwash,
f
ron
t
.........................................1
3
9
S
creenwash fluid level
..................................
21
3
S

324
Alphabetical index
S
eat, rear benc
h
.............................................
8
3
S
eat ad
j
ustmen
t
........................................
7
9
,
8
0
S
eat back stora
g
e pockets
...........................
1
0
3
S
eat belts ..............................................
.
1
5
0
-
15
3
S
eat belts warnin
g
lam
p
...............................
1
5
1
S
eats, electri
c
.................................................
8
0
Seats, rear
.......................................................
r
8
3
S
erial number
,
vehicl
e
..................................
22
2
Service indicator
.............................................
r
4
4
S
ervicin
g
.........................................................
2
2
S
ettin
g
the cloc
k
.......................................
5
4
,
5
8
S
idelam
p
s
.............................
131, 1
8
0
, 1
8
2
,1
8
4
S
ide repeater.................................................
18
3
S
ki fla
p
............................................................
8
4
Sp
are wheel
..................................................
1
7
5
Speedometer
..................................................
r
2
4
S
potlamps, sid
e
............................................
1
8
3
S
tartin
g
the vehicl
e
...............................
1
0
6
,1
0
7
S
toppin
g
the vehicl
e
.............................
10
6
,
10
7
S
top & Start s
y
stem
(
Auto Stop & Go
)
..........
11
9
S
tora
ge
.............................................
8
4
,
9
9
,
1
0
4
S
towin
g
rin
g
s ........................................
10
4
,
10
5
Sun visor
.........................................................
r
9
9
Sy
stem, audio-
CD
.................................
2
83
-
3
2
0
Sy
stem, audio-telemati
c
.......................
22
3
-2
82
U
nlockin
g
..................................................
6
0
,
6
4
USB player
...........................................
r
26
4
,
30
5
U
Warnin
g
lamp, low fuel level .........................
20
8
Warning lamps ..........................................
2
5
-42
W
e
igh
ts
.................................................
21
8
,
22
0
Welcome li
g
htin
g
.....................................
6
6
,
1
3
6
Wheel, chan
g
in
g
....................................
17
4
-
1
7
9
Wh
ee
l
b
r
ace
...................................................
17
4
Wi
n
do
w
co
ntr
ols
..............................................
7
6
Wi
per contro
l
sta
lk
.................................
1
3
8
-
141
Wipers
....................................................
1
3
8
-14
1
T
emporar
y
t
y
re repair ki
t
..............................
.
17
0
T
hird brake lam
p
..................................
.
1
8
4, 1
8
5
Tools
..............................................................
17
4
Total distance recorder
...................................
r
4
3
Towbar
...........................................................
r
19
9
To
w
ed
l
oads
.........................................
.
21
8
,
22
0
T
ow
i
n
g
anot
h
er ve
hi
c
le
.................................
1
98
T
P
(
Tra
ff
ic in
f
ormation
)
........................
260, 294
T
raction control
(
TCL
)
...................................
14
8
T
ra
j
ector
y
control s
y
stems...........................
.
1
4
8
T
yre pressures .............................................
.
2
2
2
Ty
res
................................................................
2
2
Table o
f
wei
g
hts
....................................
21
8
,
22
0
Tables of en
g
ines
..................................
2
1
7
,
21
9
T
ab
l
es
o
f f
uses
..............................................
18
6
T
CL
................................................................14
8
Tech
n
ical
da
t
a
........................................
21
7
-
2
2
2
Telephon
e
............................................
2
6
9
,
30
9
Temperature, coolan
t
......................................
4
6
Temperature adjustmen
t
...........................
9
0, 93
T
Vehicle con
f
i
g
uratio
n
......................................
5
2
V
e
hi
c
l
e
i
de
ntifi
ca
ti
on
....................................
.
22
2
Ve
nt
ila
t
ion
.................................................
8
8
-
8
9
Vi
deo
.....................................................
25
6
,
25
7
Voice
co
mm
a
n
ds
..................
27
2
,
27
3
,
27
7
-
28
1
,
30
9
,
31
0
,
31
4
-
31
8
V
W

.
325
Visual search
Exterior
Li
g
htin
g
controls 131-135
Headlamp beam ad
j
ustment 137
Welcome li
g
htin
g
136
Chan
g
in
g
bulbs 180-183
- front lamps
- fo
g
lamps
- direction indicator repeaters
Wiper controls
138
-
1
4
1
C
han
g
in
g
a wiper blade 195
Door mirrors
8
5-
86
Doors 70, 72
- openin
g
/
closin
g
- centra
l
l
oc
ki
n
g
C
hild lock 169
Electric windows 7
6
-77
A
l
a
rm 7
3
-7
5
Panoramic sunroo
f
7
8
Roo
f
bars 201
Accessories
202
-
203
Brakin
g
assistance 146-147
Tra
j
ector
y
control 148-149
T
y
re pressures 222
B
oo
t 71
- openin
g
/
closin
g
- emer
g
enc
y
re
l
ease
Temporary puncture repair kit 170-173
Chan
g
in
g
a wheel 174-179
- t
oo
l
s
- removin
g
/
re
f
ittin
g
C
han
g
in
g
bulbs 184-185
- rear
l
amps
- 3rd brake lamp
- number plate lamps
- fo
g
lamp
Parkin
g
sensors 127-129
Reversin
g
camera 130
Towbar
199
-
200
Towin
g
196-198
Fuel tank
208
Remote control ke
y
/
electronic
k
e
y
60-69
- openin
g
/ closin
g
- anti-theft protection
- batter
y
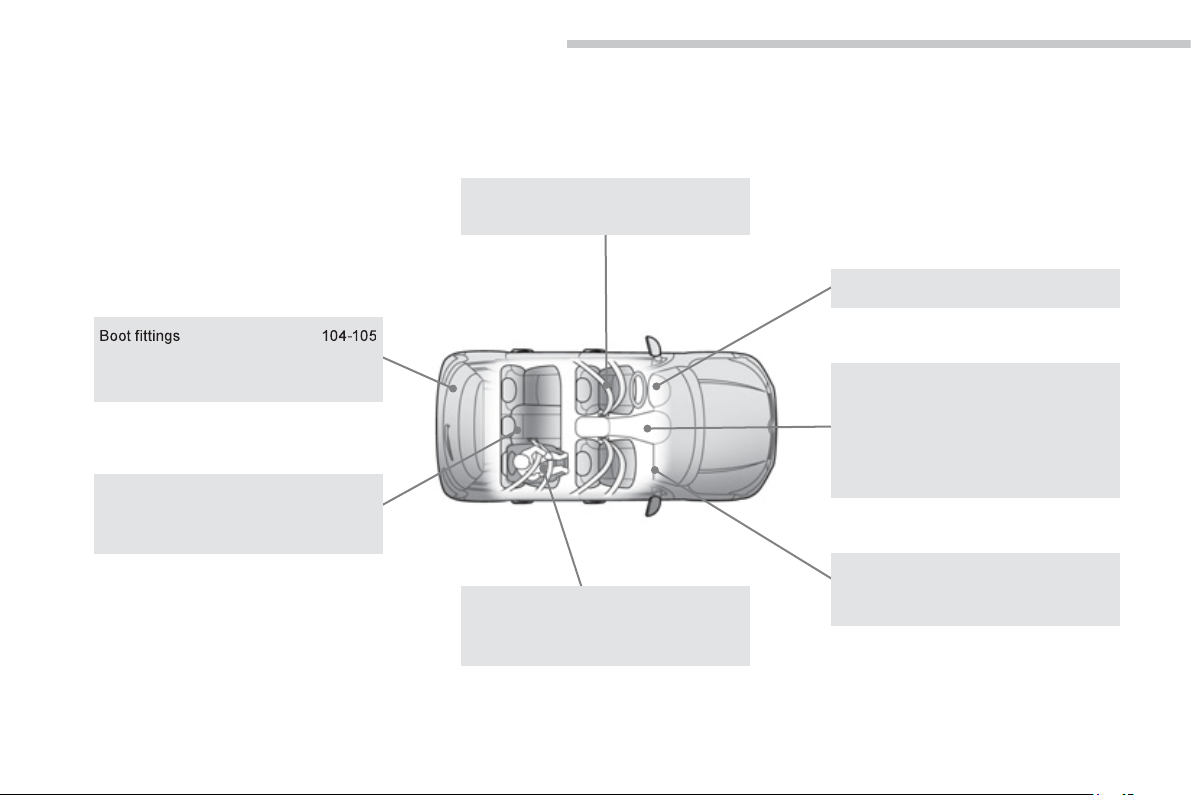
326
Visual search
Interior
- rear
p
arcel shel
f
- stow
i
n
g
r
i
n
g
s
- stora
g
e
C
hild seats 159-16
3
IS
O
FIX mountin
g
s 164-167
C
hil
d
l
oc
k 1
69
Front seats 7
9
-
82
S
eat belts 1
50
-1
53
G
love box
99
D
eact
i
vat
i
n
g
t
h
e passen
g
er
'
s
airba
g
155, 161
Airba
g
s
1
54-
1
5
8
Interior fittin
g
s 98-102
- AUX socket / USB port
- ci
g
arette li
g
hter / 12 V socket
- portable ashtra
y
-
f
r
o
nt
a
rmr
es
t
-
su
n vi
so
r
- m
a
t
Rear seats
83
-
8
4
Rear
f
ittin
g
s 103
Rear armrest
/
S
ki
f
la
p
84
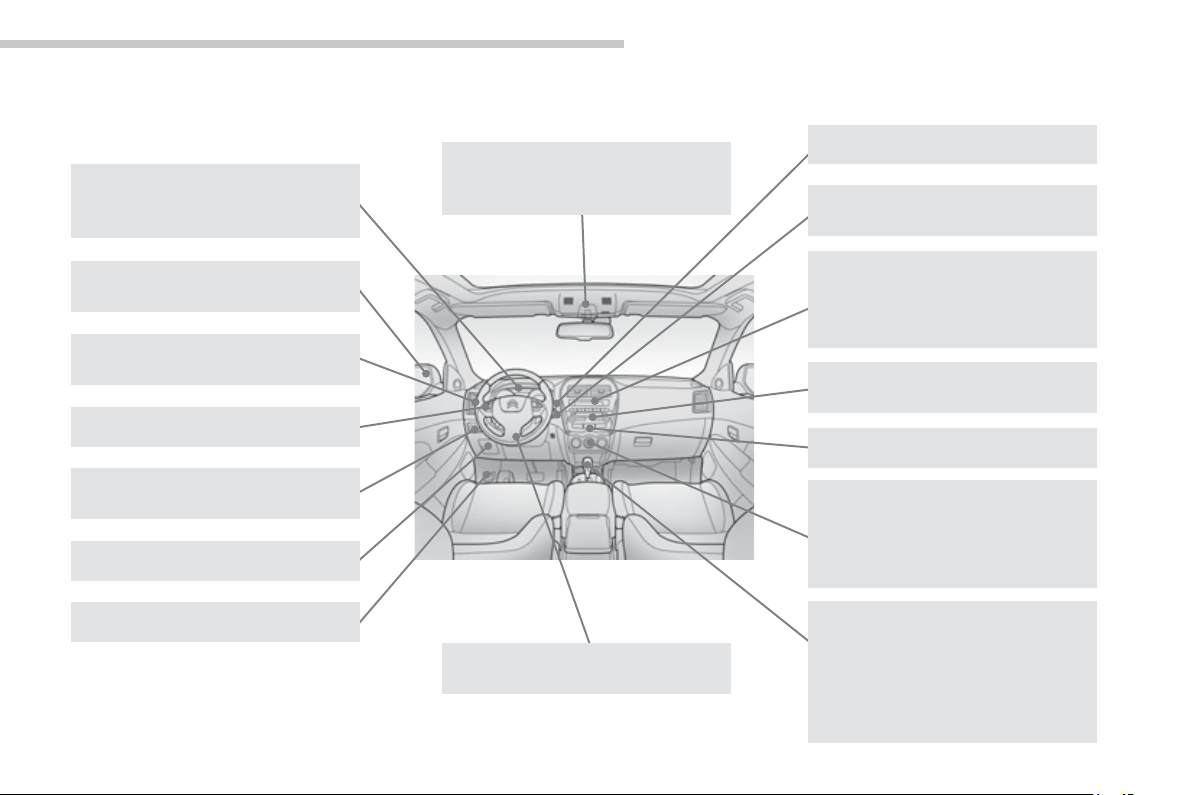
.
327
Visual search
Instruments and controls
O
penin
g
the bonnet 205
Li
g
htin
g
controls
131
-
13
5
Headlamp beam ad
j
ustment 137
Door mirrors
8
5-
86
Electric windows 7
6
-77
Rear view mirror
8
7
C
ourtesy lamps 142-143
Panoramic sunroof 7
8
Dashboard
f
uses 186-188, 191
Instrument panel 24
Warnin
g
lamps 25-30
Indicators 44-4
6
C
ruise control 124-126
A
UDI
O
-
C
D s
y
stem screen 54
S
etting the time 54-55
A
UDI
O
-TELEMATIC s
y
stem screen 56
S
ettin
g
the time 58
Steerin
g
wheel ad
j
ustment 87
H
o
rn 14
5
Wiper controls
138
-
1
4
1
Parkin
g
brake 110
5
/
6-speed manual
g
earbox 111
G
ear shift indicator 112
C
VT
g
earbox 113-117
Hill start assist
118
4 wheel drive s
y
stem 122-123
Stop & Start
(
Auto Stop & Go
)
function 11
9
-121
A
UDI
O
-
C
D s
y
stem 283
A
UDIO-TELEMATIC s
y
stem 223
V
e
ntil
a
ti
o
n
88
-
89
Manual air conditionin
g
90
-
91
,
96
A
utomatic air conditionin
g
92-96
Demistin
g
the windscreen 96
Demistin
g
the rear screen
9
7
Hazad warnin
g
lamps 145
I
g
nition switch, switchin
g
on/off 106
S
TART
/S
T
O
P button 1
0
7-1
09
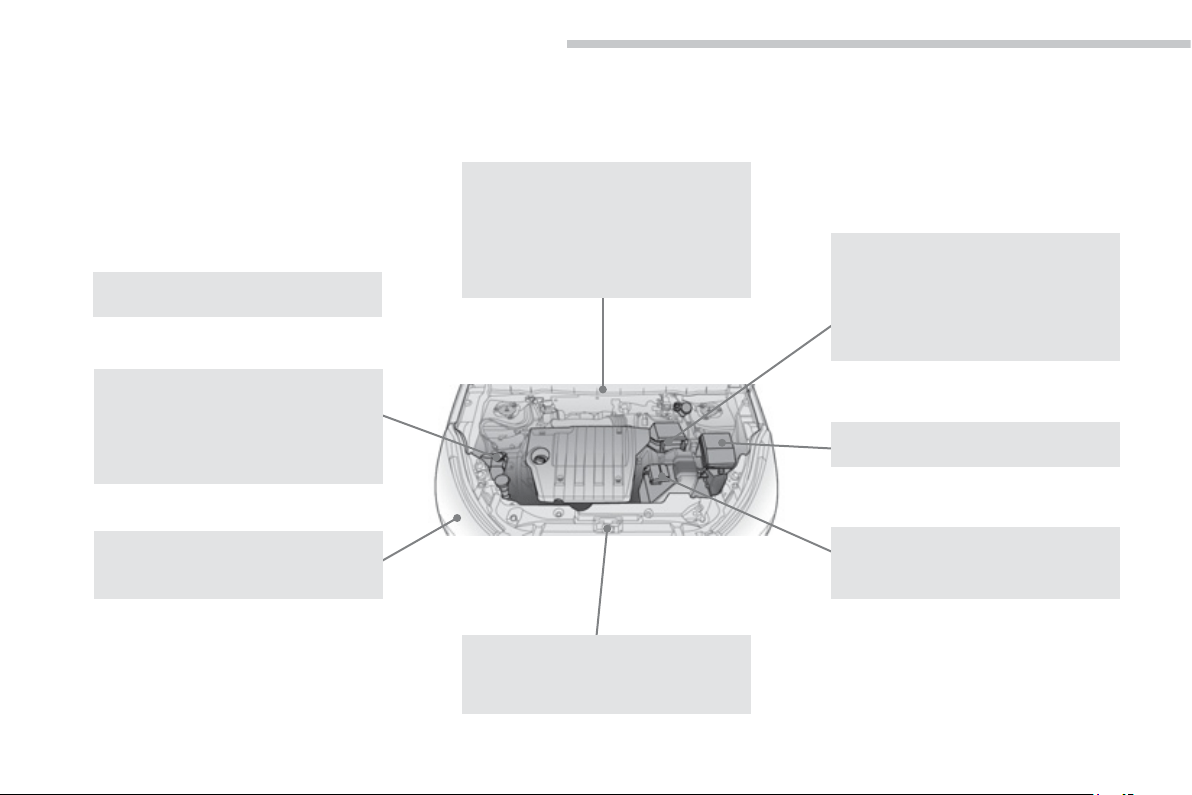
328
Visual search
Maintenance - Technical data
En
g
ine compartment
f
uses 186, 189-191
Runnin
g
out of fuel, Diesel 210
Checkin
g
levels 211-213
-
o
il
-
b
r
a
k
e
fl
u
i
d
-
coo
l
a
nt
- screenwash
/
headlam
p
wash
f
luid
C
hanging bulbs 180-185
-
f
r
o
nt
-
rear
Petrol en
g
ines 217
Petrol wei
g
hts 218
Diesel en
g
ines
219
Diesel wei
g
hts 220
Dim
e
n
s
i
o
n
s
221
Identification markin
g
s 222
B
o
nnn
e
t 2
05
Petrol en
g
ine compartment
206
Diesel en
g
ine compartment 207
Batter
y
192
-
19
4
Automatic cut of power
s
uppl
y
to accessories
19
5
Checkin
g
components 214-216
- batter
y
electrol
y
te
-
a
ir
f
ilt
e
r
-
o
il
f
ilt
e
r
- particle emissions
f
ilter
(
Diesel
)
- brake pads
/
discs
0
4-1
2
This handbook describes all of the equipment
available in the whole range.
Your vehicle will be fi tted with some of this
equipment described in this document, depending
on its trim level, version and the specifi cation for the
country in which it is sold.
The descriptions and illustrations are given without
any obligation. Automobiles CITROËN reserves
the right to modify the technical specifi cations,
equipment and accessories without having to update
this edition of the handbook.
This document is an integral part of your vehicle. It
should be passed on to the new user in the event of
sale or transfer.
Automobiles CITROËN declares, by application
of the provisions of the European regulation
(Directive 2000/53) relating to End of Life Vehicles,
that it achieves the objectives set by this regulation
and that recycled materials are used in the
manufacture of the products that it sells.
Reproduction or translation of all or part of this
handbook is prohibited without written authorisation
from Automobiles CITROËN.
Printed in the EU
Anglais
For any work on your vehicle, use a qualifi ed
workshop that has the technical information,
competence and equipment required, which
a CITROËN dealer is able to provide.

CRÉATIVE TECHNOLOGIE
20
1
2
–
D
OC
UMENT
A
TI
O
N DE B
O
R
D
4
Dconcep
t
D
i
ade
i
s
Ed
i
p
ro
12A
C
R.
00
4
1
An
g
lais